

Page 1
ENDEFR
ES
PTITNLDASVNOFIRUPLSKCS
HU
REFRIGERATION
DM20D, DM20F
Drawer Minibar
Operating manual . . . . . . . . . . . . . . . . . . . . 10
Schubfach-Minibar
Bedienungsanleitung . . . . . . . . . . . . . . . . .22
Minibar à tiroir
Notice d’utilisation . . . . . . . . . . . . . . . . . . .35
Cajón minibar
Instrucciones de uso . . . . . . . . . . . . . . . . . .48
Minibar de gaveta
Manual de instruções . . . . . . . . . . . . . . . . . 61
Cassetto del minibar
Istruzioni per l’uso . . . . . . . . . . . . . . . . . . . .74
Lade minibar
Gebruiksaanwijzing. . . . . . . . . . . . . . . . . . .88
DESIGN
Skuffe minibar
Betjeningsvejledning . . . . . . . . . . . . . . . . 101
Låda till minibar
Bruksanvisning . . . . . . . . . . . . . . . . . . . . . 113
SUttrekkbar minibar
Bruksanvisning . . . . . . . . . . . . . . . . . . . . . 125
Vetolaatikkominibaari
Käyttöohje . . . . . . . . . . . . . . . . . . . . . . . . . 137
Минибар с выдвижным ящиком
Инструкция по эксплуатации . . . . . . . . . 149
Minibary szufladowe
Instrukcja obsługi . . . . . . . . . . . . . . . . . . . 162
Minibar Drawer
Návod na obsluhu. . . . . . . . . . . . . . . . . . . 175
Minibar Drawer
Návod k obsluze . . . . . . . . . . . . . . . . . . . . 187
Fiókba szerelt minibár
Használati utasítás. . . . . . . . . . . . . . . . . . . 199
Page 2

© 2020 Dometic Group. The visual appearance of the contents of this manual is
protected by copyright and design law. The underlying technical design and the
products contained herein may be protected by design, patent or be patent
pending. The trademarks mentioned in this manual belong to Dometic Sweden AB.
All rights are reserved.
Page 3

DM20
1
2
1
2
3
1 2
3
Page 4
DM20
1
2 43
SETPE
3
1 2
4
4
Page 5
DM20
AB
C
D
≥ 200 cm²
≥ 200 cm²
≥ 200 cm²
≥ 200 cm²
≥ 200 cm² ≥ 200 cm²
5
5
Page 6
DM20
2
2
1
1
6
6
Page 7
DM20
7
8
BA
1
2
1
C
2
3
1
AB
1
68
1
2
7
Page 8
DM20
9
1
2
3
4
0
A
1
C
1
B
2
1
D
3
1
8
Page 9
DM20
314
384
160,4
71
369
400
428
31
125
357
365
DM20D
DM20F
384
357
365
71
369
398
31
125
O25,4
a
9
Page 10

EN
Explanation of symbols DM20
Please read this manual carefully before starting the device. Keep it in a
safe place for future reference. If the device is passed on to another
person, this manual must be handed over to the user along with it.
The manufacturer cannot be held liable for damage resulting from improper usage
or incorrect operation.
Contents
1 Explanation of symbols . . . . . . . . . . . . . . . . . . . . . . . . . . . . . . . . . . . . . . . . . .10
2 Safety instructions . . . . . . . . . . . . . . . . . . . . . . . . . . . . . . . . . . . . . . . . . . . . . . 11
3 Scope of delivery . . . . . . . . . . . . . . . . . . . . . . . . . . . . . . . . . . . . . . . . . . . . . . 13
4 Proper use . . . . . . . . . . . . . . . . . . . . . . . . . . . . . . . . . . . . . . . . . . . . . . . . . . . .14
5 Technical description . . . . . . . . . . . . . . . . . . . . . . . . . . . . . . . . . . . . . . . . . . . 14
6 Installation . . . . . . . . . . . . . . . . . . . . . . . . . . . . . . . . . . . . . . . . . . . . . . . . . . . .16
7 Operation . . . . . . . . . . . . . . . . . . . . . . . . . . . . . . . . . . . . . . . . . . . . . . . . . . . . 18
8 Troubleshooting . . . . . . . . . . . . . . . . . . . . . . . . . . . . . . . . . . . . . . . . . . . . . . .19
9 Cleaning and maintenance. . . . . . . . . . . . . . . . . . . . . . . . . . . . . . . . . . . . . . .19
10 Warranty . . . . . . . . . . . . . . . . . . . . . . . . . . . . . . . . . . . . . . . . . . . . . . . . . . . . 20
11 Disposal . . . . . . . . . . . . . . . . . . . . . . . . . . . . . . . . . . . . . . . . . . . . . . . . . . . . . 20
12 Technical data . . . . . . . . . . . . . . . . . . . . . . . . . . . . . . . . . . . . . . . . . . . . . . . . . 21
1 Explanation of symbols
WARNING!
!
!
10
Safety instruction: Indicates a hazardous situation that, if not avoided,
could result in death or serious injury.
CAUTION!
Safety instruction: Indicates a hazardous situation that, if not avoided,
could result in minor or moderate injury.
Page 11

EN
DM20 Safety instructions
NOTICE!
A
I
Indicates a situation that, if not avoided, can result in property damage.
NOTE
Supplementary information for operating the product.
2 Safety instructions
WARNING! Failure to obey these warnings could result in death
or serious injury.
!
Electrocution hazard
• Do not operate the cooling device if it is visibly damaged.
• If this cooling device's power cable is damaged, it must be replaced
by the manufacturer, customer service or a similarly qualified person in
order to prevent safety hazards.
• If this cooling device's power cable is damaged, it must be replaced
to prevent safety hazards.
• This cooling device may only be repaired by qualified personnel.
Improper repairs can lead to considerable hazards.
Fire hazard
• When positioning the device, ensure the supply cord is not trapped or
damaged.
• Do not locate multiple portable socket-outlets or portable power
supplies at the rear of the device.
Health hazard
• This device can be used by children aged from 8 years and above and
persons with reduced physical, sensory or mental capabilities or lack
of experience and knowledge if they have been given supervision or
instruction concerning use of the device in a safe way and understand
the hazards involved.
• Children shall not play with the device.
• Cleaning and user maintenance shall not be made by children without
supervision.
• Children aged from 3 to 8 years are allowed to load and unload
cooling devices.
11
Page 12

EN
Safety instructions DM20
Explosion hazard
• Do not store any explosive substances such as spray cans with a
flammable propellant in the cooling device.
CAUTION! Failure to obey these cautions could result in minor or
moderate injury.
!
Electrocution hazard
• Disconnect the cooling device from the power supply
– before each cleaning and maintenance
– after every use
Health hazard
• Please check if the cooling capacity of the device is suitable for storing
the food or medicine you wish to cool.
• Food may only be stored in its original packaging or in suitable
containers.
• Opening the cooling device for long periods can cause significant
increase of the temperature in the compartments of the device.
• Clean regularly surfaces that can come in contact with food and
accessible drainage systems.
• Store raw meat and fish in suitable containers in the device, so that it is
not in contact with or can drip onto other food.
• If the device is left empty for long periods:
– Switch off the device.
– Defrost the device.
– Clean and dry the device.
– Leave the lid open to prevent mould developing within the device.
A
12
NOTICE! Damage hazard
• Check that the voltage specification on the type plate corresponds to
that of the energy supply.
• Connect the cooling device with an AC connection cable to the AC
power supply.
• Never pull the plug out of the socket by the cable.
• The cooling device is not suitable for transporting caustic materials or
materials containing solvents.
• The insulation of the cooling device contains flammable cyclopentane
and requires special disposal procedures. Deliver the cooling device
at the end of its life-cycle to an appropriate recycling center.
Page 13
EN
DM20 Scope of delivery
• Do not use electrical devices inside the cooling device unless they are
recommended by the manufacturer for the purpose.
• Do not place the cooling device near naked flames or other heat
sources (heaters, direct sunlight, gas ovens etc.).
• Risk of overheating!
Ensure at all times that there is a minimum of 50 mm ventilation on all
four sides of the cooling device. Keep the ventilation area free of any
objects that could restrict the air flow to the cooling components.
Do not place the cooling device in closed compartments or areas with
none or minimal air flow.
• Ensure that the ventilation openings are not covered.
• Do not fill the inner container with ice or fluids.
• Never immerse the cooling device in water.
• Protect the cooling device and cables against heat and moisture.
3Scope of delivery
The following main alternatives are obtainable:
• Minibar DM20D with door panel, without lock
• Minibar DM20D with door panel, with lock
• Minibar DM20F without door panel, without lock
• Minibar DM20F without door panel, with lock
Quantity Description
1 Minibar
1 Cable for 230 Vw connection
2Screw 4 x 45 mm (Installation)
2Screw 4 x 25 mm (Installation of the front feet)
2 Screw M4 x 45 mm (Handle installation)
2 Plug (Installation)
1 Handle DM20D only
2 Plug (Handle installation) DM20D only
2 Plug (Wooden panel) DM20F wooden version only
13
Page 14

EN
Proper use DM20
Quantity Description
1 Lock decor (Wooden panel) DM20F wooden version with lock
only
2 Key Lock version only
1 Installation and Operating manual
4Proper use
The Minibar DM20D and DM20F are designed for use inside a piece of furniture.
The device must not be operated free-standing.
The device is suitable for cooling beverages and food.
The device is designed for use with a 230 V AC mains supply.
The cooling device is intended to be used in household and similar applications
such as
• staff kitchen areas in shops, offices and other working environments
•farm houses
• clients in hotels, motels and other residential type environments
• bed and breakfast type environments
• catering and similar non-retail applications
CAUTION! Health hazard!
!
Please check if the cooling capacity of the device is suitable for storing
the food or medicine you wish to cool.
5 Technical description
The minibar has a drawer with room for 12 cans (plus snacks bars).
The minibar DM20D comes with a anthracite panel and pull handle.
The minibar DM20F is delivered without panel and is prepared for fitting the hotel's
own door decor.
Its cooling system is a non-wearing Peltier cooling system.
A lock is optionally available.
14
Page 15
EN
DM20 Technical description
5.1 Description of the device
Front side
No. in
fig. 1, page 3
1 Lock (optional)
2 Handle (DM20D only)
3 Door panel (DM20D only)
Description
Rear side
No. in
fig. 2, page 3
1 Drip tray
2 Mains adapter
Description
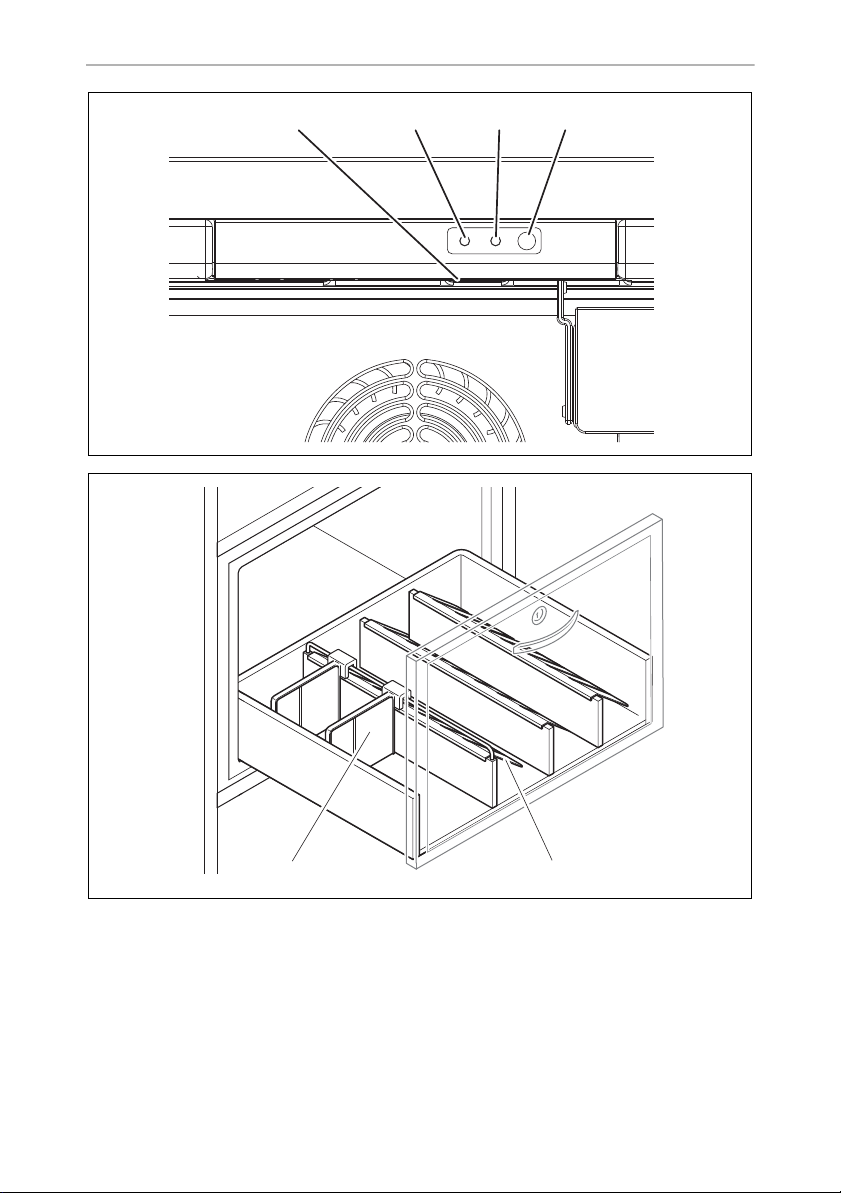
Control panel (inside the device)
No. in
fig. 3, page 4
1 Lamp
2 Error LED
3 Status LED
Description
4 Setting button
Main drawer
No. in
fig. 4, page 4
1Divider
2 Bottle finger
Description
15
Page 16

EN
Installation DM20
6 Installation
CAUTION! Health hazard
!
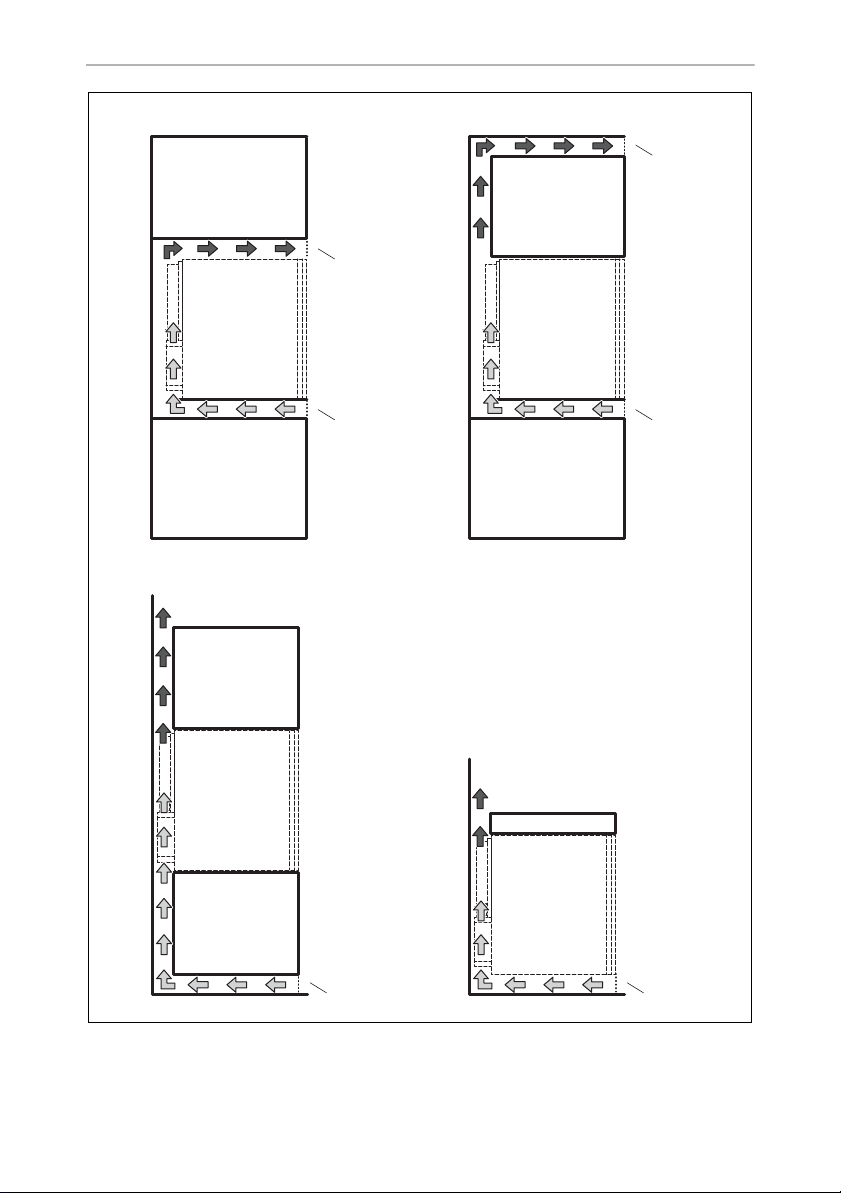
6.1 Notes on mounting into furniture
You can mount the minibar in four ways into furniture. Choose your favoured
alternative (fig. 5, page 5).
Observe the following:
• The cut-out dimensions H x W x D are:
– DM20D: 385 x 404 x 428 mm
– DM20F: 385 x 404 x 426 +d mm
• The clearance between the minibar‘s back and the furniture wall should be
approx. 10 mm.
• The ventilation openings for the chosen alternative have to be produced (fig. 5,
page 5).
• Air passing through the inlet air duct must not be heated by any heat sources
(heaters, direct sunlight, gas ovens etc.).
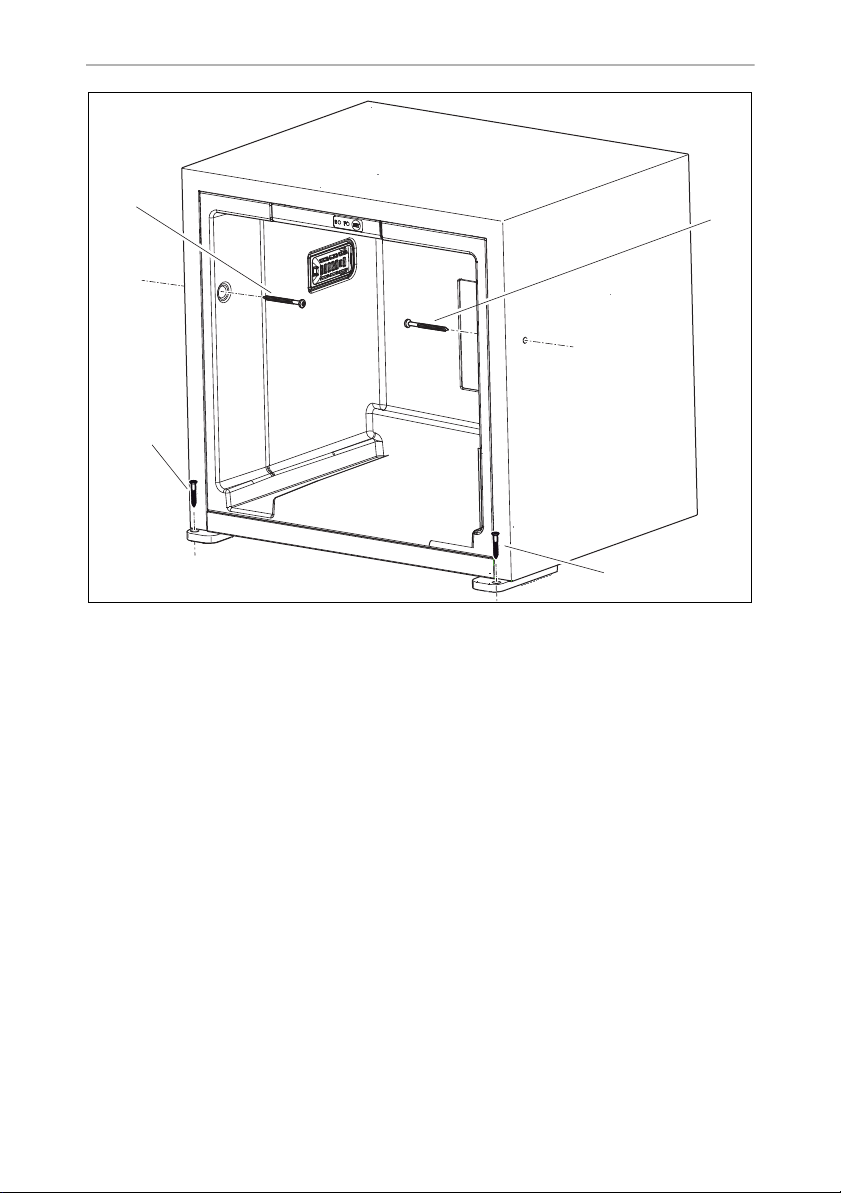
To avoid a hazard due to instability of the device, it must be fixed in
accordance with the instructions.
d is the thickness of the hotel‘s own decor
➤ Fix the refrigerator in place using suitable screws (fig. 6 1 and 2, page 6).
6.2 Connecting the minibar electrically
➤ Plug the 230 V connection cable into the AC voltage socket and connect it to the
230 V AC mains supply.
✓ The status LED lights up.
✓ The minibar starts cooling the interior.
6.3 Mounting hotel's own door decor (DM20F only)
The hotel's own door decor has to comply with the following requirements:
• Maximum weight: 2 kg
• Maximum thickness: 14 mm
➤ Fasten the decor with four screws.
16
Page 17

EN
DM20 Installation
6.4 Mounting the lock (lock version only)
➤ Drill a hole with a diameter of 35 mm into the decor.
➤ Mount the lock together with the lock decor.
6.5 Mounting the lock (no lock version only)
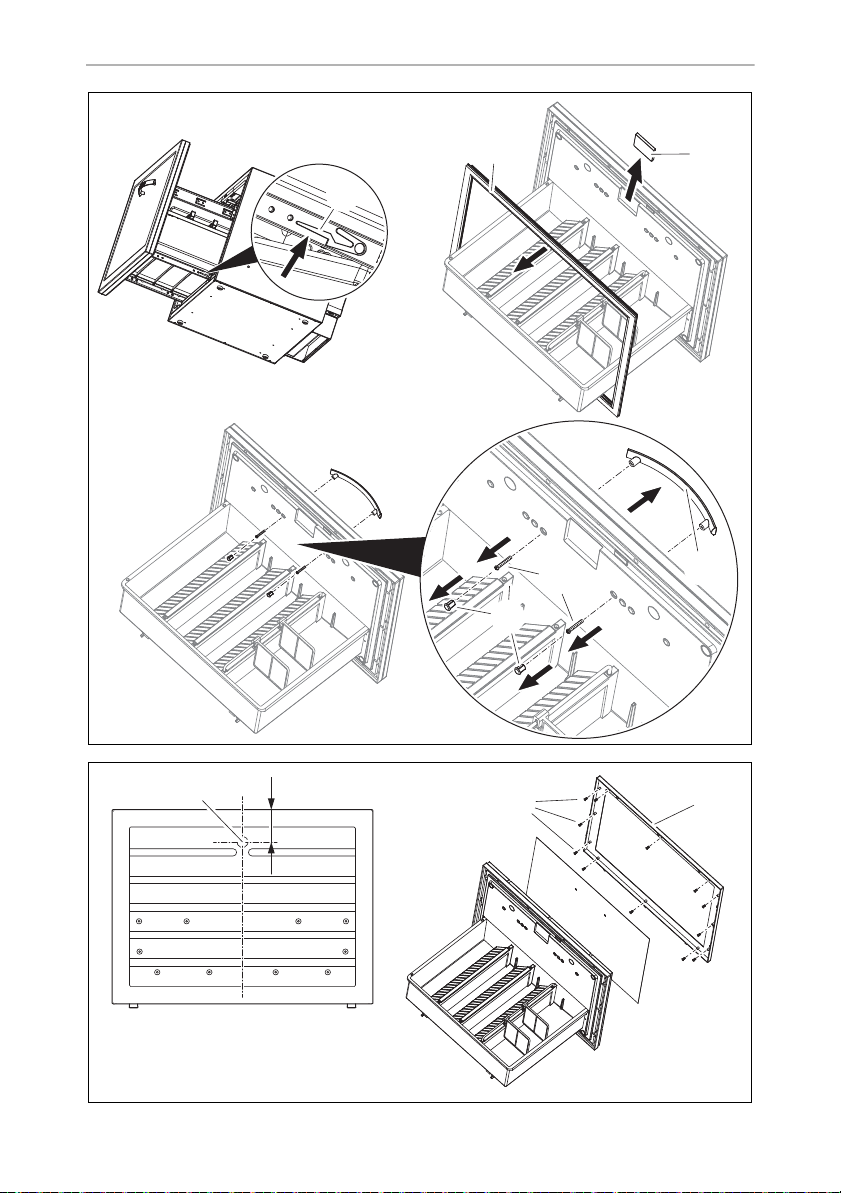
Disassembling the drawer (fig. 7, page 7)
➤ Open the drawer completely.
➤ Press the rail lock (A1).
➤ Pull the drawer out of the cabinet.
➤ Remove the gasket (B1).
➤ Remove the lock cover (B 2).
➤ Remove the plugs (C1) from the screws of the door handle (C 3).
➤ Unscrew the screws (C 2) of the door handle (C 3).
➤ Remove the door handle (C 3).
Drilling the holes (fig. 8, page 7)
➤ Drill a hole with a diameter of 25 mm through the decor and the door (A1).
➤ Unscrew the screws (B1) of the decor frame (B 2).
➤ Remove the decor frame (B 2).
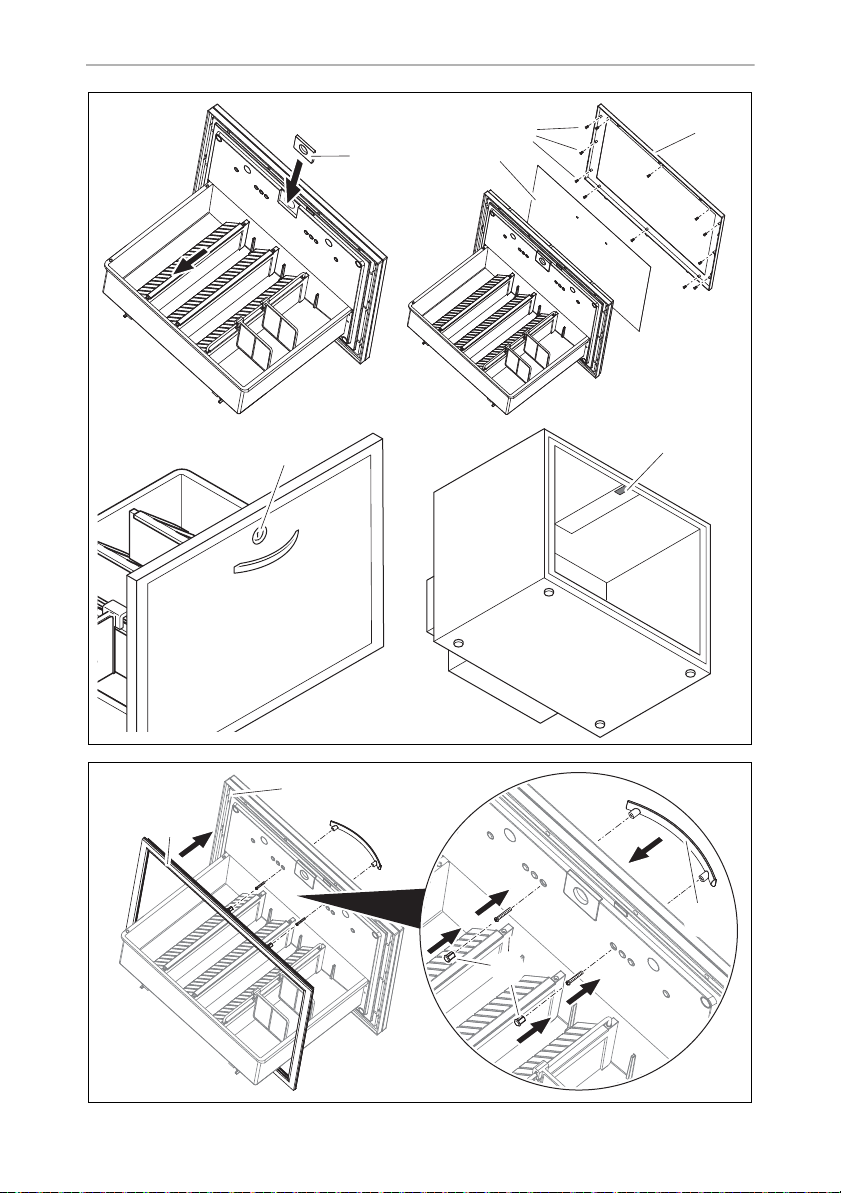
Assembling the lock (fig. 9, page 8)
➤ Put the new lock cover (A1) into place.
➤ Put the decor (B1) into the decor frame (B 3).
➤ Screw the decor frame (B 3) onto the door (B 2).
➤ Install the door lock (C1).
➤ Install the lock catch in the cabinet (D 1).
Assembling the drawer (fig. 0, page 8)
➤ Push the gasket (1) on the decor frame (2).
➤ Screw the door handle (4) onto the door.
17
Page 18

EN
Operation DM20
➤ Push the plugs (3) on the screws of the door handle (4).
➤ Push the drawer into the cabinet.
7Operation
NOTICE! Damage hazard
A
7.1 Energy saving tips
• Do not open the cooling device more often than necessary.
• Do not leave the cooler unit open for longer than necessary.
7.2 Using the minibar
The minibar starts cooling when connected to power. During normal operation the
Status LED is glowing. If an error occurs the Error LED is blinking (see chapter “Troubleshooting” on page 19).
The lamp can only be replaced by the manufacturer, service agent or
similarly qualified person to avoid hazard.
The minibar is set by default to a cooling temperature of 7 °C at an ambient
temperature of 25 °C.
You can use the setting button (fig. 3 4, page 4) to set the cooling temperature to
one of three values (5 °C, 12 °C and 7 °C).
Thereby the temperature will be changed in the order 5 °C … 12 °C … 7 °C … 5 °C
etc.
➤ Press the setting button (fig. 3 4, page 4) and keep it pressed for 5 s, until the
lamp (fig. 3 1, page 4) starts to blink.
➤ Press immediately the setting button (fig. 3 4, page 4) again.
✓ The lamp (fig. 3 1, page 4) indicates the setting temperature:
– 5 °C: the lamp flashes five times in three intervals
– 12 °C: the lamp flashes once in three intervals
– 7 °C: the lamp flashes three times in three intervals
NOTE
I
The minibar sets the cooling temperature automatically to 7 °C, when it
is connected to a power source.
18
Page 19

EN
DM20 Troubleshooting
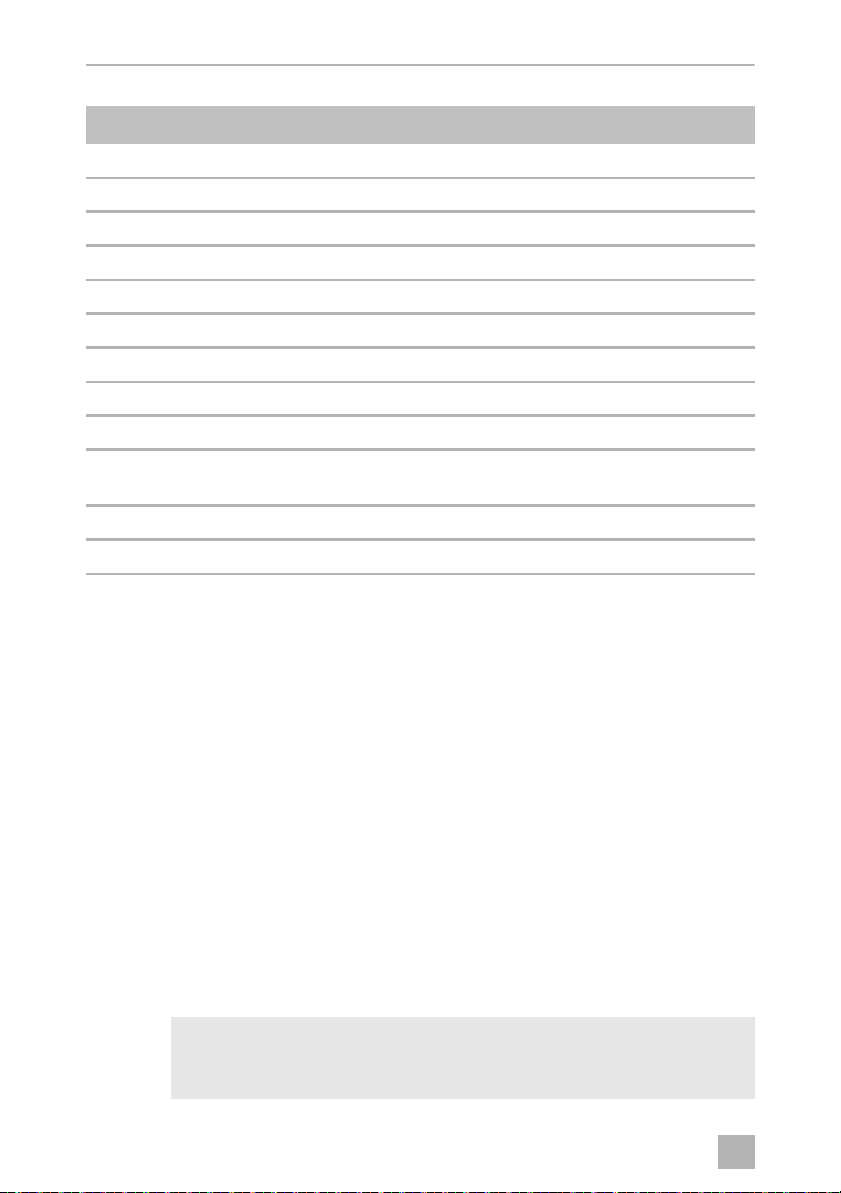
8 Troubleshooting
Fault Possible cause Suggested remedy
Device does not
function, Status LED
does not glow.
The device does not
cool (plug is inserted,
Status LED glows).
The Error LED flashes
once per second.
The Error LED flashes
twice per second.
Device does not cool
sufficiently, Status LED
glows, Error LED does
not glow.
No voltage present in
the AC voltage socket.
The mains adapter is
defective.
The cooling element is
defective.
Temperature sensor is
defective.
The fan is defective. This can only be repaired by an
The cooling element is
defective.
Poor ventilation Check the ventilation.
Try using another plug socket.
This can only be repaired by an
authorised repair centre.
This can only be repaired by an
authorised repair centre.
This can only be repaired by an
authorised repair centre.
authorised repair centre.
This can only be repaired by an
authorised repair centre.
Clean the filter underneath the device.
9 Cleaning and maintenance
NOTICE! Damage hazard
A
• Never clean the cooler under running water or in dish water.
• Do not use abrasive cleaning agents or hard objects during cleaning
as these can damage the cooler.
➤ Occasionally clean the device interior and exterior with a damp cloth.
➤ Make sure that the air inlet and outlet vents on the device are free of any dust and
dirt, so that heat can be released and the device is not damaged.
19
Page 20

EN
Warranty DM20
➤ Occasionally clean the inlet filter.
➤ If you find water in the drip tray (fig. 2 1, page 3) check whether the drainage
system is blocked.
10 Warranty
The statutory warranty period applies. If the product is defective, please contact your
retailer or the manufacturer's branch in your country (see dometic.com/dealer).
For repair and warranty processing, please include the following documents when
you send in the device:
• A copy of the receipt with purchasing date
• A reason for the claim or description of the fault
11 Disposal
WARNING! Children beware!
!
Before disposing of your old refrigerator:
• Take off the doors.
• Leave storage surfaces in the refrigerator so that children cannot
climb inside.
➤ Place the packaging material in the appropriate recycling waste bins wherever
possible.
If you wish to finally dispose of the product, ask your local recycling centre
or specialist dealer for details about how to do this in accordance with the
M
20
applicable disposal regulations.
Page 21
EN
DM20 Technical data
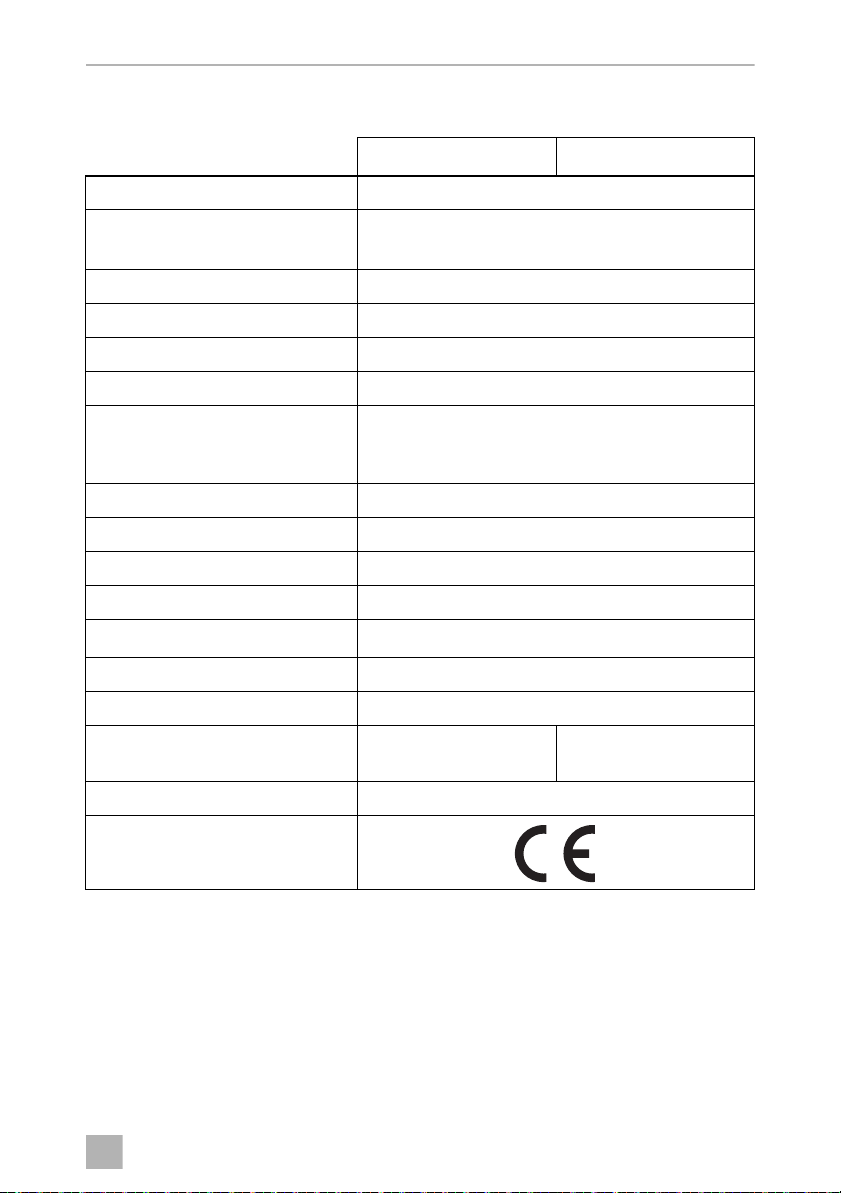
12 Technical data
DM 20D DM 20F
Voltage: 220–240Vw, 50/60 Hz
Cooling capacity: max. 20 °C below ambient temperature
(adjustable in three steps: +5 °C, +7 °C, +12 °C)
Category: Cellar
Gross capacity: 19.5 l
Capacity: 15.8 l
Energy efficiency class: A++
Power consumption
(at ambient temperature of 25 °C,
+12 °C refrigerator):
Climatic class: N
Ambient temperature: +16 °C to +32 °C
Noise emission: 0 dB(A)
Refrigerant quantity: 48 g
equivalent: 0,069 t
CO
2
Global warming potential (GWP): 1430
0.200 kWh/24 h
Dimensions main drawer Wx D x H: 285 x 228.5 x 112 mm
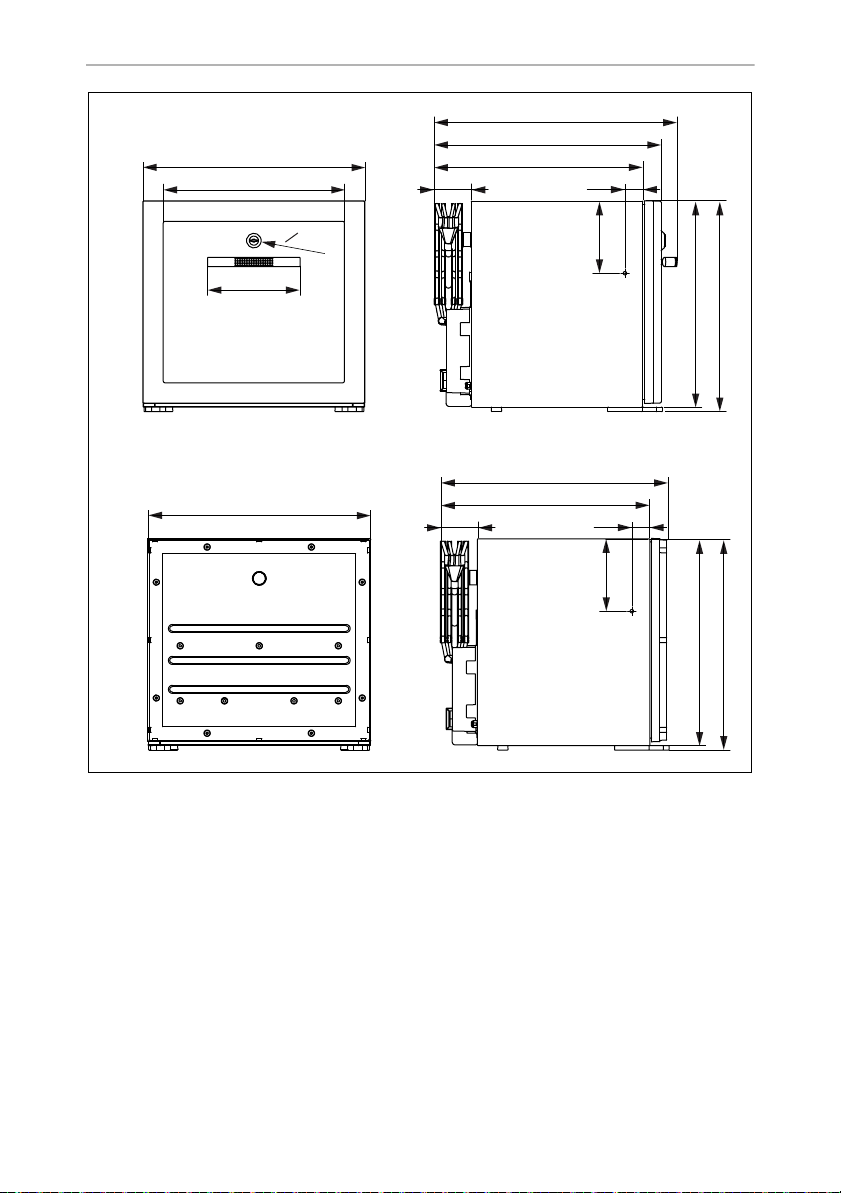
Dimensions H x W x D
(see also fig. a, page 9):
Weight: 12.3 kg
Inspection/certification:
365 x 384 x 428 mm 365 x 384 x 398 mm
The refrigerant circuit contains R134a.
Contains fluorinated greenhouse gases
Hermetically sealed equipment
21
Page 22

DE
Erklärung der Symbole DM20
Bitte lesen Sie diese Anleitung vor der Inbetriebnahme sorgfältig durch
und bewahren Sie sie auf. Geben Sie sie im Falle einer Weitergabe des
Kühlgerätes an den Nutzer weiter.
Der Hersteller haftet nicht für Schäden, die durch nicht bestimmungsgemäßen
Gebrauch oder falsche Bedienung verursacht werden.
Inhaltsverzeichnis
1 Erklärung der Symbole . . . . . . . . . . . . . . . . . . . . . . . . . . . . . . . . . . . . . . . . . 22
2 Sicherheitshinweise . . . . . . . . . . . . . . . . . . . . . . . . . . . . . . . . . . . . . . . . . . . 23
3 Lieferumfang . . . . . . . . . . . . . . . . . . . . . . . . . . . . . . . . . . . . . . . . . . . . . . . . . 25
4 Bestimmungsgemäßer Gebrauch . . . . . . . . . . . . . . . . . . . . . . . . . . . . . . . . 26
5 Technische Beschreibung . . . . . . . . . . . . . . . . . . . . . . . . . . . . . . . . . . . . . . 27
6 Montage . . . . . . . . . . . . . . . . . . . . . . . . . . . . . . . . . . . . . . . . . . . . . . . . . . . . 28
7 Bedienung. . . . . . . . . . . . . . . . . . . . . . . . . . . . . . . . . . . . . . . . . . . . . . . . . . . 30
8 Störungsbeseitigung . . . . . . . . . . . . . . . . . . . . . . . . . . . . . . . . . . . . . . . . . . 32
9 Reinigung und Pflege . . . . . . . . . . . . . . . . . . . . . . . . . . . . . . . . . . . . . . . . . . 32
10 Gewährleistung. . . . . . . . . . . . . . . . . . . . . . . . . . . . . . . . . . . . . . . . . . . . . . . 33
11 Entsorgung . . . . . . . . . . . . . . . . . . . . . . . . . . . . . . . . . . . . . . . . . . . . . . . . . . 33
12 Technische Daten . . . . . . . . . . . . . . . . . . . . . . . . . . . . . . . . . . . . . . . . . . . . . 34
1 Erklärung der Symbole
WARNUNG!
!
!
22
Sicherheitshinweis auf eine Gefahrensituation, die zum Tod oder zu
schwerer Verletzung führen kann, wenn sie nicht vermieden wird.
VORSICHT!
Sicherheitshinweis auf eine Gefahrensituation, die zu einer leichten
oder mittelschweren Verletzung führen kann, wenn sie nicht vermieden
wird.
Page 23

DE
DM20 Sicherheitshinweise
ACHTUNG!
A
I
Hinweis auf eine Situation, die zu Sachschäden führen kann, wenn sie
nicht vermieden wird.
HINWEIS
Ergänzende Informationen zur Bedienung des Produktes.
2 Sicherheitshinweise
WARNUNG! Nichtbeachtung dieser Sicherheitshinweise kann
zum Tod oder zu schweren Verletzungen führen.
!
Lebensgefahr durch Stromschlag
• Wenn das Kühlgerät sichtbare Beschädigungen aufweist, dürfen Sie
es nicht in Betrieb nehmen.
• Wenn das Anschlusskabel dieses Kühlgerätes beschädigt wird, muss
es durch den Hersteller, seinen Kundendienst oder eine ähnlich
qualifizierte Person ersetzt werden, um Gefährdungen zu vermeiden.
• Wenn das Anschlusskabel dieses Kühlgerätes beschädigt wird, muss
es ersetzt werden, um Gefährdungen zu vermeiden.
• Reparaturen an diesem Kühlgerät dürfen nur von Fachkräften durchgeführt werden. Durch unsachgemäße Reparaturen können erhebliche Gefahren entstehen.
Brandgefahr
• Stellen Sie beim Aufstellen des Geräts sicher, dass das Anschlusskabel
nicht eingeklemmt oder beschädigt wird.
• Positionieren Sie an der Geräterückseite keine tragbaren Mehrfachsteckdosen oder tragbare Netzteile.
Gesundheitsgefahr
• Dieses Gerät kann von Kindern ab 8 Jahren und Personen mit eingeschränkten physischen, sensorischen oder geistigen Fähigkeiten oder
einem Mangel an Erfahrung und Wissen verwendet werden, wenn sie
beaufsichtigt werden oder eine Anleitung zur sicheren Benutzung des
Geräts erhalten haben und sie die daraus resultierenden Gefahren verstehen.
• Kinder dürfen nicht mit dem Kühlgerät spielen.
• Reinigung und Benutzer-Wartung dürfen nicht von Kindern ohne
Beaufsichtigung durchgeführt werden.
23
Page 24

DE
Sicherheitshinweise DM20
• Kinder im Alter von 3 bis 8 Jahren dürfen Kühlgeräte be- und entladen.
Explosionsgefahr
• Lagern Sie keine explosionsfähigen Stoffe wie z. B. Sprühdosen mit
brennbarem Treibgas im Kühlgerät.
VORSICHT! Nichtbeachtung dieser Sicherheitshinweise kann zu
leichten oder mittelschweren Verletzungen führen.
!
Lebensgefahr durch Stromschlag
• Trennen Sie das Kühlgerät von der Stromversorgung
– vor jeder Reinigung und Pflege
– nach jedem Gebrauch
Gesundheitsgefahr
• Prüfen Sie, ob die Kühlleistung des Kühlgerätes den Anforderungen
der Lebensmittel oder Medikamente entspricht, die Sie kühlen
wollen.
• Lebensmittel dürfen nur in Originalverpackungen oder geeigneten
Behältern eingelagert werden.
• Das Öffnen des Kühlgerätes über einen längeren Zeitraum kann einen
erheblichen Temperaturanstieg in den Fächern des Gerätes verursachen.
• Reinigen Sie regelmäßig Oberflächen, die mit Lebensmitteln und
zugänglichen Entwässerungssystemen in Berührung kommen
können.
• Lagern Sie rohes Fleisch und Fisch in geeigneten Behältern im Gerät,
damit sie nicht mit anderen Lebensmitteln in Berührung kommen oder
auf diese abtropfen.
• Wenn das Gerät für längere Zeit leer steht:
– Schalten Sie das Gerät aus.
– Tauen Sie das Gerät ab.
– Reinigen und trocknen Sie das Gerät.
– Lassen Sie den Deckel offen, um Schimmelbildung im Gerät zu
verhindern.
A
24
ACHTUNG! Beschädigungsgefahr
• Vergleichen Sie die Spannungsangabe auf dem Typenschild mit der
vorhandenen Energieversorgung.
• Schließen Sie das Kühlgerät mit dem Wechselstrom-Anschlusskabel
an das Wechselstromnetz an.
• Ziehen Sie den Stecker nie am Anschlusskabel aus der Steckdose.
Page 25

DE
DM20 Lieferumfang
• Das Kühlgerät ist nicht geeignet für den Transport ätzender oder
lösungsmittelhaltiger Stoffe.
• Die Isolierung des Kühlgeräts enthält brennbares Zyklopentan und
erfordert ein besonderes Entsorgungsverfahren. Führen Sie das
Kühlgerät am Ende seiner Lebensdauer einer ordnungsgemäßen
Entsorgung zu.
• Benutzen Sie keine Elektrogeräte innerhalb des Kühlgerätes, außer
wenn diese Elektrogeräte vom Hersteller dafür empfohlen werden.
• Stellen Sie das Kühlgerät nicht in der Nähe von offenen Flammen oder
anderen Wärmequellen (Heizung, starke Sonneneinstrahlung, Gasöfen usw.) ab.
• Überhitzungsgefahr!
Achten Sie stets darauf, dass die Belüftung auf allen vier Seiten des
Kühlgeräts mindestens 50 mm beträgt. Halten Sie den Lüftungsbereich frei von jeglichen Gegenständen, die den Luftdurchfluss zu
den Kühlkomponenten behindern können.
Platzieren Sie das Kühlgerät nicht in geschlossenen Fächern oder
Bereichen, die keinen oder nur einen minimalen Luftstrom aufweisen.
• Achten Sie darauf, dass die Lüftungsöffnungen nicht abgedeckt
werden.
• Füllen Sie keine Flüssigkeiten oder Eis in den Innenbehälter.
• Tauchen Sie das Kühlgerät nie in Wasser.
• Schützen Sie das Kühlgerät und die Kabel vor Hitze und Nässe.
3 Lieferumfang
Folgende Grundvarianten sind erhältlich:
• Minibar DM20D mit Dekorplatte, ohne Schloss
• Minibar DM20D mit Dekorplatte, mit Schloss
• Minibar DM20F ohne Dekorplatte, ohne Schloss
• Minibar DM20F ohne Dekorplatte, mit Schloss
25
Page 26
DE
Bestimmungsgemäßer Gebrauch DM20
Menge Bezeichnung
1 Minibar
1 Anschlusskabel für 230-Vw-Anschluss
2 Schraube 4 x 45 mm (Montage)
2 Schraube 4 x 25 mm (Montage der vorderen Füße)
2 Schraube M4 x 25 mm (Griffmontage)
2 Verschlusskappe (Montage)
1 Griff nur DM20D
2 Verschlusskappe (Griffmontage) nur DM20D
2 Verschlusskappe (Holzverkleidung) nur DM20F Holzversion
1 Schlossdekor (Holzverkleidung) nur DM20F Holzversion mit
Schloss
2 Schlüssel nur Version mit Schloss
1 Montage- und Bedienungsanleitung
4 Bestimmungsgemäßer Gebrauch
Die Minibars DM20D und DM20F sind ausgelegt für den Betrieb in einem
Möbelstück. Das Gerät darf nicht freistehend betrieben werden.
Das Gerät eignet sich zum Kühlen von Getränken und Lebensmitteln.
Das Gerät ist für den Betrieb an einem 230-V-Wechselstromnetz ausgelegt.
Das Kühlgerät ist für den Hausgebrauch und ähnliche Anwendungsbereiche vorge-
sehen wie zum Beispiel
• in Personalküchen von Läden, Büros und anderen Arbeitsbereichen
• in der Landwirtschaft
• von Gästen in Hotels, Motels oder anderen Unterkünften
• in Frühstückspensionen
• im Catering und ähnlichen Großhandelsanwendungen
VORSICHT! Gesundheitsgefahr!
!
26
Prüfen Sie bitte, ob die Kühlleistung des Gerätes den Anforderungen
der Lebensmittel oder Medikamente entspricht, die Sie kühlen wollen.
Page 27
DE
DM20 Technische Beschreibung
5 Technische Beschreibung
Die Minibar hat eine Schublade für Flaschen und Dosen sowie ein Minifach für
Miniaturen und Snacks. Die Schublade bietet Platz für 12 Dosen sowie Snacks.
Die Minibar DM20D besitzt eine anthrazitfarbene Dekorplatte und einen
anthrazitfarbenen Griff.
Die Minibar DM20F wird ohne Dekorplatte geliefert und ist vorbereitet für die
Montage eines hoteleigenen Dekors.
Die Kühlung ist eine verschleißfreie Peltierkühlung mit Wärmeabfuhr durch einen
Lüfter.
Die Minibar ist mit Schloss (optional) verfügbar.
5.1 Gerätebeschreibung
Frontseite
Nr. in
Abb. 1, Seite 3
1 Schloss (optional)
2 Griff (nur DM20D)
3 Türverkleidung (nur DM20D)
Rückseite
Nr. in
Abb. 2, Seite 3
1 Tropfschale
2 Netzteil
Bezeichnung
Bezeichnung
27
Page 28
DE
Montage DM20
Bedienfeld (im Gerät)
Nr. in
Abb. 3, Seite 4
1Lampe
2 Fehler-LED
3 Status-LED
4 Einstelltaste
Schublade
Nr. in
Abb. 4, Seite 4
1 Trennwand
2 Flaschenfinger
Bezeichnung
Bezeichnung
6Montage
VORSICHT! Gesundheitsgefahr
!
Um eine Gefährdung durch Instabilität des Gerätes zu vermeiden, muss
dieses gemäß den Anweisungen befestigt werden.
6.1 Hinweise zur Montage in ein Möbelstück
Sie können die Minibar auf vier Arten in ein Möbelstück einbauen. Wählen die
gewünschte Variante (Abb. 5, Seite 5).
Beachten Sie dabei folgende Hinweise:
• Die Ausschnittmaße H x B x T betragen:
– DM20D: 385 x 404 x 428 mm
– DM20D: 385 x 404 x 426+d mm
d ist die Dicke des hoteleigenen Dekors
• Der Abstand zwischen Minibar-Rückseite und Möbelwand sollte ca. 10 mm
betragen.
• Die Lüftungsöffnungen müssen für die gewählte Variante gefertigt werden
(Abb. 5, Seite 5).
28
Page 29

DE
DM20 Montage
• Die Luft, die in den Lufteinlass strömt, darf nicht durch Wärmequellen (Heizung,
starke Sonneneinstrahlung, Gasöfen usw.) aufgeheizt werden.
➤ Befestigen Sie den Kühlschrank mit geeigneten Schrauben (Abb. 6 1 und 2,
Seite 6).
6.2 Minibar elektrisch anschließen
➤ Stecken Sie das 230-V-Anschlusskabel in die Wechselspannungs-Buchse, und
schließen Sie es an das 230-V-Wechselstromnetz an.
✓ Die Status-LED leuchtet.
✓ Die Minibar startet mit dem Kühlen des Innenraums.
6.3 Hoteleigenes Dekor montieren (nur DM20F)
Das hoteleigene Dekor muss folgende Voraussetzungen erfüllen:
•Maximales Gewicht: 2kg
• Maximale Dicke: 14 mm
➤ Befestigen Sie das Dekor mit vier Schrauben.
6.4 Schloss montieren (nur Version mit Schloss)
➤ Bohren Sie ein Loch mit einem Durchmesser von 35 mm in das Dekor.
➤ Montieren Sie das Schloss zusammen mit dem Schlossdekor.
6.5 Schloss montieren (nur für Version ohne Schloss)
Schublade demontieren (Abb. 7, Seite 7)
➤ Öffnen Sie die Schublade vollständig.
➤ Drücken Sie das Verriegelung der Schienen (A1).
➤ Ziehen Sie die Schublade aus dem Gehäuse.
➤ Entfernen Sie die Dichtung (B1).
➤ Entfernen Sie die Schlossabdeckung (B 2).
➤ Entfernen Sie die Stöpsel (C1) von den Schrauben für den Türgriff (C 3).
29
Page 30

DE
Bedienung DM20
➤ Schrauben Sie die Schrauben (C 2) aus dem Türgriff (C 3).
➤ Entfernen Sie den Türgriff (C 3).
Löcher bohren (Abb. 8, Seite 7)
➤ Bohren Sie ein Loch mit einem Durchmesser von 25 mm durch das Dekor und die
Tür (A1).
➤ Schrauben Sie die Schrauben (B1) aus dem Dekorrahmen (B 2).
➤ Entfernen Sie den Dekorrahmen (B 2).
Schloss zusammenbauen (Abb. 9, Seite 8)
➤ Setzen Sie die neue Schlossabdeckung (A1) ein.
➤ Setzen Sie das Dekor (B1) in den Dekorrahmen (B 3) ein.
➤ Schrauben Sie den Dekorrahmen (B 3) in die Tür (B 2).
➤ Montieren Sie das Türschloss (C1).
➤ Montieren Sie die Schlossfalle im Gehäuse (D 1).
Schublade zusammenbauen (Abb. 0, Seite 8)
➤ Drücken Sie die Dichtung (1) auf den Dekorrahmen (2).
➤ Schrauben Sie den Türgriff (4) an die Tür.
➤ Drücken Sie die Stöpsel (3) auf die Schrauben des Türgriffs (4).
➤ Schieben Sie die Schublade in das Gehäuse.
7Bedienung
ACHTUNG! Beschädigungsgefahr
A
7.1 Tipps zum Energiesparen
• Öffnen Sie das Kühlgerät nicht häufiger als nötig.
• Lassen Sie das Kühlgerät nicht länger offen als nötig.
30
Die Lampe darf nur durch den Hersteller, einen Kundendienst oder eine
ähnlich qualifizierte Person ersetzt werden, um um Beschädigungen zu
vermeiden.
Page 31

DE
DM20 Bedienung
7.2 Minibar benutzen
Die Minibar beginnt mit dem Kühlen, wenn sie an Spannung angeschlossen wird. Im
normalen Betrieb leuchtet die Status-LED. Wenn ein Fehler auftritt, blinkt die
Fehler-LED (siehe Kapitel „Störungsbeseitigung“ auf Seite 32).
Die Minibar ist werkseitig auf eine Kühltemperatur von 7 °C bei einer Umgebungstemperatur von 25 °C eingestellt.
Sie können die Kühltemperatur mit der Einstelltaste (Abb. 3 4, Seite 4) auf drei
Werte (5 °C, 12 °C und 7 °C) einstellen.
Dabei wird die Temperatur in der Reihenfolge 5 °C … 12 °C … 7 °C … 5 °C usw.
geändert.
➤ Drücken Sie die Einstelltaste (Abb. 3 4, Seite 4) und halten Sie sie für 5 s
gedrückt, bis die Lampe (Abb. 3 1, Seite 4) zu blinken beginnt.
➤ Drücken Sie sofort die Einstelltaste (Abb. 3 4, Seite 4) noch einmal.
✓ Die Lampe (Abb. 3 1, Seite 4) zeigt durch Blinken die eingestellte
Kühltemperatur an:
– 5 °C: die Lampe blinkt in drei Intervallen fünfmal
– 12 °C: die Lampe blinkt in drei Intervallen einmal
– 7 °C: die Lampe blinkt in drei Intervallen dreimal
I
HINWEIS
Die Minibar stellt die Kühltemperatur automatisch auf 7 °C ein, wenn sie
an eine Spannungsquelle angeschlossen wird.
31
Page 32

DE
Störungsbeseitigung DM20
8 Störungsbeseitigung
Störung Mögliche Ursache Lösungsvorschlag
Das Gerät funktioniert
nicht, Status-LED
leuchtet nicht.
Das Gerät kühlt nicht
(Stecker ist eingesteckt,
Status-LED leuchtet).
Fehler-LED blinkt einmal
pro Sekunde.
Fehler-LED blinkt
zweimal pro Sekunde.
Das Gerät kühlt nicht
genügend, Status-LED
leuchtet, Fehler-LED
leuchtet nicht.
WechselspannungsSteckdose führt keine
Spannung.
Das Netzteil ist defekt. Die Reparatur kann nur von einem
Das Kühlelement ist
defekt.
Der Temperatursensor
ist defekt.
Der Innenlüfter ist
defekt.
Das Kühlelement ist
defekt.
Schlechte Ventilation Prüfen Sie die Ventilation.
Versuchen Sie es an einer anderen
Steckdose.
zugelassenen Kundendienstbetrieb
durchgeführt werden.
Die Reparatur kann nur von einem
zugelassenen Kundendienstbetrieb
durchgeführt werden.
Die Reparatur kann nur von einem
zugelassenen Kundendienstbetrieb
durchgeführt werden.
Die Reparatur kann nur von einem
zugelassenen Kundendienstbetrieb
durchgeführt werden.
Die Reparatur kann nur von einem
zugelassenen Kundendienstbetrieb
durchgeführt werden.
Reinigen Sie den Filter unter dem
Gerät.
9 Reinigung und Pflege
ACHTUNG! Beschädigungsgefahr!
A
➤ Reinigen Sie das Kühlgerät innen und außen gelegentlich mit einem feuchten
Tuch.
32
• Reinigen Sie das Kühlgerät niemals unter fließendem Wasser oder
gar im Spülwasser.
• Verwenden Sie zur Reinigung keine scharfen Reinigungsmittel oder
harten Gegenstände, da diese das Kühlgerät beschädigen können.
Page 33

DE
DM20 Gewährleistung
➤ Stellen Sie sicher, dass die Be- und Entlüftungsöffnungen des Kühlgerätes frei
von Staub und Verunreinigungen sind, damit die beim Betrieb entstehende
Wärme abgeführt werden kann und das Kühlgerät keinen Schaden nimmt.
➤ Reinigen Sie den Lufteinlass-Filter gelegentlich.
➤ Falls Sie Wasser in der Tropfschale (Abb. 2 1, Seite 3) finden, prüfen Sie, ob das
Abflusssystem blockiert ist.
10 Gewährleistung
Es gilt die gesetzliche Gewährleistungsfrist. Sollte das Produkt defekt sein, wenden
Sie sich bitte an Ihren Fachhändler oder an die Niederlassung des Herstellers in
Ihrem Land (siehe dometic.com/dealer).
Zur Reparatur- bzw. Gewährleistungsbearbeitung müssen Sie folgende Unterlagen
mitschicken:
• eine Kopie der Rechnung mit Kaufdatum,
• einen Reklamationsgrund oder eine Fehlerbeschreibung.
11 Entsorgung
WARNUNG! Kinderfalle!
!
➤ Geben Sie das Verpackungsmaterial möglichst in den entsprechenden
Recycling-Müll.
M
Vor der Entsorgung Ihres alten Kühlschranks:
• Hängen Sie die Türen aus.
• Belassen Sie die Abstellflächen im Kühlschrank, damit Kinder nicht
hineinsteigen können.
Wenn Sie das Produkt endgültig außer Betrieb nehmen, informieren Sie
sich bitte beim nächsten Recyclingcenter oder bei Ihrem Fachhändler
über die zutreffenden Entsorgungsvorschriften.
33
Page 34

DE
Technische Daten DM20
12 Technische Daten
DM20D DM20F
Anschlussspannung: 220 – 240 Vw, 50/60 Hz
Kühlleistung: max. 20 °C unter Umgebungstemperatur
(einstellbar in den Stufen: +5 °C, +7 °C, +12 °C)
Kategorie: Kellerfach
Bruttoinhalt: 19,5 l
Nettoinhalt: 15,8 l
Energieeffizienzklasse: A++
Energieverbrauch
(Umgebungstemperatur 25 °C,
Innentemperatur im Gerät +12 °C):
Klimaklasse: N
Umgebungstemperatur: +16 °C bis +32 °C
Schallemissionen: 0 dB(A)
Kühlmittelmenge: 48 g
-Äquivalent: 0,069 t
CO
2
Treibhauspotential (GWP): 1430
0,200 kWh/24 h
Abmessungen Schublade B x Tx H: 285 x 228,5 x 112 mm
Abmessungen H x B x T
(siehe auch Abb. a, Seite 9):
Gewicht: 12,3 kg
Prüfung/Zertifikat:
365 x 384 x 428 mm 365 x 384 x 398 mm
Der Kühlkreislauf enthält R134a.
Enthält fluorierte Treibhausgase
Hermetisch geschlossene Einrichtung
34
Page 35

FR
DM20 Explication des symboles
Veuillez lire ce manuel avec attention avant de mettre l’appareil en
service. Conservez ensuite ce manuel. En cas de passer de l’appareil,
veuillez le transmettre au nouvel acquéreur.
Le fabricant décline toute responsabilité en cas de dommages provoqués par une
utilisation non-conforme de l'appareil ou par des erreurs de manipulation.
Table des matières
1 Explication des symboles . . . . . . . . . . . . . . . . . . . . . . . . . . . . . . . . . . . . . . . 35
2 Consignes de sécurité . . . . . . . . . . . . . . . . . . . . . . . . . . . . . . . . . . . . . . . . . 36
3 Contenu de la livraison . . . . . . . . . . . . . . . . . . . . . . . . . . . . . . . . . . . . . . . . . 38
4 Usage conforme . . . . . . . . . . . . . . . . . . . . . . . . . . . . . . . . . . . . . . . . . . . . . . 39
5 Description technique . . . . . . . . . . . . . . . . . . . . . . . . . . . . . . . . . . . . . . . . . 40
6 Montage . . . . . . . . . . . . . . . . . . . . . . . . . . . . . . . . . . . . . . . . . . . . . . . . . . . . .41
7 Utilisation. . . . . . . . . . . . . . . . . . . . . . . . . . . . . . . . . . . . . . . . . . . . . . . . . . . . 43
8 Dépannage . . . . . . . . . . . . . . . . . . . . . . . . . . . . . . . . . . . . . . . . . . . . . . . . . . 45
9 Entretien et nettoyage . . . . . . . . . . . . . . . . . . . . . . . . . . . . . . . . . . . . . . . . . 45
10 Garantie. . . . . . . . . . . . . . . . . . . . . . . . . . . . . . . . . . . . . . . . . . . . . . . . . . . . . 46
11 Retraitement . . . . . . . . . . . . . . . . . . . . . . . . . . . . . . . . . . . . . . . . . . . . . . . . . 46
12 Caractéristiques techniques . . . . . . . . . . . . . . . . . . . . . . . . . . . . . . . . . . . . . 47
1 Explication des symboles
AVERTISSEMENT !
!
!
Consigne de sécurité signalant une situation dangereuse qui peut
entraîner la mort ou de graves blessures si elle n’est pas évitée.
ATTENTION !
Consigne de sécurité signalant une situation dangereuse qui peut
entraîner des blessures de gravité moyenne ou légère si elle n’est pas
évitée.
35
Page 36

FR
Consignes de sécurité DM20
AVIS !
A
I
Remarque signalant une situation qui peut entraîner des dommages
matériels si elle n’est pas évitée.
REMARQUE
Informations complémentaires sur l'utilisation du produit.
2 Consignes de sécurité
AVERTISSEMENT ! Le non-respect de ces mises en garde peut
entraîner des blessures graves, voire mortelles.
!
Danger de mort par électrocution
• Si l’appareil présente des dégâts visibles, vous ne devez pas le mettre
en service.
• Si le câble de raccordement de l’appareil est endommagé, il doit être
remplacé par le fabricant, son service après-vente ou une personne de
qualification similaire, afin d’éviter tout danger.
• Si le câble d’alimentation de ce dispositif de refroidissement est
endommagé, il doit être remplacé pour éviter tout danger.
• Seul un personnel qualifié est habilité à effectuer des réparations sur
l’appareil. Toute réparation mal effectuée risque d’entraîner de graves
dangers.
Risque d’incendie
• Veillez à ne pas coincer ni endommager le cordon d’alimentation lors
de la mise en place de l’appareil.
• Ne placez pas de multiprises portables ou de blocs d’alimentation
portables à l'arrière de l’appareil.
Risque pour la santé
• Cet appareil peut être utilisé par des enfants âgés de 8 ans et plus et
des personnes ayant des capacités physiques, sensorielles ou
mentales réduites ou un manque d’expérience et de connaissances,
s’ils sont sous surveillance ou ont reçu des instructions sur l’utilisation
de l’appareil en toute sécurité et comprennent les risques impliqués.
• Les enfants ne doivent pas jouer avec cet appareil.
• Le nettoyage et la maintenance ne doivent pas être effectués par des
enfants sans surveillance.
36
Page 37

FR
DM20 Consignes de sécurité
• Les enfants âgés de 3 à 8 ans peuvent charger et décharger les
appareils de réfrigération.
Risque d'explosion
• Ne stockez aucune substance explosive comme p. ex. des aérosols
contenant des agents propulseurs dans l'appareil.
ATTENTION ! Le non-respect de ces mises en garde peut
entraîner des blessures légères ou de gravité modérée.
!
Danger de mort par électrocution
• Débranchez l'appareil du secteur
– avant tout nettoyage et entretien
– après chaque utilisation
Risque pour la santé
• Veuillez vérifier si la puissance frigorifique de l'appareil correspond à
la température de conservation recommandée pour les aliments ou
les médicaments que vous souhaitez refroidir.
• Les aliments ne peuvent être conservés que dans leurs emballages
originaux ou dans des récipients appropriés.
• Une ouverture prolongée de l’appareil de réfrigération peut entraîner
une augmentation significative de la température dans les compartiments de l’appareil.
• Nettoyez régulièrement les surfaces qui entrent en contact avec les
aliments, ainsi que les systèmes de drainage accessibles.
• Stockez la viande et le poisson crus dans des récipients appropriés
afin qu’ils n’entrent pas en contact avec d’autres aliments qui se
trouvent dans l’appareil ou ne risquent pas de couler dessus.
• Si l’appareil reste vide pendant une longue période :
– Éteignez l’appareil.
– Dégivrez l’appareil.
– Nettoyez et séchez l’appareil.
– Laissez la porte ouverte pour éviter la formation de moisissures à
l’intérieur de l’appareil.
A
AVIS ! Risque d'endommagement
• Comparez la tension indiquée sur la plaque signalétique avec
l’alimentation électrique dont vous disposez.
• Branchez l'appareil à l'aide du câble de raccordement CA au réseau
alternatif.
37
Page 38

FR
Contenu de la livraison DM20
• Ne tirez jamais sur le câble de raccordement pour sortir la fiche de la
prise.
• N’utilisez pas la glacière pour le transport de produits corrosifs ou de
solvants.
• Cette glacière contient du cyclopentane inflammable dans son
isolation. Les gaz contenus dans le matériau d'isolation exigent une
procédure de retraitement particulière. Une fois que vous ne l'utilisez
plus, recyclez l'appareil de manière conforme.
• N'utilisez aucun appareil électrique dans la glacière, sauf si ces
appareils sont recommandés par le fabricant pour cet usage.
• Ne placez pas l’appareil près de flammes ou d’autres sources de
chaleur (chauffage, rayons solaires, réchauds à gaz, etc.).
• Risque de surchauffe !
En toutes circonstances, maintenir une zone de ventilation de 50 mm
minimum autour du dispositif de réfrigération. Cette zone de ventilation doit rester libre de tout objet susceptible de réduire le flux d’air
acheminé vers les composants réfrigérants.
Ne placez pas le dispositif de réfrigération dans des zones ou à
l’intérieur de boîtiers clos dans lesquels l’air ne peut circuler pas ou
trop peu.
• Assurez-vous que les fentes d’aération ne sont pas recouvertes.
• Ne pas remplir le bac intérieur de substances liquides ou de glace.
• Ne plongez jamais l’appareil dans l’eau.
• Tenez l’appareil et les câbles à l’abri de la chaleur et de l’humidité.
3 Contenu de la livraison
Les variantes de base suivantes sont disponibles :
• Minibar DM20D avec plaque décor, sans serrure
• Minibar DM20D avec plaque décor, avec serrure
• Minibar DM20F sans plaque décor, sans serrure
• Minibar DM20F sans plaque décor, avec serrure
38
Page 39

FR
DM20 Usage conforme
Quantité Désignation
1 Minibar
1 Câble de raccordement pour prise 230 Vw
2Vis 4 x 45 mm (montage)
2Vis 4 x 25 mm (montage des pieds avant)
2Vis M4x25mm (montage poignée)
2 Bouchon de fermeture (montage)
1 Poignée Uniquement DM20D
2 Bouchon de fermeture (montage poignée) Uniquement DM20D
2 Bouchon de fermeture (habillage bois) Uniquement DM20F version
bois
1 Décor de serrure (habillage bois) Uniquement DM20F version
bois avec serrure
2 Clé Uniquement version avec
serrure
1 Notice de montage et d'utilisation
4Usage conforme
Les Minibars DM20D et DM20F sont conçus pour être exploités dans un meuble.
L’appareil ne doit pas fonctionner sans encastrement.
L'appareil convient à la réfrigération des boissons et aliments.
L'appareil est conçu pour fonctionner sur le courant alternatif 230 V.
La glacière est conçue pour un usage à domicile et tous les domaines d'applications
semblables, comme par exemple
• dans les cuisines destinées au personnel de boutiques, bureaux et autres lieux de
travail
• dans l'agriculture
• pour les clients d'hôtels, de motels ou autres types d'hébergement
• dans les « bed and breakfast »
• dans le catering et les utilisations semblables du commerce en gros
39
Page 40

FR
Description technique DM20
ATTENTION ! Risque pour la santé !
!
Veuillez vérifier si la puissance frigorifique de l'appareil correspond à la
température de conservation recommandée pour les aliments ou les
médicaments que vous souhaitez conserver au frais.
5 Description technique
Le Minibar a un tiroir pour les bouteilles et canettes ainsi qu'un compartiment pour
les miniatures et snacks. Le tiroir permet de ranger 12 canettes et des snacks.
Le Minibar DM20D possède une plaque décor de couleur anthracite et une poignée
de couleur anthracite.
Le Minibar DM20F est livré sans plaque décor et prévu pour le montage d'un
panneau décoratif propre à l'hôtel.
La réfrigération est assurée par effet Peltier, sans usure, avec évacuation de la chaleur
par ventilateur.
Le Minibar est disponible avec une serrure (en option).
5.1 Description de l'appareil
Face avant
N° sur la
fig. 1, page 3
1 Serrure (en option)
2 Poignée (uniquement DM20D)
3 Habillage de la porte (uniquement DM20D)
Face arrière
N° sur la
fig. 2, page 3
1Égouttoir
2 Bloc d'alimentation
40
Désignation
Désignation
Page 41

FR
DM20 Montage
Panneau de commande (dans l'appareil)
N° sur la
fig. 3, page 4
1Lampe
2 Voyant d'erreur
3 Voyant d'état
4 Touche de réglage
Tiroir
N° sur la
fig. 4, page 4
1 Paroi de séparation
2 Picots de retenue des bouteilles
Désignation
Désignation
6Montage
ATTENTION ! Risque pour la santé
!
Pour éviter tout risque dû à l’instabilité de l’appareil, celui-ci doit être fixé
conformément aux instructions.
6.1 Indications pour le montage dans un meuble
Vous pouvez encastrer le Minibar dans un meuble, de quatre manières différentes.
Choisissez la variante souhaitée (fig. 5, page 5).
Lorsque vous procédez à la fixation, veuillez respecter les consignes suivantes :
• Les dimensions de découpe h x l x p sont :
– DM20D : 385 x 404 x 428 mm
– DM20D : 385 x 404 x 426+ d mm
d est l'épaisseur du panneau décoratif de l'hôtel
• L'écart entre l'arrière du Minibar et la paroi du meuble doit être d'env. 10 mm.
• Les ouvertures d'aération doivent être conçues pour la variante sélectionnée
(fig. 5, page 5).
41
Page 42

FR
Montage DM20
• L'air passant par l'entrée d'air ne doit pas être chauffé par des sources de chaleur
(chauffage, fort rayonnement solaire, fours à gaz, etc.).
➤ Fixez le réfrigérateur avec des vis adaptées (fig. 6 1 et 2, page 6).
6.2 Raccordement électrique du Minibar
➤ Branchez le câble de raccordement 230 V sur la douille à tension alternative et
raccordez-le au secteur à courant alternatif 230 V.
✓ La DEL d'état s'allume.
✓ Le Minibar commence par la réfrigération du compartiment intérieur.
6.3 Montage du décor propre à l'hôtel (uniquement
DM20F)
Le décor propre à l'hôtel doit remplir les exigences suivantes :
•Poids maximal: 2kg
• Épaisseur maximale : 14 mm
➤ Fixez le décor avec quatre vis.
6.4 Montage de la serrure (uniquement version avec
serrure)
➤ Percez un trou de 35 mm de diamètre dans le décor.
➤ Montez la serrure avec le décor de la serrure.
6.5 Montage de la serrure (uniquement pour version sans
serrure)
Démontage du tiroir (fig. 7, page 7)
➤ Ouvrez complètement le tiroir.
➤ Appuyez sur le verrouillage des rails (A1).
➤ Retirez le tiroir du boîtier.
➤ Retirez le joint (B1).
42
Page 43

FR
DM20 Utilisation
➤ Retirez le couvercle de la serrure (B 2).
➤ Retirez les bouchons (C1) des vis pour la poignée de la porte (C 3).
➤ Dévissez les vis (C 2) de la poignée de la porte (C 3).
➤ Retirez la poignée de la porte (C 3).
Perçage de trous (fig. 8, page 7)
➤ Percez un trou de 25 mm de diamètre dans le décor et la porte (A1).
➤ Dévissez les vis (B1) du cadre décoratif (B 2).
➤ Retirez le cadre décoratif (B 2).
Montage de la serrure (fig. 9, page 8)
➤ Insérez le nouveau cache de la serrure (A1).
➤ Insérez le décor (B1) dans le cadre décoratif (B 3).
➤ Vissez le cadre décoratif (B 3) dans la porte (B 2).
➤ Montez la serrure de la porte (C1).
➤ Montez le bec-de-cane dans le boîtier (D 1).
Assemblage du tiroir (fig. 0, page 8)
➤ Appuyez le joint (1) sur le cadre décoratif (2).
➤ Vissez la poignée de la porte (4) sur la porte.
➤ Appuyez les bouchons (3) sur les vis de la poignée de la porte (4).
➤ Poussez le tiroir dans le boîtier.
7Utilisation
AVIS ! Risque d’endommagement
A
7.1 Comment économiser de l'énergie ?
• N'ouvrez pas le réfrigérateur plus souvent que nécessaire.
La lampe doit uniquement être remplacée par le fabricant, un technicien
du service après-vente ou toute autre personne de qualification similaire
afin d’éviter tout danger.
43
Page 44

FR
Utilisation DM20
• Ne laissez pas l'appareil de réfrigération ouvert plus longtemps que nécessaire !
7.2 Utilisation du Minibar
Le Minibar commence à refroidir lorsqu'il est raccordé à la tension. En fonctionnement normal, le voyant d'état s'allume. Lorsqu'une erreur survient, le voyant d'erreur
clignote (voir chapitre « Dépannage », page 45).
Le Minibar est réglé en usine à une température de refroidissement de 7 °C pour une
température ambiante de 25 °C.
À l'aide de la touche de réglage, vous pouvez régler la température de refroidissement (fig. 3 4, page 4) sur trois valeurs (5 °C, 12 °C et 7 °C).
La température est modifiée dans l'ordre 5°C… 12°C… 7°C… 5°C, etc.
➤ Appuyez sur la touche de réglage (fig. 3 4, page 4) et maintenez-la enfoncée
pendant 5 s, jusqu'à ce que la lampe (fig. 3 1, page 4) commence à clignoter.
➤ Appuyez immédiatement sur la touche de réglage (fig. 3 4, page 4) une
nouvelle fois.
✓ La lampe (fig. 3 1, page 4) indique en clignotant la température de
refroidissement réglée :
– 5 °C : la lampe clignote cinq fois à trois reprises
– 12 °C : la lampe clignote une fois à trois reprises
– 7 °C : la lampe clignote trois fois à trois reprises
I
44
REMARQUE
Le Minibar règle automatiquement la température de refroidissement
sur 7 °C lorsqu'il est raccordé à une source de tension.
Page 45

FR
DM20 Dépannage
8Dépannage
Dysfonctionnement Cause possible Solution proposée
L'appareil ne fonctionne
pas, la DEL d'état n'est
pas allumée.
L'appareil ne réfrigère
pas (le connecteur est
branché, la DEL d'état
est allumée).
Le voyant d'erreur
clignote une fois par
seconde.
Le voyant d'erreur
clignote deux fois par
seconde.
L'appareil ne refroidit
pas suffisamment, le
voyant d'état s'allume,
le voyant d'erreur ne
s'allume pas.
La prise de tension alternative n'est pas sous
tension.
Le bloc d'alimentation
est défectueux.
L'élément réfrigérant est
défectueux.
Le capteur de température est défectueux.
Le ventilateur intérieur
est défectueux.
L'élément réfrigérant est
défectueux.
Mauvaise ventilation Vérifiez la ventilation.
Essayez une autre prise.
La réparation doit être effectuée
uniquement par un service après-vente
agréé.
La réparation doit être effectuée
uniquement par un service après-vente
agréé.
La réparation doit être effectuée
uniquement par un service après-vente
agréé.
La réparation doit être effectuée
uniquement par un service après-vente
agréé.
La réparation doit être effectuée
uniquement par un service après-vente
agréé.
Nettoyez le filtre situé sous l'appareil.
9 Entretien et nettoyage
AVIS ! Risque d'endommagement !
A
➤ Nettoyez de temps à autre l’appareil à l’intérieur et à l’extérieur avec un chiffon
humide.
• Ne nettoyez jamais la glacière à l’eau courante et ne la plongez pas
non plus dans l'eau.
• N'utilisez pour le nettoyage ni produits abrasifs ni objets durs qui
pourraient endommager la glacière.
45
Page 46

FR
Garantie DM20
➤ Assurez-vous que les ouvertures d'aération et de ventilation de l'appareil ne sont
pas encombrées de saletés ou de poussières, pour que la chaleur générée par le
fonctionnement soit évacuée et que l'appareil ne soit pas endommagé.
➤ Nettoyez de temps à autre le filtre d'entrée d'air.
➤ Si vous trouvez de l'eau dans l'égouttoir (fig. 2 1, page 3), vérifiez si le système
d'évacuation de l'eau est bloqué.
10 Garantie
Le délai légal de garantie s'applique. Si le produit s'avérait défectueux, veuillez vous
adresser à la filiale du fabricant située dans votre pays (voir dometic.com/dealer) ou
à votre revendeur spécialisé.
Veuillez y joindre les documents suivants pour la gestion des réparations et de la
garantie :
• une copie de la facture avec la date d'achat,
• le motif de la réclamation ou une description du dysfonctionnement.
11 Retraitement
AVERTISSEMENT ! Risque d'enfermement pour les enfants !
!
➤ Jetez les emballages dans les conteneurs de déchets recyclables prévus à cet
effet.
M
46
Avant de mettre au rebut votre ancien réfrigérateur :
• Enlevez les portes de leurs gonds.
• Laissez les clayettes dans le réfrigérateur, afin que les enfants ne
puissent pas entrer dedans.
Lorsque vous mettrez votre produit définitivement hors service, informezvous auprès du centre de recyclage le plus proche ou auprès de votre
revendeur spécialisé sur les prescriptions relatives au retraitement des
déchets.
Page 47

FR
DM20 Caractéristiques techniques
12 Caractéristiques techniques
DM20D DM20F
Tension de raccordement : 220 – 240 Vw, 50/60 Hz
Puissance frigorifique : max. 20 °C en dessous de la température ambiante
(réglable selon les niveaux : +5 °C, +7 °C, +12 °C)
Catégorie : Cave
Capacité : 19,5 l
Contenu net : 15,8 l
Classe d'efficacité énergétique: A++
Consommation électrique
(température ambiante 25 °C,
température interne de l'appareil
+12 °C) :
Classe climatique : N
Température ambiante : De +16 °C à +32 °C
Émissions sonores : 0 dB(A)
Quantité de fluide frigorigène : 48 g
0,200 kWh/24 h
Équivalent CO
Potentiel d'effet de serre (GWP) : 1430
Dimensions tiroir l x p x h : 285 x 228,5 x 112 mm
Dimensions h x l x p
(voir aussi fig. a, page 9) :
Poids : 12,3 kg
Contrôle/Certificat :
: 0,069 t
2
365 x 384 x 428 mm 365 x 384 x 398 mm
Le circuit de refroidissement contient du R134a.
Contient des gaz à effet de serre fluorés
Equipement hermétiquement scellé
47
Page 48

ES
Explicación de los símbolos DM20
Lea atentamente este manual antes de la puesta en funcionamiento
del aparato y consérvelo en un lugar seguro para futuras consultas.
En caso de vender o entregar el aparato a otra persona, entregue también
estas instrucciones.
El fabricante declina toda responsabilidad por los daños causados por el uso
inadecuado o por el uso incorrecto del aparato.
Índice
1 Explicación de los símbolos . . . . . . . . . . . . . . . . . . . . . . . . . . . . . . . . . . . . . 48
2 Indicaciones de seguridad . . . . . . . . . . . . . . . . . . . . . . . . . . . . . . . . . . . . . . 49
3 Volumen de entrega . . . . . . . . . . . . . . . . . . . . . . . . . . . . . . . . . . . . . . . . . . . .51
4 Uso adecuado . . . . . . . . . . . . . . . . . . . . . . . . . . . . . . . . . . . . . . . . . . . . . . . . 52
5 Descripción técnica . . . . . . . . . . . . . . . . . . . . . . . . . . . . . . . . . . . . . . . . . . . 53
6 Montaje . . . . . . . . . . . . . . . . . . . . . . . . . . . . . . . . . . . . . . . . . . . . . . . . . . . . . 54
7 Manejo. . . . . . . . . . . . . . . . . . . . . . . . . . . . . . . . . . . . . . . . . . . . . . . . . . . . . . 56
8 Solución de averías . . . . . . . . . . . . . . . . . . . . . . . . . . . . . . . . . . . . . . . . . . . . 57
9 Limpieza y mantenimiento . . . . . . . . . . . . . . . . . . . . . . . . . . . . . . . . . . . . . . 58
10 Garantía legal . . . . . . . . . . . . . . . . . . . . . . . . . . . . . . . . . . . . . . . . . . . . . . . . 59
11 Gestión de residuos . . . . . . . . . . . . . . . . . . . . . . . . . . . . . . . . . . . . . . . . . . . 59
12 Datos técnicos. . . . . . . . . . . . . . . . . . . . . . . . . . . . . . . . . . . . . . . . . . . . . . . . 60
1 Explicación de los símbolos
¡ADVERTENCIA!
!
!
48
Aviso de seguridad sobre una situación de peligro que, si no se evita,
puede causar la muerte o heridas graves.
¡ATENCIÓN!
Aviso de seguridad sobre una situación de peligro que, si no se evita,
puede causar heridas leves o de consideración.
Page 49

ES
DM20 Indicaciones de seguridad
¡AVISO!
A
I
Aviso sobre una situación que, si no se evita, puede causar
daños materiales.
NOTA
Información complementaria para el manejo del producto.
2 Indicaciones de seguridad
¡ADVERTENCIA! El incumplimiento de estas advertencias podría
acarrear la muerte o lesiones graves.
!
Peligro de muerte por descarga eléctrica
• No ponga el aparato en funcionamiento si presenta desperfectos
visibles.
• Si se daña el cable de conexión del aparato, éste deberá ser
reemplazado por el fabricante, su servicio de atención al cliente o una
persona cualificada para evitar así posibles peligros.
• Si el cable de alimentación de este aparato de refrigeración está
dañado, se deberá sustituir para evitar riesgos de seguridad.
• Sólo personal especializado puede realizar reparaciones en el aparato. Las reparaciones realizadas indebidamente pueden dar lugar a
situaciones de considerable peligro.
Peligro de incendio
• Al colocar el aparato, asegúrese de que el cable de suministro
eléctrico no se haya quedado atrapado o esté dañado.
• No coloque varias tomas o suministros de corriente portátiles detrás
del aparato.
Riesgo para la salud
• Este aparato puede ser utilizado por menores a partir de 8 años y
personas con capacidad física, sensorial o mental reducida, o con falta
de experiencia y conocimientos, siempre que lo hagan bajo supervisión o hayan recibido instrucciones relativas al uso del mismo de
manera segura y entendiendo los riesgos asociados.
• No deje que los niños jueguen con el aparato.
• Los niños solo podrán realizar las tareas de limpieza y mantenimiento
bajo vigilancia.
49
Page 50

ES
Indicaciones de seguridad DM20
• Los menores de 3 a 8 años pueden meter y sacar artículos de la
nevera.
Peligro de explosión
• No guarde en el aparato sustancias con peligro de explosión como,
p. ej., atomizadores con gases combustibles.
¡ATENCIÓN! El incumplimiento de estas precauciones podría
acarrear lesiones moderadas o leves.
!
Peligro de muerte por descarga eléctrica
• Desconecte el aparato de la red
– antes de realizar cualquier tarea de limpieza y mantenimiento;
– después de cada uso.
Riesgo para la salud
• Compruebe si la potencia de refrigeración del aparato cumple las
exigencias de los alimentos o medicamentos que desea enfriar.
• Los alimentos sólo se pueden guardar en los envases originales o en
recipientes adecuados.
• Mantener la nevera abierta durante largos períodos de tiempo puede
producir un incremento considerable de la temperatura en los
compartimentos del aparato.
• Limpie periódicamente las superficies que puedan estar en contacto
con alimentos y los sistemas de desagüe accesibles.
• Guarde la carne y el pescado crudos en recipientes adecuados dentro
del aparato para que no entren en contacto con otros alimentos ni
goteen sobre estos.
• Si el aparato va a estar vacío durante un período prolongado:
– Desconéctelo.
– Descongélelo.
– Límpielo y séquelo.
– Deje la puerta abierta para evitar que se forme moho en el aparato.
A
50
¡AVISO! Peligro de ocasionar daños materiales
• Compare el valor de tensión indicado en la placa de características
con el suministro de energía existente.
• Conecte el aparato a la red de corriente alterna con el cable de
conexión de CA correspondiente.
• No extraiga nunca la clavija de la caja de enchufe tirando del cable de
conexión.
Page 51

ES
DM20 Volumen de entrega
• Este aparato refrigerador no es apto para transportar sustancias
corrosivas o disolventes.
• Este aislamiento de este aparato refrigerador contiene ciclopentanto
inflamable. Los gases presentes en el material aislante requieren un
proceso de eliminación especial. Elimine debidamente el aparato al
final de su vida útil.
• No utilice ningún aparato eléctrico dentro de la nevera, a no ser que
el aparato en cuestión haya sido recomendado para ello por el
fabricante.
• No coloque el aparato cerca de llamas vivas ni de otras fuentes de
calor (calefacción, radiación directa del sol, estufas de gas, etc.).
• ¡Peligro de sobrecalentamiento!
Asegúrese de que siempre haya un mínimo de 50 mm de ventilación
en los cuatro lados del aparato de refrigeración. Mantenga la zona de
ventilación libre de objetos que puedan impedir el paso de aire a los
componentes refrigerantes.
No coloque el aparato de refrigeración en compartimentos cerrados
o en áreas donde no haya un flujo mínimo de aire.
• Procure que no se obstruyan las ranuras de ventilación.
• No introduzca líquidos ni hielo en el contenedor interior.
• No sumerja nunca el aparato en agua.
• Proteja el aparato y los cables del calor y de la humedad.
3 Volumen de entrega
Están disponibles las siguientes variantes básicas:
• Minibar DM20D con placa decorativa, sin cerradura
• Minibar DM20D con placa decorativa, con cerradura
• Minibar DM20F sin placa decorativa, sin cerradura
• Minibar DM20F sin placa decorativa, con cerradura
51
Page 52

ES
Uso adecuado DM20
Cantidad Denominación
1 Minibar
1 Cable de conexión para 230 Vw
2 Tornillo 4 x 45 mm (montaje)
2 Tornillo 4 x 25 mm (montaje de las patas delanteras)
2 Tornillo M4 x 25 mm (montaje del asa)
2 Tapón (montaje)
1 Asa solo DM 20D
2 Tapón (montaje del asa) solo DM20D
2 Tapón (revestimiento de madera) solo versión de madera del
DM20F
1 Decoración de la cerradura (revestimiento
de madera)
2 Llave solo versión con cerradura
1 Instrucciones de montaje y de uso
solo versión de madera del
DM20F con cerradura
4Uso adecuado
Los minibares DM20D y DM20F están diseñados para su funcionamiento
empotrados en un mueble. El aparato no puede utilizarse de forma autónoma.
Este aparato es apto para enfriar bebidas y alimentos.
El aparato está diseñado para su uso en una red de corriente alterna de 230 V.
Esta nevera está concebida para el uso doméstico o usos similares, como
por ejemplo:
• en las cocinas destinadas al personal en establecimientos comerciales, oficinas u
otros recintos de trabajo
• en el trabajo en el campo
• para los huéspedes de hoteles, moteles u otros tipos de alojamiento
• en pensiones con desayuno
• en servicios de catering y otras aplicaciones semejantes
52
Page 53

ES
DM20 Descripción técnica
¡ATENCIÓN! ¡Riesgo para la salud!
!
Compruebe si la potencia de refrigeración del aparato cumple los
requisitos de los alimentos o medicamentos que desea enfriar.
5 Descripción técnica
El minibar tiene un cajón para botellas y latas así como un minicompartimento para
botellitas y aperitivos. El cajón dispone de espacio parA 12 latas y aperitivos.
El minibar DM20D cuenta con una placa decorativa y un asa, ambas de color
antracita.
El minibar DM20F se suministra sin placa decorativa y está preparado para su
montaje con la misma decoración que el hotel donde va a utilizarse.
La refrigeración se produce por efecto Peltier sin desgaste y con evacuación de calor
por medio de un ventilador.
El minibar puede suministrarse con una cerradura (opcional).
5.1 Descripción del aparato
Parte frontal
N.º en
fig. 1, página 3
1 Cerradura (opcional)
2 Asa (solo en DM20D)
3 Revestimiento de la puerta (solo en DM20D)
Parte trasera
N.º en
fig. 2, página 3
1 Bandeja de goteo
2 Fuente de alimentación
Denominación
Denominación
53
Page 54

ES
Montaje DM20
Panel de mando (en el aparato)
N.º en
fig. 3, página 4
1Lámpara
2 LED de error
3 LED de estado
4 Tecla de ajuste
Cajón
N.º en
fig. 4, página 4
1 Pared separadora
2 Reposabotellas
Denominación
Denominación
6Montaje
¡ATENCIÓN! Riesgo para la salud
!
Para evitar peligros causados por la inestabilidad del aparato, este
deberá fijarse tal como se indica en las instrucciones.
6.1 Indicaciones para el montaje en un mueble
Puede montar de cuatro formas distintas el minibar en un mueble. Elija la variante
que desee (fig. 5, página 5).
Observe las siguientes indicaciones:
• Dimensiones H x A x P:
– DM20F: 385 x 404 x 428 mm
– DM20F: 385 x 404 x 426 +d mm
d es el grosor de la decoración propia del hotel
• La distancia entre la parte posterior del minibar y la pared del mueble debería ser
de aprox. 10 mm.
• Las aberturas de ventilación deben perforarse para la variante seleccionada
(fig. 5, página 5).
54
Page 55

ES
DM20 Montaje
• El aire que fluye por la entrada de aire no puede calentarse mediante fuentes de
calor (calefacción, radiación solar fuerte, estufas de gas, etc.).
➤ Fije la nevera con tornillos adecuados (fig. 6 1 y 2, página 6).
6.2 Conexión eléctrica del minibar
➤ Enchufe el cable de conexión de 230 V en la clavija de tensión alterna y
conéctelo a la red de corriente alterna de 230 V.
✓ El LED de estado se ilumina.
✓ El minibar empieza a enfriar el interior.
6.3 Montar la decoración propia del hotel (solo DM20F)
La decoración propia del hotel debe cumplir los siguientes requisitos:
• Peso máximo: 2 kg
• Grosor máximo: 14 mm
➤ Fije la decoración con cuatro tornillos.
6.4 Montar la cerradura (solo versión con cerradura)
➤ Perfore un orificio con un diámetro de 35 mm en la decoración.
➤ Monte la cerradura junto con su decoración.
6.5 Montar la cerradura (solo versión sin cerradura)
Desmontar el cajón (fig. 7, página 7)
➤ Abra totalmente el cajón.
➤ Presione el bloqueo de los carriles (A1).
➤ Tire del cajón para extraerlo de la carcasa.
➤ Retire la junta (B1).
➤ Retire la cubierta de la cerradura (B 2).
➤ Retire el tapón (C1) de los tornillos para el tirador de la puerta (C 3).
➤ Desenrosque los tornillos (C 2) del tirador de la puerta (C 3).
55
Page 56

ES
Manejo DM20
➤ Retire el tirador de la puerta (C 3).
Perforar los orificios (fig. 8, página 7)
➤ Perfore un orificio con un diámetro de 25 mm en la decoración y en la puerta
(A1).
➤ Desenrosque los tornillos (B1) del marco de la decoración (B 2).
➤ Retire el marco de la decoración (B 2).
Montar la cerradura (fig. 9, página 8)
➤ Coloque la nueva cubierta de la cerradura (A1).
➤ Introduzca la decoración (B1) en el marco de la decoración (B 3).
➤ Atornille el marco de la decoración (B 3) en la puerta (B 2).
➤ Monte la cerradura de la puerta (C1).
➤ Monte el picaporte de la cerradura en la carcasa (D 1).
Montar el cajón (fig. 0, página 8)
➤ Presione la junta (1) en el marco de la decoración (2).
➤ Atornille el tirador (4) en la puerta.
➤ Presione el tapón (3) en los tornillos del tirador de la puerta (4).
➤ Inserte el cajón en la carcasa.
7Manejo
¡AVISO! Peligro de ocasionar daños materiales
A
7.1 Consejos para el ahorro de energía
• Evite abrir el minibar más de lo necesario.
• No deje el minibar abierto más tiempo del necesario.
56
Únicamente el fabricante, un técnico de mantenimiento o una persona
con cualificación similar podrá cambiar la bombilla con el fin de evitar
peligros.
Page 57

ES
DM20 Solución de averías
7.2 Utilizar el minibar
El minibar comienza a enfriar cuando se conecta a la tensión. Durante el
funcionamiento normal se ilumina el LED de estado. Si se produce un error,
parpadea el LED de error (véase el capítulo “Solución de averías” en la página 57).
El minibar está ajustado de fábrica a una temperatura de enfriamiento de 7 °C con
una temperatura ambiente de 25 °C.
Usted puede ajustar la temperatura de enfriamiento con la tecla de ajuste (fig. 3 4,
página 4) en tres valores (5 °C, 12 °C y 7 °C).
De esta forma, la temperatura se modifica en la secuencia 5 °C … 12 °C … 7 °C …
5°C, etc.
➤ Pulse la tecla de ajuste (fig. 3 4, página 4) y manténgala pulsada durante 5 s
hasta que la lámpara (fig. 3 1, página 4) comience a parpadear.
➤ Vuelva a pulsar de inmediato la tecla de ajuste (fig. 3 4, página 4).
✓ La lámpara (fig. 3 1, página 4) muestra con su parpadeo la temperatura de
enfriamiento ajustada:
– 5 °C: la lámpara parpadea cinco veces en tres intervalos
– 12 °C: la lámpara parpadea una vez en tres intervalos
– 7 °C: la lámpara parpadea tres veces en tres intervalos
NOTA
I
El minibar ajusta automáticamente la temperatura de enfriamiento a 7 °C
si se conecta a una fuente de tensión.
8 Solución de averías
Avería Posible causa Propuesta de solución
El aparato no funciona,
el LED de estado no se
ilumina.
El aparato no enfría (la
clavija está inserta, el
LED de estado se ilumina).
La caja de enchufe de
tensión alterna no
conduce tensión.
La fuente de alimentación está averiada.
El elemento refrigerador está averiado.
Inténtelo en otra toma.
Sólo un servicio de atención al cliente
autorizado puede realizar la
reparación.
Sólo un servicio de atención al cliente
autorizado puede realizar la
reparación.
57
Page 58

ES
Limpieza y mantenimiento DM20
Avería Posible causa Propuesta de solución
El LED de error
parpadea una vez por
segundo.
El LED de error
parpadea dos veces por
segundo.
El aparato no enfría lo
suficiente, el LED de
estado está encendido,
el LED de error está
apagado.
El sensor de temperatura está averiado.
El ventilador interior
está averiado.
El elemento refrigerador está averiado.
Ventilación insuficiente. Compruebe la ventilación.
Sólo un servicio de atención al cliente
autorizado puede realizar la
reparación.
Sólo un servicio de atención al cliente
autorizado puede realizar la
reparación.
Sólo un servicio de atención al cliente
autorizado puede realizar la
reparación.
Limpie el filtro situado debajo del
aparato.
9 Limpieza y mantenimiento
¡AVISO! ¡Peligro de ocasionar daños materiales!
A
➤ Limpie de vez en cuando el interior y el exterior de la nevera con un paño
húmedo.
• Nunca limpie la nevera bajo el chorro de agua corriente ni inmersa
en agua jabonosa.
• No emplee productos de limpieza corrosivos u objetos que puedan
arañar o deteriorar el aparato durante su limpieza.
➤ Asegúrese de que las aberturas de ventilación y desaireación del aparato están
limpias de polvo para que se pueda evacuar el calor generado durante el
funcionamiento y el aparato no resulte perjudicado.
➤ Limpie de vez en cuando el filtro de entrada de aire.
➤ Si hay agua en la bandeja de goteo (fig. 2 1, página 3), compruebe si el sistema
de desagüe está bloqueado.
58
Page 59

ES
DM20 Garantía legal
10 Garantía legal
Rige el plazo de garantía legal. Si el producto presenta algún defecto, diríjase a su
establecimiento especializado o a la sucursal del fabricante de su país (véase
dometic.com/dealer).
Para la tramitación de la reparación y de la garantía debe enviar también los
siguientes documentos:
• una copia de la factura con fecha de compra,
• el motivo de la reclamación o una descripción de la avería.
11 Gestión de residuos
¡ADVERTENCIA! ¡Peligro para los niños!
!
➤ Deseche el material de embalaje en el contenedor de reciclaje correspondiente.
M
Antes de desechar su vieja nevera:
• Desmonte las puertas.
• Deje las bandejas dentro de la nevera para que los niños no puedan
introducirse en ella.
Cuando vaya a desechar definitivamente el producto, infórmese en el
centro de reciclaje más cercano o en un comercio especializado sobre las
normas pertinentes de eliminación de materiales.
59
Page 60

ES
Datos técnicos DM20
12 Datos técnicos
DM20D DM20F
Tensión de conexión: 220 – 240 Vw, 50/60 Hz
Potencia de refrigeración: máx. 20 °C por debajo de la temperatura ambiente
(ajustable en los niveles: +5 °C, +7 °C, +12 °C)
Categoría: compartimento bodega
Capacidad bruta: 19,5 l
Capacidad neta: 15,8 l
Clase de eficiencia energética: A++
Consumo de energía
(Temperatura ambiente 25 °C,
temperatura interior en el aparato
+12 °C):
Clase climática: N
Temperatura ambiente: de +16 °C a +32 °C
Emisiones de ruido: 0 dB(A)
Cantidad de refrigerante: 48 g
0,200 kWh/24 h
Equivalente a CO
Índice GWP: 1430
Dimensiones del cajón A x P x H: 285 x 228,5 x 112 mm
Dimensiones H x A x P (véase
también fig. a, página 9):
Peso: 12,3 kg
Homologación/certificados:
: 0,069 t
2
365 x 384 x 428 mm 365 x 384 x 398 mm
El circuito de refrigeración contiene R134a.
Contiene gases de efecto invernadero fluorados
Aparato sellado herméticamente
60
Page 61

PT
DM20 Explicação dos símbolos
Por favor, leia atentamente este manual antes da colocação em funcionamento do aparelho e guarde-o em local seguro. Em caso de revenda do
aparelho, entregue o manual ao novo comprador.
O fabricante não se responsabiliza por danos resultantes de uma utilização
inadequada ou de uma operação incorrecta.
Índice
1 Explicação dos símbolos . . . . . . . . . . . . . . . . . . . . . . . . . . . . . . . . . . . . . . . . 61
2 Indicações de segurança . . . . . . . . . . . . . . . . . . . . . . . . . . . . . . . . . . . . . . . 62
3 Material fornecido. . . . . . . . . . . . . . . . . . . . . . . . . . . . . . . . . . . . . . . . . . . . . 64
4 Utilização adequada . . . . . . . . . . . . . . . . . . . . . . . . . . . . . . . . . . . . . . . . . . . 65
5 Descrição técnica . . . . . . . . . . . . . . . . . . . . . . . . . . . . . . . . . . . . . . . . . . . . . 66
6 Montagem. . . . . . . . . . . . . . . . . . . . . . . . . . . . . . . . . . . . . . . . . . . . . . . . . . . 67
7 Operação . . . . . . . . . . . . . . . . . . . . . . . . . . . . . . . . . . . . . . . . . . . . . . . . . . . 69
8 Eliminação de falhas . . . . . . . . . . . . . . . . . . . . . . . . . . . . . . . . . . . . . . . . . . . 70
9 Limpeza e manutenção . . . . . . . . . . . . . . . . . . . . . . . . . . . . . . . . . . . . . . . . . .71
10 Garantia . . . . . . . . . . . . . . . . . . . . . . . . . . . . . . . . . . . . . . . . . . . . . . . . . . . . . .71
11 Eliminação . . . . . . . . . . . . . . . . . . . . . . . . . . . . . . . . . . . . . . . . . . . . . . . . . . . 72
12 Dados técnicos . . . . . . . . . . . . . . . . . . . . . . . . . . . . . . . . . . . . . . . . . . . . . . . 73
1 Explicação dos símbolos
AVISO!
!
!
Indicação de segurança sobre uma situação de perigo que pode
levar à morte ou a ferimentos graves se não for evitada.
PRECAUÇÃO!
Indicação de segurança sobre uma situação de perigo que pode
levar a ferimentos ligeiros ou moderados se não for evitada.
61
Page 62

PT
Indicações de segurança DM20
NOTA!
A
I
Indicação sobre uma situação que leva a danos materiais se não for
evitada.
OBSERVAÇÃO
Informações complementares sobre a operação do produto.
2 Indicações de segurança
AVISO! O incumprimento destes avisos poderá resultar em
morte ou ferimentos graves.
!
Perigo de morte devido a choque elétrico
• Quando o aparelho apresentar danos visíveis, ele não deve ser
colocado em funcionamento.
• Quando o cabo de conexão for danificado, o mesmo tem de ser
substituído pelo fabricante, pela sua assistência técnica ou por uma
pessoa com qualificações equivalentes para evitar perigos.
• Se o cabo de alimentação deste aparelho de refrigeração estiver
danificado, ele terá de ser substituído para evitar perigos.
• As reparações neste aparelho apenas devem ser realizadas por
técnicos especializados. As reparações inadequadas podem
provocar perigos substanciais.
Perigo de incêndio
• Ao colocar o aparelho, certifique-se de que o cabo de alimentação
não fica preso nem é danificado.
• Não coloque tomadas múltiplas ou fontes de alimentação portáteis na
parte de trás do aparelho.
Risco para a saúde
• Este aparelho pode ser utilizado por crianças a partir dos 8 anos e
pessoas com capacidades físicas, sensoriais ou mentais reduzidas ou
sem experiência e conhecimento se forem supervisionadas ou receberem instruções sobre a utilização do aparelho de forma segura e
compreenderem os perigos implicados.
• As crianças não podem brincar com o aparelho.
• A limpeza e a manutenção por parte do utilizador não podem ser
efetuadas por crianças sem supervisão.
62
Page 63

PT
DM20 Indicações de segurança
• Crianças com idades entre os 3 e os 8 anos podem colocar e tirar itens
de aparelhos frigoríficos.
Perigo de explosão
• Não guarde as substâncias com risco de explosão, como p.ex. latas
de spray com gás carburante inflamável, no aparelho.
PRECAUÇÃO! O incumprimento destas advertências poderá
resultar em ferimentos ligeiros ou moderados.
!
Perigo de morte devido a choque elétrico
• Separe o aparelho da rede
– antes de cada limpeza e conservação
– após cada utilização
Risco para a saúde
• Por favor, verifique se a capacidade de refrigeração do aparelho
cumpre os requisitos dos géneros alimentares ou dos medicamentos
que pretende refrigerar.
• Os géneros alimentícios apenas podem ser armazenados nas
embalagens originais ou recipientes adequados.
• Abrir o aparelho de refrigeração durante longos períodos pode
provocar um aumento significativo da temperatura nos compartimentos do aparelho.
• Limpe regularmente as superfícies que entram em contacto com
géneros alimentícios e os sistemas de drenagem acessíveis.
• Armazene a carne crua e o peixe cru em recipientes adequados no
aparelho, de modo que não escorram sobre ou entrem em contacto
com outros géneros alimentícios.
• Se o aparelho permanecer vazio durante um longo período de
tempo:
– Desligue o aparelho.
– Descongele o aparelho.
– Limpe e seque o aparelho.
– Deixe a porta aberta para evitar a formação de bolor no aparelho.
A
NOTA! Perigo de danos
• Compare a indicação da tensão na placa de características com a
alimentação de energia existente.
• Conecte o aparelho com o cabo de ligação de AC à rede de corrente
alternada.
63
Page 64

PT
Material fornecido DM20
• Nunca retire a ficha da tomada eléctrica puxando pelo cabo de
conexão.
• A geleira não é adequada para o transporte de substâncias corrosivas
ou substâncias com solventes.
• Este aparelho contém ciclopentano inflamável no isolamento. Os
gases no material de isolamento requerem um processo de
eliminação especial. No final da sua vida útil, entregue o aparelho num
ponto de eliminação apropriado.
• Não utilize aparelhos eléctricos dentro da geleira, excepto se estes
aparelhos tiverem sido recomendados pelo fabricante.
• Não coloque o aparelho na proximidade de chamas abertas ou outras
fontes de calor (aquecimento, radiação solar intensa, fogões a gás,
etc.).
• Perigo de sobreaquecimento!
Certifique-se sempre de que existe um espaço mínimo de ventilação
de 50 mm nos quatro lados do aparelho de refrigeração. Mantenha a
área de ventilação livre de quaisquer objetos que possam obstruir o
fluxo de ar para os componentes de refrigeração.
Não coloque o aparelho de refrigeração em compartimentos fechados ou em áreas sem circulação de ar ou com uma circulação de ar
muito reduzida.
• Tenha atenção para que as aberturas de ventilação não sejam
cobertas.
• Não verta líquidos ou gelo para dentro do recipiente interior.
• Nunca mergulhe o aparelho em água.
• Proteja o aparelho e os cabos do calor e da humidade.
3 Material fornecido
Estão disponíveis as seguintes variantes básicas:
• Minibar DM20D com placa decorativa, sem fechadura
• Minibar DM20D com placa decorativa, com fechadura
• Minibar DM20F sem placa decorativa, sem fechadura
• Minibar DM20F sem placa decorativa, com fechadura
64
Page 65

PT
DM20 Utilização adequada
Quantidade Designação
1 Minibar
1 Cabo de conexão para ligação de 230 Vw
2 Parafuso 4 x 45 mm (montagem)
2 Parafuso 4 x 25 mm (montagem dos pés dianteiros)
2 Parafuso M4 x 25 mm (montagem da pega)
2 Tampa de fecho (montagem)
1 Pega apenas DM20D
2 Tampa de fecho (montagem da pega) apenas DM20D
2 Tampa de fecho (revestimento de madeira) apenas versão de madeira
DM20F
1 Decoração da fechadura (revestimento de
madeira)
2 Chave apenas versão com fechadura
1 Manual de montagem e operação
apenas versão de madeira
DM20F com fechadura
4Utilização adequada
Os minibares DM20D e DM20F são concebidos para o funcionamento integrado
numa peça de mobiliário. O aparelho não pode funcionar sem estar integrado.
O aparelho é adequado para refrigerar bebidas e géneros alimentícios.
O aparelho foi concebido para funcionar com uma corrente alternada de 230 V.
A geleira foi concebida para a utilização doméstica e outras áreas de utilização seme-
lhantes como por exemplo
• em copas de lojas, escritórios e outras áreas de trabalho
• na agricultura
• por hóspedes em hotéis, motéis ou outros alojamentos
• em pensões com pequeno-almoço
• no Catering e outras utilizações semelhantes no comércio grossista
65
Page 66

PT
Descrição técnica DM20
PRECAUÇÃO! Risco para a saúde!
!
Por favor, verifique se a potência de refrigeração do aparelho cumpre os
requisitos dos géneros alimentícios ou dos medicamentos que pretende refrigerar.
5 Descrição técnica
O minibar possui uma gaveta para garrafas e embalagens, bem como um
minicompartimento para miniaturas e lanches. A gaveta oferece espaço
parA 12 embalagens ou lanches.
O minibar DM20D possui uma placa decorativa de cor antracite e uma pega na
mesma cor.
O minibar DM20F é fornecido sem placa decorativa e está preparado para a
montagem de uma decoração de unidade hoteleira.
A refrigeração é uma refrigeração tipo Peltier sem desgaste com dissipação de calor
por uma ventoinha.
O minibar está disponível com fechadura (opcional).
5.1 Descrição do aparelho
Parte frontal
N.º na
fig. 1, página 3
1 Fechadura (opcional)
2 Pega (apenas DM20D)
3 Revestimento da porta (apenas DM20D)
Parte traseira
N.º na
fig. 2, página 3
1 Cuba coletora
2 Fonte de alimentação
66
Designação
Designação
Page 67

PT
DM20 Montagem
Painel de comando (no dispositivo)
N.º na
fig. 3, página 4
1 Lâmpada
2 LED de erro
3 LED de estado
4 Botão de ajuste
Gaveta
N.º na
fig. 4, página 4
1 Parede de separação
2 Sistema de fixação de garrafas
Designação
Designação
6Montagem
PRECAUÇÃO! Riesgo para la salud
!
Para evitar peligros causados por la inestabilidad del aparato, este
deberá fijarse tal como se indica en las instrucciones.
6.1 Instruções de montagem numa peça de mobiliário
É possível montar o minibar de quatro maneiras numa peça de mobiliário. Selecione
a variante desejada (fig. 5, página 5).
Preste neste caso atenção às seguintes indicações:
• As dimensões da abertura A x L x P são:
– DM20D: 385 x 404 x 428 mm
– DM20D: 385 x 404 x 426+e mm
“e” corresponde à espessura da decoração da unidade hoteleira
• A distância entre a parte traseira do minibar e a parede do móvel deve ser de
aprox. 10 mm.
• As aberturas de ventilação têm de estar realizadas para a variante escolhida
(fig. 5, página 5).
67
Page 68

PT
Montagem DM20
• O ar que entra na entrada de ar não pode ser aquecido por fontes de calor
(aquecedor, radiação solar forte, forno a gás, etc.).
➤ Fixe o frigorífico com parafusos adequados (fig. 6 1 e 2, página 6).
6.2 Efetuar a ligação elétrica do minibar
➤ Encaixe o cabo de ligação de 230 V na tomada de tensão alternada e ligue-o à
rede de corrente alternada de 230 V.
✓ O LED de estado acende.
✓ O minibar inicia a refrigeração do interior.
6.3 Montar a decoração da unidade hoteleira (apenas
DM20F)
A decoração da unidade hoteleira tem de cumprir os seguintes requisitos:
• Peso máximo: 2 kg
• Espessura máxima: 14 mm
➤ Fixe a decoração com quatro parafusos.
6.4 Montar a fechadura (apenas versão com fechadura)
➤ Faça um furo com um diâmetro de 35 mm na decoração.
➤ Monte a fechadura em conjunto com a decoração da fechadura.
6.5 Montar a fechadura (apenas versão sem fechadura)
Desmontar a gaveta (fig. 7, página 7)
➤ Abra totalmente a gaveta.
➤ Pressione o bloqueio da calha (A1).
➤ Remova a gaveta do compartimento.
➤ Remova a vedação (B1).
➤ Remova a cobertura da fechadura (B 2).
➤ Remova a tampa (C1) dos quatro parafusos da pega da porta (C 3).
68
Page 69

PT
DM20 Operação
➤ Retire os parafusos (C 2) da pega da porta (C 3).
➤ Retire a pega da porta (C 3).
Fazer os furos (fig. 8, página 7)
➤ Faça um furo com um diâmetro de 25 mm através da decoração e da porta (A1).
➤ Retire os parafusos (B1) da estrutura da decoração (B 2).
➤ Remova a estrutura da decoração (B 2).
Montar a fechadura (fig. 9, página 8)
➤ Coloque a nova cobertura da fechadura (A1).
➤ Coloque a decoração (B1) na estrutura da decoração (B 3).
➤ Aparafuse a estrutura da decoração (B 3) na porta (B 2).
➤ Monte a fechadura da porta (C1).
➤ Monte o trinco na caixa (D 1).
Montar a gaveta (fig. 0, página 8)
➤ Pressione a vedação (1) contra a estrutura da decoração (2).
➤ Aparafuse a pega da porta (4).
➤ Pressione as tampas (3) nos parafusos da pega da porta (4).
➤ Insira a gaveta no compartimento.
7Operação
NOTA! Peligro de ocasionar daños materiales
A
7.1 Sugestões para poupar energia
• Não abra a geleira mais do que as vezes necessárias.
• Não deixe a geleira aberta mais tempo do que o necessário.
Únicamente el fabricante, un técnico de mantenimiento o una persona
con cualificación similar podrá cambiar la bombilla con el fin de evitar
peligros.
69
Page 70

PT
Eliminação de falhas DM20
7.2 Utilizar o minibar
O minibar inicia a refrigeração assim que é ligado à eletricidade. No funcionamento
normal, acende-se o LED de estado. Se ocorrer algum erro, o LED de erro pisca (ver
capítulo “Eliminação de falhas” na página 70).
O minibar vem configurado de fábrica para uma temperatura de refrigeração de
7 °C a uma temperatura ambiente de 25 °C.
É possível ajustar a temperatura de refrigeração com o botão de ajuste (fig. 3 4
página 4) para três valores (5 °C, 12 °C e 7 °C).
A temperatura é alterada na sequência de 5 °C … 12 °C … 7 °C … 5 °C etc.
➤ Prima e mantenha premido o botão de ajuste (fig. 3 4, página 4) durante 5
segundos até que a luz (fig. 3 1, página 4) comece a piscar.
➤ Prima imediatamente o botão de ajuste (fig. 3 4, página 4) outra vez.
✓ A luz (fig. 3 1, página 4) indica a temperatura de refrigeração ajustada através
da intermitência:
– 5 °C: a luz pisca em três intervalos cinco vezes
– 12 °C: a luz pisca em três intervalos uma vez
– 7 °C: a luz pisca em três intervalos três vezes
OBSERVAÇÃO
I
O minibar ajusta a temperatura de refrigeração automaticamente para
7 °C quando é ligado a uma fonte de tensão.
8 Eliminação de falhas
Falha Possível causa Sugestão de resolução
O aparelho não
funciona, o LED de
estado não acende.
O aparelho não
refrigera (ficha inserida
na tomada, LED de
estado acende).
70
Tomada da tensão
alternada sem tensão.
A fonte de alimentação
está avariada.
O elemento de
refrigeração está
avariado.
Tente novamente noutra tomada.
A reparação apenas pode ser realizada
por um serviço de assistência técnica
autorizado.
A reparação apenas pode ser realizada
por um serviço de assistência técnica
autorizado.
Page 71

PT
DM20 Limpeza e manutenção
Falha Possível causa Sugestão de resolução
O LED de erro pisca
uma vez por segundo.
O LED de erro pisca
duas vezes por
segundo.
O aparelho não
refrigera o suficiente, o
LED de estado acende,
o LED de erro não
acende.
O sensor de
temperatura está
avariado.
O ventilador interno
está avariado.
O elemento de
refrigeração está
avariado.
Má ventilação Verifique a ventilação.
A reparação apenas pode ser realizada
por um serviço de assistência técnica
autorizado.
A reparação apenas pode ser realizada
por um serviço de assistência técnica
autorizado.
A reparação apenas pode ser realizada
por um serviço de assistência técnica
autorizado.
Limpe o filtro sob o aparelho.
9 Limpeza e manutenção
NOTA! Perigo de danos!
A
➤ De vez em quando, limpe o interior e o exterior do aparelho com um pano
húmido.
• Nunca limpe a geleira debaixo de água corrente nem dentro de
água de lavar a loiça.
• Não utilize produtos de limpeza abrasivos ou objectos duros para a
limpeza, uma vez que podem danificar a geleira.
➤ Certifique-se que as aberturas de ventilação e extracção de ar do aparelho estão
livres de pó e sujidade para que, durante o funcionamento, o ar quente possa ser
extraído e o aparelho não seja danificado.
➤ Limpe o filtro na entrada de ar ocasionalmente.
➤ Se existir água na cuba coletora (fig. 2 1, página 3), verifique se o sistema de
escoamento está bloqueado.
10 Garantia
É válido o prazo de garantia legal. Se o produto estiver com defeito, por favor,
dirija-se ao seu revendedor ou à representaçãodo fabricante no seu país (ver
dometic.com/dealer).
71
Page 72

PT
Eliminação DM20
Para fins de reparação ou de garantia, terá de enviar os seguintes documentos em
conjunto:
• uma cópia da factura com a data de aquisição,
• um motivo de reclamação ou uma descrição da falha.
11 Eliminação
AVISO! Perigo para crianças!
!
➤ Sempre que possível, coloque o material de embalagem no respectivo
contentor de reciclagem.
M
Antes da eliminação do seu frigorífico velho:
• Retire as portas.
• Deixe ficar as prateleiras no frigorífico para que as crianças não
entrem no mesmo.
Para colocar o aparelho definitivamente fora de funcionamento, por
favor, informe-se junto do centro de reciclagem mais próximo ou
revendedor sobre as disposições de eliminação aplicáveis.
72
Page 73

PT
DM20 Dados técnicos
12 Dados técnicos
DM20D DM20F
Tensão de conexão: 220 – 240 Vw, 50/60 Hz
Potência de refrigeração: máx. 20 °C abaixo da temperatura ambiente
(ajustável nos seguintes níveis: +5 °C, +7 °C, +12 °C)
Categoria: Compartimento tipo cave
Volume bruto: 19,5 l
Volume líquido: 15,8 l
Classe de eficiência energética: A++
Consumo de energia
(Temperatura ambiente 25 °C, temperatura interna no dispositivo
+12 °C):
Classe climática: N
Temperatura ambiente: +16 °C a +32 °C
Emissões acústicas: 0 dB(A)
Quantidade do agente de
refrigeração:
Equivalente a CO
Potencial de aquecimento global
(GWP):
: 0,069 t
2
0,200 kWh/24 h
48 g
1430
Dimensões da gaveta L x P x A: 285 x 228,5 x 112 mm
Dimensões A x L x P
(ver também fig. a, página 9):
Peso: 12,3 kg
Verificação/certificado:
365 x 384 x 428 mm 365 x 384 x 398 mm
O circuito de refrigeração contém R134a.
Contém gases fluorados com efeito de estufa
Equipamento hermeticamente fechado
73
Page 74

IT
Spiegazione dei simboli DM20
Prima della messa in funzione leggere accuratamente questo manuale di
istruzioni, conservarlo e, nel caso in cui il frigorifero portatile venga consegnato a un altro utente, consegnare anche le relative istruzioni.
Il produttore declina ogni responsabilità per danni risultanti da un uso non
conforme alla destinazione o da un impiego scorretto.
Indice
1 Spiegazione dei simboli . . . . . . . . . . . . . . . . . . . . . . . . . . . . . . . . . . . . . . . . 74
2 Indicazioni di sicurezza . . . . . . . . . . . . . . . . . . . . . . . . . . . . . . . . . . . . . . . . . 75
3 Dotazione . . . . . . . . . . . . . . . . . . . . . . . . . . . . . . . . . . . . . . . . . . . . . . . . . . . 77
4 Conformità d'uso . . . . . . . . . . . . . . . . . . . . . . . . . . . . . . . . . . . . . . . . . . . . . 78
5 Descrizione tecnica. . . . . . . . . . . . . . . . . . . . . . . . . . . . . . . . . . . . . . . . . . . . 79
6 Montaggio . . . . . . . . . . . . . . . . . . . . . . . . . . . . . . . . . . . . . . . . . . . . . . . . . . 80
7 Impiego . . . . . . . . . . . . . . . . . . . . . . . . . . . . . . . . . . . . . . . . . . . . . . . . . . . . . 82
8 Eliminazione dei disturbi. . . . . . . . . . . . . . . . . . . . . . . . . . . . . . . . . . . . . . . . 84
9 Pulizia e cura . . . . . . . . . . . . . . . . . . . . . . . . . . . . . . . . . . . . . . . . . . . . . . . . . 85
10 Garanzia . . . . . . . . . . . . . . . . . . . . . . . . . . . . . . . . . . . . . . . . . . . . . . . . . . . . 85
11 Smaltimento . . . . . . . . . . . . . . . . . . . . . . . . . . . . . . . . . . . . . . . . . . . . . . . . . 86
12 Specifiche tecniche. . . . . . . . . . . . . . . . . . . . . . . . . . . . . . . . . . . . . . . . . . . . 87
1 Spiegazione dei simboli
AVVERTENZA!
!
!
74
Indicazione di sicurezza che segnala una situazione di pericolo che
se non evitata può provocare morte o gravi lesioni.
ATTENZIONE!
Indicazione di sicurezza che segnala una situazione di pericolo che
se non evitata può provocare lesioni lievi o di gravità media.
Page 75

IT
DM20 Indicazioni di sicurezza
AVVISO!
A
I
Indicazione di una situazione che se non evitata può provocare danni
materiali.
NOTA
Informazioni integranti relative all'impiego del prodotto.
2 Indicazioni di sicurezza
AVVERTENZA! La mancata osservanza di queste avvertenze
potrebbe causare la morte o lesioni gravi.
!
Pericolo di morte a causa di scossa elettrica
• Se l’apparecchio presenta danni visibili, non metterlo in funzione.
• Se il cavo di allacciamento di questo apparecchio viene danneggiato,
esso deve essere sostituito dal produttore, da parte del suo servizio
clienti, oppure da una persona sufficientemente qualificata, al fine di
evitare pericoli.
• Se il cavo di alimentazione di questo frigorifero è danneggiato, deve
essere sostituito per evitare pericoli per la sicurezza.
• Questo apparecchio deve essere riparato solo da personale specializzato. Le riparazioni effettuate in modo scorretto potrebbero causare
rischi enormi.
Pericolo di incendio
• Durante il posizionamento dell’apparecchio, assicurarsi che il cavo di
alimentazione non venga bloccato o danneggiato.
• Non collocare prese multiple portatili o alimentatori portatili sul retro
dell’apparecchio.
Pericolo per la salute
• Questo apparecchio può essere utilizzato da bambini di età superiore
a 8 anni, da persone con ridotte capacità fisiche, sensoriali o mentali o
da persone inesperte o prive di conoscenze specifiche solo se sorvegliate o preventivamente istruite sull’impiego dell’apparecchio in
sicurezza e se informate dei pericoli legati al prodotto stesso.
• I bambini non devono giocare con l’apparecchio.
• La pulizia e la manutenzione da parte dell’utente non possono essere
compiute da bambini lasciati soli.
75
Page 76

IT
Indicazioni di sicurezza DM20
• I bambini dai 3 agli 8 anni possono caricare e scaricare gli apparecchi
di refrigerazione.
Pericolo di esplosione
• Nell’apparecchio non conservare sostanze esplosive come ad es.
bombolette spray con gas propellente infiammabile.
ATTENZIONE! La mancata osservanza di queste precauzioni
potrebbe causare lesioni lievi o moderate.
!
Pericolo di morte a causa di scossa elettrica
• Staccare l'apparecchio dalla rete
– prima di effettuare la pulizia e la cura
– dopo ogni utilizzo
Pericolo per la salute
• Controllare che la capacità di raffreddamento dell'apparecchio sia
conforme ai requisiti degli alimenti o medicinali che si desidera
raffreddare.
• I prodotti alimentari possono essere conservati solo nelle confezioni
originali o in contenitori adeguati.
• L’apertura prolungata del frigorifero può causare un significativo
aumento della temperatura nei vani dell’apparecchio.
• Pulire regolarmente le superfici che vengono a contatto con gli alimenti e i sistemi di scarico accessibili.
• Conservare la carne cruda e il pesce in contenitori adatti nell’apparecchio, in modo che non vengano a contatto con altri alimenti o sgocciolino su di essi.
• Se l’apparecchio resta vuoto a lungo:
– Spegnere l’apparecchio.
– Sbrinare l’apparecchio.
– Pulire e asciugare l’apparecchio.
– Lasciare la porta aperta per prevenire la formazione di muffa
nell’apparecchio.
A
76
AVVISO! Pericolo di danni
• Confrontare i dati della tensione riportati sulla targhetta con quelli
delle prese e degli attacchi disponibili.
• Collegare l’apparecchio con il cavo di allacciamento da CA alla rete di
alimentazione in corrente alternata.
• Non estrarre mai la spina dalla presa tirando il cavo di allacciamento.
Page 77

IT
DM20 Dotazione
• Il frigorifero non è adatto per il trasporto di sostanze corrosive o
solventi.
• Questo frigorifero contiene nell'isolamento ciclopentano
infiammabile. I gasi contenuti nel materiale di isolamento richiedono
un processo di smaltimento particolare. Al termine della sua vita utile,
smaltire l'apparecchio in modo conforme.
• Non utilizzare apparecchi elettrici all'interno del frigorifero ad
eccezione di quelli consigliati dallo stesso produttore.
• Non collocare l’apparecchio nelle vicinanze di fiamme libere o altre
fonti di calore (riscaldamento, intensa esposizione ai raggi solari, forni
a gas ecc.).
• Pericolo di surriscaldamento!
Assicurarsi che ci sia sempre una ventilazione minima di 50 mm su tutti
i quattro lati del frigorifero. Mantenere l’area di ventilazione priva di
oggetti che potrebbero limitare il flusso d’aria verso i componenti di
raffreddamento.
Non collocare il frigorifero in scomparti chiusi o aree con flusso d’aria
assente o minimo.
• Fare attenzione che le feritoie di aerazione non vengano coperte.
• Non versare nessun tipo di liquido o ghiaccio nel contenitore interno.
• Non immergere mai l’apparecchio in acqua.
• Proteggere l’apparecchio e i cavi dal caldo e dall’umidità.
3Dotazione
Sono disponibili le seguenti varianti di base:
• Minibar DM20D con pannello decorativo, senza serratura
• Minibar DM20D con pannello decorativo, con serratura
• Minibar DM20F senza pannello decorativo, senza serratura
• Minibar DM20F senza pannello decorativo, con serratura
Quantità Denominazione
1 Minibar
1 Cavo di allacciamento per collegamento da 230 Vw
2Vite 4 x 45 mm (montaggio)
77
Page 78

IT
Conformità d'uso DM20
Quantità Denominazione
2Vite 4 x 25 mm (montaggio dei piedini anteriori)
2 Vite M4 x 25 mm (montaggio della maniglia)
2 Cappuccio di chiusura (montaggio)
1 Maniglia solo DM 20D
2 Cappuccio di chiusura (montaggio della
maniglia)
2 Cappuccio di chiusura (rivestimento in
legno)
1 Inserto per serratura (rivestimento in legno) solo DM 20F versione in
2 Chiave solo versione con serratura
1 Istruzioni di montaggio e d’uso
solo DM20D
solo DM20F versione in
legno
legno con serratura
4Conformità d'uso
I minibar DM20D e DM20F sono realizzati per il funzionamento in un mobile.
L'apparecchio non può essere messo in funzione se installato sul pavimento.
L'apparecchio è adatto per raffreddare bevande e generi alimentari.
L’apparecchio è realizzato per il funzionamento con una rete di alimentazione in
corrente alternata da 230 V.
Il frigorifero è adatto per l'uso domestico e campi di applicazione simili come ad
esempio
• in cucine per il personale in negozi, uffici e altri campi professionali
•in agricoltura
• dagli ospiti in hotel, motel o altri alloggi
• in bed & breakfast
• nel catering e applicazioni simili nel commercio all'ingrosso
ATTENZIONE! Pericolo per la salute!
!
Controllare che la capacità di raffreddamento dell’apparecchio sia conforme ai requisiti dei generi alimentari o dei medicinali che si desidera
raffreddare.
78
Page 79

IT
DM20 Descrizione tecnica
5 Descrizione tecnica
Il minibar ha un cassetto per le bottiglie e per le lattine e un piccolo vano per
contenere prodotti in miniatura e snack. Il cassetto offre spazio per 12 lattine e snack.
Il minibar DM20D ha un pannello decorativo e una maniglia color antracite.
Il minibar DM 20F viene consegnato senza pannello decorativo ed è predisposto
per il montaggio di un pannello decorativo proprio dell'hotel.
Il raffreddamento viene generato mediante un sistema refrigerante detto di Peltier
resistente all’usura e completo di ventola per asportare il calore.
Il minibar è disponibile con serratura (opzionale).
5.1 Descrizione dell’apparecchio
Lato anteriore
N. nella
fig. 1, pagina 3
1 Serratura (opzionale)
2 Maniglia (solo DM20D)
3 Rivestimento delle sportello (solo DM20D)
Denominazione
Lato posteriore
N. nella
fig. 2, pagina 3
1 Raccogligoccia
2 Alimentatore
Denominazione
Pannello di comando (nell'apparecchio)
N. nella
fig. 3, pagina 4
1 Lampada
2 LED difettoso
3 LED di stato
Denominazione
79
Page 80

IT
Montaggio DM20
N. nella
fig. 3, pagina 4
4 Tasto di regolazione
Cassetto
N. nella
fig. 4, pagina 4
1 Parete divisoria
2 Fermabottiglie
Denominazione
Denominazione
6Montaggio
ATTENZIONE! Pericolo per la salute
!
6.1 Indicazioni per il montaggio in un mobile
È possibile incassare il minibar in un mobile in quattro modi diversi. Scegliere la
variante desiderata (fig. 5, pagina 5).
Per evitare pericoli a causa dell’instabilità dell’apparecchio, fissarlo
secondo le istruzioni.
Osservare quindi le seguenti indicazioni:
• Le dimensioni dell'apertura sono H x L x P:
– DM20D: 385 x 404 x 428 mm
– DM20D: 385 x 404 x 426+d mm
d è lo spessore del pannello decorativo proprio dell'hotel
• La distanza fra il lato posteriore del minibar e la parete del mobile deve essere
circA 10 mm.
• Per la variante scelta è necessario realizzare le aperture di aerazione (fig. 5,
pagina 5).
• L'aria che entra nella presa d'aria non deve essere riscaldata da fonti di calore
(riscaldamento, intensa esposizione ai raggi solari, forni a gas ecc.).
➤ Fissare il frigorifero con viti idonee (fig. 6 1 e 2, pagina 6).
80
Page 81

IT
DM20 Montaggio
6.2 Allacciamento elettrico del minibar
➤ Inserire il cavo di collegamento da 230 V nella presa a tensione alternata e colle-
garlo alla rete di alimentazione in corrente alternata da 230 V.
✓ Il LED di stato è acceso.
✓ Lo spazio interno del minibar inizia a raffreddarsi.
6.3 Montaggio del pannello proprio dell'hotel (solo
DM20F)
Il pannello proprio dell'hotel deve soddisfare i seguenti requisiti:
• peso massimo: 2 kg
• spessore massimo: 14 mm
➤ Fissare il pannello decorativo con quattro viti.
6.4 Montaggio della serratura (solo per la versione con
serratura)
➤ Realizzare con il trapano un foro nel pannello decorativo del diametro di 35 mm.
➤ Montare la serratura insieme al relativo inserto.
6.5 Montaggio della serratura (solo per versione senza
serratura)
Smontaggio del cassetto (fig. 7, pagina 7)
➤ Aprire completamente il cassetto.
➤ Premere il dispositivo di bloccaggio delle guide (A1).
➤ Estrarre il cassetto dall'alloggiamento.
➤ Rimuovere la guarnizione (B1).
➤ Rimuovere la copertura della serratura (B 2).
➤ Rimuovere i tappi (C1) dalle viti per la maniglia della porta (C 3).
➤ Svitare le viti (C 2) dalla maniglia della porta (C 3).
➤ Rimuovere la maniglia della porta (C 3).
81
Page 82

IT
Impiego DM 20
Realizzazione di fori con il trapano (fig. 8, pagina 7)
➤ Realizzare un foro con il trapano del diametro di 25 mm nel pannello decorativo
e nella porta (A1).
➤ Svitare le viti (B1) dal telaio del pannello decorativo (B 2).
➤ Rimuovere il telaio del pannello decorativo (B 2).
Montaggio della serratura (fig. 9, pagina 8)
➤ Inserire la nuova copertura della serratura (A1).
➤ Inserire il pannello decorativo (B1) nel rispettivo telaio (B 3).
➤ Avvitare il telaio del pannello decorativo (B 3) nella porta (B 2).
➤ Montare la serratura della porta (C1).
➤ Montare il saliscendi nell'alloggiamento (D 1).
Montaggio del cassetto (fig. 0, pagina 8)
➤ Premere la guarnizione (1) sul telaio del pannello decorativo (2).
➤ Avvitare la maniglia (4) alla porta.
➤ Premere i tappi (3) sulle viti della maniglia della maniglia della porta (4).
➤ Spingere il cassetto nell'alloggiamento.
7Impiego
AVVISO! Rischio di danni
A
7.1 Suggerimenti per risparmiare energia
• Non aprire il frigorifero più spesso del necessario.
• Non lasciare il frigorifero aperto più del tempo necessario.
82
Per prevenire rischi, la lampadina può essere sostituita soltanto dal
produttore, da un tecnico di assistenza o da una persona dotata di
qualifica analoga.
Page 83

IT
DM20 Impiego
7.2 Utilizzo del minibar
Il minibar inizia a raffreddare quando viene collegato alla tensione. Nel funzionamento normale il LED di stato è acceso. Se si presenta un errore, il LED di errore
lampeggia (vedi capitolo “Eliminazione dei disturbi” a pagina 84).
Il minibar è regolato in fabbrica a una temperatura di raffreddamento di 7 °C con una
temperatura ambiente di 25 °C.
È possibile impostare la temperatura di raffreddamento con il tasto di regolazione
(fig. 3 4, pagina 4) su tre valori (5 °C, 12 °C e 7 °C).
Così facendo, la temperatura viene modificata nella sequenza 5 °C … 12 °C …
7 °C … 5 °C ecc.
➤ Premere il tasto di regolazione (fig. 3 4, pagina 4) e tenerlo premuto per 5 s
finché la lampada (fig. 3 1, pagina 4) non inizia a lampeggiare.
➤ Premere immediatamente il tasto di regolazione (fig. 3 4, pagina 4) ancora una
volta.
✓ La lampada (fig. 3 1, pagina 4) mostra mediante lampeggiamento la
temperatura di raffreddamento impostata:
– 5 °C: la lampada lampeggia cinque volte per tre intervalli
– 12 °C: la lampada lampeggia una volta per tre intervalli
– 7 °C: la lampada lampeggia tre volte per tre intervalli
I
NOTA
Il minibar imposta la temperatura di raffreddamento automaticamente a
7 °C quando viene collegato a una fonte di tensione.
83
Page 84

IT
Eliminazione dei disturbi DM20
8 Eliminazione dei disturbi
Guasto Possibile causa Proposta di soluzione
L'apparecchio non
funziona, il LED di stato
è spento.
L'apparecchio non
raffredda (la spina è
inserita nella presa, il
LED di stato è acceso).
Il LED di errore
lampeggia una volta al
secondo.
Il LED di errore
lampeggia due volte al
secondo.
L'apparecchio non
raffredda abbastanza, il
LED di stato è acceso, il
LED di errore non è
acceso.
Nella presa di tensione
alternata non c'è
tensione.
L’alimentatore è
difettoso.
L'elemento raffreddante
è difettoso.
Il sensore termico è
guasto.
La ventola interna è
guasta.
L'elemento raffreddante
è difettoso.
Cattiva ventilazione Controllare la ventilazione.
Provare a collegare l’apparecchio ad
un’altra presa.
I lavori di riparazione devono essere
effettuati solo da un Servizio assistenza
clienti autorizzato.
I lavori di riparazione devono essere
eseguiti solo da un Servizio assistenza
clienti autorizzato.
I lavori di riparazione devono essere
effettuati solo da un centro autorizzato
per il Servizio Assistenza Clienti.
I lavori di riparazione devono essere
effettuati solo da un centro autorizzato
per il Servizio Assistenza Clienti.
I lavori di riparazione devono essere
eseguiti solo da un Servizio assistenza
clienti autorizzato.
Pulire il filtro sotto l'apparecchio.
84
Page 85

IT
DM20 Pulizia e cura
9 Pulizia e cura
AVVISO! Pericolo di danni!
A
➤ Pulire l’interno e l’esterno dell’apparecchio di tanto in tanto con un panno
umido.
➤ Assicurarsi che le aperture di aerazione e disaerazione dell'apparecchio siano
prive di polvere e sporcizia in modo da permettere, al calore generato durante il
funzionamento, di fuoriuscire e non danneggiare l'apparecchio.
➤ Pulire di tanto in tanto il filtro della presa d'aria.
➤ Se si trova acqua nello sgocciolatoio (fig. 2 1, pagina 3), controllare se il
sistema di scarico è bloccato.
• Non lavare mai il frigorifero sotto acqua corrente e non immergerlo
in acqua per risciacquarlo.
• Per la pulizia non impiegare detergenti corrosivi oppure oggetti
ruvidi, perché potrebbero danneggiare il frigorifero.
10 Garanzia
Vale il termine di garanzia previsto dalla legge. Qualora il prodotto risultasse
difettoso, La preghiamo di rivolgersi al proprio rivenditore specializzato o alla filiale
del produttore del suo Paese (vedi dometic.com/dealer).
Per la riparazione e per il disbrigo delle condizioni di garanzia è necessario inviare la
seguente documentazione:
• una copia della fattura con la data di acquisto del prodotto,
• un motivo su cui fondare il reclamo, oppure una descrizione del guasto.
85
Page 86

IT
Smaltimento DM20
11 Smaltimento
AVVERTENZA! Situazione di pericolo per bambini!
!
➤ Raccogliere il materiale di imballaggio possibilmente negli appositi contenitori di
riciclaggio.
M
Prima di smaltire il vostro vecchio frigorifero:
• scardinare le porte.
• Lasciare le superfici d'appoggio all'interno del frigorifero in modo
che i bambini non possano entrarvi dentro.
Quando il prodotto viene messo fuori servizio definitivamente, informarsi
al centro di riciclaggio più vicino, oppure presso il proprio rivenditore
specializzato, sulle prescrizioni adeguate concernenti lo smaltimento.
86
Page 87

IT
DM20 Specifiche tecniche
12 Specifiche tecniche
DM20D DM20F
Tensione di allacciamento: 220 – 240 Vw, 50/60 Hz
Capacità di raffreddamento: fino a max 20 °C al di sotto della temperatura
ambiente
(possibilità di regolazione su tre livelli: +5 °C, +7 °C,
+12 °C)
Categoria: scomparto cantina
Volume interno: 19,5 l
Capacità netta: 15,8 l
Classe di efficienza energetica: A++
Consumo energetico
(Temperatura ambiente 25 °C,
temperatura interna
nell'apparecchio +12 °C):
Classe climatica: N
Temperatura ambiente: da +16 °C a +32 °C
Emissioni acustiche: 0 dB(A)
Quantità di refrigerante: 48 g
Equivalente CO
Potenziale di riscaldamento globale
(GWP):
Dimensioni cassetto L x P x H: 285 x 228,5 x 112 mm
Dimensioni H x L x P
(vedi anche fig. a, pagina 9):
Peso: 12,3 kg
Certificati di controllo:
: 0,069 t
2
365 x 384 x 428 mm 365 x 384 x 398 mm
0,200 kWh/24 h
1430
Il circuito di raffreddamento contiene R134a.
Contiene gas fluorurati a effetto serra
Apparecchiature ermeticamente sigillate
87
Page 88

NL
Verklaring van de symbolen DM20
Lees deze handleiding voor de ingebruikname zorgvuldig door en bewaar
deze. Geef de handleiding bij doorgeven van het toestel door aan de
gebruiker.
De fabrikant kan niet aansprakelijk worden gesteld voor schade die door gebruik
tegen de voorschriften in of door verkeerde bediening wordt veroorzaakt.
Inhoudsopgave
1 Verklaring van de symbolen . . . . . . . . . . . . . . . . . . . . . . . . . . . . . . . . . . . . . 88
2 Veiligheidsinstructies . . . . . . . . . . . . . . . . . . . . . . . . . . . . . . . . . . . . . . . . . . 89
3 Omvang van de levering . . . . . . . . . . . . . . . . . . . . . . . . . . . . . . . . . . . . . . . . 91
4 Gebruik volgens bestemming . . . . . . . . . . . . . . . . . . . . . . . . . . . . . . . . . . . 92
5 Technische beschrijving . . . . . . . . . . . . . . . . . . . . . . . . . . . . . . . . . . . . . . . . 93
6 Montage . . . . . . . . . . . . . . . . . . . . . . . . . . . . . . . . . . . . . . . . . . . . . . . . . . . . 94
7 Bediening . . . . . . . . . . . . . . . . . . . . . . . . . . . . . . . . . . . . . . . . . . . . . . . . . . . 96
8 Verhelpen van storingen. . . . . . . . . . . . . . . . . . . . . . . . . . . . . . . . . . . . . . . . 98
9 Reiniging en onderhoud. . . . . . . . . . . . . . . . . . . . . . . . . . . . . . . . . . . . . . . . 98
10 Garantie. . . . . . . . . . . . . . . . . . . . . . . . . . . . . . . . . . . . . . . . . . . . . . . . . . . . . 99
11 Afvoer . . . . . . . . . . . . . . . . . . . . . . . . . . . . . . . . . . . . . . . . . . . . . . . . . . . . . . 99
12 Technische gegevens. . . . . . . . . . . . . . . . . . . . . . . . . . . . . . . . . . . . . . . . . .100
1 Verklaring van de symbolen
WAARSCHUWING!
!
!
88
Veiligheidsaanwijzing met betrekking tot een gevaarlijke situatie die
kan leiden tot ernstig letsel of de dood, als deze niet wordt vermeden.
VOORZICHTIG!
Veiligheidsaanwijzing met betrekking tot een gevaarlijke situatie die
kan leiden tot licht of gemiddeld letsel, als deze niet wordt vermeden.
Page 89

NL
DM20 Veiligheidsinstructies
LET OP!
A
I
Aanwijzing met betrekking tot een situatie die kan leiden tot materiële
schade, als deze niet wordt vermeden.
INSTRUCTIE
Meer informatie over de bediening van het product.
2 Veiligheidsinstructies
WAARSCHUWING! Niet in acht nemen van deze
waarschuwingen kan leiden tot ernstig letsel of de dood.
!
Levensgevaar door elektrische schok
• Als het toestel zichtbaar beschadigd is, mag het niet in gebruik
worden genomen.
• Als de aansluitkabel van dit toestel wordt beschadigd, moet deze, om
gevaren te vermijden, door de fabrikant, diens klantenservice of een
gelijkwaardig gekwalificeerd persoon vervangen worden.
• Als de stroomkabel van deze koelbox beschadigd is, moet deze
worden vervangen om veiligheidsrisico’s te voorkomen.
• Reparaties aan dit toestel mogen uitsluitend door vakmonteurs uitgevoerd worden. Door ondeskundige reparaties kunnen grote gevaren
ontstaan.
Brandgevaar
• Voorkom bij het positioneren van het apparaat het blijven hangen of
beschadigd raken van de voedingskabel.
• Plaats geen beweeglijke, meervoudige stopcontacten of dergelijke
voedingseenheden aan de achterkant van het apparaat.
Gevaar voor de gezondheid
• Dit toestel kan door kinderen vanaf 8 jaar en ouder evenals door personen met verminderde fysieke, zintuiglijke of geestelijke vermogens
of tekortschietende ervaring en kennis gebruikt worden, als ze worden begeleid of hun is uitgelegd hoe ze het toestel veilig kunnen
gebruiken. Ook dienen ze inzicht te hebben in de gevaren die het
gebruik van het toestel met zich meebrengt.
• Kinderen mogen niet met het toestel spelen.
• Reiniging en gebruikersonderhoud mogen niet door kinderen zonder
begeleiding worden uitgevoerd.
89
Page 90

NL
Veiligheidsinstructies DM20
• Kinderen van 3 tot 8 jaar mogen koelapparaten laden en ontladen.
Explosiegevaar
• Bewaar geen explosiegevaarlijke stoffen, zoals spuitbussen met
brandbaar drijfgas, in het toestel.
VOORZICHTIG! Niet in acht nemen van deze voorzichtigheidsaanwijzingen kan leiden tot licht of gemiddeld letsel.
!
Levensgevaar door elektrische schok
• Scheid het toestel van het net
– voor iedere reiniging en ieder onderhoud
–na elk gebruik
Gevaar voor de gezondheid
• Controleer of het koelvermogen van het toestel voldoet aan de eisen
van de levensmiddelen of geneesmiddelen die u wilt koelen.
• Levensmiddelen mogen alleen in de originele verpakkingen of
geschikte bakken worden opgeslagen.
• Langdurig openen van het koeltoestel kan leiden tot een aanzienlijke
temperatuurstijging in de compartimenten van het toestel.
• Reinig oppervlakken die in contact komen met voedsel en aftapsystemen regelmatig.
• Sla rauw vlees en vis op in geschikte containers in het apparaat,
zodat ze niet met andere levensmiddelen in contact komen of erop
druppelen.
• Als het apparaat langdurig leeg blijft:
– Schakel het apparaat uit.
– Ontdooi het apparaat.
– Reinig het apparaat en droog het af.
– Laat de deur open om schimmelvorming in het apparaat te
voorkomen.
A
90
LET OP! Gevaar voor beschadiging
• Vergelijk de spanning op het typeplaatje met de voorhanden energievoorziening.
• Sluit het toestel met de AC-aansluitkabel op het wisselstroomnet aan.
• Trek de stekker nooit aan de aansluitkabel uit het stopcontact.
• Het koeltoestel is niet geschikt voor het transport van bijtende of
oplosmiddelhoudende stoffen.
Page 91

NL
DM20 Omvang van de levering
• Deze koeltoestel bevat in de isolering brandbaar cyclopentaan.
De gassen in het isoleringsmateriaal vereisen een bijzonder afvoerproces. Voer het apparaat aan het einde van zijn levensduur af volgens
de voorschriften.
• Gebruik geen elektrische toestellen binnen de koeltoestel, behalve
als deze toestellen daarvoor door de fabrikant worden aanbevolen.
• Zet het toestel niet in de buurt van open vlammen of andere warmtebronnen (verwarming, sterke zonnestraling, gasovens enz.).
• Gevaar voor oververhitting!
Zorg er altijd voor dat er rond het koeltoestel minimaal 50 mm
ventilatie is. Houd het ventilatiebereik vrij van objecten die de
luchtstroom rond de koelcomponenten kunnen hinderen.
Plaats het koeltoestel niet in gesloten ruimtes of bereiken met
minimale luchtstroming.
• Let erop dat de ventilatiesleuven niet worden afgedekt.
• Doe geen vloeistoffen of ijs in het binnenreservoir.
• Dompel het toestel nooit onder water.
• Bescherm het toestel en de kabels tegen hitte en vocht.
3 Omvang van de levering
Onderstaande basisvarianten zijn verkrijgbaar:
• Minibar DM20D met decorplaat, zonder slot
• Minibar DM20D met decorplaat, met slot
• Minibar DM20F zonder decorplaat, zonder slot
• Minibar DM20F zonder decorplaat, met slot
91
Page 92

NL
Gebruik volgens bestemming DM20
Hoeveel-
heid
1 Minibar
1 Aansluitkabel voor 230-Vw-aansluiting
2 Schroef 4 x 45 mm (montage)
2 Schroef 4 x 25 mm (montage van de voorste voeten)
2 Schroef M4 x 25 mm (greepmontage)
2 Afsluitkap (montage)
1 Greep alleen DM20D
2 Afsluitkap (greepmontage) alleen DM20D
2 Afsluitkap (houten bekleding) alleen DM20F houten versie
1 Slotdecor (houten bekleding) alleen DM20F houten versie
2 Sleutel alleen versie met slot
1 Montagehandleiding en gebruiksaanwijzing
Omschrijving
met slot
4 Gebruik volgens bestemming
De Minibars DM20D en DM20F zijn ontworpen voor gebruik in een meubel. Het
toestel mag niet vrijstaand worden gebruikt.
Het toestel is geschikt voor het koelen van drank en levensmiddelen.
Het toestel is ontworpen voor gebruik met een 230-V-wisselstroomnet.
Het koeltoestel is bestemd voor het gebruik thuis en soortgelijke toepassingen,
zoals
• in personeelskeukens van winkels, kantoren en andere werkruimtes
• in de landbouw
• door gasten in hotels, motels of andere accommodaties
• in B&B's
• in de catering en vergelijkbaar commercieel gebruik
92
Page 93

NL
DM20 Technische beschrijving
VOORZICHTIG! Gevaar voor de gezondheid!
!
Controleer of het koelvermogen van het toestel voldoet aan de eisen
van de levensmiddelen of geneesmiddelen die u wilt koelen.
5 Technische beschrijving
De minibar heeft een lade voor flessen en conservenblikken en blikjes een minivak
voor tussendoortjes en snacks. De lade biedt plaats voor 12 blikjes en snacks.
De Minibar DM20D heeft een antracietkleurige decorplaat en een antracietkleurige
greep.
De Minibar DM20F wordt zonder decorplaat geleverd en is voorbereid voor de
montage van een decor als in een hotel.
De koeler is een slijtvaste Peltier-koeler met warmteafvoer door middel van een
ventilator.
Die minibar is ook met slot (optioneel) beschikbaar.
5.1 Toestelbeschrijving
Voorkant
Nr. in
afb. 1, pagina 3
1 Slot (optioneel)
2 Greep (alleen DM20D)
3 Deurbekleding (alleen DM20D)
Achterkant
Nr. in
afb. 2, pagina 3
1 Opvangschaal
2 Voedingseenheid
Omschrijving
Omschrijving
93
Page 94

NL
Montage DM20
Bedienveld (in het toestel)
Nr. in
afb. 3, pagina 4
1 Lamp
2 Fout-led
3 Status-led
4Insteltoets
Lade
Nr. in
afb. 4, pagina 4
1 Scheidingswand
2 Fleshouder
Omschrijving
Omschrijving
6Montage
VOORZICHTIG! Gevaar voor de gezondheid
!
Om gevaar door instabiliteit van het toestel te voorkomen, moet het
volgens de instructies worden bevestigd.
6.1 Aanwijzingen voor montage in een meubel
U kunt de minibar op vier manieren in een meubelstuk inbouwen. Kies de gewenste
variant (afb. 5, pagina 5).
Neem hierbij de volgende instructies in acht:
• Afmetingen binnen h x b x d:
– DM20D: 385 x 404 x 428 mm
– DM20D: 385 x 404 x 426+d mm
d is de dikte van de hoteldecors
• De afstand tussen minibarachterzijde en meubelwand moet ca. 10 mm
bedragen.
• De ventilatie-openingen moeten voor de geselecteerde varianten worden
gemaakt (afb. 5, pagina 5).
94
Page 95

NL
DM20 Montage
• De lucht die in de luchtinlaat stroomt mag niet door warmtebronnen
(verwarming, direct zonlicht, gaskachels etc.) worden opgewarmd.
➤ Bevestig de koelkast met geschikte schroeven (afb. 6 1 en 2, pagina 6).
6.2 Minibar elektrisch aansluiten
➤ Steek de 230-V-aansluitkabel in de wisselspanningsbus, en sluit deze aan op het
230-V-wisselstroomnet.
✓ De status-led brandt.
✓ De minibar start met het koelen van de binnenruimte.
6.3 Hoteldecor monteren (alleen DM20F)
Het hoteldecor moet voldoen aan het volgende:
• Maximaal gewicht: 2 kg
• Maximale dikte: 14 mm
➤ Bevestig het decor met vier schroeven.
6.4 Slot monteren (alleen versie met slot)
➤ Boor een opening met een diameter van 35 mm in het decor.
➤ Monteer het slot samen met het slotdecor.
6.5 Slot monteren (alleen voor versie zonder slot)
Lade demonteren (afb. 7, pagina 7)
➤ Open de lade volledig.
➤ Druk voor de vergrendeling van de rails (A1).
➤ Trek de lade uit de behuizing.
➤ Verwijder de afdichting (B1).
➤ Verwijder de slotafdichting (B 2).
➤ Verwijder de stoppen (C1) van de schroeven voor de deurgreep (C 3).
➤ Schroef de schroeven (C 2) uit de deurgreep (C 3).
95
Page 96

NL
Bediening DM20
➤ Verwijder de deurgreep (C 3).
Gaten boren (afb. 8, pagina 7)
➤ Boor een opening met een diameter van 25 mm in het decor en de deur (A1).
➤ Schroef de schroeven (B1) uit het decorraam (B 2).
➤ Verwijder het decorraam (B 2).
Slot samenbouwen (afb. 9, pagina 8)
➤ Plaats de nieuwe slotafdekking (A1).
➤ Plaats het decor (B1) in het decorraam (B 3).
➤ Schroef het decorraam (B 3) in de deur (B 2).
➤ Monteer het deurslot (C1).
➤ Monteer de schoot in de behuizing (D 1).
Lade samenbouwen (afb. 0, pagina 8)
➤ Druk de afdichting (1) op het decorraam (2).
➤ Schroef de deurgreep (4) op de deur.
➤ Druk de stoppen (3) op de schroeven van de deurgreep (4).
➤ Schuif de lade in de behuizing.
7 Bediening
LET OP! Gevaar voor beschadiging
A
7.1 Tips om energie te sparen
• Open het koeltoestel niet vaker dan nodig.
• Laat het koeltoestel niet langer open dan nodig.
96
Om gevaren te voorkomen moet de lamp worden vervangen door de
fabrikant, servicemedewerker of een gelijkwaardig gekwalificeerde
persoon.
Page 97

NL
DM20 Bediening
7.2 Minibar gebruiken
De minibar begint met koelen, als hij op het net wordt aangesloten. Bij normaal
bedrijf brandt de status-led. Bij een fout knippert de fout-led (zie hoofdstuk „Verhelpen van storingen” op pagina 98).
De minibar is af fabriek ingesteld op een koeltemperatur van 7 °C bij een
omgevingstemperatuur van 25 °C.
U kunt de koeltemperatuur met de insteltoets (afb. 3 4, pagina 4) op drie waarden
(5 °C, 12 °C en 7 °C) instellen.
Hierbij wordt de temperatuur in de volgorde 5 °C … 12 °C … 7 °C … 5 °C etc.
gewijzigd.
➤ Druk op de insteltoets (afb. 3 4, pagina 4) en houd deze 5 s ingedrukt tot de
lamp (afb. 3 1, pagina 4) begint te knipperen.
➤ Druk onmiddellijk opnieuw op de insteltoets (afb. 3 4, pagina 4).
✓ De lamp (afb. 3 1, pagina 4) toont door knipperen de ingestelde
koeltemperatuur:
– 5 °C: de lamp knippert vijf keer in drie intervallen
– 12 °C: de lamp knippert een keer in drie intervallen
– 7 °C: de lamp knippert drie keer in drie intervallen
I
INSTRUCTIE
De minibar stelt de koeltemperatuur automatisch op 7 °C in, is hij op een
spanningsbron wordt aangesloten.
97
Page 98

NL
Verhelpen van storingen DM20
8 Verhelpen van storingen
Storing Mogelijke oorzaak Voorstel tot oplossing
Het toestel functioneert
niet, de status-led
brandt niet.
Het toestel koelt niet
(stekker is niet ingestoken, status-led brandt).
Fout-led knippert een
keer per seconden.
Fout-led knippert twee
keer per seconde.
Het toestel koelt
onvoldoende, statusled brandt, fout-led
brandt niet.
Op het wisselspanningsstopcontact staat
geen spanning.
De voedingseenheid is
defect.
Het koelelement is
defect.
De temperatuursensor
is defect.
De binnenventilator is
defect.
Het koelelement is
defect.
Slechte ventilatie Controleer de ventilatie.
Probeer een ander stopcontact.
De reparatie kan alleen door een
geautoriseerd servicebedrijf
uitgevoerd worden.
De reparatie kan alleen door een
geautoriseerd servicebedrijf
uitgevoerd worden.
De reparatie kan alleen door een
geautoriseerd servicebedrijf
uitgevoerd worden.
De reparatie kan alleen door een
geautoriseerd servicebedrijf
uitgevoerd worden.
De reparatie kan alleen door een
geautoriseerd servicebedrijf
uitgevoerd worden.
Reinig de filter onder het toestel.
9 Reiniging en onderhoud
LET OP! Gevaar voor beschadiging!
A
• Reinig het koeltoestel nooit onder stromend water of in afwaswater.
• Gebruik voor het reinigen geen bijtende schoonmaakmiddelen of
harde voorwerpen, aangezien het koeltoestel hierdoor beschadigd
zou kunnen raken.
➤ Reinig het toestel van binnen en buiten af en toe met een vochtige doek.
➤ Zorg ervoor dat de ventilatieopeningen van het toestel vrij zijn van stof en veront-
reinigingen, zodat de bij het gebruik ontstane warmte kan worden afgevoerd en
het toestel niet beschadigd raakt.
➤ Reinig het luchtinlaat-filter regelmatig.
98
Page 99

NL
DM20 Garantie
➤ Indien u water in de druppelschaal (afb. 2 1, pagina 3) vindt, controleer dan of
het afvoersysteem geblokkeerd is.
10 Garantie
De wettelijke garantieperiode is van toepassing. Als het product defect is, wendt u
zich tot uw speciaalzaak of tot het filiaal van de fabrikant in uw land (zie
dometic.com/dealer).
Voor de afhandeling van de reparatie of garantie dient u de volgende documenten
mee te sturen:
• een kopie van de factuur met datum van aankoop,
• reden van de klacht of een beschrijving van de storing.
11 Afvoer
WAARSCHUWING! Gevaar voor kinderen!
!
Voor het afvoeren van uw oude koelkast:
• Haak de deuren uit
• Laat de aflegvlakken in de koelkast, zodat kinderen er niet kunnen
instappen.
➤ Laat het verpakkingsmateriaal indien mogelijk recyclen.
Als u het product definitief buiten bedrijf stelt, informeer dan bij het
dichtstbijzijnde recyclingcentrum of uw speciaalzaak naar de betreffende
M
afvoervoorschriften.
99
Page 100

NL
Technische gegevens DM20
12 Technische gegevens
DM20D DM20F
Aansluitspanning: 220 – 240 Vw, 50/60 Hz
Koelvermogen: max. 20 °C onder omgevingstemperatuur
(instelbaar in niveaus: +5 °C, +7 °C, +12 °C)
Categorie: Keldervak
Bruto-inhoud: 19,5 l
Nettoinhoud: 15,8 l
Energie-efficiëntieklasse: A++
Energieverbruik
(omgevingstemperatuur 25 °C,
binnentemperatuur in het toestel
+12 °C):
Klimaatklasse: N
Omgevingstemperatuur: +16 °C tot +32 °C
Geluidsemissie: 0 dB(A)
Koelmiddelhoeveelheid: 48 g
0,200 kWh/24 h
CO
-equivalent: 0,069 t
2
Aardopwarmingsvermogen (GWP): 1430
Afmetingen lade b x d x h: 285 x 228,5 x 112 mm
Afmetingen h xb xd
(zie ook afb. a, pagina 9):
Gewicht: 12,3 kg
Keurmerk/certificaat:
365 x 384 x 428 mm 365 x 384 x 398 mm
Het koelcircuit bevat R134a.
Bevat gefluoreerde broeikasgassen
Hermetisch afgesloten apparatuur
100
 Loading...