

Page 1
Classic1, Classic2
ENDEFRESPT
ITNLDA
SV
NO
FIRUPLSKCS
HU
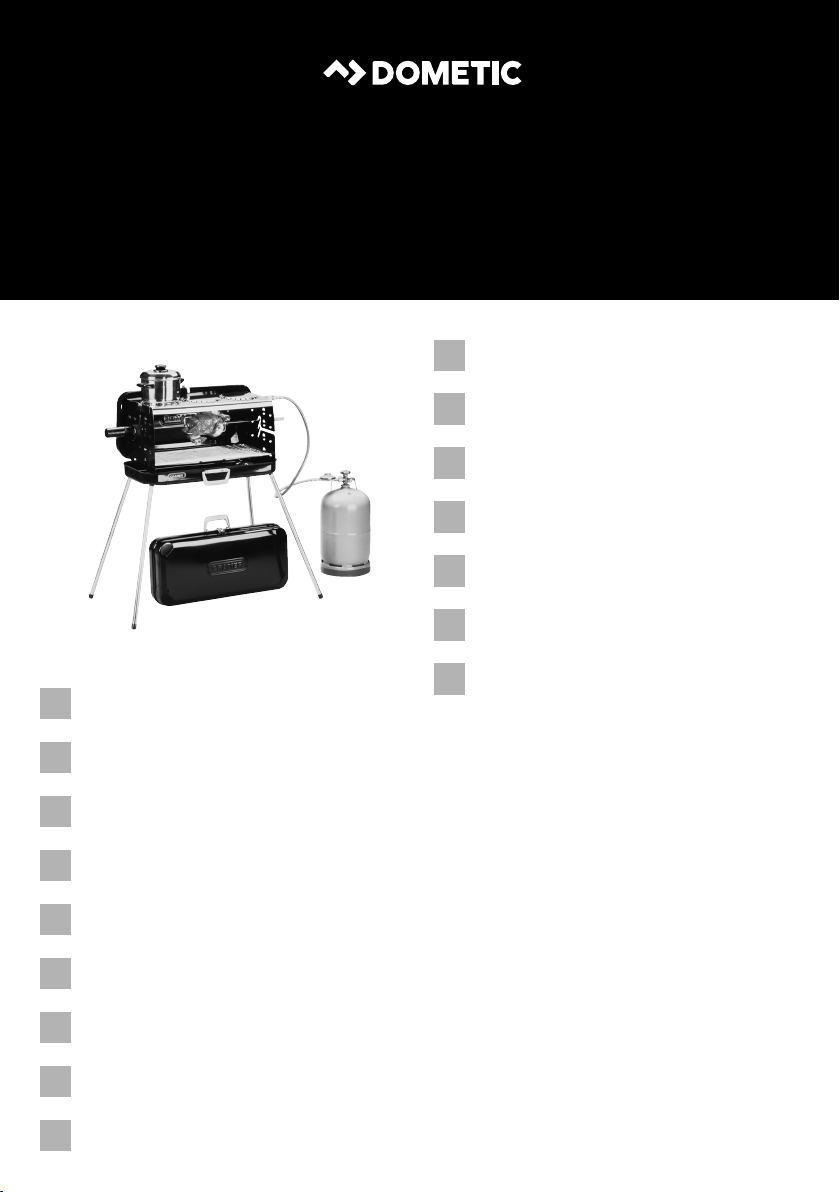
Portable grill
Operating manual . . . . . . . . . . . . . . . . . . . . . 5
Koffergrill
Bedienungsanleitung . . . . . . . . . . . . . . . . . 19
Barbecue portable
Notice d’utilisation . . . . . . . . . . . . . . . . . . .34
Barbacoa con maletín
Instrucciones de uso . . . . . . . . . . . . . . . . . .50
Grelhador de mala
Manual de instruções . . . . . . . . . . . . . . . . .66
Barbecue portatile
Istruzioni per l’uso . . . . . . . . . . . . . . . . . . . . 81
Koffergrill
Gebruiksaanwijzing. . . . . . . . . . . . . . . . . . .97
Kuffertgrill
Betjeningsvejledning . . . . . . . . . . . . . . . . 112
Koffertgrill
Bruksanvisning. . . . . . . . . . . . . . . . . . . . . .126
COOKING
GRILLS & BBQ
Koffertgrill
Bruksanvisning . . . . . . . . . . . . . . . . . . . . . 140
Laukkugrilli
Käyttöohje . . . . . . . . . . . . . . . . . . . . . . . . . 154
Портативный гриль
Инструкция по эксплуатации . . . . . . . . . 168
Grill walizkowy
Instrukcja obsługi . . . . . . . . . . . . . . . . . . . 183
Kufríkový gril
Návod na obsluhu. . . . . . . . . . . . . . . . . . . 199
Kufříkový gril
Návod k obsluze . . . . . . . . . . . . . . . . . . . . 213
Hordozható grill
Használati utasítás. . . . . . . . . . . . . . . . . . . 227
Page 2

Page 3
Classic
11
9
10
1
5
6
7
8
3
4
2
1
2.
1.
2
7
6
A
1
2
3
3
5
4
B
3
Page 4
Classic
1
32
3
1
2
4
4
Page 5

EN
Classic
Please read this manual carefully before installation and starting up the
device. Keep it in a safe place for future reference. If you pass on the device
to another person, hand over this instruction manual along with it.
Contents
1 Explanation of symbols. . . . . . . . . . . . . . . . . . . . . . . . . . . . . . . . . . . . . . . . . . .6
2 General safety instructions . . . . . . . . . . . . . . . . . . . . . . . . . . . . . . . . . . . . . . . .6
3 Scope of delivery . . . . . . . . . . . . . . . . . . . . . . . . . . . . . . . . . . . . . . . . . . . . . . .9
4 Optional extras . . . . . . . . . . . . . . . . . . . . . . . . . . . . . . . . . . . . . . . . . . . . . . . .10
5 Intended use . . . . . . . . . . . . . . . . . . . . . . . . . . . . . . . . . . . . . . . . . . . . . . . . . .10
6 Technical description . . . . . . . . . . . . . . . . . . . . . . . . . . . . . . . . . . . . . . . . . . .10
7 Before initial use . . . . . . . . . . . . . . . . . . . . . . . . . . . . . . . . . . . . . . . . . . . . . . . 11
8 Using the portable grill . . . . . . . . . . . . . . . . . . . . . . . . . . . . . . . . . . . . . . . . . . 12
9 Troubleshooting . . . . . . . . . . . . . . . . . . . . . . . . . . . . . . . . . . . . . . . . . . . . . . . 16
10 Cleaning the portable grill . . . . . . . . . . . . . . . . . . . . . . . . . . . . . . . . . . . . . . . 17
11 Guarantee . . . . . . . . . . . . . . . . . . . . . . . . . . . . . . . . . . . . . . . . . . . . . . . . . . . .17
12 Disposal . . . . . . . . . . . . . . . . . . . . . . . . . . . . . . . . . . . . . . . . . . . . . . . . . . . . . .17
13 Technical data . . . . . . . . . . . . . . . . . . . . . . . . . . . . . . . . . . . . . . . . . . . . . . . . .18
5
Page 6

EN
Explanation of symbols Classic
1 Explanation of symbols
WARNING!
!
!
A
I
Safety instruction: Failure to observe this instruction can cause fatal or
serious injury.
CAUTION!
Safety instruction: Failure to observe this instruction can lead to injury.
NOTICE!
Failure to observe this instruction can cause material damage and impair
the function of the product.
NOTE
Supplementary information for operating the product.
2 General safety instructions
The manufacturer accepts no liability for damage in the following cases:
• Faulty assembly or connection
• Damage to the product resulting from mechanical influences and excess voltage
• Alterations to the product without express permission from the manufacturer
• Use for purposes other than those described in the operating manual
2.1 General safety
WARNING!
!
A
6
• Only use category l
other fuel sources.
NOTICE!
• Use the device only as intended.
liquid gas (propane/butane). Do not use any
3
Page 7

EN
Classic General safety instructions
2.2 Safety precautions when handling liquid gas
WARNING!
!
• Keep combustible materials away from heating or cooking devices
and other light or heat sources.
• Compare the pressure information on the type plate with the pressure
information on the propane or butane gas cylinder.
• Never store liquid gas cylinders in unventilated areas or below
ground level (funnel shaped holes in the ground).
• Keep liquid gas cylinders away from direct sunlight. The temperature
may not exceed 50 °C.
2.3 Operating the device safely
WARNING!
!
• Beware of suffocation.
While burning liquid gas, the device also consumes oxygen. When
used indoors, there is a risk of suffocation due to insufficient oxygen.
Only use the device outdoors.
• If you smell gas:
– Close the valve on the gas cylinder and keep it closed until the
error is rectified.
– Never attempt to find a gas leak with a naked flame.
• This device can be used by children aged 8 years or over, as well as by
persons with diminished physical, sensory or mental capacities or a
lack of experience and knowledge, providing they are supervised, or
have been taught how to use the device safely and are aware of the
resulting risks.
• Children must be supervised to ensure that they do not play with the
device.
• Never leave the device unattended when in use for prolonged periods of time.
• Use long matches or a suitable lighter. Check the gas outlets when
you ignite the burners. Do not ignite the burners if you cannot see
them directly.
Take your hand away quickly once the burner is ignited.
• Wear appropriate clothing when using the portable grill.
Do not wear loose-fitting clothing which could easily catch fire.
7
Page 8

EN
General safety instructions Classic
• Leave the portable grill to cool down properly before you touch it with
bare hands.
• Replace porous or damaged hoses immediately.
• Never change the nozzles, injector or burners.
NOTICE!
A
• Never use the rack without the drip tray.
• Hot parts should not be allowed to come into contact with oil, water
or any other liquids.
• Never move the device when it is still hot.
• Only use pots and pans with a level base and a diameter of 10 to
20 cm.
• Ensure that pots and pans are stable when cooking.
• Never allow pot or pan handles to protrude over the edge of the port-
able grill. Turn all the handles inwards. This reduces the risk of spillage,
the ignition of flammable materials and serious scolding.
• Proceed with caution when heating oil or fat, as they can ignite under
excessive heat.
• Only use dry pot holders to avoid steam build-up. Do not use towels
or cloths as these can catch fire.
• Never leave the portable grill unattended while in use. Pots which boil
over can cause smoke and fires.
8
Page 9

EN
Classic Scope of delivery
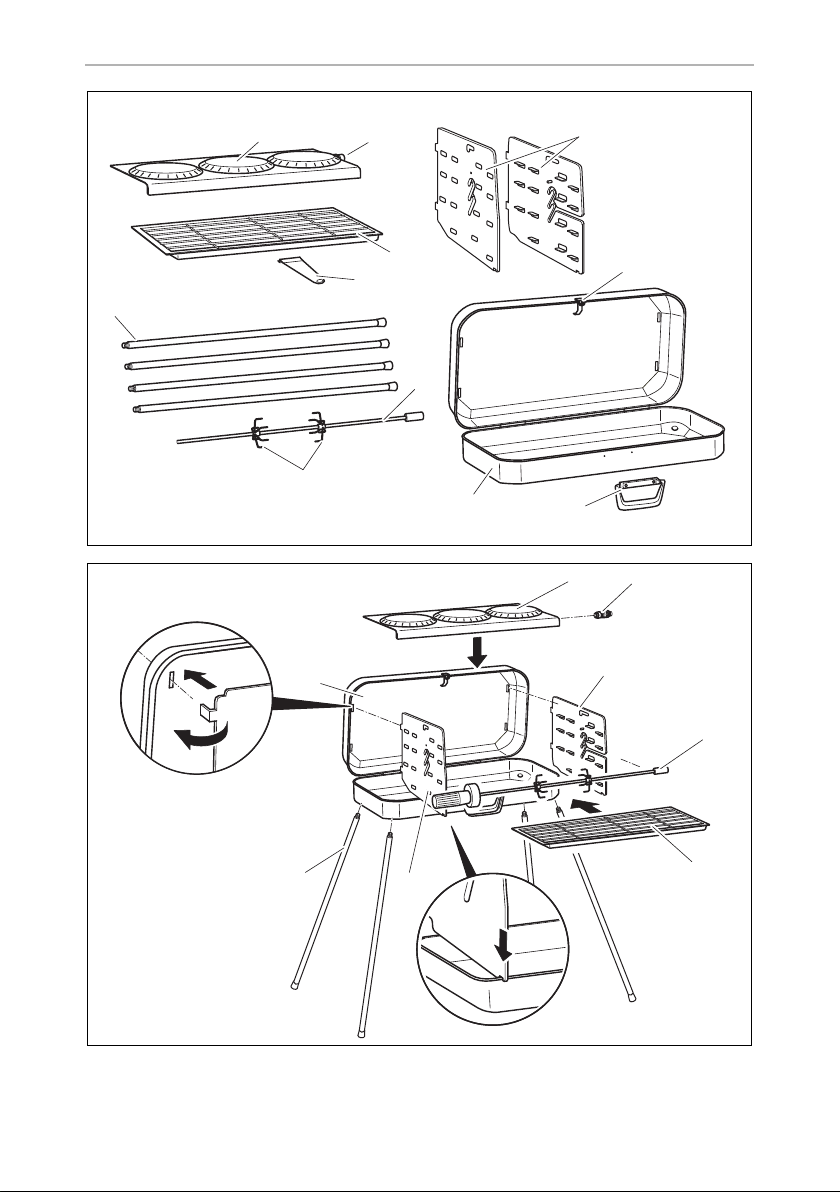
3Scope of delivery
No. in
fig. 1,
page 3
1 1 Burner with hob
2 2 Injector (on burner)
3 1 Drip tray with rack
4 1 Grill rack holder
54Legs
6 1 Roasting spit
7 2 Meat clamps
81Case
91Handle
10 1 Lock
11 2 Side panel
– 2 Screws and nuts M3
– 1 Screw and nut M4
– 1 Operating manual
Quantity Designation
9
Page 10

EN
Optional extras Classic
4Optional extras
Available as accessory (not included in scope of delivery):
Designation Item no.
Grill trays 9103300804
Grill basket midi 9103300800
Grill basket maxi 9103300801
Grill motor battery (1.5 V) 9103300802
Combination grill motor (1.5 V/230 V) 9103300807
Network motor battery (230 V) 9103300803
Grill cover Classic 1 9103500360
Grill cover Classic 2 9103500361
5 Intended use
The Classic 1 and Classic 2 portable grills from Dometic are intended for mobile use
outdoors.
The Classic 1 and Classic 2 portable grills allow you to cook on cooking rings at the
top at the same time as barbecuing. You can also connect the portable grill to a gas
cylinder or gas socket of a mobile home by means of a suitable gas hose (not
included in delivery).
The portable grill must not be used in enclosed spaces (such as tents and awnings).
Leave the portable grill to cool down completely before putting it in a tent or awning.
6 Technical description
The portable grill can be dismantled and is easy to transport. All the parts fit into the
case.
Category I
10
(propane/butane) liquid gas is used as fuel.
3
Page 11

EN
Classic Before initial use
6.1 Specifications for the portable grill models
The portable grill is available in different models and with different connections:
• Classic 1: portable grill with three cooking rings
• Classic 2: portable grill with two cooking rings
All models are available with the following connections:
• Connection pressure 30 mbar
• Connection pressure 50 mbar
6.2 Gas pressure
The permitted gas pressure can be found on the type plate in the bottom of the case.
Models with a gas cylinder connection must be used with a pressure reducing valve.
Only use pressure reducing valves that have been specified and approved in your
country.
WARNING! Beware of injury
!
The outlet pressure of the valve must always match the connection pressure (gas pressure) of the portable grill.
7 Before initial use
Proceed as follows (fig. 1, page 3):
➤ Remove the protective film from the top of the burner (1).
➤ Screw the handle (9) into the lower part of the case with both the screws M3.
➤ Attach the lock (10) to the lid of the case with the screw M4.
➤ Clean the rack and the drip tray with a standard cleaning agent.
➤ Only when connecting to gas cylinders:
– Use a suitable gas hose and a pressure reduction valve (both not included in
delivery).
– Connect the pressure reduction valve to the free end of the gas hose.
➤ Only when connecting to gas sockets: Use a suitable gas hose (not included
in delivery).
➤ Connect the gas hose to the injector (2).
11
Page 12

EN
Using the portable grill Classic
Table of adapters
NOTICE! Beware of damage
A
Country Adapter
To ensure proper operation, an adapter supplied by the manufacturer
(item no. 9103300168 or 9103300169) must be used. If you have any
questions, please contact the manufacturer's branch in your country
(see the back for the addresses).
k a h
l m q L T U
Rest of Europe 9103300169
–
9103300168
8 Using the portable grill
8.1 Mounting the portable grill
When selecting the location for barbecuing, observe the following instructions:
• Set up the portable grill outside in a well-ventilated place. Do not place it in a dip
to prevent any gases from accumulating there.
• The ground must be firm, level and stabile.
• Keep the portable grill protected from the wind.
• Never place the portable grill near flammable materials, even when cooling
down. Keep a distance of at least 20 cm.
• Observe the safety instructions, see chapter “Safety precautions when handling
liquid gas” on page 7.
Proceed as follows (fig. 2, page 3):
➤ Screw the stands (1) onto the base.
➤ Gather all the individual parts and put them to one side.
➤ Turn the stand (2) by hand in the fastening plates.
12
Page 13

EN
Classic Using the portable grill
➤ Attach the side panels:
–Hang the side panel (3) in the slot in the upper part of the portable grill (1)(A).
– Fold it down.
– Hook the side panel onto the front of the grill base (B).
NOTICE!
A
➤ Always slide the rack in at the required height together with the drip tray (4).
➤ If required, insert the roasting spit (5) into the rails on the side panels.
Never use the device without the drip tray. Without a drip tray the signs
in the base of the portable grill could get dirty, damaged from the heat
and illegible.
8.2 Installing the burner
Proceed as follows (fig. 2, page 3):
➤ Place the burners (7) onto the side panels.
➤ Insert the injector (6) into the burner (7) until you hear it click.
8.3 Connecting the portable grill to the gas cylinder
WARNING! Beware of injury
!
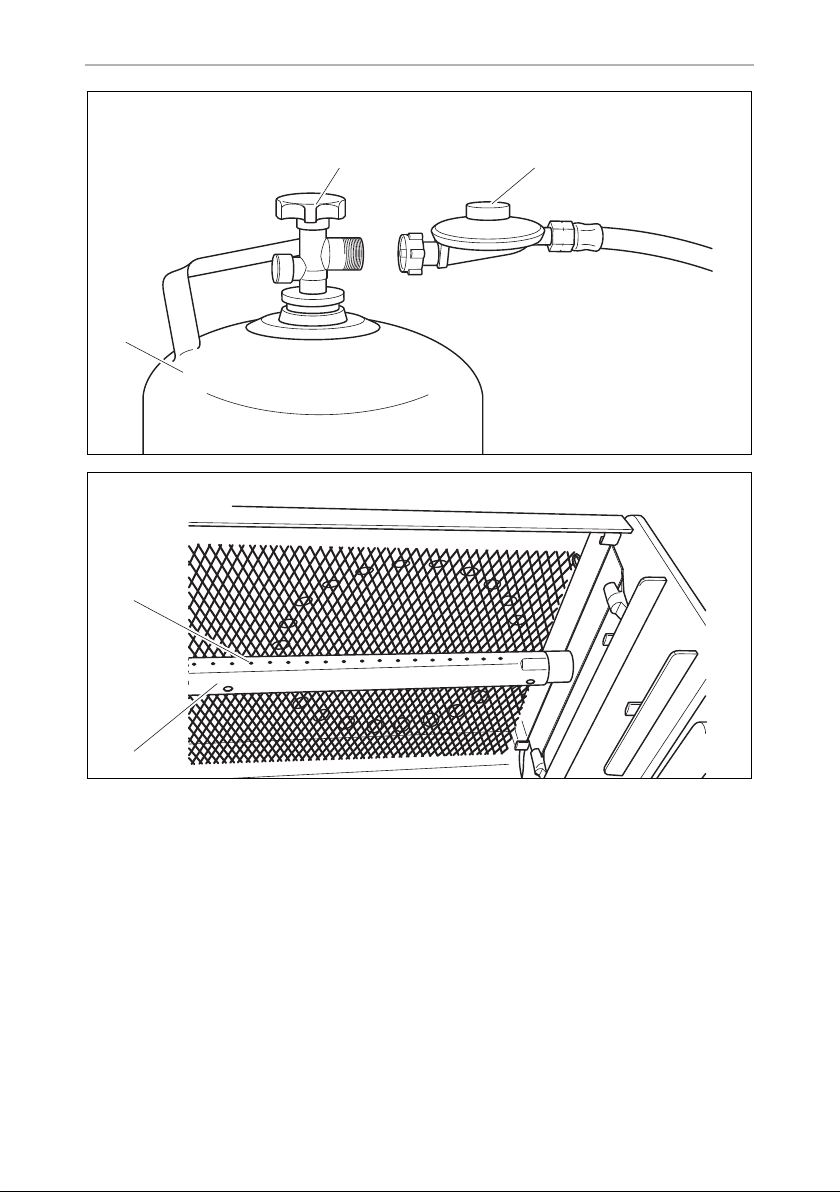
Proceed as follows (fig. 3, page 4):
➤ Place the gas cylinder (1) upright and at least 50 cm away from the portable grill.
➤ Check that the valve (2) on the gas cylinder is closed.
➤ Screw the pressure reducing valve (3) onto the gas cylinder firmly by hand.
➤ Make sure that the gas hose
– is not crushed or kinked
– is a safe distance from the burner
➤ After connecting the device to the gas supply, check the gas pipe for leakage
using a foaming agent, e. g. with soap.
• Only use propane or butane gas cylinders with an approved
pressure reducing valve and a suitable head.
• Compare the pressure information on the type plate with the
information on the pressure reducing valve.
13
Page 14

EN
Using the portable grill Classic
8.4 Connect the portable grill to the gas socket
➤ Plug the gas hose into the gas socket.
➤ Make sure that the gas hose
– is not crushed or kinked
– is a safe distance from the burner
➤ After connecting the device to the gas supply, check the gas pipe for leakage
using a foaming agent, e. g. with soap.
8.5 Igniting the portable grill
WARNING! Beware of injury
!
I
• Do not leave the portable grill unattended while in use.
• Ignite the burners as soon as you have turned on the gas supply.
Otherwise gas can accumulate in the burner area and could cause an
explosion.
• The complete ignition process must be visible from above and must
not be hidden by pots placed on top of the hob.
NOTE
• While it is operating, you will be able to hear a slight noise caused by
the gas flowing out. This is completely harmless.
• Smoke can occur when using it for the first time. This is caused by
deposits of machine oil burning and stops after approx. 10 minutes.
• The stainless steel burners turn blue from the high temperature. This
does not affect the operation or the quality of the material.
Proceed as follows (fig. 4, page 4):
➤ Turn on the gas supply.
➤ Ignite the burner straight away at the gas outlet (1) using a long match or a
suitable lighter.
Remove your hand quickly as soon as the burner is lit.
➤ After lighting, check that the burner is burning properly. The flames must be
burning along the whole length of both sides of the burner pipe (2).
14
Page 15

EN
Classic Using the portable grill
8.6 Barbecuing
Please observe the following instructions when barbecuing:
CAUTION! Danger of burns
!
• When barbecuing, control the temperature by raising or lowering the drip tray
and rack using the holder.
• The very top recesses at the sides are intended for barbecuing steaks quickly with
intense heat.
• Never use the device without the drip tray. Without a drip tray the signs in the
base of the portable grill could get dirty, damaged from the heat and illegible.
Using the drip tray also allows the heat from the burners to be used more efficiently.
• Attach the food, such as poultry or a joint for roasting, with the two meat clamps
on the spit. Place the spit in the holders on the portable grill.
• A grill motor (optional extra) is ideal here for turning the joint. First attach the grill
motor to the left side panel by putting the fastener into the keyhole. Then plug in
the head of the roasting spit into the motor.
• When barbecuing with the roasting spit, the meat juices in the drip tray can be
used for making sauces according to taste.
• Always use the grill rack holder when you want to raise or lower the
drip tray and spit while hot.
• Remove the grill rack holder while you are barbecuing.
Otherwise it gets very hot.
8.7 Cooking
Please observe the following instructions when cooking:
• Do not use any pots with curved bases.
• Only use pots with a diameter between 10 cm and 20 cm.
8.8 Switching off the portable grill
➤ Turn off the gas supply.
✓ The flames go out.
15
Page 16

EN
Troubleshooting Classic
8.9 Dismantling the portable grill
CAUTION! Beware of burns
!
➤ Disconnect the portable grill from the gas supply.
➤ Dismantle the portable grill once it has cooled down.
➤ Clean the individual parts (see chapter “Cleaning the portable grill” on page 17).
➤ Store the individual parts in the case.
➤ Close the case with the zip.
The portable grill is very hot when you use it. Leave the portable grill to
cool down before you clean, dismantle or transport it.
8.10 Replacing the gas cylinder
WARNING! Beware of injury
!
➤ Completely close the valve on the gas cylinder.
Change the gas cylinder in a well-ventilated location.
Ensure that there are no open flames in the vicinity.
Only replace the gas cylinder when the portable grill is switched off.
➤ Unscrew the pressure reducing valve from the cylinder.
➤ Check the condition of the gas hose.
Replace the hose line if the material is brittle or porous.
➤ Tightly screw the pressure reducing valve by hand onto the new cylinder.
9 Troubleshooting
Repairs to the gas supply parts on the device may only be carried out by a qualified
technician.
➤ Shut off the gas supply immediately if a fault occurs.
➤ Check again that the device has been assembled correctly and the parts are
undamaged, especially the gas hose and injector.
➤ Replace the damaged parts.
➤ Only use the device again once all the faults have been rectified.
16
Page 17

EN
Classic Cleaning the portable grill
10 Cleaning the portable grill
NOTICE!
A
➤ Allow the device to cool down properly before cleaning it.
➤ Clean the surfaces. Pay special attention to removing sticky fat and oil residue.
➤ Do not use a steam cleaner to clean the device under any circumstances.
➤ Allow the device to dry before packing and storing.
Do not use any sharp or hard objects for cleaning since they may damage the device.
Only use standard cleaning agents.
11 Guarantee
The statutory warranty period applies. If the product is defective, please contact the
manufacturer's branch in your country (see the back of the instruction manual for the
addresses) or your retailer.
For repair and guarantee processing, please include the following documents when
you send in the device:
• A copy of the receipt with purchasing date
• A reason for the claim or description of the fault
12 Disposal
➤ Place the packaging material in the appropriate recycling waste bins wherever
possible.
If you wish to finally dispose of the product, ask your local recycling centre
or specialist dealer for details about how to do this in accordance with the
M
applicable disposal regulations.
17
Page 18
EN
Technical data Classic
13 Technical data
Description, connection pressure Item no.
Portable grill Classic 1, 30 mbar 9103300172
Portable grill Classic 1, 50 mbar 9103300173
Portable grill Classic 2, 30 mbar 9103300174
Portable grill Classic 2, 50 mbar 9103300175
Dometic Classic 1
Gas consumption: 385 g/h
Gas category: Category I
Number of cooking rings: 3
Burner output: 5300 W
Dimensions: Closed portable grill: 620 x 128 x 288 mm
Drip tray with rack: 544 x 238 mm
Wei ght: 10 kg
Inspection/certification:
Gas consumption: 320 g/h
Gas category: Category I3, propane/butane
Number of cooking rings: 2
Burner output: 4300 W
Dimensions: Closed portable grill: 510 x 128 x 288 mm
Drip tray with rack: 435 x 238 mm
Wei ght: 8 kg
Inspection/certification:
, propane/butane
3
Dometic Classic 2
18
Page 19

DE
Classic
Bitte lesen Sie diese Anleitung vor dem Einbau und der Inbetriebnahme
sorgfältig durch und bewahren Sie sie auf. Geben Sie sie im Fall einer Weitergabe des Geräts an den Nutzer weiter.
Inhalt
1 Erklärung der Symbole . . . . . . . . . . . . . . . . . . . . . . . . . . . . . . . . . . . . . . . . . 20
2 Allgemeine Sicherheitshinweise . . . . . . . . . . . . . . . . . . . . . . . . . . . . . . . . . 20
3 Lieferumfang . . . . . . . . . . . . . . . . . . . . . . . . . . . . . . . . . . . . . . . . . . . . . . . . . 23
4 Zubehör. . . . . . . . . . . . . . . . . . . . . . . . . . . . . . . . . . . . . . . . . . . . . . . . . . . . . 24
5 Bestimmungsgemäßer Gebrauch . . . . . . . . . . . . . . . . . . . . . . . . . . . . . . . . 24
6 Technische Beschreibung . . . . . . . . . . . . . . . . . . . . . . . . . . . . . . . . . . . . . . 24
7 Vor dem ersten Gebrauch . . . . . . . . . . . . . . . . . . . . . . . . . . . . . . . . . . . . . . 25
8 Koffergrill benutzen. . . . . . . . . . . . . . . . . . . . . . . . . . . . . . . . . . . . . . . . . . . . 27
9 Störungsbeseitigung . . . . . . . . . . . . . . . . . . . . . . . . . . . . . . . . . . . . . . . . . . .31
10 Koffergrill reinigen. . . . . . . . . . . . . . . . . . . . . . . . . . . . . . . . . . . . . . . . . . . . . 32
11 Gewährleistung. . . . . . . . . . . . . . . . . . . . . . . . . . . . . . . . . . . . . . . . . . . . . . . 32
12 Entsorgung . . . . . . . . . . . . . . . . . . . . . . . . . . . . . . . . . . . . . . . . . . . . . . . . . . 32
13 Technische Daten . . . . . . . . . . . . . . . . . . . . . . . . . . . . . . . . . . . . . . . . . . . . . 33
19
Page 20

DE
Erklärung der Symbole Classic
1 Erklärung der Symbole
WARNUNG!
!
!
A
I
Sicherheitshinweis: Nichtbeachtung kann zu Tod oder schwerer
Verletzung führen.
VORSICHT!
Sicherheitshinweis: Nichtbeachtung kann zu Verletzungen führen.
ACHTUNG!
Nichtbeachtung kann zu Materialschäden führen und die Funktion des
Produktes beeinträchtigen.
HINWEIS
Ergänzende Informationen zur Bedienung des Produktes.
2 Allgemeine Sicherheitshinweise
Der Hersteller übernimmt in folgenden Fällen keine Haftung für Schäden:
• Montage- oder Anschlussfehler
• Beschädigungen am Produkt durch mechanische Einflüsse und Über-
spannungen
• Veränderungen am Produkt ohne ausdrückliche Genehmigung vom Hersteller
• Verwendung für andere als die in der Anleitung beschriebenen Zwecke
2.1 Grundlegende Sicherheit
WARNUNG!
!
A
20
• Verwenden Sie ausschließlich Flüssiggas der Kategorie I
(Propan/Butan). Verwenden Sie keine anderen Brennstoffe.
ACHTUNG!
• Benutzen Sie das Gerät nur zu seinem bestimmungsgemäßen
Gebrauch.
3
Page 21

DE
Classic Allgemeine Sicherheitshinweise
2.2 Sicherheit beim Umgang mit Flüssiggas
WARNUNG!
!
• Halten Sie brennbare Stoffe von Heiz- und Kochgeräten sowie ande-
ren Licht- und Wärmequellen fern.
• Vergleichen Sie die Druckangabe auf dem Typenschild mit der Druckangabe auf der Propan- oder Butangasflasche.
• Bewahren Sie Flüssiggasflaschen niemals an unbelüfteten Plätzen
oder unterhalb Bodenniveau (trichterförmige Erdmulden) auf.
• Schützen Sie Flüssiggasflaschen vor direkter Sonneneinstrahlung. Die
Temperatur darf 50 °C nicht überschreiten.
2.3 Sicherheit beim Betrieb des Geräts
WARNUNG!
!
• Erstickungsgefahr!
Das Gerät verbrennt Flüssiggas und verbraucht dabei Sauerstoff. Bei
der Verwendung in Räumen besteht Erstickungsgefahr durch Sauerstoffmangel.
Betreiben Sie das Gerät ausschließlich im Freien.
• Wenn Sie Gasgeruch wahrnehmen:
– Schließen Sie das Gasflaschenventil und lassen Sie es geschlos-
sen, bis der Fehler behoben wurde.
– Versuchen Sie niemals das Leck mit einer offenen Flamme zu fin-
den.
• Dieses Gerät kann von Kindern ab 8 Jahren und darüber sowie von
Personen mit verringerten physischen, sensorischen oder mentalen
Fähigkeiten oder Mangel an Erfahrung und Wissen benutzt werden,
wenn sie beaufsichtigt oder bezüglich des sicheren Gebrauchs des
Kühlgerätes unterwiesen wurden und die daraus resultierenden
Gefahren verstehen.
• Kinder sollten beaufsichtigt werden, um sicherzustellen, dass sie nicht
mit dem Gerät spielen.
• Lassen Sie das Gerät beim Betrieb niemals über längere Zeit unbeaufsichtigt.
21
Page 22

DE
Allgemeine Sicherheitshinweise Classic
• Benutzen Sie lange Zündhölzer oder einen entsprechenden
Anzünder. Schauen Sie beim Zündvorgang auf die Gasaustrittsöffnungen. Zünden Sie den Brenner nicht ohne direkten Sichtkontakt
an.
Ziehen Sie schnell Ihre Hand zurück, sobald der Brenner gezündet
hat.
• Tragen Sie beim Benutzen des Koffergrills entsprechende Kleidung.
Tragen Sie keine lose hängenden Kleidungsstücke, die Feuer fangen
könnten.
• Lassen Sie den Koffergrill bis auf die Umgebungstemperatur abkühlen, bevor Sie ihn mit den bloßen Händen berühren.
• Wechseln Sie poröse oder beschädigte Schläuche sofort aus.
• Verändern Sie niemals Düse, Injektor oder Brenner.
ACHTUNG!
A
• Verwenden Sie nie den Rost ohne Saftschale.
• Heiße Geräteteile sollten nicht mit Fett, Wasser oder anderen Flüssig-
keiten in Kontakt kommen.
• Transportieren Sie das Gerät niemals im heißen Zustand.
• Benutzen Sie nur Töpfe und Pfannen mit ebenem Boden und einem
Durchmesser von 10 bis 20 cm.
• Achten Sie beim Kochen darauf, dass die Töpfe und Pfannen sicher
stehen.
• Lassen Sie die Griffe von Töpfen oder Pfannen niemals über den Koffergrill hinausragen. Drehen Sie die Griffe nach innen. Damit wird die
Gefahr des Verschüttens, der Entzündung von brennbaren Stoffen
und schwerer Verbrennungen verringert.
• Gehen Sie vorsichtig vor, wenn Sie Fett oder Öl erhitzen. Fett und Öl
können sich bei zu großer Hitze entzünden.
• Benutzen Sie nur trockene Topflappen, um die Dampfbildung zu vermeiden. Benutzen Sie anstelle von Topflappen keine Handtücher
o. ä., da diese Feuer fangen könnten.
• Betreiben Sie den Koffergrill niemals unbeaufsichtigt. Überkochende
Töpfe können Rauch und Brände verursachen.
22
Page 23

DE
Classic Lieferumfang
3 Lieferumfang
Nr. in
Abb. 1,
Seite 3
1 1 Brenner mit Kochfeld
2 2 Injektor (am Brenner)
3 1 Saftschale mit Rost
4 1 Grillrosthalter
5 4 Standbeine
6 1 Grillspieß
7 2 Fleischklammern
8 1 Koffer
9 1 Tragegriff
10 1 Verschluss
11 2 Seitenteile
– 2 Schrauben und Muttern M3
– 1 Schraube und Mutter M4
– 1 Bedienungsanleitung
Menge Bezeichnung
23
Page 24

DE
Zubehör Classic
4Zubehör
Als Zubehör erhältlich (nicht im Lieferumfang enthalten):
Bezeichnung Artikel-Nr.
Grill Ablagetabletts 9103300804
Grillkorb Midi 9103300800
Grillkorb Maxi 9103300801
Batterie-Grillmotor (1,5 V) 9103300802
Kombi-Grillmotor (1,5 V/230 V) 9103300807
Netz-Grillmotor (230 V) 9103300803
Grill-Abdeckung Classic 1 9103500360
Grill-Abdeckung Classic 2 9103500361
5 Bestimmungsgemäßer Gebrauch
Die Koffergrills von Dometic sind für den mobilen Einsatz im Freien vorgesehen.
Mit dem Koffergrill Classic 1 und Classic 2 kann gleichzeitig gegrillt und auf den
Kochplatten auf der Oberseite gekocht werden. Der Koffergrill kann mit einem entsprechenden Gasschlauch (nicht im Lieferumfang enthalten) an eine Gasflasche oder
an die Gassteckdose eines Wohnmobils angeschlossen werden.
Der Koffergrill darf nicht in geschlossenen Räumen (z. B. Zelte oder Vorzelte) betrieben werden. Lassen Sie den Koffergrill vollständig abkühlen, bevor Sie ihn in ein Zelt
oder Vorzelt stellen.
6 Technische Beschreibung
Der Koffergrill ist zerlegbar und einfach zu transportieren. Sämtliche Einzelteile finden im Koffer Platz.
Als Brennstoff wird Flüssiggas der Kategorie I
24
(Propan/Butan) verwendet.
3
Page 25

DE
Classic Vor dem ersten Gebrauch
6.1 Spezifikationen der Gerätevarianten
Der Koffergrill ist in verschiedenen Ausführungen und Anschlussvarianten erhältlich:
• Classic 1: Koffergrill mit drei Kochplatten
• Classic 2: Koffergrill mit zwei Kochplatten
Alle Ausführungen sind in folgenden Anschlussvarianten lieferbar:
• Anschlussdruck 30 mbar
• Anschlussdruck 50 mbar
6.2 Gasdruck
Den zulässigen Gasdruck können Sie dem Typenschild im Unterteil des Koffers
entnehmen.
Gerätevarianten zum Anschluss an Gasflaschen müssen mit einem
Druckreduzierventil betrieben werden.
Benutzen Sie nur in Ihrem Land vorgeschriebene und zugelassene
Druckreduzierventile.
WARNUNG! Verletzungsgefahr!
!
Der Ausgangsdruck des Druckreduzierventils muss auf jeden Fall mit
dem Anschlussdruck (Gasdruck) des Koffergrills übereinstimmen.
7 Vor dem ersten Gebrauch
Gehen Sie wir folgt vor (Abb. 1, Seite 3):
➤ Ziehen Sie die Schutzfolie von der Oberseite des Brenners (1) ab.
➤ Schrauben Sie den Griff (9) mit den beiden Schrauben M3 an das Unterteil des
Koffers.
➤ Befestigen Sie den Verschluss (10) mit der Schraube M4 am Deckel des Koffers.
➤ Reinigen Sie den Rost und die Saftschale mit einem handelsüblichen
Reinigungsmittel.
25
Page 26

DE
Vor dem ersten Gebrauch Classic
➤ Nur bei Anschluss an Gasflaschen:
– Verwenden Sie einen passenden Gasschlauch und ein Druckreduzierventil
(beides nicht im Lieferumfang enthalten).
– Schließen Sie das Druckreduzierventil an das freie Ende des Gasschlauches
an.
➤ Nur bei Anschluss an Gassteckdosen: Verwenden Sie einen passenden Gas-
schlauch (nicht im Lieferumfang enthalten).
➤ Schließen Sie den Gasschlauch an den Injektor (2) an.
Tab el le A da pte r
ACHTUNG! Beschädigungsgefahr!
A
Land Adapter
Ein ordnungsgemäßer Betrieb ist nur mit einem vom Hersteller
gelieferten Adapter (Art.-Nr. 9103300168 oder 9103300169) möglich.
Bei Fragen wenden Sie sich bitte an die Niederlassung des Herstellers in
Ihrem Land (Adressen siehe Rückseite).
k a h
l m q L T U
Restliches Europa 9103300169
–
9103300168
26
Page 27

DE
Classic Koffergrill benutzen
8 Koffergrill benutzen
8.1 Koffergrill aufbauen
Beachten Sie folgende Hinweise bei der Auswahl des Aufstellortes:
• Stellen Sie den Koffergrill im Freien an einer gut belüfteten Stelle auf. Der Platz
darf nicht in einer Senke liegen, damit sich dort nicht Gas ansammeln kann.
• Der Untergrund muss fest, eben und stabil sein.
• Der Koffergrill muss windgeschützt stehen.
• Der Koffergrill darf niemals in der Nähe von leicht entzündlichen Materialien ste-
hen, auch nicht beim Abkühlen. Halten Sie einen Mindestabstand von 20 cm ein.
• Beachten Sie auch die Sicherheitshinweise, siehe Kapitel „Sicherheit beim
Umgang mit Flüssiggas“ auf Seite 21.
Gehen Sie wir folgt vor (Abb. 2, Seite 3):
➤ Öffnen Sie den Verschluss und klappen Sie den Koffer (1) auf.
➤ Entnehmen Sie alle Einzelteile und legen Sie sie beiseite.
➤ Schrauben Sie die Standbeine (2) am Kofferunterteil fest.
➤ Montieren Sie die Seitenteile:
– Hängen Sie das Seitenteil (3) in die Schlitze im Kofferoberteil (1) ein (A).
– Klappen Sie es nach vorne.
– Haken Sie das Seitenteil an der Vorderseite des Kofferunterteils ein (B).
ACHTUNG!
A
➤ Schieben Sie den Rost immer zusammen mit der Saftschale (4) in der
gewünschten Höhe ein.
➤ Stecken Sie bei Bedarf den Grillspieß (5) in die Führung der Seitenteile.
Verwenden Sie das Gerät niemals ohne Saftschale. Ohne Saftschale
können die Hinweisschilder im Kofferunterteil verschmutzt, durch die
Hitze beschädigt und unleserlich werden.
27
Page 28

DE
Koffergrill benutzen Classic
8.2 Brenner montieren
Gehen Sie wir folgt vor (Abb. 2, Seite 3):
➤ Legen Sie den Brenner (7) auf die Seitenteile.
➤ Schieben Sie den Injektor (6) in den Brenner (7), bis er hörbar einrastet.
8.3 Koffergrill an Gasflasche anschließen
WARNUNG! Verletzungsgefahr!
!
Gehen Sie wir folgt vor (Abb. 3, Seite 4):
➤ Stellen Sie die Gasflasche (1) senkrecht und mindestens 50 cm vom Koffergrill
entfernt auf.
➤ Prüfen Sie, ob das Ventil (2) der Gasflasche geschlossen ist.
➤ Schrauben Sie das Druckreduzierventil (3) von Hand auf der Gasflasche fest.
➤ Achten Sie darauf, dass der Gasschlauch
– nicht eingeklemmt oder abgeknickt wurde,
– in sicherem Abstand vom Brenner liegt.
• Verwenden Sie nur Propan- oder Butangasflaschen mit geprüftem
Druckreduzierventil und passendem Kopfstück.
• Vergleichen Sie die Druckangabe auf dem Typenschild mit der
Druckangabe auf dem Druckreduzierventil.
➤ Prüfen Sie nach dem Anschluss des Geräts an die Gasversorgung die Dichtheit
der Gasleitung mit einem schaumbildenden Mittel, z. B. mit Seifenlauge.
8.4 Koffergrill an Gassteckdose anschließen
➤ Stecken Sie den Gasschlauch in die Gassteckdose.
➤ Achten Sie darauf, dass der Gasschlauch
– nicht eingeklemmt oder abgeknickt wurde,
– in sicherem Abstand vom Brenner liegt.
➤ Prüfen Sie nach dem Anschluss des Geräts an die Gasversorgung die Dichtheit
der Gasleitung mit einem schaumbildenden Mittel, z. B. mit Seifenlauge.
28
Page 29

DE
Classic Koffergrill benutzen
8.5 Koffergrill anzünden
WARNUNG! Verletzungsgefahr!
!
I
Gehen Sie wir folgt vor (Abb. 4, Seite 4):
• Betreiben Sie den Koffergrill nicht unbeaufsichtigt.
• Zünden Sie den Brenner unmittelbar nach dem Öffnen der Gaszu-
fuhr an. Anderenfalls kann sich Gas im Brennerbereich sammeln, und
es kann zu einer Verpuffung kommen.
• Der gesamte Zündvorgang muss von oben sichtbar sein und darf
nicht durch aufgestellte Töpfe verdeckt werden.
HINWEIS
• Während des Betriebs ist ein leichtes Rauschen wahrnehmbar, das
durch ausströmendes Gas verursacht wird. Dies ist jedoch völlig
ungefährlich.
• Beim ersten Gebrauch kann sich Rauch entwickeln. Dies wird durch
verbrennende Reste von Maschinenfett verursacht und hört nach ca.
10 min auf.
• Das Edelstahlblech des Brenners verfärbt sich bläulich durch die
hohen Temperaturen. Dies hat keinen Einfluss auf die Funktion des
Geräts und die Qualität des Materials.
➤ Öffnen Sie die Gaszufuhr.
➤ Zünden Sie unmittelbar danach den Brenner an den Gasaustrittsöffnungen (1)
mit einem langen Zündholz oder einer anderen geeigneten Zündeinrichtung an.
Ziehen Sie Ihre Hand zurück, sobald der Brenner gezündet hat.
➤ Kontrollieren Sie nach dem Anzünden, ob der Brenner ordnungsgemäß brennt:
Auf beiden Seiten des Brennerrohres (2) muss die Flammenreihe über die
gesamte Länge brennen.
29
Page 30

DE
Koffergrill benutzen Classic
8.6 Grillen
Beachten Sie bitte folgende Hinweise beim Grillen:
VORSICHT! Verbrennungsgefahr
!
• Regeln Sie die Temperatur beim Grillen, indem Sie Saftschale und Rost mit dem
Grillrosthalter höher oder tiefer setzen.
• Die obersten seitlichen Aufnahmen sind für das kurze, intensive Grillen von
Steaks geeignet.
• Verwenden Sie das Gerät niemals ohne Saftschale. Ohne Saftschale können
die Hinweisschilder im Kofferunterteil verschmutzt, durch die Hitze beschädigt
und unleserlich werden.
Zudem wird durch die Saftschale die Hitze des Brenners besser genutzt.
• Befestigen Sie Grillgut wie z. B. Geflügel und Rollbraten mit den beiden Fleischklammern am Grillspieß. Setzen Sie den Spieß in die Grillspießhalterung.
• Zum bequemeren Wenden von Braten eignet sich ein Grillmotor (Zubehör).
Befestigen Sie zuerst den Grillmotor im linken Seitenteil, indem Sie den Befestigungsknopf in das Schlüsselloch einführen. Stecken Sie anschließend die Vierkant-Spitze des Grillspießes in die Öffnung des Motors.
• Beim Grillen von Spießbraten können mit dem ausgetretenen Bratensaft in der
Saftschale Soßen je nach Geschmack zubereitet werden.
• Benutzen Sie stets den Grillrosthalter, wenn Sie Saftschale und Rost
in heißem Zustand höher oder tiefer stellen wollen.
• Nehmen Sie den Grillrosthalter während des Grillens ab.
Er wird sonst sehr heiß.
8.7 Kochen
Beachten Sie bitte folgende Hinweise beim Kochen:
• Verwenden Sie keine Töpfe mit gewölbtem Boden.
• Verwenden Sie nur Töpfe mit einem Durchmesser zwischen 10 cm und 20 cm.
8.8 Koffergrill außer Betrieb nehmen
➤ Schließen Sie die Gaszufuhr.
✓ Die Flammen erlöschen.
30
Page 31

DE
Classic Störungsbeseitigung
8.9 Koffergrill abbauen
VORSICHT! Verbrennungsgefahr!
!
➤ Trennen Sie den Koffergrill von der Gasversorgung.
➤ Bauen Sie den abgekühlten Koffergrill auseinander.
➤ Reinigen Sie die Einzelteile, siehe Kapitel „Koffergrill reinigen“ auf Seite 32.
➤ Verstauen Sie die Einzelteile im Koffer.
➤ Verschließen Sie den Koffer mit dem Verschluss.
8.10 Gasflasche auswechseln
!
➤ Schließen Sie das Ventil der Gasflasche ganz.
Der Koffergrill wird bei der Benutzung sehr heiß. Lassen Sie den Koffergrill abkühlen, bevor Sie ihn reinigen oder abbauen und transportieren.
WARNUNG! Verletzungsgefahr!
Wechseln Sie die Gasflasche nur bei guter Belüftung aus.
Achten Sie darauf, dass keine Zündquelle in der Nähe ist.
Wechseln Sie die Gasflasche nur bei ausgeschaltetem Koffergrill.
➤ Schrauben Sie das Druckreduzierventil von der Gasflasche ab.
➤ Prüfen Sie den Zustand des Gasschlauchs.
Wechseln Sie die Schlauchleitung aus, falls das Material spröde oder porös ist.
➤ Schrauben Sie das Druckreduzierventil von Hand auf der neuen Gasflasche fest.
9 Störungsbeseitigung
Reparaturen am gasführenden Teil des Geräts dürfen nur Fachleute durchführen.
➤ Schließen Sie bei Störungen sofort die Gaszufuhr.
➤ Prüfen Sie nochmals, ob das Gerät richtig zusammengebaut ist und ob die Teile
unbeschädigt sind, insbesondere Gasschlauch und Injektor.
➤ Wechseln Sie beschädigte Teile aus.
➤ Nehmen Sie das Gerät erst wieder in Betrieb, wenn alle Störungen beseitigt sind.
31
Page 32

DE
Koffergrill reinigen Classic
10 Koffergrill reinigen
ACHTUNG!
A
➤ Lassen Sie das Gerät abkühlen, bevor Sie es reinigen.
➤ Reinigen Sie die Oberflächen. Entfernen Sie insbesondere klebrige Fett- und
Ölrückstände.
➤ Benutzen Sie auf keinen Fall einen Dampfstrahlreiniger zum Reinigen des Geräts.
➤ Lassen Sie das Gerät vor dem Einpacken und Lagern trocknen.
Keine scharfen oder harten Mittel zur Reinigung verwenden, da dies zu
einer Beschädigung des Gerätes führen kann.
Verwenden Sie handelsübliche Reinigungsmittel.
11 Gewährleistung
Es gilt die gesetzliche Gewährleistungsfrist. Sollte das Produkt defekt sein, wenden
Sie sich bitte an die Niederlassung des Herstellers in Ihrem Land (Adressen siehe
Rückseite der Anleitung) oder an Ihren Fachhändler.
Zur Reparatur- bzw. Gewährleistungsbearbeitung müssen Sie folgende Unterlagen
mitschicken:
• eine Kopie der Rechnung mit Kaufdatum,
• einen Reklamationsgrund oder eine Fehlerbeschreibung.
12 Entsorgung
➤ Geben Sie das Verpackungsmaterial möglichst in den entsprechenden
Recycling-Müll.
Wenn Sie das Produkt endgültig außer Betrieb nehmen, informieren Sie
sich bitte beim nächsten Recyclingcenter oder bei Ihrem Fachhändler
M
32
über die zutreffenden Entsorgungsvorschriften.
Page 33

DE
Classic Technische Daten
13 Technische Daten
Bezeichnung, Anschlussdruck Artikel-Nr.
Koffergrill Classic 1, 30 mbar 9103300172
Koffergrill Classic 1, 50 mbar 9103300173
Koffergrill Classic 2, 30 mbar 9103300174
Koffergrill Classic 2, 50 mbar 9103300175
Dometic Classic 1
Gasverbrauch: 385 g/h
Gaskategorie: Kategorie I
Anzahl der Kochplatten: 3
Brennerleistung: 5300 W
Abmessungen: Koffergrill geschlossen: 620 x 128 x 288 mm
Saftschale mit Rost: 544 x 238 mm
Gewicht: 10 kg
Prüfung/Zertifikat:
Gasverbrauch: 320 g/h
Gaskategorie: Kategorie I
Anzahl der Kochplatten: 2
Brennerleistung: 4300 W
Abmessungen: Koffergrill geschlossen: 510 x 128 x 288 mm
Saftschale mit Rost: 435 x 238 mm
Gewicht: 8 kg
Prüfung/Zertifikat:
, Propan/Butan
3
Dometic Classic 2
, Propan/Butan
3
33
Page 34

FR
Classic
Veuillez lire ce manuel avec attention avant le montage et la mise en service, puis le conserver. En cas de revente de l'appareil, veuillez le remettre
au nouvel acquéreur.
Contenu
1 Explication des symboles . . . . . . . . . . . . . . . . . . . . . . . . . . . . . . . . . . . . . . . 35
2 Consignes générales de sécurité . . . . . . . . . . . . . . . . . . . . . . . . . . . . . . . . . 35
3 Contenu de la livraison . . . . . . . . . . . . . . . . . . . . . . . . . . . . . . . . . . . . . . . . . 38
4 Accessoires . . . . . . . . . . . . . . . . . . . . . . . . . . . . . . . . . . . . . . . . . . . . . . . . . . 39
5 Usage conforme . . . . . . . . . . . . . . . . . . . . . . . . . . . . . . . . . . . . . . . . . . . . . . 39
6 Description technique . . . . . . . . . . . . . . . . . . . . . . . . . . . . . . . . . . . . . . . . . 39
7 Avant la première utilisation . . . . . . . . . . . . . . . . . . . . . . . . . . . . . . . . . . . . . 40
8 Utilisation du barbecue portable . . . . . . . . . . . . . . . . . . . . . . . . . . . . . . . . . 42
9 Dépannage . . . . . . . . . . . . . . . . . . . . . . . . . . . . . . . . . . . . . . . . . . . . . . . . . . 47
10 Nettoyage du barbecue portable . . . . . . . . . . . . . . . . . . . . . . . . . . . . . . . . 47
11 Garantie. . . . . . . . . . . . . . . . . . . . . . . . . . . . . . . . . . . . . . . . . . . . . . . . . . . . . 48
12 Elimination. . . . . . . . . . . . . . . . . . . . . . . . . . . . . . . . . . . . . . . . . . . . . . . . . . . 48
13 Caractéristiques techniques . . . . . . . . . . . . . . . . . . . . . . . . . . . . . . . . . . . . . 49
34
Page 35

FR
Classic Explication des symboles
1 Explication des symboles
AVERTISSEMENT !
!
!
A
I
Consigne de sécurité : le non-respect de ces consignes peut entraîner
la mort ou de graves blessures.
ATTENTION !
Consigne de sécurité : le non-respect de ces consignes peut entraîner
des blessures.
AVIS !
Le non-respect de ces consignes peut entraîner des dommages
matériels et des dysfonctionnements du produit.
REMARQUE
Informations complémentaires sur l'utilisation du produit.
2 Consignes générales de sécurité
Le fabricant décline toute responsabilité pour des dommages dans les cas suivants :
• des défauts de montage ou de raccordement
• des influences mécaniques et des surtensions ayant endommagé le matériel
• des modifications apportées au produit sans autorisation explicite de la part du
fabricant
• une utilisation différente de celle décrite dans la notice
2.1 Consignes générales de sécurité
AVERTISSEMENT !
!
A
• Utilisez exclusivement du gaz liquide de catégorie I
(propane/butane). N'utilisez pas d'autres combustibles.
AVIS !
• Utilisez l'appareil conformément à l'usage pour lequel il a été conçu.
3
35
Page 36

FR
Consignes générales de sécurité Classic
2.2 Sécurité de manipulation du gaz liquide
AVERTISSEMENT !
!
• Veillez à tenir les matières inflammables éloignées des cuisinières,
appareils de chauffage et autres sources de lumière ou de chaleur.
• Vérifiez que les données inscrites sur la bouteille de propane ou de
butane correspondent aux données inscrites sur la plaque signalétique.
• N'entreposez jamais les bouteilles de gaz liquide à des endroits mal
aérés ou sous le niveau du sol (dans des trous en forme d'entonnoir).
• Protégez les bouteilles de gaz liquide d'un rayonnement solaire
direct. La température ne doit pas dépasser 50 °C.
2.3 Sécurité lors de l'utilisation de l'appareil
AVERTISSEMENT !
!
• Risque d'étouffement!
L'appareil brûle du gaz liquide et consomme de l'oxygène. En cas
d'utilisation en intérieur, il existe un risque d'étouffement par manque
d'oxygène.
Utilisez l'appareil uniquement en plein air.
• Si vous sentez une odeur de gaz :
– fermez le robinet de la bouteille de gaz et laissez-le fermé jusqu'à
élimination de la fuite ;
– n'essayez en aucun cas de détecter la fuite avec une flamme.
• Les enfants âgés de 8 ans et plus ainsi que les personnes ayant des
déficiences physiques, sensorielles ou mentales ou un manque
d'expérience ou de connaissances peuvent utiliser ce produit à
condition d'être sous surveillance ou d'avoir reçu des instructions
concernant l'utilisation de l'appareil en toute sécurité et de
comprendre les dangers qui en résultent.
• Les enfants doivent être surveillés pour s'assurer qu'ils ne jouent pas
avec l'appareil.
• Ne laissez jamais l'appareil fonctionner sans surveillance pendant une
longue durée.
• Employez de longues allumettes ou un allume-gaz approprié. Pendant la procédure d'allumage, regardez les orifices de sortie de gaz.
N'allumez pas le brûleur sans contact visuel direct.
Retirez rapidement vos mains dès que le brûleur est allumé.
36
Page 37

FR
Classic Consignes générales de sécurité
• Portez des vêtements appropriés lors de l'utilisation du barbecue portable.
Attention aux pièces de tissu pendantes qui pourraient prendre feu.
• Laissez le barbecue portable refroidir à température ambiante avant
de le toucher à mains nues.
• Remplacez immédiatement les flexibles poreux ou endommagés.
• Ne modifiez jamais la buse, l'injecteur ou le brûleur.
AVIS !
A
• N'utilisez jamais la grille sans bac de récupération.
• Les parties chaudes de l'appareil ne doivent pas entrer en contact
avec de la graisse, de l'eau ou d'autres liquides.
• Ne transportez jamais l'appareil lorsqu'il est chaud.
• Utilisez uniquement des casseroles et des poêles à fond plat et d'un
diamètre de 10 à 20 cm.
• Lors de la cuisson, veillez à ce que les casseroles et les poêles soient
installées de manière sûre.
• Ne laissez jamais les poignées des poêles et casseroles dépasser du
barbecue portable. Tournez les poignées vers l'intérieur. Vous réduisez ainsi les risques de renversement de casserole, d'inflammation de
substances inflammables ou de graves brûlures.
• Soyez prudent lorsque vous chauffez de la graisse ou de l'huile car ces
substances peuvent s'enflammer à haute température.
• N'utilisez que des maniques sèches afin d'éviter toute formation de
vapeur. N'utilisez pas de torchons ou de tissus semblables qui sont
inflammables.
• Faites fonctionner le barbecue portable uniquement sous surveillance. Les casseroles qui débordent peuvent occasionner la formation
de fumées ou d'incendies.
37
Page 38

FR
Contenu de la livraison Classic
3 Contenu de la livraison
N° dans
fig. 1,
page 3
1 1 Brûleur avec plan de cuisson
2 2 Injecteur (au niveau du brûleur)
3 1 Bac de récupération avec grille
4 1 Support pour la grille
54Pieds
61Broche
7 2 Pinces à viande
8 1 Mallette
9 1 Poignée de transport
10 1 Fermeture
11 2 Parties latérales
– 2 Vis et écrous M3
– 1 Vis et écrou M4
– 1 Manuel d’utilisation
Quantité Désignation
38
Page 39

FR
Classic Accessoires
4Accessoires
Disponible en accessoires (non compris dans la livraison) :
Désignation N° d'article
Plateaux pour grillades 9103300804
Panier grill midi 9103300800
Panier grill maxi 9103300801
Moteur de grill sur piles (1,5 V) 9103300802
Moteur de grill combi (1,5 V/230 V) 9103300807
Moteur de grill sur secteur (230 V) 9103300803
Cache de grill Classic 1 9103500360
Cache de grill Classic2 9103500361
5Usage conforme
Les barbecues portables Classic 1 et Classic 2 de Dometic sont conçus pour l'utilisation mobile en plein air.
Les barbecues portables Classic 1 et Classic 2 permettent de faire des grillades et de
cuire en même temps des aliments sur les plaques de cuisson de la partie supérieure.
Grâce à un flexible adapté (non compris à la livraison), le grill portable peut être raccordé à une bouteille de gaz ou à la prise de gaz d’une caravane.
Le barbecue portable ne doit pas être utilisé dans des espaces clos (par exemple des
tentes ou auvents). Laissez refroidir complètement le barbecue portable avant de le
placer dans une tente ou sous un auvent.
6 Description technique
Le barbecue portable peut être démonté et transporté facilement. Toutes les pièces
se rangent dans la mallette.
Le combustible est du gaz liquide de catégorie I
(propane/butane).
3
39
Page 40

FR
Avant la première utilisation Classic
6.1 Spécifications des variantes de l'appareil
Le barbecue portable est disponible en différents modèles et variantes de raccordement :
• Classic 1 : barbecue portable à trois plaques de cuisson
• Classic 2 : barbecue portable à deux plaques de cuisson
Tous les modèles sont disponibles dans les variantes de raccordement suivantes :
• pression de raccordement 30 mbars
• pression de raccordement 50 mbars
6.2 Pression du gaz
La pression autorisée du gaz se trouve sur la plaque signalétique située dans le dessous de la mallette.
Les variantes d'appareil pour le raccordement à des bouteilles de gaz doivent être
utilisées avec une vanne de réduction de pression.
Utilisez uniquement les vannes de réduction de pression prescrites et autorisées
dans votre pays.
AVERTISSEMENT ! Risque de blessures !
!
La pression de sortie de la vanne de réduction de pression doit dans tous
les cas correspondre à la pression de raccordement (pression du gaz) du
barbecue portable.
7 Avant la première utilisation
Procédez comme suit (fig. 1, page 3) :
➤ Retirez le film de protection du dessus du brûleur (1).
➤ Vissez la poignée (9) avec les deux vis M3 sur la partie inférieure de la mallette.
➤ Fixez la fermeture (10) avec la vis M4 sur le couvercle de la mallette.
➤ Nettoyez la grille et le bac de récupération avec un nettoyant disponible dans le
commerce.
40
Page 41

FR
Classic Avant la première utilisation
➤ Uniquement en cas de raccordement à des bouteilles de gaz :
– Procurez-vous un flexible de gaz adapté et une vanne de réduction de la pres-
sion (non compris à la livraison).
– Raccordez la vanne de réduction de la pression à l’extrémité libre du flexible
de gaz.
➤ Uniquement en cas de raccordement à des prises de gaz : procurez-vous
un flexible de gaz adapté (non compris à la livraison).
➤ Raccordez le flexible de gaz à l’injecteur (2).
Tableau adaptateurs
AVIS ! Risque d'endommagement !
A
Pays Adaptateurs
L'exploitation conforme n'est possible qu'avec un adaptateur fourni par
le fabricant (n° de réf. 9103300168 ou 9103300169). Si vous avez des
questions, veuillez vous adresser à la filiale du fabricant de votre pays
(adresses, voir au dos).
k a h
l m q L T U
Autres pays européens 9103300169
–
9103300168
41
Page 42

FR
Utilisation du barbecue portable Classic
8 Utilisation du barbecue portable
8.1 Montage du barbecue portable
Respectez les consignes suivantes lors du choix de l'emplacement d'installation :
• Installez le barbecue portable à l'air libre, dans un endroit bien aéré. L'emplacement ne doit pas se trouver dans une cuvette, pour que le gaz ne puisse pas s'y
accumuler.
• Le sol doit être dur, plat et stable.
• Le barbecue portable doit être installé à l'abri du vent.
• Le barbecue portable ne doit jamais se trouver à proximité de matériaux facile-
ment inflammables, même lorsqu'il refroidit. Respectez un écart minimal de
20 cm.
• Veuillez respecter également les consignes de sécurité, voir chapitre « Sécurité
de manipulation du gaz liquide », page 36.
Procédez comme suit (fig. 2, page 3) :
➤ Ouvrez le dispositif de fermeture et ouvrez la mallette (1).
➤ Prenez les pièces et posez-les à proximité.
➤ Vissez les pieds (2) sur le dessous du barbecue portable.
➤ Montez les parties latérales :
– Suspendez la partie latérale (3) dans la fente de la partie supérieure de la mal-
lette (1)(A).
– Rabattez-la vers l'avant.
– Accrochez la partie latérale à l'avant de la partie inférieure de la mallette (B).
AVIS !
A
➤ Insérez toujours la grille avec le bac de récupération (4) à la hauteur souhaitée.
➤ En cas de besoin, glissez la broche rôtissoire (5) dans le guidage des parties
latérales.
Ne faites jamais fonctionner l'appareil sans bac de récupération. Sans
bac de récupération, les plaques de signalisation dans la partie inférieure de la mallette risquent d'être salies, endommagées par la chaleur
et rendues illisibles.
42
Page 43

FR
Classic Utilisation du barbecue portable
8.2 Monter le brûleur
Procédez comme suit (fig. 2, page 3) :
➤ Placez le brûleur (7) sur les parties latérales.
➤ Faites glisser l’injecteur (6) dans le brûleur (8) jusqu’à ce que vous entendiez qu’il
s’enclenche.
8.3 Raccordement du barbecue portable à une bouteille
de gaz
AVERTISSEMENT ! Risque de blessures !
!
Procédez comme suit (fig. 3, page 4) :
➤ Installez la bouteille de gaz (1) à la verticale et à au moins 50 cm du barbecue
portable.
➤ Vérifiez que la vanne (2) de la bouteille de gaz est fermée.
• Utilisez uniquement des bouteilles de gaz propane ou butane dont
la vanne de réduction de pression a été contrôlée et un embout correspondant.
• Vérifiez que les données inscrites sur la vanne de réduction de pression correspondent aux données inscrites sur la plaque signalétique.
➤ Fixez la vanne de réduction de pression (3) en la vissant à la main sur la bouteille
de gaz.
➤ Veillez à ce que le flexible de gaz
– ne soit pas compressé ou plié,
– se trouve à une distance suffisante du brûleur.
➤ Après le raccordement de l'appareil à l'alimentation en gaz, vérifiez l'étanchéité
de la conduite de gaz avec un produit moussant, p. ex. avec une lessive.
43
Page 44

FR
Utilisation du barbecue portable Classic
8.4 Raccordement du barbecue portable à un raccord de
gaz
➤ Placez le flexible de gaz dans le raccord de gaz.
➤ Veillez à ce que le flexible de gaz
– ne soit pas compressé ou plié,
– se trouve à une distance suffisante du brûleur.
➤ Après le raccordement de l'appareil à l'alimentation en gaz, vérifiez l'étanchéité
de la conduite de gaz avec un produit moussant, p. ex. avec une lessive.
8.5 Allumage du barbecue portable
AVERTISSEMENT ! Risque de blessures !
!
• Faites fonctionner le barbecue portable uniquement sous
surveillance.
• Allumez le brûleur immédiatement après l'ouverture de l'alimenta-
tion en gaz . Sinon, le gaz ri sque de s 'accumu ler au nive au du b rûleur
et une déflagration risque de se produire.
• Vous devez pouvoir contrôler visuellement la procédure d'allumage
par le haut et des casseroles ne doivent pas boucher le champ de
vision.
REMARQUE
I
Procédez comme suit (fig. 4, page 4) :
➤ Ouvrez l'alimentation en gaz.
➤ Allumez le brûleur immédiatement après au niveau des orifices de sortie du
gaz (1) avec une longue allumette ou un autre système d'allumage approprié.
Retirez rapidement vos mains dès que le brûleur est allumé.
➤ Après l'allumage, contrôlez que le brûleur brûle correctement : la rangée de
flammes doit brûler des deux côtés, sur toute la longueur du tuyau du brûleur (2).
• Pendant le fonctionnement, un léger bruit est perceptible. Il est provoqué par la sortie du gaz. Cela est sans aucun danger.
• Lors de la première utilisation, il est possible que de la fumée se
forme. Cela est causé par la combustion des restes de graisse pour
machines et dure environ 10 minutes.
• La tôle en inox du brûleur prend une couleur bleutée du fait des
fortes températures. Cela n'a aucune influence sur le fonctionnement de l'appareil et la qualité du matériau.
44
Page 45

FR
Classic Utilisation du barbecue portable
8.6 Grillades
Veuillez respecter les consignes suivantes pour la préparation de grillades :
ATTENTION ! Risque de brûlure !
!
• Réglez la température pour les grillades en plaçant le bac de récupération et la
grille plus haut ou plus bas à l'aide du support pour la grille.
• Les logements latéraux supérieurs sont prévus pour griller brièvement et intensément des steacks.
• Ne faites jamais fonctionner l'appareil sans bac de récupération. Sans bac de
récupération, les plaques de signalisation dans la partie inférieure de la mallette
risquent d'être salies, endommagées par la chaleur et rendues illisibles.
De plus, le bac de récupération permet de mieux utiliser la chaleur du brûleur.
• Fixez la viande sur la broche, comme p. ex. de la volaille et des rôtis, avec les
deux pinces à viande. Placez la broche dans son support.
• Un moteur de grill (accessoire) est idéal pour tourner les rôtis de manière plus
pratique. Fixez d'abord le moteur de grill dans la partie latérale de gauche, en
introduisant le bouton de fixation dans le trou de la clé. Placez ensuite la pointe à
quatre pans de la broche dans l'ouverture du moteur.
• Lorsque vous grillez des rôtis, vous pouvez préparer des sauces avec le jus récupéré dans le bac.
• Utilisez toujours le support pour la grille lorsque le bac de récupération et la grill e sont chauds et que vous voulez les plac er plus haut ou
plus bas.
• Retirez le support pour la grille pendant que vous faites des grillades.
Il devient sinon très chaud.
8.7 Cuisson
Veuillez respecter les consignes suivantes pour la cuisson :
• N’utilisez pas de casserole dont le fond n’est pas plat.
• Utilisez uniquement des casseroles dont le diamètre est compris entre 10 cm et
20 cm.
8.8 Arrêt du barbecue portable
➤ Fermez l'alimentation en gaz.
✓ Les flammes s'éteignent.
45
Page 46

FR
Utilisation du barbecue portable Classic
8.9 Démontage du barbecue portable
ATTENTION ! Risque de brûlure !
!
➤ Débranchez le barbecue portable de l'alimentation en gaz.
➤ Une fois qu'il a refroidi, démontez le barbecue portable.
➤ Nettoyez les pièces, voir chapitre « Nettoyage du barbecue portable », page 47.
➤ Rangez les pièces dans la mallette.
➤ Fermez la mallette avec le dispositif de fermeture.
8.10 Changement de la bouteille de gaz
!
Lors de l'utilisation, le barbecue portable devient très chaud. Laissez
refroidir le barbecue portable avant de le nettoyer, de le démonter ou
de le transporter.
AVERTISSEMENT ! Risque de blessures !
Ne changez la bouteille de gaz que lorsque l'aération est suffisante.
Veillez à ce qu'aucune source d'étincelles ne soit à proximité.
Ne changez la bouteille de gaz que lorsque le barbecue portable est
éteint.
➤ Fermez complètement la vanne de la bouteille de gaz.
➤ Dévissez la vanne de réduction de pression de la bouteille de gaz.
➤ Vérifiez l'état du flexible de gaz.
Changez le flexible si le matériel est cassant ou poreux.
➤ Fixez la vanne de réduction de pression en la vissant à la main sur la nouvelle bou-
teille de gaz.
46
Page 47

FR
Classic Dépannage
9Dépannage
Seuls des spécialistes sont habilités à effectuer des réparations sur la partie de l'appareil dans laquelle se trouve le gaz.
➤ En cas de dysfonctionnements, fermez immédiatement l'alimentation en gaz.
➤ Vérifiez une nouvelle fois si l'appareil est correctement monté et si les pièces sont
en bon état, en particulier le flexible de gaz et l'injecteur.
➤ Remplacez les pièces endommagées.
➤ Ne remettez l'appareil en marche que lorsque tous les dysfonctionnements sont
éliminés.
10 Nettoyage du barbecue portable
AVIS !
A
➤ Laissez refroidir l'appareil avant de le nettoyer.
N’utilisez aucun objet coupant ou dur pour le nettoyage de l'appareil.
Cela risquerait de l'endommager.
Employez des nettoyants du commerce.
➤ Nettoyez les surfaces. Nettoyez les résidus de graisse et d'huile particulièrement
tenaces.
➤ Ne nettoyez en aucun cas l'appareil au jet de vapeur.
➤ Laissez l'appareil sécher avant de l'emballer et de l'entreposer.
47
Page 48

FR
Garantie Classic
11 Garantie
Le délai légal de garantie s'applique. Si le produit s'avérait défectueux, veuillez vous
adresser à la filiale du fabricant située dans votre pays (voir adresses au verso du
présent manuel) ou à votre revendeur spécialisé.
Veuillez y joindre les documents suivants pour la gestion des réparations et de la
garantie :
• une copie de la facture avec la date d'achat,
• le motif de la réclamation ou une description du dysfonctionnement.
12 Elimination
➤ Jetez les emballages dans les conteneurs de déchets recyclables prévus à cet
effet.
Lorsque vous mettrez votre produit définitivement hors service, informezvous auprès du centre de recyclage le plus proche ou auprès de votre
M
revendeur spécialisé sur les prescriptions relatives au retraitement des
déchets.
48
Page 49

FR
Classic Caractéristiques techniques
13 Caractéristiques techniques
Désignation, pression de raccordement N° d'article
Barbecue portable Classic 1, 30 mbar 9103300172
Barbecue portable Classic 1, 50 mbar 9103300173
Barbecue portable Classic 2, 30 mbar 9103300174
Barbecue portable Classic 2, 50 mbar 9103300175
Dometic Classic 1
Consommation en gaz : 385 g/h
Catégorie de gaz : Catégorie I
Nombre de plaques de
cuisson :
Puissance du brûleur : 5300 W
Dimensions : Barbecue portable fermé : 620 x 128 x 288 mm
Bac de récupération avec grille : 544 x 238 mm
Poids : 10 kg
Contrôle/certificat :
Consommation en gaz : 320 g/h
Catégorie de gaz : Catégorie I
Nombre de plaques de
cuisson :
Puissance du brûleur : 4300 W
Dimensions : Barbecue portable fermé : 510 x 128 x 288 mm
Bac de récupération avec grille : 435 x 238 mm
Poids : 8 kg
, propane/butane
3
3
Dometic Classic 2
, propane/butane
3
2
Contrôle/certificat :
49
Page 50

ES
Classic
Lea atentamente este manual antes del montaje y de la puesta en funcionamiento del aparato y consérvelo en un lugar seguro para futuras consultas.
En caso de vender o entregar el aparato a otra persona, entregue también
estas instrucciones.
Índice
1 Aclaración de los símbolos . . . . . . . . . . . . . . . . . . . . . . . . . . . . . . . . . . . . . . .51
2 Indicaciones generales de seguridad . . . . . . . . . . . . . . . . . . . . . . . . . . . . . .51
3 Volumen de entrega . . . . . . . . . . . . . . . . . . . . . . . . . . . . . . . . . . . . . . . . . . . 54
4 Accesorios. . . . . . . . . . . . . . . . . . . . . . . . . . . . . . . . . . . . . . . . . . . . . . . . . . . 55
5 Uso adecuado . . . . . . . . . . . . . . . . . . . . . . . . . . . . . . . . . . . . . . . . . . . . . . . . 55
6 Descripción técnica . . . . . . . . . . . . . . . . . . . . . . . . . . . . . . . . . . . . . . . . . . . 55
7 Antes del primer uso. . . . . . . . . . . . . . . . . . . . . . . . . . . . . . . . . . . . . . . . . . . 56
8 Usar la barbacoa con maletín . . . . . . . . . . . . . . . . . . . . . . . . . . . . . . . . . . . . 58
9 Solución de averías . . . . . . . . . . . . . . . . . . . . . . . . . . . . . . . . . . . . . . . . . . . . 63
10 Limpiar la barbacoa con maletín. . . . . . . . . . . . . . . . . . . . . . . . . . . . . . . . . . 63
11 Garantía legal . . . . . . . . . . . . . . . . . . . . . . . . . . . . . . . . . . . . . . . . . . . . . . . . 64
12 Gestión de residuos . . . . . . . . . . . . . . . . . . . . . . . . . . . . . . . . . . . . . . . . . . . 64
13 Datos técnicos. . . . . . . . . . . . . . . . . . . . . . . . . . . . . . . . . . . . . . . . . . . . . . . . 65
50
Page 51

ES
Classic Aclaración de los símbolos
1 Aclaración de los símbolos
¡ADVERTENCIA!
!
!
A
I
Indicación de seguridad: su incumplimiento puede acarrear la
muerte o graves lesiones.
¡ATENCIÓN!
Indicación de seguridad: su incumplimiento puede acarrear
lesiones.
¡AVISO!
Su incumplimiento puede acarrear daños materiales y perjudicar el
correcto funcionamiento del producto.
NOTA
Información adicional para el manejo del producto.
2 Indicaciones generales de seguridad
El fabricante declina toda responsabilidad ante daños ocurridos en los siguientes
casos:
• errores de montaje o de conexión
• daños en el producto debido a influencias mecánicas y sobretensiones
• modificaciones realizadas en el producto sin el expreso consentimiento del
fabricante
• utilización del aparato para fines distintos a los descritos en las instrucciones
2.1 Seguridad básica
¡ADVERTENCIA!
!
A
• Utilice únicamente gas licuado de la categoría I
No utilice otro combustible.
¡AVISO!
• Utilice el aparato sólo para aquellos fines para los que ha sido concebido.
(propano/butano).
3
51
Page 52

ES
Indicaciones generales de seguridad Classic
2.2 Seguridad al manipular el gas licuado
¡ADVERTENCIA!
!
• Mantenga las sustancias inflamables alejadas de calefactores, disposi-
tivos de cocina y otras fuentes de luz y calor.
• Compare la indicación de presión en la placa de características con la
indicación de presión de la bombona de gas butano o propano.
• Nunca guarde las bombonas de gas licuado en lugares sin ventilación
o bajo el nivel del suelo (hoyos en forma de embudo).
• Proteja las bombonas de gas licuado de las radiaciones solares directas. La temperatura no debe superar los 50 °C.
2.3 Seguridad durante el funcionamiento del aparato
¡ADVERTENCIA!
!
• ¡Peligro de asfixia!
El aparato quema gas líquido y consume oxigeno en el proceso. Si se
utiliza en espacios cerrados, se corre peligro de asfixia por falta de oxigeno.
Use este aparato únicamente al aire libre.
• Si nota olor a gas:
– Cierre la válvula de la bombona y déjela cerrada hasta que se sub-
sane el fallo.
– No intente encontrar fugas con un fuego abierto.
• Los niños mayores de 8 años y las personas de capacidad física,
sensorial o mental disminuida, así como aquellas personas con falta de
experiencia y conocimientos suficientes solo podrán utilizar este
aparato bajo vigilancia o si han sido instruidos respecto al uso seguro
del aparato y a los posibles peligros que pueden emanar de él.
• Se ha de vigilar a los niños para garantizar que no usen este aparato
como juguete.
• Durante el funcionamiento vigile siempre el aparato.
• Utilice cerillas largas o un encendedor adecuado. Al encender fíjese
en los orificios de salida del gas. No encienda el quemador sin mirarlo.
Retire rápidamente la mano en cuanto el quemador esté encendido.
• Al usar la barbacoa con maletín lleve ropa apropiada.
No lleve prendas de vestir flojas que puedan prender fuego.
• Deje que la barbacoa con maletín se enfríe a la temperatura ambiente,
antes de tocarla directamente con las manos.
52
Page 53

ES
Classic Indicaciones generales de seguridad
• Cambie inmediatamente las mangueras porosas o dañadas.
• No cambie nunca la boquilla, el inyector o el quemador.
¡AVISO!
A
• No use el estante de horno sin una bandeja para recogida de grasas.
• Las partes calientes del aparato no deberían entrar en contacto con
grasa, agua u otras sustancias líquidas.
• No mueva nunca el aparato estando caliente.
• Use únicamente cazuelas y sartenes con una base lisa y con un diáme-
tro de 10 a 20 cm.
• Al cocinar, asegúrese de que las cazuelas y sartenes estén colocadas
de forma segura.
• No deje que los mangos de las cazuelas o sartenes sobresalgan de la
barbacoa con maletín. Gire los mangos hacia el interior. De esta forma
se reduce el peligro de derrames, la ignición de sustancias inflamables
y quemaduras graves.
• Proceda con cuidado al calentar grasa o aceite. La grasa y el aceite
prenden a elevadas temperaturas.
• Utilice únicamente paños secos para evitar la formación de vapor. No
utilice toallas o cualquier otro objeto donde pudiera prenderse el
fuego.
• Mantenga vigilada la barbacoa con maletín durante su funcionamiento. Las cazuelas que se desbordan pueden provocar humo e
incendios.
53
Page 54

ES
Volumen de entrega Classic
3 Volumen de entrega
N.º en
fig. 1,
página 3
1 1 Placa con quemadores
2 2 Inyector (en la placa)
3 1 Bandeja para recogida de grasas con parrilla
4 1 Soporte para la parrilla
5 4 Patas
6 1 Rustidor
7 2 Aguantadores
8 1 Maletín
9 1 Asa de transporte
10 1 Cierre
11 2 Laterales
– 2 Tornillos y tuercas M3
– 1 Tornillos y tuercas M4
– 1 Instrucciones de uso
Cantidad Denominación
54
Page 55

ES
Classic Accesorios
4Accesorios
Disponible como accesorio (no incluido en el alcance del suministro):
Denominación N.° de artículo
Repisas para parrilla 9103300804
Cesta parrilla Midi 9103300800
Cesta parrilla Maxi 9103300801
Batería del motor de la parrilla (1,5 V) 9103300802
Motor combinado de la parrilla (1,5 V/230 V) 9103300807
Motor de parrilla para operación con la red (230 V) 9103300803
Cubierta de parrilla Classic 1 y Consul 9103500360
Cubierta de parrilla Dometic Classic 2 9103500361
5Uso adecuado
Las barbacoas con maletín Classic 1 y Classic 2 de Dometic están diseñadas para
usarlas al aire libre de forma portátil.
Con la barbacoa con maletín Classic 1 y Classic 2 se puede asar y, al mismo tiempo,
cocinar en los quemadores de la parte superior. La barbacoa con maletín se puede
conectar con una manguera de gas adecuada (no incluida en el volumen de entrega)
a una bombona de butano o a la toma de gas de una caravana.
No está permitido usar la barbacoa con maletín en recintos cerrados (por ejemplo,
tiendas de campaña o avances). Deje que la barbacoa con maletín se enfríe completamente antes de introducirla en la tienda de campaña o de situarla en sus proximidades.
6 Descripción técnica
La barbacoa con maletín es desmontable y fácil de transportar. Todas las piezas
entran en el maletín.
Utilice como combustible gas licuado de la categoría I
(propano/butano).
3
55
Page 56

ES
Antes del primer uso Classic
6.1 Especificaciones de las variantes del aparato
La barbacoa con maletín está disponible en diferentes modelos y con variantes de
conexión:
• Classic 1: Barbacoa con tres hornillos con maletín
• Classic 2: Barbacoa con dos hornillos con maletín
Todos los modelos están disponibles en las siguientes variantes de conexión:
• Presión de conexión 30 mbares
• Presión de conexión 50 mbares
6.2 Presión de gas
La presión de gas autorizada la puede encontrar en la placa de características en la
parte inferior del maletín.
Las variantes del aparato para la conexión a bombonas de gas se deben usar con una
válvula de reducción de la presión.
Utilice únicamente válvulas de reducción de la presión autorizadas y prescritas en su
país.
¡ADVERTENCIA! ¡Peligro de sufrir lesiones!
!
La presión de salida de la válvula de reducción de la presión tiene que
coincidir en cualquier caso con la presión de conexión (presión del gas)
de la barbacoa con maletín.
7 Antes del primer uso
Proceda de la siguiente manera (fig. 1, página 3):
➤ Retire la lámina de protección de la parte superior de la placa (1).
➤ Atornille el asa (9) con los dos tornillos M3 en la parte inferior del maletín.
➤ Fije el cierre (10) con el tornillo M4 en la tapa del maletín.
➤ Limpie el estante de horno y la bandeja para recogida de grasas con un producto
de limpieza convencional.
56
Page 57

ES
Classic Antes del primer uso
➤ Solo para la conexión a bombonas de gas:
– Procúrese una manguera de gas adecuada y una válvula de reducción de pre-
sión (ninguna de ellas viene incluida en el volumen de entrega).
– Conecte la válvula de reducción de presión al extremo libre de la manguera
de gas.
➤ Solo para la conexión a tomas de gas: Procúrese una manguera de gas ade-
cuada (no viene incluida en el volumen de entrega).
➤ Conecte la manguera de gas al inyector (2).
Tabla Adaptador
¡AVISO! Peligro de ocasionar daños materiales
A
País Adaptador
Solo es posible un funcionamiento correcto utilizando un adaptador
suministrado por el fabricante (n.° art. 9103300168 o 9103300169).
Para cualquier consulta dirijase a la sucursal del fabricante en su país
(véase la dirección al dorso).
k a h
l m q L T U
Resto de Europa 9103300169
–
9103300168
57
Page 58

ES
Usar la barbacoa con maletín Classic
8 Usar la barbacoa con maletín
8.1 Montar la barbacoa con maletín
Tenga en cuenta las siguientes indicaciones para la elección del lugar de colocación:
• Coloque la barbacoa con maletín al aire libre en un lugar bien ventilado. El lugar
no debe estar en una depresión de terreno para que no se pueda acumular gas.
• El suelo tiene que ser firme, plano y con estabilidad.
• La barbacoa con maletín tiene que estar protegida del viento.
• La barbacoa con maletín no debe estar nunca cerca de materiales fácilmente
inflamables, tampoco al enfriarse. Mantenga una distancia mínima de 20 cm.
• Tenga en cuenta las indicaciones de seguridad, véase capítulo “Seguridad al
manipular el gas licuado” en la página 52.
Proceda de la siguiente manera (fig. 2, página 3):
➤ Abra el cierre y el maletín por completo (1).
➤ Saque cada una de las piezas y déjelas a un lado.
➤ Fije las patas (2) en la parte inferior del maletín:
➤ Monte los laterales:
– Enganche el lateral (3) en la ranura de la parte superiot del maletín (1)(A).
–Abátalo hacia delante.
– Enganche el lateral en la parte delantera de la parte inferior del maletín (B).
¡AVISO!
A
➤ Introduzca la parrilla siempre junto con la bandeja para recogida de grasas (4)
a la altura deseada.
➤ En caso necesario, introduzca el rustidor (5) en la ranura guía de los laterales.
No use el aparato nunca sin la bandeja para recogida de grasas. Sin
ella, las señales de aviso de la parte inferior del maletín se pueden ensuciar y con el calor dañarse y hacerse ilegibles.
58
Page 59

ES
Classic Usar la barbacoa con maletín
8.2 Montar la placa
Proceda de la siguiente manera (fig. 2, página 3):
➤ Coloque la placa (7) sobre los laterales.
➤ Introduzca el inyector (6) en la placa (7) hasta que se oiga que encaje.
8.3 Conectar la barbacoa con maletín a la bombona de
gas
¡ADVERTENCIA! ¡Peligro de sufrir lesiones!
!
Proceda de la siguiente manera (fig. 3, página 4):
➤ Coloque la bombona de gas (1) en posición vertical y alejada de la barbacoa
con maletín una distancia mínima de 50 cm.
➤ Compruebe si la válvula (2) de la bombona de gas está cerrada.
• Utilice sólo bombonas de gas butano o propano equipadas con una
válvula autorizada de reducción de la presión y un cabezal adecuado.
• Compare la indicación de presión en la placa de características con
la indicación de presión de la válvula de reducción de presión.
➤ Atornille la válvula de reducción de presión (3) en la bombona de gas con la
mano.
➤ Compruebe que la manguera de gas
– no se doble ni quede atrapada,
– esté colocada a una distancia prudencial de seguridad del quemador.
➤ Una vez conectado el aparato al suministro de gas, compruebe la estanqueidad
del conducto de gas con un medio espumante, p. ej. con agua jabonosa.
8.4 Conectar la barbacoa con maletín a la toma de gas
➤ Conecte la manguera de gas en la toma de gas.
➤ Compruebe que la manguera de gas
– no se doble ni quede atrapada,
– esté colocada a una distancia prudencial de seguridad del quemador.
➤ Una vez conectado el aparato al suministro de gas, compruebe la estanqueidad
del conducto de gas con un medio espumante, p. ej. con agua jabonosa.
59
Page 60

ES
Usar la barbacoa con maletín Classic
8.5 Encender la barbacoa con maletín
¡ADVERTENCIA! ¡Peligro de sufrir lesiones!
!
I
Proceda de la siguiente manera (fig. 4, página 4):
• Mantenga vigilada la barbacoa con maletín durante su funcionamiento.
• Encienda el quemador inmediatamente después de haber abierto
el suministro de gas. De lo contrario se puede acumular gas en la
zona del quemador y producir una deflagración.
• El proceso completo de encendido tiene que ser visible desde
arriba y no puede estar tapado por cazuelas u otros objetos.
NOTA
• Durante el funcionamiento se puede oír un ruido ligero producido
por la salida del gas. No representa ningún peligro.
• Al usar el aparato por primera vez puede salir humo. Esto es debido
a los restos combustibles de la grasa de máquina y desaparece al
cabo de aprox. 10 minutos.
• La bandeja de acero fino del quemador se pone azulada con las altas
temperaturas. Esto no influye en el funcionamiento del aparato y
tampoco en la calidad del material.
➤ Abra el suministro de gas.
➤ Encienda inmediatamente después el quemador en los orificios de salida del
gas (1) con una cerilla larga o con otro dispositivo de encendido adecuado.
Retire la mano en cuanto se haya encendido la placa.
➤ Una vez encendida la placa, controle si la llama prende correctamente: La llama
debe ser uniforme a lo largo de todo el tubo quemador (2).
60
Page 61

ES
Classic Usar la barbacoa con maletín
8.6 Asar
Para la función asar tenga en cuenta las siguientes indicaciones:
¡ATENCIÓN! ¡Peligro de quemaduras!
!
• Regule la temperatura al asar colocando la bandeja para recogida de grasas y el
estante de horno con la rejilla para la parrilla más arriba o más abajo.
• Los alojamientos laterales más superiores son adecuador para un asado corto e
intenso de bistecs.
• No use el aparato nunca sin la bandeja para recogida de grasas. Sin ella, las
señales de aviso de la parte inferior del maletín se pueden ensuciar y con el calor
dañarse y hacerse ilegibles.
Además con la bandeja para recogida de grasas se aprovecha mejor el calor del
quemador.
• Sujete la carne para asar, p. ej., carne de ave y redondo de carne en el asador con
las pinzas de carne. Coloque el asador en la rejilla para la parrilla.
• Si quiere dar la vuelta al asado de una manera cómoda, puede usar un motor de
parrilla (accesorio). En primer lugar fije el motor de parrilla en el lateral izquierdo
introduciendo el botón de fijación en el ojo de la cerradura. A continuación meta
la punta cuadrada del asador en la abertura del motor.
• Si asa brochetas, se pueden preparar salsas con el jugo recogido en la bandeja
para grasas al gusto de cada uno.
• Use siempre la rejilla para la parrilla cuando quiera colocar la bandeja
para recogida de grasas y el estante de horno más arriba o más abajo
estando calientes.
• Retire la rejilla para la parrilla durante el asado.
Si no se pondrá muy caliente.
8.7 Cocinar
Para la función cocinar tenga en cuenta las siguientes indicaciones:
• No use cazuelas con una base abombada.
• Use únicamente cazuelas con un diámetro entre 10 cm y 20 cm.
8.8 Poner fuera de servicio la barbacoa con maletín
➤ Cierre el suministro de gas.
✓ Se apagan las llamas.
61
Page 62

ES
Usar la barbacoa con maletín Classic
8.9 Desmontar la barbacoa con maletín
¡ATENCIÓN! ¡Peligro de sufrir quemaduras!
!
➤ Separe la barbacoa con maletín del suministro de gas.
➤ Desmonte la barbacoa con maletín ya enfriada.
➤ Limpie cada una de las piezas (véase capítulo “Limpiar la barbacoa con maletín”
en la página 63).
➤ Guarde cada una de las piezas en el maletín.
➤ Cierre el maletín con el cierre.
8.10 Cambiar la bombona de gas
!
La barbacoa se calienta mucho cuando se usa. Deje que se enfría antes
de limpiarla, desmontarla o transportarla.
¡ADVERTENCIA! ¡Peligro de sufrir lesiones!
Cambie la bombona de gas únicamente en lugares bien ventilados.
Preste atención a que no haya cerca ninguna fuente de encendido.
Cambie la bombona únicamente con la barbacoa con maletín apagada.
➤ Cierre completamente la válvula de la bombona de gas.
➤ Desenrosque la válvula de reducción de la presión de la bombona de gas.
➤ Compruebe el estado de la manguera de gas
Cámbiela si el material está demasiado seco o presenta porosidades.
➤ Enrosque con la mano la válvula de reducción de presión a la nueva bombona de
gas.
62
Page 63

ES
Classic Solución de averías
9 Solución de averías
Las reparaciones de las partes del aparato conductoras de gas deben ser realizadas
únicamente por especialistas.
➤ En caso de avería cierre inmediatamente el suministro de gas.
➤ Controle varias veces si el aparato está bien montado y si las piezas están daña-
das, especialmente la manguera de gas y el inyector.
➤ Cambie las piezas dañadas.
➤ No vuelva a poner el aparato en funcionamiento hasta que todas las averías estén
subsanadas.
10 Limpiar la barbacoa con maletín
¡AVISO!
A
➤ Deje que el aparato se enfríe antes de limpiarlo.
No utilice ningún instrumento afilado o duro en la limpieza ya que podría
dañar el aparato.
Utilice un producto de limpieza convencional.
➤ Limpie las superficies. Retire los restos de grasa y aceite especialmente incrusta-
dos.
➤ No utilice en ningún caso un limpiador por chorro de vapor para limpiar el apa-
rato.
➤ Antes de guardar y almacenar el aparato deje que se seque.
63
Page 64

ES
Garantía legal Classic
11 Garantía legal
Rige el plazo de garantía legal. Si el producto presenta algún defecto, diríjase a la
sucursal del fabricante de su país (ver direcciones en el dorso de estas instrucciones)
o a su establecimiento especializado.
Para la tramitación de la reparación y de la garantía debe enviar también los
siguientes documentos:
• una copia de la factura con fecha de compra,
• el motivo de la reclamación o una descripción de la avería.
12 Gestión de residuos
➤ Deseche el material de embalaje en el contenedor de reciclaje correspondiente.
Cuando vaya a desechar definitivamente el producto, infórmese en el
centro de reciclaje más cercano o en un comercio especializado sobre las
M
normas pertinentes de eliminación de materiales.
64
Page 65

ES
Classic Datos técnicos
13 Datos técnicos
Denominación, presión de conexión N.° de artículo
Barbacoa con maletín Classic 1, 30 mbar 9103300172
Barbacoa con maletín Classic 1, 50 mbar 9103300173
Barbacoa con maletín Classic 2, 30 mbar 9103300174
Barbacoa con maletín Classic 2, 50 mbar 9103300175
Dometic Classic 1
Consumo de gas: 385 g/h
Categoría del gas: Categoría I
Número de hornillos: 3
Potencia del quemador: 5300 W
Dimensiones: Barbacoa con maletín cerrada: 620 x 128 x 288 mm
Bandeja para recogida de grasas con estante de horno:
Peso: 10 kg
Homologación /
certificados:
Consumo de gas: 320 g/h
Categoría del gas: Categoría I
Número de hornillos: 2
Potencia del quemador: 4300 W
Dimensiones: Barbacoa con maletín cerrada: 510 x 128 x 288 mm
Bandeja para recogida de grasas con estante de horno:
Peso: 8 kg
, propano/butano
3
544 x 238 mm
Dometic Classic 2
, propano/butano
3
435 x 238 mm
Homologación /
certificados:
65
Page 66

PT
Classic
Por favor, leia atentamente este manual antes da montagem e da colocação em funcionamento e guarde-o num local seguro. Em caso de transmissão do aparelho, entregue o manual ao novo proprietário.
Índice
1 Explicação dos símbolos . . . . . . . . . . . . . . . . . . . . . . . . . . . . . . . . . . . . . . . 67
2 Indicações gerais de segurança . . . . . . . . . . . . . . . . . . . . . . . . . . . . . . . . . . 67
3 Material fornecido. . . . . . . . . . . . . . . . . . . . . . . . . . . . . . . . . . . . . . . . . . . . . 70
4 Acessórios . . . . . . . . . . . . . . . . . . . . . . . . . . . . . . . . . . . . . . . . . . . . . . . . . . . . 71
5 Utilização adequada . . . . . . . . . . . . . . . . . . . . . . . . . . . . . . . . . . . . . . . . . . . . 71
6 Descrição técnica . . . . . . . . . . . . . . . . . . . . . . . . . . . . . . . . . . . . . . . . . . . . . .71
7 Antes da primeira utilização . . . . . . . . . . . . . . . . . . . . . . . . . . . . . . . . . . . . . 72
8 Utilizar o grelhador de mala . . . . . . . . . . . . . . . . . . . . . . . . . . . . . . . . . . . . . 73
9 Resolução de falhas. . . . . . . . . . . . . . . . . . . . . . . . . . . . . . . . . . . . . . . . . . . . 78
10 Limpar o grelhador de mala . . . . . . . . . . . . . . . . . . . . . . . . . . . . . . . . . . . . . 79
11 Garantia . . . . . . . . . . . . . . . . . . . . . . . . . . . . . . . . . . . . . . . . . . . . . . . . . . . . . 79
12 Eliminação . . . . . . . . . . . . . . . . . . . . . . . . . . . . . . . . . . . . . . . . . . . . . . . . . . . 79
13 Dados técnicos . . . . . . . . . . . . . . . . . . . . . . . . . . . . . . . . . . . . . . . . . . . . . . . 80
66
Page 67

PT
Classic Explicação dos símbolos
1 Explicação dos símbolos
AVISO!
!
!
A
I
Indicação de segurança: o incumprimento pode provocar a morte ou
ferimentos graves.
PRECAUÇÃO!
Indicação de segurança: o incumprimento pode provocar
ferimentos.
NOTA!
O incumprimento pode causar danos materiais e pode prejudicar o
funcionamento do produto.
OBSERVAÇÃO
Informações suplementares sobre a operação do produto.
2 Indicações gerais de segurança
O fabricante não se responsabiliza por danos nos seguintes casos:
• Erros de montagem ou de conexão
• Danos no produto resultantes de influências mecânicas e sobretensões
• Alterações ao produto sem autorização expressa do fabricante
• Utilização para outras finalidades que não as descritas no manual de instruções
2.1 Princípios básicos de segurança
AVISO!
!
A
• Utilize apenas gás líquido da categoria I
lize outros combustíveis.
NOTA!
• Utilize o aparelho apenas para a utilização adequada.
(propano/butano). Não uti-
3
67
Page 68

PT
Indicações gerais de segurança Classic
2.2 Segurança no manuseamento de gás líquido
AVISO!
!
• Mantenha as substâncias inflamáveis afastadas dos aparelhos de
aquecimento e de cozedura, assim como de outras fontes de luz e de
aquecimento.
• Compare a indicação da pressão na chapa de características com a
indicação da pressão na garrafa de propano ou de butano.
• Nunca guarde as garrafas de gás em locais sem ventilação ou abaixo
do nível do solo (cavidades no solo em forma de funil).
• Proteja as garrafas de gás da radiação solar direta. A temperatura não
deve exceder os 50°C.
2.3 Segurança durante o funcionamento do aparelho
AVISO!
!
• Perigo de asfixia!
O aparelho queima gás líquido e consome oxigénio. Na utilização em
espaços fechados, existe perigo de asfixia por falta de oxigénio.
Utilize o aparelho exclusivamente no exterior.
• Se você se aperceber de cheiro de gás:
– Feche a válvula da garrafa de gás e mantenha-a fechada até o erro
ter sido eliminado.
– Nunca tente encontrar a fuga com uma chama aberta.
• Este aparelho pode ser utilizado por crianças a partir dos 8 anos, assim
como por pessoas com capacidades físicas, sensoriais ou mentais
reduzidas ou com insuficiente experiência e conhecimento quando
supervisionadas ou quando tenham recebido informação acerca da
utilização segura do aparelho e compreendam os perigos dele
resultantes.
• As crianças devem ser supervisionadas para assegurar que não brincam com o aparelho.
• Nunca mantenha o aparelho em funcionamento durante um período
de tempo mais prolongado sem supervisão.
• Utilize fósforos compridos ou uma acendalha adequada. Durante o
processo de fogueamento, preste atenção às aberturas de saída do
gás. Não acenda o queimador sem contacto visual direto.
Retire rapidamente a sua mão assim que o queimador estiver ligado.
68
Page 69

PT
Classic Indicações gerais de segurança
• Utilize vestuário apropriado durante a utilização do grelhador de
mala.
Não utilize peças de vestuário soltas que poderão apanhar fogo.
• Deixe o grelhador de mala arrefecer à temperatura ambiente antes de
lhe tocar com as mãos.
• Substitua imediatamente os tubos porosos ou danificados.
• Nunca modifique o bocal, o injetor nem o queimador.
NOTA!
A
• Nunca utilize a grelha sem a bandeja coletora de suco.
• As peças quentes de aparelhos não devem entrar em contacto com
gordura, água nem outros líquidos.
• Nunca transporte o aparelho em estado quente.
• Utilize apenas as panelas e as frigideiras com um fundo plano e um diâ-
metro de 10 a 20 cm.
• Ao cozinhar garanta que as panelas e as frigideiras estão apoiadas
com segurança.
• Nunca deixe as pegas das panelas nem das frigideiras ficarem projetadas para fora do grelhador de mala. Vire as pegas para dentro. Deste
modo é evitado o perigo de derramamento, da ignição de substâncias inflamáveis e de queimaduras graves.
• Proceda com cuidado quando estiver a aquecer gordura e óleo. A
gordura e o óleo poderão inflamar em caso de muito calor.
• Utilize apenas pegas secas para evitar a formação de vapores. Não utilize toalhas de mão ou afins em vez de pegas, uma vez que estas
poderão incendiar facilmente.
• Nunca utilize o grelhador de mala sem supervisão. As panelas demasiado cheias poderão provocar fumo e incêndios.
69
Page 70

PT
Material fornecido Classic
3 Material fornecido
N.º na
fig. 1,
página 3
1 1 Queimador com placa de fogão
2 2 Injetor (no queimador)
3 1 Bandeja coletora de suco com grelha
4 1 Suporte da grelha do grelhador
54Pernas
6 1 Espeto do grelhador
7 2 Tenaz para carne
81Mala
9 1 Pega
10 1 Fecho
11 2 Peças laterais
– 2 Parafusos e porcas M3
– 1 Parafuso e porca M4
– 1 Manual de instruções
Quant. Designação
70
Page 71

PT
Classic Acessórios
4Acessórios
Disponível como acessório (não incluído no material fornecido):
Designação N.º de artigo
Tabuleiros para grelhador 9103300804
Cesto médio para grelhador 9103300800
Cesto grande para grelhador 9103300801
Motor do grelhador a bateria (1,5 V) 9103300802
Motor do grelhador de funcionamento misto
(1,5 V/230 V)
Motor do grelhador a energia elétrica (230 V) 9103300803
Cobertura do grelhador Classic 1 e Consul 9103500360
Cobertura do grelhador Classic 2 9103500361
9103300807
5Utilização adequada
Os grelhadores de mala Classic 1 e Classic 2 da Dometic estão previstos para a utilização móvel ar livre.
Com o grelhador de mala Classic 1 e Classic 2 é possível grelhar ao mesmo tempo
que se cozinha nas placas de fogão na parte superior. O grelhador de mala pode ser
conectado a uma garrafa de gás ou à tomada de gás de uma autocaravana com um
respetivo tubo de gás (não contido no material fornecido).
O grelhador de mala não deve ser utilizado em espaços fechados (por ex. tendas ou
toldos). Deixe o grelhador de mala arrefecer totalmente antes de o colocar numa
tenda ou de baixo de um toldo.
6 Descrição técnica
O grelhador de mala pode ser desmontado e é fácil de transportar. Todas as peças
individuais podem ser encontradas na mala.
Como combustível é utilizado gás líquido da categoria I
(propano/butano).
3
71
Page 72

PT
Antes da primeira utilização Classic
6.1 Especificações das variantes de aparelhos
O grelhador de mala está disponível em diversas variantes de ligação:
• Classic 1: Grelhador de mala com três placas de fogão
• Classic 2: Grelhador de mala com duas placas de fogão
Todas as versões estão disponíveis nas seguintes variantes de conexão:
• Pressão de conexão 30 mbar
• Pressão de conexão 50 mbar
6.2 Pressão do gás
Poderá consultar a pressão do gás na chapa de características na parte de baixo da
mala.
As variantes de aparelhos para a conexão a garrafas de gás têm de ser operadas com
uma válvula redutora da pressão.
Utilize apenas as válvulas redutoras de pressão prescritas e admissíveis no seu país.
AVISO! Perigo de ferimentos!
!
A pressão de saída da válvula redutora de pressão tem em todo o caso
de coincidir com a pressão de conexão (pressão do gás) do grelhador
de mala.
7 Antes da primeira utilização
Proceda do seguinte modo (fig. 1, página 3):
➤ Retire a película de proteção da parte superior do queimador (1).
➤ Aparafuse a pega (9) com ambos os parafusos M3 à parte inferior da mala.
➤ Fixe o fecho (10) com o parafuso M4 à tampa da mala.
➤ Limpe a grelha e a bandeja coletora de suco com um detergente convencional.
➤ Apenas na ligação a garrafas de gás:
– Utilize um tubo de gás adequado e uma válvula redutora de pressão (ambos
não estão contidos no material fornecido).
– Conecte a válvula redutora de pressão à extremidade livre do tubo de gás.
➤ Apenas na ligação a tomadas de gás: Utilize um tubo de gás adequado (não
contido no material fornecido).
➤ Conecte o tubo de gás ao injetor (2).
72
Page 73

PT
Classic Utilizar o grelhador de mala
Tabela de adaptadores
NOTA! Perigo de danos!
A
País Adaptador
Um funcionamento adequado apenas é possível com um adaptador fornecido pelo fabricante (n.º art. 9103300168 ou 9103300169). Em caso
de dúvidas, por favor, entre em contacto com a filial do fabricante no seu
país (consulte os endereços no verso).
k a h
l m q L T U
Restantes países europeus 9103300169
–
9103300168
8 Utilizar o grelhador de mala
8.1 Desmontar o grelhador de mala
Respeite as seguintes indicações durante a escolha do local de instalação:
• Posicione o grelhador de mala no exterior e num sítio bem arejado. O local não
se deve encontrar num vale para que não possa haver aí uma acumulação de gás.
• A base tem de ser sólida, plana e resistente.
• O grelhador de mala deve estar na horizontal.
• O grelhador de mala nunca deve estar próximo de materiais facilmente inflamá-
veis nem mesmo durante o seu arrefecimento. Mantenha uma distância de segurança mínima de 20 cm.
• Resp eite tam bém as in dicaçõe s de se gurança , ver cap ítul o “Seg uranç a no manu seamento de gás líquido” na página 68.
Proceda do seguinte modo (fig. 2, página 3):
➤ Abra o fecho e desdobre a mala (1).
➤ Retire todas as peças individuais e coloque-as de parte.
➤ Enrosque as pernas (2) na parte inferior da mala.
73
Page 74

PT
Utilizar o grelhador de mala Classic
➤ Monte as peças laterais:
– Suspenda a peça lateral (3) nas fendas da parte superior da mala (1)(A).
– Bascule-a para a frente.
– Suspenda a parte lateral no lado dianteiro da parte inferior da mala (B).
NOTA!
A
➤ Empurre a grelha sempre juntamente com a bandeja de coletora de suco (4)
para a altura pretendida.
➤ Se necessário, insira o espeto do grelhador (5) na guia das peças laterais.
Nunca utilize o aparelho sem bandeja coletora de suco. Sem a ban-
deja coletora de suco, as advertências localizadas na parte inferior da
mala poderão ficar sujas, poderão ficar danificadas devido ao calor ou
poderão ficar ilegíveis.
8.2 Montar o queimador
Proceda do seguinte modo (fig. 2, página 3):
➤ Coloque o queimador (7) sobre as peças laterais
➤ Empurre o injetor (6) no queimador (7) até este engrenar audivelmente.
8.3 Conectar o grelhador de mala à garrafa de gás
AVISO! Perigo de ferimentos!
!
Proceda do seguinte modo (fig. 3, página 4):
➤ Instale a garrafa de gás (1) verticalmente e, pelo menos, 50 cm afastada do
grelhador de mala.
➤ Verifique se a válvula (2) está conectada à garrafa de gás.
➤ Enrosque manualmente a válvula redutora de pressão (3) na nova garrafa de gás.
• Utilize apenas garrafas de gás propano ou butano com uma válvula
redutora de pressão testada e uma peça de topo adequada.
• Compare a indicação da pressão na chapa de características com a
indicação da pressão na válvula redutora de pressão.
74
Page 75

PT
Classic Utilizar o grelhador de mala
➤ Preste atenção para que o tubo de gás
– não fique preso nem dobrado,
– se encontre a uma distância segura do queimador.
➤ Após a conexão do aparelho ao abastecimento de gás, verifique a estanquei-
dade do tubo de gás com um agente formador de espuma, por exemplo,
solução de sabão.
8.4 Conectar o grelhador de mala à tomada de gás
➤ Encaixe o tubo de gás na tomada de gás.
➤ Preste atenção para que o tubo de gás
– não fique preso nem dobrado,
– se encontre a uma distância segura do queimador.
➤ Após a conexão do aparelho ao abastecimento de gás, verifique a estanquei-
dade do tubo de gás com um agente formador de espuma, por exemplo,
solução saponácea.
8.5 Iniciar o fogo no grelhador de mala
AVISO! Perigo de ferimentos!
!
• Não utilize o grelhador de mala sem supervisão.
• Fogueie o queimador imediatamente após a abertura do abasteci-
mento de gás. Caso contrário, na zona do queimador poderá ocorrer uma acumulação de gás e poderá ser provocada uma explosão.
• Todo o processo de fogueamento tem de ser visível a partir de cima
e não pode ser coberto por panelas.
I
OBSERVAÇÃO
• Durante o funcionamento é perceptível um pequeno ruído que é
provocado por uma fuga de gás. No entanto, isto é completamente
inofensivo.
• Na primeira utilização pode ocorrer formação de fumo. Tal deve-se
aos resíduos queimados da massa lubrificante e irá parar após aprox.
10 min.
• A cor da chapa em aço inoxidável do queimador transformar-se-à
numa cor azul devido às temperaturas elevadas. Isto não tem qualquer tipo de influência sobre a função do aparelho e a qualidade do
material.
75
Page 76

PT
Utilizar o grelhador de mala Classic
Proceda do seguinte modo (fig. 4, página 4):
➤ Abra o abastecimento de gás.
➤ Imediatamente depois, fogueie o queimador nas aberturas de saída do gás (1)
com um fósforo comprido ou com outro dispositivo de fogueamento adequado.
Retire a sua mão assim que o queimador estiver ligado.
➤ Após iniciar o fogo, controle se o queimador está a queimar devidamente. De
ambos os lados do tubo do queimador (2) a fila de chamas tem de estar viva em
todo o comprimento.
8.6 Grelhar
Por favor, respeite as seguintes indicações durante a preparação de grelhados:
PRECAUÇÃO! Perigo de queimaduras
!
• Utilize sempre o suporte da grelha do grelhador quando pretender
colocar a bandeja coletora de suco e a grelha numa posição mais
elevada ou baixa em estado quente.
• Retire o suporte da grelha do grelhador durante a preparação de
grelhados.
Caso contrário, a mesma aquece demasiado.
• Regule a temperatura durante a preparação de grelhados, colocando a bandeja
coletora de suco e a grelha juntamente com o suporte da grelha do grelhador
numa posição mais eleva ou mais baixa.
• As recepções laterais superiores são apropriadas para a preparação breve e
intensa de grelhados, por exemplo, de bifes.
• Nunca utilize o aparelho sem bandeja coletora de suco. Sem a bandeja cole-
tora de suco, as advertências localizadas na parte inferior da mala poderão ficar
sujas, poderão ficar danificadas devido ao calor ou poderão ficar ilegíveis.
Além disso, graças à bandeja coletora de suco, o calor ainda será melhor aproveitado.
• Introduza o alimento a confecionar, por exemplo, aves e rolos de carne com
ambas as tenazes no espeto do grelhador. Coloque o espeto no suporte da
grelha do grelhador.
76
Page 77

PT
Classic Utilizar o grelhador de mala
• Para uma viragem mais cómoda de assados é adequado o motor do grelhador
(acessório). Fixe primeiramente o motor do grelhador na peça lateral da
esquerda, introduzindo a cabeça de fixação no orifício da chave. Em seguida,
encaixe a ponta quadrada do espeto na abertura do motor.
• Durante a preparação dos grelhados confecionados em espeto é possível preparar molhos de acordo com cada paladar graças ao suco da carne escorre para
a bandeja coletora de suco.
8.7 Preparação culinária
Por favor, respeite as seguintes indicações durante as preparações culinárias:
• Não utilize panelas com um fundo abaulado.
• Utilize apenas panelas com um diâmetro entre 10 cm e 20 cm.
8.8 Colocar o grelhador de mala fora de funcionamento
➤ Feche a alimentação de gás.
✓ As chamas extinguem.
8.9 Desmontar o grelhador de mala
PRECAUÇÃO! Perigo de queimaduras!
!
➤ Desligue o grelhador de mala do abastecimento de gás.
➤ Desmonte o grelhador de mala arrefecido.
➤ Limpe as peças individuais, ver capítulo “Limpar o grelhador de mala” na
página 79.
➤ Guarde as diversas peças na mala.
➤ Feche a mala com o fecho.
O grelhador de mala fica muito quente durante a utilização. Deixe o grelhador de mala arrefecer antes de o limpar, desmontar ou transportar.
77
Page 78

PT
Resolução de falhas Classic
8.10 Substituir a garrafa de gás
AVISO! Perigo de ferimentos!
!
➤ Feche totalmente a válvula da garrafa de gás.
➤ Desenrosque a válvula redutora de pressão da nova garrafa de gás.
➤ Verifique o estado da mangueira de gás.
Substitua a mangueira caso o material tenha ficado desgastado ou poroso.
➤ Enrosque manualmente a válvula redutora de pressão na nova garrafa de gás.
Substitua a garrafa de gás apenas em caso de uma boa ventilação.
Garanta que não existe nenhuma fonte de fogueamento por perto.
Substitua a garrafa de gás apenas se o grelhador de mala estiver
desligado.
9 Resolução de falhas
As reparações na peça condutora de gás deve ser da responsabilidade de
eletricistas.
➤ Em caso de falhas, desligue imediatamente o abastecimento de gás.
➤ Verifique mais uma vez se o aparelho está corretamente montado e se as peças
estão intatas, em especial, o tubo de gás e o injetor.
➤ Substitua as peças danificadas.
➤ Volte a colocar o aparelho em funcionamento apenas quando todas as falhas
tiverem sido eliminadas.
78
Page 79

PT
Classic Limpar o grelhador de mala
10 Limpar o grelhador de mala
NOTA!
A
➤ Deixe o aparelho arrefecer antes de o limpar.
➤ Limpe as superfícies. Remova, em especial os resíduos de gordura e de óleo ade-
rentes.
➤ Nunca utilize um aparelho de limpeza a vapor para a limpeza do aparelho.
➤ Deixe o aparelho secar antes do embalamento e o armazenamento.
Não utilize materiais afiados ou duros para a limpeza, uma vez que
podem causar danos no aparelho.
Utilize detergentes convencionais.
11 Garantia
É válido o prazo de garantia legal. Se o produto estiver com defeito, por favor,
dirija-se à representação do fabricante no seu país (endereços, ver verso do manual)
ou ao seu revendedor.
Para fins de reparação ou de garantia, terá de enviar os seguintes documentos em
conjunto:
• uma cópia da factura com a data de aquisição,
• um motivo de reclamação ou uma descrição da falha.
12 Eliminação
➤ Sempre que possível, coloque o material de embalagem no respectivo
contentor de reciclagem.
Para colocar o aparelho definitivamente fora de funcionamento, por
favor, informe-se junto do centro de reciclagem mais próximo ou
M
revendedor sobre as disposições de eliminação aplicáveis.
79
Page 80

PT
Dados técnicos Classic
13 Dados técnicos
Designação, pressão de conexão N.º de artigo
Grelhador de mala Classic 1, 30 mbar 9103300172
Grelhador de mala Classic 1, 50 mbar 9103300173
Grelhador de mala Classic 2, 30 mbar 9103300174
Grelhador de mala Classic 2, 50 mbar 9103300175
Dometic Classic 1
Consumo de gás: 385 g/h
Categoria do gás: Categoria I
Quantidade de placas de
fogão:
Potência do queimador: 5300 W
Dimensões: Grelhador de mala fechado: 620 x 128 x 288 mm
Bandeja coletora de suco com grelha: 544 x 238 mm
Peso: 10 kg
Verificação/certificado:
Consumo de gás: 320 g/h
Categoria do gás: Categoria I
Quantidade de placas de
fogão:
Potência do queimador: 4300 W
Dimensões: Grelhador de mala fechado: 510 x 128 x 288 mm
Bandeja coletora de suco com grelha: 435 x 238 mm
Peso: 8 kg
, propano/butano
3
3
Dometic Classic 2
, propano/butano
3
2
Verificação/certificado:
80
Page 81

IT
Classic
Prima di effettuare il montaggio e la messa in funzione, leggere accuratamente questo manuale di istruzioni, conservarlo e nel caso in cui
l'apparecchio venga consegnato ad un altro utente, consegnare anche le
relative istruzioni.
Indice
1 Spiegazione dei simboli . . . . . . . . . . . . . . . . . . . . . . . . . . . . . . . . . . . . . . . . 82
2 Indicazioni di sicurezza generali. . . . . . . . . . . . . . . . . . . . . . . . . . . . . . . . . . 82
3 Dotazione . . . . . . . . . . . . . . . . . . . . . . . . . . . . . . . . . . . . . . . . . . . . . . . . . . . 85
4 Accessori . . . . . . . . . . . . . . . . . . . . . . . . . . . . . . . . . . . . . . . . . . . . . . . . . . . . 86
5 Uso conforme alla destinazione . . . . . . . . . . . . . . . . . . . . . . . . . . . . . . . . . . 86
6 Descrizione tecnica. . . . . . . . . . . . . . . . . . . . . . . . . . . . . . . . . . . . . . . . . . . . 86
7 Prima della messa in funzione iniziale. . . . . . . . . . . . . . . . . . . . . . . . . . . . . . 87
8 Uso del barbecue portatile . . . . . . . . . . . . . . . . . . . . . . . . . . . . . . . . . . . . . . 89
9 Eliminazione dei disturbi. . . . . . . . . . . . . . . . . . . . . . . . . . . . . . . . . . . . . . . . 94
10 Pulizia del barbecue portatile . . . . . . . . . . . . . . . . . . . . . . . . . . . . . . . . . . . . 94
11 Garanzia . . . . . . . . . . . . . . . . . . . . . . . . . . . . . . . . . . . . . . . . . . . . . . . . . . . . 95
12 Smaltimento . . . . . . . . . . . . . . . . . . . . . . . . . . . . . . . . . . . . . . . . . . . . . . . . . 95
13 Specifiche tecniche. . . . . . . . . . . . . . . . . . . . . . . . . . . . . . . . . . . . . . . . . . . . 96
81
Page 82

IT
Spiegazione dei simboli Classic
1 Spiegazione dei simboli
AVVERTENZA!
!
!
A
I
Avviso di sicurezza: la mancata osservanza di questo avviso può
causare ferite gravi anche mortali.
ATTENZIONE!
Avviso di sicurezza: la mancata osservanza di questo avviso può
essere causa di lesioni.
AVVISO!
La mancata osservanza di questa nota può causare danni materiali e
compromettere il funzionamento del prodotto.
NOTA
Informazioni integranti relative all'impiego del prodotto.
2 Indicazioni di sicurezza generali
Il produttore non si assume nessuna responsabilità per danni nei seguenti casi:
• errori di montaggio o di allacciamento
• danni al prodotto dovuti a influenze meccaniche o a sovratensioni
• modifiche al prodotto senza esplicita autorizzazione del produttore
• impiego per altri fini rispetto a quelli descritti nel manuale di istruzioni
2.1 Sicurezza di base
AVVERTENZA!
!
A
82
• Utilizzare esclusivamente gas liquido della categoria I
pano/butano). Non impiegare altri combustibili.
AVVISO!
• Utilizzare l'apparecchio solamente per un uso conforme alla sua destinazione.
(pro-
3
Page 83

IT
Classic Indicazioni di sicurezza generali
2.2 Sicurezza durante l'uso del gas liquido
AVVERTENZA!
!
• Tenere le sostanze infiammabili lontane da stufette elettriche, appa-
recchi per la cucina e altre fonti di luce o di calore.
• Confrontare i dati della pressione riportati sulla targhetta con quelli
indicati sulla bombola di gas propano o butano.
• Non conservare mai le bombole di gas liquido in luoghi non aerati o
al di sotto del livello del terreno (avvallamenti del terreno a forma di
imbuto).
• Proteggere le bombole di gas liquido dalla diretta esposizione dei
raggi solari. La temperatura non deve superare i 50 °C.
2.3 Sicurezza durante il funzionamento dell'apparecchio
AVVERTENZA!
!
• Pericolo di asfissia!
L'apparecchio brucia gas liquido, consumando in tal modo ossigeno.
Nell'utilizzo in ambienti chiusi sussiste il pericolo di asfissia a causa
della mancanza di ossigeno.
Azionare l'apparecchio solo all'aperto.
• In caso di odore di gas:
– Chiudere la valvola della bombola del gas e lasciarla chiusa fino a
quando non è stato eliminato l'errore.
– Non provare mai a cercare la perdita con una fiamma libera.
• Questo dispositivo può essere usato sia da bambini dagli 8 anni in su,
sia da persone con ridotte capacità fisiche, sensoriali o mentali o con
poca esperienza o conoscenze, se non lasciati soli o se istruiti
sull’utilizzo sicuro del dispositivo e se sono in grado di capire i pericoli
che possono sorgere.
• Sorvegliare i bambini per evitare che giochino con l'apparecchio.
• Quando l'apparecchio è in funzione, non lasciarlo mai incustodito per
un lungo periodo di tempo.
• Utilizzare fiammiferi lunghi o un accendigas adeguato. Durante
l'accensione, prestare attenzione alle aperture di uscita del gas. Non
distogliere lo sguardo dal bruciatore quando lo si accende.
Ritirare subito la mano non appena il bruciatore si è acceso.
83
Page 84

IT
Indicazioni di sicurezza generali Classic
• Quando si utilizzano i barbecue portatili, indossare sempre un abbigliamento adeguato.
Non indossare vestiti ampi, in quanto possono prendere fuoco facilmente.
• Lasciar raffreddare il barbecue portatile fino alla temperatura ambiente
prima di toccarlo a mani nude.
• Sostituire la conduttura flessibile se il materiale dovesse risultare infragilito o poroso.
• Non sostituire mai le bocchette, l'iniettore o il bruciatore.
AVVISO!
A
• Non utilizzare mai la grigla senza il recipiente per i liquidi.
• Le parti calde dell'apparecchio non devono entrare in contatto con
grassi, acqua o altri liquidi.
• Non trasportare mai l'apparecchio se ancora caldo.
• Utilizzare solo pentole e padelle con fondo piatto e dal diametro di
10 – 20 cm.
• Mentre si cucina, assicurarsi che le pentole e le padelle siano stabili.
• Assicurarsi che i manici delle padelle o delle pentole non sporgano
dal barbecue portatile. Girare i manici verso l'interno. In questo modo
si riduce il pericolo di rovesciamento, di gravi ustioni e il rischio che le
sostanze infiammabili prendano fuoco.
• Prestare la massima attenzione quando si scaldano grasso o olio, infatti
essi potrebbero infiammarsi se dovessero raggiungere temperature
molto elevate.
• Utilizzare esclusivamente presine asciutte, in modo da evitare la formazione di vapore. Al posto delle presine non utilizzare asciugamani
o simili, in quanto potrebbero prendere fuoco.
• Non lasciare mai incustodito il barbecue portatile quando è in funzione. Le pentole che traboccano possono provocare fumo e incendi.
84
Page 85

IT
Classic Dotazione
3Dotazione
N. in fig. 1,
pagina 3
1 1 Bruciatore con piano cottura
2 2 Iniettori (sul bruciatore)
3 1 Recipiente per liquidi con griglia
4 1 Supporto griglia
54Piedini
61Spiedo
7 2 Fermacarne
8 1 Contenitore
91Manico
10 1 Chiusura
11 2 Componenti laterali
– 2 Viti e dadi M3
– 1 Vite e dado M4
– 1 Istruzioni per l’uso
Quantità Denominazione
85
Page 86

IT
Accessori Classic
4Accessori
Disponibile come accessorio (non in dotazione):
Denominazione N. articolo
Vassoi barbecue 9103300804
Cestino per barbecue Midi 9103300800
Cestino per barbecue Maxi 9103300801
Batteria del motore per barbecue (1,5 V) 9103300802
Motore del barbecue Combi (1,5 V/230 V) 9103300807
Motore del barbecue di rete (230 V) 9103300803
Copertura barbecue Classic 1 e Consul 9103500360
Copertura barbecue Classic 2 9103500361
5 Uso conforme alla destinazione
I barbecue portatili Classic 1 e Classic 2 di Dometic sono realizzati per essere impiegati all’aperto.
Con i barbecue portatili Classic 1 e Classic 2 è possibile grigliare e contemporaneamente cucinare con i fuochi sulla parte superiore. Il barbecue portatile può essere
collegato mediante un tubo flessibile del gas (non compreso nella fornitura) a una
bombola del gas o a una presa del gas di un camper.
Il barbecue portatile non deve essere azionato in ambienti chiusi (ad es. tende o
verande). Lasciare raffreddare completamente il barbecue portatile prima di collocarlo in una tenda o in una veranda.
6 Descrizione tecnica
È possibile smontare il barbecue portatile in modo che sia più semplice da trasportare. Nella valigetta trovano posto tutti i suoi componenti.
Come combustibile, utilizzare esclusivamente gas liquido della categoria I
pano/butano).
86
(pro-
3
Page 87

IT
Classic Prima della messa in funzione iniziale
6.1 Specifiche delle varianti dell'apparecchio
Il barbecue portatile è disponibile in diversi modelli e in diverse varianti di
allacciamento:
• Classic 1: barbecue portatile con tre fuochi
• Classic 2: barbecue portatile con due fuochi
Tutti i modelli sono disponibili nelle seguenti versioni:
• pressione di collegamento da 30 mbar
• pressione di collegamento da 50 mbar
6.2 Pressione del gas
La pressione del gas ammessa è riportata sulla targhetta nella parte inferiore della
valigetta.
Gli apparecchio con il collegamento alla bombola del gas, devono essere messi in
esercizio con una valvola di riduzione della pressione.
Utilizzare solo valvole di riduzione della pressione previste e autorizzate nel vostro
Paese.
AVVERTENZA! Rischio di lesioni!
!
La pressione di uscita della valvola di riduzione della pressione deve corrispondere alla pressione di collegamento (pressione di gas) del barbecue portatile.
7 Prima della messa in funzione iniziale
Procedere come segue (fig. 1, pagina 3):
➤ Togliere la pellicola di protezione dalla parte superiore del bruciatore (1).
➤ Avvitare il manico (9) con le due viti M3 nella parte inferiore della valigetta.
➤ Fissare il dispositivo di chiusura (10) con la vite M4 sul coperchio della valigetta.
➤ Lavare la griglia e il recipiente per liquidi con un detergente comunemente in
commercio.
87
Page 88

IT
Prima della messa in funzione iniziale Classic
➤ Solo con collegamento a bombole del gas:
– Procuratevi un flessibile del gas adatto e una valvola di riduzione della pres-
sione (entrambi non compresi nella fornitura).
– Collegare la valvola di riduzione della pressione all’estremità libera del tubo
flessibile del gas.
➤ Solo con collegamento alle prese del gas: procurarsi un tubo flessibile
adatto (non contenuto nella fornitura).
➤ Collegare il flessibile del gas all’iniettore (2).
Adattatore tabella
AVVISO! Pericolo di danneggiamento!
A
Paese Adattatore
Un funzionamento regolare è possibile solo con l'adattatore
(n. art. 9103300168 oppure 9103300169) fornito dal produttore.
In caso di domande rivolgersi alla filiale del produttore presente nel proprio Paese (i rispettivi indirizzi sono indicati sul retro).
k a h
l m q L T U
Resto dell'Europa 9103300169
–
9103300168
88
Page 89

IT
Classic Uso del barbecue portatile
8 Uso del barbecue portatile
8.1 Installazione del barbecue portatile
Quando si sceglie il luogo di montaggio, tenere presente le seguenti indicazioni.
• Posizionare il barbecue portatile all'aperto, in un'area ben ventilata. Non posizionarlo in un avvallamento del terreno: il gas deve potersi disperdere liberamente.
• Il terreno deve essere fermo, piano e stabile.
• Il barbecue portatile deve essere al riparo dal vento.
• Non posizionare il barbecue portatile nelle vicinanze di materiali facilmente
infiammabili, nemmeno quando si sta raffreddando. Mantenere una distanza
minima di 20 cm.
• Osservare anche le indicazioni di sicurezza, vedi a questo proposito il capitolo
“Sicurezza durante l'uso del gas liquido” a pagina 83.
Procedere come segue (fig. 2, pagina 3):
➤ Aprire il dispositivo di chiusura e aprire la valigetta (1).
➤ Estrarre i singoli componenti e metterli da parte.
➤ Fissare le gambe di sostegno (2) sul fondo della valigetta..
➤ Montare i componenti laterali.
– Agganciare il componente laterale (3) nella feritoia sulla parte superiore della
valigetta (1)(A).
– Ribaltarlo in avanti.
– Agganciare il componente laterale sul lato anteriore del fondo della
valigetta (B).
AVVISO!
A
➤ Spostare la griglia sempre insieme con il recipiente per i liquidi (5) all’altezza
desiderata.
➤ Se necessario, inserire lo spiedo (6) nella guida dei componenti laterali.
Non utilizzare mai l'apparecchio senza il recipiente per liquidi. Senza
il recipiente per liquidi, le targhette segnaletiche sul fondo della valigetta si sporcherebbero e il calore potrebbe danneggiarle e renderle
illeggibili.
89
Page 90

IT
Uso del barbecue portatile Classic
8.2 Montaggio del bruciatore
Procedere come segue (fig. 2, pagina 3):
➤ Appoggiare il bruciatore (7) sui componenti laterali.
➤ Inserire l’iniettore (6) nel bruciatore (7) finché non è innestato con uno scatto udi-
bile.
8.3 Collegamento del barbecue portatile alla bombola
del gas
AVVERTENZA! Rischio di lesioni!
!
Procedere come segue (fig. 3, pagina 4):
➤ Posizionare la bombola del gas (1) verticalmente e ad almeno 50 cm di
distanza dal barbecue portatile.
➤ Verificare se la valvola (2) della bombola del gas è chiusa.
• Impiegare solo bombole di gas propano o butano con valvola di
riduzione della pressione certificata e con un cappuccio appropriato.
• Confrontare i dati della pressione riportati sulla targhetta con quelli
indicati sulla valvola di riduzione della pressione.
➤ Serrare a mano la valvola di riduzione della pressione (3) sulla bombola del gas.
➤ Assicurarsi che il tubo flessibile del gas
– non sia stato bloccato o piegato,
– si trovi a una distanza di sicurezza dal bruciatore.
➤ Dopo il collegamento dell'apparecchio all'alimentazione del gas, controllare la
tenuta del tubo flessibile con un mezzo schiumogeno, ad es. acqua saponata.
90
Page 91

IT
Classic Uso del barbecue portatile
8.4 Collegamento del barbecue portatile alla presa del
gas
➤ Inserire il tubo flessibile del gas nella presa del gas.
➤ Assicurarsi che il tubo flessibile del gas
– non sia stato bloccato o piegato,
– si trovi a una distanza di sicurezza dal bruciatore.
➤ Dopo il collegamento dell'apparecchio all'alimentazione del gas, controllare la
tenuta del tubo flessibile con un mezzo schiumogeno, ad es. acqua saponata.
8.5 Accensione del grill
AVVERTENZA! Rischio di lesioni!
!
• Non lasciare incustodito il barbecue portatile quando è in funzione.
• Accendere il bruciatore subito dopo l'apertura dell'alimentazione
del gas. In caso contrario, il gas potrebbe raccogliersi attorno al bruciatore e causare un'esplosione.
• Deve essere possibile controllare dall'alto l'intero processo di
accensione; pentole o altri oggetti non devono coprire il campo
visivo.
I
NOTA
• Durante l'esercizio è udibile un leggero rumore prodotto dal gas in
uscita. Esso è completamente innocuo.
• Quando viene messo in esercizio per la prima volta, l'apparecchio
può produrre fumo. Questo è causato dalla bruciatura dei resti
infiammabili del grasso delle macchine e non dura che una decina di
minuti.
• La lamiera in acciaio inox del briuciatore assume un colore bluastro a
causa delle alte temperature. Questo non influisce tuttavia sul funzionamento dell'apparecchio e sulla qualità del materiale.
91
Page 92

IT
Uso del barbecue portatile Classic
Procedere come segue (fig. 3, pagina 4):
➤ Aprire l'alimentazione del gas.
➤ Subito dopo accendere il bruciatore in corrispondenza delle aperture delle
uscite del gas (1) con un lungo fiammifero o un altro strumento idoneo per
l'accensione.
Ritirare la mano non appena il bruciatore si è acceso.
➤ Dopo averlo acceso, controllare se il bruciatore brucia correttamente: su
entrambi i lati del tubo del bruciatore (2) la fila con la fiamma deve bruciare
sull'intera lunghezza.
8.6 Grigliare
Osservare le seguenti indicazioni per grigliare:
ATTENZIONE! Pericolo di ustioni!
!
• Utilizzare sempre il supporto della griglia se si desidera alzare o
abbassare l'altezza del recipiente per liquidi e della griglia quando
sono caldi.
• Estrarre il supporto della griglia quando si griglia.
Potrebbe diventare troppo caldo.
• Quando si griglia, regolare la temperatura, alzando o abbassando l'altezza del
recipiente per liquidi e della griglia.
• Gli alloggiamenti superiori e laterali, sono adatti per grigliare in modo breve e
intenso (p.es.: bistecche).
• Non utilizzare mai l'apparecchio senza il recipiente per liquidi. Senza il reci-
piente per liquidi, le targhette segnaletiche sul fondo della valigetta si sporcherebbero e il calore potrebbe danneggiarle e renderle illeggibili.
Inoltre, grazie al recipiente per liquidi, il calore del bruciatore viene sfruttato
meglio.
• Fissare allo spiedo i cibi che si desidera grigliare (come il pollo o l'arrosto) con i
due fermacarne. Inserire lo spiedo nel supporto per lo spiedo.
• Per girare comodamente l'arrosto, utilizzare un motore del barbecue (accessorio). Per prima cosa, fissare il motore per barbecue sulla parte sinistra, inserendo
la manopola di fissaggio nel relativo foro. Inserire infine la punta quadrata dello
spiedo nell'apertura del motore.
• Quando vengono grigliati arrosti allo spiedo, con il sugo di cottura dell'arrosto è
possibile preparare salse deliziose.
92
Page 93

IT
Classic Uso del barbecue portatile
8.7 Cucinare
Osservare le seguenti indicazioni per cucinare:
• Non utilizzare pentole dal fondo convesso.
• Utilizzare solo pentole dal diametro di 10 – 20 cm.
8.8 Come spegnere il barbecue portatile
➤ Chiudere l'alimentazione del gas.
✓ Le fiamme si spengono.
8.9 Come smontare il barbecue portatile
ATTENZIONE! Pericolo di ustioni!
!
➤ Scollegare il barbecue portatile dall'alimentazione di gas.
➤ Smontare il barbecue portatile raffreddato.
➤ Pulire i singoli componenti, a riguardo vedi capitolo “Pulizia del barbecue porta-
tile” a pagina 94.
Dopo l'uso, il barbecue portatile è estremamente caldo. Lasciar raffreddare il barbecue portatile prima di pulirlo, smontarlo o trasportarlo.
➤ Inserire i componenti nella valigetta.
➤ Chiudere la valigetta con il dispositivo di chiusura.
8.10 Sostituzione della bombola del gas
AVVERTENZA! Rischio di lesioni!
!
➤ Chiudere completamente la valvola della bombola del gas.
➤ Svitare la valvola di riduzione della pressione dalla bombola di gas.
➤ Controllare lo stato del tubo flessibile del gas.
Sostituire la conduttura flessibile se il materiale dovesse risultare infragilito o
poroso.
➤ Serrare a mano la valvola di riduzione della pressione sulla nuova bombola.
Sostituire la bombola del gas solo in ambienti ben areati.
Assicurarsi che la fonte di accensione sia nelle vicinanze.
Sostituire la bombola del gas solo se il barbecue portatile è spento.
93
Page 94

IT
Eliminazione dei disturbi Classic
9 Eliminazione dei disturbi
Le riparazioni ai componenti dell'alimentazione del gas possono venire eseguite
solo da tecnici specializzati.
➤ In caso di guasti, chiudere l'alimentazione del gas.
➤ Controllare nuovamente se l'apparecchio è stato montato correttamente e se i
componenti non presentano danneggiamenti (in modo particolare il tubo flessibile del gas e l'iniettore).
➤ Sostituire le parti danneggiate.
➤ Mettere in esercizio l'apparecchio solo quando tutti i guasti sono stati eliminati.
10 Pulizia del barbecue portatile
AVVISO!
A
➤ Prima di pulire l'apparecchio, lasciarlo raffreddare.
Per la pulizia non impiegare detergenti corrosivi o oggetti ruvidi perché
potrebbero provocare danni all'apparecchio.
Utilizzare detergenti comunemente in commercio.
➤ Pulire le superfici. Rimuovere, in particolare, residui di olio e grasso incrostati.
➤ Non pulire in nessun caso l'apparecchio con un getto di vapore.
➤ Prima di mettere via l'apparcchio, assicurarsi che si asciutto.
94
Page 95

IT
Classic Garanzia
11 Garanzia
Vale il termine di garanzia previsto dalla legge. Qualora il prodotto risultasse difettoso, La preghiamo di rivolgersi alla filiale del produttore del suo Paese (l'indirizzo si
trova sul retro del manuale di istruzioni), oppure al rivenditore specializzato di riferimento.
Per la riparazione e per il disbrigo delle condizioni di garanzia è necessario inviare la
seguente documentazione:
• una copia della fattura con la data di acquisto del prodotto,
• un motivo su cui fondare il reclamo, oppure una descrizione del guasto.
12 Smaltimento
➤ Raccogliere il materiale di imballaggio possibilmente negli appositi contenitori di
riciclaggio.
Quando il prodotto viene messo fuori servizio definitivamente, informarsi
al centro di riciclaggio più vicino, oppure presso il proprio rivenditore
M
specializzato, sulle prescrizioni adeguate concernenti lo smaltimento.
95
Page 96

IT
Specifiche tecniche Classic
13 Specifiche tecniche
Denominazione, pressione di collegamento N. articolo
Barbecue portatile Classic 1, 30 mbar 9103300172
Barbecue portatile Classic 1, 50 mbar 9103300173
Barbecue portatile Classic 2, 30 mbar 9103300174
Barbecue portatile Classic 2, 50 mbar 9103300175
Dometic Classic 1
Consumo di gas: 385 g/h
Categoria del gas: Categoria I
Numero dei fuochi: 3
Potenza del bruciatore: 5300 W
Dimensioni: Barbecue portatile chiuso: 620 x 128 x 288 mm
Recipiente per liquidi con griglia: 544 x 238 mm
Peso: 10 kg
Certificati di controllo:
Consumo di gas: 320 g/h
Categoria del gas: Categoria I
Numero dei fuochi: 2
Potenza del bruciatore: 4300 W
Dimensioni: Barbecue portatile chiuso: 510 x 128 x 288 mm
Recipiente per liquidi con griglia: 435 x 238 mm
Peso: 8 kg
Certificati di controllo:
, propano/butano
3
Dometic Classic 2
, propano/butano
3
96
Page 97

NL
Classic
Lees deze handleiding voor de montage en ingebruikneming zorgvuldig
door en bewaar de handleiding. Geef de handleiding bij het doorgeven
van het toestel door aan de volgende gebruiker.
Inhoud
1 Verklaring van de symbolen . . . . . . . . . . . . . . . . . . . . . . . . . . . . . . . . . . . . . 98
2 Algemene veiligheidsinstructies . . . . . . . . . . . . . . . . . . . . . . . . . . . . . . . . . 98
3 Omvang van de levering . . . . . . . . . . . . . . . . . . . . . . . . . . . . . . . . . . . . . . . 101
4 Accessoires . . . . . . . . . . . . . . . . . . . . . . . . . . . . . . . . . . . . . . . . . . . . . . . . . .102
5 Gebruik volgens de voorschriften . . . . . . . . . . . . . . . . . . . . . . . . . . . . . . . .102
6 Technische beschrijving . . . . . . . . . . . . . . . . . . . . . . . . . . . . . . . . . . . . . . . .102
7 Voor het eerste gebruik . . . . . . . . . . . . . . . . . . . . . . . . . . . . . . . . . . . . . . . .103
8 Koffergrill gebruiken . . . . . . . . . . . . . . . . . . . . . . . . . . . . . . . . . . . . . . . . . . .104
9 Verhelpen van storingen. . . . . . . . . . . . . . . . . . . . . . . . . . . . . . . . . . . . . . . .109
10 Koffergrill schoonmaken. . . . . . . . . . . . . . . . . . . . . . . . . . . . . . . . . . . . . . . .109
11 Garantie. . . . . . . . . . . . . . . . . . . . . . . . . . . . . . . . . . . . . . . . . . . . . . . . . . . . . 110
12 Afvoeren . . . . . . . . . . . . . . . . . . . . . . . . . . . . . . . . . . . . . . . . . . . . . . . . . . . . 110
13 Technische gegevens. . . . . . . . . . . . . . . . . . . . . . . . . . . . . . . . . . . . . . . . . . 111
97
Page 98

NL
Verklaring van de symbolen Classic
1 Verklaring van de symbolen
WAARSCHUWING!
!
!
A
I
Veiligheidsaanwijzing: Het niet naleven kan leiden tot overlijden of
ernstig letsel.
VOORZICHTIG!
Veiligheidsaanwijzing: Het niet naleven kan leiden tot letsel.
LET OP!
Het niet naleven ervan kan leiden tot materiële schade en de werking
van het product beperken.
INSTRUCTIE
Aanvullende informatie voor het bedienen van het product.
2 Algemene veiligheidsinstructies
De fabrikant kan in de volgende gevallen niet aansprakelijk worden gesteld voor
schade:
• montage- of aansluitfouten
• beschadiging van het product door mechanische invloeden en overspanningen
• veranderingen aan het product zonder uitdrukkelijke toestemming van de
fabrikant
• gebruik voor andere dan de in de handleiding beschreven toepassingen
2.1 Fundamentele veiligheid
WAARSCHUWING!
!
A
98
• Gebruik uitsluitend vloeibaar gas van categorie de I
aan/butaan). Gebruik geen andere brandstoffen.
LET OP!
• Gebruik het toestel alleen volgens de voorschriften.
(prop-
3
Page 99

NL
Classic Algemene veiligheidsinstructies
2.2 Veiligheid bij de omgang met vloeibaar gas
WAARSCHUWING!
!
• Houd brandbare stoffen uit de buurt van verwarmings- en kook-
toestellen, evenals andere licht- en warmtebronnen.
• Vergelijk de druk op het typeplaatje met de druk op de propaan- of
butaangasfles.
• Bewaar de flessen met vloeibaar gas nooit op niet geventileerde
plaatsen of onder grondniveau (trechtervormige kuilen in de grond).
• Bescherm flessen met vloeibaar gas tegen directe zonnestralen. De
temperatuur mag niet hoger zijn dan 50°C.
2.3 Veiligheid bij het gebruik van het toestel
WAARSCHUWING!
!
• Gevaar voor verstikking!
Het toestel verbrandt vloeibaar gas en verbruikt daarbij zuurstof. Bij
het gebruik in ruimtes bestaat gevaar voor verstikking door zuurstofgebrek.
Gebruik het toestel uitsluitend buiten.
• Indien u gas ruikt:
– Sluit het gasflesventiel en houd deze gesloten, totdat de fout is
verholpen.
– Probeer nooit het lek met een vlam te vinden.
• Dit toestel kan door kinderen vanaf 8 jaar en ouder alsmede door
personen met verminderde fysieke, zintuiglijke of geestelijke
vermogens of tekortschietende ervaring en kennis gebruikt worden,
indien ze worden begeleid of hun is uitgelegd hoe ze het apparaat
veilig kunnen gebruiken. Ook dienen ze inzicht te hebben in de
gevaren die het gebruik van het toestel zich meebrengt.
• Er moet toezicht worden gehouden op kinderen, zodat ze niet met
het toestel gaan spelen.
• Laat het toestel tijdens de werking nooit gedurende langere tijd onbeheerd.
• Gebruik lange lucifers of een geschikte aansteker. Houd bij het ontsteken de gasuitstroomopeningen in de gaten. Ontsteek de brander
niet zonder direct zichtcontact.
Trek uw hand snel terug op het moment dat de brander ontstoken is.
99
Page 100

NL
Algemene veiligheidsinstructies Classic
• Draag bij gebruik van de koffergrill geschikte kleding.
Draag geen loshangende kledingstukken die vlam kunnen vatten.
• Laat de koffergrill tot de omgevingstemperatuur afkoelen, voordat u
deze met blote handen aanraakt.
• Vervang poreuze of beschadigde slangen meteen.
• Verander nooit de sproeier, injector of brander.
LET OP!
A
• Gebruik het rooster nooit zonder vetopvangbak.
• Hete toestelonderdelen mogen niet met vet, water of andere vloei-
stoffen in contact komen.
• Transporteer het toestel nooit in hete toestand.
• Gebruik uitsluitend pannen en potten met een vlakke bodem en een
diameter van 10 tot 20 cm.
• Let er bij het koken op, dat de potten en pannen veilig staan.
• Laat de grepen van de potten of pannen nooit boven de koffergrill uit-
steken. Draai de grepen naar binnen. Daardoor wordt het risico op
morsen, het ontvlammen van brandbare stoffen en ernstig letsel verminderd.
• Ga voorzichtig te werk, als u vet of olie verhit. Vet en olie kunnen bij
grote hitte ontvlammen.
• Gebruik enkel droge pannenlappen, om stoomvorming te voorkomen. Gebruik geen handdoeken in plaats van pannenlappen omdat
deze o.a. vuur kunnen vatten.
• Gebruik de koffergrill nooit zonder toezicht. Overkokende pannen
kunnen rook en brand veroorzaken.
100
 Loading...