

Page 1
Dunstabzugshaube
Montage- und Bedienungsanleitung . 8
Extractor hood
Installation and Operating Manual. . 17
Hotte d'aspiration
Instructions de montage
et de service . . . . . . . . . . . . . . . . . . 26
Extractor de humos
Instrucciones de montaje y de uso . 35
Cappa aspirante
Istruzioni di montaggio e d’uso . . . . 44
Afzuigkap
Montagehandleiding en
gebruiksaanwijzing . . . . . . . . . . . . . 53
Emhætte
Monterings- og
betjeningsvejledning . . . . . . . . . . . . 62
Spisfläkt
Monterings- och bruksanvisning . . . 71
Avtrekkshette
Monterings- og bruksanvisning . . . . 80
Liesituuletin
Asennus- ja käyttöohje . . . . . . . . . . 89
Exaustor
Instruções de montagem e manual de
instruções . . . . . . . . . . . . . . . . . . . . 98
DE
EN
FRESIT
NL
DA
SV
NO
FI
PT
Отводящая вытяжка
Инструкция по монтажу и
эксплуатации . . . . . . . . . . . . . . . . 107
Okap kuchenny
Instrukcja montażu i obsługi . . . . . .116
Odsavač par
Návod k montáži a obsluze. . . . . . 125
Odsávač pár
Návod na montáž a uvedenie do
prevádzky . . . . . . . . . . . . . . . . . . . 134
Páraelszívó
Szerelési és használati útmutató . 143
RU
PL
CSSKHU
CK400
Page 2

Page 3
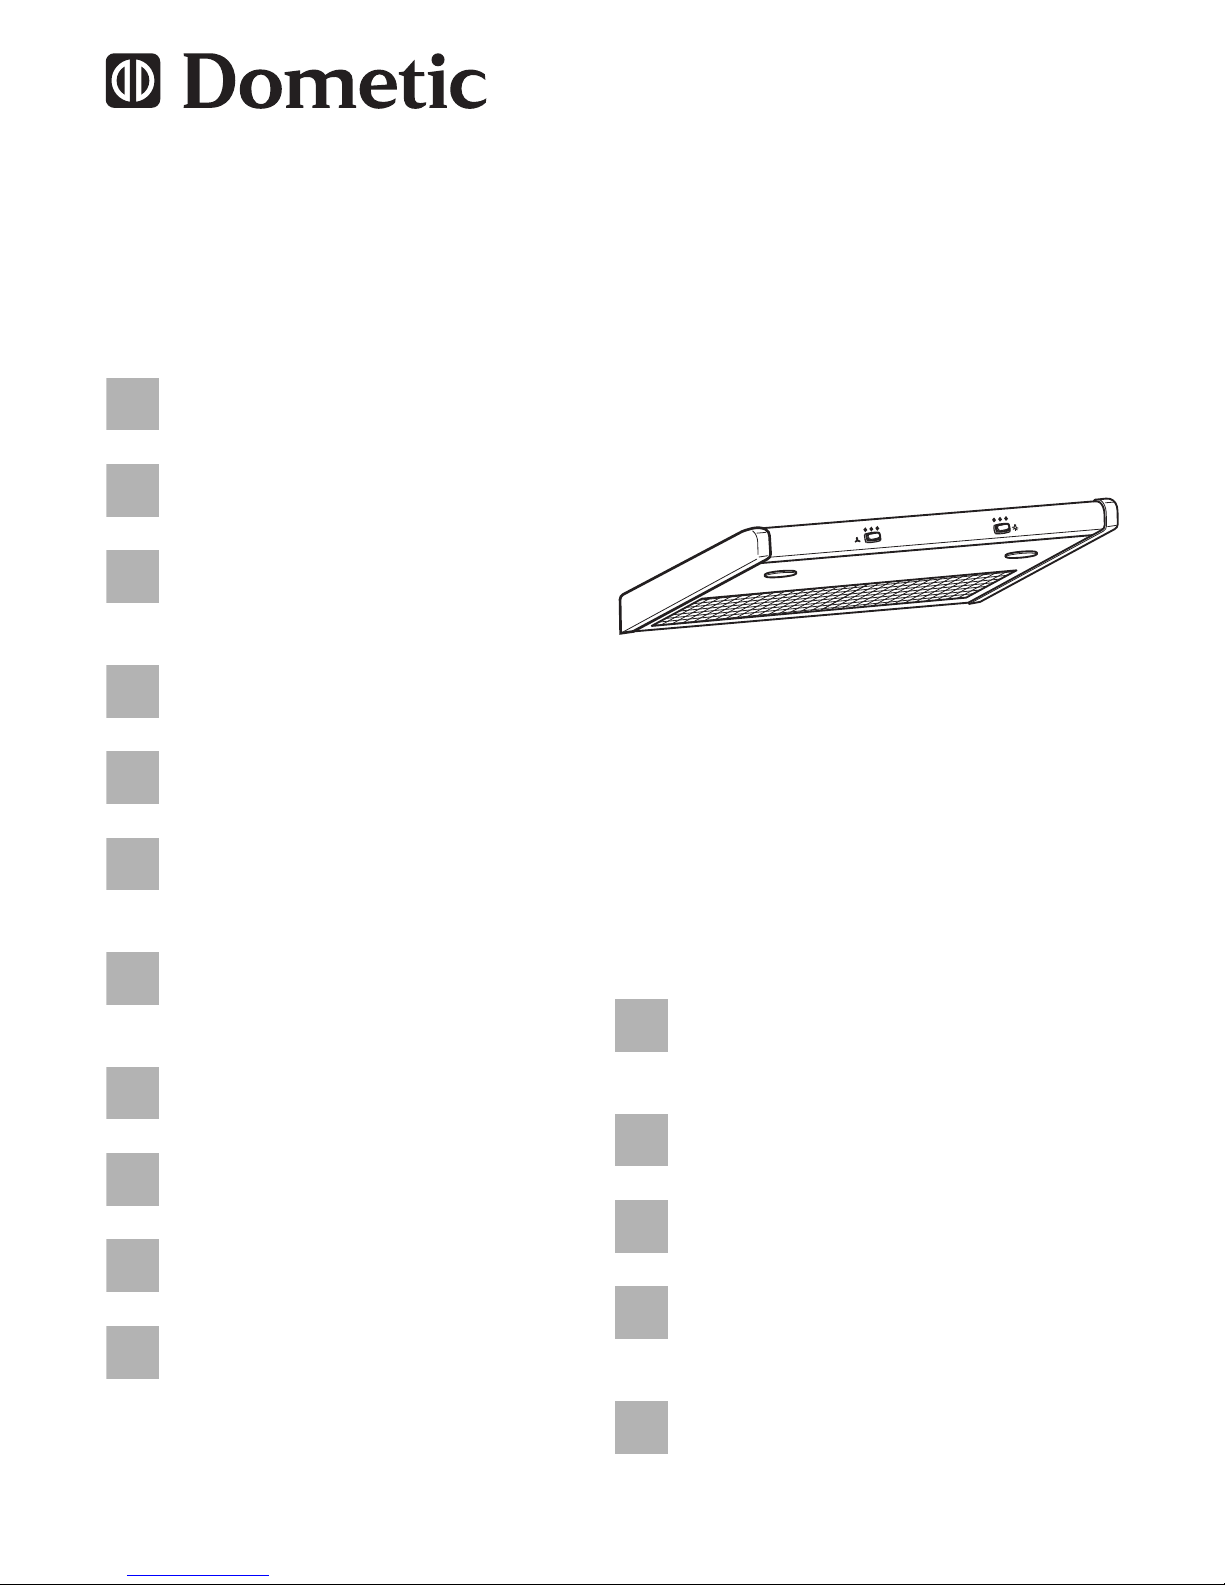
Dometic CK400
3
2
3
4
7
6
8
1
9
5
10
11
12
13
14
1
1
2
3
4
2
105 mm
3
Page 4
Dometic CK400
4
16012
80
125
56 mm
30 mm
4
4
3
2
1
5
Page 5
Dometic CK400
5
1
2
3
5
4
6
Page 6
Dometic CK400
6
1
2
3
ws
ws
ws
sw
rt
sw
bl
bl
rt
7
1.
2.
8
Page 7
Dometic CK400
7
400 mm
275 mm
68 mm
9
Page 8

DE
Erklärung der Symbole Dometic CK400
8
Bitte lesen Sie diese Anleitung vor Einbau und Inbetriebnahme sorgfältig durch und bewahren Sie sie auf. Geben Sie sie im Falle einer
Weitergabe des Produktes an den Nutzer weiter.
Inhalt
1 Erklärung der Symbole . . . . . . . . . . . . . . . . . . . . . . . . . . . . . . . . . . . 8
2 Sicherheitshinweise . . . . . . . . . . . . . . . . . . . . . . . . . . . . . . . . . . . . . . 9
3 Lieferumfang . . . . . . . . . . . . . . . . . . . . . . . . . . . . . . . . . . . . . . . . . . 11
4 Bestimmungsgemäßer Gebrauch . . . . . . . . . . . . . . . . . . . . . . . . . . 11
5 Technische Beschreibung . . . . . . . . . . . . . . . . . . . . . . . . . . . . . . . . 12
6 Dunstabzugshaube montieren . . . . . . . . . . . . . . . . . . . . . . . . . . . . . 12
7 Dunstabzugshaube verwenden . . . . . . . . . . . . . . . . . . . . . . . . . . . . 15
8 Reinigung. . . . . . . . . . . . . . . . . . . . . . . . . . . . . . . . . . . . . . . . . . . . . 15
9 Entsorgung. . . . . . . . . . . . . . . . . . . . . . . . . . . . . . . . . . . . . . . . . . . . 15
10 Gewährleistung . . . . . . . . . . . . . . . . . . . . . . . . . . . . . . . . . . . . . . . . 16
11 Technische Daten . . . . . . . . . . . . . . . . . . . . . . . . . . . . . . . . . . . . . . 16
1 Erklärung der Symbole
!
!
A
WARNUNG!
Sicherheitshinweis: Nichtbeachtung kann zu Tod oder schwerer
Verletzung führen.
VORSICHT!
Sicherheitshinweis: Nichtbeachtung kann zu Verletzungen
führen.
ACHTUNG!
Nichtbeachtung kann zu Materialschäden führen und die
Funktion des Produktes beeinträchtigen.
Page 9

DE
Dometic CK400 Sicherheitshinweise
9
I
➤ Handlung: Dieses Symbol zeigt Ihnen, dass Sie etwas tun müssen. Die
erforderlichen Handlungen werden Schritt für Schritt beschrieben.
✓ Dieses Symbol beschreibt das Ergebnis einer Handlung.
Abb. 1 5, Seite 3: Diese Angabe weist Sie auf ein Element in einer Abbildung hin, in diesem Beispiel auf „Position 5 in Abbildung 1 auf Seite 3“.
2 Sicherheitshinweise
Beachten Sie die vom Fahrzeughersteller und vom Kfz-Handwerk vorgeschriebenen Sicherheitshinweise und Auflagen!
Der Hersteller übernimmt in folgenden Fällen keine Haftung für Schäden:
Montage- oder Anschlussfehler
Beschädigungen am Produkt durch mechanische Einflüsse und Über-
spannungen
Veränderungen am Produkt ohne ausdrückliche Genehmigung vom
Hersteller
Verwendung für andere als die in der Anleitung beschriebenen Zwecke
Beachten Sie folgende grundsätzliche Sicherheitsmaßnahmen beim Gebrauch von elektrischen Geräten zum Schutz vor:
elektrischem Schlag
Brandgefahr
Verletzungen
2.1 Umgang mit dem Gerät
!
WARNUNG!
Die Montage und Reparaturen der Dunstabzugshaube dürfen
nur von Fachkräften durchgeführt werden, die mit den verbundenen Gefahren bzw. den einschlägigen Vorschriften vertraut
sind.
Durch unsachgemäße Reparaturen können erhebliche Gefah-
ren entstehen. Wenden Sie sich im Reparaturfall an den Service-Stützpunkt in Ihrem Land (Adressen auf der Rückseite).
HINWEIS
Ergänzende Informationen zur Bedienung des Produktes.
Page 10

DE
Sicherheitshinweise Dometic CK400
10
Personen (einschließlich Kinder), die aufgrund ihrer physi-
schen, sensorischen oder geistigen Fähigkeiten oder ihrer
Unerfahrenheit oder Unkenntnis nicht in der Lage sind, das
Produkt sicher zu benutzen, sollten dieses Produkt nicht ohne
Aufsicht oder Anweisung durch eine verantwortliche Person
nutzen.
Montagearbeiten und elektrische Verkabelung müssen von
qualifizierten Fachhandwerkern unter Einhaltung aller gültigen
Vorschriften und Normen durchgeführt werden.
Achten Sie beim Schneiden oder Bohren in Wand oder Decke
darauf, dass keine elektrischen Leitungen oder nicht sichtbare
Geräte beschädigt werden.
Um das Brandrisiko zu reduzieren, dürfen nur Rohre der Klasse
UL94-HB oder höher verwendet werden.
Der Abstand zwischen Gaskocherflamme und Dunstabzugs-
haube muss mindestens 50 cm betragen.
!
VORSICHT!
Die Dunstabzugshaube muss so sicher installiert werden, dass
diese nicht herabfallen kann.
Betreiben Sie die Dunstabzugshaube nur, wenn das Gehäuse
und die Leitungen unbeschädigt sind.
Achten Sie darauf, dass brennbare Gegenstände nicht im Be-
reich des Luftaustritts gelagert bzw. montiert sind. Der Abstand
muss mindestens 50 cm betragen.
Greifen Sie nicht in den Lüftungsauslass und führen Sie keine
Fremdgegenstande in das Gerät ein.
Page 11
DE
Dometic CK400 Lieferumfang
11
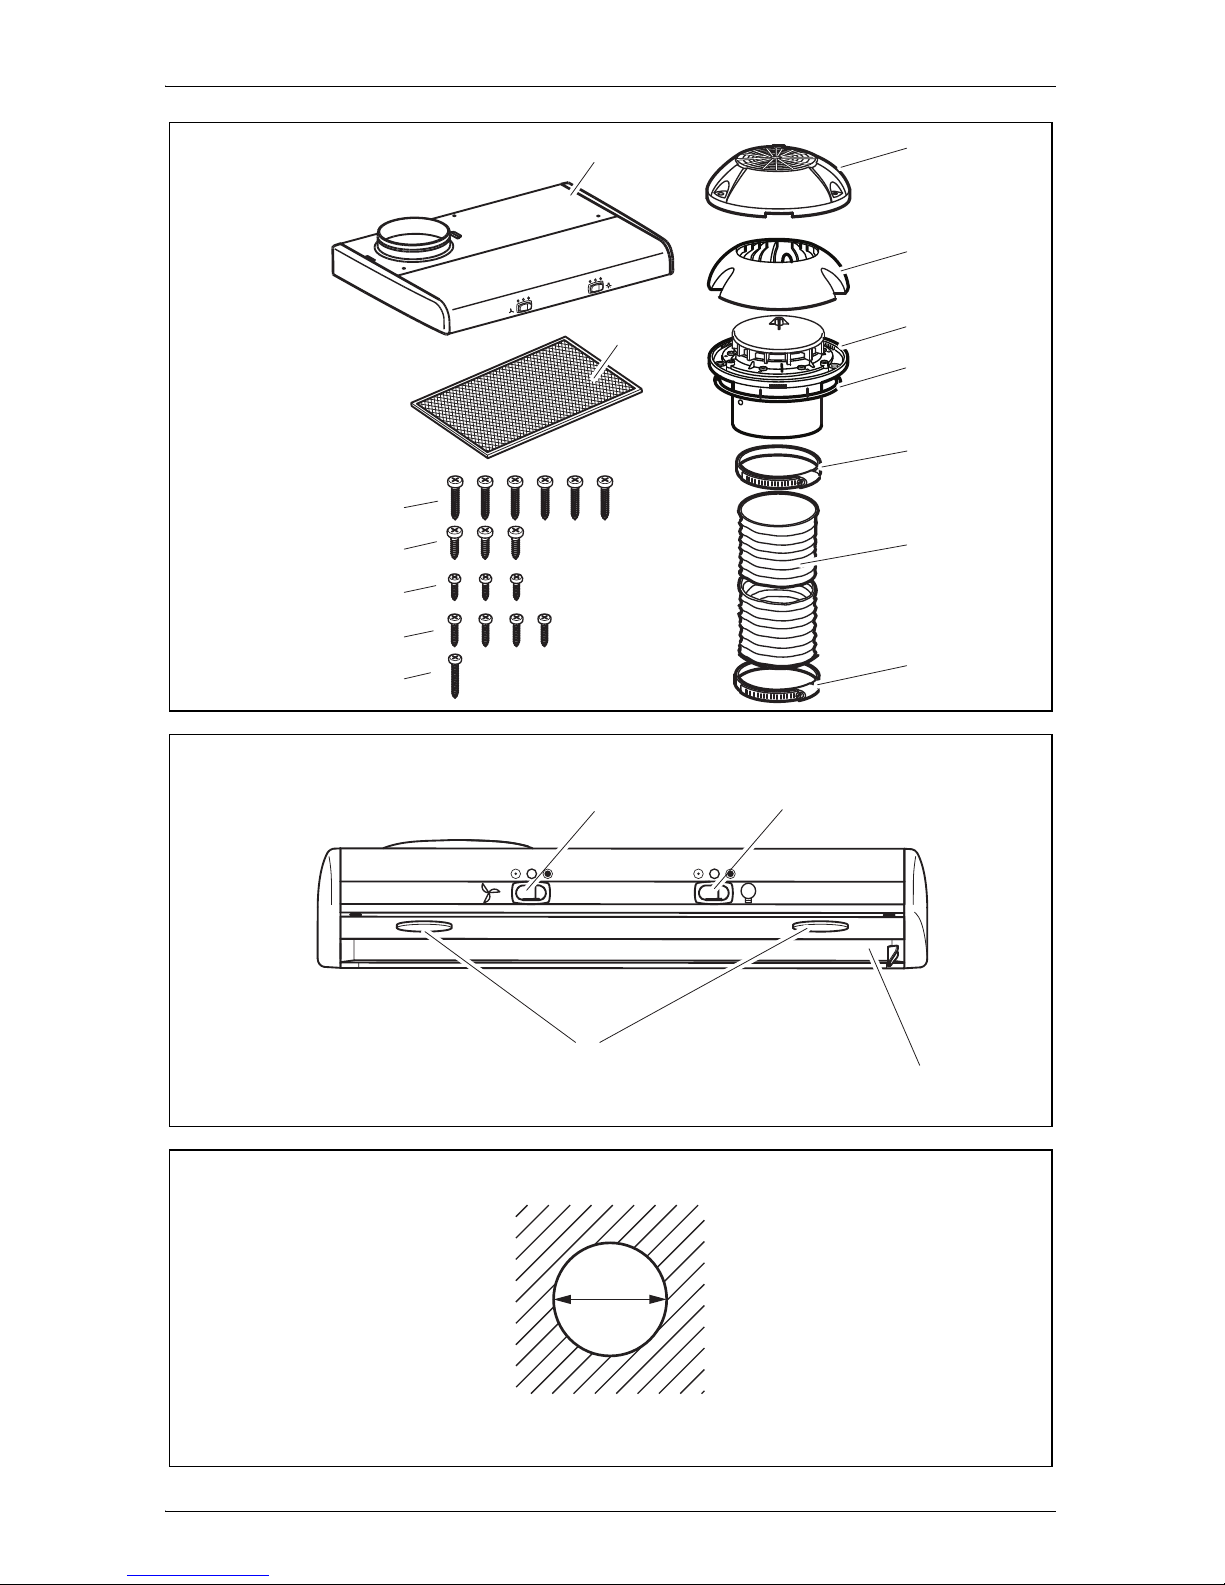
3Lieferumfang
4 Bestimmungsgemäßer Gebrauch
Die Dunstabzugshaube CK400 (Art.-Nr. 9107300001) ist für den Einbau in
Wohnwagen, Wohnmobilen und Booten vorgesehen.
Pos. in
Abb. 1,
Seite 3
Menge Beschreibung
1 1 Dunstabzugshaube
2 1 Abdeckkappe
3 1 Dachhaube
4 1 Lüfter
5 1 Gummidichtung
6 1 Schlauchschelle
7 1 Rohrleitung
8 1 Schlauchschelle
91Filter
10 6 Schrauben 4,2 x 25
11 3 Schrauben 4,2 x 13
12 3 Schrauben 3,5 x 9,5
13 4 Schrauben 3,5 x 13
14 1 Schraube 3,5 x 25
Page 12
DE
Technische Beschreibung Dometic CK400
12
5 Technische Beschreibung
Die Dunstabzugshaube CK400 entfernt beim Kochen entstehende Gerüche
und Dampf. Das Gerät ist ausgestattet mit einem abnehm- und waschbaren
Filter, zwei eingebauten Halogenlampen und einem Lüfter mit zwei Leistungsstufen. Er ist über eine biegsame Rohrleitung mit dem Innenbereich
verbunden und kann dank der witterungsbeständigen Abdeckkappe auf dem
Dach des Wohnmobils montiert werden.
5.1 Bedienelemente
6 Dunstabzugshaube montieren
Hinweise zum Montageort
Die Dunstabzugshaube soll vorzugsweise über der Kochstelle angebracht
und nach Möglichkeit in einen Hängeschrank eingebaut werden. Der Abstand zwischen Gaskocherflamme und Dunstabzugshaube muss mindestens 50 cm betragen.
Der Lüfter soll auf dem Dach auf möglichst ebener Fläche montiert werden.
Bei Anbringen auf schrägem Untergrund muss die
Dachhaube so gedreht
werden, dass eine der drei Wasserablauföffnungen in Richtung des Gefälles
gerichtet ist. Ein Neigungswinkel bis zu 20° beeinträchtigt die Leistung des
Lüfters bei stillstehendem Motor nicht.
Pos. in
Abb. 2,
Seite 3
Beschreibung
1 Filter
2 Schalter Lüfter
3 Schalter Licht
4 Halogenleuchten
Page 13

DE
Dometic CK400 Dunstabzugshaube montieren
13
6.1 Lüfter montieren
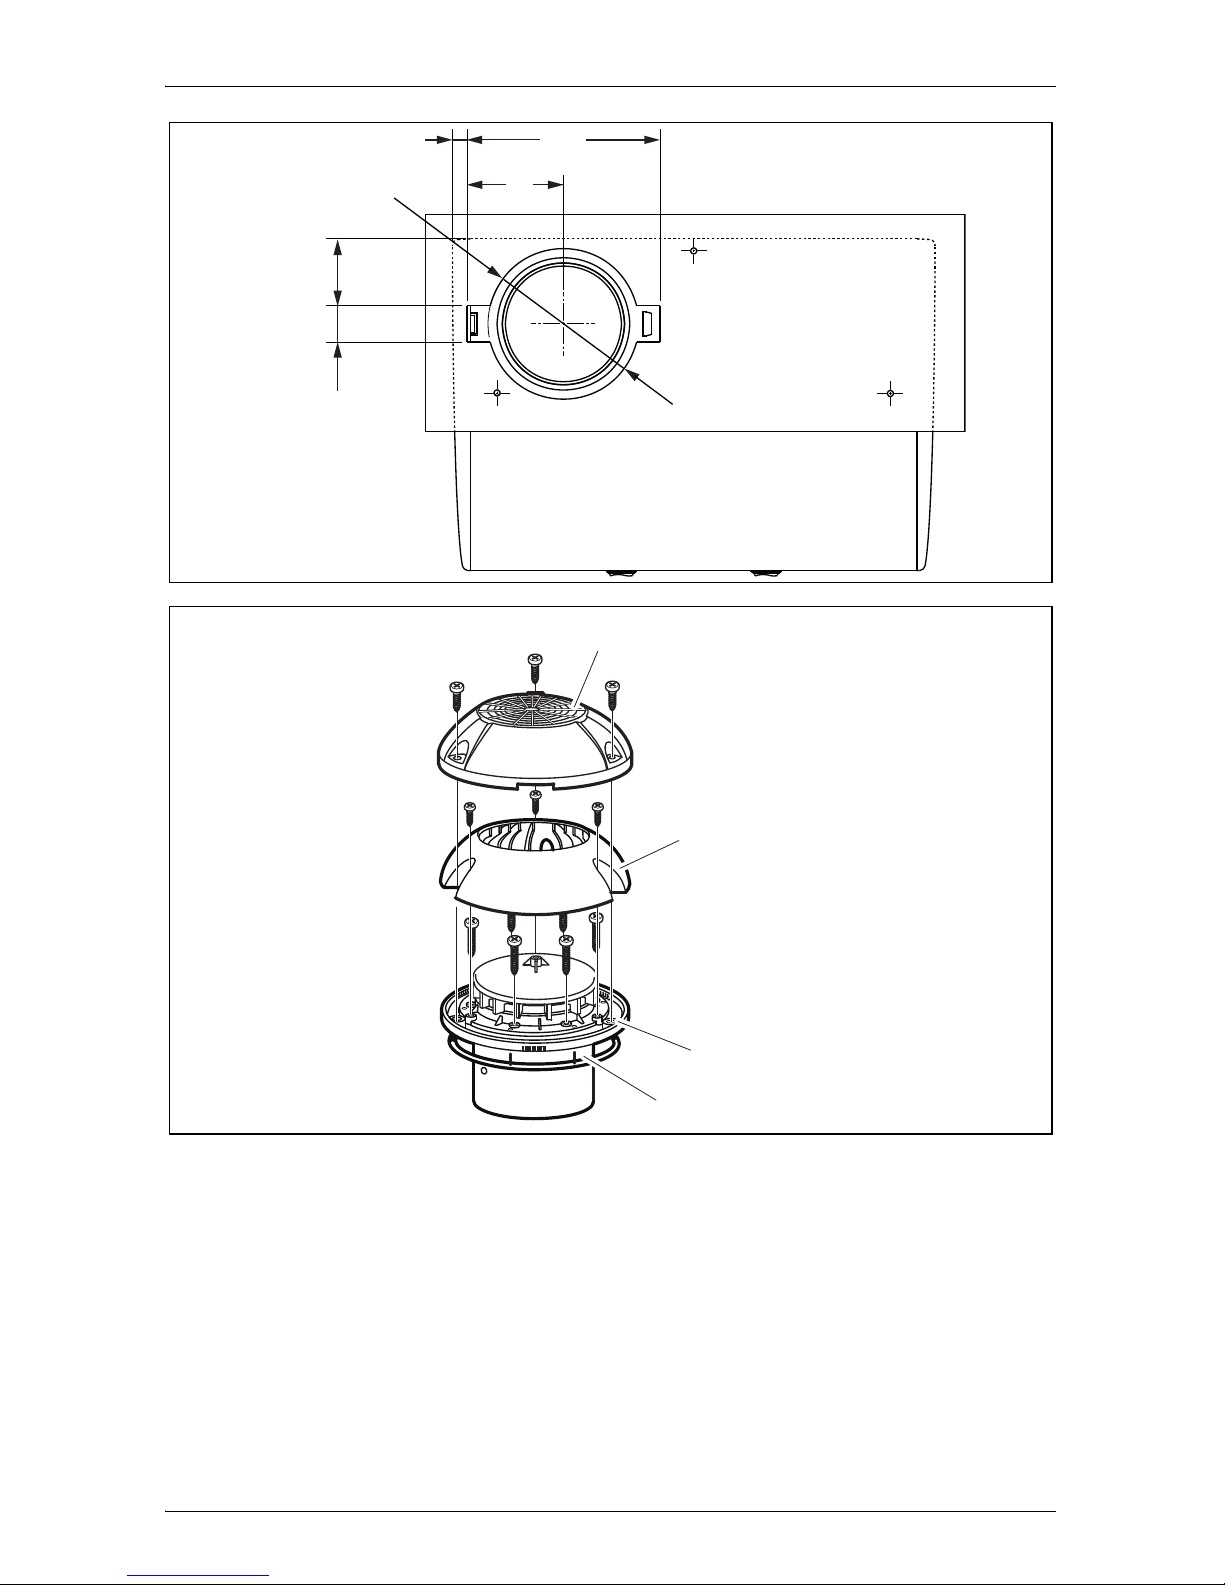
➤ Wählen Sie auf dem Dach einen geeigneten Montageort für den Lüfter.
➤ Zeichnen Sie die Lage und Größe der Öffnung von 105 mm Durchmesser
vor (Abb. 3, Seite 3).
➤ Bohren Sie vor und schneiden Sie die Öffnung auf dem Dach sorgfältig
mit einer Stichsäge o. ä. aus.
➤ Legen Sie den Lüfter auf die Öffnung und markieren Sie die sechs
Schraubenlöcher.
➤ Tragen Sie einen dünnen Ring aus einem dauerelastischen Abdichtungs-
material um jedes Loch auf.
➤ Setzen Sie die Gummidichtung (Abb. 5 4, Seite 4) in die Rille auf die
Unterseite des Lüfters ein.
I
➤ Befestigen Sie den Lüfter (Abb. 5 3, Seite 4) mit den sechs mitgeliefer-
ten Schrauben (4,2 x 25).
➤ Befestigen Sie die Dachhaube (Abb. 5 2, Seite 4) mit den drei mitgelie-
ferten Schrauben (3,5 x 9,5).
➤ Befestigen Sie die Abdeckkappe (Abb. 5 1, Seite 4) mit den drei mitge-
lieferten Schrauben (4,2 x 13).
6.2 Dunstabzugshaube montieren
!
➤ Wählen Sie im Innenraum einen geeigneten Montageort für die Dunstab-
zugshaube.
➤ Zeichnen Sie die Lage und Größe des Ausschnitts im Boden des Hänge-
schrankes vor (Abb. 4, Seite 4).
HINWEIS
Ziehen Sie den Lüfter so fest an, dass die Gummidichtung nahtlos
am Dach anliegt.
WARNUNG!
Bringen Sie die Dunstabzugshaube vorzugsweise über der
Kochstelle an und bauen Sie sie in einen Hängeschrank ein.
Der Abstand zwischen Gaskocherflamme und Dunstabzugs-
haube muss mindestens 50 cm betragen.
Page 14
DE
Dunstabzugshaube montieren Dometic CK400
14
➤ Bohren Sie vor und schneiden Sie den Ausschnitt sorgfältig mit einer
Stichsäge o. ä. aus.
➤ Setzen Sie die Dunstabzugshaube von unten in den Schrank ein und be-
festigen Sie sie mit den vier mitgelieferten Schrauben (3,5 x 13) (Abb. 6,
Seite 5).
➤ Befestigen Sie den Schlauch (Abb. 6 3, Seite 4) an der Dunstabzugs-
haube (Abb. 6 5, Seite 4) und am Lüfter (Abb. 6 1, Seite 4) mit den
Schlauchschellen (Abb. 6 2 und 4, Seite 4).
➤ Setzen Sie den Filter (Abb. 2 1, Seite 3) in die in die Dunstabzugshaube
ein.
6.3 Dunstabzugshaube elektrisch anschließen
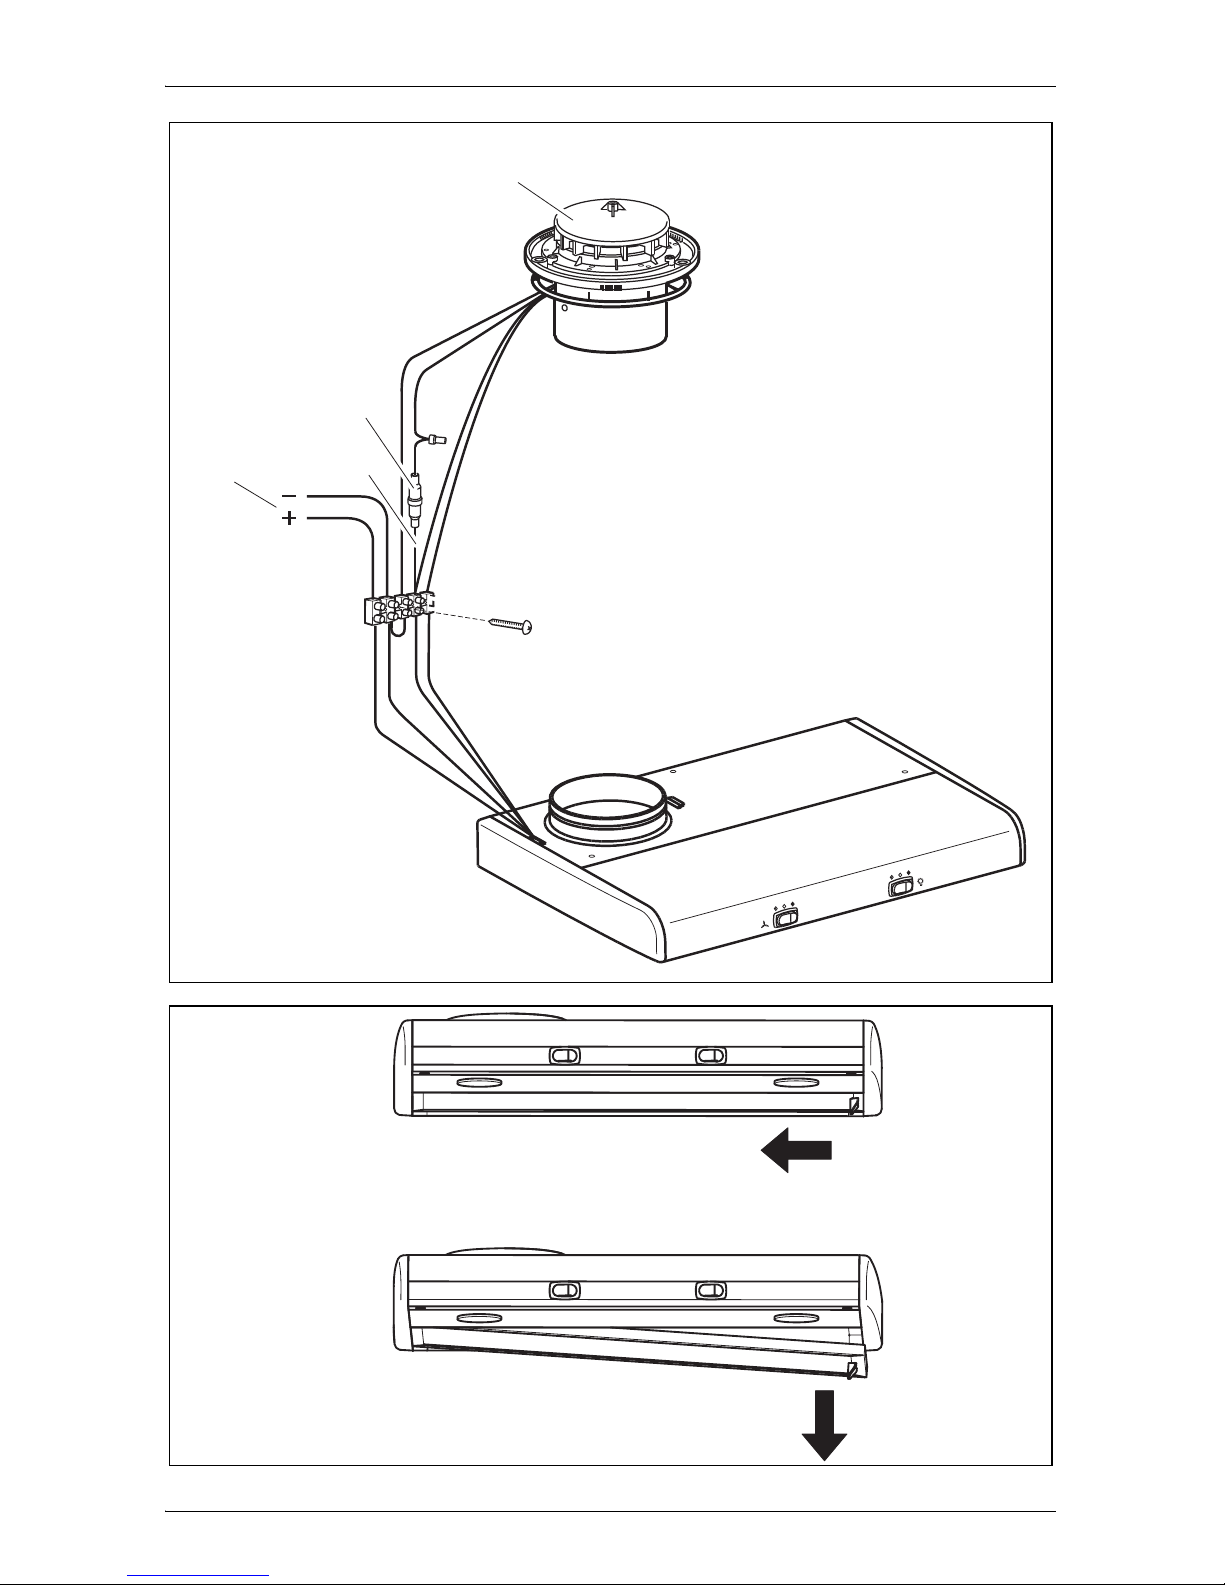
➤ Verbinden Sie den Lüfter mit der Batterie, siehe Abb. 7, Seite 6.
Legende
Pos. in
Abb. 7,
Seite 6
Beschreibung
1 Lüfter
2 Sicherungshalter mit Sicherung T4 A 5x20 mm
3 Batterie
sw schwarz
ws weiß
rt rot
bl blau
Page 15
DE
Dometic CK400 Dunstabzugshaube verwenden
15
7 Dunstabzugshaube verwenden
Dunstabzugshaube ein- und ausschalten
➤ Schalten Sie die Dunstabzugshaube mit dem Schalter „ “ (Abb. 2 2,
Seite 3) ein (auf halber oder voller Leistung des Gebläses) und
aus .
Licht ein- und ausschalten
➤ Schalten Sie das Licht mit dem Schalter „ “ (Abb. 2 3, Seite 3) ein (auf
halber oder voller Beleuchtung) und aus .
8 Reinigung
I
A
➤ Reinigen Sie das Produkt gelegentlich mit einem feuchten Tuch.
➤ Entnehmen Sie den Filter (Abb. 8, Seite 6) und reinigen Sie den Filter
mit warmem Wasser und synthetischem Reinigungsmittel (z. B. Spülmittel).
HINWEIS
Der Filter der Dunstabzugshaube muss regelmäßig gereinigt werden, da sich dort das Fett sammelt. Wie oft eine Reinigung nötig
ist, hängt davon ab, wie oft gekocht und wie oft die Dunstabzugshaube eingeschaltet wird. Reinigen Sie den Filter nicht erst, wenn
die Leistung der Dunstabzugshaube merklich nachlässt.
ACHTUNG!
Keine scharfen oder harten Gegenstände oder Reinigungsmittel
zur Reinigung verwenden, da dies zu einer Beschädigung des
Produktes führen kann.
Page 16
DE
Entsorgung Dometic CK400
16
9 Entsorgung
➤ Geben Sie das Verpackungsmaterial möglichst in den entsprechenden
Recycling-Müll.
M
Wenn Sie das Produkt endgültig außer Betrieb nehmen, informieren Sie sich bitte beim nächsten Recyclingcenter oder bei
Ihrem Fachhändler über die zutreffenden Entsorgungsvorschriften.
10 Gewährleistung
Es gilt die gesetzliche Gewährleistungsfrist. Sollte das Produkt defekt sein,
wenden Sie sich bitte an die Niederlassung des Herstellers in Ihrem Land
(Adressen siehe Rückseite der Anleitung) oder an Ihren Fachhändler.
Zur Reparatur- bzw. Gewährleistungsbearbeitung müssen Sie folgende
Unterlagen mitschicken:
eine Kopie der Rechnung mit Kaufdatum,
einen Reklamationsgrund oder eine Fehlerbeschreibung.
11 Technische Daten
Dometic CK400
Artikelnummer: 9107300001
Anschlussspannung: 12 Vg
Kapazität:
70/125 m
3
/h
Leistungsaufnahme: 30 W
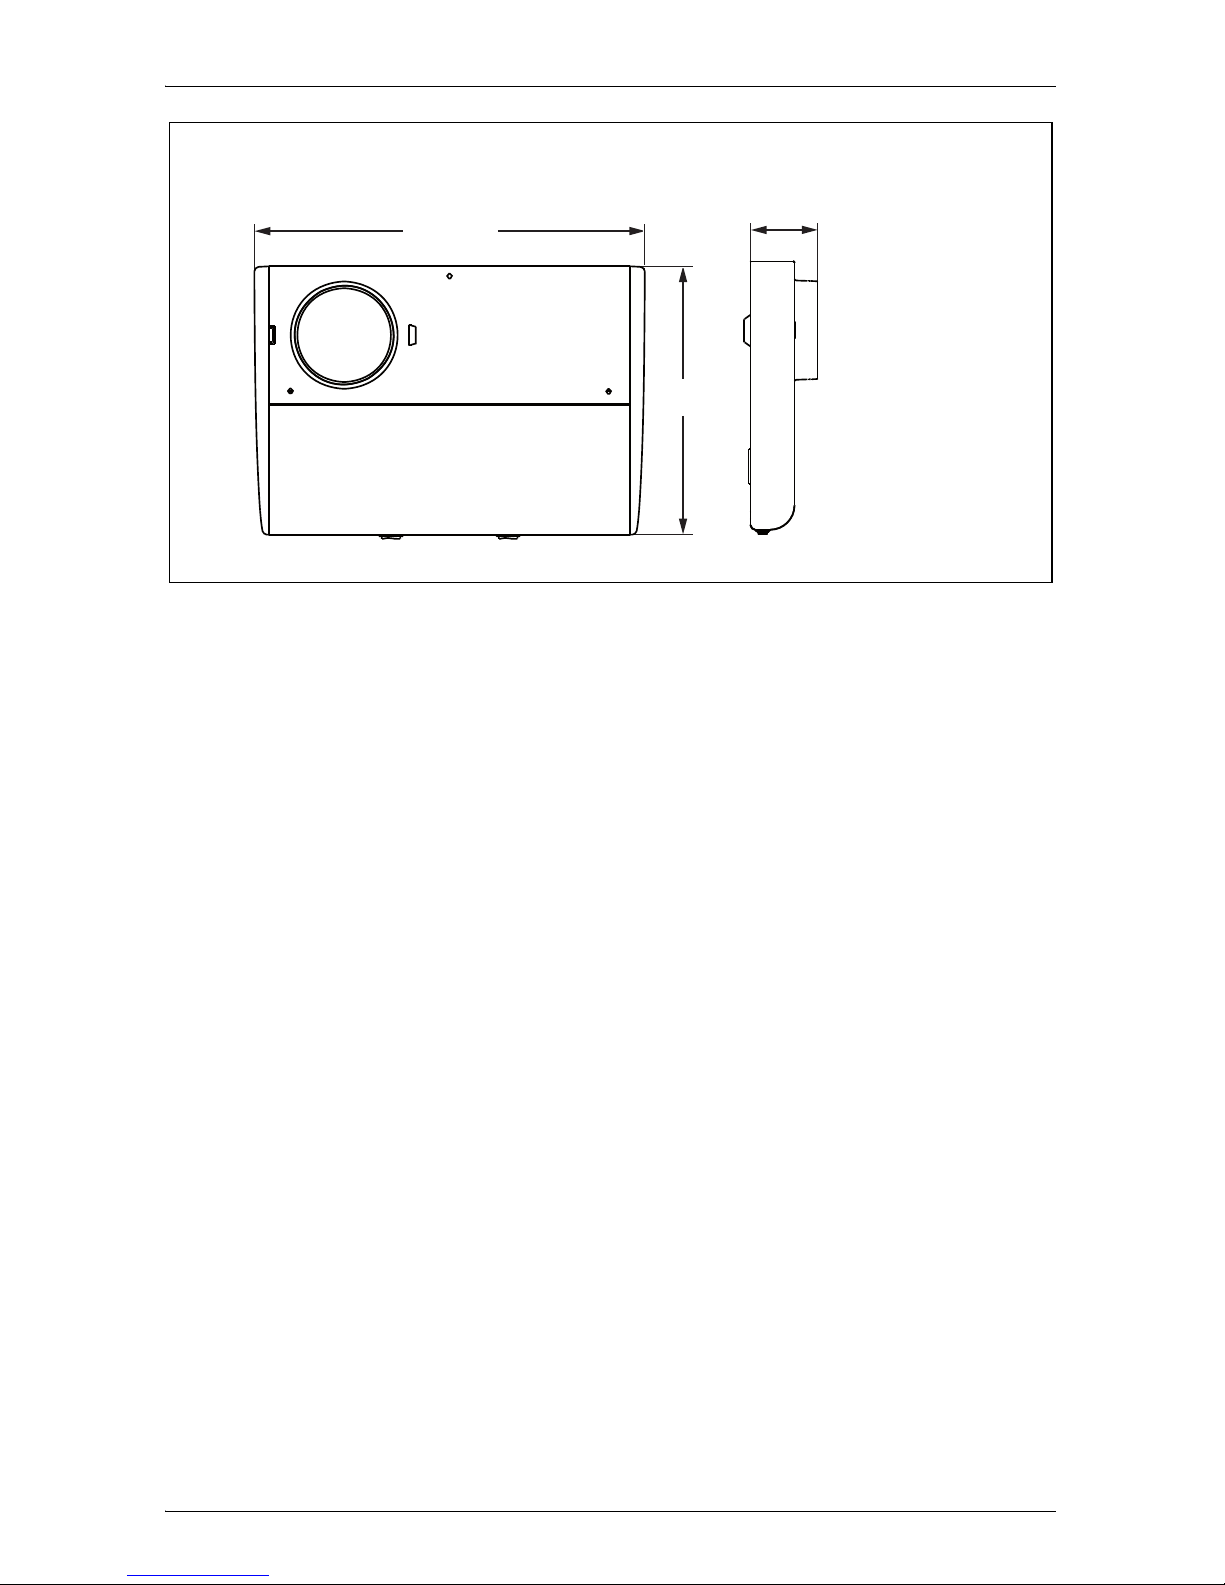
Abmessungen (B x H x T): siehe Abb. 9, Seite 7
Gewicht: 3,0 kg
Prüfzeichen:
5
Page 17

EN
Dometic CK400 Explanation of symbols
17
Please read this instruction manual carefully before installation and
first use, and store it in a safe place. If you pass on the product to
another person, hand over this instruction manual along with it.
Contents
1 Explanation of symbols . . . . . . . . . . . . . . . . . . . . . . . . . . . . . . . . . . 17
2 Safety instructions . . . . . . . . . . . . . . . . . . . . . . . . . . . . . . . . . . . . . . 18
3 Scope of delivery . . . . . . . . . . . . . . . . . . . . . . . . . . . . . . . . . . . . . . . 20
4 Intended use . . . . . . . . . . . . . . . . . . . . . . . . . . . . . . . . . . . . . . . . . . 20
5 Technical description . . . . . . . . . . . . . . . . . . . . . . . . . . . . . . . . . . . . 21
6 Mounting the extractor hood . . . . . . . . . . . . . . . . . . . . . . . . . . . . . . 21
7 Using the extractor hood . . . . . . . . . . . . . . . . . . . . . . . . . . . . . . . . . 23
8 Cleaning. . . . . . . . . . . . . . . . . . . . . . . . . . . . . . . . . . . . . . . . . . . . . . 24
9 Disposal . . . . . . . . . . . . . . . . . . . . . . . . . . . . . . . . . . . . . . . . . . . . . . 24
10 Warranty . . . . . . . . . . . . . . . . . . . . . . . . . . . . . . . . . . . . . . . . . . . . . 24
11 Technical data . . . . . . . . . . . . . . . . . . . . . . . . . . . . . . . . . . . . . . . . . 25
1 Explanation of symbols
!
!
A
WARNING!
Safety instruction: Failure to observe this instruction can cause
fatal or serious injury.
CAUTION!
Safety instruction: Failure to observe this instruction can lead to
injury.
NOTICE!
Failure to observe this instruction can cause material damage and
impair the function of the product.
Page 18

EN
Safety instructions Dometic CK400
18
I
➤ Action: This symbol indicates that action is required on your part. The
required action is described step-by-step.
✓ This symbol describes the result of an action.
Fig. 1 5, page 3: This refers to an element in an illustration. In this case,
item 5 in figure 1 on page 3.
2 Safety instructions
Please observe the prescribed safety instructions and stipulations
from the vehicle manufacturer and service workshops.
The manufacturer accepts no liability for damage in the following cases:
Faulty assembly or connection
Damage to the product resulting from mechanical influences and excess
voltage
Alterations to the product without express permission from the manu-
facturer
Use for purposes other than those described in the operating manual
Note the following basic safety information when using electrical devices to
protect against:
Electric shock
Fire hazards
Injury
2.1 Operating the device safely
!
WARNING!
Installation and repair of the extractor hood may only be carried
out by qualified personnel who are familiar with the risks involved and the relevant regulations.
Inadequate repairs may cause serious hazards. For repair ser-
vice, please contact the service centre in your country (addresses on the back page).
NOTE
Supplementary information for operating the product.
Page 19

EN
Dometic CK400 Safety instructions
19
People (including children) whose physical, sensory or mental
capacities or whose lack of experience or knowledge prevent
them from using this product safely should not use it without the
supervision or instruction of a responsible person.
Installation work and electrical wiring must be performed by
skilled technicians in compliance with all applicable regulations
and standards.
When cutting or drilling into walls or ceilings, make sure that no
electrical cables or hidden devices are damaged.
To reduce the risk of fire, use only pipes of the UL94-HB class
or higher.
The distance between the gas hob flame and the extractor hood
must be at least 50 cm.
!
CAUTION!
The extractor hood must be installed securely so that it cannot
fall down.
Only operate the extractor hood if you are certain that the hous-
ing and the cables are not damaged.
Make sure no combustible objects are stored or installed near
the air outlet. A distance of at least 50 cm must be maintained.
Do not reach into the air outlet or insert any foreign objects into
the device.
Page 20
EN
Scope of delivery Dometic CK400
20
3 Scope of delivery
4 Intended use
The extractor hood CK400 (item no. 9107300001) is designed for installation
in caravans, motorhomes and boats.
No. in
fig. 1,
page 3
Quantity Description
1 1 Extractor fan
2 1 Cover cap
3 1 Roof hood
41Fan
5 1 Rubber seal
6 1 Hose clip
7 1 Pipeline
8 1 Hose clip
91Filter
10 6 Bolts, 4.2 x 25
11 3 Bolts, 4.2 x 13
12 3 Bolts, 3.5 x 9.5
13 4 Bolts, 3.5 x 13
14 1 Bolt, 3.5 x 25
Page 21
EN
Dometic CK400 Technical description
21
5 Technical description
The extractor hood CK400 removes odours and steam that arises during
cooking. The device is equipped with a removable and washable filter, two
built-in halogen lamps and a fan with two power levels. It is connected via a
flexible pipeline with the interior area and can be mounted on the roof of the
motorhome due to its weather-resistant cover cap.
5.1 Control elements
6 Mounting the extractor hood
Note on installation location
The extractor hood should preferably be mounted above the cooking zone
and built into a suspended cabinet if possible. The distance between the gas
hob flame and the extractor hood must be at least 50 cm.
The fan should be mounted on the roof on a level surface. When mounted on
a sloping surface, the roof hood must be rotated so that one of the three water drainage holes is directed toward the incline. A tilt angle up to 20° will not
affect the performance of the fan when the motor is not running.
6.1 Mounting the fan
➤ Select an appropriate installation location for the fan on the roof.
➤ Draw the location and size of the opening of 105 mm diameter (fig. 3 ,
page 3).
➤ Pre-drill and cut out the hole on the roof carefully with a keyhole saw or
similar tool.
No. in
fig. 2,
page 3
Description
1 Filter
2 Fan On/Off switch
3 Light On/Off switch
4 Halogen lamps
Page 22

EN
Mounting the extractor hood Dometic CK400
22
➤ Place the fan on the opening and mark the six screw holes.
➤ Apply a thin ring of a permanently elastic sealing material around each
hole.
➤ Put the rubber seal (fig. 5 4, page 4) into the groove on the underside of
the fan.
I
➤ Attach the fan (fig. 5 3, page 4) with the six included bolts (4.2 x 25).
➤ Attach the roof hood (fig. 5 2, page 4) with the three included bolts
(3.5 x 9.5).
➤ Attach the cover cap (fig. 5 1, page 4) with the three included bolts
(4.2 x 13).
6.2 Mounting the extractor hood
!
➤ Choose a suitable installation location in the interior for the extractor
hood.
➤ Draw the location and size of the section of 381 x 142 mm on the bottom
of the suspended cabinet (fig. 4, page 3).
➤ Pre-drill and cut out the section carefully with a keyhole saw or similar
tool.
➤ Insert the extractor hood from below into the cabinet and secure it with the
four included bolts (3.5 x 13) (fig. 6, page 4).
➤ Attach the hose (fig. 6 3, page 4) to the extractor hood (fig. 6 5,
page 4) and the fan (fig. 6 1, page 4) with the hose clips (fig. 6 2 and
4, page 4).
➤ Insert the filter (fig. 2 1, page 3) into the extractor hood.
NOTE
Pull the fan on tightly enough that the rubber seal is seamlessly in
contact with the roof.
WARNING!
Attach the extractor hood preferably over the cooking zone
and install it in a a suspended cabinet.
The distance between the gas hob flame and the extractor
hood must be at least 50 cm.
Page 23
EN
Dometic CK400 Using the extractor hood
23
6.3 Connecting the extractor hood electrically
➤ Connect the fan to the battery; see fig. 7, page 6.
Key
7 Using the extractor hood
Switching the extractor hood on and off
➤ Turn the extractor hood on with the switch “ ” (fig. 2 2, page 3) (blower
at half or full fan power) and off .
Switching the light on and off
➤ Turn the light on with switch “ ” (fig. 2 3, page 3) (light at half-strength
or full-strength ) and off .
No. in
fig. 7,
page 6
Description
1Fan
2 Fuse holder with fuse T4 A 5 x 20 mm
3 Battery
sw Black
ws White
rt Red
bl Blue
Page 24

EN
Cleaning Dometic CK400
24
8 Cleaning
I
A
➤ Occasionally clean the product with a damp cloth.
➤ Remove the filter (fig. 8, page 6) and clean it with warm water and a syn-
thetic detergent (such as washing-up liquid).
9 Disposal
➤ Place the packaging material in the appropriate recycling waste bins
wherever possible.
M
If you wish to finally dispose of the product, ask your local recycling
centre or specialist dealer for details about how to do this in
accordance with the applicable disposal regulations.
10 Warranty
The statutory warranty period applies. If the product is defective, please
contact the manufacturer's branch in your country (see the back of the
instruction manual for the addresses) or your retailer.
For repair and guarantee processing, please include the following documents when you send in the device:
A copy of the receipt with purchasing date
A reason for the claim or description of the fault
NOTE
The filter of the extractor hood must be cleaned regularly, as
grease collects there. How often cleaning is necessary depends
on how often you cook and how often the extractor hood is
switched on. Do not wait for the performance of the extractor hood
to noticeably decline before you clean the filter.
NOTICE!
Do not use sharp or hard objects or cleaning agents for cleaning
as these may damage the product.
Page 25
EN
Dometic CK400 Technical data
25
11 Technical data
Dometic CK400
Item number: 9107300001
Connection voltage: 12 Vg
Capacity:
70/125 m
3
/h
Power consumption: 30 W
Dimensions (W x H x D): see fig. 9, page 7
Weight: 3.0 kg
Test mark:
5
Page 26

FR
Explication des symboles Dometic CK400
26
Veuillez lire attentivement cette notice avant le montage et la mise en
service. Veuillez ensuite la conserver. En cas de passer le produit,
veuillez le transmettre au nouvel acquéreur.
Contenu
1 Explication des symboles. . . . . . . . . . . . . . . . . . . . . . . . . . . . . . . . . 26
2 Consignes de sécurité . . . . . . . . . . . . . . . . . . . . . . . . . . . . . . . . . . . 27
3 Contenu de la livraison . . . . . . . . . . . . . . . . . . . . . . . . . . . . . . . . . . 29
4 Usage conforme. . . . . . . . . . . . . . . . . . . . . . . . . . . . . . . . . . . . . . . . 29
5 Description technique . . . . . . . . . . . . . . . . . . . . . . . . . . . . . . . . . . . 30
6 Montage de la hotte aspirante . . . . . . . . . . . . . . . . . . . . . . . . . . . . . 30
7 Utilisation de la hotte aspirante . . . . . . . . . . . . . . . . . . . . . . . . . . . . 32
8 Nettoyage. . . . . . . . . . . . . . . . . . . . . . . . . . . . . . . . . . . . . . . . . . . . . 33
9 Élimination . . . . . . . . . . . . . . . . . . . . . . . . . . . . . . . . . . . . . . . . . . . . 33
10 Garantie . . . . . . . . . . . . . . . . . . . . . . . . . . . . . . . . . . . . . . . . . . . . . . 33
11 Caractéristiques techniques. . . . . . . . . . . . . . . . . . . . . . . . . . . . . . . 34
1 Explication des symboles
!
!
A
AVERTISSEMENT !
Consigne de sécurité : le non-respect de ces consignes peut
entraîner la mort ou de graves blessures.
ATTENTION !
Consigne de sécurité : le non-respect de ces consignes peut
entraîner des blessures.
AVIS !
Le non-respect de ces consignes peut entraîner des dommages
matériels et des dysfonctionnements du produit.
Page 27

FR
Dometic CK400 Consignes de sécurité
27
I
➤ Manipulation : ce symbole vous indique une action à effectuer. Les
manipulations à effectuer sont décrites étape par étape.
✓ Ce symbole décrit le résultat d’une manipulation.
Fig. 1 5, page 3 : cette information renvoie à un élément figurant sur une
illustration, dans cet exemple à la « position 5 de l'illustration 1 à la page 3 ».
2 Consignes de sécurité
Respectez les consignes de sécurité et autres prescriptions imposées
par le fabricant du véhicule et par les professionnels de l’automobile !
Le fabricant décline toute responsabilité pour des dommages dans les cas
suivants :
des défauts de montage ou de raccordement
des influences mécaniques et des surtensions ayant endommagé le
matériel
des modifications apportées au produit sans autorisation explicite de la
part du fabricant
une utilisation différente de celle décrite dans la notice
Lors de l’utilisation d’appareils électriques, les consignes générales de sécurité suivantes doivent être respectées afin d’éviter
une décharge électrique,
un incendie,
des blessures.
2.1 Précautions d'usage
!
AVERTISSEMENT !
Le montage et les réparations de la hotte aspirante doivent être
effectués par un personnel qualifié et parfaitement informé des
dangers et règlements spécifiques à ces manipulations.
REMARQUE
Informations complémentaires sur l'utilisation du produit.
Page 28

FR
Consignes de sécurité Dometic CK400
28
Toute réparation mal effectuée risquerait d'entraîner de graves
dangers. Si des réparations sont nécessaires, adressez-vous à
la filiale chargée du service après-vente dans votre pays
(adresses au dos de la notice).
Ne laissez pas des personnes (enfants compris) incapables
d'utiliser le produit de manière sûre, en raison de déficiences
physiques, sensorielles ou mentales ou de leur manque d'expérience ou de connaissances, utiliser ce produit sans surveillance.
Les travaux de montage et le câblage électrique doivent être ef-
fectués par des artisans qualifiés, dans le respect de toutes les
directives et normes en vigueur.
Lors de la découpe ou du perçage dans les murs ou les pla-
fonds, veillez à ce qu'aucune conduite électrique ou appareil
non visible ne soit endommagé.
Afin de réduire le risque d'incendie, seuls des tuyaux de la ca-
tégorie UL94-HB ou supérieures doivent être utilisés.
La distance entre la flamme d'un réchaud à gaz et la hotte doit
être d'au moins 50 cm.
!
ATTENTION !
La hotte aspirante doit être installée de manière à ce qu'elle ne
puisse pas tomber.
Ne faites fonctionner la hotte que si le bâti et les raccordements
sont intacts.
Veillez à ce qu'aucun objet inflammable ne soit entreposé ni
monté dans la zone de sortie de l'air. Il convient de maintenir
une distance de 50 cm minimum.
Ne glissez pas les doigts dans la sortie d'air et n'introduisez au-
cun objet étranger à l'intérieur de l'appareil.
Page 29

FR
Dometic CK400 Contenu de la livraison
29
3 Contenu de la livraison
4 Usage conforme
La hotte aspirante CK400 (n° de produit 9107300001) est conçue pour le
montage dans des caravanes, campings-cars et bateaux.
Pos. dans
fig. 1,
page 3
Quantité Description
1 1 Hotte d'aspiration
21Cache
3 1 Lanterneau
4 1 Ventilateur
5 1 Joint en caoutchouc
6 1 Collier pour flexible
7 1 Tuyau
8 1 Collier pour flexible
9 1 Filtre
10 6 Vis 4,2 x 25
11 3 Vis 4,2 x 13
12 3 Vis 3,5 x 9,5
13 4 Vis 3,5 x 13
14 1 Vis 3,5 x 25
Page 30
FR
Description technique Dometic CK400
30
5 Description technique
La hotte aspirante CK400 élimine les mauvaises odeurs et la vapeur se formant lors de la cuisson. L'appareil est équipé d'un filtre amovible et lavable,
de deux lampes halogènes intégrées et d'un ventilateur possédant deux niveaux de puissance. Ce dernier est raccordé à l'habitacle par un tuyau
flexible et peut, grâce au capot résistant aux intempéries, se monter sur le
toit de la caravane.
5.1 Éléments de commande
6 Montage de la hotte aspirante
Consignes relatives au lieu de montage
La hotte aspirante doit être installée de préférence au-dessus des plaques
de cuisson et encastrée si possible dans une armoire suspendue. La distance entre la flamme d'un réchaud à gaz et la hotte doit être d'au moins
50 cm.
Le ventilateur se monte sur le toit, sur une surface aussi plane que possible.
En cas de montage sur une surface inclinée, le
lanterneau doit être tourné de
telle sorte que l'une des trois ouvertures d'écoulement de l'eau soit orientée
dans le sens de la pente. Un angle d'inclinaison allant jusqu'à 20° ne nuit pas
à la performance du ventilateur lorsque le moteur est arrêté.
Pos. dans
fig. 2,
page 3
Description
1 Filtre
2 Commutateur ventilateur
3 Commutateur lumière
4 Lampes halogènes
Page 31

FR
Dometic CK400 Montage de la hotte aspirante
31
6.1 Montage du ventilateur
➤ Choisissez un emplacement de montage adapté sur le toit pour le venti-
lateur.
➤ Tracez la position et la taille de l'ouverture, d'un diamètre de 105 mm
(fig. 3, page 3).
➤ Percez et découpez soigneusement l'ouverture sur le toit avec une scie
sauteuse ou un outil similaire.
➤ Placez le ventilateur sur l'ouverture et marquez les six trous des vis.
➤ Positionnez un anneau fin en matériau d'étanchéité à élasticité durable
autour de chaque trou.
➤ Placez le joint en caoutchouc (fig. 5 4, page 4) dans la rainure sur la
face inférieure du ventilateur.
I
➤ Fixez le ventilateur (fig. 5 3, page 4) avec les six vis fournies (4,2 x 25).
➤ Fixez le dôme (fig. 5 2, page 4) avec les trois vis fournies (3,5 x 9,5).
➤ Fixez le capot (fig. 5 1, page 4) avec les trois vis fournies (4,2 x 13).
6.2 Montage de la hotte aspirante
!
➤ Choisissez un lieu de montage adapté pour la hotte dans l'habitacle.
➤ Tracez l'emplacement et la taille de la découpe au fond de l'armoire sus-
pendue (fig. 4, page 4).
➤ Percez et découpez soigneusement l'ouverture avec une scie sauteuse
ou un outil similaire.
REMARQUE
Vissez le ventilateur de sorte que le joint en caoutchouc soit parfaitement appliqué contre le toit.
AVERTISSEMENT !
Installez la hotte aspirante de préférence au-dessus des
plaques de cuisson et encastrez-la dans une armoire suspendue.
La distance entre la flamme d'un réchaud à gaz et la hotte doit
être d'au moins 50 cm.
Page 32

FR
Utilisation de la hotte aspirante Dometic CK400
32
➤ Insérez la hotte aspirante par le bas dans l'armoire et fixez-la à l'aide des
quatre vis fournies (3,5 x 13) (fig. 6, page 5).
➤ Fixez le flexible (fig. 6 3, page 4) au niveau de la hotte aspirante
(fig. 6 5, page 4) et du ventilateur (fig. 6 1, page 4) à l'aide des colliers
pour flexibles (fig. 6 2 et 4, page 4).
➤ Insérez le filtre (fig. 2 1, page 3) dans la hotte aspirante.
6.3 Raccordement électrique de la hotte aspirante
➤ Raccordez le ventilateur à la batterie, voir fig. 7, page 6.
Légende
7 Utilisation de la hotte aspirante
Mise en marche / à l'arrêt de la hotte aspirante
➤ Allumez et éteignez la hotte aspirante à l'aide du commutateur « »
(fig. 2 2, page 3) (sur la demi-puissance ou la pleine puissance
de la soufflerie).
Mise en marche / à l'arrêt de la lumière
➤ Allumez et éteignez la lumière à l'aide du commutateur « »
(fig. 2 3, page 3) (sur la demi-puissance lumineuse ou la pleine
puissance lumineuse).
Pos. dans
fig. 7,
page 6
Description
1 Ventilateur
2 Porte-fusible avec fusible T4 A 5 x 20 mm
3Batterie
sw noir
ws blanc
rt rouge
bl bleu
Page 33

FR
Dometic CK400 Nettoyage
33
8 Nettoyage
I
A
➤ Nettoyez le produit avec un tissu humide.
➤ Retirez le filtre (fig. 8, page 6) et nettoyez le filtre à l'eau chaude et au
détergent synthétique (p. ex. produit lave-vaisselle).
9 Élimination
➤ Jetez les emballages dans les conteneurs de déchets recyclables prévus
à cet effet.
M
Lorsque vous mettrez votre produit définitivement hors service,
informez-vous auprès du centre de recyclage le plus proche ou
auprès de votre revendeur spécialisé sur les prescriptions relatives
au retraitement des déchets.
10 Garantie
Le délai légal de garantie s'applique. Si le produit s'avérait défectueux,
veuillez vous adresser à la filiale du fabricant située dans votre pays (voir
adresses au verso du présent manuel) ou à votre revendeur spécialisé.
Veuillez y joindre les documents suivants pour la gestion des réparations et
de la garantie :
une copie de la facture avec la date d'achat,
le motif de la réclamation ou une description du dysfonctionnement.
REMARQUE
Le filtre de la hotte aspirante doit être nettoyé régulièrement, car
la graisse s'y accumule. La fréquence de nettoyage dépend de la
fréquence des cuissons et de la fréquence d'allumage de la hotte
aspirante. N'attendez pas que la puissance de la hotte aspirante
soit sensiblement réduite pour nettoyer le filtre.
AVIS !
N’utilisez aucun objet coupant ou dur, ni de détergents pour le
nettoyage. Cela pourrait endommager le produit.
Page 34

FR
Caractéristiques techniques Dometic CK400
34
11 Caractéristiques techniques
Dometic CK400
Numéro de l'article : 9107300001
Tension de raccordement : 12 Vg
Capacité :
70/125 m
3
/h
Puissance absorbée : 30 W
Dimensions (L x h x l) : voir fig. 9, page 7
Poids : 3,0 kg
Conformité :
5
Page 35

ES
Dometic CK400 Explicación de los símbolos
35
Lea detenidamente estas instrucciones antes de llevar a cabo la instalación y puesta en funcionamiento, y consérvelas en un lugar seguro.
En caso de vender o entregar el producto a otra persona, entregue
también estas instrucciones.
Índice
1 Explicación de los símbolos. . . . . . . . . . . . . . . . . . . . . . . . . . . . . . . 35
2 Indicaciones de seguridad . . . . . . . . . . . . . . . . . . . . . . . . . . . . . . . . 36
3 Volumen de entrega. . . . . . . . . . . . . . . . . . . . . . . . . . . . . . . . . . . . . 38
4 Uso adecuado . . . . . . . . . . . . . . . . . . . . . . . . . . . . . . . . . . . . . . . . . 38
5 Descripción técnica . . . . . . . . . . . . . . . . . . . . . . . . . . . . . . . . . . . . . 39
6 Montar el extractor de humos . . . . . . . . . . . . . . . . . . . . . . . . . . . . . 39
7 Uso del extractor de humos . . . . . . . . . . . . . . . . . . . . . . . . . . . . . . . 41
8 Limpieza. . . . . . . . . . . . . . . . . . . . . . . . . . . . . . . . . . . . . . . . . . . . . . 42
9 Gestión de residuos . . . . . . . . . . . . . . . . . . . . . . . . . . . . . . . . . . . . . 42
10 Garantía legal . . . . . . . . . . . . . . . . . . . . . . . . . . . . . . . . . . . . . . . . . 42
11 Datos técnicos . . . . . . . . . . . . . . . . . . . . . . . . . . . . . . . . . . . . . . . . . 43
1 Explicación de los símbolos
!
!
A
¡ADVERTENCIA!
Indicación de seguridad: su incumplimiento puede acarrear la
muerte o graves lesiones.
¡ATENCIÓN!
Indicación de seguridad: su incumplimiento puede acarrear
lesiones.
¡AVISO!
Su incumplimiento puede acarrear daños materiales y perjudicar
el correcto funcionamiento del producto.
Page 36

ES
Indicaciones de seguridad Dometic CK400
36
I
➤ Paso a seguir: este símbolo le indica que debe realizar un paso. Todos
los procedimientos necesarios se describen paso a paso.
✓ Este símbolo describe el resultado de un paso realizado.
Fig. 1 5, página 3: esta indicación hace referencia a un elemento de una
figura, en este ejemplo a la “Posición 5 en la figura 1 de la página 3”.
2 Indicaciones de seguridad
Tenga en cuenta las indicaciones de seguridad y la documentación suministrada por el fabricante y el taller del vehículo.
El fabricante declina toda responsabilidad ante daños ocurridos en los
siguientes casos:
errores de montaje o de conexión,
daños en el producto debido a influencias mecánicas y sobretensiones
modificaciones realizadas en el producto sin el expreso consentimiento
del fabricante
utilización del aparato para fines distintos a los descritos en las instruc-
ciones.
Al utilizar los aparatos eléctricos, respete las siguientes normas básicas de
seguridad para protegerse de:
descargas eléctricas
peligro de incendio
lesiones
2.1 Manejo del aparato
!
¡ADVERTENCIA!
Sólo personal técnico que conozca los posibles peligros y las
normas correspondientes tiene autorización para realizar las tareas de instalación y la reparación del extractor de humos.
NOTA
Información adicional para el manejo del producto.
Page 37

ES
Dometic CK400 Indicaciones de seguridad
37
Las reparaciones que se realicen incorrectamente pueden dar
lugar a situaciones de considerable peligro. En caso de reparaciones, diríjase al punto de atención al cliente de su país (direcciones al dorso).
Las personas (incluidos los niños) que, debido a sus capacida-
des físicas, sensoriales o mentales, a su falta de experiencia o
a desconocimiento, no pueden utilizar el producto de forma segura, no tienen permitido utilizar este producto sin la vigilancia
y las instrucciones de una persona sobre la que recae tal responsabilidad.
Los trabajos de montaje y cableado eléctrico deben ser realiza-
dos por personas cualificadas para tal efecto, respetando todos
los reglamentos y normas vigentes.
Cuando taladre o perfore la pared o el techo, preste atención a
no dañar ningún cable eléctrico o aparatos no visibles.
Para reducir el riesgo de incendio, solo pueden utilizarse tube-
rías de la categoría UL94-HB o superior.
La distancia entre la llama del hornillo de gas y el extractor de
humos debe ser como mínimo de 50 cm.
!
¡ATENCIÓN!
Instale el extractor de humos de forma segura para evitar que
se pueda caer.
Use el extractor de humos sólo cuando la carcasa y los cables
no presenten daños.
Asegúrese de que no haya objetos inflamables situados o ins-
talados en el área de salida de aire. La distancia debe ser como
mínimo de 50 cm.
No introduzca las manos en las salidas de ventilación ni inserte
objetos extraños en el aparato.
Page 38

ES
Volumen de entrega Dometic CK400
38
3 Volumen de entrega
4 Uso adecuado
El extractor de humos CK400 (n.° art. 9107300001) está previsto para ser
integrado en autocaravanas, caravanas y embarcaciones.
Pos. en
fig. 1,
página 3
Cantidad Descripción
1 1 Extractor de humos
21Tapa
3 1 Claraboya
41Extractor
5 1 Junta de goma
6 1 Abrazadera
7 1 Tubería
8 1 Abrazadera
91Filtro
10 6 Tornillos 4,2 x 25
11 3 Tornillos 4,2 x 13
12 3 Tornillos 3,5 x 9,5
13 4 Tornillos 3,5 x 13
14 1 Tornillo 3,5 x 25
Page 39

ES
Dometic CK400 Descripción técnica
39
5 Descripción técnica
El extractor de humos CK400 elimina los olores y el vapor originados al cocinar. El aparato está equipado con un filtro extraíble y lavable, dos lámparas
halógenas integradas y un extractor con dos niveles de potencia. Está conectado con el habitáculo mediante una tubería flexible y puede montarse en
el techo de la caravana gracias a la tapa resistente a la intemperie.
5.1 Elementos de mando
6 Montar el extractor de humos
Indicaciones relativas al lugar de montaje
El extractor de humos debe colocarse preferiblemente justo encima del hornillo y, si es posible, montarse en un armario suspendido. La distancia entre
la llama del hornillo de gas y el extractor de humos debe ser como mínimo
de 50 cm.
El extractor debe montarse en el techo sobre una superficie lo más plana posible. Si se instala sobre una base inclinada, la claraboya debe girarse de
modo que uno de los tres orificios de salida de agua esté orientado hacia el
declive. Un ángulo de inclinación de hasta 20° no afecta a la potencia del extractor con el motor parado.
6.1 Montar el extractor
➤ Elija en el techo un lugar de montaje adecuado para el extractor.
➤ Marque la posición y el tamaño de la abertura de 105 mm de diámetro
(fig. 3, página 3).
Pos. en
fig. 2,
página 3
Descripción
1 Filtro
2 Interruptor del extractor
3 Interruptor de la luz
4 Lámparas halógenas
Page 40

ES
Montar el extractor de humos Dometic CK400
40
➤ Taladre previamente y recorte cuidadosamente la abertura en el techo
con una sierra de calar o una herramienta similar.
➤ Coloque el extractor en la abertura y marque los seis orificios de tornillos.
➤ Aplique sobre cada orificio un círculo fino de un material de sellado de
elasticidad permanente.
➤ Coloque la junta de goma (fig. 5 4, página 4) en la ranura situada en la
parte inferior del extractor.
I
➤ Fije el extractor (fig. 5 3, página 4) con los seis tornillos suministrados
(4,2 x 25).
➤ Fije la claraboya (fig. 5 2, página 4) con los tres tornillos suministrados
(3,5 x 9,5).
➤ Fije la tapa (fig. 5 1, página 4) con los tres tornillos suministrados
(4,2 x 13).
6.2 Montar el extractor de humos
!
➤ Escoja en el habitáculo el lugar apropiado para el extractor de humos.
➤ Dibuje la posición y el tamaño de la abertura en el suelo del armario sus-
pendido (fig. 4, página 4).
➤ Taladre previamente y recorte cuidadosamente la abertura con una sierra
de calar o una herramienta similar.
➤ Introduzca en el armario desde abajo el extractor de humos y fíjelo con
los cuatro tornillos suministrados (3,5 x 13) (fig. 6, página 5).
NOTA
Apriete los tornillos de fijación del extractor hasta que la junta de
goma quede completamente pegada al techo.
¡ADVERTENCIA!
Coloque el extractor de humos preferiblemente justo encima
del hornillo y móntelo en un armario suspendido.
La distancia entre la llama del hornillo de gas y el extractor de
humos debe ser como mínimo de 50 cm.
Page 41

ES
Dometic CK400 Uso del extractor de humos
41
➤ Fije el tubo flexible (fig. 6 3, página 4) al extractor de humos (fig. 6 5,
página 4) y al extractor (fig. 6 1, página 4) con las abrazaderas
(fig. 6 2 y 4, página 4).
➤ Coloque el filtro (fig. 2 1, página 3) en el extractor de humos.
6.3 Conexión eléctrica del extractor de humos
➤ Conecte el extractor a la batería; véase fig. 7, página 6.
Leyenda
7 Uso del extractor de humos
Encender y apagar el extractor de humos
➤ Encienda (con el ventilador a media o a plena potencia ) o apague
el extractor de humos con el interruptor “ ” (fig. 2 2, página 3) .
Encender y apagar la luz
➤ Encienda (con una iluminación parcial o total ) o apague la luz con
el interruptor “ ” (fig. 2 3, página 3) .
Pos. en
fig. 7,
página 6
Descripción
1 Extractor
2 Portafusibles con fusible T4 A 5 x 20 mm
3 Batería
sw negro
ws blanco
rt rojo
bl azul
Page 42

ES
Limpieza Dometic CK400
42
8Limpieza
I
A
➤ Limpie de vez en cuando el producto con un paño húmedo.
➤ Retire el filtro (fig. 8, página 6) y límpielo con agua caliente y un produc-
to de limpieza sintético (p. ej. lavavajillas).
9 Gestión de residuos
➤ Deseche el material de embalaje en el contenedor de reciclaje correspon-
diente.
M
Cuando vaya a desechar definitivamente el producto, infórmese en
el centro de reciclaje más cercano o en un comercio especializado
sobre las normas pertinentes de eliminación de materiales.
10 Garantía legal
Rige el plazo de garantía legal. Si el producto presenta algún defecto,
diríjase a la sucursal del fabricante de su país (ver direcciones en el dorso
de estas instrucciones) o a su establecimiento especializado.
Para la tramitación de la reparación y de la garantía debe enviar también los
siguientes documentos:
una copia de la factura con fecha de compra,
el motivo de la reclamación o una descripción de la avería.
NOTA
El filtro del extractor de humos debe limpiarse a intervalos regulares porque allí se concentra la grasa. La frecuencia de limpieza
depende de la frecuencia con la que cocine y de cuántas veces
encienda el extractor de humos. No espere hasta limpiar el filtro
cuando la potencia del extractor de humos quede claramente
mermada.
¡AVISO!
No utilice ningún objeto o producto de limpieza corrosivo o duro
en la limpieza, ya que podría dañar el producto.
Page 43

ES
Dometic CK400 Datos técnicos
43
11 Datos técnicos
Dometic CK400
Número de artículo: 9107300001
Tensión de conexión: 12 Vg
Capacidad:
70/125 m3/h
Consumo de potencia: 30 W
Dimensiones (A x H x P): Véase fig. 9, página 7
Peso: 3,0 kg
Marca de homologación:
5
Page 44

IT
Spiegazione dei simboli Dometic CK400
44
Prima di effettuare il montaggio e la messa in funzione leggere
accuratamente questo manuale di istruzioni, conservarlo e in caso di
trasmissione del prodotto, consegnarlo all'utente successivo.
Indice
1 Spiegazione dei simboli . . . . . . . . . . . . . . . . . . . . . . . . . . . . . . . . . . 44
2 Indicazioni di sicurezza . . . . . . . . . . . . . . . . . . . . . . . . . . . . . . . . . . 45
3 Dotazione. . . . . . . . . . . . . . . . . . . . . . . . . . . . . . . . . . . . . . . . . . . . . 47
4 Conformità d’uso . . . . . . . . . . . . . . . . . . . . . . . . . . . . . . . . . . . . . . . 47
5 Descrizione tecnica . . . . . . . . . . . . . . . . . . . . . . . . . . . . . . . . . . . . . 48
6 Montaggio della cappa aspirante . . . . . . . . . . . . . . . . . . . . . . . . . . . 48
7 Uso della cappa aspirante . . . . . . . . . . . . . . . . . . . . . . . . . . . . . . . . 50
8 Pulizia . . . . . . . . . . . . . . . . . . . . . . . . . . . . . . . . . . . . . . . . . . . . . . . 51
9 Smaltimento . . . . . . . . . . . . . . . . . . . . . . . . . . . . . . . . . . . . . . . . . . . 51
10 Garanzia . . . . . . . . . . . . . . . . . . . . . . . . . . . . . . . . . . . . . . . . . . . . . 51
11 Specifiche tecniche . . . . . . . . . . . . . . . . . . . . . . . . . . . . . . . . . . . . . 52
1 Spiegazione dei simboli
!
!
A
AVVERTENZA!
Avviso di sicurezza: la mancata osservanza di questo avviso
può causare ferite gravi anche mortali.
ATTENZIONE!
Avviso di sicurezza: la mancata osservanza di questo avviso
può essere causa di lesioni.
AVVISO!
La mancata osservanza di questa nota può causare danni materiali e compromettere il funzionamento del prodotto.
Page 45

IT
Dometic CK400 Indicazioni di sicurezza
45
I
➤ Modalità di intervento: questo simbolo indica all'utente che è necessario
un intervento. Le modalità di intervento necessarie saranno descritte
passo dopo passo.
✓ Questo simbolo descrive il risultato di un intervento.
Fig. 1 5, pagina 3: questi dati si riferiscono ad un elemento in una figura,
in questo caso alla “posizione 5 nella figura 1 a pagina 3”.
2 Indicazioni di sicurezza
Osservare le indicazioni di sicurezza e le direttive previste dal produttore del veicolo e dagli specialisti del settore!
Il produttore non si assume nessuna responsabilità per danni nei seguenti
casi:
errori di montaggio o di allacciamento
danni al prodotto dovuti a influenze meccaniche o a sovratensioni
modifiche al prodotto senza esplicita autorizzazione del produttore
impiego per altri fini rispetto a quelli descritti nel manuale di istruzioni
Durante l’uso di dispositivi elettrici attenersi alle misure di sicurezza fondamentali descritte qui di seguito per proteggersi da:
scosse elettriche
pericolo di incendio
lesioni
2.1 Utilizzo del dispositivo
!
AVVERTENZA!
I lavori di montaggio e riparazione della cappa di aspirazione
devono essere effettuati solo da uno specialista informato sui
pericoli connessi e che conosca le relative prescrizioni.
Le riparazioni effettuate in modo scorretto possono causare ri-
schi enormi. In caso di riparazioni, rivolgersi al Centro di assistenza del proprio Paese (l’indirizzo si trova sul retro di questo
manuale).
NOTA
Informazioni integranti relative all'impiego del prodotto.
Page 46

IT
Indicazioni di sicurezza Dometic CK400
46
Le persone (bambini compresi) che, a causa delle proprie capa-
cità fisiche, sensoriali o mentali o della propria inesperienza e
scarsa conoscenza, non sono in grado di utilizzare il prodotto in
modo sicuro, devono evitare di utilizzare il prodotto se non in
presenza di terzi e seguendo le istruzioni di una persona per
loro responsabile.
I lavori di montaggio e del cablaggio elettrico devono essere
eseguiti da personale specializzato nel rispetto di tutte le prescrizioni e norme vigenti.
Fare attenzione, in fase di taglio o di perforazione in una parete
o nel soffitto, a non danneggiare alcun cavo elettrico o dispositivi non direttamente visibili.
Per ridurre il rischio di incendio, utilizzare solo tubi della classe
UL94-HB o superiore.
La distanza tra la fiamma di un fornello a gas e la cappa aspi-
rante deve essere almeno 50 cm.
!
ATTENZIONE!
Installare la cappa aspirante in modo tale che non possa cade-
re.
Mettere in funzione la cappa aspirante solo se i tubi e l’alloggia-
mento non sono danneggiati.
Assicurarsi che nella zona di fuoriuscita dell’aria non siano col-
locati o montati oggetti infiammabili. La distanza deve essere almeno 50 cm.
Non intervenire nell’area della bocchetta di aerazione e non in-
trodurre corpi estranei nel dispositivo.
Page 47

IT
Dometic CK400 Dotazione
47
3Dotazione
4 Conformità d’uso
La cappa aspirante CK400 (n. art. 9107300001) è prevista per il montaggio
su roulotte, camper e barche.
Pos. in
fig. 1,
pagina 3
Quantità Descrizione
1 1 Cappa aspirante
2 1 Cappuccio di protezione
3 1 Copertura
4 1 Ventola
5 1 Guarnizione in gomma
6 1 Fascetta stringitubo
7 1 Condotto
8 1 Fascetta stringitubo
91Filtro
10 6 Viti 4,2 x 25
11 3 Viti 4,2 x 13
12 3 Viti 3,5 x 9,5
13 4 Viti 3,5 x 13
14 1 Viti 3,5 x 25
Page 48

IT
Descrizione tecnica Dometic CK400
48
5 Descrizione tecnica
La cappa aspirante CK400 elimina gli odori e il vapore che si formano quando si cucina. Il dispositivo è dotato di un filtro amovibile e lavabile, due lampade alogene incorporate e una ventola con due livelli di potenza. È collegato
alla zona interna mediante un condotto flessibile e, grazie al cappuccio di
protezione resistente alle intemperie posto sul tetto, può essere montato sul
tetto del camper.
5.1 Elementi di comando
6 Montaggio della cappa aspirante
Indicazioni per il luogo di montaggio
Applicare la cappa aspirante preferibilmente sopra il fornello e se possibile
montarla in un mobile pensile. La distanza tra la fiamma di un fornello a gas
e la cappa aspirante deve essere almeno 50 cm.
La ventola deve essere montata sul tetto su una superficie il più possibile in
piano. In caso di collocazione su un fondo inclinato, la
copertura del tetto deve
essere fatta ruotare in modo che una delle tre aperture per lo scarico dell’acqua sia rivolta verso la pendenza. Un angolo di pendenza fino a 20° non limita la potenza della ventola a motore spento.
6.1 Montaggio della ventola
➤ Scegliere sul tetto un punto di montaggio adatto alla ventola.
➤ Marcare la posizione e l'estensione dell'apertura, con un diametro pari a
105 mm (fig. 3, pagina 3).
Pos. in
fig. 2,
pagina 3
Descrizione
1 Filtro
2 Interruttore ventola
3 Interruttore luce
4 Lampade alogene
Page 49

IT
Dometic CK400 Montaggio della cappa aspirante
49
➤ Eseguire dapprima un foro e tagliare con cura l'apertura sul tetto con un
gattuccio o uno strumento simile.
➤ Porre lo ventola sull’apertura e contrassegnare i sei fori per le viti.
➤ Applicare un sottile anello di materiale isolante elastico e resistente intor-
no a ciascun foro.
➤ Inserire la guarnizione in gomma (fig. 5 4, pagina 4) nella scanalatura
sul lato inferiore della ventola.
I
➤ Fissare la ventola (fig. 5 3, pagina 4) con le sei viti in dotazione
(4,2 x 25).
➤ Fissare la copertura del tetto (fig. 5 2, pagina 4) con le tre viti in dotazio-
ne (3,5 x 9,5).
➤ Fissare il cappuccio di protezione (fig. 5 1, pagina 4) con le tre viti in do-
tazione (4,2 x 13).
6.2 Montaggio della cappa aspirante
!
➤ Scegliere nell’abitacolo un luogo di montaggio adatto per la cappa aspi-
rante.
➤ Contrassegnare la posizione e le dimensioni dell’apertura sulla base del
mobile pensile (fig. 4, pagina 4).
➤ Eseguire dapprima un foro e tagliare con cura l’apertura con un gattuccio
o uno strumento simile.
➤ Inserire la cappa aspirante nel mobile dal basso e fissarla con le quattro
viti in dotazione (3,5 x 13) (fig. 6, pagina 5).
NOTA
Stringere la ventola in modo tale che la guarnizione in gomma abbia aderenza perfetta al tetto.
AVVERTENZA!
Applicare la cappa aspirante preferibilmente sopra il fornello e
montarla in un mobile pensile.
La distanza tra la fiamma di un fornello a gas e la cappa aspi-
rante deve essere almeno 50 cm.
Page 50

IT
Uso della cappa aspirante Dometic CK400
50
➤ Fissare il tubo flessibile (fig. 6 3, pagina 4) sulla cappa aspirante
(fig. 6 5, pagina 4) e sulla ventola (fig. 6 1, pagina 4) con le fascette
stringitubo (fig. 6 2 e 4, pagina 4).
➤ Inserire il filtro (fig. 2 1, pagina 3) nella cappa aspirante.
6.3 Collegamento elettrico della cappa aspirante
➤ Per collegare la ventola con la batteria, vedi fig. 7, pagina 6.
Legenda
7 Uso della cappa aspirante
Accensione e spegnimento della cappa aspirante
➤ Accendere e spegnere la cappa aspirante con l’interruttore “ ” (fig. 2 2,
pagina 3) (a metà potenza o a potenza completa del ventilatore) .
Accensione e spegnimento della luce
➤ Accendere e spegnere la luce con l’interruttore “ ” (fig. 2 3, pagina 3)
(a illuminazione dimezzata o completa ) .
Pos. in
fig. 7,
pagina 6
Descrizione
1 Ventola
2 Portafusibile con fusibile T4 A 5 x 20 mm
3 Batteria
sw nero
ws bianco
rt rosso
bl blu
Page 51

IT
Dometic CK400 Pulizia
51
8 Pulizia
I
A
➤ Pulire il prodotto di tanto in tanto con un panno umido.
➤ Rimuovere il filtro (fig. 8, pagina 6) e pulirlo con acqua calda e detergen-
te sintetico (ad es. detersivo).
9 Smaltimento
➤ Raccogliere il materiale di imballaggio possibilmente negli appositi
contenitori di riciclaggio.
M
Quando il prodotto viene messo fuori servizio definitivamente,
informarsi al centro di riciclaggio più vicino, oppure presso il proprio
rivenditore specializzato, sulle prescrizioni adeguate concernenti lo
smaltimento.
10 Garanzia
Vale il termine di garanzia previsto dalla legge. Qualora il prodotto risultasse
difettoso, La preghiamo di rivolgersi alla filiale del produttore del suo Paese
(l'indirizzo si trova sul retro del manuale di istruzioni), oppure al rivenditore
specializzato di riferimento.
Per la riparazione e per il disbrigo delle condizioni di garanzia è necessario
inviare la seguente documentazione:
una copia della fattura con la data di acquisto del prodotto,
un motivo su cui fondare il reclamo, oppure una descrizione del guasto.
NOTA
Il filtro della cappa aspirante deve essere pulito regolarmente perché lì si deposita il grasso. La necessità di una pulizia dipende
dalla frequenza con cui si cucina e dalle volte che la cappa aspirante viene accesa. Non pulire il filtro solo quando la prestazione
della cappa aspirante è sensibilmente ridotta.
AVVISO!
Per la pulizia non impiegare oggetti ruvidi o appuntiti, oppure
detergenti perché potrebbero danneggiare il prodotto.
Page 52

IT
Specifiche tecniche Dometic CK400
52
11 Specifiche tecniche
Dometic CK400
Numero articolo: 9107300001
Tensione di allacciamento: 12 Vg
Capacità:
70/125 m3/h
Potenza assorbita: 30 W
Dimensioni (L x A x P): vedi fig. 9, pagina 7
Peso: 3,0 kg
Marchio di collaudo:
5
Page 53

NL
Dometic CK400 Verklaring van de symbolen
53
Lees deze handleiding voor de montage en de ingebruikname zorgvuldig door en bewaar hem. Geef de handleiding bij het doorgeven van
het product aan de gebruiker.
Inhoud
1 Verklaring van de symbolen. . . . . . . . . . . . . . . . . . . . . . . . . . . . . . . 53
2 Veiligheidsinstructies . . . . . . . . . . . . . . . . . . . . . . . . . . . . . . . . . . . . 54
3 Omvang van de levering . . . . . . . . . . . . . . . . . . . . . . . . . . . . . . . . . 56
4 Gebruik volgens de voorschriften . . . . . . . . . . . . . . . . . . . . . . . . . . 56
5 Technische beschrijving. . . . . . . . . . . . . . . . . . . . . . . . . . . . . . . . . . 57
6 Afzuigkap monteren . . . . . . . . . . . . . . . . . . . . . . . . . . . . . . . . . . . . . 57
7 Afzuigkap gebruiken . . . . . . . . . . . . . . . . . . . . . . . . . . . . . . . . . . . . 59
8 Reiniging . . . . . . . . . . . . . . . . . . . . . . . . . . . . . . . . . . . . . . . . . . . . . 60
9 Afvoer. . . . . . . . . . . . . . . . . . . . . . . . . . . . . . . . . . . . . . . . . . . . . . . . 60
10 Garantie . . . . . . . . . . . . . . . . . . . . . . . . . . . . . . . . . . . . . . . . . . . . . . 60
11 Technische gegevens . . . . . . . . . . . . . . . . . . . . . . . . . . . . . . . . . . . 61
1 Verklaring van de symbolen
!
!
A
WAARSCHUWING!
Veiligheidsaanwijzing: Het niet naleven kan leiden tot overlijden
of ernstig letsel.
VOORZICHTIG!
Veiligheidsaanwijzing: Het niet naleven kan leiden tot letsel.
LET OP!
Het niet naleven ervan kan leiden tot materiële schade en de
werking van het product beperken.
Page 54

NL
Veiligheidsinstructies Dometic CK400
54
I
➤ Handeling: dit symbool geeft aan dat u iets moet doen. De vereiste
handelingen worden stap voor stap beschreven.
✓ Dit symbool beschrijft het resultaat van een handeling.
Afb. 1 5, pagina 3: deze aanduiding wijst u op een element in een afbeelding, in dit voorbeeld op „positie 5 in afbeelding 1 op pagina 3”.
2 Veiligheidsinstructies
Neem de veiligheidsinstructies en voorschriften van de fabrikant van
het voertuig en het garagebedrijf in acht!
De fabrikant kan in de volgende gevallen niet aansprakelijk worden gesteld
voor schade:
montage- of aansluitfouten
beschadiging van het product door mechanische invloeden en over-
spanningen
veranderingen aan het product zonder uitdrukkelijke toestemming van de
fabrikant
gebruik voor andere dan de in de handleiding beschreven toepassingen
Neem onderstaande fundamentele veiligheidsmaatregelen in acht bij het gebruik van elektrische toestellen ter bescherming tegen:
elektrische schokken
brandgevaar
verwondingen
2.1 Omgang met het toestel
!
WAARSCHUWING!
De montage van en reparaties aan de afzuigkap mogen alleen
door vakmensen worden uitgevoerd die bekend zijn met de betreffende gevaren en voorschriften.
Door ondeskundige reparaties kunnen grote gevaren ontstaan.
Neem bij reparaties contact op met het servicesteunpunt in uw
land (adressen aan de achterzijde).
INSTRUCTIE
Aanvullende informatie voor het bedienen van het product.
Page 55

NL
Dometic CK400 Veiligheidsinstructies
55
Personen (ook kinderen) die door hun fysieke, sensorische of
geestelijke vaardigheden, of hun onervarenheid of onwetendheid niet in staat zijn om het product veilig te gebruiken, mogen
dit niet zonder toezicht of instructie door een verantwoordelijke
persoon doen.
Montagewerkzaamheden en de elektrische bedrading moeten
door gekwalificeerde vakmensen worden uitgevoerd onder naleving van alle geldende voorschriften en normen.
Voorkom bij snijden of boren in muren of plafonds dat elektri-
sche leidingen of niet-zichtbare apparaten worden beschadigd.
Om het brandgevaar te verminderen, mogen uitsluitend buizen
van de klasse UL94-HB of hoger worden gebruikt.
De afstand tussen de vlam van het gastoestel en de afzuigkap
moet minstens 50 cm bedragen.
!
VOORZICHTIG!
De afzuigkap moet zo stevig worden geïnstalleerd, dat deze niet
naar beneden kan vallen.
Gebruik de afzuigkap alleen als de behuizing en de leidingen
onbeschadigd zijn.
Zorg ervoor dat brandbare voorwerpen niet in de buurt van de
luchtuitlaat zijn opgeslagen of gemonteerd. De afstand moet
minstens 50 cm bedragen.
Grijp niet in de luchtuitlaat en steek geen vreemde voorwerpen
in het apparaat.
Page 56

NL
Omvang van de levering Dometic CK400
56
3 Omvang van de levering
4 Gebruik volgens de voorschriften
De afzuigkap CK400 (artikelnr. 9107300001) is bestemd voor de montage in
campers, caravans en boten.
Pos. in
afb. 1,
pag. 3
Aantal Beschrijving
1 1 Afzuigkap
2 1 Afdekkap
3 1 Dakkap
4 1 Ventilator
5 1 Rubberen afdichting
6 1 Slangklem
7 1 Buisleiding
8 1 Slangklem
91Filter
10 6 Schroeven 4,2 x 25
11 3 Schroeven 4,2 x 13
12 3 Schroeven 3,5 x 9,5
13 4 Schroeven 3,5 x 13
14 1 Schroef 3,5 x 25
Page 57

NL
Dometic CK400 Technische beschrijving
57
5 Technische beschrijving
De afzuigkap CK400 verwijdert geurtjes en stoom die ontstaan bij het koken.
Het toestel is uitgerust met een afneembaar en wasbaar filter, twee ingebouwde halogeenlampen en een ventilator met twee standen. De afzuigkap
is via een buigzame buisleiding verbonden met de binnenruimte en kan
dankzij de weerbestendige afdekkap op het dak van de camper worden geenstalleerd.
5.1 Bedieningselementen
6 Afzuigkap monteren
Instructies voor de montageplaats
De afzuigkap moet bij voorkeur boven het fornuis worden aangebracht en,
indien mogelijk, in een hangend keukenkastje worden ingebouwd. De afstand tussen de vlam van het gastoestel en de afzuigkap moet minstens
50 cm bedragen.
De ventilator moet op het dak op een zo effen mogelijke positie worden gemonteerd. Als de ventilator op een schuine ondergrond aangebracht wordt,
moet de dakkap zodanig worden gedraaid dat een van de drie waterafvoeropeningen naar beneden is gericht. Een hellingshoek tot 20° heeft geen invloed op het vermogen van de ventilator bij stilstaande motor.
6.1 Ventilator monteren
➤ Kies voor de ventilator een geschikte montageplaats op het dak.
➤ Teken op de gewenste montageplaats een opening van 105 mm diameter
(afb. 3, pag. 3).
Pos. in
afb. 2,
pag. 3
Beschrijving
1 Filter
2 Schakelaar ventilator
3 Schakelaar licht
4 Halogeenlampen
Page 58

NL
Afzuigkap monteren Dometic CK400
58
➤ Boor gaten en snij de opening met een decoupeerzaag o.i.d. zorgvuldig
uit het dak.
➤ Plaats de ventilator op de opening en markeer de zes schroefgaten.
➤ Plaats een dunne ring van een duurzaam elastisch afdichtingsmateriaal
op ieder gat.
➤ Plaats de rubberen afdichting (afb. 5 4, pagina 4) in de gleuf aan de on-
derzijde van de ventilator.
I
➤ Bevestig de ventilator (afb. 5 3, pagina 4) met de zes meegeleverde
schroeven (4,2 x 25).
➤ Bevestig de dakkap (afb. 5 2, pagina 4) met de drie meegeleverde
schroeven (3,5 x 9,5).
➤ Bevestig de afdekkap (afb. 5 1, pagina 4) met de drie meegeleverde
schroeven (4,2 x 13).
6.2 Afzuigkap monteren
!
➤ Kies in de binnenruimte een geschikte montageplaats voor de afzuigkap.
➤ Teken de positie en grootte van de opening in de bodem van het hangen-
de keukenkastje (afb. 4, pag. 4).
➤ Boor gaten en snij de opening met een decoupeerzaag o.i.d. zorgvuldig
uit het kastje.
➤ Plaats de afzuigkap van onderen in de kast en bevestig hem met de vier
meegeleverde schroeven (3,5 x 13) (afb. 6, pag. 5).
➤ Bevestig de slang (afb. 6 3, pagina 4) met de slangklemmen (afb. 6 2
en 4, pagina 4) aan de afzuigkap (afb. 6 5, pagina 4) en aan de ventilator (afb. 6 1, pagina 4).
INSTRUCTIE
Draai de ventilator zo stevig aan dat de rubberen afdichting naadloos tegen het dak ligt.
WAARSCHUWING!
Breng de afzuigkap, ingebouwd in een hangend keukenkastje,
bij voorkeur boven het fornuis aan.
De afstand tussen de vlam van het gastoestel en de afzuigkap
moet minstens 50 cm bedragen.
Page 59

NL
Dometic CK400 Afzuigkap gebruiken
59
➤ Plaats het filter (afb. 2 1, pagina 3) in de afzuigkap.
6.3 Afzuigkap elektrisch aansluiten
➤ Verbind de ventilator met de accu, zie afb. 7, pag. 6.
Legenda
7 Afzuigkap gebruiken
Afzuigkap in- en uitschakelen
➤ Schakel de afzuigkap met de schakelaar „ ” (afb. 2 2, pagina 3) in (op
half of maximaal vermogen van de ventilator) en uit .
Licht in- en uitschakelen
➤ Schakel het licht met de schakelaar „ ” (afb. 2 3, pagina 3) in (op halve
of maximale lichtsterkte) en uit .
Pos. in
afb. 7,
pag. 6
Beschrijving
1 Ventilator
2 Zekeringshouder met zekering T4 A 5 x 20 mm
3 Accu
sw zwart
ws wit
rt rood
bl blauw
Page 60

NL
Reiniging Dometic CK400
60
8 Reiniging
I
A
➤ Reinig het product af en toe met een vochtige doek.
➤ Verwijder het filter (afb. 8, pag. 6) en reinig het met warm water en een
synthetisch reinigingsmiddel (bijv. afwasmiddel).
9Afvoer
➤ Laat het verpakkingsmateriaal indien mogelijk recyclen.
M
Als u het product definitief buiten bedrijf stelt, informeer dan bij het
dichtstbijzijnde recyclingcentrum of uw speciaalzaak naar de betreffende afvoervoorschriften.
10 Garantie
De wettelijke garantieperiode is van toepassing. Als het product defect is,
wendt u zich tot het filiaal van de fabrikant in uw land (adressen zie achterkant van de handleiding) of tot uw speciaalzaak.
Voor de afhandeling van de reparatie of garantie dient u de volgende documenten mee te sturen:
een kopie van de factuur met datum van aankoop,
reden van de klacht of een beschrijving van de storing.
INSTRUCTIE
Het filter van de afzuigkap moet regelmatig worden gereinigd, omdat het vet zich daar ophoopt. Hoe vaak het filter moet worden gereinigd, hangt af van hoe vaak er wordt gekookt en hoe vaak de
afzuigkap wordt ingeschakeld. Reinig het filter niet pas als het
vermogen van de afzuigkap duidelijk vermindert.
LET OP!
Geen scherpe of harde voorwerpen of reinigingsmiddelen bij het
reinigen gebruiken. Dit kan het product beschadigen.
Page 61

NL
Dometic CK400 Technische gegevens
61
11 Technische gegevens
Dometic CK400
Artikelnummer: 9107300001
Netspanning: 12 Vg
Capaciteit:
70/125 m
3
/h
Opgenomen vermogen: 30 W
Afmetingen (b x h x d): zie afb. 9, pag. 7
Gewicht: 3,0 kg
Keurmerk:
5
Page 62

DA
Forklaring af symbolerne Dometic CK400
62
Læs denne vejledning omhyggeligt igennem før installation og ibrugtagning, og opbevar den. Giv den til brugeren, hvis du giver produktet
videre.
Indhold
1 Forklaring af symbolerne . . . . . . . . . . . . . . . . . . . . . . . . . . . . . . . . . 62
2 Sikkerhedshenvisninger. . . . . . . . . . . . . . . . . . . . . . . . . . . . . . . . . . 63
3 Leveringsomfang . . . . . . . . . . . . . . . . . . . . . . . . . . . . . . . . . . . . . . . 65
4 Korrekt brug . . . . . . . . . . . . . . . . . . . . . . . . . . . . . . . . . . . . . . . . . . . 65
5 Teknisk beskrivelse . . . . . . . . . . . . . . . . . . . . . . . . . . . . . . . . . . . . . 66
6 Montering af emhætten . . . . . . . . . . . . . . . . . . . . . . . . . . . . . . . . . . 66
7 Anvendelse af emhætten . . . . . . . . . . . . . . . . . . . . . . . . . . . . . . . . . 68
8 Rengøring . . . . . . . . . . . . . . . . . . . . . . . . . . . . . . . . . . . . . . . . . . . . 69
9 Bortskaffelse . . . . . . . . . . . . . . . . . . . . . . . . . . . . . . . . . . . . . . . . . . 69
10 Garanti . . . . . . . . . . . . . . . . . . . . . . . . . . . . . . . . . . . . . . . . . . . . . . . 69
11 Tekniske data. . . . . . . . . . . . . . . . . . . . . . . . . . . . . . . . . . . . . . . . . . 70
1 Forklaring af symbolerne
!
!
A
ADVARSEL!
Sikkerhedshenvisning: Manglende overholdelse kan medføre
død eller alvorlig kvæstelse.
FORSIGTIG!
Sikkerhedshenvisning: Manglende overholdelse kan medføre
kvæstelser.
VIGTIGT!
Manglende overholdelse kan medføre materielle skader og
begrænse produktets funktion.
Page 63

DA
Dometic CK400 Sikkerhedshenvisninger
63
I
➤ Handling: Dette symbol viser dig, at du skal gøre noget. De påkrævede
handlinger beskrives trin for trin.
✓ Dette symbol beskriver resultatet af en handling.
Fig. 1 5, side 3: Denne information henviser til et element på en figur, i
dette eksempel til „Position 5 på figur 1 på side 3“.
2 Sikkerhedshenvisninger
Overhold sikkerhedshenvisningerne og pålæggene, der er foreskrevet
af køretøjsproducenten og af automobilbranchen!
Producenten påtager sig intet ansvar for skader i følgende tilfælde:
Monterings- eller tilslutningsfejl
Beskadigelser på produktet på grund af mekanisk påvirkning og over-
spænding
Ændringer på produktet uden udtrykkelig tilladelse fra producenten
Anvendelse til andre formål end dem, der er beskrevet i vejledningen
Overhold følgende grundlæggende sikkerhedsforanstaltninger ved brug af
elektriske apparater for at beskytte mod:
Elektrisk stød
Brandfare
Kvæstelser
2.1 Omgang med apparatet
!
ADVARSEL!
Montering af og reparationer på emhætten må kun foretages af
fagfolk, der kender farerne, der er forbundet hermed, og de pågældende forskrifter.
Ved ukorrekte reparationer kan der opstå betydelige farer. Ved
reparationer skal du henvende dig til serviceafdelingen i dit land
(adresser på bagsiden).
BEMÆRK
Supplerende informationer om betjening af produktet.
Page 64

DA
Sikkerhedshenvisninger Dometic CK400
64
Personer (inkl. børn), der på grund af deres fysiske, sanse- eller
mentale evner eller deres uerfarenhed eller uvidenhed ikke er i
stand til at anvende produktet sikkert, bør kun anvende dette
produkt under en ansvarlig persons opsyn eller anvisning.
Monteringarbejder og elektrisk ledningsføring skal foretages af
kvalificerede faghåndværkere under overholdelse af alle gældende forskrifter og standarder.
Sørg for, at elektriske ledninger eller apparater, der ikke kan
ses, ikke beskadiges, når der skæres eller bores i væggen eller
loftet.
For at reducere risikoen for brand må der kun anvendes rør i
klassen UO94-HB eller højere.
Afstanden mellem gasblussets flamme og emhætten skal være
mindst 50 cm.
!
FORSIGTIG!
Emhætten skal installeres sikkert, så den ikke kan falde ned.
Anvend kun emhætten, hvis kabinettet og ledningerne er ube-
skadigede.
Brændbare genstande må ikke placeres eller monteres, hvor
luften strømmer ud. Afstanden skal være på min. 50 cm.
Grib ikke i ventilationsudgangen, og stik ikke fremmedlegemer
ind i apparatet.
Page 65

DA
Dometic CK400 Leveringsomfang
65
3 Leveringsomfang
4 Korrekt brug
Emhætten CK400 (art.nr. 9107300001) er beregnet til montering i campingvogne, autocampere og både.
Pos. på
fig. 1,
side 3
Mængde Beskrivelse
11Emhætte
2 1 Afdækningskappe
3 1 Tagluge
4 1 Ventilator
51Gummitætning
6 1 Spændebånd
7 1 Rørledning
8 1 Spændebånd
91Filter
10 6 Skruer 4,2 x 25
11 3 Skruer 4,2 x 13
12 3 Skruer 3,5 x 9,5
13 4 Skruer 3,5 x 13
14 1 Skrue 3,5 x 25
Page 66

DA
Teknisk beskrivelse Dometic CK400
66
5 Teknisk beskrivelse
Emhætten CK400 fjerner lugte og damp, der opstår ved madlavning. Apparatet er udstyret med et filter, der kan tages af og vaskes, to indbyggede halogenlamper og en ventilator med to ydelsestrin. Det er forbundet med det
indvendige område ved hjælp af en bøjelig rørledning og kan takket være
den vejrbestandige afdækningskappe monteres på autocamperens tag.
5.1 Betjeningselementer
6 Montering af emhætten
Henvisninger vedr. monteringsstedet
Emhætten skal fortrinsvis placeres og blusset og så vidt muligt monteres i et
hængeskab. Afstanden mellem gasblussets flamme og emhætten skal være
mindst 50 cm.
Ventilatoren skal monteres på taget på en så plan flade som muligt. Hvis taglugen anbringes på et skråt underlag, skal den drejes, så en af de tre vandafløbsåbninger vender i retning af hældningen. En hældningsvinkel på op til
20° reducerer ikke ventilatorens effekt, når motoren er standset.
6.1 Montering af ventilatoren
➤ Vælg et egnet monteringssted til ventilatoren på taget.
➤ Markér placeringen og størrelsen for åbningen på 105 mm diameter
(fig. 3, side 3).
➤ Bor for, og skær åbningen på taget omhyggeligt ud med en stiksav el.lign.
➤ Læg ventilatoren på åbningen, og markér de seks skruehuller.
Pos. på
fig. 2,
side 3
Beskrivelse
1 Filter
2 Kontakt ventilator
3 Kontakt lys
4 Halogenlamper
Page 67

DA
Dometic CK400 Montering af emhætten
67
➤ Påfør en tynd ring af permanent elastisk tætningsmateriale omkring hul-
let.
➤ Sæt gummiringen (fig. 5 4, side 4) ind i rillen på undersiden af ventilato-
ren.
I
➤ Fastgør ventilatoren (fig. 5 3, side 4) med de seks medfølgende skruer
(4,2 x 25).
➤ Fastgør taglugen (fig. 5 2, side 4) med de tre medfølgende skruer
(3,5 x 9,5).
➤ Fastgør afdækningskappen (fig. 5 1, side 4) med de tre medfølgende
skruer (4,2 x 13).
6.2 Montering af emhætten
!
➤ Vælg et egnet monteringssted til emhætten i det indvendige rum.
➤ Tegn placeringen og størrelsen for udsnittet i bunden af hængeskabet
(fig. 4, side 4).
➤ Bor for, og skær udsnittet omhyggeligt ud med en stiksav el.lign.
➤ Sæt emhætten nedefra ind i skabet, og fastgør den med de fire medføl-
gende skruer (3,5 x 13) (fig. 6, side 5).
➤ Fastgør slangen (fig. 6 3, side 4) på emhætten (fig. 6 5, side 4) og på
ventilatoren (fig. 6 1, side 4) med spændebåndene (fig. 6 2 og 4,
side 4).
➤ Sæt filteret (fig. 2 1, side 3) ind i emhætten.
BEMÆRK
Spænd ventilatoren fast, så gummitætningen ligger sømløst op
mod taget.
ADVARSEL!
Placér fortrinsvis emhætten over blusset, og montér den i et
hængeskab.
Afstanden mellem gasblussets flamme og emhætten skal
være mindst 50 cm.
Page 68

DA
Anvendelse af emhætten Dometic CK400
68
6.3 Elektrisk tilslutning af emhætten
➤ Forbind ventilatoren med batteriet, se fig. 7, side 6.
Forklaring
7 Anvendelse af emhætten
Til- og frakobling af emhætten
➤ Tænd emhætten med kontakten „ “ (fig. 2 2, side 3) (på halv eller
fuld ydelse for blæseren), og sluk den med den .
Til- og frakobling af lyset
➤ Tænd lyset med kontakten „ “ (fig. 2 3, side 3) (på halv eller fuld
belysning), og sluk det med den .
Pos. på
fig. 7,
side 6
Beskrivelse
1 Ventilator
2 Sikringsholder med sikring T4 A5 x 20 mm
3 Batteri
sw Sort
ws Hvid
rt Rød
bl Blå
Page 69

DA
Dometic CK400 Rengøring
69
8 Rengøring
I
A
➤ Rengør af og til produktet med en fugtig klud.
➤ Tag filteret (fig. 8, side 6) ud, og rengør det med varmt vand og syntetisk
rengøringsmiddel (f.eks. skyllemiddel).
9 Bortskaffelse
➤ Bortskaf så vidt muligt emballagen sammen med det tilsvarende
genbrugsaffald.
M
Hvis du tager produktet endegyldigt ud af drift, skal du kontakte det
nærmeste recyclingcenter eller din faghandel for at få de pågældende forskrifter om bortskaffelse.
10 Garanti
Den lovbestemte garantiperiode gælder. Hvis produktet er defekt, skal du
kontakte producentens afdeling i dit land (adresser, se vejledningens bagside) eller din forhandler.
Ved reparation eller krav om garanti skal du medsende følgende bilag:
En kopi af regningen med købsdato
En reklamationsgrund eller en fejlbeskrivelse
BEMÆRK
Emhættens filter skal rengøres regelmæssigt, da der samler sig
fedt dér. Hvor tit en rengøring er nødvendig, afhænger af, hvor tit
der laves mad, og hvor tit emhætten tilkobles. Rengør ikke først
filteret, når emhættens effekt reduceres betydeligt.
VIGTIGT!
Anvend ikke skarpe eller hårde genstande eller rengøringsmidler
til rengøring, da det kan beskadige produktet.
Page 70

DA
Tekniske data Dometic CK400
70
11 Tekniske data
Dometic CK400
Artikelnummer: 9107300001
Tilslutningsspænding: 12 Vg
Kapacitet:
70/125 m
3
/h
Effektforbrug: 30 W
Mål (B x H x D): se fig. 9, side 7
Vægt: 3,0 kg
Kontrolmærke:
5
Page 71

SV
Dometic CK400 Förklaring av symboler
71
Läs igenom anvisningarna noga innan produkten monteras och
används. Spara monterings- och bruksanvisningen för senare bruk.
Överlämna bruksanvisningen till den nya ägaren vid ev. vidareförsäljning.
Innehållsförteckning
1 Förklaring av symboler. . . . . . . . . . . . . . . . . . . . . . . . . . . . . . . . . . . 71
2 Säkerhetsanvisningar . . . . . . . . . . . . . . . . . . . . . . . . . . . . . . . . . . . 72
3 Leveransomfattning . . . . . . . . . . . . . . . . . . . . . . . . . . . . . . . . . . . . . 74
4 Ändamålsenlig användning . . . . . . . . . . . . . . . . . . . . . . . . . . . . . . . 74
5 Teknisk beskrivning . . . . . . . . . . . . . . . . . . . . . . . . . . . . . . . . . . . . . 75
6 Montera spisfläkten . . . . . . . . . . . . . . . . . . . . . . . . . . . . . . . . . . . . . 75
7 Använda spisfläkten. . . . . . . . . . . . . . . . . . . . . . . . . . . . . . . . . . . . . 77
8 Rengöra . . . . . . . . . . . . . . . . . . . . . . . . . . . . . . . . . . . . . . . . . . . . . . 78
9 Avfallshantering . . . . . . . . . . . . . . . . . . . . . . . . . . . . . . . . . . . . . . . . 78
10 Garanti . . . . . . . . . . . . . . . . . . . . . . . . . . . . . . . . . . . . . . . . . . . . . . . 78
11 Tekniska data. . . . . . . . . . . . . . . . . . . . . . . . . . . . . . . . . . . . . . . . . . 79
1 Förklaring av symboler
!
!
A
VARNING!
Observera: Beaktas anvisningen ej kan det leda till dödsfara eller
svåra skador.
AKTA!
Observera: Beaktas anvisningen ej kan det leda till kropps-
skador.
OBSERVERA!
Om anvisningarna inte beaktas kan det leda till materialskador
och produktens funktion kan påverkas negativt.
Page 72

SV
Säkerhetsanvisningar Dometic CK400
72
I
➤ Arbetssteg: denna symbol står framför en arbetsinstruktion.
Tillvägagångssättet beskrivs steg för steg.
✓ Denna symbol står framför beskrivningen av resultatet.
Bild 1 5, sidan 3: anger en detalj på en bild, i detta exempel ”position 5 på
bild 1 på sidan 3”.
2 Säkerhetsanvisningar
Följ säkerhetsanvisningarna och riktlinjerna från fordonstillverkaren
samt reglerna för bilmekaniska arbeten!
Tillverkaren övertar inget ansvar för skador i följande fall:
monterings- eller anslutningsfel
skador på produkten, orsakade av mekanisk påverkan eller överspänning
ändringar som utförts utan uttryckligt medgivande från tillverkaren
ej ändamålsenlig användning
Beakta nedanstående grundläggande säkerhetsanvisningar för elapparater
för att förhindra:
elstötar
brandfara
skador.
2.1 Handhavande
!
VARNING!
Spisfläkten får endast monteras och repareras av behörig, utbil-
dad personal som känner till riskerna och gällande föreskrifter.
Icke fackmässiga reparationer kan medföra allvarliga risker.
Vänd dig till ett servicekontor när det gäller reparationer (adresser finns på baksidan).
ANVISNING
Kompletterande information om användning av produkten.
Page 73

SV
Dometic CK400 Säkerhetsanvisningar
73
Personer (och barn), som på grund av fysiska, sensoriska eller
mentala funktionshinder eller på grund av oerfarenhet eller ovetande inte kan använda apparaten på ett säkert sätt, bör inte använda denna apparat utan uppsikt eller hjälp av en ansvarig
person.
Monteringsarbete och dragning av elkablar får endast utföras av
kvalificerad, behörig personal enligt gällande föreskrifter och
standarder.
Se till att inga elkablar eller dolda apparater skadas vid skärar-
beten eller borrning i väggar eller tak.
För att minska brandrisken får bara rör som tillhör klass UL94-
HB eller högre användas.
Avståndet mellan gasolspisens låga och spisfläkten ska vara
minst 50 cm.
!
AKTA!
Spisfläkten måste installeras säkert så att den inte kan falla ner!
Spisfläkten får endast användas om höljet och kablarna är
oskadade.
Se till att inga brännbara föremål finns i närheten av luftutsläp-
pet. Avståndet måste vara minst 50 cm.
Stick inte in händerna i ventilationsöppningen och för inte in
några främmande föremål i apparaten.
Page 74

SV
Leveransomfattning Dometic CK400
74
3 Leveransomfattning
4 Ändamålsenlig användning
Spisfläkten CK400 (art.nr 9107300001) är avsedd för montering i husvagnar,
husbilar och båtar.
Pos. på
bild 1,
sida 3
Mängd Beskrivning
11Spisfläkt
2 1 Täckkåpa
3 1 Takkåpa
4 1 Fläktenhet
5 1 Gummitätning
6 1 Slangklämma
7 1 Rörledning
8 1 Slangklämma
91Filter
10 6 Skruvar 4,2 x 25
11 3 Skruvar 4,2 x 13
12 3 Skruvar 3,5 x 9,5
13 4 Skruvar 3,5 x 13
14 1 Skruv 3,5 x 25
Page 75

SV
Dometic CK400 Teknisk beskrivning
75
5 Teknisk beskrivning
Spisfläkten CK400 tar bort matos och kondensation vid matlagningen. Apparaten har ett avtagbart filter som kan tvättas, två monterade halogenlampor
samt en tvåstegs fläktenhet. Fläktenheten kan monteras på husbilens tak
tack vare täckkåpan som är väderbeständig. Komponenterna på taket kopplas samman med komponenterna i pentryt genom en böjbar rörledning.
5.1 Reglage, knappar
6 Montera spisfläkten
Information om monteringsplatsen
Spisfläkten bör monteras ovanför spishällen och i ett hängskåp om det är
möjligt. Avståndet mellan gasolspisens låga och spisfläkten ska vara minst
50 cm.
Fläktenheten ska monteras på taket, på en så jämn yta som möjligt. Vid montering på lutande ytor måste
takkåpan vridas så att en av de tre vattenutlopps-
öppningarna är riktad mot lutningen. En lutning på högst 20° påverkar inte
fläktens effekt när motorn står still.
6.1 Montera fläktenheten
➤ Välj ett lämpligt monteringsställe på taket.
➤ Rita ut läget och storleken på öppningen (105 mm diameter, bild 3,
sida 3).
➤ Förborra och skär noggrant ut öppningen på taket med en sticksåg eller
dylikt.
Pos. på
bild 2,
sida 3
Beskrivning
1 Filter
2 Strömbrytare för fläkten
3 Strömbrytare för belysningen
4 Halogenlampor
Page 76

SV
Montera spisfläkten Dometic CK400
76
➤ Lägg fläktenheten på öppningen och märk upp de sex skruvhålen.
➤ Applicera ett tunt lager elastiskt tätningsmaterial runt varje borrhål.
➤ Sätt in gummitätningen (bild 5 4, sida 4) i spåret på fläktenhetens under-
sida.
I
➤ Skruva fast fläktenheten (bild 5 3, sida 4) med de sex bifogade skruvar-
na (4,2 x 25).
➤ Skruva fast takkåpan (bild 5 2, sida 4) med de tre bifogade skruvarna
(3,5 x 9,5).
➤ Skruva fast täckkåpan (bild 5 1, sida 4) med de tre bifogade skruvarna
(4,2 x 13).
6.2 Montera spisfläkten
!
➤ Välj ett lämpligt monteringsställe i pentryt.
➤ Rita ut dess läge och storlek på hängskåpets golv (bild 4, sida 4).
➤ Förborra och skär noggrant ut öppningen med en sticksåg eller dylikt.
➤ Sätt in spisfläkten underifrån i skåpet och skruva fast den med de fyra
bifogade skruvarna (3,5 x 13) (bild 6, sida 5).
➤ Montera slangen (bild 6 3, sida 4) på spisfläkten (bild 6 5, sida 4) och
på fläktenheten (bild 6 1, sida 4) med slangklämmorna (bild 6 2 och 4,
sida 4).
➤ Sätt i filtret (bild 2 1, sida 3) i spisfläkten.
ANVISNING
Dra åt fläktenheten så att hela gummitätningen sitter tätt mot taket.
VARNING!
Placera spisfläkten ovanför spishällen och montera den i ett
hängskåp.
Avståndet mellan gasolspisens låga och spisfläkten ska vara
minst 50 cm.
Page 77

SV
Dometic CK400 Använda spisfläkten
77
6.3 Ansluta spisfläkten till elsystemet
➤ Koppla ihop fläktenheten och batteriet, se bild 7, sida 6.
Teckenförklaring
7 Använda spisfläkten
Slå på och stänga av spisfläkten
➤ Slå på spisfläkten med ” ” (bild 2 2, sida 3) (kan gå med halv eller
full fläkthastighet). Stäng av fläkten med .
Tända och släcka ljuset
➤ Tänd ljuset med ” ” (bild 2 3, sida 3) (på halv eller full ljusstyr-
ka). Släck ljuset med .
Pos. på
bild 7,
sida 6
Beskrivning
1 Fläktenhet
2 Säkringshållare med säkring T4 A 5 x 20 mm
3 Batteri
sw Svart
ws Vit
rt Röd
bl Blå
Page 78

SV
Rengöra Dometic CK400
78
8 Rengöra
I
A
➤ Rengör produkten då och då med en fuktig trasa.
➤ Ta ut filtret (bild 8, sida 6) och rengör det med varmt vatten och synte-
tiskt rengöringsmedel (t.ex. diskmedel).
9 Avfallshantering
➤ Lämna om möjligt förpackningsmaterialet till återvinning.
M
När produkten slutgiltigt tas ur bruk: informera dig om
gällande bestämmelser hos närmaste återvinningscentral
eller hos återförsäljaren.
10 Garanti
Den lagstadgade garantitiden gäller. Om produkten är defekt: kontakta tillverkarens kontor i ditt land (adresser, se bruksanvisningens baksida) eller
återförsäljaren.
Vid reparations- resp. garantiärenden ska följande skickas med:
en kopia på fakturan med inköpsdatum,
en reklamationsbeskrivning/felbeskrivning.
ANVISNING
Rengör spisfläktens filter regelbundet och ta bort fettet som har
fastnat. Hur ofta filtret behöver rengöras varierar beroende på hur
ofta du lagar mat och hur ofta spisfläkten används. Vänta inte
med att rengöra filtret tills spisfläktens effekt har minskat.
OBSERVERA!
Använd inga vassa eller hårda föremål för rengöring, använd inga
skarpa rengöringsmedel; produkten kan skadas.
Page 79

SV
Dometic CK400 Tekniska data
79
11 Tekniska data
Dometic CK400
Artikelnummer: 9107300001
Anslutningsspänning: 12 Vg
Kapacitet:
70/125 m
3
/h
Effektbehov: 30 W
Mått (B x H x D): se bild 9, sida 7
Vikt: 3,0 kg
Kontrollmärkning:
5
Page 80

NO
Symbolforklaringer Dometic CK400
80
Les bruksanvisningen nøye før du monterer og tar apparatet i bruk, og
ta vare på den. Hvis produktet selges videre, må du sørge for å gi bruksanvisningen videre også.
Innhold
1 Symbolforklaringer . . . . . . . . . . . . . . . . . . . . . . . . . . . . . . . . . . . . . . 80
2 Sikkerhetsregler . . . . . . . . . . . . . . . . . . . . . . . . . . . . . . . . . . . . . . . . 81
3 Leveringsomfang . . . . . . . . . . . . . . . . . . . . . . . . . . . . . . . . . . . . . . . 83
4 Tiltenkt bruk . . . . . . . . . . . . . . . . . . . . . . . . . . . . . . . . . . . . . . . . . . . 83
5 Teknisk beskrivelse . . . . . . . . . . . . . . . . . . . . . . . . . . . . . . . . . . . . . 84
6 Montere avtrekkshette . . . . . . . . . . . . . . . . . . . . . . . . . . . . . . . . . . . 84
7 Bruke avtrekkshetten . . . . . . . . . . . . . . . . . . . . . . . . . . . . . . . . . . . . 86
8 Rengjøring . . . . . . . . . . . . . . . . . . . . . . . . . . . . . . . . . . . . . . . . . . . . 87
9 Deponering . . . . . . . . . . . . . . . . . . . . . . . . . . . . . . . . . . . . . . . . . . . 87
10 Garanti . . . . . . . . . . . . . . . . . . . . . . . . . . . . . . . . . . . . . . . . . . . . . . . 87
11 Tekniske spesifikasjoner . . . . . . . . . . . . . . . . . . . . . . . . . . . . . . . . . 88
1 Symbolforklaringer
!
!
A
ADVARSEL!
Sikkerhetsregel: Hvis man ikke overholder denne regelen, kan
det føre til død eller alvorlig skade.
FORSIKTIG!
Sikkerhetsregel: Hvis man ikke overholder denne regelen, kan
det føre til personskader.
PASS PÅ!
Hvis man ikke overholder denne regelen, kan det føre til materielle skader og skade funksjonen til produktet.
Page 81

NO
Dometic CK400 Sikkerhetsregler
81
I
➤ Handling: Dette symbolet indikerer at du må gjøre noe. De nødvendige
handlingene beskrives trinnvis.
✓ Dette symbolet beskriver resultatet av en handling.
Fig. 1 5, side 3: Denne angivelsen henviser til et element i en illustrasjon,
i dette eksemplet til «Posisjon 5 i illustrasjon 1 på side 3».
2 Sikkerhetsregler
Følg rådene og betingelsene som kjøretøyprodusenten og motorvognprodusenten har bestemt!
Produsenten tar i følgende tilfeller intet ansvar for skader:
Montasje- eller tilkoblingsfeil
skader på produktet på grunn av mekanisk påvirkning og overspenninger
endringer på produktet uten at det er gitt uttrykkelig godkjenning av
produsenten
Bruk til andre formål enn det som er beskrevet i veiledningen
Overhold følgende grunnleggende sikkerhetsregler ved bruk av elektriske
apparater for å beskytte mot:
Elektrisk støt
Brannfare
Skader
2.1 Behandling av apparatet
!
ADVARSEL!
Montering og reparasjon av avtrekkshetten må kun utføres av
fagfolk som kjenner til farene og gjeldende forskrifter.
Feil reparasjoner kan føre til betydelige skader. Ved behov for
reparasjon kontakter du servicestedene i ditt land (adresse på
baksiden).
MERK
Utfyllende informasjon om bruk av produktet.
Page 82

NO
Sikkerhetsregler Dometic CK400
82
Personer (inklusive barn) som på grunn av sine fysiske, senso-
riske eller mentale ferdigheter eller på grunn av sin uerfarenhet
eller manglende kjennskap ikke er i stand til å bruke produktet
på en sikker måte, må ikke bruke dette produktet uten oppsyn
eller anvisning fra en ansvarlig person.
Montasjearbeid og legging av elektriske kabler må utføres av
kvalifiserte fagfolk, og alle gjeldende forskrifter og normer må
overholdes.
Ved boring eller skjæring i vegger eller tak må man passe på at
man ikke skader elektriske ledninger eller apparater som ikke er
synlige.
For å redusere brannfaren må det kun brukes rør i klasse UL94-
HB eller høyere.
Det må være minimum 50 cm mellom gassflammen på komfy-
ren og avtrekkshetten.
!
FORSIKTIG!
Avtrekkshetten må installeres på en slik måte at den ikke kan
falle ned.
Bruk avtrekkshetten kun når kapslingen og ledningene er
uskadd.
Påse at brennbare gjenstander ikke lagres eller monteres i nær-
heten av luftuttakene. Avstanden må være minst 50 cm.
Ta ikke inn i lufteåpningene, og stikk ikke fremmedlegemer inn
i apparatet.
Page 83

NO
Dometic CK400 Leveringsomfang
83
3 Leveringsomfang
4 Tiltenkt bruk
Avtrekkshetten CK400 (art.nr. 9107300001) er beregnet for montering i campingvogner, mobiler og båter.
Pos. i
fig. 1,
side 3
Antall Beskrivelse
1 1 Avtrekkshette
2 1 Dekkhette
3 1 Takhette
41Vifte
5 1 Gummitetning
6 1 Slangeholder
7 1 Rørledning
8 1 Slangeholder
91Filter
10 6 Skruer 4,2 x 25
11 3 Skruer 4,2 x 13
12 3 Skruer 3,5 x 9,5
13 4 Skruer 3,5 x 13
14 1 Skrue 3,5 x 25
Page 84

NO
Teknisk beskrivelse Dometic CK400
84
5 Teknisk beskrivelse
Avtrekkshetten CK400 fjerner lukt og damp som oppstår under matlagingen.
Apparatet er utstyrt med et avtakbart og vaskbart filter, to innebygde halogenlamper og en vifte med to effekttrinn. Den er forbundet med det innvendige rommet ved hjelp av en bøyelig rørledning, og kan takket være den
værbestandige dekkhetten monteres på taket til bobilen.
5.1 Betjeningselementer
6 Montere avtrekkshette
Tips for monteringsstedet
Avtrekkshetten skal helst plasseres over kokeplassen, og om mulig monteres i et skap. Det må være minimum 50 cm mellom gassflammen på komfyren og avtrekkshetten.
Avtrekkshetten skal monteres på taket på et så flatt sted som mulig. Hvis det
monteres på et skrått underlag, må takhetten dreies slik at en av de tre dreneringsåpningene vender mot det laveste punktet. En helningsvinkel på inntil
20° påvirker ikke ytelsen til viften når motoren står stille.
6.1 Montere vifte
➤ Velg egnet sted for å montere takavtrekket.
➤ Merk på en åpning med diameter 105 mm på ønsket sted på taket
(fig. 3, side 3).
➤ Forbor og sag forsiktig ut åpningen på taket med en stikksag e.l.
➤ Plasser viften i åpningen og merk av de seks skruehullene.
Pos. i
fig. 2,
side 3
Beskrivelse
1 Filter
2 Bryter vifte
3 Bryter lys
4 Halogenlamper
Page 85

NO
Dometic CK400 Montere avtrekkshette
85
➤ Påfør hvert hull en tynn ring av et elastisk tetningsmateriale.
➤ Sett gummitetningsringen (fig. 5 4, side 4) inn i rillen på undersiden av
viften.
I
➤ Fest viften (fig. 5 3, side 4) med de seks skruene som følger med
(4,2 x 25).
➤ Fest takhetten (fig. 5 2, side 4) med de tre skruene som følger med
(3,5 x 9,5).
➤ Fest dekkhetten (fig. 5 1, side 4) med de tre skruene som følger med
(4,2 x 13).
6.2 Montere avtrekkshette
!
➤ Velg et egnet monteringssted for avtrekkshetten.
➤ Merk av plasseringen og størrelsen på utsparingene i bunnen av skapet
(fig. 4, side 4).
➤ Forbor og sag forsiktig ut utsparingen med en stikksag e.l.
➤ Sett avtrekkshetten inn i skapet nedenfra, og fest den med de fire skruene
som følger med (3,5 x 13) (fig. 6, side 5).
➤ Fest slangen (fig. 6 3, side 4) på avtrekkshetten (fig. 6 5, side 4) og på
viften (fig. 6 1, side 4) med slangeholderne (fig. 6 2 og 4, side 4).
➤ Sett filteret (fig. 2 1, side 3) inn i avtrekkshetten.
MERK
Trekk til viften slik at gummitetningen ligger sømløst mot taket.
ADVARSEL!
Plasser avtrekkshetten helst over kokeplassen, og monter den
i et skap.
Det må være minimum 50 cm mellom gassflammen på komfy-
ren og avtrekkshetten.
Page 86

NO
Bruke avtrekkshetten Dometic CK400
86
6.3 Koble strømmen til avtrekkshetten
➤ Koble viften til batteriet, se fig. 7, side 6.
Tegnforklaring
7 Bruke avtrekkshetten
Slå avtrekkshetten av og på
➤ Slå avtrekkshetten av og på med bryteren « » (fig. 2 2, side 3) (på halv
eller full effekt på viften) .
Slå lyset av og på
➤ Slå lyset av og på med bryteren « » (fig. 2 3, side 3) (på halv eller
full belysning) .
Pos. i
fig. 7,
side 6
Beskrivelse
1 Vifte
2 Sikringsbryter med sikring T4 A 5 x 20 mm
3 Batteri
sw Svart
ws Hvit
rt Rød
bl blå
Page 87

NO
Dometic CK400 Rengjøring
87
8 Rengjøring
I
A
➤ Rengjør produktet regelmessig med en fuktig klut.
➤ Ta ut filteret (fig. 8, side 6) og rengjør filteret med varmt vann og synte-
tisk rengjøringsmiddel (f.eks. oppvaskmiddel).
9 Deponering
➤ Lever emballasje til resirkulering så langt det er mulig.
M
Når du tar produktet ut av drift for siste gang, må du sørge for å få
informasjon om deponeringsforskrifter hos nærmeste resirkuleringsstasjon eller hos din faghandler.
10 Garanti
Lovmessig garantitid gjelder. Hvis produktet skulle være defekt, kontakter du
produsentens filial i ditt land (du finner adressene på baksiden av veiledningen) eller til din faghandler.
Ved henvendelser vedrørende reparasjon eller garanti, må du sende med
følgende dokumentasjon:
kopi av kvitteringen med kjøpsdato,
årsak til reklamasjonen eller beskrivelse av feilen.
MERK
Filteret i avtrekkshetten må rengjøres regelmessig, ellers vil det
samle seg fett der. Hvor ofte rengjøring er nødvendig er avhengig
av hvor ofte du lager mat og hvor ofte avtrekkshetten slås på. Ikke
rengjør filteret først når ytelsen til avtrekkshetten merkbart avtar.
PASS PÅ!
Bruk ikke skarpe eller harde gjenstander eller rengjøringsmidler til
rengjøring, da det kan skade produktet.
Page 88

NO
Tekniske spesifikasjoner Dometic CK400
88
11 Tekniske spesifikasjoner
Dometic CK400
Artikkelnummer: 9107300001
Tilkoblingsspenning: 12 Vg
Kapasitet:
70/125 m
3
/h
Effektforbruk: 30 W
Mål (B x H x D): se fig. 9, side 7
Vekt: 3,0 kg
Testmerke:
5
Page 89

FI
Dometic CK400 Symbolien selitykset
89
Lue tämä ohje huolellisesti läpi ennen asennusta ja käyttöönottoa ja
säilytä ohje hyvin. Jos myyt tuotteen eteenpäin, anna ohje tällöin edelleen uudelle käyttäjälle.
Sisältö
1 Symbolien selitykset . . . . . . . . . . . . . . . . . . . . . . . . . . . . . . . . . . . . 89
2 Turvallisuusohjeet . . . . . . . . . . . . . . . . . . . . . . . . . . . . . . . . . . . . . . 90
3 Toimituskokonaisuus . . . . . . . . . . . . . . . . . . . . . . . . . . . . . . . . . . . . 92
4 Tarkoituksenmukainen käyttö . . . . . . . . . . . . . . . . . . . . . . . . . . . . . 92
5 Tekninen kuvaus . . . . . . . . . . . . . . . . . . . . . . . . . . . . . . . . . . . . . . . 93
6 Liesituulettimen asennus . . . . . . . . . . . . . . . . . . . . . . . . . . . . . . . . . 93
7 Liesituulettimen käyttäminen . . . . . . . . . . . . . . . . . . . . . . . . . . . . . . 95
8 Puhdistus . . . . . . . . . . . . . . . . . . . . . . . . . . . . . . . . . . . . . . . . . . . . . 96
9 Hävittäminen . . . . . . . . . . . . . . . . . . . . . . . . . . . . . . . . . . . . . . . . . . 96
10 Tuotevastuu . . . . . . . . . . . . . . . . . . . . . . . . . . . . . . . . . . . . . . . . . . . 96
11 Tekniset tiedot . . . . . . . . . . . . . . . . . . . . . . . . . . . . . . . . . . . . . . . . . 97
1 Symbolien selitykset
!
!
A
VAROITUS!
Turvallisuusohje: Huomiotta jättäminen voi aiheuttaa hengen-
vaaran tai vakavan loukkaantumisen.
HUOMIO!
Turvallisuusohje: Huomiotta jättäminen voi johtaa loukkaantu-
miseen.
HUOMAUTUS!
Huomiotta jättäminen voi johtaa materiaalivaurioihin ja haitata
tuotteen toimintaa.
Page 90

FI
Turvallisuusohjeet Dometic CK400
90
I
➤ Menettely: Tämä symboli ilmaisee, että sinun tulee tehdä jotakin. Tarvit-
tava menettely kuvataan askel askeleelta.
✓ Tämä symboli kuvailee menettelyn tuloksen.
Kuva 1 5, sivulla 3: Tämä tieto viittaa kuvassa olevaan elementtiin, tässä
esimerkissä ”kohteeseen 5 kuvassa 1, sivulla 3”.
2 Turvallisuusohjeet
Noudata ajoneuvovalmistajan ja autoalan ammattipiirien antamia turvallisuusohjeita ja vaatimuksia!
Valmistaja ei ota mitään vastuuta vahingoista seuraavissa tapauksissa:
asennus- tai liitäntävirheet
tuotteeseen mekaanisen vaikutuksen tai ylijännitteiden takia syntyneet
vauriot
tuotteeseen ilman valmistajan nimenomaista lupaa tehdyt muutokset
käyttö muuhun kuin käyttöohjeessa ilmoitettuun tarkoitukseen
Noudata seuraavia perustavia turvatoimenpiteitä käyttäessäsi sähköllä toimivia laitteita. Tämä suojelee sinua:
sähköiskulta
palovaaralta
loukkaantumiselta
2.1 Laitteen käsittely
!
VAROITUS!
Liesituulettimen saavat asentaa ja sitä saavat korjata vain am-
mattimiehet, jotka tuntevat töihin liittyvät vaarat sekä niitä koskevat määräykset.
Epäasianmukaisista korjauksista saattaa aiheutua huomattavia
vaaroja. Käänny oman maasi huoltotukiliikkeen puoleen, jos laite tarvitsee korjausta (osoitteet takasivulla).
OHJE
Tuotteen käyttöä koskevia lisätietoja.
Page 91

FI
Dometic CK400 Turvallisuusohjeet
91
Henkilöiden (mukaan lukien lapset), jotka eivät voi käyttää tuo-
tetta turvallisesti fyysisten, sensoristen tai psyykkisten taitojensa takia tai kokemattomuuden tai tietämättömyyden vuoksi, ei
tulisi käyttää tuotetta ilman valvontaa tai vastuullisen henkilön
opastusta.
Asennustyöt ja sähköisen johdotuksen saavat tehdä vain päte-
vät ammattilaiset, jotka noudattavat kaikkia voimassa olevia
määräyksiä ja standardeja.
Varmista ennen leikkausten tai porausten tekemistä seiniin ja
kattoon, etteivät sähköjohdot ja piilossa olevat laitteet vahingoitu.
Tulipaloriskin pienentämiseksi käyttää saa vain luokan UL94-
HB tai sitä ylemmän luokan putkia.
Kaasukeittimen liekin ja liesituulettimen etäisyyden tulee olla
vähintään 50 cm.
!
HUOMIO!
Liesituuletin täytyy asentaa niin vakaasti, että se ei voi pudota.
Käytä liesituuletinta vain, kun laitteen kotelossa ja johtimissa ei
ole vaurioita.
Huolehdi siitä, että syttyviä esineitä ei varastoida tai asenneta il-
man ulostulon alueelle. Etäisyyden täytyy olla vähintään 50 cm.
Älä työnnä käsiä ilmanpoistoaukkoon äläkä vie mitään vieraita
esineitä laitteen sisään.
Page 92

FI
Toimituskokonaisuus Dometic CK400
92
3 Toimituskokonaisuus
4 Tarkoituksenmukainen käyttö
Liesituuletin CK400 (tuotenro 9107300001) on tarkoitettu asennettavaksi
asuntovaunuihin, matkailuautoihin ja veneisiin.
Kohta –
kuva 1,
sivulla 3
Määrä Kuvaus
1 1 Liesituuletin
2 1 Peitekorkki
31Kattoluukku
41Tuuletin
5 1 Kumitiiviste
6 1 Letkuklemmari
71Putki
8 1 Letkuklemmari
9 1 Suodatin
10 6 Ruuvit 4,2 x 25
11 3 Ruuvit 4,2 x 13
12 3 Ruuvit 3,5 x 9,5
13 4 Ruuvit 3,5 x 13
14 1 Ruuvi 3,5 x 25
Page 93

FI
Dometic CK400 Tekninen kuvaus
93
5 Tekninen kuvaus
Liesituuletin CK400 poistaa ruoanlaiton yhteydessä syntyvät hajut ja höyryn.
Laitteessa on irrotettava ja pestävä suodatin, kaksi sisäänrakennettua halogeenilamppua ja kaksitehoinen tuuletin. Se yhdistetään sisätiloihin joustavalla putkella. Säänkestävän peitelevyn ansiosta se voidaan asentaa
matkailuauton katolle.
5.1 Käyttölaitteet
6 Liesituulettimen asennus
Asennuspaikkaa koskevia ohjeita
Liesituuletin tulisi kiinnittää mieluiten keittopisteen yläpuolelle ja mahdollisuuksien mukaan kiinni seinäkaappiin. Kaasukeittimen liekin ja liesituulettimen etäisyyden tulee olla vähintään 50 cm.
Tuuletin tulisi asentaa kattoon mahdollisimman tasaisen pinnan päälle. Jos
kattotuuletin asennetaan viiston alustan päälle,
kattoluukkua on käännettävä
siten, että jokin kolmesta vedenpoistoaukosta on katon laskusuunnan puolella. Alle 20°:n kallistuskulma ei haittaa tuulettimen tehoa moottorin seistessä.
6.1 Tuulettimen asennus
➤ Valitse katolta sopiva asennuspaikka tuuletinta varten.
➤ Merkitse halkaisijaltaan 105 mm:n aukon sijainti kattoon (kuva 3,
sivulla 3).
➤ Poraa kattoon aloitusreikä leikkausta varten ja leikkaa aukko esimerkiksi
pistosahalla tms.
Kohta –
kuva 2,
sivulla 3
Kuvaus
1 Suodatin
2 Tuulettimen kytkin
3 Valon kytkin
4 Halogeenilamput
Page 94

FI
Liesituulettimen asennus Dometic CK400
94
➤ Sijoita tuuletin aukon päälle ja merkitse kuuden ruuvinreiän paikat.
➤ Laita ohut rengas elastisena pysyvää tiivistemateriaalia jokaisen reiän
ympärille.
➤ Aseta kumitiiviste (kuva 5 4, sivulla 4) tuulettimen alapuolella olevaa
uraan.
I
➤ Kiinnitä tuuletin (kuva 5 3, sivulla 4) kuudella mukana toimitetulla ruuvil-
la (4,2 x 25).
➤ Kiinnitä kattoluukku (kuva 5 2, sivulla 4) kolmella mukana toimitetulla
ruuvilla (3,5 x 9,5).
➤ Kiinnitä peitekorkki (kuva 5 1, sivulla 4) kolmella mukana toimitetulla
ruuvilla (4,2 x 13).
6.2 Liesituulettimen asennus
!
➤ Valitse liesituulettimelle sisätilasta sopiva asennuspaikka.
➤ Merkitse reiän paikka ja koko seinäkaapin alapinnalle (kuva 4, sivulla 4).
➤ Poraa aloitusreikä ja leikkaa aukko huolellisesti esimerkiksi pistosahalla
tms.
➤ Aseta liesituuletin alhaalta kaappiin ja kiinnitä se neljällä mukana toimite-
tulla ruuvilla (3,5 x 13) (kuva 6, sivulla 5).
➤ Kiinnitä letku (kuva 6 3, sivulla 4) an liesituulettimeen (kuva 6 5,
sivulla 4) ja tuulettimeen (kuva 6 1, sivulla 4) letkuklemmareilla
(kuva 6 2 ja 4, sivulla 4).
➤ Aseta suodatin (kuva 2 1, sivulla 3) liesituulettimeen.
OHJE
Kiristä tuuletin niin tiukalle, että kumitiiviste on saumattomasti
kiinni katossa.
VAROITUS!
Kiinnitä liesituuletin mieluiten keittopisteen yläpuolelle ja kiin-
nitä se seinäkaappiin.
Kaasukeittimen liekin ja liesituulettimen etäisyyden tulee olla
vähintään 50 cm.
Page 95

FI
Dometic CK400 Liesituulettimen käyttäminen
95
6.3 Liesituulettimen liittäminen sähköisesti
➤ Liitä tuuletin akkuun, katso kuva 7, sivulla 6.
Selitys
7 Liesituulettimen käyttäminen
Liesituulettimen päälle ja pois kytkeminen
➤ Kytke liesituuletin kytkimellä ” ” (kuva 2 2, sivulla 3) (tuulettimen puoli-
tai täysteho) päälle ja pois päältä .
Valon päälle ja pois kytkeminen
➤ Kytke valo kytkimellä ” ” (kuva 2 3, sivulla 3) (puoli- tai täysva-
laistus) päälle ja pois päältä .
Kohta –
kuva 7,
sivulla 6
Kuvaus
1 Tuuletin
2 Sulakepidike ja sulake T4 A 5 x 20 mm
3 Akku
sw musta
ws valkoinen
rt punainen
bl sininen
Page 96

FI
Puhdistus Dometic CK400
96
8 Puhdistus
I
A
➤ Puhdista tuote toisinaan ulkopuolelta kostealla liinalla.
➤ Ota suodatin (kuva 8, sivulla 6) pois ja puhdista se lämpimällä vedellä
sekä synteettisellä puhdistusaineella (esim. astianpesuaineella).
9 Hävittäminen
➤ Vie pakkausmateriaali mahdollisuuksien mukaan vastaavan kierrätysjät-
teen joukkoon.
M
Jos poistat tuotteen lopullisesti käytöstä, pyydä tietoa sen hävittämistä koskevista määräyksistä lähimmästä kierrätyskeskuksesta
tai ammattiliikkeestäsi.
10 Tuotevastuu
Laitetta koskee lakisääteinen takuuaika. Jos tuote sattuu olemaan viallinen,
käänny maasi valmistajan toimipisteen puoleen (osoitteet käyttöohjeen takasivulla) tai ota yhteyttä omaan ammattikauppiaaseesi.
Korjaus- ja takuukäsittelyä varten lähetä mukana seuraavat asiakirjat:
kopio ostolaskusta, jossa näkyy ostopäivä,
valitusperuste tai vikakuvaus.
OHJE
Liesituulettimen suodatin täytyy puhdistaa säännöllisesti, koska
siihen kertyy rasvaa. Se, miten usein puhdistus on tarpeen, riippuu siitä, miten usein ruokaa laitetaan ja miten usein liesituuletin
kytketään päälle. Älä jätä suodattimen puhdistusta tilanteeseen,
jossa liesituulettimen teho heikkenee huomattavasti.
HUOMAUTUS!
Puhdistukseen ei saa käyttää teräviä tai kovia välineitä eikä puhdistusaineita, koska tämä voi johtaa tuotteen vahingoittumiseen.
Page 97

FI
Dometic CK400 Tekniset tiedot
97
11 Tekniset tiedot
Dometic CK400
Tuotenumero: 9107300001
Liitäntäjännite: 12 Vg
Kapasiteetti:
70/125 m
3
/h
Tehonkulutus: 30 W
Mitat (L x K x S): katso kuva 9, sivulla 7
Paino: 3,0 kg
Tarkastusmerkit:
5
Page 98

PT
Explicação dos símbolos Dometic CK400
98
Por favor, leia atentamente este manual antes da montagem e colocação em funcionamento do aparelho e guarde-o em local seguro. Em
caso de transmissão do produto, entregue o manual ao novo utilizador.
Índice
1 Explicação dos símbolos . . . . . . . . . . . . . . . . . . . . . . . . . . . . . . . . . 98
2 Indicações de segurança . . . . . . . . . . . . . . . . . . . . . . . . . . . . . . . . . 99
3 Material fornecido . . . . . . . . . . . . . . . . . . . . . . . . . . . . . . . . . . . . . 101
4 Utilização adequada . . . . . . . . . . . . . . . . . . . . . . . . . . . . . . . . . . . 101
5 Descrição técnica. . . . . . . . . . . . . . . . . . . . . . . . . . . . . . . . . . . . . . 101
6 Montar o exaustor . . . . . . . . . . . . . . . . . . . . . . . . . . . . . . . . . . . . . 102
7 Utilizar o exaustor . . . . . . . . . . . . . . . . . . . . . . . . . . . . . . . . . . . . . 104
8 Limpeza . . . . . . . . . . . . . . . . . . . . . . . . . . . . . . . . . . . . . . . . . . . . . 105
9 Eliminação . . . . . . . . . . . . . . . . . . . . . . . . . . . . . . . . . . . . . . . . . . . 105
10 Garantia . . . . . . . . . . . . . . . . . . . . . . . . . . . . . . . . . . . . . . . . . . . . . 105
11 Dados técnicos . . . . . . . . . . . . . . . . . . . . . . . . . . . . . . . . . . . . . . . 106
1 Explicação dos símbolos
!
!
A
AVISO!
Indicação de segurança: o incumprimento pode provocar a
morte ou ferimentos graves.
PRECAUÇÃO!
Indicação de segurança: o incumprimento pode provocar
ferimentos.
NOTA!
O incumprimento pode causar danos materiais e pode prejudicar
o funcionamento do produto.
Page 99

PT
Dometic CK400 Indicações de segurança
99
I
➤ Acção: este símbolo indica que há uma acção a realizar. As acções
necessárias são descritas passo a passo.
✓ Este símbolo descreve o resultado de uma acção.
Fig. 1 5, página 3: esta informação refere-se a um elemento presente na
figura, neste exemplo para a “posição 5 na figura 1 da página 3”.
2 Indicações de segurança
Cumpra as indicações de segurança e o especificado na literatura do
fabricante automóvel e das associações profissionais!
O fabricante não se responsabiliza por danos nos seguintes casos:
Erros de montagem ou de conexão
Danos no produto resultantes de influências mecânicas e sobretensões
Alterações ao produto sem autorização expressa do fabricante
Utilização para outras finalidades que não as descritas no manual de
instruções
Tenha em atenção as seguintes medidas de segurança fundamentais na utilização de aparelhos elétricos para a proteção contra:
choque elétrico
perigo de incêndio
ferimentos
2.1 Manuseamento do aparelho
!
AVISO!
A montagem e as reparações do exaustor apenas devem ser
realizadas por técnicos especializados familiarizados com os
perigos inerentes ou com as normas em vigor.
As reparações inadequadas podem levar a perigos graves. Em
caso de reparação, entre em contacto com o centro de assistência técnica do seu país (endereços no verso).
OBSERVAÇÃO
Informações suplementares sobre a operação do produto.
Page 100

PT
Indicações de segurança Dometic CK400
100
As pessoas (incluindo crianças) que não estão aptas a utilizar
o produto de modo seguro devido a incapacidade física, sensorial ou mental ou devido à sua inexperiência não devem utilizar
o produto sem a supervisão ou as instruções de uma pessoa
responsável.
Os trabalhos de montagem e a instalação elétrica apenas de-
vem ser realizados por técnicos especializados e qualificados
familiarizados com as leis e normas em vigor.
Ao realizar cortes ou perfurações em paredes ou tetos, certifi-
que-se de que não danifica cabos elétricos nem dispositivos
não visíveis.
Para reduzir o risco de incêndios, só podem ser utilizados tubos
da classe UL94-HB ou superior.
É necessário manter uma distância mínima de 50 cm entre a
chama de fogões a gás e o exaustor.
!
PRECAUÇÃO!
O exaustor deve ser instalado de tal forma segura que não pos-
sa tombar ou cair.
Utilize o exaustor apenas quando o corpo e os cabos não apre-
sentam danos.
Preste atenção para que os objetos inflamáveis não sejam ar-
mazenados nem montados na área da saída de ar. A distância
tem de ser de, pelo menos, 50 cm.
Não coloque as mãos na saída de ar e não insira objetos estra-
nhos no aparelho.
 Loading...