

Page 1
EN
CLIMATE CONTROL
HARRIER
CK36H401RI, CK36H401RIY
Air conditioning roof unit
Operating manual
Harrier Inverter
Page 2

Page 3

EN
Dometic Harrier Inverter
Please read this instruction manual carefully before installation and startup, and store it in a safe place. If you pass on the device to another person,
hand over this instruction manual along with it.
Table of contents
1 Explanation of symbols. . . . . . . . . . . . . . . . . . . . . . . . . . . . . . . . . . . . . . . . . . .4
2 Safety instructions . . . . . . . . . . . . . . . . . . . . . . . . . . . . . . . . . . . . . . . . . . . . . . .4
3 Target group for this manual. . . . . . . . . . . . . . . . . . . . . . . . . . . . . . . . . . . . . . .6
4 Scope of delivery . . . . . . . . . . . . . . . . . . . . . . . . . . . . . . . . . . . . . . . . . . . . . . .7
5 Intended use . . . . . . . . . . . . . . . . . . . . . . . . . . . . . . . . . . . . . . . . . . . . . . . . . . .7
6 Technical description . . . . . . . . . . . . . . . . . . . . . . . . . . . . . . . . . . . . . . . . . . . .7
7 Before initial use . . . . . . . . . . . . . . . . . . . . . . . . . . . . . . . . . . . . . . . . . . . . . . .13
8 Operating the roof air conditioner . . . . . . . . . . . . . . . . . . . . . . . . . . . . . . . . .13
9 Cleaning the roof air conditioner . . . . . . . . . . . . . . . . . . . . . . . . . . . . . . . . . .21
10 Maintenance of the roof air conditioner. . . . . . . . . . . . . . . . . . . . . . . . . . . . 22
11 Troubleshooting . . . . . . . . . . . . . . . . . . . . . . . . . . . . . . . . . . . . . . . . . . . . . . 23
12 Warranty . . . . . . . . . . . . . . . . . . . . . . . . . . . . . . . . . . . . . . . . . . . . . . . . . . . . 25
13 Disposal . . . . . . . . . . . . . . . . . . . . . . . . . . . . . . . . . . . . . . . . . . . . . . . . . . . . . 25
14 Technical data . . . . . . . . . . . . . . . . . . . . . . . . . . . . . . . . . . . . . . . . . . . . . . . . 27
3
Page 4

EN
Explanation of symbols Dometic Harrier Inverter
1 Explanation of symbols
WARNING!
!
!
A
I
Safety instruction: Indicates a hazardous situation that, if not avoided,
could result in death or serious injury.
CAUTION!
Safety instruction: Indicates a hazardous situation that, if not avoided,
could result in minor or moderate injury.
NOTICE!
Indicates a situation that, if not avoided, can result in property damage.
NOTE
Supplementary information for operating the product.
2 Safety instructions
The manufacturer accepts no liability for damage in the following cases:
• Damage to the product resulting from mechanical influences and incorrect
connection voltage
• Alterations to the product without express permission from the manufacturer
• Use for purposes other than those described in the operating manual
In particular, the manufacturer will not be liable for any consequential damage,
especially consequential damage caused by failure of the roof air conditioner.
Note the following basic safety information when using electrical devices to protect
against:
• Electric shock
•Fire hazards
•Injury
4
Page 5

EN
Dometic Harrier Inverter Safety instructions
2.1 General safety
WARNING!
•
!
Electrical devices are not toys.
The device is not to be used by persons (including
children) with reduced physical, sensory or mental capabilities, or lack of experience and knowledge, unless they
are under supervision or have been given instruction.
•
Children should be supervised to ensure that they do not
play with the device.
•
This device can be used by children aged from 8 years and
above and persons with reduced physical, sensory or
mental capabilities or lack of experience and knowledge if
they are under supervision or have been given instruction
concerning use of the device in a safe way and understand
the hazards involved.
•
Children shall not play with the device.
•
Cleaning and user maintenance shall not be performed by
children without supervision.
•
Only use the device as intended.
•
Do not make any alterations or conversions to the device.
•
Installation, maintenance and repairs of the roof air
conditioner may only be carried out by qualified personnel
who are familiar with the risks involved when handling
refrigerant and air conditioning systems as well as the
relevant regulations. Inadequate repairs may cause serious
hazards. For repair service, please contact the service
centre in your country (addresses on the back page).
•
Do not use the device near flammable fluids or in closed
rooms.
•
Make sure no combustible objects are stored or installed
near the air outlet. A distance of at least 50 cm must be
kept.
5
Page 6

EN
Target group for this manual Dometic Harrier Inverter
•
Do not reach into air outlets or insert any foreign objects in
the roof air conditioner.
•
Do not undo the upper cover of the roof air conditioner in
the event of a fire. Use approved extinguishing agents
instead. Do not use water to extinguish fires.
•
If the supply cord is damaged, it must be replaced by the
manufacturer, its service agent or similarly qualified
persons in order to avoid a hazard.
NOTICE!
A
I
• Never drive through automatic car washes when the roof air
conditioner is mounted.
• If faults occur in the roof air conditioner's refrigerant circuit, the roof air
conditioner must be checked by a specialist company and properly
repaired. The refrigerant must never be released into the air.
NOTE
• Please ask your vehicle manufacturer if a technical inspection is
required after fitting an air conditioner and whether the height entered
in your vehicle documents needs to be altered:
– Harrier Inverter: increased height 255 mm
2.2 Operating the device safely
WARNING!
•
!
A
Always disconnect the power supply when working on the
device.
NOTICE!
• The roof air conditioner is not suitable for use in agricultural or
construction vehicles.
• Operate the device only if you are certain that the housing and the
cables are undamaged.
3 Target group for this manual
This operating manual is for the user of the roof air conditioner.
6
Page 7

EN
Dometic Harrier Inverter Scope of delivery
4Scope of delivery
Rooftop unit
Designation Quantity Ref. number
Dometic Harrier Inverter roof air conditioner 1 CK36H401RI2
CK36H401RIY2
ADB with oscillation vents 1 CA02HR112
Installation manual 1
Operating manual 1
5 Intended use
The Dometic Harrier Inverter roof air conditioner can condition the interior of
campers and caravans with cool or warm dehumidified air.
The roof air conditioner is not suitable for installation in construction machines, agricultural machines or similar equipment. It will not work properly if exposed to strong
vibrations.
Do not operate the roof air conditioner if the ambient temperature is above 52 °C (at
extreme temperatures the performance will be affected).
6 Technical description
The roof air conditioner supplies the interior with cool or warm dehumidified air without dust and dirt.
LED lamps integrated in the air outlet unit provide pleasant lighting.
The roof air conditioner is operated with the remote control.
NOTE
I
• The roof air conditioner can lower the temperature within the vehicle
to a certain level. The temperature depends on the type of vehicle,
the ambient temperature and the cooling capacity of your roof air
conditioner.
• Below an outside temperature of 16 °C the roof air conditioner
doesn’t cool anymore.
7
Page 8
EN
1
Technical description Dometic Harrier Inverter
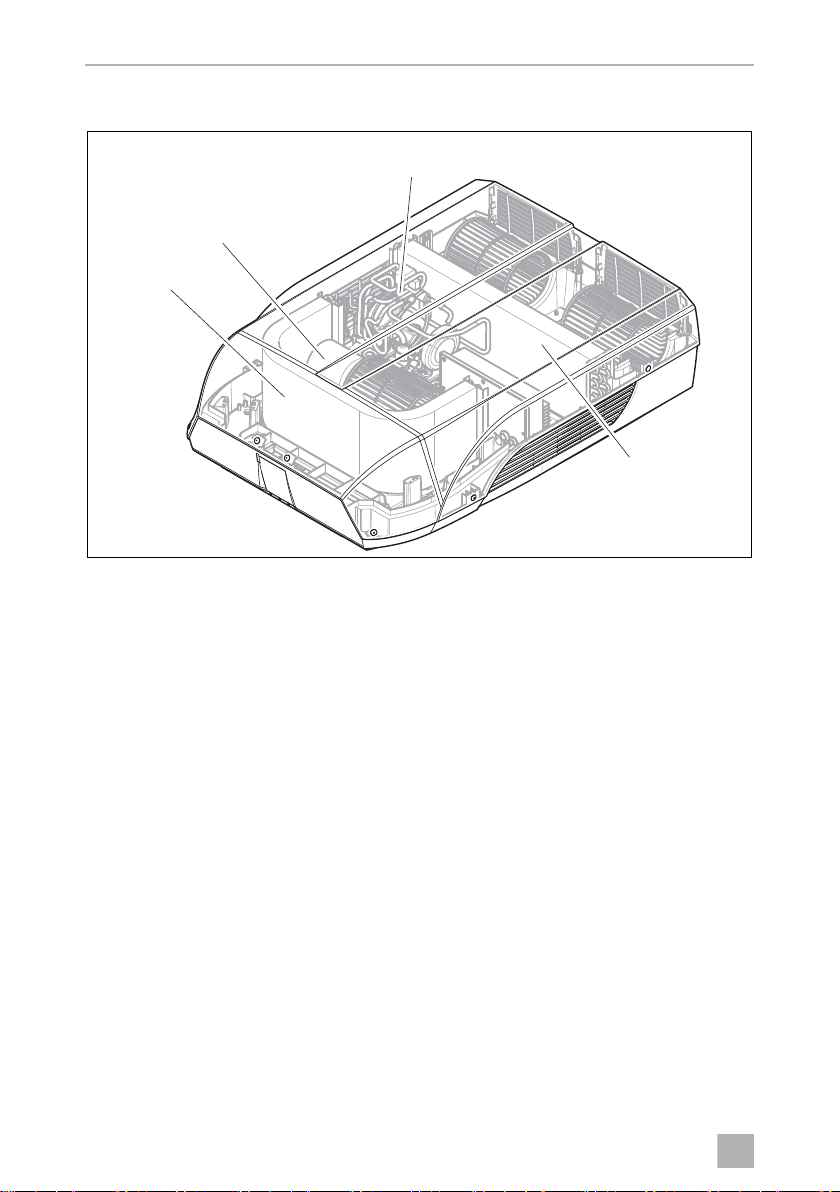
6.1 Components
1
4
3
2
The refrigerant circuit of the roof air conditioner consists of the following main
components:
• Compressor (1)
The compressor draws in the refrigerant used and compresses it. This raises the
pressure and therefore the temperature of the refrigerant.
• Condenser (2)
The built-in liquefier works like a cooler or heat exchanger. The air flowing past
absorbs the heat and the hot refrigerant gas cools down and becomes liquid.
• Evaporator (3)
The evaporators cool down and dehumidify the air flowing past them. The
refrigerant absorbs the heat and vaporises.
• Blower (4)
A blower distributes the cooled air within the vehicle through an air outlet unit.
8
Page 9
EN
Dometic Harrier Inverter Technical description
1 2 3 54
67810 9
2
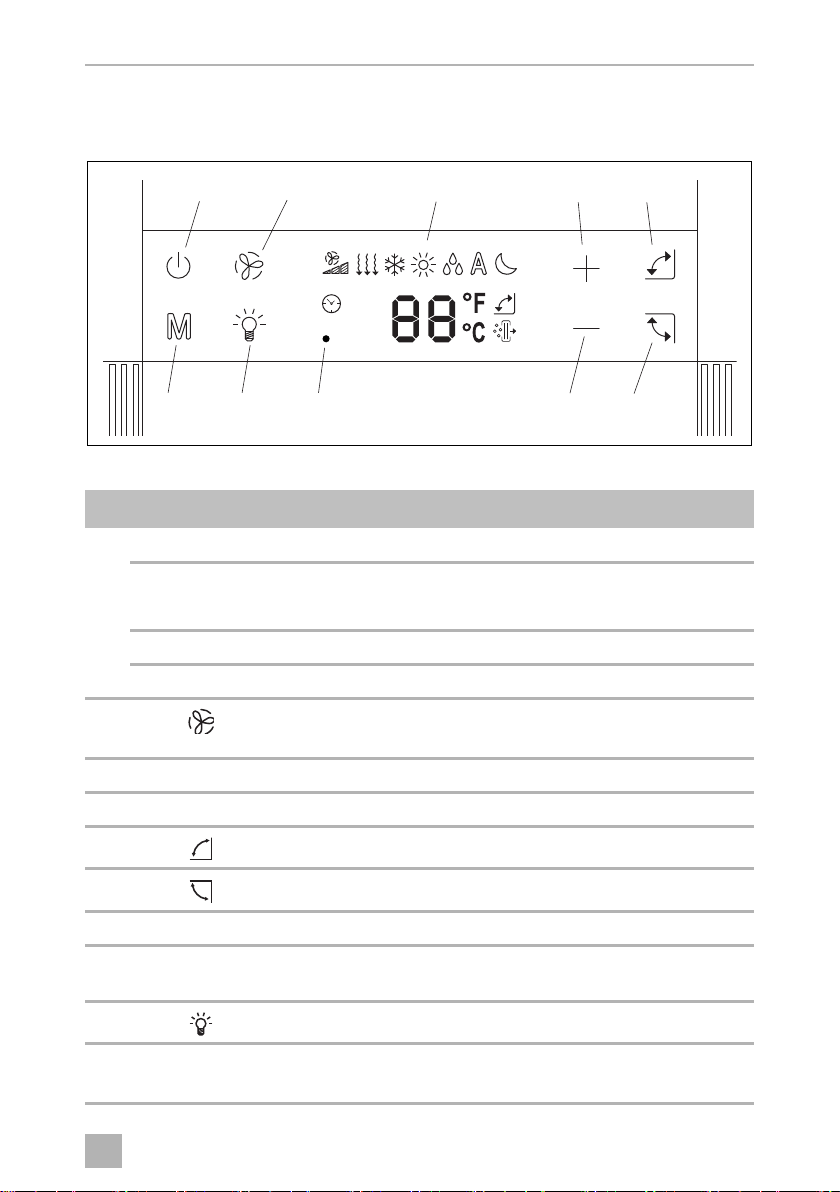
6.2 Control panel
The control panel is at the air outlet unit of the roof air conditioner.
It contains the following control and display elements:
No. Explanation
1Button P Switches the roof air conditioner on, off or to stand-by mode
With status indicator:
Off: The roof air conditioning is switched off (no mains power).
Red light: The roof air conditioner is in stand-by mode.
White light: The roof air conditioning is switched on.
2
Button
3 Display Fan, Mode, Timer, Oscillation, Temperature setting, °C or °F
4Button + Increases the temperature setting
5
Button
6
Button
7Button – Reduces the temperature setting
8 Infrared receiver for
the remote control
9
Button
10 Button M Switches the mode to:
Switches the fan level to:
LOW, MED, HIGH, AUTO
Switches the front oscillation vent On/Off.
Switches the rear oscillation vent On/Off.
Switches the light on or off.
COOL, HEAT, DEHUMIDIFICATION, VENTILLATION, AUTO
9
Page 10

EN
1
2
3
4
5
6
9
8
7
10
11
13
12
3
Technical description Dometic Harrier Inverter
6.3 Remote control
All settings of the device (e. g. temperature settings, timer programming) are
transmitted to the roof air conditioner by remote control.
10
Page 11

EN
Dometic Harrier Inverter Technical description
The following control and display elements are available on the remote control:
No. Explanation
1 Display Displays the following:
•Timer
• Set temperature (target value) in °C or °F
•Mode
• Fan level
• Symbols for active additional functions
2Button P Switches the roof air conditioner and remote control
on or to stand-by mode
3Button M Switches the mode to:
COOL, HEAT, DEHUMIDIFICATION, VENTILLATION,
AUTO
4Button + Increases the value being set
5
Button
6Button – Reduces the value being set
7
Button
8
Button
9
Button
10
Button
11 Button °F/°C If temperature is displayed: switches between
12
Button
13
Button
Activates the sleep function. The sleep function automatically modifies the fan speed to reduce noise.
Sets the timer function
Turns the air purifier function On/Off.
Switches the rear oscillation vent On/Off.
Switches the front oscillation vent On/Off.
temperature units Celsius (°C) and Fahrenheit (°F)
Switches the light of the roof air conditioner on or off.
Switches the fan level to:
LOW, MED, HIGH, AUTO
11
Page 12

EN
Technical description Dometic Harrier Inverter
6.4 Air conditioning modes
The roof air conditioner has the following air conditioning modes:
Mode
Automatic The air conditioner automatically maintains the
Cooling You specify the temperature and blower settings, and
Heating You specify the temperature and blower settings, and
Ventillation The fan operates to circulate air without heating or
Dehumidification Dehumidification removes moisture from the air
Display
message
Explanation
temperature between 20 °C and 25 °C by heating or
cooling as needed.
the roof air conditioner cools the interior to this
temperature.
the roof air conditioner heats the interior to this
temperature.
cooling.
without heating or cooling the inside. The fan speed is
Low.
6.5 Additional functions
The roof air conditioner has the following additional functions:
Function
Display
message
Explanation
Timer The roof air conditioner is switched on at the specified
Sleep The sleep function reduces the fan speed and the
01.5 h
23.5 h
time between 0.5 to 24 hours in the future.
The roof air conditioner is switched off at the specified
time between 0.5 to 24 hours in the future.
compressor speed to reduce the noise levels for easier
sleeping.
12
Page 13

EN
Dometic Harrier Inverter Before initial use
7 Before initial use
Inspection before starting up
Before you switch on the roof air conditioner, observe the following:
➤ Check whether the supply voltage and frequency correspond to the values
specified in the technical data (page 27).
➤ Ensure both the air intake opening and the air nozzles are free. All ventilation
grilles must always be kept free to ensure that the roof air conditioner is able to
operate at maximum capacity.
CAUTION! Beware of injury
!
Check remote control and insert batteries
➤ Insert the provided batteries in the remote control battery compartment (chapter
“Replacing the remote control batteries” on page 20).
Do not insert your fingers or objects into the air nozzles or the intake
grille.
8 Operating the roof air conditioner
8.1 Basic notes on operation
The roof air conditioner has three operating modes:
Operating mode Features
Off The roof air conditioner is switched off.
The remote control is inactive.
Stand-by The roof air conditioner is ready for operation and can be switched on
with the remote control. The lights are available.
On The roof air conditioner is conditioning the air in the interior.
You can use the control panel to
• switch the roof air conditioner on or to stand-by mode
• switch the light on and off
• make adjustments to the settings
13
Page 14

EN
Operating the roof air conditioner Dometic Harrier Inverter
IR receiver
4
You can use the remote control to
• switch the roof air conditioner on or to stand-by mode
• switch the light on and off
• make adjustments to the settings
• select additional functions
8.2 Using the remote control
The values are directly transmitted to the roof air conditioner when you set them.
The remote control must be pointed at the IR receiver on the control panel during
operation.
When a button is pressed, the value is transmitted directly to the roof air conditioner.
The roof air conditioner confirms the receipt of data with a beep.
14
Page 15

EN
Dometic Harrier Inverter Operating the roof air conditioner
8.3 Hint for improved use
The following hints will optimise the performance of your roof air conditioner:
• Improve the heat insulation of your vehicle by sealing gaps and hanging reflective
blinds or curtains on your windows.
• If the vehicle has been subjected to direct sunlight for a long time and the outside
temperature is lower than the inside temperature: Operate the roof air conditioner in the “Ventilation” ( ) mode with the windows open for a while before
switching on the “Cooling” ( ) air conditioning mode.
• Avoid opening doors and windows as far as possible in the “Cooling” ( )
mode.
• Select an appropriate temperature and blower speed or use the Automatic
blower fan setting.
• Make sure the air nozzles and intake grille are not covered by cloths, paper or
other objects.
8.4 Selecting the air conditioning mode
➤ Select the air conditioning mode of your choice using the M key (chapter “Air
conditioning modes” on page 12).
✓ The roof air conditioner confirms the receipt of the values with a beep.
✓ The roof air conditioner is switched to the selected air conditioning mode.
15
Page 16

EN
Operating the roof air conditioner Dometic Harrier Inverter
8.5 Selecting the blower setting manually
The blower controls the strength of the air supply.
Display message Explanation
Low blower level
Medium blower level
High blower level
Boost to quickly bring the temperature in the RV to the setting
Automatic
Blower level changes automatically based on temperature condi-
(bars cycling)
tions
➤ Use the button to select the desired blower level.
✓ The roof air conditioner confirms the receipt of the values with a beep.
✓ The new blower level has been set.
8.6 Setting the temperature
Cooling Mode
In the “Cooling” ( ) and “Dehumidifying” ( ) modes you can specify a
temperature between 16 °C and 30 °C via the remote control.
➤ Use the + or – button to select the desired temperature.
✓ The roof air conditioner confirms the receipt of the values with a beep.
✓ The temperature is set on the roof air conditioner.
Heating Mode
In the “Heating” ( ) mode you can specify a temperature between 16 °C and 30 °C
via the remote control.
➤ Use the + or – button to select the desired temperature.
✓ The roof air conditioner confirms the receipt of the values with a beep.
✓ The temperature is set on the roof air conditioner.
16
Page 17

EN
Dometic Harrier Inverter Operating the roof air conditioner
5
8.7 Adjusting the air nozzles
The air supply within the vehicle can be regulated by setting the air nozzles.
➤ Press the button and/or the button to start oscillation of each door.
Pressing again will fix the door at the current angle. When the roof air conditioner is turned off, the doors return to the closed position.
If the doors become misaligned they will return to the default position when the
unit is turned off. Also, they can be rotated safely by hand without damaging the
motors.
8.8 Setting the timer
The timer function allows you to set a specific time period for air conditioning. You
can specify the switch-on time and the switch-off time. The time can be set in
0.5 hour increments.
NOTE
I
➤ Before programming the timer, select the air conditioning mode and all required
values (e.g. temperature).
I
The remote control returns to its initial mode if no button is pressed on
the remote control for 15 seconds while programming the timer.
NOTE
The ON timer can only be set when the unit is turned OFF.
17
Page 18

EN
Operating the roof air conditioner Dometic Harrier Inverter
Cancelling the timer settings
If you have set the timer, you can cancel these settings as follows:
➤ Press the TIMER button once.
✓ The timer symbol disappears.
✓ The setting has been cancelled.
Setting the on and off times
➤ Press the TIMER button once.
✓ The ON symbol ( ) flashes on the display of the remote control.
➤ Use the + or – button to set the time when the roof air conditioner is to switch on.
➤ Press the TIMER button to transmit the value to the roof air conditioner.
✓ The OFF symbol ( ) flashes on the display of the remote control.
➤ Use the + or – button to set the time when the roof air conditioner is to switch off.
➤ Press the TIMER button to transmit the value to the roof air conditioner.
✓ The on and off times are set on the roof air conditioner.
The roof air conditioner runs in the selected air conditioning mode during the
specified time.
01.5 h
23.5 h
18
Page 19

EN
Dometic Harrier Inverter Operating the roof air conditioner
8.9 Activating the sleep function
NOTE
I
When the sleep function is activated, the inside and outside fan speeds are set to low
to reduce noise.
➤ Set the required temperature (chapter “Setting the temperature” on page 16)
and mode.
➤ Press the SLEEP button.
✓ The symbol appears in the display.
The sleep function is activated.
➤ To deactivate the sleep function press the SLEEP button again.
I
8.10 Operating the lights
The sleep function is only available in “Cooling” ( ) or “Heating” ( )
modes.
NOTE
The sleep function is deactivated if the M button is pressed.
Switching the light on/off with the control panel
➤ Briefly press the button to switch the lamps on or off.
Switching the light on/off with the remote control
➤ Press the button to switch the lamps on or off.
19
Page 20

EN
Operating the roof air conditioner Dometic Harrier Inverter
8.11 Replacing the remote control batteries
Replace the batteries if you notice the range of the remote control reduced.
NOTE
I
The battery compartment is on the back of the remote control.
➤ Gently lift the lid of the battery compartment via the clip and remove it.
➤ Insert the new batteries (2 x type AAA) in the remote control as indicated in the
battery compartment.
➤ Close the cover of the battery compartment.
B
The display of the remote control will still be bright even if the batteries
are running low.
Protect the environment!
Do not dispose of any batteries with general household waste.
Return defective or used batteries to your retailer or dispose of them at
collection points.
20
Page 21

EN
Dometic Harrier Inverter Cleaning the roof air conditioner
1
6
9 Cleaning the roof air conditioner
NOTICE! Beware of damage
A
➤ Clean the housing of the roof air conditioner and the air outlet unit occasionally
with a damp cloth.
➤ Regularly remove leaves and other dirt from the ventilation grilles (1) of the roof
air conditioner. Make sure you do not damage the grilles in the process.
• Do not clean the roof air conditioner with a high-pressure cleaner.
Exposure to water can damage the air conditioner.
• Do not use sharp or hard objects or cleaning agents for cleaning as
these may damage the roof air conditioner.
• To clean the roof air conditioner, use water with a gentle cleaning
agent. Never use petrol, diesel or solvents.
➤ Clean the remote control with a slightly damp cloth from time to time. We
recommend using a cleaning cloth for glasses to clean the display.
21
Page 22

EN
Maintenance of the roof air conditioner Dometic Harrier Inverter
1
1
7
1
1
8
10 Maintenance of the roof air conditioner
WARNING!
!
Interval Inspection/maintenance
Regularly Check the condensation water drainage:
Any other maintenance work to that which is described here may only
be carried out by qualified personnel who are familiar with the risks
involved when handling refrigerant and air conditioning systems as well
as the relevant regulations.
➤ Check whether the condensation water drainage channels (1) at the
sides of the roof air conditioner are clear and the condensation water
is able to escape.
Clean the filter of the air discharge unit:
➤ Remove the filter (1).
➤ Clean the filter (1) with a detergent solution and let it dry.
➤ Put the dry filter (1) back in.
22
Page 23

EN
Dometic Harrier Inverter Troubleshooting
Interval Inspection/maintenance
Once per year Check the profile seals:
➤ Check the seal between the roof air conditioner and the roof of the
vehicle for cracks and other damage.
Have the heat exchanger serviced:
➤ Have the heat exchanger of the roof air conditioner serviced by
specialist workshop.
Check the fastening bolt tightness:
➤ Check the fastening bolts are tightened to the correct torque and
adjust if necessary.
11 Troubleshooting
Problem Cause Remedy
Roof air conditioner constantly
switches itself off.
Not cooling well The roof air conditioner is not set to cool-
Icing sensor has tripped. Outer temperature is too low or all air
nozzles are closed.
➤ Set the roof air conditioner to
ing.
The ambient temperature is above 52 °C. The roof air conditioner is only
The temperature set is higher than the
room temperature.
The ambient temperature is below 16 °C. The roof air conditioner is only
One of the temperature sensors is defective.
The evaporator fan is damaged.
The condenser fan is damaged.
cooling.
designed for ambient temperatures of
up to 52 °C.
➤ Select a lower temperature.
designed for ambient temperatures
above 16 °C.
➤ Contact an authorised service
agent or Dometic.
23
Page 24

EN
Troubleshooting Dometic Harrier Inverter
Problem Cause Remedy
Not heating well The roof air conditioner is not set to heat-
ing.
The ambient temperature is above –2 °C. The roof air conditioner will only heat
The temperature set is lower than the
room temperature.
One of the temperature sensors is
defective.
The evaporator fan is damaged.
The condenser fan is damaged.
Low air output The air intake grilles are blocked or
Water enters the
vehicle
Roof air conditioner does not
switch on.
Roof air conditioner does not
switch off.
Remote control
does not register
obstructed.
The blower is defective. ➤ Contact an authorised service
The condensation water drainage openings are clogged up.
The seals are damaged. ➤ Contact an authorised service
No supply voltage (240 Vw) connected. ➤ Check the power supply.
The voltage is too low (under 200 Vw).
The voltage converter is defective.
One of the temperature sensors is defective.
The electrical fuse of the power supply is
too low.
One of the temperature sensors is defective.
The electrical fuse of the power supply is
too low.
The remote control is not pointing
towards the ADB display.
The batteries in the remote control need
replacing.
Note: The display of the remote control
will still be bright even if the batteries are
low.
➤ Set the roof air conditioner to
heating.
at ambient temperatures above
–2 °C.
➤ Select a higher temperature.
➤ Contact an authorised service
agent or Dometic.
➤ Remove any leaves and other dirt
from the ventilation grilles of the
roof air conditioner.
agent or Dometic.
➤ Clean the drainage openings for
condensation water.
agent or Dometic.
➤ Contact an authorised service
agent or Dometic.
➤ Check the electrical fuse of the
power supply.
➤ Contact an authorised service
agent or Dometic.
➤ Check the electrical fuse of the
power supply.
➤ Point the remote control towards
the ADB display.
➤ Replace the batteries in the
remote control.
24
Page 25

EN
Dometic Harrier Inverter Warranty
12 Warranty
The statutory warranty period applies. If the product is defective, please contact the
service partner in your country (addresses on the back on the instruction manual).
Our experts will be happy to help you and will discuss the warranty process with you
in more detail.
13 Disposal
Regulations for environmental safety and correct disposal
All organisations must apply a set of procedures to identify, evaluate and control the
influence that their activities (manufacturing, products, services, etc.) have on the
environment.
The procedures to be followed to identify significant environmental impact must take
the following factors into account:
• use of raw materials and natural resources
• atmospheric emissions
• discharge of liquids
• waste management and recycling
• contamination of the soil
In order to minimise environmental impact, the manufacturer provides a series of
indications here below that should be taken into account by all those who, for whatever reason, interact with the appliance during its working life.
• All packing components must be disposed of (preferably recycled) in
compliance with statutory legislation in the country in which disposal takes place.
• All product components must be disposed of (preferably recycled) in
compliance with statutory legislation in the country in which disposal takes place.
• For correct disposal, the appliance must be consigned to an authorised waste
disposal company to ensure that all recyclable components are reused and the
remaining materials are processed properly.
• During installation ensure the room has adequate ventilation to prevent the buildup of stale air that might be harmful to the health of the operators.
• During operation and maintenance ensure that any waste pollutant products (oil,
grease, etc.) are disposed of correctly.
• Keep noise levels down to reduce noise pollution.
25
Page 26

EN
Disposal Dometic Harrier Inverter
For more information on correct dismantling of our products please refer to the recycling handbooks at www.dometic.com.
➤ Place the packaging material in the appropriate recycling waste bins wherever
possible.
➤ When in operation or undergoing repairs and maintenance work, make sure that
the refrigerant circuit is not damaged and refrigerant cannot escape. It acts as a
greenhouse gas and should not be allowed into the environment.
Any person who handles or works on equipment containing refrigerant in Australia
must have an appropriate refrigerant handling license.
This includes:
• decanting the refrigerant
• manufacturing, installing, commissioning, servicing or maintaining equipment
regardless of whether it is charged with refrigerant or not
• decommissioning or disposing of equipment where refrigerant is present
Discharge of refrigerant into the atmosphere is against the law. Severe penalties
apply.
If you wish to finally dispose of the product, ask your local recycling centre
or specialist dealer for details about how to do this in accordance with the
M
➤ Dispose of the product at an official waste disposal facility in accordance with the
B
applicable disposal regulations.
applicable recycling or disposal guidelines.
Protect the environment!
Do not dispose of any batteries with general household waste.
Return defective or used batteries to your retailer or dispose of them at
collection points.
26
Page 27

EN
Dometic Harrier Inverter Technical data
4
10R-05 407
14 Technical data
Dometic
Harrier Inverter
Model: CK36H401RI2, CK36H401RIY2
Compressor rated capacity: 3675 W
Cooling capacity based on ISO 5151: 3124 W
Heating capacity based on ISO 5151: 2827 W
Rated input voltage: 220 – 240 Vw / 50 Hz
Power consumption in cooling mode: 6.5 A
Power consumption in heating mode: 6.3 A
Operating temperature range: –2 °C to +52 °C
Refrigerant: R-410A
Refrigerant quantity: 0.780 kg
CO2 equivalent: 1.629 t
Global warming potential (GWP): 2088
Protection class (outdoor unit): IPX4
Blower: 3 blower levels
1 Automatic mode
Suggested max. vehicle length
(with insulated walls):
Dimensions L x W x H (mm): 1070 x 750 x 280 mm
(height above vehicle roof)
Wei ght: 45 kg
Inspection/certification:
≥ 7. 5 m
27
Page 28

AUSTRALIA
Dometic Australia Pty. Ltd.
1 John Duncan Court · Varsity Lakes QLD 4227
+61 7 55076000 · +61 7 55076001
Mail: sales@dometic.com.au
dometic.com
AUSTRIA
Dometic Austria GmbH
Neudorferstraße 108
A-2353 Guntramsdorf
+43 2236 908070
+43 2236 90807060
Mail: info@dometic.at
BENELUX
Dometic Branch Office Belgium
Lourdesstraat 84 B
B-8940 Geluwe
+32 2 3598040
+32 2 3598050
Mail: info@dometic.be
DENMARK
Dometic Denmark A/S
Nordensvej 15, Taulov
DK-7000 Fredericia
+45 75585966
+45 75586307
Mail: info@dometic.dk
FINLAND
Dometic Finland OY
Mestarintie 4
FIN-01730 Vantaa
+358 20 7413220
Mail: info@dometic.fi
FRANCE
Dometic SAS
ZA du Pré de la Dame Jeanne
B.P. 5
F-60128 Plailly
+33 3 44633501
+33 3 44633518
Mail : marine@dometic.fr
GERMANY
Dometic WAECO International GmbH
Hollefeldstraße 63 · D-48282 Emsdetten
+49 (0) 2572 879-0
+49 (0) 2572 879-300
Mail: info@dometic-waeco.de
HONG KONG
Dometic Group Asia Pacific
Suites 2207-11 · 22/F, Tower 1
The Gateway · 25 Canton Road,
Tsim Sha Tsui · Kowloon
+852 2 4611386
+852 2 4665553
Mail: info@waeco.com.hk
HUNGARY
Dometic Zrt. Sales Office
Kerékgyártó u. 5.
H-1147 Budapest
+36 1 468 4400
+36 1 468 4401
Mail: budapest@dometic.hu
ITALY
Dometic Italy S.r.l.
Via Virgilio, 3
I-47122 Forlì (FC)
+39 0543 754901
+39 0543 754983
Mail: vendite@domet ic.it
JAPAN
Dometic KK
Maekawa-Shibaura, Bldg. 2
2-13-9 Shibaura Minato-ku
Tokyo 108-0023
+81 3 5445 3333
+81 3 5445 3339
Mail: info@dometic.jp
MEXICO
Dometic Mx, S. de R. L. de C. V.
Circuito Médicos No. 6 Local 1
Colonia Ciudad Satélite
CP 53100 Naucalpan de Juárez
Estado de México
+52 55 5374 4108
+52 55 5393 4683
Mail: info@dometic.com.mx
NETHERLANDS
Dometic Benelux B.V.
Ecustraat 3
NL-4879 NP Etten-Leur
+31 76 5029000
+31 76 5029019
Mail: info@dometic.nl
NEW ZEALAND
Dometic New Zealand Ltd.
PO Box 12011
Penrose
Auckland 1642
+64 9 622 1490
+64 9 622 1573
Mail: customerservices@dometic.co.nz
NORWAY
Dometic Norway AS
Østerøyveien 46
N-3232 Sandefjord
+47 33428450
+47 33428459
Mail: firmapost@dometic.no
POLAND
Dometic Poland Sp. z o.o.
Ul. Puławska 435A
PL-02-801 Warszawa
+48 22 414 3200
+48 22 414 3201
Mail: info@dometic.pl
PORTUGAL
Dometic Spain, S.L.
Branch Office em Portugal
Rot. de São Gonçalo nº 1 – Esc. 12
2775-399 Carcavelos
+351 219 244 173
+351 219 243 206
Mail: info@dometic.pt
RUSSIA
Dometic RUS LLC
Komsomolskaya square 6-1
RU-107140 Moscow
+7 495 780 79 39
+7 495 916 56 53
Mail: info@dometic.ru
SINGAPORE
Dometic Pte Ltd
18 Boon Lay Way
06–141 Trade Hub 21
Singapore 609966
+65 6795 3177
+65 6862 6620
Mail: dometic.sg@dom etic.com
SLOVAKIA
Dometic Slovakia s.r.o.
Sales Office Bratislava
Nádražná 34/A
900 28 Ivánka pri Dunaji
/ +421 2 45 529 680
Mail: bratislava@dome tic.com
SOUTH AFRICA
Dometic (Pty) Ltd.
Regional Office
South Africa & Sub-Saharan Africa
2 Avalon Road
West Lake View Ext 11
Modderfontein 1645
Johannesburg
+27 87 3530380
Mail: info@dometic.co.za
SPAIN
Dometic Spain S.L.
Avda. Sierra del Guadarrama, 16
E-28691 Villanueva de la Cañada
Madrid
+34 918 336 089
+34 900 100 245
Mail: info@dometic.es
SWEDEN
Dometic Scandinavia AB
Gustaf Melins gata 7
SE-42131 Västra Frölunda
+46 31 7341100
+46 31 7341101
Mail: info@dometicgroup.se
SWITZERLAND
Dometic Switzerland AG
Riedackerstrasse 7a
CH-8153 Rümlang
+41 44 8187171
+41 44 8187191
Mail: info@dometic.ch
UNITED ARAB EMIRATES
Dometic Middle East FZCO
P. O. Box 17860
S-D 6, Jebel Ali Freezone
Dubai
+971 4 883 3858
+971 4 883 3868
Mail: info@dometic.ae
UNITED KINGDOM
Dometic UK Ltd.
Dometic House, The Brewery
Blandford St. Mary
Dorset DT11 9LS
+44 344 626 0133
+44 344 626 0143
Mail: customerservices@dometi c.co.uk
USA
Dometic RV Division
1120 North Main Street
Elkhart, IN 46515
+1 574-264-2131
4445101505 54-AA-MA53503 05/2019
 Loading...