

Dometic 8000 Series, 8100, 8500, 8700, 8600 Operation Manual
...
SANITATION
TOILETS
8100/8500/8600/8700/8900
EN
8000 Series
Operation Manual ................ 1
FR
Série 8000
Manuel d’utilisation .............. 13
Form No. 600347404_B 08/18 | ©2018 Dometic Corporation

2
EN
Toilets
NORTH AMERICAN ADDRESS INFORMATION
U.S.A. & CANADA
Service Office
Dometic Corporation
13128 St. Rte. 226
Big Prairie, OH 44611
Service Center & Dealer
Locations
Refer to “7 Customer Service” on
page 11.
+
Read these instructions carefully. These instructions MUST stay with this product.
CONTENTS
1 Explanation of symbols and safety instructions. . . . . . . . . . . . . . . . . . . . . . . . . . . . . . . . . . 3
2 Intended use ............................................................ 4
3 Operation ............................................................... 5
4 Maintenance ............................................................ 8
5 Troubleshooting ..........................................................10
6 Disposal ................................................................11
7 Customer Service .........................................................11
8 Limited warranty ..........................................................11

3
EN
Toilets
1 EXPLANATION OF SYMBOLS AND SAFETY INSTRUCTIONS
This manual has safety information and instructions to help you eliminate or reduce the risk of
accidents and injuries.
1.1 Recognize safety information
This is the safety alert symbol. It is used to alert you to potential physical injury hazards.
Obey all safety messages that follow this symbol to avoid possible injury or death.
1.2 Understand signal words
A signal word will identify safety messages and property damage messages, and will indicate the
degree or level of hazard seriousness.
indicates a hazardous situation that, if not avoided, could result in death or
serious injury.
indicates a hazardous situation that, if not avoided, could result in minor or
moderate injury.
is used to address practices not related to physical injury.
I
indicates additional information that is not related to physical injury.
1.3 Supplemental directives
Read and follow all safety information and instructions to avoid possible injury or death.
Read and understand these instructions before use and maintenance of this product.
Incorrect operation and maintenance of this product can lead to serious injury.
The installation must comply with all applicable local or national codes, including the
latest edition of the following standards:
U.S.A.
• ANSI/NFPA70, National Electrical Code
(NEC)
• ANSI/NFPA 1192, Recreational Vehicles
Code
• ABYC guidelines for marine installations
Canada
• CSA C22.1, Parts l & ll, Canadian Electrical
Code
• CSA Z240 RV Series, Recreational
Vehicles
1.4 General safety messages
Failure to obey the following warnings could result in property damage, serious
injury, or death:
• This product must be installed and serviced by a qualified service technician.
• Do not modify this product in any way. Modifi cation can be extremely hazardous.
• Before beginning work on this product, be sure that all electrical power to the unit has been
turned off and that seacocks are in the closed or off position.
• FLOOD HAZARD:
• For toilets connected to any through-the-hull fittings: always close seacocks when the
toilet is not in use (even if boat is unattended for a brief period).
• Instruct all passengers on how to close valves when the toilet is not in use.
• For toilets using fresh water for flushing, disconnect any shoreside water connections
when the boat is unattended for any length of time.

4
EN
Toilets
RISK OF PROPERTY DAMAGE. Failure to comply may cause damage to the toilet
or toilet system.
• Only flush water, bodily wastes, and rapid-dissolving toilet tissue.
• Do not overfill the holding tank, or serious damage can occur to the sanitation system.
Overfilling the holding tank can rupture the holding tank or release tank contents into
the bilge.
2 INTENDED USE
The 8000 Series toilets are designed and intended for use only inside a boat or recreational
vehicle (hereinaer referred to as “RV”) for which it is supplied. Use the instructions to ensure
correct operation of the toilet. Dometic accepts no liability for damage in the following cases:
• Faulty assembly or connection.
• Damage to the product resulting from mechanical influences and excess voltage.
• Alterations to the product without expressed permission from the Dometic Corporation.
• Use for purposes other than those described in the operating manual.
Dometic Corporation reserves the right to modify appearances and specifications without notice.
I
RV installation is available for certain models only. Refer to the toilet installation manual for
information on the applicable models.
5
EN
Toilets
3 OPERATION
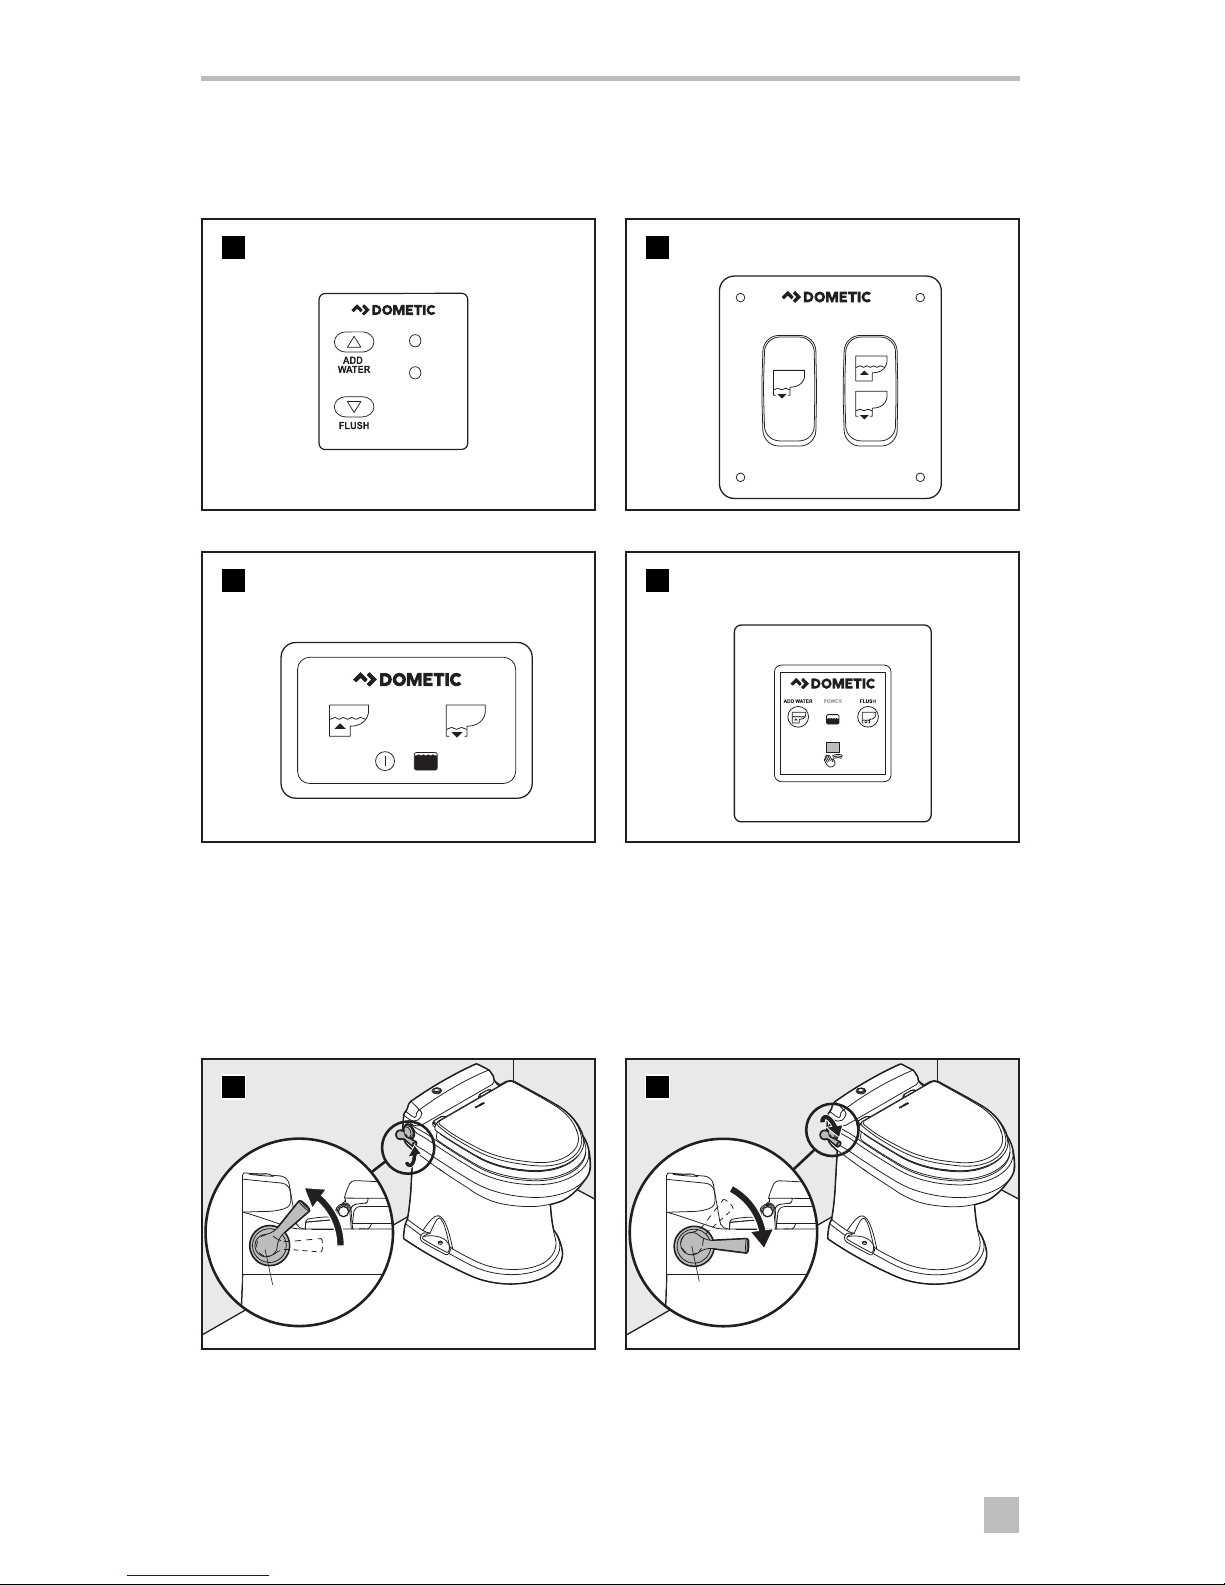
3.1 Using the flush touchpad or flush switches
OK TO
FLUSH
DO NOT
FLUSH
1
Dometic Flush Switch (DFS)
2
Dometic Flush Toggle Switch (DFST)
3
Dometic Flush Touchpad (DFT)
4
Dometic Flush Touch Panel (DFSHW)
➤ Press and hold the Add Water switch to reach the desired water level.
➤ Press the Flush switch, then release it.
I
8100 models only: Press and hold the Flush switch until the bowl is clear. Press and
hold the Dry Bowl switch to flush the toilet without adding water during or aer a flush.
3.2 Using the flush handle (8700 models only)
5
Flush Handle
➤ Li the flush handle to fill the bowl to the
desired water level.
6
Flush Handle
➤ Press the flush handle down, then release it
to flush the toilet.

6
EN
Toilets
3.3 Understanding the indicator lights for 8500, 8600, 8700, and 8900
Indicator Light Status
Power on Steady green Electrical power to the toilet is
activated
Flashing green Flush mode is changing
Tank level Amber The holding tank is 75% full
Red The holding tank is 100% full*
*Flush actuation is disabled to prevent overfilling the holding tank
3.4 Changing the flush modes for 8500 8600, 8700, and 8900
Flush modes Action Gallons per flush
Normal Adds water to the bowl aer
every flush
0.85 gal (3200 ml)
Dry bowl Does not add water to the
bowl aer every flush
0.45 gal (1700 ml)
➤ To change modes, press the Flush switch or handle until the power-on light begins flashing
(about five seconds).
➤ Release the Flush switch or handle.
3.5 Toilet operation when connected to “full tank” shut-down relay and
tank monitor system (8100 models only)
When a macerator toilet system uses a “full tank” shut-down relay, flush capability is shut off when
the holding tank level reaches the “full” mark.
➤ Empty the holding tank to restore flush capability.
3.6 Initializing the toilet system
➤ Turn on the water supply and electrical power to the toilet.
➤ Press the Flush switch or handle once.
I
8100 models only:
➤ Press the Flush switch or handle and hold it for at least five seconds.
➤ Toss several sheets of toilet tissue into the bowl and flush the toilet again.
I
If the toilet does not function as expected, refer to “5 Troubleshooting” on page 10
for possible solutions.
7
EN
Toilets
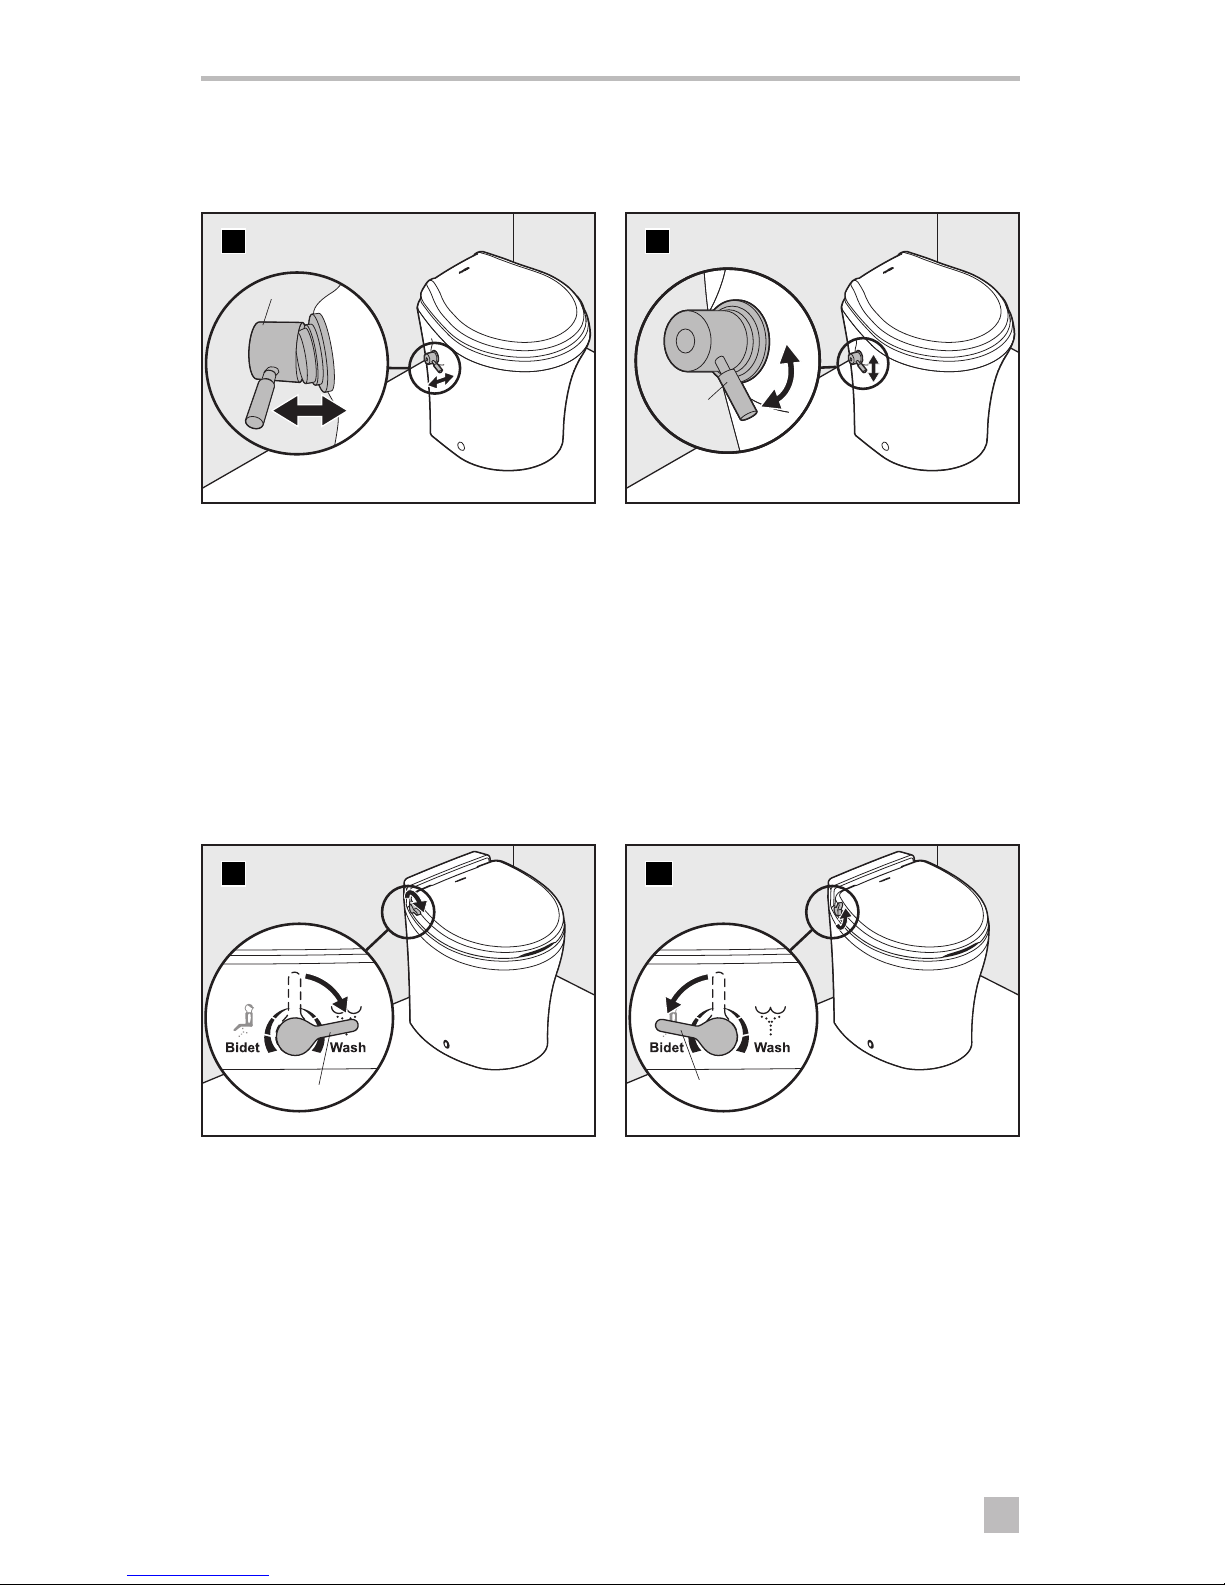
3.7 Using the bidet (8900 models only)
FLOODING HAZARD: Shut the bidet faucet off completely aer use. Failure to
do so could result in property damage, serious injury, or death.
7
Handle
➤ Turn the handle away from the toilet to
activate the bidet faucet.
8
Handle
➤ Adjust the water temperature by turning
the handle up for warm water, and down
for cool water.
➤ Use the electronic flush switch to clear
the toilet bowl during and aer using the
bidet.
3.8 Using the bidet (8500 models only)
FLOODING HAZARD: Shut the bidet faucet off completely aer use. Failure to
do so could result in property damage, serious injury, or death.
9
Handle
➤ Turn the handle toward the front of the
toilet to activate the Wash function.
10
Handle
➤ Turn the handle toward the back of the
toilet to activate the Bidet function.
 Loading...