

Dolmar WD-2035 Instruction Manual
http://www.dolmar.com
WD-2035
Istruzioni d’impiego (Pagina 7-11)
Instruction Manual (Page 12-16)
Instructions d’emploi (Page 17-21)
Betriebsanleitung (Seite 22-26)
Gebruiksaanwijzing (Bladzijde 27-31)
Instrucciones de manejo (Página 32-36)
Οδηγιες λειτουργιαςΟδηγιες λειτουργιας
Οδηγιες λειτουργιαςΟδηγιες λειτουργιας
Οδηγιες λειτουργιας (Σελιδα 37-41)
Instruções de serviço (Página 42-46)
47-51
Lietosanas instrukcija (52-56 lpp)

- 2 -
- - - - - - ø 45mm - - - - - -
Cod. 668 001 316
- Tubo flessibile con manicotti girevoli ed impugnatura ergonomica
- Swivel hose with ergonomic handgrip
- Tuyau flexible avec manchons pivotants et poignée ergonomique
- Schlauch mit drehbaren Muffen komplett mit ergonomischem Handgriff
- Buigzame leiding met draaibare verbindingsstukken compleet met
ergonomische handgreep
- Tubo flexible con manguitos giratorios dotado de empuñadura ergonómica
-
- Tubo flexível com engates giratórios completo de punho ergonômico.
-
-
- Tubo flessibile per elettroutensili con adattatore universale
- Flexible hose for electric portable tools with universal adapter
- Tuyau flexible pour accessoires électriques avec adaptateur universel
- Schlauch für elektrische Zubehörteile mit Universaladapter
- Slang voor elektrische accessoires met universele adapter
- Tubo flexible para electroutensilio con adaptador universal
- ™ИЪ¿П БИ· ЛПВОЩЪИОfi ВЪБ·ПВ›Ф МВ ·УЩ¿ЩФЪ·
- Tubo flexível para utensílios eléctricos com adaptador universal
- Ub,rbq ikfyu lkz 'ktrnhjbycnhevtynf c eybdthcfkmysv
gtht[jlysv gfnhe,rjv
-
- Ghiera blocca cavo alimentazione elettrica dell’elettroutensile
- Clamp to lock power cable of electric power tool
- Collier de blocage cordon d’alimentation électrique de l’accessoire
- Ringmutter zum Befestigen des Stromkabels des elektrischen Zubehörteils
- Ring voor het bevestigen van de elektriciteitskabel van het elektrische accessoire
- Abrazadera de bloqueo para el cable de alimentación eléctrica del utensilio eléctrico
- ¢·ОЩ‡ПИФ˜ Ы˘БОЪ¿ЩЛЫЛ˜ О·Пˆ‰›Ф˘ ЩФ˘ ЛПВОЩЪИОФ‡ ВЪБ·ПВ›Ф˘
-
Rosca de bloqueio do cabo alimentação eléctrica do utensílio eléctrico
- Rjkmwj ,kjrbhjdrb ghjdjlf 'ktrnhjgbnfybz 'ktrnhjbycnhevtynf
-
Cod. 668 001 321
Cod. 668 050 318
IT ACCESSORI UK ACCESSORIES FR ACCESSOIRES
DE ZUBEHÖR NL
TOEBEHOREN
ES
ACCESORIOS
GR
ΕΞΑΡΤΗΜΑΤΑΕΞΑΡΤΗΜΑΤΑ
ΕΞΑΡΤΗΜΑΤΑΕΞΑΡΤΗΜΑΤΑ
ΕΞΑΡΤΗΜΑΤΑ
PT ACESSÓRIOS
RU
GHBYFLKT:YJCNBGHBYFLKT:YJCNB
GHBYFLKT:YJCNBGHBYFLKT:YJCNB
GHBYFLKT:YJCNB
- Prolunghe rigide
- Rigid extension tubes
- Rallonges rigides
- Verlängerungsrohre
- Verlengpijpen
- Tubos rígidos de extensión
- ∞ηÌÙÔÈ ÛˆÏ‹Ó˜ ÚÔ¤ÎÙ·Û˘
- Tubos rígidos de extensão
- :tcnrbt elkbybntkmyst nhe,s
-
Cod. 668 050 091
LT
PAPILDAPRIKOJUMS
-
- 3 -
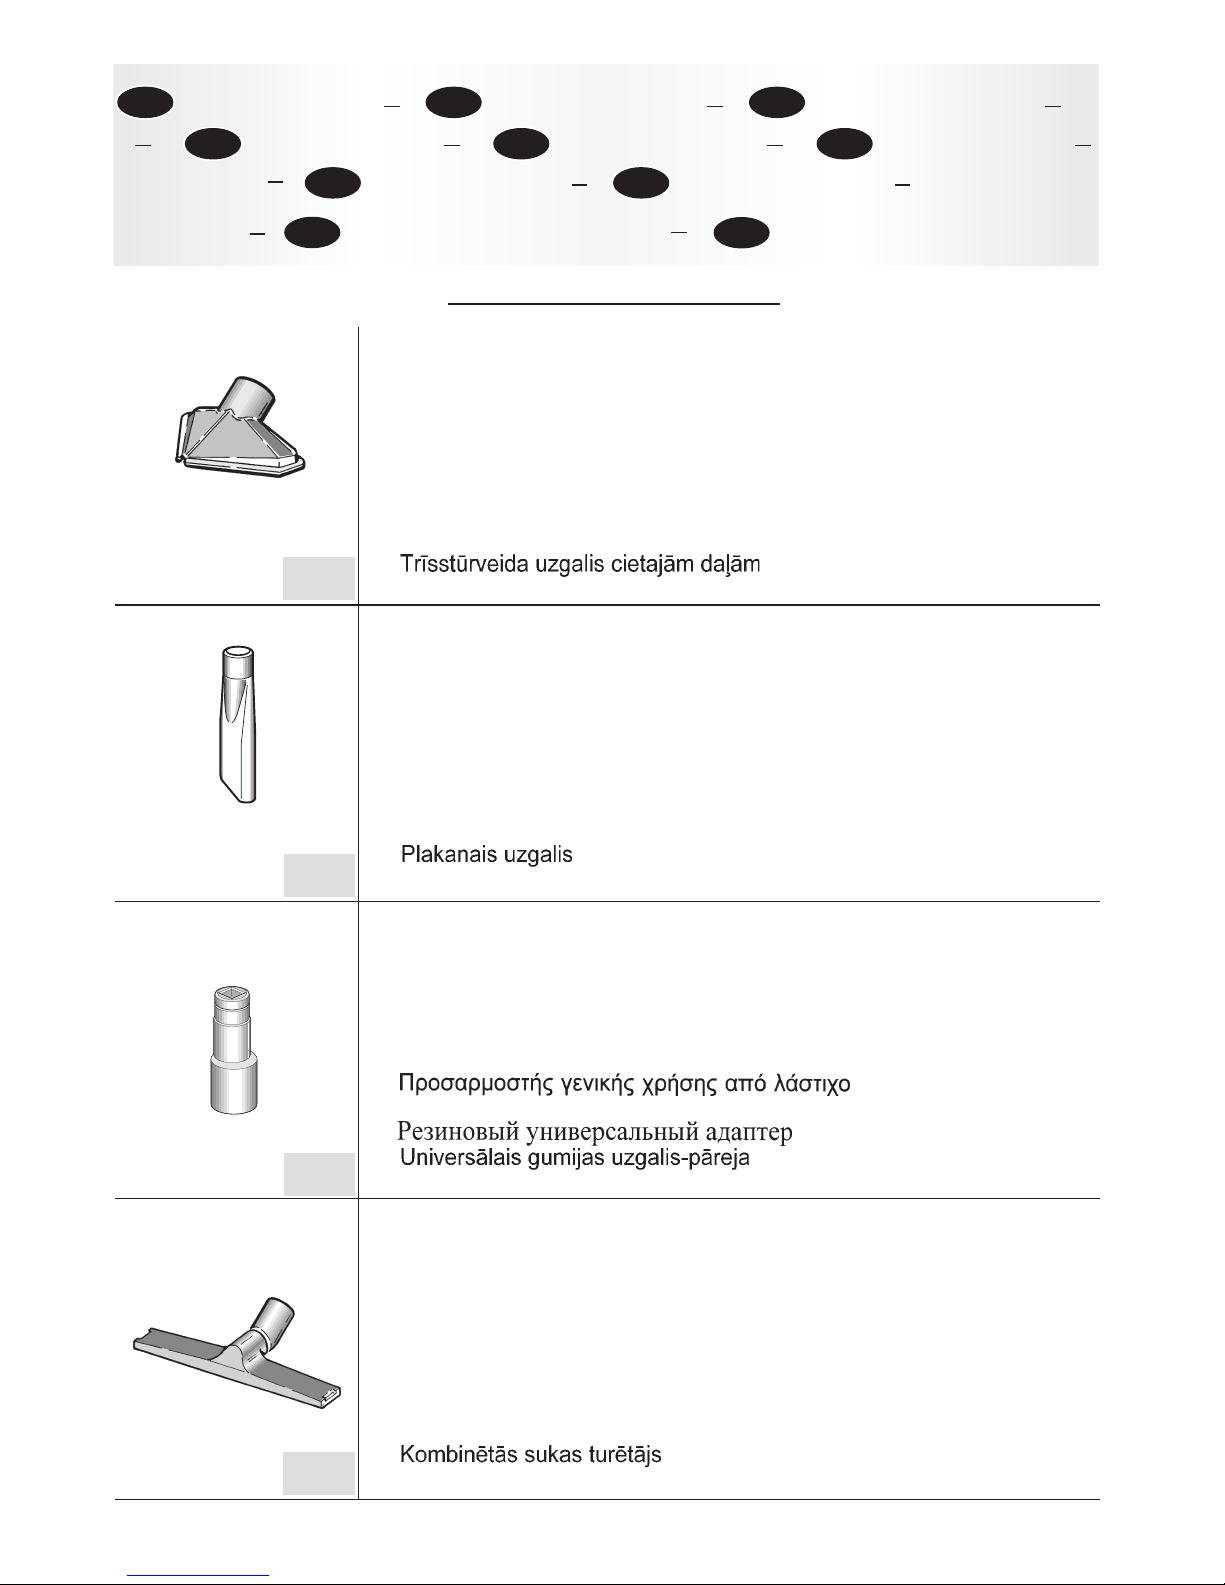
- Adattatore universale in gomma
- Rubber universal adapter
- Adaptateur universel en caoutchouc
- Universaladapter aus Gummi
- Universeel rubber adaptor
- Adaptador universal de goma
-
- Adaptador universal de borracha
-
-
- Telaio per spazzola combinata
- Combi brush holder
- Châssis pour brosse combinée
- Gerüst für Kombi-Bürste
- Houder voor gecombineerde borstel
- Cuadro multiadaptador
- µ¿ÛË Ú˘ıÌÈ˙fiÌÂÓ˘ ‚Ô‡ÚÙÛ·˜
- Quadro para escova combinada
- Rfhrfc lkz rjv,bybhjdfyyjq otnrb
-
Cod. 668 070 123
Cod. 668 060 277
- Bocchetta a lancia
- Crevice tool
- Suceur de plinthe
- Fugendüse
- Spleetzuigmond
- Boquilla chata
- ∞ÎÚÔʇÛÈÔ ÁÈ· Û¯ÈṲ̂˜
- Boca em lança
- Yfcflrf d dblt cjgkf
-
Cod. 668 050 080
- - - - - - ø 45mm - - - - - -
- Bocchetta triangolare per detriti solidi
- Triangular solid waste nozzle
- Suceur triangulaire pour déchets
- Dreieckige Grobschmutzdüse
- Driehoekige zuigmond voor niet vloeibaar vuil
- Boquilla triangular para desechos sólidos
- ∞ÎÚÔʇÛÈÔ ·Ó·ÚÚfiÊËÛ˘ ÛÎÔ˘È‰ÈÒÓ
- Boca triangular para detritos sólidos
- Nhteujkmyfz yfcflrf lkz ndthls[ xfcnbw
-
Cod. 668 050 089
IT ACCESSORI UK ACCESSORIES FR ACCESSOIRES
DE ZUBEHÖR NL
TOEBEHOREN
ES
ACCESORIOS
GR
ΕΞΑΡΤΗΜΑΤΑΕΞΑΡΤΗΜΑΤΑ
ΕΞΑΡΤΗΜΑΤΑΕΞΑΡΤΗΜΑΤΑ
ΕΞΑΡΤΗΜΑΤΑ
PT ACESSÓRIOS
RU
GHBYFLKT:YJCNBGHBYFLKT:YJCNB
GHBYFLKT:YJCNBGHBYFLKT:YJCNB
GHBYFLKT:YJCNB
-
LT
PAPILDAPRIKOJUMS
- 4 -
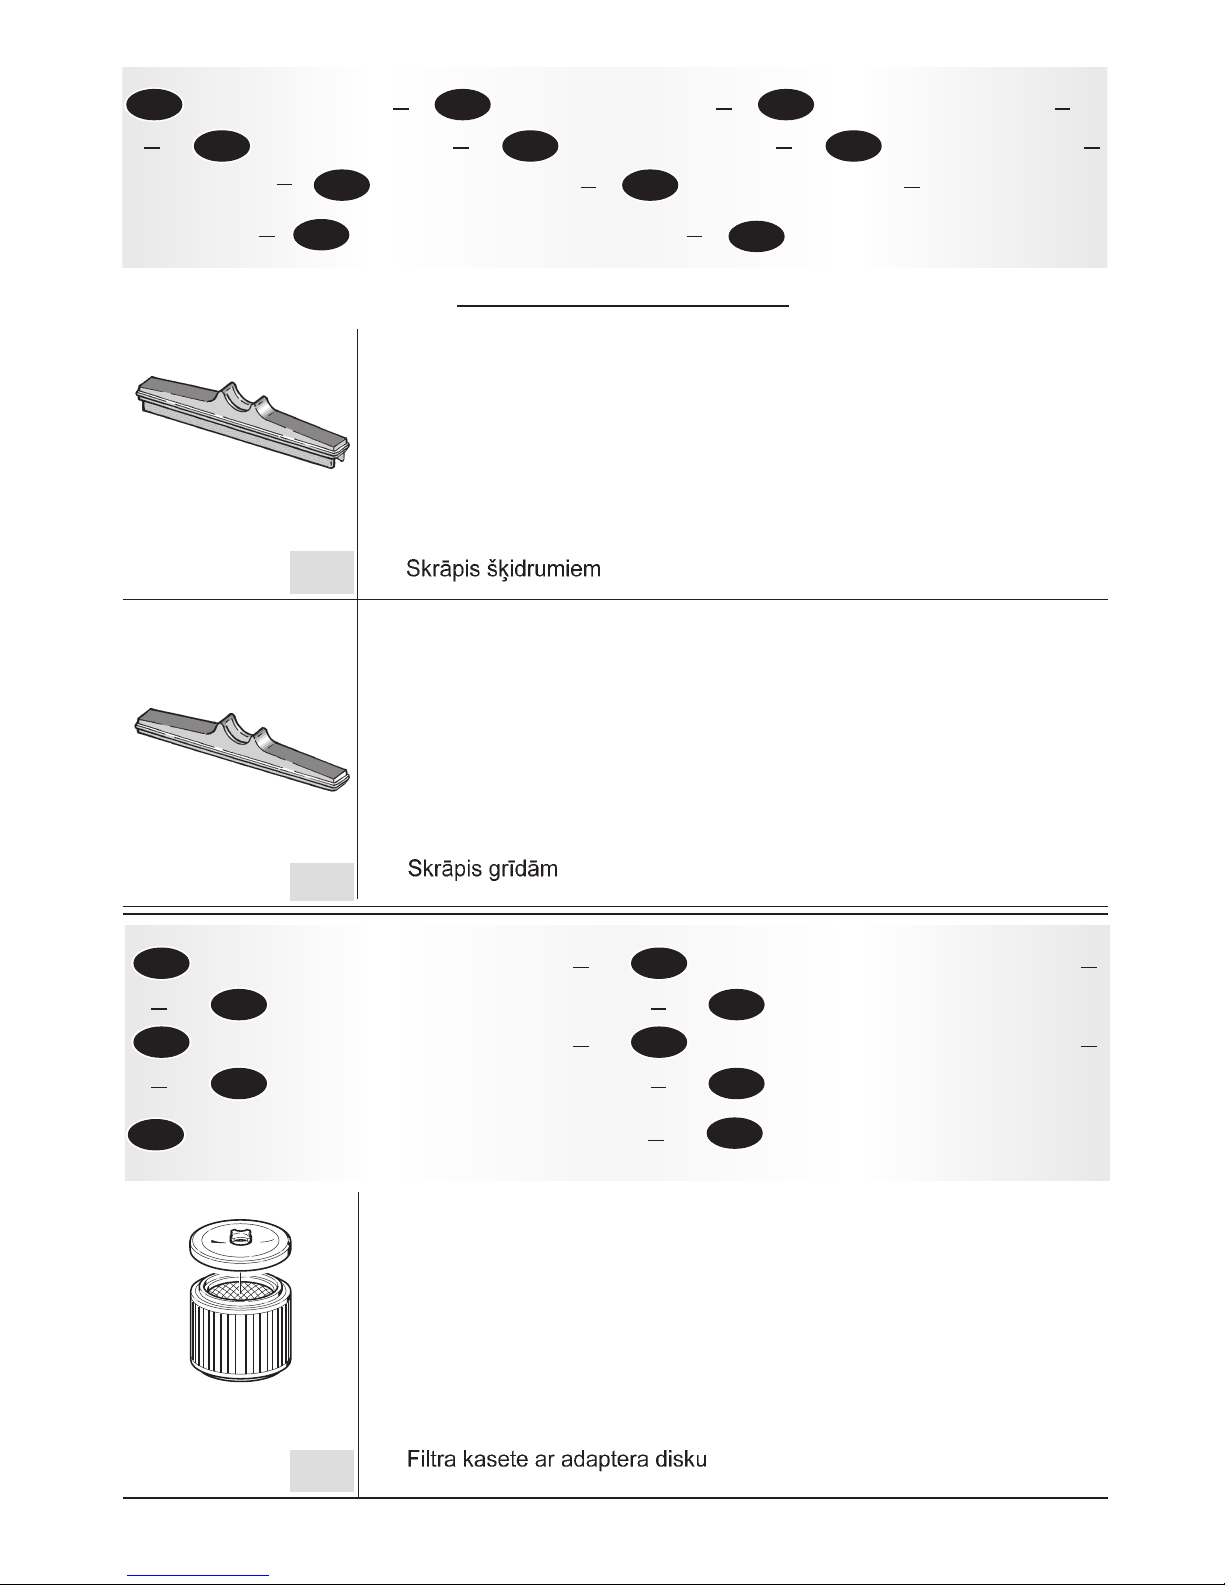
- Racla per liquidi
- Scraper for liquids
- Racle pour liquides
- Bürste für Nassarbeit
- Rakel voor vloeistoffen
- Rasqueta para líquidos
- µÔ‡ÚÙÛ· ÁÈ· ˘ÁÚ¿
- Boca para líquidos
- Crht,jr lkz ;blrjcntq
-
- Racla per pavimenti
- Scraper for floors
- Racle pour sols
- Bürste für Bodenbeläge
- Rakel voor vloeren
- Rasqueta para pisos
- µÔ‡ÚÙÛ· ÁÈ· ‰¿Â‰·
- Boca para pavimentos
- Crht,jr lkz gjkf
-
- Cartuccia filtro con disco adattatore
- Filter cartridge with adapter disc
- Cartouche de filtre avec disque adaptateur
- Filtereinsatz mit Adapterscheibe
- Filterpatroon met aanpasschijf
- Cartucho filtro con filtro adaptador
- ™ÙÔÈ¯Â›Ô Ê›ÏÙÚÔ˘ Ì ‰›ÛÎÔ ÚÔÛ·ÚÌÔÁ‹˜
- Cartucho filtro com disco adaptador
- Gfnhjy abkmnhf c lbcrjv- gtht[jlybrjv
-
❊
IT SISTEMI FILTRANTI UK FILTER SYSTEMS
FR SYSTEMES FILTRANTS DE FILTERSYSTEME
NL FILTER SYSTEEM ES SISTEMAS FILTRANTES
GR
ΣΥΣΤΗΜΑΤΑ ΦΙΛΤΡΑΡΙΣΜΑΤΟΣΣΥΣΤΗΜΑΤΑ ΦΙΛΤΡΑΡΙΣΜΑΤΟΣ
ΣΥΣΤΗΜΑΤΑ ΦΙΛΤΡΑΡΙΣΜΑΤΟΣΣΥΣΤΗΜΑΤΑ ΦΙΛΤΡΑΡΙΣΜΑΤΟΣ
ΣΥΣΤΗΜΑΤΑ ΦΙΛΤΡΑΡΙΣΜΑΤΟΣ
PT
SISTEMAS DE FILTRAGEM
RU
ABKMNHE>OBT CBCNTVSABKMNHE>OBT CBCNTVS
ABKMNHE>OBT CBCNTVSABKMNHE>OBT CBCNTVS
ABKMNHE>OBT CBCNTVS
Cod. 668 060 278
Cod. 668 060 279
Cod. 668 083 201
- - - - - - ø 45mm - - - - - -
IT ACCESSORI UK ACCESSORIES FR ACCESSOIRES
DE ZUBEHÖR NL
TOEBEHOREN
ES
ACCESORIOS
GR
ΕΞΑΡΤΗΜΑΤΑΕΞΑΡΤΗΜΑΤΑ
ΕΞΑΡΤΗΜΑΤΑΕΞΑΡΤΗΜΑΤΑ
ΕΞΑΡΤΗΜΑΤΑ
PT ACESSÓRIOS
RU
GHBYFLKT:YJCNBGHBYFLKT:YJCNB
GHBYFLKT:YJCNBGHBYFLKT:YJCNB
GHBYFLKT:YJCNB
-
LT
PAPILDAPRIKOJUMS
LT
FILTRESANAS SISTEMAS
-
ˇ
-
- 5 -
ALTO
TOP
HAUL
OBEN
ARRIBA
MASSIMO LIVELLO DI RIEMPIMENTO
MAXIMUM FILLING LEVEL
NIVEAU MAXIMUM DE REMPLISSAGE
HÖCHSTFÜLLSTAND
MAXIMO NIVEL DE LLENADO
1 2 3 5412 3 54
Come si sostituisce il sacco quando è pieno - How to change the bag when it is full
Procédure de remplacement du sac quand il est plein - Wie den Filterbeutel ersetzen, wenn er voll ist
Como se sustituye la bolsa cuando esté llena
1-• Introdurre il sacco in carta filtro nel contenitore dei detriti
(bidone).
•Insert the filter paper bag in the dust container (tank).
•Introduire le sac en papier dans le récipient des déchets (bidon).
•Einlegen des Papierfilterbeutels in den Kessel.
•Introducir la bolsa de papel filtro en el contenedor de desechos
(tanque).
2-• Inserire la flangia in plastica sul raccordo entrata aria dell’aspi-
rapolvere evitando, durante l’operazione, di danneggiare il sacco.
•Fit the plastic flange on to the air inlet of the vacuum cleaner.
Take care not to damage the bag during this operation.
•Monter la bride en plastique sur le raccord d'entrée de l'air de
l'aspirateur; faire attention à ne pas endommager le sac.
•Den Plastikflansch auf den Stutzen des Staubsaugers stecken.
Während diesem Vorgang den Filterbeutel nicht beschädigen.
•Insertar el anillo de plástico en el empalme de entrada de aire de
la
ORIGINALIORIGINALI
RICAMBIRICAMBI
SPARE
ORIGINAL
SPARE
ORIGINAL
DÉTACHÉE
ORIGINALE
PIÈCEPIÈCE
DÉTACHÉE
ORIGINALE
ERSATZTEILE
ORIGINAL
ERSATZTEILE
ORIGINAL
REPUESTOS
ORIGINALES
REPUESTOS
ORIGINALES
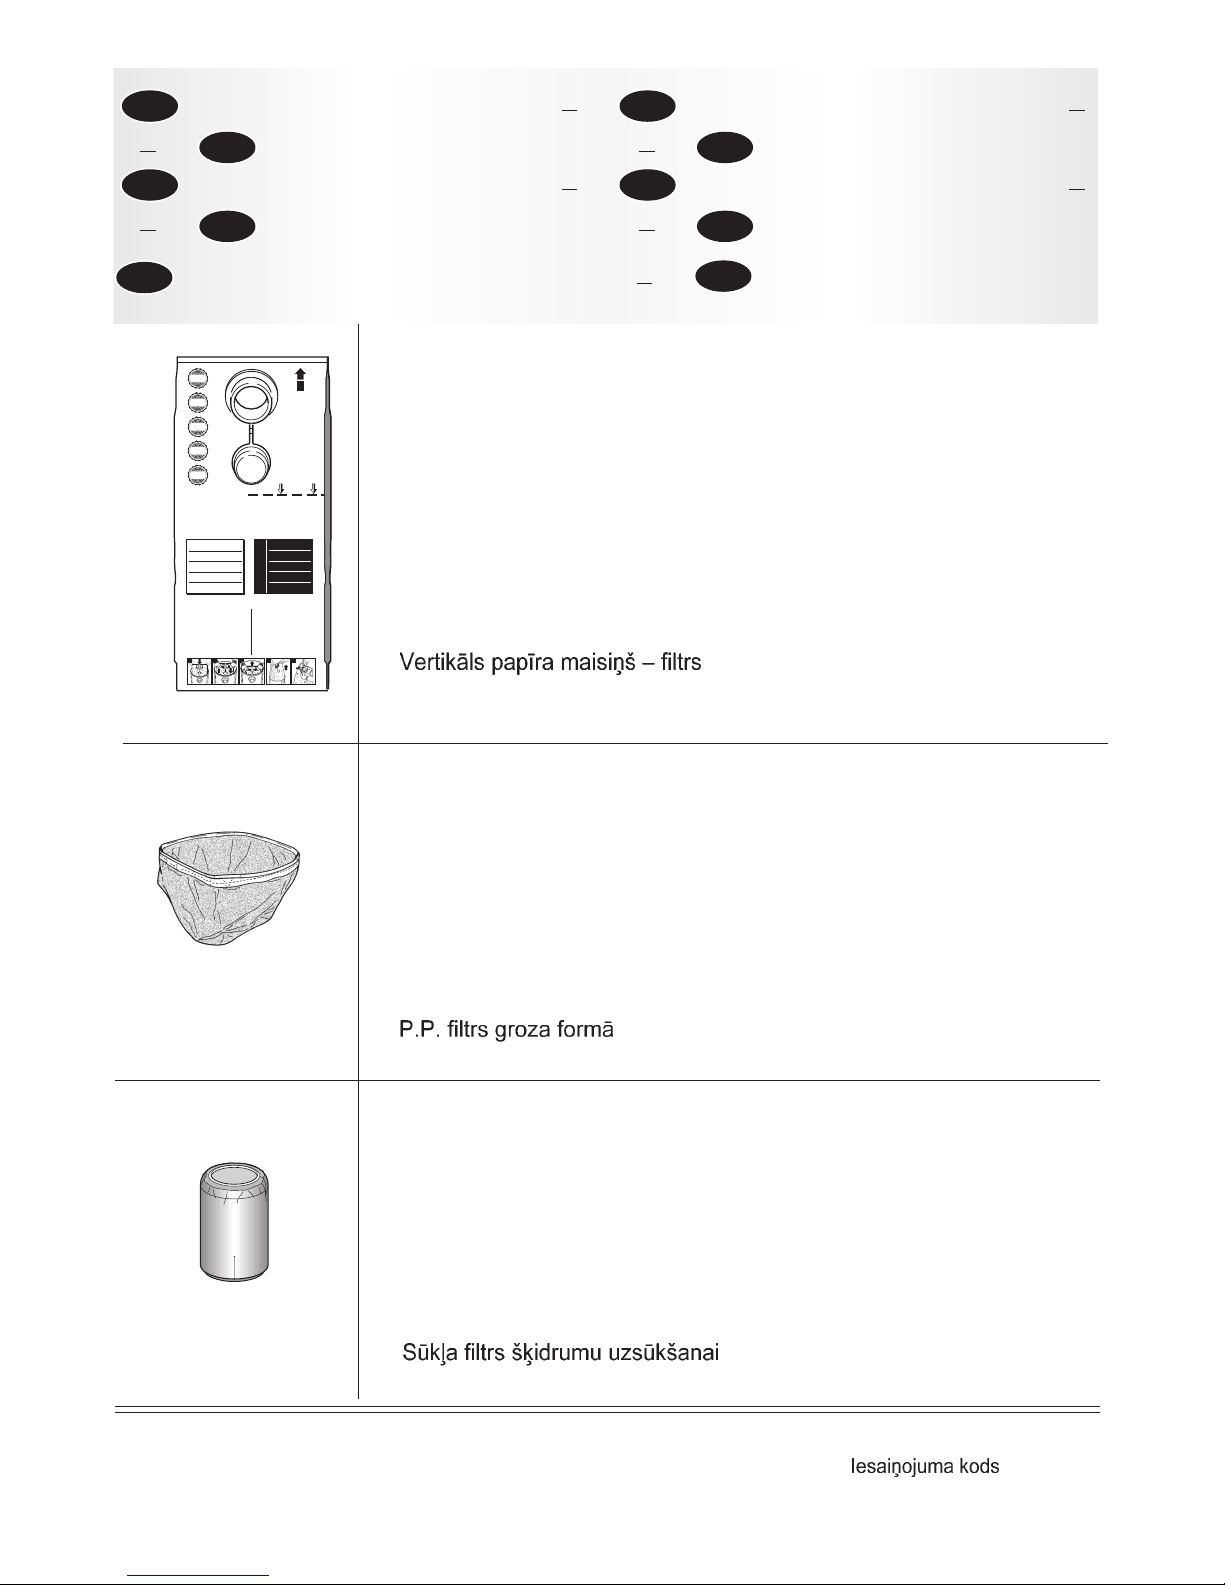
Sacco in carta filtro “verticale” per detriti solidi. Indispensabile per l’aspirazione di polveri impalpabili
come ad esempio cemento, talco, ecc... Necessario per trasferire in modo rapido ed igenico i detriti aspirati.
“Vertical” paper bag for solid debris. Indispensable for sucking up impalpable dust, i.e. cement, talcum and
so on. Necessary to remove speedly and hygienically the collected debris.
Sac en papier “vertical” pour déchets solides. Indispensable pour l’aspiration de poussières impalpables par
exemple ciment, talc, etc. Nécessaire pour transférer rapidement et hygiéniquement les déchets aspirés.
“Senkrechte” Papierfilterbeutel für Trockenstaub. Unentbehrlich um Feinstaub wie z. B. Zement,Talkum, usw.
zu saugen. Notwendig um rasch und hygienisch den eingesaugten Staub zu entsorgen.
Bolsa en papel filtro “vertical” para desechos sólidos. Inidispensable para la aspiración de polvo fino como por
ejemplo cemento, talco, etc. Necesario para transferir en modo rápido e higiénico los desechos aspirados.
NON ASPIRARE SOSTANZE
LIQUIDE CON QUESTO SACCO
DO NOT VACUUM LIQUIDS
WHEN THIS BAG IS USED
NE PAS ASPIRER DE MATIERES
LIQUIDES AVEC CE SAC
FLÜSSIGE SUBSTANZEN MIT
DIESEM SACK NICHT EINSAUGEN
NO ASPIRAR SUSTANCIAS
LIQUIDAS CON ESTA BOLSA
! ! ATTENZIONE ! !
WARNING - ATTENTION
ACHTUNG - ATENCION
NON ASPIRARE SOSTANZE
LIQUIDE CON QUESTO SACCO
DO NOT VACUUM LIQUIDS
WHEN THIS BAG IS USED
NE PAS ASPIRER DE MATIERES
LIQUIDES AVEC CE SAC
FLÜSSIGE SUBSTANZEN MIT
DIESEM SACK NICHT EINSAUGEN
NO ASPIRAR SUSTANCIAS
LIQUIDAS CON ESTA BOLSA
3-• Togliere la flangia in plastica dal raccordo entrata aria dell’aspirapolvere.
•Remove the plastic flange from the air inlet of the vacuum cleaner.
•Retirer la bride en plastique du raccord d’entrée de l’air de l’aspirateur.
•Den Plastikflansch vom Stutzen des Staubsaugers ziehen.
•Sacar el anillo de plástico del empalme de entrada de aire de la
aspiradora.
4-• Estrarre il sacco in carta filtro pieno dal contenitore dei detriti (bidone).
•Remove the full filter paper bag from the waste container.
•Extraire le sac papier filtre plein du récipient à déchets (bidon).
•Den vollen Filterbeutel aus dem Kessel (Kanister) herausnehmen.
•Extraer la bolsa de papel filtro llena del contenedor de desechos (tanque).
5-• Chiudere la flangia in plastica con l’apposito tappo.
•Close the plastic flange with the plug provided for this.
•Fermer la bride en plastique par le bouchon prévu à cet effet.
•Den Plastikflansch mit dem Verschlußdeckel schliessen.
•Cerrar el anillo de plástico con el respectivo tapón.
Materiale controllato e certificato
secondo le norme ISO 9073-2 / 9073-3
Material checked and certified in compliance
with ISO 9073-2 / 9073-3 standards
Matériel contrôlé et certifié conformément
aux normes ISO 9073-2 / 9073-3
Material, das nach den Normen ISO 9073-2
/ 9073-3 geprüft und zertifiziert wird.
Material controlado y certificado según
las normas ISO 9073-2/9073-3
- Sacco in carta filtro verticale
- Vertical filter paper bag
- Sachet filtre en papier vertical
- Vertikaler Papierstaubbeutel
- Verticale papieren filterstofzak
- Bolsa filtro vertical de papel
- Г¿ЪЩИУЛ Ы·ОФ‡П· Ы˘ППФБ‹˜ ЫОfiУЛ˜
- Saco de papel de filtro vertical
- Dthnbrfkmysq ,evf;ysq gfrtn - abkmnh
-
- Filtro in P.P. a canestro
- P.P. basket filter
- Filtre en P.P. à corbeille
- Korbfiltereinsatz P.P.
- P.P. korffilter
- Filtro de P.P. en forma de canasta
- º›ÏÙÚÔ Ï¤ÁÌ·ÙÔ˜ ·fi ƒ.ƒ.
- Bolsa filtro vertical de papel BIA “C”
- Abkmnh bp G7G7 bvt.obq ajhve ,fcrtn,jkmyjq rjhpbyrb
-
❊
Codice confezione - Pack code - Code emballage - Bestellnummer der Verpackung - Code verpakking
Código del empaque - ∫ˆ‰ÈÎfi˜ Û˘Û΢·Û›·˜ - Código do empaque - Rjl egfrjdrb -
❊
- Filtro-mousse per aspirare sostanze liquide
- Sponge filter to vacuum liquids
- Filtre mousse pour aspirer les substances liquides
- Schaumstofffilter zum Saugen von Flüssigkeiten
- Schuimfilter voor het opzuigen van vloeistoffen
- Filtro en espuma para aspirar sustancias líquidas
- ™ÔÁÁ҉˜ Ê›ÏÙÚÔ ÁÈ· ·Ó·ÚÚfiÊËÛË ˘ÁÚÒÓ
- Filtro de P.P. em forma de cesto
- Ue,xfnsq Abkmnh lkz dcfcsdfybz ;blrjcntq
-
Cod. 668 083 100
Cod. 668 083 035
Cod. 668 083 134
IT SISTEMI FILTRANTI UK FILTER SYSTEMS
FR SYSTEMES FILTRANTS DE FILTERSYSTEME
NL FILTER SYSTEEM ES SISTEMAS FILTRANTES
GR
ΣΥΣΤΗΜΑΤΑ ΦΙΛΤΡΑΡΙΣΜΑΤΟΣΣΥΣΤΗΜΑΤΑ ΦΙΛΤΡΑΡΙΣΜΑΤΟΣ
ΣΥΣΤΗΜΑΤΑ ΦΙΛΤΡΑΡΙΣΜΑΤΟΣΣΥΣΤΗΜΑΤΑ ΦΙΛΤΡΑΡΙΣΜΑΤΟΣ
ΣΥΣΤΗΜΑΤΑ ΦΙΛΤΡΑΡΙΣΜΑΤΟΣ
PT
SISTEMAS DE FILTRAGEM
RU
ABKMNHE>OBT CBCNTVSABKMNHE>OBT CBCNTVS
ABKMNHE>OBT CBCNTVSABKMNHE>OBT CBCNTVS
ABKMNHE>OBT CBCNTVS
LT
FILTRESANAS SISTEMAS
-
ˇ
-

- 6 -
IT
- 7 -
-- DATI TECNICI
- Tensione di alimentazione elettrica .......................................................... V~ .............................. 230
- Frequenza ....................................................................................................... Hz ............................ 50/60
- Potenza ............................................................................................................ W ......................... 1000 IEC
. .......................................................................................................................... W ........................ 1100 MAX
- Contenitore realizzato in ..................................................................................................................
- Capacità del contenitore (bidone) ............................................ l (nominale) ............................... 35
- Depressione ........................................................................................... KPa ca. ............................... 21
- Portata d’aria effettiva ........................................................................ m
3
/h ca. .............................. 210
- Classe di isolamento apparecchio ...................................................................................................... I
a
- Dispositivo automatico di prolungamento aspirazione ................. sec. ca. ................................. 8
- Potenza massima disponibile alla presa elettroutensile ........................ W ............................. 2000
- Peso ........................................................................................................... Kg ca. ............................... 8,0
- Livello di rumorosità ..................................................................................... dB ............................... 65
AVVERTENZE
- se è caduto e presenta evidenti rotture o
anomalie di funzionamento;
- se la spina o il cavo di alimentazione elettrica
sono difettosi.
✓ Togliere SEMPRE la spina dalla rete di
alimentazione elettrica immediatamente
dopo l’uso e prima di eseguire qualsiasi
intervento di pulizia o manutenzione.
✓ Le eventuali riparazioni devono essere eseguite
solo da specialisti che dispongano dei pezzi di
ricambio, originali, forniti dal fabbricante.
Riparare da se l’apparecchio può essere
estremamente pericoloso.
✓ Nel rispetto delle normative vigenti, un
apparecchio fuori uso deve essere reso
inutilizzabile, tagliando il cavo di alimentazione
elettrica, prima di buttarlo.
✓ Non aspirare sostanze infiammabili, esplosive o
corrosive (fig. 003).
✓ Non utilizzare l’apparecchio in ambienti saturi di
gas.
✓ Pulire l’apparecchio utilizzando solo acqua. Non
usare trielina, solventi o detersivi abrasivi.
La casa costruttrice declina ogni
responsabilità per uso improprio o non
conforme alle istruzioni fornite,
manomissione e manutenzione inadeguata
dell’apparecchio.
✓ Un apparecchio elettrico non è un giocattolo.
Utilizzarlo e riporlo fuori dalla portata dei bambini.
✓ I componenti dell’imballaggio (eventuali sacchetti
in plastica, cartoni, ecc.) devono essere tenuti
lontani dalla portata dei bambini.
✓ Questo apparecchio è concepito per funzionare
unicamente a corrente alternata. Prima di metterlo
in funzione assicurarsi che la tensione di rete
corrisponda a quella indicata sulla targhetta dati.
✓
Collegare l’apparecchio SOLO a prese di
corrente aventi portata minima 10A(fig. 001).
✓ Non tirate il cavo di alimentazione o
l’apparecchio stesso per togliere la spina
dalla presa di corrente (fig. 002).
✓ Accertarsi che l’impianto elettrico di rete sia
provvisto di interruttore differenziale (tipo
salvavita).
✓ Svolgere completamente il cavo di alimentazione
elettrica prima di mettere in funzione
l’apparecchio.
✓ Utilizzare una prolunga elettrica solo se in perfetto
stato. Assicurarsi che la sezione sia appropriata
alla potenza dell’apparecchio.
✓ Non lasciare mai scorrere il cavo di alimentazione
su spigoli taglienti; evitare di schiacciarlo.
✓ Non lasciare mai l’apparecchio in funzione senza
sorvegliarlo.
✓ Non lasciare l’apparecchio esposto ad agenti
atmosferici (pioggia, gelo, sole, etc.).
✓ Non utilizzare mai l’apparecchio:
- con le mani bagnate o umide;
==========================================================================
Conservare con cura il presente libretto istruzioni.

IT
- 8 -
A - UTILIZZO DELL'APPARECCHIO
1 ..... SGANCIO DELL’UNITA’ MOTORE
- Per liberare l’unità motore tirare verso l’esterno la parte superiore delle cerniere (fig. “A1”).
- Per la chiusura, assicurarsi che le cerniere siano ben alloggiate nella loro sede.
2 ..... AVVIAMENTO (figure “A2” - “A3”)
Impiego dell’apparecchio come aspirapolvere o aspiraliquidi (fig. “A2”)
- Deviatore (“A”): in posizione “MANUALE” ( ).
- Interruttore (“B”): • Posizione O= apparecchio a riposo (spia luminosa spenta)
• Posizione 1 = apparecchio in funzione (spia luminosa accesa)
Impiego dell’apparecchio con elettroutensile (fig. “A3”)
- Deviatore (“A”): in posizione “AUTOMATICO” ( ).
- Interruttore: in posizione 1= Apparecchio in funzione (spia luminosa accesa)
Con i due interruttori in queste posizioni l’apparecchio si mette automaticamente in funzione all’avvio
dell’elettroutensile.
3 ..... COLLEGAMENTO ELETTRICO ELETTROUTENSILE-ASPIRAPOLVERE
(figure “A4” - “A5”)
- Inserire la spina dell’elettroutensile nella presa di corrente posta sull’unità motore e
successivamente collegare l’apparecchio alla rete di alimentazione elettrica (fig. “A4”).
ATTENZIONE: La presa di corrente è predisposta al collegamento di elettroutensili aventi una
potenza massima di 2000 W (fig. “A5”).
Non collegare MAI più di un elettroutensile alla presa di corrente posta sull’unità
motore.
-------------------------------------------------------------------------
B - SISTEMI FILTRANTI
1 ..... IMPIEGO DEL SACCO RACCOGLIPOLVERE cod. confezione 668 083 134
(fig. “B1” - “B2”)
Utilizzare il sacco raccoglipolvere insieme alla cartuccia filtro.
- Introdurre il sacco in carta filtro nel contenitore-bidone
(fig. “B1”).
- Inserire la flangia in plastica (x) nel raccordo entrata aria (y) evitando, durante l’operazione,
di danneggiare il sacco
(fig. “B2”).
- Far aderire il sacco alle pareti del contenitore-bidone e applicare l’unità motore.
- Il sacco in carta filtro garantisce il recupero delle polveri aspirate in condizioni di igiene.
Evitarne l’uso per materiali taglienti o umidi.
- Cambiare il sacco quando i materiali aspirati hanno raggiunto il livello massimo di capienza.
- Il sacco non deve essere riutilizzato ma deve sempre essere sostituito.
-
Si consiglia di tenere sempre a disposizione una confezione di sacchi raccoglipolvere cod.
confezione
668 083 134
.

IT
- 9 -
2 ..... IMPIEGO DELLA CARTUCCIA FILTRO cod. confezione 668 083 201
(fig. “B3” - “B4”)
-
Sganciare l’unità motore dal contenitore-bidone (fig. “A1”).
- Posizionare l’elemento filtrante (b) sul supporto motore (c) (fig. “B3”).
- Inserire il disco adattatore in plastica (a) sull’elemento filtrante (b) e rendere le due parti solidali,
ruotando in senso orario la manopola (fig. “B4”).
- Rimontare l’unità motore sul contenitore-bidone ed agganciarla.
- L’impiego della cartuccia filtro é particolarmente consigliato per la raccolta di polveri o sostanze
solide e può essere integrato dall’utilizzo contemporaneo del sacco in carta che oltre ad evitare
l’intasamento della cartuccia filtro, offre il vantaggio di trasferire in modo rapido ed igienico i
materiali aspirati
Evitarne l’uso per materiali taglienti o umidi.
3 ..... IMPIEGO DEL FILTRO MOUSSE cod. 668 083 035 (fig. “B5”)
- Per aspirare sostanze liquide sganciare l’unità motore dal contenitore-bidone (fig. “A1”).
- Applicare il filtro-mousse sul supporto motore come indicato nella figura “B5”.
- Riposizionare l’unità motore sul contenitore assicurandosi che le cerniere siano alloggiate
nella sede.
4 ..... IMPIEGO DEL PRE-FILTRO IN P.P. A CANESTRO cod. 668 083 100
(fig. “B6”)
Utilizzare il pre-filtro a canestro solo con la cartuccia filtrante inserita.
- È particolarmente adatto per filtrare polveri fini quali cemento, talco, ecc.
- Applicare il pre-filtro a canestro nel contenitore-bidone come indicato nella figura “B6”.
5 ..... POST-FILTRI ARIA IN USCITA cod. 668 083 021 (fig. “B7”)
- La presenza di questi post-filtri elettrostatici garantisce che l’aria reimmessa nell’ambiente sia
priva di impurità.
-------------------------------------------------------------------------
C - IMPIEGO DELL'APPARECCHIO
1 .... UTILIZZO COME ASPIRAPOLVERE
- La cartuccia filtro deve essere sempre applicata
ATTENZIONE: • Per un buon rendimento dell’apparecchio, è importante mantenere sempre
pulita la cartuccia filtro.
Se ne consiglia la sostituzione dopo circa 100 ore di funzionamento.
2 .... UTILIZZO COME ASPIRALIQUIDI
- Togliere sempre la cartuccia filtro.
- Montare il filtro-mousse come indicato al punto “B3”.
ATTENZIONE: • Quando nel contenitore (bidone) i liquidi aspirati raggiungono il massimo
livello consentito, l’aspirazione viene automaticamente bloccata dal galleggiante di sicurezza.
L’utente viene avvertito dall’incremento del numero di giri del motore e
dall’assenza di aspirazione.
- Spegnere immediatamente l’apparecchio e procedere allo svuotamento del contenitorebidone.

IT
- 10 -
3 .... PER ASPIRARE GRANDI QUANTITÀ DI LIQUIDI (fig. “C1”)
- Per aspirare liquidi da recipienti non immergere completamente la bocchetta a lancia onde
assicurare un parziale afflusso d’aria.
4 .... UTILIZZO ELETTROUTENSILE - ASPIRAPOLVERE
(fig. “C2” - “C3” - “C4”)
- La cartuccia filtro deve essere sempre applicata.
- Togliere, se presente, il filtro-mousse.
ATTENZIONE:
Per un buon rendimento dell’apparecchio, è importante mantenere sempre pulita la cartuccia filtro.
Se ne consiglia la sostituzione dopo circa 100 ore di funzionamento.
- Inserire il manicotto (M) del tubo flessibile (cod.668 001 321) nel raccordo entrata aria (Y)
(fig. “C2”) e l’adattatore universale (U) nel convogliatore dell’elettroutensile (fig. “C3”).
- Collegare elettricamente l’elettroutensile e l’apparecchio come descritto al punto “A3”.
- Con le ghiere (G) agganciare il cavo di alimentazione elettrica dell’elettroutensile al tubo
flessibile (fig. “C4”).
- Posizionare gli interruttori come descritto al punto “A2”.
-------------------------------------------------------------------------
D - MANUTENZIONE
Prima di eseguire qualsiasi operazione di
manutenzione, togliere sempre la spina di alimentazione elettrica.
1 .... SACCO RACCOGLIPOLVERE cod. confezione 668 083 134
-
Il sacco non deve essere riutilizzato ma deve essere sempre sostituito.
Per sostituire il sacco raccoglipolvere.
- Togliere la flangia in plastica (X) dal raccordo entrata aria (Y) dell’aspirapolvere (fig. “D1”).
- Estrarre il sacco in carta filtro dal contenitore-bidone (fig. “D2”).
- Chiudere la flangia in plastica con l’apposito tappo (fig. “D3”).
2 .... CARTUCCIA FILTRO cod. confezione 668 083 201 (fig. “D4” - “D5”)
- Rimuovere la cartuccia filtro dal supporto motore.
- Pulire frequentemente la cartuccia filtro con un pennello a setole morbide (fig. “D4”).
- Per la pulizia a fondo utilizzare un rubinetto a doccia dirigendo il getto dell’acqua dall’interno
verso l’esterno (fig. “D5”).
- Prima di riutilizzarlo, assicurarsi che sia ben asciutto.
- In caso di eccessive incrostazioni o se consunto, procedere alla sostituzione del
solo
elemento filtrante (b).
3 .... FILTRO MOUSSE cod. 668 083 035 (fig. “D6”)
- Lavare il filtro mousse sotto acqua corrente SENZA utilizzare detersivi.
- Procedere alla sua sostituzione in caso di lacerazioni o se consunto.
4 .... PRE-FILTRO IN P.P. A CANESTRO cod. 668 083 100 (fig. “D7”)
- Per pulire il pre-filtro a canestro, sbatterlo in un contenitore per immondizia.
- Nell’eventualità soffiarlo con aria compressa.
- Procedere alla sua sostituzione in caso di lacerazioni o se consunto.

IT
- 11 -
======================================================================
5 .... POST-FILTRI ARIA IN USCITA cod. 668 083 021 (fig. “D8”)
- Procedere periodicamente alla sostituzione dei post-filtri elettrostatici, facendo leva con una
moneta per sganciare i due coperchi a griglia.
- Riposizionarli assicurandosi dell’avvenuto aggancio.
6 .... PULIZIA DEL CONTENITORE-BIDONE (fig. “D9”)
- Controllare la quantità dei materiali aspirati, specie se usato per materiali voluminosi.
- Si consiglia di vuotare il contenitore una volta riempito a metà.
- Dopo aver utilizzato l’apparecchio come aspiraliquidi, vuotare il contenitore ed asciugarlo
unitamente agli accessori per evitare incrostazioni.
7 .... SOSTITUZIONE DEL CAVO DI ALIMENTAZIONE
-- Se il cavo di alimentazione elettrica è danneggiato rivolgersi ad un centro di assistenza
autorizzato perchè sono necessari utensili speciali.
AVETE DELLE DIFFICOLTA’ ?
EFFETTI
---------------------------------------
• L’apparecchio non si avvia.
======================
• La polvere esce dalle griglie
uscita aria.
======================
• Diminuzione di rendimento
(aspirazione).
======================
• Il motore aumenta
notevolmente il numero dei
giri.
======================
RIMEDI
-----------------------------------------
• Verificare la presa di corrente.
• Rivolgersi al centro di assistenza
tecnica.
=========================
• Controllare i filtri ed
eventualmente sostituirli.
=========================
• Controllare il contenitorebidone.
• Pulire o sostituire i filtri.
• Controllare il tubo flessibile o
gli accessori.
=========================
• Controllare il contenitorebidone.
• Pulire o sostituire i filtri.
• Controllare il tubo flessibile o
gli accessori.
=========================
CAUSE
-----------------------------------------
• Mancanza di corrente.
• Cavo di alimentazione elettrica,
interruttore o motore difettosi.
=========================
• Filtri saturi o lacerati.
=========================
• Contenitore-bidone troppo
pieno.
• Filtri saturi o consunti.
• Tubi o accessori otturati.
=========================
• Contenitore-bidone troppo
pieno.
• Filtri saturi o incrostati.
• Tubi o accessori otturati.
=========================
UK
- 12 -
-- TECHNICAL SPECIFICATIONS
- Power source voltage rating ...................................................................... V~ .............................. 230
- Frequency ....................................................................................................... Hz ............................ 50/60
- Power rating ................................................................................................... W ......................... 1000 IEC
W ........................ 1100 MAX
- Drum made of .....................................................................................................................................
- Drum capacity ................................................................................. l (nominal) ............................... 35
- Vacuum .......................................................................................... Kpa approx. ............................... 21
- Effective air flow rate ................................................................. m
3
/h approx. .............................. 210
-
Appliance insulation class ............................................................................................................
I
a
- Automatic suction extension device ........................................ sec. approx. ................................. 8
- Maximum power delivered to power tool tap ....................................... W ............................. 2000
- Weight ............................................................................................... Kg approx. ............................... 8,0
- Noise level ...................................................................................................... dB ............................... 65
RECOMMENDATIONS
✓ ALWAYS remove the plug from the
electricity main immediately after use and
before proceeding with any cleaning or
servicing operation.
✓ If needed, repairs must only be carried out by
specialists using genuine spare parts supplied by
the manufacturer.
It can be very dangerous to repair the
appliance on your own.
✓ In compliance with the current laws in force, an
appliance no longer required for service must be
rendered unusable by cutting off the electric power
cable before the appliance itself is thrown away.
✓ Do not use the appliance to vacuum up
inflammable, explosive or corrosive substances (fig.
003).
✓ Do not use the appliance in places saturated with
gas.
✓ Only use water to clean the appliance. Do not
use trichloroethylene, solvents or abrasive
detergents.
The manufacturer declines all responsibility
for improper use, use that fails to comply
with the supplied instructions, tampering
and inadequate maintenance of the
appliance.
✓ An electrical appliance is not a toy.
Use it then store it well out of children’s reach.
✓ The packing materials (plastic bags, cardboard
boxes, etc.) must be kept out of children’s reach.
✓ This appliance has been designed to operate with
alternate current alone. Before use, make sure that
the mains voltage rating corresponds to the value
on the data plate.
✓
ONLY connect the appliance to a power socket
with a capacity of at least 10A (fig. 001).
✓ Do not pull the power cable to remove the
plug from the socket (fig. 002).
✓ Make sure that the electricity main is equipped
with a differential circuit-breaker (safety type).
✓ Completely unwind the electric power cable
before turning on the appliance.
✓ Only use electric cable extension in perfect
conditions. Make sure that the cable section suits
the power required by the appliance.
✓ Never drag the power cable over sharp edges and
do not crush it.
✓ Never leave the appliance operating while
unattended.
✓Never leave the appliance outdoors where it can
be exposed to adverse weather conditions (rain,
frost, sun, etc.).
✓ Never use the appliance:
- with wet or damp hands;
- if it has dropped, is obviously broken or operates
in an abnormal way;
- if the electric power plug or cable are defective.
==========================================================================
Keep this instruction manual with care.

UK
- 13 -
A - USE OF THE APPLIANCE
1 ..... HOW TO RELEASE THE MOTOR UNIT
- Pull the top part of the hinges outwards to release the motor unit (fig. “A1”).
- When closing, make sure that the hinges have correctly fitted into their housings.
2 ..... STARTING (figures “A2” - “A3”)
Use of the appliance as a vacuum cleaner or wet cleaner (fig. “A2”)
- Control (“A”): in “MANUAL” position ( ).
- Switch (“B”): • Posizion O = appliance off (indicator light off)
• Posizion 1 = appliance on (indicator light on)
U
se of the appliance with electric power tools (fig. “A3”)
- Control (“A”): in “AUTOMATIC” position ( ).
- Switch: in position 1 = Appliance on (indicator light on)
When the two switches are in these positions, the appliance will automatically operate when the
electric power tool is turned on.
3 ..... ELECTRIC POWER TOOL-VACUUM CLEANER CONNECTION
(figures “A4” - “A5”)
- Plug the electric power tool into the socket on the motor unit and then plug the appliance
into the electricity main (fig. “A4”).
ATTENTION: The power socket can be used to connect electric power tools with a maximum
power rating of 2000 W (fig. “A5”).
NEVER plug more than one electric power tool into the socket on the motor unit.
-------------------------------------------------------------------------
B - FILTERING SYSTEMS
1 ..... USE OF THE DUST BAG pack code 668 083 134
(fig. “B1” - “B2”)
Use the dust bag together with the filter cartridge.
- Fit the filter paper bag into the container-drum (fig. “B1”).
- Fit the plastic flange (x) into the air inlet union (y). Take care not to damage the bag during the
operation (fig. “B2”).
- Allow the bag to adhere to the sides of the container-drum and then fit on the motor unit.
- The filter paper bag ensures the dust is vacuumed in conditions of hygiene.
Do not use the bag to vacuum sharp or wet materials.
- Change the bag when it becomes full.
- The bag cannot be reused. It must always be changed.
-
Always keep a spare pack of dust bags pack code 668 083 134 ready to hand.

UK
- 14 -
2 ..... USE OF THE FILTER CARTRIDGE pack code 668 083 201
(fig. “B3” - “B4”)
-
Release the motor unit from the container-drum (fig. “A1”) .
- Place the filter element (b) on the motor support (c) (fig. “B3”).
- Fit the plastic adapter disc (a) on to the filter element (b) and clamp the two parts together by
turning the knob in a clockwise direction (fig. “B4”).
- Fit the motor unit back on to the container-drum and clip it in place.
- Use of the filter cartridge is particularly recommended to clean up dust or solids. It can be used
together with the paper bag which, besides preventing the filter cartridge from clogging, also
transfers the vacuumed dirt in a rapid and hygienic way.
Do not use to vacuum sharp or wet materials.
3 ..... USE OF THE SPONGE FILTER code 668 083 035 (fig. “B5”)
- To clean up liquid substances, release the motor unit from the container-drum (fig. “A1”).
- Attach the foam filter to the motor support as indicated in figure “B5”.
- Place the motor unit back into the drum, making sure that the hinges fit into their slot.
4 ..... USING THE P.P. CANISTER-TYPE PRE-FILTER code 668 083 100
(fig. “B6”)
The canister-type pre-filter must only be used with the cartridge filter element.
- Is particularly suitable when fine dust such as cement, talcum and so forth, must be filtered.
- Attach the canister-type pre-filter to the container-drum as indicated in figure “B6”.
5 ..... OUTLET AIR POST-FILTERS code 668 083 021 (fig. “B7”)
- These electrostatic post-filters ensure that the air blown back into the room is free from
impurities.
-------------------------------------------------------------------------
C - USE OF THE APPLIANCE
1 .... FOR VACUUMING DUST AND DIRT
- Filter cartridge must always be fitted
ATTENTION: • For good performance of the appliance, both bags must always be kept clean.
It is recommended to replace the cartridge after around 100 hours of use.
2 .... USE AS A WET CLEANER
- Always remove the filter cartridge.
-
Mount the sponge filter as indicated in point “B3”.
ATTENTION: • When the vacuumed liquids reach the maximum tolerated level in the drum,
the suction action is automatically blocked by the safety float.
The user will be warned by the increase in the rpm rate of the motor.
- If this happens, immediately turn off the appliance and empty the container-drum.

UK
- 15 -
3 .... TO CLEAN UP LARGE AMOUNTS OF LIQUID (fig. “C1”)
- To ensure a partial air flow, do not fully immerse the crevice tool when large
amounts of liquid are sucked up from containers.
4 .... USE OF THE ELECTRIC POWER TOOL - VACUUM CLEANER
(fig. “C2” - “C3” - “C4”)
- Always fit the filter cartridge.
-
Remove the sponge filter if installed.
ATTENTION: To ensure that the appliance works efficiently, always keep the filter cartridge clean.
It is advisable to replace the cartridge after about 100 hours service.
- Fit the sleeve (M) of the hose pipe (code 668 001 321) into the air inlet union (Y) (fig. “C2”)
and the universal adapter (U) into the conveyor of the electric power tool (fig. “C3”).
- Plug in the electric power tool and the appliance as described in point “A3”.
- Using the clamps (G), fix the electric cable of the electric power tool to the hose pipe (fig.
“C4”).
- Set the switches in the positions described in point “A2”.
-------------------------------------------------------------------------
D - MAINTENANCE
Always remove the plug from the electricity
main before proceeding with any maintenance operation.
1 .... DUST BAG pack code 668 083 134
- The bag cannot be reused. It must always be replaced.
How to change the dust bag.
- Remove the plastic flange (X) from the air inlet union (Y) of the vacuum cleaner (fig. “D1”).
- Take the filter paper bag out of the container-drum (fig. “D2”).
- Close the plastic flange with the relative plug (fig. “D3”).
2 .... FILTER CARTRIDGE pack code 668 083 201(fig. “D4” - “D5”)
- Remove the filter cartridge from the motor support.
- Clean the filter cartridge frequently using a soft bristle brush (fig. “D4”).
- To clean more thoroughly, use a shower fitting and direct the jet of water from the inside
towards the outside of the filter cartridge (fig. “D5”).
- Make sure that the filter cartridge is perfectly dry before using it again.
- If the filter cartridge is heavily caked or worn, replace the filter element
only (b).
3 .... SPONGE FILTER code 668 083 035 (fig. “D6”)
- Rinse the sponge filter under running water WITHOUT using detergents.
- Replace the sponge filter if it is torn or worn.
4 .... P.P. BASKET PRE-FILTER code 668 083 100 (fig. “D7”)
- Shake the dirt from the basket pre-filter into a waste bin.
- Blow it clean with compressed air if necessary.
- Replace the basket filter if it is torn or worn.

UK
- 16 -
======================================================================
5 .... OUTLET AIR POST-FILTERS code 668 083 021 (fig. “D8”)
- Periodically replace the electrostatic post-filters by levering them up with a coin to release
the two slotted covers.
- Make sure that they fit correctly back in place when they are re-positioned.
6 .... HOW TO CLEAN THE CONTAINER-DRUM(fig. “D9”)
- Check to see how much waste has been vacuumed up, particularly if the appliance is used for
bulky materials.
- It is advisable to empty the drum when it is half full.
- After the appliance has been used as a wet cleaner, empty the drum and dry it and the
accessories to prevent scaling.
7 .... POWER CABLE REPLACEMENT
-- Contact your nearest authorized technical assistance center (see enclosed list) if the power
cable has been damaged as special tools are required to change it.
TROUBLESHOOTING ?
FAULTS
---------------------------------------
•
The appliance fails to start.
======================
•
Dust blows from the air outlet
grilles.
======================
•
The appliance becomes less
efficient
.
======================
•
The motor rate increases to a
notable extent.
======================
REMEDIES
-----------------------------------------
•
Check the power socket.
•
Contact the technical assistance
center.
=========================
•
Check the filters and replace them
if necessary.
=========================
•
Check the
container-drum
.
•
Clean or replace the filters.
•
Check the hose pipe or
accessories.
=========================
•
Check the
container-drum
.
•
Clean or replace the filters.
•
Check the hose pipe or
accessories.
=========================
CAUSES
-----------------------------------------
•
No power.
•
Defective power cable, switch or
motor.
=========================
•
Filters dirty or torn.
=========================
•
Container-drum
too full.
•
Filters dirty or worn.
•
Clogged tubes or accessories.
=========================
•
Container-drum
too full.
•
Filters dirty or torn.
•
Clogged tubes or accessories.
=========================
FR
- 17 -
-- DONNEES TECHNIQUES
-
Tension d’alimentation ..........................................................................
V~ .............................. 230
-
Fréquence .................................................................................................
Hz ............................ 50/60
-
Puissance ...................................................................................................
W ......................... 1000 IEC
W ........................ 1100 MAX
-
Bidon réalisé en ..........................................................................................................................
-
Contenance du bidon................................................... (nominale) litres ..............................
35
-
Dépression approximatif .................................................................... Kpa
............................... 21
-
Débit d’air effectif approximatif ........................................................
m3/h .............................. 210
-
Classe d’isolement de l’appareil .................................................................................................
I
a
-Dispositif automatique de prolongation de l’aspiration approximatif ....
sec. ................................. 8
-
Puissance maxi. disponible à la prise de l’accessoire.......................
W ............................. 2000
-
Poids approximatif ..................................................................................
Kg ............................... 8,0
-
Niveau sonore .........................................................................................
dB ............................... 65
RECOMMANDATIONS
-
s’il est tombé et s’il présente des ruptures
évidentes ou des problèmes de fonctionnement ;
- si la fiche ou le cordon d’alimentation électrique
sont défectueux.
✓ Débranchez TOUJOURS la fiche du secteur
électrique immédiatement après usage et
avant toute opération d’entretien ou de
nettoyage.
✓ Les réparations éventuelles seront effectuées
uniquement par des spécialistes qui disposent de
pièces détachées d’origine fournies par le fabricant.
Il ne faut pas réparer l’appareil tout seul
car cela peut être très dangereux.
✓ Un appareil qui ne sert plus doit être rendu
inutilisable, conformément aux normes en vigueur,
en coupant le cordon d’alimentation électrique
avant de le jeter.
✓ N’aspirez pas de substances inflammables,
explosives ou corrosives (fig. 003).
✓ N’utilisez pas l’appareil dans des milieux saturés
de gaz.
✓ Nettoyez l’appareil en utilisant uniquement de
l’eau. N’utilisez jamais de térébenthine, solvants
ou détersifs abrasifs.
Le constructeur décline toute
responsabilité suite à une utilisation
incorrecte et non conforme aux instructions
ou à la modification et à l’entretien
impropre de l’appareil.
✓ Un appareil électrique n’est pas un jouet. Après
l’avoir utilisé, rangez-le hors de la portée des
enfants.
✓ Mettez l’emballage (sacs en plastique, cartons, etc.)
hors de la portée des enfants.
✓ Cet appareil est conçu pour fonctionner
uniquement à courant alternatif. Avant de le
mettre en marche, assurez-vous que la tension du
secteur correspond à celle indiquée sur la plaque
signalétique de l’appareil.
✓ Branchez l’appareil UNIQUEMENT à des
prises de courant ayant une capacité d’au
moins 10A (fig. 001) .
✓ Ne tirez pas le cordon d’alimentation ou
l’appareil lui-même pour débrancher la
fiche de la prise de courant (fig. 002).
✓ Assurez-vous que le circuit électrique est équipé
d’un disjoncteur différentiel (type coupe-circuit).
✓ Déroulez entièrement le cordon d’alimentation
électrique avant de mettre l’appareil en marche.
✓ Utilisez une rallonge électrique uniquement si elle
est en parfait état. Assurez-vous que la section du
câble est appropriée à la puissance de l’appareil.
✓ Faites attention à ne jamais poser le cordon
d’alimentation sur des arêtes coupantes et surtout
à ne pas l’écraser.
✓ Ne laissez jamais l’appareil en marche sans
surveillance.
✓ Ne laissez pas l’appareil exposé aux agents
atmosphériques (pluie, gel, soleil, etc.).
✓ N’utilisez jamais l’appareil :
- avec les mains mouillées ou humides ;
==========================================================================
Conservez soigneusement cette notice d’instructions.

FR
- 18 -
A - UTILISATION DE L’APPAREIL
1 ..... DECROCHAGE DE L’UNITE MOTEUR
-
Pour libérer l’unité moteur, tirez vers l’extérieur la partie supérieure des charnières (fig. “A1”).
- Pour la fermeture, assurez-vous que les charnières sont bien logées dans leurs sièges.
2 ..... MISE EN MARCHE (figure “A2” - “A3”)
Utilisation de l’appareil comme aspirateur d’eau et poussière (fig. “A2”)
- Commutateur (“A”): sur la position “MANUEL” ( ).
- Interrupteur (“B”): • Position O = appareil au repos (témoin lumineux éteint)
• Position 1 = appareil en marche (témoin lumineux allumé)
Utilisation de l’appareil avec un accessoire électrique (fig. “A3”)
- Commutateur (“A”): sur la position “AUTOMATIQUE” ( ).
- Interrupteur: sur la position 1= Appareil en marche (témoin lumineux allumé)
Quand les deux interrupteurs sont dans ces positions, l’appareil démarre automatiquement dès la
mise en marche de l’accessoire électrique.
3 ..... RACCORDEMENT ELECTRIQUE DE L’ACCESSOIRE - ASPIRATEUR
(figures “A4” - “A5”)
- Branchez la fiche de l’accessoire dans la prise de courant prévue sur l’unité moteur et ensuite
raccordez l’appareil au secteur d’alimentation électrique (fig. “A4”).
ATTENTION: La prise de courant de l’appareil est prévue pour la connexion d’accessoires
électriques d’une puissance maximum de 2000 WATTS (fig. “A5”).
Il ne faut JAMAIS brancher plus d’un accessoire électrique à la prise sur l’unité
moteur.
-------------------------------------------------------------------------
B - SYSTEMES FILTRANTS
1 ..... UTILISATION DU SAC A POUSSIERE code emballage 688 083 134
(fig. “B1” - “B2”)
Utiliser le sac à poussière seulement si la cartouche filtre est montée.
- Mettez le sac en papier filtre dans le récipient-bidon
(fig. “B1”).
- Adaptez la bride en plastique (x) sur le raccord d’entrée de l’air (y) en évitant de déchirer
le sac
(fig. “B2”).
-
Faites adhérer le sac en papier aux parois du récipient-bidon et mettez l’unité moteur à sa place.
-
Le sac en papier filtre garantit la récupération de la poussière aspirée dans des conditions
d’hygiène.
Eviter de l’utiliser pour des matières coupantes ou humides.
-
Changez le sac en papier filtre dès que les matériaux aspirés ont atteint le niveau maximum
de remplissage.
-
Le sac en papier filtre ne doit jamais être réutilisé, mais il faut toujours le remplacer.
-
Nous conseillons d’avoir toujours des sacs à poussière en réserve code
emballage
668 083 134.

FR
- 19 -
2 .....
UTILISATION DE LA CARTOUCHE FILTRE
code emballage 668 083 201
(fig. “B3” - “B4”)
- Décrochez l’unité moteur du récipient-bidon (fig. “A1”).
-
Placez l’élément filtrant (b) sur le support moteur
(c) (fig. “B3”).
-
Adaptez le disque adaptateur en plastique (a) sur l’élément filtrant (b) et rendez les deux
parties solidaires en tournant la poignée vers la droite
(fig. “B4”).
-
Remettez l’unité moteur sur le récipient - bidon et accrochez-la.
-
La cartouche filtre est particulièrement indiquée pour ramasser les poussières ou les
substances solides. Vous pouvez aussi utiliser en même temps le sac en papier qui évite le
colmatage de la cartouche et permet de transférer les matières aspirées de manière rapide
et hygiénique.
Eviter de l’utiliser pour des matières coupantes ou humides.
3 ..... UTILISATION DU FILTRE - MOUSSE code 668 083 035 (fig. “B5”)
- Pour aspirer des substances liquides, décrochez l'unité moteur du récipient-bidon(Fig. “A1”).
- Appliquer le filtre mousse sur le support moteur comme l’indique la figure “B5”.
- Remettez l’unité moteur sur le bidon en faisant attention à ce que les crochets s’encastrent
parfaitement dans leurs sièges.
4 ..... EMPLOI DU PRÉ-FILTRE À CARTOUCHE EN P.P. code 668 083 100
(fig. “B6”)
Utiliser le pré-filtre à cartouche uniquement avec l’élément filtrant à cartouche.
- Est particulièrement indiqué pour l’aspiration de poussières très fines comme par exemple
le ciment, le talc, etc.
- Appliquer le pré-filtre à cartouche sur le récipient-bidon comme l’indique la figure “B6”.
5 ..... POST-FILTRES A AIR EN SORTIE code 668 083 021(fig. “B7”)
- La présence de ces post-filtres électrostatiques garantit l’éjection de l’air sans impuretés.
-------------------------------------------------------------------------
C - FONCTIONNEMENT DE L’APPAREIL
1 .... COMME ASPIRATEUR
- La cartouche filtre doit toujours être appliquée.
ATTENTION: • Pour un bon rendement de l'appareil il est important que les deux papiers
soient toujours maintenus.
Son remplacement est conseillé après environ 100 heures de fonctionnement.
2 .... COMME ASPIRATEUR DE LIQUIDES
- Retirez toujours la cartouche filtre.
- Montez le filtre mousse de la manière indiquée au point “B3”.
ATTENTION: • Quand les liquides aspirés atteignent le niveau maximum admis dans le bidon,
l’aspiration se bloque automatiquement par intervention du flotteur de
sécurité.
L’utilisateur sera informé par l’augmentation du nombre de tours du moteur
et le manque d’aspiration.
- Arrêtez immédiatement l’appareil et videz le récipient-bidon.
 Loading...