

Page 1
ORIGINAL INSTRUCTION MANUAL
ОРИГІНАЛЬНИЙ ПОСІБНИК З ЕКСПЛУАТАЦІЇ
ORYGINALNA INSTRUKCJA OBSŁUGI
MANUAL DE INSTRUCŢIUNI ORIGINAL
ORIGINAL-BEDIENUNGSANLEITUNG
EREDETI KEZELŐI KÉZIKÖNYV
PÔVODNÝ NÁVOD NA OBSLUHU
PŮVODNÍ NÁVOD K POUŽITÍ
WARNING:
Read this instruction manual carefully before putting the petrol mist blower into operation and strictly observe
the safety regulations!
Save instruction manual for future reference.
ПОПЕРЕДЖЕННЯ:
Уважно прочитайте ці інструкції з експлуатації перед тим, як використовувати бензиновий обприскувач, та строго дотримуйтесь
правил з техніки безпеки!
Збережіть інструкцію з експлуатації для подальшого використання.
OSTRZEŻENIE:
Przeczytać uważnie niniejszą instrukcję obsługi przed uruchomieniem spalinowego opryskiwacza mgławiącego i ściśle przestrzegać
przepisów dotyczących bezpieczeństwa!
Instrukcję obsługi zachować do wglądu na przyszłość.
AVERTISMENT:
Citiţi cu atenţie acest manual înainte de a pune în funcţiune atomizorul cu motor pe benzină şi respectaţi cu stricteţe reglementările de
siguranţă!
Păstraţi manualul de instrucţiuni pentru a-l putea consulta pe viitor.
WARNUNG:
Lesen Sie diese Bedienungsanleitung aufmerksam durch, bevor Sie das Benzin-Sprühgerät in Betrieb nehmen, und halten Sie sich strikt
an die Sicherheitsbestimmungen!
Bewahren Sie diese Bedienungsanleitung für spätere Bezugnahme auf.
VIGYÁZAT!
Mielőtt a benzines párafúvót használni kezdené, olvassa el gyelmesen a kezelési kézikönyvet, és szigorúan tartsa be a biztonsági
szabályokat.
A kezelési kézikönyvet őrizze meg, később még szükség lehet rá.
VÝSTRAHA:
Pred uvedením benzínového rozprašovacieho dúchadla do činnosti si dôkladne prečítajte tento návod na obsluhu a prísne dodržiavajte
bezpečnostné predpisy!
Návod na obsluhu uchovajte pre použitie v budúcnosti.
VAROVÁNÍ:
Před uvedením benzínového postřikovače do provozu si důkladně prostudujte tento návod k obsluze a pečlivě dodržujte bezpečnostní
směrnice!
Návod k použití si uložte k pozdějšímu nahlédnutí.
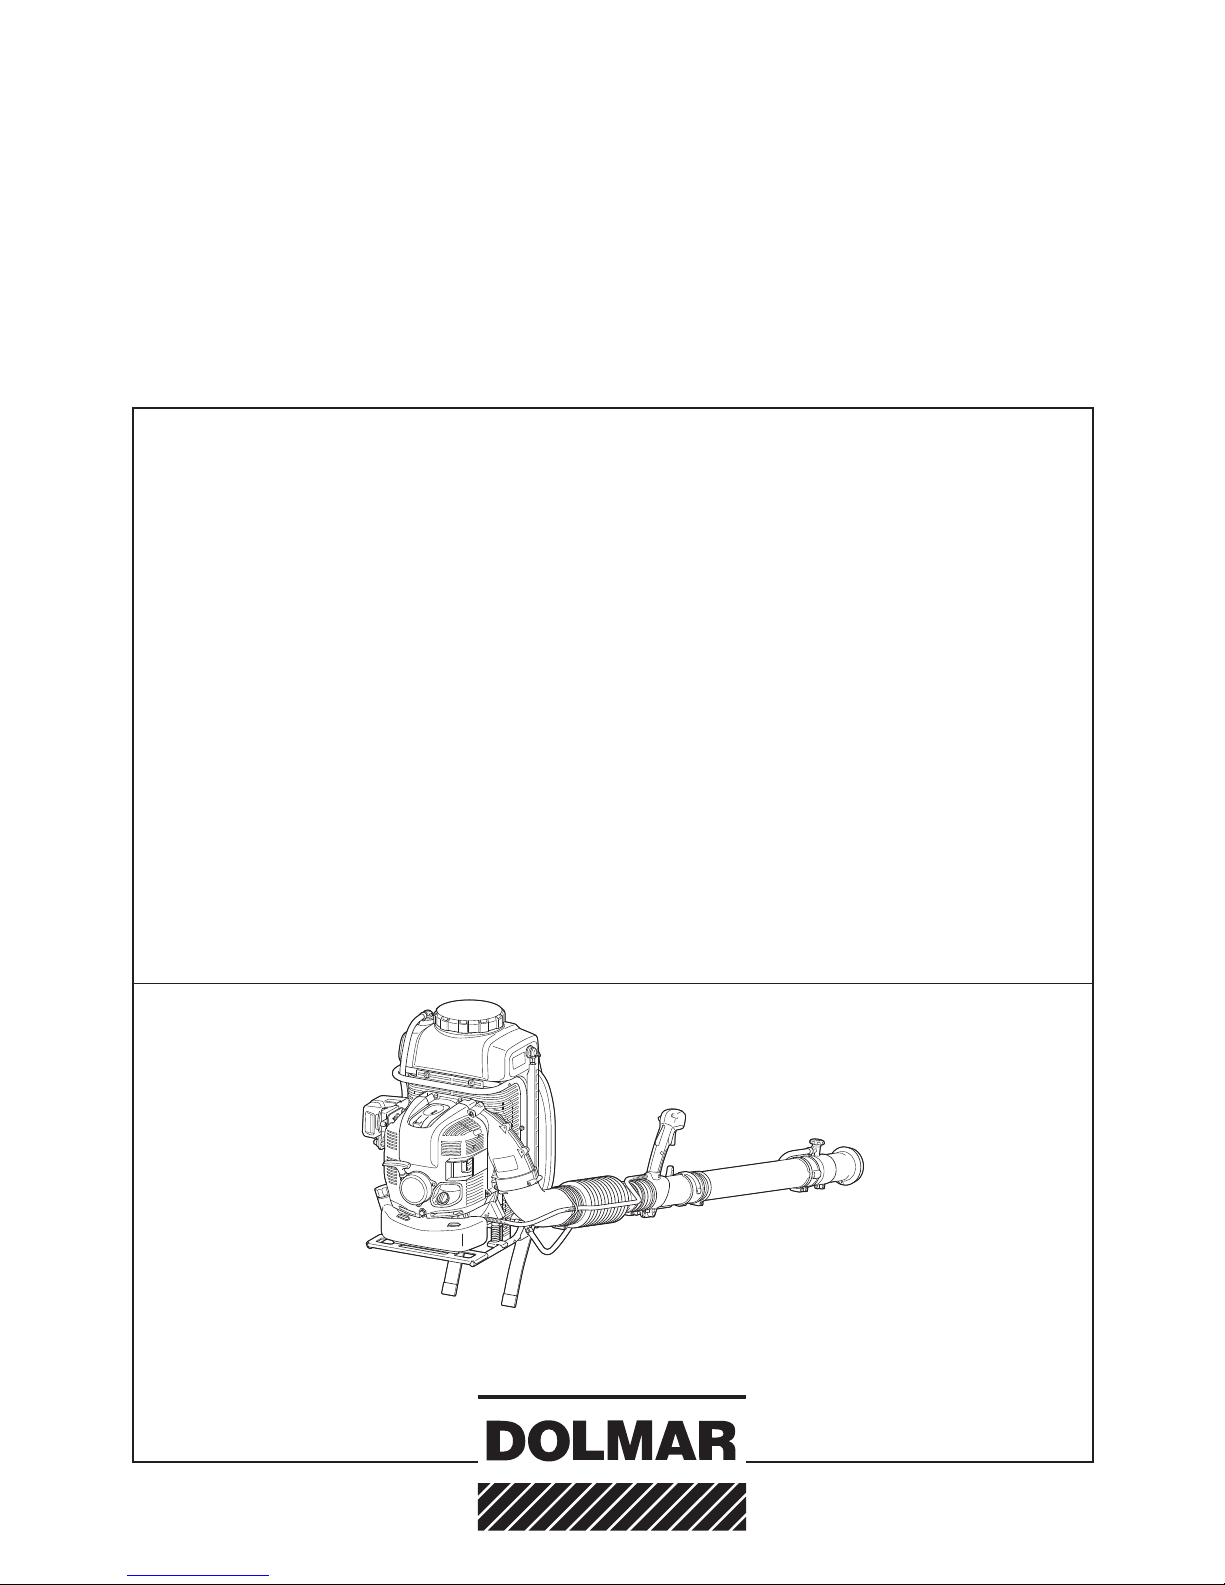
SP-7650.4 R
Page 2
2
3
Thank you very much for selecting the DOLMAR petrol mist blower.
We are pleased to be able to offer you the DOLMAR petrol mist
blower, which is the result of a long development program and many
years of knowledge and experience.
The mist blower combines the advantages of state-of-the-art
technology with ergonomic design. They are of handy, compact and
represent professional equipment for a great variety of applications.
Please read, understand and follow this booklet, which refers in
detail to the various points that will demonstrate its outstanding
performance. This will assist you to safety obtain the best
possible results from your DOLMAR mist blower.
English
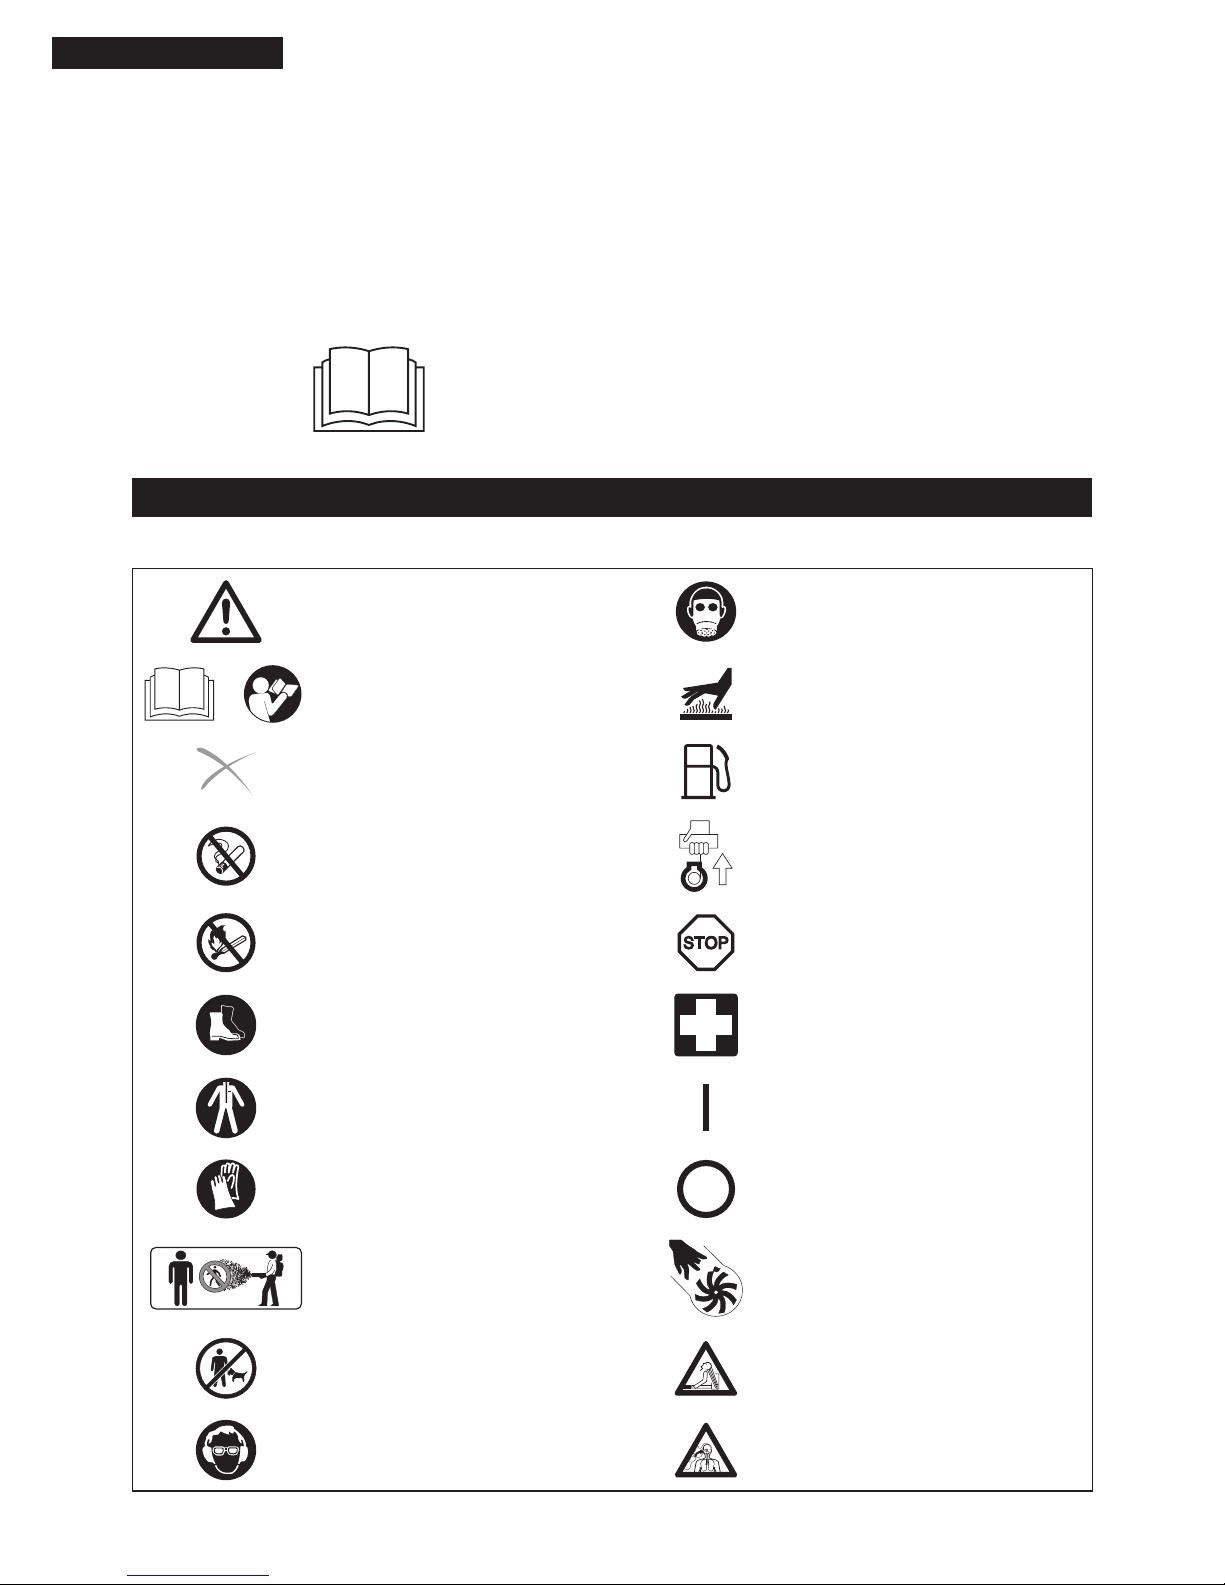
SYMBOLS
It is very important to understand the following symbols when reading this instructions manual.
WARNING/DANGER Wear respiratory protection
Read, understand and follow instruction
manual
Hot surfaces – Burns to ngers or hands
Forbidden Fuel (Gasoline)
No smoking Engine-manual start
No open ame Emergency stop
Wear sturdy boots with nonslip soles. First aid
Wear suitable protective clothing ON/START
Protective gloves must be worn OFF/STOP
Keep bystanders away when spraying
Severing of ngers or hand, impeller
blade
Keep the area of operation clear of all
persons and pets
Long hair may cause entanglement
accident
Wear eye and ear protection
Poisonous fumes or toxic gases.
Do not operate in an unventilated area.
Table of Contents
Page
Symbols ............................................................................................2
Important safety instructions.............................................................3
Technical data...................................................................................9
Designation of parts........................................................................10
Assembly instructions ..................................................................... 11
Before starting the engine ..............................................................13
Starting and stopping engine ..........................................................15
Adjusting idle speed .......................................................................16
Operation method ...........................................................................17
Inspection and maintenance...........................................................23
Storage ........................................................................................... 26
Troubleshooting ..............................................................................28
Page 3
3
IMPORTANT SAFETY INSTRUCTIONS
WARNING:
● Read all safety warnings and all instructions. Failure to follow the warnings and
instructions may result in electric shock, re and/or serious injury.
Save all warnings and instructions for future reference.
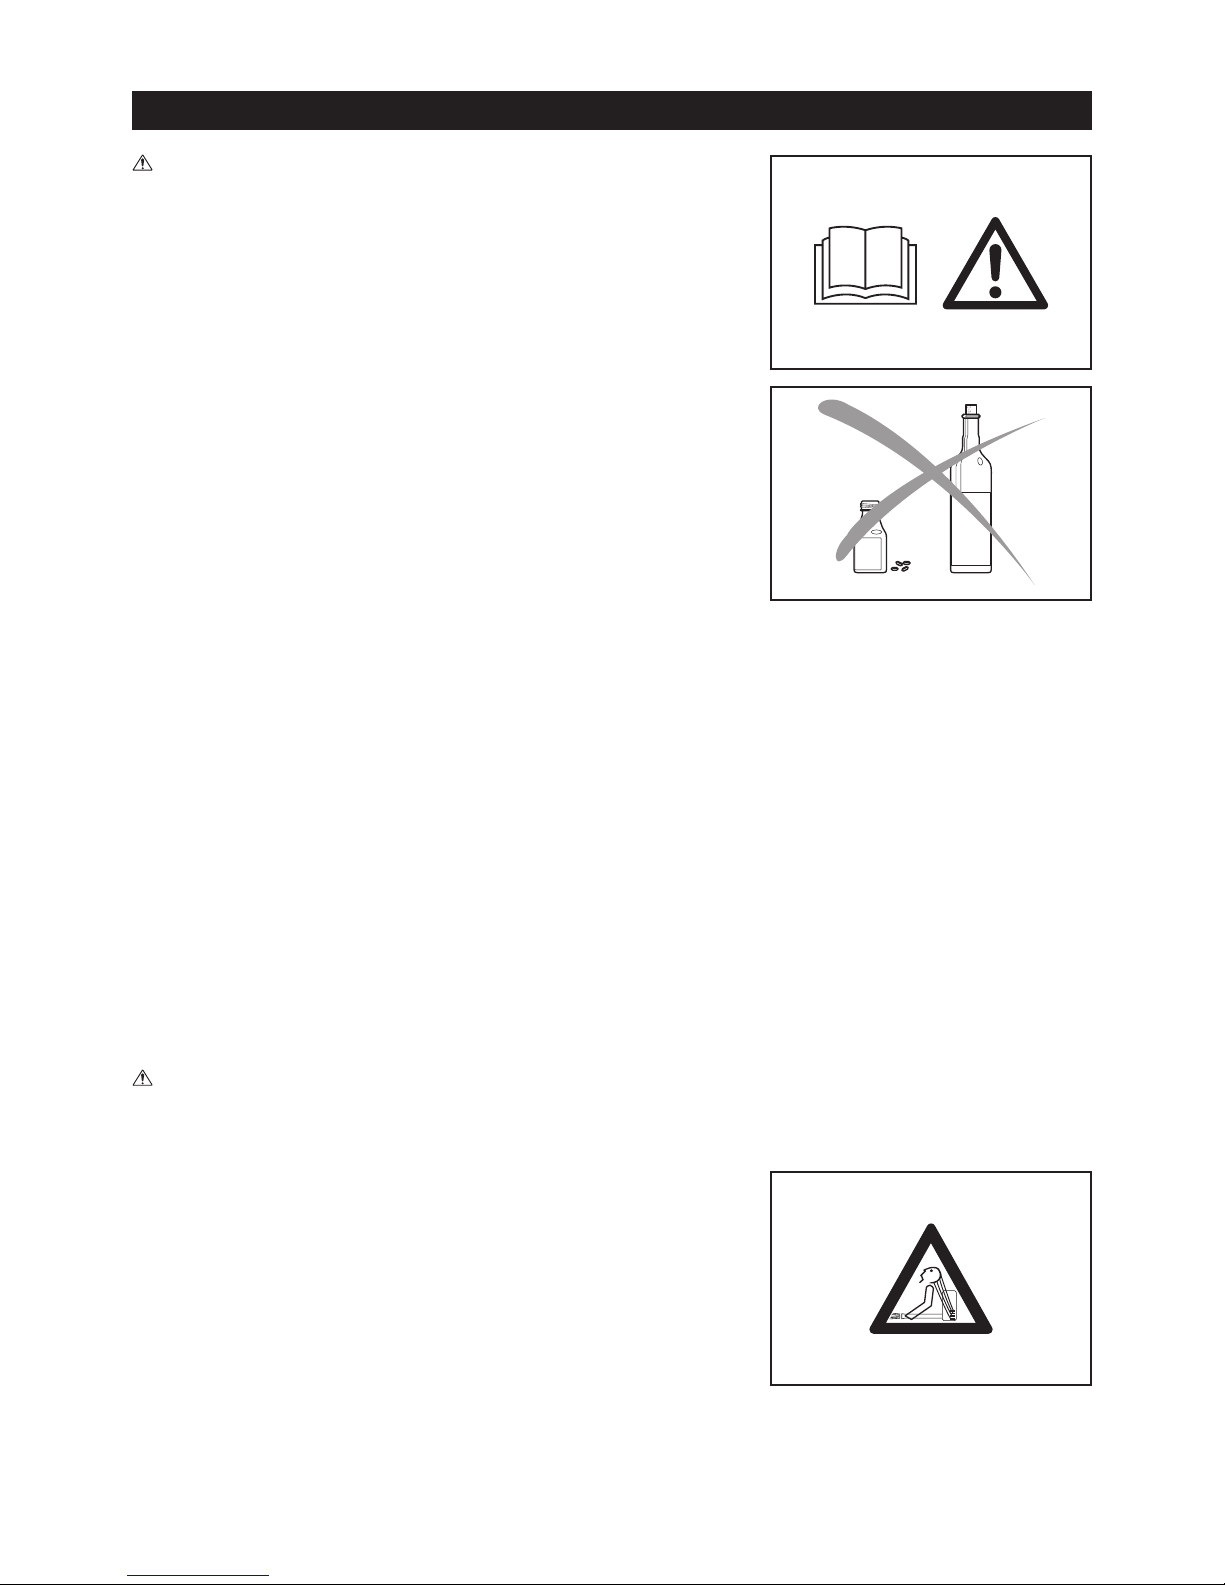
General instructions
● To ensure correct and safe operation, the user must read, understand and follow
this instruction manual to assure familiarity with the handling of the mist blower (1).
Users insufciently informed will risk danger to themselves as well as others due
to improper handling.
● It is recommended only to loan the mist blower to people who have proven to be
experienced with mist blowers.
● Always hand over the instruction manual.
● First-time users should ask the dealer for basic instructions to familiarize oneself
with the handling of a mist blower.
● Children and young persons aged under 18 years must not be allowed to operate
the mist blower. Persons over the age of 16 years may however use the machine
for the purpose of being trained only while under the direct supervision of a
qualied trainer.
● Use mist blowers with the utmost care and attention.
● Operate the mist blower only if you are in good physical condition.
● Perform all work conscientiously and carefully. The user has to accept responsibility
for others.
● Never use the mist blower while under the inuence of alcohol or drugs (2).
● Do not use the unit when you are tired.
● Save these instructions for future referral.
Intended use of the machine
● Use right machine. The mist blower is only intended for spraying liquid chemicals
and other liquids to control pests and weeds in fruit, ower and vegetable gardens,
on trees and bushes and on other plants, such as coffee, tobacco and cotton. It is
also useful in the maintenance of young trees for, e.g., controlling the bark beetle
and other pests and plant diseases.
Never use for any other purpose.
If the machine is equipped with proper pipe for blower operation, the machine can
be used for blower operation.
● Only use plant protection products that are specically approved for use with mist
blowers by their manufacturer and that meet all applicable safety regulations,
standards and ordinances.
Get information from your dealer on how to operate your mist blower. Observe all
applicable local safety regulations, standards and ordinances.
All operating and servicing people should be trained and familiarized with the proper
handling procedures for the chemical products being used, as well as with rst aid/
emergency care, and liquid chemical disposal regulations.
WARNING:
● Your mist blower is only for professional use. Do not lend or rent your mist blower
without the instruction manual. Make sure that anyone using it understands the
information contained in this instruction manual.
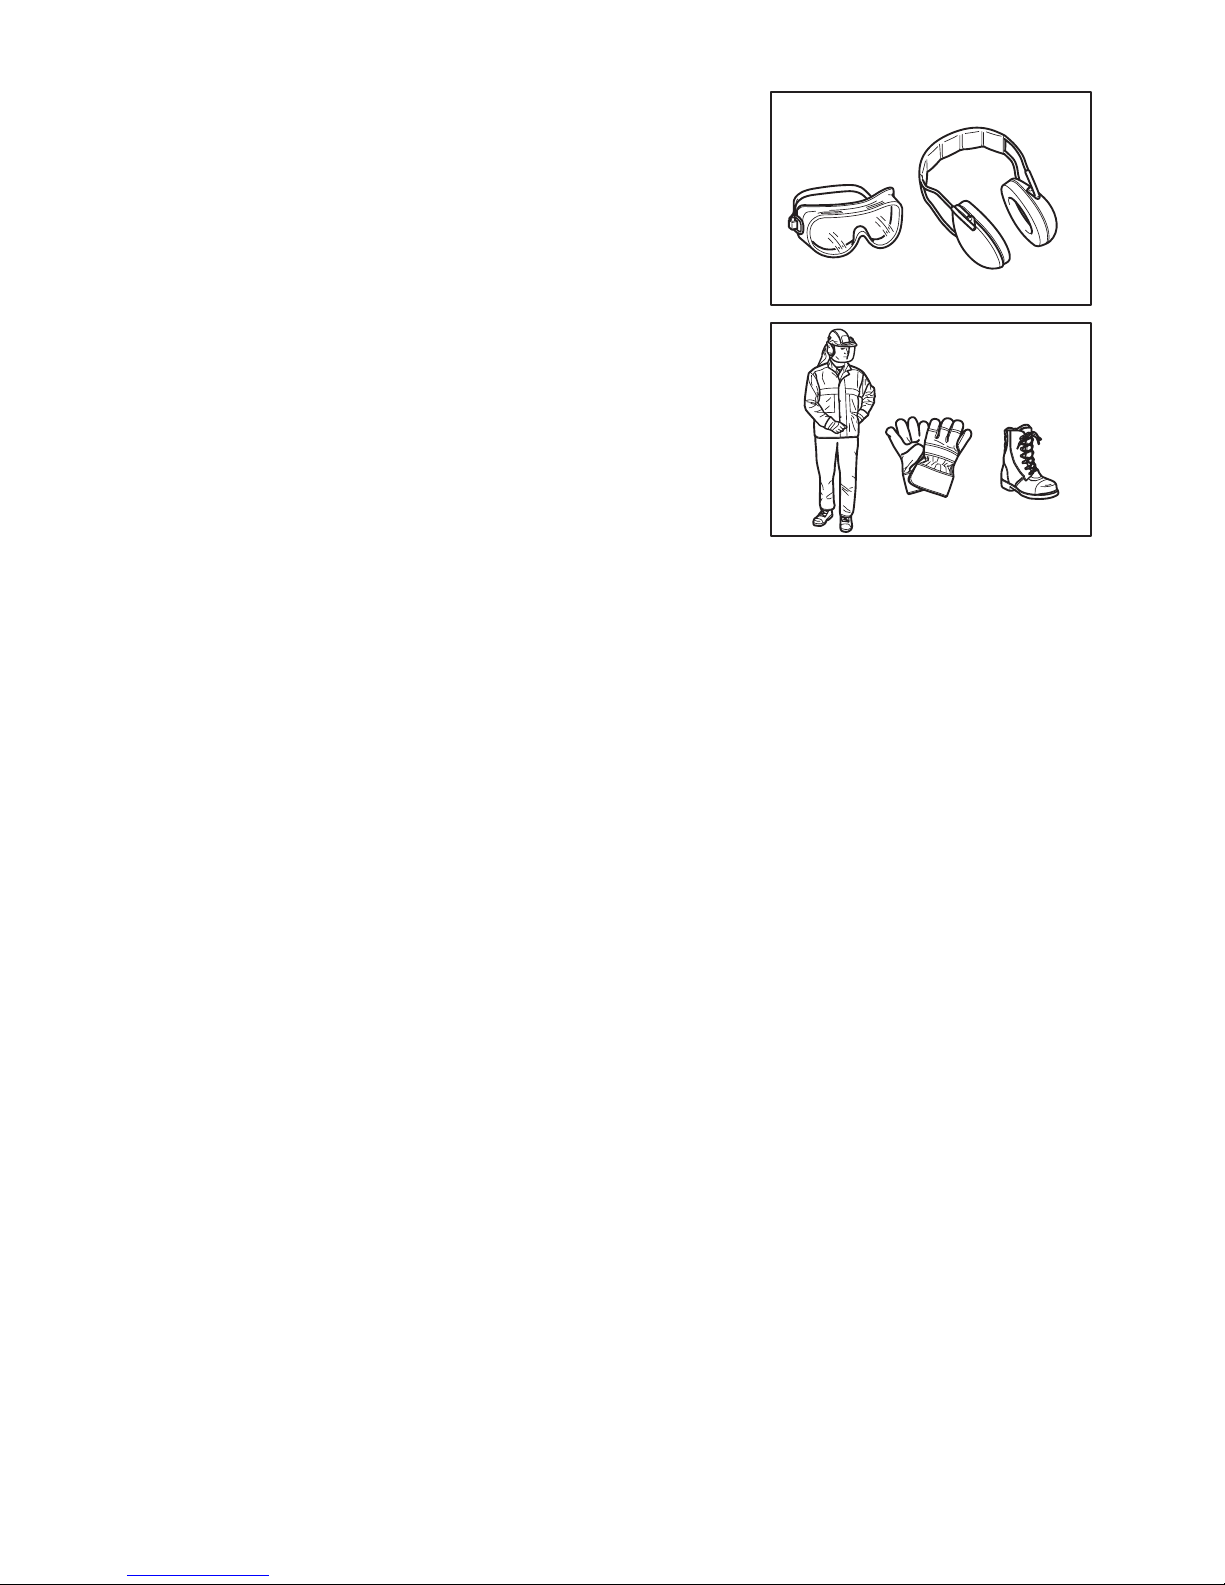
Personal protective equipment
● To reduce the risk of injury when using chemical products, wear proper protective
apparel when lling, using and cleaning the mist blower. Always follow all of
the chemical manufacturer’s instructions with respect to proper eye, skin and
respiratory protection. They may differ from and exceed the following precautions.
● When using toxic chemicals, the operator and any bystanders may need to wear
a properly tted respirator approved for the chemical being used. Refer to the
chemical product label. Breathing toxic chemicals can cause serious or fatal injury.
● The clothing worn should be functional and appropriate, i.e. it should be tight tting
but not cause a hindrance. Do not wear jewelry, clothing or long hair which could
be drawn into the air intake. (3)
● In order to avoid head-, eye-, hand- or foot injuries as well as to protect your
hearing the following protective equipment and protective clothing must be used
during operation of the mist blower.
(2)
(1)
(3)
Page 4
4
5
Pay particular attention to the following regulations
● Clothing must be sturdy and snug-tting, but allow complete freedom of movement.
Avoid loose-tting jackets, ared or cuffed pants, scarves, unconned long hair or
anything that could be drawn into the air intake.
Wear long pants to protect your legs.
Do not wear shorts. (5)
● Mist blower noise may damage your hearing. Wear sound barriers (ear plugs or
ear mufers) to protect your hearing. Continual and regular users should have their
hearing checked regularly. (4)
● Always use rubber/chemical-resistant gloves when working with the mist blower.
Good footing is most important. Wear rubber/chemical boot. (5)
● Proper eye protection is a must. Even though the discharge is directed away from
the operator, ricochets and bounce-backs can occur during mist blower operation.
(4)
● Never operate a mist blower unless wearing goggles or properly tted safety
glasses with adequate top and side protection which comply with ANSI Z 87.1 (or
your applicable national standard).
HANDLING OF CHEMICALS
● Some chemicals used with your mist blower may contain toxic and/or caustic
substances. Such chemicals can be dangerous and cause serious or fatal injury to
persons and animals and/or severe damage to plants and the environment.
Avoid direct contact with chemicals.
Follow the chemical manufacturer’s instructions with respect to any contact with
its product.
● Read the manufacturer’s label and instruction manual each time before mixing or
using the chemical and before storing or disposing of it.
Do not rely on your memory.
Careless or improper use may cause serious or fatal injury.
● Carefully read the labels on chemical containers before use.
Chemicals are classied into categories of toxicity.
Each category will have unique handling characteristics.
Familiarize yourself with the characteristics for the category of the chemical you
are using.
Chemicals may be used only by persons trained in their handling and the
appropriate rst-aid measures.
● Chemicals may be harmful to persons, animals and the environment if improperly
used. In addition, it is advisable not to use some chemicals that are caustic,
corrosive or poisonous in your mist blower.
● Mix only compatible pesticides. Wrong mixtures can produce toxic fumes.
When handling and spraying chemicals, make sure you are operating in accordance
with local, state, and federal environmental protection rules and guidelines. Do not
spray when it is windy. To help protect the environment, use only the recommended
dosage – do not overuse.
Pay special attention when using near watersheds, waterway, etc.
● Avoid opening mouth such as eating, drinking, or smoking while handling chemicals
or while you are spraying. Never blow through nozzles, tubes, pipes or any other
component by mouth. Always handle chemicals in a well-ventilated area while
wearing appropriate protective clothing and safety equipment.
Do not store or transport chemicals together with food, drink, or medicines, and
never reuse a chemical container for any other purpose.
Do not transfer liquid chemicals to other containers, especially food and/or drink
containers.
● In case of accidental contact or ingestion of chemicals or in case of contamination
of clothing, stop working and immediately rinse them out with clear water and
consult the chemical manufacturer’s instructions.
If doubtful about what to do, ask a poison control center or doctor for advice without
delay.
Keep the product’s label ready to read to or show the persons you consult.
Clean all chemical spills immediately.
Dispose of any residue observing state, federal or your nation’s laws and
regulations.
● Keep chemicals out of reach of children, other unauthorized people and animals.
When not in use, store chemicals in a safe and locked place. Follow the
manufacturer’s recommendations for proper storage.
(4)
(5)
Page 5

5
Preparing chemicals
● Prepare chemical solutions according to the chemical manufacturer’s instructions.
● Prepare solution only enough for the job at hand so that no solution is left over.
● Mix chemicals only by following instructions – wrong mixtures can produce toxic
fumes or explosive mixtures.
● Never spray undiluted chemicals.
● Prepare solution and ll the container outdoors only in a well-ventilated place.
● The operator should clarify the name of the chemical currently in use.
Storage
● Do not store spray solution in the container for more than one day.
● Always store and transport spray solution only in approved containers.
● Never store or transport the spray solution in containers intended for foods, drinks
or animal feed.
● Do not store or transport spray solution with foods, drinks or animal feed.
● Keep spray solution out of the reach of children, other unauthorized people and
animals.
● Store the spray solution in a locked place secured against unauthorized use.
Disposal
Never dispose of residual chemicals or contaminated rinsing solutions in waterways,
drains, sewers, street gutters, manholes or the like.
When disposing of contaminated rinse, observe all applicable laws, regulations and
ordinances.
Strictly observe the precautionary instructions of the chemical manufacturer.
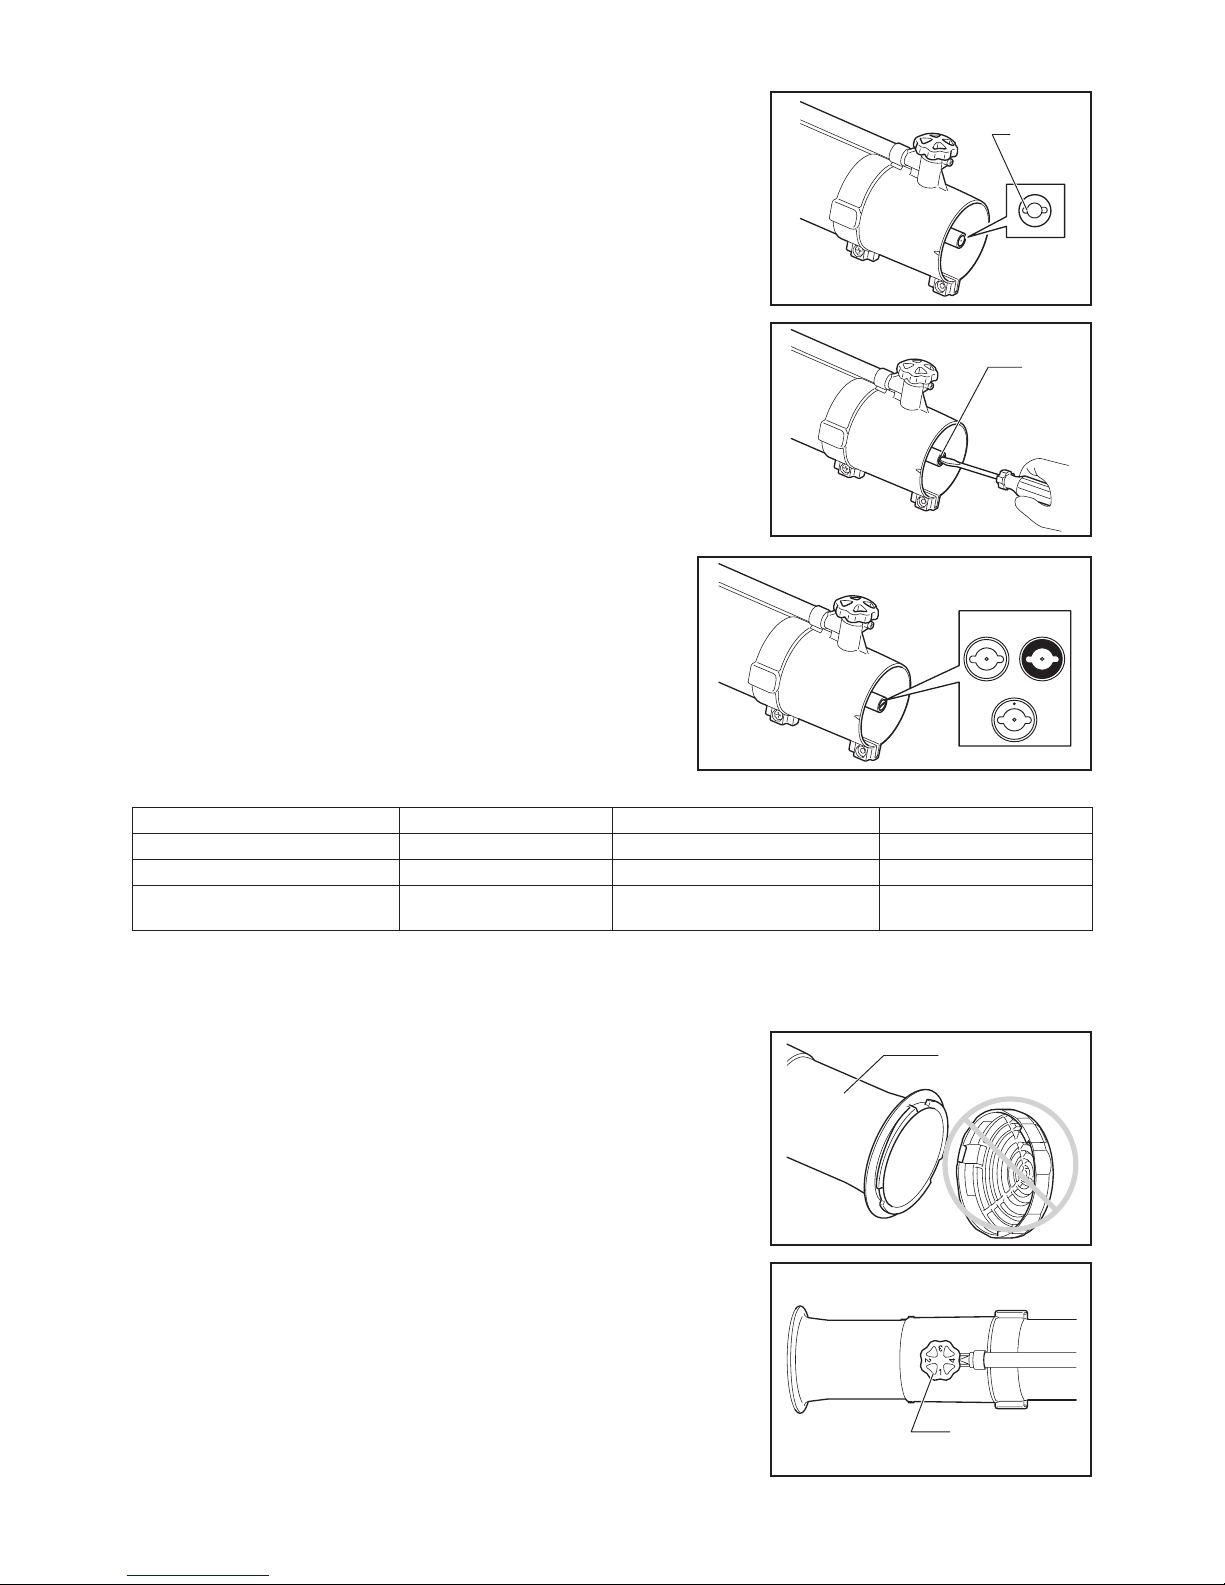
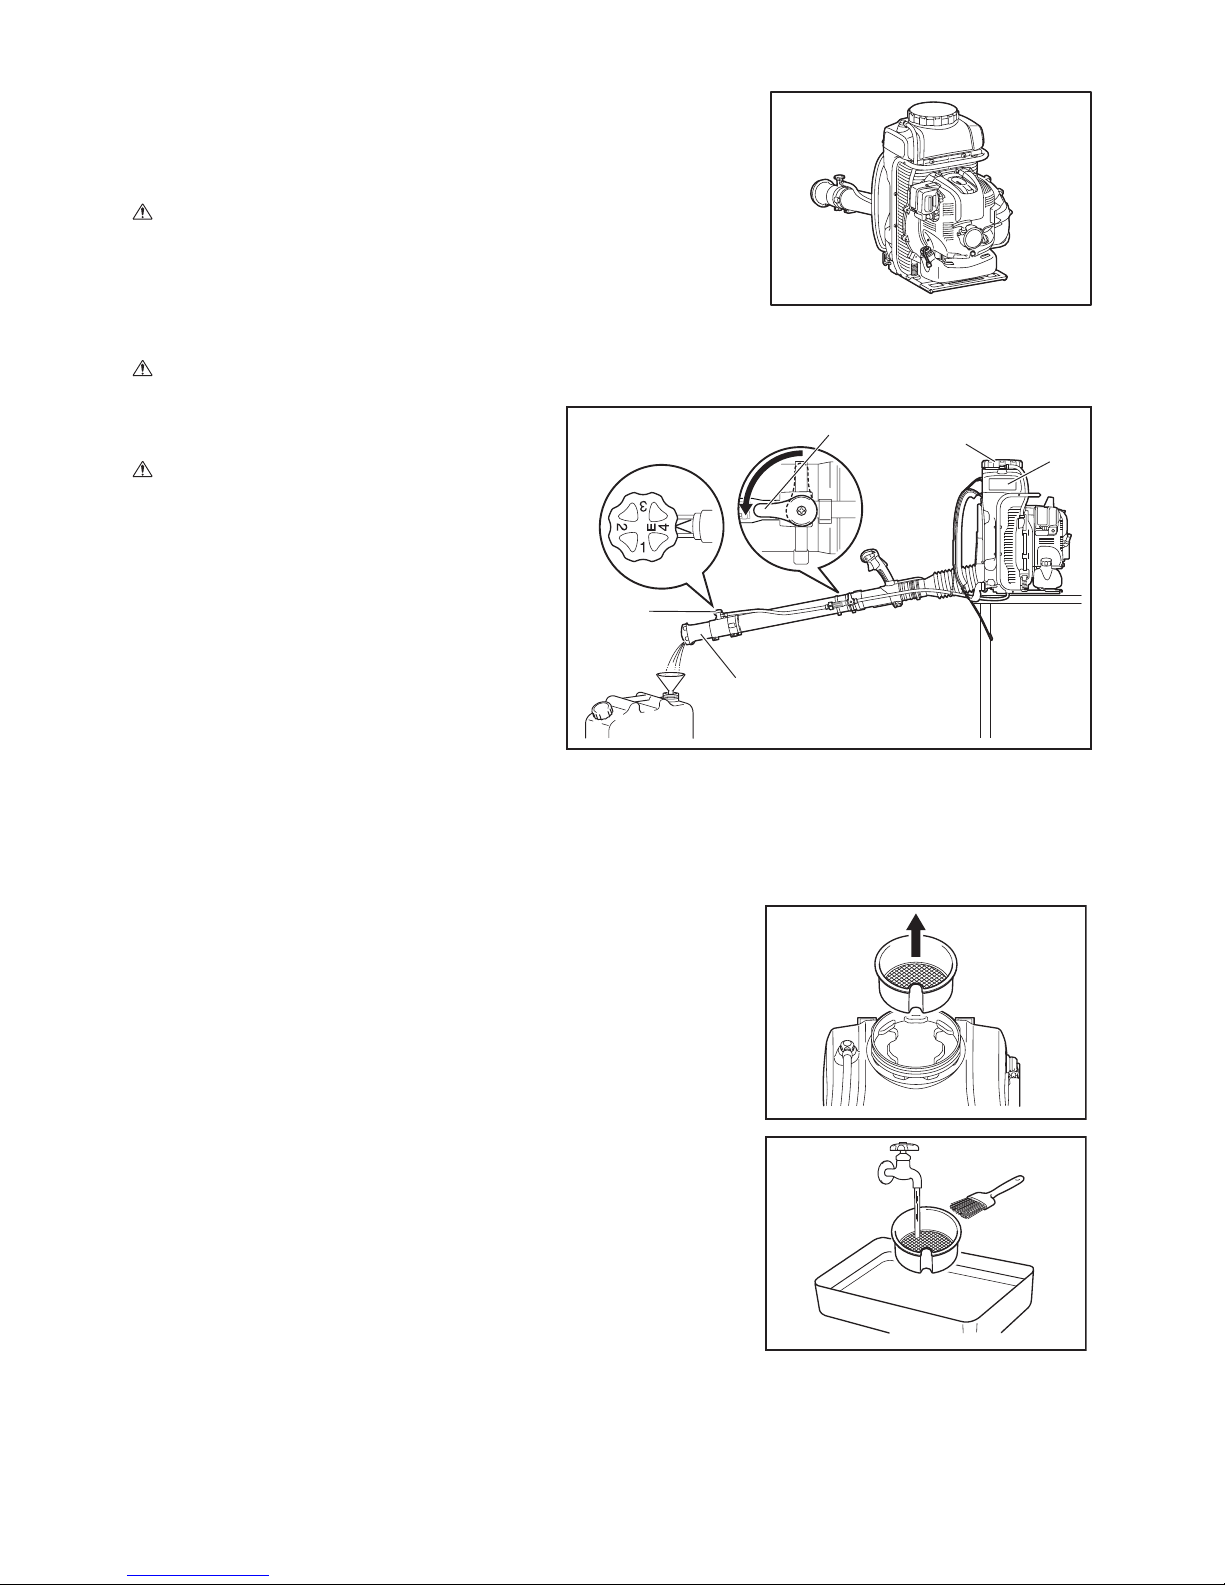
Filling the container
● Tighten all connections and check to be sure the pipes as well as a tube are
securely attached and in good condition. Keep the solution discharge lever closed.
● Before using the mist blower with chemicals, ll it with fresh water to assure that
you have assembled it properly and practice spraying. Also, check for any leaks at
this time. When thoroughly familiar with the mist blower operation, follow normal
operating procedures.
● Fill your mist blower in well-ventilated areas, outdoors.
● Do not use:
– ammables in the mist blower, which may cause explosion resulting in serious
or fatal injury;
– caustic or corrosive materials in the mist blower, which could result in damage
to the unit;
– liquids with a temperature above 50°C to reduce the risk of scalding and damage
to the unit.
To ll the solution tank, place the mist blower on a level surface, ll the solution
only in good light and visibility. To reduce the risk of contaminating the surrounding
environment, be careful not to overll the solution tank with chemical solution.
To reduce the risk of injury, do not ll the mist blower while wearing it on your back.
If you ll the solution tank with a hose attached to a central water supply, be sure the
end of the hose is out of the solution to reduce the risk of backow, i.e. the chemicals
being sucked into the water supply in the case of a sudden vacuum.
Calculate the correct amount of chemical solution so that it is used up at one time,
with no extra solution left over in the tank.
After lling, t the solution tank cap and tighten it down rmly.
● Check for leakage while relling and during operation. A leak from the solution tank
or a loose tting could soak your clothing and come into contact with your skin.
Page 6
6
7
Starting up the mist blower
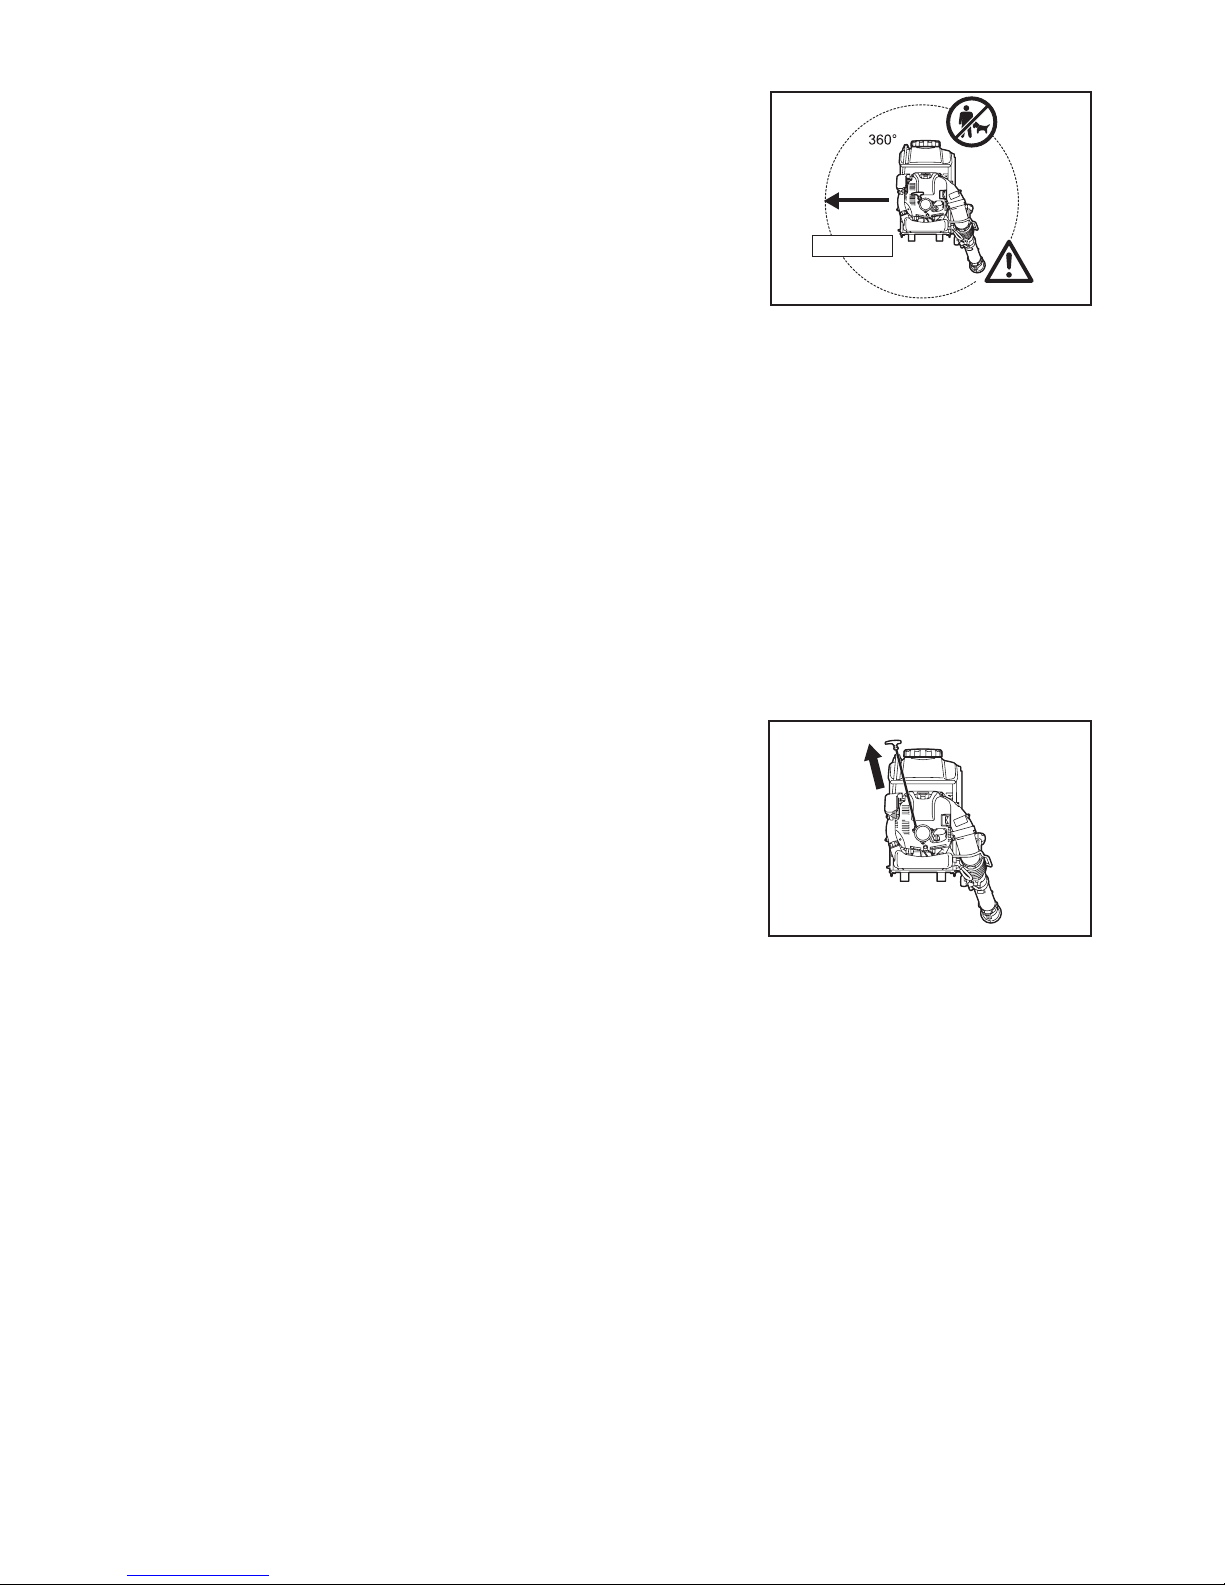
● Please make sure that there are no children or other people within a working range
of 20 meters (66 feet) (6), also pay attention to any animals in the working vicinity.
Never use the mist blower in urban areas.
● Before operating, always check that the mist blower is safe for operation:
Check the security of the throttle trigger. The throttle trigger should be checked for
smooth and easy action. Check for proper functioning of the throttle trigger lock.
Check for clean and dry handles and test the function of the l-O switch. Keep
handles free of oil and fuel.
● To reduce the risk of leakage and skin contact with chemicals, check that the
container cap and all connections in the path of the spray are tight, and be sure
the hose is securely attached and in good condition. Keep the solution discharge
lever closed.
● Make sure that the solution discharge lever is closed before starting the machine.
● Check that the spark plug cap is securely mounted on the spark plug – a loose
plug cap may cause arcing that could ignite combustible fumes and cause a re.
● Check condition of harness straps and replace damaged or worn straps.
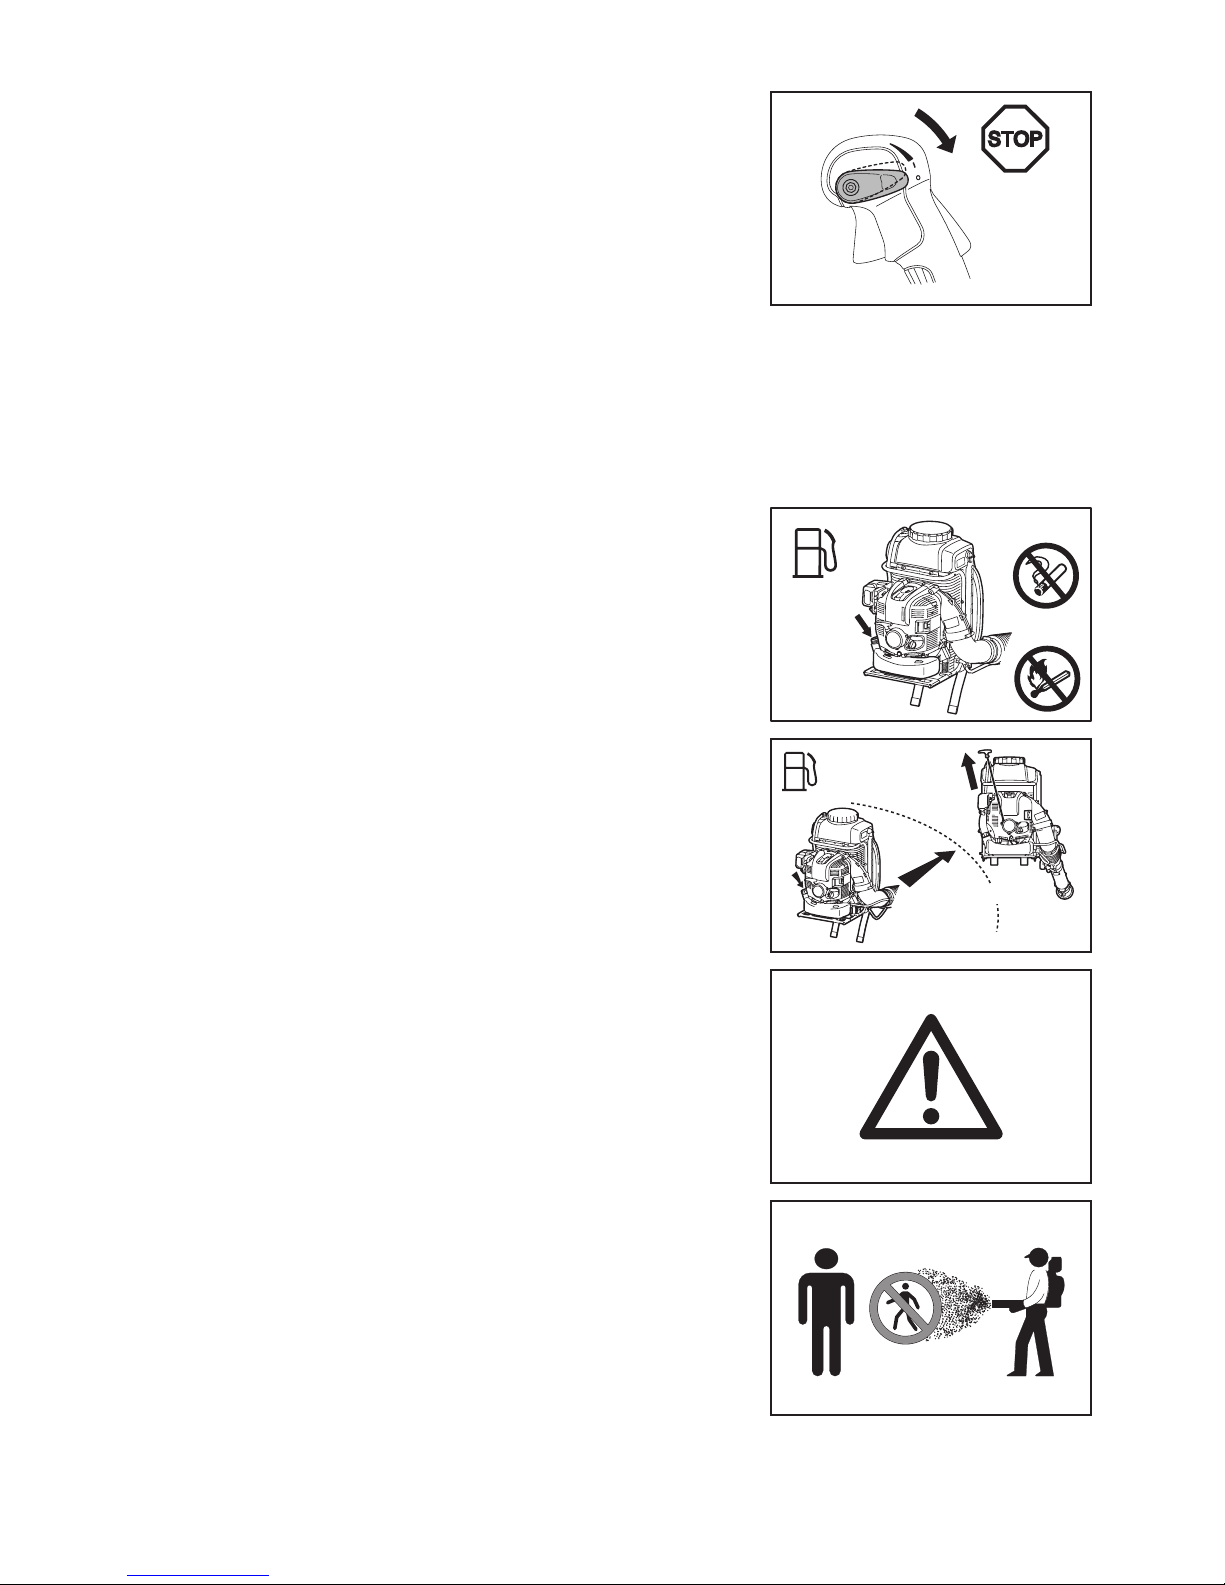
● Adjust shoulder strap to suit your size before starting work.
In an emergency, you may slip out of the shoulder strap and throw off the machine
quickly. Practice slipping out of the harness a number of times before using the
machine in order to become accustomed to it. Do not throw off the machine while
practicing as it could damage the machine.
● When you pull the starter handle, do not wrap the starter rope around your hand.
Do not let the starter handle snap back, but guide the starter rope to rewind it
properly.
Failure to follow this procedure may result in injury to your hand or ngers and may
damage the starter mechanism.
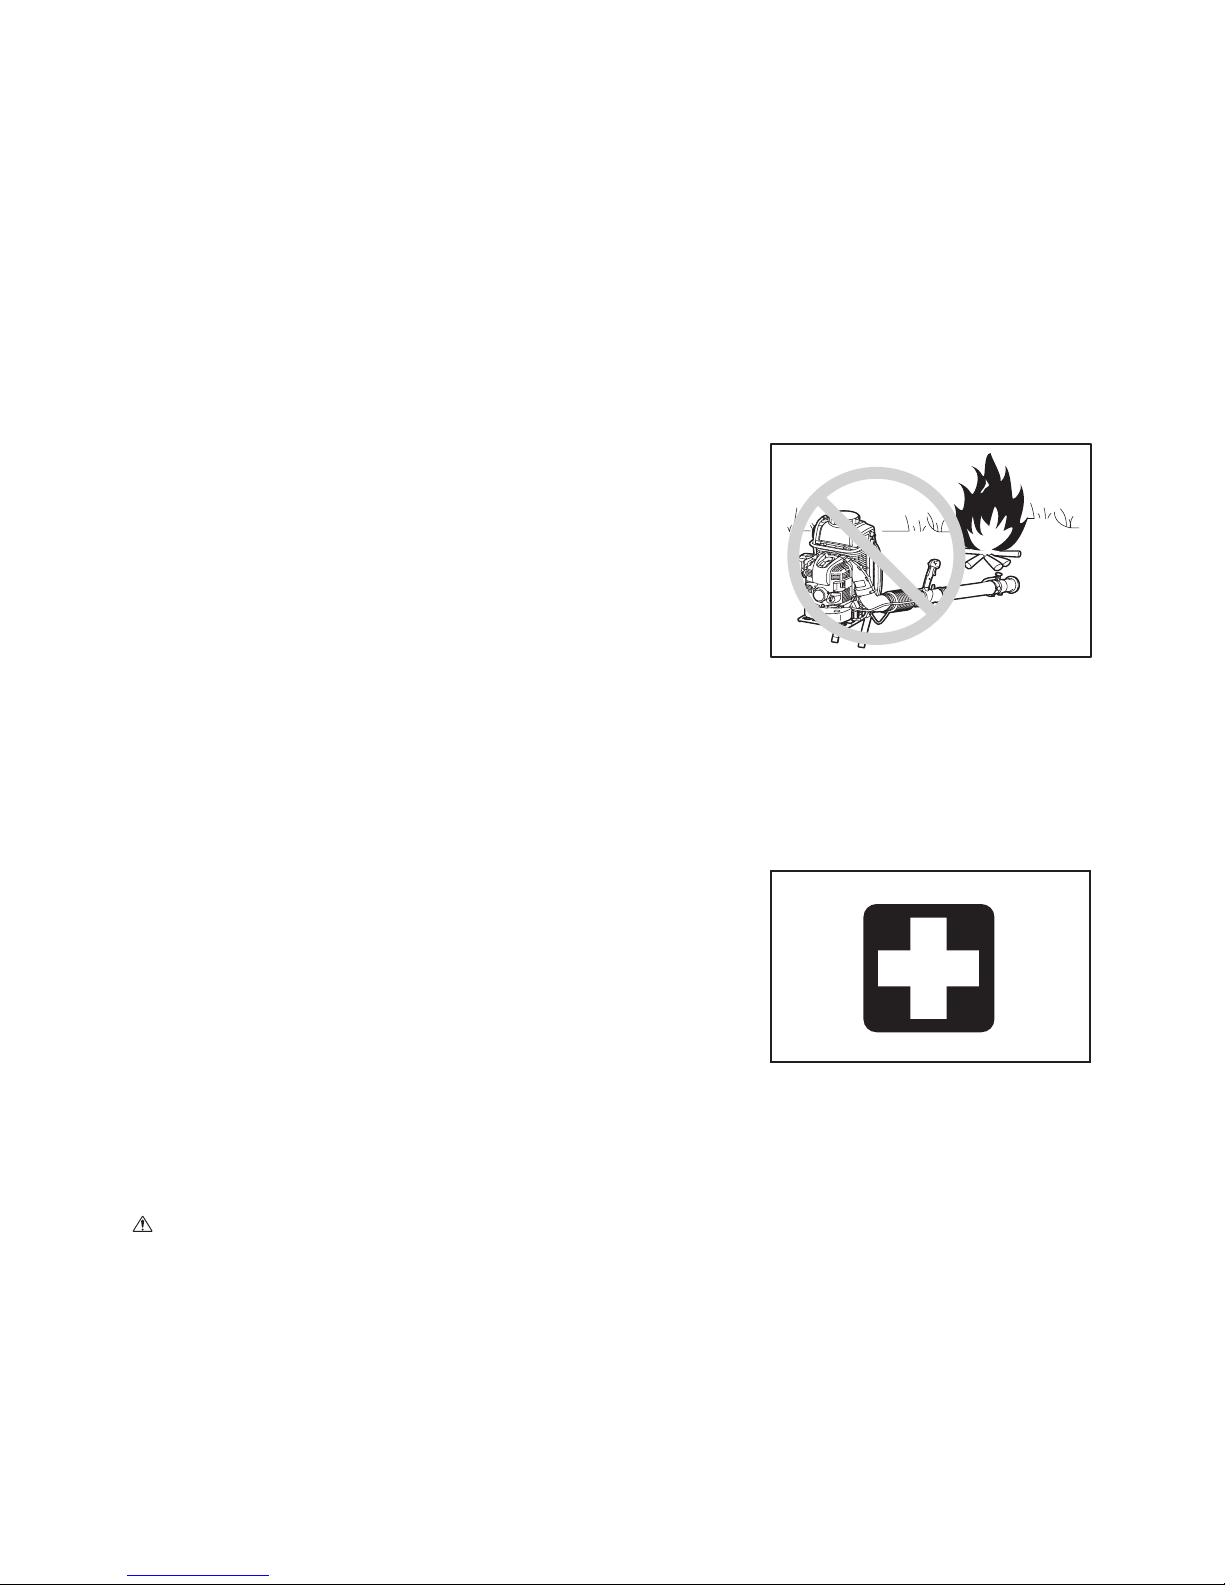
● The assistance of another person may be needed in placing the mist blower on
your back after starting. In order to reduce the risk of injury to the assistant from
thrown objects, chemical spray/liquid or from contact with hot exhaust fumes, keep
the engine at idle speed during this brief period, and do not let your assistant stand
in the area of the outlet nozzle or exhaust. Otherwise, the mist blower should be
started and operated without assistance.
● Start the mist blower only in accordance with the instructions.
● Do not use any other methods for starting the engine (7)!
● Use the mist blower and the accessories supplied only for applications specied.
● Start the mist blower engine only after the entire machine has been assembled.
Operation of the machine is permitted only after all the appropriate accessories
are attached.
● The engine is to be switched off immediately if there are any engine problems.
● Use the mist blower for single-handed operation with the right hand on the control
handle. Carry as a backpack with the shoulder straps over both shoulders.
To reduce the risk of loss of control, never carry the mist blower with the strap(s)
over one shoulder.
● When working with the mist blower, always wrap your ngers tightly around the
handle, keeping the control handle cradled between your thumb and forenger.
Keep your hand in this position to have your machine under control at all times.
Make sure your control handle is in good condition and free of moisture, pitch, oil
or grease.
● Always ensure a safe, well-balanced footing.
● In order to keep the solution tank upright and reduce the risk of spillage, do not
bend at the waist. Bend only at the knees and support yourself as required to
ensure proper balance.
Remember that a mist blower lled with liquid has a signicant amount of weight.
Use extra caution when bending, leaning or walking.
● Operate the mist blower in such a manner as to avoid inhalation of the exhaust
gases. Never run the engine in enclosed rooms (risk of suffocation and gas
poisoning). Carbon monoxide is an odorless gas.
Always ensure there is adequate ventilation.
● Your mist blower is not insulated against electric shock. To reduce the risk of
electrocution, never operate this mist blower in the vicinity of any wires or cables
(power, etc.) which may be carrying electric current. Do not spray on or near
electrical installations.
20 m (66 ft)
(6)
(7)
Page 7
7
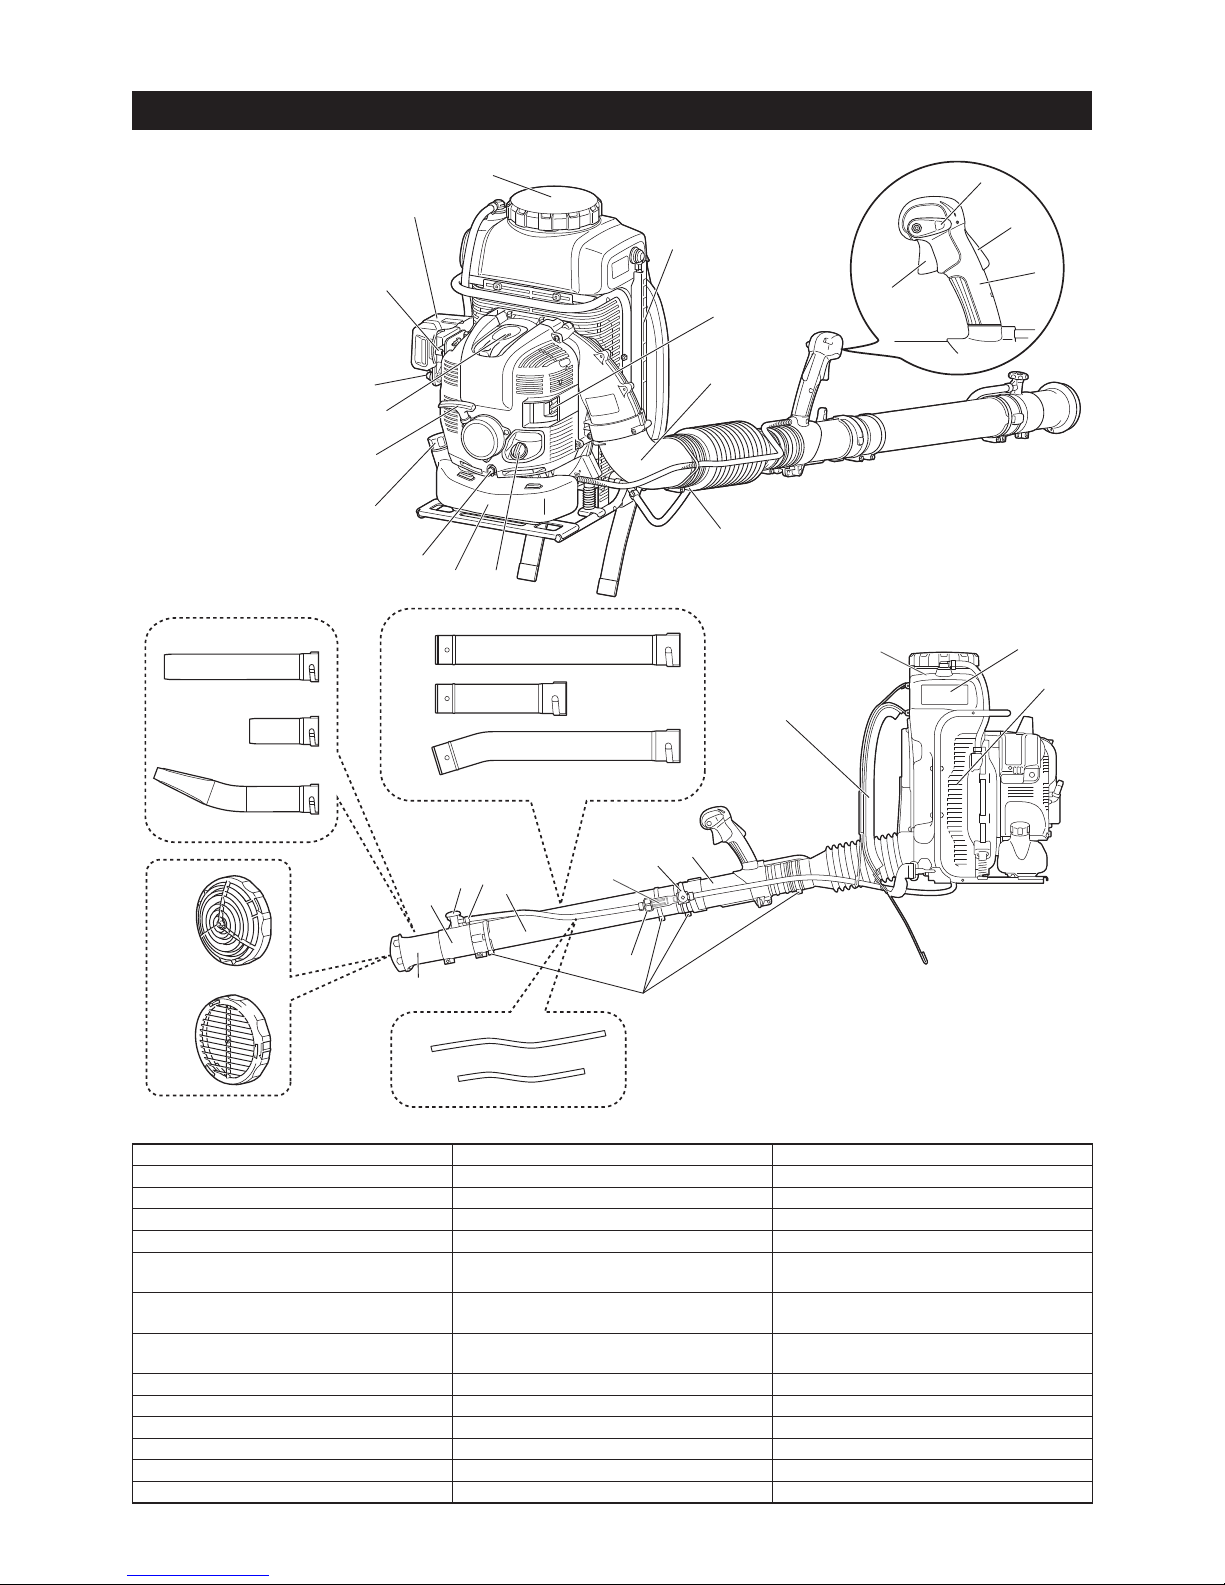
● Switch off the engine when resting and when leaving the mist blower unattended.
Place it in a safe location to prevent danger to others, setting re to combustible
materials, or damage to the machine (8).
● Never lay the hot mist blower onto dry grass or onto any combustible materials.
● Do not place the mist blower on the ground when operating at high speed, because
small objects such as sand, grass, dust, etc. may be pulled into the air intake and
damage the fan wheel.
● During work breaks, do not leave the mist blower in the hot direct sunlight or near
any heat source.
● All protective parts and guards supplied with the machine must be used during
operation.
● Never operate the engine with a faulty exhaust mufer.
● Do not put your hand into exhaust vent. The mufer become very hot during
operation, and may cause burns.
● Do not touch engine cover for long time. It may become hot during operation and
may cause burns.
● Shut off the engine during transport (8).
● Position the mist blower safely during car or truck transportation to avoid fuel
leakage.
● When transporting the mist blower, ensure that the fuel tank and liquid/chemical
container are completely empty.
Refueling
● Shut off the engine (8) during refueling, keep well away from open ame (9) and
do not smoke.
● Avoid skin contact with petroleum products. Do not inhale fuel vapor.
Always wear protective gloves during refueling. Change and clean protective
clothing at regular intervals.
● Take care not to spill either fuel or oil in order to prevent soil contamination
(environmental protection). Clean the mist blower immediately after fuel has been
spilled. Allow wet cloths to dry before disposing in properly, covered container to
prevent spontaneous combustion.
● Avoid any fuel contact with your clothing. Change your clothing immediately if fuel
has been spilled on it (re hazard).
● Inspect the fuel tank cap at regular intervals making sure that it stays securely
fastened.
● Carefully tighten the locking screw of the fuel tank. Change locations to start the
engine (at least 3 meters (10 feet) away from the place of refueling) (10).
● Never refuel in closed rooms. Fuel vapors accumulate at ground level (risk of
explosions)
● Only transport and store fuel in approved containers. Make sure stored fuel is not
accessible to children.
● Do not attempt to refuel a hot or a running engine.
Method of operation
● Use the mist blower only in good light and visibility. During cold seasons beware of
slippery or wet areas, ice and snow (risk of slipping).
Always ensure a safe footing (11).
● Never work on unstable surfaces or steep terrain (11).
● If you are unfamiliar with the risks associated with the particular chemical you use,
review the product label and/or material safety data sheet for that substance and/
or consult the material manufacturer/supplier.
You may also ask your employer, governmental agencies and other sources for
information on hazardous materials.
Some other authorities have published lists of substances known to cause cancer,
reproductive toxicity, etc. (11).
● To reduce the risk of personal injury, do not direct air blast towards bystanders,
since the high pressure of the air ow could injure eyes and could blow small
objects at great speed (12).
● Never spray in the direction of humans, animals or property which might be injured
or damaged by spraying (12).
● Never insert any foreign object into the air intake of the machine or into the nozzle
of the mist blower. It will damage the fan wheel and may cause serious injury to
the operator or bystanders as a result of the object or broken parts being thrown
out at high speed.
● Pay attention to the direction of the wind, i.e., do not work against the wind.
● To reduce the risk of stumbling and loss of control, do not walk backward while
operating the machine.
● Always shut off the engine before cleaning or servicing the unit or replacing parts.
● Take a rest to prevent loss of control caused by fatigue. We recommend to take a
10 to 20-minute rest every hour.
(8)
(9)
(10)
3 m (10 ft)
(11)
(12)
Page 8
8
9
After nishing work
● Always wash yourself thoroughly with soap and water after spraying or handling
chemicals. Shower immediately, and wash all protective clothing separately from
other items.
Follow any additional recommendations of the chemical manufacturer.
Always clean dust and dirt off the mist blower.
● Empty, rinse and clean solution tank and assembly after each use. This helps
to prevent the solution from crystallizing, which could later cause clogging and
chemical damage to the unit. In addition, residual chemicals may have undesirable
effects during subsequent spraying with a different type of chemical (e.g., residual
herbicide may damage or kill plants being sprayed with a pesticide).
Do not store the mist blower with spray solution in the solution tank.
● Keep children, unconcerned people and pets away from areas that have just been
sprayed.
After the use of some chemicals, especially agricultural pesticides, a notice must
be posted on the treated area that a “Restricted Entry Interval” (REI) is in effect.
See the chemical product’s label and any applicable governmental regulations.
Maintenance instructions
● Perform cleaning and maintenance before storage.
● Be kind to the environment. Operate the mist blower with as little noise and pollution
as possible. In particular check the correct adjustment of the carburetor.
● Clean the mist blower at regular intervals and check that all screws and nuts are
securely tightened.
● Never service or store the mist blower in the vicinity of open ames, sparks, etc.
(13).
● Always store the mist blower in a well-ventilated locked room and with an emptied
fuel tank and the emptied solution tank.
(13)
Observe and follow all relevant accident prevention instructions issued by the trade associations and by insurance companies.
Do not perform any modications to the mist blower as this will risk your safety.
The performance of maintenance or repair work by the user is limited to those activities as described in this instruction manual. All other work is
to be done by Authorized Service Agents.
Use only genuine spare parts and accessories supplied by DOLMAR.
Use of non-approved accessories and machines means increased risk of accidents and injuries. DOLMAR will not accept any liability for accidents
or damage caused by the use of any non-approved attachment or accessories.
First Aid
In case of accident make sure that a well-stocked rst-aid kit is available in the vicinity
of the operations. Immediately replace any item taken from the rst aid kit.
When asking for help, please give the following information:
● Place of accident
● What happened
● Number of injured persons
● Extent of injuries
● Your name
Packaging
The DOLMAR mist blower is delivered in a protective cardboard box to prevent
shipping damage. Cardboard is a basic raw material and is therefore consequently
reusable or suitable for recycling (waste paper recycling).
SAVE THESE INSTRUCTIONS.
WARNING:
● DO NOT let comfort or familiarity with product (gained from repeated use) replace
strict adherence to safety rules for the subject product. MISUSE or failure to follow
the safety rules stated in this instruction manual may cause serious personal
injury.
Page 9

9
TECHNICAL DATA
Model SP-7650.4 R
Weight (with full fuel, full chemical, 220 ml of engine oil) (kg) 30.4
Weight (dry weight) (kg) 14.1
Dimension (without blower pipe L x W x H) (mm) 420 x 440 x 595
Engine type Air cooled, 4-stroke, single cylinder
Max. engine performance (kW) 2.7
Max. engine speed (min
–1
) 7,400
Idling speed (min
–1
) 2,800
Engine displacement (cm
3
) 75.6
Fuel Automobile gasoline
Fuel tank capacity (L) 1.8
Engine oil
API grade SF class or higher, SAE 10W-30 oil
(automobile 4-stroke engine oil)
Engine oil volume (L) 0.22
Carburetor (Diaphragm-carburetor) WALBRO WYK
Spark plug NGK CMR6A
Electrode gap (mm) 0.7 – 0.8
Chemical tank capacity (L) 15.0
Spray range (Horizontal / Vertical) (m) 16 / 13
Max air velocity (m/s) 85
Air ow rate (m
3
/min) 14.1
Vibration per ISO 22867
a
hv eq
(m/s2) 2.7
Uncertainty K (m/s
2
) 0.8
Sound pressure level average to ISO 22868
L
PA eq
dB (A) 95.4
Uncertainty K dB (A) 2.9
Sound power level average to ISO 22868
L
WA eq
dB (A) 110.1
Uncertainty K dB (A) 1.3
Note:
1. Use the oil and spark plug specied in the table.
2. This specication is subject to change without prior notice.
3. Use the level line 10 L as a guide line for the gross weight 25 kg of the mist blower including the solution.
4. Vibration and noise levels are measured with using the straight pipe (long).
For European countries only
EC Declaration of Conformity
Makita declares that the following Machine(s):
Designation of Machine: Petrol Mist Blower
Model No./ Type: SP-7650.4 R
Specications: see “TECHNICAL DATA” table
Conforms to the following European Directives:
2006/42/EC, 2000/14/EC
They are manufactured in accordance with the following standard or standardized documents:
EN ISO 28139, ISO 10988
The technical le in accordance with 2006/42/EC is available from:
Makita, Jan-Baptist Vinkstraat 2, 3070, Belgium
The conformity assessment procedure required by Directive 2000/14/EC was in accordance with annex V.
Measured Sound Power Level: 110.1 dB
Guaranteed Sound Power Level: 111 dB
8.7.2014
Yasushi Fukaya
Director
Makita, Jan-Baptist Vinkstraat 2, 3070, Belgium
Page 10
10
11
DESIGNATION OF PARTS
1
2
4
3
5
7
11
15
17
8
6
10
13
14
16
9
12
18
19
20
21
22
23
24
25
26
27
28
29
30
31
32
33
34
35
36
37
38
39
40
41
41
1. Stop control lever 15. Oil drain bolt 29. Straight pipe (long) (optional accessory)
2. Control handle 16. Fuel tank 30. Straight pipe (short) (optional accessory)
3. Throttle trigger 17. Oil cap 31. Bent pipe (optional accessory)
4. Lock-off lever 18. Hose band (diameter 100 mm) 32. Strainer of tube joint
5. Solution tank cap 19. Hose band (diameter 76 mm) 33. Strainer of solution tank (in solution tank)
6. Air cleaner cover 20. Top nozzle
34. End pipe (long) (optional accessory for
blower operation)
7. Tube for solution level check 21. Second nozzle
35. End pipe (short) (optional accessory for
blower operation)
8. Choke lever 22. Liquid adjustment knob
36. Flat pipe (optional accessory for blower
operation)
9. Mufer 23. Straight pipe 37. Tube (long) (optional accessory)
10. Primer pump 24. Solution discharge lever 38. Tube (short) (optional accessory)
11. Plug cover 25. Swivel pipe 39. Dispersion cover
12. Elbow 26. Shoulder strap 40. Deector
13. Starter handle 27. Air inlet net 41. Hose clamp
14. Fuel tank cap 28. Solution tank
Page 11
11
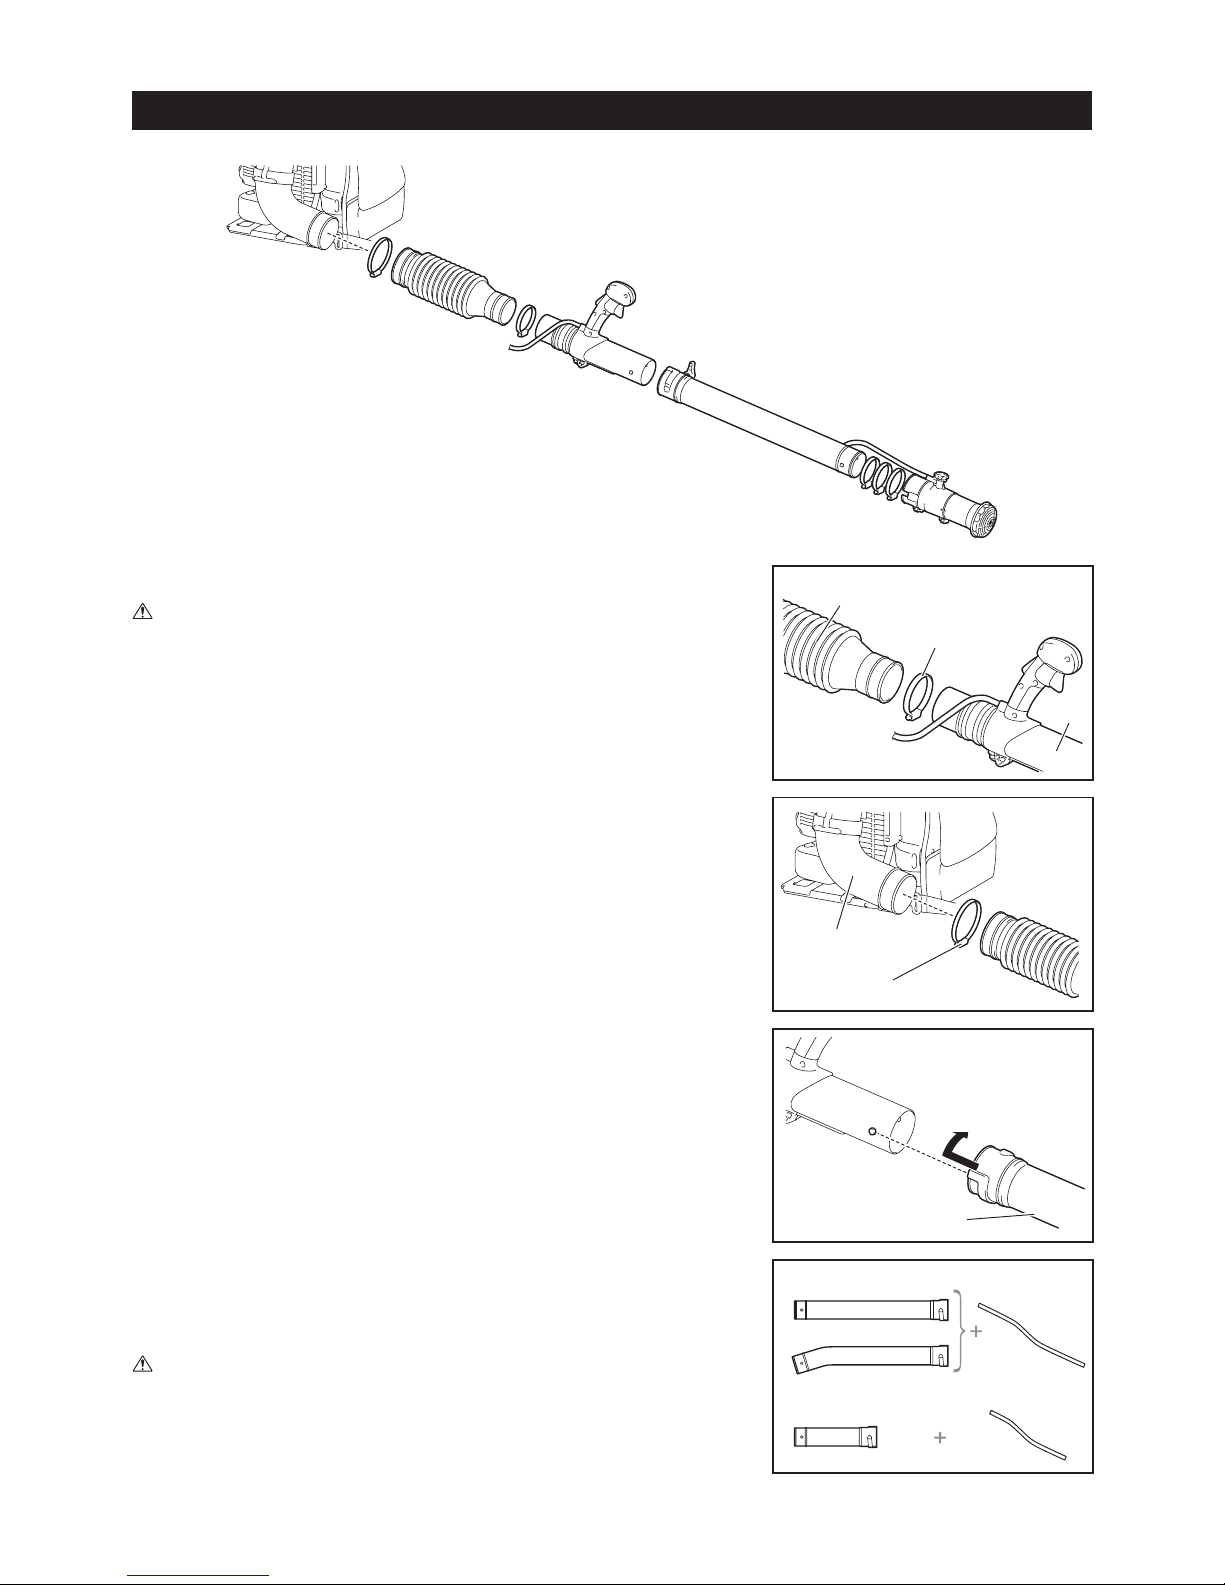
ASSEMBLY INSTRUCTIONS
Assembling mist blower pipes
CAUTION:
● Before performing any work on the mist blower, always stop the engine and pull
the spark plug connectors off the spark plug.
● Always wear protective gloves!
● Start the mist blower only after having assembled it completely.
● Make sure that all the hose bands are tight after assembly.
NOTE:
● Make the band’s bolt heads come outer side when you tighten them as illustrated.
1. Assemble the swivel pipe (1) with the exible pipe (2).
Tighten them with the 76 mm diameter band (3).
2. Assemble the exible pipe with the elbow (4) of the mist blower.
Tighten them with the 100 mm diameter band (5).
3. Assemble the straight pipe (6) with the swivel pipe (1).
Align the groove of the straight pipe with the projection on the swivel pipe, and
turn the straight pipe until it clicks, and then tighten them with the 76 mm diameter
band (3).
NOTE:
● The straight pipe stated above means the following three pipes and can be
substituted depending on your work need.
– Straight pipe (long) (6)
– Bent top pipe (7)
– Straight pipe (short) (8)
When using the straight pipe (long) (6) or the bent pipe (7), use with tube (long)
(9).
When using the straight pipe (short) (8), use with tube (short) (10).
To replace a tube, the hose clamps need to be removed and assembled. Use
pliers or a similar tool, if necessary.
CAUTION:
● When replacing the tube, be careful not to damage it.
Only one or combination of the above pipes is supplied as a standard equipment
with your mist blower, which may differ from country to country.
The remaining types of pipes may need to be obtained as optional accessories.
(2)
(3)
(1)
(4)
(5)
(6)
(6)
(7)
(8)
(9)
(10)
Page 12

12
13
4. Set two of 76 mm diameter bands (3) on the pipe loosely (those bands are used for
tightening the solution discharge lever and tube joint later).
Assemble the second nozzle (11) with straight pipe.
Tighten them with another 76 mm diameter band (3).
(11)
(3)
(3)
(3)
(13)
(14)
(12)
(1)
(2)
5. Put the solution discharge lever (12) onto the pipe.
Make sure that the open side of the lever’s base (13) faces the swivel pipe.
Align the lever’s base with the gap of the projection on the straight pipe (14).
Then tighten them with the 76 mm diameter bands (3).
6. Make sure all clamps are tight.
Adjusting and securing the control handle
1. Put the machine on your back and adjust the shoulder strap (see “Adjusting the
shoulder strap”).
2. Slide the control handle (1) along the tube to the most comfortable position.
3. Secure the control handle by turning the knob (2).
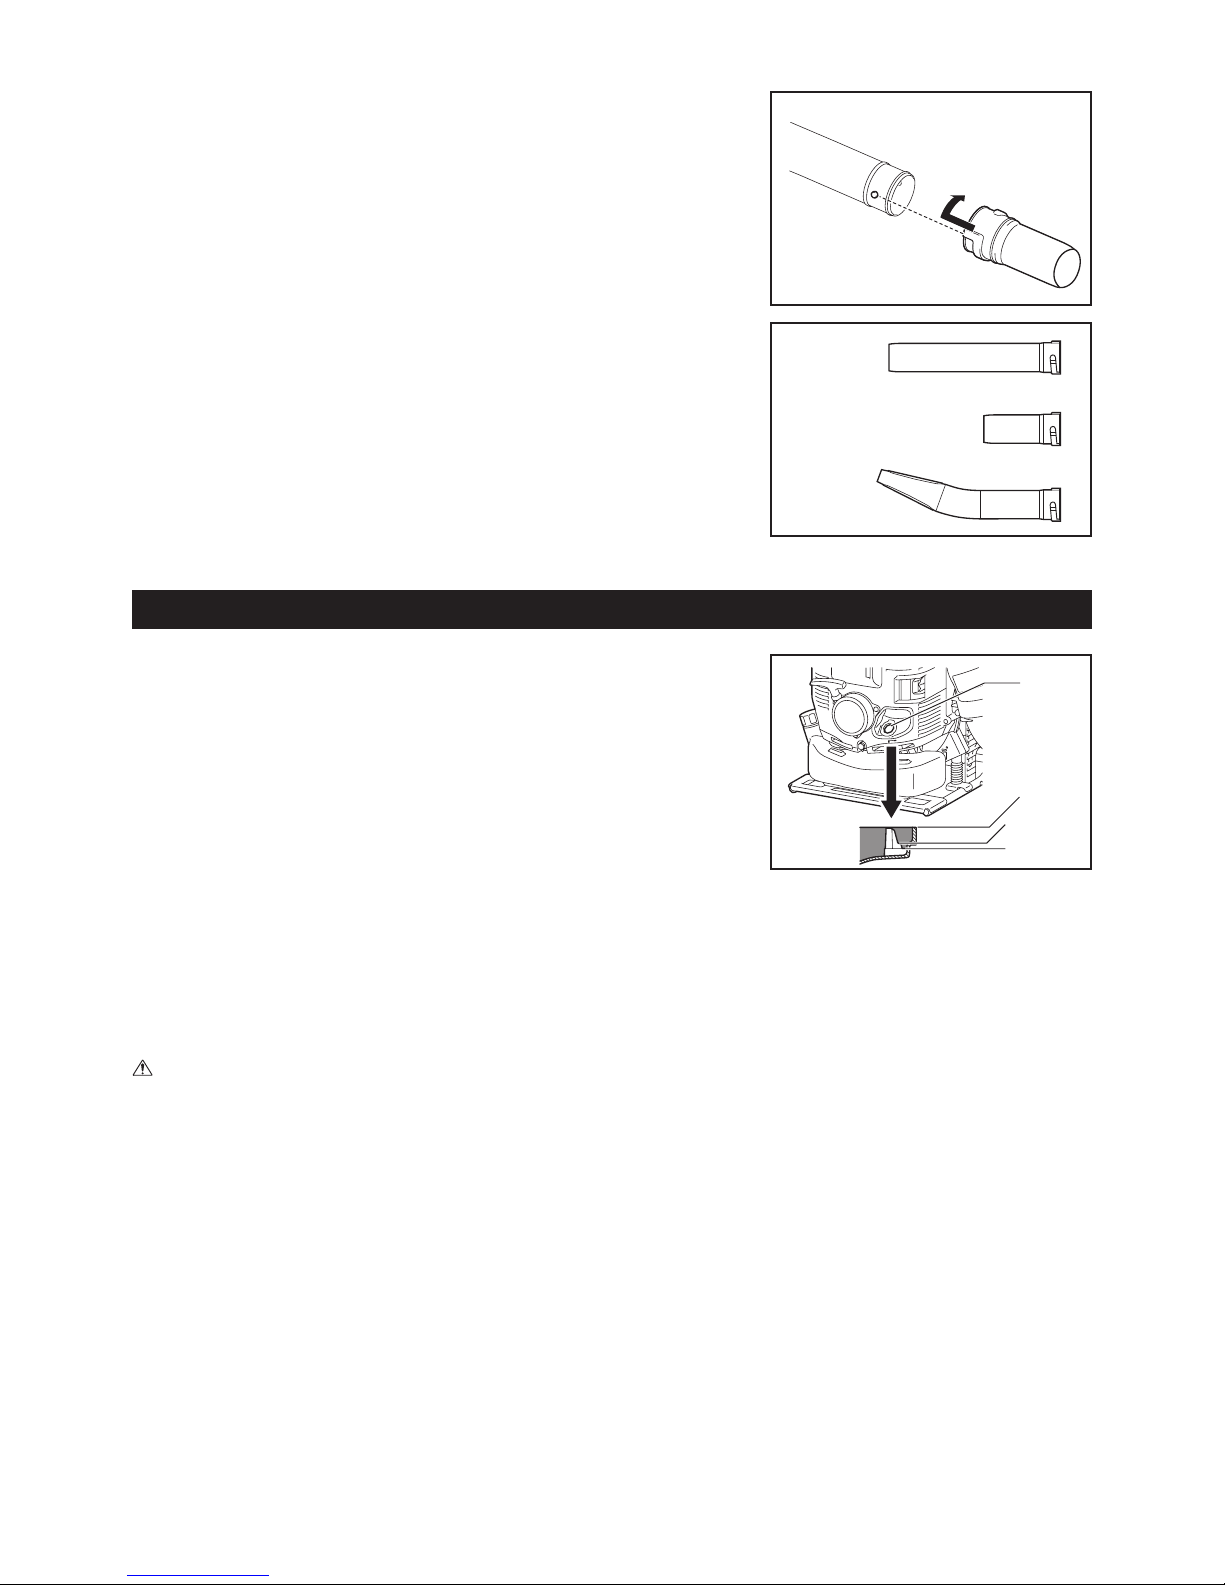
Installing the end pipe (optional accessory for blower
operation)
WARNING:
● Drain all chemical solution from the solution hose (1) and tube joint (2), and make
sure the solution discharge lever (3) is closed before installing the end pipe.
Otherwise chemical solution may be spilled out.
1. Remove the solution hose from the tube joint by loosening the hose band.
2. Remove the 76 mm band, and remove the second nozzle from the straight pipe.
(1)
(2)
(3)
Page 13
13
BEFORE STARTING THE ENGINE
1. Checking and relling engine oil
1) Follow the procedure below when the engine oil is cold i.e. the mist blower has
not been running.
● Inspection: Set the blower down on a level surface and remove the oil cap.
Verify that the oil level is within the upper (1) and lower (2) limit
marks on the oil level gauge (3). If the oil is not up to the 100 mL
level (4), ll up with new oil.
● Adding oil: Set the mist blower down on a level surface and remove the oil
cap. Fill the oil up to the upper limit of the oil level gauge.
2) On average, engine oil normally needs to be added after every 20 hours of
operation. This interval for every change in oil corresponds to refueling the mist
blower approximately 10 – 15 times.
3) Please change the oil whenever it becomes dirty or signicantly changes color.
(Refer to P. 23 for the oil change procedure and frequency.)
Recommended oil: DOLMAR genuine oil or SAE10W-30 oil of API type SF
grade or better (4-stroke motor oil for automobiles)
Oil capacity: Approximately 0.22 L (220 mL)
(3)
(1)
(4)
(2)
CAUTION:
● If the mist blower is not stored in an upright position, the oil may ow from the level gauge into the engine and give a false reading when
checking the oil level. This may result in inadvertently overlling whenever adding engine oil. Always store in an upright position.
● If the upper oil level limit is exceeded, this can result in the oil becoming dirty and white smoke from burning excess oil.
Check Point #1: Concerning the oil cap when adding oil
● Wipe off dirt and grime around the opening before removing the oil cap.
● Remove the oil cap and place it on a clean surface so that it does not accumulate any sand, dirt, or other foreign bodies. These may stick to
the cap and adulterate the engine oil if proper care is not taken. Dirty oil containing sand, dirt, or foreign bodies may cause excessive wear on
the engine due to improper lubrication and result in a breakdown.
Check Point #2: If oil is spilled when adding oil
● Oil spillage on the outside on the mist blower may result in the engine oil becoming dirty or adulterated. Therefore, please wipe off any oil
spillage before starting the engine.
3. Align the groove of the end pipe with the projection on the straight pipe, and turn
the end pipe until it clicks.
NOTE:
● The end pipe stated above means the following three end pipes and can be
substituted depending on your work need.
– End pipe (long) (4)
– End pipe (short) (5)
– Flat pipe (6)
(4)
(5)
(6)
Page 14

14
15
2. Fuel supply
WARNING:
● When supplying the fuel, be sure to observe the following instructions to prevent ignition or re:
– Fuel supply must be made in a place free of re. Never bring the re (smoking, etc.) near to the place of fuel supply.
– Stop the engine and allow the engine to cool down before fuel supply.
– Refuel on at surface. Do not refuel on unstable or bad ventilated place.
– Refuel in good light and visibility.
– Refuel at open clear place.
– Open the fuel tank cap full of fuel slowly. The fuel may sprout out under internal pressure.
– Take care not to spill the fuel. Any spilled fuel must be wiped clean.
– Do not fuel more than necessary.
– Carry out fuel supply in a well-ventilated place.
● Handle the fuel with care.
– Fuel sticking to the skin or entering an eye may cause allergies or irritation. When any physical abnormality is detected, consult the medical
specialist immediately.
Storage period of fuel
Fuel should be used up within a period of 4 weeks, even if it is kept in a special container in a well-ventilated shade.
If a special container is not used or if the container is not covered, fuel may deteriorate in one day.
Storage of machine and rell tank
● Keep the machine and tank at a cool place free from direct sunshine.
● Never keep the fuel in the cabin or trunk.
Fuel
The engine is a 4-stroke engine. Be sure to use an automobile gasoline (regular gasoline or premium gasoline).
Points for Fuel
● Never use a gasoline mixture which contains engine oil. Otherwise, it will cause excessive carbon accumulation or mechanical troubles.
● Use of deteriorated fuel will cause irregular startup.
When refueling the fuel, be sure to stop the engine and make sure that the engine cools down.
Refuelling method
● Loosen the tank cap a little so that there will be no difference in atmospheric pressure.
● Detach the tank cap, and refuel, discharging air by tilting the fuel tank so that the refuel port will be oriented upward. (Never rell fuel full to the
oil rell port.)
● After refueling, securely tighten the tank cap.
● If there is any aw or damage on the tank cap, replace it.
● The tank cap will wear. Replace the tank cap every two to three years.
Page 15
15
1) When the engine is cold, or after refuelled (cold start):
(1) Set this machine on a at space.
(2) Set the stop control lever (1) to “I” position.
(1)
(3)
(3) Push the primer pump (2) several times until fuel enters into the primer
pump.
● In general, fuel enters into the carburetor by 7 to 10 pushes.
● If the primer pump is pushed excessively, an excess of gasoline returns
to the fuel tank.
(4) Lift the choke lever (3).
(5) Hold the air cleaner cover with a left hand to prevent the engine from
moving, settle down to take the stable position.
(6) Pull the starter handle slowly until feeling compression. Then pull it
strongly. It may take two to four attempts until engine starts.
● Do not pull the rope to the full extension.
● Return the starter handle gently into the housing. Otherwise released
starter handle may hit your body or it may not rewind appropriately.
(7) When the engine starts, gradually lower the choke lever while checking
the engine operation. Be sure to lower the choke lever fully in the end.
● In cold or when the engine is cooled down, always lower the choke
lever slowly. Otherwise, the engine may stop.
(8) Grasp the control handle (the lock-off lever is released by the grasp)
and pull the throttle trigger for warm-up operation. Continue warm-up
operation for 2 to 3 minutes.
(9) When the rotation of the engine stabilizes and the engine accelerates
smoothly from low to high speed by throttle movement, it is completion of
warming-up.
(2)
STARTING AND STOPPING ENGINE
1. Starting
WARNING:
● Never attempt engine start in a place where the unit was refueled. When starting the engine, keep a distance of at least 3 m (10 feet).
– Otherwise, it may cause ignition or re.
● Exhaust gas from the engine is toxic. Do not operate the engine in a poorly-ventilated place, such as in a tunnel, building, etc.
– Operating the engine in the poorly-ventilated place may cause poisoning by exhaust gas.
● In case of detection of any abnormality in sound, odor, vibration after start, stop the engine immediately and carry out inspection.
– If the engine is operated without attending such abnormality, an accident may occur.
● Make sure that the engine stops when the stop control lever is set to “O” position.
● Make sure that the solution discharge lever is closed before starting the machine.
Page 16
16
17
NOTE:
● The engine may be damaged if the choke lever is moved further beyond the “CLOSE” position.
● If the engine stops with an explosion sound or if the engine started, but stopped before operation of the choke lever, return it to the “OPEN”
position and pull the starter handle several times to start the engine again.
● If the operator keeps pulling the starter handle several times with the choke lever left in the “CLOSE” position, the engine may be difcult to
start because of over-suction of the fuel.
● In case of over-suction of the fuel, remove the spark plug and pull the handle several times rapidly to discharge any excess fuel. Dry the spark
plug electrode.
● When the throttle valve does not return to a position in contact with the idling adjusting screw even if the throttle trigger is set to the low speed,
correct the control cable catching state to ensure proper return of the valve.
2) When the engine is warm (warm start)
(1) Place the engine on a at ground.
(2) Press the primer pump several times.
(3) Make sure that the choke lever is down.
(4) Hold the air cleaner cover with a left hand to prevent the engine from moving, settle down to take the stable position.
(5) Pull the starter handle slowly until feeling compression. Then pull it strongly.
(6) When the engine is difcult to start, open the throttle valve by 1/3.
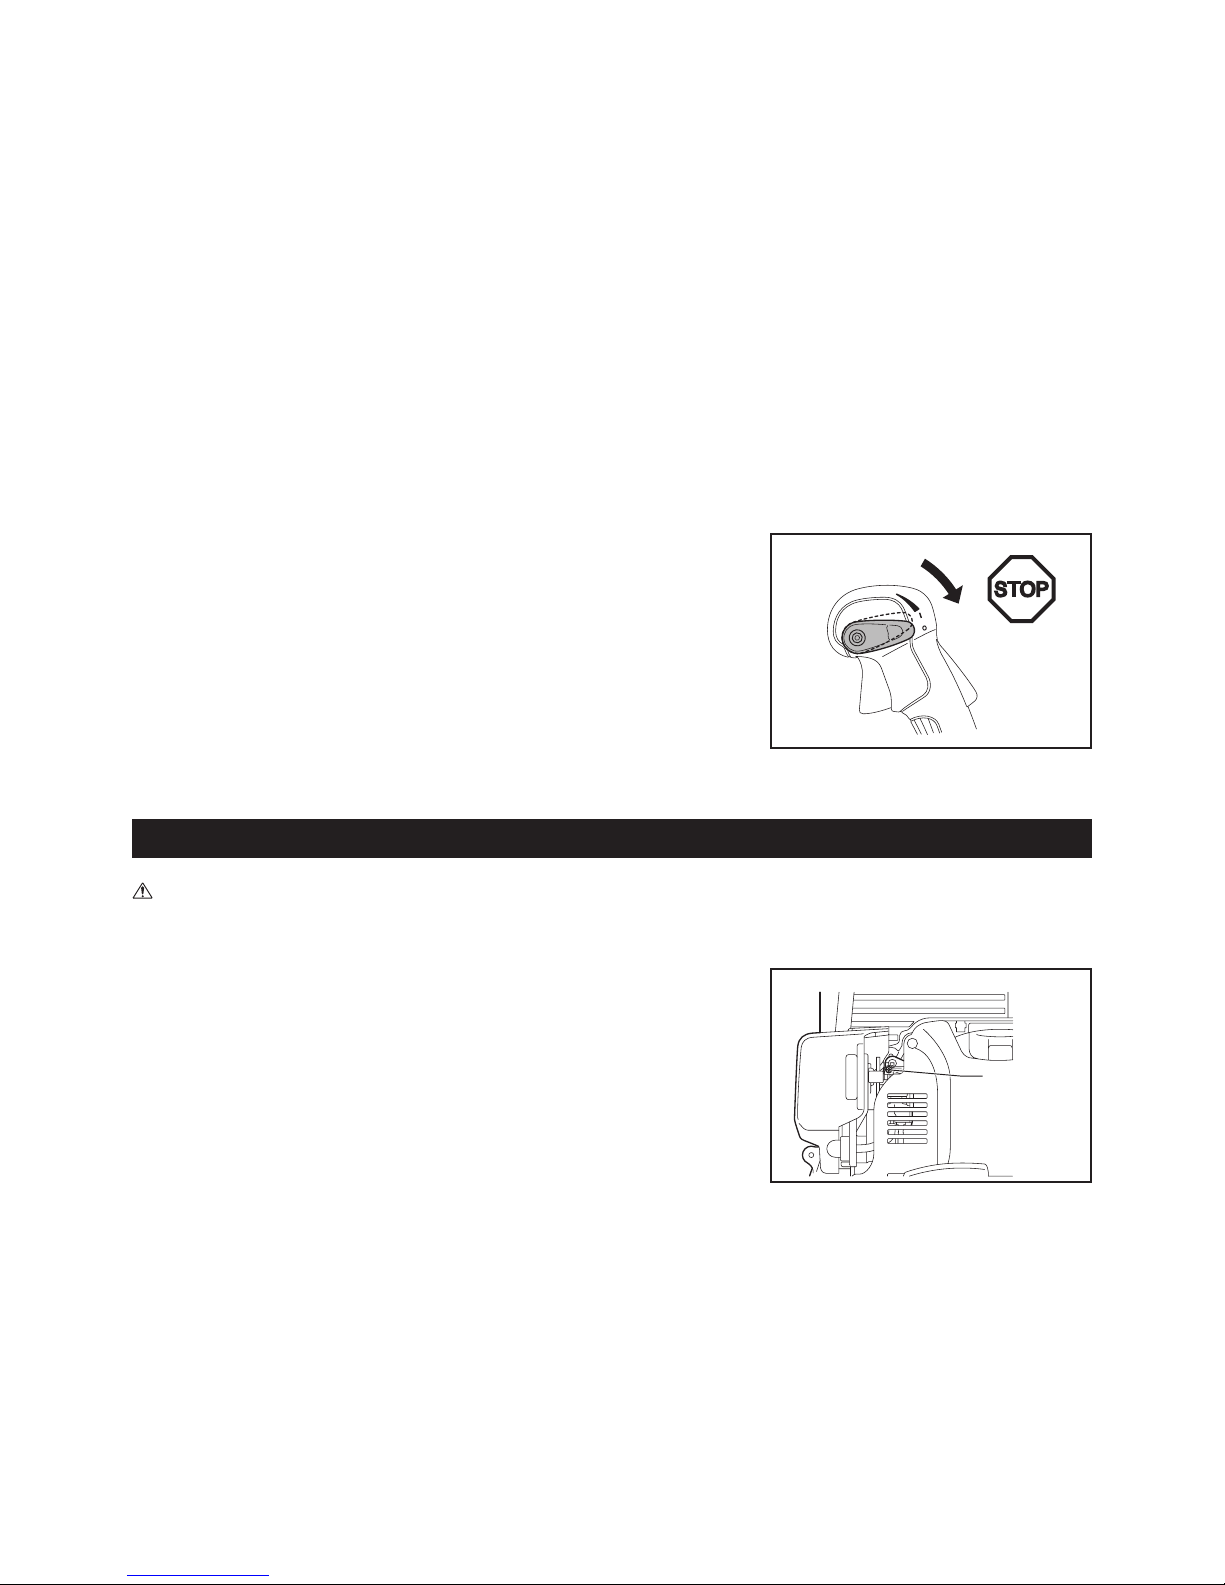
2. Stopping
1) Release the throttle trigger to reduce the engine speed, and set the stop
control lever to the “O” position.
ADJUSTING IDLE SPEED
DANGER:
● The adjustment of the carburetor is completed at the time of factory shipment. Please do not adjust other than idling adjusting. When adjustment
becomes necessary, please consult your authorized service center.
Checkup of idle speed
Set the idle speed rotation to 2,800 min–1.
● If it is necessary to change the rotation speed, regulate the adjusting screw (1),
with Phillips screwdriver.
● Turn the adjusting screw to the right, and the engine rotation will increase. Turn the
adjusting screw to the left, and the engine rotation will drop.
(1)
Page 17
17
OPERATION METHOD
Installing the strainer
The mist blower is provided with the strainers at the solution tank opening and the
pipe inlet head.
Always make sure the strainer is installed in place.
To install the strainer, push it in place.
To remove the strainer, pry it out of place.
WARNING:
● Tighten the tank cap rmly. Failure to tighten the tank cap may cause solution
leakage, pressure reduction and the like.
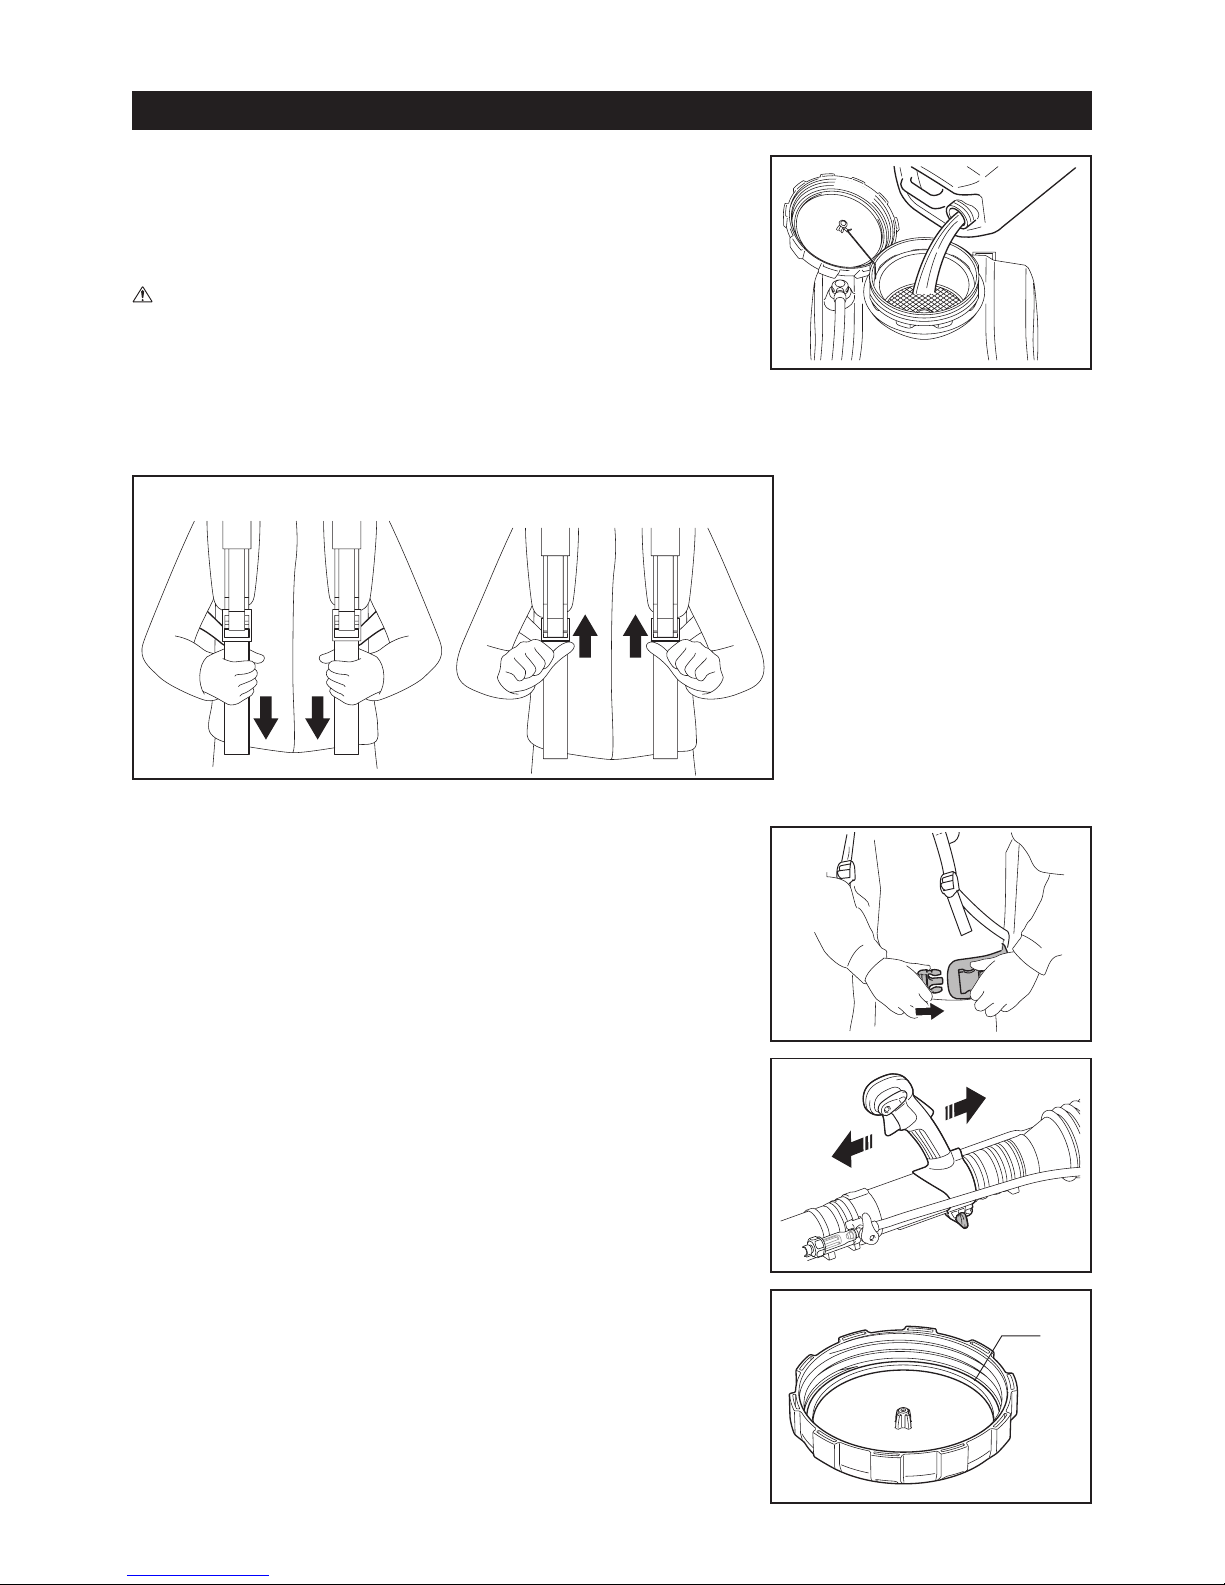
Adjusting the shoulder strap
Adjust the shoulder strap to a length that is comfortable to work while carrying the
mist blower.
Adjust as shown in the gure.
(1)
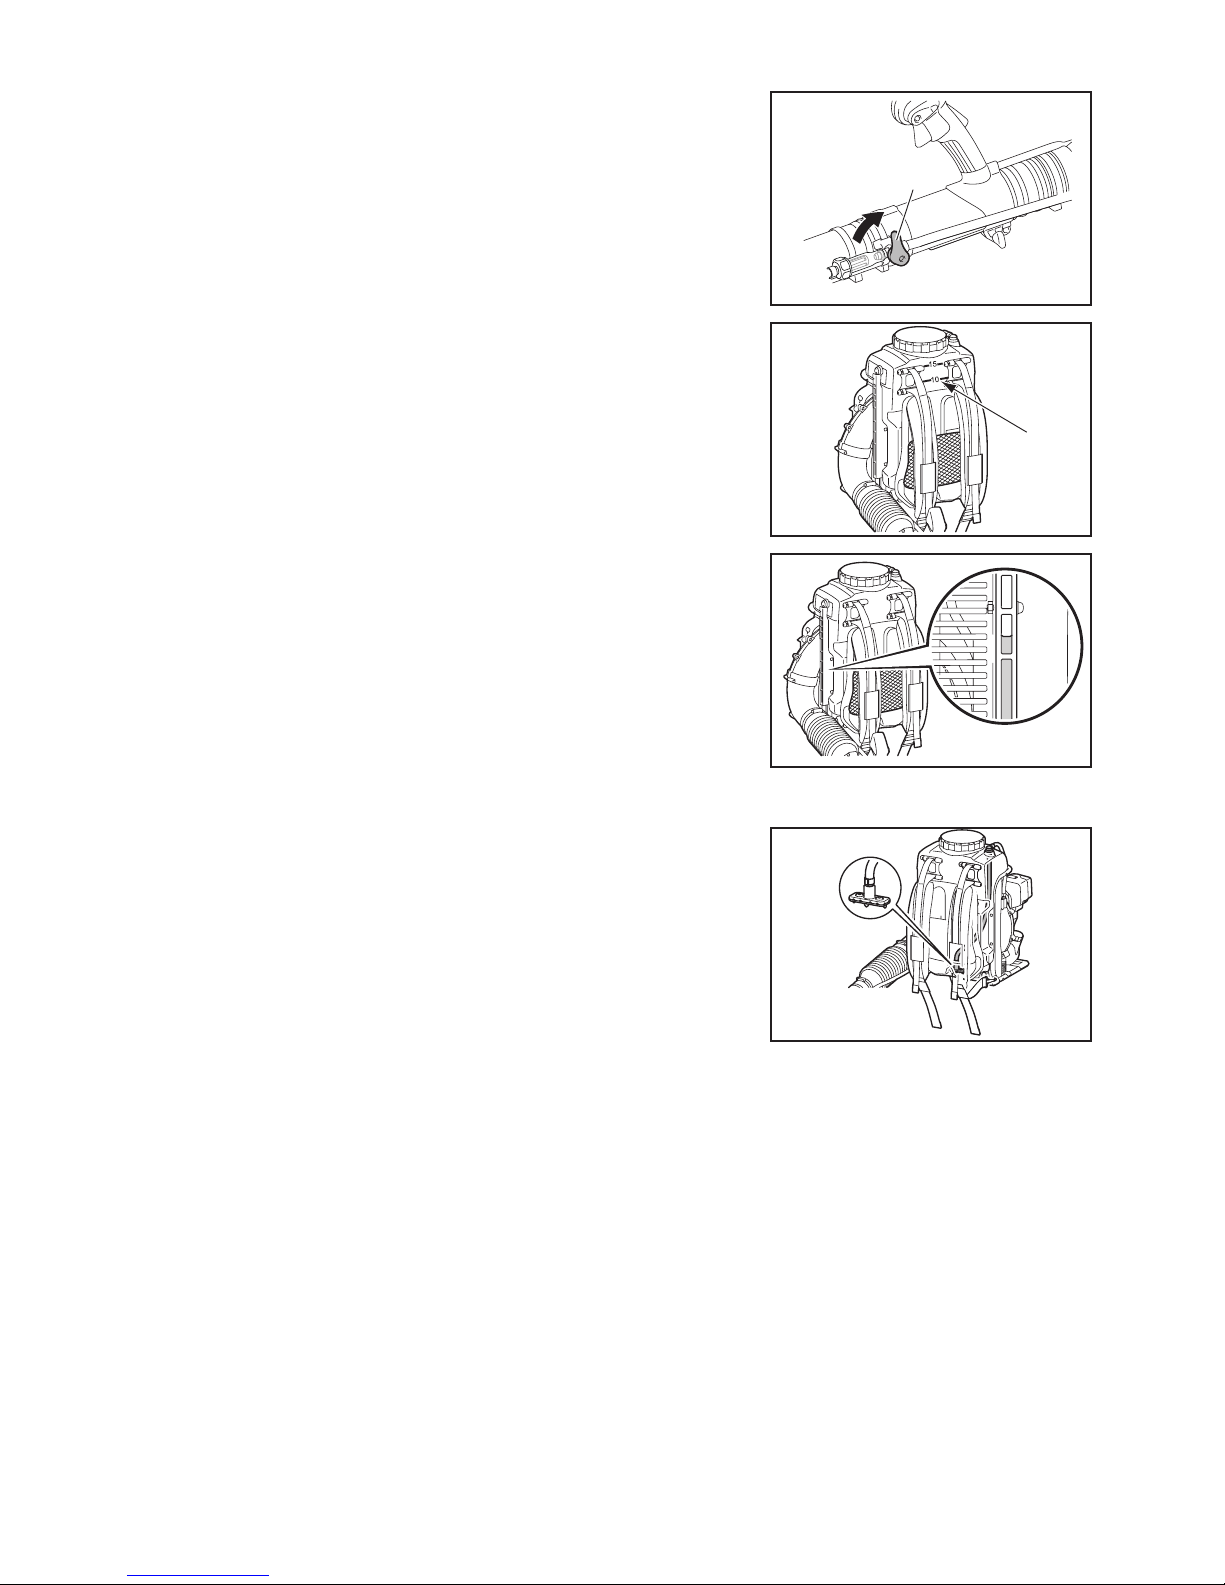
Hip belt (optional accessory)
The hip belt (optional accessory) enables the operator to carry the appliance more
stably.
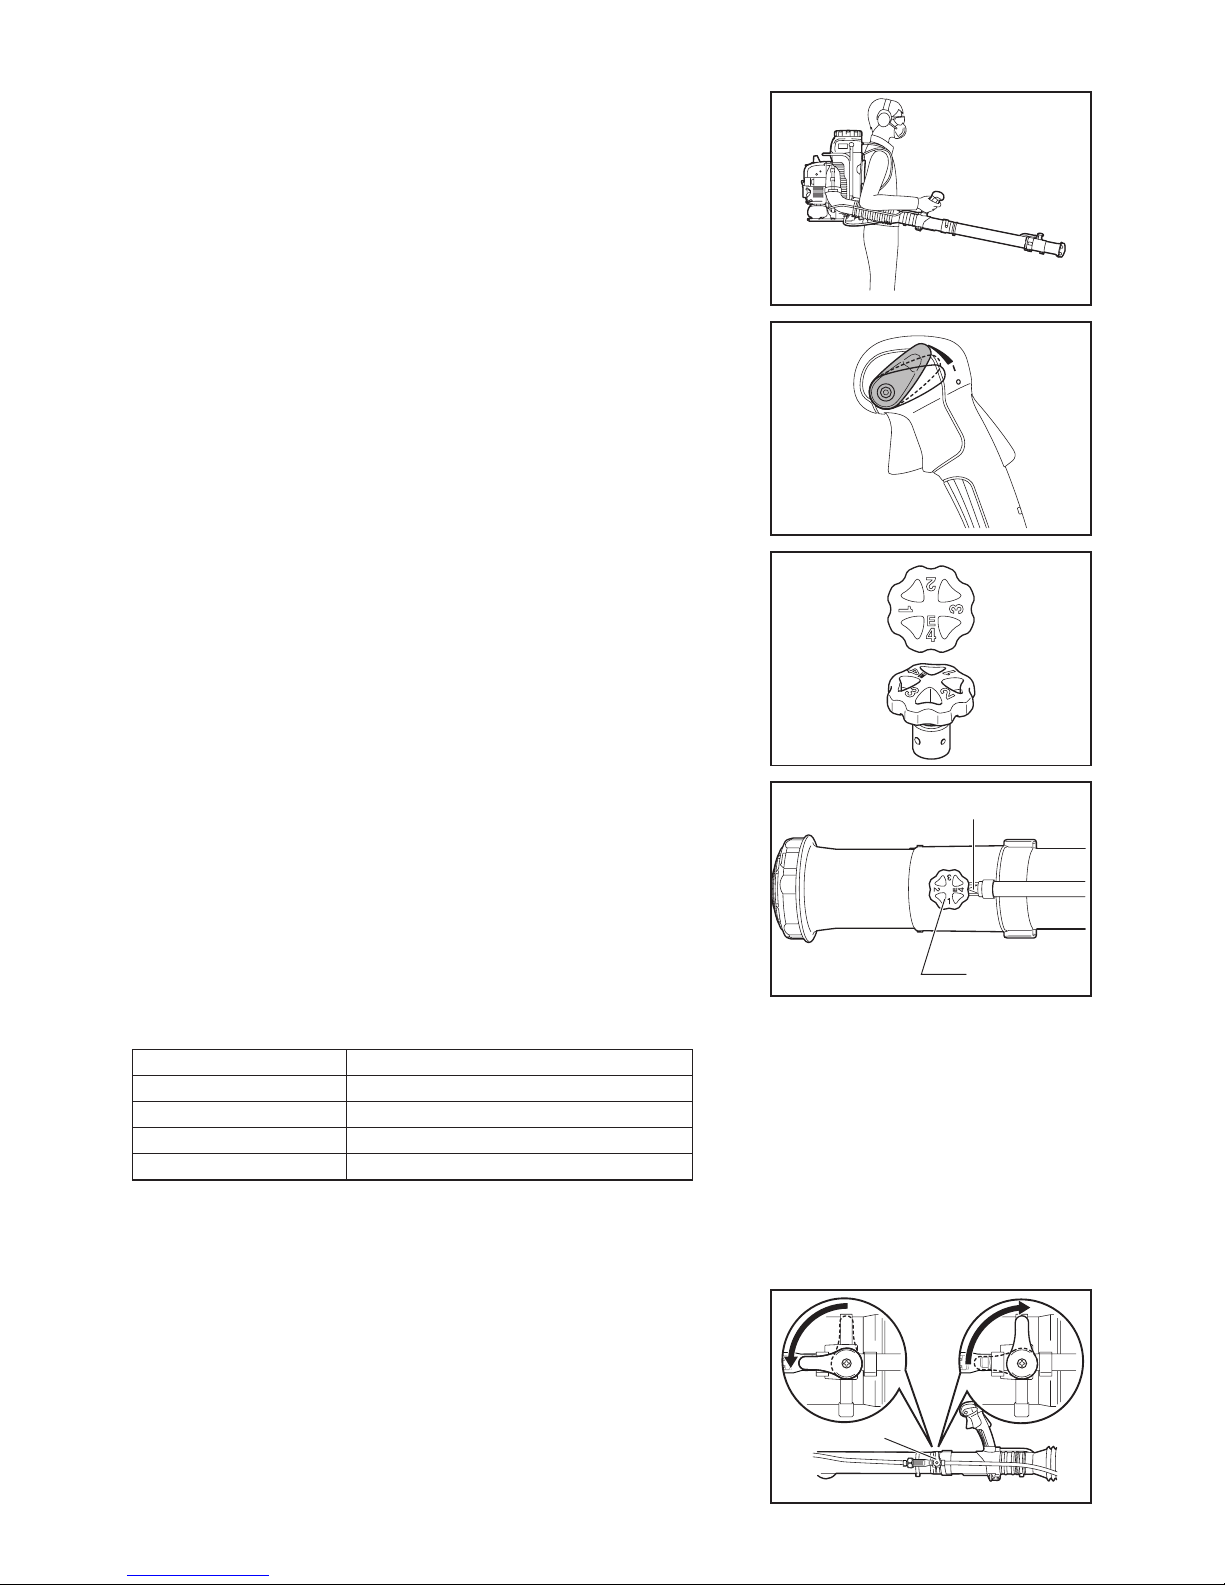
Adjusting the control handle
Move the control handle along the swivel pipe to the most comfortable position.
Filling the solution tank
1. Keep the gasket (1) in good condition and lubricated with grease and clean.
2. Put the mist blower on a at surface.
To tighten strap To loosen strap
Page 18
18
19
3. Before lling the solution tank, be sure to close the solution discharge lever (2).
(2)
4. The solution tank is capable of 15 liters of solution.
When the tank is full, the total weight including solution is nearly 30 kg.
Adjust the solution pouring volume so that the mist blower with solution in tank is
not over-weighted and can be within an operator’s strength.
When 10 liters of solution is poured (that is, when the poured solution level points
10 liters marking on the side of the tank), the total product weight is nearly 25 kg.
It is recommended that the total weight of the machine does not excess 30 kg for
men, and 25 kg for women.
Use the solution level in the tube on the side of the mist blower as a guideline to check
the solution level in the solution tank.
Solution mixing function
The solution mixing device inside the solution tank allows solution to be mixed with
air bubbles coming out of it during spraying operation.
Page 19
19
Mist blower operation
To increase engine speed, grasp the control handle (the lock-off lever is released by
the grasp) and pull the throttle trigger.
Pressure on the throttle trigger controls engine speed.
Position of the stop control lever can restrict the angle of the throttle trigger.
There are four positions for the stop control lever. “O”(engine stop), “I”, and two
throttle trigger angle restriction positions.
“I” position does not restrict the engine speed (you can pull the throttle trigger fully).
The throttle trigger angle gets restricted from one step above the “I” position. The
throttle trigger is more restricted when you move the stop control lever one more step
above the “I” position.
Adjust engine speed appropriate for the work location and conditions during operation.
Liquid adjustment knob
Liquid adjustment knob allows a wide range of different discharge rates.
Adjusting the discharge rate
Turn the liquid adjustment knob (1) on the second nozzle to obtain the desired
discharge rate so that the number on the liquid adjustment knob is aligned with the
triangle marking (2).
Discharge rate
Spray holding the straight pipe with the angle of 0 degrees to minus degrees to the horizontal.
Knob position Discharge rate (L/min) (mean value)
1 0.36
2 1.0
3 1.6
4 2.5
NOTE:
● Use the gures shown in the above table as a guide line for operation and these may be changed according to the density of chemical solution
used in the solution tank.
Solution discharge lever
To start the solution feeding (A), turn the solution discharge lever (1) horizontally to
the pipe.
To stop the solution feeding (B), turn the solution discharge lever vertically to the pipe.
(2)
(1)
(1)
(A) (B)
Page 20

20
21
Installing and removing the dispersion cover
To install the dispersion cover (1), mount the dispersion cover on the top nozzle (2)
so that its protrusion (3) is aligned with the notch (4) in the top nozzle.
(2)
(4)
(1)
(3)
(2)
(3)
(4)
(1)
Secure the dispersion cover by turning it fully clockwise.
To remove the dispersion cover, follow the above procedure in reverse.
Changing the nozzle to a small-amount-solution-discharge
nozzle (optional accessory)
When a small amount of solution needs to be sprayed, replace the nozzle cap with
another type of supplied nozzle cap with a small discharge hole.
To replace the nozzle, follow the procedure below.
1. Remove the screw (1) from the second nozzle (2) and then remove the top nozzle
(3) and dispersion cover (4).
Installing and removing the deector (optional accessory)
The deector (1) allows chemicals to be sprayed upward. This helps treatment for
low-growing plants and the underside of leaves of plants.
To install the deector (1), mount the deector on the top nozzle so that the “I” mark
(3) on it is aligned with the “I” mark (4) of the top nozzle (2).
Secure the deector by turning it fully clockwise.
To remove the deector, follow the above procedure in reverse.
(1)
(2)
(3)
(4)
(1)
Page 21
21
3. Mount another supplied nozzle with a small discharge hole.
NOTE:
● Choose a right nozzle out of the following two according to the kind (viscosity)
of the chemical you use.
(7) (8)
(9)
(3)
(10)
Nozzle type Viscosity of chemical Example of chemical Discharge rate (L/min)*
1
Aluminum nozzle (silver color) (7) *
2
High MALATHION (Mix the oil.) 0.14
Brass nozzle (gold color) (8) *
2
Low Aqua K-Othrine (Mix the water.) 0.075
Brass nozzle with punch marking
(gold color) (9) *
2
Low Cipermetrinato (Mix the water.) 0.060
Note 1: The discharge rate shown in the table is that in case of water only used for a guide line. This varies by chemicals being used.
Note 2: The type of the nozzle(s) provided with the mist blower changes from country to country.
4. Mount the top nozzle (3) and secure it with the screw (1).
NOTE:
● When using an above small-amount-solution-discharge nozzle, do not mount the
dispersion cover (4) or deector (optional accessory) and put it aside so that it is
not lost.
5. Set the knob (10) to the position 4.
(5)
(6)
2. Fit a slotted bit screwdriver to the slit (5) in the nozzle top and remove the nozzle
cap (6) by turning it fully counterclockwise.
Page 22
22
23
Draining and cleaning the solution tank
WARNING:
● Always wear rubber/chemical-resistant gloves when cleaning and draining the solution tank.
Draining the solution tank
WARNING:
● Never dispose chemical or rinsed water by opening the cap
at the bottom of the solution tank.
● Before and after draining, make sure that the solution
discharge lever is closed.
● If chemical solution is still remained in the solution tank
after the method mentioned in the instruction manual, tilt
the machine towards pipe side to pour out all the remained
solution.
1. Put the mist blower onto a stable place. Position the nozzle
(1) lower than the bottom of solution tank (2), and place a
receiving container beneath it.
2. Set the knob (3) to the position E.
3. Open the solution tank cap (4) slightly to release pressure of the tank.
4. Open the solution discharge lever (5). Chemical solution is discharged from the nozzle.
5. Clean the tank inside with water.
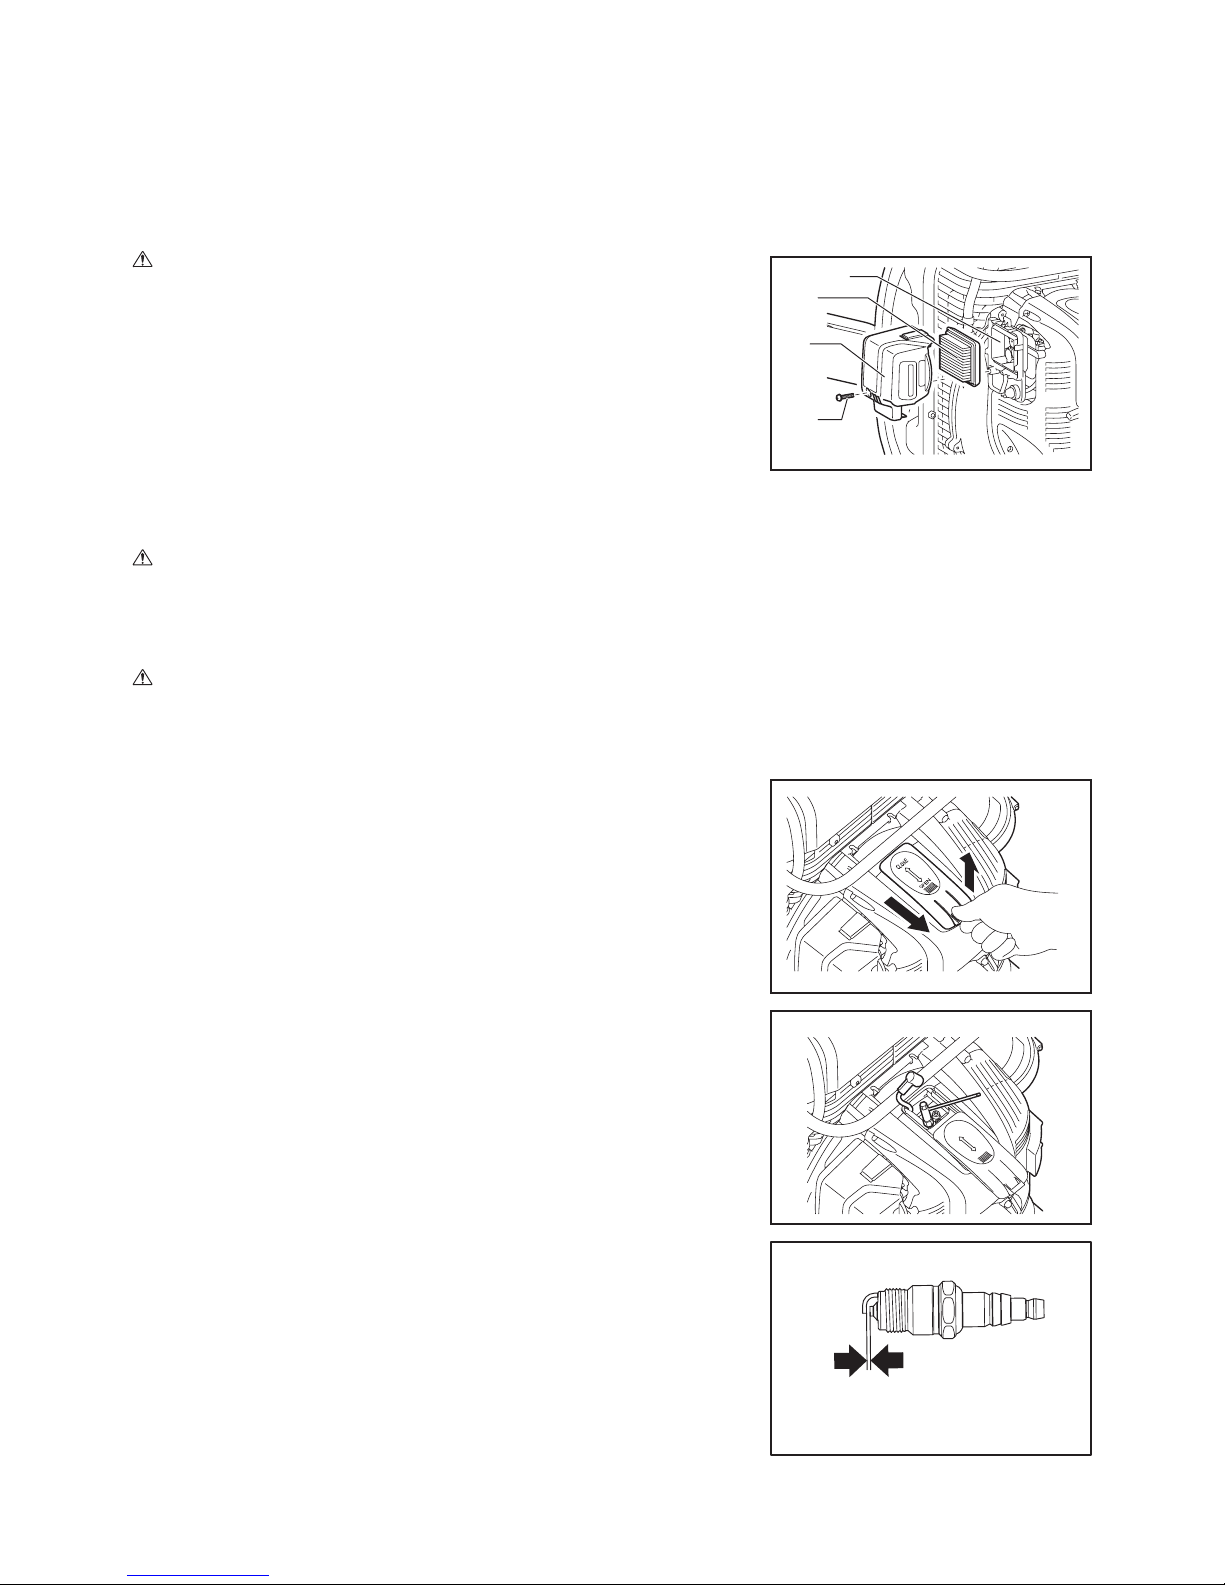
Cleaning the strainer of solution tank
Remove the tank cap, take out the strainer from inside the tank and then clean it
after use.
(3)
(1)
(4)
(2)
(5)
TRANSPORTING THE MIST BLOWER
Please keep the mist blower in an upright position whenever transporting or storing.
Transporting or storing in a position that is not upright may cause oil to spill inside the
mist blower engine. This may result in oil leaks and white smoke from burning oil, and
the air cleaner may become dirty with oil.
DANGER:
● When transporting and storing the mist blower, be sure to stop the engine.
Page 23

23
1. Loosen and remove the cap (1) that comes out with the strainer (2).
2. Clear dust and particles away from strainer.
3. Put the strainer back to the original position. Be sure to tighten the cap rmly.
INSPECTION AND MAINTENANCE
DANGER:
● Before inspection and maintenance, stop the engine and allow it to cool. Remove also the spark plug and plug cap.
– If inspection or maintenance is attempted immediately after engine stop or with the plug cap left attached, the operator may suffer burn or an
accident due to careless startup.
● After inspection and maintenance, make sure that all parts are assembled. Then, proceed to operation.
● Always wear rubber/chemical-resistant gloves for inspection and maintenance.
NOTICE:
● Never use gasoline, benzine, thinner, alcohol or the like. Discoloration, deformation or cracks may result.
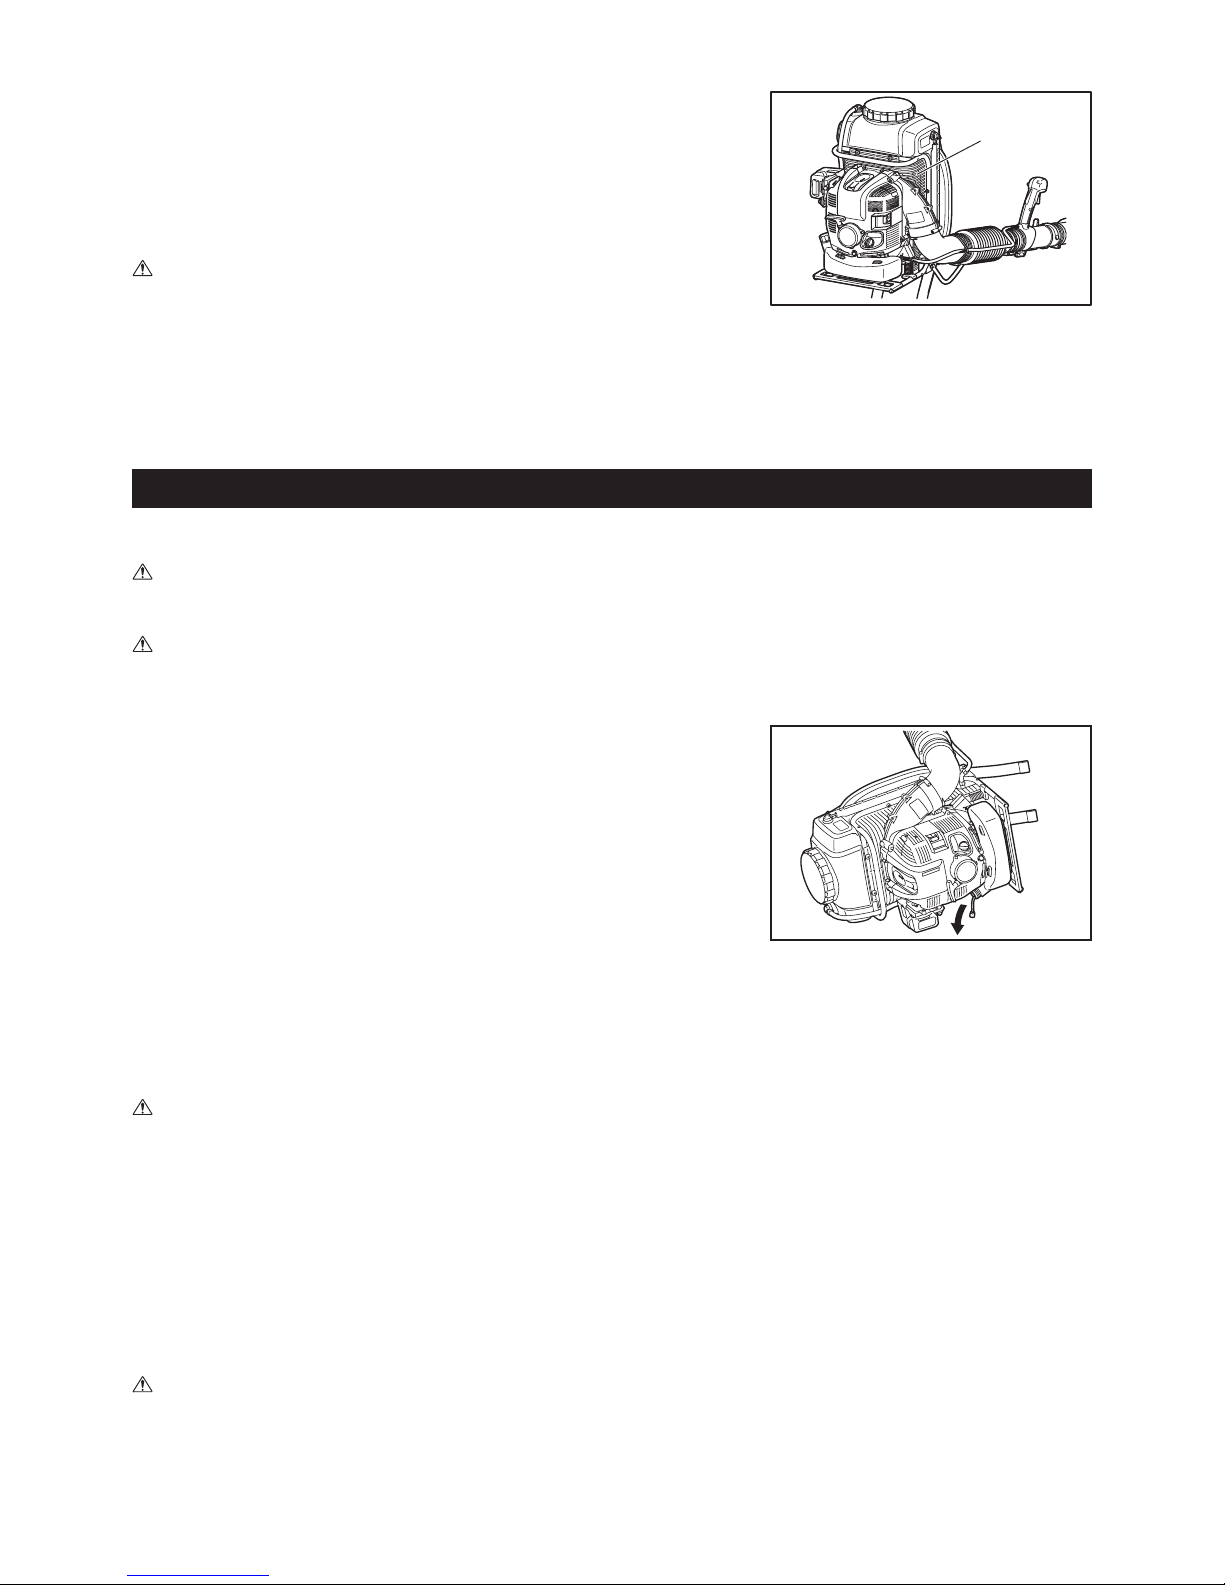
Replacement of engine oil
Deteriorated engine oil will shorten the life of the sliding and rotating parts to a great extent. Be sure to check the period and quantity of replacement.
DANGER:
● In general, the engine main unit and engine oil still remain hot just after the engine is stopped. In replacement of oil, make sure that the engine
main unit and engine oil are sufciently cooled down. Otherwise, there may remain a risk of burn. In addition just after of the engine stops all
the oil may not return to crank case. Do not check the oil level right after engine stops.
● If the oil lled above the limit, it may be contaminated or may catch re with white smoke.
Interval of replacement: Initially, every 20 operating hours, and subsequently every 50 operating hours
Recommended oil: SAE10W-30 oil of API Classication SF Class or higher (4-stroke engine oil for automobile)
Oil change procedure
1. Set the mist blower down on a level surface.
2. Place a waste oil container under the drainage hole (1) to catch the oil as it drains out.
The container should have a capacity of at least 220 mL to be able to catch all of the oil.
3. Loosen the oil drain bolt (2) to let the oil drain out. Be careful not to allow oil to get on the
fuel tank or other parts.
CAUTION:
● Be careful not to lose the gasket (aluminum washer) (3). Place the oil drain bolt (2) in a
location where it will not accumulate dirt.
4. Remove the oil cap (4). (Removing the oil cap (4) allows the oil to drain easily.)
CAUTION:
● Be sure to set the oil cap (4) down in a location where it will not accumulate dirt.
5. As the level of the oil being drained decreases, tilt the mist blower over on to the side with
the drain so that the oil will completely drain out.
6. After the oil has completely drained out, tighten the oil drain bolt (2) securely. If the bolt is not tightly fastened, this may result in an oil leak.
CAUTION:
● Do not forget to put the gasket (aluminum washer) (3) back on when reattaching the drain plug.
7. Adding oil during the oil change procedure is performed in the same manner as the separately explained procedure for adding oil whenever the
level is insufcient. Always add oil by lling from the opening under the oil cap.
(Specied oil level: Approximately 220 mL)
8. After lling with oil, tighten the oil cap (4) securely to prevent oil leaks.
(3)
(2)
(1)
(4)
(2)
(1)
Cleaning the tube joint
WARNING:
● Do not remove the hose band, tube, or cap, when the solution discharge lever is
open.
● Do not loosen the cap when the solution discharge lever is open.
Page 24
24
25
Points in replacement of engine oil
● Never discard replaced engine oil in garbage, earth or sewage ditch. Disposal of oil is regulated by law. In disposal, always follow the relevant
laws and regulations. For any points remaining unknown, contact Authorized Service Agent.
● Oil will deteriorate even when it is kept unused. Perform inspection and replacement at regular intervals (replace with new oil every 6 months).
(4)
(3)
(2)
(1)
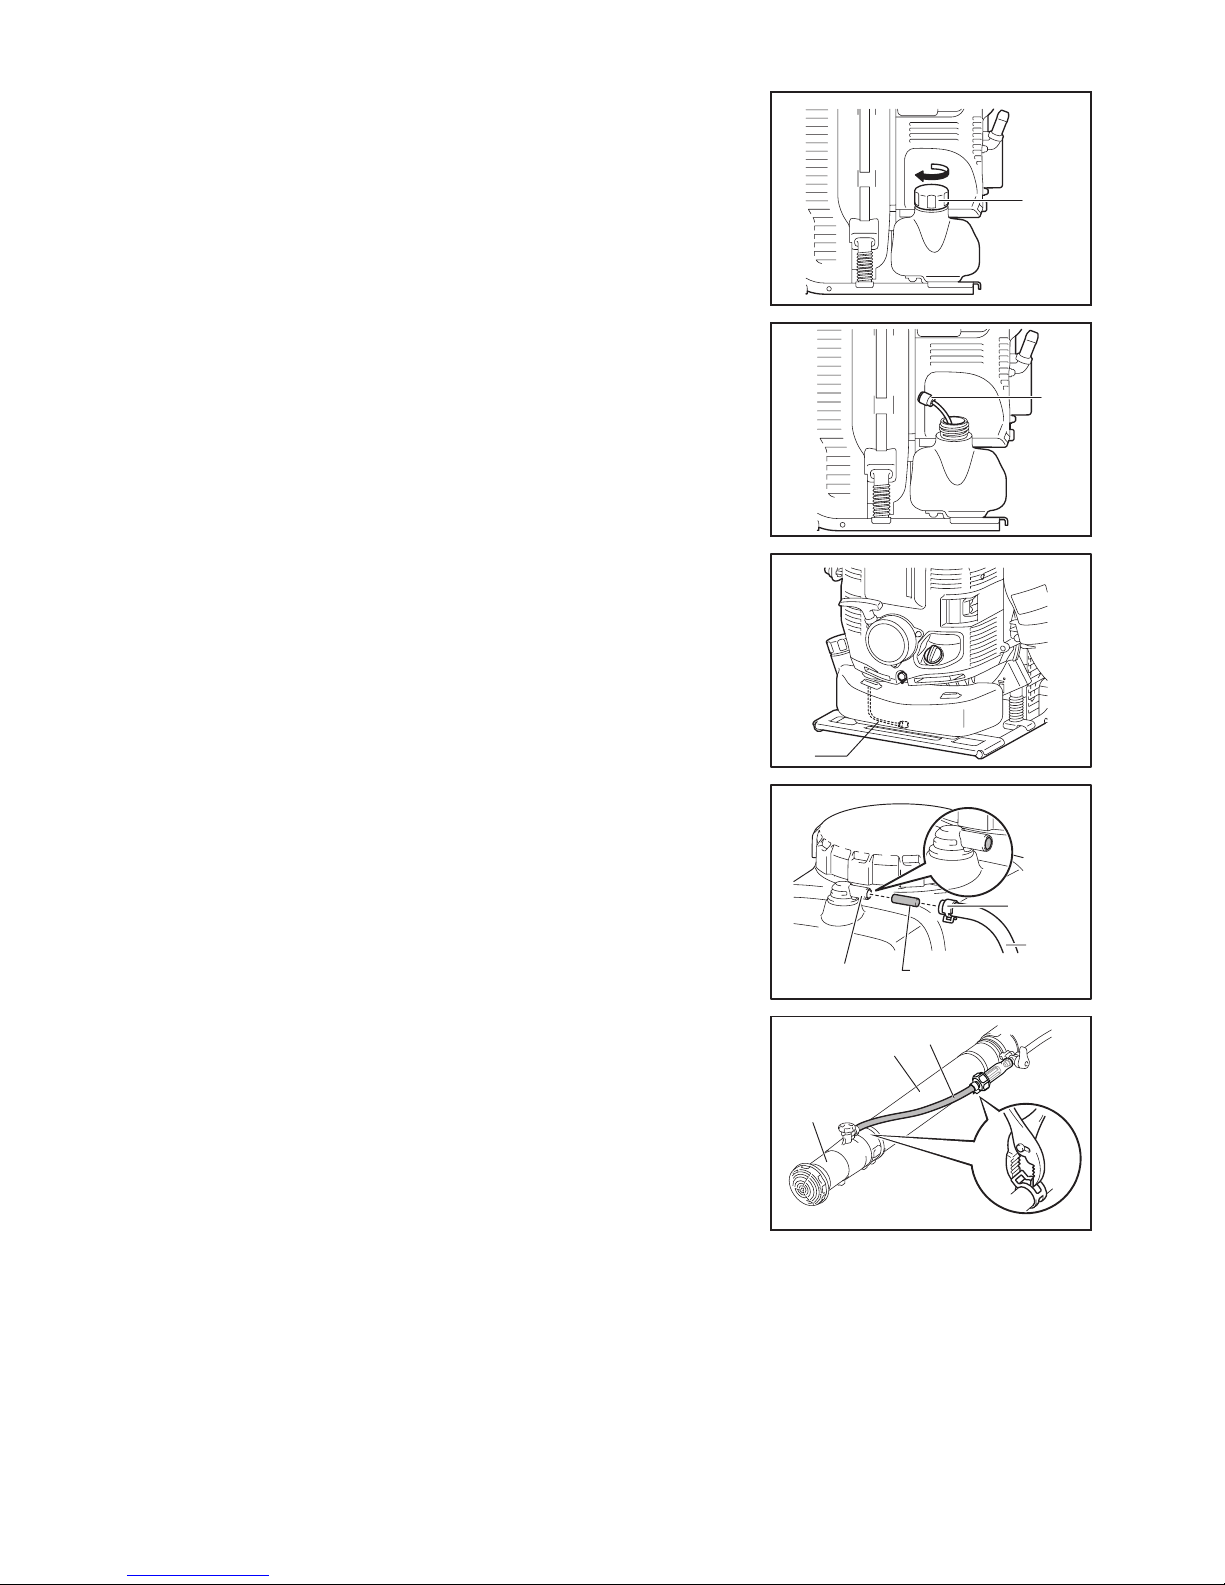
Cleaning of air cleaner
WARNING: INFLAMMABLES STRICTLY PROHIBITED
Interval of Cleaning and Inspection: Daily (every 10 operating hours)
1. Loosen the knob bolt (1).
2. Remove the air cleaner cover (2).
3. Take out the element (3) and remove any dirt with the brush.
NOTE:
● The element is a dry type and should not get wet. Never wash with water.
4. Replace the element with a new one if it is damaged or very dirty.
5. Wipe off any oil that has come into contact with the breather with a rag or cloth.
6. Install the element in the cleaner case (4).
7. Attach the air cleaner cover and tighten the knob bolt.
DANGER:
● Clean the element several times a day, if excessive dust adheres to it.
● If operation continues with the element remaining not cleared of oil, oil in the air cleaner may fall outside, resulting in oil contamination.
Checking the spark plug
CAUTION:
● When removing the spark plug, clean the spark plug and cylinder head rst, so that no dirt, sand, etc. will enter the cylinder.
● You must remove the spark plug after the engine has cooled down in order to avoid damaging the threaded hole in the cylinder.
● The spark plug must be installed properly into the threaded hole. If installed at an angle, the threaded hole in the cylinder will get damaged.
1. Opening/closing the plug cover
To open the plug cover, pull up on the seam of the plug cover projection and slide
in the direction of the “OPEN” indication as shown in the gure at right.
When closing the cover, slide the cover in the “CLOSE” direction till the click under
the plug cover projection rides over the engine cover. Finally, push in the projection.
2. Removing the spark plug
Use an attached box wrench to remove or install the spark plug.
3. Checking the spark plug
The clearance between two electrodes of spark plug (see the gure) is
0.7 to 0.8 mm. Adjust to the correct clearance when it is too wide or too narrow.
Clean thoroughly or replace the spark plug if it has accumulated carbon or
contaminated.
4. Replacing the spark plug
For replacement, use NGK-CMR6A.
0.7 – 0.8 mm
Page 25
25
Cleaning the fuel lter
● Clogged fuel lter may cause difculty of start-up or failure of engine speed
increase.
● Check the fuel lter regularly as follows:
1. Remove the fuel tank cap (1), drain the fuel to empty the tank. Check the tank
inside for any foreign materials. If any, wipe clean such materials.
2. Pull out the fuel lter (2) with wire through the fuel lling port.
3. If the fuel lter surface is contaminated, clean it with gasoline. Foul gasoline must
be disposed of according to the method specied by each local authority.
Excessively foul lter must be replaced.
4. Reset the fuel lter in the fuel tank and tighten rmly the fuel tank cap.
NOTE:
● When resetting the fuel lter in the tank, return it to the position as shown in the
gure.
For replacement, contact your authorized service center.
(1)
(2)
(2)
(4)
(3)
(2)
(1)
Cleaning the joint pipe cleaner element
1. Remove the hose band (1) and the hose (2).
2. Pull out the element (3) and remove any dirt form it with a brush.
If it is difcult to pull out the element, use a slender stick to catch it out.
3. Replace the element with a new one if it is damaged or very dirty.
4. Press the element into the joint pipe (4) until the element tail is ush with its port
end.
5. Install the hose and secure it with a hose band.
Replacement of solution hose
● Check the solution hose (1) frequently. Damaged hose may result in leakage of
chemical solution. Replace the hose if necessary as follows.
1. Remove the nozzle (2) from the pipe (3).
2. Loosen the hose band, and then replace the old hose with new one.
Inspection of bolts, nuts and screws
● Retighten loose bolts, nuts, etc.
● Check for fuel and oil leakage.
● Replace damaged parts with new ones for safety operation.
Replacement of gaskets and packings
In reassembling after the engine is dismounted, be sure to replace the gaskets and
packings with new ones.
(3)
(2)
(1)
Page 26
26
27
Cleaning of parts
● Keep the engine always clean.
● Keep the cylinder ns free of dust or dirt. Dust or dirt adhering to the ns will cause
seizure.
● Blowing air is taken in from the air inlet net (1). When airow has dropped down
during operation, stop engine and inspect the air inlet net for blocking by obstacles.
● Note that failure to remove any such obstacles may result in the engine becoming
overheated and damaged.
WARNING:
● Never use the mist blower without the net of the mist blower. Before each use,
check that the net is attached in place and is free from any damage.
(1)
Any maintenance of adjustment work that is not included and described in this manual is only to be performed by Authorized Service Centers.
STORAGE
Draining the fuel
WARNING:
● When draining the fuel, be sure to stop the engine and conrm that the engine cools down.
– Just after stopping the engine, it may still hot with possibility of burns, inammability and re.
CAUTION:
● When the machine is kept out of operation for a long time, drain up all fuel from the fuel tank and carburetor, and keep it at a dry and clean
place.
Drain up fuel from the fuel tank and carburetor according to the following procedure:
1) Remove the fuel tank cap, and drain fuel completely.
If there is any foreign matter remaining in the fuel tank, remove it completely.
2) Pull out the fuel lter from the rell port using a wire.
3) Push the primer pump until fuel is drained from there, and drain fuel coming
into the fuel tank.
4) Reset the lter to the fuel tank, and securely tighten the fuel tank cap.
5) Then, continue to operate the engine until it stops.
6) Remove the spark plug, and drip several drops of engine oil through the spark
plug hole.
7) Gently pull the starter handle so that engine oil will spread over the engine, and
attach the spark plug.
8) During storage, please keep the machine upright.
9) Keep the drained fuel in a special container in a well-ventilated shade.
Draining the solution tank
WARNING:
● When draining the solution tank, be sure to stop the engine and conrm that the engine cools down.
– Just after stopping the engine, it may still hot with possibility of burns, inammability and re.
Before storing the mist blower, drain the solution tank by referring to the section titled “Draining and cleaning the solution tank”.
Cleaning the strainer at the top of the solution tank
When storing the mist blower, always clean the strainer at the top of solution tank.
To clean the strainer, refer to the section titled “Draining and cleaning the solution tank”.
Cleaning the strainer at the tube joint
When storing the mist blower, always clean the strainer at the tube joint.
To clean the strainer, refer to the section titled “Draining and cleaning the solution tank”.
CAUTION:
● When storing the mist blower, be sure to stop the engine.
Page 27
27
Retaining the straight pipe with a supplied hand strap
When storing the mist blower, retain the straight pipe with a supplied hand strap tied
to the frame.
Retaining the pipe in this position will be easy to transport the unit.
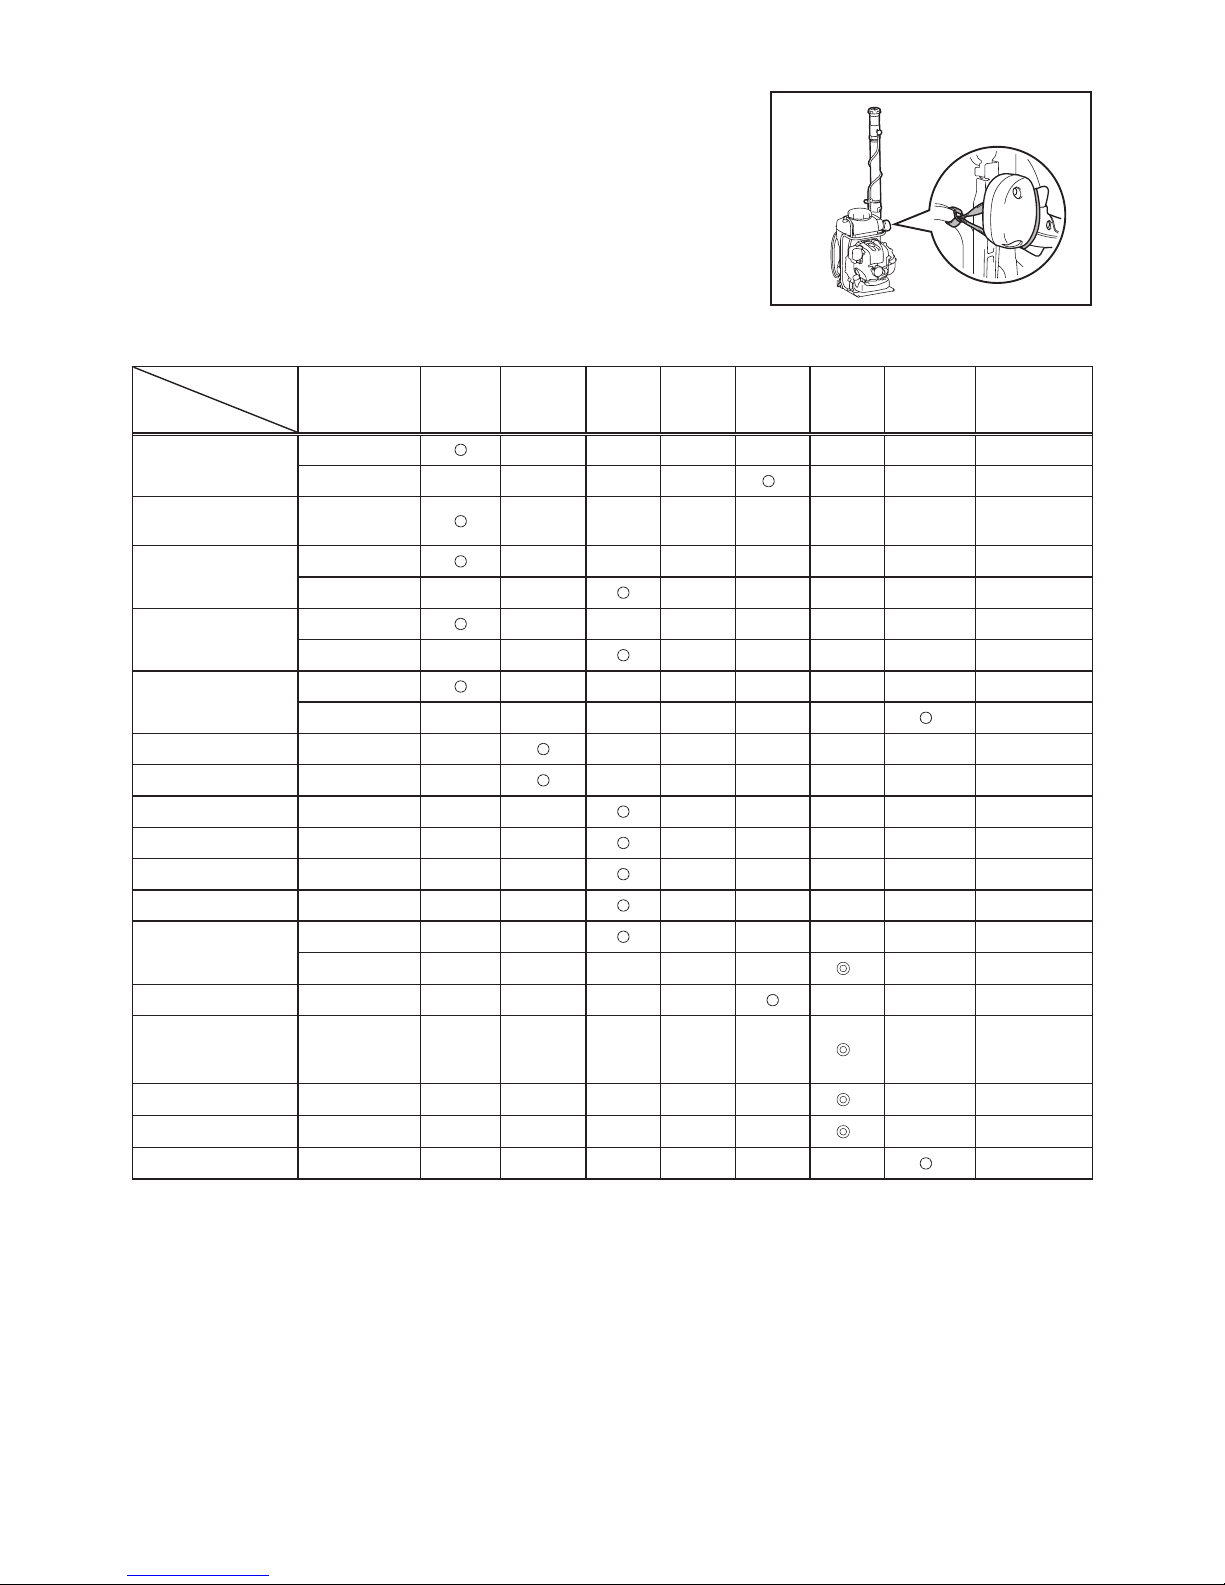
Maintenance interval
Operating time
Item
Before
operation
After
lubrication
Daily
(10h)
30h 50h 200h
Shutdown/
rest
Corresponding
Page
Engine oil Inspect
13
Replace
*1
23
Tightening parts (bolt,
nut)
Inspect
25
Strainer of solution
tank
Inspect
22
Clean
22
Strainer of tube joint Inspect
23
Clean
23
Fuel tank Clean/inspect
—
Drain fuel
*3
26
Throttle trigger Check function
—
Stop control lever Check function
16
Idle speed Inspect/adjust
16
Air cleaner Clean
24
Ignition plug Inspect
24
Cooling air duct Clean/inspect
26
Fuel pipe Inspect
25
Replace
*2
—
Fuel lter Clean/replace
25
Clearance between
air intake valve and air
discharge valve
Adjust
*2
—
Oil tube Inspect
*2
—
Engine overhaul
*2
—
Carburetor Drain fuel
*3
26
*1 Perform initial replacement after 20h operation.
*2 For the 200 operating hour inspection, request Authorized Service Center or a machine shop.
*3 After emptying the fuel tank, continue to run the engine and drain fuel in the carburetor.
Page 28

28
TROUBLESHOOTING
Before making a request for repairs, check a trouble for yourself. If any abnormality is found, control your machine according to the description
of this manual. Never tamper or dismount any part contrary to the description. For repairs, contact Authorized Service Agent or local dealership.
State of abnormality Probable cause (malfunction) Remedy
Engine does not start. I-O switch is set to STOP. Set the I-O switch to START.
Failure to operate primer pump. Push 7 to 10 times.
Low pulling speed of starter rope. Pull strongly.
Lack of fuel. Feed fuel.
Incorrect choke position.
Set to “CLOSE” (cold start).
Set to “OPEN” (warm start).
Clogged fuel lter. Clean.
Bent or blocked fuel tube. Straighten or replace fuel tube.
Deteriorated fuel.
Deteriorated fuel makes starting more difcult.
Replace with new one. (Recommended
replacement: 1 month)
Excessive suction of fuel.
Set throttle lever from medium speed to high
speed, and pull starter handle until engine
starts.
If engine will not start still, remove spark plug,
make electrode dry, and reassemble them as
they originally are. Then, start as specied.
Detached plug cap. Attach securely.
Contaminated spark plug. Clean.
Abnormal clearance of spark plug. Adjust clearance.
Abnormality of spark plug. Replace.
Abnormal carburetor. Make request for inspection and maintenance.
Starter rope cannot be pulled, or no
compression is felt.
Make request for inspection and maintenance.
Abnormal drive system/electric system.
(I-O switch fault, wiring fault, connector
fault, etc.).
Make request for inspection and maintenance.
Engine stops soon.
Engine speed does not increase.
Insufcient warm-up. Perform warm-up operation.
Choke lever is set to “CLOSE” although
engine is warmed up.
Set to “OPEN”.
Low idle speed. Adjust idle speed.
Clogged fuel lter. Clean.
Contaminated or clogged air cleaner. Clean.
Abnormal carburetor. Make request for inspection and maintenance.
Exhaust mufer fault (clogged etc.). Make request for inspection and maintenance.
Abnormal drive/electric system. Make request for inspection and maintenance.
Detached throttle wire. Attach securely.
Engine does not stop.
Run engine at idling, and set choke lever to
CLOSE.
Detached connector. Attach securely.
Abnormal electric system. Make request for inspection and maintenance.
When the engine does not start after warm-up operation:
If there is no abnormality found for the check items, open the throttle by about 1/3 and start the engine.
Page 29

29
Дуже дякуємо Вам за вибір бензинового обприскувача
DOLMAR. Ми раді запропонувати Вам бензиновий обприскувач
DOLMAR, що є результатом довготривалої програми розвитку та
багаторічного знання й досвіду.
Цей обприскувач втілює у собі переваги новітніх технологій та
ергономічного дизайну. Даний виріб є зручним та компактним
професійним інструментом, призначеним для широкого кола
робіт.
Будь ласка, прочитайте, зрозумійте та дотримуйтесь
інструкцій з цієї брошури, оскільки в ній наведені детальні
вказівки щодо роботи інструмента, які дозволять йому
продемонструвати відмінні робочі характеристики. Це
допоможе Вам безпечно досягти найкращих результатів
експлуатації Вашого обприскувача DOLMAR.
Українська
СИМВОЛИ
Під час читання цієї інструкції з експлуатації вкрай важливо розуміти такі символи.
ПОПЕРЕДЖЕННЯ/НЕБЕЗПЕКА
Використовуйте засоби захисту
органів дихання
Прочитайте, зрозумійте і
дотримуйтесь інструкції з експлуатації
Гарячі поверхні – можна обпекти
пальці або руки
Заборонено Пальне (бензин)
Не палити Ручний запуск двигуна
Уникайте контакту з відкритим
полум’ям
Аварійна зупинка
Надягайте міцне взуття із нековзною
підошвою.
Перша допомога
Надягайте відповідний захисний одяг УВІМКНЕННЯ/ЗАПУСК
Надягайте захисні рукавиці ВИМКНЕННЯ/STOP
Під час обприскування не дозволяйте
стороннім особам наближатися
Відрізання пальців або руки об лезо
крильчатки
Не допускайте до зони роботи
сторонніх осіб та домашніх тварин
Довге волосся може заплутатись і
призвести до нещасного випадку
Використовуйте засоби захисту зору
і слуху
Отруйні пари або токсичні гази.
Не використовуйте там, де відсутня
вентиляція.
Зміст
Сторінка
Символи .........................................................................................29
Важливі правила безпеки .............................................................30
Технічні дані ..................................................................................36
Найменування частин ...................................................................37
Інструкції з монтажу ......................................................................38
Перед запуском двигуна ...............................................................40
Запуск та зупинення двигуна .......................................................42
Регулювання холостого ходу ........................................................43
Спосіб використання ....................................................................44
Технічне обслуговування та догляд .............................................50
Зберігання .....................................................................................53
Усунення несправностей ..............................................................55
Page 30
30
31
ВАЖЛИВІ ПРАВИЛА БЕЗПЕКИ
ПОПЕРЕДЖЕННЯ:
● Прочитайте усі застереження та інструкції. Недотримання застережень та
інструкцій може призвести до ураження електричним струмом, займання та/
або тяжкої травми.
Збережіть усі застереження та інструкції для
подальшого використання.
Загальні інструкції
● Для належного і безпечного користування обприскувачем користувач повинен
прочитати, зрозуміти і дотримуватись цієї інструкції з експлуатації (1).
Недостатньо проінформовані користувачі піддають себе та оточуючих людей
небезпеці через невідповідне поводження з інструментом.
● Передавати обприскувач дозволяється виключно особам, які довели, що
мають досвід роботи із обприскувачами.
● Разом із інструментом слід завжди передавати й інструкцію з експлуатації.
● Особи, які користуються цим інструментом уперше, повинні попросити дилера
надати основні інструкції щодо належного поводження з обприскувачем.
● Заборонено користуватись обприскувачем дітям та особам, яким не
виповнилося 18 років. Разом з тим, особам, яким вже виповнилося 16 років,
дозволяється використовувати інструмент виключено з навчальною метою,
однак під безпосереднім наглядом кваліфікованого інструктора.
● Будьте надзвичайно уважними та обережними під час використання
обприскувачів.
● Користуйтесь обприскувачем лише за умови доброго фізичного стану.
● Усі роботи слід виконувати сумлінно та обережно. Користувач несе
відповідальність за інших людей.
● За жодних обставин не використовуйте обприскувач, перебуваючи під
впливом алкоголю або ліків (2).
● Не використовуйте інструмент, коли ви втомлені.
● Збережіть інструкцію для подальшого використання.
Використання інструмента за призначенням
● Використовуйте правильне обладнання. Обприскувач призначений лише для
розприскування рідких хімікатів та інших рідин для боротьби зі шкідниками та
бур’янами у плодових, декоративних садах та огородах, на деревах, кущах
та інших рослинах, як-от кава, тютюн і бавовна. Окрім того, даний інструмент
корисний для догляду за молодими деревами, як-от для боротьби із короїдами
й іншими шкідниками та захворюваннями рослин.
В жодному разі не використовуйте даний інструмент для інших цілей.
Якщо інструмент обладнано відповідною трубкою для функції обприскування,
його можна використовувати для обприскування.
● Використовуйте лише засоби захисту рослин, що спеціально призначені
виробником для використання із обприскувачами та відповідають усім
наявним правилам, стандартам і розпорядженням з техніки безпеки.
Інформацію щодо порядку використання обприскувача можна отримати у
дилера. Дотримуйтесь усіх наявних місцевих правил, стандартів і розпоряджень
з техніки безпеки.
Весь персонал, що відповідає за експлуатацію та обслуговування, має пройти
підготовку та ознайомитись із правилами належного поводження із хімікатами,
що використовуються, а також із правилами надання першої/екстреної допомоги
та утилізації рідких хімікатів.
ПОПЕРЕДЖЕННЯ:
● Ваш обприскувач призначений виключено для професійного використання. Не
передавайте та не здавайте в оренду обприскувач без інструкції з експлуатації.
Переконайтесь, що особи, які будуть користуватись інструментом, розуміють
інформацію, що міститься у даній інструкції з експлуатації.
Засоби індивідуального захисту
● Для зменшення ризику травмування під час використання хімікатів, надягайте
відповідне захисне спорядження під час заливання, використання та очищення
обприскувача. Завжди дотримуйтесь усіх інструкцій виробника хімікатів щодо
належного захисту очей, шкіри та органів дихання. Вони можуть відрізнятися
та бути суворішими за наступні застереження.
● Під час використання токсичних хімікатів оператор та особи, що знаходяться
поруч, повинні носити відповідні респіратори, затверджені для захисту від
хімікатів, що використовуються. Дивіться товарну етикетку хімікату. Вдихання
токсичних хімікатів може призвести до значної або смертельної травми.
● Одяг має бути функціональним та відповідним, тобто щільно прилягати,
проте не заважати рухам. Не надягайте прикраси і слідкуйте, щоб одяг і довге
волосся не затягнуло в повітрозабірник. (3)
● Для запобігання травмам голови, очей, рук або ніг, а також для захисту
органів слуху під час роботи з обприскувачем слід використовувати захисний
спецодяг та засоби захисту, зазначені нижче.
(2)
(1)
(3)
Page 31

31
Зверніть особливу увагу на такі правила
● Одяг має бути міцним і зручно облягати, однак не обмежувати рухів. Уникайте
вільних жакетів, розкльошених штанів або штанів із манжетами, шарфів,
незаплетеного довгого волосся або будь-чого іншого, що може бути затягнено
в повітрозабірник.
Для захисту ніг надягайте довгі штани.
Не надягайте шорти. (5)
● Шум від обприскувача може пошкодити слух. Для захисту слуху використовуйте
засоби, що створюють звукові бар’єри (беруші або шумопоглиначі). Якщо
ви постійно чи регулярно користуєтесь інструментом, вам слід регулярно
перевіряти слух. (4)
● Під час роботи з обприскувачем завжди надягайте гумові/хімічно стійкі
рукавиці. Важливо використовувати відповідне взуття. Надягайте гумове/
хімічно стійке взуття. (5)
● Обов’язковим є належний захист очей. Хоча потік повітря спрямовано в інший
від оператора бік, під час роботи обприскувача можуть мати місце рикошети
і відскоки назад. (4)
● Не використовуйте обприскувач, не надягнувши захисну маску або правильно
підібрані окуляри з належним верхнім і боковим захистом, які відповідають
стандарту ANSI Z 87.1 (або наявному національному стандарту).
ПОВОДЖЕННЯ ІЗ ХІМІКАТАМИ
● Деякі хімікати, що використовуються із обприскувачем, можуть містити токсичні
та/або їдкі речовини. Такі хімікати можуть бути небезпечні і спричинити важкі
чи смертельні травми людям і тваринам, та/або нанести сильні пошкодження
рослинам і навколишньому середовищу.
Уникайте прямого контакту із хімікатами.
Дотримуйтесь інструкцій виробника хімікатів щодо будь-яких контактів із його
продукцією.
● Ознайомлюйтесь із товарною етикеткою та інструкцією з експлуатації кожного
разу, перш ніж змішувати чи використовувати хімікат, та перш ніж складати на
зберігання або утилізувати його.
Не покладайтесь на пам’ять.
Недбале або неправильне використання може призвести до значної або
смертельної травми.
● Перед використанням уважно читайте етикетки на контейнерах хімікатів.
Хімікати класифікуються на категорії токсичності.
Для кожної категорії діють унікальні правила поводження.
Ознайомтесь із правилами категорії хімікату, що використовується.
Хімікати дозволяється використовувати лише тим особам, які мають
підготовку із поводження з ними та знають відповідні процедури надання
першої допомоги.
● У разі неналежного використання хімікати можуть бути шкідливими для
людей, тварин та навколишнього середовища. Окрім того, не рекомендується
використовувати з обприскувачем деякі їдкі, корозійні або отруйні хімікати.
● Змішуйте лише сумісні пестициди. Неправильні суміші можуть утворити
токсичні пари.
Під час роботи із хімікатами та їх розбризкування слід обов’язково
дотримуватись місцевих, державних та федеральних правил і рекомендацій
із захисту навколишнього середовища. Не розбризкуйте у вітряну погоду.
Для захисту навколишнього середовища дотримуйтесь рекомендованого
дозування – не перевищуйте його.
Будьте особливо обережні під час роботи поблизу водозборів, водних каналів
тощо.
● Не відкривайте рота, як-от для приймання їжі, пиття або паління під час
роботи із хімікатами, а також під час розбризкування. Ніколи не дуйте ротом
у насадки, трубки, труби на будь-які інші компоненти. Завжди працюйте із
хімікатами у добре провітрюваному місці та використовуйте відповідний
захисний одяг і обладнання.
Не зберігайте і не транспортуйте хімікати разом із їжею, напоями чи ліками, і
ніколи не використовуйте пустий контейнер від хімікату для інших цілей.
Не переливайте рідкі хімікати в інші контейнери, особливо у контейнери для
їжі та/або напоїв.
● У разі випадкового контакту або проковтування хімікатів, чи у разі зараження
одягу, припиніть роботу і негайно подивіться інформацію в інструкції виробника
хімікату.
Якщо не знаєте що робити, негайно зверніться за порадою до токсикологічного
центру або лікаря.
Тримайте етикетку виробу напоготові, щоб прочитати або показати особі, із
якою консультуєтесь.
Негайно прибирайте розлиті хімікати.
Утилізуйте будь-які залишки відповідно до державних, федеральних або
національних законів та розпоряджень.
● Тримайте хімікати у місцях, недоступних для дітей, сторонніх осіб та тварин.
Якщо хімікати не використовуються, зберігайте їх у безпечному та зачиненому
місці. Дотримуйтесь рекомендацій виробника щодо належного зберігання.
(4)
(5)
Page 32

32
33
Підготовка хімікатів
● Готуйте хімічні розчини відповідно до інструкцій виробника хімікатів.
● Готуйте розчин лише для поточної роботи, щоб не залишалось зайвого
розчину.
● Змішуйте хімікати лише відповідно до інструкцій – неправильні суміші можуть
утворювати токсичні пари або вибухові суміші.
● Ніколи не розбризкуйте нерозбавлені хімікати.
● Готуйте розчин та заливайте контейнер лише надворі у добре провітрюваному
місці.
● Оператор має з’ясувати назву хімікати, що наразі використовується.
Зберігання
● Не зберігайте розчин для розбризкування у контейнері довше одного дня.
● Завжди зберігайте та транспортуйте розчин для розбризкування лише у
рекомендованих контейнерах.
● Ніколи не зберігайте та не транспортуйте розчин для розбризкування у
контейнерах, призначених для їжі, напоїв або корму для тварин.
● Не зберігайте та не транспортуйте розчин для розбризкування разом із їжею,
напоями або кормом для тварин.
● Тримайте розчин для розбризкування у місцях, недоступних для дітей,
сторонніх осіб та тварин.
● Зберігайте розчин для розбризкування у зачиненому місці, недоступному для
сторонніх осіб.
Утилізація
Ніколи не зливайте залишки хімікатів або забруднені миючі розчини у водні
канали, дренажні системи, каналізацію, вуличні стоки, каналізаційні колодязі
тощо.
Під час утилізації забруднених миючих розчинів дотримуйтесь усіх наявних
законів, правил та розпоряджень.
Суворо дотримуйтесь застережних інструкцій виробника хімікатів.
Заповнення контейнера
● Затягніть усі з’єднання та переконайтесь, що труби та трубка надійно
приєднані та перебувають у доброму стані. Тримайте важіль подачі розчину
закритим.
● Перш ніж використовувати обприскувач із хімікатами, залийте у нього чисту
воду, щоб перевірити правильність збірки та потренуватися із розбризкування.
Також перевірте наявність витоків. Після детального ознайомлення із роботою
обприскувача переходьте до звичайної експлуатації.
● Заповнюйте обприскувач у добре провітрюваних місцях надворі.
● Не використовуйте у обприскувачі:
– займисті речовини, що можуть спричинити вибух, який призведе до значних
або смертельних травм;
– їдкі або корозійні матеріали, які можуть призвести до пошкодження
інструмента;
– рідини із температурою вище 50°C для зменшення ризику отримання опіків
та пошкодження інструмента.
Для заповнення бака для розчину поставте обприскувач на рівну поверхню
і заливайте розчин лише за умови доброго освітлення та видимості. Для
зменшення ризику забруднення навколишнього середовища намагайтесь не
переповнювати хімічним розчином бак для розчину.
Для зменшення ризику травмування не заповнюйте обприскувач, коли він
знаходиться на спині.
Якщо бак із розчином заповнюється за допомогою шланга, підключеного
до централізованого водопостачання, переконайтесь, що кінець шланга не
знаходиться у розчині, щоб зменшити ризик протитечії, а саме, щоб хімікати не
потрапили у систему водопостачання у разі несподіваного утворення вакууму.
Розрахуйте правильний об’єм хімічного розчину, щоб використати все за один
раз і не залишати нічого у баку.
Після заливання встановіть кришку бака для розчину і надійно затягніть.
● Перевіряйте наявність витоків під час доливання та роботи. У разі витоку з
бака для розчину або незакріпленого з’єднання, розчин може замочити одяг
та потрапити на шкіру.
Page 33

33
Запуск обприскувача
● Будь ласка, перевіряйте, щоб у радіусі 20 метрів (6) не було дітей або сторонніх
осіб, а також слідкуйте за тваринами поблизу місця роботи.
Ніколи не використовуйте обприскувач у міській місцевості.
● Перш ніж розпочати роботу, завжди перевіряйте безпечність використання
обприскувача.
Перевірте надійність дросельного регулятора. Дросельний регулятор потрібно
перевірити на плавність та вільність руху. Перевірте належне функціонування
фіксатора дросельного регулятора.
Перевіряйте, щоб ручки були чистими та сухими, та перевіряйте
функціональність пускового перемикача. Слідкуйте, щоб ручки не були
забруднені мастилом і пальним.
● Для зменшення ризику витоку та потрапляння хімікатів на шкіру, перевірте
затягнення кришки контейнера та усіх з’єднань на шляху подачі розчину, та
переконайтесь, що шланг надійно встановлений і перебуває у доброму стані.
Тримайте важіль подачі розчину закритим.
● Перш ніж вмикати інструмент, переконайтесь що важіль подачі розчину
закритий.
● Переконайтесь, що ковпачок свічки запалювання встановлено надійно –
недостатньо надійно встановлений ковпачок може спричинити утворення дуги
і призвести до запалення легкозаймистих парів і пожежі.
● Перевірте стан ременів ранця і замініть пошкоджені чи зношені ремені.
● Перш ніж починати роботу, відрегулюйте довжину плечового ременя.
У разі екстреної ситуації можна швидко вилізти з плечового ременя і кинути
інструмент. Перш ніж користуватися інструментом, спробуйте декілька разів
вилізти з ранця, щоб зрозуміти, як це робиться. Не кидайте інструмент під час
тренувань, оскільки це може призвести до його пошкодження.
● Коли тягнете за ручку стартера, не намотуйте мотузку стартера на руку. Не
дозволяйте ручці стартера різко повертатися до початкового положення, а
спрямовуйте мотузку стартера так, щоб вона правильно намотувалась.
Недотримання цієї процедури може призвести до травмування руки або
пальців та пошкодження механізму стартера.
● Після запуску може знадобитись допомога іншої особи, щоб надягти
обприскувач на спину. Для зменшення ризику травмування помічника
внаслідок рикошету сторонніх предметів, потрапляння струменя хімікату/
рідини або гарячих вихлопних парів, протягом цього короткого часу тримайте
двигун на холостому ходу та не дозволяйте помічнику стояти на шляху насадки
або вихлопу. Або запускайте та працюйте із обприскувачем без допомоги.
● Запускайте обприскувач тільки відповідно до інструкції.
● Не використовуйте інші способи запуску двигуна (7)!
● Використовуйте обприскувач та аксесуари, що входять до комплекту, тільки
за призначенням.
● Запускайте двигун обприскувача тільки після того, як зібрано весь інструмент.
Робота з інструментом дозволяється тільки після прикріплення усіх відповідних
аксесуарів.
● У разі виникнення будь-яких проблем із двигуном його слід негайно вимикати.
● Під час використання одноручного обприскувача тримайте праву руку на ручці
керування. Носіть ранець так, щоб плечові ремені були на обох плечах.
Для зменшення ризику втрати керування ніколи не носіть обприскувач із
ременем/ременями на одному плечі.
● Працюючи з обприскувачем, завжди міцно обхоплюйте ручку так, щоб
ручка керування знаходилась між великим і вказівним пальцями. Тримайте
руку в такому положенні, щоб інструмент завжди перебував під контролем.
Слідкуйте, щоб ручка керування перебувала у доброму стані і на ній не було
вологи, смоли, масла або мастила.
● Ваше положення під час роботи має бути стійким і безпечним.
● Для того щоб бак для розчину перебував у вертикальному положенні і для
зменшення ризику виливання, не нахиляйтесь у поясі. Нахиляйтесь лише у
колінах і підтримуйте себе так, щоб завжди зберігати рівновагу.
Пам’ятайте, що заповнений рідиною обприскувач має значну вагу.
Будьте особливо обережні, коли нахиляєтесь, спираєтесь або ходите.
● Використовуйте обприскувач таким чином, щоб уникнути вдихання вихлопних
газів. Ніколи не вмикайте двигун у закритому приміщенні (небезпека
задушення та отруєння газом). Чадний газ не має запаху.
Завжди забезпечуйте належну вентиляцію.
● Ваш обприскувач не захищає від ураження електричним струмом. Для
зменшення ризику ураження електричним струмом ніколи не використовуйте
даний обприскувач поблизу проводів або кабелів (живлення тощо) із
електричним струмом. Не розпилюйте на електричні пристрої та поблизу них.
20 m (66 ft)
(6)
(7)
20 м
Page 34

34
35
● Вимикайте двигун, коли відпочиваєте і коли залишаєте обприскувач без нагляду.
Помістіть його у безпечне місце, щоб уникнути небезпеки для оточуючих,
займання легкозаймистих матеріалів або пошкодження інструменту (8).
● Ніколи не кладіть гарячий обприскувач на суху траву або на поверхню із
легкозаймистого матеріалу.
● Не кладіть обприскувач на землю, коли той працює із високою швидкістю,
оскільки у повітрозабірник може бути затягнуто дрібні предмети, як-от пісок,
трава, пил тощо, що призведе до пошкодження робочого колеса вентилятора.
● Під час робочої перерви не залишайте обприскувач під прямим сонячним
промінням або поряд із джерелом тепла.
● Під час роботи слід використовувати усі захисні та запобіжні елементи, що
входять до комплекту постачання інструмента.
● Ніколи не користуйтеся двигуном із пошкодженим глушником.
● Не засовуйте руку у витяжний отвір. Під час роботи глушник дуже сильно
нагрівається і може завдати опіки.
● Не торкайтесь кришки двигуна протягом тривалого часу. Під час роботи вона
може дуже сильно нагрітися і завдати опіки.
● Під час транспортування вимикайте двигун інструмента (8).
● Надійно кладіть обприскувач в автомобіль або вантажівку, в якій виконується
транспортування, щоб уникнути витоку пального.
● Перед транспортуванням обприскувача слід переконатися, що паливний бак
та контейнер для рідини/хімікату порожні.
Заправляння
● Під час заправки вимикайте двигун (8), тримайте інструмент подалі від
відкритого полум’я (9) і не паліть поблизу.
● Слідкуйте, щоб на шкіру не потрапили нафтопродукти. Не вдихайте
випарування пального.
Під час заправляння завжди надягайте захисні рукавиці. Регулярно замінюйте
та чистіть захисний одяг.
● Будьте обережними, щоб не розлити пальне або мастило, оскільки це
призведе до забруднення ґрунту (захист довкілля). Почистьте обприскувач
відразу після того, як було пролито пальне. Дайте мокрому одягу висохнути,
перш ніж утилізувати його належним чином; закривайте контейнер для
запобігання самозайманню.
● Уникайте потрапляння пального на одяг. Якщо пальне потрапить на одяг,
негайно замініть його (небезпека займання).
● Регулярно перевіряйте кришку паливного бака, аби переконатися, що вона
надійно закрита.
● Обережно затягніть гвинт блокування паливного бака. Перед увімкненням
двигуна переходьте в інше місце (щонайменше на 3 метри від місця
заправляння) (10).
● Ніколи не заправляйте інструмент у закритому приміщенні. Випарування
пального збираються на рівні підлоги (небезпека вибуху).
● Перевозіть та зберігайте пальне тільки у рекомендованих контейнерах.
Слідкуйте за тим, щоб пальне зберігалось у недоступному для дітей місці.
● Не намагайтесь заправити інструмент, коли двигун гарячий або працює.
Спосіб використання
● Використовуйте обприскувач лише за умов доброго освітлення та видимості.
У холодну пору року будьте обережні зі слизькими або мокрими ділянками,
льодом та снігом (можна ослизнутися).
Завжди займайте стійке положення (11).
● Ніколи не працюйте на нестійкій або крутій поверхні (11).
● Якщо вам не знайомі ризики, пов’язані із хімікатом, що використовується,
ознайомтесь із товарною етикеткою та/або паспортом безпеки матеріалу та/
або проконсультуйтесь із виробником/постачальником матеріалу.
Ви також можете звернутись за інформацією про небезпечні матеріали до
вашого роботодавця, державної установи та інших джерел.
Деякі інші установи оприлюднили списки речовин, щодо яких відомо, що вони
викликають захворювання на рак, мають токсичний вплив на репродуктивну
функцію тощо (11).
● Щоб знизити ризик травмування, не скеровуйте обприскувач на перехожих,
оскільки повітряний потік високого тиску може травмувати очі і нести у собі
невеличкі предмети, які рухаються з великою швидкістю (12).
● Ніколи не розпилюйте на людей, тварин або навколишні предмети, якщо
розпилення може травмувати або пошкодити їх (12).
● Ніколи не вставляйте сторонні предмети в повітрозабірник або насадку
обприскувача. Це може призвести до пошкодження робочого колеса вентилятора
і до серйозних травм оператора або сторонніх у результаті викидання таких
предметів або зламаних деталей назовні із високою швидкістю.
● Зверніть увагу на напрямок вітру, тобто не працюйте проти вітру.
● Щоб зменшити ризик падіння і втрати контролю, не ходіть задом наперед під
час використання інструменту.
● Перш ніж чистити або обслуговувати інструмент чи замінювати деталі, завжди
вимикайте двигун.
● Відпочивайте, щоб не втратити контроль через втому. Ми рекомендуємо
робити паузу на 10 – 20 хвилин після кожної години роботи.
(8)
(9)
(10)
3 m (10 ft)
(11)
(12)
3 м
Page 35

35
Після завершення роботи
● Завжди ретельно мийтесь із милом та водою після розпилювання або
роботи із хімікатами. Негайно прийміть душ та помийте окремо кожну деталь
захисного одягу.
Дотримуйтесь усіх додаткових рекомендацій виробника хімікату.
Завжди чистіть обприскувач від пилу та бруду.
● Спорожнюйте, мийте та чистіть бак для розчину та інструмент після кожного
використання. Це запобігає кристалізації розчину, що може спричинити
засмічення та хімічне пошкодження інструменту. Окрім того, залишки хімікатів
можуть давати небажаний ефект під час розпилювання з використанням
хімікату іншого типу (напр., залишки гербіцидів можуть пошкодити або вбити
рослини, на які розпилюються пестициди).
Не зберігайте обприскувач, якщо у баку знаходиться розчин для обприскування.
● Не допускайте дітей, сторонніх осіб та домашніх тварин до територій, які було
щойно обприскано.
Після використання деяких хімікатів, особливо сільськогосподарських
пестицидів, на обробленій території слід встановити табличку щодо
тимчасового обмеження доступу.
Дивіться етикетку хімікату та будь-які застосовні державні розпорядження.
Вказівки щодо догляду
● Перш ніж складати інструмент, почистіть та догляньте його.
● Ставтесь дбайливо до навколишнього середовища. Під час використання
обприскувача намагайтесь забезпечити мінімальний рівень шуму і
забруднення. Зокрема, перевіряйте правильність налаштування карбюратора.
● Регулярно чистіть обприскувач та перевіряйте, чи міцно затягнуті всі гвинти
та гайки.
● Ніколи не здійснюйте технічне обслуговування та не кладіть обприскувач на
зберігання поблизу відкритого полум’я, іскор тощо (13).
● Завжди зберігайте обприскувач у добре провітрюваному замкненому
приміщенні і з порожнім паливним баком та баком для розчину.
(13)
Дотримуйтесь усіх відповідних правил з техніки безпеки, виданих професійними асоціаціями та страховими компаніями.
Не вносьте жодних модифікацій до конструкції обприскувача, оскільки це ставить під загрозу Вашу безпеку.
Догляд та ремонт, покладені на користувача, обмежуються діями, описаними в цій інструкції з експлуатації. Усі інші роботи повинні
виконуватися співробітниками авторизованого сервісного центру.
Використовуйте тільки оригінальні запасні частини та аксесуари, поставлені компанією DOLMAR.
Використання нерекомендованих аксесуарів та машин підвищує ризик виникнення нещасних випадків та отримання травм. Компанія
DOLMAR не несе відповідальності за нещасні випадки або пошкодження, що сталися внаслідок використання будь-яких нерекомендованих
насадок або аксесуарів.
Перша допомога
На випадок екстреної ситуації слід забезпечити, щоб неподалік від місця роботи
знаходилася добре укомплектована аптечка. Одразу поповнюйте аптечку, якщо
чимось скористалися.
Викликаючи допомогу, надавайте таку інформацію:
● Місце нещасного випадку
● Що сталося
● Кількість поранених людей
● Важкість травми
● Ваше ім’я
Пакування
Обприскувач DOLMAR постачається у захисній картонній коробці, що захищає
від пошкоджень під час транспортування. Картон є базовим сировинним
матеріалом і тому може бути перероблений або утилізований (утилізація
паперового сміття).
ЗБЕРІГАЙТЕ ЦІ ІНСТРУКЦІЇ.
ПОПЕРЕДЖЕННЯ:
● НЕ ДОЗВОЛЯЙТЕ впевненості або обізнаності із виробом (що набувається
через регулярне використання) замінити чітке дотримання правил безпеки
щодо даного виробу. НЕНАЛЕЖНЕ ВИКОРИСТАННЯ або недотримання
викладених у даному керівництві правил безпеки може призвести до тяжкої
травми.
Page 36

36
37
Лише для країн ЄС
Декларація відповідності ЄС
Makita декларує, що наступне обладнання:
Найменування виробу: Бензиновий обприскувач
Модель (тип): SP-7650.4 R
Технічні характеристики: див. таблицю “ТЕХНІЧНІ ДАНІ”
Відповідає таким Європейським директивам:
2006/42/ЄС, 2000/14/ЄС
Та виготовлене відповідно до таких стандартів або стандартизованих документів:
EN ISO 28139, ISO 10988
Технічна документація відповідає 2006/42/ЄС та зберігається за адресою:
Makita, Jan-Baptist Vinkstraat 2, 3070, Бельгія
Процедура оцінювання відповідності, якої вимагає Директива 2000/14/ЄС, відбулася відповідно до Додатка V.
Виміряна акустична потужність: 110,1 дБ
Гарантована акустична потужність: 111 дБ
8.7.2014
Yasushi Fukaya
Директор
Makita, Jan-Baptist Vinkstraat 2, 3070, Бельгія
ТЕХНІЧНІ ДАНІ
Модель SP-7650.4 R
Вага (із повним паливним баком, повним баком для хімікату, 220 мл
моторного мастила)
(кг) 30,4
Вага (суха вага) (кг) 14,1
Розміри (без трубки обприскувача Д x Ш x В) (мм) 420 x 440 x 595
Тип двигуна
Із повітряним охолодженням, 4-тактний,
одноциліндровий
Макс. продуктивність двигуна (кВт) 2,7
Макс. кількість обертів двигуна (хв
–1
) 7 400
Кількість обертів холостого ходу (хв
–1
) 2 800
Робочий об’єм двигуна (см
3
) 75,6
Пальне Автомобільний бензин
Ємність паливного бака (л) 1,8
Моторне мастило
Мастило SAE 10W-30 за класифікацією API,
клас SF або вище (мастило для 4-тактного
автомобільного двигуна)
Об’єм мастила у двигуні (л) 0,22
Карбюратор (мембранний) WALBRO WYK
Свічка запалювання NGK CMR6A
Зазор між електродами (мм) 0,7 – 0,8
Ємність бака для розчину (л) 15,0
Відстань обприскування (по горизонталі/вертикалі) (м) 16 / 13
Макс. швидкість повітряного потоку (м/с) 85
Споживання повітря (м
3
/хв) 14,1
Вібрація за ISO 22867
a
hv eq
(м/с2) 2,7
Похибка K (м/с
2
) 0,8
Середній рівень тиску звуку відповідно до ISO 22868
L
PA eq
дБ (A) 95,4
Похибка K дБ (A) 2,9
Середній рівень потужності звуку відповідно до
ISO 22868
L
WA eq
дБ (A) 110,1
Похибка K дБ (A) 1,3
Примітка:
1. Використовуйте вказані у таблиці мастило та свічку запалювання.
2. Дана характеристика може бути змінена без попереднього повідомлення.
3. Обприскувач із розчином має загальну вагу 25 кг, якщо рівень рідини у баку досягає лінії 10 л.
4. Рівні вібрацій та шуму виміряні під час використання прямої трубки (довгої).
Page 37

37
НАЙМЕНУВАННЯ ЧАСТИН
1
2
4
3
5
7
11
15
17
8
6
10
13
14
16
9
12
18
19
20
21
22
23
24
25
26
27
28
29
30
31
32
33
34
35
36
37
38
39
40
41
41
1. Важіль зупинки 15. Болт отвору для зливу мастила 29. Пряма трубка (довга) (додатковий аксесуар)
2. Ручка керування 16. Паливний бак
30. Пряма трубка (коротка) (додатковий
аксесуар)
3. Дросельний регулятор 17. Кришка резервуара для мастила 31. Зігнута трубка (додатковий аксесуар)
4. Важіль блокування 18. Шланговий хомут (діаметр 100 мм) 32. Фільтр трубного з’єднання
5. Кришка бака для розчину 19. Шланговий хомут (діаметр 76 мм)
33. Фільтр бака для розчину (знаходиться у
баці для розчину)
6. Кришка повітряного фільтра 20. Верхня насадка
34. Кінцева трубка (довга) (додатковий
аксесуар для функції обприскування)
7. Трубка для перевірки рівня розчину 21. Друга насадка
35. Кінцева трубка (коротка) (додатковий
аксесуар для функції обприскування)
8. Важіль повітряної заслінки 22. Ручка регулювання подачі рідини
36. Пласка трубка (додатковий аксесуар для
функції обприскування)
9. Глушник 23. Пряма трубка 37. Трубка (довга) (додатковий аксесуар)
10. Пусковий насос 24. Важіль подачі розчину 38. Трубка (коротка) (додатковий аксесуар)
11. Кришка відсіку для свічки 25. Шарнірна трубка 39. Розпилювач
12. Коліно 26. Плечовий ремінь 40. Дефлектор
13. Ручка стартера 27. Сітка повітрозабірника 41. Затискач шланга
14. Кришка паливного бака 28. Бак для розчину
Page 38

38
39
ІНСТРУКЦІЇ З МОНТАЖУ
Збирання трубок обприскувача
УВАГА:
● Перш ніж виконувати будь-які роботи з обприскувачем, завжди зупиняйте
двигун і знімайте з’єднувачі зі свічок запалювання.
● Завжди надягайте захисні рукавиці!
● Вмикайте обприскувач, лише повністю його зібравши.
● Після збирання перевірте, щоб усі шлангові хомути були добре затягнені.
ПРИМІТКА:
● Коли затягуєте болти хомутів, головки болтів мають з’являтись із зовнішньої
сторони, як показано на малюнку.
1. З’єднайте шарнірну трубку (1) із гнучкою трубкою (2).
Зафіксуйте за допомогою хомута діаметром 76 мм (3).
2. З’єднайте гнучку трубку із коліном (4) обприскувача.
Зафіксуйте за допомогою хомута діаметром 100 мм (5).
3. З’єднайте пряму трубку (6) з шарнірною трубкою (1).
Сумістіть жолобок прямої трубки із виступом на шарнірній трубці і обертайте
пряму трубку до клацання, після чого зафіксуйте за допомогою хомута
діаметром 76 мм (3).
ПРИМІТКА:
● Під згаданою вище прямою трубкою маються на увазі наступні три трубки, що
обираються відповідно до типу роботи.
– Пряма трубка (довга) (6)
– Зігнута верхня трубка (7)
– Пряма трубка (коротка) (8)
Якщо використовується пряма труба (довга) (6) або зігнута
труба (7), використовуйте разом із трубкою (довгою) (9).
Якщо використовується пряма труба (коротка) (8), використовуйте разом із
трубкою (короткою) (10).
Для заміни трубки необхідно зняти і зібрати затискачі шланга. За потреби
скористайтесь плоскогубцями або подібним інструментом.
УВАГА:
● Під час заміни трубки будьте обережні, щоб не пошкодити її.
В залежності від країни стандартний комплект постачання вашого
обприскувача може містити лише одну або декілька вищезгаданих трубок.
Трубки іншого типу можна придбати як додаткові аксесуари.
(2)
(3)
(1)
(4)
(5)
(6)
(6)
(7)
(8)
(9)
(10)
Page 39

39
4. Одягніть на трубку два хомути діаметром 76 мм (3), не затягуючи їх (ці
хомути пізніше використовуються для герметизації важелю подачі розчину та
трубного з’єднання).
З’єднайте другу насадку (11) із прямою трубкою.
Виконайте герметизацію за допомогою іншого хомута діаметром 76 мм (3).
(11)
(3)
(3)
(3)
(13)
(14)
(12)
(1)
(2)
5. Встановіть на трубку важіль подачі розчину (12).
Перевірте, щоб відкрита сторона в основі важелю (13) була повернута до
шарнірної трубки.
Сумістіть основу важелю із отвором на виступі прямої трубки (14).
Потім загерметизуйте за допомогою хомутів діаметром 76 мм (3).
6. Переконайтесь, що усі хомути затягнено.
Регулювання та закріплення ручки керування
1. Одягніть інструмент на спину та відрегулюйте плечовий ремінь (див.
“Припасування плечового ременя”).
2. Перемістіть ручку керування (1) у більш зручне положення на трубці.
3. Закріпіть ручку керування, обертаючи ручку (2).
(1)
(2)
(3)
Встановлення кінцевої трубки (додатковий аксесуар для
функції обприскування)
ПОПЕРЕДЖЕННЯ:
● Перш ніж встановлювати кінцеву трубку, вилийте із шланга для розчину (1) та
трубного з’єднання (2) весь хімічній розчин, та перевірте, щоб важіль подачі
розчину (3) був закритий. Інакше хімічний розчин може вилитися.
1. Зніміть із трубного з’єднання шланг для розчину, послабивши шланговий
хомут.
2. Зніміть хомут діаметром 76 мм, після чого зніміть із прямої трубки другу
насадку.
Page 40

40
41
ПЕРЕД ЗАПУСКОМ ДВИГУНА
1. Перевірка і заправка моторного мастила
1) Виконуйте наведену нижче процедуру, коли моторне мастило охолоне,
тобто обприскувач має бути вимкнений.
● Перевірка: Покладіть обприскувач на рівну поверхню і зніміть
кришку резервуара для мастила. Упевніться, що мастило
знаходиться на рівні між верхньою (1) і нижньою (2)
позначками щупа (3). Якщо рівень мастила нижче рівня
100 мл (4), долийте мастило.
● Доливання мастила:
Покладіть обприскувач на рівну поверхню і зніміть
кришку резервуара для мастила. Налийте мастило до
верхньої позначки на щупі.
2) У середньому мастило треба доливати через кожні 20 годин роботи.
Заміна мастила проводиться приблизно через кожні 10 – 15 заправок
обприскувача пальним.
3) Замінюйте мастило, якщо воно забруднюється або помітно змінює колір.
(Для отримання інформації щодо процедури та частоти заміни мастила
див. стор. 50.)
Рекомендоване мастило: оригінальне мастило DOLMAR або мастило
SAE10W-30 типу API, класу SF або з вищими
характеристиками (мастило для 4-тактного
автомобільного двигуна)
Об’єм мастила: приблизно 0,22 л (220 мл)
(3)
(1)
(4)
(2)
УВАГА:
● Якщо обприскувач не зберігати у вертикальному положенні, мастило може стекти зі щупа у двигун, що може призвести до помилкового
визначення рівня мастила. Це може призвести до випадкового переповнення під час додавання моторного мастила. Завжди зберігайте
обприскувач у вертикальному положенні.
● Якщо налити мастила вище верхньої позначки, це може призвести до забруднення мастила та утворення білого диму внаслідок
горіння зайвого мастила.
Момент для перевірки 1: Стосовно кришки резервуара для мастила під час доливання мастила
● Перш ніж знімати кришку резервуара для мастила, витріть бруд та сажу навколо отвору.
● Зніміть кришку резервуара для мастила і покладіть на чисту поверхню, щоб до неї не прилип пісок, бруд або інші сторонні тіла. Якщо
бути недостатньо обережним, вони можуть прилипнути до кришки і змішатися із моторним мастилом. Забруднене мастило із піском,
брудом або сторонніми тілами може спричинити надмірне зношення двигуна через недостатнє змащування, що може стати причиною
поломки.
Момент для перевірки 2: Якщо під час доливання мастила воно пролилося
● Проливання мастила назовні обприскувача може призвести до забруднення або псування мастила. Тому перш ніж запускати двигун,
витріть усе пролите мастило.
3. Сумістіть жолобок кінцевої трубки із виступом на прямій трубці і обертайте
кінцеву трубку до клацання.
ПРИМІТКА:
● Згадана вище кінцева трубка може бути будь-якою із наведених нижче трьох
кінцевих трубок, що обираються відповідно до типу роботи.
– Кінцева трубка (довга) (4)
– Кінцева трубка (коротка) (5)
– Пласка трубка (6)
(4)
(5)
(6)
Page 41

41
2. Заправляння пального
ПОПЕРЕДЖЕННЯ:
● Під час заправляння пального дотримуйтесь викладених нижче вказівок, щоб уникнути займання чи пожежі:
– Заправляти пальне слід у місці, де немає вогню. Ніколи не підносьте вогонь (не паліть тощо) до місця заправлення пального.
– Перш ніж заправляти пальне, зупиніть двигун і дайте йому охолонути.
– Заправляйте на рівній поверхні. Не заправляйте на нестійкій поверхні або в погано провітрюваному місці.
– Заправляйте в освітлюваному місці з доброю видимістю.
– Заправляйте на відкритому просторі.
– Повільно відкривайте кришку паливного бака, повністю заправленого пальним. Під внутрішнім тиском пальне може вилитись.
– Будьте обережні, щоб не пролити пальне. Пролите пальне слід повністю витерти.
– Не заправляйте пального більше, ніж потрібно.
– Заправляйте пальне у добре провітрюваному місці.
● Будьте обережні із пальним.
– Потрапляння пального на шкіру або в очі може спричинити алергійну реакцію чи подразнення. Якщо помітні будь-які фізичні
негаразди, негайно звертайтесь до лікаря.
Тривалість зберігання пального
Пальне слід використати упродовж 4 тижнів, навіть якщо воно зберігається у спеціальному контейнері у добре провітрюваному затіненому
місці.
Якщо спеціальний контейнер не використовується або не накритий від сонця, пальне може зіпсуватися за один день.
Зберігання інструмента та паливного бака
● Зберігайте інструмент і бак у прохолодному місці, де відсутній контакт з прямим сонячним промінням.
● Ніколи не зберігайте пальне в салоні або багажнику автомобіля.
Пальне
Інструмент обладнано 4-тактним двигуном. Обов’язково використовуйте автомобільний бензин (звичайний чи вищої якості).
Застереження щодо пального
● Ніколи не використовуйте бензинову суміш, що містить моторне мастило. Нехтування цією вимогою призведе до надмірного
накопичення вуглецю чи механічних проблем.
● Використання зіпсутого пального призведе до проблем із запуском інструмента.
Перш ніж заправляти пальне, обов’язково зупиніть двигун і перевірите, щоб він охолов.
Спосіб заправлення
● Трішки послабте кришку бака, щоб не було перепадів тиску.
● Зніміть кришку бака і залийте пальне; при цьому треба випускати повітря, нахиляючи бак таким чином, щоб отвір для заправки був
спрямований угору. (Ніколи не заправляйте пальне до отвору для заливання мастила.)
● Після заправляння надійно затягніть кришку бака.
● Якщо кришку бака пошкоджено, замініть її.
● Кришка бака з часом зношується. Замінюйте її кожні два-три роки.
Page 42

42
43
ЗАПУСК ТА ЗУПИНЕННЯ ДВИГУНА
1. Запуск
ПОПЕРЕДЖЕННЯ:
● Ніколи не запускайте двигун у місці заправляння пальним. Під час запуску двигуна відстань до місця заправляння має становити
принаймні 3 м.
– Інакше може виникнути запалення або пожежа.
● Вихлопні гази двигуна є токсичними. Не запускайте двигун у погано провітрюваному місці, як-от у тунелі, будівлі тощо.
– Запуск двигуна у погано провітрюваному місці може призвести до отруєння вихлопними газами.
● У разі виявлення ненормального звуку, запаху, вібрації після запуску, негайно зупиніть двигун і виконайте перевірку.
– Якщо запустити двигун, не перевіривши, у чому справа, може мати місце нещасний випадок.
● Якщо важіль зупинки встановлено у положення “О”, перевірте, що двигун зупинився.
● Перш ніж вмикати інструмент, переконайтесь що важіль подачі розчину закритий.
1) Коли двигун холодний чи після заправки (холодний запуск):
(1) Покладіть інструмент на пласку поверхню.
(2) Встановіть важіль зупинки (1) у положення “I”.
(1)
(3)
(3) Натисніть на пусковий насос (2) декілька разів, поки у нього не
надійде пальне.
● Як правило, для надходження пального у карбюратор потрібно від
7 до 10 натискань.
● Якщо на пусковий насос натиснути більше ніж треба, зайве пальне
повернеться до паливного бака.
(4) Підніміть важіль повітряної заслінки (3).
(5) Щоб двигун не рухався, притискайте кришку повітряного фільтра
лівою рукою, та займіть стійке положення.
(6) Повільно витягуйте ручку стартера, допоки не відчуєте стиснення.
Тоді потягніть із силою. Для запуску двигуна може знадобитись від
двох до чотирьох таких спроб.
● Не витягуйте трос до кінця.
● Обережно встановіть ручку стартера назад у корпус. Інакше, якщо
ручку стартера відпустити, вона може вдарити вас або неправильно
змотатись.
(7) Після запуску двигуна поступово опускайте важіль повітряної
заслінки, постійно слідкуючи за роботою двигуна. Упевніться, що в
кінці важіль повітряної заслінки опущено повністю.
● На холоді чи коли двигун охолов, завжди опускайте важіль
повітряної заслінки повільно. Інакше двигун може зупинитися.
(8) Візьміться за ручку керування (коли ви беретесь за ручку, важіль
блокування відпускається) і натисніть дросельний регулятор для
прогрівання. Продовжуйте прогрівання протягом 2 – 3 хвилин.
(9) Прогрівання завершено, коли оберти двигуна стабілізуються і при
натисканні дросельного регулятора він рівномірно прискорюється від
низьких до високих обертів.
(2)
Page 43

43
РЕГУЛЮВАННЯ ХОЛОСТОГО ХОДУ
НЕБЕЗПЕКА:
● Регулювання карбюратора здійснюється на заводі перед відправкою. Самостійно можна регулювати лише холостий хід. Якщо потрібне
регулювання, звертайтесь до авторизованого сервісного центру.
Перевірка холостого ходу
Установіть швидкість холостого ходу на 2 800 хв–1.
● Щоб змінити швидкість обертання, за допомогою хрестової викрутки
відрегулюйте регулювальний гвинт (1).
● Повертайте регулювальний гвинт праворуч, щоб збільшити швидкість двигуна.
Повертайте регулювальний гвинт ліворуч, щоб зменшити швидкість двигуна.
(1)
ПРИМІТКА:
● Якщо важіль повітряної заслінки посунути далі положення ЗАКРИТИ, двигун може бути пошкоджено.
● Якщо двигун зупиняється зі звуком вибуху або запускається, проте зупиняється, перш ніж ви встигаєте скористатися важелем
повітряної заслінки, поверніть важіль повітряної заслінки у положення ВІДКРИТИ та потягніть за ручку стартера декілька разів, щоб
знову запустити двигун.
● Якщо оператор потягне за ручку стартера кілька разів, коли важіль повітряної заслінки встановлено у положення ЗАКРИТИ, двигун
може бути важко запустити через переливання пального.
● У разі переливання пального зніміть свічку запалювання і швидко потягніть ручку кілька разів, щоб злити надлишок пального. Висушіть
електрод свічки запалювання.
● Якщо дросельний клапан не повертається у положення, за якого він контактує з регулювальним гвинтом холостого ходу, навіть якщо
дросельний регулятор встановлено на низьку швидкість, відкоригуйте кабель керування, щоб забезпечити належне повернення
клапана.
2) Якщо двигун теплий (теплий запуск)
(1) Покладіть двигун на пласку поверхню.
(2) Натисніть кілька разів пусковий насос.
(3) Переконайтесь, що важіль повітряної заслінки опущено.
(4) Щоб двигун не рухався, притискайте кришку повітряного фільтр лівою рукою, та займіть стійке положення.
(5) Повільно витягуйте ручку стартера, допоки не відчуєте стиснення. Тоді потягніть із силою.
(6) Якщо двигун важко запускається, відкрийте дросельний клапан на 1/3.
2. Зупинення
1) Відпустіть дросельний регулятор, щоб зменшити швидкість двигуна,
та встановіть важіль зупинки у положення “О”.
Page 44

44
45
СПОСІБ ВИКОРИСТАННЯ
Установка фільтра
Обприскувач обладнано фільтрами на отворі бака для розчину та на вході
трубки.
Завжди перевіряйте наявність фільтрів.
Щоб встановити фільтр, натискайте на нього.
Щоб зняти фільтр, потягніть його.
ПОПЕРЕДЖЕННЯ:
● Міцно затягуйте кришку бака. Недостатньо затягнута кришка бака може стати
причиною витікання розчину, втрати тиску тощо.
Припасування плечового ременя
Встановіть таку довжину плечового ременя, щоб було зручно переносити
обприскувач під час роботи.
Припасуйте, як показано на малюнку.
(1)
Поясний ремінь (додатковий аксесуар)
Поясний ремінь (додатковий аксесуар) дозволяє оператору носити інструмент
більш впевнено.
Регулювання ручки керування
Перемістіть ручку керування вздовж шарнірної трубки у найбільш зручне
положення.
Наповнення бака для розчину
1. Тримайте прокладку (1) у доброму стані, змащуйте та чистіть її.
2. Покладіть обприскувач на рівну поверхню.
Щоб затягти ремінь Щоб ослабити ремінь
Page 45

45
3. Перш ніж заправляти бак для розчину, обов’язково закрийте важіль подачі
розчину (2).
(2)
4. Бак для розчину вміщує 15 літрів розчину.
Із повним баком загальна вага, включно із розчином, становить близько 30 кг.
Контролюйте об’єм розчину, що заливається, щоб обприскувач із розчином у
баку не важив занадто багато і був по силам оператору.
Якщо залити 10 літрів розчину (тобто, коли рівень розчину досягає позначки
10 літрів на стінці бака), загальна вага інструмента становитиме близько 25 кг.
Рекомендується не перевищувати загальну вагу інструмента у 30 кг для
чоловіків та 25 кг для жінок.
Для перевірки рівня розчину у баку користуйтесь трубкою, що знаходиться збоку
від обприскувача.
Функція змішування розчину
Пристрій перемішування розчину, що знаходиться всередині бака для розчину,
перемішує розчин, випускаючи під час розпилювання повітряні бульбашки.
Page 46

46
47
Використання обприскувача
Для збільшення швидкості двигуна візьміться за ручку керування (коли ви
беретесь за ручку, важіль блокування відпускається) і натисніть дросельний
регулятор.
Натискання дросельного регулятора регулює швидкість двигуна.
Положення важеля зупинки може обмежити робочий кут дросельного регулятора.
Важіль зупинки має чотири положення. “O” (зупинка двигуна), “I” та два
положення обмеження робочого кута дросельного регулятора.
Положення “I” не обмежує швидкість двигуна (дросельний регулятор можна
натискати повністю).
Для обмеження робочого кута дросельного регулятора виберіть положення,
наступне після “I”. Щоб обмежити робочий кут дросельного регулятора ще
більше, встановіть важіль зупинки ще на одне положення вище “I”.
Регулюйте швидкість двигуна відповідно до місця та умов роботи.
Ручка регулювання подачі рідини
Ручки регулювання подачі рідини дозволяють виставити потрібну інтенсивність
потоку з широкого діапазону.
Регулювання інтенсивності потоку
Обертайте ручку регулювання подачі рідини (1) на другій насадці, щоб
встановити потрібну інтенсивність потоку — цифра на ручці регулювання подачі
рідини повинна співпадати із зображенням трикутника (2).
Інтенсивність потоку
Розпилюйте розчин, тримаючи пряму трубку горизонтально, або нижче горизонталі.
Положення ручки Інтенсивність потоку (л/хв) (середнє значення)
1 0,36
2 1,0
3 1,6
4 2,5
ПРИМІТКА:
● У якості рекомендацій щодо використання керуйтесь значеннями у таблиці вище, і вносьте потрібні зміни відповідно до щільності
хімічного розчину у баку для розчину.
Важіль подачі розчину
Щоб розпочати подачу розчину (А), поверніть важіль подачі розчину (1) у
положення, вздовж трубки.
Щоб зупинити подачу розчину (В), поверніть важіль подачі розчину у положення,
перпендикулярне до трубки.
(2)
(1)
(1)
(A) (B)
Page 47

47
Встановлення і знімання розпилювача
Щоб встановити розпилювач (1), встановіть розпилювач на верхню насадку (2)
таким чином, щоб його виступ (3) співпадав із пазом (4) на верхній насадці.
(2)
(4)
(1)
(3)
(2)
(3)
(4)
(1)
Зафіксуйте розпилювач, повернувши його за годинниковою стрілкою до кінця.
Щоб зняти розпилювач, виконайте наведену вище процедуру у зворотному
порядку.
Заміна насадки на насадку із малим рівнем подачі
(додатковий аксесуар)
Якщо треба розпилювати малу кількість розчину, замініть насадку на іншу із
малим отвором подачі.
Для заміни насадки виконайте процедуру нижче.
1. Викрутіть гвинт (1) другої насадки (2), після чого зніміть верхню насадку (3) і
розпилювач (4).
Встановлення і знімання дефлектора (додатковий
аксесуар)
Дефлектор (1) дозволяє розпилювати хімічні речовини угору. Це дозволяє
обробляти невисокі рослини і нижню поверхню листя рослин.
Для встановлення дефлектора (1) закріпіть дефлектор на верхній насадці таким
чином, щоб позначка “I” (3) на ньому співпадала із позначкою “I” (4) на верхній
насадці (2).
Зафіксуйте дефлектор, повернувши його за годинниковою стрілкою до кінця.
Щоб зняти дефлектор, виконайте наведену вище процедуру у зворотному
порядку.
(1)
(2)
(3)
(4)
(1)
Page 48

48
49
3. Встановіть іншу насадку, що додається, із малим отвором подачі.
ПРИМІТКА:
● Виберіть правильну насадку із наступних двох відповідно до типу
(в’язкості) хімікату, що використовується.
(7) (8)
(9)
(3)
(10)
Тип насадки В’язкість хімікату Приклад хімікату
Інтенсивність потоку
(л/хв)*
1
Алюмінієва насадка
(срібного кольору) (7) *
2
Висока
MALATHION
(з додаванням мастила)
0,14
Латунна насадка
(золотого кольору) (8) *
2
Низька Aqua K-Othrine (з додаванням води) 0,075
Латунна насадка із ударним
маркуванням (золотого кольору) (9) *
2
Низька Cipermetrinato (з додаванням води) 0,060
Примітка 1: Вказана у таблиці інтенсивність потоку наводиться для води і є лише прикладом. Вона буде змінюватись залежно від хімікату,
що використовується.
Примітка 2: Тип насадки(ок), що надається у комплекті із обприскувачем, змінюється залежно від країни.
4. Встановіть верхню насадку (3) і зафіксуйте за допомогою гвинта (1).
ПРИМІТКА:
● Якщо використовується згадана вище насадка із малим рівнем подачі, не
встановлюйте розпилювач (4) або дефлектор (додатковий аксесуар), а
покладіть його у надійне місце, щоб не загубити.
5. Переведіть ручку (10) в положення “4”.
(5)
(6)
2. Вставте шліцьову викрутку в паз (5) зверху насадки і зніміть насадку (6),
обертаючи проти годинникової стрілки до кінця.
Page 49

49
ТРАНСПОРТУВАННЯ ОБПРИСКУВАЧА
Під час транспортування чи зберігання обприскувач має знаходитись у
вертикальному положенні.
Якщо обприскувач транспортувати чи зберігати не у вертикальному положенні,
мастило може протекти всередину двигуна. Це може призвести до витоку
мастила або появи білого диму внаслідок займання мастила, чи мастило може
забруднити повітряний фільтр.
НЕБЕЗПЕКА:
● Перш ніж транспортувати чи зберігати обприскувач, обов’язково зупиніть
двигун.
Осушення та очищення бака для розчину
ПОПЕРЕДЖЕННЯ:
● Під час чищення та осушення бака для розчину завжди надягайте гумові/хімічно стійкі рукавиці.
Осушення бака для розчину
ПОПЕРЕДЖЕННЯ:
● Ніколи не виливайте хімікати та промивальну воду,
відкриваючи кришку в нижній частині бака для розчину.
● Перед та після осушення перевіряйте, щоб важіль подачі
розчину був закритий.
● Якщо хімічний розчин залишається у баку для розчину
після виконання наведеної в інструкції з експлуатації
операції, нахиліть інструмент у бік трубки, щоб вилити усі
залишки.
1. Покладіть обприскувач на стійку поверхню. Розташуйте
насадку (1) нижче нижньої частини бака для розчину (2),
та покладіть під неї приймальний контейнер.
2. Переведіть ручку (3) в положення “Е”.
3. Злегка відкрийте кришку бака для розчину (4), щоб знизити внутрішній тиск.
4. Відкрийте важіль подачі розчину (5). Хімічний розчин витікає з насадки.
5. Почистіть бак зсередини водою.
Чищення фільтра бака для розчину
Після використання зніміть кришку бака, зніміть фільтр зсередини бака та
почистіть його.
(3)
(1)
(4)
(2)
(5)
Page 50

50
51
1. Розкрутіть та зніміть кришку (1) разом із фільтром (2).
2. Почистіть фільтр від пилу та твердих часток бруду.
3. Встановіть фільтр у початкове положення. Обов’язково надійно затягніть
кришку.
ТЕХНІЧНЕ ОБСЛУГОВУВАННЯ ТА ДОГЛЯД
НЕБЕЗПЕКА:
● Перед перевіркою та доглядом зупиніть двигун і дайте йому охолонути. Зніміть свічку запалювання і ковпачок свічки.
– Якщо перевірку чи догляд проводити одразу після зупинки двигуна або зі встановленим ковпачком свічки, внаслідок випадкового
запуску оператор може отримати опіки чи може статися нещасний випадок.
● Після перевірки чи догляду упевніться, що усі частини зібрано. Тоді перейдіть до роботи.
● Під час перевірки та догляду завжди надягайте гумові/хімічно стійкі рукавиці.
ПОВІДОМЛЕННЯ:
● Ніколи не використовуйте пальне, бензин, розчинник, спирт або щось подібне. Це може призвести до знебарвлення, деформації або
розтріскування.
Заміна моторного мастила
Використання моторного мастила, властивості якого з часом погіршилися, призведе до значного скорочення терміну служби частин, які
ковзають чи обертаються. Обов’язково перевіряйте період і кількість замін.
НЕБЕЗПЕКА:
● Зазвичай відразу після зупинки двигуна сам двигун і мастило залишаються гарячими. Перш ніж заміняти мастило, упевніться, що
двигун і мастило достатньо охололи. Інакше існує ризик отримання опіків. Окрім того, одразу після зупинення двигуна мастило ще не
повністю повернулось до картера двигуна. Не перевіряйте рівень мастила одразу після зупинення двигуна.
● Якщо залити мастила вище визначеного рівня, воно може забруднитись чи зайнятись, в результаті чого з’явиться білий дим.
Інтервал заміни: після перших 20 годин роботи, а тоді кожні 50 годин роботи
Рекомендоване мастило: SAE10W-30 за класифікацією API, клас SF або вище (для 4-тактного автомобільного двигуна)
Процедура заміни мастила
1. Покладіть обприскувач на рівну поверхню.
2. Поставте ємність для відпрацьованого мастила під зливний отвір (1), щоб зібрати
мастило, яке витікатиме.
Щоб помістилось усе відпрацьоване мастило, об’єм ємності має бути не менше
220 мл.
3. Послабте болт отвору для зливу мастила (2), щоб злити мастило. Слідкуйте, щоб
мастило не потрапило на паливний бак або на інші частини інструменту.
УВАГА:
● Будьте обережні, щоб не загубити прокладку (алюмінієву шайбу) (3). Покладіть
болт отвору для зливу мастила (2) у таке місце, де на нього не потрапить бруд.
4. Зніміть кришечку резервуара для мастила (4). (Якщо зняти кришку резервуара для
мастила (4), мастило витікатиме швидше.)
УВАГА:
● Покладіть кришку резервуара для мастила (4) у таке місце, де на неї не потрапить бруд.
5. Зі зменшенням рівня мастила, яке ви зливаєте, нахиліть обприскувач на бік (у сторону зливу) так, щоб мастило витекло повністю.
6. Після того, як витече усе мастило, надійно затягніть болт отвору для зливу мастила (2). Якщо болт затягнуто не до кінця, це може
призвести до витоку мастила.
УВАГА:
● Встановлюючи пробку зливного отвору, не забудьте повернути на місце прокладку (алюмінієву шайбу) (3).
7. Додавання мастила під час заміни мастила виконується у спосіб, описаний у процедурі додавання мастила, коли його недостатньо.
Завжди додавайте мастило, заливаючи його через отвір під кришкою резервуара для мастила.
(Вказаний рівень мастила: приблизно 220 мл)
8. Додавши мастило, затягніть кришку резервуара для мастила (4), щоб запобігти витоку.
(3)
(2)
(1)
(4)
(2)
(1)
Чищення трубного з’єднання
ПОПЕРЕДЖЕННЯ:
● Не знімайте шланговий хомут, трубку чи кришку, якщо важіль подачі розчину
відкритий.
● Не розкручуйте кришку, якщо важіль подачі розчину відкритий.
Page 51

51
Застереження під час заміни моторного мастила
● Ніколи не виливайте відпрацьоване моторне мастило у смітник, на землю чи в каналізацію. Утилізація мастила регулюється
законодавством. Утилізуючи мастило, завжди дотримуйтесь відповідних законів та норм. З будь-яких питань звертайтесь до
авторизованого сервісного центру.
● Навіть якщо пристрій не використовується, характеристики мастила погіршуються. Регулярно перевіряйте та замінюйте мастило
(заливайте нове мастило кожні 6 місяців).
(4)
(3)
(2)
(1)
Чищення повітряного фільтра
ПОПЕРЕДЖЕННЯ: ВИКОРИСТАННЯ ЗАЙМИСТИХ РЕЧОВИН СУВОРО
ЗАБОРОНЕНО
Інтервал чищення та перевірки: щодня (кожні 10 годин роботи)
1. Викрутіть виступаючий болт (1).
2. Зніміть кришку повітряного фільтра (2).
3. Зніміть елемент (3) і приберіть бруд за допомогою щіточки.
ПРИМІТКА:
● Це елемент сухого типу і його не слід мочити. Ніколи не мийте його водою.
4. Якщо елемент пошкоджений чи надто брудний, замініть його на новий.
5. За допомогою ганчірки витріть мастило з сапуна.
6. Встановіть елемент у корпус повітряного фільтра (4).
7. Прикріпіть кришку повітряного фільтра і затягніть виступаючий гвинт.
НЕБЕЗПЕКА:
● Чистьте елемент кілька разів на день, якщо на ньому накопичується надто багато бруду.
● Якщо продовжити роботу, не усунувши з елемента мастило, мастило у повітряному фільтрі може вилитись назовні, що призведе до
забруднення довкілля.
Перевірка свічки запалювання
УВАГА:
● Знімаючи свічку запалювання, спершу почистьте свічку та головку циліндра, щоб бруд, пісок тощо не потрапили у циліндр.
● Знімайте свічку запалювання, коли двигун охолов, щоб уникнути пошкодження різьбового отвору у циліндрі.
● Встановлюйте свічку запалення у різьбовий отвір належним чином. Якщо свічку встановлено під кутом, різьбовий отвір циліндра буде
пошкоджено.
1. Відкривання/закривання кришки відсіку для свічки
Щоб відкрити кришку відсіку для свічки, потягніть за виступ кришки та зсуньте
її у напрямку напису “ВІДКРИТИ”, як показано на малюнку праворуч.
Щоб закрити кришку, зсуньте її у напрямку “ЗАКРИТИ” до клацання, коли
виступ кришки стане на кришку двигуна. Після цього натисніть на виступ.
2. Виймання свічки запалювання
Для виймання чи встановлення свічки запалювання використовуйте торцевий
гайковий ключ, що надається у комплекті.
3. Перевірка свічки запалювання
Зазор між двома електродами свічки запалення (див. малюнок) має становити
0,7 – 0,8 мм. Відрегулюйте зазор, якщо він надто великий чи малий.
Якщо на свічці запалення накопичився вуглець або вона забруднена, ретельно
її почистьте чи замініть.
4. Заміна свічки запалювання
Для заміни використовуйте NGK-CMR6A.
0,7 – 0,8 мм
Page 52

52
53
Чищення паливного фільтра
● Забруднений паливний фільтр може ускладнити запуск чи унеможливити
збільшення швидкості двигуна.
● Регулярно перевіряйте паливний фільтр, дотримуючись вказівок нижче.
1. Зніміть кришку паливного бака (1) та злийте усе пальне. Перевірте, чи немає
всередині бака сторонніх речовин. За потреби усуньте такі речовини.
2. Вийміть паливний фільтр (2) за допомогою дроту крізь отвір для заливання
пального.
3. Якщо поверхня фільтра забруднена, почистьте її бензином. Бензин, який
використовувався для чищення, слід утилізувати відповідно до місцевих
норм.
Сильно забруднений фільтр слід замінити.
4. Встановіть паливний фільтр у бак і надійно затягніть кришку бака.
ПРИМІТКА:
● Під час встановлення паливного фільтра у бак, повертайте його у положення,
показане на малюнку.
Якщо фільтр треба замінити, зверніться до авторизованого сервісного центру.
(1)
(2)
(2)
(4)
(3)
(2)
(1)
Чищення фільтруючого елемента з’єднувальної трубки
1. Зніміть шланговий хомут (1) і шланг (2).
2. Витягніть елемент (3) і приберіть бруд за допомогою щіточки.
Якщо витягати елемент складно, скористайтесь вузькою паличкою, щоб
підчепити його.
3. Якщо елемент пошкоджений чи надто брудний, замініть його на новий.
4. Вставте елемент у з’єднувальну трубку (4) так, щоб задня частина елемента
знаходилась на одному рівні із отвором.
5. Встановіть шланг і зафіксуйте за допомогою шлангового хомута.
Заміна шланга для розчину
● Часто перевіряйте шланг для розчину (1). Пошкодження шлангу може
призвести до витікання хімічного розчину. За необхідності замініть шланг,
виконавши такі дії.
1. Зніміть насадку (2) з труби (3).
2. Послабте шланговий хомут і замініть старий шланг на новий.
Перевірка болтів, гайок і гвинтів
● Затягніть послаблені болти, гайки тощо.
● Перевірте наявність витоку пального і мастила.
● Замініть пошкоджені частини на нові задля безпечної роботи.
Заміна прокладок і ущільнювачів
Якщо ви розібрали двигун, замініть прокладки і ущільнювачі, коли будете
збирати його.
(3)
(2)
(1)
Page 53

53
Чищення деталей
● Підтримуйте двигун у чистоті.
● Підтримуйте ребра циліндра чистими і без пилу. Пил або бруд на ребрах
можуть спричинити заклинювання.
● Повітря затягується крізь сітку повітрозабірника (1). Якщо під час роботи потік
повітря послабився, зупиніть двигун і перевірте сітку повітрозабірника на
наявність сторонніх предметів, що блокують потік повітря.
● Майте на увазі, що якщо такі сторонні предмети не прибрати, вони можуть
призвести до перегрівання та пошкодження двигуна.
ПОПЕРЕДЖЕННЯ:
● Ніколи не використовуйте обприскувач без сітки. Перед кожним використанням
перевіряйте, чи прикріплено сітку і чи вона не пошкоджена.
(1)
Будь-який догляд та роботи із регулювання, не включені до цієї інструкції з експлуатації та не описані в ній, повинні виконуватися тільки
авторизованим сервісним центром.
ЗБЕРІГАННЯ
Зливання пального
ПОПЕРЕДЖЕННЯ:
● Перш ніж зливати пальне, обов’язково зупиніть двигун і перевірите, щоб він охолов.
– Одразу після зупинення двигун може бути достатньо гарячим, щоб стати причиною опіків, займання та пожежі.
УВАГА:
● Якщо інструмент відправляється на зберігання на тривалий час, слід злити все пальне із паливного баку і карбюратора і тримати
інструмент в сухому та чистому місці.
Зливайте пальне із паливного баку та карбюратора відповідно до зазначеної
процедури:
1) Зніміть кришку паливного баку та повністю злийте пальне.
Якщо в паливному баку залишається стороння речовина, видаліть її
повністю.
2) За допомогою дроту витягніть паливний фільтр із отвору для заливання
пального.
3) Натискайте на пусковий насос, доки пальне не витече з нього, а потім
злийте пальне, що потрапило до паливного бака.
4) Знову встановіть фільтр у паливний бак та надійно затягніть кришку
паливного бака.
5) Після цього продовжуйте використовувати двигун, доки він не зупиниться.
6) Зніміть свічку запалювання та залийте декілька крапель моторного
мастила крізь отвір свічки запалювання.
7) Обережно потягніть ручку стартера так, щоб моторне мастило розлилось
по двигуну, тоді установіть свічку запалювання.
8) Під час зберігання інструмент має знаходитись у вертикальному
положенні.
9) Зберігайте злите пальне у спеціальному контейнері у добре
провітрюваному затіненому місці.
Осушення бака для розчину
ПОПЕРЕДЖЕННЯ:
● Перш ніж осушувати бак для розчину, обов’язково зупиніть двигун і перевірите, щоб він охолов.
– Одразу після зупинення двигун може бути достатньо гарячим, щоб стати причиною опіків, займання та пожежі.
Перш ніж складати обприскувач на зберігання, осушіть бак для розчину, відповідно до розділу “Осушення та очищення бака для розчину”.
Чищення фільтра у верхній частині бака для розчину
Перш ніж складати обприскувач на зберігання, обов’язково почистіть фільтр у верхній частині бака для розчину.
Інформація про чищення фільтра наводиться у розділі “Осушення та очищення бака для розчину”.
Чищення фільтра трубного з’єднання
Перш ніж складати обприскувач на зберігання, обов’язково почистіть фільтр трубного з’єднання.
Інформація про чищення фільтра наводиться у розділі “Осушення та очищення бака для розчину”.
УВАГА:
● Перш ніж зберігати обприскувач, обов’язково зупиніть двигун.
Page 54

54
55
Закріплення прямої трубки за допомогою кистьового
ременя з комплекту
Перш ніж складати обприскувач на зберігання, закріпіть пряму трубку за
допомогою кистьового ременя з комплекту, прив’язавши його до рами.
Якщо закріпити трубку в такому положенні, це полегшить транспортування
інструмента.
Інтервал догляду
Час роботи
Елемент
Перед
початком
роботи
Після
змащування
Щодня
(10 год.)
30 год. 50 год. 200 год.
Вимикання/
без роботи
Відповідна
сторінка
Моторне мастило Перевірте
40
Замініть
*1
50
Елементи кріплення
(болти, гайки)
Перевірте
52
Фільтр бака для
розчину
Перевірте
49
Почистьте
49
Фільтр трубного
з’єднання
Перевірте
50
Почистьте
50
Паливний бак Почистьте/
перевірте
—
Злийте пальне
*3
53
Дросельний
регулятор
Перевірте
роботу
—
Важіль зупинки Перевірте
роботу
43
Швидкість холостого
ходу
Перевірте/
відрегулюйте
43
Повітряний фільтр Почистьте
51
Свічка запалювання Перевірте
51
Канал
охолоджувального
повітря
Почистьте/
перевірте
53
Паливна трубка Перевірте
52
Замініть
*2
—
Паливний фільтр Почистьте/
замініть
52
Зазор між клапаном
повітрозабірника і
клапаном випуску
повітря
Відрегулюйте
*2
—
Трубка для мастила Перевірте
*2
—
Ретельна перевірка
двигуна
*2
—
Карбюратор Злийте пальне
*3
53
*1 Виконайте першу заміну після 20 годин роботи.
*2 Для перевірки інструменту після 200 годин роботи зверніться до авторизованого сервісного центру чи у відповідну майстерню.
*3 Спорожнивши паливний бак, не вимикайте двигун і зливайте пальне у карбюраторі.
Page 55

55
УСУНЕННЯ НЕСПРАВНОСТЕЙ
Перш ніж зробити замовлення на ремонт, перевірте несправність самостійно. У разі виявлення несправності здійснюйте керування
інструментом таким чином, як описано в цій інструкції з експлуатації. Ніколи не втручайтеся в роботу інструмента та не розбирайте його,
якщо це суперечить указівкам, наведеним у цій інструкції з експлуатації. З питань ремонту звертайтеся до авторизованого сервісного
центру або до місцевого представництва компанії.
Несправність Можлива причина (несправність) Спосіб усунення проблеми
Двигун не запускається. Пусковий перемикач встановлений у
положення STOP.
Установіть пусковий перемикач у положення
ПУСК.
Не був задіяний пусковий насос. Натисніть 7 – 10 разів.
Низька швидкість витягування троса
стартера.
Тягніть сильно.
Нестача пального. Залийте пальне.
Неправильне положення дроселювання.
Встановіть у положення “ЗАКРИТИ”
(холодний запуск).
Встановіть у положення “ВІДКРИТИ” (теплий
запуск).
Засмічений паливний фільтр. Прочистіть.
Погнутий або блокований паливний
трубопровід.
Випряміть або замініть паливний трубопровід.
Зіпсоване пальне.
Зіпсоване пальне спричиняє труднощі під час
запуску двигуна.
Замініть новим. (рекомендований строк
заміни: 1 місяць)
Надмірне усмоктування пального.
Установіть важіль постачання пального із
середньої швидкості на високу та потягніть за
ручку стартера, доки двигун не запуститься.
Якщо двигун все ще не запускається,
витягніть свічку запалювання, висушіть
електроди та встановіть знову на місце. Після
цього запустіть двигун, як описано вище.
Від’єднаний ковпачок свічки
запалювання.
Надійно прикріпіть.
Забруднена свічка запалювання. Прочистіть.
Неналежний зазор свічки запалювання. Відрегулюйте зазор.
Несправність свічки запалювання. Замініть.
Несправний карбюратор.
Зверніться до відповідного спеціаліста щодо
перевірки і догляду.
Не вдається потягнути ручку стартера
або відсутнє стиснення.
Зверніться до відповідного спеціаліста щодо
перевірки і догляду.
Несправна система приводу/електрична
система. (Несправність пускового
перемикача, проводки, конектора тощо).
Зверніться до відповідного спеціаліста щодо
перевірки і догляду.
Двигун швидко зупиняється.
Швидкість двигуна не збільшується.
Недостатнє прогрівання. Здійсніть процедуру прогрівання.
Важіль повітряної заслінки встановлений
у положення “ЗАКРИТИ”, хоча двигун
прогрітий.
Установіть його у положення “ВІДКРИТИ”.
Низька швидкість холостого ходу. Відрегулюйте швидкість холостого ходу.
Засмічений паливний фільтр. Прочистіть.
Забруднений чи засмічений повітряний
фільтр.
Прочистіть.
Несправний карбюратор.
Зверніться до відповідного спеціаліста щодо
перевірки і догляду.
Несправність глушника (засмічений
тощо).
Зверніться до відповідного спеціаліста щодо
перевірки і догляду.
Несправна система приводу/електрична
система.
Зверніться до відповідного спеціаліста щодо
перевірки і догляду.
Від’єднаний дросельний дріт. Надійно прикріпіть.
Двигун не зупиняється.
Запустіть двигун на холостому ходу та
встановіть важіль повітряної заслінки в
положення ЗАКРИТИ.
Від’єднаний конектор. Надійно прикріпіть.
Несправність електросистеми.
Зверніться до відповідного спеціаліста щодо
перевірки і догляду.
Якщо двигун не запускається після прогрівання:
Якщо ніяких несправностей деталей не виявлено, відкрийте дросельну заслінку приблизно на 1/3 та запустіть двигун.
Page 56

56
57
Dziękujemy za wybór spalinowego opryskiwacza mgławiącego
marki DOLMAR. Mamy przyjemność zaoferować Państwu
spalinowy opryskiwacz mgławiący marki DOLMAR, będący efektem
długotrwałego programu wdrażania oraz wieloletniej wiedzy i
doświadczenia.
Wspomniany opryskiwacz mgławiący łączy w sobie zalety
najnowocześniejszej technologii z ergonomiczną konstrukcją.
Jest to poręczny, profesjonalny sprzęt o niewielkich gabarytach do
wielorakich zastosowań.
Należy uważnie przeczytać niniejszą broszurę, w której
szczegółowo opisano różne aspekty świadczące o doskonałych
parametrach urządzenia, dobrze ją zrozumieć i postępować
zgodnie z podanymi w niej instrukcjami. Umożliwi ona Państwu
optymalne wykorzystanie opryskiwacza mgławiącego marki
DOLMAR.
Polski
SYMBOLE
Podczas czytania niniejszej instrukcji obsługi bardzo istotne jest właściwe rozumienie poniższych symboli.
OSTRZEŻENIE/
NIEBEZPIECZEŃSTWO
Stosować ochronę dróg oddechowych
Przeczytać instrukcję obsługi, zrozumieć
ją i postępować zgodnie z nią
Gorące powierzchnie – Możliwość
poparzenia palców lub rąk
Zabronione Paliwo (benzyna)
Zakaz palenia Ręczny rozruch silnika
Nie używać otwartego ognia Wyłączanie awaryjne
Nosić wytrzymałe obuwie robocze na
podeszwie antypoślizgowej.
Pierwsza pomoc
Nosić odpowiednią odzież ochronną WŁĄCZENIE/ROZRUCH
Nosić rękawice ochronne WYŁĄCZENIE/STOP
Podczas oprysków nie pozwalać zbliżać
się osobom postronnym
Wirnik - możliwe poważne urazy palców
lub ręki
Do strefy roboczej nie dopuszczać osób
postronnych i zwierząt
Długie włosy mogą zaplątać się, grożąc
wypadkiem
Stosować ochronę oczu i słuchu
Trujące opary lub toksyczne gazy.
Nie uruchamiać w stree słabego
przewiewu.
Spis treści
Strona
Symbole..........................................................................................56
Ważne zasady bezpieczeństwa .....................................................57
Dane techniczne .............................................................................63
Opis części .....................................................................................64
Instrukcja montażu .........................................................................65
Przed uruchomieniem silnika..........................................................67
Rozruch i zatrzymywanie silnika.....................................................69
Regulacja obrotów biegu jałowego .................................................70
Sposób obsługi ............................................................................... 71
Przeglądy i konserwacja .................................................................77
Przechowywanie.............................................................................80
Rozwiązywanie problemów ............................................................82
Page 57

57
WAŻNE ZASADY BEZPIECZEŃSTWA
OSTRZEŻENIE:
● Należy zapoznać się z wszystkimi zasadami bezpieczeństwa i zaleceniami.
Niezastosowanie się do wspomnianych zasad i zaleceń może doprowadzić do
porażenia prądem elektrycznym, pożaru i/lub poważnego urazu.
Wszystkie zasady i zalecenia należy zachować do
wglądu na przyszłość.
Instrukcje ogólne
● Z uwagi na prawidłowość i bezpieczeństwo obsługi, użytkownik powinien
przeczytać niniejszą instrukcję obsługi, dobrze ją zrozumieć i postępować zgodnie
z zawartymi w niej zaleceniami, aby dobrze opanować obsługę opisywanego
opryskiwacza mgławiącego (1). Użytkownicy posiadający niewystarczającą
wiedzę w zakresie obsługi urządzenia stanowią zagrożenie zarówno dla siebie
samych, jak i dla innych osób.
● Opisywany opryskiwacz mgławiący można pożyczać jedynie osobom posiadającym
odpowiednie doświadczenie w pracy z opryskiwaczami mgławiącymi.
● Wraz z urządzeniem należy zawsze przekazać również instrukcję obsługi.
● Osoby używające urządzenia po raz pierwszy powinny zwrócić się do sprzedawcy
z prośbą o podstawowy instruktaż w zakresie obsługi opryskiwacza mgławiącego.
● Dzieciom i młodzieży w wieku poniżej 18 roku życia nie wolno obsługiwać
opisywanego opryskiwacza mgławiącego. Osoby powyżej 16 roku życia mogą
warunkowo obsługiwać urządzenie w celach szkoleniowych, o ile szkolenie
odbywa się pod bezpośrednim nadzorem wykwalikowanego instruktora.
● Z opryskiwacza mgławiącego należy korzystać z zachowaniem szczególnej
ostrożności i uwagi.
● Opryskiwacz mgławiący mogą obsługiwać tylko osoby w dobrej kondycji zycznej.
● Wszelkie prace powinny być wykonywane starannie i ostrożnie. To użytkownik
ponosi odpowiedzialność za inne osoby.
● Opryskiwacza mgławiącego nie wolno używać osobom pod wpływem alkoholu,
narkotyków lub przyjmującym leki (2).
● Nie używać urządzenia będąc zmęczonym.
● Niniejszą instrukcję zachować do wglądu na przyszłość.
Przeznaczenie urządzenia
● Należy używać właściwego urządzenia. Opryskiwacz mgławiący jest przeznaczony
wyłącznie do wykonywania oprysków płynnymi środkami chemicznymi i innymi
substancjami w postaci ciekłej do zwalczania szkodników i chwastów w sadach
oraz ogrodach kwiatowych i warzywnych, na drzewach i krzewach oraz na innych
roślinach, na przykład w przypadku upraw kawy, tytoniu i bawełny. Jest on również
przydatny przy pielęgnacji młodych drzew, na przykład w walce z kornikami i
innymi szkodnikami oraz z chorobami roślin.
Nie stosować do innych celów.
Urządzenie może być wykorzystywane do nadmuchu, jeżeli jest wyposażone w
odpowiednią rurę do nadmuchu.
● Można stosować jedynie środki ochrony roślin, które są specjalnie zatwierdzone
przez ich producenta do opryskiwaczy mgławiących i które spełniają wszelkie
obowiązujące przepisy, normy i rozporządzenia dotyczące bezpieczeństwa.
Informacje na temat sposobu obsługi posiadanego opryskiwacza mgławiącego można
uzyskać od sprzedawcy. Przestrzegać wszelkich obowiązujących miejscowych
przepisów, norm i rozporządzeń dotyczących bezpieczeństwa.
Wszystkie osoby zaangażowane w obsługę i serwisowanie powinny zostać
przeszkolone i zaznajomione z procedurami właściwego postępowania ze
stosowanymi środkami chemicznymi, jak również w zakresie pierwszej pomocy/
ratownictwa oraz przepisów dotyczących utylizacji płynnych substancji chemicznych.
OSTRZEŻENIE:
● Opisywany opryskiwacz mgławiący jest przeznaczony wyłącznie do zastosowań
profesjonalnych. Nie wolno pożyczać ani wydzierżawiać opryskiwacza
mgławiącego bez instrukcji obsługi. Należy upewnić się, że każdy, kto będzie go
używał, rozumie informacje podane w niniejszej instrukcji obsługi.
Sprzęt ochrony osobistej
● W celu zmniejszenia ryzyka obrażeń występującego w przypadku stosowania
środków chemicznych, opryskiwacz mgławiący należy napełniać, użytkować i
czyścić mając na sobie odpowiednią odzież ochronną. Zawsze należy stosować się
do wszelkich instrukcji podanych przez producenta danego preparatu chemicznego,
gdy chodzi o właściwą ochronę oczu, skóry i układu oddechowego. Mogą one
odbiegać od poniższych zasad bezpieczeństwa lub wykraczać poza ich zakres.
● Stosowanie toksycznych środków chemicznych może wymagać noszenia przez
operatora i osoby postronne odpowiedniej maski z atestem dla stosowanego
środka chemicznego. Informacje można znaleźć na etykiecie danego produktu
chemicznego. Wziewne środki chemiczne mogą powodować poważne lub
śmiertelne obrażenia.
● Ubranie powinno być funkcjonalne i właściwie dobrane, obcisłe, ale przy tym
niekrępujące ruchów. Nie zakładać biżuterii, ani luźnej odzieży z uwagi na
możliwość ich wciągnięcia do wlotu powietrza. To samo dotyczy długich włosów. (3)
● Aby uniknąć obrażeń głowy, oczu, dłoni lub stóp, jak również w celu ochrony słuchu,
podczas pracy z opryskiwaczem mgławiącym należy używać następującego
sprzętu i odzieży ochronnej.
(2)
(1)
(3)
Page 58

58
59
Zwrócić szczególną uwagę na poniższe przepisy
● Ubranie powinno być mocne i dobrze dopasowane, umożliwiając jednocześnie
pełną swobodę ruchu. Unikać luźnych kamizelek, dzwonów lub spodni z
mankietami, szalików, rozpuszczonych długich włosów bądź też jakichkolwiek
innych elementów, które mogłyby zostać wciągnięte do wlotu powietrza.
Nosić długie spodnie chroniące nogi.
Nie zakładać krótkich spodni. (5)
● Hałas generowany przez opryskiwacz mgławiący może prowadzić do uszkodzenia
słuchu. Z uwagi na ochronę słuchu, należy ograniczyć poziom hałasu (stosując
zatyczki do uszu lub nauszniki). Użytkownicy stale lub regularnie korzystający z
urządzenia powinni regularnie badać swój słuch. (4)
● Do pracy z opryskiwaczem mgławiącym należy zawsze zakładać rękawice gumowe/
odporne na działanie środków chemicznych. Bardzo ważne jest dobre obuwie.
Należy nosić gumowce/buty odporne na działanie środków chemicznych. (5)
● Obowiązkowa jest odpowiednia ochrona oczu. Mimo że wypływający strumień
jest skierowany w przeciwną stronę w stosunku do operatora, podczas obsługi
opryskiwacza mgławiącego mogą występować rykoszety i odbite strumienie
wsteczne. (4)
● Opryskiwacza mgławiącego nie wolno obsługiwać bez gogli lub prawidłowo
założonych okularów ochronnych z odpowiednią osłoną od góry i z boków
zgodnych z normą ANSI Z 87.1 (lub stosowną normą krajową).
ZASADY OBCHODZENIA SIĘ ZE ŚRODKAMI CHEMICZNYMI
● Niektóre środki chemiczne stosowane w posiadanym opryskiwaczu mgławiącym
mogą zawierać substancje toksyczne i/lub żrące. Wspomniane środki chemiczne
mogą być niebezpieczne dla osób i zwierząt, grożąc poważnymi lub śmiertelnymi
obrażeniami, jak również dla roślin i środowiska, grożąc poważnymi szkodami.
Unikać bezpośredniego kontaktu ze środkami chemicznymi.
W przypadku kontaktu z danym preparatem chemicznym, należy postępować
zgodnie z instrukcją podaną przez jego producenta.
● Przed przystąpieniem do mieszania danego środka chemicznego, jego
przechowywania lub utylizacji należy przeczytać etykietę producenta i dołączoną
instrukcję obsługi.
Nie polegać na własnej pamięci.
Beztroskie lub niewłaściwe użytkowanie grozi poważnymi lub śmiertelnymi
obrażeniami.
● Przed użyciem należy starannie przeczytać etykiety umieszczone na pojemnikach
zawierających środek chemiczny.
Środki chemiczne podzielono na różne kategorie pod względem toksyczności.
Każda kategoria ma specyczne charakterystyki obchodzenia się z
zaklasykowanymi do niej środkami.
Należy zapoznać się z charakterystykami dla danej kategorii używanego środka
chemicznego.
Środki chemiczne mogą być używane tylko przez osoby przeszkolone w zakresie
obchodzenia się z nimi i odpowiednich środków pierwszej pomocy.
● Niewłaściwie używane środki chemiczne mogą być szkodliwe dla osób, zwierząt i
środowiska. Dodatkowo, w posiadanym opryskiwaczu mgławiącym lepiej nie stosować
pewnych środków chemicznych, które są żrące, powodują korozję lub są trujące.
● Można mieszać tylko zgodne pestycydy. W przypadku źle dobranych mieszanin
mogą powstawać toksyczne opary.
Mając do czynienia ze środkami chemicznymi lub rozpylając je, należy postępować
zgodnie z miejscowymi, stanowymi i federalnymi zasadami i wytycznymi
dotyczącymi ochrony środowiska. Nie przeprowadzać oprysków podczas wietrznej
pogody. Z uwagi na ochronę środowiska nie należy stosować nadmiernych ilości,
tylko zalecaną dawkę.
Specjalną uwagę należy zwrócić w przypadku stosowania w pobliżu działów
wodnych, dróg wodnych itp.
● Mając do czynienia ze środkami chemicznymi lub rozpylając je, należy starać
się mieć zamknięte usta. W tym czasie nie wolno jeść, pić, ani palić. Nie wolno
w żadnym wypadku dmuchać przez dysze, rurki, rury lub inne podzespoły
przykładając bezpośrednio usta. Wszelkie czynności przy środkach chemicznych
należy zawsze wykonywać w obszarze z dobrym przewiewem, mając na sobie
odpowiednią odzież ochronną i sprzęt bezpieczeństwa.
Środków chemicznych nie wolno składować ani przewozić razem z żywnością,
napojami lub lekarstwami. Pojemników po środkach chemicznych nie wolno w
żadnym wypadku ponownie wykorzystywać do jakichkolwiek innych celów.
Ciekłych środków chemicznych nie wolno przelewać do innych pojemników,
zwłaszcza od żywności i/lub napojów.
● W razie przypadkowego kontaktu ze środkami chemicznymi lub ich połknięcia, albo
w przypadku zanieczyszczenia nimi odzieży, należy przerwać pracę i natychmiast
sięgnąć do instrukcji producenta danego środka chemicznego.
W razie wątpliwości co robić, należy bezzwłocznie zapytać o poradę pracownika
ośrodka kontroli zatruć lub lekarza.
Etykietę danego produktu należy mieć pod ręką, aby móc przeczytać jej treść lub
okazać ją osobie, do której zwracamy się o poradę.
Rozlany środek chemiczny należy niezwłocznie zebrać.
Wszelkie pozostałości utylizować przestrzegając stanowych, federalnych lub
krajowych praw i przepisów.
● Środki chemiczne należy chronić przed dziećmi, innymi nieupoważnionymi
osobami i zwierzętami.
Nieużywane środki chemiczne przechowywać w bezpiecznym, zamykanym
na klucz miejscu. Postępować zgodnie z zaleceniami producenta odnośnie
właściwego przechowywania.
(4)
(5)
Page 59

59
Przygotowanie środków chemicznych
● Roztwory chemiczne należy przygotowywać zgodnie z instrukcją producenta
danego środka chemicznego.
● Przygotować tylko niezbędną ilość roztworu do wykonania bieżącej pracy, aby po
jej zakończeniu nie pozostał niewykorzystany roztwór.
● Substancje chemiczne należy mieszać tylko zgodnie z instrukcją. W przypadku
źle dobranych mieszanin mogą powstawać toksyczne opary lub mieszanki
wybuchowe.
● W żadnym wypadku nie wolno rozpylać nierozcieńczonych środków chemicznych.
● Przygotowanie roztworu i napełnianie pojemników należy przeprowadzać na
świeżym powietrzu tylko w miejscu zapewniającym dobry przewiew.
● Operator powinien wiedzieć, jaki środek chemiczny aktualnie stosuje.
Przechowywanie
● Roztworu do oprysków nie należy przechowywać dłużej niż przez jeden dzień.
● Roztwór do oprysków powinien być zawsze przechowywany i przewożony tylko w
atestowanych pojemnikach.
● Roztworu do oprysków nie wolno w żadnym wypadku przechowywać ani przewozić
w pojemnikach przeznaczonych do żywności, napojów lub karmy dla zwierząt.
● Roztworu do oprysków nie wolno przechowywać ani przewozić razem z żywnością,
napojami lub karmą dla zwierząt.
● Roztwór do oprysków należy chronić przed dziećmi, innymi nieupoważnionymi
osobami i zwierzętami.
● Roztwór do oprysków przechowywać w zamykanym na klucz miejscu
zabezpieczonym przed nieupoważnionym dostępem.
Utylizacja
Pozostałości środków chemicznych lub zanieczyszczonych roztworów po płukaniu
nie wolno w żadnym wypadku wylewać do cieków wodnych, rur kanalizacyjnych,
kanałów ściekowych, kratek ściekowych, studzienek ulicznych i tym podobnych.
Utylizując zanieczyszczoną wodę po płukaniu, należy przestrzegać wszelkich
obowiązujących praw, przepisów i rozporządzeń.
Należy ściśle przestrzegać instrukcji zapobiegania wypadkom opracowanej przez
producenta środka chemicznego.
Napełnianie pojemnika
● Sprawdzić szczelność wszelkich połączeń i upewnić się, że rury jak również rurka
cienkościenna są dobrze zamocowane i w dobrym stanie. Dźwignię wypływu
roztworu trzymać w pozycji zamkniętej.
● Przed przystąpieniem do rozpylania środków chemicznych, opryskiwacz mgławiący
należy najpierw napełnić wodą, aby upewnić się, że został prawidłowo zmontowany,
i móc przećwiczyć opryskiwanie. Na tym etapie należy również sprawdzić, czy
nie ma wycieków. Po dokładnym zapoznaniu się z działaniem opryskiwacza
mgławiącego należy postępować zgodnie ze zwykłą procedurą obsługi.
● Opryskiwacz mgławiący napełniać na świeżym powietrzu w miejscu z dobrym
przewiewem.
● Nie stosować:
– w opryskiwaczu mgławiącym środków łatwopalnych, które mogą grozić
eksplozją, a w konsekwencji poważnymi lub wręcz śmiertelnymi obrażeniami;
– w opryskiwaczu mgławiącym materiałów żrących lub powodujących korozję,
które mogą prowadzić do uszkodzenia urządzenia;
– substancji płynnych o temperaturze przekraczającej 50°C w celu zmniejszenia
ryzyka poparzenia i uszkodzenia urządzenia.
W celu napełnienia zbiornika na roztwór, opryskiwacz mgławiący należy ustawić
na równej powierzchni. Wlewać roztwór tylko przy dobrym oświetleniu i dobrej
widoczności. Podczas napełniania zbiornika roztworem chemicznym należy
zachować ostrożność, aby nie doszło do jego przepełnienia z uwagi na zmniejszenie
ryzyka skażenia środowiska.
W celu zmniejszenia ryzyka obrażeń, nie wolno napełniać opryskiwacza mgławiącego
mając go założonego na plecach.
W przypadku napełniania zbiornika na roztwór za pomocą węża podłączonego do
centralnej instalacji wodociągowej, należy upewnić się, że wąż nie jest zanurzony
w roztworze, aby zmniejszyć ryzyko przepływu zwrotnego, na przykład zassania
środków chemicznych do instalacji wodociągowej w razie wystąpienia nagłego
podciśnienia.
Należy wyliczyć właściwą ilość roztworu chemicznego, aby wykorzystać go za
jednym razem w całości bez pozostawiania w zbiorniku nadwyżki roztworu.
Po napełnieniu, zamocować korek zbiornika na roztwór i dobrze go dokręcić.
● Podczas napełniania i w trakcie pracy kontrolować pod kątem ewentualnych
wycieków. Roztwór wyciekający ze zbiornika lub spod luźnej złączki może
zamoczyć ubranie i wejść w kontakt ze skórą.
Page 60

60
61
Uruchamianie opryskiwacza mgławiącego
● Upewnić się, że w promieniu 20 metrów (6) od miejsca pracy nie ma dzieci ani
innych osób, jak również zwrócić uwagę, czy w sąsiedztwie nie ma zwierząt.
Opryskiwacza mgławiącego nie wolno w żadnym wypadku używać na obszarach
miejskich.
● Przed uruchomieniem zawsze należy sprawdzić, czy opryskiwacz mgławiący
gwarantuje bezpieczne użytkowanie.
Sprawdzić działanie języka spustowego przepustnicy pod względem
bezpieczeństwa. Należy skontrolować działanie języka spustowego przepustnicy
pod kątem płynnego ruchu i łatwego przesuwania. Sprawdzić prawidłowe
funkcjonowanie blokady języka spustowego przepustnicy.
Sprawdzić, czy uchwyty są czyste i suche oraz przetestować działanie przełącznika
l-O. Na uchwytach nie powinno być pozostałości oleju lub paliwa.
● W celu zmniejszenia ryzyka wycieku i kontaktu skóry ze środkami chemicznymi,
należy sprawdzić szczelność korka pojemnika i wszelkich złączek na drodze do
wylotu rozpylanego preparatu i upewnić się, że wąż jest dobrze przymocowany, a
jego stan dobry. Dźwignię wypływu roztworu trzymać w pozycji zamkniętej.
● Przed uruchomieniem urządzenia, upewnić się, że dźwignia wypływu roztworu
znajduje się w pozycji zamkniętej.
● Sprawdzić, czy nasadka świecy jest dobrze osadzona na świecy zapłonowej. Luźna
nasadka świecy może być przyczyną iskrzenia, co z kolei może doprowadzić do
zapalenia się łatwopalnych oparów i pożaru.
● Sprawdzić stan szelek. Uszkodzone lub zużyte pasy wymienić.
● Przed przystąpieniem do pracy wyregulować pas naramienny dopasowując go do
własnych rozmiarów.
W razie zagrożenia można szybko zsunąć pas naramienny i odrzucić urządzenie.
Przed przystąpieniem do eksploatacji urządzenia należy kilka razy przećwiczyć
zsuwanie szelek, aby nabrać wprawy. W trakcie ćwiczeń nie należy odrzucać
urządzenia, gdyż można go uszkodzić.
● Ciągnąc za linkę rozrusznika, nie należy owijać jej wokół ręki. Uchwytu wysuniętej
linki rozrusznika nie należy puszczać swobodnie, lecz zwalniając naciąg starać się
prowadzić linkę rozrusznika, aby zapewnić jej prawidłowe nawinięcie.
Niestosowanie się do opisanej procedury grozi urazami ręki lub palców i może
doprowadzić do uszkodzenia mechanizmu rozrusznika.
● Do założenia uruchomionego opryskiwacza mgławiącego na plecy może być
konieczna pomoc drugiej osoby. Aby zmniejszyć ryzyko wystąpienia obrażeń
u pomocnika w wyniku wyrzucanych w powietrze przedmiotów, kontaktu z
rozpylonym/ciekłym środkiem chemicznym lub kontaktu z gorącymi spalinami,
przez ten krótki okres należy utrzymywać wolne obroty silnika i nie pozwalać, aby
pomocnik znalazł się w stree dyszy wylotowej lub rury wydechowej. W przeciwnym
razie opryskiwacz mgławiący należy uruchamiać i obsługiwać bez pomocnika.
● Opryskiwacz mgławiący należy uruchamiać tylko zgodnie z instrukcją.
● Nie wolno stosować żadnej innej metody uruchomiania silnika (7)!
● Opryskiwacza mgławiącego i znajdujących się w zestawie akcesoriów można
używać tylko do podanych zastosowań.
● Silnik opryskiwacza mgławiącego można uruchomić dopiero po zakończeniu
montażu całego urządzenia. Z urządzenia można korzystać dopiero po
zamontowaniu wszystkich stosownych akcesoriów.
● W razie jakichkolwiek problemów z silnikiem należy natychmiast go wyłączyć.
● Opryskiwacz mgławiący należy obsługiwać jedną ręką, trzymając prawą rękę na
drążku sterowania. Nosić jak plecak z pasami naramiennymi na obu ramionach.
Z uwagi na ryzyko utraty kontroli, nie wolno w żadnym wypadku nosić opryskiwacza
mgławiącego zawieszonego na pasie (pasach) na jednym ramieniu.
● Korzystając z opryskiwacza mgławiącego, należy mocno obejmować palcami
drążek sterowania trzymając go między kciukiem a palcem wskazującym.
Przez cały czas należy trzymać rękę w tej pozycji, aby nie utracić kontroli nad
urządzeniem. Upewnić się, że drążek sterowania jest w dobrym stanie, nie jest
wilgotny i nie jest zabrudzony smołą, olejem lub smarem.
● Zawsze należy zadbać o odpowiednie oparcie dla stóp zapewniające
bezpieczeństwo i równowagę.
● Aby zbiornik na roztwór znajdował się zawsze w pionie i zmniejszyć ryzyko
rozlania, nie należy zginać się w talii. Zginać można tylko kolana, w razie potrzeby
podpierając się w celu zachowania równowagi.
Należy pamiętać, że napełniony cieczą opryskiwacz mgławiący dość sporo waży.
Należy zachować większą czujność przy zginaniu się, pochylaniu się lub chodzeniu.
● Opryskiwacz mgławiący należy obsługiwać w taki sposób, aby unikać wdychania
spalin. Nigdy nie uruchamiać silnika w zamkniętych pomieszczeniach (ryzyko
uduszenia lub zatrucia gazem). Tlenek węgla jest gazem bezwonnym.
Zawsze należy pamiętać o odpowiedniej wentylacji.
● Opisywany opryskiwacz mgławiący nie posiada izolacji przed udarem elektrycznym.
W celu zmniejszenia ryzyka śmiertelnego porażenia prądem elektrycznym, nie
wolno w żadnym wypadku korzystać z opisywanego opryskiwacza mgławiącego w
pobliżu przewodów lub kabli (zasilających itp.), przez które płynie prąd elektryczny.
Nie wolno dokonywać oprysków instalacji elektrycznych bądź miejsc w ich
sąsiedztwie.
20 m (66 ft)
(6)
(7)
20 m
Page 61

61
● Przed odpoczynkiem lub pozostawieniem opryskiwacza mgławiącego bez
nadzoru należy wyłączyć silnik. Umieścić go w bezpiecznym miejscu, aby nie
stanowił zagrożenia dla innych, nie doszło do zapłonu materiałów łatwopalnych
lub uszkodzenia urządzenia (8).
● Gorącego opryskiwacza mgławiącego nie wolno w żadnym wypadku kłaść na
suchej trawie lub jakimkolwiek innym materiale łatwopalnym.
● Opryskiwacza mgławiącego pracującego na wysokich obrotach nie wolno kłaść na
ziemi, z uwagi na drobiny, takie jak piasek, trawa, kurz itp., które mogą dostać się
do wlotu powietrza i uszkodzić wirnik wentylatora.
● Podczas przerw w pracy nie należy pozostawiać opryskiwacza mgławiącego
bezpośrednio na słońcu lub w pobliżu źródła ciepła.
● W trakcie pracy należy korzystać z wszystkich elementów zabezpieczających i
osłon znajdujących się w zestawie z urządzeniem.
● Nigdy nie uruchamiać silnika z wadliwym tłumikiem wydechowym.
● Nie wkładać ręki do otworu wydechowego. W trakcie pracy tłumik mocno się
nagrzewa, grożąc poparzeniami.
● Nie dotykać zbyt długo pokrywy silnika. Może się ona mocno nagrzewać w trakcie
pracy, grożąc poparzeniami.
● Wyłączać silnik na czas transportu (8).
● Opryskiwacz mgławiący należy ustawić w bezpiecznej pozycji na czas transportu
samochodem osobowym lub ciężarowym, aby uniknąć wycieku paliwa.
● Przed przetransportowaniem opryskiwacza mgławiącego należy upewnić się,
że zbiornik paliwa i pojemnik na ciecz/środek chemiczny zostały całkowicie
opróżnione.
Tankowanie
● Przed tankowaniem należy wyłączyć silnik (8). Zachować odpowiednią odległość
od otwartego ognia (9) i nie palić.
● Unikać kontaktu skóry z produktami naftowymi. Nie wdychać oparów paliwa.
Podczas uzupełniania paliwa zawsze nosić rękawice ochronne. Pamiętać o
regularnym zmienianiu i praniu odzieży ochronnej.
● Z uwagi na możliwość skażenia gleby (ochrona środowiska), uważać, aby nie
doszło do rozlania paliwa lub oleju. W przypadku rozlania paliwa natychmiast
wyczyścić opryskiwacz mgławiący. Przed wrzuceniem do odpowiedniego
zamykanego pojemnika, zawilgoconą odzież należy pozostawić aż wyschnie, aby
nie doszło do samorzutnego zapalenia.
● Unikać kontaktu paliwa z odzieżą. W przypadku rozlania paliwa na odzież należy
się natychmiast przebrać (niebezpieczeństwo zapalenia).
● Regularnie sprawdzać korek wlewu paliwa, aby mieć pewność, że jest dobrze
dokręcony.
● Starannie dokręcić śrubę zabezpieczającą zbiornik paliwa. Przed przystąpieniem
do uruchomienia silnika zmienić miejsce (min. 3 metry od miejsca tankowania) (10).
● Nie wolno uzupełniać paliwa w pomieszczeniach zamkniętych. Opary paliwa
gromadzą się na poziomie podłoża (ryzyko wybuchu).
● Paliwo można transportować i przechowywać tylko w atestowanych kanistrach.
Upewnić się, że dzieci nie mają dostępu do przechowywanego paliwa.
● Nie wolno podejmować prób tankowania gorącego lub pracującego silnika.
Zasady użytkowania
● Korzystać z opryskiwacza mgławiącego tylko przy dobrym oświetleniu i
widoczności. W okresie niskich temperatur należy wystrzegać się śliskich lub
mokrych powierzchni, lodu i śniegu (ryzyko poślizgnięcia się).
Zawsze należy zapewnić stopom bezpieczne oparcie (11).
● Nie pracować na niestabilnym podłożu lub na stromych pochyłościach terenu (11).
● W przypadku nieznajomości ryzyka związanego z konkretnym środkiem
chemicznym będącym w użyciu, należy zapoznać się z etykietą produktu i/lub
kartą charakterystyki tej substancji, albo zasięgnąć porady producenta/dostawcy.
Można również zapytać pracodawcy, agencji rządowych i skorzystać z innych
źródeł informacji na temat materiałów niebezpiecznych.
Niektóre inne władze opublikowały wykazy substancji, co do których wiadomo, że
są rakotwórcze, mają toksyczny wpływ na funkcje rozrodcze itp. (11).
● Aby zmniejszyć ryzyko obrażeń ciała, nie wolno kierować strumienia powietrza w
stronę osób stojących obok, z uwagi na możliwość urazów oczu spowodowanych
wysokim ciśnieniem strumienia powietrza i wydmuchiwanymi z dużą szybkością
drobinami (12).
● Strumienia nie wolno w żadnym wypadku kierować w stronę ludzi, zwierząt lub
mienia, które mogłoby ulec uszkodzeniu w wyniku oprysku (12).
● Do wlotu powietrza urządzenia ani do dyszy opryskiwacza mgławiącego nie wolno
w żadnym wypadku wsuwać obcych przedmiotów. Mogą one uszkodzić wirnik
wentylatora i spowodować poważne obrażenia u operatora lub osób postronnych w
wyniku wyrzucenia z dużą szybkością danego przedmiotu lub wyłamanych części.
● Zwrócić uwagę na kierunek wiatru. Nie wolno pracować pod wiatr.
● Z uwagi na ryzyko potknięcia się i utraty kontroli, w trakcie korzystania z urządzenia
nie należy iść tyłem.
● Przed przystąpieniem do czyszczenia lub serwisowania urządzenia, albo wymiany
części należy zawsze wyłączyć silnik.
● Robić przerwy, aby zapobiec utracie panowania spowodowanej zmęczeniem.
Wskazane jest robienie przerw od 10 do 20 minut po każdej przepracowanej
godzinie.
(8)
(9)
(10)
3 m (10 ft)
(11)
(12)
3 m
Page 62

62
63
Po zakończeniu pracy
● Po wykonaniu oprysku lub zakończeniu czynności przy środkach chemicznych
należy zawsze dokładnie się umyć wodą z mydłem. Należy niezwłocznie wziąć
prysznic, a całą odzież ochronną prać oddzielnie.
Postępować zgodnie z wszelkimi dodatkowymi zaleceniami producenta środka
chemicznego.
Opryskiwacz mgławiący należy zawsze oczyścić z pyłu i brudu.
● Po każdym użyciu opróżnić, wypłukać i oczyścić zbiornik na roztwór i cały zespół.
Zapobiegnie to krystalizacji roztworu, co mogłoby później prowadzić do zapychania
się urządzenia i jego uszkodzeń pod wpływem substancji chemicznych. Ponadto,
resztki środków chemicznych mogłyby mieć niepożądany wpływ podczas kolejnych
oprysków z wykorzystaniem innego rodzaju środka chemicznego (np. pozostałości
herbicydu mogą zaszkodzić roślinom opryskiwanych pestycydem).
Opryskiwacza mgławiącego nie wolno przechowywać wraz z roztworem do
oprysków w zbiorniku.
● Obszary poddane opryskom chronić przed dostępem dzieci, osób niepowołanych
i zwierząt domowych.
Po użyciu pewnych środków chemicznych, zwłaszcza pestycydów rolniczych,
na granicach obszaru poddanego opryskom należy umieścić informacje o
obowiązującym „okresie karencji” (OK).
Zapoznać się z etykietą produktu chemicznego i wszelkimi obowiązującymi
przepisami państwowymi.
Instrukcja konserwacji
● Przed okresem przechowywania należy przeprowadzić czyszczenie i wykonać
czynności konserwacyjne.
● Nie obciążać środowiska naturalnego. Podczas obsługi opryskiwacza mgławiącego
należy ograniczać poziom hałasu i zanieczyszczeń. W szczególności należy
sprawdzić prawidłową regulację gaźnika.
● Regularnie czyścić opryskiwacz mgławiący i sprawdzać, czy wszystkie śruby i
nakrętki są dobrze dokręcone.
● Nigdy nie serwisować ani nie przechowywać opryskiwacza mgławiącego w pobliżu
otwartego ognia, źródła iskier itp. (13).
● Zawsze przechowywać opryskiwacz mgławiący w pomieszczeniach zamkniętych z
dobrą wentylacją, po uprzednim opróżnieniu zbiornika paliwa i zbiornika na roztwór.
(13)
Przestrzegać i postępować zgodnie z instrukcjami dotyczącymi zapobiegania wypadkom, wydanymi przez organizacje branżowe i rmy
ubezpieczeniowe.
Nie dokonywać żadnych przeróbek opryskiwacza mgławiącego, gdyż zagraża to bezpieczeństwu.
Zakres prac konserwacyjnych lub naprawczych wykonywanych przez użytkownika ograniczony jest do tych, które opisano w niniejszej instrukcji
obsługi. Wszelkie pozostałe prace należy zlecać przedstawicielom autoryzowanego serwisu.
Stosować tylko oryginalne części zamienne i akcesoria dostarczane przez rmę DOLMAR.
Użytkowanie niezatwierdzonych akcesoriów i urządzeń wiąże się ze zwiększonym ryzykiem wypadków i obrażeń. Firma DOLMAR nie ponosi
żadnej odpowiedzialności za wypadki lub szkody spowodowane używaniem niezatwierdzonych przystawek lub akcesoriów.
Pierwsza pomoc
Należy zadbać o to, aby w pobliżu miejsca wykonywania prac, zawsze znajdowała
się porządnie wyposażona apteczka pierwszej pomocy, z której można będzie
skorzystać w razie wypadku. Braki w apteczce należy niezwłocznie uzupełnić.
Wzywając pomocy, należy podać następujące informacje:
● Miejsce wypadku
● Opis zdarzenia
● Liczba poszkodowanych osób
● Stopień obrażeń
● Własne imię i nazwisko
Opakowanie
Opryskiwacz mgławiący marki DOLMAR dostarczany jest w pudle kartonowym
zabezpieczającym przed uszkodzeniami w transporcie. Karton jest podstawowym
materiałem i z tego względu może być ponownie użyty lub nadaje się do recyklingu
(recykling makulatury).
INSTRUKCJĘ OBSŁUGI NALEŻY ZACHOWAĆ.
OSTRZEŻENIE:
● NIE WOLNO pozwolić, aby wygoda lub rutyna (nabyta w wyniku wielokrotnego
użytkowania) zastąpiły ścisłe przestrzeganie obowiązujących zasad
bezpieczeństwa w przypadku przedmiotowego wyrobu. NIEWŁAŚCIWE
UŻYTKOWANIE narzędzia lub niestosowanie się do zasad bezpieczeństwa
podanych w niniejszej instrukcji obsługi może prowadzić do poważnych obrażeń
ciała.
Page 63

63
Dotyczy tylko krajów europejskich
Deklaracja zgodności WE
Firma Makita oświadcza, że poniższe urządzenie (urządzenia):
Opis urządzenia: Spalinowy opryskiwacz mgławiący
Nr modelu/Typ: SP-7650.4 R
Dane techniczne: informacje w tabeli „DANE TECHNICZNE”
jest (są) zgodne z następującymi Dyrektywami Europejskimi:
2006/42/WE, 2000/14/WE
Są produkowane zgodnie z następującymi normami lub dokumentami normalizacyjnymi:
EN ISO 28139, ISO 10988
Dokumentacja techniczna zgodna z normą 2006/42/WE dostępna jest w siedzibie:
Makita, Jan-Baptist Vinkstraat 2, 3070, Belgia
Procedura oceny zgodności wymagana przez Dyrektywę 2000/14/WE została przeprowadzona zgodnie z aneksem V.
Zmierzony poziom mocy akustycznej: 110,1 dB
Gwarantowany poziom mocy akustycznej: 111 dB
8.7.2014
Yasushi Fukaya
Dyrektor
Makita, Jan-Baptist Vinkstraat 2, 3070, Belgia
DANE TECHNICZNE
Model SP-7650.4 R
Ciężar (przy pełnym zbiorniku paliwa, pełnym zbiorniku ze środkiem
chemicznym, 220 ml oleju silnikowego)
(kg) 30,4
Ciężar (ciężar na sucho) (kg) 14,1
Wymiary (bez rury dmuchawy dł. x sz. x wys.) (mm) 420 x 440 x 595
Typ silnika
chłodzony powietrzem, 4-suwowy, z pojedynczym
cylindrem
Maks. moc silnika (kW) 2,7
Maks. obroty silnika (min
–1
) 7 400
Obroty na biegu jałowym (min
–1
) 2 800
Pojemność skokowa silnika (cm
3
) 75,6
Paliwo Benzyna samochodowa
Pojemność zbiornika paliwa (L) 1,8
Olej silnikowy
Olej SAE 10W-30 klasy SF lub wyższej wg klasykacji API
(olej do 4-suwowych silników samochodowych)
Objętość oleju silnikowego (L) 0,22
Gaźnik (gaźnik membranowy) WALBRO WYK
Świeca zapłonowa NGK CMR6A
Przerwa międzyelektrodowa (mm) 0,7 – 0,8
Pojemność zbiornika na roztwór (L) 15,0
Zasięg oprysku (w poziomie / w pionie) (m) 16 / 13
Maks. szybkość powietrza (m/s) 85
Natężenie przepływu powietrza (m
3
/min) 14,1
Wibracje wg ISO 22867
a
hv eq
(m/s2) 2,7
Niepewność K (m/s
2
) 0,8
Średni poziom ciśnienia akustycznego wg ISO 22868
L
PA eq
dB (A) 95,4
Niepewność K dB (A) 2,9
Średni poziom mocy akustycznej wg ISO 22868
L
WA eq
dB (A) 110,1
Niepewność K dB (A) 1,3
Uwaga:
1. Stosować olej i świecę zapłonową podane w tabeli.
2. Dane techniczne mogą ulec zmianie bez uprzedzenia.
3. Poziom 10 L stanowi poziom odpowiadający 25 kg wagi brutto opryskiwacza mgławiącego wraz z roztworem.
4. Poziomy drgań i hałasu zostały zmierzone przy zastosowaniu rury prostej (długiej).
Page 64

64
65
OPIS CZĘŚCI
1
2
4
3
5
7
11
15
17
8
6
10
13
14
16
9
12
18
19
20
21
22
23
24
25
26
27
28
29
30
31
32
33
34
35
36
37
38
39
40
41
41
1. Dźwignia zatrzymania 15. Śruba spustowa oleju 29. Rura prosta (długa) (wyposażenie opcjonalne)
2. Drążek sterowania 16. Zbiornik paliwa 30. Rura prosta (krótka) (wyposażenie opcjonalne)
3. Język spustowy przepustnicy 17. Korek wlewu oleju 31. Rura zakrzywiona (wyposażenie opcjonalne)
4. Dźwignia blokująca 18. Opaska zaciskowa (średnica 100 mm) 32. Sitko łącznika przewodu
5. Korek zbiornika na roztwór 19. Opaska zaciskowa (średnica 76 mm)
33. Sitko zbiornika na roztwór (w zbiorniku na
roztwór)
6. Pokrywa ltra powietrza 20. Dysza górna
34. Rura końcowa (długa) (wyposażenie
opcjonalne do obsługi dmuchawy)
7. Rurka kontrolna poziomu roztworu w
zbiorniku
21. Druga dysza
35. Rura końcowa (krótka) (wyposażenie
opcjonalne do obsługi dmuchawy)
8. Dźwignia ssania 22. Pokrętło regulacyjne cieczy
36. Rura płaska (wyposażenie opcjonalne do
obsługi dmuchawy)
9. Tłumik 23. Rura prosta 37. Przewód (długi) (wyposażenie opcjonalne)
10. Pompka zastrzykowa 24. Dźwignia wypływu roztworu 38. Przewód (krótki) (wyposażenie opcjonalne)
11. Pokrywa świecy 25. Rura ze złączką obrotową 39. Pokrywa rozpraszająca
12. Kolanko 26. Pas naramienny 40. Deektor
13. Uchwyt rozrusznika 27. Siatka wlotu powietrza 41. Zacisk przewodu
14. Korek wlewu paliwa 28. Zbiornik na roztwór
Page 65

65
INSTRUKCJA MONTAŻU
Montaż rur opryskiwacza mgławiącego
OSTROŻNIE:
● Przed przystąpieniem do jakichkolwiek prac przy opryskiwaczu mgławiącym,
należy zawsze wyłączyć silnik i zdjąć nasadkę ze świecy zapłonowej.
● Zawsze nosić rękawice ochronne!
● Opryskiwacz mgławiący można uruchomić dopiero po kompletnym zmontowaniu
wszystkich elementów.
● Po zakończeniu montażu upewnić się, że nie ma nieszczelności na opaskach
zaciskowych.
UWAGA:
● Przed dokręceniem, opaski należy tak ustawić, aby łby śrub były skierowane na
zewnątrz, jak pokazano na rysunku.
1. Rurę ze złączką obrotową (1) połączyć z rurą elastyczną (2).
Ścisnąć oba elementy opaską zaciskową o średnicy 76 mm (3).
2. Rurę elastyczną połączyć z kolankiem (4) opryskiwacza mgławiącego.
Ścisnąć oba elementy opaską zaciskową o średnicy 100 mm (5).
3. Rurę prostą (6) połączyć z rurą ze złączką obrotową (1).
Wyrównać rowek na rurze prostej z występem na rurze ze złączką obrotową i
obrócić rurę prostą, aż wskoczy na swoje miejsce, po czym ścisnąć oba elementy
opaską zaciskową o średnicy 76 mm (3).
UWAGA:
● Wspomniana powyżej rura prosta oznacza poniższe trzy rodzaje rur, które można
wymieniać w zależności od potrzeb podczas pracy.
– Rura prosta (długa) (6)
– Rura zakrzywiona u góry (7)
– Rura prosta (krótka) (8)
W przypadku korzystania z rury prostej (długiej) (6) lub rury zakrzywionej (7),
należy użyć przewodu (długiego) (9).
W przypadku korzystania z rury prostej (krótkiej) (8), należy użyć przewodu
(krótkiego) (10).
Aby wymienić przewód, należy ściągnąć zaciski przewodu i przeprowadzić
montaż. W razie potrzeby skorzystać z kombinerek lub podobnego narzędzia.
OSTROŻNIE:
● Podczas wymiany przewodu uważać, aby go nie uszkodzić.
W standardzie w zestawie z opryskiwaczem mgławiącym znajduje się jedna z
wyżej wymienionych rur lub ich kombinacja. Zależy to od kraju przeznaczenia.
Pozostałe typy rur mogą stanowić wyposażenie opcjonalne.
(2)
(3)
(1)
(4)
(5)
(6)
(6)
(7)
(8)
(9)
(10)
Page 66

66
67
4. Na rurę nasunąć luźno dwie opaski zaciskowe o średnicy 76 mm (3) (wspomniane
opaski zaciskowe będą później wykorzystane do ściśnięcia dźwigni wypływu
roztworu i łącznika przewodu).
Połączyć drugą dyszę (11) z rurą prostą.
Ścisnąć je kolejną opaską zaciskową o średnicy 76 mm (3).
(11)
(3)
(3)
(3)
(13)
(14)
(12)
(1)
(2)
5. Nałożyć dźwignię wypływu roztworu (12) na rurę.
Upewnić się, że otwarta strona u podstawy dźwigni (13) jest zwrócona w kierunku
rury ze złączką obrotową.
Wyrównać podstawę dźwigni ze szczeliną występu na rurze prostej (14).
Następnie ścisnąć je opaską zaciskową o średnicy 76 mm (3).
6. Upewnić się, że wszystkie obejmy zaciskowe są dociągnięte.
Regulacja i mocowanie drążka sterowania
1. Założyć urządzenie na plecy i wyregulować pas naramienny (informacje w
rozdziale „Regulacja pasa naramiennego”).
2. Nasunąć drążek sterowania (1) na rurę i ustawić w pozycji zapewniającej
największy komfort.
3. Obracając pokrętłem (2), unieruchomić drążek sterowania.
Montaż rury końcowej (wyposażenie opcjonalne do obsługi
dmuchawy)
OSTRZEŻENIE:
● Przed przystąpieniem do montażu rury końcowej należy z węża podawania
roztworu (1) i łącznika przewodu (2) spuścić cały roztwór chemiczny i upewnić
się, że dźwignia wypływu roztworu (3) znajduje się w pozycji zamkniętej. W
przeciwnym wypadku może dojść do rozlania roztworu chemicznego.
1. Poluzować opaskę zaciskową i ściągnąć wąż podawania roztworu z łącznika
przewodu.
2. Ściągnąć opaskę o średnicy 76 mm i zdemontować drugą dyszę z rury prostej.
(1)
(2)
(3)
Page 67

67
PRZED URUCHOMIENIEM SILNIKA
1. Kontrola i uzupełnianie oleju silnikowego
1) Poniższą procedurę należy wykonać przy zimnym oleju silnikowym, to znaczy
gdy opryskiwacz mgławiący nie pracował.
● Kontrola: Położyć opryskiwacz na poziomej powierzchni i odkręcić korek
wlewu oleju. Sprawdzić, czy poziom oleju mieści się pomiędzy
znakami górnej (1) i dolnej (2) granicy na wskaźniku poziomu
oleju (3). Jeżeli olej znajduje się poniżej poziomu 100 mL (4),
należy dolać świeżego oleju.
● Dolewanie oleju:
Postawić opryskiwacz mgławiący na poziomej powierzchni
i odkręcić korek wlewu oleju. Dolać oleju do górnej granicy na
wskaźniku poziomu oleju.
2) Przeciętnie, olej silnikowy wymaga uzupełnienia zwykle po każdych 20
roboczogodzinach. Odstęp czasu między kolejnymi wymianami oleju
odpowiada 10 – 15 tankowaniom opryskiwacza mgławiącego.
3) Olej należy wymieniać, gdy ulegnie zabrudzeniu lub zmieni wyraźnie kolor.
(Informacje na temat procedury i częstotliwości wymiany oleju można znaleźć
na str. 77.)
Zalecany olej: Oryginalny olej marki DOLMAR lub olej SAE10W-30
klasy SF według API lub lepszy (do 4-suwowych silników
samochodowych)
Pojemność oleju: Około 0,22 L (220 mL)
(3)
(1)
(4)
(2)
OSTROŻNIE:
● Jeżeli opryskiwacz mgławiący nie jest przechowywany w pozycji pionowej, olej może przepłynąć od wskaźnika poziomu do silnika dając
fałszywy odczyt podczas sprawdzania poziomu oleju. Może to skutkować nieumyślnym przepełnieniem przy dolewaniu oleju. Zawsze
przechowywać w pozycji pionowej.
● Przekroczenie górnej granicy poziomu oleju może skutkować zabrudzeniem oleju i pojawieniem się białego dymu w wyniku spalania nadmiaru oleju.
Punkt kontrolny 1: W kwestii korka wlewu oleju przy dolewaniu oleju
● Przed odkręceniem korka wlewu oleju należy wytrzeć brud z miejsc wokół otworu.
● Odkręcić korek wlewu oleju i położyć go na czystej powierzchni, aby nie uległ zanieczyszczeniu piaskiem, brudem lub innymi obcymi
substancjami. Mogą one przylgnąć do korka i, jeżeli nie zostaną podjęte odpowiednie działania, mogą przyczynić się do pogorszenia jakości
oleju. Olej zanieczyszczony piaskiem, brudem lub obcymi substancjami może przyczynić się do nadmiernego zużycia silnika w wyniku
nieodpowiedniego smarowania i skutkować jego awarią.
Punkt kontrolny 2: W przypadku rozlania oleju przy dolewaniu
● Rozlanie oleju na zewnątrz opryskiwacza mgławiącego może skutkować zabrudzeniem lub pogorszeniem jakości oleju w silniku. Z tego
względu przed uruchomieniem silnika należy wytrzeć wszelkie ślady rozlanego oleju.
3. Wyrównać rowek na rurze końcowej z występem na rurze prostej i obrócić rurę
końcową, aż wskoczy na swoje miejsce.
UWAGA:
● Wspomniana powyżej rura końcowa oznacza poniższe trzy rodzaje rur końcowych,
które można wymieniać w zależności od potrzeb podczas pracy.
– Rura końcowa (długa) (4)
– Rura końcowa (krótka) (5)
– Rura płaska (6)
(4)
(5)
(6)
Page 68

68
69
2. Dolewanie paliwa
OSTRZEŻENIE:
● Przy dolewaniu paliwa należy koniecznie przestrzegać poniższych zaleceń, aby nie doszło do zapłonu lub pożaru:
– Paliwo uzupełniać w miejscu, gdzie nie ma ognia. W żadnym wypadku nie wolno wnosić ognia (papierosów itp.) do strefy tankowania paliwa.
– Przed zatankowaniem paliwa należy wyłączyć silnik i odczekać, aż ostygnie.
– Uzupełniać paliwo na płaskiej powierzchni. Nie tankować paliwa na niestabilnej powierzchni lub w słabo wentylowanym miejscu.
– Uzupełniać paliwo przy dobrym oświetleniu i widoczności.
– Uzupełniać paliwo na otwartej, wolnej przestrzeni.
– Odkręcić korek wlewu paliwa i powoli wlewać paliwo. Paliwo może wydostać się na zewnątrz pod wpływem wewnętrznego ciśnienia.
– Uważać, aby nie doszło do rozlania paliwa. Wszelkie ślady rozlanego paliwa należy wytrzeć do czysta.
– Nie wlewać więcej paliwa niż potrzeba.
– Tankować w dobrze wentylowanym miejscu.
● Z paliwem należy obchodzić się ostrożnie.
– Paliwo w kontakcie ze skórą lub w przypadku dostania się do oczu może powodować alergie lub podrażnienie. W przypadku stwierdzenia
jakichkolwiek nietypowych objawów zycznych, należy niezwłocznie zasięgnąć porady lekarskiej u specjalisty.
Okres przechowywania paliwa
Paliwo należy zużyć w ciągu 4 tygodni, nawet jeżeli jest ono przechowywane w specjalnym kanistrze, w dobrze wietrzonym i zacienionym miejscu.
Jeżeli nie jest używany specjalny kanister lub gdy kanister nie jest przykryty, jakość paliwa może ulec pogorszeniu w ciągu jednego dnia.
Przechowywanie urządzenia i kanistra na paliwo
● Urządzenie oraz kanister na paliwo należy przechowywać w chłodnym, zacienionym miejscu.
● Nigdy nie przechowywać paliwa w kabinie lub bagażniku.
Paliwo
W urządzeniu zastosowano silnik 4-suwowy. Używać wyłącznie benzyny samochodowej (zwykłej lub premium).
Zalecenia dotyczące paliwa
● Nigdy nie wolno stosować mieszanki paliwowej z dodatkiem oleju silnikowego. W przeciwnym wypadku mogą gromadzić się nadmierne ilości
osadów węgla lub wystąpić problemy mechaniczne.
● Stosowanie paliwa, którego parametry uległy pogorszeniu, przyczynia się do problemów z rozruchem silnika.
W przypadku uzupełniania paliwa, należy wyłączyć silnik i upewnić się, że silnik ostygł.
Metoda uzupełniania paliwa
● Poluzować odrobinę korek wlewu paliwa, aby wyrównać ciśnienie w zbiorniku z ciśnieniem atmosferycznym.
● Odkręcić korek i uzupełnić paliwo, przechylając zbiornik paliwa w taki sposób, aby otwór wlewu skierowany był do góry, w celu usunięcia
powietrza. (W żadnym wypadku nie wolno wlewać paliwa do otworu wlewu oleju.)
● Po zatankowaniu dobrze dokręcić korek wlewu paliwa.
● W przypadku stwierdzenia wady lub uszkodzenia korka, należy go wymienić.
● Korek podlega zużyciu i należy go wymieniać co dwa, trzy lata.
Page 69

69
ROZRUCH I ZATRZYMYWANIE SILNIKA
1. Rozruch
OSTRZEŻENIE:
● W żadnym wypadku nie wolno podejmować próby uruchomienia silnika w miejscu tankowania urządzenia. W przypadku uruchamiania silnika
należy zachować odległość co najmniej 3 metrów.
– W przeciwnym razie może dojść zapłonu lub pożaru.
● Spaliny z silnika są trujące. Nie wolno uruchamiać silnika w słabo wentylowanym miejscu, na przykład w tunelu, budynku itp.
– Uruchamianie silnika w słabo wentylowanym miejscu może prowadzić do zatrucia spalinami.
● W przypadku stwierdzenia nietypowego dźwięku, zapachu lub innych niż zwykle drgań po uruchomieniu, należy natychmiast wyłączyć silnik i
zrobić przegląd.
– Uruchamianie silnika bez ustalenia przyczyny nietypowego zachowania grozi wypadkiem.
● Upewnić się, że silnik staje po ustawieniu dźwigni zatrzymania w pozycji „O”.
● Przed uruchomieniem urządzenia, upewnić się, że dźwignia wypływu roztworu znajduje się w pozycji zamkniętej.
1) Gdy silnik jest zimny lub po zatankowaniu (zimny rozruch):
(1) Położyć urządzenie na płaskiej powierzchni.
(2) Ustawić dźwignię zatrzymania (1) w pozycji „I”.
(1)
(3)
(3) Naciskać kilkakrotnie pompkę zastrzykową (2) do momentu dopłynięcia
paliwa do pompki zastrzykowej.
● Zwykle paliwo dociera do gaźnika po 7 do 10 naciśnięciach.
● W przypadku zbyt długiego naciskania pompki zastrzykowej, nadmiar
benzyny powraca do zbiornika paliwa.
(4) Unieść dźwignię ssania (3).
(5) Przytrzymując pokrywę ltra powietrza lewą ręką, unieruchomić silnik,
stanąć nieruchomo przyjmując stabilną pozycję.
(6) Ciągnąć powoli za uchwyt rozrusznika, aż do wyczuwalnego oporu.
Następnie szarpnąć mocno. Uruchomienie silnika może wymagać dwóch
do czterech takich prób.
● Nie należy wyciągać linki do samego końca.
● Delikatnie popuszczać linkę pozwalając, aby uchwyt wrócił na swoje
miejsce w obudowie. W przeciwnym razie puszczony swobodnie uchwyt
rozrusznika może uderzyć operatora lub spowodować nieprawidłowe
nawinięcie linki.
(7) Po uruchomieniu silnika stopniowo przesuwać dźwignię ssania w dół,
kontrolując pracę silnika. Na koniec dźwignię ssania należy całkowicie
opuścić.
● W niskich temperaturach lub przy zimnym silniku dźwignię ssania należy
zawsze obniżać powoli. W przeciwnym wypadku silnik może zgasnąć.
(8) Chwycić drążek sterowania (chwyt powoduje zwolnienie dźwigni
blokującej) i pociągnąć za język spustowy przepustnicy, aby rozgrzać
silnik. Kontynuować rozgrzewanie przez 2 do 3 minut.
(9) Ustabilizowanie się obrotów silnika i płynne zwiększanie obrotów od
niskich do wysokich przy ruchu przepustnicy sygnalizuje zakończenie
procedury rozgrzewania silnika.
(2)
Page 70

70
71
REGULACJA OBROTÓW BIEGU JAŁOWEGO
NIEBEZPIECZEŃSTWO:
● Gaźnik został wyregulowany fabrycznie przed wysyłką. Nie należy przeprowadzać innych regulacji za wyjątkiem regulacji obrotów biegu
jałowego. W przypadku konieczności przeprowadzenia regulacji należy zgłosić się do autoryzowanego punktu serwisowego.
Kontrola obrotów biegu jałowego
Obroty biegu jałowego należy ustawić na 2 800 min–1.
● Gdy zachodzi potrzeba zmiany prędkości obrotowej, regulację należy
przeprowadzić za pomocą śrubokręta krzyżowego i śruby regulacyjnej (1).
● Obrót śruby regulacyjnej w prawo zwiększa obroty silnika, a obrót śruby regulacyjnej
w lewo - zmniejsza je.
(1)
UWAGA:
● Silnik może ulec uszkodzeniu w przypadku przesunięcia dźwigni ssania dalej poza pozycję „ZAMKNIĘTE”.
● Jeżeli zgaśnięciu silnika towarzyszy odgłos wybuchu lub gdy udało się uruchomić silnik, ale zgasł on przed zmianą położenia dźwigni ssania,
należy ponownie ustawić dźwignię ssania w położeniu „OTWARTE” i pociągnąć kilkakrotnie za uchwyt rozrusznika, aby powtórnie uruchomić
silnik.
● Kilkakrotne pociągnięcie za uchwyt rozrusznika przez operatora przy dźwigni ssania pozostawionej w położeniu „ZAMKNIĘTE” może utrudnić
uruchomienie silnika z uwagi na zbyt dużą ilość zassanego paliwa.
● W przypadku zassania zbyt dużej ilości paliwa, należy wykręcić świecę zapłonową, a następnie szybko pociągnąć kilkakrotnie za uchwyt, aby
usunąć nadmiar paliwa. Osuszyć elektrodę świecy zapłonowej.
● Gdy zawór przepustnicy nie wraca do położenia, w którym styka się ze śrubą regulacji wolnych obrotów, nawet jeśli język spustowy przepustnicy
zostanie ustawiony w pozycji odpowiadającej niskim obrotom, należy skorygować ustawienie zaczepu linki sterującej, aby zapewnić prawidłowy
powrót zaworu do właściwego położenia.
2) Gdy silnik jest ciepły (ciepły rozruch)
(1) Postawić silnik na płaskim terenie.
(2) Nacisnąć kilka razy pompkę zastrzykową.
(3) Upewnić się, że dźwignia ssania znajduje się w dolnym położeniu.
(4) Przytrzymując pokrywę ltra powietrza lewą ręką, unieruchomić silnik, stanąć nieruchomo przyjmując stabilną pozycję.
(5) Ciągnąć powoli za uchwyt rozrusznika, aż do wyczuwalnego oporu. Następnie szarpnąć mocno.
(6) W przypadku trudności z uruchomieniem silnika, należy otworzyć zawór przepustnicy o 1/3.
2. Zatrzymywanie
1) Zwolnić język spustowy przepustnicy w celu zredukowania obrotów silnika
i ustawić dźwignię zatrzymania w pozycji „O”.
Page 71

71
SPOSÓB OBSŁUGI
Montaż sitka
Opryskiwacz mgławiący jest dostarczany wraz z sitkami na otworze zbiornika na
roztwór i na głowicy na wlocie rury.
Zawsze należy upewnić się, że sitko znajduje się na swoim miejscu.
Aby zamontować sitko, wystarczy wepchnąć je na swoje miejsce.
Aby wyjąć sitko, wystarczy podważyć je i wypchnąć z gniazda.
OSTRZEŻENIE:
● Starannie dokręcić korek zbiornika. Niedokręcenie korka zbiornika może
spowodować wyciek roztworu, zmniejszenie ciśnienia i tym podobne problemy.
Regulacja pasa naramiennego
Wyregulować długość pasa naramiennego w taki sposób, aby gwarantował wygodne
noszenie opryskiwacza mgławiącego podczas pracy.
Regulację przeprowadzić zgodnie z rysunkiem.
(1)
Pas biodrowy (wyposażenie opcjonalne)
Pas biodrowy (wyposażenie opcjonalne) zapewnia większą stabilność urządzenia
podczas noszenia go przez operatora.
Regulacja drążka sterowania
Przesunąć drążek sterowania wzdłuż rury ze złączką obrotową do pozycji
zapewniającej największy komfort.
Napełnianie zbiornika na roztwór
1. Uszczelkę (1) należy utrzymywać w dobrym stanie, smarować ją i czyścić.
2. Postawić opryskiwacz mgławiący na płaskiej powierzchni.
Dociąganie pasa Popuszczanie pasa
Page 72

72
73
3. Przed przystąpieniem do napełnienia zbiornika na roztwór, należy koniecznie
ustawić dźwignię wypływu roztworu (2) w pozycji zamkniętej.
(2)
4. Zbiornik na roztwór ma pojemność 15 litrów.
Gdy zbiornik jest pełny, całkowity ciężar wraz z roztworem wynosi prawie 30 kg.
Wlewając roztwór nie należy przeciążać opryskiwacza mgławiącego, lecz
dostosować objętość do siły i wytrzymałości operatora.
Po wlaniu 10 litrów roztworu (to znaczy, gdy poziom wlanego roztworu sięga
znacznika z boku zbiornika odpowiadającego 10 litrom) całkowity ciężar produktu
wynosi prawie 25 kg.
Wskazane jest, aby całkowity ciężar opisywanego urządzenia nie przekraczał
30 kg w przypadku mężczyzn i 25 kg w przypadku kobiet.
Do określania poziomu roztworu w zbiorniku służy rurka znajdująca się z boku
opryskiwacza mgławiącego.
Funkcja mieszania roztworu
Mechanizm mieszający wewnątrz zbiornika na roztwór umożliwia mieszanie roztworu
z pęcherzykami powietrza wydostającymi się z dyszy podczas zraszania.
Page 73

73
Obsługa opryskiwacza mgławiącego
Aby zwiększyć obroty silnika, należy chwycić drążek sterowania (chwyt powoduje
zwolnienie dźwigni blokującej) i pociągnąć za język spustowy przepustnicy.
Nacisk na język spustowy przepustnicy steruje prędkością silnika.
Pozycja dźwigni zatrzymania pozwala ograniczyć kąt odchylenia języka spustowego
przepustnicy.
Są cztery pozycje dźwigni zatrzymania: „O” (zatrzymanie silnika), „I” oraz dwie
pozycje ograniczenia kąta odchylenia języka spustowego przepustnicy.
Pozycja „I” nie powoduje ograniczenia prędkości silnika (można do końca pociągnąć
za język spustowy przepustnicy).
Ograniczenie kąta odchylenia języka spustowego przepustnicy następuje począwszy
od następnego położenia powyżej pozycji „I”. Zakres kąta odchylenia języka
spustowego przepustnicy jest jeszcze bardziej ograniczony po przesunięciu dźwigni
zatrzymania do kolejnego położenia powyżej pozycji „I”.
Prędkość silnika należy dostosować do miejsca i warunków panujących podczas
pracy.
Pokrętło regulacyjne cieczy
Pokrętła regulacyjne cieczy zapewniają szeroki zakres różnych szybkości wypływu.
Regulacja szybkości wypływu
W celu uzyskania właściwej szybkości wypływu, należy obrócić pokrętło regulacyjne
cieczy (1) na drugiej dyszy w taki sposób, aby odpowiednia liczba na pokrętle
regulacyjnym cieczy pokryła się z trójkątnym znacznikiem (2).
Szybkość wypływu
Prowadzić oprysk trzymając rurę prostą pod kątem od 0 stopni do ujemnych stopni względem poziomu.
Pozycja pokrętła Szybkość wypływu (L/min) (wartość średnia)
1 0,36
2 1,0
3 1,6
4 2,5
UWAGA:
● Liczby podane w powyższej tabeli należy traktować jedynie jako wartości orientacyjne. Mogą się one zmieniać w zależności od gęstości
stosowanego roztworu chemicznego znajdującego się w zbiorniku.
Dźwignia wypływu roztworu
Aby rozpocząć podawanie roztworu (A), wystarczy obrócić dźwignię wypływu
roztworu (1) do pozycji poziomej względem rury.
Aby zatrzymać podawanie roztworu (B), wystarczy obrócić dźwignię wypływu
roztworu do pozycji pionowej względem rury.
(2)
(1)
(1)
(A) (B)
Page 74

74
75
Montaż i demontaż pokrywy rozpraszającej
Pokrywę rozpraszającą (1) należy zamontować na dyszy górnej (2) wyrównując
występ (3) pokrywy z nacięciem (4) w dyszy górnej.
(2)
(4)
(1)
(3)
(2)
(3)
(4)
(1)
Zabezpieczyć pokrywę rozpraszającą dokręcając ją do oporu zgodnie z ruchem
wskazówek zegara.
Aby zdemontować pokrywę rozpraszającą, wystarczy wykonać powyższą procedurę
w odwrotnej kolejności.
Wymiana dyszy na dyszę o małym wydatku roztworu
(wyposażenie opcjonalne)
Gdy wymagany jest oprysk niewielką ilością roztworu, wystarczy wymienić nasadkę
dyszy na inny rodzaj nasadki z zestawu o niewielkim otworze wylotowym.
W celu wymiany dyszy należy wykonać poniższe czynności.
1. Odkręcić śrubę (1) z drugiej dyszy (2), a następnie zdemontować dyszę górną (3)
i pokrywę rozpraszającą (4).
Montaż lub demontaż deektora (wyposażenie opcjonalne)
Deektor (1) umożliwia rozpylanie środków chemicznych w górę. Jest pomocny przy
opryskiwaniu niskich bylin i liści roślin od spodniej strony.
Deektor (1) zamontować na dyszy górnej w taki sposób, aby znajdujący się na niej
znak „I” (3) pokrywał się ze znakiem „I” (4) na dyszy górnej (2).
Zabezpieczyć deektor dokręcając go do oporu zgodnie z ruchem wskazówek
zegara.
Aby zdemontować deektor, wystarczy wykonać powyższą procedurę w odwrotnej
kolejności.
(1)
(2)
(3)
(4)
(1)
Page 75

75
3. Zamontować inną dyszę z zestawu o niewielkim otworze wylotowym.
UWAGA:
● Należy dobrać właściwą dyszę spośród poniższych dwóch w zależności od
rodzaju (lepkości) stosowanego środka chemicznego.
(7) (8)
(9)
(3)
(10)
Rodzaj dyszy Lepkość środka chemicznego Przykład środka chemicznego Szybkość wypływu (L/min)*
1
Dysza aluminiowa (kolor srebrny)
(7) *
2
Wysoka MALATHION (Mieszany z olejem) 0,14
Dysza mosiężna (kolor złoty) (8) *
2
Niska Aqua K-Othrine (Mieszany z wodą) 0,075
Dysza mosiężna ze stemplem
(kolor złoty) (9) *
2
Niska Cipermetrinato (Mieszany z wodą) 0,060
Uwaga 1: Podany w tabeli wydatek w przypadku wody należy traktować jedynie jako wartość orientacyjną. Zmienia się on w zależności od
stosowanego środka chemicznego.
Uwaga 2: Rodzaje dysz oferowane w zestawie z opryskiwaczem mgławiącym zależą od kraju.
4. Zamontować dyszę górną (3) i zabezpieczyć ją śrubą (1).
UWAGA:
● W przypadku korzystania z dyszy o małym wydatku roztworu, nie należy montować
pokrywy rozpraszającej (4) lub deektora (wyposażenie opcjonalne), które należy
odłożyć w taki sposób, aby nie zaginęły.
5. Ustawić pokrętło (10) w pozycji 4.
(5)
(6)
2. Wsunąć płaski śrubokręt w nacięcie (5) w dyszy górnej i zdemontować nasadkę
dyszy (6) obracając ją do oporu przeciwnie do ruchu wskazówek zegara.
Page 76

76
77
Opróżnianie i czyszczenie zbiornika na roztwór
OSTRZEŻENIE:
● Do czyszczenia i opróżniania zbiornika na roztwór należy zawsze zakładać rękawice gumowe/odporne na działanie środków chemicznych.
Opróżnianie zbiornika na roztwór
OSTRZEŻENIE:
● Środków chemicznych lub wody po płukaniu nie wolno w
żadnym wypadku usuwać przez wyjęcie korka znajdującego
się na spodzie zbiornika na roztwór.
● Przed przystąpieniem do opróżniania zbiornika i po
zakończeniu tej czynności należy upewnić się, że dźwignia
wypływu roztworu znajduje się w pozycji zamkniętej.
● Jeżeli roztwór chemiczny nadal pozostaje w zbiorniku na
roztwór po opróżnieniu go metodą opisaną w instrukcji
obsługi, należy przechylić urządzenie w kierunku strony z
rurą, aby wylać resztki roztworu.
1. Postawić opryskiwacz mgławiący na stabilnym miejscu.
Ustawić dyszę (1) poniżej dna zbiornika na roztwór (2) i
podstawić pod nią pojemnik.
2. Ustawić pokrętło (3) w pozycji E.
3. Lekko odkręcić korek zbiornika na roztwór (4), aby zmniejszyć ciśnienie wewnątrz zbiornika.
4. Otworzyć dźwignię wypływu roztworu (5). Roztwór chemiczny zostanie usunięty przez dyszę.
5. Przepłukać zbiornik od wewnątrz wodą.
Czyszczenie sitka zbiornika na roztwór
Po zakończeniu pracy odkręcić korek zbiornika, wyjąć sitko ze środka zbiornika, a
następnie oczyścić je.
(3)
(1)
(4)
(2)
(5)
TRANSPORTOWANIE OPRYSKIWACZA MGŁAWIĄCEGO
Opryskiwacz mgławiący w czasie transportu lub przechowywania powinien stać w
pozycji pionowej.
Transportowanie lub przechowywanie w innej pozycji niż pionowa może prowadzić
do rozlania się oleju wewnątrz silnika opryskiwacza mgławiącego. Może to
skutkować wyciekami oleju, pojawieniem się białego dymu w wyniku spalania oleju i
zabrudzeniem ltra powietrza olejem.
NIEBEZPIECZEŃSTWO:
● Na czas transportowania i przechowywania opryskiwacza mgławiącego należy
koniecznie wyłączyć silnik.
Page 77

77
1. Poluzować i wykręcić nasadkę (1), która wyjdzie razem z sitkiem (2).
2. Oczyścić sitko z pyłu i drobin.
3. Umieścić sitko z powrotem w pierwotnej pozycji. Pamiętać o solidnym dokręceniu
nasadki.
PRZEGLĄDY I KONSERWACJA
NIEBEZPIECZEŃSTWO:
● Przed przystąpieniem do przeglądu i konserwacji należy wyłączyć silnik i poczekać, aż ostygnie. Należy również zdjąć nasadkę świecy i
wykręcić świecę zapłonową.
– Próba przeprowadzenia przeglądu lub konserwacji bezpośrednio po zatrzymaniu silnika lub z zamocowaną nasadką świecy grozi poparzeniem
lub wypadkiem spowodowanym przypadkowym uruchomieniem.
● Po zakończeniu przeglądu i konserwacji należy upewnić się, że wszystkie elementy zostały zamontowane. Wówczas można przystąpić do
obsługi.
● Do przeglądu i konserwacji należy zawsze zakładać rękawice gumowe/odporne na działanie środków chemicznych.
PRZESTROGA:
● Nie wolno używać benzyny, rozpuszczalnika, alkoholu lub podobnych substancji. Mogą one powodować przebarwienia, odkształcenia lub
pęknięcia.
Wymiana oleju silnikowego
Olej silnikowy, którego parametry uległy pogorszeniu, w dużym stopniu skraca okres eksploatacji elementów wykonujących ruch posuwisty i
obrotowy. Należy kontrolować wymaganą częstotliwość i liczbę wymian.
NIEBEZPIECZEŃSTWO:
● Zwykle urządzenie zasadnicze z silnikiem i olej silnikowy są jeszcze przez pewien czas gorące po wyłączeniu silnika. Przed przystąpieniem do
wymiany oleju należy upewnić się, że urządzenie zasadnicze z silnikiem i olej silnikowy ostygły w wystarczającym stopniu. W przeciwnym razie
istnieje ryzyko poparzenia. Ponadto bezpośrednio po zatrzymaniu silnika, nie wszystek olej zdąży spłynąć do skrzyni korbowej. Nie należy
sprawdzać poziomu oleju bezpośrednio po zatrzymaniu silnika.
● W przypadku wlania zbyt dużej ilości oleju może dojść do jego zanieczyszczenia lub zapalenia, któremu towarzyszy biały dym.
Częstotliwość wymiany: Początkowo co 20 roboczogodzin, a później co 50 roboczogodzin
Zalecany olej: Olej SAE 10W-30 klasy SF według API lub lepszy (olej do 4-suwowych silników samochodowych)
Procedura wymiany oleju:
1. Postawić opryskiwacz mgławiący na równej powierzchni.
2. Pod otwór spustowy (1) podstawić pojemnik na przepracowany olej.
Wspomniany pojemnik powinien mieć pojemność co najmniej 220 mL, aby pomieścić
wszystek olej.
3. Spuścić olej poluzowując śrubę spustu oleju (2). Należy uważać, aby olej nie przedostał
się na zbiornik paliwa lub inne podzespoły.
OSTROŻNIE:
● Uważać, aby nie zgubić uszczelki (aluminiowej podkładki) (3). Śrubę spustową oleju (2)
położyć w odpowiednim miejscu, aby nie uległa zabrudzeniu.
4. Odkręcić korek wlewu oleju (4). (Odkręcenie korka wlewu oleju (4) ułatwia spływanie
oleju.)
OSTROŻNIE:
● Korek wlewu oleju (4) należy koniecznie położyć w odpowiednim miejscu, aby nie uległ zabrudzeniu.
5. Gdy poziom oleju obniży się, dobrze jest przechylić opryskiwacz mgławiący na bok w stronę, po której znajduje się otwór spustowy, aby
umożliwić spłynięcie całego oleju.
6. Gdy spłynie wszystek olej, należy porządnie dokręcić śrubę spustową oleju (2). Słabo dokręcona śruba może być przyczyną wycieku oleju.
OSTROŻNIE:
● Wkręcając korek spustowy, nie należy zapomnieć o uszczelce (aluminiowej podkładce) (3).
7. W przypadku procedury wymiany oleju, olej dolewa się w taki sam sposób, jak podczas objaśnionej oddzielnie procedury dolewania oleju przy
zbyt niskim jego poziomie. Olej zawsze należy dolewać przez otwór pod korkiem wlewu oleju.
(Ustalony poziom oleju: około 220 mL)
8. Po wlaniu oleju należy mocno dokręcić korek wlewu oleju (4), aby zapobiec wyciekom oleju.
(3)
(2)
(1)
(4)
(2)
(1)
Czyszczenie łącznika przewodu
OSTRZEŻENIE:
● W żadnym wypadku nie wolno ściągać opaski zaciskowej, demontować przewodu
ani zdejmować nasadki, gdy dźwignia wypływu roztworu znajduje się w pozycji
otwartej.
● Gdy dźwignia wypływu roztworu znajduje się w pozycji otwartej, nie wolno
poluzowywać nasadki.
Page 78

78
79
Uwagi dotyczące wymiany oleju silnikowego
● Przepracowanego oleju silnikowego nie wolno w żadnym wypadku pozbywać się razem ze śmieciami, wylewać na ziemię lub do rowu
ściekowego. Utylizację oleju regulują odpowiednie przepisy prawne. Utylizując, należy zawsze postępować zgodnie ze stosownymi wymogami
prawa i przepisami. W razie pytań lub wątpliwości skontaktować się z przedstawicielem autoryzowanego serwisu.
● Parametry oleju ulegają pogorszeniu, nawet jeżeli nie jest używany. Należy regularnie przeprowadzać kontrolę i dokonywać wymiany
(wymieniać olej na nowy co 6 miesięcy).
(4)
(3)
(2)
(1)
Czyszczenie ltra powietrza
OSTRZEŻENIE: SUBSTANCJE ŁATWOPALNE SUROWO WZBRONIONE
Częstotliwość czyszczenia i kontroli: Codziennie (po każdych 10 roboczogodzinach)
1. Poluzować pokrętło śrubowe (1).
2. Zdjąć pokrywę ltra powietrza (2).
3. Wyjąć wkład (3) i oczyścić go szczotką.
UWAGA:
● Wkład jest ltrem suchym i należy chronić go przed zawilgoceniem. W żadnym
wypadku nie wolno myć go wodą.
4. Uszkodzony lub mocno zabrudzony wkład należy wymienić na nowy.
5. Wszelkie ślady oleju na odpowietrzniku wytrzeć ściereczką lub szmatką.
6. Zamontować wkład w obudowie ltra (4).
7. Zamocować pokrywę ltra powietrza i przykręcić pokrętłem śrubowym.
NIEBEZPIECZEŃSTWO:
● W przypadku nadmiernego zapylenia, wkład należy czyścić kilka razy dziennie.
● Kontynuowanie pracy z wkładem zabrudzonym olejem grozi przedostawaniem się oleju z ltra powietrza na zewnątrz i zanieczyszczanie oleju.
Kontrola świecy zapłonowej
OSTROŻNIE:
● Przed wykręceniem świecy zapłonowej najpierw należy oczyścić świecę i głowicę cylindra, aby do środka cylindra nie dostały się zabrudzenia,
piasek itp.
● Do wykręcania świecy zapłonowej należy przystąpić dopiero po ostygnięciu silnika, aby nie uszkodzić gwintowanego otworu cylindra.
● Świecę zapłonową należy prawidłowo osadzić w gwintowanym otworze. Wkręcanie pod kątem może uszkodzić gwintowany otwór w cylindrze.
1. Otwieranie/zamykanie pokrywy świecy
Aby otworzyć pokrywę świecy, należy pociągnąć w górę za łączenie wystającego
elementu pokrywy świecy i przesunąć w kierunku oznaczenia „OTWARTE”, jak
pokazano na rysunku z prawej strony.
W celu zamknięcia pokrywy wystarczy przesunąć ją w kierunku oznaczenia
„ZAMKNIĘTE”, aż zatrzask pod wystającym elementem pokrywy świecy zaczepi o
pokrywę silnika. Na koniec wcisnąć wystający element.
2. Wykręcanie świecy zapłonowej
Do wykręcania i wkręcania świecy zapłonowej należy używać dołączonego klucza
nasadowego.
3. Kontrola świecy zapłonowej
Przerwa między elektrodami świecy zapłonowej (rysunek) powinna wynosić
0,7 do 0,8 mm. Jeżeli przerwa jest zbyt duża lub zbyt mała, należy ją wyregulować.
Jeżeli na świecy zapłonowej jest dużo nagaru lub zanieczyszczeń, należy ją
dokładnie oczyścić lub wymienić.
4. Wymiana świecy zapłonowej
W przypadku wymiany, zastosować świecę NGK-CMR6A.
0,7 – 0,8 mm
Page 79

79
Czyszczenie ltra paliwa
● Zapchany ltr paliwa może być przyczyną problemów z rozruchem lub
zwiększaniem obrotów silnika.
● Filtr paliwa należy regularnie kontrolować w następujący sposób:
1. Odkręcić korek wlewu paliwa (1) i spuścić paliwo, aby opróżnić zbiornik. Sprawdzić,
czy wewnątrz zbiornika nie ma przypadkiem zanieczyszczeń. W przypadku ich
stwierdzenia, należy je wytrzeć.
2. Za pomocą drutu wyciągnąć ltr paliwa (2) przez otwór wlewu paliwa.
3. Zanieczyszczoną powierzchnią ltra paliwa oczyścić benzyną. Zanieczyszczoną
benzynę należy utylizować zgodnie z procedurą określoną przez lokalne władze.
Mocno zanieczyszczony ltr należy wymienić.
4. Włożyć ponownie ltr do zbiornika paliwa i solidnie zakręcić korek wlewu paliwa.
UWAGA:
● Wkładając ponownie ltr do zbiornika paliwa, należy ustawić go w pozycji
pokazanej na rysunku.
W przypadku wymiany, należy skontaktować się z autoryzowanym punktem
serwisowym.
(1)
(2)
(2)
(4)
(3)
(2)
(1)
Czyszczenie wkładu ltrującego rury łącznika
1. Ściągnąć opaskę zaciskową (1) i wąż (2).
2. Wyciągnąć wkład (3) i oczyścić go szczotką.
W przypadku trudności z wyciągnięciem wkładu, można go wyciągnąć przy użyciu
cienkiego patyczka.
3. Uszkodzony lub mocno zabrudzony wkład należy wymienić na nowy.
4. Wcisnąć wkład do rurki łącznika (4), aż końcówka wkładu zrówna się z krawędzią
otworu.
5. Założyć wąż i zabezpieczyć go opaską zaciskową.
Wymiana węża podawania roztworu
● Wąż podawania roztworu (1) należy często kontrolować. Uszkodzony wąż może
być przyczyną wycieku roztworu chemicznego. W razie potrzeby wymienić wąż
zgodnie z poniższą procedurą.
1. Zdemontować dyszę (2) z rury (3).
2. Poluzować opaskę zaciskową, a następnie wymienić stary wąż na nowy.
Kontrola śrub, nakrętek i wkrętów
● Dokręcić poluzowane śruby, nakrętki itp.
● Sprawdzić, czy nie ma wycieków paliwa i oleju.
● Ze względów bezpieczeństwa wymieniać uszkodzone części na nowe.
Wymiana uszczelnień i uszczelek
W przypadku ponownego montażu zdemontowanego silnika, należy koniecznie
wymienić uszczelnienia i uszczelki na nowe.
(3)
(2)
(1)
Page 80

80
81
Czyszczenie podzespołów
● Silnik zawsze powinien być czysty.
● Żeberka cylindra powinny być wolne od kurzu i zabrudzeń. Kurz lub zabrudzenia
na żeberkach mogą doprowadzić do zatarcia.
● Powietrze nadmuchowe jest pobierane przez siatkę wlotu powietrza (1). Gdy
przepływ powietrza spadnie podczas pracy, należy wyłączyć silnik i skontrolować
siatkę wlotu powietrza pod kątem ewentualnego przytkania.
● Należy pamiętać, że pozostawienie przytkanej siatki może skutkować
przegrzewaniem się silnika i jego uszkodzeniem.
OSTRZEŻENIE:
● Opryskiwacza mgławiącego nie wolno w żadnym wypadku używać bez siatki
opryskiwacza. Przed każdorazowym użyciem należy sprawdzić, czy siatka
zamocowana jest na swoim miejscu i nie jest przypadkiem uszkodzona.
(1)
Wszelkie prace konserwacyjne i regulacyjne, których nie opisano w niniejszej instrukcji, mogą być wykonywane wyłącznie przez autoryzowane
punkty serwisowe.
PRZECHOWYWANIE
Spuszczanie paliwa
OSTRZEŻENIE:
● W przypadku spuszczania paliwa, należy wyłączyć silnik i sprawdzić, czy silnik ostygł.
– Bezpośrednio po zatrzymaniu, silnik może być nadal gorący, co stwarza zagrożenie poparzeniami, zapaleniem i pożarem.
OSTROŻNIE:
● Jeżeli urządzenie nie będzie używane przez dłuższy czas, należy spuścić całe paliwo ze zbiornika i gaźnika i przechowywać je w suchym i
czystym miejscu.
Paliwo należy spuszczać ze zbiornika i gaźnika zgodnie z poniższą procedurą:
1) Odkręcić korek wlewu paliwa i całkowicie spuścić paliwo.
Jeżeli w zbiorniku paliwa znajdują się jakiekolwiek osady stałe, należy je
całkowicie usunąć.
2) Korzystając z drutu, wyciągnąć ltr paliwa przez otwór wlewu.
3) Naciskać pompkę zastrzykową, aż do całkowitego usunięcia z niej paliwa, po
czym spuścić paliwo, które wlało się do zbiornika.
4) Włożyć ponownie ltr do zbiornika paliwa i dokręcić mocno korek wlewu
paliwa.
5) Następnie uruchomić silnik i odczekać, aż samoczynnie się zatrzyma.
6) Wykręcić świecę zapłonową i przez otwór świecy wpuścić kilka kropli oleju
silnikowego.
7) Delikatnie pociągnąć za uchwyt rozrusznika, aby olej silnikowy został
rozprowadzony po silniku, po czym wkręcić świecę zapłonową.
8) Urządzenie należy przechowywać w pozycji pionowej.
9) Spuszczone paliwo należy trzymać w specjalnym kanistrze, w dobrze
wentylowanym i ocienionym miejscu.
Opróżnianie zbiornika na roztwór
OSTRZEŻENIE:
● W przypadku opróżniania zbiornika na roztwór, należy wyłączyć silnik i sprawdzić, czy silnik ostygł.
– Bezpośrednio po zatrzymaniu, silnik może być nadal gorący, co stwarza zagrożenie poparzeniami, zapaleniem i pożarem.
Przed przystąpieniem do przechowywania opryskiwacza mgławiącego należy opróżnić zbiornik na roztwór zgodnie z opisem w części zatytułowanej
„Opróżnianie i czyszczenie zbiornika na roztwór”.
Czyszczenie sitka znajdującego się u góry zbiornika na roztwór
Przed przystąpieniem do przechowywania opryskiwacza mgławiącego należy zawsze oczyścić sitko znajdujące się u góry zbiornika na roztwór.
Aby wyczyścić sitko, należy zapoznać się z opisem w części zatytułowanej „Opróżnianie i czyszczenie zbiornika na roztwór”.
Czyszczenie sitka w łączniku przewodu
Przed przystąpieniem do przechowywania opryskiwacza mgławiącego należy zawsze oczyścić sitko znajdujące się w łączniku przewodu.
Aby wyczyścić sitko, należy zapoznać się z opisem w części zatytułowanej „Opróżnianie i czyszczenie zbiornika na roztwór”.
OSTROŻNIE:
● Na czas przechowywania opryskiwacza mgławiącego należy koniecznie wyłączyć silnik.
Page 81

81
Mocowanie rury prostej za pomocą paska na rękę
Na czas przechowywania opryskiwacza mgławiącego należy przymocować rurę
prostą do ramy za pomocą paska na rękę.
Przymocowanie rury w tej pozycji ułatwia transportowanie urządzenia.
Częstotliwość konserwacji
Czas pracy
Pozycja
Przed
pracą
Po nasma-
rowaniu
Codziennie
(10 godz.)
30 godz. 50 godz. 200 godz.
Przerwy w
pracy
Odnośna strona
Olej silnikowy Sprawdzić
67
Wymienić
*1
77
Elementy mocujące
(śruba, nakrętka)
Sprawdzić
79
Sitko zbiornika na
roztwór
Sprawdzić
76
Oczyścić
76
Sitko łącznika
przewodu
Sprawdzić
77
Oczyścić
77
Zbiornik paliwa Wyczyścić/
sprawdzić
—
Spuścić paliwo
*3
80
Język spustowy
przepustnicy
Sprawdzić
działanie
—
Dźwignia
zatrzymania
Sprawdzić
działanie
70
Prędkość biegu
jałowego
Sprawdzić/
wyregulować
70
Filtr powietrza Oczyścić
78
Świeca zapłonowa Sprawdzić
78
Kanał powietrza
chłodzącego
Wyczyścić/
sprawdzić
80
Przewód paliwowy Sprawdzić
79
Wymienić
*2
—
Filtr paliwa Wyczyścić/
wymienić
79
Luz między
zaworem wlotowym i
zaworem wylotowym
Wyregulować
*2
—
Rurka olejowa Sprawdzić
*2
—
Remont silnika
*2
—
Gaźnik Spuścić paliwo
*3
80
*1 Pierwszą wymianę przeprowadzić po 20 roboczogodzinach.
*2 Przegląd po 200 roboczogodzinach zlecić w autoryzowanym punkcie serwisowym lub warsztacie.
*3 Po opróżnieniu zbiornika paliwa uruchomić silnik, aby zużyć paliwo w gaźniku.
Page 82

82
ROZWIĄZYWANIE PROBLEMÓW
Przed zleceniem naprawy należy spróbować samodzielnie rozwiązać problem. W razie wykrycia usterki sprawdzić urządzenie zgodnie z opisem
w niniejszej instrukcji obsługi. Nigdy nie manipulować przy żadnej części ani nie demontować jej w sposób niezgodny z opisem. W celu naprawy
skontaktować się z przedstawicielem autoryzowanego serwisu lub miejscowym punktem sprzedaży.
Nieprawidłowy stan Prawdopodobna przyczyna (usterki) Rozwiązanie
Silnik nie uruchamia się. Przełącznik I-O jest ustawiony w pozycji
STOP.
Ustawić przełącznik I-O w położeniu
ROZRUCH.
Problem z uruchomieniem pompki
zastrzykowej.
Nacisnąć 7 do 10 razy.
Zbyt wolne pociąganie za linkę rozrusznika.
Pociągnąć mocniej.
Brak paliwa. Uzupełnić paliwo.
Nieprawidłowa pozycja ssania.
Ustawić w położeniu „ZAMKNIĘTE” (zimny
rozruch).
Ustawić w położeniu „OTWARTE” (ciepły
rozruch).
Zapchany ltr paliwa. Oczyścić.
Zagięty lub przytkany przewód paliwowy. Wyprostować lub wymienić przewód paliwowy.
Gorsza jakość paliwa.
Paliwo gorszej jakości utrudnia rozruch.
Wymienić na nowe. (Zalecana wymiana: co
miesiąc)
Nadmierne zasysanie paliwa.
Przestawić dźwignię przepustnicy z pozycji
średnich obrotów do pozycji wysokich obrotów
i pociągać za uchwyt rozrusznika, aż silnik
zaskoczy.
Jeżeli dalej nie można uruchomić silnika,
należy wykręcić świecę zapłonową, osuszyć
elektrodę i ponownie wkręcić świecę na swoje
miejsce. Następnie uruchomić silnik zgodnie z
zaleceniami.
Odłączona nasadka świecy. Prawidłowo zamocować.
Zanieczyszczona świeca zapłonowa. Oczyścić.
Nieprawidłowa przerwa międzyelektrodowa
świecy zapłonowej.
Wyregulować przerwę międzyelektrodową.
Nieprawidłowe działanie świecy
zapłonowej.
Wymienić.
Usterka gaźnika. Zlecić przegląd i konserwację.
Zacięta linka rozrusznika lub brak
wyczuwalnego sprężania.
Zlecić przegląd i konserwację.
Usterka układu napędowego/układu
elektrycznego (usterka przełącznika I-O,
usterka instalacji elektrycznej, usterka
łącznika itp.).
Zlecić przegląd i konserwację.
Silnik szybko gaśnie.
Prędkość silnika nie wzrasta.
Silnik niedostatecznie rozgrzany. Rozgrzać silnik.
Dźwignia ssania jest ustawiona w
położeniu „ZAMKNIĘTE”, mimo że silnik
jest nagrzany.
Przestawić w położenie „OTWARTE”.
Niskie obroty biegu jałowego. Wyregulować obroty biegu jałowego.
Zapchany ltr paliwa. Oczyścić.
Zanieczyszczony lub zapchany ltr
powietrza.
Oczyścić.
Usterka gaźnika. Zlecić przegląd i konserwację.
Usterka tłumika wydechowego (zapchany
itp.).
Zlecić przegląd i konserwację.
Usterka układu napędowego/układu
elektrycznego.
Zlecić przegląd i konserwację.
Odczepiona linka przepustnicy. Prawidłowo zamocować.
Silnik nie zatrzymuje się.
Uruchomić silnik na biegu jałowym i ustawić
dźwignię ssania w położeniu ZAMKNIĘTE.
Odłączony łącznik. Prawidłowo zamocować.
Usterka układu elektrycznego. Zlecić przegląd i konserwację.
Jeżeli silnik nie rusza po rozgrzaniu:
Jeżeli nie stwierdzono żadnej innej usterki, otworzyć przepustnicę o 1/3 i uruchomić silnik.
Page 83

83
Vă mulţumim pentru că aţi ales atomizorul cu motor pe benzină
DOLMAR. Ne bucurăm că vă putem oferi acest atomizor cu motor pe
benzină DOLMAR, care este rezultatul unui program de dezvoltare
de durată şi al multor ani de studii şi experienţă.
Atomizorul combină avantajele unei tehnologii de cel mai înalt
nivel cu designul ergonomic. Maşinile de acest tip sunt practice şi
compacte şi reprezintă un echipament profesionist pentru o gamă
largă de utilizări.
Vă rugăm să citiţi, reţineţi şi respectaţi conţinutul acestui
manual, în care sunt explicate detaliat diversele aspecte
care demonstrează performanţele extraordinare ale maşinii.
Informaţiile vă vor ajuta să utilizaţi atomizorul DOLMAR la
parametri optimi.
Română
SIMBOLURI
Este foarte important să înţelegeţi următoarele simboluri atunci când citiţi acest manual.
AVERTISMENT/PERICOL
Purtaţi mască pentru protecţie
respiratorie
Citiţi, reţineţi şi respectaţi manualul de
utilizare
Suprafeţe erbinţi – arsuri ale degetelor
sau mâinilor
Interzis Combustibil (benzină)
Fumatul interzis Motor – pornire manuală
Accesul interzis cu acără deschisă Oprire de urgenţă
Purtaţi încălţăminte solidă, cu talpă
antiderapantă.
Primul ajutor
Purtaţi îmbrăcăminte de protecţie
adecvată
PORNIT/START
Mănuşile de protecţie sunt obligatorii OPRIT/STOP
Interziceţi prezenţa altor persoane în
zona în care se pulverizează
Pericol de secţionare a degetelor sau
mâinilor, paletă rotor
Accesul interzis tuturor persoanelor şi
animalelor
Părul lung neprins se poate încurca în
piesele în mişcare, putându-se produce
accidente
Purtaţi echipament de protecţie oculară
şi auditivă
Gaze sau vapori otrăvitori sau toxici.
A nu se utiliza în zone neaerisite.
Cuprins
Pagina
Simboluri.........................................................................................83
Instrucţiuni importante privind siguranţa .........................................84
Date tehnice ...................................................................................90
Identicarea componentelor ...........................................................91
Instrucţiuni de asamblare ...............................................................92
Înainte de a porni motorul ...............................................................94
Pornirea şi oprirea motorului ..........................................................96
Reglarea turaţiei la ralanti...............................................................97
Metoda de utilizare .........................................................................98
Revizia şi întreţinerea ................................................................... 104
Depozitarea ..................................................................................107
Remedierea problemelor .............................................................. 109
Page 84

84
85
INSTRUCŢIUNI IMPORTANTE PRIVIND SIGURANŢA
AVERTISMENT:
● Citiţi toate avertismentele şi instrucţiunile cu privire la siguranţă. Nerespectarea
avertismentelor şi a instrucţiunilor poate duce la electrocutare, incendiu şi/sau
vătămări grave.
Păstraţi toate avertismentele şi instrucţiunile pentru a le
putea consulta ulterior.
Instrucţiuni generale
● Pentru a garanta utilizarea corectă şi sigură, utilizatorul trebuie să citească, să reţină
şi să respecte conţinutul acest manual, familiarizându-se astfel cu manevrarea
atomizorului (1). Utilizatorii insucient informaţi riscă să se pună în pericol şi să
pună şi alte persoane în pericol, din cauza manipulării necorespunzătoare.
● Se recomandă ca atomizorul să e încredinţat numai persoanelor cu experienţă
dovedită în utilizarea atomizoarelor.
● Înmânaţi întotdeauna şi manualul de utilizare.
● Utilizatorii aaţi la prima utilizare îi vor solicita dealerului instrucţiunile de bază
pentru a se familiariza cu manipularea unui atomizor.
● Se interzice manipularea atomizorului de către copii sau tinerii sub 18 ani. Cu toate
acestea, tinerii peste 16 ani vor putea învăţa să folosească maşina, dar numai sub
supravegherea directă a unui instructor calicat.
● Utilizaţi atomizoarele cu cea mai mare grijă şi atenţie.
● Utilizaţi atomizorul numai dacă starea dvs. de sănătate zică este bună.
● Efectuaţi toate lucrările cu conştiinciozitate şi atenţie. Utilizatorul îşi va asuma
responsabilitatea pentru ceilalţi.
● Nu utilizaţi niciodată atomizorul atunci când vă aaţi sub inuenţa alcoolului sau a
medicamentelor (2).
● Nu utilizaţi maşina atunci când sunteţi obosit.
● Păstraţi aceste instrucţiuni pentru a le putea consulta ulterior.
Domeniu de utilizare
● Utilizaţi maşina adecvată pentru lucrarea pe care o efectuaţi. Atomizorul se va
utiliza exclusiv pentru pulverizarea erbicidelor lichide şi a altor produse lichide
destinate combaterii dăunătorilor şi buruienilor din grădinile de pomi fructiferi,
ori şi legume, copaci, arbuşti şi alte plante, de exemplu arborii de cafea, tutun
şi bumbac. De asemenea, este util pentru îngrijirea copacilor tineri, de exemplu
pentru combaterea gândacilor de scoarţă şi a altor dăunători şi boli ale plantelor.
Nu utilizaţi niciodată atomizorul în alt scop.
Dacă este prevăzută cu ţeava corespunzătoare pentru suare, maşina poate
utilizată pentru efectuarea operaţiunilor de suare.
● Utilizaţi numai produse pentru protecţia plantelor special aprobate de către
producător pentru utilizarea cu atomizoare şi care îndeplinesc toate regulamentele
de siguranţă, normele şi legislaţia în vigoare.
Solicitaţi-i distribuitorului dvs. informaţii privind modul de utilizare a atomizorului.
Respectaţi toate regulamentele, normele şi legislaţia naţională în vigoare cu privire
la siguranţă.
Personalul care deserveşte şi efectuează lucrările de întreţinere şi reparare trebuie să
cunoască procedurile corecte de manipulare a produselor chimice utilizate, precum
şi măsurile de prim ajutor şi legislaţia privind eliminarea produselor chimice lichide.
AVERTISMENT:
● Atomizorul este destinat exclusiv utilizării profesioniste. Nu împrumutaţi şi nu
închiriaţi atomizorul fără manualul de instrucţiuni. Asiguraţi-vă că toate persoanele
care folosesc atomizorul înţeleg informaţiile din acest manual de instrucţiuni.
Echipamentul de protecţie personală
● Pentru a reduce riscul de vătămări corporale rezultate în urma utilizării produselor
chimice, purtaţi echipament de protecţie adecvat în momentul alimentării, utilizării şi
curăţării atomizorului. Respectaţi în permanenţă toate instrucţiunile producătorului
produselor chimice cu privire la protecţia corespunzătoare a ochilor, pielii şi
sistemului respirator. Aceste instrucţiuni pot diferite de cele din prezentul manual.
● Atunci când se folosesc produse chimice toxice, operatorul şi persoanele din jur
trebuie să poarte echipament de protecţie respiratorie omologat pentru produsul
respectiv. Consultaţi eticheta produsului chimic. Inhalarea substanţelor chimice
toxice poate cauza leziuni grave sau letale.
● Îmbrăcămintea trebuie să e practică şi adecvată, cu alte cuvinte să e strânsă pe
corp, dar să ofere libertate de mişcare. Nu purtaţi părul lung, bijuterii sau articole de
îmbrăcăminte care ar putea prinse în oriciul de admisie a aerului. (3)
● Pentru a evita rănirea capului, ochilor, mâinilor şi picioarelor, precum şi pentru
a vă proteja auzul, se impune utilizarea următoarelor echipamente şi articole de
îmbrăcăminte de protecţie în timpul utilizării atomizorului.
(2)
(1)
(3)
Page 85

85
Fiţi foarte atent la următoarele reglementări
● Îmbrăcămintea trebuie să e rezistentă şi strânsă pe corp, dar să permită o libertate
completă de mişcare. Evitaţi jachetele largi, pantalonii evazaţi sau cu manşete,
eşarfele, părul lung despletit sau orice alt obiect care ar putea prins în oriciul de
admisie a aerului.
Purtaţi pantaloni lungi, pentru a vă proteja picioarele.
Nu purtaţi pantaloni scurţi. (5)
● Zgomotul atomizorului vă poate afecta auzul. Purtaţi echipamente de protecţie
antifonică (căşti care se introduc în ureche sau care acoperă urechea) pentru a vă
proteja auzul. Utilizatorii care folosesc permanent sau regulat maşina trebuie să
efectueze periodic un control al auzului. (4)
● Purtaţi întotdeauna mănuşi din cauciuc/antichimice atunci când lucraţi cu
atomizorul. O poziţie sigură a picioarelor este foarte importantă. Purtaţi cizme din
cauciuc/rezistente la acţiunea substanţelor chimice. (5)
● Este obligatorie purtarea de dispozitive adecvate de protecţie oculară. Deşi aerul
este evacuat în direcţia opusă operatorului, în timpul funcţionării atomizorului pot
apărea ricoşeuri şi reveniri în poziţia iniţială. (4)
● Nu utilizaţi niciodată atomizorul dacă nu purtaţi ochelari de protecţie sau ochelari de
protecţie de mărime corespunzătoare, cu protecţie superioară şi laterală adecvată,
care respectă ANSI Z 87.1 (sau standardul naţional echivalent).
MANIPULAREA PRODUSELOR CHIMICE
● Unele produse chimice utilizate cu atomizorul pot conţine substanţe toxice şi/sau
caustice. Aceste produse pot periculoase şi pot provoca leziuni grave sau letale
persoanelor şi animalelor şi/sau pot afecta grav plantele şi mediul înconjurător.
Evitaţi contactul direct cu produsele chimice.
Respectaţi instrucţiunile producătorului în caz de contact cu aceste produse.
● Citiţi eticheta şi manualul de instrucţiuni ale producătorului de ecare dată când
amestecaţi sau utilizaţi produsul chimic şi înainte de a-l depozita sau elimina.
Nu vă bazaţi pe memoria dvs.
Utilizarea neglijentă sau incorectă poate cauza leziuni grave sau letale.
● Citiţi cu atenţie etichetele de pe recipiente înainte de a utiliza produsele chimice.
Acestea sunt clasicate în diverse categorii, în funcţie de gradul de toxicitate.
Pentru ecare categorie există caracteristici speciale de manipulare.
Familiarizaţi-vă cu caracteristicile categoriei din care face parte produsul chimic
pe care îl utilizaţi.
Produsele chimice pot utilizate numai de către persoanele cu pregătirea necesară
pentru manipularea produselor şi acordarea primului ajutor.
● Dacă nu sunt utilizate corect, produsele chimice pot dăunătoare persoanelor,
animalelor şi mediului. În plus, se recomandă să nu folosiţi în atomizor produse
chimice caustice, corosive sau toxice.
● Nu amestecaţi decât pesticide compatibile. Amestecurile necorespunzătoare pot
degaja vapori toxici.
Atunci când manipulaţi şi pulverizaţi produse chimice, asiguraţi-vă că nu încălcaţi
legislaţia şi directivele naţionale, regionale şi guvernamentale privind protecţia
mediului. Nu utilizaţi atomizorul atunci când bate vântul. Pentru a ajuta la protejarea
mediului, nu pulverizaţi decât cantitatea recomandată – nu suprasolicitaţi
atomizorul.
Fiţi foarte atent atunci când utilizaţi atomizorul în apropierea bazinelor de apă,
cursurilor de apă etc.
● Evitaţi să deschideţi gura în timpul manipulării sau pulverizării produselor chimice:
sunt interzise consumarea alimentelor şi a băuturilor şi fumatul. Nu suaţi niciodată
cu gura în duze, tuburi, conducte sau în alte componente. Manipulaţi produsele
chimice numai în zone bine aerisite şi purtaţi întotdeauna îmbrăcăminte şi
echipament de protecţie adecvate.
Nu păstraţi şi nu transportaţi produsele chimice împreună cu alimente, băuturi sau
medicamente şi nu refolosiţi recipientele produselor chimice în alte scopuri.
Nu transvazaţi produsele chimice lichide în alte recipiente, mai ales în recipiente
pentru alimente şi/sau băuturi.
● Dacă aţi atins sau înghiţit din greşeală produse chimice sau dacă îmbrăcămintea
a fost contaminată, opriţi imediat lucrul şi consultaţi instrucţiunile producătorului
produsului chimic.
Dacă nu ştiţi ce să faceţi, adresaţi-vă imediat unui centru de toxicologie sau
solicitaţi asistenţă medicală.
Păstraţi la îndemână eticheta produsului pentru a o citi sau arăta persoanelor
cărora le solicitaţi asistenţă.
Curăţaţi imediat produsul vărsat.
Eliminaţi reziduurile în conformitate cu legislaţia şi reglementările naţionale,
guvernamentale sau regionale.
● Nu lăsaţi produsele chimice la îndemâna copiilor, persoanelor neautorizate şi
animalelor.
Atunci când nu le folosiţi, păstraţi produsele chimice într-un loc sigur, încuiat cu
cheie. Respectaţi recomandările producătorului privind depozitarea în condiţii
corespunzătoare.
(4)
(5)
Page 86

86
87
Prepararea produselor chimice
● Preparaţi soluţiile chimice conform instrucţiunilor producătorului.
● Preparaţi numai cantitatea de soluţie necesară pentru operaţiunea pe care o
efectuaţi, pentru a nu rămâne surplus.
● Amestecaţi produsele chimice numai conform instrucţiunilor – amestecurile
incorecte pot degaja vapori toxici sau pot produce explozii.
● Nu pulverizaţi niciodată produse chimice nediluate.
● Preparaţi soluţia şi umpleţi rezervorul numai în aer liber, într-o zonă bine aerisită.
● Operatorul trebuie să specice denumirea exactă a produsului chimic pe care îl
utilizează.
Depozitarea
● Nu păstraţi soluţia în rezervor pentru mai mult de o zi.
● Păstraţi şi transportaţi soluţia de pulverizat numai în recipiente omologate.
● Nu păstraţi şi nu transportaţi soluţia de pulverizat în recipiente destinate alimentelor,
băuturilor sau hranei pentru animale.
● Nu păstraţi şi nu transportaţi soluţia de pulverizat împreună cu alimente, băuturi
sau hrană pentru animale.
● Nu lăsaţi soluţia de pulverizat la îndemâna copiilor, persoanelor neautorizate şi
animalelor.
● Depozitaţi soluţia într-un loc încuiat cu cheia şi asigurat împotriva utilizării de către
persoane neautorizate.
Eliminarea
Nu aruncaţi niciodată reziduurile chimice sau soluţiile de clătire contaminate în
bazinele de apă, scurgeri, canalizări, canale de scurgere, cămine de vizitare etc.
Respectaţi toate reglementările, directivele şi legislaţia în vigoare atunci când
aruncaţi lichidul contaminat cu care au fost clătite recipientele în care s-a aat soluţia.
Respectaţi cu stricteţe instrucţiunile fabricantului produsului chimic cu privire la
măsurile de siguranţă.
Umplerea rezervorului de soluţie
● Strângeţi toate racordurile şi asiguraţi-vă că toate conductele, inclusiv tubul, sunt
bine xate şi în bună stare. Aveţi grijă ca robinetul pentru soluţie să e închis.
● Înainte de a utiliza atomizorul cu produse chimice, umpleţi rezervorul cu apă
curată pentru a avea certitudinea că l-aţi asamblat corect şi pulverizaţi de câteva
ori. Vericaţi, în acelaşi timp, dacă există scurgeri. După ce v-aţi familiarizat cu
funcţionarea atomizorului, urmaţi procedurile de utilizare normale.
● Umpleţi rezervorul de soluţie al atomizorului în aer liber, în zone bine aerisite.
● Nu utilizaţi:
– produse inamabile care pot provoca explozii cauzatoare de vătămări grave sau
letale;
– produse caustice sau corosive care pot deteriora atomizorul;
– lichide cu temperatură mai mare de 50°C, pentru a reduce pericolul de a vă opări
şi deteriora atomizorul.
Pentru a umple rezervorul de soluţie, aşezaţi atomizorul pe o suprafaţă dreaptă şi
turnaţi soluţia numai în bune condiţii de lumină şi vizibilitate. Pentru a reduce pericoul
contaminării mediului înconjurător, aveţi grijă să nu turnaţi prea multă soluţie chimică
în rezervor.
Pentru a reduce pericolul vătămărilor corporale, nu umpleţi rezervorul în timp ce ţineţi
atomizorul pe spate.
Dacă umpleţi rezervorul de soluţie cu un furtun racordat la o reţea de alimentare cu
apă în sistem centralizat, aveţi grijă să nu ţineţi capătul furtunului în soluţie, pentru a
reduce pericolul de refulare, cu alte cuvinte, pentru a evita pătrunderea substanţelor
chimice în reţeaua de apă în cazul în care în furtun se creează brusc vid.
Calculaţi cantitatea corectă de soluţie necesară unei singure utilizări, pentru a nu
rămâne soluţie în rezervor.
După ce aţi umplut rezervorul, puneţi buşonul şi strângeţi-l bine.
● Vericaţi dacă există scurgeri în timpul umplerii rezervorului şi în timpul utilizării.
Scurgerea soluţiei din rezervor sau pe lângă un racord slăbit vă poate contamina
îmbrăcămintea, iar soluţia poate intra în contact cu pielea dvs.
Page 87

87
Pornirea atomizorului
● Pe o distanţă de 20 metri de la maşină (6) nu trebuie să se ae copii sau alte
persoane; de asemenea, ţi atent la prezenţa animalelor în apropierea zonei de
lucru.
Nu utilizaţi niciodată atomizorul în zonele urbane.
● Înainte de a pune în funcţiune atomizorul, vericaţi întotdeauna dacă sunt
îndeplinite cerinţele de siguranţă:
Vericaţi siguranţa butonului de acceleraţie. Vericaţi dacă butonul de acceleraţie
poate acţionat uşor, fără probleme. Vericaţi funcţionarea corespunzătoare a
dispozitivului de blocare a butonului de acceleraţie.
Vericaţi dacă manetele sunt curate şi uscate şi testaţi funcţionarea butonului I-O.
Pe manete nu trebuie să existe urme de ulei şi combustibil.
● Pentru a reduce pericolul de scurgere şi contact cu pielea al produselor chimice,
vericaţi dacă toate racordurile sistemului de pulverizare şi capacul rezervorului
de lichid sunt bine strânse şi dacă furtunul este bine xat şi în bună stare. Ţineţi
robinetul pentru soluţie închis.
● Asiguraţi-vă că robinetul este închis înainte de a porni atomizorul.
● Vericaţi dacă pe bujie este bine xat capacul – dacă este slăbit, capacul bujiei
poate cauza formarea unui arc electric care poate aprinde vaporii de combustibil,
provocând astfel un incendiu.
● Vericaţi starea centurii şi înlocuiţi curelele rupte sau uzate.
● Reglaţi cureaua de umăr la mărimea dvs. înainte de a începe lucrul.
În caz de urgenţă, puteţi desface rapid cureaua de umăr şi lăsa atomizorul să cadă.
Înainte de a utiliza atomizorul, scoateţi şi puneţi centura de câteva ori, pentru a
vă obişnui cu ea. Nu lăsaţi să cadă atomizorul atunci când faceţi aceste mişcări,
pentru a nu-l deteriora.
● Atunci când trageţi maneta sistemului de pornire, nu înfăşuraţi sfoara în jurul
mâinii. Nu lăsaţi maneta să lovească atomizorul la revenire; ghidaţi sfoara pentru
a se înfăşura corect.
Nerespectarea acestei proceduri poate duce la rănirea mâinilor sau degetelor şi
poate defecta mecanismul de pornire.
● S-ar putea să aveţi nevoie de ajutorul unei alte persoane, care să vă aşeze pe
spate atomizorul, după ce l-aţi pornit. Pentru a reduce pericolul de vătămare a
persoanei care vă ajută ca urmare a obiectelor proiectate sau contactului cu stropii
de produs chimic/lichid ori vaporii evacuaţi erbinţi, ţineţi motorul la ralanti cât
timp vă aranjaţi atomizorul pe spate şi nu lăsaţi persoana care vă ajută să stea în
apropierea duzei de ieşire sau tobei de eşapament. De altfel, atomizorul poate
pornit şi utilizat fără ajutor.
● Porniţi atomizorul numai în conformitate cu instrucţiunile.
● Nu utilizaţi nicio altă metodă de pornire a motorului (7)!
● Folosiţi atomizorul şi accesoriile incluse numai în scopurile specicate.
● Porniţi motorul atomizorului numai după ce aţi asamblat toate componentele.
Punerea maşinii în funcţiune este permisă numai după montarea tuturor
accesoriilor potrivite.
● Motorul trebuie oprit imediat dacă apar probleme.
● Utilizaţi atomizorul pentru lucrările efectuate cu o singură mână ţinând mâna
dreaptă pe maneta de control. Purtaţi-o pe spate, ca pe un rucsac, şi xaţi curelele
pentru umeri pe ambii umeri.
Pentru a reduce pericolul pierderii controlului, nu purtaţi niciodată atomizorul cu o
singură curea sau cu ambele curele xate numai pe un umăr.
● Atunci când lucraţi cu atomizorul, prindeţi întotdeauna strâns maneta cu degetele,
ţinând maneta de control între degetul mare şi arătător. Ţineţi mâna în această
poziţie pentru a controla permanent maşina. Vericaţi dacă maneta de control este
în stare bună; aceasta nu trebuie să prezinte urme de umezeală, smoală, ulei sau
vaselină.
● Adoptaţi întotdeauna o poziţie sigură a picioarelor şi un bun echilibru corporal.
● Pentru a menţine rezervorul de soluţie în poziţie verticală şi pentru a reduce riscul
vărsării soluţiei, nu vă îndoiţi din talie. Îndoiţi-vă numai genunchii şi găsiţi-vă un
punct de sprijin potrivit pentru a vă păstra echilibrul.
Nu uitaţi faptul că atomizorul umplut cu lichid are o greutate semnicativă.
Aveţi mare grjiă atunci când vă îndoiţi, vă aplecaţi sau vă deplasaţi.
● Utilizaţi atomizorul astfel încât să evitaţi inhalarea gazelor de eşapament. Nu lăsaţi
niciodată motorul să funcţioneze în spaţii închise (pericol de sufocare şi intoxicare
cu gaz). Monoxidul de carbon este un gaz inodor.
Vericaţi întotdeauna dacă mediul de lucru este bine aerisit.
● Atomizorul nu este prevăzut cu protecţie împotriva electrocutării. Pentru a reduce
pericolul de electrocutare, nu utilizaţi atomizorul în apropierea relor sau cablurilor
(de alimentare etc.) care pot conduce curent electric. Nu pulverizaţi pe sau în jurul
instalaţiilor electrice.
20 m (66 ft)
(6)
(7)
20 m
Page 88

88
89
● Opriţi motorul atunci când vă odihniţi şi atunci când lăsaţi atomizorul
nesupravegheat. Aşezaţi-l într-un loc sigur, pentru a evita punerea în pericol a
celorlalţi, aprinderea materialelor combustibile sau defectarea maşinii (8).
● Nu aşezaţi niciodată atomizorul erbinte pe iarbă uscată sau pe un material
combustibil.
● Atunci când utilizaţi atomizorul la turaţie ridicată, nu îl aşezaţi pe sol; obiectele de
mici dimensiuni, de exemplu nisip, iarbă, praf etc., pot aspirate prin oriciul de
admisie a aerului şi pot deteriora palele ventilatorului.
● În timpul pauzelor, nu lăsaţi atomizorul în lumina directă a soarelui sau lângă o
sursă de căldură.
● În timpul utilizării se vor folosi toate piesele şi dispozitivele de protecţie livrate
odată cu maşina.
● Nu porniţi niciodată motorul dacă toba de eşapament este defectă.
● Nu puneţi mâna pe toba de eşapament. Aceasta se poate încinge în timpul
funcţionării şi poate cauza arsuri.
● Nu ţineţi mâna pe capacul motorului. Acesta se poate încinge în timpul funcţionării
şi poate cauza arsuri.
● Opriţi motorul în timpul transportului (8).
● Aşezaţi atomizorul într-o poziţie sigură în timpul transportului cu maşina sau
camionul, pentru a evita scurgerile de combustibil.
● Atunci când transportaţi atomizorul, asiguraţi-vă că rezervorul de combustibil şi
rezervorul de soluţie/produs chimic sunt complet goale.
Alimentarea cu combustibil
● Opriţi motorul în timpul alimentării cu combustibil (8), staţi la o distanţă considerabilă
de ăcările deschise (9) şi nu fumaţi.
● Evitaţi contactul pielii cu produsele pe bază de petrol. Nu inhalaţi vaporii de
combustibil.
Purtaţi întotdeauna mănuşi de protecţie în timpul alimentării cu combustibil.
Schimbaţi şi curăţaţi periodic îmbrăcămintea de protecţie.
● Aveţi grijă să nu vărsaţi combustibil sau ulei, pentru a evita contaminarea solului
(protecţia mediului). Curăţaţi atomizorul imediat după ce aţi vărsat combustibil.
Lăsaţi cârpele ude să se usuce înainte de a le introduce într-un recipient
corespunzător, închis, pentru a evita combustia spontană.
● Evitaţi contactul combustibilului cu îmbrăcămintea. Schimbaţi-vă imediat
îmbrăcămintea dacă aţi vărsat combustibil pe aceasta (pericol de incendiu).
● Vericaţi regulat buşonul rezervorului de combustibil, pentru a vă asigura că este
bine xat.
● Strângeţi cu atenţie şurubul de închidere al rezervorului de combustibil. Schimbaţi
locul pentru a porni motorul (o distanţă de cel puţin 3 metri de la locul de alimentare
cu combustibil) (10).
● Nu alimentaţi niciodată cu combustibil în spaţii închise. Vaporii de combustibil se
acumulează la nivelul solului (pericol de explozie).
● Transportaţi şi depozitaţi combustibilul numai în recipiente omologate. Asiguraţi-vă
că recipientele de combustibil nu sunt la vederea şi îndemâna copiilor.
● Nu încercaţi să alimentaţi un motor erbinte sau aat în funcţiune.
Metoda de utilizare
● Utilizaţi atomizorul numai în condiţii bune de lumină şi vizibilitate. În timpul
sezonului rece, ţi atent la zonele alunecoase sau umede, gheaţă şi zăpadă
(pericol de alunecare).
Adoptaţi întotdeauna o bună poziţie a picioarelor (11).
● Nu lucraţi niciodată pe suprafeţe instabile sau pe teren înclinat (11).
● Dacă nu cunoaşteţi pericolele asociate cu produsul chimic pe care îl utilizaţi,
consultaţi eticheta produsului şi/sau şa cu date de securitate pentru substanţa
respectivă şi/sau solicitaţi-i informaţii producătorului/furnizorului.
De asemenea, puteţi solicita informaţii despre substanţele periculoase şi de la
angajator, agenţii guvernamentale şi alte surse.
Unele instituţii guvernamentale au publicat liste cu substanţele cunoscute ca ind
cancerigene sau cu efecte toxice asupra funcţiei de reproducere etc. (11).
● Pentru a reduce riscul de accidentare, nu îndreptaţi curentul de aer către persoanele
din jur, deoarece presiunea ridicată a acestuia poate răni ochii şi proiecta obiecte
mici cu mare viteză (12).
● Nu pulverizaţi soluţie înspre persoane, animale sau bunuri care pot suferi leziuni
sau deteriorări (12).
● Nu introduceţi niciodată un corp străin în oriciul de admisie a aerului sau în duza
atomizorului. Acţiunea va determina defectarea rotorului ventilatorului şi poate
provoca rănirea gravă a operatorului sau a persoanelor din apropiere, ca rezultat
al proiectării obiectului sau a unor părţi din acesta cu mare viteză.
● Fiţi atent la direcţia vântului, adică nu lucraţi contravânt.
● Pentru a reduce riscul de împiedicare şi pierdere a controlului, nu păşiţi în spate
atunci când utilizaţi atomizorul.
● Opriţi întotdeauna motorul înainte de a curăţa sau repara maşina sau de a înlocui
o piesă.
● Luaţi pauze pentru a evita pierderea controlului pe fondul oboselii. Vă recomandăm
să luaţi câte o pauză de 10 – 20 de minute la ecare oră.
(8)
(9)
(10)
3 m (10 ft)
(11)
(12)
3 m
Page 89

89
După terminarea lucrului
● Spălaţi-vă temeinic cu apă şi săpun după ce aţi pulverizat sau manipulat produse
chimice. Faceţi duş imediat şi spălaţi îmbrăcămintea de protecţie separat.
Respectaţi toate recomandările suplimentare ale fabricantului produsului chimic.
Nu lăsaţi praful şi impurităţile să se acumuleze pe atomizor.
● După ecare utilizare, goliţi, spălaţi şi clătiţi rezervorul de soluţie şi componentele
aferente. Astfel, se va evita cristalizarea soluţiei, care poate duce ulterior la
colmatarea şi deteriorarea atomizorului ca urmare a acţiunii substanţelor chimice.
În plus, reziduurile chimice pot avea efecte nedorite atuci când sunt combinate cu
tipuri diferite de substanţe chimice (de exemplu, reziduurile erbicidelor pot afecta
sau ucide plantele pe care se pulverizează pesticide).
Nu depozitaţi atomizorul cu soluţie în rezervor.
● Interziceţi accesul copiilor, persoanelor neautorizate şi animalelor în zonele în care
s-a efectuat recent pulverizarea.
După utilizarea anumitor produse chimice, în special pesticide pentru culturi
agricole, în zona tratată se va aşa obligatoriu un indicator de semnalizare a
restricţionării accesului într-un anumit interval de timp.
Consultaţi eticheta produsului chimic şi reglementările guvernamentale în vigoare.
Instrucţiuni de întreţinere
● Efectuaţi procedurile de curăţare şi întreţinere înainte de a depozita atomizorul.
● Protejaţi mediul înconjurător. Utilizaţi atomizorul cu cât mai puţin(ă) zgomot şi
poluare. Vericaţi în special reglarea corectă a carburatorului.
● Curăţaţi periodic atomizorul şi vericaţi dacă toate şuruburile şi piuliţele sunt bine
strânse.
● Nu reparaţi şi nu depozitaţi niciodată atomizorul în apropierea ăcărilor deschise,
scânteilor etc. (13).
● Depozitaţi întotdeauna atomizorul într-o încăpere închisă, bine aerisită, cu
rezervoarele de combustibil şi de soluţie golite.
(13)
Respectaţi şi urmaţi toate instrucţiunile relevante de prevenire a accidentelor, stabilite de asociaţiile comerciale şi de companiile de
asigurări.
Nu modicaţi sub nicio formă atomizorul, deoarece vă puneţi în pericol siguranţa.
Executarea lucrărilor de întreţinere sau reparaţii de către utilizator este limitată la activităţile descrise în acest manual. Toate celelalte lucrări vor
efectuate de către reprezentanţii de service autorizaţi.
Utilizaţi numai piese de schimb şi accesorii originale, furnizate de către DOLMAR.
Utilizarea de accesorii şi aparate neaprobate creşte riscul de accidentare şi vătămare corporală. DOLMAR nu îşi asumă nicio responsabilitate
pentru accidentele sau pagubele provocate de utilizarea de accesorii neaprobate.
Primul ajutor
În caz de accidentare, asiguraţi-vă că în apropierea zonei de utilizare se aă o trusă
de prim ajutor bine echipată. Înlocuiţi imediat orice articol luat din trusa de prim ajutor.
Atunci când solicitaţi ajutor, indicaţi următoarele:
● Locul producerii accidentului
● Ce s-a întâmplat
● Numărul de persoane rănite
● Gravitatea leziunilor
● Numele dvs.
Ambalajul
Atomizorul DOLMAR este livrat într-o cutie de carton de protecţie, pentru a se
împiedica defectarea în timpul transportului. Cartonul este o materie primă de bază
şi, prin urmare, poate reutilizat sau reciclat (reciclarea deşeurilor de hârtie).
PĂSTRAŢI ACESTE INSTRUCŢIUNI.
AVERTISMENT:
● NU ignoraţi respectarea cu stricteţe a regulilor de siguranţă bazându-vă pe
faptul că sunteţi deja familiarizat cu produsul (în urma utilizării îndelungate).
UTILIZAREA INCORECTĂ sau nerespectarea regulilor de siguranţă menţionate
în acest manual poate provoca vătămări corporale grave.
Page 90

90
91
Numai pentru ţările din Europa
Declaraţie de conformitate CE
Makita declară că următoarea maşină/următoarele maşini:
Denumirea maşinii: Atomizor cu motor pe benzină
Nr. model/tip: SP-7650.4 R
Date tehnice: vezi tabelul „DATE TEHNICE”
Este/sunt în conformitate cu următoarele directive europene:
2006/42/CE, 2000/14/CE
Declarăm că este/sunt fabricat(e) în conformitate cu următoarele standarde sau documente standardizate:
EN ISO 28139, ISO 10988
Fişierul tehnic conform 2006/42/CE poate obţinut de la:
Makita, Jan-Baptist Vinkstraat 2, 3070, Belgia
Procedura de evaluare a conformităţii, solicitată de Directiva 2000/14/CE, corespunde anexei V.
Nivel de putere acustică măsurat: 110,1 dB
Nivel de putere acustică garantat: 111 dB
8.7.2014
Yasushi Fukaya
Director
Makita, Jan-Baptist Vinkstraat 2, 3070, Belgia
DATE TEHNICE
Model SP-7650.4 R
Greutate (cu rezervorul de combustibil plin, cu rezervorul de soluţie
chimică plin şi 220 ml de ulei de motor)
(kg) 30,4
Greutate (fără lichide) (kg) 14,1
Dimensiuni (fără ţeava de pulverizare, L x l x H) (mm) 420 x 440 x 595
Tip motor Răcit cu aer, în 4-timpi, cu un singur cilindru
Puterea maximă a motorului (kW) 2,7
Turaţia maximă a motorului (min
–1
) 7.400
Turaţie la ralanti (min
–1
) 2.800
Cilindree (cm
3
) 75,6
Combustibil Benzină obişnuită
Capacitate rezervor de combustibil (l) 1,8
Ulei de motor
SAE 10W-30, Clasicarea API, Clasa SF sau
superioară (motor în 4-timpi, pentru automobile)
Cantitate ulei de motor (l) 0,22
Carburator (carburator cu membrană) WALBRO WYK
Bujie NGK CMR6A
Distanţă între electrozi (mm) 0,7 – 0,8
Capacitate rezervor de soluţie (l) 15,0
Rază de pulverizare (orizontală/verticală) (m) 16 / 13
Viteză maximă a uxului de aer (m/s) 85
Debit de aer (m
3
/min) 14,1
Vibraţii conform ISO 22867
a
hv eq
(m/s2) 2,7
Incertitudine K (m/s
2
) 0,8
Medie presiune acustică conform ISO 22868
L
PA eq
dB (A) 95,4
Incertitudine K dB (A) 2,9
Medie intensitate sonoră conform ISO 22868
L
WA eq
dB (A) 110,1
Incertitudine K dB (A) 1,3
Notă:
1. Utilizaţi uleiul şi bujia specicate în tabel.
2. Specicaţia poate modicată fără preaviz.
3. Folosiţi indicatorul de nivel de 10 litri ca punct de referinţă pentru o greutate brută a atomizorului şi soluţiei de 25 kg.
4. Nivelurile de vibraţii şi zgomot sunt măsurate folosindu-se ţeava dreaptă (lungă).
Page 91

91
IDENTIFICAREA COMPONENTELOR
1
2
4
3
5
7
11
15
17
8
6
10
13
14
16
9
12
18
19
20
21
22
23
24
25
26
27
28
29
30
31
32
33
34
35
36
37
38
39
40
41
41
1. Manetă de oprire 15. Şurub golire ulei 29. Ţeavă dreaptă (lungă) (accesoriu opţional)
2. Manetă de control 16. Rezervor de combustibil 30. Ţeavă dreaptă (scurtă) (accesoriu opţional)
3. Buton acceleraţie 17. Buşon ulei 31. Ţeavă curbată (accesoriu opţional)
4. Buton de blocare 18. Colier furtun (diametru 100 mm) 32. Sita din îmbinarea tubului
5. Buşon rezervor de soluţie 19. Colier furtun (diametru 76 mm)
33. Sita rezervorului de soluţie (din rezervorul de
soluţie)
6. Capac ltru de aer 20. Duză primară
34. Ţeavă nală (lungă) (accesoriu opţional
pentru operaţiunea de suare)
7. Tub indicator al nivelului de soluţie 21. Duză secundară
35. Ţeavă nală (scurtă) (accesoriu opţional
pentru operaţiunea de suare)
8. Clapetă de aer 22. Şurub de reglare a debitului de soluţie
36. Ţeavă plată (accesoriu opţional pentru
operaţiunea de suare)
9. Tobă de eşapament 23. Ţeavă dreaptă 37. Tub (lung) (accesoriu opţional)
10. Pompă de amorsare 24. Robinet pentru soluţie 38. Tub (scurt) (accesoriu opţional)
11. Capac bujie 25. Ţeavă pivotantă 39. Difuzor
12. Cot 26. Curea de umăr 40. Deector
13. Manetă sistem de pornire cu sfoară 27. Grilă de admisie a aerului 41. Colier furtun
14. Buşon rezervor de combustibil 28. Rezervor de soluţie
Page 92

92
93
INSTRUCŢIUNI DE ASAMBLARE
Asamblarea ţevilor de pulverizare
ATENŢIE:
● Înainte de a executa o lucrare pe atomizor, opriţi motorul şi scoateţi şa bujiei de
pe bujie.
● Purtaţi întotdeauna mănuşi de protecţie!
● Porniţi atomizorul numai după ce l-aţi asamblat complet.
● După asamblare, asiguraţi-vă că toate colierele sunt strânse.
NOTĂ:
● Atunci când le strângeţi, capetele şuruburilor colierelor trebuie să iasă din coliere,
după cum se arată în imagine.
1. Introduceţi ţeava pivotantă (1) în ţeava exibilă (2).
Strângeţi-le cu colierul cu diametru de 76 mm (3).
2. Introduceţi ţeava exibilă în cotul (4) atomizorului.
Strângeţi-le cu colierul cu diametru de 100 mm (5).
3. Introduceţi ţeava dreaptă (6) în ţeava pivotantă (1).
Potriviţi şanţul de pe ţeava dreaptă pe partea proeminentă de pe ţeava pivotantă
şi rotiţi ţeava dreaptă până când se xează în poziţie, după care strângeţi ţevile cu
colierul de diametru de 76 mm (3).
NOTĂ:
● Ţeava dreaptă indicată mai sus se referă la următoarele trei ţevi, care pot
schimbate în funcţie de necesităţi.
– Ţeavă dreaptă (lungă) (6)
– Ţeavă nală curbată (7)
– Ţeavă dreaptă (scurtă) (8)
Atunci când utilizaţi ţeava dreaptă (lungă) (6) sau ţeava curbată (7), folosiţi-o cu
tubul (lung) (9).
Atunci când utilizaţi ţeava dreaptă (scurtă) (8), folosiţi-o cu tubul (scurt) (10).
Pentru a înlocui un tub, trebuie să demontaţi şi să montaţi colierele pentru furtun.
Folosiţi un cleşte sau un instrument asemănător, dacă este necesar.
ATENŢIE:
● Aveţi grijă să nu deterioraţi tubul atunci când îl înlocuiţi.
Numai una dintre ţevile de mai sus sau o combinaţie a acestora este livrată ca
echipament standard odată cu atomizorul şi poate diferită, în funcţie de ţară.
Celelalte tipuri de ţevi pot obţinute ca accesorii opţionale.
(2)
(3)
(1)
(4)
(5)
(6)
(6)
(7)
(8)
(9)
(10)
Page 93

93
4. Fixaţi uşor cele două coliere cu diametru de 76 mm (3) pe ţeavă (aceste coliere
sunt utilizate pentru strângerea ulterioară a robinetului pentru soluţie şi îmbinării
tubului).
Introduceţi duza secundară (11) în ţeava dreaptă.
Strângeţi-le cu un alt colier cu diametru de 76 mm (3).
(11)
(3)
(3)
(3)
(13)
(14)
(12)
(1)
(2)
5. Aşezaţi robinetul pentru soluţie (12) pe ţeavă.
Aveţi grijă ca partea deschisă a porţiunii de jos a robinetului (13) să e orientată
spre ţeava pivotantă.
Aliniaţi partea de jos a robinetului cu spaţiul gol al proeminenţei de pe ţeava
dreaptă (14).
După aceea, strângeţi-le cu colierele cu diametru de 76 mm (3).
6. Vericaţi dacă aţi strâns bine toate colierele.
Reglarea şi xarea manetei de control
1. Puneţi atomizorul pe spate şi reglaţi cureaua de umăr (vezi „Reglarea curelei de
umăr”).
2. Mişcaţi maneta de control (1) înainte sau înapoi pe tub, până la poziţia în care o
puteţi manevra cel mai uşor.
3. Fixaţi maneta de control prin rotirea butonului (2).
Montarea ţevii nale (accesoriu opţional pentru operaţiunea
de suare)
AVERTISMENT:
● Scurgeţi toată cantitatea de soluţie chimică din furtunul pentru soluţie (1) şi din
îmbinarea tubului (2) şi aveţi grijă ca robinetul pentru soluţie (3) să e închis
înainte de a monta ţeava nală. În caz contrar, soluţia chimică se poate vărsa.
1. Slăbiţi cu mâna colierul furtunului şi scoateţi furtunul pentru soluţie din îmbinarea
tubului.
2. Scoateţi colierul de 76 mm şi scoateţi a doua duză din ţeava dreaptă.
(1)
(2)
(3)
Page 94

94
95
ÎNAINTE DE A PORNI MOTORUL
1. Vericarea şi completarea cu ulei de motor
1) Urmaţi procedura de mai jos atunci când uleiul de motor este rece, adică
atomizorul nu a funcţionat.
● Revizia: Aşezaţi atomizorul pe o suprafaţă dreaptă şi scoateţi
buşonul de ulei. Vericaţi dacă nivelul uleiului se aă
între marcajele de limită superioară (1) şi inferioară (2)
de pe indicatorul de nivel al uleiului (3). Dacă uleiul nu
atinge nivelul de 100 ml (4), completaţi cu ulei.
● Completarea cu ulei: Aşezaţi atomizorul pe o suprafaţă dreaptă şi scoateţi
buşonul de ulei. Completaţi cu ulei până la limita
superioară de pe indicatorul de nivel al uleiului.
2) În medie, uleiul de motor trebuie completat după ecare 20 de ore de
funcţionare. Acest interval de schimbare a uleiului corespunde cu aproximativ
10 – 15 alimentări cu combustibil.
3) Schimbaţi uleiul ori de câte ori se umple de impurităţi sau îşi modică semnicativ
culoarea. (Consultaţi p. 104 pentru procedura şi frecvenţa schimbului de ulei).
Ulei recomandat: Ulei original DOLMAR sau ulei SAE10W-30 de tipul
API, clasa SF sau superioară (ulei de motor în 4-timpi,
pentru automobile)
Capacitatea de ulei: Aproximativ 0,22 l (220 ml)
(3)
(1)
(4)
(2)
ATENŢIE:
● Dacă atomizorul nu este depozitat în poziţie verticală, uleiul poate curge din indicatorul de nivel în motor, ind indicată o valoare incorectă atunci
când vericaţi nivelul uleiului. Acest lucru poate determina supraumplerea atunci când completaţi cu ulei de motor. Depozitaţi întotdeauna
atomizorul în poziţie verticală.
● Dacă limita superioară de nivel al uleiului este depăşită, uleiul se poate murdări şi se poate degaja fum alb, de la arderea surplusului de ulei.
Punct de vericare nr. 1: Buşonul de ulei la completarea cu ulei
● Îndepărtaţi prin ştergere murdăria şi impurităţile din jurul oriciului înainte de a scoate buşonul de ulei.
● Scoateţi buşonul de ulei şi aşezaţi-l pe o suprafaţă curată, pentru a evita depunerea de nisip, impurităţi şi alte corpuri străine. Acestea se pot
lipi de buşon şi contamina uleiul de motor dacă nu se procedează cu grijă. Uleiul murdar, care conţine nisip, impurităţi sau corpuri străine, poate
determina uzarea excesivă a motorului din cauza lubrierii necorespunzătoare şi defectarea acestuia.
Punct de vericare nr. 2: Ulei vărsat în momentul completării cu ulei
● Uleiul vărsat pe suprafaţa exterioară a atomizorului poate determina murdărirea sau contaminarea uleiului de motor. De aceea, îndepărtaţi prin
ştergere uleiul vărsat înainte de a porni motorul.
3. Potriviţi şanţul de pe ţeava nală pe partea proeminentă de pe ţeava dreaptă şi
rotiţi ţeava nală până când se xează în poziţie.
NOTĂ:
● Ţeava nală indicată mai sus se referă la următoarele trei ţevi nale, care pot
schimbate în funcţie de necesităţi.
– Ţeavă nală (lungă) (4)
– Ţeavă nală (scurtă) (5)
– Ţeavă plată (6)
(4)
(5)
(6)
Page 95

95
2. Alimentarea cu combustibil
AVERTISMENT:
● În momentul alimentării cu combustibil, urmaţi instrucţiunile de mai jos, pentru a împiedica aprinderea sau producerea de incendii:
– Alimentarea cu combustibil se va efectua într-un loc unde nu există ăcări. Nu aduceţi niciodată o sursă de foc (o ţigară aprinsă etc.) lângă
locul de alimentare cu combustibil.
– Opriţi motorul şi lăsaţi-l să se răcească înainte de a alimenta cu combustibil.
– Efectuaţi alimentarea pe o suprafaţă dreaptă. Nu lăsaţi atomizorul pe o suprafaţă instabilă sau într-un loc neaerisit în timpul alimentării.
– Efectuaţi alimentarea în locuri bine iluminate şi cu vizibilitate bună.
– Efectuaţi alimentarea în aer liber.
– Deschideţi lent buşonul rezervorului plin cu combustibil. Picături de combustibil pot sări afară sub inuenţa presiunii interne.
– Aveţi grijă să nu vărsaţi combustibilul. Combustibilul vărsat trebuie să e îndepărtat prin ştergere.
– Nu supraalimentaţi.
– Alimentaţi cu combustibil într-un loc bine aerisit.
● Manipulaţi cu atenţie combustibilul.
– Combustibilul ajuns pe piele sau în ochi poate provoca alergii sau iritaţii. Atunci când observaţi o anomalie zică, prezentaţi-vă de urgenţă
la medic.
Perioada de depozitare a combustibilului
Combustibilul trebuie să e consumat într-o perioadă de 4 săptămâni, chiar dacă este păstrat într-un recipient special, într-un loc bine aerisit, aat
la umbră.
Dacă nu se păstrează într-un recipient special sau dacă recipientul nu este închis, combustibilul se poate deteriora într-o singură zi.
Depozitarea maşinii şi a rezervorului
● Păstraţi maşina şi rezervorul într-un loc răcoros, ferite de lumina directă a soarelui.
● Nu păstraţi niciodată combustibilul în cabină sau portbagaj.
Combustibil
Motorul este un motor în 4-timpi. Folosiţi benzină pentru automobile (obişnuită sau premium).
Observaţii privind combustibilul
● Nu utilizaţi niciodată un amestec de benzină şi ulei de motor. În caz contrar, se va depune prea multă calamină sau vor apărea probleme de
natură mecanică.
● Utilizarea de combustibil contaminat va determina o pornire neregulată.
Atunci când alimentaţi cu combustibil, opriţi motorul şi aşteptaţi ca acesta să se răcească.
Procedura de alimentare cu combustibil
● Desfaceţi puţin buşonul rezervorului, pentru a elimina diferenţele de presiune atmosferică.
● Scoateţi buşonul rezervorului şi alimentaţi cu combustibil, eliminând aerul prin înclinarea rezervorului, astfel încât oriciul de alimentare să e
orientat în sus. (Nu alimentaţi niciodată cu combustibil prin oriciul de completare cu ulei).
● După alimentare, strângeţi bine buşonul rezervorului.
● Dacă buşonul este surat sau deteriorat, înlocuiţi-l.
● Buşonul se uzează în timp. Înlocuiţi-l o dată la doi-trei ani.
Page 96

96
97
PORNIREA ŞI OPRIREA MOTORULUI
1. Pornirea
AVERTISMENT:
● Nu încercaţi niciodată să porniţi motorul în locul în care s-a efectuat alimentarea cu combustibil. Atunci când porniţi motorul, păstraţi o distanţă
de minimum 3 m.
– În caz contrar, obiectele din apropiere se pot aprinde sau se poate produce un incendiu.
● Gazele de eşapament ale motorului sunt toxice. Nu lăsaţi motorul să funcţioneze într-un loc insucient aerisit, cum ar un tunel, o clădire etc.
– Lăsarea motorului să funcţioneze într-un loc insucient aerisit poate provoca intoxicarea cu gazele de eşapament.
● În cazul detectării unui sunet, miros ciudat, unei vibraţii anormale după pornire, opriţi motorul imediat şi efectuaţi vericările necesare.
– Dacă motorul este lăsat să funcţioneze fără ca astfel de probleme să e remediate, se pot produce accidente.
● Asiguraţi-vă că motorul se opreşte atunci când maneta de oprire este adusă în poziţia „O”.
● Asiguraţi-vă că robinetul pentru soluţie este închis înainte de a porni atomizorul.
1) Atunci când motorul este rece sau după alimentarea cu combustibil
(pornirea la rece):
(1) Aşezaţi maşina pe o suprafaţă dreaptă.
(2) Aduceţi maneta de oprire (1) în poziţia „I”.
(1)
(3)
(3) Apăsaţi pompa de amorsare (2) de câteva ori, până când combustibilul
intră în pompă.
● În general, combustibilul intră în carburator după 7 – 10 apăsări.
● Dacă pompa de amorsare este apăsată excesiv, în rezervor revine un
surplus de benzină.
(4) Ridicaţi clapeta de aer (3).
(5) Ţineţi capacul ltrului de aer cu mâna stângă, pentru a împiedica mişcarea
motorului, şi aşezaţi-vă într-o poziţie stabilă.
(6) Trageţi încet maneta sistemului de pornire cu sfoară, până simţiţi o
rezistenţă. După aceea, trageţi-o cu putere. Motorul poate porni după
două, trei sau patru încercări.
● Nu trageţi complet sfoara.
● Lăsaţi maneta sistemului de pornire cu sfoară să revină uşor la loc
în carcasă. În caz contrar, maneta vă poate lovi sau poate să nu
desfăşoare sfoara corect.
(7) După ce motorul a pornit, coborâţi treptat clapeta de aer şi vericaţi
funcţionarea motorului. Nu uitaţi să coborâţi complet clapeta de aer la
nal.
● Atunci când motorul este rece sau se răceşte, coborâţi lent clapeta de
aer. În caz contrar, motorul se poate opri.
(8) Apucaţi maneta de control (în acest moment, butonul de acceleraţie se
deblochează) şi apăsaţi butonul de acceleraţie pentru a încălzi motorul.
Continuaţi operaţiunea de încălzire timp de 2 – 3 minute.
(9) Operaţiunea de încălzire este încheiată atunci când turaţia motorului se
stabilizează şi trecerea de la turaţia redusă la cea ridicată se face lin.
(2)
Page 97

97
REGLAREA TURAŢIEI LA RALANTI
PERICOL:
● Carburatorul este reglat în momentul livrării din fabrică. Vă rugăm să nu efectuaţi alte reglaje decât reglarea ralantiului. Dacă este necesară o
altă reglare, adresaţi-vă centrului de service autorizat.
Vericarea turaţiei la ralanti
Fixaţi turaţia la ralanti la 2.800 rot/min (min–1).
● Dacă este necesar să modicaţi turaţia, reglaţi şurubul de reglare (1) cu o
şurubelniţă cu cap cruce.
● Rotiţi şurubul de reglare la dreapta şi turaţia motorului va creşte. Rotiţi şurubul de
reglare la stânga şi turaţia motorului va scădea.
(1)
NOTĂ:
● Motorul se poate defecta dacă clapeta de aer este deplasată dincolo de poziţia „CLOSE” (închis).
● Dacă motorul se opreşte cu un sunet de explozie sau dacă motorul a pornit, dar s-a oprit înainte de acţionarea clapetei de aer, readuceţi
clapeta în poziţia „OPEN” (deschis) şi trageţi de câteva ori maneta sistemului de pornire cu sfoară, pentru a reporni motorul.
● Dacă operatorul continuă să tragă maneta sistemului de pornire cu sfoară de câteva ori cu clapeta de aer lăsată în poziţia „CLOSE” (închis),
pornirea motorului poate dicilă, din cauza supraalimentării cu combustibil.
● În cazul supraalimentării cu combustibil, scoateţi bujia şi trageţi maneta de câteva ori rapid, pentru a elimina surplusul de combustibil. Lăsaţi
electrodul bujiei să se usuce.
● Atunci când clapeta de acceleraţie nu revine într-o poziţie în contact cu şurubul de reglare a ralantiului chiar dacă butonul de acceleraţie este
xat la turaţie redusă, corectaţi prinderea cablului de control, pentru a asigura revenirea corectă a clapetei.
2) Atunci când motorul este cald (pornirea la cald)
(1) Aşezaţi motorul pe o suprafaţă dreaptă.
(2) Apăsaţi pompa de amorsare de câteva ori.
(3) Vericaţi dacă este deschisă clapeta de aer.
(4) Ţineţi capacul ltrului de aer cu mâna stângă, pentru a împiedica mişcarea motorului, şi aşezaţi-vă într-o poziţie stabilă.
(5) Trageţi încet maneta sistemului de pornire cu sfoară, până simţiţi o rezistenţă. După aceea, trageţi-o cu putere.
(6) Atunci când pornirea motorului este dicilă, deschideţi clapeta de acceleraţie cu 1/3.
2. Oprirea
1) Eliberaţi butonul de acceleraţie, pentru a reduce turaţia motorului, şi
aduceţi maneta de oprire în poziţia „O”.
Page 98

98
99
METODA DE UTILIZARE
Montarea sitei
Atomizorul este prevăzut cu site pe oriciul rezervorului de soluţie şi la capătul de
admisie al ţevii.
Asiguraţi-vă întotdeauna că sitele sunt montate.
Apăsaţi sita pentru a o monta în locaşul său.
Pentru a scoate sita, ridicaţi-o din locaş.
AVERTISMENT:
● Strângeţi bine buşonul rezervorului. Dacă buşonul nu este bine strâns, soluţia
poate curge, presiunea se poate reduce sau pot apărea probleme similare.
Reglarea curelei de umăr
Reglaţi lungimea curelei de umăr astfel încât să puteţi lucra confortabil cu atomizorul
în timp ce îl ţineţi pe spate.
Reglaţi cureaua aşa cum se arată în imagine.
(1)
Cureaua pentru talie (accesoriu opţional)
Cureaua pentru talie (accesoriu opţional) îi permite operatorului să transporte unealta
într-un mod mai stabil.
Reglarea manetei de control
Mişcaţi maneta de control de-a lungul ţevii pivotante, până ajunge în poziţia în care
o puteţi manevra cel mai uşor.
Umplerea rezervorului de soluţie
1. Aveţi grijă ca garnitura (1) să e în bună stare, lubriaţi-o cu vaselină şi curăţaţi-o
periodic.
2. Aşezaţi atomizorul pe o suprafaţă dreaptă.
Strângerea curelei Slăbirea curelei
Page 99

99
3. Înainte de a umple rezervorul, închideţi robinetul pentru soluţie (2).
(2)
4. Rezervorul are o capacitate de 15 litri de soluţie.
Cu rezervorul umplut, greutatea totală, cu tot cu soluţie, este de aproape 30 kg.
Reglaţi cantitatea de soluţie astfel încât atomizorul, cu soluţie în rezervor, să nu
depăşească greutatea maximă şi să poate susţinut cu uşurinţă de către operator.
Atunci când în rezervor s-au turnat 10 litri de soluţie (adică atunci când nivelul
ajunge la marcajul de 10 litri de pe partea laterală a rezervorului), greutatea totală
a atomizorului este de circa 25 kg.
Se recomandă ca greutatea totală a atomizorului să nu depăşească 30 kg pentru
bărbaţi şi 25 kg pentru femei.
Folosiţi tubul situat pe partea laterală a atomizorului ca punct de reper pentru nivelul
soluţiei din rezervor.
Funcţia de amestecare a soluţiei
Dispozitivul de amestecare a soluţiei din interiorul rezervorului de soluţie permite
amestecarea soluţiei cu bulele de aer formate în timpul pulverizării.
Page 100

100
101
Funcţionarea atomizorului
Pentru a mări turaţia motorului, apucaţi maneta de control (în acest moment, butonul
de acceleraţie se deblochează) şi apăsaţi butonul de acceleraţie.
Turaţia motorului este controlată prin apăsarea mai puternică sau mai uşoară a
butonului de acceleraţie.
Poziţia manetei de oprire poate reduce unghiul butonului de acceleraţie.
Maneta de oprire are patru poziţii: „O” (oprirea motorului), „I” şi două poziţii pentru
unghiul de reducere a turaţiei.
În poziţia „I” , turaţia motorului nu este redusă (puteţi apăsa butonul de acceleraţie
până la capăt).
Unghiul butonului este redus cu o treaptă în poziţia următoare treptei „I”. Acţionarea
butonului de acceleraţie se reduce mai mult atunci când deplasaţi butonul cu încă o
treaptă peste poziţia „I”.
Reglaţi turaţia motorului în timpul funcţionării în funcţie de zona şi condiţiile de lucru.
Rozetă de reglare a debitului de soluţie
Rozetele de reglare a debitului permit xarea debitului într-un interval larg de valori.
Reglarea debitului
În funcţie de debitul dorit, rotiţi rozeta de reglare a debitului (1) de pe duza secundară
astfel încât cifra de pe rozetă să se ae în dreptul semnului de forma unui triunghi (2).
Debitul
Pulverizaţi ţinând ţeava dreaptă într-un unghi de la 0 la minus grade pe orizontală.
Poziţia rozetei Debit (l/min) (valoare medie)
1 0,36
2 1,0
3 1,6
4 2,5
NOTĂ:
● Folosiţi cifrele din tabelul de mai sus ca valoare de referinţă; acestea se pot schimba în funcţie de densitatea soluţiei chimice utilizate în
rezervorul de soluţie.
Robinetul pentru soluţie
Pentru a porni alimentarea cu soluţie (A), rotiţi robinetul (1) şi aduceţi-l în poziţia
paralelă cu ţeava.
Pentru a opri alimentarea cu soluţie (B), rotiţi robinetul şi aduceţi-l în poziţie
perpendiculară pe ţeavă.
(2)
(1)
(1)
(A) (B)
 Loading...