

Page 1
GB
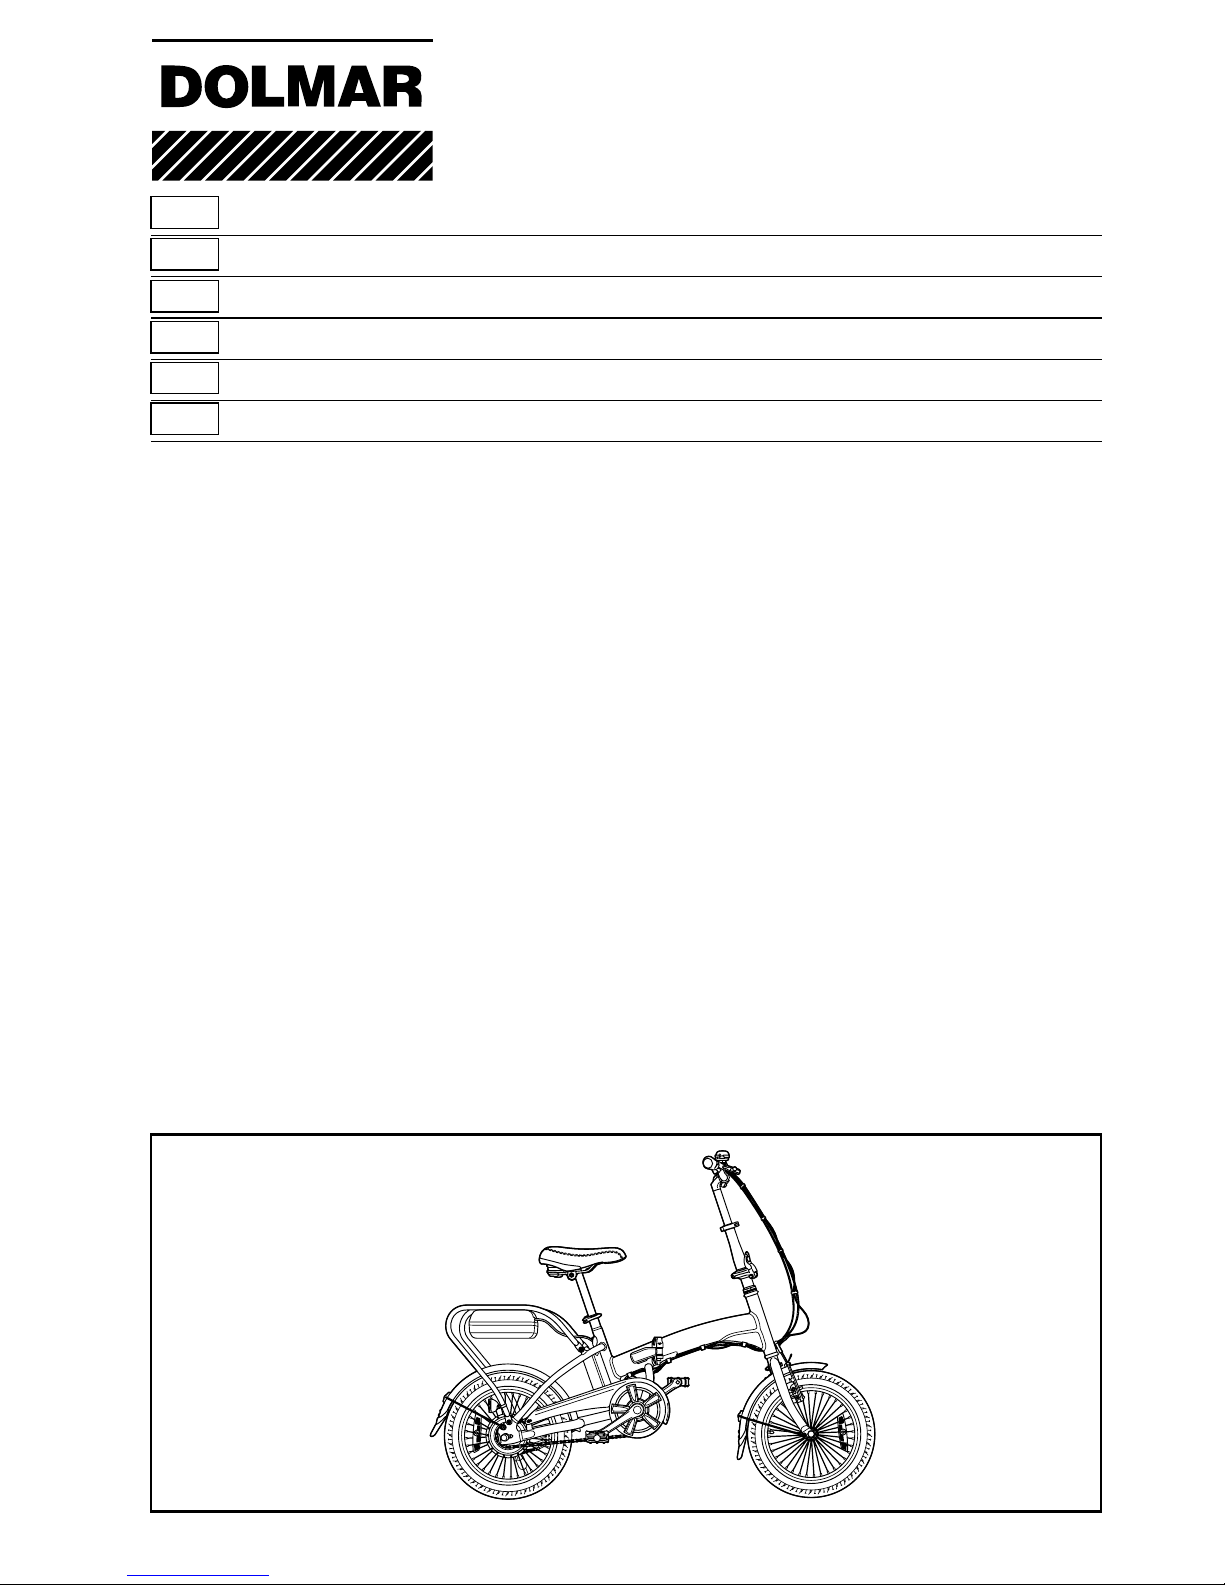
Motor-assisted bicycle Instruction manual
F
Vélo à Assistance Électrique Manuel d’instructions
D
Fahrrad mit Hilfsmotor Betriebsanleitung
I
Bicicletta assistita da motore elettrico Istruzioni per l’uso
NL
Elektrische vouwfiets Gebruiksaanwijzing
E
Bicicleta Asistida por Motor Manual de instrucciones
AB-1816
Page 2

2
12
34
56
78
Hs
H
A
B
A + H = B
1
23
4
Page 3
3
9
10
11 12
13 14
5
6
7
8
9
10
11
14
12
13
a
b
a
b
c
Page 4
4
15 16
17 18
19 20
21
16
15
15
16
17
18
19
20
21
22
23
24
25
25 26 21
Page 5

5
ENGLISH (Original instructions)
Explanation of general view
Specifications
• Due to our continuing programme of research and development, the specifications herein are subject to change without
notice.
*1: With two battery AP-183
*2: Measuring range condition of cruising distance: Assist level 3, Loading capacity 75 kg, no wind, concrete flat ground
Please read carefully before using
AB-1816:
• Please read the manual and check all the parts and
accessories carefully before use.
• The rider has to comply with the road regulation
according to each country’s requirement.
• Do not ride on the streets exclusive to cars. Make sure
to ride safely.
• Have to use the specified battery, motor, controller and
other electric parts, if need any change, please contact
our agent.
• Insure the safety, do not lend AB-1816 to other person
especially pregnant women or somebody who cannot
ride the bicycle.
• AB-1816 can be used under wet, raining, snowing
weather, but make sure to ride slowly, do not cross the
water over 150 mm of depth to avoid the electric parts
getting damage by water.
• Implement standard: EN15194
Max loading weight: 100 KG
Do not dispose of the battery.
• The assisted speed cannot exceed 16 Km/h.
For the safety use, please let our sales
staff adjust the seat to a comfortable
position.
• Warning: The safety line of the seat post should be
below under into the frame.
• Check the function before use.
• Please park the bicycle on even road and do not block
traffic.
• Comply with road regulations.
• Ride it on non-motor roads.
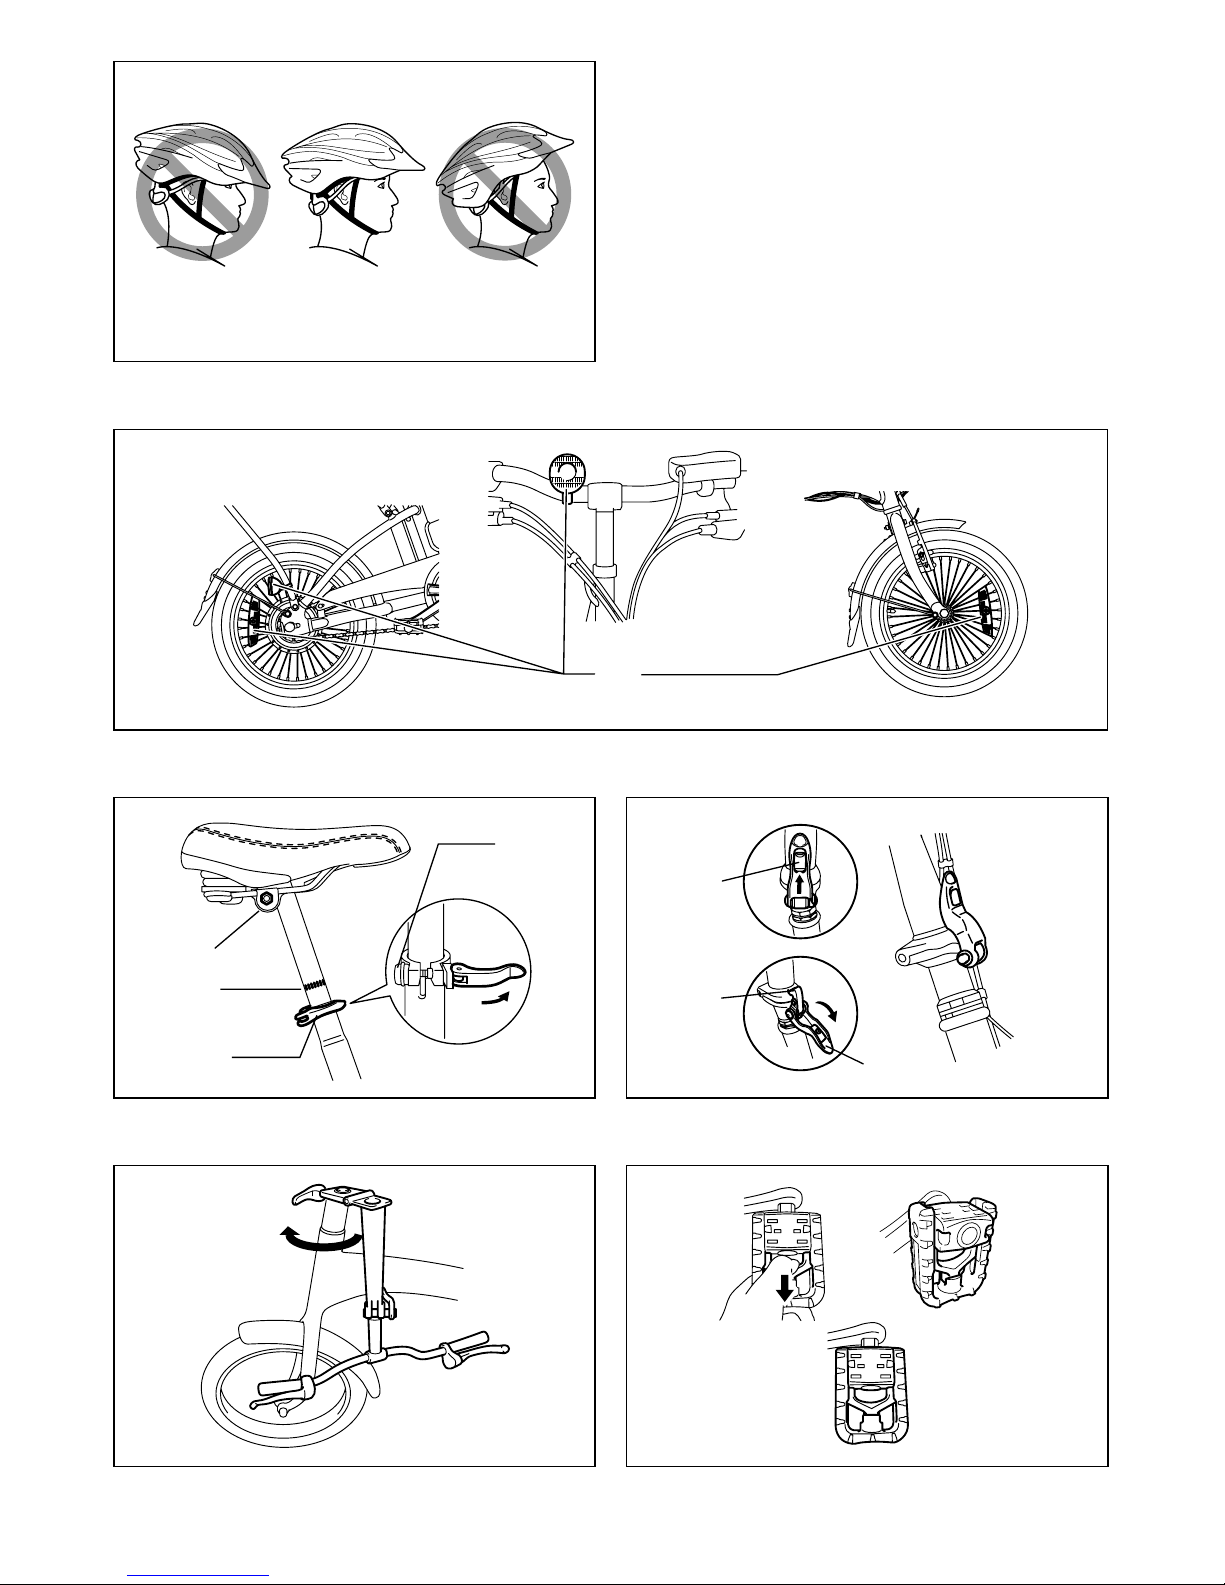
• Wear a safety helmet when ride the bicycle.
1. Red part
2. Assist display
3. Power display
4. ON/OFF button
5. Correct
6. Reflector
7. Seat clamp
8. Safety Line
9. Quick release lever
10. Locknut
11. Close direction
12. Self-locking slider
13. Hook
14. Folding handle
15. Frame
16. Folding locking buckle
17. Screw
18. Brake support
19. Brake spoke support
20. Brake arm
21. Brake cable
22. Brake broad
23. Spring screw
24. Sliding parts
25. Adjust screw
26. Brake cable fix board
Model AB-1816
Motor
Output 100 W
Model DC brushless motor
Rated voltage D.C. 18 V
Dimensions
Length 1,450 mm
Width 570 mm
Seat height 670 mm - 910 mm
Distance between wheel axes 975 mm
Tire size 16 inch
Weight*
1
20.8 kg
Battery
Model AP-183
Capacity 3.0 Ah
Kind Li-ion
Cruising distance*
2
Approx. 8.5 km
(AP-183 1 piece)
Control type Pedal speed sensor type
Speed range for assist 0 - 16 (km/h)
Brake type
Front V brake
Rear Drum brake
Page 6
6
• AB-1816 requires less pedal power than a normal
bicycle to move. However, until the cyclist gets used to
lighter pedaling, he or she may pedal too powerfully,
causing faster speeds than a normal bicycle, which
may lead to accidents, such as a fall or crash.
• Do not ride the bicycle across extremely bumpy
surfaces (pavement curbstones, drainage runs, etc.).
• When bringing the bicycle to a halt, apply both front
and rear brakes.
• Do not ride the bicycle when there is a problem with it.
• Do not dismantle or lubricate the parts comprising the
power assist system.
• Do not remodel the bicycle by yourself.
• Only use genuine parts as accessories or
replacements.
• After removing/replacing wheel(s) or adjusting the
saddle, always check that relevant bolts have been
tightened before riding the bicycle.
• Never ride the bicycle with the saddle or handlebar
higher than the limit line.
• Do not lubricate brake, tires or rims in damping areas.
1. Check before use.
For the safety use, please check the following before
using it.
a. Check if the tires and screws work well.
b. Brake system: When the brake level reaches its 1/2
range, the brakes have to stop the bicycle completely.
c. Power system: Check if the battery is fixed well, and
the power is full for use.
2. Attention:
a. Please decelerate when turning and going downhills.
Article 1.
To the customer
a. Thanks for selecting our AB-1816, and we wish it
could bring you an excellent riding experience.
b. Please read the manual carefully before using AB-
1816. If any questions, please contact one of our
agent without hesitation.
Article 2.
Introduction of AB-1816
1. To secure your safety, please check the product
before use.
a. Does the brake system work well?
b. Does the E-system work well? (Ref: 3.3)
c. Are the handlebar and saddle in position and locked
well?
d. Is the tire pressure normal?
e. Are the Folding handle and pedals locked well?
2. AB-1816
a. This product is designed for the customer’s easy
operation.
b. AB-1816 could protect the battery under a over-
current or low voltage situation.
c. The front brake and band brake provide safe
functions.
d. Within one year, the regular usage range could
comply with the EN15194 requirement.
3. Operation
3.1 How to adjust your position on the bicycle
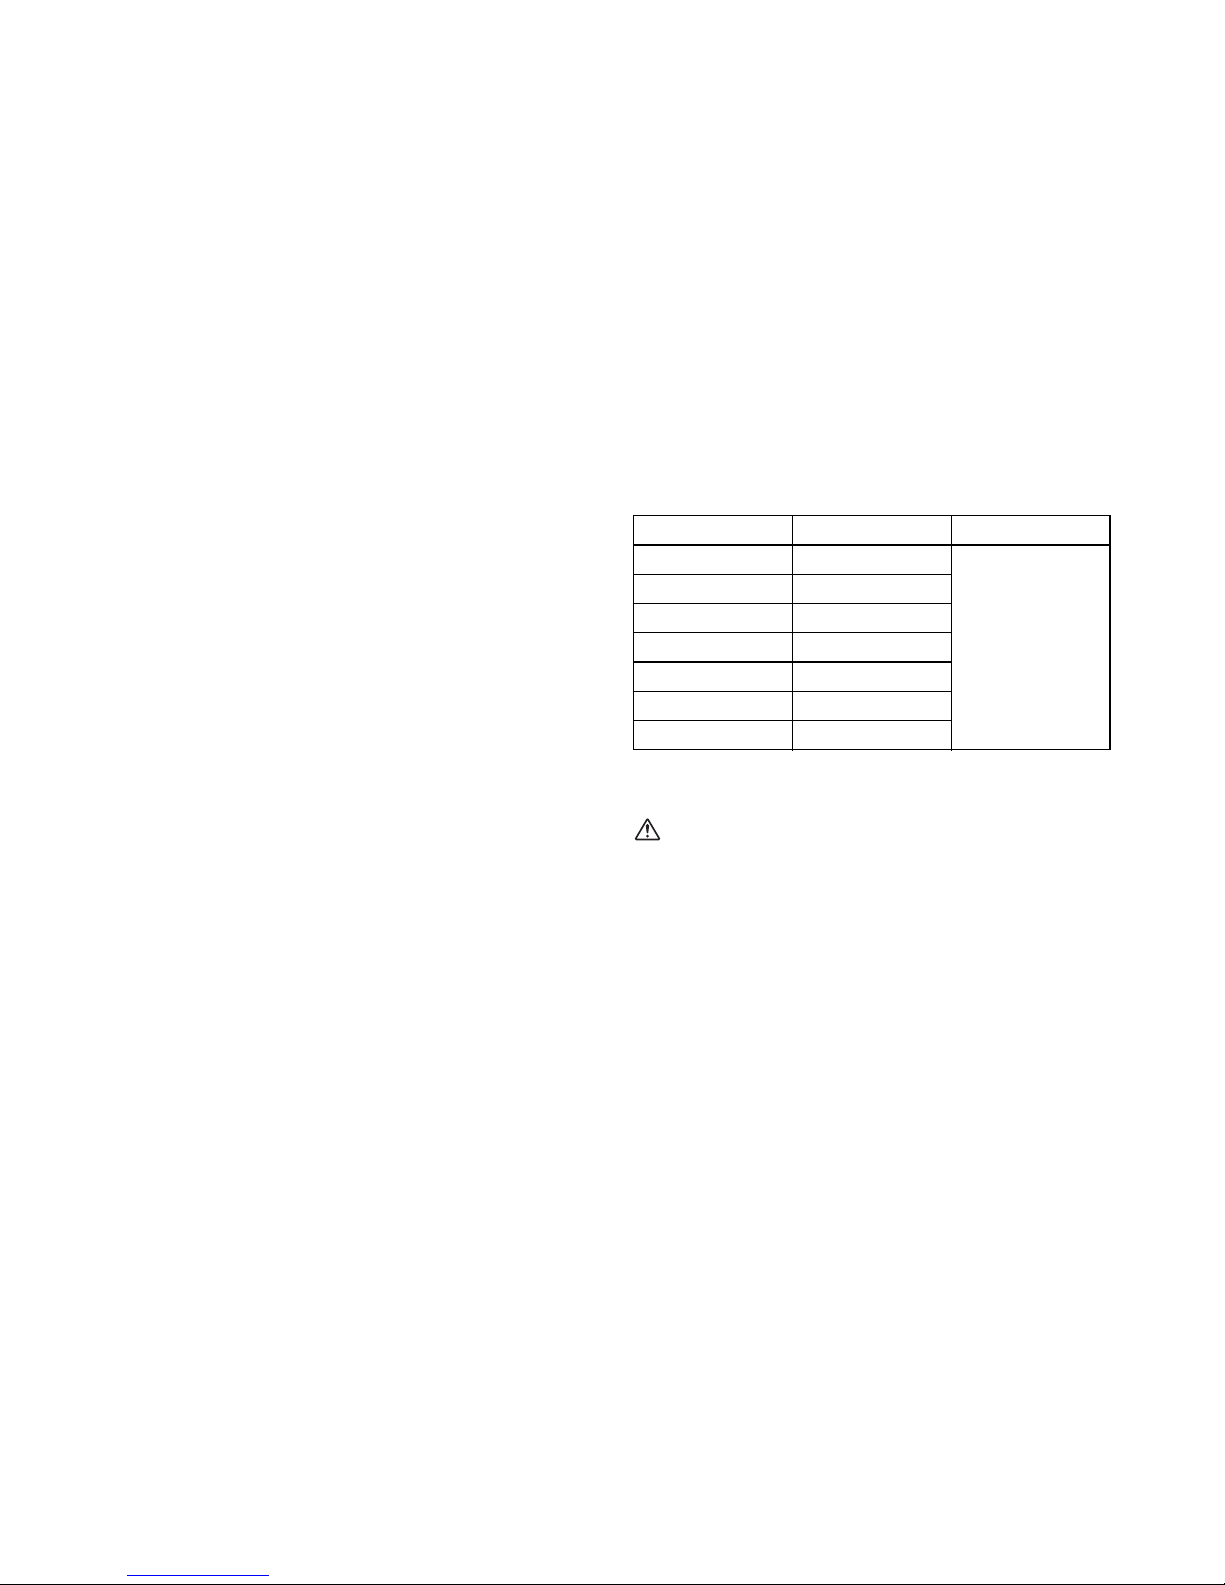
1. Measure your height. (Fig. 1)
2. Refer to the bicycle’s settings table.
3. Adjust your bicycle. (Fig. 2 – 3)
Warning
• Do not ride the bicycle when the safety lines on the
seat or handles are visible.
Adjusting the seat
Minimum seat height is the height determined when the
position of the seat is lowered and the clamp is locked.
Practical Information
Depending on the terrain you are travelling on, the seat
height can be modified:
- On a flat ground or when climbing, the seat should be
in a high position for the greater efficiency.
- When travelling downhill, the seat should be slightly
lowered to improve bicycle control and to make it
easier to go over or circumvent obstacles.
3.2 Introduction of battery:
Use and care for AB-1816
• Remove the battery from AB-1816 when not in use.
• Recharge only with the charger specified by the
manufacturer. A charger that is suitable for only one
type of battery pack may create a risk of fire when used
with another battery pack.
• Use AB-1816 only with specifically designated battery
packs. Use of any other battery packs may create a
risk of injury and fire.
• When the battery pack is not in use, keep it away from
metal objects, like paper clips, coins, keys, nails,
screws or other small metal objects, which can make a
conductive connection from one terminal to another.
Shorting both the battery under abusive conditions,
terminals may cause burns or a fire.
• As liquid may leak from the battery, avoid contact. If
you touch it accidentally, flush with water. If the liquid
contacts with eyes, seek medical help. Liquid leaked
from the battery may cause irritation or burns.
IMPORTANT SAFETY
INSTRUCTIONS
For battery cartridge
• Before using battery cartridge, read all instructions and
cautionary markings on the (1) battery charger, (2)
battery, and (3) product the battery is used for.
• Do not disassemble the battery cartridge.
S (cm) Hs (cm) H (cm)
155 – 159 55.5
+12
160 – 164 58
165 – 169 60
170 – 174 62.5
175 – 179 64.5
180 – 184 67
185 – 190 69.5
(Fig. 2) (Fig. 3)
Page 7

7
• If operating time has become excessively shorter, stop
operating immediately. It may result in a risk of
overheating, possible burns and even an explosion.
• If the electrolyte gets into your eyes, rinse it out with
clear water and seek medical attention right away. It
may result in loss of your eyesight.
• Do not short the battery cartridge:
(1) Do not touch the terminals with any conductive
materials.
(2) Avoid storing battery cartridge in a container with
other metal objects such as nails, coins, etc.
(3) Do not expose the battery cartridge to water or
rain.
A battery short can cause a large current flow,
overheating, possible burns and even a brakedown.
• Do not store AB-1816 and battery cartridge in locations
where the temperature may reach or exceed 50°C
(122°F).
• Do not incinerate the battery cartridge even if it is
severely damaged or is completely worn out. The
battery cartridge can explode in a fire.
• Be careful not to drop or strike the battery.
• Do not use a dropped or struck battery.
SAVE THESE INSTRUCTIONS.
Tips for maintaining a maximum battery
life
• Never recharge a fully charged battery cartridge.
Overcharging shortens the battery service life.
• Charge the battery cartridge with a room temperature
at 10°C – 40°C (50°F – 104°F).
Let a hot battery cartridge cool down before charging it.
Instruction of installing or
removing battery cartridge
Installing battery cartridge
Insert the key into the key hole and turn the key counter
clockwise 90°. (Fig. 4)
Open the cover and always insert the battery cartridge all
the way until it locks in place with a little click.
If you can see the red part on the upper side of the button,
it is not locked completely. Insert it fully until the red part
cannot be seen. (Fig. 5 & 7)
Close the cover and insert the key to the key hole and turn
the key to clockwise 90°. (Fig. 6)
NOTE:
Even with one battery cartridge, the assisting function
works, but the total battery life will be half compared with
that when using two battery cartridges.
Removing battery cartridge
Open the cover with the key.
To remove the battery cartridge, withdraw it from the tool
while sliding the button on the front of the cartridge.
(Fig. 7)
3.3 Instruction of display and button (Fig. 8)
Operation
1. The ON/OFF button is the power switch. Press ON/
OFF button rightly to turn ON power source for
bicycle. Turning power source ON enables assisting
function (Initial setting when power is turned ON is
“Assist Level 3”). After turning ON power, the five
LEDs on the Power display will show battery capacity.
Battery capacity is shown as low on the left through to
high on the right. When five LEDs are lit, battery has
approximately 80 percent or more capacity. When far
left single LED flashes, recharge battery. Press ON/
OFF button again, all the LEDs will extinguish, and
power will turn OFF.
2. The plus (+) and minus (–) buttons are for setting
assist level. Press “+” button lightly to increase
assistance level, and press “–” button to decrease
assistance level. When assist level is at maximum, the
Assist display’s five LEDS will be lit. For each of the
assist levels (1 to 5) there are five LEDs that light up in
accordance with the level from 1 to 5.
3. Press ON/OFF button to turn OFF power and switch to
low power consumption status.
4. After power has been turned ON, if the bicycle is not
used for approximately ten minutes, power will turn
OFF automatically, and the bicycle switched to low
power consumption status.
Article 3.
Important notice
Warning
1. The product complies with EN15194. The purpose of it
is for travelling, not for other purposes.
2. Do not ride the bicycle across water deeper than
150 mm to avoid damaging the electric system.
3. Wear the helmet during the riding. (Fig. 9)
4. Avoid over loading.
5. Avoid shorting the circuit.
6. Do not put the battery under a high temperature
environment such as heating or insolation.
7. Avoid putting the battery into water, acid or alkaline
liquid.
8. Charge the battery with the charger specified by the
manufacturer.
• Please do not accelerate when travelling downhills and
on busy streets.
• Please lock when you stop.
• Please walk with AB-1816 when the road has stone or
other things.
• Please do not disassemble the parts. (without lights)
• Check the power before riding.
• Please stop and checking when have something
wrong.
• Use AB-1816 original parts. (without lights)
• Please do not disassemble and change the reflector.
(Fig. 10)
If any change please make sure to comply with
BS6102/2 and EN15194
• Please check the rim regularly.
Page 8

8
Article 4.
Charging instruction
1. Make sure the battery is full-charged and charge each
time after the use to insure the battery life.
2. Please do not put the battery in a wet place when
charge, the temperature should be 10°C – 40°C
(50°F – 104°F).
3. Do not cover the battery cartridge and charger with
anything when charging and avoid letting liquid and
metal powder inside.
4. If the battery’s temperature exceeds 60°C (140°F), it
may lead any trouble in the charger. Please cut off the
power and sent for repair.
5. Keep the battery and charger away from kids.
6. The charger could only be used for this battery.
Article 5.
Repair and maintenance
• Before use, please check if the battery is locked well
and the display works well.
• Please check the connector of the bicycle and battery
box. Remove dirt to avoid any damage.
• Check the tire regularly, otherwise it will affect the
usage range or damage the tire.
• Before use, check the mechanism and other accessory
on time.
• Do not put the bicycle in humidified atmosphere or
some other place which might make the hardware rust.
• Do not put the whole bicycle under rain or insolation for
too long time so as to avoid the controller and
accessory damaged.
• If any problem in the motor, battery and controller,
please sent to the exclusive agent for the maintenance.
• If you feel it a bit heavy to move the backward, it’s a
normal status.
• Do not over load on the bicycle so as to avoid damage
the motor and battery.
• It’s important to lubricate the bicycle, the front, rear
axle, BB set per year or half a year. Use a special
lubricant for the hub (Recommend to use the clear
gasoline and vesaline lube), if anything wrong, please
send to our agency for the maintenance.
Article 6.
Using instruction for folding parts
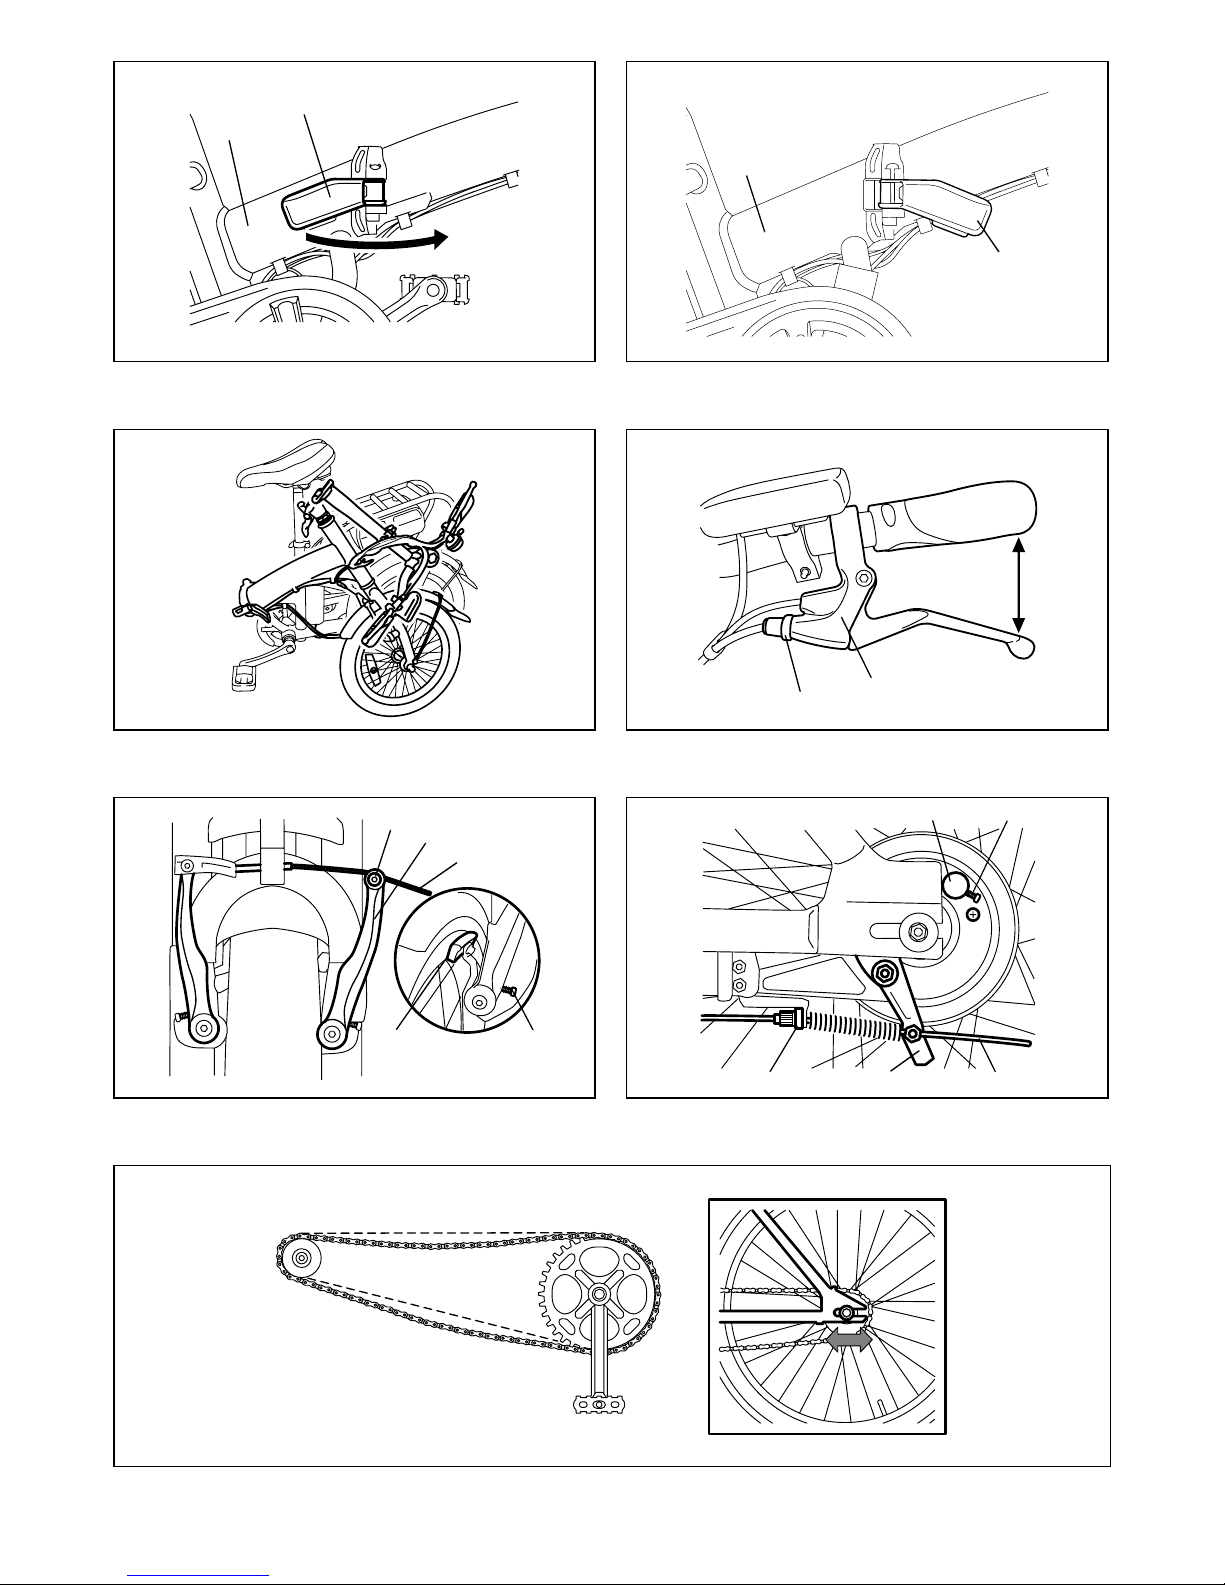
1. To assemble the seat
Insert the seat into the support bar, and adjust the
height according to the length of customer’s legs, then
fix the bolt.
Please note the insert depth should not see the safety
line, and twisting force of the clamp lock can not be
less than 18 N.m. (Fig. 11)
2. Quick release use
Fasten the screw tightly and push down the lever
toward the pole to adjust the position correctly.
(Fig. 11)
3. To fold the handlebar stem
Push up the self-locking slider down as showed in the
picture a, then push the handle down according to the
picture b. (Fig. 12)
Fold the stem down when the hook is opened as
showed in Fig. 12 & 13.
4. To put pedal
By putting the pedal inside, the desired manner for the
bicycle can be achieved. Grip the lever inside the
pedal and push it down to the body side. (Fig. 14)
5. To fold the frame
Stand on the left side of bicycle, and fold the
handlebar stem first, then hold the frame with your left
hand, hold the folding handle and move it to open.
Turn the folding handle as showed in Fig. 13. When
the folding locking buckle is opened, then hold the
frame from two sides and fold the frame toward the left
of frame, and stop folding until the front wheel and
rear wheel is parallel, as showed in Fig. 15 – 17.
Article 7.
Accessories and adjustment
1. The battery controller and motor cannot be removed.
2. To change parts please come to the agency for
change, we do not responsible for the problem which
caused by customer who remove the parts by
themselves.
3. Please use the Dolmar battery AP-183.
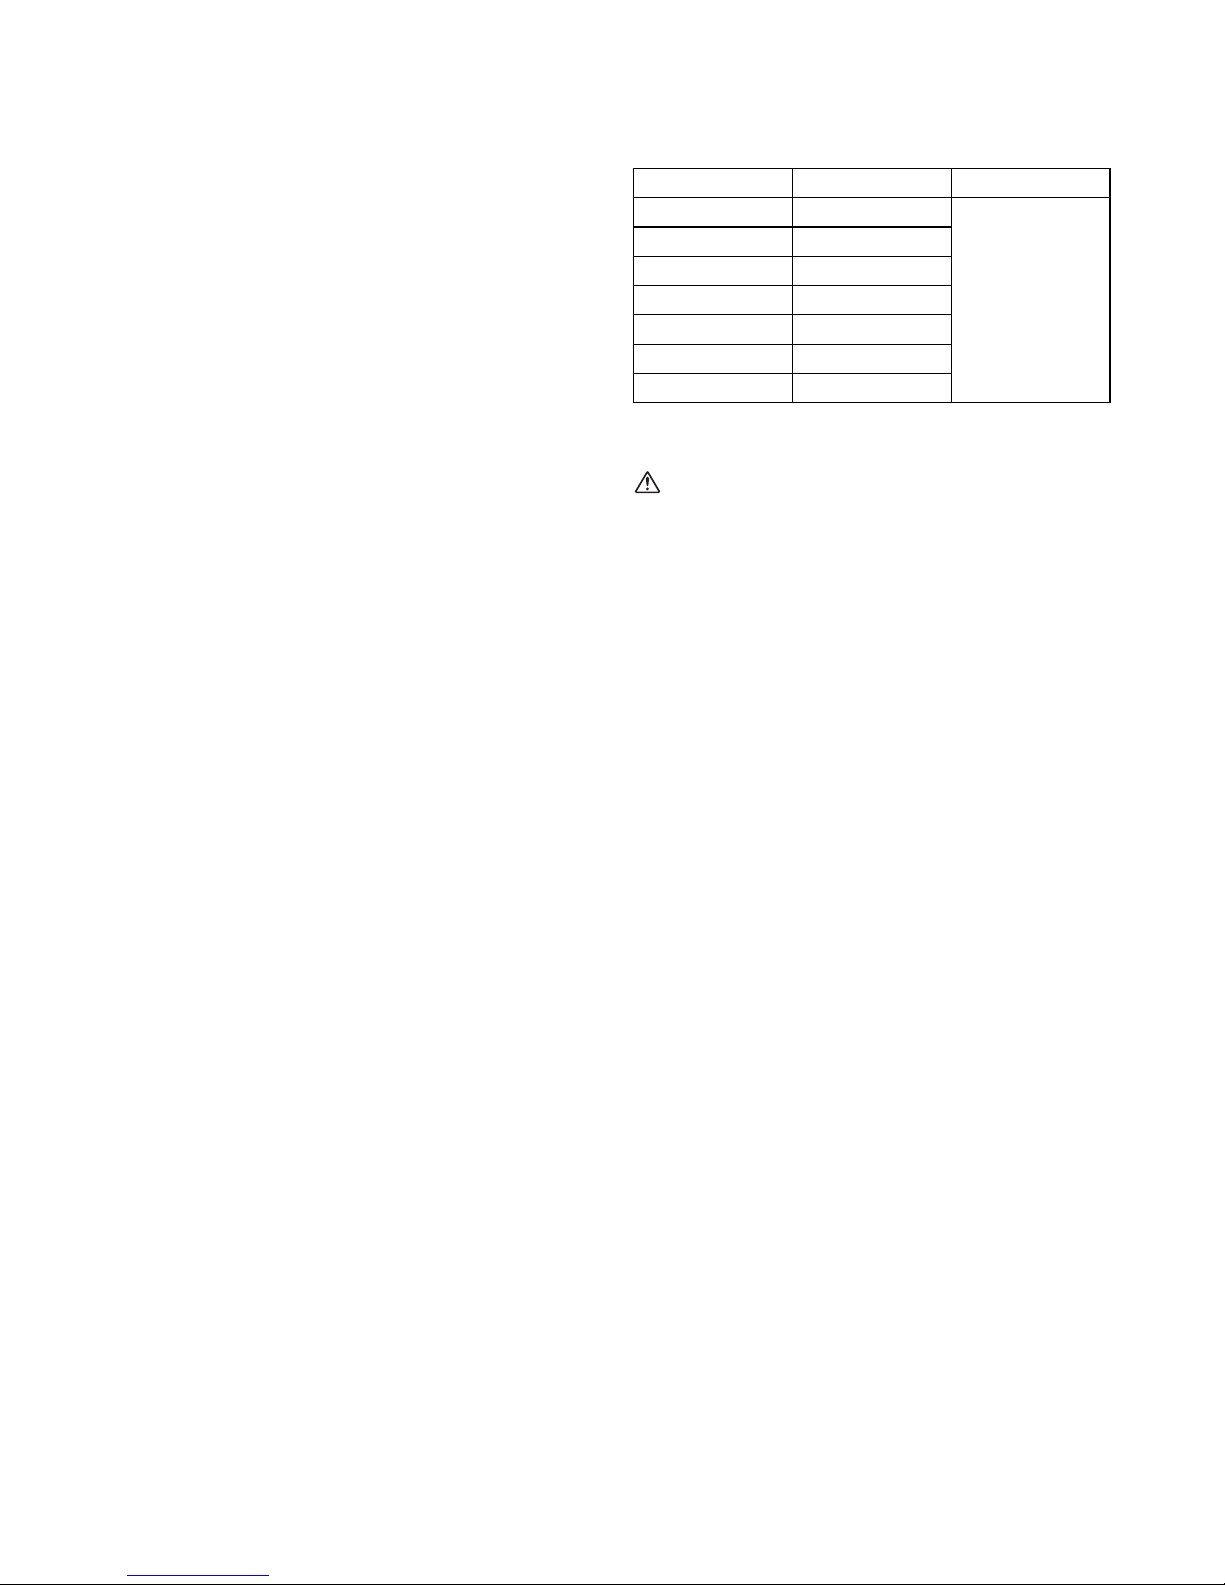
4. Brake adjustment.
Check the brake regularly and check as below:
(Fig. 18 – 20)
4.1 Adjust front brake.
4.1.1. As shown in Fig. 18, check the front brake. The
brake will be fully triggered when the brake lever is
gripped to the half-closed position.
4.1.2. As shown in Fig. 19, loosen the screw to loosen or
tighten the brake arms, and make the distance
between the brake broad and the tire 1.5 – 2 mm.
Tighten the screw. If the distance is different,
please keep adjusting the spring until made the
desired distance, is made which meets the 4.1.1
request.
4.2 Adjust the rear brake.
4.2.1. As shown in Fig. 18, check the rear brake as
4.1.1.
4.2.2. See Fig. 20, to adjust brake, as described in 4.1.1
showing adjustment of the front brake, loose the
brake lever then adjust the screw till it touch the
move board, enclasp the brake lever, adjust the
move board and bolt (2 mm). Adjust some times till
rearwheel turns well and brake function works
well. When 1/3 of the brake is frayed, please
change it.
Attention:
Please do not add lubricants on the rear brake. And
please replace brake shoe in the front brake each year, to
avoid shoe abrasion.
Brake maintenance
In order to maintain your bicycle’s braking performance, it
is important to perform maintenance on the braking
system.
• Replacing brake cables and housings.
5. Chain adjusting
Adjust as below:
Disassemble the plastic protecting cover of rear axle,
and release two M12 nut. Turn the adjust nut
Page 9
9
clockwise to make sure chain fixed well. During
adjustment, if the chain is fixed too tight, please turn
the nut counterclockwise and push the rear wheel
forward.
If there are any parts needed to be adjusted, fix the
screw and other parts tightly according to the
requirements below. (Fig. 21)
For European countries only
EC DECLARATION OF CONFORMITY
The undersigned, Tamiro Kishima and Rainer
Bergfeld, as authorized by Dolmar GmbH, declare that
the DOLMAR machine(s):
Designation of Machine:
Motor-assisted bicycle
Model No./ Type: AB-1816
are of series production and
Conforms to the following European Directives:
2004/108/EC
And are manufactured in accordance with the following
standards or standardised documents:
EN55014-1: 2006, EN15194: 2009,
EN61000-3-2: 2006, EN61000-3-3: 2008,
EN55014-2/A2: 2008, IEC61000-4-2: 2008,
IEC61000-4-3: 2006, IEC61000-4-4: 2004,
IEC61000-4-5: 2005, IEC61000-4-6: 2006,
IEC61000-4-11: 2004
The technical documentation is on file at:
Dolmar GmbH,
Jenfelder Straße 38, Abteilung FZ,
D-22045 Hamburg
15. 7. 2010
Tamiro Kishima Rainer Bergfeld
Managing Director Managing Director
Parts Standardtwist Remarks
Locknut 14 – 18 N.m. The press sticker cannot show out
Stem 20 – 25 N.m. The safety line of stem cannot be seen
Seat screw 18 – 20 N.m. The safety line of seat post cannot be seen
Seat and fix the seat parts 18 – 22 N.m.
Hub 30 – 35 N.m.
Hub nut 35 – 40 N.m.
Pedal 18 – 20 N.m.
Handlebar 18 – 20 N.m.
The following standards are used for safety:
EN14764: 2005, EN15194: 2009
Page 10

10
FRANÇAIS (Instructions d’origine)
Descriptif
Spécifications
• Étant donné l’évolution constante de notre programme de recherche et de développement, les spécifications
contenues dans ce manuel sont sujettes à des modifications sans préavis.
*1: Avec deux batteries AP-183
*2: Mesure de l’état de la plage de la distance de croisière : niveau d’assistance 3, capacité en charge 75 kg, pas de vent,
sol plat en béton
Avant d’utiliser le AB-1816, lisez
attentivement ce qui suit :
• Lisez le manuel et vérifiez attentivement toutes les
pièces et tous les accessoires avant d’utiliser le vélo.
• Vous devez respecter les règles de conduite en
vigueur dans votre pays.
• Ne circulez pas sur les routes réservées aux voitures.
Veillez à conduire prudemment.
• Utilisez la batterie, le moteur, le boîtier de commande
et les autres composants électriques indiqués. Si vous
devez les remplacer, contactez notre représentant.
• Veillez à utiliser le AB-1816 en toute sécurité, ne le
prêtez à personne, en particulier à des femmes
enceintes ou des personnes qui ne sont pas capables
de le conduire.
• Vous pouvez utiliser ce AB-1816 par temps humide,
pluvieux ou neigeux, mais veillez à conduire lentement,
ne traversez pas des flaques d’eau d’une profondeur
supérieure à 150 mm pour éviter que l’eau
endommage les composants électriques.
• Conforme à la norme : EN15194
Poids maximal en charge : 100 KG
Ne jetez pas la batterie.
• Sa vitesse ne peut pas dépasser 16 km/h.
Pour une utilisation en toute sécurité,
demandez à notre représentant de régler
la selle en position confortable.
• Avertissement : le repère de sécurité de la tige de selle
doit s’insérer dans le cadre.
1. Partie rouge
2. Affichage de l’assistance
3. Affichage de l’autonomie
4. Bouton MARCHE/ARRÊT
5. Correct
6. Catadioptre
7. Selle
8. Repère de sécurité
9. Levier de réglage rapide
10. Contre-écrou
11. Sens de fermeture
12. Glissière auto-bloquante
13. Crochet
14. Poignée pliante
15. Cadre
16. Boucle de pliage du guidon
17. Vis
18. Support de frein
19. Étrier de frein
20. Bras de frein
21. Câble de frein
22. Tampon de frein
23. Vis à ressort
24. Parties coulissantes
25. Vis de réglage
26. Tampon de fixation du câble de
frein
Modèle AB-1816
Moteur
Puissance effective 100 W
Modèle Moteur à courant continu sans balai
Tension nominale 18 V C.C.
Dimensions
Longueur 1 450 mm
Largeur 570 mm
Hauteur de la selle 670 mm - 910 mm
Distance entre les axes de
roue
975 mm
Dimension des pneus 16 pouces
Poids*
1
20,8 kg
Batterie
Modèle AP-183
Capacité 3,0 Ah
Type Li-ion
Distance de croisière*
2
Environ 8,5 km
(AP-183 1 exemplaire)
Type de commande Type de capteur de vitesse de la pédale
Plage de vitesse pour l’assistance 0 - 16 (km/h)
Type de frein
Avant Frein du pneu avant
Arrière Frein à tambour
Page 11
11
• Vérifiez son fonctionnement avant de l’utiliser.
• Stationnez le vélo sur une route lisse et ne gênez pas
la circulation.
• Respectez les règles de conduite.
• Circulez sur les voies réservées aux véhicules non
motorisés.
• Portez un casque de protection lors de l’utilisation du
vélo.
• Pour faire avancer le AB-1816, il n’est pas nécessaire
d’appuyer sur les pédales autant que sur un vélo
normal. Toutefois, avant de vous habituer à pédaler de
manière plus douce, il est possible que vous appuyez
trop fort sur les pédales, faisant rouler le vélo plus
rapidement qu’un vélo normal et risquant ainsi de
provoquer des accidents, tels que des chutes ou des
collisions.
• N’utilisez pas le vélo sur des surfaces extrêmement
bosselées (bordurettes de chaussée, réseaux de
drainage, etc.).
• Lors de l’arrêt du vélo, serrez les freins avant et arrière.
• N’utilisez pas le vélo lorsqu’il présente un
dysfonctionnement.
• Ne démontez pas et ne lubrifiez pas les pièces liées au
système d’assistance électrique.
• Ne transformez pas le vélo vous-même.
• Utilisez uniquement des accessoires et pièces de
rechange Dolmar.
• Après avoir retiré/remplacé la/les roue(s) ou réglé la
selle, vérifiez toujours que les boulons correspondants
sont bien serrés avant d’utiliser le vélo.
• N’utilisez jamais le vélo lorsque la selle ou le fermoir
sont plus hauts que le repère limite.
• Ne lubrifiez pas les tampons de frein, les pneus ou les
jantes.
1. Vérifiez avant utilisation.
Pour une utilisation en toute sécurité, vérifiez les points
suivants avant d’utiliser le vélo.
a. Vérifiez le bon fonctionnement des pneus et des vis.
b. Système de freinage : lorsque le niveau de freinage
atteint la moitié de sa capacité, les freins doivent être
en mesure d’arrêter totalement le vélo.
c. Système d’autonomie : vérifiez que la batterie est bien
installée et entièrement chargée.
2. Attention :
a. Ralentissez dans les virages et lorsque vous
descendez une pente.
Article 1.
À l’attention du client
a. Merci d’avoir choisi notre AB-1816. Nous espérons
qu’il vous donnera entière satisfaction.
b. Avant d’utiliser le AB-1816, lisez attentivement le
manuel correspondant. Pour toute question, n’hésitez
pas à contacter l’un de nos représentants.
Article 2.
Présentation du AB-1816
1. Pour garantir votre sécurité, vérifiez le produit
avant de l’utiliser.
a. Le système de freinage fonctionne-t-il bien ?
b. Le système électrique fonctionne-t-il bien ? (Réf. : 3.3)
c. Le fermoir et la selle sont-ils bien positionnés et
verrouillés ?
d. La pression des pneus est-elle normale ?
e. La poignée pliante et les pédales sont-elles bien
verrouillées ?
2. AB-1816
a. Ce produit a été conçu pour fonctionner facilement.
b. Le AB-1816 peut protéger la batterie contre les
surcharges de courant ou les basses tensions.
c. Le frein du pneu avant et celui du pneu arrière
permettent un fonctionnement en toute sécurité.
d. En moins d’un an, la gamme destinée à une utilisation
normale est devenue conforme à la norme EN15194.
3. Fonctionnement
3.1 Comment ajuster votre position sur la bicyclette
1. Mesurez-vous. (Fig. 1)
2. Reportez-vous au tableau des réglages de votre
bicyclette.
3. Réglage de votre bicyclette. (Fig. 2 à 3)
Avertissement
• N’utilisez pas la bicyclette lorsque les repères de
sécurité sur la selle ou le guidon sont visibles.
Réglage de la selle
La hauteur minimale de la selle correspond à la hauteur
définie lorsque la selle est abaissée et le collier verrouillé.
Informations pratiques
Selon le terrain sur lequel vous circulez, vous pouvez
modifier la hauteur de la selle :
- Sur un sol plat ou en côte, vous pouvez régler la selle
en position haute pour une plus grande efficacité.
- En descente, la selle doit être légèrement abaissée
afin de permettre un meilleur contrôle de la bicyclette et
faciliter le passage ou le contournement d’obstacles.
3.2 Présentation de la batterie :
Utilisation et entretien du AB-1816
• Lorsque vous n’utilisez pas le AB-1816, retirez sa
batterie.
• N’utilisez que le chargeur spécifié par le fabricant. Un
chargeur qui convient à un seul type de batterie peut
créer un risque d’incendie s’il est utilisé avec un autre
type de batterie.
• Utilisez le AB-1816 uniquement avec les batteries
désignées. L’utilisation d’autres types de batterie peut
créer un risque de blessures et d’incendie.
• Lorsque le bloc-batterie n’est pas utilisé, gardez-le
éloigné de tout objet métallique, comme les trombones,
pièces, clefs, clous, vis ou autres petits objets
métalliques, qui peuvent faire office de connexion
S (cm) Hs (cm) H (cm)
155 – 159 55,5
+12
160 – 164 58
165 – 169 60
170 – 174 62,5
175 – 179 64,5
180 – 184 67
185 – 190 69,5
(Fig. 2) (Fig. 3)
Page 12

12
d’une borne à l’autre. Court-circuiter les bornes de la
batterie dans de mauvaises conditions peut provoquer
des brûlures ou un incendie.
• Évitez tout contact avec la batterie car elle peut
présenter des fuites de liquide. Si vous le touchez
accidentellement, rincez vos mains à l’eau. Si le liquide
entre en contact avec les yeux, consultez un médecin.
Le liquide fuyant de la batterie peut provoquer une
irritation ou des brûlures.
CONSIGNES DE SÉCURITÉ
IMPORTANTES
Pour la batterie
• Avant d’utiliser la batterie, veuillez lire toutes les
instructions et tous les avertissements inscrits sur (1) le
chargeur, (2) la batterie et (3) l’appareil alimenté par la
batterie.
• Ne démontez pas la batterie.
• Cessez immédiatement d’utiliser le vélo si le temps de
fonctionnement devient excessivement court. Il y a
risque de surchauffe, de brûlures, voire d’explosion.
• Si l’électrolyte pénètre dans vos yeux, rincez-les à
l’eau claire et consultez immédiatement un médecin. Il
y a risque de perte de la vue.
• Ne court-circuliez pas la batterie :
(1) Ne touchez les bornes avec aucun matériau
conducteur.
(2) Évitez de ranger la batterie dans un contenant où
se trouvent d’autres objets métalliques tels que
des clous, pièces de monnaie, etc.
(3) N’exposez pas la batterie à l’eau ou à la pluie.
Un court-circuit de la batterie risque de provoquer un fort
courant, une surchauffe, parfois des brûlures et même
une panne.
• Ne rangez pas le AB-1816 et la batterie dans des
endroits où la température risque d’atteindre ou de
dépasser 50°C (122°F).
• Ne jetez pas la batterie au feu même si elle est
sérieusement endommagée ou complètement épuisée.
La batterie peut exploser et provoquer un incendie.
• Veillez à ne pas laisser tomber ou heurter la batterie.
• N’utilisez pas une batterie qui est tombée ou qui a subi
un choc.
CONSERVEZ CES
INSTRUCTIONS.
Conseils pour assurer la durée de vie
optimale de la batterie
• Ne rechargez jamais une batterie complètement
chargée.
La surcharge réduit la durée de service de la batterie.
• Rechargez la batterie lorsque la température ambiante
est comprise entre 10°C et 40°C (50°F et 104°F).
Avant de recharger une batterie chaude, laissez-la
refroidir.
Instruction d’installation ou de
retrait de la batterie
Installation de la batterie
Insérez la clé dans la serrure et tournez-la dans le sens
antihoraire à 90°. (Fig. 4)
Ouvrez le couvercle et insérez toujours la batterie à fond
jusqu’à ce qu’elle se verrouille en émettant un léger
déclic.
Si vous pouvez voir la partie rouge sur la face supérieure
du bouton, la batterie n’est pas parfaitement verrouillée.
Insérez-la à fond, jusqu’à ce que la partie rouge ne soit
plus visible. (Fig. 5 et 7)
Fermez le capot, insérez la clé dans le trou de la serrure
et tournez-la dans le sens horaire à 90°. (Fig. 6)
REMARQUE :
La fonction d’assistance fonctionne même avec une seule
batterie, mais dans ce cas, la durée de vie totale de la
batterie est divisée par deux comparée à celle obtenue
avec deux batteries.
Retrait de la batterie
Ouvrez le couvercle à l’aide de la clé.
Pour retirer la batterie, maintenez le bouton à l’avant de la
batterie enfoncé et sortez la batterie. (Fig. 7)
3.3 Instructions relatives à l’affichage et aux
boutons (Fig. 8)
Fonctionnement
1. Le bouton ON/OFF correspond à l’interrupteur.
Appuyez légèrement sur le bouton ON/OFF pour
mettre la bicyclette sous tension. La mise sous
tension entraîne l’activation de la fonction
d’assistance (le réglage initial lors de la mise sous
tension est « Niveau d’assistance 3 »). Suite à la mise
sous tension, les cinq DEL sur l’affichage de
l’autonomie indiquent la capacité de la batterie. La
capacité minimale est indiquée à gauche et la
capacité maximale à droite. Lorsque les cinq DEL sont
allumées, l’autonomie de la batterie est de 80 %
environ au moins. Lorsque la DEL située à l’extrême
gauche clignote, rechargez la batterie. Si vous
appuyez à nouveau sur le bouton ON/OFF, toutes les
DEL s’éteignent et le vélo est mis hors tension.
2. Les boutons portant les signes plus (+) et moins (–)
permettent de régler le niveau d’assistance. Appuyez
légèrement sur le bouton « + » pour augmenter le
niveau d’assistance et appuyez sur le bouton « – »
pour le diminuer. Lorsque le niveau d’assistance est
au maximum, les cinq DEL situées sur l’affichage de
l’assistance s’allument. Pour chaque niveau
d’assistance (1 à 5), cinq DEL s’allument en fonction
du niveau sélectionné, de 1 à 5.
3. Appuyez légèrement sur le bouton ON/OFF pour
mettre le vélo hors tension et passer en basse
consommation d’énergie.
4. Après avoir mis la bicyclette sous tension, si vous ne
l’utilisez pas pendant 10 minutes environ, elle s’éteint
automatiquement et passe en basse consommation
d’énergie.
Page 13

13
Article 3.
Remarque importante
Avertissement
1. Ce produit est conforme à la norme EN15194. Il a été
conçu pour voyager, non à d’autres fins.
2. Pour éviter d’endommager le système électrique, ne
traversez pas des flaques d’eau de plus de 150 mm
de profondeur.
3. Portez un casque lors de l’utilisation du vélo. (Fig. 9)
4. Évitez de surcharger la bicyclette.
5. Évitez de court-circuiter le système.
6. N’exposez pas la batterie à des températures élevées,
telles que les rayons du soleil et les radiateurs.
7. Évitez de placer la batterie dans l’eau, dans l’acide ou
dans un liquide alcalin.
8. Rechargez la batterie à l’aide du chargeur spécifié par
le fabricant.
• N’accélérez pas lorsque vous roulez sur une pente ou
dans une rue encombrée.
• Verrouillez la bicyclette lorsque vous la stationnez.
• Marchez à côté du AB-1816 lorsque la route est
jonchée de pierres ou d’autres objets.
• Ne démontez pas les pièces. (à l’exception des
lampes)
• Vérifiez l’autonomie de la batterie avant d’utiliser le
vélo.
• En cas d’anomalie, arrêtez-vous et vérifiez le vélo.
• Utilisez les pièces d’origine du AB-1816. (à l’exception
des lampes)
• Ne démontez pas et ne remplacez pas le catadioptre.
(Fig. 10)
En cas de modification, veillez respecter les normes
BS6102/2 et EN15194.
• Vérifiez régulièrement les jantes.
Article 4.
Instructions de chargement
1. Assurez-vous que la batterie est entièrement chargée
et rechargez-la après utilisation afin de garantir une
longue durée de service.
2. Ne placez pas la batterie dans un endroit humide lors
du chargement. La température ambiante doit être
comprise entre 10°C et 40°C (entre 50°F et 104°F).
3. Ne placez aucun objet sur la batterie et le chargeur
lors du chargement et évitez de verser des liquides et
des objets métalliques conducteurs à l’intérieur.
4. Si la température de la batterie est supérieure à 60°C
(140°F), cela peut entraîner un dysfonctionnement du
chargeur. Mettez-le hors tension et faites-le réparer.
5. Conservez la batterie et le chargeur hors de portée
des enfants.
6. Le chargeur ne peut être utilisé qu’avec cette batterie.
Article 5.
Réparation et entretien
• Avant d’utiliser le vélo, vérifiez que la batterie est bien
verrouillée et que l’affichage fonctionne correctement.
• Vérifiez le connecteur de la bicyclette ainsi que la
batterie. Pour éviter qu’ils s’endommagent, nettoyezles régulièrement.
• Vérifiez les pneus régulièrement afin de ne pas les
endommager et préserver les jantes.
• Avant utilisation, vérifiez le mécanisme et les autres
accessoires.
• Ne placez pas la bicyclette dans un endroit humide ou
susceptible de faire rouiller ses composants.
• Ne placez pas la bicyclette sous la pluie et ne
l’exposez pas aux rayons du soleil pendant une
période prolongée, au risque d’endommager le boîtier
de commande et les accessoires.
• En cas de problème au niveau du moteur, de la
batterie ou du boîtier de commande, envoyez le
composant concerné à un agent exclusif pour le faire
vérifier.
• Si vous éprouvez des difficultés à reculer le vélo, cela
est normal.
• Ne surchargez pas la bicyclette afin d’éviter
d’endommager le moteur et la batterie.
• Il est important de lubrifier la bicyclette, notamment les
axes avant et arrière, ainsi que les pédales, tous les
ans ou tous les semestres. Utilisez une huile spéciale
pour moyeu (il est recommandé d’utiliser de l’essence
propre ou de la vaseline). En cas de
dysfonctionnement, envoyez le vélo dans l’une de nos
agences pour entretien.
Article 6.
Instructions d’utilisation des
parties pliantes
1. Pour monter la selle
Insérez la selle sur la barre de soutien. Réglez sa
hauteur selon la longueur des jambes de l’utilisateur,
puis fixez le boulon.
La selle ne doit pas être enfoncée au-delà du repère
de sécurité et le couple de serrage du verrou du collier
ne peut pas être inférieur à 18 N.m. (Fig. 11)
2. Réglage rapide
Serrez à fond la vis et enfoncez le levier vers la ligne
de bord intérieure pour régler correctement la position.
(Fig. 11)
3. Repliage de la tige du fermoir
Soulevez la glissière auto-bloquante, comme illustré
sur la figure a, puis abaissez la poignée, comme
illustré sur la figure b. (Fig. 12)
Repliez la tige vers le bas lorsque le crochet est
ouvert, comme illustré sur les Fig. 12 et 13.
4. Placement de la pédale
En plaçant la pédale à l’intérieur, vous pouvez
positionner correctement la bicyclette. Saisissez le
levier à l’intérieur de la pédale et enfoncez-le du côté
de votre corps. (Fig. 14)
5. Repliage du cadre
Placez-vous debout à gauche du vélo et repliez
d’abord le tube de direction. Tenez ensuite le cadre
avec votre main gauche, tenez le guidon repliable et
avancez pour l’ouvrir. Tournez le guidon repliable
comme illustré sur la Fig. 13. Lorsque la boucle de
pliage du guidon est ouverte, tenez le cadre de
chaque côté et repliez-le vers la gauche. Arrêtez de
plier le cadre lorsque la roue avant et la roue arrière
sont parallèles, comme illustré sur les Fig. 15 à 17.
Page 14

14
Article 7.
Accessoires et réglage
1. Vous ne pouvez pas retirer le boîtier de commande de
la batterie et le moteur.
2. Pour remplacer certaines pièces du vélo, rendez-vous
dans une agence. Nous n’assumons aucune
responsabilité en cas de problème résultant de la
dépose de pièces par vos soins.
3. Utilisez les batteries Dolmar AP-183.
4. Réglage du frein.
Vérifiez régulièrement le frein, en procédant comme
suit : (Fig. 18 à 20)
4.1 Réglez le frein du pneu avant.
4.1.1. Comme illustré sur la Fig. 18, vérifiez le frein du
pneu avant. Pour serrer à fond le frein, tirez le
levier du frein à mi-course.
4.1.2. Comme illustré sur la Fig. 19, desserrez la vis
pour desserrer ou serrer la manette de frein et
éloignez le tampon de frein du pneu de 1,5 à
2 mm. Serrez la vis. Si la distance est différente,
continuez de régler le ressort jusqu’à ce qu’il
atteigne la même distance, puis exécutez l’étape
4.1.1.
4.2 Réglez le frein arrière.
4.2.1. Comme illustré sur la Fig. 18, vérifiez le frein
arrière comme décrit à l’étape 4.1.1.
4.2.2. Reportez-vous à la Fig. 20 pour régler le frein,
comme décrit à l’étape 4.1.1 qui présente le
réglage du frein avant, desserrez la poignée de
frein, puis ajustez la vis jusqu’à ce qu’elle touche
le pédalier. Serrez la poignée du frein et réglez le
pédalier et le boulon (2 mm). Réglez le boulon
jusqu’à ce que la roue arrière tourne bien et que le
frein fonctionne correctement. Lorsque 1/3 du
tampon du frein est usé, remplacez-le.
Attention :
N’ajoutez pas de lubrifiant sur le frein arrière. Remplacez
le patin du frein avant tous les ans pour éviter qu’il s’use.
Entretien du frein
Pour préserver les performances de freinage de votre
bicyclette, il est important d’entretenir le système de
freinage.
• Remplacement des câbles de frein et des carters.
5. Réglage de la chaîne
Procédez au réglage comme suit :
Démontez la protection en plastique de l’axe arrière et
retirez les deux boulons M12. Tournez l’écrou de
réglage dans le sens horaire pour vous assurer que la
chaîne est bien fixée. Pendant le réglage, si la chaîne
est trop serrée, tournez l’écrou dans le sens
antihoraire et poussez la roue arrière vers l’avant.
Si certaines pièces doivent être ajustées, serrez à
fond cette vis ainsi que les autres, conformément aux
indications suivantes. (Fig. 21)
Pour les pays d’Europe uniquement
DÉCLARATION DE CONFORMITÉ CE
Les soussignés, Tamiro Kishima et Rainer Bergfeld,
tels qu’autorisés par Dolmar GmbH, déclarent que les
outils DOLMAR :
Nom de la machine :
Vélo à Assistance Électrique
N° de modèle/Type : AB-1816
sont fabriquées en série et
sont conformes aux directives européennes
suivantes :
2004/108/CE
et sont produites conformément aux normes ou
documents de normalisation suivants :
EN55014-1 : 2006, EN15194 : 2009,
EN61000-3-2 : 2006, EN61000-3-3 : 2008,
EN55014-2/A2 : 2008, IEC61000-4-2 : 2008,
IEC61000-4-3 : 2006, IEC61000-4-4 : 2004,
IEC61000-4-5 : 2005, IEC61000-4-6 : 2006,
IEC61000-4-11 : 2004
La documentation technique se trouve dans les locaux de
l’entreprise sise :
Dolmar GmbH,
Jenfelder Straße 38, Abteilung FZ,
D-22045 Hamburg
15. 7. 2010
Tamiro Kishima Rainer Bergfeld
Directeur général Directeur général
Pièces
Couple de
serrage
Remarques
Contre-écrou 14 – 18 N.m. L’autocollant ne doit pas être visible
Tige 20 – 25 N.m. Le repère de sécurité de la tige n’est pas visible
Vis de la selle 18 – 20 N.m. Le repère de sécurité de la tige de selle n’est pas visible
Selle et composants de la selle 18 – 22 N.m.
Moyeu 30 – 35 N.m.
Écrou du moyeu 35 – 40 N.m.
Pédale 18 – 20 N.m.
Fermoir 18 – 20 N.m.
Les normes suivantes sont utilisées pour votre
sécurité :
EN14764 : 2005, EN15194 : 2009
Page 15

15
DEUTSCH (Originalanweisungen)
Erklärung der Gesamtdarstellung
Technische Daten
• Aufgrund unserer beständigen Forschungen und Weiterentwicklungen sind Änderungen an den hier angegebenen
Technischen Daten ohne Vorankündigung vorbehalten.
*1: Mit zwei Batterien AP-183
*2: Messbereichsbedingungen der Reiseentfernung: Unterstützungsleistung 3, Ladeleistung 75 kg, kein Wind, flachen
Betonboden
Lesen Sie diese Anleitung aufmerksam
durch, bevor Sie das AB-1816 verwenden:
• Lesen Sie diese Anleitung und überprüfen Sie vor
Verwendung alle Teile und Zubehörteile.
• Der Fahrer muss sich an die Straßenverkehrsordnung
des jeweiligen Landes halten.
• Fahren Sie nicht auf Straßen, auf denen nur Autos
zugelassen sind. Fahren Sie sicher.
• Wenden Sie die an Ihren Verkäufer, um Informationen
zur Verwendung der angegebenen Batterie, des
Motors, des Reglers und anderer Elektroteile zu
erhalten.
• Sorgen Sie für Sicherheit. Verleihen Sie das AB-1816
nicht an andere Personen, vor allem nicht an
Schwangere oder Personen, die nicht Fahrrad fahren
können.
• Dieses AB-1816 kann bei Nässe, Regen und
Schneefall verwendet werden, fahren Sie jedoch
langsam, durchqueren Sie keine Wasserläufe von
mehr als 150 mm Tiefe, da andernfalls elektrische
Bauteile durch Wasser beschädigt werden könnten.
• Implementierter Standard: EN15194
Max. Last: 100 kg
Werfen Sie den Akku nicht weg.
• Die Geschwindigkeit darf 16 km/h nicht übersteigen.
Lassen Sie den Sattel durch den Händler
zu Ihrer Sicherheit auf eine komfortable
Position anpassen.
• Warnung: Die Sicherheitsmarkierung für die Sitzhöhe
muss durch den Rahmen verdeckt sein.
1. Roter Bereich
2. Beihilfeanzeige
3. Netzanzeige
4. EIN/AUS-Taste
5. Richtig
6. Reflektor
7. Sitzklemme
8. Sicherheitsmarkierung
9. Schnellverschlusshebel
10. Gegenmutter
11. Schließen
12. Selbstklemmender Schieber
13. Haken
14. Klappgriff
15. Rahmen
16. Klapp-Klemm-Schloss
17. Schraube
18. Bremsträger
19. Bremsseilzug-Halterung
20. Bremsarm
21. Bremskabel
22. Bremsbacke
23. Federschraube
24. Schiebeanschlag
25. Einstellschraube
26. Fixierbacke des Bremskabels
Modell AB-1816
Motor
Leistung 100 W
Modell bürstenloser Gleichstrommotor
Nennspannung 18 V Gleichspannung
Abmessungen
Länge 1.450 mm
Breite 570 mm
Sitzhöhe 670 bis 910 mm
Abstand zwischen
Radachsen
975 mm
Reifengröße 16 Zoll
Gewicht*
1
20,8 kg
Akkublock
Modell AP-183
Leistung 3,0 Ah
Typ Lithium-Ionen
Reiseentfernung*
2
ca. 8,5 km
(AP-183 1 Stück)
Regelungstyp Sensortyp für Pedalgeschwindigkeit
Geschwindigkeitsbereich für Unterstützung 0 bis 16 (km/h)
Bremstyp
Vorderseite Vorderbremse
Rückseite Trommelbremse
Page 16

16
• Prüfen Sie vor Verwendung die Funktion.
• Parken Sie das Fahrrad auf einer ebenen Straße und
blockieren Sie den Verkehr nicht.
• Halten Sie die Straßenverkehrsordnung ein.
• Fahren Sie auf einem Radweg.
• Tragen Sie einen Fahrradhelm.
• Zum Fahren ist für das AB-1816 eine geringere
Pedalkraft als für ein normales Fahrrad erforderlich. Da
der/die Radler/in jedoch nun leichter tritt, könnte er/sie
zu kraftvoll in die Pedale treten und dadurch schneller
als ein normales Fahrrad fahren; dies kann Unfälle
verursachen, beispielsweise einen Sturz oder
Zusammenstoß.
• Fahren Sie nicht über zu holprige Strecken
(Asphaltbordsteine, Regenrinnen usw.).
• Wenn Sie das Fahrrad zum Halten bringen möchten,
wenden Sie Vorder- und Rückbremse an.
• Fahren Sie nicht mit den Fahrrad, wenn an diesem ein
Problem vorliegt.
• Zerlegen oder schmieren Sie keine Teile, die zum
Unterstützungssystem gehören.
• Arbeiten Sie das Fahrrad nicht selbst um.
• Verwenden Sie als Zubehör oder Ersatzteile nur
originale Teile.
• Prüfen Sie nach dem Entfernen/Austauschen der
Räder oder dem Einstellen des Sattels und bevor Sie
mit dem Fahrrad fahren stets, dass alle Schrauben
festgezogen sind.
• Fahren Sie niemals mit dem Fahrrad, wenn die
Begrenzungslinie für den Sattel oder Lenker zu sehen
ist.
• Schmieren Sie Radschuhdämpfer, Räder oder Felgen
nicht.
1. Überprüfen Sie dies vor Benutzung.
Überprüfen Sie zu Ihrer eigenen Sicherheit vor
Verwendung folgende Punkte.
a. Überprüfen Sie die Funktion der Reifen und
Verschraubung.
b. Bremssystem: Wenn der Bremshebel die Hälfte
seines Weges zurücklegt, muss die Bremse das
Fahrrad zum völligen Stillstand bringen.
c. Antriebssystem: Stellen Sie sicher, dass der Akku
ordnungsgemäß befestigt und für die Nutzung
ausreichend aufgeladen ist.
2. Achtung:
a. Verlangsamen Sie die Fahrt in Kurven und beim
Abwärtsfahren.
Artikel 1
An den Kunden
a. Vielen Dank, dass Sie sich für unser AB-1816
entschieden haben. Wir wünschen Ihnen angenehme
Fahrerfahrungen.
b. Lesen Sie diese Anleitung aufmerksam durch, bevor
Sie das AB-1816 verwenden. Wenden Sie sich bei
Fragen an einen unserer Verkäufer.
Artikel 2
Einführung zum AB-1816
1. Überprüfen Sie zu Ihrer eigenen Sicherheit vor
Verwendung folgende Punkte.
a. Funktioniert das Bremssystem ordnungsgemäß?
b. Funktioniert das Elektrosystem ordnungsgemäß?
(Siehe 3.3)
c. Sind Lenker und Sattel in der richtigen Höhe
eingestellt und ordnungsgemäß gesichert?
d. Ist der Reifendruck normal?
e. Sind der Klappgriff und die Pedale gut verriegelt?
2. AB-1816
a. Dieses Produkt wurde für einen einfachen Umgang
durch den Bediener entwickelt.
b. Das AB-1816 kann den Akku vor Überstrom- und
Niederspannungssituationen schützen.
c. Die Vorderbremse und Bandbremse bieten die
Sicherheitsfunktionen.
d. Innerhalb eines Jahres kann die reguläre
Anwendungspalette den Anforderungen der EN15194
genügen.
3. Betrieb
3.1 So stellen Sie Ihre Position am Fahrrad ein
1. Messen Sie Ihre Körperhöhe. (Abb. 1)
2. Schlagen Sie in der Tabelle der Fahrradeinstellungen
nach.
3. Stellen Sie Ihr Fahrrad richtig ein. (Abb. 2 bis 3)
Warnung
• Fahren Sie nicht mit dem Fahrrad, wenn die
Sicherheitslinien am Sitz oder Lenker zu sehen sind.
Anpassen der Sitzhöhe
Die minimale Höhe des Sitzes ist die Höhe, wenn der Sitz
in seiner niedrigsten Position ist und die Klemme
verriegelt ist.
Praktische Informationen
In Anhängigkeit vom Gelände, in dem Sie fahren
möchten, kann die Sitzhöhe verändert werden:
- Auf flachem Grund oder bei Anstiegen sollte der Sitz
für eine höhere Effizient in einer höheren Position sein.
- Bei Gefälle sollte der Sitze etwas niedriger eingestellt
werden, um die Kontrolle über das Fahrrad zu
verbessern und um leichter über oder um Hindernisse
zu gelangen.
3.2 Einführung zum Akku:
Verwendung und Pflege des AB-1816
• Bauen Sie den Akku aus, wenn das AB-1816 nicht
verwendet wird.
S (cm) Hs (cm) H (cm)
155 – 159 55,5
+12
160 – 164 58
165 – 169 60
170 – 174 62,5
175 – 179 64,5
180 – 184 67
185 – 190 69,5
(Abb. 2) (Abb. 3)
Page 17

17
• Der Akku darf nur mit dem vom Hersteller
angegebenen Ladegerät aufgeladen werden. Ein
Ladegerät ist nur für einen Akkutyp eignet und kann bei
der Verwendung mit einem anderen Akku eine
Brandgefahr darstellen.
• Das AB-1816 darf nur mit den speziell dafür
vorgesehenen Akkus verwendet werden. Die
Verwendung anderer Akkus kann eine Verletzungsund Brandgefahr darstellen.
• Wenn der Akku nicht verwendet wird, darf er nicht in
der Nähe von anderen metallischen Gegenständen wie
Büroklammern, Münzen, Schlüssel, Nägeln,
Schrauben oder sonstigen metallischen
Kleingegenständen aufbewahrt werden, da die Gefahr
besteht, dass eine leitende Verbindung zwischen den
Kontakte hergestellt wird. Ein Kurzschluss des Akkus
bei falschem Gebrauch kann Verbrennungen
verursachen oder eine Brandgefahr darstellen.
• Vermeiden Sie den Kontakt, falls Flüssigkeit aus dem
Akku austritt. Wenn Sie versehentlich damit in Kontakt
geraten, spülen Sie die betroffene Stelle gründlich mit
Wasser. Wenn die Flüssigkeit in die Augen gerät,
müssen Sie einen Arzt aufsuchen. Die aus dem Akku
austretende Flüssigkeit kann Hautreizungen oder
Verbrennungen verursachen.
WICHTIGE
SICHERHEITSHINWEISE
Für Akkublock
• Lesen Sie vor der Verwendung des Akkublocks alle
Anweisungen und Sicherheitshinweise für das
Akkuladegerät (1), den Akku (2) und das Produkt (3),
für das der Akku verwendet wird, sorgfältig durch.
• Der Akkublock darf nicht zerlegt werden.
• Falls die Betriebsdauer erheblich eingeschränkt wird,
beenden Sie den Betrieb umgehend. Andernfalls
besteht die Gefahr einer Überhitzung sowie das Risiko
möglicher Verbrennungen und sogar einer Explosion.
• Wenn Elektrolyt in Ihre Augen gerät, waschen Sie
diese mit klarem Wasser aus und suchen Sie sofort
einen Arzt auf. Andernfalls können Sie Ihre
Sehfähigkeit verlieren.
• Vermeiden Sie einen Kurzschluss des Akkublocks:
(1) Die Kontakte dürfen nicht mit leitendem Material in
Berührung kommen.
(2) Der Akkublock darf nicht in einem Behälter
aufbewahrt werden, in dem sich andere
metallische Gegenstände wie beispielsweise
Nägel, Münzen usw. befinden.
(3) Der Akkublock darf weder Feuchtigkeit noch
Regen ausgesetzt werden.
Ein Kurzschluss des Akkus kann zu hohem Kriechstrom,
Überhitzung, möglichen Verbrennungen und sogar zu
einer Zerstörung des Werkzeugs führen.
• Das AB-1816 und der Akkublock dürfen nicht an Orten
aufbewahrt werden, an denen Temperatur von 50°C
oder höher erreicht werden.
• Beschädigte oder verbrauchte Akkus dürfen nicht
verbrannt werden. Der Akkublock kann in den
Flammen explodieren.
• Lassen Sie den Akku nicht fallen und vermeiden Sie
Schläge gegen den Akku.
• Verwenden Sie heruntergefallene Akkus oder Akkus,
die Stößen ausgesetzt waren, nicht mehr.
BEWAHREN SIE DIESE
ANLEITUNG SORGFÄLTIG AUF.
Tipps für eine maximale Nutzungsdauer
von Akkus
• Ein voll aufgeladener Akkublock darf niemals erneut
geladen werden.
Durch Überladungen wird die Lebensdauer des Akkus
verkürzt.
• Laden Sie den Akkublock bei einer Zimmertemperatur
von 10°C bis 40°C auf.
Lassen Sie einen heißen Akkublock vor dem Aufladen
abkühlen.
Anleitung zur Montage und
Demontage des Akkublocks
Montage des Akkublocks
Stecken Sie den Schlüssel in das Schlüsselloch und
drehen Sie den Schlüssel um 90° entgegen dem
Uhrzeigersinn. (Abb. 4)
Öffnen Sie die Abdeckung und setzen Sie den Akkublock
immer ganz ein, bis er mit einem Klick einrastet.
Wenn Sie den roten Bereich oben auf der Taste sehen
können, ist der Block nicht ganz eingerastet. Setzen Sie
den Akku ganz ein, bis der rote Bereich nicht mehr zu
sehen ist. (Abb. 5 und 7)
Schließen Sie die Abdeckung, stecken Sie den Schlüssel
in das Schlüsselloch und drehen Sie den Schlüssel um
90° im Uhrzeigersinn. (Abb. 6)
HINWEIS:
Mit einem (1) Akkublock funktioniert die
Unterstützungsfunktion, die Gesamtlebenszeit des Akkus
beträgt jedoch nur die Hälfte im Vergleich zur
Verwendung von zwei Akkublocks.
Ausbauen des Akkublocks
Öffnen Sie die Abdeckung mit dem Schlüssel.
Zur Entfernung des Akkublocks müssen Sie diesen aus
dem Gerät herausziehen, während Sie die Taste auf der
Vorderseite des Blocks schieben. (Abb. 7)
3.3 Anleitungen zur Anzeige und den Tasten
(Abb. 8)
Betrieb
1. Der ON/OFF-Schalter ist der Netzschalter. Drücken
Sie den ON/OFF-Schalter leicht, um die
Stromversorgung für das Fahrrad einzuschalten.
Durch Einschalten der Stromversorgung wird die
Unterstützungsfunktion aktiviert (Anfangseinstellung
beim Einschalten ist „Unterstützungsniveau 3“). Nach
dem Einschalten zeigen die fünf LEDs der
Netzanzeige die Akkuleistung an. Links wird eine
niedrige Akkuleistung angezeigt, rechts die hohe.
Wenn fünf LEDs leuchten, beträgt die Akkuleistung
mind. 80% der Leistung. Wenn nur noch eine LED
leuchtet, müssen Sie den Akku laden. Drücken Sie die
Page 18

18
ON/OFF-Taste erneut und alle LEDs erlöschen und
die Stromversorgung wird ausgeschaltet.
2. Die Plus- (+) und Minus- (–) Tasten dienen der
Einstellung des Unterstützungsniveaus. Zum Erhöhen
des Unterstützungsniveaus drücken Sie leicht die
Taste „+“, und zum vermindern des
Unterstützungsniveaus drücken Sie leicht die Taste
„–“. Wenn das Unterstützungsniveau bereits maximal
ist, leuchten die fünf LEDs des
Unterstützungsniveaus. Für die Unterstützungsniveau
(1 bis 5) sind entsprechend fünf LEDs vorhanden, die
das Unterstützungsniveau 1 bis 5 anzeigen.
3. Drücken Sie die ON/OFF-Taste, um die
Stromversorgung auszuschalten und in den
Energiesparmodus zu wechseln.
4. Wenn das Fahrrad bei eingeschalteter
Stromversorgung für ca. 10 Minuten nicht verwendet
wird, schaltet sich die Stromversorgung automatisch
aus und das Fahrrad wechselt in den
Energiesparmodus.
Artikel 3
Wichtiger Hinweis
Warnung
1. Das Produkt genügt EN15194. Es dient dem Fahren
und keinen anderen Zwecken.
2. Fahren Sie das Fahrrad nicht durch Wassertiefen von
mehr als 150 mm, um eine Beschädigung des
Elektrosystems zu vermeiden.
3. Tragen Sie beim Fahren einen Fahrradhelm. (Abb. 9)
4. Vermeiden Sie ein Überladen.
5. Vermeiden Sie das Kurzschließen des Kreislaufs.
6. Setzen Sie den Akku weder hohen Temperaturen
noch direkter Sonneneinstrahlung aus.
7. Vermeiden Sie, dass der Akku Wasser, Säuren oder
Basen ausgesetzt wird.
8. Der Akku darf nur mit dem vom Hersteller
angegebenen Ladegerät aufgeladen werden.
• Beschleunigen Sie nicht, wenn Sie bergab fahren oder
auf belebten Straßen.
• Schließen Sie bei einem Stopp das Schloss.
• Schieben Sie das AB-1816, wenn der Untergrund sehr
steinig oder unwirtlich ist.
• Demontieren Sie die Teile nicht selbst. (außer
Beleuchtung)
• Prüfen Sie vor dem Fahren die Spannung.
• Halten Sie an und prüfen Sie, wenn etwas auffällig ist.
• Verwenden Sie originale Ersatzteile für das AB-1816.
(außer Beleuchtung)
• Demontieren Sie die Teile und ändern Sie den
Reflektor nicht selbst. (Abb. 10)
Stellen Sie sicher, dass alle Änderungen BS 6102/2
und EN15194 genügen.
• Überprüfen Sie die Felge regelmäßig.
Artikel 4
Ladeanweisungen
1. Prüfen Sie, dass der Akku auch nach längerer
Verwendung voll geladen ist, um die optimale
Akkulebenszeit zu gewährleisten.
2. Schützen Sie beim Laden den Akku vor Feuchtigkeit,
gewährleisten Sie eine Raumtemperatur zwischen 10
und 40°C.
3. Decken Sie während des Ladens weder den
Akkublock noch das Ladegerät ab und vermeiden Sie
das Eindringen von Flüssigkeiten und Metallpulver.
4. Falls die Akkutemperatur 60°C übersteigt, kann dies
zu Problemen im Ladegerät führen. Trennen Sie die
Stromversorgung ab und senden Sie das Gerät zur
Reparatur.
5. Halten Sie den Akku und das Ladegerät von Kindern
fern.
6. Das Ladegerät darf nur mit diesem Akku verwendet
werden.
Artikel 5
Reparatur und Wartung
• Prüfen Sie vor Verwendung, dass der Akku fest
verriegelt ist und die Anzeige ordnungsgemäß
funktioniert.
• Überprüfen Sie den Steckverbinder des Fahrrads und
des Akkublocks. Entfernen Sie Schmutz, um jegliche
Beschädigung zu vermeiden.
• Prüfen Sie regelmäßig den Reifendruck, andernfalls
wird der Nutzungsbereich beeinträchtigt oder der
Reifen beschädigt.
• Überprüfen Sie vor Verwendung von Zeit zu Zeit die
Mechanik und anderes Zubehör.
• Halten Sie das Fahrrad von Nässe und anderen
Platzen fern, an denen sich Rost bilden könnte.
• Setzen Sie das Fahrrad weder Regen noch
Sonneneinstrahlung aus, damit Regler und Zubehör
nicht beschädigt werden.
• Tritt mit dem Motor, Akku oder Regler ein Problem auf,
wenden Sie sich für die Wartung an einen
Exklusivhändler.
• Sollte sich das Fahrrad etwas schwer rückwärts
bewegen lassen, ist dies normal.
• Überladen Sie das Fahrrad nicht, um den Motor und
den Akku nicht zu beschädigen.
• Das Fahrrad, die Vorder- und Hinterachse sowie BB-
Teile müssen jedes Jahr oder jedes Halbjahr
geschmiert werden. Verwenden Sie spezielles
Schmiermittel für den Radkranz. (Empfohlen wird die
Verwendung von Benzinreiniger und
Vaselineschmiermittel.) Falls etwas fehlerhaft ist,
senden Sie dies für Wartungsarbeiten an unseren
Händler.
Artikel 6
Verwendung der Anleitung für
Klappteile
1. So montieren Sie die Höhe des Sitzes
Setzen Sie den Sitz in die Stütze ein, passen Sie die
Höhe auf die Beinlänge des Anwenders an und
befestigen Sie anschließend den Bolzen.
Beachten Sie, dass bei der Einsetzhöhe das
Sicherheitsmarkierung nicht zu sehen sein darf und
die Klemmverriegelung muss mit mindestens 18 N.m.
angezogen werden. (Abb. 11)
Page 19

19
2. Verwendung des Schnellverschlusses
Ziehen Sie die Schraube fest und drücken Sie den
Hebel in Richtung Stange nach unten, um die Position
ordnungsgemäß einzustellen. (Abb. 11)
3. So klappen Sie den Lenker
Drücken Sie den selbstklemmenden Schieber (siehe
Abbildung) und drücken Sie den Griff, wie in
Abbildung b dargestellt. (Abb. 12)
Klappen Sie den Lenker nach unten, wenn der Haken
offen ist (siehe Abb. 12 und 13).
4. So klappen Sie das Pedal
Durch nach innen Klappen des Pedals kann das
Fahrrad verkleinert werden. Drücken Sie den Hebel in
der Pedale nach unten. (Abb. 14)
5. So klappen Sie den Rahmen
Stehen Sie auf der linken Seite des Fahrrads und
klappen Sie zuerst den Lenker ein. Halten Sie
anschließend den Rahmen in Ihrer linken Hand
bewegen Sie den Klappgriff zum Öffnen. Drehen Sie
den Klappgriff, wie in Abb. 13 dargestellt. Wenn der
Klappmechanismus geöffnet wurde, halten Sie den
Rahmen von zwei Seiten und klappen Sie den
Rahmen auf die linke Seite des Rahmens. Das
Fahrrad ist vollständig zusammengeklappt, wenn
Vorder- und Hinterrad parallel sind, wie in Abb. 15 bis
17 dargestellt.
Artikel 7
Zubehörteile und Anpassungen
1. Der Akkuregler und der Motor dürfen nicht entfernt
werden.
2. Zum Austauschen von Teilen wenden Sie sich an den
Händler. Wir lehnen eine Verantwortung für Probleme
ab, die auftreten, weil der Kunde Teile selbst
ausgetauscht hat.
3. Verwenden Sie nur den Dolmar-Akku AP-183.
4. Bremseinstellung.
Prüfen Sie die Bremse regelmäßig und wie folgt:
(Abb. 18 bis 20)
4.1 Anpassen der Vorderbremse.
4.1.1. Prüfen Sie die Vorderbremse anhand Abb. 18. Die
Bremse wird vollständig ausgelöst, wenn sich der
Bremshebel in der halbgeschlossenen Position
befindet.
4.1.2. Lösen Sie die Schraube (siehe Abb. 19), um die
Bremsarme zu lösen oder festzuziehen, und
stellen Sie einen Abstand zwischen Bremsbacke
und Reifen von 1,5 bis 2 mm ein. Ziehen Sie die
Schrauben fest. Falls der Abstand unterschiedlich
ist, passen Sie den gewünschten Abstand mit der
Feder so an, dass die Forderung aus 4.1.1 erfüllt
wird.
4.2 Anpassen der hinteren Bremse.
4.2.1. Prüfen Sie die Hinterbremse anhand 4.1.1 und
Abb. 18.
4.2.2. Passen Sie die Vorderbremse anhand Abb. 20
wie beschrieben an. Lösen Sie den Bremshebel,
passen Sie den Bolzen an, bis dieser die
bewegliche Backe berührt, lassen Sie den
Bremshebel los, passen Sie die bewegliche Backe
und die Schraube (2 mm) an. Nehmen Sie die
Anpassungen so lange vor, bis sich das Rückrad
leicht dreht und die Bremse gut funktioniert.
Tauschen Sie die Bremsbacken aus, wenn 1/3 der
Backe verschlissen ist.
Achtung:
Tragen Sie keine Schmiermittel auf die hintere Bremse
auf. Tauschen Sie bei einer Vorderbremse den
Bremsschuh jährlich aus, um eine Schuhabnutzung zu
vermeiden.
Bremsenpflege
Zur Erhaltung der Bremsleistung Ihres Fahrrads müssen
Sie das Bremssystem warten.
• Tauschen Sie Bremskabel und -gehäuse aus.
5. Anpassungen der Kette
Nehmen Sie die Anpassungen wie folgt vor:
Demontieren Sie den Kunststoff-Schutzabdeckung
der Hinterachse und lösen Sie die zwei Schrauben
M12. Drehen Sie die Einstellmutter in
Uhrzeigerrichtung, um sicherzustellen, dass die Kette
korrekt eingestellt ist. Wenn die Kette beim Einstellen
zu straff gespannt wurde, drehen Sie die Mutter
entgegen der Uhrzeigerrichtung, und schieben Sie
das Hinterrad nach vorn.
Wenn Einstellungen vorzunehmen sind, ziehen Sie
die Schraube und andere Elemente wie im Folgenden
angegeben ordnungsgemäß fest. (Abb. 21)
Teile Standardanzug Anmerkungen
Gegenmutter 14 – 18 N.m. Das Drucketikett darf nicht zu sehen sein
Lenker 20 – 25 N.m. Die Sicherheitsmarkierung am Lenker darf nicht zu sehen sein
Sitzschraube 18 – 20 N.m. Die Sicherheitsmarkierung am Sitz darf nicht zu sehen sein
Sitz und Befestigungsteile 18 – 22 N.m.
Radkranz 30 – 35 N.m.
Kranzmutter 35 – 40 N.m.
Pedal 18 – 20 N.m.
Lenker 18 – 20 N.m.
Page 20

20
Nur für europäische Länder
EG-KONFORMITÄTSERKLÄRUNG
Die Unterzeichnenden, Tamiro Kishima und Rainer
Bergfeld, bevollmächtigt durch die Dolmar GmbH,
erklären, dass die Geräte der Marke DOLMAR:
Bezeichnung des Geräts:
Fahrrad mit Hilfsmotor
Nummer / Typ des Modells: AB-1816
in Serienfertigung hergestellt werden und
den folgenden Richtlinien der Europäischen Union
genügt/genügen:
2004/108/EG
Außerdem werden die Werkzeuge gemäß den folgenden
Standards oder Normen gefertigt:
EN55014-1: 2006, EN15194: 2009,
EN61000-3-2: 2006, EN61000-3-3: 2008,
EN55014-2/A2: 2008, IEC61000-4-2: 2008,
IEC61000-4-3: 2006, IEC61000-4-4: 2004,
IEC61000-4-5: 2005, IEC61000-4-6: 2006,
IEC61000-4-11: 2004
Die technische Dokumentation befindet sich bei:
Dolmar GmbH,
Jenfelder Straße 38, Abteilung FZ,
D-22045 Hamburg
15. 7. 2010
Tamiro Kishima Rainer Bergfeld
Geschäftsführer Geschäftsführer
Die folgenden Standards dienen der Sicherheit:
EN14764: 2005, EN15194: 2009
Page 21

21
ITALIANO (Istruzioni originali)
Spiegazione della vista generale
Caratteristiche tecniche
• Le caratteristiche tecniche riportate di seguito sono soggette a modifica senza necessità di preavviso in virtù del nostro
programma continuo di ricerca e sviluppo.
*1: Con due batterie AP-183
*2: Condizioni di misurazione della distanza di crociera: livello di assistenza 3, capacità di carico 75 kg, vento assente,
asfalto pianeggiante
Leggere attentamente prima di utilizzare
la AB-1816:
• Leggere il manuale e controllare attentamente tutte le
parti e gli accessori prima dell’uso.
• Il ciclista deve rispettare le norme di circolazione
stradale del proprio paese.
• Non percorrere strade riservate alle automobili.
Assicurarsi di procedere in sicurezza.
• Utilizzare la batteria, il motore, il controller e gli altri
componenti elettrici specificati; se fosse necessario
effettuare delle sostituzioni si prega di rivolgersi a un
agente Dolmar.
• Prestare attenzione alla sicurezza: non prestare la AB-
1816 ad altre persone, in particolare a donne in stato di
gravidanza o persone inabili alla guida della bicicletta.
• La AB-1816 può essere utilizzata in condizioni di
umidità, pioggia o neve, purché a bassa velocità ed
evitando l’acqua con profondità superiore a 150 mm
per non danneggiare i componenti elettrici.
• Normativa applicata: EN15194
Peso massimo di carico: 100 kg
Non gettare la batteria.
• La velocità non può superare 16 km/h.
Per un utilizzo sicuro, consentire al
venditore di regolare la sella fino a
ottenere la posizione più comoda.
• Avvertenza: la linea di sicurezza del reggisella deve
essere inserita nel telaio.
1. Parte rossa
2. Display di assistenza
3. Display di alimentazione
4. Tasto ON/OFF
5. Corretto
6. Catarifrangente
7. Morsetto della sella
8. Linea di sicurezza
9. Leva di sblocco rapido
10. Dado di fissaggio
11. Direzione di chiusura
12. Dispositivo di scorrimento a
chiusura automatica
13. Gancio
14. Manubrio pieghevole
15. Telaio
16. Fibbia di chiusura pieghevole
17. Vite
18. Supporto del freno
19. Supporto del raggio del freno
20. Braccio del freno
21. Cavo del freno
22. Pastiglia del freno
23. Vite a molla
24. Parti scorrevoli
25. Vite di regolazione
26. Piastra di fissaggio del cavo del
freno
Modello AB-1816
Motore
Uscita 100 W
Modello Motore brushless CC
Tensione nominale 18 V CC
Dimensioni
Lunghezza 1.450 mm
Larghezza 570 mm
Altezza della sella 670 mm - 910 mm
Distanza tra gli assi delle
ruote
975 mm
Dimensioni delle gomme 16 pollici
Peso*
1
20,8 kg
Batteria
Modello AP-183
Capacità 3,0 Ah
Tipo Agli ioni di litio
Distanza di crociera*
2
Circa 8,5 km
(AP-183, 1 pz)
Tipo di controllo Sensore di velocità a pedale
Intervallo di velocità per la modalità assistita 0 - 16 (km/h)
Tipo di freno
Anteriore Freno a V
Posteriore Freno a tamburo
Page 22

22
• Controllare il funzionamento prima dell’uso.
• Parcheggiare la bicicletta in piano, evitando di
ostacolare il traffico.
• Rispettare il codice della strada.
• Utilizzare la bicicletta sulle piste ciclabili.
• Indossare il casco quando si è alla guida della
bicicletta.
• La AB-1816 richiede una pressione sul pedale inferiore
rispetto a una bicicletta normale. Tuttavia, fin quando il
ciclista non si abitua alla pedalata più leggera, è
possibile che eserciti una pressione eccessiva sul
pedale, ottenendo una velocità superiore a quella di
una normale bicicletta; tale velocità potrebbe essere la
causa di incidenti, quali cadute o scontri.
• Non guidare la bicicletta su superfici particolarmente
accidentate (ciottoli, canali di scolo e così via).
• Per arrestare la bicicletta, azionare entrambi i freni
anteriore e posteriore.
• Non guidare la bicicletta se essa presenta dei
problemi.
• Non smontare né lubrificare le parti che compongono il
sistema di assistenza elettrico.
• Non modificare autonomamente la bicicletta.
• Utilizzare solo accessori o ricambi originali.
• Dopo aver rimosso o sostituito le ruote, oppure dopo
aver regolato la sella, controllare che i relativi bulloni
siano stati serrati prima di utilizzare la bicicletta.
• Non guidare la bicicletta se la sella o il manubrio sono
più in alto della linea di sicurezza.
• Non lubrificare le aree di ammortizzazione dei freni, le
gomme o i cerchioni.
1. Effettuare un controllo prima dell’uso.
Per ragioni di sicurezza, prima dell’uso è opportuno
controllare quanto riportato di seguito.
a. Verificare che le gomme e le viti funzionino
correttamente.
b. Impianto frenante: quando i freni sono a metà della
loro corsa devono consentire un arresto completo
della bicicletta.
c. Impianto di alimentazione: verificare che la batteria sia
ben inserita e che sia sufficientemente carica per
l’uso.
2. Attenzione:
a. Ridurre la velocità nelle curve e in discesa.
Articolo 1.
Al cliente
a. Complimenti per l’acquisto della AB-1816. Le
auguriamo delle splendide escursioni in bicicletta.
b. Leggere attentamente il manuale prima di utilizzare la
AB-1816. Per qualsiasi domanda rivolgersi senza
esitazioni a un agente Dolmar.
Articolo 2.
Introduzione alla AB-1816
1. Per garantire la sicurezza, controllare il prodotto
prima dell’uso.
a. L’impianto frenante funziona correttamente?
b. L’impianto elettrico funziona correttamente? (Rif: 3.3)
c. Il manubrio e la sella sono in posizione e sono fissati
correttamente?
d. La pressione delle gomme è normale?
e. Il manubrio pieghevole e i pedali sono fissati
correttamente?
2. AB-1816
a. Il prodotto è concepito per un utilizzo agevole da parte
del cliente.
b. La AB-1816 è in grado di proteggere la batteria da
sovracorrenti e basse tensioni.
c. Il freno anteriore e il freno a nastro garantiscono la
sicurezza.
d. Entro un anno la modalità di utilizzo attuale potrebbe
essere conforme alla normativa EN15194.
3. Funzionamento
3.1 Come regolare la propria posizione sulla
bicicletta
1. Misurare la propria altezza. (Fig. 1)
2. Consultare la tabella delle impostazioni della
bicicletta.
3. Regolare la bicicletta. (Fig. 2 - 3)
Avvertenza
• Non utilizzare la bicicletta se sono visibili le linee di
sicurezza della sella o del manubrio.
Regolazione della sella
L’altezza minima della sella corrisponde all’altezza
determinata quando la sella è abbassata e il morsetto è
bloccato.
Informazioni pratiche
L’altezza della sella può essere modificata in base al tipo
di terreno su cui si guida:
- In pianura o in salita, la sella dovrebbe essere in una
posizione alta per ottenere una maggiore efficienza.
- In discesa, la sella dovrebbe essere leggermente
abbassata per migliorare il controllo della bicicletta e
facilitare il superamento o l’aggiramento degli ostacoli.
3.2 Introduzione della batteria
Uso e manutenzione della AB-1816
• Rimuovere la batteria dalla AB-1816 quando la
bicicletta non viene utilizzata.
• Effettuare la ricarica utilizzando solamente il
caricabatterie specificato dal produttore. Un
caricabatterie adatto per uno specifico tipo di batteria
potrebbe provocare un pericolo di incendio se utilizzato
con un’altra batteria.
• Utilizzare la AB-1816 solo con le batterie specificate.
L’uso di batterie diverse può provocare un pericolo di
infortuni e incendi.
• Quando la batteria non è in uso, evitare di tenerla a
contatto con oggetti metallici, quali graffette, monete,
S (cm) Hs (cm) H (cm)
155 – 159 55,5
+12
160 – 164 58
165 – 169 60
170 – 174 62,5
175 – 179 64,5
180 – 184 67
185 – 190 69,5
(Fig. 2) (Fig. 3)
Page 23

23
chiavi, chiodi, viti o altri piccoli oggetti metallici che
possano stabilire un contatto tra un terminale e l’altro.
Un cortocircuito dei terminali della batteria potrebbe
causare ustioni o incendi.
• In caso di perdite della batteria evitare il contatto con il
liquido. Risciacquare immediatamente con acqua in
caso di contatto accidentale. Consultare un medico se
il liquido entra in contatto con gli occhi. Il liquido
fuoriuscito dalla batteria può causare irritazioni o
ustioni.
ISTRUZIONI IMPORTANTI PER LA
SICUREZZA
Per la batteria
• Prima di utilizzare la batteria, leggere tutte le istruzioni
e le avvertenze relative a (1) caricabatterie, (2) batteria
e (3) prodotto alimentato a batteria.
• Non smontare la batteria.
• Se il tempo di funzionamento è divenuto
eccessivamente limitato, interrompere
immediatamente l’utilizzo. Potrebbero verificarsi
surriscaldamenti, ustioni e persino esplosioni.
• In caso di penetrazione dell’elettrolita negli occhi,
risciacquare con acqua fresca e consultare
immediatamente un medico. Potrebbero verificarsi
danni permanenti alla funzionalità visiva.
• Non cortocircuitare la batteria:
(1) Non toccare i terminali con materiali in grado di
condurre elettricità.
(2) Evitare di conservare la batteria in un contenitore
con altri oggetti metallici, ad esempio chiodi,
monete e così via.
(3) Non esporre la batteria all’acqua o alla pioggia.
Un cortocircuito della batteria può causare un elevato
flusso di corrente, surriscaldamenti, ustioni e persino
guasti.
• Non conservare la AB-1816 e la batteria in luoghi in cui
la temperatura può raggiungere o superare 50 °C.
• Non smaltire le batterie nel fuoco, nemmeno se sono
gravemente danneggiate o del tutto esauste. La
batteria può esplodere e causare un incendio.
• Evitare di far cadere o di colpire la batteria.
• Non utilizzare una batteria caduta o che ha subito urti.
CONSERVARE LE PRESENTI
ISTRUZIONI.
Suggerimenti per il prolungamento della
durata della batteria
• Non ricaricare una batteria completamente carica.
Un caricamento eccessivo riduce la durata della
batteria.
• Caricare la batteria a una temperatura compresa tra
10 °C e 40 °C.
Lasciare raffreddare una batteria surriscaldata prima di
caricarla.
Istruzioni per l’installazione o la
rimozione della batteria
Installazione della batteria
Inserire la chiave nella toppa e ruotarla di 90° in senso
orario. (Fig. 4)
Aprire il coperchio e inserire a fondo la batteria fino a
quando non si blocca in posizione con uno scatto.
Se la parte rossa del lato superiore del pulsante è ancora
visibile, la batteria non è completamente inserita. Inserirla
a fondo fino a quando la parte rossa non è più visibile.
(Fig. 5 e 7)
Chiudere il coperchio, inserire la chiave nella toppa e
ruotarla di 90° in senso orario. (Fig. 6)
NOTA:
La funzione di assistenza è attiva anche con una sola
batteria, ma la distanza percorribile è dimezzata rispetto
all’uso con due batterie.
Rimozione della batteria
Aprire il coperchio con la chiave.
Per rimuovere la batteria, estrarla dall’utensile facendo
scorrere il pulsante nella parte anteriore della batteria.
(Fig. 7)
3.3 Istruzioni sul display e sui pulsanti (Fig. 8)
Funzionamento
1. Il tasto ON/OFF è l’interruttore di accensione.
Premere leggermente il tasto ON/OFF per attivare
l’alimentazione della bicicletta. L’attivazione
dell’alimentazione consente di abilitare la funzione di
pedalata assistita (l’impostazione iniziale
all’accensione è “livello di assistenza 3”). Dopo aver
attivato l’alimentazione, i cinque LED sul display di
alimentazione indicano la capacità della batteria. La
capacità della batteria è bassa a sinistra e più alta
man mano che ci si sposta verso destra. Se tutti i
cinque LED sono illuminati, la capacità della batteria è
pari almeno all’80%. Se l’ultimo LED a sinistra
lampeggia è necessario ricaricare la batteria.
Premendo di nuovo il tasto ON/OFF, tutti i LED si
spengono e l’alimentazione viene disattivata.
2. I tasti più (+) e meno (–) consentono l’impostazione
del livello di assistenza. Premere leggermente il tasto
“+” per aumentare il livello di assistenza; premere il
tasto “–” per diminuirlo. Quando il livello di assistenza
è al massimo, i cinque LED del display di assistenza
sono illuminati. Per ciascuno dei livelli di assistenza
(da 1 a 5) è disponibile uno di cinque LED (che si
illumina in base al livello prescelto).
3. Premere di nuovo il tasto ON/OFF per disattivare
l’alimentazione e attivare la modalità a basso
consumo energetico.
4. Dopo aver attivato l’alimentazione, se la bicicletta
rimane inutilizzata per circa 10 minuti, l’alimentazione
viene disattivata automaticamente e la bicicletta
passa alla modalità a basso consumo energetico.
Page 24

24
Articolo 3.
Avviso importante
Avvertenza
1. Il prodotto è conforme a EN15194. È pensato per
viaggiare e non per altri scopi.
2. Non guidare la bicicletta in acque con profondità
superiori a 150 mm onde evitare danni all’impianto
elettrico.
3. Indossare il casco alla guida. (Fig. 9)
4. Evitare le situazioni di sovraccarico.
5. Evitare i cortocircuiti.
6. Non lasciare la batteria in un ambiente soggetto ad
alte temperature, dovute al riscaldamento o
all’esposizione al sole.
7. Evitare di immergere la batteria in acqua o in liquidi
acidi o alcalini.
8. Ricaricare la batteria utilizzando solamente il
caricabatterie specificato dal produttore.
• Non accelerare in discesa e nelle strade trafficate.
• Applicare il blocco quando ci si ferma.
• Proseguire a piedi, accompagnando la AB-1816, sulle
strade con pietrisco o altre asperità.
• Non smontare i componenti. (tranne le luci)
• Controllare l’alimentazione prima dell’uso.
• Fermarsi ed effettuare i controlli necessari in caso di
problemi di funzionamento.
• Utilizzare i ricambi originali per la AB-1816. (tranne le
luci)
• Non smontare e non sostituire il catarifrangente.
(Fig. 10)
Eventuali modifiche devono essere eseguite nel
rispetto delle norme BS6102/2 ed EN15194.
• Controllare regolarmente i cerchioni.
Articolo 4.
Istruzioni per la ricarica
1. Assicurarsi che la batteria sia completamente carica e
ricaricarla dopo ogni utilizzo per garantire la durata
della batteria.
2. Non lasciare la batteria in ambiente umido durante la
ricarica; la temperatura dovrebbe essere compresa fra
10 °C e 40 °C.
3. Non coprire la batteria e il caricabatterie con durante
la ricarica ed evitare la penetrazione di liquidi e polveri
metalliche.
4. Se la temperatura della batteria supera 60 °C
potrebbe essersi verificato un problema di
funzionamento del caricabatterie. Disattivare
l’alimentazione e inviarlo per la riparazione.
5. Mantenere la batteria e il caricabatterie lontano dalla
portata dei bambini.
6. Il caricabatterie può essere utilizzato solo per questa
batteria.
Articolo 5.
Riparazioni e manutenzione
• Prima dell’uso, verificare che la batteria sia inserita a
fondo e che il display funzioni correttamente.
• Controllare il connettore della bicicletta e il vano
batteria. Rimuovere lo sporco al fine di evitare danni.
• Controllare regolarmente le gomme, che altrimenti
potrebbero compromettere l’utilizzo o subire danni.
• Prima dell’uso, controllare il meccanismo e gli altri
accessori per tempo.
• Non lasciare la bicicletta in ambienti umidi o in luoghi
che potrebbero causare la comparsa di ruggine.
• Non lasciare la bicicletta esposta alla pioggia o alla
luce diretta del sole per periodi prolungati onde evitare
danni al controller e agli accessori.
• In caso di problemi al motore, alla batteria o al
controller, inviare il componente interessato all’agente
addetto alla manutenzione.
• Se lo spostamento all’indietro risulta difficoltoso, non si
tratta di un problema di funzionamento: è il
comportamento normale.
• Non sovraccaricare la bicicletta onde evitare danni al
motore e alla batteria.
• È importante lubrificare la bicicletta, gli assi anteriore e
posteriore e il set BB una o due volte l’anno. Utilizzare
un lubrificante speciale per il mozzo (si consiglia l’uso
di un lubrificante trasparente a base di vaselina senza
benzina). Per qualsiasi problema rivolgersi all’agenzia
addetta alla manutenzione.
Articolo 6.
Uso delle istruzioni per i
componenti pieghevoli
1. Per montare la sella
Inserire la sella nell’asta di supporto, quindi regolarne
l’altezza in base alla lunghezza delle gambe del
ciclista e infine serrare il bullone.
La profondità di inserimento deve garantire che la
linea di sicurezza sia nascosta; inoltre, la forza di
serraggio del morsetto non deve essere inferiore a
18 N.m. (Fig. 11)
2. Uso dello sblocco rapido
Serrare la vite e premere la leva verso il basso lungo il
reggisella per regolarne correttamente la posizione.
(Fig. 11)
3. Per piegare l’asta del manubrio
Spingere verso il basso il dispositivo di scorrimento a
chiusura automatica, come mostrato nella figura a,
quindi abbassare il manubrio come mostrato
nell’immagine b. (Fig. 12)
Piegare l’asta verso il basso quando il gancio è
aperto, come mostrato nelle Fig. 12 e 13.
4. Per ripiegare il pedale
Ripiegando il pedale è possibile ottenere la modalità
desiderata per la bicicletta. Afferrare la leva all’interno
del pedale e premerla verso il basso sul lato del telaio.
(Fig. 14)
5. Per piegare il telaio
Posizionarsi a sinistra della bicicletta e piegare per
prima cosa l’asta del manubrio; tenere quindi il telaio
con la mano sinistra, afferrare il manubrio pieghevole
e spingere in avanti per aprirlo. Ruotare il manubrio
pieghevole come mostrato nella Fig. 13. Quando la
fibbia di chiusura pieghevole è aperta, afferrare il
telaio dai due lati e piegarlo verso la sua sinistra.
Smettere di piegare quando la ruota anteriore e quella
posteriore sono parallele, come mostrato nelle
Fig. 15 – 17.
Page 25

25
Articolo 7.
Accessori e regolazioni
1. Il motore e il controller della batteria non possono
essere rimossi.
2. Per sostituire i componenti rivolgersi all’agenzia
competente. Dolmar declina qualunque responsabilità
per danni derivanti dalla rimozione dei componenti da
parte del cliente.
3. Utilizzare una batteria Dolmar AP-183.
4. Regolazione del freno.
Controllare regolarmente il freno in base alle seguenti
indicazioni: (Fig. 18 – 20)
4.1 Regolare il freno anteriore
4.1.1. Controllare il freno anteriore come mostrato nella
Fig. 18. Il freno deve essere completamente
azionato quando la leva del freno viene tirata fino
a metà corsa.
4.1.2. Allentare la vite per allentare o serrare i bracci del
freno, quindi lasciare una distanza di 1,5 – 2 mm
tra la pastiglia del freno e la gomma, come
mostrato nella Fig. 19. Serrare la vite. Se la
distanza è diversa, continuare a regolare la molla
fino a ottenere la distanza desiderata, come
indicato nel punto 4.1.1.
4.2 Regolare il freno posteriore.
4.2.1. Controllare il freno posteriore come mostrato nella
Fig. 18 (vedere il punto 4.1.1).
4.2.2. Fare riferimento alla Fig. 20 per regolare il freno,
secondo quanto descritto nel punto 4.1.1 relativo
alla regolazione del freno anteriore; allentare la
leva del freno, regolare la vite in modo che tocchi
la piastra mobile, pinzare la leva del freno e infine
regolare la piastra mobile e il bullone (2 mm).
Ripetere più volte la regolazione fin quando la
ruota posteriore non gira correttamente e il freno
viene azionato in modo corretto. Sostituire il
gommino del freno quando risulta consumato per
un terzo.
Attenzione:
Non lubrificare il freno posteriore. Sostituire il ceppo del
freno anteriore una volta l’anno onde evitare l’abrasione
del ceppo stesso.
Manutenzione dei freni
La manutenzione dei freni è importante per il
mantenimento delle prestazioni di frenata della bicicletta.
• Sostituzione dell’alloggiamento e dei cavi dei freni.
5. Regolazione della catena
Effettuare la regolazione come riportato di seguito:
Smontare la protezione in plastica dell’assale
posteriore e rilasciare le due viti M12. Ruotare il dado
di regolazione in senso orario per assicurarsi che la
catena sia ben fissata. Durante la regolazione, se la
catena è serrata in maniera troppo stretta, ruotare il
dado in senso antiorario e spingere in avanti la ruota
posteriore.
Se fosse necessario regolare qualche componente,
serrare la vite e gli altri componenti in base ai requisiti
indicati di seguito. (Fig. 21)
Solo per i paesi europei
DICHIARAZIONE DI CONFORMITÀ CE
I sottoscritti Tamiro Kishima e Rainer Bergfeld,
debitamente autorizzati da Dolmar GmbH, dichiarano
che gli utensili DOLMAR:
Denominazione della macchina:
Bicicletta assistita da motore elettrico
N. modello/Tipo: AB-1816
appartengono a una produzione in serie e
sono conformi alle seguenti direttive europee:
2004/108/CE
Sono inoltre prodotti in conformità con gli standard o i
documenti standardizzati riportati di seguito:
EN55014-1: 2006, EN15194: 2009,
EN61000-3-2: 2006, EN61000-3-3: 2008,
EN55014-2/A2: 2008, IEC61000-4-2: 2008,
IEC61000-4-3: 2006, IEC61000-4-4: 2004,
IEC61000-4-5: 2005, IEC61000-4-6: 2006,
IEC61000-4-11: 2004
La documentazione tecnica viene conservata presso:
Dolmar GmbH,
Jenfelder Straße 38, Abteilung FZ,
D-22045 Amburgo
15. 7. 2010
Tamiro Kishima Rainer Bergfeld
Direttore responsabile Direttore responsabile
Componenti Coppia standard Commenti
Dado di fissaggio 14 - 18 N.m. L’adesivo non deve risultare visibile
Asta 20 - 25 N.m. La linea di sicurezza dell’asta non deve essere visibile
Vite della sella 18 - 20 N.m. La linea di sicurezza del reggisella non deve essere visibile
Sella e componenti della sella 18 - 22 N.m.
Mozzo 30 - 35 N.m.
Dado del mozzo 35 - 40 N.m.
Pedale 18 - 20 N.m.
Manubrio 18 - 20 N.m.
Gli standard indicati di seguito vengono utilizzati per
la sicurezza:
EN14764: 2005, EN15194: 2009
Page 26

26
NEDERLANDS (Originele instructies)
Verklaring van het onderdelenoverzicht
Technische gegevens
• Als gevolg van ons doorlopende onderzoeks- en ontwikkelingsprogramma, zijn de technische gegevens van dit
gereedschap onderhevig aan veranderingen zonder voorafgaande kennisgeving.
*1: Met twee accu’s van type AP-183
*2: Meetomstandigheden voor fietsafstand: hulpaandrijfniveau 3, beladingsgewicht van 75 kg, geen wind, en een
betonnen, vlakke ondergrond
Lees deze informatie zorgvuldig voordat
u de AB-1816 in gebruik neemt:
• Lees de gebruiksaanwijzing en controleer alle
onderdelen en accessoires zorgvuldig vóór gebruik.
• De fietser moet zich aan de plaatselijk geldende
verkeersregels houden.
• Fiets niet op wegen die uitsluitend bedoeld zijn voor
auto’s. Zorg ervoor dat u veilig fietst.
• Gebruik uitsluitend de gespecificeerde accu, motor,
regelaar en andere elektrische onderdelen. In geval
onderdelen vervangen moeten worden, neemt u
contact op met uw dealer.
• Let op de veiligheid. Leen de AB-1816 niet uit aan aan
anderen, met name zwangere vrouwen of iemand die
niet goed kan fietsen.
• De AB-1816 kan worden gebruikt onder natte,
regenachtige en sneeuwachtige
weersomstandigheden, maar zorg ervoor dat u
langzaam fietst. Fiets niet door water dieper dan
150 mm om te voorkomen dat de elektrische
onderdelen beschadigd worden door het water.
• Voldoet aan de norm: EN15194
Max. belading: 100 kg
Gooi de accu niet weg.
• De snelheid mag niet boven 16 km/u komen.
Voor een veilig gebruik laat u het zadel
door de verkoper afstellen op een
comfortabele hoogte.
• Waarschuwing: de veiligheidslijn op de zadelpen moet
in het frame verdwijnen.
• Controleer de werking vóór gebruik.
1. Rode deel
2. Hulpaandrijfmeter
3. Accumeter
4. Aan/uit-toets
5. Correct
6. Reflector
7. Zadelklem
8. Veiligheidslijn
9. Quick release-hendel
10. Borgmoer
11. Vastzetten
12. Zelfvergrendelende schuif
13. Haak
14. Hendel omklappen
15. Frame
16. Vergrendeling vouwscharnier
17. Schroef
18. Remhendelsteun
19. Remkabelbevestiging
20. Remarm
21. Remkabel
22. Remblok
23. Veerschroef
24. Schuivende delen
25. Stelschroef
26. Bevestigingspunt van remkabel
Model AB-1816
Motor
Uitgangsvermogen 100 W
Model Borstelloze gelijkstroommotor
Nominale spanning 18 volt gelijkstroom
Afmetingen
Lengte 1.450 mm
Breedte 570 mm
Zadelhoogte 670 mm - 910 mm
Afstand tussen de wielassen 975 mm
Bandenmaat 16 inch
Gewicht*
1
20,8 kg
Accu
Model AP-183
Vermogen 3,0 Ah
Type Li-ion
Fietsafstand*
2
Ong. 8,5 km
(AP-183, 1 stuk)
Type regeling Pedaalsnelheidsensor
Snelheidsbereik voor hulpaandrijving 0 - 16 (km/u)
Type remsysteem
Voor Remblokken
Achter Trommelrem
Page 27

27
• Parkeer de fiets op een horizontale plaats zonder dat
deze het verkeer hindert.
• Houd u aan de verkeersregels.
• Fiets op het fietspad.
• Draag een veiligheidshelm tijdens het fietsen.
• De AB-1816 vereist minder koopkracht dan een
normale fiets om vooruit te komen. Totdat de fietsen
gewend is aan het lichtere trappen, is het echter
mogelijk dat hij/zij te hard trapt zodat de snelheid hoger
wordt dan bij een normale fiets, waardoor een
verkeersongeval kan ontstaan, zoals vallen of een
botsing.
• Fiets niet over bijzonder hobbelige ondergronden
(stoepbanden, putroosters, enz.).
• Gebruik bij het stoppen zowel de voor- als achterrem.
• Gebruik de fiets niet wanneer er zich een probleem
mee heeft voorgedaan.
• Demonteer of smeer de onderdelen van het
hulpaandrijfsysteem niet.
• Breng zelf geen wijzigingen aan op de fiets.
• Gebruik uitsluitend originele accessoires of
vervangingsonderdelen.
• Na het verwijderen of vervangen van een wiel of het
afstellen van het zadel, controleert u altijd of de
betreffende bouten goed zijn vastgedraaid voordat u de
fiets gebruikt.
• Gebruik de fiets nooit terwijl het zadel of stuur hoger
staat dan de veiligheidslijn.
• Smeer nooit remwerkingsgebieden, banden en velgen.
1. Controleren vóór gebruik.
Voor een veilig gebruik controleert u de onderstaande
punten vóór gebruik.
a. Controleer of de wielen en bevestigingen goed vast
zitten.
b. Remsysteem: wanneer de remhendel tot halverwege
ingeknepen wordt, moet de fiets volledig tot stilstand
komen.
c. Aandrijvingssysteem: Controleer of de accu goed
bevestigd is en het vermogen volledig beschikbaar is.
2. Let op:
a. Matig uw fietssnelheid in bochten en bergafwaarts.
Artikel 1.
Aan de consument
a. Hartelijk dank voor uw keuze voor de AB-1816. Wij
hopen dat u er veel fietsplezier van zult hebben.
b. Lees de gebruiksaanwijzing aandachtig door voordat
u de AB-1816 in gebruik neemt. Mocht u vragen
hebben, aarzel dan niet en neem contact op met uw
dealer.
Artikel 2.
Inleiding tot de AB-1816
1. Voor uw eigen veiligheid controleert u het product
vóór gebruik.
a. Werken de remmen goed?
b. Werkt het elektrisch systeem goed? (Zie 3.3)
c. Zijn het zadel en het stuur goed afgesteld en stevig
vergrendeld?
d. Is de bandenspanning normaal?
e. Zijn de omklaphendel en de pedalen goed
vergrendeld?
2. AB-1816
a. Dit product is ontworpen voor het gebruikersgemak
van de consument.
b. De AB-1816 beschermt de accu tegen een te hoge
stroomsterkte en te lage spanning.
c. De voorrem en achterrem zijn
veiligheidsvoorzieningen.
d. Binnen één jaar kan bij normaal gebruik worden
voldaan aan de norm EN15194.
3. Bediening
3.1 Uw positie op de fiets aanpassen
1. Meet uw lengte. (zie afb. 1)
2. Raadpleeg de tabel met fietsafstellingen.
3. Stel de fiets af. (zie afb. 2 t/m 3)
Waarschuwing
• Gebruik de fiets niet wanneer de veiligheidslijn op de
zadelpen of de stuurstang zichtbaar is.
Het zadel afstellen
De minimale zadelhoogte is de hoogte waarbij het zadel
helemaal omlaag staat en de quick release-hendel is
vergrendeld.
Praktische informatie
Afhankelijk van het terrein waarin u fietst, kan de optimale
zadelhoogte verschillen:
- Bij fietsen op een vlakke ondergrond of bergopwaarts,
moet het zadel hoger afgesteld staan voor efficiënter
fietsen.
- Bij bergafwaarts fietsen moet het zadel iets lager
afgesteld staan voor een betere beheersing van de
fiets en om het gemakkelijker te maken over en om
obstakels heen te fietsen.
3.2 Inleiding tot de accu:
Gebruik en onderhoud in de AB-1816
• Verwijder de accu uit de AB-1816 wanneer deze niet in
gebruik is.
• Laad alleen op met de acculader aanbevolen door de
fabrikant. Een acculader die geschikt is voor alleen een
bepaald type accu, kan brandgevaar opleveren indien
gebruikt met een ander type accu.
• Gebruik de AB-1816 uitsluitend met de daarvoor
bestemde accu. Als u een andere accu erin gebruikt,
kan dit leiden tot persoonlijk letsel of brand.
• Als de accu niet wordt gebruikt, houdt u deze uit de
buurt van metalen voorwerpen, zoals paperclips,
muntgeld, sleutels, schroeven en andere kleine
metalen voorwerpen, die een geleidende verbinding
S (cm) Hs (cm) H (cm)
155 – 159 55,5
+12
160 – 164 58
165 – 169 60
170 – 174 62,5
175 – 179 64,5
180 – 184 67
185 – 190 69,5
(zie afb. 2) (zie afb. 3)
Page 28

28
kunnen vormen tussen de accupolen. Door kortsluiting
van beide accupolen kan leiden tot brandwonden of
brand.
• Wanneer vloeistof uit de accu lekt, vermijdt u ieder
contact hiermee. Als de vloeistof per ongeluk op uw
huid is gekomen, spoelt u dit onmiddellijk af met water.
Als de vloeistof in uw ogen komt, raadpleegt u een arts.
Vloeistof uit de accu kan irritatie en brandwonden
veroorzaken.
BELANGRIJKE
VEILIGHEIDSINSTRUCTIES
Voor de accu
• Alvorens de accu in gebruik te nemen, leest u eerst alle
instructies en waarschuwingsopschriften op (1) de
acculader, (2) de accu en (3) het apparaat waarin de
accu wordt gebruikt.
• Haal de accu niet uit elkaar.
• Als de gebruikstijd aanzienlijk korter is geworden, stopt
u onmiddellijk met het gebruik. Anders kan dit leiden tot
kans op oververhitting, mogelijke brandwonden en
zelfs een explosie.
• Als de elektrolyt in uw ogen komt, wast u deze uit met
schoon water en raadpleegt u onmiddellijk een arts. Dit
kan leiden tot verlies van gezichtsvermogen.
• Sluit de accu niet kort:
(1) Raak de accupolen niet aan met enig geleidend
materiaal.
(2) Bewaar de accu niet op een plaats waar deze in
aanraking kan komen met andere metalen
voorwerpen, zoals spijkers, munten, enz.
(3) Stel de accu niet bloot aan water of regen.
Kortsluiting van de accu kan leiden tot een hoge
stroomsterkte, oververhitting, mogelijke brandwonden en
zelfs een defect.
• Bewaar de AB-1816 en de accu niet op plaatsen waar
de temperatuur kan oplopen tot 50 °C of hoger.
• Werp de accu niet in een vuur, zelfs niet als deze al
ernstig beschadigd of helemaal versleten is. De accu
kan exploderen en brand veroorzaken.
• Wees voorzichtig dat u de accu niet laat vallen of
ergens tegenaan stoot.
• Gebruik een accu die is gevallen of gestoten niet meer.
BEWAAR DEZE INSTRUCTIES.
Tips voor een lange levensduur van de
accu
• Laad nooit een volledig opgeladen accu op.
Te lang opladen verkort de levensduur van de accu.
• Laad de accu op bij een omgevingstemperatuur van
10 °C t/m 40 °C.
Laat een warme accu eerst afkoelen voordat u deze
oplaadt.
Instructies voor het aanbrengen
en verwijderen van de accu
De accu aanbrengen
Steek de sleutel in het sleutelgat en draai de sleutel 90°
linksom. (zie afb. 4)
Open het deksel en steek de accu er altijd helemaal in tot
deze met een klik op zijn plaats wordt vergrendeld.
Als u het rode deel aan de bovenkant van de knop kunt
zien, is de accu niet goed aangebracht. Steek de accu zo
ver mogelijk erin tot het rode deel niet meer zichtbaar is.
(zie afb. 5 en 7)
Sluit het deksel, steek de sleutel in het sleutelgat en draai
de sleutel 90° rechtsom. (zie afb. 6)
OPMERKING:
Zelfs met één accu werkt de hulpaandrijving, maar de
totale gebruiksduur van de accu zal slechts de helft zijn
van die bij gebruik van twee accu’s.
De accu verwijderen
Open het deksel met de sleutel.
Om de accu te verwijderen verschuift u de knop aan de
voorkant van de accu en trekt u tegelijkertijd de accu eruit.
(zie afb. 7)
3.3 Instructies voor het display en de functies
(zie afb. 8)
Bediening
1. De ON/OFF-toets is de hoofdschakelaar. Druk zacht
op de ON/OFF-toets om de stroomtoevoer naar de
fiets in te schakelen. Door de stroomtoevoer in te
schakelen, treedt de hulpaandrijving in werking
(standaardinstelling na inschakelen van de
stroomtoevoer is “Hulpaandrijfniveau 3”). Nadat de
stroomtoevoer is ingeschakeld, geven de vijf LED’s op
de accumeter de beschikbare acculading aan. De
beschikbare acculading wordt van links naar rechts
aangegeven van laag tot hoog. Wanneer vijf LED’s
branden, is ongeveer 80 procent of meer van de
acculading beschikbaar. Wanneer slechts één LED
uiterst links brandt, laadt u de accu’s op. Druk
nogmaals op de ON/OFF-toets zodat alle LED’s
uitgaan om de stroomtoevoer uit te schakelen.
2. De plus-toets (+) en min-toets (–) zijn voor het
instellen van het hulpaandrijfniveau. Druk zacht op de
“+” toets om het hulpaandrijfniveau te verhogen, en op
de “–” toets om het hulpaandrijfniveau te verlagen.
Wanneer het hulpaandrijfniveau maximaal is, branden
alle vijf LED’s van de hulpaandrijfmeter. Voor elk van
de hulpaandrijfniveaus (1 t/m 5) gaat één van de vijf
LED’s branden overeenkomstig het hulpaandrijfniveau
van 1 tot en met 5.
3. Druk op de ON/OFF-toets om de stroomtoevoer uit te
schakelen en over te schakelen naar de toestand met
laag stroomverbruik.
4. Nadat de stroomtoevoer is ingeschakeld en de fiets
gedurende ongeveer tien minuten niet wordt gebruikt,
wordt automatisch de stroomtoevoer uitgeschakeld en
de fiets in de toestand met laag stroomverbruik gezet.
Artikel 3.
Belangrijke opmerkingen
Waarschuwing
1. Dit product voldoet aan de norm EN15194. Het
gebruiksdoel is het vervoer van personen, en geen
enkel ander doel.
Page 29

29
2. Fiets niet door water dieper dan 150 mm om te
voorkomen dat het elektrisch systeem beschadigd
wordt.
3. Draag een helm tijdens het fietsen. (zie afb. 9)
4. Vermijd een te zware belading.
5. Vermijd kortsluiting.
6. Plaats de accu’s niet in een omgeving met een hoge
temperatuur, zoals bij een verwarming of afgedekt
door isolerend materiaal.
7. Vermijd dat de accu in aanraking komt met water, zuur
of een alkalische vloeistof.
8. Laad de accu op in een acculader aanbevolen door de
fabrikant.
• Fiets niet te snel bergafwaarts en op een drukke weg.
• Zet de fiets op slot wanneer u hem parkeert.
• Loop met de AB-1816 aan de hand wanneer er stenen
en andere voorwerpen op de weg liggen.
• Demonteer de fietsonderdelen niet (behalve de
verlichting).
• Controleer de hulpaandrijving voordat u wegfietst.
• Als er iets mis lijkt te zijn, stopt en controleert u.
• Gebruik originele onderdelen voor de AB-1816
(uitgezonderd de verlichting).
• Verwijder of vervang de reflector niet. (zie afb. 10)
Zorg ervoor dat bij iedere wijziging voldaan wordt aan
de normen BS6102/2 en EN15194.
• Controleer de velgen regelmatig.
Artikel 4.
Instructies voor het opladen
1. Zorg ervoor dat de accu volledig opgeladen is en na
ieder gebruik wordt opgeladen voor een lange
levensduur van de accu.
2. Leg tijdens het opladen de accu niet op een vochtige
plaats. De omgevingstemperatuur moet tussen 10 en
40 °C liggen.
3. Bedek de accu en acculader niet tijdens het opladen.
Voorkom dat vloeistof en metaaldeeltjes kunnen
binnendringen.
4. Als de accutemperatuur hoger wordt dan 60 °C, kan
een storing worden veroorzaakt in de acculader.
Koppel de acculader los van de stroombron en stuur
hem op voor reparatie.
5. Houd de accu en acculader uit de buurt van kinderen.
6. De acculader kan alleen worden gebruikt met deze
accu.
Artikel 5.
Reparatie en onderhoud
• Controleer vóór gebruik of de accu’s goed vergrendeld
zijn en de meters goed werken.
• Controleer de aansluiting van de fiets op de
accuhouder. Verwijder vuil om beschadiging te
voorkomen.
• Controleer de banden regelmatig omdat anders de
gebruiksafstand afneemt of de banden beschadigd
kunnen worden.
• Controleer vóór gebruik op tijd het mechanisme en
andere accessoires.
• Plaats de fiets niet in een vochtige omgeving of op
andere plaatsen waar de hardware kan gaan roesten.
• Laat de hele fiets niet langdurig in de regen of op een
geïsoleerde plaats staan om te voorkomen dat de
regelaar en accessoires beschadigd raken.
• Als zich een probleem voordoet met de motor, een
accu of de regelaar, laat u deze repareren door een
erkende dealer.
• Het is normaal dat de fiets bij het achteruitduwen zwaar
aanvoelt.
• Belaad de fiets niet te zwaar om te voorkomen dat de
motor en accu beschadigd raken.
• Het is belangrijk om de voor- en achteras en
trapasonderdelen van de fiets ieder jaar of halfjaar te
smeren. Gebruik een speciaal smeermiddel voor
naven (aanbevolen wordt schone benzine of
vaselinevet). Als zich een probleem voordoet, laat u
het repareren door een erkende dealer.
Artikel 6.
Instructies voor het gebruik van
de vouw-onderdelen
1. Het zadel monteren
Steek de zadelpen in de framebuis, stel de hoogte af
op de gebruiker en draai de bout vast.
Let erop dat de zadelpen voldoende diep in de
framebuis is gestoken en de veiligheidslijn niet meer
zichtbaar is. De klemkracht van de quick releasehendel mag niet lager zijn dan 18 N.m. (zie afb. 11)
2. De quick release-hendel gebruiken
Draai de bout stevig vast en duw de hendel omlaag in
de richting van de framebuis om de hoogte goed af te
stellen. (zie afb. 11)
3. De stuurstang omlaag vouwen
Duw de zelfvergrendelende schuif omlaag, zoals
aangegeven in inzet a, duw de stuurstang omlaag en
duw de hendel omlaag, zoals aangegeven in inzet b.
(zie afb. 12)
Vouw de stuurstang omlaag wanneer de haak
geopend is, zoals aangegeven in zie afb. 12 en 13.
4. De pedalen omvouwen
Door de pedalen om te vouwen kan de fiets nog
smaller worden gemaakt. Bedien de vergrendeling
binnenin het pedaal en vouw het pedaal omlaag. (zie
afb. 14)
5. Het frame vouwen
Ga links naast de fiets staan en vouw eerst het stuur
omlaag. Houd vervolgens het frame met uw
linkerhand vast, pak de vouwhendel vast en klap deze
om om de vergrendeling van het vouwscharnier te
openen. Draai het vouwscharnier zoals aangegeven
in afbeelding 13. Nadat de vergrendeling van het
vouwscharnier is geopend, pakt u het frame aan beide
zijden van het vouwscharnier vast en vouwt u het
frame dubbel tot het voorwiel parallel staat aan het
achterwiel, zoals aangegeven in de zie afb. 15 t/m 17.
Artikel 7.
Accessoires en afstelling
1. De accuregelaar en motor mogen niet worden
verwijderd.
2. Als het nodig is onderdelen te vervangen, gaat u naar
een dealer voor vervanging. Wij zijn niet
Page 30

30
verantwoordelijk voor problemen veroorzaakt doordat
de klant zelf onderdelen heeft verwijderd.
3. Gebruik Dolmar-accu AP-183.
4. De remmen afstellen
Controleer de remmen regelmatig als volgt:
(zie afb. 18 t/m 20)
4.1 De voorrem afstellen
4.1.1. Controleer de voorrem zoals aangegeven in zie
afb. 18. De rem grijpt volledig aan wanneer de
remhendel tot halverwege wordt ingetrokken.
4.1.2. Draai de veerschroeven los om de remarmen te
bewegen zodat de afstand tussen de remblokken
en de velg 1,5 tot 2 mm bedraagt, en draai daarna
de schroeven weer vast, zoals aangegeven in zie
afb. 19. Als de afstand anders is, blijft u de
veerschroef draaien totdat de gewenste afstand
wordt verkregen zoals is beschreven onder 4.1.1.
4.2 De achterrem afstellen
4.2.1. Controleer de achterrem op dezelfde manier als is
beschreven onder 4.1.1, en zoals aangegeven in
zie afb. 18.
4.2.2. Zie zie afb. 20 om de achterrem af te stellen op
dezelfde manier als is beschreven onder 4.1.1
voor het afstellen van de voorrem. Zet de
remhendel los, stel de bout af tot deze de
verschuifbare plaat raakt, pak de remhendel vast
en stel de verschuifbare plaat en bout af (2 mm).
Stel enkele keren af tot het achterwiel goed draait
en de rem goed werkt. Wanneer 1/3 van de
remkabel gerafeld is, deze moet worden
vervangen.
Let op:
Breng geen smeermiddel aan op de achterrem. Vervang
de remblokken van de voorrem elk jaar om overmatige
slijtage te voorkomen.
De remmen onderhouden
Om de remprestaties van uw fiets op peil te houden, is het
belangrijk onderhoud te plegen aan het remsysteem.
• Remkabels en -huizen vervangen.
5. De ketting afstellen
Stel als volgt af:
Demonteer de kunststoffen beschermkap van de
achteras en draai de twee M12-bouten los. Draai de
stelmoer rechtsom om te controleren of de ketting
goed is bevestigd. Tijdens het afstellen, als de ketting
te strak staat, draait u de stelmoer linksom en duwt u
het achterwiel naar voren.
Als het nodig is onderdelen af te stellen, moet u
daarna alle bevestigingsmiddelen stevig vastdraaien
volgens de onderstaande vereisten. (zie afb. 21)
Alleen voor Europese landen
EU-VERKLARING VAN CONFORMITEIT
Ondergetekenden, Tamiro Kishima en Rainer
Bergfeld, als erkende vertegenwoordigers van Dolmar
GmbH, verklaren dat de DOLMAR-machine(s):
Aanduiding van de machine:
Elektrische vouwfiets
Modelnr./Type: AB-1816
in serie is geproduceerd en
Voldoet aan de volgende Europese richtlijnen:
2004/108/EC
En is gefabriceerd in overeenstemming met de volgende
normen of genormaliseerde documenten:
EN55014-1: 2006, EN15194: 2009,
EN61000-3-2: 2006, EN61000-3-3: 2008,
EN55014-2/A2: 2008, IEC61000-4-2: 2008,
IEC61000-4-3: 2006, IEC61000-4-4: 2004,
IEC61000-4-5: 2005, IEC61000-4-6: 2006,
IEC61000-4-11: 2004
De technische documentatie wordt bewaard door:
Dolmar GmbH,
Jenfelder Straße 38, Abteilung FZ,
D-22045 Hamburg, Duitsland
15. 7. 2010
Tamiro Kishima Rainer Bergfeld
Hoofddirecteur Hoofddirecteur
Onderdeel Aanhaalmoment Opmerkingen
Borgmoer 14 – 18 N.m. De duwen-sticker mag niet zichtbaar zijn
Stuurstang 20 – 25 N.m. De veiligheidslijn op de stuurstang mag niet zichtbaar zijn
Quick release-hendel 18 – 20 N.m. De veiligheidslijn op de zadelpen mag niet zichtbaar zijn
Zadelmontageonderdelen 18 – 22 N.m.
Naaf 30 – 35 N.m.
Naafmoer 35 – 40 N.m.
Pedalen 18 – 20 N.m.
Stuur 18 – 20 N.m.
De volgende normen worden omwille van de
veiligheid gebruikt:
EN14764: 2005, EN15194: 2009
Page 31

31
ESPAÑOL (Instrucciones originales)
Explicación de los dibujos
Especificaciones
• Debido a nuestro programa continuo de investigación y desarrollo, las especificaciones aquí descritas están sujetas a
cambios sin previo aviso.
*1: Con dos baterías AP-183
*2: Condiciones de la medición de la autonomía: Nivel de asistencia 3, capacidad de carga de 75 kg, sin viento, suelo
llano de hormigón
Lea atentamente antes de utilizar la
bicicleta AB-1816:
• Lea el manual y compruebe todas las piezas y los
accesorios cuidadosamente antes del uso.
• El ciclista debe respetar las normas de circulación de
acuerdo con los requisitos del país.
• No circule por las callas destinadas exclusivamente a
los automóviles. Asegúrese de circular de forma
segura.
• Debe utilizar la batería, el motor, el controlador y otras
piezas eléctricas designadas para la bicicleta; si
necesita cambiarlas, póngase en contacto con nuestro
agente.
• Para garantizar la seguridad, no deje la bicicleta AB1816 a otras personas, especialmente mujeres
embarazadas o una persona que no sepa utilizar la
bicicleta.
• La bicicleta AB-1816 se puede utilizar en condiciones
de humedad, lluvia o nieve, pero debe asegurarse de
desplazarse a una velocidad lenta y no cruzar cursos
de agua de más de 150 mm de profundidad para evitar
que las partes eléctricas se humedezcan y se dañen.
• Estándar de implementación: EN15194
Peso máximo de carga: 100 KG
No deseche la batería.
• La velocidad no puede superar los 16 Km/h.
1. Pieza roja
2. Visualización de asistencia
3. Visualización de alimentación
4. Botón de Encendido/Apagado
5. Correcto
6. Reflector
7. Abrazadera del sillín
8. Línea de seguridad
9. Palanca de liberación rápida
10. Contratuerca
11. Dirección de cierre
12. Mecanismo deslizante
autoblocante
13. Gancho
14. Asa de plegado
15. Cuadro
16. Hebilla de bloqueo en la posición
plegada
17. Tornillo
18. Soporte del freno
19. Soporte del cable del freno
20. Leva del freno
21. Cable del freno
22. Pastilla de freno
23. Tornillo de muelle
24. Partes deslizantes
25. Tornillo de ajuste
26. Placa de fijación del cable de freno
Modelo AB-1816
Motor
Potencia 100 W
Modelo Motor CC sin escobillas
Tensión nominal 18 V CC
Dimensiones
Largo 1.450 mm
Ancho 570 mm
Altura del sillín 670 mm - 910 mm
Distancia entre los ejes de las
ruedas
975 mm
Tamaño del neumático 16 pulgadas
Peso*
1
20,8 kg
Batería
Modelo AP-183
Capacidad 3,0 Ah
Tipo Li-ion
Autonomía*
2
Aprox. 8,5 km
(AP-183 1 pieza)
Tipo de control Tipo de sensor de velocidad del pedal
Rango de velocidades de asistencia 0 - 16 (km/h)
Tipo de freno
Delantero Freno en V
Trasero Freno de tambor
Page 32

32
Para garantizar un uso seguro, deje que
nuestro personal de ventas ajuste el
asiento en una posición cómoda.
• Advertencia: La línea de seguridad de la tija del sillín
debe estar insertada en el cuadro.
• Compruebe el funcionamiento antes del uso.
• Aparque la bicicleta en una carretera sin pendiente y
no bloquee el tráfico.
• Cumpla con el código de circulación.
• Utilícela en carreteras en las que no circulen vehículos
a motor.
• Utilice un casco de seguridad cuando vaya en
bicicleta.
• AB-1816 requiere un esfuerzo de pedaleo menor que
una bicicleta normal para desplazarse. No obstante,
hasta que el ciclista se acostumbre a pedalear más
suavemente, es posible que pedalee con demasiada
fuerza, lo que hará que se alcancen velocidades
mayores que con una bicicleta normal, lo que puede
provocar accidentes, como una caída o una colisión.
• No utilice la bicicleta en superficies con muchos
baches (bordillos, canalizaciones de desagüe, etc.).
• Cuando detenga la bicicleta, aplique los frenos
delantero y trasero.
• No utilice la bicicleta cuando ésta tenga un problema.
• No desmonte ni lubrique las piezas que forman parte
del sistema de asistencia.
• No remodele la bicicleta usted mismo.
• Utilice únicamente piezas genuinas para accesorios o
sustituciones.
• Tras extraer/volver a colocar la(s) rueda(s) o ajustar el
sillín, compruebe siempre que se hayan apretado los
pernos relevantes antes de utilizar la bicicleta.
• Nunca utilice la bicicleta con el sillín o el manillar por
encima de la línea de límite.
• No lubrique las zonas de las pastillas de freno, los
neumáticos o las llantas.
1. Comprobación antes del uso.
Por su seguridad, compruebe los siguientes elementos
antes del uso.
a. Compruebe si las ruedas y los tornillos funcionan
correctamente.
b. Sistema de frenos: Cuando la palanca de freno llegue
a la mitad de su recorrido, el freno debe detener la
bicicleta totalmente.
c. Sistema de alimentación: Compruebe si la batería
está bien fijada y totalmente cargada.
2. Atención:
a. Reduzca la velocidad durante los giros o en
pendientes descendientes.
Artículo 1.
Para el cliente
a. Gracias por elegir nuestra bicicleta AB-1816.
Deseamos que le ofrezca una experiencia excelente.
b. Lea el manual atentamente antes de utilizar la
bicicleta AB-1816. Si tiene alguna pregunta, no dude
en ponerse en contacto con nuestro agente.
Artículo 2.
Introducción de AB-1816
1. Por su seguridad, compruebe el producto antes
de su uso.
a. ¿Funciona correctamente el sistema de frenos?
b. ¿Funciona correctamente el sistema electrónico?
(Ref: 3.3)
c. ¿Se han fijado correctamente el manillar y el sillín?
d. ¿La presión de los neumáticos es normal?
e. ¿El asa de plegado y los pedales están bien
bloqueados?
2. AB-1816
a. Este producto se ha diseñado para que su uso resulte
sencillo para los clientes.
b. AB-1816 puede proteger la batería de una situación
de sobrecorriente o baja tensión.
c. El freno delantero y el freno de cinta ofrecen una
función de seguridad.
d. En un año, el intervalo de uso regular podría cumplir
con el requisito de EN15194.
3. Funcionamiento
3.1 Cómo ajustar la posición de la bicicleta
1. Mida su altura. (Fig. 1)
2. Consulte la tabla de ajustes de la bicicleta.
3. Ajuste su bicicleta. (Fig. 2 – 3)
Advertencia
• No utilice la bicicleta cuando las líneas de seguridad
del sillín o del manillar sean visibles.
Ajuste del sillín
La altura mínima del sillín es la altura determinada
cuando el sillín está bajado en la totalidad de la tija y la
abrazadera está bloqueada.
Información práctica
En función del terreno por el que se desplace, se puede
modificar la altura del sillín:
- En superficies planas o cuando suba por una
pendiente, el asiento debe estar en una posición alta
para lograr una mayor eficiencia.
- Cuando descienda una pendiente, el sillín se debe
bajar ligeramente para mejorar el control de la bicicleta
y hacer que resulte más fácil sortear los obstáculos.
3.2 Introducción de la batería:
Uso y cuidados de AB-1816
• Extraiga la batería de la AB-1816 cuando no la utilice.
• Recárguela solamente con el cargador especificado
por el fabricante. Un cargador que es adecuado sólo
para un tipo de batería puede crear un riesgo de
incendio cuando se usa con otra batería.
S (cm) Hs (cm) H (cm)
155 – 159 55,5
+12
160 – 164 58
165 – 169 60
170 – 174 62,5
175 – 179 64,5
180 – 184 67
185 – 190 69,5
(Fig. 2) (Fig. 3)
Page 33

33
• Utilice AB-1816 solamente con los paquetes de batería
designados. El uso de cualquier otra batería puede
crear un riesgo de lesiones e incendio.
• Cuando no se utilice la batería, manténgala alejada de
otros objetos metálicos, como clips de papel,
monedas, llaves, clavos, tornillos u otros objetos
metálicos pequeños que puedan establecer una
conexión conductora de electricidad entre los
terminales. Si se realiza un cortocircuito entre los
terminales de la batería bajo condiciones de mal trato,
se pueden provocar quemaduras o un incendio.
• Evite el contacto con la batería, ya que puede verter
líquido. Si la toca accidentalmente, enjuáguese con
agua. Si el líquido entra en contacto con los ojos,
solicite ayuda médica. El líquido vertido de la batería
puede provocar irritaciones o quemaduras.
INSTRUCCIONES IMPORTANTES
DE SEGURIDAD
Para el cartucho de la batería
• Antes de utilizar el cartucho de la batería, lea todas las
instrucciones y referencias de precaución que se
encuentran en (1) el cargador de baterías, (2) la
batería y (3) el producto para el que se utiliza la
batería.
• No desmonte el cartucho de la batería.
• Si el tiempo de funcionamiento es excesivamente
limitado, deje de utilizar la herramienta de inmediato.
De lo contrario, existe el riesgo de sobrecalentamiento,
quemaduras e incluso explosión.
• Si se produce contacto ocular con electrolito,
enjuáguese los ojos con agua limpia y acuda de
urgencia al médico. Corre el riesgo de perder la visión.
• No cortocircuite el cartucho de la batería:
(1) No toque los terminales con material conductor.
(2) Evite guardar el cartucho de la batería en un
recipiente con otros objetos metálicos, como
clavos, monedas, etc.
(3) No exponga el cartucho de la batería al agua o a
la lluvia.
Un cortocircuito puede provocar un elevado flujo de
corriente, sobrecalentamiento, quemaduras o incluso una
avería.
• No almacene la AB-1816 ni el cartucho de la batería en
lugares donde la temperatura supere los 50°C (122°F).
• No queme el cartucho de la batería aunque esté
gravemente dañado o completamente gastado. El
cartucho de la batería puede explotar y provocar un
incendio.
• Procure que la batería no sufra golpes ni caídas.
• No utilice baterías que hayan sufrido golpes o caídas.
GUARDE ESTAS
INSTRUCCIONES.
Consejos para conseguir una mayor
duración de la batería
• No recargue nunca un cartucho de batería
completamente cargado.
La sobrecarga acorta la vida útil de la batería.
• Cargue el cartucho de la batería a una temperatura
ambiente que oscile entre 10°C y 40°C (50°F y 104°F).
Antes de cargar un cartucho de batería caliente, deje
que se enfríe.
Instrucciones de instalación o
extracción del cartucho de la
batería
Instalación del cartucho de la batería
Inserte la llave en el orificio para la llave y gírela 90° en el
sentido contrario a las agujas del reloj. (Fig. 4)
Abra la cubierta e inserte siempre el cartucho de la
batería completamente hasta que encaje en su lugar con
un leve clic.
Si puede ver la parte roja de la zona superior del botón,
significa que el cartucho no está completamente
bloqueado. Insértelo completamente hasta que la parte
roja quede oculta. (Fig. 5 y 7)
Cierre la cubierta, inserte la llave en el orificio para la llave
y gírela 90° en el sentido de las agujas del reloj. (Fig. 6)
NOTA:
La función de asistencia funciona incluso con un solo
cartucho de batería; sin embargo, la duración total del
cartucho de la batería será la mitad en comparación con
el uso de dos cartuchos de batería.
Extracción del cartucho de la
batería
Abra la cubierta con la llave.
Para quitar el cartucho de la batería, mantenga pulsado el
botón de la parte frontal del cartucho y retírelo. (Fig. 7)
3.3 Instrucciones de visualización y de botones
(Fig. 8)
Funcionamiento
1. El botón ON/OFF (Encendido/Apagado) es el
interruptor de alimentación. Pulse el botón ON/OFF
ligeramente para encender la fuente de alimentación
de la bicicleta. Al encender la fuente de alimentación
de la bicicleta se activa la función de asistencia (el
ajuste inicial cuando se enciende la fuente de
alimentación es “Nivel de asistencia 3”). Cuando se
encienda la alimentación, los cinco LED de la
visualización de alimentación mostrarán la capacidad
de la batería. La capacidad de la batería se muestra
de más baja, a la izquierda, a más alta, a la derecha.
Cuando los cinco LED están encendidos, la batería
tiene una capacidad de aproximadamente el 80% o
más. Cuando el LED que se encuentra más a la
izquierda parpadee en solitario, recargue la batería. Si
pulsa el botón ON/OFF de nuevo, se apagarán todos
los LED y la alimentación se desconectará.
2. Los botones más (+) y menos (–) ajustan el nivel de
asistencia. Pulse el botón “+” ligeramente para
aumentar el nivel de asistencia y pulse el botón “–”
para reducir el nivel de asistencia. Cuando el nivel de
asistencia sea máximo, se encenderán los cinco LED
de la visualización de asistencia. Para cada uno de
los niveles de asistencia (de 1 a 5) hay cinco LED que
se encenderán de acuerdo con el nivel, del 1 al 5.
Page 34

34
3. Pulse el botón ON/OFF para desconectar la
alimentación y pasar al estado de bajo consumo de
energía.
4. Después de conectar la alimentación (ON), si la
bicicleta no se utiliza durante aproximadamente diez
minutos, la alimentación se desconecta (OFF)
automáticamente y la bicicleta pasa al estado de bajo
consumo de energía.
Artículo 3.
Aviso importante
Advertencia
1. El producto cumple con EN15194. Su finalidad es
exclusivamente la de permitir desplazamientos.
2. No se desplace con la bicicleta por zonas con agua de
una profundidad superior a 150 mm para evitar daños
en el sistema eléctrico.
3. Utilice casco cuando se desplace en la bicicleta.
(Fig. 9)
4. No la sobrecargue.
5. No la cortocircuite.
6. No coloque la batería en un entorno de temperatura
elevada, como al lado de una calefacción o bajo la luz
directa del sol.
7. No ponga la batería en agua o líquido ácido o alcalino.
8. Cargue la batería con el cargador especificado por el
fabricante.
• No acelere cuando se desplace por pendientes
descendentes o en calles muy transitadas.
• Bloquéela cuando se detenga.
• Camine empujando la AB-1816 cuando haya piedras u
otros objetos en la carretera.
• No desmonte las piezas. (Excepto las luces)
• Compruebe el nivel de carga antes de iniciar el
desplazamiento.
• Si detecta alguna anomalía, deténgase y compruébela.
• Utilice piezas originales de AB-1816. (Excepto las
luces)
• No desmonte ni cambie el reflector. (Fig. 10)
Cualquier cambio que se realice debe cumplir con
BS6102/2 y EN15194
• Compruebe la llanta periódicamente.
Artículo 4.
Instrucciones de carga
1. Asegúrese de que la batería esté totalmente cargada
y cárguela con tiempo para garantizar su duración.
2. No coloque la batería en un lugar húmedo durante la
carga, la temperatura debe ser 10 – 40°C (50°F –
104°F).
3. No cubra el cartucho de la batería o el cargador
durante la carga y evite el contacto con líquidos y
polvos metálicos.
4. Si la temperatura de la batería excede los 60°C
(140°F), puede provocar problemas en el cargador.
Desconecte la alimentación y haga que se repare.
5. Mantenga la batería y el cargador alejados de los
niños.
6. El cargador solamente se puede utilizar en esta
batería.
Artículo 5.
Reparación y mantenimiento
• Antes del uso, compruebe si la batería está
correctamente insertada y el indicador de su estado
funciona correctamente.
• Compruebe el conector de la bicicleta y de la caja de la
batería. Elimine la suciedad para evitar daños.
• Compruebe los neumáticos periódicamente, de lo
contrario la autonomía de uso se puede ver reducida o
se puede dañar el neumático.
• Antes del uso, compruebe periódicamente el
mecanismo y otros accesorios.
• No deje la bicicleta en una atmósfera húmeda o en otro
lugar que pueda hacer que se oxide.
• No deje la bicicleta bajo la lluvia o la luz directa del sol
por un período de tiempo prolongado para evitar que el
controlador y los accesorios se dañen.
• Si detecta un problema en el motor, la batería y el
controlador, envíelos a un agente exclusivo para su
mantenimiento.
• Si nota que resulta un poco difícil moverla hacia atrás,
es un estado normal.
• No sobrecargue la bicicleta para evitar daños en el
motor y la batería.
• Es importante lubricar la bicicleta, los ejes delantero y
trasero y la caja de pedalier cada año o medio año.
Utilice un lubricante especial para el buje (Se
recomienda utilizar lubricante de gasolina y vaselina),
si surge algún problema, acuda a nuestra agencia para
realizar el mantenimiento.
Artículo 6.
Instrucciones de uso para plegar
las piezas
1. Para montar el sillín
Inserte el sillín en el tubo del sillín. Ajuste la altura en
función de la longitud de las piernas del cliente y fije el
perno.
Tenga en cuenta que la profundidad de inserción no
debe dejar ver la línea de seguridad y la fuerza de
apriete de la abrazadera no puede ser inferior a
18 N.m. (Fig. 11)
2. Uso del mecanismo de liberación rápida
Apriete el tornillo firmemente y baje la palanca hacia
la barra para ajustar la posición correctamente.
(Fig. 11)
3. Para plegar la tija del manillar
Empuje el mecanismo deslizante autoblocante hacia
abajo como se muestra en la imagen a y empuje el
manillar hacia abajo tal y como se muestra en la
imagen b. (Fig. 12)
Pliegue el manillar hacia abajo cuando el gancho esté
abierto, como se muestra en las Fig. 12 y 13.
4. Para colocar el pedal
Si se pone el pedal dentro se puede lograr la forma
deseada para la bicicleta. Agarre la palanca de dentro
del pedal y empújela hacia abajo, al lado del chasis.
(Fig. 14)
5. Para plegar el cuadro
Colóquese en el lado izquierdo de la bicicleta y
pliegue la tija del manillar primero, sujete el cuadro
con la mano izquierda, sujete el asa de plegado y
Page 35

35
muévala para abrirla. Gire el asa de plegado como se
muestra en la Fig. 13. Cuando la hebilla de plegado
esté abierta, sujete el cuadro desde los dos lados y
pliegue el marco hacia la izquierda del cuadro;
detenga el plegado cuando la rueda delantera y la
trasera estén paralelas, como se muestra en la
Fig. 15 – 17.
Artículo 7.
Accesorios y ajuste
1. No se pueden puede extraer el controlador de la
batería y el motor.
2. Para sustituir esas piezas, acuda a un centro de
servicio para la sustitución. No nos responsabilizamos
de los problemas causados por clientes que extraen
piezas ellos mismos.
3. Utilice la batería Dolmar AP-183.
4. Ajuste de los frenos.
Compruebe los frenos periódicamente, de la siguiente
manera: (Fig. 18 – 20)
4.1 Ajuste de los frenos en V
4.1.1. Tal y como se muestra en la Fig. 18, compruebe
el freno delantero. El freno se accionará
completamente cuando la palanca de freno se
coloque en la posición medio cerrada.
4.1.2. Tal y como se muestra en la Fig. 19, afloje el
tornillo para aflojar o apretar las levas de freno y
haga que la distancia entre la pastilla de freno y la
rueda sea de 1,5 – 2 mm. Apriete el tornillo. Si la
distancia es diferente, siga ajustando el muelle
hasta lograr la distancia deseada, de acuerdo con
los requisitos del punto 4.1.1.
4.2 Ajuste del freno trasero.
4.2.1. Tal y como se muestra en la Fig. 18, compruebe
el freno delantero de acuerdo con 4.1.1.
4.2.2. Consulte la Fig. 20, para ajustar el freno, tal y
como se describe en 4.1.1 donde se muestra el
agente del freno delantero. Afloje la palanca de
freno y ajuste el tornillo hasta que toque la pastilla
de freno, fije la palanca de freno y ajuste la pastilla
de freno y el perno (2 mm). Repita el ajuste hasta
que la rueda trasera gire libremente y el freno
funcione correctamente. Cuando el freno se haya
desgastado hasta 1/3, cámbielo.
Atención:
No añada lubricantes al freno trasero. Por favor, sustituya
la zapata de freno del freno delantero cada año para
evitar su abrasión.
Mantenimiento de los frenos
Para mantener en perfecto funcionamiento los frenos de
la bicicleta, es importante realizar un mantenimiento del
sistema de frenos.
• Sustitución de los cables de freno y las carcasas.
5. Ajuste de la cadena
Realice el ajuste de la siguiente manera:
Desmonte la cubierta de protección de plástico del eje
trasero y suelte dos tornillos M12. Gire la tuerca de
ajuste en el sentido de las agujas del reloj para
asegurarse de que la cadena esté bien fijada. Durante
el ajuste, si la cadena está demasiado tensada, gire la
tuerca en el sentido contrario a las agujas del reloj y
empuje la rueda trasera hacia delante.
Si tiene que ajustarse alguna pieza, fije el tornillo y
otras piezas de acuerdo con los requisitos siguientes.
(Fig. 21)
Sólo para países europeos
DECLARACIÓN DE CONFORMIDAD DE LA CE
Los abajo firmantes, Tamiro Kishima y Rainer
Bergfeld, debidamente autorizados por Dolmar
GmbH, declaran que la(s) máquina(s) DOLMAR:
Designación de la máquina:
Bicicleta Asistida por Motor
Nº de modelo/ Tipo: AB-1816
son de producción serie y
Cumplen con las siguientes Directivas europeas:
2004/108/CE
Y se han fabricado de acuerdo con los siguientes
estándares o documentos estandarizados:
EN55014-1: 2006, EN15194: 2009,
EN61000-3-2: 2006, EN61000-3-3: 2008,
EN55014-2/A2: 2008, IEC61000-4-2: 2008,
IEC61000-4-3: 2006, IEC61000-4-4: 2004,
IEC61000-4-5: 2005, IEC61000-4-6: 2006,
IEC61000-4-11: 2004
La documentación técnica está depositada en:
Dolmar GmbH,
Jenfelder Straße 38, Abteilung FZ,
D-22045 Hamburgo
15. 7. 2010
Tamiro Kishima Rainer Bergfeld
Director general Director general
Piezas Apriete estándar Observaciones
Contratuerca 14 – 18 N.m. El adhesivo de presión no puede ser visible
Tija 20 – 25 N.m. La línea de seguridad de la tija no puede ser visible
Tornillo del sillín 18 – 20 N.m. La línea de seguridad del sillín no puede ser visible
Sillín y fijación de las piezas del sillín 18 – 22 N.m.
Buje 30 – 35 N.m.
Tuerca del buje 35 – 40 N.m.
Pedal 18 – 20 N.m.
Manillar 18 – 20 N.m.
Se utilizan los siguientes estándares de seguridad:
EN14764: 2005, EN15194: 2009
Page 36

ALA
AB-1816_6L_0610
DOLMAR GmbH
Postfach 70 04 20
D-22004 Hamburg
Germany
http://www.dolmar.com
 Loading...