

Page 1
AA-3618CL
GB Battery converter Instruction Manual
Adaptateur-Transfo Ceinture
F
de Batterie
D Akku-Adapter Gebrauchsanleitung
I Convertitore batteria Istruzioni per l’uso
NL Accudraaghouder Gebruiksaanwijzing
E Convertidor de Baterías Manual de instrucciones
P Conversor de Baterias Manual de instruções
DK Akku-konverter Brugervejledning
S Batteriadapter Bruksanvisning
NO Batterikonverter Bruksanvisning
FIN Vaihtosuunnin Käyttöohje
GR Μετατροπέας μπαταριών Εγχειρίδιο οδηγιών
PL Konwerter Akumulatorów Instrukcja obsługi
LV Akumulatoru pārveidotājs Lietošanas rokasgrāmata
EE Akumuundur Kasutusjuhend
LT Akumuliatoriaus keitiklis Naudojimo instrukcija
HU Akkumulátor átalakító Használati útmutató
RO Transformator cu baterii Manual de instrucţiuni
SK Adaptér batérií Návod na obsluhu
CZ Akumulátorový konvertor Návod k použití
UR Адаптер для акумуляторів Інструкція з експлуатації
Аккумуляторный
RU
Преобразователь Тока
TR Batarya dönüştürücü Kullanım Kılavuzu
TH
ID Konverter baterai Buku Petunjuk
VT
Bộ chuyển đổi pin Hướng dẫn sử dụng
电池转换器 使用说明书
CS
KR
배터리 컨버터 사용 설명서
PR
Manuel d’instructions
Инструкция по эксплуатации
Page 2
1 2
1
1
2
2
4
5
3
6
6
7
9
8
10
11
4
5
12
3 4
5
2
Page 3

English (Original instructions)
Explanation of general view
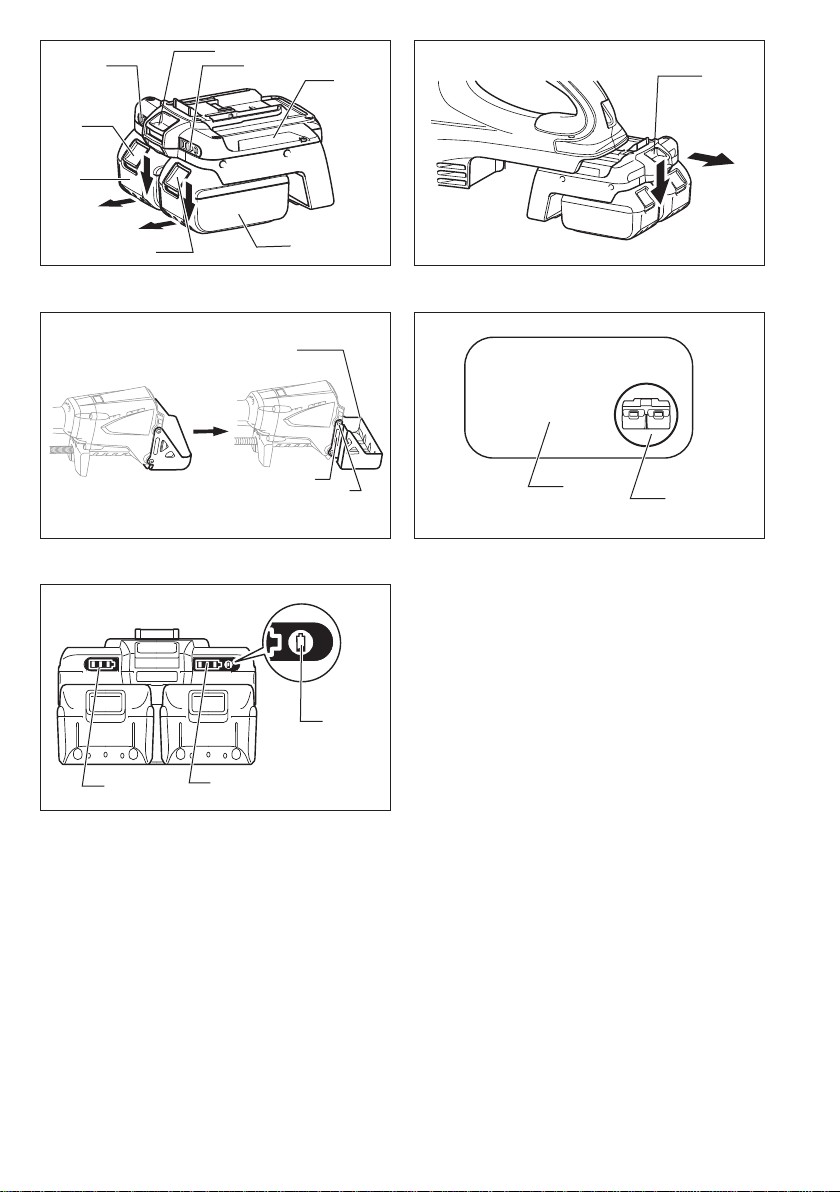
1 Button
2 Battery cartridge
3 Battery converter
4 Remaining battery capacity
indication lamp for battery 1
Applications
This battery converter uses two 18 V batteries, and can be used with 36 V battery-powered products.
Compatible battery: AP-183
CAUTION:
• Be sure to carefully read the product main unit instruction manual before use.
• This battery converter is designed exclusively for use with 18 V batteries. Do not use 14.4 V batteries.
• Install two 18 V batteries for use. This battery converter cannot be used with only one 18 V battery.
• Do not insert the battery converter into the charger. Charging is not possible in this case.
Removing or installing batteries and battery converter
CAUTION:
• Always switch off the tool before installing or removing of the battery cartridges.
• Firmly hold the battery converter and battery cartridges when replacing battery cartridges.
Failure to rmly hold the battery converter and battery cartridges may damage them or cause a serious injury.
• When replacing battery cartridges with the battery converter installed on the tool, rmly hold the battery cartridges
and the tool.
• Firmly hold the tool and battery converter when removing the battery converter.
Failure to rmly hold the tool and the battery converter may drop them and cause damage to them or a serious in-
jury.
Removing/installing the battery cartridges from/on the battery converter (Fig. 1)
1. To remove battery cartridge from the battery converter, slide it from the battery converter while sliding the button on
the front of the battery cartridge.
2. To install the battery cartridge, align the tongue on the battery cartridge with the groove in the battery converter and
slip it into place. Always insert it all the way until it locks in place with a little click. If you can see the red indicator on
the upper side of the button, it is not locked completely. Install it fully until the red indicator cannot be seen. If not, it
may accidentally fall out of the battery converter, causing injury to you or someone around you.
Do not use force when installing the battery cartridge. If the cartridge does not slide in easily, it is not being inserted
correctly.
Removing/installing the battery converter from/on the tool (Fig. 2)
1. To remove the battery converter, slide it from the tool while sliding the button on the front of the battery converter.
2. To install the battery converter, align the tongue on the battery converter with the groove in the tool and
slip it into place. Always insert it all the way until it locks in place with a little click. If you can see the red indicator on the upper side of the button, it is not locked completely. Install it fully until the red indicator cannot be seen. If not, it may accidentally fall out of the tool, causing injury to you or someone around you.
Do not use force when installing the battery converter. If the battery converter does not slide in easily, it is not being
inserted correctly.
CAUTION:
• Be careful not to pinch your ngers when inserting batteries and the battery converter.
How to use this converter with the 36 V cordless brushcutter (Fig. 3)
When using with the above cordless brushcutter, mount the battery guard (optional accessory).
To install the accessory battery guard, t it over the protrusion of the tool and then secure it with screws.
To remove the accessory battery guard, unscrew and slide it off.
5 Remaining battery capacity
indication lamp for battery 2
6 Button
7 Battery
8 Protrusion
guard
9 Screws
10 Label
11 Battery converter symbol
12 Battery capacity display button
3
Page 4

4
How to use this converter with the chain saw Model AS-3625, AS-3625CLG (Fig. 4)
Note:
• Model AS-3625, AS-3625CLG only with a label including the battery converter symbol shown in the gure can be
used with this converter.
Remaining battery capacity indication (Fig. 5)
Press the remaining battery capacity display button to light the indicator lamps and indicate the remaining battery
capacities for approximately 10 seconds. The indicator lamps correspond to each battery.
NOTE:
only the lowermost indicator lamp blinks for either Battery 1 or Battery 2, this means that the battery capacity is
• When
low, so the product does not operate. In these cases, charge the battery that is low, or replace it with a fully charged
battery. The product does not operate when either of the batteries has run out.
• The indicated charge may be slightly lower than the actual level during use or immediately after using the product.
How to read the remaining battery capacity indication
Indicator lamps (Battery 1 or Battery 2)
Remaining charge or indication contents
: On
: Off
: Blinking
50% to 100%
20% to 50%
0% to 20%
or
• Depending on the conditions of use and the ambient temperature, the remaining capacity may not be indicated correctly.
Charge the battery
Example of remaining charge indication (Battery 1: 80%, Battery 2: 10%)
Battery 1 Battery 2
Page 5

Abnormal indications during use
The AA-3618CL indicates various states using the remaining battery capacity indication.
Indicator lamps
: On : Off
Battery 1 Battery 2
1. AA-3618CL malfunction
When the three indicator lamps for Battery 1 and the three indicator lamps for Battery 2 light alternately, the
AA-3618CL may have malfunctioned. Contact your Dolmar dealer or nearest Dolmar Sales Center to request inspection
2. AA-3618CL protective function
3. Battery protective function
4. AA-3618CL abnormally high voltage detection
NOTE:
and/or repair.
When a product is used continuously at a high load, the motor may stop automatically. This is due to the AA-3618CL’s
protective function, and is not a malfunction. If the product does not operate even when the product switches are
operated, stop use, disconnect the product and batteries from the AA-3618CL, and let the AA-3618CL cool down.
The batteries have an internal protective function that automatically stops power output in order to extend the battery
life. When the following states occur during product use, the motor stops automatically, but this is due to the battery’s
protective function, and is not a malfunction.
When the battery temperature rises above a certain level, the motor stops automatically, and remains stopped even
when the switches are operated. In these cases, stop battery use, remove the batteries from the AA-3618CL, and
allow the batteries to cool or charge the batteries.
When the battery capacity becomes low, the product’s motor stops automatically. If the product does not operate
even when the switches are operated, remove the batteries from the AA-3618CL and charge the batteries.
When the AA-3618CL detects an abnormally high battery voltage, the motor stops automatically. This is due to the
AA-3618CL’s protective function, and is not a malfunction. In these cases, the motor remains stopped even when
the switches are operated.
Remove the batteries from the AA-3618CL, and use different batteries with normal voltage.
: Blinking
The AA-3618CL may have malfunctioned.
Indication contents
The protective function operated.
The protective function operated.
Charge the battery.
The AA-3618CL detected an
abnormally high voltage.
When the product stops automatically without any AA-3618CL indication
When the product enters an overload state, power output stops automatically in order to extend the battery life. This is
due to the battery’s protective function, and is not a malfunction. In addition, in these cases the AA-3618CL does not
indicate anything, but this is not a malfunction. When this happens, release the switch, and remove the cause of the
overload. The product can then be used again by operating the switch again.
5
Page 6

Deutsch (Originale Anleitungen)
Übersicht
1 Knopf
2 Akku
3
Akku-Adapter
4 Akku-Restkapazitäts-Anzeige-
lampe für Akku 1
5 Akku-Restkapazitäts-Anzeige-
6 Knopf
7 Akku-Schutz
8 Vorsprung
lampe
für Akku 2
Anwendungen
Dieser Akku-Adapter verwendet zwei 18-V-Akkus und kann mit 36-V-Akkugeräten eingesetzt werden.
Kompatibler Akku: AP-183
VORSICHT:
• Lesen Sie vor Gebrauch unbedingt die Gebrauchsanleitung des Hauptgerätes aufmerksam durch.
• Dieser Akku-Adapter ist ausschließlich für den Einsatz mit 18-V-Akkus ausgelegt. Verwenden Sie keine 14,4-V-Akkus.
• Setzen Sie zum Gebrauch zwei 18-V-Akkus ein. Dieser Akku-Adapter kann nicht mit nur einem 18-V-Akku benutzt
werden.
• Führen Sie den Akku-Adapter nicht in das Ladegerät ein. In diesem Fall ist Laden nicht möglich.
Abnehmen oder Anbringen von Akkus und Akku-Adapter
VORSICHT:
• Schalten Sie stets die Maschine aus, bevor Sie die Akkus anbringen oder abnehmen.
• Halten Sie den Akku-Adapter und die Akkus beim Austauschen der Akkus gut fest.
Werden Akku-Adapter und Akkus nicht festgehalten, können sie beschädigt werden, oder es kann zu ernsthaften
Verletzungen kommen.
• Wenn Sie Akkus bei in der Maschine eingesetztem Akku-Adapter austauschen, halten Sie die Akkus und die Maschine gut fest.
• Maschine und Akku-Adapter beim Abnehmen des Akku-Adapters gut festhalten.
Werden Maschine und Akku-Adapter nicht festgehalten, können sie herunterfallen und beschädigt werden oder
ernsthafte Verletzungen verursachen.
Abnehmen/Anbringen der Akkus vom/am Akku-Adapter (Abb. 1)
1. Ziehen Sie den Akku zum Abnehmen vom Akku-Adapter ab, während Sie den Knopf an der Vorderseite des Akkus
verschieben.
2. Richten Sie zum Anbringen des Akkus dessen Führungsfeder auf die Nut im Akku-Adapter aus, und
schieben Sie den Akku hinein. Schieben Sie ihn stets vollständig ein, bis er mit einem hörbaren Klicken einrastet.
ständig verriegelt.
derenfalls kann er aus dem Akku-Adapter herausfallen und Sie oder umstehende Personen verletzen.
Wenden Sie beim Anbringen des Akkus keine Gewalt an. Falls der Akku nicht reibungslos hineingleitet, ist er nicht
richtig ausgerichtet.
Falls die rote Anzeige an der Oberseite des Knopfes sichtbar ist, ist der Akku nicht voll-
Schieben Sie ihn bis zum Anschlag ein, bis die rote Anzeige nicht mehr sichtbar ist. An-
Abnehmen/Anbringen des Akku-Adapters von/an der Maschine (Abb. 2)
1. Ziehen Sie den Akku-Adapter zum Abnehmen von der Maschine ab, während Sie den Knopf an der Vorderseite des
Akku-Adapters verschieben.
2. Richten Sie zum Anbringen des Akku-Adapters dessen Führungsfeder auf die Nut in der Maschine aus,
und schieben Sie den Akku-Adapter hinein. Schieben Sie ihn stets vollständig ein, bis er mit einem hörbaren Klicken einrastet. Falls die rote Anzeige an der Oberseite des Knopfes sichtbar ist, ist der Akku-Adapter nicht vollständig verriegelt. Schieben Sie ihn bis zum Anschlag ein, bis die rote Anzeige nicht mehr sichtbar ist. Anderenfalls kann er aus der Maschine herausfallen und Sie oder umstehende Personen verletzen.
Wenden Sie beim Anbringen des Akku-Adapters keine Gewalt an. Falls der Akku-Adapter nicht reibungslos hineingleitet, ist er nicht richtig ausgerichtet.
VORSICHT:
• Achten Sie beim Einsetzen der Akkus und des Akku-Adapters darauf, dass Sie sich nicht die Finger klemmen.
Verwendung dieses Adapters mit der 36-V-Akku-Sense (Abb. 3)
Wenn Sie den Adapter mit einem der obigen Akku-Sensen verwenden, montieren Sie den Akku-Schutz (Sonderzubehör).
Zum Anbringen den mitgelieferten Akku-Schutz auf den Vorsprung der Maschine setzen und dann mit Schrauben
befestigen.
Zum Abnehmen die Schrauben entfernen und den Akku-Schutz abziehen.
9 Schrauben
10 Aufkleber
11 Akku-Adapter-Symbol
12 Akkukapazität-Anzeigetaste
10
Page 7

Verwendung dieses Adapters mit den Kettensägen AS-3625, AS-3625CLG (Abb. 4)
Hinweis:
• Nur das Modell AS-3625, AS-3625CLG mit einem Aufkleber, der das abgebildete Akku-Adapter-Symbol trägt, kann
mit diesem Adapter verwendet werden.
Akku-Restkapazitätsanzeige (Abb. 5)
Drücken Sie die Akku-Restkapazitäts-Anzeigetaste, um die Anzeigelampen zum Aueuchten zu bringen und die Akku-
Restkapazität für ca. 10 Sekunden anzuzeigen. Jedem Akku sind eigene Anzeigelampen zugeordnet.
HINWEIS:
enn nur die niedrigste Anzeigelampe entweder für Akku 1 oder Akku 2 blinkt, bedeutet dies, dass die Akkukapazität
• W
zu niedrig ist, so dass das Produkt nicht funktioniert. Laden Sie in einem solchen Fall den schwachen Akku auf, oder
ersetzen Sie ihn durch einen voll aufgeladenen. Das Produkt funktioniert nicht, wenn einer der Akkus erschöpft ist.
• Während des Gebrauchs oder unmittelbar nach der Benutzung des Produkts kann die angezeigte Ladung etwas
niedriger als das tatsächliche Ladeniveau sein.
Ableseweise der Akku-Restkapazitätsanzeige
Anzeigelampen (Akku 1 oder Akku 2)
Restladung oder Anzeigeinhalt
: Ein
: Aus
: Blinkt
50 bis 100 %
20 bis 50 %
0 bis 20 %
oder
• Je nach den Benutzungsbedingungen und der Umgebungstemperatur wird die Akku-Restkapazität eventuell nicht
korrekt angezeigt.
Den Akku auaden.
Beispiel der Restkapazitätsanzeige (Akku 1: 80 %, Akku 2: 10 %)
Akku 1 Akku 2
11
Page 8

Anormale Anzeigen während des Gebrauchs
Der AA-3618CL zeigt unterschiedliche Zustände mit der Akku-Restkapazitätsanzeige an.
Anzeigelampen
: Ein : Aus
Akku 1 Akku 2
1. Funktionsstörung des AA-3618CL
Wenn jeweils die drei Anzeigelampen für Akku 1 und Akku 2 abwechselnd aueuchten, liegt möglicherweise eine
Funktionsstörung des
Dolmar-Händler oder das nächste Dolmar-Vertriebszentrum.
2. Schutzfunktion des AA-3618CL
Wenn ein Produkt ununterbrochen bei hoher Last benutzt wird, kann sich der Motor automatisch abschalten. Dies
ist auf die Schutzfunktion des AA-3618CL zurückzuführen und stellt keine Funktionsstörung dar. Falls das Produkt
trotz Betätigung der Schalter am Produkt nicht funktioniert, stellen Sie die Benutzung ein, trennen Sie Produkt und
Akkus vom AA-3618CL, und lassen Sie den AA-3618CL abkühlen.
3. Akku-Schutzfunktion
Die Akkus besitzen eine interne Schutzfunktion, welche automatisch die Stromausgabe unterbricht, um die Akkulebensdauer zu verlängern. Wenn die folgenden Zustände während des Produktgebrauchs auftreten, schaltet sich
der Motor automatisch ab. Dies ist auf die Schutzfunktion des Akkus zurückzuführen und stellt keine Funktionsstörung dar.
Wenn die Akkutemperatur eine bestimmte Schwelle überschreitet, schaltet sich der Motor automatisch ab und bleibt
in diesem Zustand, selbst wenn die Schalter betätigt werden. Brechen Sie in solchen Fällen die Benutzung ab, und
entfernen Sie die Akkus vom AA-3618CL. Lassen Sie die Akkus entweder abkühlen, oder laden Sie sie auf.
Wenn die Akkukapazität niedrig wird, schaltet sich der Motor des Produkts automatisch ab. Falls das Produkt trotz
Betätigung der Schalter nicht funktioniert, entfernen Sie die Akkus vom AA-3618CL, und laden Sie sie auf.
4. Überspannungserkennung des AA-3618CL
Wenn der AA-3618CL eine Überspannung des Akkus erkennt, schaltet sich der Motor automatisch ab. Dies ist auf
die Schutzfunktion des AA-3618CL zurückzuführen und stellt keine Funktionsstörung dar. In solchen Fällen bleibt
der Motor trotz Betätigung der Schalter abgeschaltet.
Entfernen Sie die Akkus vom AA-3618CL, und benutzen Sie andere Akkus mit normaler Spannung.
AA-3618CL vor. Wenden Sie sich bezüglich einer Überprüfung und/oder Reparatur an Ihren
: Blinkt
Möglicherweise liegt eine Funktionsstörung
Die Schutzfunktion wurde aktiviert.
Die Schutzfunktion wurde aktiviert.
Der AA-3618CL hat eine Überspannung
Anzeigeinhalt
im AA-3618CL vor.
Den Akku auaden.
erkannt.
12
Page 9

HINWEIS:
Wenn das Produkt ohne jegliche Anzeige am AA-3618CL automatisch stehen bleibt
Wenn das Produkt einen Überlastungszustand erreicht, wird die Stromausgabe automatisch unterbrochen, um die
Lebensdauer der Akkus zu verlängern. Dies ist auf die Schutzfunktion des Akkus zurückzuführen und stellt keine
Funktionsstörung dar. Außerdem erscheint in solchen Fällen keine Anzeige am AA-3618CL, was aber keine Funktionsstörung darstellt. Wenn dies eintritt, lassen Sie den Schalter los, und beseitigen Sie die Ursache der Überlastung.
Das Produkt kann dann durch erneute Betätigung des Schalters wieder benutzt werden.
13
Page 10

885082A924
IDE
Postfach 70 04 20
D-22004 Hamburg
Germany
http://www.dolmar.com
DOLMAR GmbH
 Loading...