

Page 1
Dark link
Owners Manual
DOEPFER MUSIKELEKTRONIK GmbH
Page 2

Page 3
DOEPFER
Dark link
User Manual
Inhalt:
Safety Instructions………………………………… 4
1. Introduction
1.1. Preface………………………………..5
1.2. Preparations…………………………6
1.2.1. Setup………………….…….6
1.2.2. Connections………………..6
2. Overview………………………………………8
3. Functions
3.1. MIDI Connections…………………..9
3.2. MIDI Channel Selection……………9
3.3. The MIDI-to-CV/Gate Interface…. 10
3.4. Learn Mode / MIDI Functions…....11
3.5. The Glide Control……………….…14
3.6. Initialisation……………………….. 14
3.7. Firmware Update…………………..15
3.8. Changing Gate-Signal and CV2…16
4. Nuts‘n Bolts of
MIDI-CV/Gate Conversion………………17
5. Addendum……………………………………19
3
Page 4

Safety Instructions
Please follow the instructions for use of the instrument carefully because this will guarantee
proper operation of the instrument. Due to the fact that these instructions touch on Product Liability, it is
absolutely imperative that they be read carefully. Any claim for defect will be rejected if one or more
of the items has not been observed.
Disregard of the instructions can void the two years covered by warranty.
The instrument may only be operated at the voltage stated on the power input on the rear panel. Before
opening the case, disconnect both power plug and power adaptor.
All eventual modications are to be performed by a qualied person only in accordance with valid safety
instructions. With the introduction of a third person, the warranty will be void. In case of a destroyed
warranty seal, any warranty claim will be rejected.
The instrument must never be operated outdoors but solely in dry rooms. Never use the instrument in a
humid or wet environment, nor near ammable goods.
No liquids or conducting substances must get into the instrument. Should this be the case, the instrument
is to be disconnected from mains power immediately and examined, cleaned and possibly repaired by a
qualied technician.
Never expose the instrument to temperatures above +50° C or below -10° C. Before operation, the
instrument should have a temperature of at least 10°C. Do not expose the instrument to direct sunlight.
Do not install the instrument near heat sources like heaters, open re places, central heating etc.
Keep the top of the instrument clear in order to allow proper ventilation, otherwise the instrument
could eventually overheat.
Never place heavy objects on the instrument.
Transport the instrument carefully, never let it drop or fall over. Make sure that during transport and in use
the instrument is supported properly and cannot drop, slip or fall over because people might get injured.
Never use the instrument in the immediate proximity of electronic devices (e.g. monitors, power
supplies, computers) as these interferences could cause malfunctions within Dark Link and corrupt memory
data.
The instrument is to be shipped in the original packaging only. Any instrument shipped to us for return,
exchange, warranty repair, update or examination has to be in its original packaging! All other deliveries
will be rejected. Therefore, make sure you keep the original packaging and technical documentation.
The instrument may only be used for the purpose described in this operating manual. Due to safety
reasons, the instrument must never be used for other purposes.
When using the instrument in Germany, the appropriate VDE standards are to be followed. The following
standards are of special importance: DIN VDE 0100 (Teil 300/11.85, Teil 410/11.83, Teil 481/10.87), DIN
VDE 0532 (Teil 1/03.82), DIN VDE 0550 (Teil 1/12.69), DIN VDE 0551 (05.72), DIN VDE 0551e (06.75),
DIN VDE 0700 (Teil 1/02.81, Teil 207/10.82), DIN VDE 0711 (Teil 500/10.89), DIN VDE 0860 (05.89), DIN
VDE 0869 (01.85). VDE papers can be obtained from the VDE-Verlag GmbH, Berlin.
4
Page 5

DOEPFER
Dark link
Introduction
1. Introduction
1.1. Preface
Doepfer thanks you!
First of all we would like to thank you for having purchased Doepfer Dark Link! We really appreciate your
choice and promise you an extraordinary support throughout, including useful information, easy service,
and innovative product development.
May your Dark Link be an important and useful tool for ages to come.
What‘s this?
Dark Link is an easy to use but pretty powerful USB/MIDI-to-CV/Gate-Interface. Monophonic Synthesizers
that are not equipped with a built in MIDI Interface can be easily controlled via MIDI resp. MIDI via USB.
Your synthesizer simply needs inputs for a pitch control voltage and a gate signal. Dark Link provides not
only a pitch control voltage but also three additional control voltages that are derived from pitch bender,
velocity and MIDI-controller data (e.g. modwheel) of your MIDI/USB keyboard. So it is most easy to hook
up a vintage synthesizer in your MIDI setup. Dark Link is housed in a compact and solid metal enclosure.
Power supply is an included 12-15 volt ”wall wart”.
R.t.f.m.!
We knew it: User manuals are your rst and only choice in literature. Hey, that’s great – we’re talking the
same language here!
If you are doubting the entertaining qualities of this manual – how dare you! –, please bear in mind that its
thorough study will eventually turn out to be quite useful as it will highly increase the inspirational value of
your new MIDI-to-CV/Gate interface. So please do yourself - and us - a big favor: Read (and, if possible,
understand) this frigging manual! Thanks for your time, and bless you for your efforts!
In the rst section you will nd all info needed to successfully hook up Dark Link to your setup.
After that, you will nd a brief overview of its functions. Experts may use this as a quickstart guide. You
should not skip the complete description of the entire “Functions” section in the next chapter, though – Dark
Link hides some interesting features under its hood. If sequencer technology –
especially the secrets of MIDI-to-CV/Gate conversion – are totally new to you, please refer to “Nuts and
Bolts of MIDI-to-CV/Gate conversion“ later on in this manual.
Enough babble - here we go...
5
Page 6

DOEPFER
Dark Link
Introduction
1.2. Getting started
When lifting Dark Link out of its box for the rst time, please make sure that everything is in its right place.
You will nd the following component parts in the box:
• Dark Link USB/MIDI-to-CV/Gate-Interface
• wall-wart (12V AC / 200mA)
• USB cable (A-B type)
• this owners´ manual
You will also need:
• A suitable monophonic sound generation device with CV/gate connectors.
• A suitable MIDI/USB keyboard, -controller (e.g. a Doepfer master keyboard).
• At least two patch cables with 1/8“ minijacks (to connect to Dark Link) and jacks, tting to your
CV/gate controlled synthesizer.
• (If nec.) a switch trigger cable to control some vintage Moog and Korg synthesizers (available at
Doepfer or your local dealer).
To run Dark Link via its MIDI-DIN socket, you will also need:
• A MIDI cable to connect a MIDI master keyboard / controller to Dark Link.
1.2.1. Setup:
Please use a suitable support. Used pizza cartons or beer crates should not be your rst choice. Don’t say
we didn’t warn you.
1.2.2. Connections:
You do not necessarily need all its built-in sockets to get Dark Link going. For a simple setup, you will need
just the ones pictured below. Make use of the additional terminals and you will tremendously expand Dark
Link‘s potential. These connectors will be described later on in this manual.
• Power supply:
Connect the included power adaptor (“wall wart”) to the 12V AC socket on the rear panel of
Dark Time.
Important: Use this power adaptor only or an equivalent one with exactly the same specs!
Powering Dark Link via USB is not possible since the internal analog circuitry of Dark Link
runs at +/-12V.
• MIDI:
Connect Dark Link’s USB socket with your suitably equipped keyboard or computer. Any
conguration or driver installation work is not required on your computer.You will nd more
information about USB operation in chapter 3 ”Functions” on page 9.
Connect Dark Link’s MIDI-in socket with the MIDI-out socket of your MIDI keyboard to run Dark
Link in a conventional MIDI setup without USB.
The default setting of Dark Link‘s MIDI channel is Channel 1. How to change this setting is
described on page 9 in chapter 3. “Functions“.
Do NOT use MIDI-in socket and USB port simultanously! Misfunctions may occur.
6
Page 7

DOEPFER
Dark link
Introduction
• CV/Gate:
Connect Dark Link‘s Gate socket to the gate input of your synthesizer.
Connect Dark Link‘s CV-1 socket to the pitch controlvoltage input of your synthesizer.
At least these two connections are obligatory to run a voltage controlled synthesizer. The additional
three control voltage provided by Dark Link (broken lines) make your voltage controlled synth
”listen” to pitchbender, velocity and modwheel (resp. a MIDI controller of your choice). Please note
that not all voltage controlled sythesizers are equipped with such inputs to handle these additional
voltages.
The following pictures shows the most importand connections to and from Dark Link:
USB
computer
with
software-sequencer
MIDI-keyboard/sequencer
MIDI out
Gate in
CV/Gate-controlled synthesizer
Pitch-CV in
12V AC
200mA
power-
adaptor
wall-outlet
to additional CV-ins
7
Page 8

DOEPFER
Dark link
Overview
2. Overwiev
Dark Link uses a very simple user-interface. To be exactly, it is not much more than the learn button and
one additional knob. The learn-button is used to congurate Dark Link and ”tell” it, in which manner it has to
transform incomming MIDI data into analogue control voltages and the gate signal.
The GLIDE knob controls the – you guessed it – the glide time of Dark Link‘s internal glide function.
As a hidden feature, you will also nd a simple but useful arpeggiator which is also accessed by the learn
button. It‘s use is pretty simple, even without a display.
Dark Link receives MIDI data via it‘s USB port or the MIDI-IN DIN-socket. Please do not use both
simultanously.
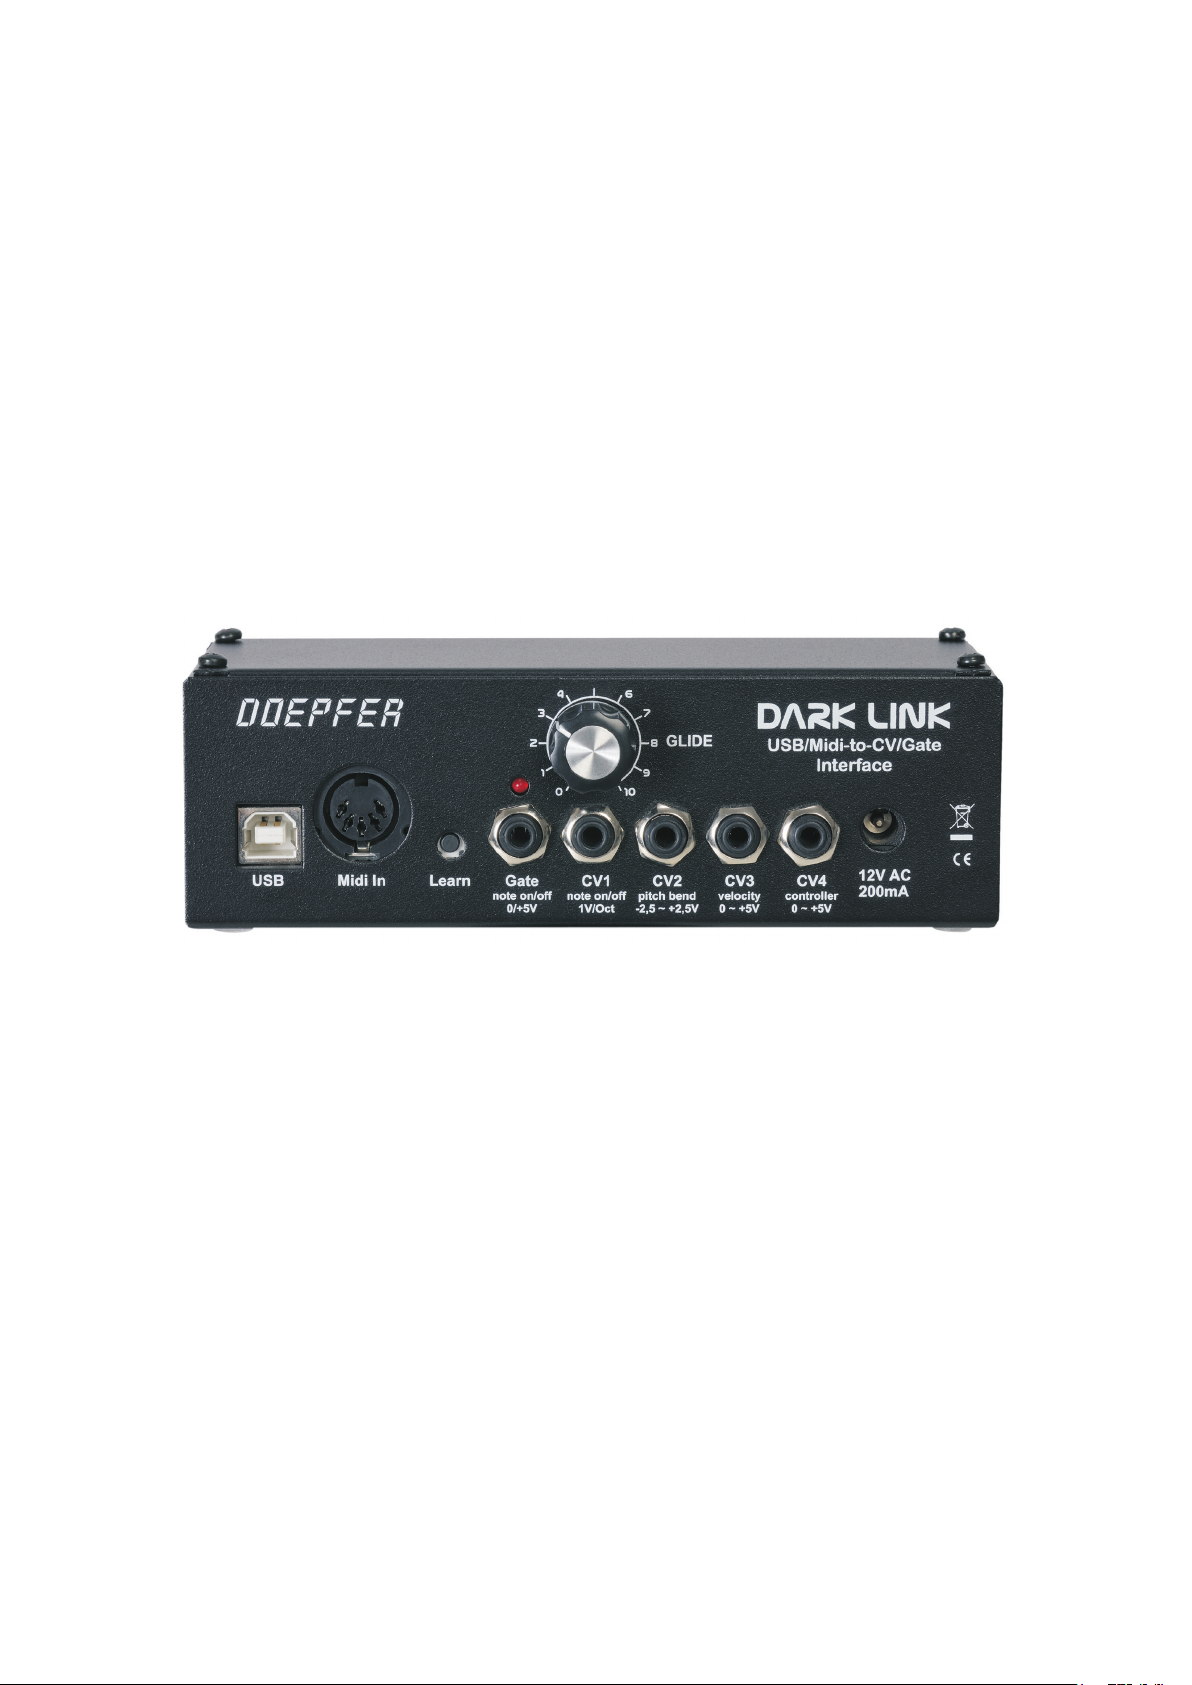
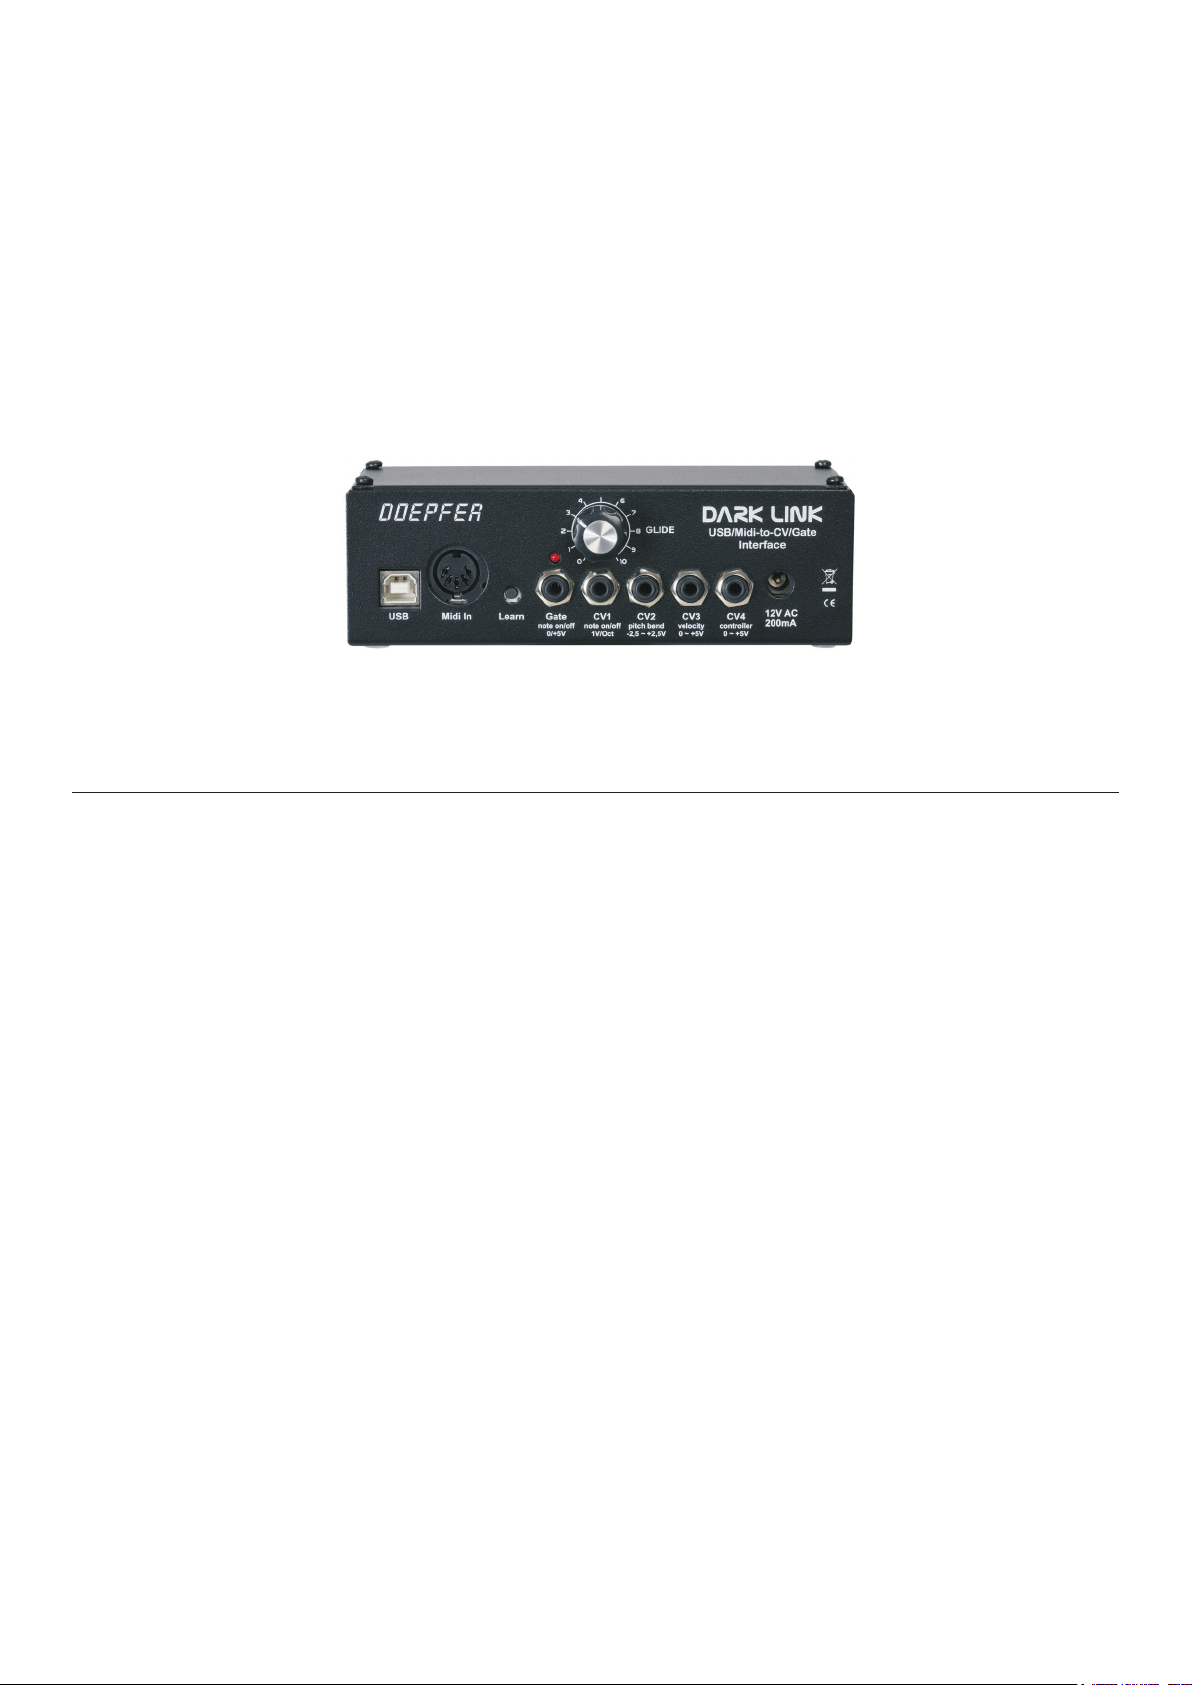
The ve 1/8“ mini sockets provide the four controlvoltages and the gate signal, generated by Dark Link.
GLIDE knob
controls duration of glide effect
between two successive notes
USB
(MIDI via USB)
MIDI input
Learn button
for configuration of
gate-signal and
cv-outs as well as for
control of internal
arpeggiator with the
help of MIDI prgmchange data
Powersupply
(12V AC, 200mA)
CV-Outputs
CV1: controlled by MIDI-note numbers
(1V/Octave, 0...+5V)
CV2: controlled by MIDI-pitchbend data
(centered approx. -2,5...+2,5V or positive 0...+5V,
userselectable via internal jumper)
CV3: controlled by MIDI-velocity data
(0...+5V)
CV4: controlled by MIDI-controller data
(learn mode for setting via controller number, 0...+5V)
Gate-Output:
(with LED, also for learn function),
+/-5V, +/-12V, Switch-Trigger selectable via internal jumper
inverted polarity via learn-mode
8
Page 9

DOEPFER
Dark link
Functions
3. Functions
In this section, we will explore all of Dark Link‘s functions in detail. First, we will have another and more
closer look at the MIDI/USB hookup. Next to this, we will become familiar with Dark Link‘s learn mode and
the way to congure it‘s functions easily via MIDI programm change commands.
3.1. MIDI Connection
To connect Dark Link to your MIDI keyboard / controller / computer there are two easy ways to do so:
• MIDI via USB or
• the „traditional“ MIDI-connection via DIN socket.
• USB: To hook up Dark Link in your MIDI-setup via USB, simply connect the included USB cable with Dark
Link and with an unused USB port on your Mac or Windows PC.
Mac OSX, Windows XP (SP2 or higher), and Windows Vista offer the necessary drivers and Dark Link will
be mounted as soon as it has been connected. You will nd a new MIDI port in your MIDI application, named „USB audio device“ (Windows XP) or „Dark Link“ (OSX, Windows Vista), and you are ready to go.
If this message is missing or an error message is shown, e.g. „USB device not found“, the necessary driver
has most likely not been installed or is not working properly on this computer. In this case, Dark Link‘s USB
port unfortunately cannot be used on this specic computer. We apologize for not being able to support this
particular problem as there can be various reasons for that misbehavior which are very specic and depend
on the individual computer. Of course, you can run Dark Link via the MIDI DIN-connection in such a case
without any problems. The same goes for an older system based on Windows or Mac that does not provide
you with the necessary drivers.
• DIN socket: You may alternatively connect Dark Link via MIDI cable to a MIDI interface, a MIDI keyboard,
or a MIDI hardware sequencer. Simply connect the MIDI output of your MIDI device with Dark Link‘s MIDI
port. Please do not use USB and DIN connections simultaneously.
3.2. MIDI channel selection (Learn button):
In order to enable Dark Link to receive incoming MIDI messages, the MIDI channel of both the MIDI device
and Dark Link have to be identical. This is how you can select Dark Link‘s MIDI channel:
– Select the desired MIDI channel on your MIDI device / software application. Please refer to their
respective user manuals when in doubt.
– Press the „Learn“ button of Dark Link and keep it depressed for at least one second. The
LED will start ashing, showing that Dark Link is in „learn mode“. The delay of one second avoids
accidental use of the „learn“ mode. The ashing LED always indicates Dark Link‘s active learn mode.
For easy access to the „learn“ button you can use a pen or a plug.
– Press the key on your keyboard with the lowest key that your connected CV/gate synthesizer is supposed
to play. This key will set CV1 (pitch CV) to 0 Volt. The available range will cover ve octaves above that
key. The default setting is MIDI note number 36.
– Now you´re done - Dark Links MIDI channel will now correspond to the one of the connected MIDI
device. Dark Link will quit learn mode automatically and return to normal running mode. If you enable
„learn“ mode accidentally, simply hit the „learn“ button again to quit.
When Dark Link receives a MIDI note, the „learn“ LED will turn off briey. You may use this as a MIDI-in
monitor, without the need to connect a sound system.
9
Page 10

DOEPFER
Dark link
Functions
3.3.2. MIDI to CV/Gate interface
The „USB/MIDI-to-CV/Gate“ interface generates not only a pitch control voltage and a gate signal to trigger
the envelope with, it also produces several control voltages derived from incoming MIDI velocity and MIDI
controller data. The MIDI-to-CV interface also features a simple but useful arpeggiator and a so-called
reference pitch. You have encountered the reference tone before when you selected the MIDI channel it was the MIDI note that set Dark Link‘s pitch CV1 to 0 Volts and thus became the lowest key of Dark Link‘s
resp. of the connected CV/gate synthesizer‘s key range.
All CVs and the gate signal can be tapped from sockets on the front of Dark Link. Use patch cords or
adapter cords to connect them with the suitable inputs on your CV/gate controlled synthesizer. In case,
your synthesizer is equipped with the suitable inputs, you can control it‘s most important sound parameters
dynamically via MIDI velocity and a MIDI controller.
Depending on the incoming MIDI data (note on/off, notenumber, pitch bend, MIDI controller, velocity), the
interface will generate:
• The gate signal for the envelope generator: The level of the gate-signal (5V or 12V) as well as
switch trigger (needed for some vintage Moog and Korg synthesizers) can be selected via an
internal jumper on the board of Dark Link. Default setting is +5V. Please refer to page 15/16.
Polarity can be inverted via learn-function. More on this on page 12, note (4).
• CV1: controlled by MIDI note numbers;
1V/oct scaling
Range: 0…+5V
• CV2: controlled by MIDI pitch bend data (ranges approx. –2.5V to +2.5V or 0V to +5V,
selectable via internal jumper). Default setting is –2,5V to +2,5V. Please refer to page 15/16.
• CV3: controlled by volume or the sum of volume and velocity (selectable via learn mode).
Please refer to page 11, note (2).
Range: 0…+5V.
• CV4: controlled by a freely selectable MIDI controller or the product of controller data and
velocity (controller number selectable via learn mode).
Please refer to page 11, note (2).
Range: 0…+5V.
10
Page 11

DOEPFER
0
1
2
3
4
5
#4
0
1
2
3
4
5
14
15
16
17
18
19
20
21
22
#4
Dark link
Functions
3.4. Learn Mode / MIDI Functions
In „learn“ mode you will determine how Dark Link will process incoming MIDI data. In addition to this, you
will control the settings of the internal arpeggiator and set the reference tone which will determine the lowest key of Dark Link‘s resp. your connected CV/gate synthesizer‘s keyboard range.
You can access each function via MIDI program changes. The table below lists all functions. The notes (1)
to (10) explain all functions in detail.
Function
MIDI-Chan / Ref-Note
o
on
o
on
O
On
Trigger Polarity Normal
Key-Assign-Mode
MIDI-Message
Program Change #7 6 (4)
Program ChangeTrigger Polarity Inverted
Counting Counting Note
0
1
2
#4
#8
3
4
5
7
14
15
16
17
18
19
20
21
22
(4)
Short Explanation
Volume
Volume Velocity
internal Tempo
external Tempo
any MIDIController (except
Bank-Controller
Ctrl#032
Notes:
(1) MIDI channel/reference for CV1=0V
In case of an incoming note event in learn mode, the note number and the channel of the event will be
taken as the new reference tone and MIDI channel of Dark Link. The reference key will be the MIDI note
number that is assigned to 0V CV1 output. In practice you simply enter the learn mode and press the key
on your MIDI keyboard that is supposed to be 0V CV1. MIDI note events below the reference note or higher
than 5 octaves above the reference note will be ignored as the CV1 voltage range of Dark Link
is 0...+5V. The factory default settings of reference key and MIDI channel are note number 36 (C) and
channel 1.
11
Page 12

DOEPFER
For setting these parameters, MIDI Program Change messages coming from your MIDI device are used.
Normally, you will have to press the program change keys on your MIDI keyboard or MIDI synthesizer while
in „learn“ mode. Bear in mind that some manufacturers count the MIDI program change numbers from 0 to
127 rather than from 1 to 128 as dened by the MIDI standard. If the lowest program change number you
can send with your MIDI device is 0 (zero), you have to subtract 1 from the program change numbers in the
table above because in this case the program changes of your device range from 0 to 127 instead of 1 to
128. For some devices (especially software sequencers) the type of program change numbering
can be selected. In this case you should use the 1 to 128 range to comply with the numbers in the table
above.
The program change messages must be sent on Dark Link‘s MIDI channel (please refer to section „MIDI
channel selection / learn button“ on page 9).
(2) Velocity on/off
These program-change messages are used to select whether the note-on velocity affects the control volta-
ges CV3 and / or CV4. If velocity is „off“, only volume (CV3) respectively the unassigned controller (CV4) is
used to generate the control voltage. If velocity is „on“, the volume or controller value is multiplied with the
note-on velocity, i.e. the CV value changes with every new note event as the velocity of the note event is
used to calculate the control voltage together the volume message (CV3) resp. the unassigned controller
(CV4).
Dark link
Functions
(3) Retrigger on/off
With this parameter you can select whether a new gate/trigger pulse is generated when playing legato (i.e.
playing a new key on the keyboard without releasing the key played previously). The factory default setting
is „retrigger off“. Additionally, the MIDI controllers legato (controller #68) and sustain (controller #64) affect
the gate output in the usual way.
(4) Trigger polarity
With this function you may select between not inverted/normal trigger (meaning +5V/+12V when key
is pressed and 0V when no key is pressed) and inverted trigger (meaning 0V when key is pressed and
+5V/+12V when no key is pressed). If your synthesizer might behave in a reversed way (envelopes are
started when key is released instead of being pressed) please simply change the trigger polarity.
When Dark Link generates a switch trigger (see page 15/16), the polarity also has to be inverted.
(6) CV1 Key Assign Mode (Note Priority)
These program change messages adjust the type of assign modes for CV1.
• If „highest note“ is selected, the highest key pressed on the MIDI keyboard is used to calculate CV1 if
more than one key is being held.
• In the „last note mode“ always the last note played (chronologically) is taken as CV1. „Reference note“
means that only the reference note is accepted. This feature is useful if you want to trigger different
devices from the same MIDI channel using two or more Dark Link‘s. In this case you have to set the
reference keys for each Dark Link unit to a different value.
12
Page 13

DOEPFER
(7) Arpeggiator
Dark Link features an internal arpeggiator. An arpeggiator splits the notes of a sustained chord into a successive pattern of single notes. In music, splitting chords into a pattern of successive pitches is generally
called „arpeggio“. Dark Link‘s arpeggiator makes use of the following parameters:
• Tempo of the arpeggio can be determined by Dark Link itself or synced to an external MIDI device.
• Direction is dened by the order in which the keys have been played on the keyboard.
• Playback Mode:
– On/off: Enables the arpeggiator. Set to „on“, a key has to be depressed to become part of the
arpeggio. As soon as a key is released, the note will be deleted from the arpeggio pattern. In other
words: Only sustained keys will be played back as an arpeggio.
– Hold: In contrast to the „On“ mode, notes will still be played back after the corresponding
key has been released. The notes will be deleted from the pattern as soon as they are
played a second time. Imagine this function was a „toggle switch“.
– Overwrite: Again, the notes will be played back in the same order in which they have been
played on the keyboard. After the sixth note (maximum capacity), the arpeggio will start all
over again. This mode will „collect“ played keys, deleting notes selectively is not possible.
The entire pattern will be deleted when the arpeggiator is stopped.
Dark link
Functions
(8) Arpeggiator Sync - internal
Dark Link‘s arpeggiator generates its own clock signal. The tempo can be controlled via MIDI modwheel
data. Since a modwheel can be found on almost every MIDI keyboard, it is a useful controller to set the
tempo of the arpeggiator in realtime (see below).
(9) Arpeggiator Sync - external (MIDI clock)
The arpeggiator receives tempo data from an external device via the USB/MIDI input. It will process the
so-called MIDI realtime events: MIDI Start, Stop, Continue, Clock.
Please note: The arpeggiator will run only if these events are generated and sent by the master MIDI
device!
The following realtime parameters can be controlled by several MIDI controller messages (these parameters cannot be saved. After powering down/up Dark Link, they will return to their default settings).
• Tempo
– MIDI controller 1 (Modwheel)
– Value range: 0 - 127
– Value 0 = Stop
• Gate length (note length)
– MIDI controller # 0
– Value range: 0 - 127
(Devides the MIDI-clock value or the value of the internal clock. Devider is 1/96.)
13
Page 14

DOEPFER
• Octave
– MIDI controller # 0
– Value range: 0 - 6
(The pattern will be transposed up to 7 octaves, until it starts again with note „one“.)
Since Dark Link‘s note range covers a maximum of 5 octaves, higher notes will be ignored and
produce „pauses“ within the pattern. This effect can be used in a creative way to create musical
phrases.
Example: With the setting „octave 1“, the played chord A3-C4-F4-G4 will produce exactly the same
pattern. Using „octave 2“ instead results in the pattern A3, C4, F4, G4, A4, F5, G5 and so on.
(10) MIDI controller for CV4
If Dark Link receives a MIDI controller message (except bank controller # 0 and # 32) while in „learn mode“,
the controller number of this message will dene the controller number for CV4, for instance, the CV4
output of Dark Link will correspond to this controller number from now on. The controller message must be
sent on Dark Link‘s MIDI channel (see section „MIDI channel / Learn mode“ on page 17).
Controller # 0 and # 32 (Bank Change) will be ignored and cannot be „learned“.
Whenever Dark Link receives one of the MIDI messages listed in the table above, the parameter in questi-
on will be changed and Dark Link will return to normal play mode, i.e. the LED will stop ashing. Make sure
that no accidental MIDI messages appear while in learn mode (e.g. from a sequencer) as you alter the settings of Dark Link by such MIDI messages. All parameter changes made while in learn mode are stored in
Dark Link´s non-volatile parameter memory. When Dark Link is turned on next time, the parameter settings
will be loaded from this memory.
Dark link
Functions
3.5. The GLIDE control
A popular effect – or rather playing technique – is letting one note‘s pitch
slide gradually to the pitch of the note played next. You get this effect (on a
suitably equipped synthesizer) when hitting a new key before releasing the
preceding one (i. e. legato playing). This function is also part of Dark Link.
Synthesizers that do not feature this function can now easily be tricked into
doing it without any further modications necessary. Cool stuff, eh?
Unfortunately, some vintage synthesizers lose their built-in glide function
when controlled by external CV/gate signals (e.g. Moog Prodigy). These
instruments will also benet from Dark Link‘s glide function.
Dark Link´s GLIDE knob sets the time that it takes a note to slide up or down to the pitch of the note played
subsequently. Simply turn the knob to the desired value to enable Dark Links glide function. The glide
function affects CV1.
3.6. Resetting Dark Link
In order to return to the factory settings of all parameters, you have to reset the device. This might be useful
if, for instance, you do not remember the last parameter settings (e.g. MIDI channel, reference note, con-
troller # for CV4, key assign mode) or if they are out of alignment. If your Dark Link seems to behave in
strange ways and you do not know how to solve the problem, resetting the device may help as the values
of all parameters will be restored after the reset.
14
Page 15

DOEPFER
To reset the device, depress and hold the learn button while the power supply is plugged in. The LED will
light up and you have to keep the button depressed for a few seconds until the LED starts ashing. Pressing the button again gets you back into normal operation mode and the LED will turn on.
After resetting, Dark Link‘s parameters are set to the following default values:
- MIDI channel 1
- Reference note 36 (i.e. the lowest „C“ on a standard 5-octave keyboard)
- Retrigger: on
- CV3: volume (controller #7)
- CV4: modulation (controller #1)
- Key assign mode: highest note
- Internal Arp-Tempo: approx. 120 BPM
- Gate length: 6
- Octave: 1
- Arppeggiator Sync: internal
These values are identical with the factory default settings.
Dark link
Functions
3.7. Firmware Update
Dark Link‘s rmware can easily be updated via USB. In case a new rmware version is available, you can
download it from our website (www.doepfer.de). A detailed description of the update process can be found
in the additional technical description of Dark Link. You can download this documentation here:
www.doepfer.de -> Products -> Dark Link -> Additional technical documentation
3.8 Changing gate signal and CV2 range by setting internal jumpers (ser-no. 112700 and
higher)
• Dark Link can generate gate signals of 5V or 12V as well as switch triggers. You can select the desired
trigger signal by simply setting the internal jumper JP1 on Dark Links circuitboard.
• The MIDI pitchbend related control voltage CV2 can have two different ranges: -2,5V to +2,5V or 0V
to +5V. Please select the desired voltage range by setting the internal jumpers JP2A / JP2B on Dark
Links circuitboard.
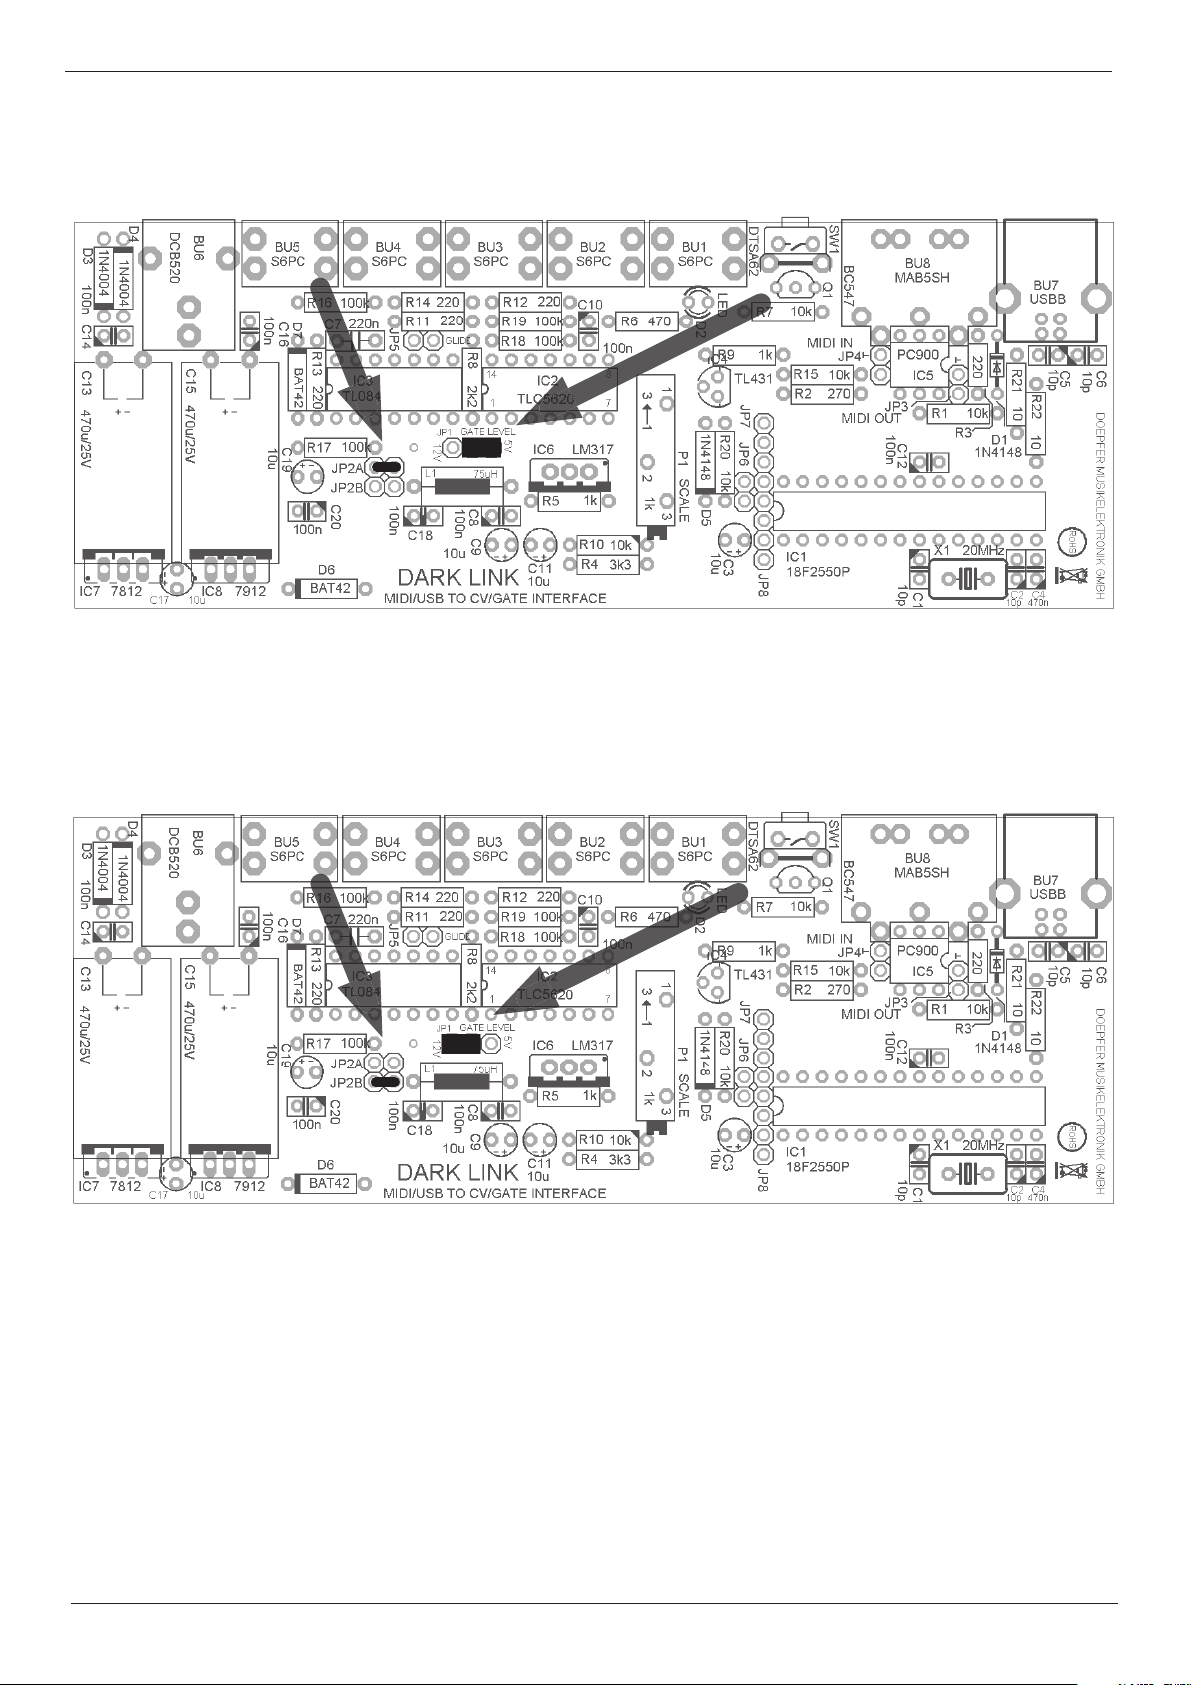
How to set the jumpers JP1 and JP2A / JP2B:
• Pull off Dark Links power plug and open the box carefully with a tting scewdriver.
• Localise jumper JP1 and jumpers JP2A / JP2B on the circuitboard (see page 16).
• Set the jumper into the desired position. Avoid touching other parts and soldering side of the
circuitboard.
• Close the box again.
15
Page 16
DOEPFER
JP1 position for 5 Volts gate signal (middle and rightmost contacts – default setting)
JP2 position for CV2 range -2,5V to +2,5V (set to JP2A – default setting)
Dark link
Nuts‘n bolts of MIDI-CV/Gate conversion
JP1
JP2A
JP1 position for 12 Volts trigger (middle and leftmost contacts)
JP2 position for CV2 range 0V to +5V (set to JP2B)
JP1
JP2B
To generate a switch trigger, the jumper (JP1) has to be taken off.
Please note that it is necessary to invert the trigger polarity when generating a switch trigger.
Please refer to page 12, note (4).
16
Page 17

DOEPFER
Dark link
Nuts‘n bolts of MIDI-CV/Gate conversion
4. Nuts and bolts of MIDI to CV/Gate conversion
As you may certainly know, synthesizers from the early days of electronic music (1970s and early 1980s)
used so-called „analog“ sound generators. Oscillators, lters, and ampliers generated and processed
sound while parameters as pitch, timbre, and volume were controlled by analog voltages. The voltage that
controls pitch is usually generated by the instrument‘s keyboard: The further up the keyboard, the higher
the control-voltage and thus the higher the pitch of the note generated by the oscillator. Easy as that.
The loudness contour of an analog synthesizer is generated by an envelope generator. This requires a
certain signal to get it started, the ”gate” or ”trigger” which is also generated by the keyboard. To make a
long story short: To make an analog synthesizer produce a sound (in the most simple case), a control
voltage to determine pitch, and a gate signal to re off some tone, are required.
When MIDI came up, the technology to control a synthesizer with changed completely. MIDI transmits
pitch, loudness, note-on, and note-off information as digital data (plus some additional stuff as well).
To connect both worlds – i. e. the integration of a classic analog synthesizer into a contemporary MIDIbased setup – we need a converter that translates digital data into analog voltages. This is exactly what
Dark Link does.
In those days of yore (see above), not all specications were subject to technical standards. Some manufacturers opted for their own designs. Due to these idiosyncracies, some of the most sought-after vintage
synthesizers have different specications in terms of controlling pitch and ring off envelope generators.
You ought to keep this in mind when using them in connection with a MIDI to CV/Gate interface.
Voltage control of pitch / scaling
With most analog synthesizers, increasing the voltage controlling pitch by one volt means increasing pitch
by one octave. This so-called volt/octave scaling has since become a common standard and is still valid for
contemporary analog synthesizers. Doepfer´s A-100 modular system and the Doepfer compact synthesizer
Dark Energy also use this standard. That is why Dark Link makes use of it as well. Alas, a handful of
vintage synthesizers (e.g. Korg MS-models and Yamaha CS-models) make use of different types of
scaling, thus cannot be played tonally in combination with Dark Link.
On most analog synthesizers the input socket for controlling pitch externally is labeled ”KBD in”, ”VCO CV
in”, „KEY Volt in”, ”Oscillator CV in” or something along these lines. Plug Dark Link´s CV1 into this input.
Gate
There are also different ways of getting the envelope generators of some synthesizers going. The most
commonly used standard is a positive gate signal, i. e. a positive voltage when a key is held down and zero
volts when no key is depressed. Nearly all manufacturers of now classic synthesizers made use of that
system, e.g. Roland, ARP, Oberheim, Sequential, you name it. If your synthesizer is one of the rare breed
that works in a reversed way (a positive voltage when no key is pressed and zero volts when a key is
depressed), Dark Link can be set up to match this as well (see page 12, note (4)). If that is no good news,
we honestly do not know what is.
The is also no commen standard concerning the level of the gate signals on vintage synths. Some
manufacturers used voltages around 5 V, others 10-12V. Again – Dark Link is prepared: Simply set an
internal jumper to adapt the gate-voltage setting to your needs. Please refer to page 15/16 of this manual.
17
Page 18

DOEPFER
Some vintage Moog synthesizers (e.g. the Mini Moog or the Prodigy) require a so-called ”switch trigger”
or ”s-trigger”. Setting the internal jumper on Dark Link‘s board will enable it to generate a switch trigger as
well. Please bear in mind that you reverse trigger polarity by using switch trigger. If your synthesizer behaves strange (in an undesired way, mind you) like envelopes being triggered when a key is released rather
than being pressed, please simply change the trigger polarity of Dark Link.
With most analog synthesizers, the input socket for an external gate signal is labeled ”GATE in”, „TRIG in”,
„S-TRIG in”, „KBD in” or something like that. Connect it to Dark Link´s CV1 output.
Additional Control Voltages
Dark Link can generate three additional control voltages that can be very handy when it comes to
addressing further parameters of your analog synthesizer.
CV2 is derived from the pitch bend information of the MIDI-keyboard connected. If your synthesizer sports
an additional input for pitch control, use this in connection with CV2. In oder to use CV2 as exibel as possible, it‘s range can be selected between -2,5V to +2,5V or 0V to +5V by setting an internal jumper. Please
refer to page 15/16.
Dark link
Nuts‘n bolts of MIDI-CV/Gate conversion
CV3 is derived from the velocity information of the MIDI-keyboard connected. Patch CV3 into the lter and/
or amplier control-voltage inputs of your synthesizer. This gives dynamic control of timbre and/or volume –
just like on a modern synth.
With most analog synthesizers, the input sockets for external lter and volume modulation are labeled
”VCF in”, ”VCF fcM”, “Filter-CV” or, respectively, ”VCA”, ”Volume“, “Loudness“ or something like this.
Connect these to Dark Link´s CV3 output.
CV4 is derived from a user-selectable MIDI controller, generated by the MIDI-keyboard connected. The
most commonly used MIDI controller would be #1 which is the mod wheel. Depending on the interfacing
options of your synthesizer, you can use this control voltage in various ways.
In case your analog synthesizer is not equipped with standard mini jacks (1/8“), please use matching
adaptor cables.
18
Page 19

DOEPFER
Dark link
Addendum
5. Addendum
Service and terms of warranty.
Concerning service and warranty conditions, please refer to our terms of business.
You will nd our terms of business at:
www.doepfer.de
Doepfer Musikelektronic GmbH
Geigerstr. 13
D-82166 Gräfelng / Deutschland
EG Conformity
Für das als Doepfer Musikelektronik GmbH „Dark Link“ bezeichnete Produkt wird hiermit bestätigt, dass es den
Schutzanforderungen entspricht, die in der Richtlinie 89/336/FWG des Rates zur Angleichung der Rechtsvorschriften der
Mitgliedsstatten über die elektromagnetische Verträglichkeit festgelegt sind. Es entspricht außerdem den Vorschriften des Gesetzes
über die elektromagnetische Verträglichkeit von Geräten (EMVG) vom 30. 08. 1995. Zur Beurteilung des Produkts wurden folgende
harmonisierende Normen herangezogen:
EM 50 082-1: 1992, EN 50 081-1 : 1992, EN60065 : 1995
Please refer to our website „terms of business“.
Disposal
This device complies to the EU guidelines and is manufactured RoHS conform without the use of led, mercury, cadmium and
chrome. Still, this device is special waste and disposal in household waste is not permitted.
For disposal, please contact your dealer or :
Doepfer Musikelektronik GmbH, Geigerstr. 13, D-82166 Gräfelng / Deutschland
IMPRINT
Owners Manual by Matthias Fuchs / VISOPHON, Berlin, Germany
English version tweaked and adjusted by Stephen Parsick / doombient music, Bielefeld, Germany
Copying, distribution or any commercial use in any way is prohibited and needs the written permission by the manufacturer.
Specications subject to change without notice.
Although the content of this owners manual has been thoroughly checked for errors, Doepfer Musikelektronik GmbH cannot
guarantee that it is error-free throughout. Doepfer Musikelektronik GmbH cannot be held liable for any misleading or incorrect
information within this guide.
doepfer
Doepfer Musikelektronik GmbH
D-82166 Gräfelng / Deutschland
All rights reserved ©2011 Doepfer Musikelektronik GmbH
Geigerstr. 13
www.doepfer.de
19
Page 20

Dark link
DOEPFER MUSIKELEKTRONIK GmbH
 Loading...