

Page 1

Owner’s Manual Supplement
Uconnect® 8.4/8.4N
Page 2

SECTION PAGE
SAFETY GUIDELINES .........................................................3
1
INTRODUCTION .............................................................5
2
RADIO MODE ...............................................................11
3
DISC MODE . . . . . . . . . . . . . . . . . . . . . . . . . . . . . . . . . . . . . . . . . . . . . . . . . . . . . . . . . . . . . . . . 31
4
USB/IPOD® MODE . . . . . . . . . . . . . . . . . . . . . . . . . . . . . . . . . . . . . . . . . . . . . . . . . . . . . . . . . . . 37
5
AUX MODE . . . . . . . . . . . . . . . . . . . . . . . . . . . . . . . . . . . . . . . . . . . . . . . . . . . . . . . . . . . . . . . . . 45
6
SD CARD MODE . . . . . . . . . . . . . . . . . . . . . . . . . . . . . . . . . . . . . . . . . . . . . . . . . . . . . . . . . . . . 49
7
BLUETOOTH® MODE . . . . . . . . . . . . . . . . . . . . . . . . . . . . . . . . . . . . . . . . . . . . . . . . . . . . . . . . 57
8
NAVIGATION (8.4N ONLY) . . . . . . . . . . . . . . . . . . . . . . . . . . . . . . . . . . . . . . . . . . . . . . . . . . . . . 61
9
MORE & SETTINGS .........................................................111
10
TABLE OF CONTENTS
1
2
3
4
5
6
7
8
9
10
Page 3

Page 4

SAFETY GUIDELINES
CONTENTS
! SAFETY GUIDELINES .....................4
1
Page 5
4SAFETYGUIDELINES
SAFETY GUIDELINES
Ensure that all persons read this manual carefully before
using the radio system. It contains instructions on how to
use the system in a safe and effective manner.
WARNING!
ALWAYS drive safely with your hands on the
steering wheel. You have full responsibility and
assume all risks related to the use of the
Uconnect® features and applications in this
vehicle. Only use Uconnect® when it is safe to
do so. Failure to do so may result in an accident
involving serious injury or death.
• Use these features only when safe to do so. If prolonged viewing of the screen is required, park in a safe
location and set the parking brake.
• Stop use immediately if a problem occurs. Failure to
do so may cause injury or damage to the product.
Return it to your authorized dealer to repair.
• Make certain the volume level of the system is set to a
level that still allows you to hear outside traffic and
emergency vehicles.
The law in some states prohibits the Front Seat DVD
•
Viewer. As a result, it may be disabled prior to delivery
to you. If you move to another state, you should consult
your dealer for the proper enable/disable setting for
your new state. Currently all states prohibit front seat
video viewers except for: Arkansas, Delaware, Georgia,
Hawaii, Idaho, Iowa, Kentucky, Mississippi, Missouri,
Montana, North Dakota and Ohio.
Page 6

INTRODUCTION
CONTENTS
! Uconnect® 8.4 SYSTEM ....................6
2
Page 7

6INTRODUCTION
Uconnect® 8.4 SYSTEM
WARNING!
ALWAYS drive safely with your hands on the
steering wheel. You have full responsibility
and assume all risks related to the use of the
Uconnect® features and applications in this
vehicle. Only use Uconnect® when it is safe to
do so. Failure to do so may result in an accident
involving serious injury or death.
Page 8
INTRODUCTION 7
2
Page 9

8INTRODUCTION
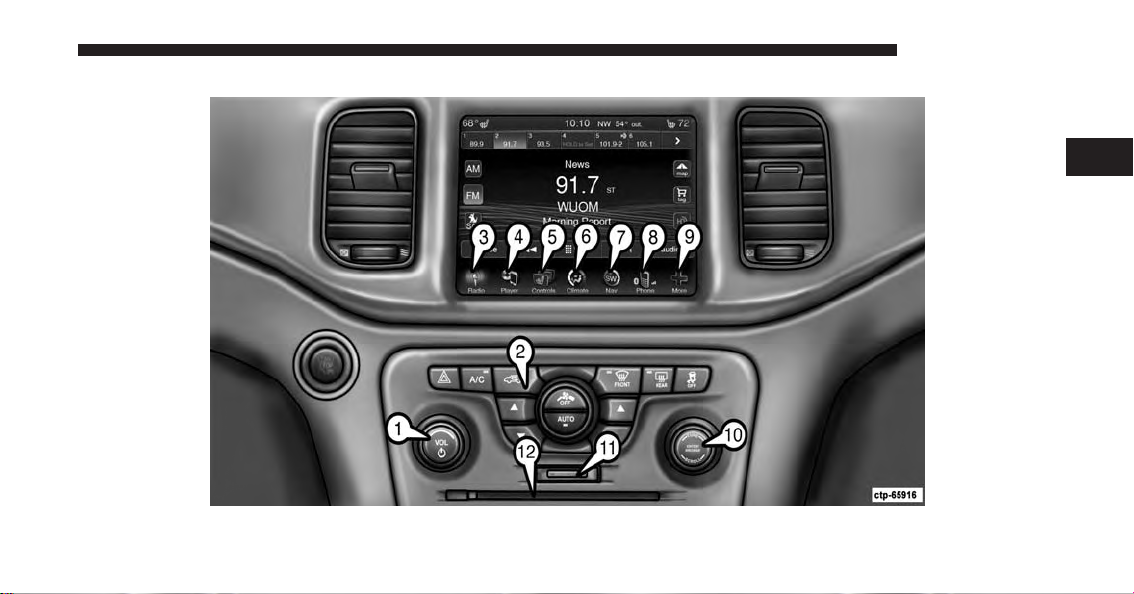
1 — ON/OFF & VOLUME
3 — RADIO
Push the ON/OFF button to turn the system ON or OFF.
Rotate the rotary knob to adjust the Volume.
NOTE: If the ignition is switched OFF with the radio in
standby mode, the radio memorizes the standby mode
when the ignition is turned ON again. Push the ON/OFF
VOLUME Control to turn the radio ON. It is possible to
eject the Disc and to display the time if the system is off.
The navigation software is always working when the
ignition is switched ON, even if the radio is in standby
mode.
2 — CLIMATE CONTROLS (Manual Controls)
Refer to Climate Controls in your vehicles Owner’s
Manual on the DVD for further details.
Press the “Radio” button on the touchscreen to enter the
Radio Mode. The different tuner modes; AM, FM and
SAT can be selected by pressing the corresponding buttons in the Radio Mode.
4 — PLAYER
Press the “Player” button on the touchscreen to access
media sources such as: Disc, USB Device and AUX as
long as the requested media is present.
5 — CONTROLS
Press the “Controls” button on the touchscreen to access
the Settings list. Controls such as; Heated Seats, Heated
Steering Wheel, Vented Seats, etc. can be selected or
turned ON/OFF by pressing the corresponding button.
Page 10

6 — CLIMATE (On-Screen Controls)
INTRODUCTION 9
9 — MORE
Refer to Climate Controls in your vehicles Owner’s
Manual on the DVD for further details.
7 — NAV (8.4N Only)
Press the “Nav” button on the touchscreen to access the
Navigation feature. Refer to the Navigation section in
this manual for further details.
8 — PHONE — If Equipped
Press the “Phone” button on the touchscreen to access the
Uconnect® Phone feature. Refer to the Uconnect® Phone
section in the Owner’s Manual on the DVD for further
details.
Press the “More” button on the touchscreen to access
additional options. Options available such as: Settings
and SiriusXM Travel Link (if equipped) can be accessed
by pressing the corresponding button in the More Menu.
10 — ENTER/BROWSE & TUNE/SCROLL
Push the ENTER/BROWSE button to accept a highlighted
selection on the screen. Rotate the TUNE/SCROLL rotary
knob to scroll through a list or tune a radio station.
11 — SD CARD SLOT
Insert an SD Card containing audio media files to play
them through the vehicle’s sound system.
12 — DISC SLOT
When inserting a disc, ensure the label is facing up. Push
the Eject button to eject the disc.
2
Page 11

Page 12

RADIO MODE
CONTENTS
! OVERVIEW............................13
! COMMON RADIO FUNCTIONS.............13
! SETTING PRESETS ......................17
▫ Browse in AM/FM .....................17
3
▫ ON/OFF & Volume Control ...............13
▫ Tune/Scroll Control.....................14
! SEEK AND DIRECT TUNE FUNCTIONS .......14
▫ Seek Up .............................14
▫ Fast Seek Up..........................14
▫ Seek Down ...........................15
▫ Fast Seek Down .......................15
▫ Direct Tune. . . . . . . . . . . . . . . . . . . . . . . . . . .15
▫ Scrolling Preset List .....................18
▫ Preset Selection From List ................18
▫ Deleting Presets .......................18
▫ Return to Main Radio Screen ..............18
! SiriusXM SATELLITE RADIO MODE —
IF EQUIPPED ..........................19
▫ No Subscription .......................20
▫ Acquiring SiriusXM Subscription ...........20
Page 13

12 RADIO MODE
▫ Replay ..............................21
▫ Traffic & Weather ......................26
▫ Favorites ............................22
▫ Traffic & Weather ......................23
! BROWSE IN SAT ........................23
▫ All. . . . . . . . . . . . . . . . . . . . . . . . . . . . . . . . .23
▫ Presets ..............................24
▫ Favorites ............................24
▫ Game Zone ...........................25
! AUDIO ...............................26
▫ Balance/Fade .........................27
▫ Equalizer ............................27
▫ Speed Adjusted Volume..................28
▫ Music Info Cleanup .....................28
▫ Surround Sound — If Equipped ............29
Page 14
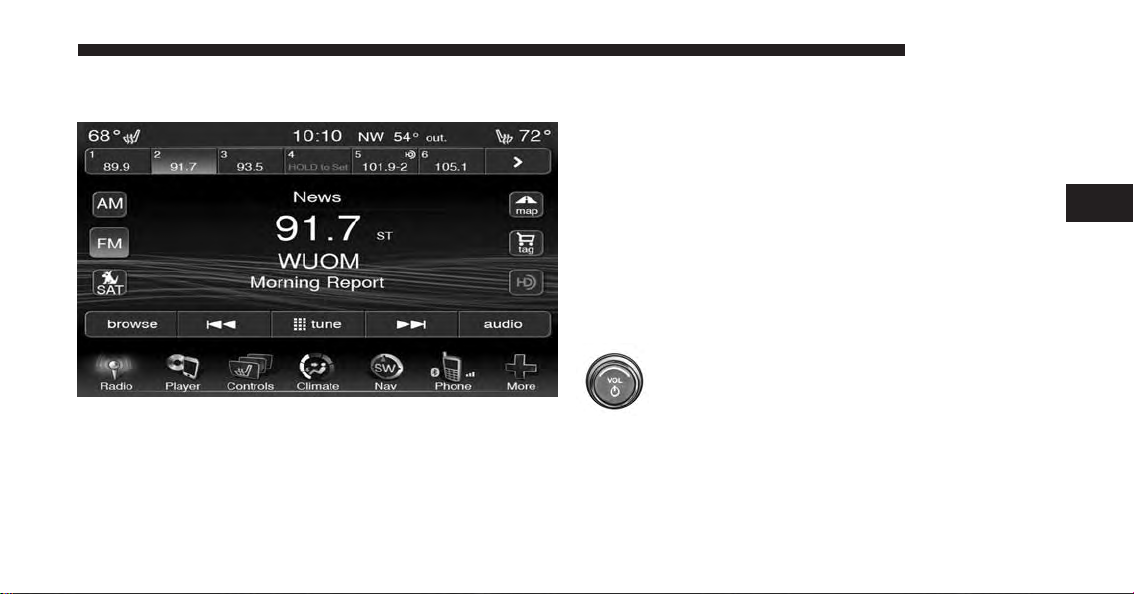
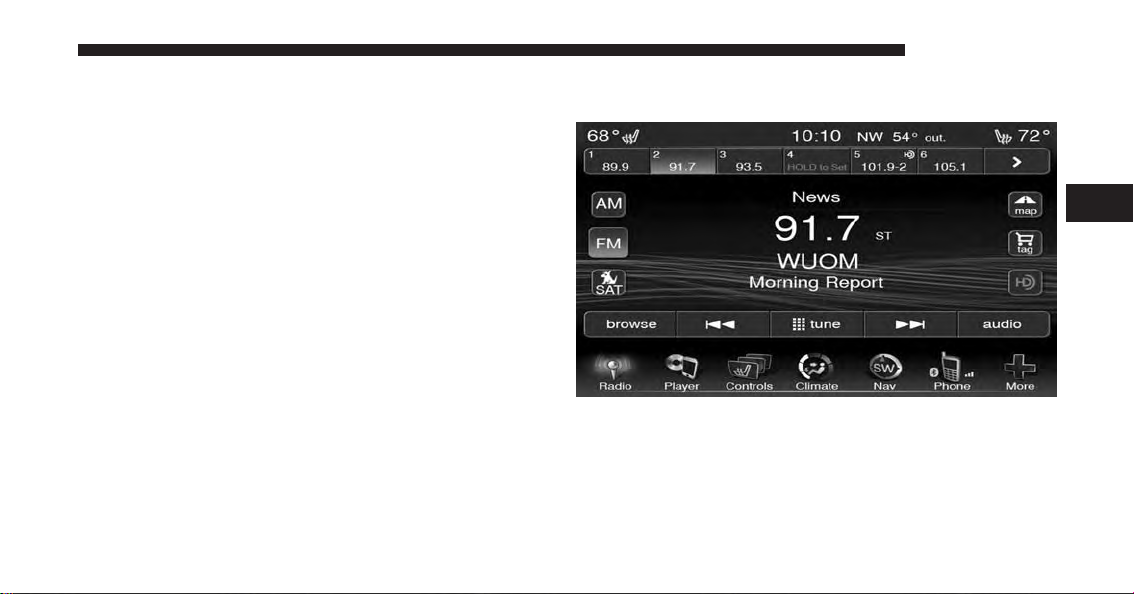
OVERVIEW
RADIO MODE 13
Press the “Radio” button, bottom left corner, to enter the
Radio Mode. The different tuner modes; AM, FM, and
SAT, can then, be selected by pressing the corresponding
buttons in the Radio mode.
The radio is equipped with the following modes:
• FM
• AM
• SAT SiriusXM Satellite Radio (if equipped)
COMMON RADIO FUNCTIONS
The following operations offer the same functionality
across all Radio Modes, and further instructions are
provided where differences exist.
ON/OFF & Volume Control
Push the ON/OFF Volume Control knob to turn
on the radio. Push the ON/OFF Volume Control
knob a second time to turn off the radio.
The electronic Volume control turns continuously
(360 degrees) in either direction, without stopping. Turning the ON/OFF Volume Control knob clockwise increases the Volume and counterclockwise decreases it.
3
Page 15

14 RADIO MODE
When the audio system is turned on, the sound will be
set at the same Volume level as last played.
Tune/Scroll Control
Turn the rotary TUNE/SCROLL control knob
clockwise to increase or counterclockwise to
decrease the radio station frequency. Push the
ENTER/BROWSE button to choose a selection.
SEEK AND DIRECT TUNE FUNCTIONS
The Seek Up and Down functions are activated by
pressing the Double Arrow buttons to the right and left of
the radio station display, or by pushing the left Steering
Wheel Audio Control (if equipped) up or down.
Seek Up
Press and release the Seek Up button on the touchscreen to tune the radio to the next listenable station or
channel.
During a Seek Up function, if the radio reaches the
starting station after passing through the entire band two
times, the radio will stop at the station where it began.
Fast Seek Up
Press and hold the Seek Up button on the touchscreen
to advance the radio through the available stations or
channels at a faster rate, the radio stops at the next
available station or channel when the button on the
touchscreen is released.
Page 16

Seek Down
Press and release the Seek Down button on the
touchscreen to tune the radio to the next listenable station
or channel.
During a Seek Down function, if the radio reaches the
starting station after passing through the entire band two
times, the radio will stop at the station where it began.
Fast Seek Down
Press and hold the Seek Down button on the touchscreen to advance the radio through the available stations
or channel at a faster rate, the radio stops at the next
available station or channel when the button is released.
RADIO MODE 15
Direct Tune
3
Press the “tune” button located at the bottom of the radio
screen. The Direct Tune screen is available in AM, FM,
and SAT radio modes and can be used to direct tune the
radio to a desired station or channel.
Page 17
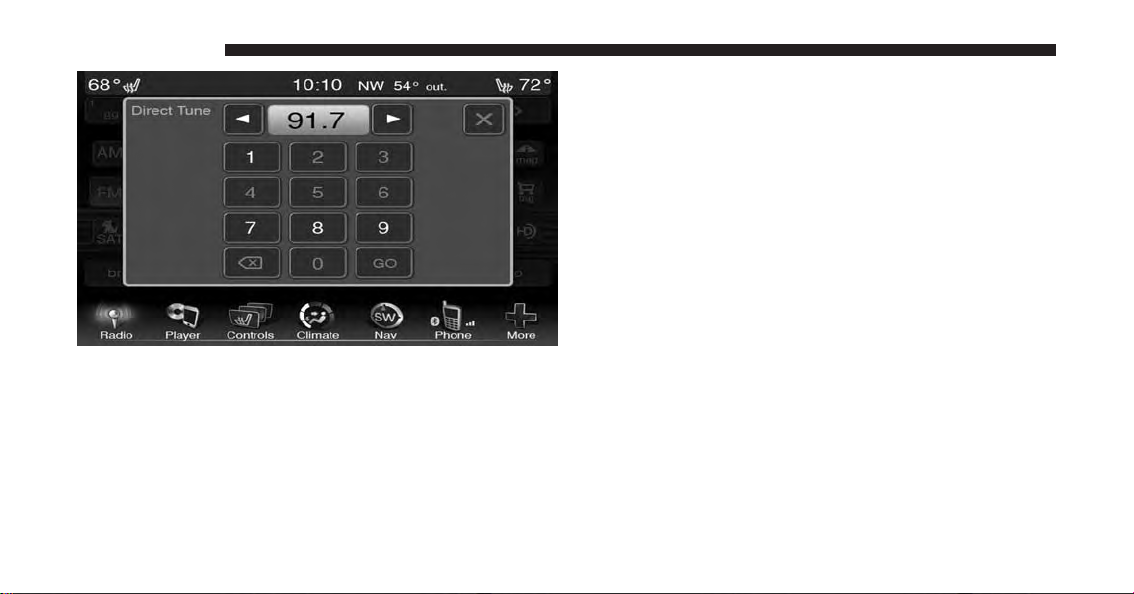
16 RADIO MODE
Press the available number button on the touchscreen to
begin selecting a desired station. Once a number has been
entered, any numbers that are no longer possible (stations that cannot be reached) will become deactivated/
grayed out.
Once the last digit of a station has been entered, the
Direct Tune screen will close and the system will automatically tune to that station.
The selected Station or Channel number is displayed in
the Direct Tune text box.
Undo
You can backspace an entry by pressing the bottom left
“Undo” button.
GO
When pressed, the “GO” button allows the you to commit
an entry, at which time the radio will tune to the entered
station or channel and close the Direct Tune Screen.
Screen Close
The “X” button at the top right closes the Direct Tune
Screen. The Direct Tune Screen also automatically closes
if no activity occurs within 10 seconds.
Page 18
SETTING PRESETS
The Presets are available for all Radio Modes, and are
activated by pressing any of the six “Preset” buttons,
located at the top of the touchscreen.
RADIO MODE 17
Browse in AM/FM
When you are receiving a station that you wish to
commit into memory, press and hold the desired numbered button for more that two seconds or until you hear
a confirmation beep.
The Radio stores up to 12 presets in each of the Radio
modes. A set of 6 presets are visible at the top of the radio
touchscreen.
You can switch between the two radio presets by pressing
the “Arrow” button located in the upper right of the
radio screen.
3
When in either AM or FM, the Browse Screen provides a
means to edit the Presets List and is entered by pressing
the “browse” button on the touchscreen.
Page 19

18 RADIO MODE
Scrolling Preset List
Once in the Browse Presets screen, you can scroll the
preset list by rotation of the Tune Knob, or by pressing
the Up and Down arrow buttons on the touchscreen,
located on the right of the touchscreen.
Preset Selection From List
A Preset can be selected by pressing of the listed “Presets”, or by pushing the ENTER/BROWSE button on the
TUNE/SCROLL knob to select the currently highlighted
Preset.
When selected, the radio tunes to the station stored in the
Preset and returns to the main radio screen.
Deleting Presets
A Preset can be deleted in the Presets Browse screen by
pressing the “Trash Can” icon for the corresponding Preset.
Return to Main Radio Screen
You can return to the Main Radio Screen, by pressing the
“X” button on the touchscreen when in the Browse
Presets screen.
Page 20
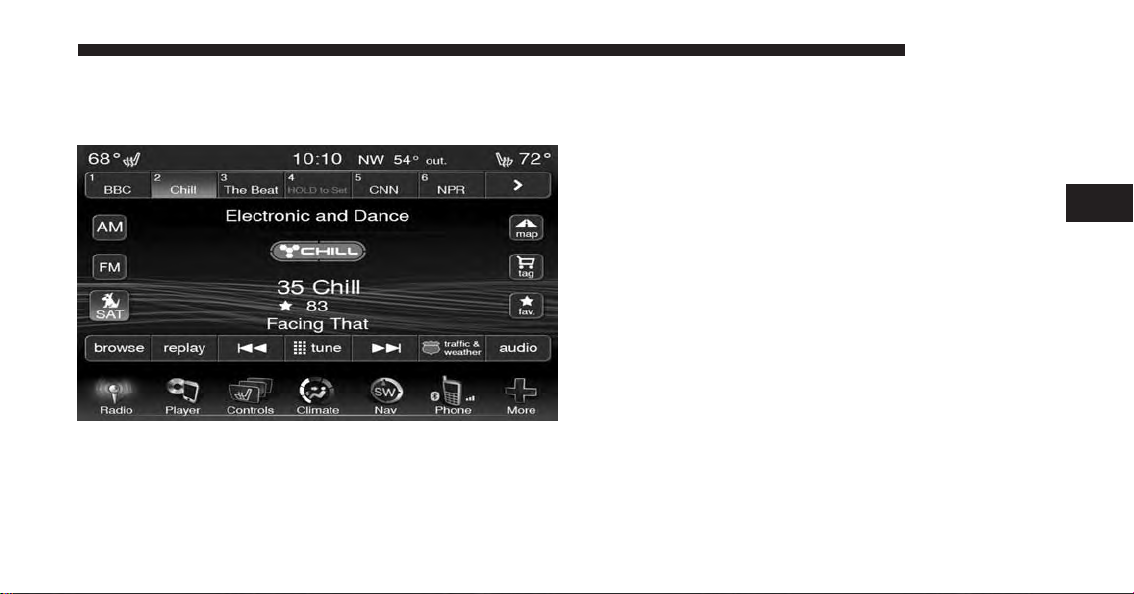
SiriusXM SATELLITE RADIO MODE — IF EQUIPPED
RADIO MODE 19
SiriusXM Premier has over 160 channels. Get every
channel available on your satellite radio, and enjoy all
you want, all in one place. Hear commercial-free music
plus sports, news, talk and entertainment.
SiriusXM Satellite Radio uses direct satellite-to-receiver
broadcasting technology to provide clear, coast to coast
radio content. SiriusXM is a subscription based service.
Get all the premium programming, including Howard
Stern, every NFL game, Oprah Radio®, every MLB®
and NHL® game, every NASCAR® race, Martha Stewart
and more. And get 20+ extra channels, including
SiriusXM Latino, offering 20 channels of commercial free
music, news, talk, comedy, sports and more dedicated to
Spanish language programming.
SiriusXM services require subscriptions, sold separately
after the 12-month trial included with the new vehicle
purchase. If you decide to continue your service at
the end of your trial subscription, the plan you choose
will automatically renew and bill at then-current rates
3
Page 21

20 RADIO MODE
until you call SiriusXM at 1-866-635-2349 to cancel. See
SiriusXM Customer Agreement for complete terms at
www.siriusxm.com
. All fees and programming subject
to change. Our satellite service is available only to those
at least 18 and older in the 48 contiguous USA and D.C.
Our Sirius satellite service is also available in PR (with
coverage limitations). Our Internet radio service is available throughout our satellite service area and in AK and
HI. © 2014 SiriusXM Radio Inc. Sirius, XM and all related
marks and logos are trademarks of SiriusXM Radio Inc.
This functionality is only available for radios equipped
with a Satellite receiver. To receive satellite radio, the
vehicle needs to be outside with a clear view to the sky.
If the screen shows Acquiring Signal, you might have to
change the vehicle’s position to receive a signal. In most
cases, the satellite radio does not receive a signal in
underground parking garages or tunnels.
No Subscription
Radios equipped with a Satellite receiver, require a
subscription to the SiriusXM Service. When the Radio
does not have the necessary subscription, the Radio is
able to receive the Preview channel only.
Acquiring SiriusXM Subscription
To activate the SiriusXM Satellite Radio subscription, call
1-800-643-2112 (USA residents) or 1-888-534-7474 (Canadian Residents). You will need to provide the Sirius ID
(ESN) located at the bottom of the Channel 0 screen.
The SiriusXM Satellite Mode is activated by a press of the
SAT button on the touchscreen.
When in SiriusXM Satellite mode:
• The SAT button is highlighted.
• The SiriusXM Presets are displayed at the top of the
screen.
Page 22

• The Genre is displayed below the Presets Bar.
• The SiriusXM Channel Number is displayed in the
center.
• The Program Information is displayed at the bottom of
the Channel Number.
• The SiriusXM function buttons are displayed below
the Program Information.
Tuning is done by operating the Tune Knob or by Direct
Tune, similar to other Radio Bands, see Presets, browse,
Tune Knob, and Direct Tune.
In addition to the tuning Operation functions common to
all Radio modes, the replay, Traffic/Weather Jump, and
fav button functions are available in SiriusXM Mode.
RADIO MODE 21
Replay
The replay function provides a means to store and replay
up to 22 minutes of music audio and 48 minutes of talk
radio. Once the channel is switched, content in replay
memory is lost.
Press the “Replay” button. The Play/Pause, Rewind/
Forward and Live buttons will display at the top of the
screen, along with the replay time.
You can exit by pressing the “Replay” button any time
during the Replay mode.
Play/Pause
Press the “Pause” or “Play” buttons to pause playing of
the content at any time that the content is playing live or
rewound content. Play can be resumed again by pressing
the “Pause/Play” button.
3
Page 23

22 RADIO MODE
Rewind
Press the “RW” button to rewind the content in steps of
five seconds. Pressing the “RW” button for more than
two seconds rewinds the content. The Radio begins
playing the content when the “RW” button is released.
Forward
Each press of the “FW” button forwards the content in
steps of five seconds. Forwarding of the content can only
be done when the content is previously rewound, and
therefore, can not be done for live content. A continuous
press of the “FW” button also forwards the content. The
Radio begins playing the content when the “FW” button
is released.
Live
Press the “Live” button to resume playing Live content.
Favorites
Press the “Fav.” button to activate the favorites menu,
which will time out in five seconds in absence of user
interaction.
You can exit the Favorites Menu by a press of the “X” in
the top right corner.
The favorites feature enables you to set a favorite artist,
or song that is currently playing. The Radio then uses this
information to alert you when either the favorite song, or
favorite artist are being played at any time by any of the
SiriusXM Channels.
The maximum number of favorites that can be stored in
the Radio is 50.
Fav. Artist
While the song is playing to set a Favorite Artist, press
the “Fav.” button and then the “Fav. Artist” button.
Page 24

Fav. Song
While the song is playing to set a Favorite Song, press the
“Fav.” button and then the “Fav Song” button.
Traffic & Weather
Press the “Traffic & Weather” button to tune to a SiriusXM
Traffic & Weather channel. To set a Traffic & Weather alert
for any one of the cities in the Browse list, see Browse in
SAT.
When the Traffic & Weather button is pressed the Jump
Traffic & Weather channel is tuned.
If the Traffic & Weather alert City is not set you are
presented with a pop up to allow you to select the
favorite city using the Browse Screen.
RADIO MODE 23
BROWSE IN SAT
Press the “Browse” button to edit Presets, Favorites,
Game Zone and Jump settings, along with providing the
SiriusXM Channel List.
This Screen contains many sub menus. You can exit a sub
menu to get back to a parent menu by a press of the “Back
Arrow.”
All
Press the All button on the touchscreen at the left of the
Browse Screen.
Channel List
Press the Channel List to display all the SiriusXM Channel Numbers along with the corresponding Genre. You
can scroll the Channel list by pressing the up and down
arrows, located on the right side of the screen. Scrolling
can also be done by operating the Tune/Scroll Knob.
3
Page 25

24 RADIO MODE
Genre
Press the Genre button to display a list of Genres. You can
select any desired Genre by pressing the Genre list, at
which point, the Radio tunes to a channel with the
content in the selected Genre.
Presets
Press the “Presets” button located at the left of the
Browse screen.
You can scroll the Presets list pressing the “Up and
Down” arrows, located at the right side of the screen.
Scrolling can also be done by operating the TUNE/
SCROLL knob.
Preset Selection
A Preset can be selected by pressing any of the listed
Presets, or by pushing the ENTER/BROWSE button on
the TUNE/SCROLL knob to select the currently highlighted Preset. When selected, the Radio tunes to the
station stored in the Preset, and returns to the main Radio
screen.
Deleting a Preset
A Preset can be deleted in the Presets Browse screen by
pressing the “Trash Can” icon for the corresponding
Preset.
Favorites
Press the “Favorites” button, located at the left of the
Browse screen.
The Favorites menu provides a means to Edit the Favorites list and to configure the Alert Settings, along with
providing a list of Channels currently airing any of the
items in the Favorites list.
Page 26

You can scroll the Favorites list pressing the “Up and
Down” arrows, located at the right side of the screen.
Scrolling can also be done by operating the TUNE/
SCROLL knob.
Remove Favorites
Press the “Remove Favorites” tab at the top of the screen.
Press the “Delete All” button to delete all of the Favorites
or press the “Trash Can” icon next to the Favorite to be
deleted.
Alert Settings
Press the “Alert Setting” tab at the top of the screen. The
Alert Settings menu allows you to choose from a Visual
alert or Audible and Visual alert when one of your
favorites is airing on any of the SiriusXM channels.
RADIO MODE 25
Game Zone
Press the “Game Zone” button on the touchscreen, located at the left of the Browse screen. This feature
provides you with the ability to select teams, edit the
selection, and set alerts.
On Air
Press the “On-Air” tab at the top of the screen. The
On-Air list provides a list of Channels currently airing
any of the items in the Selections list, and pressing any of
the items in the list tunes the radio to that channel.
Select Teams
Press the “Select Teams” button on the touchscreen to
activate the League Scroll list. Press the chosen league
and a scroll list of all teams within the league will appear,
then you can select a team by pressing the corresponding
box. A check mark appears for all teams that are chosen.
3
Page 27

26 RADIO MODE
Remove Selection
Press the “Remove Selection” tab at the top of the screen.
Press the “Delete All” button on the touchscreen to delete
all of the Selections or press the Trash Can icon next to the
Selection to be deleted.
Alert Settings
Press the “Alert Setting” tab at the top of the screen. The
Alert Settings menu allows you to choose from “Alert me
to on-air games upon start” or “Alert upon score update”
or both when one or more of your selections is airing on
any of the SiriusXM channels.
Traffic & Weather
Press the “Traffic & Weather” button to tune to a SiriusXM
Traffic & Weather channel.
Press the “Up and Down” arrows to the right side of the
list to view all the available cities. This operation can also
be done with operation of the TUNE/SCROLL knob.
Press the check box next to the desired City.Acheck mark
appears besides the selected City.
AUDIO
Press the “Audio” button to activate the Audio settings
screen to adjust Balance/Fade, Equalizer and Speed
Adjusted Volume.
You can return to the Radio screen by pressing the “X”
button located at the top right.
Page 28
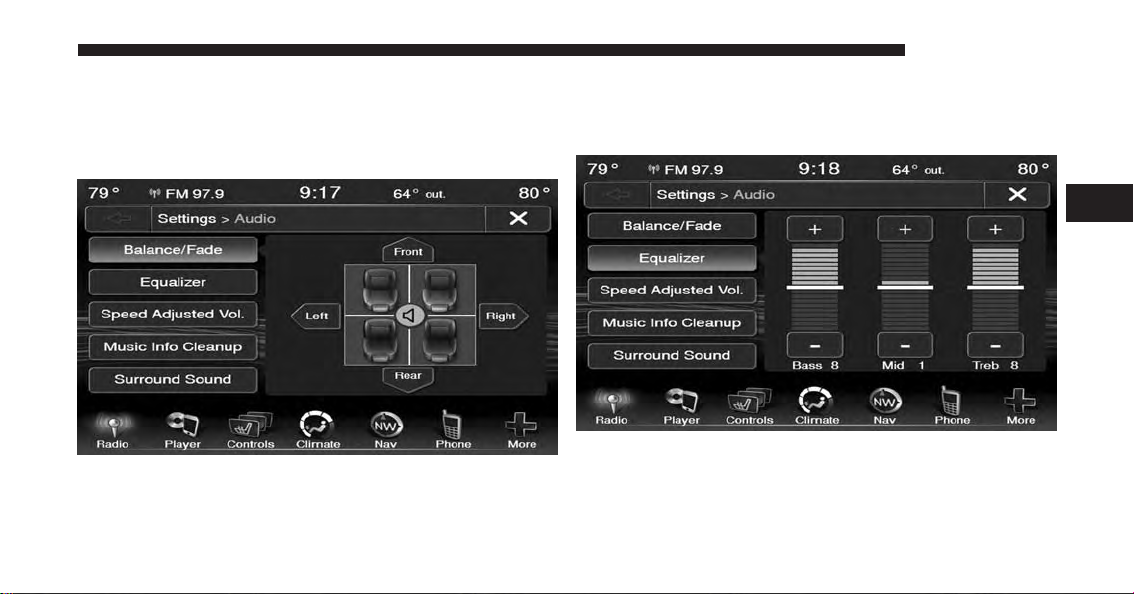
Balance/Fade
Press the “Balance/Fade” button to Balance audio between the front speakers or fade the audio between the
rear and front speakers.
Pressing the “Front,” “Rear,” “Left,” or “Right” buttons
or press and drag the blue “Speaker” icon to adjust the
Balance/Fade.
RADIO MODE 27
Equalizer
Press the “Equalizer” button to activate the Equalizer
screen.
3
Press the “+ or –” buttons, or by pressing and dragging
over the level bar for each of the equalizer bands. The
level value, which spans between ±9, is displayed at the
bottom of each of the Bands.
Page 29
28 RADIO MODE
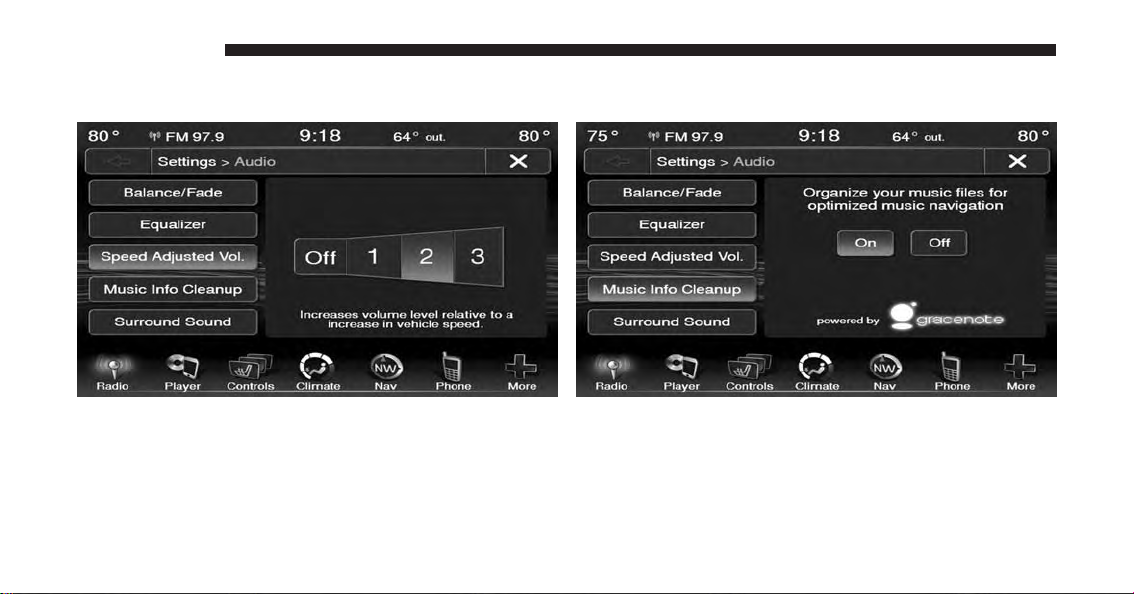
Speed Adjusted Volume
Music Info Cleanup
Press the “Speed Adjusted Volume” button to activate the
Speed Adjusted Volume screen.
Press the “Speed Adjusted Volume” button to select
between “OFF,” “1,” “2” or “3.” This will decrease the
radio volume relative to a decrease in vehicle speed.
Press the “On” button to active the Music Info Cleanup.
Press “Off” to deactivate this feature.
When Music Cleanup is On, the radio uses the
Gracenotes database to display standard normalized
information for song title, artist, album, etc.
Page 30
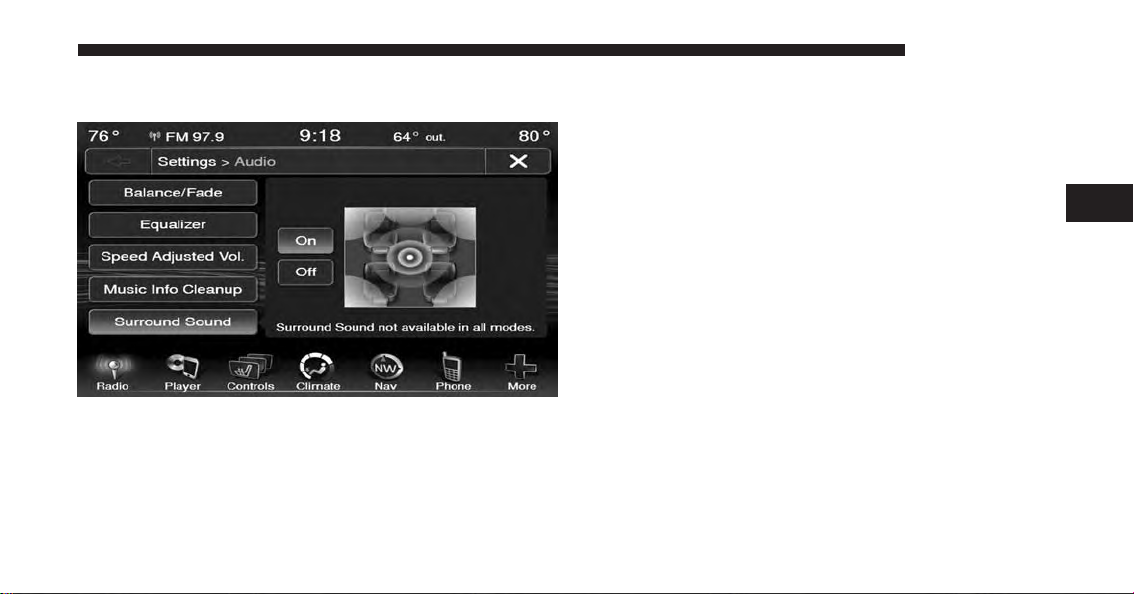
Surround Sound — If Equipped
Press the “On” button to activate Surround Sound. Press
“Off” to deactivate this feature.
When Surround Sound is on, you can hear audio coming
from every direction as in a movie theatre or home
theatre system.
RADIO MODE 29
3
Page 31

Page 32

DISC MODE
CONTENTS
! OVERVIEW............................32
! SOURCE ..............................34
▫ Inserting Compact Disc ..................32
▫ Eject Button — Ejecting A Disc .............33
! SEEK UP/DOWN .......................33
▫ Fast Seek Up..........................33
▫ Fast Seek Down .......................33
! BROWSE..............................34
! REPEAT ..............................34
4
! SHUFFLE .............................34
! INFO ................................34
! TRACKS ..............................35
! AUDIO ...............................35
Page 33

32 DISC MODE
OVERVIEW
Disc Mode is entered by either inserting a Disc or by
pressing the “Player” button located on the bottom of the
display. Once in Player Mode, press the “Source” button
and select Disc.
A “No Disc” message will be displayed on the screen in
the Disc mode when a Disc is not present in the Radio.
Inserting Compact Disc
Gently insert one Disc into the Disc player with the Disc
label facing up. The Disc will automatically be pulled
into the player and the Disc icon will illuminate on the
radio display. If a Disc does not go into the slot more than
1.0 in (2.5 cm), a disc may already be loaded and must be
ejected before a new disc can be loaded.
If you insert a disc with the ignition ON and the radio
ON, the unit will switch to Disc mode and begin to play
when you insert the disc. The display will show the track
number, and index time in minutes and seconds. Play
will begin at the start of track 1.
Page 34

CAUTION!
• This CD Player will accept 4-3/4 in (12 cm) discs
only. The use of other sized discs may damage the
CD player mechanism.
• Do not use adhesive labels. These labels can peel
away and jam the player mechanism.
Uconnect® 8.4 is a single Disc player. Do not attempt
•
to insert a second Disc if one is already loaded.
DISC MODE 33
A disc can be ejected with the radio OFF and ignition in
Accessories (ACC) mode.
SEEK UP/DOWN
Press and release the “Right Arrow” button for the next
selection on the Disc. Press and release the “Left Arrow”
button to return to the beginning of the current selection,
or return to the beginning of the previous selection if the
Disc is within the first second of the current selection.
4
Eject Button — Ejecting A Disc
Press the EJECT button to eject the Disc.
If you push EJECT and do not remove the disk within
10 seconds, it will be reloaded. If the Disc is not removed,
the radio will reinsert the Disc but will not play it.
Fast Seek Up
Press and hold the “Right Arrow” button and the Disc
player will begin to fast forward through the current
track until the button is released.
Fast Seek Down
Press and hold the “Left Arrow” button and the Disc
player will begin to rewind through the current track
until the button is released.
Page 35

34 DISC MODE
BROWSE
Press the “Browse” button to display the browse window.
The left side of the browse window displays a list of ways
you can browse through the contents of the Disc. If
supported by the device, you can browse by Folders,
Artists, Playlists, Albums, Songs, etc. Press the desired
button on the left side of the screen. The center of the
browse window shows items and it’s sub-functions,
which can be scrolled by pressing the “Up and Down”
buttons to the right. The TUNE/SCROLL knob can also
be used to scroll.
REPEAT
Press the “Repeat” button to toggle the repeat functionality. The “Repeat” button is highlighted when active.
The Radio will continue to play the current track, repeatedly, as long as the repeat is active.
SHUFFLE
Press the “Shuffle” button to play the selections on the
compact disc in random order to provide an interesting
change of pace. Press the “Shuffle” button a second time
to turn this feature off.
SOURCE
Press the “Source” button on the touchscreen to select
the desired audio source, Disc/USB/SD Card/AUX/
Bluetooth®. This screen will time out after a few seconds
and return to the main radio screen if no selection is
made.
INFO
Press the “Info” button to display the current track
information. Press the “Info” button a second time to
cancel this feature.
Page 36

TRACKS
Press the “trks” button to display a pop up with the Song
List. The currently playing song is indicated by an arrow
and lines above and below the song title.
Pressing the “trks” button while the pop up is displayed
will close the pop up.
DISC MODE 35
AUDIO
Refer to Operating Instructions — Radio Mode for adjusting the audio settings.
4
Page 37

Page 38

USB/iPod® MODE
CONTENTS
! OVERVIEW............................38
▫ Inserting USB/iPod® Device ..............38
! SEEK UP/DOWN .......................38
▫ Fast Seek Up..........................39
▫ Fast Seek Down .......................39
! BROWSE..............................39
▫ ABC Jump ...........................39
▫ Search ..............................40
▫ Folders — If Equipped...................41
▫ Artist ...............................41
▫ Playlists — If Equipped ..................41
▫ Songs...............................41
▫ Albums .............................42
▫ Genres ..............................42
! SOURCE ..............................42
! REPEAT ..............................42
! SHUFFLE .............................42
! INFO ................................42
! TRACKS ..............................43
! AUDIO ...............................43
5
Page 39

38 USB/iPod® MODE
OVERVIEW
USB/iPod® Mode is entered by either inserting a USB
device or iPod and cable into the USB Port or by pressing
the “Player” button located on the bottom of the display.
Once in Player Mode, press the “Source” button and
select iPod®.
Inserting USB/iPod® Device
Gently insert the USB/iPod® device into the USB Port. If
you insert a USB/iPod® device into the USB port, with
the ignition ON and the radio ON, the unit will switch to
USB/iPod® mode and begin to play. The display will
show the track number and index time in minutes and
seconds. Play will begin at the start of track 1.
SEEK UP/DOWN
Press and release the right arrow button on the touchscreen for the next selection on the USB device/iPod®.
Press and release the left arrow button on the touchscreen
to return to the beginning of the current selection, or
return to the beginning of the previous selection if the
USB device/iPod® is within the first second of the
current selection.
Page 40

Fast Seek Up
Press and hold the “Right Arrow” button and the USB
device/iPod will begin to fast forward through the
current track until the button is released.
Fast Seek Down
Press and hold the left arrow button on the touchscreen
and the USB device/iPod® will begin to rewind through
the current track until the button on the touchscreen is
released.
BROWSE
Press the “Browse” button to display the browse window.
The left side of the browse window displays a list of ways
you can browse through the contents of the USB
device/iPod®. If supported by the device, you can
browse by Folders, Artists, Playlists, Albums, Songs, etc.
USB/iPod® MODE 39
Press the desired button on the left side of the screen.
The center of the browse window shows items and it’s
sub-functions, which can be scrolled by pressing the “Up
and Down” buttons to the right. The TUNE/SCROLL
knob can also be used to scroll.
ABC Jump
Press the “ABC Jump” button tab at the top of the screen
to search an alpha numeric keypad used to search by
letter/number for a certain Folder,Artist, Song, Album or
Genre. Press one letter to select all contents that start with
that letter. Press the “123” button to display all contents
that start with numbers. Press the “123” button again to
return to letters. Press the “X” button to exit the ABC
Jump feature.
5
Page 41

40 USB/iPod® MODE
NOTE: Many features of this system are speed dependent. For your own safety these features may be grayed
out and not accessible while the vehicle is in motion. Pull
over at a safe location to complete your task.
Search
Press the “Search” tab at the top of the screen to display
the Keyboard. This allows you to enter a folder or file
name to be searched.
Page 42

Up Arrow
Press the “Up Arrow” button to toggle between Upper
Case and Lower Case keys.
ABC, ÅØÜ and 1234!&#@
Press the “ABC” key to activate a keyboard with Alphabetic characters, or press the ÅØÜ to activate a keyboard
with accented characters or press the 1234!&#@ key to
activate a keyboard with Numeric plus Special characters.
Folders — If Equipped
Press the “Folders” button on the left side of the screen to
display the Folders scroll menu. The Folders list consists
of folders and files sorted alphanumerically, followed by
a list of files sorted similarly. You can browse the contents
of a subfolder by pressing the Folder Name in the list.
Press the “Back Arrow” button to return or back up to a
previous folder level.
USB/iPod® MODE 41
Artist
Press the “Artist” button on the left side of the screen to
display the Artists list in which you can Scroll, Search
and Jump to operations.
Playlists — If Equipped
Press the “Playlists” button on the left side of the screen
to display the current playlist information.
Songs
Press the “Songs” button on the left side of the screen to
display the Songs list in which the user can Scroll, Search
and Jump to operations.
The currently playing song is displayed with a black
background and lines both above and below the title.
5
Page 43

42 USB/iPod® MODE
Albums
Press the “Albums” button on the left side of the screen
to display the Albums list in which you can Scroll, Search
and Jump to operations.
Genres
Press the “Genres” button to display the Genres list in
which you can Scroll, Search and Jump to operations.
SOURCE
Press the “Source” button on the touchscreen to select
the desired audio source, Disc/USB/SD Card/AUX/ or
Bluetooth®. This screen will time out after a few seconds
and return to the main radio screen if no selection is
made.
REPEAT
Press the “Repeat” button to toggle the repeat functionality. The “Repeat” button is highlighted when active.
The Radio will continue to play the current track, repeatedly, as long as the repeat is active.
SHUFFLE
Press the “Shuffle” button to play the selections on the
USB/iPod® device in random order. Press the “Shuffle”
button a second time to turn this feature off.
INFO
Press the “Info” button to display the current track
information. Press the “Info” button a second time to
cancel this feature.
Page 44

TRACKS
Press the “trks” button to display a pop up with the Song
List. The currently playing song is indicated by an arrow
with lines above and below the song title. When in the
Tracks List screen you can rotate the TUNE/SCROLL
knob to highlight a track (indicated by the line above
and below the track name) and then push the ENTER/
BROWSE knob to start playing that track.
USB/iPod® MODE 43
5
Pressing the “trks” button while the pop up is displayed
will close the pop up.
AUDIO
Refer to Operating Instructions — Radio Mode for adjusting the audio settings.
Page 45

Page 46

AUX MODE
CONTENTS
! OVERVIEW............................46
! SOURCE ..............................47
! AUDIO ...............................47
6
Page 47

46 AUX MODE
OVERVIEW
AUX Mode is entered by inserting an AUX device using
a cable with a 3.5 mm audio jack into the AUX port or by
pressing the “Player” button located at the bottom of the
display. Once in Player Mode, press the “Source” button
and select AUX.
Inserting Auxiliary Device
Gently insert the Auxiliary device cable into the AUX
Port. If you insert an Auxiliary device with the ignition
ON and the radio ON, the unit will switch to AUX mode
and begin to play when you insert the device cable.
Controlling The Auxiliary Device
The control of the auxiliary device (e.g., selecting playlists, play, fast forward, etc.) cannot be provided by the
radio; use the device controls instead. Adjust the volume
with the ON/OFF VOLUME rotary knob, or with the
volume of the attached device.
NOTE: The vehicle radio unit is acting as the amplifier
for audio output from the Auxiliary device. Therefore if
the volume control on the Auxiliary device is set too low,
there will be insufficient audio signal for the radio unit to
play the music on the device.
Page 48

SOURCE
Press the “Source” button on the touchscreen to select the
desired audio source, Disc/USB/SD Card/AUX/ or
Bluetooth®. This screen will time out after a few seconds
and return to the main radio screen if no selection is
made.
AUDIO
Refer to Operating Instructions — Radio Mode for adjusting the audio settings.
AUX MODE 47
6
Page 49

Page 50

SD CARD MODE
CONTENTS
! OVERVIEW............................50
▫ Inserting SD Card ......................50
! SEEK UP/DOWN .......................50
▫ Fast Seek Up..........................51
▫ Fast Seek Down .......................51
! BROWSE..............................51
▫ ABC Jump ...........................51
▫ Playlists — If Equipped ..................53
▫ Songs...............................53
▫ Albums .............................54
▫ Genres ..............................54
! SOURCE ..............................54
! REPEAT ..............................54
7
! SHUFFLE .............................54
▫ Search ..............................52
▫ Folders — If Equipped...................53
▫ Artist ...............................53
! INFO ................................54
! TRACKS ..............................55
! AUDIO ...............................55
Page 51

50 SD CARD MODE
OVERVIEW
SD Card Mode is entered by inserting a SD Card containing music into the SD Card slot above the Disc slot on the
Instrument Panel or by pressing the “Player” button
located at the bottom of the display. Once in Player
Mode, press the Source button and select SD Card.
Inserting SD Card
Gently insert the SD Card into the SD Card slot. If you
insert a SD Card with the ignition ON and the radio ON,
the unit will switch to SD Card mode and begin to play
when you insert the card. The display will show the track
number, and index time in minutes and seconds. Play
will begin at the start of track 1.
SEEK UP/DOWN
Press and release the Seek Up button for the next
selection on the SD Card. Press and release the Seek
Down
button to return to the beginning of the current
selection, or return to the beginning of the previous
selection if the SD Card is within the first second of the
current selection.
Page 52

Fast Seek Up
Press and hold the “Right Arrow” button and the SD
Card will begin to fast forward through the current track
until the button is released.
Fast Seek Down
Press and hold the “Left Arrow” button and the SD Card
will begin to rewind through the current track until the
button is released.
BROWSE
Press the “Browse” button to display the browse window.
The left side of the browse window displays a list of ways
you can browse through the contents of the SD Card.
If equipped, you can browse by Folders, Artists, Playlists,
Albums, Songs, etc. Press the desired button on the left
SD CARD MODE 51
side of the screen. The center of the browse window
shows items and it’s sub-functions, which can be scrolled
by pressing the “Up and Down” buttons to the right. The
TUNE/SCROLL knob can also be used to scroll.
ABC Jump
Press the “ABC Jump” button tab at the top of the screen
to display a alpha numeric keypad used to search by
letter/number for a certain Folder,Artist, Song, Album or
Genre. Press one letter to select all contents that start with
that letter. Press the “123” button to search all contents
that start with numbers. Press the “123” button to return
to letters. Press the “X” button to exit the ABC Jump
feature.
7
Page 53

52 SD CARD MODE
NOTE: Many features of this system are speed dependent. For your own safety these features may be grayed
out and not accessible while the vehicle is in motion. Pull
over at a safe location to complete your task.
Search
Press the “Search” tab at the top of the screen to display
the Keyboard. This allows you to enter a folder or file
name to be searched.
Page 54

Up Arrow
Press the “Up Arrow” button to toggle between Upper
Case and Lower Case keys.
ABC, ÅØÜ and 1234!&#@
Press the “ABC” key to activate a keyboard with Alphabetic characters, or press the ÅØÜ to activate a keyboard
with accented characters or press the 1234!&#@ key to
activate a keyboard with Numeric plus Special characters.
Folders — If Equipped
Press the “Folders” button on the left side of the screen to
display the Folders scroll menu. The Folders list consists
of folders, and files sorted alphanumerical, followed by a
list of files sorted similarly. You can browse the contents
of a sub-folder by pressing the “Folder Name” in the list.
Press the “Back Arrow” button to return or back up to a
previous folder level.
SD CARD MODE 53
Artist
Press the “Artist” button on the left side of the screen to
display the Artists list in which you can Scroll, Search
and Jump to operations.
Playlists — If Equipped
Press the “Playlists” button on the left side of the screen
to display the current playlist information.
Songs
Press the “Songs” button on the left side of the screen to
display the Songs list in which the user can Scroll, Search
and Jump to operations.
7
The currently playing song is displayed with a black
background and blue lines both above and below the
title.
Page 55

54 SD CARD MODE
Albums
Press the “Albums” button on the left side of the screen
to display the Albums list in which you can Scroll, Search
and Jump to operations.
Genres
Press the “Genres” button to display the Genres list in
which you can Scroll, Search and Jump to operations.
SOURCE
Press the “Source” button on the touchscreen to select
the desired audio source, Disc/USB/SD Card/AUX/ or
Bluetooth®. This screen will time out after a few seconds
and return to the main radio screen if no selection is made.
REPEAT
Press the “Repeat” button to toggle the repeat functionality. The “Repeat” button is highlighted when active.
The Radio will continue to play the current track, repeatedly, as long as the repeat is active.
SHUFFLE
Press the “Shuffle” button to play the selections on the
Auxiliary device in random order to provide an interesting change of pace. Press the “Shuffle” button a second
time to turn this feature off.
INFO
Press the “Info” button to display the current track
information. Press the “Info” button a second time to
cancel this feature.
Page 56

TRACKS
Press the “trks” button to display a pop up with the Song
List. The currently playing song is indicated by an arrow
with lines above and below the song title. When in the
Tracks List screen you can rotate the TUNE/SCROLL
knob to highlight a track (indicated by the line above and
below the track name) and then push the ENTER/
BROWSE knob to start playing that track.
SD CARD MODE 55
Pressing the “trks” button while the pop up is displayed
will close the pop up.
AUDIO
Refer to Operating Instructions — Radio Mode for adjusting the audio settings.
7
Page 57

Page 58

Bluetooth® MODE
CONTENTS
! OVERVIEW............................58
! REPEAT ..............................59
! SEEK UP/DOWN .......................58
▫ Fast Seek Up..........................58
▫ Fast Seek Down .......................58
! SOURCE ..............................58
! INFO ................................59
! TRACKS ..............................59
! AUDIO ...............................59
8
Page 59

58 Bluetooth® MODE
OVERVIEW
Bluetooth® Streaming Audio (BTSA) or Bluetooth® Mode
is entered by pairing a Bluetooth® device, containing
music, to the Uconnect® system.
Before proceeding, the Bluetooth® device needs to be
paired through Uconnect® Phone in order to communicate with the Uconnect® System.
NOTE: See the pairing procedure in the Owner’s Manual
on the DVD for more details.
Once the Bluetooth® device is paired to the Uconnect®
System, press the “Player” button located on the bottom
of the display. Once in Player Mode, press the “Source”
button and select “Bluetooth®.”
SEEK UP/DOWN
Press and release the Seek Up button on the touchscreen for the next selection on the Bluetooth® device.
Press and release the Seek Down
button on the
touchscreen to return to the beginning of the current
selection, or return to the beginning of the previous
selection if the Bluetooth® device is within the first eight
seconds of the current selection.
Fast Seek Up
Press and hold the Seek Up button and the
Bluetooth® device will begin to fast forward through the
current track until the button is released.
Fast Seek Down
Press and hold the Seek Down button and the
Bluetooth® device will begin to rewind through the
current track until the button is released.
SOURCE
Press the “Source” button on the touchscreen to select
the desired audio source, Disc/USB/SD Card/AUX/ or
Bluetooth®. This screen will time out after a few seconds
and return to the main radio screen if no selection is made.
Page 60

REPEAT
Press the “Repeat” button to toggle the repeat functionality. The “Repeat” button is highlighted when active.
The Radio will continue to play the current track, repeatedly, as long as the repeat is active.
INFO
Press the “Info” button to display the current track
information. Press the “Info” button a second time to
cancel this feature.
Bluetooth® MODE 59
TRACKS
Press the “trks” button to display a pop up with the Song
List. The currently playing song is indicated by a blue
arrow and lines above and below the song title.
Pressing the “trks” button while the pop up is displayed
will close the pop up.
AUDIO
Refer to Operating Instructions — Radio Mode for adjusting the audio settings.
8
Page 61

Page 62

NAVIGATION (8.4N ONLY)
CONTENTS
! SAFETY PRECAUTIONS AND IMPORTANT
INFORMATION.........................65
▫ WARNING ...........................65
▫ CAUTION ...........................66
▫ NOTICE.............................66
▫ Map Data Information ...................66
! GETTING STARTED......................67
▫ Main Menu...........................67
▫ Using The On-Screen Buttons ..............68
▫ Finding A Point Of Interest ...............68
▫ Using The On-screen Keyboard ............68
▫ Adding Points To The Active Route .........69
▫ Changing The Destination Of The Active
Route...............................69
▫ Setting Up Your System ..................67
▫ Acquiring Satellites .....................67
▫ Taking A Detour .......................70
▫ Stopping The Route.....................70
9
Page 63

62 NAVIGATION (8.4N ONLY)
! FINDING LOCATIONS ...................70
▫ Activating Voice Command ...............77
▫ Finding An Address ....................70
▫ Using The Go! Page.....................71
▫ Setting A Home Location .................72
▫ Viewing A List Of Recently Found Locations . . .73
▫ About Favorites .......................73
▫ Planning A Trip........................74
▫ Using The Map Buttons ..................75
▫ Browsing The Map By Pressing The
Touchscreen ..........................75
▫ Entering Coordinates ....................76
! SPEAKING COMMANDS..................77
▫ About Voice Commands .................77
▫ About Icons And Tones ..................77
▫ Tips for Using Voice Commands ............77
▫ Navigating To A Popular Location Using
Voice Commands ......................78
▫ Speaking An Address ...................79
! ABOUT THE MAP PAGES .................80
▫ Viewing The Map While Navigating .........80
▫ About myTrends™ .....................82
▫ Viewing Trip Information.................82
▫ Viewing The Turn List ...................83
▫ Viewing The Next Turn ..................84
▫ Viewing The Junction View ...............84
Page 64

! USING THE TOOLS......................85
NAVIGATION (8.4N ONLY) 63
! CUSTOMIZING THE NAVIGATION SYSTEM . . .89
▫ Viewing Current Location Information .......85
▫ Using Help...........................85
▫ Using The World Clock ..................85
▫ Using The Calculator....................85
▫ Using The Unit Converter ................86
! TRAFFIC..............................87
▫ Notice ..............................87
▫ About The Traffic Icon ...................87
▫ Traffic On Your Route ...................88
▫ Viewing The Traffic Map .................88
▫ Searching For Traffic Delays ...............88
▫ System Settings ........................89
▫ Changing The Map Settings ...............90
▫ Route Preferences ......................90
▫ Language Settings ......................92
▫ Restoring Original Traffic Settings ...........92
▫ Restoring All Original Settings .............92
! APPENDIX ............................92
▫ About GPS Satellite Signals ...............92
▫ Updating The Software ..................92
▫ Updating The Map Data .................93
▫ Custom POIs (Points of Interest)............94
9
Page 65

64 NAVIGATION (8.4N ONLY)
! SiriusXM TRAVEL LINK...................95
▫ Sports Scores .........................96
▫ Fuel Prices ...........................95
▫ Movie Listings ........................95
▫ Ski Info .............................96
▫ Weather .............................97
! END-USER LICENSE AGREEMENT ..........97
Page 66

SAFETY PRECAUTIONS AND IMPORTANT INFORMATION
WARNING!
ALWAYS drive safely with your hands on
the steering wheel. You have full responsibility
and assume all risks related to the use of the
Uconnect® features and applications in this
vehicle. Only use Uconnect® when it is safe to
do so. Failure to do so may result in an accident
involving serious injury or death.
WARNING
Read this information carefully before starting to operate
the navigation system and follow the instructions in this
manual. Neither the Chrysler Group LLC nor Garmin
shall be liable for problems or accidents resulting from
failure to observe the instructions in this manual.
NAVIGATION (8.4N ONLY) 65
Failure to avoid the following potentially hazardous
situations could result in an accident or collision resulting in death or serious injury.
• Always drive safely. Only use the navigation features
in this vehicle when it is safe to do so. You accept full
responsibility for the use of the features in this vehicle.
• When navigating, carefully compare information displayed on the navigation system to all available navigation sources, including road signs, road closures,
road conditions, traffic congestion, weather conditions, and other factors that may affect safety while
driving. For safety, always resolve any discrepancies
before continuing navigation, and defer to posted road
signs and road conditions.
• The navigation system is designed to provide route
suggestions. It is not a replacement for driver attentiveness and good judgement. Do not follow route
9
Page 67

66 NAVIGATION (8.4N ONLY)
suggestions if they suggest an unsafe or illegal
maneuver or would place the vehicle in an unsafe
situation.
• Be careful of the ambient temperature. Using the
navigation system at extreme temperatures can lead to
malfunction or damage. Also note that the unit can be
damaged by strong vibration, metal objects, or by
water getting inside the unit.
CAUTION
The navigation system is designed to provide you with
route suggestions. It does not reflect road closures or road
conditions, weather conditions, or other factors that may
affect safety or timing while driving.
Use the navigation system only as a navigational aid. Do
not attempt to use the navigation system for any purpose
requiring precise measurement of direction, distance,
location, or topography.
The Global Positioning System (GPS) is operated by the
United States government, which is solely responsible for
its accuracy and maintenance. The government system is
subject to changes that could affect the accuracy and
performance of all GPS equipment, including the navigation system.
NOTICE
This navigation system can be used when the ignition
key is turned to ON or ACC. To preserve the battery,
however, it should be used with the engine running
whenever possible. Using the navigation system for a
long time with the engine switched off can cause the
battery to run down.
Map Data Information
Garmin uses a combination of governmental and private
data sources. Virtually all data sources contain some inaccurate or incomplete data. In some countries, complete
Page 68

and accurate map information is either not available or is
prohibitively expensive.
GETTING STARTED
To access the Navigation system, press the “Nav” button
on bottom of the screen.
Setting Up Your System
When using your navigation system for the first time,
complete the following tasks:
1. Acquire satellites.
2. Understand the main menu.
NAVIGATION (8.4N ONLY) 67
Main Menu
Acquiring Satellites
The
bars indicate satellite strength.
Go to an open area, away from tall buildings and trees.
Acquiring satellite signals can take a few minutes.
1 — Press To Find A Destination
2—PressToViewTheMap
3—PressToStopARoute
4—PressToDetourARoute
5—PressToOpenTheMenuOfTools
6—PressToOpenTheMenuOfSettings
9
Page 69

68 NAVIGATION (8.4N ONLY)
Using The On-Screen Buttons
•
Press and hold
• Press
and to see more choices.
• Press and hold
to quickly return to the main menu.
and to scroll faster.
Finding A Point Of Interest
The detailed maps loaded in your navigation system
contain points of interest, such as restaurants, hotels and
auto services.
1. From the main menu, press Where To? > Points of
Interest.
2. Select a category.
3. If necessary, select a subcategory.
4. Select a destination.
5. Press Go!.
Finding A Location By Spelling The Name
1. From the main menu, press Where To? > Points of
Interest > Spell Name.
2. Enter all or part of the name.
3. Press Done.
4. Select a destination.
5. Press Go!
Using The On-screen Keyboard
• Press a character on the keyboard to enter a letter or
number.
• Press “Space” to add a space.
• Press
• Press and hold
to delete a character.
to erase the entire entry.
Page 70

• Press
• Press
tuation marks.
to select the keyboard language mode.
to enter special characters, such as punc-
NAVIGATION (8.4N ONLY) 69
Changing The Destination Of The Active Route
Before you can change destinations you must be navigating a route.
Adding Points To The Active Route
1. While navigating a route, press
main menu.
2. From the main menu, press Where To?.
3. Select a category.
4. If necessary, select a subcategory.
5. Select a destination.
6. Press Go!.
7. Press Add as a Via Point.
to return to the
1. Press
2. Press Where To?.
3. Search for the location.
4. Press Go!.
5. Press Set as a New Destination.
to return to the main menu.
9
Page 71

70 NAVIGATION (8.4N ONLY)
Taking A Detour
While navigating a route, you can use detours to avoid
obstacles ahead of you, such as construction zones.
NOTE: If the route you are currently taking is the only
reasonable option, the navigation system might not calculate a detour.
1. While navigating a route, press
.
2. From the main menu, press Detour.
Stopping The Route
1. While navigating a route, press
.
2. From the main menu, press Stop.
FINDING LOCATIONS
The Where To? menu provides several different categories you can use to search for locations. To perform a
simple search, see the “Getting Started” section.
Finding An Address
NOTE: Depending on the version of the built in map data
on your navigation system, the button names and the
order of steps could be different than the steps below.
1. From the main menu, press Where To? > Address.
If necessary, change the state, the country, or the prov-
2.
ince.
3. Press Spell City.
4. Enter the city/postal code.
Page 72

NOTE: If you are unsure of the city/postal code, press
Search All.
5. Press Done.
6. If necessary, select the city/postal code.
NOTE: Not all map data provides postal code searching.
7. Enter the number of the address.
8. Press Done.
9. Enter the street name.
10. Press Done.
11. If necessary, select the street.
12. If necessary, select the address.
NAVIGATION (8.4N ONLY) 71
Using The Go! Page
The Go! page opens when you select a location to navigate to.
1. Press to call the selected location when your device is
connected to phone, or to save the location to your
favorites.
9
Page 73

72 NAVIGATION (8.4N ONLY)
2. Press to switch between 2-D and 3-D view.
3. Press to rotate the view.
4. Press to view more information for the location.
5. Press to zoom in and out.
6. Press to return to the previous page. Press and hold to
return to the main menu.
7. Press to create a turn-by-turn route to this location.
Setting A Home Location
You can set your home location for the location you
return to most often.
1. From the main menu, press Where To? > Go Home.
2. Select Enter My Address, Use My Current Location or
Recently Found.
Going Home
Before you can navigate to home you must set a home
location.
• From the main menu, press Where To? > Go Home.
Resetting Your Home Location
1. From the main menu, press Where To? >
> Set
Home Location.
2. Select an option to change your address.
Editing Your Home Location Information
1. From the main menu, press Where To? > Favorites >
Home.
2. Press
> Edit.
3. Enter your changes.
4. Press Done.
Page 74

Viewing A List Of Recently Found Locations
Your navigation system stores the last 50 locations you
have found.
• From the main menu, press Where To? >
.
Found
Clearing The List Of Recently Found Locations
From the main menu, press Where To? > Recently
Found >
About Favorites
You can save locations in your Favorites so you can
quickly find them and create routes to them. Your home
location is also stored in Favorites.
Saving Your Current Location To Favorites
1. From the map, press the vehicle icon.
2. Press Save.
> Clear > Yes.
Recently
NAVIGATION (8.4N ONLY) 73
3. Enter a name.
4. Press Done.
The location is saved in Favorites.
Saving Locations To Favorites
1. Search for the location.
2. From the Go! page, press
Finding Favorites
1. From the main menu, press Where To? > Favorites.
2. If necessary, select a category.
3. Select a saved location.
Editing Favorites
1. From the main menu, press Where To? > Favorites.
2. Select a category.
>Save>OK.
9
Page 75

74 NAVIGATION (8.4N ONLY)
3. Select a favorite.
1. From the main menu, press Where To? > Trip Planner.
4. Press the information box.
5. Press
> Edit.
6. Select an option:
• Name
• Phone Number
• Categories
• Change Map Symbol
7. Edit the information.
8. Press Done.
Planning A Trip
You can use Trip Planner to create and save a trip with
multiple destinations.
2. Press
.
3. Press Select Start Location.
4. Search for a location.
5. Press Select.
6. Press
to add an additional location.
7. Press Select.
8. Repeat steps 4–6 to add additional locations to your
trip.
9. Press Next.
10. Enter a name.
11. Press Done.
Page 76

Navigating To A Saved Trip
NAVIGATION (8.4N ONLY) 75
Using The Map Buttons
1. From the main menu, press Where To? > Trip Planner.
2. Select a saved trip.
3. Press Go!.
Editing A Saved Trip
1. From the main menu, press Where To? > Trip Planner.
2. Select a saved trip.
3. Press
4. Select an option:
• Press Rename Trip to edit the trip name.
• Press Edit Destinations to add or delete locations.
• Press Delete Trip to delete the entire trip.
• Press Optimize Order to arrange your trip locations
in the most efficient order.
.
1. From the main menu, press Where To? > Browse Map.
2. Press anywhere on the map.
• Press
• Press
• Press
Browsing The Map By Pressing The Touchscreen
• Press an area on the map to select a location.
• An information box appears next to the location.
• Press and drag the map to view different parts of the
map.
• Press the map twice to zoom in and center on a
location.
and to zoom in and out.
to switch between 2D and 3D views.
to rotate the view.
9
Page 77

76 NAVIGATION (8.4N ONLY)
Finding A Location Using The Map
1. From the main menu, press Where To? > Browse Map.
2. Press a location.
An information box appears next to the location.
3. Press the information box.
4. Select an option:
• Press
> Save.
5. Press Go!.
3. Press an area on the map.
4. Press
> Set Location.
Entering Coordinates
If you know the geographic coordinates of your destination, you can use your navigation system to navigate to the
destination using the latitude and longitude coordinates.
1. From the main menu, press Where To? > Coordinates.
2. Press a field to enter the latitude and longitude data.
Setting A Simulated Location
You can use the GPS simulator to select another location,
near which you can search for and save points of interest.
This may be helpful when planning trips.
1. From the main menu, press Tools > Settings > Sys-
tem > GPS Simulator > On.
2. From the main menu, press Where To? > Browse Map.
3. Press View on Map.
4. Press Go!.
Changing The Map Coordinate Format
1. From the Home Screen, press Where To? > Coordi-
nates >
> Format.
2. Select a format.
Page 78

SPEAKING COMMANDS
About Voice Commands
NOTE: The voice command feature is not available for
all languages or regions.
The voice commands allow you to use your navigation
system by speaking the words you see on the screen or by
speaking certain commands.
Activating Voice Command
• Press the “Voice Command” button.
• The navigation system enters voice command.
About Icons And Tones
• The navigation system sounds two tones when it
enters and exits voice recognition mode.
NAVIGATION (8.4N ONLY) 77
• A
• Wait until the
Tips for Using Voice Commands
• Speak in a normal voice directed at the navigation
• Speak commands as they appear on the screen.
• Respond to voice prompts from the navigation system
• Speak “Exit” to exit voice command.
red icon appears in the upper-right corner of
the screen when the navigation system is not ready
for your command.
icon is green to speak your
command.
system.
as needed.
9
Page 79

78 NAVIGATION (8.4N ONLY)
Navigating To A Popular Location Using Voice Commands
You can speak the names of very popular, well-known
locations.
1. Press the voice command button.
2. Speak “Find by Name.”
3. Listen for the voice prompt and speak the name of the
location.
A list of locations appears.
4. Speak the line number.
Page 80

NAVIGATION (8.4N ONLY) 79
“Line 1”
5. Speak an option:
• Speak “Go!” to navigate to the location.
• Speak “Call” to call the location when connected to a
compatible mobile phone.
Speaking An Address
1. Speak “Voice Command.”
2. Speak “Find Address.”
3. Follow the on-screen prompts.
9
Page 81

80 NAVIGATION (8.4N ONLY)
ABOUT THE MAP PAGES
Viewing The Map While Navigating
NOTICE
In no event shall Garmin be liable for any incidental,
special, indirect, or consequential damages, including,
without limitation, damages for any traffic fines or citations, whether resulting from the use, misuse, or inability
to use the product or from defects in the product. Some
states do not allow the exclusion of incidental or consequential damages, so the above limitations may not
apply to you.
Your route is marked with a magenta line. A checkered
flag marks your destination.
As you travel, your navigation system guides you to your
destination with voice prompts, arrows on the map, and
directions at the top of the map. If you depart from the
original route, your navigation system recalculates the
route and provides new directions.
A speed limit icon displaying the current speed limit may
appear as you travel on major roadways.
Page 82

Using The Navigation Map
NAVIGATION (8.4N ONLY) 81
1. Press to view the next turn.
The turn indicator also tells you which lane you
should be in to prepare for your next maneuver, when
available.
2. Press to view the turn list.
3. Press to zoom in and zoom out.
4. Press to return to the main menu.
5. Press to display a different data field.
6. Press to view information for the location.
7. Press to view trip information.
9
Page 83

82 NAVIGATION (8.4N ONLY)
About myTrends™
When the myTrends™ feature is enabled, your estimated
time of arrival and traffic information for your frequent
destinations, like your workplace, automatically appear
in the navigation bar at the top of the map.
When myTrends™ information appears in the navigation
bar, you can press the navigation bar to view route
options for the suggested destination.
Enabling myTrends™
From the main menu press Settings > Navigation >
myTrends > Enabled.
Viewing Trip Information
The trip information page displays your present speed
and provides statistics about your trip.
NOTE: If you make frequent stops, leave the navigation
system turned on so it can accurately measure elapsed
time during the trip.
From the map, press the Speed field.
Page 84

Resetting Trip Information
1. From the map, press the Speed field.
NAVIGATION (8.4N ONLY) 83
1. From the map, press the text bar on the top of the map.
2. Press
3. Select an option:
• Press Reset Trip Mileage to reset the information on
the trip computer.
• Press Reset Max. Speed to reset the maximum
speed.
Viewing The Turn List
When you are navigating a route, you can view all of the
turns for your entire route and the distance between
turns.
.
2. Select an option:
• Select a turn on the list to view the next turn.
• Press
map.
>Mapto view the entire route on the
9
Page 85

84 NAVIGATION (8.4N ONLY)
Viewing The Next Turn
Before you can view the next turn you must be navigating a route.
The next turn shows the turn on the map and the distance
and time left before you reach the turn.
Press the turn indicator in the top left corner of the map.
Viewing The Junction View
Before you can view the junction view, you must be
navigating a route.
The junction view displays a view of some upcoming
junctions and in which lane you should be driving.
Page 86

USING THE TOOLS
NAVIGATION (8.4N ONLY) 85
Using The World Clock
Viewing Current Location Information
Use the Where Am I? page to view information about
your current location. This feature is helpful if you need
to tell emergency personnel your location.
• From the main menu, press Tools > Where Am I?.
Finding Nearby Services
1. From the main menu, press Tools > Where Am I?.
2. Press Hospitals, Police Stations or Fuel to view the
nearest locations in that category.
Using Help
From the main menu, press Tools > Help to view
information about using your navigation system.
Searching Help Topics
From the main menu, press Tools > Help.
1. From the main menu, press Tools > World Clock.
2. Press a city name.
3. Enter a new city name.
4. Press Done.
5. If necessary, select a city.
Viewing The World Map
• From the main menu press Tools > World Clock >
• Nighttime hours appear in the shaded area.
Using The Calculator
From the main menu press Tools > Calculator.
.
9
Page 87

86 NAVIGATION (8.4N ONLY)
Using The Unit Converter
1. From the main menu press Tools > Unit Converter.
2. Press the box with a unit of measure listed.
3. Select a unit of measure.
4. Press Save.
Two units of measure are listed.
5. Press a unit of measure to change.
6. Select a unit of measure.
7. Press Done.
8. Repeat steps 5–6, if necessary.
9. Enter a value.
10. Press Done.
Setting Currency Conversion Rates Manually
You can update the currency conversion rates manually
so that you are always using the most current rates.
1. From the main menu press Tools > Unit Converter.
2. Press the box with a currency listed.
3. Select Currency.
4. Press Save.
5. Press a currency box.
6. Select the currency you want to update.
7. Repeat steps 3–6 to select a currency to convert to,
if necessary.
Page 88

8. Press a box under a currency.
9. Enter a new value for the currency.
10. Press Done.
11. Repeat steps 8–9, if necessary.
TRAFFIC
Notice
Garmin is not responsible for the accuracy or timeliness
of the traffic information. Your navigation system may
receive traffic content via Satellite Radio service in North
America or via FM broadcast in other regions.
NAVIGATION (8.4N ONLY) 87
About The Traffic Icon
When you are receiving traffic information, a traffic icon
appears on the map. The traffic icon changes color to
indicate the severity of traffic conditions.
Color Description Meaning
Green Low severity Traffic is flowing freely.
Yellow Medium
severity
Red High severity Traffic is not moving or
Gray No data Traffic information is not
Traffic is moving but there
is a delay. There is moderate
traffic congestion.
moving very slowly.
There is a severe delay.
available.
9
Page 89

88 NAVIGATION (8.4N ONLY)
Traffic On Your Route
When calculating your route, the navigation system
examines the current traffic and automatically optimizes
the route for the shortest time. If a severe traffic delay
occurs on your route while you are navigating, the
navigation system automatically recalculates the route.
You might still be routed through traffic if no better
alternative routes exist.
Manually Avoiding Traffic On Your Route
1. From the map press the
2. Press Traffic On Route.
3. If necessary, press the arrows to view other traffic
delays on your route.
4. Press Avoid.
Viewing The Traffic Map
The traffic map shows color-coded traffic flow and delays
on nearby roads.
1. From the map press
.
2. Press Traffic Map to view the traffic incidents on a
map.
Searching For Traffic Delays
1. From the map page press
.
2. Press Traffic Search to view a list of roads with traffic
delays.
3. Press an item in the list to view delays on the road.
4. If there is more than one delay, press the arrows to
view additional delays.
Page 90

CUSTOMIZING THE NAVIGATION SYSTEM
1. From the main menu press “Settings.”
2. Press a setting category.
NAVIGATION (8.4N ONLY) 89
System Settings
From the main menu press Settings > System.
• GPS Simulator — stops the navigation system from
receiving a GPS signal, and saves battery power.
• About — displays the software version number, the
unit ID number and information on several other
software features.
NOTE: You need this information when you update the
system software or purchase additional map data.
Restoring The System Settings
From the main menu, press Settings > System >
Restore.
>
3. Press the setting to change it.
9
Page 91

90 NAVIGATION (8.4N ONLY)
Changing The Map Settings
From the main menu press Settings > Map.
• Map Detail — sets the level of detail on the map. More
detail may result in slower map drawing.
• Map View — sets the perspective on the Map page.
• Map Theme — changes the color of the map data.
• Map Data Layout — changes the amount of data
visible on the map.
• Vehicle — changes the icon to represent your position
on the map.
• Trip Log
• Show on Map — displays the path of your travels on
the map.
• Clear Trip Log
Changing The Map Perspective
1. From the main menu press Settings > Map > Map
View.
2. Select an option:
• Press Track Up to display the map in two dimen-
sions (2-D), with your direction of travel at the top.
• Press North Up to display the map in 2-D with North
at the top.
• Press 3-D to display the map in three dimensions.
Route Preferences
From the main menu, press Settings > Navigation >
Route Preference.
Page 92

The route calculation is based on road speeds and vehicle
acceleration data for a given route.
• Faster Time — Calculates routes that are faster to drive
but can be longer in distance.
• Shorter Distance — Calculates routes that are shorter
in distance but can take more time to drive.
• Prompted — Select the faster time and shorter distance
for your route.
Avoiding Road Features
1. From the main menu press Settings > Navigation >
Avoidances.
2. Select the road features to avoid on your routes.
3. Press “Save.”
NAVIGATION (8.4N ONLY) 91
About trafficTrends™
When the trafficTrends™ feature is enabled, your navigation system uses historic traffic information to calculate more-efficient routes. Different routes may be calculated based on traffic trends for the day of the week or
based on the time of day.
Enabling trafficTrends™
1. From the main menu press Settings > Navigation >
trafficTrends.
2. Select Enabled.
Restoring The Original Navigation Settings
From the main menu press Settings > Navigation >
Restore.
>
9
Page 93

92 NAVIGATION (8.4N ONLY)
Language Settings
From the main menu press Settings > Language.
• Voice Personality — sets the language for voice
prompts.
• Keyboard — sets the language for your keyboard.
• Keyboard Layout — sets the keyboard layout.
Restoring The Original Language Settings
• From the main menu press Settings > Language >
> Restore.
Restoring Original Traffic Settings
From the main menu, press Settings > Traffic >
Restore.
Restoring All Original Settings
From the main menu, press Settings >
> Restore >
Yes.
APPENDIX
About GPS Satellite Signals
The navigation system must acquire satellite signals in
order to navigate.
When the navigation system has acquired satellite
signals, the signal strength bars on the main menu are
full
. When it loses satellite signals, the bars are
clear .
For more information about GPS, go to
www.garmin.com/aboutGPS.
Updating The Software
>
To update the navigation system software, you must have
a USB mass storage device and an Internet connection.
1. Go to www.garmin.com/Chrysler.
2. Find your model and select Software Updates >
Download.
Page 94

3. Read and accept the terms of the Software License
Agreement.
4. Follow the instructions on the Web site to complete the
installation of the software update.
Updating The Map Data
To update the navigation system map, you must have a
USB mass storage device and an Internet connection, or
visit your local dealer for assistance. A map update can
be purchased once a year.
1. Go to www.garmin.com/auto-update.
2. Select your vehicle from the drop-down lists.
3. Select Order Map Updates for your unit.
4. Follow the Web site instructions to update your map.
NAVIGATION (8.4N ONLY) 93
CAUTION
Garmin and Chrysler Group LLC are not responsible for
the accuracy of, or the consequences of using, a safety
camera database.
Safety camera information is available in some locations.
Go to http://my.garmin.com for availability. For these
locations, the navigation system includes the locations of
hundreds of safety cameras. Your navigation system
alerts you when you are approaching a safety camera and
can warn you if you are driving too fast. The data is
updated at least weekly, so you always have access to the
most up-to-date information.
You can purchase a new region or extend an existing
subscription at any time. Each region that you purchase
has an expiration date.
9
Page 95

94 NAVIGATION (8.4N ONLY)
Custom POIs (Points of Interest)
NOTE: Custom POI files must be named “poi.gpi”. and
located on the USB storage device in a folder named
‘POI’ within a folder named “Garmin” (Garmin/POI/).
You can manually load custom points of interest (POI)
databases, available from various companies on the Internet. Some custom POI databases contain alert information for points such as safety cameras and school
zones. The navigation system can notify you when you
approach one of these points. You are responsible for
ensuring that your use of safety camera information is
lawful in your area.
CAUTION
Garmin and Chrysler Group LLC are not responsible for
the consequences of using custom POI databases, or for
the accuracy of custom POI databases.
After downloading your POI database, use the Garmin
POI Loader to install the POIs onto a USB mass
storage device. Use the USB mass storage device to
load the POIs. The POI Loader is available at
www.garmin.com/products/poiloader. Refer to the
POI Loader Help file for more information; click Help
to open the Help file. The file name can only be POI.gpi.
No other file name or extension should be used.
NOTE: Each time you load custom POIs to the navigation system, any other custom POIs already saved in the
system will be overwritten.
Finding Custom PoIs
You can view a list of the custom POIs loaded in your
navigation system.
• Press Where To? > Extras > Custom POIs.
Page 96

Deleting Custom PoIs
1. Press Tools > My Data > Delete Custom POI(s).
2. Press Yes to confirm.
NOTE: All custom POIs will be deleted from your
navigation system.
Saving Trip Logs
Trip logs are recorded while you navigate a route.
SiriusXM TRAVEL LINK
Now, in addition to delivering over 130 channels of the best
sports, entertainment, talk and commercial-free music,
SiriusXM now offers premium infotainment services that
work in conjunction with compatible navigation systems.
To access SiriusXM Travel Link, press the MENU button
then press the “Travel Link” button.
NAVIGATION (8.4N ONLY) 95
SiriusXM Travel Link brings a wealth of useful information into your vehicle and right to your fingertips:
Fuel Prices
• Check detailed price information for fuel stations near
your current location.
• Sort the list of closest fuel stations by price, distance or
alphabetically.
• Route to selected fuel station.
Store a favorite fuel station for quick access to pricing.
•
Movie Listings
• Check which movies are playing at theaters near your
current location.
• Sort the list of theaters by distance or alphabetically.
9
Page 97

96 NAVIGATION (8.4N ONLY)
• Show movie titles, start times, ratings, run length, and
summaries.
• Store a favorite theater for quick access to schedules.
Ski Info
• View ski and snowboarding conditions at ski resorts.
• Store a favorite location for quick access to snow
conditions.
Sports Scores
• View scores and upcoming events for all major sports.
• Store your favorite teams for quick access to the scores
and schedules.
NOTE: SiriusXM Travel Link data services subscription
is separate from your SiriusXM Satellite Radio (audio)
subscription.
CAUTION!
Neither SiriusXM nor Chrysler Group LLC is
responsible for any errors in accuracies in the
SiriusXM data services or its use in vehicles.
SiriusXM services require subscriptions, sold separately
after the 12-month trial included with the new vehicle
purchase. If you decide to continue your service at the
end of your trial subscription, the plan you choose will
automatically renew and bill at then-current rates until
you call SiriusXM at 1-866-635-2349 to cancel.
See SiriusXM Customer Agreement for complete terms at
www.siriusxm.com
to change. Our satellite service is available only to those
at least 18 and older in the 48 contiguous USA and D.C.
Our Sirius satellite service is also available in PR (with
coverage limitations). Our Internet radio service is avail-
. All fees and programming subject
Page 98

able throughout our satellite service area and in AK and
HI. © 2014 Sirius XM Radio Inc. Sirius, XM and all related
marks and logos are trademarks of Sirius XM Radio Inc.
Weather
• View detailed current conditions at your current location.
• Check extended 12–hour and 5–day forecasts.
• Store a favorite location for quick access to weather
conditions and forecasts.
END-USER LICENSE AGREEMENT
Software License Agreement
BY USING THE NAVIGATION SYSTEM, YOU AGREE
TO BE BOUND BY THE TERMS AND CONDITIONS OF
THE FOLLOWING SOFTWARE LICENSE AGREEMENT.
PLEASE READ THIS AGREEMENT CAREFULLY.
NAVIGATION (8.4N ONLY) 97
Garmin Ltd. and its subsidiaries (“Garmin”) grant you a
limited license to use the software embedded in this
device (the “Software”) in binary executable form in the
normal operation of the product. Title, ownership rights,
and intellectual property rights in and to the Software
remain in Garmin and/or its third-party providers.
You acknowledge that the Software is the property of
Garmin and/or its third-party providers and is protected
under the United States of America copyright laws and
international copyright treaties. You further acknowledge
that the structure, organization, and code of the Software,
for which source code is not provided, are valuable trade
secrets of Garmin and/or its third-party providers and
that the Software in source code form remains a valuable
trade secret of Garmin and/or its third-party providers.
You agree not to decompile, disassemble, modify, reverse
assemble, reverse engineer, or reduce to human readable
form the Software or any part thereof or create any
derivative works based on the Software. You agree not to
9
Page 99

98 NAVIGATION (8.4N ONLY)
export or re-export the Software to any country in
violation of the export control laws of the United States of
America or the export control laws of any other applicable country.
The Garmin device you have purchased (“Device”), or
the download that you are making (the “Download”),
may contain an application, content, or both. If a Device,
the software embedded in it (the “Software”), or if a
Download, the application, including its embedded software (collectively, the “Application”) is owned by
Garmin Ltd. or its subsidiaries (collectively, “Garmin”).
The map data that may be embedded in your Device, the
Application or downloaded separately (the “Map Data”)
is either owned by Garmin, or by HERE North America
LLC and/or its affiliates (“HERE”) or another third party
and is licensed to Garmin. Garmin also owns, or licenses
from third party providers, information, traffic data, text,
images, graphics, photographs, audio, video, images and
other applications and data that may be embedded in the
Device or Application, or downloaded separately (“Other
Content”). The Map Data and Other Content are collectively the “Content”. The Software, Application and
Content (collectively, the “Garmin Products”) are protected under copyright laws and international copyright
treaties. The Garmin Products are licensed, not sold. The
structure, organization and code of the Software and
Application are valuable trade secrets of Garmin and/or
its third-party providers. The Garmin Products are each
provided under this License Agreement and are subject
to the following terms and conditions which are agreed
to by End User (“you” or “your”), on the one hand, and
Garmin and its licensors and affiliated companies of
Garmin and its licensors, on the other hand. Garmin’s
licensors, including the licensors, service providers, channel partners, suppliers and affiliated companies of
Garmin and its licensors, are each a direct and intended
third party beneficiary of this Agreement and may enforce their rights directly against you in the event of your
breach of this Agreement.
Page 100

IMPORTANT: CAREFULLY READ THIS ENTIRE LICENSE AGREEMENT BEFORE PURCHASING OR USING YOUR DEVICE OR DOWNLOADED APPLICATION OR CONTENT. PURCHASING, INSTALLING,
COPYING, OR OTHERWISE USING YOUR DEVICE OR
DOWNLOADED APPLICATION OR CONTENT INDICATES YOUR ACKNOWLEDGMENT THAT YOU
HAVE READ THIS LICENSE AGREEMENT AND
AGREE TO ITS TERMS AND CONDITIONS. IF YOU DO
NOT AGREE TO THESE TERMS AND CONDITIONS
FOR YOUR PRODUCT, RETURN THE COMPLETE DEVICE WITHIN 7 DAYS OF THE DATE YOU ACQUIRED
IT (IF PURCHASED NEW) FOR A FULL REFUND TO
THE DEALER FROM WHICH YOU PURCHASED THIS
DEVICE. IF YOU DO NOT AGREE TO THESE TERMS
AND CONDITIONS FOR YOUR DOWNLOAD, DO
NOT PURCHASE, INSTALL OR USE THE DOWNLOAD.
NAVIGATION (8.4N ONLY) 99
License Terms and Conditions Garmin (“we” or “us”)
provides you with the storage media containing the
Software and the Content embedded therein, including
any “online” or electronic documentation and printed
materials in the case of a Device, or in the case of a
Download, the Application and the embedded or accompanying Content, including any “online” or electronic
documentation and printed materials. Garmin grants you
a limited, non-exclusive license to use the applicable
Garmin Product in accordance with the terms of this
Agreement. You agree to use the applicable Garmin
Product for solely personal use, or if applicable, for use in
your business’ internal operations, and not for service
bureau, time-sharing, resale or other similar purposes.
Accordingly, but subject to the restrictions set forth in the
following paragraphs, you may copy the applicable
Garmin Product only as necessary for your use to (i) view
it, and (ii) save it, provided that you do not remove any
copyright notices that appear and do not modify the
Garmin Product in any way. Your use of the Application
9
 Loading...