


 Loading...
2020 DODGE GRAND CARAVAN
OWNER’S MANUAL

This Owner’s Manual illustrates and describes the operation of features and equipment that are either standard or optional on this vehicle. This manual may also include a description of features and equipment that are no longer available or were not ordered on this vehicle. Please disregard any features and equipment described in this manual that are not on this vehicle. FCA US LLC reserves the right to make changes in design and specifications, and/or make additions to or improvements to its products without imposing any obligation upon itself to install them on products previously manufactured.
With respect to any vehicles sold in Canada, the name FCA US LLC shall be deemed to be deleted and the name FCA Canada Inc. used in substitution therefore.
If you are the first registered retail owner of your vehicle, you may obtain a complimentary printed copy of the Warranty Booklet by calling 1-800-423-6343 (U.S.) or 1-800-387-1143 (Canada) or by contacting your dealer.
This Owner’s Manual is intended to familiarize you with the important features of your vehicle. Your most up-to-date Owner’s Manual, Navigation/Uconnect manuals and Warranty Booklet can be found by visiting the website on the back cover. U.S. residents can purchase replacement kits by visiting www.techauthority.com and Canadian residents can purchase replacement kits by calling 1-800-387-1143.
 WARNING: Operating, servicing and maintaining a passenger vehicle or off-highway motor vehicle can expose you to chemicals including engine exhaust, carbon monoxide, phthalates, and lead, which are known to the State of California to cause cancer and birth defects or other reproductive harm. To minimize exposure, avoid breathing exhaust, do not idle the engine except as necessary, service your vehicle in a well-ventilated area and wear gloves or wash your hands frequently when servicing your vehicle. For more information go to www.P65Warnings.ca.gov/passenger-vehicle.

TABLE OF CONTENTS |
|
|
1 |
INTRODUCTION.............................................................................................................................. |
7 |
2 |
GETTING TO KNOW YOUR VEHICLE ................................................................................... |
9 |
3 |
GETTING TO KNOW YOUR INSTRUMENT PANEL ........................................................ |
82 |
4 |
SAFETY ......................................................................................................................................... |
103 |
5 |
STARTING AND OPERATING ............................................................................................... |
162 |
6 |
IN CASE OF EMERGENCY ..................................................................................................... |
194 |
7 |
SERVICING AND MAINTENANCE ...................................................................................... |
226 |
8 |
TECHNICAL SPECIFICATIONS ............................................................................................ |
266 |
9 |
MULTIMEDIA .............................................................................................................................. |
275 |
10 |
CUSTOMER ASSISTANCE ..................................................................................................... |
364 |
11 |
INDEX............................................................................................................................................. |
368 |
1
2
3
4
5
6
7
8
9
10
11

2 
INTRODUCTION
HOW TO USE THIS MANUAL.................................. |
8 |
Essential Information .................................... |
8 |
Symbols.......................................................... |
8 |
WARNINGS AND CAUTIONS ................................. |
8 |
VEHICLE MODIFICATIONS/ALTERATIONS........... |
8 |
GETTING TO KNOW YOUR VEHICLE |
|
KEYS ........................................................................ |
9 |
Key Fobs......................................................... |
9 |
IGNITION SWITCH................................................. |
11 |
Wireless Ignition Node (WIN) ...................... |
11 |
REMOTE START — IF EQUIPPED......................... |
12 |
How To Use Remote Start........................... |
12 |
Remote Start Abort Messages.................... |
12 |
To Enter Remote Start Mode ...................... |
12 |
To Exit Remote Start Mode Without |
|
Driving The Vehicle ..................................... |
13 |
To Exit Remote Start Mode And Drive The |
|
Vehicle.......................................................... |
13 |
General Information .................................... |
13 |
SENTRY KEY.......................................................... |
13 |
Key Programming ....................................... |
14 |
Replacement Keys....................................... |
14 |
General Information .................................... |
14 |
VEHICLE SECURITY ALARM — IF EQUIPPED ..... |
15 |
Rearming Of The System............................. |
15 |
To Arm The System ..................................... |
15 |
To Disarm The System ................................ |
15 |
Tamper Alert................................................. |
16 |
DOORS .................................................................. |
16 |
Manual Door Locks...................................... |
16 |
Power Door Locks — If Equipped ............... |
17 |
Power Sliding Side Door — If Equipped...... |
18 |
Child Locks................................................... |
19 |
SEATS .................................................................... |
20 |
Manual Adjustment (Front Seats) — If |
|
Equipped...................................................... |
20 |
Manual Adjustment (Rear Seats) ............... |
21 |
Power Seats — If Equipped ......................... |
27 |
Heated Seats — If Equipped ....................... |
28 |
Plastic Grocery Bag Retainer Hooks........... |
30 |
HEAD RESTRAINTS.............................................. |
30 |
Supplemental Active Head Restraints |
|
— Front Seats............................................... |
30 |
Head Restraints — Second Row Quad |
|
Seats............................................................. |
31 |
Head Restraints — Second Row Bench...... |
32 |
Head Restraints — Third Row...................... |
32 |
STEERING WHEEL ............................................... |
33 |
Tilt/Telescoping Steering Column .............. |
33 |
Heated Steering Wheel — If Equipped ....... |
34 |
MIRRORS .............................................................. |
34 |
Automatic Dimming Mirror |
|
— If Equipped .............................................. |
34 |
Automatic Dimming Mirror With Rear |
|
View Camera Display — If Equipped........... |
35 |
Outside Mirrors ........................................... |
35 |
Interior Observation Mirror.......................... |
36 |
Power Mirrors — If Equipped ...................... |
36 |
Outside Mirrors Folding Feature................. |
36 |
Heated Mirrors — If Equipped..................... |
37 |
Illuminated Vanity Mirrors |
|
— If Equipped .............................................. |
37 |
EXTERIOR LIGHTS ............................................... |
37 |
Headlight Switch.......................................... |
37 |
Multifunction Lever .................................... |
37 |
Daytime Running Lights (DRLs) |
|
— If Equipped ............................................... |
38 |
High/Low Beam Switch .............................. |
38 |
Flash-To-Pass............................................... |
38 |
Automatic Headlights ................................. |
38 |
Headlights On With Wipers |
|
— If Equipped ............................................... |
38 |
Headlight Delay — If Equipped.................... |
38 |
Lights-On Reminder..................................... |
39 |
Front Fog Lights — If Equipped .................. |
39 |
Turn Signals................................................. |
39 |
Lane Change Assist..................................... |
39 |
Battery Protection ....................................... |
39 |
INTERIOR LIGHTS ................................................ |
39 |
Courtesy/Interior Lighting........................... |
39 |
WINDSHIELD WIPER AND WASHERS ............... |
41 |
Windshield Wiper Operation....................... |
41 |
Rear Wiper And Washer.............................. |
42 |
CLIMATE CONTROLS ........................................... |
42 |
Manual Climate Control Overview.............. |
42 |
Automatic Climate Control Overview.......... |
48 |
Climate Control Functions........................... |
56 |
Automatic Temperature Control (ATC) |
|
— If Equipped ............................................... |
56 |
Operating Tips ............................................. |
57 |

WINDOWS ............................................................ |
59 |
Power Vent Windows — If Equipped .......... |
59 |
Power Windows............................................ |
59 |
HOOD...................................................................... |
61 |
Opening The Hood ....................................... |
61 |
Closing The Hood......................................... |
61 |
LIFTGATE................................................................ |
62 |
Opening ........................................................ |
62 |
Closing.......................................................... |
62 |
Power Liftgate — If Equipped ...................... |
62 |
Cargo Area Features ................................... |
63 |
LOAD LEVELING SYSTEM — IF EQUIPPED......... |
63 |
GARAGE DOOR OPENER — IF EQUIPPED.......... |
63 |
Before You Begin Programming |
|
HomeLink®.................................................. |
64 |
Programming A Rolling Code ...................... |
64 |
Programming A Non-Rolling Code............... |
65 |
Canadian/Gate Operator Programming..... |
66 |
Using HomeLink®........................................ |
67 |
Security......................................................... |
67 |
Troubleshooting Tips ................................... |
67 |
General Information .................................... |
68 |
INTERNAL EQUIPMENT........................................ |
68 |
Storage......................................................... |
68 |
Cupholders .................................................. |
73 |
Sun Screens — If Equipped......................... |
75 |
Electrical Power Outlets — If Equipped....... |
75 |
Power Inverter — If Equipped...................... |
77 |
Smoker's Package Kit — If Equipped ......... |
78 |
Sunglass Storage Bin — If Equipped........... |
78 |
ROOF LUGGAGE RACK — IF EQUIPPED............. |
79 |
Deploying The Crossbars............................. |
79 |
Stowing The Crossbars................................ |
80 |
GETTING TO KNOW YOUR INSTRUMENT PANEL
INSTRUMENT CLUSTER ...................................... |
82 |
Instrument Cluster Descriptions ................ |
84 |
INSTRUMENT CLUSTER DISPLAY ..................... |
85 |
Instrument Cluster Display Location And |
|
Controls ....................................................... |
85 |
Oil Life Reset................................................ |
87 |
Instrument Cluster Display Menu Items .... |
87 |
TRIP COMPUTER ................................................. |
93 |
WARNING LIGHTS AND MESSAGES.................. |
94 |
Red Warning Lights ..................................... |
94 |
Yellow Warning Lights ................................. |
97 |
White Indicator Lights ............................... |
100 |
Green Indicator Lights............................... |
100 |
Blue Indicator Lights.................................. |
100 |
ONBOARD DIAGNOSTIC SYSTEM — OBD II..... |
101 |
Onboard Diagnostic System (OBD II) |
|
Cybersecurity ............................................. |
101 |
EMISSIONS INSPECTION AND |
|
MAINTENANCE PROGRAMS............................. |
102 |
SAFETY |
|
SAFETY FEATURES............................................. |
103 |
Anti-Lock Brake System (ABS) ................. |
103 |
Electronic Brake Control (EBC) System ... |
104 |
|
3 |
AUXILIARY DRIVING SYSTEMS........................ |
110 |
Blind Spot Monitoring (BSM) |
|
— If Equipped ............................................. |
110 |
Tire Pressure Monitoring System |
|
(TPMS)........................................................ |
115 |
OCCUPANT RESTRAINT SYSTEMS ................. |
119 |
Occupant Restraint Systems Features .... |
119 |
Important Safety Precautions................... |
119 |
Seat Belt Systems .................................... |
120 |
Supplemental Restraint Systems (SRS)... |
131 |
Child Restraints......................................... |
141 |
Transporting Pets ..................................... |
159 |
SAFETY TIPS ...................................................... |
159 |
Transporting Passengers .......................... |
159 |
Exhaust Gas............................................... |
159 |
Safety Checks You Should Make |
|
Inside The Vehicle .................................... |
160 |
Periodic Safety Checks You Should |
|
Make Outside The Vehicle........................ |
161 |
STARTING AND OPERATING |
|
STARTING THE ENGINE .................................... |
162 |
Normal Starting ......................................... |
162 |
Cold Weather Operation |
|
(Below –22°F Or −30°C) ......................... |
163 |
After Starting — Warming Up The |
|
Engine ........................................................ |
163 |
If Engine Fails To Start ............................. |
163 |
ENGINE BLOCK HEATER — IF EQUIPPED........ |
163 |

4 |
|
ENGINE BREAK-IN RECOMMENDATIONS ...... |
163 |
PARK BRAKE ..................................................... |
164 |
AUTOMATIC TRANSMISSION............................ |
165 |
Key Ignition Park Interlock........................ |
166 |
Brake/Transmission Shift Interlock |
|
System........................................................ |
166 |
Fuel Economy (ECON) Mode..................... |
167 |
Six-Speed Automatic Transmission.......... |
167 |
Gear Ranges .............................................. |
168 |
POWER STEERING............................................. |
172 |
Power Steering Fluid Check...................... |
173 |
SPEED CONTROL — IF EQUIPPED.................... |
173 |
To Activate.................................................. |
174 |
To Set A Desired Speed............................. |
174 |
To Vary The Speed Setting........................ |
174 |
To Accelerate For Passing ........................ |
175 |
To Resume Speed...................................... |
175 |
To Deactivate............................................. |
175 |
PARKSENSE REAR PARK ASSIST |
|
— IF EQUIPPED................................................... |
175 |
ParkSense Sensors ................................... |
176 |
ParkSense Warning Display...................... |
176 |
ParkSense Display..................................... |
176 |
Enabling/Disabling ParkSense................. |
178 |
Service The ParkSense Rear Park Assist |
|
System........................................................ |
178 |
Cleaning The ParkSense System.............. |
178 |
ParkSense System Usage Precautions.... |
178 |
PARKVIEW REAR BACK UP CAMERA ............. |
179 |
REFUELING THE VEHICLE ................................. |
181 |
Loose Fuel Filler Cap Message................. |
181 |
VEHICLE LOADING ............................................ |
182 |
Certification Label ..................................... |
182 |
TRAILER TOWING............................................... |
183 |
Common Towing Definitions..................... |
183 |
Trailer Hitch Classification ........................ |
184 |
Trailer Towing Weights |
|
(Maximum Trailer Weight Ratings) .......... |
186 |
Trailer And Tongue Weight ....................... |
186 |
Towing Requirements ............................... |
187 |
Towing Tips ................................................ |
189 |
RECREATIONAL TOWING |
|
(BEHIND MOTORHOME, ETC.) .......................... |
191 |
Towing This Vehicle Behind Another |
|
Vehicle........................................................ |
191 |
Recreational Towing — All Models............ |
191 |
DRIVING TIPS...................................................... |
192 |
Driving On Slippery Surfaces .................... |
192 |
Driving Through Water .............................. |
192 |
IN CASE OF EMERGENCY |
|
HAZARD WARNING FLASHERS ....................... |
194 |
BULB REPLACEMENT ........................................ |
194 |
Replacement Bulbs .................................. |
194 |
Replacing Exterior Bulbs........................... |
196 |
FUSES.................................................................. |
197 |
General Information.................................. |
198 |
Totally Integrated Power Module |
|
(Fuses) ....................................................... |
198 |
JACKING AND TIRE CHANGING ....................... |
202 |
Jack Location............................................. |
203 |
Spare Tire Tools......................................... |
203 |
To Access Spare Tire Winch Drive Nut..... |
203 |
Spare Tire Removal .................................. |
205 |
Spare Tire Removal Instructions .............. |
205 |
Preparations For Jacking ......................... |
206 |
Jacking Instructions................................... |
206 |
Securing The Compact Spare Tire............ |
210 |
Road Tire Installation................................ |
211 |
TIRE SERVICE KIT — IF EQUIPPED................... |
212 |
JUMP STARTING ................................................ |
219 |
Preparations For Jump Start..................... |
219 |
Jump Starting Procedure .......................... |
220 |
IF YOUR ENGINE OVERHEATS ......................... |
221 |
GEAR SELECTOR OVERRIDE ........................... |
222 |
FREEING A STUCK VEHICLE ............................. |
223 |
TOWING A DISABLED VEHICLE ....................... |
224 |
ENHANCED ACCIDENT RESPONSE |
|
SYSTEM (EARS) ................................................. |
225 |
EVENT DATA RECORDER (EDR)....................... |
225 |

SERVICING AND MAINTENANCE |
|
SCHEDULED SERVICING .................................. |
226 |
Maintenance Plan...................................... |
227 |
ENGINE COMPARTMENT .................................. |
231 |
Engine Compartment — 3.6L .................... |
231 |
Checking Oil Level...................................... |
232 |
Adding Washer Fluid ................................. |
232 |
Maintenance-Free Battery ....................... |
232 |
Pressure Washing...................................... |
233 |
DEALER SERVICE .............................................. |
233 |
Engine Oil .................................................. |
233 |
Engine Oil Filter.......................................... |
234 |
Engine Air Cleaner Filter ........................... |
235 |
Air Conditioner Maintenance ................... |
235 |
Accessory Drive Belt Inspection................ |
236 |
Body Lubrication........................................ |
237 |
Windshield Wiper Blades .......................... |
238 |
Exhaust System ........................................ |
238 |
Cooling System .......................................... |
239 |
Brake System ............................................ |
242 |
Automatic Transmission............................ |
243 |
RAISING THE VEHICLE ...................................... |
244 |
TIRES................................................................... |
245 |
Tire Safety Information ............................. |
245 |
Tires — General Information ..................... |
252 |
Tire Types ................................................... |
256 |
Spare Tires — If Equipped ......................... |
257 |
Wheel And Wheel Trim Care .................... |
259 |
Tire Chains and Traction Devices ............ |
260 |
Tire Rotation Recommendations ............. |
261 |
DEPARTMENT OF TRANSPORTATION |
|
UNIFORM TIRE QUALITY GRADES .................. |
261 |
Treadwear .................................................. |
261 |
Traction Grades ......................................... |
261 |
Temperature Grades ................................. |
262 |
VEHICLE STORAGE............................................. |
262 |
BODYWORK........................................................ |
262 |
Protection From Atmospheric Agents....... |
262 |
Body And Underbody Maintenance.......... |
263 |
Preserving The Bodywork.......................... |
263 |
INTERIORS ......................................................... |
264 |
Seats And Fabric Parts.............................. |
264 |
Plastic And Coated Parts........................... |
264 |
Glass Surfaces .......................................... |
265 |
Cleaning The Instrument Panel |
|
Cupholders................................................. |
265 |
TECHNICAL SPECIFICATIONS |
|
IDENTIFICATION DATA....................................... |
266 |
Vehicle Identification Number.................. |
266 |
BRAKE SYSTEM.................................................. |
266 |
WHEEL AND TIRE TORQUE |
|
SPECIFICATIONS ................................................ |
266 |
Torque Specifications................................ |
266 |
FUEL REQUIREMENTS ...................................... |
267 |
3.6L Engine................................................ |
267 |
Reformulated Gasoline ............................ |
268 |
Materials Added To Fuel ........................... |
268 |
Gasoline/Oxygenate Blends ..................... |
268 |
|
5 |
Do Not Use E-85 In Non-Flex Fuel |
|
Vehicles...................................................... |
269 |
CNG And LP Fuel System |
|
Modifications ............................................. |
269 |
MMT In Gasoline........................................ |
269 |
Fuel System Cautions................................ |
270 |
Carbon Monoxide Warnings...................... |
270 |
FLUID CAPACITIES ............................................ |
271 |
FLUIDS AND LUBRICANTS................................ |
272 |
Engine ........................................................ |
272 |
Chassis....................................................... |
274 |
MULTIMEDIA |
|
CYBERSECURITY ............................................... |
275 |
SAFETY AND GENERAL INFORMATION .......... |
276 |
Safety Guidelines....................................... |
276 |
RADIO 430/430 NAV........................................ |
277 |
General Handling....................................... |
277 |
Getting Started .......................................... |
279 |
Radio Mode................................................ |
281 |
Media Mode............................................... |
286 |
Remote Devices......................................... |
299 |
Uconnect Phone— If Equipped ................. |
304 |
Navigation — If Equipped.......................... |
317 |
STEERING WHEEL AUDIO CONTROLS — IF |
|
EQUIPPED .......................................................... |
340 |
Radio Operation......................................... |
340 |
CD Player.................................................... |
340 |

6 |
|
USB/MP3 CONTROL — IF EQUIPPED.............. |
340 |
Connecting The External USB Device....... |
341 |
Using This Feature..................................... |
341 |
Controlling The External USB Device |
|
Using Radio Buttons.................................. |
341 |
Play Mode................................................... |
341 |
List Or Browse Mode ................................. |
342 |
Bluetooth® Streaming Audio (BTSA) ....... |
343 |
UCONNECT MULTIMEDIA — VIDEO |
|
ENTERTAINMENT SYSTEM (VES) |
|
— IF EQUIPPED................................................... |
344 |
Getting Started........................................... |
344 |
Play Video Games...................................... |
344 |
Play A DVD Using The Touchscreen |
|
Radio........................................................... |
346 |
Play A DVD Using The VES Player |
|
— If Equipped ............................................. |
347 |
VES Remote Control — If Equipped .......... |
348 |
Remote Control Storage............................ |
349 |
Locking The Remote Control..................... |
349 |
Replacing The Remote Control |
|
Batteries..................................................... |
349 |
Headphones Operation............................. |
350 |
Controls...................................................... |
350 |
Replacing The Headphone Batteries ....... |
350 |
Accessibility — If Equipped........................ |
350 |
Stereo Headphone Lifetime Limited |
|
Warranty..................................................... |
351 |
System Information................................... |
351 |
RADIO OPERATION AND MOBILE PHONES.... |
359 |
Regulatory And Safety Information........... |
359 |
VOICE RECOGNITION QUICK TIPS |
|
— IF EQUIPPED .................................................. |
360 |
Voice Command System Operation ......... |
360 |
Commands ................................................ |
361 |
Voice Training ........................................... |
363 |
CUSTOMER ASSISTANCE |
|
SUGGESTIONS FOR OBTAINING SERVICE |
|
FOR YOUR VEHICLE .......................................... |
364 |
Prepare For The Appointment .................. |
364 |
Prepare A List............................................. |
364 |
Be Reasonable With Requests................. |
364 |
IF YOU NEED ASSISTANCE .............................. |
364 |
FCA US LLC Customer Center................... |
365 |
FCA Canada Inc. Customer Center........... |
365 |
In Mexico Contact...................................... |
365 |
Puerto Rico And U.S. Virgin Islands.......... |
365 |
Customer Assistance For The Hearing |
|
Or Speech Impaired (TDD/TTY) ................ |
365 |
Service Contract ....................................... |
365 |
WARRANTY INFORMATION.............................. |
366 |
MOPAR PARTS................................................... |
366 |
REPORTING SAFETY DEFECTS ........................ |
366 |
In The 50 United States And |
|
Washington, D.C........................................ |
366 |
In Canada................................................... |
366 |
PUBLICATION ORDER FORMS ........................ |
367 |

7
INTRODUCTION
Dear Customer, |
1 |
Congratulations on selecting your new vehicle. Be assured that it represents precision workmanship, distinctive styling, and high quality. This Owner’s Manual has been prepared with the assistance of service and engineering specialists to acquaint you with the operation and maintenance of your vehicle. Itissupplementedby Warranty Informationandcustomer orienteddocuments. Withinthisinformation,youwillfindadescriptionof theservices that FCA US LLC offers to its customers, the vehicle's warranty coverage, and the details of the terms and conditions for maintaining its validity. Please take the time to read all of these publications carefully before driving your vehicle for the first time. Following the instructions, recommendations, tips, and important warnings in this manual will help assure safe and enjoyable operation of your vehicle. Be sure you are familiar with all vehicle controls, particularly those used for braking, steering, transmission, and transfer case shifting (if equipped). Learn how your vehicle handles on different road surfaces. Your driving skills will improve with experience.
This Owner’s Manual describes all versions of this vehicle. Options andequipment dedicatedto specific markets or versions are not expressly indicated in the text. Therefore, you should only consider the information which is related to the trim level, engine, and version that you have purchased. Any content introduced throughout the Owner’s Information, that may or may not be applicable to your vehicle, will be identified with the wording “If Equipped”. All data contained in this publication are intended to help you use your vehicle in the best possible way. FCA US LLC aims at a constant improvement of the vehicles produced. For this reason, it reserves the right to make changes to the model described for technical and/or commercial reasons. For further information, contact an authorized dealer.
When itcomes to service, remember that authorizeddealers know your vehicle best, have factory-trainedtechnicians and genuine MOPAR® parts, and care about your satisfaction.

8
HOWTOUSETHISMANUAL
Essential Information
Consult the Table of Contents to determine which section contains the information you desire.
Since the specification of your vehicle depends on the items of equipment ordered, certain descriptions and illustrations may differ from your vehicle's equipment.
The detailed Index at the back of this Owner's Manual contains a complete listing of all subjects.
Symbols
Some vehicle components have colored labels whose symbols indicate precautions to be observed when using this component. Refer to “Warning Lights and Messages” in “Getting To Know Your Instrument Panel” for further information on the symbols used in your vehicle.
WARNINGSANDCAUTIONS
This Owner’s Manual contains WARNINGS against operating procedures that could result in a collision, bodily injury and/or death. It also contains CAUTIONS against procedures that could result in damage to your vehicle. If you do not read this entire Owner’s Manual, you may miss important information. Observe all Warnings and Cautions.
VEHICLEMODIFICATIONS/ALTERATIONS
WARNING!
Any modifications or alterations to this vehicle could seriously affect its roadworthiness and safety and may lead to a collision resulting in serious injury or death.
9
GETTING TO KNOW YOUR VEHICLE
KEYS
Key Fobs
Yourvehicleusesakeylessignitionsystem.This system consists of a Remote Keyless Entry (RKE) key fob and a Wireless Ignition Node (WIN) with integral ignition. You can insert the key fob into the ignition switch with either side up. It also contains an emergency key, which stores in the rear of the key fob.
NOTE:
The key fob may notbefoundif it is locatednext to a mobile phone, laptop or other electronic device; these devices may block the key fob’s wireless signal.
The emergency key allows for entry into the vehicle should the battery in the vehicle or the key fob become depleted. You can keep the emergency key with you when valet parking.
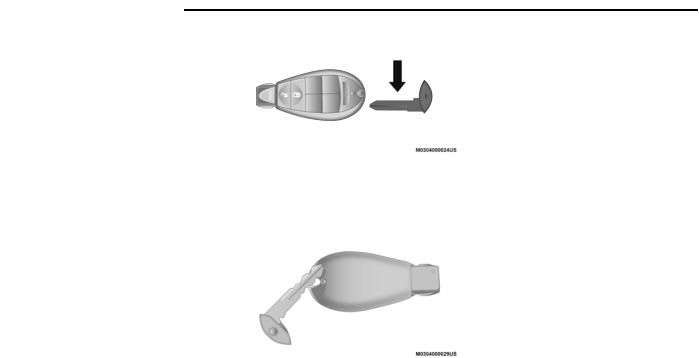
To remove the emergency key, slide the mechanical latch at the top of the key fob sideways with your thumb and then pull the key out with your other hand.
NOTE:
When using the emergency key to gain access to your vehicle,beaware thatthesecurity alarm may be triggered. Insertthe key into the ignition andplacethe ignitionintheON/RUNpositionto disarm the security system.
KeyFob
2
EmergencyKeyRemoval
To Unlock The Doors And Liftgate
Push and release the unlock button on the key fob once to unlock the doors. Push and release the unlock button a second time within five seconds to unlock the liftgate. The turn signal lights will flash to acknowledge the unlock signal.
To Lock The Doors And Liftgate
Push andrelease thelock buttonon the key fob once to lock the doors. The turnsignallightswill flash to acknowledge the lock signal.
10 GETTING TO KNOW YOUR VEHICLE
Replacing The Battery In The Key Fob With Remote Control
The replacement battery is one CR2032 battery.
NOTE:
Perchlorate Material — special handling may apply. See www.dtsc.ca.gov/hazardouswaste/perchlorate for further information.
Do not replace coin battery unless the instrument cluster display shows the message “Key Fob Low Battery”.
Do not touch the battery terminals that are on the back housing or the printed circuit board.
1.Remove the emergency key by sliding the mechanical latch on the back of the key fobsidewayswithyour thumbandthenpull the key out with your other hand.
Emergency WINKey Removal
2.Gently pry the two halves of the key fob apart. Make sure not to damage the seal during removal.
Separating WINKey FobCase
3.Remove the battery by turning the back cover over (battery facing downward) and tapping it lightly on a solid surface such as a table or similar, then replace the battery. When replacing the battery, match the (+) sign on the battery to the (+) sign on the inside of the battery clip, located on the back cover. Avoid touching the new battery with your fingers. Skin oils may cause battery deterioration. If you touch a battery, clean it with rubbing alcohol.
4.To assemble the key fob case, line up the two case halves, and snap them together.
Programming Additional Key Fobs
Programming the key fob may be performed by an authorized dealer.
NOTE:
Once a key fob is programmed to a vehicle, it cannot be repurposed and reprogrammed to another vehicle.

General Information
Thefollowing regulatory statementappliestoall Radio Frequency (RF) devices equipped in this vehicle:
This device complies with Part 15 of the FCC Rules and with Innovation, Science and EconomicDevelopmentCanadalicense-exempt RSS standard(s). Operation is subject to the following two conditions:
1.This device may not cause harmful interference, and
2.This device must accept any interference received, including interference that may cause undesired operation.
Le présent appareil est conforme aux CNR d`Innovation, Science and Economic Development applicables aux appareils radio exempts de licence. L'exploitation est autorisée aux deux conditions suivantes:
1.l'appareil ne doit pas produire de brouillage, et
2.l'utilisateur de l'appareil doit accepter tout brouillage radioélectrique subi, même si le brouillage est susceptible d'en compromettre le fonctionnement.
La operación de este equipo está sujeta a las siguientes dos condiciones:
1.es posible que este equipo o dispositivo no cause interferencia perjudicial y
2.este equipo o dispositivo debe aceptar cualquier interferencia, incluyendo la que pueda causar su operación no deseada.
NOTE:
Changes or modifications not expressly approved by the party responsible for compliance could void the user’s authority to operate the equipment.
GETTING TO KNOW YOUR VEHICLE 11
11
IGNITIONSWITCH
Wireless Ignition Node (WIN)
The Wireless Ignition Node (WIN) operates
similar to an ignition switch. It has four 2 operating positions, three withdetents and one that is spring-loaded. The detent positions are OFF, ACC, andON/RUN. The STARTposition is a spring-loaded momentary contact position.
When released from the START position, the switch automatically returns to the ON/RUN position.
Wireless IgnitionSwitch
1 — OFF
2 — ACC (Accessory)
3 — ON/RUN
4 — START

12 GETTING TO KNOW YOUR VEHICLE
REMOTESTART—IFEQUIPPED
How To Use Remote Start
All of the following conditions must be met before the engine will remote start:
Gear selector in PARK
Doors closed
Hood closed
Liftgate closed
Hazard switch off
Brake switch inactive (brake pedal not pushed)
Battery at an acceptable charge level
System not disabled from previous remote start event
Vehicle security alarm not active
Ignition in OFF position
Malfunction Indicator Light is not illuminated
WARNING!
Do not start or run an engine in a closed garage or confined area. Exhaust gas contains Carbon Monoxide (CO) which is odorlessandcolorless. CarbonMonoxideis poisonous and can cause serious injury or death when inhaled.
Keep key fobs away from children. Operation of the Remote Start System, windows, door locks or other controls could cause serious injury or death.
Remote Start Abort Messages
The following messages will display in the instrument cluster display if the vehicle fails to remote start or exits remote start prematurely:
Remote Start Aborted — Door Ajar
Remote Start Aborted — Hood Ajar
Remote Start Aborted — Fuel Low
Remote Start Aborted — L/Gate Ajar
Remote Start Disabled — Start Vehicle To Reset
The instrument cluster display message stays active until the ignition is placed in the ON/RUN position.
To Enter Remote Start Mode
Push and release the Remote Start button on the key fob twice within five seconds. The vehicle doors will lock, the turn signals will flash twice, and the horn will chirp twice. Then the engine will start, and the vehicle will remain in the Remote Start mode for a 15 minute cycle.
NOTE:
If an engine fault is present or fuel level is low, the vehicle will start and then shut down in 10 seconds.
The park lamps will turn on and remain on during Remote Start mode.
For security, power window operation is disabled when the vehicle is in the Remote Start mode.
The engine can be started two consecutive times (two 15 minute cycles) with the key fob. However, the ignition must be placed in the ON/RUN position before you can repeat the start sequence for a third cycle.

To Exit Remote Start Mode Without Driving The Vehicle
Push and release the Remote Start button one time or allow the remote start cycle to complete the entire 15 minute cycle.
NOTE:
To avoid unintentional shutdowns, the system will disable for two seconds after receiving a valid Remote Start request.
To Exit Remote Start Mode And Drive The Vehicle
Beforetheendofthe15 minutecycle,pushand release the unlock button on the key fob to unlock the doors and disarm the vehicle securityalarm(ifequipped). Then,insertthekey into the ignition and place the ignition in the ON/RUN position.
NOTE:
The ignition must be placed in the ON/RUN position in order to drive the vehicle.
The message “Remote Start Active — Key To Run” will display in the instrument cluster display until you place the ignition in the ON/RUN position.
General Information
Thefollowingregulatory statementappliestoall Radio Frequency (RF) devices equipped in this vehicle:
This device complies with Part 15 of the FCC Rules and with Innovation, Science and EconomicDevelopmentCanadalicense-exempt RSS standard(s). Operation is subject to the following two conditions:
1.This device may not cause harmful interference, and
2.This device must accept any interference received, including interference that may cause undesired operation.
Le présent appareil est conforme aux CNR d`Innovation, Science and Economic Development applicables aux appareils radio exempts de licence. L'exploitation est autorisée aux deux conditions suivantes:
1.l'appareil ne doit pas produire de brouillage, et
GETTING TO KNOW YOUR VEHICLE 13
13
2.l'utilisateur de l'appareil doit accepter tout brouillage radioélectrique subi, même si le brouillage est susceptible d'en compromettre le fonctionnement.
La operación de este equipo está sujeta a las |
2 |
siguientes dos condiciones: |
|
1.es posible que este equipo o dispositivo no cause interferencia perjudicial y
2.este equipo o dispositivo debe aceptar cualquier interferencia, incluyendo la que pueda causar su operación no deseada.
NOTE:
Changes or modifications not expressly approved by the party responsible for compliance could void the user’s authority to operate the equipment.
SENTRYKEY
The Sentry Key Immobilizer system prevents unauthorized vehicle operation by disabling the engine. The system does not need to be armed or activated. Operation is automatic,regardless of whether the vehicle is locked or unlocked.

14 GETTING TO KNOW YOUR VEHICLE
The system uses a key fob, keyless push button ignition and a Radio Frequency (RF) receiver to prevent unauthorized vehicle operation.
Therefore, only key fobs that are programmed to the vehicle can be used to start and operate the vehicle.Thesystemcannot reprogram akey fob obtained from another vehicle.
After placing the ignition switch in the ON/RUN position, thevehiclesecuritylight willturnonfor three seconds for a bulb check. If the light remains on after the bulb check, it indicates that there is a problem with the electronics. In addition, if the light begins to flash after the bulb check, it indicates that someone attemptedtostarttheenginewithaninvalidkey fob. In the event that a valid key fob is used to start the engine but there is an issue with the vehicle electronics, the engine will start and shut off after two seconds.
If the vehicle security light turns on during normal vehicle operation (vehicle running for longer than ten seconds), it indicates that there is a fault in the electronics. Should this occur, havethevehicleservicedassoonaspossibleby an authorized dealer.
CAUTION!
The Sentry Key Immobilizer system is not compatible with some aftermarket remote starting systems. Use of these systems may result in vehicle starting problems and loss of security protection.
All of the key fobs provided with your new vehicle have been programmed to the vehicle electronics.
Key Programming
Key fob programming is performed at an authorized dealer.
Replacement Keys
NOTE:
Only key fobs that are programmed to the vehicle electronics can be used to start and operate the vehicle. Once a key fob is programmed to a vehicle, it cannot be programmed to any other vehicle.
CAUTION!
Always remove the key fobs from the vehicle and lock all doors when leaving the vehicle unattended.
NOTE:
Duplication of key fobs may be performed at an authorized dealer. This procedure consists of programming a blank key fob to the vehicle electronics. A blank key fob is one that has never been programmed.
When having the Sentry Key Immobilizer System serviced, bring all vehicle keys with you to an authorized dealer.
General Information
Thefollowingregulatory statementappliesto all Radio Frequency (RF) devices equipped in this vehicle:
This device complies with Part 15 of the FCC Rules and with Innovation, Science and EconomicDevelopmentCanadalicense-exempt RSS standard(s). Operation is subject to the following two conditions:
1.This device may not cause harmful interference, and
2.This device must accept any interference received, including interference that may cause undesired operation.

Le présent appareil est conforme aux CNR d`Innovation, Science and Economic Development applicables aux appareils radio exempts de licence. L'exploitation est autorisée aux deux conditions suivantes:
1.l'appareil ne doit pas produire de brouillage, et
2.l'utilisateur de l'appareil doit accepter tout brouillage radioélectrique subi, même si le brouillage est susceptible d'en compromettre le fonctionnement.
La operación de este equipo está sujeta a las siguientes dos condiciones:
1.es posible que este equipo o dispositivo no cause interferencia perjudicial y
2.este equipo o dispositivo debe aceptar cualquier interferencia, incluyendo la que pueda causar su operación no deseada.
NOTE:
Changes or modifications not expressly approved by the party responsible for compliance could void the user’s authority to operate the equipment.
VEHICLESECURITYALARM—IFEQUIPPED
The vehicle security alarm monitors the vehicle doors for unauthorized entry and the ignition switch for unauthorized operation. When the alarm isactivated, theinterior switchesfor door locks, power sliding doors and power liftgate are disabled. The vehicle security alarm provides both audible and visible signals.
If something triggers the alarm, the vehicle security alarm will provide the following audible and visible signals: the horn will pulse, the park lamps and/or turn signals will flash, and the vehicle security light in the instrument cluster will flash.
Rearming Of The System
The vehicle security alarm will rearm itself after the 15 additional minutes of the park lamps and vehicle security light flashing, if the system has not been disabled. If the condition which initiated the alarm is still present, the system will ignore that condition and monitor the remaining doors and ignition.
GETTING TO KNOW YOUR VEHICLE 15
15
To Arm The System
Follow these steps to arm the vehicle security alarm:
1. Make sure the vehicle’s ignition is placed |
2 |
in the OFF position (refer to "Starting The |
Engine" in "Starting And Operating" for further information).
2.Perform one of the following methods to lock the vehicle:
Push lock on the interior power door lock switch with the driver and/or passenger door open.
Push the lock button on the key fob.
3.If any doors are open, close them.
To Disarm The System
The vehicle security alarm can be disarmed using any of the following methods:
Push the unlock button on the key fob.
Cycle the vehicle ignition system out of the OFF position. Insert a valid key into the ignition switch and place the ignition into the ON position.

16 GETTING TO KNOW YOUR VEHICLE
NOTE:
The driver's door key cylinder and the liftgate button on the key fob cannot arm or disarm the vehicle security alarm.
The vehicle security alarm remains armed during power liftgate entry. Pushing the liftgate button will not disarm the vehicle security alarm. If someone enters the vehicle through the liftgate and opens any door, the alarm will sound.
When the vehicle security alarm is armed, the interior power door lock switches will not unlock the doors.
Thevehiclesecurityalarmisdesignedtoprotect your vehicle. However, you can create conditionswherethesystemwillgiveyouafalse alarm. If one of thepreviously describedarming sequences has occurred, the vehicle security alarm will arm regardless of whether you are in the vehicle or not. If you remain in the vehicle and open a door, the alarm will sound. If this occurs, disarm the vehicle security alarm.
If the vehicle security alarm is armed and the battery becomes disconnected, the vehicle security alarm will remain armed when the battery is reconnected; the exterior lights will flash, and the horn will sound. If this occurs, disarm the vehicle security alarm.
Tamper Alert
If something has triggered the vehicle security alarminyourabsence,thehornwillsoundthree times and the exterior lights will blink three times when you disarm the vehicle security alarm. Check the vehicle for tampering.
DOORS
Manual Door Locks
Lock the front doors by pushing down on the lock knobs on each door trim panel.
If the lock knob is down when you shut either front door, the door will lock. Make sure the keys are not inside the vehicle before closing the door.
Door Lock Knob
If the lock knob is rearward when you shut either side sliding door, the door will lock. Make sure the keys are not inside the vehicle before closing the door.
WARNING!
Do not leave children or animals inside parked vehicles in hot weather. Interior heat build-up may cause serious injury or death.
For personal security and safety in the event of an collision, lock the vehicle doors as you drive as well as when you park and leave the vehicle.
(Continued)
WARNING! (Continued)
Before exiting a vehicle, always shift the automatic transmission into PARK or the manual transmission into FIRST gear or REVERSE, apply the parking brake,turnthe vehicle OFF, remove the key fobs from vehicle, and lock all doors. and lock your vehicle.
Never leave children alone in a vehicle, or withaccesstoanunlockedvehicle.Leaving children in a vehicle unattended is dangerous for a number of reasons. A child or others could be seriously or fatally injured. Children should be warned not to touch the parking brake, brake pedalor the gear selector.
Allowing children to be in a vehicle unattended is dangerous for a number of reasons.Achildorotherscouldbeseriously or fatally injured. Children should be warned not to touch the parking brake, brake pedal or the gear selector.
WARNING! (Continued)
Do not leave the key fob in or near the vehicle, or in a location accessible to children. A child could operate power windows, other controls, or move the vehicle.
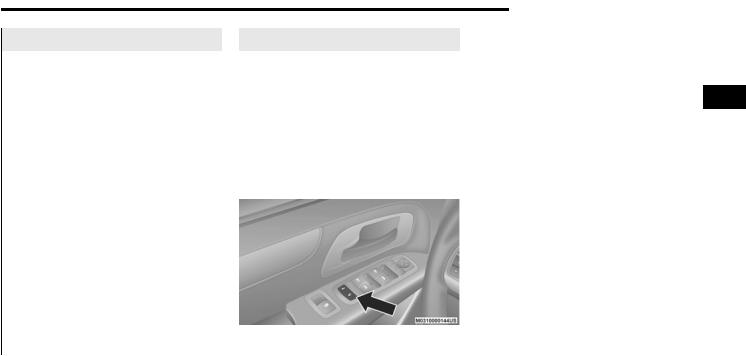
Power Door Locks — If Equipped
Power door lock switches are located on each front doortrimpanel. Usetheseswitchestolock or unlock the doors.
Driver Power Door Lock Switches
GETTING TO KNOW YOUR VEHICLE 17
17
If you push the power door lock switch while the key fob is in the ignition, and any front door is open, the power locks will not operate. This prevents you from accidentally locking your keys in the vehicle. Removing the key fob or
closing the door will allow the locks to operate. 2 A chimewillsoundif the key fob is in theignition switch and a door is open, as a reminder to remove the key fob.
NOTE:
If you push the power door lock switch while the sliding door is open, the sliding door will lock.
Automatic Door Locks — If Equipped
The auto door lock feature default condition is enabled. When enabled, the door locks willlock automaticallywhenthevehicle'sspeedexceeds 15 mph (24 km/h). The auto door lock feature can be enabled or disabled by your authorized dealer per written request of the customer.
Please see an authorized dealer for service.
(Continued)

18 GETTING TO KNOW YOUR VEHICLE
Unlock Doors Automatically On Exit — If Equipped
The Unlock Doors Automatically On Exit feature unlocks all of the vehicle doors when any door is opened. This will occur only after the gear selector has been placed into the PARK position, after the vehicle has been driven (the gear selector has been placed out of the PARK position and all doors closed).
The Unlock Doors Automatically On Exit feature willnot operateif there is any manualoperation of the power door locks (lock or unlock).
On vehicles equipped with the optional instrument cluster display, refer to “Instrument Cluster Display” in “Getting To Know Your Instrument Panel” for further information.
NOTE:
Use the Automatic Door Locks at 15 mph (24 km/h) and Unlock Doors Automatically On Exit features in accordance with local laws.
Power Sliding Side Door — If Equipped
Push the button on the key fob twice within five seconds to open, close, or reverse a power sliding door.
The power sliding door may bepower opened or closed in several ways:
Key fob
Inside or outside handles
Buttons located:
In the overhead console
Just inside the sliding door
On the outside handle
Push the button on the key fob twice within five secondstoopenapower sliding door.Whenthe door is fully open, pushing the button twice within five seconds a second time will close the door.
There are power sliding side door switches located onthe B-pillar trim panel, just infront of the power sliding door for the rear seat passengers andin the overheadconsole for the driver andpassengers.Pushingtheswitchonce will open the power sliding door. If the switch is pushed while the door is under a power cycle, the door will reverse direction.
NOTE:
The power sliding side door must be unlocked before the power sliding door switches will operate.
Power Sliding DoorSwitch
If the inside or outside door handles are used while the power sliding side door is activated, the power sliding door feature will be canceled and will go into manual mode.
To avoid unintentional operation of the power sliding doors from the rear seats, push the power sliding door master lock button, located intheoverheadconsole,todisabletheswitches and handles for the rear seat passengers.
NOTE:
The power sliding side door switches will not open the power sliding door if the gear selector is in gear or the vehicle speed is above 0 mph (0 km/h). To close the power slidingdoor withthegear selectoringear and vehicle speed at 0 mph (0 km/h), the brake must be pushed.
If anything obstructs the power sliding side door while it is closing or opening, the door will automatically reverse to the closed or open position, provided it meets sufficient resistance.
If the power sliding side door is not in the full open or close position, it will fully open when a power sliding door switch is pushed. To close the door, wait until it is fully open and then push the switch again.
If the power sliding door encounters multiple obstructions within the same cycle, the system will automatically stop, the power sliding door motor will make a clicking sound until the door has no further movement. This clicking sound can be stopped by pulling the
inside or outside handle. If this condition occurs, no damage is done to the power sliding door motor. The power sliding door must be opened or closed manually.
WARNING!
You, or others, could be injured if caught in the path of the sliding door. Make sure the door path is clear before closing the door.
Overhead ConsoleControl Buttons
1 — Left Sliding Door
2 — Liftgate
3 — Right Sliding Door
4 — Sliding Door Power Off
GETTING TO KNOW YOUR VEHICLE 19
19
Child Locks
To provide a safer environment for small |
|
children riding in the rear seats, the sliding |
|
doorsare equippedwithaChildProtection Door |
|
Lock system. |
2 |
NOTE:
When the Child Protection Door Lock System is engaged, the door can only be opened by using the outside door handle even though the inside lock is in the unlocked position.
Child ProtectionDoor Locks
20 GETTING TO KNOW YOUR VEHICLE
SEATS
Seats are a part of the Occupant Restraint System of the vehicle.
WARNING!
It is dangerous to ride in a cargo area, inside or outside of a vehicle. In a collision, people riding in these areas are more likely to be seriously injured or killed.
Do not allow people to ride in any area of your vehicle that is notequipped withseats and seat belts. In a collision, people riding in these areas are more likely to be seriously injured or killed.
Besureeveryone in your vehicleis ina seat and using a seat belt properly.
Manual Adjustment (Front Seats) — If
Equipped
WARNING!
Adjusting a seat while the vehicle is moving isdangerous.Thesuddenmovementofthe seat could cause you to lose control. The seat belt might not be adjusted properly and you could be injured. Adjust the seat only while the vehicle is parked.
Do not ride with the seatback reclined so that the shoulder belt is no longer resting against your chest. In a collision you could slide under theseatbeltandbeseriously or even fatally injured. Use the recliner only when the vehicle is parked.
Manual Front/Second Row Seat Adjuster
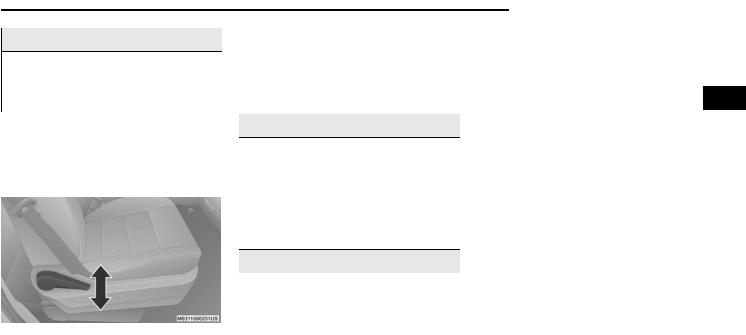
Both front seats are adjustable forward or rearward. The manual seat adjustment handle is located under the seat cushion at the front edge of each seat.
ManualSeatAdjuster
While sitting in the seat, pull up on the handle and slide the seat forwardor rearward. Release the bar once you have reached the desired position. Then, using body pressure, move forward and rearward on the seat to be sure that the seat adjusters have latched.
WARNING!
Adjusting a seat while driving may be dangerous. Moving aseat whiledrivingcould result in loss of control which could cause a collision and serious injury or death.
(Continued)
WARNING! (Continued)
Seats should be adjusted before fastening the seat belts and while the vehicle is parked. Serious injury or deathcould result from a poorly adjusted seat belt.
Manual Reclining Seats — If Equipped
For models equipped with manual reclining seats, the recline lever is located on the outboard side of the seat.
ManualRecline Lever
To recline, lean forward slightly, lift the lever, then push back to the desired position and releasethelever. Leanforwardand liftthelever to return the seatback to its normal position. Usingbodypressure, leanforwardandrearward ontheseatto be sure theseatback has latched.
WARNING!
Do not ride with the seatback reclined so that the shoulder belt is no longer resting against your chest.In a collision you could slide under the seat belt, which could result in serious injury or death.
Manual Adjustment (Rear Seats)
WARNING!
Do not pile luggage or cargo higher than the top of the seatback. This could impair visibility or become a dangerous projectile in a sudden stop or collision.
GETTING TO KNOW YOUR VEHICLE 21
21
Stow 'n Go Seating
On vehicles equipped with Stow 'n Go seating, the second and third row seats can be folded into the floor for convenient storage.
Second Row Stow 'n Go |
2 |
OnvehiclesequippedwithStow'nGo seats, the seats will fold and tumble in one motion.
To stow the second row seats, proceed as follows:
1.Move the front seat fully forward.
2.Recline the front seatback fully forward.
3.Raise the armrests on the second row seat.
NOTE:
Seat will not stow in the storage bin unless the armrests are raised.

22 GETTING TO KNOW YOUR VEHICLE
4.Slide the storage bin locking mechanism to the “lock” position and then pull up on the storage bin latch to open the cover.
StorageBin Cover Lock Release
5.Pull upward on the seatback recliner lever located on the outboard side of the seat.
Seatback Recliner Lever, Seat Tumble, AndHead
Restraint FoldLever
The non-adjustable head restraint and seatback will fold automatically during the seat tumble. No additional actuation is necessary.
Non-Adjustable HeadRestraint
AutomaticFolding Seatback
The seat will automatically tumble into position for easy storage.
Tumbled SecondRow Seat
NOTE:
You may experience deformation in the seat cushion from the seat belt buckles if the seats are left folded for an extended period of time. This is normal and by simply opening the seats to the open position,over time theseat cushion will return to its normal shape.
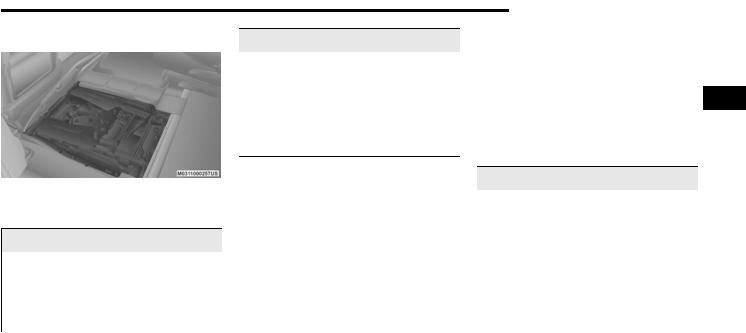
6. Push the seat into the storage bin.
SeatInStorageBin
7. Close the storage bin cover.
WARNING!
In a collision, serious injury could result if the seat storage bin covers are not properly latched:
Donot drivethevehiclewiththestoragebin covers open.
(Continued)
WARNING! (Continued)
Keep the storage bin covers closed and latched while the vehicle is in motion.
Do not use a storage bin latch as a tie down.
CAUTION!
The storage bin cover must be locked and flat to avoid damage from contact with the front seattracks, which have minimal clearance to the cover.
Do not siton the secondrow seat when itis in the stowed position with the seatback upright otherwise damage to the seat may occur.
To Unstow Second Row Seats
To unstow the second row seat, proceed as follows:
1.Pull up on the storage bin latch to open the cover.
GETTING TO KNOW YOUR VEHICLE 23
23
2.Pull up on the strap to lift the seat outof the storage bin and push the seat rearward to latch the seat anchors.
3.Lift the seatback to the full upright position.
4. Return the head restraint to its upright |
2 |
|
|
position, close the storage bin cover and |
|
slide the storage bin locking mechanism to |
|
the “unlocked” position. |
|
WARNING!
In a collision, you or others in your vehicle could be injured if seats are not properly latched to their floor attachments. Always be sure the seats are fully latched.
Sittinginaseatwiththeheadrestraintinits lowered position could result in serious injury or death in a collision. Always make sure the head restraints are in their upright positions when the seat is to be occupied.
24 GETTING TO KNOW YOUR VEHICLE
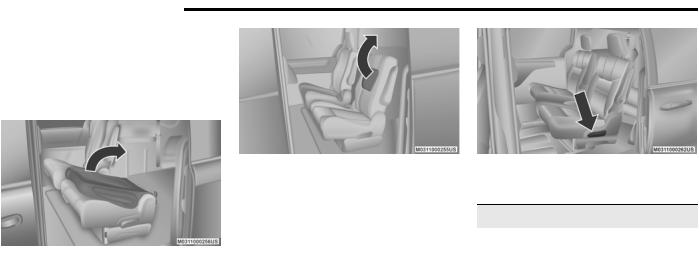
Stow 'n Go Seat — Folded And Latched Position
To tumble or stow the seat from the folded and latched position, proceed as follows:
1.Return the seatback to the upright position.
Raising The Seatback
2.Return the head restraint to the upright position.
Raising The HeadRestraint
3.Pull up on the seatback recliner lever onthe outboard side of the seat to fold head rest, seatback, and tumble the seat forward.
Easy Entry Second Row
The second row Stow 'n Go seats allow easy entry to the third row seat or rear cargo area.
Pull up on the seatback recliner lever on the outboard side of the seat.
Seatback Recliner Lever
The seat will automatically fold into position for easy entry into the third row.
WARNING!
In the event of a collision you could be injured if the seat is not fully latched.
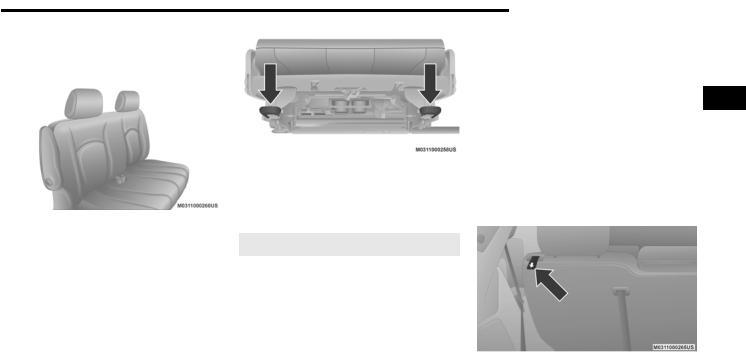
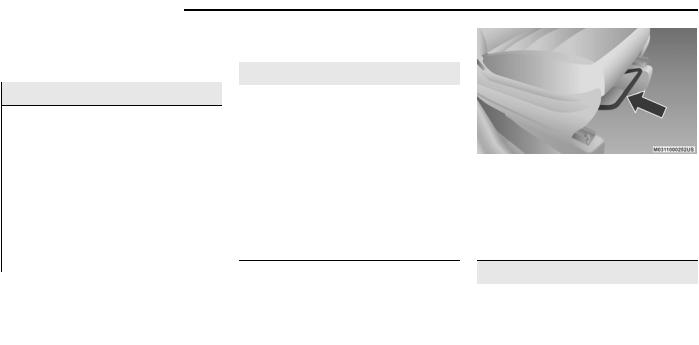
Second Row Bench Seat — If Equipped
While the bench seat does not stow in the floor, it is removable for added cargo space.
SecondRowBenchSeat
Release levers are located on the rear leg assemblies, near the floor. To remove the seat, squeeze each release handle and rotate downwards to deploy the wheels. A lock indicator button pops up when the seat is unlocked. The seat assembly can now be removed from the vehicle and moved on its Easy Out Rollers.
ReleaseHandles
To reinstall the seat, align the seat into the detent positions on the floor. Squeeze the release handle and rotate upward until the lock indicator button returns into the handle.
WARNING!
If notproperly latched, the seat couldbecome loose. Personal injuries could result. After reinstalling these seats, be sure the red indicator button on the release handles return into the handles.
GETTING TO KNOW YOUR VEHICLE 25
25
Manually Folding Third Row Seats — If Equipped
Tomanually foldthe thirdrowseats, proceedas follows:
1. Lower the center head restraint down to |
2 |
the seatback by pushing the button on the guide and pushing the head restraint down.
2.Lower the outboard head restraints by pulling on the release strap marked “1” located on the outboard side of the head restraint.
HeadRestraint Release Strap“1”

26 GETTING TO KNOW YOUR VEHICLE
3.Pull release strap marked “2” located on the rear of the seat to lower the seatback.
Release Strap“2”
4.Pull release strap marked“3”to release the anchors.
Release Strap“3”
5.Pull release strap marked “4” and tumble the seat rearward into the storage bin.
Release Strap“4”
StowedThirdRow Seat
NOTE:
You may experience deformation in the seat cushion from the seat belt buckles if the seats are left folded for an extended period of time. This is normal and by simply opening the seats to the open position, over time theseat cushion will return to its normal shape.
To Unfold Third Row Seats
To unfold the third row seats, proceed as follows:
1.Pull up on the assist strap to lift the seat out of the storage bin and push the seat forward until the anchors latch.
2.Pull release strap marked “2” to unlock the recliner.
3.Pulling strap “4” releases the seatback to return to its full upright position.
4.Raise the head restraint to its upright position.
WARNING!
In a collision, you or others in your vehicle could be injured if seats are not properly latched to their floor attachments. Always be sure the seats are fully latched.
Sittinginaseatwiththeheadrestraint inits lowered position could result in serious injury or death in a collision. Always make sure the head restraints are in their upright positions when the seat is to be occupied.
Tailgate Mode
To fold the third row seats into Tailgate Mode, proceed as follows:
1.Pull release strap “3”, then pull release strap “4” to rotate the entire seat rearward.
2.Torestorethe seattoits uprightposition, lift up on the seatback and push forward until the anchors latch.
WARNING!
To avoid serious injury or death, never operate the vehicle with occupants in the third row seat while in the tailgate mode.
Power Seats — If Equipped
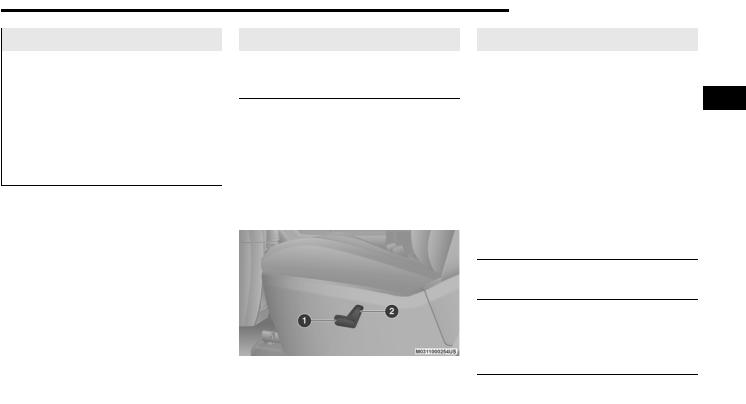
Some models may be equipped with eight-way power seats for the driver and front passenger. The power seat switches are located on the outboard side of the seat. The switches control the movement of the seat cushion and the seatback.
DriverPowerSeat Switch
GETTING TO KNOW YOUR VEHICLE 27
27
WARNING!
Adjusting a seat while driving may be |
|
dangerous. Moving a seat while driving |
|
could result in loss of control which could |
2 |
cause a collision and serious injury or |
death.
Seats should be adjusted before fastening the seat belts and while the vehicle is parked. Serious injury or death could result from a poorly adjusted seat belt.
Do not ride with the seatback reclined so that the shoulder belt is no longer resting against your chest. In a collision you could slide under the seatbelt, whichcouldresult in serious injury or death.
CAUTION!
Do not place any article under a power seat or impede its ability to move as it may cause damage to the seat controls. Seat travel may become limited if movement is stopped by an obstruction in the seat's path.
1 — Seat Switch
2 — Seatback Switch

28 GETTING TO KNOW YOUR VEHICLE
Adjusting The Seat Forward Or Rearward
The seat can be adjusted both forward and rearward. Push the seat switch forward or rearward. The seat will move in the direction of theswitch.Releasetheswitchwhenthedesired position has been reached.
Adjusting The Seat Up Or Down
The height of the seats can be adjusted up or down. Pull upward or push downward on the rear of seat switch, the seat will move in the directionof theswitch.Releasetheswitchwhen the desired position has been reached.
Tilting The Seat Up Or Down
The angle of the seat cushion can be adjusted in two directions. Pull upward or push downward on the front of the seat switch, the front of the seat cushion will move in the directionof theswitch.Releasetheswitchwhen the desired position has been reached.
Reclining The Seatback
The angle of the seatback can be adjusted forward or rearward. Push the seatback switch forward or rearward, the seat will move in the directionof theswitch.Releasetheswitchwhen the desired position is reached.
WARNING!
Adjusting a seat while driving may be dangerous. Moving a seat while driving could result in loss of control which could cause a collision and serious injury or death.
Seats should be adjusted before fastening the seat belts and while the vehicle is parked. Serious injury or death could result from a poorly adjusted seat belt.
Do not ride with the seatback reclined so that the shoulder belt is no longer resting against your chest. In a collision you could slide under the seatbelt, whichcouldresult in serious injury or death.
CAUTION!
Do not place any article under a power seat or impede its ability to move as it may cause damage to the seat controls. Seat travel may become limited if movement is stopped by an obstruction in the seat's path.
Power Lumbar — If Equipped
Vehicles equipped with power driver or passenger seats may also be equipped with power lumbar. The power lumbar switch is located on the outboard side of the power seat. Push the switch forward to increase the lumbar support. Push the switch rearward to decrease the lumbar support.
PowerLumbar Switch
Heated Seats — If Equipped
On some models, the front seats may be equipped with heaters located in the seat cushions and seat backs.
Loading...