

Page 1

2 0 0 9
O W N E R ’ S M A N U A L H y b r i d S u p p l e m e n t
Aspen/Durango
Page 2

VEHICLES SOLD IN CANADA
With respect to any Vehicles Sold in Canada, the name
Chrysler LLC shall be deemed to be deleted and the
name Chrysler Canada Inc. used in substitution therefor.
DRIVING AND ALCOHOL
Drunken driving is one of the most frequent causes of
accidents.
Your driving ability can be seriously impaired with blood
alcohol levels far below the legal minimum. If you are
drinking, don’t drive. Ride with a designated non-drinking
driver, call a cab, a friend, or use public transportation.
WARNING!
Driving after drinking can lead to an accident. Your
perceptions are less sharp, your reflexes are slower,
and your judgment is impaired when you have been
drinking. Never drink and then drive.
This manual illustrates and describes the operation of
features and equipment that are either standard or optional on this vehicle. This manual may also include a
description of features and equipment that are no longer
available or were not ordered on this vehicle. Please
disregard any features and equipment described in this
manual that are not on this vehicle.
Chrysler LLC reserves the right to make changes in
design and specifications, and/or make additions to or
improvements to its products without imposing any
obligation upon itself to install them on products previously manufactured.
Copyright © 2008 Chrysler LLC
Page 3

SECTION PAGE
1
INTRODUCTION
2
THINGS TO KNOW BEFORE STARTING YOUR VEHICLE
3
UNDERSTANDING THE FEATURES OF YOUR VEHICLE
4
UNDERSTANDING YOUR INSTRUMENT PANEL
5
STARTING AND OPERATING
6
WHAT TO DO IN EMERGENCIES
7
MAINTAINING YOUR VEHICLE
8
MAINTENANCE SCHEDULES
9
INDEX
....................................................................127
TABLE OF CONTENTS
.............................................................3
...............................5
...............................19
.................................... 21
.................................................. 55
................................................67
................................................ 87
..................................................113
1
2
3
4
5
6
7
8
9
Page 4

Page 5

INTRODUCTION
CONTENTS
䡵 Introduction ........................... 4
1
Page 6

4 INTRODUCTION
INTRODUCTION
This booklet is a supplement to the Owner’s Manual.
This manual was prepared with the assistance of service
and engineering specialists and is intended to aid the
operators of Hybrid vehicles in understanding the operation and required maintenance procedures for such vehicles. This supplement applies to Hybrid vehicles only.
You are urged to read this Owner’s Manual carefully.
Following the instructions and recommendations provided herein will help assure safe and reliable operation
of your vehicle. After you have read the Owner’s Manual,
it should be stored in the vehicle for convenient reference
and remain with the vehicle when sold.
Copyright© 2008 Chrysler LLC
Page 7

THINGS TO KNOW BEFORE STARTING YOUR VEHICLE
CONTENTS
䡵 A Word About Your Keys .................. 6
䡵 Hybrid System Operation .................. 7
▫ Hybrid Operation ...................... 7
▫ Hybrid Vehicle Operating Characteristics .... 10
▫ Driving To Achieve Maximum Fuel
Economy ........................... 11
䡵 Important Hybrid System Information ........ 12
2
▫ Hybrid System Components ............. 12
▫ High Voltage Battery ................... 14
▫ Disposal Of High Voltage Battery .......... 15
▫ High Voltage Battery Service Disconnect ..... 15
▫ Charge Assist — High Voltage Battery ...... 16
▫ In The Event Of An Accident ............. 16
Page 8

6 THINGS TO KNOW BEFORE STARTING YOUR VEHICLE
A WORD ABOUT YOUR KEYS
It is not recommended to leave the ignition switch in the
ACC position for extended periods of time. This will
discharge the 12-Volt battery and may degrade the battery life and/or prevent the vehicle from starting. For
information on using the vehicles accessories (radio,
video system or power outlets) refer to “Electrical Power
Outlets” in Section 3 of this supplement.
Ignition Switch Positions
1 — ACC 4 — ON/RUN
2 — LOCK 5 — START
3 — OFF
Page 9

THINGS TO KNOW BEFORE STARTING YOUR VEHICLE 7
HYBRID SYSTEM OPERATION
Your Hybrid vehicle combines the power of a gasoline
engine and electric motors to minimize fuel consumption
and emissions. This vehicle requires no special fuels and
never has to be plugged in to recharge. Understanding
the unique characteristics of your vehicle will help ensure
maximum performance and best fuel economy from your
vehicle.
Your Hybrid vehicle is also equipped with two electrical
voltage systems. A 12-Volt system which is used to power
the conventional electrical system and a high voltage
system which is used to power the motors in the 2-Mode
Hybrid Transmission as well as other high voltage system components.
Hybrid Operation
Shifting
You must press the brake pedal fully before shifting out
of PARK. During this first brake application, the brake
system is undergoing a self-test function. The brake pedal
travel will be longer then usual. This is normal. Press
firmly on the brake to prevent rolling. Refer to “Regenerative Braking System” under “Hybrid Vehicle Unique
Operating Characteristics” in this Section for further
information.
Driving
When the “READY” light is illuminated the gas engine
can shut off automatically to save on fuel, and start
automatically to provide power when it is needed. While
coasting at low speeds, coming to a stop or standing still,
the gas engine will normally shut off and the vehicle will
operate on electric power only. Conditions that may
cause the gas engine to start up or remain running
include:
•
Moderate or rapid acceleration
•
Vehicle speed
2
Page 10

8 THINGS TO KNOW BEFORE STARTING YOUR VEHICLE
•
Climbing a hill
•
Charge level of high voltage battery
•
Engine temperature, transmission temperature or
coolant temperature
•
Hybrid System malfunction (Hybrid service lamp on)
•
Tow/Haul activated
•
Hood is ajar
•
Shift lever position 2 or 1
NOTE: The gas engine can also automatically shut off
with the shift lever in PARK, REVERSE, DRIVE or
NEUTRAL.
Stopping In Traffic With Auto Stop/Start Function
The gas engine may shut off as you decelerate to a stop,
this is normal and will conserve fuel at idle. Restarting
the vehicle is not necessary.
When you desire to move forward with traffic flow,
simply press the accelerator pedal and continue accelerating from idle up to your cruising speed. The gas engine
will restart and shut down again automatically when
commanded by the Hybrid System. Shutting down and
restarting (cycling) of the gas engine during low speed
traffic conditions less than 30 mph (48 km/h) is normal.
Re-Starting A Warm Engine
Your Hybrid vehicle is equipped with ⬙Silent Start⬙ fuel
saving technology. The decision to enable the gas engine
on a restart is automatically determined by the Hybrid
System.
Under certain conditions, the gas engine will not start
(usually when restarting a warmed-up engine that has
recently been parked) when the ignition key is inserted
and turned to the START position. This is normal and is
considered a ⬙Silent Start⬙. When the ignition key is
released to the ON/RUN position you will observe the
Page 11

THINGS TO KNOW BEFORE STARTING YOUR VEHICLE 9
green ⬙READY⬙ light illuminated in the instrument cluster, but, again, the gas engine is not running. When you
experience a “Silent Start” leave the key in the ON/RUN
position, then simply place your foot on the brake pedal,
move the shift lever into REVERSE or DRIVE and press
the accelerator pedal to drive the Hybrid vehicle in the
electric mode.
2-Mode Hybrid Transmission Operation
The 2-Mode Hybrid Transmission combines two electric
motors with four fixed gear ratios within a single transmission housing. The electric motors can be used for
electric-only propulsion, boosting the internal combustion engine or providing regenerative braking.
The 2-Mode Hybrid Transmission will select one of the
four fixed gear ratios, or operate as an electrically variable transmission (variable ratio or EVT) depending on
driver input, vehicle speed and loading.
Unlike a conventional transmission, the 2-Mode Hybrid
Transmission can propel the vehicle without the engine
running during low speed, light load operation (electric
only mode).
NOTE: Your Hybrid vehicle can be run through typical
commercial car wash facilities. There are some precautions that you should keep in mind.
•
When entering an automatic/conveyor style car wash
facility, it is important that the driver follow the
attendant’s or posted instructions and that your shift
lever is shifted to NEUTRAL when instructed.
•
A Hybrid vehicle that is in REVERSE or DRIVE with
the “READY” light illuminated and gas engine
stopped, is NOT a substitute for the NEUTRAL
position.
2
Page 12

10 THINGS TO KNOW BEFORE STARTING YOUR VEHICLE
CAUTION!
Car wash equipment damage, vehicle damage or a
potential accident event could result if the car wash
facility instructions for PARK, NEUTRAL, DRIVE
and REVERSE are not followed.
Hybrid Vehicle Operating Characteristics
Your Hybrid vehicle operates differently compared to a
Non-Hybrid vehicle. The following is a description of the
major differences:
Regenerative Braking
Your Hybrid vehicle has a Regenerative Braking System
(RBS). The RBS increases the fuel economy of the vehicle,
particularly in stop-and-go city traffic. The electric motors which propel the vehicle forward can operate as
generators when braking. The RBS recharges the high
voltage battery under certain braking conditions by recapturing energy that would otherwise be lost while
braking. The electric power that is generated goes back
into the high voltage battery for later use, for example
when acceleration is desired.
The RBS uses conventional hydraulic friction brakes,
regenerative braking, or a combination to slow the vehicle. The Hybrid power gauge indicates the amount of
regenerative braking. If the system detects slippery conditions while braking, mainly friction is used to slow the
vehicle. The RBS can result in extended life of the
hydraulic service brakes; however, all inspection, scheduled maintenance, and service intervals for the vehicle
service brakes must be followed.
NOTE: Lighter brake pedal efforts and longer brake
pedal travel are normal Hybrid brake operations during
the first brake application. After start-up, during the first
brake application, the brake system undergoes a self-test
Page 13

THINGS TO KNOW BEFORE STARTING YOUR VEHICLE 11
function. The brake pedal has a lighter effort (longer
travel) than during normal driving but provides full
power assist.
Climate Control (HVAC System)
Your Hybrid vehicle uses automatic temperature control
(ATC) HVAC system with specialized components. This
HVAC system utilizes a humidity sensor, cabin infrared
(IR) sensor, sun sensor, and ambient temperature sensor
to choose operation mode and control cabin comfort.
Your Hybrid vehicle also uses a heater auxiliary pump to
provide heat to the cabin while the vehicle is in electric
mode. The electrically driven AC compressor is not
connected to the engine like a standard gas vehicle. These
components allow the control to operate the HVAC
system in a very efficient manner to save fuel.
NOTE: It is recommended the vehicle be operated with
the air conditioning (AC) on in high ambient temperatures as the high voltage battery is cooled by the cabin air.
Driving To Achieve Maximum Fuel Economy
Your fuel economy should improve throughout your
Hybrid vehicle’s break-in period. As with any vehicle,
fuel economy can be significantly impacted by your
driving style and accessory usage. For best results, keep
in mind the following:
Tire Inflation
Keep tires properly inflated and only use the recommended size. Refer to “Tire and Loading Information
Placard” under “Tires Safety Information” in Section 5 of
your Owner’s Manual.
Driving Style
Aggressive driving increases the amount of energy required to move your vehicle. In general, better fuel
economy is achieved with mild to moderate acceleration
and deceleration.
2
Page 14
12 THINGS TO KNOW BEFORE STARTING YOUR VEHICLE
Moderate braking is particularly important since it allows you to maximize the energy converted and stored
from the vehicle’s momentum by the Regenerative Braking System (RBS).
Additional Tips:
•
Observe posted speed limits.
•
Do not carry extra loads, when it is not necessary.
•
Perform all scheduled maintenance.
IMPORTANT HYBRID SYSTEM INFORMATION
Before operating your new Hybrid vehicle, be sure to
read the following information.
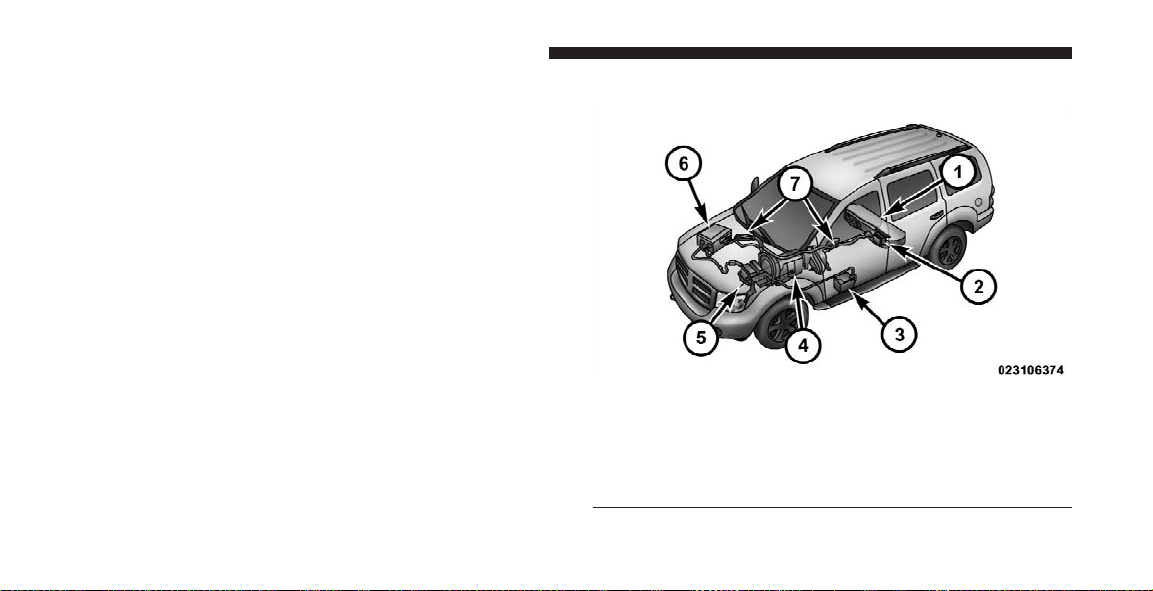
Hybrid System Components
1 — High Voltage Battery (located under the second row seat)
2 — High Voltage Battery Service Disconnect
3 — 12-Volt Battery (located under
drivers side running board)
4 — 2-Mode Hybrid Transmission
5 — Underhood Fuse Boxes and Integrated Power Module
6 — Traction Power Inverter Module
(TPIM) (Hybrid Control Module
7 — High Voltage Cables (Orange Colored)
Page 15

THINGS TO KNOW BEFORE STARTING YOUR VEHICLE 13
Additional Hybrid System electrical components:
•
Electric Power Steering Pump (12-Volt)
•
Electric A/C Compressor
WARNING!
Your vehicle has both a high voltage DC and AC
system as well as a 12-Volt system. DC and AC high
voltage are both extremely dangerous and can cause
severe burns, electric shock, serious injury or even
death. In order to avoid personal injuries:
•
DO NOT TOUCH THE HIGH VOLTAGE
CABLES (ORANGE COLORED) AND THEIR
CONNECTORS.
•
Do not drill or probe the HIGH VOLTAGE
CABLES (ORANGE COLORED).
(Continued)
WARNING! (Continued)
•
Follow all Caution and Warning Labels attached to
the high voltage (Hybrid System) components.
•
Do not remove or replace any of the Hybrid
System (high voltage) components. All replacement or repairs of Hybrid System components
should be performed at an authorized dealer.
2
Page 16
14 THINGS TO KNOW BEFORE STARTING YOUR VEHICLE
High Voltage Battery
Your Hybrid vehicle is equipped with a maintenance free
Nickel Metal-Hydride (NiMH) battery rated at approximately 300-Volts. The high voltage battery is located
under the second row seat.
High Voltage Battery Location
The high voltage battery has an internal electric fan and
an interior air inlet to keep the battery cool.
Air Inlet
Page 17

THINGS TO KNOW BEFORE STARTING YOUR VEHICLE 15
NOTE:
•
Be sure to keep the battery air inlet vent (located
within the interior of the vehicle along the front of the
second row seats) free from blockage to avoid overheating the high voltage battery.
•
Stow all cargo, parcels, and luggage securely fastened
in the rear of vehicle and not along the second row seat
floor.
If your vehicle is parked for 2–3 months, the high voltage
battery will discharge gradually. To keep the high voltage
battery in good operating condition, drive the vehicle at
least once every several months for a minimum of
30 minutes or 10 miles (16 km) or until the high voltage
battery has been completely recharged. Refer to “Hybrid
Gauge” and “Hybrid Energy Center” in Section 4 of this
supplement for further information.
If the high voltage battery becomes fully discharged and
the vehicle will not start, refer to “Jump-Starting Procedures” in Section 6 of this supplement. If the engine fails
to start after following the appropriate “Jump-Starting
Procedures” see your authorized dealer.
Disposal of High Voltage Battery
Your vehicle’s high voltage battery is designed to last the
life of your vehicle. Should the battery require replacement, see your authorized dealer for information on the
disposal of the high voltage battery, or on the internet at
http://www.high-voltage-battery-recycling.com
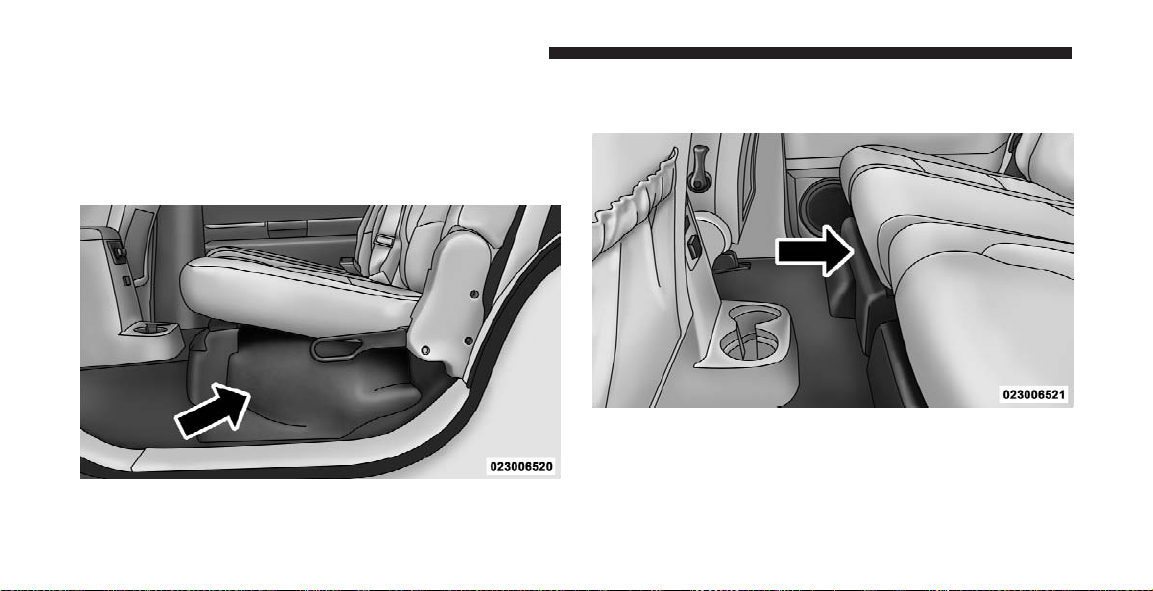
High Voltage Battery Service Disconnect
The high voltage battery service disconnect is located
behind a trim panel on the driver’s side second row seat.
If your vehicle requires service see your authorized
dealer.
NOTE: Always make sure the trim panel is securely
attached at all times.
2
Page 18

16 THINGS TO KNOW BEFORE STARTING YOUR VEHICLE
WARNING!
Never try to remove the high voltage service disconnect. The high voltage service disconnect is used
when your vehicle requires service by a trained
technician at an authorized dealer. Failure to follow
this warning can cause severe burns or electrical
shock that may result in serious injury or death.
Charge Assist — High Voltage Battery
The “Charge Assist” procedure allows you to charge the
high voltage battery using the 12-Volt battery system. If
the high voltage battery’s state of charge is too low and
the engine will not crank, the MyGIG radio will display
a “Charge Insufficient” message. For additional information, refer to the “Charge Assist Procedure — High
Voltage Battery” in Section 6 of this supplement.
In The Event Of An Accident
If your Hybrid vehicle is involved in an accident, if
possible, pull the vehicle off the road to a safe location,
put the shift lever in PARK and remove the ignition key.
NOTE:
•
If your vehicle is involved in an accident causing the
airbags to deploy, your vehicle will not start. See your
authorized dealer.
•
If your vehicle needs to be towed, always use a flatbed
truck. For additional information, refer to “Towing A
Disabled Vehicle” in Section 6 of this supplement.
Page 19

WARNING!
•
In order to avoid personal injuries or death, DO
NOT TOUCH ANY EXPOSED HIGH VOLTAGE
WIRING (ORANGE COLORED) inside or outside
of your vehicle, an electric shock may occur.
NEVER TOUCH THE ELECTRIC WIRING.
•
If fluid is leaking on the ground or leaks in some
parts of the vehicle, never touch it because it may
be Electrolyte (strong alkali) from the high voltage
battery. If it gets on your skin or in your eyes, wash
it off immediately with large amounts of water,
and get immediate medical attention.
•
If a vehicle fire occurs, extinguish it using a fire
extinguisher that is used exclusively for electrical
fires. Or use large amounts of water to prevent
flammable gas from being generated from the
batteries.
THINGS TO KNOW BEFORE STARTING YOUR VEHICLE 17
2
Page 20

Page 21

UNDERSTANDING THE FEATURES OF YOUR VEHICLE
CONTENTS
䡵 Electrical Power Outlets .................. 20
3
Page 22

20 UNDERSTANDING THE FEATURES OF YOUR VEHICLE
ELECTRICAL POWER OUTLETS
Using the vehicles accessories (radio, video system or
power outlets) can discharge the 12-Volt battery, degrade
the battery life and/or prevent the vehicle from starting.
It is recommended to limit the use of the ACC mode to
approximately 15 minutes to avoid discharging the 12Volt battery. Refer to “Electric Power Outlets” in Section 3
of the Owner’s Manual for more information on using the
Electrical Power Outlets.
NOTE:
•
If the voltage light (located in the instrument cluster)
illuminates when using the accessories, the vehicle
should be started and driven to recharge the 12-Volt
battery. Refer to “Starting and Operating” in Section 5
of this Supplement for further information.
•
All accessories connected to these outlets should be
removed or turned off when the vehicle is not in use to
protect the 12-Volt battery against discharge.
CAUTION!
•
Many accessories that can be plugged in draw
power from the vehicle’s 12-Volt battery, even
when not in use (i.e., cellular phones, etc.). Eventually, if plugged in long enough, the vehicle’s
battery will discharge sufficiently to degrade battery life and/or prevent engine starting.
•
Accessories that draw higher power (i.e., coolers,
vacuum cleaners, lights, etc.) will discharge the
12-Volt battery even more quickly. Only use these
intermittently and with greater caution.
•
After the use of high power draw accessories or
long periods of the vehicle not being started (with
accessories still plugged in), the vehicle must be
driven a sufficient length of time to allow the
generator to recharge the vehicle’s batteries.
Page 23

UNDERSTANDING YOUR INSTRUMENT PANEL
CONTENTS
䡵 Hybrid Instrument Cluster ................ 22
䡵 Instrument Cluster Description ............. 23
䡵 Hybrid Gauge ......................... 35
䡵 Hybrid Energy Center ................... 36
▫ Hybrid System Operating Conditions ....... 36
䡵 Climate Controls ....................... 42
▫ Automatic Temperature Control (ATC) ...... 42
▫ Automatic Control .................... 43
▫ Level Of Automatic Control .............. 44
▫ Manual Control (ATC) .................. 44
▫ Rear Zone Climate Control .............. 48
▫ Rear Rotary Temperature Control .......... 49
▫ Front Unit To Rear Unit Chart ............ 50
▫ Operating Tips ....................... 50
▫ Operating Tips Chart .................. 53
4
Page 24
22 UNDERSTANDING YOUR INSTRUMENT PANEL
HYBRID INSTRUMENT CLUSTER
Page 25

UNDERSTANDING YOUR INSTRUMENT PANEL 23
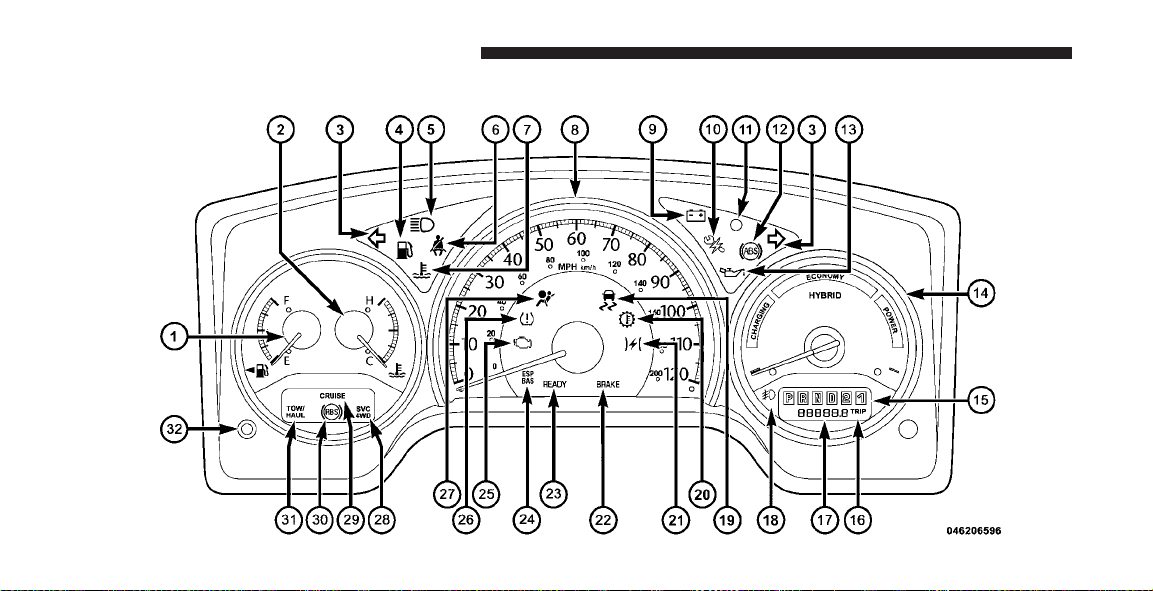
INSTRUMENT CLUSTER DESCRIPTION
1. Fuel Gauge
The fuel gauge shows the level of fuel in the tank when
ignition switch is in the ON position.
2. Temperature Gauge
The temperature gauge indicates engine coolant temperature. Any reading within the normal range indicates
that the cooling system is operating satisfactory. The
temperature gauge will likely indicate a high temperature when driving in hot weather, up mountain grades, in
heavy traffic or when towing a trailer. If the temperature
gauge rises to the “H” mark, stop the vehicle, and shift
into NEUTRAL, press the TOW/HAUL button and increase engine speed for two to three minutes. If the
temperature reading does not return to normal, see your
authorized dealer for service immediately.
CAUTION!
Do not leave your vehicle unattended with the engine running as you would not be able to react to the
temperature reading if the engine overheats.
The temperature gauge will remain near its last reading
when the ignition is turned OFF. It will return to a true
reading when the engine is restarted.
3. Turn Signal Indicators
When a turn signal is activated, right-pointing or leftpointing arrows illuminate and flash to indicate the
direction of the turn. These indicators also indicate
proper operation of the front and rear turn signal lights.
If either indicator flashes at a faster rate than normal,
check for a defective bulb. If either indicator fails to light
up when the multifunction lever is moved, check for a
defective fuse or turn signal LED. A single chime is
4
Page 26
24 UNDERSTANDING YOUR INSTRUMENT PANEL
activated when the left/right turn signal is left on with
the engine RPM vehicle speed greater than 15 mph
(24 km/h) for more than 1 mile (1 km).
4. Low Fuel Light
This indicator illuminates when the fuel gauge
reads 1/16 of a tank or less.
After the Low Fuel Warning Light turns on, some
changes in driveability like reduced power and high idle
may be experienced. When the vehicle completely runs
out of fuel, the Hybrid System will turn off and the
vehicle will stop running.
NOTE: The ignition must be OFF for a minimum of five
minutes prior to restarting the engine once the vehicle
has been refueled.
5. High Beam Indicator
This indicator illuminates when the High beam
headlights are on.
6. Seat Belt Reminder Light
This light comes on for several seconds after the
ignition is turned ON as a reminder to “buckle
up.” This light will remain on as long as the seat
belt remains unbuckled. If this light flashes, it indicates a
fault in the airbag system. Have the system checked by
your authorized dealer.
7. Coolant Temperature Light
This light warns of an overheated engine condition. For a bulb check, this light will come on
momentarily when the ignition is turned ON. If
the light turns on while driving, stop the vehicle, shift
into NEUTRAL, press the TOW/HAUL button and increase the engine speed for two to three minutes. If the
temperature reading does not return to normal, see your
authorized dealer for service immediately.
Page 27
UNDERSTANDING YOUR INSTRUMENT PANEL 25
CAUTION!
Driving with a hot engine cooling system could
damage your vehicle. If the temperature light is on,
safely pull over and stop the vehicle. Press the
TOW/HAUL button and idle the vehicle in NEUTRAL with the air conditioner turned off until the
light turns off. If the light remains on, turn the
engine off immediately and call for service.
WARNING!
A hot engine cooling system is dangerous. You or
others could be badly burned by steam or boiling
coolant. You may want to call a service center if your
vehicle overheats. If you decide to look under the
hood yourself, see Section 7 of your Owner’s Manual.
Follow the warnings under the “cooling system pressure cap” paragraph.
8. Speedometer
The speedometer shows the speed of the vehicle.
9. Voltage Light
This light should turn on momentarily as the
engine is started. If the light stays on or turns on
while driving, it indicates a problem with the 12-Volt
electrical system. See your authorized dealer for service
immediately.
10. HEV Service Light
This light indicates that the Hybrid System
requires service. See your authorized dealer.
11. Vehicle Security Light
This light will flash rapidly for approximately 15 seconds
when the Vehicle Security Alarm is arming. The light will
flash at a slower speed continuously after the alarm is set.
4
Page 28

26 UNDERSTANDING YOUR INSTRUMENT PANEL
The Vehicle Security Light will also illuminate for approximately three seconds when the ignition is first
turned ON.
12. Anti-Lock Brake (ABS) Warning Light
This light monitors the Anti-Lock Brake System
(ABS) which is described in the Owner’s
Manual. This light will come on when the
ignition key is turned to the ON position and
may stay on for approximately three seconds. If this light
remains on or comes on during driving, it indicates that
the Anti-Lock portion of the brake system is not functioning and that service is required. See your authorized
dealer immediately. With the ABS malfunctioning, the
Brake Assist System (BAS) and Electronic Stability Program (ESP) are also switched off. Both malfunction
indicator lights illuminate with the engine running. If the
charging voltage falls below 10-Volts, the malfunction
indicator light illuminates and the ABS is switched off.
When the voltage is above this value again, the malfunction indicator light should go out and the ABS is operational. If the malfunction indicator light stays illuminated, have the system checked at your authorized dealer
as soon as possible.
13. Oil Pressure Warning Light
This light indicates that the engine oil pressure has
become too low. For a bulb check, this light will
illuminate momentarily when the ignition is turned ON.
If the light comes on while driving, stop the vehicle and
shut off the engine as soon as possible. See your authorized dealer for service immediately.
14. Hybrid Gauge
This gauge indicates in what mode the vehicle is being
operated. Refer to “Hybrid Gauge” under “Instrument
Panel And Controls”, in this Section of the supplement.
Page 29

UNDERSTANDING YOUR INSTRUMENT PANEL 27
15. Shift Lever Indicator
The electronic shift lever indicator is self-contained
within the instrument cluster. It displays the position of
the transmission shift lever, and the relation of each
position to all other positions. For a good signal the
display will place a box around the selected transmission
range (PRND21). If the PRND21 displays all characters
boxed, have the system checked by an authorized dealer.
16. Trip Odometer
The trip odometer shows an individual trip mileage. To
switch from odometer to trip odometer, press and release
the trip odometer button.
To reset the trip odometer, display the trip odometer then
push and hold the TRIP button until the display resets
(approximately two seconds).
Engine Run Time
Engine run time shows the elapsed time that the gasoline
engine has run. While viewing the odometer reading
press and hold the TRIP button for approximately eight
seconds and the engine run time will be displayed.
Vehicle Warning Messages
For non-Electronic Vehicle Information Center (EVIC)
equipped vehicles, when the appropriate conditions exist, messages such as “door ajar” (indicates that a door(s)
may be ajar), “gASCAP” (which indicates that your gas
cap is possibly loose or damaged), ⬙CHANgE OIL”
(indicates that the engine oil should be changed), “LoWASH” (low washer fluid), and “noFUSE” (indicates
that the IOD fuse is removed from the Integrated Power
Module), will display in the odometer.
NOTE: If the vehicle is equipped with an EVIC, most
warnings will display in the EVIC. For additional information, refer to “Overhead Console With Electronic
Vehicle Information Center (EVIC) — If Equipped” in
Section 4 of the Owner’s Manual.
4
Page 30

28 UNDERSTANDING YOUR INSTRUMENT PANEL
The outside temperature will display in the odometer for
non-EVIC equipped vehicles. Pressing the trip odometer
RESET button toggles the feature back to the odometer.
Change Oil Message
Your vehicle is equipped with an engine oil change
indicator system. The “Change Oil” message will flash in
the instrument cluster odometer for approximately
12 seconds after a single chime has sounded to indicate
the next scheduled oil change interval. The engine oil
change indicator system is duty cycle based, which
means the engine oil change interval may fluctuate
dependent upon your personal driving style.
Unless reset, this message will continue to display each
time you turn the ignition switch to the ON/RUN
position. To turn off the message temporarily, press and
release the Trip Odometer button on the instrument
cluster. To reset the oil change indicator system (after
performing the scheduled maintenance) refer to the following procedure.
1. Turn the ignition switch to the ON position (Do not
start the engine).
2. Fully press the accelerator pedal, slowly, three times
within 10 seconds.
3. Turn the ignition switch to the OFF/LOCK position.
NOTE: If the indicator message illuminates when you
start the vehicle, the oil change indicator system did not
reset. If necessary repeat this procedure.
17. Odometer
The odometer shows the total distance the vehicle has
been driven.
Page 31

UNDERSTANDING YOUR INSTRUMENT PANEL 29
U.S. Federal regulations require that upon transfer of
vehicle ownership, the seller certify to the purchaser the
correct mileage that the vehicle has been driven. Therefore, if the odometer reading is changed during repair or
replacement, be sure to keep a record of the reading
before and after the service so that the correct mileage can
be determined.
18. Fog Light Indicator
This light illuminates when the fog lights are on.
19. Electronic Stability Program (ESP) Indicator Light
The yellow ESP indicator light in the speedometer area illuminates with the key in the ignition switch turned to the ON/RUN position. It
should go out with the engine running. The
ESP/TCS indicator light starts to flash as soon as the tires
lose traction and the ESP system becomes active. The
ESP/TCS indicator light also flashes when TCS is active
as well as when the ABS is active. If the ESP/TCS
indicator light begins to flash during acceleration, ease
up on the accelerator and apply as little throttle as
possible. Be sure to adapt your speed and driving to the
prevailing road conditions. The ESP/TCS indicator light
becomes illuminated when the ESP-OFF button has been
pressed or ESP is only partially available, caused by lack
of engine management or brake thermal model.
20. Transmission Temperature Indicator
This light indicates that there is excessive transmission fluid temperature that might occur
with severe usage, such as trailer towing. If this
light comes on, stop the vehicle, press the
TOW/HAUL button, and run the engine at idle or faster
with the transmission in NEUTRAL until the light goes
off.
4
Page 32

30 UNDERSTANDING YOUR INSTRUMENT PANEL
21. Electronic Throttle Control (ETC)
This light informs you of a problem with the
Electronic Throttle Control (ETC) system. If a
problem is detected, the light will come on
while the engine is running. If the light remains
on with the engine running your vehicle will usually be
drivable, however, see your authorized dealer for service
as soon as possible. If the light is flashing when the
engine is running, immediate service is required and you
may experience reduced performance, an elevated/
rough idle or engine stall and your vehicle may require
towing. The light will illuminate when the ignition is first
turned ON and remain on for 15 seconds as a bulb check.
If the light does not come on during starting, have the
system checked by your authorized dealer.
22. BRAKE Warning Light
The red “BRAKE” warning light will illuminate when the
ignition key is first turned ON, and stay on briefly as a
bulb check. If the bulb does not illuminate on start-up,
have the bulb repaired promptly. If the light stays on, it
may be an indication that the parking brake has not been
released, or there is a low brake fluid level. If the light
remains on when the parking brake has been disengaged,
and the fluid level is at the full mark on the master
cylinder reservoir, it indicates a possible brake hydraulic
system malfunction or a problem with the brake booster.
In this case, the light will remain on until the condition
has been corrected. If the problem is related to the brake
booster, the ABS pump will run when applying the brake.
If the parking brake is applied, the light will flash when
the shift lever is out of PARK for automatic transmissions.
If the light comes on while driving, pull over immediately. Do not drive the vehicle. Have the vehicle towed to
the nearest authorized dealer.
If brake failure is indicated, immediate repair is necessary. Operating the vehicle in this condition is dangerous!
Page 33

UNDERSTANDING YOUR INSTRUMENT PANEL 31
23. READY
When the ignition key is turned to the START position,
the “READY” lamp in the cluster will illuminate to
indicate the Hybrid System has “started”. When the
“READY” lamp is illuminated, your Hybrid vehicle can
be driven under electric power even though the internal
combustion engine may not be running.
24. Electronic Stability Program (ESP) Indicator
Light/Brake Assist System (BAS) Warning Light
The malfunction lamp for the Electronic Stabil-
ity Program (ESP) is combined with Brake
Assist System (BAS). The yellow “ESP/BAS
Warning Lamp” comes on when the ignition
switch is turned to the ON position. They should go out
with the engine running. If the “ESP/BAS Warning
Lamp” comes on continuously with the engine running,
a malfunction has been detected in either the ESP or the
BAS system. If this light remains on after several ignition
cycles, and the vehicle has been driven several miles/
kilometers at speeds greater than 30 mph (48 km/h), see
an authorized dealer as soon as possible.
25. Malfunction Indicator Light (MIL)
The Malfunction Indicator Light (MIL) is part of
an Onboard Diagnostic system (OBD II) which
monitors the emissions and engine/hybrid control system. If the vehicle is ready for emissions testing
the light will come on when the ignition is first turned
ON and remain on, as a bulb check, until the engine is
started. If the vehicle is not ready for emissions testing
the light will come on when the ignition is first turned
ON and remain on for 15 seconds, then blink for 10 seconds, and remain on until the vehicle is started. If the
bulb does not come on during starting, have the condition investigated promptly.
4
Page 34

32 UNDERSTANDING YOUR INSTRUMENT PANEL
If this light comes on and remains on while driving, it
suggests a potential engine control problem and the need
for system service. See your authorized dealer as soon as
possible.
Although your vehicle will usually be drivable and not
need towing, see your authorized dealer for service as
soon as possible.
CAUTION!
•
Prolonged driving with the MIL on could cause
damage to the engine control system. It also could
affect fuel economy and driveability.
•
If the MIL is flashing, severe catalytic converter
damage and power loss will soon occur. Immediate service is required. See your authorized dealer
for service immediately.
26. Tire Pressure Monitoring Telltale Light
Each tire, including the spare (if provided),
should be checked monthly when cold and
inflated to the inflation pressure recommended
by the vehicle manufacturer on the vehicle
placard or tire inflation pressure label. (If your vehicle
has tires of a different size than the size indicated on the
vehicle placard or tire inflation pressure label, you should
determine the proper tire inflation pressure for those
tires.)
As an added safety feature, your vehicle has been
equipped with a Tire Pressure Monitoring System
(TPMS) that illuminates a low tire pressure telltale when
one or more of your tires are significantly under-inflated.
Accordingly, when the low tire pressure telltale illuminates, you should stop and check your tires as soon as
possible, and inflate them to the proper pressure. Driving
on a significantly under-inflated tire causes the tire to
overheat and can lead to tire failure. Under-inflation also
Page 35

UNDERSTANDING YOUR INSTRUMENT PANEL 33
reduces fuel efficiency and tire tread life, and may affect
the vehicle’s handling and stopping ability.
Please note that the TPMS is not a substitute for proper
tire maintenance, and it is the driver’s responsibility to
maintain correct tire pressure, even if under-inflation has
not reached the level to trigger illumination of the TPMS
low tire pressure telltale.
Your vehicle has also been equipped with a TPMS
malfunction indicator to indicate when the system is not
operating properly. The TPMS malfunction indicator is
combined with the low tire pressure telltale. When the
system detects a malfunction, the telltale will flash for
approximately one minute and then remain continuously
illuminated. This sequence will continue upon subsequent vehicle start-ups as long as the malfunction exists.
When the malfunction indicator is illuminated, the system may not be able to detect or signal low tire pressure
as intended. TPMS malfunctions may occur for a variety
of reasons, including the installation of replacement or
alternate tires or wheels on the vehicle that prevent the
TPMS from functioning properly. Always check the
TPMS malfunction telltale after replacing one or more
tires or wheels on your vehicle to ensure that the replacement or alternate tires and wheels allow the TPMS to
continue to function properly.
4
Page 36

34 UNDERSTANDING YOUR INSTRUMENT PANEL
CAUTION!
The TPMS has been optimized for the original
equipment tires and wheels. TPMS pressures and
warning have been established for the tire size
equipped on your vehicle. Undesirable system operation or sensor damage may result when using replacement equipment that is not of the same size,
type, and/or style. Aftermarket wheels can cause
sensor damage. Do not use tire sealant from a can, or
balance beads if your vehicle is equipped with a
TPMS, as damage to the sensors may result.
27. Airbag Warning Light
This indicator illuminates and remains on for
six to eight seconds when the ignition is first
turned ON. If the light does not come on when
the ignition is first turned ON, or the light stays
on or comes on while driving, have the airbag system
checked by an authorized dealer.
28. SVC (Service) 4WD Indicator
The SVC 4WD lights will come on when the ignition key
is turned to the ON position and will stay on for two
seconds. If the light stays on or comes on during driving,
it means that the 4WD system is not functioning properly
and that service is required. See your authorized dealer.
29. Cruise Light (Electronic Speed Control)
This indicator lights when the Electronic Speed Control
system is turned on.
30. Hybrid Regenerative Brake System Light
This yellow light will illuminate for a few
seconds when the ignition is turned to the ON
position as a bulb check. If the light turns on
and remains on while driving, it suggests that
there is a potential problem with the Regenerative Brake
System (RBS) and the need for system service. See your
authorized dealer as soon as possible.
Page 37

31. TOW/HAUL
The TOW/HAUL button is located at the end of the shift
lever. This light will illuminate when the TOW/HAUL
button has been selected. Refer to “When To Use TOW/
HAUL Mode” under “2-Mode Hybrid Transmission
Ranges” in Section 5 of this supplement for further
information.
32. Odometer/Trip Odometer Button
Press this button to toggle between the odometer and the
trip odometer display. Holding the button in resets the
trip odometer reading.
HYBRID GAUGE
The Hybrid Gauge, located on the instrument cluster, has
three different zones to indicate how the vehicle is being
operated in the sense of fuel savings.
NOTE: Driving with the gauge pointer in the 12 O’clock
(ECONOMY) position is the optimal Hybrid location.
UNDERSTANDING YOUR INSTRUMENT PANEL 35
Hybrid Gauge
1 — CHARGING — Indicates that the high voltage battery is being
charged during braking or certain driving conditions.
2 — ECONOMY — Indicates the HEV vehicle is being propelled
forward in electric mode, Hybrid mode or Fuel Saver mode (MDS)
which are the most fuel efficient modes of operation.
3 — POWER — indicates that the accelerator pedal is being applied
for additional power which is not the most fuel efficient mode of
operation.
4
Page 38

36 UNDERSTANDING YOUR INSTRUMENT PANEL
HYBRID ENERGY CENTER
Hybrid System Operating Conditions
The Hybrid System performs various functions depending on the operating condition, such as starting the gas
engine, when charging is required, etc.
The following Hybrid System information screens will be
displayed on your vehicle’s MyGIG radio based on the
which mode the Hybrid System is operating in.
To access the Hybrid Energy Center press the “Menu”
button on the radio screen then select “Hybrid Info”.
System Ready
Page 39

UNDERSTANDING YOUR INSTRUMENT PANEL 37
This screen will display when the vehicle has been
started and the Hybrid System is active.
Charging — Engine Power
This display will appear when the vehicle is slowing
down with the gasoline engine running and the high
voltage battery is being charged. The engine will be
illuminated on the radio screen.
4
System Off
Page 40

38 UNDERSTANDING YOUR INSTRUMENT PANEL
This display appears when the Hybrid system is off. The
engine will not be illuminated on the radio screen.
Engine Power
This display appears when the engine is at or near wide
open throttle. The engine will be illuminated on the radio
screen.
Battery Power
Page 41

UNDERSTANDING YOUR INSTRUMENT PANEL 39
This display appears when the vehicle is driving in
electric mode only. The engine will not be running or
illuminated on the radio screen.
Engine And Battery Power
This display appears when the vehicle is driving in
Hybrid mode (both the electric motors and gasoline
engine running). The engine will be illuminated on the
radio screen.
4
Charging Battery — Engine Off
Page 42

40 UNDERSTANDING YOUR INSTRUMENT PANEL
This display appears when the high voltage battery is
being charged during braking or coasting down and the
engine is not running. The engine will not be illuminated
on the radio screen.
Charging Battery — Engine On Charging — Engine Idling
This display appears when the high voltage battery is
being charged during braking or coasting down and the
engine is running. The engine will be illuminated on the
radio screen.
Page 43

UNDERSTANDING YOUR INSTRUMENT PANEL 41
This display appears when the engine is idling and the
high voltage battery is charging. The engine will be
illuminated on the radio screen.
Fuel Saver Mode
This display appears when the vehicle is operating in
Hybrid mode and the Multi-Displacement System (MDS)
is active. Half of the engine will appear illuminated on
the radio screen. Refer to “Multi-Displacement System
(MDS)” in Section 5 of the Owner’s Manual for further
information on MDS.
4
Page 44

42 UNDERSTANDING YOUR INSTRUMENT PANEL
CLIMATE CONTROLS
Automatic Temperature Control (ATC)
The control can be turned on by pressing the power knob.
When the control is turned on, it will be in the last mode
prior to being turned off. Pressing the power knob a
second time will turn off the control. The control can also
be turned on by pressing any button and it will display
the corresponding operation mode for that button.
Automatic Temperature Control
Page 45

UNDERSTANDING YOUR INSTRUMENT PANEL 43
Automatic Control
The ATC system can maintain a steady comfort level in
various weather conditions with a simple operation:
•
Select your desired temperature setting by pressing
the + or - side of the Temp rocker switches. A digital
temperature setting for driver and passenger will be
displayed. The ATC system uses an infrared sensor
located in the overhead console to measure the temperature of the driver and passengers. Based on the
sensor input, the system will automatically control
comfort by varying the temperature, fan speed, and
mode. This maintains a comfortable temperature, even
under changing conditions. It is important that objects
are not blocking the infrared sensor. It is also important that objects are not used that may scratch or
damage it in any way.
The Hybrid vehicle also uses a humidity sensor to
determine cabin comfort, improve system efficiency,
and reduce window fogging. This sensor is located
behind the rearview mirror. Do not block airflow to the
sensor. Use care not to spray the sensor with window
cleaner.
4
Humidity Sensor
Page 46

44 UNDERSTANDING YOUR INSTRUMENT PANEL
Level Of Automatic Control
72°F (22°C) is the recommended setting for maximum
comfort for the average person, however, this may vary.
NOTE:
•
The temperature setting can be adjusted at any time
without affecting automatic control operation. It is not
necessary to move the temperature setting for cold or
hot vehicles. The system automatically adjusts the
temperature, mode and fan speed to provide comfort
as quickly as possible.
•
In cold weather, the fan will not turn on in Auto mode
until the engine coolant has warmed up sufficiently.
This is indicated by the “WARM UP DELAY” message
on the display.
•
The temperature can be displayed in U.S. or Metric by
selecting the U.S./METRIC Customer-Programmable
feature. The mode will also be shown in the display
and will change as required during automatic operation. Refer to ⬙Personal Setting (CustomerProgrammable Features) under “Overhead Console
With Electronic Vehicle Information Center (EVIC) —
If Equipped” in Section 3 of the Owner’s Manual.
•
The system can be put into recirculate mode without
affecting ATC operation. This will temporarily prevent
outside air from entering the vehicle. Use this mode to
block out any outside odors, smoke, or dust.
Manual Control (ATC)
You may also choose to customize your comfort by
selecting the fan speed and mode manually. Turning the
fan speed knob or any mode button places the system
into manual operation.
While in manual operation there are six fan speeds
available and the choice of any mode. The airflow
Page 47

UNDERSTANDING YOUR INSTRUMENT PANEL 45
temperature is adjusted automatically to maintain the
desired comfort level. You can adjust the temperature by
pressing the + or - Temp rocker switches.
FAN Control
Use this knob to regulate the amount of air delivered
through the system in any mode you select. Rotation
of the knob to increase (clockwise) or decrease (counterclockwise) fan speed.
Air Conditioning Operation
Press this button to enable the air conditioning
system. Compressor operation is automatic when
you press the AUTO button and no snowflake is
shown. A snowflake indicates that the A/C system is
enabled. The snowflake will not be displayed in AUTO
mode even though the A/C system is enabled.
The compressor may operate at any temperature above
32°F (0°C).
Recirculate Button
The Hybrid vehicle automatically uses a range of recirculation from all outside air to full recirculation (vehicle
cabin air) to improve air conditioning efficiency. To
request additional outside air push the recirculation
button to turn the recirculation indicator on, then push
the button again to cycle the indicator off. This will
provide more fresh air to the cabin. Press the auto button
to return to efficiency recirculation.
Press the RECIRC button to recirculate the air
inside the vehicle. Outside air is temporarily
prevented from entering the vehicle. Use this
mode to block out any outside odors, smoke,
dust or when rapid cooling of the interior is required.
4
Page 48

46 UNDERSTANDING YOUR INSTRUMENT PANEL
Manual control of recirculation is possible only in Panel,
Floor, and Bi-Level modes. It will not operate in Mix, or
Defrost modes. The recirculation symbol will flash three
times indicating recirculation is not available in these
modes.
NOTE: If the interior of the windows begin to fog, press
the RECIRCULATE button to return to outside air. Some
conditions will cause captured interior air to fog windows when in recirculate mode. In the auto mode the
humidity sensor may move the recirc setting to outside
air to automatically clear the windows of fog.
Panel
Air flows through the outlets located in the instrument panel. These outlets can be adjusted to direct
the airflow.
Floor (Heat)
Air flows primarily through the floor outlets lo-
cated under the instrument panel. A small amount
of air is directed through the defrost and side window
demister outlets.
Mix
Outside air flows in equal proportions through the
floor and defroster outlets.
Bi-Level
Air flows through the outlets located in the instrument panel and those located on the floor.
NOTE: There is a difference in temperature between the
upper and lower outlets for added comfort. The warmer
air goes to the floor outlets. This feature gives improved
comfort during sunny but cool conditions.
Page 49

UNDERSTANDING YOUR INSTRUMENT PANEL 47
Defrost
Outside air is directed to the windshield through
the defroster outlet located at the base of the
windshield and side window demist outlets.
NOTE: The air conditioning compressor operates in
both Mix and Defrost or a blend of these modes, even if
the A/C snowflake button has not been pressed. This
dehumidifies the air to help dry the windshield.
Rear Temperature Control (ATC)
The REAR button cycles through the following modes:
Rear Control From Front
This allows the driver or passenger to control the rear
blower speeds rotating the Power/Fan knob and the rear
temperature using the PASS/REAR Temp +/- rocker
switch. While in this mode, pressing the POWER/FAN
knob will turn the rear system off. Pressing the Power/
Fan knob will turn the rear system back on.
NOTE: The display will show a ⬙REAR⬙ fan speed graph
and a ⬙REAR⬙ digital temp setting.
CONTROL IN REAR
This allows the passengers in the second row seats to
control the blower speed and temperature by means of the
rear control located in the rear of the center floor console as
described under the ⬙Rear Zone Climate Control.⬙
NOTE: The front display will show “CONTROL IN
REAR.”
REAR OFF
This turns the rear system off. The control will return to the
front system display after approximately five seconds if no
buttons are pushed while in one of the rear system displays.
You may also return to the front system display sooner by
pushing any button except the Power/Fan knob, the REAR
button, or the driver/passenger Temp rocker buttons.
NOTE: The display will show “REAR OFF.”
4
Page 50

48 UNDERSTANDING YOUR INSTRUMENT PANEL
AUTO REAR
This mode places the rear system in automatic temperature control. Rear temperature can be set as desired (72°F
[22°C] recommended for average person) and will be
displayed digitally on the front control when in rear
mode.
Rear Window Defrosting and Rear Window
Washer/Wiper
Refer to “Rear Window Features” in Section 4 of the
Owner’s Manual.
Rear Zone Climate Control
Headliner air comes from the outlets in the headliner.
Each of these outlets can be individually adjusted to
direct the flow of air. Moving the air vane knobs on the
outlets to one side will shut off the airflow.
Rear Outlets
Page 51

UNDERSTANDING YOUR INSTRUMENT PANEL 49
The rear compartment control uses two rotary knobs: one
for the temperature control and the other for the fan
speed control. The mode for the rear air conditioning and
heating system is always controlled by the front control
unit. Fan and temperature can be controlled from the
front control unit or the rear control unit.
Rear Compartment Controls
Rear Rotary Blower Control
The second row seat occupants have control of the rear
blower speed only when the front control unit is in the
“CONTROL IN REAR⬙ mode.
The rear blower switch has an OFF position and a range
of blower speeds. Rotating the rear blower control clockwise will increase the blower speed.
Rear Rotary Temperature Control
The second row seat occupants have control of the rear
temperature only when the front control unit is in the
⬙REAR CONTROL⬙ position.
To change the temperature in the rear of the vehicle,
rotate the temperature control knob to the right or left.
The blue area indicates cooler temperatures while the red
area indicates warmer temperatures.
4
Page 52

50 UNDERSTANDING YOUR INSTRUMENT PANEL
NOTE: For best operation, make sure that ventilation
grilles located in the rear storage area are not obstructed
by stowed articles.
Rear Storage Ventilation Grilles
Front Unit to Rear Unit Chart
If the Front Control is
selected
Rear Airflow will come
from
Panel Headliner
Bi-Level Headliner
Floor Floor
Mix Floor
Defrost Floor
Operating Tips
Fast Cooldown
It is recommended to use Auto mode to allow the control
to make the mode and recirculation decisions for a fast
cooldown. Drive with the windows down for the first
few minutes to purge hot cabin air. To use manual mode
follow the steps listed below for a fast cooldown.
For a fast cooldown, set the blower fan to the highest
setting, set the mode control to the panel fresh position,
Page 53

UNDERSTANDING YOUR INSTRUMENT PANEL 51
press the Snowflake button to turn on the air conditioning, and drive with the windows open for the first few
minutes. Once the hot air has been expelled, close the
windows and set the mode selector to the Recirculation
panel or Recirculation Bi-level position. When a comfortable condition has been reached, choose a mode position
and adjust the temperature control and blower speed as
necessary to maintain comfort.
Window Fogging
Windows will fog on the inside when the humidity inside
the vehicle is high. This often occurs in mild or cool
temperatures when it’s rainy or humid. In most cases,
turning on the air conditioning (pressing the snowflake
button) will clear the fog. Adjust the temperature control,
air direction and blower speed to maintain comfort.
When the control is in Auto mode the humidity sensor
will monitor cabin conditions and reduce interior fogging.
As the temperature gets colder it may be necessary to
direct air onto the windshield by using Mix Mode
position on the control. Adjust the temperature control
and blower speed to maintain comfort. Interior fogging
on the windshield can be quickly removed by selecting
the defrost mode.
Regular cleaning of the inside of the windows with a
non-filming cleaning solution (vinegar and water works
very well) will help prevent contaminants (cigarette
smoke, perfumes, etc.) from sticking to the windows.
Contaminants increase the rate of window fogging.
Summer Operation
Air conditioned vehicles must be protected with a high
quality antifreeze coolant during Summer to provide
proper corrosion protection and to raise the boiling point
of the coolant for protection against overheating. A 50%
concentration is recommended.
4
Page 54

52 UNDERSTANDING YOUR INSTRUMENT PANEL
Winter Operation
When operating the system during the Winter months,
make sure the air intake, located directly in front of the
windshield, is free of ice, slush, snow, or other obstructions. This will also prevent snow ingestion into the
ducts.
Page 55

Operating Tips Chart
UNDERSTANDING YOUR INSTRUMENT PANEL 53
4
Operating Tips
Page 56

Page 57

CONTENTS
STARTING AND OPERATING
䡵 Starting Procedures ..................... 56
▫ Starting ............................ 56
䡵 2-Mode Hybrid Transmission .............. 58
▫ Brake/Transmission Interlock System ....... 58
▫ 2-Mode Hybrid Transmission Ranges ....... 58
䡵 Four-Wheel Drive Operation .............. 62
▫ MP 3010 “Active On Demand” Transfer
Case .............................. 62
䡵 Power Steering ........................ 63
䡵 Electronic Brake Control System ............ 64
▫ Hill Start Assist (HSA) ................. 64
䡵 Recreational Towing (Behind Motorhome, Etc.) . . 66
5
Page 58

56 STARTING AND OPERATING
STARTING PROCEDURES
Before starting your vehicle, adjust your seat, adjust both
inside and outside mirrors, and fasten your seat belts.
NOTE: This vehicle is not compatible with any aftermarket remote starting systems. The installation of aftermarket remote starting systems is NOT recommended.
WARNING!
•
Never leave children alone in a vehicle. Leaving
unattended children in a vehicle is dangerous for a
number of reasons. A child or others could be
seriously or fatally injured. Do not leave the key in
the ignition. A child could operate power windows, other controls, or move the vehicle.
•
Do not leave animals or children inside parked
vehicles in hot weather; interior heat buildup may
cause serious injury or death.
(Continued)
WARNING! (Continued)
•
Be sure to turn off the engine and remove the key
from the ignition switch if you want to rest or
sleep in your car. Accidents can be caused by
inadvertently moving the shift lever. Accidents
can also be caused by pressing the accelerator
pedal. This may cause excessive heat in the exhaust system, resulting in overheating and vehicle
fire, which may cause serious or fatal injuries.
Starting
Normal starting of either a warm or cold engine is
obtained without pumping or pressing the accelerator
pedal.
Turn the key to the START position while your vehicle is
in PARK. When the ignition key is turned to the START
position, the “READY” light in the cluster will illuminate
to indicate the Hybrid System has started. When the
Page 59

STARTING AND OPERATING 57
“READY” light is illuminated, your Hybrid vehicle can
be driven under electric power even though the internal
combustion engine may not be running.
If the “READY” light fails to illuminate after you have
followed the normal starting procedure contact your
authorized dealer.
WARNING!
•
Never pour fuel or other flammable liquid into the
throttle body air inlet opening in an attempt to
start the vehicle. This could result in flash fire
causing serious personal injury.
(Continued)
WARNING! (Continued)
•
Do not attempt to push or tow your vehicle to get
it started. Vehicles equipped with an automatic
transmission cannot be started this way. Unburned
fuel could enter the catalytic converter and once
the engine has started, ignite and damage the
converter and vehicle. If the vehicle has a discharged battery, booster cables may be used to
obtain a start from a booster battery or the battery
in another vehicle. This type of start can be dangerous if done improperly. Refer to Section 6 of
this supplement for proper jump-starting procedures and follow them carefully.
5
Page 60

58 STARTING AND OPERATING
2-MODE HYBRID TRANSMISSION
The electronic PRND21 on the instrument cluster indicates the transmission range that has been selected. The
shift lever is mounted on the right side of the steering
column. To drive the vehicle, move the shift lever from
PARK or NEUTRAL to the desired drive position. Pull
the shift lever toward you when shifting into REVERSE,
SECOND, FIRST or PARK, or when shifting out of PARK.
Brake/Transmission Interlock System
This system prevents you from moving the shift lever out
of PARK and into any range unless the brake pedal is
pressed. This system is active only while the ignition
switch is in the ON position. Always press the brake
pedal first, before moving the shift lever out of PARK.
2-Mode Hybrid Transmission Ranges
PARK
Supplements the parking brake by locking the transmission. The engine can be started in this range. Never use
PARK while vehicle is in motion. Apply the parking
brake when leaving the vehicle in this range. Always
apply the parking brake first, then place the shift lever in
the PARK position.
NOTE: DO NOT race the engine when shifting from
PARK or NEUTRAL position into another range.
Page 61

STARTING AND OPERATING 59
WARNING!
•
Your vehicle could move and injure you and others
if it is not completely in PARK. Check by trying to
move the shift lever back and forth without first
pulling the shift lever toward you, after you have
set it in PARK. Make sure it is in PARK before
leaving the vehicle.
•
Never use PARK position on an automatic transmission as a substitute for the parking brake.
Always apply the parking brake fully when
parked to guard against vehicle movement and
possible injury or damage.
(Continued)
WARNING! (Continued)
•
It is dangerous to shift the shift lever out of PARK
or NEUTRAL if the engine speed is higher than
idle speed. If your foot is not firmly on the brake
pedal, the vehicle could accelerate quickly forward
or in reverse. You could lose control of the vehicle
and hit someone or something. Only shift into
gear when the engine is idling normally and when
your right foot is firmly on the brake pedal.
REVERSE
Use this range only after the vehicle has come to a
complete stop.
NEUTRAL
Shift to NEUTRAL when vehicle is standing for prolonged periods with engine running. Engine may be
started in this range. Set the parking brake if you must
leave the vehicle.
5
Page 62

60 STARTING AND OPERATING
NOTE: Towing the vehicle (except as specified under
“Towing A Disabled Vehicle”), coasting, or otherwise
driving the vehicle while in NEUTRAL can cause severe
transmission damage.
DRIVE
For most city and highway driving. This is the preferred
operating mode for this vehicle. The best fuel economy is
achieved by operating the vehicle in DRIVE.
“2” SECOND
For driving on mountain roads where more precise speed
control is desirable. Use it also when climbing long
grades, and for engine braking when descending moderately steep grades. To prevent excessive engine speed do
not exceed 45 mph (72 km/h) in this range.
NOTE: When operating in “2” SECOND the gasoline
engine will start and/or remain running.
“1” FIRST
For driving up very steep hills and for engine braking at
low speeds 25 mph (40 km/h) or less when going
downhill. To prevent excessive engine speed do not
exceed 25 mph (40 km/h) in this range.
NOTE: When operating in “1” FIRST the gasoline
engine will start and/or remain running.
Drive Operation
The 2-Mode Hybrid Transmission will select one of four
fixed gear ratios to maximize fuel economy. However, the
best fuel economy savings will be when the following is
conditions are met:
•
the shift lever is in DRIVE.
•
the engine coolant has reached normal operating temperature.
•
the TOW/HAUL switch has not been activated.
Page 63

•
the transmission has reached normal operating temperature.
•
the high voltage battery has reached normal operating
temperature.
•
a sufficient state of charge in the high voltage battery.
NOTE:
•
If the vehicle is started in extremely cold temperatures,
the 2-Mode Hybrid Transmission will automatically
select the most desirable gear for operation. Normal
operation will resume when the transmission fluid
temperature has risen to a suitable level.
•
If the 2-Mode Hybrid Transmission temperature gets
extremely hot, the transmission will automatically
select the most desirable gear for operation. If the
transmission temperature becomes hot enough, the
TRANS TEMP light may illuminate until the transmission cools down. After cool down, the transmission
will resume normal operation.
STARTING AND OPERATING 61
When To Use TOW/HAUL Mode
When driving in hilly areas, towing a trailer, carrying a
heavy load, etc., and frequent transmission shifting occurs, press the TOW/HAUL switch.
5
TOW/HAUL Switch
Page 64

62 STARTING AND OPERATING
When operating in TOW/HAUL mode, the 2-Mode
Hybrid Transmission will select gear ratios that maximize towing power, with less emphasis on fuel economy.
NOTE: Electric only mode and engine stop-start are
disabled then TOW/HAUL is activated.
The TOW/HAUL light will illuminate in the instrument
cluster to indicate when the switch has been activated.
Pressing the switch a second time restores normal
operation.
FOUR-WHEEL DRIVE OPERATION
MP 3010 “Active On Demand” Transfer Case
The MP 3010 is a single speed (4 HI range only) transfer
case which provides convenient full-time four-wheel
drive. No driver interaction is required.
Proper operation of four-wheel drive vehicles depends
on tires of equal size, type and circumference on each
wheel. Any difference in tire size can cause damage to the
transfer case.
Because four-wheel drive provides improved traction,
there is a tendency to exceed safe turning and stopping
speeds. Do not go faster than road conditions permit.
This four-wheel drive (4WD) system allows the front and
rear wheels to rotate at different speeds when required by
the road condition or road surface.
The “SVC 4WD” warning light monitors the electric shift
4WD system. If this light remains on after engine start up
or illuminates during driving, it means that the 4WD
system is not functioning properly and that service is
required. See your authorized dealer for immediate service.
Page 65

STARTING AND OPERATING 63
WARNING!
Always engage the parking brake when powering
down the vehicle if the ⴖSVC 4WDⴖ light is illuminated. Not engaging the parking brake may allow the
vehicle to roll, which may cause personal injury.
POWER STEERING
Your vehicle is equipped with an electro-hydraulic power
steering system that will give you good vehicle response
and increased ease of maneuverability in tight spaces.
The system will vary its assist to provide light efforts
while parking and good feel while driving. If the electrohydraulic power steering system experiences a fault that
prevents it from providing power steering assist, the
system will provide mechanical steering capability.
CAUTION!
Operation in very high temperatures with a high
level of steering activity may cause the electrically
driven pump to reduce or stop assist in order to
prevent damage to the system. Normal operation will
resume once the system is allowed to cool.
If for some reason the power assist is interrupted, it will
still be possible to steer your vehicle. Under these conditions you will observe a substantial increase in steering
effort, especially at very low vehicle speeds and during
parking maneuvers.
NOTE: Increased noise levels at the end of the steering
wheel travel are considered normal and does not indicate
that there is a problem with the power steering system.
5
Page 66

64 STARTING AND OPERATING
Upon initial start-up in cold weather, the power steering
pump may make noise for a short period of time. This
noise should be considered normal, and does not in any
way damage the steering system.
WARNING!
Continued operation with reduced power steering
assist could pose a safety risk to yourself and others.
Service should be obtained as soon as possible.
CAUTION!
Prolonged operation of the steering system at the end
of the steering wheel travel will increase the steering
fluid temperature and should be avoided when possible. Damage to the power steering pump may occur.
ELECTRONIC BRAKE CONTROL SYSTEM
Your vehicle is equipped with an advanced electronic
brake control system that includes Anti-Lock Brake System (ABS), Brake Assist System (BAS), Traction Control
System (TCS), Electronic Roll Mitigation (ERM), Electronic Stability Program (ESP), Trailer Sway Control
(TSC) and Hill Start Assist (HSA). All seven systems
work together to enhance vehicle stability and control in
various driving conditions, and are commonly referred to
as ESP.
Hill Start Assist (HSA)
The HSA system is designed to assist the driver when
starting a vehicle from a stop on a hill. HSA will maintain
the level of brake pressure the driver applied for a short
period of time after the driver takes their foot off of the
brake pedal. If the driver does not apply the throttle
during this short period of time, the system will release
brake pressure and the vehicle will roll down the hill. The
Page 67

STARTING AND OPERATING 65
system will release brake pressure in proportion to
amount of throttle applied as the vehicle starts to move in
the intended direction of travel.
HSA Activation
The following must be met in order for HSA to activate:
•
Vehicle must be stopped.
•
Vehicle must be on a 8% grade or greater hill.
•
Gear selection matches vehicle uphill direction (i.e.,
vehicle facing uphill is in forward gear; vehicle backing uphill is in REVERSE gear).
HSA will work in REVERSE and all forward gears when
the activation requirements have been met. The system
will not activate if the vehicle is placed in NEUTRAL or
PARK.
WARNING!
There may be situations on minor hills (i.e., less than
8%), with a loaded vehicle, or while pulling a trailer,
when the system will not activate and slight rolling
may occur. This could cause a collision with another
vehicle or object. Always remember the driver is
responsible for braking the vehicle.
Towing with HSA
HSA will provide assistance when starting on a grade
when pulling a trailer.
5
Page 68

66 STARTING AND OPERATING
WARNING!
•
If you use a trailer brake controller with your
trailer, your trailer brakes may be activated and
deactivated with the brake switch. If so, when the
brake pedal is released there may not be enough
brake pressure to hold the vehicle and trailer on a
hill and this could cause a collision with another
vehicle or object behind you. In order to avoid
rolling down the hill while resuming acceleration,
manually activate the trailer brake prior to releasing the brake pedal. Always remember the driver
is responsible for braking the vehicle.
(Continued)
WARNING! (Continued)
•
HSA is not a parking brake. If you stop the vehicle
on a hill without putting the transmission in
PARK and using the parking brake, it will roll
down the hill and could cause a collision with
another vehicle or object. Always remember to use
the parking brake while parking on a hill, and that
the driver is responsible for braking the vehicle.
RECREATIONAL TOWING (BEHIND MOTORHOME, ETC.)
CAUTION!
Your vehicle is equipped with an MP 3010 “Active On
Demand” transfer case which has no NEUTRAL position and may NOT be used for recreational towing.
Page 69

CONTENTS
WHAT TO DO IN EMERGENCIES
䡵 Jacking Instructions ..................... 68
▫ Jack Location ........................ 68
▫ Removing The Spare Tire ................ 69
▫ Tire Changing Procedure ................ 70
䡵 Jump-Starting Procedures ................. 77
▫ Charge Assist Procedure — High Voltage
Battery ............................. 77
▫ Jump-Starting — 12-Volt Battery ........... 84
䡵 Towing A Disabled Vehicle ................ 86
▫ Four–Wheel Drive ..................... 86
6
Page 70

68 WHAT TO DO IN EMERGENCIES
JACKING INSTRUCTIONS
WARNING!
•
Being under a jacked-up vehicle is dangerous. The
vehicle could slip off the jack and fall on you. You
could be crushed. Never put any part of your body
under a vehicle that is on a jack. Never start or run
the engine while the vehicle is on a jack. If you
need to get under a raised vehicle, take it to a
service center where it can be raised on a lift.
•
The jack is designed to use as a tool for changing
tires only. The jack should not be used to lift the
vehicle for service purposes. The vehicle should
be jacked on a firm level surface only. Avoid ice or
slippery areas.
Jack Location
The scissor jack and tire changing tools are stowed in the
rear cargo area.
Jack Location
The jack is secured in place with a winged stud and a
fixed stud. It is very important to secure the jack tightly
in place by engaging the slot in the base to the fixed stud
under the middle seat. The winged stud inserts through
the eyelet in the end of the jack’s worm screw.
Page 71

WHAT TO DO IN EMERGENCIES 69
Removing The Spare Tire
The spare tire on your vehicle is located underneath the
vehicle in the rear.
Spare Tire Location
Remove the spare tire before attempting to jack the
vehicle.
1. Remove the rubber plug from the floor in the cargo
area.
6
Spare Tire Winch
2. Engage the jack wrench extension to the spare tire
winch through the hole in the floor.
Page 72

70 WHAT TO DO IN EMERGENCIES
3. Turn the wrench counterclockwise to lower the spare
tire. Continue to turn the wrench until the spare tire can
be pulled out from under the vehicle.
It is recommended that you stow the flat tire or spare to
avoid tangling the loose cable.
CAUTION!
The winch mechanism is designed for use with the
jack extension tube only. Use of an air wrench or
other power tools is not recommended and can damage the winch.
Tire Changing Procedure
WARNING!
Getting under a jacked-up vehicle is dangerous. The
vehicle could slip off the jack and fall on you. You
could be crushed. Never get any part of your body
under a vehicle that is on a jack. Never start or run
the engine while the vehicle is on a jack. If you need
to get under a raised vehicle, take it to a service center
where it can be raised on a lift.
Do not raise this vehicle using a bumper jack. The scissor
jack is designed as a tool for changing tires on this vehicle
only. It is not recommended that the jack be used for
service purposes or to lift more than one wheel at a time.
Page 73

WHAT TO DO IN EMERGENCIES 71
Preparations
1. Park the vehicle on a firm level surface. Avoid ice or
slippery areas.
WARNING!
Do not attempt to change a tire on the side of the
vehicle close to moving traffic. Pull far enough off
the road to avoid the danger of being hit when
operating the jack or changing the wheel.
2. Set the parking brake.
3. Place the shift lever in PARK (automatic transmission).
On 4-wheel drive vehicles, shift the transfer case to the
“4L” position.
4. Turn the ignition OFF.
5. Turn on the Hazard Warning flasher.
6. Block both the front and rear of the
wheel diagonally opposite the jacking
position. For example, if the right front
wheel is being changed, block the left
rear wheel.
NOTE: Passengers should not remain in the vehicle
when the vehicle is being jacked.
6
Page 74

72 WHAT TO DO IN EMERGENCIES
Instructions
WARNING!
Carefully follow these tire changing warnings to help
prevent personal injury or damage to your vehicle:
•
Always park on a firm, level surface as far from
the edge of the roadway as possible before raising
the vehicle.
•
Block the wheel diagonally opposite the wheel to
be raised.
•
Set the parking brake firmly and set an automatic
transmission in PARK; a manual transmission in
REVERSE.
•
Never start or run the engine with the vehicle on a
jack.
•
Do not let anyone sit in the vehicle when it is on a
jack.
(Continued)
WARNING! (Continued)
•
Do not get under the vehicle when it is on a jack.
•
Only use the jack in the positions indicated and
for lifting this vehicle during a tire change.
•
If working on or near a roadway, be extremely
careful of motor traffic.
•
To assure that spare tires, flat or inflated are
securely stowed, spares must be stowed with the
valve stem facing the ground.
•
Turn on the Hazard Warning flasher.
Jack Warning Label
1. Remove the spare wheel, jack, and tools from storage.
Page 75

2. Using the wheel wrench, loosen, but do not remove,
the wheel nuts by turning them counterclockwise one
turn while the wheel is still on the ground.
3. When changing a front wheel, place the jack under the
frame rail behind the wheel. Locate the jack as far
forward as possible on the straight part of the frame
(prior to inboard transition). Operate the jack using the
jack drive tube and the wheel wrench; the tube extension
may be used but is not required.
WHAT TO DO IN EMERGENCIES 73
6
Front Jacking Location
Page 76

74 WHAT TO DO IN EMERGENCIES
When changing a rear wheel, assemble the jack drive
tube to the jack and connect the drive tube to the
extension tube. Place the jack under the axle as close to
the tire as possible with the drive tubes extending to the
rear. Connect the jack tube extension and wheel wrench.
Right Rear Jacking Location
Before raising the wheel off the ground, make sure that
the jack will not damage surrounding truck parts and
adjust the jack position as required.
Left Rear Jacking Location
4. Raise the vehicle by rotating the wheel wrench clockwise, until the wheel just clears the surface.
Page 77

WHAT TO DO IN EMERGENCIES 75
WARNING!
Raising the vehicle higher than necessary can make
the vehicle unstable and cause an accident. It could
slip off the jack and hurt someone near it. Raise the
vehicle only enough to remove the tire.
5. Remove the wheel nuts and pull the wheel off. Install
the spare wheel and wheel nuts with the cone shaped end
of the nuts toward the wheel. Lightly tighten the nuts. To
avoid risk of forcing the vehicle off the jack, do not fully
tighten the nuts until the vehicle has been lowered.
NOTE: Do not oil wheel studs. For chrome wheels, do
not substitute with chrome plated wheel nuts.
6. Using the wheel wrench, finish tightening the nuts in
a crisscross pattern. Correct nut tightness is 135 ± 10 ft lbs
(183 ± 14 N·m) dynamic torque. If in doubt about the
correct tightness, have them checked with a torque
wrench by your authorized dealer or at a service station.
WARNING!
A loose tire or jack thrown forward in a collision or
hard stop could injure someone in the vehicle. Always stow the jack, tools and the extra tire and wheel
in the places provided.
7. Remove wheel blocks. Do not install chrome or aluminum wheel center caps on the spare wheel. This may
result in cap damage.
8. Lower the jack to its fully closed position. Stow the
replaced tire, jack, and tools as previously described.
9. Adjust the tire pressure when possible.
NOTE: Do not oil wheel studs. For chrome wheels, do
not substitute with chrome plated wheel nuts.
6
Page 78

76 WHAT TO DO IN EMERGENCIES
WARNING!
Carefully follow these tire changing warnings to
help prevent personal injury or damage to your
vehicle:
•
Always park on a firm, level surface as far from
the edge of the roadway as possible before raising
the vehicle.
•
Block the wheel diagonally opposite the wheel to
be raised.
•
Apply the parking brake firmly before jacking.
•
Never start the engine with the vehicle on a jack.
•
Do not let anyone sit in the vehicle when it is on a
jack.
•
Do not get under the vehicle when it is on a jack.
•
Only use the jack in the positions indicated.
(Continued)
WARNING! (Continued)
•
If working on or near a roadway, be extremely
careful of motor traffic.
•
To assure that spare tires, flat or inflated, are
securely stowed, spares must be stowed with the
valve stem facing the ground.
To Stow The Flat Or Spare
Turn the wheel so that the valve stem is downward. Slide
the wheel retainer through the center of the wheel and
position it properly across the wheel opening.
For convenience in checking the spare tire inflation, stow
with the valve stem toward the rear of the vehicle.
Rotate the winch mechanism until the wheel is drawn
into place against the underside of the vehicle. Continue
to rotate until you feel the winch mechanism slip or click
two times. It cannot be overtightened. Push against the
tire several times to be sure it is firmly in place.
Page 79

WHAT TO DO IN EMERGENCIES 77
JUMP-STARTING PROCEDURES
Your Hybrid vehicle is equipped with both a 12-Volt
battery and a high voltage battery. Either battery may
become discharged and cause a no crank condition as a
result of low voltage.
If the 12-Volt battery’s state of charge is to low and the
engine will not crank, the 12-Volt battery light located in
the cluster may illuminate. If this occurs refer to “JumpStarting — 12-Volt Battery” in this Section.
If the high voltage battery’s state of charge is too low and
the engine will not crank, the Navigation radio will
display a “Charge Insufficient” message. If this occurs
refer to “Charge Assist Procedure — High Voltage Battery” in this Section.
Charge Assist Procedure — High Voltage Battery
The “Charge Assist” procedure allows you to charge the
high voltage battery using the 12-Volt battery system. The
Navigation radio will guide you through the “Charge
Assist” procedure.
6
Charge Insufficient Message
Page 80

78 WHAT TO DO IN EMERGENCIES
This message indicates that the vehicle is in “Charge
Assist” mode, and can be charged by following the
“Charge Assist” procedure.
NOTE:
•
Depending on the high voltage battery’s state of
charge, it may take up to 60 minutes for the system to
become adequately charged to start the engine.
•
There are remote battery posts located under the hood
that are used to assist in the “Charge Assist” procedure.
•
A second running vehicle may be used in this “Charge
Assist” procedure provided the generator output is a
minimum of 125 amps.
WARNING!
•
A battery generates hydrogen gas which is flammable and explosive. Keep flame or spark away
from the vent holes. DO NOT use a booster battery
or any other booster source with a nominal voltage
output that exceeds 12-Volts.
•
Battery fluid is a corrosive acid solution; do not
allow battery fluid to contact eyes, skin or clothing. If acid splashes in eyes or on skin, flush the
contaminated area immediately with large quantities of water.
NOTE:
•
A 12-Volt battery charger with a minimum 30 Amp
rating is the only type recommended to use when
charging the high voltage battery. There are many types
of these units available. Follow the manufacturer’s
instructions for necessary precautions and operation.
Page 81

•
Depending on the condition of the second running
vehicles alternator and the number of accessories
operating on both vehicles, it could take up to 60 minutes to charge the high voltage battery. To minimize
the charging time ensure that a minimum amount of
accessories are being used.
Always wear eye protection and remove all metal jewelry
such as watch bands or bracelets which might make an
unintended electrical contact.
WHAT TO DO IN EMERGENCIES 79
4. Connect the positive cable clamp of the 12-Volt battery
charger to the remote positive post located near the
engine oil dipstick underhood.
1. Turn OFF all unnecessary electrical loads such as the
heater, radio, lights etc.
2. Set the parking brake, place the shift lever in PARK
and turn the ignition to the ON/RUN position.
3. Place the battery charger within cable reach of the
remote battery posts located under the hood.
6
Remote Positive Post
Page 82

80 WHAT TO DO IN EMERGENCIES
5. Connect the negative cable clamp of the 12-Volt battery charger to the remote negative post located near the
driver’s side fender underhood.
Negative Post
WARNING!
During cold weather when temperatures are below
freezing point, electrolyte in a discharged battery
may freeze. Do not attempt jump-starting because
the battery could rupture or explode. The battery
temperature must be brought up above freezing
point before attempting a jump-start.
6. Turn on the battery charger and allow the high voltage
battery to charge.
NOTE: Depending on the type of battery charger you
are using and the vehicle load, the charging current may
vary. Do not allow the charging current to exceed 70
Amps. Follow the manufacturer’s instructions for necessary precautions and operation.
Page 83

CAUTION!
Charging the high voltage battery at a rate higher
then 70 Amps could damage the 12-Volt battery.
7. If the 12-Volt battery charger has been properly connected and the system determines that the conditions are
correct for charging, the Navigation radio will display a
message “CHARGING in Progress”.
WHAT TO DO IN EMERGENCIES 81
6
Charging In Progress
CAUTION!
Do not leave the vehicle unattended while charging
the high voltage battery. The battery charger must be
turned off once “Charge Assist” has been completed
or damage to the 12-Volt battery can occur.
Page 84

82 WHAT TO DO IN EMERGENCIES
NOTE:
•
To minimize the charging time, it is recommended to
leave the key in the OFF position while in the
“CHARGING in Progress” mode, however the key
may be turned to the ON/RUN position to use an
accessory.
•
Do not use the accessory mode for a long period of
time, since the charging system will not maintain
either the 12-Volt or high voltage battery in this mode.
Allow the system to charge until the Navigation radio
displays the “Attempt to start vehicle” message.
Attempt To Start Message
8. Attempt to start the vehicle, if the vehicle starts, leave
it running and turn off the 12-Volt battery charger.
9. Remove the 12-Volt battery charger negative clamp.
Page 85

WHAT TO DO IN EMERGENCIES 83
CAUTION!
Be careful of the moving belt and fan blades.
10. Remove the 12-Volt battery charger positive clamp.
NOTE: Allow the vehicle to idle for a minimum of
10 minutes before attempting to drive.
WARNING!
Any procedure other than above could result in:
•
Personal injury caused by electrolyte squirting out
the battery vent.
•
Personal injury or property damage due to battery
explosion.
•
Damage to charging system or immobilized
vehicle.
Charging Aborted
If the “Charge Assist” procedure is interrupted, the
Navigation radio will display “Charge Aborted”.
6
Charging Aborted
Page 86

84 WHAT TO DO IN EMERGENCIES
“Charge Assist” can be aborted by the following items:
•
The key is turned to the START position while the
system is being charged.
•
Incorrect installation of the 12-Volt battery charger.
•
Poor cable clamp contact.
•
The Hybrid Control Module determines conditions are
not suitable for charging.
If the “Charge Aborted” message is displayed check the
battery charger clamps, making sure there is a good
connection. Check to see that the 12-Volt battery charger
is turned on. Turn OFF the ignition, wait 10 to 15 seconds
and turn the key to the START position. If the “Charge
Aborted” message is still active have the vehicle towed to
the nearest authorized dealer for service.
Jump-Starting — 12-Volt Battery
WARNING!
•
Battery fluid is a corrosive acid solution; do not
allow battery fluid to contact eyes, skin or clothing. Don’t lean over battery when attaching
clamps or allow the clamps to touch each other. If
acid splashes in eyes or on skin, flush the contaminated area immediately with large quantities of
water.
•
A battery generates hydrogen gas which is flammable and explosive. Keep flame or spark away
from the vent holes. Do not use a booster battery
or any other booster source with an output that
exceeds 12-Volts.
1. Wear eye protection and remove all metal jewelry such
as watch bands or bracelets which might make an
unintended electrical contact.
Page 87

2. Park the booster vehicle within cable reach but without letting the vehicles touch. Set the parking brake, place
the shift lever in PARK and turn the ignition OFF on both
vehicles.
3. Turn OFF heater, radio and all unnecessary electrical
loads.
4. Connect one end of a jumper cable to the positive
terminal of the booster battery. Connect the other end of
the same cable to the remote positive post.
WHAT TO DO IN EMERGENCIES 85
6
Remote Positive Post
WARNING!
Do not permit vehicles to touch each other as this
could establish a ground connection and personal
injury could result.
Page 88

86 WHAT TO DO IN EMERGENCIES
5. Connect the other cable, first to the negative terminal
of the booster battery and then to the engine of the
vehicle with the discharged battery. Make sure you have
a good contact on the engine.
WARNING!
•
Do not connect the cable to the negative post of the
discharge battery. The resulting electrical spark
could cause the battery to explode.
•
During cold weather when temperatures are below freezing point, electrolyte in a discharged
battery may freeze. Do not attempt jump-starting
because the battery could rupture or explode. The
battery temperature must be brought up above
freezing point before attempting a jump-start.
6. Start the engine in the vehicle which has the booster
battery, let the engine idle a few minutes, then start the
engine in the vehicle with the discharged battery.
7. When removing the jumper cables, reverse the above
sequence exactly. Be careful of the moving belt and fan.
WARNING!
Any procedure other than above could result in:
•
Personal injury caused by electrolyte squirting out
the battery vent.
•
Personal injury or property damage due to battery
explosion.
•
Damage to charging system of booster vehicle or
of immobilized vehicle.
TOWING A DISABLED VEHICLE
Four–Wheel Drive
The manufacturer requires towing your Hybrid with all
four wheels OFF the ground using a flatbed.
Page 89

CONTENTS
MAINTAINING YOUR VEHICLE
䡵 Engine Compartment — 5.7L HEMI V-8 ...... 88
䡵 Maintenance Procedures .................. 89
▫ Traction Power Inverter Module Cooling
System ............................. 89
▫ 2-Mode Hybrid Transmission ............. 95
▫ Transfer Case (All Wheel Drive) ........... 96
▫ Axles .............................. 96
▫ Appearance Care And Protection From
Corrosion ........................... 97
䡵 Fuses ............................... 98
▫ Interior Fuses ........................ 99
▫ Power Distribution Center .............. 101
▫ Power Distribution Center 2 ............ 105
▫ Integrated Power Module .............. 106
䡵 Fluids And Capacities .................. 109
䡵 Fluids, Lubricants And Genuine Parts ....... 110
▫ Engine ............................ 110
▫ Chassis ............................111
7
Page 90

88 MAINTAINING YOUR VEHICLE
ENGINE COMPARTMENT — 5.7L HEMI V-8
1 — Traction Power Inverter Module (TPIM) Coolant Bottle 8 — Washer Fluid Bottle
2 — Air Cleaner Filter 9 — Engine Coolant Bottle
3 — Engine Oil fill 10 — Fuses (Integrated Power Module)
4 — Engine Oil Dipstick 11 — Power Steering Fluid
5 — Brake Fluid Reservoir 12 — Remote Jump-Start Positive Battery Post
6 — Fuses (Power Distribution Center 2) 13 — Engine Coolant Pressure Cap
7 – Fuses (Power Distribution Center)
Page 91

MAINTAINING YOUR VEHICLE 89
MAINTENANCE PROCEDURES
WARNING!
Your vehicle has both a high voltage DC and AC
system as well as a 12-Volt system. DC and AC high
voltage are both extremely dangerous and can cause
severe burns, electric shock, serious injury or even
death. In order to avoid personal injuries:
•
DO NOT TOUCH THE HIGH VOLTAGE
CABLES (ORANGE COLORED) AND/OR THE
CONNECTORS.
•
Follow all Caution and Warning labels attached to
the high voltage (Hybrid System) components.
•
Do not remove or replace any of the Hybrid
System components. All replacement or repairs of
Hybrid System components should be performed
by a factory-trained technician at an authorized
dealer.
The pages that follow contain the required maintenance
services determined by the engineers who designed your
vehicle.
Besides the maintenance items for which there are fixed
maintenance intervals, there are other items that should
operate satisfactorily without periodic maintenance.
However, if a malfunction of these items does occur, it
could adversely affect the engine or vehicle performance.
These items should be inspected if a malfunction is
observed or suspected.
Traction Power Inverter Module Cooling System
The Traction Power Inverter Module (TPIM) cooling
system is completely separate from the engine cooling
system and is designed to remove heat away from the
TPIM.
7
Page 92

90 MAINTAINING YOUR VEHICLE
Traction Power Inverter Module (TPIM) Cooling
System – Coolant Level Check
Check the TPIM coolant (antifreeze) protection every
12 months (before the onset of freezing weather, where
applicable).
Check the coolant bottle tubing for brittle rubber, cracking, tears, cuts and tightness of the connection at the
bottle and radiator. Inspect the entire system for leaks.
NOTE: DO NOT REMOVE THE COOLANT PRESSURE CAP WHEN THE COOLING SYSTEM IS HOT.
Cooling System Warning Label
Page 93

MAINTAINING YOUR VEHICLE 91
WARNING!
•
The warning graphic that appears on the cooling
system pressure cap is a safety precaution for “DO
NOT OPEN HOT”. Never add coolant (antifreeze)
when the engine is overheated. Do not loosen or
remove the cap to cool an overheated engine. Heat
causes pressure to build up in the cooling system. To
prevent scalding or injury, do not remove the pressure cap while the system is hot or under pressure.
•
Do not use a pressure cap other than the one
specified for your vehicle. Personal injury or engine damage may result.
Maintain coolant (antifreeze) concentration at a minimum of 50% MOPAR威 Antifreeze/Coolant 5
Year/100,000 Mile Formula HOAT (Hybrid Organic Additive Technology) and distilled/deionized water for
proper corrosion protection.
Check the coolant (antifreeze) level with the engine off. If
the coolant (antifreeze) level is below the Cold Fill mark,
add coolant until it reaches the MAX level mark.
7
TPIM Coolant Reservoir
TPIM Cooling System — Drain, Flush and Refill
Refer to “Maintenance Schedules” in Section 7 of this
supplement for the proper maintenance intervals.
Page 94

92 MAINTAINING YOUR VEHICLE
If the coolant (antifreeze) is dirty or contains a considerable amount of sediment, clean and flush with a reliable
cooling system cleaner. Follow with a thorough rinsing to
remove all deposits and chemicals. Properly dispose of
old coolant (antifreeze) solution.
Selection Of Coolant
Refer to “Fluids, Lubricants, and Genuine Parts” in this
section for the correct fluid type.
CAUTION!
•
Mixing of coolant (antifreeze) other than specified
HOAT TPIM coolant (antifreeze), may result in
engine damage and may decrease corrosion protection. If a non-HOAT coolant (antifreeze) is
introduced into the cooling system in an emergency, it should be replaced with the specified
coolant (antifreeze) as soon as possible.
(Continued)
CAUTION! (Continued)
•
Do not use plain water alone or alcohol-base
coolant (antifreeze) products. Do not use additional rust inhibitors or antirust products, as they
may not be compatible with the TPIM coolant and
may plug the TPIM cooler.
•
This vehicle has not been designed for use with
Propylene Glycol based coolant (antifreeze). Use
of Propylene Glycol based coolant (antifreeze) is
not recommended.
Adding Coolant
Your vehicle has been built with an improved TPIM
coolant (antifreeze) that allows extended maintenance
intervals. This coolant (antifreeze) can be used up to 5
Years or 102,000 miles (170 000 km) before replacement.
To prevent reducing this extended maintenance period, it
is important that you use the same coolant (antifreeze)
throughout the life of your vehicle.
Page 95

MAINTAINING YOUR VEHICLE 93
Please review these recommendations for using Hybrid
Organic Additive Technology (HOAT) coolant (antifreeze).
When adding coolant (antifreeze):
•
The manufacturer recommends using MOPAR威
Antifreeze/Coolant 5 Year/100,000 Mile Formula
HOAT (Hybrid Organic Additive Technology).
•
Mix a minimum solution of 50% HOAT coolant (antifreeze) and distilled water. Use higher concentrations
(not to exceed 70%) if temperatures below -34°F
(-37°C) are anticipated.
•
Use only high purity water such as distilled or deionized water when mixing the water/TPIM coolant
(antifreeze) solution. The use of lower quality water
will reduce the amount of corrosion protection in the
engine cooling system.
Please note that it is the owner’s responsibility to maintain the proper level of protection against freezing according to the temperatures occurring in the area where
the vehicle is operated.
NOTE: Mixing coolant (antifreeze) types will decrease
the life of the TPIM coolant (antifreeze) and will require
more frequent coolant (antifreeze) changes.
TPIM Cooling System Pressure Cap
The cap must be fully tightened to prevent loss of
coolant.
The cap should be inspected and cleaned if there is any
accumulation of foreign material on the sealing surfaces.
7
Page 96

94 MAINTAINING YOUR VEHICLE
Disposal of Used TPIM Coolant
Used ethylene glycol based TPIM coolant (antifreeze) is a
regulated substance requiring proper disposal. Check
with your local authorities to determine the disposal
rules for your community. To prevent ingestion by animals or children, do not store ethylene glycol based TPIM
coolant (antifreeze) in open containers or allow it to
remain in puddles on the ground. If ingested by a child,
contact a physician immediately. Clean up any ground
spills immediately.
TPIM Coolant Level
The TPIM coolant bottle provides a quick visual method
for determining that the coolant (antifreeze) level is
adequate. With the engine cold, the level of the coolant
(antifreeze) in the coolant recovery bottle should be
between the ranges indicated on the bottle.
When additional coolant (antifreeze) is needed to maintain the proper level, it should be added to the coolant
bottle. Do not overfill.
Points to Remember
If an examination of your engine compartment shows no
evidence of TPIM cooler or hose leaks, the vehicle may be
safely driven.
•
Do not overfill the coolant recovery bottle.
•
Check coolant (antifreeze) freeze point in the coolant
recovery bottle. If coolant (antifreeze) needs to be
added, contents of coolant recovery bottle must also be
protected against freezing.
•
If frequent coolant (antifreeze) additions are required,
or if the level in the coolant recovery bottle does not
drop when the engine cools, the cooling system should
be pressure tested for leaks.
Page 97

•
Maintain coolant (antifreeze) concentration at 50%
HOAT coolant (antifreeze) (minimum) and distilled/
deionized water for proper corrosion protection of
your engine which contains aluminum components.
•
Make sure that the TPIM cooler and coolant recovery
bottle overflow hoses are not kinked or obstructed.
•
Keep the front of the TPIM cooler clean. If your vehicle
is equipped with air conditioning, keep the front of the
condenser clean.
2-Mode Hybrid Transmission
MAINTAINING YOUR VEHICLE 95
Fluid And Filter Change
Refer to “Maintenance Schedules” in Section 7 of this
supplement for the proper maintenance intervals.
Selection of Lubricant
It is important that the proper lubricant is used in the
transmission to assure optimum transmission performance. Use only the manufacturer’s recommended transmission fluid. Refer to “Fluids, Lubricants and Genuine
Parts” in this section for the correct fluid type. It is
important that the transmission fluid be maintained at
the prescribed level using the recommended fluid.
Fluid Level Check
NOTE: Your vehicle has a capped transmission fill tube.
It is sealed and should not be tampered with. Your
authorized dealer has the proper tools to ensure that the
fluid level is set properly.
Special Additives
Automatic transmission fluid is an engineered product
and its performance may be impaired by supplemental
additives. Therefore, do not add any fluid additives to
the transmission. The only exception to this policy is the
7
Page 98

96 MAINTAINING YOUR VEHICLE
use of special dyes to aid in detecting fluid leaks. In
addition, avoid using transmission sealers as they may
adversely affect seals.
Transfer Case (All Wheel Drive)
Inspect the transfer case for fluid leaks. If a fluid leak is
evident the transfer case fluid level may be low. Have the
transfer case serviced immediately.
CAUTION!
Damage may result from operation of the vehicle
with low transfer case fluid.
Drain And Refill
Refer to “Maintenance Schedules” in Section 7 of this
supplement for the proper maintenance intervals.
Lubricant Selection
Refer to “Fluids, Lubricants and Genuine Parts” in this
section for the correct fluid type.
Axles
Drain And Refill
Refer to “Maintenance Schedules” in Section 7 of this
supplement for the proper maintenance intervals.
Lubricant Selection
Refer to “Fluids, Lubricants and Genuine Parts” in this
section for the correct fluid type.
NOTE: The presence of water in the gear lubricant will
result in corrosion and possible failure of differential
components. Operation of the vehicle in water, as may be
encountered in some off-highway types of service, will
require draining and refilling the axle to avoid damage.
Rear Axle
Rear Axle fluid level should be 1 1/8 in (28 mm) +/1/8 in (3 mm) below the fill hole. The total lubricant
volume is 64 oz (1.9 L).
Page 99

MAINTAINING YOUR VEHICLE 97
Front Axle
Front axle fluid level should be 3/4 in (20 mm) +/- 1/8 in
(3 mm) below the level of the fill hole. The total lubricant
volume is 55 oz (1.6 L).
Appearance Care and Protection From Corrosion
Washing
Wash your vehicle regularly. Always wash your ve-
•
hicle in the shade using a mild car wash soap, and
rinse the panels completely with clear water.
•
If insects, tar or other similar deposits have accumulated on your vehicle, wash it as soon as possible.
•
Use MOPAR威 Auto Polish to remove road film and
stains and to polish your vehicle. Take care never to
scratch the paint.
•
Avoid using abrasive compounds and power buffing
that may diminish the gloss or thin out the paint
finish.
CAUTION!
Do not use abrasive or strong cleaning materials such
as steel wool or scouring powder, which will scratch
metal and painted surfaces.
NOTE: Your Hybrid vehicle can be run through typical
commercial car wash facilities. There are some simple
precautions that you should keep in mind.
•
When entering an automatic/conveyor style car wash
facility, it is important that the driver follow the
attendant’s or posted instructions and that your shift
lever is shifted to NEUTRAL when instructed.
7
Page 100

98 MAINTAINING YOUR VEHICLE
•
A Hybrid vehicle that is in DRIVE with the “READY”
light illuminated and gas engine stopped, is NOT a
substitute for the NEUTRAL position. The vehicle can
creep in DRIVE or REVERSE when the “READY” light
is illuminated.
CAUTION!
Car wash equipment damage, vehicle damage or a
potential accident event could result if the car wash
facility instructions for PARK, NEUTRAL, DRIVE
and REVERSE are not followed.
FUSES
CAUTION!
When replacing a blown fuse, it is important to use
only a fuse having the correct amperage rating. The
use of a fuse with a rating other than indicated may
result in a dangerous electrical system overload. If a
properly rated fuse continues to blow, it suggests a
problem in the circuit that must be corrected.
NOTE: If you are leaving your vehicle dormant for
longer than 21 days you may want to take steps to protect
your battery. You may do this by disconnecting the
12-Volt battery or by disconnecting the two ignition-off
draw (I.O.D.) fuses located in the auxiliary Power Distribution Center (PDC) in the engine compartment. The
I.O.D. cavities include a snap-in retainer that allows the
 Loading...