

Page 1
USER MANUAL
MANUEL DE L’UTILISATEUR
Page 2

Copyright 2015 DOD Tech
All Rights Reserved
C
Customer Support
DOD Tech is dedicated to providing the best possible support. We
offer email, toll-free phone and live chat service 6 days a week.
Service à la clientèle
DOD Tech s'engage à offrir le meilleur à la clientèle possible. Nous
sommes disponibles via courriels, appels tèlèphoniques gratuits et
service de clavardage en ligne six jours sur sept.
Pour le service à la clientèle et les dernières informations à propos
de la DOD products.
Website: dod-tech.ca/support
Email: tech-support@dod-tech.ca
Toll-Free: 1-888-866-8993
Website: dod-tech.us/support
Email: tech-support@dod-tech.us
Toll-Free: 1-888-866-0859
Website: dod-tech.ca/support
Email: tech-support@dod-tech.ca
Toll-Free: 1-888-866-8993
Website: dod-tech.us/support
Email: tech-support@dod-tech.us
Toll-Free: 1-888-866-0859
Page 3

Table of Contents
Safety Precautions ................................................................................................. 3
Package Contents .................................................................................................. 4
Camera Controls .................................................................................................... 5
Getting Started ...................................................................................................... 8
Installing Your Camera ................................................................................... …… 10
Basic Operation ................................................................................................... 12
Camera Modes .................................................................................................... 13
Video Recording Mode ................................................................................... 13
Photo Mode................................................................................................... 14
Playback Mode .............................................................................................. 15
Camera Settings .................................................................................................. 16
Video Recording Settings ............................................................................... 16
System Settings.............................................................................................. 18
Photo Settings ............................................................................................... 19
Transferring Files ................................................................................................. 20
Video Output ...................................................................................................... 20
Firmware Update................................................................................................. 20
1
Page 4

Table des matières
Précautions de sécurité ....................................................................................... 21
Contenu de l’emballage ....................................................................................... 22
Commandes de la caméra .................................................................................... 23
Commençons ...................................................................................................... 26
Installer votre caméra .................................................................................... …… 28
Installer votre caméra .......................................................................................... 29
Fonctionnement de base de la caméra ................................................................. 30
Modes de la caméra ............................................................................................ 31
Mode d’enregistrement vidéo ........................................................................ 31
Mode photo................................................................................................... 32
Mode lecture ................................................................................................. 33
Réglages de la caméra ......................................................................................... 34
Réglages de l’enregistrement vidéo ................................................................ 34
Paramètres du système .................................................................................. 38
Paramètres du système .................................................................................. 39
Transférer des fichiers.......................................................................................... 40
Sortie vidéo ......................................................................................................... 40
Mise à jour du micrologiciel ................................................................................. 40
2
Page 5

Safety Precautions
Product
Do not disassemble, repair, modify your camera or power related accessories. For warranty service,
please contact DOD Tech Support.
Do not adjust camera while driving.
Avoid exposing your camera to extended periods of humidity and/or heat.
Prolonged exposure may reduce the product’s lifespan.
Do not spray water or cleaning agents directly onto the camera.
Fluids may cause fire, electric shocks, or malfunctions.
Avoid installing camera where it may obstruct the driver’s view or airbag deployment.
Car Charger
Use only the power adapter supplied with your unit.
Other power adapters may create a safety hazard or damage the unit.
Do not use damaged power adapters or cords. If damaged, please disconnect the power adapter
and contact DOD Tech Support for assistance.
Do not pull, insert, or bend the power cable using excessive force.
Do not operate or handle power cable with wet hands.
Battery
Keep the device away from heaters or other hot objects.
Store the camera at lower temperatures to reduce the rate of self-discharge and preserves the initial
energy stored in the battery. The battery in the device self discharges over a period of time naturally
whether the battery is used or not.
Charge the dash camera for 5 minutes if you are unable to turn on the camera.
3
Page 6
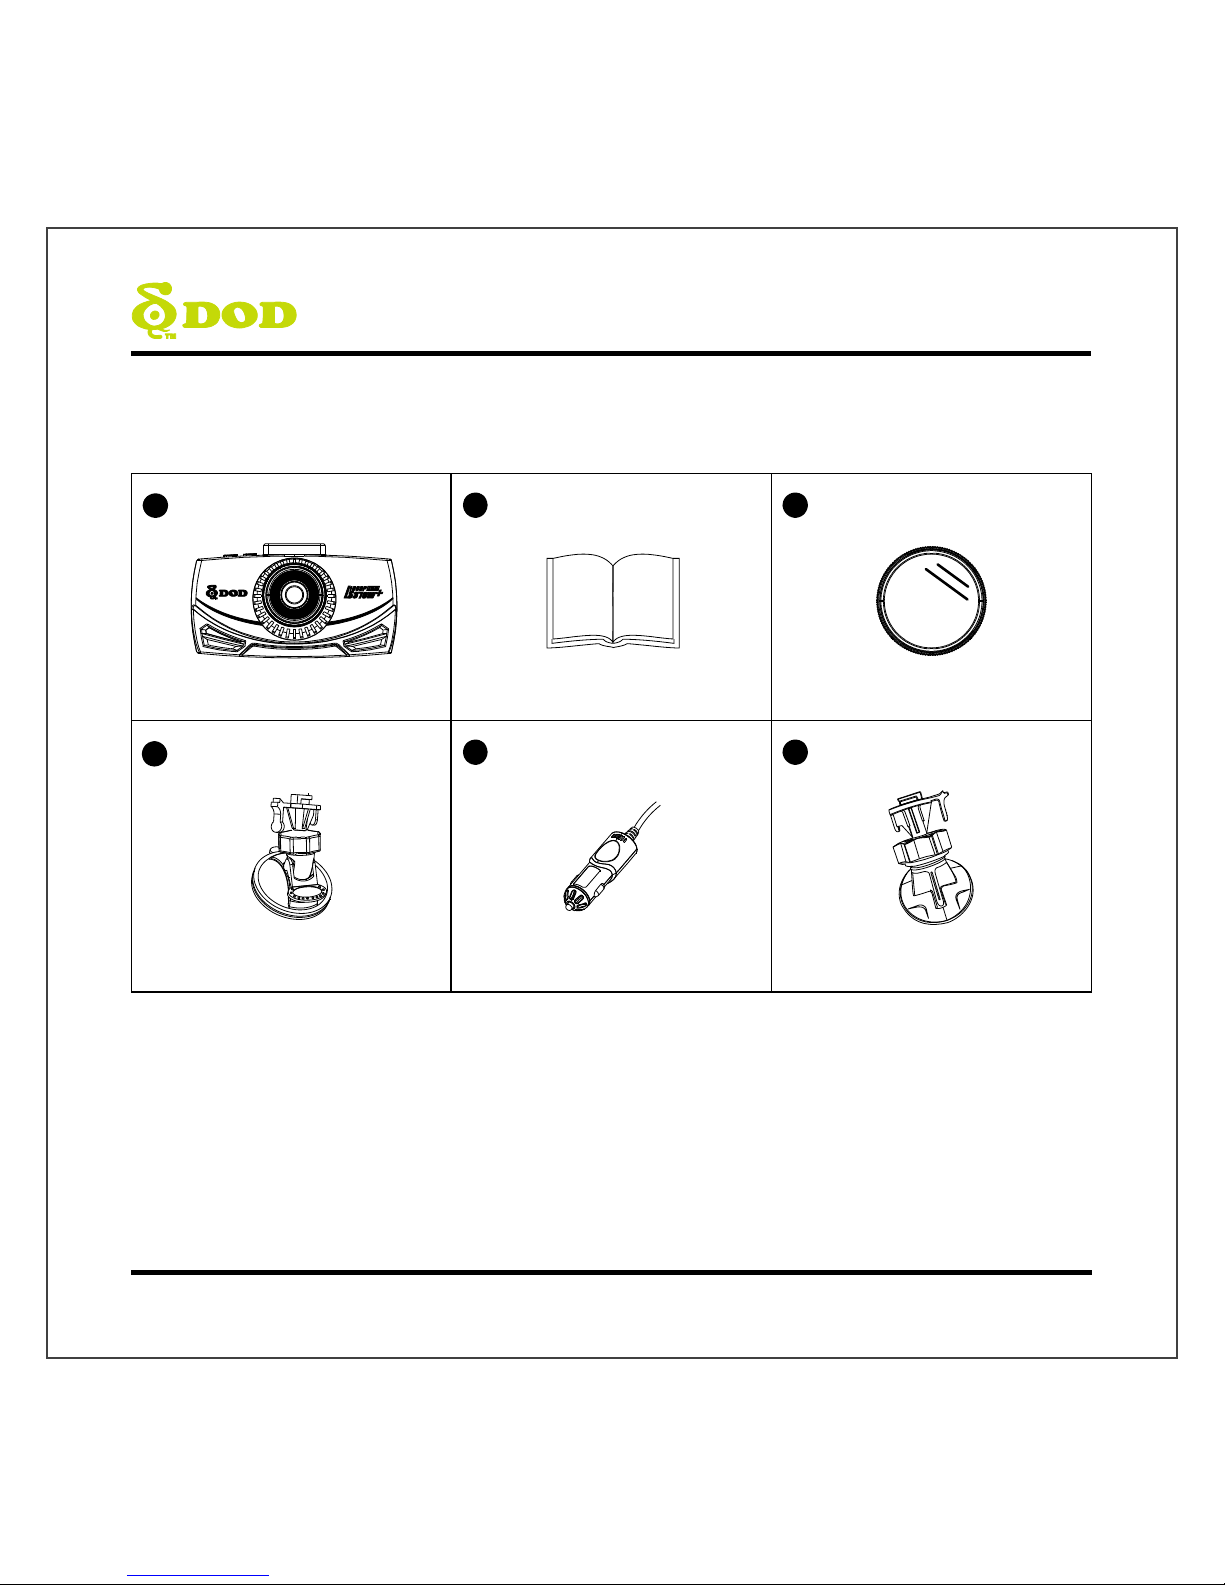
Package Contents
1
2
3
DOD LS370W+ Dash Camera User Manual CPL Filter*
4 5 6
Suction Mount Car Charger Adhesive Tape Mount
*CPL filter will reduce reflections from windshield.
Note: Supplied accessories may vary by region.
4
Page 7
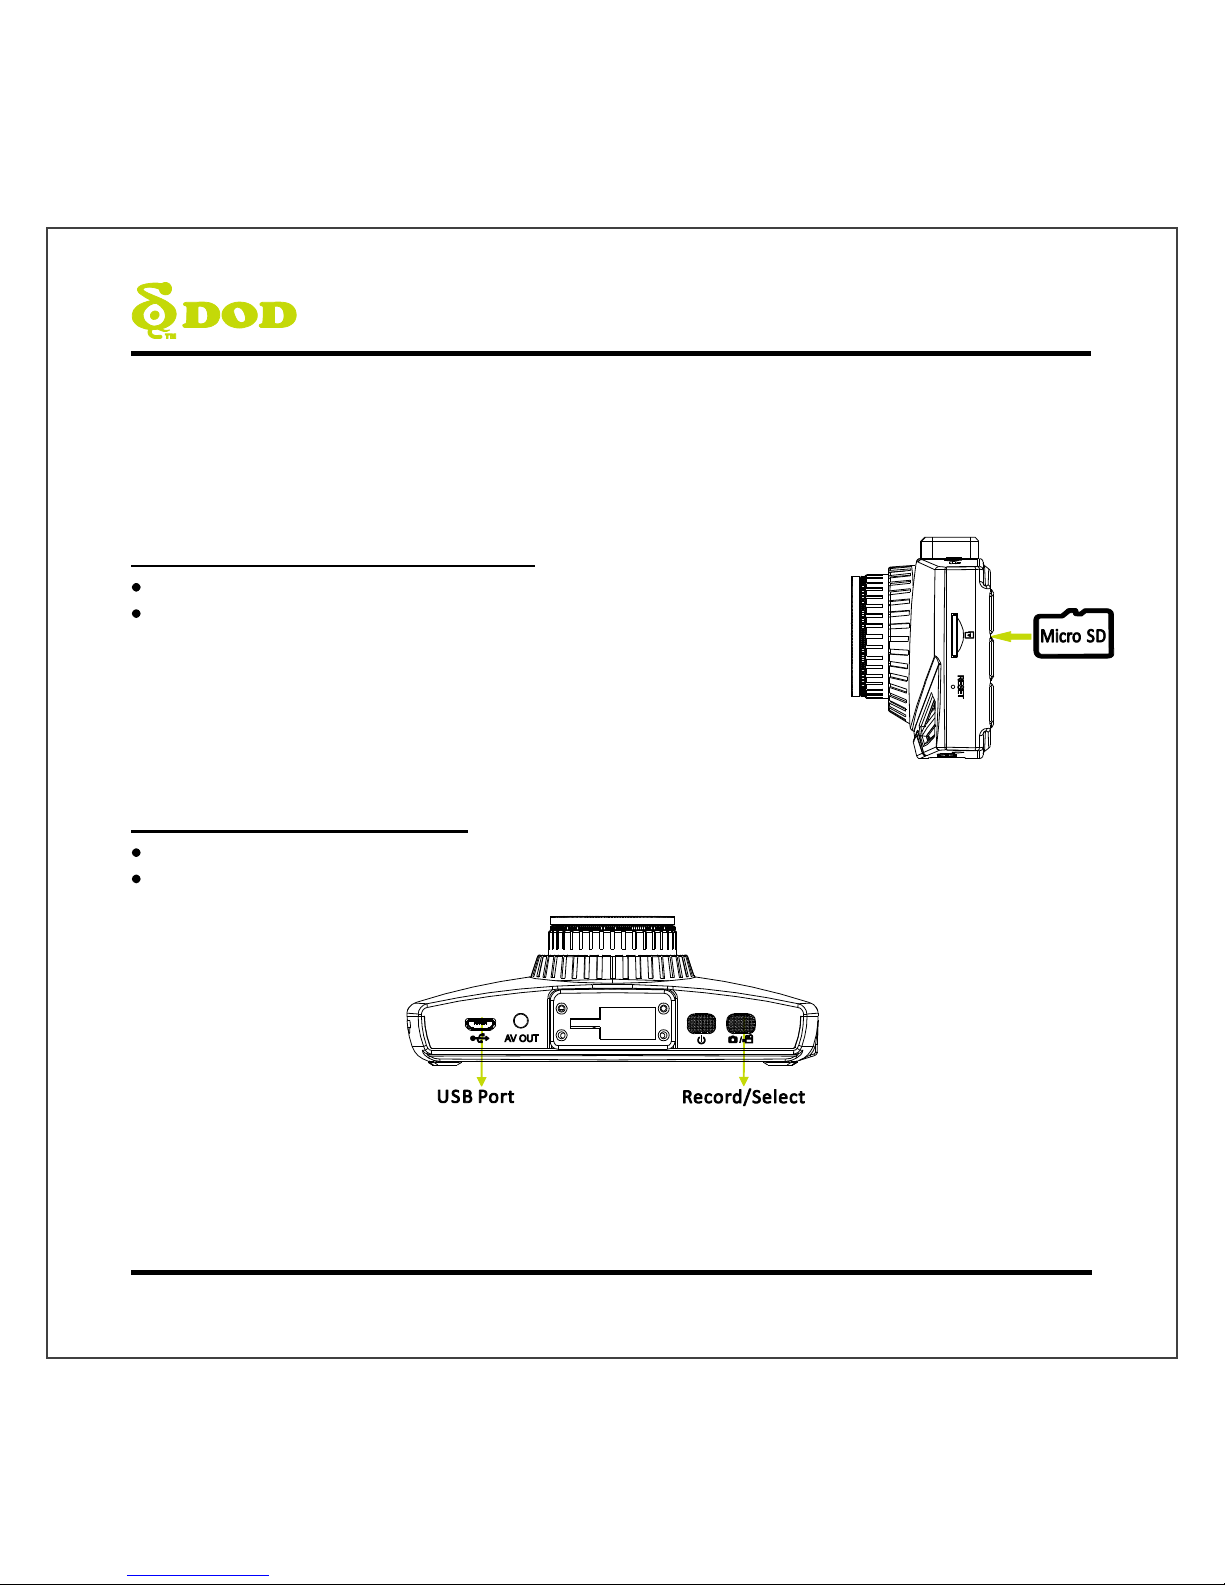
Camera Controls
5
Page 8
Camera Controls
●
1
Record/Shutter/Confirm [ ]
Video Recording- Starts/Stops recording.
Photo- Takes a photo.
Video Playback-Plays/Pauses video.
Settings- Selects highlighted item.
●
2
Power [ ]
Turn on/off the unit.
●
3
A/V Video Out Port
●
4
USB Port
●
5
Speaker
●
6
Operation Status LED:
Indicates the device operating status.
Steady Blue-Powered off and charging.
Steady Pink-Powering up while charging or is in
Playback Mode.
Steady Red-In Standby Mode but not charging.
Flashing Red-Recording video, not charging.
Flashing Blue & Pink-Recording video and
Charging.
●
7
Arrow Key[]/[]
Used to navigate through menus.
Select videos for playback.
●
8
Menu [ ]
Access the setting menu
While recording the video
Press [ ] to stop recording.
Enter the Standby Mode, and
Press [ ] once to access the Camera Menu.
Press [ ]twice to access the System Menu.
Note: Cannot access menu while recording
In the Photo Mode
Switch between the two menu settings by
pressing [ ]:
Camera Menus Settings
System Menu Settings
In the Video Playback Mode
Press [ ] to enter the menu settings.
Delete file /protect file/create a slideshow.
●
9
Mutes Microphone[ ]
To turn off the audio recording, press [ ] and hold
it until the icon appears.
6
Page 9

Camera Controls
●
10
Mode[ ]
Press [ ] to stop recording.
Enter the Standby Mode.
Switch between 3 Modes by pressing [ ]:
Video Recording-Starts/Stops recording.
Photo-Takes a photo.
Video Playback-Plays/Pauses video.
●
11
3”LCD Screen
●
12
SOS Emergency File Lock [ ]
Press[ ] while recording videos to lock the
current file from being overwritten.
●
13
Micro SD Slot
A Micro SDHC card rated at class 10 or above is
required.
Supports up to 32GB.
●
14
HDMI Out Port
Outputs either live or previously recorded video
over the HDMI connection.
The camera is unable to record while HDMI
output is enabled.
●
15
Reset Button / Microphone
Press to force the device to reboot.
If camera freezes, use a small pin to press button.
7
Page 10
Getting Started
Setting Up Your Camera
Set up your camera inside your vehicle to ensure easy access to power.
1. Insert the Micro SD Memory Card.
Format the Micro SD card when using the unit for the first time.
To save recorded videos stably, DOD Tech recommends
formatting your SD card every two weeks.
Note:
Please purchase a micro SD card for use with this unit.
After formatting the SD card, all of your data will be lost. Be sure that you have
backed up the important files.
2. Connect the Power Adapter.
Plug the DOD power adapter into your vehicle’s power outlet.
Insert the USB plug into the USB port.
8
Page 11
Getti ng Sta rted
3. Turn on Your Vehicle.
Power from your vehicle through the outlet will automatically turn on your camera and when power
is turned off your camera will shut off automatically. The camera automatically begins recording
every time it is turned on and stops recording when it is turned off.
Note: In some vehicles, the power outlet is continuously providing power, even when the vehicle is turned off.
4. Turn on/off Your Camera.
Press[ ]to turn on or turn off the unit.
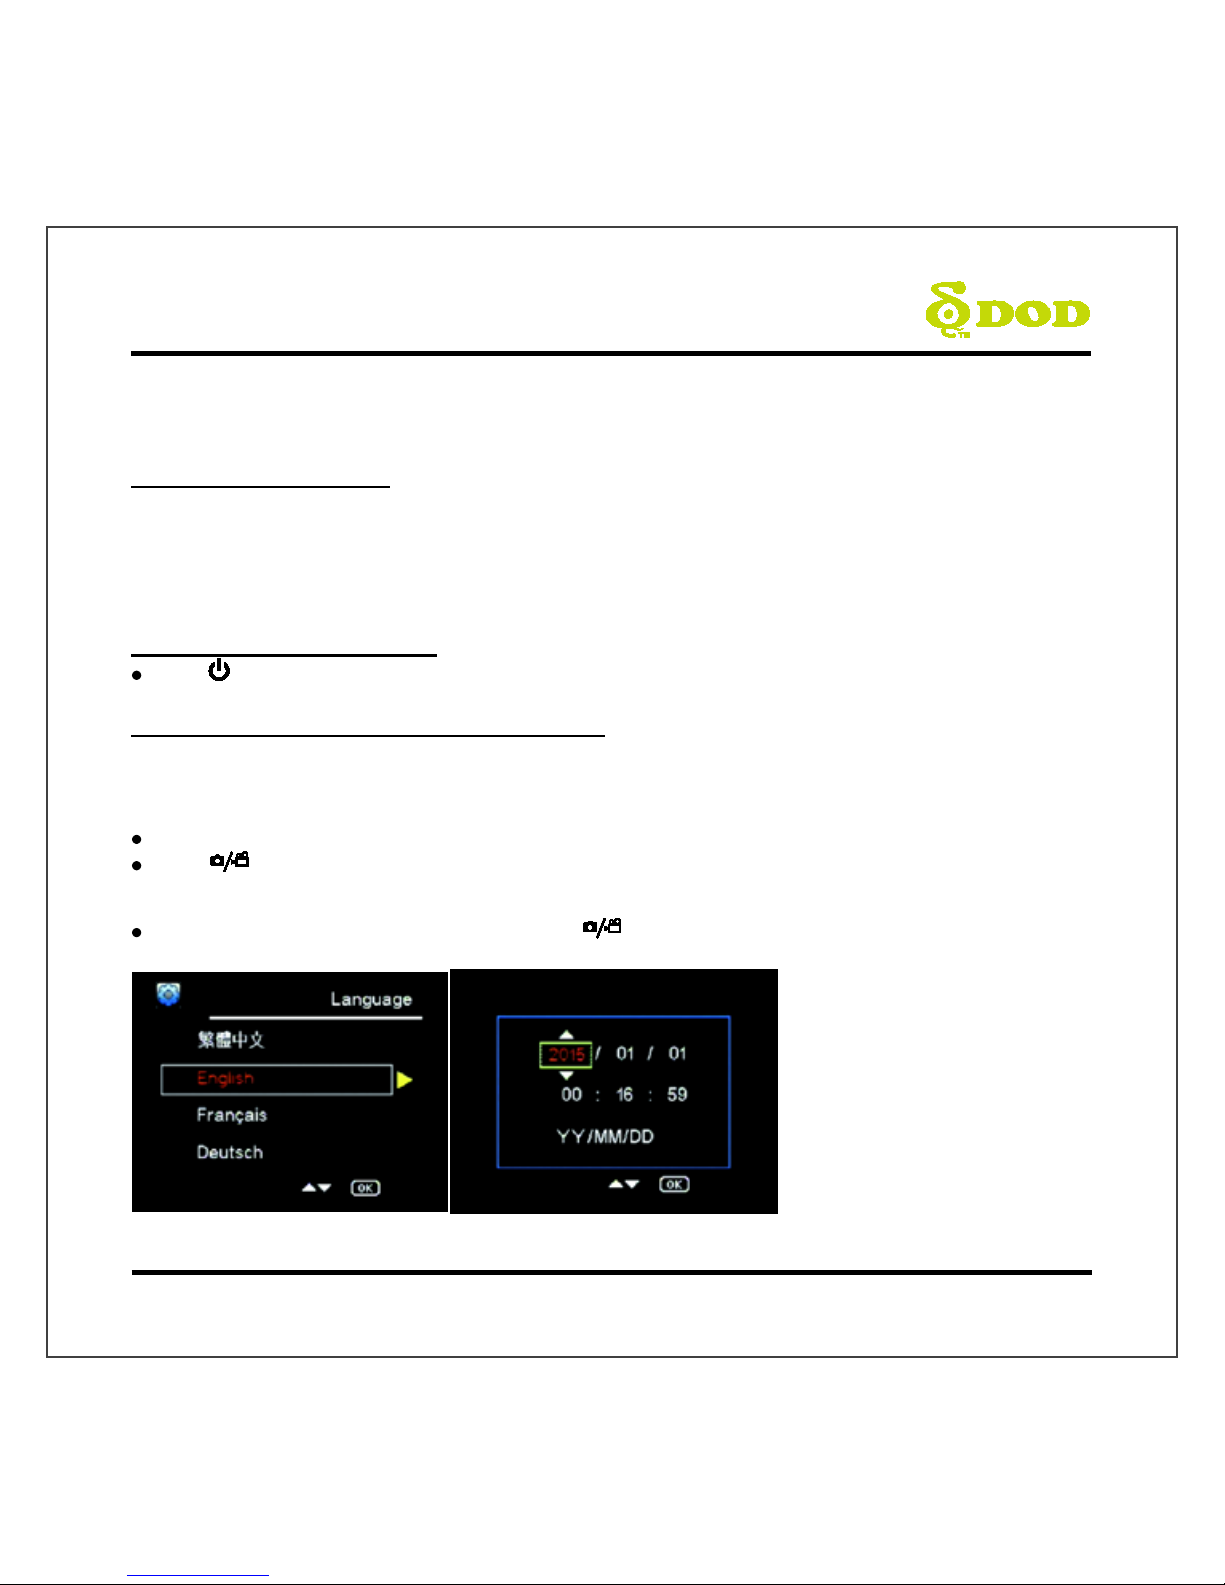
5. Select Language→Set the Date and Time
Upon powering up the camera for the first time or after upgrading the firmware on the device, you
will need to go through the Settings below.
Select Language
Select the language of your choice by pressing[] / [].
Press [ ] found on the top of your unit to confirm your selection.
Set the Date and Time Format
Select your Year, Month, Day, Time and press [ ] to confirm.
9
Page 12

Installing Your Camera
1. Clean Windshield
Wipe down both the interior and exterior glass for the best image quality.
Keep the mount secured to the windshield.
Please insert Micro SD card to the unit.
2. Attach the Mount to Your Camera
3. Prepare the Camera for Installation
Peel off the protective mount cover.
Find a location which does not obstruct your view when driving.
DOD Tech recommends placing the camera behind the rear view mirror without obstructing either
lenses or camera functions.
10
Page 13
Installing Your Camera
4. Adjust the Angle
Set your camera to the best angle, which do not be blocked by the rearview mirror. The mount has an
adjustable ball joint, which can be loosened using the plastic locking nut. Angle your camera slightly
below the horizon line to minimize glare.
5. Connect the Cigarette Lighter Adapter
If you have not done so previously plug the cigarette adapter into your vehicle’s power port. Insert
the USB plug (opposite end of the power adapter) into the USB port on the camera. The wiring can be
hidden in the headliner and the various seams and rubber strips around the perimeter of the
windshield.
6. Remove the Protective Lens Cover
Congratulations! Your camera is now installed and ready for daily use.
Tips:
Remove any grease, fingerprints, or dirt and dust from the external or internal side of your
windshield to ensure the best recording.
Do not turn on Motion Detection unless your vehicle is parked. If Motion Detection is enabled while
driving, the camera may not continuously record.
DOD Tech recommends setting the G-Sensor to low.
11
Page 14

Basic Camera Operation
Everyday Operation
Your dash camera will automatically turn on and start recording when it starts receiving power. By
default, the camera will record over the oldest videos when the memory card is full (loop recording).
Continuously Powered Electrical Outlet
If your camera is continuously powered, the camera will not automatically shut down when your
vehicle is turned off. To turn off your camera, the USB cable can be pulled out or the power button
can be pressed (see the below section).
The camera may be left on while parked to capture video while you are away.
“Continuously-Powered-Electrical-Outlet” operation will slowly drain your vehicle’s
battery and may eventually prevent your car from starting.
Manually Turning On / Off Your Camera
Press [ ]to turn on /off your camera.
Press [ ]to begin recording.
12
Page 15

Camera Modes
When the camera is not recording video, you can switch between three modes by pressing the [ ]:
1. Video Recording
2. Photo
3. Video Playback
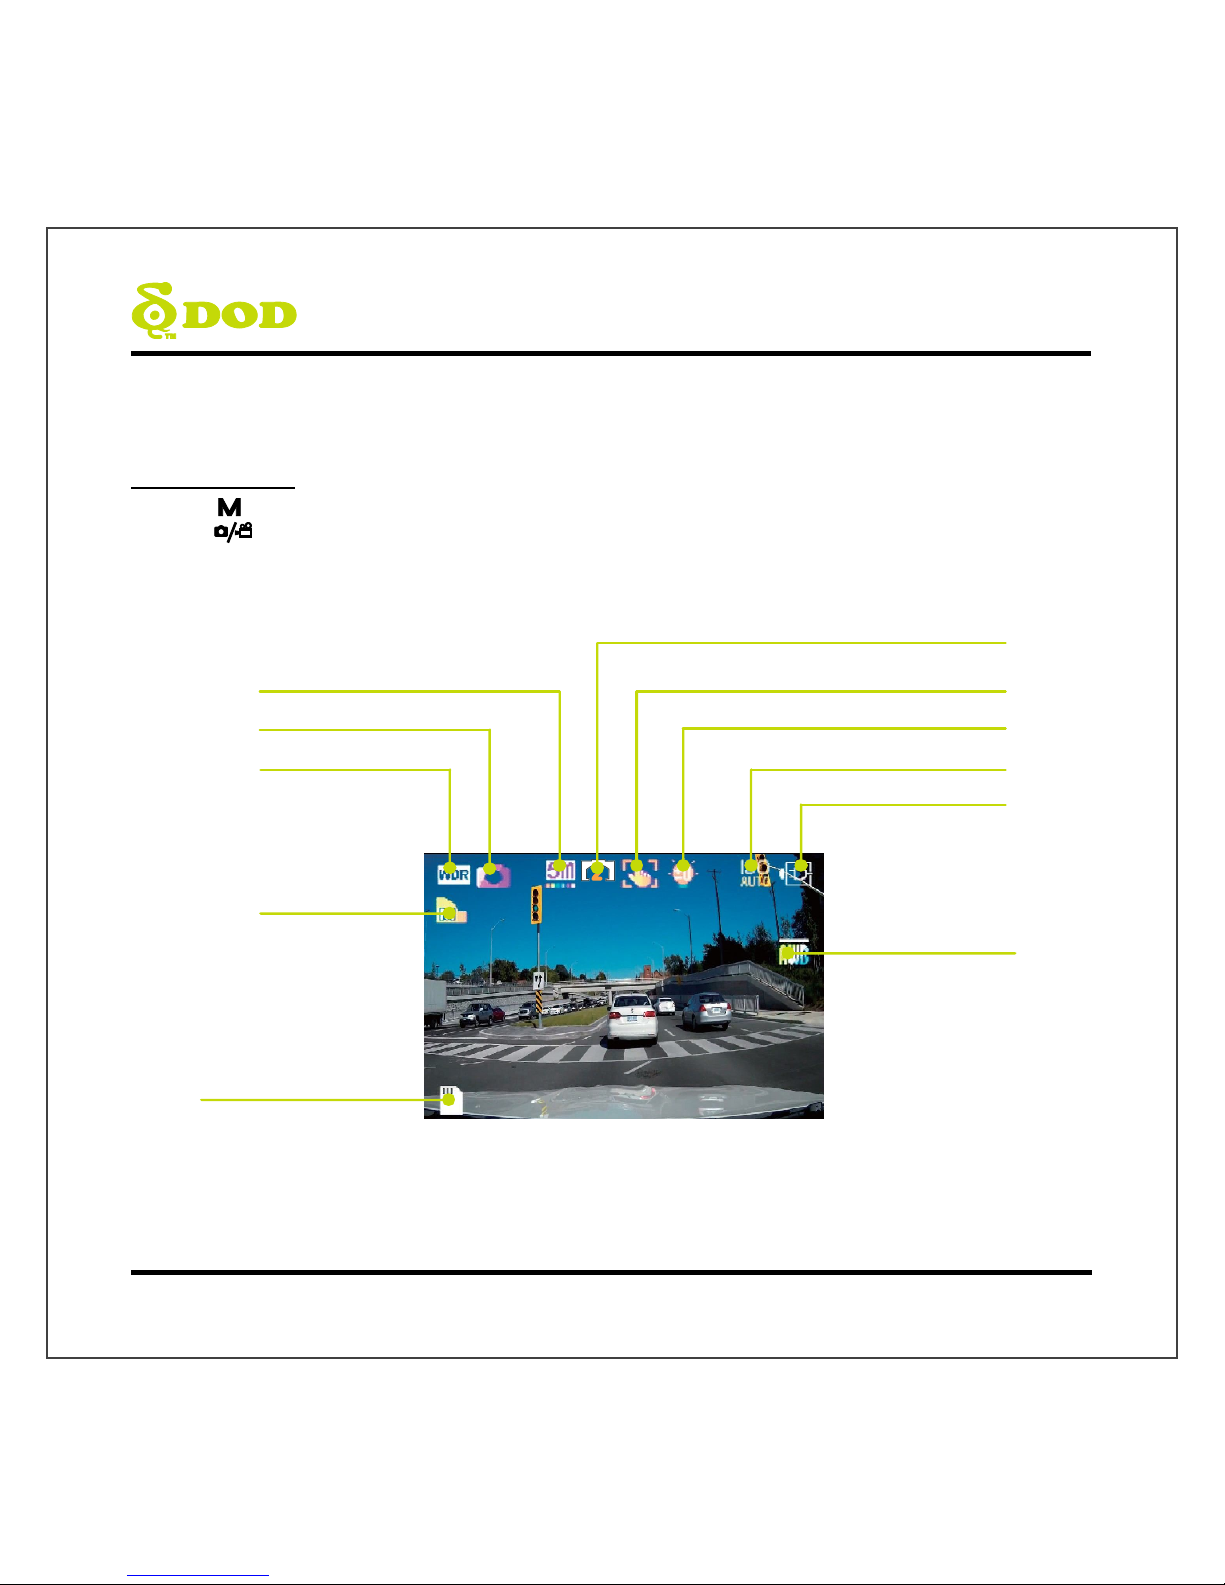
1. Video Recording Mode
The camera defaults to video recording when the camera is first turned on.
Recording Mode: Press[ ]to stop recording.
Standby Mode: Press[ ] to access two Modes: Photo Mode and Playback Mode.
Microphone (
on) White Balance (Auto)
Date/Time
Exposure Value(Auto)
Loop Recording (3 Minutes)
WDR Enabled
Recording
Status
Video Recording Mode
Video Resolution
Motion Detection
(Enable in parking mode)
Memory Card Inserted
Power Status
Time Elapsed
SOS Emergency File Lock
ISO sensitivity
Parking mode
13
Page 16
Camera Modes
2. Photo Mode
Press [ ] once to enter the Photo Mode during the Standby Mode.
Press [ ] to take a photo.
Note: Photo Mode is only accessible during the Standby Mode.
Memory Card Inserted
Image Quality
White Balance
(Auto)
Power Connected
ISO Sensitivity
(A
uto)
Exposure Value
(Auto)
Shake Reduction
(on)
WDR Enabled
Camera Mode
Image Resolution
Self-Timer
(2s)
14
Page 17

Camera Modes
3. Playback Mode
You can watch previously recorded videos in Playback Mode.
Press [ ] twice to enter the Playback Mode during the Standby Mode.
Play the Video
Press [ ] to play and pause.
Press [] / []to move or back forwards and press [ ] to enter the Playback Mode.
Delete Files from the card(This cannot be undone).
Press [ ] to enter Playback Menu during Playback Mode.
Press [] / []to delete the file and press [ ] to confirm.
Protect the current file from being overwritten or erased
Press [ ] to enter Playback Menu during Playback Mode.
Press [] / []to lock the file.
Press [ ] to confirm. If protected, a blue padlock icon will appear at the top of the screen.
Press [ ] to exit.
Note: The “Format” setting will erase all files including locked files.
Slideshow
Press the menu button and navigate to slideshow.
Photos and the first frame of each video will be shown in order.
Video File Name
Video Resolution
Power Connected
Play/Pause Indicator
Playback Mode
15
Page 18

Camera Settings
Each mode has a unique set of settings. See the description below.
Video Recording: First Settings Page
Accessed by pressing[ ] once.
WDR (Wide Dynamic Range)
Cannot be changed.
Shows WDR processing is enabled.
Resolution
Changes the video resolution. Lower the resolution for
smaller file sizes but this reduces video quality.
Recommended
s
etting: 1080P FHD.
Exposure
Value
Sets the brightness /darkness of the video.
Video too bright? Set between -1 to -3.
Video too dark? +1 to +3.
Recommended
s
etting: 0.
White Balance
Sets the white balance.
Recommended setting: Auto.
Record Audio
Switches the microphone on/off.
Can be used during recording by pressing button [
].
Date Stamp
Imprints the time and date on the recorded video.
Loop Recording
Can be set to 2, 3 or 5 minutes. Video recordings of
the selected length will be recorded onto the memory
card. When the memory card is full, the oldest files
will be overwritten, excluding locked clips. Turing off
loop recording will prevent the camera from writing
new files when the memory card is filled.
G –Sensor
Measures shock forces. The settings from “low to
high” determine the amount of force needed to lock
the file from being overwritten.
Recommended setting: Low.
Two Camera
Settings pages are accessible:
Video Recording Settings
System Settings
The menu settings can be switched by pressing [ ].
If you move the cursor before pressing [ ], you must exit and try again.
Note: Press [ ]to enter the camera settings when recording.
16
Page 19

Camera Settings
Video Recording: First Settings Page
Accessed by pressing [ ] once.
Parking mode (Default: off)
When function is enabled, dashboard camera will automatically switch to parking mode if vehicle is stationary for
over 10 minutes.
1. Automatically records a 15-second video when motion detected within view range of camera.
2. Automatically records and locks a 1-minute video when excessive force of impact is detected by G-sensor.
3. Unit will return to normal recording mode if vehicle moves continuously for 3 seconds or longer.
Note:
Parking Mode requires consistent power supply via vehicle battery. (Power cord with low-voltage protection is
recommended to prevent battery drainage.)
Please ensure to enable G-sensor function in setting menu before switch to Parking Mode. (G-sensor
sensitivity Default: Medium)
Plate Stamp
Imprints a customized set of 8 digits to the recorded
video. Add license plates or other identifying features
to watermark your video.
Password Settings
Set a password lock which will prevent files from being
deleted or the settings changed on the device.
Note: This does not prevent other users from
extracting the memory card or changing the files. This
feature should be turned off during regular driving.
Speed Units
Select Metric or Imperial units.
Image Rotation
Rotates the recorded image 180o. Used if the camera is
mounted o
n the dashboard.
Time-Lapse
The time-lapse function is used to create a sped-up
video. When set, the camera will record one frame
every 200ms (milliseconds)/500 ms/1 second/5
seconds.
ISO Stamp
On/ Off
Default: On.
17
Page 20

Camera Settings
System Settings: Second Setting Page
Accessed by pressing [ ] twice.
Format
Completely deletes all files including locked footage on
the Memory Card and optimizes the card for
recording. 64GB cards should use DOD's formatting
program for proper functionality. See the support
section online.
Language
Sets the language.
Date/Time
Sets Year/Date/Time format.
Frequency
Adjusts the camera's frequency setting to minimize
flickering and banding in the recorded video.
Beep Sound
Turns
on/off notification sounds.
Screen Saver
Turns
off the screen after the set time.
TV Mode
Switches between the NTSC and PAL video output
standard.
Version
Shows the model name and current firmware version.
Default Settings
Sets all settings back to the original settings.
18
Page 21

Camera Settings
Photo Settings
Accessed in “Photo Mode”.
WDR (Wide Dynamic Range)
Cannot be changed. Shows WDR processing is
enabled.
Image Size
Adjusts the size of the image. Higher megapixels
increases file size and details.
Color
Apply a color filter to the photo.
Anti-Shaking
Helps reduce the effects of shaking when taking a
p
hoto.
Capture Mode
Sets a timed delay before taking a photo.
White Balance
Set the White Balance.
Recommended
s
etting: Auto
ISO
Change the ISO settings. Higher ISO reduces motion
blur at night but lowers video quality.
Exposure
Sets the brightness /darkness of the video.
Photo too bright?
Set between -1 to -3.
Photo too dark? +1 to +3.
Recommended
s
etting: 0.
Date Stamp
Imprints the date at the captured photo.
19
Page 22

Transferring Files
Video files can be transferred to your electronic device for viewing and storage.
USB Cable
1. Connect a USB cable from the camera’s USB port to computer.
2. Turn on your camera. A black screen should appear showing “Mass Storage”.
3. Press the “Record/Select” button. A blue screen should appear labeled “Mass Storage”.
4. Your computer should now detect a new device. The memory card and videos can be accessed
similar to a USB flash drive.
Card Reader/Micro SD Slot
Use a memory card reader (separately purchased) or a compatible electronic device with a MicroSD
slot (ex: tablet). Follow the manufacturer’s instructions.
Video Output
HDMI (TV)
Connecting a mini-HDMI to HDMI from your camera to a compatible television/monitor will
automatically output the camera’s screen. Recording functions are disabled while streaming video.
AV Port
Using a 3.5mm AV cable, plug the 3.5mm connector into the camera’s AV port. Plug the RCA end into
a compatible port on your television or monitor.
Firmware Update
See the support section on DOD-Tech’s website for any available firmware updates and instructions.
20
Page 23

Précautions de sécurité
Produit
Ne pas démonter, réparer , modifier votre appareil photo ou des accessoires liés à l’alimentation.
Pour le service de garantie, veuillez communiquer avec contact le service de soutien de DOD Tech.
Ne réglez pas la caméra pendant que vous conduisez.
Évitez d'exposer votre caméra à l’humidité ou à la chaleur pendant des périodes prolongées.
Une exposition prolongée peut réduire la durée de vie du produit.
Ne pulvérisez pas de l’eau ou des agents de nettoyage directement sur la caméra.
Les liquides peuvent provoquer un incendie, des décharges électriques ou des dysfonctionnements.
Évitez d'installer la caméra là où elle peut obstruer le champ de vision du conducteur ou entraver le
déploiement du coussin de sécurité gonflable.
Chargeur de voiture
Utilisez uniquement le bloc d’alimentation externe fourni avec votre appareil.
L’utilisation d’autres blocs d’alimentation externe peut créer un danger pour la sécurité ou
endommager l'appareil.
N’utilisez pas des blocs ou des cordons d'alimentation endommagés. S’ils sont endommagés,
débranchez le bloc d'alimentation et communiquez avec le service de soutien de DOD Tech pour
obtenir de l'aide.
Ne tirez pas, n’insérez pas et ne pliez pas le cordon d’alimentation en employant une force
excessive.
N’utilisez pas et ne manipulez pas le cordon d’alimentation avec des mains mouillées.
Batterie
Tenez l'appareil à l’écart des radiateurs ou d'autres objets chauds.
Entreposez la caméra à des températures inférieures pour réduire le taux d'autodécharge et
préserver la charge initiale de la batterie. La batterie de l'appareil se décharge au fil du temps de
façon naturelle, que la batterie soit utilisée ou non.
Chargez la caméra pour tableau de bord pendant cinq minutes si vous ne parvenez pas à l’allumer.
21
Page 24

Contenu de l’emballage
1
2
3
Caméra pour tableau de bord
DOD LS370W+
Manuel de l’utilisateur CPL filtre *
4 5 6
Support à ventouse Chargeur de voiture Support à ruban adhésif
*CPL filtre permettra de réduire les reflets du pare-brise.
Remarque: Les accessoires fournis peuvent varier selon la région .
22
Page 25

Commandes de la caméra
23
Page 26
Commandes de la caméra
1 Enregistrer/obturateur/confirmer [ ]
L’enregistrement vidéo commence/s’arrête.
Photo – Prend une photo.
Lecteur vidéo – Lit/interrompt la vidéo.
Mode paramètres – Sélectionne l’élément surligné.
2 Alimentation [ ] Met en marche/éteint l’appareil.
3 Sortie AV vidéo
4 Port USB
5 Enceinte
6 Indicateur de fonctionnement DEL
Indique l’état de fonctionnement de l’appareil.
Lumière bleue constante – la caméra est éteinte et
en charge.
Lumière rose constante – la caméra démarre
pendant la charge ou est en mode lecture.
Lumière rouge constante – la caméra est en mode
veille, mais pas en charge.
Lumière rouge clignotante – la caméra enregistre
une vidéo, mais elle n'est pas en charge.
Lumière bleue et rose clignotante – la caméra
enregistre une vidéo et est en charge.
7 Touche de direction [] / []
Elle sert à naviguer dans les menus et à
sélectionner les vidéos pour les lire.
8 Menu [
]
Pendant l’enregistrement de la vidéo
Appuyez sur [ ] pour arrêter l’enregistrement.
Entrez dans le mode veille, puis
Appuyez sur [
] une fois pour accéder au menu
de la caméra.
Appuyez sur [ ] deux fois pour accéder au
menu du système.
Remarque : Il n’est pas possible d’accéder aux menus
pendant l’enregistrement.
Dans le mode photo
Passez d’un menu à l’autre en appuyant sur [ ].
Réglages du menu de la caméra.
Réglage du menu du système.
Dans le mode de lecture vidéo
Appuyez sur [ ] pour accéder aux réglages du
menu.
Supprimer le fichier/protéger le fichier/créer un
diaporama.
9 Mise en sourdine du microphone[ ]
Pour éteindre l’enregistrement audio, appuyez sur
[ ] et maintenez jusqu’à ce que l’icône s'affiche.
10 Mode[ ]
Appuyez sur [ ] pour arrêter l’enregistrement.
Accéder au mode veille.
Passez à l’un des trois modes en appuyant sur
[ ] :
L’enregistrement vidéo commence/s’arrête.
Photo – Prend une photo.
Lecteur vidéo – Lit/interrompt la vidéo.
24
Page 27

Commandes de la caméra
11 Écran ACL de
3 po
12 Verrouillage d’urgence du fichier[ ]
Appuyez sur [ ] pendant que vous enregistrez des
vidéos pour verrouiller le fichier actuel et
empêcher sa suppression.
13 Fente pour carte microSD
Un carte micro SDHC de classe 10 ou supérieure
est requise.
Capacité maximale de 32 GB.
14 Sortie HDMI
Diffuse une vidéo en direct ou précédemment
enregistrée au moyen de la connexion HDMI.
La caméra ne peut pas enregistrer pendant que la
sortie HDMI est activée.
15 Bouton de réinitialisation / Microphone
Appuyez pour forcer le redémarrage de l’appareil.
Si la caméra se bloque, utiliser une petite épingle
pour appuyer sur le bouton.
25
Page 28

Commençons
Configurer votre caméra
Installez votre caméra à l’intérieur de votre véhicule en vous assurant de pouvoir accéder facilement à
la source d'alimentation.
1. Insérez la carte mémoire Micro SD.
Formattez la carte Micro SD lorsque vous utilisez l'appareil pour la
première fois.
Pour enregistrer des vidéos de manière stable, DOD Tech vous
recommande de formater votre carte SD toutes les deux semaines.
Remarque : Veuillez acheter une carte micro SD pour l’utiliser avec cet appareil.
Remarque : Une fois que vous aurez formaté la carte SD, toutes vos données seront perdues.
Assurez-vous de sauvegarder vos fichiers importants au préalable.
2. Branchez le bloc d’alimentation externe.
Branchez le bloc d’alimentation externe DOD dans la prise d’alimentation de votre véhicule.
Insérez la prise USB dans le port USB.
3. Mettez votre véhicule en marche
L’alimentation générée par votre véhicule à travers la prise mettra automatiquement votre caméra
sous tension et celle-ci s’éteindra automatiquement lorsque l’alimentation sera coupée. La caméra
commencera automatiquement l’enregistrement chaque fois qu’elle est allumée et s’arrêtera
d’enregistrer lorsque vous l’éteindrez.
Remarque : Dans certains véhicules, la prise est alimentée en permanence, même lorsque le véhicule est éteint.
Port USB
Enregistrer/sélecti
26
Page 29
Commençons
4. Allumez/éteignez votre caméra.
Appuyez sur [ ]pour allumer ou étendre l’unité.
5. Sélectionner la langue→ Régler la date et l’heure
Lorsque vous mettez la caméra sous tension pour la première fois ou après la mise à niveau du
micrologiciel sur l’appareil, vous devrez parcourir les paramètres ci-dessous.
Choisissez la langue.
Sélectionnez la langue de votre choix en appuyant sur [] / [].
Appuyez [ ] sur la touche qui se trouve sur le dessus de votre appareil pour confirmer votre
sélection.
Régler le format de la date et de l’heure
Sélectionner l’année, le mois, le jour, l’heure et appuyer sur [ ] pour confirmer la sélection.
27
Page 30
Installer votre caméra
1. Nettoyez votre pare-brise
Nettoyez le côté intérieur et extérieur du pare-brise pour obtenir la meilleure qualité d’image.
Gardez le support bien fixé au pare-brise.
Veuillez insérer la carte Micro SD dans l’appareil.
2. Attachez le support à votre caméra
3. Préparez la caméra pour l’installation
Retirez la pellicule de protection du support.
Trouvez un emplacement qui n’obstrue pas votre champ de vision lorsque vous conduisez.
DOD Tech recommande de placer la caméra derrière le rétroviseur sans obstruer la lentille ou les
fonctions de la caméra.
28
Page 31

Installer votre caméra
4. Réglez l’angle
Le support est doté d’une joint à rotule réglable qui peut être desserré en utilisant l'écrou de
blocage en plastique.
Réglez l’angle de votre caméra légèrement sous la ligne d’horizon pour réduire l’éblouissement le
plus possible.
Appuyez sur le support fermement contre la vitre et tournez le bras du support pour fixer le
support.
5. Installez l’adaptateur d’allume-cigarette
Si vous ne l'avez pas déjà fait, branchez l'adaptateur d’allume-cigarette dans le port d'alimentation
de votre véhicule.
Insérez la prise USB (l’extrémité opposée de l'alimentation) dans le port USB de la caméra.
Le câblage peut être caché dans la garniture du toit et les bandes de caoutchouc autour du
pare-brise.
6. Retirez le cache optique de protection
Votre caméra est maintenant installée est prête pour une utilisation quotidienne.
Conseils :
Si de la graisse, des empreintes digitales ou des taches se trouvent sur les côtés intérieur ou
extérieur du pare-brise de la voiture, veuillez le nettoyer ou installer l'appareil à un autre endroit.
Les tâches peuvent réduire la qualité de l’enregistrement ou rendre le support instable.
N'activez pas la fonction de détection de mouvement si votre véhicule n’est pas stationné. Si la
fonction de détection de mouvement est activée pendant que vous conduisez, il est possible que la
caméra n’enregistre pas en continu.
DOD Tech recommande de régler la sensibilité de l'accéléromètre à faible.
29
Page 32

Fonctionnement de base de la caméra
Fonctionnement quotidien
Votre caméra de tableau de bord se mettra automatiquement en marche et commencera
l'enregistrement lorsqu’elle commencera à recevoir de l’électricité. Par défaut, la caméra enregistre
en effaçant les vidéos les plus anciennes lorsque la carte mémoire est pleine (enregistrement en
boucle).
Prise électrique alimentée en continu
Si votre caméra est alimentée en permanence, elle ne s’arrêtera pas automatiquement lorsque votre
véhicule est éteint. Pour éteindre votre caméra, vous pouvez débrancher le câble USB ou appuyez sur
le bouton d’alimentation (voir la section ci-dessous).
V
ous pouvez laisser la caméra allumée pendant que vous êtes stationné pour enregistrer
une vidéo pendant que vous êtes parti. Le branchement de votre caméra dans une
prise électrique alimentée en continu videra lentement la batterie de votre véhicule et
pourrait éventuellement empêcher votre véhicule de démarrer.
Allumer/éteindre votre caméra manuellement
Appuyez sur [ ]pour allumer ou éteindre votre caméra.
Appuyez sur [ ] pour commencer l’enregistrement.
30
Page 33

Modes de la caméra
Lorsque la caméra n'enregistre pas de vidéo, vous pouvez passer à l’un des trois modes en
appuyant sur [ ] :
1.
Enregistrement vidéo
2. Photo
3.
Lecture vidéo
1.Mode d’enregistrement vidéo
La caméra passe au mode d’enregistrement vidéo par défaut lorsque la caméra s'allume.
Mode enregistrement : Appuyez sur [●]pour arrêter l’enregistrement.
Mode veille : Appuyez sur [ ] pour accéder aux deux modes : Mode photo et mode lecture.
Enregistrement audio
(actif)
Balance des blancs (automatique)
Date/heure
Exposition (automatique)
Enregistrement en boucle (3 minutes)
WDR activé
Mode d’enregistrement vidéo
Résolution vid
é
o
Détection de mouvement
(activée en mode stationnement)
Carte mémoire insérée
Temps écoulé
État de l’alimentation
Verrouillage d’urgence du
fichier
État de l’enregistrement
Mode stationnement
Sensibilité ISO
31
Page 34

Modes de la caméra
2. Mode photo
Appuyez sur [ ] une fois pour accéder au mode photo pendant le mode veille.
Appuyez sur [ ] pour prendre une photo.
Remarque : Le mode Photo est uniquement accessible pendant le mode veille.
Carte mémoire insérée
Qualité d’image
Balance des blancs
(automatique)
Alimentation connectée
Sensibilité
ISO (Auto)
Exposition (automatique)
Réduction des vibrations (activé)
Mode de la caméra
Résolution d’image
Retardateur (2
s)
WDR activé
32
Page 35

Modes de la caméra
3. Mode lecture
Vous pouvez regarder des vidéos précédemment enregistrées en mode lecture.
Appuyez sur [ ] deux fois pour accéder au mode lecture pendant le mode veille.
Lire la vidéo
Appuyez sur [ ] pour lire et interrompre momentanément la vidéo.
Appuyez sur [] / [] pour avancer ou reculer et appuyez sur [ ] pour accéder au mode lecture.
Supprimer des fichiers de la carte (cette action ne peut pas être annulée).
Appuyez sur [ ] pour accéder au menu de la fonction de lecture pendant le mode lecture.
Appuyez sur [] / [] pour supprimer le fichier, puis appuyez sur [ ] pour confirmer.
Empêcher l’écrasement ou l’effacement d’un fichier existant
Appuyez sur [ ] pour accéder au menu de la fonction de lecture pendant le mode lecture.
Appuyez sur [] / [] pour verrouiller le fichier.
Appuyez sur [ ] pour confirmer. Si le fichier est protégé, un cadenas bleu s'affichera dans la
partie supérieure de l’écran.
Appuyez sur [ ] pour sortir.
Remarque : Le paramètre « Format » effacera tous les fichiers, y compris les fichiers verrouillés.
Diaporama
Appuyez sur le bouton du menu et allez au diaporama.
Les photos et la première image de chaque vidéo seront affichées dans l’ordre.
Nom du fichier vid
é
o Résolution vid
é
o Alimentation
connectée
Mode lecture
Indicateur
de
lecture/pause
33
Page 36
Réglages de la camera
WDR (Wide Dynamic Range)
Il n’est pas possible de changer ce paramètre.
Indique que le traitement WDR est activé.
Résolution
Change la résolution vidéo. Diminuez la résolution
pour réduire la taille des fichiers, mais la qualité de la
vidéo sera plus basse.
Réglage recommandé : 1080p FHD.
Exposition
Règle la luminosité/l’obscurité de la vidéo.
Est-ce que la vidéo est trop lumineuse? Choisissez
un paramètre entre -1 et -3.
Est-ce que la vidéo est trop foncée? +1 à +3
Réglage recommandé : 0.
Balance des blancs
Règle l’équilibre des blancs.
Réglage recommandé : Automatique.
Enregistrement audio
Éteint/allume le microphone.
Vous pouvez l’utiliser pendant l’enregistrement en
appuyant sur le bouton [ ].
Horodatage
Ajoute l’heure et la date à vidéo enregistrée.
34
Page 37
Réglages de la caméra
Enregistrement en boucle
Vous pouvez choisir une boucle d’enregistrement de
2, 3 ou 5 minutes. Des enregistrements vidéo de la
longueur sélectionnée seront enregistrés dans la carte
mémoire. Lorsque la carte mémoire sera pleine, les
fichiers les plus anciens seront remplacés, à l’exception
des fichiers verrouillés. La désactivation de
l'enregistrement en boucle empêchera la caméra
d'enregistrer de nouveaux fichiers lorsque la carte
mémoire est pleine.
Accéléromètre
Mesure les forces de choc. Les réglages de« faible
à élevé » déterminent la force nécessaire pour
verrouiller le fichier et empêcher son écrasement.
Réglage recommandé : faible.
35
Page 38

Réglages de la caméra
Enregistrement vidéo : Première page de paramètres
Vous pouvez y accéder en appuyant sur [ ] une fois.
Mode stationnement (désactivé par défaut)
Lorsque la fonction est activée, la caméra du tableau de bord se mettra automatiquement en mode de stationnement si le
véhicule est à l'arrêt pendant plus de 10 minutes.
4. Enregistre automatiquement une vidéo de 15 secondes lorsqu’un mouvement est détecté dans le champ de vision de la
caméra.
5. Enregistre automatiquement et verrouille une vidéo d’une minute lorsqu’une force d’impact excessive est détectée par
l'accéléromètre.
6. L’appareil reviendra au mode d'enregistrement normal si le véhicule se déplace de façon continue pendant trois secondes
ou plus.
Remarque :
Le mode stationnement nécessite une alimentation continue par la batterie du véhicule. (Un cordon d'alimentation avec
protection basse tension est recommandé pour éviter de vider la batterie.)
Veuillez vous assurer d’activer la fonction d’accéléromètre dans le menu des réglages avant de passer au mode
stationnement. (Sensibilité par défaut de l’accéléromètre : moyenne)
Le mode de stationnement arrêtera automatiquement la localisation GPS et reprendra en passant au mode
d'enregistrement normal.
Estampe de plaque
Insère un ensemble personnalisé de huit chiffres dans la vid
éo enregistrée. Ajoute des plaques d'immatriculation ou
d'autres éléments d'identification en incrustation dans
votre vidéo.
P
aramètres de mot de p
asse
Définit un verrouillage par mot de passe qui permettra d'é
viter que les fichiers soient supprimés ou que les paramè
tres de l'appareil soient modifiés.
Remarque : Ceci n’empêche pas d'autres utilisateurs
d'extraire la carte mémoire ou de modifier les fichiers. Cette
fonction doit être désactivée pendant la conduite régulière.
Rotation de l
’
image
Fait pivoter l’image enregistrée à 180o. Utilisez cette fonction si la caméra est installée sur le tableau de bord.
36
Page 39

Réglages de la caméra
Enregistrement vidéo : Première page de paramètres
Vous pouvez y accéder en appuyant sur [ ] une fois.
Laps de temps
La fonction de laps de temps est utilisée pour créer
une vidéo accélérée. Lorsqu'elle est réglée, la
caméra enregistre une image toutes les 200 ms
(millisecondes)/500 ms/1 seconde/5 secondes.
Estampe ISO
Activé/désAactivé
Par défaut : Activé.
37
Page 40

Réglages de la caméra
Paramètres du système : Deuxième page de réglages
Vous pouvez y accéder en appuyant sur [ ] deux fois.
Format
Supprime complètement tous les fichiers, y compris
les enregistrements verrouillés sur la carte mémoire,
et optimise la carte pour l'enregistrement.
Langue
Définit la langue.
Date/heure
Définit le format an/date/heure.
Fréquence
Ajuste le paramètre de la fréquence de la caméra afin
de minimiser le scintillement et les bandes dans la
vidéo enregistrée.
Bip
Active/désactive les notifications sonores.
Écran de veille
Éteint l’écran après le délai établi.
Mode TV
Permet de passer d’une sortie vidéo NTSC à une sortie
vidéo PAL standard.
Version
Affiche le nom du modèle et la version actuelle du
micrologiciel.
Paramètres par défaut
Rétablit tous les paramètres d'origine.
38
Page 41

Réglages de la caméra
Réglages du mode photo
Vous pouvez y accéder dans le « Photo Mode ».
WDR (Wide Dynamic Range)
Il n’est pas possible de changer ce paramètre. Indique
que le traitement WDR est activé.
Taille de l’image
Règle la taille de l’image. Un nombre de mégapixels
plus élevé augmente la taille du fichier et les détails.
Couleur
Applique un filtre de couleur à la photo.
Anti-secousses
Aide à réduire les effets des secousses lors de la prise
d'une photo.
Mode capture
Établit un délai d'attente avant de prendre une photo.
Balance des blancs
Règle l’équilibre des blancs.
Réglage recommandé : Auto
ISO
Change les paramètres ISO. Un réglage ISO élevé
réduit les effets de flou la nuit, mais diminue la qualité
de la vidéo.
Exposition
Règle la luminosité/l’obscurité de la vidéo. Estce que la photo est trop lumineuse? Choisissez
un paramètre entre -1 et -3.
Est-ce que la photo est trop foncée? +1 à +3
Réglage recommandé : 0.
Horodatage
Incruste la date dans la photo prise.
39
Page 42

Transférer des fichiers
Vous pouvez transférer les fichiers vidéo dans votre appareil électronique pour les consulter et les
stocker.
Câble USB
5. Branchez un câble USB du port USB de la caméra à l'ordinateur.
6. Allumez votre caméra. Un écran noire s’affichera indiquant « Mass Storage ».
7. Appuyez sur le bouton « record/select ». Un écran bleu intitulé « Mass Storage » devrait s’afficher.
8. Votre ordinateur devrait maintenant être en mesure de détecter le nouvelle appareil. Vous pouvez
accéder à la carte mémoire et aux vidéos de la même manière qu’avec un disque flash USB.
Lecteur de carte/fente pour carte microSD
Utilisez un lecteur de carte mémoire (acheté séparément) ou un appareil électronique compatible
doté d’une fente pour carte micro SD (p. ex. une tablette). Suivez les instructions du fabricant.
Sortie vidéo
HDMI (téléviseur)
L’écran de la caméra s’affichera automatiquement lorsque vous raccorderez votre caméra à
un téléviseur ou un moniteur compatible à l’aide d’un câble mini-HDMI à HDMI. Les fonctions
d’enregistrement sont désactivées pendant la diffusion de la vidéo.
Port AV
À l'aide d’un câble AV de 3,5 mm, branchez le connecteur de 3,5 mm dans le port AV de la caméra.
Branchez la prise RCA dans un port compatible de votre téléviseur ou de votre moniteur.
Mise à jour du micrologiciel
Veuillez consulter la section du soutien du site Web de DOD Tech pour obtenir les mises à jour du
micrologiel et les instructions.
40
Page 43

 Loading...