

Page 1
’10.11
Page 2
DOCOMO W-CDMA, GSM/GPRS System
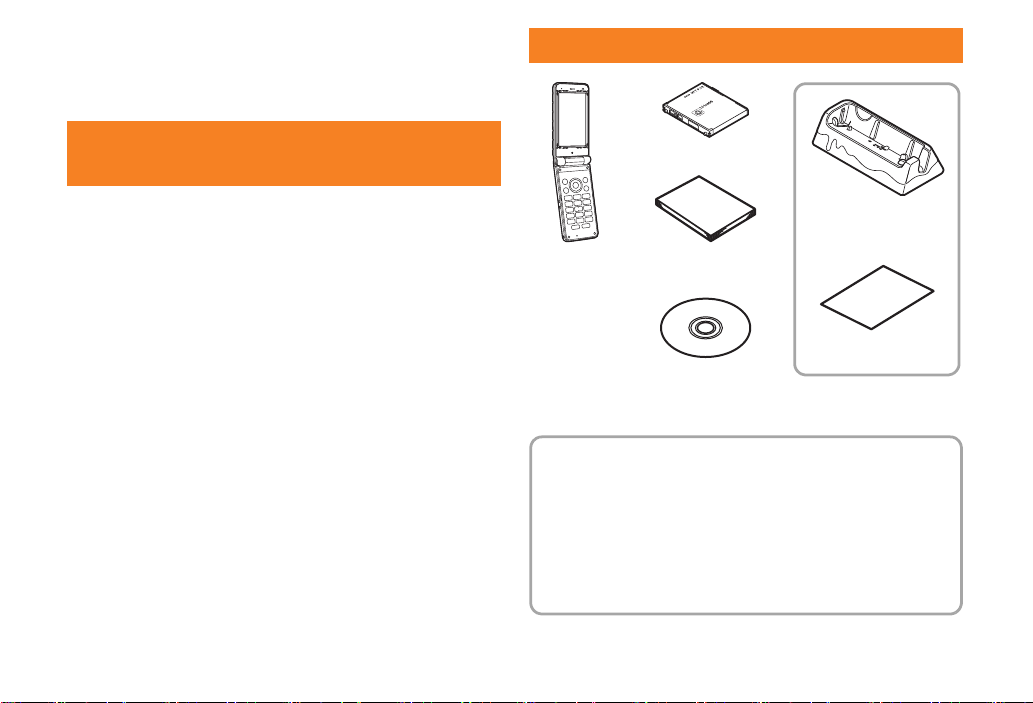
SH-04C
terminal
(includes
warranty and
Back Cover
SH47)
Q-pot. Original melty
desktop holder
(sample)
Original postcard
(sample)
Battery Pack SH23
Manual
(Japanese version)
SH-04C CD-ROM
The explanations in this manual are based on the case when
Kisekae tool is set for the handset color “Milk”.
The screens and illustrations in this manual are shown as
examples. The actual screens and illustrations may differ.
Note that “SH-04C” is referred to as the “FOMA terminal” in this
manual.
Reproduction of this manual in part or in whole is prohibited.
The contents of this manual are subject to change without prior
notice.
Thank you for purchasing “docomo STYLE series
SH-04C”. Before use of SH-04C, make sure that you read
this manual to ensure proper operation.
Explanation for operation of
SH-04C
Other than this manual, “Guide” (contained in the FOMA
terminal) or “Manual (detailed edition)” (PDF file)
explains how to operate SH-04C.
“Manual” (this manual)
Explanation for contents displayed on the screen or
operation of basic function
“Guide” (in Japanese only) (contained in
the FOMA terminal)
Explanation for the outline and operation of
frequently-used function
From SH-04C In the Normal menu, [Tool]/[Guide]/select
an item
“Manual (detailed edition)” (in Japanese
only) (PDF file)
Explanation for the detailed information and operation
of all functions
From a PC Download from the DOCOMO website
http://www.nttdocomo.co.jp/support/trouble/manual/
download/index.html
※ The URL and contents are subject to change without
prior notice.
Basic package
Manual
For details on optional parts compatible with the FOMA terminal
nP. 87
Page 3

Introduction
Contents
Introduction
P. 1
FOMA Terminal nP. 2 What You Can Do with SH-04C nP. 3 Part Names and Functions nP. 4
Precautions nP. 6 Handling Precautions nP. 14 Waterproof/Dust-proof function nP. 17
More
Convenient
P. 75
Others
P. 82
Enjoy
P. 63
Search
P. 57
Basic
Operation
P. 23
Connect
P. 44
Support nP. 82 Appendix nP. 88 Index nP. 105
Before Using nP. 23 Screen Explanation nP. 27 Character Entry nP. 32
Sound/Screen Setting nP. 34 Lock/Security nP. 40
Call nP. 44 Mail nP. 51 Phonebook nP. 56
i-mode/Full Browser nP. 57 i-Channel nP. 60 Map/GPS nP. 61
Camera nP. 63 1Seg nP. 67 Music nP. 70 i-appli/i-Widget nP. 73
i-motion/Movie nP. 74
Osaifu-Keitai nP. 75 i-concier nP. 76 Convenient Tools nP. 77 Data Management nP. 78
1
Page 4
FOMA Terminal
Because the FOMA terminal relies on radio signals, it cannot be
Introduction
used in places with no signal (such as tunnels, underground, or in
buildings), in places with a weak signal or outside the FOMA
service area. You may not use the FOMA terminal in the upper
floors of a building even with no obstructions in sight. There may
also be times when the signal is strong and you are not moving but
the call is interrupted.
Make sure not to disturb others when using the FOMA terminal in
public places, places with many people or quiet places.
Because the FOMA terminal uses electrical signals, it is possible for
a third party to listen in on a conversation. However, since the
W-CDMA and GSM/GPRS system automatically applies privacy to
every call, a third party that tries to listen in only hears static.
The FOMA terminal converts conversations into a digital signal and
sends it to the other party over the radio. If the signal cannot be
reconverted properly by such as moving to an area with a weak
signal, the voice may not be heard correctly.
Keep a separate memo and note information (e.g. phonebook,
schedule, memo, record message, voice memo) stored in the
FOMA terminal. DOCOMO shall not be liable for any loss of content
due to a failure, repair, upgrade or other handling of the FOMA
terminal.
It is recommended to save the important data to the microSD Card.
If you own a PC, you can also transfer and store the information
such as a phonebook, mail and schedule to your PC using
DOCOMO keitai datalink.
The user hereby agrees that the user shall be solely responsible for
the result of the use of SSL/TLS. Neither DOCOMO nor the certifier
as listed herein makes any representation and warranty as for the
security in the use of SSL/TLS. In the event that the user shall
sustain damage or loss due to the use of SSL/TLS, neither
DOCOMO nor the certifier shall be liable for any such damage or
loss.
Certifier: VeriSign Japan K.K.,
Cybertrust Japan Co., Ltd.,
GlobalSign K.K.,
RSA Security Japan Ltd.,
SECOM Trust Systems Co., Ltd.,
Comodo CA Ltd., Entrust, Inc., Go Daddy, Inc.
The FOMA terminal supports the FOMA Plus-Area and the FOMA
HIGH-SPEED area.
The FOMA terminal can be used only via the FOMA network
provided by DOCOMO and DOCOMO’s roaming area.
2
Page 5
What You Can Do with SH-04C
Waterproof/Dust-proof function nP. 17
The FOMA terminal is waterproof and dust-proof.
You can call or watch 1Seg programs in the rain, in a
bathroom, at a poolside, etc. Also, rinse off dirt from the
FOMA terminal with tap water.
Guide (in Japanese only) nP. 31
Guide is a convenient function which allows you to check
an operation method of function on the FOMA terminal.
You can search immediately without a manual.
i-concier (in Japanese only) nP. 76
“i-concier” is a service to support your life like butler or
concierge. It can keep your various data (information of
your living area, memo and schedule, ToruCa and
phonebook, etc.) and timely provide information tailored to
your living area, current location, or hobbies and diversions.
Quick voice activation (in Japanese only) nP. 31
You can activate a function just by speaking keyword of
the function to use. It is convenient when you cannot find
the menu of function to use or when you want to activate
the function immediately.
Highly-functional camera nP. 63
The FOMA terminal has built-in highly-functional camera
offering approximately 9.6 million effective pixels
(Recorded pixels: approximately 9.5 million pixels).
AUTO-GPS (in Japanese only) nP. 62
By the AUTO-GPS function, you can receive convenient
services, such as providing surrounding information
including weather information, store information, etc., or
sight-seeing information.
Deco-mail nP. 51
The FOMA terminal supports Auto-Decome, a function to
enter pictograms or Deco-mail pictograms by predicting
from the text, and Font change, a function to change a
font.
Introduction
3
Page 6
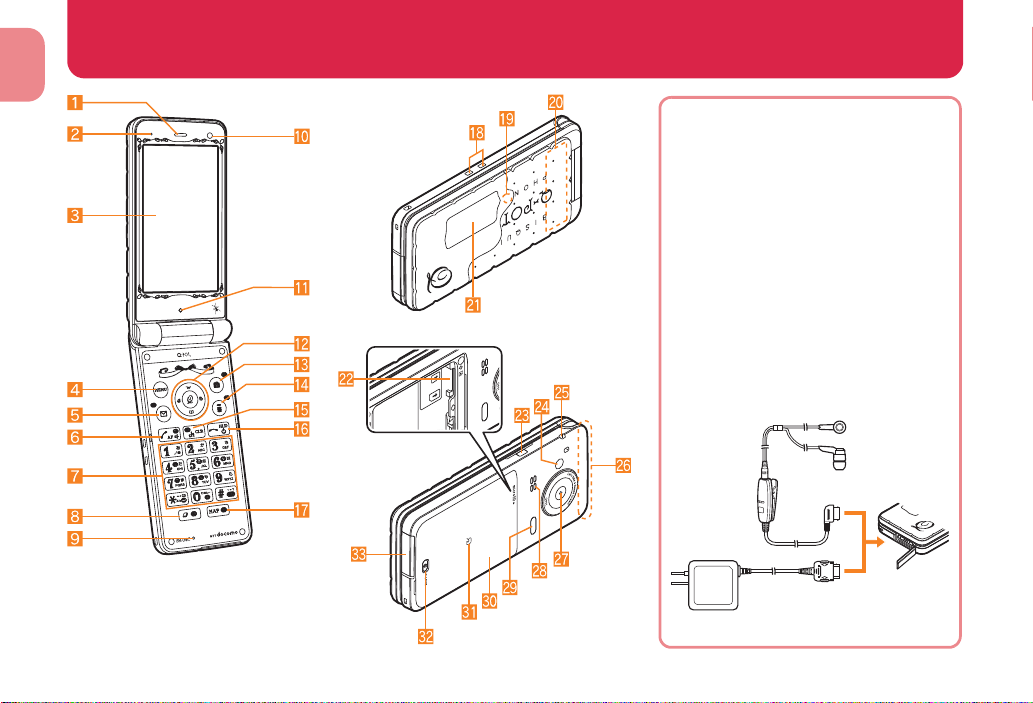
Introduction
Using earphone
Connect an earphone compatible with
external connector terminal (sold
separately).
In addition, when using an earphone which
does not support external connector
terminal, connect with a plug adapter (sold
separately).
AC adapter (charging) and Stereo Earphone/
Microphone 01 (earphone/microphone
terminal) share the same entry point.
Connection example for Stereo
Earphone/Microphone for external
connector terminal 01 (sold
separately)
Stereo
Earphone/
Microphone
01
AC adapter
Key illustrations may look
different from actual keys.
Part Names and Functions
4
Page 7

1Earpiece
2Air vent
This is a vent for taking any remaining air out of the FOMA
terminal.
3Main display (nP. 27)
4z: MENU/Operation guidance key (nP. 30, P. 36)
5m: Mail/Operation guidance key (nP. 30, P. 51)
6s: Start/Hands-free key (nP. 44)
71 to 9, *, 0 and #: Dial/Character entry keys
8$: Multi/VeilView key (nP. 36)
9Mouthpiece/Microphone
aSub camera
Use to shoot a still/moving picture of yourself.
bBrightness sensor
Sensor detects brightness of the surrounding area.
Do not cover the sensor area with your hand or a sticker.
cw&t&: Multi-guide key (nP. 30)
dC: Camera/TV/Operation guidance key (nP. 30, P. 63, P. 68)
ei (,): i-mode/Operation guidance key (nP. 30, P. 57)
fc (J): i-Channel/Clear key (nP. 60)
Display the channel list.
Return to the previous screen.
gH: Power/End key (nP. 26)
Press for at least 2 seconds to turn the power on/off.
Use to end the function being activated and return to stand-by
display.
hy: MAP/GPS key
Activates GPS compatible i-appli.
Checks your present location.
iC
ger terminal (nP. 24)
har
Use for charging with the exclusive desktop holder.
jCalled/Charging LED
Flashes while receiving a call.
Illuminates while charging.
Illuminates/Flashes while activating the camera or when
shooting, etc.
k1Seg antenna
1Seg antenna is built in.
lSub display (nP. 29)
mmicroSD Card slot (nP. 79)
n&: Side key (nP. 39)
Use to shoot still pictures or moving pictures.
oPicture Light
Flashes/Illuminates while activating the camera/shooting.
pStrap hole
qFOMA antenna
FOMA antenna is built in.
rMain camera
Use to shoot still pictures or moving pictures.
sSpeaker
tInfrared port (nP. 80)
uBack cover (nP. 18)
A radio frequency-preventing sticker is attached on the back of
the back cover. Do not peel off this sticker.
vb mark (nP. 75, P. 80)
wBack cover lever (nP. 18)
xExternal connector terminal
Integrated terminal to use for charging and connecting the
earphone/microphone, etc.
Introduction
5
Page 8
Precautions (Always follow these directions)
Before use, read these “Precautions” carefully and use your FOMA
Introduction
terminal properly.
Keep this manual in a safe place for future reference.
These precautions contain information intended to prevent bodily injury
to the user and to surrounding people, as well as damage to property,
and must be observed at all times.
The following symbols indicate the different degrees of injury or
damage that may occur if information provided is not observed and
the FOMA terminal is used improperly.
This symbol indicates that “death or
Danger
Warning
Caution
serious bodily injury may directly and
immediately result from improper use”.
This symbol indicates that “death or
serious bodily injury may result from
improper use”.
This symbol indicates that “minor injury
and/or property damage may result from
improper use”.
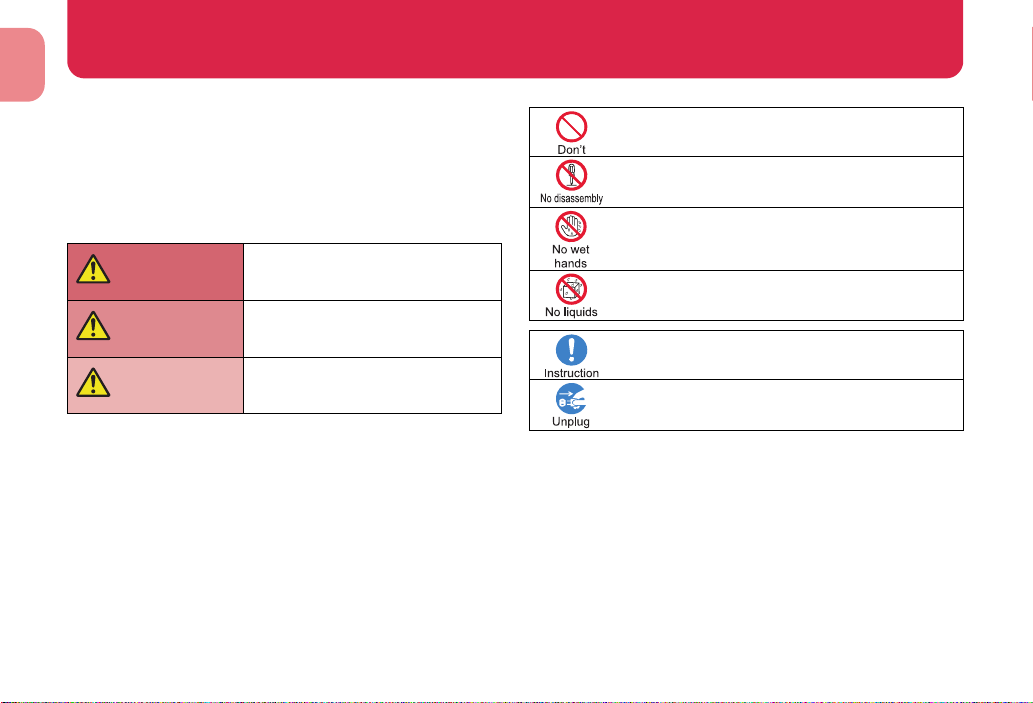
The following symbols indicate specific directions.
Indicates a prohibited action.
Indicates not to disassemble the device.
Indicates not to handle the device with wet hands.
Indicates not to use the device near water or get it wet.
Indicates that instructions specified are compulsory
(must be followed).
Indicates that the power cord must be unplugged from the
outlet.
“Precautions” is explained in the following six sections.
Handling the FOMA terminal, battery pack, adapters, and UIM (general)
. . . . . . . . . . . . . . . . . . . . . . . . . . . . . . . . . . . . . . . . . . . . . . . . . . . . . . P. 7
Handling the FOMA terminal . . . . . . . . . . . . . . . . . . . . . . . . . . . . . . . P. 8
Handling battery pack . . . . . . . . . . . . . . . . . . . . . . . . . . . . . . . . . . . P. 10
Handling adapters . . . . . . . . . . . . . . . . . . . . . . . . . . . . . . . . . . . . . . P. 11
Handling UIM . . . . . . . . . . . . . . . . . . . . . . . . . . . . . . . . . . . . . . . . . . P. 12
Handling near electronic medical equipment. . . . . . . . . . . . . . . . . . P. 12
6
Page 9
Handling the FOMA terminal,
Danger
Warning
Caution
battery pack, adapters, and UIM
(general)
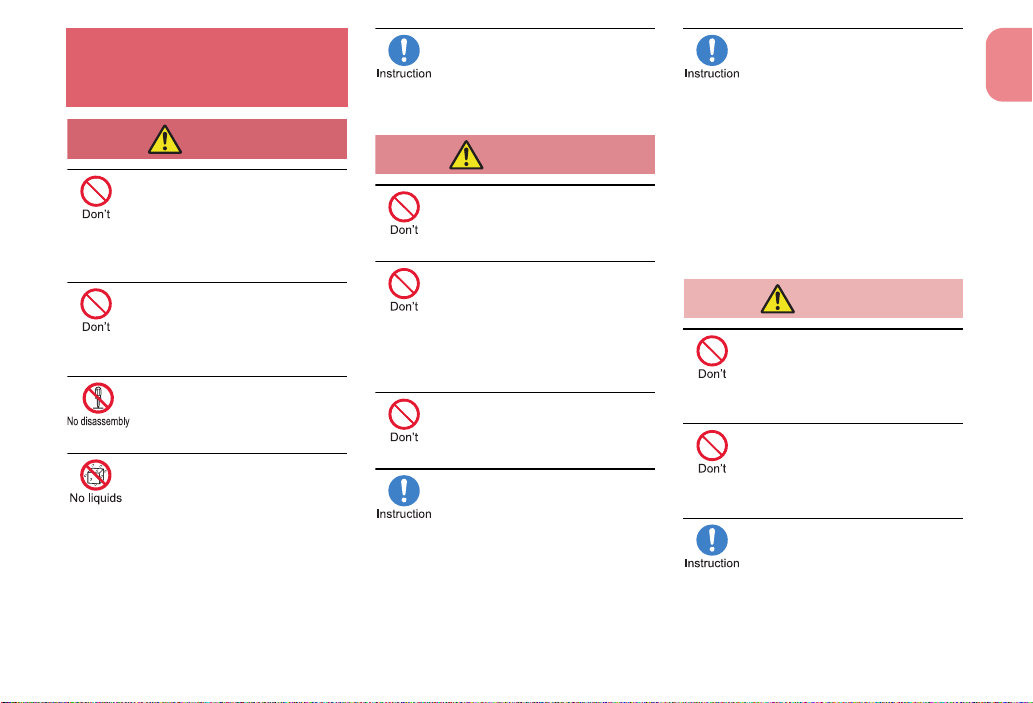
Do not use, store, or leave the
equipment in locations subject
to high temperatures, such as
near a fire, in direct sunlight, or
inside a car on a hot day.
May cause fires, burns or bodily injury.
Do not place the equipment
inside cooking appliances such
as microwave ovens or pressure
cookers.
May cause fires, burns, bodily injury or electric shock.
Do not attempt to disassemble
or modify the equipment.
May cause fires, burns, bodily injury or electric shock.
Do not get the equipment wet
with water, drinking water, pet
urine, etc.
May cause fires, burns, bodily injury or electric shock.
Refer to the following for details on
waterproofness.
n“Waterproof/Dust-proof function” on P. 17
Use only the battery packs and
adapters specified by NTT
DOCOMO for use with the
FOMA terminal.
May cause fires, burns, bodily injury or electric shock.
Do not subject the equipment to
strong impacts or throw it.
May cause fires, burns, bodily injury or electric shock.
Do not allow conductive materials
(such as metal objects and pencil
lead) to come into contact with
the charger terminal or external
connector terminal. In addition,
do not insert such objects.
May cause fires, burns, bodily injury or electric shock.
Do not cover or wrap the
equipment with bedding, etc.
when using or charging.
May cause fires or burns.
Make sure to turn off the FOMA
terminal and not to charge the
battery in locations such as gas
stations where flammable gas
is generated.
May cause a gas explosion or fire.
To use Osaifu-Keitai in locations such as gas
stations, make sure to turn off the power in
advance (If the IC card lock is set, disable the
lock before turning off the power).
If you notice anything unusual,
such as an unusual odor,
overheating, discoloration or
deformation during use,
charging or storage, immediately
follow the instructions below.
Unplug the power cord from
the outlet or cigarette lighter
socket.
Turn off the FOMA terminal.
Remove the battery pack
from the FOMA terminal.
May cause fires, burns, bodily injury or electric shock.
Do not leave the equipment on
unstable surfaces, such as on a
wobbling table or sloped
surface.
May fall and cause injury.
Do not store the equipment in
locations that are subject to
humidity, dust or high
temperatures.
May cause fires, burns or electric shock.
If being used by a child, have a
guardian teach him/her the
proper handling procedures. In
addition, check that the child is
using the equipment as
directed.
May result in bodily injury.
Introduction
7
Page 10
Keep the equipment out of the
Warning
Picture Light
reach of young children.
A young child may swallow the equipment or
Introduction
suffer other bodily injury.
Be very careful when using the
FOMA terminal connected to
adapters repeatedly or for a
long time.
The FOMA terminal, battery pack or adapters
may become warm if i-appli, videophone, or
1Seg is used for a long time while charging.
Touch high temperature areas for a long time
may cause skin irritations, itchiness, or
low-temperature burn in some people.
Handling the FOMA terminal
Do not aim the infrared port
towards the eyes.
May cause eye injury.
Do not aim the infrared port
towards home electric
appliances with an infrared
device during Ir
May interfere with the operation of infrared
devices and cause an accident.
communication.
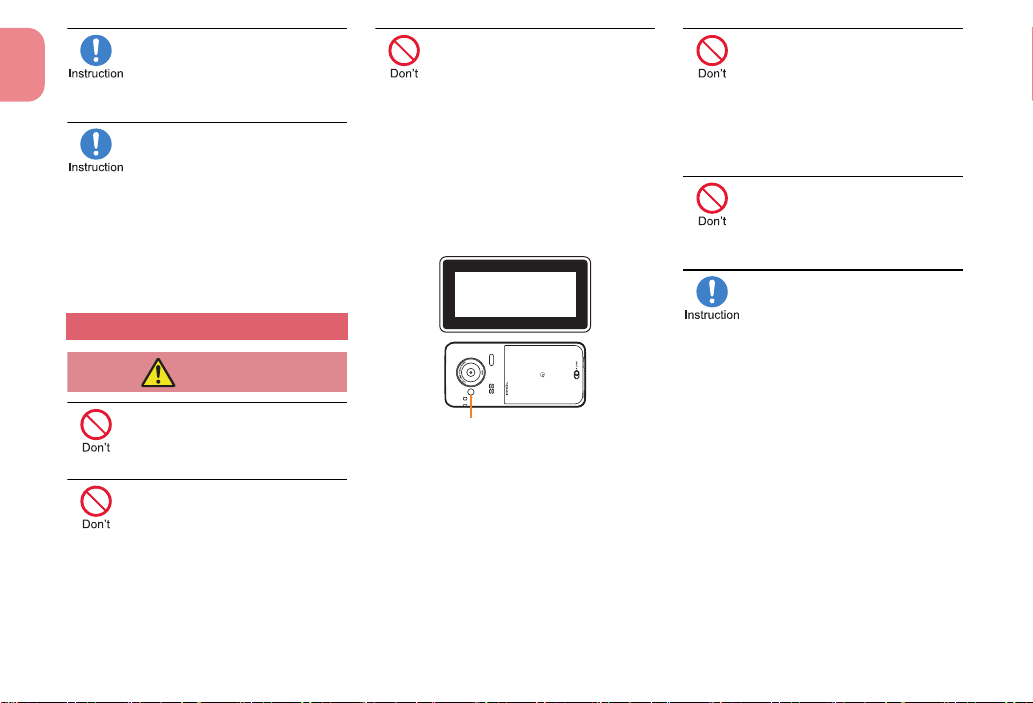
Do not point the illuminated
light directly at someone’s
eyes.
Do not use Picture Light near people’s faces.
Eyesight may be temporarily affected leading to
accidents.
Precautions:
The picture light source used for this product
may emit the light over the safety level for eyes
when operations such as undirected adjustments
are intentionally made. Therefore, do not
disassemble the terminal.
EN60825-1:1994 A1:2002 & A2:2001
CLASS1
LED Product
CAUTION:
Use of controls, adjustments or performance of
procedure other than those specified herein may
result in hazardous radiation exposure. As the
emission level from Picture Light LED used in
this product is harmful to the eyes, do not
attempt to disassemble the cabinet. Servicing is
limited to qualified servicing station only.
Do not allow water or other
liquids, metal, flammable
material, or other foreign
objects to enter the UIM or
microSD Card port on the
FOMA terminal.
May cause fires, burns, bodily injury or electric
shock.
Do not shine the light at anyone
driving a car or other vehicles.
May prevent a driver from driving safely and
cause a traffic accident.
Turn off the FOMA terminal in
areas where the use of mobile
phones is prohibited, such as
in aircraft or hospitals.
May interfere with the operation of electronic
devices and electronic medical equipment. In
addition, if auto power on function is set to on,
disable this function before turning off your
mobile phone.
Follow the instructions given by the respective
medical facilities regarding the use of mobile
phones on their premises.
In addition, actions such as using on a mobile
phone aboard aircraft are prohibited and
punishable by law.
8
Page 11
Keep the FOMA terminal away
Caution
from the ears during a call in
which hands-free is set or while
the ring tone is ringing.
When you attach the earphone/
microphone, etc. to the FOMA
terminal to play games or
music, do not make the volume
too loud.
Excessive high volume may damage your
hearing.
Also it may prevent you from hearing the
ambient sounds and cause an accident.
Earphone Signal Level
The maximum output voltage for the music
player function, measured in accordance with
EN 50332-2, is 28.0 mV.
If you have a weak heart, take
extra precautions when setting
functions such as the vibrator
and ring tone volume for
incoming calls.
May have harmful effects on your heart.
If you are using electronic
medical equipment, contact the
respective manufacturer or
vendor to check whether the
operation of the equipment is
affected by signals.
May interfere with the operation of electronic
medical equipment, etc.
Turn the FOMA terminal off
near high-precision electronic
devices or devices that use
weak electronic signals.
May interfere with the operation of electronic
devices.
Take particular care with the following
devices
Hearing aids, implanted cardiac pacemakers,
implanted cardioverter-defibrillators, or other
electronic medical equipment. Fire alarms,
automatic doors, and other equipment controlled
by electronic signals. If you use an implanted
cardiac pacemaker, implanted
cardioverter-defibrillator or other electronic
medical equipment, contact the respective
manufacturer or vendor to check whether the
operation of the equipment is affected by signals.
In case that the display part or
camera lens is damaged, make
sure to pay attention to a
broken glass and the exposed
inside of the FOMA terminal.
The display part or the surface of camera lens are
covered by a plastic panel so as to minimize the
possibility of glass scattering. However, touching
the broken or exposed parts may cause injury.
Do not swing the FOMA
terminal by its strap, etc.
May hit you or others around you, resulting in
bodily injury.
Do not use the damaged FOMA
terminal.
May cause fires, burns, bodily injury or electric
shock.
When using motion tracking,
confirm the safety of
surroundings, hold the FOMA
terminal securely and do not
swing it around more than
necessary.
May result in bodily injury.
If the display is broken and
internal substances such as
liquid crystal then leaks, do not
get the liquid on your skin
(face, hands, etc.).
May result in loss of eyesight and harm to your skin.
If internal substances such as liquid crystal come
into contact with your eyes or mouth,
immediately rinse your eyes or mouth with clean
water and see a doctor.
If the liquid comes into contact with your skin or
clothes, immediately wipe it off with alcohol, and
wash with water and soap.
Introduction
9
Page 12
If you use the FOMA terminal in
Danger
Warning
an automobile, contact the
automobile manufacturer or
Introduction
May interfere with the operation of electronic
equipment in some vehicle models. In such
cases, stop using the FOMA terminal.
For details on materials of each part n“Material
list” on P. 13
May result in bodily injury.
Otherwise, eyesight may be decreased.
vendor to check whether the
operation of the electronic
equipment is affected by
signals.
Use of the FOMA terminal may
cause skin irritations such as
itchiness, rashes or eczema in
some people. If this occurs,
immediately stop using the
FOMA terminal and seek
medical treatment.
Do not close the FOMA terminal
on your fingers or objects such
as the strap.
Look at the display in a well-lit
place, keeping a certain
distance from the screen.
Handling battery pack
Check the type of battery using the
information printed on the battery pack label.
Label Battery type
Li-ion00 Lithium-ion
Do not touch terminals with
metallic objects such as wires.
In addition, do not carry or
store the battery pack with
metallic necklaces, etc.
The battery pack may catch fire, explode,
overheat or leak.
Check that the battery pack is
facing the correct direction
before you attach it to the
FOMA terminal. If you are
having difficulty fitting the
battery pack to the FOMA
terminal, do not use excessive
pressure to force the battery
into place.
The battery pack may catch fire, explode,
overheat or leak.
Do not throw the battery pack
into a fire.
The battery pack may catch fire, explode,
overheat or leak.
Do not puncture, hit with a
hammer or step on the battery
pack.
The battery pack may catch fire, explode,
overheat or leak.
If the battery fluid, etc. comes
into contact with your eyes, do
not rub your eyes but
immediately rinse your eyes
with clean water. Then seek
prompt medical treatment.
May result in loss of eyesight.
If any trouble such as a
deformation or scratches
caused by a drop is found,
never use it.
The battery pack may catch fire, explode,
overheat or leak.
If the battery pack leaks or
emits an unusual odor,
immediately stop use and move
it away from any flame or fire.
The battery fluid is flammable and could ignite,
causing a fire or explosion.
Prevent your pet from biting the
battery pack.
The battery pack may catch fire, explode,
overheat or leak.
10
Page 13
Do not dispose of used battery
Caution
Warning
packs in ordinary garbage.
May cause fires or damage to the environment.
Place tape over the terminals to insulate
unnecessary battery packs, and take them to a
docomo Shop, retailer or institution that handles
used batteries in your area.
Do not use or charge a wet
battery pack.
The battery pack may catch fire, explode,
overheat or leak.
If the battery fluid, etc. leaks, do
not get the liquid on your skin
(face, hands, etc.).
May result in loss of eyesight and harm to your skin.
If the liquid, etc. comes into contact with your
eyes, mouth, skin or clothes, immediately rinse
them with clean water.
If the liquid comes into contact with your eyes or
mouth, see a doctor immediately after rinsing
your eyes or mouth.
Handling adapters
Do not use if the adapter’s cord
is damaged.
May cause fires, burns or electric shock.
Never use the AC adapter or
desktop holder in humid
locations such as a bathroom.
May cause fires, burns or electric shock.
The DC adapter should only be
used in negative grounded
vehicles. Never use this adapter
in positive grounded vehicles.
May cause fires, burns or electric shock.
Do not touch adapters if you
hear thunder.
May cause electric shock.
Take care not to short-circuit
the charging terminal when
connected to an outlet or
cigarette lighter socket. Also,
take care not to allow any part
of your body (hands, fingers,
etc.) to come into contact with
the charging terminal.
May cause fires, burns or electric shock.
Do not place heavy objects on
the adapter’s cord.
May cause fires, burns or electric shock.
When plugging/unplugging the
AC adapter into/from the outlet,
do not allow metallic straps or
other metallic objects to come
into contact with the terminal.
May cause fires, burns or electric shock.
Do not handle the cord of the
adapters and outlet with wet
hands.
May cause fires, burns or electric shock.
Always use the specified power
supply and voltage.
When using overseas, use the
AC adapter that is available
overseas.
Using the incorrect voltage may cause fire, burns
or electric shock.
AC adapter: 100V AC
DC adapter: 12/24V DC (for negative grounded
vehicles only)
AC adapter available overseas: 100 to 240V AC
(Connect only with household AC outlet)
If the fuse in the DC adapter
blows, always replace it with a
fuse of the specified type.
May cause fires, burns or electric shock. Refer to
the respective manuals for information on the
correct fuse specifications.
Introduction
11
Page 14
Wipe off any dust on the power
Caution
Warning
plug.
May cause fires, burns or electric shock.
Introduction
May cause fires, burns or electric shock.
May cause fires, burns or electric shock.
May cause fires, burns or electric shock.
May cause fires, burns or electric shock.
May cause fires, burns or electric shock.
Fully plug the AC adapter into
the outlet.
Always grasp the power plug
when unplugging the adapters
from the outlet or cigarette
lighter socket. Do not forcibly
pull by the adapter’s cord.
Unplug the power plug from the
outlet or cigarette lighter socket
when not using for a long time.
Should water or other liquids
enter the adapters, remove the
power plug from the outlet or
cigarette lighter socket
immediately.
Always unplug the power plug
from the outlet or cigarette
lighter socket before cleaning
the adapters.
Handling UIM
Be careful with the cutting
surface when detaching the
UIM.
May cause bodily injury.
Handling near electronic
medical equipment
The precautions detailed here conform to the
guidelines drawn up by the Electromagnetic
Compatibility Conference Japan, regarding
the protection of electronic medical
equipment from signals emitted by mobile
phones.
Observe the following in
hospitals or other medical
facilities.
Do not take your FOMA terminal into
operating rooms, ICUs (Intensive Care Units)
or CCUs (Coronary Care Units).
Turn off your FOMA terminal inside hospital
wards.
Turn off your FOMA terminal even when you
are in an area outside hospital wards, such as
a hospital lobby, since electronic medical
equipment may be in use nearby.
Where a medical facility has specific
instructions prohibiting the carrying and use of
mobile phones, observe those instructions
strictly.
If auto power on function is set to on, disable
this function before turning off your mobile
phone.
Turn off your FOMA terminal in
crowded places such as
rush-hour trains in case
somebody nearby is using an
implanted cardiac pacemaker
or implanted
cardioverter-defibrillator.
Electromagnetic signals may have harmful
effects on the operation of implanted cardiac
pacemakers and implanted
cardioverter-defibrillators.
12
Page 15
If you have an implanted
cardiac pacemaker or an
implanted
cardioverter-defibrillator,
always carry or use your FOMA
terminal at least 22 cm away
from your implant.
Electromagnetic signals may have harmful
effects on the operation of implanted cardiac
pacemakers and implanted
cardioverter-defibrillators.
Patients receiving medical
treatment away from a hospital
or medical facility (e.g. home
treatment) who are using
electronic medical equipment
other than implanted cardiac
pacemakers or implanted
cardioverter-defibrillators
should consult the respective
manufacturers for information
regarding the effects of signals
on the equipment.
Electromagnetic signals may have harmful
effects on the operation of electronic medical
equipment.
Material list
PART
Display side
Surface
of FOMA
terminal
Camera ornament
Camera window
Hinge section
Back
cover
Cabinet ornament
Picture Light PC resin
Protective
cover
Operation key (including
ornament)
Operation key base sheet
Back of display
side
Keyboard side,
Back of
keyboard side
Back cover
Lever POM resin
Gasket
Radio
frequency
preventing
sticker
Upper
Lower Urethane resin
Material/Surface
treatment
PC, PMMA resin/
Hard coating
ABS resin/UV
coating
PA + GF45/UV
coating
PC resin/UV
transfer
PMMA resin/Hard
coating
ABS resin/UV
coating
PA + GF45/UV
coating
EPDM/Low friction
coating
IFL 12 (Magnetic
powder + urethane
resin)/PET
ABS resin/UV
coating
PET resin/UV
cured resin
UV cured resin
PART
Side key
External
connector
External
connector
terminal
Infrared port ABS resin
Charger terminal SUS/Gold plating
microSD
Card slot
UIM tray POM resin
Battery storage side Glass epoxy resin
Battery
storage
section
Battery
terminal
Battery
pack
terminal
Cover
Gasket
Slot ABS resin
Inside slot SUS
Surrounding
section of
battery storage
section
Screw
Battery terminal
connector
Battery terminal
Battery pack
Terminal
section
Material/Surface
treatment
ABS resin/UV
coating
SUS/Nickel plating
PC resin,
Elastomer resin/
UV coating
EPDM/Low friction
coating
PA + GF45
SUS/Passivation
coating (Insulator
coating)
LCP
Copper alloy/Gold
plating
PC resin/Spark
erosion
Copper alloy/Full
surface nickel with
plating base, Gold
plating
Introduction
13
Page 16
Handling Precautions
General notes Notes about the FOMA
Introduction
SH-04C is waterproof/dust-proof, however,
do not allow water to seep or dust to get in
the FOMA terminal and do not allow
accessories or optional parts to get wet or
do not allow dust to adhere.
The battery pack, adapters and the UIM are
not waterproof/dust-proof. Do not use in
humid locations such as a bathroom and do
not get wet by raining, etc. Also, when you
have the handset close to your body, humidity
from sweating causes corrosion inside and
leads to malfunction. Note that if problem is
found to be due to moisture, handset and
parts are not covered by warranty and in
some cases may be irreparable. Even where
repairs are possible, repair charges will be
incurred since damage is not covered by
warranty.
Clean only with a soft and dry cloth (such
as the type used for eyeglasses).
• Forceful rubbing of the display with a dry
cloth may scratch the display surface.
• Note also that the display coating may stain
if moisture or soiling is left on the surface for
a long period.
• Never use chemicals such as alcohol,
thinners, benzene or detergents, as these
agents may erase the printing on the
handset or cause discoloration.
Occasionally clean terminals with a dry
cotton swab, etc.
Unclean terminals may result in poor
connections and loss of power. Keep terminal
clean with a dry cotton swab, etc.
Take care of the terminal while cleaning it.
Do not place the handset near an air
conditioning vent.
Condensation formed due to rapid changes in
temperature may cause internal corrosion
and lead to malfunction.
Do not apply excessive force to the FOMA
terminal and battery pack when using
them.
Carrying the handset in a tightly packed bag,
or sitting on the handset in your pocket may
cause a damage to display, other internal
components or battery pack, or result in
malfunction.
Keeping an external connector device
plugged into the external connector terminal
(earphone/microphone terminal) may cause a
damage to the connector or result in
malfunction.
Do not rub or scratch the display with
metal, etc.
May scratch the handset and cause
malfunction or damage.
Read the respective manuals supplied
with the battery pack, adapters, and
desktop holder carefully.
terminal
Avoid using the handset in extremely high
or low temperatures.
Use the FOMA terminal within the range of a
temperature between 5°C and 40°C (for
temperatures of 36°C or higher, such as in a
room with a bath, limit usage to a short period
of time) and a humidity between 45% and
85%.
Using the handset close to landline
phones, TVs or radios may have harmful
effects on the operation of such
equipment. Move as far away as possible
from such items before use.
Keep a separate memo and note
information stored in the FOMA terminal.
DOCOMO shall not be liable for any loss of
content.
Do not drop or otherwise subject the
FOMA terminal to severe impact.
May damage the handset and cause
malfunction.
When connecting an external connector
device to the external connector terminal
(earphone/microphone terminal), do not
put it in obliquely or do not pull it while it
is plugged in.
May damage the handset and cause
malfunction.
14
Page 17
Do not close the FOMA terminal on strap,
etc.
May damage the handset and cause
malfunction.
The FOMA terminal becomes warm during
using or charging but this is not a
malfunction.
Do not leave the camera in direct sunlight.
May cause discoloration or burn-in.
Use the FOMA terminal with the external
connector terminal cover on.
Dust, water and others enter inside and cause
a malfunction.
Do not use the FOMA terminal without the
back cover.
May detach the battery pack or cause
malfunction or damage.
Do not cover the surface of the display or
keys with an extremely thick sticker.
May cause malfunction, damage or error.
While using a microSD Card, do not
remove the card or turn off the FOMA
terminal.
May cause data loss or malfunction.
Never place a magnetic card near or in the
FOMA terminal.
The stored magnetic data in cash cards,
credit cards, telephone cards, floppy disks,
etc. may be erased.
Never place magnetized items near the
FOMA terminal.
Putting highly magnetized items closer may
cause an error.
Notes about battery pack Notes about adapters
Battery pack is a consumable product.
Though usage time varies with use, change
battery if battery level is extremely low even
after fully charged. Purchase a specified new
battery pack.
Charge battery in areas where ambient
temperature is between 5°C and 35°C.
The usage time for a battery pack depends
on the usage and deterioration of battery
pack.
Depending on usage, the battery pack may
swell as it approaches the end of its
service life but this will not cause
problems.
Note the followings when the battery pack
is stored.
The storage with the battery pack fully
charged (immediately after charging is
completed)
The storage with no battery level (cannot
turn the FOMA terminal on)
May lower the performance or shorten the life
of the battery pack.
The second level of the battery pack icon or
approximately 40% is recommended as the
battery level for storage.
Charge battery in areas where ambient
temperature is between 5°C and 35°C.
Do not charge battery pack in the
following locations.
Areas with high humidity or dust, or in
areas exposed to strong vibrations
Close to landline phones, TVs, radios, etc.
Adapters may become warm during
charging but this is not a malfunction.
Do not use DC adapter to charge battery
when the car engine is not running.
May cause car battery to run down.
When using an outlet with a feature to
prevent the plug from being removed
accidentally, follow instructions in the
outlet user’s guide.
Do not subject to strong force or impacts.
Also, do not disfigure the charger
terminals.
May cause a malfunction.
Introduction
15
Page 18
Notes about UIM FeliCa reader/writer Caution
Do not apply unnecessary force when
inserting/removing the UIM.
Customer is responsible for malfunctions
Introduction
arising from inserting UIM into a different
IC card reader/writer.
Always keep IC area clean.
Clean only with a soft and dry cloth (such
as the type used for eyeglasses).
Keep a separate memo and note
information stored in the UIM.
DOCOMO shall not be liable for any loss of
content.
To protect the environment, please take
any unnecessary UIMs to a docomo Shop
or retailer.
Do not damage, touch haphazardly or
short-circuit the IC.
May cause data loss or malfunction.
Do not drop or otherwise subject the UIM
to severe impact.
May cause a malfunction.
Never bend the UIM or place heavy objects
on it.
May cause a malfunction.
Do not insert the UIM to the FOMA terminal
with a label or sticker attached on the
card.
May cause a malfunction.
The FeliCa reader/writer function in the
FOMA terminal uses weak electric waves
in the handling of which does not require a
license of radio station.
The frequency in use is the 13.56 MHz
band. When another reader/writer is being
used nearby, keep enough distance from
it. Make sure that there is no radio station
using the same frequency band in the
nearby area.
Never use the FOMA terminal that is
modified. Using a modified device violates
the Radio Law.
The FOMA terminal has acquired the
certification of conformity with technical
regulations for the specified radio station
based on the Radio Law, and the “Technical
Conformity Mark ” is printed on the model
nameplate of the FOMA terminal as a proof.
If the screws of FOMA terminal are removed
and a modification is given to the inside, the
certification of conformity with technical
regulations will become invalid.
Never use the FOMA terminal without the
valid certification. Doing so violates the Radio
Law.
Be careful when using the FOMA terminal
while driving a motor vehicle.
Using a mobile phone in hand while driving is
regarded as a punishable act.
However, the punishment has no application
in some cases such as when rescuing sick
and injured people or maintaining public
safety.
Use the FeliCa reader/writer function only
in Japan.
The FeliCa reader/writer function in the
FOMA terminal conforms to the domestic
radio wave standards. Using the function
overseas may result in punishment.
16
Page 19
Waterproof/Dust-proof function
SH-04C is waterproof to IPX5 (former JIS protection code
*1
and IPX7 (former JIS protection code 7)*2 standards,
5)
and dust-proof to IP5X (JIS protection code 5)
*3
standards if the external connector terminal cover is
securely closed as well as the back cover is attached and
locked.
*1 IPX5 means that phone keeps functioning after being subjected to
a jet flow (approximately 12.5 liters/min) discharged from a nozzle
(inner diameter: 6.3 mm), from all directions (approximately 3 m
from the handset) for 3 minutes or more.
*2 IPX7 means that SH-04C phone keeps functioning after it is slowly
submerged to depth of 1 m in static tap water at room temperature,
left there for approximately 30 minutes and then taken out.
*3 IP5X means the level of protection. Phone keeps functioning in
safety after it is left in the device containing dust (diameter: 75 μm
or smaller) for 8 hours, agitated and then taken out.
What you can do with waterproof/
dust-proof function of SH-04C
You can call or watch 1Seg programs without using an umbrella in
the rain (for rainfall of approximately 20 mm per hour).
You can rinse off dirt from the FOMA terminal. Wash the FOMA
terminal with low-pressure water flow (6 liters/min or lower and tap
water at room temperature (between 5°C and 35°C)), holding it
approximately 10 cm below faucet or shower head. Wash by using
only your hands, not a brush or sponge, with the back cover
attached and locked, and the external connector terminal cover
held in position. Drain the handset before use (nP. 21).
You can use the FOMA terminal at a poolside. Do not throw water
in a swimming pool on the FOMA terminal or soak the FOMA
terminal in the water of a swimming pool.
You can use the FOMA terminal in a bathroom. Do not soak the
FOMA terminal in the bathtub.
Things to keep in mind
To maintain waterproof/dust-proof performance, check
the followings.
Securely close the external connector terminal cover and the back
cover. Be careful not to place too much force on the rubber gasket
when opening and closing them.
Make sure that the external connector terminal cover and the back
cover are completely closed without floating.
Before using, make sure that the back cover lever is at the LOCK
position.
To maintain waterproof/dust-proof performance, the FOMA terminal
has the external connector terminal cover and the back cover that
allow you to close securely. May cause injuries to your nails or
fingers if you try to open them forcibly.
Introduction
17
Page 20
Opening external connector terminal cover
Slot
Back cover
Securely push
tab areas down
with both hands
Lever
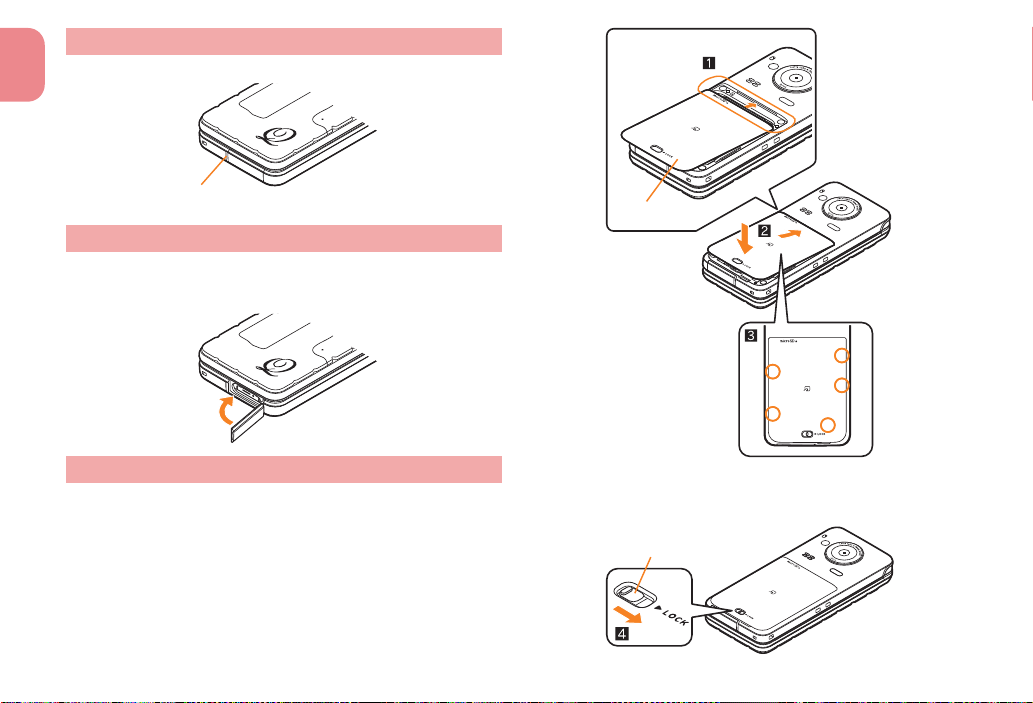
Hook a finger on the slot to open.
Introduction
Closing external connector terminal cover
Push and close securely in the direction of the arrow so that gaps are
not left between the FOMA terminal and the external connector
terminal cover.
Attaching back cover
Insert the tab of the top of the back cover
1
into the FOMA terminal slot (1), attach it
in the direction of the arrow (2) and
securely push down with both hands (3)
The back of the back cover has also five tabs to insert the back
cover. Securely push tab areas down with both hands so that
gaps are not left between the FOMA terminal and the back cover.
18
Slide the back cover lever in the direction
2
of the arrow (4) to lock
Page 21
Removing back cover
Slot
To maintain waterproof/dust-proof performance, replacement of
parts is required every 2 years regardless of whether the FOMA
terminal appears normal or abnormal. DOCOMO replaces the
parts as a chargeable service. Bring the FOMA terminal to a
repair center that DOCOMO specifies.
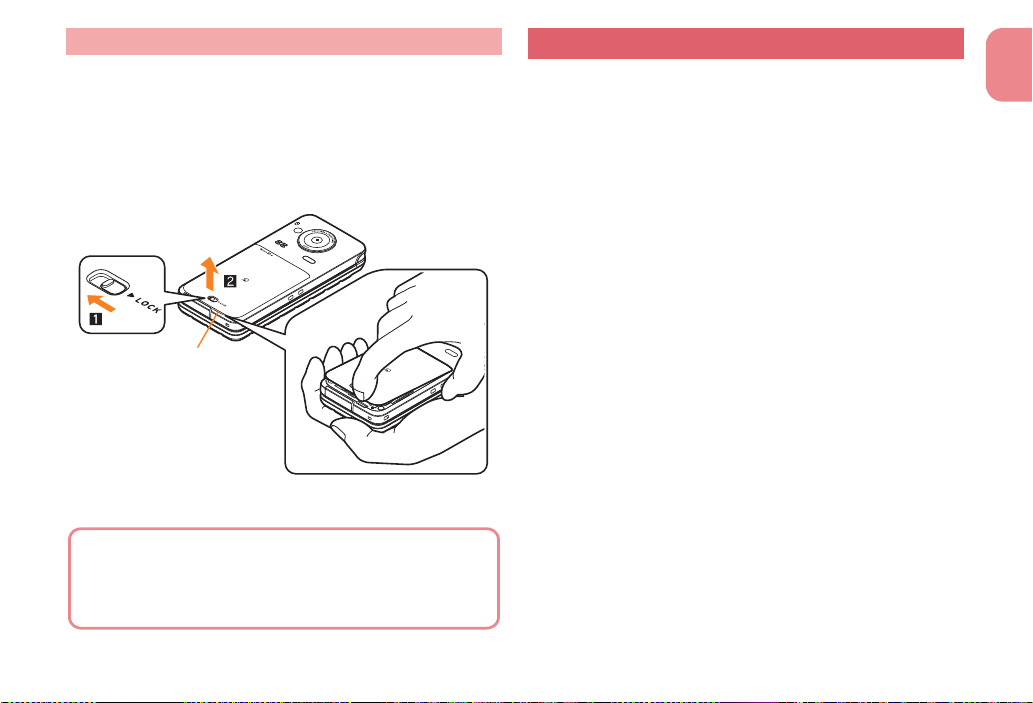
Slide the back cover lever in the direction
1
of the arrow (1) to unlock and remove the
back cover (2)
The FOMA terminal has a slot to remove the back cover.
Securely hold the FOMA terminal as shown in the illustration to
prevent excessive force on the back cover and hook a nail on
the slot and remove the back cover upward.
Precautions
When your hands or the FOMA terminal are wet, do not attach/
remove the back cover or open/close the external connector
terminal cover.
Securely lock the back cover and close the external connector
terminal cover. Even a fine obstacle (one hair, one grain of sand,
tiny fiber, etc.) put between contact surfaces may allow water to
seep or dust to get in.
If the FOMA terminal gets wet with water or other liquids with the
external connector terminal cover or the back cover open, the liquid
may get inside the terminal causing electric shocks or malfunction.
Stop using the FOMA terminal, turn off the power, remove the
battery pack and contact a repair center that DOCOMO specifies.
The rubber gasket of the external connector terminal cover and the
back cover play an important role in maintaining waterproof/
dust-proof performance. Do not remove or scratch them. Also,
prevent dust from adhering to them.
If the rubber gasket of the external connector terminal cover or the
back cover is damaged or deformed, replace it at a repair center
that DOCOMO specifies.
Do not insert sharp objects through external connector terminal
cover and back cover gaps. It causes damage to the rubber gasket
and allow water to seep or dust to get in.
If the back cover is damaged, replace it. Water may seep inside
from a damaged section causing troubles such as electric shocks or
corrosion of the battery.
Do not use the FOMA terminal underwater (including opening/
closing and key operations). May cause malfunction.
Do not apply water flow stronger than allowed (nP. 17) (over 6
liters/min). May cause malfunction though SH-04C provides
waterproof performance of IPX5.
Do not let the FOMA terminal get wet with liquids other than water
at room temperature (between 5°C and 35°C).
Introduction
19
Page 22
Do not wash the FOMA terminal in a washing machine, etc.
Soap/Detergent/
Bath powder
Seawater Swimming pool
Sand/DirtHot spring
DOCOMO does not guarantee actual operations under all
states. Malfunctions deemed to be caused by inappropriate
operation by the customer are not covered by the warranty.
To prevent condensation, do not bring the FOMA terminal from a
cold place to a bathroom, etc. without letting the FOMA terminal
cool to room temperature.
Do not expose the FOMA terminal to extreme humidity for long
Introduction
periods. Avoid prolonged use in bathrooms.
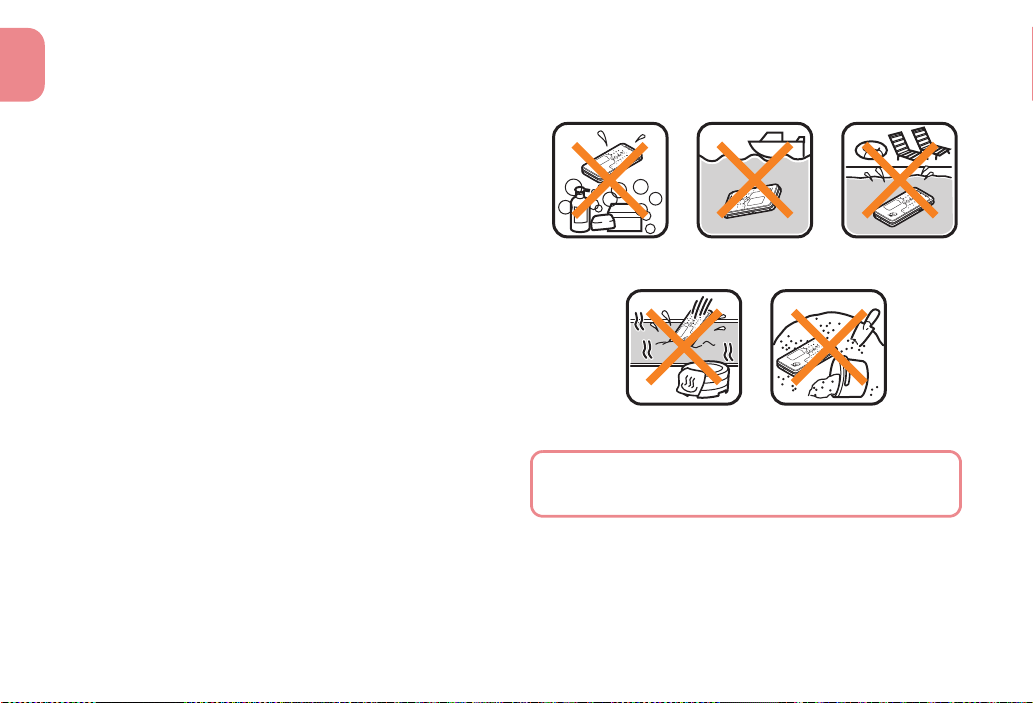
Never soak the FOMA terminal in hot spring water or water
containing soap, detergent or bath powder.
Do not soak the FOMA terminal in hot water, use it in a sauna or
apply hot air (from a hair dryer, etc.) to it.
Do not soak the FOMA terminal in seawater.
Do not put the FOMA terminal directly on sand/dirt.
Do not leave the FOMA terminal wet. In cold places, water may
freeze and cause malfunction.
The FOMA terminal does not float on water.
Do not let the FOMA terminal fall. It may become scratched and
cause the waterproof/dust-proof performance to degrade.
Do not leave water on the mouthpiece, earpiece or speaker. Such
water may interfere with talking.
Accessories and optional parts are not waterproof/dust-proof. When
the FOMA terminal is placed on the exclusive desktop holder, do
not use it in rooms which water is regularly in use such as
bathroom, shower room, kitchen, lavatory, etc. even if it is not
connected to the AC adapter.
20
Page 23
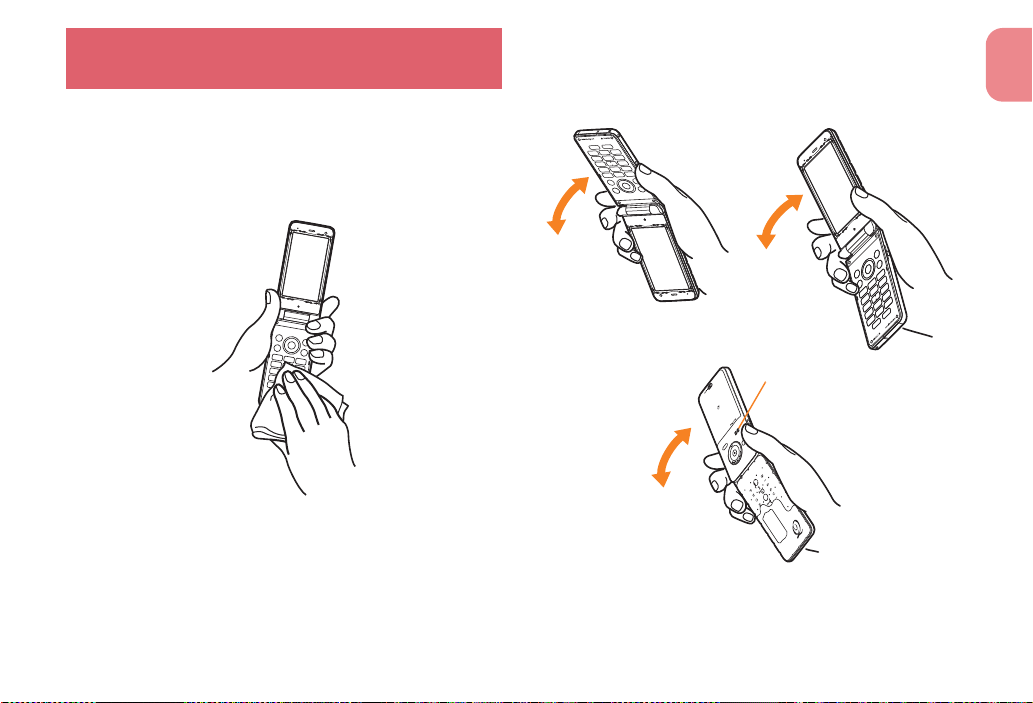
Draining water when the FOMA
To drain water off the speaker,
shake the FOMA terminal with
the speaker upward
terminal gets wet
When the FOMA terminal is wet, water may flow out after
wiping it off. Drain the water following the steps below.
Wipe the FOMA terminal surface with dry
1
and clean cloth, etc.
If a strap is attached, dry the strap well.
Shake the FOMA terminal approximately
2
20 times, securely holding its hinge
section, until there is no more water
splattering
Introduction
21
Page 24
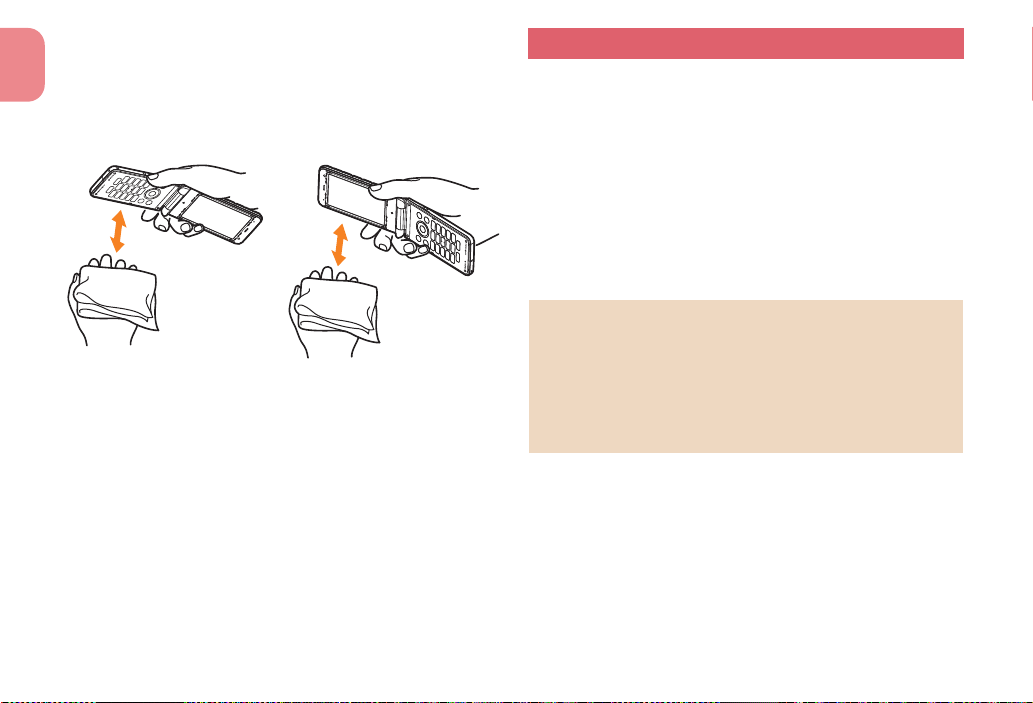
Softly press dry and clean cloth, etc.
3
against the FOMA terminal to wipe off
water remaining in the mouthpiece,
Introduction
earpiece, speaker, keys, air vent or hinges
Pat the opening with cloth to remove water because there may
be any water remaining in the grooves of each part.
Wipe off water drained from the FOMA
4
terminal with dry and clean cloth, etc.
Water, if any, remaining in the FOMA terminal may ooze up
after wiping off.
Charging
Accessories and optional parts are not waterproof/
dust-proof. Check the followings before and after
charging.
Make sure that the FOMA terminal is not wet. If the FOMA terminal
is wet or after the FOMA terminal is wet, adequately drain it and
wipe off water with dry and clean cloth, etc. before placing on a
desktop holder or opening the external connector terminal cover.
When the external connector terminal cover is opened for charging,
close the cover securely after charging. It is recommended that the
desktop holder be used for charging to prevent water from seeping
inside and dust from getting in from the external connector terminal
cover.
Never try to charge the battery pack when the FOMA terminal is
wet.
Do not touch the AC adapter or desktop holder with your wet
hands. May cause electric shock.
Do not use the AC adapter or desktop holder in a place subject to
water. Do not use the AC adapter or desktop holder in rooms
which water is regularly in use such as bathroom, shower room,
kitchen, lavatory, etc. May cause fire or electric shock.
22
Page 25
~~~~~ ~~~~~ ~~~~~ ~~~~~ ~~~~~
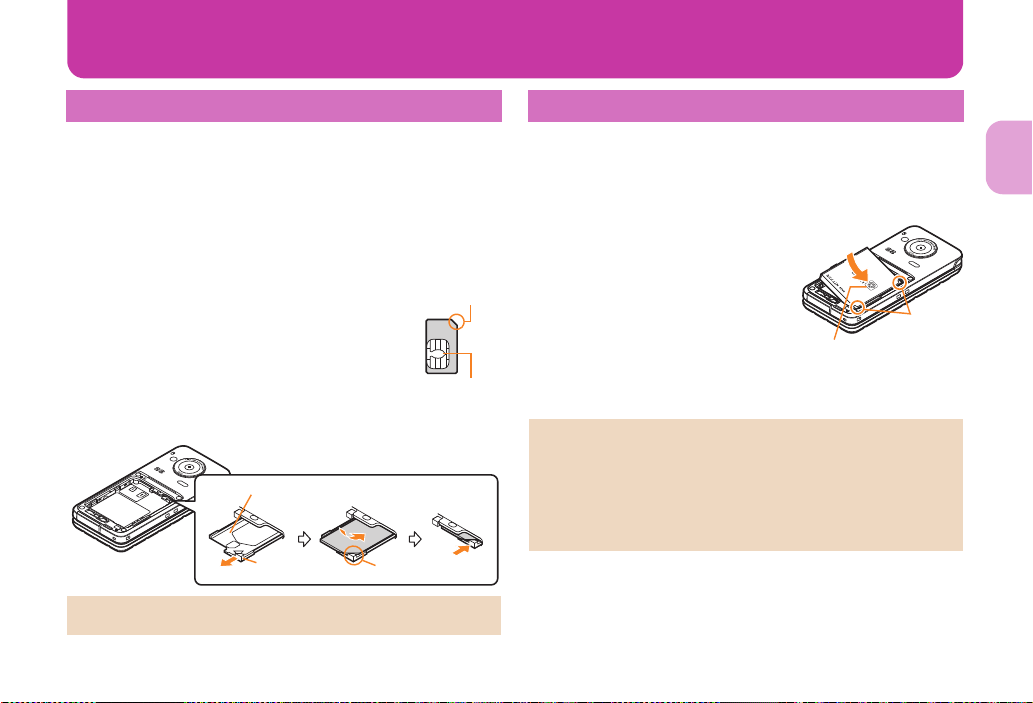
Basic Operation
Notch
IC (gold)
123
Notch
Tray
Tab
Tabs
With a recycle mark
side up
Before Using
Inserting UIM
A UIM is an IC card that records personal information,
such as phone numbers, etc.
The FOMA terminal does not support the UIM (blue). Change the
UIM (blue) at a docomo Shop.
Hook a finger on the tab and pull out the
1
tray (1)
Pull out the tray straight until it stops.
Hold the UIM with the IC (gold)
2
turned down and set on the tray
(2)
Push the tray all the way in (3)
3
Note that inserting or removing the UIM forcibly may damage the
UIM or deform the tray.
Attaching battery pack
Perform with the FOMA terminal turned off and closed while holding
with your both hands.
The battery pack is not waterproof/dust-proof.
Remove the back cover (nP. 19)
1
Attach the battery pack
2
Turn a recycle mark side of the
battery pack up, match tabs and
attach the battery pack.
Attach the back cover (nP. 18)
3
Using unnecessary force when attaching or removing the battery
pack may damage the connector terminal for the battery pack
(charger terminal) on the FOMA terminal.
Securely close the back cover. If not closed securely, the back
cover may come off and the battery pack may fall out due to
vibration. May damage the waterproof/dust-proof performance and
allow water to seep or dust to get in.
Basic Operation
23
Page 26
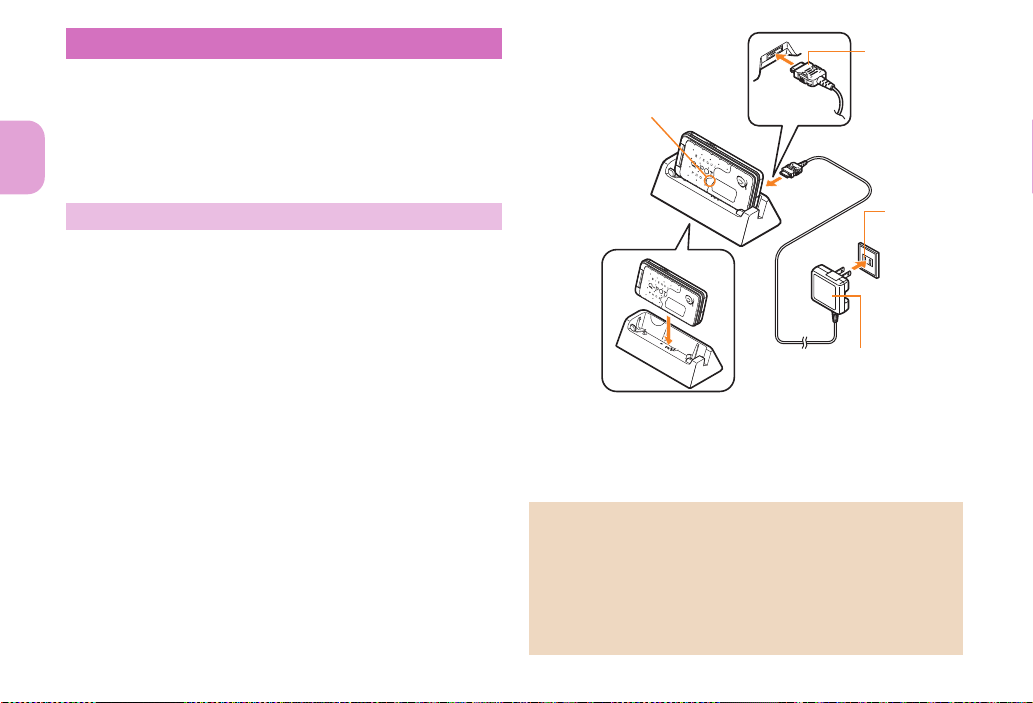
Charging
2
1
Charging LED
Connector
(Turn the side
with the arrows
up)
FOMA AC
Adapter 01/02
100V AC
outlet
3
It is recommended that the exclusive desktop holder be used for
charging to prevent water from seeping or dust from getting in
caused by forgetting to close the external connector terminal cover.
The AC adapter and desktop holder are not waterproof/dust-proof.
Never try to charge the battery pack when the FOMA terminal is
wet. For precautions on the waterproof/dust-proof performance
when charging nP. 22
Basic Operation
Charging by using desktop holder
Method of charging by using Desktop Holder SH32 (sold
separately) is explained here. Read the user’s guide of desktop
holder to be used.
Use with the FOMA terminal closed.
Turn the side with the arrows of the AC
24
1
adapter connector up and insert it into the
connector terminal of the desktop holder
(1)
Keep the connector parallel with the desktop holder and
securely push all the way in until it clicks.
Insert the AC adapter power plug into an
2
outlet (2)
When placing the FOMA terminal in the
3
desktop holder, charge alert is heard,
charging LED illuminates, and charging
starts
Place the FOMA terminal in the direction of the arrow until it
clicks (3).
Charging is complete when charge alert is
4
heard and charging LED turns off
Hold the desktop holder, flip the FOMA terminal forward and
lift it out.
Pull the AC adapter out of the outlet when left unused for a long
period of time.
When charge alert is not heard or when charging LED does not
illuminate, check that the FOMA terminal is placed securely in the
desktop holder (except when terminal is turned off, manner mode
is set or charge alert is [OFF]).
When placing the FOMA terminal in the desktop holder, be careful
not to catch a strap, etc.
Page 27
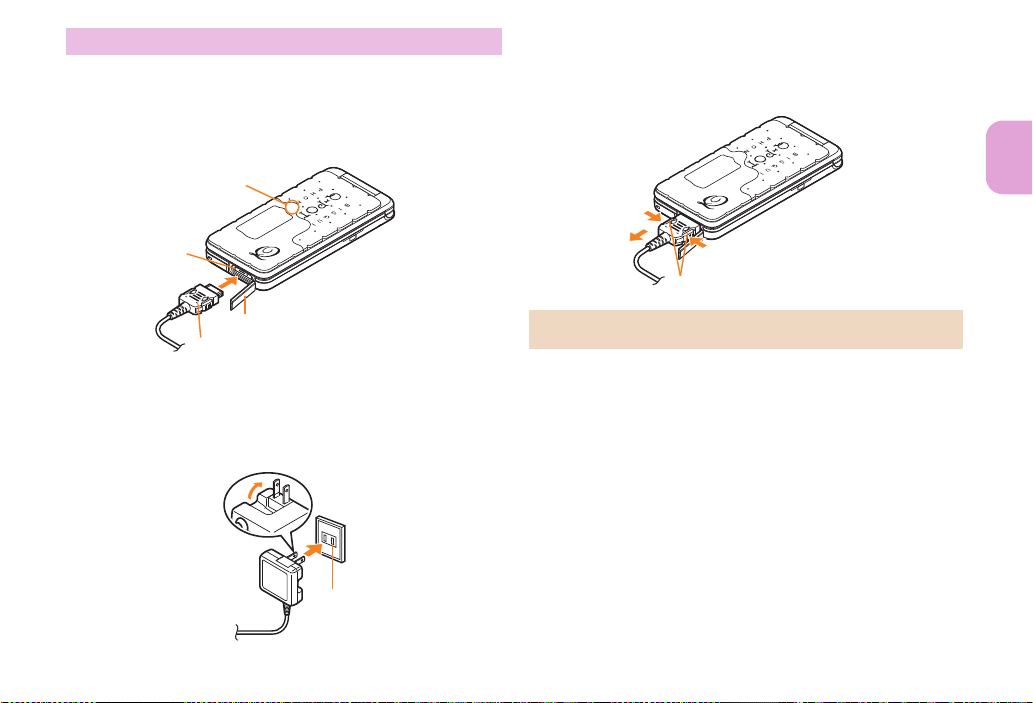
Charging by using AC adapter
External connector
terminal
External connector terminal cover
Connector (Turn the side with the arrows up)
Charging LED
1
100V AC
outlet
Release buttons
1
2
1
Read the user’s guide of FOMA AC Adapter 01/02 (sold separately).
Open the external connector terminal cover
1
and insert the AC adapter horizontally into
1
the external connector terminal (
When inserting the AC adapter power plug
2
)
into an outlet, charge alert is heard,
charging LED illuminates, and charging
starts
When charge alert is heard and charging
3
LED turns off, charging is complete
When removing the connector, always hold the release
buttons on both sides (1) and unplug it horizontally (2).
Do not forcibly insert or remove. May cause damage to the
external connector terminal and the connector.
Basic Operation
25
Page 28
Turning power on
H (for at least 2 seconds)
1
Stand-by display appears when initial settings are complete.
Press H for at least 2 seconds to turn the power off.
Changing screen display to English
Basic Operation
[文字表示/入力] (Text display/input)/
[Select language]/[English]
In the Normal menu, [本体設定] (Setting)/
1
Making initial setting
If the setting of Password or Request permit/deny is not complete,
the setting screen appears every time the power is turned on.
Alternatively, in the Normal menu, [Setting]/[Other setting]/[Initial
setting] to display the setting screen.
[Date and time setting]/set the date and
1
time
[Password]/register a terminal security
2
code
[Keypad sound]/set the key sound
3
[Text size]/set the font size collectively
4
[Request permit/deny]/set GPS location
5
provision
C
6
26
Checking your own phone number
In the Normal menu, [Profile]
1
Saving your own name and image
In the Normal menu, [Profile]
1
C/enter the terminal security code
2
Set each item/C
3
Changing mail address or configuring spam
mail prevention
You can connect to the i-mode site for changing mail address or
configuring spam mail prevention, etc. Refer to “Mobile Phone User’s
Guide [i-mode] FOMA version” for details on setting method.
In stand-by, m/[Mail setting]/
1
[Address/Spam Setting]
[Yes]
2
Page 29
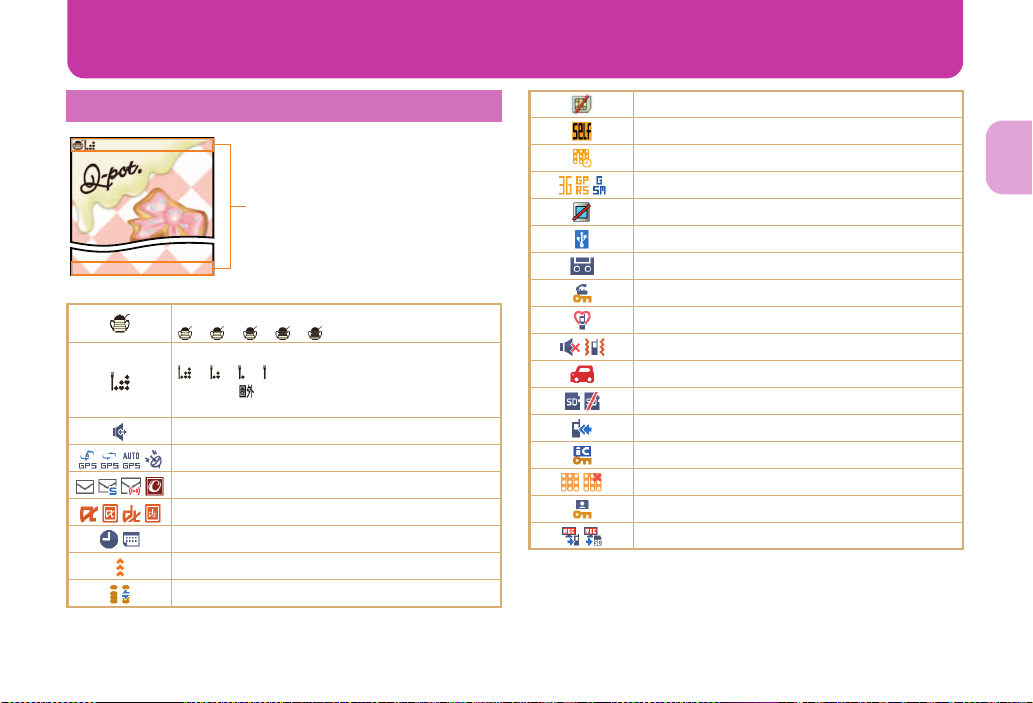
Screen Explanation
Icon display area
Viewing display
Main icons
Battery level
bbbb (High b Low)
Signal status
bbb (Strong b Weak)
When [ ] appears, the handset is outside the
service area or in a place with no signal.
Hands-free
GPS
i-mode mail/SMS/Area Mail/Information received
i-appli
Alarm/Schedule
Ir communication
i-mode
UIM error
Self mode
Music&Video Channel program reservation
3G/GSM
VeilView
USB connection
Record message
Keypad dial lock
Manner mode
Silent/Vibrator
Public mode (Drive mode)
microSD Card
Software update
IC card lock
Music&Video Channel
Personal data lock
1Seg recording
Basic Operation
27
Page 30
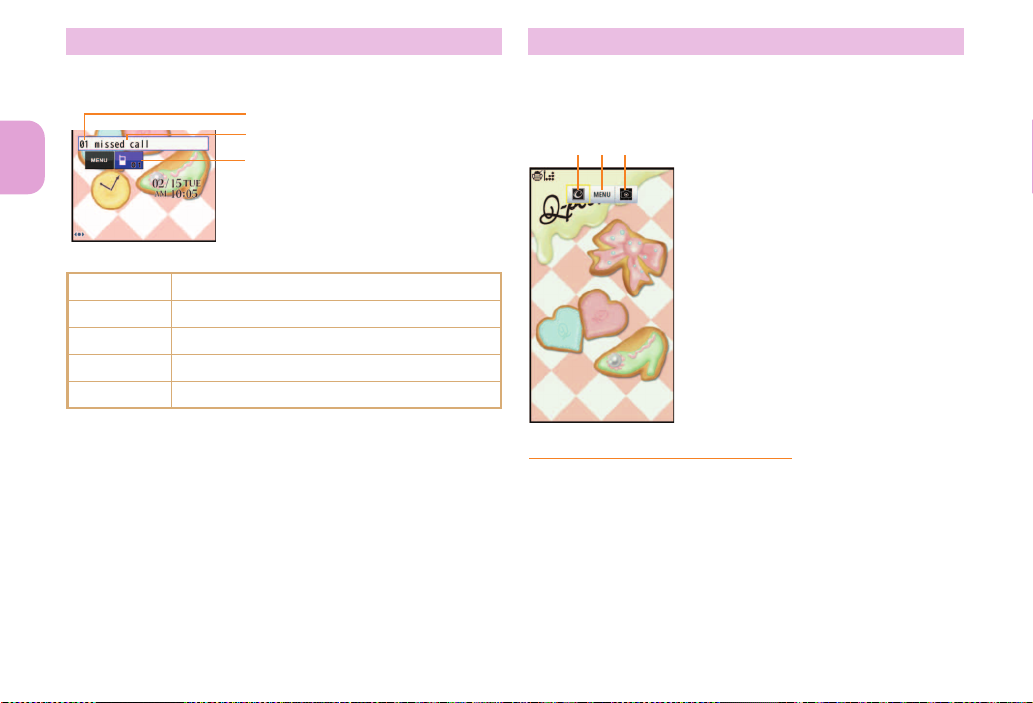
Checking notices with stock icon
Number of entries
Message
Stock icon
21 31i-concier button
2MENU button
3Camera launcher button
Activates still picture shooting,
moving picture shooting, Pretty
arrange camera, Effect camera,
Recommended photo,
Shotmemo, Kanji/English
Grabber, Golf swing video
camera and Shotdeco.
Stock icons appear in the stand-by display and notify you when a call
is missed or a new mail is received.
Basic Operation
Main stock icon type
B
F
E
C
G
* The displayed message differs depending on the menu screen.
A stock icon appears in the stand-by
1
display/t&
Select the stock icon
2
The stock icon and message disappear after you check the
details.
xx missed call
xx message
xx voice mail
xx mail message
Normal menu/Basic menu/Shortcut menu
Display and operation of Stand-by accessory
Stand-by accessory allows you to perform functions by displaying
accessory icons which are i-concier, MENU and camera to activate in
the stand-by display.
Stand-by Accessory is set to [OFF] by default.
*
Setting Stand-by accessory
In the Normal menu, [Setting]/[Screen/
1
Display]/[Stand-by display setting]/
[Stand-by Accessory]
Select the setting
2
28
Page 31
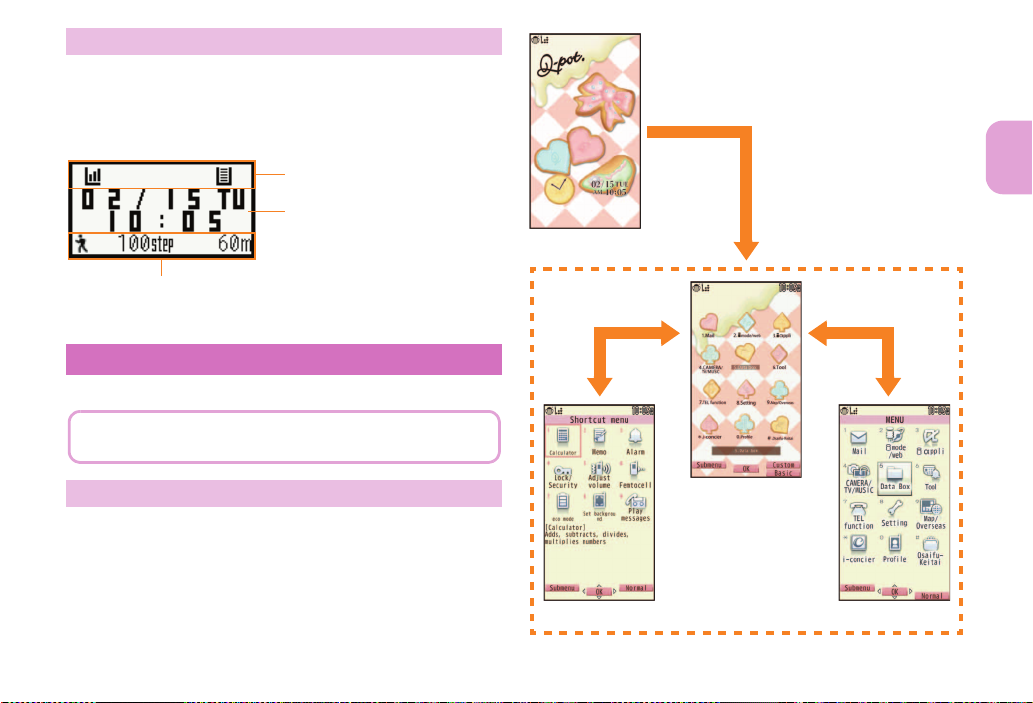
Viewing sub display
Icon display area
Clock display
Function display
Functions set to Small clock function in the Display
setting of Sub-display setting appear.
The explanations in this manual are based on the method for
retrieving a function from the Normal menu.
z
i
Stand-by display
Normal menu
Basic menuShortcut menu
C
You can change the menu
which is displayed when you
press z (nP. 36).
The following shows a screen when Clock display is set to [Stand-by
clock (S)] and Small clock function is set to [Steps/distance] in the
Display setting of Sub-display setting (nP. 36).
Set Wellness display to [ON] to use Small clock function and Set
pedometer to [ON] to use a pedometer.
Setting and selecting menu
Set, change or register functions from the menu screens.
Displaying each menu
Press z in the stand-by display to display Normal menu, Basic menu
and Shortcut menu.
Basic Operation
29
Page 32
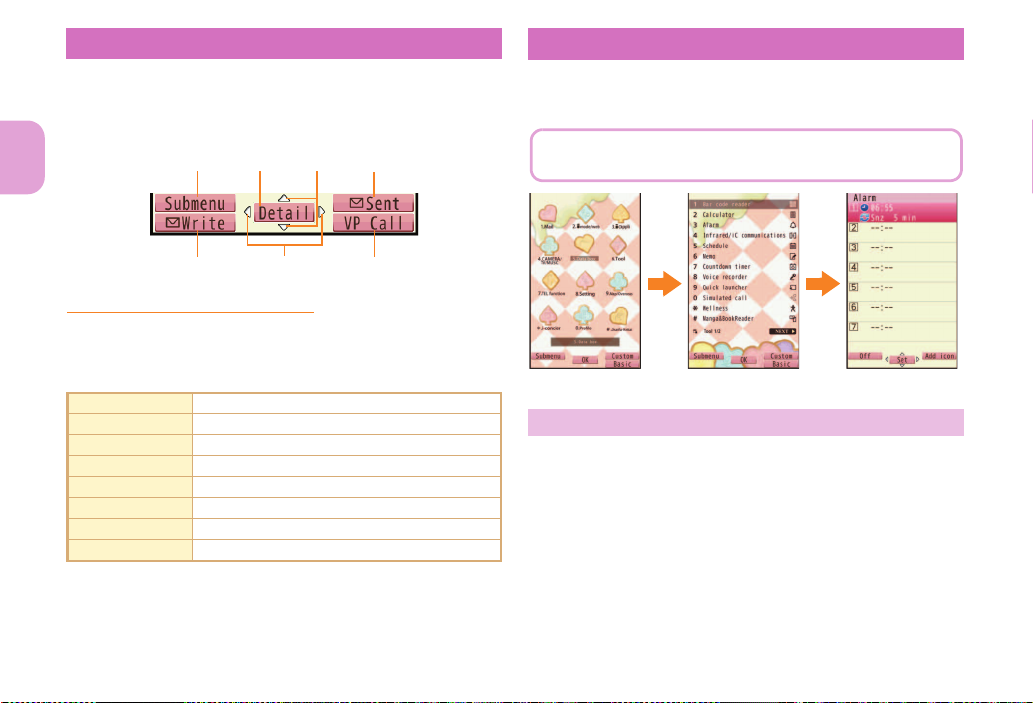
Operation guidance key
zC
im
t&
v&
u&
The way of activating alarm with Multi guide key is explained as an
example below.
w&t&
w&t&
Normal menu [Tool] appears Alarm is activated
Use to select or execute the menus displayed in the
operation guidance. The following shows the keys
assigned to select or execute the menu items displayed
in the guidance.
Basic Operation
Operation guidance menu
In the operation guidance, menus appear according to the function
being used and situation.
The following table describes examples of the main operation
guidance menus that appear.
OK Set selected item
Submenu Display the submenu
Agree Check selected image or music, etc.
Back Return to the previous screen
Show all Display sorted files as a list
Cancel Cancel an operation such as receiving mail
SelAll/ClrAll Select/Disable all selectable items
Close Close the submenu, etc.
Menu operation
For details on the available functions nP. 88
The method for selecting functions may differ depending on the
Kisekae Tool set for the Normal menu.
Selecting a function from submenu
When [Submenu] appears in the operation guidance, functions
(submenu) that can be used in the screen appear by pressing z.
Select the displayed submenu with w&.
If there are multiple pages in submenu, change pages with w&.
30
Page 33
Using Quick voice activation
※ Quick voice activation function is provided in Japanese.
You can retrieve and execute a function with voice in the
stand-by display.
It is convenient when you cannot find the menu of
function to use or when you want to activate a function
immediately.
In stand-by, s (for at least 1 second)
1
When [それではどうぞ ★★音声受付中★
2
★] (Go ahead ★★Receiving voice★★)
appears, speak the function to use to the
mouthpiece
Speak approximately within 10 seconds. When you stop
speaking, approximately 10 seconds past or you press t&,
voice activation ends and applicable function is activated.
Guide (in Japanese only) is activated when the function to be
used is not specified.
In the following cases, Quick voice activation may not work
properly.
When the voice is too loud or too low
When the surrounding noise is big
When the phonation is not clear
When the phonation is not natural or too fast
Using Guide
※ Guide function is provided in Japanese.
Use this function when you do not know the operation
method of FOMA terminal. Guide appears and you can
check the explanations and operation methods of each
function. Also, you can activate functions directly from
Guide.
In the Normal menu, [Tool]/[Guide]
1
Select the item
2
Basic Operation
31
Page 34
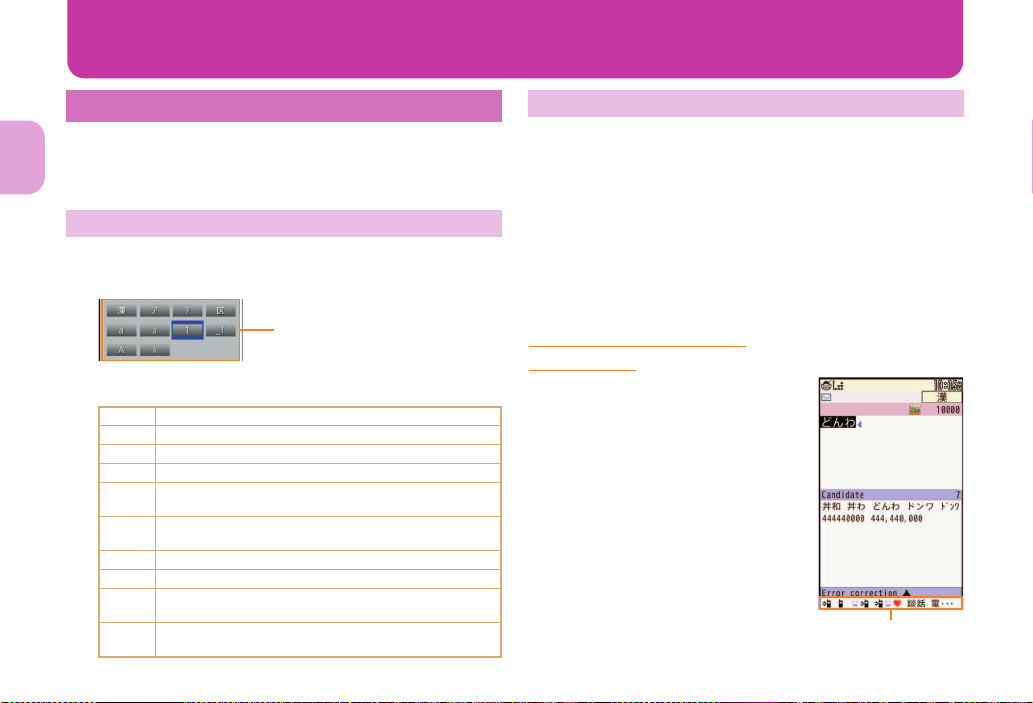
Character Entry
Items to switch
Error correction
conversion field
Entering characters
Enter characters for functions such as phonebook and
mail on the FOMA terminal.
The explanations in this manual are based on method for entering
Basic Operation
characters in 5-touch entry method.
Switching entry modes
Switch entry modes to enter various types of characters.
In the character entry screen, m
1
Select the entry mode
2
Kanji/Hiragana
漢
Double-byte katakana
ア
Single-byte katakana
ア
Kuten code
区
Double-byte alphabet characters
a
(lower case b upper case)
Single-byte alphabet characters
a
(lower case b upper case)
Double-byte numbers
1
_1
Single-byte numbers
Double-byte alphabet characters
A
(upper case b lower case)
Single-byte alphabet characters
A
(upper case b lower case)
32
Entering characters
Example: When entering “電話”
In the character entry screen, enter “
1
でんわ: 4 (four times)/* (once)/0 (three times)/r&/
0 (once)
To enter multiple characters assigned to the same key: Enter a
character/r&/enter a character
C
2
t&
3
Using error correction
conversion
Error correction conversion field may appear
under the conversion candidates field when
entering wrong character which is assigned
to the same key. Press o& to display the
corrected conversion candidate in the
conversion candidates field.
でんわ
”
Page 35
Entering pictograms/symbols
In the character entry screen, C
1
To switch between pictogram and Deco-mail pictogram: C
To switch between single- and double-byte symbols: z
Select a pictogram/symbol
2
Using phrases
In the character entry screen, z/[Quote
1
phrase/data]/[Phrase]
Select a phrase
2
Entering emoticons
In the character entry screen, z/[Pict/
1
Symbol/Smiley]/[Smiley]
For a mail message: In the character entry screen, z/
[Quote phrase/data]/[Pict/Symbol/Smiley]/[Smiley]
Select a category/select an emoticon
2
Copying/Cutting characters
In the character entry screen, z/[Copy]/
1
[Cut]
For a mail message: In the character entry screen, z/
[Copy/Cut/etc.]/[Copy]/[Cut]
Select the start position
2
Select the end position
3
The highlighted text string is copied.
Pasting characters
In the character entry screen, point the
1
cursor to the paste position/z/[Paste]
For a mail message: In the character entry screen, point the
cursor to the paste position/z/[Copy/Cut/etc.]/[Paste]
Basic Operation
33
Page 36
Sound/Screen Setting
Changing ring tone
In the Normal menu, [Setting]/[Sound/
1
Vibration/Manner]/[Ring tone]
Basic Operation
Select an item
2
;[Call ring tone]/select an item
;[Videophone]
;[Mail]/select an item
Set each item/C
3
Changing ring tone volume
In the Normal menu, [Setting]/[Sound/
1
Vibration/Manner]/[Adjust volume]
Select an item
2
;[Alert/Call volume]/select an item/u&
;[Mail/Msg. alert vol]/u&
34
Changing keypad sound volume
In the Normal menu, [Setting]/[Sound/
1
Vibration/Manner]/[Adjust volume]
[Operation sound]/u&
2
Setting vibrator
You can set the vibration for incoming calls, GPS
positioning, alarms and using i-appli.
In the Normal menu, [Setting]/[Sound/
1
Vibration/Manner]/[Vibration mode]
Select an item
2
Select the vibrator
3
Note that if you set the vibrator and put the FOMA terminal on a
table, it may fall due to vibration.
Page 37
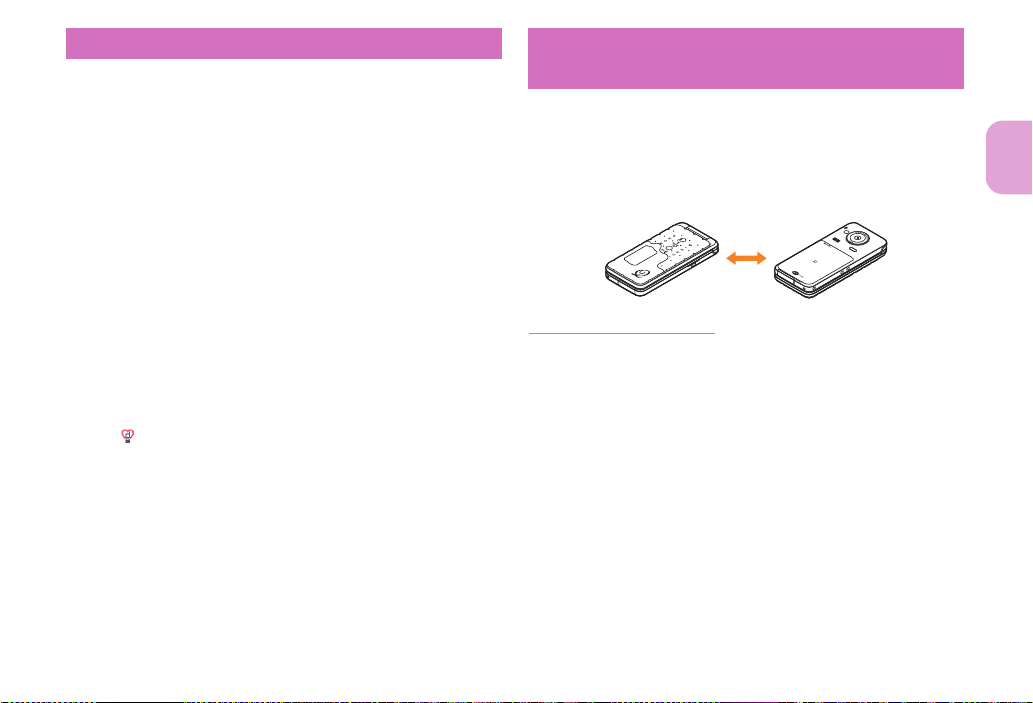
Using manner mode Stopping ring tone or alarm sound
You can switch the FOMA terminal to mute.
The following sounds are heard even while the manner mode is set.
Shutter sound of camera
Record start/end sound of camera
Start/End sound of voice recorder
The vibrator is activated regardless of the manner mode settings
when the earthquake early warning is received. In addition, when
any of the following sounds is set to ring in the Personalized, the
dedicated alarm tone (beep sound) also sounds.
Keypad sound Call alert volume Mail alert volume
Alarm sound Low battery alert
In the Normal menu, [Setting]/[Sound/
1
Vibration/Manner]/[Silent mode]
Select a type
2
;[General]
;[Personalized]/set each item/C
;[Silent manner mode]
[ ] appears when the manner mode is set.
with motion silent
Even if manner mode is not set, you can stop the ring
tone, alarm tone, or timer sound, etc. temporarily by
turning the FOMA terminal back.
Turn the FOMA terminal back while a call
1
is being received or alarm sounds
Using motion silent
In the Normal menu, [Setting]/[Sound/
1
Vibration/Manner]/[Motion silent]
Select the setting
2
Basic Operation
35
Page 38
Changing screen setting
Changing main display
In the Normal menu, [Setting]/[Screen/
1
Display]/[Stand-by display setting]/
[Image/i-appli]
Basic Operation
Select an item
2
Making display hard to see from people
around
Display the pattern (design or animation) on the screen to prevent
others from seeing the screen.
$ (for at least 1 second)
1
[ ] appears when VeilView is set.
Disabling VeilView
$ (for at least 1 second)
Changing sub display
In the Normal menu, [Setting]/[Screen/
1
Display]/[Sub-display setting]
[Display setting]/set each item/C
2
36
Changing menu display
You can set the start menu which is displayed when you press z in
the stand-by display.
In the Normal menu, [Setting]/[Screen/
1
Display]/[Menu preference]
[Select startup menu]/select a menu
2
Changing font size
In the Normal menu, [Setting]/[Text
1
display/input]/[Font size]
Select an item/select the font size
2
Page 39
Changing Machi-chara setting
A character appears in the stand-by display when you set
Machi-chara.
In the Normal menu, [Setting]/[Screen/
1
Display]/[Machi-chara setting]
[Display setting]/set each item/C
2
Setting to talk with Machi-chara
You can set whether to output Machi-chara voice when you use Quick
voice activation (in Japanese only).
Pre-installed [メイちゃん] and [セイリアン] are compatible with
Machi-chara chat setting.
In the Normal menu, [Setting]/[Sound/
1
Vibration/Manner]/[Machi-chara chat
setting]
Select the setting
2
Setting Kisekae tool
You can change the Normal menu screen, stand-by
display, menu icon, ring tone, etc. collectively.
In the Normal menu, [Setting]/[Screen/
1
Display]/[Kisekae Tool setting]
Point the cursor to Kisekae tool/C/
2
[Yes]
To check data: Select Kisekae tool (to display data list screen
in Kisekae tool)/select data
Basic Operation
37
Page 40
Setting illumination
When selecting illumination
pattern and illumination color, you
can check flushing pattern or color
of illumination by pointing the
cursor to the pattern and color.
Alternatively, 5 (for at least 1
second) in the stand-by display to
set.
In the Normal menu, [Setting]/[Backlight/
1
Illumination]/[Light alert]
Checking missed calls or new mails
In the Normal menu, [Setting]/[Screen/
1
Display]/[Each display setting]
Select an item
2
Set each item/C
3
Basic Operation
38
[Info display & light]/select an item
2
Following items can be set.
Caller/Sender info: Set whether to display phone numbers
or names registered in phonebook when receiving a call or
mail.
Indicator light: LED flashes at approximately 4-second
intervals and notify you of missed calls and new mails.
Setting eco mode
In the Normal menu, [Setting]/[Battery]/
1
[eco mode]
[ ] appears when eco mode is set.
Page 41
Setting light of display and keypad
Set light of display and keypad.
In the Normal menu, [Setting]/[Backlight/
1
Illumination]/[Display light]
Select an item
2
;[Display light time]/select an item/select the
setting
• You can set the length of light time for each function when
the FOMA terminal is not in use for a set length of time.
;[Light time-out]/select the time
• Display is turned off when the FOMA terminal is not in use
for a set length of time.
;[Brightness]/u&
• You can select from five display brightness levels. Check
brightness with adjusting.
• ON/OFF of Brightness sensor: z
• The display brightness is automatically adjusted according
to the surrounding light if you use brightness sensor.
;[Keypad backlight]/select the setting/C
Setting function to activate by
pressing side key for at least 1 second
You can set the function to activate from still picture
shooting, Simulated call and Picture Light, by pressing &
for at least 1 second with the FOMA terminal closed.
In the Normal menu, [Setting]/[Other
1
setting]/[Side key shortcut]
Select the setting
2
Basic Operation
39
Page 42
Lock/Security
Precautions for various security codes
Do not use easily estimated numbers for security codes to be
set such as “birthday”, “part of a phone number”, “address or
room number”, “1111” or “1234”. Keep a separate memo of
security codes.
Keep security codes private. If the security codes are found and
improperly used by others, DOCOMO shall not be liable for any
loss of the users.
If you forget your security codes, you are required to bring your
identification (a driver’s license, etc.), your FOMA terminal and
your UIM to a docomo Shop.
For further details, contact the number listed in “General
Inquiries” on the back of this manual.
PUK (PIN Unlock Key) is described in the agreement form
(customer copy) you received at the time of subscription at a
docomo Shop. If you made a subscription outside a docomo
Shop, bring your identification (a driver’s license, etc.) and your
UIM to a docomo Shop or contact the number listed in “General
Inquiries” on the back of this manual.
Various security codes
Some functions for convenient use of the FOMA terminal
require security codes.
Basic Operation
40
Terminal security code (Default: 0000)
If you enter the wrong terminal security code five times
continuously, the power is turned off.
Changing terminal security code
In the Normal menu, [Setting]/[Lock/
1
Security]/[Change security code]/enter
the current terminal security code
Enter the new terminal security code
2
Enter the new terminal security code
3
again
C
4
Network security code
Network security code is a four-digit code required for confirming the
subscriber’s identity when an order is received at a docomo Shop,
docomo Information Center or “お客様サポート” (user support) (in
Japanese only), or used for accessing various network services.
(At subscription: Set any code)
Page 43
Changing network security code
You cannot change the code.
Setting PIN code
In stand-by, i/[お客様サポート] (user
1
support)/[各種設定 (確 認・変 更・利 用 )]
(settings (check/change/use))/[ネット
ワーク暗証番号変更] (change network
security code)
i-mode password (At subscription: 0000)
A four-digit “i-mode password” is required to register/delete sites in マ
イメニュー (My menu), or subscribe/cancel message services and
charged i-mode services (Additionally, information providers may set
their own passwords).
Changing i-mode password
In stand-by, i/[English]/[Options]/
1
[Change i-mode Password]
PIN1 code/PIN2 code (At subscription: 0000)
You can set two security codes, PIN1 code and PIN2 code, on the
UIM.
The PIN1 code is a four- to eight-digit security code that is entered
when a UIM is inserted or when the FOMA terminal is turned on to
prevent unauthorized use by a third party. Enter the PIN1 code to
enable making/receiving calls and operating the handset. The PIN2
code is four- to eight-digit security code that is entered for performing
operations such as resetting total call cost or using client certificates,
or applying for.
If you enter the wrong PIN1 code or PIN2 code three times
continuously, it is locked.
In the Normal menu, [Setting]/[Lock/
1
Security]/[UIM setting]
Select an item
2
;[Change PIN1 code]/enter the terminal security
code/enter the current PIN1 code/enter the new
PIN1 code/enter the new PIN1 code again/C
• When the PIN1 entry ON/OFF is set to [OFF], you cannot
change the PIN1 code.
;[Change PIN2 code]/enter the terminal security
code/enter the current PIN2 code/enter the new
PIN2 code/enter the new PIN2 code again/C
;[PIN1 entry ON/OFF]/[ON]/enter the PIN1 code
• You can set to enter the PIN1 code when the power is turned
on.
PUK (PIN Unlock Key)
PUK is an eight-digit number used to disable the PIN1/PIN2 code lock.
If you enter the wrong code ten times continuously, the UIM is
completely locked. In this case, contact a docomo Shop.
Basic Operation
41
Page 44
Various lock functions
Lock
function
All lock Prevents all operations other than power on/off and
Basic Operation
Omakase
Lock
Self mode Prevents communication such as calls, i-mode mails,
Personal
data lock
answering calls/videophone calls.
Enable: In the Normal menu, [Setting]/[Lock/
Security]/[Lock settings]/[All lock]/enter the
terminal security code
Disable: In stand-by, enter the terminal security
code
Omakase Lock is a service to lock the personal data
and IC card functions in case of loss, etc. by only your
request to DOCOMO via phone.
Set/Release Omakase Lock
s 0120-524-360 Office hours: 24 hours (in
Japanese only) (open all year round)
※ Unavailable from part of IP phones.
Omakase Lock can also be set/released from the
My docomo website using PCs.
Refer to “Mobile Phone User’s Guide [Basic
Usage]” for details on Omakase Lock.
i-mode, iC communication or Ir communication.
Enable/Disable: In the Normal menu, [Setting]/
[Other setting]/[Self mode]/select the setting/
[Yes]
Prevents the display of mail, personal information, etc.
Enable/Disable: In the Normal menu, [Setting]/
[Lock/Security]/[Lock settings]/[Personal data
lock]/enter the terminal security code/select the
setting
Operation/Restriction
Lock
function
Keypad dial
lock
AutoKeyLock Prevents key operation automatically when the FOMA
IC card lock Locks to prevent the use of IC card functions.
Side key lock Locks the side key when the FOMA terminal is closed
Prevents calls or i-mode mails/SMS to a number not
saved in the phonebook.
Enable/Disable: In the Normal menu, [Setting]/
[Lock/Security]/[Keypad dial lock]/enter the
terminal security code/select the setting
terminal is closed or set time passed after the display
disappeared.
Enable/Disable: In the Normal menu, [Setting]/
[Lock/Security]/[Lock settings]/[AutoKeyLock]/
select a lock type/enter the terminal security
code/set each item/C
Disable Lock on close temporarily: Open the FOMA
terminal and enter the terminal security code
Disable Display off lock temporarily: Press any key
to show the display/z/enter the terminal
security code
Enable: In stand-by, r& (for at least 1 second)/
[Yes]
Disable: In stand-by, r& (for at least 1 second)/
enter the terminal security code
to prevent false operation.
Enable/Disable: In stand-by, t& (for at least 1
second)/[Side key lock]
Operation/Restriction
42
Page 45
Incoming call restriction
Resetting to default
Setting response to a call with no caller ID
You can set different responses when caller ID is not sent, depending
on the reason.
The following are the types of non-disclosure reason.
User unset Payphone Unavailable
In the Normal menu, [Setting]/[Lock/
1
Security]/[Call rejection setting]/enter
the terminal security code
Select the reason
2
Set each item/C
3
Rejecting a call from a caller unset in
phonebook
In the Normal menu, [TEL function]/[Dial/
1
Receive call setting]/[Reject/Accept call]
[Unregistered caller]/enter the terminal
2
security code/select the setting
Resetting various functions
For items return to default by Reset nP. 88
In the Normal menu, [Setting]/[Other
1
setting]/[Reset]
Enter the terminal security code
2
Select an item/C/[Yes]
3
Deleting saved data all at once
You can delete all saved data and reset the settings of each function
to default.
Protected data in the FOMA terminal is also deleted.
In the Normal menu, [Setting]/[Other
1
setting]/[Delete all data]
Enter the terminal security code/[Yes]
2
Basic Operation
43
Page 46
Call
Connect
Connect
44
Making a voice/videophone call
DOCOMO videophones comply with “3G-324M as defined by the
international 3GPP standard”. Connection is not available with
videophones using other standards.
Making a call by entering a phone number
In stand-by, enter a phone number
1
Start with the area code.
s (Phone)/C (V.phone)
2
Key operation during a voice call
To enable/disable Triple Kukkiri Talk: m
H to end the call
3
Making a call from phonebook
In stand-by, p&
1
Point the cursor to the name
2
s (Phone)/i (V.phone)
3
Making a call with redials/received calls
In stand-by, r& (I) (Redial)/q& (M)
1
(Received calls)
Point the cursor to the phone number
2
s (Phone)/i (V.phone)
3
Notifying the other party of your phone
number
You can display your number (caller ID) on the other party’s phone
(display) when you make a call or videophone call.
When you hear a message requesting caller ID, activate Caller ID
notification or put “186” and make a call again.
In the Normal menu, [TEL function]/[Dial/
1
Receive call setting]/[Caller ID
notification]
[Setting]/select the setting/[OK]
2
Page 47
Making an international call
WORLD CALL is an international calling service available from
DOCOMO mobile phones.
WORLD CALL is registered when FOMA services are registered
(excluding users who did not apply for WORLD CALL).
WORLD CALL charges are billed with the monthly mobile phone
charges.
Commission and monthly usage fees are free.
For details on WORLD CALL, contact the number listed in “General
Inquiries” on the back of this manual.
To make an international call through a company other than
DOCOMO, contact the representative companies directly for
instructions.
Some payment plans may not be available.
In stand-by, enter “+” (0 for at least 1
1
second), the country code, area code (city
code) and phone number
When the area code (city code) begins with “0”, omit the “0”
when dialing (Include “0” when making a call to some countries
or regions such as Italy).
s (Phone)/C (V.phone)
2
[Yes]
3
Receiving a voice/videophone call
When a call is received, the ring tone
1
sounds and the called LED flashes
When the caller does not send a caller ID, a non-disclosure
reason message appears.
• [User Unset]: When the caller purposely withholds caller ID
• [PublicPhone]: When the call is received from a payphone
• [Unavailable]: When the caller cannot send a caller ID, such
as when the call is received from overseas or ordinary
(landline) telephones via various transfer services
s
2
H to end a call
3
Adjusting earpiece volume
During a call, u&
1
Connect
45
Page 48
When you cannot answer a call
Setting record message (voice/videophone
calls)
If you set record message, the FOMA terminal answers a call and
records the caller’s message when you cannot answer.
In the Normal menu, [TEL function]/
1
[Record message/Voice memo]/[Record
message]
Setting Public mode (Drive mode)
When Public mode (Drive mode) is set, the caller hears a message
stating that you are driving or otherwise unable to speak and the call is
disconnected.
A ring tone does not sound when a voice/videophone call is
received. The stock icon [B] (missed call) appears on the display
and the call is saved in Received calls.
In stand-by, * (for at least 1 second)
1
Disabling Public mode (Drive mode)
In stand-by, * (for at least 1 second)
[ON]
2
Connect
Recorded contents may be lost due to malfunctions, repairs or
other handling of the FOMA terminal. DOCOMO shall not be liable
for any loss of content. It is recommended that a memo be kept of
contents for record message (voice/videophone calls).
Playing record message
In the Normal menu, [TEL function]/
1
[Record message/Voice memo]/[Record
message list]
Select a message
2
[NO]
3
46
Setting Public mode (Power off)
If Public mode (Power off) is set, when a call is received with the
power is turned off, the caller hears a message stating that you are in
a place that does not allow the use of mobile phone and the call is
disconnected.
In stand-by, *25251/s
1
Disabling Public mode (Power off)
In stand-by, *25250/s
Page 49
Using various network services
Service name Subscription Monthly fee
Voice Mail Service Necessary Fees apply
Call Waiting Service Necessary Fees apply
Call Forwarding Service Necessary Free
Nuisance Call Blocking
Service
Caller ID Notification Service Not necessary Free
Caller ID Display Request
Service
2in1 Necessary Fees apply
Public mode (Drive mode) Not necessary Free
Public mode (Power off) Not necessary Free
Dual Network Service Necessary Fees apply
English Guidance Not necessary Free
Multi Number Necessary Fees apply
OFFICEED Necessary Fees apply
Melody Call Necessary Fees apply
Network services are not available outside the service area or in a
place with no signal.
“OFFICEED” is a service that requires a subscription. Refer to the
DOCOMO website for corporations (in Japanese only) (http://
www.docomo.biz/html/service/officeed/) for further information.
Refer to “Mobile Phone User’s Guide [Network Services]” for details
on each network service.
For subscription and inquiries, contact the number listed in “General
Inquiries” on the back of this manual.
Not necessary Free
Not necessary Free
Setting Voice Mail Service
In the Normal menu, [TEL function]/
1
[Voice mail service]
[Activate]/[Yes]/[Yes]/enter the
2
ringing time/[OK]
Setting Call waiting service
In the Normal menu, [TEL function]/
1
[Other network service]/[Call waiting]
[Activate]/[Yes]/[OK]
2
Setting Call Forwarding Service
In the Normal menu, [TEL function]/
1
[Other network service]/[Call forwarding]
[Activate]/[Yes]/[Yes]/enter a phone
2
number/C/[Yes]/enter the ringing
time/[OK]
Connect
47
Page 50
Emergency call
Emergency calls Phone number
Emergency call to police 110
Emergency call to fire station/medical assistance 119
Emergency call at sea 118
The FOMA terminal supports “Location notification of emergency call”.
When dialing an emergency number such as 110, 119, and 118, the
information of your location (location information) is automatically
notified to the agency that receives the emergency call (e.g. the police
station). Depending on your location and the reception status of the
signal, the agency that received the emergency call may not be able to
confirm the exact location.
Connect
If the location information is notified, the name of the agency that
received the emergency call is displayed on the screen.
If you are not sending your caller ID by calling with “184” added or
other means, your location information and phone number are not
notified. However, if the agency that received the emergency call
considers your location information and phone number necessary for
important purposes, such as life saving, the agency can retrieve them
regardless of your settings. In addition, the area/timing to introduce
“Location notification of emergency call” depends on the state of
preparation in each agency that receives emergency calls.
When calling 110, 119, and 118 from your FOMA terminal, the
police or fire stations may return your call for verification purposes.
State that you are calling from a mobile phone, and give your
phone number and exact location.
Remain stationary to ensure that you are not disconnected while
making an emergency call, and keep handset turned on to receive
calls for approximately 10 minutes afterwards.
Depending on the region, calls to the police or fire station may not
be connected.
If you call 110, 119 or 118 by videophone with the FOMA terminal,
the call is disconnected. When Auto redial as voice is set to [ON],
the call is automatically switched to the voice call and made again.
Using overseas
International roaming (WORLD WING) is a service that
enables you to use the same FOMA terminal as you use
in Japan in the service area of DOCOMO affiliated
overseas telecommunications carriers without changing
your phone number and mail address. You can use voice
calls, SMS and i-mode mail without any changes in
settings.
Available area
You can use the FOMA terminal in the 3G network and GSM/GPRS
network service areas. In addition, this service is available in countries
and regions supporting 3G 850 MHz. Check the available area.
Refer to the following before using the FOMA terminal overseas.
“海外ご利用ガイド” (in Japanese only) pre-installed in [My
document] of Data box
“Mobile Phone User’s Guide [International Services]”
DOCOMO International Services website
Subscription
Check the status of a subscription for WORLD WING. For details,
contact “General Inquiries” on the back of this manual.
Charge
Overseas charges (call charges, packet transmission charges)
differ from those in Japan.
When a call is received during international roaming, the call is
forwarded from Japan. Call charges to Japan are incurred by the
caller and receiving charges by the receiver.
48
Page 51
Inquiries
When the FOMA terminal or the UIM is lost or stolen overseas,
promptly contact DOCOMO and conduct a procedure for canceling
the use of service from your country of stay. Refer to “General
Inquiries” on the back of this manual for inquiries. Note that
transmission/calling charges after the FOMA terminal or the UIM is
lost or stolen are incurred to the subscriber.
Available services overseas
Communication service 3G GSM GPRS
*1
Voice call
Videophone
SMS
i-mode
i-mode mail ABA
i-Channel
i-concier
i-Widget
Packet transmission by connecting a PC ABA
GPS position location
*1 When the 2in1 is used, calling from Number B is not available.
*2 Enter the same phone number as used in Japan when sending to
*3 Overseas use settings for i-mode is required.
*4 Overseas use settings for i-Channel is required. Packet
*5 Overseas use settings for i-concier is required. Packet
*1
*2
*3
*3, 4
*5
*6
*7
When Multi Number is used, calling from Additional Number is not
available.
the FOMA terminal.
transmission charges for automatically updating information
provided by Basic Channel are incurred (included in i-Channel
usage fee in Japan).
transmission charges are incurred for each information reception.
AAA
ABB
AAA
ABA
ABA
ABA
ABA
ABA
*6
i-Widget overseas use setting is required. Multiple Widget Appli may
attempt transmission when i-Widget screen appears. In such case,
packet transmission charges are incurred for each transmission.
*7 Charges are not incurred for GPS positioning. However, packet
transmission charges are incurred such as when you display a
map based on the location information.
Some services are not available depending on the
telecommunications carrier or network.
Refer to “Mobile Phone User’s Guide [International Services]” or
the DOCOMO International Services website for information on
available countries and regions, and telecommunications carriers.
Making a call to outside the country you
stay in (including Japan)
Make a call from your country of stay to Japan or other countries.
In stand-by, enter “+” (0 for at least 1
1
second), country code, area code (city
code) and other party’s phone number
When the area code (city code) begins with “0”, omit the “0”
when dialing (Include “0” when making a call to some countries
or regions such as Italy).
s (Phone)/C (V.phone)
2
Connect
49
Page 52
Making a call in country you stay
You can make a domestic call at your country of stay in the same way
as you do in Japan.
In stand-by, enter a phone number
1
s (Phone)/C (V.phone)
2
Making a call to WORLD WING user
overseas
When you make a call to a WORLD WING user overseas, you make a
call as an international call to Japan regardless of your country of stay.
Connect
In stand-by, enter “+” (0 for at least 1
1
second), country code “81” (Japan) and
the other party’s mobile phone number
excluding the first “0”
s (Phone)/C (V.phone)
2
50
Page 53
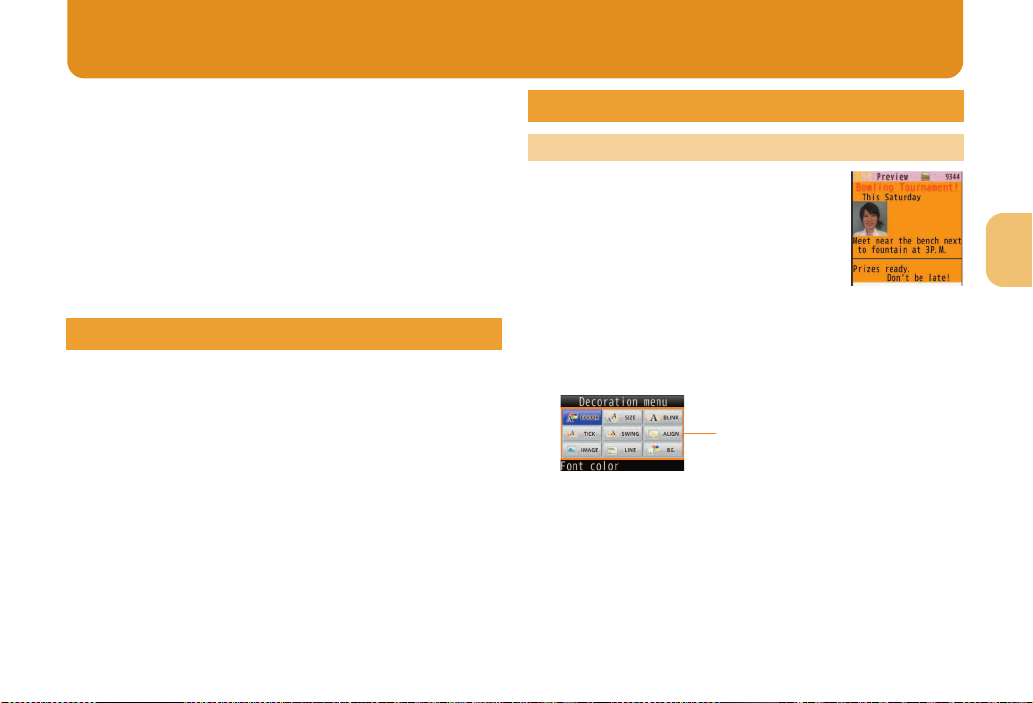
Palette
You can exchange mails with other i-mode terminals and
e-mail via the Internet by subscribing to i-mode service.
You can attach up to ten files (pictures, moving picture
files, etc.) in total of 2 MB to a message. Also, Deco-mail
is available. You can send an expressive mail by
changing character color and size, or background color
and inserting Deco-mail pictograms.
Moreover, Flash movie Decome-Anime with a message
or image inserted is available.
Refer to “Mobile Phone User’s Guide [i-mode] FOMA version” for
details on i-mode mail.
Sending i-mode mail
In stand-by, m/[Compose message]
1
Select the TO field/select an item
2
Select the SUB field/enter a subject
3
[Message]/enter a message
4
C
5
Creating Deco-mail/Decome-Anime
Creating Deco-mail
You can change color and font size of message
text, insert images such as Flash movies or
change background color when composing i-mode
mail.
In the message entry screen, z/
1
[Decorate mail]
Decorate
2
Select the decoration method from the palette or submenu, set
contents of decorating and enter messages.
Connect
51
Page 54
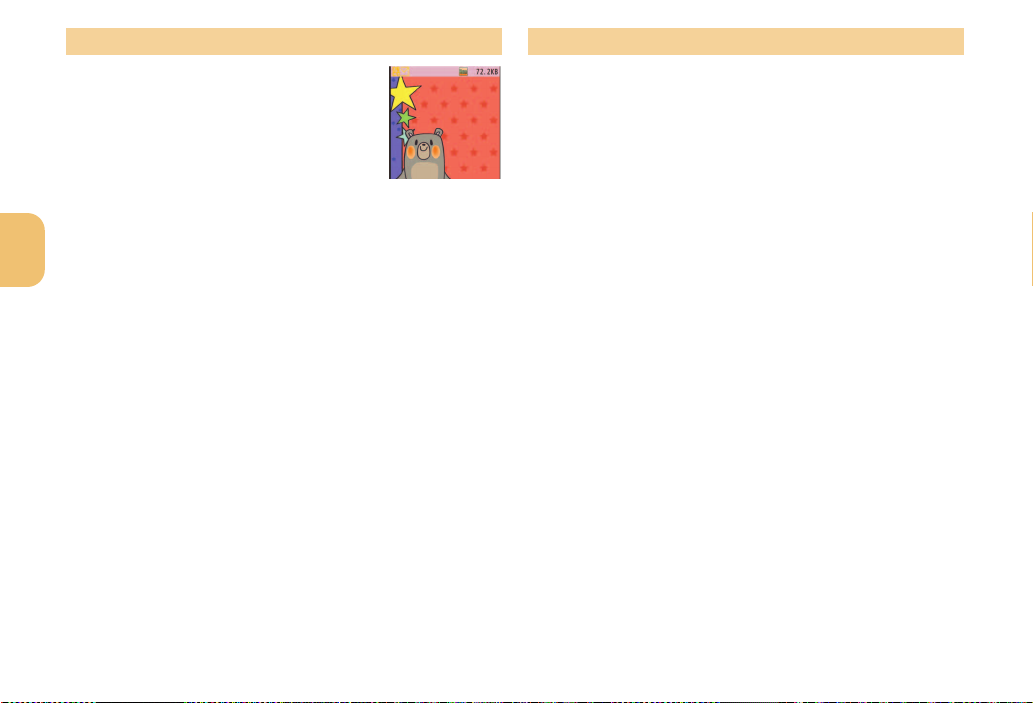
Creating Decome-Anime Using Auto-Decome
Decome-Anime is an expressive mail service that
uses Decome-Anime Templates and Flash movies
with a message or image inserted.
In stand-by, m/[Create new
1
Decome-Anime]/[Edit]
When a message is entered and converted, a pictogram or Deco-mail
pictogram is entered by predicting from the text and font color, font
size, or background color is changed automatically.
In addition, you can make the expression of conversion candidates
masculine or feminine, etc. by changing pattern of conversion.
Pattern of conversion downloaded from the iMenu site, [SH-MODE]
(in Japanese only) is also available.
In the compose message screen,
1
[Auto-Decome] after entering message
Connect
52
Point the cursor to the template/C
2
Select an edit item
3
;[@]/select an item/edit
;[!]/edit
;[&]/[Select image]/point the cursor to the
image/C
C
4
Select a candidate
2
To temporarily save the conversion candidates: m
To return to the saved conversion candidate: i
To change the pattern of conversion: z/[Pattern
conversion]/select the pattern of conversion
To change the place to enter pictograms: z/[Insert
pictogram]/select the setting
To automatically change the font color/font size/background
color: z/select an item to convert/select the setting
Pictograms are changed according to the set conversion items
each time C is pressed.
Page 55
Using font change
Enter a message and convert it to change a font.
Font downloaded from the iMenu site, [SH-MODE] (in Japanese
only) is also available.
In the compose message screen, [Mail
1
Change]/[Font change]
[Yes]
2
Select a candidate
3
To select a font type: m/select a font
Checking received i-mode mail
Receive i-mode mail automatically
1
After reception, the receive complete
2
screen appears and i-mode mail ring tone
sounds
If no operations are performed in the receive complete screen
for approximately 15 seconds, the screen before reception
automatically reappears.
[Mail]/select a mail
3
[- END -] appears at the end of the message. When receiving limit
is exceeded, [/] or [//] appears and the exceeding portion is
automatically deleted.
Displaying a mail in Inbox/Outbox/Unsent box
In stand-by, m
1
Select BOX
2
Select a mail
3
Replying to i-mode mail
In the received mail details screen, z/
1
[Reply/Forward]
Select the reply method
2
Compose and send a mail
3
Checking new i-mode mail
Received i-mode mail or Message R/F are stored at the i-mode center
while the handset is outside the service area, in the self mode or when
the power is turned off. You can check and receive mails from the
i-mode center.
In stand-by, m/[Check new mail/
1
message]
Connect
53
Page 56
Sorting i-mode mail
Set Sort rules for user folders and sort i-mode mail and SMS
automatically.
Point the cursor to the folder/z/[Sort
1
rules]
Select a number to save
2
Set the sort rules
3
Repeat steps 2 and 3 to set multiple sort
4
rules
Connect
C
5
Setting flag on mail
Point the cursor to the mail/z/
1
[Protection/Flag]/[Flag ON]/[Flag OFF]
Early warning “Area Mail”
Area Mail is a service to receive the earthquake early
warning, etc. provided from the Japan Meteorological
Agency.
Area Mail is received without i-mode subscription.
Receiving Area Mail
Receive Area Mail automatically
1
When Area Mail is received, the dedicated
2
alarm tone (beep sound) or Area Mail
dedicated ring tone sounds and Called
LED flashes
After receptions, some Area Mail automatically display a
message, while others display [Area mail received].
When [Area mail received] appears, the screen before
reception automatically reappears in approximately 30
seconds.
54
Select the setting method
2
Setting Area Mail
In stand-by, m/[Mail setting]/[Early
1
warning “Area Mail” setting]
[Receive setting]/select the setting
2
Page 57
Using SMS
You can use SMS entering mobile phone number in the
TO field.
Sending SMS
In stand-by, m/[Compose new SMS]
1
Select the TO field/select an item
2
[Message]/enter a message
3
C
4
Checking received SMS
Receive SMS automatically
1
After reception, the receive complete
2
screen appears and the SMS ring tone
sounds
[Mail]/select an SMS
3
Connect
55
Page 58
Phonebook
You can use the FOMA terminal phonebook and UIM
phonebook.
Adding phonebook entries
The following items can be added to one phonebook.
FOMA terminal phonebook: Memory number, name, reading,
image/moving picture, group, phone number, mail address,
birthday, text memo, postal code/postal address, location
information, company name, department, title and URL
Connect
UIM phonebook: Name, reading, group, phone number, mail
address
• Reading is entered automatically.
Adding new phone number, mail address,
etc.
In the Normal menu, [TEL function]/
1
[Phonebook]/[Add to phonebook]/[UIM
operation]
Set each item/C
2
56
Adding entries from redials/received calls to
phonebook
In stand-by, r& (I) (Redial)/q& (M)
1
(Received calls)
Point the cursor to the phone number/
2
z/[Add]/[Add to phonebook]
Add to phonebook
3
Editing phonebook entries
In stand-by, p&/point the cursor to the
1
name/z/[Edit/Settings]/[Edit]
Edit the phonebook/C
2
Add to phonebook
3
;[Overwrite]
;[New entry]
Deleting phonebook entries
In stand-by, p&/point the cursor to the
1
name/z/[Delete]
Select the deletion method
2
Page 59
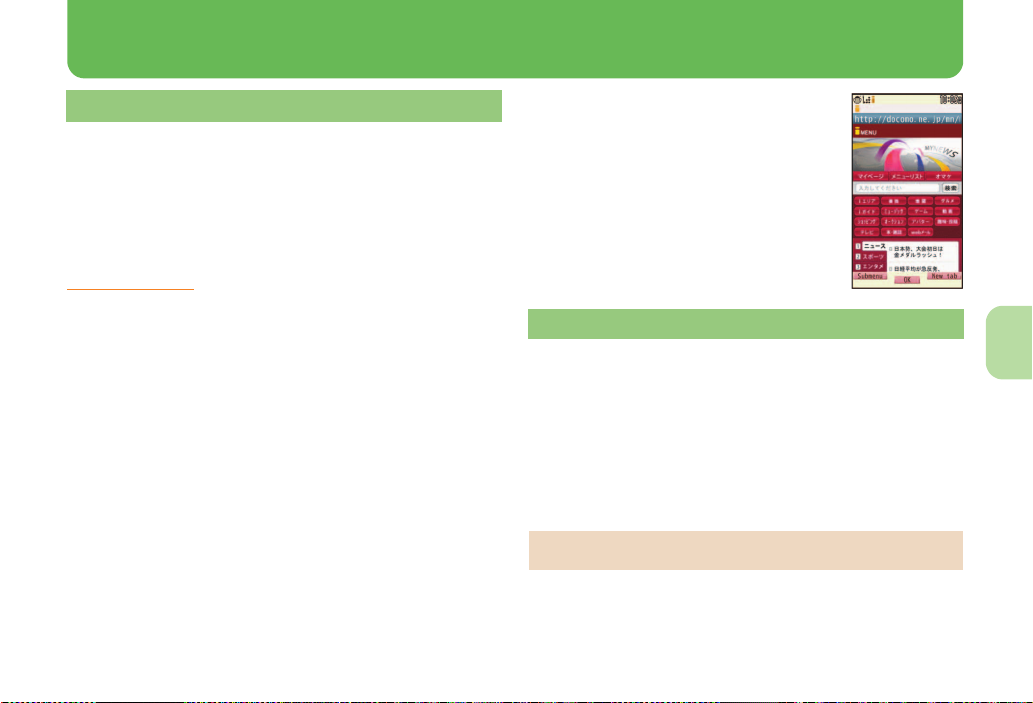
i-mode/Full Browser
Search
Viewing i-mode site
i-mode enables you to use online services, such as
connection to sites and the Internet, and i-mode mail,
using display of i-mode compatible FOMA terminals
(i-mode terminals).
i-mode is a paid service that requires a subscription.
Refer to “Mobile Phone User’s Guide [i-mode] FOMA version” for
details on i-mode.
Using i-mode
Sites and web pages on the Internet are generally protected by
copyright law. Selling and redistributing whole or a part of
downloaded text, images or other data from these sites and web
pages for non-personal use as they are or a part changed without
author’s permission is prohibited.
Some models cannot display/play images/moving pictures/
melodies, files sent/received by mail (images/moving pictures/
melodies, etc.), “Screen memos” or “Message R/F” etc.
downloaded from sites, etc. if a different UIM is inserted or the
handset is turned on without a UIM.
If files with access restrictions by a UIM are set as the stand-by
display or ring tone, etc. and a different UIM is inserted or the
handset is turned on without a UIM, settings are reset to default.
In stand-by, i
1
Select an item
2
Viewing web pages designed for PC
You can view sites that are not supported by i-mode as
they appear on PCs with the FOMA terminal using Full
Browser.
Note that making a transmission with large-volume data, such as
viewing a web page with many images and downloading data will
lead to higher transmission charges.
In the Normal menu, [i-mode/web]/[Full
1
Browser Home]
Some sites with large amounts of information do not appear
properly.
Search
57
Page 60
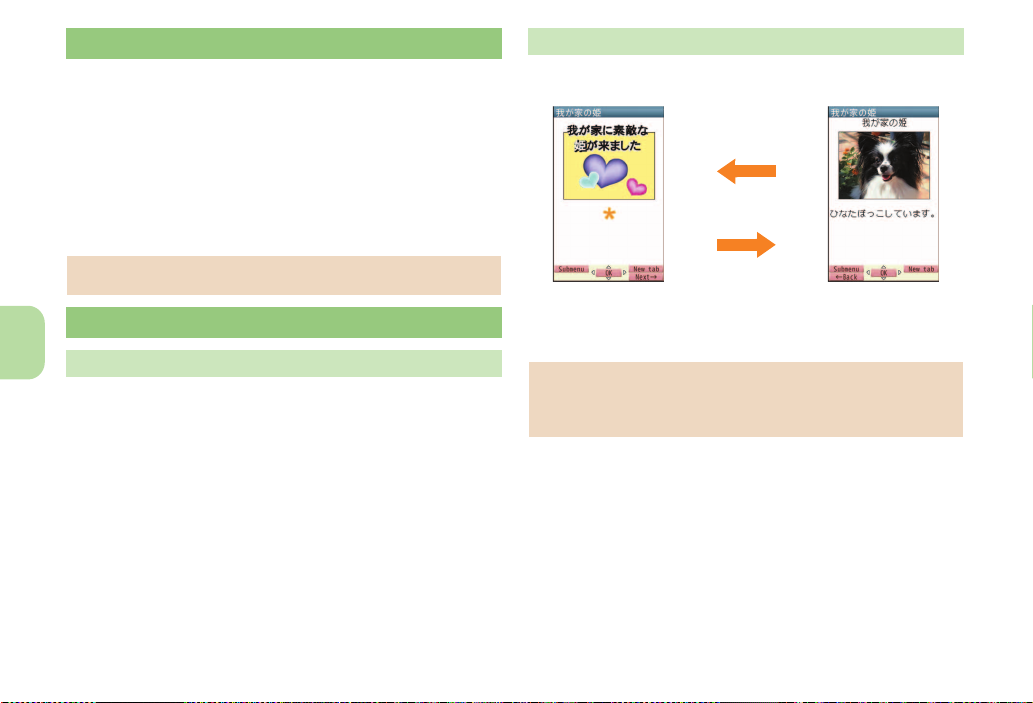
Switching browsers
m
i
For i-mode
While viewing sites with i-mode, z/[Full
1
Browser]/[Switch to FB]
For Full Browser
While viewing sites with Full Browser,
1
z/[i-mode Browser]/[Switch to
i-mode]
Note that different transmission charges are incurred when
switching between i-mode and Full Browser.
Viewing and operating sites
Selecting a link and moving to a new screen
Search
Normally, text string to which links are set appears in blue. A selected
link is highlighted.
Some links may be images. If you select, the image is outlined.
While viewing sites, select a link
1
Moving to previous/next page
The FOMA terminal saves sites you viewed. Press m/i to show the
memory without transmission. This memory is called the “cache”.
Information such as previously entered character, setting, etc. is not
viewed when you view pages saved in the cache.
The cache is reset by ending i-mode/Full Browser.
When switching from i-mode to Full Browser, you can return to the
page displayed with i-mode by pressing m. Likewise, when
switching from Full Browser to i-mode, you can return to the page
displayed with Full Browser by pressing m.
58
Page 61
Saving frequently accessed sites Saving site contents
You can save frequently viewed sites and web pages on
the Internet as bookmarks for convenient access.
While viewing sites, z/[Bookmark]/
1
[Add bookmark]
You can save screens from your favorite sites, etc. as
screen memos to the FOMA terminal or microSD Card.
While viewing sites, z/[Screen
1
Memo]/[Save screen memo]
[OK]
2
Select a folder
3
Viewing sites from bookmarks
In the Normal menu, [i-mode/web]/
1
[Bookmark]
Select a bookmark
2
Bookmarks are listed in the order of use.
Connection is made with i-mode from i-mode bookmarks,
while it is made with Full Browser from Full Browser
bookmarks.
Select a save destination/[Yes]
2
The screen memo is saved.
To save the screen capture only: Select a save destination/
[Only displayed]
Some screens may not be saved as screen memos depending on
the site such as the site whose size is zero-byte or assigned not to
be saved as screen memos.
Displaying screen memos
In the Normal menu, [i-mode/web]/
1
[Screen Memo]
Select a memo
2
If you select a link in the screen memo, connection is made
with i-mode for the screen memo of i-mode, while it is made
with Full Browser for the screen memo of Full Browser.
Search
59
Page 62
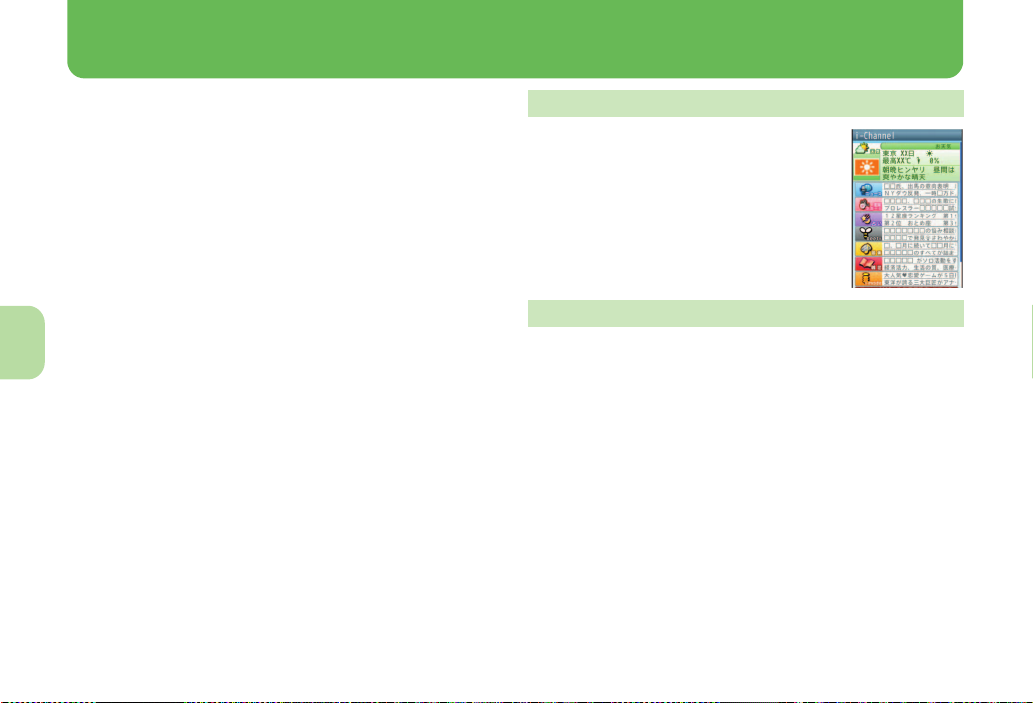
i-Channel
※ The i-Channel service is provided in Japanese.
i-Channel is a service that sends news, weather and
other information to i-Channel supported terminals.
The latest information received automatically is
displayed in the stand-by display using a ticker.
Additionally, press the i-Channel supported key to
display the latest information in a list of channels.
i-Channel is a paid service that requires a subscription
(i-mode subscription is required).
i-Channel has “ベーシックチャネル (Basic Channel)”
provided by DOCOMO and “おこのみチャネル (Okonomi
(Optional) Channel)” provided by IP (Information
Providers). Packet transmission charges for
automatically updating information provided by “Basic
channel” are not incurred. Packet transmission charges
Search
for automatically updating information provided by
“Okonomi (Optional) Channel” that can be customized
are incurred. Note that packet transmission charges are
incurred for when detailed information are viewed in both
“Basic channel” and “Okonomi (Optional) Channel”.
Packet transmission charges are incurred for
automatically updating information and viewing detailed
information during international roaming.
Refer to “Mobile Phone User’s Guide [i-mode] FOMA
version” for details on i-Channel.
Displaying i-Channel
In stand-by, c (J)
1
Select a channel
2
Setting i-Channel display
Set whether to display i-Channel ticker in the stand-by display and sub
display.
In the Normal menu, [i-mode/web]/
1
[i-Channel]/[Ticker display set.]
Select the display destination of ticker/
2
set each item/C
If [Main display] is selected, the sample of a ticker appears at
the lower part of the display.
60
Page 63
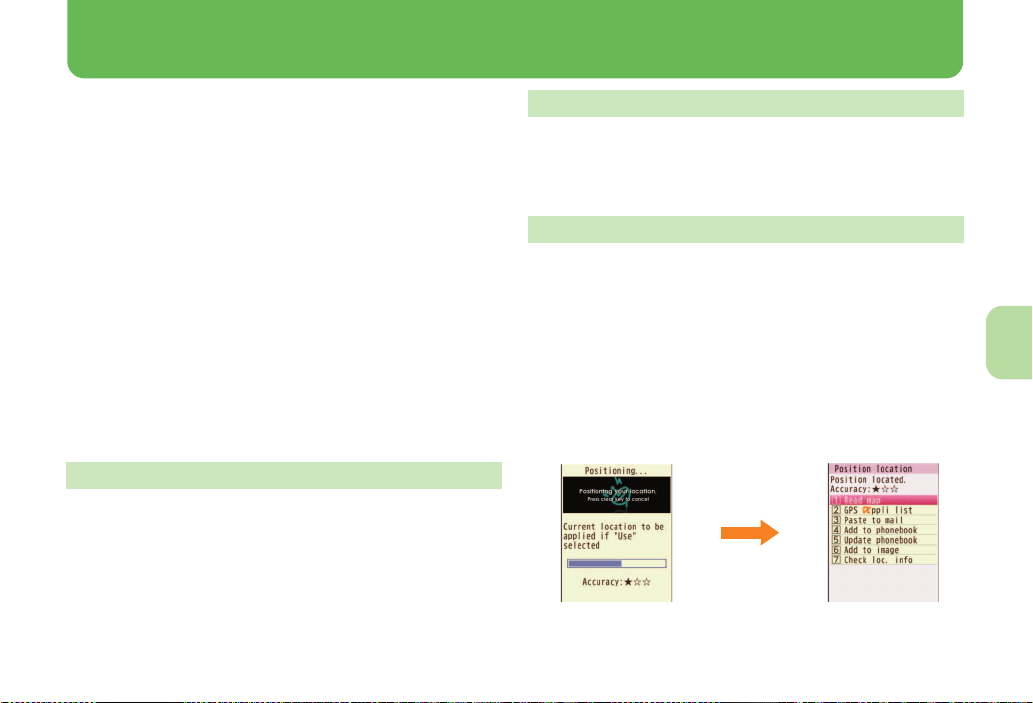
Map/GPS
Note that DOCOMO shall not be liable for the pure economic loss if
you cannot confirm the positioning (communication) result with the
FOMA terminal failure, malfunction or external factors such as
power failure (including battery exhaustion).
You cannot use the FOMA terminal as navigation system for
professional use of aircrafts, vehicles, person, etc. Therefore, note
that DOCOMO shall not be liable for the loss caused by the
navigation system to use location information.
You cannot use the FOMA terminal as surveying GPS of high
accuracy. Therefore, note that DOCOMO shall not be liable for the
loss caused by the error of location information.
GPS is the service in charge of Department of Defense of USA,
therefore, GPS radio wave condition may be controlled (accuracy
degradation, radio wave abort, etc.) for the US national security
reason.
For the use of location provision or location notification, check the
information of an information provider and DOCOMO website.
Charges may be incurred for these functions.
GPS function is not available except for positioning the present
location when the FOMA terminal is outside the service area.
Using map
You can activate GPS compatible i-appli and view the present location
or specified location.
In the Normal menu, [Map/Overseas]/
1
[Map]
GPS compatible i-appli is activated after positioning the
present location.
Using navigation
Activate GPS compatible i-appli and use the navigation function.
In the Normal menu, [Map/Overseas]/
1
[Navigation]
Checking present location
You can check your location by positioning the present location. You
can use this function for displaying a map, etc. from positioning
location information or changing the location information to a URL and
sending a mail with the URL pasted, etc.
Transmission charges are not incurred when you check the present
location. However, packet transmission charges are incurred when
you display a map based on the location information.
In the Normal menu, [Map/Overseas]/
1
[Position location/notify]/[Position
location]
Select a usage
2
Search
61
Page 64
Using AUTO-GPS
※ The AUTO-GPS service is provided in Japanese.
According to your present location, you can receive
various services, such as providing surrounding
information including weather information, store
information, etc., or sight-seeing information.
If you use AUTO-GPS function, your present location is
automatically measured based on your movement and location
information and pedometer information are sent to a service
provider (Present location is measured approximately once every 5
minutes according to your movement).
Set AUTO-GPS service information from AUTO-GPS compatible
i-appli of each service to use services supporting AUTO-GPS
function. Set DOCOMO service set to [ON] to use AUTO-GPS
function for services provided by DOCOMO.
You can register up to five AUTO-GPS services other than those
provided by DOCOMO.
For the use of AUTO-GPS function, check the information of GPS
Search
service provider or DOCOMO website. Charges may be incurred for
using these services.
Packet transmission charges may be incurred for sending location
information.
Communication is performed on a regular basis and power
consumption of the FOMA terminal increases depending on your
status of use.
Setting AUTO-GPS function
In the Normal menu, [Map/Overseas]/
1
[Map&GPS setting/history]/[AUTO-GPS]
[AUTO-GPS setting]/select the setting
2
Using services provided by DOCOMO
If you use DOCOMO AUTO-GPS service, location information of the
FOMA terminal is automatically sent to DOCOMO, and you can
receive services related to i-concier or various services provided by
DOCOMO.
Separate subscription and the settings are required to use various
services.
In the Normal menu, [Map/Overseas]/
1
[Map&GPS setting/history]/
[AUTO-GPS]/[DOCOMO service set]
[ON]/[OK]
2
62
Page 65
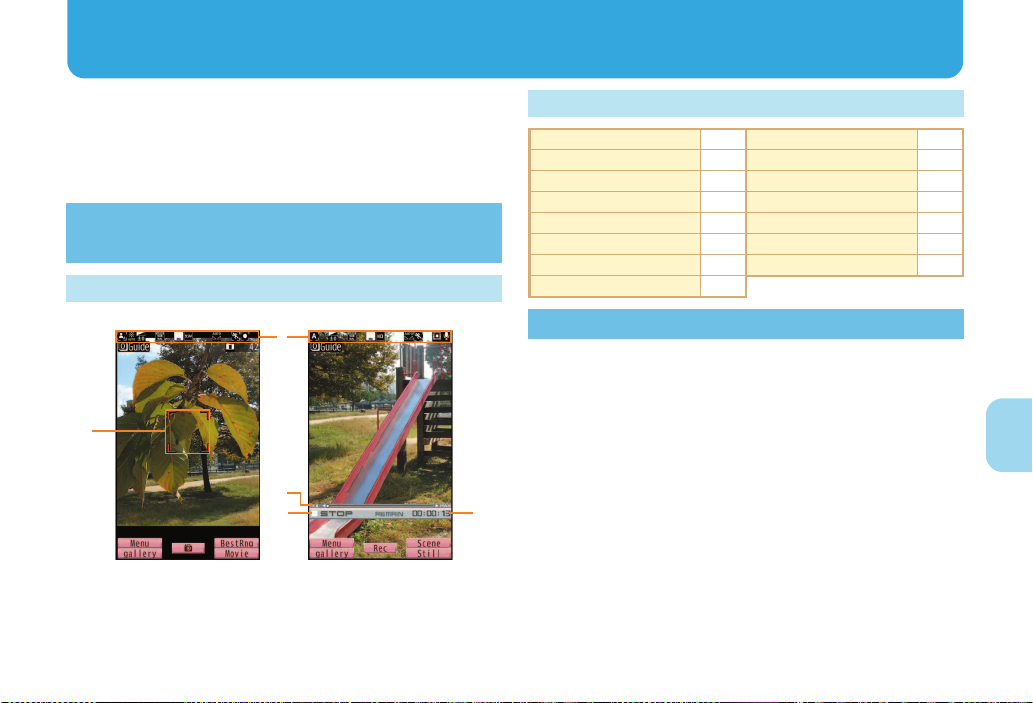
Camera
Enjoy
Still picture
Moving picture
1
3
2
5
4
It is possible to take a still picture and moving picture
with the digital camera which supports Face recognition
AF that can detect human, dog and cat face.
In addition, it supports Kanji/English Grabber, Shotdeco,
Shotmemo, etc.
Screen layout and operations for
shooting screen
Shooting screen layout
1Focus frame 2Icon display position
3Zoom bar 4Status indication
5Remaining time
Main key operations for shooting screen
Camera gallery m Switch still/moving picture i
Adjust brightness u& Adjust zoom v&
Focus lock s Switch camera-mode 1
Return to default 3 Fix camera shake 4
Select image quality 6 White balance 7
Auto timer 8 Other setting 9
Select save destination * Activate operation guide 0
My camera #
Shooting still/moving pictures
Although the cameras are made with high-precision technology,
some pixels or lines look constantly dark or bright. Further, white
lines and other noise may appear in images especially when
shooting images in dimly lit surroundings.
If the camera lens is exposed to direct sunlight for a long time, the
internal color filter may discolor, creating a discoloration of shot
images.
Images shot in shooting conditions which include the sun, a light or
other strong light source may appear dark and distorted.
Shooting the sun directly may damage the performance of the CCD.
Shot still pictures or moving pictures may not be saved when the
battery level is low.
Enjoy
63
Page 66
Shooting still pictures
In stand-by, C
1
When still pictures shooting is activated, called LED
illuminates and Picture Light flashes.
t&/&
2
Shoot a still picture.
t&/&
3
Save a still picture.
Closing the FOMA terminal and shooting
quickly
Shoot a still picture quickly with using sub-display as a finder.
Continuous AF is set to [ON].
Enjoy
With the FOMA terminal closed, & (for at
1
least 1 second)
&
2
Shoot and save a still picture.
Operate with the FOMA terminal opened to take a picture finely or
to change the settings. However, the camera is terminated when
the FOMA terminal is closed again.
Shooting moving pictures
In the Normal menu, [CAMERA/TV/
1
MUSIC]/[Camera]/[Movie shooting]
When moving pictures shooting is activated, called LED
illuminates.
t&/&
2
The subject at the center is automatically focused and shot.
To pause/resume shooting: z
t&/& to end shooting
3
[Save]
4
Viewing still/moving pictures after
shooting
Displaying shot still pictures
In the Normal menu, [Data box]/[My
1
picture]
[Camera] folder/select a still picture
2
To set as stand-by display, etc.: Point the cursor to the still
picture/z/[Set screen]/select an item
64
Page 67
Playing shot moving pictures
In the Normal menu, [Data box]/
1
[i-motion/Movie]
[Camera] folder/select a moving picture
2
To set as stand-by display, etc.: Point the cursor to the moving
picture/z/[AV settings]/select an item
Shooting in various ways
ISO sensitivity
You can shoot clear pictures with less camera shake in the low-light
situation.
In the still picture shooting screen, z/
1
C/[Shooting menu]/[ISO sensitivity]
Select the setting
2
Shoot by scene
You can set the camera to shoot with natural colors and focus based
on the surroundings and subject.
In the shooting screen, z/C/
1
[Shooting menu]/[Shoot by scene]
Select the mode
2
Focus setting
You can switch the AF (auto focus) mode according to the subject.
In the shooting screen, z/[k]
1
Select an item
2
Face registration
You can shoot the face image and register it, or shoot a picture with
registered face information and focus mark displayed on the still
picture shooting screen.
In the still picture shooting screen, z/
1
C/[FaceReg]
[Save new]
2
Detect the face/t&/&
3
Guide frame appears in red when a face is detected.
Set each item
4
z/[Yes]
5
Registered face information name is displayed as an item in
[Album] of Register type and the image can be searched by Data
search.
Enjoy
65
Page 68
Effect camera Multishot camera
You can set effects for still pictures and moving pictures to change the
color tone and touch.
For still picture shooting, shooting with effects is available when
image size is “3M: 1536×2048”, “FullHD: 1080×1920”, “Std-by:
480×854”, “VGA: 480×640”, “QVGA: 240×320” or “QCIF: 176×144”.
For moving picture shooting, shooting with effects is available in the
following settings.
Shooting size: “QVGA: 320×240” or “QCIF: 176×144”
Switch image/voice: [Image + voice] or [Image only]
Common replay mode: [OFF]
Shoot by scene: [Normal]
Face recognition AF: [OFF]
Chase focus: [OFF]
Enjoy
In the Normal menu, [CAMERA/TV/
1
MUSIC]/[Camera]/[Arrange camera]/
[Effect camera]/C
Select a type of effect
2
t&/&
3
Shoot a still picture.
You can shoot pictures continuously and choose the favorite
photograph from shot still pictures and save it.
In the Normal menu, [CAMERA/TV/
1
MUSIC]/[Camera]/[Multishot camera]
Select the setting
2
t&/&
3
The first still picture is shot and the following are shot
Save images
4
For Normal (ON)/ON/Bracket/Best select photo/Manual
To save an image: Select an image/t&/&
For Recommended photo/Strobophoto
To save displayed images only: t&/&
automatically.
66
Page 69
1Seg
Using 1Seg
1Seg is a service provided by TV broadcasters
(broadcast stations), etc. Transmission charges are not
incurred for receiving video, voice and sound. Contact
NHK for details on viewing fees of NHK.
※ Packet transmission charges are incurred when accessing a site
such as a “data broadcasting site”, “i-mode site” or others.
Also, some sites require information charges to use (i-mode paid
sites).
※ For details on the “1Seg” service, see the website below.
The Association for Promotion of Digital Broadcasting
From a PC http://www.dpa.or.jp/english/
From i-mode http://www.dpa.or.jp/1seg/k/ (in Japanese only)
Broadcasting wave
1Seg is one of the broadcasting services, and the receiving signal
(broadcast wave) differs from that of FOMA service.
In the following places, the signal status may become weak or the
signal may not be received.
Place that is far from the tower which sends the broadcasting wave
Mountain areas or behind a building
A tunnel, basement or a place in the rear of a building
To receive in better conditions, hold the FOMA terminal apart from or
close to the body or move to another place, so that the reception
status may become better.
About battery level
When recording is started with low battery level or battery level
becomes low while recording, the message stating that recording is
impossible appears and then the recording ends.
1Seg automatically ends if you do not operate for a while.
Screen display for first use of 1Seg
A confirmation screen of disclaimer appears for first use of 1Seg after
purchase.
Press t& according to the displayed contents. The same confirmation
screen does not appear after that.
Before using 1Seg
If you use 1Seg for a long time while charging, the service life of the
battery pack may be shorter than estimated.
DOCOMO shall not be liable for any loss or change of the saved
data due to malfunctions, repairs or other handling of the FOMA
terminal.
When changing the model or asking for repair of your FOMA
terminal, you cannot transfer the stored contents (video and still
pictures taken from 1Seg, TVlink, data in the broadcasting storage
area, etc.) in the terminal.
Enjoy
67
Page 70
Setting channels
Alternatively, in the stand-by
display, C (for at least 1
second) to activate 1Seg.
To watch 1Seg, set the channels and select a channel list
first.
Auto channel setting
Select a prefecture/district to use from preset information of broadcast
stations of each area. Broadcast station is automatically searched and
saved into the channel list.
Perform Auto setting inside the area of a terrestrial digital TV
broadcasting service.
In the Normal menu, [CAMERA/TV/
1
MUSIC]/[1Seg]/[Channel setting]
Enjoy
When the confirmation screen appears: [Yes]/[Auto
setting]/[Yes]/proceed to step 3
z/[Create]/[Auto setting]/[Yes]
2
Select a prefecture/district
3
[Yes]
4
Using preset
Select a prefecture/district to use from preset information of broadcast
stations of each area and save into the channel list.
In the Normal menu, [CAMERA/TV/
1
MUSIC]/[1Seg]/[Channel setting]
When the confirmation screen appears: [Yes]/[Use preset]/
proceed to step 3
z/[Create]/[Use preset]
2
Select an area
3
Select a prefecture/district
4
[Yes]
5
Watching 1Seg
In the Normal menu, [CAMERA/TV/
1
MUSIC]/[1Seg]/[Activate 1Seg]
68
Page 71
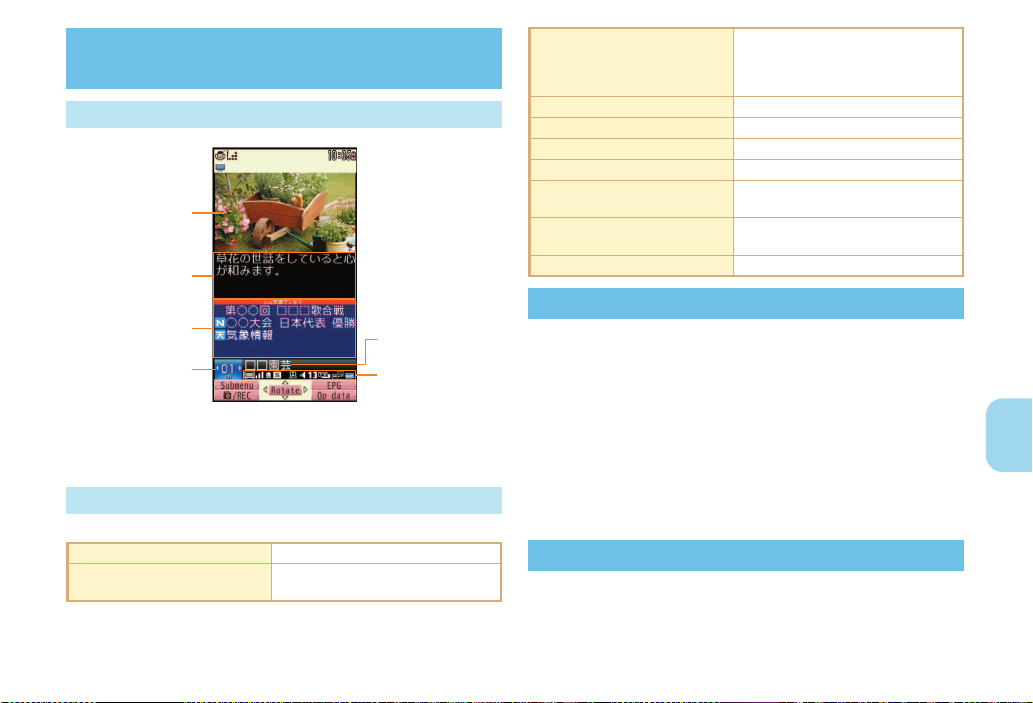
Screen layout and operations for
5
1
6
2
3
4
watching screen
1Seg watching screen layout
Select a station by searching a
frequency
Adjust volume u&
Mute/Disable s
Turn caption settings on/off s (for at least 1 second)
Activate program guide i-appli C
Record a video of 1Seg
program
Record 1Seg programs as a
still picture
Switch operation i
r& (for at least 1 second)/q& (for at
least 1 second)
To cancel selecting a station by
searching a frequency: t&/c
m (for at least 1 second)
To stop recording: m
m
1Video 2Caption
3Data broadcasting 4 Channel number
5Broadcast station/Program name 6Icon display position
Main key operations for 1Seg watching screen
Video mode
Select a station with UP/DOWN v&
Select a station with one-touch
operation
1 to 9, *, 0, #
Setting timer for starting or recording 1Seg
In the Normal menu, [CAMERA/TV/
1
MUSIC]/[1Seg]/[TV timer list]
z/[Set new timer]/[Manual reception]/
2
[Manual recording]
Set each item/C/C
3
When [Manual recording] is selected, the confirmation screen
stating that 1Seg may not be recorded correctly depending on
signal status appears.
Playing recorded videos
In the Normal menu, [Data box]/[1Seg]
1
[Video] folder/select a video
2
Enjoy
69
Page 72
Music
Handling the music data
This manual refers to Chaku-uta full® and WMA (Windows Media®
Audio) files played using MUSIC Player as “music data”.
• “Chaku-uta full” is a registered trademark of the Sony Music
Entertainment (Japan) Inc.
The FOMA terminal can play WMA files or Chaku-uta full
are protected with copyright protection technology.
When downloading the music data from web pages on the Internet,
check use conditions (license, prohibited acts, etc.) carefully before
use.
WMA files, which are protected with copyright protection
Enjoy
technology, are played using the information unique to the FOMA
terminal. When the information unique to the FOMA terminal is
changed due to a failure, repair, upgrade and others, WMA files,
which are saved before change, may not be able to be played.
DOCOMO shall not be liable for handling of CCCD (Copy
Controlled CD) or even if you cannot save music data as a WMA
file.
You can use music data saved on the FOMA terminal or the
microSD Card for personal use only. Refrain from infringing upon
intellectual property rights of a third party’s copyrighted material. Do
not copy or transfer music data saved on the FOMA terminal or the
microSD Card to PC or any other medium.
70
®
which
Music&Video Channel
※ The Music&Video Channel service is provided in Japanese.
Music&Video Channel is a service that approximately up
to 1 hour programs are automatically distributed at night
if your favorite programs such as music programs are
set in advance.
Music&Video Channel is a paid service that requires a subscription
(i-mode and the flat-rate i-mode packet transmission service are
also required to be subscribed).
Some programs may require a separate fee in addition to
Music&Video Channel service charge.
If you insert the UIM to the FOMA terminal, which does not support
Music&Video Channel, after subscribing Music&Video Channel,
you cannot use Music&Video Channel. However, a service usage
fee is incurred unless you cancel Music&Video Channel
subscription.
During international roaming, setting or acquiring programs is not
If you cancel i-mode or Music&Video Channel or delete My Menu
Refer to “Mobile Phone User’s Guide [i-mode] FOMA version” for
*
available
. When going abroad, deactivate the distribution of
programs in advance.
* When programs are attempted to be set or acquired during
international roaming, packet transmission charges are incurred
for connecting to i-mode.
registration, the program data in the Delivery program folder may be
deleted.
details on Music&Video Channel.
Page 73
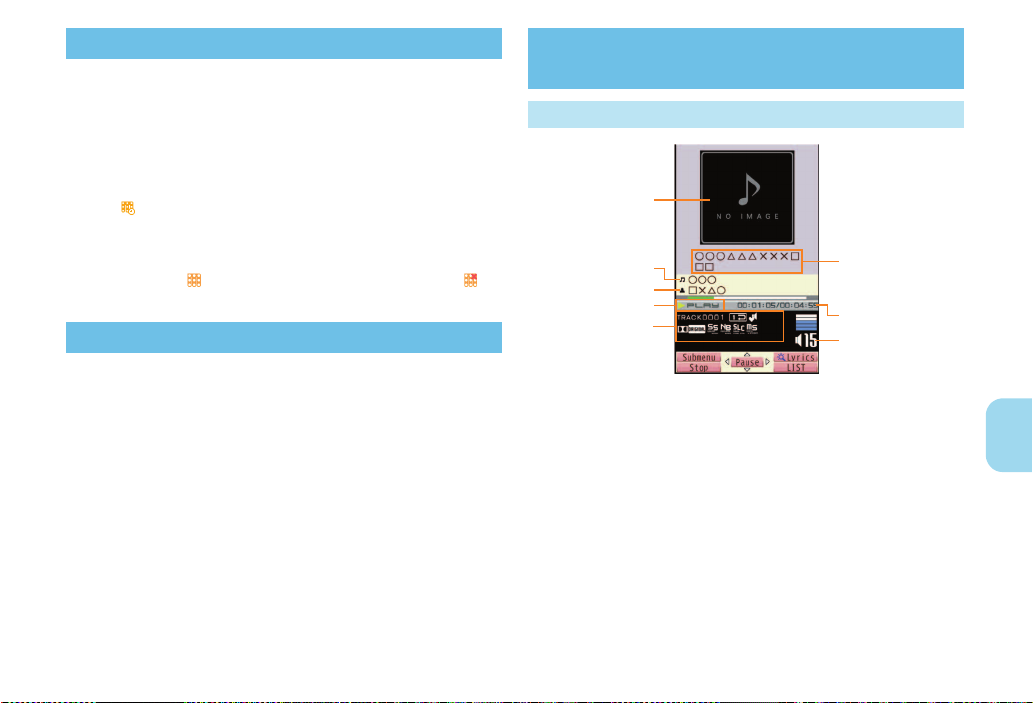
Setting programs
3
1
4
5
6
7
8
2
In the Normal menu, [CAMERA/TV/
1
MUSIC]/[Music&Video Channel]/
[Program setting]
Follow instructions on screen and set a
2
program
[ ] appears in the stand-by display 12 hours before the
program distribution.
The acquisition of the program is automatically performed at
night. When the acquisition is successfully completed, the
stock icon [ ] appears. When the acquisition is failed, [ ]
appears. In this case, acquire the program manually.
Playing programs
In the Normal menu, [CAMERA/TV/
1
MUSIC]/[Music&Video Channel]
Select a program
2
Screen layout and operations for
MUSIC Player screen
MUSIC Player screen layout
Enjoy
1Jacket image 2Title
3Artist’s name 4Playback status
5Icon display position 6Uta-moji Lyrics
7Play time/Total time 8Volume
71
Page 74
Main key operations for MUSIC Player
The music data previously played
resumes from the position where
the playback stopped if
[Continue] is selected.
screen
Pause/Play t&
Stop m
Adjust volume u&
Mute/Disable s
Play previous song/Return to
beginning of song
Fast reverse q& (for at least 1 second)
Play next song r&
Fast forward r& (for at least 1 second)
Jump to a start position assigned
to a key
Enjoy
*
Playback time is less than approximately 2 seconds: Play previous song
Playback time is approximately 2 seconds or more: Return to beginning
of song
*
q&
1: Beginning
2 to 9: Positions divided by
one-ninth increments of the total
playback time
Playing music data
In the Normal menu, [Data box]/[MUSIC]
1
Select music data
2
Downloading Chaku-uta full
You can save Chaku-uta full® downloading from sites.
You can download up to 5 MB Chaku-uta full®.
While viewing sites, select Chaku-uta full
1
[Save]/select a save destination
2
72
®
®
Page 75
i-appli/i-Widget
QR code to
connect to the
site
“i-appli” is software for the i-mode compatible mobile
phone. Download various software from i-mode sites for
more convenient use of the FOMA terminal, such as
updating stock prices or weather information
automatically, or enjoying games without connecting to
the network, etc.
For use overseas, packet transmission charges differ from those in
Refer to “Mobile Phone User’s Guide [i-mode] FOMA version” for
To use preset software again after deleting, you
1
2
Activating i-appli
Japan.
details on i-appli.
can download it from the iMenu site, [SH-MODE]
(in Japanese only).
[iMenu]/[メニューリスト] (menu list)/[ケータイ
電話メーカー] (mobile phone manufacturer)/
[SH-MODE]
• Packet transmission charges are incurred when
downloading.
In the Normal menu, [i-appli]/
[Software list]
Select software to activate
Activating Widget Appli
i-Widget is a convenient function used to easily access
to frequently used contents and tools (Widget Appli)
such as calculator/clock, memo, and stock prices.
Widget Appli can be added by downloading from sites.
If you paste the Widget Appli on the i-Widget screen, you
can use it quickly next time.
If the i-Widget screen is displayed, multiple Widget Appli may
communicate.
Packet transmission charges are incurred when detailed
information are viewed.
Refer to “Mobile Phone User’s Guide [i-mode] FOMA version” for
details on i-Widget.
In stand-by, o&
1
i-Widget screen appears.
Select Widget Appli
2
m/c
3
Widget Appli is pasted on the i-Widget screen.
To end Widget Appli: i/[YES]
Enjoy
73
Page 76
i-motion/Movie
Playing i-motion downloaded from
sites
i-motion refers to image, voice and music data. You can
download i-motion to the FOMA terminal from i-motion
compatible sites, etc. and play it.
The following shows i-motion that can be played.
Type Description
Standard type
(can be saved*)
Enjoy
Streaming type
(cannot be saved)
* Some Standard type i-motion cannot be saved.
You can play saved i-motion using the i-motion player.
While viewing sites, select i-motion
1
To save i-motion: While i-motion is played/paused, z/
[Save]/point the cursor to the folder/C
• When playing i-motion finished: [Save]/point the cursor to
the folder/C
74
Play after downloading data.
Play during downloading data.
Play during downloading data.
Playing movies downloaded from
sites
Play movies provided in portal sites or movie dedicated
sites on the Internet with Internet movie player of the
FOMA terminal.
Internet movie player supports the playback of Windows Media
Video and Windows Media Audio.
Making a transmission with large-volume data such as streaming
type movie without download limits for Full Browser will lead to
higher packet transmission charges.
The following shows the movie that can be played.
Type
Streaming
type
While viewing sites, select a movie/[Yes]
1
To play movies saved to the Import folder of the microSD
Distribution
system
Live distribution Movie is distributed in real time.
On-demand
distribution
Card: In the Normal menu, [Tool]/[microSD]/[Import]/
[i-motion/Movie]/select a movie
Movie prepared on server in
advance is distributed.
Description
Page 77
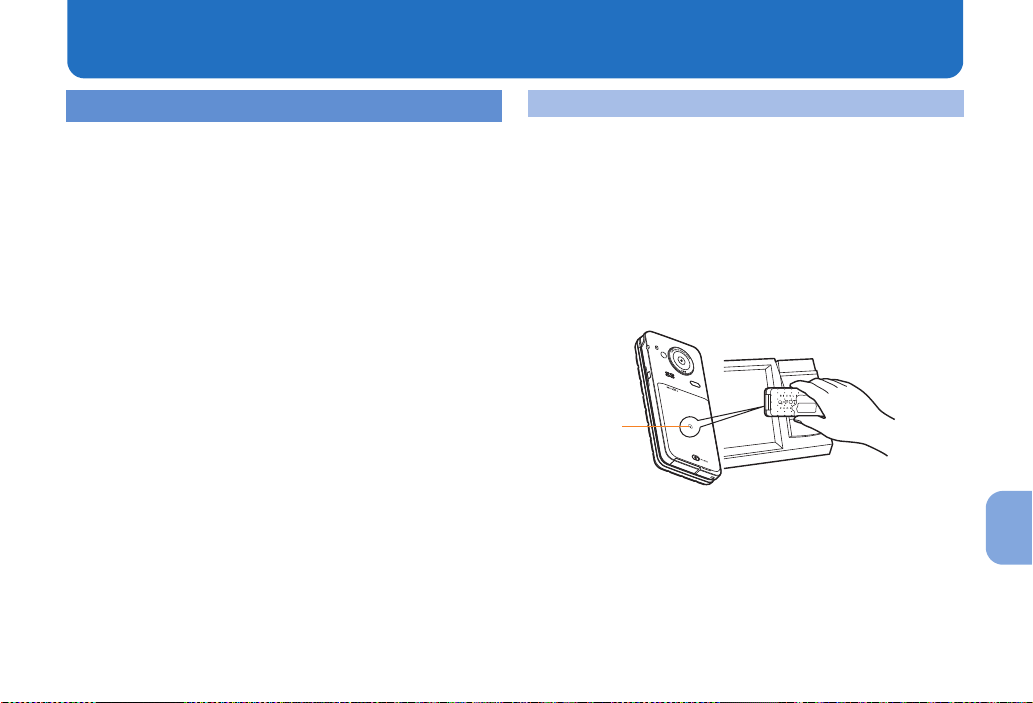
Osaifu-Keitai
More Convenient
b mark
Osaifu-Keitai/ToruCa
Osaifu-Keitai is a function which has built-in IC card and
allows you to pay, use as coupons or collect stamps by
simply holding the FOMA terminal over the scanning
device at stores.
Moreover, you can access sites and web pages by
holding the FOMA terminal over the scanning device, and
get the latest coupon, deposit electronic money and
check your usage by using transmission. In addition,
Osaifu-Keitai has enough securities to use.
ToruCa is an electronic card that can be retrieved with
Osaifu-Keitai. You can use ToruCa conveniently as fliers,
restaurant cards, coupons, etc.
FOMA terminal malfunctions may cause data (including electronic
money, points, etc.) saved in the IC card to be lost or changed
(Note that as a rule, you will be asked to delete data when leaving
your FOMA terminal for repairs, etc.). For the service such as a
reissue, restoration, temporary keeping or transfer of the data
except the transfer by iC transfer service, contact your provider of
Osaifu-Keitai compatible service. Be sure to use a service including
a backup service for important data.
DOCOMO shall not be liable for any loss or change of data in the IC
card or the damage of Osaifu-Keitai service caused by any reason
such as malfunctions and upgrading.
When the FOMA terminal is stolen or lost, immediately contact your
provider of Osaifu-Keitai compatible service for handling methods.
Holding over scanning devices
Hold the b mark of the FOMA terminal over the scanning device to
use as electronic money or railway tickets, or retrieve ToruCa.
Pay attention to the following points when holding the b mark over
the scanning device.
Avoid contact between the FOMA terminal and the scanning
device
Hold the b mark parallel over the scanning device
Hold the b mark over the center of the scanning device
If the scanning device does not recognize, hold the b mark
over the scanning device and move the handset around
Do not attach a metallic substance on the b mark side
More Convenient
75
Page 78
i-concier
※ The i-concier service is provided in Japanese.
“i-concier” is a service to support your life like butler or
concierge. It can keep your various data and timely
provide contents of memo or schedule, and information
tailored to your living area or current location, or hobby
and interests. i-concier information is provided by
Machi-chara (a character in the stand-by display) in the
stand-by display.
i-concier is a paid service that requires a subscription (i-mode
More Convenient
subscription is required).
If non-subscribers of the Data Security Service newly subscribe to
i-concier, they are supposed to be subscribers of the Data Security
Service.
In addition to monthly usage fees of i-concier, a separate fee may
be incurred depending on contents (information, i-schedule, etc.).
Packet transmission charges are incurred for receiving information
excluding some cases.
Packet transmission charges are incurred for using detailed
information.
Packet transmission charges are incurred for receiving information
and viewing detailed information during international roaming. In
addition, for use overseas, packet transmission charges differ from
those in Japan.
To use i-concier overseas, overseas settings for i-concier is
required.
Packet transmission charges are incurred for automatically
updating i-schedule, memo, ToruCa, or phonebook.
Refer to “Mobile Phone User’s Guide [i-mode] FOMA version” for
details on i-concier.
When popup message appears
A popup message appears in the stand-by display and notify you
when information is received or the set time of today’s schedule or the
set time of schedule alarm arrives.
A popup message appears
1
in the stand-by display/t&
Select a popup message
2
Displaying i-concier screen
In the Normal menu, [i-concier]
1
Select the function icon
2
76
Page 79
Convenient Tools
Using schedules
Be sure to set the date and subject.
For Normal
In the Normal menu, [Tool]/[Schedule]/
1
z/[New entry]
Set each item/i
2
Using alarm
In the Normal menu, [Tool]/[Alarm]
1
Select a number to save
2
Set each item/C
3
To switch items: v&
Using bar code reader
In the Normal menu, [CAMERA/TV/
1
MUSIC]/[Camera]/[Scanning camera]/
[Bar code reader]
Display bar code to be scanned in the
2
center of the screen/t&
Position the camera 10 cm or more from the bar code (JAN/
QR codes). Keep aligned and do not move the FOMA terminal
or code while scanning.
Use the scanned results
3
More Convenient
77
Page 80
Data Management
Using microSD Card
You can save data, such as the phonebook, mail or
bookmark in the FOMA terminal to microSD Card or
import data in microSD Card to the FOMA terminal.
microSD Card is sold separately.
You can purchase microSD Card and its adapter at home
electronics shops.
SH-04C is compatible with commercially available microSD Card of
More Convenient
up to 2 GB and microSDHC Card of up to 16 GB (as of October
2010). Refer to the following sites (in Japanese only) for the latest
information such as the manufacturer, available capacity, etc. of the
microSD Card. In addition, for microSD Cards that are not provided
in the sites, some of them may not work.
From i-mode [SH-MODE] (as of October 2010)
[iMenu]/[メニューリスト] (menu list)/[ケータイ電話メーカー]
(mobile phone manufacturer)/[SH-MODE]
From a PC
http://k-tai.sharp.co.jp/support/d/sh-04c/
Note that the provided information is the information checked for
operation. DOCOMO shall not be liable for all operations.
Do not insert or remove a microSD Card while the FOMA terminal is
on. Data may be damaged and operation may not work properly.
Do not remove the microSD Card or turn off the FOMA terminal
immediately after inserting the microSD Card to the FOMA terminal,
or while editing data on a microSD Card. Data may be damaged
and operation may not work properly.
Format unformatted microSD Cards on the FOMA terminal before
use. microSD Cards formatted by PCs or other devices may not be
used properly by the FOMA terminal.
When a microSD Card formatted with another FOMA terminal or PC
is used, the displayed folder name may differ.
Since some types of microSD Cards do not support copyright
protection functions, they may not be formatted. There is no
guarantee for the save and copy of data of the microSD Card
because it is unsupported by FOMA terminal.
When a microSD Card used with another FOMA terminal or PC is
inserted, it may not be used.
Back up the data saved in a microSD Card and store in another
place. DOCOMO shall not be liable for any loss or change of the
saved data.
78
Page 81
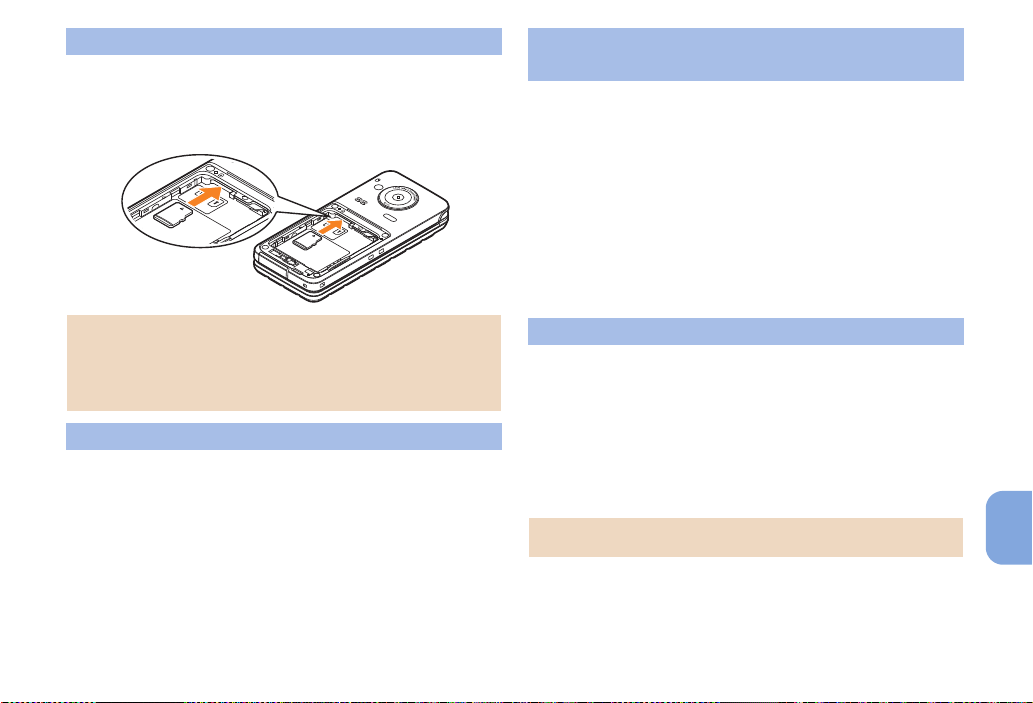
Inserting/Removing microSD Card
Slowly insert the microSD Card with the
1
metal terminal side turned down
Push slowly with a finger until a click is heard.
Gently push the microSD Card in before removing.
Note that excessive force may damage the FOMA terminal or
microSD Card.
Keep your face away from microSD Card when inserting or
removing card. When taking your fingers off abruptly, card may
pop out.
Formatting microSD Card
Note that all the data in the microSD Card is deleted when
formatted.
In the Normal menu, [Tool]/[microSD]/
1
C
Enter the terminal security code/[Yes]
2
Copying data to microSD Card/FOMA
terminal
Example: i-motion
In the Normal menu, [Data box]/
1
[i-motion/Movie] (/[bmicroSD])*
* When the save destination is microSD
Point the cursor to i-motion/z/[Move/
2
Copy]/[Copy to microSD]/[Copy to the
phone]
Select the copying method
3
Backing up data to microSD Card
You can collectively backup data, such as phonebook or mail, and
each setting information.
In the Normal menu, [Tool]/[microSD]/
1
[Backup/Restore]
[Backup to microSD]/enter the terminal
2
security code/[Yes]
When backing up the phonebook, a confirmation screen asking
whether to save the profile appears.
More Convenient
79
Page 82
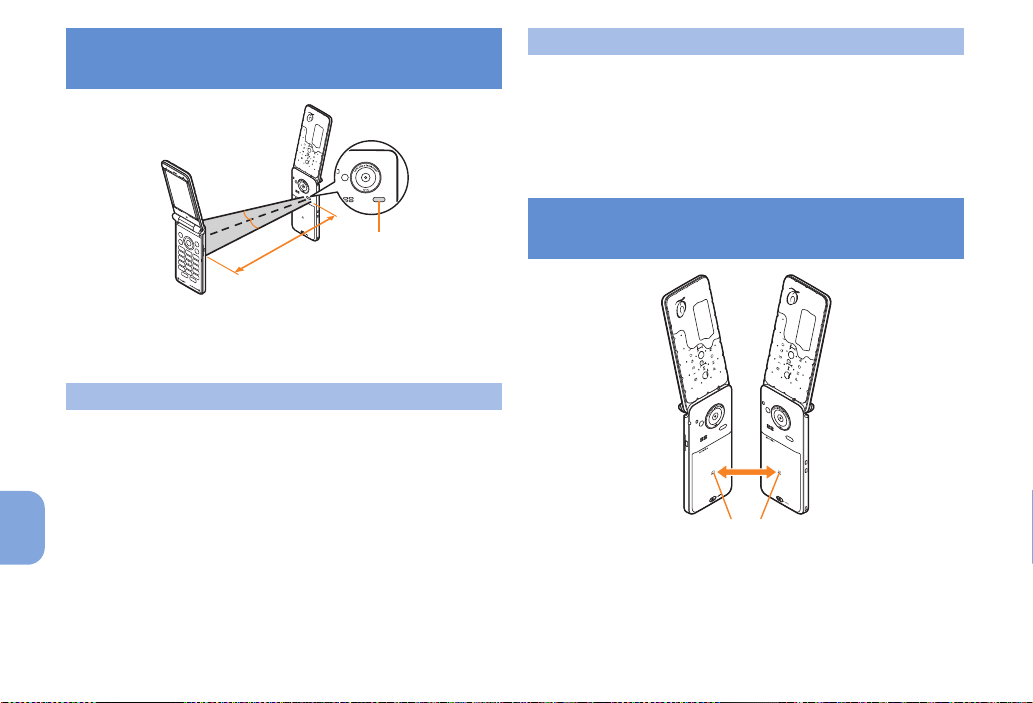
Sending and receiving data via Ir
Infrared port
Approx. 20 cm or
less
b mark
communication
Receiving data
In the Normal menu, [Tool]/[Infrared/iC
1
communications]/[Receive infrared data]
Select the receiving method
2
[Yes]
3
15°
15°
More Convenient
Face the infrared ports of the receiver’s and sender’s FOMA
terminal each other and set the distance between them to
approximately 20 cm or less.
Sending data
Example: Phonebook
In stand-by, p&
1
Point the cursor to the name/z/[Send
2
data]/[Send Ir data]
Select the sending method
3
[Yes]
4
80
Sending and receiving data via iC
communication
Use while placing the b mark of receiver’s FOMA terminal on that
of sender’s FOMA terminal.
Page 83
Sending data
Example: Phonebook
In stand-by, p&
1
Point the cursor to the name/z/[Send
2
data]/[iC transmission]
Select the sending method
3
[Yes]
4
Place the b mark on that of the other
5
party’s FOMA terminal
Receiving data
In stand-by, place the b mark on that of
1
the other party’s FOMA terminal
[Yes]
2
Connecting to PC
By connecting the FOMA terminal and your PC,
exchange WMA files and images in the microSD Card.
In addition, connect to the Internet and perform data
communication.
FOMA USB Cable with Charge Function 02 (sold separately) or
FOMA USB Cable (sold separately) is required.
For a data communication, installation of the FOMA communication
configuration file from the accompanying CD-ROM is required.
Refer to “Manual for PC Connection” in the accompanying
CD-ROM for details.
More Convenient
81
Page 84
Support
Others
Others
82
Troubleshooting
First, check whether the software update is required. If it is required,
update the software (nP. 85).
If there is no improvement in problems even after checking the following
items, feel free to contact the number listed in “Repairs” (in Japanese
only) on the back of this manual, or a repair center that DOCOMO
specifies.
Power
The FOMA terminal is not turned on
Is the battery pack attached properly? P. 23
Make sure the battery has not run out. –
Charging
Cannot charge the battery (Charging LED does not illuminate, or
it flashes)
Is the battery pack attached properly? P. 23
Is the adapter power plug inserted into the outlet or cigarette
lighter socket properly?
Are the adapter and the FOMA terminal set properly? P. 24
When using the AC adapter (sold separately), is the
connector of the AC adapter properly connected to the FOMA
terminal or the desktop holder (sold separately)?
When using the desktop holder, make sure the charger
terminal of the FOMA terminal is not dirty. If the terminal
becomes dirty, clean it with a dry cotton swab.
If calling, transmitting, or another function is performed for a
long time with charging, the FOMA terminal may become
warm and charging LED may flash. Charge again after the
terminal temperature lowers.
P. 24
P. 24
P. 24
–
Terminal operation
Becomes hot while operating/charging
Temperature of the FOMA terminal, battery pack, or adapter
may rise while operating or charging, or when performing
i-appli, making a videophone call, or watching 1Seg for a long
time with charging. There is no safety hazard.
Battery usage time is short
Make sure the battery pack is not left for a long time outside
the service area.
Outside the service area, since electric waves are searched
to make transmission available, more electric power than
usual is used.
The usage time for the battery pack depends on the usage
environment and deterioration level.
Battery pack is a consumable product. Service time per
charge is gradually reduced every time the battery is charged.
Purchase a specified new battery pack if the usage time
becomes extremely shorter than when the battery was
purchased even after fully charged.
Power turns off/The FOMA terminal restarts
Unclean terminals for the battery pack may result in poor
connections and loss of power. Wipe with a dry cotton swab.
Make sure the IC portion of the UIM is not dirty. –
Not activated by pressing keys
Make sure All lock is not set. P. 42
Make sure Side key lock is not set. P. 42
Make sure the FOMA terminal is not turned off. P. 26
UIM does not recognize
Is a UIM inserted facing right direction? P. 23
Make sure the UIM (blue) is not inserted. P. 23
–
–
–
–
–
Page 85
Clock is wrong
Clock may become wrong if the power is turned on for a long
time.
Make sure Auto time adjust is set to [ON] and turn the power
on again in a location with good signal conditions.
–
Calling
Calls cannot be made with the dial
Make sure All lock is not set. P. 42
Make sure Keypad dial lock is not set. P. 42
Make sure self mode is not set. P. 42
Connection cannot be made ([ ] does not disappear even after
moving to another place, or calls cannot be made/received even
though signal status is not bad)
Turn the power on again, or attach the battery pack or UIM
again.
Depending on the signal type, even though status is “inside
the service area” or “[ ] (indicating signal status) appears”,
making/receiving a call may not be available. Move to another
place and call again.
Make sure Accept call from specified caller/Reject call from
specified caller is not set.
In crowded place, heavy telephone/mail traffic may be caused
and make it difficult to get a connection. In such case, [Please
wait] appears and a busy signal is played. Move to another
place or call again later.
P. 23
P. 26
P. 27
–
–
Osaifu-Keitai
Cannot use Osaifu-Keitai
If the battery pack is removed or Omakase Lock is activated,
IC card functions are not available regardless of the IC card
lock setting.
Make sure IC card lock is not set. P. 42
Is the b mark of the FOMA terminal held over the scanning
device?
P. 42
P. 75
Warranty and After-Sales Service
Warranty
Make sure that the warranty card is included with your FOMA terminal at
the time of purchase. Check that the name of the retailer, the date of
purchase, and the necessary details have been filled in on the warranty
card. Be sure to keep it in a safe place.
Contact the retailer if any necessary details on the warranty card are not
completed.
The warranty period without charge is 1 year from the date of purchase.
For the purpose of improvement, the specifications for this product and its
accessories are subject to complete or partial change without prior notice.
After-Sales Services
If you have problems with your FOMA terminal
Refer to “Troubleshooting” in this manual or “Guide” (in Japanese only)
contained in the FOMA terminal before requesting repairs.
Contact the number listed in “Repairs” (in Japanese only) on the back of this
manual if problems persist.
If your FOMA terminal needs repairs after
contacting DOCOMO
Bring your FOMA terminal to a repair counter that DOCOMO specifies.
However, the repair shop is only open during business hours. Note that it
may take several days to repair depending on the damaged condition.
During the warranty period
The FOMA terminal will be repaired without charge in accordance with
the terms of the warranty.
When bringing the FOMA terminal in for repairs, be sure to bring the warranty
card. Even during the warranty period, a fee will be charged for repairs of
malfunctions or damage caused by your improper handling (damage of
display and connector), or when no warranty certificate is presented.
Repairs for damages caused by the use of devices and accessories
other than those specified by DOCOMO will also incur a fee, even during
the warranty period.
Others
83
Page 86
Repairs may not be possible in the following circumstances.
技術基準適合認証品
QR code to
connect to
the site
When a repair counter considered water exposure (Example: When the
moisture detection seal has reacted)
As a result of inspection, when damage from water exposure,
condensation, sweat, or other liquids are found, or when the internal
circuit board is damaged or deformed (Repairs may not be possible
when external connector terminal (earphone/microphone terminal),
display, etc. is damaged, or when a housing is cracked)
※ Even when repairs are possible, repair charges will be incurred because
the warranty does not cover such damage.
After the warranty period has expired
Charged repairs will be carried out upon request.
Replacement parts
Replacement parts (required to maintain the functionality of the FOMA
terminal) will be kept in stock basically for 6 years following production.
However, note that there may be a case when repair is not possible for the
shortage of replacement parts depending on the faulty part.
IMPORTANT!
Never attempt to modify the FOMA terminal or its accessories.
Repairs may be refused depending on the extent of the modification.
The following cases may be considered as a modification.
• Stickers are applied to the display or keys
• Decorations are made to the FOMA terminal with adhesive agent
• Exterior parts are replaced with those which are not standard
DOCOMO product
Repairs for any malfunction or damage caused by such modifications
will incur fees, even during the warranty period.
Do not peel off the model nameplate attached to the FOMA terminal.
Others
If the nameplate seal does not function as a certification, repairs may be
refused because conformity to the standards cannot be determined.
Information stored in your FOMA terminal, such as the settings of various
functions and the total call duration, may be cleared or reset if your
FOMA terminal is damaged, repaired, or mishandled.
If this occurs, please re-enter the information or re-specify the
settings.
The following sections of the FOMA terminal contain parts that generate
magnetic waves. Keep ATM cards and other objects likely to be affected
by magnetic waves away from the FOMA terminal. Cards may become
unusable.
Sections: speaker, mouthpiece
This terminal is waterproof/dust-proof, however, if the FOMA terminal
gets wet or becomes moist, immediately turn off the power and remove
the battery pack. Then, visit a repair counter. The FOMA terminal may
not be repaired depending on its condition.
i-mode fault diagnosis site
※ The i-mode fault diagnosis site is only available in Japanese.
You can check whether the FOMA terminal can normally send
and receive mails, download images or melodies or perform
other operations. When a malfunction is found after checking,
contact the number listed in “Repairs” (in Japanese only) on the
back of this manual.
Accessing the “i-mode fault diagnosis site”
i-mode site: [iMenu]/[お知らせ] (notice)/[サポート情報]
(support information)/[お問い合わせ] (inquiries)/[故障・
電波状況お問い合わせ先] (inquiries about fault/signal
status)/[iモード故障診断] (i-mode fault diagnosis)
Access from abroad is charged.
84
Page 87
Updating software
This function checks if the FOMA terminal is needed to
be updated by connecting to network, and if necessary,
updates software by downloading a part of software
using packet transmission.
If updating software is necessary, check the DOCOMO website or
“お客様サポート” (user support) (in Japanese only) on iMenu for
updates. When updating, select “Auto-update”, “Now update” or
“Reserve”.
You can update software even if the FOMA terminal contains
phonebook, camera image, downloaded data, etc. However,
DOCOMO cannot protect some data that could be lost due to
malfunction, damage, water exposure and so on. It is
recommended that important data be backed up before updating.
Note that some data, such as downloaded data, cannot be backed
up.
Using software update
Do not remove the battery pack while the software is updating.
Failure to update software may occur.
Recharge battery before updating software.
Updating (downloading and rewriting) software may take time.
Making/Receiving calls, transmission functions and other functions
cannot be used while software is being updated (Receiving voice
calls is possible during download).
It is recommended to update software at a location with a strong
signal (three bars for the antenna icon) and you are not moving. If
signal status becomes weak or download is interrupted when
downloading software, update software again in a location with
good signal conditions.
When updating software, the information unique to the FOMA
terminal (model, serial number, etc.) is automatically sent to the
server (DOCOMO software update server). Sent information is only
used for software update.
If software update fails, [Rewrite failed] appears and all operations
are not available. In this case, bring the FOMA terminal to a repair
center that DOCOMO specifies.
Starting software update from icon
When the software is automatically downloaded, [ ] appears in the
stand-by display.
[ ] appears in the stand-by display/
1
t&/select [ ]
Select the rewriting method
2
To confirm settings: [OK]
To change settings: [Change]
To start rewriting: [Now rewrite]
Starting software update from menu
In the Normal menu, [Setting]/[Other
1
setting]/[Software update]
Enter the terminal security code/
2
[Update]
Select the update method
3
Others
85
Page 88
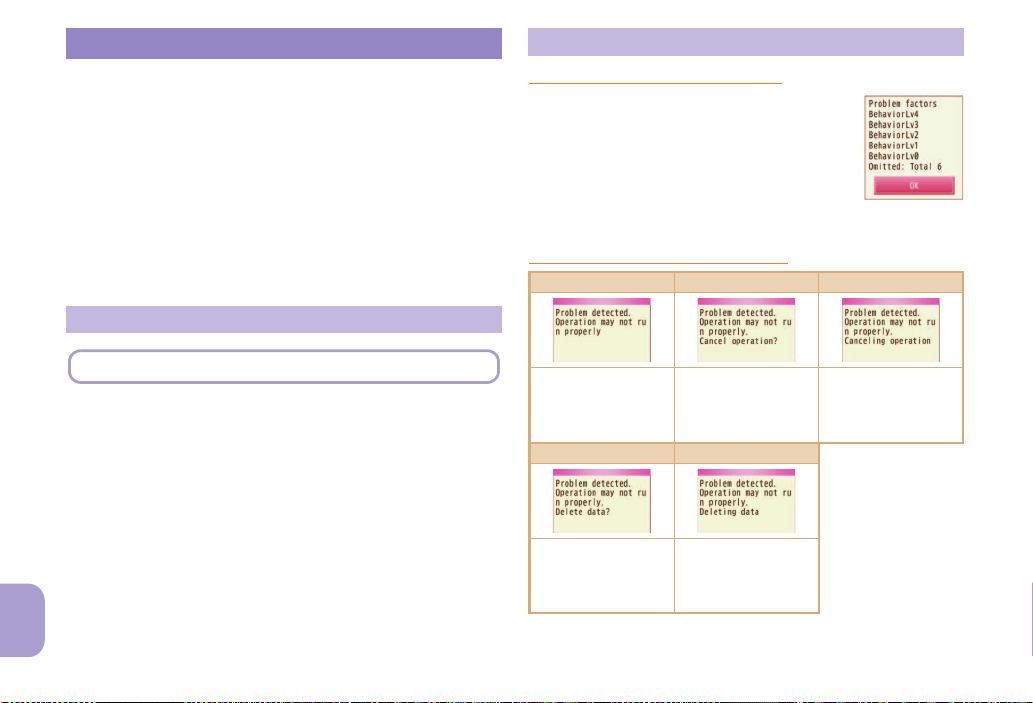
Checking harmful data
First, update pattern definitions to bring them up-to-date.
Delete or stop activating any data or applications that
could cause operational malfunctions. These types of
data include data or programs that are downloaded to the
FOMA terminal.
The scan function helps to protect the handset from damage
caused by data such as data received from web pages or mails. If
the pattern definition corresponding to a particular harmful file is not
downloaded or saved, the scan function will not be able to protect
the FOMA terminal.
Pattern definitions vary depending on the phone model. DOCOMO
may discontinue offering pattern definitions for a particular model 3
years after the release date.
Updating pattern definitions
Displaying scanned results
Displaying detected errors
If you select [Detail] in the warning screen, error
names appear. When no error name exists for the
contents of the pattern data, [Detail] does not
appear.
Up to five error names appear. Error names after
the sixth are skipped and the total number of
errors appear when six or more are detected. If
same error is detected more than once, it is only listed once.
Displaying scanned results
Level 0 Level 1 Level 2
In the Normal menu, [Setting]/[Lock/
1
Security]/[Scanning function]/[Update]
[Yes]/[Yes]
2
Others
86
[OK] when updating is completed
3
[OK]: To display/
activate/call
Level 3 Level 4
[Yes]: To delete the
data
[No]: To end without
deleting
[No]: To display/
activate/call
[Yes]: To cancel
operation
[OK]: To delete the
data
[OK]: To end
Page 89
Introduction of options and related
devices
Combine the FOMA terminal with various optional
accessories (sold separately) for expanded personal and
business use.
Some products may not be available in certain areas.
Contact a docomo Shop or retailer for details.
Refer to the user’s guide of each product for more
details.
FOMA AC Adapter 01*1/02
Battery Pack SH23
Back Cover SH47
Desktop Holder SH32
Earphone Terminal P001
Flat-plug Stereo Earphone Set P01
Flat-plug Earphone/Microphone with Switch P01*3/P02
Stereo Earphone Set P001
Earphone/Microphone with Switch P001*2/P002
Earphone/Microphone 01
Stereo Earphone/Microphone 01
Earphone Plug Adapter P001
Earphone Plug Adapter for External connector terminal 01
Earphone Plug Adapter 01
FOMA USB Cable
FOMA AC Adapter 01 for Global use
FOMA DC Adapter 01/02
FOMA Indoor Booster Antenna
In-Car Hands-Free Kit 01
FOMA In-Car Hands-Free Cable 01
In-Car Holder 01
FOMA Dry Battery Adapter 01
Carry Case S 01
*7
*1
*2
*3
*3
*2
*2
*3
*4
*1
*5
*6
Carry Case 02
Bone conduction microphone/receiver 01
FOMA USB Cable with Charge Function 02
FOMA Portable Charging Adapter 01/02
FOMA Indoor Booster Antenna (Stand Type)
*1 Refer to P. 25 for details on charging with an AC adapter.
*2 Earphone Plug Adapter for External connector terminal 01 and
Earphone Plug Adapter are required.
*3 Earphone Plug Adapter for External connector terminal 01 is
required.
*4 The use of USB HUB may prevent working correctly.
*5 For use only in Japan.
*6 FOMA In-Car Hands-Free Cable 01 is required to use/charge
SH-04C.
*7 Activate Side key lock to use the In-Car Holder 01.
*3
*4
*5
Others
87
Page 90
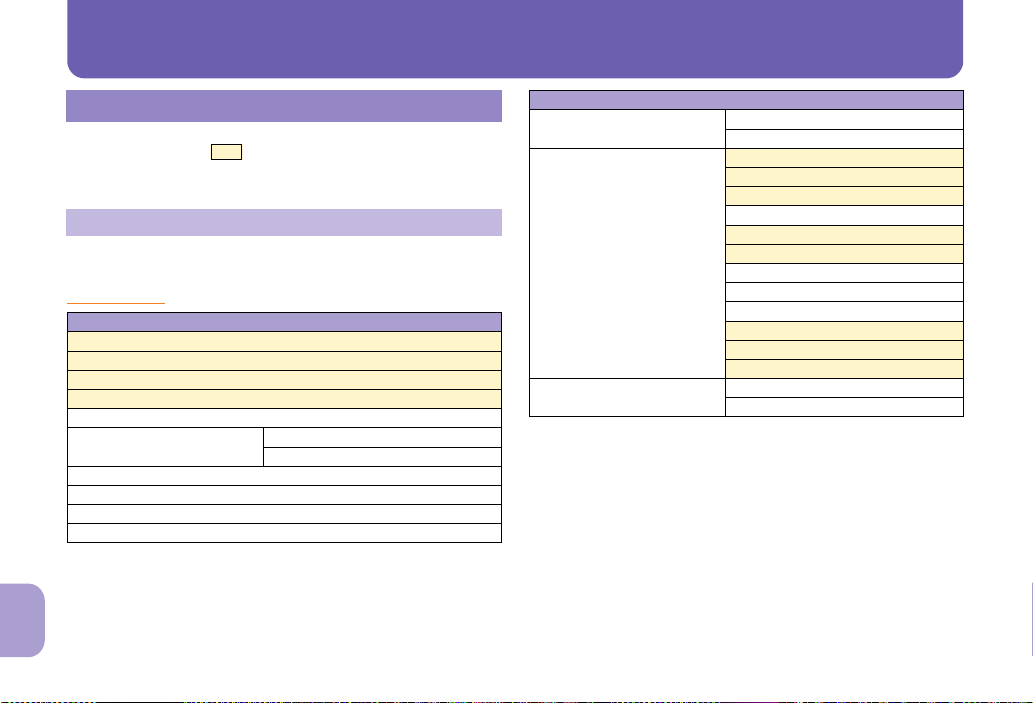
Appendix
Menu list
When settings are reset by Reset (nP. 43), functions return to default
settings (marked with ).
• Some items may include functions which do not return to default
settings.
Normal menu/Basic menu list
Depending on the Kisekae tool set in the Normal menu, the function
names may differ from those described.
Mail menu
Inbox
Outbox
Unsent messages
Compose message
Create new Decome-Anime
Decome-Template Deco-mail
Compose new SMS
Others
Check new mail/message
Check new SMS
Receive option
88
Mail
Decome-Anime
Decome-Item Pattern conversion
Mail
Font
Mail setting Receive setting
Display
Edit signature
Common phrases/Store word
Check new mail/message setting
Reply setting
Blog/SNS settings
Mail group
Address/Spam setting
Auto save setting when editing
SMS settings
Early warning “Area Mail” setting
Mail logs Sent msg. log
Received msg. log
Page 91
i-mode/web menu i-appli menu
iMenuKSearch
Bookmark
Screen Memo
Browsing history
Enter URL Enter URL
i-Channel i-Channel list
RSS reader
Access shortcuts
i-mode/web setting i-mode Browser Set.
Full Browser Home
i-mode/web
Software list
i-appli call logs
i-appli run information Start failure hist
URL enter history
i-appli setting Sound effect volume
Ticker display set.
Reset i-Channel
FB settings
Common Settings
Check i-mode setting
Reset i-mode setting
i-appli
Abnormal exit hist
Security error hist
Trace information
Software info disp.
Auto-start
i-Widget settings
AUTO-GPS preferred setting
Sort software
Display light time
Vibration mode
i-appli shortcuts
i-appli power saver
i-appli call DL set
About i-appli
Others
89
Page 92
CAMERA/TV/MUSIC menu Data box menu
Camera Still image shooting
1Seg Activate 1Seg
MUSIC Player
Music&Video Channel
CAMERA/TV/MUSIC
Movie shooting
Arrange camera
Multishot camera
Scanning camera
Make deco camera
Golf swing video cam
Hand mirror
Still image album
Movie play
Program guide
1Seg image/video
TV timer list
Recording result
TVlink
Channel setting
User setting
My picture
MUSIC
Music&Video Channel
i-motion/Movie
Melody
My document
Kisekae Tool
Machi-chara
Chara-den
1Seg
Other
Data search
Album
Others
Data box
90
Page 93
Tool menu
Tool
Bar code reader
Calculator
Alarm
Infrared/iC communications Receive infrared data
Send all infrared data
All iC transmission
Data exchange settings
Schedule
Memo
Countdown timer
Voice recorder
Quick launcher Search functions
Search phonebook
Simulated call Run simulated call
Calling timing set
Setting when silent
Wellness Check no. of steps
Register profile
Settings
Workout
Help
Manga&BookReader
Document Viewer
Data Security Service Data check/Download
microSD Data box
Guide
Quick search
Download dictionary
Common phrases/Store word Common phrases
Contact DOCOMO
Tool
Update phonebooks etc.
Update images
Update setting information
Detailed setting/Exchanging history
PIM
ToruCa
Used by i-appli
LCS client
Decome-Anime
Manga&BookReader
Backup/Restore
Other
Indiv backup/restore
Import
Store word
ドコモ総合案内・受付
ドコモ故障問合せ
Others
91
Page 94
TEL function menu
Phonebook Search phonebook
Record message/Voice memo Record message list
Dialed/Received calls Received calls
Dial/Receive call setting Nuisance call blocking service
Others
Videophone setting V.phone dialing img.
TEL function
Add to phonebook
UIM operation
Add group
Voice memo list
Record voice memo
Record message
Redial
Caller ID request
Caller ID notification
Arrival call act
Dial call detailed setting
Receive call detailed setting
In-call detailed setting
Headset function setting
Call rejection setting
Missed call notification
Sound & Image
Reject/Accept call
Videophone receiving
Data session arv. Act
Operation
Image setting
Notify switchable mode
Call duration/charge Call charge
TEL function
Call duration
Reset call cost
Call cost limit
Hide call cost icon
Chaku-moji Create message
Message display settings
2in1 2in1 mode switching
Ph.book 2in1 setting
Stand-by display setting
Call/receive settings
2in1 function OFF
Receive avoidance
Melody Call
Voice mail service Activate
Ring time
Deactivate
Check setting
Play messages
Setting
Check messages
Tone/Vibration message notification
Delete icon
Setting for videophone
92
Page 95
Other network service Call forwarding
TEL function
Call waiting
English guidance
Remote access
Multi Number
Dual network
Additional service
OFFICEED
Setting menu
Setting
Screen/Display Kisekae Tool setting
Stand-by display setting
Color theme setting
Display img quality
VeilView
Each display setting
Sub-display setting
Machi-chara setting
Menu preference
Auto SW vert/horiz
Sound/Vibration/Manner Ring tone
Other sounds
Adjust volume
Speaker booster set
Vibration mode
Silent mode
Motion silent
BGM play
Machi-chara chat setting
Backlight/Illumination Display light
Light alert
Text display/input Font size
Font style
Text input
バイリンガル
Time Date and time setting
Clock format
Auto power ON/OFF
Others
93
Page 96
Lock/Security Lock settings
Battery eco mode
External connection USB mode
Other setting Self mode
Others
Kisekae/Themes Style theme
Setting
Secret mode
Privacy setting
Caller/Sender info
Keypad dial lock
Call rejection setting
Change security code
UIM setting
Scanning function
Auto eco mode
Battery level
Battery icon setting
Icon% temp display
Femtocell
Data exchange settings
Initial setting
Delete all data
Reset
Software update
Check remote setting
Memory status
Side key shortcut
Timed theme
Map/Overseas menu
Map/Overseas
Map
Navigation
imadoco search imadoco kantan search
imadoco search
i-area
GPS appli list
Position location/notify Position location
Notify location
Map&GPS setting/history Loc. history
Map setting
GPS button setting
Request permit/deny
AUTO-GPS
Positioning mode setting
LCS clients list
Service setting
Service settings
Light color/Alert
Overseas network search 3G/GSM setting
Network search setting
PLMN setting
Display operator name setting
Display area status
Re-search icon display setting
94
Page 97
Overseas setting Inquiries(overseas)
Map/Overseas
Barring incoming call when roaming
Missed call notification for roaming
Roaming guidance
International dialing assist
i-mode service setting
Mail/Message usage setting
Network service
Overseas user’s guide
i-concier menu
i-concier
i-concier
Profile menu
Profile
Profile
Osaifu-Keitai menu
Osaifu-Keitai
IC card content
DCMX
ToruCa
IC card lock setting IC card lock
Timed lock
Programed activation
IC lock(power-off)
Setting ToruCa from IC card
ToruCa from 1Seg
ToruCa duple check
ToruCa auto-read
ToruCa auto display
ToruCa sound effect
Check IC owner
Change IC owner
Search by i-mode
Other functions
Shortcut menu
Shortcut menu
Earpiece volume
Videophone
Manner mode
Omakase Lock
Side key lock
Auto-Decome
Text input Set input method
Others
95
Page 98
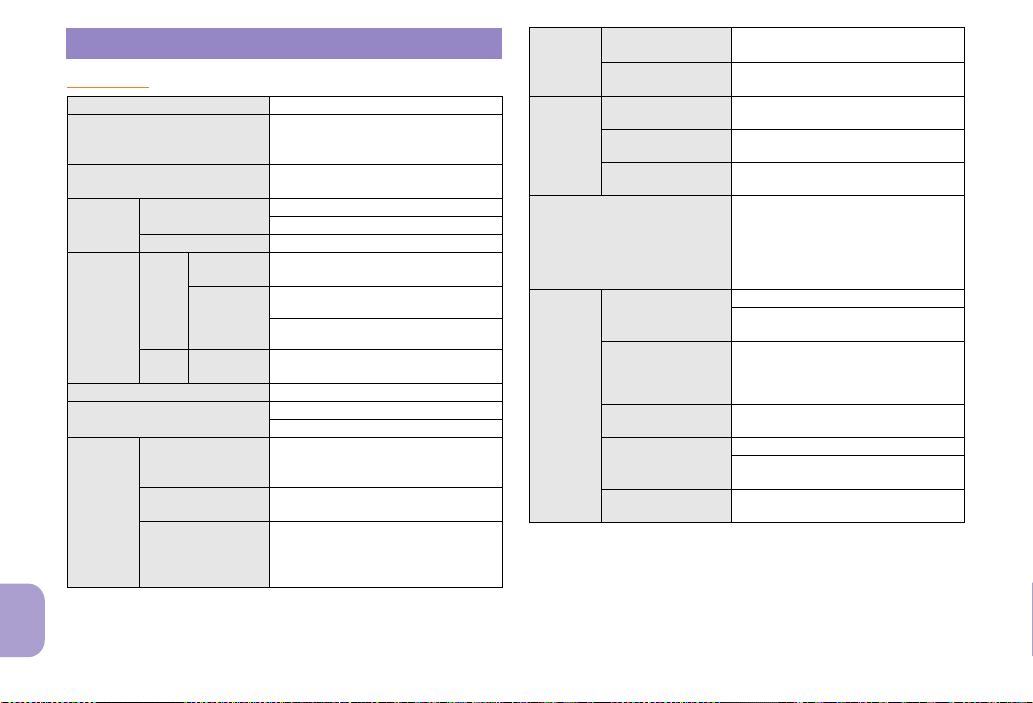
Main specifications
Package
Product name SH-04C
Size
Weight
Continuous
talk time
*1, 2
Continuous
stand-by
time
1Seg watching time Approx. 280 min
Charge time
Others
Display
FOMA/3G
GSM Voice call: Approx. 200 min
3G/GSM
setting: 3G
FOMA/
3G
3G/GSM
GSM
Type
Size
Pixels
setting: AUTO
3G/GSM
setting: AUTO
*2, 3
Approx. 110 (H) × Approx. 50 (W) ×
Approx. 17.9 (D) mm (Approx. 18.3 mm
at thickest point) (when folded)
Approx. 129 g (with battery pack
attached)
Voice call: Approx. 220 min
Videophone: Approx. 110 min
When mobile: Approx. 360 hr
When mobile: Approx. 340 hr
At rest: Approx. 520 hr
At rest: Approx. 270 hr
AC adapter: Approx. 120 min
DC adapter: Approx. 120 min
Main display: New Mobile ASV LCD
16,777,216 colors
Sub display: Organic EL 65,536 colors
Main display: Approx. 3.2 inches
Sub display: Approx. 1.4 inches
Main display: 409,920 pixels
(480 × 854 dots)
Sub display: 8,192 pixels
(128 × 64 dots)
*4
*4
*5
*5
Image
pickup
device
Camera
Picture light source LED
characteristics
Recording
Type
Size
Effective pixels
Recorded pixels
(Max.)
Zoom (Digital)
Number of still
pictures recorded
Continuous shooting
of still pictures
File format for still
picture
Recording time for
moving picture
File format for
moving picture
Main camera: CCD
Sub camera: CMOS
Main camera: 1/2.8 inches
Sub camera: 1/8.2 inches
Main camera: Approx. 9.6 million pixels
Sub camera: Approx. 0.43 million pixels
Main camera: Approx. 9.5 million pixels
Sub camera: Approx. 0.41 million pixels
Main camera: Up to approx. 22.2×
Sub camera: Up to approx. 5.4×
a) Continuous illumination
b) Wavelength
White: 400-700 nm
c) Maximum output
White: 1.8 mW (inside FOMA
terminal 0.62 mW)
Approx. 1,400 shots
Approx. 60,000 shots (when saved in
2 GB microSD Card)
9.5M: 3 shots/5M: 3 shots/3M: 3 shots/
FullHD: 3 shots/Std-by: 8 shots/
VGA: 10 shots/QVGA: 40 shots/
QCIF: 40 shots
JPEG
Approx. 26 min each
Approx. 60 min each (when saved in
2 GB microSD Card)
MP4
*6
*6
*7, 8
*7
*9
*9
96
Page 99
i-motion: Approx. 400 min
Chaku-uta full® (Compatible with
background playback): Approx. 3,320
*10
min
Music
playback
Memory
capacity
“Chaku-uta” is a registered trademark of the Sony Music Entertainment
*1 Continuous talk time is an estimate of the time when talking in a location
*2 The above mentioned talk time and stand-by time are shortened with
*3 Continuous stand-by time is an estimate of the time when FOMA
*4 Continuous stand-by time is the average usage time when the FOMA
*5 Continuous stand-by time is the average usage time when the FOMA
Continuous playback
time
®
Chaku-uta
Chaku-uta full
(Japan) Inc.
where the signal is normal.
the use of data communications, Multiaccess, and the camera.
terminal is closed and in a status where signals are received. Talk/
stand-by time may be reduced by about half depending on conditions
including battery level status, functions used, temperature and other
environmental conditions, and signal strength (no signal or weak
signal). Using i-mode reduces talk (transmission)/stand-by time. In
addition, watching 1Seg, composing i-mode mail and activating
downloaded i-appli or the i-appli stand-by will also shorten talk
(transmission)/stand-by time even if calls or i-mode transmission are not
made.
terminal is closed and in At rest, When mobile or Outside the service
area status.
terminal is closed when you are not moving and in a status where
signals are received.
WMA file (Compatible with background
playback): Approx. 2,440 min
Music&Video Channel (voice)
(Compatible with background
playback): Approx. 1,030 min
Music&Video Channel (moving
picture): Approx. 400 min
Approx. 166 MB
®
*10
*11
*12
*6 A CCD (Charge Coupled Device) and a CMOS (Complementary
Metal-Oxide Semiconductor) are image devices equivalent to the film of
silver salt cameras.
*7 Image size: QVGA (240 × 320 dots)/Image quality: NORMAL/File size:
25 KB
*8 The number is the number of still pictures that can be shot when not
deleting the data which is registered in advance.
*9 Image size: QCIF (176 × 144 dots)/Image quality: NORMAL/File size
limit: Unrestricted/Type: Image + voice
*10 File format: AAC format
*11 File format: WMA format
*12 When still picture, moving picture, music, melody, My document,
Kisekae tool, Machi-chara, Chara-den, i-appli, e-book/e-dictionary/
e-comic, Music&Video Channel, video or ToruCa are saved, the
memory capacity of Chaku-uta
®
/Chaku-uta full® will be small.
Battery pack
Product name Battery Pack SH23
Battery Lithium-ion
Nominal voltage 3.7V DC
Nominal capacity 800 mAh
Estimated number of saved videos and recording time
FOMA terminal Up to 99 Up to approx. 50 min
microSD Card (16 GB)
* Record up to 2 GB (Approx. 640 minutes) of 1Seg for each time. The
recording ends even if you use a microSD Card of more than 2 GB and
the available memory space is sufficient.
Number of entries Recording time
*
Up to 99 Up to approx. 5,120 min
Others
97
Page 100
Number of saved/registered/protected entries
in the FOMA terminal
Number of
Data type
Phonebook 2,000
1Seg TVlink 50 –
Reception/Recording 100
Channel list 10 –
Music&Video channel program 22
Music Chaku-uta full
®
Uta-moji Lyrics 100
Playlist 10 –
Schedule Schedule 2,600
Vacation 30 –
Holiday 5
Memo 2,600
Mail (The total
number of SMS
and i-mode mail)
Received mail 2,500
Sent mail 500
Unsent mail 500
Area Mail 30 –
Deco-mail
templates
Deco-mail 100
Decome-Anime 100
Decome-Item Pattern conversion 10 –
Others
Message Message R 50
Font 5 –
Message F 50
Bookmark 200 –
Screen memo 400
Download dictionary 10
i-appli 100
Image 3,000
Moving picture/i-motion 200
Kisekae tool 50
entries to be
saved/registered
*1, 2
*3
*2
*2
55
*2
*2, 4
*5
*6
*2, 7, 8
*2, 7
*2
*8
*8
*2
*2
*2
*9
*2, 8
*2, 8, 10
*2, 8
*2, 8
Number of
entries to be
protected
–
–
–
–
–
–
–
–
2,500
500
500
–
–
25
25
400
–
–
–
–
–
Number of
Data type
Machi-chara 50
Chara-den 50
Melody 500
PDF data 100
entries to be
saved/registered
*2, 8
*2, 8
*2, 8
Word, Excel, PowerPoint 100 –
ToruCa 200
e-book/e-dictionary/e-comic 1,000
1Seg video 99
*2
*2
*2
*2, 8
Number of
entries to be
protected
–
–
–
–
–
–
–
Font (TTF) 3 –
*1 You can save up to 50 entries in the UIM.
*2 Saved amount may be reduced depending on status of using memory.
*3 Total number of the timers for starting and recording programs.
*4 The timers for starting and recording programs, and Memo are included.
*5 You can save holidays besides national holidays already saved.
*6 Schedule is included.
*7 In addition, you can save up to 20 received and sent SMS in the UIM.
*8 Pre-installed data which can be deleted is included.
*9 You can set up to five dictionaries.
*10 Still picture for which 1Seg programs is recorded is included.
98
 Loading...