

Page 1

P-04D
INSTRUCTION MANUAL
’12.3
Page 2

Preface
Thank you for selecting the "P-04D".
For proper use, read this manual before and when you use the
P-04D.
Notes on Using this Mobile Phone
• This mobile phone is compatible with W-CDMA, GSM/GPRS and
wireless LAN systems.
• Because this mobile phone uses radio waves, you cannot use
in places where the radio waves do not reach such as inside
it
tunnels, basements and buildings, where the radio waves are
weak even outdoors, or out of FOMA service area. You might
not be able to operate this mobile phone even when you are
in a place with a fine view such as on upper floors of a highrise building or apartment. Note that you may experience
interruption of calls even when the four-bar antenna mark is
displayed indicating a strong radio wave and you are not
moving.
• Since this mobile phone uses radio waves as the medium of
telecommunication, calls may be tapped by a third party.
However, the W-CDMA and GSM/GPRS systems automatically
support tapping prevention, so your conversation will be
incomprehensible to the third party, because it is recognized
as mere noise.
• The mobile phones change your voice into digital signals and
send
are weak, the digital signals may not be converted correctly,
and in such a case, the voice may sound different from the
actual one.
• This mobile phone supports FOMA Plus-Area and FOMA HighSpeed Area.
• You are advised that you make separate notes of information
stored
that we cannot be held responsible for the unlikely event of loss
of the stored content due to a malfunction, repair, change of
your model, or other mishandling of this mobile phone.
• You are advised to save your important data on the microSD
card.
them to the other party. In places where the radio waves
in this mobile phone and keep them in a safe place. Note
1
Page 3

• As with PC applications, some applications you have installed
in this mobile phone may pose problems: unstable operations
of your mobile phone, unauthorized distribution and use of
your location and personal information stored in the mobile
phone. Therefore, you need to thoroughly check the source
and behaviors of intended applications before use.
SIM Unlock
This mobile phone supports SIM unlocking. You can use
another operator's SIM card once you unlock the SIM.
• Contact a docomo Shop for SIM unlocking.
• You will be charged a SIM unlocking fee separately.
• When you use another operator's SIM card, available services
functions are limited. Note that we provide no warranty of
and
operations with other operator's SIM cards.
• For details of SIM unlocking, refer to DOCOMO website.
2
Page 4
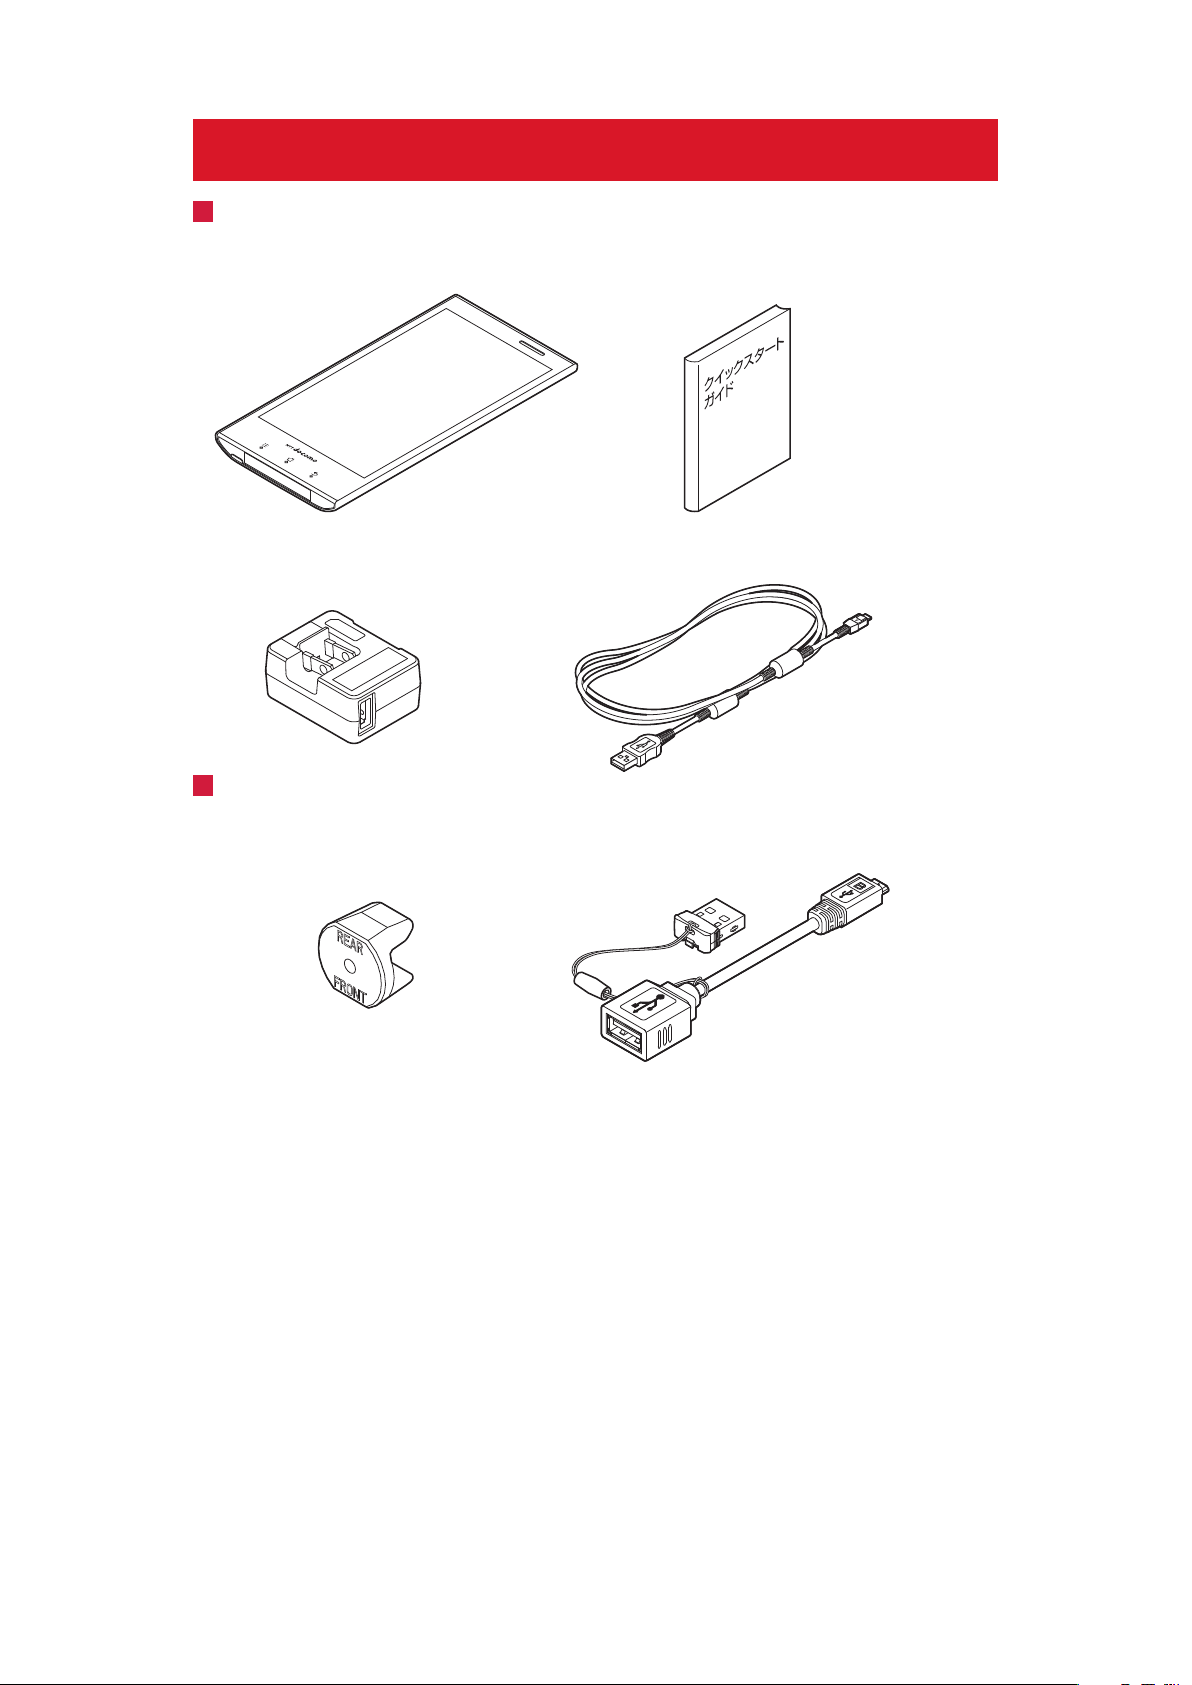
Basic Package/Samples
Q
P-04D (with warranty)
Q Quick Start Guide
(in Japanese)
Q AC Adapter Cable P01 (with warranty)
<AC adapter>
Basic Package
<microUSB cable>
Sample
Q
docomo mini UIM card Eject Tool
(with manual)
Q
microSD card Reader/Writer
Cable (with manual)
• For other optional items, Z
P.241
3
Page 5

Descriptions of Operating Procedures
The operating procedures of the P-04D are described in the
following manuals.
■ "Quick Start Guide" (in Japanese only)
(supplied with this mobile phone)
Describes operating procedures of basic functions.
■ [Instruction Manual] (in Japanese only)
(installed in your mobile phone)
Describes detailed information of functions and operating
procedures.
Home screen W
• Before using Instruction Manual for the first time, install the
application from Android Market.
W [Instruction Manual]
■ "Instruction Manual" (PDF)
Describes detailed information of functions and operating
procedures.
Download from DOCOMO website:
http://www.nttdocomo.co.jp/english/support/trouble/manual/
download/index.html
* Note that the URL and published contents may be modified
without notice.
Information
• It is prohibited to copy all or part of this manual without
permission.
• The information contained in this manual may be changed
without notice.
• Operating procedures when [docomo Palette UI] is set as the
home application are explained in this manual. If you change
the home application, some operating steps may differ from
those described in this manual.
• Screenshots and illustrations shown in this manual are for
reference. The actual ones may differ.
• Keys are simplified for explaining operating procedures in this
manual.
4
Page 6

Handling Precautions for this Mobile Phone
• This mobile phone is not compatible with i-mode site
(program) and i-
• This mobile phone is designed to perform communication
automatically
check for the latest software version and maintaining a
connection with the server. Communication of a massive
amount of data such as application download and video
watching will cost expensive packet communication fee, so we
strongly recommend subscription to the flat-rate packet
service.
• You cannot use a microSD card by inserting it into the mobile
phone.
reader/writer cable (sample) (Z P.47).
• Public mode (drive mode) is not available for this mobile
phone.
• Operation sounds such as shutter sound of the camera, etc.
are emitted from this mobile phone even in Silent mode in
which phone ringtone, touch tones and notification ringtone
are muted.
• To confirm your phone number (My Profile), Z
You can use a microSD card by using the microSD card
αppli.
for some features such as data synchronization,
P.111
• To confirm the software version of your mobile phone, Z
P.156
• New features may be added to this mobile phone and
operation
system (OS) upgrading. For the latest information on
additional features and change of operation method, see
DOCOMO website.
• OS upgrading may disable applications used in the old OS
version or pose unwanted failure.
• For services provided by Google, Inc., read Google Terms of
Service. For other web services, read the respective terms of
service.
• In the event of loss of your mobile phone, be sure to change
passwords for various service accounts from PC in order to
prevent others from accessing your accounts for Google
services such as Google Talk, Gmail and Android Market,
Facebook, Twitter, and/or mixi.
method is subject to change due to future operating
5
Page 7

• Providers other than sp-mode, mopera U and business mopera
Internet are not supported.
• sp-mode subscription is required for using tethering.
• When tethering is enabled, sp-mode functions are not
available except Internet access and mail service.
• When an external device is connecting to the Internet by
tethering, applications (browser, games, etc.) may not work
correctly on the device in some situations.
• For details including usage fees, visit
http://www.nttdocomo.co.jp/english/
.
6
Page 8
Contents
Notes on Using this Mobile Phone. . . . . . . . . . . . . . . . . . . 1
SIM Unlock. . . . . . . . . . . . . . . . . . . . . . . . . . . . . . . . . . . . 2
Basic Package/Samples. . . . . . . . . . . . . . . . . . . . . . . . . . . 3
Descriptions of Operating Procedures. . . . . . . . . . . . . . . . 4
Handling Precautions for this Mobile Phone. . . . . . . . . . . 5
Precautions (ALWAYS FOLLOW THESE DIRECTIONS). . . 11
Handling Precautions. . . . . . . . . . . . . . . . . . . . . . . . . . . 24
Waterproof/Dust-proof Performance. . . . . . . . . . . . . . . 34
Part Names and Functions. . . . . . . . . 42
docomo mini UIM card. . . . . . . . . . . 44
Storage Area of This Mobile Phone. . . 47
Preliminary Check
42
docomo Palette UI
74
Initial Setting
88
Charging. . . . . . . . . . . . . . . . . . . . . 49
Power On/Off. . . . . . . . . . . . . . . . . . 53
Basic Operations (How to Use Touch
Panel). . . . . . . . . . . . . . . . . . . . . . . 54
Screen Display/Icons. . . . . . . . . . . . 56
Character Entry. . . . . . . . . . . . . . . . 60
Home Screen. . . . . . . . . . . . . . . . . . 74
Application Screen. . . . . . . . . . . . . . 79
Home Application Settings. . . . . . . . 87
Initial Setting. . . . . . . . . . . . . . . . . . 88
Changing Screen Display to English
. . . . . . . . . . . . . . . . . . . . . . . . . . . 90
Google Account. . . . . . . . . . . . . . . . 91
Setting Access Point. . . . . . . . . . . . . 92
Email Setting. . . . . . . . . . . . . . . . . . 95
Wi-Fi. . . . . . . . . . . . . . . . . . . . . . . 97
Online Service Accounts. . . . . . . . . 100
Phone/Network
Services
101
Phone. . . . . . . . . . . . . . . . . . . . . . 101
Call Log. . . . . . . . . . . . . . . . . . . . . 107
Phonebook. . . . . . . . . . . . . . . . . . . 108
PhoneBookCopy. . . . . . . . . . . . . . . 113
Available Network Services. . . . . . . 115
7
Page 9
Setting Menu.
. . . . . . . . . . . . . . . . 124
Wireless & Networks. . . . . . . . . . . . 125
Call Settings. . . . . . . . . . . . . . . . . . 129
docomo Service. . . . . . . . . . . . . . . 132
Sound. . . . . . . . . . . . . . . . . . . . . . 133
Display. . . . . . . . . . . . . . . . . . . . . 135
Location & Security. . . . . . . . . . . . . 136
Various Settings
124
Mail/Internet
158
Applications. . . . . . . . . . . . . . . . . . 145
Accounts & Sync. . . . . . . . . . . . . . . 146
Privacy. . . . . . . . . . . . . . . . . . . . . 148
Storage. . . . . . . . . . . . . . . . . . . . . 151
Language & Keyboard. . . . . . . . . . . 152
Voice Input & Output. . . . . . . . . . . 153
Accessibility. . . . . . . . . . . . . . . . . . 154
Date & Time. . . . . . . . . . . . . . . . . 155
About Phone. . . . . . . . . . . . . . . . . 156
sp-mode Mail.
. . . . . . . . . . . . . . . . 158
Message (SMS). . . . . . . . . . . . . . . 159
Email. . . . . . . . . . . . . . . . . . . . . . 162
Gmail. . . . . . . . . . . . . . . . . . . . . . 165
Early Warning "Area Mail". . . . . . . . 168
Google Talk. . . . . . . . . . . . . . . . . . 170
Web Browser. . . . . . . . . . . . . . . . . 173
filemanager.
. . . . . . . . . . . . . . . . . 178
File Management
178
Bluetooth Communication. . . . . . . . 180
DLNA Device Connection. . . . . . . . . 184
VPN (Virtual Private Network) Connection
. . . . . . . . . . . . . . . . . . . . . . . . . . 185
External Device Connection. . . . . . . 187
8
Page 10
Camera.
. . . . . . . . . . . . . . . . . . . . 189
Picture Album. . . . . . . . . . . . . . . . 195
Media Player. . . . . . . . . . . . . . . . . 199
Android Market. . . . . . . . . . . . . . . . 201
Google Maps. . . . . . . . . . . . . . . . . 202
Osaifu-Keitai. . . . . . . . . . . . . . . . . 204
YouTube. . . . . . . . . . . . . . . . . . . . 208
Applications
189
Overseas Use
228
Clock. . . . . . . . . . . . . . . . . . . . . . . 209
Calendar. . . . . . . . . . . . . . . . . . . . 211
Memo. . . . . . . . . . . . . . . . . . . . . . 214
Calculator. . . . . . . . . . . . . . . . . . . 215
ECONAVI. . . . . . . . . . . . . . . . . . . . 216
Data Security. . . . . . . . . . . . . . . . . 217
SmartArch. . . . . . . . . . . . . . . . . . . 220
Barcode Reader. . . . . . . . . . . . . . . 222
Polaris Office. . . . . . . . . . . . . . . . . 225
iD appli. . . . . . . . . . . . . . . . . . . . . 227
Overview of International Roaming
(WORLD WING).
. . . . . . . . . . . . . . 228
Available Services. . . . . . . . . . . . . . 229
Confirmation before Use. . . . . . . . . 230
Settings for Overseas Use. . . . . . . . 233
Making/Receiving Calls in the Country You
Stay. . . . . . . . . . . . . . . . . . . . . . . 235
Configuring International Roaming
Settings. . . . . . . . . . . . . . . . . . . . . 238
Confirmation after Returning Home
. . . . . . . . . . . . . . . . . . . . . . . . . . 240
9
Page 11
Optional Items and Associated Equipment
.
. . . . . . . . . . . . . . . . . . . . . . . . . 241
Troubleshooting (FAQ). . . . . . . . . . 242
Warranty and After-Sales Service. . . 251
Software Update. . . . . . . . . . . . . . 254
Main Specifications. . . . . . . . . . . . . 266
Specific Absorption Rate (SAR) of Mobile
Phones. . . . . . . . . . . . . . . . . . . . . 270
Appendix
241
European RF Exposure Information
. . . . . . . . . . . . . . . . . . . . . . . . . . 272
Declaration of Conformity. . . . . . . . 273
FCC Notice. . . . . . . . . . . . . . . . . . . 274
FCC RF Exposure Information. . . . . 275
Important Safety Information. . . . . 277
Export Administration Regulations
. . . . . . . . . . . . . . . . . . . . . . . . . . 279
Intellectual Property Right. . . . . . . . 280
Index. . . . . . . . . . . . . . . . . . . . . . 285
10
Page 12
Precautions (ALWAYS FOLLOW THESE
Danger
Warning
Caution
Don’t
Do not
disassemble
Not wet
hands
Avoid
Water
DIRECTIONS)
■Before using the mobile phone, read these safety
precautions carefully so that you can use it correctly. After
reading the precautions, keep them in a safe place.
■Be sure to observe these safety precautions to prevent you
or those around you from inflicting injury and to avoid
unnecessary damage to the property.
■The symbols below indicate the levels of danger or damage
that can be caused if the particular precautions are not
observed and equipments are not used properly.
This symbol indicates that incorrect
handling poses an imminent risk of
causing death or serious injury.
This symbol indicates that incorrect
handling poses a potential risk of
causing death or serious injury.
This symbol indicates that incorrect
handling poses a risk of causing an
injury or damage to property.
■The following symbols show specific directions:
Denotes actions prohibited to do.
Denotes not to disassemble the units.
Denotes not to touch with wet hands.
Denotes not to use where the equipment may get wet,
and avoid get it wet.
11
Page 13
Do
Denotes mandatory instructions (matters that must be
Pull the
power plug
out
Danger
Don’t
Don’t
Do not
disassemble
complied with).
Denotes to pull the power plug out of an outlet.
■"Precautions" are divided into the following five sections:
General Precautions for this Mobile Phone, Adapters and docomo
mini UIM card.
Precautions for this Mobile Phone. . . . . . . . . . . . . . . . . . . P.15
Precautions for Adapters. . . . . . . . . . . . . . . . . . . . . . . . . P.19
Precautions for docomo mini UIM card. . . . . . . . . . . . . . . P.21
Notes on Using near Electronic Medical Equipment. . . . . . . P.21
. . . . . . . . . . . . . . . . . . . . . . . . . . . . . . . P.12
General Precautions for this Mobile Phone,
Adapters and docomo mini UIM card
Do not use, store, or leave the mobile phone or its
accessories
as near fire, near heating appliances, inside a
kotatsu or near other furniture with heating
elements, in places exposed to direct sunlight, or in
cars heated by the sun).
Fire, burns, or injury may result.
Do not place the mobile phone or its accessories
inside
or high pressure containers.
Fire, burns, injury or electric shock may result.
Do not attempt to disassemble or remodel the
mobile phone or its accessories.
Fire, burns, injury or electric shock may result.
cooking appliances such as microwave ovens
in places with a high temperature (such
12
Page 14
Avoid
Water
Do not allow the mobile phone or its accessories to
Do
Warning
Don’t
Don’t
Don’t
Do
get wet either from water, drinking water or pet
urine, etc.
Fire, burns, injury or electric shock may result.
For details about waterproof performance, see the
following:
Z P.34 "Waterproof/Dust-proof Performance"
With your mobile phone, use the adapters specified
by NTT DOCOMO, INC.
Fire, burns, injury or electric shock may result.
Do not throw the mobile phone or accessories, or
subject them to severe force or shocks.
Fire, burns, injury or electric shock may result.
Do not allow electrically conductive foreign objects
(such as metal pieces or pencil leads) to come into
contact with connector terminal or earphone/
microphone terminal. Do not allow such objects to
enter into the mobile phone.
Fire, burns, injury or electric shock may result.
Do not cover or wrap the mobile phone or its
accessories with a cushion, etc. while it is being
used or recharged.
Fire or burns may result.
Before entering a gas station or other places where
flammable gases are generated, be absolutely sure
to
turn off this mobile phone and stop charging if it
is being charged.
Otherwise, the flammable gases may ignite.
Use the Osaifu-Keitai with the mobile phone turned off
when you are near a gas station. (When Osaifu-Keitai
lock is set, release the lock, and then turn off the power.)
13
Page 15
Do
If odor, overheat, discoloration, deformation, or
Caution
Don’t
Don’t
Do
Do
Do
malfunction
is detected during use, battery charge,
or storage, immediately follow the instructions
below:
• Pull the power plug out of the outlet or cigarette
lighter socket.
• Turn off the power of this mobile phone.
Fire, burns, injury or electric shock may result.
Do not place the mobile phone or accessories on
unstable
locations such as wobbly tables or slanted
locations.
They may fall off and cause injury.
Do not store in humid or dusty places, or in high
temperature environments.
Fire, burns or electric shock may result.
If the mobile phone and its accessories are used by
a child, a guardian should explain how to operate
them correctly. During use, a guardian should also
check that they are being used as instructed.
Otherwise, injury may result.
Keep out of the reach of small children.
Accidental swallowing or injury may result.
Take special care when you use this mobile
phone for a long time with the adapter connected.
If you play applications (game) and so on for a
prolonged period of time while charging, the
temperature of this mobile phone or adapter may rise.
If you keep direct contact with high-temperature parts,
redness, itching, a rash or low-temperature skin burns
may result depending on the state of your physical
condition or constitution.
14
Page 16
Precautions for this Mobile Phone
Danger
Don’t
Don’t
Do
Warning
Don’t
■The type of internal battery for this mobile phone is
described below:
Description Type
Li-ion 00 Lithium-ion battery
Do not throw the mobile phone into fire.
Otherwise, the internal battery may ignite, burst or
overheat and its electrolyte may leak.
Do not pierce it with nails, hit it with a hammer, or
step on it.
Otherwise, the internal battery may ignite, burst or
overheat and its electrolyte may leak.
If the internal battery fluid or other material gets
into your eyes, do not rub them. Flush your eyes
with clean water and seek medical attention
immediately.
Otherwise, the loss of eyesight may result.
Do not allow liquids such as water, or foreign
materials such as metal pieces or flammable
materials to get into the docomo mini UIM card.
Fire, burns, injury or electric shock may result.
15
Page 17
Do
Turn off this mobile phone in places where use is
Do
Do
Do
prohibited such as in airplanes and hospitals.
Otherwise,
the electronic devices and electronic medical
equipment in those places may be adversely affected. If
the Auto power ON function is set, deactivate the
setting, then turn off the power.
For use inside medical facilities, make sure that you
comply with their regulations.
Engaging in any prohibited acts such as using the mobile
phone in an airplane is punishable by law.
However, if use of the mobile phones in an airplane is
permitted provided that radio wave transmission is
turned off, you may do so in accordance with
instructions of each airline.
Because this mobile phone uses the earpiece also as
the
speaker, if the speaker is set to "ON" and sound
is produced, such as when making a call or when a
ringtone sounds, a loud volume might be produced
directly into your ear. Always separate the mobile
phone from your ear.
Further, when you play games or play back music
etc. with the earphone/microphone etc. connected,
adjust the sound volume to moderate volume.
The excessive sound volume impairs your hearing.
Further, accidents may result due to the hardness of
hearing of surrounding sound.
For those with weak heart conditions, the vibrator
and ring volume must be adjusted carefully.
Otherwise, the functions may adversely affect your
heart.
If you are using an electronic medical device or
other
type of device, check with its manufacturer or
vendor regarding the influence of radio waves upon
the device.
The mobile phone may adversely affect the device.
16
Page 18
Do
Turn off this mobile phone when near electronic
Do
Do
Caution
Don’t
Don’t
devices using high-precision control or weak
signals.
The mobile phone may cause the electronic devices to
malfunction and have other adverse effects.
* Electronic devices that may be affected:
Hearing aids, implanted cardiac pacemakers, implanted
defibrillators, other electronic medical equipment, fire
alarms, automatic doors and other automatically
controlled devices. If you use an implanted cardiac
pacemaker, implanted defibrillator or any other
electronic
medical equipment, consult the manufacturer
or retailer of the device for advice regarding possible
effects from the radio waves.
If the display part or camera lens is broken, be
careful
about broken glasses or the exposed interior
of this mobile phone.
The inside of the display and the surface of the camera
lens use an anti-impact resin, and the glass and lens are
constructed so that they do not scatter easily. However,
if you touch the damaged or exposed parts by mistake,
you may injure yourself.
Immediately stop using the mobile phone and keep
it away from fire if the internal battery leaks or
emits an odor.
leaked battery fluid may ignite, causing fire or burst.
The
Do not use this mobile phone if it has been
damaged.
Fire, burns, injury or electric shock may result.
When using the motion sensor, ensure that you
check around you for safety, securely take hold of
your mobile phone, and do not swing more than
necessitated.
Otherwise, injury or other accidents may result.
17
Page 19
Don’t
If you accidentally damage the display part and
Don’t
Do
Do
Do
the substance inside leaks out, keep your face,
hands and skin away from it.
Otherwise, you may impair your eyesight or damage
your skin.
If this substance should get into your eyes or mouth,
immediately
rinse them with clean water, and then seek
medical attention.
If it should adhere to your skin or clothing, immediately
wipe it off with alcohol or similar liquid, and then rinse
the affected area with soap and water.
Do not dispose of the mobile phone with other
waste.
The internal battery may catch fire or damage the
environment. Take the unneeded mobile phone to a
handling counter such as a docomo Shop or dispose of
it in accordance with local waste disposal regulations.
Before using the mobile phone inside a car, check
with its manufacturer or dealer whether the radio
waves will have any adverse effects.
some vehicle models, the radio waves may adversely
In
affect the electronic devices inside the vehicle. Such
cases are rare. However, if this happens, stop using the
mobile phone immediately.
Itching, rash or eczema may be caused depending
on your physical conditions or predisposition. If an
abnormality occurs, stop using the mobile phone
immediately, and then seek medical attention.
For material of each part, Z
P.23 "List of materials used"
View the display in a sufficiently light place keeping
a certain distance from your eyes.
Otherwise, your eyesight may become impaired.
18
Page 20
Do
If the electrolyte fluid or other material inside the
Danger
Don’t
Warning
Don’t
Don’t
Don’t
Don’t
Don’t
internal battery has leaked out, do not allow it to
come
or any other part of your body.
Contact may result in loss of sight or skin problems.
If you get the fluid or other material in your eyes or
mouth, or on skin or clothing, immediately wash the
affected areas with clean water.
If you get it in your eyes or mouth, immediately seek
medical attention after rinsing.
into contact with the skin on your face, hands
Precautions for Adapters
Do not connect microUSB cables other than the
supplied one to AC adapter.
Fire, burns or electric shock may result.
Do not use the adapter cord if it has been damaged.
Fire, burns or electric shock may result.
Do not use the AC adapter cable in humid places
such as a bathroom.
Fire, burns or electric shock may result.
The DC adapter is for use only in a negative (-)
grounded vehicle. Do not use it in a positive (+)
grounded vehicle.
Fire, burns or electric shock may result.
If a thunderstorm is nearby, do not touch the
adapter.
Otherwise, you may receive an electric shock.
Do not place heavy objects on the adapter cord.
Fire, burns or electric shock may result.
19
Page 21
Don’t
When plugging the AC adapter into the power
Not wet
hands
Do
Do
Do
Do
Do
Pull the
power plug
out
Pull the
power plug
out
outlet,
or when unplugging it from the outlet, do not
allow metal straps or other metal objects to come
in contact with it.
Fire, burns or electric shock may result.
Do not touch the adapter or power outlet with wet
hands.
Fire, burns or electric shock may result.
Use the adapter at the specified V AC.
Supplying the wrong voltage to the AC adapter may
result in a fire, burns or electric shocks.
AC adapter: 100 V - 240 V AC (Connect only to
household AC outlet.)
DC adapter: 12/24 V DC (For negative (-) grounded
vehicles only)
If a fuse of the DC adapter has blown, replace it with
a specified fuse.
Fire, burns or electric shock may result.
the specified fuse, refer to each instruction manual.
For
Keep the power plugs dust-free.
Fire, burns or electric shock may result.
When plugging the AC adapter into the power
outlet, plug it in securely.
Fire, burns or electric shock may result.
When unplugging the power plug from the power
outlet or cigarette lighter socket, do not yank the
adapter
cord, but take hold of the adapter to unplug
it.
Fire, burns or electric shock may result.
When you do not intend to use the adapter for a
long
period of time, disconnect the power plug from
the power outlet or cigarette lighter socket.
Fire, burns or electric shock may result.
If liquids such as water get in the adapter, unplug
the power plug immediately from the outlet or
cigarette lighter socket.
Fire, burns or electric shock may result.
20
Page 22
Pull the
power plug
out
Before cleaning, pull the power plug out of the
Caution
Do
Warning
Do
outlet or cigarette lighter socket.
Fire, burns or electric shock may result.
Precautions for docomo mini UIM card
Be careful not to touch the cut surface of the
docomo mini UIM card when removing it.
Otherwise, injury may result.
Notes on Using near Electronic Medical
Equipment
■The description below meets "Guidelines on the Use of
Radio-communication Equipment such as Cellular
Telephones – Safeguards for Electronic Medical
Equipment" by the Electromagnetic Compatibility
Conference Japan.
Comply with the following in hospitals or health
care facilities:
• Do not carry this mobile phone into operating rooms,
intensive care units (ICU) or coronary care units
(CCU).
• Turn off this mobile phone in hospital wards.
• If there is any electronic medical equipment near
you, turn off this mobile phone even when in a
location such as a lobby.
• Comply with any regulations of hospital and health
care facilities instructing you not to use or carry in a
mobile phone.
• If the Auto power ON function is set, deactivate the
setting, then turn off the power.
21
Page 23
Do
Turn off this mobile phone in trains during the rush
Do
Do
hour or other crowded areas as there may be
someone near you with an implanted cardiac
pacemaker or implanted defibrillator.
The mobile phone's radio waves may adversely affect
the operation of implanted cardiac pacemakers and
implanted defibrillators.
If you use electronic medical equipment such
as implanted cardiac pacemaker or implanted
defibrillator, carry and use this mobile phone 22 cm
or more away from the implanted cardiac
pacemaker or implanted defibrillator.
The mobile phone's radio waves may adversely affect
the operation of electronic medical equipment.
Patients using electronic medical equipment other
than implanted cardiac pacemakers or implanted
defibrillators (outside medical establishments for
treatment
at home, etc.) should check the influence
of radio waves upon the equipment by consulting its
manufacturer.
The mobile phone's radio waves may adversely affect
the operation of electronic medical equipment.
22
Page 24
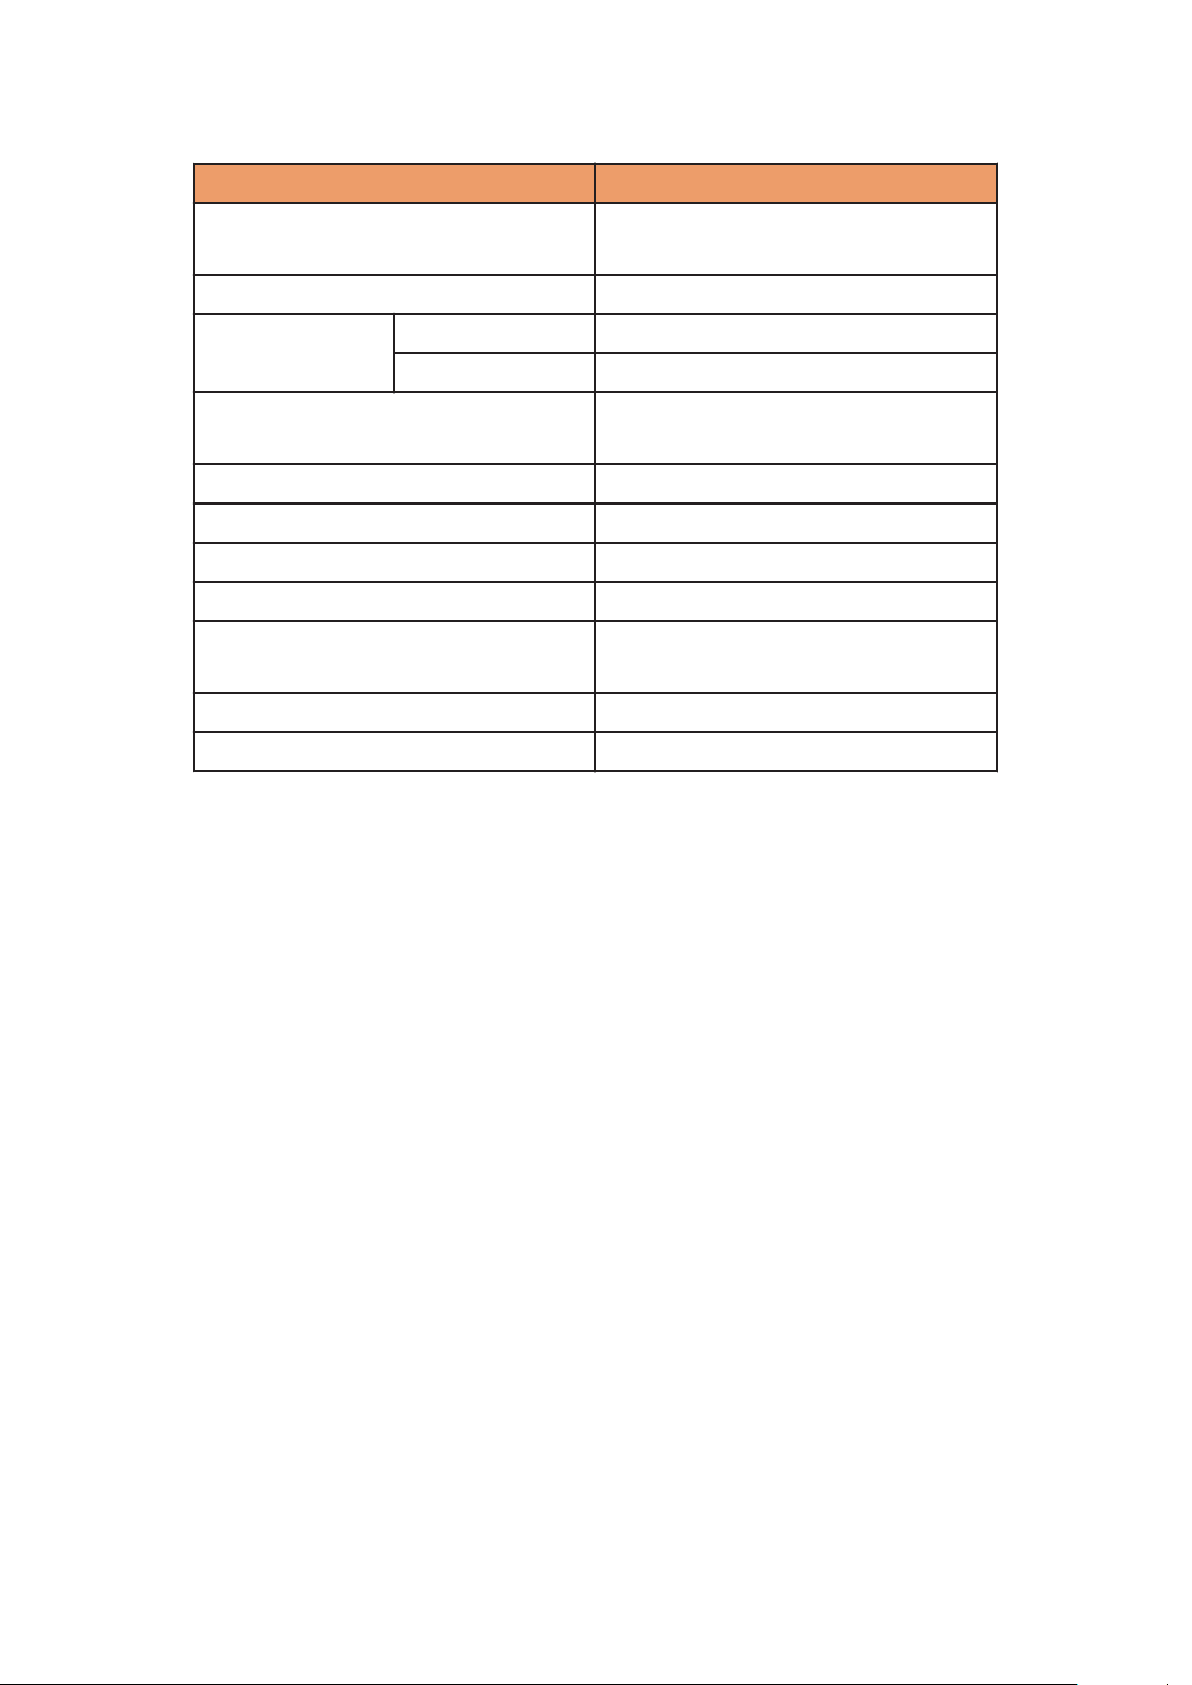
■ List of materials used
Where it is used Material/Finishing
Earphone/microphone terminal
(resin part)
Outer casing PC/UV coating
Connector
terminal
Connector terminal cover Elastomer, Silicon rubber,
Camera lens area PMMA/hard coating
Earpiece/speaker Stainless steel/UV coating
Display panel Glass/AF coating
docomo mini UIM card slot Stainless steel
docomo mini UIM card slot
cover
Barcode sticker PET
Keys ABS/UV coating
Resin area PA
Metal area Stainless steel/nickel plating
PA
PC/UV coating
Elastomer, Silicon rubber,
PC/UV coating
23
Page 25

Handling Precautions
General Notes
■The P-04D is provided with the waterproof/dust-proof
performance, however, do not allow water to seep or dust
to get in the inside of this mobile phone, or do not allow
accessories and optional items to get wet or adhere dust.
Adapter and docomo mini UIM card are not waterproofed/dustproofed. Do not use them in environments, which are high in
humidity such as in bathrooms, and do not allow them to get
wet from rain. Furthermore, if carrying them against your body,
they become moist due to perspiration and the internal parts
may become corroded, causing malfunction. If the parts are
found to have been damaged due to exposure to the liquids, any
repairs will not be covered by warranty, or repairs may not be
possible. This may be repaired at a cost if repairs are possible.
■Use a dry soft cloth such as the one for cleaning glasses to
clean the equipment.
• The display may be scratched if it is rubbed hard with a dry
cloth.
• Stains may result from droplets of water or dirt if they are
left on the display.
• Do not use alcohol, thinner, benzene, detergent or other
solvents for cleaning, otherwise the printing may be
removed or discoloration may result.
■Occasionally clean the terminals of the equipment using a
dry cotton swab, etc.
The
soiled terminals deteriorate the connection and might cause
power discontinuity or incomplete charging. Wipe the terminals
with a cotton swab, etc.
Take care not to damage the terminals when cleaning them.
■Do not place the mobile phone near an air conditioner
outlets.
Condensation may form due to rapid changes in temperature,
and this may corrode internal parts and cause malfunction.
24
Page 26

■Do not apply excessive force onto this mobile phone.
If you put the mobile phone in a bag along with many other
articles or sit with the mobile phone in a clothes pocket, the
display and internal circuitry could be damaged or malfunction.
Also, if an external device is left connected to the connector
terminal or the earphone/microphone terminal, the connector
could be damaged, or malfunction.
■Do not rub or scratch the display part with metals.
Doing so might cause damage to the part, resulting in failure or
malfunction.
■Carefully read each instruction manual attached to
adapter.
Notes on Handling this Mobile Phone
■Never forcibly press the surface of the touch panel, or
operate it with something having a sharp point like a claw,
ballpoint pen, or pin.
Damage to the touch panel might result.
■Avoid using in extremely high or low temperatures.
The mobile phone should be used within a temperature range
of 5°C to 35°C and a humidity range of 45 % to 85 %.
■If the mobile phone is operated near a land-line phone,
television set, radio or other devices in use, it may
adversely affect the devices. Operate the mobile phone as
far away from these devices as possible.
■It is recommended that you make separate notes of the
information stored in this mobile phone and keep such
notes in a safe place.
We take no responsibility for any loss of the stored data items.
■Do not drop this mobile phone or subject it to strong
impacts.
Malfunction or damage may result.
■Do not insert an external device to the connector
terminal or the earphone/microphone terminal at a slant
when connecting, and do not pull it out when it is inserted.
Malfunction or damage may result.
25
Page 27

■This mobile phone becomes warm during use or charging
but this is not an abnormality. Use the mobile phone as it
is.
■Do
not expose the organic EL display to direct sunlight for
a long time.
Malfunction may result.
■Do not leave the camera in places exposed to direct
sunlight.
Pixels may be discolored or burns may result.
■When using the mobile phone, ensure that you close the
cover for the connector terminal and docomo mini UIM
card slot.
Dust or water might enter into the mobile phone, causing
malfunction.
■While you are using the microSD card, never take it off or
turn off the power of this mobile phone.
Data may be erased or malfunction may result.
■Do not bring magnetic substances close to your mobile
phone.
Problems with operation may result if items with strong
magnetic fields are brought close to the mobile phone.
■Internal battery is a consumable item.
Though it depends on the usage state, you are advised to
replace the internal battery if its usable time is extremely short
even when you fully charge it. For replacement of the internal
battery, contact "Repairs" (Z P.297) or repair counter specified
by DOCOMO.
■Charge the battery in a place with an appropriate ambient
temperature of 5°C to 35°C.
■The usable time of the internal battery differs depending
on the usage environment and its remaining life.
26
Page 28

■Note the following points when this mobile phone is stored
for long periods without being used.
• Storing the mobile phone in a fully charged state
(immediately
state where the battery is completely depleted (in a state
such that you cannot power on the mobile phone), might
result in lower performance or shorter life for the internal
battery.
• We recommend storing the mobile phone when the battery
is at an appropriate level of charge (at about 40% battery
level remaining as a guide).
after it has finished charging), or storing it in a
■The earpiece is located at the upper right of the unit (Z
P.43
held closely to your ear.
). When making calls, make sure that the earpiece is
Notes on Handling Adapters
■Charge the battery in a place with an appropriate ambient
temperature of 5°C to 35°C.
■Charge the battery where:
• There is very little humidity, vibration, and dust.
• There are no land-line phones, television sets or radios
nearby.
■While you are charging, the adapter may become warm.
This is not a malfunction, so you can keep on using.
■Do not use the DC adapter for charging the battery when
the car engine is not running.
The car battery could go flat.
■When using the power outlet having the disengaging
prevention mechanism, observe the instructions given in
that instruction manual.
■Do not give a strong shock. Also, do not deform the
charging terminal.
Malfunction may result.
27
Page 29

Notes on Handling the docomo mini UIM
card
■Do
not apply more force than is necessary when installing
or removing the docomo mini UIM card.
■The warranty does not cover damage caused by inserting
the docomo mini UIM card into some other types of IC card
reader/writer.
■Always keep the IC portion clean.
■Use a dry soft cloth such as the one for cleaning glasses to
clean the docomo mini UIM card.
■It is recommended that you make separate notes of the
information stored on the docomo mini UIM card and keep
such notes in a safe place.
We take no responsibility for any loss of the stored data items.
■For the environmental protection, bring unneeded docomo
mini UIM cards to a handling counter such as a docomo
Shop.
■Do not damage, carelessly touch, or shortcircuit the IC.
Data might be lost or malfunction may result.
■Do not drop the docomo mini UIM card or subject it to
strong impacts.
Malfunction may result.
■Do not bend the docomo mini UIM card or place something
heavy on it.
Malfunction may result.
■Into this mobile phone, do not insert the docomo mini UIM
card with a label or sticker pasted.
Malfunction may result.
28
Page 30
Notes on Using Bluetooth Function
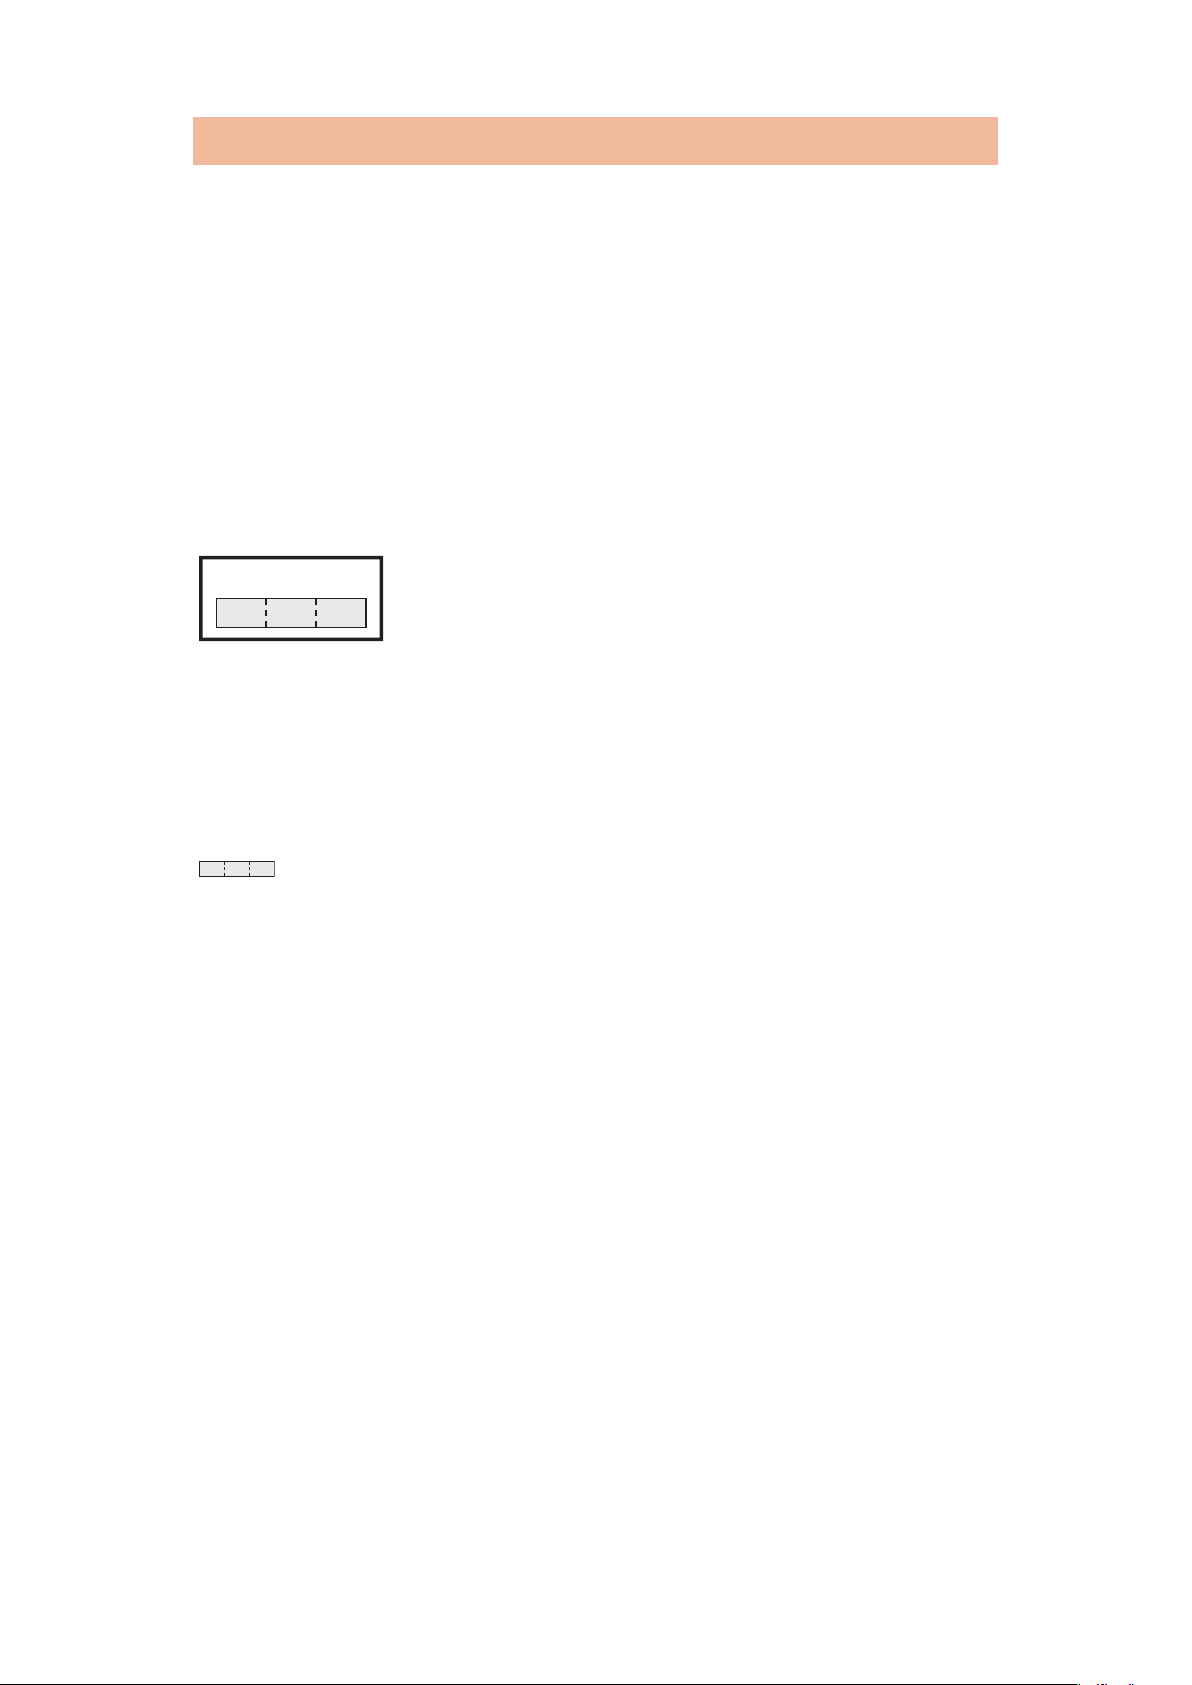
2.4FH1
■This mobile phone supports the security function that
meets the Bluetooth Specification, to secure Bluetooth
communication. However, the security may not be
sufficient depending on the settings. Take care of the
security for communication when using the Bluetooth
function.
■Note that even if any leak of data or information occurs
while
take no responsibility.
■Radio frequencies
The radio frequencies for the Bluetooth function of this
mobile phone are as follows:
2.4 : Indicates radio facilities that use 2400 MHz
making connection using the Bluetooth function, we
frequencies.
FH : Indicates modulation is the FH-SS system.
1 : Indicates that an estimated interference distance is
10 meters or less.
: Indicates that all radio frequencies 2400 MHz
through 2483.5 MHz are used, and that the
frequencies for mobile object identifiers shall not be
avoided.
To use on airplane, confirm with airline company in advance.
Use of Bluetooth may be prohibited in some countries. Please
confirm laws and regulations applicable in the country/region
before use.
29
Page 31
■Cautions on Using Bluetooth Devices
Bluetooth
house radio stations for mobile object identifiers that have
to be licensed and are used in production lines of a factory,
specific unlicensed low power radio stations, and amateur
radio stations (hereafter, referred to "another radio
station") in addition to scientific, medical, industrial
devices, or home electric appliances such as microwave
ovens.
1. Before using this mobile phone, make sure that "another
radio station" is not operating nearby.
2. If radio wave interference between this mobile
phone and "another radio station" occurs, move
immediately to another place or turn off power to avoid
interference.
3. For further details, contact "General Inquiries"
(Z P.
operates at radio frequencies assigned to the in-
296).
Notes on Handling Wireless LAN (WLAN)
■Wireless LAN (WLAN) has an advantage of any-place LAN
connectivity within the radio wave range as it establishes
communication via radio wave. At the same time,
however, you have a risk that malicious third party may
break
without security measures. It is recommended to take
security measures at your discretion and responsibility.
into the network and steal communication contents
■Wireless LAN
Do not use Wireless LAN in a place where magnetized by
electric product, AV, OA equipment, etc. or where
electromagnetic wave is generated.
• If magnetism or electrostatic noise affects your mobile
phone, noise may be increased or communication may not
be
available (especially when using microwave oven, it may
affect your mobile phone).
• Using near TV or radio may cause poor reception or TV
screen may be disturbed.
• When multiple wireless LAN access points exist near your
mobile phone and they use the same channel, search may
not be performed correctly.
30
Page 32
■Radio frequencies
2.4DS/OF4
The radio frequencies for WLAN devices are as follows:
2.4 : Indicates radio facilities that use 2400 MHz
frequencies.
DS/OF : Indicates modulation is the DS-SS/OFDM system.
4 : Indicates that an estimated interference distance
is 40 meters or less.
: Indicates that all radio frequencies 2400 MHz
through 2483.5 MHz are used, and that the
frequencies for mobile object identifiers shall be
avoided.
Available channels vary depending on countries.
To use on airplane, confirm with airline company in advance.
of wireless LAN may be prohibited in some countries. Please
Use
confirm laws and regulations applicable in the country/region
before use.
31
Page 33
■Cautions on Using 2.4 GHz Devices
The bandwidth of the WLAN devices is assigned to the inplant
in production lines of a factory (a license is required),
specified low power radio stations (a license is not
required), or amateur radio stations (a license is required),
in addition to home electric appliances such as a microwave
oven, industrial/scientific/medical devices.
1. Before using this device, confirm that in-plant radio
2. If this device generates harmful radio wave interference
radio stations for identification of mobile objects used
stations
power radio stations or amateur radio stations are not in
operation in your neighborhood.
against in-plant radio stations for identification of
mobile
or stop using wireless LAN function, and contact
"General Inquiries", then consult about treatment for
prevention of the interference (for example, installation
of partitions etc.) (Z P.296).
for identification of mobile objects, specified low
objects, immediately change the radio frequency
3. If this device generates harmful radio wave interference
against in-plant radio stations for identification of
mobile objects or amateur radio stations, or if any
trouble occurs, contact "General Inquiries" (Z P.296
Notes on Handling the FeliCa Reader/Writer
■The FeliCa reader/writer function on this mobile phone
uses very weak radio waves which do not require to be
licensed as radio stations.
■The FeliCa reader/writer is operated on the 13.56 MHz
frequencies.
take enough distance between your mobile phone and the
reader/writer. Further, ensure that there are no radio
stations that use the same frequencies.
When you use another reader/writer nearby,
).
32
Page 34

Caution
■Do not use the modified mobile phone. Using a modified
mobile phone infringes the Radio Law.
The
mobile phones are granted technical regulations conformity
certification as the specified radio equipment under the Radio
Law and you can check more details with following these steps
by this mobile phone:
Home screen W A W [Settings] W [About phone] W
[Certification information]
Modifying internal components void the technical regulations
conformity certification.
Do not use the mobile phone in this state, which infringes the
Radio Law.
■Take special care not to operate the mobile phone while
driving.
Holding a mobile phone in your hand while driving is subject to
a fine or other penalties.
However, this does not apply in unavoidable circumstances
when, for instance, rescuing someone who is sick or injured or
when maintaining public order.
■Use the FeliCa reader/writer functions in Japan only.
The FeliCa reader/writer functions on this mobile phone have
been authorized in compliance with the radio transmission
standards in Japan.
You might be imposed punishment if you use them overseas.
■Do not make any unauthorized or unsanctioned changes
to the basic software.
Such changes will be construed as remodeling and, as a result,
requests to repair faults may be denied.
33
Page 35

Waterproof/Dust-proof Performance
Your P-04D is capable of IPX5*1 and IPX7*2 waterproof
performance and IP5X*3 dust-proof performance if the
connector terminal cover and docomo mini UIM card slot
cover are firmly closed.
*1 IPX5 means that the P-04D maintains its performance as a
phone
mobile phone from all directions under conditions where
water in a volume of 12.5 liters/minute is sprayed from a
distance of about 3 meters for at least 3 minutes using a
water-pouring nozzle with an inside diameter of 6.3 mm.
*2 IPX7 means that the P-04D maintains its performance as a
phone even after the phone has been gently submerged in
a
temperature, and left in place for about 30 minutes, and
then removed from the water.
even after a water jet flow has been sprayed over the
container of still city water to a depth of 1 meter at room
*3 IP5X refers to the degree of protection, and indicates that
mobile phone has been tested by placing it in a chamber
the
wherein dust particles measuring 75 µm in diameter or
smaller are circulated for 8 hours, and then when the mobile
phone is removed, it maintains correct operation as a phone
and remains safe.
(Note) This does not mean that the waterproof performance is
guaranteed in all given conditions of actual use. Read this
manual thoroughly before use to prevent invasion of water
or foreign materials and then to enable you to safely use
your mobile phone.
34
Page 36
Waterproof/Dust-proof Performance of
Soap/detergent
Sea/pool
P-04D
■In the Rain
• You can talk on the mobile phone by holding the mobile phone
in the rain with your wet hand without umbrella. (Less than 20
mm/hour of rainfall, and your feet get wet by drops of rain
rebounded off the ground)
* When your hands are wet or water drops remain on the mobile
phone, do not open/close the connector terminal cover and
docomo mini UIM card slot cover.
■Wash
• When the mobile phone gets dirty, you can
slowly swing and wash it in a bowl filled
fresh water or tap water at an ambient
with
temperature, or wash it by hand while
running a slightly-weak water flow from a
faucet.
• Wash your mobile phone while you are
pushing the cover of the connector
terminal and docomo mini UIM card
slot down.
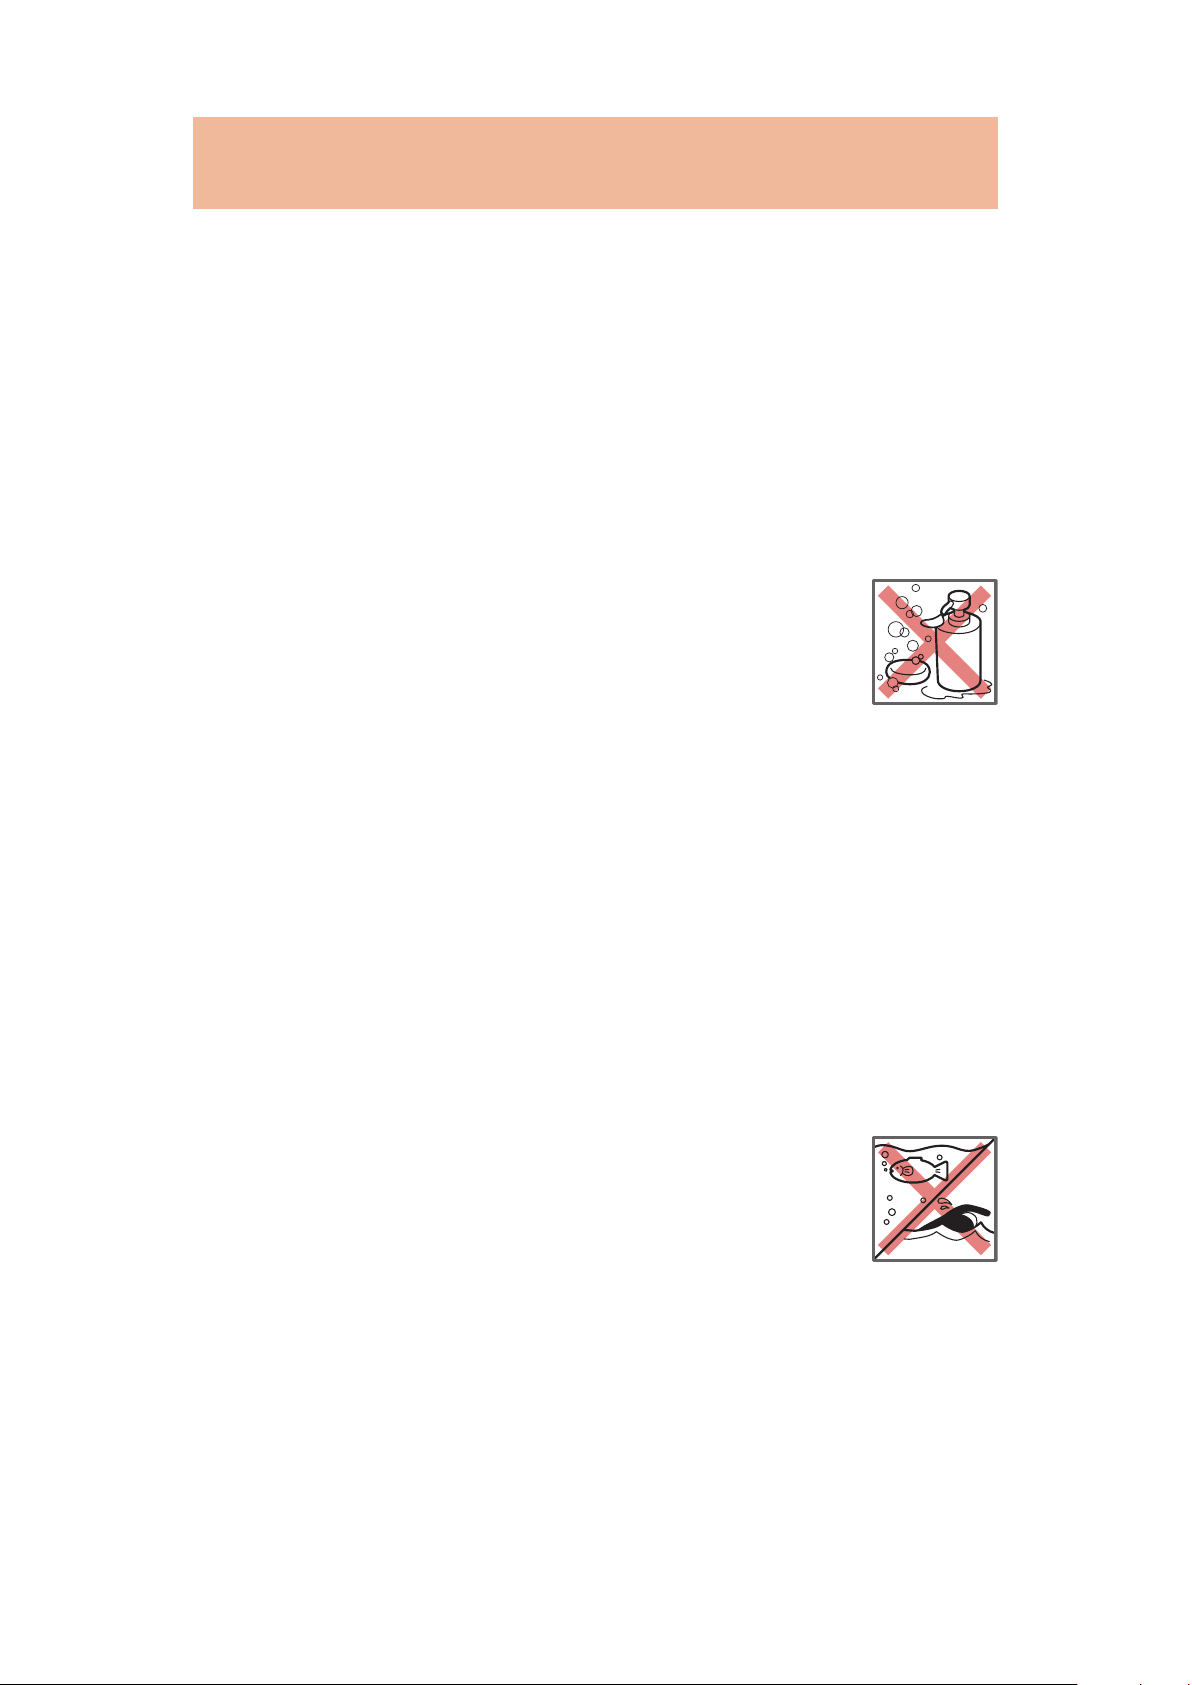
• Do not use brushes, sponges, soaps, or detergents for
washing.
• After rinsing off the mobile phone in water, wipe its surfaces
thoroughly
using a dry cloth, drain off the water (Z P.40), and
allow the mobile phone to dry out naturally.
■On Leisure
• Do not soak or drop your mobile phone into
a pool or the sea nor operate it in water.
• If pool water or seawater splash the mobile
phone,
the prescribed method (Z P.35).
wash the mobile phone by following
35
Page 37
■In the Bathroom
Spa/bath salts
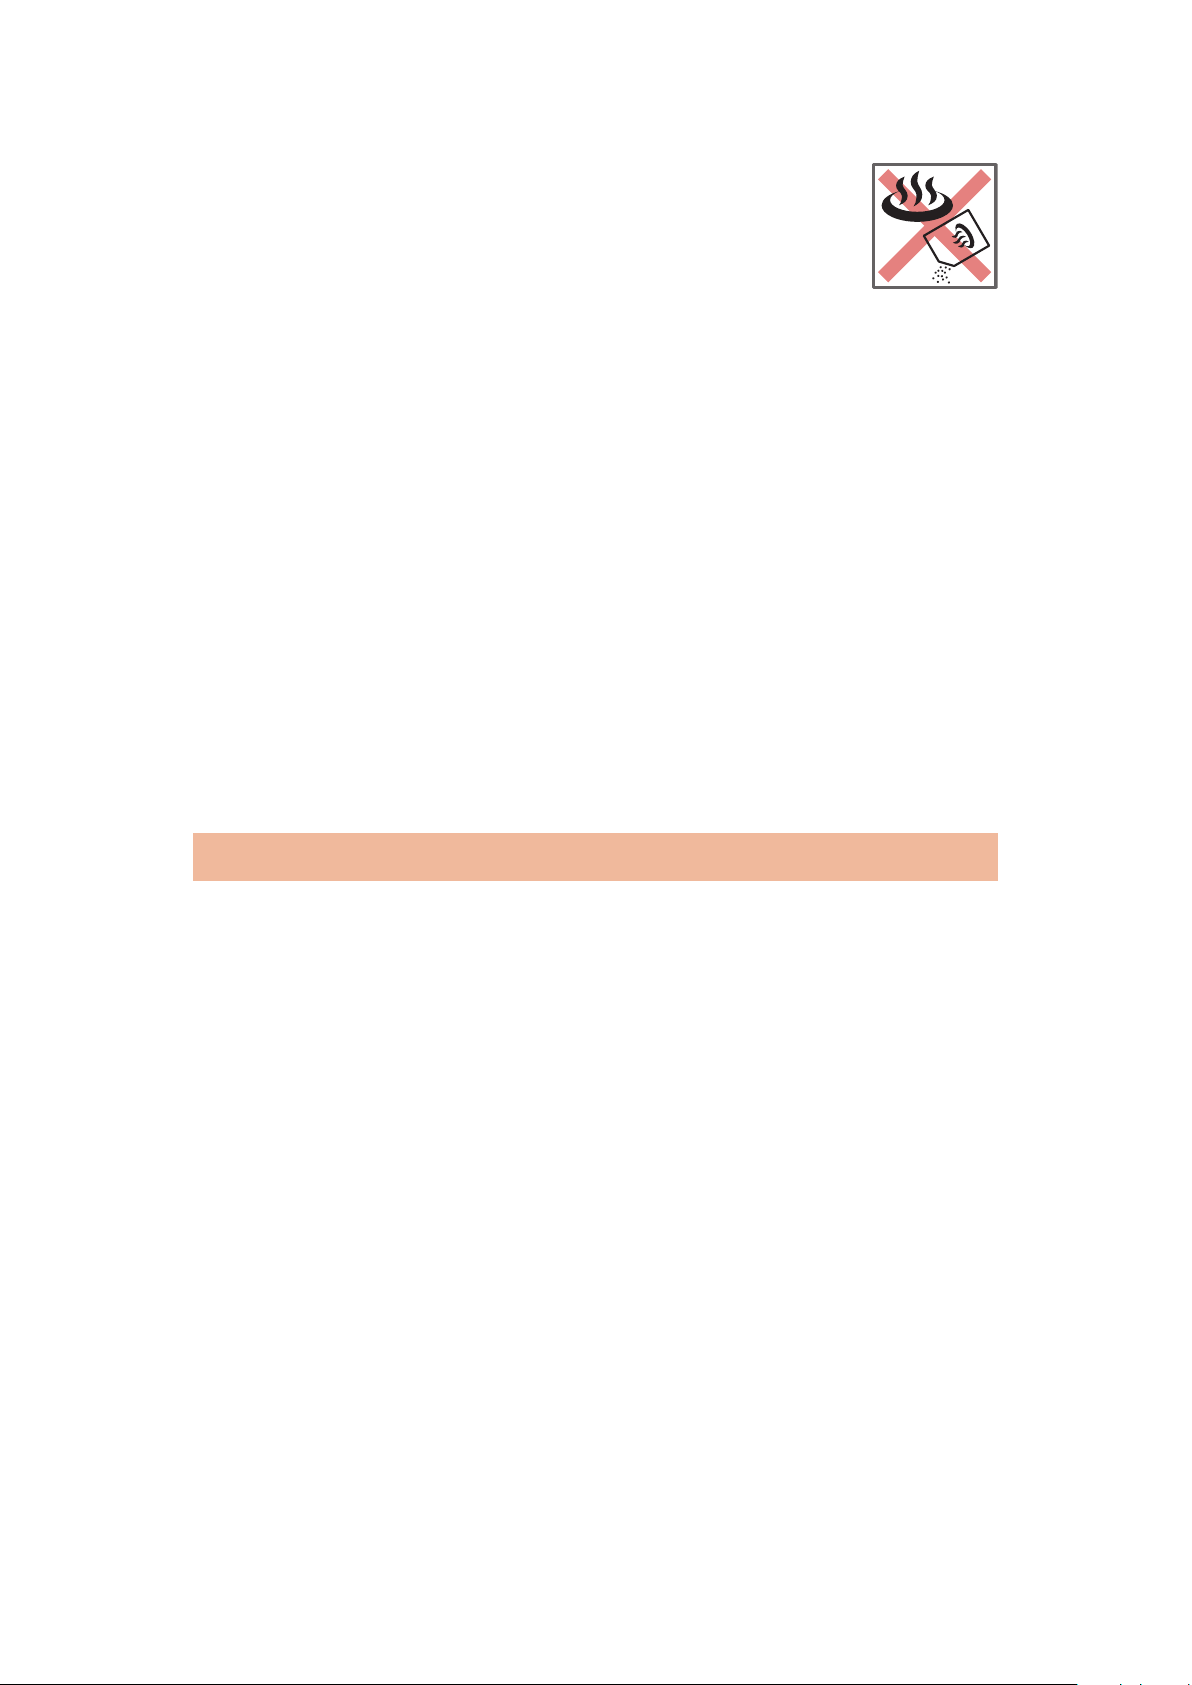
• Do not soak or drop your mobile phone into
a bathtub, nor use it in water.
• Do not soak the mobile phone into spa or
water containing soap detergent or bath
additive.
• Do not directly expose to the strong water
flows (such as water jets from a faucet or
shower
the skin) that exceed the standard.
• Avoid using the mobile phone for a long time in the bathroom.
• If you take your mobile phone from a cold place to a warm
bathroom, condensation might result because of sudden
change in ambient temperature. Warm it up until ambient
temperature is restored, and then take it to the bathroom.
head strong enough to feel pain on
■In the Kitchen
• Do not spray liquids other than fresh water or tap water at
room temperature onto the mobile phone or soak it in them.
• Do not spray hot water or cold water onto the mobile phone or
soak it in them.
Important Information before Use
• Before using the mobile phone, close the connector terminal
cover and docomo mini UIM card slot cover tightly. If there is
small particles (fine fibers, hair or grains of sand) between
any
the covers and the mobile phone, water could find its way
inside the mobile phone. When closing the connector terminal
cover and docomo mini UIM card slot cover, ensure that there
is no particles or dirt on or around these parts (especially the
packing).
• Ensure that the connector terminal cover and docomo mini
UIM card slot cover are closed tightly and that none of these
covers are askew. If the covers are not closed tightly, water
could find its way inside the mobile phone.
• To keep the waterproof/dust-proof performance, you need to
replace parts without fail once two years regardless whether
abnormality with the mobile phone is found or not. You are
any
charged for replacement of parts. Take your mobile phone to
a repair counter specified by DOCOMO.
36
Page 38
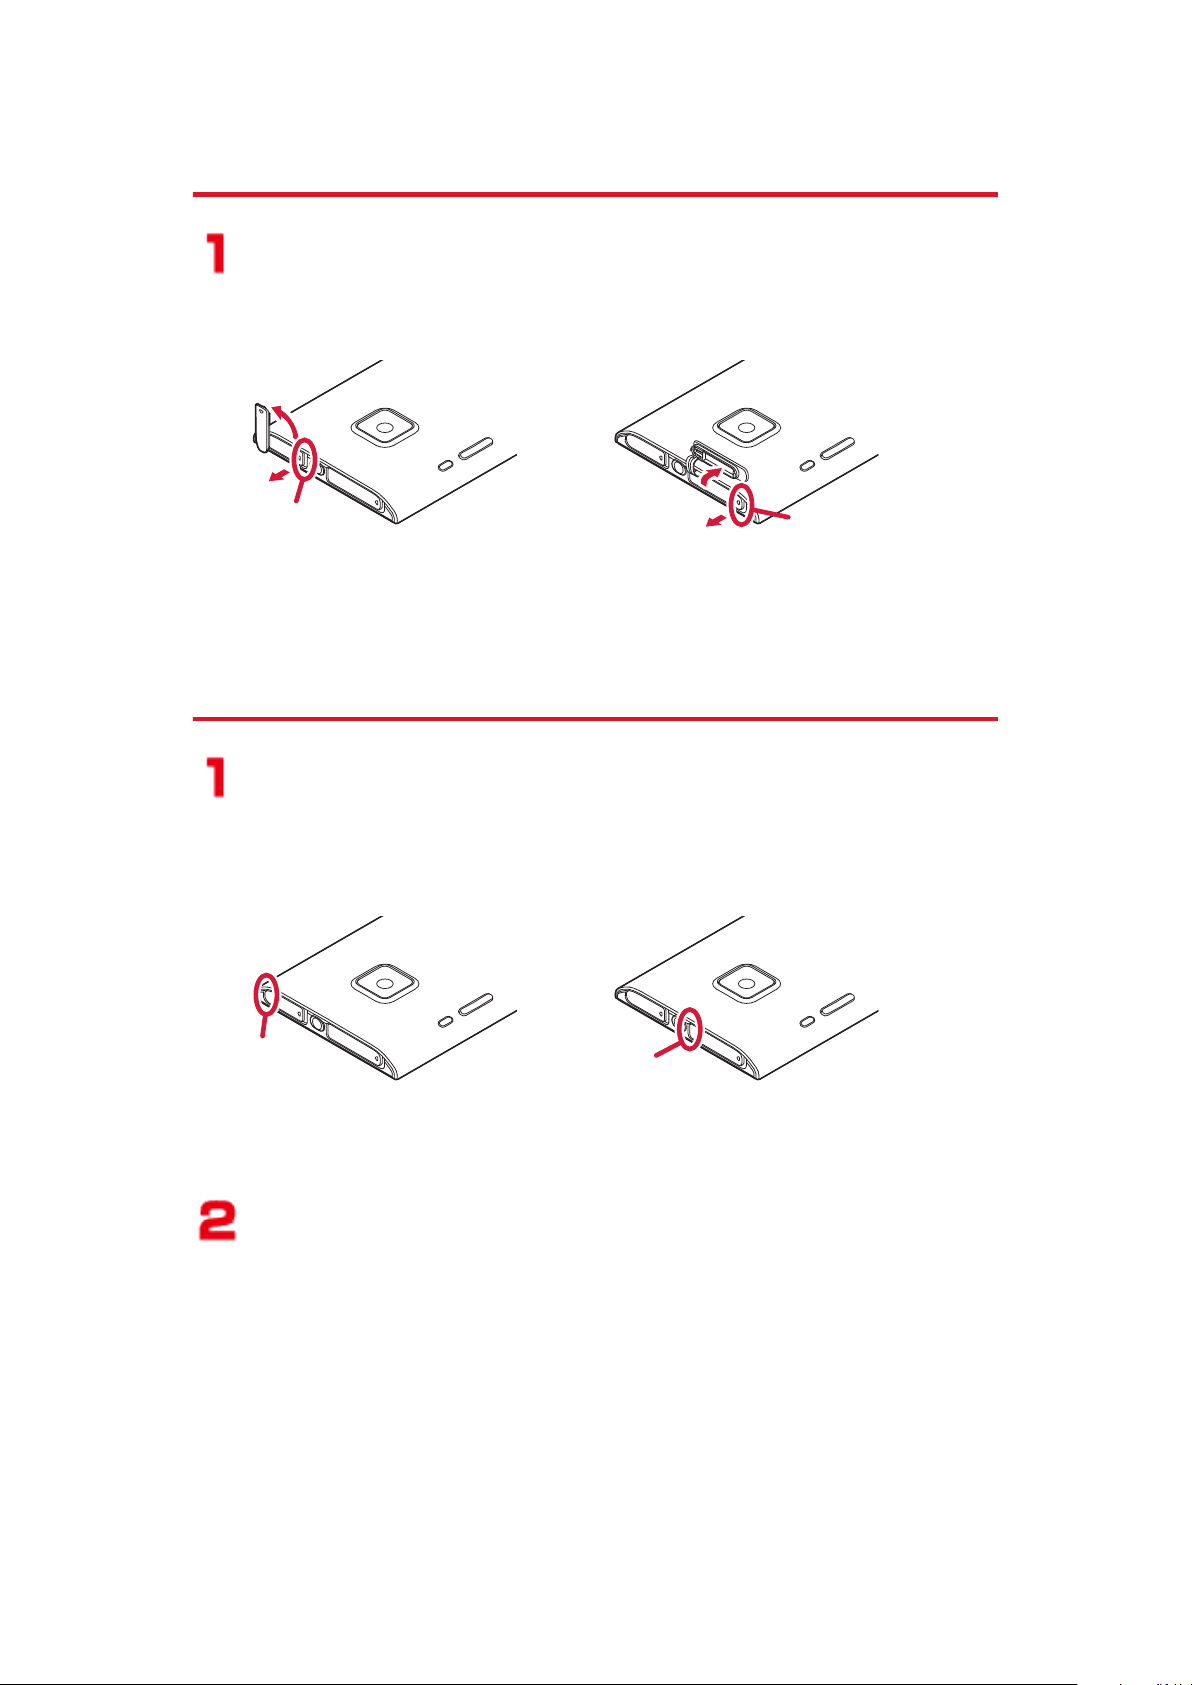
Opening the Connector Terminal Cover/
1
1
2
2
Concave
Concave
<Connector terminal cover> <docomo mini UIM card slot cover>
Base
<Connector terminal cover>
Base
<docomo mini UIM card slot cover>
docomo mini UIM Card Slot Cover
Hook your fingertip over the concave, pull out
the
cover to direction 1, and turn it as direction
2
Closing the Connector Terminal Cover/
docomo mini UIM Card Slot Cover
Align the connector terminal cover/docomo mini
UIM card slot cover in parallel with the mobile
phone, and while holding its base part firmly,
push it into place
Ensure that no float is found with the connector
terminal
cover/docomo mini UIM card slot cover
as a whole
37
Page 39

Caution
■About mobile phone
• Do not wash the mobile phone with a washing machine or
ultrasonic cleaner.
• Never charge the battery when it gets wet.
• Do not leave the mobile phone with drops of water remained
on.
• The connector terminal or earphone/microphone terminal
might be short-circuited.
• Water might enter into the inside of the mobile phone
through
mobile phone might freeze, resulting in malfunction.
If the mobile phone gets wet, keep the connector terminal
cover and docomo mini UIM card slot cover closed, drain off
the water (Z P.40), and immediately wipe off the moisture
remaining on the mobile phone with a clean dry cloth.
• Do not drop the mobile phone nor give a shock to it. The
deterioration
result depending on the damage.
• Do not soak the mobile phone in hot water, use in a sauna, nor
expose to hot wind currents such as those of a dryer.
• This mobile phone does not float on water.
• Do not directly expose to the strong water flows that exceed
the standard or submerge the mobile phone in water.
• Do not directly place the mobile phone on sandy beaches.
• Water droplets or sand might get inside the mobile phone,
such
speaker, and volume might be diminished or sound quality
might be degraded.
• Even a small amount of sand between the gaps around
buttons or other parts might result in loss of operation.
• Even the slightest sands entered from the connector
terminal cover or docomo mini UIM card slot cover could
cause water to enter the inside of the mobile phone.
If sand or other debris makes contact with the phone, do not
perform operations with the buttons, and use the
recommended method to clean the mobile phone (Z P.35).
the keys etc. In cold districts, drops of water on the
of the waterproof/dust-proof performance might
as through the holes for the microphone, or earpiece/
38
Page 40

■About the connector terminal cover and docomo
mini UIM card slot cover
• Do not open or close them with gloves put on hands. Fine dirt
might adhere to the contact surface of the packing.
• Be careful that no fibers adhere to the packing when you try
to wipe off moisture with a clean dry cloth.
• Do not peal the packing off. Also do not insert something
pointed at the head into the clearance of the connector
terminal cover or docomo mini UIM card slot cover. The
packing
phone.
• If the packing for the connector terminal cover or docomo mini
UIM card slot cover is damaged or deformed, replace them at
a repair counter specified by DOCOMO.
• When the mobile phone gets wet with the connector terminal
cover or docomo mini UIM card slot cover left open, water
enters inside, and an electric shock or malfunction could be
caused. Do not use it as is, but turn off the power, and then
take it to a repair counter specified by DOCOMO.
is damaged, resulting in water to enter into the mobile
■About microphone and earpiece/speaker
• Do not thrust something pointed at the head into the holes on
microphone or earpiece/speaker.
• Do not leave water drops adhered to them. It might happen
that communications are disabled.
■Others
• Accessories and optional items are not waterproofed/dustproofed. Do not operate it in a bathroom, shower room,
kitchen, or lavatory where water is used.
• It is not that the waterproof performance is guaranteed in all
given conditions of actual use. If the damage is found to be
caused
our inspection, the guarantee is not supported.
by your mishandling of the mobile phone as a result of
39
Page 41
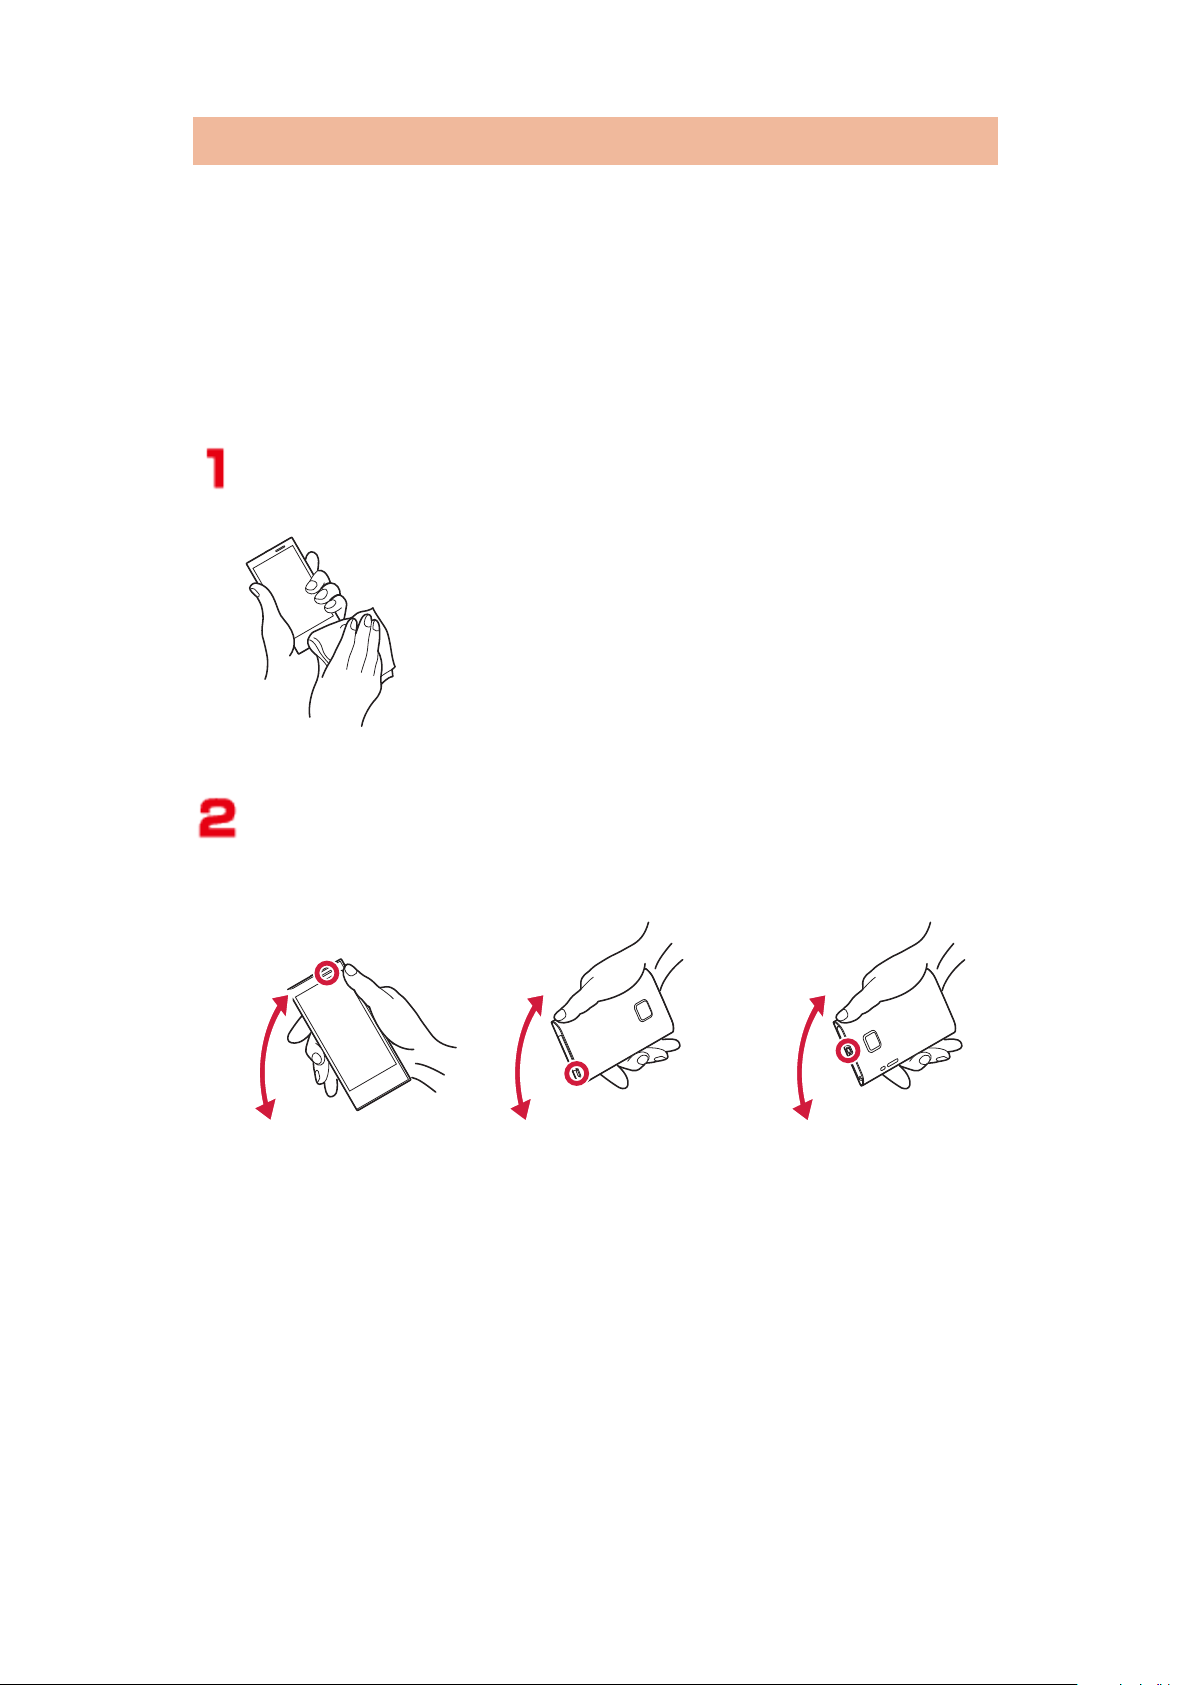
Draining Water
<Draining from
earpiece/speaker>
<Draining from earphone/
microphone terminal>
<Draining from microphone>
• If you operate the mobile phone with water drops left adhered
to,
the volume level from the speakers might be decreased or
sound quality vary.
• Moisture may have entered inside through the clearance gap
of the keys etc.
Follow the procedures described below to wipe moisture off the
mobile phone:
Wipe completely moisture off the surface of the
mobile phone with a clean dry cloth
Securely take hold of the mobile phone, and
firmly
swing each surface at least 20 times until
no moisture sprays off
40
Page 42
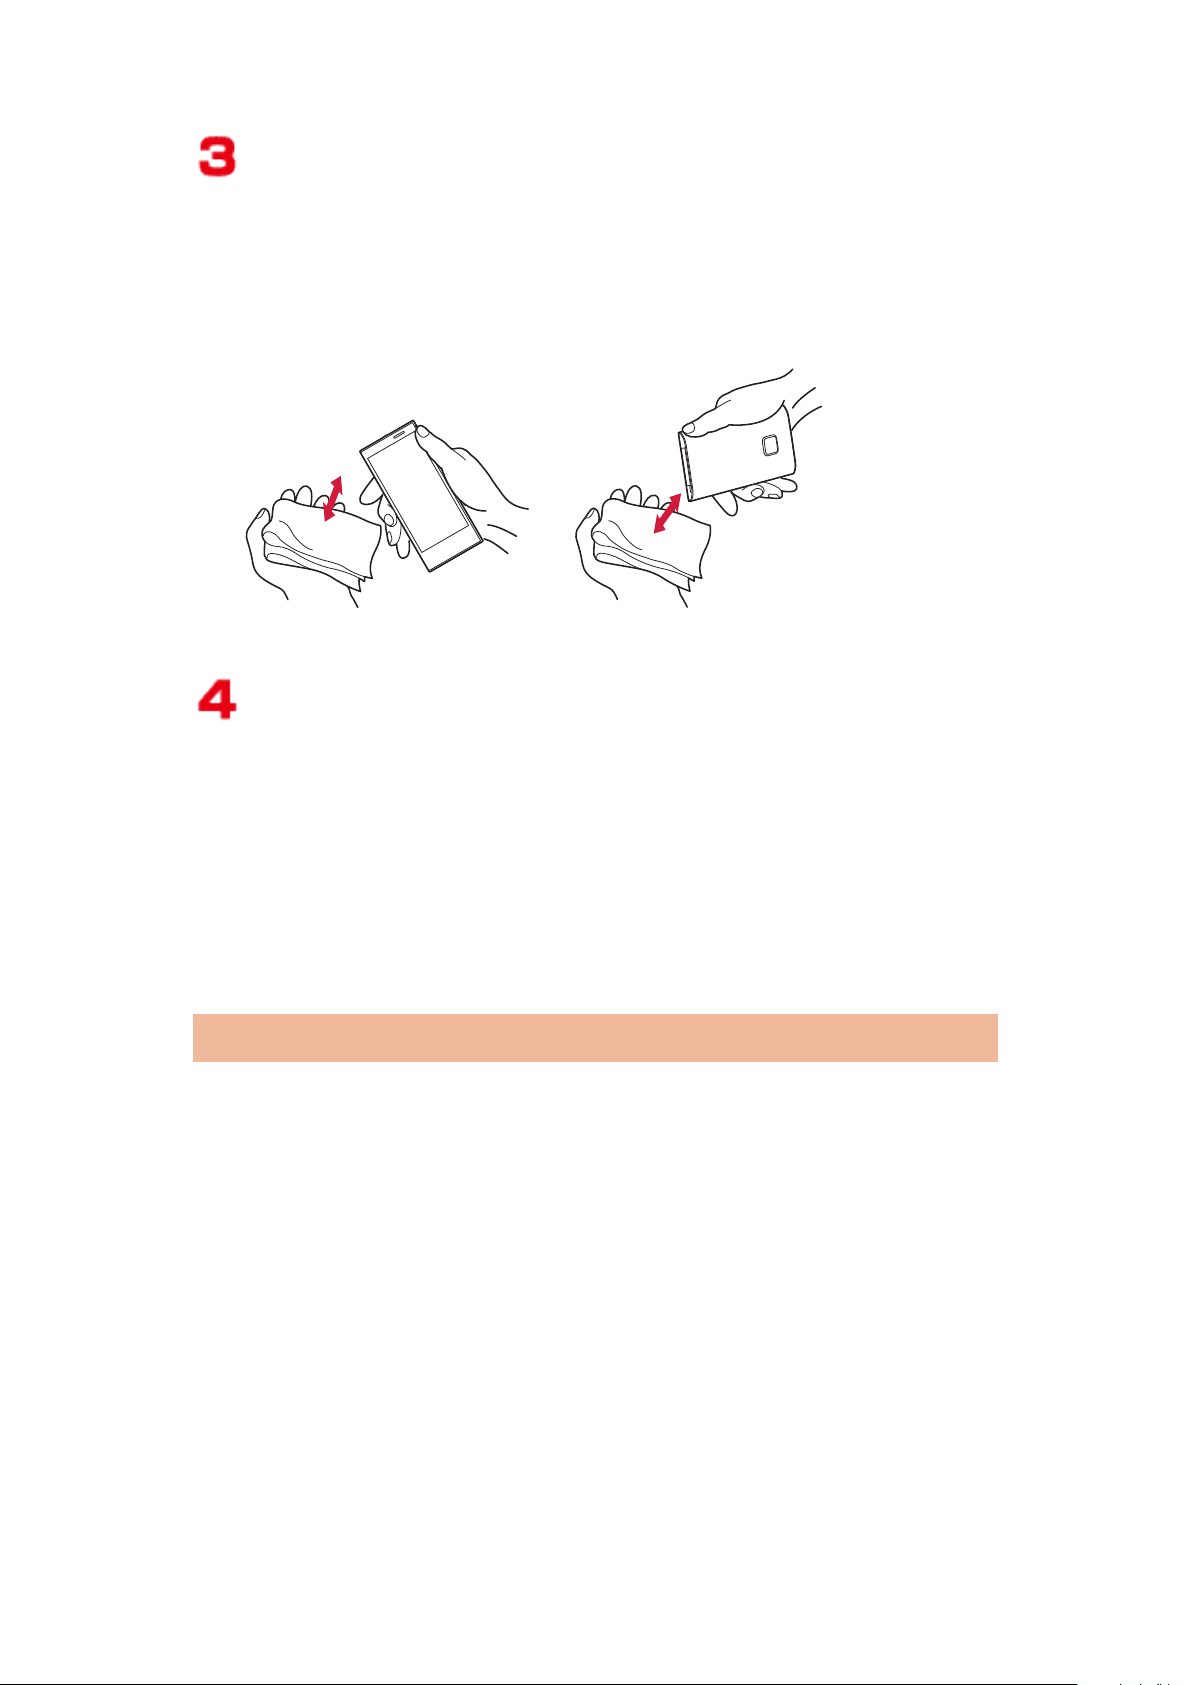
Lightly push the mobile phone against a clean
dry cloth, and wipe moisture off the clearance
gap of the microphone, earpiece/speaker,
keys or earphone/microphone terminal etc.
• Do not directly wipe moisture out of joint gap
using a cotton swab, etc.
Fully drain moisture and then operate the
mobile phone
• Even when you follow the procedures for draining
water
as described above, moisture might remain
in the mobile phone. Therefore, use the mobile
phone after allowing it to dry out naturally. Also,
take care to keep any objects you do not want to
get wet away from the mobile phone since water
may leak out from the mobile phone.
When Charging Battery
Accessories and optional items are not waterproofed/dustproofed. Check the following before and after charging:
• Never charge the battery with the mobile phone left wet. If the
mobile phone gets wet, drain and wipe off moisture with a
clean dry cloth and then charge.
• Firmly close the connector terminal cover after charging.
• Do not touch the AC adapter cable with your hands wet.
• Do not use the AC adapter cable in a bathroom, shower room,
kitchen, and lavatory where water is used.
41
Page 43
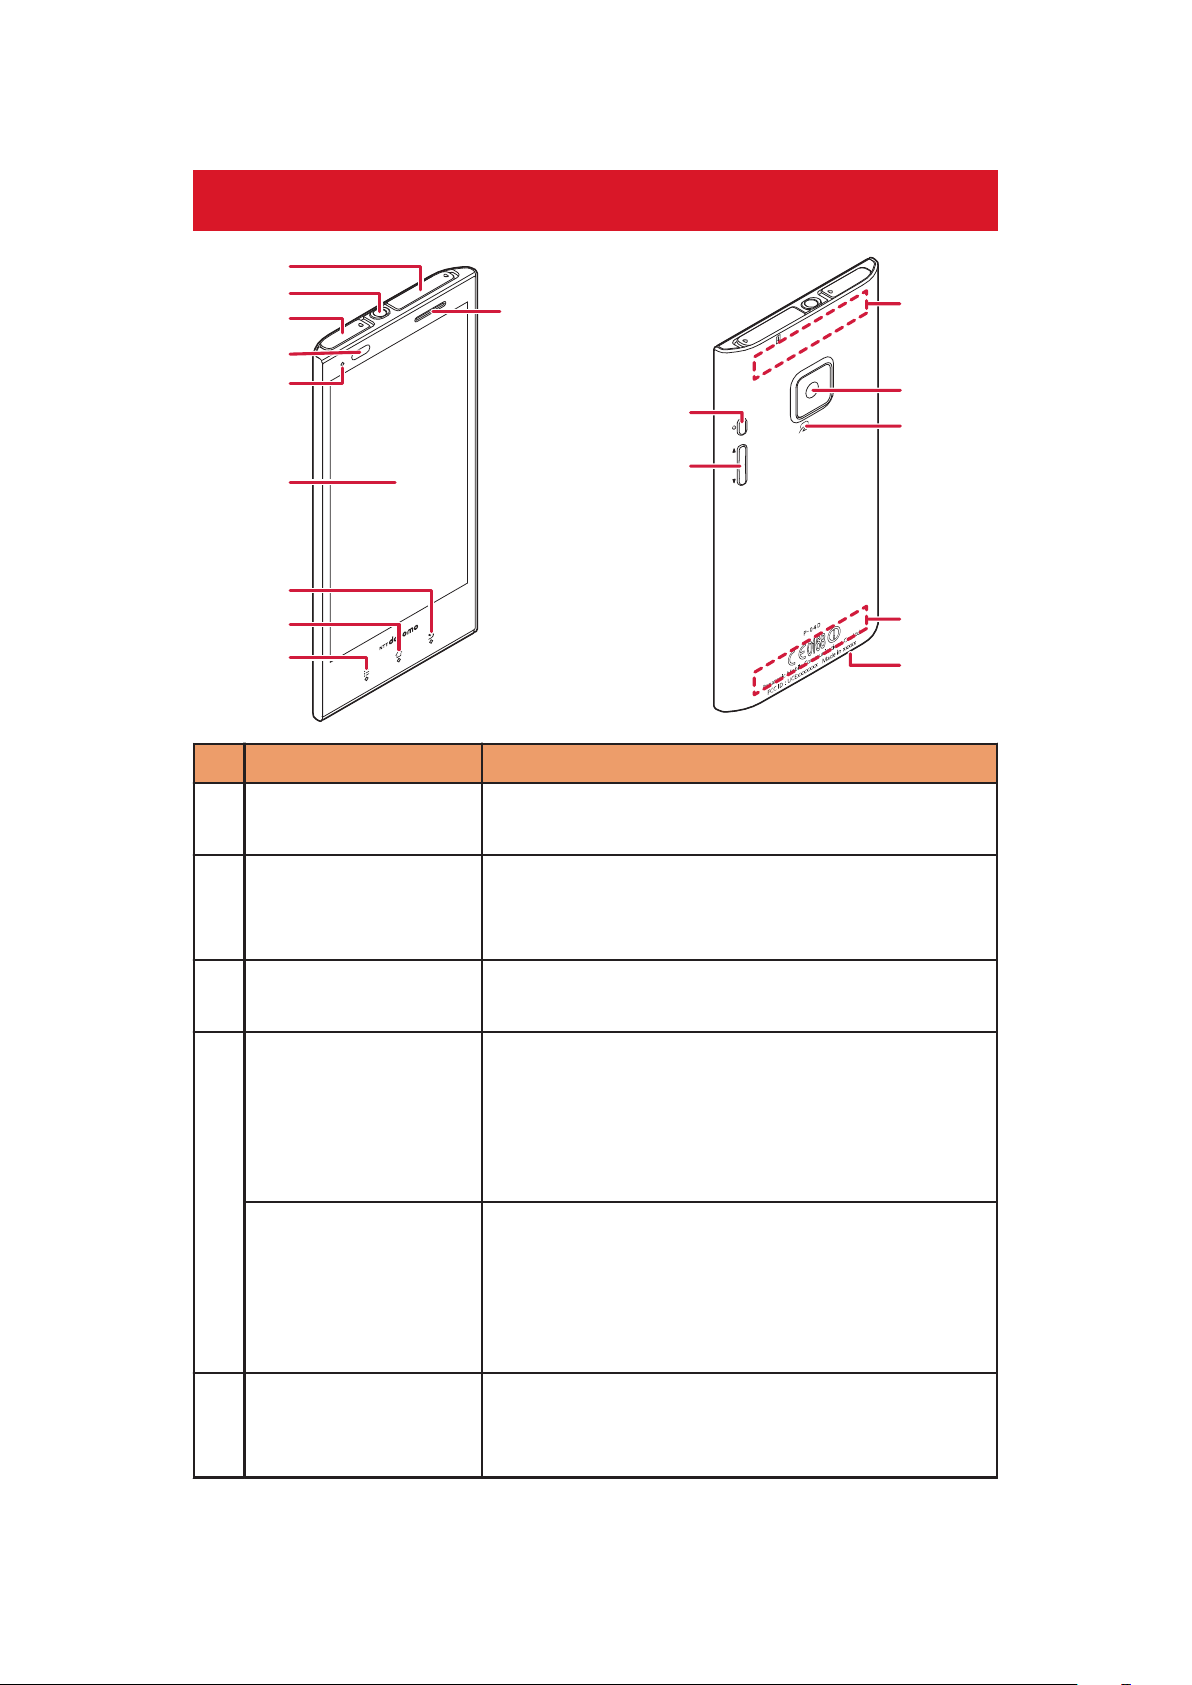
Preliminary Check
1
0
6
2
3
4
5
7
8
9
"
$
'
#
&
%
!
Part Names and Functions
Name Description
1 docomo mini UIM
-
card slot
2 Earphone/
microphone
terminal
3 Connector
terminal
Connect the included microUSB cable for
charging or PC connection.
4 Light sensor Detects ambient brightness to
automatically adjust the screen
brightness. In order for the sensor to
detect the brightness, do not cover it
with your hand or attach a seal on it.
Proximity sensor A sensor that prevents false operation of
the touch panel during call. Protective
seat or seal attached on the proximity
sensor may cause malfunction of the
5 Call/Charging
indicator
sensor.
Flashes when the mobile phone receives
a call or sp-mode mail message.
Lights during charging.
42 Preliminary Check
Page 44
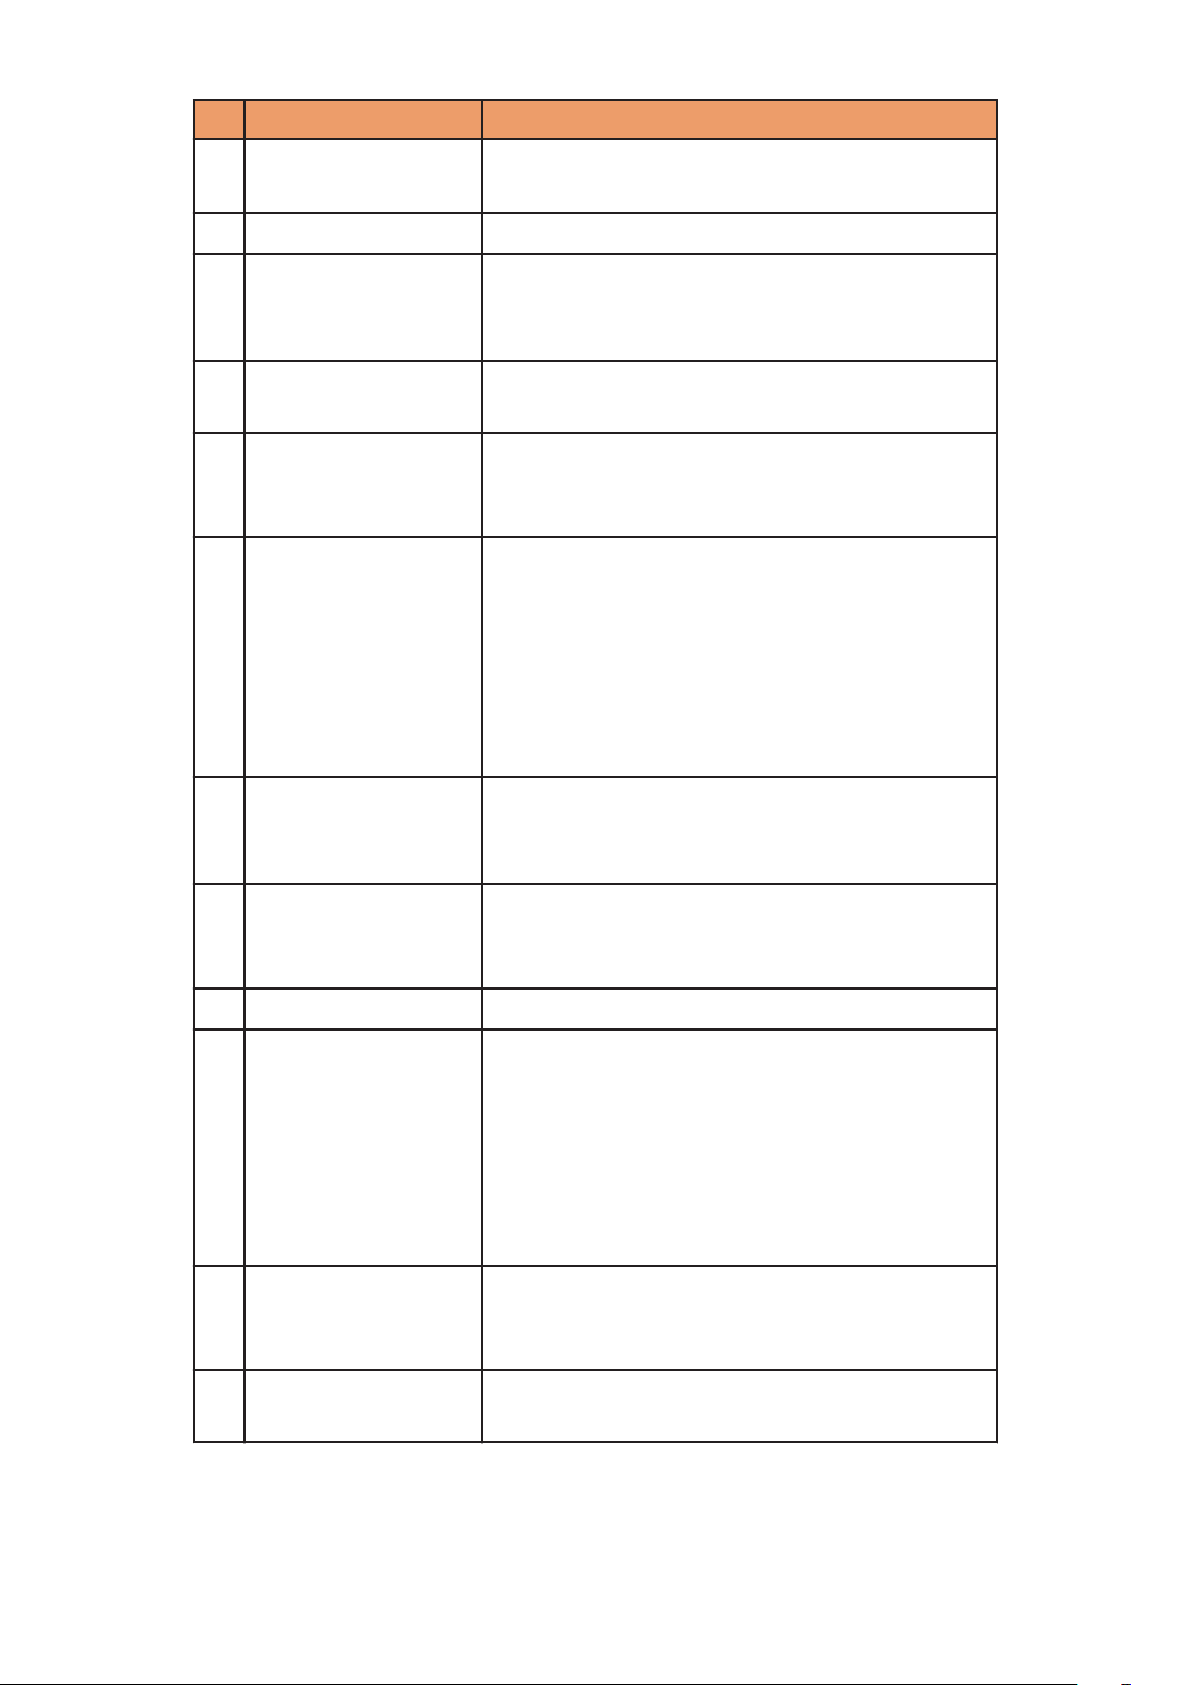
Name Description
6 Display (Touch
panel)
Slide your finger to scroll the screen, or
tap an item to select it (Z P.54).
7 C Back key Return to the previous screen.
8 B Home key Return to the home screen (Z
P.74).
Touch and hold this key to display
recently-used applications.
9 A Menu key Display the option menu available in the
current screen.
0 Earpiece/Speaker You can hear voice of the other party
from this part during a call. You can also
hear ringtones and music.
! H Power key Press and hold this key for at least two
seconds
to turn the power on (Z P.53).
To press and hold this key for at least one
second when the power is on, set/cancel
the Silent mode or Airplane mode, or turn
the power off.
Set/cancel the Sleep mode (Z P.53).
" E/F Volume keys Adjust the volume of the other party's
voice or sound from the speaker (Z
, P.134).
# Wi-Fi/
Bluetooth/GPS
antenna
P.106
The antenna is embedded in the main
unit. Do not cover this part with your
hand, as it may impair antenna quality.
$ Camera Shoot still images and videos (Z P.189).
% Kmark An IC card is installed. By holding this
mark up to a reader, you can use the
Osaifu-Keitai functionality. You can also
send and receive data via iC
communication if you download an
application
that supports it. Note that the
IC card cannot be removed.
& FOMA antenna The antenna is embedded in the main
unit. Do not cover this part with your
hand, as it may impair antenna quality.
' Microphone Send your voice from this part. Serves as
a microphone when recording sound.
43 Preliminary Check
Page 45
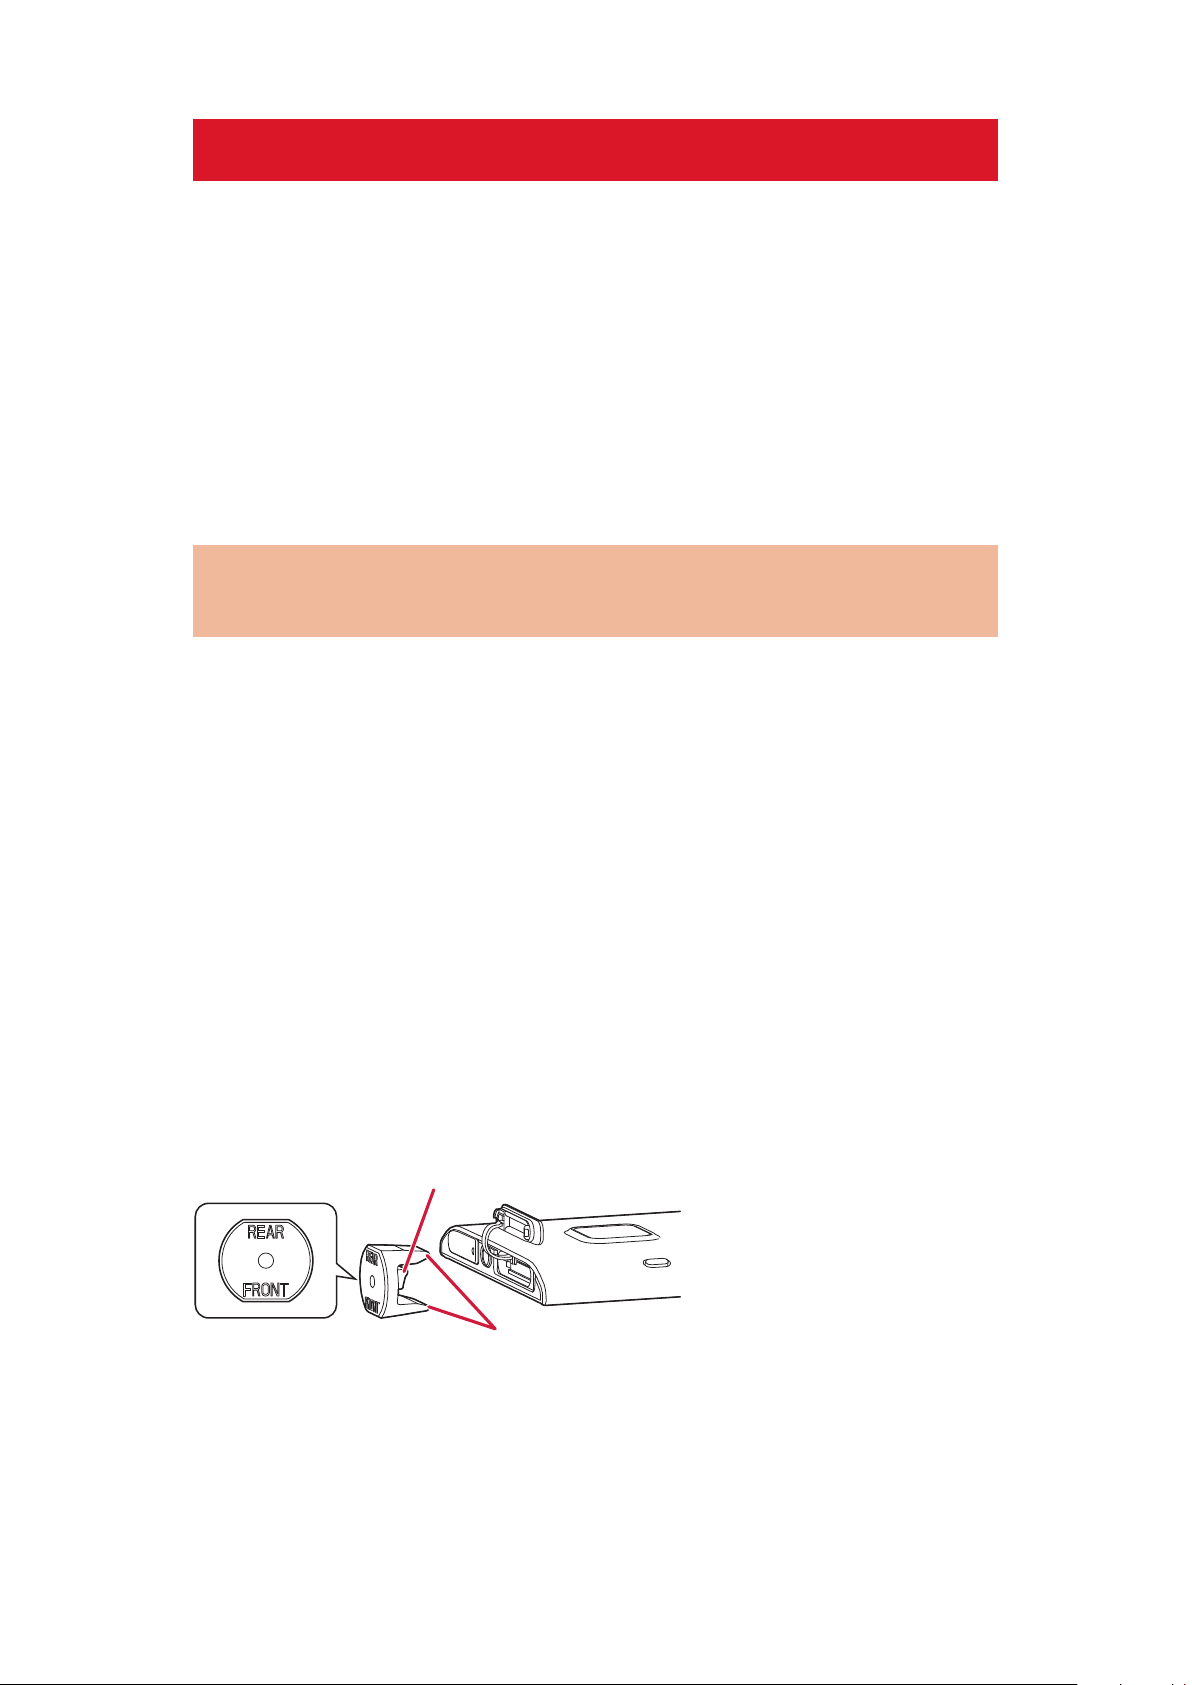
docomo mini UIM card
Guide
Projection area
The docomo mini UIM card is an IC card that holds your
information such as phone number. Unless the docomo mini
UIM card is installed, you cannot use the mobile phone's
communication features such as call, messaging and data
communication.
• Only the docomo mini UIM card is usable with this mobile
phone. If you have a DOCOMO UIM or UIM, bring it to a
docomo Shop to replace.
• For details about the docomo mini UIM card, refer to the
Instruction Manual of the docomo mini UIM card.
Installation/Removal of docomo mini UIM
card
• Installation/removal of the docomo mini UIM card should be
performed with the mobile phone turned off.
• Be careful not to touch or damage the IC part when handling
the docomo mini UIM card. Attempts to install/remove the
docomo mini UIM card forcibly may damage the docomo mini
UIM card.
■docomo mini UIM card eject tool (sample)
To install/remove the docomo mini UIM card, use docomo mini
UIM card eject tool.
Position
inscription faces the display side of the mobile phone, and that the
"REAR" inscription faces the back of the mobile phone. Fit the
mobile phone between the guide areas, and ensure that the tip of
the projection area makes contact with the edge of the docomo
mini UIM card.
the docomo mini UIM card eject tool so that the "FRONT"
44 Preliminary Check
Page 46
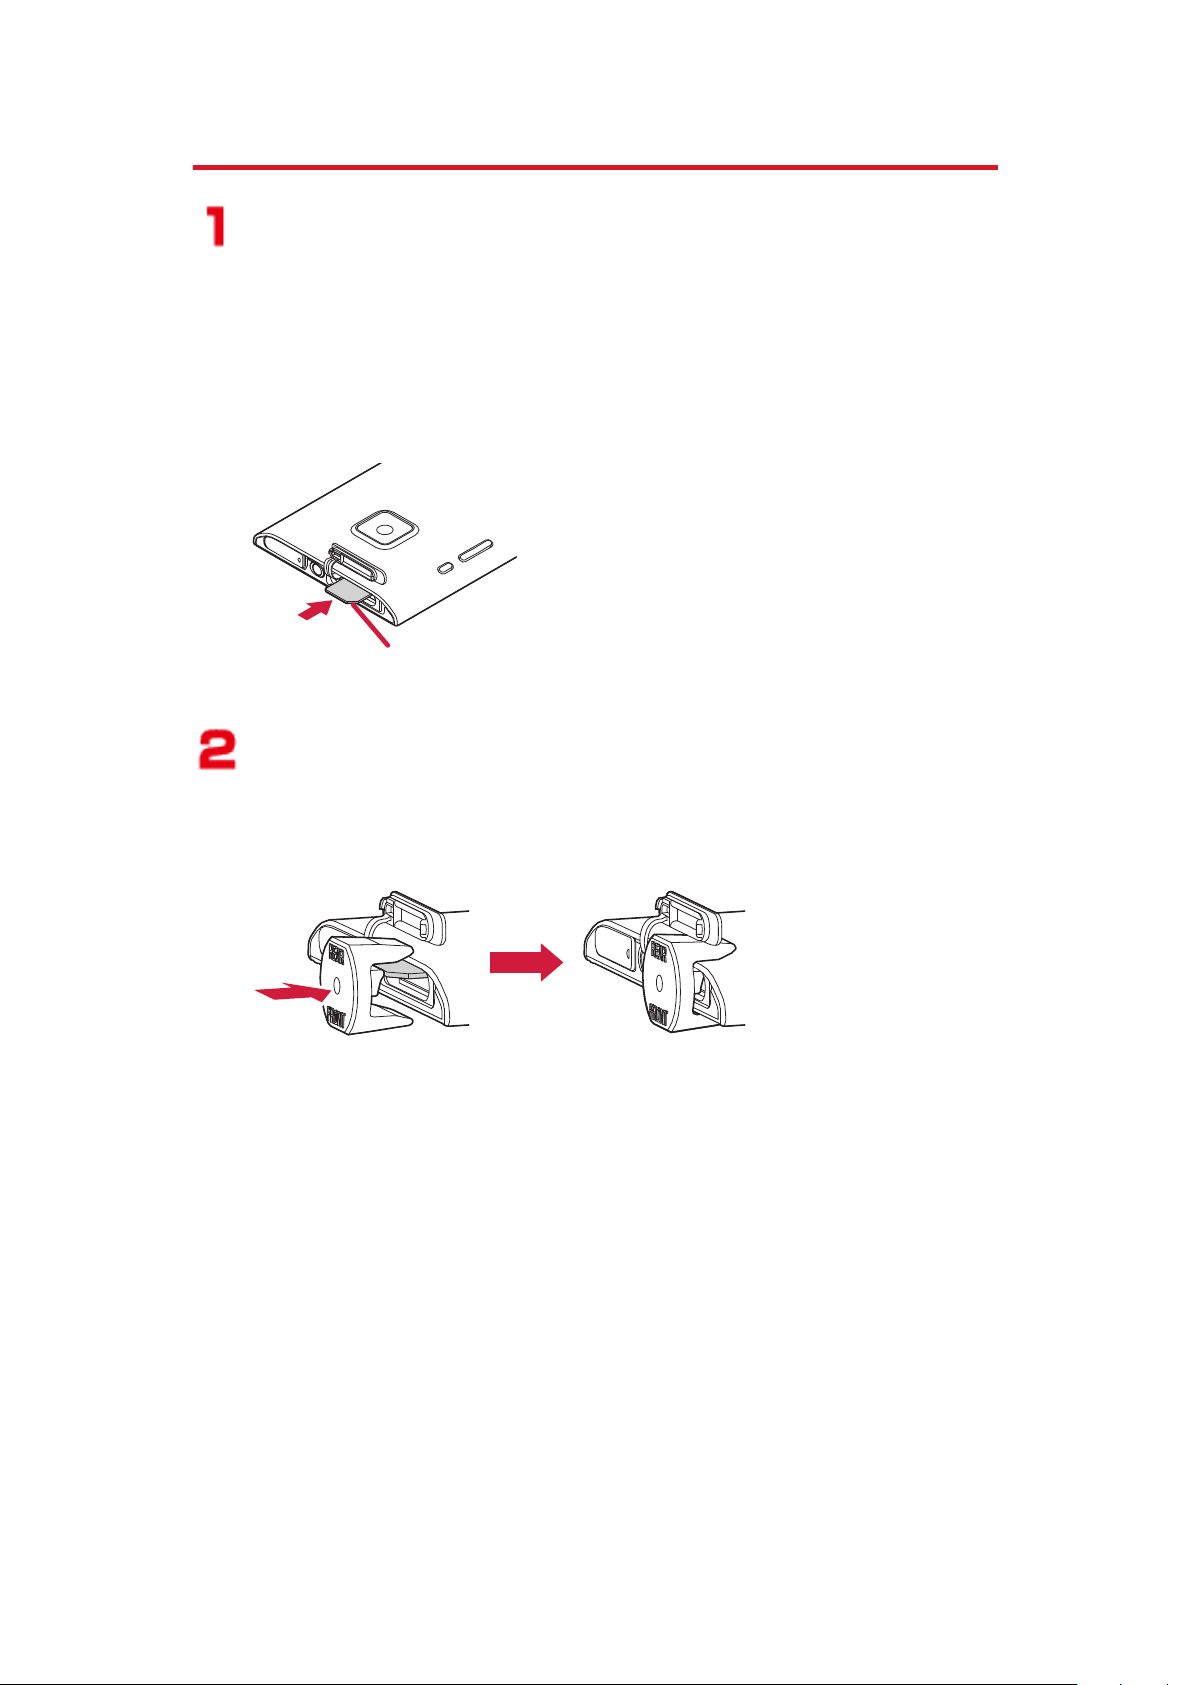
Installing docomo mini UIM card
Corner cut
With the gold IC part facing down, insert the
docomo
mini UIM card halfway into the docomo
mini UIM card slot
• To open the docomo mini UIM card slot cover,
Z P.
37
• Insert the docomo mini UIM card in the direction
shown in the illustration.
Using the projection area of the docomo mini
UIM card eject tool, push the docomo mini UIM
card straight
• Push the card until it clicks.
45 Preliminary Check
Page 47
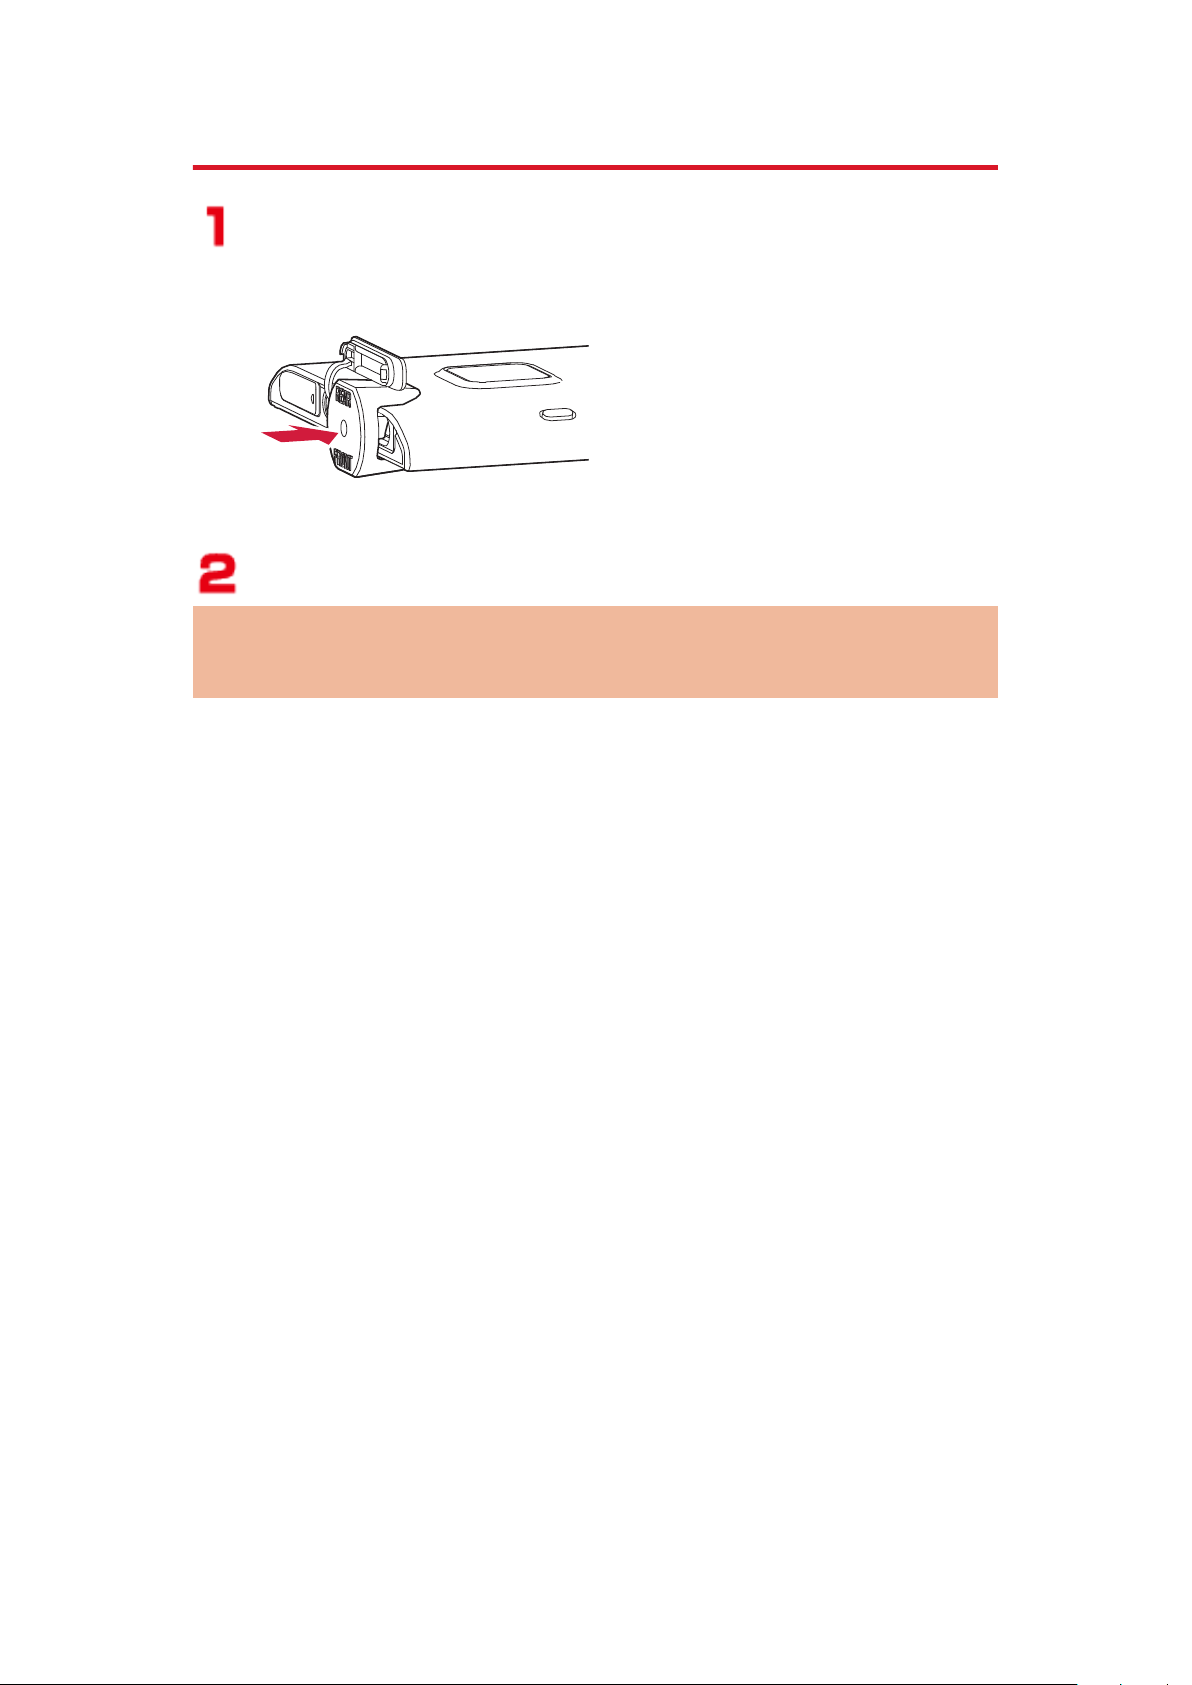
Removing docomo mini UIM card
Push the docomo mini UIM card until it stops
with the projection area of docomo mini UIM
card eject tool
Remove the docomo mini UIM card
About Security Codes for docomo mini UIM
card
Two security codes are provided for the docomo mini UIM card:
PIN1 code and PIN2 code (Z P.139).
46 Preliminary Check
Page 48

Storage Area of This Mobile Phone
Because you cannot insert and use a microSD card with this
mobile phone, two forms of storage area are provided:
internal storage and USB storage.
Internal storage is used for saving data such as applications
installed from the Android Market, contacts, and bookmarks.
USB storage is a storage area which is instead of a microSD
card. USB storage is used for saving data such as files
downloaded from websites (including applications
downloaded from sites other than the Android Market,
images, and documents), as well as for saving images that
have been shot with the camera.
Depending on the application, even if the application
indicates that data or files will be saved to a microSD card,
such data or files will be saved to USB storage.
Using microSD Card
By connecting the microSD card reader/writer cable
(sample), you can copy or move files between this mobile
phone and a microSD card, as well as back up data or files
saved on this mobile phone to a microSD card.
To copy or move data or files between this mobile phone and
a microSD card, insert a microSD card into the microSD card
reader/writer cable, and then connect the cable to this
mobile phone. For details on how to connect the microSD
card reader/writer cable, see the provided instruction
manual.
If you do not have a microSD card, you need to purchase it.
• When you connect the microSD card reader/writer cable,
enabling the use of microSD cards, you cannot use certain
features of the mobile phone, including incoming or outgoing
calls or data packet communications. (The mobile phone
switches to Airplane mode.)
Airplane mode is canceled automatically when the microSD
card reader/writer cable is removed or when it has been
connected for a long period of time (about 150 minutes).
• You cannot use the microSD card reader/writer cable when no
docomo mini UIM card is inserted. Usage is also not possible
outside of service areas or when using international roaming.
47 Preliminary Check
Page 49

• To disable the microSD card reader/writer cable, open the
notification panel, and then tap the notification.
• Some applications save data and files to a microSD card.
• For details on importing or exporting the phonebook between
this mobile phone and a microSD card, Z P.
• For details on backing up and restoring data between this
mobile phone and a microSD card, Z P.148
• For details on copying or moving files between this mobile
phone and a microSD card, Z P.179
113
48 Preliminary Check
Page 50

Charging
■ Precautions for charging
• The included AC adapter plug shape is designed for 100V
AC (domestic specification). To charge the battery abroad, a
corresponding
transformer for overseas trip.
• If you charge the mobile phone while using it, it may take more
time to fully charge the battery or charging may not be
completed. Continuous use of functions consuming large
current, such as data communication and call, may decrease
battery level even during charging, leading to battery drain.
• If you start charging when the battery is empty, the mobile
phone
this case, start charging with the mobile phone off and turn it
on after a while.
• If you leave the mobile phone being charged for long time,
charging may repeated. The mobile phone consumes power
from the internal battery after completion of charging, so the
usable
be displayed soon. In such a case, start charging the battery
again in correct manners. For recharging, disconnect the AC
adapter cable or DC adapter from the mobile phone and then
connect it again.
may not start up promptly after power-on operation. In
time may be shortened and alert of empty battery may
plug adapter is required. Do not use an adapter
■ Internal battery operating life
• Internal battery is a consumable item. Usable time per charge
gradually decreases with repeated charging.
• When its usable time per charge is decreased to about a half
of that from the time of purchase, the internal battery is near
the end of life. So you are recommended to replace with new
one soon.
• Continuous application (game) playing while charging may
shorten the internal battery operating life.
49 Preliminary Check
Page 51
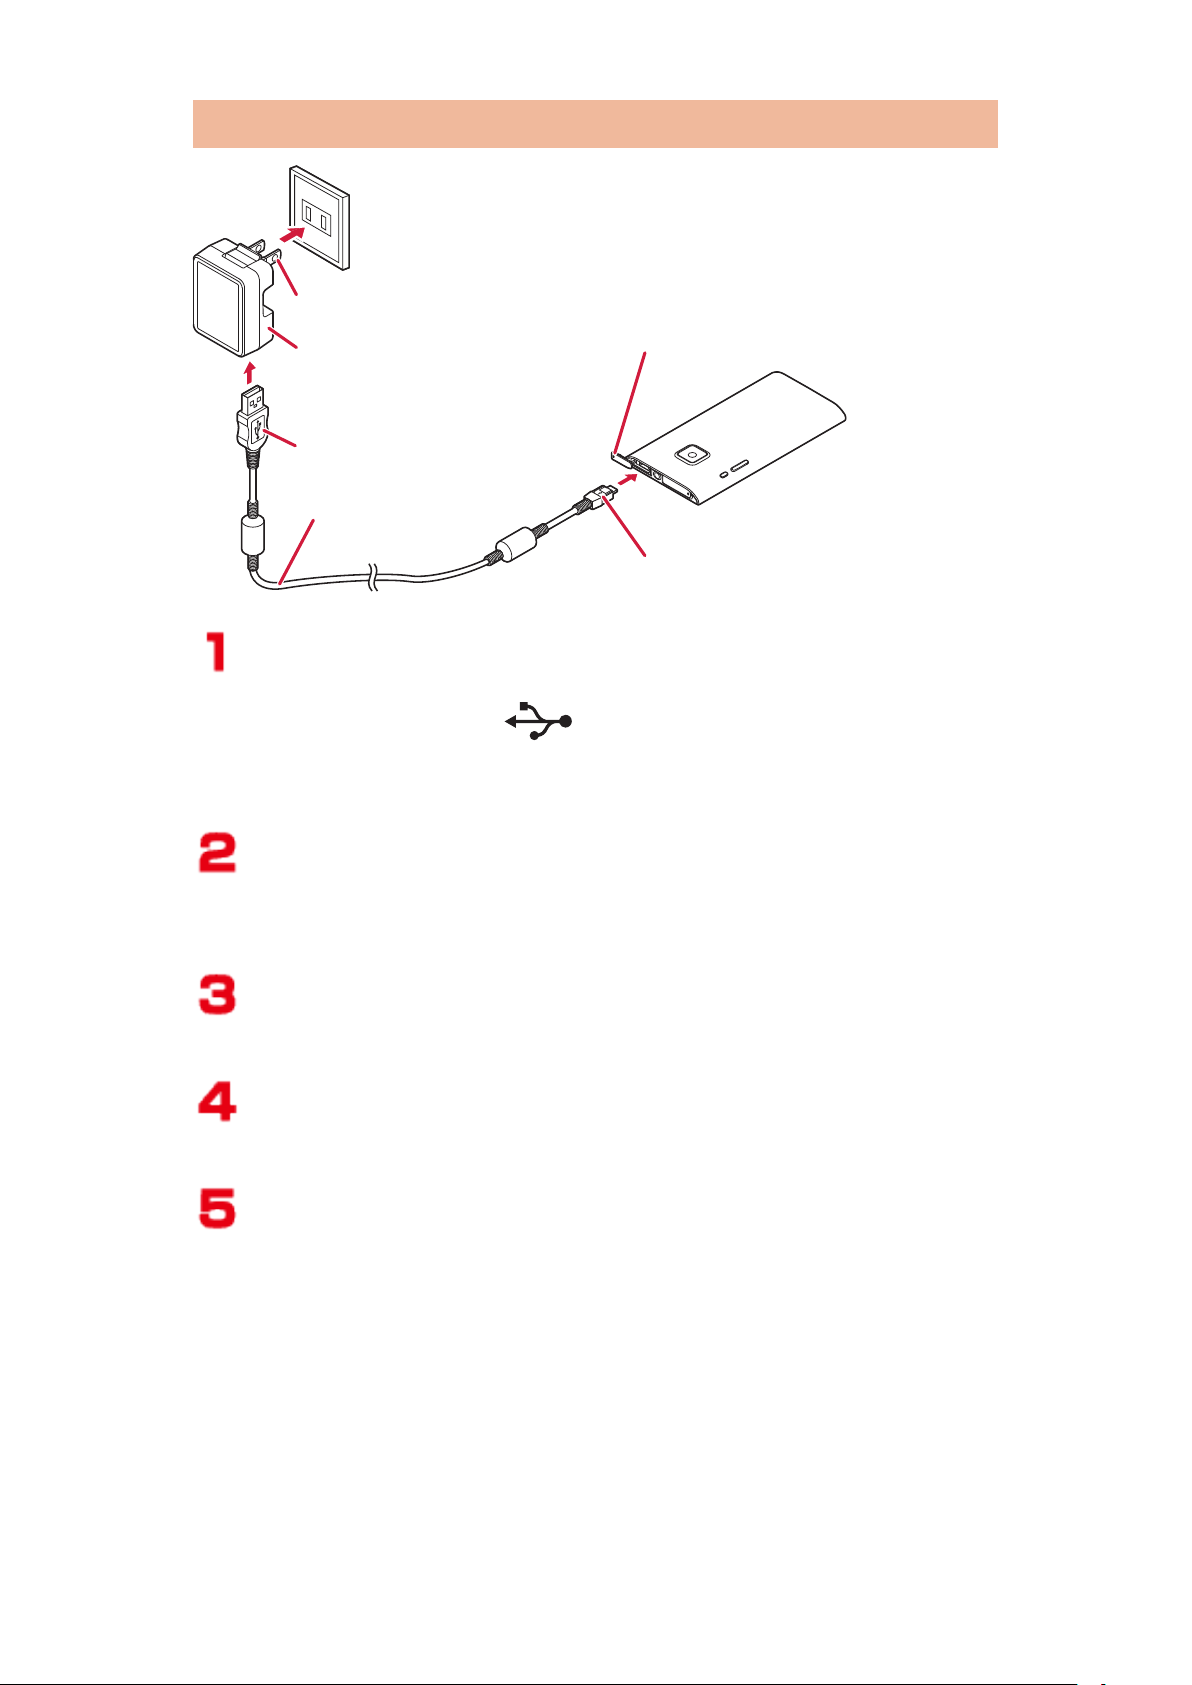
Charging by Using AC Adapter Cable
AC adapter
Power plug
USB plug
3
2
1
microUSB plug
microUSB cable
Connector
terminal cover
Insert the provided microUSB plug of microUSB
cable horizontally into the connector terminal
with USB mark ( ) facing up
• To open the connector terminal cover, Z P.37
Insert the USB plug of microUSB cable
horizontally into the USB connector of AC
adapter with USB mark faced with you
Unfold the power plug of AC adapter, and plug it
into a household outlet of 100 V AC
When charging is completed, pull out the power
plug of AC adapter from the outlet
Remove the microUSB cable from the AC
adapter and the mobile phone
50 Preliminary Check
Page 52
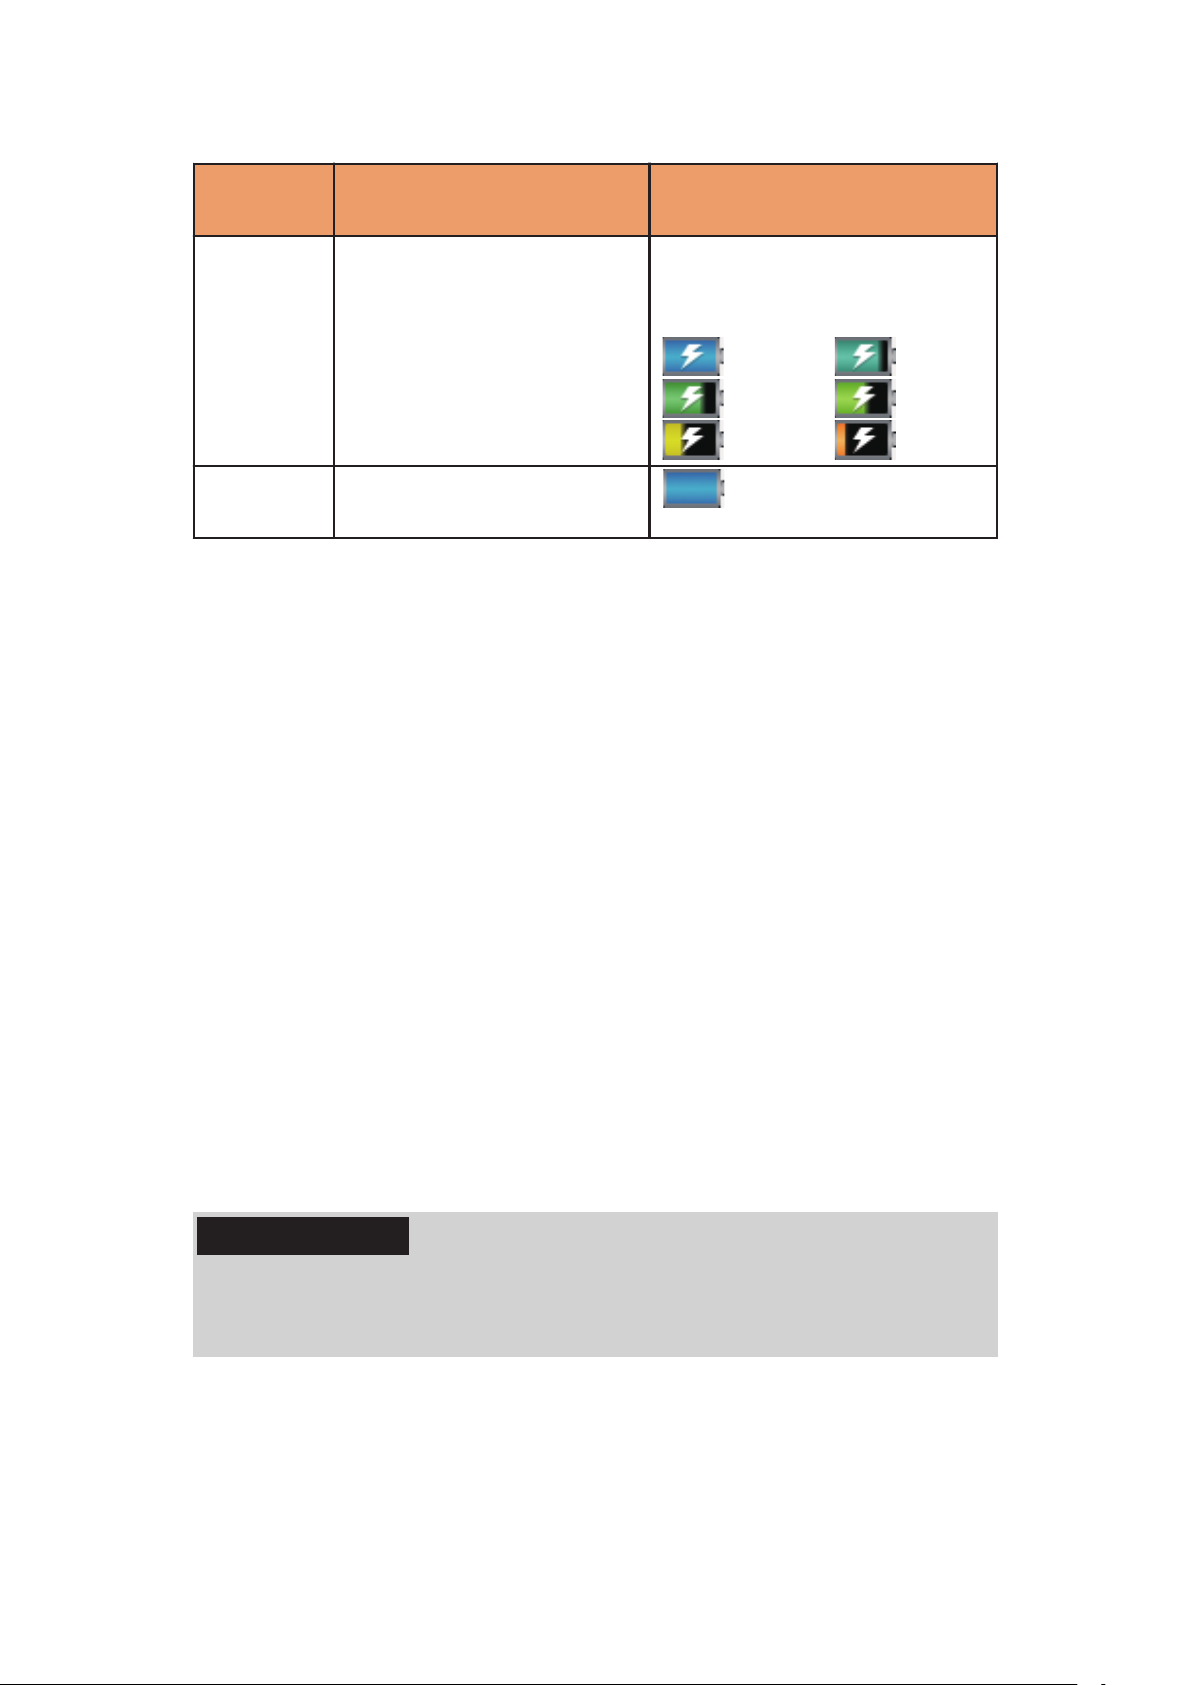
■ Charging and charging completed indications
Call/Charging
indicator
Charging Lights in red Indications are switched
from the current battery
level up to level 6.
Level 4 Level 3
Charging
completed
• The battery icon is not displayed when the mobile phone is
turned off.
The call/charging indicator may not light promptly when you
start charging with the battery in empty state. However,
charging has been started. If the call/charging indicator does
not light after a while, remove the mobile phone from AC
adapter cable and then charge again. If the symptom recurs,
the AC adapter and internal battery may be failed. Contact a
handling counter such as a docomo Shop.
Turns off
Battery icon
Level 6 Level 5
Level 2 Level 1
■ When the battery has almost run out
When
to charge appears. When the battery becomes empty, a message
that the power is turned off shortly appears and then it is turned
off.
the battery starts running out, a message that prompts you
■ DC adapter (option)
With the DC adapter, you can use a cigarette lighter socket (12
V/24 V) of cars to charge. For details, refer to the instruction
manual for the DC Adapter 03.
Information
• If the fuse blows off when charging with the DC adapter, be
sure to use a specified fuse. The fuse is consumables, so
purchase at auto parts stores in your neighborhood.
51 Preliminary Check
Page 53

Charging by Using a PC
This mobile phone can be charged from a PC when you
connect the mobile phone and a PC using the included
microUSB cable.
• For how to connect the mobile phone to a PC, Z P.187
52 Preliminary Check
Page 54
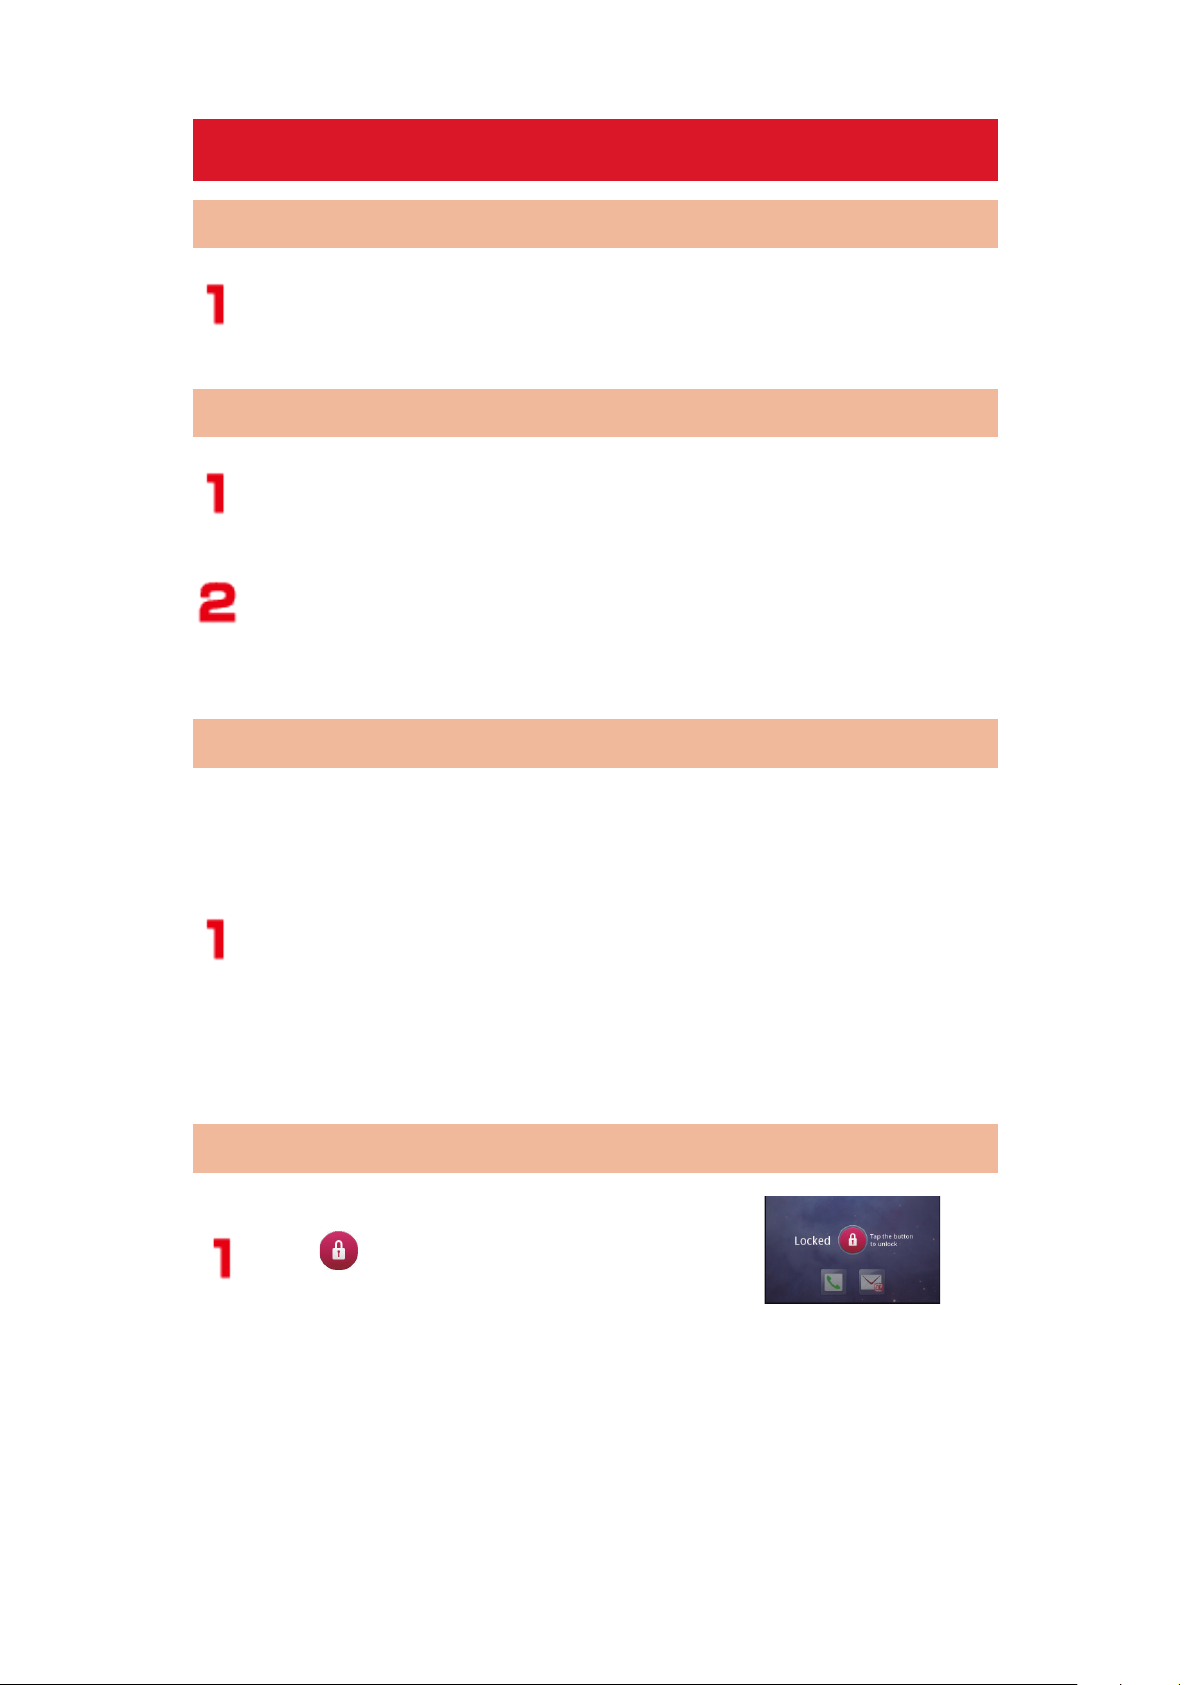
Power On/Off
Lock screen
Turning Power On
Press and hold H for at least two seconds
The lock screen appears after a while.
Turning Power Off
Press and hold H until Phone options menu
appears
[Power off] W [OK]
• Wait for a while, as it may take some time before
the power is turned off.
When Display Goes Off
If this mobile phone is not operated for a certain period of
time, the display automatically goes off and the mobile
phone enters the Sleep mode.
Press H or touch and hold B
The Sleep mode is canceled and the lock screen
appears.
• To enter the Sleep mode manually, press H when
the display is on.
Unlocking Lock Screen
Tap
• If "Security" has been set,
perform the unlocking method
that has been set.
53 Preliminary Check
Page 55
Basic Operations (How to Use Touch Panel)
Touch Panel Operations
The display of this mobile phone is a touch panel, which is
operated by direct touch with fingers.
• Before use, peel off the protective sheet which is stuck on the
touch panel at the time of purchase.
• The touch panel is designed to be touched lightly with a finger.
Do not press it strongly with a finger or pointed objects such
as fingernails, ballpoint pens, and pins.
• In the following cases, the touch panel may not work even if
you touch it. Also, following operations may cause a
malfunction.
• Operation wearing gloves
• Touching with a fingernail
• Operation with foreign objects placed on the operation
surface
• Operation on the touch panel on which a protective sheet
or a sticker is put
• Operation when the touch panel is wet
• Operation when your fingers are wet, such as from sweat
or water
■ Tap
Tap an item or icon on the screen to select it.
■ Double-tap
the screen twice quickly to zoom in the web page. Double-tap
Tap
again to zoom out.
■ Touch and hold
Keep an item or icon on the screen touched with your finger for a
while. Do this to display a pop-up menu, etc.
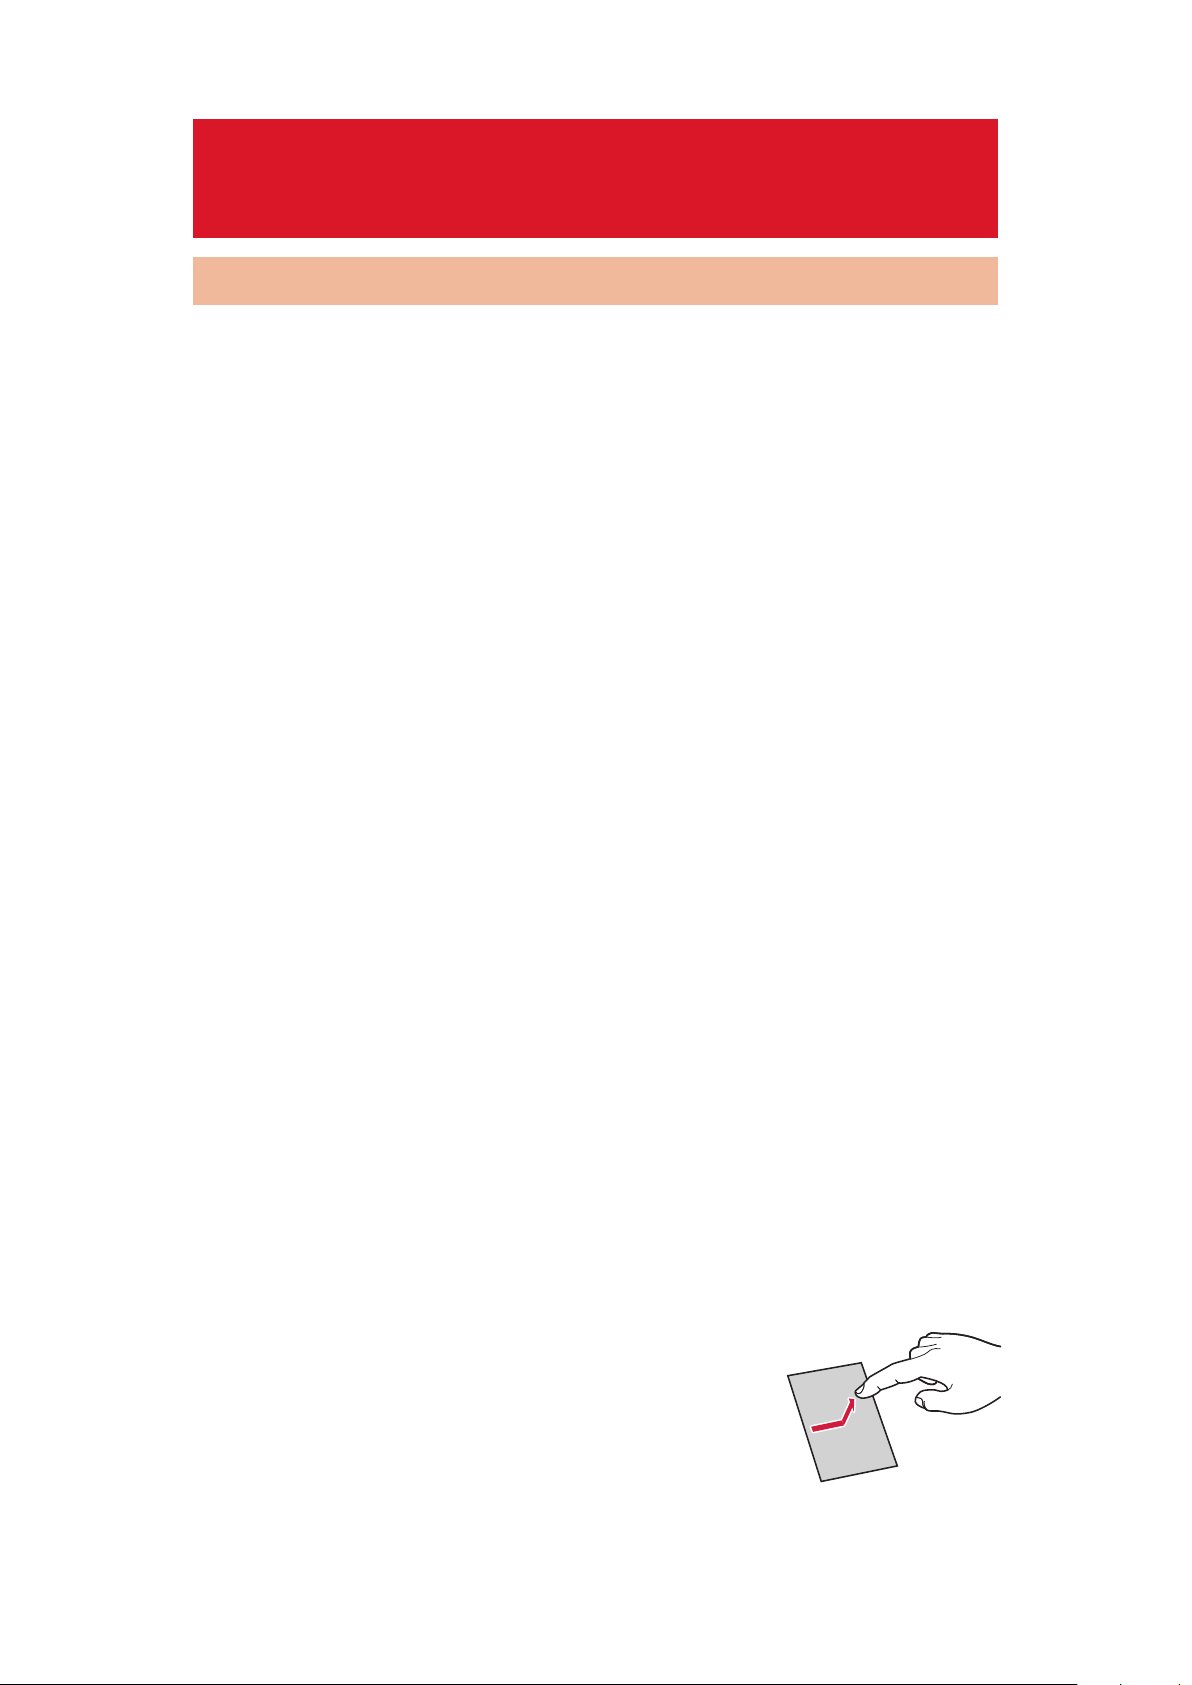
■ Flick
When
outside the screen, quickly move your finger
right or left across the surface of the screen to
show the previous/next screen.
there are multiple pages or more contents
54 Preliminary Check
Page 56
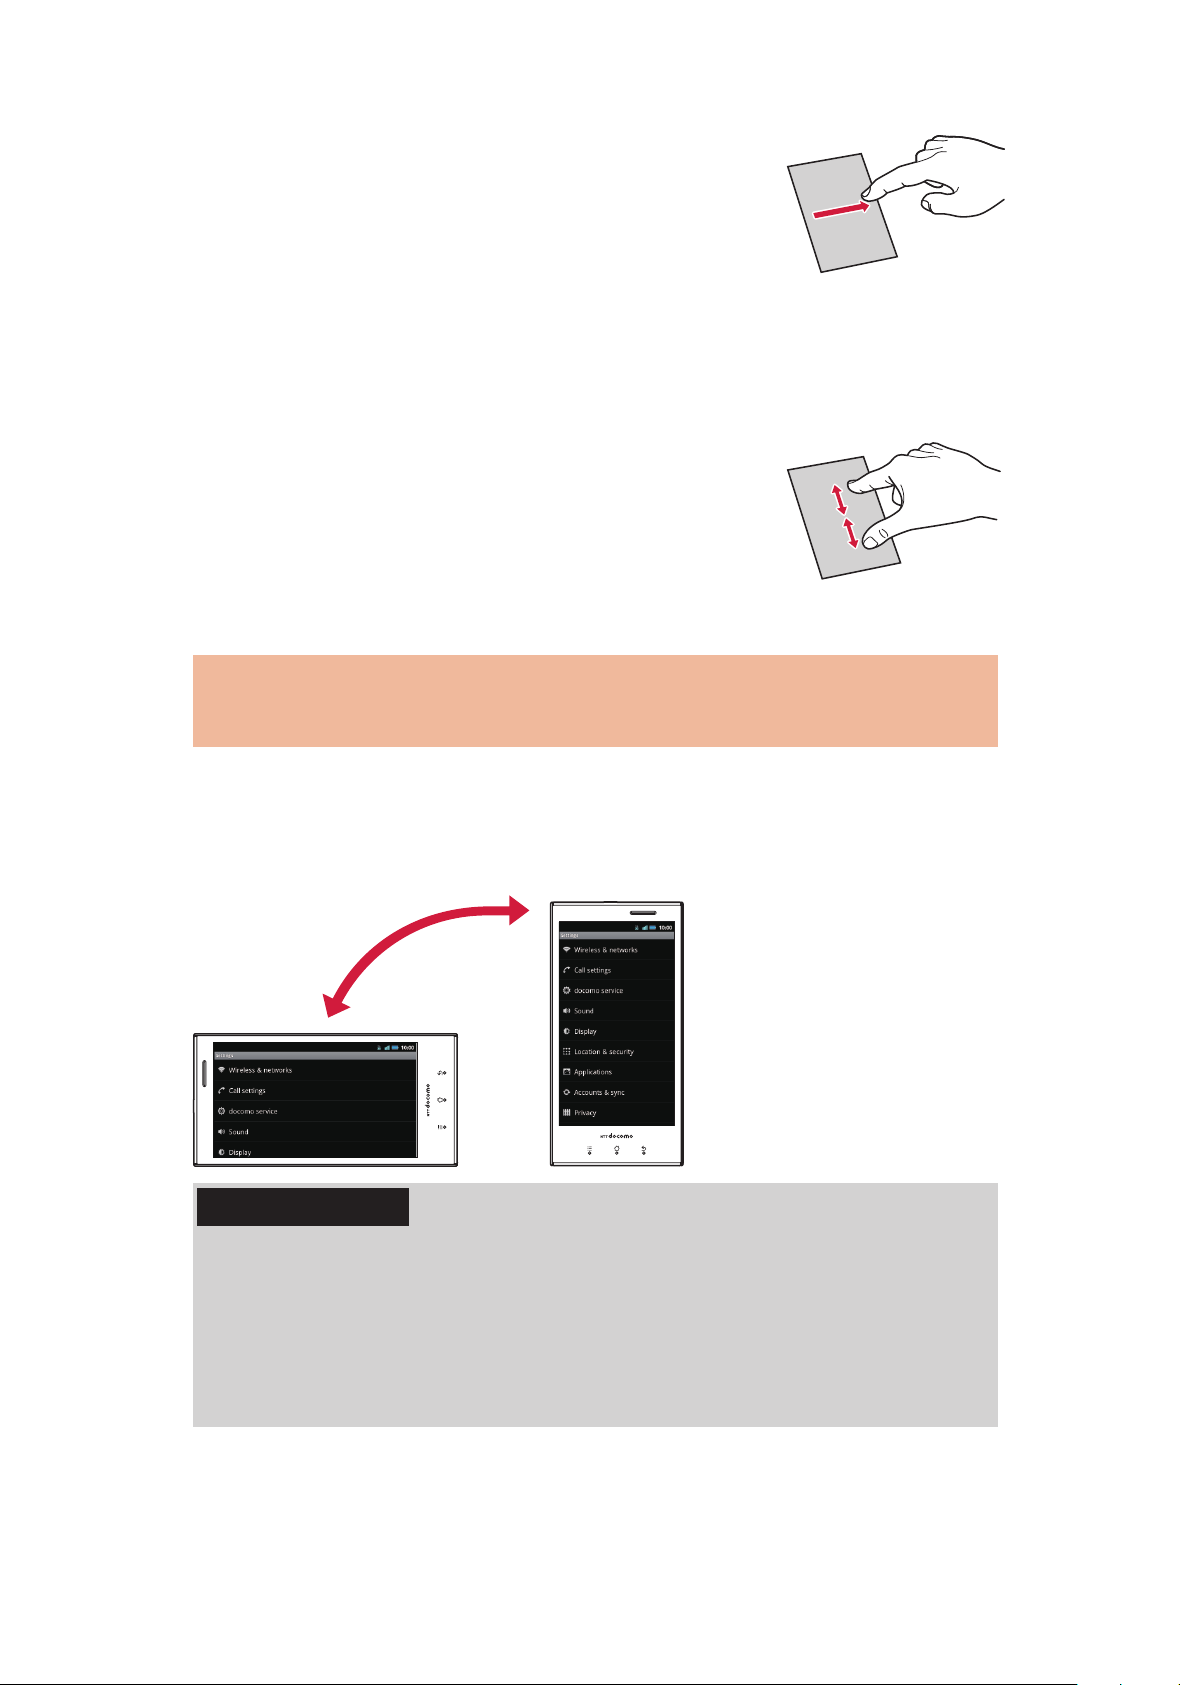
■ Drag
Move an item or icon on the screen while
holding it with your finger.
■ Scroll
Flick/drag
the hidden part.
your finger up/down or right/left on the screen to show
■ Pinch (spread apart/pinch
together)
Placing two fingers on the screen, spread them
apart to zoom in, or pinch them together to
zoom out, when a web page or still image is
displayed.
Switching Vertical/Horizontal Display
Modes
motion sensor, which detects orientation and motion of
The
the mobile phone, allows you to switch display modes by
holding the mobile phone in vertical or horizontal
orientation.
Information
• Operate the mobile phone in nearly upright state. If the mobile
phone lies flat, the sensor cannot detect a change in
orientation and motion properly, and the display modes may
not be switched.
• Changing the mobile phone's orientation may not switch
display modes depending on the screen displayed.
55 Preliminary Check
Page 57
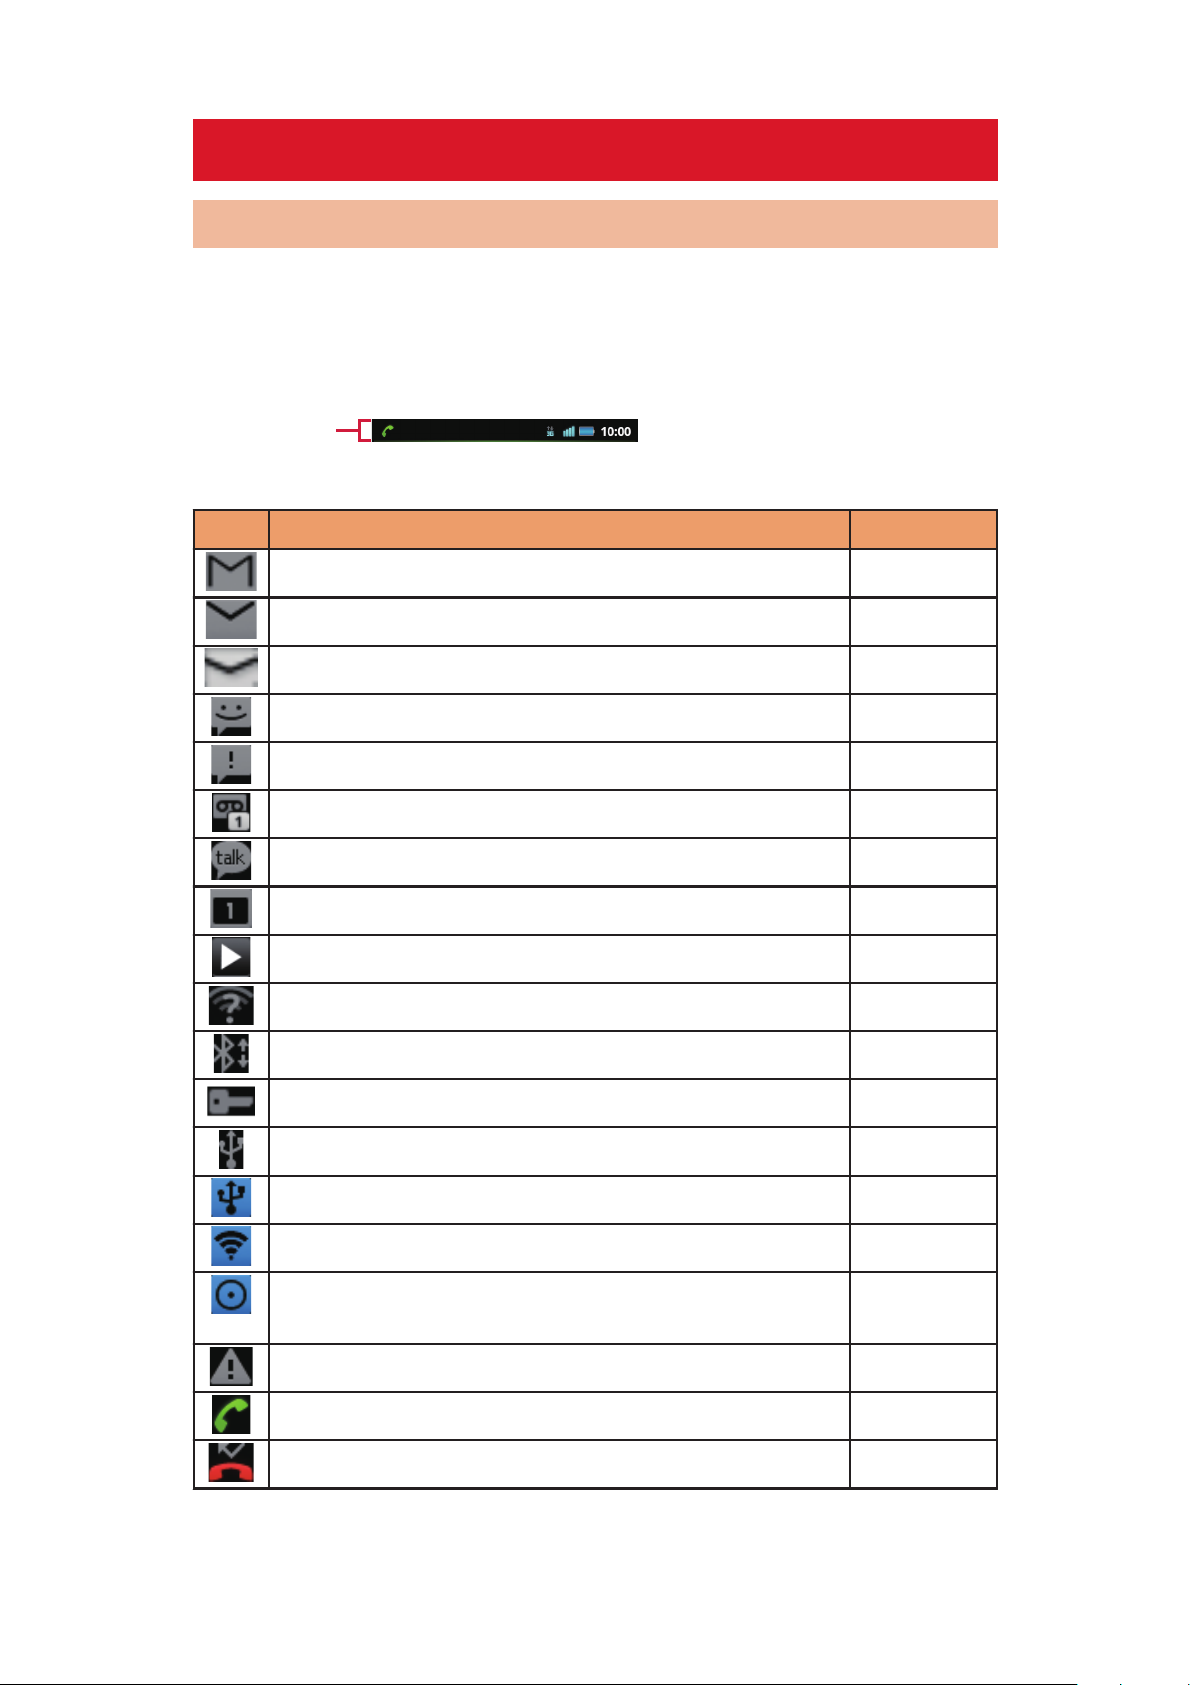
Screen Display/Icons
Status bar
Icon Definitions
Icons that indicate the mobile phone status are displayed in
the status bar.
Notification icons are displayed on the left part while status
icons are displayed on the right part of the status bar.
■ Main notification icons
Icon Description Refer to
New Gmail P.166
New Email P.163
New sp-mode mail P.158
New message (SMS) P.160
Failure to send message (SMS) P.159
Voice Mail message P.116
New instant message P.170
Calendar event P.212
Music playing P.199
Wi-Fi open network available P.97
Incoming file via Bluetooth communication P.183
VPN connected/disconnected P.185
USB connected P.187
USB tethering in use P.126
Wi-Fi tethering in use P.127
Both USB tethering and Wi-Fi tethering in use P.126
127
P.
Error message -
During call P.101
Missed call P.107
56 Preliminary Check
Page 58
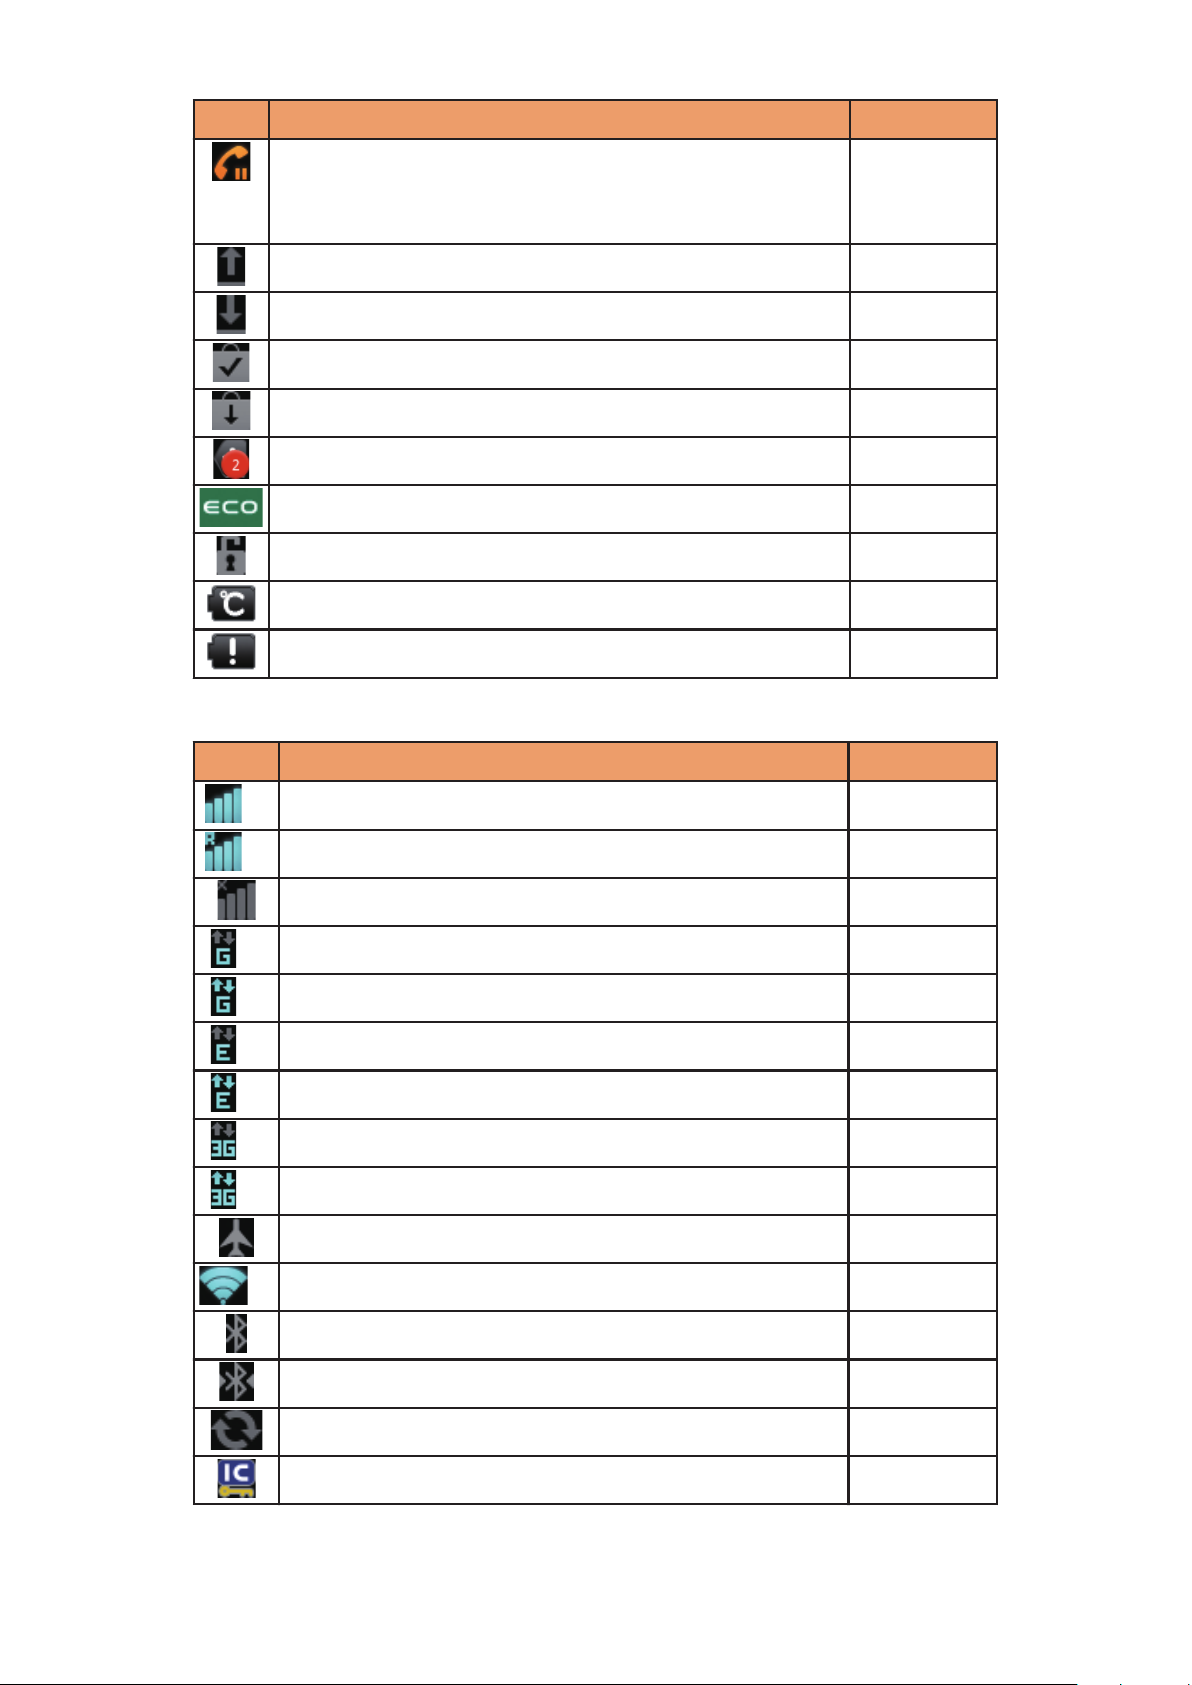
Icon Description Refer to
On hold/Call on hold P.104
P.106
P.119
Data upload -
Data download -
Application installed from Android Market P.201
Update of Android Market application available P.201
Hidden notification P.59
eco mode P.216
Security is unlocked P.142
Temperature failure P.243
Charge failure P.243
■ Main status icons
Icon Description Refer to
Radio wave strength -
*1
Roaming P.228
*1
Out of service area -
GPRS is available P.231
*1
During GPRS communication P.231
*1
EDGE is available P.231
*1
During EDGE communication P.231
*1
3G (packet) is available P.231
*1
During 3G (packet) communication P.231
*1
Airplane mode P.125
Connecting to Wi-Fi P.97
*1
Bluetooth ON P.181
Bluetooth device connected P.181
Data sync P.146
Osaifu-Keitai lock set P.206
57 Preliminary Check
Page 59
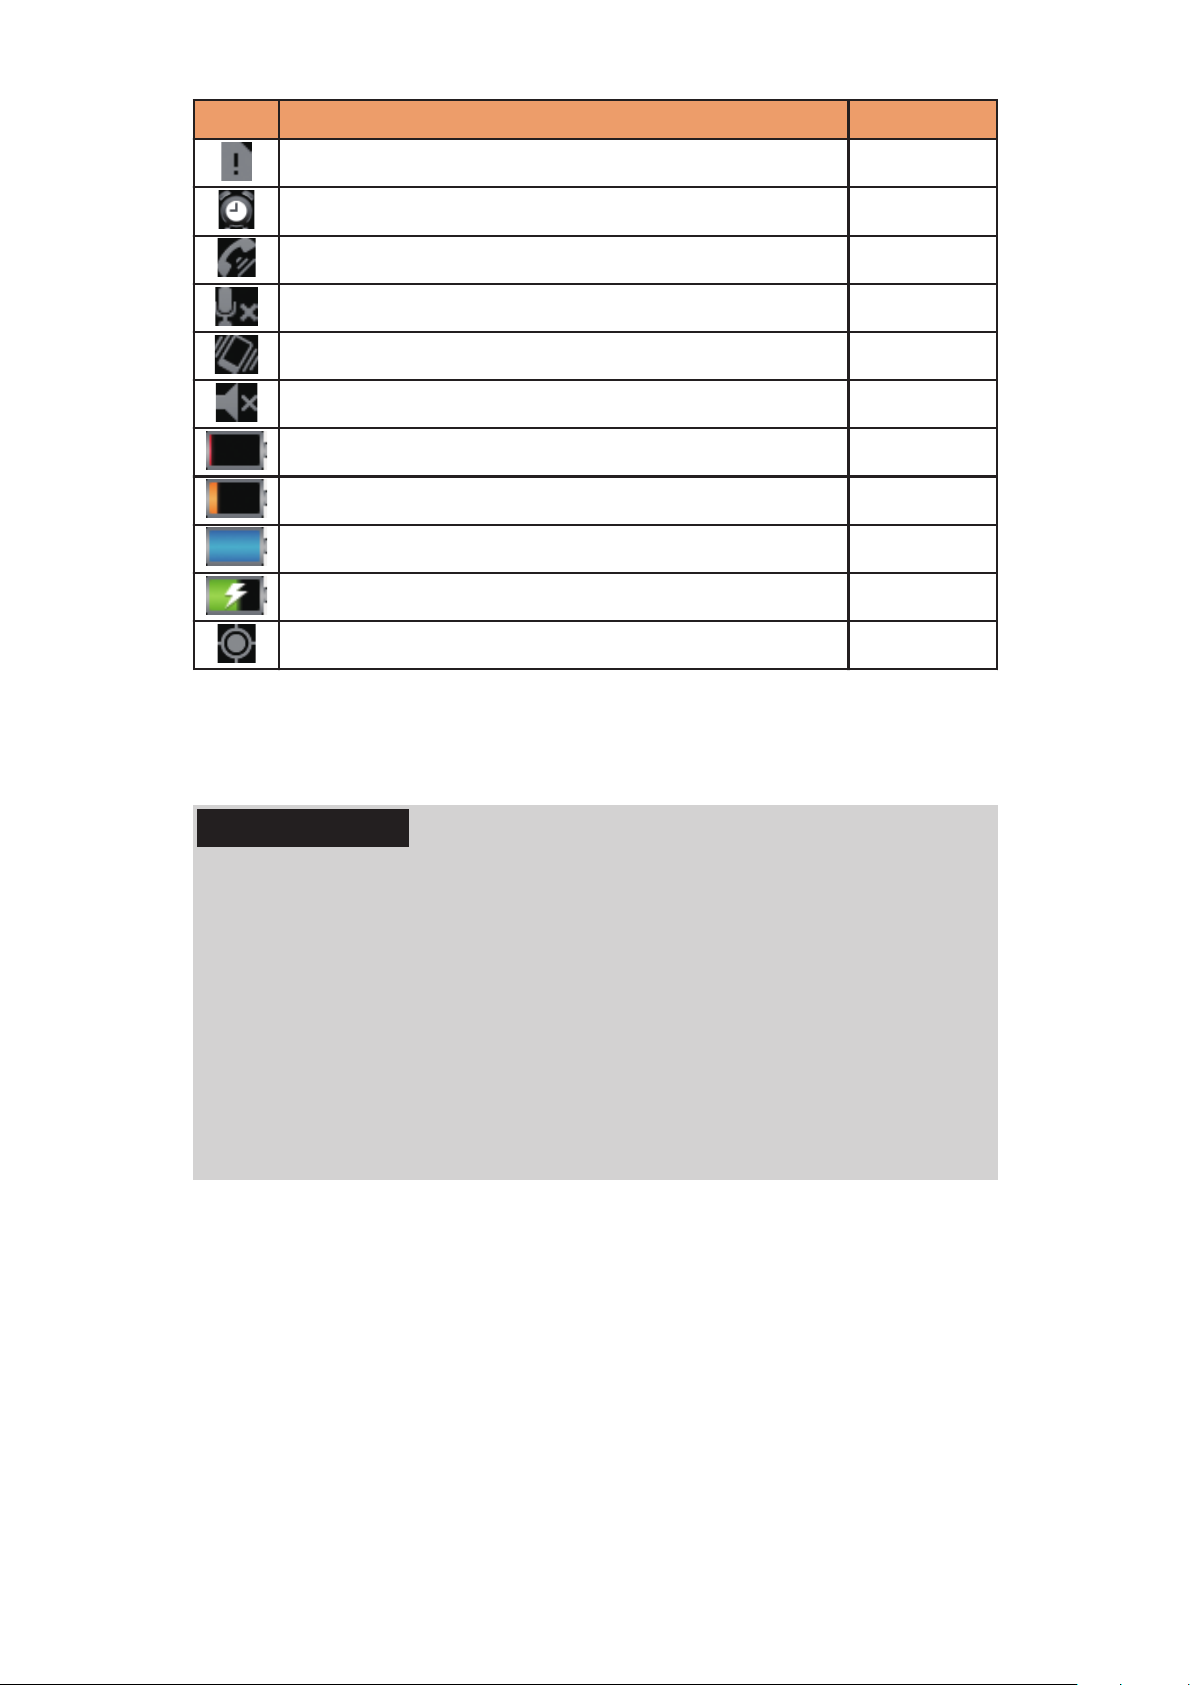
Icon Description Refer to
docomo mini UIM card not installed P.44
Alarm set P.209
Speakerphone ON P.106
Microphone mute P.106
Silent mode (vibration ON) P.133
Silent mode (vibration OFF) P.105
Charge required P.49
Low battery P.49
Sufficient battery P.51
Charging P.51
GPS positioning P.137
*1 Network icons appear in white when Google account is not
set or [Background data]
unmarked.
Information
• The P-04D employs an organic EL display. If the same image
is
displayed for a long period of time, the screen is set brighter
than necessary, or the mobile phone is used for extremely
long periods, the brightness of parts of the display might fade
and colors might change. In addition, small changes to the
environment and other factors might result in the display not
lighting up, pixels that are continuously lit, or streaks of
irregular color or uneven brightness. These occurrences are
entirely due to the composition and properties of organic EL
displays, and do not indicate a failure.
in Accounts & sync settings is
58 Preliminary Check
Page 60
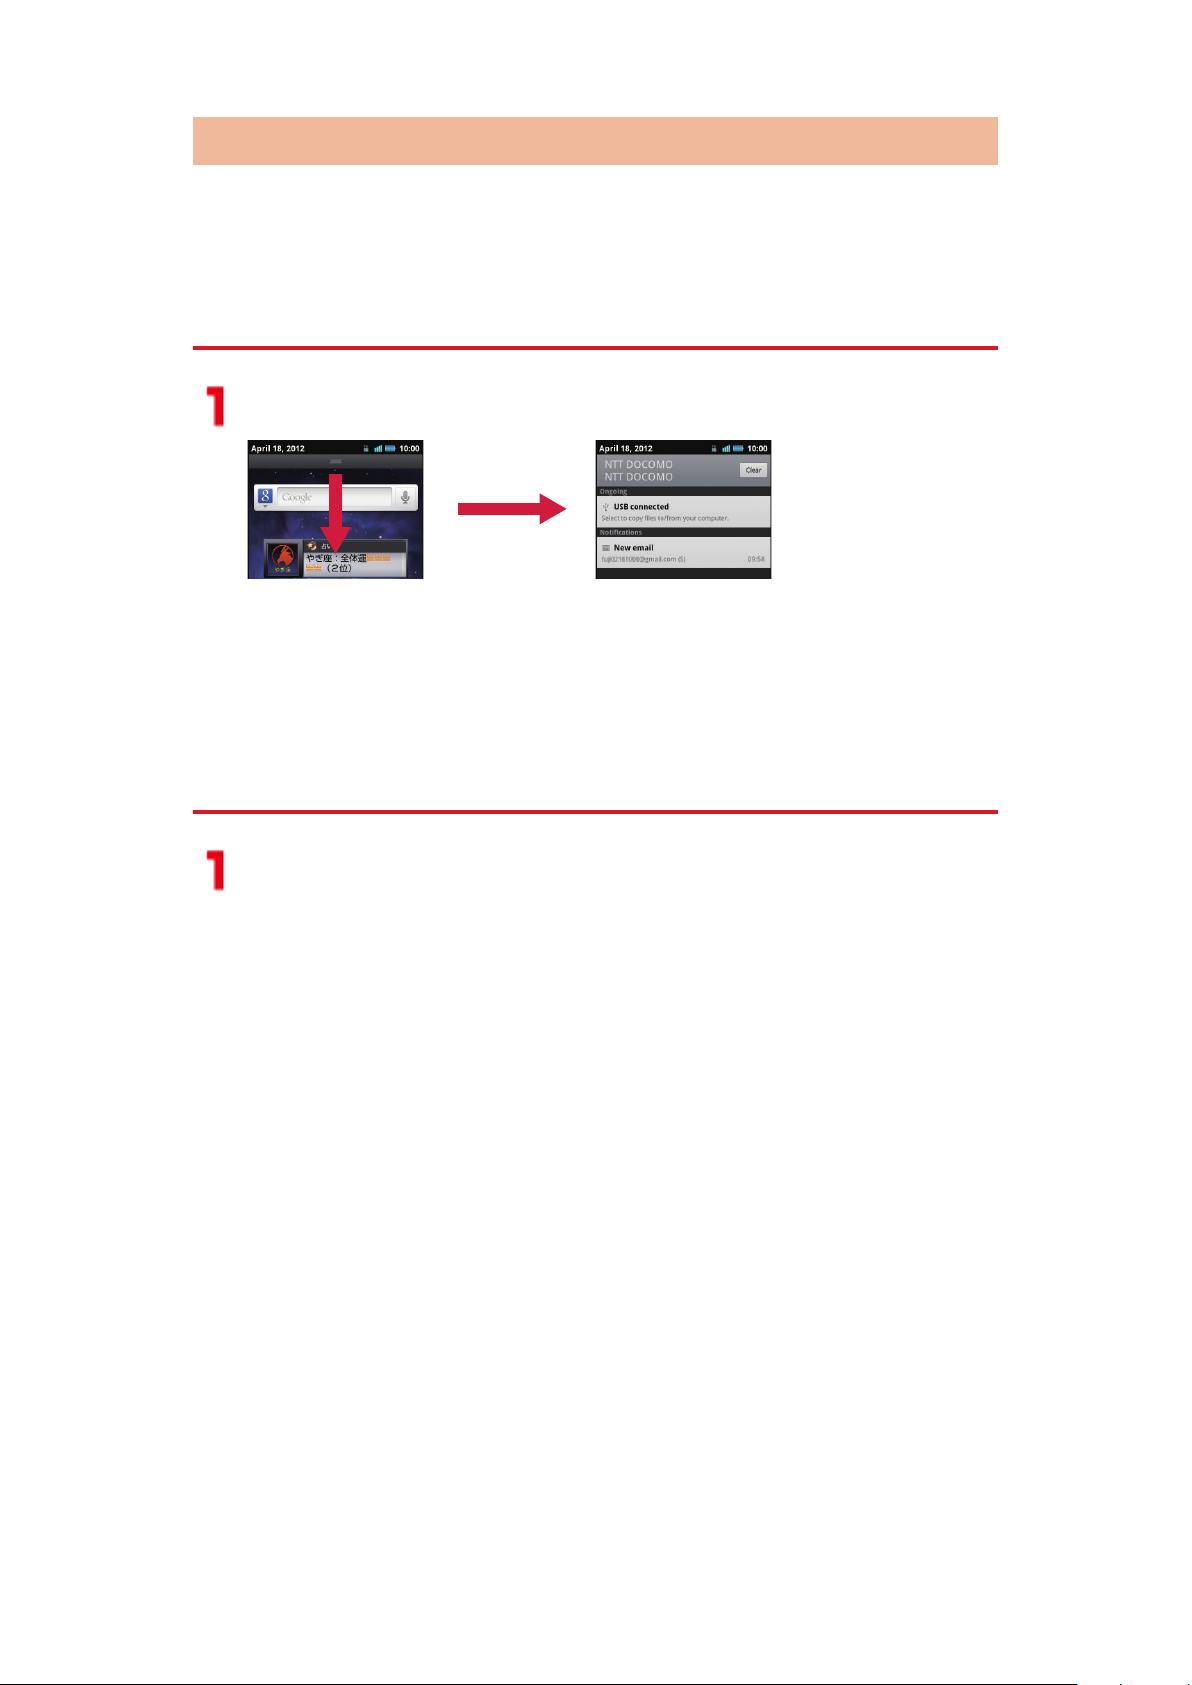
Notification Panel
When notification icons are displayed, you can open the
notification panel to check notifications of messages,
Calendar events, and so on.
Opening Notification Panel
Drag the status bar downward
• Tap a notification to check details or configure
necessary settings.
• Tap [Clear] to clear all items in the notification
panel.
However, some items may not be cleared.
Closing Notification Panel
Drag the bar at the bottom of the notification
panel upward, or tap C
59 Preliminary Check
Page 61
Character Entry
With this mobile phone, you can enter characters by tapping
the text entry field and using the keypad displayed. You can
also enter characters with handwriting.
Switching Input Method
Any of three input methods can be used to enter characters
with this mobile phone.
Touch and hold the text entry field
[Input method] W [Android keyboard]/
[Fit
Key]/[Quick Handwriting]
Entering with Fit Key
You can select from the two keypad types below:
■ Ten-key keypad
Used for Japanese Kana input.
■ QWERTY keypad
Used for Japanese Romaji input.
Entering Characters with Ten-key Keypad
Tap the text entry field W Touch and hold in
the keypad
60 Preliminary Check
Page 62
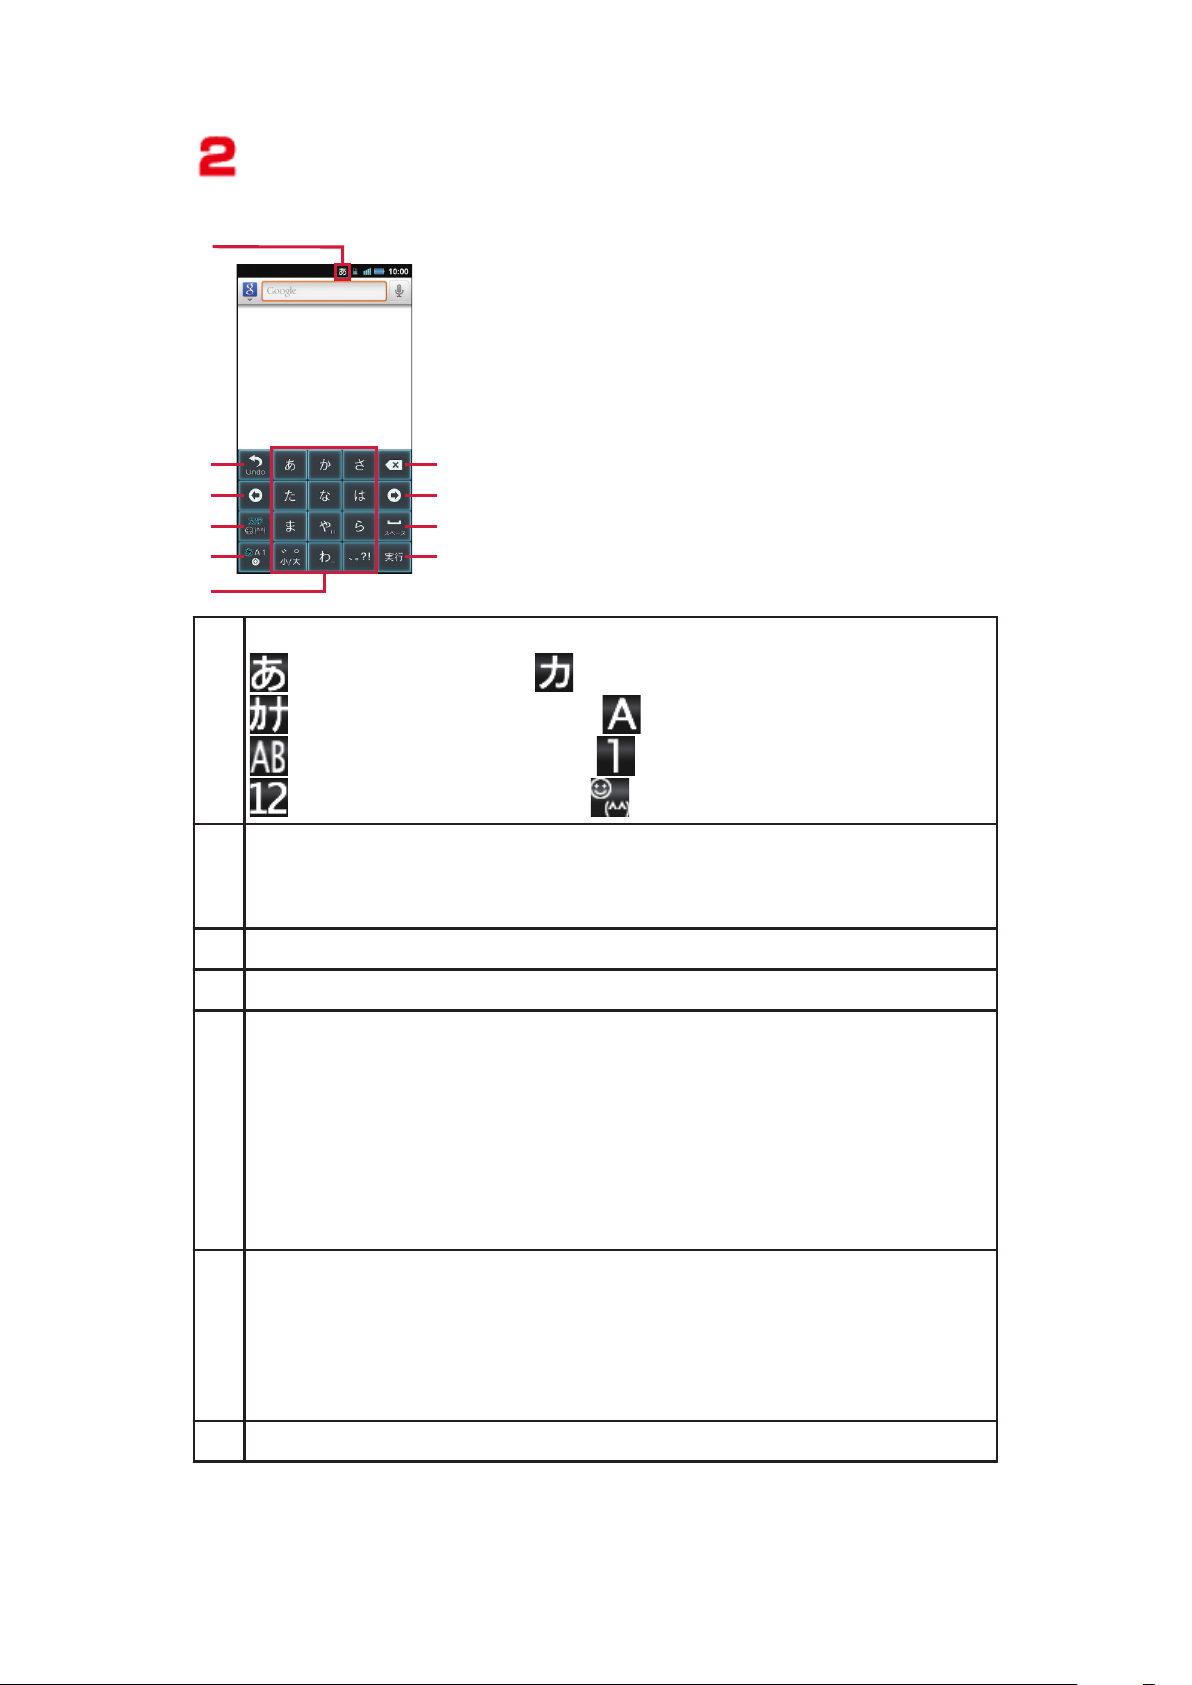
[10-key ⇔ QWERTY]
7
8
9
1
2
3
4
5
6
3
• To close the keypad, tap C.
1 Indicates the currently used input mode.
: Hiragana-Kanji : Full-width Katakana
: Half-width Katakana : Full-width Alphabet
: Half-width Alphabet : Full-width Numeric
: Half-width Numeric : Pictogram/Symbol
2 Display characters in reverse order.
Tapping the key right after confirming entered characters
returns the characters to unconfirmed state.
3 Move the cursor right/left.
4 Switch to Pictogram/Symbol input modes.
5 Alphabet/Numeric/Kana input modes are switched each time
the key is tapped.
Touch and hold the key W [10-key ⇔ QWERTY]
to switch
between ten-key keypad and QWERTY keypad for each input
mode.
Touch and hold the key W [Input Mode] to switch Full-width/
Half-width.
6 The character assigned to the key concerned is input.
Tap a key repeatedly until desired character is displayed, or
touch and hold a key and flick to desired character.
When you enter characters, prediction conversion
candidates are displayed.
7 Delete a character at the left of the cursor.
61 Preliminary Check
Page 63
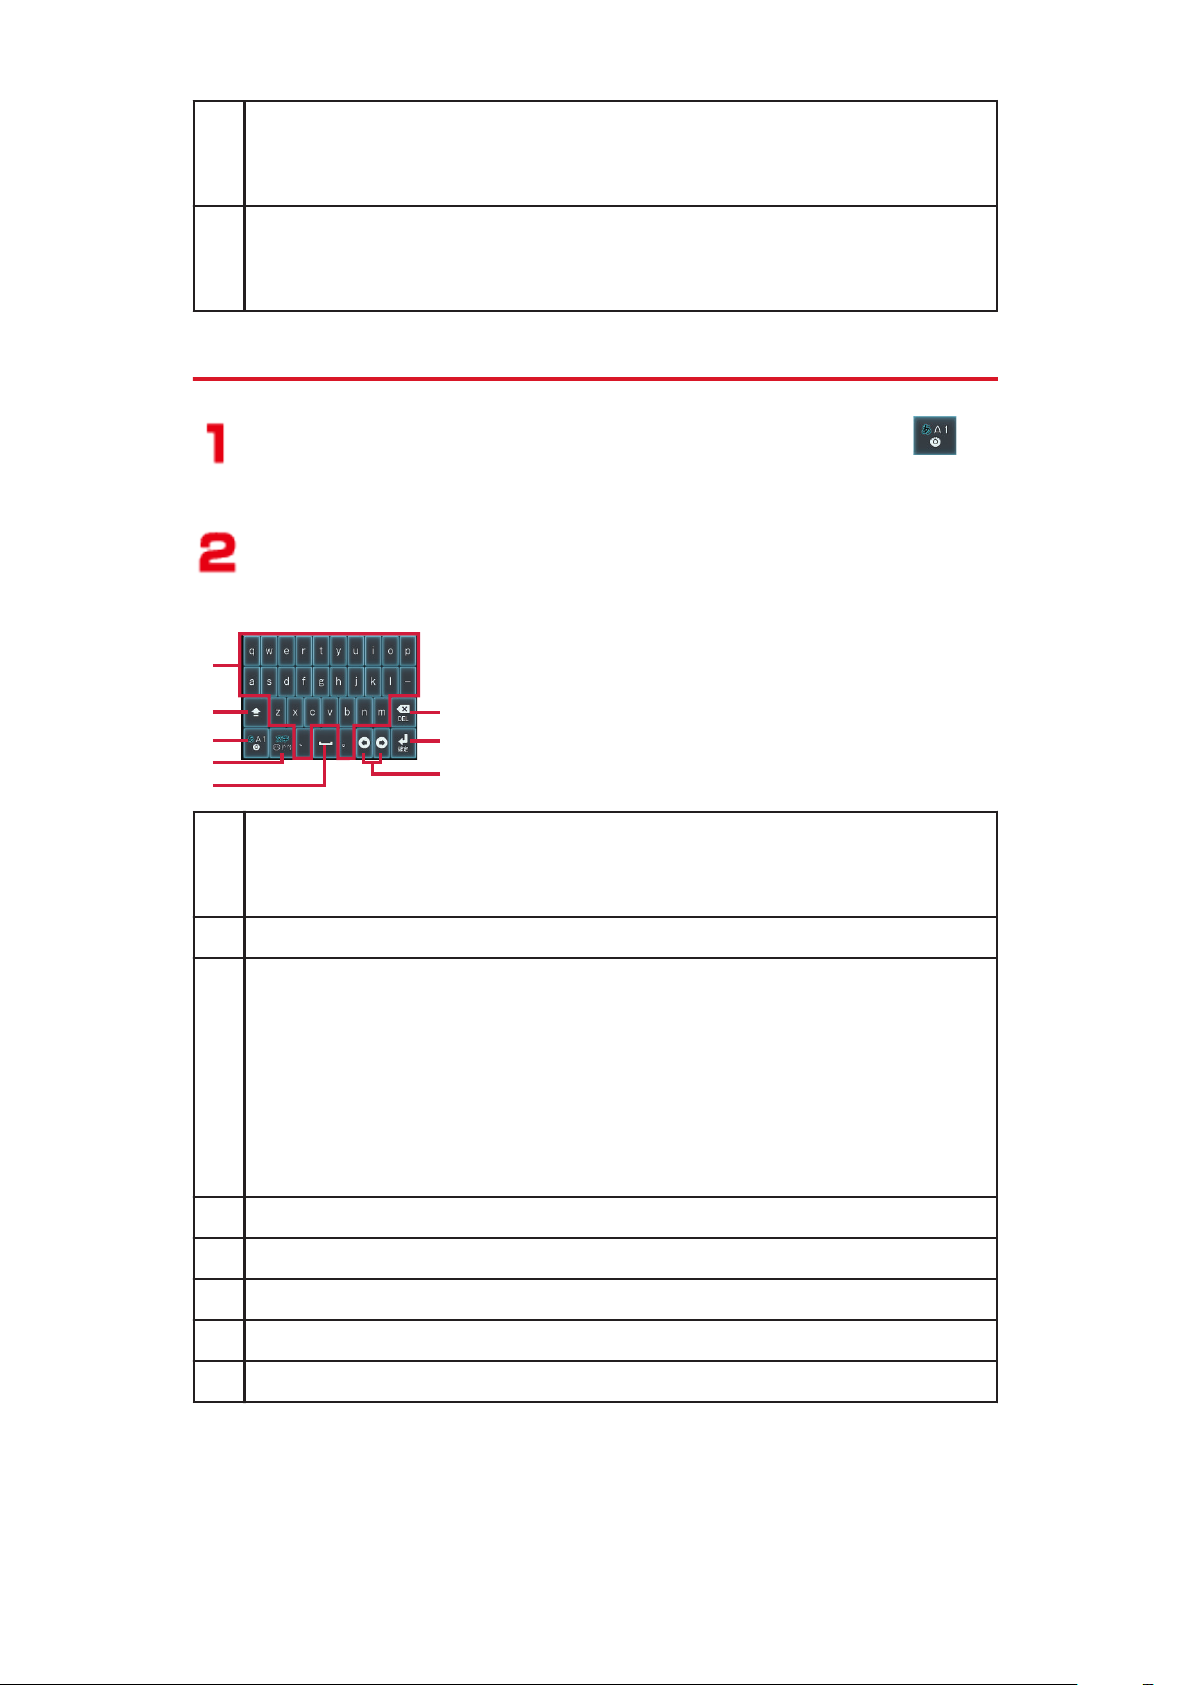
8 Insert a space.
1
2
3
4
6
7
5
8
When
this key is tapped with characters entered, conversion
candidates are displayed.
9 Confirm entered characters or feed a new line.
function now activated is executed using the characters
The
which have been input.
Entering Characters with QWERTY Keypad
Tap the text entry field W Touch and hold in
the keypad
[10-key ⇔ QWERTY]
• To close the keypad, tap C.
1 Enter characters indicated on the keys.
When you enter characters, prediction conversion
candidates are displayed.
2 Switch between uppercase and lowercase characters.
3 Alphabet/Numeric/Romaji input modes are switched each
time the key is tapped.
Touch and hold the key W [10-key ⇔ QWERTY]
to switch
between ten-key keypad and QWERTY keypad for each input
mode.
Touch and hold the key W [Input Mode] to switch Full-width/
Half-width.
4 Switch to Pictogram/Symbol input modes.
5 Insert a space.
6 Delete a character at the left of the cursor.
7 Confirm entered characters or feed a new line.
8 Move the cursor right/left.
62 Preliminary Check
Page 64
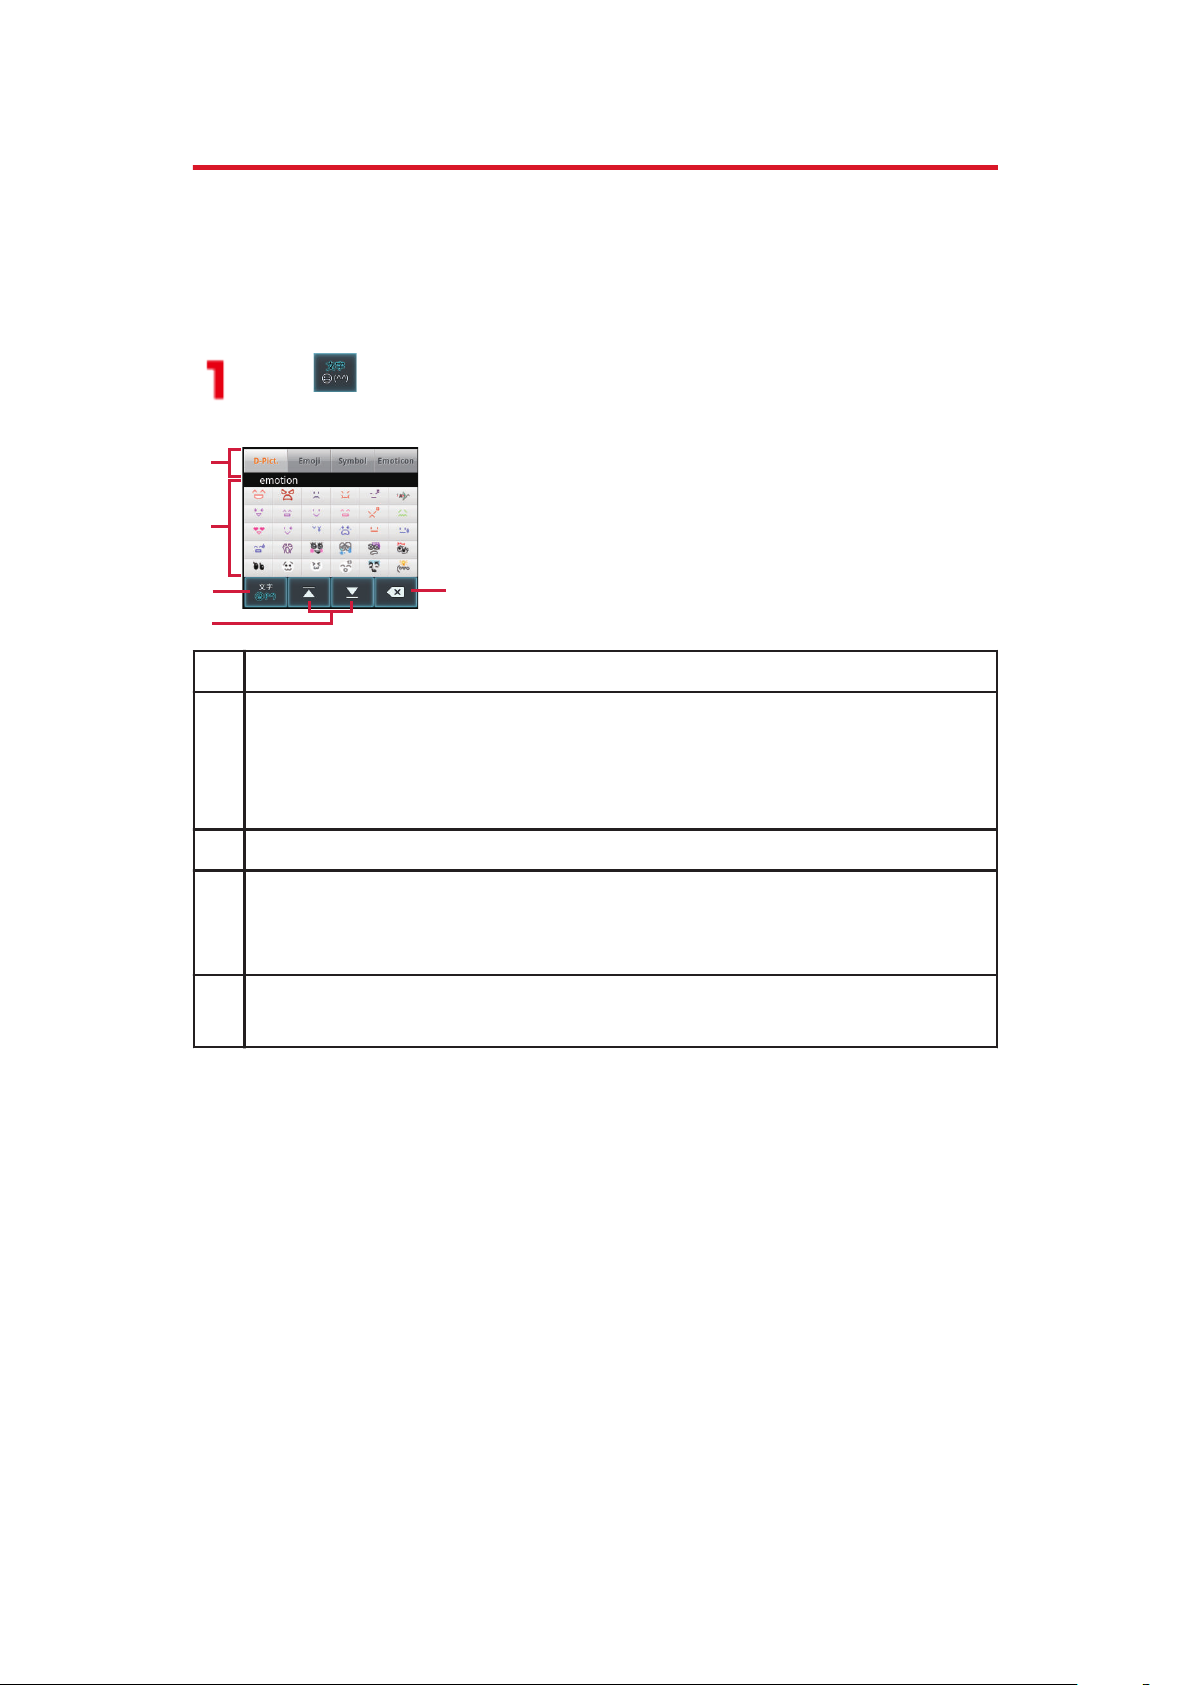
Entering Pictograms/Symbols
1
2
3
4
5
In the Pictogram/Symbol input mode, you can enter Dpictograms, pictograms, symbols or emoticons. You might
not
be able to enter D-pictograms/pictograms depending on
the text entry field.
Tap to switch to Pictogram/Symbol input
mode
1 Switch D-pictogram/pictogram/symbol/emoticon entering.
2 Scroll the screen up/down and tap a desired D-pictogram/
pictogram/symbol/emoticon.
• The pictogram or symbol last used is displayed at the top
of the list of D-pictgrams/pictograms/symbols.
3 End Pictogram/Symbol input mode.
4 Scroll the screen up/down.
• On the list of D-pictogram/pictogram, you can scroll the
screen up/down on a category by category basis.
5 Delete a D-pictogram/pictogram/symbol/emoticon at the
left of the cursor.
63 Preliminary Check
Page 65
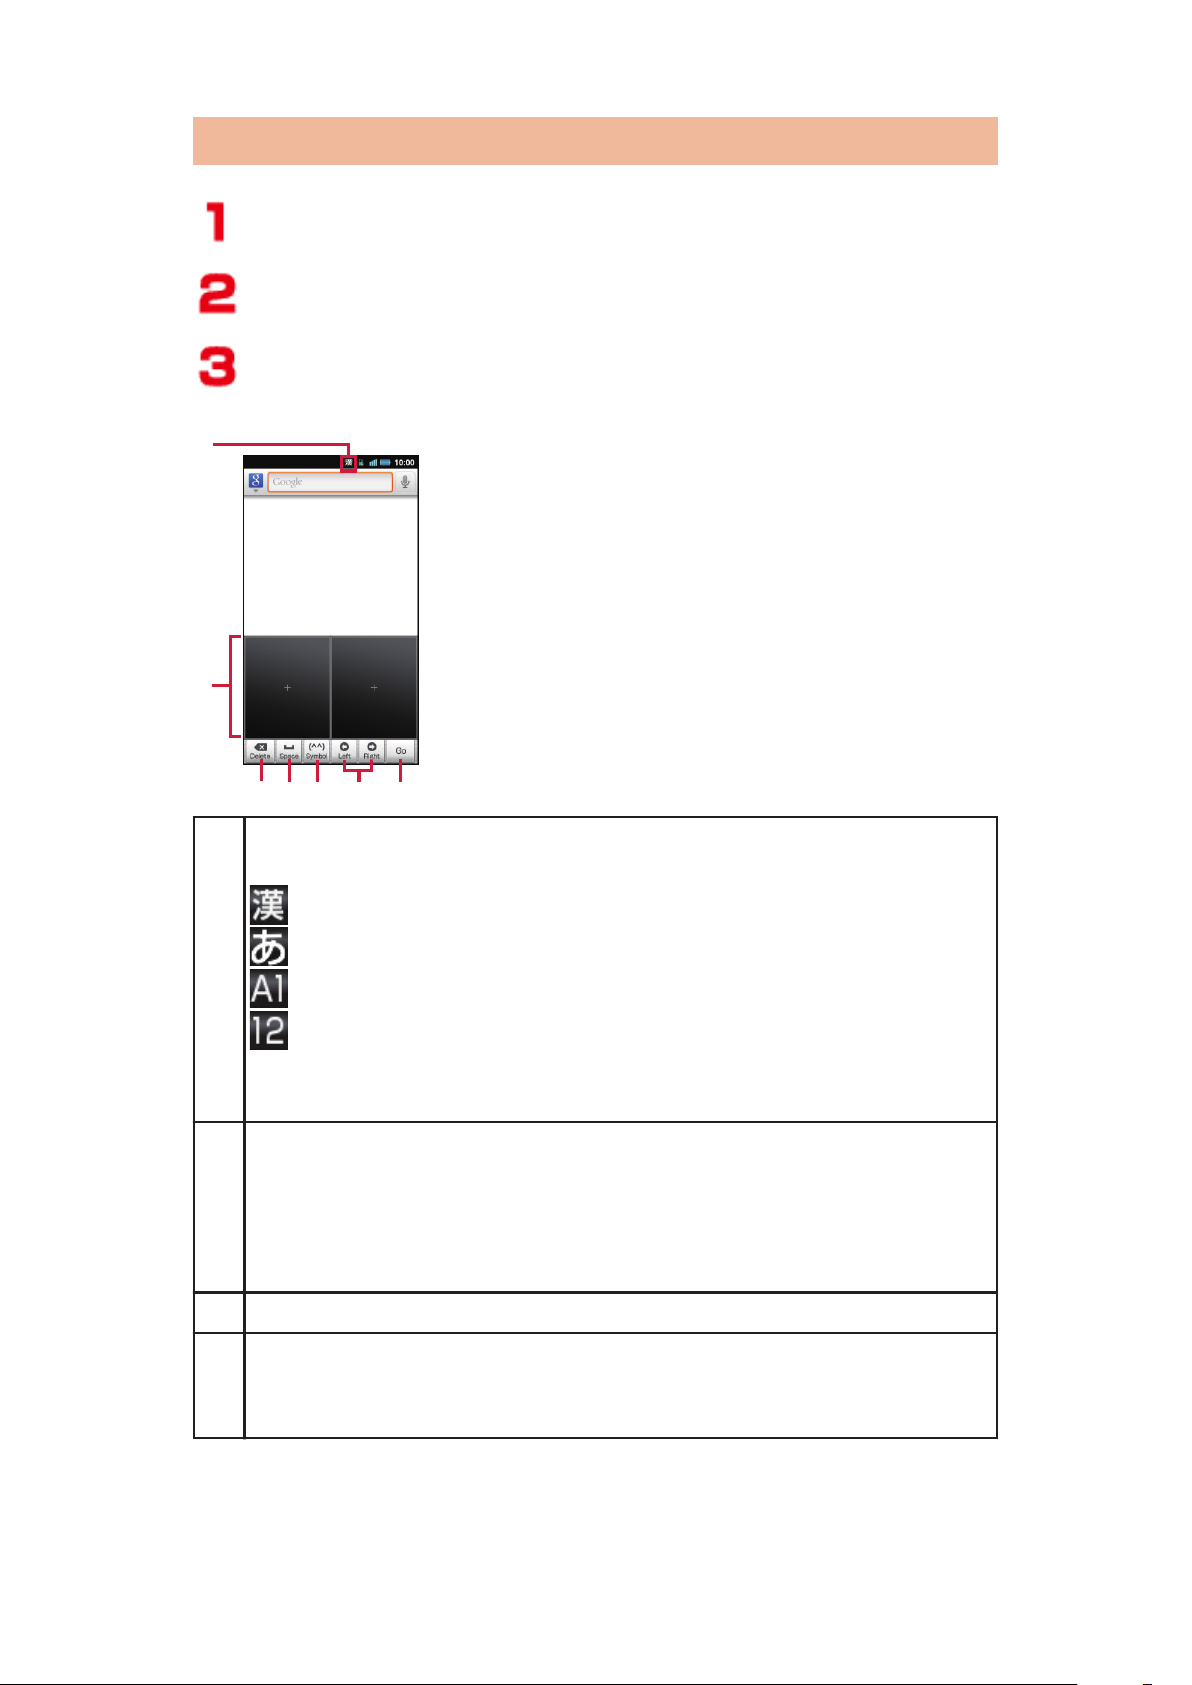
Entering Characters with Handwriting
2
3
4
5
6 7
1
Touch and hold the text entry field
[Input method] W [Quick Handwriting]
Enter characters in input frames with
handwriting
1 The types of characters which can be entered are displayed
here.
: Kanji/Hiragana/Katakana/Alphabet/Numeric/Symbol
: Hiragana/Katakana/Alphabet/Numeric
: Alphabet/Numeric/Symbol
: Numeric/Symbol
• The types of characters are switched automatically
depending on the application used.
2 Enter characters in input frames with handwriting.
When you enter characters, prediction conversion
candidates are displayed.
• When a character input frame is pinched out/in, it can be
switched to 1 frame, 2 frames or 6 frames.
3 Delete a character at the left of the cursor.
4 Insert a space.
When
this key is tapped with characters entered, conversion
candidates are displayed.
64 Preliminary Check
Page 66
5 Switch to Pictogram/Symbol input modes.
When
width/Half-width.
To change Quick Handwriting settings, touch and hold the
key W [Change Settings].
6 Move the cursor right/left.
• When the cursor is moved during character input, a list of
7 Confirm entered characters or feed a new line.
The
which have been input.
this key is tapped with characters entered, switch Full-
recognition candidates for the handwritten character
input is displayed.
function now activated is executed using the characters
Character Entry Menu
Copy/Cut/Paste
Enter characters W Touch and hold the text
entry field
[Select word]/[Select all]
Drag the slider in four directions to select
characters W
Touch and hold the text entry field
[Cut]/[Copy]
• When pasting a copied character, move the
cursor
to the position where the character is to be
pasted, touch and hold the text entry field W Tap
[Paste].
65 Preliminary Check
Page 67
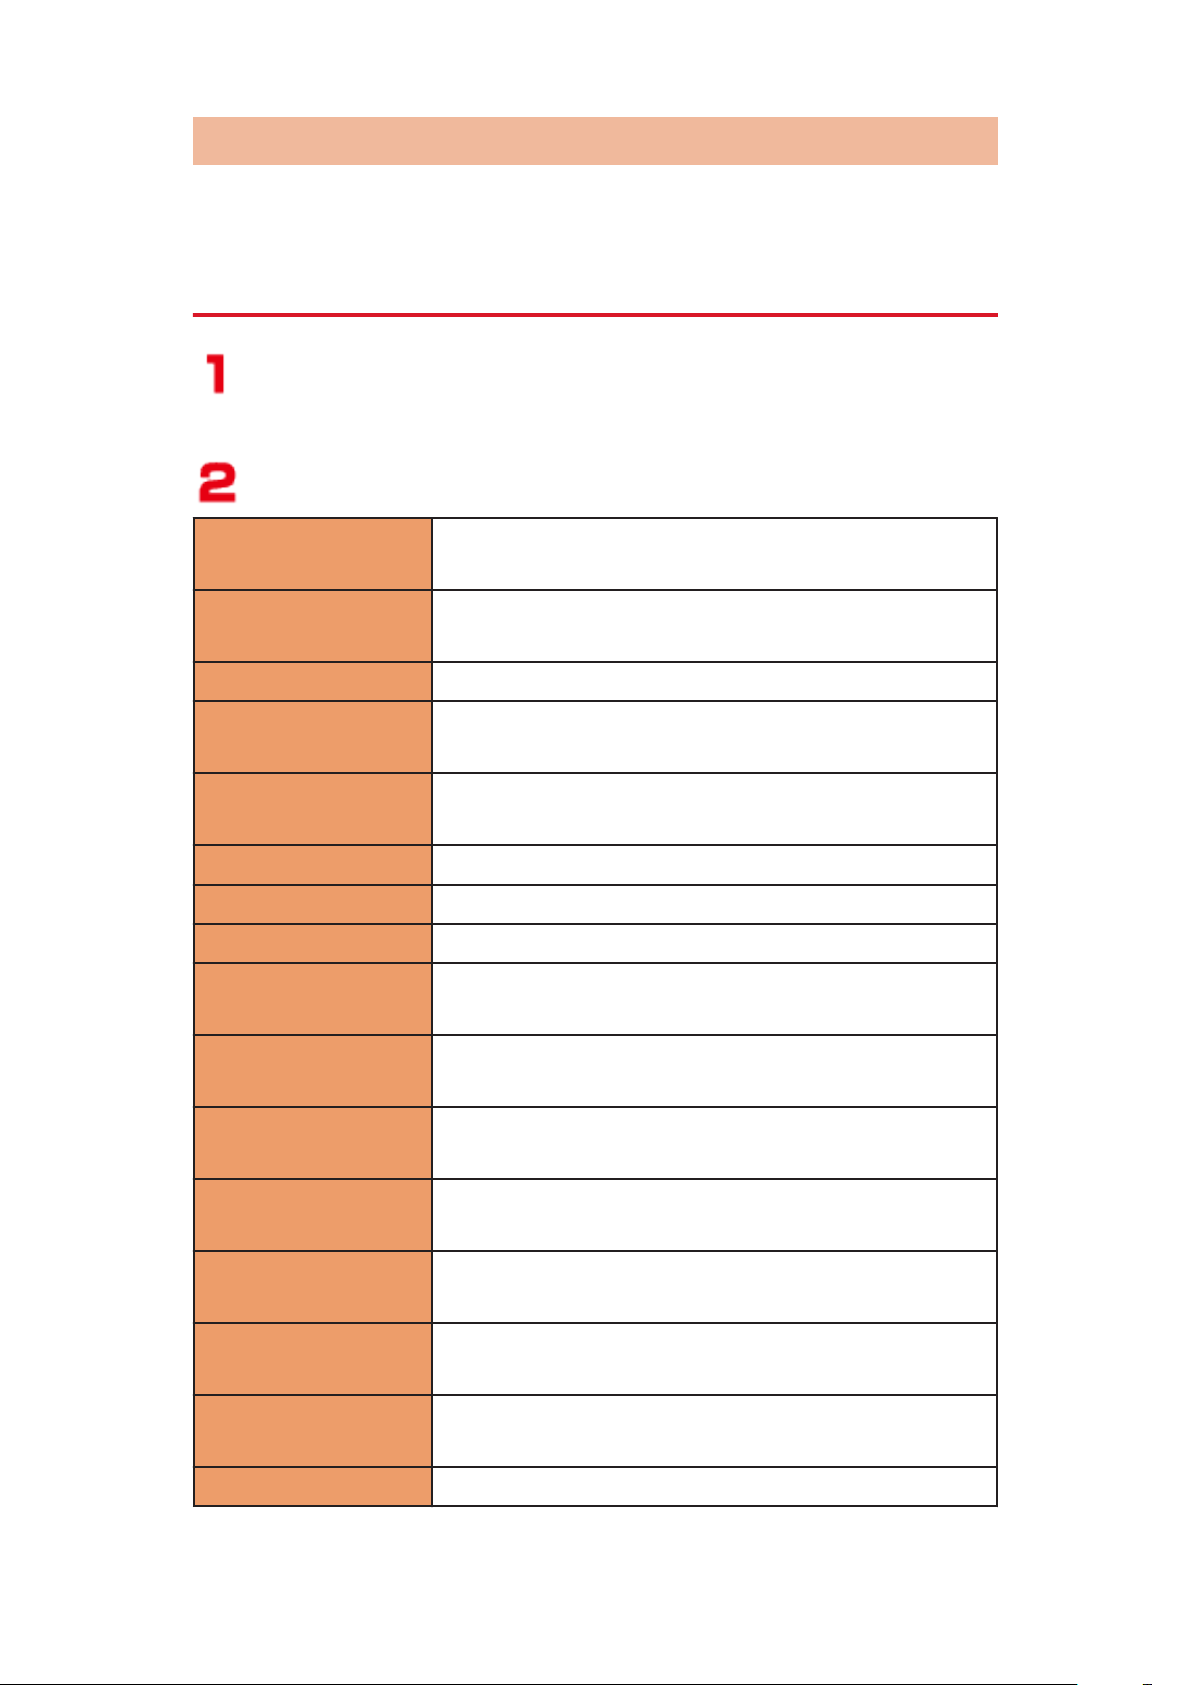
Character Entry Settings
You can configure various settings regarding character
entry.
Fit Key Settings
Home screen W A W [Settings] W
[Language & keyboard]
[Fit Key] W Perform operations listed below:
Sound on Key
Press
Vibrate on Key
Press
Key Preview Display key preview.
Auto
Capitalization
Keyboard Type Set keyboard type for each screen orientation
Voice Input Set whether or not to use voice input.
Flick Input Enable flick input.
Flick Sensitivity Specify flick sensitivity.
Toggle Input Enable toggle input when flick input is
Auto Cursor
Movement
Enable key-tapping sound.
Enable key-tapping vibration.
Automatically capitalize the first character of
a sentence in alphabet input mode.
and input mode.
enabled.
Set the speed at which the cursor is to move
automatically during character entry.
Input Word
Learning
Word Prediction Display conversion candidates as you enter
Typing Error
Correction
Wildcard
Prediction
Lines of
Candidate Area
Mushroom Use mushroom applications.
Learn converted words.
characters.
Display correction candidates for typing
errors.
Predict conversion candidates from specified
reading string length.
Set the number of lines to be displayed in the
candidate area.
66 Preliminary Check
Page 68
Japanese User
Dictionary
Z P.69
English User
Dictionary
Clear Learning
Dictionary
Download
Dictionary
iWnn IME Version of iWnn IME etc. are displayed.
Edit words in English User Dictionary.
Z P.70
Set whether to enable dictionaries which
were downloaded from websites.
Quick Handwriting Settings
Home screen W A W [Settings] W
[Language & keyboard]
[Quick Handwriting] W Perform operations
listed below:
Input Input
Method
Set input frames number.
Context
Correction
Automatic
Fixation
Inputbox
position
Japanese
Address
Input
Full-width
Space
Input
Set whether to use the context
correction function during character
recognition.
Set the speed at which the input
characters are confirmed.
• This can be set only when 1 frame
input has been selected as the
input method.
Set input frames position.
• This can be set only when 1 frame
input has been selected as the
input method.
Enable Japanese on URL/Email
address.
Set whether to input spaces as
full-width spaces during character
entry.
67 Preliminary Check
Page 69
Conversion Word
Prediction
Display conversion candidates as you
enter characters.
Input Word
Learning
Recognition
Error
Correction
User
Dictionary
Clear
Learning
Dictionary
Sound on
Operation
Sound on
Key Press
Vibration Vibrate on
Writing
Vibrate on
Key Press
Learn converted words.
Display the conversion candidates
including the recognition error
correction candidates.
Z P.69
Z P.70
Enable key-tapping sound.
Set whether or not to vibrate when
characters are entered in input
frames.
Set whether or not to vibrate when a
key is tapped.
Design Background
Set input frames background color.
Color
Key
Preview
Enlarge tapped keys during character
entry.
Initialization Restore the default Quick Handwriting
settings.
• Not clear user dictionary and
learning dictionary.
Quick Handwriting Version of Quick Handwriting etc. are
displayed.
68 Preliminary Check
Page 70
Adding Words to User Dictionary
You can add frequently-used words in Kana input mode to
Japanese User Dictionary so that the added words are
preferentially shown as conversion candidates when you
enter the reading.
Home screen W A W [Settings] W
[Language & keyboard]
For Fit Key
[Fit Key]
W [Japanese User Dictionary]
• To add English words used in half-width alphabet
input mode, tap
For Quick Handwriting
[English User Dictionary].
[Quick Handwriting] W [Conversion] W [User
Dictionary]
A W [Add]
Tap the text entry field of [Reading] W Enter
reading
Tap the text entry field of [Word] W Enter word
[Save]
69 Preliminary Check
Page 71
Clearing Learning Dictionary
Words and phrases you entered are automatically learned
and displayed as conversion candidates by predictive
conversion feature. When you clear the learning dictionary,
learned
is reset to the default status.
words and phrases are all cleared and the dictionary
Home screen W A W [Settings] W
[Language & keyboard]
For Fit Key
[Fit Key]
For Quick Handwriting
W [Clear Learning Dictionary]
[Quick Handwriting] W [Conversion] W [Clear
Learning Dictionary]
[OK]
70 Preliminary Check
Page 72
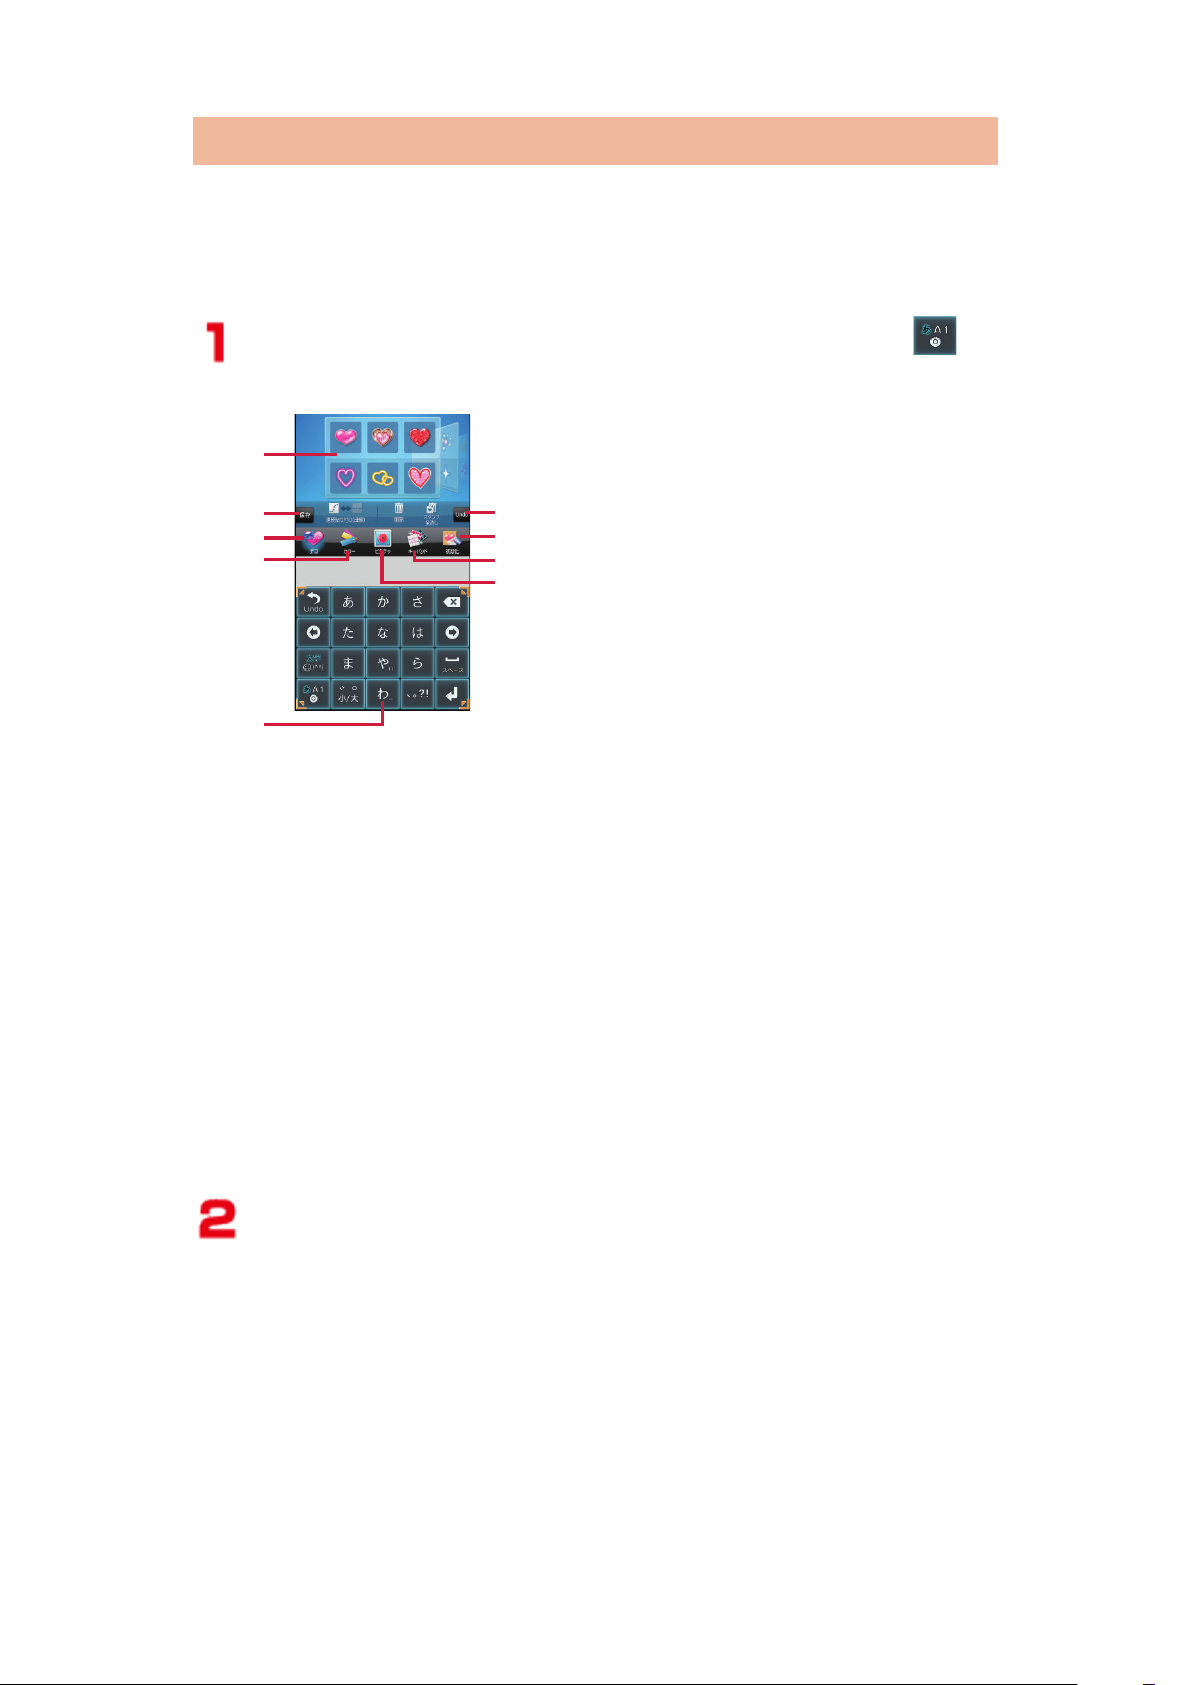
Customizing Fit Key
1
2
3
5
4
6
7
8
9
You can adjust the size and position of the keypad to fit on
your hand. In addition, you can decorate the keypad with
stamps and change the color, background and key shape.
Tap the text entry field W Touch and hold in
the keypad W [Customize]
1 Pallet
Flick right or left to select.
2 Save the edited data.
3 Switch to the stamp setting screen.
4 Switch to the color setting screen.
5 Keypad preview
6 Undo one operation on the keypad.
7 Reset the edited contents to the default state.
8 Switch to the key shape setting screen.
9 Switch to the background setting screen.
Drag inward/outward the guide icons at four
corners
of the keypad preview to define the size
W Drag the keypad preview to define the
position
• When the text entry field is hidden by the keypad
or candidate display, you can display the text
entry field by reducing the size of the keypad.
71 Preliminary Check
Page 73
To attach stamps
[
デコ (Deco)] W Select a pallet W Tap a stamp to
attach W Tap preferred location in the keypad
preview to attach the stamp W Perform stamp
operations as necessary (Z P.73)
To change color
[カラー (Color)] W Select a pallet
• Drag the slider to adjust color transparency.
• Tap [グラデーション (Gradation) ON/OFF] to
switch gradation/solid color.
To change background
[ピクチャ (Picture)] W Select a pallet
• You can select from still images you recently
saved in USB storage. To select from other still
images, tap [
すべて見る (View all)].
• Tap [背景写真をアクティブ (Activate background
photo)]
to adjust position of the still image.
• To shoot a still image for background, tap [カメ
ラ起動
(Activate camera)] W Display the object in
the keypad preview W
To change key shape
[キーパッド (Keypad)]
W Select a pallet
.
When you finish editing, [保存 (Save)] W [Yes]
Edited data is saved and reflected in the keypad.
72 Preliminary Check
Page 74
■ Stamp operations in keypad preview
When
stamp.
Move Display the stamp guide W Drag the center
Zoom in/out at
the same
magnification
Increase/
decrease height/
width
Rotate Display the stamp guide W Trace the outer
Copy & paste Display the stamp guide W Touch and
a stamp is tapped, the stamp guide is displayed around the
Operation Procedure
of the stamp guide
Display the stamp guide W Put your fingers
around the stamp guide to pinch out/in
Display the stamp guide W Drag the stamp
guide corner to increase/decrease height/
width
side of the stamp guide corner in direction
you want to rotate
hold
the center of the stamp guide W Tap the
location you want to attach the stamp
• The stamps are attached each time you
tap. Tap [
Delete Display the stamp guide W [削除 (Delete)]
• You can also delete a stamp by tapping [
除 (Delete)] W Tap a stamp to delete.
Delete all [スタンプ全消し (Erase all stamps)] W [Yes]
Paste
consecutively
Tap [連続貼り付け (Paste consecutively)] to
select
W Tap a stamp to attach W Trace the keypad
preview
コピー (Copy)] to end.
(line)/ (curve) W
Select a pallet
削
73 Preliminary Check
Page 75
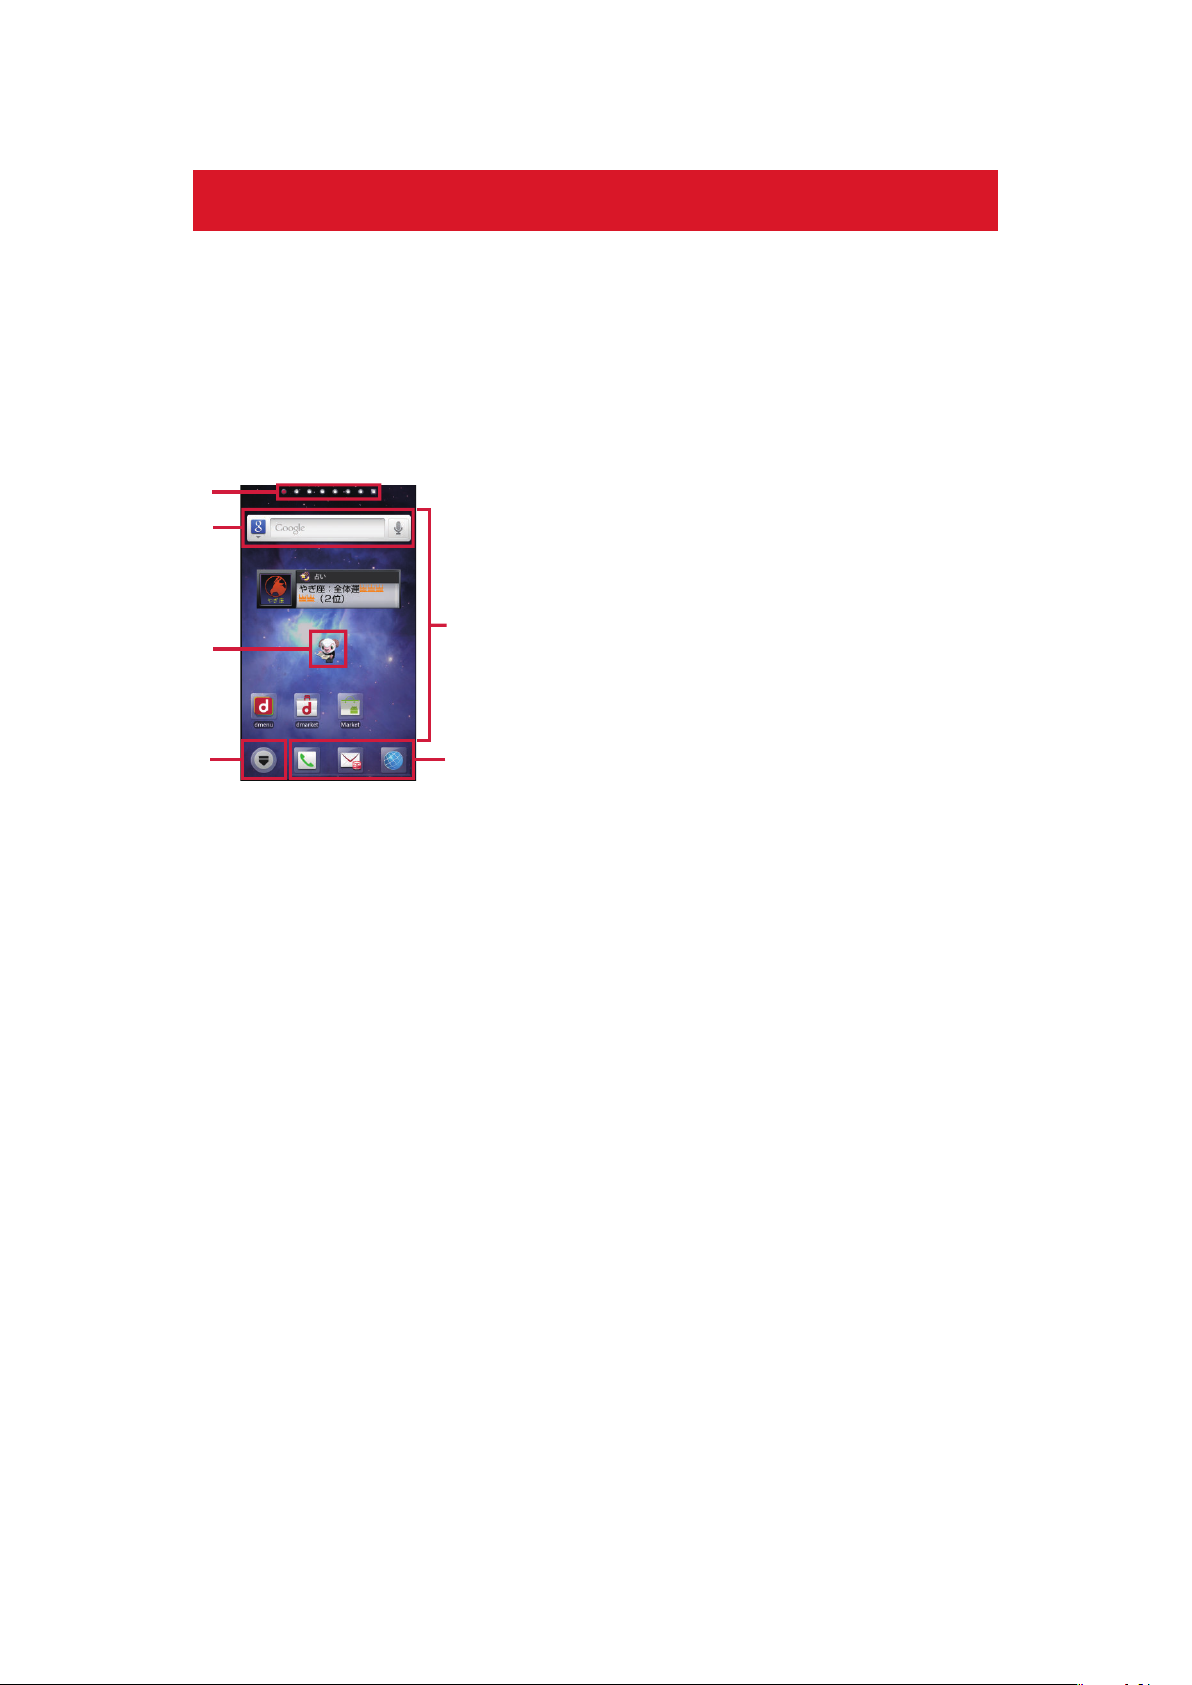
docomo Palette UI
5 6
2
3
1
4
"ひつじのしつじくん®"
©NTTDOCOMO
Home Screen
Home screen is the start screen from which you can start
using applications. Tap B to display the home screen.
You can choose from the following four home
applications: docomo Palette UI, "Fit Home",
Selector" and Launcher. This section describes how to
operate docomo Palette UI.
"Touch Speed
1 Indicators
Current location (sheet) within the home screen is indicated.
You can use up to 12 sheets (included Personal area) and
switch the screens (sheets) by flicking the screen right and
left. From
[Personal area] sheet, you can check information
such as your contract details.
2 Quick search box (Z
P.78)
3 Machi-chara
This character gives you information, such as notifications of
receiving a mail or incoming call etc.
4 Shortcuts, widgets, folders and groups can be freely placed in
home screens.
5 This part is displayed on all sheets other than [Personal area]
sheet, and displays the application list screen.
6 Dock
part is displayed on all sheets other than [Personal area]
This
sheet, and shortcuts, folders and groups can be placed.
74 docomo Palette UI
Page 76
■New! icon
Newly purchased (downloaded) applications are displayed with
(New! icon) on the home screen and the application list
screen.
Adding Shortcuts etc. to Home Screen
Home screen W
Touch and hold the background
• Applications or groups can also be added by
touching and holding the target application or
group on the application list screen, and then by
tapping [Add]
.
[Shortcut]/[Widget]/[Folder]/[Group]
Select a shortcut etc. to add
Touch and hold a shortcut etc. added to the
home screen, and drag it to preferred location
Changing Folder Name
Tap a folder W Touch and hold the title bar
• You can also change folder name by touching and
holding
a folder, and then by tapping [Edit name].
Enter folder name W [OK]
75 docomo Palette UI
Page 77
Deleting Shortcuts
Home screen W Touch and hold a shortcut
etc. to delete, and drag it into
• When the shortcut is dragged into , the color
of the shortcut icon changes to red.
• You can also delete shortcuts by touching and
holding shortcuts etc., and then by tapping
[Delete].
Changing Shortcuts etc. in a Dock
Home screen W Touch and hold a shortcut etc.
and drag it in the dock
• To delete a shortcut in the dock etc. touch and
hold the shortcut, and drag it into .
Uninstalling Applications or Widgets
Home screen W Touch and hold an application
or a widget to uninstall W [Uninstall] W
• Applications can also be uninstalled by touching
and holding the target application on the
application list screen, and then by tapping
[Uninstall]
W [OK].
Changing Kisekae of Home Screen
Home screen W Touch
W [Kisekae]
Select a Kisekae W [Set]
and hold the background
[OK]
76 docomo Palette UI
Page 78
Changing Wallpaper of Home Screen
Home screen W
W [Wallpaper]
Tap a wallpaper type W Select an image
• If you select an image from ["Picture Album"],
select a display method to complete the setting.
• If an image has been selected using [Gallery],
decide on the trimming position, and then tap
[Save]
[Set wallpaper]
to complete the setting.
Touch and hold the background
Adding Home Screens
Home screen W A W [Home
• [+] is displayed if the home screen is less than
11 sheets.
screens] W [+]
Touch and hold the home screen, and drag it to
preferred location
• To delete a home screen, touch and hold the
home screen, and drag it into .
77 docomo Palette UI
Page 79
Searching for Mobile Phone Applications
and Web Page Information
Home screen W Tap the entry field within the
quick search box
• You can also search by displaying the application
list screen W A W [Search]
.
• Tap A W
target types and settings.
W Tap a search target W Enter keyword
Search candidates that contain characters you just
entered appear.
[Search settings] to change search
78 docomo Palette UI
Page 80
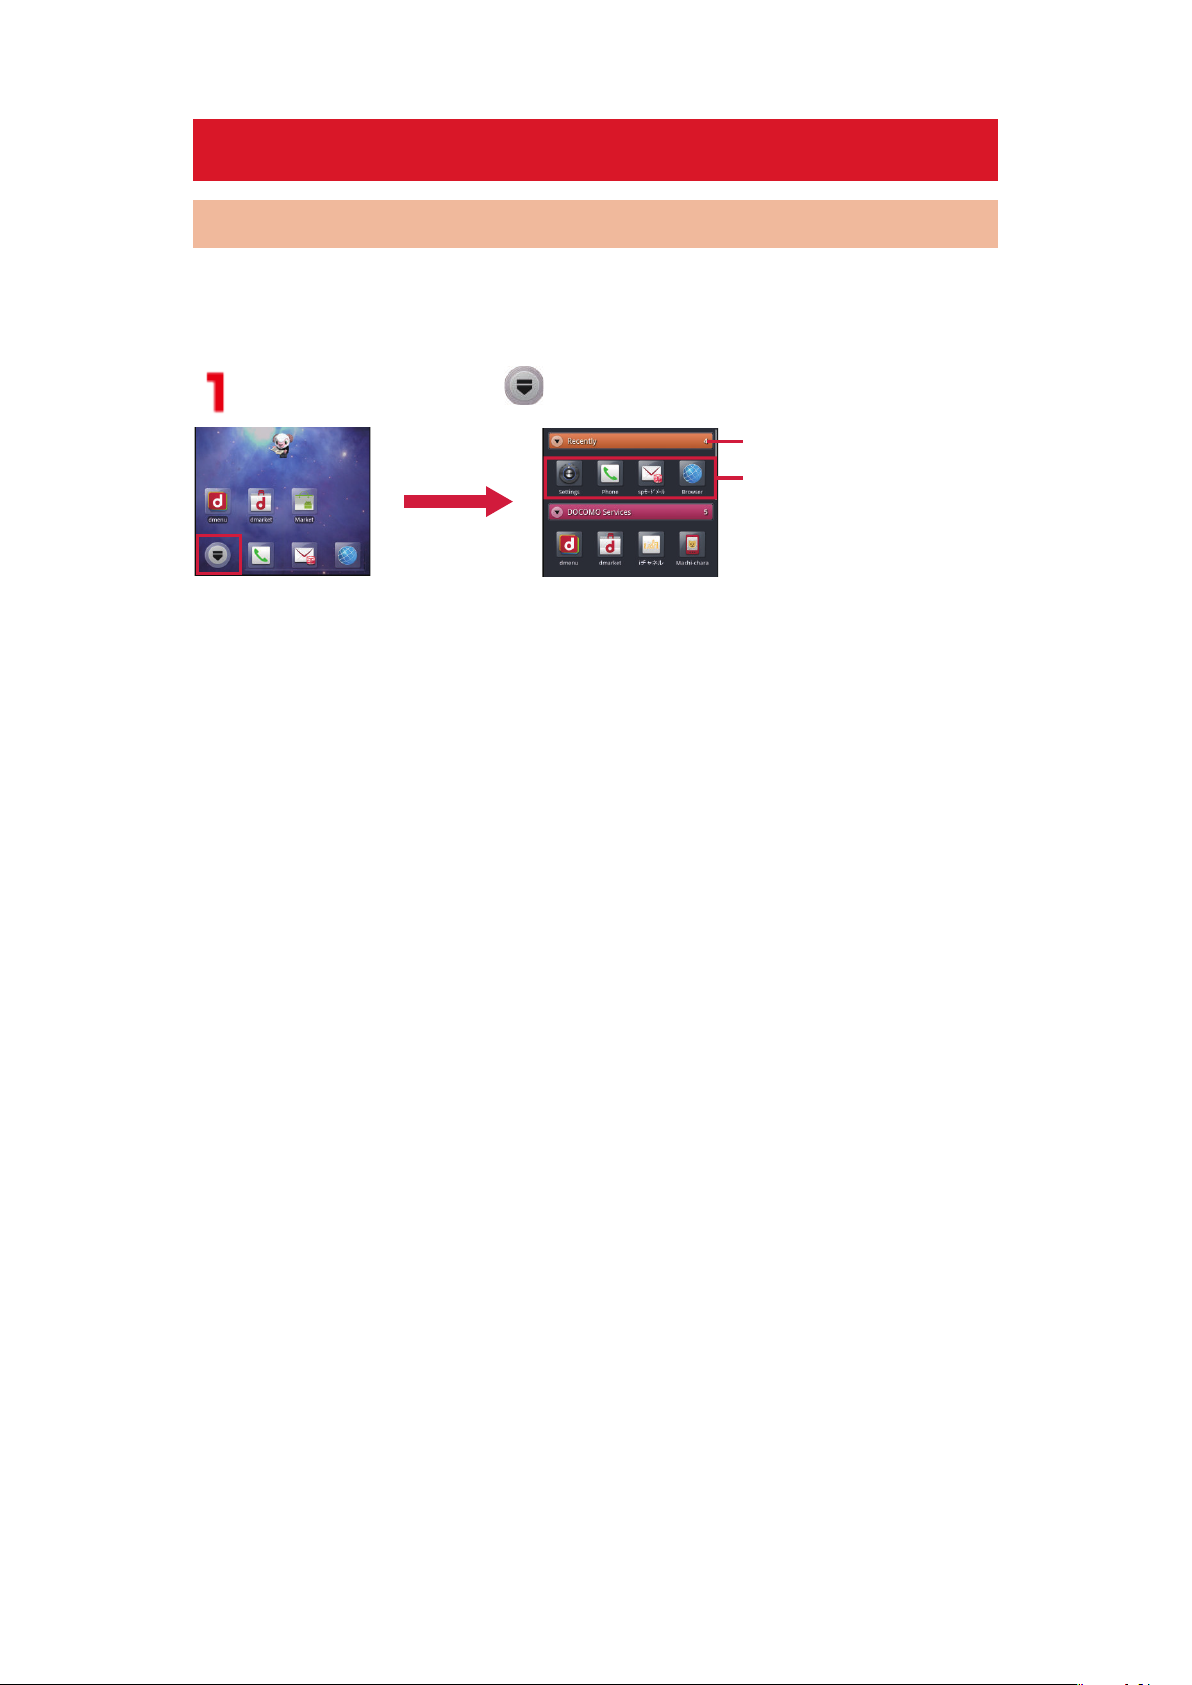
Application Screen
1
2
"ひつじのしつじくん®"
©NTTDOCOMO
Displaying Application List Screen
On the application list screen, the installed applications are
displayed on a group by group basis.
Home screen W
1 The group names and number of applications are displayed.
Tap a group to switch between displaying and hiding the
application icons.
2 Show the application list for each group.
79 docomo Palette UI
Page 81
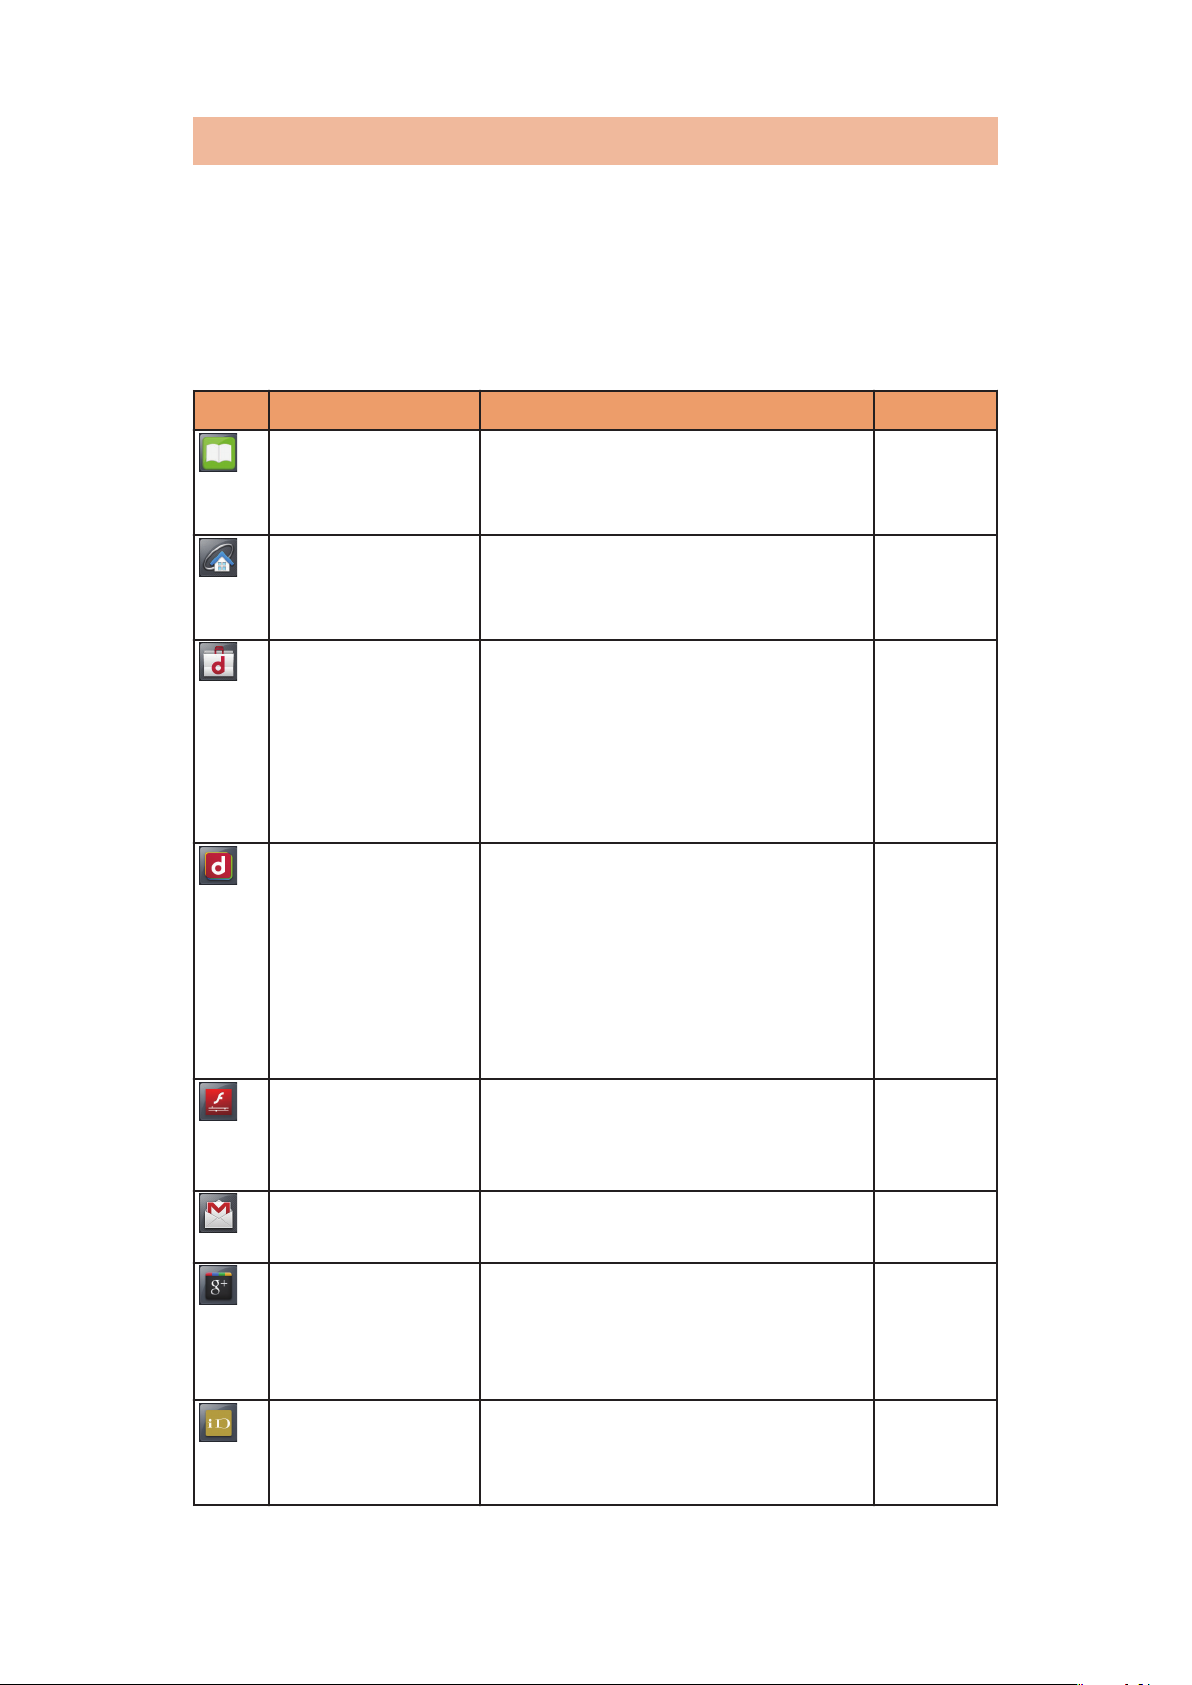
List of Applications
The following is the list of applications that are preinstalled
in the mobile phone at the time of purchase.
• To use some applications may require the separate
subscription (charged).
• Before using some applications for the first time, it may be
necessary to install them from Android Market.
Icon Application Description Refer to
Book Store
MyShelf
DLNA Use Wi-Fi communication to
dmarket This application starts
dmenu This application is a shortcut to
Use this application to read
electronic books purchased
from the dmarket Book Store.
exchange data between DLNA
compatible devices.
dmarket, from which you can
purchase music, videos, books,
and other content. Android
Market applications are also
featured.
"dmenu", from which you can
easily
familiar i-mode content to
entertaining and convenient
content available only for
smartphones.
search for anything from
-
P.184
-
-
Flash Player
Settings
Gmail Exchange mails of Google
Google+ Log in to Google+, share links
iD設定アプリ (iD
appli)
An application, which allows
you to specify settings of
Adobe®
account.
and photos with other users,
and chat with your groups by
using Messenger.
This application performs
settings for use with iD
electronic money services.
Flash® Player.
80 docomo Palette UI
-
P.165
-
P.227
Page 82
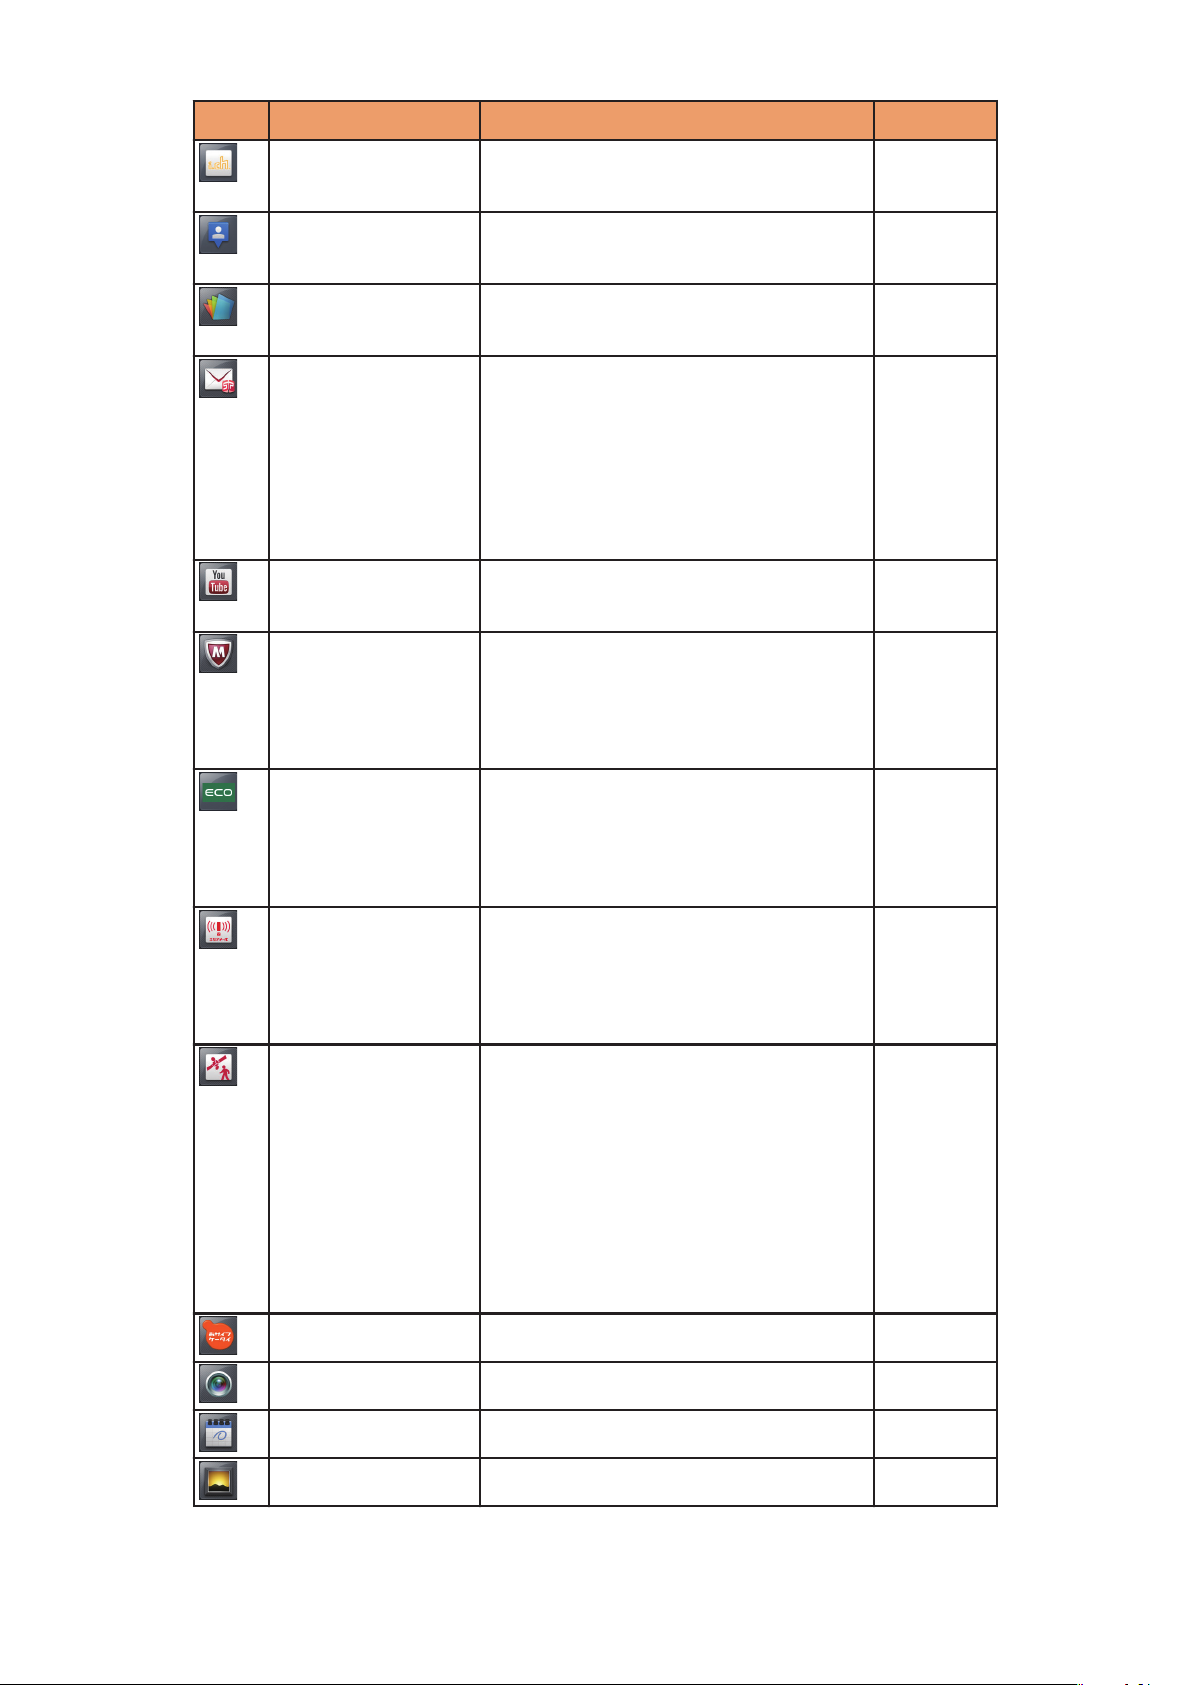
Icon Application Description Refer to
iチャネル (ichannel)
An application, which allows
you to use i-channel.
Latitude Share location information with
friends on a map.
Polaris Office View Office documents and
PDF files.
spモードメール
(sp-mode mail)
Exchange mails using docomo
mail address
(@docomo.ne.jp).
You can use
Pictograms and Deco-mail, and
automatic reception is also
supported.
YouTube You can play videos from and
post files to YouTube.
Anshin Scan An application protects your
mobile phone from damage of
virus. Search virus hidden in
installed applications, etc.
-
P.203
P.225
P.158
P.208
-
ECONAVI By adjusting various settings
P.216
such as display brightness, an
application sets "eco mode" to
reduce battery consumption.
Area Mail An application, which allows
P.168
you to receive Early Warning
"Area Mail", or check received
Area Mail messages.
AUTO-GPS Use this application to access
services that support AUTOGPS, giving you information
about the surrounding area,
such as the weather and
nearby
shops, sightseeing, and
other information based on
your location.
Osaifu-Keitai You can use Osaifu-Keitai. P.204
Camera Shoot still images and videos. P.189
Calendar Manage schedule. P.211
Gallery View still images and videos. -
81 docomo Palette UI
Page 83
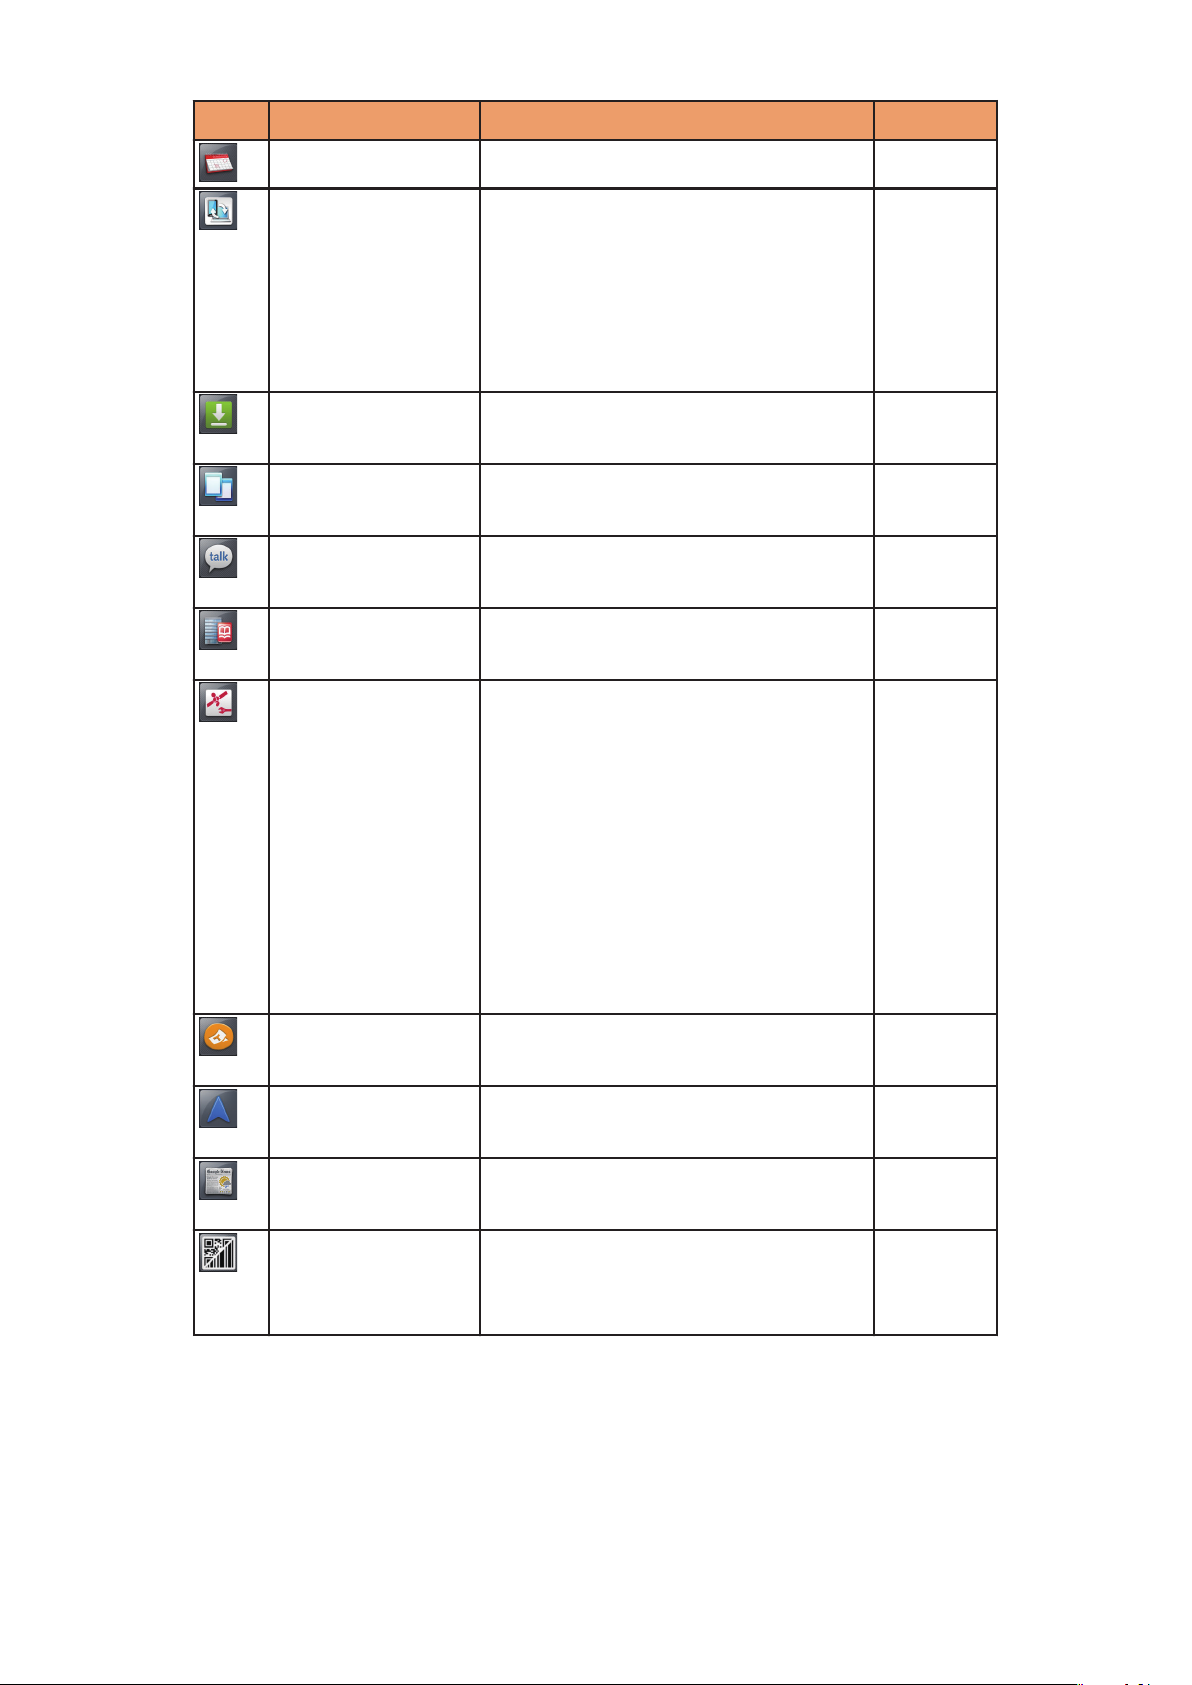
Icon Application Description Refer to
Schedule Create/manage a schedule. -
SmartArch Link this mobile phone to a
laptop computer that supports
linking functionality "Let's
note", allowing you to copy
files or display the computer's
screen.
Downloads Files downloaded from
websites are listed.
Task Viewer You can check and terminate
running applications.
Talk You can chat with people using
Google Talk.
docomo backup Back up and restore the
phonebook data etc.
docomo location
information
This application provides
location information, including
imadoco search, imadoco
kantan search, Keitai-Osagashi
Service, and Emergency
Location Report.
You can change the various
settings and access sites
related to settings and
services.
P.220
P.175
-
P.170
-
-
ToruCa Import/view/find/update etc.
ToruCa data.
Navigation Direction to the destination is
provided.
News &
Weather
バーコードリーダ
(Barcode
ー
View weather forecast and
news.
Read barcodes and QR codes
with the camera.
Reader)
P.207
P.203
-
P.222
82 docomo Palette UI
Page 84
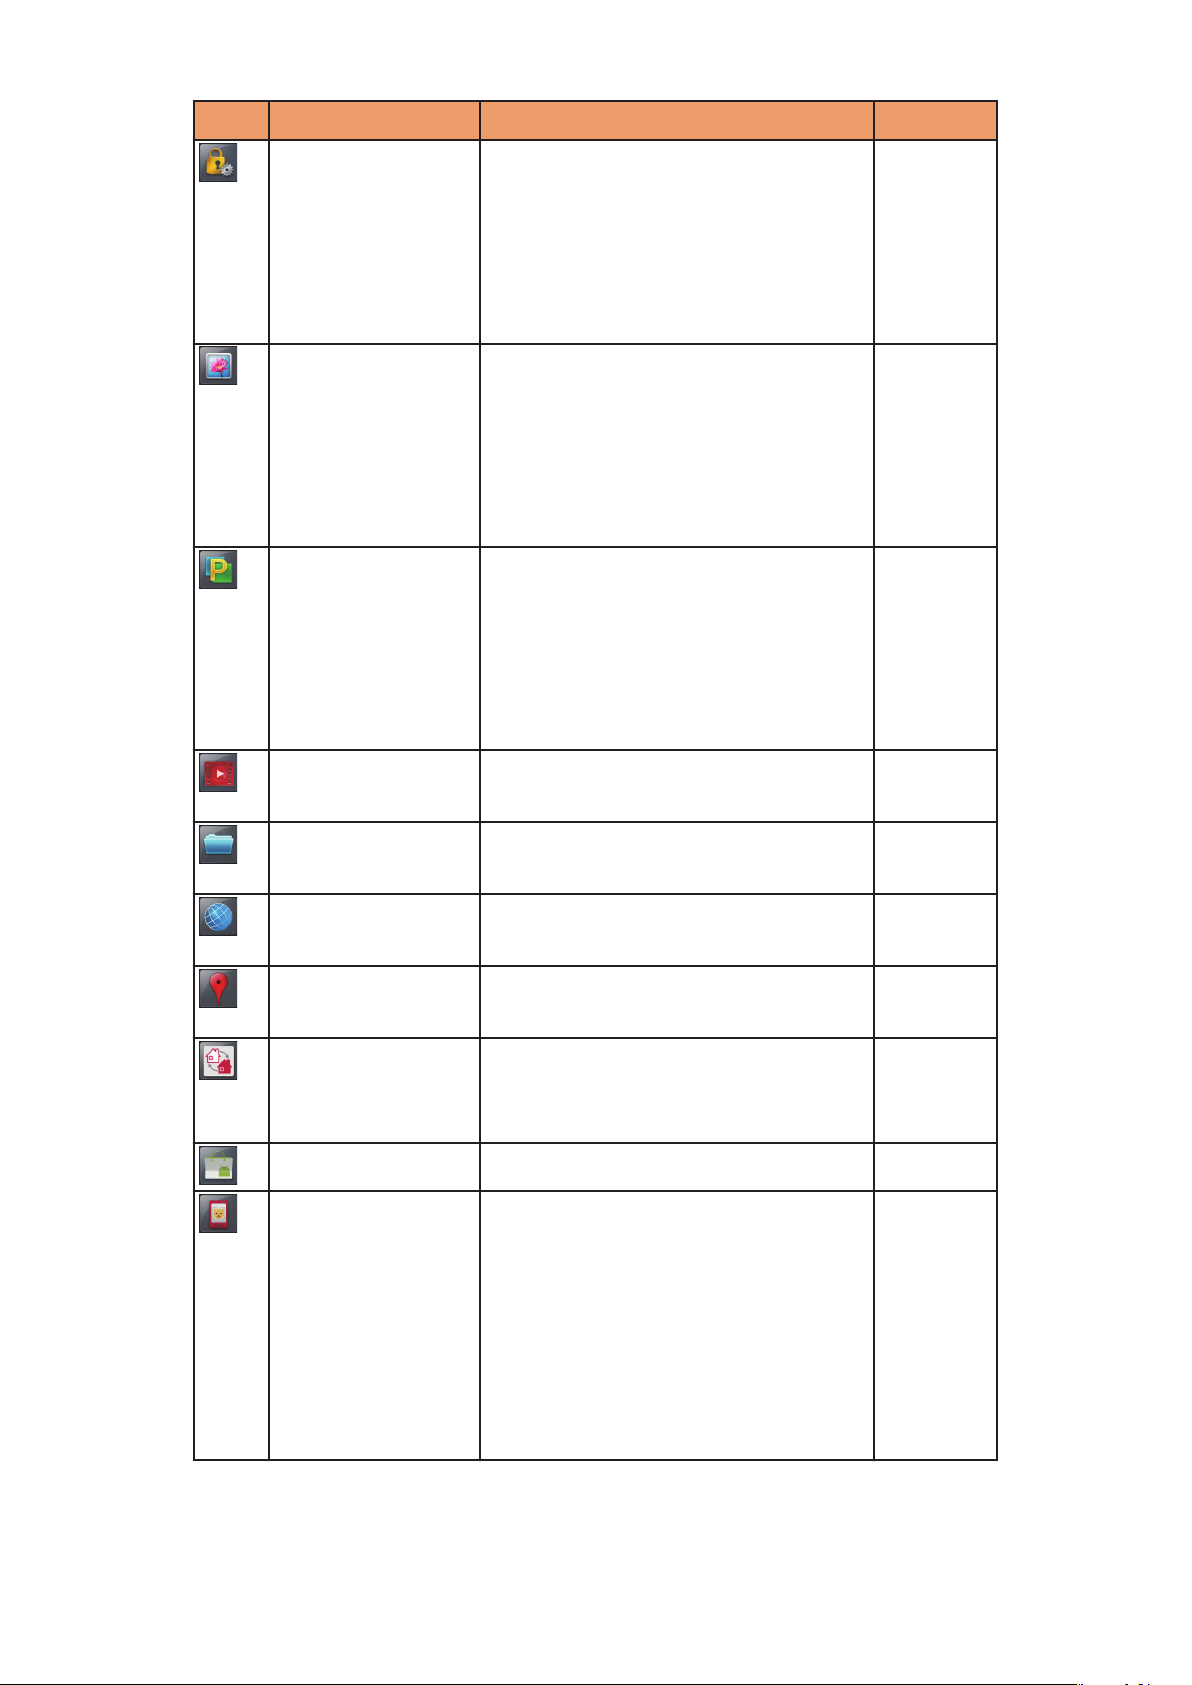
Icon Application Description Refer to
Data Security Strengthen security with
simple settings. You can also
use security to manage files
that you do not want others to
see, and use an Email address
as a Security Account.
Picture Album Perform such operations as
displaying still images and
video
separated into categories
by person or year and month,
or using Picture jump to upload
files.
PicMate Upload still images or videos to
PicMate,
the photo-sharing site
by Panasonic.
You can create an album from
the files you upload, and share
the album.
P.217
P.195
-
Videos Rent and view videos from the
-
Android Market.
filemanager Manage the files saved on this
P.178
mobile phone.
Browser You can browse web pages as
P.173
you do with a PC.
Places Search for stores and facilities
near
your location by category.
Home Switcher An application, which allows
P.202
you to switch home
applications.
Market Use Android Market. P.201
Machi-chara This application displays a
character on the screen of the
mobile phone. This character
moves around on the widgets
and gives you information,
such as notifications of
receiving a mail or incoming
call etc.
83 docomo Palette UI
Page 85
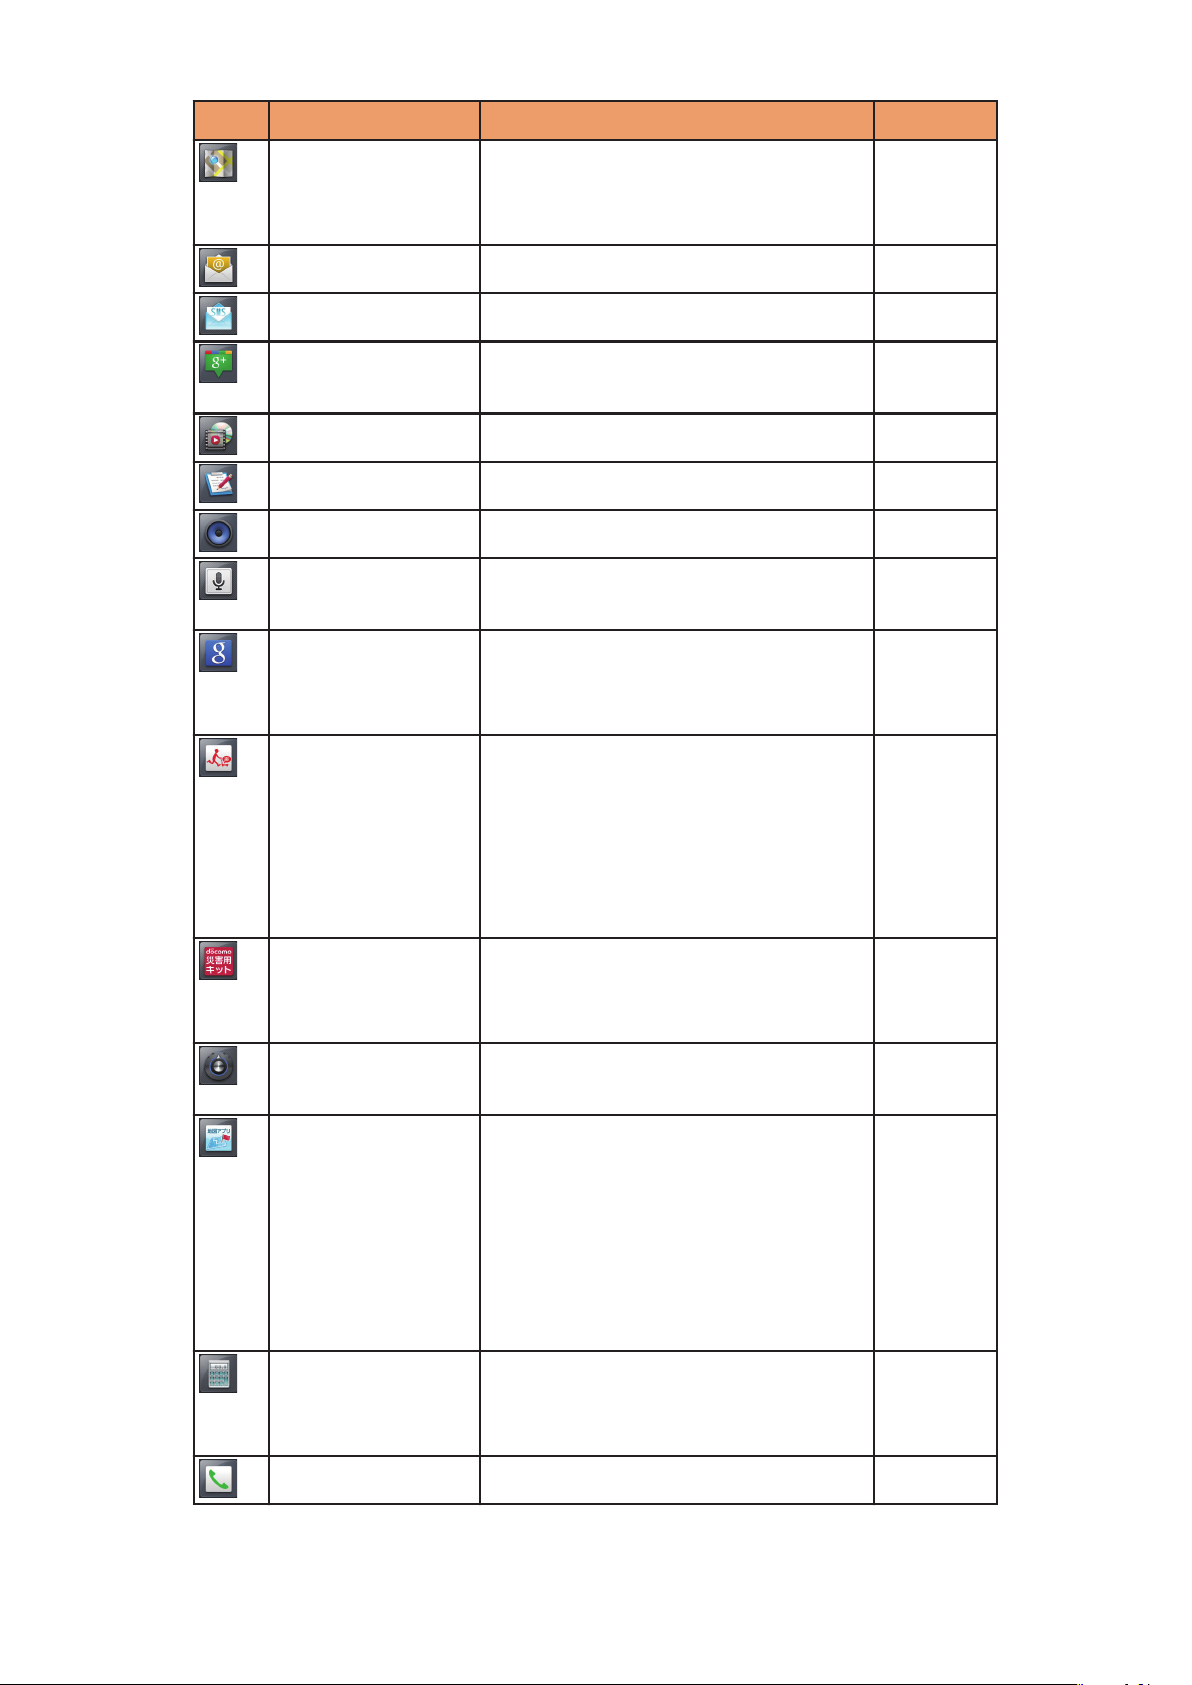
Icon Application Description Refer to
Maps You can locate your current
P.202
position, and search for places
and routes to destinations.
Email Exchange Emails with PCs, etc. P.162
Messaging Exchange messages (SMS). P.159
Messenger Link to Google+ and chat with
-
your groups.
Media Player Play music and video. P.199
Memo Create/manage notes. P.214
Music Play music. -
Voice Search Search for web page
-
information by voice input.
Google Search Search for mobile phone
P.78
applications and web page
information.
声の宅配便
no-Takuhaibin)
(Koe-
This applications allows the
simple and convenient use of
"Koe-no-Takuhaibin" by
smartphone. You can record
and play voice messages using
simple commands.
災害用キット
(Disaster kit)
Store or check messages
etc. on Disaster Message
Board.
Settings Configure various settings of
this mobile phone.
地図アプリ (Map
appli)
This application provides maps,
a search function for stores and
facilities, navigation, public
transportation timetables, a
record of places visited, and
other functions to support you
when you go out.
P.122
-
P.124
-
Calculator You can perform calculations
P.215
such as addition, subtraction,
multiplication and division.
Phone Make phone calls. P.101
84 docomo Palette UI
Page 86
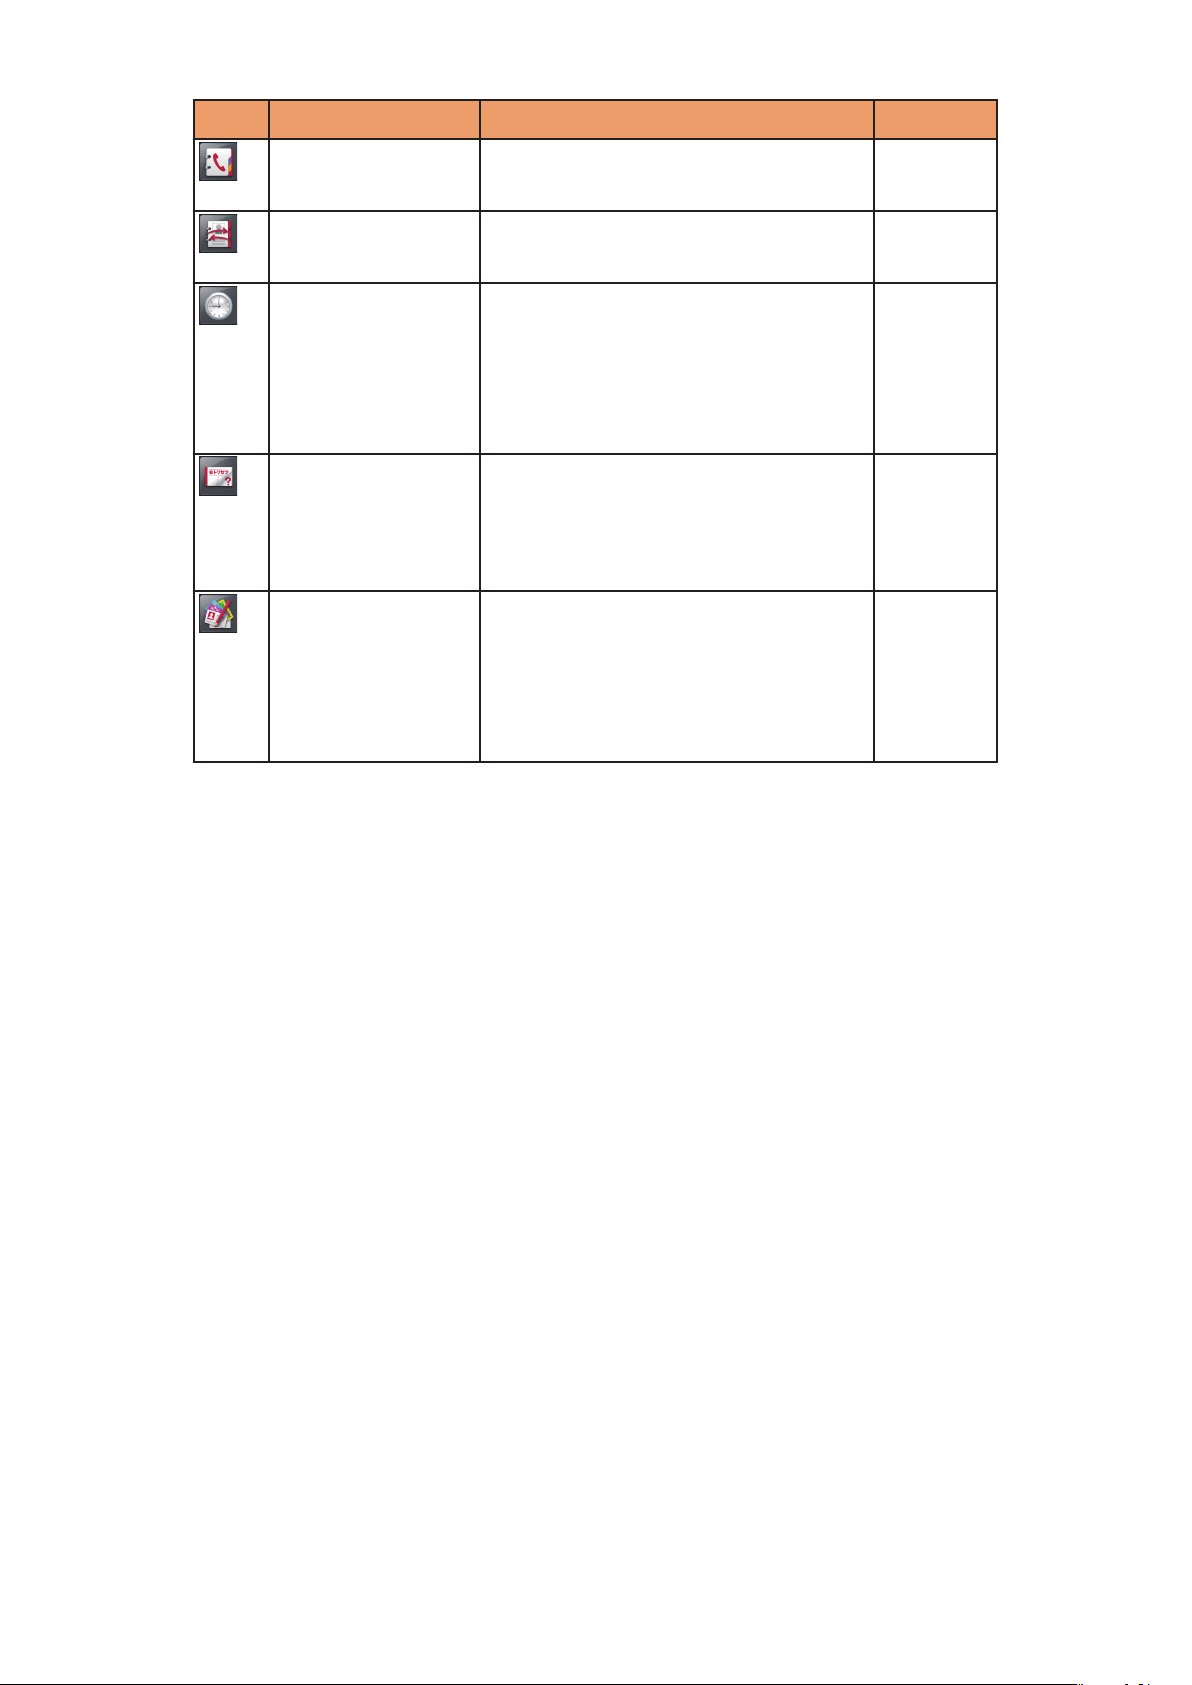
Icon Application Description Refer to
Phonebook Add and manage contacts in
the phonebook.
PhoneBookCopy You can copy your phonebook
to USB storage.
Clock On the clock screen, different
types of information and
shortcuts are shown along with
the time. You can also set
alarms.
Instruction
Manual
Name card
creator
Instruction manual for this
mobile
required functions directly from
relevant descriptions.
Use this application to create
an
displayed in the My profile
section of the "Phonebook"
application.
phone. You can activate
original name card, which is
P.108
P.113
P.209
P.4
-
85 docomo Palette UI
Page 87
Moving an Application
Application list screen W Touch and hold the
application, and drag it to preferred location
Adding Groups
Application list screen W A W [Add group]
Enter a group name W
Touch and hold the group, and drag it to
preferred location
• To change the name or color of a group, touch
and hold the group, and then tap
[Edit label].
• To delete a group, touch and hold the group, and
[Delete].
tap
[OK]
[Edit name]/
Changing the Layout of the Application List
Screen
Application list screen W A W [List
[Tile format]
format]/
86 docomo Palette UI
Page 88
Home Application Settings
Home screen W A W [More] W Perform
operations listed below:
Home settings Set Sync function etc.
Help Display help information about home
application.
Application info Display the version of home application etc.
87 docomo Palette UI
Page 89
Initial Setting
Initial Setting
When
time after purchase, configure settings for Google account
and GPS positioning by following the on-screen instructions.
you turn on the power of this mobile phone for the first
[言語変更] W [English (United States)]
• During initial setup, when the [機能バージョンア
ップ
[OK] to configure docomo service settings. After
doing so, the display will return to the previous
screen, and you can continue with operation.
Tap the Android logo W [Create]
• If you already have a Google account, tap [Sign
in].
• If you do not set a Google account, tap [Skip].
(Update features)] guide screen appears, tap
Enter your first name, last name, and desired
username (part before @gmail.com) for the
Google account W [Next]
Enter a password W Enter the password again
for confirmation W [Next]
Select a security question W
answer field W Enter a mail address you already
have in the secondary Email field
• In case you forget your password, you can make
it sent to your secondary mail address by
matching
Google website.
[Create]
the security question and answer in the
Enter answer in the
Read Google Terms of Service W [I
88 Initial Setting
agree, Next]
Page 90

Enter characters indicated in the picture
W [Next]
Read the note about Google location service
W [Next]
• To make your data backed up in the Google
server with your Google account, mark the
checkbox.
[Next] W [Finish setup]
89 Initial Setting
Page 91

Changing Screen Display to English
If you have not changed the display language to English in
the initial setting, you can do it by following the steps below.
Home screen W A W [本体設定] W [言語とキー
ボード]
[言語を選択] W [English (United States)]
90 Initial Setting
Page 92
Google Account
Once Google account is set, you can download applications
from Android Market. If you already have your own Google
account, you can use the existing account with this mobile
phone.
Home screen W A W [Settings] W [Accounts
& sync]
[Add account] W
[Google] W [Next] W [Create]
• If you already have your own Google account,
tap [Sign in]
.
Take step 3 to 8 in P.88 "Initial Setting"
Mark data items to be synced W [Finish] W
[Finish setup]
91 Initial Setting
Page 93
Setting Access Point
Access points for Internet connection (sp-mode and mopera
U) are added by default. You can add and modify access
points as necessary.
• By default, sp-mode is selected as default access point.
However, the settings may differ depending on the terms set
forth in your contract.
Checking Access Point in Use
Home screen W A W [Settings] W [Wireless
& networks]
[Mobile networks] W [Access Point Names]
Setting Additional Access Point
• Do not change MCC to other than 440, or MNC other than 10.
If you change MCC/MNC, the access point will no longer be
displayed on the screen.
Home screen W A W [Settings] W [Wireless
& networks]
[Mobile networks] W [Access Point Names] W
A W [New APN]
[Name] W Enter the name of network profile to
create W [OK]
[APN] W Enter an access point W [OK]
Enter other items required by the network
operator W A W [Save]
• If MCC or MNC has been changed and the access
point is not displayed on the screen, reset access
point settings to the default status, or manually
configure the access point.
92 Initial Setting
Page 94
Resetting Access Point
Resetting the access point restores the default status.
Home screen W A W [Settings] W [Wireless
& networks]
[Mobile networks] W [Access Point Names] W
A W [Reset to default]
sp-mode
sp-mode is an ISP for NTT DOCOMO smartphones. In
addition
with the same mail address (@docomo.ne.jp) as that of the
i-mode. sp-mode is a pay service requiring subscription. For
details of sp-mode, refer to DOCOMO website.
to the Internet connection, you can use mail service
mopera U
mopera U is NTT DOCOMO's ISP. Subscribers for mopera
U can use the Internet with simple settings. mopera U is a
pay service requiring subscription.
Setting mopera U
Home screen W A W [Settings] W [Wireless
& networks]
[Mobile networks] W [Access Point Names] W
Mark
smartphone)]/[mopera U設定 (mopera U
setting)] checkbox
[mopera U (スマートフォン定額) (flat-rate for
93 Initial Setting
Page 95

Information
• [mopera U設定 (mopera U setting)] is an access point for
mopera U setting. Connection via the access point for mopera
U setting costs no packet communication fee. Note that you
cannot access the screens other than those for initial settings
and changing settings. For details of mopera U setting, refer
to mopera U website.
• To use [mopera U (スマートフォン定額) (flat-rate for
smartphone)]
required. For details of mopera U (flat-rate for smartphone),
refer to DOCOMO website.
, subscription to flat-rate packet service is
94 Initial Setting
Page 96
Email Setting
You can configure mail account provided by mopera U or
general providers to use mail function.
• Configure access point setting in advance (Z P.92).
Setting mopera U Mail Account
Subscribers for mopera U can use mopera U mail.
■ To use POP server
Home screen W W [Email]
Enter mopera U mail address and mopera U
password W [Next] W [POP3]
Enter mopera U user name and password W
Enter [mail.mopera.net]
for POP3 server
Select [None] or security type in the security
type field W Confirm your entry W
[Next]
Enter [mail.mopera.net] for SMTP server W
Confirm
mopera U user name and password you
entered W [Next]
Option setting screen W Set frequency of
automatic mail check etc. W [Next]
Mail account register screen W Enter the name
displayed for the sent message W [Done]
95 Initial Setting
Page 97
Setting General Provider's Mail Account
• Obtain information required for settings from your service
provider in advance.
Home screen W W [Email]
Enter mail address and password W [Next]
Follow on-screen instructions
Information
• If automatic settings of mail account does not complete, tap
[Manual setup]
information manually.
• To add another mail account, display the mail list screen W
in step 2 to enter the account setting
A W
[Accounts] W A W [Add account].
96 Initial Setting
Page 98
Wi-Fi
You can use mail and the Internet by connecting to your
home or corporate network or a public wireless LAN access
point using the Wi-Fi function of this mobile phone.
Home screen W A W [Settings] W [Wireless
& networks]
Mark [Wi-Fi] checkbox
Wi-Fi is turned on and available Wi-Fi networks are
detected.
[Wi-Fi settings]
Network name and security settings (open network
or security protected) of each detected Wi-Fi
network are displayed in the Wi-Fi network list.
• To manually add a Wi-Fi network, [Add Wi-Fi
network]
W Enter required information W Tap
[Save].
Select security setting from [Open]/[WEP]/
[WPA/WPA2 PSK].
Select Wi-Fi network W [Connect]
• If
you select a security-protected Wi-Fi network,
enter the password (security key) and tap
[Connect].
• To disconnect from the Wi-Fi network which is
now connected, select the Wi-Fi network, and
then tap [Forget]
.
97 Initial Setting
Page 99

Information
• You can also use packet communication when the Wi-Fi
function is enabled. However, Wi-Fi is given priority when
the mobile phone connects to Wi-Fi network. If the mobile
phone is disconnected from the Wi-Fi network, 3G/GPRS
network connection will automatically take over. Note that
packet communication fee will be charged if you continue
using the network connection.
• If connection to a Wi-Fi network is lost because, for example,
you are outside the service area, automatic connection after
re-entering the service area might take some time.
• When connecting to an access point you have selected, if you
enter an incorrect password (security key), [The access is
limited.]
If [The access is limited.] is displayed even after you have
entered the correct password (security key), the correct IP
address might not have been obtained. Check the status of
the signal, and then try to connect again.
will be displayed. Verify the password (security key).
■WPS
If an access point supports "WPS", some simple operations will
allow you to connect to the access point.
• For the push-button method, tap [WPS Button method] in step
3, and press the WPS button of the access point.
• For the PIN code method, tap [WPS PIN Code method]
3, and at the access point, enter the PIN code displayed on the
mobile phone.
in step
■ Radio wave interference with Bluetooth devices
Wireless LAN (IEEE802.11b/g/n) and Bluetooth devices use the
same frequency band (2.4 GHz). As such, when using the mobile
phone near a Bluetooth device, radio wave interference may
occur, causing a drop in the communication speed and/or
resulting in noise or a connection failure. In cases like this, take
the following action.
• Place the Bluetooth device at least 10 meters away from the
mobile phone.
• If you must use the mobile phone within 10 meters of the
Bluetooth device, turn off the power of the Bluetooth device.
98 Initial Setting
Page 100
Setting Behavior in Sleep Mode
You
can set how the Wi-Fi function is to operate when Sleep
mode is set or during charging.
Home screen W A W [Settings] W [Wireless
& networks]
[Wi-Fi settings] W A W [Advanced]
[Wi-Fi sleep policy] W Select behavior to set
Checking MAC Address or IP Address
Home screen W A W [Settings] W [Wireless
& networks]
[Wi-Fi settings] W A W [Advanced]
"MAC address" and "IP address" are displayed.
Using Static IP Address
You can also connect to a Wi-Fi network by inputting its
static IP address.
Home screen W A W [Settings] W [Wireless
& networks]
[Wi-Fi settings] W A W [Advanced]
Mark [Use static IP] checkbox
Select [IP address] and other input items W
Enter required information W [OK]
• To enable a static IP address, you must select
settings for [IP address]
, [Gateway], [Netmask],
and [DNS 1].
99 Initial Setting
 Loading...