

Page 1

L-01C
INSTRUCTION MANUAL
’10.11
Page 2
DOCOMO W-CDMA and GSM/GPRS Systems
Thank you for selecting the "docomo STYLE series L-01C".
Read this manual before use to correctly operate your L-01C.
Operation Description of L-01C
Operations of L-01C are described in this manual as well as "Guide" (installed in this FOMA terminal, Japanese only) and
"Instruction Manual (Detailed version, Japanese only)" (in PDF format).
■ "Instruction Manual" (This Manual): Describes screen displays and operating procedures of basic functions.
■ "Guide" (installed in this FOMA terminal, Japanese only): Describes the overview or operating procedures of
frequently used functions.
From L-01C: Stand-by display u S (for over 1 second)
■ "Instruction Manual (Detailed version, Japanese only)" (in PDF format): Describes detailed information and
operating procedures of all functions.
From a PC, download it from the following DOCOMO website.
http://www.nttdocomo.co.jp/support/trouble/manual/download/index.html
* The URL and contents of the manual are subject to change without prior notice.
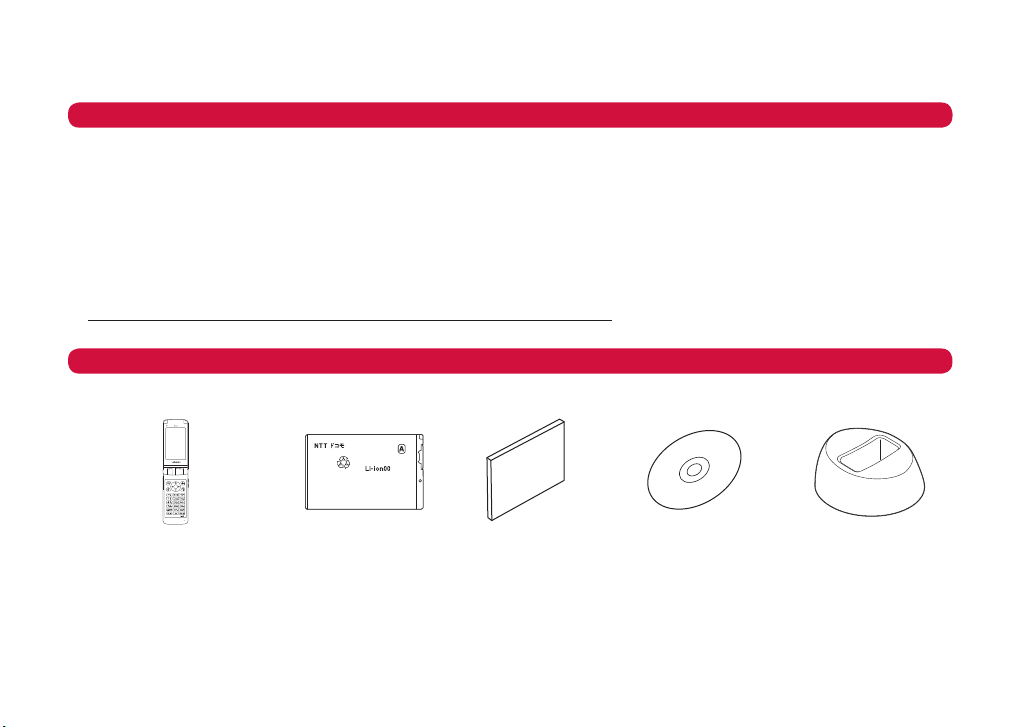
Accessories
L-01C FOMA terminal (With
Warranty and Back Cover L19)
Options compatible with this FOMA terminal →P90
• Note that "L-01C" is referred to as "FOMA terminal" in this manual.
• It is prohibited to copy all or part of this manual without permission.
• The screens or illustrations used in this manual are examples. The actual screens and illustrations may differ.
• The preinstalled Kisekae tool is set to "Simple02" in the FOMA terminal. In this manual, d
color and icons to make the descriptions clear
- Kisekae tool setting: "Deep Blue"
- Main menu: "Custom menu"
If settings are changed, screen displays or operations may differ from those described in this manual.
Battery Pack L11
.
Instruction Manual
(Japanese version)
取扱説明書
CD-ROM for L-01C Desktop Holder L09
escriptions is based on the following settings of
Page 3
Contents
Introduction
P2
Basic Operation
P26
Connect
P44
Search
P58
Enjoy
P62
More Convenient
P74
Others
P82
FOMA Terminal→P2 What You Can Do with L-01C→P3 Part Names and Functions→P4
Precautions→P6 Handling Precautions→P15 Waterproof Function→P18
Before Using→P26 Screen Explanation→P30 Character Entry→P35
Sound/Screen Setting→P37 Lock/Security→P40
Call Telephone→P44 Mail→P51 Phonebook→P55
i-mode/Full Browser→P58 i-Channel→P61
Camera→P62 1Seg→P65 MUSIC→P68 i-αppli→P71 i-motion→P72
Convenient Tools→P74 Data Management→P77
Support→P82 Appendix→P91 Index→P106
1
Page 4
FOMA Terminal
• The FOMA terminal uses radio waves, therefore, it may
not function in locations where radio waves cannot reach,
such as in tunnels, underground, or in buildings; outside
the building where radio waves are weak or out of FOMA
service area. Even when you are in an upper floor of a
tall building and nothing blocks your view outside, your
FOMA terminal may not be able to receive or transmit
signals. Also, even when radio waves are strong with
three antenna bars displayed, and you are not moving,
Introduction
communication may still be interrupted.
• Be considerate of other people around you in public or
where it is especially crowded or quiet.
• The FOMA terminal uses radio waves to communicate,
therefore, there is a possibility that calls may be
intercepted by third parties. The W-CDMA and GSM/
GPRS syste
o even if third parties should intercept calls with the
s
receiver, they will hear only noise.
• The FOMA terminal sends and receives voice
communication as encoded digital data. When you are
operating the FOMA terminal while moving, sometimes
you may encounter weaker radio waves and the
transmitted digital data may not be correctly decoded
resulting in sound distort
• It is recommended that you save important data on a
microSD card. If you use a PC, use DOCOMO keitai
datalink to send and save data such as Phonebook
entries, mail messages, Schedule events, etc. to the PC.
2
ms automatically encode signals for all calls
ions.
• When you use SSL/TLS for a secure connection, you
agree that you are responsible for any actions you
take. DOCOMO and the certifiers listed below do not
guarantee the safety of SSL/TLS for any activities of
customers while using SSL/TLS, and are not liable for any
damages incurred through using SSL/TLS.
Certifiers: VeriSign Japan K.K.,
Cybertrust Japan Co., Ltd.,
GlobalSign K.K.,
RSA Security Japan Ltd.,
SECOM Trust Systems Co., Ltd.
• The FOMA terminal supports FOMA Plus-Area and FOMA
HIGH-SPEED Area.
• The FOMA terminal can be used only via the
network provided by DOCOMO and DOCOMO's roaming
area.
• It is recommended that you make a backup of user
defined data (Phonebook entries, Schedule events, text
memos, Record messages, voice memos, or moving
picture memos) saved in the FOMA terminal by keeping
the separate record or note of those data, etc. and storing
them at a separate location. DOCOMO is not responsible
for lost data due to failure
model of your FOMA terminal.
, repair, or replacement of the
FOMA
Page 5
What You Can Do with L-01C
Waterproof function →P18
This terminal comes with the waterproof function equivalent to
IPX5 and IPX7 with the external connector terminal cover and
the inner cover firmly closed and back cover locked.
You can make a call or send/receive messages in the rain, in
your kitchen, in the bathroom, and also around poolside. If it
gets dirty, you can clean it up with tap water.
Guide (Japanese only) →P34
Guide pre-installed in the FOMA terminal allows you to look for
operating instructions of a desired function. When you cannot
refer to this manual, you can search functions with Guide quickly.
International roaming →P48
Your FOMA terminal, phone number, and mail address that are
used in Japan are available overseas (supporting 3G and GSM
areas).
i-Channel (Japanese only) →P61
You can receive graphic information such as news or weather
forecasts.
Also, you can obtain rich content created with Flash by selecting
your favorite channels from the Channel list.
* This service is a fee-based service that requires subscription.
Full browser →P59
You can browse web pages incompatible with i-mode on the
FOMA terminal in the same way as on a PC.
Camera functions →P62
You can capture still images (with auto focus) and moving
pictures using the camera with approx. 5.1 Mega effective pixels
(approx. 4.9 Mega recorded pixels).
Magnifying Glass →P64
Use the camera of the FOMA terminal as a magnifying glass
when reading newspaper or magazines to magnify small
characters.
1Seg →P65
You can enjoy 1Seg TV programs (Digital terrestrial TV
broadcasting for mobile objects). Show subtitle and broadcast
data. Also, you can set timer to record your favorite TV programs.
Bar code reader →P75
By scanning a bar code or QR code with the camera, you can
access to the corresponding site or send a mail.
Introduction
3
Page 6
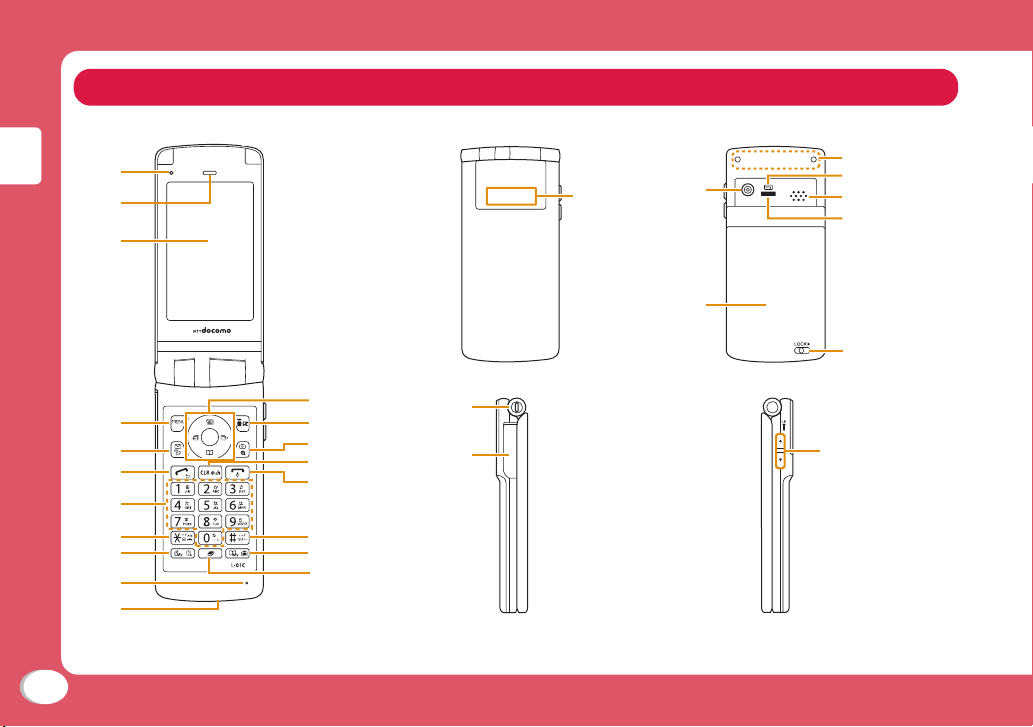
Part Names and Functions
●Face ●Front ●Back
a
b
c
Introduction
●Left ●Right
l
d
e
f
m
n
o
p
g
h
i
j
q
r
s
k
• The microSD card insertion position is beside the battery pack inside the back cover. →P77
• The 1Seg antenna is embedded inside, and the FOMA terminal itself works as an antenna.
4
v
w
tu
x
y
51M PIXELS
z
A
B
C
D
E
Page 7
a Air vent
b Earpiece / Speaker
c Display
d M Menu key / Soft key at the
upper left
Display the main menu.
e g Mail key / Soft key at the
lower left
Display the mail menu.
f A Start key
Make/receive a call.
g Dial key
Enter a phone number or
character.
h * Public mode (Drive
mode) key
iS My Function / Guide key
j Mouthpiece
kCharging terminal
l Navigation key
m I i-mode / i-
αppli key/ Soft
key at the upper right
Display the i-mode menu.
n G Camera key/ Soft key at
the lower right
Display the screen while
shooting the still images.
o Q Clear / i-Channel key
Display the channel list screen.
p P Power / Exit key
End a call or exit a function.
q # Manner mode key
rt My contact / TV key
Display my contact or 1Seg
program screen.
s m Multi-tasking key
Display task list.
t Charging light
u Rear display
v Strap hole
w External connector terminal
xCamera
y Back cover
z FOMA antenna
The FOMA antenna is inside the
FOMA terminal. To communicate
in better condition, avoid covering
the antenna part with your hands.
A Light
BSpeaker
C Infrared port
DLock keys
EF E Volume keys
Adjust volume.
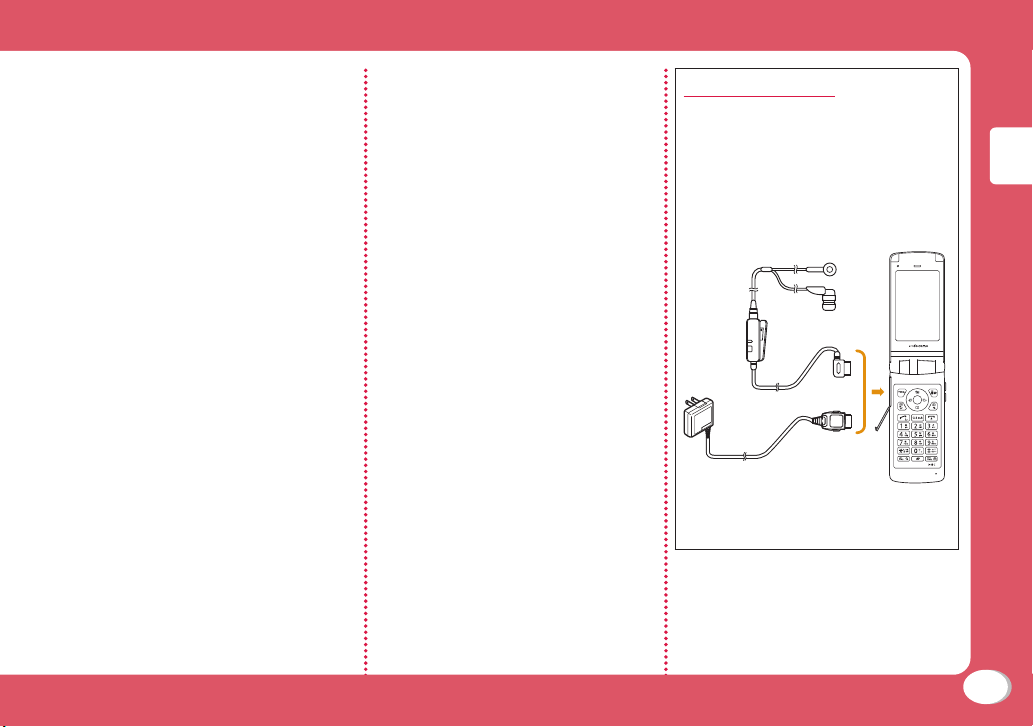
Using earphones
Connect optional earphones compatible
with the external connector terminal.
If you use the incompatible earphones,
connect the optional conversion plug
adapter to the earphones.
Common slot for both FOMA AC Adapter
01 (Optional) and Stereo Earphone/
Microphone 01 (Optional).
Stereo Earphone/Microphone 01
FOMA AC Adapter 01
Ex.: For external connector terminal
connecting the Stereo Earphone/
Microphone 01 (optional)
Introduction
5
Page 8
Don’t
Precautions (ALWAYS FOLLOW THESE PRECAUTIONS)
■ Before using your FOMA terminal, read these "Precautions"
carefully so that you can use it correctly. After reading these
precautions, keep this manual for later reference.
■ Be sure to observe these precautions because they are
intended to protect you or others around you from causing
injury and to avoid damage to the property.
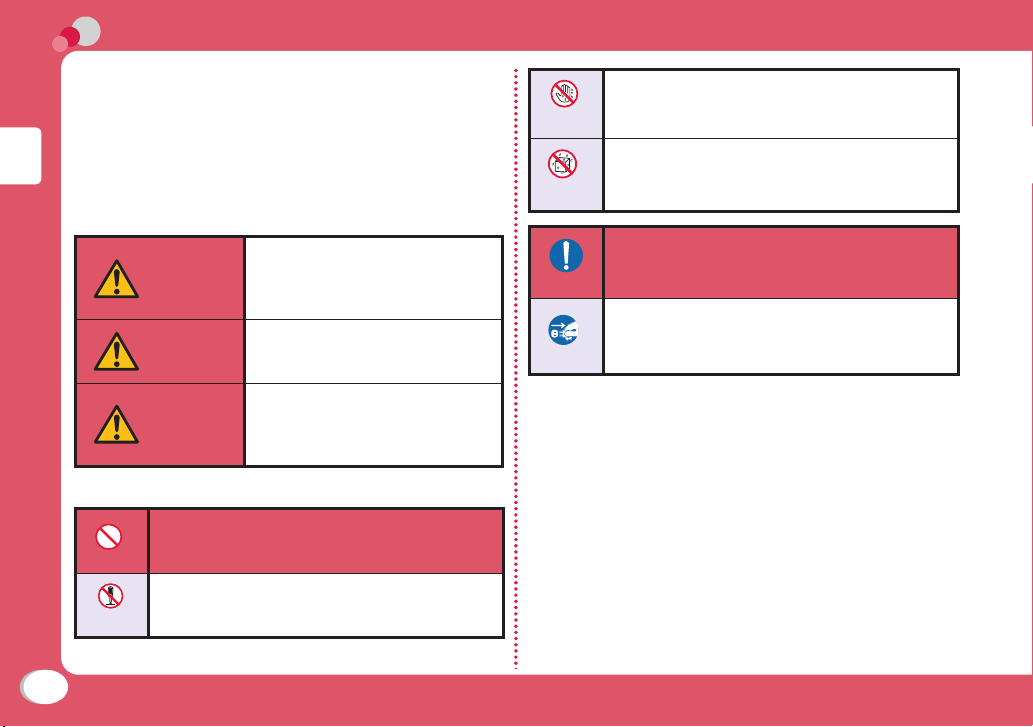
■ The symbols below indicate the levels of danger or damage
that may occur if the part
and the FOMA terminal is used improperly.
Introduction
DANGER
WARNING
CAUTION
■ The following symbols indicate specific directions:
Denotes things not to do (Prohibitions).
icular precaution is not observed
This symbol indicates that
incorrect handling may directly
or immediately cause death or
serious injury.
This symbol indicates poses a risk
of causing that incorrect handling
Unplug death or serious injury.
This symbol indicates that
incorrect handling poses a risk of
causing slight injury or damage to
the product or property.
No
wet hands
Denotes not to touch with wet hands.
Denotes not to use where it could get
No
liquids
wet or not to wet it.
Denotes mandatory instructions (matters
Do
Unplug
■ "Precautions" are explained in the following six sections:
General Precautions for FOMA Terminal, Battery Pack, Adapter,
Desktop Holder and UIM ………………………………………… P7
Precautions for FOMA Terminal ………………………………… P8
Precautions for Battery Pack ………………………………… P10
Precautions for Adapter and Desktop Holder ……………… P11
Precautions for UIM …………………………………………… P13
Precautions on Using near Electronic Medical Equipment
…
that must be complied with).
Denotes to unplug from the outlet.
………………………………………………………………… P13
6
No
disassembly
Denotes not to disassemble.
Page 9
General Precautions for FOMA
Terminal, Battery Pack, Adapter,
Desktop Holder and UIM
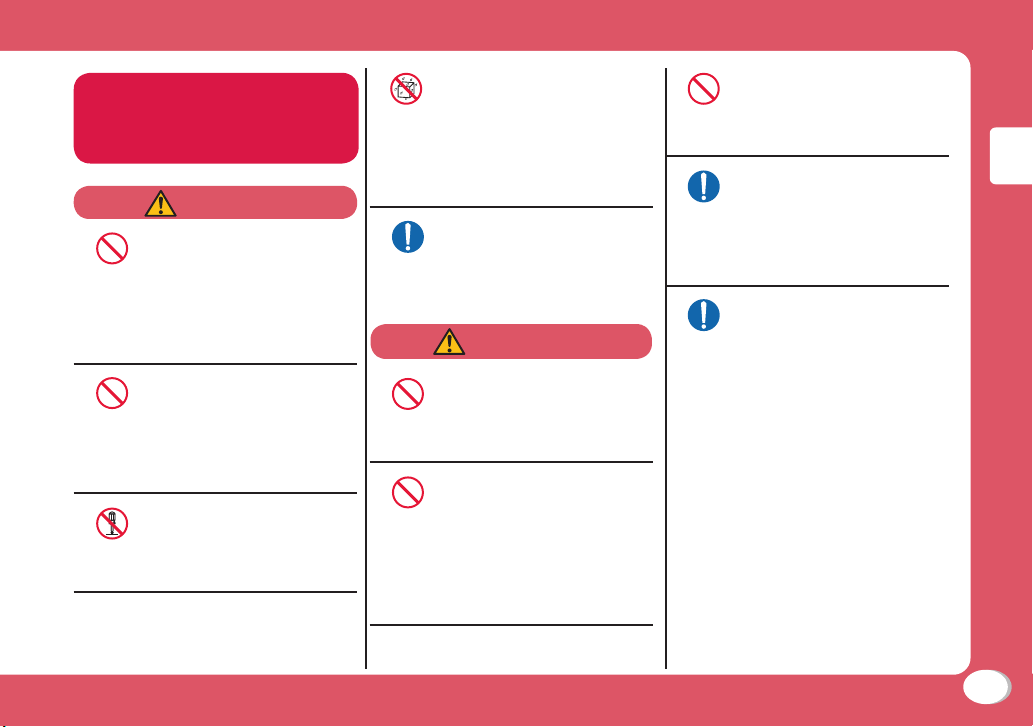
DANGER
Do not use, store, or leave
the FOMA terminal and its
accessories in locations
Don’t
subject to high temperatures,
such as near fire, in direct
sunlight, or inside a car under
the hot sun.
Fire, burns, or injury may result.
Do not put the battery pack,
FOMA terminal, adapter, or
UIM in heating appliances
Don’t
such as microwaves or high
pressure containers.
Fire, burns, injury, or electric
shock may result.
Do not disassemble or
remodel the FOMA terminal
and its accessories.
No
disassembly
Fire, burns, injury, or electric
shock may result.
Do not get the FOMA terminal
and its accessories wet with
water, drinking water, pet
No
urine, etc.
liquids
Fire, burns, injury, or electric
shock may result.
See the following for details on
waterproof function. →P18
Use battery packs and
adapters specified by NTT
DOCOMO.
Do
Fire, burns, injury, or electric
shock may result.
WARNING
Do not subject the FOMA
terminal and its accessories to
severe shocks, or throw them.
Don’t
Fire, burns, injury, or electric
shock may result.
Keep conductive foreign
objects (metal, pencil lead,
etc.) away from the charging
Don’t
terminals or external
connector. Do not insert such
objects inside the FOMA
terminal.
Fire, burns, injury, or electric
shock may result.
Do not cover or wrap
the FOMA terminal or its
accessories with bedding, etc.
Don’t
while using or charging.
Fire or burns may result.
Make sure to turn off the
FOMA terminal before you
go to a place such as a gas
Do
station where flammable gas is
generated, and do not charge
the FOMA terminal.
Catching fire may result.
If you notice any strange
smells, overheating,
discoloration, or deformation
Do
while using, charging, or
storing the FOMA terminal,
immediately take the following
actions:
● Remove the power plug
from the outlet or cigarette
lighter socket.
● Turn the FOMA terminal
power off.
● Remove the battery pack
from the FOMA terminal.
Fire, burns, injury, or electric
shock may result.
Introduction
7
Page 10
Don’t
Introduction
Don’t
Do
Do
CAUTION
Do not place the FOMA
terminal and its accessories
in unstable places such as
wobbly tables or sloping
shelves.
The FOMA terminal or its
accessories may fall, resulting
in injury.
Do not store the FOMA
terminal and its accessories
in humid or dusty places, or in
high temperatures.
Fire, burns, or electric shock
may result.
If children use the FOMA
terminal, a guardian should
explain the safety instructions
and correct operations. The
guardian should also make
sure that the instructions are
followed during use.
Injury may result.
Keep out of the reach of
babies and infants.
Accidental swallowing or injury
may result.
Pay extra attention when you
use the FOMA terminal for an
extended period of time while
Do
it is connected to the adapter.
If you use i-αppli, make a
videophone call or watch
one seg TV programs for a
long time while charging, the
FOMA terminal, battery pack,
or adapter may become hot.
Some users who continuously
or repeatedly touch a hot FOMA
terminal may develop rashes,
itching, or eczema depending
on their physical health or
existing medical conditions, or a
low temperature bare skin burn
may result.
Precautions for FOMA
Terminal
WARNING
Do not directly point the
infrared port at home
appliances with the infrared
Don’t
device.
Malfunction of the infrared
device may cause an accident.
Do not directly point the
infrared port at home
appliances with the infrared
Don’t
device.
Malfunction of the infrared
device may cause an accident.
Do not shine the light close
to eyes.
Eyesight damage may result.
Don’t
Also, accidents such as injury
might occur if someone is
startled or dazzled by the light.
Do not get liquids such as
water or foreign objects such
as metal pieces or flammable
Don’t
materials into the UIM or
microSD card slot of the FOMA
terminal.
Fire, burns, injury, or electric
shock may result.
Do not turn on the light to
drivers of cars, and others.
It disturbs driving, and accidents
Don’t
may result.
8
Page 11
Turn the FOMA terminal off in
places where use is prohibited
such as in airplanes or
Do
hospitals.
Electronic devices or electronic
medical devices may be
adversely affected. If the FOMA
terminal is set to be turned
on automatically, cancel the
setting before turning it off. For
use in medical facilities, follow
instructions of each medical
facility. You will be punished if
you take activity prohibited by
law such as use of the FOMA
terminal in airplanes.
When you use Hands-free,
or a ring tone is sounding,
make sure to keep the FOMA
Do
terminal away from your ear.
When you use the headphone/
microphone connected to the
FOMA terminal to play a game
or music, adjust the volume.
The excessive sound volume
may result in hearing loss. Also,
if you cannot hear ambient
sounds, an accident may result.
For those who suffer from
heart ailments, the vibrator or
ring tone volume should be
Do
adjusted carefully.
Their hearts may be adversely
affected.
If you wear any implanted
electronic medical devices,
contact the manufacturer
Do
or dealer of the electronic
medical device to ask about
the effect from radio waves.
Electronic medical devices may
be adversely affected.
Turn the FOMA terminal off
in places near high-precision
electronic devices or devices.
Do
Do use weak electronic
signals.
Electronic devices may be
adversely affected such as Don't
causing malfunction.
* Electronic devices that may be
affected:
Hearing aids, implanted cardiac
pacemakers and implanted
defibrillators, other medical
electronic devices, fire alarms,
automatic doors, and other
automatically controlled devices.
If you are using an implanted
cardiac pacemaker and
implanted defibrillator, or any
other electronic medical
devices, consult the
manufacturer or retailer of the
device for advice regarding
possible effects from radio waves.
If the display glass or camera
lens is broken, avoid touching
the broken glass or exposed
Do
parts inside the FOMA
terminal.
The surface of the display is
covered with a protective film
and the camera lens is covered
with a plastic panel so that
shattered glass pieces do
not scatter easily, however, if
you touch the broken glass or
exposed parts, injury may result.
CAUTION
Do not swing the FOMA
terminal by strap, etc.
It may hit you or others, resulting
Don’t
in an accident such as injury.
Do not use the broken FOMA
terminal.
Fire, burns, injury, or electric
Don’t
shock may result.
Introduction
9
Page 12
Don’t
Introduction
Do
If the display is broken and the
LCD liquid leaks, do not apply
the liquid to your skin such as
face or hand.
Blindness or injury to your skin
may result.
If the LCD liquid gets into your
eyes or mouth, immediately flush
with clean water and consult a
doctor.
Also, if the liquid gets on your
skin or clothes, immediately
wipe it off with alcohol and wash
with soap and water.
If you use the FOMA terminal
in a car, contact the car
manufacturer or dealer to ask
about the effect from radio
waves.
Depending on the type of a
car, in-car electronic devices
could be adversely affected. In
this case, stop using the FOMA
terminal immediately.
Itching, rash or eczema may
be caused depending on
your physical conditions
Do
or predisposition. If an
abnormality occurs, stop
using the FOMA terminal
immediately and consult a
doctor.
• Material List →P14
Be careful not to get your
finger or a strap caught in the
parts when you close or open
Do
the FOMA terminal.
Injury or other accidents may
result.
Look at the display in a well
lit place, keeping a certain
distance from the screen.
Do
Failure of eyesight may result.
Precautions for
Battery Pack
■ Check the battery type by the
label attached to the battery pack.
Description Type
Li-ion00 Lithium-ion battery
DANGER
Do not get any metal objects
such as wire come into
contact with the battery
Don’t
terminal. Do not carry or store
the FOMA terminal together
with any metal objects such as
a necklace.
Ignition, explosion, overheating,
or leakage of the battery pack
may result.
When attaching the battery
pack, check the direction
of the battery pack. If you
Don’t
cannot attach the battery
pack properly, do not attach it
forcibly.
Ignition, explosion, overheating,
or leakage of the battery pack
may result.
10
Page 13
Do not throw the battery pack
into fire.
Do ignition, explosion,
Don’t
overheating, or leakage of the
battery pack may result.
Do not pierce the battery
pack with a nail, hit it with a
hammer, or step on it.
Don’t
Do ignition, explosion,
overheating, or leakage of the
battery pack may result.
If the battery fluid gets into
your eyes, do not rub them.
Immediately flush with clean
Do
water and consult a doctor.
Blindness may result.
WARNING
If you found any trouble on
the battery pack such as
deformation caused by a drop
Don’t
or scratches, never use the
battery pack.
Ignition, explosion, overheating,
or leakage of the battery pack
may result.
If the battery leaks or emits
strange smell, immediately
stop using the FOMA terminal
Do
and keep it away from fire.
The leaked battery fluid may
ignite, resulting in fire or burst.
Make sure that your pets do
not bite the battery pack.
Ignition, explosion, overheating,
Do
or leakage of the battery pack
may result.
CAUTION
Do not dispose of exhausted
batteries with ordinary
household waste.
Don’t
Ignition or environmental
damage may result. Cover the
battery terminals with a nonconductive tape and take them
to the docomo Shop, etc. or
dispose of them in accordance
with local waste disposal
regulations.
Do not use or charge a wet
battery pack.
Ignition, explosion, overheating,
Don’t
or leakage of the battery pack
may result.
If the liquid inside the battery
pack leaks, do not apply the
liquid to your skin such as
Do
face or hand.
Blindness or injury to your skin
may result.
If the liquid gets into your eyes
or mouth, or attach to your skin
or clothes, flush with clean water
immediately. If the liquid gets
into your eyes or mouth, consult
a doctor immediately after
flushing with water.
Precautions for Adapter
and Desktop Holder
WARNING
Do not use a damaged adapter
cord.
Fire, burns, or electric shock
Don’t
may result.
Do not use the AC adapter and
desktop holder in a place with
high humidity such as a bath
Don’t
room.
Fire, burns, or electric shock
may result.
Introduction
11
Page 14
Don’t
Don’t
Introduction
Don’t
Don’t
Don’t
The DC adapter is for use only
in a negative (-) grounded
vehicle. Do not use it in a
positive (+) grounded vehicle.
Fire, burns, or electric shock
may result.
If it starts to thunder, do not
touch the adapter.
Electric shock may result.
Do not short-circuit the
charging terminals when
the adapter is plugged into
an outlet or cigarette lighter
socket. Also, never touch
the charging terminals with
fingers or other bare skin.
Fire, burns, or electric shock
may result.
Do not place heavy objects on
the adapter cord.
Do Fire, burns, or electric shock
may result.
When inserting the AC adapter
into an outlet or removing it,
do not contact metal object
such as metal strap.
Fire, burns, or electric shock
may result.
No
wet hands
Do
Do
Do
Do not touch the adapter cord,
desktop holder or outlet with
wet hands.
Fire, burns, or electric shock
may result.
Use the adapter at the
specified power source and
voltage. Also, if charging the
FOMA terminal overseas,
use an AC adapter available
overseas.
Using at the wrong voltage may
result in fire, burns, or electric
shock.
AC adapter: 100V AC
DC adapter: 12/24V DC (for
negative grounded vehicles
only)
AC adapter available overseas:
100 to 240V AC (Connect only
with household AC
If the fuse of the DC adapter
blows, replace it with the
specified fuse.
Fire, burns, or electric shock
may result. See each instruction
manual for the specified fuse.
Keep the power plug dust free.
Fire, burns, or electric shock
may result.
outlet)
Do
Do
Unplug
Unplug
Unplug
When plugging the AC adapter
into an outlet, plug it in firmly.
Fire, burns, or electric shock
may result.
When removing the adapter
from the outlet or cigarette
lighter socket, do not forcibly
pull the adapter cord, instead
hold the power plug and pull
it out.
Fire, burns, or electric shock
may result.
If you do not use the adapter
for a long time, unplug the
power plug from the outlet or
cigarette lighter socket.
Fire, burns, electric shock may
result.
If liquids such as water get
into the adapter, unplug the
Unplug power plug from the
outlet or cigarette lighter
socket.
Fire, burns, or electric shock
may result.
Before cleaning the adapter,
pull the plug out of the outlet
or cigarette lighter socket.
Fire, burns, or electric shock
may result.
12
Page 15
Precautions for UIM
CAUTION
Be careful not to touch the
edge of UIM when removing it.
Injury may result.
Do
Precautions on
Using near Electronic
Medical Equipment
■ The following description meets
"Guideline on the Use of Radio
communication Equipment such as
Cellular Telephones - Safeguards for
Electronic Medical Equipment" by
the Electromagnetic Compatibility
Conference Japan.
WARNING
Comply with the following
instructions inside medical
facilities:
Do
● Do not bring the FOMA
terminal in operating
rooms, intensive care
units (ICU), or coronary
care units (CCU).
● Turn the FOMA terminal
off in hospital wards.
● Turn the FOMA terminal
off in hospital lobbies
and corridors if electronic
medical devices could be
nearby.
● If the medical facility has
specific zones where use
or possession of mobile
phones is prohibited,
follow those regulations.
● I
f the FOMA term
is set to be turned on
automatically, cancel the
setting before turning it
off.
inal
Turn the FOMA terminal off in
crowded places such as on a
train where implanted cardiac
Do
pacemaker or defibrillator
wearers could be nearby.
Operation of an implanted
cardiac pacemaker or implanted
defibrillator may be adversely
affected by radio waves.
If you use an implanted
cardiac pacemaker or
implanted defibrillator, use
Do
or carry the FOMA terminal
22cm or more away from the
implanted cardiac pacemaker
or implanted defibrillator.
Operations of an implanted
cardiac pacemaker or implanted
defibrillator may be adversely
affected by radio waves.
Patients using electronic
medical equipment other than
implanted cardiac pacemakers
Do
or implanted defibrillators
(outside medical facilities
for treatment at home, etc.)
should check the influence
of radio waves upon the
equipment by consulting the
manufacturer.
Operations of electronic medical
equipment may be adversely
affected by radio waves.
Introduction
13
Page 16
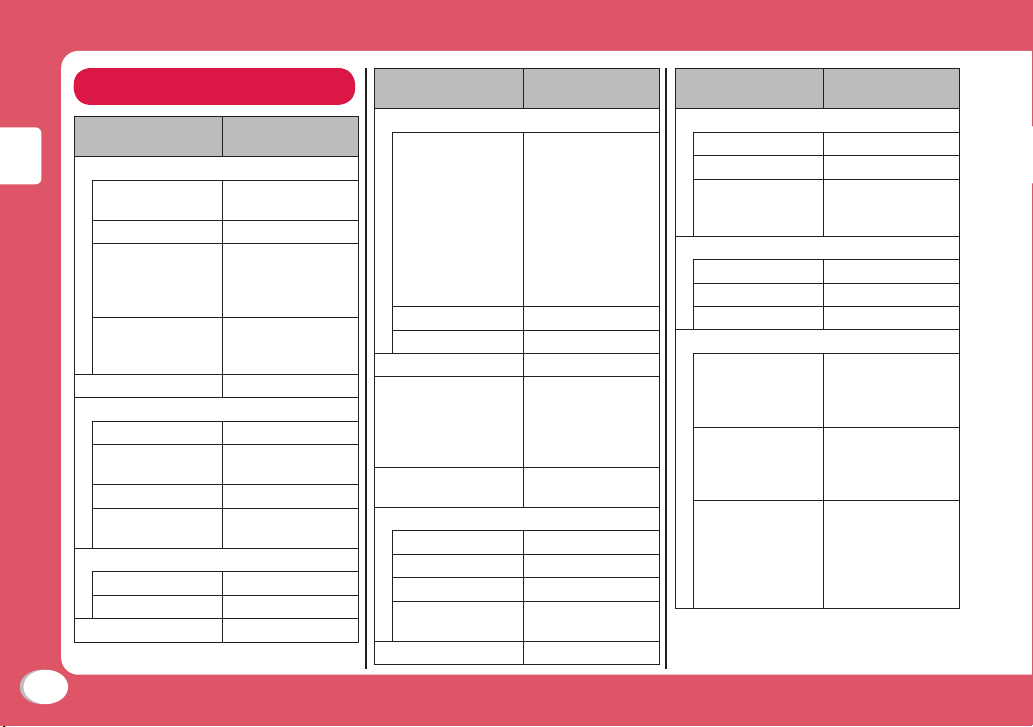
Material List
Part
Outer case
Display Mixed PC + Acryle
Rear display Acryle
Front cover,
Top part of back
Introduction
cover,
Back cover
Outer frame of key
surface,
Side of back cover
Stoppers on display Urethane
Hinge area
Hinge SUS304
Stoppers (on the
back of display)
Cap PC/UV coating
Pin (inside the
strap hole)
Operation key surface
Keypad PC + UV moding
C [OK]
Side key PC/UV coating
Material/Surface
treatment
(MR58)
PA + GF10% / UV
coating
PA + GF45% / UV
coating
Urethane
MIM
PC + UV moding
Part
External connector terminal area
External connector
terminal
Cover PC/UV coating
Packing Silicon (E662)
Charging terminals Y-CUT FX (C1990)
Charging terminal
connector (Battery
compartment)
Camera/Light/Infrared
port/Speaker part
Back cover
Lock lever PC/UV coating
Inner cover SUS301
Packing Silicon (S994)
Battery
compartment
Screws MSWR + Zn
Material/Surface
treatment
Shell:
Stainless steel
Insulator:
Synthetic Resin
(UL94 V-0)
Signal Contact:
Gold over Nickel
(Contact Area) +
Gold Flash Plating
(Terminal Area)
Mold:
LCP + Glass Fiber
Contact:
Copper + Titanium
+ Iron
Acryle
SUS304
Part
Battery pack
Battery pack
PET PE
Terminals
microSD card insertion part
Guide Corson Alloy
Fixing plate Stainless
Metal contacts Stainless
UIM insertion part
Guide
Fixing plate Materials:
Metal contacts
Material/Surface
PC Injection
Phosphor bronze
+ Ni plating + Au
plating
Housing:
Engineering
Plastic-GF30%
Black (UL94 V-0)
Stainless steel
Plating:
Ni plating
Materia
Copper alloy
Plating:
Ni underplating
Contact area(card):
Au pl
treatment
ls:
ating
14
Page 17
Handling Precautions
General notes
■ The L-01C is provided with the
waterproof function, however,
do not have water entered into
the inside of the unit, or do not
spray water over accessories and
optional items.
The battery pack, adapter, and UIM
are not waterproof. Do not use them
in places with high humidity such as a
bathroom or where rain may get them
wet. If you are carrying them against your
body, moisture from sweat may corrode
the internal parts, causing malfunction.
Note that malfunction deemed to be
caused due to exposure to liquids is not
covered by the warranty, and repair may
be impossible.
They may be repaired at your expense
even if repairs are possible.
■ Use a dry soft cloth (lens cleaning
cloth) to clean the equipment.
• If you rub the display strongly with
a dry cloth, the display may be
scratched.
• If the display is left with water drop
or stain adhered, smear may be
generated.
• Do not use alcohol, thinner, benzene,
detergent or other solvents for
cleaning, otherwise the printed images
or text may disappear or discoloration
may result.
■ Occasionally clean the terminals
with a dry cotton swab.
If the terminals become dirty, the contact
may become loose and the FOMA
terminal power may be turned off, or the
terminal may not be fully charged.
Be careful not to damage the terminals
when you clean them.
■ Do not place the equipment near
air conditioner outlets.
Condensation may form due to rapid
changes in temperature, and this
may corrode internal parts and cause
malfunction.
■ Do not place excessive force on
the FOMA terminal or the battery
pack.
If the FOMA terminal is put under heavy
objects in a bag, or if it is sat upon while
in your pocket, the display, internal circuit
board, or battery pack may be damaged
or malfunction.
While external devices are inserted to the
external connector terminal or earphone/
microphone terminal, the connector may
be damaged or malfunction.
■ Do not rub or scratch the display
with a metal object.
Doing so may cause damage or
malfunction.
■ Carefully read each manual
attached to the battery pack and
adapter.
Notes on the FOMA terminal
■ Avoid using in extremely high or
low temperatures.
Use the FOMA terminal within a
temperature range of 5 ℃ to 35 ℃ and a
humidity range of 45% to 85%.
■ The FOMA terminal may adversely
affect general phones, televisions,
or radios, etc. in use nearby. Use
the FOMA terminal as far away
from such equipment as possible.
■ Keep a separate record
information stored on the FOMA
terminal and store the copies in a
safe location.
DOCOMO assumes no responsibility for
the loss of any of your data.
■ Do not drop the FOMA terminal or
subject it to shocks.
Damage or malfunction may result.
■ Do not insert an external device
to the external connector terminal
or earphone/microphone terminal
crookedly or do not pull it when it
is inserted.
Damage or malfunction may result.
of any
Introduction
15
Page 18
■ Make sure that no objects such as
straps will get caught between the
parts of the FOMA terminal when
you close it.
Malfunction or damage may result.
■ It is normal for the FOMA terminal
to become warm during use or
being charged. You can continue
to use it.
■ Do not leave the camera in a place
Introduction
exposed to direct sunlight.
Pixels may be discolored or burns may
result.
■ Usually close the external
connector terminal cover.
Dust or moisture may seep in and cause
malfunction.
■ Do not use the FOMA terminal
with the back cover removed.
The battery pack may fall out or
malfunction or damage may result.
■ Do not apply an excessively thick
sticker onto the surfaces of the
display or keys.
Malfunctioning, damage or problems with
operation may result.
■ While using a microSD card, do
not remove it or turn the FOMA
terminal power off.
Data loss or malfunction may result.
■ Do not place magnetic card near
or between the FOMA terminal.
Data on magnetic media such as cash
cards, credit cards, telephone cards or
floppy disks may be lost.
■ Do not place a magnetized item
near the FOMA terminal.
A strong magnetic field may cause
malfunction of the FOMA terminal.
Notes on the battery pack
■ The battery pack is a consumable.
Depending on the usage, a battery pack
may run out of its charge extremely
quickly even if it is fully charged.
Purchase a new battery pack specified in
this manual.
■ Charge the battery pack in a place
with an ambient temperature of 5
℃ to 35 ℃.
■ The actual usage time of the
battery pack depends on the
usage environment or the
deterioration level of the battery
pack.
■ The battery pack may swell
as the battery
life is near its
end depending on the battery
pack condition, but it is not a
malfunction.
■ When you store the battery pack,
avoid the following conditions.
• Fully charged (immediately after
charge is completed)
• No battery (the state where the power
cannot be turned on due to battery
drain)
The performance or life of the battery
pack may be reduced.
It is recommended that you store the
pack when the battery level icon
battery
shows two bars or when 40% of the
battery is left.
Notes on the adapter
■ Charge the battery pack in a place
with an ambient temperature of 5
℃ to 35 ℃.
■ Charge the battery pack where:
• There is very little humidity, vibration,
and dust.
• There are no land-line phones,
television sets or radios nearby.
16
Page 19
■ It is normal for the adapters to
become warm while using or
charging the FOMA terminal. You
can continue to use it.
■ Use the DC adapter only when the
car engine is running.
The car battery may be exhausted.
■ When using an outlet with a latch
mechanism, follow the instruction
manual of the outlet.
■ Do not place strong impacts.
Also, do not deform the charging
terminals.
Malfunction may result.
Notes on the UIM
■ Do not use excessive force to
insert/remove the UIM.
■ Note that you are responsible for
malfunction caused by inserting
the UIM into a different IC card
reader/ writer.
■ Always keep the IC portion of the
UIM clean.
■ Clean the UIM with a soft, dry
cloth (lens cleaning cloth).
■ Keep a separate record of any
information stored on the UIM and
store the copies in a safe location.
DOCOMO assumes no responsibility for
the loss of any of your data.
■ To protect the environment,
please bring unnecessary UIM
to a service counter such as the
docomo Shop.
■ Do not scratch, carelessly touch,
or short-circuit the IC portion.
Data loss or malfunction may result.
■ Do not drop the UIM or subject it
to shocks.
Malfunction may result.
■ Do not bend the UIM or put heavy
objects on it.
Malfunction may result.
■ Do not insert the UIM with labels
or stickers attached into the
FOMA terminal.
Malfunction may result.
Cautions
■ Never use a modified FOMA
terminal. Using a modified device
violates the Radio Law.
The FOMA terminal acquires the
certification of conformity with technical
standards of specified radio equipment
based on the Radio Law. As a proof,
"Technical conformity mark " is printed
on the nameplate of the FOMA terminal.
If you remove screws to modify the
internal components of the FOMA
terminal, the certification of conformity
with technical standards becomes
invalid.
Do not use the FOMA terminal with the
invalid certification of conformity with
technical standards. Doing so violates
the Radio Law.
■ Be careful when using the FOMA
terminal while driving.
Using a handheld mobile phone while
driving will result in a penalty.
However, unavoidable circumstances
such as rescuing injured and sick people
or holding public's safety will not result in
a penalty.
Introduction
17
Page 20
Waterproof Function
Your L-01C comes with the waterproof function
equivalent to IPX5 (former JIS protection standard 5)*1
and IPX7 (former JIS protection standard 7)*2 with the
external connector terminal cover and the inner cover
firmly closed and back cover locked.
*1 IPX5 means that the L-01C maintain its performance as a phone
even after a water jet flow has been sprayed over the FOMA
terminal from all directions under conditions where water in a
volume of 12.5 liters/minute is sprayed from a distance of about
3 meters for at least 3 minutes using a water-pouring nozzle with
an inside diameter of 6.3mm.
*2 IPX7 means that the L-01C maintain its performance as a phone
Introduction
even after the unit has been gently submerged in a container of
city water to a depth of 1 meter at room temperature, and left in
place for about 30 minutes, and then re
moved from the water.
You can operate the L-01C in the rain, in your kitchen,
in the bathroom, and also around pool-side. In order
to keep the terminal out water, make sure to follow the
following points.
● You can make a call or watch 1Seg programs in the rain
(when the rainfall is around 20mm/hour)
● When your hands are wet or water drops remain on the
FOMA terminal, do no
t attach/re
move the back cover, nor
open/close the external connector terminal cover.
● You can slowly swing and wash it in a bowl filled with
fresh water or tap water at an ambient temperature, or
wash it by hand while spraying a slightly-weak water flow
from a faucet.
* Wash your FOMA terminal with the back cover firmly locked
and the cover of the external connector terminal pushed.
* Do not wash the earpiece, micro
water directly.
* Do not use brushes, sponges, soaps, or detergents for
washing.
* After rinsing off the FOMA terminal in water, wipe its surfaces
thoroughly using a dry cloth, drain off the water. → P24
phone or speaker with tap
● You can use the FOMA terminal in a bathroom.
* Do not put the terminal in the bathtub. Also, do not put the
FOMA terminal in boiled water. Malfunction may result.
* Do not put the FOMA terminal in hot spring water or water
containing soap, detergent or bath powder.
* Avoid using the FOMA terminal for a long time in a bathroom.
● Do not soak or drop your FOMA terminal into a pool or
the sea. Also, do not use the FOMA terminal in water
(including open/close the terminal and key operations)
18
Page 21
Things to keep in mind
● Before using, ensure that you firmly close the external
connector terminal cover and completely attached the
back cover. If any fine dirt (fine fibers, hairs, or sands) is
between the covers and the unit, water could enter into the
inside of the unit.
● Before using, make sure that the back cover lever is
switched to lock.
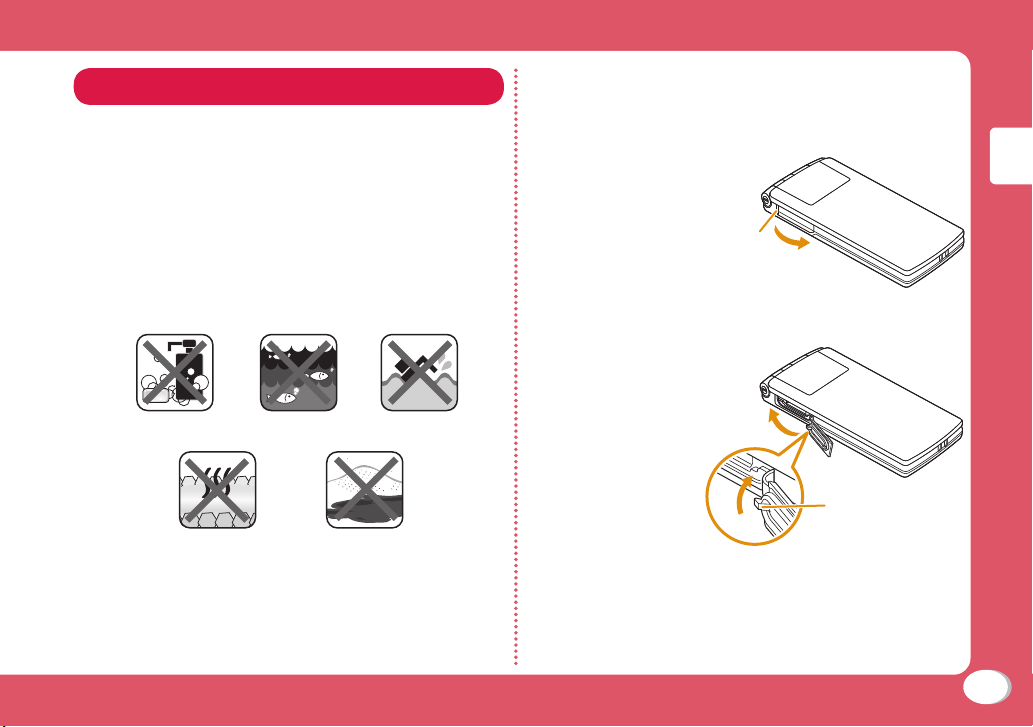
● Do not let the FOMA terminal get wet with liquids other
than water at room t
<Example>
Bath powder
emperature
as illustrated below.
Seawater Swimming poolSoap/Detergent/
Sand/DirtHot spring
Opening/Closing the External Connector
Terminal Cover
■ Opening
Hook you finger
1
over the groove
besides the cover,
pull out the cover
in the direction of
the arrow
■ Closing
Fit the tab at
1
the back cover
side of the
cap into the
concave of
FOMA terminal
in the direction
a, then close
the cap by
pressing
firmly in the
direction b
Groove
b
a
Tab at the back cover side
Introduction
19
Page 22
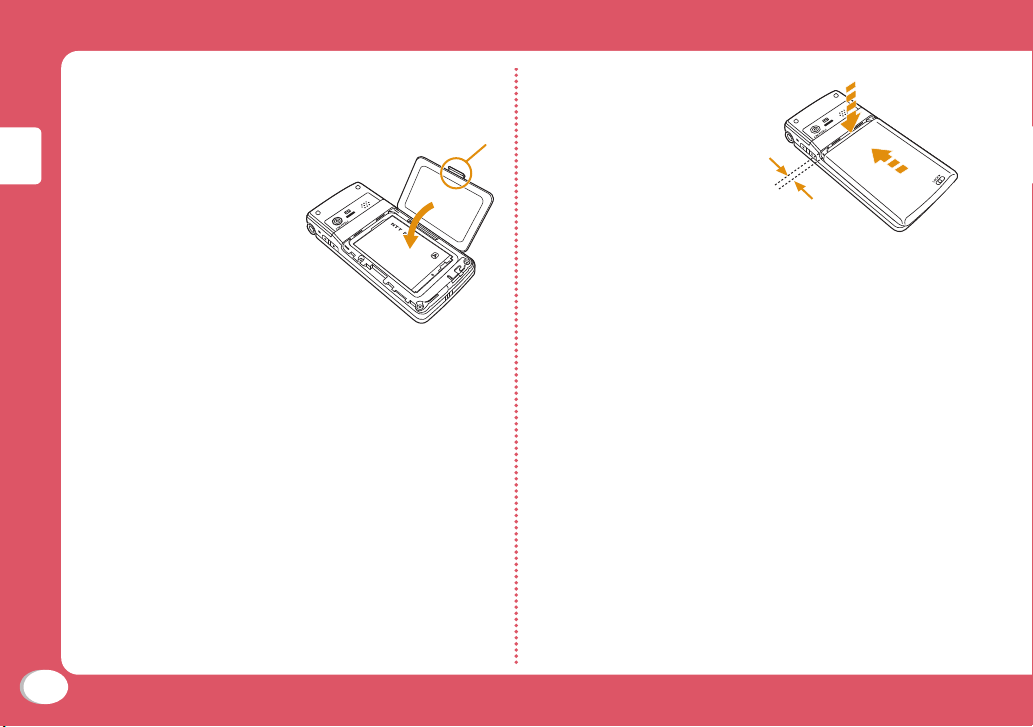
Attaching/Removing the Back Cover
■ Attaching
Using the tab on the
1
inner cover, push
the back cover in
the direction of the
arrow to close it
Introduction
firmly
Tab
Align the back
2
cover to the ditch of
the FOMA terminal
with approx. 3mm
gap kept between
the back cover and
FOMA terminal.
While holding the
back cover in the
direction a, slide it
in the direction b.
Insert till no space
left.
a
b
(Approx. 3mm)
20
Page 23
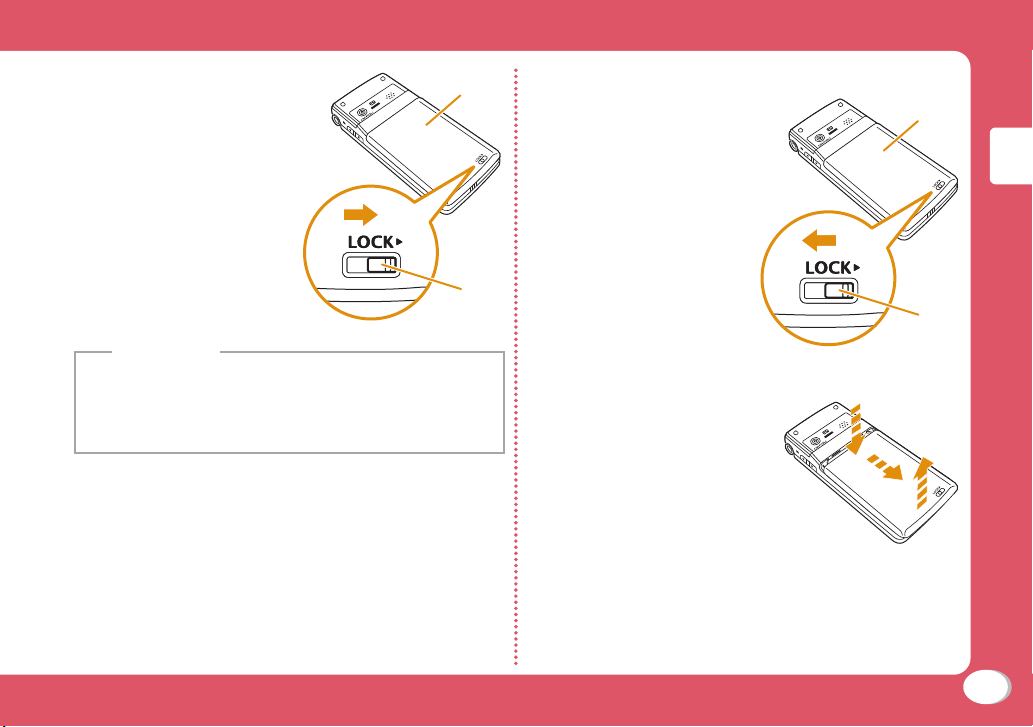
Slide the lever in
3
the direction a to
lock the back cover
a
Information
• When attaching the battery pack, ensure that the UIM, the
microSD card and the battery pack are attached securely. If the
UIM or microSD card is not correctly inserted, the waterproof
function might be deteriorated because of the gap between the
FOMA terminal and the back cover.
Back cover
Lever
■ Removing
Slide the lever in
1
the direction a to
unlock the back
cover
While holding the
2
back cover in the
direction a, slide it in
the direction b, then
pull up the back cover
in the direction c to
remove.
Back cover
Introduction
a
Lever
a
c
b
21
Page 24
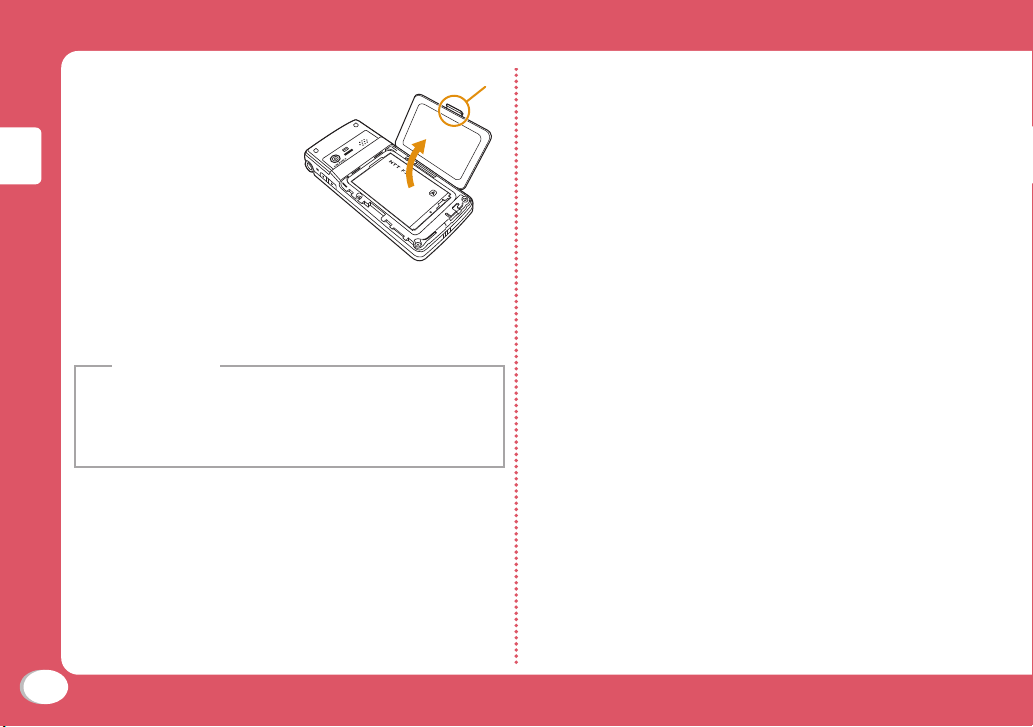
Using the tab on
3
the inner cover, pull
up the inner cover
in the direction of
the arrow and open
it until it will go no
further.
* The inner cover can
Introduction
be firmly closed
for maintaining
waterproofness. Opening
the cover forcibly may
injure your nails or fingers.
Information
• To enhance the waterproof function, you need to replace parts
without fail once two years regardless whether any abnormality
with the FOMA terminal is found or not. You are charged for
replacement of parts. Take your FOMA terminal to a repair
counter specified by DOCOMO.
Tab
Caution
■ About FOMA terminal
● Do not drop the FOMA terminal or expose it to strong
shocks. It may become scratched causing the waterproof
function to degrade.
● Do not soak the FOMA terminal in hot water, use in a
sauna, nor expose to hot wind currents such as those of a
dryer.
● Do not leave the FOMA terminal with drops of water
remained on. The external connector terminal might be
short-circuited. In c
freeze, resulting in malfunction.
● To prevent condensation, do not bring the FOMA terminal
from a cold place to a bathroom, etc. without letting the
FOMA terminal cool to room temperature.
● Do not apply water flow stronger than allowed (→P19).
Although L-01C has waterproof function, water may
seep inside and cause electric shock or corrosion of the
battery.
● N
ever charge the battery
● Do not wash the FOMA terminal with a washing machine.
● The FOMA terminal does not float on water.
old districts, the FOMA term
when it gets wet.
inal might
22
Page 25

● Do not directly place the FOMA terminal on sandy
beaches.
- Sands enter into the holes on the microphone, earpiece, or
speakers, and it might happen that volume is reduced.
- If you operate the FOMA terminal with water drops or sands
adhered to, sound might be deteriorated.
- Even the slightest sands entered from the external connector
terminal cover, inner cover or back cover could cause water to
nter the inside of the FOMA terminal.
e
● Do not thrust things such as cotton swab into the holes on
microphone, earpiece or speakers. Waterproof function
might be destroyed.
● Do not leave water drops adhered to microphone,
earpiece and speakers. Communications might be
disabled.
■ About the external connector terminal cover, inner
cover and back cover
● The rubber packing of the external connector t
erminal
cover and the inner cover play an important role in
maintaining waterproof function. Do not remove or
scratch them. Also, prevent dust from adhering to them.
If the rubber packing for the external connector terminal
cover or the inner cover is damaged or deformed,
replace then at a repair counter specified by DOCOMO.
● Do not insert something pointed at the head into the
clearance of the extern
al connector terminal cover or
inner cover. Rubber packing damage or water seeping
may result.
● If the back cover is broken, replace it with a new one.
Otherwise liquid such as water enters into the inside
of the FOMA terminal through broken portions, and an
electric shock or corrosion of the battery pack could
result.
● When the FOMA terminal gets wet with the external
connector terminal cover o
nters inside, and an electric shock or malfunction could
e
r back cover left open, water
be caused. Do not use it as is, but turn off the power,
remove the battery pack, and then take it to a repair
counter specified by DOCOMO.
■ Others
● Accessories and optional devices are not waterproof.
When watching 1Seg etc. with FOMA terminal installed in
the provided desktop holder, do not use it in a bathroom
hower room, kitchen or lavatory even if it is not
s
connected to the AC adapter.
● DOCOMO does not guarantee actual operations
under all states. Malfunctions deemed to be cause by
inappropriate operation by the customer are not covered
by the warranty.
Introduction
,
23
Page 26
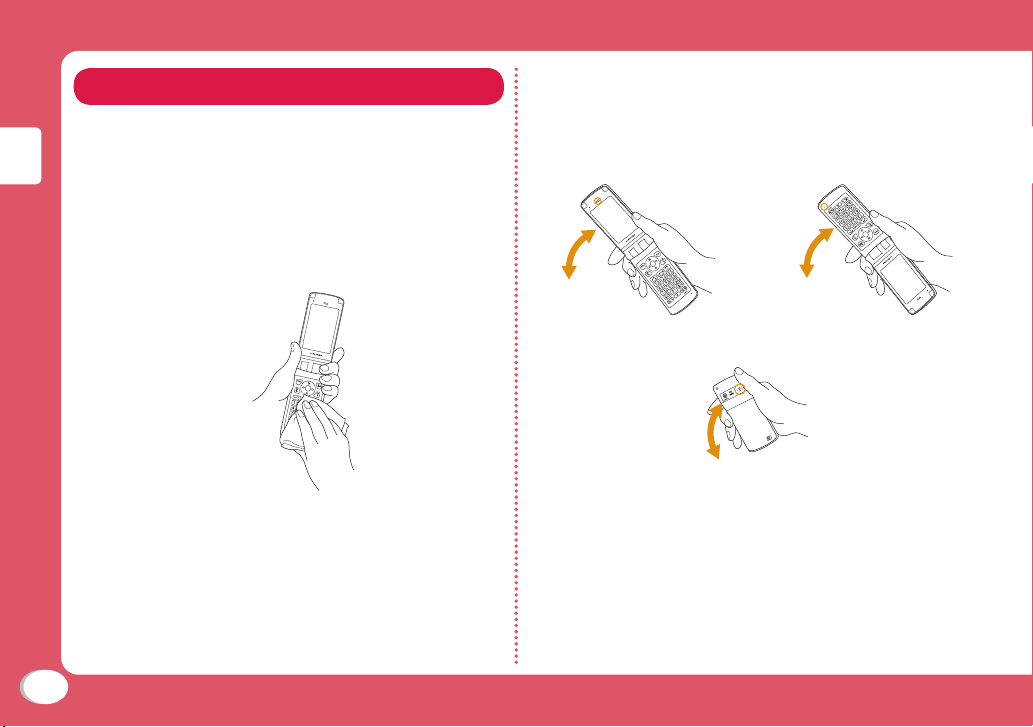
Draining Water
When the FOMA terminal gets wet, drain the water
following the steps below.
● If you operate the FOMA terminal with water drops left
adhered to, a volume level from the speakers might be
decreased or sound quality vary.
Wipe completely moisture off the surface
1
of the FOMA terminal with a clean dry
Introduction
cloth.
Securely take hold of the FOMA
2
terminal, and firmly swing each surface
approximately 20 times until there is no
more water splattering
Draining from earpiece Draining from microphone
Draining from speakers
24
Page 27
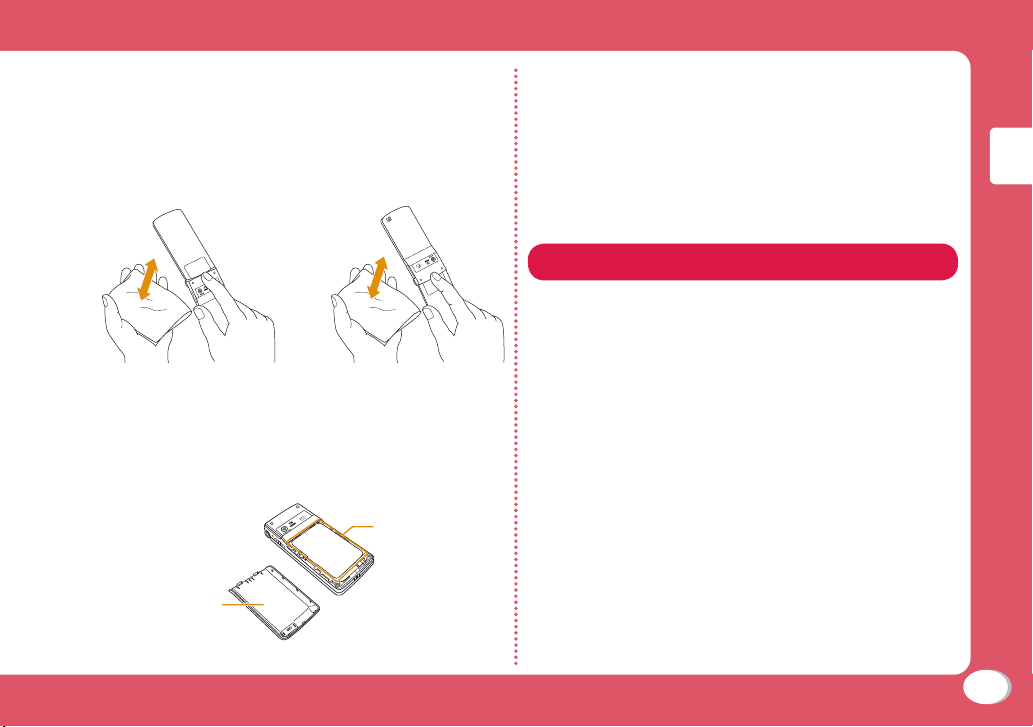
Lightly push the FOMA terminal against
3
a clean dry cloth, and wipe moisture off
the clearance gap of the microphone,
earpiece, speaker, keys and hinges.
• Do not directly wipe moisture out of joint gap using a cotton
swab, etc.
Remove the back cover and wipe off any
4
drops of water around the inner cover and
the rear surface of the back cover, and
then attach the back cover
• Never open the inner cover.
Around inner cover
Inner surface of
back cover
Fully drain moisture and then operate the
5
FOMA terminal
• Even when you follow the procedures for draining water
as described above, moisture might remain in the FOMA
terminal. Therefore, use the FOMA terminal after allowing it
to dry out naturally.
• Water, if any, remaining in the FOMA terminal may ooze up
after wiping off.
When charging battery
Accessories and optional parts are not waterproof.
Check the followings before and after charging.
• Make sure that the FOMA terminal is not wet.
Never try to charge the battery pack when the FOMA
terminal is wet.
• If the FOMA terminal is wet or after the FOMA terminal is
wet, adequately drain it and wipe off water with dry and
clean cloth, etc. before placing on a desktop holder or
opening the e
When you charge the battery with the external connector
•
terminal cover open, firmly close it after charging.
It is recommended that the desktop holder be used for
charging to prevent water from seeping inside from the
external connector terminal.
• Do not touch the AC adapter or desktop holder with wet
hands. Electric shock may result.
• Do not use the AC adapter a
oom, shower room, kitchen, and lavatory where
bathr
water is used. Fire or electric shock may result.
xternal connector terminal cover.
nd desktop holder in a
Introduction
25
Page 28
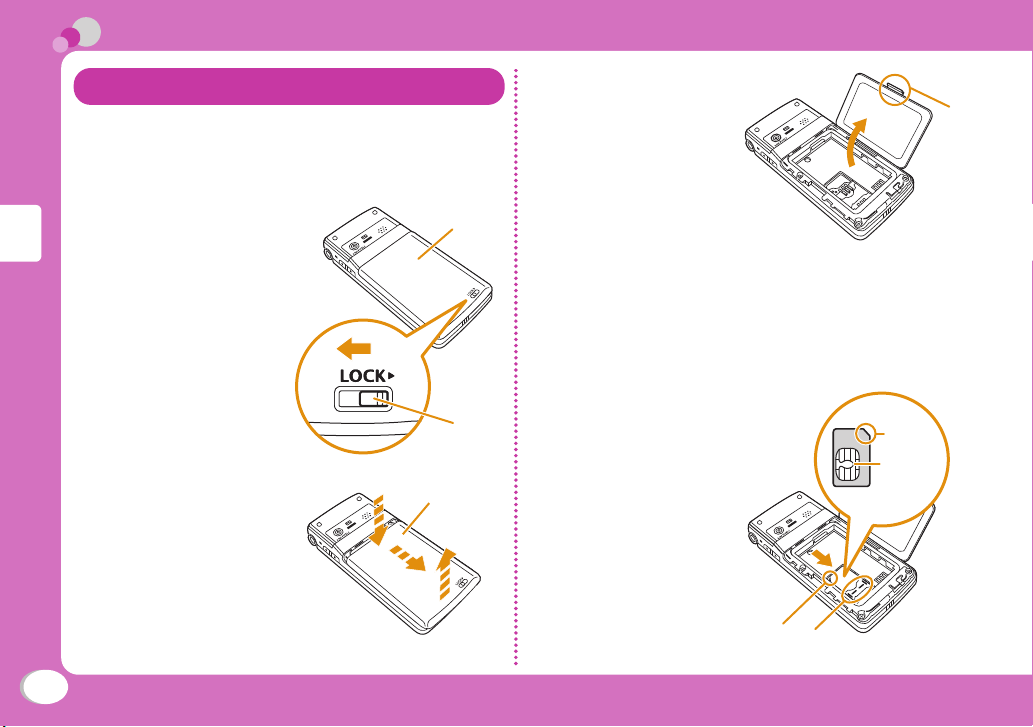
Before Using
Attaching UIM (FOMA Card)/Battery Pack
The UIM is an IC card that contains subscription
information such as your phone number.
• Turn the FOMA terminal power off and hold it with both
hands.
Slide the lever of
1
the back cover in
the direction a to
unlock it
a
Basic Operation
While holding the
2
back cover in the
direction a, slide
it in the direction
b, then pull up
the back cover in
the direction c to
remove
a
b
Back cover
Back cover
Lever
c
Using the tab on
3
the inner cover, pull
up the inner cover
in the direction of
the arrow and open
it until it will go no
further
• The inner cover can
be firmly closed
for maintaining
waterproofness.
Opening the cover
forcibly may injure
your nails or fingers.
With the gold IC
4
side down, insert
the UIM under
the guide in the
direction of the
arrow
Notch
Tab
Notch
IC (Gold)
Guide
26
Page 29
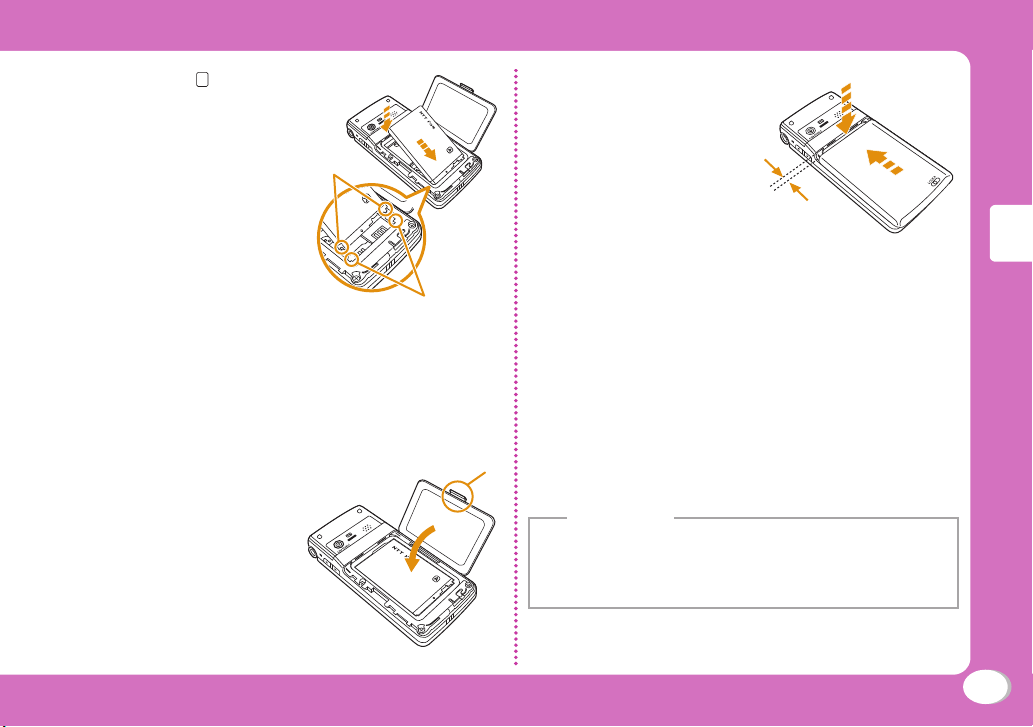
With the" A "side
5
of the battery
pack up, align the
metal contacts of
the battery pack
and the FOMA
terminal, attach the
battery pack in the
direction a, and
then push it down
in the direction b
• When attaching the
battery pack, align
the projections of the
FOMA terminal and
the depressions of the
battery pack.
Using the tab on
6
the inner cover,
push the back
cover in the
direction of the
arrow to close it
firmly
Depressions
b
a
Projections
Tab
Align the back
7
cover to the ditch
a
of the FOMA
terminal with
approx. 3mm gap
kept between the
back cover and
Approx.
3mm
b
FOMA terminal.
While holding the
back cover in the
direction a, slide it
in the direction b.
Insert till no space
left.
Switch the lever to
8
lock the back cover
Information
• If trying to attach the battery pack forcibly while UIM is not
inserted properly, UIM may be damaged.
• If trying to attach the battery pack forcibly, the contacts of the
FOMA terminal may be damaged.
Basic Operation
27
Page 30
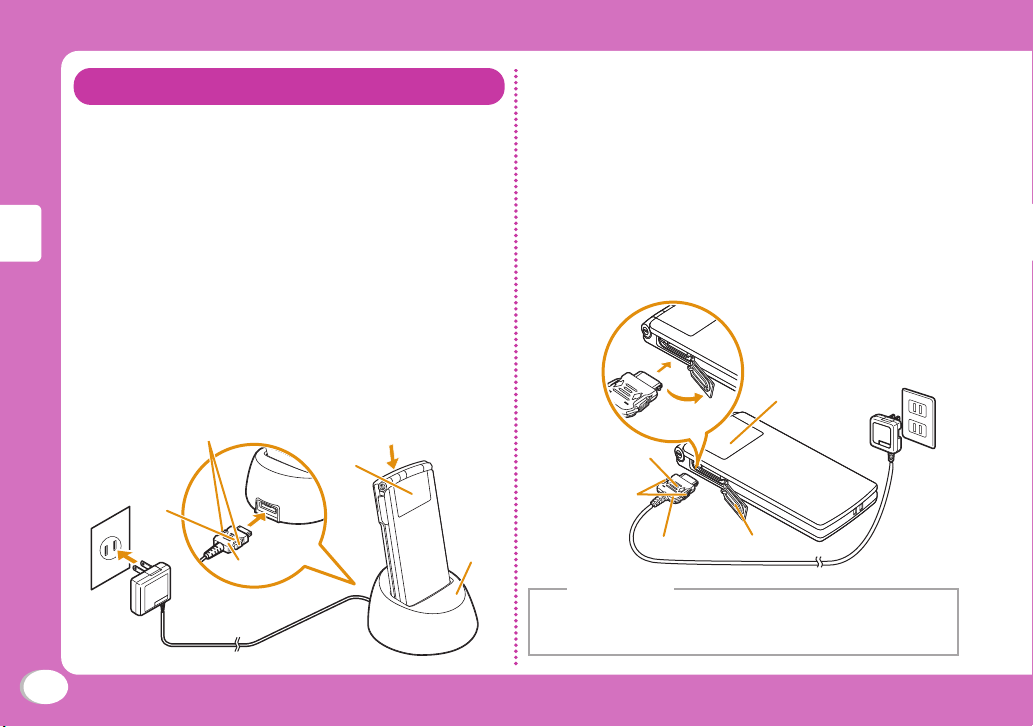
Charging
Charging with desktop holder
While holding the supplied desktop holder, insert
the AC adapter connector, with the inscribed
arrow side up, straight into the connector terminal
of the desktop holder.
Connect the AC adapter plug to an electric outlet.
Insert the FOMA terminal in the direction a along
the desktop holder.
• The charging light turns on and charging starts. When
charging completes, the charging light turns off.
After charging completes, pull the FOMA terminal
out while holding the desktop holder.
• Be careful not to pinch the strap, etc.
Basic Operation
• Pull out the AC adapter connector straight while pressing
the release buttons on both sides of the connector.
Release buttons
a
Inscription
Charging
light
Charging with AC adapter
Open the external connector terminal cover of
the FOMA terminal (a). With the inscribed arrow
side up, insert the AC adapter connector straight
into the external connector terminal of the FOMA
terminal (b).
Connect the AC adapter plug to an electric outlet.
• The charging light turns on and charging starts. When
charging completes, the charging light turns off.
After charging completes, pull the AC adapter connector
straight out while pressing the release buttons.
b
Charging light
a
Inscription
Release buttons
28
100V AC
Outlet
Power
plug
Connector
Desktop
holder
Connector
External connector
terminal cover
Information
• Make sure to insert/pull out the AC adapter connector straight
with the correct side up. Forcibly trying to pull it out may cause
damage.
Page 31
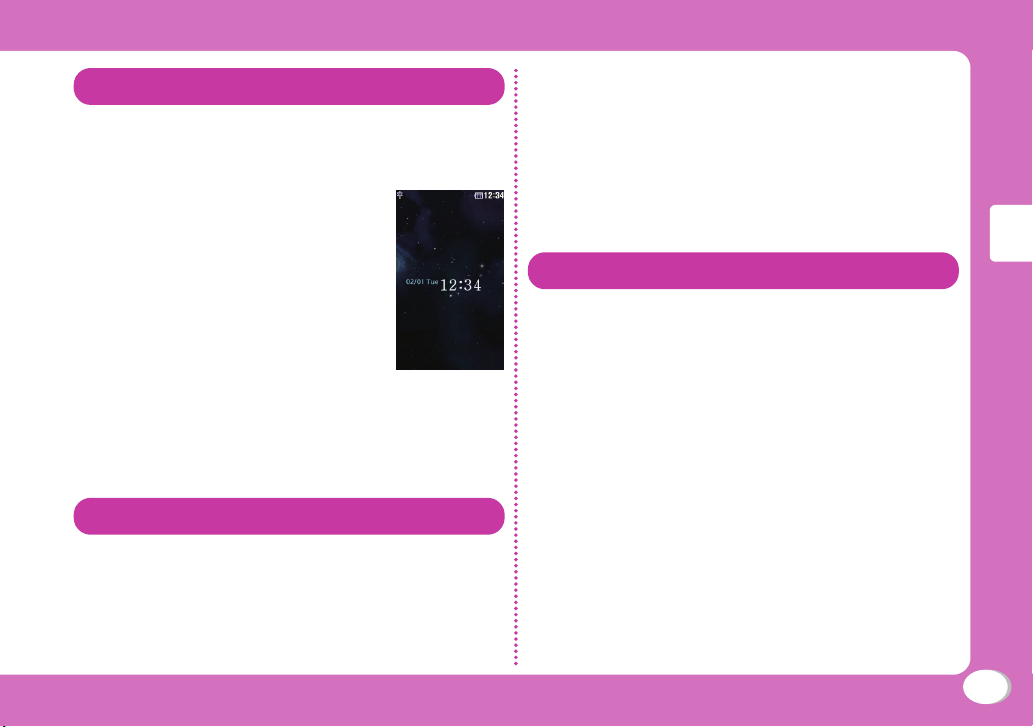
Turning Power ON
Turning power ON
With the power turned OFF, P (for over
1
2 seconds)
After the Wake-up screen is
displayed, the Stand-by display
appears.
Set the date and time
2
Set the Terminal security code
3
Set the keypad sound (select "ON" or
4
"OFF")
Set font size
5
Turning power OFF
With the power turned ON, P (for over
1
2 seconds) in Stand-by
The Exit screen appears and the power is turned OFF.
Configuring Default Setting
After turning the power ON for the first time,
set "Set Date&Time", "Change security code",
"KeyPad Sound (ON/OFF)" and "Font size" as
default settings.
Turn the power ON u "Yes"
1
Checking Your Own Phone Number
View your phone number (own number) saved on
the UIM.
• For procedures on checking/changing your mail address,
see "Mobile Phone User's Guide [i-mode] FOMA version".
Stand-by display u M u "Profile"
1
Editing your profile
Stand-by display u M u "Profile" u C
1
[Detail] u Enter the Terminal security
code
M [Menu] u "Edit"
2
Edit each item u I [Done]
3
Basic Operation
29
Page 32
Screen Explanation
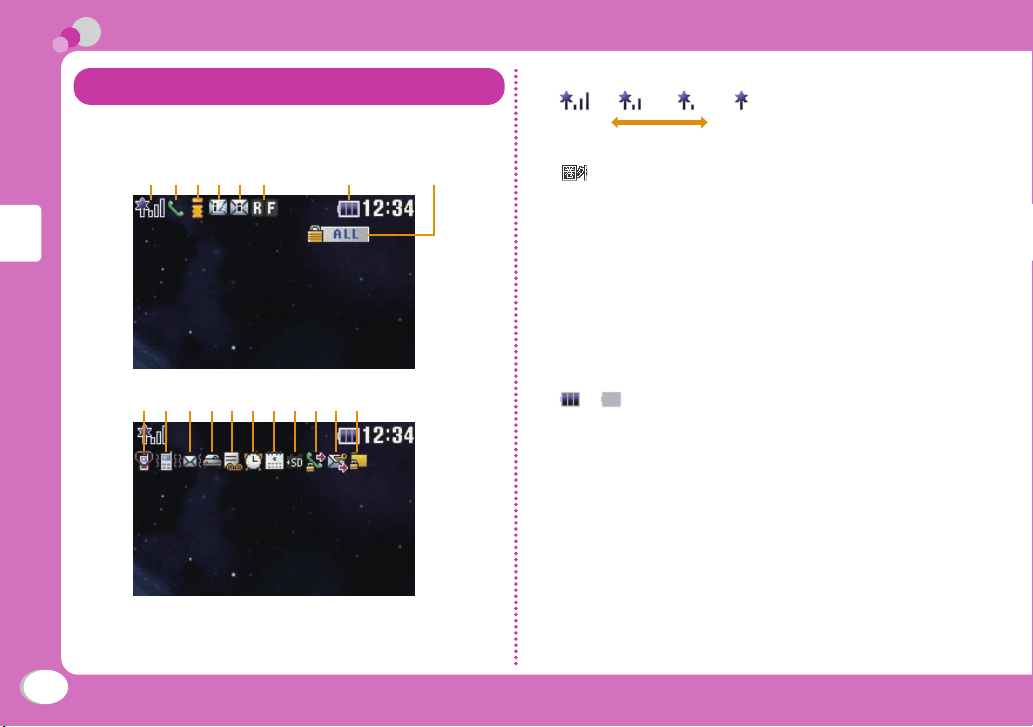
Viewing Display/Icon
The meanings of icons displayed at the top of the
screen are as follows.
a b cde f g h
Basic Operation
ij k lm n ropq s
Signal strength
a
Strong
Out of service area or no signal reception
Voice call in progress
b
i-mode connection in progress while blinking
c
i-mode mail stored at the i-mode center
d
Unread i-mode mail
e
Unread MessageR/F
f
Battery level
g
~
Lock all set
h
Manner mode set
i
A ring tone for voice/videophone call inactive and
j
vibration active
A ring tone for mail/MessageR/F inactive and vibration
k
active
Public mode (Drive mode) set
l
Record message set
m
Weak
30
Page 33
Alarm set
n
Today's schedule or To do set
o
microSD card inserted
p
Outgoing voice/videophone calls restricted
q
Outgoing mails restricted
r
Data access lock set
s
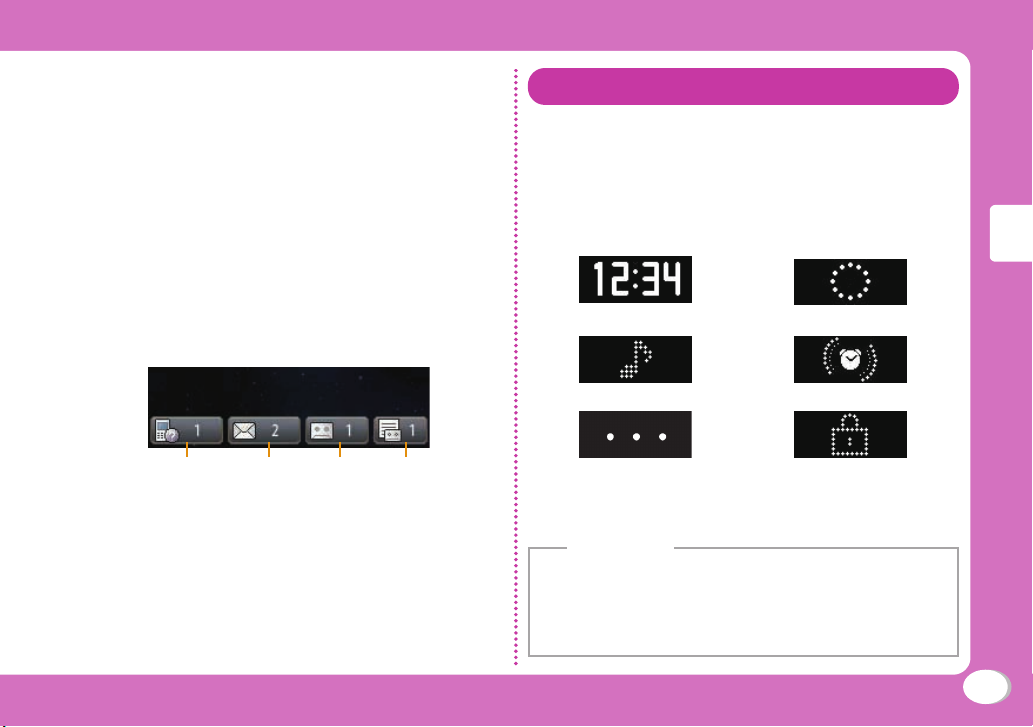
Notication icons
A number displayed on each icon indicates the
number of entries.
Sub display
When close the FOMA terminal or the FOMA
terminal is close press F / E, the clock appears
after approximately 5 seconds.
Also, the information such as an incoming call,
a message or the FOMA terminal status will be
shown on the sub screen. (Examples are shown
below.)
Time display
Playing music Alarm is ringing
Incoming voice/videophone calls
Basic Operation
Missed call
t
Unread mail
u
Voice mail message
v
Record message
w
t u v w
Charging Unavailable operation*
* This is displayed when lock functions such as Lock all is set,
or other functions are in operation, etc.
Information
• The sub display is only displayed when the FOMA terminal is
close.
• If "Sub LCD display" is set to "Text", when the contact registered
in Phonebook makes an incoming call with the caller ID
notification informed, the registered name is displayed.
31
Page 34
Vertical/horizontal View
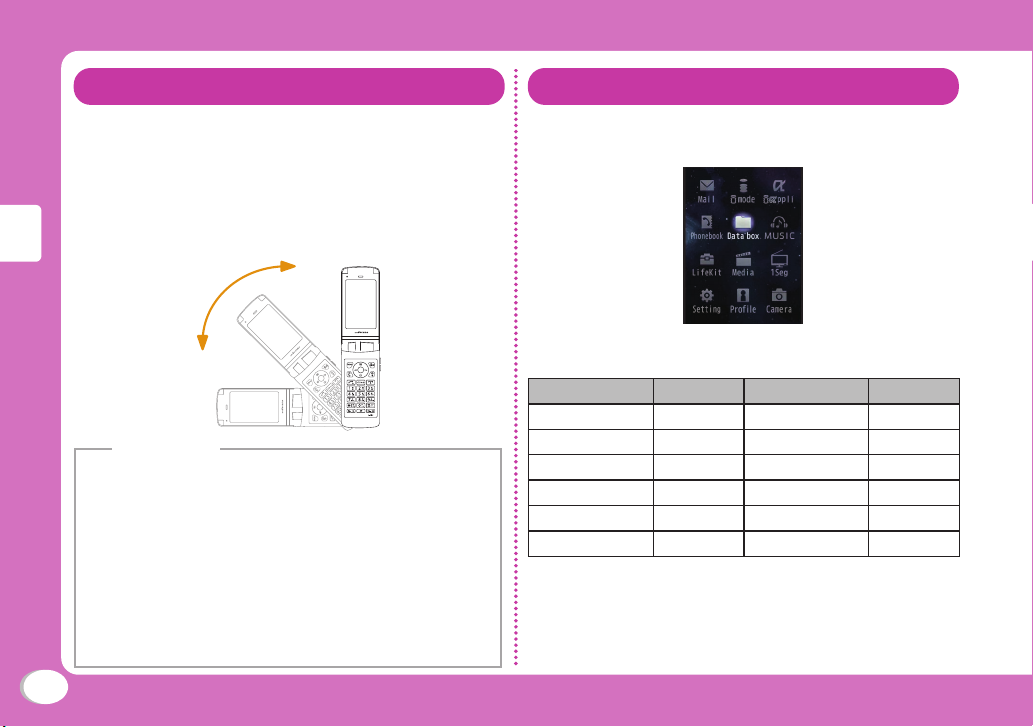
According to the motion sensor installed in the
FOMA terminal, directions and movements can be
detected. Tilt the FOMA terminal to left to switch
vertical/horizontal view.
Switching vertical/horizontal view
Tilt the FOMA terminal to switch vertical/horizontal
view.
Basic Operation
Information
• Only tilting the top part of the FOMA terminal to left can switch
vertical/horizontal view.
• The following functions in this FOMA terminal support vertical/
horizontal view.
- 1Seg
- Full Browser
- Preview of the pictures in Data box (when My picture or
i-motion/Movie is displayed with full screen)
• Please operate your FOMA terminal with it being nearly vertical
to the ground. If the display of the FOMA term
ground are nearly horizontal, tilting the FOMA terminal cannot
switch vertical/horizontal view.
inal and the
Viewing Main Menu
On the FOMA terminal, execute functions from
main menu.
● Function displayed on the main menu and
corresponding key operation
Function Operation Function Operation
Mail
i-αppli 3
Data box
LifeKit
1Seg
Profile
* Depending on the main menu design, the description of
menu name may differ.
1
5
7
9
0
i-mode
Phonebook
MUSIC
Media
Setting
Camera
2
4
6
8
*
#
32
Page 35
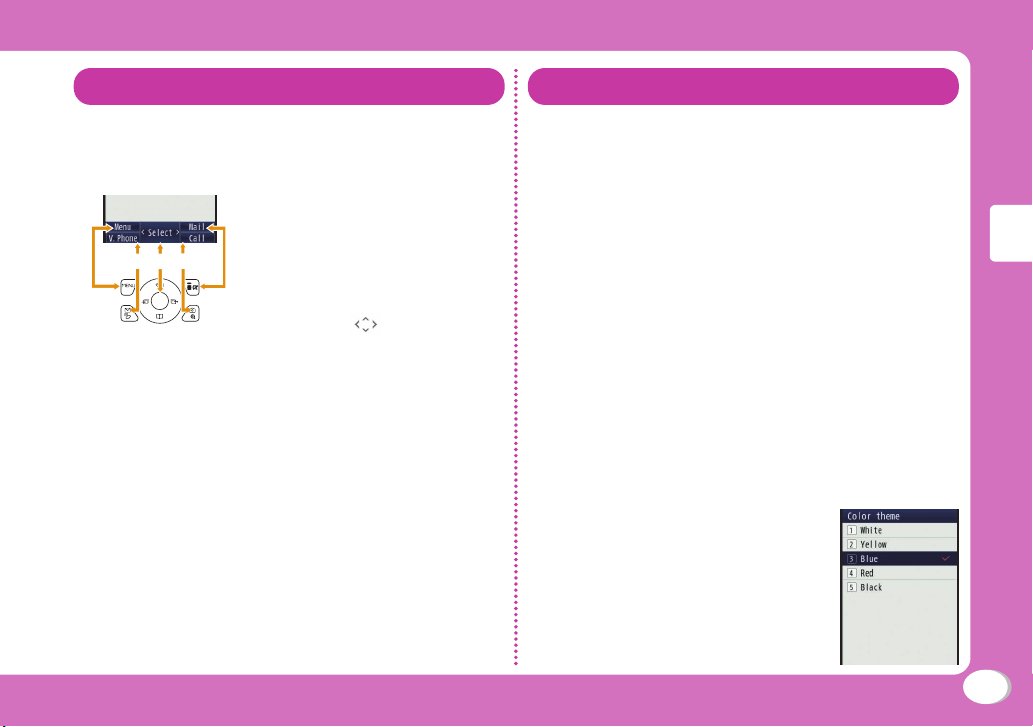
Soft Key Operation
Available operations on the currently opened
screen are displayed as Soft keys at the bottom of
a screen.
aOperation to be performed
with M appears.
bOperation to be performed
a b c d e
with g appears.
cOperation to be performed
with C appears.
• The mark
indicate the possible direction
for scrolling or selecting an
item.
dOperation to be performed
with G appears.
eOperation to be performed
with I appears.
also appears to
Menu Operation
This section explains operations for accessing
the main menu from the Stand-by display and
displaying the setting screen for "Color theme" in
the following two ways.
When using Navigation key
In Stand-by, press M to display the Main
1
menu
Use K to move the cursor to "Setting"
2
and press C [Select] to display the
Setting screen
Use H to move the cursor to "Display"
3
and press C [Select] to display the
Display screen
Use H to move the cursor to "Color
4
theme" and press C [Select]
Basic Operation
33
Page 36
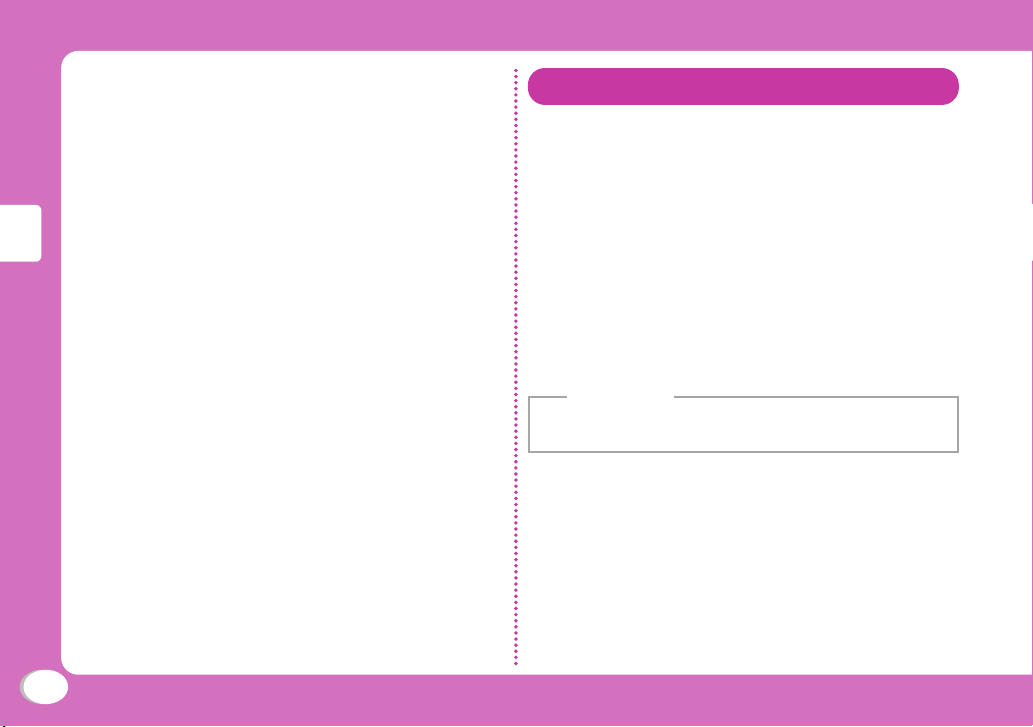
When using Dial keys
In Stand-by, press M to display the Main
1
menu
Press * corresponding to "Setting" to
2
display the Setting screen
Press 2 corresponding to "Display" to
3
display the Display screen
Press 3 corresponding to "Color
4
theme"
Basic Operation
Using Guide
Search and refer to the function you want to
know or use. Depending on the function, you can
execute the searched function after searching.
• This function is provided in Japanese only.
Stand-by display u S (for over 1 second)
1
"Menu search" / "Useful guide"
2
When selecting "Menu search", enter menu item names
or keywords to search for your desired function. Press
I [Chara] to switch input modes.
When selecting "Useful guide", select and check the
target function from the list.
Information
• If C [Start] appears on search result screen, press C [Start]
to execute the function.
34
Page 37
Character Entry
Entering Characters
Character entry is required in various situations
such as when saving entries to Phonebook or
creating mail. Learn how to enter characters
beforehand to make use of the FOMA terminal.
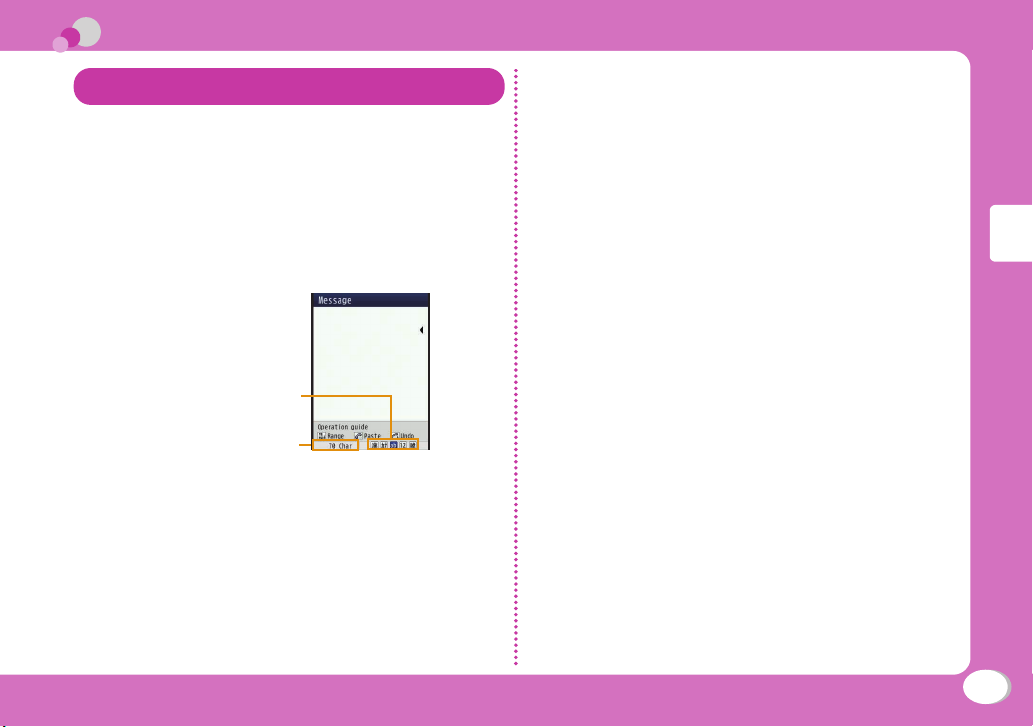
Character entry screen
On the Character entry screen, the current input
mode and operation guide are displayed.
Input mode
Available number of characters
or bytes to be input
Character entry
screen
Switching input mode
Switch the input mode according to the character
type to be input. In some input modes, switching
between full-pitch and half-pitch characters is
available.
Character entry screen u I [Mode]
1
I [Change]
2
•
Each time you press I [Change], input modes
are switched. When you press g [To full/To half],
full-pitch and half-pitch modes are switched (except
for Hiragana and Kanji input mode and Korean input
mode).
漢 :
カナ (カ) :
ab/AB
:
12
(1) :
*2
:
韓
*1 Press M [Upper/Lower] to switch between
*2 Appears when SMS input character is set to "JP/
C [Select]
3
The input mode is set.
Hiragana and Kanji input mode
Katakana input mode
*1
(a/A*1)
Alphabetical input mode
Numeric input mode
Korean input mode
upper and lower cases.
KR (70Chara)".
Basic Operation
35
Page 38
Character entry method
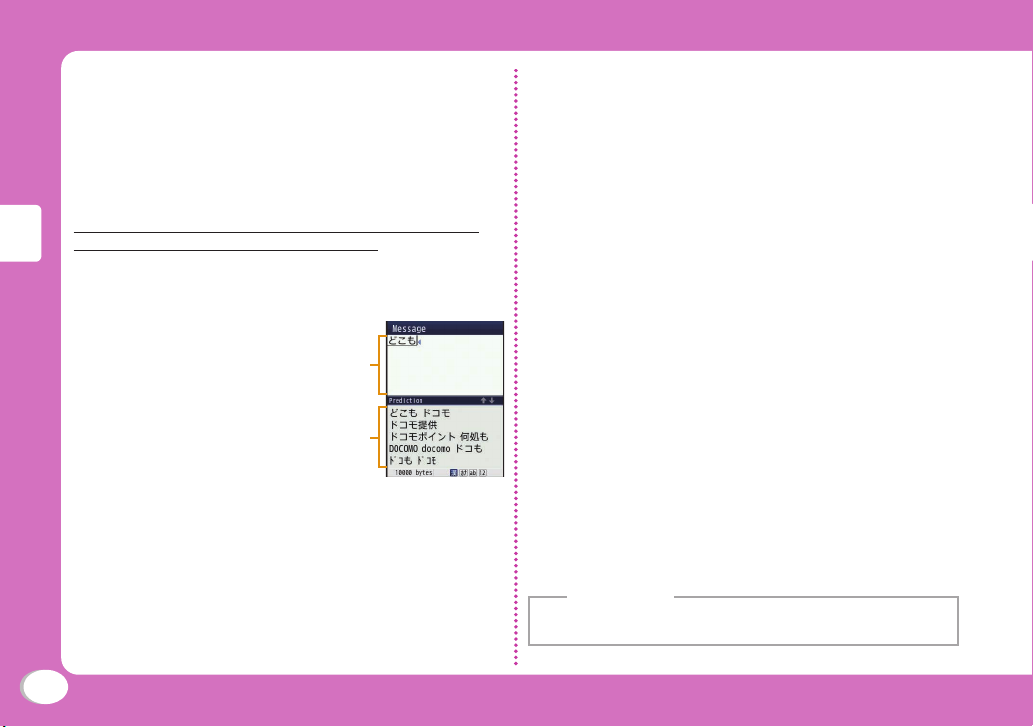
In Hiragana and Kanji input mode, enter
characters using the following two prediction
functions. Prediction input function: predicts
conversion options. Next phrase prediction
function: predicts the next phrase from the
characters being entered.
Example: Entering characters "ドコモ太郎 (DOCOMO
Taro)" in Hiragana and Kanji input mode
On the Character entry screen, enter "どこ
1
も (DOCOMO)"
"ど": 4 five timesu
* once
Basic Operation
"こ": 2 five times
"も": 7 five times
Conversion (Prediction) options predicted by the
Prediction input function appear.
Use H to move the cursor to the Prediction
2
option field
Move the cursor to "ドコモ (DOCOMO)" u
3
C [Set]
Character
input field
Prediction
option field
Enter "たろう (Taro)"
4
"た": 4 once
"ろ": 9 five times
"う": 1 three times
Use H to move the cursor to the Prediction
5
option field
Move the cursor to "太郎 (Taro)" u C [Set]
6
Entering pictograms/symbols/emoticons
Pictograms, symbols, and emoticons pre-installed
in the FOMA terminal can be used when entering
characters.
Character entry screen u G [Pict/Sym]
1
Use I [Change] to select an input mode
2
Use M [Picto./Picto.D] / [FullSymb/
3
HalfSymb] / [Category] to switch types
Select a pictogram/symbol/emoticon to
4
enter
Information
• Depending on the entry screen, pictograms, symbols, or
emoticons may not be entered.
36
Page 39
Sound/Screen Setting
Changing Ring Tone
Stand-by display u M u "Setting" u
1
"Sounds & Vibration" u "Select ring tone"
Select an item and select a file
2
I [Done]
3
Adjusting Volume
Stand-by display u M u "Setting" u
1
"Sounds &Vibration" u "Vibrator"
Move the cursor to the item to set
2
I [Done]
3
Setting Vibrator
Stand-by display u M u "Setting" u
1
"Sounds &Vibration" u "Vibrator"
Move the cursor to the item to set u C
2
[ON/OFF]
I [Done]
3
Using Manner Mode
Stand-by display u # (for over 1 second)
1
When the Manner mode is set, appears at the top of
the screen.
• Even while the manner mode is set, the camera
shutter tone, shooting start tone and end tone sound.
■ To cancel the Manner mode
In Stand-by, press # (for over 1 second).
Basic Operation
37
Page 40
Setting Keypad Sound OFF
Stand-by display u M u "Setting" u
1
"Sounds &Vibration" u "Volume" u Move
the cursor to "Keypad tone"
Use L to set (Mute)
2
Changing display brightness
Set the backlight duration and brightness of the
display.
Stand-by display u M u "Setting" u
1
"Display" u "Backlight"
Set each item
2
I [Done]
3
Changing Screen Settings
Changing Stand-by display
Basic Operation
38
Stand-by display u M u "Setting" u
1
"Display" u "Stand-by display"
Set each item
2
I [Done]
3
I [Done]
3
Changing main menu design
Set the menu design displayed when M is pressed
in Stand-by.
Stand-by display u M u M [Menu]
1
u "Menu priority" u "Custom menu" /
"Basic menu" u "Yes"
Information
•To switch the menu temporarily, press G [Basic] / g [Custom]
while the menu is displayed.
Page 41
Changing Font Size
Set font size to Phonebook entry, mail message,
i-mode and character input screen.
Stand-by display u M u "Setting" u
1
"Display" u "Font size"
Set each item
2
C [Select]
3
Setting Kisekae Tool
Set ring tones, stand-by display or menu icons,
etc. at a time.
Stand-by display u M u "Data box" u
1
"Kisekae Tool"
Move the cursor to "i-mode" / "Preinstalled"
2
u C [Open]
Move the cursor to a Kisekae Tool u I
3
[Set all] u "Yes"
Information
• "Simple02" is set by default.
• When "Simple01" or "Simple02" in "Preinstalled" is selected, the
Simple Menu only includes the basic functions is displayed.
In the Simple Menu, characters in big size are displayed in
Phonebook and m
items and font size cannot be changed.
• When use the functions not on the Simple Menu, G to select
"Basic". Normal main menu is temporarily displayed.
• Kisekae Tool is also available to operate the following settings.
Stand-by display u M u I to move the cursor to [Kisekae]
u "i-mode" / "Preinstalled" u C [Open] u Move the cursor to
Kisekae Tool u I [Set
• To reset the settings, Kisekae Tool list M [Menu] u "Reset
screen display/sound setting" u Enter the terminal security code.
ail. In the pre
all] u "Ye
-installed Simple Menu, menu
s"
Setting Eco Mode
Set the backlight brightness of the display to the
lowest power saving level, and set the backlight to
be turned off when 10 seconds elapsed after the
last operation.
Stand-by display u M u "Setting" u
1
"Other" u "eco mode" u "ON" / "OFF"
Information
• Alternatively, press 5 for over 1 second in Stand-by to set/
cancel the eco mode.
Basic Operation
39
Page 42
Lock/Security
Various Security Codes
● Cautions on security codes
• Avoid setting security codes using your birthday, part of
your phone number, your address or room number, "1111"
or "1234" that can be easily guessed by others. Be sure
to write down the set security codes and store them in a
separate location.
• Do not reveal your security codes to others. DOCOMO
is not responsible for damage caused by misuse of your
security codes by others.
• If you forget
dentification document (driver's license, etc.), the FOMA
i
terminal, and UIM to the docomo Shop. For details,
contact "General Inquiries" at the back of this manual.
• PUK code is written in the application form (copy for
Basic Operation
subscriber) given at the time of contract. If you have
subscribed at a place other than the docomo Shop, bring
your identification document (driver's license, etc.) and
U
IM to the docomo Shop or contact "General Inquiries" at
the back of this manual.
Terminal security code (Default: 0000)
You can change the Terminal security code by yourself.
Stand-by display u M u "Setting" u "Lock/Security" u
"Change security code"
your security codes, you need to bring your
Network security code
(At the time of contract: any number)
The Network security code is a 4-digit number to be used
for your identification at an acceptance of order at the
docomo Shop, docomo Information Center, or "お客様サポ
ート (user support)", or for accessing network services. You
can change the code by yourself.
If you have "docomo ID and Password" for "My docomo",
a total support site for a PC, you can change the Network
security code from a PC. From i-mode, you can change it
by accessing "iMenu" u "お客様サポート (user support)"
u "各種設定 (確認・変更・利用) (settings (check/change/
use))" u "ネットワーク暗証番号変更 (Change Network
security code)"
• For "My docomo" and "お客様サポート (user support)",
see the back side of the back cover of this manual
(Japanese only).
i-mode password
(At the time of contract: 0000)
The "i-mode password" is a 4-digit number required to
register/remove contents in My Menu, and subscribe to/
cancel the message service or fee-based i-mode services.
(Some other information service providers may set
individual passwords.)
You can change the password by yourself.
From i-mode, you can change it by accessing "iMenu" u
"English" u "Options" u "Change i-mode Password".
40
Page 43
PIN1 code/PIN2 code
(At the time of contract: 0000)
You can set PIN1 and PIN2 codes to the UIM. PIN1 code
is a 4- to 8-digit number to be entered to identify the user
every time UIM is inserted into the FOMA terminal or the
terminal power is turned on in order to prevent unauthorized
use by third party. PIN2 code is a 4- to 8-digit number used
to reset accumulated call charges, etc. You can change
them by yourself. To change PIN1 code, set "PIN1 code
request" to "ON" beforehand.
Stand-by display u M u "Setting" u "Lock/Security" u
"PIN code" u Enter the Terminal security code u "Change
PIN1 code" / "Change PIN2 code"
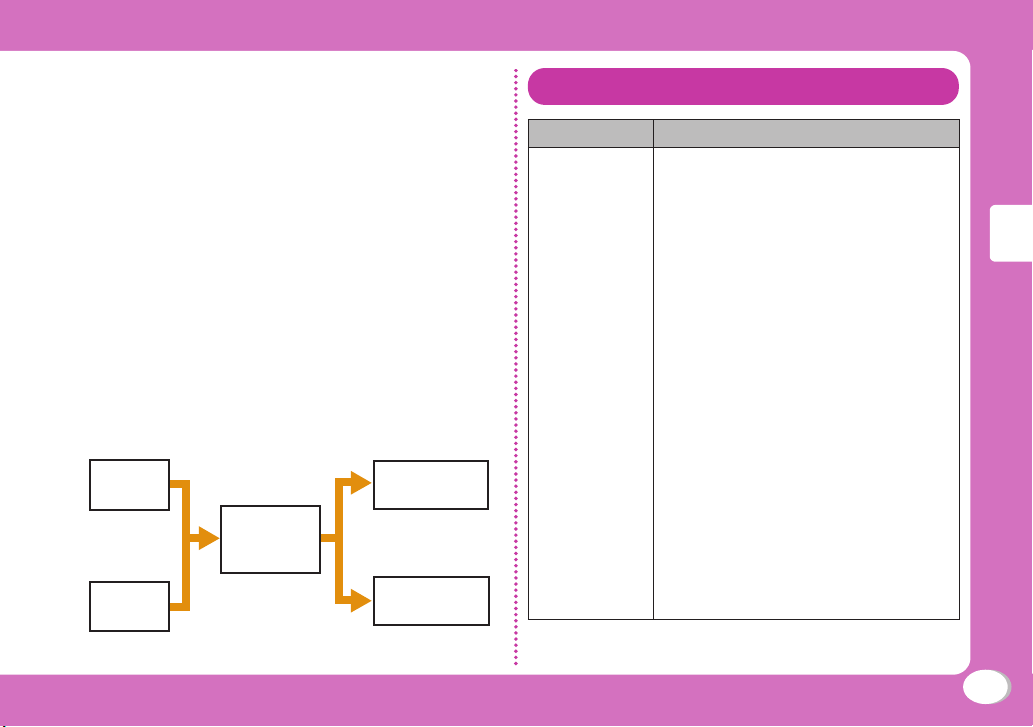
PUK code (PIN unblock code)
PUK code is an 8-digit number used to unblock PIN1
code or PIN2 code. You cannot change it by yourself.
• If you failed to enter PUK code10 times in a row, UIM is
locked.
Enter
PIN1 code
times in a row
PIN2 code
Failed 3
Enter
OK
Enter PUK
code (PIN
unblock code)
Failed 10
times in a row
Set new PIN1/
PIN2 code
Contact the
docomo Shop.
Various Lock Functions
Lock function Description
Lock all Locks the FOMA terminal to prevent
operations by others.
1 Stand-by display u M u "Setting"
u "Lock/Security" u "Lock" u
"Lock all" u Enter the Terminal
security code u "Yes"
■ To cancel Lock all
While Lock all is set, press M [Unlock]
or press any dial key
Terminal security code.
If failed to enter the correct Terminal
security code five times in a row, the
power automatically turns off.
• Emergency numbers (110, 119, 118) can
be called during Lock all.
While Lock all is set, press
I [Emergency] u Select an
emergency number u C [OK].
• When Lock all is activated, the
only operations you can perform
are turning power On/Off, making
emergency calls, answering Incoming
voice/video calls, and canceling Lock
all.
u Enter the
Basic Operation
41
Page 44
Lock function Description
Omakase Lock Locks your personal data such as
Phonebook by calling DOCOMO when
you lost the FOMA terminal.
Setting/Canceling Omakase Lock
0120-524-360* Available 24 hours
a day (open all year round)
(Japanese only)
* Unavailable from part of IP phones.
• Can be set/canceled from the My
docomo site (Japanese only) using a
PC.
• For details on Omakase Lock, see
"Mobile Phone User's Guide [Basic]".
Call/Mail lock Disables outgoing calls, address entries
Basic Operation
with dial keys, incoming calls or display
of mail messages, etc. to prevent
operations of the FOMA terminal by
others.
1 Stand-by display u M u "Setting"
u "Lock/Security" u "Lock" u "Call/
Mail lock" u Enter the Terminal
security code
2 Move the cursor t
o "Call/Mail lock
u C [ON] u Mark items to restrict
3 I [Done]
Lock function Description
Self mode Disables all functions that require
communication, such as making/
receiving calls, using i-mode, or sending/
receiving mails.
1 Stand-by display
u "Call/VT/Dialing" u "Self mode" u
"Yes"/"No"
Data access
lock
You can lock specified functions and
require the security code to use the
terminal, or restrict the use of the
terminal.
1 Stand-by display
u "Lock/Security" u "Lock" u "Data
access lock" u Enter the Terminal
security code
2 Move the cursor to "Data access
lock" u C [ON] u Mark functions
to lock
3 I
[Done]
Display Call/
Mail logs
Hides redial call, received call, sent mail,
and received mail logs.
1 Stand-by display
"
"Lock/Security" u "Display Call/Mail
logs" u Enter the Terminal security
code
2 Move the cursor to the item to set
C [ON/OFF]
u M u "Setting"
u M u "Setting"
u M u "Setting" u
u
42
Page 45
Restricting Incoming Calls
Resetting to Default
Setting actions when anonymous calls
arrive
Reject incoming calls without caller ID per reason
for anonymous call.
Stand-by display u M u "Setting" u
1
"Call/VT/Dialing" u "Incoming call" u
"Anonymous caller" u Enter the Terminal
security code u "User unset" / "Pay
phone" / "Not support" u Set each item
Rejecting calls from callers unset in
Phonebook
Set to reject calls from callers not saved to
Phonebook or without caller ID.
Stand-by display u M u "Setting" u
1
"Call/VT/Dialing" u "Incoming call" u
"Accept/Reject call" u Enter the Terminal
security code u Move the cursor to
"Reject unknown" u C [ON/OFF]
Resetting various function settings to
defaults
Reset the settings you have changed in functions
to defaults.
Stand-by display u M u "Setting"
1
u "Other" u "Reset/Clear u "Reset
settings" u "Yes" u Enter the Terminal
security code
Deleting all saved data at a time
Delete saved data.
Stand-by display u M u "Setting"
1
u "Other" u "Reset/Clear" u "Clear
memory"
Mark items to delete u I [Done] u "Yes"
2
u Enter the Terminal security code
Basic Operation
43
Page 46
Call Telephone
This FOMA terminal is not equipped with Inner
camera. So the image sent to the other party
during videophone call is a still image or current
image captured with Outer camera.
Making a Call/Videophone Call
Entering a phone number to make a call
Enter a phone number
1
• Start with a city code even for a local call.
A
2
A ringing tone sounds from the earpiece, and the
Dialing screen is displayed until the other party answers
the call.
■ To make a videophone call
Connect
Press I [V. phone]
To end the call, P
3
Making a call from Phonebook
Stand-by display u D
1
Move the cursor to the entry to call u A
2
■ To make a videophone call
Press g [V. phone].
Making a call using redial logs or received
call logs
Up to 30 entries each can be saved.
• If exceeded 30 entries, the entry is deleted from the oldest.
Stand-by display u R (Redial) or L
1
(Recv. Calls)
Move the cursor to the entry to call u C
2
[Detail]
A or C [Call]
3
■ To make a videophone call
Press g [V. phone].
Notifying other party of your phone number
Set whether to notify/not to notify other party of
your caller ID on the network beforehand.
Stand-by display u M u "Setting" u
1
"NW Services" u "Caller ID notification"
u "Activate/Deactivate"
"Notify" / "Not notify"
2
Information
• If you hear a guidance asking to notify of your caller ID, set the
caller ID notification or prefix 186 to the other party's phone
number and call again.
44
Page 47
Making an international call
WORLD CALL is an international call service
available from DOCOMO mobile phones.
When having subscribed to the FOMA service,
you have also subscribed to "WORLD CALL"
(except those who have applied not to use the
service).
• You can make calls to approximately 240 countries and
regions.
• Charges for "WORLD CALL" are added to the monthly bill
for the FOMA service.
• The application/monthly fee is free of charge.
• Some billing plans are not available for this service.
• Even if the caller ID notification is set, it may not be
notified or phone number may not be displayed correctly,
depending on the telecommunica
you cannot make a call from the Received calls screen.
• For details on WORLD CALL, contact "General Inquiries"
at the back of this manual.
• If you use international carriers other than DOCOMO,
contact them directly.
Stand-by display u Enter "010 - Country
1
code - Area code (City code) - Other
party's phone number"
• If an area code (city code) starts with "0", remove "0".
(When calling some countries such as Italy, "0" may
be required.)
tion carrier.
In this case,
A
2
■ To make a videophone call
Press I [V. phone].
Receiving a Call/Videophone Call
A call arrives
1
■ When a videophone call arrives
Press C [Image] to answer a call with the substitute
image.
A
2
■ During a videophone call
Press I [Camera/Image] to switch the image to
send between the camera image and the substitute
image.
To end the call, P
3
Adjusting Earpiece Volume
During a call, H
1
Connect
45
Page 48
When You cannot Answer a Call
Setting Record message
If the Record message is activated, the voice
guidance is played when you cannot answer
a voice call and the other party's message is
recorded.
• The Record message does not activate when a
videophone call arrives. A call arrives in a normal way.
Stand-by display u M u "Media" u
1
"Record message" u "Record msg.
setting"
Move the cursor to "Activate record msg."
2
u C [ON/OFF]
Connect
• Set to "ON" to select/set each item.
I [Done]
3
When the Record message is set, appears at the top
of the screen.
Playing Record message
Stand-by display u M u "Media" u
1
"Record message" u "Record msg. list"
Move the cursor to a recorded message u
2
C [Play]
Setting Public mode (Drive mode)
The guidance is played announcing that you
cannot answer the call because you are currently
driving or in a place where you should refrain
from talking on the phone (train, bus, or movie
theater), and then the call is disconnected.
Stand-by display u * (for over 1 second)
1
When the Public mode (Drive mode) is set, appears
at the top of the screen.
■ To cancel the Public mode (Drive mode)
In Stand-by, press * (for over 1 second).
Setting Public mode (Power OFF)
When a call arrives while the power is turned
OFF, the guidance is played announcing that you
cannot answer the call because you are in a place
where you should turn the power OFF (hospital,
airplane, near priority seats on a train), and then
the call is disconnected.
Stand-by display u Enter ":25251" u A
1
■ To cancel the Public mode (Power OFF)
In Stand-by, enter :25250 and press A.
46
Page 49
Using Various Network Services
Available network services
The following DOCOMO network services are
available for the FOMA terminal.
Service name Subscription Monthly fee
Voice Mail Service Required Charged
Call Waiting Required Charged
Call Forwarding Service Required Free
Nuisance Call Blocking Not required Free
Caller ID Notification
Service
Caller ID Request
Service
Dual Network Service Required Charged
English Guidance Not required Free
Multi Number Required Charged
Public mode
(Drive mode)
Public mode
(Power OFF)
Melody Call Required Charged
Not required Free
Not required Free
Not required Free
Not required Free
Information
• You cannot use network services while you are out of service
area or where there is no signal reception.
• For subscription or inquiries, contact "General Inquiries" at the
back of this manual.
• For details on network services, see "Mobile Phone User's
Guide [Network Services]".
Setting Voice mail service
Stand-by display u M u "Setting" u
1
"NW Services" u "Voice mail" u Select
an item
Setting Call waiting
Stand-by display u M u "Setting" u
1
"NW Services" u "Call waiting" u Select
an item
Setting Call forwarding service
Stand-by display u M u "Setting" u
1
"NW Services" u "Call forwarding" u
Select an item
Connect
47
Page 50
Emergency call
Emergency call Phone number
Calls to police 110
Calls to fire station and ambulance 119
Calls for accidents at sea 118
Information
• This FOMA terminal supports "緊急通報位置通知 (Emergency
Location Report)". When making emergency calls to 110,
119, or 118, your current location (location information) will
automatically be notified to emergency report reception
agencies such as the Police. The agency may not receive
accurate location information depending on your current
location or signal conditions. When you do not notify of your
ller ID by dialing such as with "184" added, your location
ca
information and caller ID are not notified. However, when the
Connect
agency judges that the location information and caller ID are
necessary to protect a human life, it may acquire your location
information and caller ID regardless of your setting. The region
and timing "Emergency Location Report" is introduced vary
depending on the preparation of
reception agencies.
• When making a call at 110, 119, or 118 from the FOMA terminal,
inform an operator that you are calling from a mobile phone
and your caller ID and actual location in case the calls from
police or fire station come. Do not move around while you
are talking during an emergency call to prevent the call from
being disconnected unexpectedly. Do not turn t
immediately after the call is over; and keep the FOMA terminal
ready to receive calls for approximately 10 minutes.
re
spective emergency report
he power off
• Depending on the area where you are calling, you may not be
connected to the local police or fire station.
• When you make a videophone call at 110/119/118 from the
FOMA terminal, the call will turn into a voice call automatically.
Using Overseas
International roaming (WORLD WING) is a service
that allows you to use the FOMA terminal used
domestically in a service area of international
carrier associated with DOCOMO, with the same
phone number and mail address. You can use
voice call, SMS, and i-mode mail functions without
changing settings
● Available area
This FOMA terminal can be used in 3G network and
GSM/GPRS network service areas. Check available
areas.
● Before using the FOMA terminal overseas, see
the following items.
• "Int'l Service Guide" pre-installed on the FOMA
terminal (Japanese only)
• "Mobile Phone User's Guide [International Services]"
• DOCOMO International Services website
Information
• For a country code, international call access code, and
universal number international prefix, see "Mobile Phone User's
Guide [International Services]" or DOCOMO International
Services website.
48
Page 51
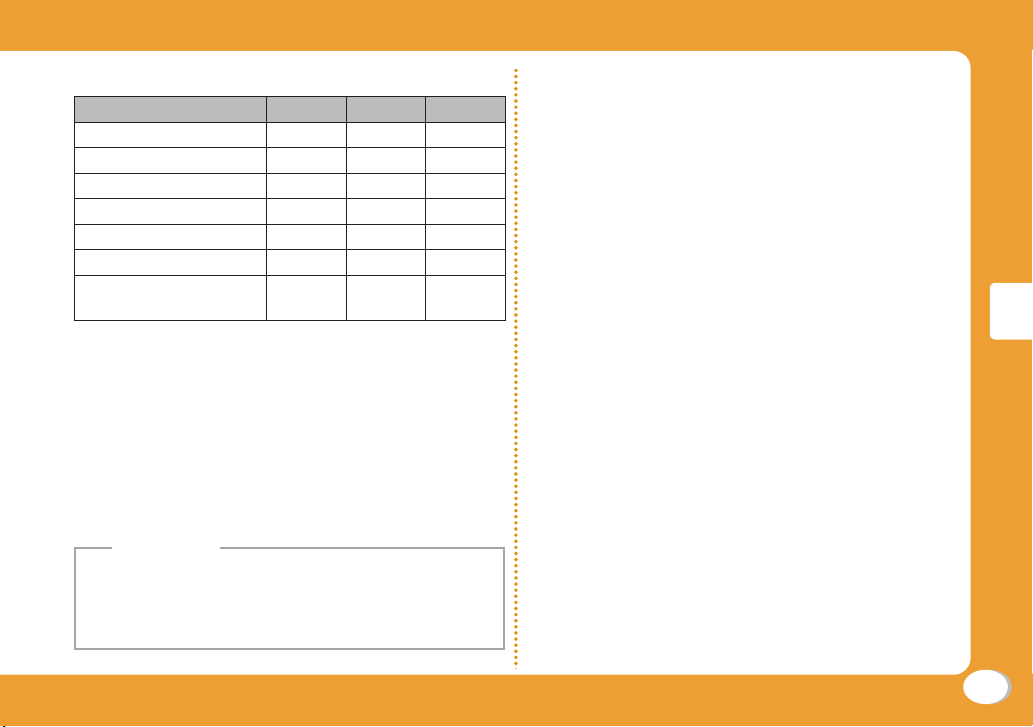
Available services
Communication service 3G GSM GPRS
Voice call
Videophone
SMS
i-mode
i-mode mail
i-Channel
Packet communication by
connecting to a PC
*1 When you use Multi number, you cannot make a call
*2 If you send a message to the FOMA terminal user,
*3 You need to make overseas usage settings for i-mode.
*4 You need to make i-Channel usage settings overseas.
• Some services are unavailable depending on the international
*1
*1
*2
*3
*3*4
using Additional number.
enter the other party's phone number in the same
operation as in Japan.
Packet communication charges apply for the automatic
update for Basic channel information. (In Japan, it is
included in i-Chanel usage fee.)
○ ○ ○
○ × ×
○ ○ ○
○ × ○
○ × ○
○ × ○
○ × ○
Information
carrier or network you access.
For countries, regions, and international carriers you can
access, see "Mobile Phone User s Guide [International
Services] or DOCOMO International Services website.
Making a call to Japan while staying overseas
Make a call with "+81" prefixed to the other
party's phone number.
Stand-by display u 0 (for over 1
1
second) u 8 1 u Enter other
party's phone number except the first "0"
A
2
■ To make a videophone call
Press I [V. phone].
Making a call to outside the country you
stay (except Japan)
Make a call with "+" and a country code prefixed
to the other party's phone number.
• To make a call to a WORLD WING user overseas, enter
"81" as a country code to make an international call to
Japan.
Stand-by display u 0 (for over 1 second)
1
u Enter "Country code - Area code (City
code) - Other party's phone number"
• If an area code (city code) starts with "0", remove "0".
(When calling some countries such as Italy, "0" may
be required.)
A
2
■ To make a videophone call
Press I [V. phone].
Connect
49
Page 52
Making a call to a person in the country you
stay
Make a call by dialing the other party's phone
number from the area code (city code).
Stand-by display u Enter "Area code (City
1
code) - Other party's phone number"
A
2
■ To make a videophone call
Press I [V. phone].
Making a call to WORLD WING user
overseas
To make a call to a WORLD WING user overseas,
make a call as an international call to Japan
Connect
regardless of in or out of the country you stay.
Stand-by display u 0 (for over 1
1
second) u 8 1 u Enter the other
party's phone number except the first "0"
A
2
■ To make a videophone call
Press I [V. phone].
Receiving a call overseas
A call arrives
1
A
2
Answer a call.
To end the call, P
3
Information
• When a call arrives during the international roaming, the call is
internationally forwarded from Japan. The caller is charged for
call fees to Japan, and the receiver is charged for receiving the
call.
50
Page 53
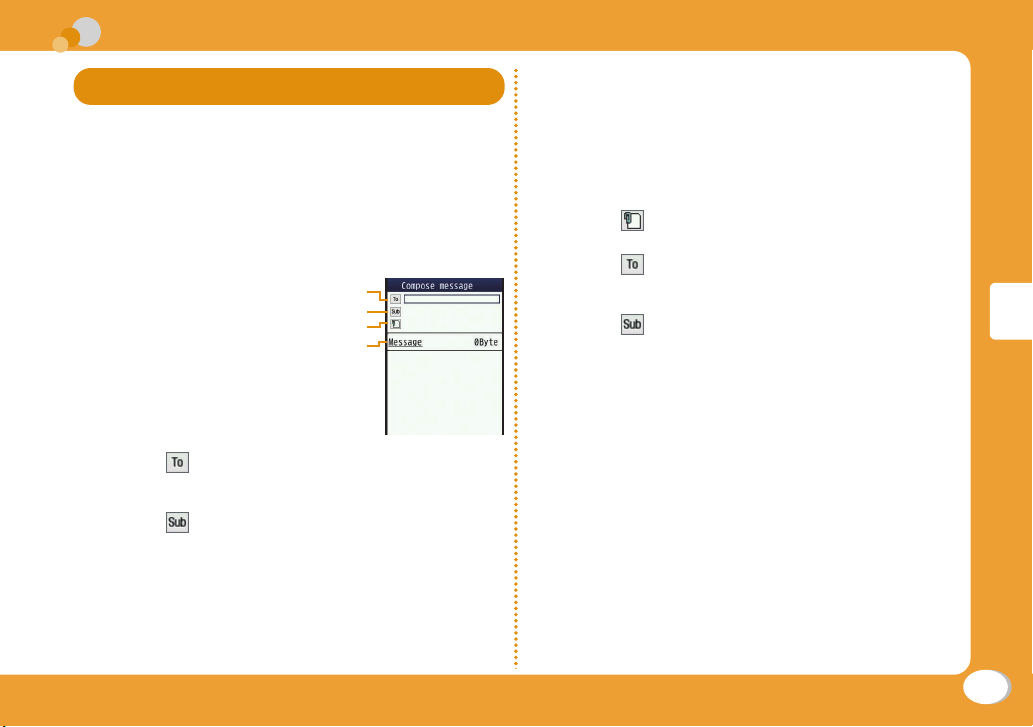
Sending i-mode Mail
Upon subscription to i-mode, you can exchange
e-mail via the Internet, as well as between i-mode
terminals.
• For details on i-mode mail, see "Mobile Phone User's
Guide [i-mode] FOMA version".
Stand-by display u g u "Compose
1
message"
Address
Subject
Attachment
Message
Select field u "Direct input" u Enter an
2
address
Select field u Enter a subject
3
Select [Message] field u Enter a message
4
I [Send]
5
Attaching and sending a file
Attaching and sending a file
• Up to 10 files, a total of 2MB, can be attached.
Stand-by display u g u "Compose
1
message"
Select field u Select a file
2
Select field u "Direct input" u Enter an
3
address
Select field u Enter a subject
4
Select [Message] field u Enter a message
5
I [Send]
6
Connect
51
Page 54
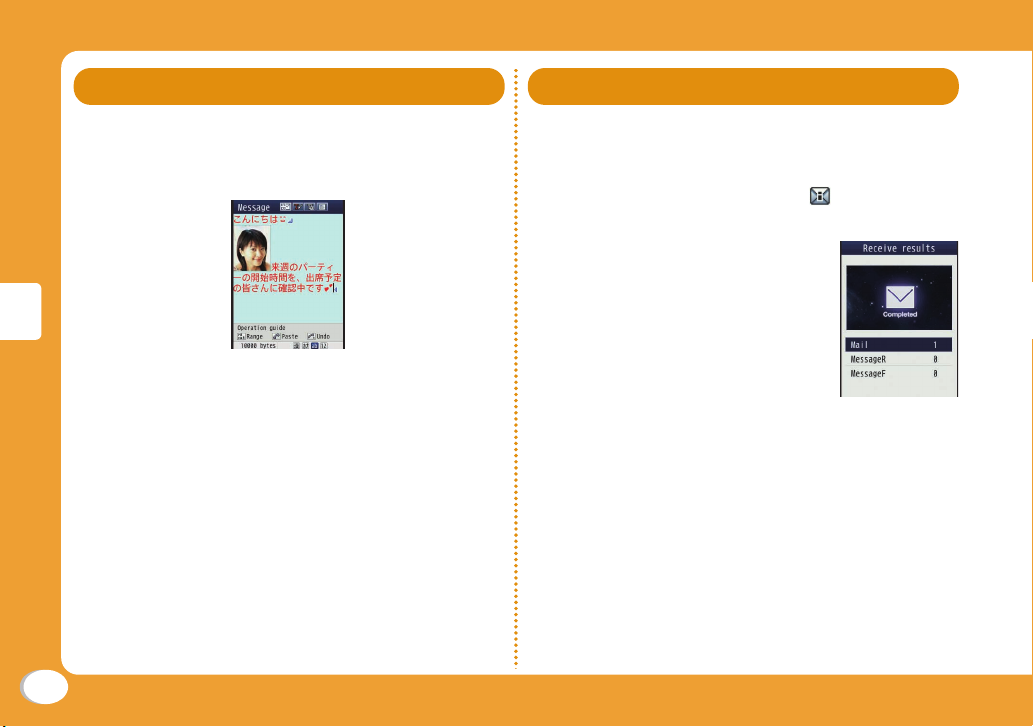
Sending Deco-mail
Create your designed mail by adding decorations
such as changing font size, font color or
background color, or inserting images when
editing i-mode mail.
Stand-by display u g u "Compose message"
1
Connect
Enter an address and subject
2
Select [Message] field u g [Deco]
3
• Set the character input mode to other than the
Alphabetical input mode to select g [Deco].
Use the palette to decorate a message
4
If the palette is open, M [Close]
5
■ To preview the Deco-mail message
Press M [Menu] u "Preview".
C [Set] u I [Send]
6
Viewing Received i-mode Mail
When the FOMA terminal is in the service area,
i-mode mail is automatically sent from the i-mode
center.
When i-mode mail arrives, appears at
1
the top of the screen
When the reception completes, the
Receive results screen appears.
"Mail" u Select a folder
2
Select a mail to display
3
52
Page 55
Replying to i-mode mail
Reply to the sender of i-mode mail. Replying can
be made by entering new text or quoting the text
of the received i-mode mail.
Received mail detail screen u M [Menu]
1
u "Reply/Forward" u "Reply" / "Reply
with quote"
Enter a subject and message
2
I [Send]
3
Checking for new i-mode mail
When the FOMA terminal is out of service area,
etc. and therefore i-mode mails are failed to be
received, they are stored in the i-mode center.
Check with the i-mode center for new messages
to receive stored i-mode mails.
Stand-by display u g (for over 1 second)
1
Sorting mails
Set sorting criteria to automatically save mails to
specified folders.
• Create sorting folders in "Inbox" and "Outbox" beforehand.
Stand-by display u g u "Mail setting" u
1
"Auto sort"
"Sort inbox" / "Sort outbox"
2
Select the sorting rule setting field
3
Select the Sorting criteria field u Set the
4
sorting criteria
Select the Folder to sort into field u Select
5
the folder for sorting mails u I [Done]
Connect
53
Page 56
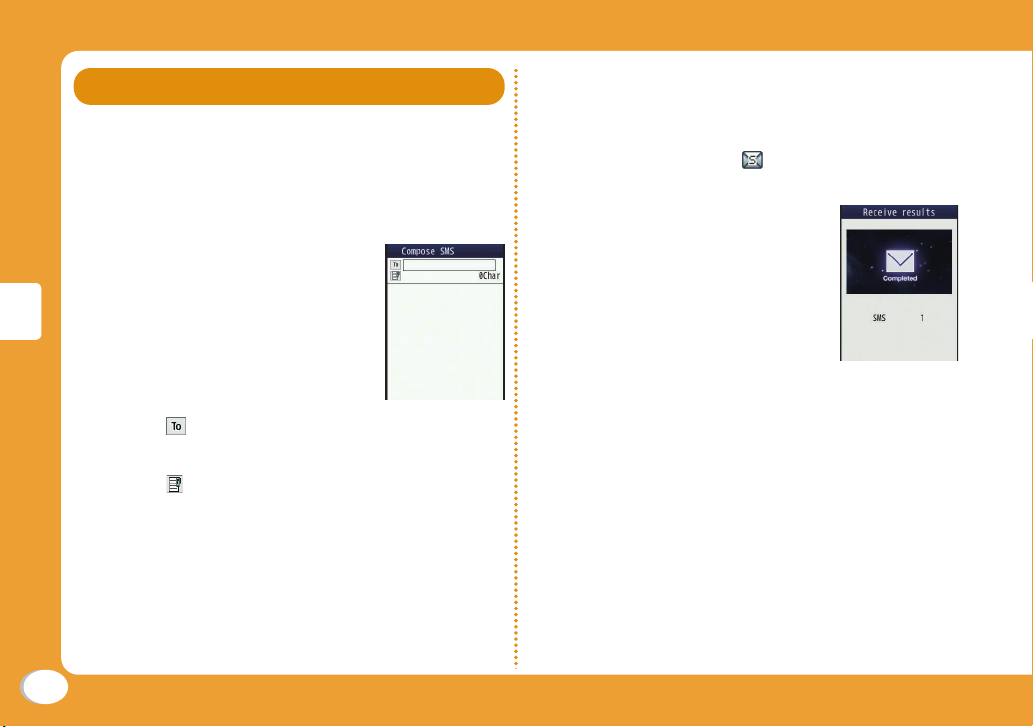
Using SMS
Sending SMS
Send a message addressed to a mobile phone
number.
Stand-by display u g u "SMS" u
1
"Compose SMS"
Connect
Select field u "Direct input" u Enter a
2
phone number
Select field u Enter a message
3
I [Send]
4
Viewing received SMS
SMS messages are sent automatically when the
FOMA terminal is in the service area.
When SMS arrives, appears at the top
1
of the screen
When the reception completes, the
Receive results screen appears.
C [Select] u Select a folder
2
Select SMS to display
3
54
Page 57
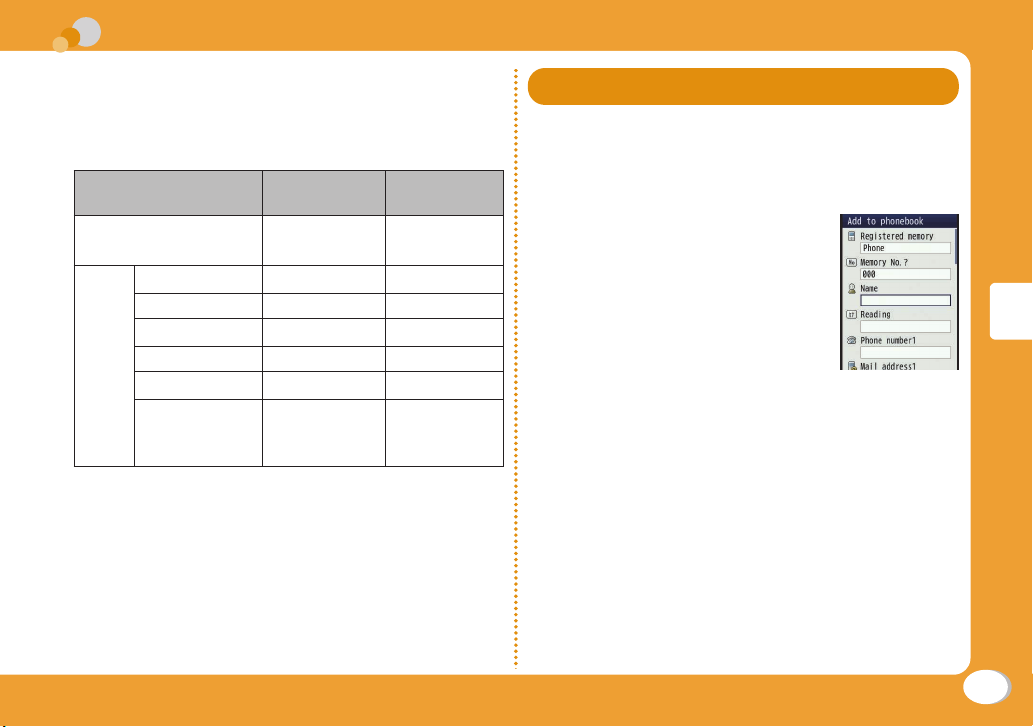
Phonebook
Two types of Phonebooks are available with the
FOMA terminal: FOMA terminal Phonebook to be
saved on the FOMA terminal and UIM Phonebook
to be saved on the UIM. Entry items that can be
saved/ set for each Phonebook are as follows.
Item
Number of Entries
Name (Reading) 1 entry 1 entry
Phone number 5 entries 1 entry
Mail address 3 entries 1 entry
Entry
details
Group 31 groups 11 groups
Image 1 entry Not available
Other settings Secret code,
FOMA terminal
Phonebook
Up to 1000
entries
Ringtone, Mail
ring tone, etc.
UIM
Phonebook
Up to 50
entries
Not available
Adding Phonebook Entries
Adding new phone number, mail address,
etc.
Stand-by display u D (for over 1 second)
1
Select "Registered memory" field u
2
"Phone" / "UIM"
Set each item
3
I [Done]
4
Connect
55
Page 58
Adding Phonebook entries from redial or
received calls
Stand-by display u R (Redial) or L
1
(Recv. Calls)
Move the cursor to the phone number to
2
add u C [Detail] u M [Menu] u "Add to
phonebook"
"New registration"
3
Set each item u I [Done]
4
Connect
Editing Phonebook Entries
Stand-by display u D u Select the entry
1
to edit u M [Menu] u "Edit" u Edit each
item
I [Done] u "Yes"
2
56
Page 59
Deleting Phonebook Entries
Stand-by display u D u Select a
1
Phonebook entry to delete u M [Menu]
u "Delete" u "One" / "Selected" / "all in
phone" / "all in UIM"
■ When select "Selected"
u "Phone" / "UIM" u Put check marks for the entries
to delete u I [Delete]
■ When select "all in phone" / "all in UIM"
Terminal security code is required.
"Yes"
2
Checking Phonebook Storage Status
Check the Phonebook storage status of the FOMA
terminal and UIM.
Stand-by display u M u "Phonebook" u
1
"No. of Phonebook"
Viewing Call/Mail History
Stand-by display u M u "Phonebook"
1
u "Call/Mail history" u Select the log to
view
Connect
57
Page 60
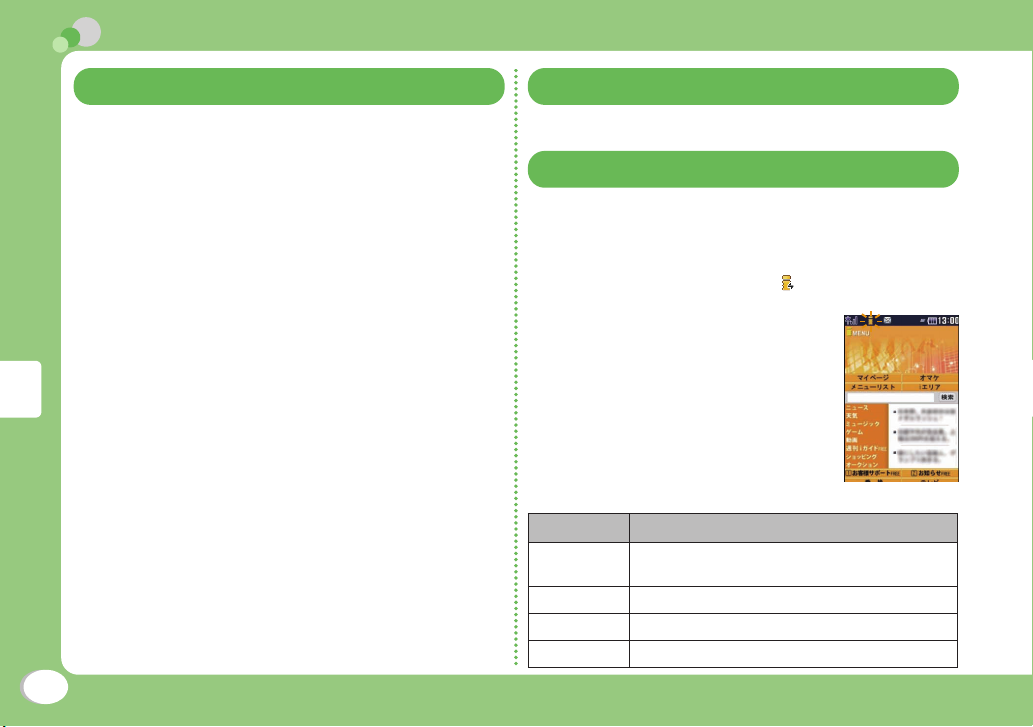
i-mode/Full Browser
i-mode
i-mode is a service that makes use of the display
of the FOMA terminal supporting i-mode (i-mode
terminal) to enable you to use online services
such as site access, Internet access, and i-mode
mail.
• i-mode is a fee-based service requiring a subscription.
• For details on i-mode, see "Mobile Phone User's Guide
[i-mode] FOMA version".
● Before using i-mode
• Contents of sites or Internet websites are generally
protected by copyright law. Data, such as text or images
you download to the i-mode terminal from sites or web
pages, can be used only for personal entertainment,
but cannot be used, in whole or in part, as it is or after
modification, for sale or redistribution, without the consent
of the copyright holders.
• If you replace the UIM with another one or turn the power
ON with the UIM not inserted, you cannot display/play
Search
files, depending on the model, such as still images,
moving pictures, melodies obtained from sites, attached
files (still images/moving pictures/melodies, etc.) sent/
received by mail, scre
• When a file with the UIM restriction is set as the Stand-by
display or ring tone, the setting will revert to default if a
different UIM is inserted or the power is turned ON with
the UIM not inserted.
58
en memos, or Message R/F.
Displaying i-mode Site
Stand-by display u I u "iMenu" u "English"
1
Viewing and Operating Sites
Selecting a site to display
While viewing a site u Select an item
1
(Linked page)
During i-mode communication, blinks at the top of the
screen.
● Key operations while viewing a site
Operation Description
g [Reload]
[∧]
g
G
[∨]
P u "Yes"
The site is updated if any content on this
site has been updated.
Move up by one item/scroll up by the screen
Move down by one item/scroll down by the screen
Exit i-mode
Page 61
Saving frequently accessed sites as
bookmarks
Save sites as bookmarks to display your favorite
pages quickly.
While viewing a site u M [Menu] u
1
"Bookmark" u "Save"
Edit a title u I [Add] u Select a
2
destination folder
Displaying homepages or sites from
bookmarks
Stand-by display u I u "Bookmark"
1
Select a folder u Move the cursor to a
2
bookmark u C [Connect]
Saving Screen memos
Save the currently displayed page as a Screen
memo. Saved Screen memo pages can be
displayed without connecting to i-mode.
• Some sites are set to disable saving Screen memos. In
this case, a page cannot be saved as a Screen memo.
While viewing a site u M [Menu] u
1
"Screen memo" u "Save" u "Yes"
Displaying Screen memos
Stand-by display u I u "Screen Memo"
1
Move the cursor to a Screen memo u C
2
[Display]
Full Browser
Using Full browser, you can browse web pages
designed for PCs on the FOMA terminal.
• Some pages may not be displayed correctly.
• Note that you may get charged a high communication
fee for massive data communication such as browsing
web pages containing many images or downloading data
files. For details on packet communication fee and billing
plan, see "Mobile Phone User's Guide [i-mode] FOMA
version".
Search
59
Page 62
Displaying Web Pages Designed for PC
Stand-by display u I u "Full browser"
1
u "Home"
Information
• SSL/TLS-compatible web pages can be displayed with Full
browser.
• SSL/TLS are the methods to communicate safely with
authentication/encryption technologies. SSL/TLS pages prevent
others from eavesdropping, spoofing, and altering information
during communication by exchanging encrypted data, and
enable you to exchange your personal information such a
c
redit card number and address safely.
Saving frequently accessed web pages as
bookmarks
Save sites as bookmarks to display your favorite
pages quickly.
Search
While viewing a web page u M [Menu] u
1
"Bookmark" u "Add"
Edit a title u I [Add] u Select a
2
destination folder
Displaying web pages from bookmarks
Stand-by display u I u "Full browser"
1
u "Bookmark"
Select a folder u Select a bookmark
2
Switching i-mode to Full browser
While viewing an i-mode site u M [Menu]
1
u "Switch to Full Browser" u "OK"
s
Information
• The billing system for Full browser is different from the
one for i-mode. Packet communication charges may be
increased
communication volume, so, it is recommended to subscribe to
i-mode packet flat-rate service.
when Full bro
wser is used, depending on the data
60
Page 63
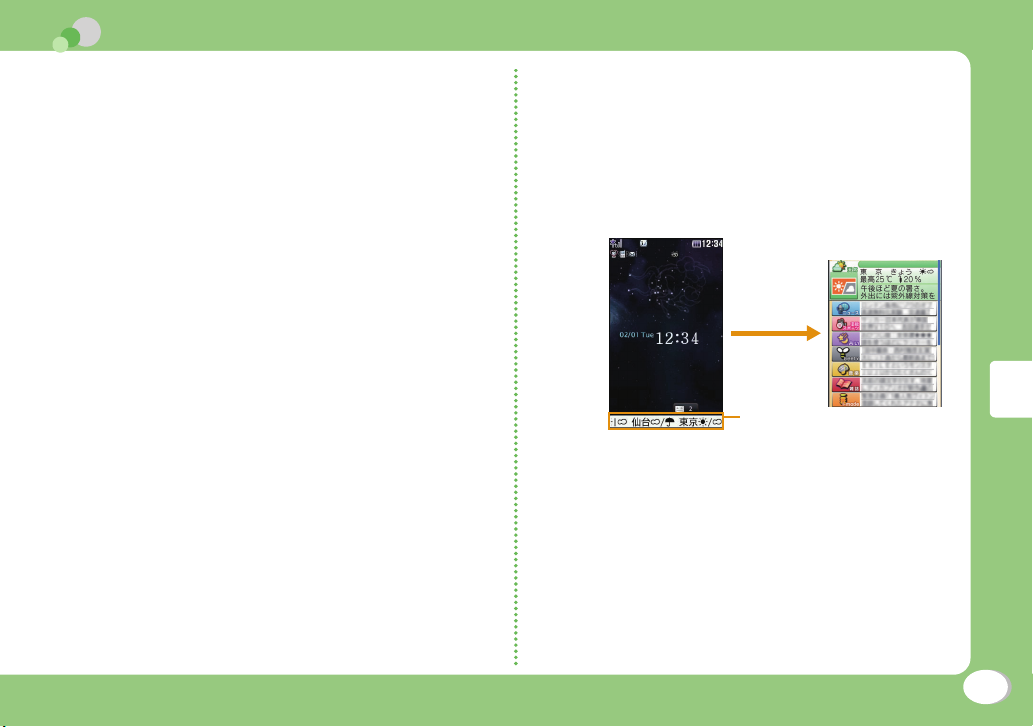
i-Channel
This service distributes information such as news
and weather forecast to i-Channel compatible
terminals. The automatically received latest
information appears as a ticker on the Standby display. Pressing Q displays the latest
information in the channel list.
• i-Channel is a fee-based service requiring a subscription
(an i-mode contract is necessary for this subscription).
i-Channel has two types of channels: "Basic
channel" provided by DOCOMO and "Okonomi
(Optional) Channel" provided by IP (Information
Provider). For "Basic channel", no packet
communication charges apply for automatically
updating information. For "Okonomi (Optional)
Channel" in which you can save and use your
favorite channels, packet communication charges
apply for automatically updating information.
Note that packet communication charges apply
for browsing detailed information for both "Basic
channel" and "Okonomi (Optional) Channel".
When you use the international roaming service,
packet communication charges apply for both
automatically updating information and browsing
detailed information.
• For details on i-Channel, see "Mobile Phone User's Guide
[i-mode] FOMA version".
• The i-Channel service is provided in Japanese only.
Displaying i-Channel
If you subscribe to i-Channel, information
automatically appears as a ticker on the Stand-by
display when the information is received.
• While the Public mode (Drive mode) is set, the ticker does
not appear.
Stand-by display u Q
1
Q
Ticker
Select a channel item screen.
2
The FOMA terminal connects to the site and detailed
information is displayed.
• L : Return to the Channel list.
Channel list screen
Search
61
Page 64
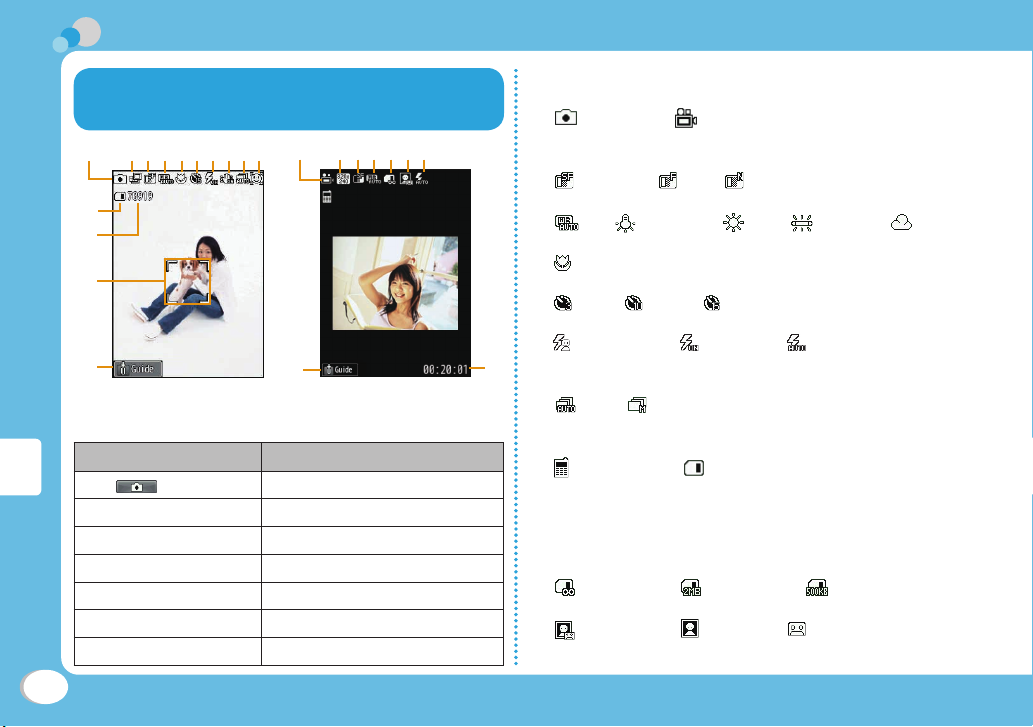
Camera
Viewing and Operating Shooting
Screen
a b cd efghij
k
l
m
n
Still image shooting screen
● Key operations on shooting screens
Operation Description
]
Enjoy
C [
C [Rec.]
J
H
I [Mode]
M [Menu]
Q , P
a b cdo
n
Moving picture shooting screen
Shutter
Start recording
Zoom
Adjust brightness
Change Camera mode
Display setting menu
Exit Photo-mode/Movie-mode
pg
● Marks (icons) displayed on shooting screens
a Mode
Photo-mode Movie-mode
Image size
b
c Image quality
Super fine Fine Normal
d White balance
Auto Incandescent Sunny Fluorescent Cloudy
e Macro
ON
f Auto timer
3sec 10sec 15sec
g Light
While shooting Always ON Auto
h Shake reduction
q
i Continuous mode
Auto Manual
jFunny face shot
k Memory in use
Phone memory microSD
l Number of available shot
m Focus frame
Frame color changes to indicate status during auto focus.
n Guide for key operations
o Size restriction
No restriction For mail long For mail short
p Type
Sound+Video Movie only Sound only
q Total recordable time
62
Page 65
Shooting Still Images/Moving
Pictures
Viewing Still Images/Moving
Pictures after Shooting
Shooting still images
Stand-by display u G
1
Point the camera to a subject uC [ ]
2
C[Save]
3
Information
• When shooting still images, if "Select size" is set to "5M (1920 ×
2560)", zoom is not available to use.
Shooting moving pictures
Stand-by display u G u I [Mode] u
1
"Movie-mode"
Point the camera to a subject u C [Rec.]
2
The tone sounds and recording a moving picture starts.
C [Stop]
3
The tone sounds and recording a moving picture ends.
C [Save]
4
Viewing still images
Stand-by display u M u "Data box"
1
u "My picture" u Move the cursor to
"Camera" u C [Open]
Move the cursor to a file u C [View]
2
Information
• To set the still image you shot to the Stand-by display, display
the still image to set and press M [Menu] u "Set as" u "Standby display".
Viewing moving pictures
Stand-by display u M u "Data box" u
1
"i-motion" u Move the cursor to
"Camera" u C [Open]
Move the cursor to a file u C [Play]
2
Information
• To set the moving picture you recorded to the Stand-by display,
play the moving picture to set and press M [Menu] u "Set as
display" u "Stand-by display".
Enjoy
63
Page 66
Shooting Still Images in Various Modes
Panorama shot
Create a panoramic image from three still images
captured by moving the FOMA terminal rightward.
Stand-by display u G u M [Menu] u "Preview"
1
u "Shot mode" u "Panorama shot" u M [Close]
C [ ]
2
Move the FOMA terminal rightward u C [ ]
3
Move the FOMA terminal rightward u C [ ]
4
A panoramic image made of three images is displayed.
C [Save]
5
Information
• The right edge of the previously shot image is displayed at the
left side of the shooting screen. This helps you to frame for the
next shot.
Funny face shot
Enjoy
When you point the camera to a subject, the
camera recognizes a face and converts it into a
funny face.
Stand-by display u G u M [Menu] u
1
"Preview" u [Shot mode] u [Funny face shot]
64
Select a funny face u M [Close] u M
2
[Close]
Point the camera to a subject
3
When the face is recognized, the effect is displayed on
the screen.
C [ ] u C [Save]
4
Shooting with frame
Shoot an image with a frame added to a subject.
Select a frame from "My picture".
Stand-by display u G u M [Menu] u
1
"Preview" u "Shot mode" u "Shoot with
frame"
Move the cursor to a folder u C [Open] u
2
Select a frame u M [Close] u M [Close]
C [ ] u C [Save]
3
Using Magnifying Glass
Use the camera of the FOMA terminal to magnify
objects.
Stand-by display u G (for over 1 second)
1
Page 67
1Seg
Using 1Seg
1Seg is a service provided by TV broadcasters
(broadcasting stations). No communication
charges apply for receiving video and audio. For
viewing fee for NHK, contact NHK.
• Packet communication charges apply for browsing "Data
broadcasting site" and "i-mode site". Some sites (feebased i-mode sites)require an information fee for use.
• For details on "1Seg" service, visit websites below.
The Association for Promotion of Digital Broadcasting
PC: http://www.dpa.or.jp/english/
i-mode: http://www.dpa.or.jp/1seg/k/ (Japanese only)
* 1Seg is not available overseas.
Signal
1Seg is one of the broadcasting services, and
receives a signal (broadcast wave) different
from the FOMA service. In the following places,
data reception may become weak and cause
difficulties in receiving messages.
• Place that is far from the tower which sends the broadcast
wave
• Mountain areas or behind a building
• In a tunnel, underground, or recess of a building
* The signal condition may be improved by moving the
FOMA terminal away from or close to you, or by moving
yourself to another place.
Battery level
If you try to use 1Seg when the battery level
is low, the battery alert tone sounds and a
confirmation screen appears asking whether
to activate 1Seg. Also, when the battery level
becomes low while watching or recording a 1Seg
program, the battery alert tone sounds.
• If no operation is performed for approximately one minute
on a confirmation screen, 1Seg automatically ends.
Messages on the screen when you use
1Seg for the first time
When you use 1Seg for the first time after purchase, a
confirmation screen of escape clause appears.
Read each clause and press C[OK]. After this, a
confirmation screen does not appear.
Enjoy
65
Page 68
Watching 1Seg
Setting channels
To watch 1Seg, make Channel settings and save a
channel list beforehand.
Example: If no channel list is saved
● Selecting an area to set channels
Stand-by display u M u "1Seg" u
1
"Channel setting"
"Select area" u Select an area u Select a
2
prefecture
C [Select] u "Yes"
3
Enjoy
● Setting channels automatically
Stand-by display u M u "1Seg" u
1
"Channel setting"
"Auto channel set" u "Yes" u C[Save]
2
u "Yes"
Information
• Perform "Auto channel set" within the service area for digital
terrestrial broadcasting.
Activating 1Seg
Stand-by display u t (for over 1
1
second)
66
Page 69
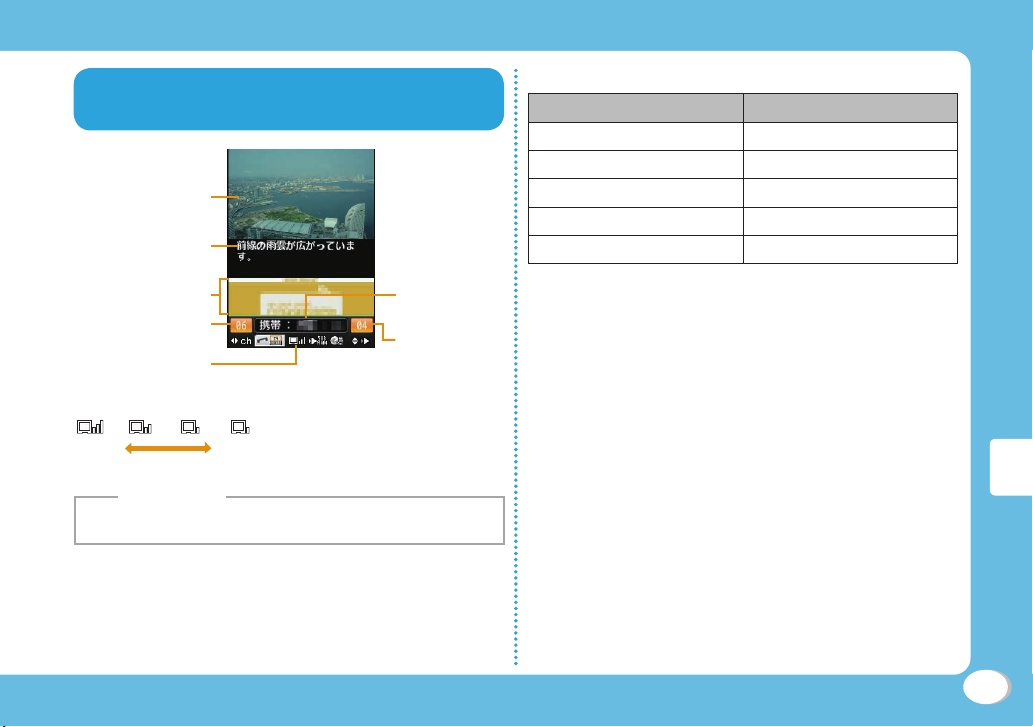
Viewing and Operating 1Seg
Watching Screen
Video
Subtitles
Data broadcasting
Remote controller
number
Reception level of
broadcast ware
Channel /
TV program
Volume
● Key operations on 1Seg watching screen
Operation Description
H, F / E
E (for over 1 second)
J, Dial keys, *, #
g [EPG]
P u "Yes"
Adjust volume
Mute
Select a channel
Display program list
Exit 1Seg
Setting timer for watching 1Seg program
Stand-by display u M u "1Seg" u "TV
1
timer list"
I [New] u Set each item
2
Strong Weak
Information
• Only tilting the top part of the FOMA terminal to left can switch
vertical/horizontal view.
I [Done]
3
Enjoy
67
Page 70
MUSIC
Music&Video Channel
Music&Video Channel is a service which
automatically delivers up to about one-hour
programs at night just by selecting your favorite
music programs in advance. Further, you can
enjoy high-quality video program of up to about
30 minutes. Programs are updated regularly which
enables you to enjoy the delivered programs
while commuting.
• Music&Video Channel is a fee-based service requiring a
subscription. You also need to subscribe to i-mode and
i-mode packet flat-rate service.
• In addition to the usage fee for the Music&Video Channel,
some programs may require additional information fees.
• After subscribing to Music&Video Channel, if you insert
the UIM into a Music&Video Channel-incompatible FOMA
terminal, the service b
service fees will still apply unless you cancel the
Music&Video Channel subscription.
• You cannot set or obtain programs during international
roaming*. When you go overseas, halt the distribution of
programs beforehand. When you come back to Japan,
resume starting distribution.
Enjoy
* Packet communication charges apply if trying to set or
obtain programs during internati
• For details on Music&Video Channel, see "Mobile Phone
User's Guide [i-mode] FOMA version".
• The Music&Video Channel service is provided in
Japanese only.
68
ecomes unavailable. However,
aming.
onal ro
Setting Programs
Stand-by display u M u "MUSIC" u
1
"Music & Video Ch"
"Set program"
2
Follow on-screen instructions to set
3
programs
Page 71
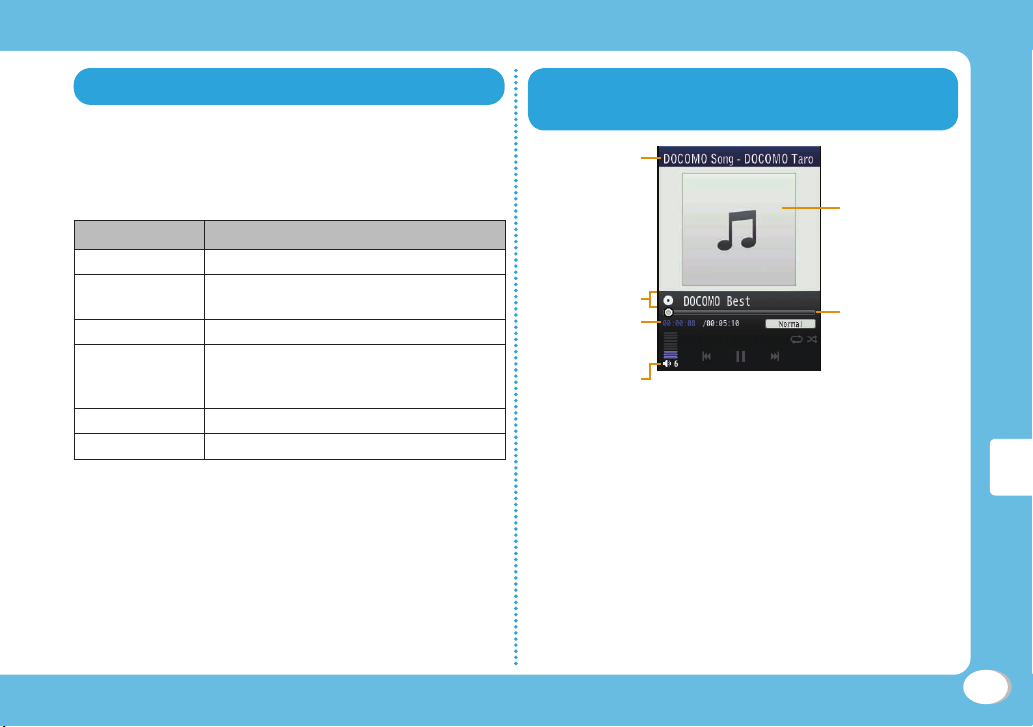
Playing Programs
Stand-by display u M u "MUSIC" u
1
"Music & Video Ch" u Select a program
● Key operations on Music&Video Channel
player screen
Operation Description
[Pause/Play]
C
C (for over 1
second)
H
J
J
(Hold down)
P
*1 When the time of playback is over 2 seconds, it will
play from the beginning.
*2 When the time of playback is less than 2 seconds, it
will play the previous chapter.
Pause/play
Find the beginning of the current
program and pause
Adjust volume
Play from the beginning*1 of the key current
chapter or play the
chapter
Rewind/fast forward while holding down
Exit Music&Video Channel player
previous*2/next
Viewing and Operating Music
Player Screen
Title (song
name), artist
name
Album name
Elapsed time/
total time
Volume
Jacket
image/lyrics
Playback
progress bar
Enjoy
69
Page 72
● Key operations on Music player screen
Operation Description
[Pause/Play]
C
H
J
J (Hold down)
8
P
*1 When the time of playback is over 2 seconds, it will
play from the beginning.
*2 When the time of playback is less than 2 seconds, it
will play the previous chapter.
Pause/play
Adjust volume
Find the beginning
previous song
Rewind/fast forward while holding down
Show/hide jacket image/lyrics
Exit Music player
*1
of the song or play
*2
/next song
Downloading Chaku-Uta Full
Display a site that contains Chaku-Uta
1
Full® songs u Select a Chaku-Uta Full®
song to download
Enjoy
"Save" u Select a folder
2
• When the microSD card is inserted, select a
destination to save.
Information
• Before downloading music data from websites, read the license
agreement (license and prohibited activities, etc.) carefully.
• Music data saved on the FOMA terminal or on a microSD card
can be used for personal use only. When using, do not violate
a third party's intellectual property right such as copyright, and
other rights. Do not copy or move music data saved on the
FOMA terminal or on a micr
PC.
• The packet communications charges for updating the time limit
of international roaming is out of i-mode packet flat-rate service.
* "Chaku-Uta Full" is a registered trademark of Sony Music
Entertainment Inc.
oSD card
to other media such as a
Playing Music Data
®
Example: To play music in "All songs"
Stand-by display u M u "MUSIC" u
1
"Music Player"
"All songs"
2
Move the cursor to music data u C [Play]
3
70
Page 73
i-αppli
"i-αppli" is software for i-mode compatible mobile
phones. Download various software from i-mode
sites to use the FOMA terminal more conveniently
by updating stock price or weather information
automatically, or enjoying games without
connecting to network, etc.
• Packet communication charges apply.
• For overseas use, packet communication charges differ
from domestic charges.
• For details on i[i-mode] FOMA version".
αppli, see "Mobile Phone User's Guide
Downloading i-αppli from Sites
Download software from a site and save it to the
FOMA terminal
While viewing a site u Select software u
1
"Yes"
Download completes u "Yes"
2
The downloaded software starts.
Starting i-αppli
Stand-by display u I (for over 1 second)
1
Select software
2
■ To exit i-αppli
Press P u "Yes".
Deleting i-αppli
Stand-by display u I (for over 1 second)
1
u Move the cursor to software u M
[Menu] u "Delete" u "This item" u "Yes"
Information
•If deleted pre-installed i-αppli, you can download from "WOW
LG" site (Japanese only). From this site, you can download preinstalled Deco-mail picture, Deco-mail pictogram, wallpaper,
melody, i-motion, etc. as well as iStand-by display
u "ケータイ電話メーカー(Mobile Phone Manufacturers)"
List)"
u "WOW LG"
* Packet communication charge applies for downloading.
u I u "iMenu" u "メニューリスト(Menu
αppli.
Enjoy
71
Page 74
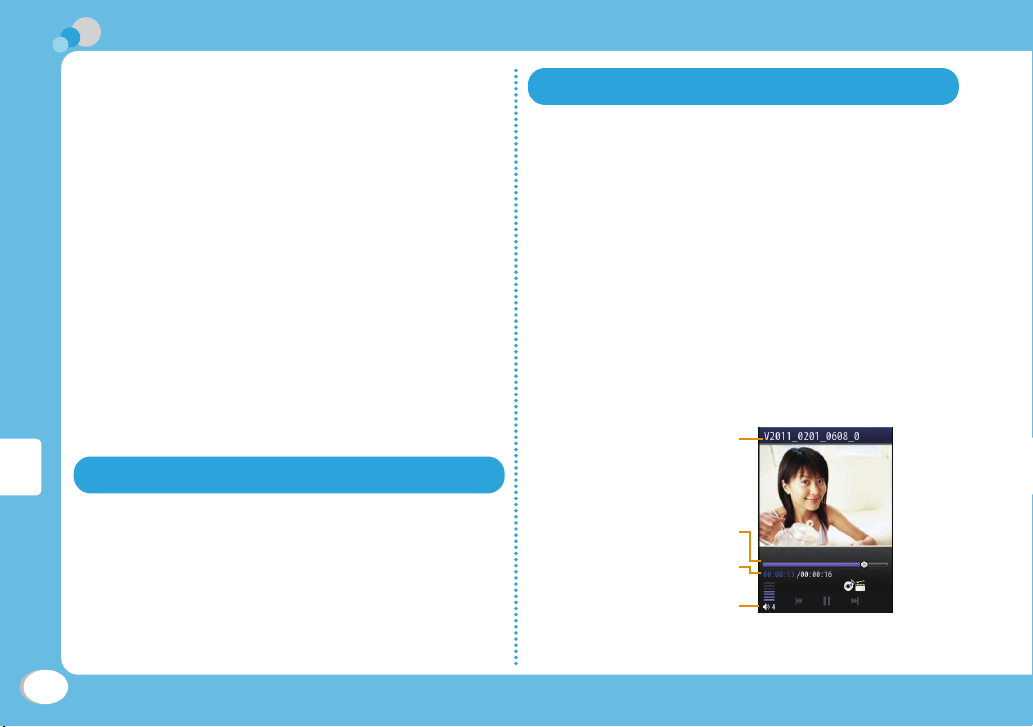
i-motion
i-motion is a moving picture data with video and
sound. i-motion can be downloaded from i-motion
sites and can be played, saved, and set as the
Stand-by display or ring tone, etc.
i-motion types
● Standard type
There are following two formats.
a
Format to be played back after downloading
(Up to 10MB)
b
Format to be played back while downloading
(Up to 10MB)
• Some standard-type i-motion may not be saved,
depending on i-motion.
● Streaming type
This type allows you to play back i-motion while
downloading. Up to 10MB of i-motion can be played
back. Data is deleted after playback and cannot be saved
on the FOMA terminal.
Downloading i-motion from sites
• Downloaded i-motion is saved to "i-mode" folder in
"i-motion" of "Data box" or a microSD card.
Enjoy
While viewing a site u Select i-motion
1
After playback or downloading, "Save"
2
• If a microSD card is inserted, further select save
location.
Playing i-motion
Play moving pictures you recorded or i-motion
downloaded from sites or i-mode mails.
Stand-by display u M u "Data box" u
1
"i-motion"
Move the cursor to a folder u C [Open]
2
Move the cursor to a file u C [Play]
3
• When playing back moving picture/i-motion (with
video) for the first time, a confirmation appears
asking whether to play i-motion in full screen at any
time. Select "Yes" to play in full screen (horizontal).
• If you switch i-motion in full screen (horizontal) to
vertical screen during playback, pre
File display name
Playback
progress bar
Elapsed time/total time
Volume
i-motion playback screen
ss Q
72
Page 75
● Key operations on i-motion playback screen
Operation Description
C
[Pause/Play]
[Stop]
I
J
(Hold down)
L
(Hold down)
R
F / E, H
Pause/play
Stop
Play previous file/next file
Rewind video/sound while holding down
Fast forward video/sound while holding
down
Adjust volume
Using Playlist
Specify the playback order of moving pictures/imotion on a playlist. Choose your favorite moving
pictures/i-motion saved on a microSD card or
FOMA terminal to play them in your favorite order.
Creating a playlist
Stand-by display u M u "Data box" u
1
"i-motion" u Move the cursor to
"Playlists" u C [Open]
I [New] u Enter a playlist name
2
C [Add] u Move the cursor to a folder u
3
C [Open]
Check moving pictures/i-motion to save
4
to a playlist u I [Done]
I [Done]
5
Playing a playlist
Stand-by display u M u "Data box" u
1
"i-motion" u Move the cursor to
"Playlists" u C [Open]
Move the cursor to the playlist to play u
2
C [Play]
Enjoy
73
Page 76
Convenient Tools
Using My Contact
After registering phone number and mail address,
press t to easily activate those functions.
Stand-by display u t
1
Move cursor to the number to register u
2
C [Add] u "Search phonebook" / "Direct
input"
■ Using Phonebook search
Move cursor to the entry to register, press C [Select].
■ Inputting directly
In the Phonebook entry screen, enter the name,
phone number, mail address, etc. press I [Done].
• If UIM is specified to be the destination to save, the
settings are saved in UIM, but not "My contact".
Information
• "Direct input" is unavailable when the number of Phonebook
entries in the FOMA terminal re
More Convenient
• The entry registered in UIM cannot be registered in "My
contact".
• The registered name, phone number, mail address, etc. via
"Direct input" are registered in the phonebook of the FOMA
terminal or UIM.
aches maximum.
Using Schedule
Save schedules such as meetings or
appointments.
Stand-by display u U u Move the cursor
1
to date to save to Schedule u I [New]
■ While setting 1 seg channel
Select "General" / "TV timer" in Select type screen.
Set each item
2
I [Done]
3
Using Alarm
Use the FOMA terminal as an alarm clock.
Stand-by display u M u "LifeKit" u
1
"Alarm"
Move the cursor to an alarm to edit u C
2
[Edit]
Set each item
3
I [Done]
4
74
Page 77
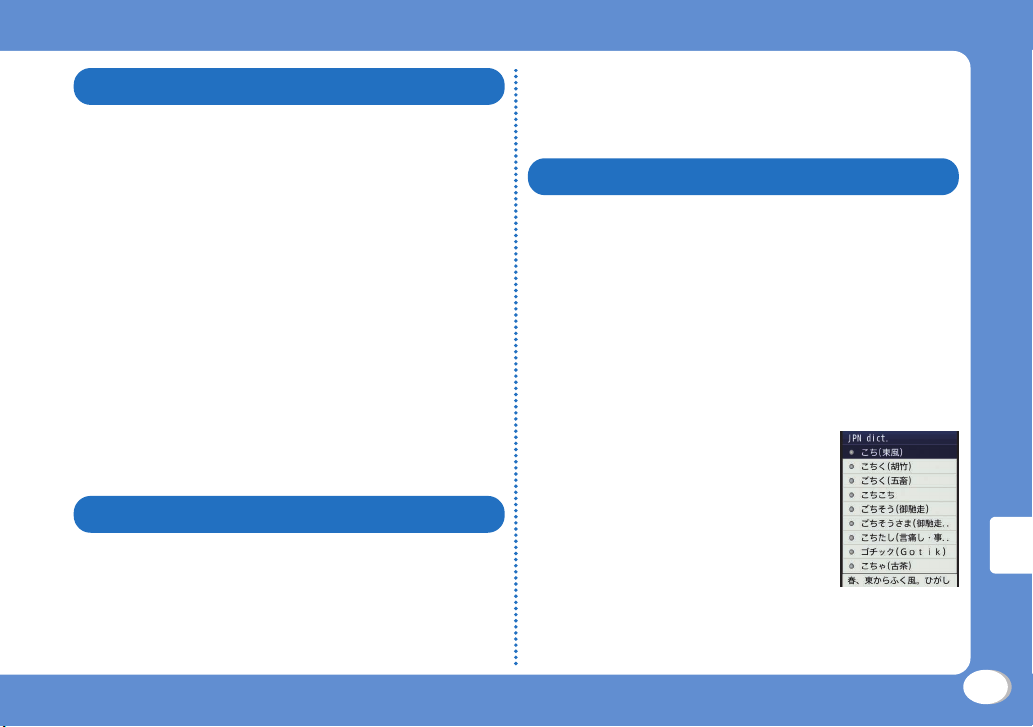
Using Bar Code Reader
Scan information embedded in JAN code or QR
code using the camera.
• When scanning a bar code, keep the camera 10cm away
from a bar code.
Stand-by display u M u "LifeKit" u "Bar
1
code reader"
Display the code to scan on the screen u
2
C [Scan]
After focus is adjusted automatically, the code is
scanned. After scanning completes, the tone sounds
and the scanned data is displayed.
• While the Manner mode is set, the tone does not
sound.
Use scanned data
3
• The display or operation differs depending on the
types of scanned data.
Setting My Function
After setting My Function, press S to easily
activate those functions.
Stand-by display u S
1
Move the cursor to the item in My
2
Function u C [Add] u Use H to select
the function to add
Using Various Convenient Tools
Using dictionary
Use Japanese dictionary, English-Japanese
dictionary, and Japanese-English dictionary.
Stand-by display u Mu "Media" u
1
"Dictionary"
"JPN dict." / "ENG-JPN dict." / "JPN-ENG
2
dict."
Enter a word to search
3
Search result
list screen
Use H key to select a word
4
More Convenient
75
Page 78
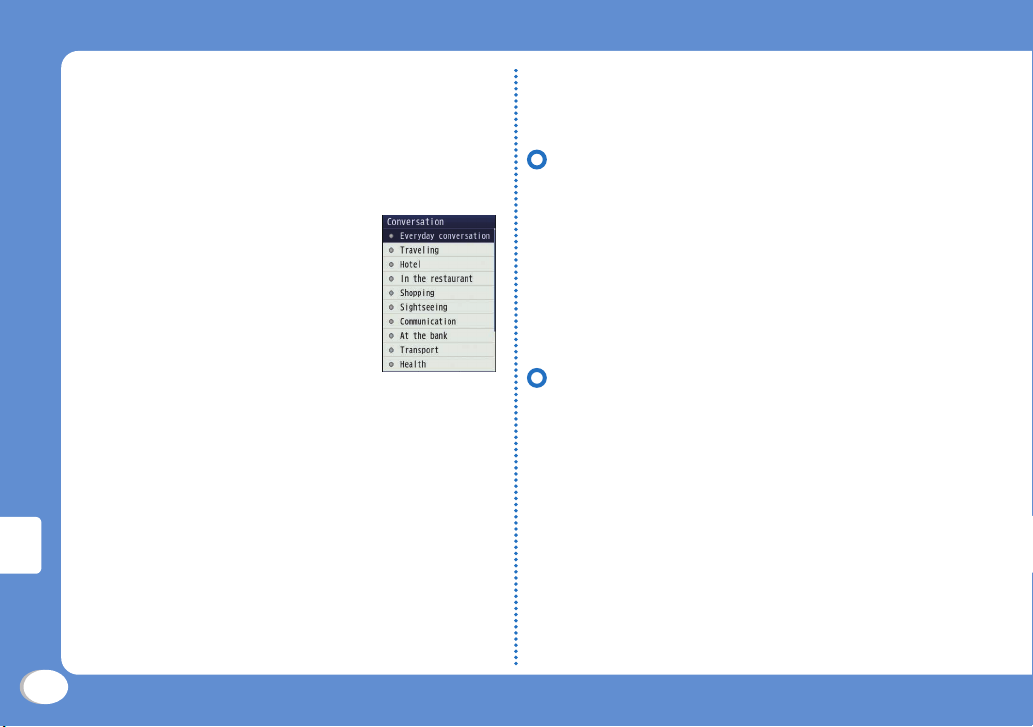
Using Conversation
Expressions about daily life, travel, business,
etc. can be displayed in Japanese, English and
Korean, also, can be read out by voice.
Stand-by display u M u "Media" u
1
"Dictionary" u "Conversation"
Viewing a document or subway map
View a document file saved on a microSD card or
subway map saved on the FOMA terminal.
● Viewing a document
• Available file types are Microsoft Word, Microsoft Excel,
Microsoft PowerPoint, and PDF. However, Word 2007,
Excel 2007, and PowerPoint 2007 files cannot be
viewed. Also, some files may not be viewed depending
on the file type.
Stand-by display u M u "Media" u
1
"Document viewer" u "microSD" u Select
a document
More Convenient
76
Conversation list
screen
Select a category
2
• Press C [Play] on the Conversation detail screen to
read out by voice.
● Viewing a subway map
Stand-by display u M u "Media" u
1
"Document viewer" u "Subway map" u
Select a region
Page 79
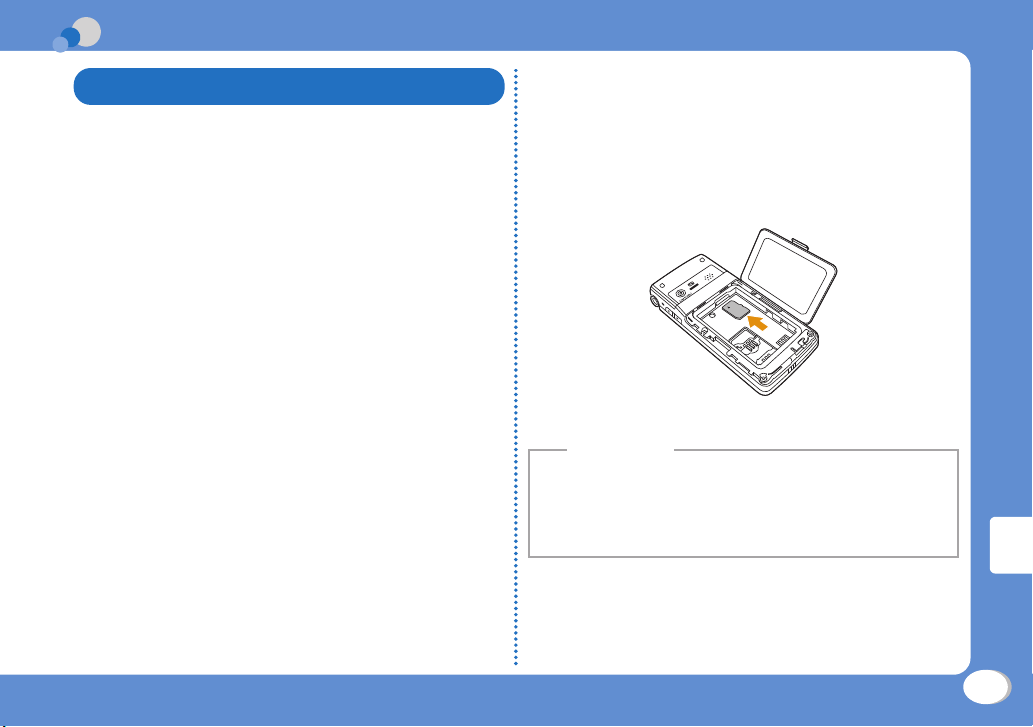
Data Management
Using microSD Card
Copy files saved in Data box on the FOMA
terminal, such as images, moving pictures/imotion, to a microSD card. Also, display files
saved from a PC to a microSD card on the FOMA
terminal.
• L-01C supports a microSD card of up to 2GB and a
microSDHC card of up to 16GB (commercially available)
(as of Nov, 2010). For the latest information on operation
check including manufacturer and capacity of microSD
card, visit the following site (Japanese only). microSD
cards not listed on the site may not function.
- From i-mode: "i Menu"
電話メーカー" u "WOW LG"
- From a PC: http://www.lg.com/jp/
Note that information on the sites shows
operation checks and all the operations are not always
guaranteed.
• Before inserting or removing a microSD card, perform the
operation of "Turning power OFF", and, with the rear side
up, remove the back cover and battery pack.
u "メニューリスト" u "ケータイ
sults of
the re
Inserting a microSD card
Make sure the power is off before inserting the
microSD card.
With the microSD card metal contact
1
side down, insert it slowly into the slot in
direction of a till it clicks.
a
Information
• When inserting a microSD card, pay attention to the direction
and insert it correctly. If inserted in the wrong direction,
damage to the microSD card, the guide or being unavailable to
remove may result.
A microSD card cannot be used if inserted incorrectly.
•
More Convenient
77
Page 80
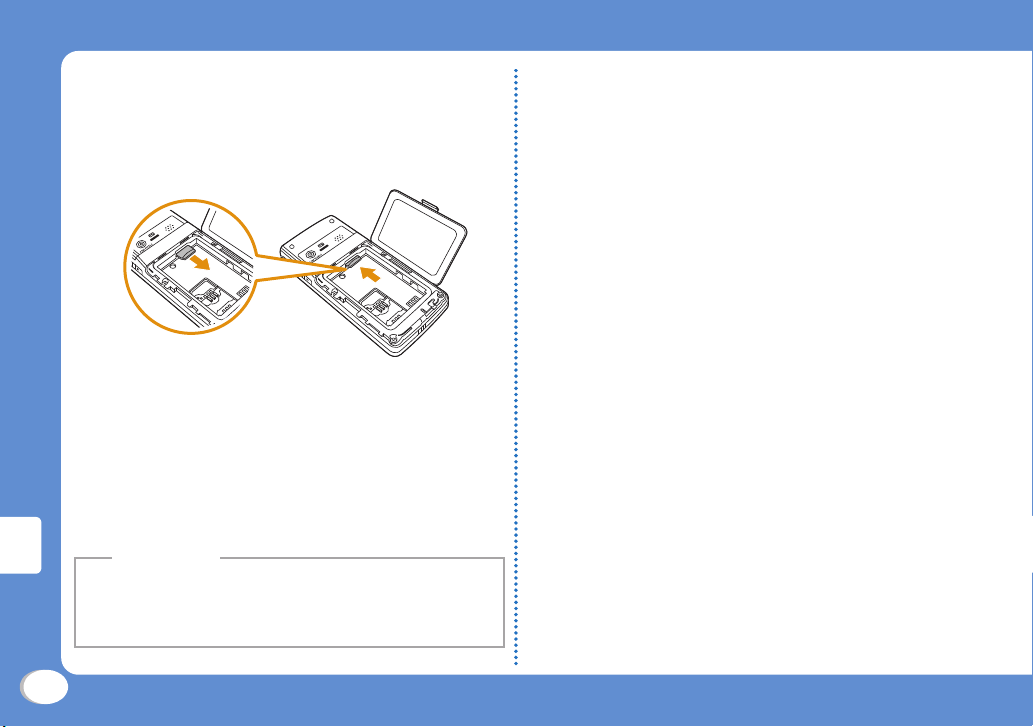
Removing a microSD card
Lightly press the center of the microSD
1
card in the direction a, take the part
popped out straight in the direction b.
b
a
Resetting a microSD card
Reset (initialize) a microSD card so that it can be
used on the FOMA terminal.
Stand-by display u M u "LifeKit" u
1
More Convenient
"microSD" u "Reset microSD"
"Yes" u Enter the Terminal security code
2
Information
• Make sure to use this FOMA terminal when resetting a microSD
card.
• Note that all data on the microSD card is deleted when
resetting.
Viewing/playing files on a microSD card
View/play files on a microSD card in the same way
as on the FOMA terminal using "Data box".
Stand-by display u M u "Data box"
1
u "My picture" / "Music" / "i motion" /
"Melody"
Move the cursor to "microSD" u C
2
[Open]
• If you select "Music" in Step 1, "Movablecontents" is
displayed instead of "microSD".
Move the cursor to folder u C [Open] u
3
move the cursor to folder u C [Open] u
move the cursor to file u C [View] / C
[Play]
78
Page 81
Copying/moving files between the FOMA
terminal and a microSD card
Copy/move files between the FOMA terminal and
a microSD card by copying/moving files between
the "microSD" folder and other folders in Data
box.
Example: To move a camera image saved on the FOMA
terminal to a microSD card
Stand-by display u M u "Data box" u
1
"My picture"
Move the cursor to a folder u C [Open]
2
• Select a folder other than "microSD".
Move the cursor to a file u M [Menu] u
3
"Move" u "One"
"External memory"
4
Move the cursor to a destination folder
5
u I [Open] u C [Select]
Backing up data to a microSD card
Select a data type and copy personal data saved
on the FOMA terminal to a microSD card at a time.
Personal data includes the following items.
• Phonebook
Schedule
•
• Memo
• To do list
Stand-by display u M u "LifeKit" u
1
"microSD" u "PIM"
I [Backup] u Select a type of data to
2
copy
Enter the Terminal security code u "Yes"
3
• Inbox
• Outbox
• Unsent message
• Bookmark
More Convenient
79
Page 82
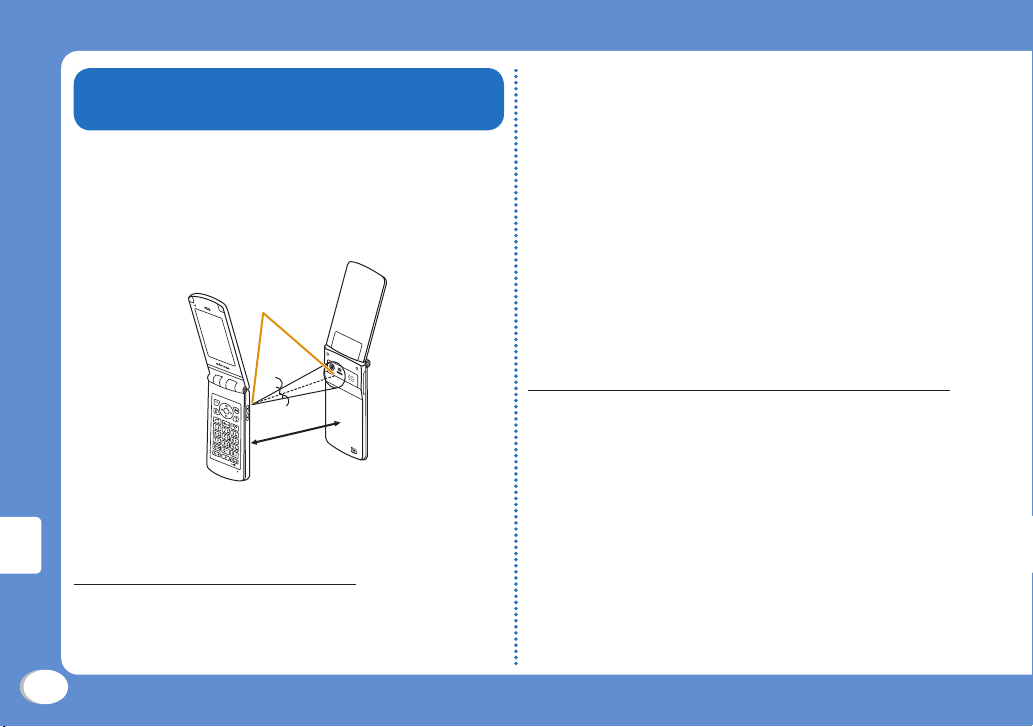
Sending/Receiving Data by
Infrared Communication
• Use infrared devices within a distance of approximately
20cm.
• Do not move the FOMA terminal until data exchange
completes.
• If you hold the FOMA terminal in your hand when
performing infrared communication, be sure to hold it
securely so that it is not shaken.
Receiving a piece of data
Stand-by display u M u "LifeKit" u
1
"Receive Ir Data" u "Receive" u "Yes"
Perform infrared transmission operations
2
on the sending device
Infrared communication starts.
"Yes"
3
Infrared port
15 degrees
15 degrees
Within approx.
20cm
More Convenient
Sending a piece of data
• Set the receiving device to the infrared receiving mode
before sending data.
Example: To send a Phonebook entry
Stand-by display u D u Move the cursor
1
to the entry to send u M [Menu] u "Send
Ir data" u "Focused data" u "Yes"
80
Sending all data
• Set the receiving device to the infrared receiving mode
before sending data.
Example: To send all FOMA terminal Phonebook entries
Stand-by display u D u M [Menu] u
1
"Send Ir data" u "all in phone"
Enter the Terminal security code u Enter
2
an authentication password u "Yes"
Infrared communication starts.
Page 83
Receiving all data
• Receiving all data overwrites data on the FOMA terminal
and deletes all saved data including protected mails
and phonebook/schedule of secret data. Make sure that
important data is not saved before exchanging all data.
Stand-by display u M u "LifeKit" u
1
"Receive Ir Data" u "Receive all" u "Yes"
Enter the Terminal security code u Enter
2
an authentication password
Perform infrared transmission operations
3
on the sending device
Infrared communication starts.
"Yes"
4
Information
• Infrared communication with infrared devices other than L-01C
may result in data not being received or displayed correctly on
the receiving device.
Connecting to a PC
Connect the FOMA terminal to a PC and exchange
WMA files or images on a microSD card.
In addition, access the Internet and perform data
communication.
• FOMA USB Cable with Charge Function 02 (optional) or
FOMA USB Cable (optional) is required.
• To perform data communication, install L-01C
communication setting files from the supplied CD-ROM.
For details, see "Manual for PC connection" in the
supplied CD-ROM.
Information
• If you use a USB HUB, the FOMA terminal may not work
properly.
More Convenient
81
Page 84
Support
Support
• First, check whether the software update is required. If
required, update the software. (Updating Software →P86)
• When the conditions are not improved even after you
checked the following symptoms, contact "Repairs
(Japanese only)" at the back of this manual or a repair
counter specified by DOCOMO.
Others
Category
Power Power
Charge Cannot
Symptom Check
does not
turn ON
charge
(Charging
light does
not turns
on or
blinks)
• Is the battery pack inserted
correctly?
• Is the battery pack charged?
• Is the battery pack inserted
correctly?
• Is the adapter power plug
correctly connected to an
electric outlet or cigarette lighter
socket?
• Is the adapter connected to the
FOMA terminal correctly?
• If the AC adapter (optional)
is used, is the AC adapter
connector connected to the
FOMA terminal or the supplied
de
sktop holder corre
• If the desktop holder is used,
are the charging terminals of the
FOMA terminal clean? If dirty,
clean with a dry cloth or cotton
swab.
• If a call or communication is
made or operations of other
functions are performed for a
long time while charging, the
FOMA terminal may become hot
and the charging light may blink.
In this case, charge again after
the FOMA terminal cools d
ctly?
own.
82
Page 85
Category
Terminal
operation
Symptom Check
Becomes
hot during
operations
or charging
Battery
usage
time is
short
• The FOMA terminal, battery
pack, or adapter may become
hot during operations or
charging, or when using i-αppli,
videophone function, etc. for a
long time while charging. This is
not a safety hazard, so, you can
continue to use them.
• Is the FOMA terminal left with
the out of service area condition
for a long time? As the FOMA
terminal searches for radio
wave to make communication
possible u
area condition, more electricity
is consumed than usual.
• The battery pack usage time
differs depending on the
ambient environment or the
degradation level.
• The battery pack is a
consumable. The available
usage time shortens every time
the battery pack is recharged.
If the usage time becomes
extremely shorter than at the
time of purchase even if the
battery pack i
purchase the specified battery
pack.
nder the out of service
s fully charged,
Category
Terminal
operation
Call Calls
Symptom Check
Power
turns off or
automatic
restart
occurs
Keys
do not
respond
UIM is not
recognized
Clock is
off
cannot be
made with
dial keys
• If the battery pack terminal is
dirty, the contact may become
poor and the power may be
turned off. If it is dirty, clean with
dry cotton swabs.
• Is Lock all set?
• Is the UIM installed in the right
direction?
• The clock may be off if the
power stays on for a long time.
Confirm if Auto time adjust is
set to ON, and then turn the
power on at a place with a good
reception.
• Is Dialing call lock set?
Is Lock all set?
•
• Is Self mode set?
Others
83
Page 86
Others
Category
Call
Symptom Check
Cannot
talk ("圏外"
does not
disappear
even when
you move,
or making/
receiving
calls is
unavailable
although
radio wave
is strong
enough)
• Turn the power off and on, or
remove and install battery pack
or the UIM.
• Even when "FOMA terminal is
not out of service area" or "signal
strength is shown as
may not be made or received
due to the type of radio waves.
Move to other place and call
again.
• Is incoming restriction such as
Reject on list or Accept/Reject
call set?
• Depending on crossing of
radio waves, calls or mails are
crossed at the crowded places
and connection status may not
be good. In this case, "Please
wait for a while" appears and the
caller hears a busy tone. Move
to o
ther place or call again later.
", calls
Warranty and After-Sales Service
Warranty
• Be sure to receive a warranty at the time of purchase
of the FOMA terminal. Read contents of the warranty
and confirm information such as "shop name and date
of purchase" and keep it in a safe place. If necessary
items are not described, immediately contact the shop
of purchase. The warranty for free repair is valid for one
year from the date of purchase.
• This product and its accessories are subject to change,
i
n part or whole, for improvement without prior notice.
After-sales service
● For problems with your FOMA terminal
Before asking repairs, check "Troubleshooting" in
this manual or "Guide (Japanese only)" installed
in this FOMA terminal. If the problem still persists,
contact "Repairs (Japanese only)" at the back of
this manual and consult them.
● For repairs after inquiry
Bring your FOMA terminal to a repair counter
specified by DOCOMO. Repairs are accepted
during business hours of a repair counter. Note
that it may take some days to repair the terminal
depending on the malfunction state.
84
Page 87
■ During the warranty period
• The FOMA terminal is repaired at no charge under the
conditions of the warranty.
• Make sure to bring the warranty for repair. You will be
charged even during the warranty period if the warranty is
not presented or the trouble or damage is caused by your
inappropriate handling (such as damage to LCD or connector,
etc.).
• You will be charged even during the warranty period if
alfunction is caused by the use of devices and consumables
m
other than those specified by DOCOMO.
■ Repair may not be possible in the following cases
• When a repair counter judges the cause of malfunction is
exposure to water (Example: when the waterproof sticker
reacts)
• When, as the result of inspection, corrosion is found due
to exposure to water, condensation or sweat, or any of the
al boards are damaged or deformed (damage to the
intern
external connector terminal (headphone/microphone terminal),
LCD, or cracked body could be the case as well)
* Since these conditions are outside the scope of the warranty,
any repairs, if at all possible, will be charged.
■ After expiration of the warranty
• All repairs that are requested are charged.
■ Replacement parts
• Replacement parts (parts require
function) will be kept in stock for four years in principle after
termination of production. However, repair may not be possible
due to a lack of replacement parts depending on the failure
part.
d to maintain production
● Notes
• Do not modify the FOMA terminal or its accessories.
- Depending on the details of modification, repair may
be refused. Modifications may include the following
cases:
• Put a sticker on LCD or keys
• Add a decoration to the FOMA terminal with adhesive
• Replace exterior with one other than DOCOMO genuine
products
- Repair of malfunction or damage caused by
modification is charged even during the warranty
period.
• Do not remove the nameplate placed on the FOMA
terminal. If the details described on the nameplate cannot
be checked, repair may be refused as we cannot verify
the conformity of the product to the technical standard.
• The settings of various functions and information such
as total call time may be cleared (reset) by malfunction,
repair or other handling of FOM
case, make settings again.
• The parts generating magnetism are used in the following
portions of the FOMA terminal. Note that the card may
become unusable if placing a magnetism sensitive object
such as cash card near the FOMA terminal.
Portions: Speaker and earpiece
• Although this terminal is waterproof, if the FOMA terminal
gets wet or moist, immediately turn the power off
move the battery pack, and then visit a repair counter.
re
Depending on the conditions of the FOMA terminal, repair
may not be possible.
A term
inal. In such a
and
Others
85
Page 88
i-mode Fault Diagnosis site
Check whether your FOMA terminal is properly
sending/receiving mails, downloading images/
melodies. As a result of your check, if you think
that the FOMA terminal is malfunctioning, contact
"Repairs (Japanese only)" at the back of this
manual.
• How to access "iモード故障診断サイト
(i-mode fault diagnosis site)" (Japanese
only)
i-mode site: i Menu u お知らせ
(Information) u サポート情報 (Support
information) u お問い合わせ (Inquiries)
u 故障・電波状況お問い合わせ先
(Inquiries for malfunction and signal)
u iモード故障診断 (i-mode fault
diagnosis)
* Charges apply when accessing from overseas.
Others
QR code for
accessing
the site
Updating Software
You can connect to network to check if your
FOMA terminal needs an update, and if necessary,
download part of the software through packet
communication to update the required software.
* Packet communication charges do not apply.
When the software is required to update, check
the DOCOMO website and "お客様サポート
(user support)" in iMenu (Japanese only). "autoupdate", "Now update", and "Reserve" are
available for updating software.
• Software can be updated with data such as Phonebook
entries, camera images, downloaded data retained in the
FOMA terminal. Note that, however, such data may not
be protected depending on the conditions of the FOMA
terminal (malfunction, damage, exposure to water, etc.).
It is recommended that you make a backup of important
data. Note that some data such as downloaded data
cannot be backed up.
86
Page 89
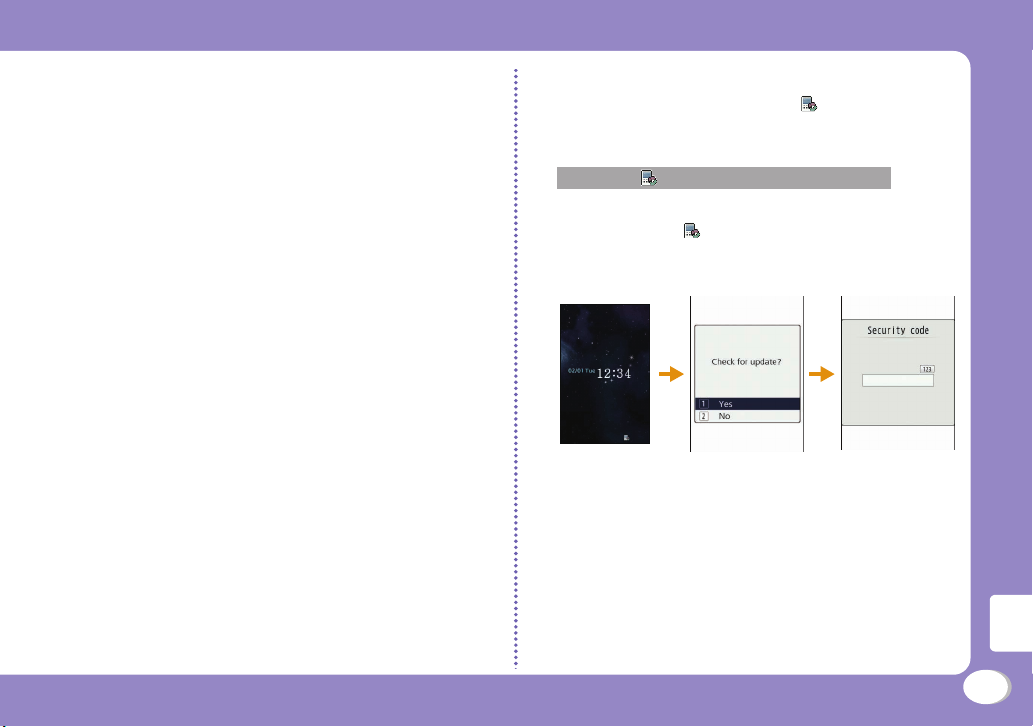
Before updating software
• Do not remove the battery pack while updating software.
Failure of updating software may result.
• Fully charge the battery pack before updating software.
• Software update (downloading or rewriting) may take
time.
• You cannot make or receive calls, use communication
functions or other functions while updating software. (You
can receive voice calls while downloading.)
• It is recommended to updat
strong signal reception with three antenna bars displayed
while you are not moving. During software download, if
signals become weak, or download is suspended, retry
software update in a location with strong signal reception.
• When updating software, the information of your FOMA
terminal (such as model name or serial number) is
automatically sent to the server (software
managed by DOCOMO). DOCOMO does not use the
sent information for other purposes than for software
update.
• If software update fails, the message, "Rewrite failed",
appears and all operations become unavailable. In this
case, you need to bring the FOMA terminal to a repair
counter specified by DOCOMO.
• Software update is unavailable overseas.
e software
in a location with
update server
How to update software
To start software update, select (update notice
icon) displayed on the Stand-by display, or
perform from the menu screen.
To select (update notice icon)
1
Stand-by display u C u Use K to move
the cursor to ( update notice icon) u
C u "Yes" u Enter the Terminal security
code
Others
87
Page 90
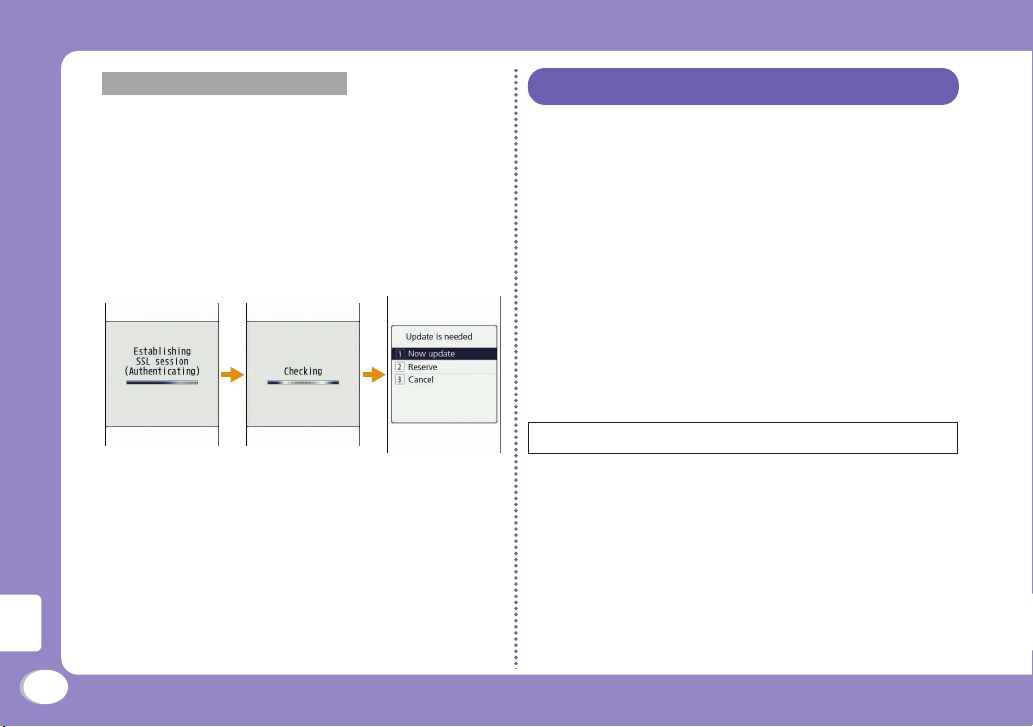
Others
To perform from the menu screen
Stand-by display u M u "Setting" u
"Other" u "Software Update" u Enter the
Terminal security code u "Update"
Communication starts and check for software update.
• If update is necessary, the software update
confirmation screen appears.
• If update is not required, "No update is needed.
Continue to use as before" appears.
Checking Harmful Data
In data or programs downloaded to the FOMA
terminal, detect and delete data that could
cause operational malfunction or stop activating
applications.
• The scanning function helps to protect the FOMA terminal
from invasion of data that cause failure when browsing
web pages or receiving mail, etc. If the pattern definition
corresponding to each failure is not downloaded or
found, the scanning function cannot protect the FOMA
terminal.
• Pattern definitions vary depending on the FOMA terminal
model. Therefore, DOCOMO may discontinue distribution
o
f pattern definitions for models three years after the
release date.
Updating pattern definitions
First, update the pattern definition to the latest one.
Stand-by display u M u "Setting" u
1
"Lock/Security" u "Scanning function" u
"Update" u "Yes" u "Yes"
Updating starts. After update completes, the notification
screen appears.
• If the pattern definition is the latest one, the screen
notifying that it is the latest appears.
C [OK]
2
88
Page 91
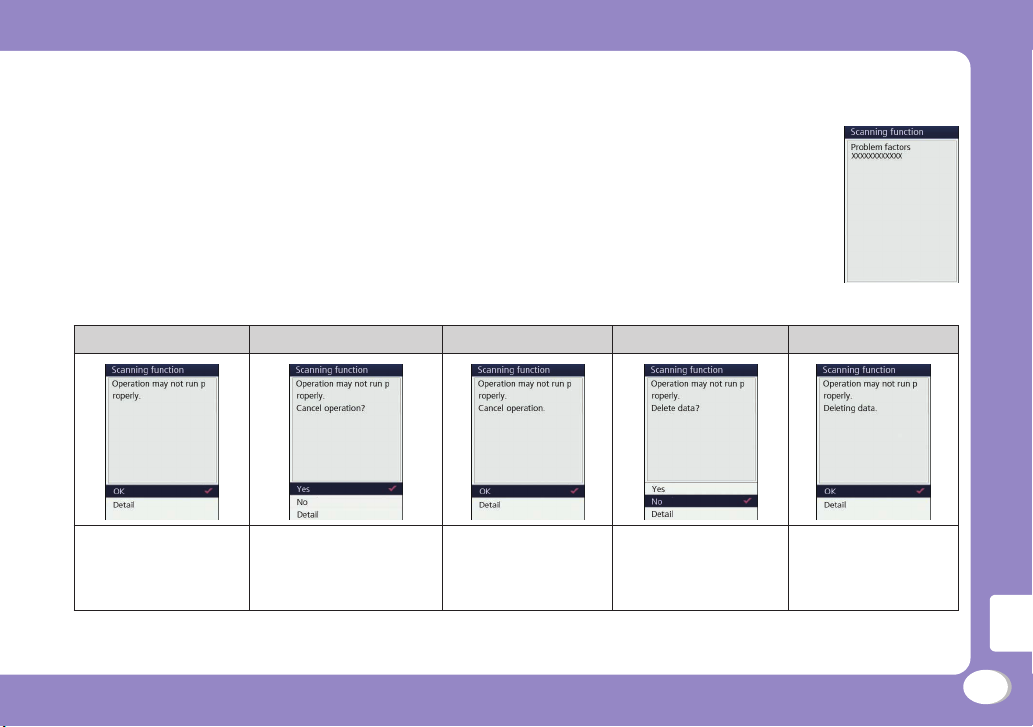
Displaying scanned result
● Displaying scanned problem factors
Select "Detail" on the alert level screen to display the problem factor list screen shown on the right.
• The screen image is an example. On the actual screen, the detected data name is displayed in the
place of "XXXXXXXX".
• Depending on the type of the detected data, "Detail" may not be displayed.
• When six or more problem factors are detected, subsequent factors after sixth one are omitted and
only the total number of factors is displayed.
● Displaying scanned result
Alert level 0 Alert level 1 Alert level 2 Alert level 3 Alert level 4
"OK": Continue the
operation.
• The screen may be different from the above depending on the scanned result.
"Yes": Stop the operation
and exit.
"No": Continue the
operation.
"OK": Stop the
operation and exit.
"Yes": Delete data and
exit.
"No": Stop the
operation and exit.
"OK": Delete data and
exit.
Others
89
Page 92
Introduction of Options and Related
Devices
Combine the FOMA terminal with various optional
devices to make it more convenient for expanded
purposes, from personal to business. Some
products may not be available depending on the
area. For details, contact a service counter such
as the docomo Shop. For details on optional
devices, see the related instruction manuals.
• Battery Pack L11
• Back Cover L19
• Desktop Holder L09
• Flat-plug Stereo Earphone Set P01
• Flat-plug Earphone/Microphone with Switch P01
• Stereo Earphone Set P001
• Earphone/Microphone with Switch P001
• Earphone Plug Adapter P001
• FOMA USB Cable
*1*4
• FOMA AC Adapter 01*5/02
• FOMA AC Adapter 01 for Global use
• FOMA DC Adapter 01/02
• FOMA Indoor Booster Antenna
Others
• In-Car Holder 01
• FOMA Dry Battery Adapter 01
• Carry Case S 01
*1*3
*5
*1*2
*1*6
*1*2
*1*3
/P002
*5
*1*2
*1*3
/P02
• Carry Case 02
• Bone conduction microphone/receiver 01
• FOMA Portable Charging Adapter 01/02
• FOMA Indoor Booster Antenna (Stand Type)
• FOMA USB Cable with Charge Function 02
• Earphone Plug Adapter 01*1 for External connector
terminal
• Earphone/Microphone 01
• Stereo Earphone Set 01
• Earphone Plug Adapter 01
*1
*1
*1
*1 Not available to use with the supplied desktop holder
at the same time.
*2 Earphone Plug Adapter 01 for External connector
*1*2
terminal is required to connect to L-01C.
*3 Earphone Plug Adapter P001 and Earphone Plug
Adapter 01 for External connector terminal are required
to connect to L-01C.
*4 May not work properly if you use a USB HUB.
*5 Charging with the AC adapter. → P28
*6 For domestic use only.
*1
*1*6
*1*4
90
Page 93
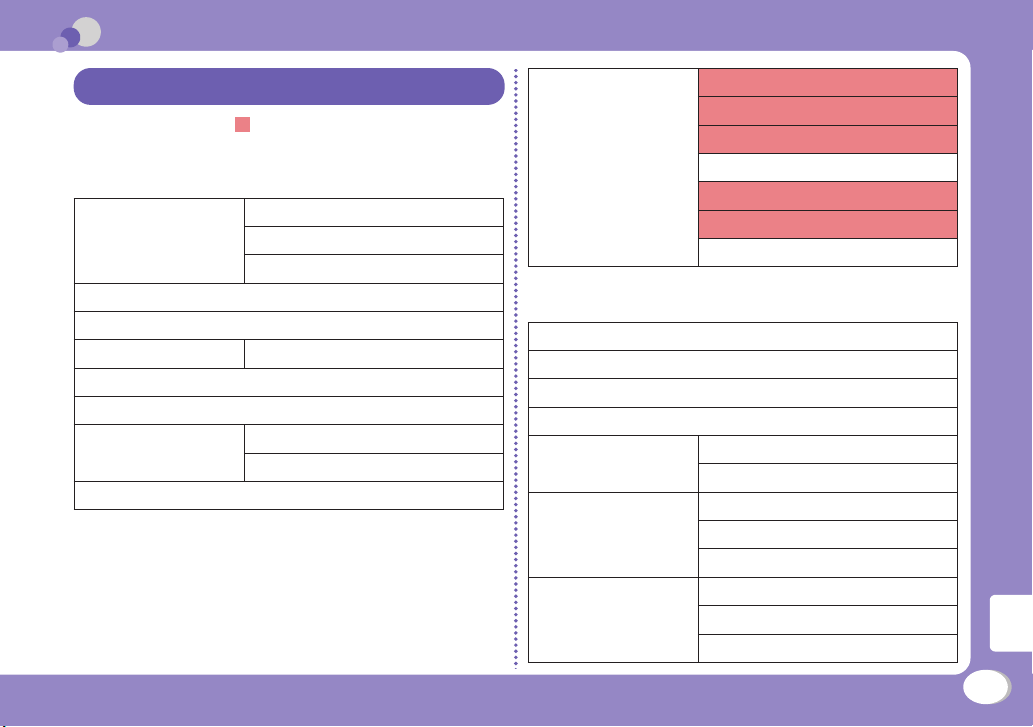
Appendix
Menu List
Items indicated by return to the default when
executing "Reset settings". →P43
■ Mail
Inbox Inbox
MessageR
MessageF
Compose message
Unsent message
Outbox Outbox
Check new messages
Receive option
SMS Compose SMS
Check new SMS
Template
Mail setting Communication
Display
Mail group
Auto sort
SMS
Edit
Others
● i-mode
i Menu
Bookmark
Screen Memo
Last URL
Go to location Input address
URL history
i-Channel i-Channel list
Ticker setting
Reset i-Channel
MessageR/F Inbox
MessageR
MessageF
Others
91
Page 94
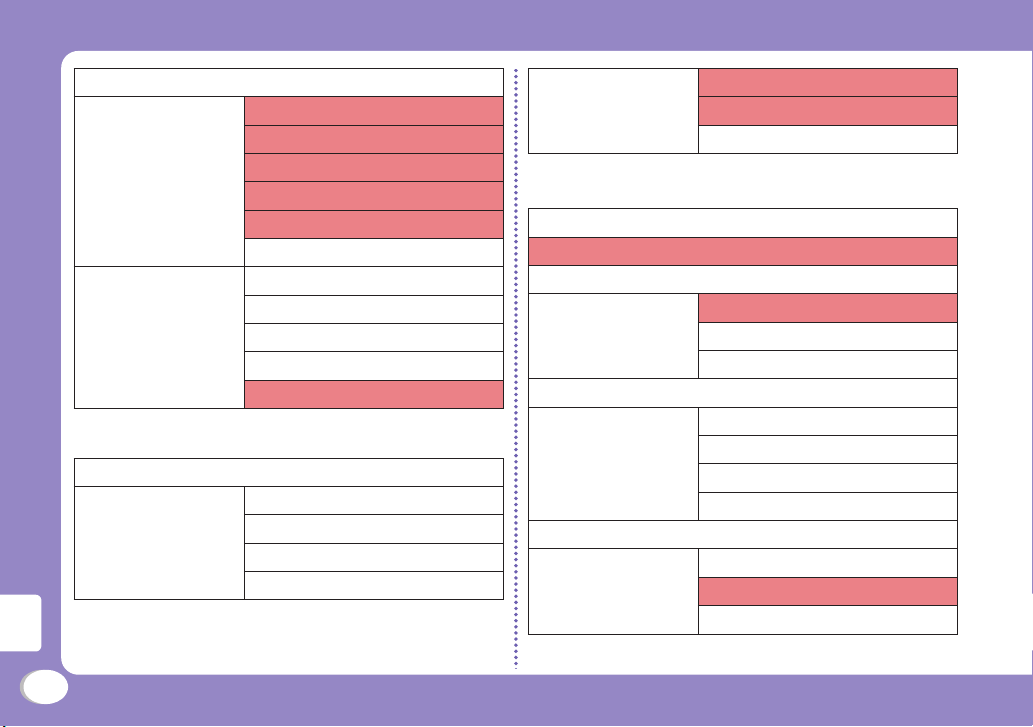
Check new messages
i-mode setting Communication
Image&Effect set.
i-motion setting
Home
Certificates
Other
Full browser Home
Bookmark
Last URL
Go to location
Full Browser Settings
● i-αppli
Software list
i-αppli info
Others
Security error history
Auto start info
Trace info
Standby error info
i-αppli settings
Display SW info
Auto start set
End stand-by display
● Phonebook
Add to phonebook
Search phonebook
No. of phonebook
Phonebook settings Default mode
Create domain list
Accept/Reject list
Group settings
Call/Mail history Received calls
Redial
Received mails
Sent mails
Call duration
Call costs Check call costs
Set call cost limit
Delete call cost icon
92
Page 95
● Data box
My picture i-mode
Camera
Decomail picture
Decomail picto
Preinstalled
Item
Data transfer
Slide show
microSD
Search by i-mode
Music i-mode
Playlists
Movablecontents
Resume play
Transferred from PC
Search by i-mode
Music & Video Ch Distributed program
i-motion i-mode
Camera
Preinstalled
Playlists
Data transfer
microSD
Search by i-mode
Melody i-mode
Preinstalled
Data transfer
microSD
Search by i-mode
Kisekae Tool i-mode
Preinstalled
Search by i-mode
Others
93
Page 96
● MUSIC
Music Player All songs
Playlists
Artist
Genre
Album
Resume play*
Music & Video Ch Channel 1
Channel 2
Set program
Program list
About this service
* "Now playing" is displayed during music playback. Select this to
display the Player screen for currently played music.
Others
● LifeKit
Bar code reader
Receive Ir data Receive
Receive all
microSD PIM
Data update
Memory info.
Reset microSD
Magnifying glass
Data security service Connect to center
Exchanging history
Sndg img in phonebook
Check FOMA HIGH-SPEED area
Schedule
Alarm
Text Memo
To do list
94
Page 97
Other World time
Calculator
Unit converter
Remembering dates
Stopwatch
● Media
Muvee Studio
Record message Record msg. setting
Record msg. list
Document viewer microSD
Subway map
Dictionary
Game
● 1Seg
Activate 1Seg
Program guide
TV timer list
TVlink
Channel setting
1Seg settings
● Settings
Sounds & Vibration Select ring tone
Select effect tone
Volume
Vibrator
Manner mode set
Mail ring duration
Set mute ring (sec.)
Headset usage setting
Display Stand-by display
Kisekae Tool
Color theme
Call & Mail image
Sub LCD display
Wake-up display
Font size
Quick dial
Backlight
Others
95
Page 98
Call/VT/Dialing Incoming call
Videophone
Call feature
Self mode
Prefix dial
Sub address setting
Headset
Lock/Security Lock
Secret mode
Display Call/Mail logs
Change security code
PIN code
Scanning function
Others
NW Services Voice mail
Call waiting
Call forwarding
Chaku-moji
Nuisance call blocking
Caller ID notification
Caller ID request
Set in-call arrival act
Arrival call act
Other
International dial Auto assist
IDD prefix
Auto Int'l dial
Country code list
96
Page 99
International roaming Network
Voice mail (Int.)
Call forwarding (Int.)
Remote access setting (Int.)
Caller ID request (Int.)
Roaming guide (Int.)
Call barring
Missed call notification for
roaming setting (Int.)
Int'l Service Guide
Date & Time Set Date&Time
Date&Time format
Hour indication
マルチリンガル (Select language)
Other Character input
Memory status
eco mode
Reset/Clear
Software Update
USB mode setting
Battery level
● Profile
Profile
● Camera
Photo-mode
Movie-mode
Bar code reader
Magnifying glass
Others
97
Page 100
Main Specifications
● Phone
Model name L-01C
Approx. 109mm X Approx.
Dimensions (H X W X D)
Weight
3G/GSM
setting:
3G
FOMA/
Continuous
stand-by
time
Continuous
call time
Others
1Seg staying active time Approx. 220 minutes
3G
GSM
FOMA/3G
GSM
3G/GSM
setting:
AUTO
3G/GSM
setting:
AUTO
50mm X Approx. 16.5mm
(Max. thickness: Approx.
18.4mm)
Approx. 128g
(with battery pack installed)
Moving: Approx. 290 hours
Stationary:
Approx. 350 hours
Moving:
Approx. 200 hours
Stationary:
Approx. 220 hours
Voice call:
Approx. 210 minutes
Videophone:
Approx. 130 minutes
Voice call:
Approx. 180 minutes
Charging time
Type
Display
Image
pickup
device
Camera
Size
Pixels
Type CMOS
Size 1/4 inches
Effective pixels Approx. 5.1 Mega pixels
Recorded pixels
(maximum)
Zoom (Digital)
AC adapter:
Approx. 200 minutes
DC adapter:
Approx. 200 minutes
Display:
TFT 262,144 colors
Sub display:
PMOLED 1 color
Display:
Approx. 2.8 inches
Sub display:
Approx. 0.9 inches
Display:
240 dots X 400 dots
Sub display:
128 dots X 36 dots
Approx. 4.9 Mega pixels
Up to approx. 1.6 times
(For still image)
Up to approx. 1.6 times
(For moving picture)
98
 Loading...