

Page 1

TURNING UNIT
OP-TU80X
Operating Instructions
© 2014 Dai Nippon Printing Co., Ltd.
3-00D-317-12 (1)
Page 2
Safety Precautions
This product is designed with proper safety considerations
in mind. However, as with all electronic appliances,
improper operation may result in accident, severe injury, or
death due to fire, electric shock, etc.
reduce the risk of accidents, be sure to adhere to the
To
following.
Follow the safety precautions
Carefully read the safety precautions on pages 5 and 6.
Perform periodic inspections
We recommend performing periodic inspections to ensure
prolonged and safe use.
For details on inspections and costs, contact a service
representative.
Discontinue use in the event of
malfunction
Contact a service representative immediately in such cases.
If the following errors occur…
Smoke is emitted
Unusual sounds or odors are emitted
Water or foreign objects enter the unit’s
interior
The unit is dropped or the cabinet is
damaged
(1) Disconnect the power cord and connection
cord.
(2) Contact your dealer or a service
representative.
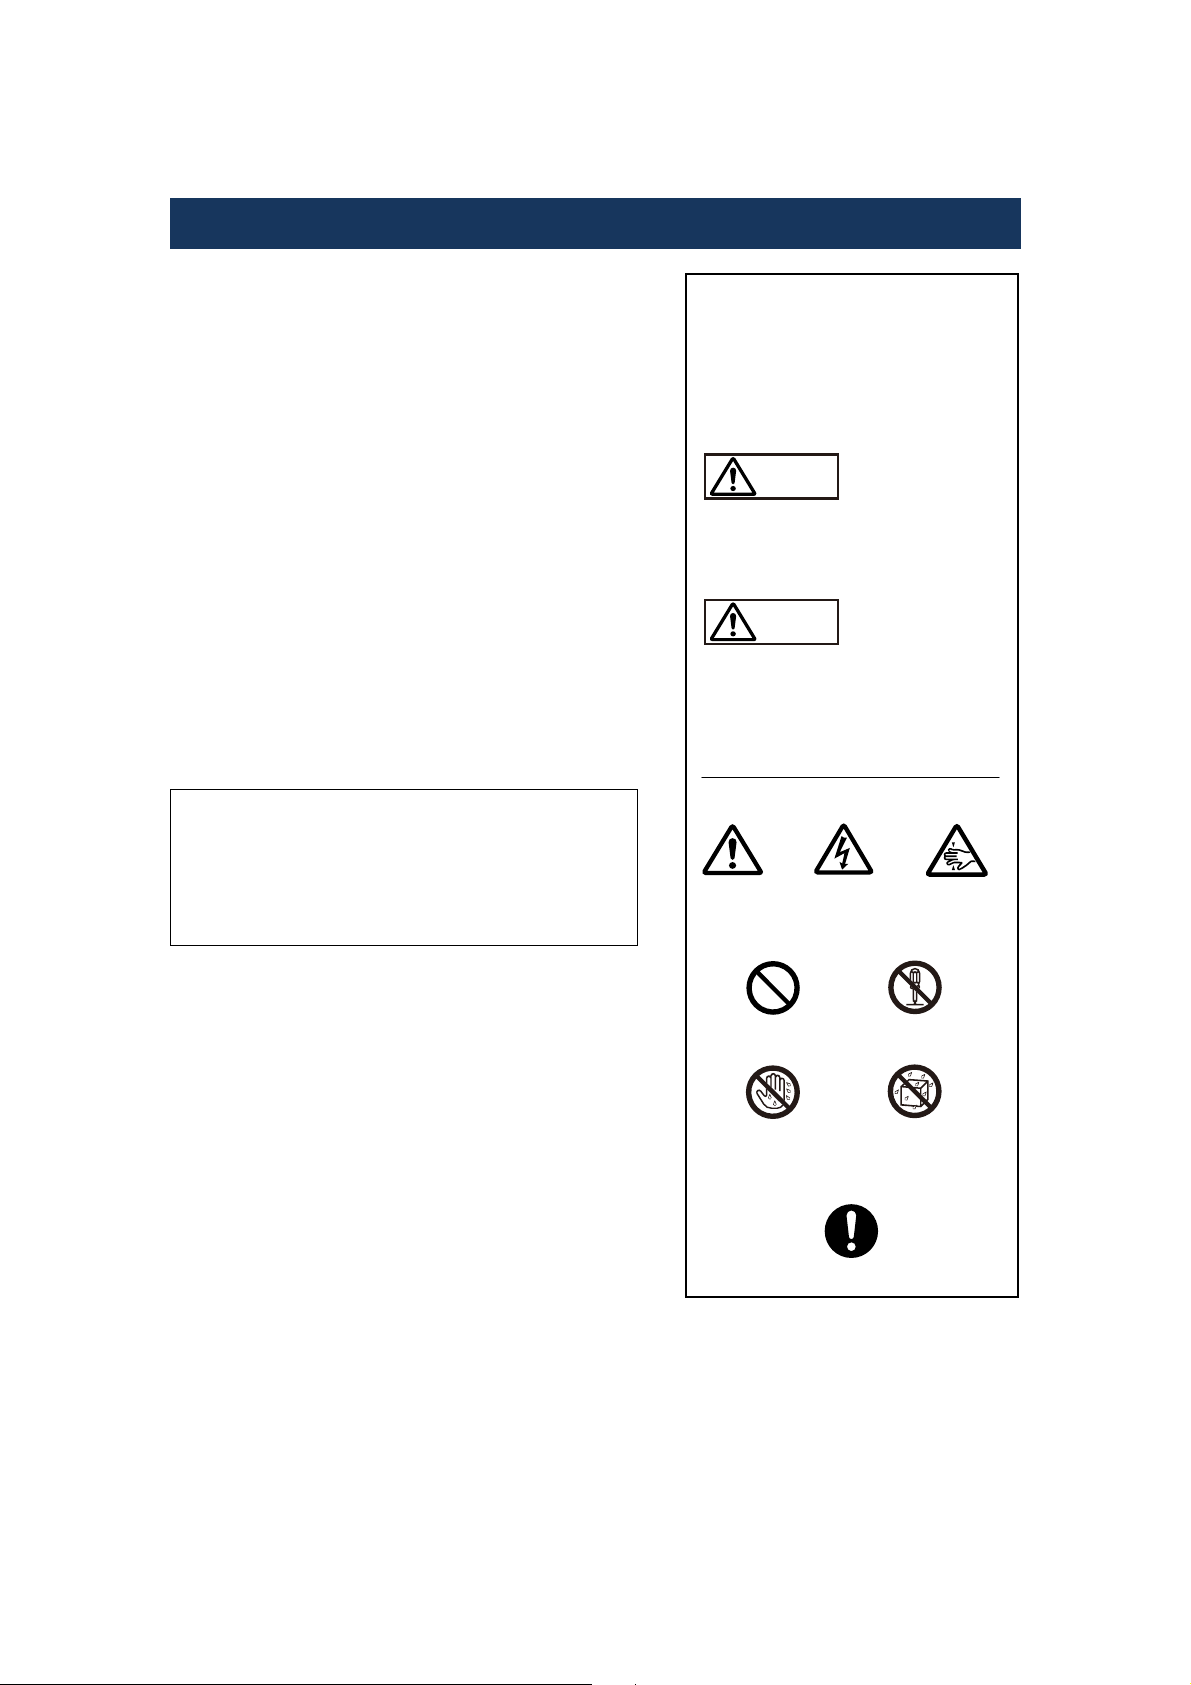
Warning indications
The following indications are used
in this document and on this
product. Be aware of the
meanings of these indications,
and read the following carefully.
WARNING
Failure to obey these warnings
may result in severe injury or
death due to fire or electric shock.
CAUTION
Failure to obey these warnings
may result in injury or damage to
surrounding property due to
electric shock or other accidents.
Caution symbols
Caution
Prohibited actions
Prohibi
hand
Wet
caution
Instructions
ted
Electric
shock
Hand
caution
Never
dismantle
Nev
er wet
2
Obey
Page 3

WARNING WARNING for connected printer
To reduce the risk of fire or electric shock,
do not expo
moisture.
o av
oid electrical shock, do not open the
T
cabinet. Refer servicing to qualified
personnel only.
This produc
residen
se this apparatus to rain or
t shall not be used in the
tial area.
For the Customers in the U.S.A.
Any changes or modifications not expressly
approved by the party responsible for compliance
could void the user’s authority to operate the
equipment.
s
equipment has been tested and found to
Thi
comply with the limits for a Class A digital device,
pursuant to Part 15 of the FCC Rules. These limits
are designed to provide reasonable protection
against harmful interference when the equipment
is operated in a commercial environment. This
equipment generates, uses, and can radiate radio
frequency energy and, if not installed and used in
accordance with the instruction manual, may
cause harmful interference to radio
communications. Operation of this equipment in a
residential area is likely to cause harmful
interference in which case the user will be
required to correct the interference at his own
expense.
The printer must be earthed.
r pluggable equipment, the socket-outlet be
Fo
installed near the equipment and shall be easily
accessible.
disconnect the main power, unplug the AC IN
o
T
connector.
When installing the unit, incorporate a readily
accessible disconnect device in the fixed wiring,
or connect the power plug to an easily accessible
socket-outlet near the unit. If a fault should occur
during operation of the unit, operate the
disconnect device to switch the power supply off,
or disconnect the power plug.
e a proper power cord for your local power
s
U
supply.
he approved Power Cord (3-core mains
Use t
1.
lead) /Appliance Connector / Plug with
earthing-contacts that conforms to the safety
regulations of each country if applicable.
2. Use the Power Cord (3-core mains lead) /
Appliance Connector /Plug conforming to the
proper ratings (Voltage, Ampere).
If you have questions on the use of the above
Power Cord/ Appliance Connector/Plug, please
consult a qualified service personnel or the
distributor.
For the Customers in Europe
This is a Class A product. In a domestic
environment, this product may cause radio
interference in which case the user may be
required to take adequate measures.
The manufacturer of this product is Dai Nippon
Printing Co.,Ltd. 1-1-1, Ichigaya Kagacho,
Shinjuku-ku, Tokyo 162-8001, Japan.
The importer for R&TTE and RoHS is DNP
PHOTO IMAGING EUROPE SAS,
ZI PARIS NORD II -BP 5 1077, 22 A VENUE
DES NATIONS, PARC SILIC -VILLEPINTE,
95948 ROISSY CDG CEDEX, FRANCE.
If you want to dispose this product, do
not mix with general household waste.
There is a separate
collection system for used electronics
products in accordance with
legislation under the WEEE Directive
n
ly
sult
(Directive 2012/19/EU) and is effective on
within European Union. For details, co
your dealer.
3
Page 4

Table of Contents
Warning ......................................................................................................................................... 5
Caution .......................................................................................................................................... 6
Overview........................................................................................................................................ 7
Features ....................................................................................................................................................7
Parts Identification....................................................................................................................................8
Preparation.................................................................................................................................... 9
Checking the Components........................................................................................................................9
Installation ................................................................................................................................... 10
Removing the Blind Plate from the Bottom of the Printer .....................................................................10
Connecting the Printer to the Unit.......................................................................................................... 10
Connecting to a Computer...................................................................................................................... 12
Attaching the Output Tray and Paper Slider...........................................................................................12
Precautions for Installation..................................................................................................................... 13
Operation..................................................................................................................................... 14
Loading Print Paper................................................................................................................................ 14
Loading Ink Ribbons..............................................................................................................................15
Printing ................................................................................................................................................... 16
Miscellaneous.............................................................................................................................. 17
Cleaning the Cleaning Roller .................................................................................................................17
Clearing Paper Jams ............................................................................................................................... 18
Specifications .............................................................................................................................. 19
4
Page 5
y
Warning
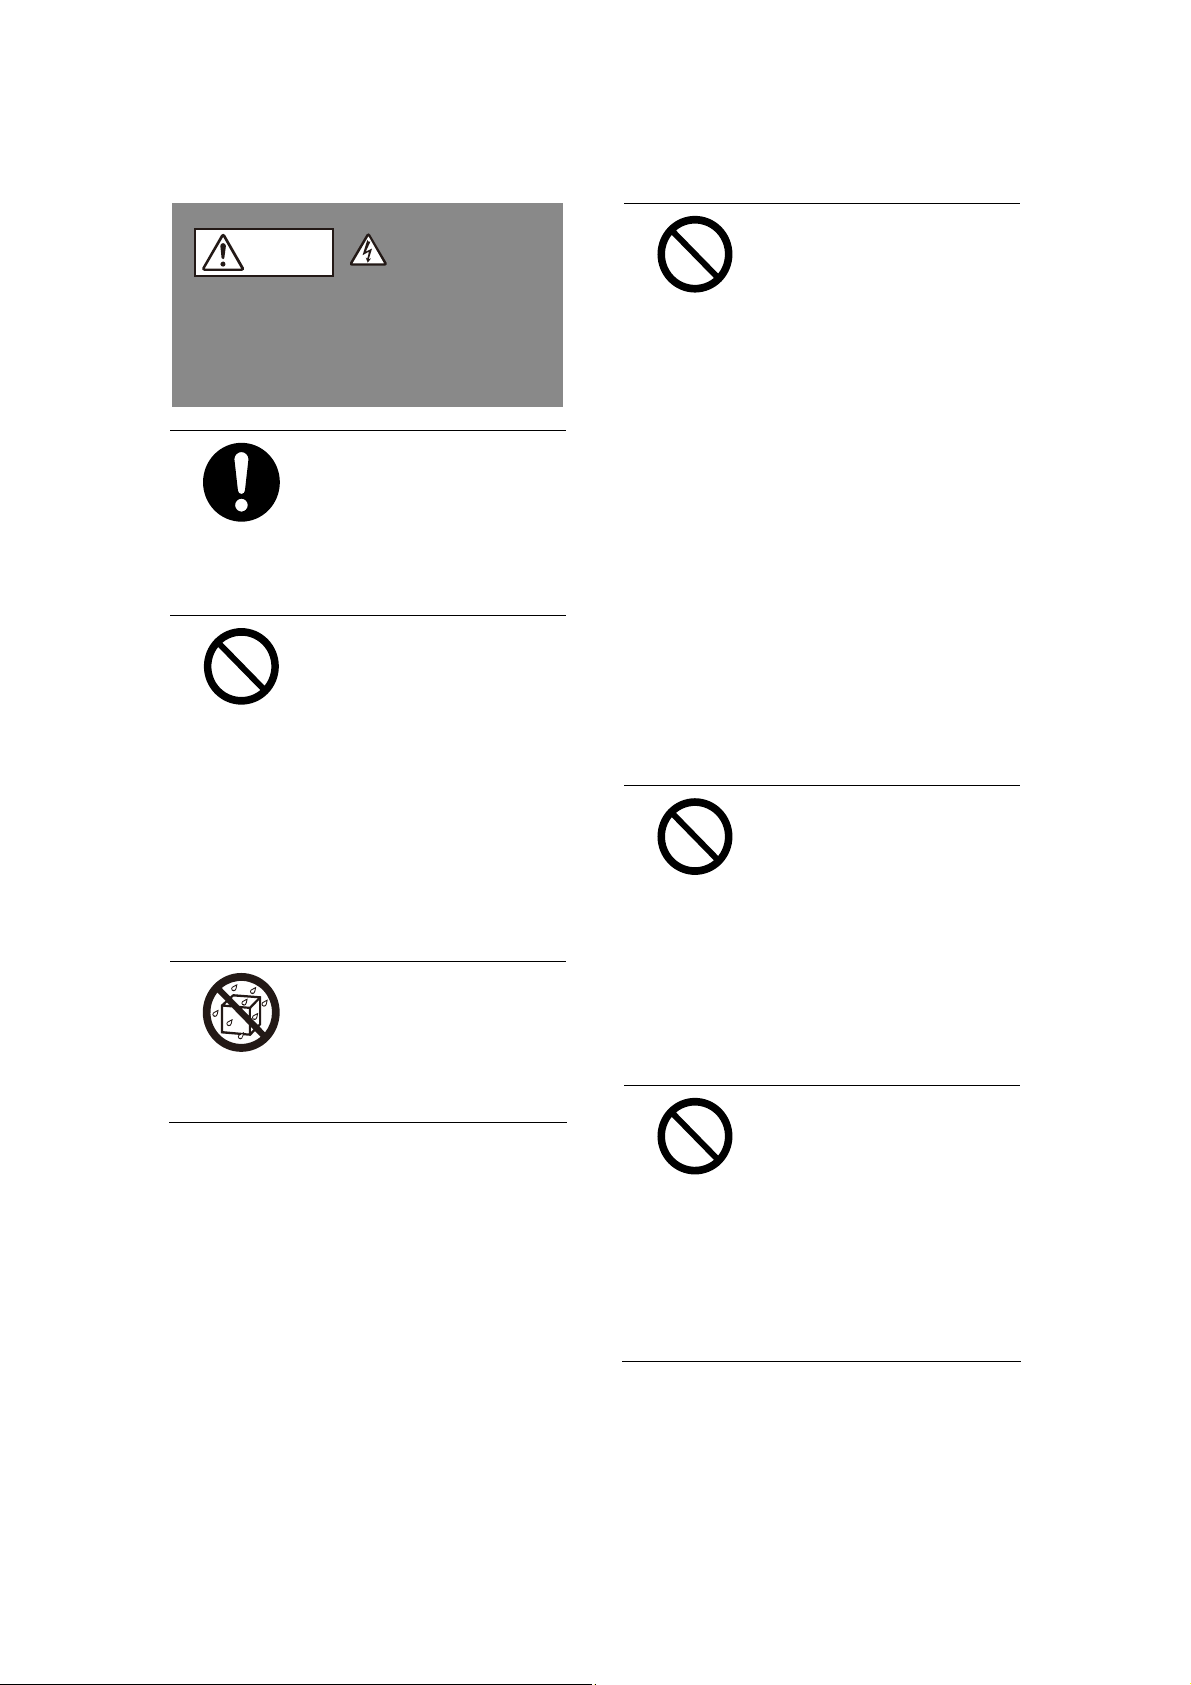
WARNING
Electric
shock
Failure to obey the following may
result in
severe injury
electric shock
, or
death
Always transport the
unit with two or more
people.
Obe
may result in lower back
Carrying the unit alone
and other injuries due to
the weight of the unit.
Do not install or operate
the unit in locations with
excessive oily smoke,
Prohibited
steam, humidity, or dust.
Installing the unit in the
above types of locations
may result in electric
shock.
Operating the unit in a
location that does not
meet the conditions
described in this manual
may result in electric
shock or injury.
Do not operate the unit
in locations exposed to
water.
Nev
er w
Exposure to water may
et
result in electric shock due
to electrical leakage.
Do not damage the
connection cord.
Damaging the connection
Prohibited
,
.
cord may result in electric
shock.
Do not pinch the cord
between the unit and
any wall, rack, shelf, etc.
Do not modify or
damage the cord.
Do not place heavy
objects on or pull on the
cord.
Always hold the cord by
its connector when
disconnecting the cord.
Keep the cord away
from heaters, and do not
apply heat to the cord.
If the connection cord is
damaged, contact your
dealer or a service
representative about a
replacement.
Do not allow water or
foreign objects to enter
the unit.
Prohibited
Doing so may result in
electric shock.
If water or foreign objects
enter the unit, disconnect
the printer’s power cord
from the power outlet
immediately, and contact
your dealer or a service
representative.
Do not move the printer
while it is connected.
Moving the printer while it
Prohibited
is connected may result in
injuries due to the printer
or this unit dropping.
When moving the unit,
always disconnect the
connection cord and
remove the printer
beforehand.
5 6
Page 6
Nev
y
y
dismantle
Caution
er
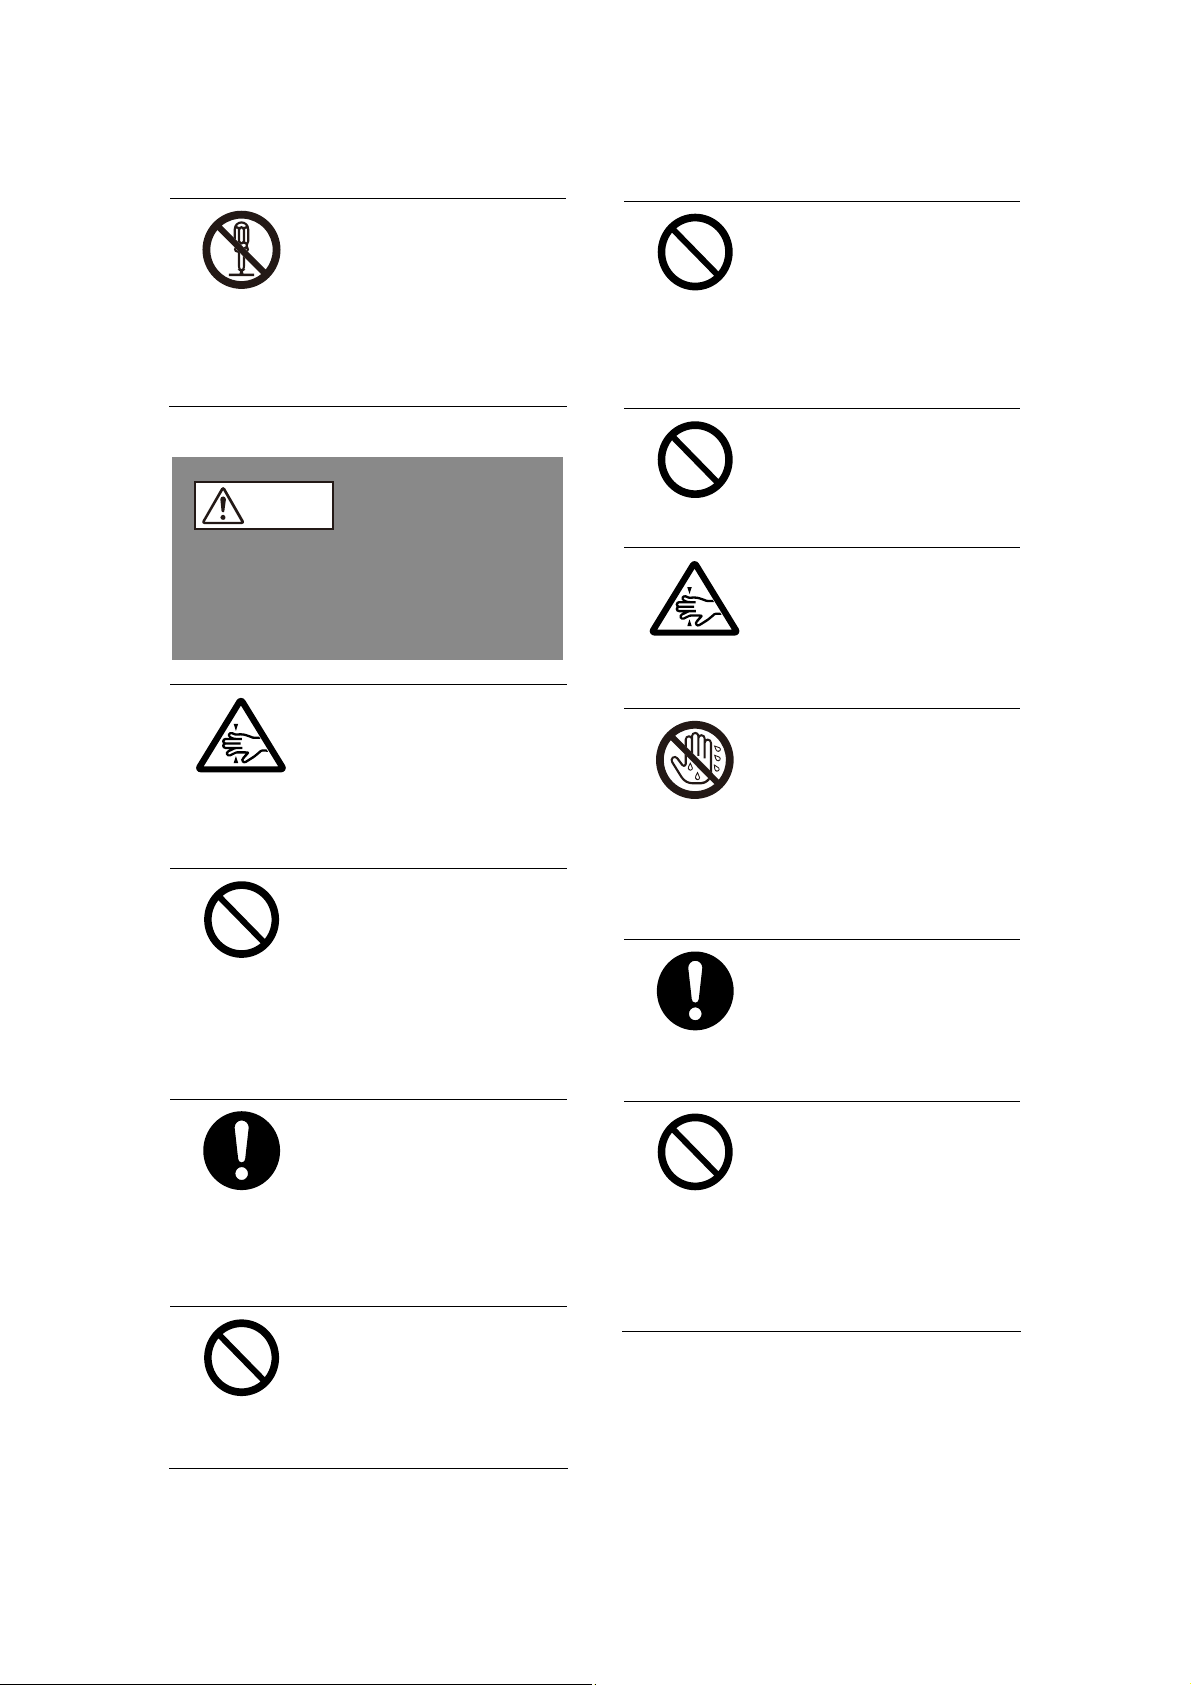
CAUTION
Do not dismantle or
modify the unit.
Doing so may result in
electric shock or injury.
Contact your dealer or a
service representative for
inspections of the unit’s
interior and repairs.
Prohibited
Prohibited
Do not look into the
output slot at close
range.
Print sheets are ejected
from the output slot.
Contact with ejected print
sheets may result in injury
or blindness.
Do not look into the
memory card slot at
close range.
Ejected cards may result
in injury or blindness.
Failure to obey the following may
result in
injury
or
damage
surrounding property.
Be careful to avoid
getting hands caught.
Be careful when placing
Hand
caution
the printer onto this unit for
connection, and avoid
getting your fingers caught
between the devices.
Do not install the unit in
unstable locations.
Installing the unit on an
Prohibited
unstable surface or a
surface that is not level
may result in injury due to
drops. Be sure to verify
the sturdiness of the
surface before installation.
Always run cables
properly.
Improperly placed
Obe
result in injury due to
connection cords may
tripping and drops. Run
the cables so that they will
not be in your way.
Do not stand on or place
heavy objects on the
unit.
Prohibited
Doing so may result in
injuries due to falls or
damage to the unit.
to
Do not get your hands or
fingers caught when
opening and closing the
Hand
caution
maintenance lid.
Doing so may result in
injury.
Do not touch the
connections cord’s
connector with wet
t hand
We
caution
hands.
Connecting or
disconnecting the cord’s
connector with wet hands
may result in electric
shock.
Turn off the connected
printer before
performing
Obe
maintenance.
Failure to do so may result
in electric shock.
Do not install the output
tray in locations where it
may obstruct human
Prohibited
traffic.
Installing the unit in
locations where the output
tray juts out into paths
frequented by people may
result in accidental bumps.
Page 7
Overview
Features
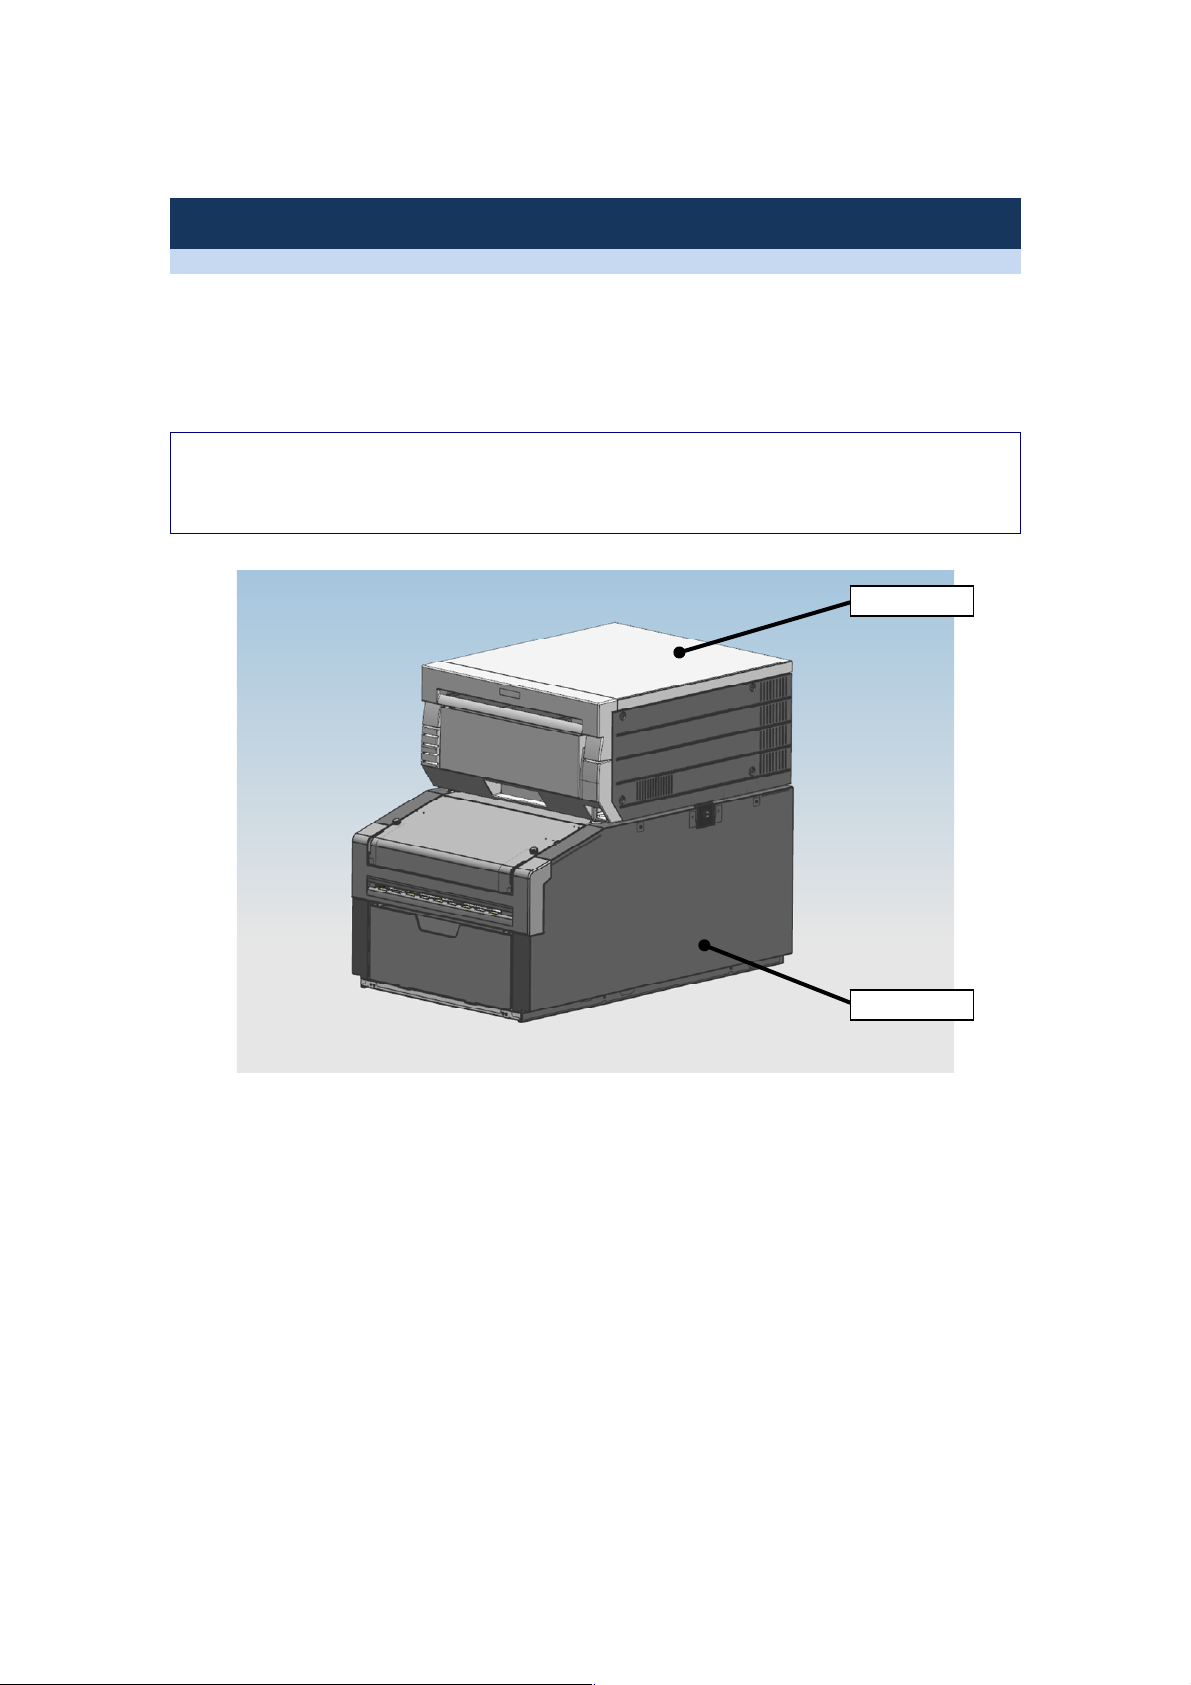
The OP-TU80X Turning Unit is a duplex printing option for use with the DP-DS80D Digital Photo
Printer. Using this unit in conjunction with the DP-DS80D allows printing on both sides of print sheets.
Duplex printing can be performed on cut sheets loaded into the OP-TU80X. Simplex printing can be
performed on paper rolls loaded into the DP-DS80D. The ink ribbon loaded into the DP-DS80D is used
for both processes.
Notes
This unit is intended for use with the DP-DS80D. Always use the unit in conjunction with the
DP-DS80D. The unit cannot be connected and used with the DS80. For details on printer
operations, refer to the user’s manual supplied with the printer.
DP-DS80D
OP-TU80X
7
Page 8
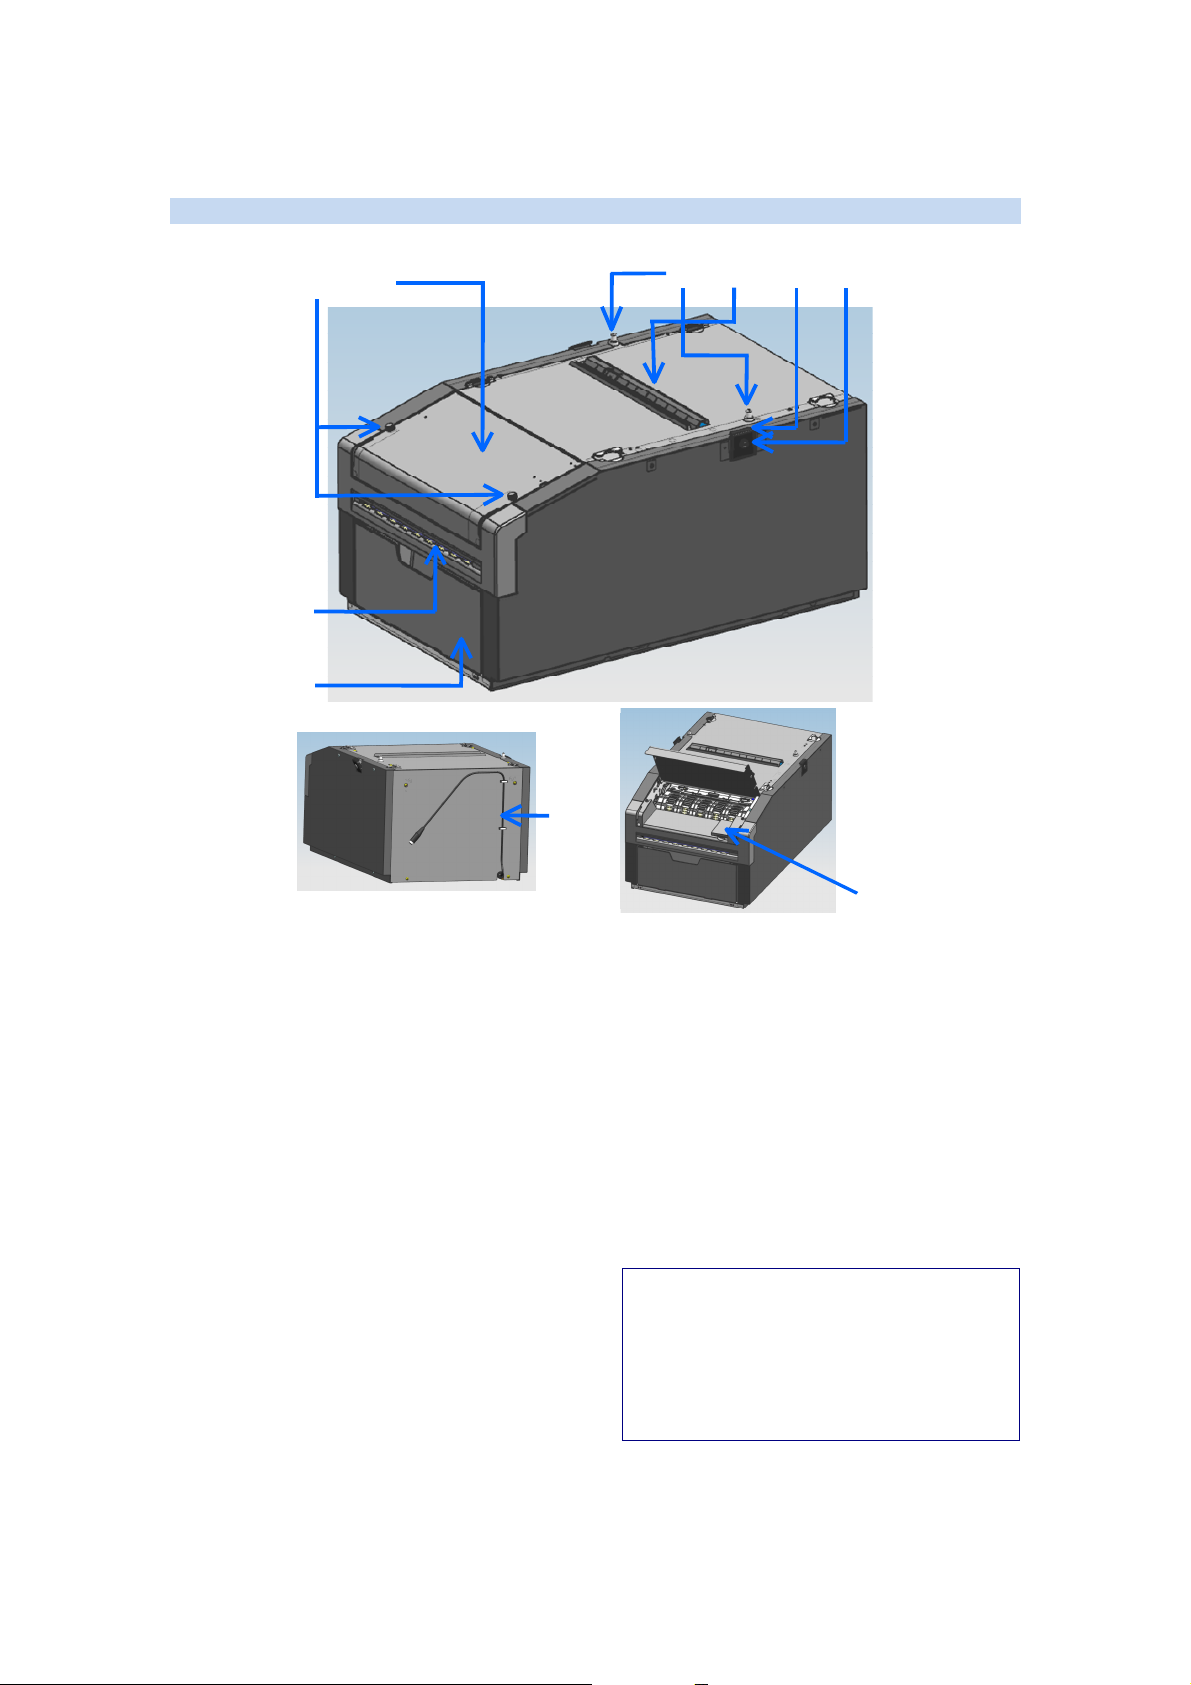
Parts Identification
① ②
③
④
⑤⑥ ⑦ ⑧
⑨
Maintenance lid scre
Use these when opening or securing the
maintenance lid.
Maintenance lid
Open this to perform maintenance on the
cleaning roller or to clear paper jams.
Output slot
Printed sheets are ejected from here.
Scrap box
Blank areas of printed images are cut off
and collected in this box.
Guide pins
These guide the printer into the proper
position for connection.
Paper guide
Paper passes through here during
printing.
ws
⑩
Connection hooks (left and right)
These secure the printer to the unit.
Connection hook screws (left and right)
Use these when securing the connection
hooks.
Communication cable
Use this to connect the printer to the unit.
SD card slot (used for servicing)
SD card slot used for servicing. This is not
used during normal operation.
Notes
This SD card slot is intended for use in
servicing only. Dai Nippon Printing will
not be liable for any recorded media or
data that is lost through use of this slot.
Do not insert foreign objects into the SD
card slot.
8
Page 9
Preparation
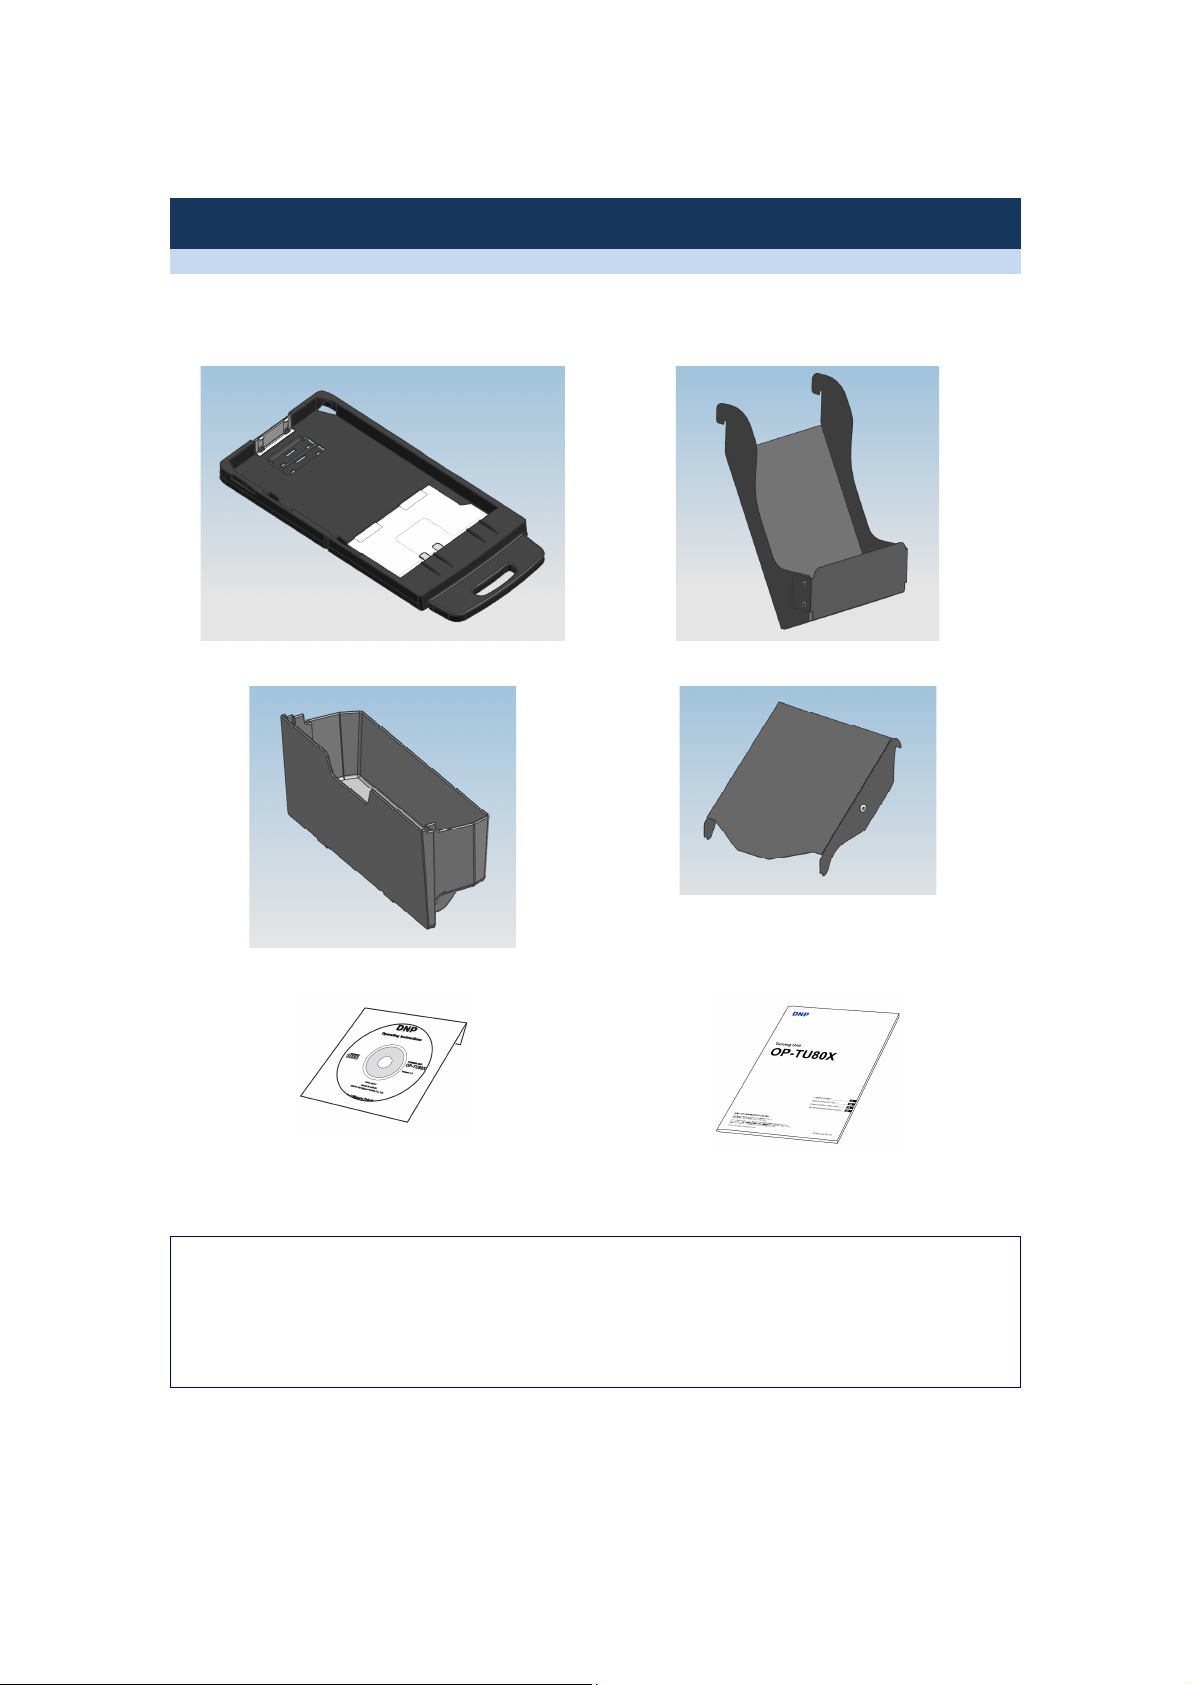
Checking the Components
Check that the unit and all the following accessories are included in the package.
Input tray* (1)
Output tray (1)
Scrap box* (1)
CD-ROM (1)
* Installed inside the turning unit.
Notes
Be careful when lifting the unit out of the box to avoid back injuries.
We recommend storing the box and packaging materials after unpacking, as they can be
used when transporting the unit.
When transporting the unit, remove the print paper from the unit beforehand. Failure to
remove these items before transport may result in malfunctions.
Paper slider (1)
Before Using this Unit (1)
9
Page 10
Installation
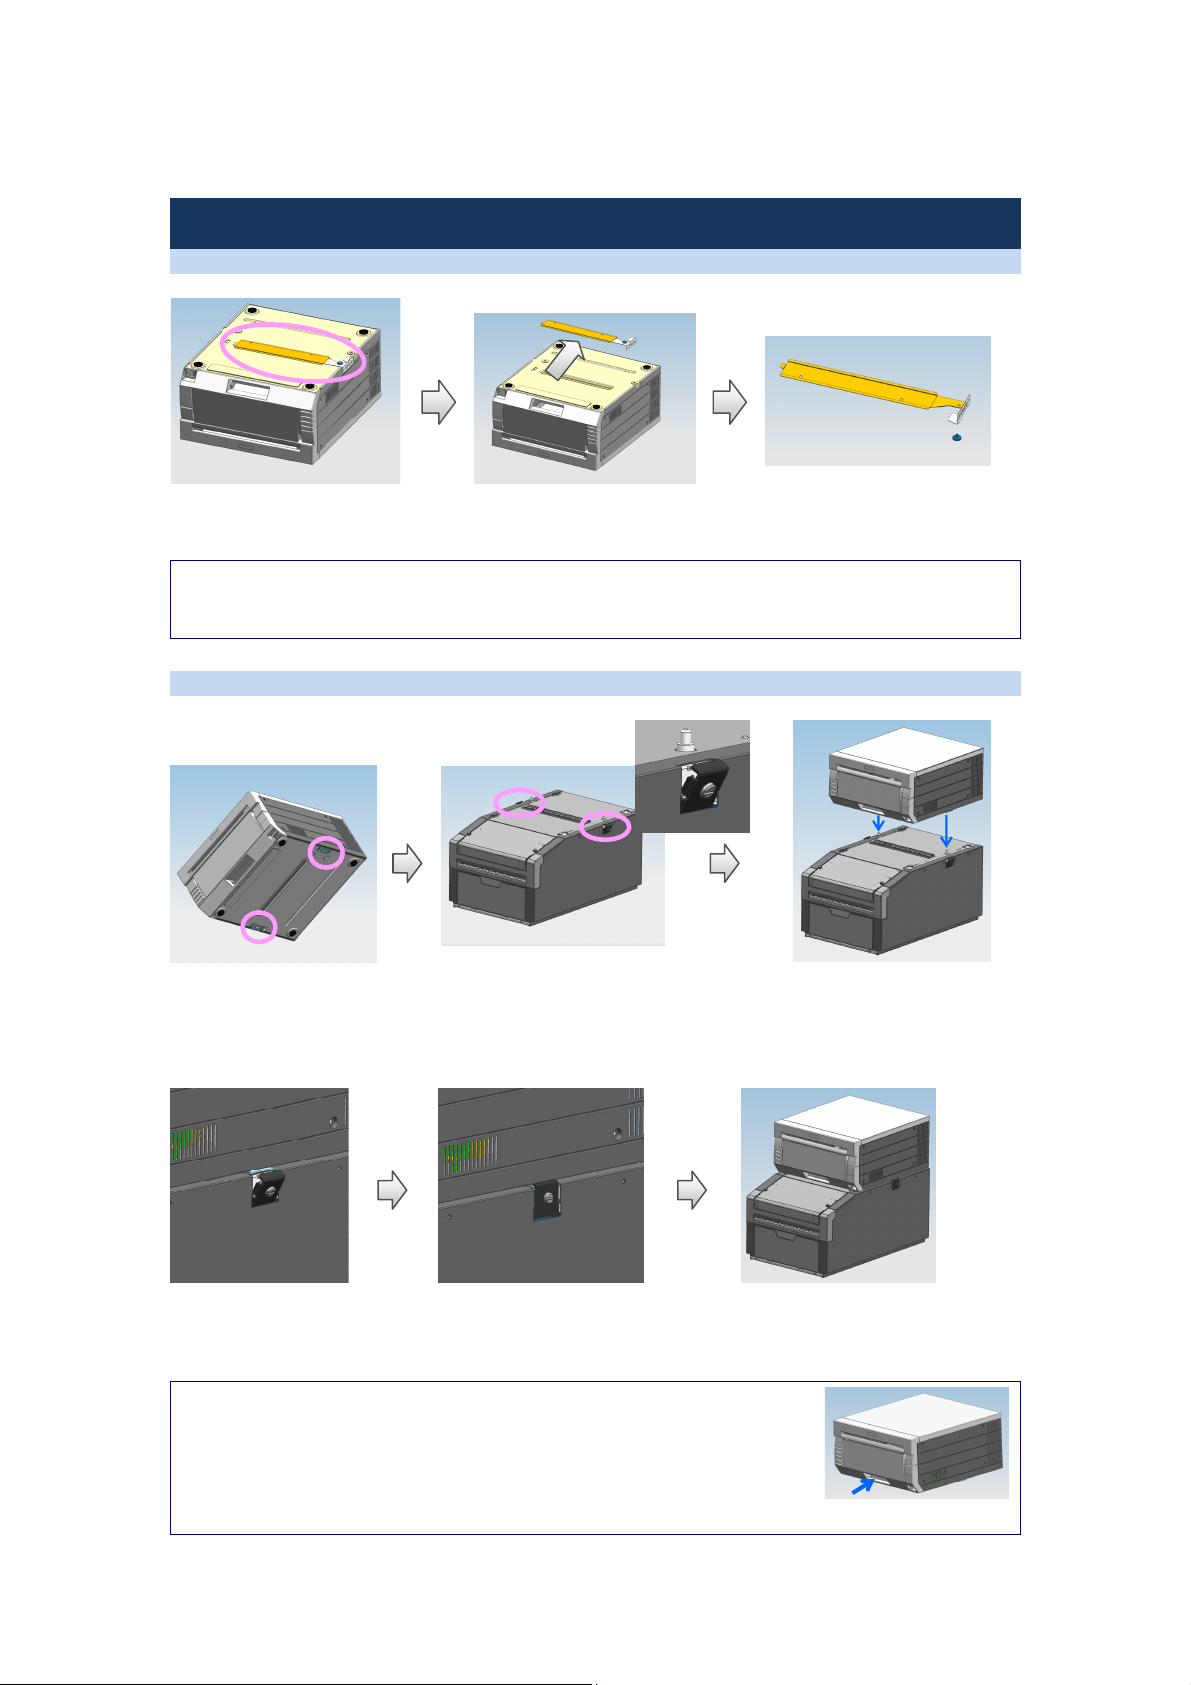
Removing the Blind Plate from the Bottom of the Printer
Carefully place the printer
upside down.
Loosen the thumbscrew, and
remove the blind plate from
the bottom of the printer.
Store the removed blind plate
and thumbscrew.
Notes
For details on printer operations, refer to the user’s manual supplied with the printer. Be sure
to turn off the printer before connecting it to the unit.
Connecting the Printer to the Unit
Check the locations of the
connection points on the
bottom of the printer and the
holes in which the guide pins
will be inserted (shown above).
Check that the connection
hooks on the unit (shown
above) are open.
Place the printer on the unit
from above while aligning the
positions of the guide pins
with the holes.
Check that the guide pins
on both sides are inserted
in the holes at the bottom
of the printer.
Raise the connection hooks,
and secure the connection
hook screws.
Notes
Avoid getting your fingers caught when placing the printer on the
unit.
Keep your hands away from the open lever when carrying the
printer. Carrying the printer by the open lever may result in
malfunctions.
10
Open leve
r
Page 11
Notes
Be careful when moving the printer or when connecting the printer to the unit. Dropping the
printer may result in injuries or malfunctions.
When placing the printer on the unit, make sure the guide pins are inserted into the printer.
If you want to move the units after installation, always disconnect the printer from the unit
and move the units separately.
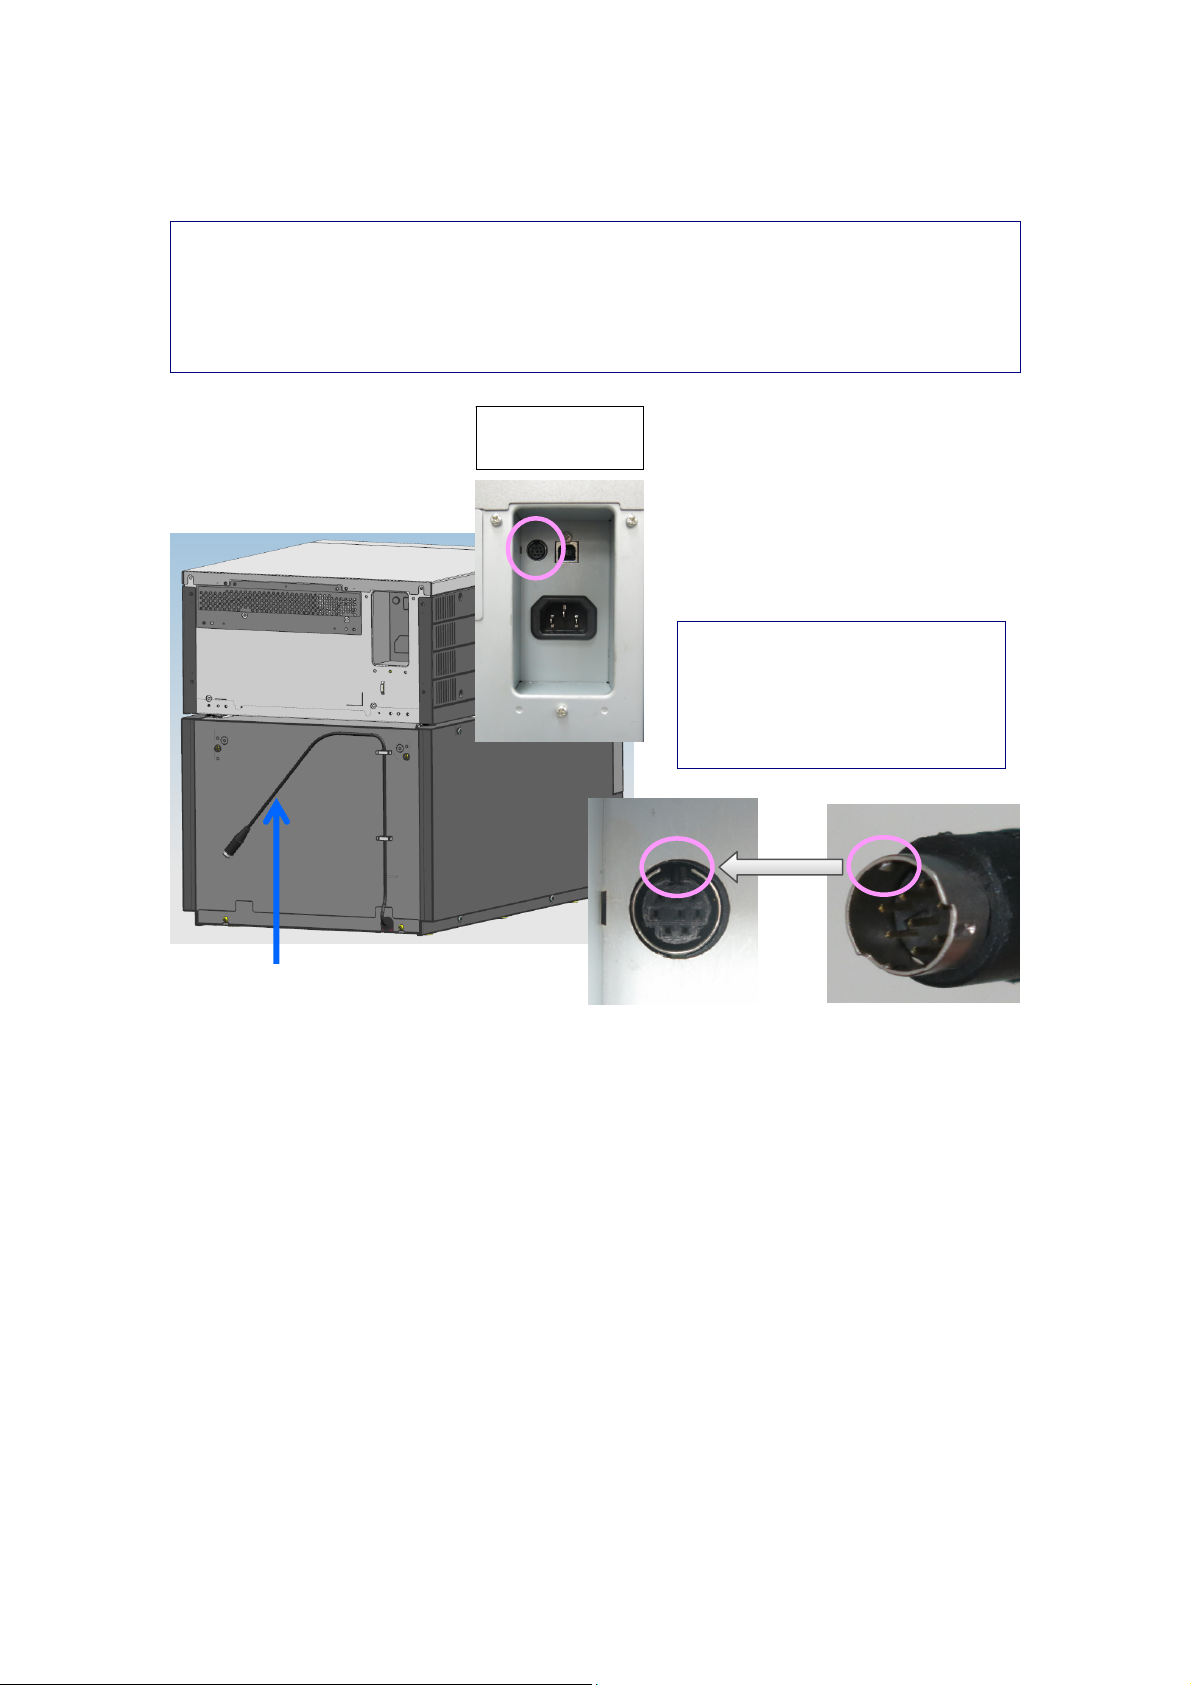
Communication cable
Communication
cable port
Connect the communication cable to the
communication cable port on the printer.
Notes
The connector of the
communication cable and the port
must align properly.
Check the pin positions, and
connect the cable securely.
Protrusion Indentation
11
Page 12
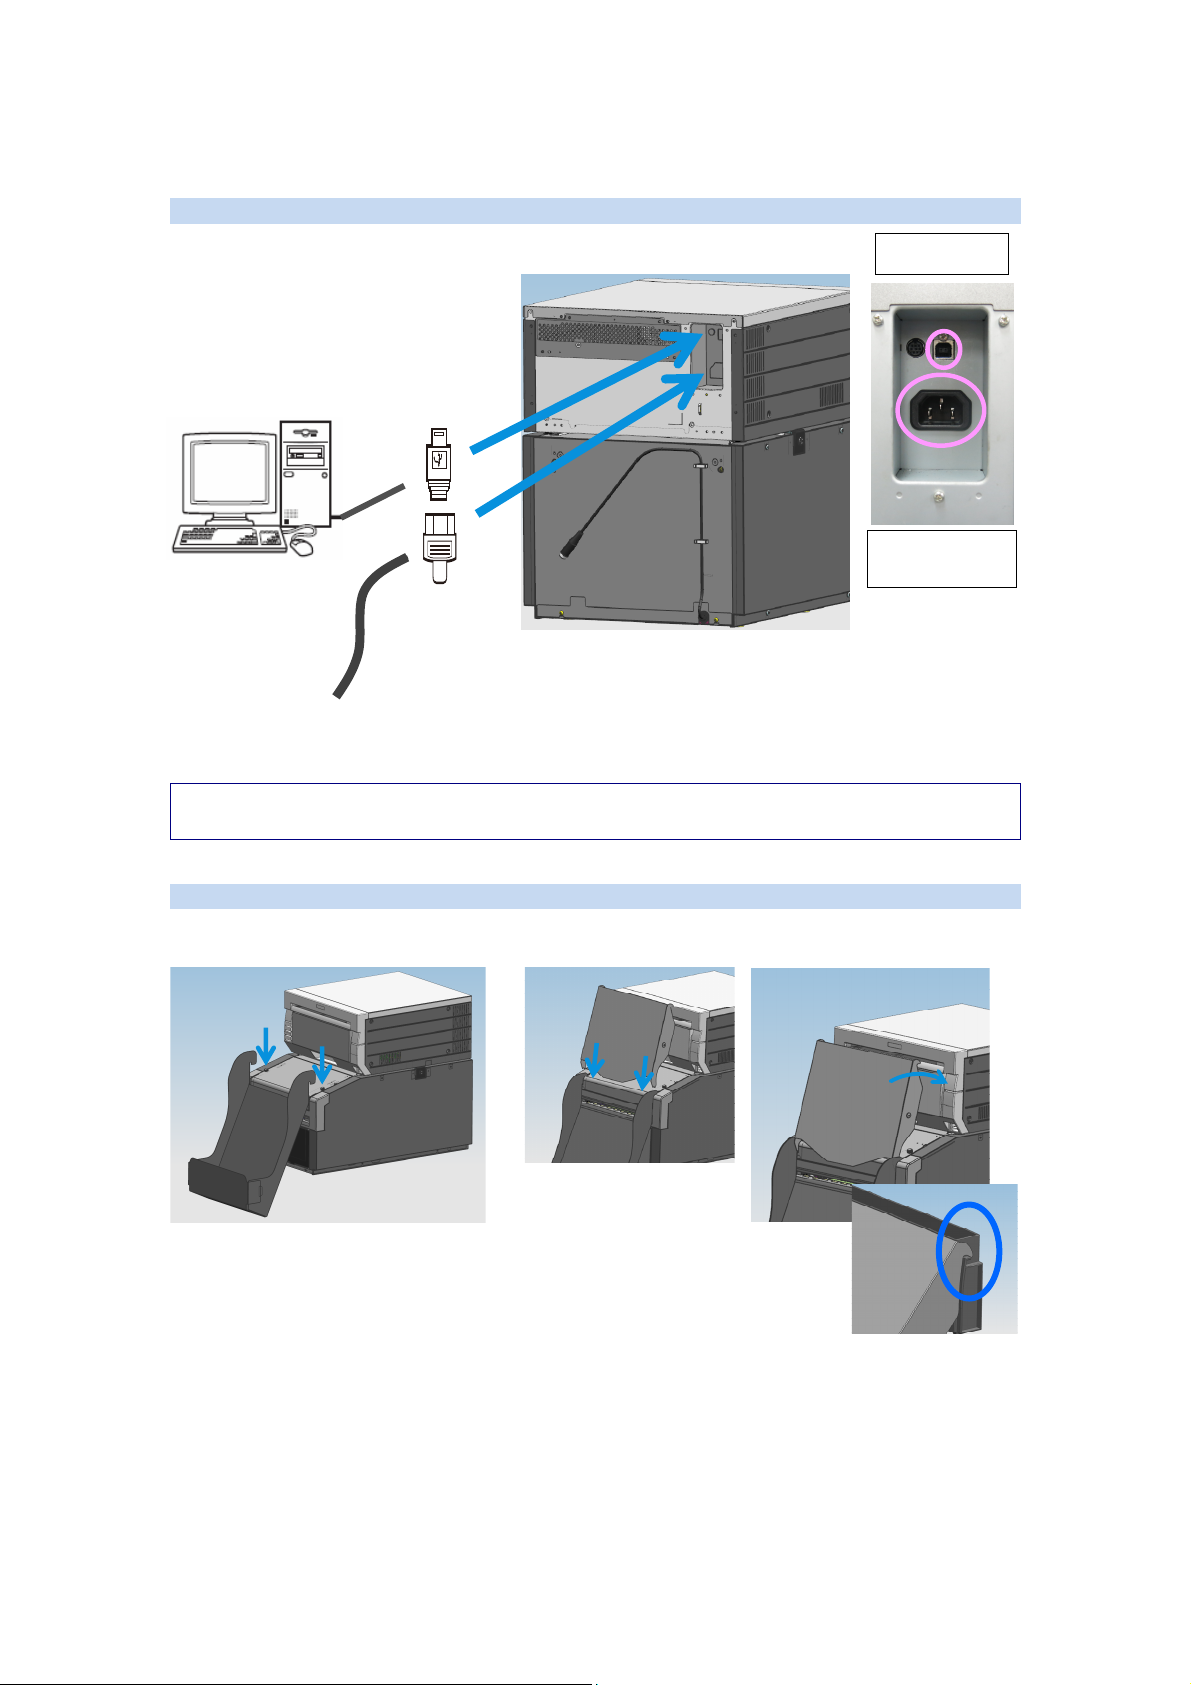
Connecting to a Computer
USB cable
Power supply
r cord (supplied with printer)
Powe
es
Not
For details on printer connection, refer to the user’s manual supplied with the printer.
Attaching the Output Tray and Paper Slider
USB port
port
Attaching the output tray Attaching the paper slider
Insert in the grooves on the
Attach from above.
inside of the output tray.
Attach from above diagonally.
Attach to the scrap
box on the printer.
12
Page 13
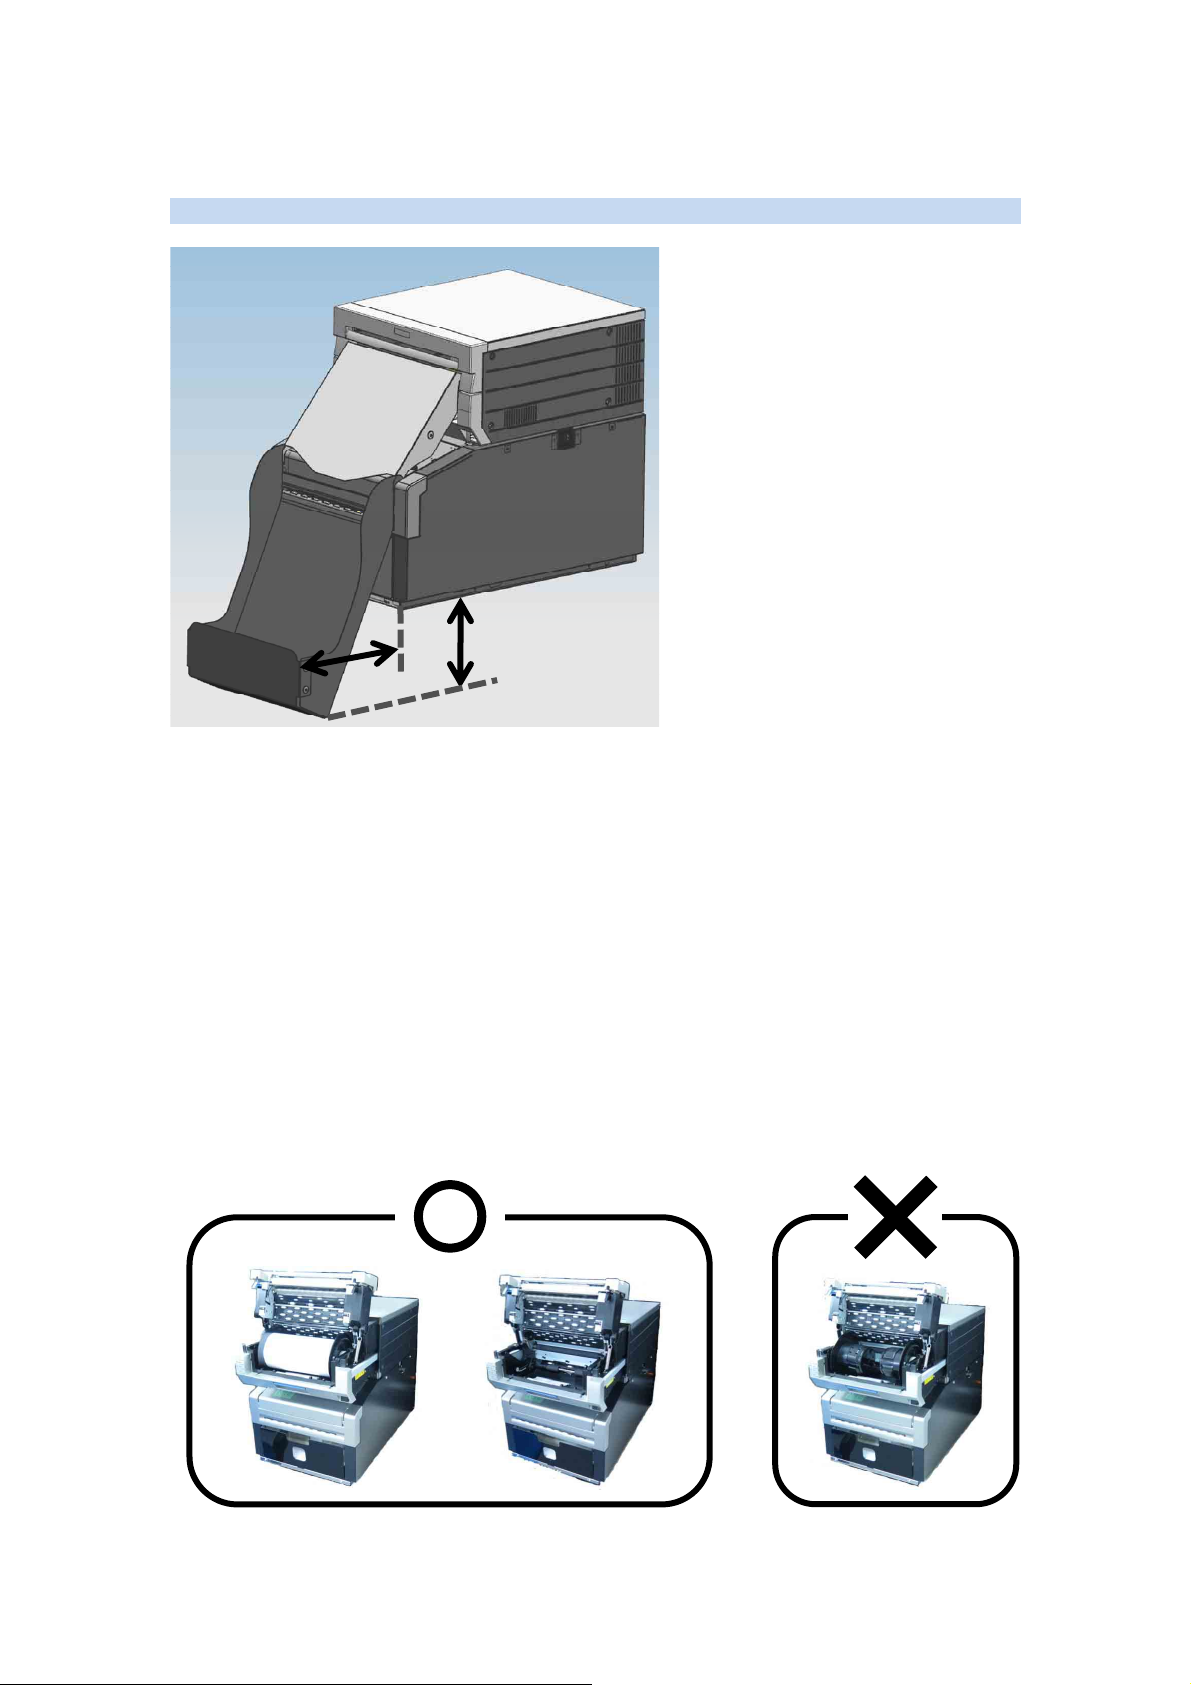
Precautions for Installation
Refer to the illustration to the left to
attach and use the output tray
properly.
160 mm
220 mm
Do no
t install the unit in the following types of locations.
- Locations exposed to excessive vibration from nearby equipment.
- Locations with high humidity.
- Locations with excessive dust.
- Locations exposed to direct sunlight.
- Locations exposed to extreme high or low temperatures.
To prevent the printer from overheating, do not obstruct the ventilation holes with cloth or other objects.
Overheating due to blocked ventilation holes may result in fire or malfunction.
When printing with paper rolls, the printed sheets may not accumulate in the output tray in some cases
due to curling in the sheets.
In addition, do not allow more than 30 printed sheets to accumulate in the output tray, as doing so may
result in paper jams.
When using the turning unit (OP-TU80X), do not set only the flange of a paper roll in the printer
(DP-DS80D).
13
Page 14
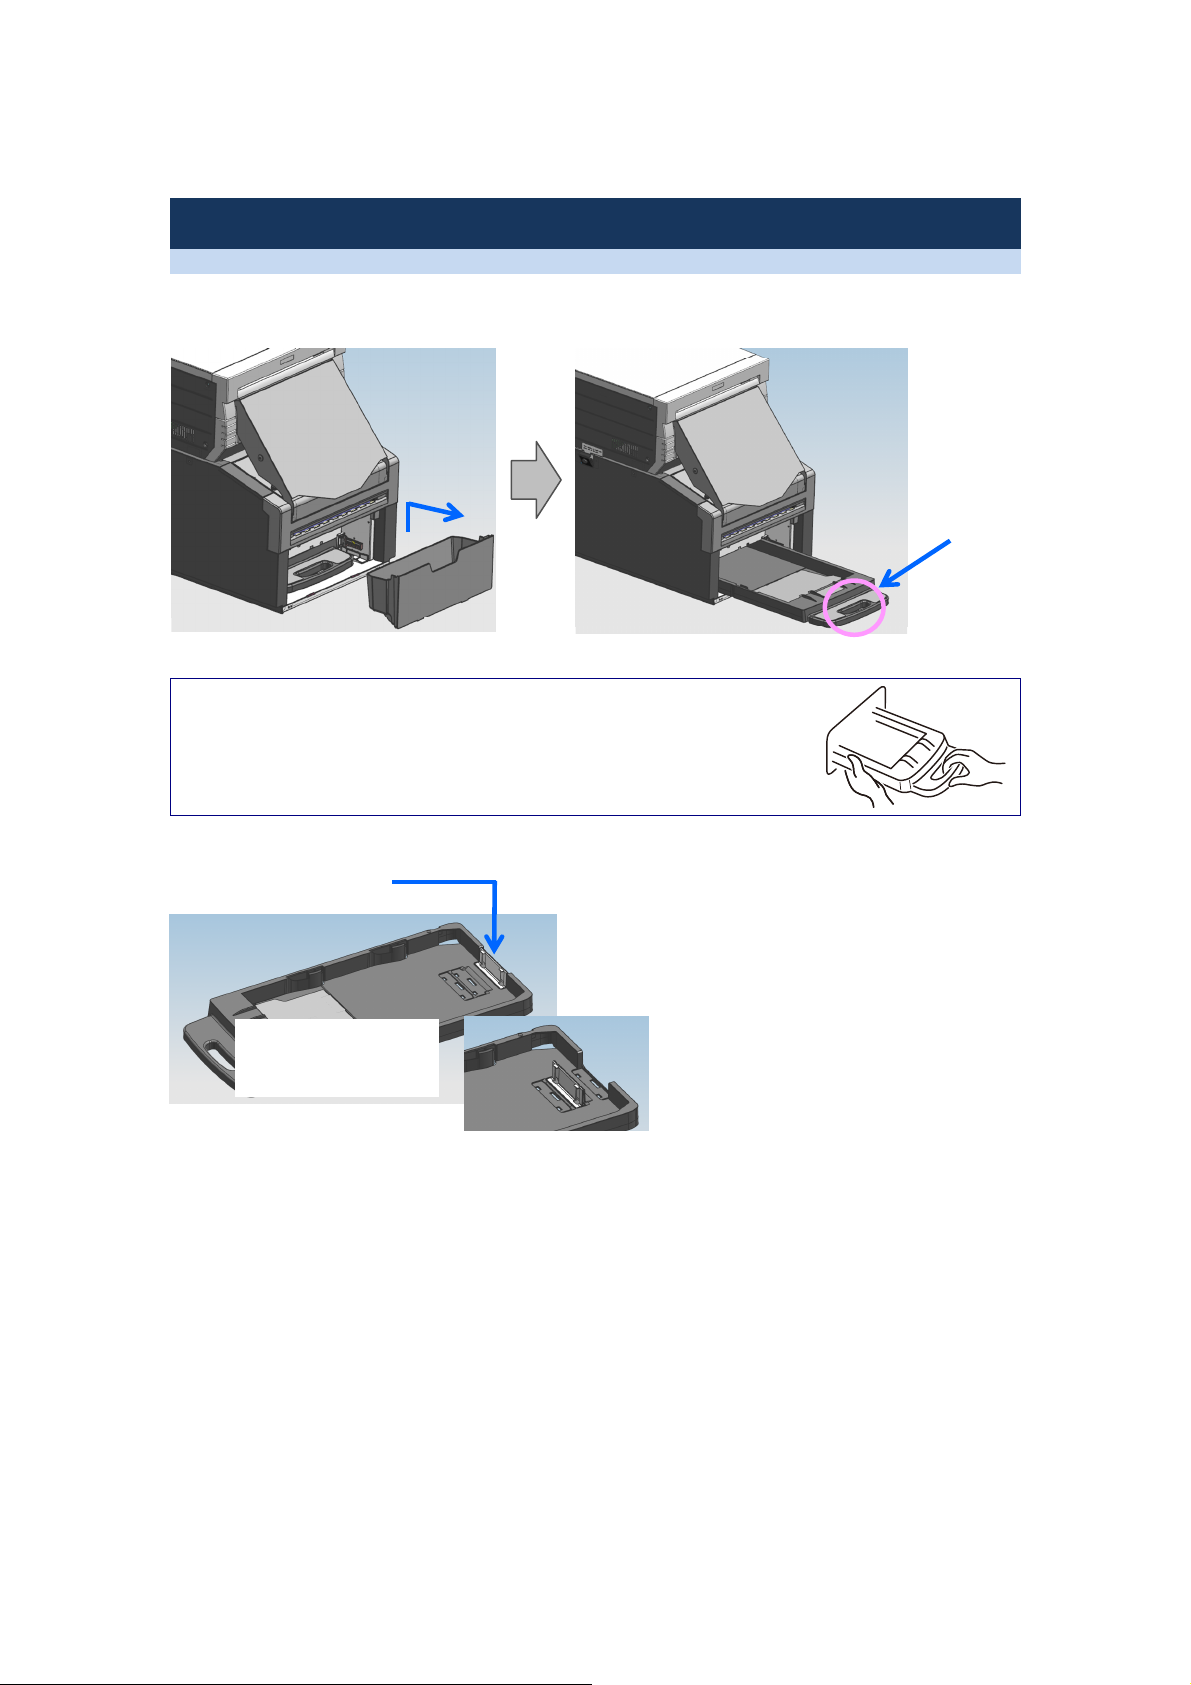
Operation
Loading Print Paper
Load print paper as follows.
Notes
Use your oth
tray
Remove the scrap box.
er han
d to support the input tray when removing the input
Handle
Pull out the input tray by its handle.
Paper size stopper
8 × 12 in. position
(for DP-DS80DX
MEDIA SET (8 × 12))
8 × 10.75 in. position
(for DP-DS80DX
MEDIA SET (8 × 10.75))
Adjust the position of the paper size stopper
according to the size of the paper you are
using as illustrated to the left.
Remove
the tabs to adjust its position.
If the paper size stopper is not positioned
properly, the paper size cannot be detected
properly, and paper jams may result.
the paper size stopper, and attach
14
Page 15
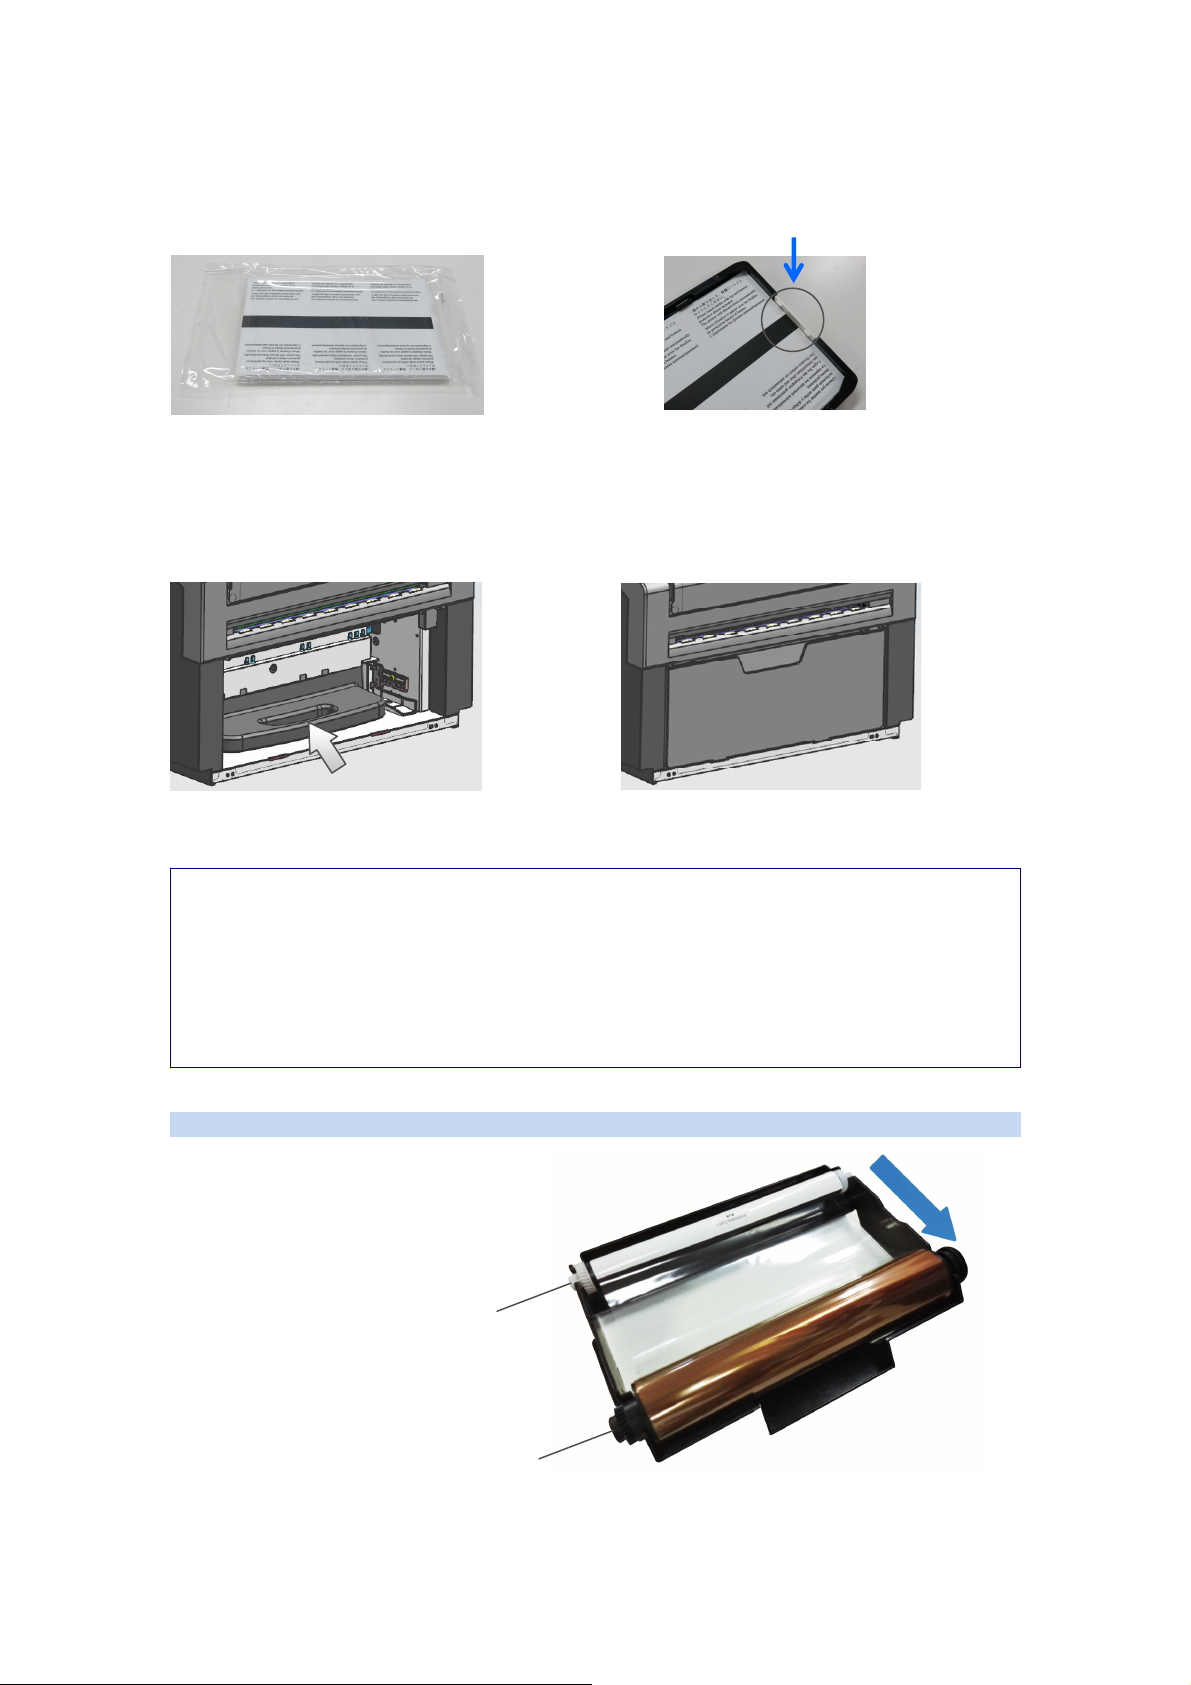
Ta b
Protective sheets are inserted at the
top and bottom of each package of
print paper. These sheets prevent
dust contamination during print
paper replacement.
Remove the print paper from the
package, including the protective
sheets, and place it in the input tray.
Insert the paper so that the edge of
the paper is placed under the tab on
the paper size stopper.
Insert the input tray inside the
turning unit.
Attach the scrap box.
e
s
Not
Touching the surface of the print paper will result in fingerprint contamination and reduced
print quality.
Do not load more than one pack’s worth of print paper into the input tray. Doing so may
result in paper jams. In addition, be sure to load the print paper so that the paper is
completely within the tray and does not protrude. Failure to do so may result in paper jams.
Always attach the scrap box to prevent scraps of paper from falling inside the unit.
The protective sheets are ejected during printing.
Loading Ink Ribbons
Load the ne
Rotate the ribbon in the direction of the arrow,
and remove any slack in the ribbon.
w ribbon in the ribbon cassette.
ke-up side (white)
Ta
Suppl
y side (black)
15
Page 16
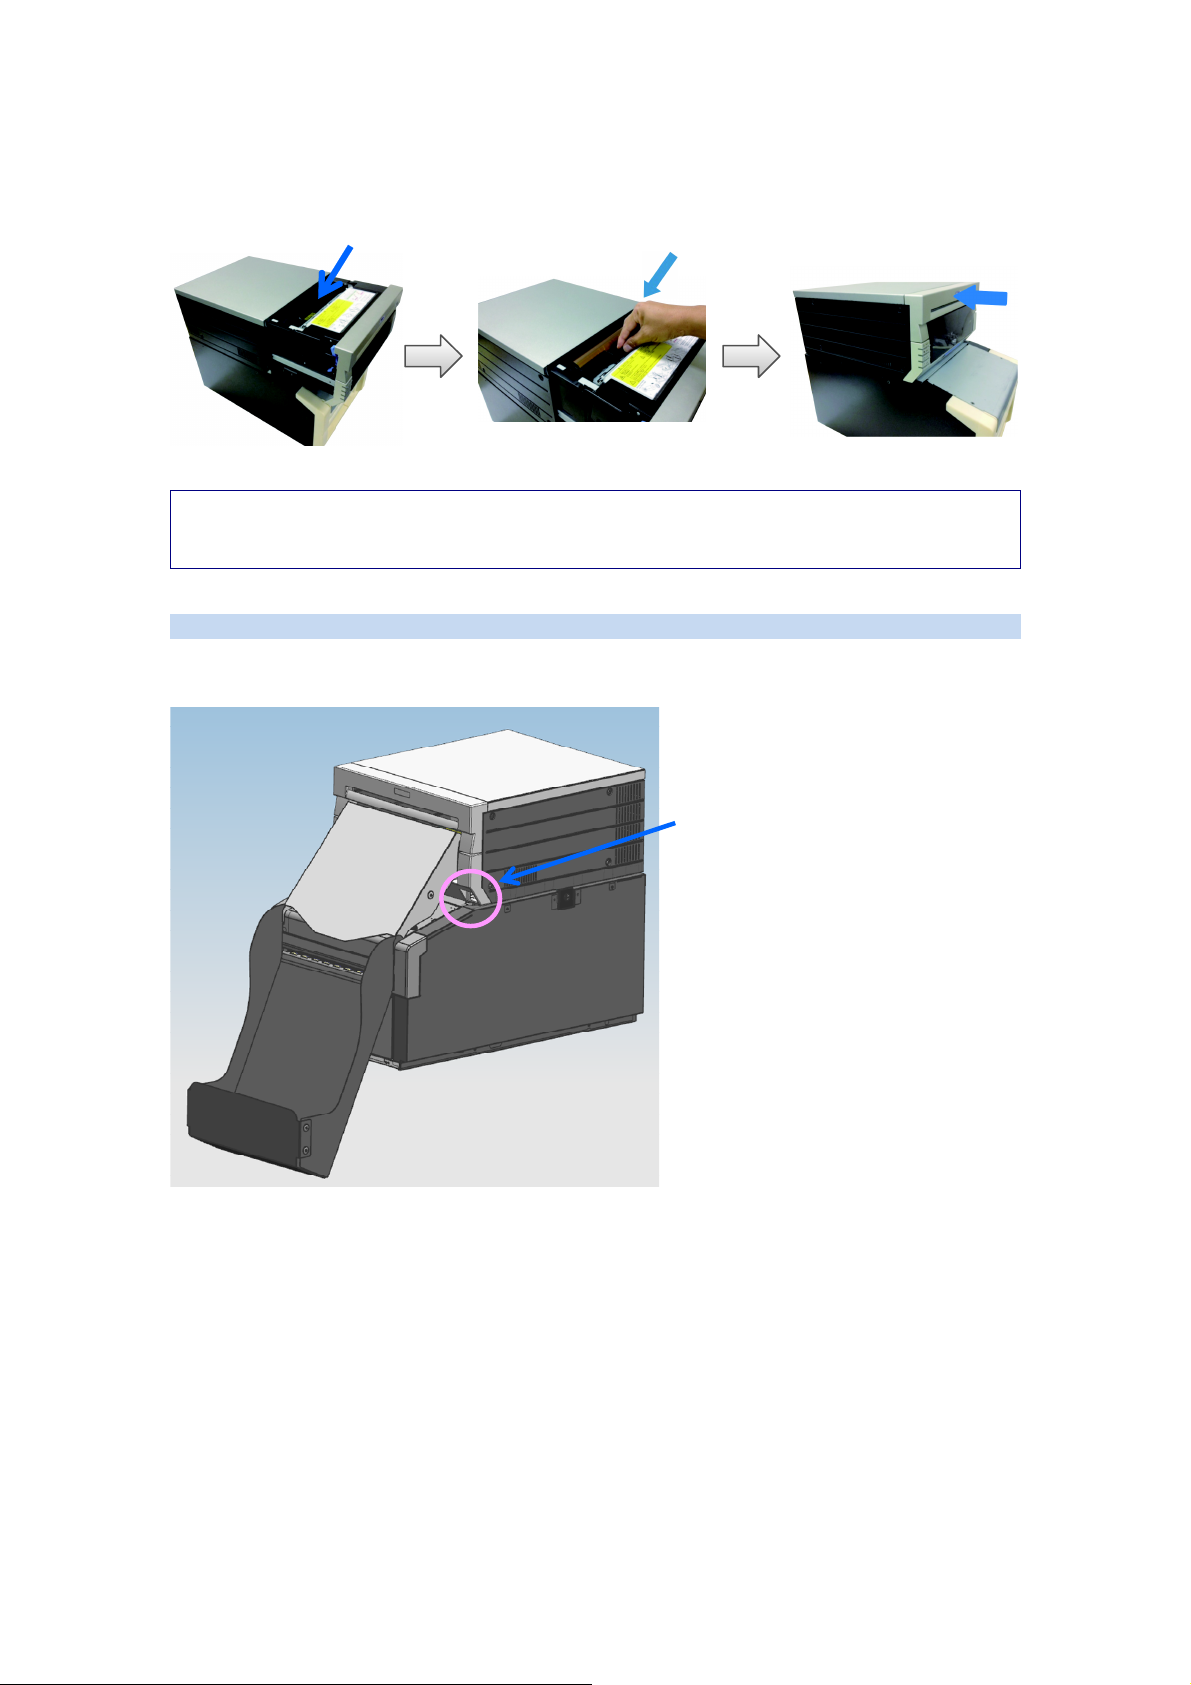
Load into this compartment.
Load so that the supp
side (black) is in the front.
ly
Close the mec
hanical unit.
Note
s
For details on loading media in the printer, refer to the “Printer Setup” section in the user’s
manual supplied with the printer.
Printing
When preparation is complete, set the power switch on the printer to ON.
er switch
Pow
initialization is complete, the POWER LED on the printer will light, and the printer will be ready to
When
print.
Replacement of print media (i.e., ink ribbons and print paper) can also be performed while the printer is
turned on.
16
Page 17
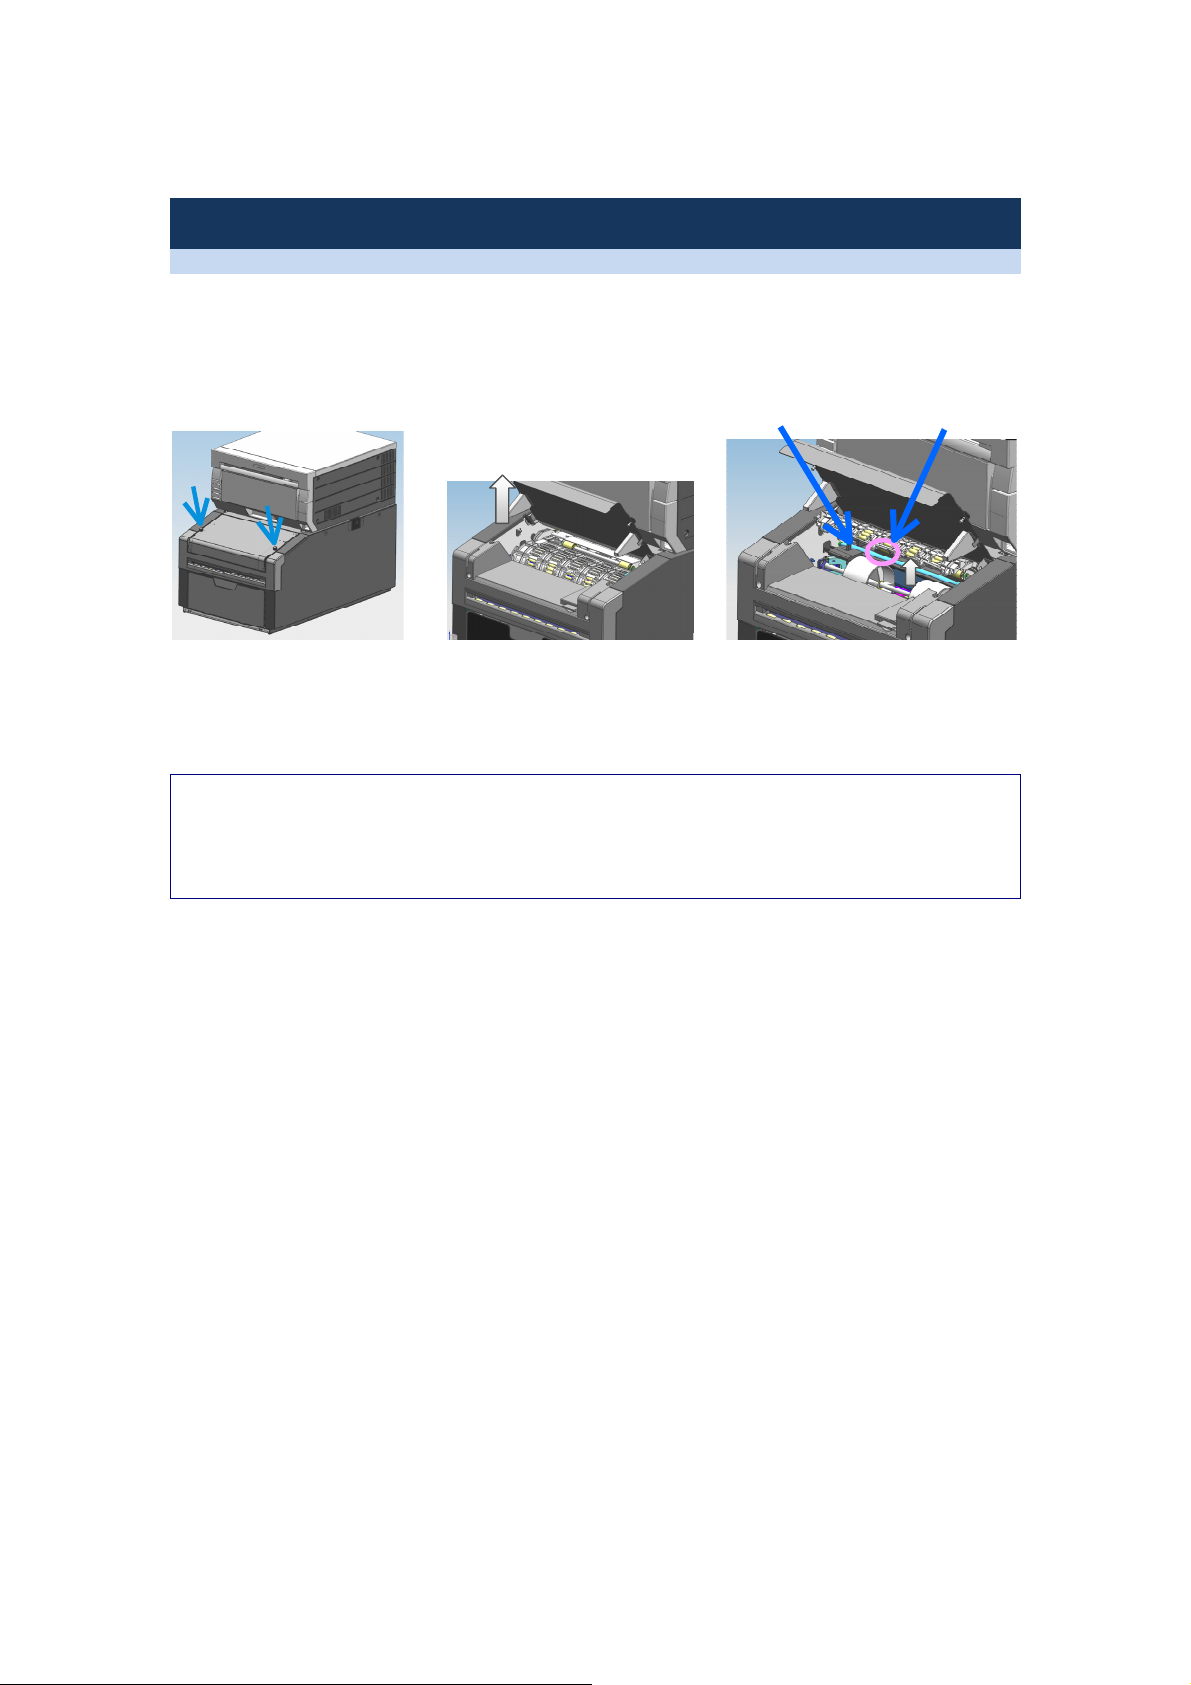
Miscellaneous
Cleaning the Cleaning Roller
The cleaning roller removes dust and other particles from print paper surfaces during printing. If dust and
other particles appear frequently on printed images, clean the cleaning roller to restore its ability to
remove dust.
Cleaning roller
Guide tab
Turn off the printer, and
loosen the maintenance lid
screws.
Note
s
Do not open the maintenance lid while printing is in progress. Doing so will stop the printing
operation.
After maintenance is complete, be sure to close the guide and maintenance lid. Be sure to
secure the maintenance lid screws tightly.
Open the maintenance lid. Hold the guide tab, and lift it until
the guide locks.
Wipe the cleaning roller with a cloth
dampened with ethanol while
rotating the roller.
17
Page 18
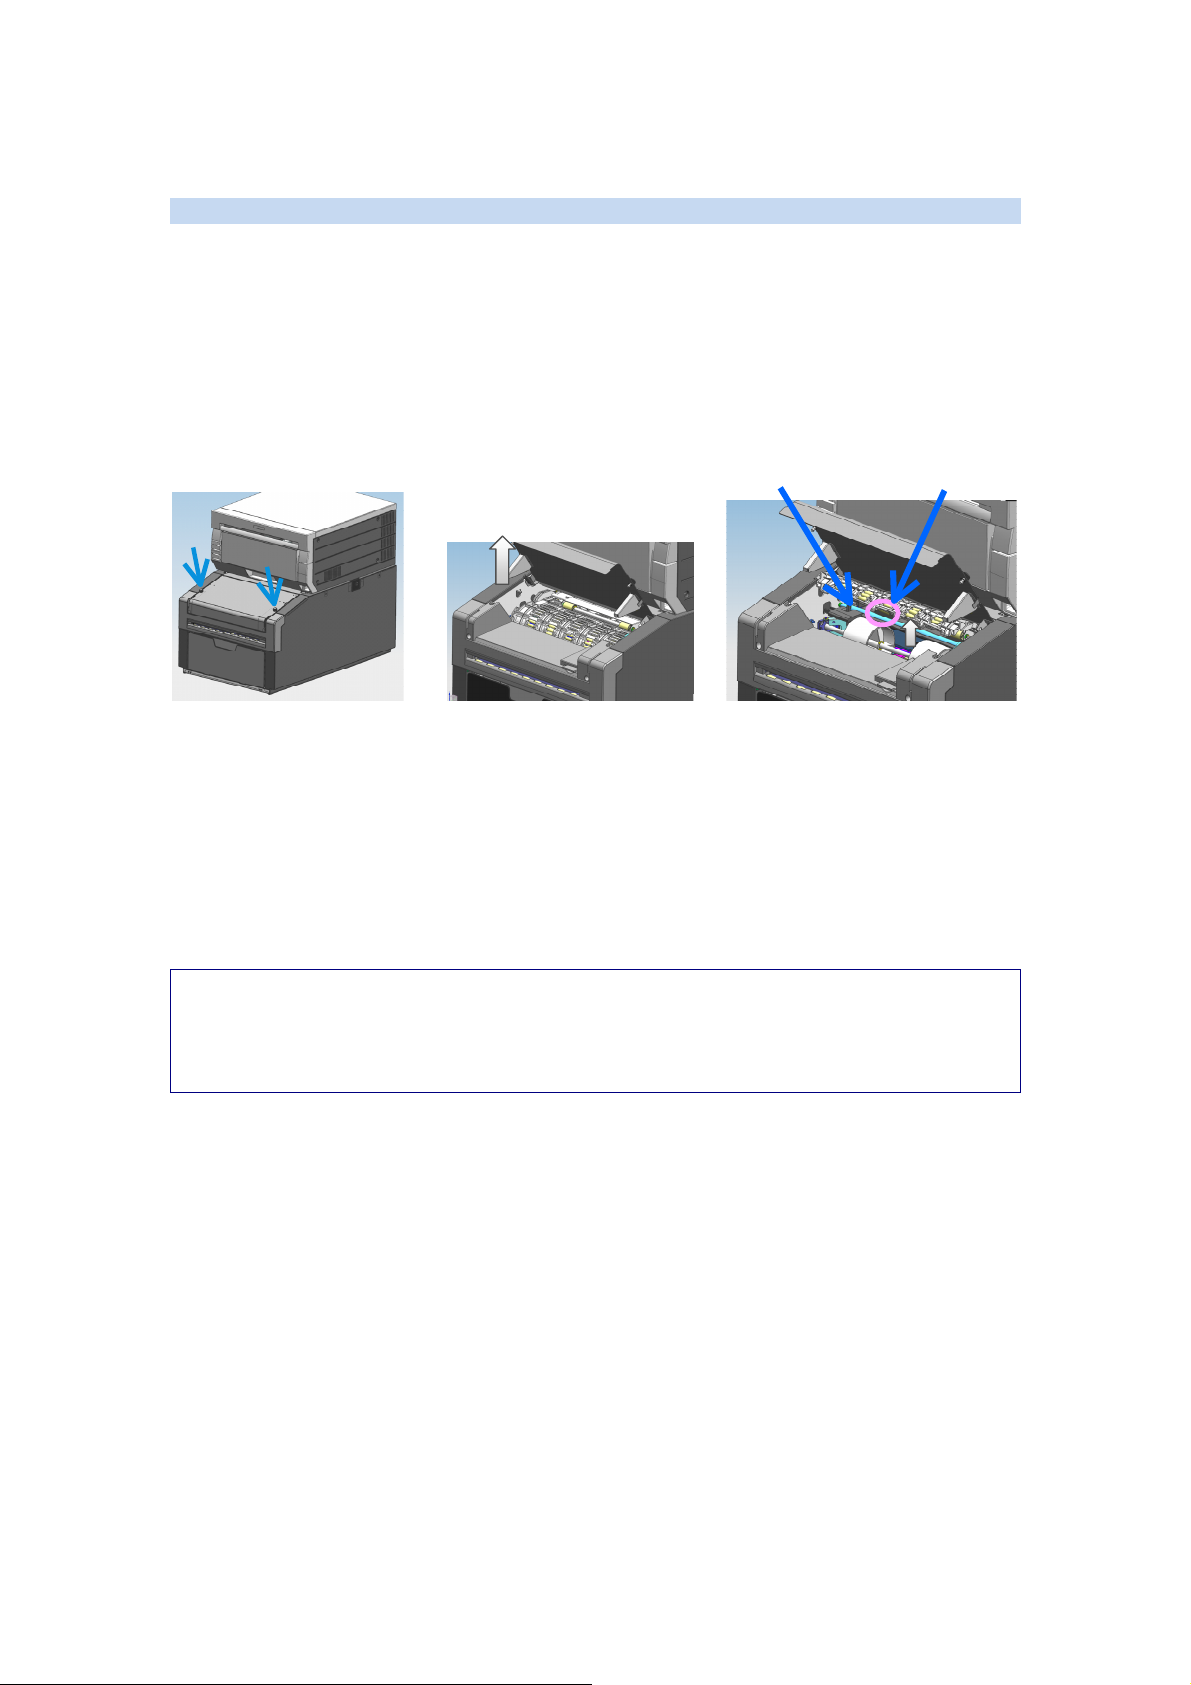
Clearing Paper Jams
If a paper jam occurs during duplex printing, use methods to to clear the jam.
If you cannot clear the paper jam, contact your dealer.
Turn off the printer, and then turn it on again. The jammed paper will be cut and ejected automatically
into the scrap box within about 1 minute.
If the paper jam is not cleared after repeating method several times, refer to the following
illustrations to remove the jammed paper.
Cleaning roller
Guide tab
Loosen the ma
screws.
intenance lid
Open the maintenance lid. Hold the guide tab, and lift it until
the guide locks.
Remove the jammed paper
carefully.
he jammed paper is not visible from the maintenance lid, open the mechanical unit of the printer,
If t
and remove the ribbon cassette before removing the jammed paper.
If the paper jam is not cleared with methods to , refer to the troubleshooting section in the user’s
manual supplied with the printer, and check the interior of the printer.
Notes
Do not open the maintenance lid while printing is in progress. Doing so will stop the printing
operation.
After you finish clearing the paper jam, be sure to close the guide and maintenance lid. Be
sure to secure the maintenance lid screws tightly.
18 19
Page 19
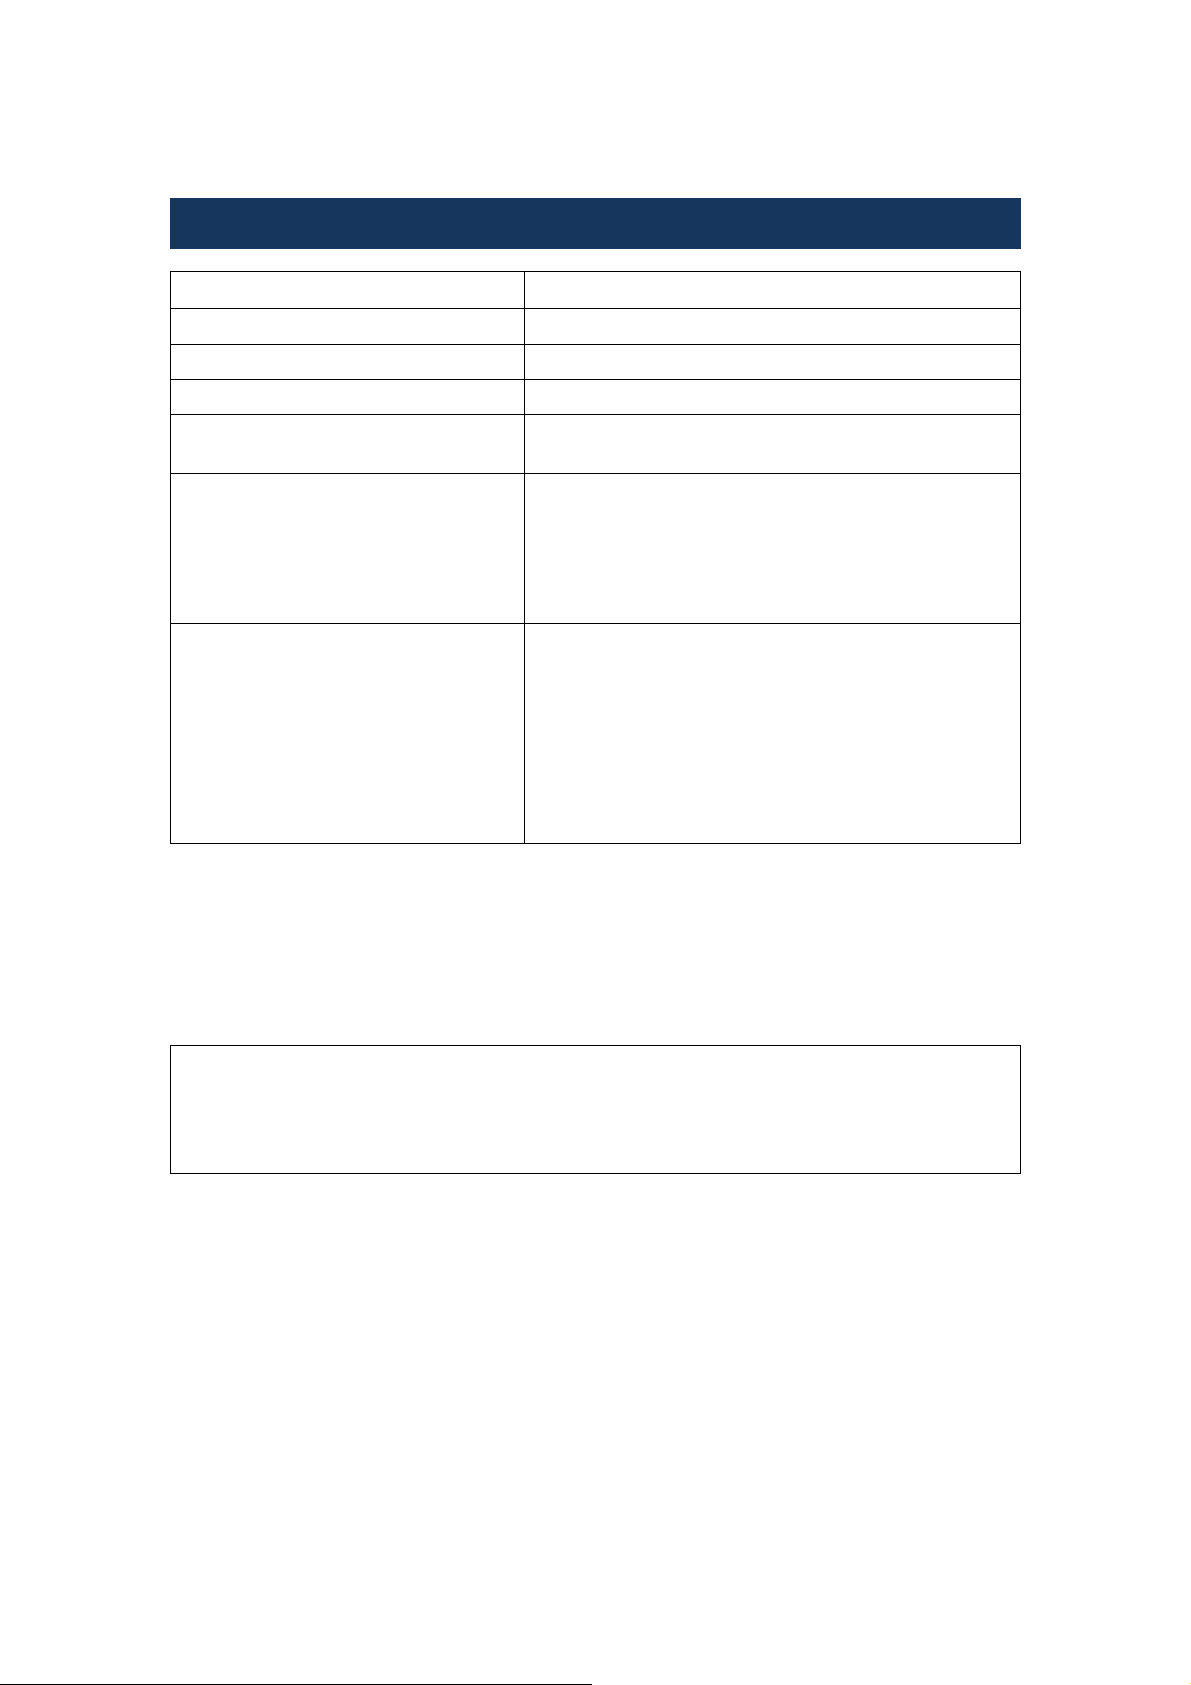
Specifications
Operating temperature
Operating humidity 35% to 80% (non condensing)
Dimensions (excluding protrusions) 322 × 500 × 248 mm (W × D × H)
Weight Approx. 15 kg (turning unit only)
Memory card slot SD card (1)
Supplied accessories Input tray (1)
Dedicated print media (not supplied) DP-DS80DX MEDIA SET (8 × 12)
Power is supplied to the unit from the connected DP-DS80D via a dedicated cable.
This unit is a duplex printing option for use with the DP-DS80D Digital Photo Printer. Do not use the unit
with any other device.
Design and specifications are subject to change without notice.
Be sure to verify operation before use. Dai Nippon Printing will not be liable for prints and recorded
data that result from malfunctions that occur during operation of the unit, printer, recording media,
external storage, and other devices.
Dai Nippon Printing will not be liable for any loss of profits or other losses due to malfunctions or
other reasons during or after the warranty period.
5 C to 35 C
(Used only for servicing and not for normal operation.)
Output tray (1)
Scrap box (1)
Paper slider (1)
CD-ROM (1)
Before Using this Unit (1)
Ink ribbon: 8 × 12 in. prints; 110 images
Print paper: 55 sheets per pack; 203 × 348 mm
paper size
DP-DS80DX MEDIA SET (8 × 10.75)
Ink ribbon: 8 × 10.75 in. prints; 130 images
Print paper: 65 sheets per pack; 203 × 311 mm
paper size
Page 20

 Loading...