

Page 1

Digital Photo Printer
DS-ID400
Operating Instructions
Before operating the unit, please read this manual thoroughly and
retain it for future reference.
© 2012 Dai Nippon Printing Co., Ltd.
3-00D-053-12 (1)
Page 2

Owner’s Record
The model and serial numbers are located at the rear.
Record these number in the space provided below.
Refer to these numbers whenever you call upon your
dealer regarding this product.
Model No. ____________________
Serial No. ____________________
WARNING
To reduce the risk of fire or electric shock, do not
expose this apparatus to rain or moisture.
To avoid electrical shock, do not open the
cabinet. Refer servicing to qualified personnel
only.
2. Use the Power Cord (2-core mains lead) / Appliance
Connector / Plug conforming to the proper ratings
(Voltage, Ampere).
If you have questions on the use of the above Power Cord
/ Appliance Connector / Plug, please consult a qualified
service personnel.
For the customers in Europe
The manufacturer of this product is Dai Nippon Printing
Co., Ltd., 1-1-1, Ichigaya Kagacho, Shinjuku-ku, Tokyo,
Japan.
The Authorized Representative for EMC and product
safety is DNP PHOTO IMAGING EUROPE SAS, ZI
PARIS NORD II - BP 51077, 22 AVENUE DES
NATIONS, PARC SILIC - VILLEPINTE, 95948
ROISSY CDG CEDEX, FRANCE.
This apparatus shall not be used in the residential area.
This unit has no power switch.
When installing the unit, incorporate a readily accessible
disconnect device in the fixed wiring, or connect the power
plug to an easily accessible socket-outlet near the unit. If a
fault should occur during operation of the unit, operate the
disconnect device to switch the power supply off, or
disconnect the power plug.
For the customers in the U.S.A.
This equipment has been tested and found to comply with
the limits for a Class A digital device, pursuant to Part 15
of the FCC Rules. These limits are designed to provide
reasonable protection against harmful interference when
the equipment is operated in a commercial environment.
This equipment generates, uses, and can radiate radio
frequency energy and, if not installed and used in
accordance with the instruction manual, may cause
harmful interference to radio communications. Operation
of this equipment in a residential area is likely to cause
harmful interference in which case the user will be
required to correct the interference at his own expense.
You are cautioned that any changes or modifications not
expressly approved in this manual could void your
authority to operate this equipment.
For the customers in Europe, Australia, and
New Zealand
WARNING
This is a Class A product. In a domestic environment, this
product may cause radio interference in which case the
user may be required to take adequate measures.
For kundene i Norge
Dette utstyret kan kobles til et IT-strømfordelingssystem.
For the customers in Europe
If you want to dispose this product, do not mix
with general household waste. There is a
separate collection system for used electronics
products in accordance with legislation under
the WEEE Directive (Directive 2002/96/EC)
and is effective only within European Union.
For details, consult your dealer.
Türkçe
EEE Yönetmeliğine Uygundur
All interface cables used to connect peripherals must be
shielded in order to comply with the limits for a digital
device pursuant to Subpart B of Part 15 of FCC Rules.
Warning on power connection
Use a proper power cord for your local power supply.
1. Use the approved Power Cord (2-core mains lead) /
Appliance Connector / Plug that conforms to the safety
regulations of each country if applicable.
2
Page 3

Table of Contents
Chapter 1 Overview
What This Product Can Do .............................................................6
Information Updates........................................................................7
Supported Storage Media and File Formats .................................7
Chapter 2 Preparation
Supplied Accessories .....................................................................9
Names and Functions of Parts .....................................................10
Installation......................................................................................12
Loading Print Packs ......................................................................12
Replacing Print Packs ...................................................................14
Inserting Storage Media (SD Cards / USB Memory Devices) ....15
Startup and Shutdown ..................................................................16
Front .................................................................................................... 10
Rear ..................................................................................................... 11
Connecting the Power Cord ................................................................ 12
Handling Print Packs ........................................................................... 12
Loading Print Packs............................................................................. 13
Removing the Print Cartridge.............................................................. 14
Loading Print Packs............................................................................. 14
Repairing Breaks in the Ink Ribbon .................................................... 15
Clearing Paper Jams ............................................................................ 15
Startup ................................................................................................. 16
Shutdown............................................................................................. 16
Chapter 3 Settings
Displaying the Menus....................................................................17
Main Menus......................................................................................... 17
Selecting the Language ................................................................18
Configuring Settings for ID Photo Prints ....................................18
Selecting the Layout............................................................................ 18
Specifying which Layouts to Display ................................................. 18
Selecting Color or Monochrome for Prints ......................................... 19
Configuring Trim Settings................................................................... 19
Adjusting the Exposure Automatically ............................................... 20
Printing the File Information............................................................... 20
Table of Contents
3
Page 4

Chapter 4 Operation
Configuring Settings for Printing with Wireless LAN SD
Cards........................................................................................21
Supported Wireless LAN SD Cards.................................................... 21
About the Supplied Wireless LAN SD Cards ..................................... 21
Configuring the Wireless LAN SD Card ............................................ 21
Formatting Wireless LAN SD Cards................................................... 22
Using Expansion SD Cards ..........................................................22
Directory Structure for Expansion SD Cards ...................................... 22
Creating Expansion SD Cards............................................................. 22
Adding Layouts ................................................................................... 22
Adding Logos ...................................................................................... 23
Shooting Preparation ....................................................................24
Digital Cameras................................................................................... 24
Shooting Environments ....................................................................... 24
Attaching the Guideline Sticker to the Digital Camera....................... 24
Shooting ID Photos and Printing Wirelessly...............................26
Shooting Photos................................................................................... 26
Printing Wirelessly .............................................................................. 26
Saving Printed Photos onto USB Memory Devices............................ 27
Printing Photos Stored on Storage Media...................................28
Reprinting the Photo Printed Last (Copy Print)..........................29
Printing from Computers ..............................................................29
Installing the Printer Driver................................................................. 29
Connecting to a Computer................................................................... 29
Chapter 5 Maintenance
Appendix
4
Table of Contents
Cleaning..........................................................................................31
Cleaning the Inside of the Printer........................................................ 31
Adjusting Print Settings................................................................32
Adjusting the Print Quality.................................................................. 32
Quality Adjustment Parameters........................................................... 32
Adjusting the Print Position ................................................................ 33
Restoring the Default Settings .....................................................34
Updating the Firmware..................................................................34
Precautions ....................................................................................35
Notes on Storage Media................................................................36
USB Memory Devices......................................................................... 36
Page 5

Layout List......................................................................................38
Troubleshooting ............................................................................39
Printer .................................................................................................. 39
Wireless LAN SD Cards ..................................................................... 39
Error Messages .................................................................................... 40
Specifications ................................................................................41
Table of Contents
5
Page 6

Chapter 1 Overview
Overview
What This Product Can Do
This unit allows you to transfer image data from
commercially available digital cameras via wireless LAN
SD cards, and print ID photos.
The unit has the following features.
Note
For details on recommended digital cameras, contact your
dealer.
ID photo printing
• The unit uses face recognition technology to
automatically detect the position and size of a face in
image data, and automatically aligns the image size to
match your ID photo requirements (see page 19). This
allows for easier ID photo printing.
• You can add original ID photo layouts to the basic
layouts that are available by default. Use a computer and
the supplied utility software to create the additional
layouts (see page 22 or refer to the Setting Guide for the
DS ID Photo Utility). This provides flexibility for a wide
range of ID photo applications.
Chapter
Logo printing
You can include logos on photo printouts by inserting an
SD card on which the logos, text, or original designs are
stored into the unit (see page 23).
Printing from computers
When the unit is connected to a computer via a USB cable,
data sent from the computer can be printed on the unit (see
page 29).
1) The supplied printer driver must be installed on the computer before
connection to the unit.
1)
1
Wireless printing (only for models supplied with
wireless LAN SD cards)
• By inserting the supplied wireless LAN SD cards in both
the unit and the digital camera, you can print photos
without having to switch storage media or connect
cables. Use the digital camera’s DPOF print mark
function to perform printing (see page 26).
• When you insert a USB memory device into the unit, the
image data that is wirelessly transferred to the unit is
automatically saved to the USB memory device. The
saved data can then be reprinted (see page 27).
6
What This Product Can Do
Page 7

Information Updates
For the latest information, visit the DS-ID400 support site
(http://dnpphoto.net/support-e/).
Supported Storage Media and File Formats
Supported storage media
The unit supports the following storage media.
1)
• SD cards
• USB memory devices
1) SDXC is not supported.
2) This unit does not support USB memory devices with security functions.
For details on SD cards and USB memory devices, see
“Notes on Storage Media” on page 36.
Supported file formats
The unit supports the following file formats and can only
read files that comply with the DCF 2.0 camera file system
standard. The maximum data size that can be read is
8,000 × 6,000 pixels.
•JPEG
JFIF 4:4:4, 4:2:2, 4:2:0 (baseline JPEG)
* Progressive JPEG and 8-bit grayscale JPEG are not
supported.
Exif 2.2.1 compliant
•TIFF
Exif 2.2.1 compliant (RGB non-compressed)
(Some format versions may not be supported. In addition,
playback of images edited on a computer may not be
possible.)
The maximum number of files that can be handled at one
time is 9,999. If a file path consists of more than 200
characters or includes non-alphanumeric characters, the
unit may not be able to read the file.
TIFF and images with large file sizes may take longer to
load.
The unit does not support files with dates before January 1,
1980 or after December 31, 2079.
2)
Chapter 1 Overview
About DCF
DCF (Design rule for Camera File system) are standards
regulated by the Japan Electronics and Information
Technology Industries Association (JEITA) mainly to
promote environments that allow users to easily manage
image files between digital still cameras and other related
devices. However, DCF standards do not guarantee
complete compatibility between products.
Information Updates / Supported Storage Media and File Formats
7
Page 8

Trademarks
• SD and SDXC are trademarks of SD-3C, LLC.
• Other product names are the registered trademarks or
trademarks of their respective owners.
• Rasterize processing for TrueType font is based on
Chapter 1 Overview
software from the FreeType Team.
• This software is based in part on the work of the
Independent JPEG Group.
• Libtiff
Copyright © 1988-1991 Sam Leffler
Copyright © 1991-1997 Silicon Graphics, Inc.
Permission to use, copy, modify, distribute, and sell this
software and its documentation for any purpose is
hereby granted without fee.
•Zlib
© 1995-2002 Jean-loup Gailly and Mark Adler
8
Supported Storage Media and File Formats
Page 9
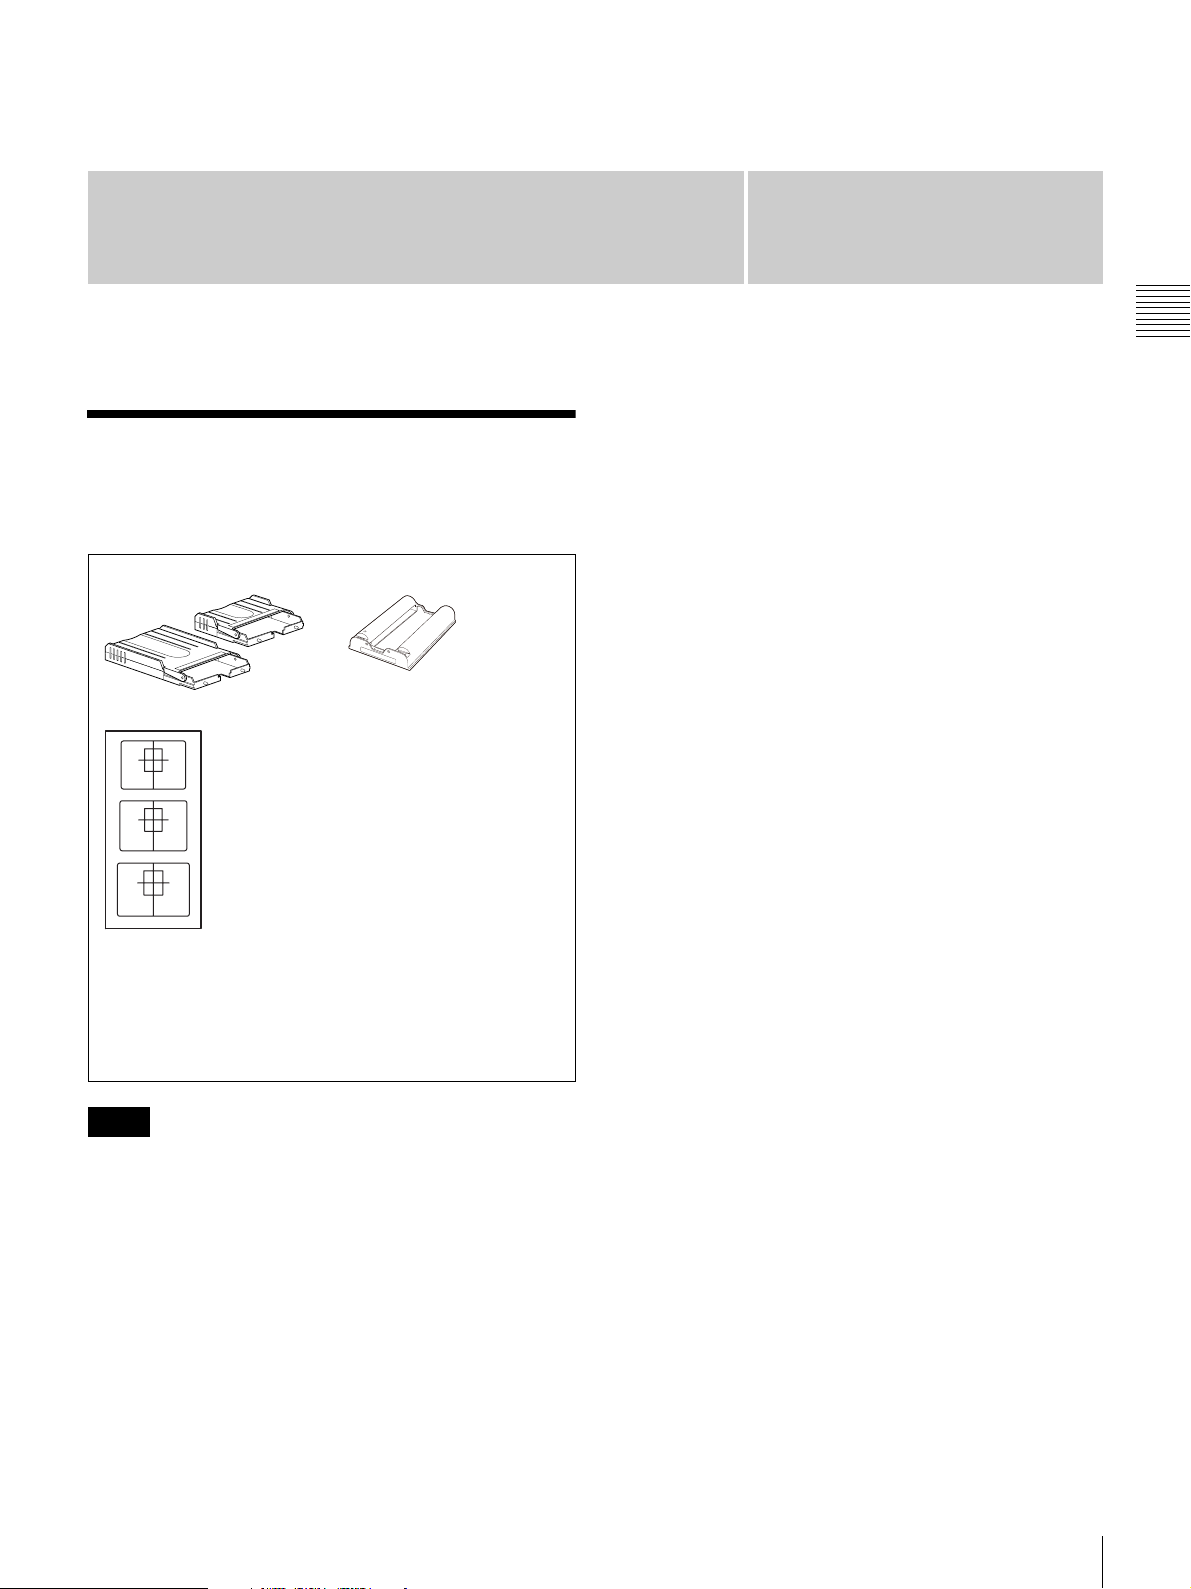
Preparation
Supplied Accessories
Make sure that the following accessories are supplied.
Chapter
2
Chapter 2 Preparation
Paper trays (2, large/small)
Guideline sticker sheet (1)
Wireless LAN SD cards (2)
(one card comes inserted in the printer’s SD card slot)
Ferrite core (1)
CD-ROM (1)
Before Using this Printer (1)
* Only with models supplied with wireless LAN SD cards
Notes
Cleaning cartridge (1)
*
*
• Be careful when lifting the unit out of the box to avoid
back injuries.
• We recommend storing the packaging materials after
unpacking as they can be used when transporting the
unit.
• When transporting the unit, remove the print cartridge
and print paper from the unit beforehand.
Supplied Accessories
9
Page 10
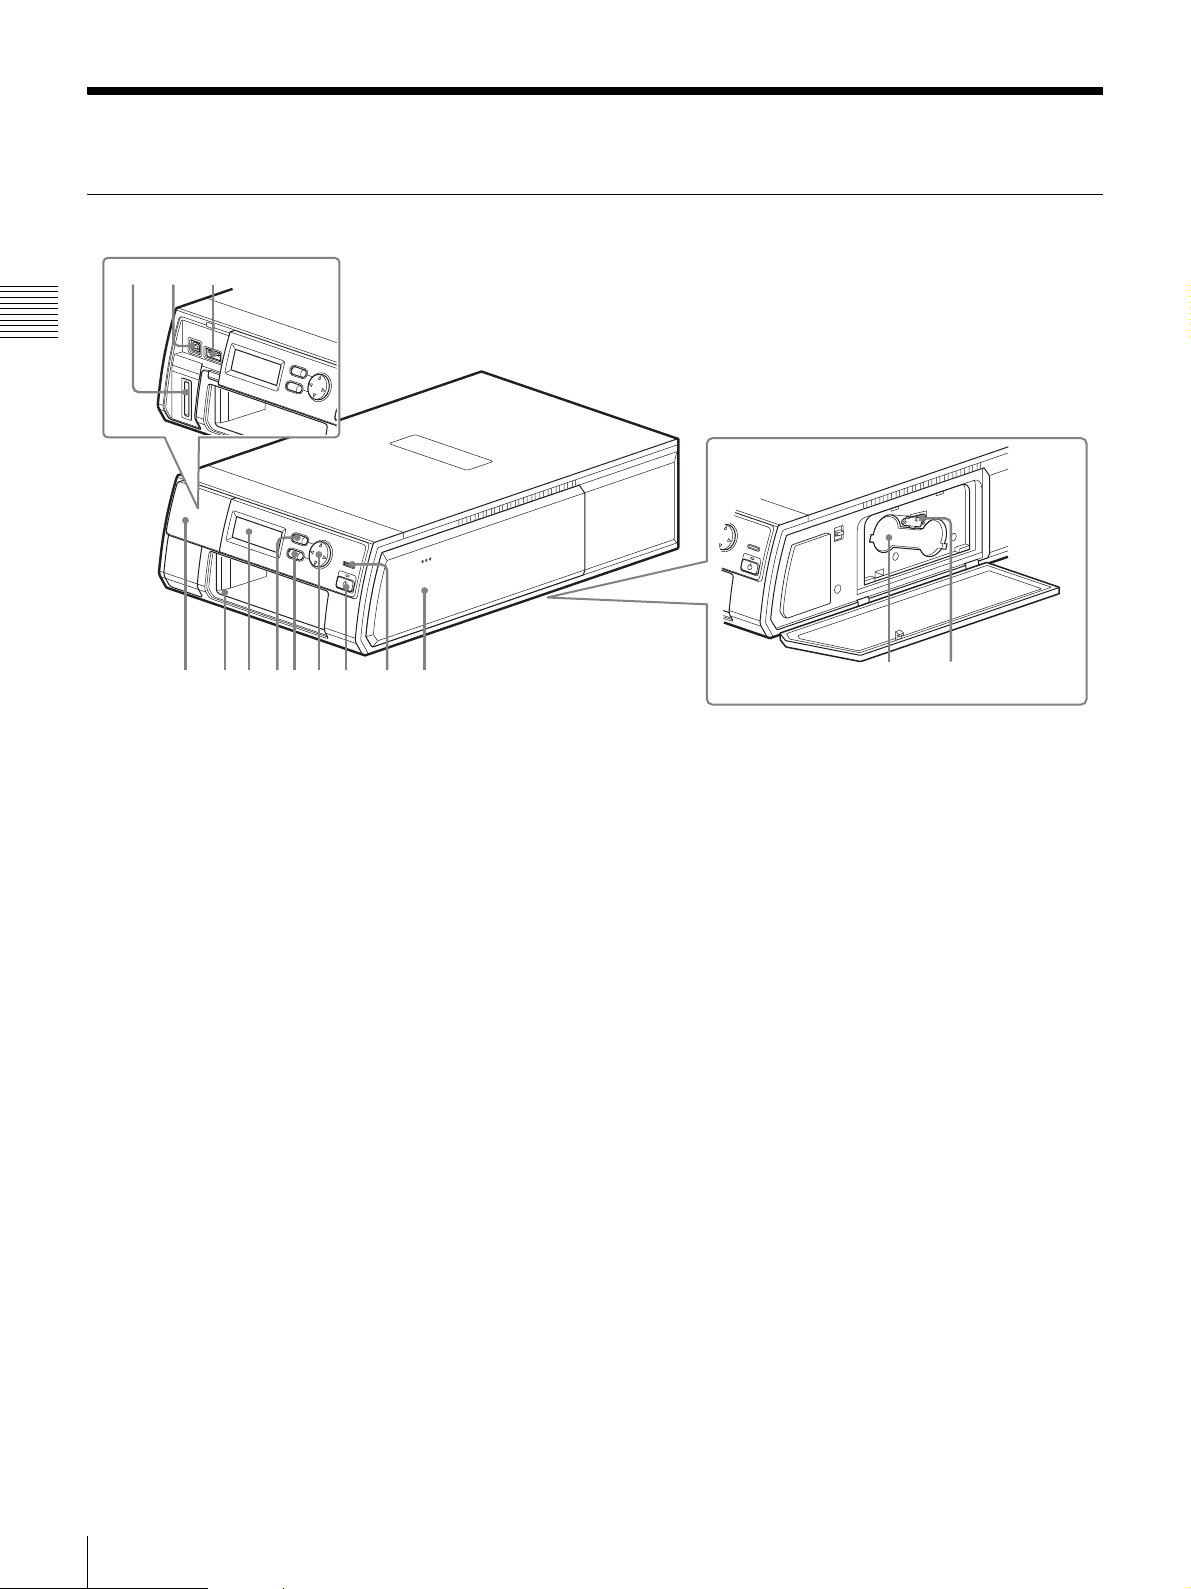
Names and Functions of Parts
Front
(3)(2)(1)
Chapter 2 Preparation
(10)(5)(6)(4) (7) (11)
(8)(9) (12)
(1) SD card slot
Insert an SD card or wireless LAN SD card here.
(2) USB port (device)
Use this to connect the unit to a computer via a USB
1)
cable.
1)Proper operation is not guaranteed when the connection
(3) USB port (USB memory device)
Insert a USB memory device here.
1)Proper operation with all USB memory devices is not
(4) Slot cover
Remove this when using the USB ports or the SD card slot.
(5) Paper tray slot
Insert the paper tray here.
(6) LCD display
When the unit is turned on, the operation status and menu
items appear here.
(7) MENU button
Press this to display the menu screens.
is made via a USB hub.
1)
guaranteed.
Proper operation is not guaranteed for other USB
devices.
(14)(13)
(8) EXEC button
When operating the menu, press this to execute selected
menu items.
(9) Control button
When operating the menu, press this to select and
configure menu items.
(10) On/standby button/indicator
When you press this, the indicator lights and power is
supplied to the unit. Pressing it again makes the indicator
turn off, and the unit enters standby mode.
(11) Status indicator
Displays the status of the unit.
Lit (red): A problem has occurred with the unit. Contact
your dealer.
Lit (orange): One of the following has occurred.
• A paper jam or ribbon break has occurred.
• The print paper or print cartridge has run out or is not
inserted.
• The print paper and cartridge sizes do not match.
Check the error message on the LCD display, and
perform the indicated action. For details, see “Error
Messages” on page 40.
Lit (green): Wireless network connection is established
and DPOF print marks are set, or printing is in
progress.
10
Names and Functions of Parts
Page 11
Slowly blinking (green): Wireless network connection is
established and all DPOF print marks are canceled, or
cleaning is in progress.
Rapidly blinking (green): Image data is being received,
or storage media is being accessed. Do not remove the
storage media while the indicator is blinking.
Blinking (orange): The firmware version is being
updated.
(12) Cartridge compartment cover
Press the PUSH OPEN area to open the cover when
inserting or removing the print cartridge.
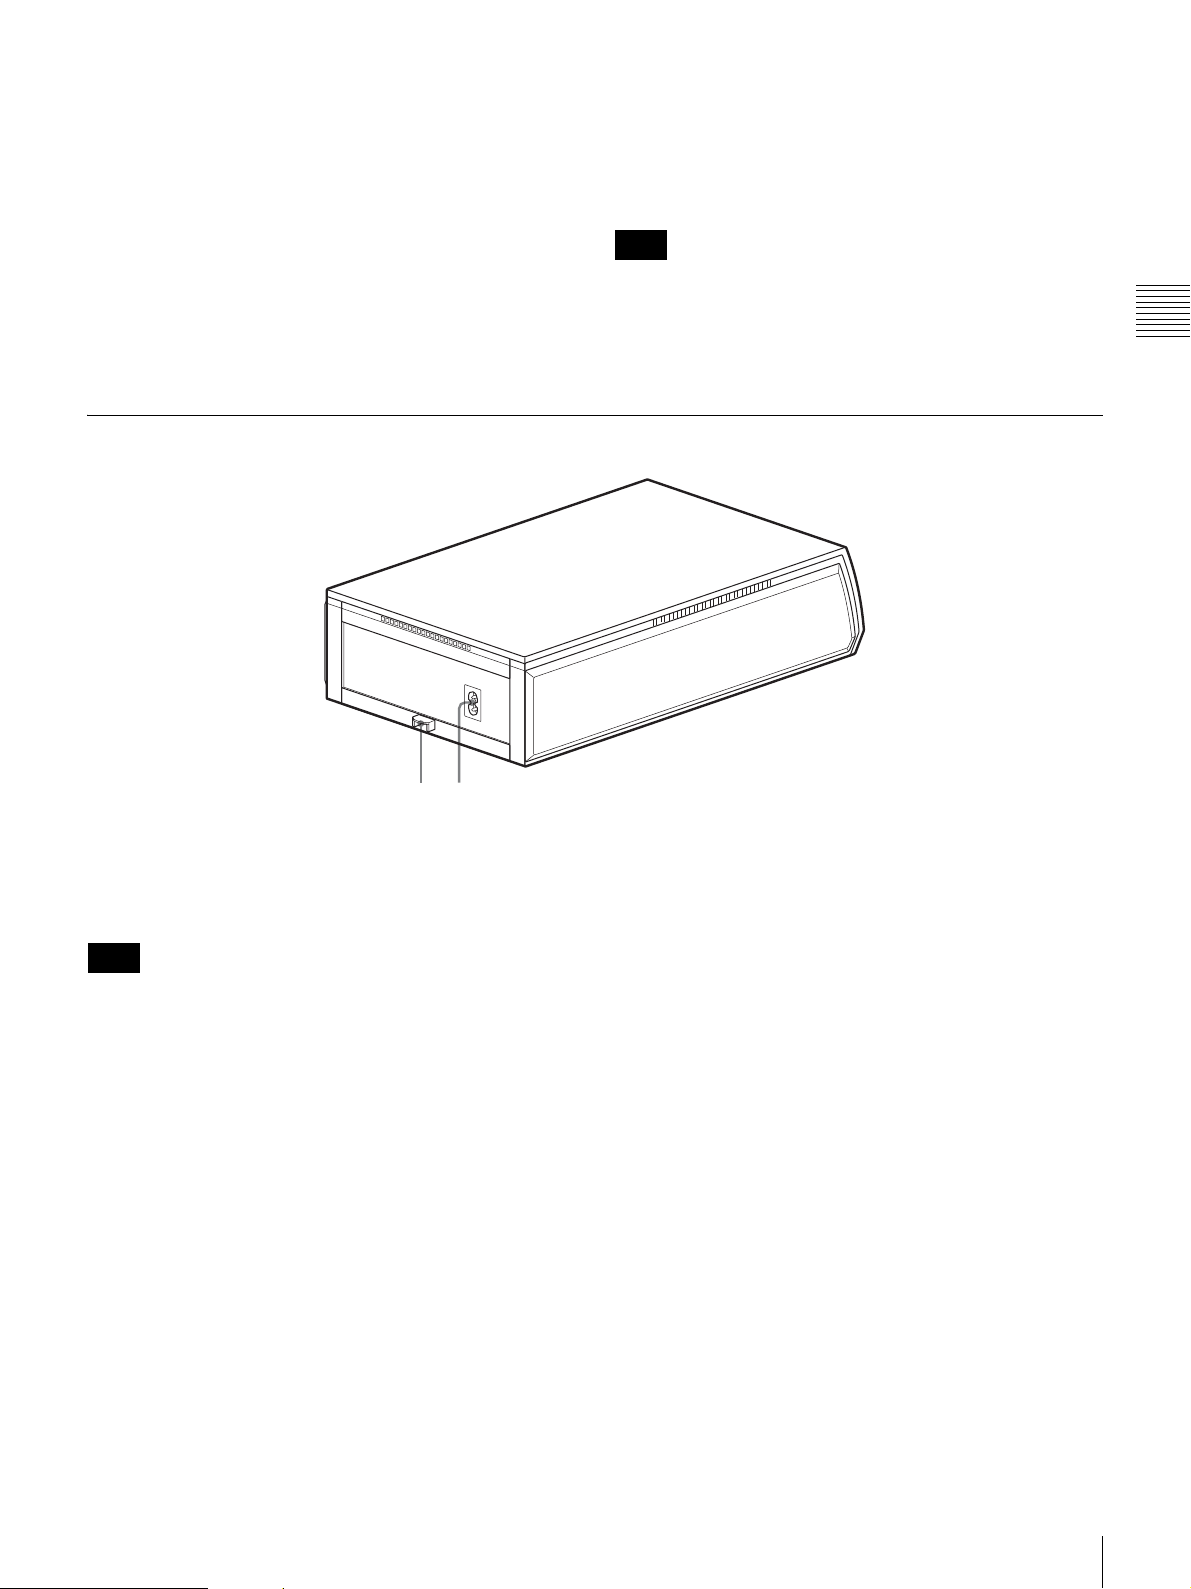
Rear
(13) Cartridge compartment
Insert the print cartridge here.
(14) Cartridge release lever
Raise the lever to eject the inserted print cartridge.
Note
The lever is disabled during printing.
Chapter 2 Preparation
(1) (2)
(1) Rear cover
When a paper jam occurs, remove this cover to remove the
jammed paper.
Note
Always keep this attached when not removing a paper jam.
(2) AC IN connector
Connect this to an AC power source using a power cord.
Names and Functions of Parts
11
Page 12
Installation
Loading Print Packs
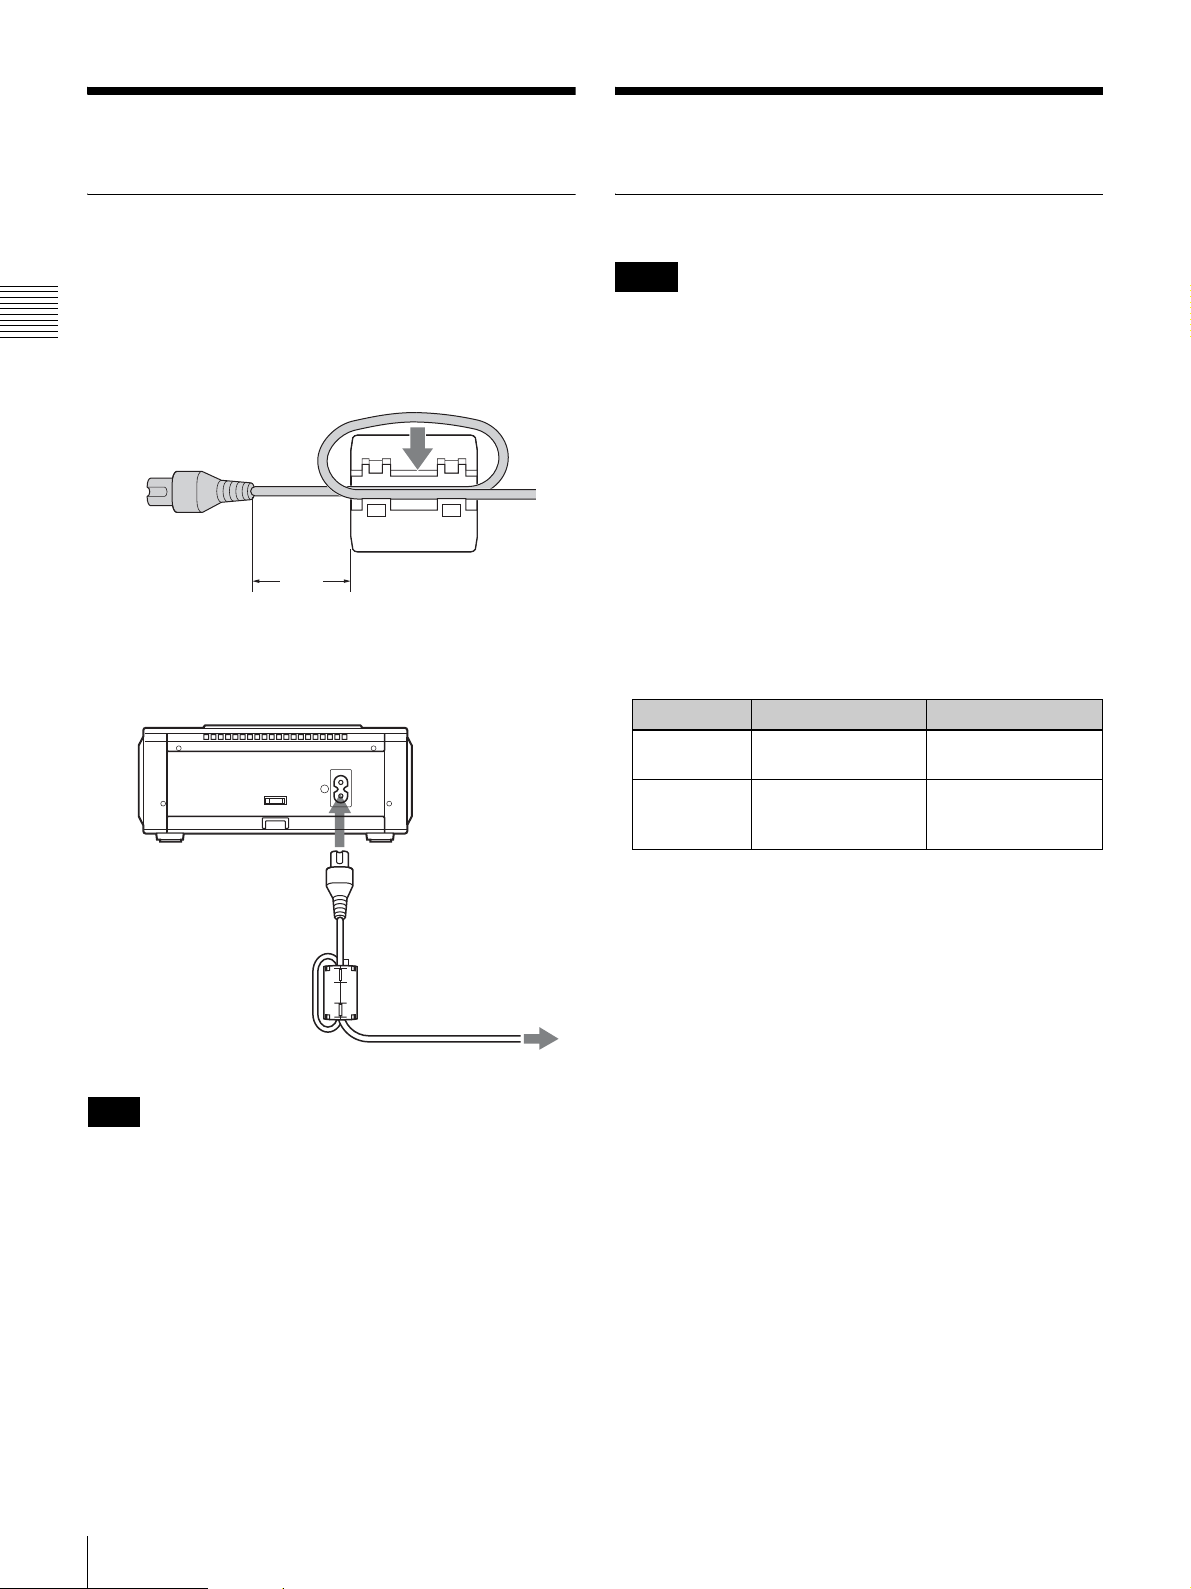
Connecting the Power Cord
1
Attach the ferrite core to the end of the power cord (not
supplied) that connects to the unit.
Chapter 2 Preparation
Position the ferrite core about 3 cm (1
power cord’s connector, and wrap the power cord once
around the ferrite core.
3 cm
3
/16")
(1
2
Connect the printer end of the power cord to the AC IN
connector on the unit, and connect the other end of the
cord to a power outlet.
Ferrite core
(supplied)
3
/16 inch) away
Handling Print Packs
Notes
• A print pack contains a print cartridge and print paper.
Be sure to use the print cartridge and print paper
packaged in the same carton as a set.
• Always use a print cartridge that matches the size of the
print paper you want to use. Using an unmatched
combination will not only prevent you from obtaining
proper print results, but may also cause paper jams and
malfunctions.
• Do not touch the printing surface of the print paper or the
ink ribbon of the print cartridge. Fingerprints or dust on
the printing surface or ink ribbon may result in lower
printing quality.
• The number of sheets that can be printed depends on the
print pack type. The following lists the numbers of
sheets that can be printed with a single set of ink ribbon
and paper.
Print pack UPC-X34 series UPC-X46 series
Number of
sheets
Print size 70 × 95 mm ± 2 mm
30 25
102 × 152 mm
(2 7/8×3 3/4 inches
3
/32 inches)
±
±2mm (4
inches ±
1
/8 × 6
3
/32 inches)
Power cord (not supplied)
to power outlet
Note
Always use a power cord of the specified type.
• Do not write or type on the print paper before printing.
You may not be able to print if you do so. If you want to
write on the printed surface after printing, use an oilbased pen. Word processor text cannot be printed on
printed images.
• Do not attach stamps or stickers on the printing paper
before printing.
• Do not print on used print paper. Printing an image twice
on the same paper will not make the printed image
darker, but may instead cause malfunctions.
• Do not fold or bend the print paper before printing.
Doing so may cause malfunctions.
Notes on storage
• Avoid storage in locations subject to:
– high temperatures
– high humidity or dust
– direct sunlight
• After opening the package, use the print pack as soon as
possible.
• When storing after partial use, store the print pack in its
original packaging.
12
Installation / Loading Print Packs
Page 13
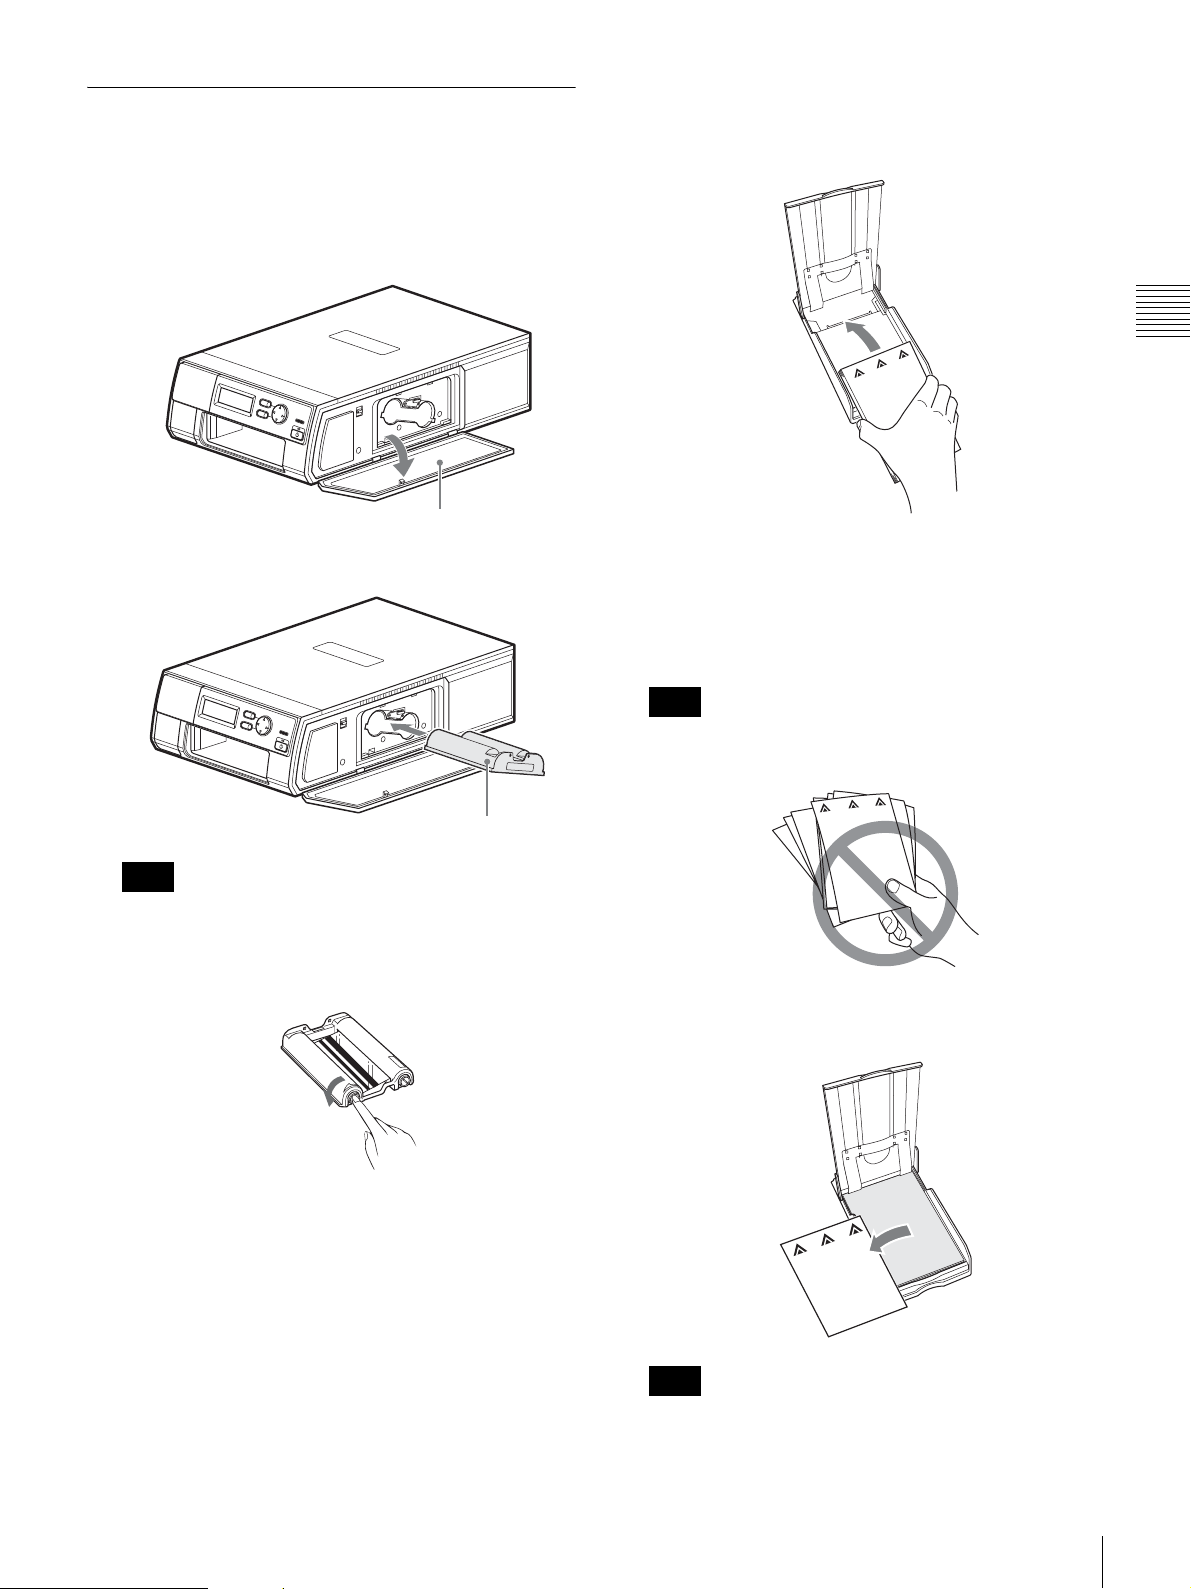
Loading Print Packs
Loading the print cartridge
1
Press the PUSH OPEN area at the top of the cartridge
compartment cover to open it.
Cartridge compartment cover
2
Insert the print cartridge until it clicks into place.
Inserting the print paper
1
Set the print paper inside the paper tray.
Insert the print paper with the protective sheet facing
up and the arrow on the protective sheet pointing in the
same direction as the arrow on the tray. You can load
25 sheets when using the UPC-X46 print pack, and 30
sheets when using the UPC-X34 print pack.
Chapter 2 Preparation
Print cartridge
Note
If the print cartridge does not click into place, remove
it and re-insert it. If the cartridge cannot be loaded due
to ink ribbon slack, wind the spool in the direction of
the arrow while pressing it to remove the slack.
3
Close the cartridge compartment cover.
Note
Handle the print paper carefully as it can easily
become disjointed.
2
Remove the protective sheet on top of the print paper
stack.
Note
Be sure to keep the protective sheet, as it is used for
cleaning the inside of the printer.
Loading Print Packs
13
Page 14

3
Fully insert the paper tray.
Replacing Print Packs
If the print cartridge or print paper runs out during printing,
the status indicator lights orange and an error message
appears. Perform the following to replace the print pack.
Chapter 2 Preparation
Note
Do not touch the printing surface. Fingerprints or dust
on the printing surface may result in lower printing
quality.
4
When you finish loading the print pack, press the
EXEC button.
The error message on the LCD display will disappear,
and you can perform operations.
Notes
• Use the large paper tray when loading UPC-X46 paper,
and the small paper tray when loading UPC-X34 paper.
If the paper size and tray size do not match, paper jams
may occur.
• Do not remove or insert the paper tray during printing.
• If the print paper does not feed automatically, the status
indicator lights orange and a message appears. In such
cases, pull out the paper tray and check for a paper jam.
• When adding print paper to a partially full tray, make
sure that the total number of sheets does not exceed 25
for UPC-X46 paper and 30 for UPC-X34 paper. Do not
place different types of print paper into the tray at the
same time. Doing so may cause paper jams.
• Do not allow more than five sheets of ejected print paper
to accumulate on the paper tray. Doing so may cause
paper jams.
Removing the Print Cartridge
1
Press the PUSH OPEN area at the top of the cartridge
compartment cover to open it.
2
Raise the cartridge release lever.
Cartridge release
lever
Remove the print cartridge when it ejects.
3
Insert a new print cartridge, and close the cartridge
compartment cover.
Notes
• Never put your hand into the cartridge compartment, as
temperatures inside can get very hot.
14
Replacing Print Packs
• Do not rewind the ink ribbon to reuse it for printing.
Doing so will prevent you from obtaining proper
printing results and may cause malfunctions.
Loading Print Packs
For details on loading print packs, see “Loading Print
Packs” on page 13.
Page 15
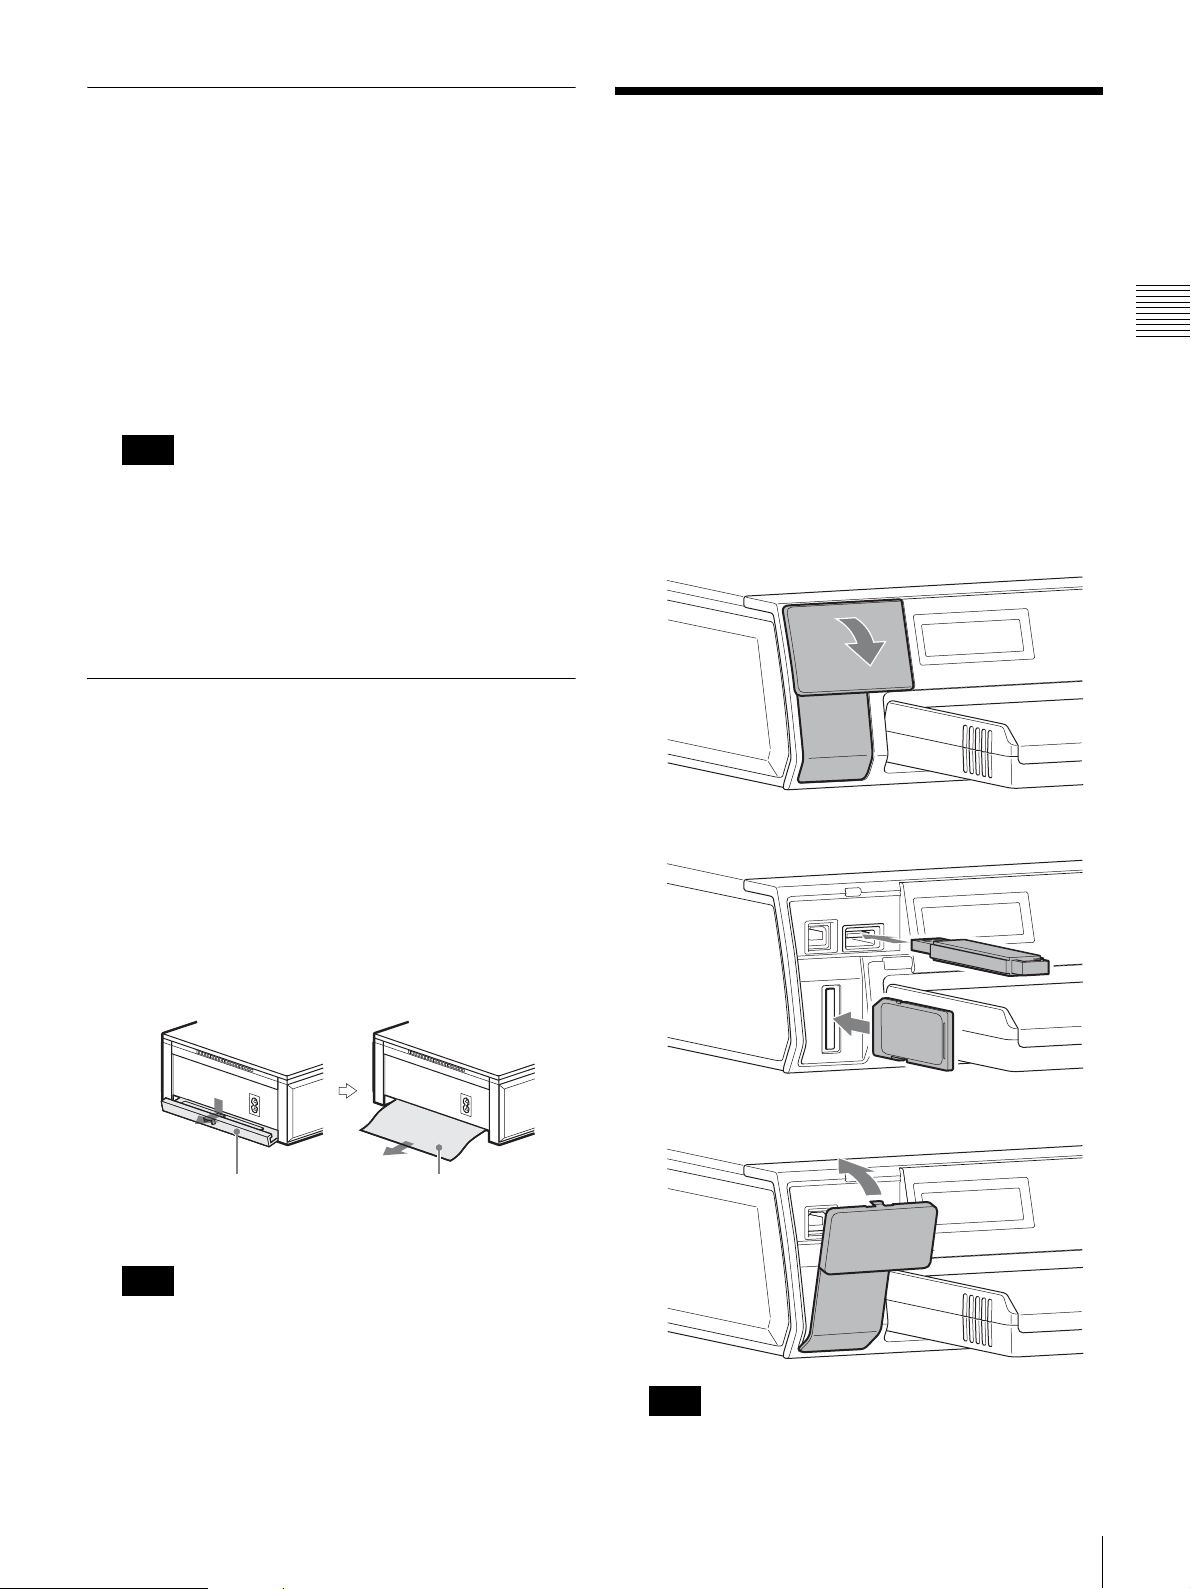
Repairing Breaks in the Ink Ribbon
The remaining ribbon can be used after repairing it with
adhesive tape.
Inserting Storage Media
(SD Cards / USB Memory
1
Remove the print cartridge.
2
Pull the ribbon on the spool, attach one edge of a strip
of adhesive tape along the entire length of the ribbon’s
end, and then attach the other edge of the tape to the
ribbon on the other spool.
3
Remove any slack from the ribbon.
Note
Be sure to wind the taped portion completely so that
the tape is not exposed.
4
Insert the print cartridge into the unit.
Depending on the position of the ribbon break, a single
printout’s worth of ribbon may be lost.
Clearing Paper Jams
If the print paper jams during printing, the status indicator
lights orange, an error message appears, and printing stops.
Devices)
Insert and remove storage media only when the unit is in
standby mode and [READY] appears on the LCD display.
Removing the storage media or disconnecting the power
cord while printing is in progress may damage the data
stored on the media.
Before using data on the unit, always create backups to
prevent data loss.
Inserting the storage media
1
Remove the slot cover on the front of the unit.
Chapter 2 Preparation
1
Press the on/standby button to set the unit to standby
mode.
2
Remove the paper tray, and then remove the jammed
paper.
3
Remove the rear cover on the unit, and check for and
remove any remaining pieces of jammed paper.
Rear cover Paper
4
Replace the rear cover.
Note
Always replace the rear cover after clearing paper
jams. The rear cover should always be attached during
normal operation.
2
Insert the storage media into the unit.
3
Replace the slot cover.
5
Insert the paper tray.
6
Turn on the unit.
Note
Depending on the shape of the USB memory device
inserted, the slot cover may not close.
Inserting Storage Media (SD Cards / USB Memory Devices)
15
Page 16

Startup and Shutdown
Startup
1
Press and hold the on/standby button for at least 1
second to turn on the unit.
Chapter 2 Preparation
The unit starts up, and [READY] appears on the LCD
display.
If there is no print cartridge or print paper loaded, the status
indicator lights orange and an error message appears on the
LCD display.
Shutdown
1
Finish any operations in progress.
2
Press the on/standby button to set the unit to standby
mode.
Note
Wait at least 5 seconds before pressing the on/standby
button to turn the unit on again after turning it off.
16
Startup and Shutdown
Page 17

Settings
Chapter
3
After preparing the unit, configure language settings, ID
photo printing, and other settings.
Note
The menu screens cannot be displayed while error
messages appear on the LCD display. Resolve the error,
and press the MENU button when [READY] appears on
the display.
Displaying the Menus
Setting configurations are performed from the menu
screens. Press the MENU button to display the menu.
Main Menus
MEMORY CARD PRINT SELECT FILE PRINT
PRINT ALL
ID PHOTO LAYOUT
ID PHOTO SETTINGS COLOR/BW
WIRELESS SETTINGS WIRELESS LAN SD
SYSTEM SYSTEM SETTINGS LANGUAGE
PRINT SETTINGS PRINT OFFSET
COLOR ADJUST COLOR
COPY PRINT
AUTO ALIGN
FACE OFFSET X
FACE OFFSET Y
AUTO EXPOSURE
ENABLE/DISABLE LAYOUT
INFORMATION FIRMWARE UPDATE
FACTORY RESET
LOGO PRINT X46
LOGO PRINT X34
FILENAME PRINT
BW
Chapter 3 Settings
Displaying the Menus
17
Page 18

Selecting the Language
Select the display language of menus and error messages
that appear on the LCD display.
Configuring Settings for ID Photo Prints
Chapter 3 Settings
1
Press the MENU button.
2
Press T on the control button to display [SYSTEM]
on the LCD display.
3
Press X.
[SYSTEM SETTINGS] appears.
4
Press X.
[LANGUAGE] appears.
5
Press X.
The currently selected language appears.
6
Press S or T to select the language you want to use,
and press the EXEC button.
The LCD display appears in the selected language.
Selecting the Layout
Select the layout you want to print from the ID photo
layout templates stored on the unit or on an expansion SD
card (page 22).
You can only select layouts that support the size of the
paper loaded in the unit. Layouts that do not support the
size of paper loaded in the unit will not be displayed.
For details on the layouts preinstalled on the unit, see
“Layout List” on page 38.
1
Press the MENU button.
2
Press T on the control button to display [ID PHOTO
LAYOUT] on the LCD display.
3
Press X.
The layout names appear.
4
Press S or T to select the layout you want to print,
and press the EXEC button.
The selected layout name appears under [READY]. If
the antenna icon appears instead, press S or T to
display the layout name.
Specifying which Layouts to Display
Select whether to display each layout name in the [ID
PHOTO LAYOUT] menu.
1
Press the MENU button.
2
Press T on the control button to display [ID PHOTO
SETTINGS] on the LCD display.
3
Press X.
[COLOR B/W] appears.
4
Press T to display [ENABLE/DISABLE LAYOUT].
5
Press X.
The layout names appear with [ENABLE] (display
layout) or [DISABLE] (do not display layout)
displayed.
18
Selecting the Language / Configuring Settings for ID Photo Prints
Page 19

6
Press S or T to select the layout name you want to
configure.
7
Press W or X to switch between [ENABLE] and
[DISABLE].
8
Repeat steps 6 and 7 if you want to configure other
layouts.
Turning auto alignment ON
1
Press the MENU button.
2
Press T on the control button to display [ID PHOTO
SETTINGS] on the LCD display.
3
Press X.
9
When you finish configuration, press the EXEC
button.
Selecting Color or Monochrome for Prints
Select whether to print in color or monochrome.
1
Press the MENU button.
2
Press T on the control button to display [ID PHOTO
SETTINGS] on the LCD display.
3
Press X.
[COLOR B/W] appears.
4
Press W or X to select [COLOR] or [BW]
(monochrome).
5
When you finish configuration, press the EXEC
button.
[COLOR B/W] appears.
4
Press T to display [AUTO ALIGN].
5
Press W or X to switch between [ON] and [OFF] for
the auto alignment function.
6
When you finish configuration, press the EXEC
button.
Aligning the trimming position manually
When the auto alignment function is OFF, you can
manually align the trimming position on an image.
1
Press the MENU button.
2
Press T on the control button to display [ID PHOTO
SETTINGS] on the LCD display.
3
Press X.
[COLOR B/W] appears.
4
Press T to display [FACE OFFSET X].
Chapter 3 Settings
Configuring Trim Settings
Trimming is used to properly position faces for printing.
The trim position and size can be aligned automatically
using a face recognition function.
Auto alignment ON:
The position and size of the face is detected automatically
from the image data, and trimming is performed
automatically according to the selected layout.
Note
Automatic trimming will not be performed if the face
recognition function does not detect a face. If you do not
obtain the desired facial size and position in your print
results, print with auto alignment turned OFF.
Auto alignment OFF (manual):
Using the image size as a base, perform trimming
according to the selected layout size.
If a face is not properly centered in a print, you can align
the trimming position manually.
5
Press W or X to move the trimming position
horizontally.
The face will move in the direction of the button
arrow. The print position will move 0.5 mm with each
press of the button.
6
Press T to display [FACE OFFSET Y].
7
Press W or X to move the trimming position vertically.
Pressing W moves the face down, and pressing X
moves the face up. The print position will move
0.5 mm with each press of the button.
Configuring Settings for ID Photo Prints
19
Page 20

Chapter 3 Settings
8
When you finish configuration, press the EXEC
button.
Adjusting the Exposure Automatically
You can use the face recognition function to detect the
position of a face in the image data and adjust the
brightness automatically (exposure compensation).
2
Press T on the control button to display [PRINT
SETTINGS] on the LCD display.
3
Press X.
[PRINT OFFSET] appears.
4
Press T to display [FILENAME PRINT].
5
Press W or X to switch between [ON] and [OFF] for
file information printing.
6
When you finish configuration, press the EXEC
button.
Note
Automatic adjustment will not be performed if the face
recognition function does not detect a face.
1
Press the MENU button.
2
Press T on the control button to display [ID PHOTO
SETTINGS] on the LCD display.
3
Press X.
[COLOR B/W] appears.
4
Press T to display [AUTO EXPOSURE].
5
Press W or X to switch between [ON] and [OFF] for
exposure compensation.
6
When you finish configuration, press the EXEC
button.
Printing the File Information
You can select whether to include file names and shooting
dates from Exif data when printing photos.
1
Press the MENU button.
20
Configuring Settings for ID Photo Prints
Page 21

Configuring Settings for
Configuring a card for use with the digital
camera
Printing with Wireless
LAN SD Cards
This function is only available on models that are supplied
with wireless LAN SD cards.
Supported Wireless LAN SD Cards
This unit supports the following SD card with embedded
wireless LAN functionality.
• Toshiba FlashAir™
FlashAir is a trademark of Toshiba Corporation.
Notes
• Use only the wireless LAN SD cards supplied with the
unit.
• Do not format the supplied wireless LAN SD cards.
About the Supplied Wireless LAN SD Cards
1
Insert the wireless LAN SD card into the SD card slot
on the unit.
2
Press the MENU button.
3
Press T on the control button to display [WIRELESS
SETTINGS] on the LCD display.
4
Press X.
[WIRELESS LAN SD] appears.
5
Press X.
[SSID] appears.
6
Press T to display [SETUP CAMERA CARD].
7
Press X.
[SETUP CARD] appears.
8
Press the EXEC button.
The card for use with the digital camera is configured.
Insert the configured SD card into a digital camera to
enable operation.
Chapter 3 Settings
Two wireless LAN SD cards, one for a digital camera and
one for the printer, are supplied with the unit. The supplied
cards come preconfigured for use with the unit and the
digital camera and can be used immediately after inserting
them in their respective SD card slots.
The cards for the digital camera and printer are labeled “C”
and “P” respectively. If the card for the digital camera is
inserted in the printer, or the card for the printer is inserted
in the digital camera, proper connection will not be
possible.
Configuring the Wireless LAN SD Card
If you unintentionally formatted the supplied wireless
LAN SD cards or are using new wireless LAN SD cards,
perform the following to configure the cards.
Note
The supplied wireless LAN SD cards are preconfigured at
the factory. Perform the following steps for these cards
only if you unintentionally formatted them.
Configuring a card for use with the printer
1
Insert the wireless LAN SD card into the SD card slot
on the unit.
2
Press the MENU button.
3
Press T on the control button to display [WIRELESS
SETTINGS] on the LCD display.
4
Press X.
[WIRELESS LAN SD] appears.
5
Press X.
[SSID] appears.
6
Press T to display [SETUP PRINTER CARD].
7
Press X.
[SETUP CARD] appears.
8
Press the EXEC button.
The card for use with the printer is configured.
Configuring Settings for Printing with Wireless LAN SD Cards
21
Page 22

Formatting Wireless LAN SD Cards
Wireless LAN SD cards that have been formatted on a
camera or computer may not operate properly on this unit.
In such cases, use the SD Formatter software provided by
the SD Association to reformat the cards.
You can download SD Formatter from the following Web
site.
https://www.sdcard.org/home/
We recommend the following for the SD Formatter option
setting.
FORMAT TYPE: QUICK
FORMAT SIZE ADJUSTMENT: OFF
Chapter 3 Settings
After formatting is finished, configure settings for the
wireless LAN SD cards.
Using Expansion SD Cards
An SD card (expansion SD card) for storing essential data
and settings is required to use the following functions:
• Adding layouts
• Printing logos
Use a commercially available SD card to create an
expansion SD card. We recommend using an SD card with
a storage capacity of 512 MB or higher.
If you are using wireless LAN SD cards to print, you can
store data and settings on the wireless LAN SD card and
use it as an expansion SD card.
Note
SDXC cards are not supported.
Directory Structure for Expansion SD Cards
Templates for ID photo layouts and logo images, and other
data are stored on an expansion SD card.
The directory structure for the expansion SD card is as
follows.
DNP DSID400
IDPhoto Layouts for ID photo printing
Template Logo images
Creating Expansion SD Cards
When you create additional layouts and logos using the
utility software found on the supplied CD-ROM and save
them to an SD card, the above folder directory is
automatically created on the SD card.
When manually copying layouts and logos, be sure to use
the above directory structure.
Insert the created expansion SD card in the SD card slot on
the front of the unit.
Adding Layouts
22
Using Expansion SD Cards
In addition to the layouts preinstalled on the unit, you can
create and use original layouts.
Page 23

Memo
For details on the layouts preinstalled on the unit, see
“Layout List” on page 38.
4
Press T to display [LOGO PRINT X34] (for the UPCX34 series) or [LOGO PRINT X46] (for the UPC-X46
series).
5
Press X.
Creating original layouts
You can create layouts using the supplied DS ID Photo
Utility. For details, refer to the Setting Guide and Readme
file for the DS ID Photo Utility stored on the supplied
CD-ROM.
Saving layouts
Save created layouts to the “\DNP\DSID400\IDPhoto”
folder on the expansion SD card.
Selecting added layouts for printing
For details on selecting layouts, see “Selecting the
Layout” on page 18.
Adding Logos
You can include logos in printouts by creating original
logo images and saving them to an expansion SD card.
Creating logo images
Use commercially available image processing software to
create logo images. You must convert the created images
to a format supported by the unit.
For the details on how to create logo images, refer to the
Setting Guide and Readme file for the DS ID Photo Utility
stored on the supplied CD-ROM.
The currently selected logo name or [NONE] appears.
6
Press S or T to select the logo you want to print, and
press the EXEC button.
If you print photos with a logo selected, the logo will be
included on the prints.
To disable logo printing
Select [NONE] in step 6 above, and press the EXEC
button to disable logo printing.
Chapter 3 Settings
Saving logo images
Save created logo images to the
“\DNP\DSID400\Template” folder on the expansion SD
card.
Printing logos
Before printing, select the logo data stored on the
expansion SD card.
1
Press the MENU button.
2
Press T on the control button to display [PRINT
SETTINGS] on the LCD display.
3
Press X.
[PRINT OFFSET] appears.
Using Expansion SD Cards
23
Page 24
Operation
Chapter
4
This chapter focuses on print operations using wireless
LAN SD cards while also describing other print methods.
Note
Printing via wireless LAN SD cards is supported only on
models that are supplied with wireless LAN SD cards.
Chapter 4 Operation
Shooting Preparation
This section describes how to prepare shooting
environments for ID photos that will be printed via
wireless LAN SD cards.
Digital Cameras
Use a digital camera that includes the following features.
• SD card support
• DPOF print mark support
For details on recommended digital cameras, contact your
dealer.
About DPOF
DPOF (Digital Print Order Format) is a standard that
enables automatic printing of images taken with a digital
camera. Digital cameras supporting this standard write
information about image selection and print quantity onto
the memory card, and this information can then be used by
DPOF-compatible photo printers to enable quick and easy
printing.
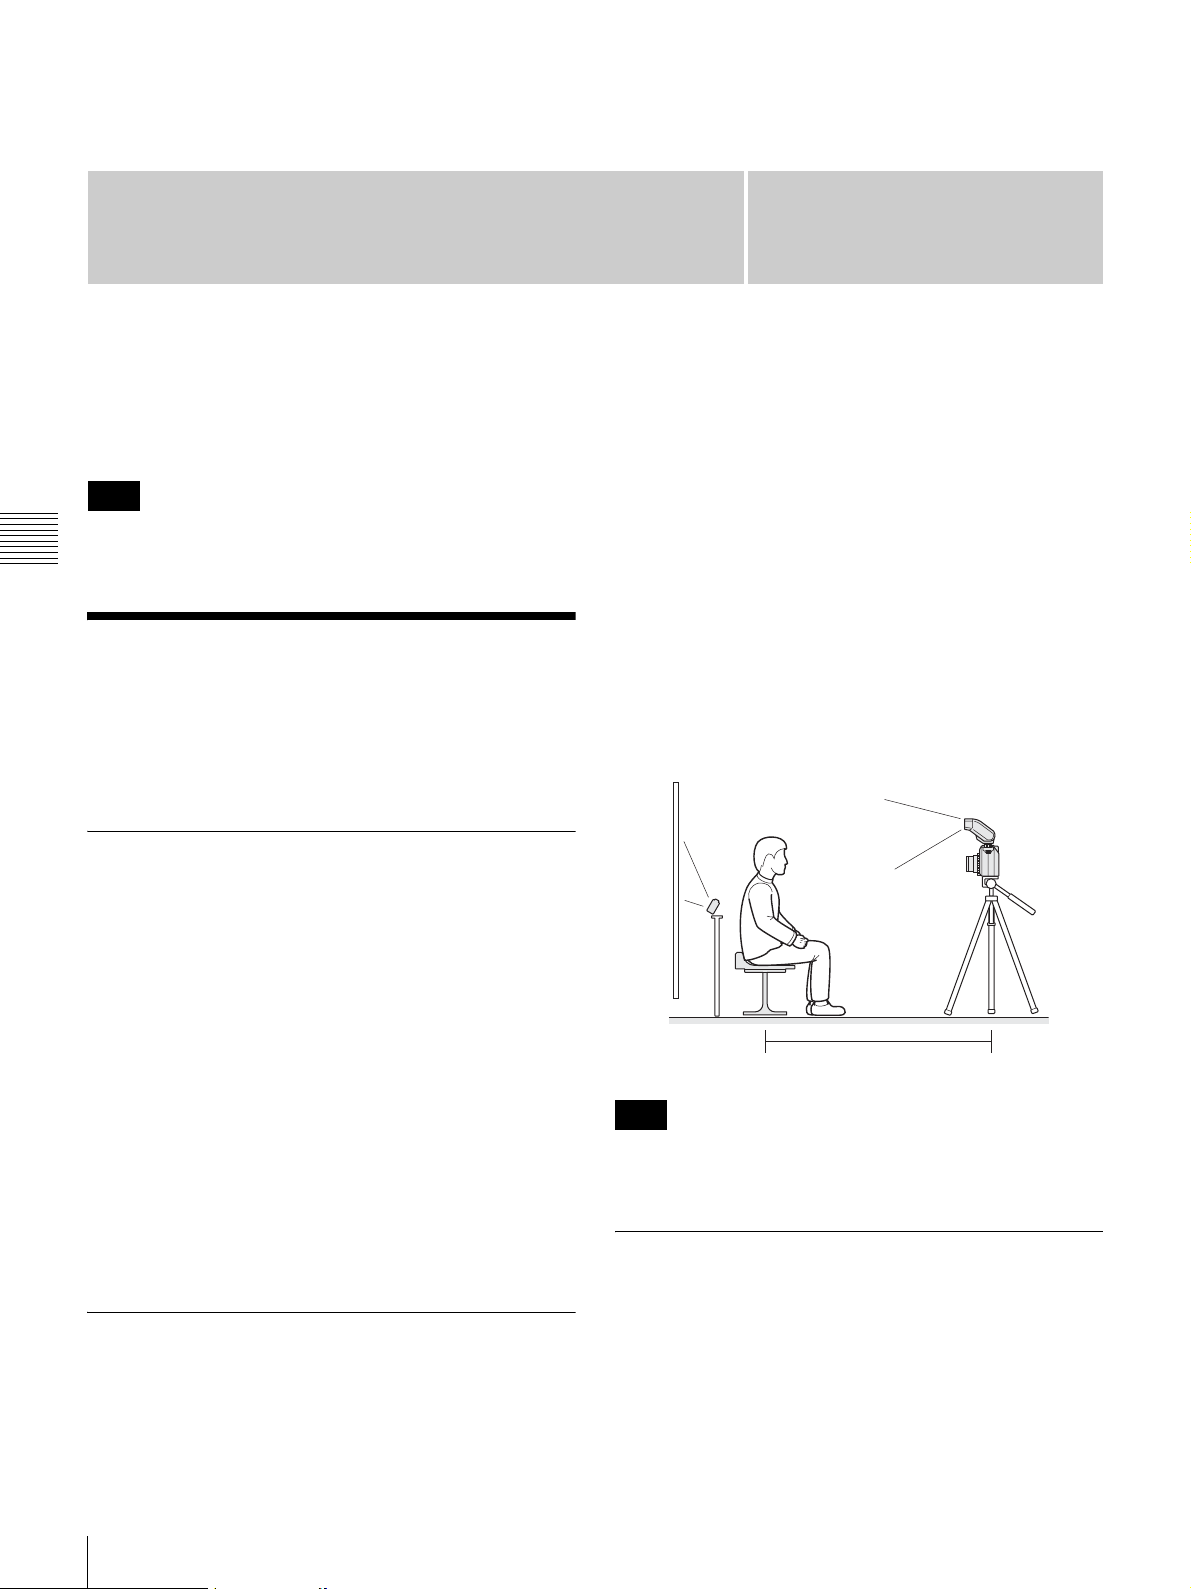
• External flash
Use a device that is compatible with your digital camera.
Guide number of about 25 is recommended.
• Diffuser
Diffusing surface of about 100 × 70 mm.
• Shadow reduction flash
Use a device the fires synchronously with the digital
camera’s flash.
•Tripod
For the digital camera and the shadow reduction flash.
Place the digital camera about 1.8 to 2 m (5.9 to 6.5 ft.)
away from the subject.
Use a plain background, and make sure that shadows and
objects other than the subject do not appear in to photo.
Shadow
reduction flash
Note
The above shooting environment does not guarantee image
quality.
1.8 to 2 m (5.9 to 6.5 ft.)
Attaching the Guideline Sticker to the Digital Camera
Shooting Environments
In addition to a digital camera, we recommend you include
the following items in your ID photo shooting
environment.
24
Shooting Preparation
Guideline stickers are supplied with the unit to make
aligning the facial position while shooting easier. To use
the guideline sticker, affix it to the monitor screen of your
digital camera.
Page 25
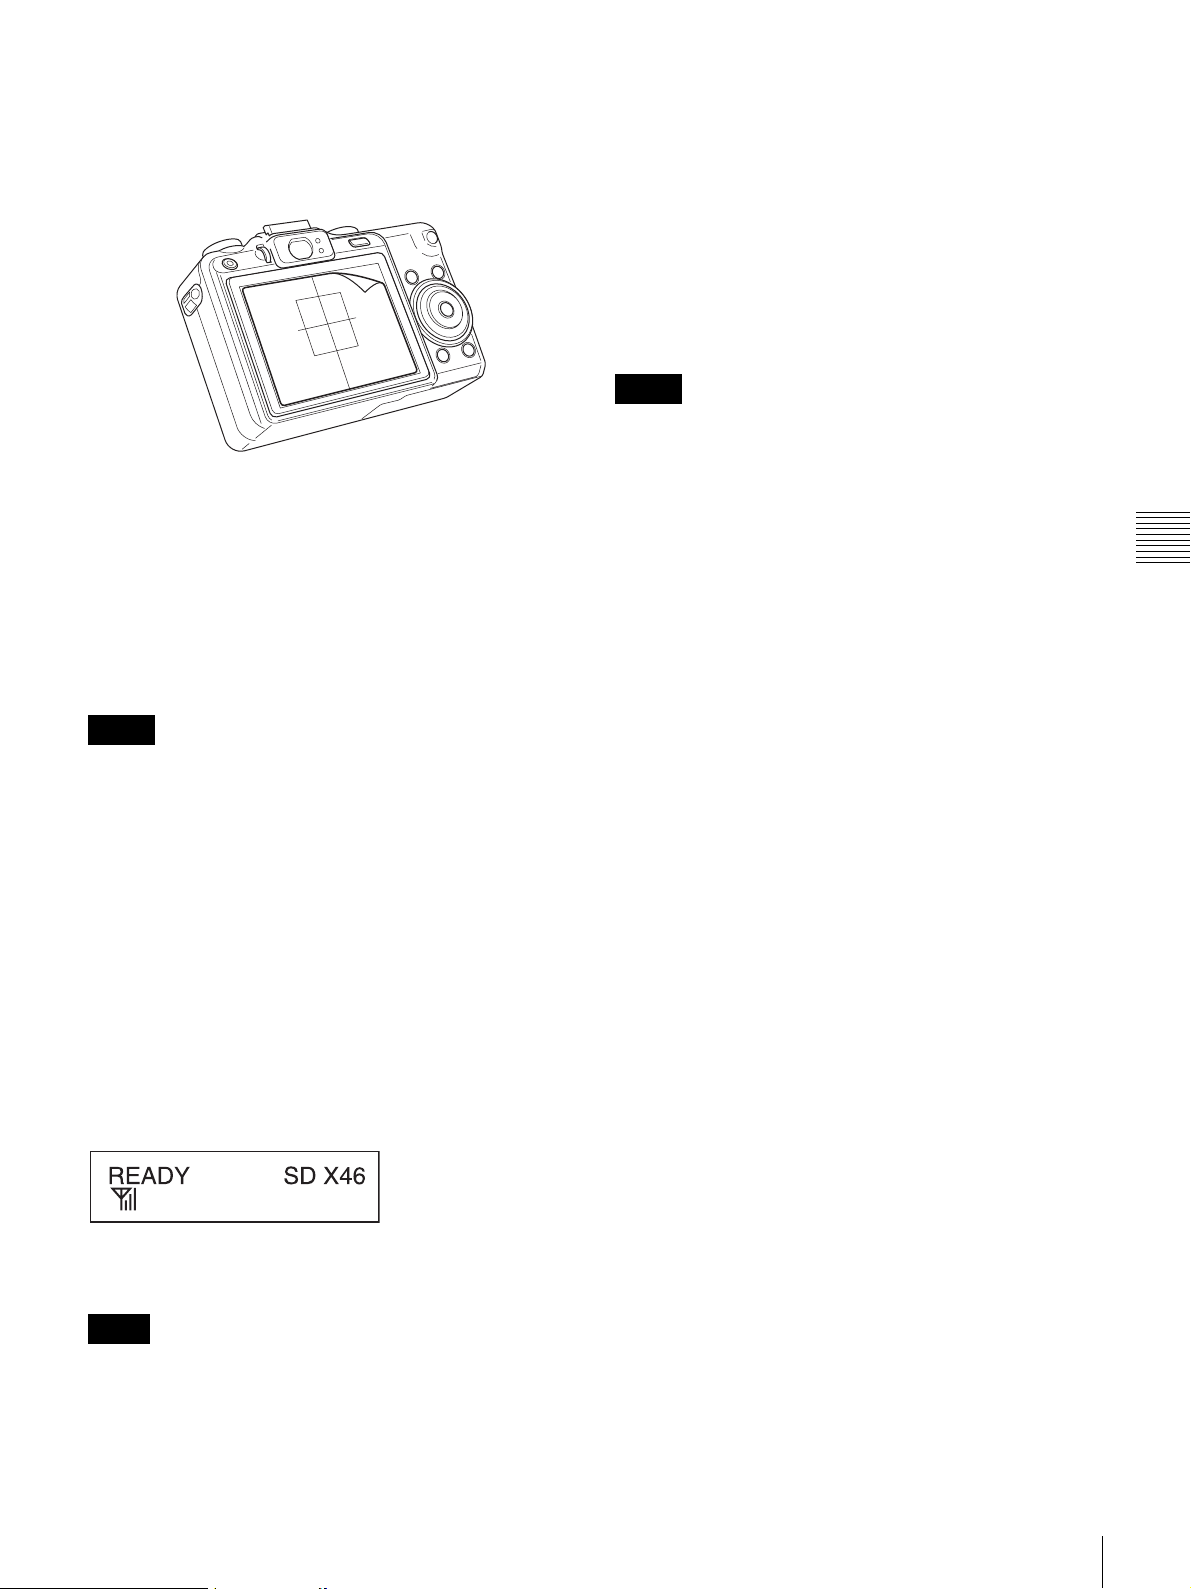
Three sizes of guideline stickers are supplied: 69 mm
(2.7"), 71 mm (2.8"), and 76 mm (3.0"). Use the sticker
size that matches the size of the monitor on your digital
camera. (The S mark on the sticker sheet indicates the top
of the sticker.)
Inserting the wireless LAN SD card
Insert the supplied wireless LAN SD cards into the printer
(this unit) and your digital camera.
The unit is supplied with one wireless LAN SD card for
use with a digital camera and one for use with the printer.
The cards for the digital camera and printer are labeled “C”
and “P” respectively. Insert the respective cards into the
SD card slots on the digital camera and the printer.
• If the card for use with the digital camera is inserted in
the printer, or the card for use with the printer is inserted
in the digital camera, proper network connection will not
be possible. Confirm the “P” (card for printer) or “C”
(card for camera) label on each card.
• Do not remove the wireless LAN SD cards while the unit
is turned on.
• If the remaining capacity on the wireless LAN SD card
is insufficient, images cannot be received. Check that the
remaining capacity is sufficient (512 MB or more is
recommended).
Memo
The wireless LAN SD cards supplied with the unit come
preconfigured for use with the unit and a digital camera. If
you want to reconfigure the wireless LAN SD card
settings, see “Configuring the Wireless LAN SD Card” on
page 21.
Chapter 4 Operation
Memo
The unit is shipped with the wireless LAN SD card for the
printer already inserted in its SD card slot.
Wireless connection
After inserting the wireless LAN SD cards, the wireless
connection will be established automatically when the unit
and the digital camera are turned on. The connection takes
about 30 seconds to establish after the power is turned on.
However, connection may take longer depending on the
signal conditions.
When proper wireless connection is established, the
following antenna icon appears under [READY] on the
unit’s LCD display. If another display (e.g., a layout name)
appears under [READY] instead of the antenna icon, press
S or T on the control button to change the display.
If wireless network connection is not established, “__” will
appear next to the antenna icon.
Notes
• If the wireless connection is not established, try
restarting the unit and digital camera.
• If the unit and the digital camera are out of range, close
the distance between the unit and the digital camera until
the signal is in range (within 5 m (16.4 ft.)).
Shooting Preparation
25
Page 26

Shooting ID Photos and Printing Wirelessly
Shooting Photos
Shooting configurations
Configure settings for shooting according to your digital
camera and shooting environment.
The following are the recommended settings when using a
commercially available high-end compact digital camera.
• If the size of the face does not match the frame, align the
face so that it fits within the frame while keeping it as
large as possible.
When the image is composed, shoot the photo.
Setting item Recommended setting
Shooting mode Shutter priority
ISO sensitivity Low sensitivity of 80 to 100
Chapter 4 Operation
Shutter speed 1/250 equivalent
Exposure metering Spot metering
White balance Flash or manual (configure with
Aspect ratio 4:3
Resolution (recorded
pixel count)
Power supply AC adaptor recommended
Auto power save Disabled
1) Transfer of images with higher resolutions will take longer. We
recommend lowering the resolution if th e size of the ID photo to be printed
is small.
1)
equivalent
diffuser attached)
Full size print: 5M or more
ID photo: 2M or more
If your digital camera includes a storage function for
setting values, we recommend using it.
Notes
• The available setting items and their names will differ
depending on the digital camera. When configuring
settings, refer to the operating instructions for your
camera.
• The above configurations do not guarantee image
quality.
Shooting
Point the digital camera toward the subject, and use the
guideline sticker attached to the monitor screen to
compose the image.
Make sure of the following when composing the image.
• Keep the face within the frame.
• Make sure the top of the subject’s head (or hair) and chin
touch the top and bottom lines of the frame.
Notes
• Automatic adjustment of the trim position may not be
performed properly in the following cases.
– If the composition is drastically different from the
guideline sticker.
– If a patterned background is used, or if shadows or
objects other than the subject appear in the image.
• The auto alignment function uses the top of the subject’s
hair as a reference for trimming. Depending on the
hairstyle or shape of the subject’s face, the face in the
printed photo may appear smaller or larger than the
standard size. In such cases, turn OFF the auto alignment
function for trimming, and adjust the size of the subject’s
face before shooting.
Printing Wirelessly
If you specify the photos you shot for printing using the
digital camera’s DPOF print mark function, the photos will
be sent to the unit and printed automatically.
Note
The operation will differ depending on the digital camera.
When performing the operation, refer to the operating
instructions for your camera.
1
Check that print size, layout, and other settings have
been configured on the unit.
26
Shooting ID Photos and Printing Wirelessly
Page 27

2
Check that the antenna icon appears on the unit’s LCD
display and that wireless connection is established.
For details on checking the connection, see “Wireless
connection” on page 25.
3
Use the digital camera’s DPOF print mark function to
specify printing.
The photos are sent to the unit and printed
automatically.
Saving Printed Photos onto USB Memory Devices
If you insert a USB memory device into the unit’s USB
port (host), the photo that was sent from the digital camera
and printed will also be saved to the USB memory device.
The photo will be saved to the USB memory device using
the same folder and file name that is used on the digital
camera’s SD card.
Notes
• Do not remove the SD card while images are being
transferred. Doing so may damage the image data on the
storage media.
• Do not turn off the digital camera until printing is
complete.
• Even if you specify two copies of a photo using the
DPOF function, only one copy will be printed. If you
want to print multiple copies, use the unit’s copy print
function.
For details, see “Reprinting the Photo Printed Last
(Copy Print)” on page 29.
• If you want to send and reprint photos that have already
been printed once, cancel all existing print marks before
specifying the print marks again.
If print mark prints do not occur
Cancel all the digital camera’s DPOF print marks, and
specify the print marks again.
Similarly, cancel all print marks when you want to resend
photos that have already been printed once.
1
Check that the antenna icon appears on the unit’s LCD
display and that wireless connection is established.
Notes
• Do not remove the USB memory device while printing
is in progress. Doing so may damage the stored image
data.
• If a file with the same name already exists on the USB
memory device, it will be automatically overwritten.
• If the remaining capacity on the USB memory device is
insufficient, an error will appear on the unit’s LCD
display and printing will stop. Back up the contents of
the USB memory device to increase the available
capacity.
Chapter 4 Operation
For details on checking the connection, see “Wireless
connection” on page 25.
2
Cancel print marks for all photos on the digital camera.
When the print mark cancellation is received by the
unit, the status indicator on the unit will slowly blink
green.
3
Specify print marks again for the photos you want to
print.
The photos are sent to the unit and printed
automatically.
Shooting ID Photos and Printing Wirelessly
27
Page 28

10
Press S or T to select the image file you want to print.
Printing Photos Stored on Storage Media
You can print photos that are stored on SD cards or USB
memory devices. You can use this function to reprint
photos that were automatically saved to a USB memory
device during wireless printing.
Note
Only photos for which the directory structures, file names,
and formats comply with DCF standards can be printed
using this function. Files created on a computer, photos
stored in folders you created yourself, and other photos
that do not comply with DCF standards cannot be printed.
1
Chapter 4 Operation
Specify the print size and layout.
For details, see “Configuring Settings for ID Photo
Prints” on page 18.
2
Press the MENU button.
DCF-standard files will be displayed in order, starting
with the most recent files (i.e., files that include the
highest numbers in their names).
11
Press the EXEC button.
Printing begins.
To print all photos on the storage media
Perform the following after step 4 of the previous
procedure.
5
Press T on the control button to display [PRINT
ALL].
6
Press X.
[SD] or [USB1] appears.
7
Press S or T to select the storage media from which
you want to print, and press the EXEC button.
A single copy of each photo is printed.
3
Press T on the control button to display [MEMORY
CARD PRINT] on the LCD display.
4
Press X.
[SELECT FILE PRINT] appears.
5
Press X.
[SELECT CARD] appears.
6
Press S or T to select the storage media from which
you want to print. Select [SD] for an SD card and
[USB1] for a USB memory device.
7
Press X.
[SELECT FOLDER] appears.
8
Press S or T to select the folder in which the photo
you want to print is stored.
Folders that contain DCF-standard image files will be
displayed in order, starting with the most recent
folders (i.e., folders with the highest numbers in front
of their names).
Notes
• Only a single copy of each image file can be printed
using this function. If you want to print multiple copies,
use the unit’s copy print function.
For details, see “Reprinting the Photo Printed Last
(Copy Print)” on page 29.
• Do not remove the storage media while printing is in
progress.
• Up to 1,000 image files can be printed in one session.
9
Press X.
[PRINT FILE] appears.
28
Printing Photos Stored on Storage Media
Page 29

Reprinting the Photo Printed Last (Copy Print)
The data for the last photo that was printed is stored on the
unit’s internal memory. This photo can be reprinted.
Printing from Computers
When the unit is connected to a computer via a
commercially available USB cable, data sent from the
computer can be printed on the unit.
1
Press the MENU button.
2
Press T on the control button to display [COPY
PRINT] on the LCD display.
3
Press X.
4
Press S or T to specify the number of copies you
want to print.
5
Press the EXEC button.
Printing begins.
Notes
• When you set the unit to standby mode, the internal
memory is cleared and copy print will not be possible.
• Photos will not be stored properly to the internal memory
if an interruption occurs during wireless image transfer
or if a storage media is removed while printing from the
storage media. Copy print will not be possible in such
cases.
• If you change the print paper size, the internal memory
data and the paper size will no longer match and copy
print will not be possible.
• Quality adjustment and trimming cannot be performed
for copy prints.
Note
When printing from a computer, you cannot specify ID
photo layouts for prints.
Installing the Printer Driver
To control the unit from a computer, you must install the
supplied printer driver on the computer before connecting
the unit to the computer.
For details on installation, refer to the installation guide
and Readme file on the supplied CD-ROM.
Note
The supplied printer driver does not support printing via a
network.
Connecting to a Computer
To print from a computer, connect the unit to the computer
via a USB cable. Connect the USB cable to the USB port
(device) on the front panel of the unit.
For more details on connection, refer to the operating
instructions for your computer.
USB Memory
Chapter 4 Operation
Computer
USB cable
Reprinting the Photo Printed Last (Copy Print) / Printing from Computers
29
Page 30

Notes
• Before connecting the unit to the computer, make sure
that the unit is turned off. If the unit is turned on, it may
not be recognized properly.
• Operation is not guaranteed with connections via USB
hubs.
Chapter 4 Operation
30
Printing from Computers
Page 31

Maintenance
Cleaning
Cleaning the Inside of the Printer
If white lines or dots appear on printed photos, clean the
inside of the printer using the supplied cleaning cartridge
(white) and the protective sheet contained in the print pack.
White lines
Chapter
3
Open the cartridge compartment cover, and remove
the print cartridge.
4
Insert the supplied cleaning cartridge, and close the
cartridge compartment cover.
5
Cleaning cartridge
Chapter 5 Maintenance
Memo
The cleaning cartridge is labeled “Cleaning Cartridge.”
Notes
• Perform cleaning only if white lines or dots appear on
prints.
• Performing cleaning when normal print results can be
obtained will not improve the print quality.
1
Remove the paper tray, and remove any paper from the
tray.
2
Place the protective sheet with its imprinted side
facing down and the arrow pointing in the same
direction as the arrow on the tray.
[HEAD CLEANING] appears on the LCD display.
5
Press the EXEC button.
The cleaning cartridge and protective sheet will clean
the inside of the printer. After the cleaning is finished,
the protective sheet ejects automatically.
6
Remove the cleaning cartridge from the unit, and
reinsert the print cartridge and paper tray.
Cleaning
31
Page 32

Adjusting Print Settings
The print quality and print position can be adjusted on this
unit. After checking print results, make adjustments as
necessary.
Adjusting the quality for monochrome
prints
After step 3 in “Adjusting the quality for color prints,”
press T on the control button to display [COLOR
ADJUST B/W] and enter the quality adjustment mode for
monochrome prints. The procedure for adjustment is the
same as that for color prints.
Adjusting the Print Quality
Adjusting the quality for color prints
1
Press the MENU button.
2
Press T on the control button to display [COLOR
ADJUST] on the LCD display.
3
Press X.
[COLOR ADJUST COLOR] appears.
4
Press X.
Chapter 5 Maintenance
[CYN-RED] appears.
5
Press S or T to select the item you want to adjust.
The following setting items are available.
CYN-RED: Adjusts the cyan and red tones. Pressing
W strengthens cyan, while pressing X strengthens
red.
MAG-GRN: Adjusts the magenta and green tones.
Pressing W strengthens magenta, while pressing
X strengthens green.
YEL-BLU: Adjusts the yellow and blue tones.
Pressing W strengthens yellow, while pressing X
strengthens blue.
DARK: Adjusts the scale of the dark tones. Pressing
X makes dark tones darker.
LIGHT: Adjusts the scale of light tones. Pressing X
makes light tones lighter.
SHARPNESS: Adjusts the sharpness of image
outlines. Pressing X makes outlines sharper.
GAMMA: Adjusts the scale of medium tones.
Pressing W makes the color tone of the whole
picture lighter, while pressing X makes it deeper.
When making adjustments, refer also to “Quality
Adjustment Parameters.”
6
Press W or X to adjust each item.
7
Repeat steps 5 and 6 if you want to adjust other items.
8
When you finish adjustment, press the EXEC button.
Saving adjustment values
After finishing adjustment, perform the following to save
the adjusted values.
1
Press X on the control button in the [COLOR
ADJUST COLOR] or [COLOR ADJUST B/W]
screen.
2
Press T to display [SAVE SETTINGS].
3
Press W or X to select the memory number (1 to 3) to
which to save the adjustment values.
4
Press the EXEC button.
The adjustment values are saved to the memory number
selected in step 3.
Recalling adjustment values
Adjustment values that are stored to memory can be
recalled.
1
Press X on the control button in the [COLOR
ADJUST COLOR] or [COLOR ADJUST B/W]
screen.
2
Press T to display [LOAD SETTINGS].
3
Press W or X to select the memory number (1 to 3) to
which the adjustment values are saved.
4
Press the EXEC button.
The adjustment values saved to the memory number
selected in step 3 are recalled.
Quality Adjustment Parameters
Color balance adjustment
These parameters adjust the balance between red, green,
and blue and their complementary colors.
CYN-RED, MAG-GRN, YEL-BLU
For red, green, and blue, pressing X strengthens each
color, while pressing W weakens them. For example,
32
Adjusting Print Settings
Page 33
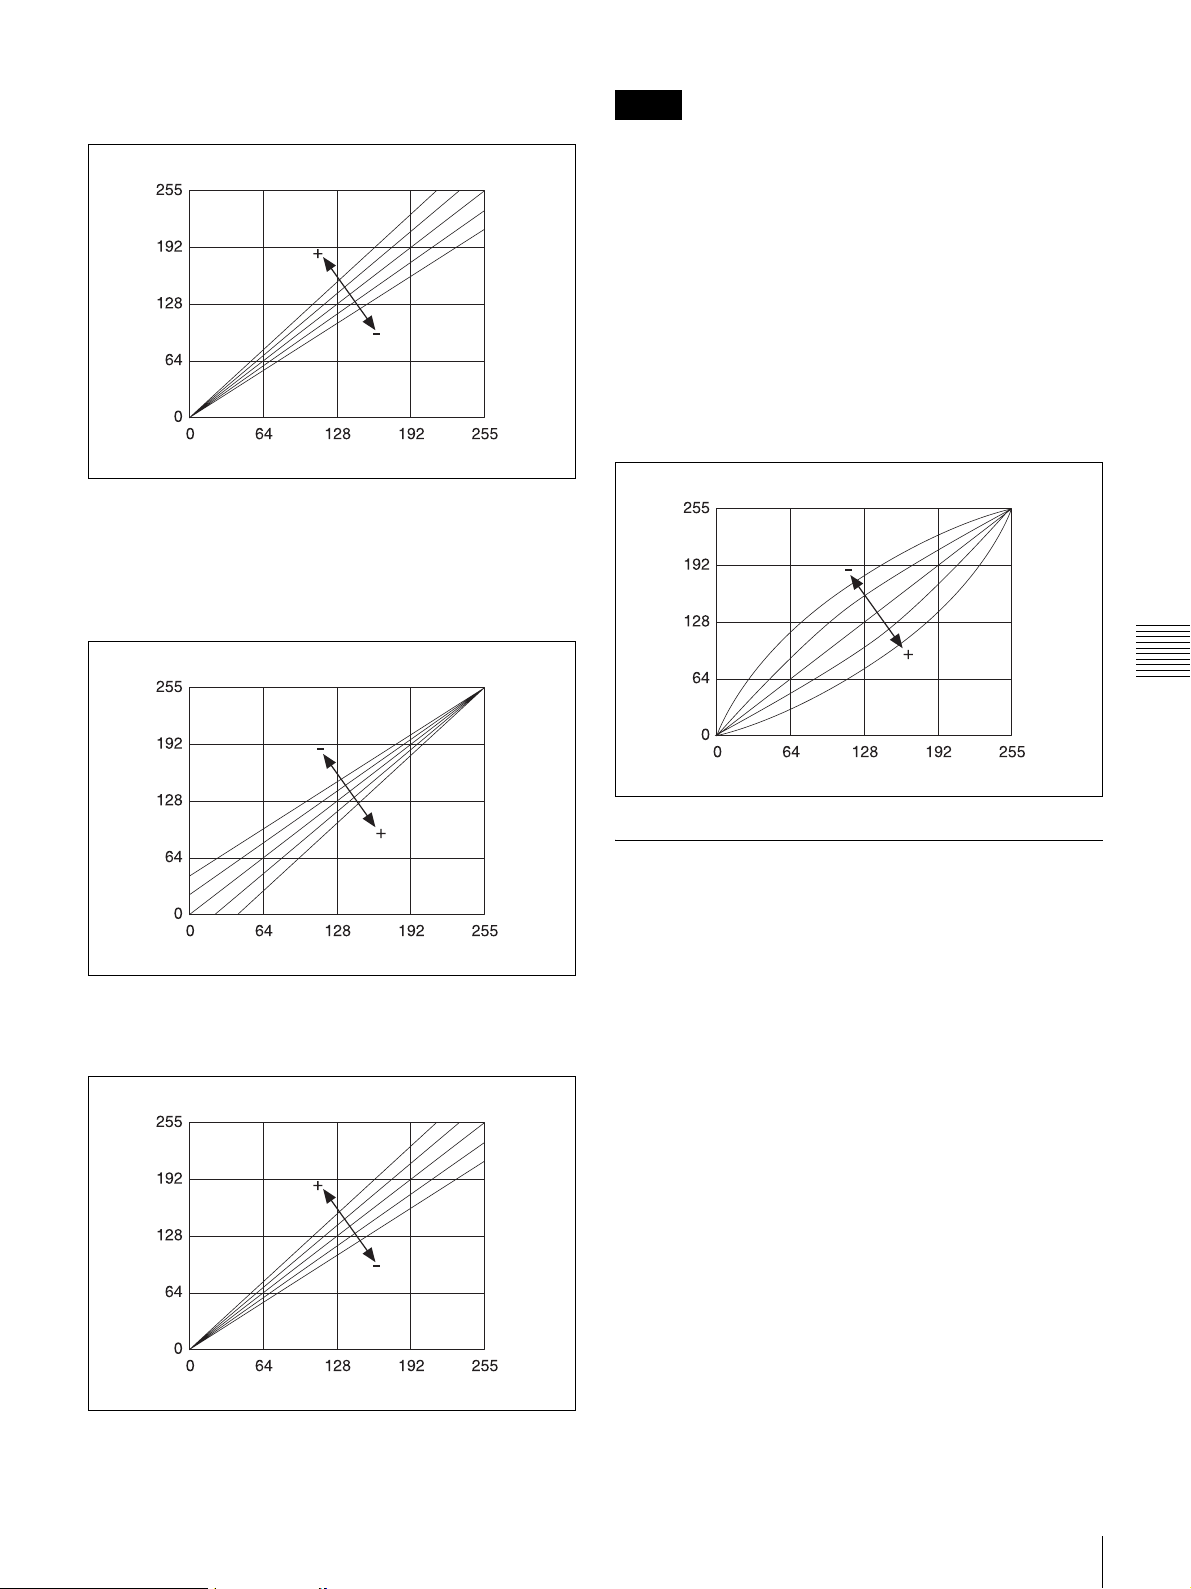
pressing W for CYN-RED weakens red, while cyan, its
complementary color, is strengthened.
Strong
Output
Weak StrongInput
Brightness adjustment
DARK
Adjusts the scale of the dark tones. Pressing X makes dark
tones darker, while pressing W makes them lighter.
Memo
You can adjust contrast by adjusting DARK and LIGHT
simultaneously. Adjusting both in the + direction using X
strengthens contrast, while adjusting both in the – direction
using W weakens it.
SHARPNESS
Adjusts the sharpness of image outlines. Pressing X makes
outlines in images sharper, while pressing W makes them
softer.
GAMMA
Adjusts the scale of medium tones. Pressing X makes
medium tones darker, while pressing W makes them
lighter.
Light
Output
Light
Output
Dark LightInput
LIGHT
Adjusts the scale of light tones. Pressing X makes light
tones lighter, while pressing W makes them darker.
Light
Output
Dark LightInput
Adjusting the Print Position
When using the UPC-X46 print pack, you can adjust the
position in which images are printed in 0.5-mm increments
to ensure proper positioning on the print paper (in relation
to the perforation).
1
Press the MENU button.
2
Press S or T on the control button to display [PRINT
SETTINGS] on the LCD display.
3
Press X.
[PRINT OFFSET] appears.
4
Press W or X to specify the offset value.
Chapter 5 Maintenance
Dark LightInput
5
Press the EXEC button.
Make a test printout, and check that the image is printed in
the correct location on the paper. If further adjustment is
needed, repeat the above steps.
Adjusting Print Settings
33
Page 34

Restoring the Default Settings
You can return the settings on the unit to their factory
default settings.
1
Press the MENU button.
2
Press T on the control button to display [SYSTEM]
on the LCD display.
3
Press X.
Updating the Firmware
You can update the unit’s firmware.
For information on the latest firmware, visit the DS-ID400
support site (http://dnpphoto.net/support-e/).
1
Save the firmware update to an SD card or USB
memory device.
2
Press the MENU button.
3
Press T on the control button to display [SYSTEM]
on the LCD display.
[SYSTEM SETTINGS] appears.
4
Press X.
5
Press T to display [FACTORY RESET].
6
Press X.
7
Chapter 5 Maintenance
Press the EXEC button.
All settings return to their factory default conditions.
Note
Even if you restore the default settings, the logo that was
selected last will be printed on subsequent prints. To
disable logo printing, cancel logo printing from the menu
(see page 23).
4
Press X.
[SYSTEM SETTINGS] appears.
5
Press X.
6
Press T to display [FIRMWARE UPDATE].
7
Press X.
[INSERT MEMORY CARD] appears.
8
Insert the SD card or USB memory device on which
the firmware update is saved.
9
Verify the firmware update version, and press the
EXEC button.
Updating begins, and [NOW UPDATING] appears on
the LCD display.
When updating is finished, the unit restarts.
Note
Do not turn off the unit while updating is in progress.
34
Restoring the Default Settings / Updating the Firmware
Page 35

Appendix
Precautions
Installation
• Install the unit on a level surface. Do not install the unit
on a slant or on its side. Doing so may cause
malfunctions.
• Do not jar or drop the unit.
• Do not install the unit in locations subject to:
– instability
– excessive dust
– extremely high or low temperatures
– vibration
– high humidity
– direct sunlight
• Do not block the ventilation holes on the unit. Doing
may cause malfunctions.
that tends to produce quantities of moisture,
condensation may form inside the unit. Using the unit in
such cases may result in errors and even malfunctions. If
condensation forms, turn off the power and leave the unit
standing for at least one hour.
• If the print pack is subjected to wide and sudden changes
in temperature, condensation may form on the print
cartridge or print paper inside. Using the print pack in
such cases will cause the unit to malfunction. In addition,
using printing packs that have been exposed to moisture
may result in spots and blemishes on printouts.
Therefore, avoid sudden changes in temperature.
Operation
• Do not insert unknown objects into the SD card slot or
USB ports.
Appendix
Extended periods of disuse
• Turn off the power and disconnect the power cord.
• When storing a partially used print pack, replace it in its
original packaging and reseal the package. If possible,
keep the sealed print pack in a cool, dark location. When
reusing a stored print pack, allow the sealed package to
acclimate to the ambient temperature before opening it
to prevent condensation.
Transportation
When transporting the unit, remove any supplied
accessories, storage media, print cartridges, or print paper
beforehand. Failure to do so may cause malfunctions.
We recommended that you store the print cartridge and
print paper in their original packaging after you remove
them.
Condensation
• If the unit is subjected to wide and sudden changes in
temperature, such as when it is moved from a cold room
to a warm room or when it is left in a room with a heater
Precautions
35
Page 36
Notes on Storage Media
This unit supports SD cards and USB memory devices. We
recommend backing up any image data stored on media
before using it with the unit.
Note
Be aware that Dai Nippon Printing Co., Ltd. is not liable
for any damage to storage media or loss of data that occurs
while using this unit.
SD cards
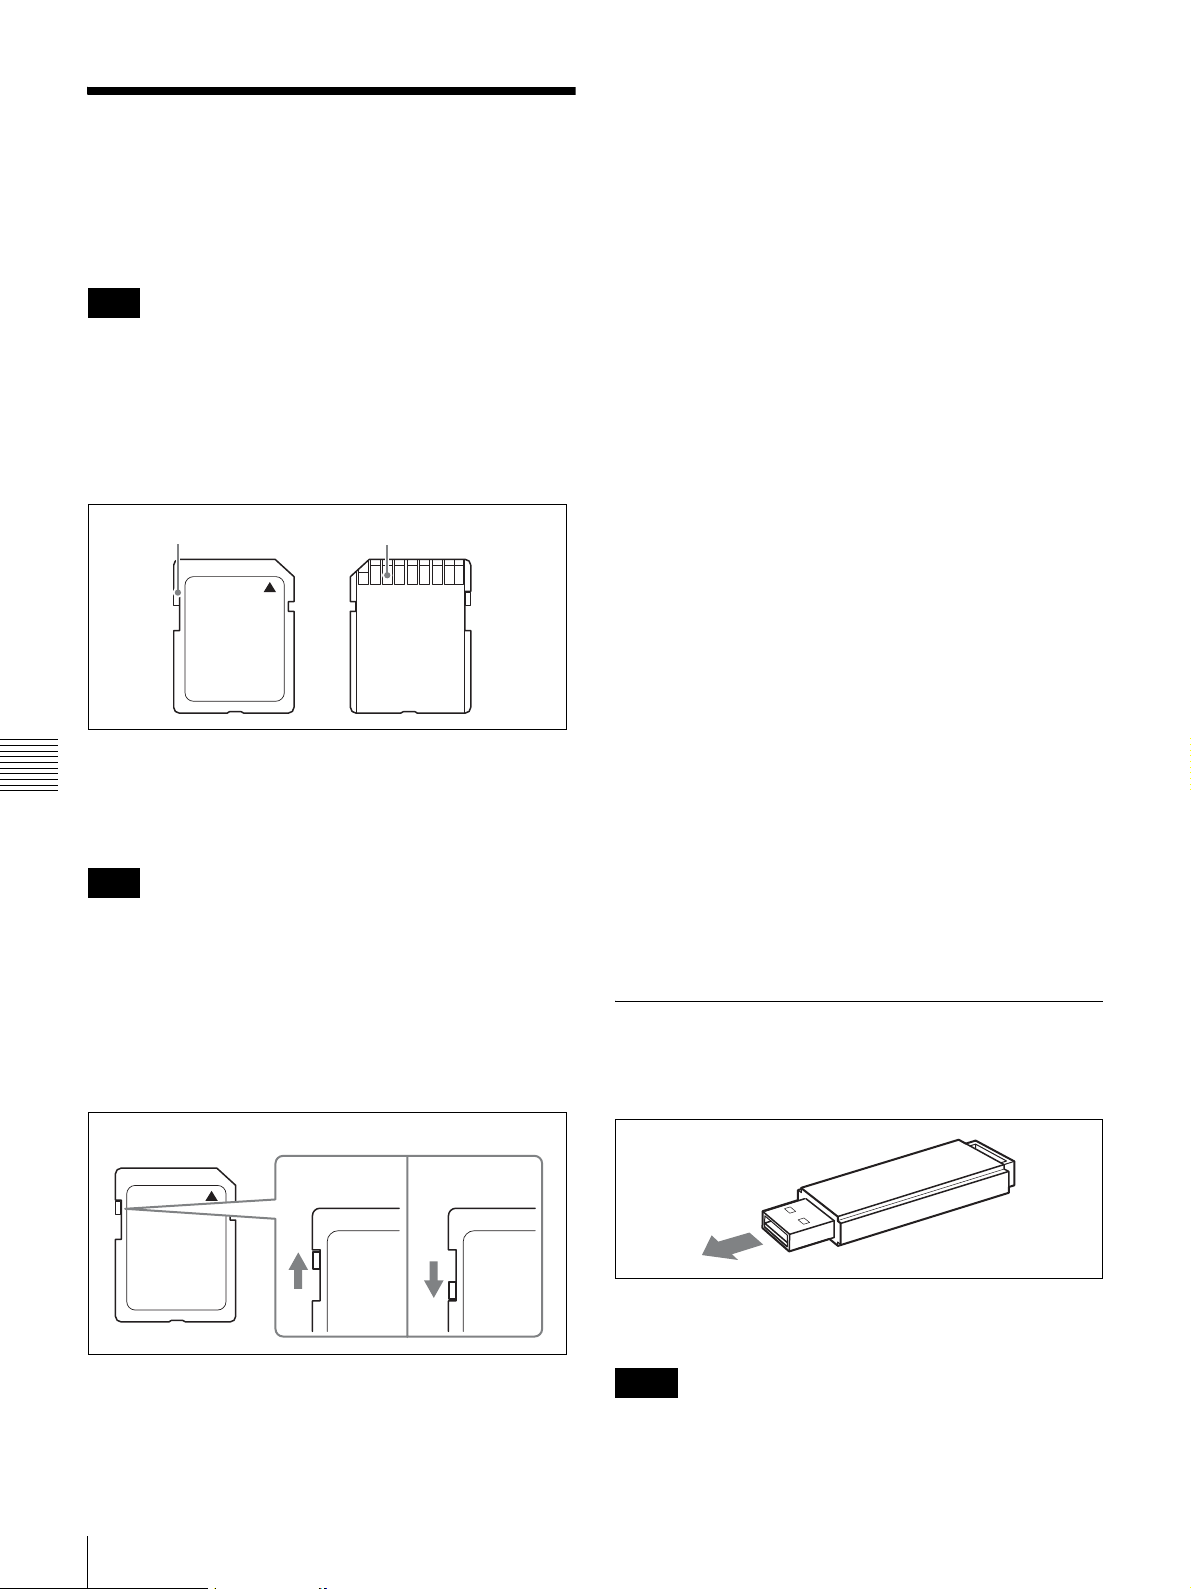
The parts of an SD card are shown below.
Write-protect switch Contacts
For details, either visit the SD Association Web site or
refer to the operating instructions accompanying your
Appendix
card.
https://www.sdcard.org/home
Note
This unit does not support SDXC.
When using SD cards and wireless LAN SD cards with the
unit, you must prepare the cards so that data can be written
to them.
Set the write-protect switch on a card to the write-enable
position as illustrated. If you use a write-protected card
with the unit, an error message will appear.
Notes on using SD cards
• Be sure to read the operating instructions accompanying
your memory card before using it.
• Do not format the supplied wireless LAN SD cards.
• Do not attempt to use any memory card that is not
specified for use with this unit. Doing so could damage
this unit.
• Do not strike, bend, or drop the memory card.
• Do not attempt to disassemble or modify the memory
card.
• Do not get the memory card wet.
• Because memory cards are vulnerable to humidity, we
recommend that you avoid using them under humid
conditions.
• Avoid storing or using memory cards under the
following conditions:
– In hot locations, such as inside a car or outside on a
very hot day.
– In direct sunlight.
– In humid locations or locations where corrosion occurs
easily.
– In locations where the memory card could be exposed
to electrostatic discharge or electronic noise.
• Do not touch the contacts on the memory card with your
hands or metallic objects.
• Always keep the memory card in its case when carrying
or storing it.
• Always make sure that the memory card is oriented
correctly before inserting it in the appropriate slot on the
unit. Inserting a memory card in the wrong direction may
damage the unit and/or memory card and cause
malfunctions.
• Do not remove the memory card or turn off the unit
while data is being read or written to the memory card.
Doing so could cause the data that is being recorded to
be deleted or damaged.
USB Memory Devices
Before inserting a USB memory device into the port, make
sure that the top and bottom of the connectors correspond.
Write-protect switch
Write-enabled Write-protected
For details, refer to the operating instructions
accompanying your card.
36
Notes on Storage Media
Direction of
insertion
For details, refer to the operating instructions
accompanying your USB memory device.
Notes
• This unit does not support USB memory devices with
security functions.
Page 37

• Compatibility is not guaranteed for all USB memory
devices.
Appendix
Notes on Storage Media
37
Page 38
Layout List
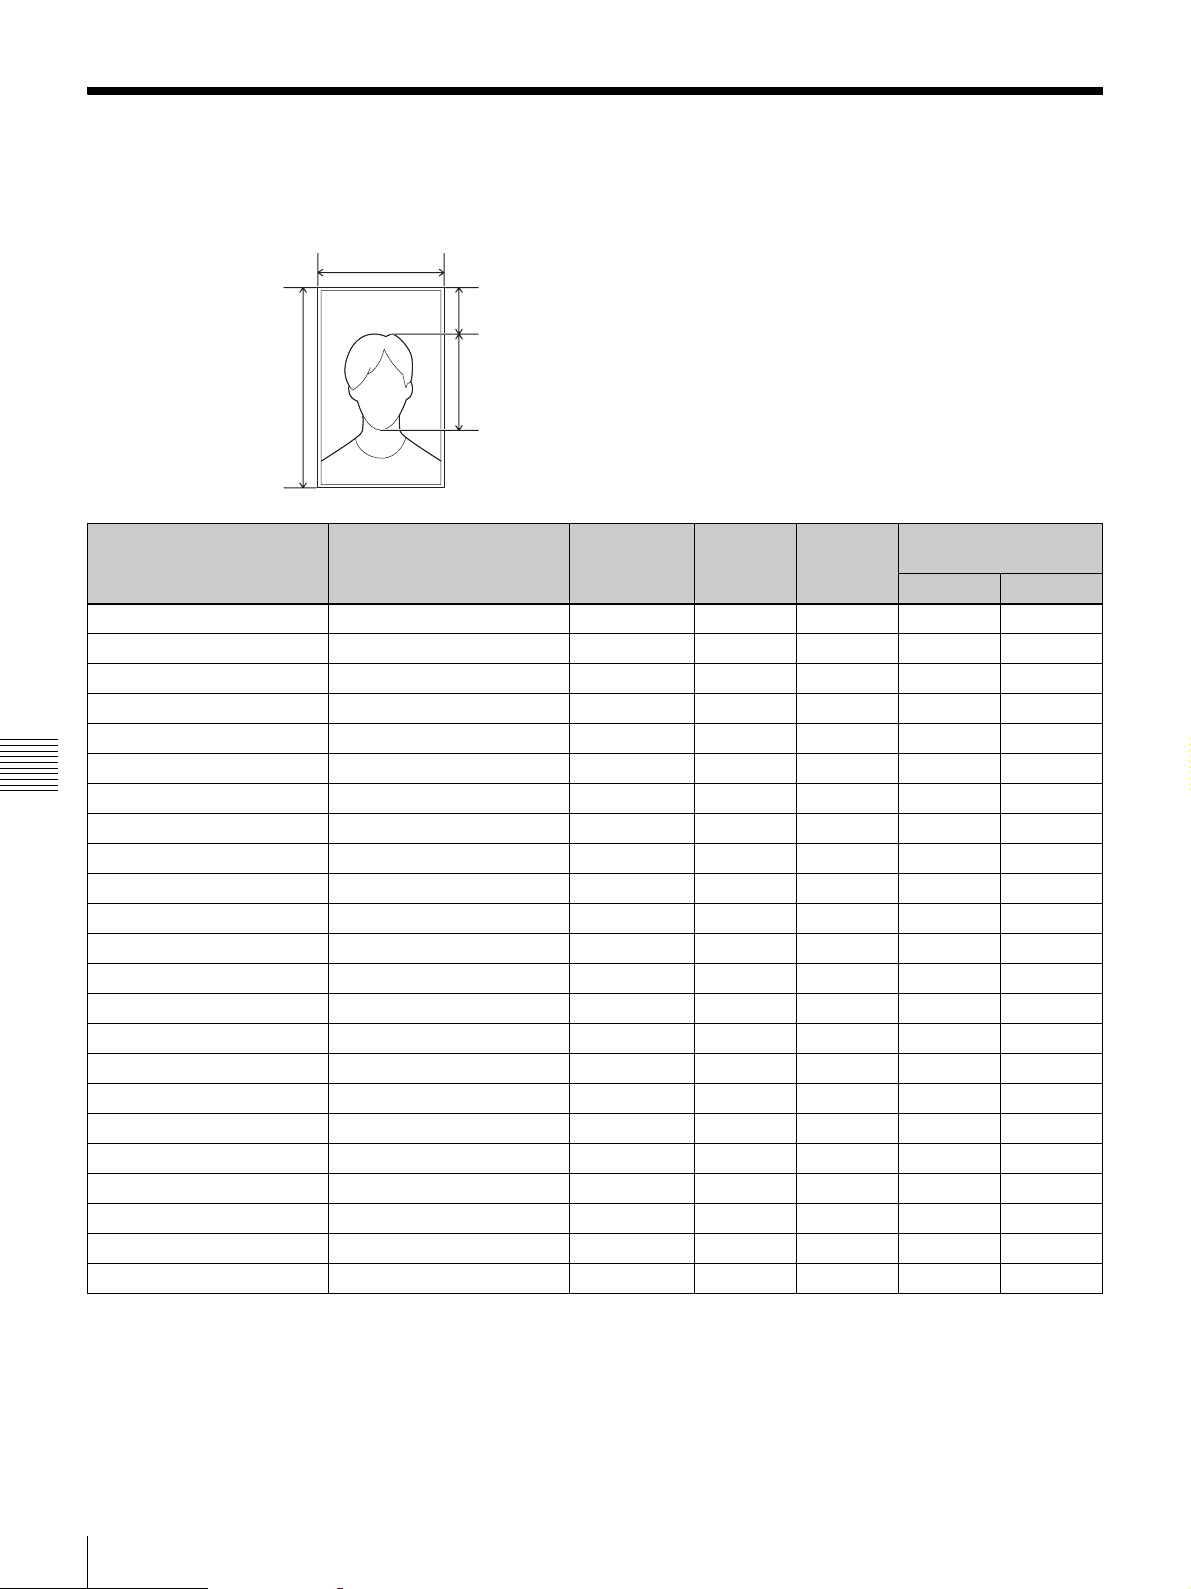
The following layouts for ID photos are preinstalled on the
unit.
a
c
bd
a: Photo size (width)
b: Photo size (height)
c: Offset (distance between top of frame and head)
d: Face size
Layout name Description Photo size
Full Bleed Print (X46) Full-size print (X46) 102 × 152 – – 1 –
Full Bleed Print (X34) Full-size print (X34) 70 × 95 – – – 1
USA Passport US passport 54 × 54 5.5 30 2 1
CAN Passport Canadian passport 50 × 70 11 35 2 1
MEX Passport Mexican passport 35 × 45 4 33 8 4
COL Passport Colombian passport 35 × 45 3.5 33.5 8 4
Appendix
VEN Passport Venezuelan passport 51 × 51 4 30 2 1
EU Passport EU passport 35 × 45 3.5 33.5 8 4
GBR Passport British passport 35 × 45 4 31 8 4
DEU Passport German passport 35 × 45 3.5 33.5 8 4
FRA Passport French passport 35 × 45 4 33 8 4
ITA Passport Italian passport 40 × 40 3 30 6 2
NLD Passport Dutch passport 35 × 45 6 27.5 8 4
ESP Passport Spanish passport 30 × 40 3 30 8 4
AUT Passport Austrian passport 35 × 45 4 32.5 8 4
GRC Passport Greek passport 40 × 60 9 32.5 4 2
RUS Passport Russian passport 35 × 45 3.5 33.5 8 4
TUR Passport Turkish passport 35 × 45 3.5 33.5 8 4
AUS Passport Australian passport 35 × 45 3.5 33.5 8 4
NZL Passport New Zealand passport 35 × 45 3.5 33.5 8 2
JPN Passport Japanese passport 35 × 45 4 34 8 4
JPN Driver license Japanese driver’s license 24 × 30 3 20 12 6
JPN Personal history Japanese resume 30 × 40 6 20 8 4
(W×H, mm)
Offset
(mm)
Face size
(mm)
Number of photos on
each printout
UPC-X46 UPC-X34
38
Layout List
Page 39

Troubleshooting
Before sending the unit out for servicing, check the items
listed below. If the problem persists, contact your dealer.
Printer
Symptom Cause/remedy
The unit does not turn
on.
The unit does not print. The print paper and print cartridge
A paper jam has
occurred.
The ink ribbon is
broken.
The print cartridge
cannot be removed.
White lines or dots
appear on printouts.
A beeping sound is
emitted.
The status indicator is lit
or blinking, and an error
message is displayed.
The AC power cord is not
connected properly.
Connect the AC power cord to
an AC outlet properly
(page 12).
do not match.
Use a print paper and print
cartridge set that corresponds
with each other.
The thermal head may be
overheated. [PLEASE WAIT]
appears on the LCD display.
If the interior of the printer
overheats, printing may be
temporarily disabled. Wait until
printing automatically resumes.
A paper jam has occurred.
Remove the jammed paper,
and try printing again
(page 15).
Remove the jammed paper,
and try printing again
(page 15).
Repair the break with adhesive
tape, and reinsert the print
cartridge (page 15).
Printing is in progress.
The print cartridge cannot be
removed during printing. Wait
until printing is finished. If the
cartridge still cannot be
removed, contact your dealer.
There may be dust on the thermal
head.
Use the supplied cleaning
cartridge to perform cleaning.
The roller inside the printer may
be damaging the print paper.
Reduce the number of sheets
inside the paper tray.
A beeping sound will be
emitted if an invalid operation is
performed.
Follow the instructions on the
LCD display.
Wireless LAN SD Cards
Symptom Cause/remedy
Connection cannot be
established.
The wireless LAN SD cards are
not inserted.
Insert a wireless LAN SD card
into both the unit and the digital
camera.
The cards for the printer and the
digital camera are interchanged.
Insert the card for the printer
into this unit, and the card for
the digital camera into the
camera.
The wireless LAN SD cards are
not configured.
If the antenna icon does not
appear on the LCD display
after inserting the wireless LAN
SD card, the wireless LAN SD
card is being not recognized.
Configure the card for use with
the printer and the card for use
with the digital camera, and
reinsert them (page 21).
If you unintentionally formatted
the cards, reconfigure them
using the unit (page 21).
The unit and the digital camera
are out of range.
Close the distance between the
unit and the digital camera until
the signal is in range (within
5 m (16.4 ft.)).
The unit or the digital camera is
not turned on.
Turn on both the unit and the
digital camera. (Connection is
established about 30 seconds
after the power is turned on.)
Appendix
Troubleshooting
39
Page 40

Symptom Cause/remedy
Images cannot be
transferred.
Appendix
The unit does not print. A print mark (DPOF) for an image
“IMAGE DATA ERROR”
appears on the LCD
display, noise-like lines
appear in printed
photos, or similar errors
occur.
If the unit and the digital camera
are out of range or the signal is
weak, the transfer rate may drop,
increasing the transfer time, or
connection may not be
established.
Close the distance between the
unit and the digital camera until
the signal is in range.
Do not block the wireless LAN
SD card slot areas with your
hands or other objects.
The transfer rate may drop or
connection may not be
established due to the effects
of magnetic or electro magnetic
waves from microwave ovens
or wireless devices (e.g.,
IEEE802.11b/g/n, Bluetooth, or
specified low power radio
devices). Check your usage
environment.
The connection was severed from
the other device.
Check the power status and
other conditions on the digital
camera, and establish
connection again. We
recommend disabling the
power saving function on the
digital camera (page 26).
The remaining capacity on the
wireless LAN SD card is
insufficient.
Back up the wireless LAN SD
card data, and increase its
remaining capacity.
that has already been printed
remains.
Cancel all the print marks
(DPOF) on the digital camera,
and specify print marks again
(page 29).
Menu operations on the unit are in
progress.
Close any menus, and check
that [READY] appears on the
LCD display.
Data transfer errors may occur
due to the effects of magnetic
or electro magnetic waves from
microwave ovens or wireless
devices (e.g., IEEE802.11b/g/
n, Bluetooth, or specified low
power radio devices). Check
your usage environment.
The wireless LAN SD cards
may be malfunctioning. Try
formatting the wireless LAN SD
cards (page 22).
Error Messages
Display Cause/remedy
SET NEW RIBBON
PUSH [EXEC]
SET PAPER
PUSH [EXEC]
MEDIA MISMATCH
PUSH [EXEC]
PAPER JAMMING
REMOVE PRINTS
REMOVE PRINTS
PUSH [EXEC]
PRINTER ERROR
PLEASE RETRY
CARD FULL
PUSH [EXEC]
CARD LOCKED
PUSH [EXEC]
CARD ERROR
PUSH [EXEC]
The print cartridge is not inserted
properly.
Insert the print cartridge
properly, and press the EXEC
button.
The print cartridge has run out.
Replace the print cartridge,
and press the EXEC button.
The paper tray is not inserted.
Insert the paper tray, and press
the EXEC button.
The print paper has run out.
Insert more print paper, and
press the EXEC button.
The paper is not feeding.
Remove the paper tray, and
reinsert it.
The print paper and print cartridge
are mismatched.
Insert the correct print paper,
and press the EXEC button.
A print cartridge of a different size
from the cartridge inserted before
the error was inserted after the
error.
After an error occurs, be sure
that the inserted print cartridge
is the same size as the
cartridge from before the error.
A paper jam has occurred.
Remove the jammed paper,
and try printing again
(page 15).
Print paper remains in the paper
eject outlet.
Remove the paper tray and
remove the print paper, and
press the EXEC button.
A printer error has occurred.
Restart the unit, and try
printing again.
The storage media is full.
Insert storage media with
sufficient remaining capacity,
and press the EXEC button.
The SD card is write-protected.
Reinsert the SD card after
setting it to write-enabled, and
press the EXEC button.
Data cannot be written properly to
the storage media.
Reinsert the storage media
after checking that it is
functioning normally, and press
the EXEC button.
40
Troubleshooting
Page 41

Display Cause/remedy
NO IMAGE DATA Printable image files cannot be
found on the storage media when
trying to print from storage media.
Printable data does not exist on
the internal memory when trying
to perform copy print.
NO ID PHOTO DATA
SELECT ID PHOTO
NO FACE DETECTED A face was not properly detected
IMAGE DATA ERROR Images cannot be read properly.
Data for the specified ID photo
layout cannot be found.
Reselect the ID photo layout
(page 18).
Check that the ID photo layout
exists on the expansion SD
card.
Insert the expansion SD card
on which the ID photo layout is
stored.
during passport printing with the
auto alignment trimming function
enabled.
Check the photo that was
taken.
Turn OFF the auto alignment
function for trimming, and
shoot and print the photo again
(page 19).
If you are printing from storage
media, check the image files
on the storage media.
Check whether the format of
the image file is supported by
this unit (page 7).
Data transfer errors may occur
due to the effects of magnetic
or electro magnetic waves from
microwave ovens or wireless
devices (e.g., IEEE802.11b/g/
n, Bluetooth, or specified low
power radio devices). Check
your usage environment.
The wireless LAN SD cards
may be malfunctioning. Try
formatting the wireless LAN SD
cards (page 22).
Specifications
Power requirements
100 to 240 V AC, 50/60 Hz
Input current 1.6 to 0.8 A max.
Operating temperature range
10°C to 35°C (50°F to 95°F)
Operating humidity range
20% to 80% (no condensation)
External dimensions
Approx. 203 × 85 × 305 mm (WHD)
Mass Approx. 2.7 kg (5 lb. 15 oz.)
Printing system Dye sublimation thermal transfer
Resolution 403 dpi
Gradations 8 bits (256 levels) each for Yellow,
Print size UPC-X34 series:
UPC-X46 series:
Printable pixels UPC-X34 series:
UPC-X46 series:
(The top and bottom and right and left
Printing time UPC-X34 series: Approx. 65 sec.
UPC-X46 series: Approx. 100 sec.
(Printing time may vary depending on the
Input connector AC IN (for power)
USB function port
Hi-Speed USB (USB2.0)
USB host port for the USB memory (1)
Memory card slots
SD Card interface slot (1)
(SDXC not supported)
Compatible image file formats
DCF 2.0 compatible image files
• JPEG: JFIF 4:4:4, 4:2:2, 4:2:0 (baseline
• TIFF: Exif 2.2.1 compatible (RGB non-
3
(8 × 3
/8 × 12 1/8 inches)
(excluding the maximum projecting
parts)
(printer only)
Magenta, Cyan
70 × 95 mm ±2 mm (2
inches ±
102 × 152 mm ±2 mm (4
6 inches ±
3
/32 inches)
3
/32 inches)
7
/8× 3 3/4
1
/8×
1,112 × 1,512 dots
1,664 × 2,440 dots
portions will not be printed by about
2 mm)
conditions of use.)
JPEG)
Exif 2.2.1 compatible (progressive
JPEG and 8-bit grayscale JPEG not
supported)
compressed)
Appendix
Specifications
41
Page 42

Maximum number of pixels to be handled
JPEG: 8,000 (H) × 6,000 (V) or
8,000 (V) × 6,000 (H) pixels
TIFF: 8,000 (H) × 6,000 (V) or
8,000 (V) × 6,000 (H) pixels
Maximum number of files to be handled
9,999 files for each storage media
Accessories supplied
Paper trays (2, large/small)
Ferrite core (1)
Cleaning cartridge (1)
Guideline sticker sheet (1)
Wireless LAN SD cards (2)
1)
1)
CD-ROM (1)
Before Using this Printer (1)
1) Only with models supplied with wireless LAN SD cards
Optional accessories
Ink ribbon / print paper
Self-Laminating Color Print Pack
10UPC-X34 series (300 sheets)
10UPC-X46 series (250 sheets)
Design and specifications are subject to change without
notice.
Notes
• Always verify that the unit is operating properly before
Appendix
use.
DAI NIPPON PRINTING CO., LTD. WILL NOT BE
LIABLE FOR DAMAGES OF ANY KIND
INCLUDING, BUT NOT LIMITED TO,
COMPENSATION OR REIMBURSEMENT ON
ACCOUNT OF FAILURE TO PRINT CONTENT OF
ANY TYPE OR LOSS OF DATA DUE TO FAILURE
OF THIS UNIT OR ITS PRINTING MEDIA,
ASSOCIATED SOFTWARE, EXTERNAL
STORAGE, OR OTHER EXTERNAL DEVICE.
• DAI NIPPON PRINTING CO., LTD. WILL NOT BE
LIABLE FOR DAMAGES OF ANY KIND
INCLUDING, BUT NOT LIMITED TO,
COMPENSATION OR REIMBURSEMENT ON
ACCOUNT OF THE LOSS OF PRESENT OR
PROSPECTIVE PROFITS DUE TO FAILURE OF
THIS UNIT, EITHER DURING THE WARRANTY
PERIOD OR AFTER EXPIRATION OF THE
WARRANTY, OR FOR ANY OTHER REASON
WHATSOEVER.
42
Specifications
Page 43

 Loading...