Dmsichina DiSEqC User Manual

DiSEqC Positioner
DiSEqC 1.0 / 1.2 Receivers Compatible
Work with any Receiver via Optional Remote Control
Compatible with any Actuator or H-H Mount
99 Programmable Memories
Easy Operation and Quick Installation
Fine-tune Function for Better Reception
Anti-Noise Circuit to avoid miscounting
Short circuit and Overload Protection
Software Limits Protection
Auto Turn-off Function
Re-calculate Function
Available for OEM and private label. Contact sales@dmsichina.com. ~ http://www.dmsichina.com

Content
|
Page |
|
1 |
Optional Remote Control v.s. Receiver |
P2 |
2 |
Basic Operation |
P3 |
3 |
Cable Connection |
P4 |
4 |
For any Receiver |
P5 |
|
Optional Remote Control is necessary |
|
5 |
For DiSEqC 1.2 Receiver |
P8 |
6 |
For DiSEqC 1.0 Receiver |
P10 |
7 |
Trouble Shooting |
P11 |
8 |
Quick Table |
P12 |
The picture and the description may be different from your product; and is subject to change without further notice.
Safety Precautions
1.The ventilation should not be impeded by covering the ventilation openings with items, such as newspapers, table-cloths, curtains, etc.
2.No open flame sources, such as lighted candles, should be placed on the apparatus.
3.The apparatus shall not be exposed to dripping or splashing and no objects
filled with liquids, such as vases, shall be placed on the apparatus.
The DiSEqCTM is a trademark of EUTELSAT.
Optional Remote Control v. s. Receiver
Do you need the optional remote control? It is upon your receiver and how many positions you want. Please check the following table.
Receiver Type |
Remote Control |
Positions |
Note |
DiSEqC 1.2 |
Not Necessary |
99 |
Fully controlled by receiver. |
|
|
Yes/Option |
99 |
DiSEqC 1.0 |
|
al |
|
NO |
4 |
Controlled by receiver |
|
|
|
Yes/Option |
99 |
No DiSEqC |
|
al |
|
Yes/Necessary |
99 |
Just like stand-alone positioner |
Available for OEM and private label. Contact sales@dmsichina.com. ~ http://www.dmsichina.com

Basic Operation
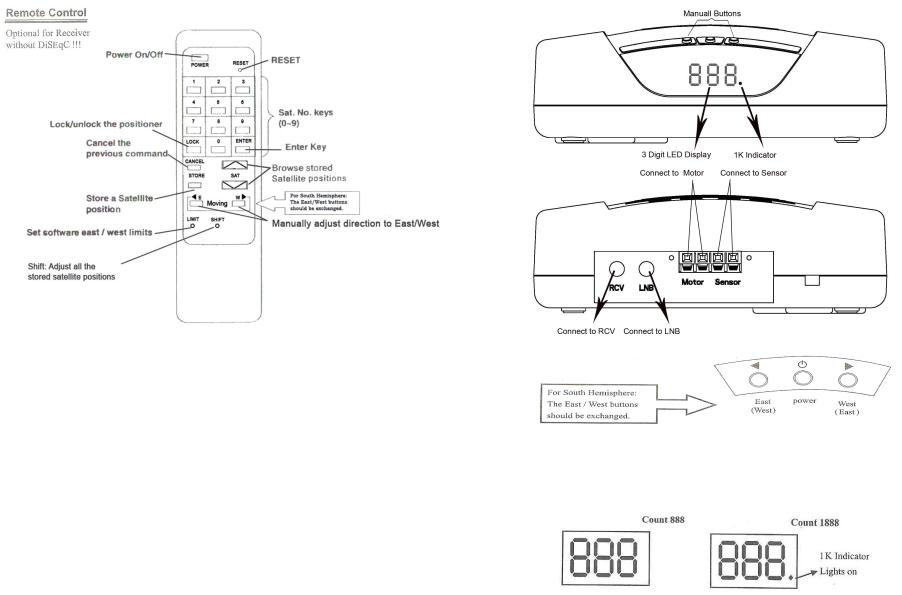
• 3 Digits LED Display
1. The total antenna position index(pulse counts) is 2,000(0~1,999). 2. For index 0~999, the lower right dot (1K Indicator) will not light on.
3. For index 1,000~1,999, the lower right dot (1K Indicator) will light on.
Available for OEM and private label. Contact sales@dmsichina.com. ~ http://www.dmsichina.com

Cable Connection
1.Connect the Motor to the terminals printed MOTOR, and connect the Reed Switch Sensor to the terminals printed SENSOR via Motor Cable.
p.s.: The wrong connection between Motor Sensor might damage the
Reed Switch Sensor on the Actuator.
2.Connect one coaxial cable (RG-6/U is recommended) from the receiver to the rear panel of the positioner printed to Receiver. Connect another coaxial cable from the positioner to the LNB.
3.Plug the AC Power Cord into the AC outlet. 1 dots of the LED display will light on. Now is the stand-by mode. The power of the Positioner will be turned on/off automatically while the LNB power of receiver is turned on/off.
For any Receiver optional Remote Control is necessary
• Set the Software High / Low Limits:
Setting the software High / Low Limits are recommended for better protection even if there are Hardware Limit Switches on the actuator or H-H mount. However, the Positioner can be operated without setting the software High/Low Limits.
1. Drive the Actuator by pressing East / West button to the intended lowest / highest position. P.s. For North Hemisphere, the Low limit means East Limit, For South Hemisphere. the Low Limit means West Limit.
2. Prod Limit button on the remote control. The Display will show LL.
3. Press East or West button within 5 seconds. The Display will show LL, or HL. Press Enter button within 3 seconds.
Available for OEM and private label. Contact sales@dmsichina.com. ~ http://www.dmsichina.com
 Loading...