

Page 1

INSTALLATION GUIDE
SCS-1R
SECURITY CONTROL RECEIVER
DMP Receiver Help Line
Technical Service
1-888-436-7832
International
1-417-831-9362
After hours receiver emergencies
1-417-831-2866
Page 2

Security Control Receiver
Model SCS-1R
Installation Guide
© 2011 Digital Monitoring Products, Inc.
Information furnished by DMP is believed to be accurate and reliable.
This information is subject to change without notice.
Page 3

TABLE OF CONTENTS
Operator’s Quick Reference
Acknowledging an Alarm Signal .............................................. 1
LED Indicators ...................................................................... 1
System Overview
Description ........................................................................... 2
Function ............................................................................... 2
32-Character LCD Membrane Keypad ...................................... 2
Printer .................................................................................. 2
Additional Messages .............................................................. 2
24-Hour Recall Tests .............................................................. 2
Line Capacity ........................................................................ 2
Number of Standard/Encrypted Line Security Network Accs ...... 2
Opening and Closing Signals .................................................. 2
System Block Diagram ........................................................... 3
Installation Checklist
SCS-1R Faceplate .................................................................. 4
Earth Ground ........................................................................ 4
Location of Circuit Boards ...................................................... 4
SCS-208 Power Cord .............................................................. 4
Phone Lines .......................................................................... 4
Network Connection .............................................................. 4
AC Power .............................................................................. 4
Optional Printer ..................................................................... 4
Start up ................................................................................ 4
Conguration ........................................................................ 4
Model SCS-1R Security Control Receiver
Description ........................................................................... 5
SCS-1R Components Included ................................................ 5
Model SCS-RACK System Enclosure
Description ........................................................................... 6
Modem Rack ......................................................................... 6
Multibus Rack........................................................................ 6
32-Character LCD Membrane Keypad ...................................... 6
Installing the SCS-RACK ......................................................... 6
Rack Mounting ...................................................................... 6
Model SCS-150 Receiver Processor Board
Description ........................................................................... 7
Compatibility ......................................................................... 7
Line Card Slots ...................................................................... 7
Communication Output Ports .................................................. 7
SCS-150 LEDs ....................................................................... 7
Reset Button ......................................................................... 7
Installing the SCS-150 ........................................................... 7
Dip Switch Settings (S2) ........................................................ 7
Reset Programming To Factory Defaults .............................. 8
Clearing Receiver Events ................................................... 8
Software Update Using the SD Card ....................................... 8
Model SCS-100 Line Card
Description ........................................................................... 9
Transmit Level ....................................................................... 9
Echo Cancel Off .................................................................... 9
Installing the SCS-100 ........................................................... 9
Connecting the Phone Line .................................................... 9
Phone Line Monitor................................................................ 9
Power Monitor LED ................................................................ 9
SCS-100 LEDs ....................................................................... 9
SCS-1R Installation Guide Digital Monitoring Products
i
Page 4

TABLE OF CONTENTS
Model SCS-101 Network Interface Card
Model SCS-104 Line Card
Model SCS-110 Modem Power Supply Card
Model SCS-120 Multibus Power Supply Card
Model SCS-130 Transformer Card
Model SCS-208 Power Cable
Model SCS-203 Convenience Panel
Model SCS-204 Host Cable
SCS-1R Printer Cable
Security Control Terms
Using the LCD Membrane Keypad
Description ..........................................................................10
Installing the SCS-101 ..........................................................10
Connecting the Network........................................................10
LED Indicators .....................................................................10
SCS-101 Data Jumper Settings ..............................................10
RXD and TXD ....................................................................10
FORCE CTS .......................................................................10
Description ..........................................................................11
Installing the SCS-104 ..........................................................11
Connecting the Phone Lines .................................................11
Connecting the Network........................................................11
Phone Line Monitor...............................................................11
Power Monitor LED ...............................................................11
SCS-104 LED Indicators ........................................................11
Description ..........................................................................12
Installing the SCS-110 ..........................................................12
Power Monitor LEDs .............................................................12
LCD Membrane Keypad Trouble LED ......................................12
UPS Trouble LED ..................................................................12
AC Trouble LED ....................................................................12
Description ..........................................................................13
Installing the SCS-120 ..........................................................13
Processor Monitor .................................................................13
Power Monitor LEDs .............................................................13
Description ..........................................................................14
Installation...........................................................................14
AC Power Connection ...........................................................14
Three Amp Fuse ...................................................................14
Description ..........................................................................15
Installation...........................................................................15
Description ..........................................................................15
Installation...........................................................................15
Description ..........................................................................15
Installation...........................................................................15
Host Cable ...........................................................................15
Printer Cable Pinout ..............................................................16
Special Keys .........................................................................17
COMMAND Key .................................................................17
Back Arrow Key .................................................................17
Select Keys .......................................................................17
Keypad Prompts Display Current Programming .......................17
Entering Alpha Characters .....................................................17
Digital Monitoring Products SCS-1R Installation Guide
ii
Page 5

TABLE OF CONTENTS
LCD Membrane Keypad Conguration
User Options ........................................................................18
Keypad Options and Diagnostics ............................................18
Keypad Options .................................................................19
Accessing Keypad Diagnostics ............................................19
Exiting the Installer Options ...............................................19
Status Displays
Receiver Startup Display .......................................................20
Time Display ........................................................................20
Off-Normal Status .................................................................20
System Status ......................................................................20
SCS-150 Programming
SCS-150 Membrane Keypad Programming
Programming Menu ..............................................................21
Service Code (XR500 Series panels) .......................................21
Receiver Options ..................................................................21
Line Cards ...........................................................................23
Dialer Lines Setup ................................................................23
Network Line Setup ..............................................................24
Exiting Network Line Setup ................................................25
Host Automation ..................................................................25
Serial Ports ..........................................................................26
Set System Time/Date ..........................................................26
Exit Programming Menu ........................................................27
Browser Programming
Receiver Options ..................................................................27
Print Operation .....................................................................29
Receiver Line Cards ..............................................................30
SCS-104 Dialer Settings ........................................................30
SCS-104 Network Settings.....................................................31
SCS-104 Check-in Table Settings ............................................32
Host Automation ..................................................................32
Receiver Diagnostics .............................................................33
Remote Link Programming ..........................................33
Printout Explanations
General Description ..............................................................34
System Messages .................................................................34
Panel Messages ....................................................................34
Alarm, Trouble, and Restore ..................................................34
Ambush ...............................................................................34
Opening and Closing .............................................................34
Bypass and Reset .................................................................34
Schedule Changes ................................................................34
Door Access .........................................................................35
Acknowledgment of Fire Alarms and Troubles .........................35
Message Destinations ...........................................................35
Printer Troubleshooting
Activity Log ERROR ...........................................................35
Power Light Not Lit............................................................35
SEL Light Not Lit ...............................................................35
PAPER Light Lit .................................................................35
Bad Printer Cable ..............................................................35
Notes: ................................................................................36
Components
Accessory Devices
Listings and Approvals
SCS-1R Installation Guide Digital Monitoring Products
iii
Page 6

INTRODUCTION
Operator’s Quick Reference
This section explains basic operation for the operator.
Acknowledging an Alarm Signal
Press the key labeled ACK, or any top row Select key, to acknowledge an alarm.
When the SCS-1R is in normal mode, the alarm message displays in the LCD display.
If you are in programming when an alarm is received and requires acknowledgement, the ACK LED lights and the
keypad begins to beep. If more than one message is received, the Message LED also lights.
You must exit programming before you can acknowledge any alarm signals. All alarms must be acknowledged
before you can enter or return to programming mode.
LED Indicators
The SCS-1R features three LED indicators:
The Green Power LED lights when power is applied to the SCS-1R.
The Red ACK LED lights when an alarm signal is received that must be acknowledged.
The Red Message LED lights when more than one signal has been received that must be acknowledged.
SCS-1R Installation Guide Digital Monitoring Products
1
Page 7

INTRODUCTION
System Overview
Description
The SCS-1R Security Control Receiver system from DMP is a full featured digital dialer and data network capable
alarm receiver. The receiver provides a 32-character LCD display for viewing incoming messages and a built-in
membrane keypad for acknowledging messages and conguring the SCS-1R system.
Function
The SCS-1R Receiver system provides central stations with computerized monitoring of DMP panels. Features of
the SCS-1R include automatic alarm, trouble, and supervisory account message logging on a local printer including
the date and time of their occurrence. The SCS-1R also provides an output to most security automation software
packages.
32-Character LCD Membrane Keypad
The built-in LCD display and Membrane Keypad add exibility to the SCS-1R system by allowing the operator to
view alarm messages before acknowledging them from the built-in Membrane Keypad. A typical alarm message
includes the account number, zone name, and alarm type with the time and date of the occurrence. Alarm
messages display on the LCD and print to the local printer.
Printer
Routine messages print without the need of operator response while non-routine messages print and display on
the LCD for operator acknowledgment.
Note: UL central station applications must use a serial printer that is listed for Fire Protective Signaling Systems.
Additional Messages
Other messages transmitted to the SCS-1R by DMP panels include:
• Zone bypasses and resets by name and number including the name of the person making the change
• Schedule changes including the name of the person making the change
• Trouble and Restoral message by zone name and number
• Door access reports including the user name and the number of the door being accessed
The Printout Explanation section of this guide provides a description of the SCS-1R alarm and activity messages
that print and display.
24-Hour Recall Tests
The automatic recall test from a digital dialer account must be tracked manually or with a listed automation
system. The SCS-1R Receiver does not automatically indicate a delinquent recall test. Failure to receive a signal
from a Digital Alarm Communicator Panel (DACT) over a 24-hour period is handled by the automation system.
Line Capacity
The SCS-1R Receiver accommodates up to eight line cards. The account range for Digital Dialer panels is 1 to
65,535.
To select the communication type used on each incoming line, refer to Line Card Programming section of this
guide.
Number of Standard or Encrypted Line Security Network Accounts
The maximum number of accounts with standard or encrypted line security and substitution using 6 minute
checkin that can be received by a single SCS-101 or SCS-104 Line Card is 3200.
Opening and Closing Signals
The total capacity of opening or closing signals per SCS-1R Receiver, limited by automation system using 19200
baud and acknowledgement speed of 100 milliseconds, is 300 per minute.
Compliance Instructions
For applications that must conform to a local authorities installation standard or a National Recognized Testing
Laboratory certicated system, please see the the Listed Compliance Specications section near the end of this
guide for additional instructions.
Digital Monitoring Products SCS-1R Installation Guide
2
Page 8

System Block Diagram
120 VAC Input
J1
UPS Brownout Input
INTRODUCTION
Cooling
Fan
Model SCS-208
Power Cable
Model SCS-120
Multibus Power
Supply Card
Multibus Backplane
Model SCS-150
Receiver Processor
Board
J15
Keypad
Port
A3
Port
A2
Model SCS-130
Transformer Card
Port
Ethernet
A1
J3
J3
J2
J6 Port
J7 Port
Modem Rack
Backplane
10-Conductor
Card 1
1
Card 2
2
Card 3
3
Card 4
4
Line Card
Connector
Card 5
5
6
Card 6
7
Card 7
8
Line Card
Card 8
Connector
Flat Cable
Model SCS-100 Line Card,
Model SCS-104 Line Card, or
Model SCS-100 Line Card,
Model SCS-104 Line Card, or
Model SCS-100 Line Card,
Model SCS-104 Line Card, or
Model SCS-100 Line Card,
Model SCS-104 Line Card, or
Model SCS-100 Line Card,
Model SCS-104 Line Card, or
Model SCS-104 Line Card
Model SCS-104 Line Card
Model SCS-104 Line Card
Model SCS-110
Modem Rack
Supply Card
RJ11X Cable or
Ethernet Cable
Model SCS-101 Network
Interface Card
Model SCS-101 Network
Interface Card
Model SCS-101 Network
Interface Card
Model SCS-101 Network
Interface Card
Model SCS-101 Network
Interface Card
Cable A3
Cable A2
Cable A1
Network Connection
Model SCS-203
Convenience Panel
3-connector
Ribbon Cable
Model SCS-204
Host Cable
Listed Printer or
Automation
Computer
Remote Link
for
Listed Capture
Software
Programming
SCS-1R Installation Guide Digital Monitoring Products
Membrane
Keypad and
32-Character LCD
3
Page 9

INTRODUCTION
Installation Checklist
Refer to the Hardware Description section of this guide for installation, setup, and operating information.
SCS-1R Faceplate
To lower the SCS-1R faceplate, turn the two screws located in the top corners of the SCS-1R. The front of the
SCS-1R opens on a hinge to allow access to the inside of the SCS-1R. Close the SCS-1R system by raising the front
of the SCS-1R and securing the two screws in the top corners.
Earth Ground
Connect the ground lug on the modem rack rear side to earth ground. Using a minimum of 14 gauge wire, ground
to a cold water pipe, building ground, or a ground rod. Do not ground to electrical conduit or telephone company
ground.
Location of Circuit Boards
Conrm the circuit boards in the modem rack and in the multibus rack are installed properly and are in their
proper locations. The circuit boards are properly installed when completely seated into the connector on the
rack backplane.
SCS-208 Power Cord
Connect the SCS-208 Power Cord from the SCS-120 Multibus Power Supply card to the SCS-130 Transformer Card.
Phone Lines
Connect the RJ11X cables provided with each line card to the phone lines used for receiving alarms.
Network Connection
When using a network connection, connect the SCS-101 or SCS-104 network cable to the data network. Refer to
the Hardware Description and Appendix for network installation instructions.
AC Power
AC power input of the receiver is 120 VAC, 60Hz and at least 3.5 Amps outlet not controlled by a switch . Do
not apply AC power yet. For listed operation, use a listed uninterrupted power supply (UPS). The UPS system
must have a secondary power source (batteries) and provide alarm contacts to indicate when the UPS switches
from primary power to secondary power. The SCS-1R Receiver requires a UPS that delivers at least 400 VA power
operating at 60Hz.
Optional Printer
Connect the RS-232 printer cable. Install paper, connect the printer to AC power, and turn on the printer power
switch.
Note: UL central station applications must use a serial printer that is listed for Fire Protective Signaling
Systems.
Start up
Apply 120 VAC to the AC power cord. The 120 volts supplied to the SCS-1R Receiver and the printer must be from
the same UPS circuit.
Conguration
After powering up the system, set the correct time, congure the phone lines and network communications.
Note: Be sure that the Membrane Keypad is set to Address 01 (one). Refer to LCD Membrane Keypad Conguration
for complete information.
Digital Monitoring Products SCS-1R Installation Guide
4
Page 10

INSTALLATION
Model SCS-1R Security Control Receiver
Description
The DMP SCS-1R Receiver ships from the factory with all of the necessary system components to provide four
Digital Dialer lines and one line of Data Network receiving capability. This package can be expanded to include a
maximum of 32 digital dialer communication lines.
SCS-1R Components Included
The SCS-1R includes the following:
• SCS-RACK with Modem and Multibus Racks, fan, and 32-Character LCD with Membrane Keypad
• SCS-150 Receiver Processor Board
• SCS-104 Line Card
• SCS-110 Modem Supply Card
• SCS-120 Multibus Power Supply Card
• SCS-130 Transformer Card
• SCS-203 Convenience Panel
• SCS-208 Power Cord
SCS-1R Installation Guide Digital Monitoring Products
5
Page 11
INSTALLATION
Model SCS-RACK System Enclosure
Description
The SCS-RACK houses the receiver processor, power supply, line cards, and associated cables. The enclosure
measures 8.75” high, 19” wide, and 12” deep.
Modem Rack
The SCS-RACK top portion holds the modem rack, which connects the SCS-110 Modem Power Supply Card and up
to eight line cards. The SCS-130 Transformer Card for connecting the 120 VAC mounts on the rear of the modem
rack.
Multibus Rack
The bottom portion of the SCS-RACK holds the Multibus Rack, which holds the SCS-150 Receiver Processor Board
and the SCS-120 Multibus Power Supply Card.
32-Character LCD Membrane Keypad
Mounted on the front faceplate of the SCS-RACK is a 32-character LCD Membrane Keypad. The LCD and keypad
come pre-mounted and pre-wired with the power cable and ribbon cable.
Installing the SCS-RACK
Connect the SCS-RACK to earth ground before making any module connections. Use a minimum 14 gauge wire
for grounding. A crimp type spade connector is provided for connecting the ground wire to the ground lug on the
modem rack.
Rack Mounting
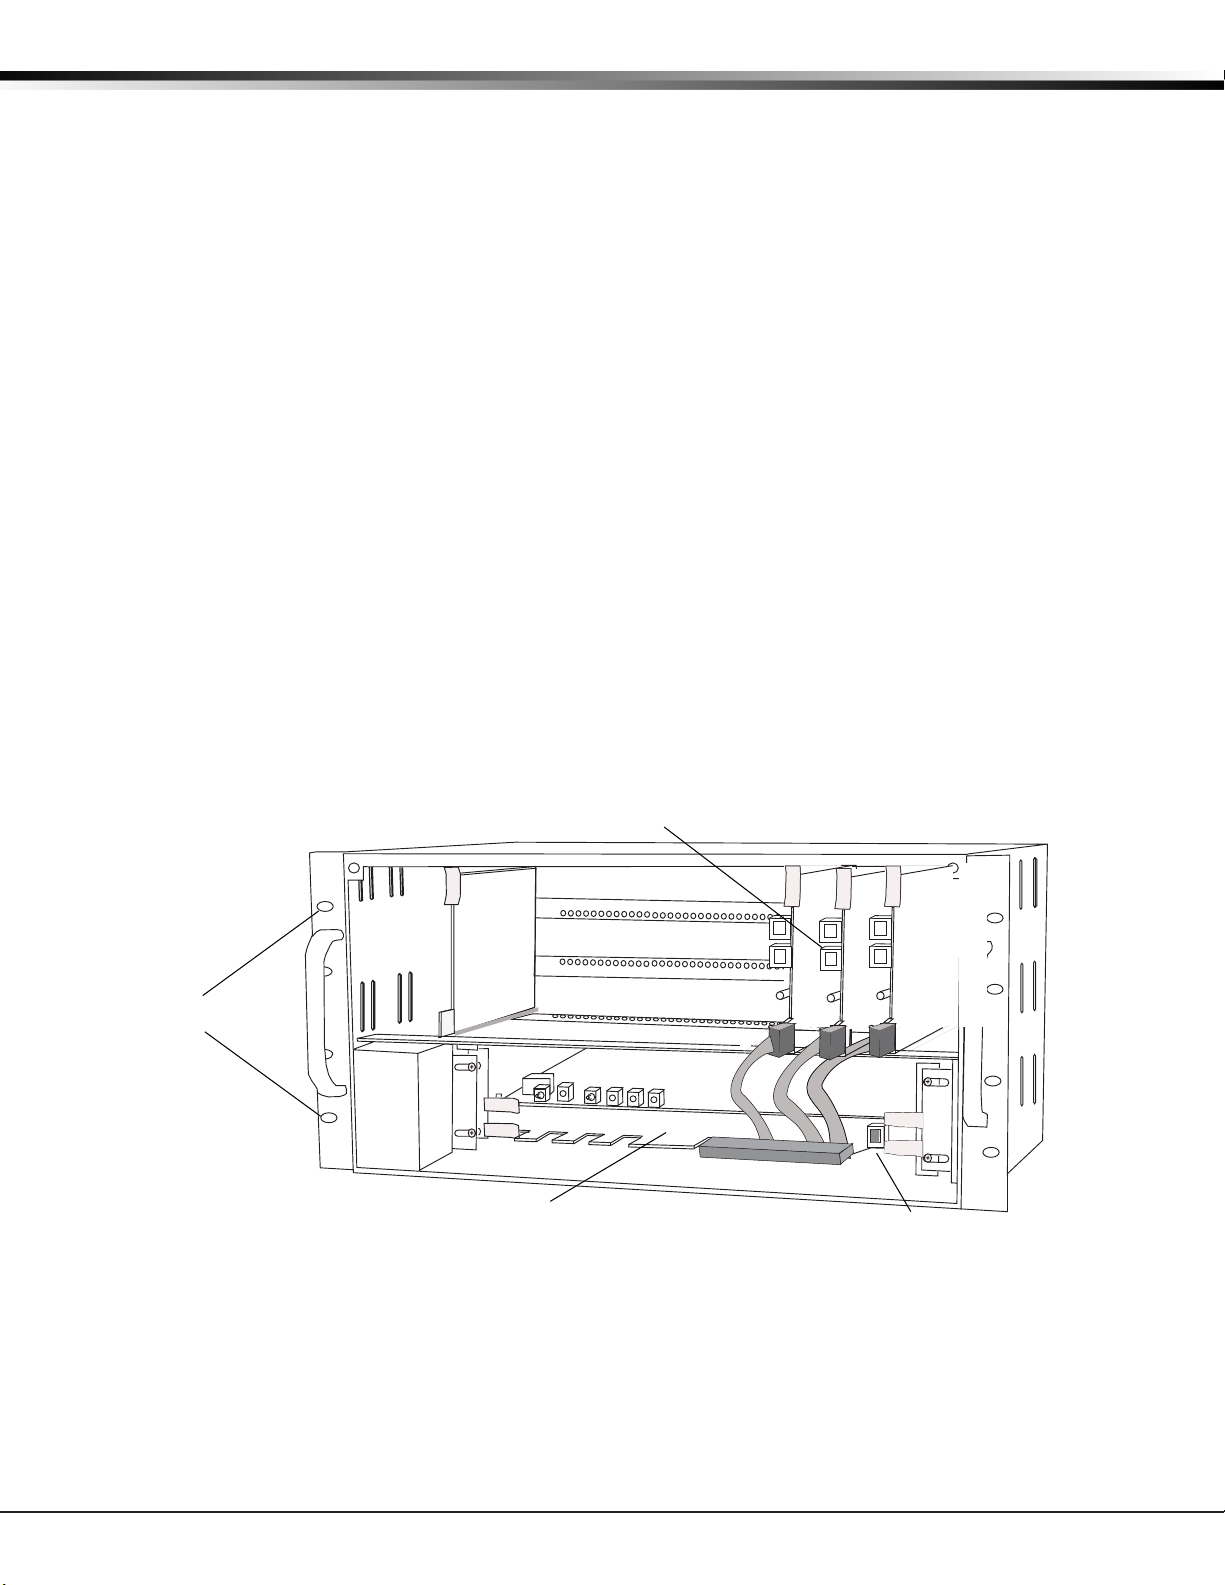
The SCS-1R must be mounted in a standard 19” rack for listed Fire Signaling applications. Simply slide the entire
unit into the 19” rack and secure with screws. Refer to the drawing below for rack-mounting hole locations.
SCS-104 Line Cards
Rack-Mounting
holes
Line Card Connector
SCS-150 Receiver
Processor Card
SCS-150 Network
Connection
Digital Monitoring Products SCS-1R Installation Guide
6
Page 12

INSTALLATION
Model SCS-150 Receiver Processor Board
Description
The SCS-150 is the main system processor for the SCS-1R Security Control Receiver and controls the line cards, the
LCD display, the printer (if used), and data output to a host automation system. The SCS-150 contains the software
for system operation, the line conguration, and all time keeping functions. Programming can be done from the
front panel of the SCS-1R Receiver or using an internet browser communicating to an SCS-150 Version 103 or higher.
Programming can also be done with an SCS-150 Version 100 or 101 via Remote Link version 1.47 or higher.
Compatibility
The SCS-150 is compatible with the SCS-100 Dialer Line Cards, SCS-104 Line Cards, and the SCS-101 Network Line
Card using Level E hardware with Version 200 or higher software
Line Card Slots
The SCS-150 Receiver Processor Board has two Line Card harness connectors.
Port J6 has ve cables to support SCS-100, SCS-101, and SCS-104 cards. Port J7
has three cables to support SCS-104 cards. Note: Lines 6-8 can only be used with
SCS-104 Line Cards using SCS-150 Version 101 or higher and updated SCS-RACK
hardware. Slide the Line Card Cable Connector onto the J6 or J7 port on the
SCS-150. Connect the line card cables to the existing line cards.
Communication Output Ports
The SCS-150 receiver has three ports to use for peripheral communication. The A1
port is used for printing to the Activity Log, the A2 port is for programming using
Remote Link, and the A3 port is used as a host automation output port.
SCS-150 LEDs
1) Far Left LED: Flashes constantly. This is the heartbeat LED.
2) Center Left LED: On when saving data, such as programming changes.
3) Not used.
4) Far Right LED: On if memory resources are ever too low, such as thousands of
messages pending at the LCD display or the printer.
Reset Button
The reset button resets the SCS-150 receiver but does not
clear the stored events.
Installing the SCS-150
Always remove power to the SCS-1R Receiver when
installing or removing any components.
1)
Check that the S2 dip switch settings on the SCS-150
are set to OFF for Normal Operation.
2) Slide the center connector of the keypad cable onto
the keypad PCB. Connect the end labeled “J15” to the
SCS-150 Keypad J15 header. Connect the other end to the
SCS-110 Modem Power Supply with Brown stripe to the top.
3)
Slide the SCS-150 into the SCS-RACK lowest position,
component side up. Press into place.
4)
Install the SCS-203 cables labeled “A1” to port A1, “A2” to
port A2, and “A3” to port A3 (Brown stripe to the right).
5)
Slide the 5-Line Card Cable Connector onto the J6 port (Brown stripe to the right) and the 3-Line Card Cable
Connector onto the J7 port on the SCS-150 (Brown stripe to the right).
existing line cards making sure that the brown wire always faces up and the cable labled 1 or 6 is to the right.
6)
Connect an ethernet cable to J3 Network Connection on the SCS-150 if using a browser for programming or sending
messages through the network connection to the host automation computer.
Note: Network Connection must be terminated to a network switch within the same room.
7) Once all connections are completed, power up the SCS-1R.
Dip Switch Settings (S2)
Dip switches 1-4, designated as S2 on the SCS-150 board, have the following settings and usage:
Settings: 0 is OFF, 1 is ON
1 2 3 4 Function Description
0 0 0 0 Normal Operation Used during normal receiver operation
1 0 1 0 Default Programming Set the receiver programming stored in EEPROM to factory defaults
1 1 0 1 Update Software Used for software updates with the SD card
1 1 1 1 Clear Events Clear all pending LCD display, printer, and host output events
.
To
Keypad
LCD
LCD Cable Detail
Connect to
SCS-110 with
light brown stripe
to the top
Black
Stripe
Connect to Keypad PCB
with light brown
stripes to the right
5
5
Dip Switches
S2
J6
3
4
Line Card
Connector
4
SCS-150
Keypad
J15
A3 A2
A2 A1
A3
Model SCS-203
Convenience
Panel
A1
J7
8
7
Line Card
Connector
78
6
6
Connect the line card cables to the
ON
1 234
23
to the SCS-150
J15 header
Light Brown
Network
Connection
J3
12
Ethernet
Cable
1
Stripe
(Pin 1)
Connect
LEDs
1 234
S1
Reset
SCS-1R Installation Guide Digital Monitoring Products
7
Page 13

INSTALLATION
Before changing the the dip switch settings on the SCS-150 board, rst power down the SCS-1R receiver and
remove the processor board. After setting the dip switches, plug the SCS-150 board back into the receiver
and power up.
Reset Programming To Factory Defaults
Return the receiver programming in EEPROM to factory defaults using the procedure below.
• Power down the SCS-1R and remove the SCS-150 board.
• Set the dip switches to 1010.
• Replace the SCS-150 board and power up.
• Wait until after the VERSION/DATE/CODE screen is displayed.
• Reset the dip switches to 0000 and replace the SCS-150 board.
Clearing Receiver Events
The SCS-150 stores up to 5000 events in battery-backed RAM.
Clear the receiver events stored in RAM using the procedure below.
• Set the dip switches to 1111.
• Replace the SCS-150 board and power up.
• Wait until after the VERSION/DATE/CODE screen is displayed.
• Reset the dip switches to 0000 and replace the SCS-150 board.
Software Update Using the SD Card
The SCS-150/UPDATE comes pre-formatted and loaded with the current software update for use with the SD
(Secure Digital) card slot. Refer to the Update the SCS-150 section below. If using an SD Card other than the
SCS-150/UPDATE, follow the instructions as listed.
Before updating, make sure the SD Card is formatted for FAT32.
• Insert the SD Card into the card reader attached to the computer.
• Go to My Computer and right-click on the drive that has the card reader attached.
• Select Properties to display the Removable Disk Properties.
• If the File System displays FAT32, then you are ready to load the software onto the SD Card.
• If the File System does not show FAT32 as the File System, the SD Card needs to be formatted.
To format the SD card:
• Go to My Computer and right-click on the drive that has the card reader attached.
• Select Format to open up the Format Removable Disk window.
• Select FAT32 in the File system drop-down menu and select Start.
• To format the disk, click OK on the pop-up Warning box.
To load the software onto the SD Card:
• Locate the software download on the Dealer Direct website. Click on title to download.
• Select Save in the popup window. Save the zip le to your computer.
• Extract the zip le onto the SD Card. There should be two les extracted on the SD card: SCS150a.bin and
SCS150b.bin. Note: These two les need to be placed on the root directory of the SD card, not inside a folder.
To update the SCS-150:
• Set the S2 dip switches on the SCS-150 to 1101 (ON ON OFF ON).
• Insert a FAT32 formatted SD card with the new software into the SD card slot on the SCS-150 processor board.
• Reconnect the keypad to the J15 header.
• Insert the SCS-150 processor board into the SCS-1R and power up. Observe the display for programming status.
• When nished with the update the SCS-1R display instructs you to remove the SD Card.
• Remove the SD card from the SCS-150 and remove the SCS-150 board.
• Reset the dip switches to 0000 (OFF OFF OFF OFF) and replace the SCS-150 board and cables.
Digital Monitoring Products SCS-1R Installation Guide
8
Page 14

INSTALLATION
Model SCS-100 Line Card
Description
The SCS-100 provides for one incoming line of digital dialer (DD) communication to DMP panels. Each line card
includes one RJ11X cable for phone line connection from a customer supplied RJ11X connection block.
Transmit Level
The Transmit Level is the level of signal strength at which the SCS-100 transmits through the phone line. To
adjust the transmit level, place the 2-pin jumper on the desired level on the J11 Transmit Level header.
The Transmit Level comes from the factory set to -9 dB. -9 dB is the quietest, 0 dB is the loudest.
Echo Cancel Off
Echo Cancellation is technology used by telephone companies to stop echo from interfering with digital telephone
transmissions. In some cases this technology can interfere with alarm signals. If you have problems with Echo
Cancellation interfering with your signals, place the 2-pin jumper on the J12 Echo Cancel Off header to the
YES position to turn off the echo cancellers. If you are not having problems with the telephone company echo
cancellation, leave the jumper on the default setting of NO to leave the echo cancelers on.
Installing the SCS-100
Install the SCS-100 in any one of the SCS-RACK ve right hand positions with the card puller in the up position.
Connect the 10-position at cable from the SCS-150 processor card. The line card number is determined by the
processor card cable it is connected to.
THE LIGHT BROWN (PIN 1) WIRE OF THE FLAT CABLE CONNECTOR MUST FACE UP ON THE LINE CARD.
Silence
-9 -6 -3 0
PWR
TD
RD
CD
OL
RG
DT
RJ11X Phone
Line Input
SCS-100
Echo Cancel Off
NO YES
J12
Phone Line Fail
Transmit Level
J11
Connecting the Phone Line
Install the RJ11X cable provided with the line card between the RJ11X connector on the line card front to a
customer supplied RJ jack. Use a standard 103J voice grade (analog) line. A slot is provided in the receiver back
plate for the RJ11X cable to pass through. Maximum line impedance is 100 Ohms.
The SCS-100 is registered with the FCC, registration number CCK8GW-16197-AL-N; Ringer Equivalence 1.2.
Phone Line Monitor
The SCS-100 monitors the incoming phone line voltage. During a loss of phone line voltage, the red Phone Line
Fail LED lights and the alert sounds. The alert can be silenced by pressing the silence switch on the SCS-100. The
LED remains lit until the phone line is restored.
Power Monitor LED
The green LED labeled PWR lights when the power supply on the line card is working properly.
SCS-100 LEDs
The six yellow LEDs indicate the line card condition during the various stages of communication. A description of
each LED is listed below:
TD Transmit Data On when the line card is transmitting to a panel.
RD Receive Data On when the line card is receiving data from a panel.
CD Carrier Detect On when the carrier tone from the panel is detected on the phone line.
OL On Line On when a digital dialer line card has answered the phone line.
RG Ring Detect On when ringing voltage is detected on phone line.
DT Data Terminal Ready On when the line card is ready for operation.
SCS-1R Installation Guide Digital Monitoring Products
9
Page 15

INSTALLATION
Model SCS-101 Network Interface Card
Description
The SCS-101 Network Interface Card provides for a connection from a digital data network to a port on the SCS-1R
Receiver. Each card includes one eight-pin modular connector for digital data network connection. This allows
the SCS-1R Receiver to accept alarm and system messages over a network from DMP panels. Refer to the SCS-101
Installation Guide (LT-0320).
An optional PC software application, SCS-CTM Check-in Table Manager, is available to backup the SCS-101 records
of all supervised network accounts for up to 32 different SCS-101 line cards. The SCS-CTM program is compatible
with SCS-101 Version 201 or higher. For complete operation information, refer to the SCS-CTM User’s Guide
(LT-0940). Contact DMP Customer Service to purchase a copy of the SCS-CTM Check-in Table Manager software.
SCS-101
Network Interface Card
Red Black
J8
DCO
CLK
TXD RXD
2
3
FORCE
J5
3
2
J3 J4J2
CTS
TXD
RXD
RTS
CTS
DTR
TXC
RXC
Serial Input
8-Pin Modular
Plug
Installing the SCS-101
Install the SCS-101 in any one of the ve right-hand SCS-RACK positions (slots 1-5) with the card puller in the
up position. Connect the 10-position at cable from the SCS-150 processor card. The line card number is
determined by the processor card cable it is connected to.
THE LIGHT BROWN (PIN 1) WIRE OF THE FLAT CABLE CONNECTOR MUST FACE UP ON THE LINE CARD.
Connecting the Network
Connect a UTP network cable to an available 10BaseT port on the network. Maximum line impedance is 100
Ohms. The SCS-101 automatically communicates UDP or TCP with DMP panels, and iCOMSL Network Alarm
Communicators.
LED Indicators
The seven bi-color LEDs indicate the network interface card condition during various stages of communication. A
description of each LED is listed below:
TXD Transmit Data RXD Receive Data
RTS Ready To Send CTS Clear To Send
DTR Data Terminal Ready TXC *Transmit Clock
RXC *Receive Clock
* If the clock signal is present, both red and green segments of the LEDs light.
SCS-101 Data Jumper Settings
The SCS-101 data jumpers are pre-congured for NET at the factory.
RXD and TXD
The factory setting is Transmit Data (TXD) on pin #2 and Receive Data (RXD) on pin #3.
FORCE CTS
The jumpers are set vertically as the factory default. This allows the SCS-101 to tie the CTS and RTS data lines
together.
Digital Monitoring Products SCS-1R Installation Guide
10
Page 16

INSTALLATION
Model SCS-104 Line Card
Description
The SCS-104 provides four digital dialer (DD) lines and a network connection for communication to DMP panels.
Each card includes one shielded eight-pin modular connector (J1) for the digital data network connection. This
allows the SCS-1R Receiver to accept alarm and system messages over a network from DMP panels. Each card
also includes a non-shielded eight-pin modular connector (J3) that supports up to four digital dialer lines, when
connected to a standard RJ61 jack.
An optional PC software application, SCS-CTM Check-in Table Manager, is available to backup the SCS-104 records of
all supervised network accounts for up to 32 different SCS-104 line cards. The SCS-CTM program is compatible with
SCS-104 Version 100 or higher. For complete operation information, refer to the SCS-CTM User’s Guide (LT-0940).
Contact DMP Customer Service to purchase a copy of the SCS-CTM Check-in Table Manager software.
Installing the SCS-104
Install the SCS-104 in any one of the SCS-RACK positions with the card puller in the up position. Connect the
10-position at cable from the SCS-150 processor card. The line card number is determined by the processor card
cable it is connected to.
THE LIGHT BROWN (PIN 1) WIRE OF THE FLAT CABLE CONNECTOR MUST FACE UP ON THE LINE CARD.
SCS-104 Line Card
Phone
J3
Line
Ethernet
J1
Red
J8
Black
Power
DTR
Line 1
Line 2
Line 3
Line 4
Connecting the Phone Lines
Install the phone line cable between the connector on the line card front to the customer supplied RJ61 jacks.
Use a standard 103J voice grade
(analog) line. A slot is provided
in the receiver back plate for the
cables to pass through. Maximum
line impedance is 100 Ohms.
The SCS-104 is registered with
the FCC, registration number
CCKCN03BSCS-104; Ringer
Equivalence 0.3B.
Connecting the Network
Connect an IP network cable between the J1 Ethernet connector on the front
of the line card and the network LAN/WAN connection. Maximum line impedance is 100 Ohms. The SCS-104
automatically communicates UDP or TCP with DMP panels, and iCOMSL Network Alarm Communicators.
Phone Line Monitor
The SCS-104 monitors incoming phone line voltage. During a loss of phone line voltage, the SCS-104 sends a
Warning: Phone Line Trouble message to the host automation or LCD display.
Power Monitor LED
The green LED labeled PWR lights when the power supply on the line card is working properly.
SCS-104 LED Indicators
The SCS-104 provides eight LEDs on the card. The table below describes the LED operation.
LED
Solid Flashing Off
POWER Power On N/A Power Off
DTR Data Terminal Ready N/A Processor is nearly full
LINE 1 Connected Ringing Idle
LINE 2 Connected Ringing Idle
LINE 3 Connected Ringing Idle
LINE 4 Connected Ringing Idle
LINK Indicates a valid Network connection
LINK SPEED Connected at 100 Base-T N/A Connected at 10 Base-T
SCS-1R Installation Guide Digital Monitoring Products
Description
Indicates a valid Network connection
No Connection
11
Page 17
INSTALLATION
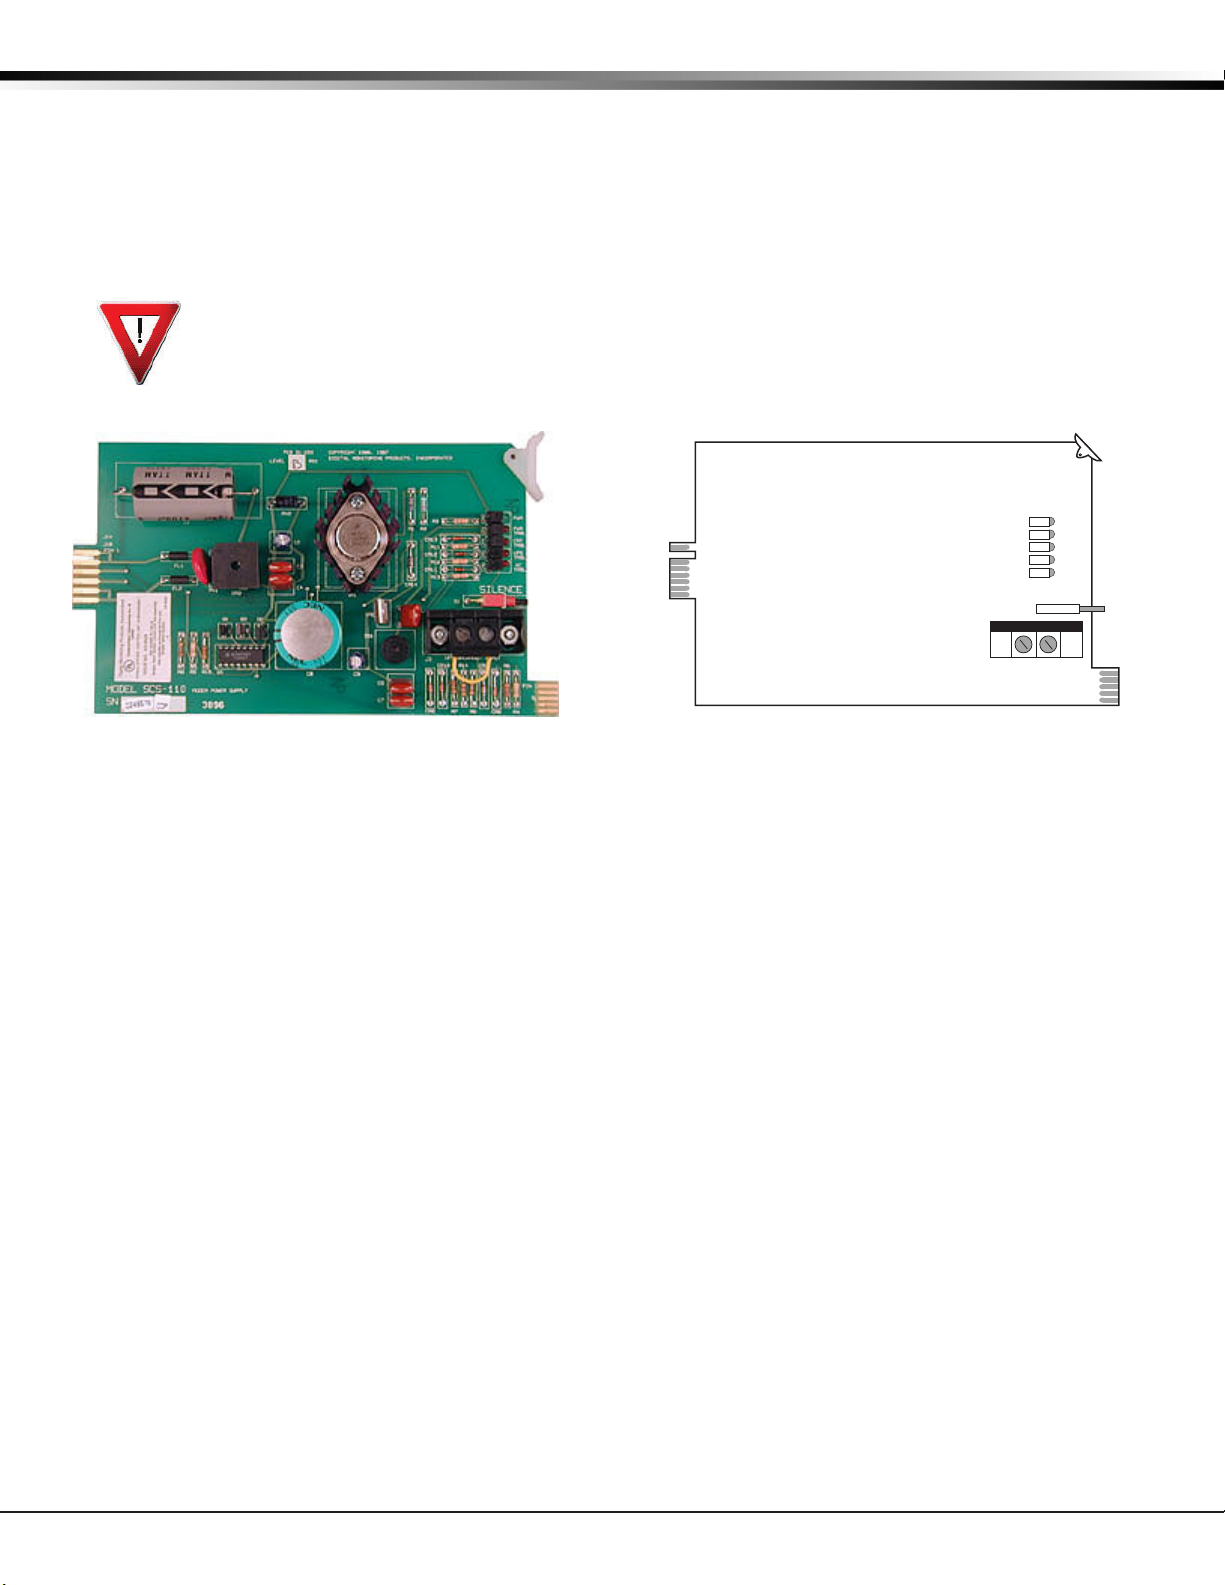
Model SCS-110 Modem Power Supply Card
Description
The SCS-110 provides power to a maximum of eight line cards. Power is supplied through the modem rack
backplane connectors without additional cabling. The SCS-110 also provides LCD and keypad connection, UPS
system status, and the 120 VAC input monitoring information to the SCS-1R Receiver.
Installing the SCS-110
Always remove power to the SCS-1R Receiver when installing or removing the SCS-110.
Slide the SCS-110 into the modem rack far left hand position, with the card puller up as shown below.
Plug the at cable from the membrane keypad PCB onto the card edge connector at the bottom of the
SCS-110. The light brown (pin 1) wire of the at cable connector must face up on the power supply
card.
Power Monitor LEDs
The green LED labeled PWR lights when the power supply to the SCS-110 is working properly. The red LED labeled
PWR TRBL is controlled by the SCS-120 Multibus Power Supply Card and lights when there is a power problem on
the SCS-110. The red LED remains lit until the power problem is corrected. The alert tone on the SCS-110 Modem
Power Supply Card sounds during a power problem and is silenced by pressing the silence switch on the SCS-110.
LCD Membrane Keypad Trouble LED
The LCD Membrane Keypad trouble LED lights and the alert tone sounds when the LCD Membrane Keypad fails to
operate or the cable is unplugged. The alert tone is silenced by pressing the silence button on the SCS-110.
UPS Trouble LED
The UPS (Uninterrupted Power Supply) trouble LED lights and the alert tone sounds when the UPS Brownout Input
is opened. Connect this circuit to the brownout contacts on your UPS system (Refer to SCS-130 information). No
End-of-Line resistor is needed. Silence the alert tone by pressing the silence button on the SCS-110.
AC Trouble LED
The AC trouble LED lights and the alert tone sounds when AC power to the SCS-130 Transformer Card fails. Silence
the alert tone by pressing the silence button on the SCS-110.
Digital Monitoring Products SCS-1R Installation Guide
12
Page 18

INSTALLATION
Model SCS-120 Multibus Power Supply Card
Description
The SCS-120 provides power to the SCS-150 through the multibus backplane. The SCS-120 also monitors the
SCS-150 condition, the SCS-110 Modem Power Supply Card voltage output, and its own internal voltages.
Installing the SCS-120
Always disconnect power to the SCS-1R Receiver when installing or removing the SCS-120. Slide the
SCS-120 Multibus Power Supply Card, the component side up, into the multibus rack upper position,
which is the lower rack in the SCS-RACK.
Connect the SCS-208 Power Cable to J3 on the card front right side. Connect the other end of the
power cable to the SCS-130 Transformer Card on the back of the modem rack. The power cable can be
used in either direction.
Processor Monitor
The SCS-120 monitors the Model SCS-150 processor through the multibus backplane. The green OK LED lights
when the processor operates. If the processor stops operating, the red FAIL LED lights and the SCS-120 failure
buzzer sounds.
Press the processor restart button to restart the system, silence the buzzer, and turn off the red LED. The restart
button restarts the system.
Power Monitor LEDs
The SCS-120 monitors three different system voltages, +5, +12, -12 and the modem power supply. Four LEDs
located to the right of the power alert silence switch display any voltage failures. A green OK LED lights when the
voltages are working properly. The green PWR LED for the modem power supply is located on the SCS-110 Modem
Power Supply Card. The red TRBL LED lights and the trouble alert tone on the SCS-120 sounds when there is a
problem with a voltage level.
Press the SCS-120 power alert silence switch to silence the alert tone. The red TRBL LED remains lit until the
power problem is corrected. The modem power LED, the SCS-120 trouble alert tone, and the SCS-110 Modem
Power Supply Card power alert LED all operate together.
SCS-1R Installation Guide Digital Monitoring Products
13
Page 19

INSTALLATION
Model SCS-130 Transformer Card
Description
The SCS-130 provides power to the SCS-110 Modem Power Supply Card and the SCS-120 Multibus Power Supply
Card. Two terminals are provided for connecting 120 VAC to the system. A power cord is provided for connecting
the multibus rack cooling fan.
Installation
Always remove power to the SCS-1R Receiver when installing or removing the SCS-130.
J3
3 Amp 250V
COM
HOT
AC Power Cord
J2
To fan
1. Install the SCS-130 with J2 on the right side on the rear of the modem rack and J3 on the bottom
as shown above. Four 6-32 screws with lock washers are provided.
2. Connect the SCS-208 Power Cable to J3 on the bottom left of the SCS-130 Transformer Card.
Connect the other end of the power cable to the SCS-120 Multibus Power Supply. The power cable
can be used in either direction.
3. Connect the cable from the right end of the modem rack labeled J2 to J2 on the right side of the
SCS-130 Transformer Card.
4. Connect the 2-conductor cables labeled TO FAN to the multibus cooling fan on the lower right side
of multibus rack.
AC Power Connection
Connect 120 VAC to the SCS-1R Receiver through the SCS-130 Transformer Card. The SCS-1R Receiver backplate
provides a 7/8” conduit knockout.
1. Install the supplied strain relief onto the AC power cord approximately 12 inches from the AC wires.
2. Feed the end of the AC power cord through the backplate knockout until the strain relief snaps into place.
3. Connect the White AC power cord wire to the COM terminal on the bottom of the SCS-130.
4. Connect the Black AC power cord wire to the HOT terminal on the bottom of the SCS-130.
5. Connect the Green AC power cord ground wire to the grounding lug located on the right side of the
enclosure.
The AC power must be provided by a listed UPS. A signal shall be provided at the operators console when the UPS
power source switches from primary power to secondary power.
DO NOT APPLY POWER TO THE RECEIVER UNTIL THE REAR COVER IS REPLACED ON THE RECEIVER CABINET.
Three Amp Fuse
The 120 VAC connection to the SCS-1R Receiver is current limited with a DMP Model 319, 3 Amp 250 volt fuse. The
3 Amp fuse is a Type AGC 1/4” x 1 1/4” fast blow.
Digital Monitoring Products SCS-1R Installation Guide
14
Page 20

INSTALLATION
PIN
Model SCS-208 Power Cable
Description
The SCS-208 is a 2-foot cable that connects the different system voltages between the SCS-130 Transformer Card
J3 and SCS-120 Multibus Power Supply Card J3.
Installation
The SCS-208 cable can be used in either direction, but is polarized on each end for proper installation to the J3
connectors.
Model SCS-203 Convenience Panel
Description
The SCS-203 provides cabling for three RS-232 ports for the host output, auxiliary port (used for Remote Link
programming), and an activity log printer.
Installation
1) Install the metal plate with the three 25-pin RS-232 connectors on the SCS-1R Receiver backplate using the two
6-32 x 1/4” screws provided.
2) Install the three 10-pin at cable connectors to the SCS-150 Receiver ports A1, A2, and A3.
a) Connect the ribbon cable marked A1(Activity Log) to port A1.
b) Connect the ribbon cable marked A2(Aux) to port A2.
c) Connect the ribbon cable marked A3 (Host Output) to port A3.
3) Connect the printer using a DMP Model 389 Printer Cable and host computer using a DMP model SCS-204 Host
Cable (see below) to the appropriate RS-232 connectors.
Model SCS-204 Host Cable
Description
The SCS-204 is a 10-foot RS-232 cable that connects a host computer to the SCS-1R Receiver.
Installation
Connect the SCS-204 cable from a host computer to the SCS-203 Convenience Panel center connector marked
“HOST OUTPUT”.
THE END OF THE CABLE MARKED “HOST” MUST BE INSTALLED ONTO THE HOST COMPUTER.
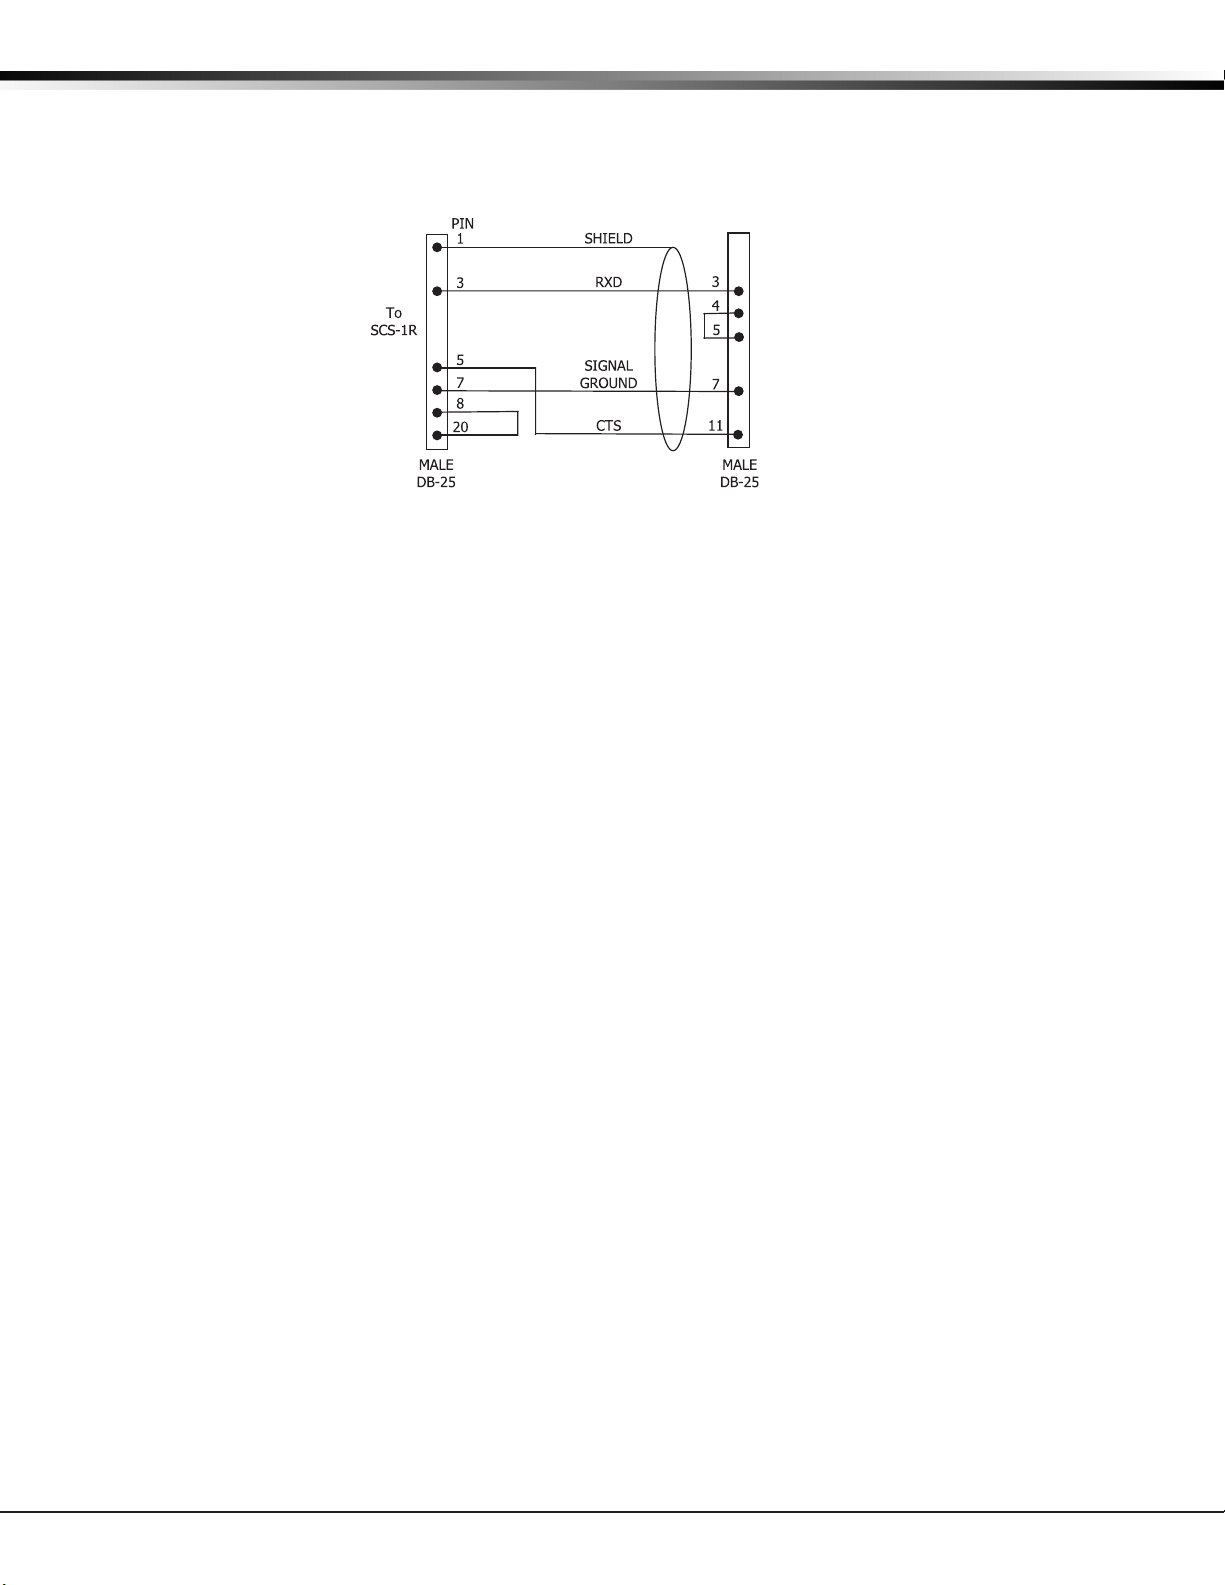
Host Cable
If you are using a cable different from the SCS-204, be sure the cable pin out matches the drawing below.
SHIELD
DB-25
(DB-9)
2 (3)
3 (2)
Connect to
HOST
COMPUTER
(DTE)
7 (5)
MALE
DB-25
1
2 RXD
3 TXD
4
5
7
8
SIGNAL GROUND
SCS-1R Installation Guide Digital Monitoring Products
15
Page 21
INSTALLATION
SCS-1R Printer Cable
Printer Cable Pinout
Note: UL central station applications must use a serial printer that is listed for Fire Protective Signaling Systems.
To Okidata
Printer
Security Control Terms
This is an alphabetical list of terms used in the SCS-1R Receiver system operating instructions. Refer to these
explanations for additional information.
ACK - Acknowledge an alarm signal by pressing any top row Select key on the Membrane Keypad.
Alphanumeric - A set of characters consisting of either the letters A through Z, the digits 0 through 9, special
symbols, or a combination of all of these. For example, the set of characters “AB76#2,” is alphanumeric.
Character - One of a set of symbols that can be arranged in groups to express information. This includes the
digits 0 through 9, the letters A through Z, punctuation marks, and other special symbols.
COMMAND - The key on the Membrane Keypad used to scroll through programming and enter programming
information.
LCD Membrane Keypad - A 32-character Liquid Character Display that displays information and provides a
Membrane Keypad that allows you to enter information.
Default Value - A value assigned to a prompt by the SCS-1R. The SCS-1R Receiver assigns the value to that prompt
allowing the operator to accept its entry and respond to the next prompt.
Entry - Information typed into the SCS-1R through the LCD Membrane Keypad mounted in the front of the
SCS-1R. This information is entered into the system when the COMMAND key is pressed.
Prompt- A single item of information on the LCD. For example, a prompt within the System Conguration program
would be the company name.
Menu - An LCD display that lists the program selections available to the operator.
Numeric - Description of numerical information. For example, the set of characters 1 2 3 4 5 is numeric.
User Number - The sequential number assigned to each user code number by the panel during its programming.
This is the number transmitted to the SCS-1R Receiver. The actual code number is never transmitted.
Digital Monitoring Products SCS-1R Installation Guide
16
Page 22

OPERATOR’S GUIDE
Using the LCD Membrane Keypad
Special Keys
COMMAND Key
The COMMAND key allows you to go forward through the conguration menu and each conguration step (or
prompt). As you go through programming, the keypad display shows any current programming already stored in
the panel memory. If the information does not need to be changed, press the COMMAND key to advance to the
next step. After changing programming, press the COMMAND key to advance to the next option.
Back Arrow Key
Use the Back Arrow key to back up one step during programming. The Back Arrow key is also used when an error
is made while entering in formation. Press the Back Arrow key once to erase the last character entered.
Select Keys
The top row of keys are called the Select keys. Each time a top row Select key is to be used, the keypad displays
the function or options above the key. Displaying choices above the individual top row Select keys allows them to
be used for many different applications. For example, you can enter AM or PM when programming time or answer
YES or NO for a NET Option.
During programming, the top row Select keys also allow you to change infor mation currently in the panel memory.
Press the appropriate Select key under the display then enter the new information through the keypad.
The Select keys are also used for choosing a pro gramming menu. Press any one of the top row Select keys when
the name of the programming section you want displays.
When the SCS-1R system is in normal mode, the Select keys are used to acknowledge alarm messages. Press the
Select key labeled ACK, or any top row Select key, to acknowledge the alarm message.
Keypad Prompts Display Current Programming
Each prompt displayed at the keypad shows the currently selected option in the panel memory. These options are
either shown as a number, a blank, or NO or YES. To change a number or blank to a new number, press any top
row Select key. An underscore replaces the current option. Press the number(s) on the keypad you want to enter
as the new number for that prompt.
It is not necessary to enter numbers with leading zeros. The SCS-1R automatically right justies the number when
you press the COMMAND key.
To change a programming prompt that requires a NO or YES response, press the top row Select key under the
response not selected.
For example, if the current prompt is selected as YES and you want to change it to NO, press the third top row
Select key. The display changes to NO. Press the COMMAND key display the next prompt.
Entering Alpha Characters
You can use the keypad to enter alpha characters. To enter an alpha character, press the key that has the desired
letter written below it. The keypad display shows the number on that key. To change the number to a letter,
press the top row Select key that corresponds to the location of the letter under the key. For example, if you
press key number 1, the letters for that key are A, B, and C. Press the rst top row Select key for A, the second
for B, and the third for C. See the gure below.
(CBA
First Letter Second LetterThird Letter Special Character
Entering Alphanumeric Characters
SCS-1R Installation Guide Digital Monitoring Products
17
Page 23

OPERATOR’S GUIDE
LCD Membrane Keypad Conguration
User Options
The keypad provides three adjustments to suit the environment.
To access, press and hold the Back Arrow and COMMAND keys for two seconds. The keypad display changes to
SET BRIGHTNESS. Use the COMMAND key to display the next Option or press the Back Arrow key to exit the User
Options function.
SET BRIGHTNESS
< >
SET TONE
< >
SET VOLUME LEVEL
< >
MODEL NUMBER
V200 071603
KEYPAD ADDRESS
01
Brightness
Set the keypad LCD brightness level and the AC Power LED. Use the left Select key
to lower the keypad brightness and the right Select key to raise the brightness. The
LCD backlighting turns on every time a key is pressed or the speaker sounds. The
backlighting dims to medium brightness whenever the speaker is on.
Note: If the brightness level is lowered, it reverts to maximum intensity whenever a
key is pressed. If no keys are pressed, and the speaker has not sounded for 30 seconds,
the user-selected brightness level restores.
Speaker Tone
The keypad speaker emits standard tones for key presses and alerts. At the SET TONE
display, use the left Select key to lower the tone and the right Select key to raise the
tone.
Volume Level
Set the keypad internal speaker volume level for key presses and entry delay tone
conditions. During alarm and trouble conditions, the volume is always at maximum
level. Use the left Select key to decrease the keypad volume and the right Select key
to increase the volume. Press the COMMAND key to display the Model Number.
Model Number
The LCD displays the keypad rmware version and date. The user cannot change this
information in User Options.
Keypad Address
The LCD displays the keypad address. While in User Options, the user cannot change
the keypad address. Press the Back Arrow key to exit the User Options function.
Keypad Options and Diagnostics
The keypad also contains Options and Diagnostic options that allow you to congure and test keypad operation.
You can only access Keypad Options and Diagnostics through the User Options. After holding down the Back
Arrow and COMMAND keys for two seconds to display SET BRIGHTNESS, enter the code 3577 (INST) and press the
COMMAND key. The display changes to KPD OPT (keypad options) KPD DIAG (keypad diagnostics) and STOP.
Digital Monitoring Products SCS-1R Installation Guide
18
Page 24
Keypad Options
KPD KPD
OPT DIAG STOP
OPERATOR’S GUIDE
Keypad Options (KPD OPT)
To program keypad options, press the left Select key under KPD OPT. The display
changes to CURRENT KEYPAD ADDRESS: # #.
CURRENT KEYPAD
ADDRESS: 01
KEYPAD MODE:
*SUP UNSUP
DEFAULT KEYPAD
MSG:
ARM PANIC KEYS:
PN EM F1
ACTIVATE ZONE 2
SHUNT: NO YES
ACTIVATE ZONE 3
EXIT: NO YES
4 DIGIT ENTRY
CARDS: NO YES
Current Keypad Address
The keypad must be set to keypad address 01. This is the default setting and should
not be changed.
Keypad Mode
The keypad can be set for either Supervised or Unsupervised operation. It is
recommended the setting be left at the default Supervised setting.
Default Keypad Message
Press COMMAND to scroll past this option. The keypad does not provide a
programmable Keypad Message.
Arm Panic Keys
The Panic Keys should be disabled. They cannot be used on the membrane keypad. If
an asterisk appears next to one of the options, for example *PN, press the Select key
under the option with the asterisk to remove the asterisk and disable the panic key.
Zone 2 Shunt
Leave this option set to NO.
Zone 3 Exit
Leave this option set to NO.
Entry Cards
Leave this option set to NO.
ALL?: NO YES
DELAY: 2
All?
Leave this option set to NO.
Accessing Keypad Diagnostics
KPD KPD
OPT DIAG STOP
Keypad Diagnostics (KPD DIAG)
The Keypad Diagnostic option allows you to check the display segments and test
individual keys.
Press the Select key under KPD DIAG. The keypad lights all display segments and turns
off LEDs (Power, ACK, Message). A few seconds later the keypad turns the display
off and turns LEDs on. The keypad then alternates between these two states for
approximately two minutes. Press COMMAND at any time to continue.
PRESS KEY TO
TEST
Test Individual Keys
The display changes to PRESS KEY TO TEST. This option allows you to test each
membrane key to ensure it is operating properly. Press and hold each key for about
two seconds. The key number being held appears in the display. Verify the correct
number displays before testing the next key.
Exiting the Installer Options
When done, press the COMMAND key until the display returns to the Keypad Options and Diagnostics screen. Press
the Select key under STOP to exit the Keypad Options and Diagnostics function.
SCS-1R Installation Guide Digital Monitoring Products
19
Page 25

OPERATOR’S GUIDE
Status Displays
Receiver Startup Display
When the SCS-1R powers up, the software version and date of version release is displayed.
Time Display
During normal operation the display shows the current time. Press Command button to enter the OFF-NORMAL menu.
Off-Normal Status
Displays previous Fire, Fire Verify, Burglary, and Supervisory zones that have not restored. In addition, supervised
network (NET or CELL) accounts that are not communicating properly display here.
Off-Normal
OFF-NORMAL?
OFF-NORMAL
ACCTS ZONES
1245678 ZN 123
FIRE ALARM
1245678 ZN 123
When an off-normal zone displays, pressing any top row Select key can delete the zone
DELETE? NO YES
1245678 NET ACCT
NOT RESPONDING
1245678 NET ACCT
When an off-normal account message displays, pressing any top row Select key can
DELETE? NO YES
OFF-NORMAL
END OF LIST
Press any top row Select key to view Off-Normal conditions. Press the COMMAND key to
advance to the System Status menu.
Off-Normal Accounts and Zones
Press the far left Select key to view supervised accounts. Press the far right Select key
to view non-restored zones.
Off-Normal Zone Display Example
After pressing the top row Select key under ZONES, all non-restored zone messages
display similar to the one shown on the left. The card number is listed rst: Card 1 in
the example. The line number is listed second: Line 2 in the example. The account
number follows the line number: 45678. The zone number then displays: ZN 123. The
second line displays the zone type, Fire, Burglary, or Supervisory, followed by the event
type, Alarm or Trouble: FIRE ALARM is the message in the example.
Delete Off-Normal Zone Instance
off normal status from the SCS-1R. Press the top row Select key under YES to delete,
or NO to save the message and return to the previous display. Default is NO.
Off-Normal Account Display Example
After pressing the Select key under ACCTS, all off normal supervised accounts display
a message similar to the one shown on the left. The card number is listed rst: Card 1
in the example. The line number is listed second: Line 2 in the example. The account
number follows the line number: 45678. The example message then displays: Network
Account not Responding.
Delete Off-Normal Account Instance
delete this display from the SCS-1R. Press the top row Select key under YES to delete,
or NO to save the message and return to the last display. Default is NO.
End of List
This displays when the end of the Off-Normal list has been reached.
System Status
The System Status section displays the number of calls since 12:00 AM for each line card programmed for Digital
Dialer (DD) communication.
System Status
SYSTEM STATUS?
LINE 12
NO OF CALLS: XXXX
Line Level
LINE 12 -19.5DBM
4175551234
Digital Monitoring Products SCS-1R Installation Guide
20
Press any top row Select key to view System Status.
Number of Calls
This displays the number of calls the line on a particular card has received since
midnight. The card number is listed rst: Card 1 in the example. Range is 1-8. The
line number is listed second: Line 2 in the example. Range is 1-4 for all enabled DD
lines. XXXX in the second line of the display represents the number of calls. Press the
COMMAND key to advance to the next DD line card. If no more DD line cards display,
the display advances to the programming menu.
This displays the signal strength and caller ID information for each line. The card number
is listed rst: Card 1 in the example. Range is 1-8. The line number is listed second:
Line 2 in the example. Range is 1-4 for all enabled DD lines. The number in the top line
of the display represents the signal strength of the last call in -dBM. The second line
displays caller ID information of the last call. If caller ID information is unavailable, then
the ANI/DNIS information is displayed. If ANI/DNIS information is unavailable, then NO
DATA will display. Press the COMMAND key to advance to the next DD line card. If no more
DD line cards display, the display advances to the programming menu.
Page 26

OPERATOR’S GUIDE
No DD Lines
NO DD LINES
Displays for four seconds if no DD lines are programmed.
SCS-150 Programming
Programming of the SCS-150 can be performed using the following methods:
Programming Method Requirements
SCS-1R Membrane Keypad SCS-1R membrane keypad
Browser SCS-150 Version 103 or higher have the ability to be programmed using a standard browser.
Note: IP and Gateway addresses must be programmed at the SCS-1R membrane keypad to
allow access.
Remote Link Remote Link version 1.47 or higher when using an SCS-150 Version 100 or 101 only.
SCS-150 Membrane Keypad Programming
Programming Menu
Allows entry to the programming menu for the SCS-1R using the keypad display.
MENU? NO YES
Select YES to enter the programming code. Select NO to return to the Time Display.
Enter PROG (6653) to enter the Programming Menu.
ENTER CODE: 6653
Service Code (XR500 Series panels)
This option allows the entry of a 5-digit service authorization code used to authenticate service personnel before
allowing access to panel programming or performing any user operations.
SCS-1R MENU
SERVICE CODE
SERVICE CODE
00000
Receiver Options
This section assigns the company name and system number as well as the communication type for each SCS-1R
Receiver incoming line.
SCS-1R MENU
RECEIVER OPTIONS
COMPANY NAME
-
COMPANY NAME 2
-
RECEIVER SYSTEM
NUMBER: 1
RECEIVER KEY
KEY:********
SCS-1R Installation Guide Digital Monitoring Products
Menu?
Programming Code
Service Code (XR500 Series panels)
Press any top row Select key to enter the Service Code. Press the COMMAND key to
advance to the next section of programming.
Range for the 5-digit code is 00000-65535. When this feature is enabled on an XR500
Series panel a service person is required to enter a valid service user code for system
programming access. Once the code is authenticated with the receiver, access to panel
programming is granted. If the code is not authenticated, access is denied.
The receiver cannot authenticate service personnel until a number is entered at this
option. Entering 00000 at the receiver disables this operation and panel access is
always granted.
Note: This panel operation is available to purchase for XR500 Series panels with version
108 or higher software. Refer to the Feature Upgrade section in the XR500 Series
Programming Guide (LT-0679) for additional information.
Receiver Options
Press any top row Select key to display the company name and congure the system.
Press the COMMAND key to advance to the next section of programming.
Company Name
Enter your company name using two lines, each line can have up to 16 characters.
Enter the rst 16 characters and press the COMMAND key to accept.
Enter the second 16 characters and press the COMMAND key to accept.
Receiver System Number
The LCD displays the current receiver system number. Press any top row Select key,
then enter the system number, 0 through 9. The default System Number is 1. Press the
COMMAND key when nished.
Note: This identier is used by the automation computer to distinguish between
multiple SCS-1R systems.
Receiver Key
The current Receiver Key displays. Press the COMMAND key to leave the Receiver key
the same and move to the next programming option. Press any top row Select key to
change the Receiver Key.
Note: This is an eight-character alphanumeric entry. This key is requested by panels
in the eld when using remote programming from this receiver. Once entered this key
does not display and should never be changed. Record this number in the Important
information Sheet at the end of this document and store in a secure place.
21
Page 27

OPERATOR’S GUIDE
Enter the new Receiver Key up to eight characters long. Press the COMMAND key to
display the next prompt.
CHANGE REC KEY
SURE? YES NO
RECEIVER KEY
CHANGED
RECEIVER HOURS
FROM GMT: 6
GMT City/Time Zone GMT City/Time Zone
0 London, Monrovia, Lisbon, Dublin, Casablanca, Edinburgh 13 New Cadelonia
1 Cape Verde Island, Azores 14 Guam, Sydney
2 Mid-Atlantic, Fernando de Noronha 15 Tokyo, Seoul
3 Buenos Aires, Georgetown, Brasilia, Rio de Janeiro 16 Hong Kong, Singapore
4 Atlantic Time (Canada), Caracas, La Paz, Santiago 17 Bangkok, Hanoi
5 Eastern Time (US, Canada) Bogota, Lima, Arequipa 18 Dhaka, Almaty
6 Central Time (US, Canada), Mexico City, Saskatchewan 19 Islamabad, Karachi
7 Mountain Time (US, Canada), Edmonton 20 Abu Dhabi, Kazan
8 Pacic Time (US, Canada), Tijuana 21 Moscow, Bagdad
9 Alaska 22 Eastern Europe
10 Hawaii 23 Rome, Paris, Berlin
11 Midway Island, Samoa
12 Fiji, Marshall Island, Wellington, Auckland, Kwajalein, Kamchatka
DIALER LINE
MONITOR? NO YES
EVENT DISPLAY
PRIORITY STD
STD ULC
LOCAL IP ADDRESS
192.168.000.250
LOCAL PORT
2001
GATEWAY ADDRESS
000.000.000.000
Change Receiver Key
After entering the desired Receiver Key and pressing COMMAND, the SURE? YES NO
prompt displays. Press the Select key under YES to keep the new key, or under NO to
use the previously stored key.
Receiver Key Changed
After pressing the Select key under YES, the display indicates that the receiver key has
been successfully changed.
Receiver Hours From GMT
Number of hours (0 to 23), from the Greenwich Time zone (GMT), where the receiver is
located. Refer to the table below for various cities and GMT settings. Default is 6.
Dialer Line Monitor
Press the far right Select key for YES to enable monitoring of digital dialer lines for
any failed communication attempts. A failed communication attempt occurs when the
line card goes off hook but does not successfully communicate with a panel. Press the
middle right Select key for NO, to disable the line monitoring operation. Default is NO.
When enabled, and a line communication fails, an S153 Communication Trouble
message, along with the card and line number, is sent to the host automation computer,
SCS-1R printer and LCD display. Manual acknowledgement is required when the SCS-1R
is not successfully communicating with the host automation computer.
Event Display Priority
For Canadian Central Stations that receive signals from a ULC-599-04 re communicator
installation, set the Event Display priority to ULC. Otherwise, set to STD. This option
denes the priority of messages waiting for manual acknowledgement in event memory
when the receiver is unable to communicate with the host automation computer.
To change the setting, press a top row key. Select STD to have the display follow the
standard priority as shown below. Select ULC to have the display follow the ULC priority
shown below for Canadian re communicator installations. Default is STD.
Priority Number STD ULC
1 Fire Alarms Fire Alarms
2 Burglary Alarms Fire Supervisory
3 Trouble, Fire Supervisory, & Fire Trouble Fire Trouble
4 Other Messages
5 N/A Other Messages
Local IP Address
Enter the LOCAL IP ADDRESS of the SCS-150 processor. The Local IP Address must
be unique and cannot be duplicated and needs to be a privately accessible network
connection. The default value is 192.168.000.250.
Local Port
The LOCAL PORT identies the SCS-150 IP port used when the host automation
computer communicates with the receiver over network. If a setting change is
required, enter the new number. Valid range is 1 to 65,535. The default value is 2001.
Gateway Address
Enter the local SCS-150 GATEWAY ADDRESS. You need the SCS-150 Gateway Address if
subnets are divided in your network. The default value is 000.000.000.000.
Burglary Alarms & Trouble
Digital Monitoring Products SCS-1R Installation Guide
22
Page 28
OPERATOR’S GUIDE
SUBNET MASK:
255.255.255.000
WEB USER NAME:
NEW
WEB PASSWORD:
NEW
Subnet Mask
Enter the SUBNET MASK assigned to the SCS-150. The default value is 255.255.255.000.
Web User Name
Enter a User Name for web programming access. This is the User Name entered to gain
access to the programming and can be up to 10 characters long. Default is NEW.
Web Password
Enter the password to use for web programming access. This is the password used to gain
access to the programming and can be up to 10 characters long. Default is NEW.
Line Cards
This section assigns the line number and line type for all line cards connected to the SCS-150.
SCS-1R MENU
LINE CARDS
CARD NUMBER: 1
CARD NUMBER: 1
NONE 104 101 100
CARD NUMBER: 1
CARD MODEL: 104
SEND TIME CHANGE
TO PNLS? NO YES
The following options display if 104 is selected as the Card Model.
Line Cards
Press any top row Select key to assign the line number and line type for each line card
connected to the SCS-150.
Card Number
Press COMMAND to select the displayed Card Number to program. Press any top row
Select key to clear the display and enter a new card number. Enter the card number, 1
through 8, for which the communication method is to be specied.
Note: Lines 6-8 can only be used with SCS-104 Line Cards using SCS-150 Version 101 and
updated SCS-RACK hardware.
Card Model
The display shows the current card model setting. Press any top row Select key to
change the Card Model. Press the Select key under the model for this card. Options
include NONE, 104, 101, and 100. Card number 1 defaults to Model 104. Card numbers
2-8 default to NONE.
Send Time Change
Press the top row Select key under YES to allow the SCS-1R to send time changes to
panels that communicate to the receiver on this line card. Select NO to prevent the
SCS-1R Receiver from sending time changes.
Dialer Lines Setup
DIALER LINE 21
ENABLE? NO YES
DIALER LINE 22
ENABLE? NO YES
DIALER LINE 23
ENABLE? NO YES
DIALER LINE 24
ENABLE? NO YES
First Communication Type
FIRST COMM
TYPE: DD
digital dialer communication format. Select CID to enable all dialer lines on the line
card to communicate with panels using contact ID format. To change the
FIRST COMM TYPE
communication type, press any select key to display the options. Default is DD. If the
DD CID
receiver cannot communicate with the panel using the rst communication type, the
receiver attempts communication using the secondary communication type.
Second Communication Type
SECOND COMM
TYPE: DD
digital dialer communication format. Select CID to enable all dialer lines on the line
card to communicate with panels using contact ID format. Select NONE to have no
SECOND COMM TYPE
second communication type. To change the communication type, press any select key
DD CID NONE
to display the options. Default is DD.
SEND ANI/DNIS
INFO? NO YES
Enable Dialer Lines
The card number is displayed rst (Card 2 in the examples) followed by the line number
(Line 1 in the rst example).
Press the far right Select key for YES, which enables dialer for the selected card and
line. After selecting, Line 2, 3 and 4 are displayed. Default is YES for all lines. If NO is
selected for all four lines, the dialer line setup prompts are skipped and the network
line setup prompts are displayed.
Select DD to enable all dialer lines on the line card to communicate with panels using
Select DD to enable all dialer lines on the line card to communicate with panels using
Send ANI/DNIS Information
Press the far right Select key for YES, which enables the Automatic Number
Identication (ANI) and Dialed Number Identication Service (DNIS) information to be
sent. ANI sends the phone number that the panel is using to call. DNIS sends the DNIS
identier of the phone number that the panel dialed. Default is NO.
Line numbers 1-4 represent dialer line cards for each card.
SCS-1R Installation Guide Digital Monitoring Products
23
Page 29

OPERATOR’S GUIDE
Send Caller ID Information
SEND CALLER ID
INFO? NO YES
ECHO CANCEL
DISABLE? NO YES
Press the far right Select key for YES, which enables the Caller ID information to be
sent. Caller ID sends the phone number that the panel is using to call. Default is NO.
Echo Cancel Disable
Echo Cancellation is technology used by telephone companies to eliminate echo from
voice telephone transmissions. In some cases this technology can interfere with alarm
signals. If you have problems with Echo Cancellation interfering with your signals,
p
ress the far right Select key for YES
having problems with the telephone company echo cancellation, select NO to leave the
echo cancelers on.
Default is NO.
to turn off the echo cancellers. If you are not
Network Line Setup
NET LINE 20
ENABLE? NO YES
LOCAL IP ADDRESS
192.168.000.250
LOCAL PORT
2001
GATEWAY ADDRESS
000.000.000.000
SUBNET MASK:
255.255.255.000
PASSPHRASE:
S16 AND S17
ALWAYS? NO YES
ACK SUBSTITUTED
MESSAGE? NO YES
Digital Monitoring Products SCS-1R Installation Guide
24
Enable Network Line
The card number is displayed rst (Card 2 in the example) followed by the line number
(Line displays as 0 (zero) for the network line of each card)
key for YES, which enables the network for the selected card. Default is YES. If NO is
selected, the display returns to the Card Number prompt.
Local IP Address
Enter the LOCAL IP ADDRESS. This is the SCS-104 IP address. The Local IP Address must
be unique and cannot be duplicated. The default value is 192.168.000.250.
Local Port
The LOCAL PORT identies the port used to communicate messages to and from the
panel. If a setting change is required, enter the new number. Valid range is 1 to
65,535. The default value is 2001.
Gateway Address
Enter the local GATEWAY ADDRESS. You need the Gateway Address to exit your local
network. The default value is 000.000.000.000.
Subnet Mask
Enter the local SUBNET MASK assigned to the SCS-104. The default value is
255.255.255.000.
Passphrase
In order to communicate using encryption, XR500 Series panels reporting in to the SCS104 at the receiver must have a Passphrase. This Passphrase must be programmed into
every panel reporting in to the SCS-104 at the receiver. The SCS-104 installed in the
receiver must also be programmed with the same Passphrase. To clear the passphrase
press any Select Key and then press the COMMAND key.
To enable encryption enter an 8 to 16-character Passphrase using alphanumeric
characters. If you leave the Passphrase blank, the SCS-104 communicates with XR500
Series panels, but the data is not encrypted. The Passphrase is blank by default.
Note: DO NOT LOSE THE PASSPHRASE. A lost or forgotten Passphrase requires that
every XR500 Series panel reporting in to the SCS-104 at the receiver be individually
reprogrammed with a new passphrase.
S16 and S17 Always
When NO is selected, the S16 Panel Not Responding message is sent to the automation
computer for each supervised account that has stopped sending check-in messages
unless 50 S16 messages have been generated for different accounts within one
minute. This could occur because the network has failed. Once this occurs, S72
Network Trouble is sent and the receiver stops sending S16 messages to the automation
computer. The receiver sends S73 Network Restored and will begin sending S16
messages after the receiver starts receiving check-in messages again.
When YES is selected, the S16 Panel Not Responding message is always sent to the
automation computer for each supervised account that has stopped sending check-in
messages without regard to the number of accounts generating S16 messages.
When YES is selected, the S17 Panel Response Restored message is sent to the
automation computer each time a supervised account checks in for the rst time
after installation. This also occurs at an account’s rst check-in after the receiver or
SCS-104 is powered-up. Default is NO.
Acknowledge Panel Substitution Message
When YES is selected, the SCS-104 replies with an acknowledgment to messages sent by
substituted panels. See the Substitution Code section of the panel programming guide
for the denition of a substituted panel. The SCS-104 generates only one S58 Alarm:
Panel Substitution message to the host automation computer and receiver printer for
. Press the far right Select
Page 30

OPERATOR’S GUIDE
each substituted panel. Subsequent messages from substituted panels do not generate
additional S58 messages. Default is YES.
When NO is selected, substituted panels are not sent acknowledgments for their
messages. For each message received from a substituted panel, an S58 Alarm: Panel
Substitution message is sent to the host automation computer and receiver printer.
Note: Set this option to YES for all receiver installations except for Canadian receiver
installations where the security requirement is ULC Active Level 3.
CHECKIN TABLE IP
000.000.000.000
CHECKIN TABLE
PORT: 2005
CHECKIN TABLE
ID: 1
Exiting Network Line Setup
When done, press the COMMAND key once to return to the Card Number prompt. The next Card Number in
sequence will be displayed.
Check-in Table IP Address
The optional SCS-CTM Check-in Table Manager software is used to backup the records
of supervised network accounts on up to 32 different SCS-104 line cards. Use SCS-CTM
to repopulate the list of supervised network accounts when one SCS-104 or SCS-101
line card is replaced by another SCS-104 or SCS-101. Additionally, the list of supervised
network accounts used by an SCS-104 or SCS-101 on a primary receiver can be mirrored
by the SCS-CTM for use by an SCS-104 or SCS-1011 card on a second receiver. Refer to
the SCS-CTM User’s Guide (LT-0940).
Note: The list of supervised network accounts on an SCS-104 line card is automatically
populated as each panel sends its supervisory check-in message to the SCS-104 line card.
Enter the IP address for the computer where the SCS-CTM Check-in Table Manager
software is installed. When no SCS-CTM software is installed, leave the IP address set
to 000.000.000.000.
Check-in Table Port
Enter the IP port used to communicate Check-In Table messages to the SCS-CTM
Check-in Table Manager program. Valid range is 1 to 65,535. Default is 2005.
Check-in Table ID
Enter the table ID number to be used by the SCS-CTM Check-in Table Manager to
identify the check-in table. Valid range is 1 to 255. Default is 1.
Host Automation
The SCS-1R Host Automation programming section allows adjustments to optimize the SCS-1R performance with
the host automation computer. The display shows the current setting for each prompt. Press any top row Select
key to clear the display and enter the new information.
SCS-1R MENU
HOST AUTOMATION
HOST NAME
HOST 1 NAME
HOST PORT TYPE:
SERIAL
HOST PORT TYPE:
SERIAL NETWORK
Host Automation
Press any top row Select key to program Host Automation settings. Press the COMMAND
key to advance to the next programming section. Press the Back Arrow key to return to
the previous section.
Host Name
Enter a Host Name up to 16 characters. When done, press Command to accept name
and continue to HOST PORT TYPE. Default is HOST 1 NAME.
Host Port Type
Select SERIAL to send messages to the host automation computer through the Host
Output serial port on the SCS-203 Convenience panel located on the back of the
receiver. Select NETWORK to send messages through the network connection on the
SCS-150 to the host automation computer. Default is SERIAL.
HOST IP ADDRESS:
192.168.000.250
HOST PORT:
2001
PROTOCOL: TCP
Protocol
UDP TCP
START CHARACTER :
NONE
SCS-1R Installation Guide Digital Monitoring Products
Host IP Address
Enter the Host IP Address. This is the IP address of the host automation computer. The
default value is 192.168.000.250.
Host Port
The Host Port identies the port on the host automation computer. Valid range is 1 to
65,535. The default value is 2001.
Select TCP to communicate with the host automation computer over the network using
TCP protocol. Select UDP to communicate using UDP protocol. Default is TCP.
Start Character
Enter the character to be used at the start of a host message. Enter None or 01-12 or
14-31. Default is NONE.
25
Page 31

OPERATOR’S GUIDE
CRC ERROR CHECK?
NO YES
SEQUENCE NUMBER?
NO YES
TEST INTERVAL
MINUTES: 1
ACKNOWLEDGE
TIMEOUT: 3
LINE NUMBER
LENGTH: 0
RETRIES TO
FAILURE: 3
CRC Error Check
Press the far right Select key for YES, which allows each message sent to the host to be
prexed with an SIA CIS CRC-16. The format is 4 hexadecimal characters. Default is NO.
Sequence Number
Press the far right Select key for YES, which sends each message sent to the host with a
sequence number ranging from 1 to 99. Default is NO.
Test Interval
Press any top row Select key to clear the display and enter the new Test Interval. Enter
the number of minutes, 1 through 60, between communication test messages (S99) of
the SCS-1R Receiver and host computer. Default is 1.
Acknowledge Timeout
Press any top row Select key to clear the display and enter the new Acknowledge
Timeout. This is the time in seconds, 1 through 15, the SCS-1R waits for a host
acknowledgment of a message before transmitting it again. Default is 3.
Line Number Length
Press any top row Select key to clear the display and enter the new Line Number
Length. Enter the number of decimal ASCII characters, 0 (zero) through 2, used to
report the SCS-1R Receiver signal line number. If 0 (zero), no information is sent. If 1,
display card number. If 2, display card and line number. Default is 0 (zero).
Retries to Failure
Press any top row Select key to clear the display. Enter the number of attempts, between
1 and 15, the SCS-1R makes to transmit a message to the host computer. When this
number is reached, the SCS-1R begins manual acknowledgement operation. Default is 3.
Serial Ports
The SCS-1R Serial Ports section allows you to make adjustments to the Host Output, Activity Log, and Print
Operation Serial Port.
SCS-1R MENU
SERIAL PORTS
HOST OUTPUT BAUD
RATE: 9600
ACTIVITY LOG BAUD
RATE: 1200
PRINT OPERATION:
ALWAYS
PRINT OPERATION
ALWYS NEVER FAIL
Serial Ports
Press any top row Select key to program the Serial Port settings. Press the COMMAND
key to advance to the next programming section. Press the Back Arrow key to return to
the previous section.
Host Output Baud Rate
Press any top row Select key to change the Host Output Baud Rate. Enter 300, 600, 1200,
2400, 4800, 9600, 19200, or 38400. Press the Command button to accept. Default is 9600.
Activity Log Baud Rate
Press any top row Select key to change the Activity Log Baud Rate. Enter 300, 600, 1200,
2400, 4800, 9600, 19200, or 38400. Press the Command button to accept. Default is 1200.
Print Operation
Press any top row Select key to change the Print Operation. Select ALWAYS to enable
the Activity Log output for all system events. Select NEVER to disable the Activity Log.
Select FAIL to enable only when Host Automation has failed and is not acknowledging
messages from the receiver.
Note: If Print Operation is set to Always or Primary Fail, ensure that a printer is
connected to the printer port.
Set System Time/Date
This section allows you to set the correct time and date on the SCS-1R. All changes made in this section print to the
Activity Log printer. The time entered here is sent to panels if the Time Change programming option is set to YES.
SCS-1R MENU
TIME/DATE
TUE 12:05 PM
04/07/09
SET TIME/DATE
TIME DATE
ENTER TIME:
- : AM PM
Digital Monitoring Products SCS-1R Installation Guide
26
Time/Date
Press any top row Select key to display the time and date. Press the COMMAND key to
advance to the next section of programming.
Current Time/Day/Date
Press any select key to program the time and/or date. Press the Back Arrow key to
return to the previous display.
Set Time/Date
Press the top row Select key under the item you would like to change. For example,
press the far left Select key to change the SCS-1R time.
Time
Press any top row Select key to enter the new time. Using the Digit keys on the
keypad, enter the current time and then press Select key under AM or PM. TIME
CHANGED displays after the time has been changed.
Page 32

OPERATOR’S GUIDE
ENTER DATE:
- / /
TIME CHANGED
Date
Press any top row Select key to enter the date. Enter the month, date, and year in the
following format: MM/DD/YY, with leading zeroes. Press COMMAND to accept the date
and display the following prompt.
Time/Date Changed
If the Time or Date has been changed successfully, the display shows TIME/DATE CHANGED.
Exit Programming Menu
Exit Menu allows you to properly end programming and exit the menu.
SCS-1R MENU
STOP
Exit Menu
Press any top row Select key to exit the SCS-1R menu.
Browser Programming
Programming of the SCS-150, version 103 or higher, can be performed using a browser.
Note: Obtain an IP and Gateway address from the network administrator. Enter the IP and Gateway address in
Receiver Options at the SCS-1R membrane keypad to allow access to browser programming for the rst time.
The IP Address must be unique and cannot be duplicated.
security on the network connection does not allow outside access to this site before accessing programming through
the browser.
After programming the IP and Gateway addresses in Receiver Options at the membrane keypad, cconnect to the SCS150 by entering the IP address into the address bar of any web browser. Once connected, the Authenticated Required
box displays.
When accessing the programming for the rst time, the default User Name and Password are both “NEW”. Once in
the programming, the User
Name and Password should be
changed in Receiver Options.
Each SCS-150 programming
section in the browser is
independent and changes
should be saved after
programming is completed
for each section.
Receiver Options
This section assigns the company name and system number as well as the IP and Gateway addresses for each
SCS-1R Receiver incoming line.
Make sure the network connection is secure and the
SCS-1R Installation Guide Digital Monitoring Products
27
Page 33

OPERATOR’S GUIDE
Company Name
Enter the name of the company operating the central station receiver. The company name can have up to 32
characters.
Receiver Number
If the central station has more than one SCS-1R or SCS-105 receiver, enter the number of the appropriate
receiver in the Receiver Number eld. The default Receiver Number is 1.
Note: This identier is used by the automation computer to distinguish between multiple SCS-1R systems.
Receiver Key
The Receiver Key is a number that the receiver uses as a password to conrm its identity to panels. Enter the
number to use as a key to identify the receiver in the Receiver Key eld.
The key numbers programmed into the panel and the receiver must match to enable the receiver and the panel
communication. If the numbers do not match, the panel and the receiver cannot establish communication and an
“Invalid receiver number” error message displays. Default is blank.
Once entered this key does not display and should never be changed. Record this number in the Important
information Sheet at the end of this document and store in a secure place.
Service Code (XR500 Series panels)
This option allows the entry of a 5-digit service authorization code used to authenticate service personnel before
allowing access to panel programming or performing any user operations.
Range for the 5-digit code is 00000-65535. When this feature is enabled on an XR500 Series panel a service person
is required to enter a valid service user code for system programming access. Once the code is authenticated
with the receiver, access to panel programming is granted. If the code is not authenticated, access is denied.
The receiver cannot authenticate service personnel until a number is entered at this option. Entering 00000 at
the receiver disables this operation and panel access is always granted. Default is 00000.
Hours From GMT
Number of hours (0 to 23), from the Greenwich Time zone (GMT), where the receiver is located. Refer to the
table below for various cities and GMT settings. Default is 6.
GMT City/Time Zone GMT City/Time Zone
0 London, Monrovia, Lisbon, Dublin, Casablanca, Edinburgh 13 New Cadelonia
1 Cape Verde Island, Azores 14 Guam, Sydney
2 Mid-Atlantic, Fernando de Noronha 15 Tokyo, Seoul
3 Buenos Aires, Georgetown, Brasilia, Rio de Janeiro 16 Hong Kong, Singapore
4 Atlantic Time (Canada), Caracas, La Paz, Santiago 17 Bangkok, Hanoi
5 Eastern Time (US, Canada) Bogota, Lima, Arequipa 18 Dhaka, Almaty
6 Central Time (US, Canada), Mexico City, Saskatchewan 19 Islamabad, Karachi
7 Mountain Time (US, Canada), Edmonton 20 Abu Dhabi, Kazan
8 Pacic Time (US, Canada), Tijuana 21 Moscow, Bagdad
9 Alaska 22 Eastern Europe
10 Hawaii 23 Rome, Paris, Berlin
11 Midway Island, Samoa
12 Fiji, Marshall Island, Wellington, Auckland, Kwajalein, Kamchatka
Event Display Priority
For Canadian Central Stations that receive signals from a ULC-599-04 re communicator installation, set the Event
Display priority to “Canadian”, otherwise, set to “Standard”. This option denes the priority of messages waiting
for manual acknowledgement at the membrane keypad in the event memory when the receiver is unable to
communicate with the host automation computer.
Select “Standard” to have the display follow the standard priority as shown below. Select “Canadian” to have the
display follow the Canadian priority shown below for Canadian re communicator installations.
Priority Number Standard Canadian
1 Fire Alarms Fire Alarms
2 Burglary Alarms Fire Supervisory
3 Trouble, Fire Supervisory, & Fire Trouble Fire Trouble
4 Other Messages
5 N/A Other Messages
Dialer Line Monitor
Select to enable monitoring of digital dialer lines for any failed communication attempts. A failed communication
attempt occurs when the line card goes off hook but does not successfully communicate with a panel. Default is
unchecked (disabled).
Digital Monitoring Products SCS-1R Installation Guide
28
Burglary Alarms & Trouble
Page 34

OPERATOR’S GUIDE
Local IP Address
Enter the Local IP Address. This is the SCS-150 IP address used for Web Programming and Net Host Output. The
Local IP Address must be unique and cannot be duplicated. The default value is 192.168.000.250.
Local Port
The Local Port identies the port used for the Net Host Output connections. If a setting change is required, enter
the new number. Valid range is 1 to 65,535. The default value is 2001.
Gateway Address
Enter the local Gateway Address. The Gateway Address is needed if subnets are divided in your network. The
default value is 000.000.000.000.
Subnet Mask
Enter the local SUBNET MASK assigned to the SCS-150. The default value is 255.255.255.000.
Web User Name
Enter a User Name for web programming access. This is the User Name entered to gain access to the programming
and can be up to 10 characters long. Default is “NEW”.
Web Password
Enter the password to use for web programming access. This is the password used to gain access to the programming
and can be up to 10 characters long. Default is “NEW”. If the password is forgotten, a new password can be entered
at the keypad only.
Print Operation
This section assigns the printing operation and the activity log baud rate.
Print Operation
Select the printer operation. Default is Always.
Print Operation Function
Never Suppresses all printing
Always Prints all messages from the receiver
Primary Fail (Host Output) Prints only when the communication to the primary host fails
Note: If Print Operation is set to Always or Primary Fail, ensure that a printer is connected to the printer port.
Activity Log Baud Rate
Select the baud rate for the Serial Printer port. Default is 1200. Select 300, 600, 1200, 2400, 4800, 9600, 19200, or
38400.
SCS-1R Installation Guide Digital Monitoring Products
29
Page 35

OPERATOR’S GUIDE
Receiver Line Cards
Line Card Number
Select the line card number (1-8) from the options at the top of the screen.
Note: Lines 6-8 can only be used with SCS-104 Line Cards using SCS-150 Version 101 and updated SCS-RACK
hardware.
Note: SCS-104 options are always displayed in programming, even when a line card model other than an SCS-104
is selected.
Line Card Model
Select the current model for the selected line card number above. Options include None, SCS-104, SCS-101, and
SCS-100. Card number 1 defaults to model 104. Card numbers 2-8 default to None.
Send Time to Panels
Select this option to allow the receiver to update the panel’s internal clock as the panel communicates with the
SCS-150. Select NO to prevent the receiver from updating the communicating panel’s internal clock.
SCS-104 Dialer Settings
Dialer Line 1 Enable
Select to enable dialer communication for line 1 of the selected card. Default
is enabled.
Dialer Line 2 Enable
Select to enable dialer communication for line 2 of the selected card. Default
is enabled.
Dialer Line 3 Enable
Select to enable dialer communication for line 3 of the selected card. Default
is enabled.
Dialer Line 4 Enable
Select to enable dialer communication for line 4 of the selected card. Default
is enabled.
First Communication Type
Select DD to enable all dialer lines on the line card to communicate with panels using the DMP digital dialer
communication format. Select CID to enable all dialer lines on the line card to communicate with panels using
contact ID format. Default is DD. If the receiver cannot communicate with the panel using rst communication
type, the receiver attempts communication using the secondary communication type.
Second Communication Type
Select DD to enable all dialer lines on the line card to communicate with panels using the DMP digital dialer
communication format. Select CID to enable all dialer lines on the line card to communicate with panels using
contact ID format. Select NONE to have no second communication type. Default is DD.
Digital Monitoring Products SCS-1R Installation Guide
30
Page 36

OPERATOR’S GUIDE
Send ANI/DNIS Information
Select to enable the Automatic Number Identication (ANI) and Dialed Number Identication Service (DNIS)
information to be sent to the host automation computer. ANI sends the phone number that the panel is using to
call. DNIS sends information about the phone number the panel dialed. Default is disabled.
Send Caller ID Information
Select to enable the Caller ID information to be sent. Caller ID sends the phone number that the panel is using to
call. Default is disabled.
Echo Cancel Disable
Echo Cancellation is technology used by telephone companies to eliminate echo from voice telephone
transmissions. In some cases this technology can interfere with alarm signals. If you have problems with Echo
Cancellation interfering with your signals, select to turn off the echo cancellers.
SCS-104 Network Settings
Net Line Enable
Select to enable the network for the selected line card. Default is
selected.
S16 and S17 Always
When disabled, the S16 Panel Not Responding message is sent to
the automation computer for each supervised account that has
stopped sending check-in messages unless 50 S16 messages have
been generated for different accounts within one minute. This could
occur because the network has failed. Once this occurs, S72 Network
Trouble is sent and the receiver stops sending S16 messages to the
automation computer. The receiver sends S73 Network Restored and
will begin sending S16 messages after the receiver starts receiving check-in messages again.
When enabled, the S16 Panel Not Responding message is always sent to the automation computer for each
supervised account that has stopped sending check-in messages without regard to the number of accounts
generating S16 messages.
When enabled, the S17 Panel Response Restored message is sent to the automation computer each time a
supervised account checks in for the rst time after installation. This also occurs at an account’s rst check-in
after the receiver or SCS-104 is powered-up. Default is disabled.
Acknowledge Panel Substitution Message
When selected, the SCS-104 replies with an acknowledgment to messages sent by substituted panels. See the
Substitution Code section of the panel programming guide for the denition of a substituted panel. The SCS-104
generates only one S58 Alarm: Panel Substitution message to the host automation computer and receiver printer for
each substituted panel. Subsequent messages from substituted panels do not generate additional S58 messages.
When not selected, substituted panels are not sent acknowledgments for their messages. For each message
received from a substituted panel, an S58 Alarm: Panel Substitution message is sent to the host automation
computer and receiver printer.
Local IP Address
Enter the Local IP Address. This is the SCS-104 IP address. The Local IP Address must be unique and cannot be
duplicated. The default value is 192.168.000.250.
Local Port
The Local Port identies the port used to communicate messages to and from the panel. Valid range is 1 to
65,535. The default value is 2001.
Gateway Address
Enter the local Gateway Address to exit your local network. The default value is 000.000.000.000.
Subnet Mask
Enter the local Subnet Mask assigned to the SCS-104. The default value is 255.255.255.000.
Passphrase
To enable encrypted communication, enter an 8 to 16-character Passphrase using alphanumeric character. This
Passphrase must be programmed into every panel reporting to the SCS-104 at the receiver. The SCS-104 installed
in the receiver must also be programmed with the same Passphrase. To clear the passphrase press any Select Key
and then press the COMMAND key.
The passphrase can include numbers 0-9, letters A-Z, and special characters of - (dash), . (period), * (asterisk), #
(number), and a space. If you leave the Passphrase blank, the SCS-104 communicates with XR500 Series panels,
but the data is not encrypted. The Passphrase is blank by default.
Note: DO NOT LOSE THE PASSPHRASE. A lost or forgotten Passphrase requires that every XR500
Series panel reporting to the SCS-104 at the receiver be individually reprogrammed with a new
passphrase.
SCS-1R Installation Guide Digital Monitoring Products
31
Page 37

OPERATOR’S GUIDE
SCS-104 Check-in Table Settings
Check-in Table IP Address
The optional SCS-CTM Check-in Table Manager software is used to backup
the records of supervised network accounts on up to 32 different SCS104 line cards. Use SCS-CTM to repopulate the list of supervised network
accounts when one SCS-104 or SCS-101 line card is replaced by another
SCS-104 or SCS-101. Additionally, the list of supervised network accounts used by an SCS-104 or SCS-101 on a
primary receiver can be mirrored by the SCS-CTM for use by an SCS-104 or SCS-1011 card on a second receiver.
Refer to the SCS-CTM User’s Guide (LT-0940).
Note: The list of supervised network accounts on an SCS-104 line card is automatically populated as each panel
sends its supervisory check-in message to the SCS-104 line card.
Enter the IP address for the computer where the SCS-CTM Check-in Table Manager software is installed. When no
SCS-CTM software is installed, leave the IP address set to 000.000.000.000.
Check-in Table Port
Enter the IP port used to communicate Check-In Table messages to the SCS-CTM Check-in Table Manager program.
Valid range is 1 to 65,535. Default is 2005.
Check-in Table ID
Enter the table ID number to be used by the SCS-CTM Check-in Table Manager to identify the check-in table. Valid
range is 1 to 255. Default is 1.
Host Automation
The SCS-1R Host Automation programming section allows adjustments to optimize the SCS-1R performance with
the host automation computer.
Host Name
Enter a Host Name up to 16 characters.
Host Port Type
Select Serial to send messages to the host automation computer through the Host Output serial port. Select
Network to send messages through the network connection on the SCS-150 to the host automation computer.
Default is Serial.
Host IP Address
Enter the Host IP Address. This is the IP address of the host automation computer. The default value is
192.168.000.250.
Host Port
The Host Port identies the port on the host automation computer. Valid range is 1 to 65,535. The default value
is 2001.
Protocol
Select TCP to communicate with the host automation computer over the network using TCP protocol. Select UDP
to communicate using UDP protocol. Default is TCP.
Digital Monitoring Products SCS-1R Installation Guide
32
Page 38

OPERATOR’S GUIDE
Host Output Baud Rate
Select the baud rate for the Host Output. Select 300, 600, 1200, 2400, 4800, 9600, 19200, or 38400. Default is 9600.
Start Character
Enter the character to be used at the start of a host message. Enter None, 01-12, or 14-31. Default is None.
Use CRC
Select to enable CRC error checking on each message sent to the host. Default is disabled.
Use Sequence Number
Select to enable 1-99 numbering of all messages sent to the host. Default is disabled.
Test Interval (Minutes)
Enter number of minutes between message tests. The test interval can be between 1-60 minutes. Default is 1.
Acknowledge Timeout
Enter the number of seconds (1-15) that the receiver should wait for an acknowledgment from the host before resending the message. Default is 3.
Line Number Length
Enter the number of digits, 0 (zero) through 2, used to report the SCS-1R Receiver signal line number. Default is 0.
Retries to Failure
Enter the number of retries allowed without receiving an acknowledgment from the host before entering a failed
state. This retry number includes the initial message sent to host. The retry range may be from 1-15. Default is 3.
Receiver Diagnostics
The Receiver Diagnostics tab displays the MAC Address, Serial Number, Firmware Version Number, Firmware Date,
Bank Number, Key value, Write Count and DB Version.
Note: The information on this tab is for display only and changes can not be made.
SCS-150 Line Level Diagnostics
Select the SCS-150 Line Level Diagnostics link to display the the diganostics window. This displays the Caller ID
information, ANI/DNIS information and signal Strength level for each line. The card number is listed rst: Card 7
in the rst example. Range is 1-8. The line number is listed second: Line 1 in the example. Range is 1-4 for all
enabled DD lines.
Remote Link Programming
Programming of the SCS-150 Version 100 or 101 can be performed using Remote Link version 1.47 or higher. SCS-150
Version 103 and higher cannot be programmed using Remote Link. Connect the computer with Remote Link installed
to the 25-pin connector Auxiliary Port on the back of the SCS-1R Receiver using an SCS-204 cable. See Remote Link for
more information.
Note: Each SCS-150 programming section in Remote Link is independent and changes should be sent to the
receiver after programming is completed for each window.
SCS-1R Installation Guide Digital Monitoring Products
33
Page 39

PRINTOUT EXPLANATIONS
Printout Explanations
General Description
Note: UL central station applications must use a serial printer listed for Fire Protective Signaling Systems.
The SCS-1R prints out two general types of messages: changes in the system information and messages received
from DMP panels. The message line for system changes is bracketed by double asterisks with the time of
occurrence printed at the far right. Messages from panels always list the account number rst followed by the
message and the time of occurrence. The printout below is a typical page from an Activity Log.
ATLAS SECURITY SERVICE, INCORPORATED
Wednesday 5/1/03 * * ACTIVITY LOG * * Page number: 2
* * SECURITY CONTROL SYSTEM NUMBER CHANGED TO: 1. * * 8:01 a.m.
* * LINE: 3 CONFIGURED AS: DD PHONE NUMBER: (214) 555-1212 * * 8:02 a.m.
* * DIALER PANEL NUMBER: 108 ADDED TO LINE: 1 * * 8:04 a.m.
1- 1 Zone: 8 FRONT DOOR - BURG ALARM 8:18 a.m.
1- 1 Zone: 2 BACK DOOR - BURG TROUBLE 8:23 a.m.
1- 1 Zone: 2 BACK DOOR - BURG RESTORE 8:24 a.m.
1- 1 * * AMBUSH * * 8:27 a.m.
1- 1 Area: 1 OFFICE - DISARMED Usr: 007 8:31 a.m.
2 PLANT
3 SHIPPING
1- 1 Zone: 010 FRONT DOOR - BYP Usr: 015 8:33 a.m.
1- 1 Usr: 009 added to panel Usr: 002 8:33 a.m.
1- 1 Permanent schedule for Tuesday Area: 1 8:35 a.m.
Open: 8:00 a.m. Close: 5:30 p.m. Usr: 005
1- 1 Door access Dr: 001 Usr: 021 8:36 a.m.
1- 1 WARNING: Low standby battery 8:38 a.m.
1- 1 Zone: 37 SMOKE DET. - FIRE ALARM 8:40 a.m.
System Messages
System messages are provided on the Activity Log printer to provide a permanent record of changes made to the
system information. The operator making the change is determined by referring to the last sign on.
Panel Messages
Messages from panels are sent to the SCS-1R advising of various changes in the panel status. The messages print
and/or display on the LCD.
Alarm, Trouble, and Restore
These messages are all formatted the same. Alarm and Trouble messages print to the Activity Log and display on
the LCD for acknowledgment.
Fire and Supervisory restorals display on the LCD for acknowledgment and printed to the Activity Log while other
restore messages print to the Activity Log only.
Ambush
The Ambush message prints and displays on the LCD for acknowledgment.
Opening and Closing
Openings and Closings reports list the areas that are armed or disarmed and the user name making the change.
These messages can be from 1 to 8 consecutive lines and print to the Activity Log only.
Bypass and Reset
This message prints in a one line format listing the zone number, zone name, and user name making the change.
The message prints on the Activity Log only.
Schedule Changes
This prints in a 2-line format listing the type of schedule, day of the week, opening and closing time, and the user
name making the change. This message prints on the Activity Log only.
Door Access
This message lists the user name accessing the door strike relay and the door number that is being accessed. The
door number matches the keypad address operated by the user. This message prints on the Activity Log only.
Digital Monitoring Products SCS-1R Installation Guide
34
Page 40
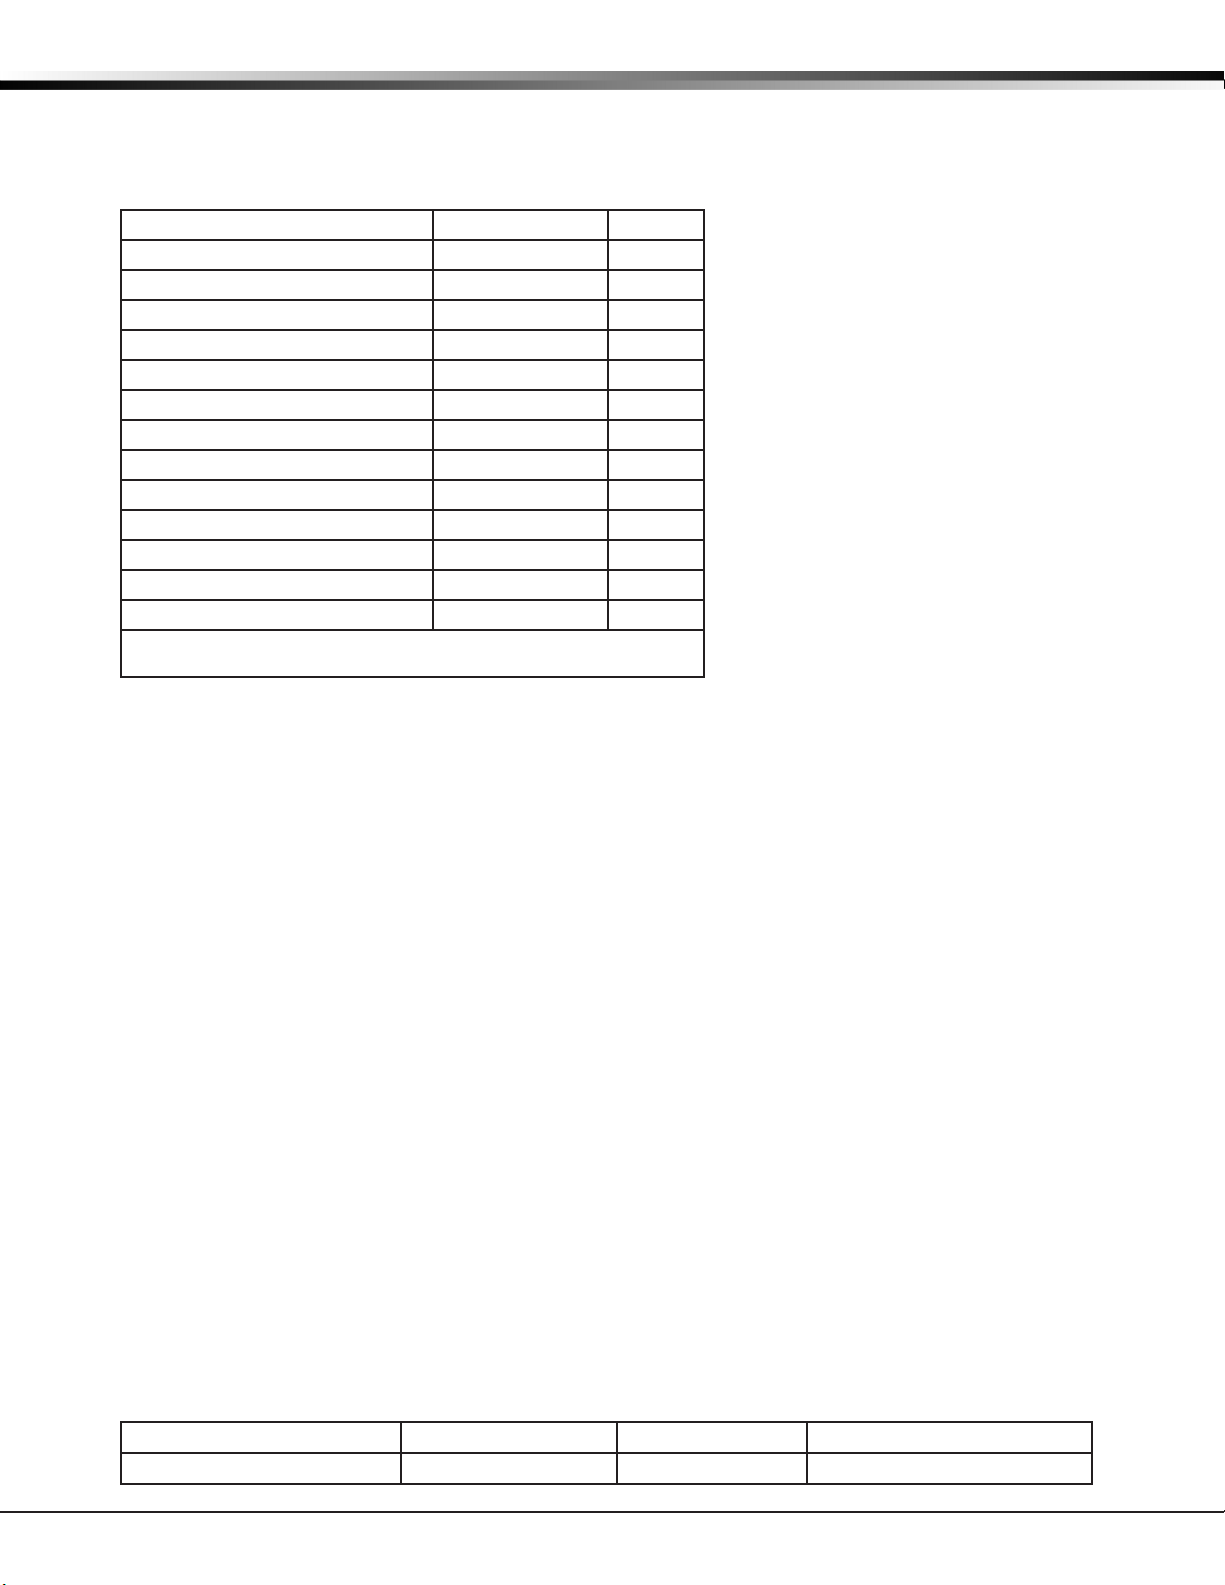
PRINTOUT EXPLANATIONS
Acknowledgment of Fire Alarms and Troubles
This message is listed each time the operator acknowledges a re type zone alarm or trouble message. The
message includes the account number, zone number, and the acknowledged condition.
Message Destinations
Message Activity Log LCD
Time/Date X
System Number X
Telephone Line Conguration X
Zone Alarm X X
Zone Trouble X X
Zone Restore X *
Ambush X X
Opening and Closing X
Bypass and Reset X
Add and Delete Codes X
Schedule Changes X
System Messages X X
Door Access X
* Fire and supervisory type zones restorals are the only
restorals that display on the LCD for acknowledgement.
Printer Troubleshooting
Activity Log ERROR
When the SCS-1R cannot complete printing a message to the Activity Log printer, this alarm message displays on
the LCD for acknowledgment. Possible causes of failure are:
Power Light Not Lit
Check AC outlet. If the outlet is good, check the internal circuit breaker and fuse located on the left rear
corner of the printer.
SEL Light Not Lit
Press the SEL switch to light the SEL light. If the light does not come on, turn the unit off for ve seconds and try
again.
PAPER Light Lit
In this case the SEL light cannot be lit and paper must be added.
Bad Printer Cable
If the printer can complete a test printing and installing a dummy plug at the rear of the SCS-1R can silence an
alarm, the printer cable has been damaged.
If none of the above are the cause for the activity log error, contact DMP Technical Support at:
1-888-4DMPTEC (1-888-436-7832)
If calling internationally, dial 1-417-831-9362
Note: Installation of a dummy plug, which shorts pins 4 and 5, causes all messages waiting to be printed and all
messages received while it is installed will not be printed.
Compliance Listing Specications
UL Commercial Fire
This product incorporates eld-programmable software. In order for the product to comply with the requirements
in the Standard for Control Units and Accessories for Fire Alarm Systems, UL 864, certain programming features or
options must be limited to specic values or not used at all as indicated below.
Feature or Option Permitted in UL 864? Possible Settings? Settings Permitted in UL 864
Print Operation Ye s Always, Never, Fail Always, Fail
SCS-1R Installation Guide Digital Monitoring Products
35
Page 41

Digital Monitoring Products SCS-1R Installation Guide
36
Page 42

Important Information
Use the table below to record the reciever key for your SCS-1R Receiver. Keep this sheet and the rest of the
manual in a safe location for future reference.
Receiver Key __ __ __ __ __ __ __ __
Passphrase __ __ __ __ __ __ __ __ __ __ __ __ __ __ __ __
Notes:
Components
SCS-RACK System Enclosure
SCS1R-Spares Spare Board kit
SCS-100 Dialer Line Card
SCS-101 Network Line Card
SCS-104 Line Card
SCS-110 Modem Power Card
SCS-120 Multibus Power Card
SCS-130 Transformer Card
SCS-203 Convenience Panel
SCS-204 Host Cable
SCS-208 Power Cord
SCS-150 Receiver Processor Board
Accessory Devices
SG-DPU-414 Printer with Power Supply
and Cable
SCS-186T Printer with Cable (Non-UL)
Listings and Approvals
FCC Part 15
FCC Part 68 Registration ID CCK8GW-16197-AL-N (SCS-100)
FCC Part 68 Registration ID CCKCN03BSCS-104 (SCS-104)
NIST AES Algorithm Certicate #1937 (SCS-104)
California State Fire Marshal (CSFM)
New York City (FDNY COA #6055)
Underwriters Laboratories (UL) Listed
ANSI/UL 864 Fire Protective Signaling
ANSI/UL 1635 Digital Alarm Communicator
ANSI/UL 1610 Central-station Burglar
ANSI/UL 365 Police Station Connected Burglar
ANSI/UL 1076 Proprietary Burglar
Underwriters Laboratories Canada (ULC) Listed
ULC-S559-04 Equipment for Fire Signal Receiving
Centers and Systems
ULC-S545 Standard for Residential Fire Warning
System Control Units
ULC-S304 Standard for Central and Monitoring
Station Burglar Alarm Units
ULC-C1023 Household Burglar Alarm System Units
ULC/ORD-C1076 Standard for Proprietary Burglar Alarm
Units and Systems
For additional information, access www.dmp.com and
select Compliance.
11525
800-641-4282
www.dmp.com
Made in the USA
INTRUSION • FIRE • ACCESS • NETWORKS
2500 North Partnership Boulevard
Springfield, Missouri 65803-8877
LT-1037 1.06 © 2011 Digital Monitoring Products, Inc.
 Loading...