

Page 1

12
A B C
567
90
User's Guide
3
DEF
YZ
4
GHI JKL
8
STUPQRMNO
VWX
COMMAND
POWER
Page 2

FCC Information Supplied to Users
This equipment complies with part 68 of the FCC rules. On
the top of this equipment is a label that contains, among other
information, the FCC Registration Number and Ringer Equivalence Number (REN) for this equipment. You must, upon
request, provide this information to your telephone company.,
The REN is useful to determine the quantity of devices you
may connect to your telephone line and still have all of those
devices ring when your telephone number is called. In most,
but not all areas, the sum of the REN's of all devices
connected to one line should not exceed five (5.0). To be
certain of the number of devices you may connect to your
line, as determined by the REN, you should contact your local
telephone company to determine the maximum REN for your
calling area.
If your telephone equipment caused harm to the telephone
network, the Telephone Company may discontinue your
service temporarily. If possible, they will notify you in
advance, but if advance notice is not practical, you will
notified as soon as possible. You will be informed of your
right to file a complaint with the FCC.
Your telephone company may make changes in its facilities, equipment, operations, or procedures that could affect
the proper functioning of your equipment. If they do, you will
be notified in advance to give you an opportunity to maintain
uninterrupted telephone service.
If you experience trouble with this telephone equipment,
please contact Digital Monitoring Products, Incorporated,
2841 E. Industrial Drive, Springfield, MO 65802, for information on obtaining service or repairs. The telephone
company may ask that you disconnect this equipment from
the network until the problem has been corrected or until
you are sure that the equipment is not malfunctioning.
This equipment may not be used on coin service provided
by the telephone company. Connection to party lines is
subject to state tariffs.
The device is equipped with an USOC RJ31X connector.
Page 3

Model 670, 770, 771 Security Command
User's Guide
For use with DMP Series 1512 Controls
Copyright © 1992 – 1993 Digital Monitoring Products, Incorporated.
Information furnished by DMP is believed to be accurate and reliable.
This information is subject to change without notice.
TABLE OF CONTENTS
Special SECURITY COMMAND messages .......... 2
Special SECURITY COMMAND tones.................. 2
Special SECURITY COMMAND keys ................... 3
Terms ..................................................................... 4
Status ..................................................................... 5
Closing Check/Extend ............................................ 6
System Arming and Disarming For Area System.... 7
Area System Arming ........................................ 8
Area System Disarming ................................... 9
System Arming and Disarming For All/Permieter.. 10
All/Perimeter Arming ...................................... 11
All/Perimeter Disarming ................................. 12
Menu Options
Alarm Silence................................................. 13
Fire Reset ...................................................... 14
Door Access .................................................. 15
Armed Areas .................................................. 16
Loop Status.................................................... 17
Bypass Loops ................................................ 18
Loop Monitor .................................................. 19
System Status................................................ 20
System Test ................................................... 21
User Codes .................................................... 22
Schedules ...................................................... 2 6
Time............................................................... 28
Remote Authorize .......................................... 29
Display Events ............................................... 30
1
Page 4

Special SECURITY COMMAND Messages
Special SECURITY COMMAND Tones
ENTER CODE:- This message will be displayed when the
COMMANDCOMMAND
COMMAND is requesting a code number. Code numbers are needed for arming,
COMMANDCOMMAND
disarming, and many of the various system options. When you press the
SECURITY COMMANDSECURITY COMMAND
SECURITY COMMAND keys to enter your code number the numbers you enter will
SECURITY COMMANDSECURITY COMMAND
not be displayed. Instead a * will be displayed for each digit. This is to keep other
people from seeing your code number when you enter it. Always press COMMAND
after you complete the entry of your code number.
TRY AGAIN This message is displayed when a code number is
entered the first time which does not exist in the alarm system memory.
INVALID CODE This message is displayed when a code number is
entered a second time which does not exist in the alarm system memory.
INVALID LEVEL This message may be displayed when trying to access
one of the Menu Options. When a code number is entered which is in the alarm
system memory, but is not a high enough level to access a particular Menu Option,
this message will be displayed.
INVALID TIME This message is displayed when a level 1 or 2 code
number is entered outside permanent or temporary schedules. Level 1 or 2 codes
will function only during a permanent or temporary schedule.
SERVICE REQUIRED
failure in your alarm system. You should contact your alarm dealer if this message
is ever displayed.
This message is displayed when there is an electronic
SECURITYSECURITY
SECURITY
SECURITYSECURITY
Keystroke tone:Keystroke tone:
Keystroke tone: Short beep. This short beep is emitted each time a key is pressed
Keystroke tone:Keystroke tone:
on the SECURITY COMMAND.
Prewarn tone:Prewarn tone:
Prewarn tone: Pulsed tone, one second on, one second off, continuous. This tone
Prewarn tone:Prewarn tone:
is emitted after an entry delay door is opened to remind you to disarm your burglary
system.
Monitor tone:Monitor tone:
Monitor tone: Pulsed tone, one second on then off, one pulse only. This tone is
Monitor tone:Monitor tone:
emitted when using the loop monitor option. The tone will be emitted every time
the loop is displayed in the alert condition.
Trouble tone:Trouble tone:
Trouble tone: Steady tone, always on. When using the Status Display option this
Trouble tone:Trouble tone:
tone will be emitted for any fire or system trouble until the tone is acknowledged by
pressing any top row select key on the SECURITY COMMAND.
2
Page 5
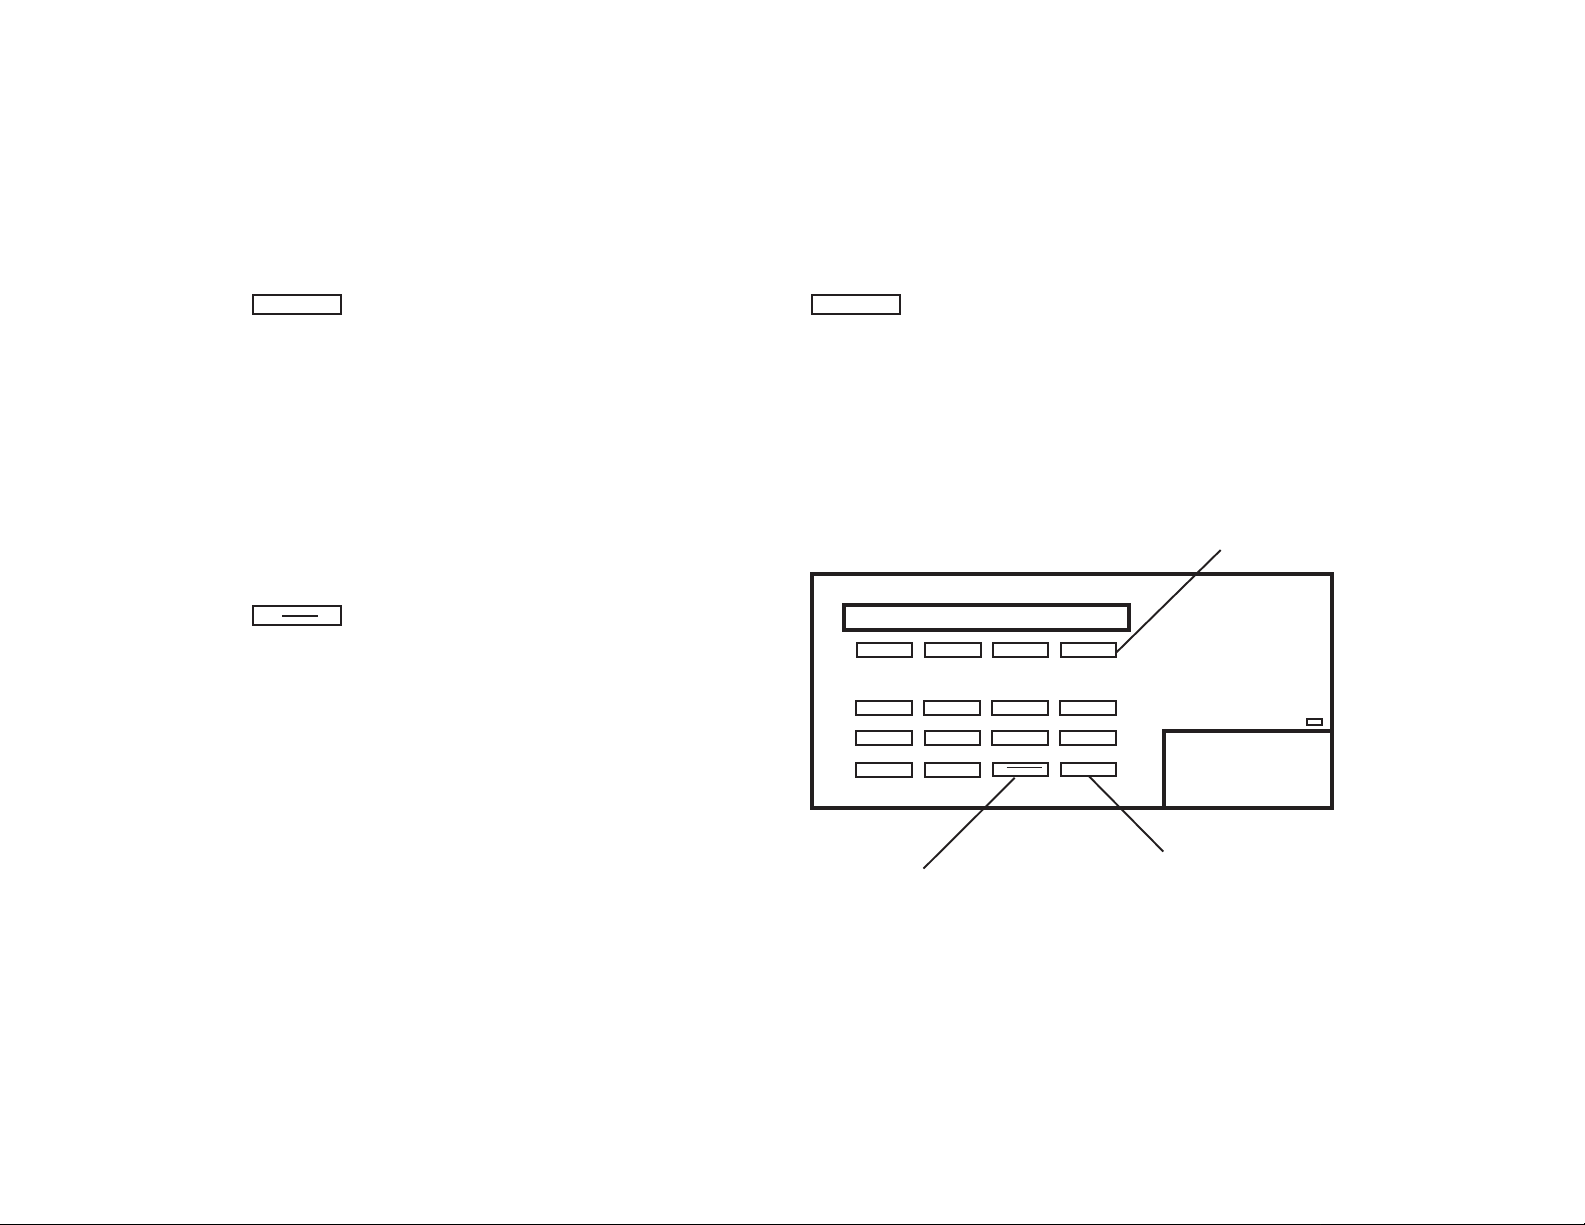
Special SECURITY COMMAND Keys
COMMAND
The COMMAND key is used to speed up system operation. It can be pressed to go
“forward” one step during various operations of your alarm system. It can go
forward through the list of Menu Options or through each step of a particular Menu
Option. The COMMAND key is excellent for quickly stepping through a list of
information such as the names of the armed loops in the Loop Status Menu Option.
The COMMAND key is also used when entering information, such as code numbers
or a loop number. Think of it as a carriage return on a typewriter and press it when
you have entered information on the keypad and you are ready for the SECURITY
COMMAND to take it. The information requested by the SECURITY COMMAND
must be entered first. The COMMAND key will not skip past a step that requires
you to make an entry.
▲
The back arrow is used for “backing up” when operating your system. It can be
pressed to back up through the list of Menu Options or when entering information
such as a code number. If an error is made while entering information press the
back arrow and the character will be erased.
The back arrow will also back up a step in the operation of any Menu Option. If the
back arrow is pressed at the first step in a Menu Option the option will terminate.
This is a quick way to exit a Menu Option when you are finished with it. The back
arrow will not back up through a list of information within a Menu Option, such as
Alarmed Loops or System Status.
The top row of keys are called the select keys. Each time a select key is to be used
its function will be labeled by the display above it. By labeling each key with the
display they can be used for many different applications such as entering AM or PM
when setting time or selecting which areas of your system you want to arm during
system arming. The most common use is selecting a Menu Option. This is done
by pressing any one of the select keys when the name of the Menu Option is
displayed.
Select keys
1
ABC DEF GHI JKL
5
9
6
MNO PQR STU VWX
0
YZ
32
7
Back Arrow key
4
8
▲
COMMAND
Command key
3
Page 6

TERMS
Loop:
Loop describes the wiring run from your alarm control cabinet to each protection
point in your alarm. Therefore each door, window, motion detector, smoke
detector, etc. which has been individually wired to the alarm control cabinet via a
“loop” of wire is referred to as a loop. Since every loop can have a name and number
the SECURITY COMMAND can use these to identify a protection point for you.
Like, loop: 3 Front Door or loop: 12 Smoke Detector.
Entry/ Exit loop:
A loop which has an entry and exit delay time assigned. Each time the loop is armed
it will ignore any trips until the exit delay expires. When the system is armed and
the loop is tripped an alarm signal will not be transmitted if the loop is disarmed
before the delay expires. This allows you to enter the alarm system through the
entry door so you can disarm the system at the
Instant Loop:
A loop which has no entry/exit delay. If this loop is tripped when armed an alarm
will be transmitted.
24 Hour Loop:
A loop which is always armed. It is not controlled by arming and disarming.
Example: Fire loop, panic loop, etc.
SECURITY COMMAND SECURITY COMMAND
SECURITY COMMAND keypad.
SECURITY COMMAND SECURITY COMMAND
Areas:
A group of loops assigned together for arming and disarming. Each loop in your
burglary system must be assigned to an area. These loops are then armed and
disarmed by area. Example: The basement area may be made up of the basement
door loop, the basement window loop and the basement motion detector loop. By
arming the basement area all three loops would be armed. 24 hour loops are not
assigned to an area since they are always armed.
Transmit:
Reporting alarms, troubles, system disarming, etc. to a central station receiver.
Your system can be programmed to report alarms, troubles, or any combination of
the many system reports to a central station receiver. You should consult your alarm
dealer for information about which reports will be transmitted. When a combination
burglary and fire alarm system is installed all fire transmissions will have priority
over burglary transmissions.
4
Page 7

STATUS
Status is a system feature which automatically displays the armed or disarmed
status of your burglary system, as well as any alarm or trouble conditions of a loop
or internal system monitor. You can choose to have all of the available status
information displayed, only selected items, or no status display at all. You can also
choose which
are programmed during system installation. All of the available status information
is described in this section.
Status works automatically when the
other function. This could be right after system arming or disarming is complete or
just after you have finished using a menu option. The
will stay in Status until you choose to go to system arming/disarming or a menu
option.
Armed Status:
Armed Status will display the current armed condition of your burglary system in
one of two ways. If this is an area arming system, the area number is displayed
if the area is armed.
Examples: Both areas are armed = 1 2
Area 2 is armed = 2
If this is an all/perimeter system and the interior or perimeter is armed the display
will read ON .
Armed Status will display at all SECURITY COMMANDS in the system. If no areas
are armed the display will be blank.
SECURITY COMMANDSECURITY COMMAND
SECURITY COMMANDs will display the Status List. These options
SECURITY COMMANDSECURITY COMMAND
SECURITY COMMANDSECURITY COMMAND
SECURITY COMMAND is not performing any
SECURITY COMMANDSECURITY COMMAND
SECURITY COMMANDSECURITY COMMAND
SECURITY COMMAND
SECURITY COMMANDSECURITY COMMAND
Status List:
Status List will display any alarm or trouble condition on a loop, and any trouble
condition on any internal system monitor. The system monitors are AC power,
battery power, panel box tamper and phone line monitor. If more than one alarm
or trouble condition is displayed the
through the list.
SECURITY COMMANDSECURITY COMMAND
SECURITY COMMAND will continue to scroll
SECURITY COMMANDSECURITY COMMAND
5
Page 8

CLOSING CHECK/EXTEND
Opening and Closing Schedules Opening and Closing Schedules
Opening and Closing Schedules may be utilized to check to see if the burglary
Opening and Closing Schedules Opening and Closing Schedules
system is armed by a scheduled time each day. The closing check feature will verify
that all areas of the system are armed when the permanent and temporary schedule
expires. If an area is not armed the keypad will display CLOSING TIME.* The
steady trouble tone will also sound. If the system is not armed or a schedule
extended within ten minutes, a no closing report will be transmitted to the central
station receiver.
Step by Step:Step by Step:
Step by Step:
Step by Step:Step by Step:
1. When a schedule expires
the steady trouble tone will sound.
2. Press any top row key to silence the tone. The display will read
ENTER CODE:- ENTER CODE:-
ENTER CODE:- .
ENTER CODE:- ENTER CODE:-
CLOSING TIME!CLOSING TIME!
CLOSING TIME! *will be displayed and
CLOSING TIME!CLOSING TIME!
The closing schedule can be lengthened by entering a temporary schedule or using
the extend feature. The extend function step by step follows. Temporary schedules
are described in the schedule menu option section.
If an area has been disarmed outside of any permanent or temporary schedule, the
closing check sequence will occur one hour after the area was disarmed.
Extending A Schedule Extending A Schedule
Extending A Schedule is accomplished by pressing a top row key to silence the
Extending A Schedule Extending A Schedule
closing time display. After a valid code number is accepted the keypad will request
the new closing time. Any time may be entered up to 11:59 p.m. If no time is entered
the closing time will be extended for one hour.
6
3. Enter at least a level six code number and press
.
The display will read
4. Enter the new closing time and press the or
key.
5. If no time is entered in step 4, the schedule will be extended for one hour
* If the system has been programmed to provide independent schedules per
area, the closing time will be replaced by
- : AM PM - : AM PM
- : AM PM .
- : AM PM - : AM PM
AM PM
COMMAND
AREA NAME-LATE AREA NAME-LATE
AREA NAME-LATE .
AREA NAME-LATE AREA NAME-LATE
Page 9

SYSTEM ARMING AND DISARMING FOR AN AREA SYSTEM
Area Assignment:Area Assignment:
Area Assignment: The Area Arming system can contain one or two individual
Area Assignment:Area Assignment:
areas. Your burglary alarm system has been divided into ___ separate areas. The
specific area names should be listed below for easy reference.
Area Name
_______-_______________________
_______-_______________________
Arming or Disarming: Arming or Disarming:
Arming or Disarming: The first choice to be made is if you wish to arm or disarm.
Arming or Disarming: Arming or Disarming:
Arming or disarming may be done for all areas at one time or each area may be
controlled individually. If a code number is required you will only be allowed to
control the areas which are assigned to your code number.
Arming:Arming:
Arming: When arming is selected a code number may be required. This is
Arming:Arming:
optional. The option is programmed during system installation. If a code number is
required you will only be able to arm the areas which are assigned to your code
number. If no code number is required you will be able to arm all areas.
All Or Selective Arming:All Or Selective Arming:
All Or Selective Arming: After entering your code number you will be asked if
All Or Selective Arming:All Or Selective Arming:
you wish to arm all of the areas to which you have access or only a selected area.
If you choose to arm all areas the system will begin checking to see that all loops
are in a good condition. If you choose to arm a selective area the
COMMANDCOMMAND
COMMAND will allow you to choose the individual area you want to arm before
COMMANDCOMMAND
beginning the loop check.
Bypassing:Bypassing:
Bypassing: After you have made your arming selection the
Bypassing:Bypassing:
COMMANDCOMMAND
COMMAND will display any loops which have been bypassed prior to arming . This
COMMANDCOMMAND
is for your information only and they may not be reset during arming. They will
remain bypassed until disarmed or reset. Any 24 hour loops which are in a bad
condition will also be displayed. The system will then check to see that all doors
and windows which will be armed are closed and that any motion detectors, etc.,
are set properly.
SECURITYSECURITY
SECURITY
SECURITYSECURITY
SECURITYSECURITY
SECURITY
SECURITYSECURITY
If no problems exist the areas you have selected will be armed. If a problem does
exist on one or more loops the
and allow you to bypass those loops. If the problems can be corrected by simply
closing a door or window you should not bypass. You should correct the problems
and repeat the arming procedure. If the loop or loops are in some way damaged
and cannot be corrected they may be bypassed. Bypassing a loop means it will be
ignored while the system is armed. A code number may be required to bypass. This
is optional and is programmed during system installation.
Armed Message:Armed Message:
Armed Message: After all loops are bypassed or corrected the areas you selected
Armed Message:Armed Message:
will be armed. The
areas are armed. The display will read “SYSTEM ON” if all areas are not armed.
The display will then show you the exit delay. Any exit loops will not be armed until
the delay expires.
One Moment Message:One Moment Message:
One Moment Message: Your system may be programmed to wait for the
One Moment Message:One Moment Message:
transmission of the arming signal to the central station receiver before displaying
the Armed Message. This is to insure that your phone lines are working properly.
While the system is waiting for the transmission the display will read “ONE
MOMENT...”. If the test is okay the Armed Message will be displayed. If the test
fails the display will read “LOCAL ALARM ONLY” before displaying the Armed
Message. If this is a multiplex communicating system and the closing report can
only be accomplished via a digital backup, the display will read "DIGITAL ALARM
ONLY". This communication test is optional and is programmed during system
installation.
Arming Report:Arming Report:
Arming Report: A report of the system arming or loops which were bypassed
Arming Report:Arming Report:
can be transmitted to your central station. This is optional and is programmed
during system installation.
SECURITY COMMANDSECURITY COMMAND
SECURITY COMMAND will display “ALL SYSTEM ON” if all
SECURITY COMMANDSECURITY COMMAND
SECURITY COMMANDSECURITY COMMAND
SECURITY COMMAND will display the problems
SECURITY COMMANDSECURITY COMMAND
7
Page 10

Step By Step:Step By Step:
Step By Step:
Step By Step:Step By Step:
1. Press the key until
ARM
2. Press to arm areas.
COMMAND
AREA SYSTEM ARMING
ARM DISARMARM DISARM
ARM DISARM is displayed.
ARM DISARMARM DISARM
6. Loops which have been bypassed prior to arming and bad 24 hour loops will
be displayed. No action is required by you.
7. Bypass any bad loops if required (step 7a, 7b, 7c)
7a. If a problem exists on one or more loops, the loop name and problem will
be displayed followed by
BYPASS? NO YESBYPASS? NO YES
BYPASS? NO YES
BYPASS? NO YESBYPASS? NO YES
3. Enter your code number if required. The display will read
ALL NO YES ALL NO YES
ALL NO YES
ALL NO YES ALL NO YES
NO
4. Press to arm selective areas. Go to step 5.
YES
Press to arm all areas to which you have access. Go to step 6.
5. If NO is selected in step 4 the display will list each area to which you have
access, followed by NO and YES. Example:
YES
5a. Press for every area you wish to arm.
NO
5b. Press for every area you do not wish to arm.
OFFICE NO YESOFFICE NO YES
OFFICE NO YES
OFFICE NO YESOFFICE NO YES
8
NO
7b. Select to stop the arming sequence without bypassing
any loops. Correct the problem and return to step 1.
YES
Select to bypass all loops displayed as bad.
7c. Enter your code number if required to bypass loops.
8. The display will read
system is armed, and
armed.
9. The exit time will be displayed in seconds and begin counting down,
EXIT : XXEXIT : XX
EXIT : XX . When the delay expires the exit loops will be armed.
EXIT : XXEXIT : XX
SYSTEM ON SYSTEM ON
SYSTEM ON
SYSTEM ON SYSTEM ON
ALL SYSTEM ONALL SYSTEM ON
ALL SYSTEM ON if all areas in the system are
ALL SYSTEM ONALL SYSTEM ON
if at least one area in the
Page 11

AREA SYSTEM DISARMING
Disarming:Disarming:
Disarming: You should enter the premises through an entry/exit delay door. By
Disarming:Disarming:
doing this the
disarm. Entering a delay door prior to disarming is not required. When disarming
is selected a code number may be required. This is optional. A code number may
not be required within permanent or temporary schedules, or the system may be
programmed to always require a code regardless of time. If a code is required you
should note that level 2 User Codes only function during permanent or temporary
schedules. If a code number is required you will only be allowed to control the areas
which are assigned to your code number.
All Or Selective Disarming:All Or Selective Disarming:
All Or Selective Disarming: After entering your code number you will be asked
All Or Selective Disarming:All Or Selective Disarming:
if you wish to disarm all of the areas to which you have access or only a selected
area. If you choose to disarm all areas the system will disarm them all. If you choose
to disarm a selective area the
individual area you want to disarm.
SECURITY COMMANDSECURITY COMMAND
SECURITY COMMAND prewarn tone will pulse to remind you to
SECURITY COMMANDSECURITY COMMAND
SECURITY COMMANDSECURITY COMMAND
SECURITY COMMAND will allow you to choose the
SECURITY COMMANDSECURITY COMMAND
Step By Step:Step By Step:
Step By Step:
Step By Step:Step By Step:
1. Press the key until
(Note: during entry delay the display immediately jumps to step 3.)
DISARM
2. Press to disarm areas.
3. Enter your code number if required. The display will read
ALL NO ALL NO
ALL NO
ALL NO ALL NO
NO
4. Press to disarm selective areas. Go to step 5.
YES
Press to disarm all areas to which you have access.
Go to step 6.
COMMAND
YES YES
YES
YES YES
.
ARM DISARM ARM DISARM
ARM DISARM is displayed.
ARM DISARM ARM DISARM
Alarm Display:Alarm Display:
Alarm Display: After selecting your areas the
Alarm Display:Alarm Display:
any loops which tripped in the areas you are disarming or any transmission
problems which occurred during the armed period. All burglary loops in the areas
you selected are then disarmed and any bypassed loops are automatically reset.
Disarmed Message:Disarmed Message:
Disarmed Message: After disarming, the
Disarmed Message:Disarmed Message:
“ALL SYSTEM OFF” if all areas are now disarmed.
Central Station Report:Central Station Report:
Central Station Report: A report of the system disarming can be transmitted to
Central Station Report:Central Station Report:
your Central Station. This is optional and is programmed at the time of system
installation.
SECURITY COMMANDSECURITY COMMAND
SECURITY COMMAND will display
SECURITY COMMANDSECURITY COMMAND
SECURITY COMMAND SECURITY COMMAND
SECURITY COMMAND will display
SECURITY COMMAND SECURITY COMMAND
5. If NO is selected in step 4 the display will list each area to which you have
access, followed by NO and YES. Example:
YES
5a. Press for every area you wish to disarm.
NO
5b. Press for every area you do not wish to disarm.
6. Any loops which tripped or any communication problems which occurred
during the armed period are automatically displayed.
7. The display will read
now disarmed.
ALL SYSTEM OFFALL SYSTEM OFF
ALL SYSTEM OFF if all areas in the system are
ALL SYSTEM OFFALL SYSTEM OFF
OFFICE NO YES OFFICE NO YES
OFFICE NO YES .
OFFICE NO YES OFFICE NO YES
9
Page 12

SYSTEM ARMING FOR ALL/PERIMETER SYSTEM
Area Assignment:Area Assignment:
Area Assignment: Your burglary alarm system has been divided into two separate
Area Assignment:Area Assignment:
areas. Interior loops like motion detectors, inside doors, etc., have been assigned
to the interior area. Perimeter loops like windows, outside doors, etc., have been
assigned to the perimeter area. The specific loop names and their area assignment
are listed below for easy reference.
Interior area Perimeter area
Loop Name Loop Name
____ _________________________ ____ ________________________
____ _________________________ ____ _______________________
____ _________________________ ____ ______________________
____ _________________________ ____ ______________________
____ _________________________ ____ ______________________
____ _________________________ ____ ______________________
____ _________________________ ____ ______________________
____ _________________________ ____ ______________________
____ _________________________ ____ ______________________
____ _________________________ ____ ______________________
All or Perimeter: All or Perimeter:
All or Perimeter: When arming your system you may arm only the perimeter area
All or Perimeter: All or Perimeter:
if you are remaining inside, or arm both areas if you are leaving. The use of a code
number for system arming is optional. This option is programmed during system
installation.
Bypassing: Bypassing:
Bypassing: After you have made your arming selection and have entered your
Bypassing: Bypassing:
code number, if required, the
have been bypassed prior to arming. This is for your information only. They will
remain bypassed until disarmed or reset using the Bypass Loops menu option. Any
24 hour loops which are in a bad condition will also be displayed.
The system will then check to see that all doors and windows which will be armed
are closed and that any motion detectors, etc., are set properly. If no problems exist
the system will be armed. If a problem does exist on one or more loops the
10
SECURITY COMMANDSECURITY COMMAND
SECURITY COMMAND will display any loops which
SECURITY COMMANDSECURITY COMMAND
SECURITY COMMANDSECURITY COMMAND
SECURITY COMMAND will display the problems and allow you to bypass those
SECURITY COMMANDSECURITY COMMAND
loops. If the problem can be corrected by simply closing a door or window you
should not bypass. You should correct the problems and repeat the arming
procedure. If the loop or loops are in some way damaged and cannot be corrected
they may be bypassed. Bypassing a loop means it will be ignored while the system
is armed. A code number may be required to bypass. This is optional and is
programmed during system installation.
Armed Message:Armed Message:
Armed Message:
Armed Message:Armed Message:
armed. The
only the perimeter is armed or “ALL SYSTEM ON” if both have been armed. The
display will then show you the exit delay. Any exit loops will not be armed until the
delay expires. All other non-exit loops are armed immediately.
One Moment Message:One Moment Message:
One Moment Message:
One Moment Message:One Moment Message:
transmission of the arming signal to the central station receiver before displaying
the Armed Message. This is to ensure that your phone lines are working properly.
While the system is waiting for the transmission the display will read “ONE
MOMENT...”. If the test is okay the Armed Message will be displayed. If the test
fails the display will read “LOCAL ALARM ONLY” before displaying the Armed
Message. If this is a multiplex communicating system and the closing report can
only be accomplished via a digital backup, the display will read "DIGITAL ALARM
ONLY". This communication test is optional and is programmed during system
installation.
Instant:Instant:
Instant:
If you wish to cancel all exit and entry times, causing all loops to be instant
Instant:Instant:
loops, you should press the “INSTANT” key while the exit delay is being displayed.
This immediately arms all entry/exit loops and there will be no entry delay when the
system is disarmed.
Arming Reports: Arming Reports:
Arming Reports: A report of the system arming or loops which were bypassed
Arming Reports: Arming Reports:
can be transmitted to your central station. This is optional and is programmed
during system installation.
After all loops are bypassed or corrected the system will be
SECURITY COMMANDSECURITY COMMAND
SECURITY COMMAND will display the “SYSTEM ON” message if
SECURITY COMMANDSECURITY COMMAND
Your system may be programmed to wait for the
Page 13

ALL/PERIMETER ARMING
Step By Step:Step By Step:
Step By Step:
Step By Step:Step By Step:
1. Press the key until
PERIM
2. Press to arm areas.
ALL
Press to arm areas.
3. Enter your code number if required.
4. Loops which have been bypassed prior to arming and 24 hour loops which
are in a bad condition will be displayed. No action is required by you.
5. Bypass any bad loops if required (step 5a, 5b, 5c).
5a. If a problem exists on one or more loops the loop name and problem will
be displayed and followed by
NO
5b. Select to stop the arming sequence without bypassing
any loops. Correct the problem and return to step 1.
YES
Select to bypass all non-24 hour loops displayed as bad.
5c. Enter your code number if required to bypass loops.
COMMAND
PERIM ALLPERIM ALL
PERIM ALL is displayed.
PERIM ALLPERIM ALL
BYPASS? NO YES BYPASS? NO YES
BYPASS? NO YES .
BYPASS? NO YES BYPASS? NO YES
6. The display will read
ALL SYSTEM ONALL SYSTEM ON
and
ALL SYSTEM ON if both the perimeter and interior are armed.
ALL SYSTEM ONALL SYSTEM ON
7. The exit time will be displayed in seconds and begin counting down,
EXIT DELAY: XXEXIT DELAY: XX
EXIT DELAY: XX . When the delay expires the exit loops will be
EXIT DELAY: XXEXIT DELAY: XX
armed.
INSTNT
8. Press while the exit delay is displayed to immediately
arm all exit loops and make them instant.
SYSTEM ONSYSTEM ON
SYSTEM ON if only the perimeter is armed,
SYSTEM ONSYSTEM ON
11
Page 14

ALL/PERIMETER DISARMING
To disarm your burglary system you should enter the premises through an entry/
exit delay door. By doing this the SECURITY COMMAND prewarn tone will pulse
to remind you to disarm. Entering a delay door prior to disarming is not required
however, you can simply press COMMAND until DISARM? is displayed and
proceed from that point.
Code number:Code number:
Code number: A code number may be required when disarming. If this is a
Code number:Code number:
residential system a code number is normally required to disarm. If this is a
commercial system a code number may not be required within permanent or
temporary scheduled opening times. This is optional. The system may be programmed to always require a code regardless of time. If this is the case you should
note that level 2 User Codes only function during temporary or permanent
scheduled opening times. The disarming code options are programmed during
system installation.
Alarm Display:Alarm Display:
Alarm Display: After entering a code number, if required, the SECURITY
Alarm Display:Alarm Display:
COMMAND will display any loops which tripped or any transmission problems
which occurred during the armed period. All burglary loops are then disarmed and
any bypassed loops are automatically reset.
Central Station Report:Central Station Report:
Central Station Report: A report of the system disarming can be transmitted to
Central Station Report:Central Station Report:
your Central Station. This is optional and is programmed at the time of system
installation.
Step By Step:Step By Step:
Step By Step:
Step By Step:Step By Step:
1. Press the key until
(Note: during entry delay the display immediately jumps to step 3.)
2. When
select keys.
3. Enter your code number if required. If a code number is not required the
display will read
4. Any loops which tripped or any communication problems which occurred
during the armed period are automatically displayed.
5. The display will read
disarmed.
COMMAND
DISARM?DISARM?
DISARM? is displayed press any one of the top four
DISARM?DISARM?
PRESS COMMAND PRESS COMMAND
PRESS COMMAND during entry delay only.
PRESS COMMAND PRESS COMMAND
ALL SYSTEM OFFALL SYSTEM OFF
ALL SYSTEM OFF to confirm that the system is
ALL SYSTEM OFFALL SYSTEM OFF
DISARM? DISARM?
DISARM? is displayed.
DISARM? DISARM?
12
Page 15

ALARM SILENCE
FIRE RESET
User Code Level:User Code Level:
User Code Level: 2-During permanent or temporary schedules only
User Code Level:User Code Level:
3-Anytime
Function:Function:
Function: Silences alarm bell
Function:Function:
Alarm Silence is used to silence the alarm bell or siren of your alarm system. When
selected you will be asked to enter your code number. When the code number
is accepted the alarm bell or siren will be turned off.
Step By Step:Step By Step:
Step By Step:
Step By Step:Step By Step:
1. Press the key until
2. When
select keys. The display will read
3. Enter your code number and press . The alarm bell or siren
will be turned off.
COMMAND
ALARM SILENCE? ALARM SILENCE?
ALARM SILENCE? is displayed press any one of the top four
ALARM SILENCE? ALARM SILENCE?
ALARM SILENCE? ALARM SILENCE?
ALARM SILENCE? is displayed.
ALARM SILENCE? ALARM SILENCE?
ENTER CODE: - ENTER CODE: -
ENTER CODE: - .
ENTER CODE: - ENTER CODE: -
COMMAND
User Code Level:User Code Level:
User Code Level: 1- During permanent or temporary schedules only
User Code Level:User Code Level:
3- Anytime
Function:Function:
Function: Resets smoke detectors
Function:Function:
Fire Reset is used to reset smoke detectors after they have been tripped. Once a
smoke detector has been tripped it must be reset before it will function again. When
Fire Reset is selected the smoke detectors are automatically reset. Insure that all
smoke is cleared from the detector before resetting.
Step By Step:Step By Step:
Step By Step:
Step By Step:Step By Step:
1. Press the key until
2. When
select keys. The display will read
3. Enter your code number and press . The display will read
DETECTORS OFF DETECTORS OFF
DETECTORS OFF then change to
DETECTORS OFF DETECTORS OFF
confirm that the smoke detectors have been reset.
COMMAND
FIRE RESET? FIRE RESET?
FIRE RESET? is displayed press any one of the top four
FIRE RESET? FIRE RESET?
FIRE RESET? FIRE RESET?
FIRE RESET? is displayed.
FIRE RESET? FIRE RESET?
ENTER CODE:- ENTER CODE:-
ENTER CODE:- .
ENTER CODE:- ENTER CODE:-
COMMAND
DETECTORS ON DETECTORS ON
DETECTORS ON to
DETECTORS ON DETECTORS ON
13
Page 16

DOOR ACCESS
User Code Level:User Code Level:
User Code Level: 1- During permanent or temporary schedules only
User Code Level:User Code Level:
3- Anytime
Function:Function:
Function: To operate the door strike
Function:Function:
Door Access is used to operate the door strike at a single
When Door Access is selected you will be asked to enter your code number. When
the code number is accepted the door strike at the
are operating will turn on for five seconds.
Door Access also functions any time any area of the system is disarmed at the door
strike keypad or by simply entering your code number and pressing COMMAND.
A report of this entry can be transmitted to your central station. This report is
optional and is programmed during system installation.
SECURITY COMMANDSECURITY COMMAND
SECURITY COMMAND
SECURITY COMMANDSECURITY COMMAND
SECURITY COMMANDSECURITY COMMAND
SECURITY COMMAND you
SECURITY COMMANDSECURITY COMMAND
Step By Step:Step By Step:
Step By Step:
Step By Step:Step By Step:
1. Press the key until
2. When
.
select keys. The display will read
3. Enter your code number and press . The door strike will turn
on for five seconds.
COMMAND
DOOR ACCESS?DOOR ACCESS?
DOOR ACCESS? is displayed press any one of the top four
DOOR ACCESS?DOOR ACCESS?
DOOR ACCESS?DOOR ACCESS?
DOOR ACCESS? is displayed.
DOOR ACCESS?DOOR ACCESS?
ENTER CODE: - ENTER CODE: -
ENTER CODE: - .
ENTER CODE: - ENTER CODE: -
COMMAND
14
Page 17

ARMED AREAS
User Code Level:User Code Level:
User Code Level: None
User Code Level:User Code Level:
Function:Function:
Function: Displays all armed areas
Function:Function:
Armed Areas is used to display all of the armed areas in your system. Each area
that is armed will be displayed with area number and name.
Step By Step:Step By Step:
Step By Step:
Step By Step:Step By Step:
1. Press the key until
2. When
select keys. The display will list each armed area one at a time.
3. If no areas are armed the display will read
COMMAND
ARMED AREAS? ARMED AREAS?
ARMED AREAS? is displayed press any one of the top four
ARMED AREAS? ARMED AREAS?
ARMED AREAS? ARMED AREAS?
ARMED AREAS? is displayed.
ARMED AREAS? ARMED AREAS?
NONE NONE
NONE .
NONE NONE
15
Page 18

LOOP STATUS
User Code Level:User Code Level:
User Code Level: None
User Code Level:User Code Level:
Function:Function:
Function: Displays a list of armed, bypassed, or alarmed loops; or checks the
Function:Function:
status of individual loops.
Loop Status can be used to give you a list of loops by category or display the current
status of an individual loop number. The three categories are:
1) Armed Loops; loops which are currently armed.
2) Bypassed Loops; loops which are currently bypassed.
3) Alarmed Loops; loops which have tripped during the current
or previous armed period.
When Loop Status is selected you will be asked which kind of display you want to
see. If you choose one of the three categories, the list of loops in that category will
follow immediately, including loop number and name. If you choose to enter an
individual loop number you will be asked for the specific number then the loop name
and status will be displayed.
Step By Step:Step By Step:
Step By Step:
Step By Step:Step By Step:
ARM
3. Press for a list of loops which are currently armed.
BYPS
Press for a list of loops which are currently bypassed.
ALR
Press for a list of loops which have tripped during the current
or previous armed period.
NBR
Press and
4. If NBR is selected enter the desired loop number and press
The loop name will be displayed followed by its current status:
-OKAY = loop in normal condition
-BYPAS = loop is bypassed
-BAD O = loop is open
-BAD S = loop is shorted
5. After displaying the loop status the display will return for another loop number.
LOOP: - LOOP: -
LOOP: - will be displayed.
LOOP: - LOOP: -
COMMAND
1. Press the key until
2. When
select keys. The display will read
COMMAND
LOOP STATUS? LOOP STATUS?
LOOP STATUS? is displayed press any one of the top four
LOOP STATUS? LOOP STATUS?
16
LOOP STATUS? LOOP STATUS?
LOOP STATUS? is displayed.
LOOP STATUS? LOOP STATUS?
ARM ARM
BYPS BYPS
ALR ALR
ARM
ARM ARM
BYPS
BYPS BYPS
ALR
ALR ALR
NBR NBR
NBR .
NBR NBR
Page 19

BYPASS LOOPS
User Code Level:User Code Level:
User Code Level: 6
User Code Level:User Code Level:
Function:Function:
Function: Bypasses and Resets loops prior to arming.
Function:Function:
Bypass Loops is used to bypass individual loops from the alarm system. This is
usually done because the loop is inoperative. Bypassing means the alarm system
will not respond to any activity on the bypassed loop except that the loop name will
still appear in the Alarmed Loops list. A loop may be bypassed only while it is
disarmed. Since fire, panic, emergency, and supervisory type loops are always
armed they can never be bypassed. Bypassing may also be done during system
arming.
Bypass Loops can also be used to reset a loop, which has been bypassed, back
into the system. This can only be done while the loop is still disarmed. A bypassed
loop is automatically reset during system disarming.
When Bypass Loops is selected you will be asked to enter your code number.
When the code number is accepted you may enter the desired loop number and
bypass or reset it. A report of bypassed or reset loops can be transmitted to your
central station. This report is optional and is programmed during system installation.
Step By Step:Step By Step:
Step By Step:
Step By Step:Step By Step:
1. Press the key until
2. When
select keys. The display will read
3. Enter your code number and press . The display will read
LOOP: - RST BYPS LOOP: - RST BYPS
LOOP: - RST BYPS .
LOOP: - RST BYPS LOOP: - RST BYPS
4. Enter the desired loop number and press to reset or
BYPS
5. The loop number will automatically disappear and a new loop number may
be entered in step 4.
COMMAND
BYPASS LOOPS? BYPASS LOOPS?
BYPASS LOOPS? is displayed press any one of the top four
BYPASS LOOPS? BYPASS LOOPS?
to bypass.
BYPASS LOOPS? BYPASS LOOPS?
BYPASS LOOPS? is displayed.
BYPASS LOOPS? BYPASS LOOPS?
ENTER CODE: - ENTER CODE: -
ENTER CODE: - .
ENTER CODE: - ENTER CODE: -
COMMAND
RST
17
Page 20

LOOP MONITOR
User Code Level: 4
Function: Function:
Function: Monitor selected disarmed loops and display their name when tripped.
Function: Function:
Loop Monitor will monitor any disarmed loop and will display the loop name and
sound the keypad monitor tone when the loop trips. The loop will be displayed at
SECURITY COMMANDSECURITY COMMAND
all
SECURITY COMMANDs in the system. Any combination of disarmed loops
SECURITY COMMANDSECURITY COMMAND
may be placed in Loop Monitor. If more than one loop is in Loop Monitor the last
loop that tripped will be displayed. When the loop is armed the name is cleared.
Loop Monitor display will alternate with Armed Display and Status List. Armed
Display and Status List are optional. The options are selected at the time the
system is programmed.
Step By Step:Step By Step:
Step By Step:
Step By Step:Step By Step:
1. Press the key until
2. When
select keys. The display will read
3. Enter your code number and press . The display will read:
PERIM ALL NBR PERIM ALL NBR
PERIM ALL NBR .
PERIM ALL NBR PERIM ALL NBR
COMMAND
LOOP MONITOR? LOOP MONITOR?
LOOP MONITOR? is displayed press any one of the top four
LOOP MONITOR? LOOP MONITOR?
LOOP MONITOR?LOOP MONITOR?
LOOP MONITOR? is displayed.
LOOP MONITOR?LOOP MONITOR?
ENTER CODE: -ENTER CODE: -
ENTER CODE: - .
ENTER CODE: -ENTER CODE: -
COMMAND
PERIM
4. Press to place all disarmed perimeter loops into loop monitor.
(PERIM is displayed on all/perimeter systems only.)
ALL
Press to place all disarmed loops into loop monitor.
NBR
Press to enter a specific loop number for loop monitor.
5. If ALL or PERIM is selected the display will ask if the loops are to be added
or removed from loop monitor.
6. If NBR is selected the display will read
6a. Enter the desired loop number and press to add to, or
RMV
to remove from Loop Monitor.
7. The loop number will automatically disappear and a new loop number may be
entered in step 6. A loop is automatically removed from Loop Monitor when it
is armed. The loop can be returned to the Monitor mode automatically, when
disarmed, or it may be required to manually reenter the loop number each
arming cycle. This option is selected at the time the system is programmed.
LOOP : - ADD RMV LOOP : - ADD RMV
LOOP : - ADD RMV .
LOOP : - ADD RMV LOOP : - ADD RMV
ADD
18
Page 21

SYSTEM STATUS
User Code Level:User Code Level:
User Code Level: None
User Code Level:User Code Level:
Function:Function:
Function: Displays the condition of internal system power and wiring.
Function:Function:
System Status will display the condition of the internal system monitors. The
monitors are the AC power and battery power . When System Status is selected
each monitor will be displayed followed by okay or trouble to indicate the current
condition.
Step By Step:Step By Step:
Step By Step:
Step By Step:Step By Step:
1. Press the key until
2. When
keys. The display will list each system monitor and status one at a time.
Example:
Monitors Status
A.C. POWER = A.C. power -OKAY = Normal
BATTERY = Battery power -TRBL = Trouble
COMMAND
SYSTEM STATUS? SYSTEM STATUS?
SYSTEM STATUS? is displayed press any one of the top four select
SYSTEM STATUS? SYSTEM STATUS?
AC POWER - OKAYAC POWER - OKAY
AC POWER - OKAY
AC POWER - OKAYAC POWER - OKAY
SYSTEM STATUS? SYSTEM STATUS?
SYSTEM STATUS? is displayed.
SYSTEM STATUS? SYSTEM STATUS?
19
Page 22

SYSTEM TEST
User Code Level:User Code Level:
User Code Level: 4
User Code Level:User Code Level:
Function: Function:
Function: Automatically tests various parts of your alarm system.
Function: Function:
System Test is used to test the battery, alarm bell or siren, and communication to
a central station. When selected you will be asked to enter your code number.
When the code number is accepted the system test begins automatically.
A test of the alarm system should be made at least once a week.
Step By Step:Step By Step:
Step By Step:
Step By Step:Step By Step:
1. Press the key until
2. When
COMMAND
SYSTEM TEST? SYSTEM TEST?
SYSTEM TEST? is displayed press any one of the top four
SYSTEM TEST? SYSTEM TEST?
select keys. The display will read
SYSTEM TEST?SYSTEM TEST?
SYSTEM TEST? is displayed.
SYSTEM TEST?SYSTEM TEST?
ENTER CODE: -ENTER CODE: -
ENTER CODE: - .
ENTER CODE: -ENTER CODE: -
3. Enter your code number and press . The system test begins
COMMAND
automatically. The display will read:
BELL SOUNDING BELL SOUNDING
1)
BELL SOUNDING during two second bell test, then
BELL SOUNDING BELL SOUNDING
BATTERY -OKAY BATTERY -OKAY
2)
BATTERY -OKAY or
BATTERY -OKAY BATTERY -OKAY
BATTERY -TRBL BATTERY -TRBL
BATTERY -TRBL
BATTERY -TRBL BATTERY -TRBL
to indicate condition of battery, then
* 3)
TRANSMIT TEST TRANSMIT TEST
TRANSMIT TEST and
TRANSMIT TEST TRANSMIT TEST
ATTEMPT NO : 1 .ATTEMPT NO : 1 .
ATTEMPT NO : 1 .
ATTEMPT NO : 1 .ATTEMPT NO : 1 .
during the transmit test, then
(up to 10 attempts may be made, the dot
in the far corner will flash during this test.)
TRANSMIT OKAY TRANSMIT OKAY
4)
TRANSMIT OKAY or
TRANSMIT OKAY TRANSMIT OKAY
TRANSMIT FAILED TRANSMIT FAILED
TRANSMIT FAILED
TRANSMIT FAILED TRANSMIT FAILED
to show results of the transmit test, then
TEST END TEST END
5)
TEST END After System Test is complete.
TEST END TEST END
20
6) You may cancel the transmit test by pressing .
* The transmit test does not operate on local systems.
▲
Page 23

USER CODES
User Code Level: 9
Function: To add and delete user codes
User Codes is used to add and delete the user codes programmed into your alarm
system. Up to 32 different user codes may be available. Each user code consists
of four assignments; the user number, the user code, the code level, and the area
access.
User Number: A number from one to 32 which identifies the person
using the code. This number is transmitted to your
central station on various system reports. User number
one may be used as an Ambush Code. Any time this
code number is used an Ambush signal will be transmit
ted to your central station. This function is optional and
is programmed during system installation.
Code Number: A one to five digit number which is used to arm, disarm
and gain entry to the various menu options. This code
number cannot begin or end with zero.
Code Level: The first digit of the five digit code number which defines
the level of menu options available to that code.
User Code Level
Menu Options 1 2 3 4 5 6 7 8 9
Door Access * * x x x x x x x
Fire Reset * * x x x x x x x
Arm/Disarm * x x x x x x x
Alarm Silence * x x x x x x x
System Test x x x x x x
Loop Monitor x x x x x x
Bypass loops, Extend x x x x
Schedules x x x
Set Time x x
Remote Authorization x x
User Codes x
* only during permanent or temporary schedules
Area Access: The area numbers which may be armed or disarmed by a
code number. One or two areas may be available in your
system. Each User Code can have a different combination
of areas assigned to it. (NOTE: Area Access does not
function on all/perimeter systems.)
When User Codes is selected you will be asked to enter your code number. When your
code number is entered you will be asked if you want to add or delete a User Code. If you
are deleting a User Code you will be asked which user number is to be deleted. If you are
adding a User Code you will be asked the User Number, the Code Number , and the Area
Access. When this is complete you will be able to add or delete another User Code.
Internally the System insures that each User Number (1 to 32) is used only once, that no
5 digit Code Number is used twice, and that the user number entered to access the User
Codes option cannot be deleted. A report of User Codes added or deleted can be
transmitted to your central station. This report is optional and is programmed during
system installation.
21
Page 24

Step By Step:Step By Step:
Step By Step:
Step By Step:Step By Step:
6. If ADD or CHG is pressed the display will read
USER NUMBER: - USER NUMBER: -
USER NUMBER: - .
USER NUMBER: - USER NUMBER: -
1. Press the key until
2. When
select keys. The display will read
3. Enter your code number and press . The display will read
ADD DEL CHGADD DEL CHG
ADD DEL CHG .
ADD DEL CHGADD DEL CHG
ADD DEL
4. Press the key to add User Codes, to
delete User Codes and to change User Codes. If add is
pressed go to step 6. If delete is pressed go to step 5.
If DELETE is pressed the display will show
5.
5a. Enter the user number to be deleted and press . The
display will confirm the deletion and return to step 5 for the next User Code
to be deleted.
COMMAND
USER CODES? USER CODES?
USER CODES? is displayed press any one of the top four
USER CODES? USER CODES?
CHG
USER CODES? USER CODES?
USER CODES? is displayed.
USER CODES? USER CODES?
ENTER CODE: - ENTER CODE: -
ENTER CODE: - .
ENTER CODE: - ENTER CODE: -
COMMAND
USER NUMBER: - USER NUMBER: -
USER NUMBER: - .
USER NUMBER: - USER NUMBER: -
COMMAND
6a. Enter the user number to be added or changed and press
The display will then read
6b. Enter the one to five digit Code Number and press . If the
code number is not to be changed press with no entry
and skip to step 6b. The display will read
6c. Enter the areas which this User Code will have arming and disarming
control over. The digits will appear as they are pressed. To erase a digit
simply press it again. (NOTE: Area Access does not function on
all/perimeter systems.)
6d. Press when area assignment is complete. The display
will confirm the addition or change of the User Code and return to step 6
for the next User Code.
COMMAND
CODE NUMBER: - CODE NUMBER: -
CODE NUMBER: - .
CODE NUMBER: - CODE NUMBER: -
COMMAND
AREAS:- AREAS:-
AREAS:-
AREAS:- AREAS:-
COMMAND
COMMAND
.
.
22
Page 25

User Code Area
Number Number Access ** Person Assigned To
1 1 2 Ambush Code*
21 2
31 2
41 2
51 2
61 2
71 2
81 2
91 2
10 1 2
11 1 2
12 1 2
13 1 2
14 1 2
15 1 2
16 1 2
*Optional
** Not Functional on All/Perimeter Systems
User Code Area
Number Number Access ** Person Assigned To
17 1 2
18 1 2
19 1 2
20 1 2
21 1 2
22 1 2
23 1 2
24 1 2
25 1 2
26 1 2
27 1 2
28 1 2
29 1 2
30 1 2
31 1 2
32 1 2
23
Page 26

24
Page 27

SCHEDULES
User Code Level:User Code Level:
User Code Level: 7
User Code Level:User Code Level:
Function: Function:
Function: To enter and delete Permanent and Temporary Schedules
Function: Function:
Schedules is used to enter permanent and temporary opening and closing times
for your burglary system. When Schedules is selected you will be asked to enter
your code number. When the code number is accepted you will be asked if you want
to enter Permanent or Temporary Schedules.
Permanent Schedules and Temporary Schedules provide opening and closing
times for your burglary system. One Permanent and one Temporary opening and
closing schedule is available for each area for each day of the week.* A Temporary
schedule is erased from memory automatically each day, but permanent schedules remain in memory until a new schedule is entered. Level one and two User
Codes will function only during a scheduled period, also your alarm system can be
programmed to not require a code number for disarming during a scheduled
period. This reduces the need for each employee to have their own code number.
This is optional and is programmed during system installation.
Your system may be programmed to automatically arm and disarm at the permanent and temporary opening and closing times. The option is selected during
sytsem installation.
Permanent and Temporary Schedules are also used for Closing Check. This is an
option which checks to see that the burglary alarm is armed by the closing time each
day. Closing Check is further described in the Closing Check section of the users
manual.
Once you have selected Permanent or Temporary Schedules you will be asked
which area and day you wish to schedule. The
you the current schedule for that day. It can be deleted and the new opening and
closing times may be entered. You should list your permanent schedule on the next
page for easy reference.
Step By Step:Step By Step:
Step By Step:
Step By Step:Step By Step:
1. Press the key until
2. When
select keys. The display will read
3. Enter your code number and press . The display will read
PRM TMP PRM TMP
PRM TMP .
PRM TMP PRM TMP
4. Press to enter permanent schedules, then go to step 5.
Press to enter temporary schedules, then go to step 5.
* The use of a separate schedule for each area is optional and is programmed
during system installation.
COMMAND
SCHEDULES?SCHEDULES?
SCHEDULES? is displayed press any one of the top four
SCHEDULES?SCHEDULES?
PRM
TMP
SECURITY COMMANDSECURITY COMMAND
SECURITY COMMAND will show
SECURITY COMMANDSECURITY COMMAND
SCHEDULES?SCHEDULES?
SCHEDULES? is displayed.
SCHEDULES?SCHEDULES?
ENTER CODE: -ENTER CODE: -
ENTER CODE: - .
ENTER CODE: -ENTER CODE: -
COMMAND
25
Page 28

Permanent or Temporary Step By Step:Permanent or Temporary Step By Step:
Permanent or Temporary Step By Step:
Permanent or Temporary Step By Step:Permanent or Temporary Step By Step:
5. If PRM or TMP is pressed in step 4 the display will read
AREA NO:- AREA NO:-
AREA NO:- . *
AREA NO:- AREA NO:-
5a. Enter the area number you wish to schedule and press .
The display will read
THU FRI SAT THU FRI SAT
then
THU FRI SAT .
THU FRI SAT THU FRI SAT
SUN MON TUE WED SUN MON TUE WED
SUN MON TUE WED
SUN MON TUE WED SUN MON TUE WED
COMMAND
5b. Press the key below the desired day when it is displayed.
The SECURITY COMMAND will show you the current scheduled
opening and closing times for that day
CL TIME ??:?? ?MCL TIME ??:?? ?M
CL TIME ??:?? ?M then
CL TIME ??:?? ?MCL TIME ??:?? ?M
OP TIME ??:?? ?MOP TIME ??:?? ?M
OP TIME ??:?? ?M then
OP TIME ??:?? ?MOP TIME ??:?? ?M
DELETE DELETE
DELETE KEEP .
DELETE DELETE
KEEP
5c. Press to keep the current schedule and return to step 5a
AM
5d. Enter the new opening time and press the or
PM
key.
(Note: a zero must be entered for the tens digit of the hour
if the hour is less than 10)
The display will read
- : AM PM - : AM PM
- : AM PM .
- : AM PM - : AM PM
CLOSING TIME? CLOSING TIME?
CLOSING TIME? then
CLOSING TIME? CLOSING TIME?
AM
5e. Enter the new closing time and press the or
PM
key. The display will return to step 5a for the next day
to be scheduled.
DELETE
Press to delete the current schedule. The display will
OPENING TIME? OPENING TIME?
read
OPENING TIME? then
OPENING TIME? OPENING TIME?
- : AM PM - : AM PM
- : AM PM .
- : AM PM - : AM PM
* An area number is requested only if your system is programmed to utilize
a separate permanent or temporary schedule for each area.
26
PERMANENT SCHEDULE
SUN MON TUE WED THU FRI SAT
Opening
Closing
Opening
Closing
Area 4Area 3Area 2Area 1
: _M : _M : _M : _M : _M : _M : _M
: _M : _M : _M : _M : _M : _M : _M
: _M : _M : _M : _M : _M : _M : _M
: _M : _M : _M : _M : _M : _M : _M
Page 29

TIME
User Code Level:User Code Level:
User Code Level: None for time display
User Code Level:User Code Level:
8 to reset time
Function:Function:
Function: Displays day, time and date.
Function:Function:
Time is used to display the current day of the week, the time of day and date of year.
The day, time or date can also be reset. When time is selected the day of week
and time of day are displayed, followed by the date and year. If no changes are to
be made do nothing and the display will clear automatically. If the day , time or date
is to be changed press COMMAND while the date is being displayed. You will be
asked to enter your code number. When the code number is accepted you can
choose which of the three you wish to change and enter the new information.
Step By Step:Step By Step:
Step By Step:
Step By Step:Step By Step:
1. Press until
2. When
3. To reset the day, time or date press while the current
4. Enter your code number and press . The display will read
COMMAND
TIME? TIME?
TIME?
TIME? TIME?
four select keys. The display will show the current day and time.
Press and the current date will be displayed.
COMMAND
date is being displayed. The display will read
TIME DAY DATE TIME DAY DATE
TIME DAY DATE .
TIME DAY DATE TIME DAY DATE
TIME? TIME?
TIME?
TIME? TIME?
is displayed press any one of the top
COMMAND
COMMAND
is displayed.
ENTER CODE: - ENTER CODE: -
ENTER CODE: -
ENTER CODE: - ENTER CODE: -
.
TIME
5. Press to reset the time of day, then go to step 6.
DAY
Press to reset the day of week, then go to step 7.
DATE
Press to reset the date and year, then go to step 8.
6. If TIME is pressed in step 5, the display will read
AM PM
Enter the new time and then press the or
key. (Note: a zero must be entered for the
tens digit of the hour if the hour is less than 10.)
After time is entered the display will return to step 5.
7. If DAY is pressed in step 5, the display will read:
SUN MON TUE WED SUN MON TUE WED
SUN MON TUE WED then
SUN MON TUE WED SUN MON TUE WED
Press the key below the desired day when it is displayed.
The display will return to step 5.
8. If DATE is pressed in step 5, the display will read:
MONTH:- MONTH:-
MONTH:- Enter up to two digits for the month, then
MONTH:- MONTH:-
DAY:- DAY:-
DAY:- Enter up to two digits for the day, then
DAY:- DAY: YEAR:- YEAR:-
YEAR:- Enter up to two digits for the year.
YEAR:- YEAR:-
The display will return to the time of day display.
THU FRI SATTHU FRI SAT
THU FRI SAT
THU FRI SATTHU FRI SAT
- : AM PM - : AM PM
- : AM PM
- : AM PM - : AM PM
.
27
Page 30

REMOTE AUTHORIZE
User Code Level:User Code Level:
User Code Level: 8
User Code Level:User Code Level:
Function:Function:
Function: Authorizes remote functions for one hour.
Function:Function:
Remote Authorize is used to give your central station access to your alarm system
for remote programming and commands. When remote authorize is selected you
will be asked to enter your code number, when the code number is accepted the
central station will have access to your system for one hour.
Step By Step:Step By Step:
Step By Step:
Step By Step:Step By Step:
1. Press until
2. When
3. Enter your code number and press . The display will
COMMAND
REMOTE AUTHORIZE REMOTE AUTHORIZE
REMOTE AUTHORIZE is displayed press any one of the
REMOTE AUTHORIZE REMOTE AUTHORIZE
top four select keys. The display will read
AUTHORIZED - - 1 HR AUTHORIZED - - 1 HR
read
AUTHORIZED - - 1 HR .
AUTHORIZED - - 1 HR AUTHORIZED - - 1 HR
REMOTE AUTHORIZE REMOTE AUTHORIZE
REMOTE AUTHORIZE is displayed.
REMOTE AUTHORIZE REMOTE AUTHORIZE
ENTER CODE: - ENTER CODE: -
ENTER CODE: - .
ENTER CODE: - ENTER CODE: -
COMMAND
28
Page 31

DISPLAY EVENTS
User Code Level:User Code Level:
User Code Level: None
User Code Level:User Code Level:
Function:Function:
Function: Displays past system events.
Function:Function:
The Display Events menu option will list past loop activity, area arming and
disarming, and internal system status. The events are automatically stored in the
system memory for retrieval and display on the keypad. The system may hold a
maximum of 99 events for 45 days. As new events occur the oldest event will be
deleted from the memory.
When Display Events is selected you will be asked to enter your code number.
When the code number is accepted you will be asked if the display should start at
the first or last of the event memory. Once the events are displayed the command
and back arrow keys may be used to go forward or backward through the list.
When a specific event is displayed, more detailed information concerning the event
can be obtained by pressing the select key below the desired detail shown on the
display. For example, if the select key is pressed below the date, then the time of
occurrence will be displayed.
Step by Step:
1. Press the key until
2. When
COMMAND
DISPLAY EVENTS? DISPLAY EVENTS?
DISPLAY EVENTS? is displayed press any one of the top four
DISPLAY EVENTS? DISPLAY EVENTS?
select keys. The display will read
3. Enter your code number and press . The display will read
FIRST LASTFIRST LAST
FIRST LAST . If you wish to begin with the oldest event press
FIRST LASTFIRST LAST
DISPLAY EVENTS? DISPLAY EVENTS?
DISPLAY EVENTS? is displayed.
DISPLAY EVENTS? DISPLAY EVENTS?
ENTER CODE:- ENTER CODE:-
ENTER CODE:- .
ENTER CODE:- ENTER CODE:-
COMMAND
FIRST LAST
. To begin with the newest event press .
4. Once in the event history list press to go forward to newer
events and press to go backward to older events.
▲
COMMAND
5. All events are displayed with month and day at the right hand side of the display.
If time of event is desired press the key below the month/date
display.
6. Loop Name and Area Names are available by pressing the
key below the loop or area number.
29
Page 32

30
LT-0149 (3/93)
 Loading...