

Page 1

1
D-LINK USB Modem
User Manual
Page 2

2
Copyright © 2008 by D-LINK Corporation
All rights reserved.
No part of this publication may be excerpted,
reproduced, translated or utilized in any form or by
any means, electronic or mechanical, including
photocopying and microfilm, without the prior written
permission of D-LINK Corporation.
The manual is published by D-LINK Corporation.
We reserve the right to make modifications on print
errors or update specifications without prior notice.
Edition 1st edition, Dec 2008
Page 3

3
Contents
1 Modem Introduction .................................................... 5
1.1 Introduction ........................................................ 5
1.2 Warning and Notice ......................................... 5
1.3 Applicability Scope .......................................... 8
1.4 System requi r em ent s ...................................... 8
1.5 Functions ............................................................. 8
2 Installation ................................................................... 11
2.1 Software In st all a tion .................................... 11
2.2 Run the Application Software .................... 13
2.3 Software U nin st a ll ......................................... 17
3 Functions & Operation ............................................. 18
3.1 Interface introduction................................... 18
3.1.1 Main Interface .......................................................18
3.1.2 Description of Mini Icons .....................................19
3.2 Connecting Internet ...................................... 20
3.3 SMS ...................................................................... 20
3.3.1 Read SMS .............................................................21
3.3.2 Create new message ..............................................21
3.3.3 The SMS box Operating Guide .............................22
3.4 Phonebook ........................................................ 22
3.4.1 Creating a new contact ..........................................22
3.4.2 Modifying contacts ................................................23
3.4.3 Deleting contacts ...................................................23
3.4.4 Sending SMS to a contact .....................................23
3.4.5 Searching for a contact ..........................................23
3.5 Settings .............................................................. 23
3.5.1 Connect Settings ....................................................24
Page 4

4
3.5.2 Network Selection .................................................24
3.5.3 Preference Network ...............................................25
3.5.4 SMS Settings .........................................................25
3.5.5 Alert settings..........................................................26
3.5.6 Security Settings ....................................................26
3.5.7 System Settings ..................... 错误!未定义书签。
3.5.8 Speed Manager ...................... 错误!未定义书签。
3.5.9 Upgrade Settings ................... 错误!未定义书签。
3.6 Data Record ...................................................... 26
3.8 MicroSD car d.................................................... 26
3.9 Help ..................................................................... 26
4 FAQ & Answers ........................................................... 28
Page 5

5
1 Modem Introduction
1.1 Introduction
Thank you for using D-LINK USB Modem.
To guarantee the modem always in its best condition, please
read this manual carefully and keep it for further use.
The pictures, symbols a nd contents in this manual are just f or
your reference. They m ight not be c ompletely identical with your
modem. We operate a policy of continuous development. We
reserve the right to update the technical specifications in this
document at any time without prior notice.
The D-LINK USB Modem is a type of m ulti-mode, 3G modem,
suitable for GSM/GPRS/WCDMA/EDGE/HSDPA network. It
adopts USB interface which provides an easy interface to laptop
and desktop PC. With the GSM/ GPRS/ EDGE/ UMTS/ HSDPA
mobile network, it can help you carry out SM S, data s e r vice a n d
will help you break away from the lim it of time and zone, and
realize wireles s communication at any moment everywhere.
1.2 Warning and Notice To the owner
Some electronic devices are susceptible to electromagnetic
interference sent b y m odem if inade quat ely shielded, such as
electronic system of vehicles. Please consult the
manufacturer of the device before using the modem if
necessary.
Operating of laptop and desktop PC and modem may
interfere with medical devices like hearing aids and
pacemakers. Please always keep them more than 20
centimeters awa y from such medic al devices when they are
turned on. Turn the modem off if necessary. Consult a
physician or the manufacturer of the medical device before
using the modem.
Be aware of the usage limitation when using a modem at
Page 6

6
places such as oil wareho uses or chemical factories, where
there are explosive gases or explosive products being
processed. Therefore, turn off your modem if required.
Don’t touch the inner antenna area if not necessary.
Otherwise it wil l af f ec t your m odem ’s perf orm anc e.
Store the modem out of the reach of little children. The
modem may cause injury if used as a toy.
Modem
Please use original accessories or accessories that are
authorized. Using any unauthorized accessories may affect
your modem’s performance, and violate related national
regulations about telecom terminals.
Avoid using the modem near metallic structure device or
establishment that can emit electromagnet wave. Otherwise it
may influence receiving signals.
The modem is non-waterproof type, please keep it dry and
store in shady and cool place.
Don’t use the modem immediately after a sudden
temperature change. In su ch case, it will produc e dew insid e
and outside the modem, so don’t use it until it becomes dry.
Take the modem carefully. Don’t lose, bend or cause it struck.
Otherwise it will lead to destruc t dam age.
No dismantling by non-professional and only qualified
maintainer can undertake repair work.
FCC Health and safety in formation
Radio Frequency (RF) Energy
This model USB Modem meets t he go ver nmen t’ s requ irem ents for ex po sure
to radio wave s.
This USB Modem is designed and manufactured not to exceed the emission
limits for exposure to radio frequency (RF) energy set by the Federal
Communications Commission of the U.S. Government:
The exposure standard for USB Mode m employs a unit of measu rement
known as the Specific Absorption Rate, or SAR. The SAR limit set by the
FCC is 1.6W/ kg. *Tests for SAR are conduc ted using stand ard operating
Page 7

7
positions accepted by the FCC with the USB Modem transmitting at its
highest certified power level in all tested frequency bands. Although the
SAR is determ ined at th e h igh est cert if ied p ow er lev e l, the a ct ua l S AR level
of the USB modem while operating can be well below the maximum value.
This is because the USB modem is designed to operate at multiple power
levels so as to u se only th e poser r equired to reac h the netwo rk. In general,
the closer you are to a wireless base station antenna, the lower the power
output.
The highest SAR value for the model USB Modem as reported to the FCC is
0.823 W/kg on the body with 5mm separation between USB modem to SAR
phantom.
While there may be differences between the SAR levels of various USB
Modem and at vario us positions, they all mee t the gover nment requi rement.
The FCC has gran ted an Equ ipmen t Auth oriz ation for this model phone with
all reported SAR l evels eval uated as in comp liance with th e FCC RF exposur e
guidelines. SAR informat ion on this mode l phone is on fi le with the FCC and
can be found under the Display Grant section of
http://www.fcc.gov/oet/fccid after search ing o n
FCC ID: KA2WM152A3.
FCC Compliance
This device complies with part 15 of the FCC Rules. Operation is subject to
the following two conditions: (1) This device may not cause harmful
interference, and (2) this device must accept any interference received,
including interfere nce that may cau s e undes ired opera t ion.
Caution: Changes or modifications not expressly approved by the
manufacturer could void the user’s authority to operate the equipment.
NOTE: This equipm e nt h as b ee n tested and fou nd to comply with the limits
for a Class B d igital device, p ursuant to part 15 of the FCC Rules. These lim its
are designed to provide reasonable protection against harmful interference
in a residential in stallation. This equ ipment g enerat es, uses an d can rad iate
radio frequency energy and, if not installed and used in accordance with the
instructions, may cause harmful interference to radio communications.
However, there is no guarantee that interference will not occur in a
particular installation. If this equipment does cause harmf ul in t erfer en c e to
radio or television reception, which can be determined by turning the
Page 8

8
equipment off and on, the user is encouraged to try to correct the
interference by one or more of the following measures:
—Reorient or relocate the receiving antenna.
—Increase the separation between the equipment and receiver.
—Connect the equipment into an outlet on a circuit different from that to
which the receiver is connected.
—Consult the dealer or an experience d radio/ TV technician for help.
1.3 Applicability Scope
D-LINK U SB Modem supports the present m ainstream t ypes of
laptops and desk top PCs, such as HP, IBM, T oshiba, Lenovo,
Dell, Founder, etc.
1.4 System requirements
Operating System:
Windows 2000(SP4) / XP(SP2/3) / Vist a SP1
Configuration (Recommended):
CPU 500MHz Pentium or above
Hard Disk 30M or above
RAM 128M or above
The performance of the modem may be influenced if
configuration is under the recommended requirement.
1.5 Functions
Functions: SMS service, data service, applied management,
data concurrence, support MicroSD card, etc.
1.6 Notification of private information
Security features protect you from illegal use of your Modem
and SIM card.
SIM password: The SIM password (PIN 1 code) can prevent
your SIM card from illegal use. Select ON/OFF to enable or
Page 9

9
disable the SIM password protection; select Change PIN 1 to set
a new PIN 1 code.
Note: Three consecutive incorrect PIN 1 code entries will lock
the SIM card. Then, the PUK code is needed to unlock the SIM
card. The PIN 1 code and the PUK code may be provided to you
together with the SIM card. If not, please contact with your
network service provider. Please change it with your own private
password as soon as possible.
Network call bar: You can set any combination of the
following call restriction options to improve security level.
Please contact with the network service provider for detailed use.
The network service provider provides a 4-digit network
password to enable your call restrictions.
International calls: Bar all international calls.
All except home: Bar international calls except local call.
Incoming calls: Bar all incoming calls.
Incoming if abroad: Bar all incoming calls when roaming abroad.
Outgoing calls: Bar all outgoing calls.
After choosing one of the above options, choose
Select to restrict any of the following services:
All services: Restrict incoming calls, voice calls and short messages.
Voice calls: Restrict voice c a l ls only.
Data: Restrict data only.
Fax: Restrict faxes only.
Messages: Restrict short messages only.
All except messages: Restrict all services except short messages.
After select one type of restriction services, the
following can be chosen:
Activate: The restriction is functional.
Deactivate: Delete the restriction.
Ch ecki n g avail abili ty: Check the current status of the restriction
service.
Cancel all: Select Cancel all to cancel all call restrictions setting.
Note: You need to input the network password to set
or cancel network restrictions. Three consecutive incorrect
Page 10
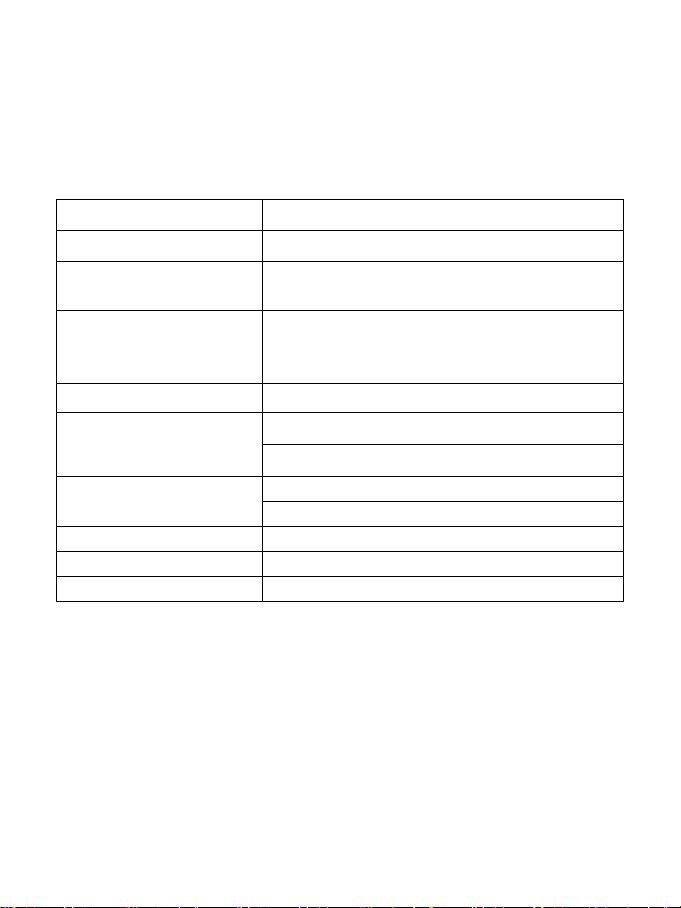
10
password entries will lock the call restrictions service.
MicroSD card, etc.
UMTS: 384Kbps UL
HSDPA: 3.6Mbps DL
Storage: -20°C ~ +65°C
Dimension
84.8×25.0×10.9mm
T-Flash Capability
Support up to 4G microSD
Please contact network service provider to unlock it.
1.6Specification
Interface Type USB 2.0 high speed
Systems supported Supports most types of laptop and desktop PC.
Operating systems
supported
Functions SMS service, Data service, Applications
Network Standards HSDPA/UMTS/EDGE/GPRS/GSM
Transmission
Temperature
Weight About 21.5g
Windows 2000, XP SP2, Vista
Apple MAC OS X 10.3, 10.4, 10.5
management, Data concurrent, support
Operation: -10°C ~ +55°C
Page 11
11
4
2
5
1
3
2 Installation
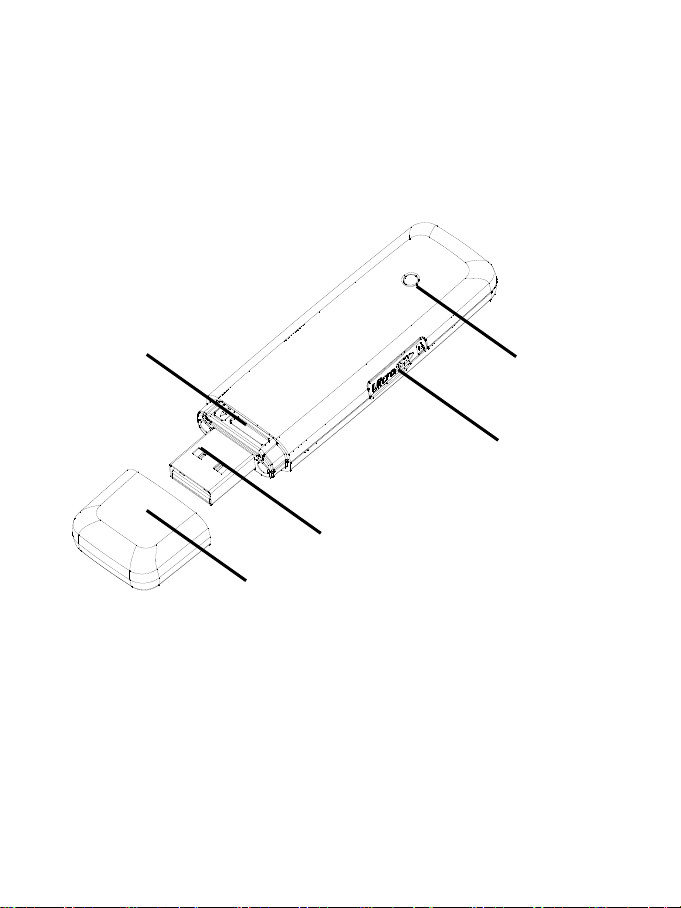
2.1 Outline and Part Introduction
1
○
Indicator
It indicates your modem status.
2
Memory card slot (MicroSD card)
○
It is where you insert memory card (MicroSD card).
3
Modem cap
○
It helps your modem USB port when it is not used.
Page 12

12
4
○
SIM/USIM card slot
It is where you insert the subscriber identity module/UMTS
subscriber identity module (SIM/USIM) card
5
○
USB port
Connect your modem to the laptop or desktop computer.
2.2 Software Installation
The system will automatically detect and recognize the
new hardware and display the new icon in the desktop
status bar, indicating that the computer and the USB
Modem have been connected properly. After a few
seconds, the system will launch the installation
automatically.
The following steps show the installation process.
• Click on the drop-down button to choose the setup
language, and click “OK”.
• Click “Next” to continue.
• Read the agreement carefully. If you agree, choose “I accept
the terms of the license agreement”, and then click “Next”.
• Select the folder that you want to install the software, and
you can s elect a different location by pressin g “Change”, then
click “Next”.
• Wait a minute and click “Finish” to complete the installation.
Note
:If the s ystem does not launch installation automatically,
you can run the installat ion program in path of My Computer →
D-LINKMODEM → Install.exe. If you have problems with
installation after the u pper oper atio n, please c ontac t you’re your
service provider.
After the installation, select the “Start → Program s” and there
will be a “D-LINK Join Air” progr am group,which includes “Join
Page 13
13
Air” and “Uninstall”. There will be a Shortcut icon on the
desktop.
2.3 Hardware Installation
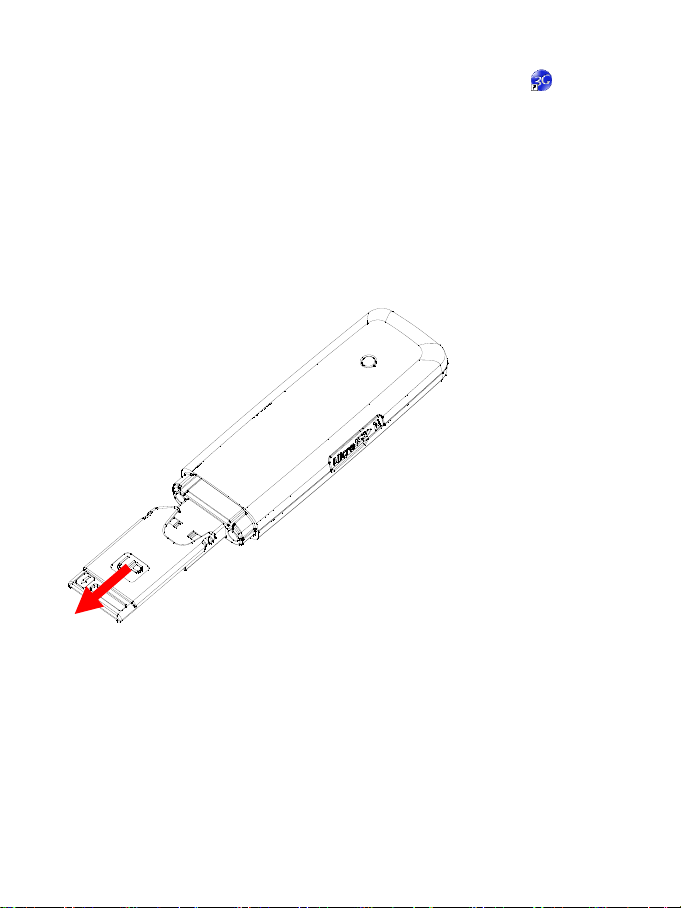
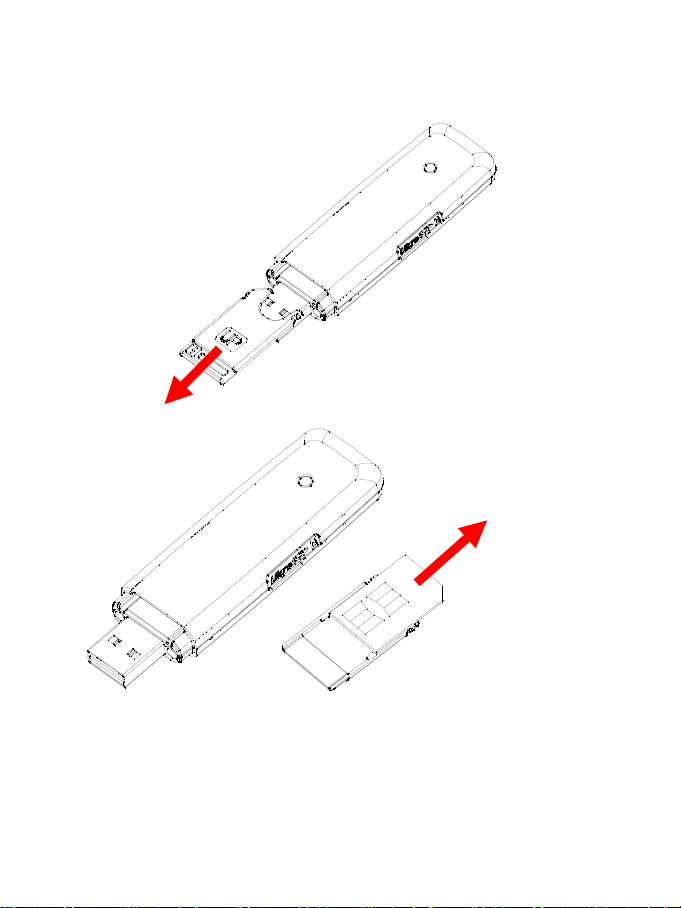
1) Insert the SIM/USIM card into the USB modem
To install SIM/USIM card
First take down the modem cap, then the USB connector is
visible.
Pull the plastic socket above the USB connector out.
Then insert the SIM/USIM card into the socket, here make
sure that metal contact area facing to the modem.
Page 14
14
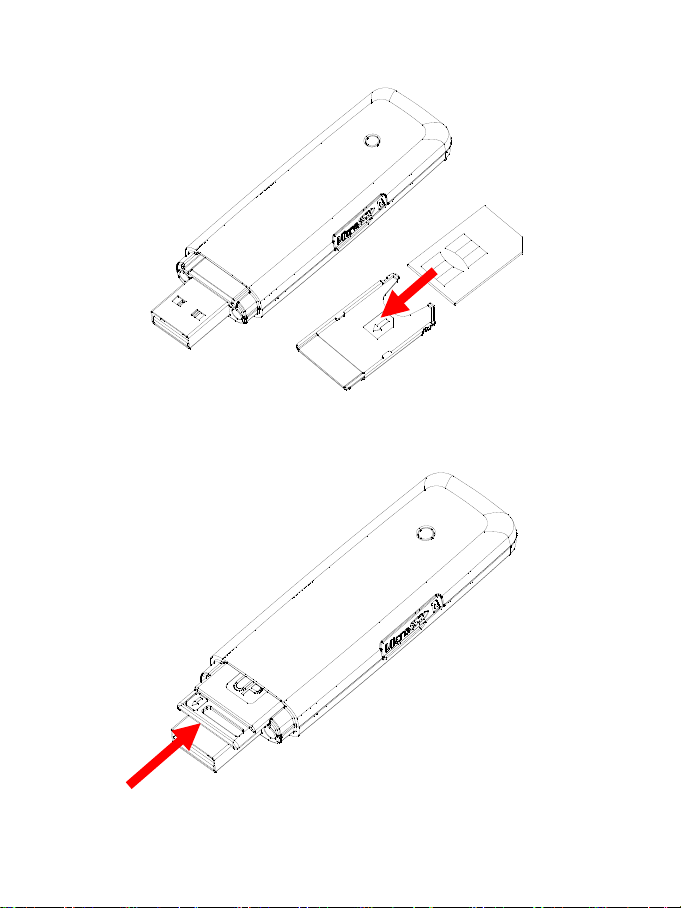
Insert the plastic socket into the modem. You can hear a
click when the SIM/USIM card locks into place.
To Remove the SIM/USIM card from the USB modem
First take down the modem cap.
Page 15
15
Pull the plastic socket slightly, and you can hear a click
when the SIM/USIM card gets unlocked.
Take off the SIM/USIM card.
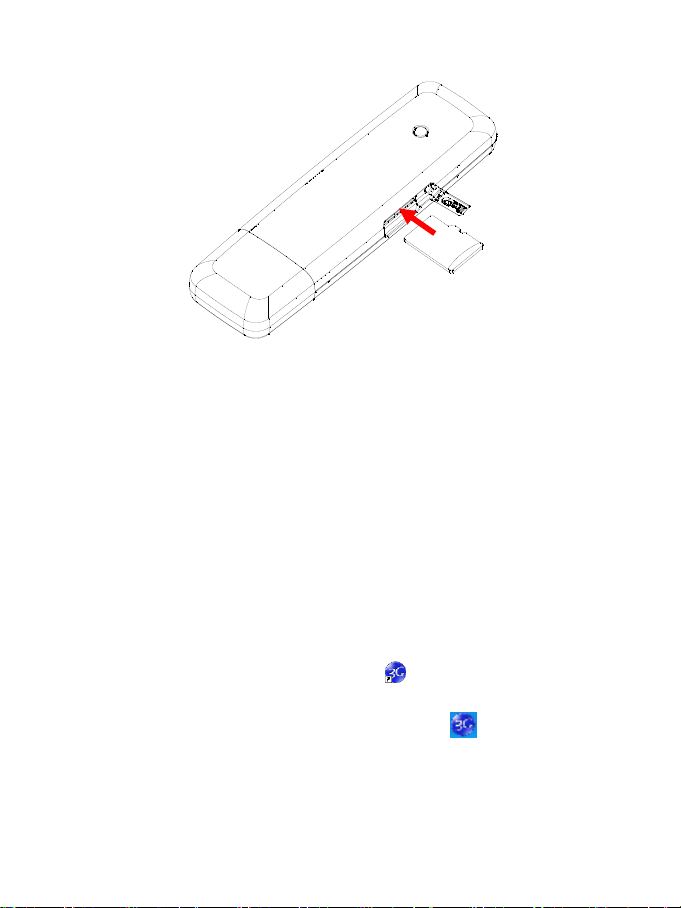
2) Install the microSD card into the USB modem:
Install microSD card in the USB modem, if you want to use it.
Insert the microSD into the microSD slot from the side of the
modem, the following picture indicates the correct inserting
direction.
Page 16
16
The driver of the m icroSD card will installed au tomatic ally when
the modem driver is installed.
3) Connect the USB modem to your PC:
Plug the USB modem into your computer’s USB port and
ensure that it is tightly inserted.
The OS automatically detects and recognizes new hardware
and starts the installation wizard.
2.4 Run the Application Software
After the modem is correctly connected, click the “Start →
Programs →D-LINK Join Air →Join Air” m enu on the laptop or
desktop PC to run the application software.
Or double click the shortcut icon
software.
After modem initialized, the standby icon
taskbar, the modem can work properly. Doub le click it to popup
the main interface.
to run the application
appears in the
Page 17

17
2.5 Hardware Uninstall
Close the software application then remove the hardware
following the proc ed ur e below.
- Firstly click the “close” menu, and then click “OK” to
close the software.
- Now you can safely remove your USB Modem .
When you use a MicroSD card in the modem:
- please left click the icon
in the Windows system
tray bar. A pop-up menu indicates the USB devices list.
- Select “Safely remove the USB disk” which is relevant to
the MicroSD card.
Pull off the USB cable directly, if you want to disconnect the
modem from the laptop and desktop PC.
2.6 Software Uninstall
Close the application program before the software uninstalls.
Click “Start → Programs →D-LINK Join Air →Uninstall” menu on
the lapt op or desk top PC.
And follow the system prompts to
complete the application software uninstall.
• Click “Yes” to confirm uninstall of the software.
• Click “Yes” according to the indication, then the system
begins to uninstall programs.
• Wait a minute and click “Finish” to complete the application
software uninstall.
Page 18
18
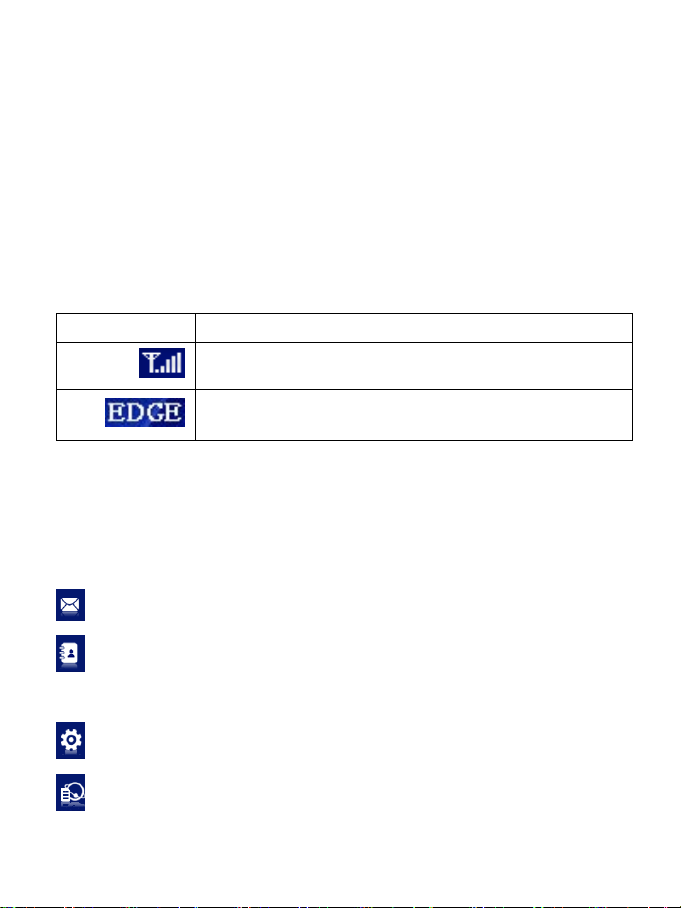
Icon
The icon indicates the n etwor k signal int ensit y.
There are 6 stages from none to the strongest.
The icon indicates the current network type, i.e.
3 Functions & Operation
3.1 Interface introduction
3.1.1 Main Interface
The whole interface is divi ded into four parts. Related functions
can be executed by operation in the related areas.
1. System information area:
Show the system status and different kinds of tips.
Explanations
EDGE or GPRS, HSPA service.
2. Internet information area:
This area indicates the name of the current service providers,
device condition and connection information.
3. Functional button area:
There will show various function button icons. Select different
function button and it will carry out corresponding operation.
SMS: Send SMS or read SMS.
Phonebook: Save and view the different inf ormation of the
contacts.
Settings: Set normal relative information for the modem.
Data Record: Show connection information.
Page 19

19
Connect: Connect to the Internet.
4. Main menu button area:
Click on the drop-down button, and select the following menu:
Log: The records of software operation.
Diagnostics: Show you the hardware information, operational
information and network settings.
Help: Enter the USB modem software help.
3.1.2 Description of Mini Icons
When click the mini button, the software will minimize as an icon
on the system taskbar. If connected to the Internet, the
minimized software won’t influence the download of data or
receiving SMS. W hen the application window is minim ized, the
system icons will display on the taskbar. Double click the icon to
resize the display.
1. Taskbar Icons Description:
The USB Modem is ready to connect to Internet.
The Internet is already connected.
2. The uses of Tray Icons:
Right click the tray icon to popup the operation menu:
Log: The records of software operation.
Diagnostics: Show you the hardware information, operational
information and network settings.
Page 20

20
Help: Enter the USB modem software help.
Exit: Close the software and stop the modem from working.
3.2 Connecting Internet
You can browse web pag e s af ter you ha ve acc es s ed t o In ter ne t
with the help of modem, you can also receive SMS when surfing
in the Internet.
Click the “Connect” button
. Then the system will research
available network automatically. You can click “Cancel” button
to cancel connection.
When connected, the internet information area will show data
amount, connected tim e, and active I E browser. Then you can
access internet and receive email etc through network.
You can click “Disconnect” button to stop the c onnection when
the “Connect” 'button becomes “Disconnect” button.
3.3 SMS
Note: To ensure that the SMS can be used properly, at first, you
should setup the correct S MS center number. Refer to sectio n
“3.5.4 SMS Settings”.
Click the “SMS” icon
to switch to the SMS inter face and it
will show the number of messages in the inbox, sentbox and
draftbox of PC and SIM/USIM card. T he user can click icons of
“Inbox”, “Sentbox”, “Draftbox” to enter relative interface.
Inbox: Save the received messages.
Sentbox: Save the successfully sent messages.
Draftbox: Save the edit ing SMS which haven’t been sent. The
Page 21

21
drafts can only be saved in computer, not SIM/USIM.
3.3.1 Read SMS
Click the “Inbox” button on the main interface, and click a
message to read this SMS.
When you rec eive a new SMS, the system will pop-up prompt
dialog box.
3.3.2 Create new message
Click “New” button to input the recipient’s number and content.
The recipient’s num ber can be input directly or b y entering the
phonebook to select one/more/group records.
The recipient’s am ount can be one or more. Please use “;” to
separate recipients.
The SMS content can include 1 60 individua l English char acters
(including English symbols). On the interface, there will show
total characters and the number of sending message.
Click “Send”, the prompt screen will appear on the interface.
Select “OK”, and then the edited short messages will be sent.
After sent successfully, the SMS will be saved into sentbox
automatically. If send fails, it will be saved to the draftbox
automatically.
Send SMS while browse the web:
When surfing the Internet, if your network supports, you can
send short messages at same time. Click “SMS” button icon,
enter the short message interface to send short messages
normally.
Page 22

22
3.3.3 The SMS box Operating Guide
Enter any of the Inbox / Sentbox / Draftbox to execute the
following functions:
Reply: Reply short m essage to the sen der (which is only
available in the Inbox).
Forward: Send the short message to other recipients
(which is only available in the Inbox).
Save Num: Sav e the sender number obta ined from the
message to the phonebook.
Move: Change the saving location of the selected
message. Move this message from PC to SIM card or
from SIM card to PC. (Can not use in Draftbox)
Delete: Delete the selected short messages.
If you want to select several messages, you can use the “Ctrl” or
“Shift” key to execute multi-choice, and left c lick an item to add
to selection.
New message can not be received when the SIM /USIM card is
full of short m essages (Different SI M/USIM cards have different
capacities), the system will indicate the inbox is full and ask
users to clear the inbox at USIM/SIM card side, while new
message can not be saved.
3.4 Phonebook
Click “Phonebook” icon to access to the phonebook
window, the phoneb ook information can be s aved in the PC or
SIM/USIM card and you can choose the sa ved position. Each
record includes contact name, mobile phone number, family
phone number, office phone number, email and the group name
which it belongs to.
3.4.1 Creating a new contact
1) Click “New” to add new contact.
Page 23

23
2) Select save position to decide wher e you want to save your
contact, PC or SIM.
3) Enter the nam e, telephone num ber, Email addr ess,etc. T hen
click “OK”.
3.4.2 Modifying contacts
1) Select a contact and then click Edit to modify.
2) After the modification, click OK.
3.4.3 Deleting contacts
Select one or more contacts and then click Delete.
3.4.4 Sending SMS to a contact
1) Select one or more contacts and then click “SMS”.
2) You will acces s in the writing SMS window automatically, the
selected contact mobile phone numbers will be listed in the
receiver column.
3) Enter the contents of the message and then click “Send”.
3.4.5 Searching for a contact
1) Enter the search conditions in the search condition blank.
2) Click “Search” to begin searching.
3) The searching results will display in the contacts window.
3.5 Settings
Click “Settings” icon to switch to the settings interface. It
includes: Connection settings, Network Selection settings,
Preference Network settings, SMS Settings, Sound settings and
Security settings.
Note: all the necessary settings have been correctly saved in
your USB modem b y D-LINK. There is no need to ch a nge these
default settings.
Page 24

24
3.5.1 Connection
To ensure that the modem can connect the Internet properly,
you should configure the connection information first.
1. Button description
Add: Add new configuration files.
Delete: Delete the selected configuration files.
Edit: Edit the selected configuration files.
2. Config File
Select “Add” to add new connection i nformation to the s ystem.
There are two parts of configuration inform ation: Common and
Advance.
The Common information includes: Config File, APN, User
name.
The Advance information includes: DNS, PDP server,
Authentication Mode and PDP Type. If network supports “Obtain
server address automatically”, the modem can obtain the
assigned IP information automatically. If network does not
support it, you should input the proper address manually. Please
consult the network supplier of SIM/USIM card for all above
information. The configuration information may be various
according to the different network suppliers and network types.
3.5.2 Selection
Automatic: The system selects the network automatically by
the user’s selected rules and the network status.
Manual: The network is selected by users themselves.
When the “Manual” is selected, click the “Search” button to
Page 25

25
research the network. Wait a minute, the supplier list will show in
the windows and which with the available status can be
selected.
Select the network which the supplier is utilized to serve your
SIM and press “Apply” to confirm.
3.5.3 Preference
Automatic: The system will select the available network
automatically.
UMTS/HSPA: The system will only select the UMTS/HSPA
network.
GPRS/EDGE: The system will only select the GPRS/EDGE
network.
3.5.4 SMS Settings
SMS Center Number: Set the corresponding SMS center
number via the SIM card of the supplier. You must input the
correct SMS center number to use the SMS properly and the
number will be provided by the net work supplier. Please enter
the country code before the number.
SMS Validity: Set the t ime limit for saving SMS in the net work
side. (This function needs network supports.)In option: 12
hours/A day/A week/The longest period. The default setting is
the longest period permitted by the network.
Default Save Location of New SMS: Select “PC” to save in
laptop or desktop PC. Select “(U)SIM Card” to save in SIM card.
State report: When selected, the network will inf orm you of the
status for the sent messages.
Page 26

26
3.5.5 Sound
You can set “Network connect alert, Network disconnect alert
and SMS alert” by yourse lf. These alerts will s ound on the PC
side. The audio file supports MP3、WAV、WMA and MIDI format.
If you select “Mute”, you cannot hear corresponding alert.
3.5.6 Security Settings
When “Enable” item is s elected, please enter PIN code to use
the modem and you can click “Change” to modify the PIN code.
3.6 Data Record
Click “Data Record” icon to check the log of Internet
connection history.
Select start date (in “From” item) and end date (in “To” item ) on
the top of the “Data R ecord” dialog box, the r ecords during this
period will be lis ted. Select a record which you want to del ete,
and click Delete. And you can clear the record(s) by clicking
“Clear” button.
Note: Data usage is approximate only, please contact your
operator for actual usage.
3.8 MicroSD card
When you use microSD card in the modem, the system will
display the MicroSD card as a rem ovable disk. You can use it
freely. It is convenient for you to check the contents in your
MicroSD card.
3.9 Help
Select Help, and switch to the help interface. Under the help
Page 27

27
topic, you can get th e useful inform ation about function of the
software, etc.
Page 28

28
4 FAQ & Answers
Problem
Description
Possible Causes
Problem Solving
The system can
The system
The device will
first.
After installation,
The system
Please install the
installation folder.
After the device is
run automatically.
The system
Please open the UI
the desktop.
When you meet the f ollowing problems in service, please refer
to the following answers to solve it. If the problems still exist,
please contact with your suppliers.
not run the
installation
program
automatically.
the system
doesn't install the
driver program
properly.
plugged in, the UI
program doesn't
configuration is
having difficulty
with the auto-run
software.
configuration is
having difficulty with
the auto-run
software.
configuration is
incorrect.
appear as a virtual
CDROM on the
PC’s start menu.
Click on the icon
and start the
autorun.exe. If you
have previously
installed a version
of the program,
please uninstall it
driver program
manually. The
driver program can
be found in
program manually.
You can find it on
Page 29

29
Problem
Description
Possible Causes
Problem Solving
After restarting
the computer,
1. You are in the
remote rural areas.
1. Change location
2. The device is not
2. Close the device
3. The SIM/USIM
3. Remove and
4. The MODEM
4. Adjust the angle /
there is no signal
indicated.
place where there
is no GSM/ GPRS
/EDGE /WCDMA
/HSDPA network
coverage. Such
places include
underground
parking garages,
tunnels, and some
to find a good
where having
signal.
properly connected.
card isn't inserted
properly.
device is positioned
in such a way as
that adversely
affects the devices
signal reception.
safely as usual, pull
out the device and
reinsert the device
again.
reinsert the
SIM/USIM card
correctly.
position of the
MODEM device or
its proximity to
other electronic
devices.
Page 30

30
Problem
Description
Possible Causes
Problem Solving
When the Device
is being installed,
1. The installation
1. Run the
2. The device is not
2. Restart the
device.
3. The SIM/USIM
3. Reinsert the
Sent Message
1. The SMS center
1. Your device is
operator.
2. The network is
signal.
2. Try later or move
Date connection
1. You are in the
1. Move to an area
the computer
cannot find it.
programs of the
MODEM device
have not been
installed properly.
installation program
first then connect
the device. Now
install the drivers as
normal in Windows.
failure.
failed.
connected properly.
card is not inserted
properly.
number is incorrect.
busy or you are in
an area with no
place where there
is no GSM/ GPRS/
EDGE/ WCDMA/
HSDPA network
coverage.
computer, or
reconnect the
SIM/USIM card
correctly.
preconfigured so it
is unlikely that it wi ll
need changing.
However if it is
missing or incorrect
contact your
to an area with a
stronger signal.
with good signal.
Page 31

31
Problem
Description
Possible Causes
Problem Solving
2. The network is
busy.
2. Try later.
3. The APN in the
user configuration
3. Check the APN
settings".
4. The device data
4. Local network
data request.
5. The network type
5. Reselect the
SIM/USIM card.
Connected to the
1. After connection,
1. Check that the
correct.
2. IE browser is
2. Upgrade to the
browser.
file is incorrect.
in the user
configuration file in
the "Network
Internet, but it
cannot open any
website page.
is corrupted.
has been selected
manually, but is
incorrect.
you are unable to
open web pages.
causing problems.
access or the target
server maybe
experiencing
problems. Retry
network type
according to the
type of the
APN in the
configuration files is
new version or
reinstall the IE
Page 32

32
Problem
Description
Possible Causes
Problem Solving
3. Your operating
system maybe
website.
3. Use the
4. You have
4. This happens
your operator.
infected by a virus.
Worm Blaster for
example can affect
upload and
downloaded data
flow, resulting in an
inability to access a
professional
anti-virus software
to check and
remove the virus.
connected to an
APN which cannot
connect to the
Internet.
when you are
changing any
preset operator
value in the setting
section. Check the
entry and enter the
correct APN from
 Loading...