

Page 1
Page 2
Preface
D-Link reserves the right to revise this publication and to make changes in the content hereof without obligation to notify any person or organization
of such revisions or changes.
Manual Revisions
Revision Date Description
1.0 October 8, 2009 • Revision A1 with rmware version 1.0
1.1 March 24, 2010 • Update to New Version 1.1
2.0 March 3, 2011 • Update Hardware
Trademarks
D-Link and the D-Link logo are trademarks or registered trademarks of D-Link Corporation or its subsidiaries in the United States or other countries.
All other company or product names mentioned herein are trademarks or registered trademarks of their respective companies.
Copyright © 2010 by D-Link Systems, Inc.
All rights reserved. This publication may not be reproduced, in whole or in part, without prior expressed written permission from D-Link Systems, Inc.
iD-Link DIR-601 User Manual
Page 3

Table of Contents
Table of Contents
Preface ..........................................................................................i
Manual Revisions ........................................................................... i
Trademarks ...................................................................................... i
Product Overview ......................................................................1
Package Contents .........................................................................1
System Requirements ................................................................. 2
Features ............................................................................................ 3
Hardware Overview ..................................................................... 4
Connections ...........................................................................4
LEDs ........................................................................................... 5
Installation ..................................................................................6
Before you Begin ........................................................................... 6
Wireless Installation Considerations ...................................... 7
Network Diagram ......................................................................... 8
Desktop Computer ....................................................................8
Dynamic IP Address (DHCP) .......................................20
PPPoE (DSL) ......................................................................21
PPTP ....................................................................................23
L2TP ....................................................................................25
Static IP Address .............................................................27
Wireless Settings .................................................................29
Manual Wireless Network Setup ..............................30
Network Settings ................................................................32
DHCP Server Settings ...................................................33
DHCP Reservation .........................................................34
IPv6 ..........................................................................................35
Link-Local Connectivity ...............................................35
Static IPv6 (Stateful) ......................................................36
Static IPv6 (Stateless) ....................................................37
DHCPv6 (Stateful) ..........................................................38
DHCPv6 (Stateless) ........................................................39
IPv6 over PPPoE (Stateful) ...........................................40
DIR-601 Router ...........................................................................8
Connect to Cable/DSL/Satellite Modem .............................. 9
Connect to Another Router ....................................................10
Getting Started ............................................................................12
Conguration .......................................................................... 13
Web-based Conguration Utility ..........................................13
Internet Connection Setup Wizard ...............................14
Manual Conguration .......................................................19
Dynamic (Cable) .............................................................19
IPv6 over PPPoE (Stateless) ........................................42
6 to 4 Tunneling (Stateful) ..........................................44
6 to 4 Tunneling (Stateless) ........................................45
IPv6 in IPv4 Tunneling (Stateful) ...............................46
IPv6 in IPv4 Tunneling (Stateless).............................47
Virtual Server ........................................................................48
Port Forwarding ..................................................................50
Application Rules ................................................................51
QoS Engine............................................................................52
Network Filters .....................................................................53
iiD-Link DIR-601 User Manual
Page 4

Table of Contents
Access Control .....................................................................54
Access Control Wizard ..................................................54
Website Filters ......................................................................57
Inbound Filters.....................................................................58
Firewall Settings ..................................................................59
Routing ...................................................................................60
Advanced Wireless Settings ............................................61
Advanced Network Settings ...........................................62
IPv6 Routing .........................................................................63
Administrator Settings ......................................................64
Time Settings .......................................................................66
SysLog .....................................................................................67
E-mail Settings .....................................................................68
System Settings ...................................................................69
Update Firmware ................................................................70
DDNS .......................................................................................71
System Check .......................................................................72
Schedules ..............................................................................73
What is WPA? ................................................................................84
Wireless Connection Setup Wizard ......................................85
Add Wireless Device with WPS Wizard ................................87
Congure WPA-Personal (PSK) ...............................................88
Congure WPA-Enterprise (RADIUS) ....................................89
Connect to a Wireless Network ............................................ 91
Using Windows® 7 .......................................................................91
Using Windows Vista
® ..................................................................................................................94
Congure WPA/WPA2 ........................................................95
Connect Using WCN 2.0 ...................................................97
Using Windows® XP ....................................................................98
Congure WPA-PSK ............................................................99
Troubleshooting ................................................................... 101
Wireless Basics ......................................................................105
What is Wireless? ...................................................................... 106
Wireless Modes ......................................................................... 109
Device Information ............................................................74
Log ...........................................................................................76
Stats .........................................................................................77
Internet Sessions .................................................................78
Routing Table .......................................................................80
Wireless ..................................................................................81
IPv6 ..........................................................................................82
Support ..................................................................................83
Wireless Security ..................................................................... 84
Networking Basics ................................................................ 110
Check your IP address ............................................................ 110
Statically Assign an IP address ............................................ 111
Technical Specications ......................................................112
Contacting Technical Support ............................................ 113
Warranty ................................................................................. 114
Registration ........................................................................... 120
iiiD-Link DIR-601 User Manual
Page 5
Section 1 - Product Overview
Product Overview
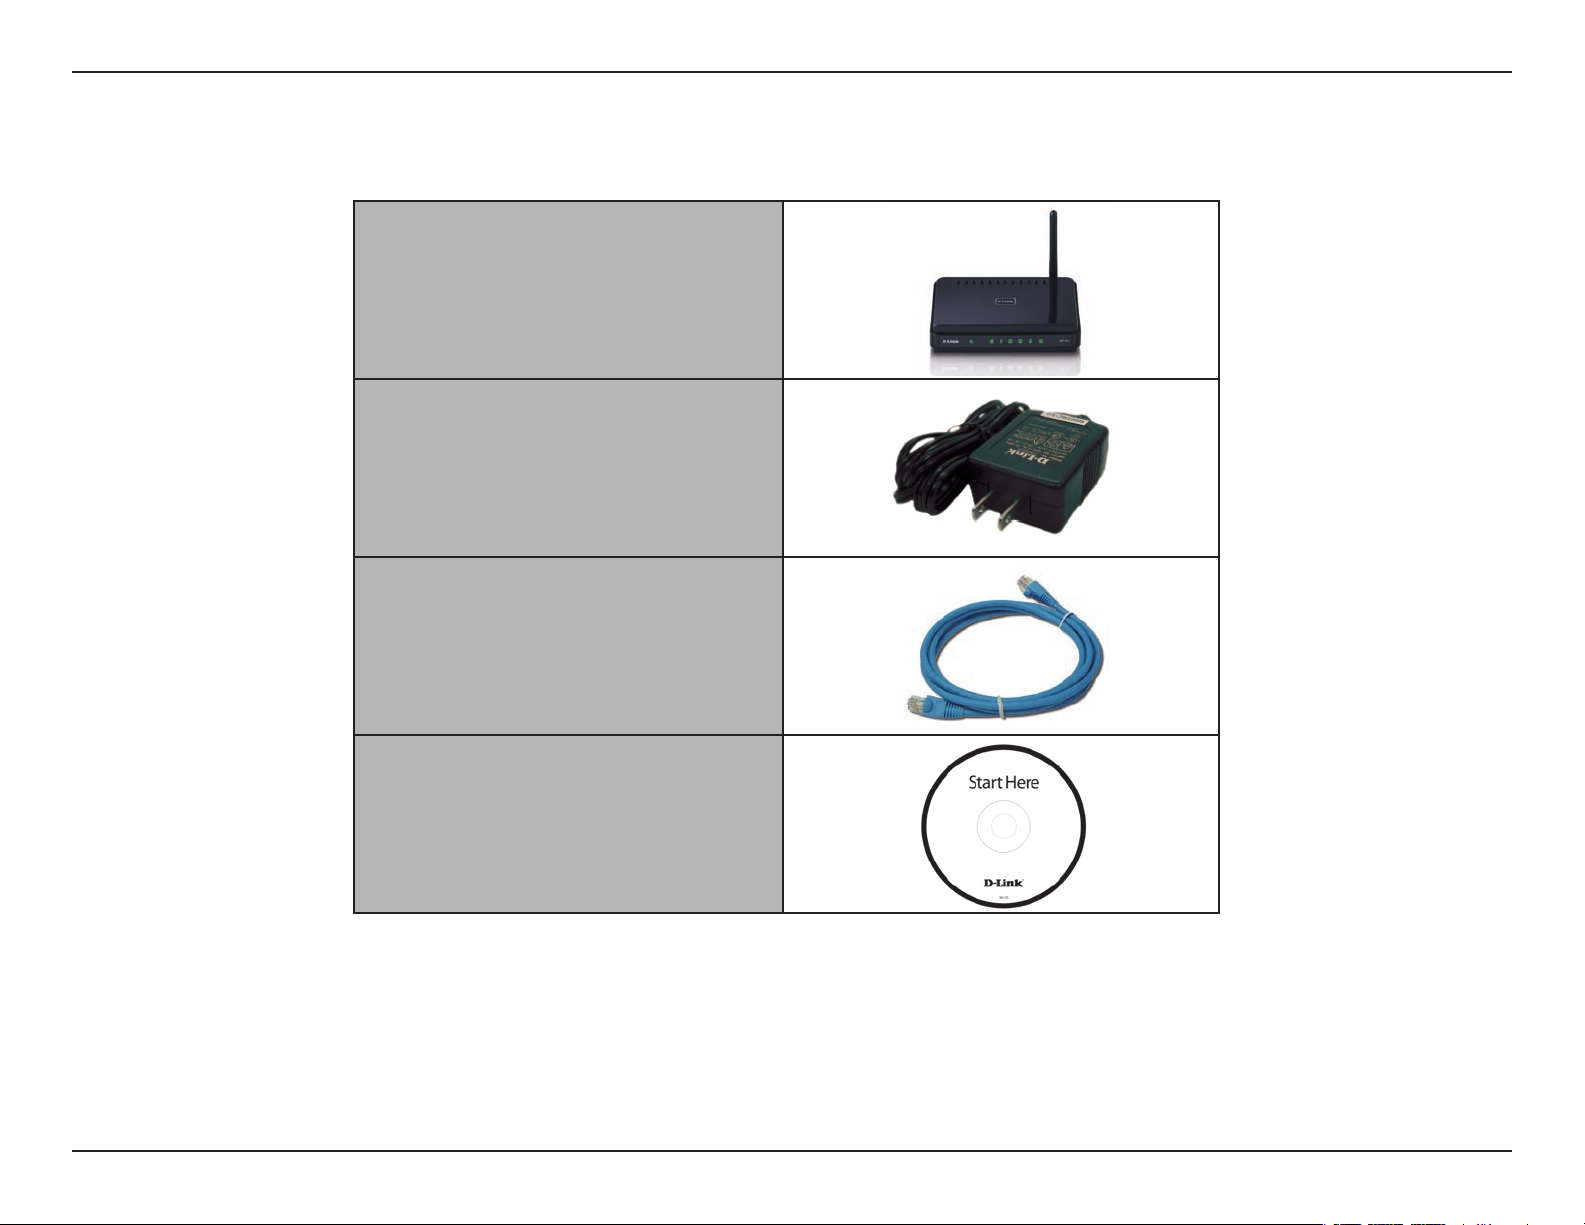
Package Contents
D-Link DIR-601 Wireless N
150 Home Router
Power Adapter
Ethernet Cable
CD-ROM
Note: Using a power supply with a dierent voltage rating than the one included with the DIR-601 will cause damage and void the
warranty for this product.
1D-Link DIR-601 User Manual
Page 6

Section 1 - Product Overview
System Requirements
Network Requirements
• An Ethernet-based Cable or DSL modem
• IEEE 802.11n/g wireless clients
• 10/100 Ethernet
Computer with the following:
• Windows®, Macintosh
• An installed Ethernet adapter
Browser Requirements:
Web-based Conguration
Utility Requirements
CD Installation Wizard
Requirements
• Internet Explorer® 6.0 and higher
• Mozilla Firefox 3.0 and higher
• Google™ Chrome 2.0 and higher
• Apple Safari 3.0 and higher
Windows® Users: Make sure you have the latest version of
Java installed. Visit www.java.com to download the latest
version.
Computer with the following:
• Windows® XP with Service Pack 2, Vista® or Windows®7
• An installed Ethernet adapter
• CD-ROM drive
2D-Link DIR-601 User Manual
Page 7

Section 1 - Product Overview
• FasterWirelessNetworking - The DIR-601 provides up to 150Mbps.* This capability allows users to participate in real-time activities
online, such as video streaming, online gaming, and real-time audio.
• Compatiblewith802.11gDevices - The DIR-601 is still fully compatible with the IEEE 802.11g standard, so it can connect with
existing 802.11g PCI, USB and Cardbus adapters.
• AdvancedFirewallFeatures - The Web-based user interface displays a number of advanced network management features
including:
• ContentFiltering - Easily applied content ltering based on MAC Address, URL, and/or Domain Name.
• Filter Scheduling - These lters can be scheduled to be active on certain days or for a duration of hours or
minutes.
Features
• Secure Multiple/Concurrent Sessions - The DIR-601 can pass through VPN sessions. It supports multiple and
concurrent IPSec and PPTP sessions, so users behind the DIR-601 can securely access corporate networks.
•User-friendlySetupWizard - Through its easy-to-use Web-based user interface, you can congure your router to your specic
settings within minutes.
* Maximum wireless signal rate derived from IEEE Standard 802.11g specications. Actual data throughput will vary. Network conditions and environmental factors, including volume of network
trac, building materials and construction, and network overhead, lower actual data throughput rate. Environmental conditions will adversely aect wireless signal range.
3D-Link DIR-601 User Manual
Page 8
Section 1 - Product Overview
Hardware Overview
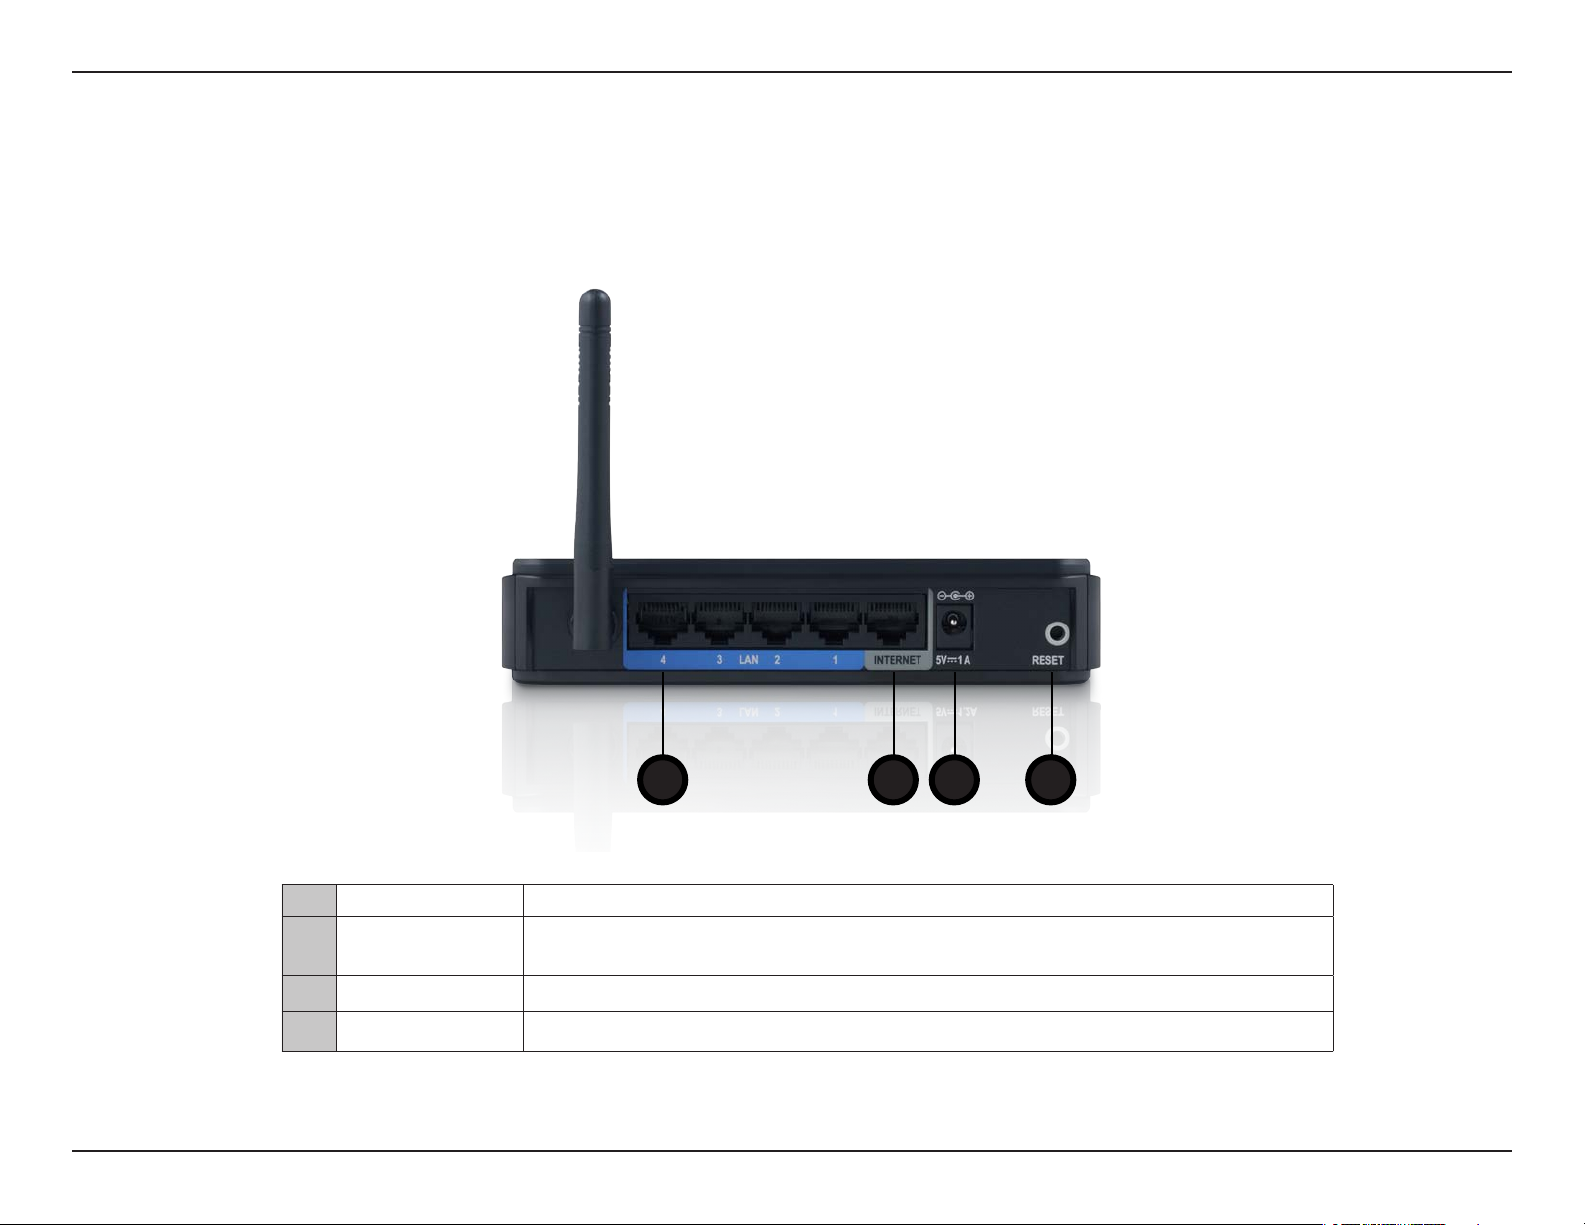
Connections
41 32
1 LAN Ports (1-4) Connect Ethernet devices such as computers, switches, and hubs.
2 Internet Port
3 Power Receptor The Power LED will illuminate red when the camera is receiving power.
4 Reset Pressing the Reset button restores the router to its original factory default settings.
The auto MDI/MDIX Internet port is the connection for the Ethernet cable to the cable or DSL
modem.
4D-Link DIR-601 User Manual
Page 9
Section 1 - Product Overview
Hardware Overview
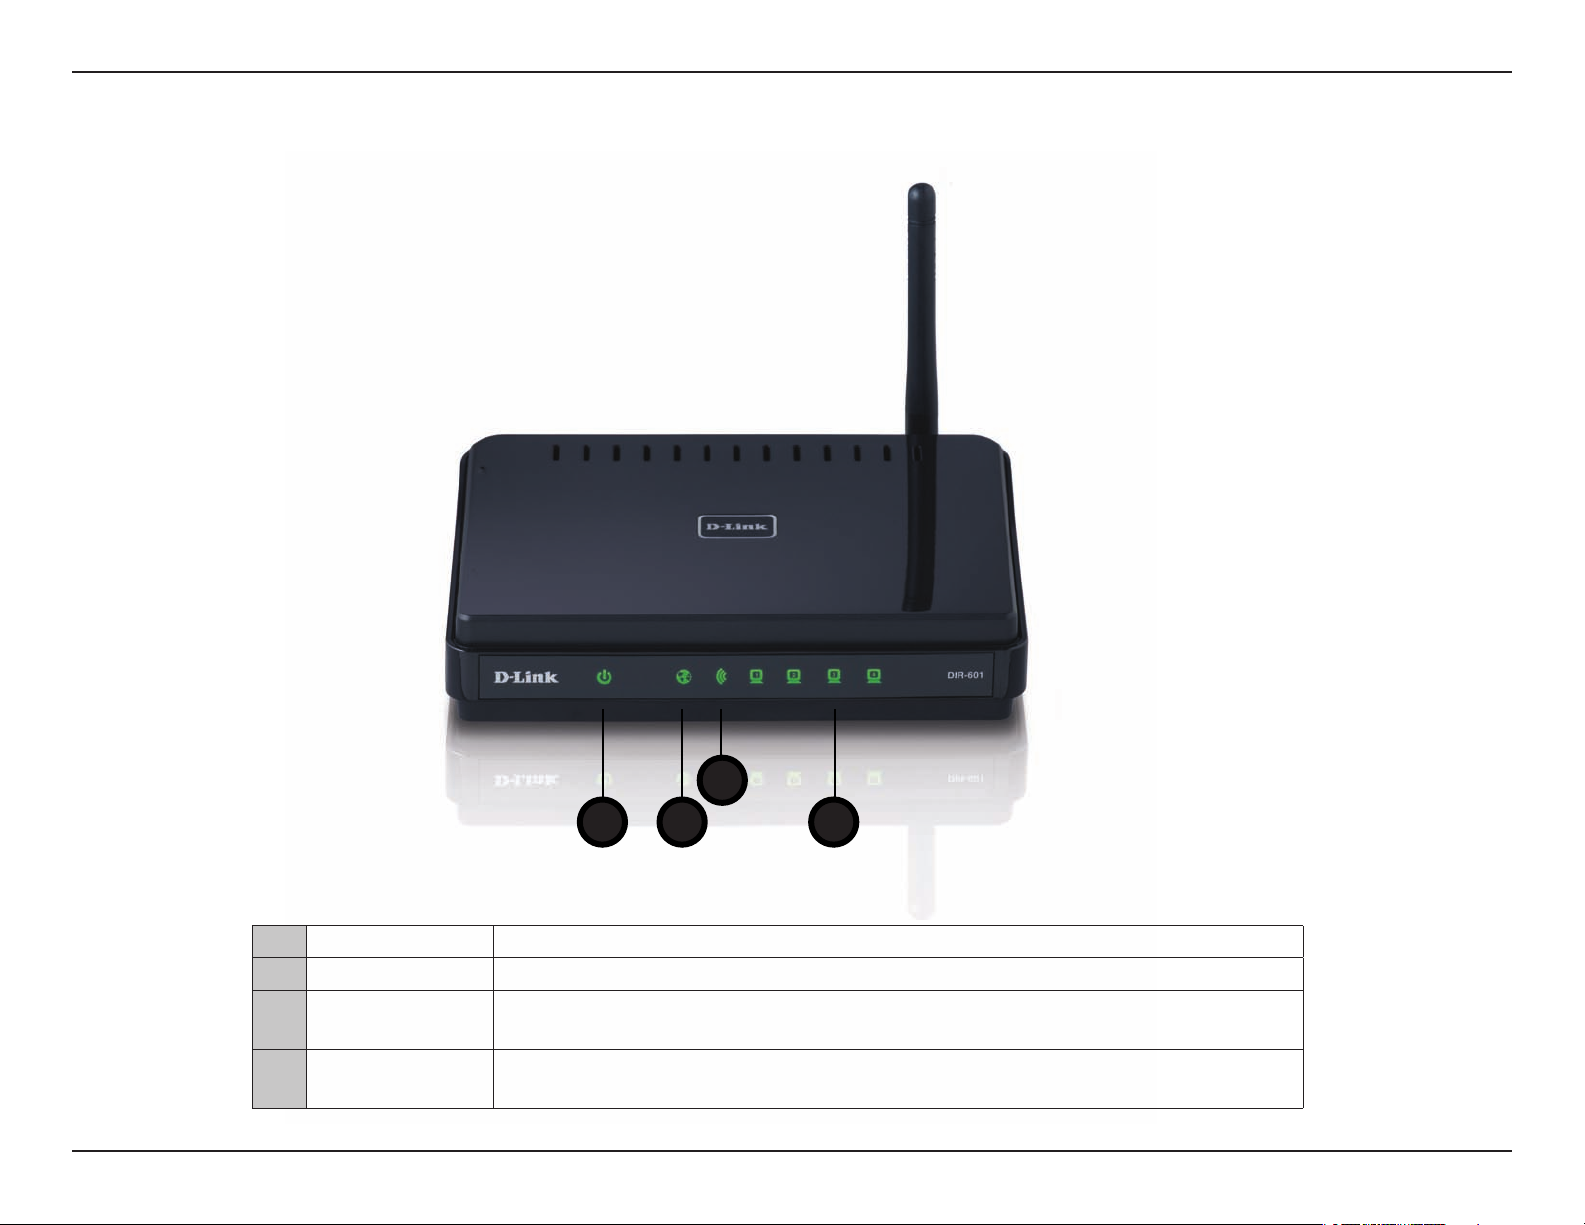
LEDs
3
1 2
1 Power LED A solid light indicates a proper connection to the power supply.
2 Internet LED A solid light indicates connection on the Internet port. This LED blinks during data transmission.
3 WLAN LED
4 Local Network LEDs
A solid light indicates that the wireless segment is ready. This LED blinks during wireless data
transmission.
A solid light indicates a connection to an Ethernet-enabled computer on ports 1-4. This LED
blinks during data transmission.
4
5D-Link DIR-601 User Manual
Page 10

Section 2 - Installation
Installation
This section will walk you through the installation process. Placement of the router is very important. Do not place the router in an enclosed area
such as a closet, cabinet, or in the attic or garage.
Before you Begin
• Please congure the router with the computer that was last connected directly to your modem.
• You can only use the Ethernet port on your modem. If you were using the USB connection before using the router, then you must
turn o your modem, disconnect the USB cable and connect an Ethernet cable to the Internet port on the router, and then turn
the modem back on. In some cases, you may need to call your ISP to change connection types (USB to Ethernet).
• If you have DSL and are connecting via PPPoE, make sure you disable or uninstall any PPPoE software such as WinPoet, Broadjump,
or Enternet 300 from your computer or you will not be able to connect to the Internet.
• When running the Setup Wizard from the D-Link CD, make sure the computer you are running the CD from is connected to the
Internet and online or the wizard will not work. If you have disconnected any hardware, re-connect your computer back to the
modem and make sure you are online.
6D-Link DIR-601 User Manual
Page 11

Section 2 - Installation
Wireless Installation Considerations
The D-Link wireless router lets you access your network using a wireless connection from virtually anywhere within the operating range of your
wireless network. Keep in mind, however, that the number, thickness and location of walls, ceilings, or other objects that the wireless signals must
pass through, may limit the range. Typical ranges vary depending on the types of materials and background RF (radio frequency) noise in your
home or business. The key to maximizing wireless range is to follow these basic guidelines:
1. Keep the number of walls and ceilings between the D-Link router and other network devices to a minimum - each wall or ceiling
can reduce your adapter’s range from 3-90 feet (1-30 meters.) Position your devices so that the number of walls or ceilings is
minimized.
2. Be aware of the direct line between network devices. A wall that is 1.5 feet thick (.5 meters), at a 45-degree angle appears to be
almost 3 feet (1 meter) thick. At a 2-degree angle it looks over 42 feet (14 meters) thick! Position devices so that the signal will
travel straight through a wall or ceiling (instead of at an angle) for better reception.
3. Building Materials make a dierence. A solid metal door or aluminum studs may have a negative eect on range. Try to position
access points, wireless routers, and computers so that the signal passes through drywall or open doorways. Materials and objects
such as glass, steel, metal, walls with insulation, water (sh tanks), mirrors, le cabinets, brick, and concrete will degrade your
wireless signal.
4. Keep your product away (at least 3-6 feet or 1-2 meters) from electrical devices or appliances that generate RF noise.
5. If you are using 2.4GHz cordless phones or X-10 (wireless products such as ceiling fans, lights, and home security systems), your
wireless connection may degrade dramatically or drop completely. Make sure your 2.4GHz phone base is as far away from your
wireless devices as possible. The base transmits a signal even if the phone in not in use.
7D-Link DIR-601 User Manual
Page 12
Section 2 - Installation
5V
-- -
1A
1 2 LAN 3 4 INTERNET
RESET
INTERNET
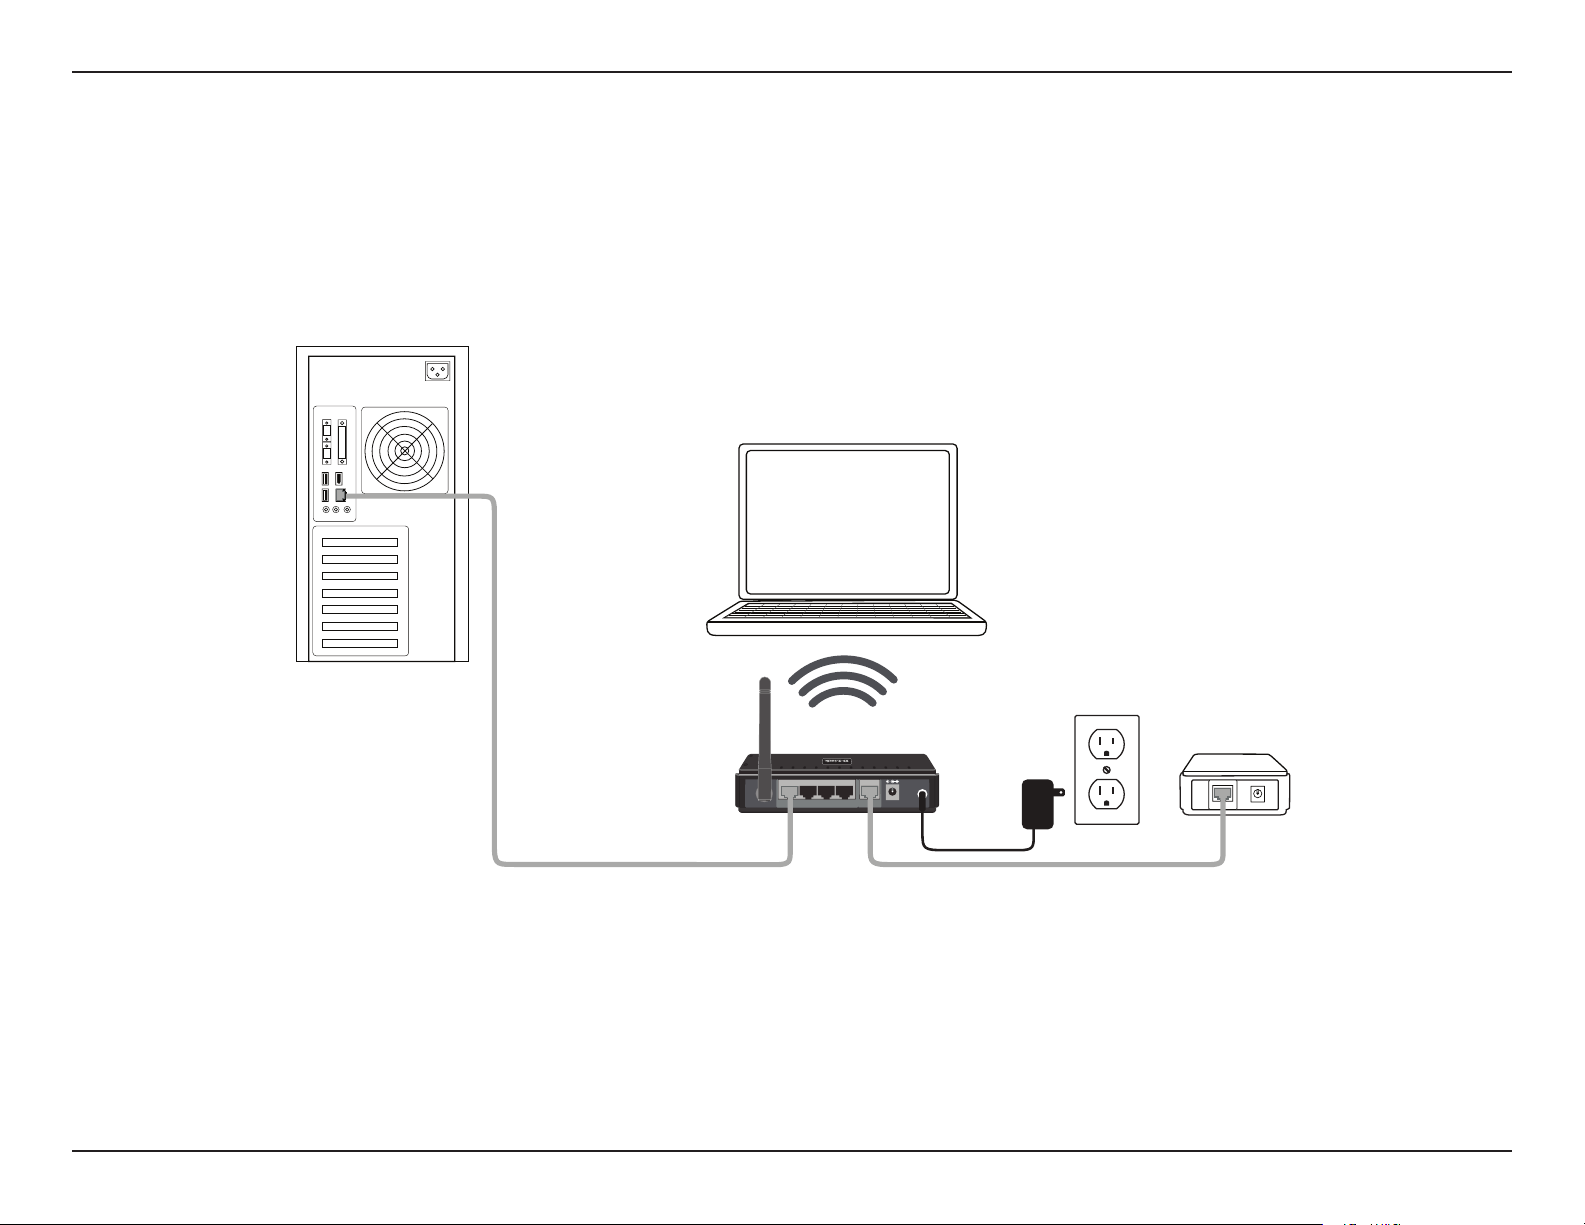
Network Diagram
Desktop Computer
DIR-601 Router
8D-Link DIR-601 User Manual
Page 13

Section 2 - Installation
Connect to Cable/DSL/Satellite Modem
If you are connecting the router to a cable/DSL/satellite modem, please follow the steps below:
1. Place the router in an open and central location. Do not plug the power adapter into the router.
2. Turn the power o on your modem. If there is no on/o switch, then unplug the modem’s power adapter. Shut down your computer.
3. Unplug the Ethernet cable (that connects your computer to your modem) from your computer and place it into the Internet port on the
router.
4. Plug an Ethernet cable into one of the four LAN ports on the router. Plug the other end into the Ethernet port on your computer.
5. Turn on or plug in your modem. Wait for the modem to boot (about 30 seconds).
6. Plug the power adapter to the router and connect to an outlet or power strip. Wait about 30 seconds for the router to boot.
7. Turn on your computer.
8. Verify the link lights on the router. The power light, Internet light, and the LAN light (the port that your computer is plugged into) should be lit.
If not, make sure your computer, modem, and router are powered on and verify the cable connections are correct.
9. Skip to page 12 to congure your router.
9D-Link DIR-601 User Manual
Page 14

Section 2 - Installation
Connect to Another Router
If you are connecting the D-Link router to another router to use as a wireless access point and/or switch, you will have to do the following before
connecting the router to your network:
• Disable UPnP™
• Disable DHCP
• Change the LAN IP address to an available address on your network. The LAN ports on the router cannot accept a DHCP address
from your other router.
To connect to another router, please follow the steps below:
1. Plug the power into the router. Connect one of your computers to the router (LAN port) using an Ethernet cable. Make sure your IP address on
the computer is 192.168.0.xxx (where xxx is between 2 and 254). Please see the Networking Basics section for more information. If you need
to change the settings, write down your existing settings before making any changes. In most cases, your computer should be set to receive an
IP address automatically in which case you will not have to do anything to your computer.
2. Open a web browser and enter http://192.168.0.1 and press Enter. When the login window appears, set the user name to Admin and leave
the password box empty. Click Log In to continue.
3. Click on Advanced and then click Advanced Network. Uncheck the Enable UPnP checkbox. Click SaveSettings to continue.
4. Click Setup and then click NetworkSettings. Uncheck the Enable DHCP Server server checkbox. Click SaveSettings to continue.
5. Under Router Settings, enter an available IP address and the subnet mask of your network. Click SaveSettings to save your settings. Use this
new IP address to access the conguration utility of the router in the future. Close the browser and change your computer’s IP settings back to
the original values as in Step 1.
6. Disconnect the Ethernet cable from the router and reconnect your computer to your network.
7. Connect an Ethernet cable in one of the LAN ports of the router and connect it to your other router. Do not plug anything into the Internet port
of the D-Link router.
10D-Link DIR-601 User Manual
Page 15

Section 2 - Installation
8. You may now use the other 3 LAN ports to connect other Ethernet devices and computers. To congure your wireless network, open a web
browser and enter the IP address you assigned to the router. Refer to the Conguration and Wireless Security sections for more information
on setting up your wireless network.
11D-Link DIR-601 User Manual
Page 16
Section 2 - Installation
Getting Started
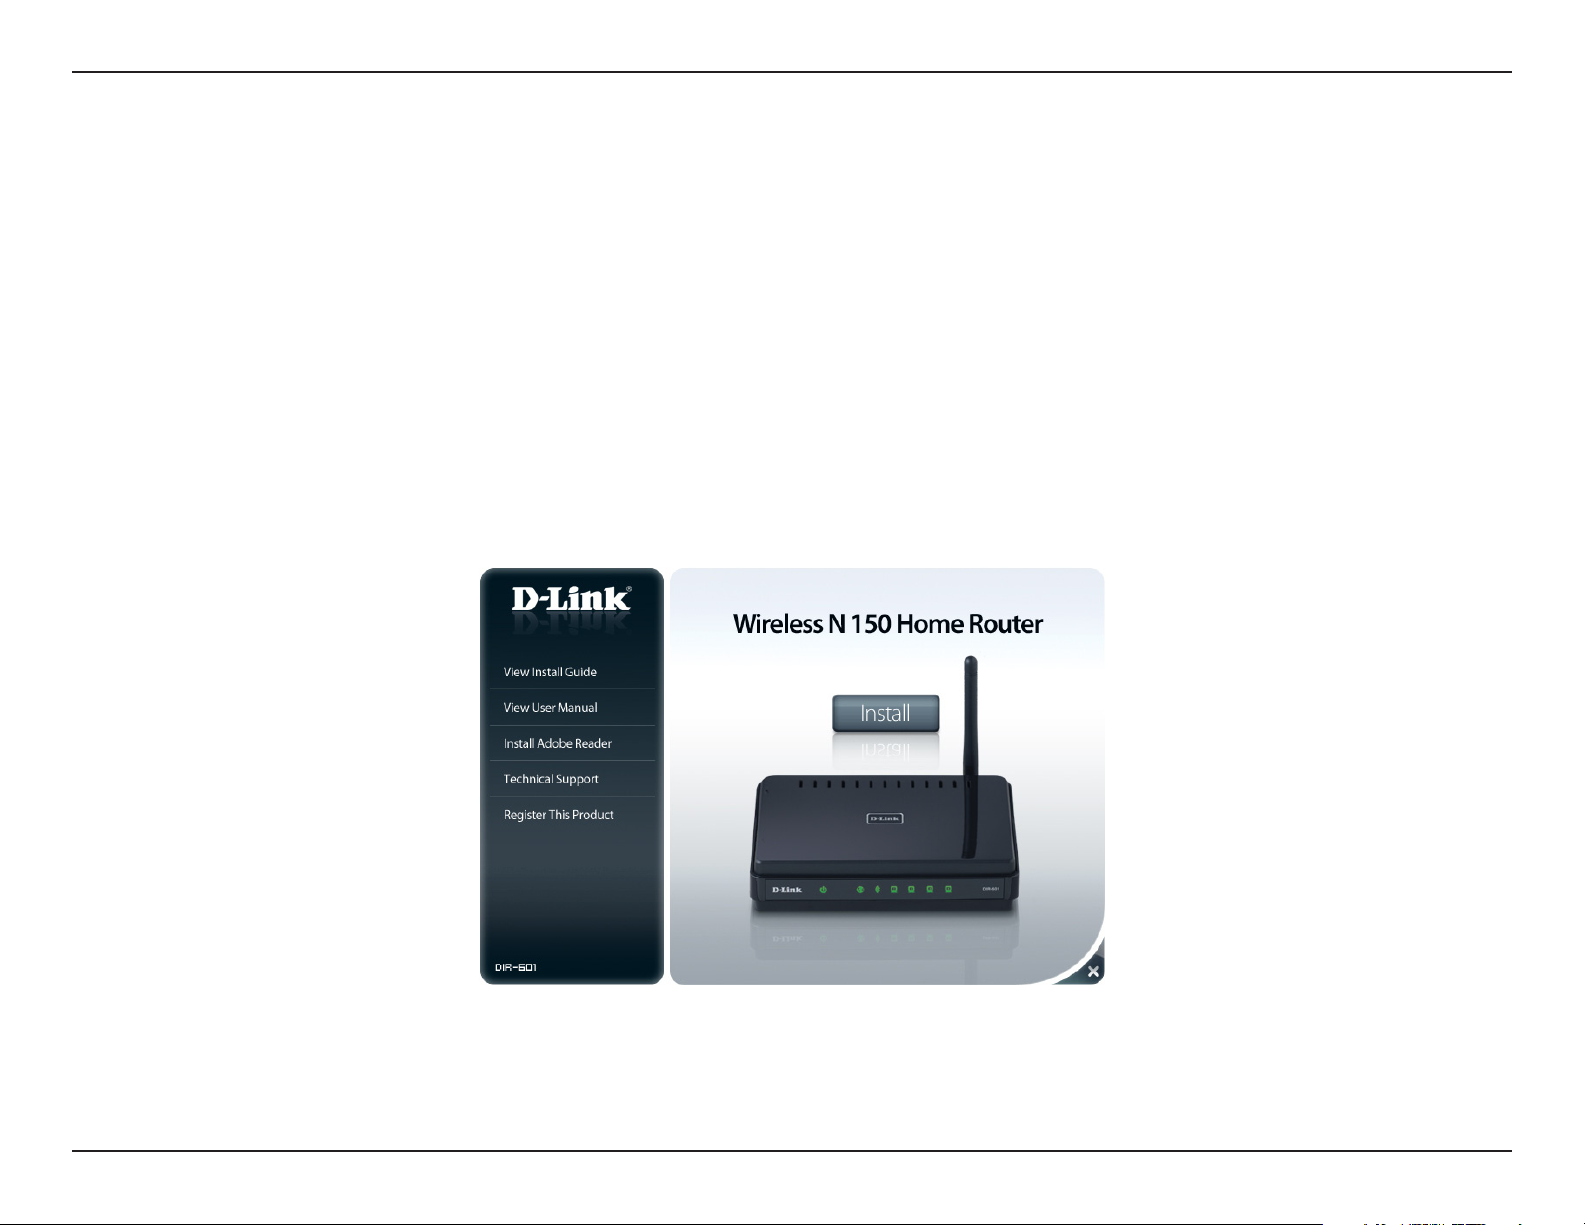
The DIR-601 includes a Quick Router Setup Wizard CD. Follow the simple steps below to run the Setup Wizard to guide you quickly through the
installation process. You may manually congure your router without the wizard. Refer to the next page to manually setup your router.
Insert the QuickRouterSetupWizardCD in the CD-ROM drive. The step-by-step instructions that follow are shown in Windows® XP or Vista®.
The steps and screens are similar for the other Windows® operating systems.
If the CD autorun function does not automatically start on your computer, go to Start > Run. In the run box type “D:\autorun.exe” (where D:
represents the drive letter of your CD-ROM drive).
When the autorun screen appears, click Install Router and follow the on-screen instructions.
Note: It is recommended to write down the login password on the provided CD holder.
12D-Link DIR-601 User Manual
Page 17
Section 3 - Conguration
Conguration
This section will show you how to congure your new D-Link wireless router using the web-based conguration utility.
Web-based Conguration Utility
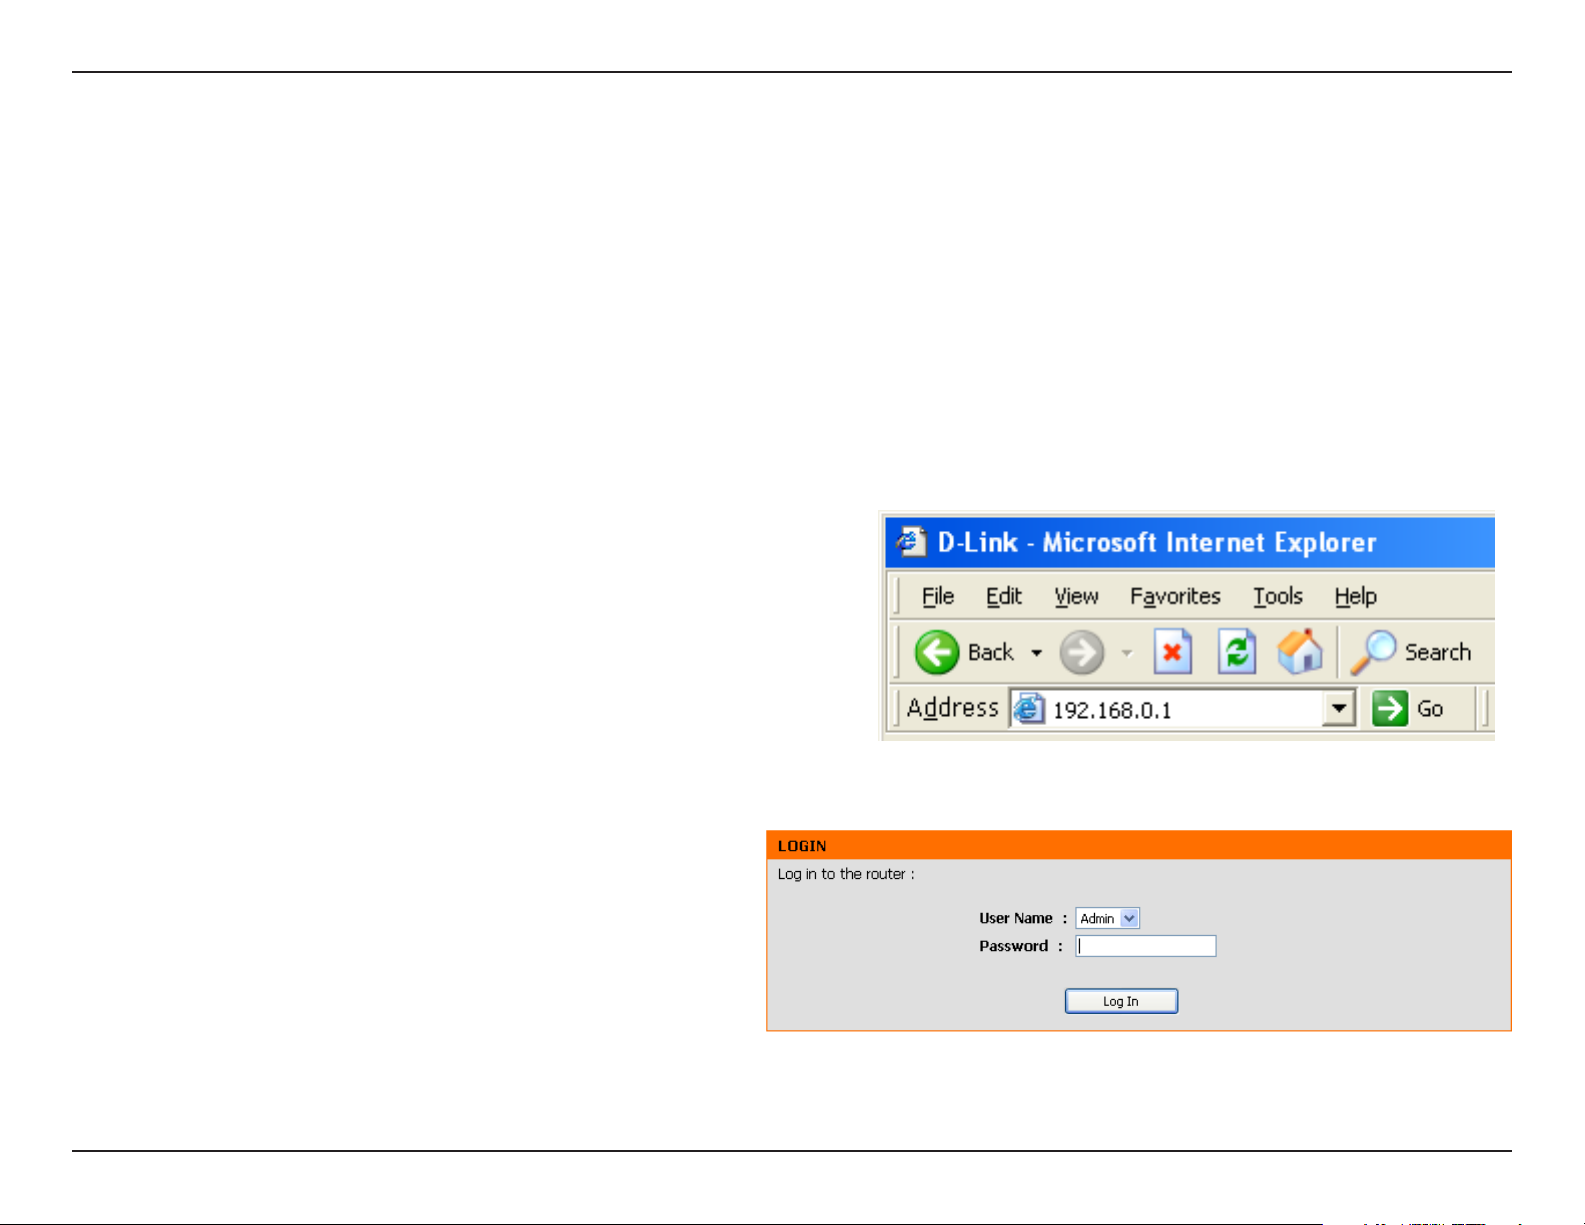
To access the conguration utility, open a web-browser such as Internet
Explorer and enter the IP address of the router (192.168.0.1).
Select Admin from the drop-down menu and then enter your
password. Leave the password blank by default.
If you get a Page Cannot be Displayed error, please refer to the
Troubleshooting section for assistance.
13D-Link DIR-601 User Manual
Page 18

Section 3 - Conguration
Internet Connection Setup Wizard
Once logged into the web interface of the router, the Setup>Internet page will appear. Click the InternetConnectionSetupWizard button to
quickly congure your router using the setup wizard.
If you want to enter your settings without running the wizard, click Manual Internet Conguration Wizard and skip to page 18.
14D-Link DIR-601 User Manual
Page 19
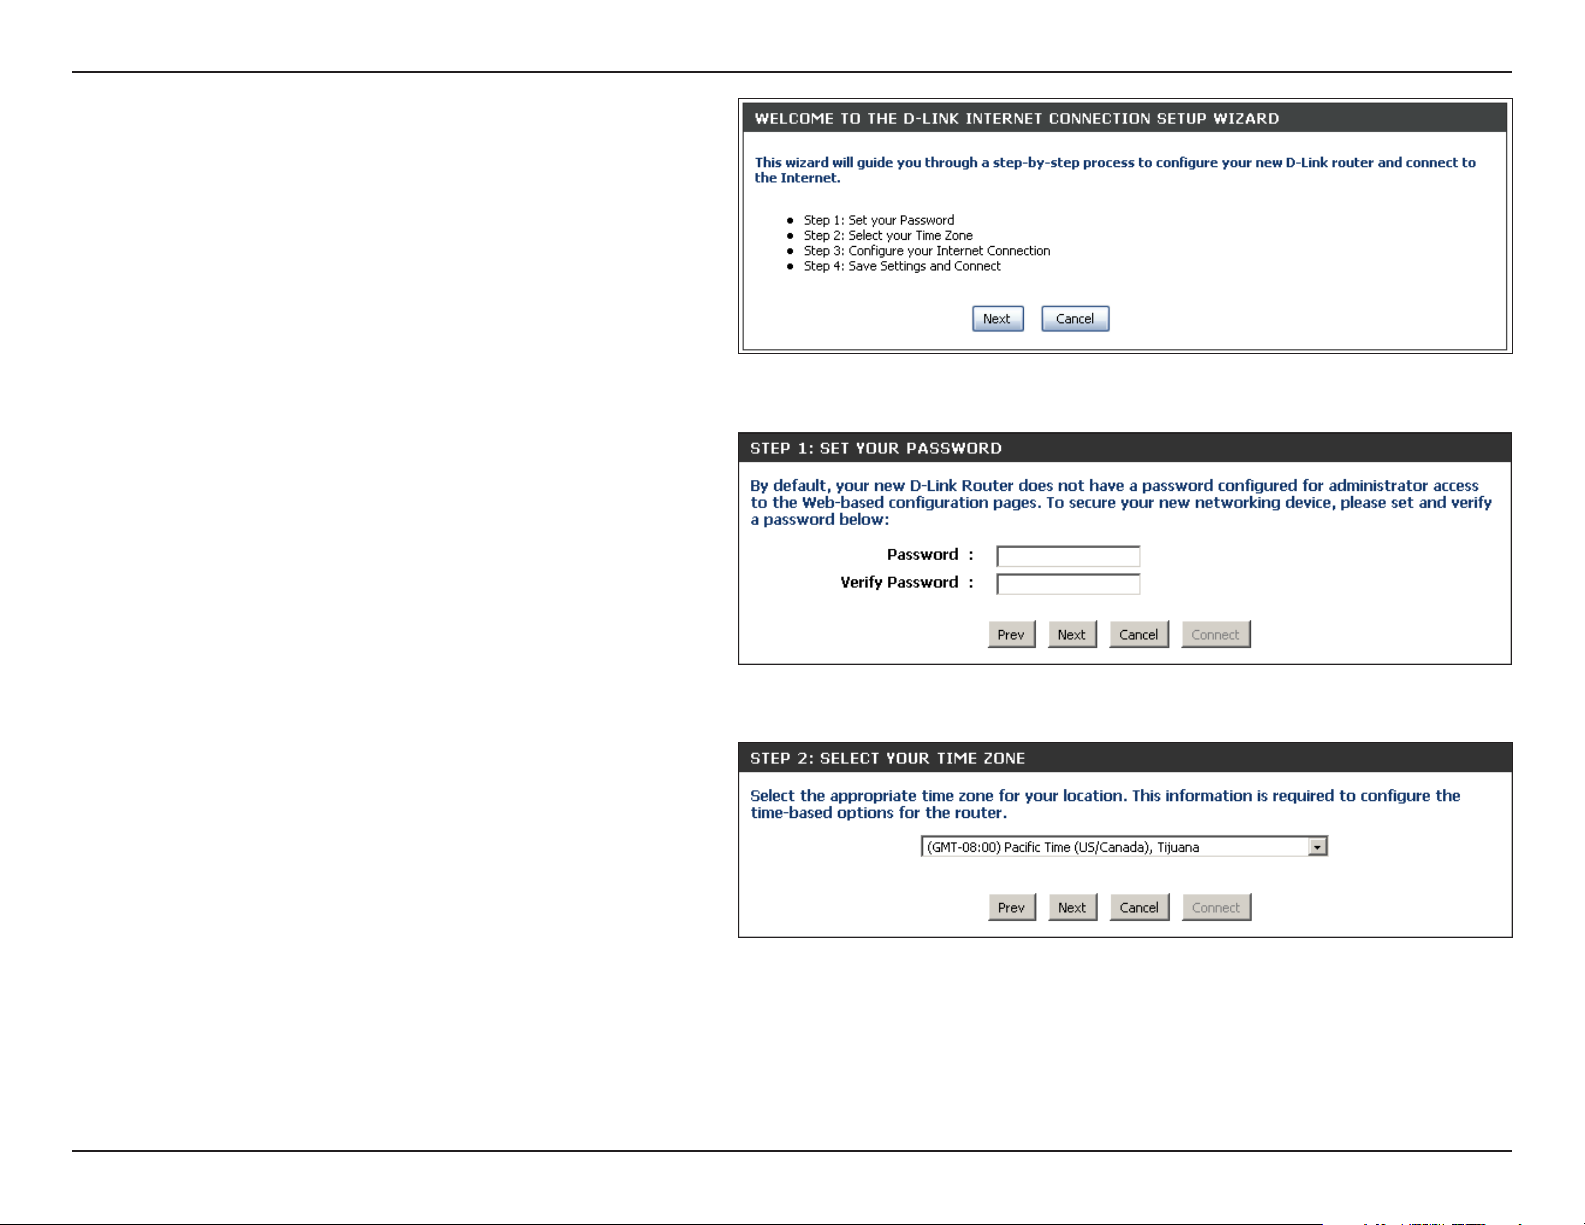
Section 3 - Conguration
Click Next to continue.
Create a new password and then click Next to continue.
Select your time zone from the drop-down menu and then click
Next to continue.
15D-Link DIR-601 User Manual
Page 20
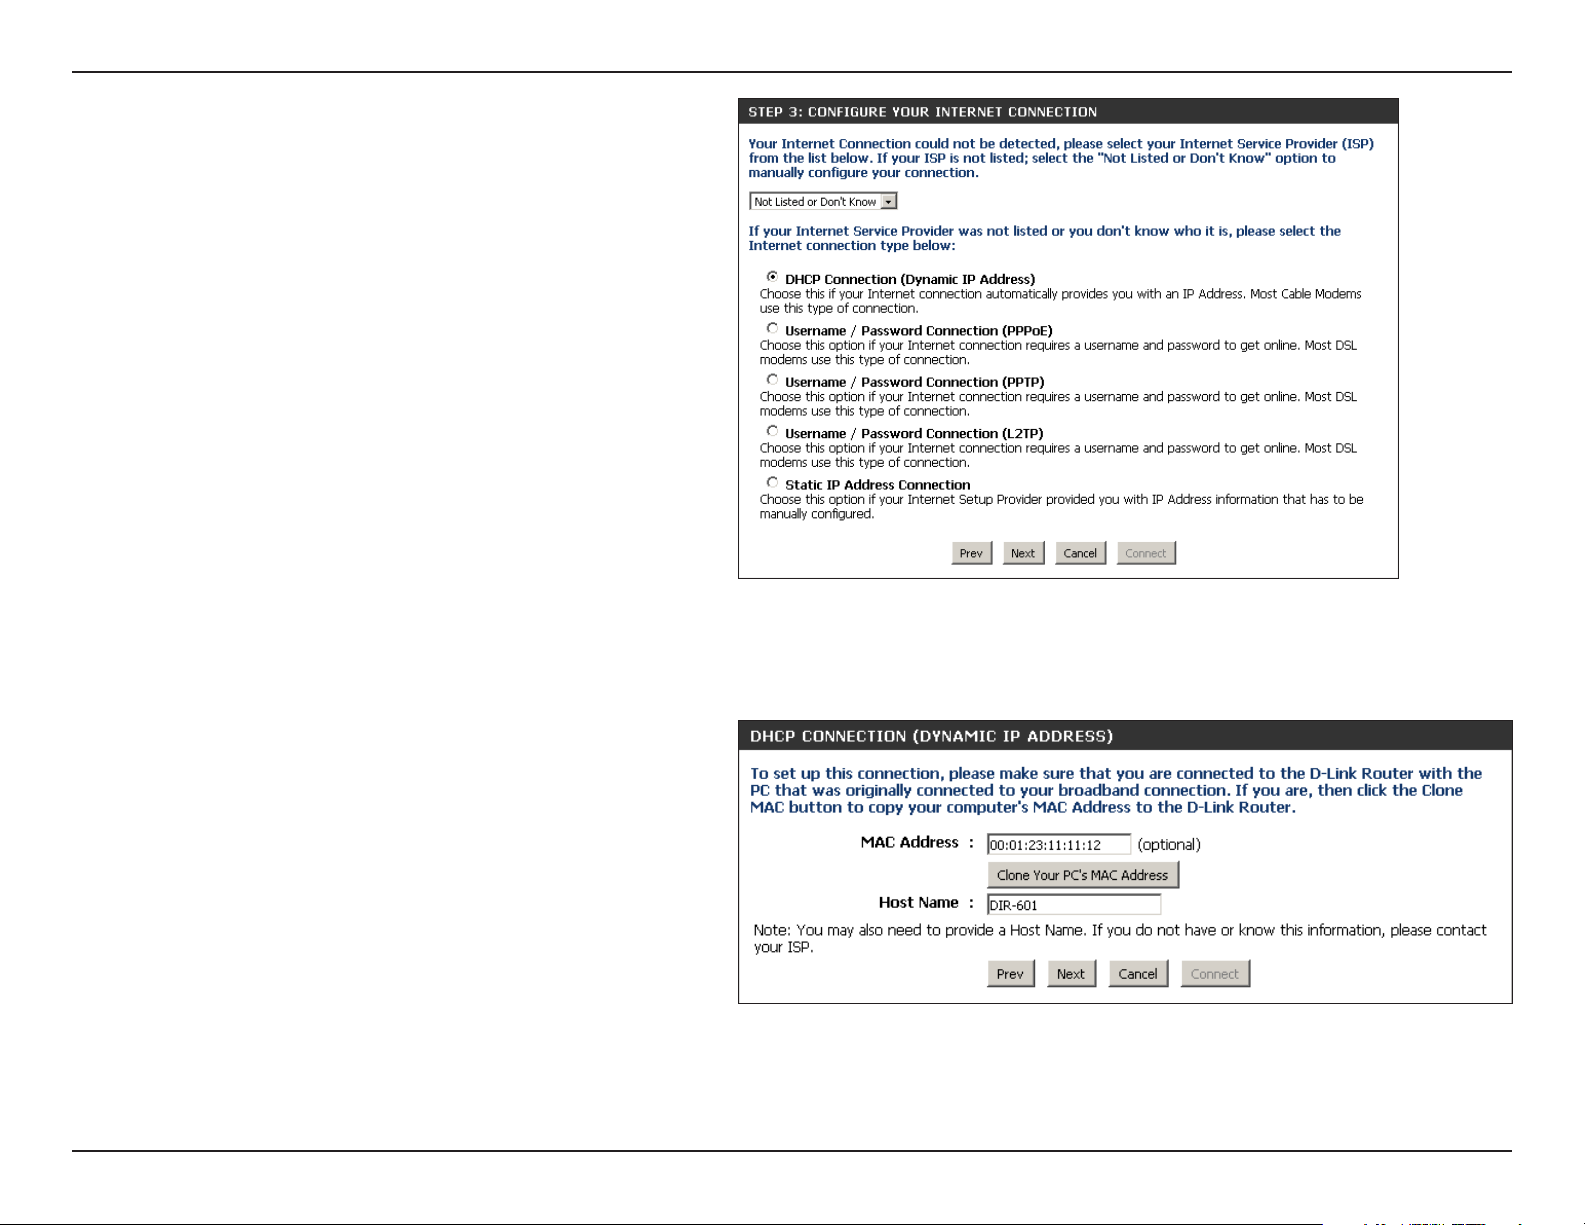
Section 3 - Conguration
Select the type of Internet connection you use and then click
Next to continue.
If you selected Dynamic, you may need to enter the MAC address
of the computer that was last connected directly to your modem.
If you are currently using that computer, click Clone Your PC’s
MAC Address and then click Next to continue.
The Host Name is optional but may be required by some ISPs.
The default host name is the device name of the Router and may
be changed.
16D-Link DIR-601 User Manual
Page 21
Section 3 - Conguration
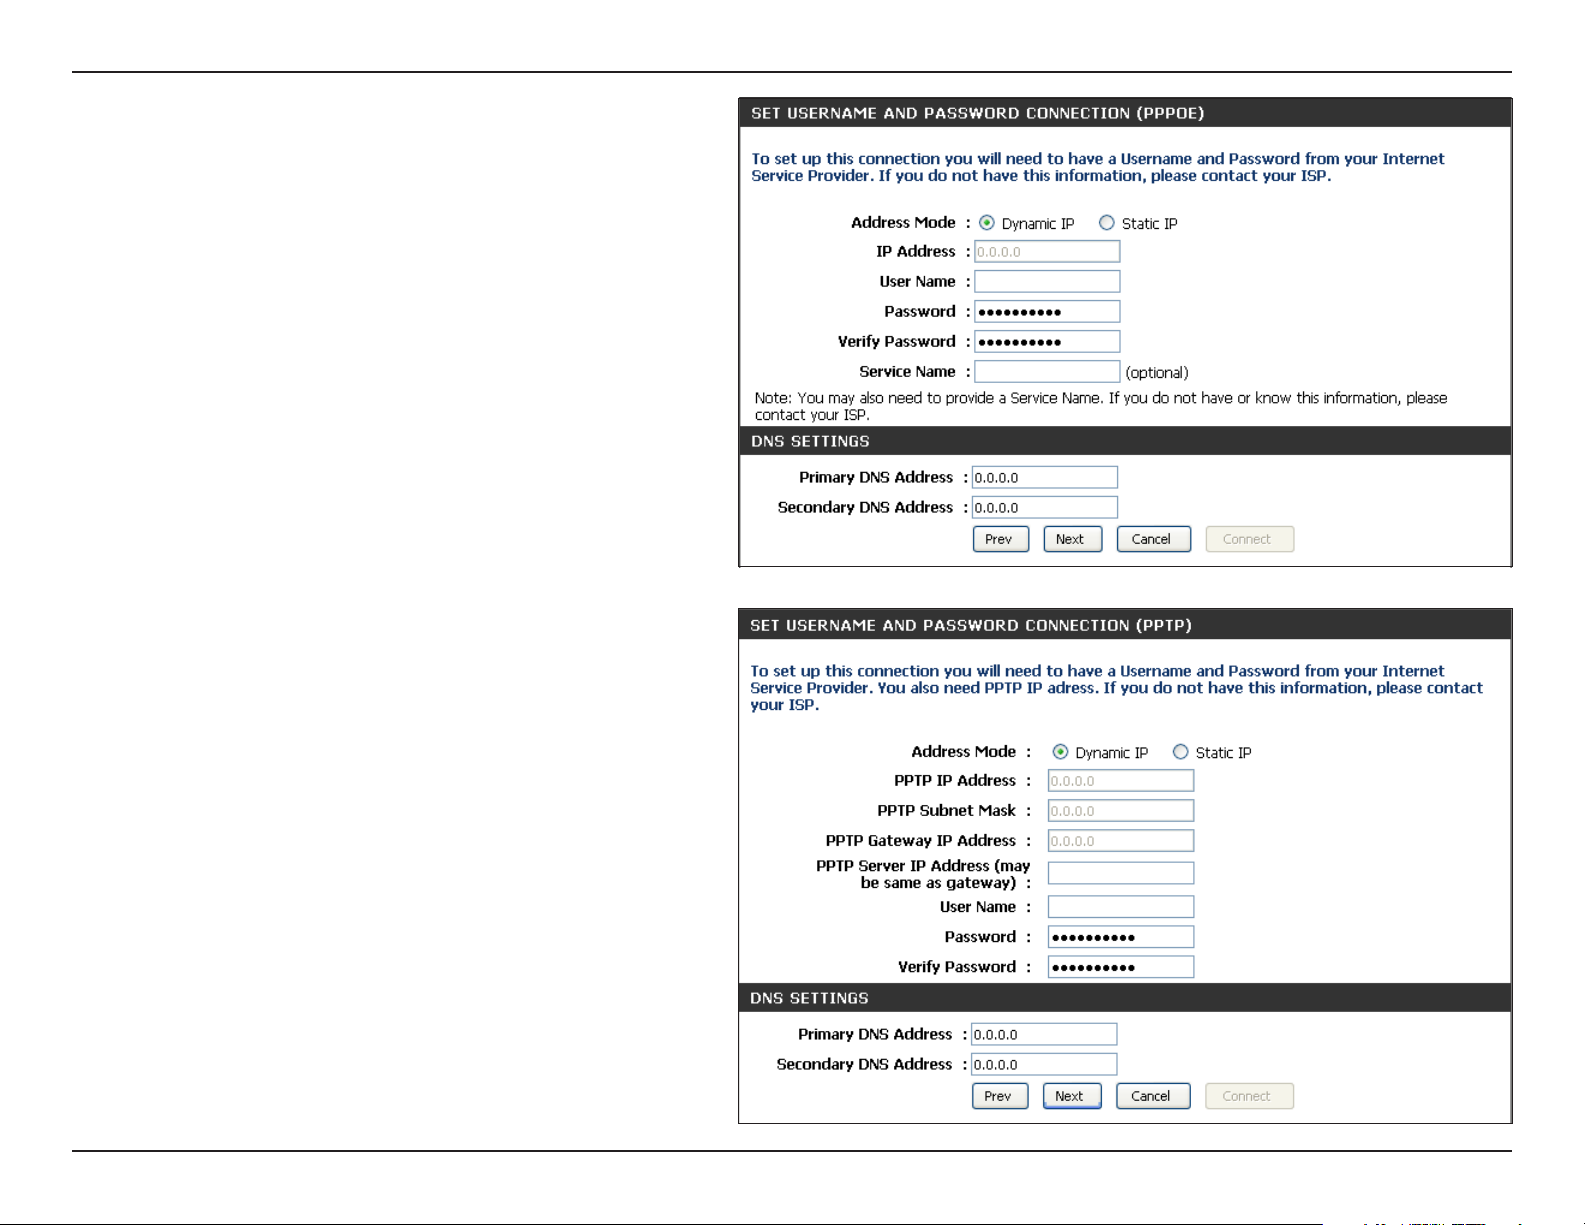
If you selected PPPoE, enter your PPPoE username and password.
Click Next to cozntinue.
Select Static if your ISP assigned you the IP address, subnet mask,
gateway, and DNS server addresses.
Note: Make sure to remove your PPPoE software from your computer.
The software is no longer needed and will not work through a
router.
If you selected PPTP, enter your PPTP username and password.
Click Next to continue.
17D-Link DIR-601 User Manual
Page 22
Section 3 - Conguration
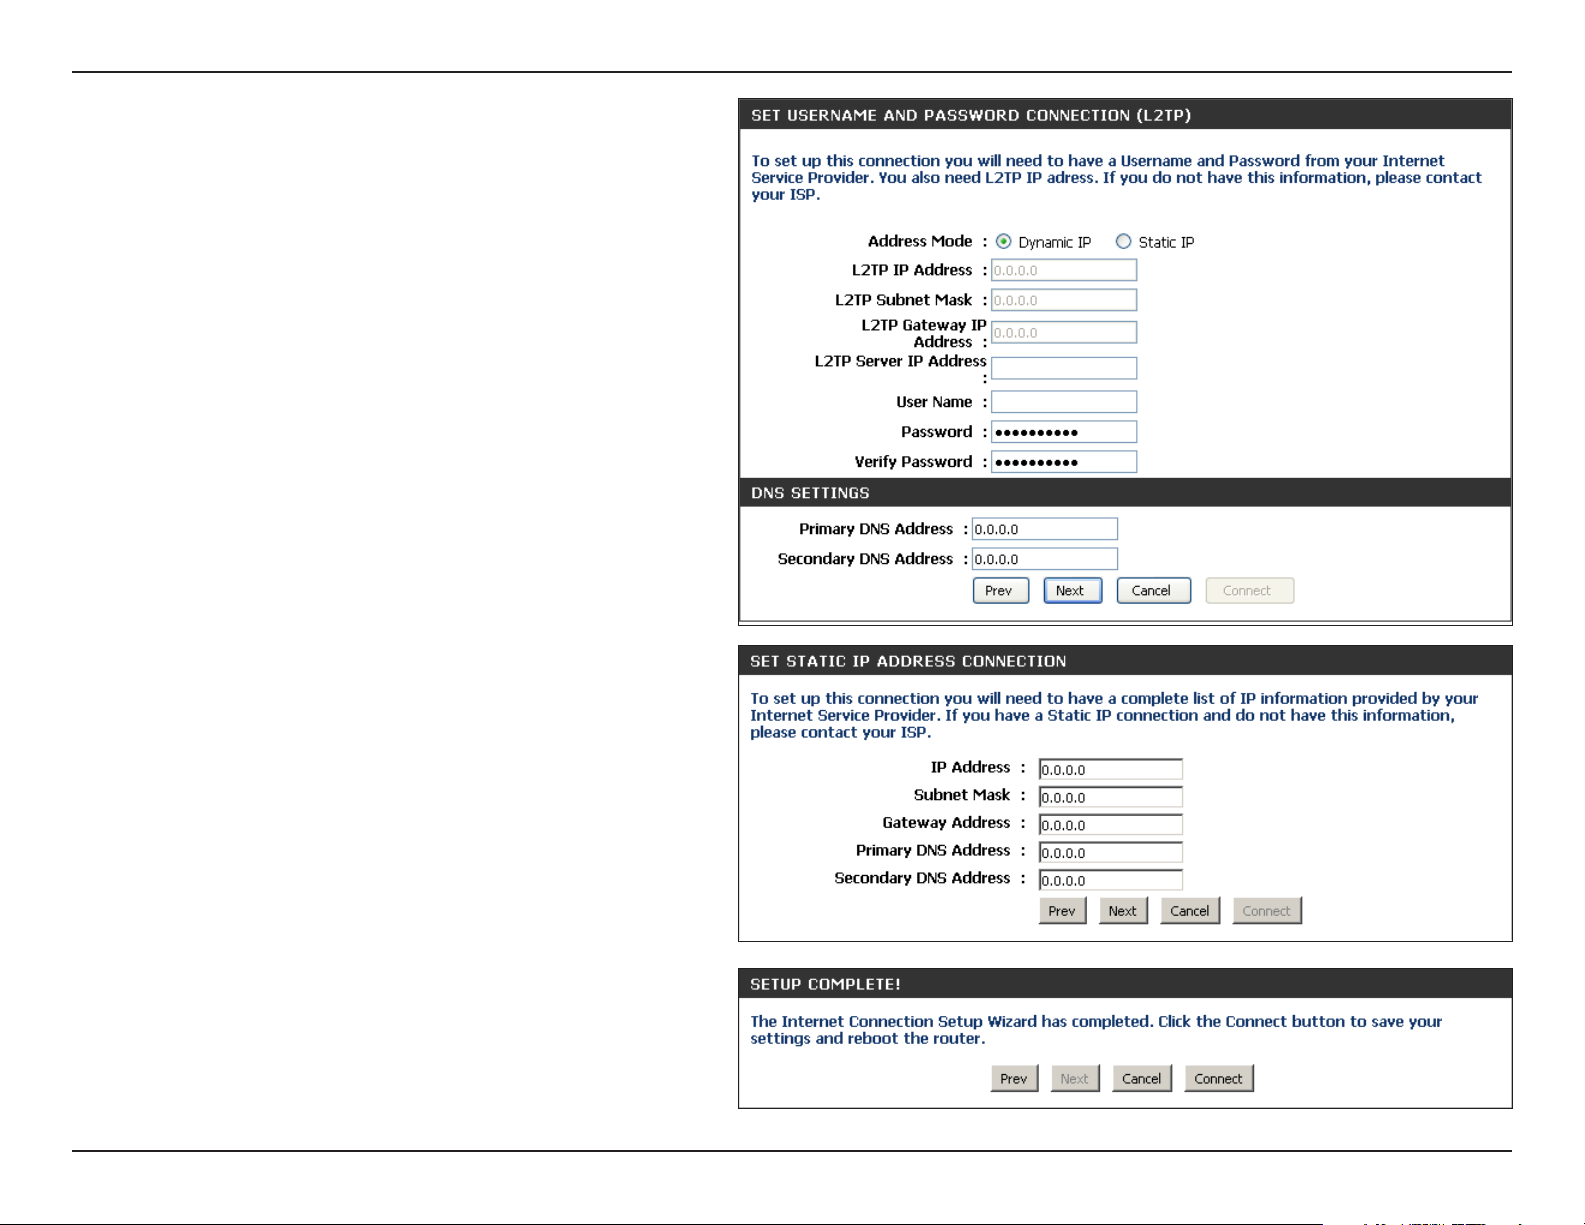
If you selected L2TP, enter your L2TP username and password.
Click Next to continue.
If you selected Static, enter your network settings supplied by
your Internet provider. Click Next to continue.
Click Connect to save your settings. Once the router is nished
rebooting, click Continue. Please allow 1-2 minutes to connect.
18D-Link DIR-601 User Manual
Page 23
Section 3 - Conguration
Manual Conguration
Dynamic (Cable)
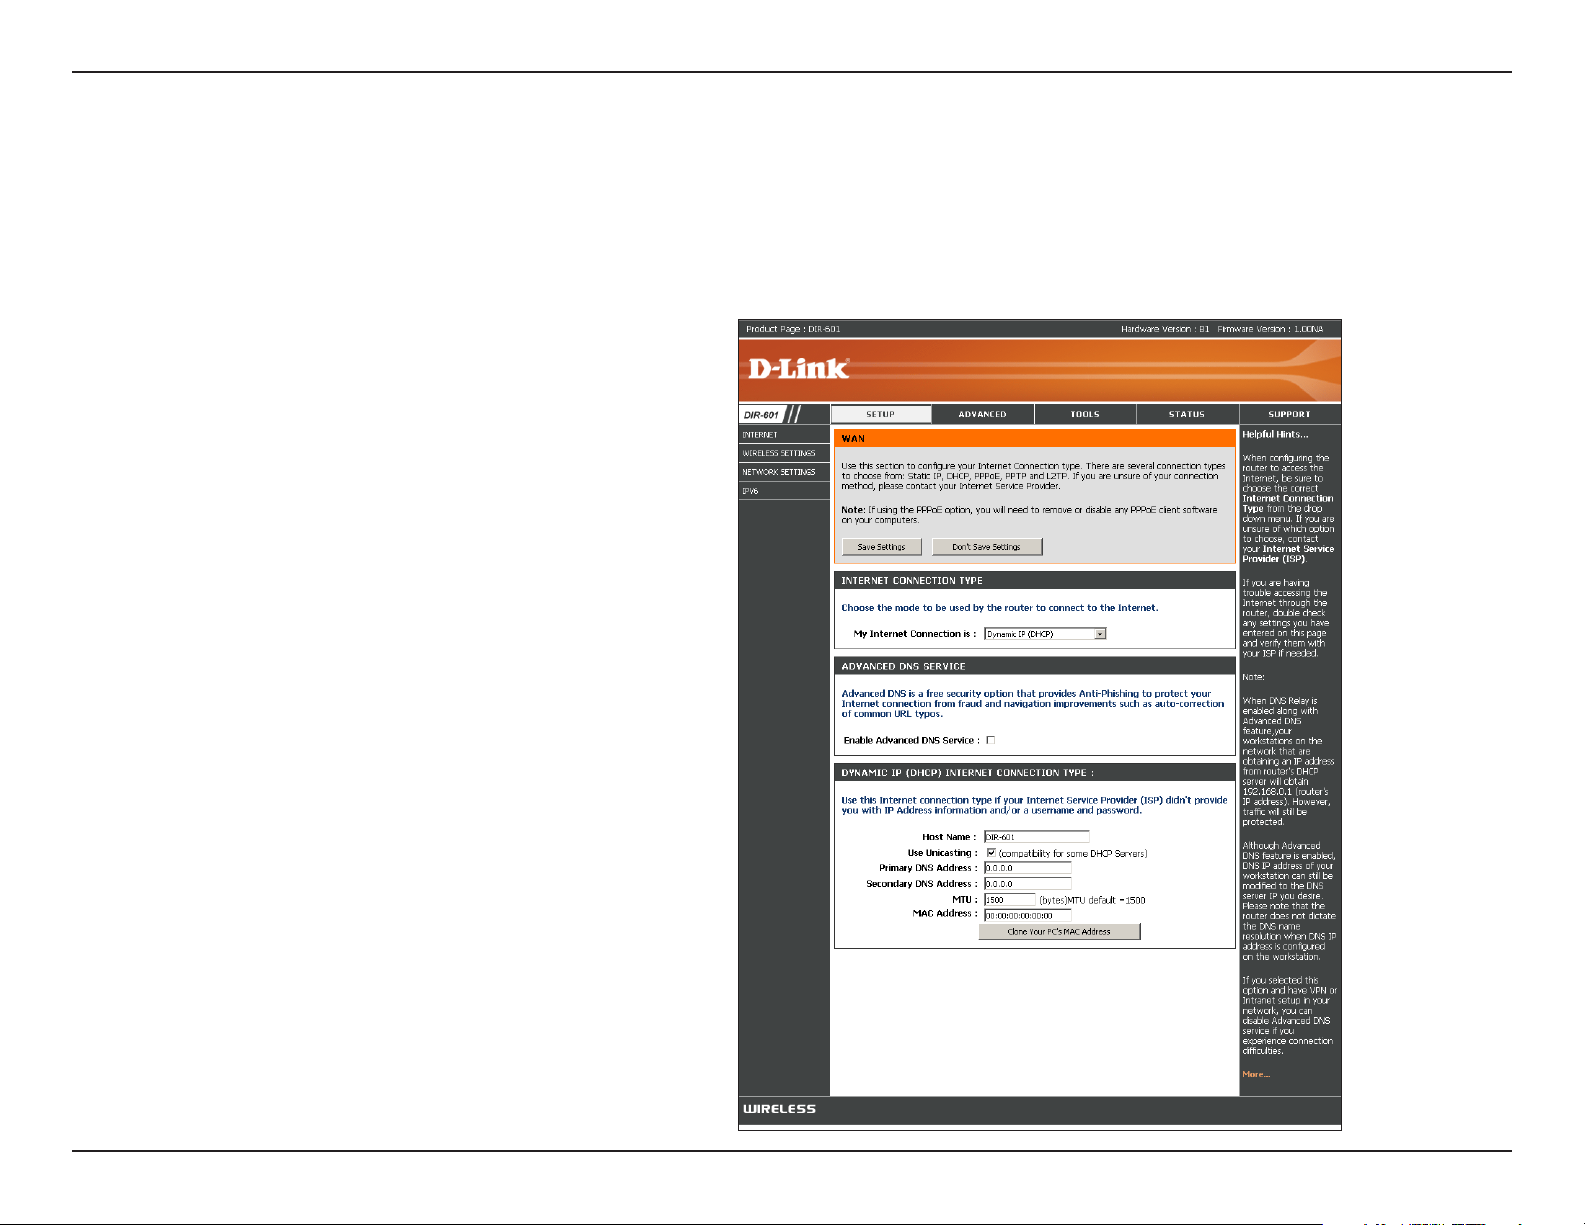
If you opt to set up your Internet connection manually, you will be redirected to a WAN page that allows you to select your Internet type and enter
the correct conguration parameters.
Select your Internet connection type using the “My Internet
Connection is” drop-down menu.
Click the SaveSettings button when you have congured the
connection.
19D-Link DIR-601 User Manual
Page 24
Section 3 - Conguration
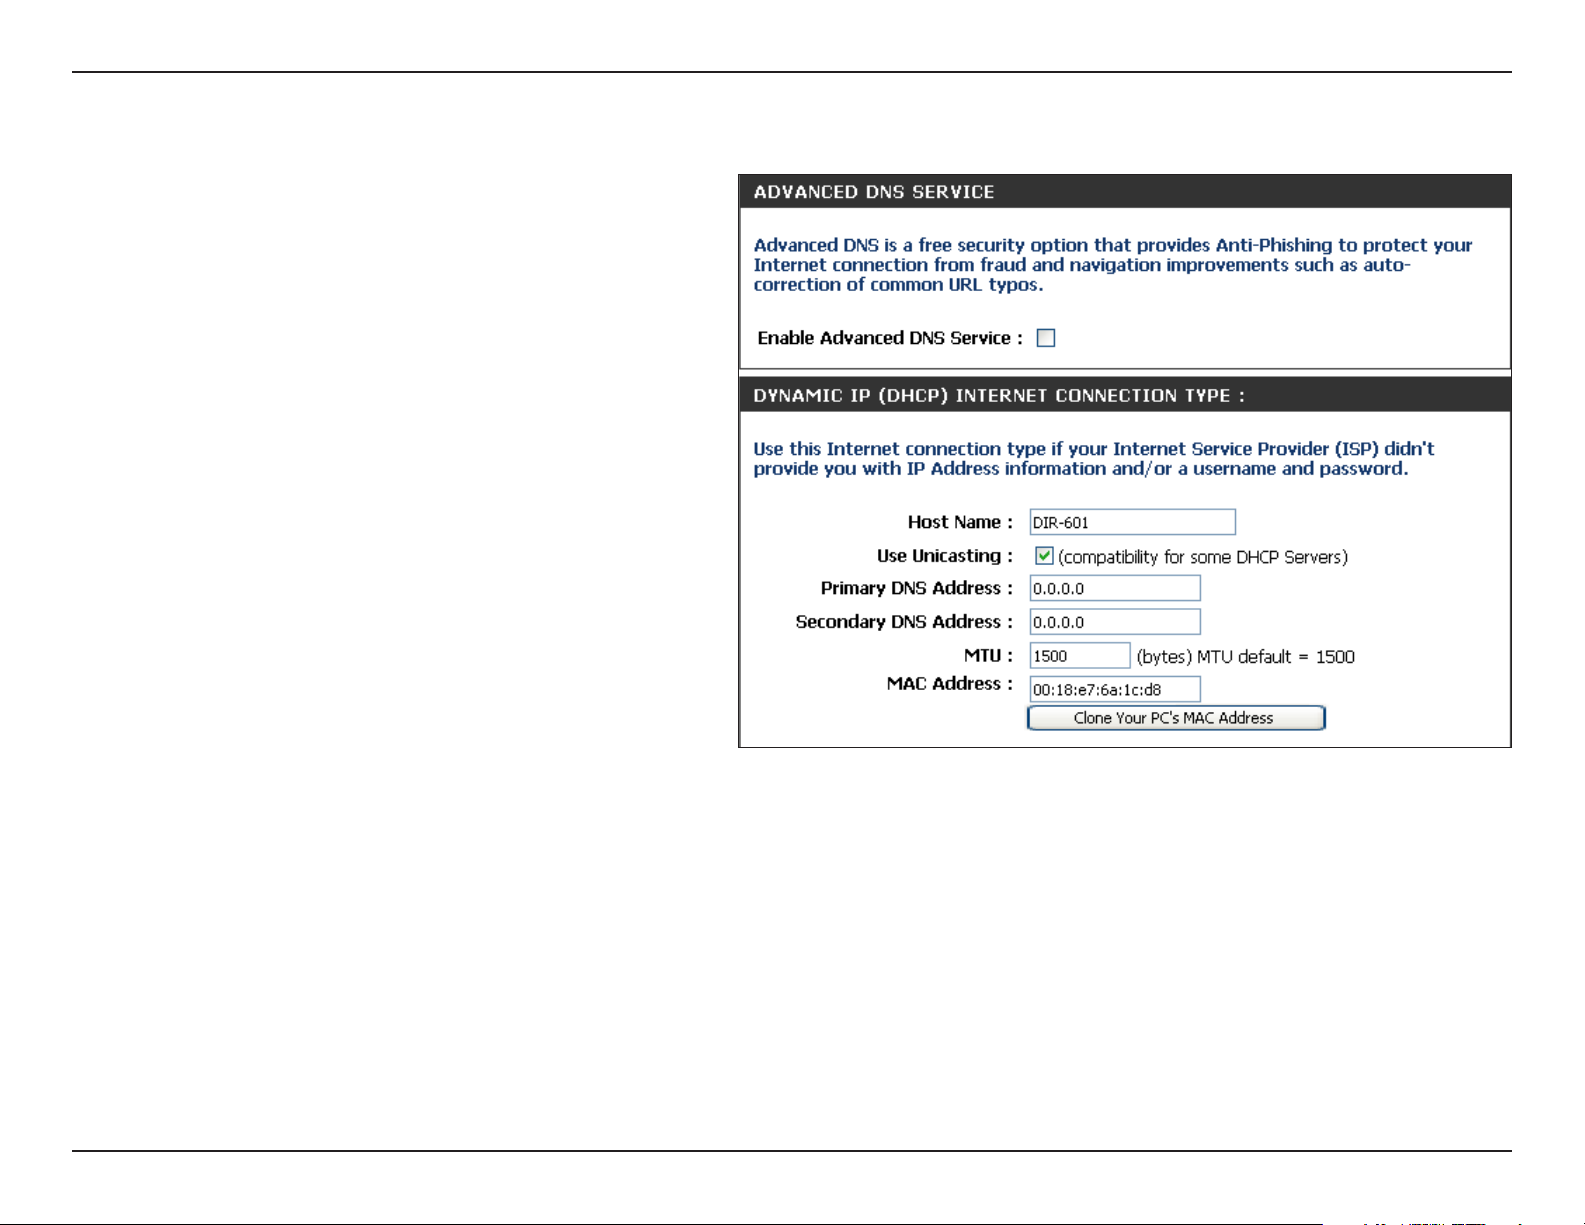
Dynamic IP Address (DHCP)
Enable
Advanced
DNS Service:
Host Name:
Use
Unicasting:
Advanced Domain Name System (DNS) services
enhances your Internet performance by getting
you the information and web pages you are looking
for faster and more reliably. In addition, it improves
your overall Internet experience by correcting many
common typo mistakes automatically, taking you
where you intended to go and saving you valuable
time.
Disclaimer: D-Link makes no warranty as to the
availability, reliability, functionality and operation of
the Advanced DNS service or its features.
The Host Name is optional but may be required
by some ISPs.
Check the box if you are having problems obtaining
an IP address from your ISP.
DNS Addresses:
MTU:
MAC
Address:
Enter the Primary DNS server IP address assigned
by your ISP.
Maximum Transmission Unit - you may need to change the MTU for optimal performance with your specic ISP. 1500 is the default
MTU.
The default MAC Address is set to the Internet port’s physical interface MAC address on the Broadband Router. It is not recommended
that you change the default MAC address unless required by your ISP. You can use the Clone Your PC’s MAC Address button to
replace the Internet port’s MAC address with the MAC address of your Ethernet card.
20D-Link DIR-601 User Manual
Page 25
Section 3 - Conguration
PPPoE (DSL)
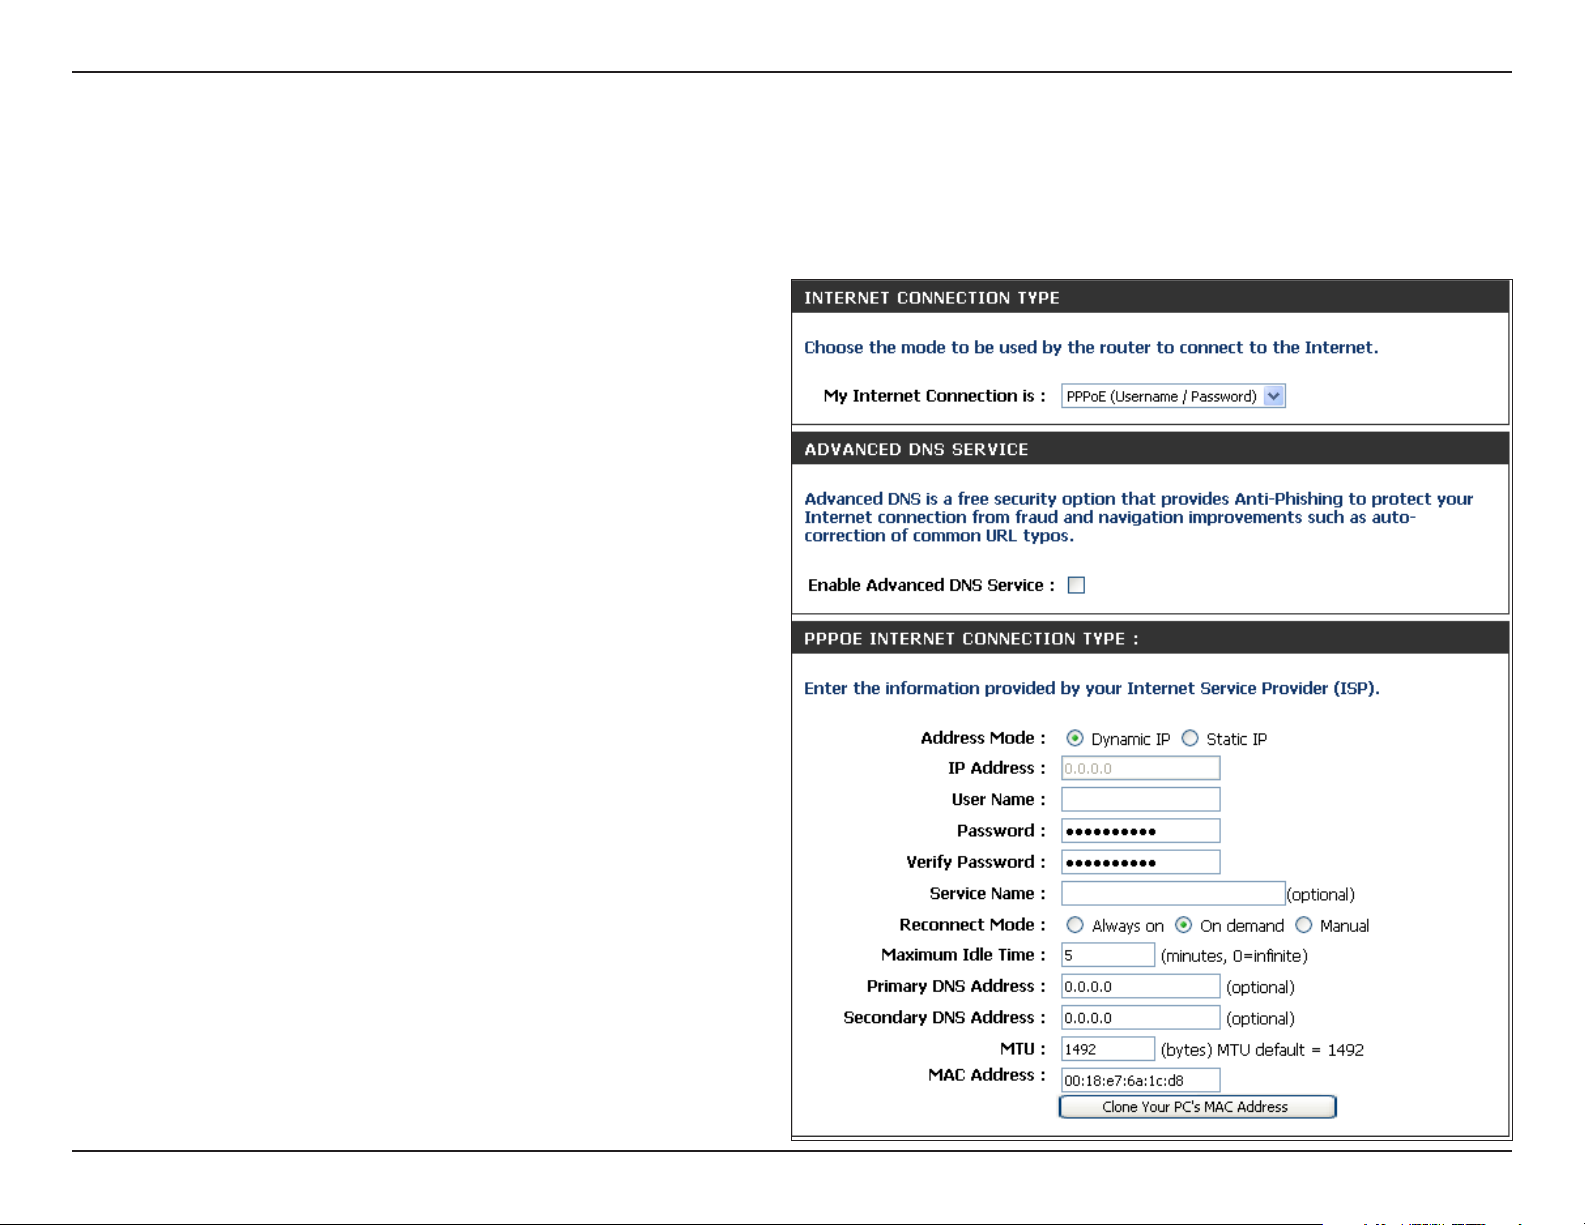
Choose PPPoE (Point to Point Protocol over Ethernet) if your ISP uses a PPPoE connection. Your ISP will provide you with a username and password.
This option is typically used for DSL services. Make sure to remove your PPPoE software from your computer. The software is no longer needed and
will not work through a router.
My Internet
Connection:
Enable
Advanced DNS
Service:
Address Mode:
Select Dynamic IP (DHCP) to obtain IP Address
information automatically from your ISP. Select this
option if your ISP does not give you any IP numbers to
use. This option is commonly used for Cable modem
services.
Advanced Domain Name System (DNS) services
enhances your Internet performance by getting you the
information and web pages you are looking for faster
and more reliably. In addition, it improves your overall
Internet experience by correcting many common typo
mistakes automatically, taking you where you intended
to go and saving you valuable time.
Disclaimer: D-Link makes no warranty as to the availability,
reliability, functionality and operation of the Advanced
DNS service or its features.
Select Static if your ISP assigned you the IP address,
subnet mask, gateway, and DNS server addresses. In
most cases, select Dynamic.
IP Address:
User Name:
Password:
Service Name:
Enter the IP address (Static PPPoE only).
Enter your PPPoE user name.
Enter your PPPoE password and then retype the
password in the next box.
Enter the ISP Service Name (optional).
21D-Link DIR-601 User Manual
Page 26

Section 3 - Conguration
Reconnection
Mode:
Maximum Idle
Time:
DNS Addresses:
MTU:
MAC Address:
Select either Always-on, On-Demand, or Manual.
Enter a maximum idle time during which the Internet connection is maintained during inactivity. To disable this feature, enable
Auto-reconnect.
Enter the Primary and Secondary DNS Server Addresses (Static PPPoE only).
Maximum Transmission Unit - you may need to change the MTU for optimal performance with your specic ISP. 1492 is the default
MTU.
The default MAC Address is set to the Internet port’s physical interface MAC address on the Broadband Router. It is not recommended
that you change the default MAC address unless required by your ISP. You can use the Clone Your PC’s MAC Address button to
replace the Internet port’s MAC address with the MAC address of your Ethernet card.
22D-Link DIR-601 User Manual
Page 27
Section 3 - Conguration
PPTP
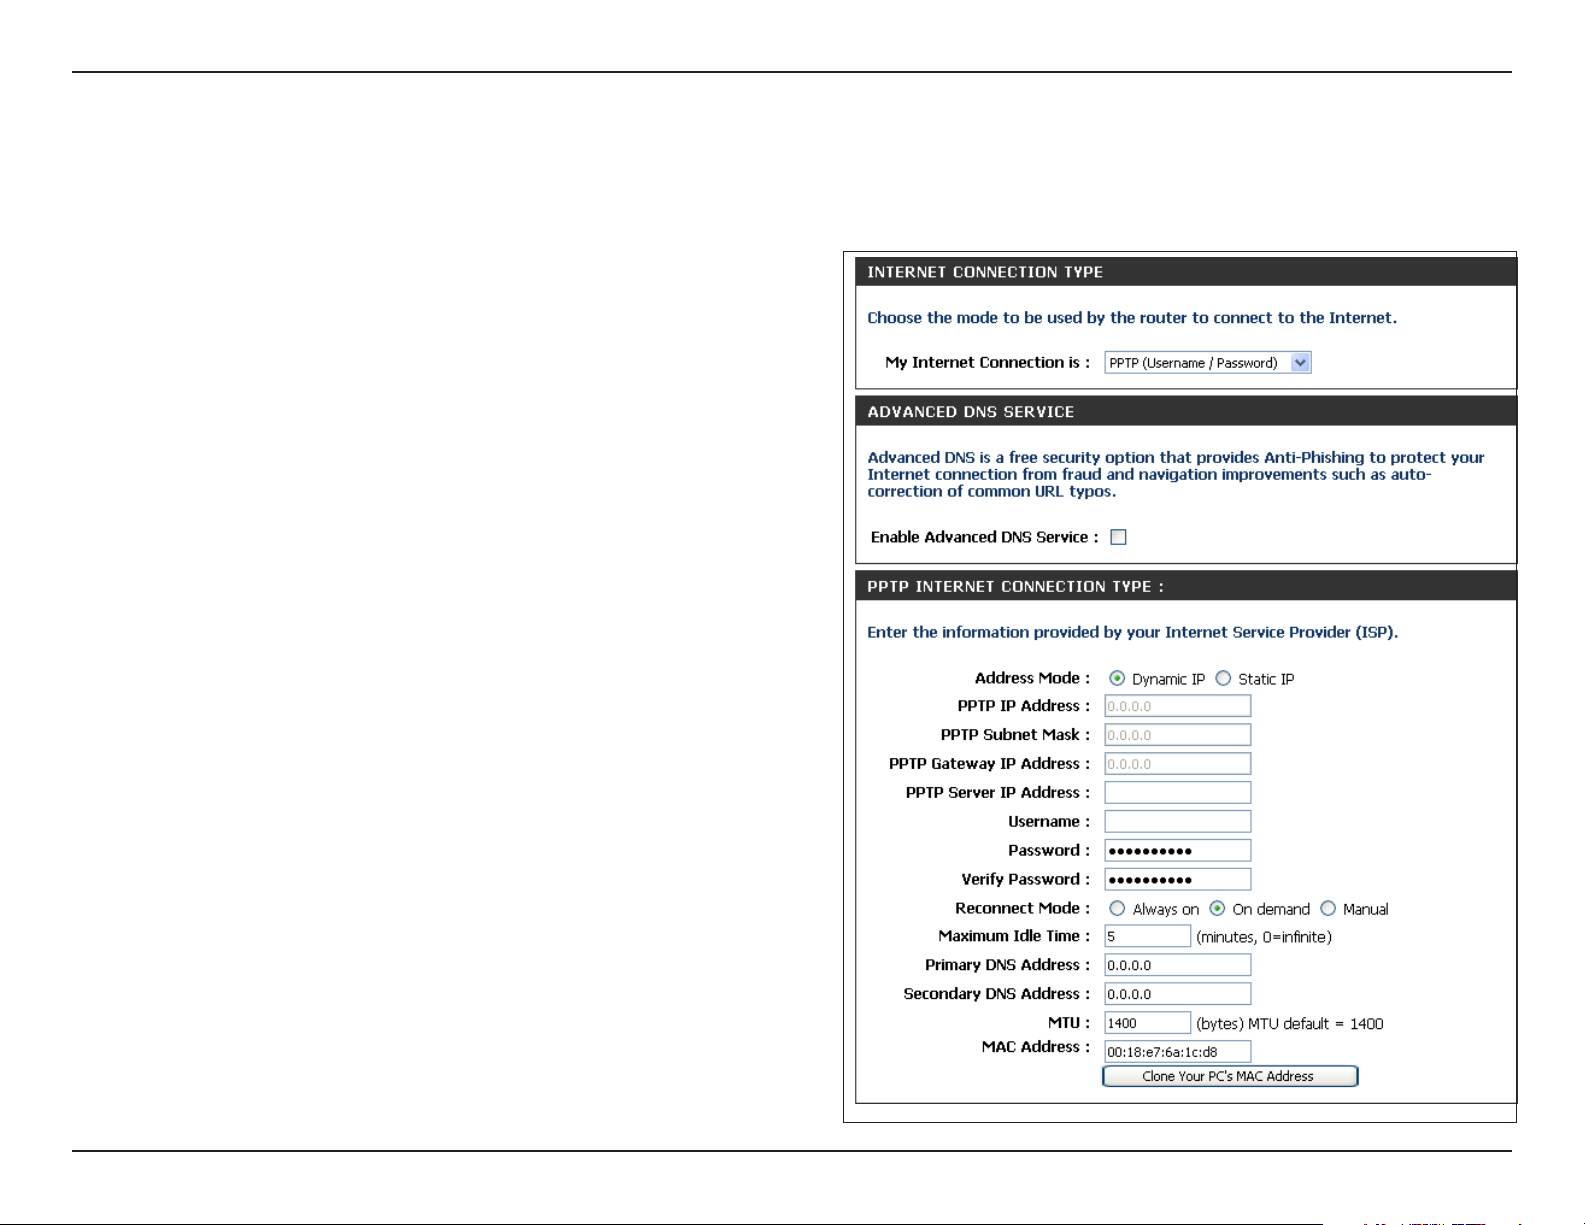
Choose PPTP (Point-to-Point-Tunneling Protocol ) if your ISP uses a PPTP connection. Your ISP will provide you with a username and password. This
option is typically used for DSL services.
My Internet
Connection:
Enabled
Advanced
DNS
Service:
Address
Mode:
Select Dynamic IP (DHCP) to obtain IP Address information
automatically from your ISP. Select this option if your ISP
does not give you any IP numbers to use. This option is
commonly used for Cable modem services.
Advanced Domain Name System (DNS) services enhances
your Internet performance by getting you the information
and web pages you are looking for faster and more reliably.
In addition, it improves your overall Internet experience
by correcting many common typo mistakes automatically,
taking you where you intended to go and saving you
valuable time.
Disclaimer: D-Link makes no warranty as to the availability,
reliability, functionality and operation of the Advanced DNS
service or its features.
Select Static if your ISP assigned you the IP address, subnet
mask, gateway, and DNS server addresses. In most cases,
select Dynamic.
PPTP IP
Address:
PPTP
Subnet
Mask:
Enter the IP address (Static PPTP only).
Enter the Primary and Secondary DNS Server Addresses
(Static PPTP only).
23D-Link DIR-601 User Manual
Page 28

Section 3 - Conguration
PPTP Gateway:
PPTP Server IP:
Username:
Password:
Reconnect
Mode:
Maximum Idle
Time:
DNS Servers:
MTU:
MAC Address:
Enter the Gateway IP Address provided by your ISP.
Enter the Server IP provided by your ISP (optional).
Enter your PPTP username.
Enter your PPTP password and then retype the password in the next box.
Select either Always-on, On-Demand, or Manual.
Enter a maximum idle time during which the Internet connection is maintained during inactivity. To disable this feature, enable
Auto-reconnect.
The DNS server information will be supplied by your ISP (Internet Service Provider.)
Maximum Transmission Unit - you may need to change the MTU for optimal performance with your specic ISP (1400 is the
default MTU).
The default MAC Address is set to the Internet port’s physical interface MAC address on the Broadband Router. It is not recommended
that you change the default MAC address unless required by your ISP. You can use the Clone Your PC’s MAC Address button to
replace the Internet port’s MAC address with the MAC address of your Ethernet card.
24D-Link DIR-601 User Manual
Page 29
Section 3 - Conguration
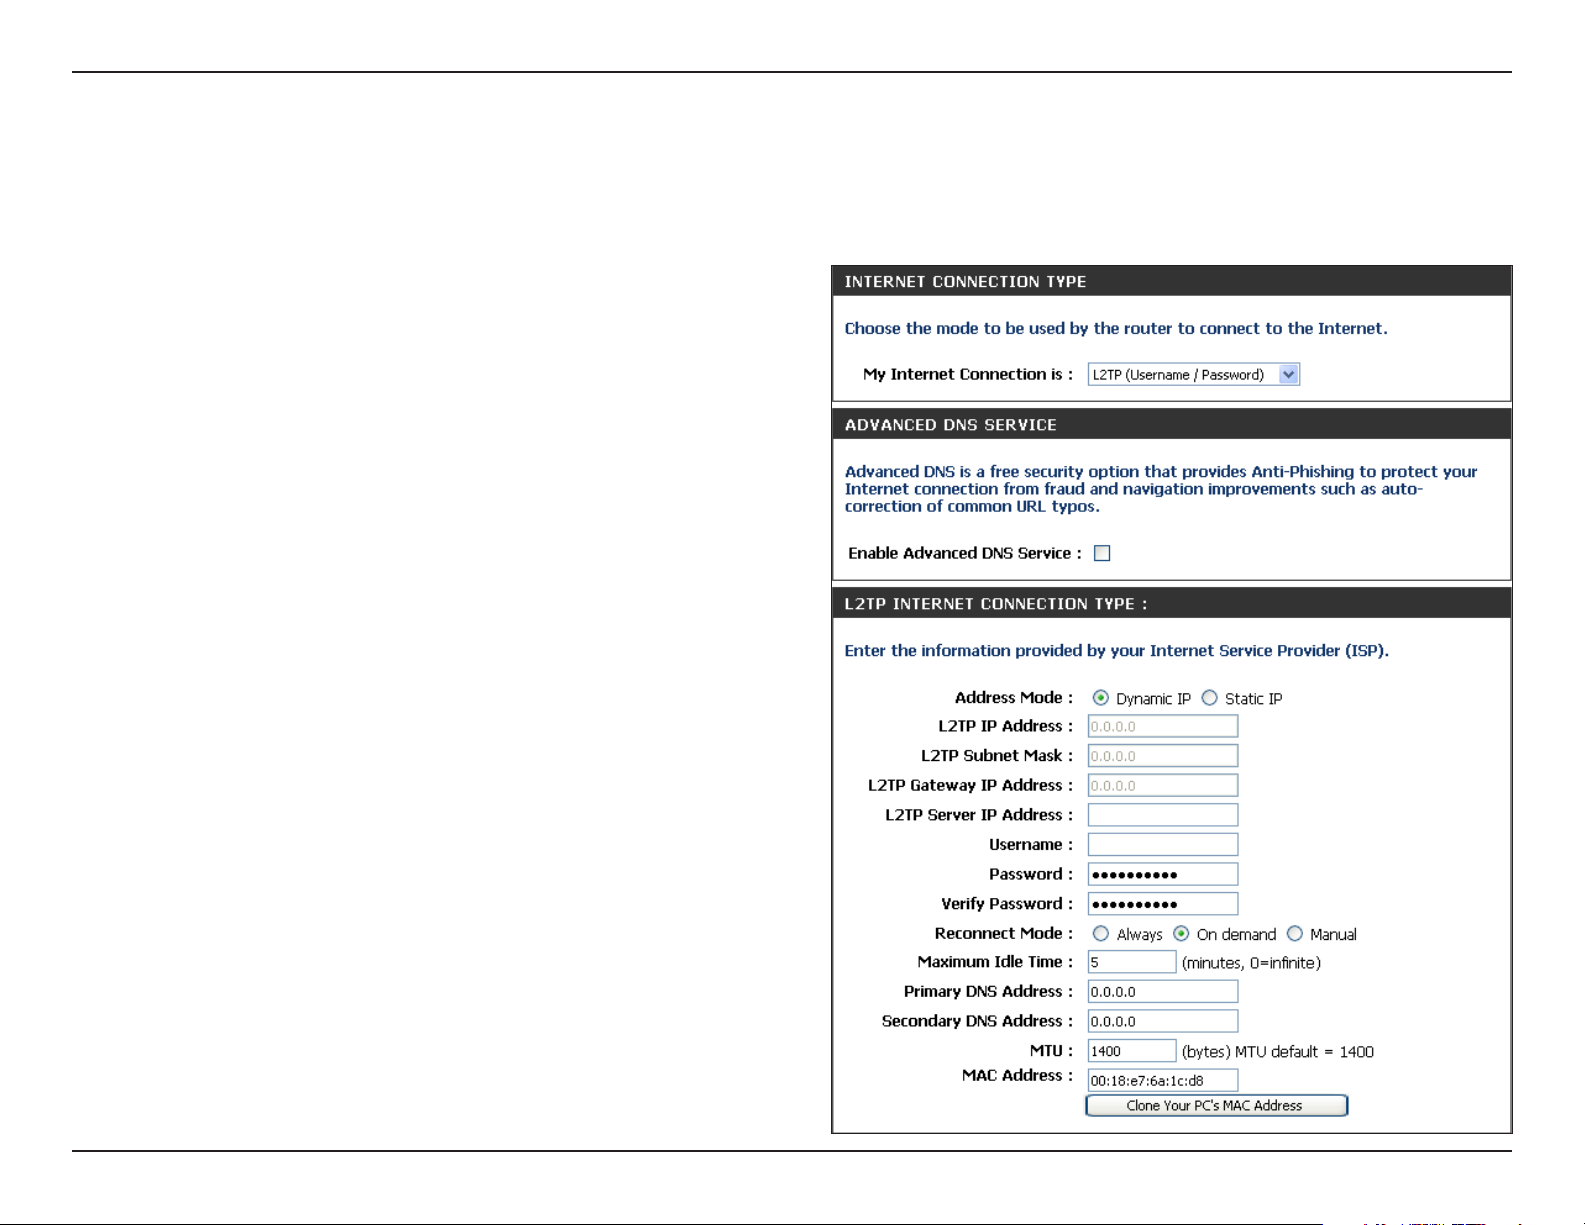
L2TP
Choose L2TP (Layer 2 Tunneling Protocol) if your ISP uses a L2TP connection. Your ISP will provide you with a username and password. This option
is typically used for DSL services.
My Internet
Connection:
Enabled
Advanced DNS
Service:
Address Mode:
Select Dynamic IP (DHCP) to obtain IP Address
information automatically from your ISP. Select this
option if your ISP does not give you any IP numbers to
use. This option is commonly used for Cable modem
services.
Advanced Domain Name System (DNS) services enhances
your Internet performance by getting you the information
and web pages you are looking for faster and more
reliably. In addition, it improves your overall Internet
experience by correcting many common typo mistakes
automatically, taking you where you intended to go and
saving you valuable time.
Disclaimer: D-Link makes no warranty as to the availability,
reliability, functionality and operation of the Advanced DNS
service or its features.
Select Static if your ISP assigned you the IP address,
subnet mask, gateway, and DNS server addresses. In
most cases, select Dynamic.
L2TP IP
Address:
L2TP Subnet
Mask:
L2TP Gateway:
L2TP Server IP:
Enter the L2TP IP address supplied by your ISP (Static
only).
Enter the Subnet Mask supplied by your ISP (Static
only).
Enter the Gateway IP Address provided by your ISP.
Enter the Server IP provided by your ISP (optional).
25D-Link DIR-601 User Manual
Page 30

Section 3 - Conguration
Username:
Password:
Reconnect
Mode:
Maximum Idle
Time:
DNS Servers:
MTU:
Clone MAC
Address:
Enter your L2TP username.
Enter your L2TP password and then retype the password in the next box.
Select either Always-on, On-Demand, or Manual.
Enter a maximum idle time during which the Internet connection is maintained during inactivity. To disable this feature, enable
Auto-reconnect.
Enter the Primary and Secondary DNS Server Addresses (Static L2TP only).
Maximum Transmission Unit - you may need to change the MTU for optimal performance with your specic ISP. 1400 is the default
MTU.
The default MAC Address is set to the Internet port’s physical interface MAC address on the Broadband Router. It is not recommended
that you change the default MAC address unless required by your ISP. You can use the Clone Your PC’s MAC Address button to
replace the Internet port’s MAC address with the MAC address of your Ethernet card.
26D-Link DIR-601 User Manual
Page 31

Section 3 - Conguration
Static IP Address
Select Static IP Address if all the Internet port’s IP information is provided to you by your ISP. You will need to enter in the IP address, subnet mask,
gateway address, and DNS address(es) provided to you by your ISP. Each IP address entered in the elds must be in the appropriate IP form, which
are four octets separated by a dot (x.x.x.x). The Router will not accept the IP address if it is not in this format.
My Internet
Connection:
Enabled
Advanced DNS
Service:
IP Address:
Select Dynamic IP (DHCP) to obtain IP Address
information automatically from your ISP. Select this
option if your ISP does not give you any IP numbers
to use. This option is commonly used for Cable
modem services.
Advanced Domain Name System (DNS) services
enhances your Internet performance by getting you
the information and web pages you are looking for
faster and more reliably. In addition, it improves
your overall Internet experience by correcting many
common typo mistakes automatically, taking you
where you intended to go and saving you valuable
time.
Disclaimer: D-Link makes no warranty as to the
availability, reliability, functionality and operation of
the Advanced DNS service or its features.
Enter the IP address assigned by your ISP.
Subnet Mask:
Default
Gateway:
DNS Servers:
MTU:
Enter the Subnet Mask assigned by your ISP.
Enter the Gateway assigned by your ISP.
The DNS server information will be supplied by your
ISP (Internet Service Provider.)
Maximum Transmission Unit - you may need to change the MTU for optimal performance with your specic ISP (1500 is the default
MTU).
27D-Link DIR-601 User Manual
Page 32

Section 3 - Conguration
The default MAC Address is set to the Internet port’s physical interface MAC address on the Broadband Router. It is not recommended
MAC
Address:
that you change the default MAC address unless required by your ISP. You can use the Clone Your PC’s MAC Address button to
replace the Internet port’s MAC address with the MAC address of your Ethernet card.
28D-Link DIR-601 User Manual
Page 33
Section 3 - Conguration
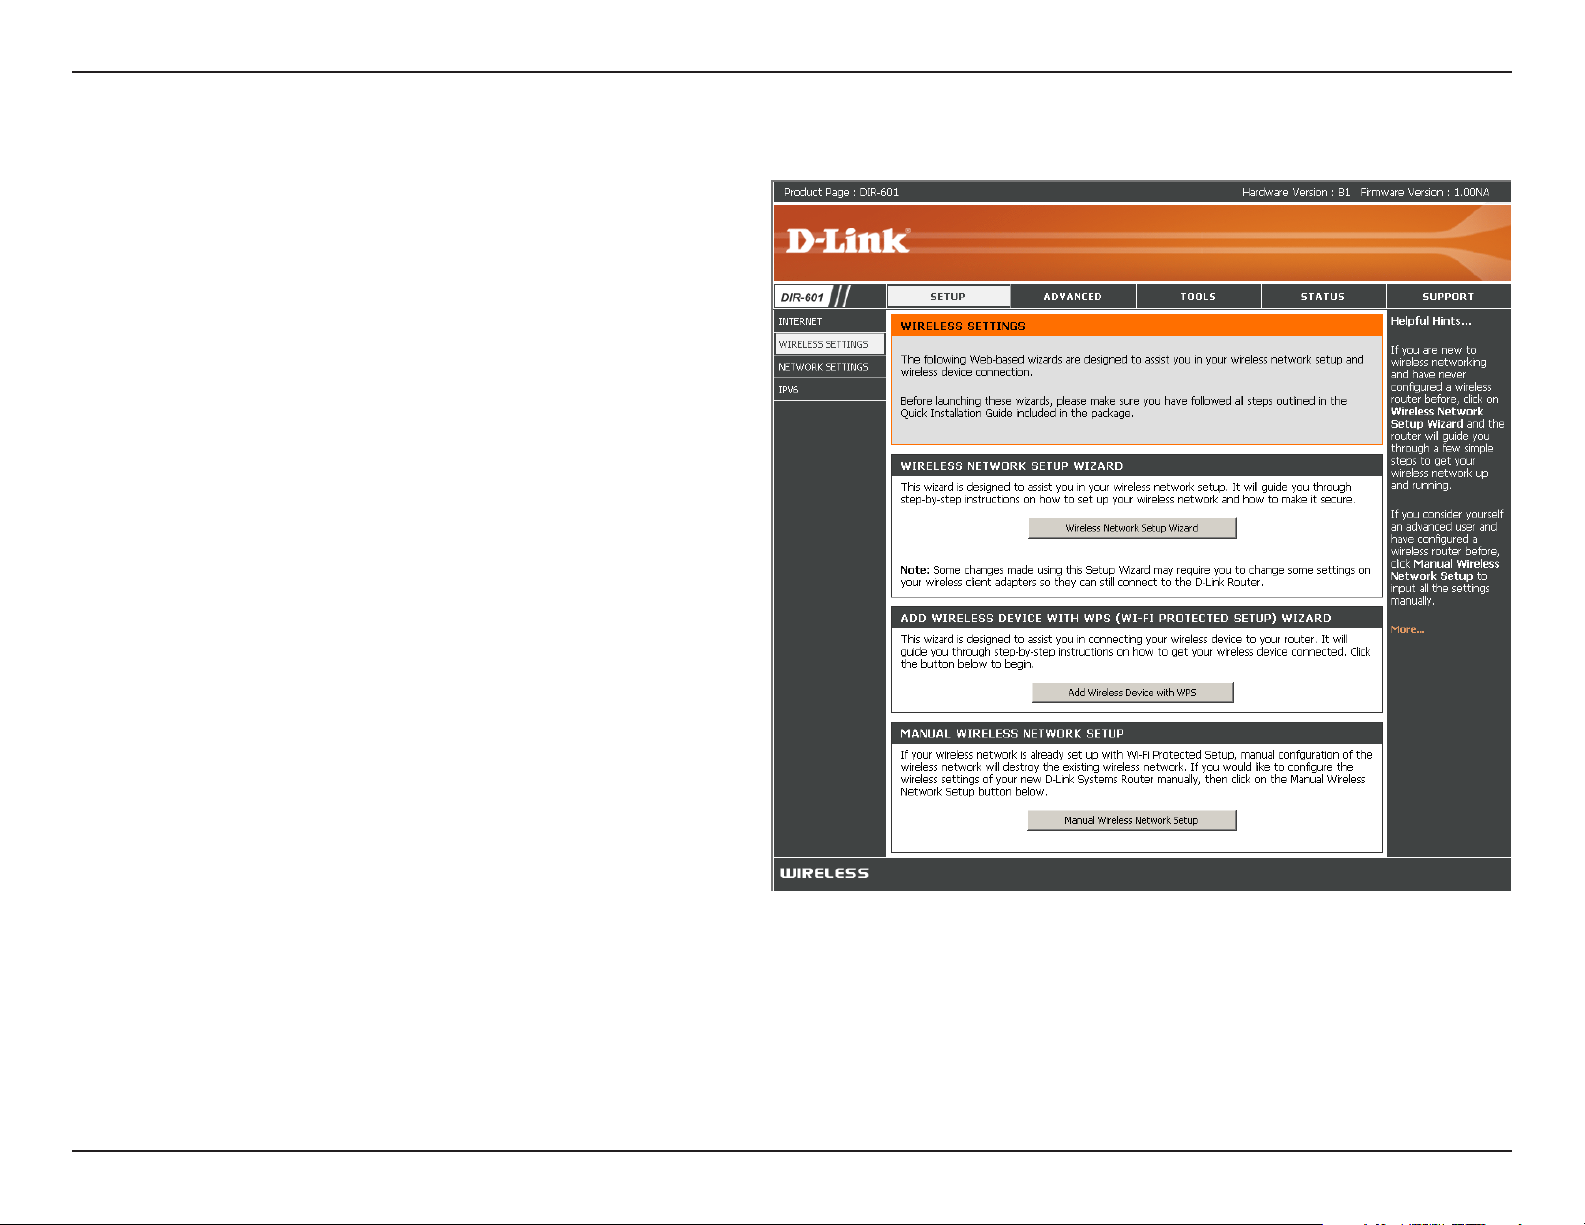
Wireless Settings
If you want to congure the wireless settings on your router using
the wizard, click WirelessConnectionSetupWizardand refer to
page 81.
Click AddWirelessDevicewithWPS if you want to add a wireless
device using Wi-Fi Protected Setup (WPS) and refer to page 83.
If you want to manually congure the wireless settings on your router
click Manual WirelessNetworkSetupand refer to the next page.
29D-Link DIR-601 User Manual
Page 34

Section 3 - Conguration
Manual Wireless Network Setup
Enable
Wireless:
Wireless
Network
Name:
802.11 Mode:
Enable Auto
Channel Scan:
Check the box to enable the wireless function. If you do
not want to use wireless, uncheck the box to disable all
the wireless functions. Click Add New to create your own
time schedule to enable the wireless function.
Service Set Identier (SSID) is the name of your wireless
network. Create a name using up to 32 characters. The
SSID is case-sensitive.
Select one of the following:
802.11gOnly - Select if all of your wireless clients are
802.11g.
802.11nOnly - Select only if all of your wireless clients
are 802.11n.
Mixed802.11nand802.11g - Select if you are using
a mix of 802.11n and 802.11g wireless clients.
The AutoChannelScan setting can be selected to allow
the DIR-601 to choose the channel with the least amount
of interference.
Wireless
Channel:
Channel
Width:
Indicates the channel setting for the DIR-601. By default
the channel is set to 6. The Channel can be changed to
t the channel setting for an existing wireless network
or to customize the wireless network. If you enable Auto
ChannelScan, this option will be greyed out.
Select the Channel Width:
Auto20/40 - Select if you are using both
802.11n and non-802.11n wireless devices.
20MHz - Select if you are not using any 802.11n wireless
clients. This is the default setting.
40MHz - Select if you are using only 802.11n wireless
clients.
30D-Link DIR-601 User Manual
Page 35

Section 3 - Conguration
Visibility
Status:
Wireless
Security:
Select Invisible if you do not want the SSID of your wireless network to be broadcasted by the DIR-601. If Invisible is selected, the
SSID of the DIR-601 will not be seen by Site Survey utilities so your wireless clients will have to know the SSID of your DIR-601 in
order to connect to it.
Refer to page 82 for more information regarding wireless security.
31D-Link DIR-601 User Manual
Page 36
Section 3 - Conguration
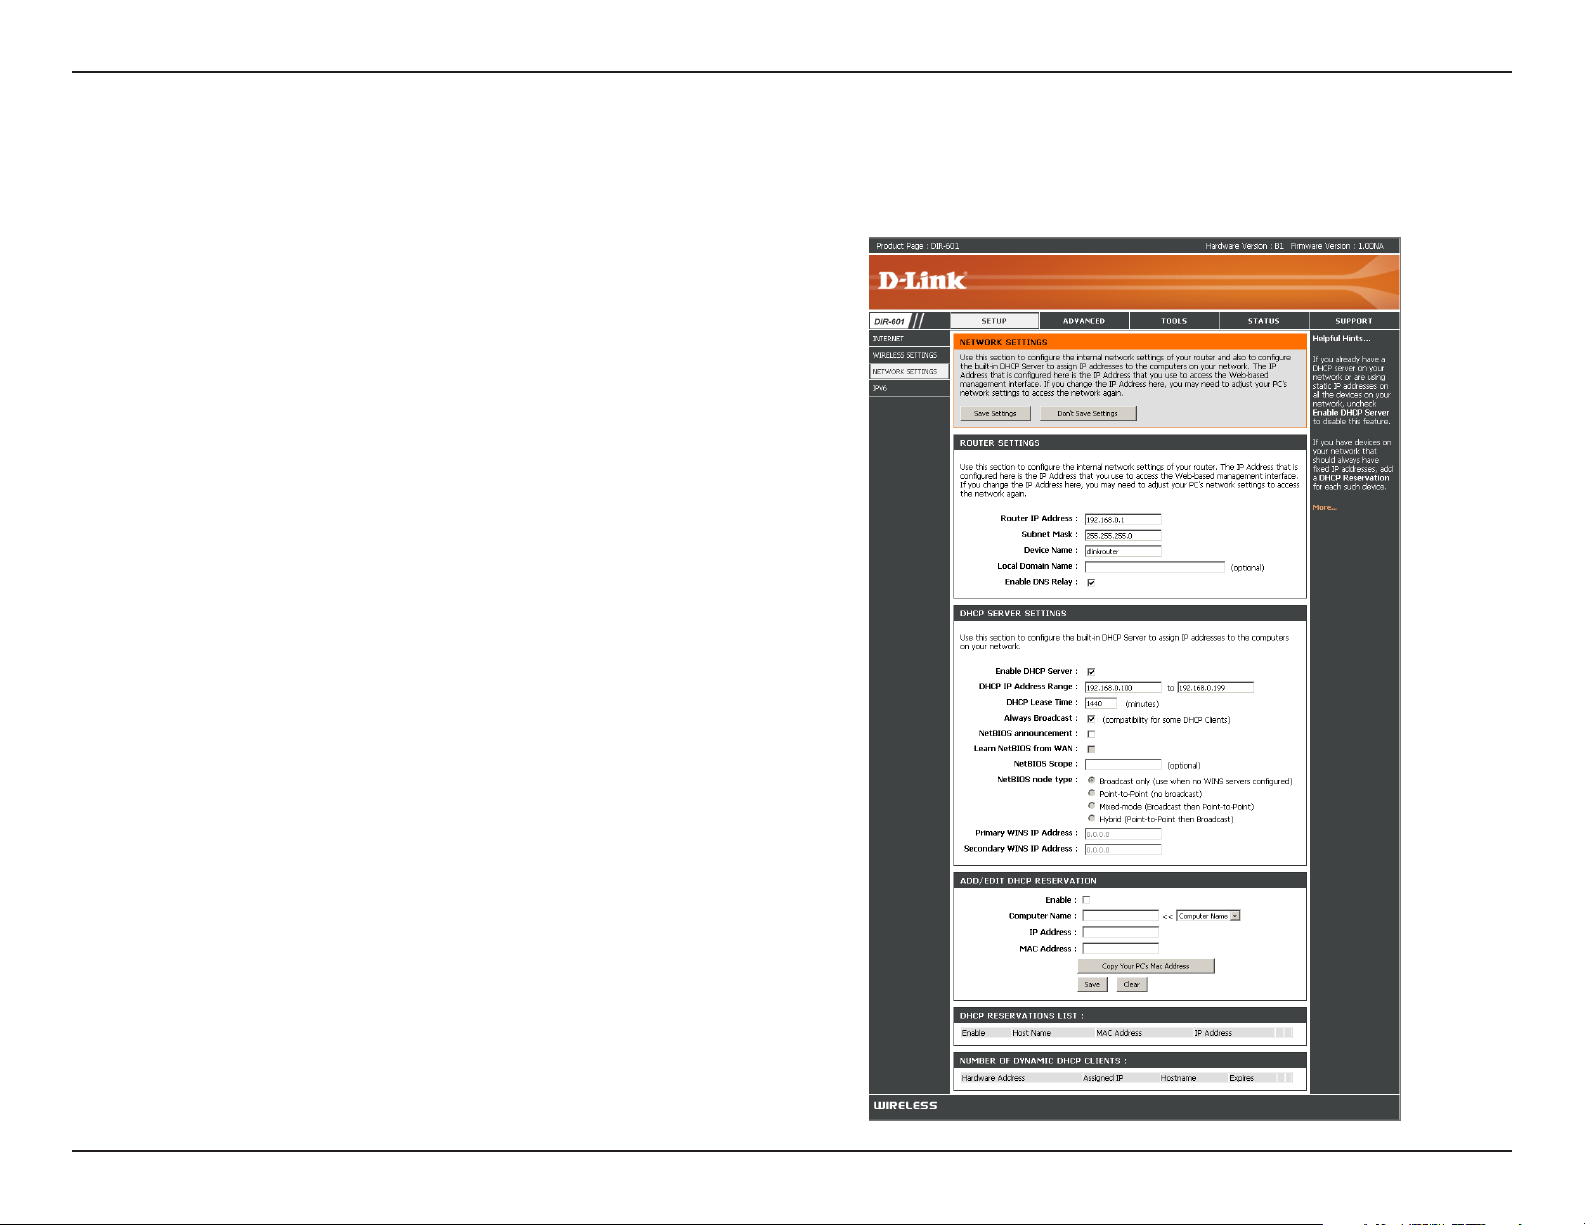
Network Settings
This section will allow you to change the local network settings of the router and to congure the DHCP settings.
IP Address:
Subnet Mask:
Local Domain:
Enable DNS
Relay:
Enter the IP address of the router. The default IP address
is 192.168.0.1.
If you change the IP address, once you click Apply, you
will need to enter the new IP address in your browser to
get back into the conguration utility.
Enter the Subnet Mask. The default subnet mask is
255.255.255.0.
Enter the Domain name (Optional).
Uncheck the box to transfer the DNS server information
from your ISP to your computers. If checked, your
computers will use the router for a DNS server.
32D-Link DIR-601 User Manual
Page 37
Section 3 - Conguration
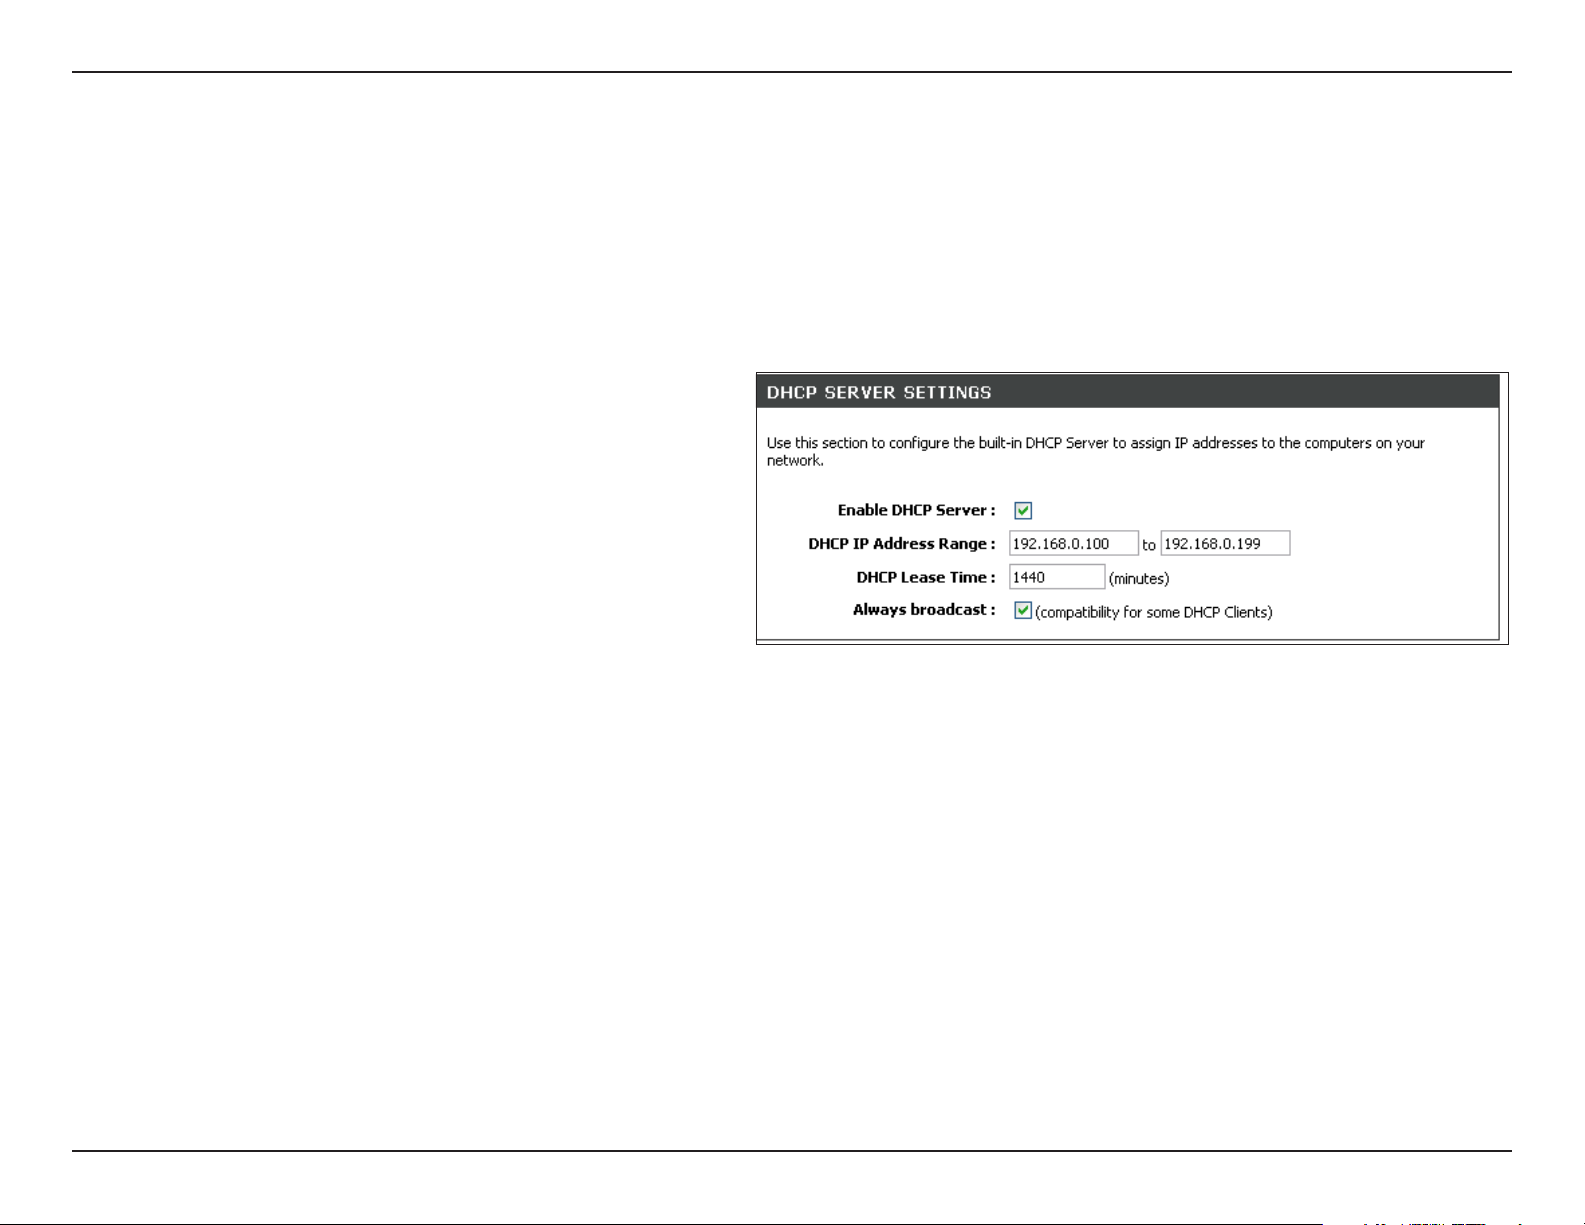
DHCP Server Settings
DHCP stands for Dynamic Host Control Protocol. The DIR-601 has a built-in DHCP server. The DHCP Server will automatically assign an IP address
to the computers on the LAN/private network. Be sure to set your computers to be DHCP clients by setting their TCP/IP settings to “Obtain an IP
Address Automatically.” When you turn your computers on, they will automatically load the proper TCP/IP settings provided by the DIR-601. The
DHCP Server will automatically allocate an unused IP address from the IP address pool to the requesting computer. You must specify the starting
and ending address of the IP address pool.
Enable DHCP
Server:
DHCP IP
Address
Range:
Lease Time:
Always
Broadcast:
Check this box to enable the DHCP server on your
router. Uncheck to disable this function.
Enter the starting and ending IP addresses for the
DHCP server’s IP assignment.
Note: If you statically (manually) assign IP addresses to
your computers or devices, make sure the IP addresses
are outside of this range or you may have an IP conict.
The length of time for the IP address lease. Enter the
Lease time in minutes.
Enable this feature to broadcast your LAN/WLAN network.
33D-Link DIR-601 User Manual
Page 38
Section 3 - Conguration
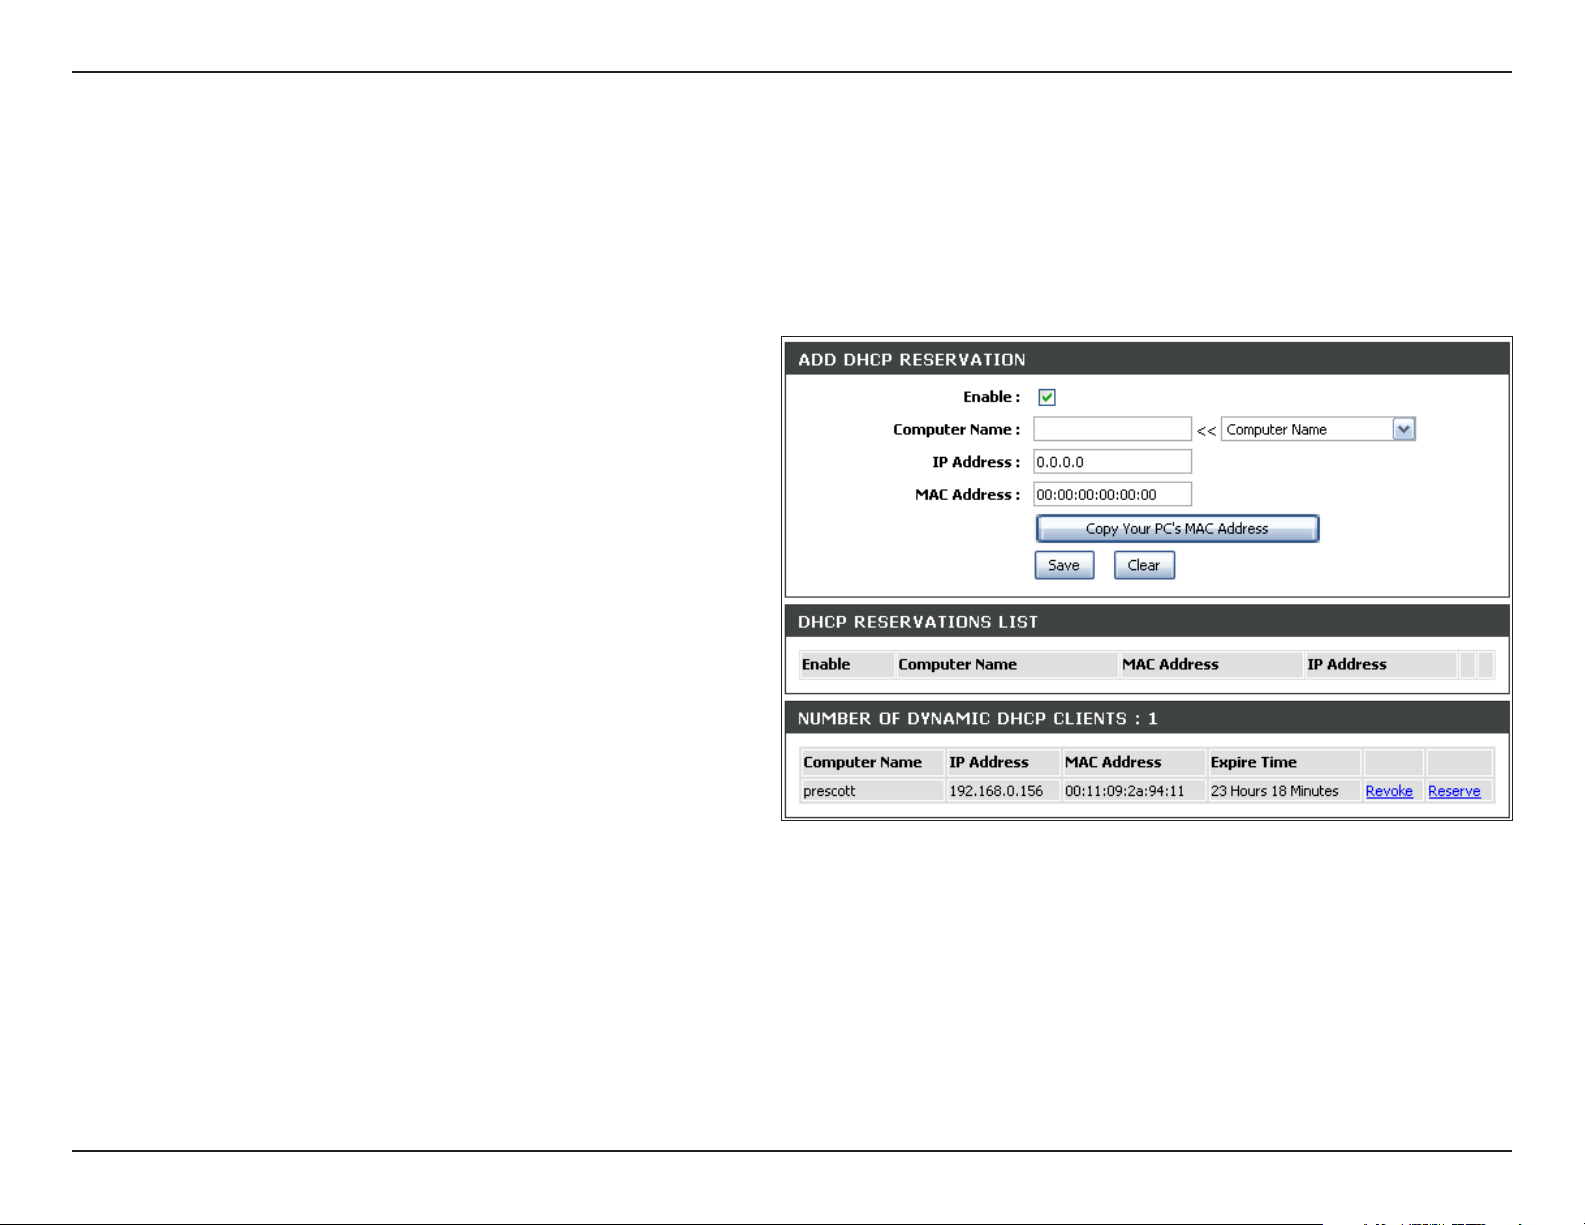
DHCP Reservation
If you want a computer or device to always have the same IP address assigned, you can create a DHCP reservation. The router will assign the IP
address only to that computer or device.
Note: This IP address must be within the DHCP IP Address Range.
Enable:
Computer
Name:
IP Address:
MAC Address:
Copy Your PC’s
MAC Address:
Save:
Number of
Dynamic DHCP
Clients:
Check this box to enable the reservation.
Enter the computer name or select from the drop-down
menu and click <<.
Enter the IP address you want to assign to the computer
or device. This IP Address must be within the DHCP IP
Address Range.
Enter the MAC address of the computer or device.
If you want to assign an IP address to the computer you
are currently on, click this button to populate the elds.
Click Save to save your entry. You must click Save
Settings at the top to activate your reservations.
In this section you can see what LAN devices are currently
leasing IP addresses.
Revoke:
Click Revoke to cancel the lease for a specic LAN device and free an entry in the lease table. Do this only if the device no longer
needs the leased IP address, because, for example, it has been removed from the network.
Note: The Revoke option will not disconnect a PC with a current network session from the network; you would need to use MAC Address
Filter to do that. Revoke will only free up a DHCP Address for the very next requester. If the previous owner is still available, those two devices
may both receive an IP Address Conict error, or the second device may still not receive an IP Address; in that case, you may still need to
extend the “DHCP IP Address Range” to address the issue, it is located in the DHCP Server section.
34D-Link DIR-601 User Manual
Page 39
Section 3 - Conguration
IPv6
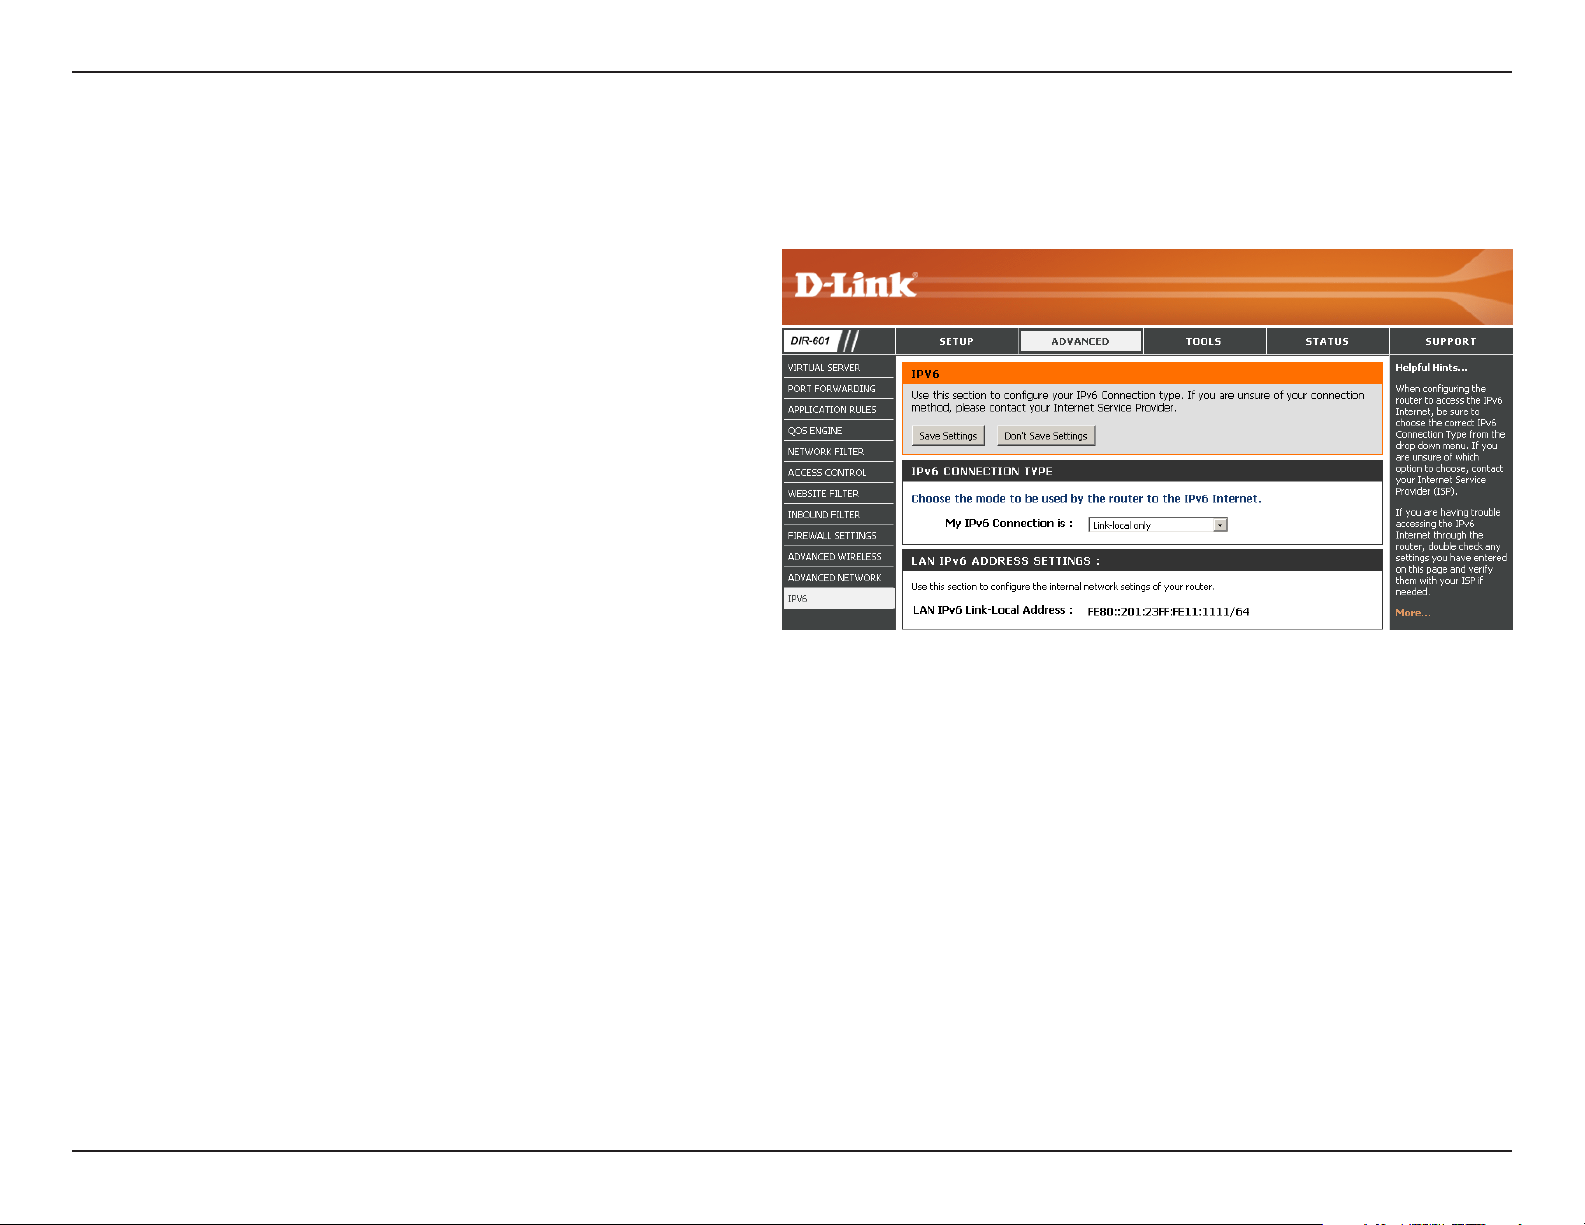
Link-Local Connectivity
My IPv6 Connection:
LAN IPv6 Address
Settings:
Select Link-Local Only from the drop-down
menu.
Displays the IPv6 address of the router.
35D-Link DIR-601 User Manual
Page 40
Section 3 - Conguration
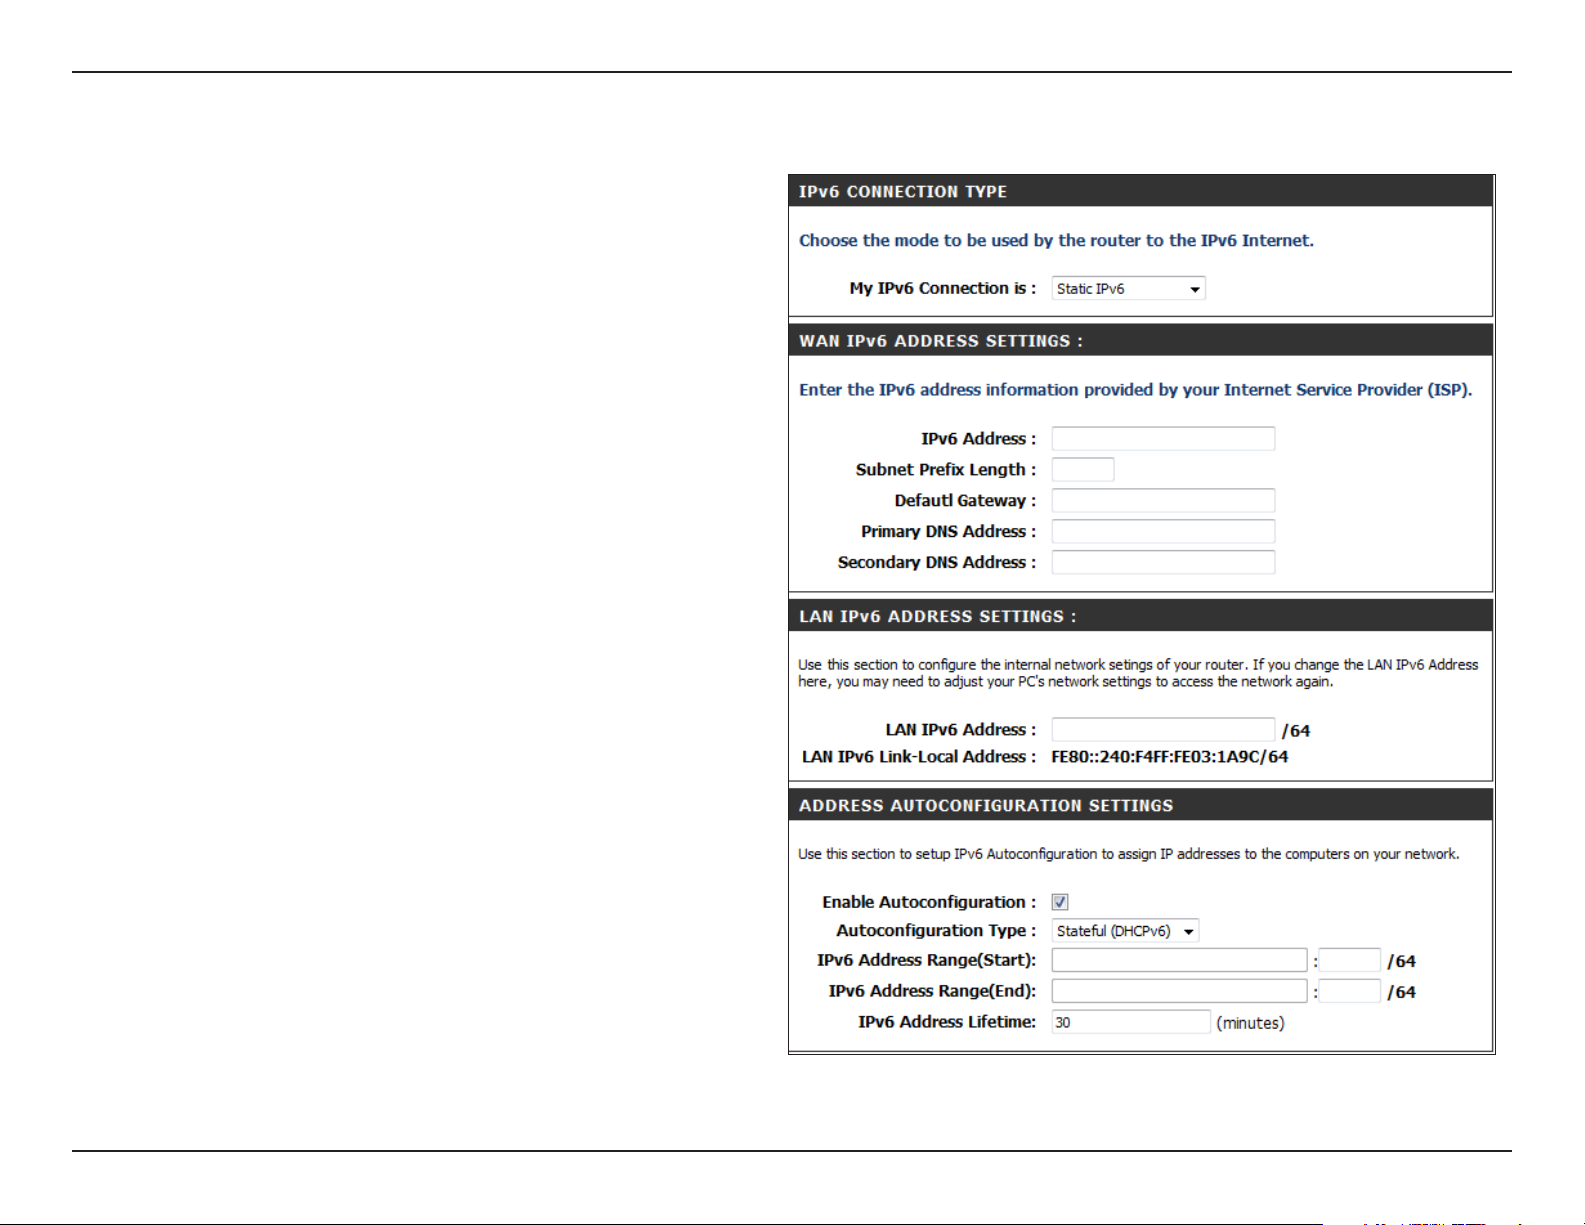
Static IPv6 (Stateful)
My IPv6 Connection:
WAN IPv6 Address
Settings:
LAN IPv6 Address:
LAN Link-Local
Address:
Enable
Autoconguration:
Autoconguration
Type:
IPv6 Address Range
Start:
Select Static IPv6 from the drop-down
menu.
Enter the address settings supplied by your
Internet provider (ISP).
Enter the LAN (local) IPv6 address for the
router.
Displays the Router’s LAN Link-Local Address.
Check to enable the Autoconfiguration
feature.
Select Stateful(DHCPv6) or Stateless. Refer
to the next page for Stateless.
Enter the start IPv6 Address for the DHCPv6
range for your local computers.
IPv6 Address Range
End:
IPv6 Address
Lifetime:
Enter the end IPv6 Address for the DHCPv6
range for your local computers.
Enter the IPv6 Address Lifetime (in minutes).
36D-Link DIR-601 User Manual
Page 41

Section 3 - Conguration
Static IPv6 (Stateless)
My IPv6 Connection:
WAN IPv6 Address
Settings:
LAN IPv6 Address:
LAN Link-Local
Address:
Enable
Autoconguration:
Autoconguration
Type:
Router
Advertisement
Lifetime:
Select Static IPv6 from the drop-down
menu.
Enter the address settings supplied by your
Internet provider (ISP).
Enter the LAN (local) IPv6 address for the
router.
Displays the Router’s LAN Link-Local Address.
Check to enable the Autoconfiguration
feature.
Select Stateless. Refer to the previous page
for Stateful.
Enter the Router Advertisement Lifetime (in
minutes).
37D-Link DIR-601 User Manual
Page 42

Section 3 - Conguration
DHCPv6 (Stateful)
My IPv6 Connection:
IPv6 DNS Settings:
Primary/Secondary
DNS Address:
LAN IPv6 Address:
LAN Link-Local
Address:
Enable
Autoconguration:
Autoconguration
Type:
Select DHCPv6 from the drop-down menu.
Select either Obtain DNSserver address
automatically or Use the following DNS
Address.
Enter the primary and secondary DNS server
addresses.
Enter the LAN (local) IPv6 address for the
router.
Displays the Router’s LAN Link-Local Address.
Che ck to enable the Autoconfig uration
feature.
Select Stateful(DHCPv6) or Stateless. Refer to
the next page for Stateless.
IPv6 Address Range
Start:
IPv6 Address Range
End:
IPv6 Address
Lifetime:
Enter the start IPv6 Address for the DHCPv6
range for your local computers.
Enter the end IPv6 Address for the DHCPv6 range
for your local computers.
Enter the IPv6 Address Lifetime (in minutes).
38D-Link DIR-601 User Manual
Page 43
Section 3 - Conguration
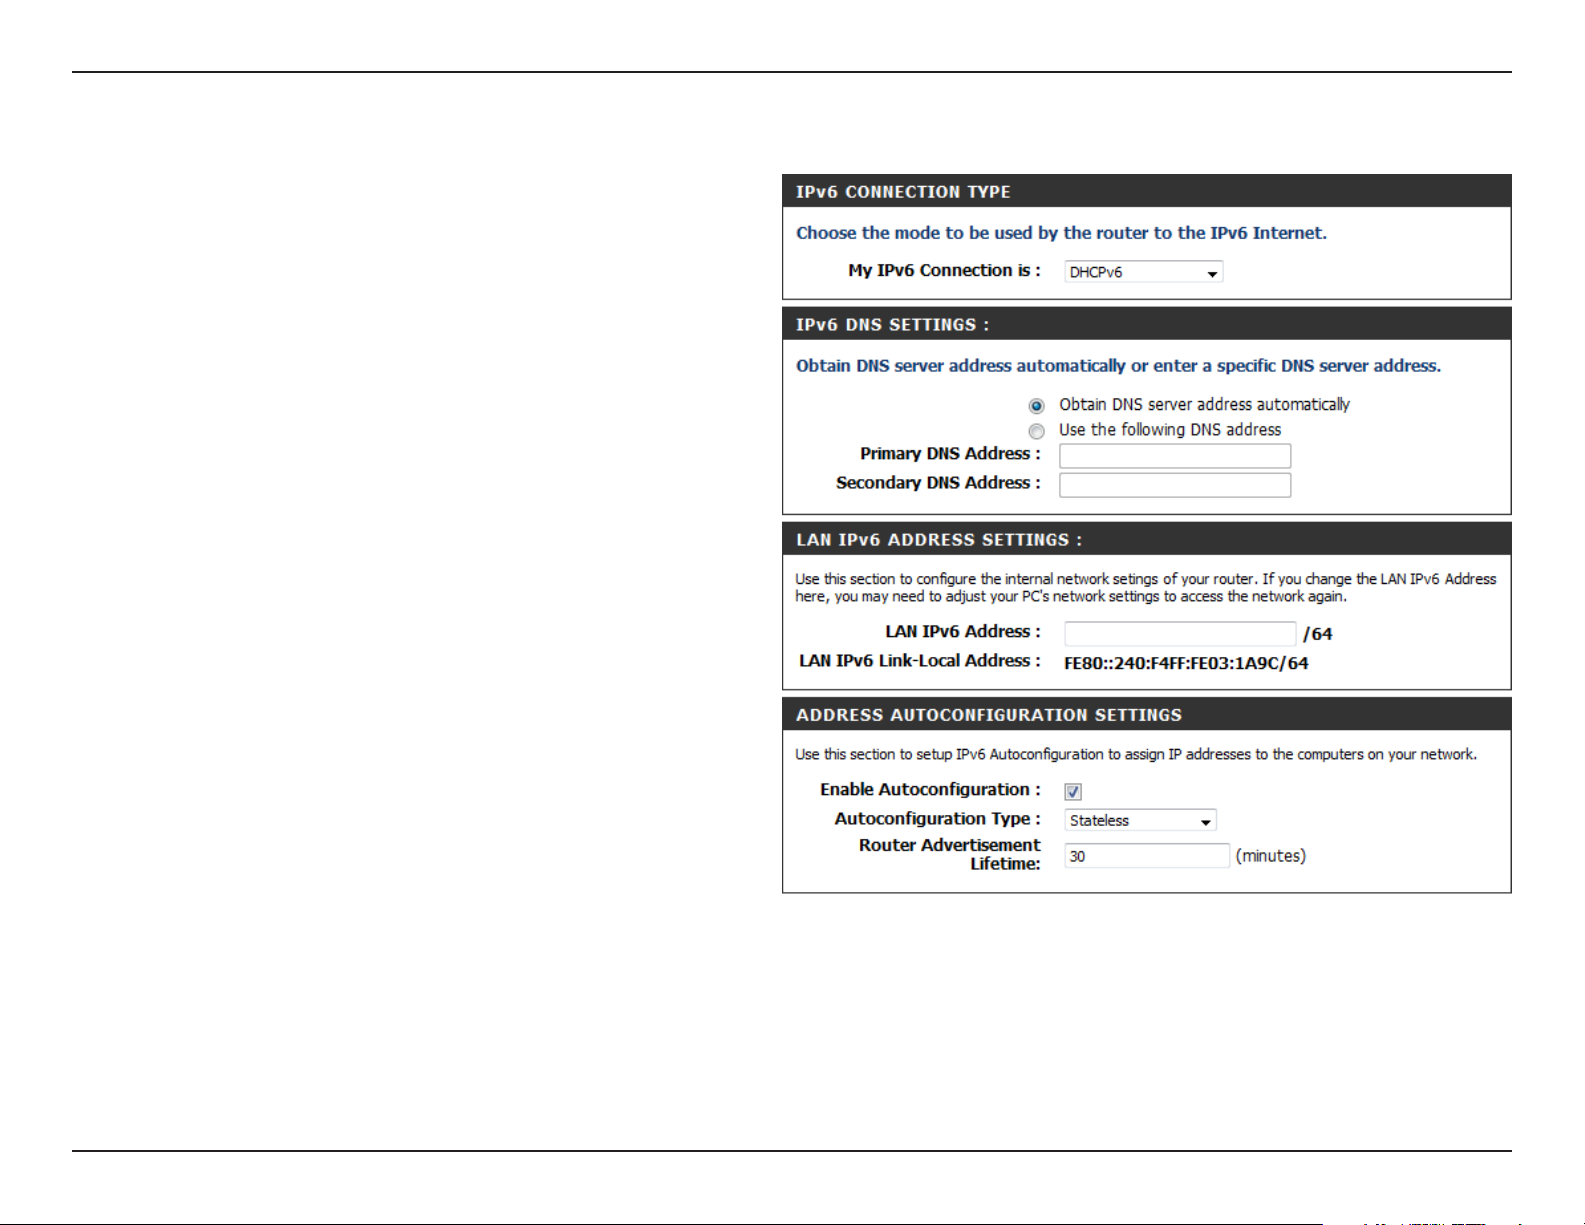
DHCPv6 (Stateless)
My IPv6 Connection:
IPv6 DNS Settings:
Primary/Secondary
DNS Address:
LAN IPv6 Address:
LAN Link-Local
Address:
Enable
Autoconguration:
Autoconguration
Type:
Select DHCPv6 from the drop-down menu.
Select either Obtain DNS server address
automatically or Use thefollowing DNS
Address.
Enter the primary and secondary DNS server
addresses.
Enter the LAN (local) IPv6 address for the
router.
Displays the Router’s LAN Link-Local Address.
Check to enable the Autoconfiguration
feature.
Select Stateless. Refer to the previous page
for Stateful.
Router Advertisement
Lifetime:
Enter the Router Advertisement Lifetime (in
minutes).
39D-Link DIR-601 User Manual
Page 44

Section 3 - Conguration
IPv6 over PPPoE (Stateful)
My IPv6 Connection:
PPPoE:
Address Mode:
IP Address:
User Name:
Password:
Service Name:
Reconnection Mode:
Maximum Idle Time:
Select PPPoE from the drop-down menu.
Enter the PPPoE account settings supplied by your Internet
provider (ISP).
Select Static if your ISP assigned you the IP address, subnet
mask, gateway, and DNS server addresses. In most cases, select
Dynamic.
Enter the IP address (Static PPPoE only).
Enter your PPPoE user name.
Enter your PPPoE password and then retype the password in
the next box.
Enter the ISP Service Name (optional).
Select either Always-on, On-Demand, or Manual.
Enter a maximum idle time during which the Internet connection
is maintained during inactivity. To disable this feature, enable
Auto-reconnect.
IPv6 DNS Settings:
Primary/Secondary DNS
Address:
LAN IPv6 Address:
LAN Link-Local Address:
Select either ObtainDNSserveraddressautomatically or Use
thefollowingDNSAddress.
Enter the primary and secondary DNS server addresses.
Enter the LAN (local) IPv6 address for the router.
Displays the Router’s LAN Link-Local Address.
40D-Link DIR-601 User Manual
Page 45

Section 3 - Conguration
Enable
Autoconguration:
Autoconguration Type:
IPv6 Address Range Start:
IPv6 Address Range End:
IPv6 Address Lifetime:
Check to enable the Autoconguration feature.
Select Stateful(DHCPv6) or Stateless. Refer to the next page for Stateless.
Enter the start IPv6 Address for the DHCPv6 range for your local computers.
Enter the end IPv6 Address for the DHCPv6 range for your local computers.
Enter the IPv6 Address Lifetime (in minutes).
41D-Link DIR-601 User Manual
Page 46
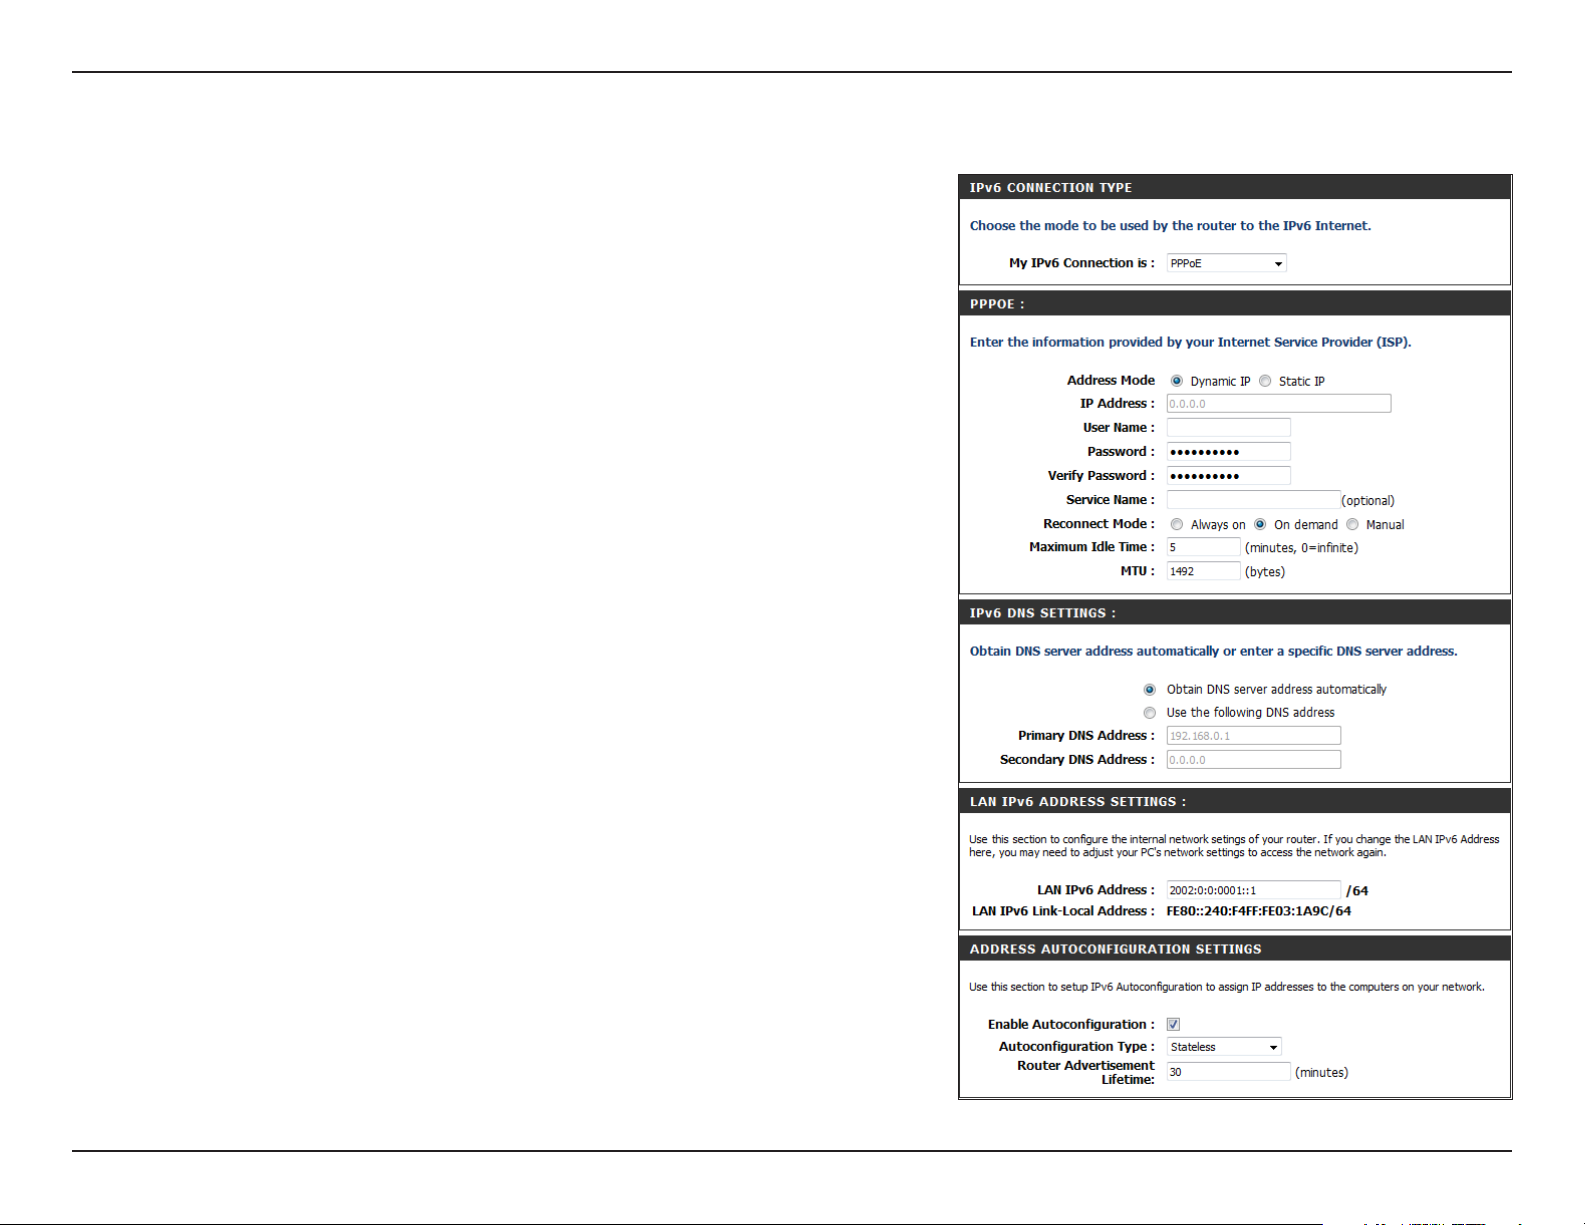
Section 3 - Conguration
IPv6 over PPPoE (Stateless)
My IPv6 Connection:
PPPoE:
Address Mode:
IP Address:
User Name:
Password:
Service Name:
Reconnection Mode:
Maximum Idle Time:
Select PPPoE from the drop-down menu.
Enter the PPPoE account settings supplied by your Internet
provider (ISP).
Select Static if your ISP assigned you the IP address, subnet
mask, gateway, and DNS server addresses. In most cases, select
Dynamic.
Enter the IP address (Static PPPoE only).
Enter your PPPoE user name.
Enter your PPPoE password and then retype the password in
the next box.
Enter the ISP Service Name (optional).
Select either Always-on, On-Demand, or Manual.
Enter a maximum idle time during which the Internet connection
is maintained during inactivity. To disable this feature, enable
Auto-reconnect.
IPv6 DNS Settings:
Primary/Secondary
DNS Address:
LAN IPv6 Address:
LAN Link-Local
Address:
Select either ObtainDNSserveraddressautomatically or Use
thefollowingDNSAddress.
Enter the primary and secondary DNS server addresses.
Enter the LAN (local) IPv6 address for the router.
Displays the Router’s LAN Link-Local Address.
42D-Link DIR-601 User Manual
Page 47

Section 3 - Conguration
Enable
Autoconguration:
Autoconguration Type:
Router Advertisement
Lifetime:
Check to enable the Autoconguration feature.
Select Stateful(DHCPv6) or Stateless.
Enter the Router Advertisement Lifetime (in minutes).
43D-Link DIR-601 User Manual
Page 48
Section 3 - Conguration
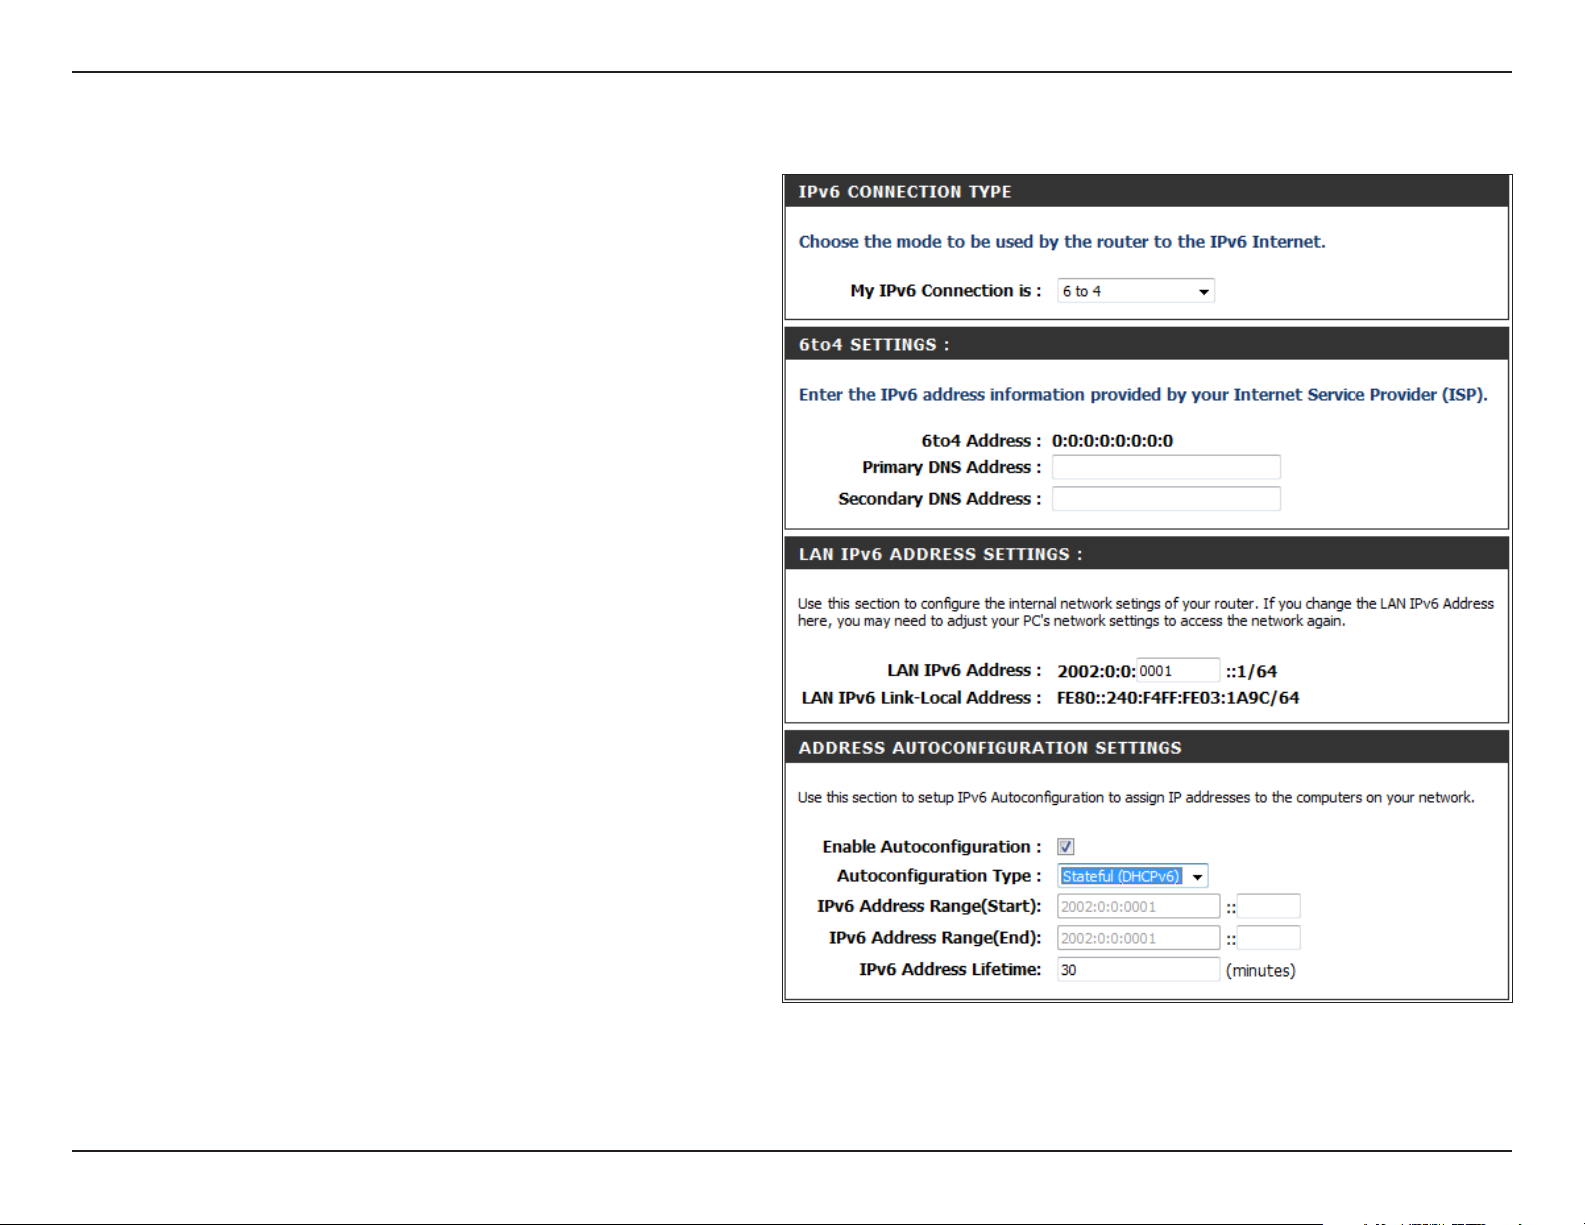
6 to 4 Tunneling (Stateful)
My IPv6 Connection:
6 to 4 Settings:
Primary/Secondary
DNS Address:
LAN IPv6 Address:
LAN Link-Local
Address:
Enable
Autoconguration:
Autoconguration
Type:
Select 6 to 4 from the drop-down menu.
Enter the IPv6 settings supplied by your Internet
provider (ISP).
Enter the primary and secondary DNS server
addresses.
Enter the LAN (local) IPv6 address for the
router.
Displays the Router’s LAN Link-Local Address.
Check to enable the Autoconguration feature.
Select Stateful(DHCPv6) or Stateless. Refer to
the next page for Stateless.
IPv6 Address Range
Start:
IPv6 Address Range
End:
IPv6 Address
Lifetime:
Enter the start IPv6 Address for the DHCPv6
range for your local computers.
Enter the end IPv6 Address for the DHCPv6 range
for your local computers.
Enter the IPv6 Address Lifetime (in minutes).
44D-Link DIR-601 User Manual
Page 49
Section 3 - Conguration
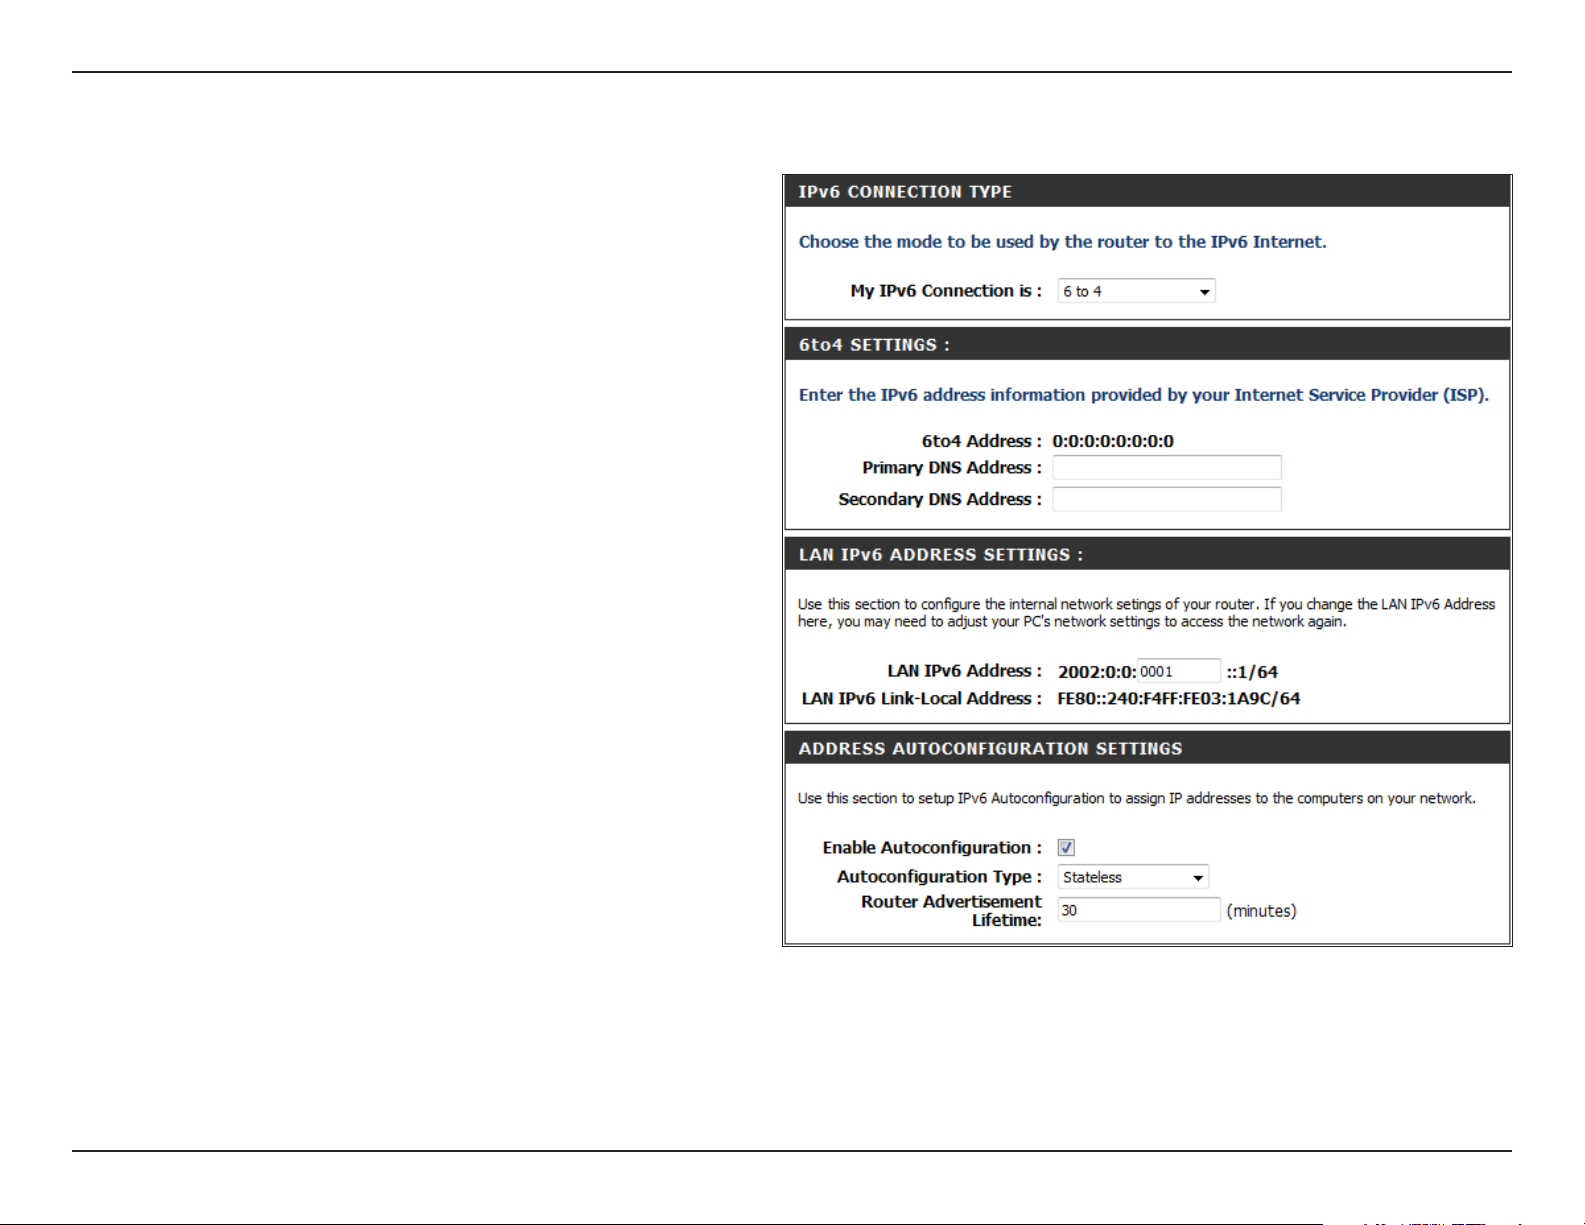
6 to 4 Tunneling (Stateless)
My IPv6 Connection:
6 to 4 Settings:
Primary/Secondary
DNS Address:
LAN IPv6 Address:
LAN Link-Local
Address:
Enable
Autoconguration:
Autoconguration
Type:
Select 6 to 4 from the drop-down menu.
Enter the IPv6 settings supplied by your Internet
provider (ISP).
Enter the primary and secondary DNS server
addresses.
Enter the LAN (local) IPv6 address for the
router.
Displays the Router’s LAN Link-Local Address.
Check to enable the Autoconguration feature.
Select Stateless. Refer to the previous page for
Stateful.
Router
Advertisement
Lifetime:
Enter the Router Advertisement Lifetime (in
minutes).
45D-Link DIR-601 User Manual
Page 50

Section 3 - Conguration
IPv6 in IPv4 Tunneling (Stateful)
My IPv6 Connection:
IPv6 in IPv4 Tunnel
Settings:
LAN IPv6 Address:
LAN Link-Local
Address:
Enable
Autoconguration:
Autoconguration
Type:
Router
Advertisement
Lifetime:
Select IPv6 in IPv4 Tunnel from the drop-down
menu.
Enter the settings supplied by your Internet
provider (ISP).
Enter the LAN (local) IPv6 address for the router.
Displays the Router’s LAN Link-Local Address.
Check to enable the Autoconguration feature.
Select Stateless. Refer to the previous page for
Stateful.
Enter the Router Advertisement Lifetime (in
minutes).
46D-Link DIR-601 User Manual
Page 51
Section 3 - Conguration
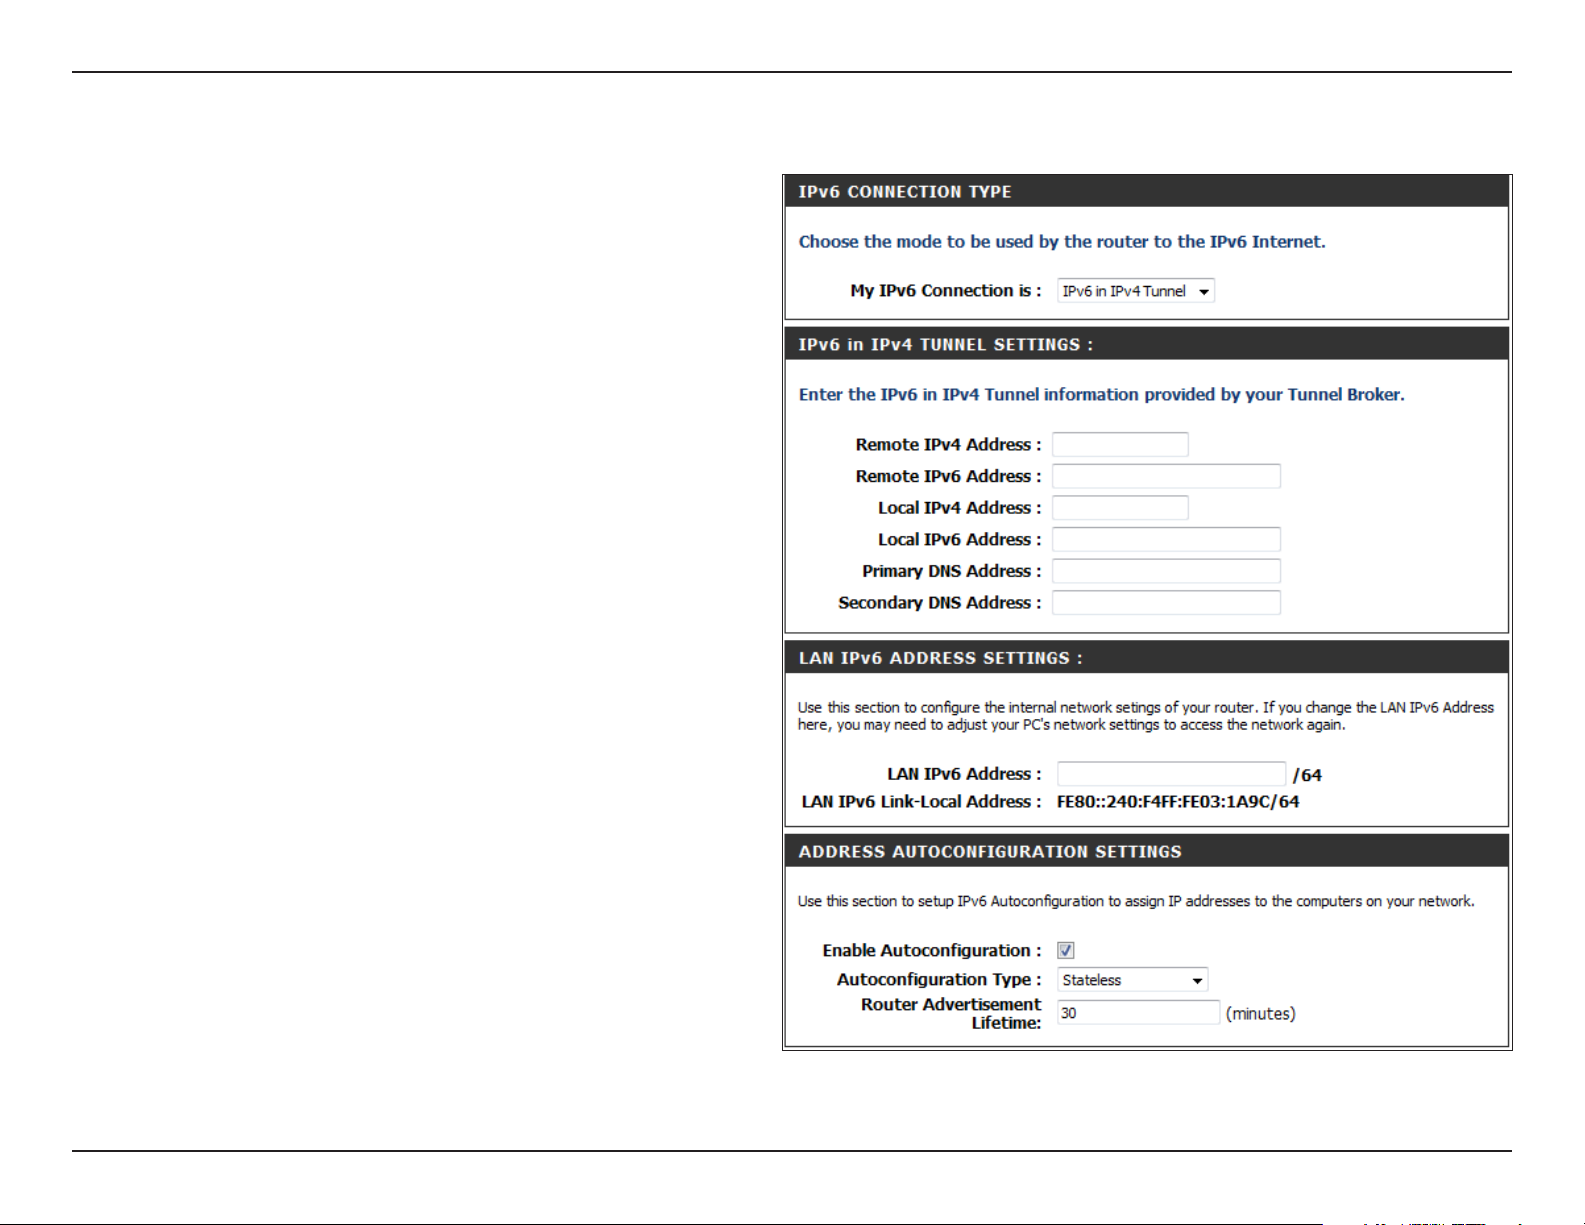
IPv6 in IPv4 Tunneling (Stateless)
My IPv6 Connection:
IPv6 in IPv4 Tunnel
Settings:
LAN IPv6 Address:
LAN Link-Local
Address:
Enable
Autoconguration:
Autoconguration
Type:
IPv6 Address Range
Start:
Select IPv6 in IPv4 Tunnel from the drop-down
menu.
Enter the settings supplied by your Internet
provider (ISP).
Enter the LAN (local) IPv6 address for the router.
Displays the Router’s LAN Link-Local Address.
Check to enable the Autoconguration feature.
Select Stateful(DHCPv6) or Stateless. Refer to
the next page for Stateless.
Enter the start IPv6 Address for the DHCPv6 range
for your local computers.
IPv6 Address Range
End:
IPv6 Address
Lifetime:
Enter the end IPv6 Address for the DHCPv6 range
for your local computers.
Enter the IPv6 Address Lifetime (in minutes).
47D-Link DIR-601 User Manual
Page 52

Section 3 - Conguration
Virtual Server
The DIR-601 can be congured as a virtual server so that remote users accessing Web or FTP services via the public IP address can be automatically
redirected to local servers in the LAN (Local Area Network).
The DIR-601 rewall feature lters out unrecognized packets to protect your LAN
network so all computers networked with the DIR-601 are invisible to the outside
world. If you wish, you can make some of the LAN computers accessible from
the Internet by enabling Virtual Server. Depending on the requested service, the
DIR-601 redirects the external service request to the appropriate server within
the LAN network.
The DIR-601 is also capable of port-redirection meaning incoming trac to a
particular port may be redirected to a dierent port on the server computer.
Each virtual service that is created will be listed at the bottom of the screen in the
Virtual Servers List. There are pre-dened virtual services already in the table. You
may use them by enabling them and assigning the server IP to use that particular
virtual service.
For a list of ports for common applications, please visit http://support.dlink.
com/faq/view.asp?prod_id=1191.
48D-Link DIR-601 User Manual
Page 53
Section 3 - Conguration
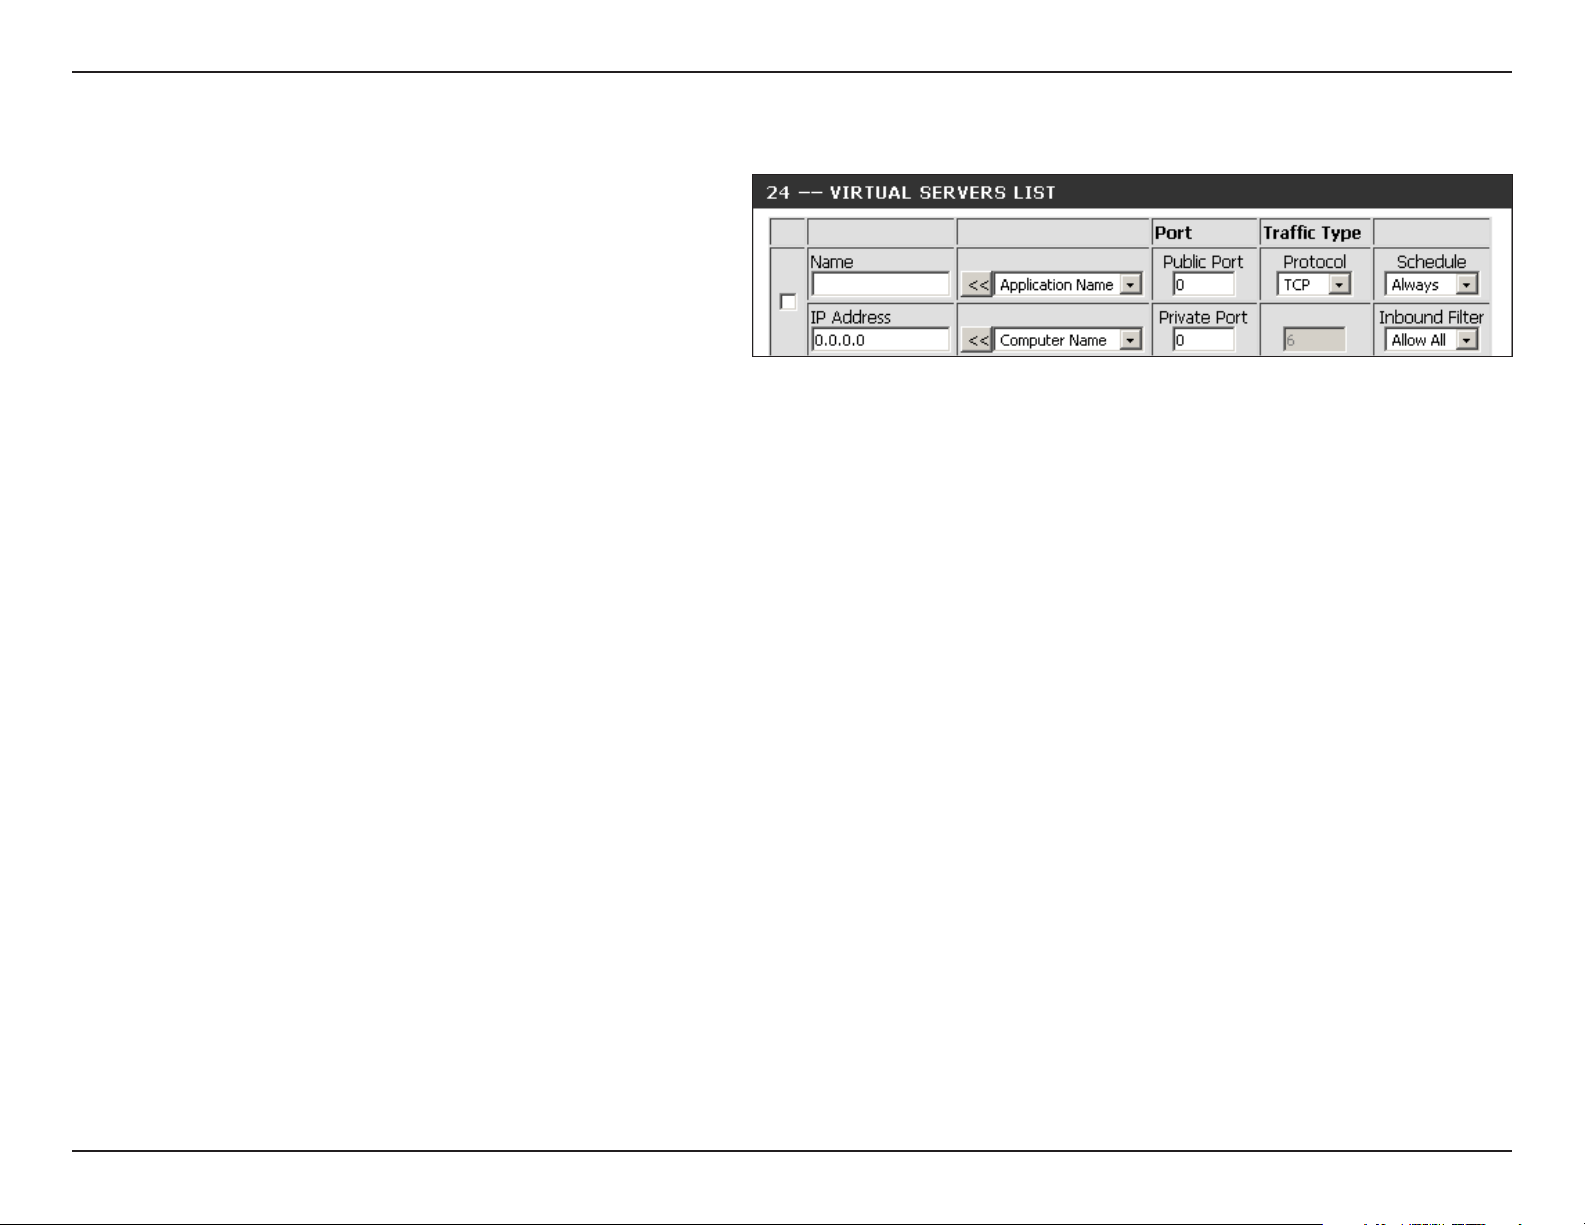
This will allow you to open a single port. If you would like to open a range of ports, refer to the next page.
Name:
IP Address:
Private Port/
Public Port:
Protocol Type:
Inbound Filter:
Schedule:
Enter a name for the rule or select an application from
the drop-down menu. Select an application and click
<< to populate the elds.
Enter the IP address of the computer on your local
network that you want to allow the incoming service
to. If your computer is receiving an IP address
automatically from the router (DHCP), you computer
will be listed in the “Computer Name” drop-down menu. Select your computer and click <<.
Enter the port that you want to open next to Private Port and Public Port. The private and public ports are usually the same. The
public port is the port seen from the Internet side, and the private port is the port being used by the application on the computer
within your local network.
Select TCP, UDP, or Both from the drop-down menu.
Select Allow All (most common) or a created Inbound lter. You may create your own inbound lters in the Advanced>Inbound
Filter page.
The schedule of time when the Virtual Server Rule will be enabled. The schedule may be set to Always, which will allow the particular
service to always be enabled. You can create your own times in the Tools > Schedules section.
49D-Link DIR-601 User Manual
Page 54
Section 3 - Conguration
Port Forwarding
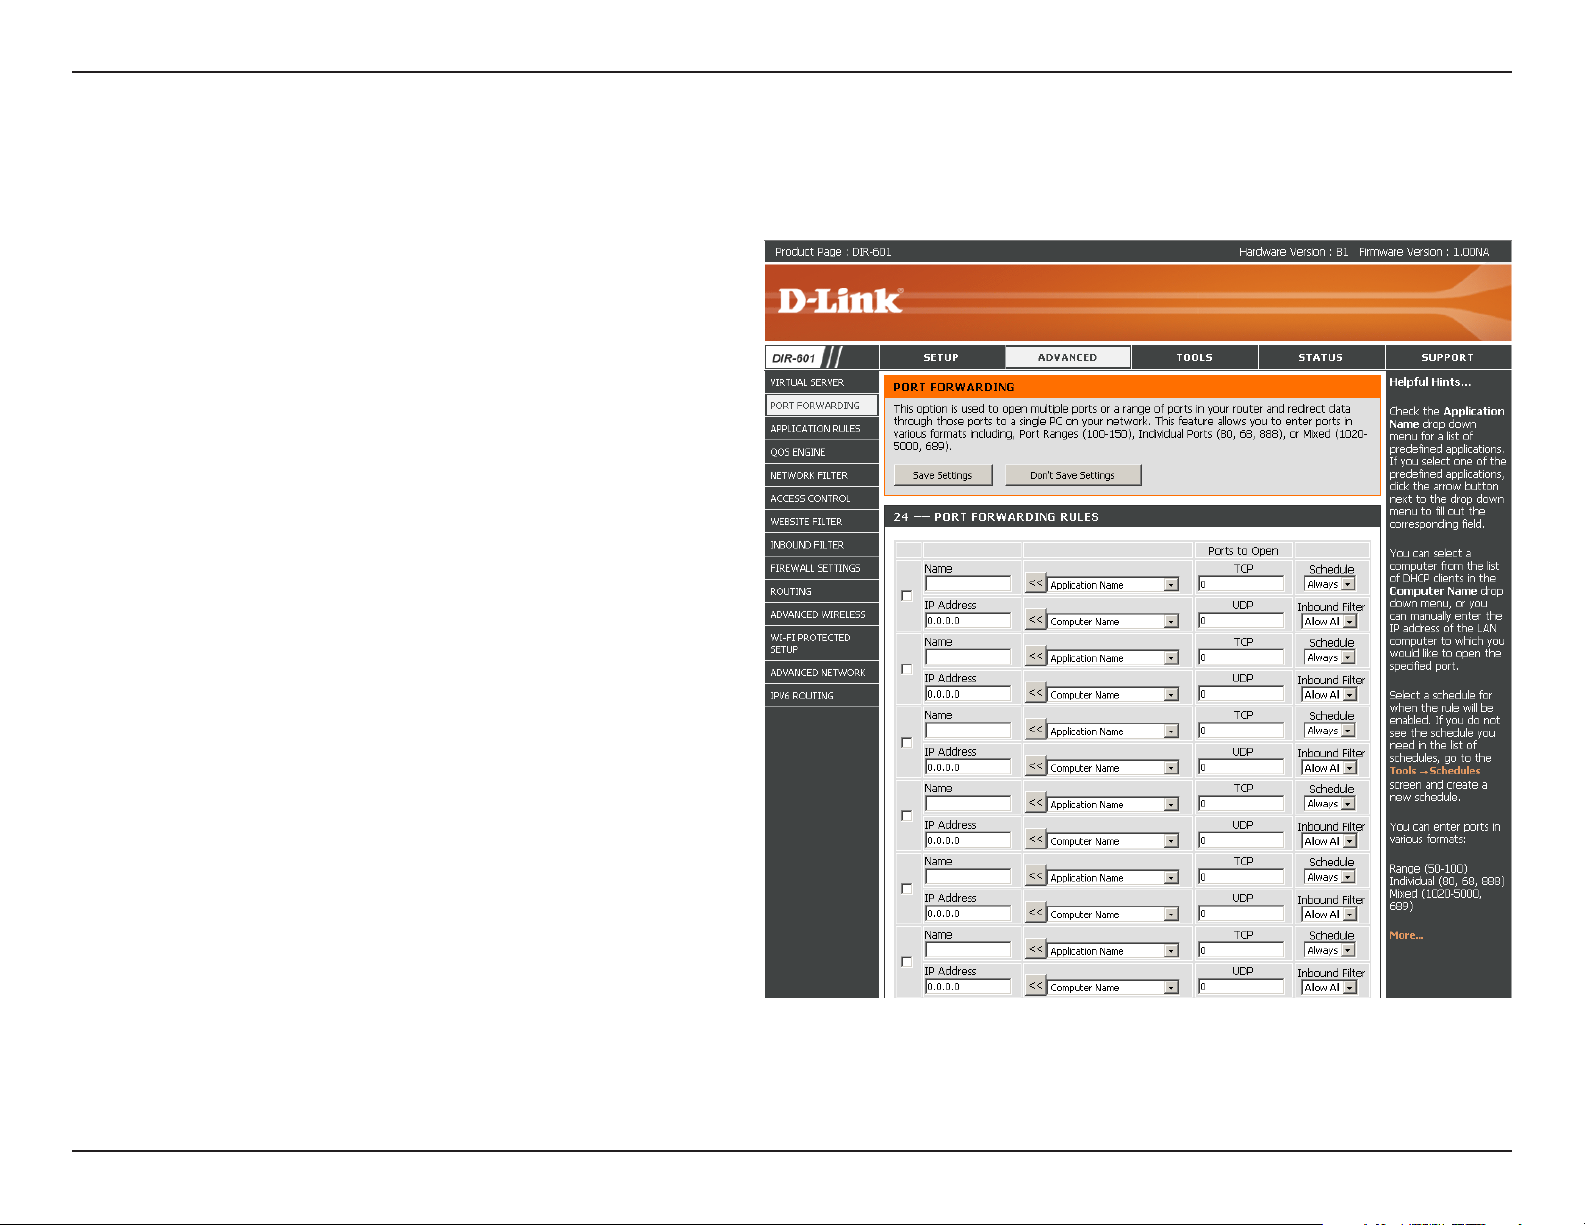
This will allow you to open a single port or a range of ports.
Name:
IP Address:
TCP/UDP:
Inbound Filter:
Enter a name for the rule or select an application from
the drop-down menu. Select an application and click
<< to populate the elds.
Enter the IP address of the computer on your local
network that you want to allow the incoming
service to. If your computer is receiving an IP address
automatically from the router (DHCP), you computer
will be listed in the “Computer Name” drop-down
menu. Select your computer and click <<.
Enter the TCP and/or UDP port or ports that you want
to open. You can enter a single port or a range of ports.
Separate ports with a common.
Example: 24,1009,3000-4000
Select Allow All (most common) or a created Inbound
lter. You may create your own inbound lters in the
Advanced>InboundFilter page.
Schedule:
The schedule of time when the Virtual Server Rule
will be enabled. The schedule may be set to Always,
which will allow the particular service to always
be enabled. You can create your own times in the
Tools > Schedules section.
50D-Link DIR-601 User Manual
Page 55

Section 3 - Conguration
Application Rules
Some applications require multiple connections, such as Internet gaming, video conferencing, Internet telephony and others. These applications
have diculties working through NAT (Network Address Translation). Special Applications makes some of these applications work with the DIR-601.
If you need to run applications that require multiple connections, specify the port normally associated with an application in the “Trigger Port” eld,
select the protocol type as TCP or UDP, then enter the rewall (public) ports associated with the trigger port to open them for inbound trac.
The DIR-601 provides some predened applications in the table on the bottom of the web page. Select the application you want to use and enable
it.
Name:
Trigger:
Trac Type:
Firewall:
Trac Type:
Schedule:
Enter a name for the rule. You may select a pre-dened
application from the drop-down menu and click <<.
This is the port used to trigger the application. It can
be either a single port or a range of ports.
Select the protocol of the trigger port (TCP, UDP, or
Both).
This is the port number on the Internet side that will
be used to access the application. You may dene a
single port or a range of ports. You can use a comma
to add multiple ports or port ranges.
Select the protocol of the rewall port (TCP, UDP, or
Both).
The schedule of time when the Application Rule
will be enabled. The schedule may be set to Always,
which will allow the particular service to always be
enabled. You can create your own times in the Tools
> Schedules section.
51D-Link DIR-601 User Manual
Page 56
Section 3 - Conguration
QoS Engine
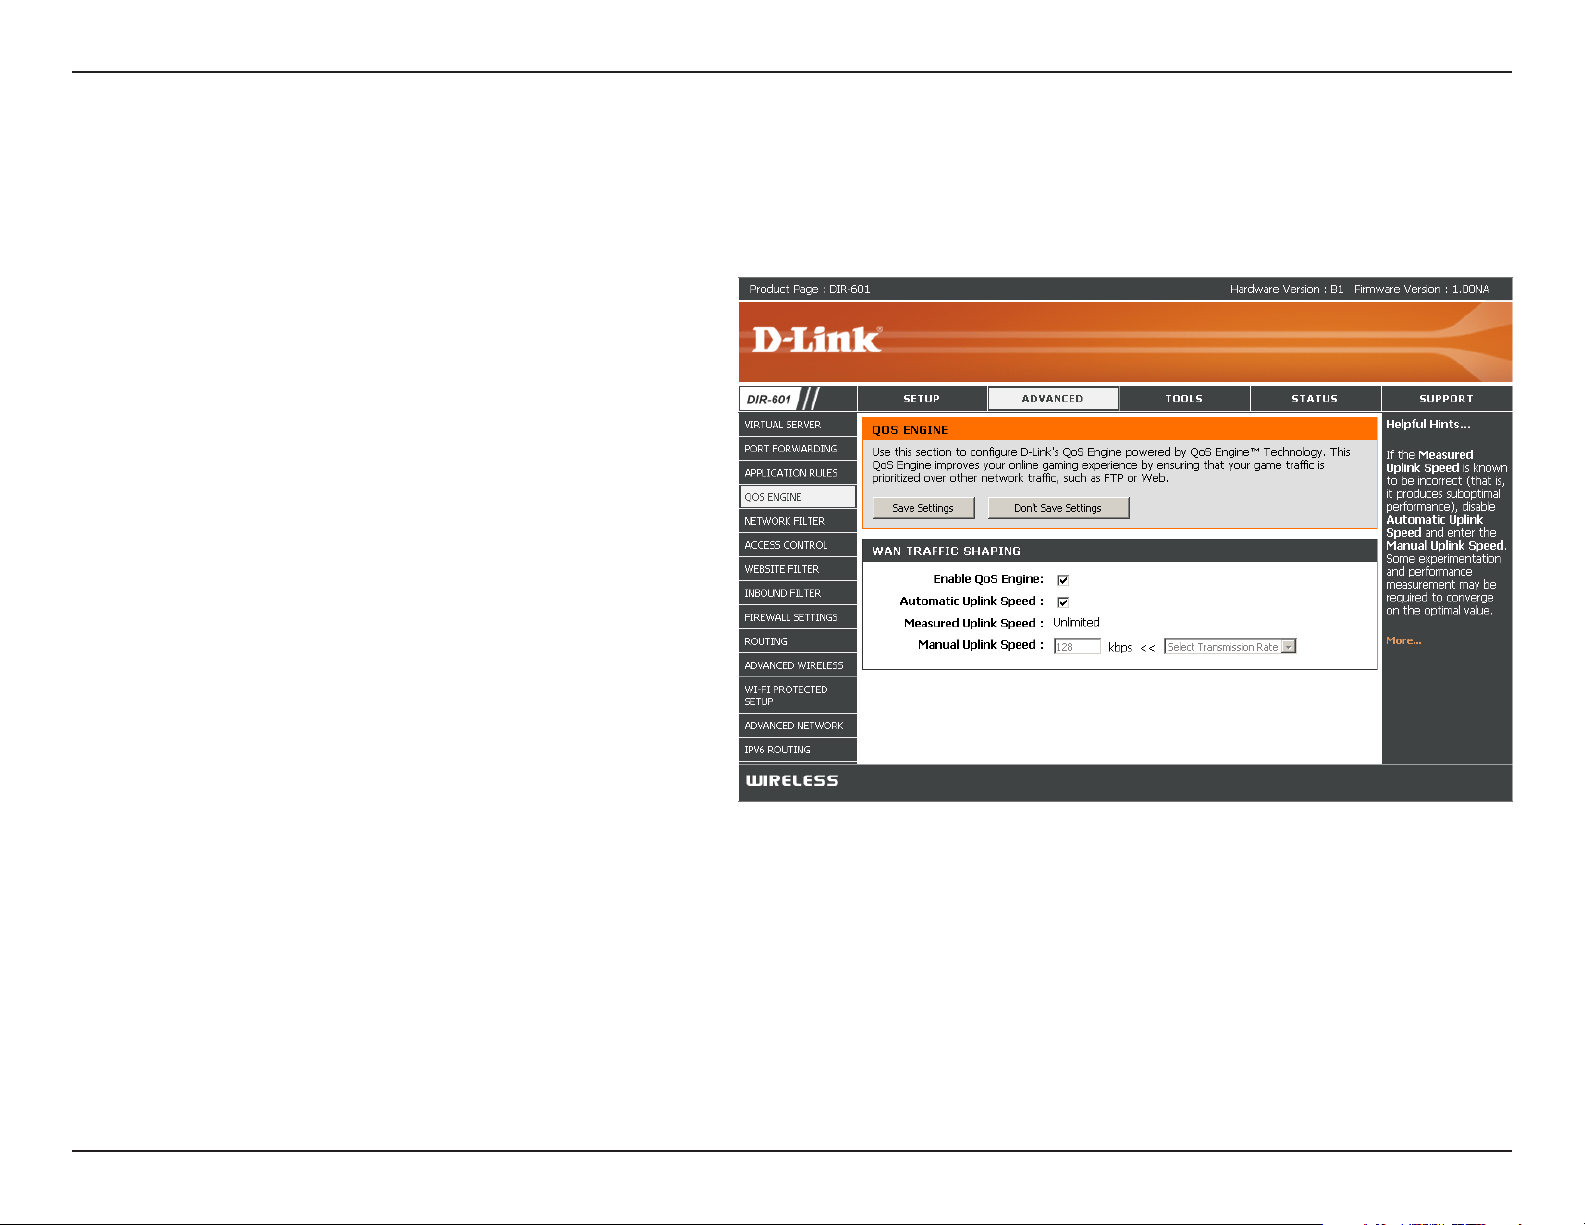
The QoS Engine option helps improve your network gaming performance by prioritizing applications. By default the QoS Engine settings are
disabled and application priority is not classied automatically.
Enable QoS
Engine:
Automatic
Uplink Speed:
Measured Uplink
Speed:
Manual Uplink
Speed:
This option is disabled by default. Enable this
option for better performance and experience
with online games and other interactive
applications, such as VoIP.
This option is enabled by default when the QoS
Engine option is enabled. This option will allow
your router to automatically determine the uplink
speed of your Internet connection.
This displays the detected uplink speed.
The speed at which data can be transferred from
the router to your ISP. This is determined by
your ISP. ISP’s oer speed as a download/upload
pair. For example, 1.5Mbits/284Kbits. Using this
example, you would enter 284. Alternatively you
can test your uplink speed with a service such as
www.dslreports.com.
52D-Link DIR-601 User Manual
Page 57
Section 3 - Conguration
Network Filters
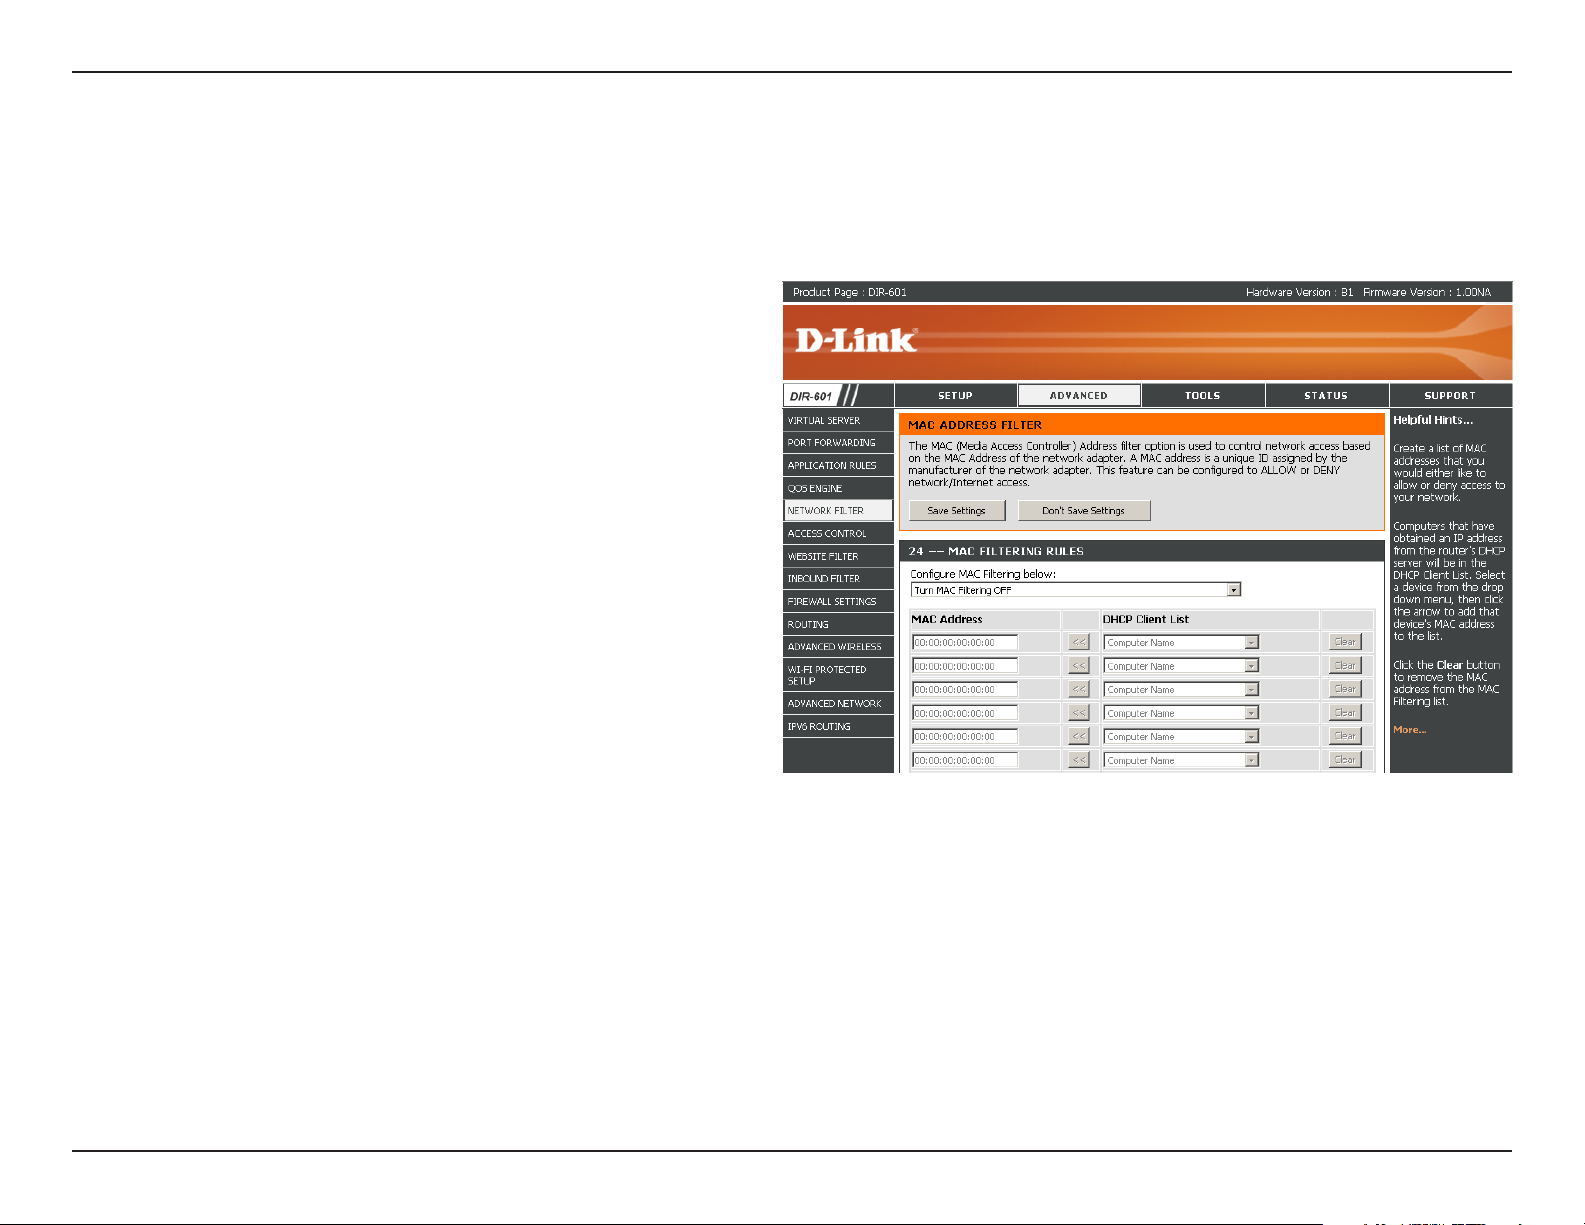
Use MAC (Media Access Control) Filters to allow or deny LAN (Local Area Network) computers by their MAC addresses from accessing the Network. You
can either manually add a MAC address or select the MAC address from the list of clients that are currently connected to the Broadband Router.
Congure MAC
Filtering:
MAC Address:
DHCP Client:
Select Turn MAC Filtering O, allow MAC addresses
listed below, or deny MAC addresses listed below from
the drop-down menu.
Enter the MAC address you would like to lter.
To nd the MAC address on a computer, please refer to
the Networking Basics section in this manual.
Select a DHCP client from the drop-down menu and
click << to copy that MAC Address.
53D-Link DIR-601 User Manual
Page 58

Section 3 - Conguration
Access Control
The Access Control section allows you to control access in and out of your network. Use this feature as Parental Controls to only grant access to
approved sites, limit web access based on time or dates, and/or block access from applications like P2P utilities or games.
Add Policy:
Check the Enable Access Control check box and
click the Add Policy button to start the Access
Control Wizard.
Access Control Wizard
Click Next to continue with the wizard.
54D-Link DIR-601 User Manual
Page 59
Section 3 - Conguration
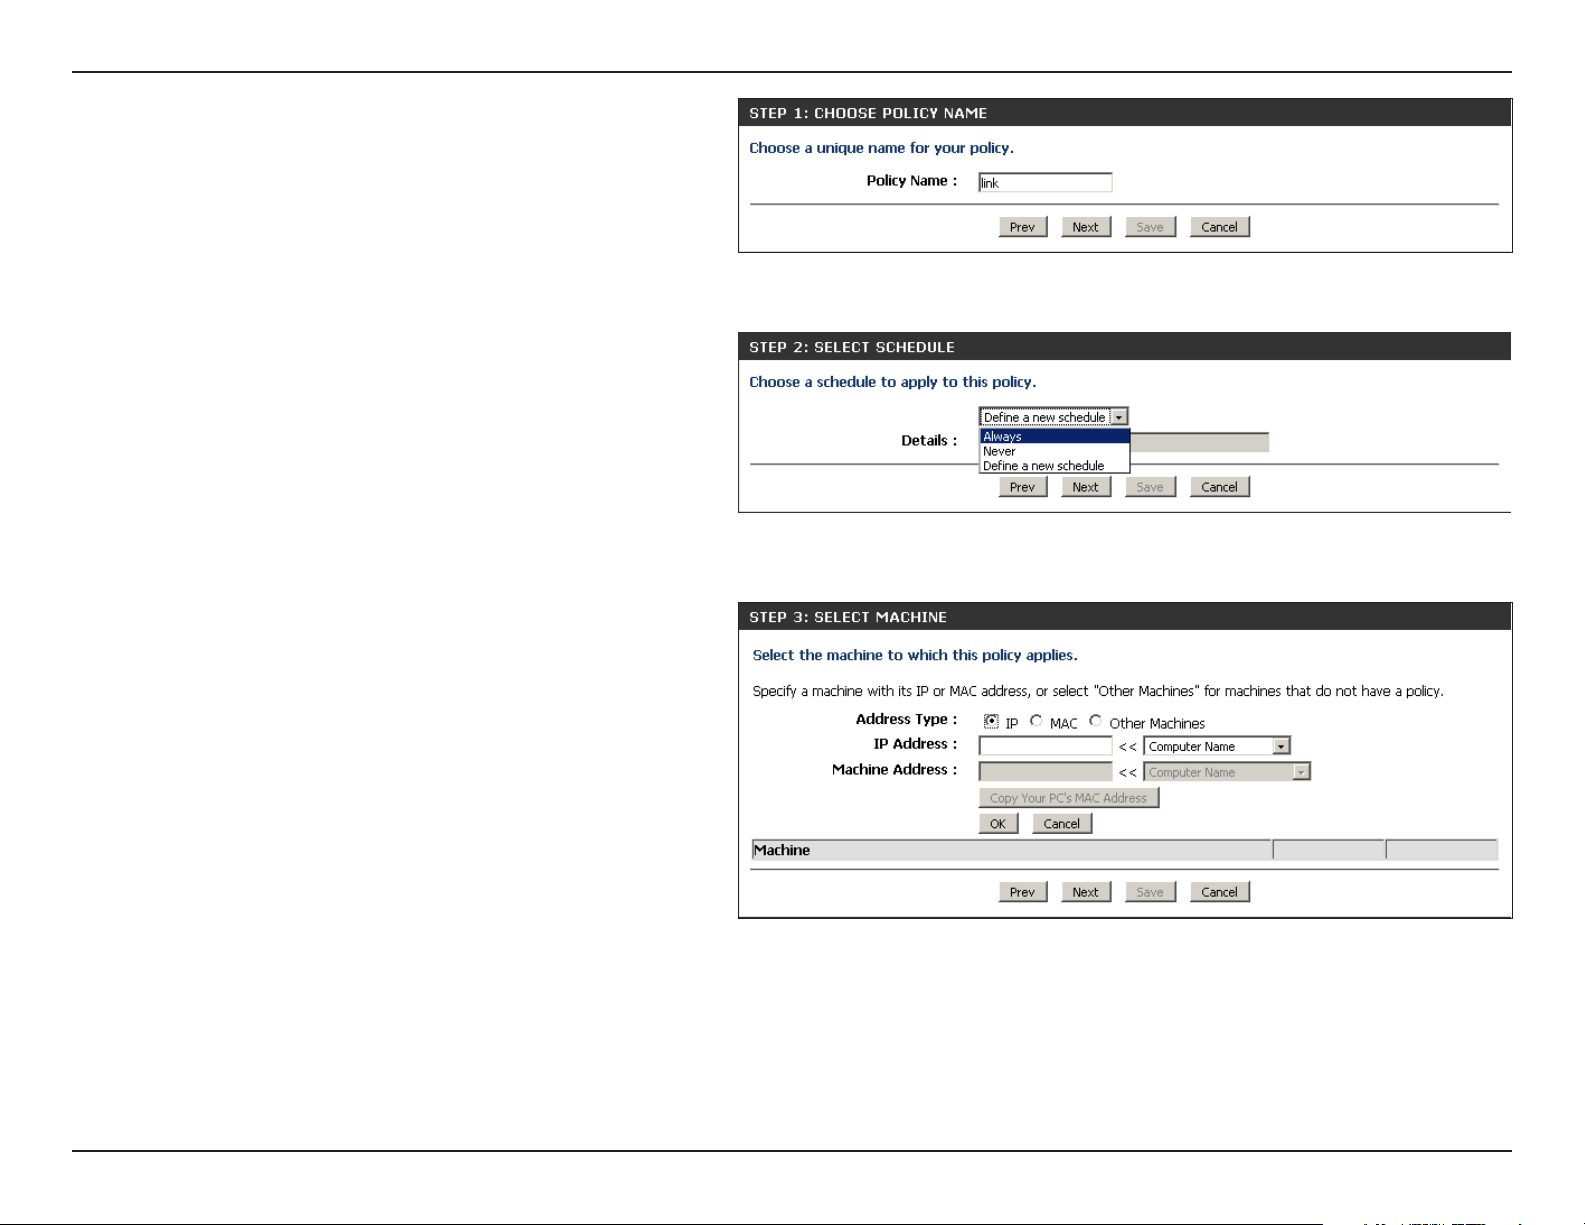
Enter a name for the policy and then click Next to continue.
Select a schedule (I.E. Always) from the drop-down menu and
then click Next to continue.
Enter the following information and then click Next to
continue.
• Address Type - Select IP address, MAC address, or Other
Machines.
• IP Address - Enter the IP address of the computer you
want to apply the rule to.
55D-Link DIR-601 User Manual
Page 60
Section 3 - Conguration
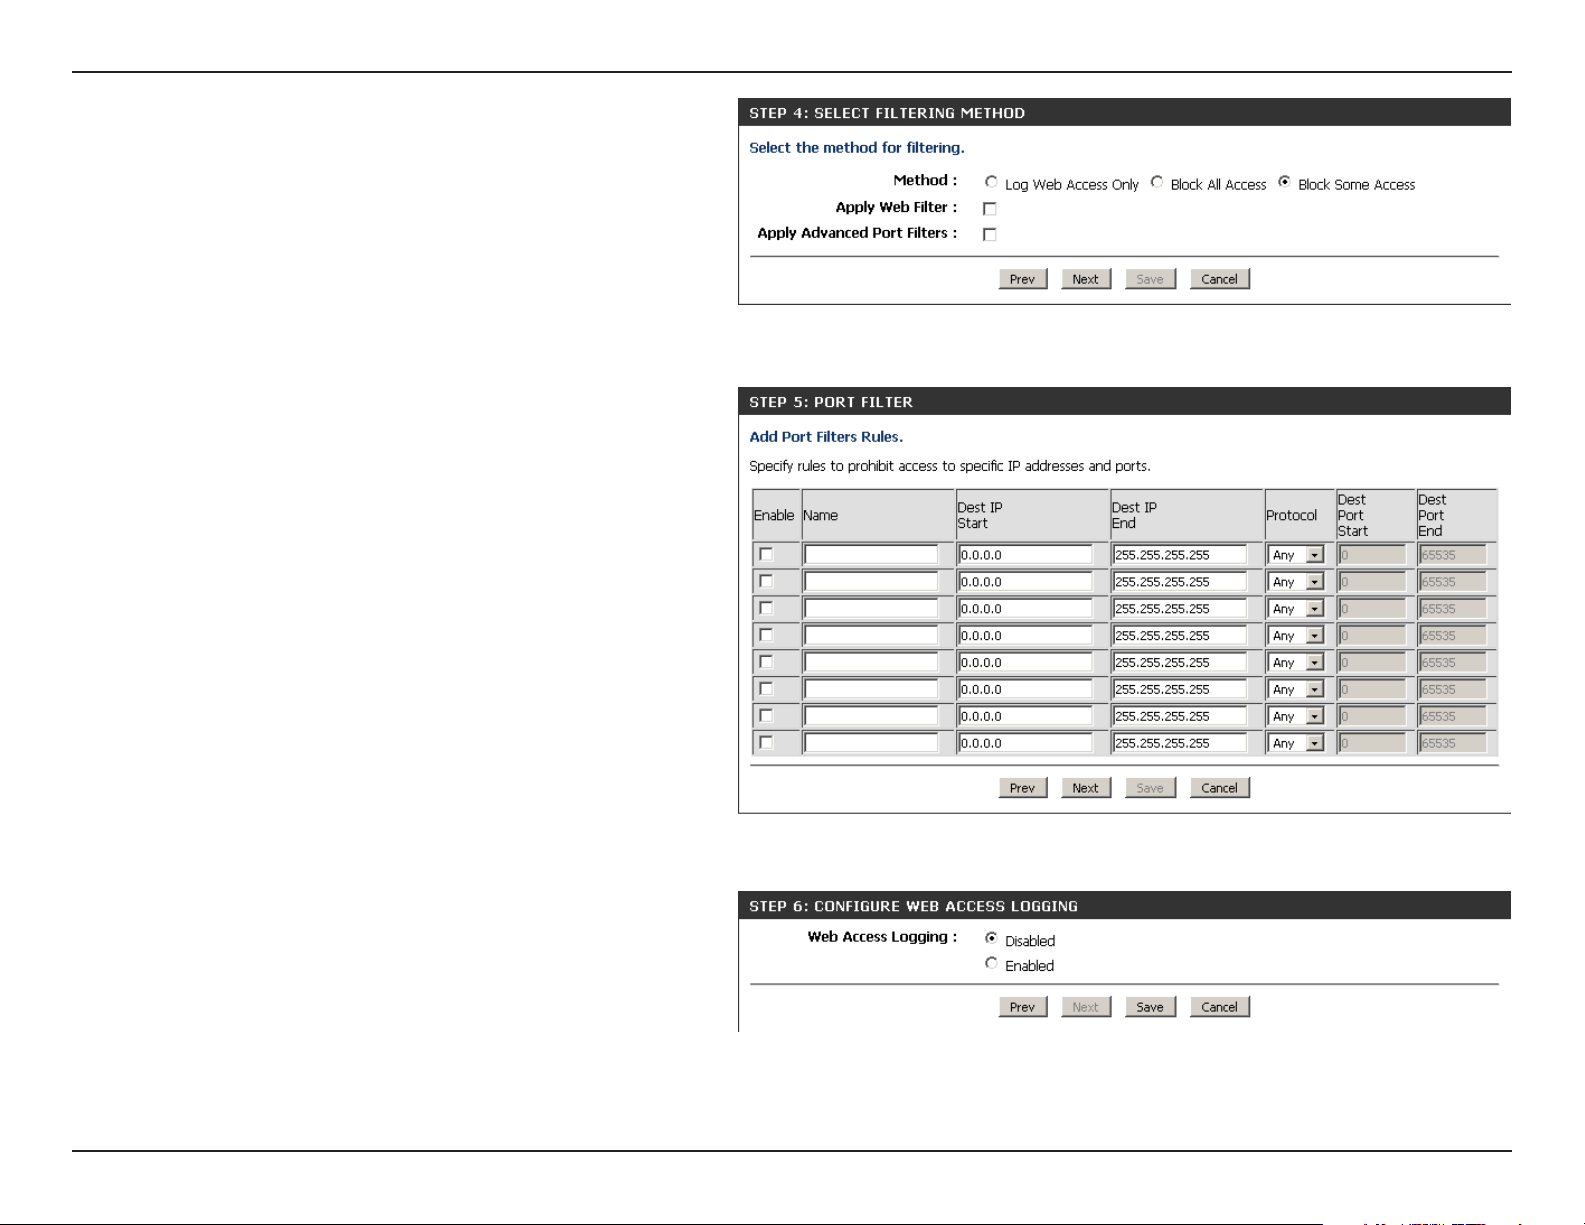
Select the ltering method and then click Next to continue.
Enter the rule:
Enable - Check to enable the rule.
Name - Enter a name for your rule.
DestIPStart - Enter the starting IP address.
Dest IP End - Enter the ending IP address.
Protocol - Select the protocol.
DestPortStart - Enter the starting port number.
Dest Port End - Enter the ending port number.
To enable web logging, click Enable.
Click Save to save the access control rule.
56D-Link DIR-601 User Manual
Page 61
Section 3 - Conguration
Website Filters
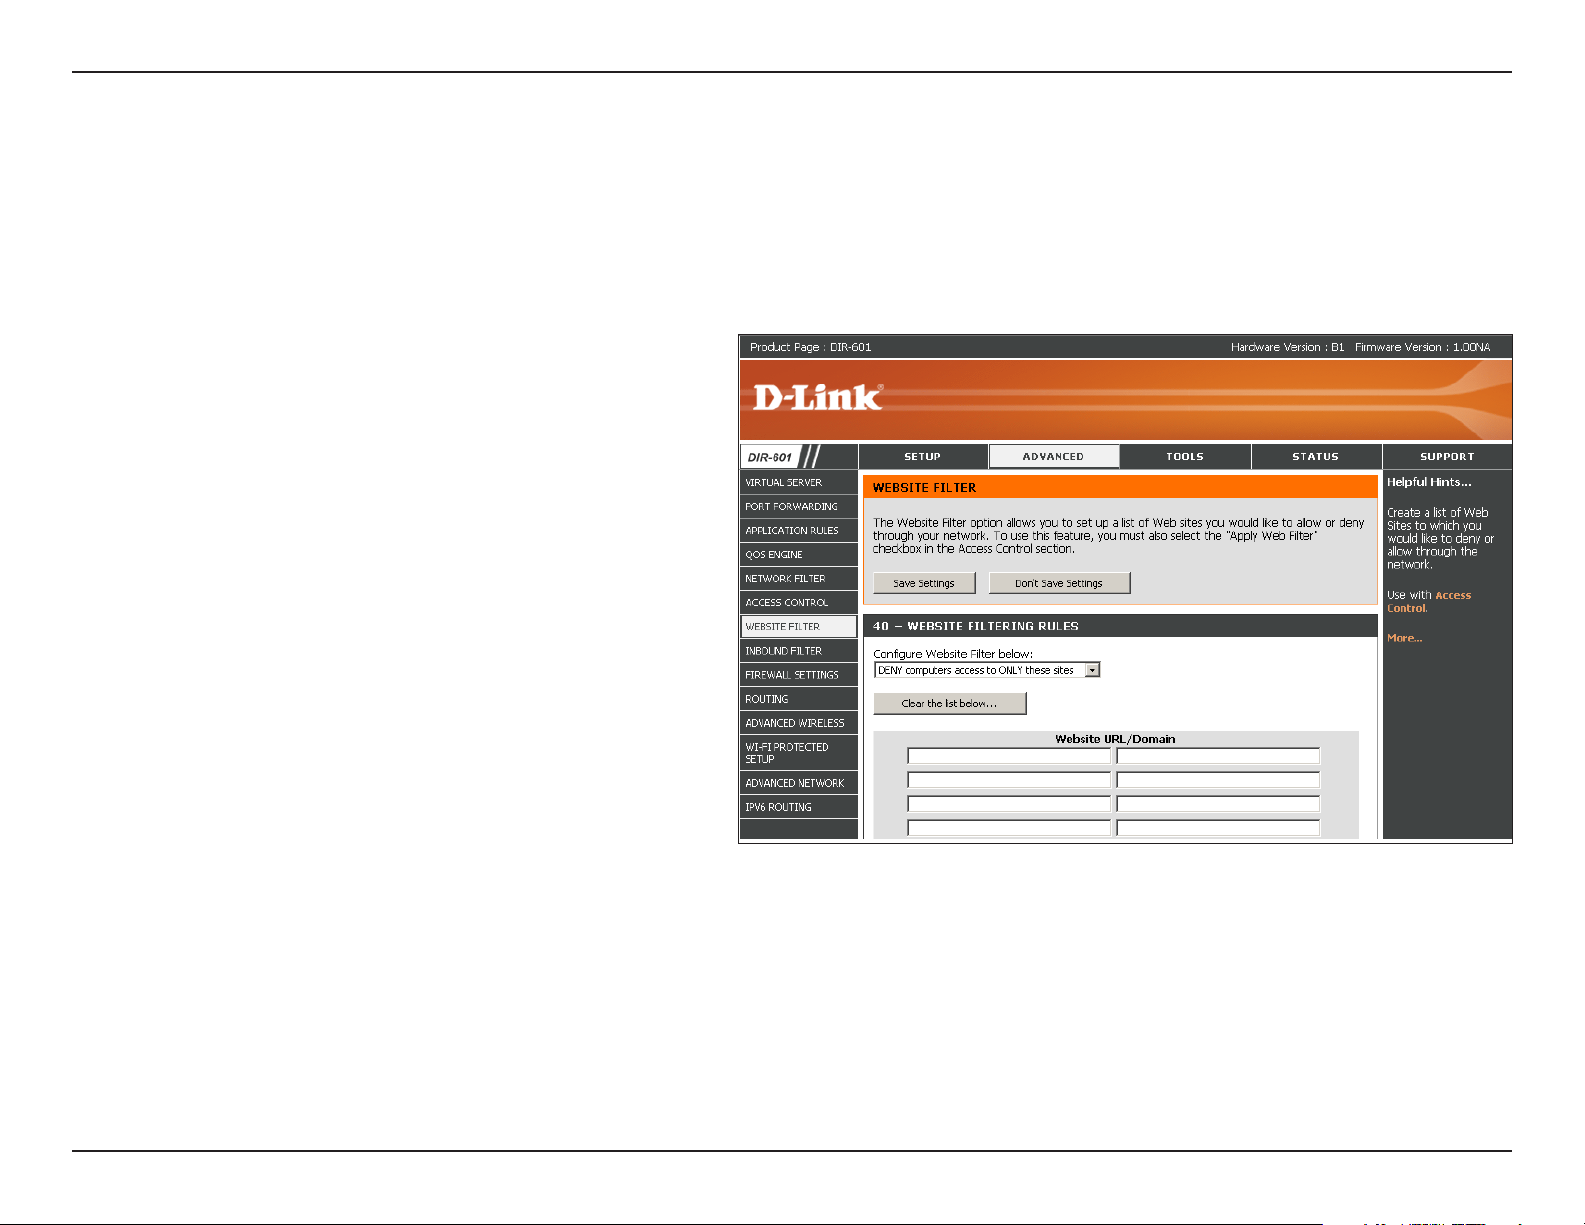
Website Filters are used to allow you to set up a list of allowed Web sites that can be used by multiple users through the network. To use this feature
select to Allow or Deny, enter the domain or website and click Add, and then click SaveSettings. You must also select ApplyWebFilter under
the Access Control section (page 41).
Congure
Website Filter
Below:
Clear the list
below:
Website URL/
Domain:
Select Deny or Allow computers access to only
these sites.
Click to delete all entries in the list.
Enter the keywords or URLs that you want to allow
or deny.
57D-Link DIR-601 User Manual
Page 62

Section 3 - Conguration
Inbound Filters
The Inbound Filter option is an advanced method of controlling data received from the Internet. With this feature you can congure inbound
data ltering rules that control data based on an IP address range. Inbound Filters can be used with Virtual Server, Port Forwarding, or Remote
Administration features.
Name:
Action:
Enable:
Source IP Start:
Source IP End:
Save:
Inbound Filter
Rules List:
Enter a name for the inbound lter rule.
Select Allow or Deny.
Check to enable rule.
Enter the starting IP address. Enter 0.0.0.0 if you
do not want to specify an IP range.
Enter the ending IP address. Enter 255.255.255.255
if you do not want to specify and IP range.
Click the Save button to apply your settings. You
must click SaveSettings at the top to save the
settings.
This section will list any rules that are created. You
may click the Edit icon to change the settings or
enable/disable the rule, or click the Delete icon
to remove the rule.
58D-Link DIR-601 User Manual
Page 63

Section 3 - Conguration
Firewall Settings
A rewall protects your network from the outside world. The D-Link DIR-601 oers a rewall type functionality. The SPI feature helps prevent cyber
attacks. Sometimes you may want a computer exposed to the outside world for certain types of applications. If you choose to expose a computer,
you can enable DMZ. DMZ is short for Demilitarized Zone. This option will expose the chosen computer completely to the outside world.
Enable SPI:
NAT Endpoint
Filtering:
Enable Anti-Spoof
Checking:
Enable DMZ Host:
SPI (Stateful Packet Inspection, also known as dynamic packet ltering)
helps to prevent cyber attacks by tracking more state per session. It
validates that the trac passing through the session conforms to the
protocol.
Select one of the following for TCP and UDP ports:
Endpoint Independent - Any incoming trac sent to an open port will
be forwarded to the application that opened the port. The port will close
if idle for 5 minutes.
Address Restricted - Incoming trac must match the IP address of the
outgoing connection.
Address + Port Restriction - Incoming trac must match the IP address
and port of the outgoing connection.
Enable this option to provide protection from certain kinds of “spoong”
attacks.
If an application has trouble working from behind the router, you can
expose one computer to the Internet and run the application on that
computer.
IP Address:
Note: Placing a computer in the DMZ may expose that computer to a variety
of security risks. Use of this option is only recommended as a last resort.
Specify the IP address of the computer on the LAN that you want to have
unrestricted Internet communication. If this computer obtains its IP address automatically using DHCP, be sure to make a static
reservation on the System>NetworkSettings page so that the IP address of the DMZ machine does not change.
59D-Link DIR-601 User Manual
Page 64
Section 3 - Conguration
Routing
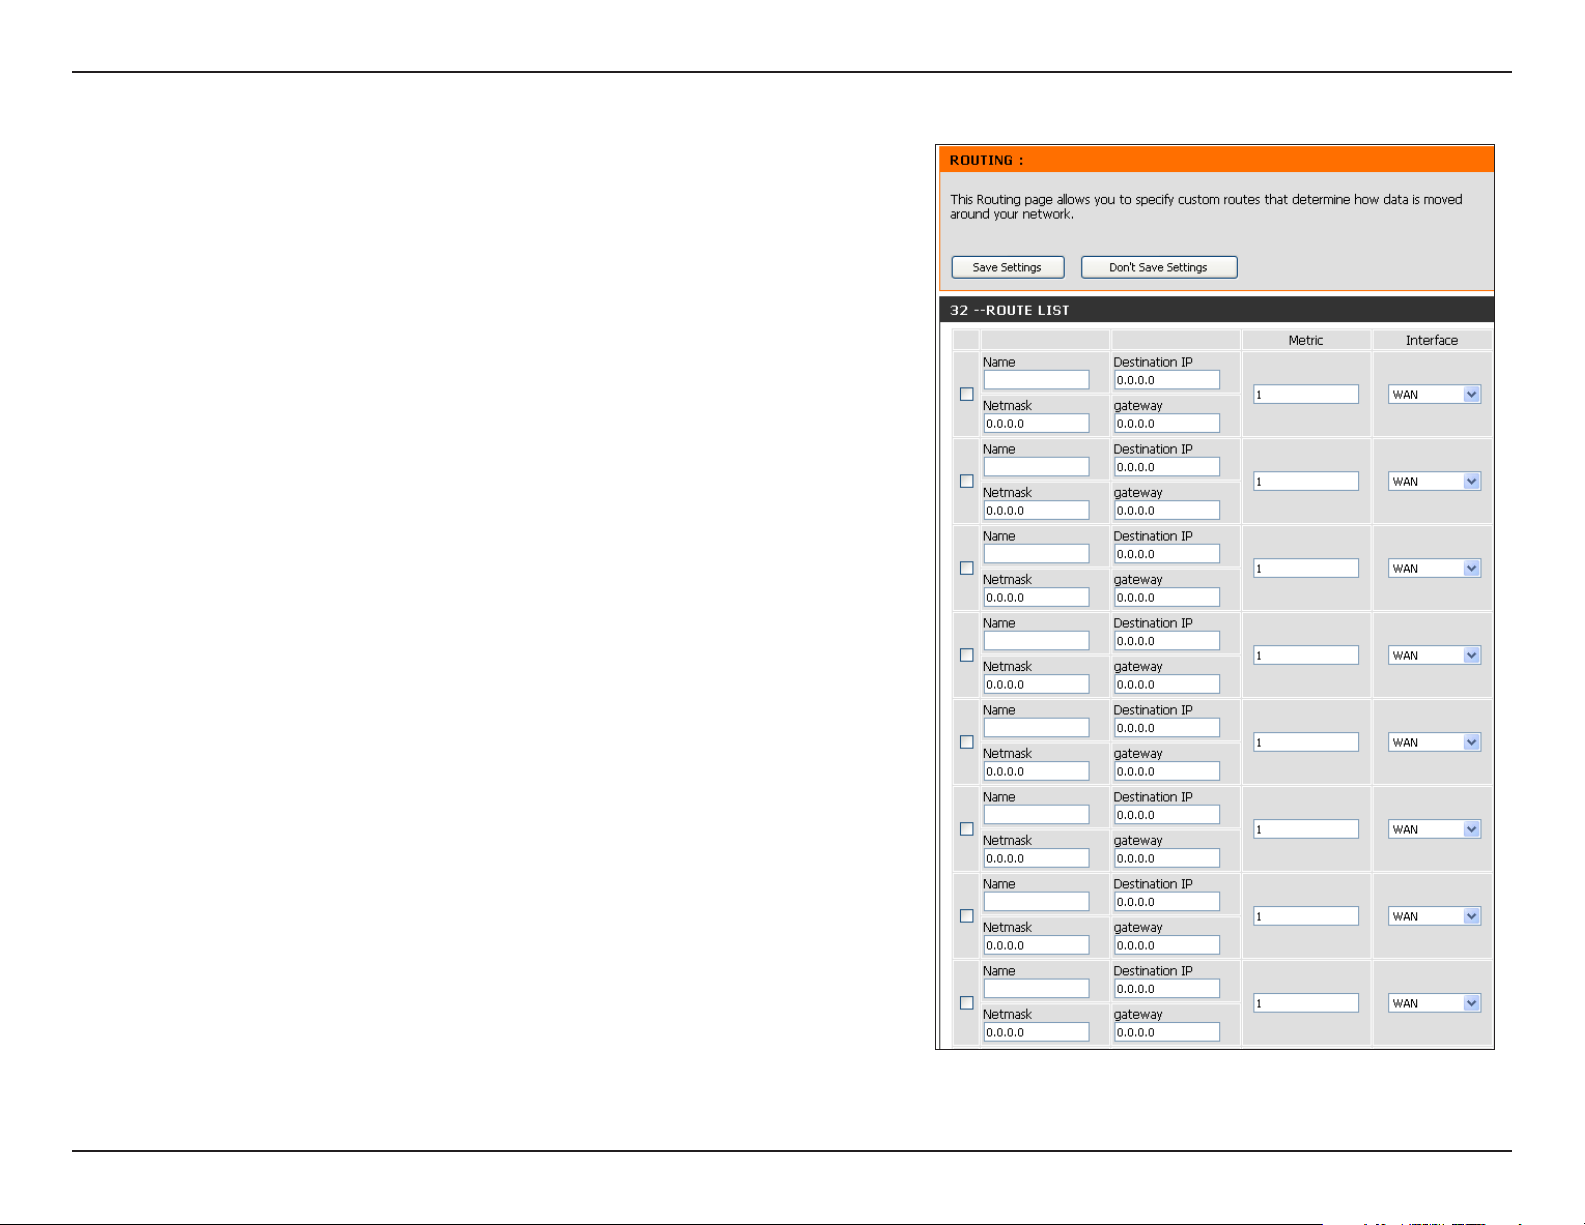
The Routing option is an advanced method of customizing specic routes of data
through your network.
Destination IP:
Netmask:
Gateway:
Metric:
Interface:
Enter the IP address of packets that will take this route.
Enter the netmask of the route, please note that the octets must match
your destination IP address.
Enter your next hop gateway to be taken if this route is used.
The route metric is a value from 1 to 16 that indicates the cost of using
this route. A value 1 is the lowest cost and 15 is the highest cost.
Select the interface that the IP packet must use to transit out of the
router when this route is used.
60D-Link DIR-601 User Manual
Page 65
Section 3 - Conguration
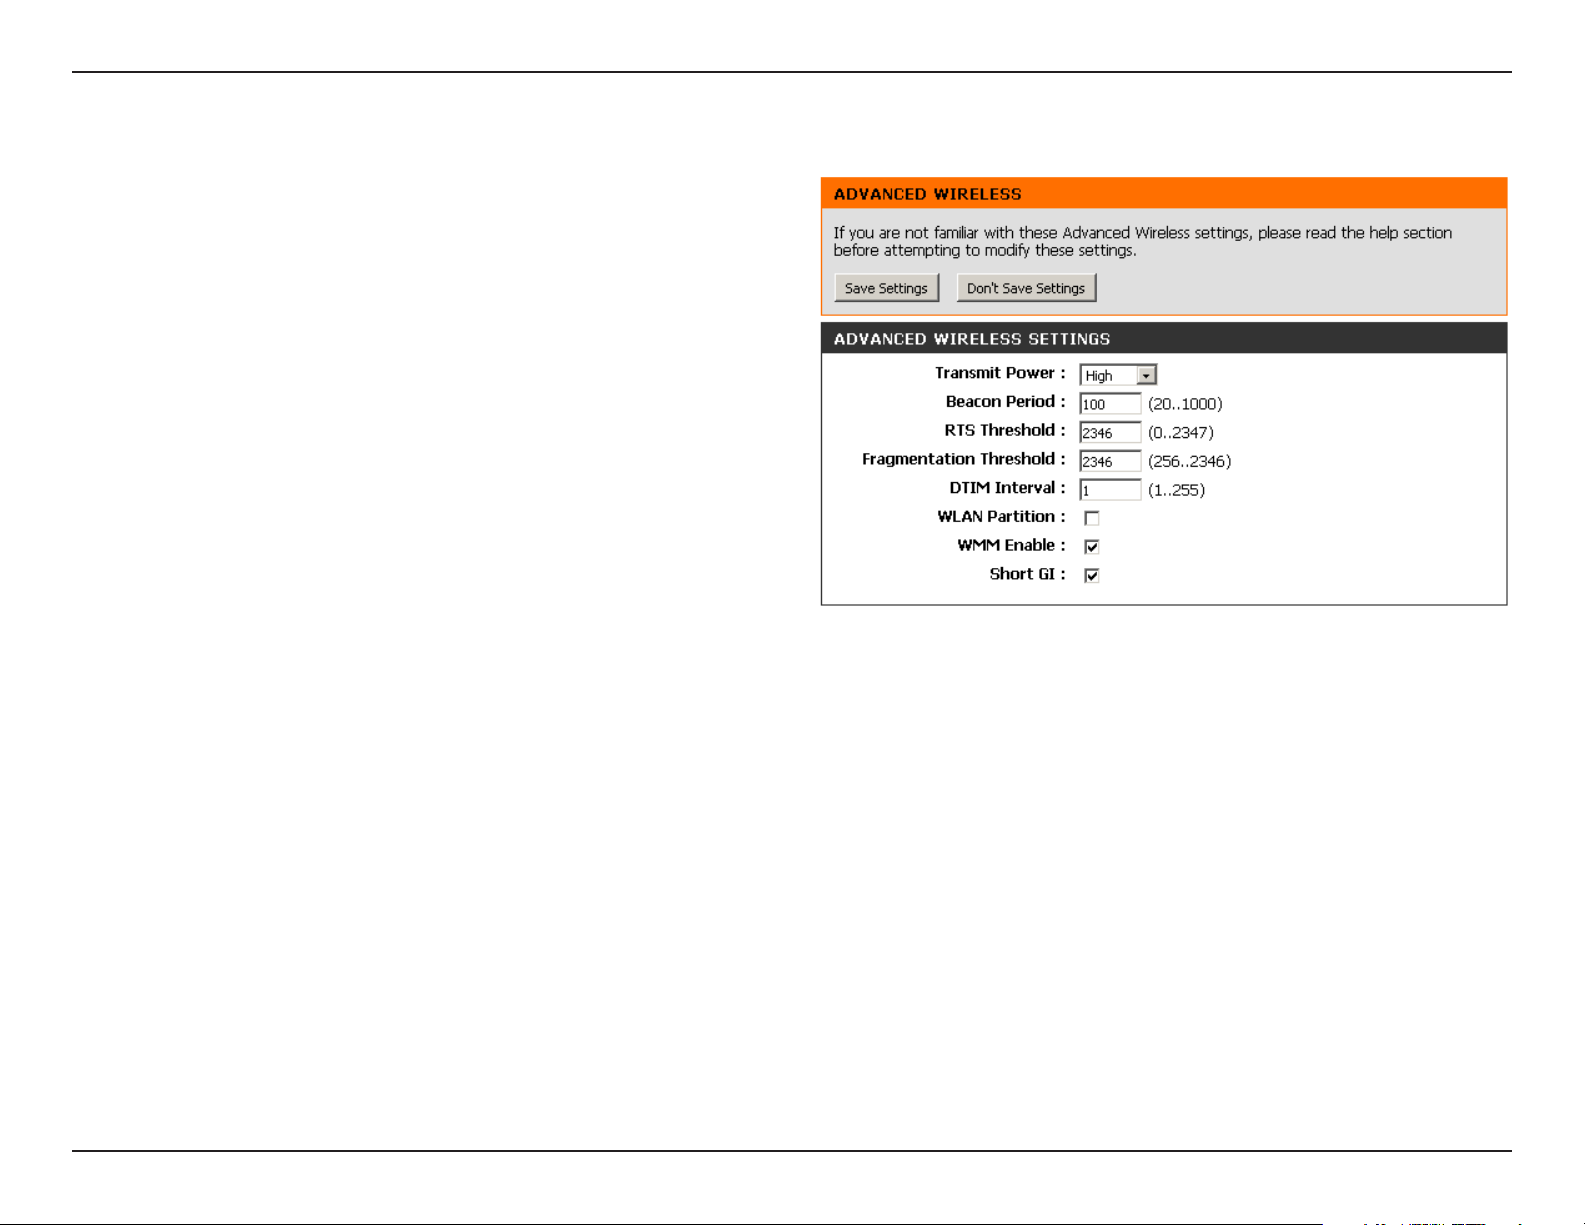
Advanced Wireless Settings
Transmit
Power:
Beacon Period:
RTS Threshold:
Fragmentation
Threshold:
DTIM Interval:
Set the transmit power of the antennas.
Beacons are packets sent by an Access Point to synchronize
a wireless network. Specify a value. 100 is the default
setting and is recommended.
This value should remain at its default setting of 2432.
If inconsistent data flow is a problem, only a minor
modication should be made.
The fragmentation threshold, which is specied in bytes,
determines whether packets will be fragmented. Packets
exceeding the 2346 byte setting will be fragmented before
transmission. 2346 is the default setting.
(Delivery Traffic Indication Message) 3 is the default
setting. A DTIM is a countdown informing clients of the
next window for listening to broadcast and multicast
messages.
WLAN
Partition:
WMM Enable:
Short GI:
This feature enables client isolation. If enabling, all clients will not be able to view or access each other’s information or within the
network.
WMM is QoS for your wireless network. This will improve the quality of video and voice applications for your wireless clients.
Check this box to reduce the guard interval time therefore increasing the data capacity. However, it’s less reliable and may create
higher data loss.
61D-Link DIR-601 User Manual
Page 66
Section 3 - Conguration
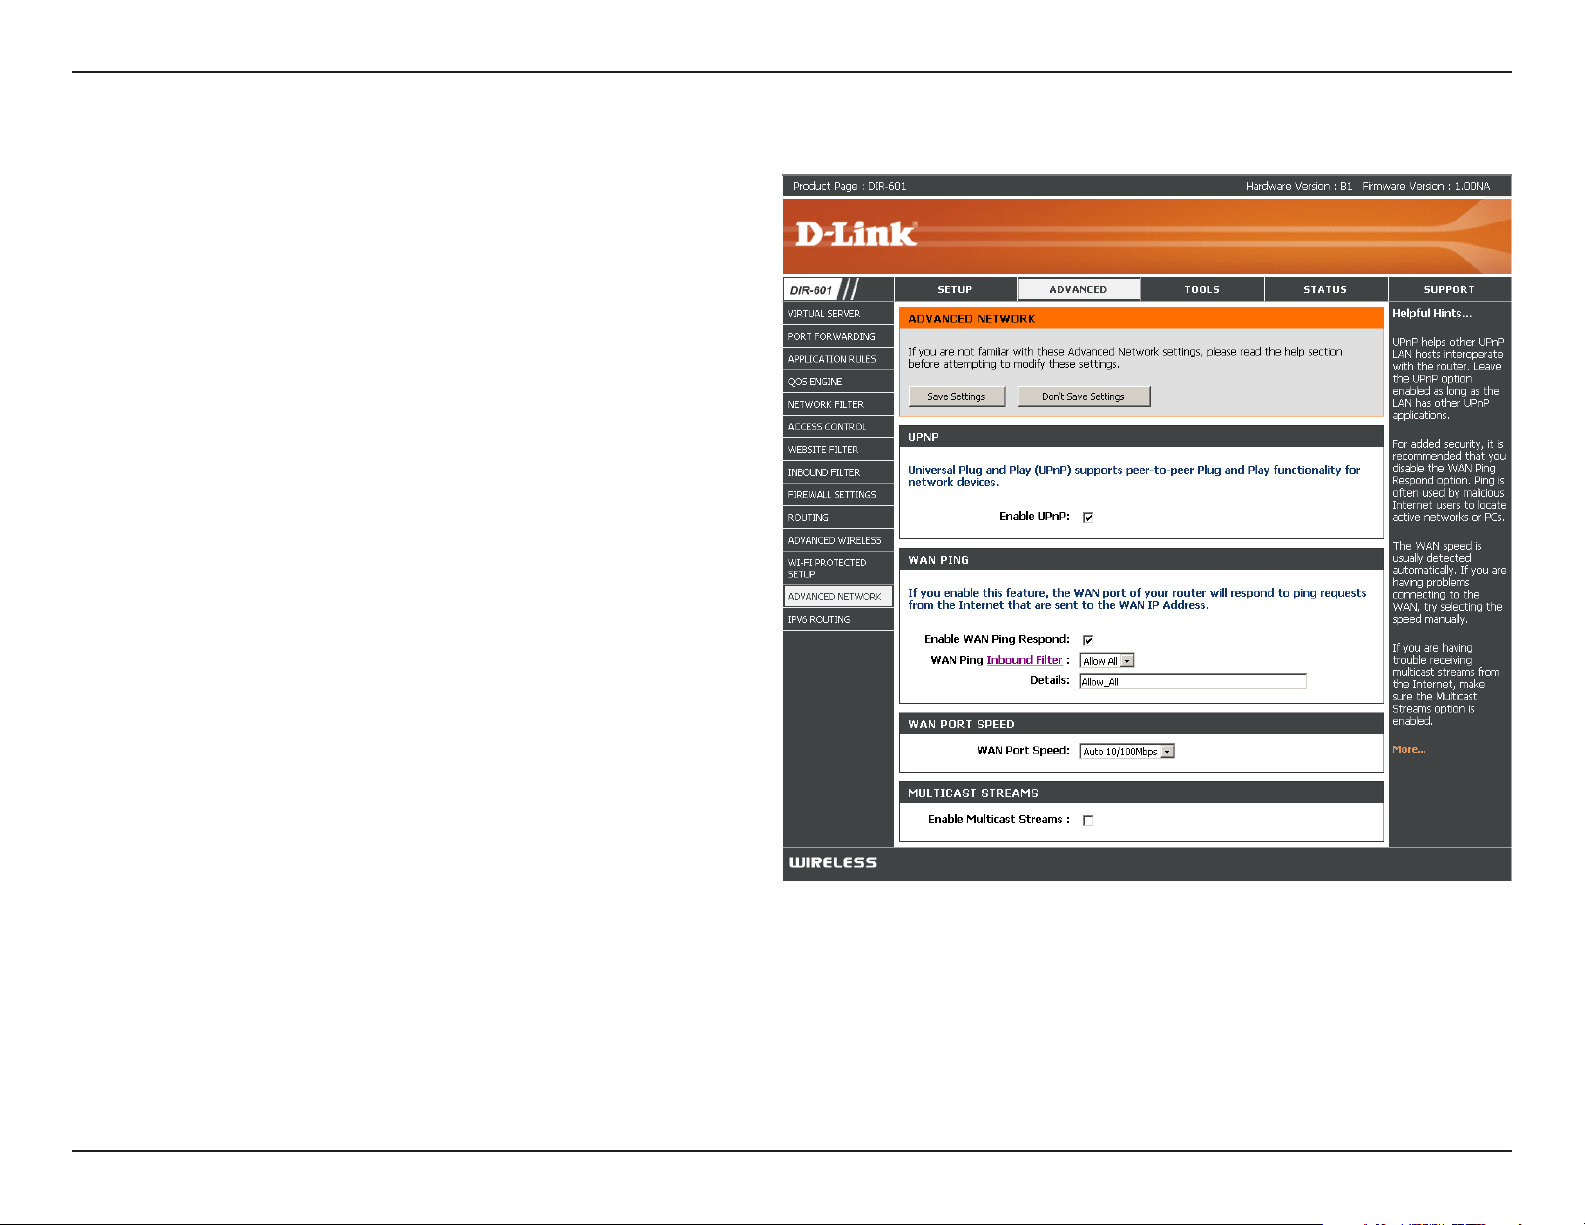
Advanced Network Settings
UPnP Settings:
WAN Ping:
WAN Port Speed:
Multicast
Streams:
To use the Universal Plug and Play (UPnP™) feature click
on Enable UPnP. UPNP provides compatibility with
networking equipment, software and peripherals.
Unchecking the box will not allow the DIR-601 to
respond to pings. Blocking the Ping may provide
some extra security from hackers. Check the box to
allow the Internet port to be “pinged”.
You may set the port speed of the Internet port to
10Mbps, 100Mbps, or Auto. Some older cable or
DSL modems may require you to set the port speed
to 10Mbps.
Check the box to allow multicast traffic to pass
through the router from the Internet.
62D-Link DIR-601 User Manual
Page 67
Section 3 - Conguration
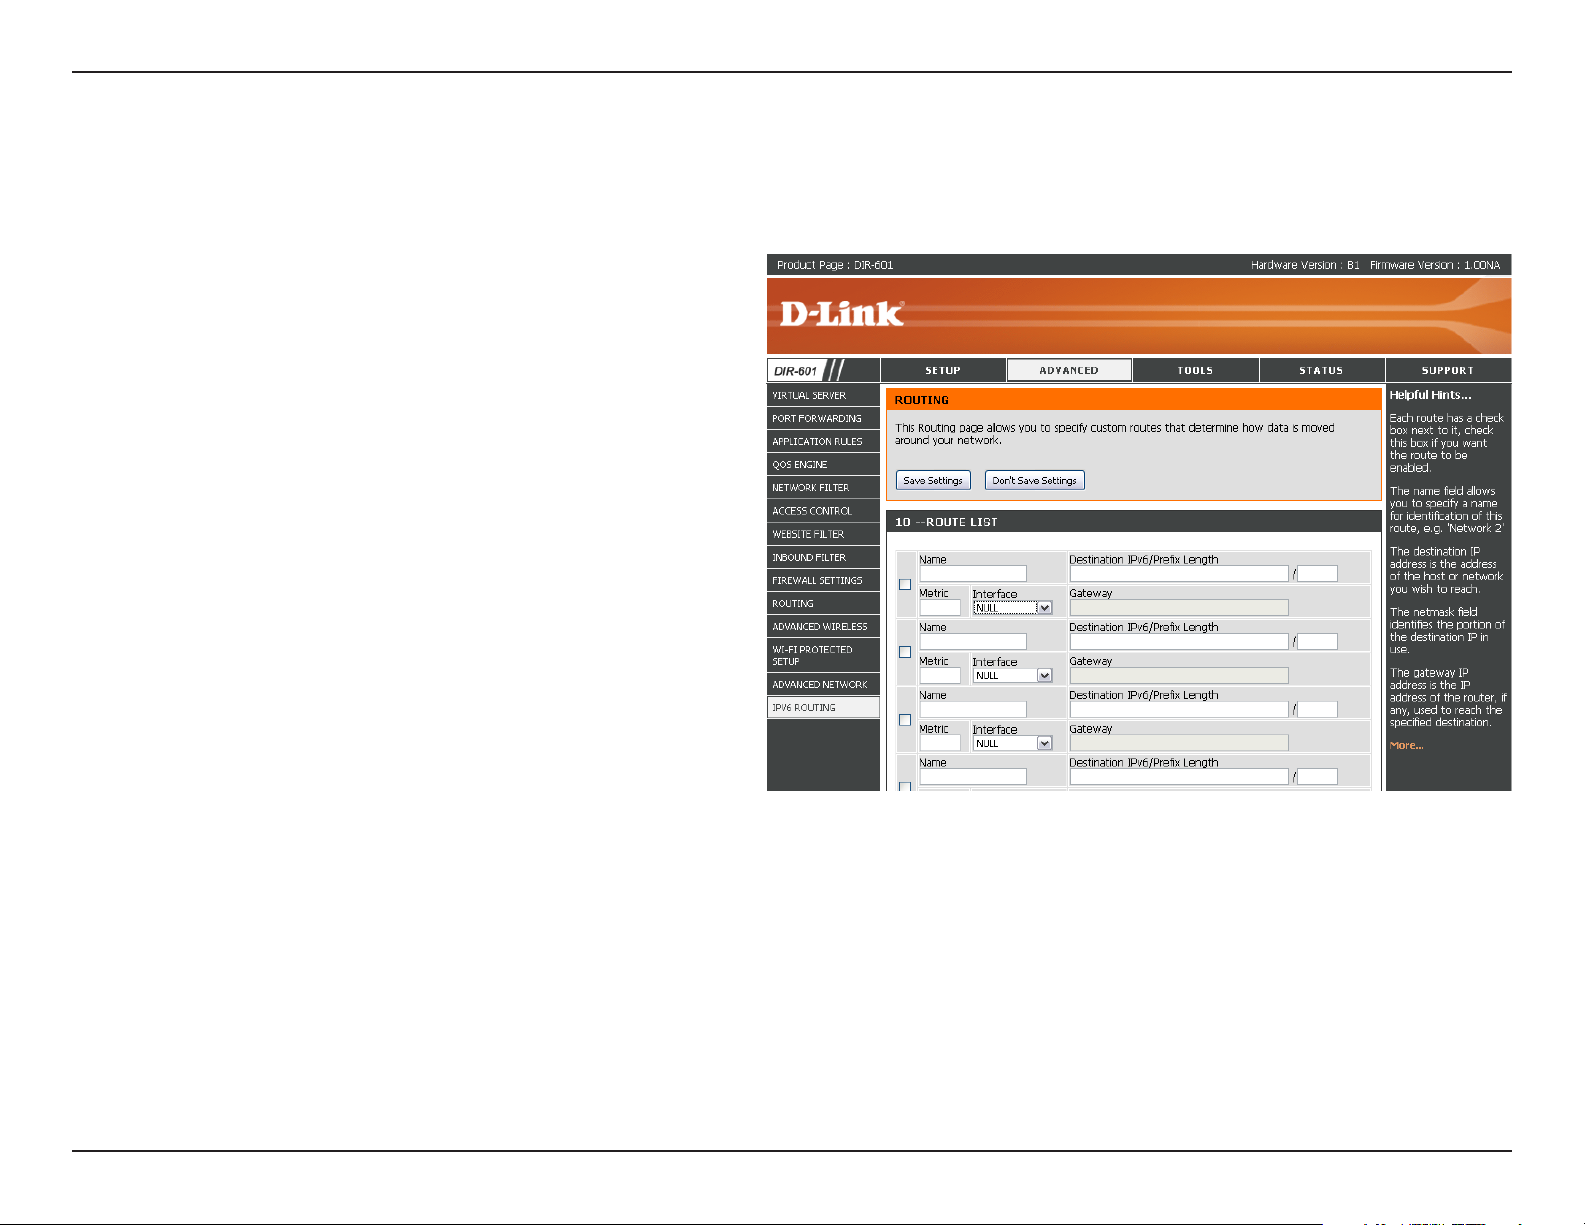
IPv6 Routing
This page allows you to specify custom routes that determine how data is moved around your network.
Destination IP:
Gateway:
Metric:
Interface:
Enter the IP address of packets that will take this
route.
Enter your next hop gateway to be taken if this
route is used.
The route metric is a value from 1 to 16 that
indicates the cost of using this route. A value 1 is
the lowest cost and 15 is the highest cost.
Select the interface that the IP packet must use to
transit out of the router when this route is used.
63D-Link DIR-601 User Manual
Page 68
Section 3 - Conguration
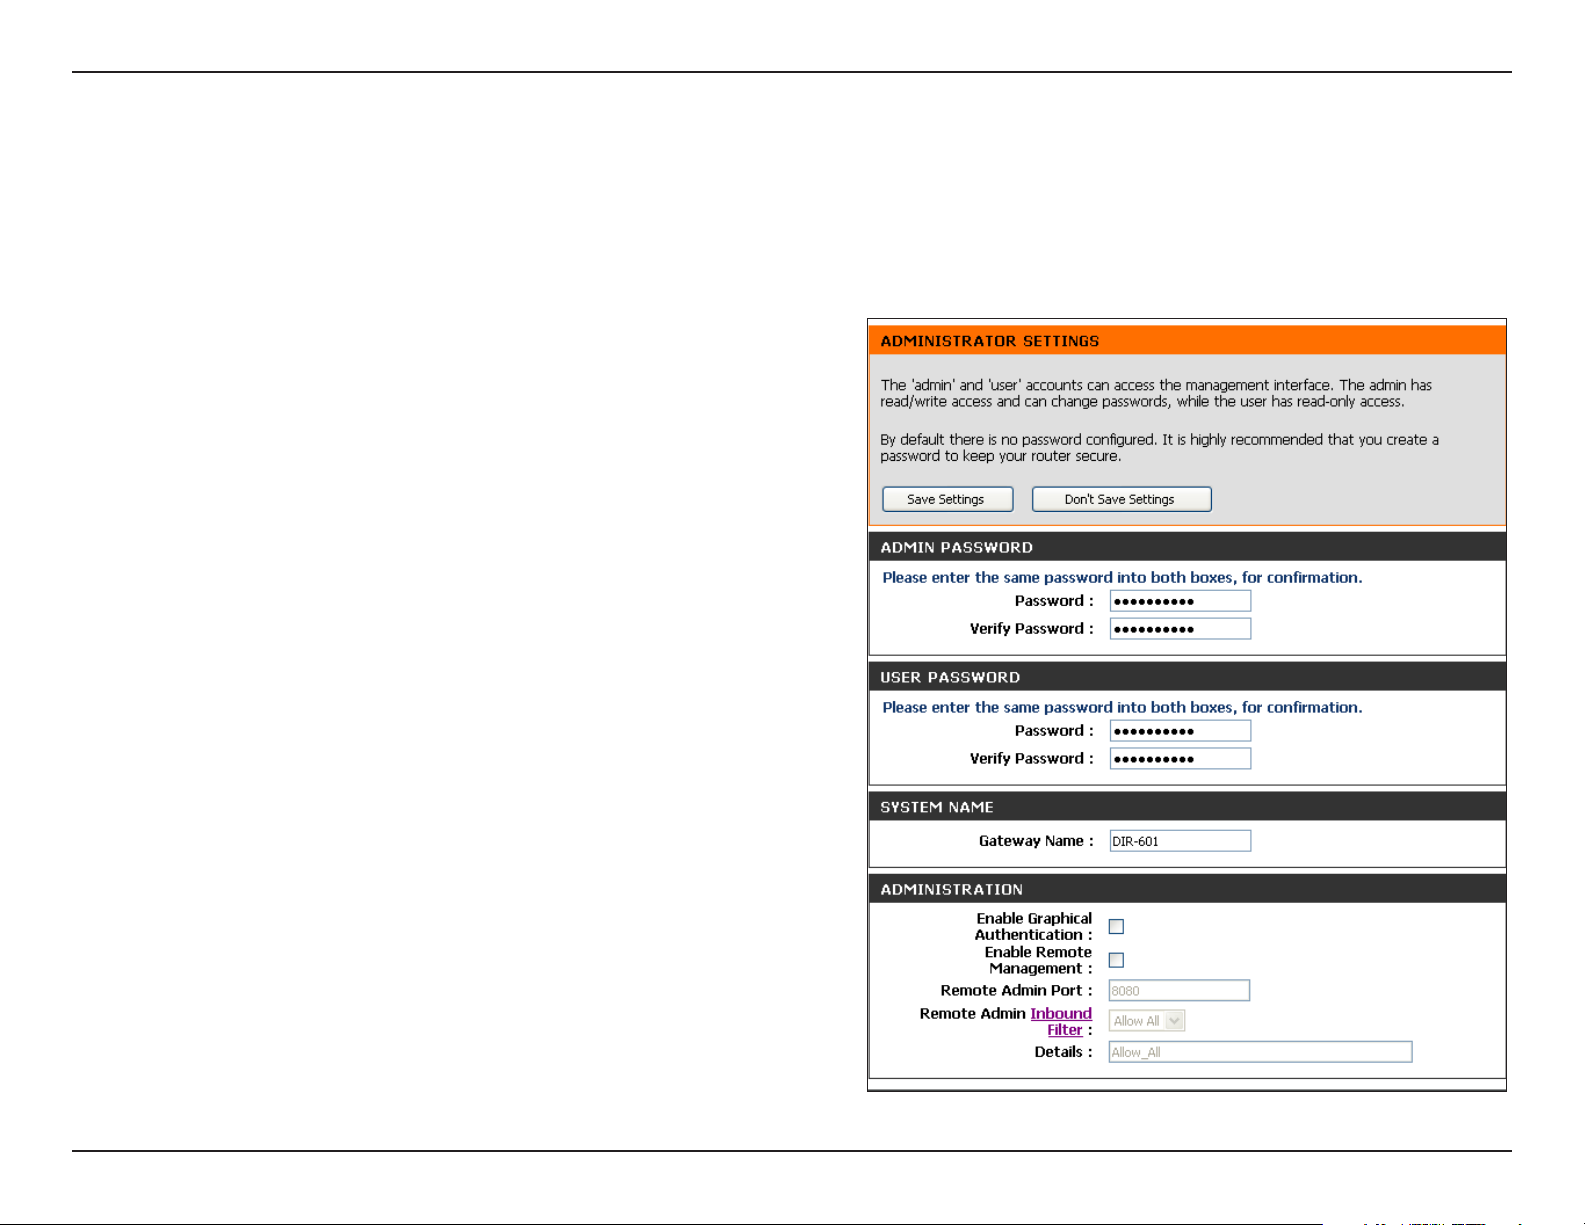
Administrator Settings
This page will allow you to change the Administrator and User passwords. You can also enable Remote Management. There are two accounts that
can access the management interface through the web browser. The accounts are admin and user. Admin has read/write access while user has
read-only access. User can only view the settings but cannot make any changes. Only the admin account has the ability to change both admin and
user account passwords.
Admin Password:
User Password:
Gateway Name:
Enable Graphical
Authentication:
Remote
Management:
Enter a new password for the Administrator Login Name. The
administrator can make changes to the settings.
Enter the new password for the User login. If you login as the
User, you can only see the settings, but cannot change them.
Enter a name for the DIR-601 router.
Enables a challenge-response test to require users to type
letters or numbers from a distorted image displayed on the
screen to prevent online hackers and unauthorized users from
gaining access to your router’s network settings.
Remote management allows the DIR-601 to be congured from
the Internet by a web browser. A username and password is still
required to access the Web-Management interface. In general,
only a member of your network can browse the built-in web
pages to perform Administrator tasks. This feature enables
you to perform Administrator tasks from the remote (Internet)
host.
Remote Admin
Port:
Remote Admin
Inbound Filter:
The port number used to access the DIR-601.
Example: http://x.x.x.x:8080 whereas x.x.x.x is the Internet IP
address of the DIR-601 and 8080 is the port used for the Web
Management interface.
This section will list any rules that are created. You may click the
Edit icon to change the settings or enable/disable the rule, or
click the Delete icon to remove the rule.
64D-Link DIR-601 User Manual
Page 69

Section 3 - Conguration
Reserve:
The Reserve option converts this dynamic IP allocation into a DHCP Reservation and adds the corresponding entry to the DHCP
Reservations List.
65D-Link DIR-601 User Manual
Page 70

Section 3 - Conguration
Time Settings
The Time Conguration option allows you to congure, update, and maintain the correct time on the internal system clock. From this section you can
set the time zone that you are in and set the Time Server. Daylight Saving can also be congured to automatically adjust the time when needed.
Time Zone:
Daylight
Saving:
Enable NTP
Server:
NTP Server
Used:
Manual:
Select the Time Zone from the drop-down menu.
To select Daylight Saving time manually, select
enabled or disabled, and enter a start date and an
end date for daylight saving time.
NTP is short for Network Time Protocol. NTP
synchronizes computer clock times in a network
of computers. Check this box to use a NTP server.
This will only connect to a server on the Internet,
not a local server.
Enter the NTP server or select one from the drop-
down menu.
To manually input the time, enter the values in
these elds for the Year, Month, Day, Hour, Minute,
and Second and then click SetTime. You can also
click CopyYourComputer’sTimeSettings.
66D-Link DIR-601 User Manual
Page 71
Section 3 - Conguration
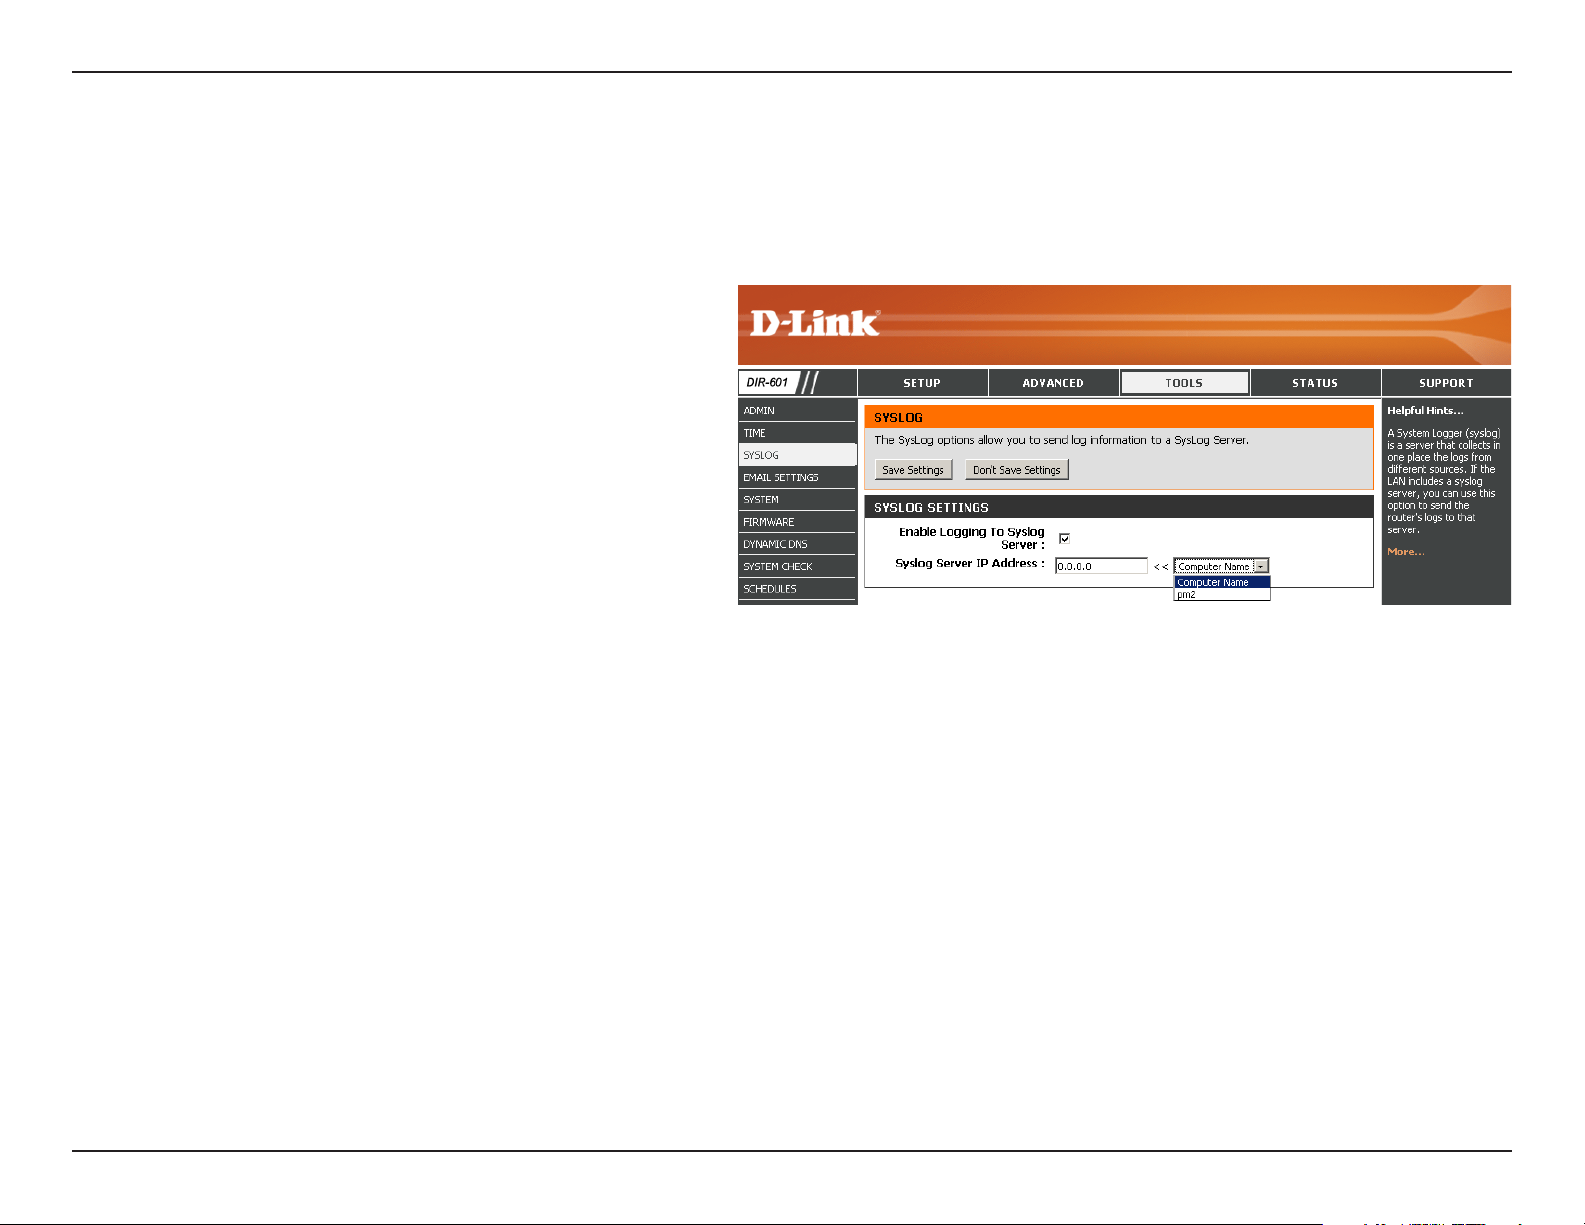
SysLog
The Broadband Router keeps a running log of events and activities occurring on the Router. You may send these logs to a SysLog server on your
network.
Enable Logging
to SysLog
Server:
SysLog Server
IP Address:
Check this box to send the router logs to a SysLog
Server.
The address of the SysLog server that will be used
to send the logs. You may also select your computer
from the drop-down menu (only if receiving an IP
address from the router via DHCP).
67D-Link DIR-601 User Manual
Page 72

Section 3 - Conguration
E-mail Settings
The Email feature can be used to send the system log les, router alert messages, and rmware update notication to your e-mail address.
Enable Email
Notication:
From Email
Address:
To Email
Address:
SMTP Server
Address:
Enable
Authentication:
Account Name:
Password:
When this option is enabled, router activity logs are
e-mailed to a designated e-mail address.
This e-mail address will appear as the sender when you
receive a log le or rmware upgrade notication via
e-mail.
Enter the e-mail address where you want the e-mail
sent.
Enter the SMTP server address for sending e-mail. If
your SMTP server requires authentication, select this
option.
Chec k t his box if you r S MTP serve r requi res
authentication.
Enter your account for sending e-mail.
Enter the password associated with the account.
Re-type the password associated with the account.
On Log Full:
On Schedule:
Schedule:
When this option is selected, logs will be sent via e-mail when the log is full.
Selecting this option will send the logs via e-mail according to schedule.
This option is enabled when On Schedule is selected. You can select a schedule from the list of dened schedules. To create a schedule,
go to Tools>Schedules.
68D-Link DIR-601 User Manual
Page 73

Section 3 - Conguration
System Settings
Save Settings
to Local Hard
Drive:
Load Settings
from Local
Hard Drive:
Restore to
Factory Default
Settings:
Use this option to save the current router
conguration settings to a le on the hard disk
of the computer you are using. First, click the
Save button. You will then see a le dialog, where
you can select a location and le name for the
settings.
Use this option to load previously saved router
conguration settings. First, use the Browse control
to find a previously save file of configuration
settings. Then, click the Load button to transfer
those settings to the router.
This option will restore all conguration settings
back to the settings that were in effect at the
time the router was shipped from the factory.
Any settings that have not been saved will be
lost, including any rules that you have created. If
you want to save the current router conguration
settings, use the Save button above.
Reboot Device:
Click to reboot the router.
69D-Link DIR-601 User Manual
Page 74

Section 3 - Conguration
Update Firmware
You can upgrade the rmware of the Router here. Make sure the rmware you want to use is on the local hard drive of the computer. Click on Browse
to locate the rmware le to be used for the update. Please check the D-Link support site for rmware updates at http://support.dlink.com. You can
download rmware upgrades to your hard drive from the D-Link support site.
Check Now:
Firmware
Upgrade:
Click on Check Now to find out if there is an
updated firmware; if so, download the new
rmware to your hard drive.
After you have downloaded the new rmware,
click Browse to locate the rmware update on your
hard drive. Click Upload to complete the rmware
upgrade.
70D-Link DIR-601 User Manual
Page 75

Section 3 - Conguration
DDNS
The DDNS feature allows you to host a server (Web, FTP, Game Server, etc…) using a domain name that you have purchased (www.whateveryournameis.
com) with your dynamically assigned IP address. Most broadband Internet Service Providers assign dynamic (changing) IP addresses. Using a DDNS
service provider, your friends can enter in your domain name to connect to your server no matter what your IP address is.
Enable DDNS:
Server
Address:
Host Name:
Username or
Key:
Password or
Key:
Timeout:
Status:
Check to enable DDNS.
Choose your DDNS provider from the drop down
menu.
Enter the Host Name that you registered with your
DDNS service provider.
Enter the Username for your DDNS account.
Enter the Password for your DDNS account.
Enter a time (in hours).
Displays the current connection status to your
DDNS server.
71D-Link DIR-601 User Manual
Page 76

Section 3 - Conguration
System Check
Ping Test/IPv6
Ping Test:
Ping Results:
The Ping Test is used to send Ping packets to test if
a computer is on the Internet. Enter the IP Address
that you wish to Ping, and click Ping.
The results of your ping attempts will be displayed
here.
72D-Link DIR-601 User Manual
Page 77
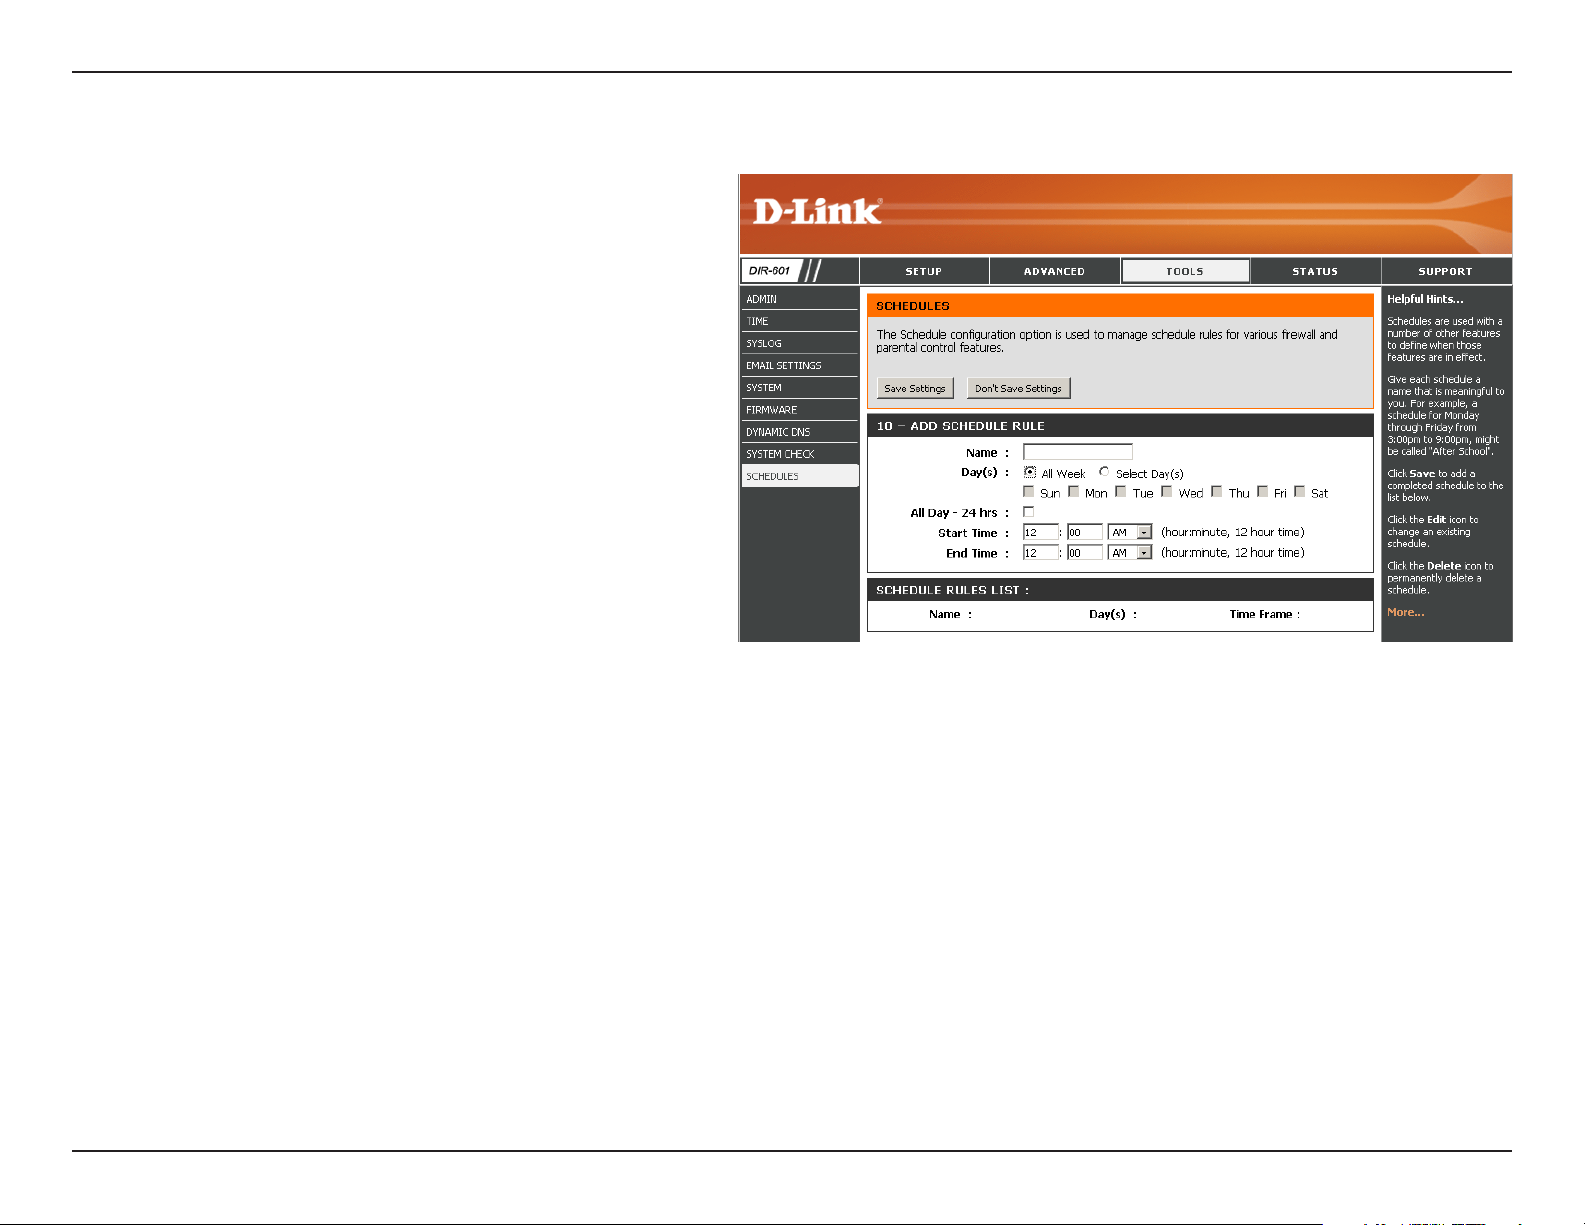
Section 3 - Conguration
Schedules
Name:
Days:
Time:
Save:
Schedule Rules
List:
Enter a name for your new schedule.
Select a day, a range of days, or All Week to
include every day.
Check AllDay-24hrs or enter a start and end
time for your schedule.
Click Save to save your schedule. You must click
Save Settings at the top for your schedules to go
into eect.
The list of schedules will be listed here. Click the
Edit icon to make changes or click the Delete
icon to remove the schedule.
73D-Link DIR-601 User Manual
Page 78
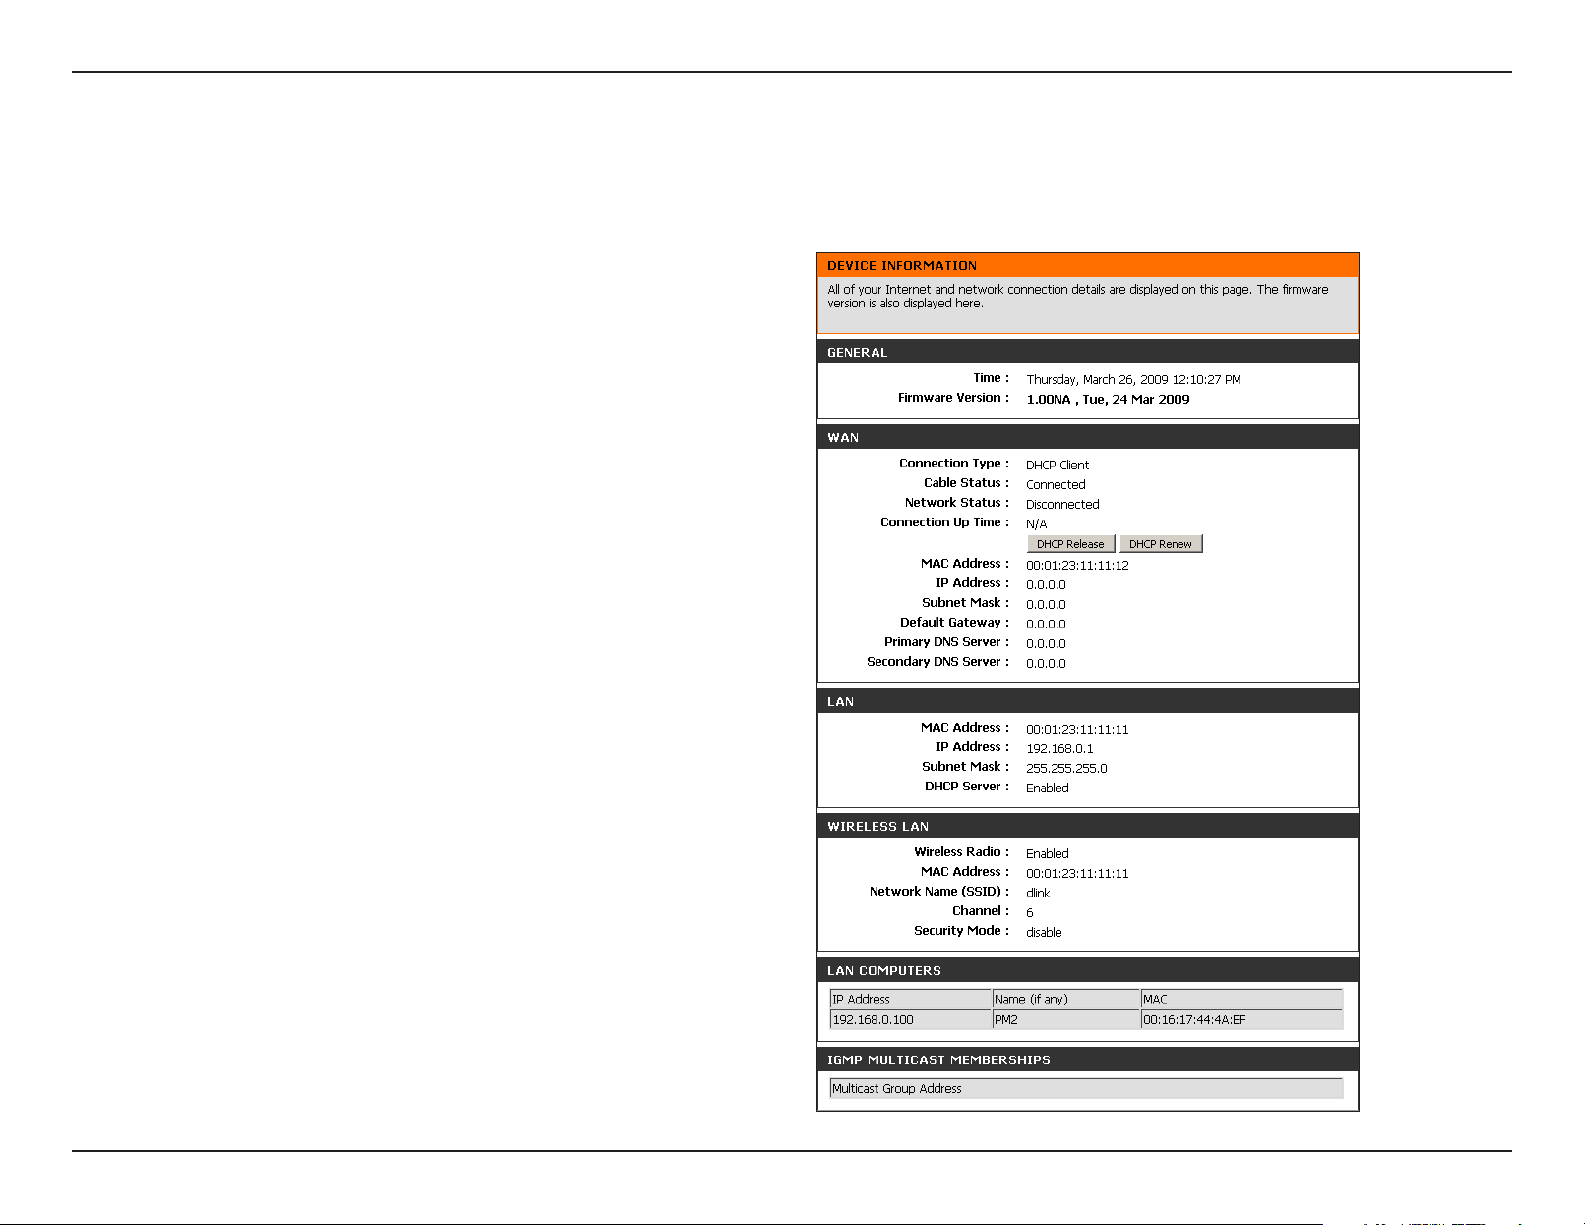
Section 3 - Conguration
Device Information
This page displays the current information for the DIR-601. It will display the LAN, WAN (Internet), and Wireless information.
If your Internet connection is set up for a Dynamic IP address then a
Release button and a Renew button will be displayed. Use Release
to disconnect from your ISP and use Renew to connect to your ISP.
If your Internet connection is set up for PPPoE, a Connect button
and a Disconnect button will be displayed. Use Disconnect to
drop the PPPoE connection and use Connect to establish the PPPoE
connection.
See the following page for more information.
74D-Link DIR-601 User Manual
Page 79
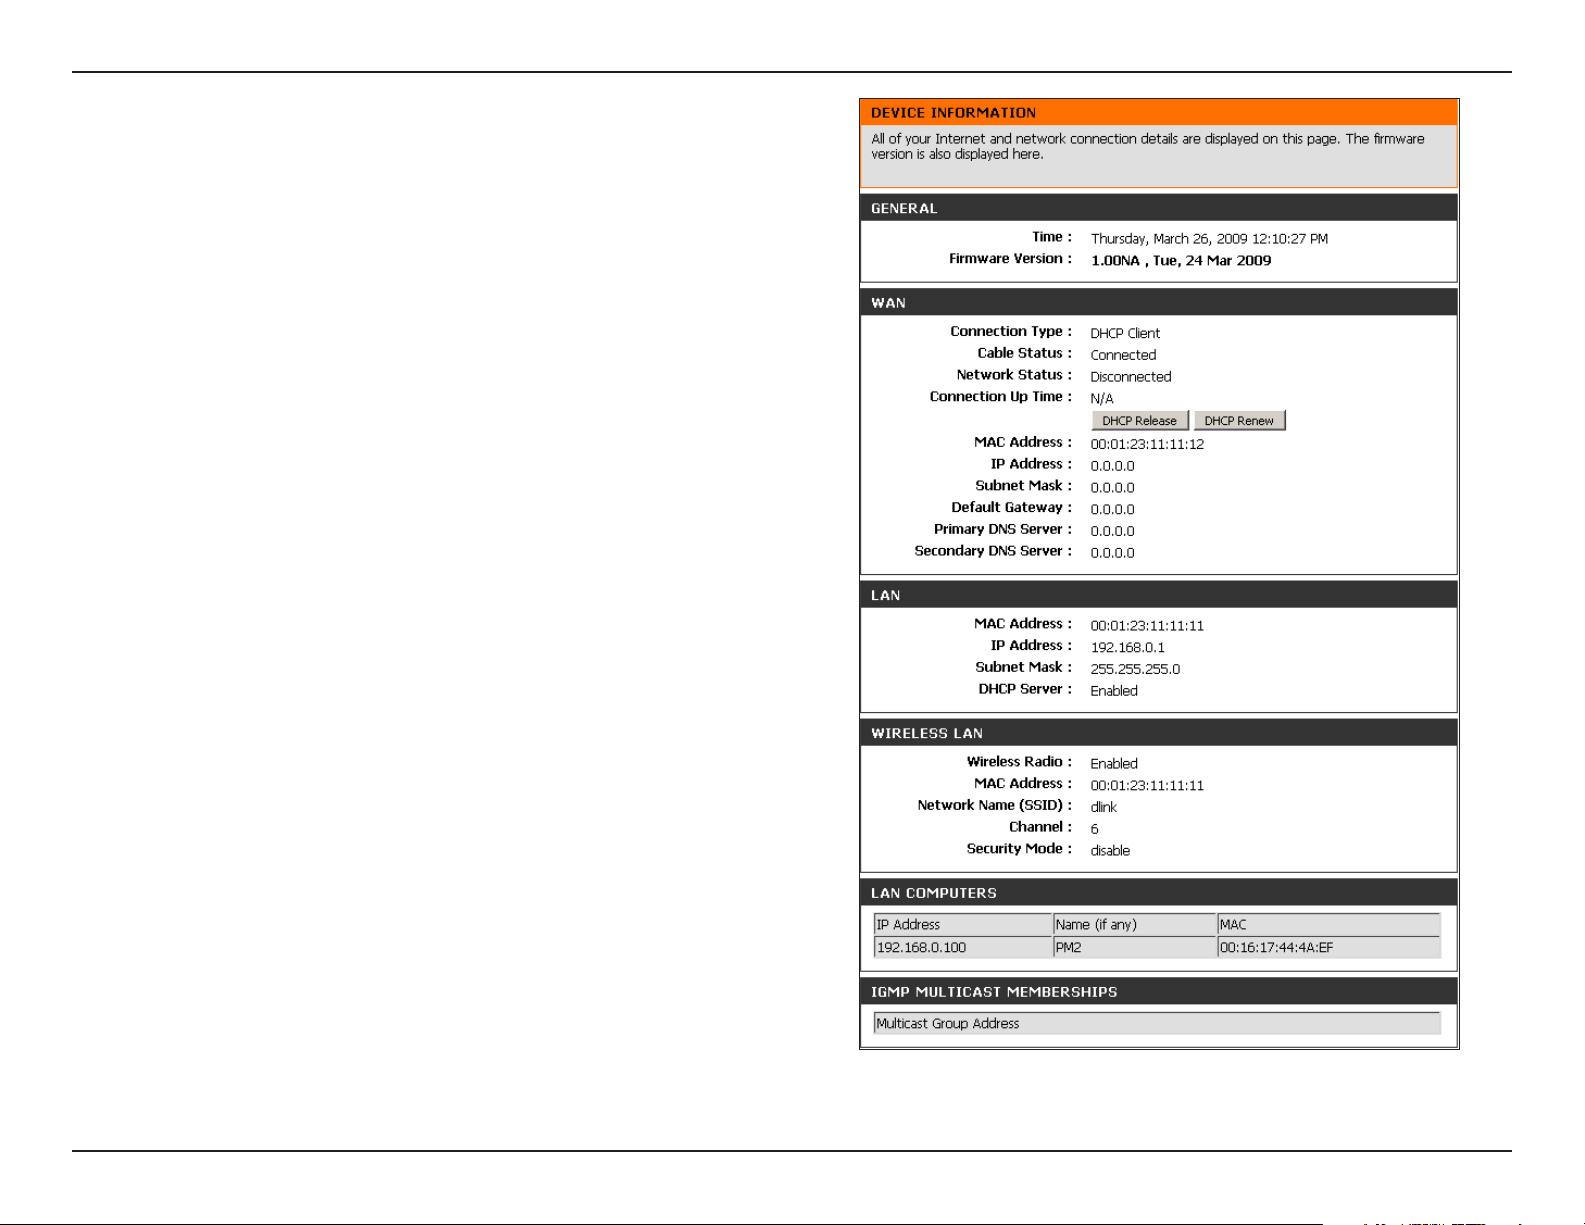
Section 3 - Conguration
General:
WAN:
LAN:
Wireless LAN:
LAN
Computers:
IGMP Multicast
Memberships:
Displays the router’s time and rmware version.
Displays the MAC address and the public IP settings
for the router.
Displays the MAC address and the private (local) IP
settings for the router.
Displays the wireless MAC address and your wireless
settings such as SSID and Channel.
Displays computers and devices that are connected
to the router via Ethernet and that are receiving an IP
address assigned by the router (DHCP).
Displays the Multicast Group IP Address.
75D-Link DIR-601 User Manual
Page 80
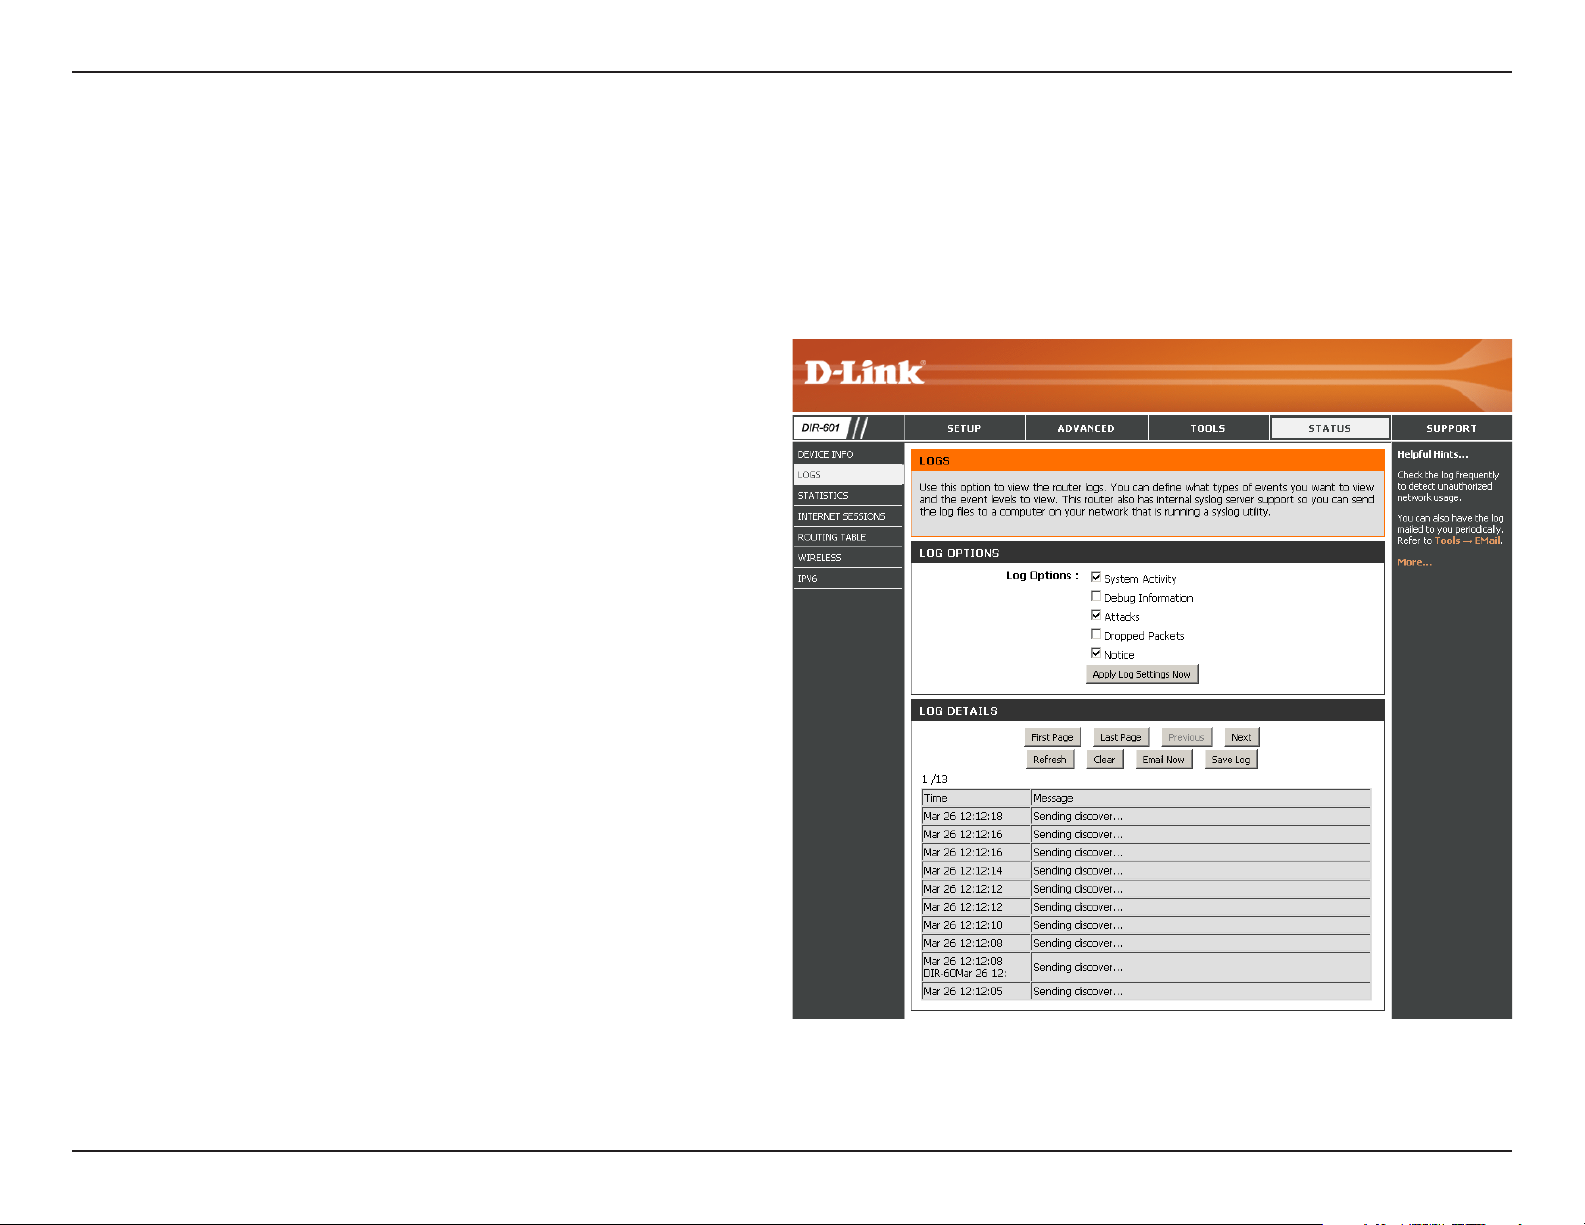
Section 3 - Conguration
Log
The router automatically logs (records) events of possible interest in it’s internal memory. If there isn’t enough internal memory for all events, logs
of older events are deleted but logs of the latest events are retained. The Logs option allows you to view the router logs. You can dene what types
of events you want to view and the level of the events to view. This router also has external Syslog Server support so you can send the log les to
a computer on your network that is running a Syslog utility.
Log Options:
Apply Log
Settings:
Refresh:
Clear:
Email Now:
Save Log:
You can select the types of messages that you want
to display from the log.
Will lter the log results so that only the selected
options appear.
Updates the log details on the screen so it displays
any recent activity.
Clears all of the log contents.
This option will send a copy of the router log to
the e-mail address congured in the Tools>Email
Settings screen.
This option will save the router to a log le on your
computer.
76D-Link DIR-601 User Manual
Page 81
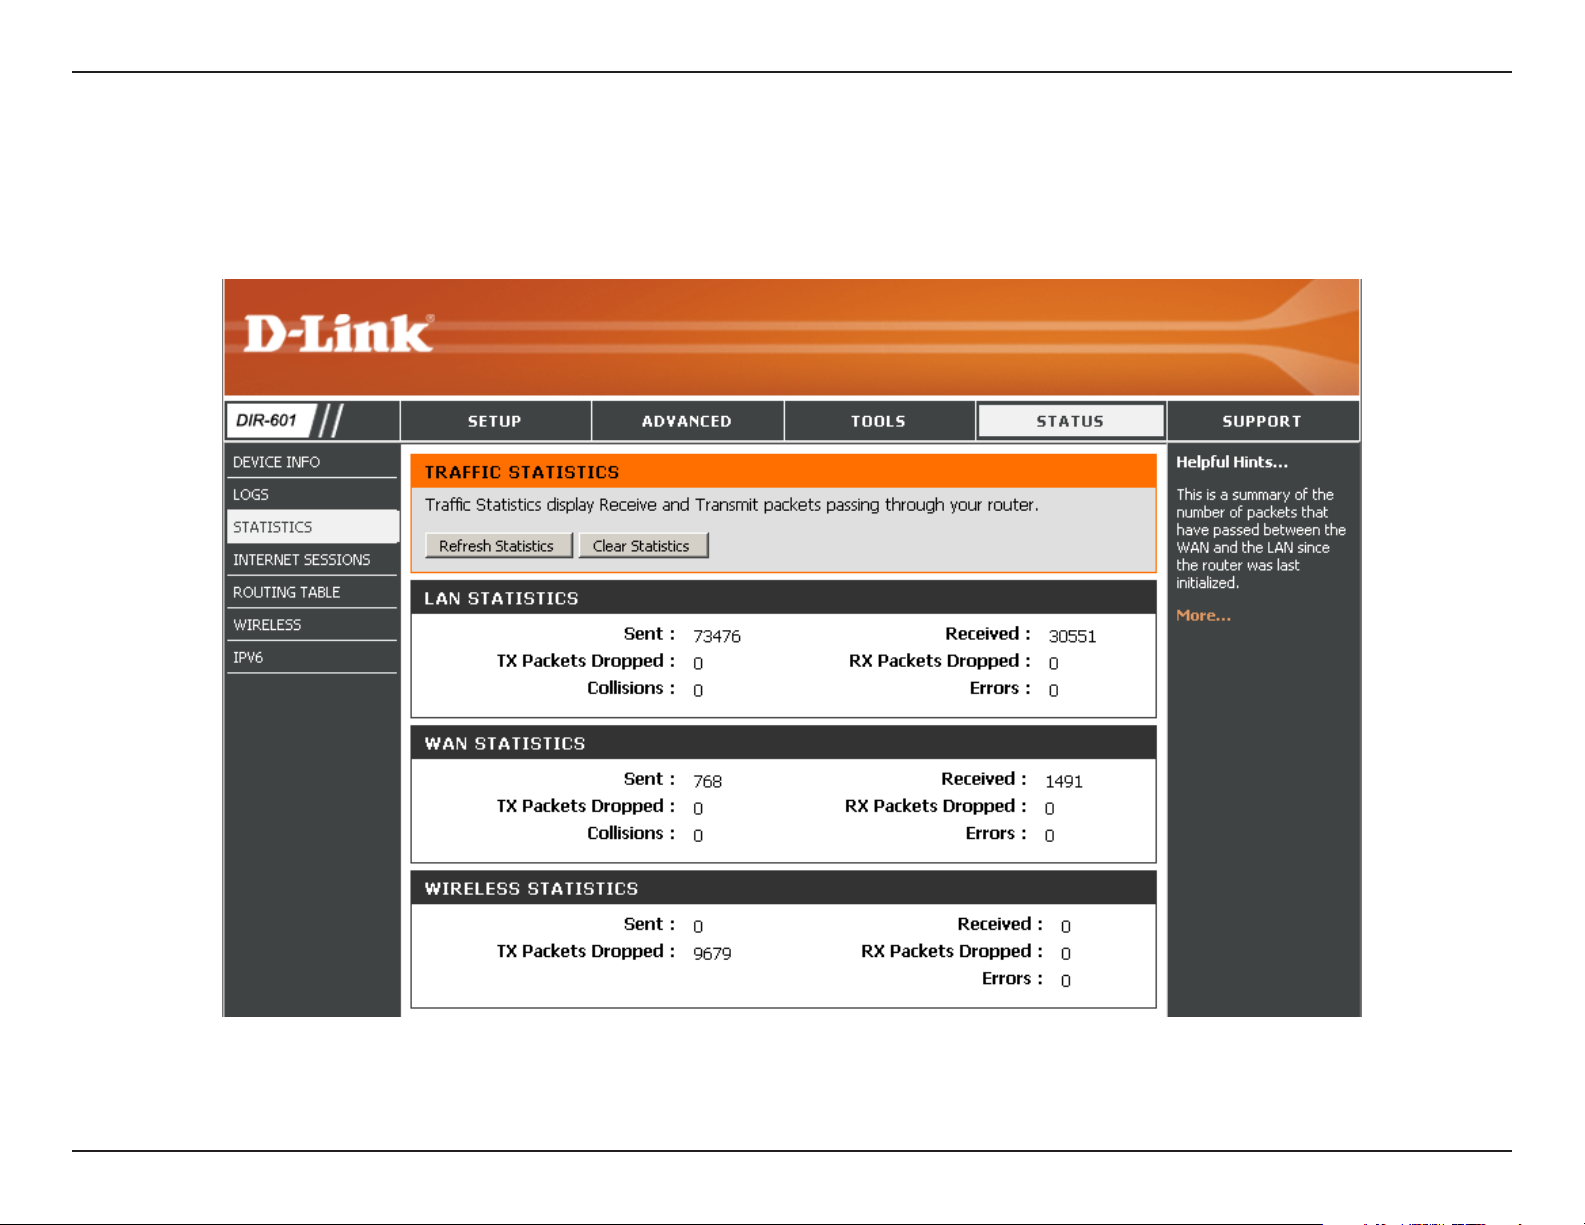
Section 3 - Conguration
Stats
The screen below displays the Trac Statistics. Here you can view the amount of packets that pass through the DIR-601 on both the Internet and the LAN
ports. The trac counter will reset if the device is rebooted.
77D-Link DIR-601 User Manual
Page 82
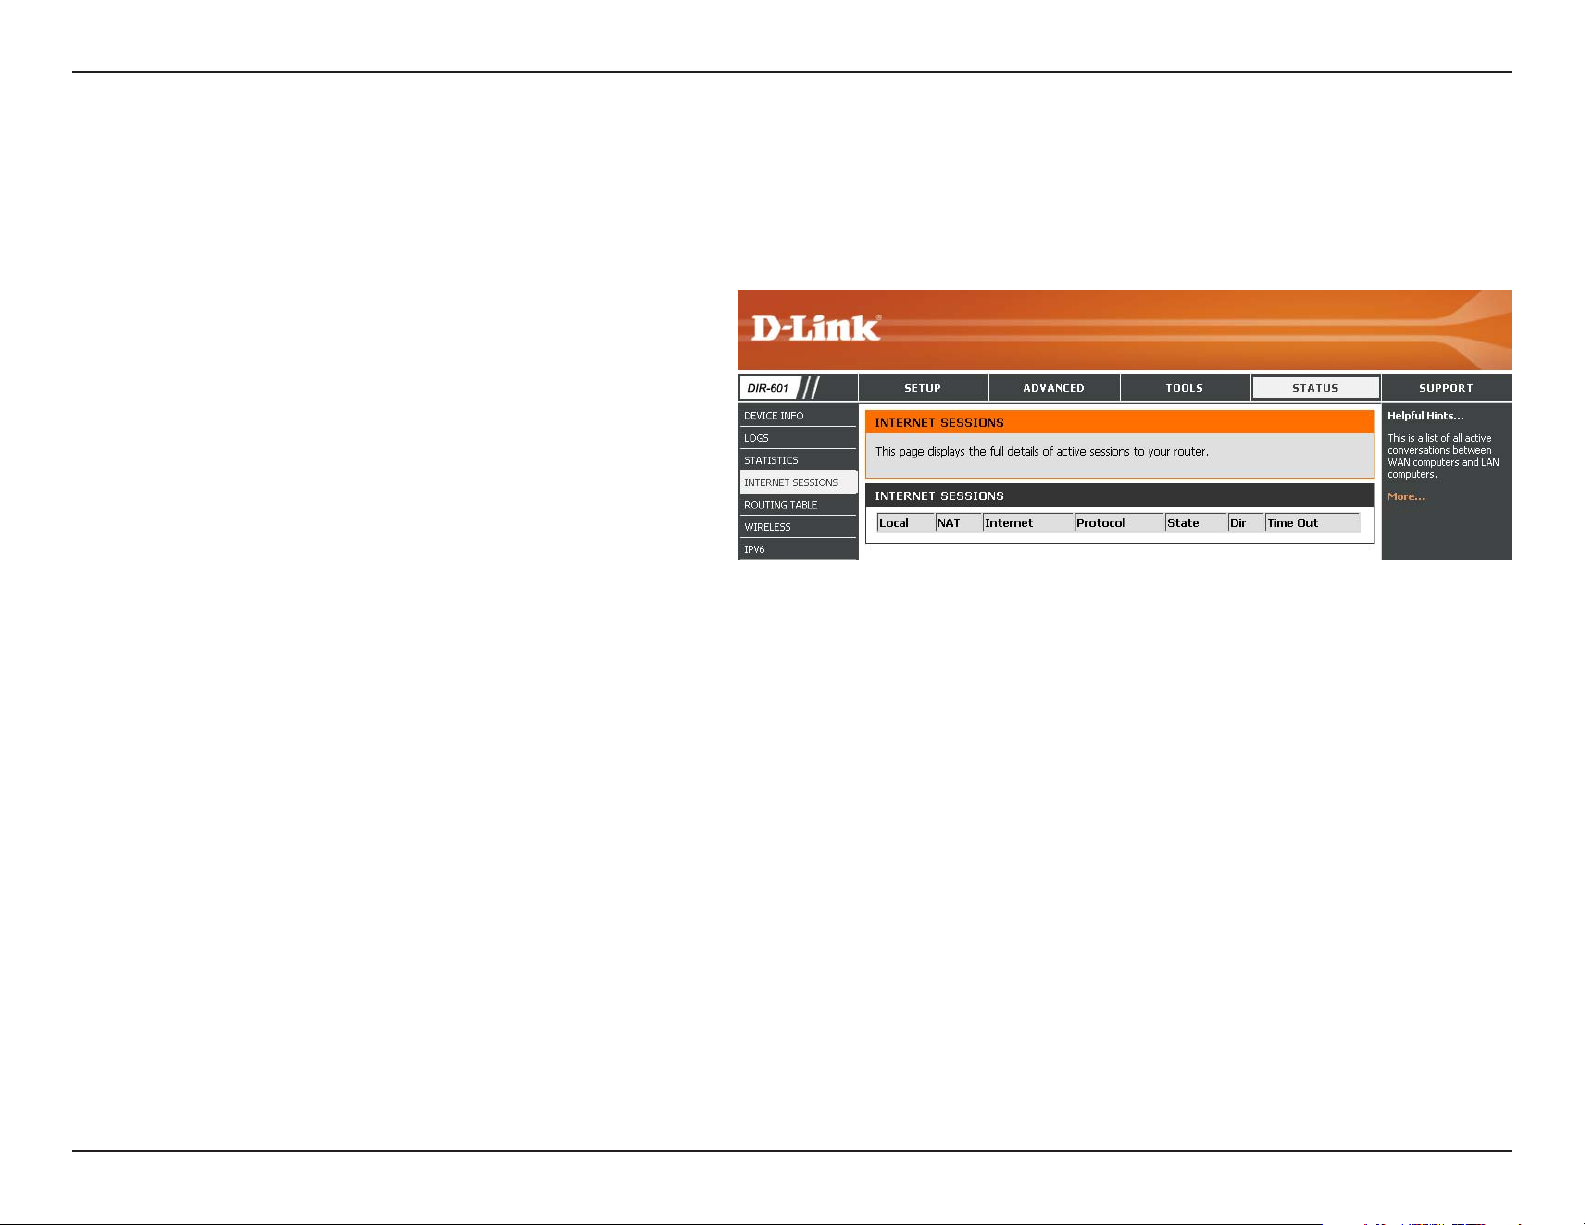
Section 3 - Conguration
Internet Sessions
The Internet Sessions page displays full details of active Internet sessions through your router. An Internet session is a conversation between a
program or application on a LAN-side computer and a program or application on a WAN-side computer.
Local:
NAT:
Internet:
Protocol:
State:
The IP address and, where appropriate, port number
of the local application.
The port number of the LAN-side application as
viewed by the WAN-side application.
The IP address and, where appropriate, port number
of the application on the Internet.
The co mmunications protocol used for the
conversation.
State for sessions that use the TCP protocol:
NO: None -- This entry is used as a placeholder for a future connection that may occur.
SS: SYN Sent -- One of the systems is attempting to start a connection.
EST: Established -- the connection is passing data.
FW: FIN Wait -- The client system has requested that the connection be stopped.
CW: Close Wait -- The server system has requested that the connection be stopped.
TW: Time Wait -- Waiting for a short time while a connection that was in FIN Wait is fully closed.
LA: Last ACK -- Waiting for a short time while a connection that was in Close Wait is fully closed.
CL: Closed -- The connection is no longer active but the session is being tracked in case there are any retransmitted packets still pending.
Dir:
Priority:
The direction of initiation of the conversation:
Out - Initiated from LAN to WAN.
In - Initiated from WAN to LAN.
The preference given to outbound packets of this conversation by the QoS Engine logic. Smaller numbers represent higher
priority.
78D-Link DIR-601 User Manual
Page 83

Section 3 - Conguration
Time Out: The number of seconds of idle time until the router considers the session terminated. The initial value of Time Out depends on the
type and state of the connection.
300 seconds - UDP connections.
240seconds - Reset or closed TCP connections. The connection does not close instantly so that lingering packets can pass or the connection can be
re-established.
7800seconds - Established or closing TCP connections.
79D-Link DIR-601 User Manual
Page 84

Section 3 - Conguration
Routing Table
This page displays the routing details congured for your router.
80D-Link DIR-601 User Manual
Page 85
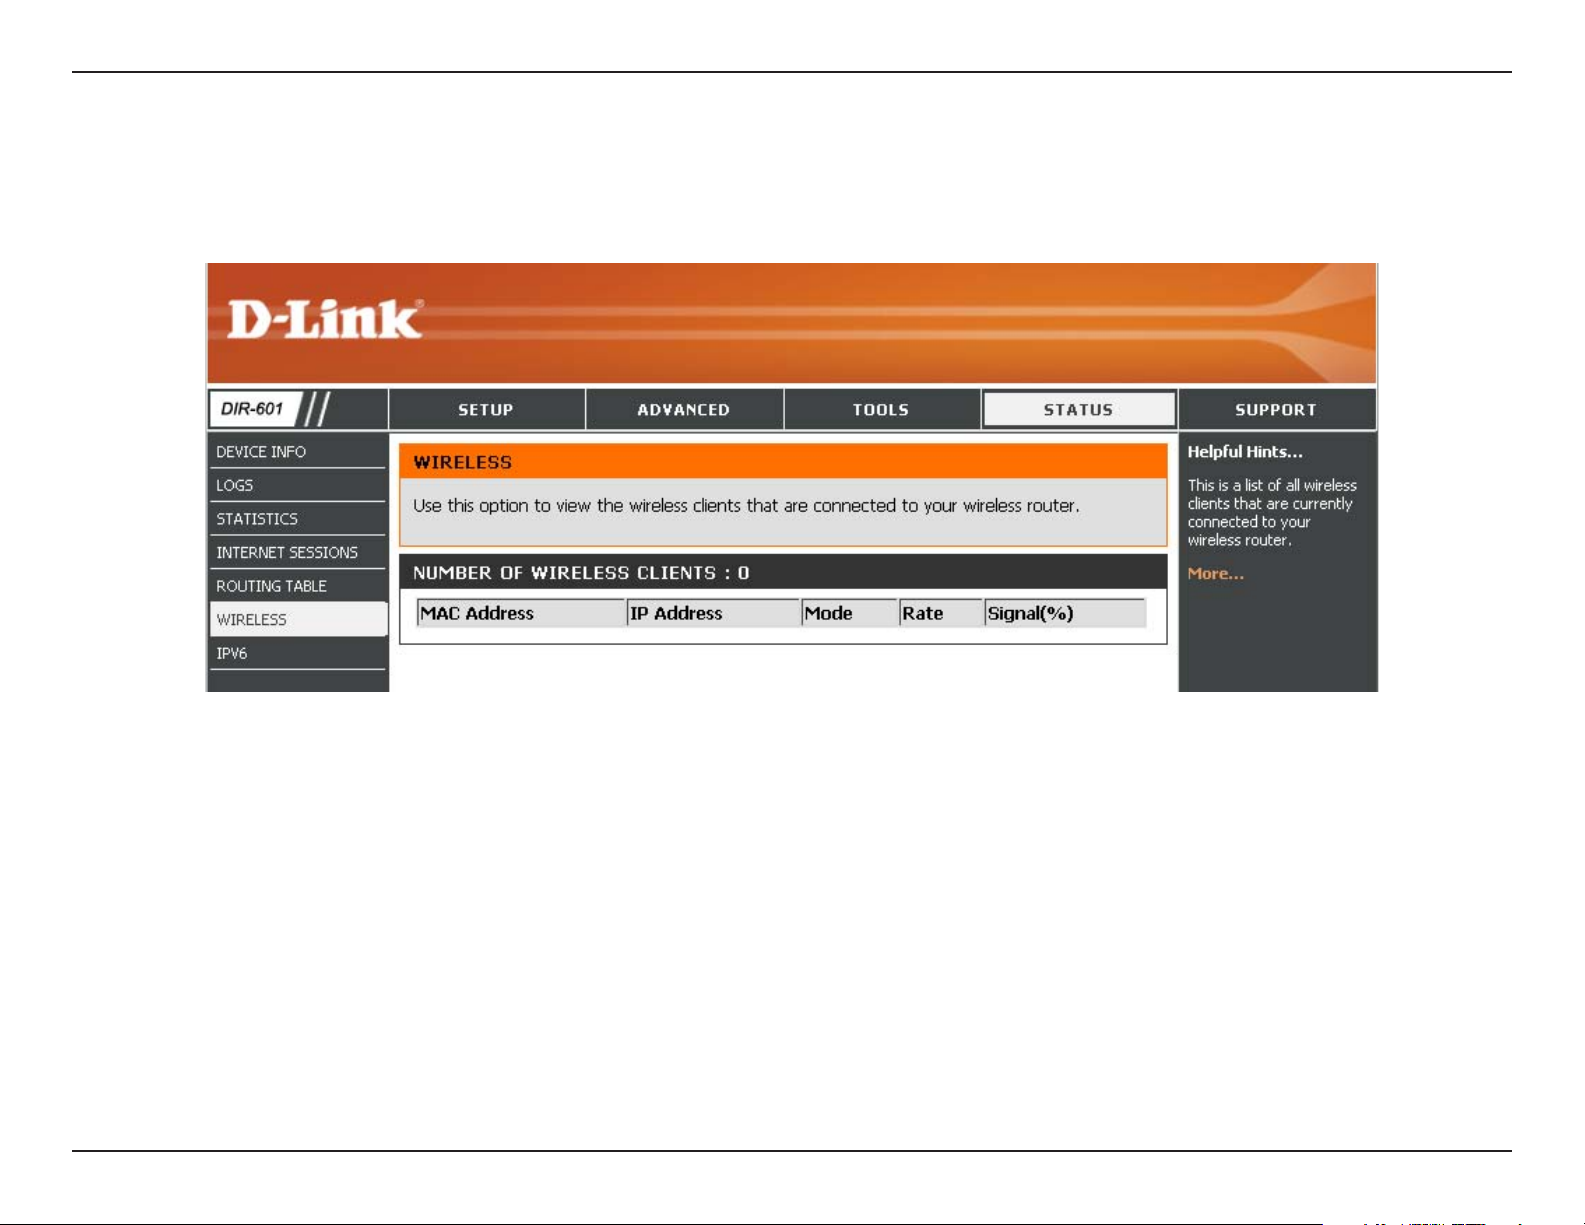
Section 3 - Conguration
Wireless
The wireless client table displays a list of current connected wireless clients. This table also displays the connection time and MAC address of the
connected wireless clients.
81D-Link DIR-601 User Manual
Page 86
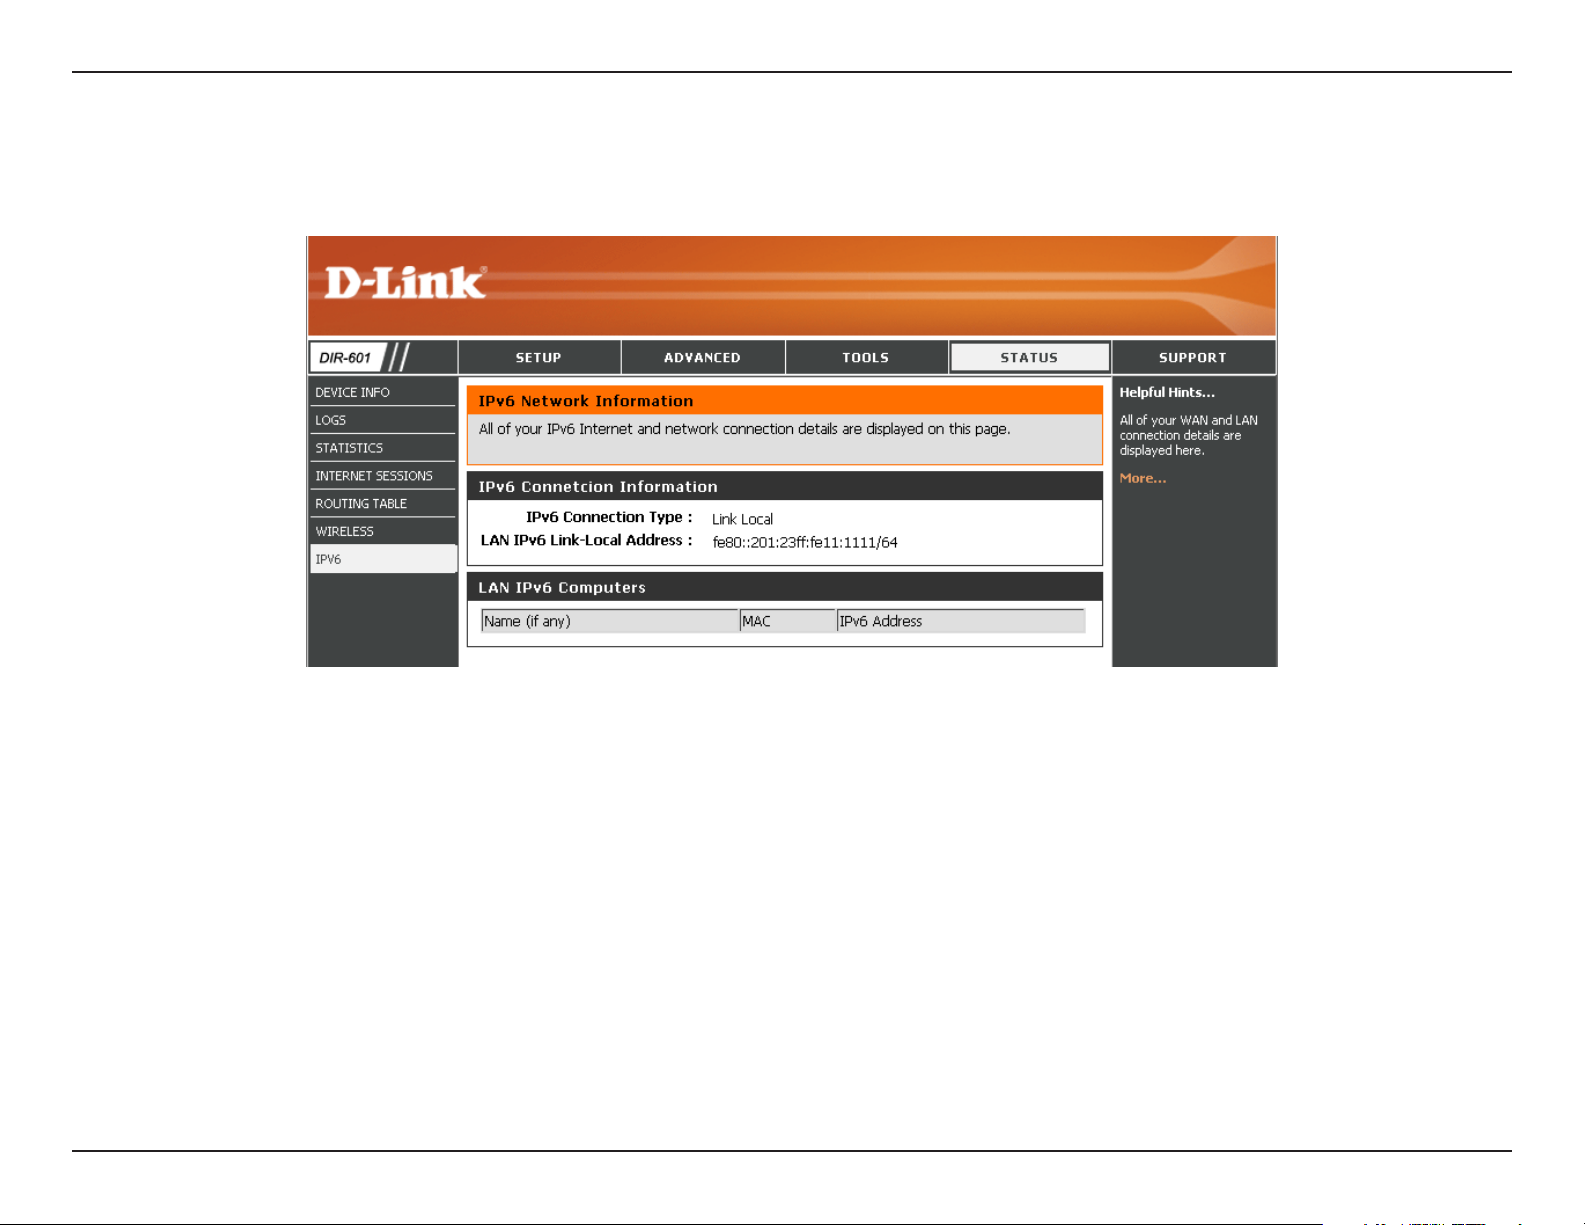
Section 3 - Conguration
IPv6
All of your IPv6 Internet and network connection details are displayed on this page.
82D-Link DIR-601 User Manual
Page 87
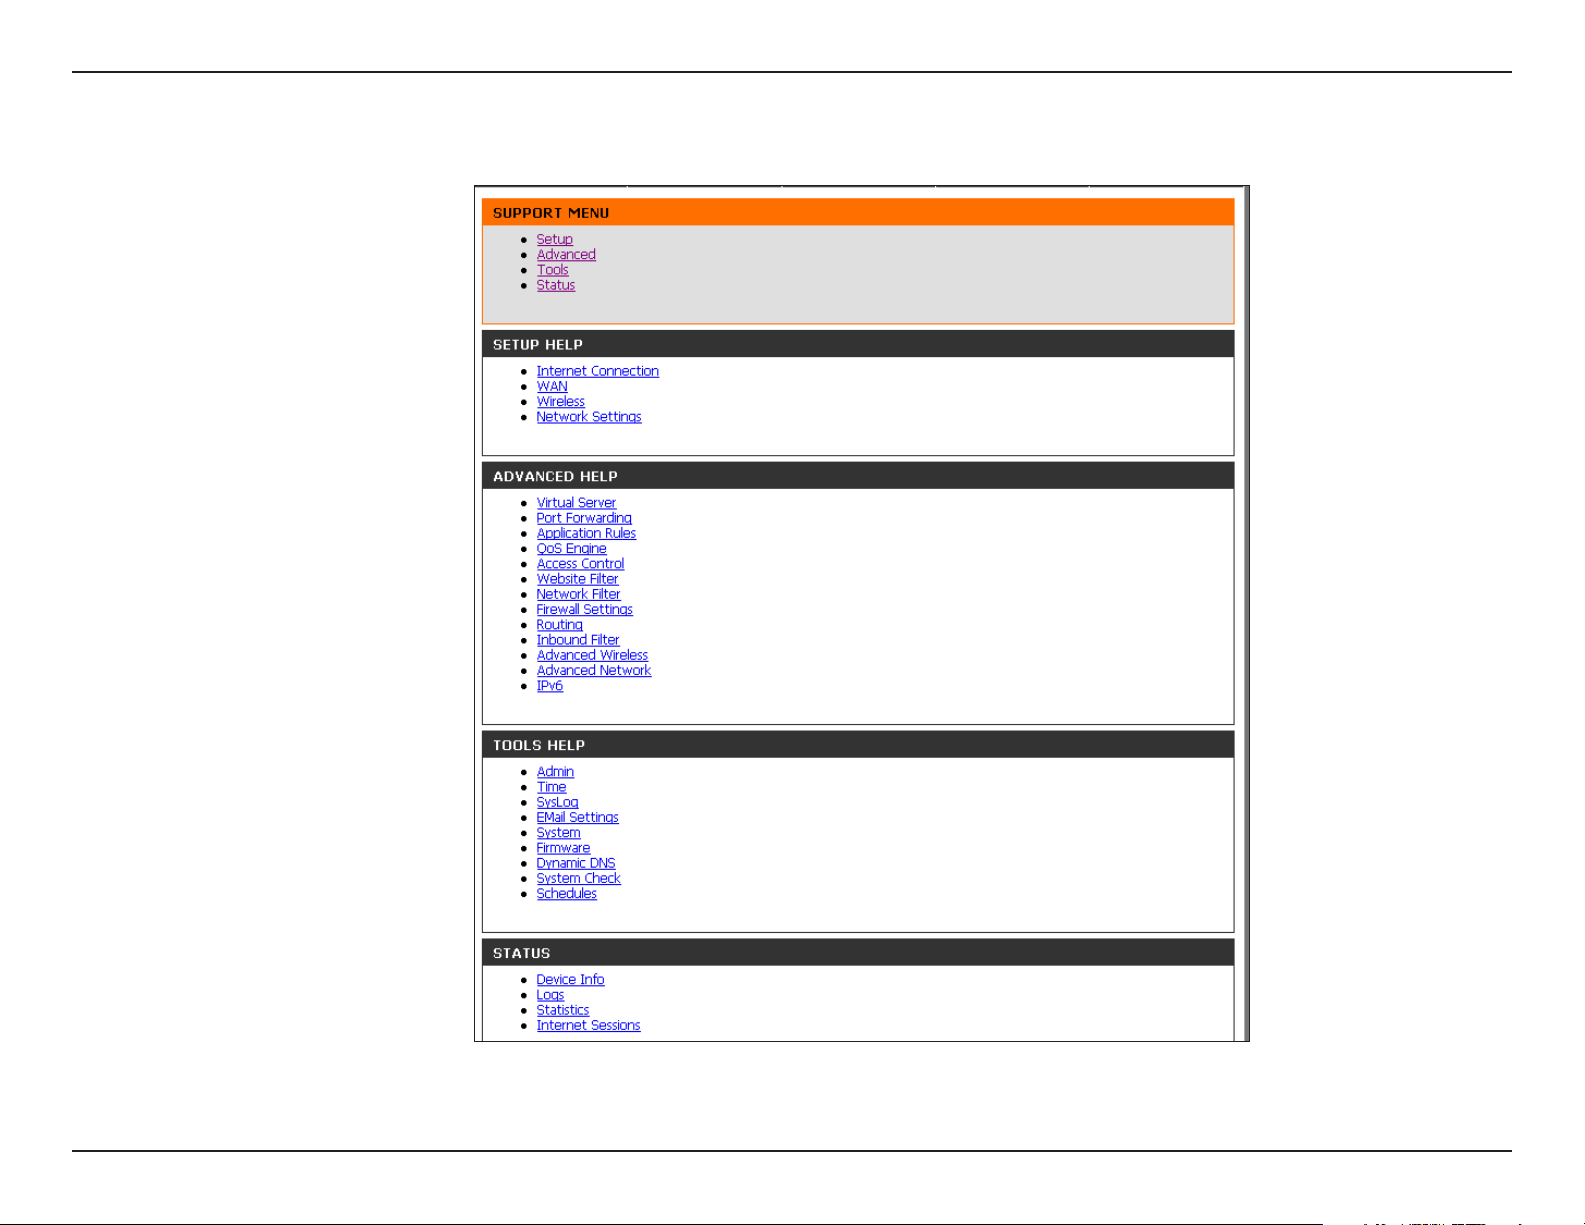
Section 3 - Conguration
Support
83D-Link DIR-601 User Manual
Page 88

Section 4 - Security
Wireless Security
This section will show you the dierent levels of security you can use to protect your data from intruders. The DIR-601 oers the following types
of security:
• WPA2 (Wi-Fi Protected Access 2) • WPA2-PSK(Pre-Shared Key)
• WPA (Wi-Fi Protected Access) • WPA-PSK (Pre-Shared Key)
What is WPA?
WPA, or Wi-Fi Protected Access, is a Wi-Fi standard that was designed to improve the security features of WEP (Wired Equivalent Privacy).
The 2 major improvements over WEP:
• Improved data encryption through the Temporal Key Integrity Protocol (TKIP). TKIP scrambles the keys using a hashing algorithm
and, by adding an integrity-checking feature, ensures that the keys haven’t been tampered with. WPA2 is based on 802.11i and
uses Advanced Encryption Standard (AES) instead of TKIP.
• User authentication, which is generally missing in WEP, through the extensible authentication protocol (EAP). WEP regulates
access to a wireless network based on a computer’s hardware-specic MAC address, which is relatively simple to be snied out
and stolen. EAP is built on a more secure public-key encryption system to ensure that only authorized network users can access
the network.
WPA-PSK/WPA2-PSK uses a passphrase or key to authenticate your wireless connection. The key is an alpha-numeric password between 8 and 63
characters long. The password can include symbols (!?*&_) and spaces. This key must be the exact same key entered on your wireless router or
access point.
WPA/WPA2 incorporates user authentication through the Extensible Authentication Protocol (EAP). EAP is built on a more secure public key encryption
system to ensure that only authorized network users can access the network.
84D-Link DIR-601 User Manual
Page 89
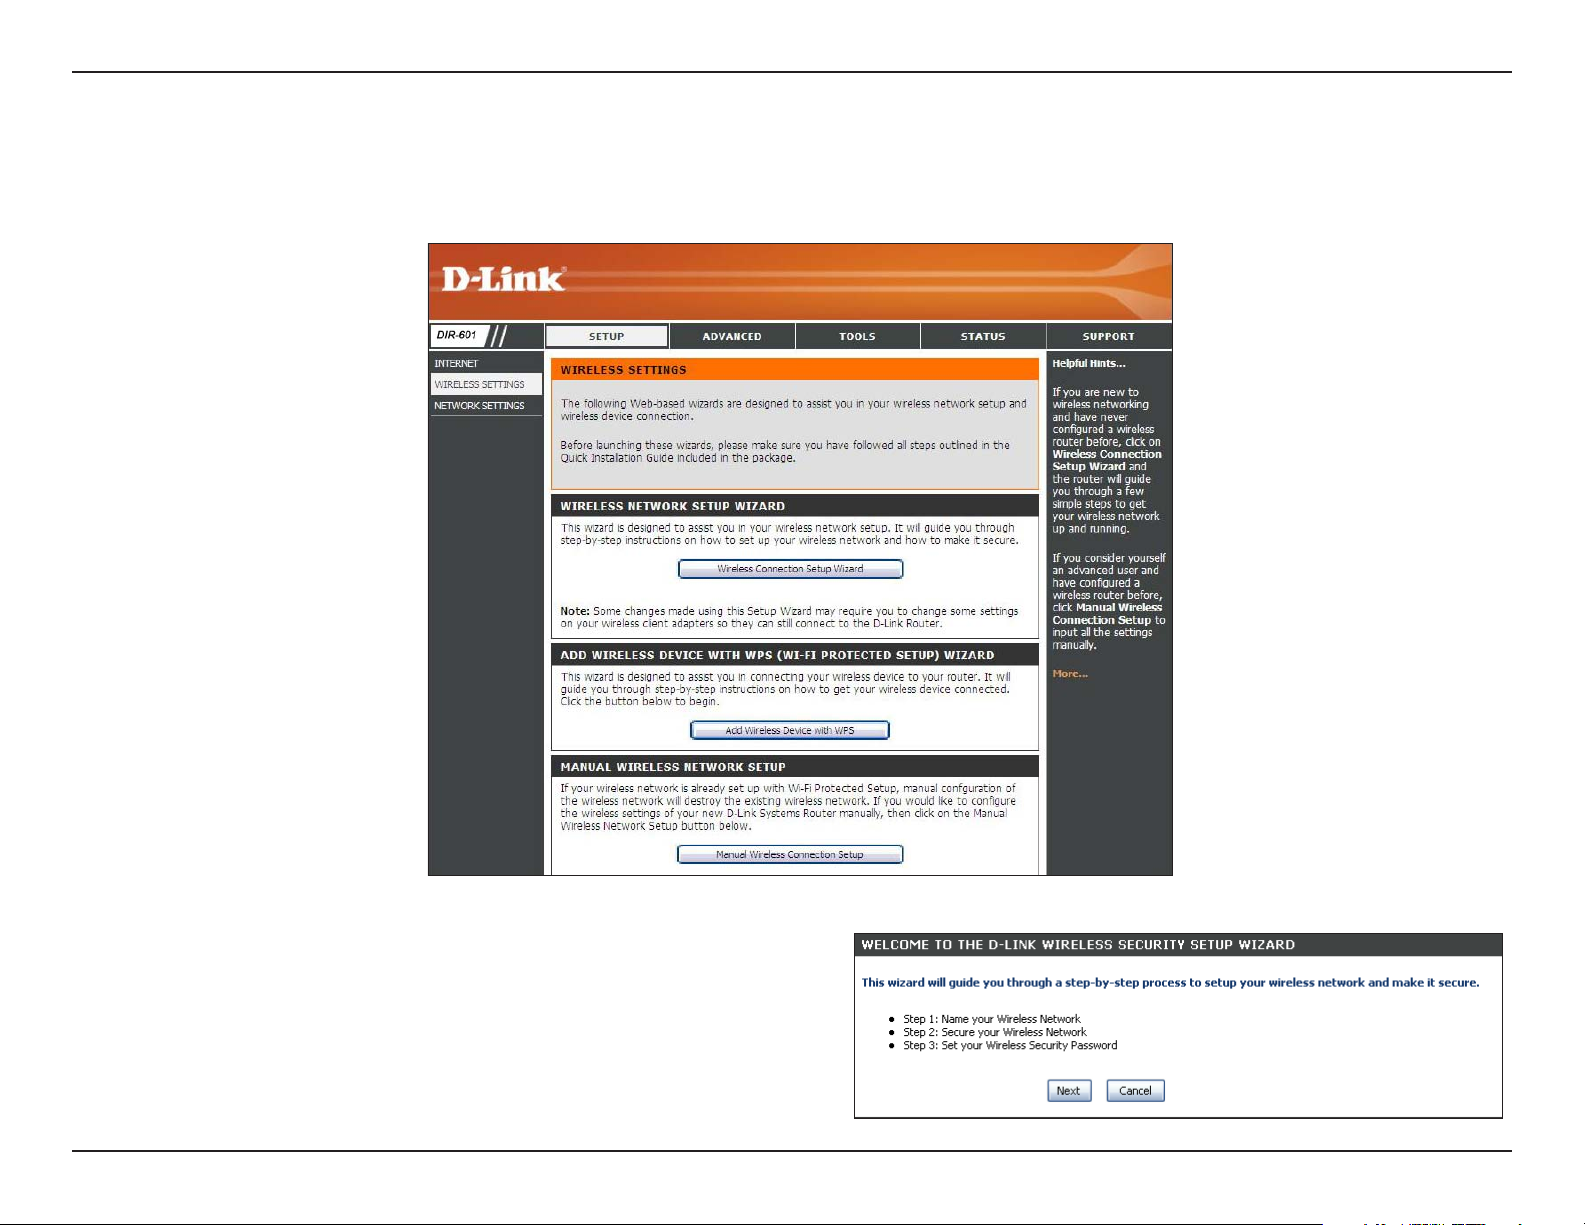
Section 4 - Security
Wireless Connection Setup Wizard
To run the security wizard, browse to the Setup page and then click the WirelessConnectionSetupWizardbutton.
Click Next to continue.
85D-Link DIR-601 User Manual
Page 90

Section 4 - Security
Enter the SSID (Service Set Identier). The SSID is the name of your wireless
network. Create a name using up to 32 characters. The SSID is casesensitive.
Select Automatically assign a network key to have the router create a
security key for you or select Manually assign a network key if you would
like to create your own security key or passphrase.
If you want to use WPA, check the Use WPA encryption instead of WEP
box.
If you select Manually assign a network key, enter your encryption key in
the box and click Next to continue. You will need to enter this key on your
wireless clients to connect to the router.
If you selected Automatically, the following screen will show you your
security key to enter on your wireless clients.
Click Save to nish the Security Wizard.
86D-Link DIR-601 User Manual
Page 91
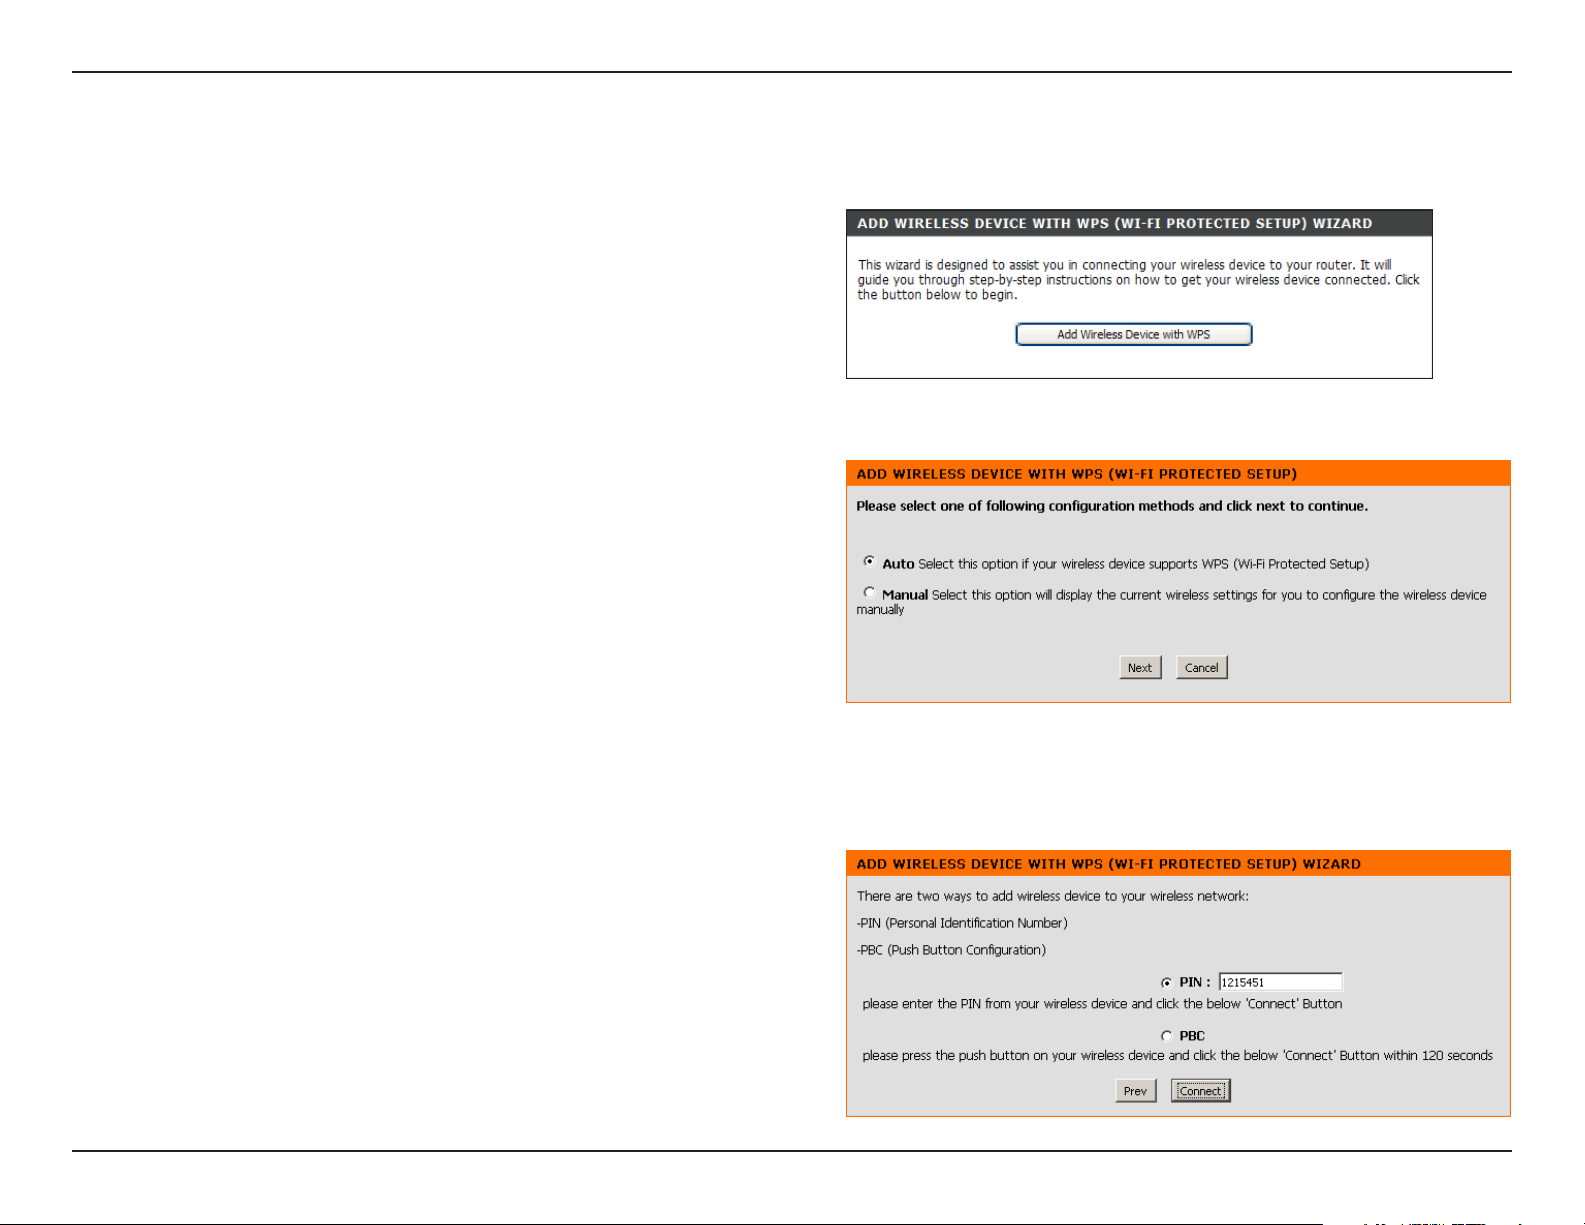
Section 4 - Security
Add Wireless Device with WPS Wizard
From the Setup > WirelessSettings screen, click Add Wireless Device
withWPS.
Select Auto to add a wireless client using WPS (Wi-Fi Protected Setup). Once
you select Auto and click Connect, you will have a 120 second time limit
to apply the settings to your wireless client(s) and successfully establish a
connection.
If you select Manual, a settings summary screen will appear. Write down
the security key and enter this on your wireless clients.
PIN: Select this option to use PIN method. In order to use this method you
must know the wireless client’s 8 digit PIN and click Connect.
PBC: Select this option to use PBC (Push Button) method to add a wireless
client. Click Connect.
87D-Link DIR-601 User Manual
Page 92
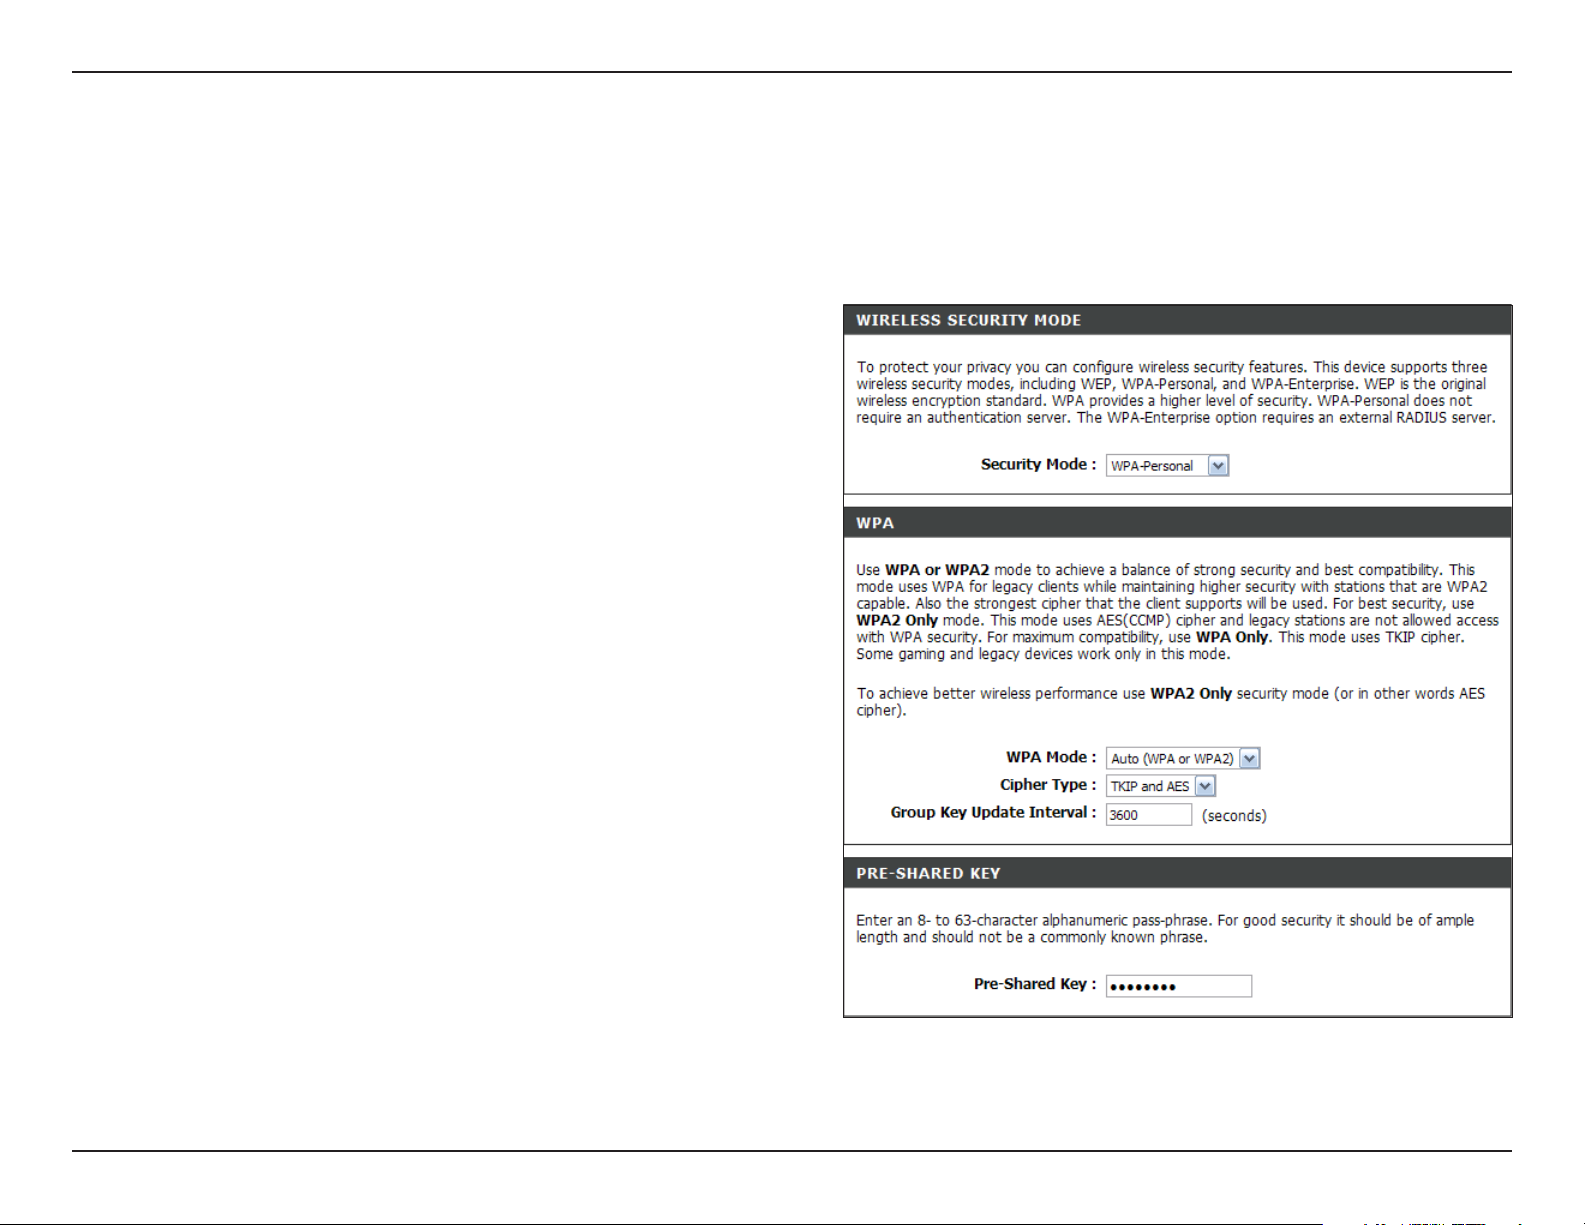
Section 4 - Security
Congure WPA-Personal (PSK)
It is recommended to enable encryption on your wireless router before your wireless network adapters. Please establish wireless connectivity before
enabling encryption. Your wireless signal may degrade when enabling encryption due to the added overhead.
1. Log into the web-based conguration by opening a web browser and
entering the IP address of the router (192.168.0.1). Click onSetupand then
clickWirelessSettings on the left side.
2. Next to Security Mode, select WPA-Personal.
3. Next to WPA Mode, select Auto, WPA2Only, or WPA Only. Use Auto if you
have wireless clients using both WPA and WPA2.
4. Next to Cypher Type, select TKIPandAES, TKIP, or AES. If you have wireless
clients that use both types, use TKIPandAES.
5. Next to Group Key Update Interval, enter the amount of time before the group
key used for broadcast and multicast data is changed (3600 is default).
6. Next to Pre-Shared Key, enter a key (passphrase). The key is entered as a
pass-phrase in ASCII format at both ends of the wireless connection. The
pass-phrase must be between 8-63 characters.
7. Click SaveSettings to save your settings. If you are conguring the router
with a wireless adapter, you will lose connectivity until you enable WPA-PSK
on your adapter and enter the same passphrase as you did on the router.
88D-Link DIR-601 User Manual
Page 93
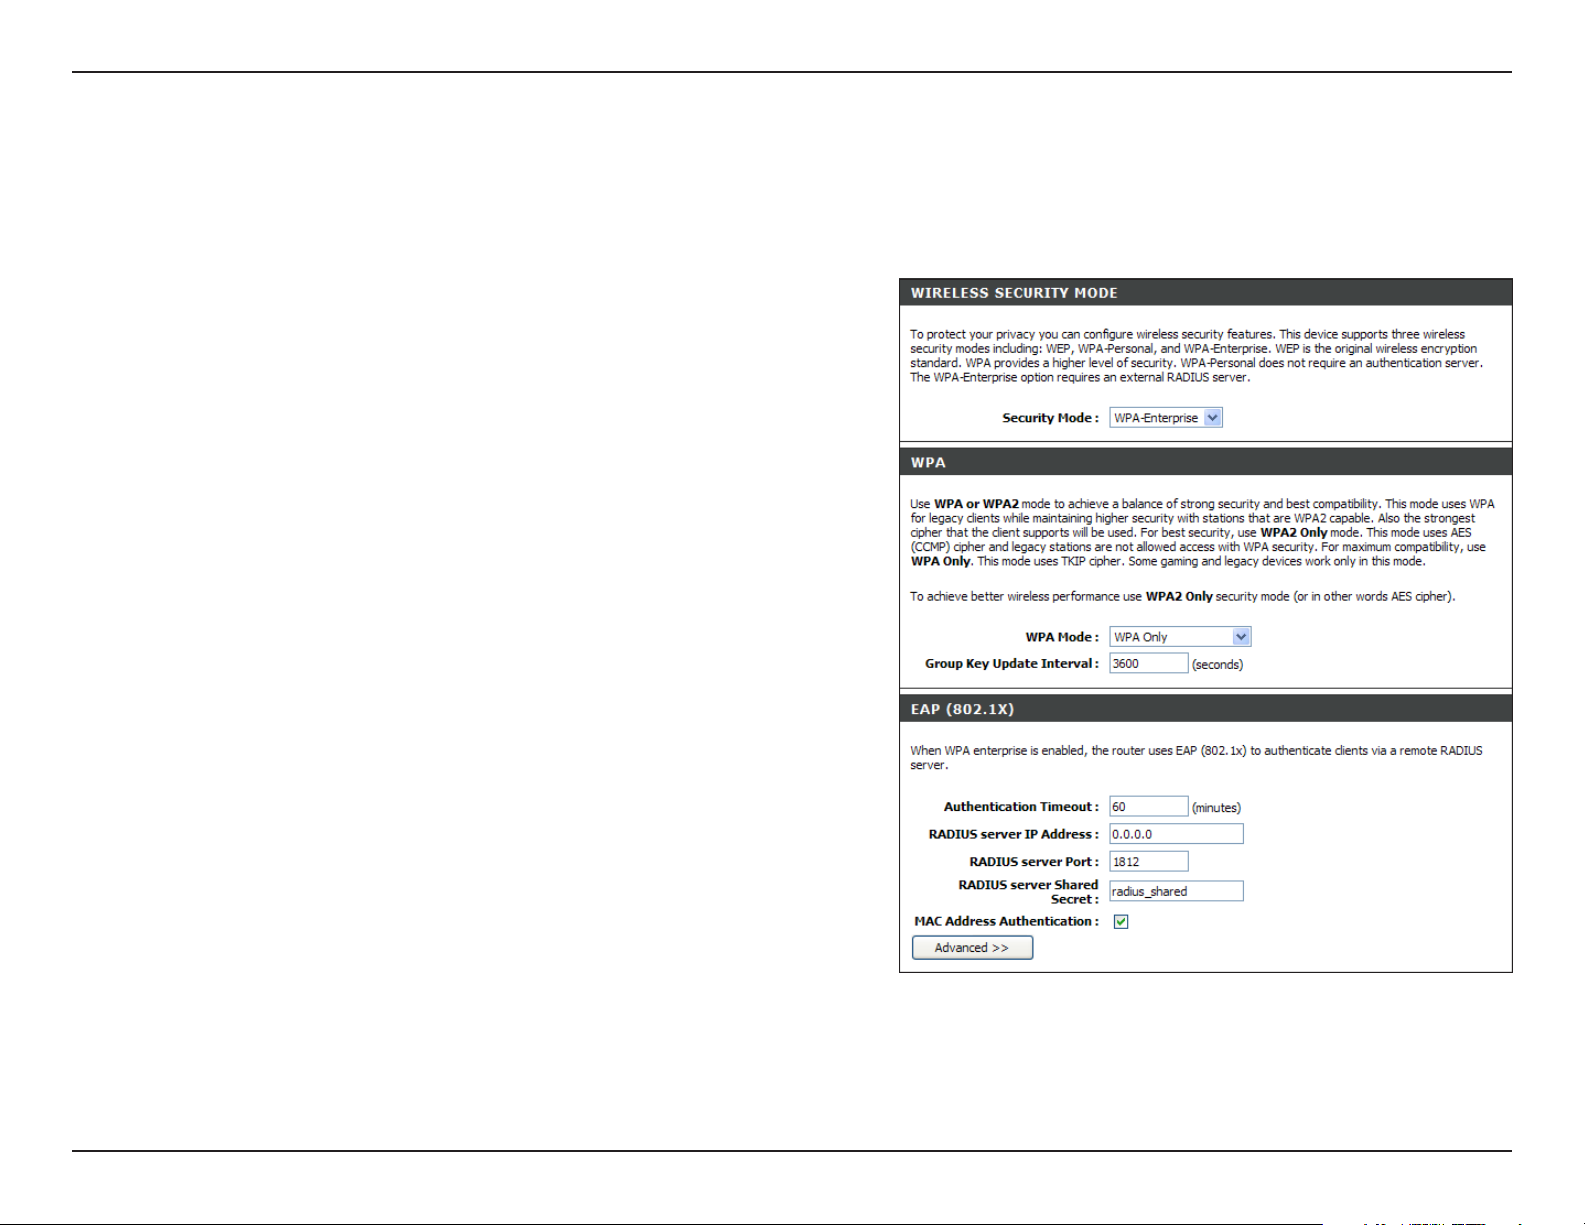
Section 4 - Security
Congure WPA-Enterprise (RADIUS)
It is recommended to enable encryption on your wireless router before your wireless network adapters. Please establish wireless connectivity before
enabling encryption. Your wireless signal may degrade when enabling encryption due to the added overhead.
1. Log into the web-based conguration by opening a web browser and entering
the IP address of the router (192.168.0.1). Click onSetupand then click Wireless
Settings on the left side.
2. Next to Security Mode, select WPA-Enterprise.
3. Next to WPA Mode, select Auto, WPA2Only, or WPA Only. Use Auto if you have
wireless clients using both WPA and WPA2.
4. Next to Cypher Type, select TKIPandAES, TKIP, or AES. If you have wireless
clients that use both types, use TKIPandAES.
5. Next to Group Key Update Interval, enter the amount of time before the group
key used for broadcast and multicast data is changed (3600 is default).
6. Next to Authentication Timeout, enter the amount of time before a client is
required to re-authenticate (60 minutes is default).
7. Next to RADIUS Server IP Address enter the IP Address of your RADIUS server.
8. Next to RADIUS Server Port, enter the port you are using with your RADIUS server.
1812 is the default port.
9. Next to RADIUS Server Shared Secret, enter the security key
89D-Link DIR-601 User Manual
Page 94
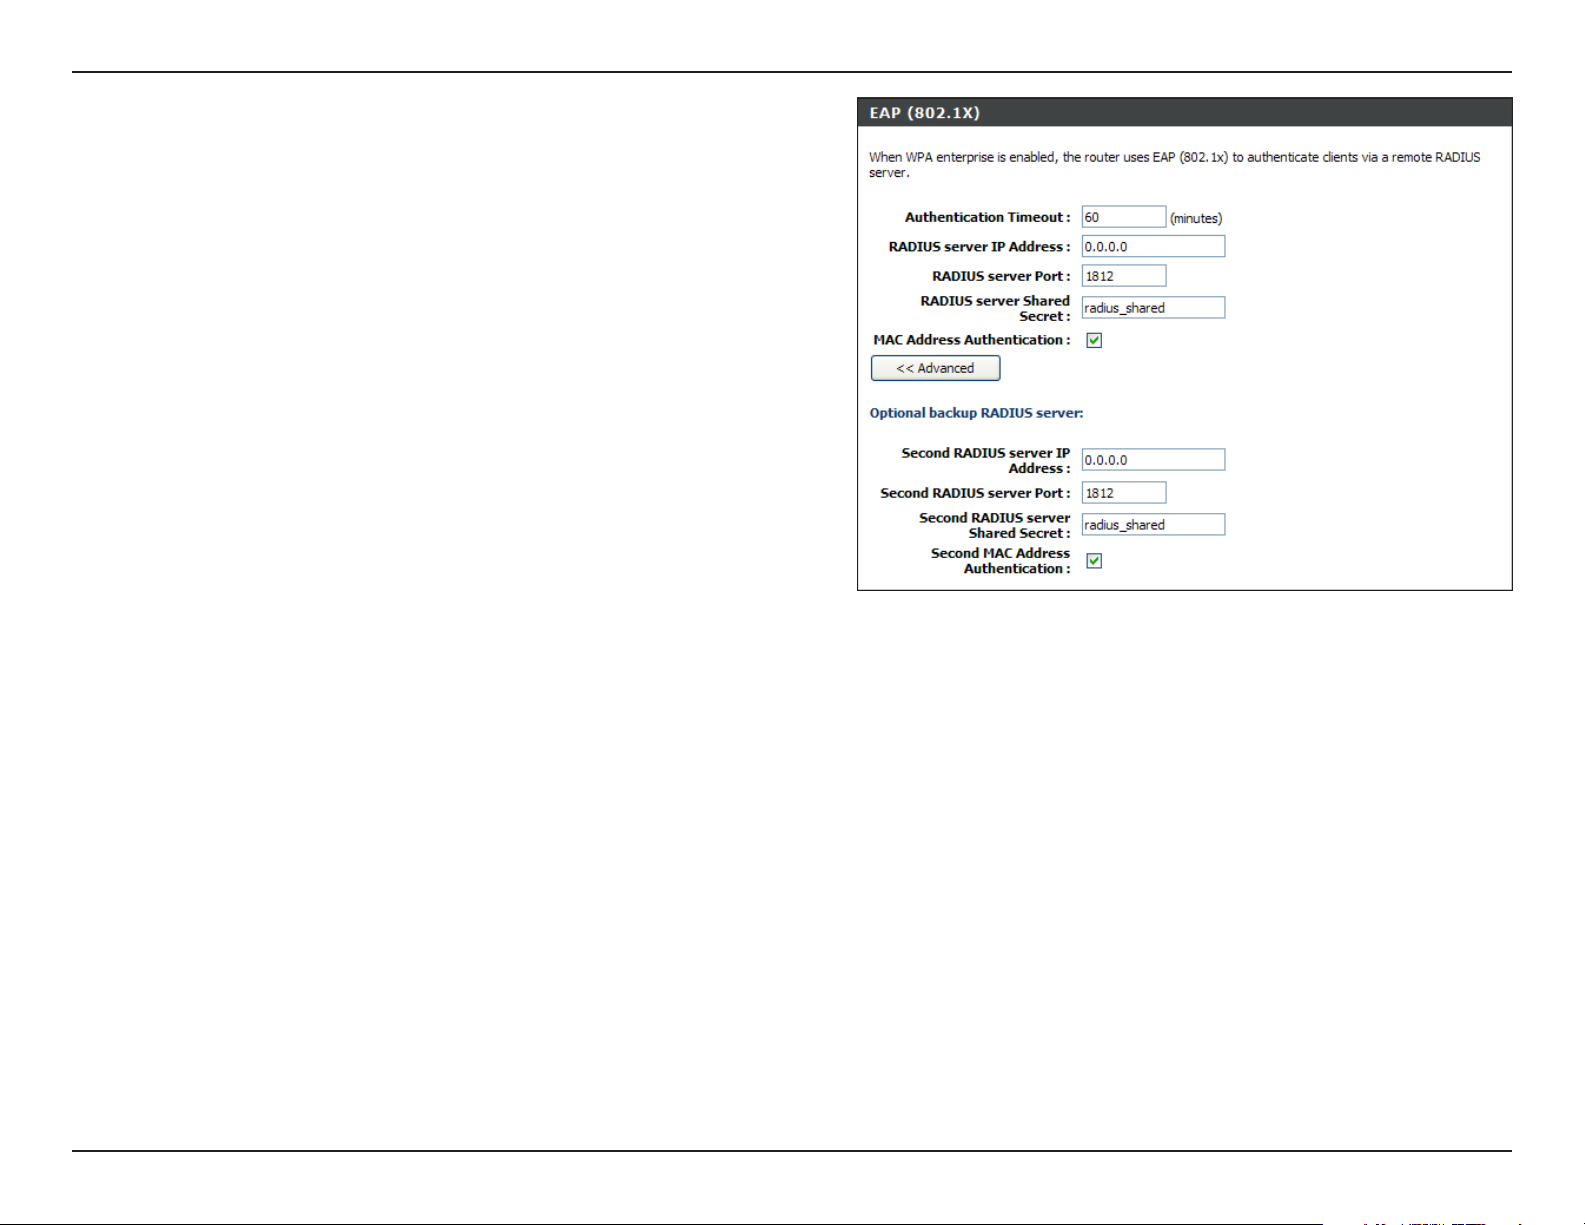
Section 4 - Security
.
10. If the MAC Address Authentication box is selected then the user will need
to connect from the same computer whenever logging into the wireless
network.
11. Click Advanced to enter settings for a secondary RADIUS Server.
12. Click ApplySettings to save your settings.
90D-Link DIR-601 User Manual
Page 95
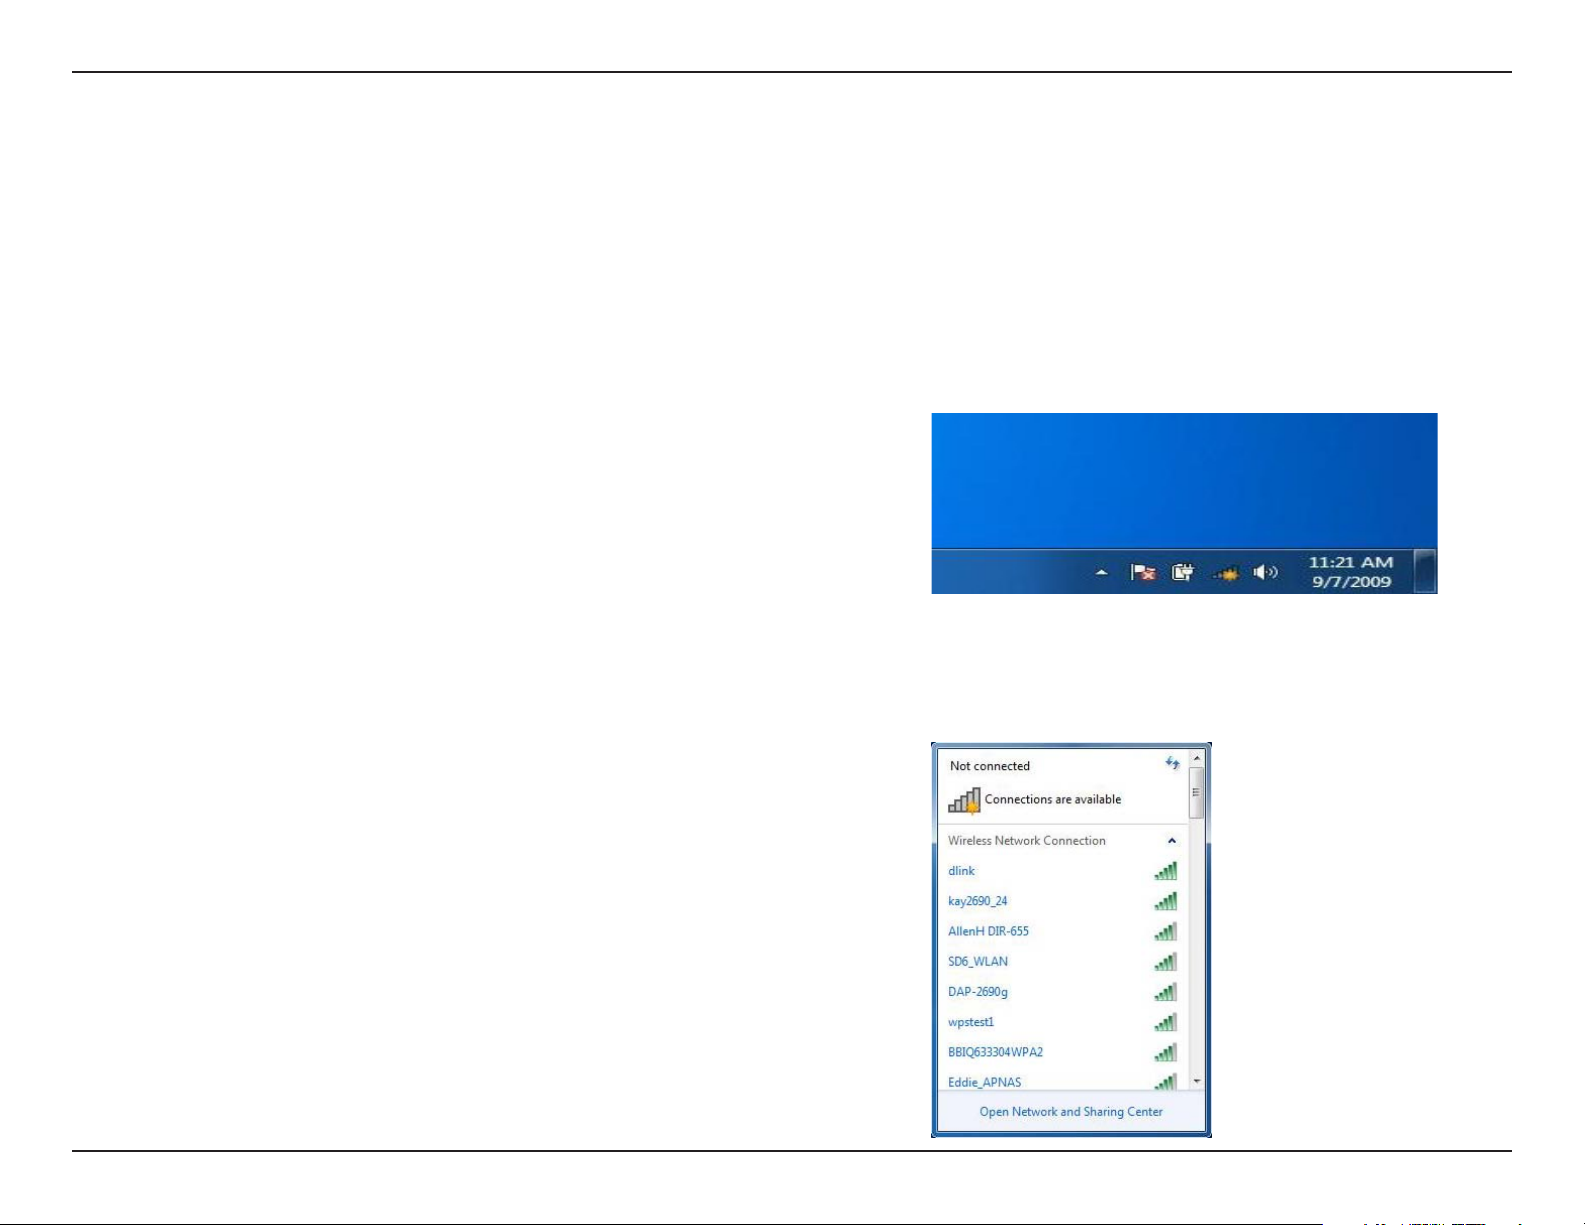
Section 5 - Connecting to a Wireless Network
Connect to a Wireless Network
Using Windows® 7
It is recommended to enable wireless security (WPA/WPA2) on your wireless router or access point before conguring your wireless adapter. If you
are joining an existing network, you will need to know the security key or passphrase being used.
1. Click on the wireless icon in your system tray (lower-right corner).
2. The utility will display any available wireless networks in your area.
91D-Link DIR-601 User Manual
Page 96
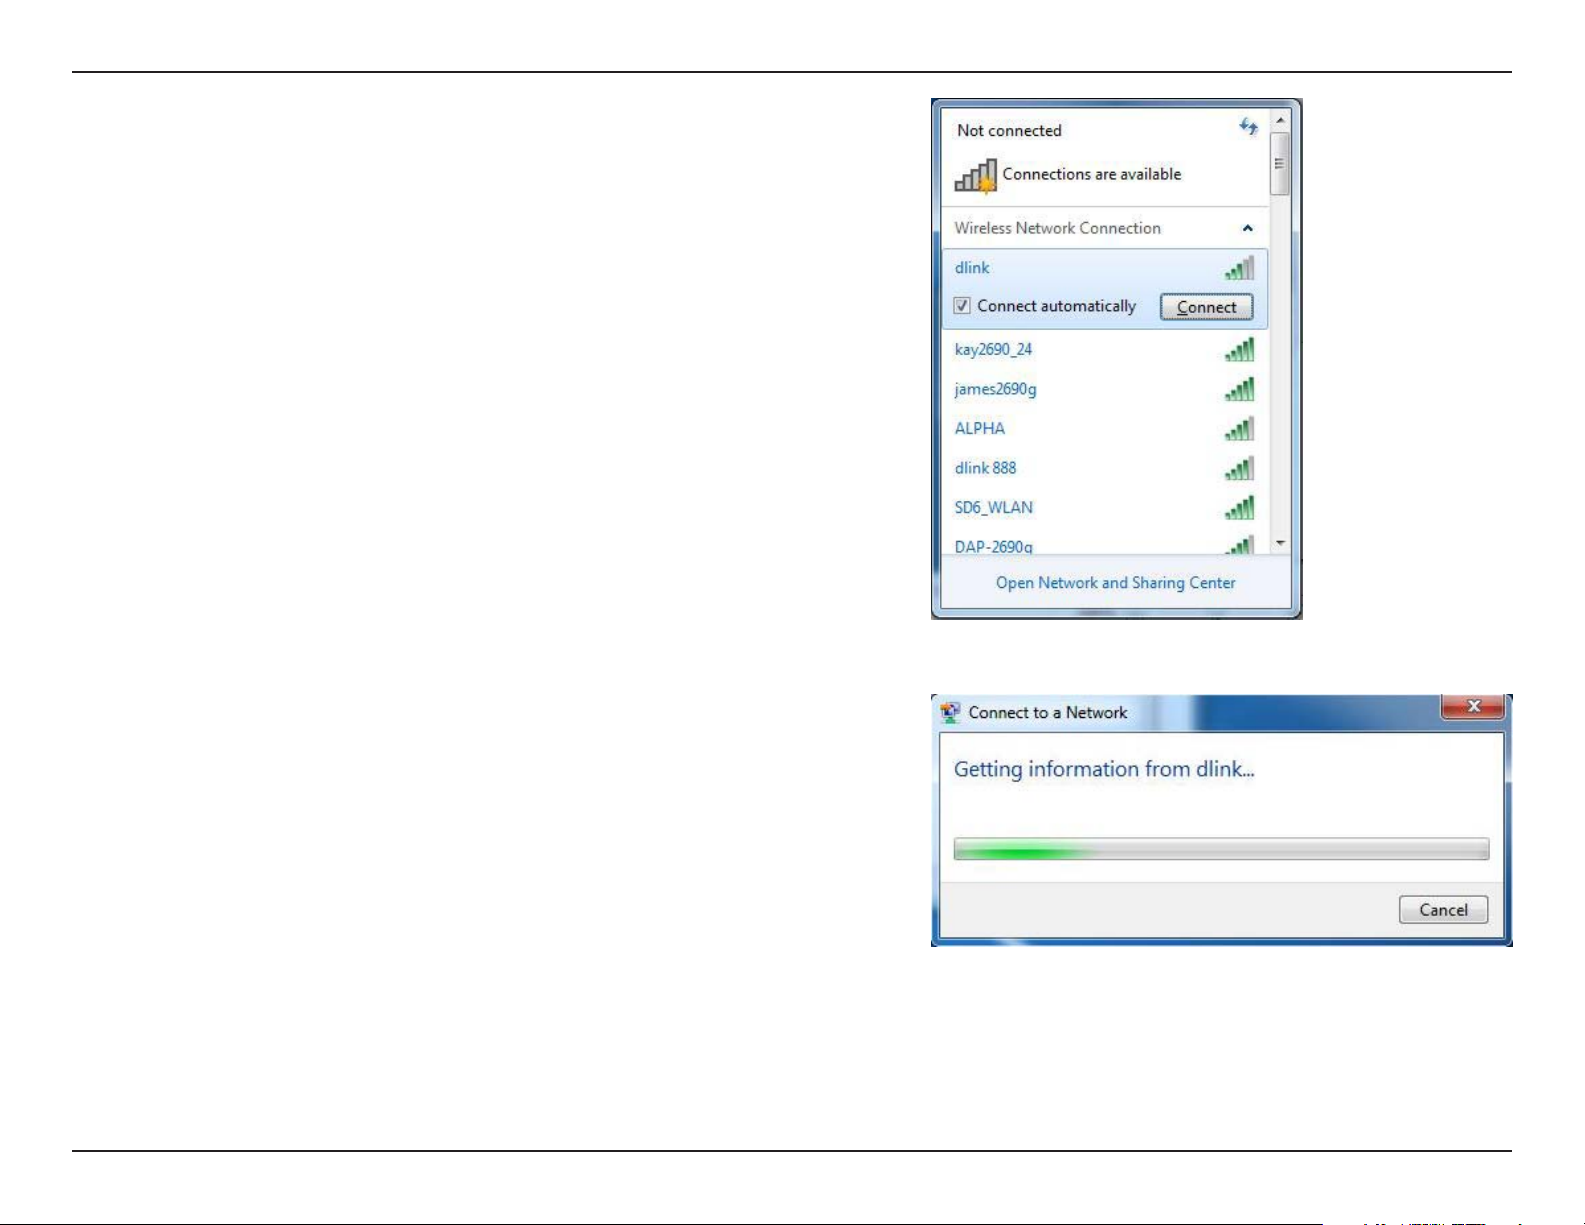
Section 5 - Connecting to a Wireless Network
3. Highlight the wireless network (SSID) you would like to connect to and click
the Connect button.
If you get a good signal but cannot access the Internet, check your TCP/IP
settings for your wireless adapter. Refer to the Networking Basics section in
this manual for more information.
4. The following window appears while your computer tries to connect to the
router.
92D-Link DIR-601 User Manual
Page 97

Section 5 - Connecting to a Wireless Network
5. Enter the same security key or passphrase that is on your router and click
Ok.
It may take 20-30 seconds to connect to the wireless network. If the connection
fails, please verify that the security settings are correct. The key or passphrase
must be exactly the same as on the wireless router.
93D-Link DIR-601 User Manual
Page 98
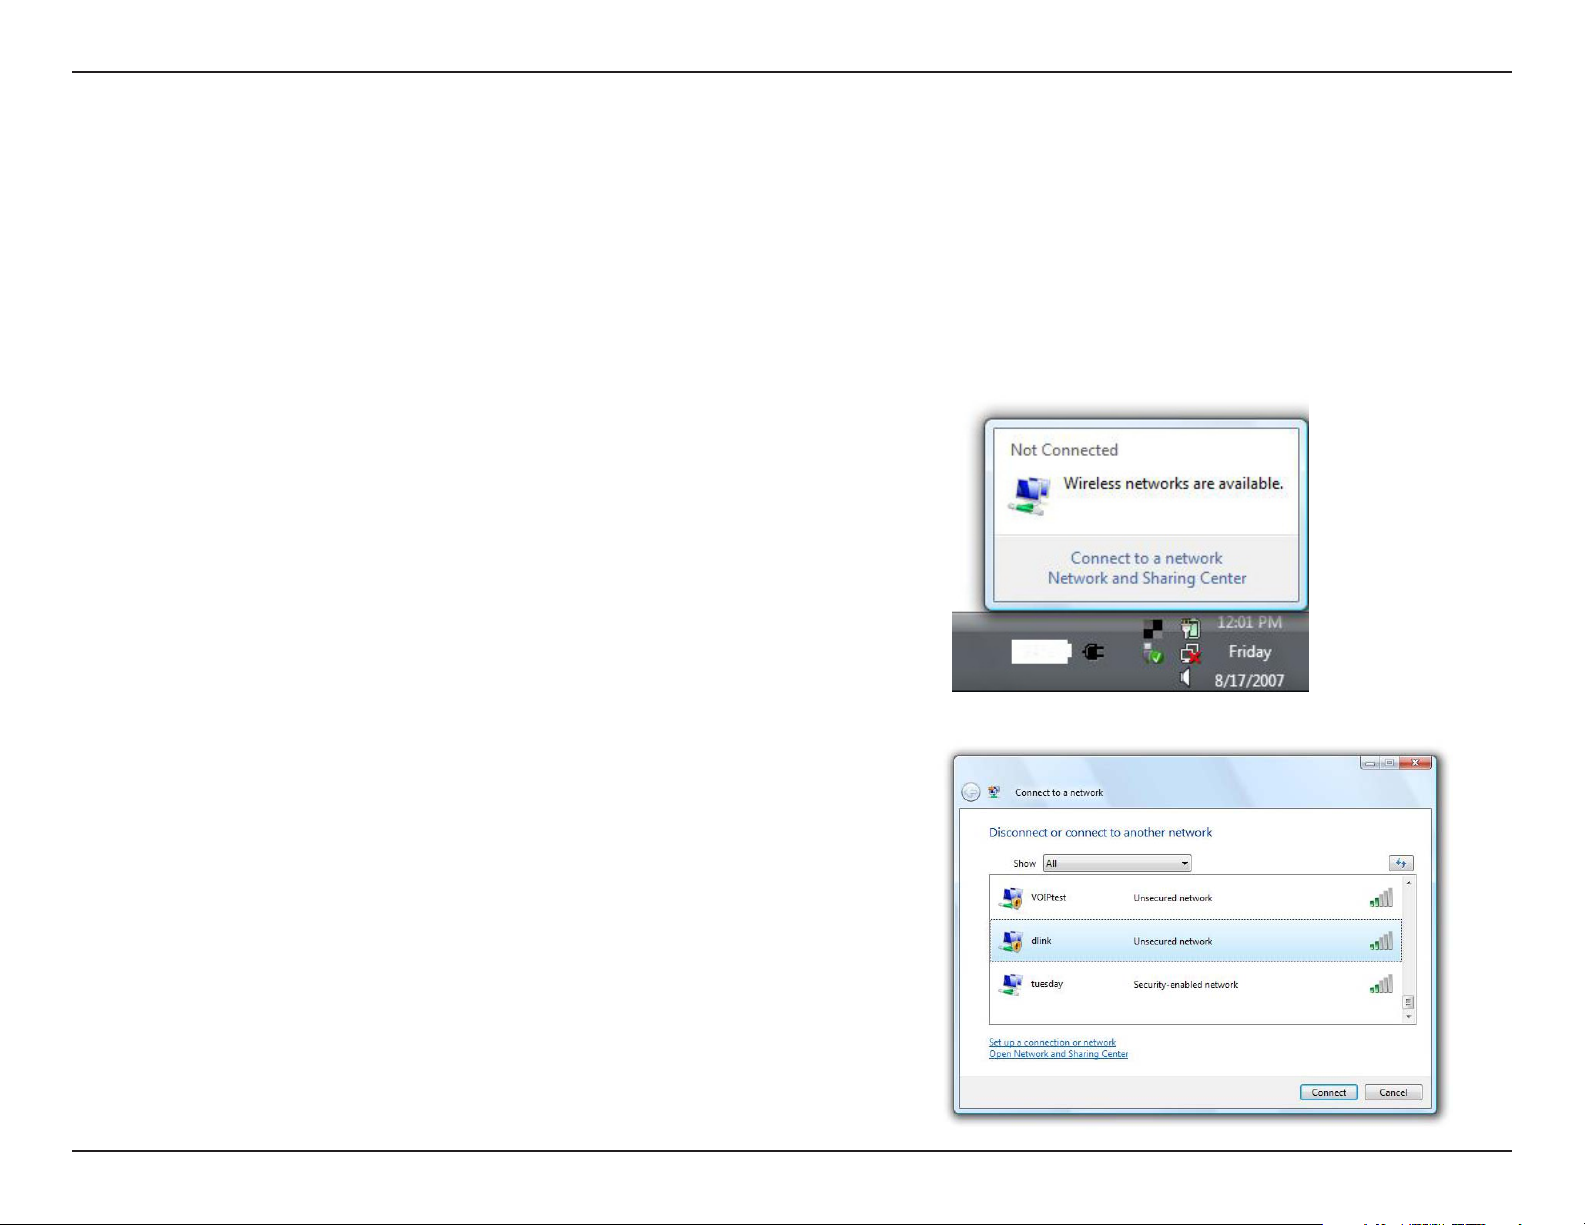
Section 5 - Connecting to a Wireless Network
Using Windows Vista
®
Windows Vista® users may use the built-in wireless utility. If you are using another company’s utility or Windows® 2000, please refer to the user manual
of your wireless adapter for help with connecting to a wireless network. Most utilities will have a “site survey” option similar to the Windows Vista®
utility as seen below.
If you receive the Wireless Networks Detected bubble, click on the center
of the bubble to access the utility.
or
Right-click on the wireless computer icon in your system tray (lower-right
corner next to the time). Select Connect to a network.
The utility will display any available wireless networks in your area. Click on a
network (displayed using the SSID) and click the Connect button.
If you get a good signal but cannot access the Internet, check you TCP/IP settings
for your wireless adapter. Refer to the Networking Basics section in this manual
for more information.
94D-Link DIR-601 User Manual
Page 99

Section 5 - Connecting to a Wireless Network
Congure WPA/WPA2
It is recommended to enable wireless security (WPA/WPA2) on your wireless router or access point before conguring your wireless adapter. If you
are joining an existing network, you will need to know the security key or passphrase being used.
1. Open the Windows Vista® Wireless Utility by right-clicking on the wireless
computer icon in your system tray (lower right corner of screen). Select
Connect to a network.
2. Highlight the wireless network (SSID) you would like to connect to
and click Connect.
95D-Link DIR-601 User Manual
Page 100
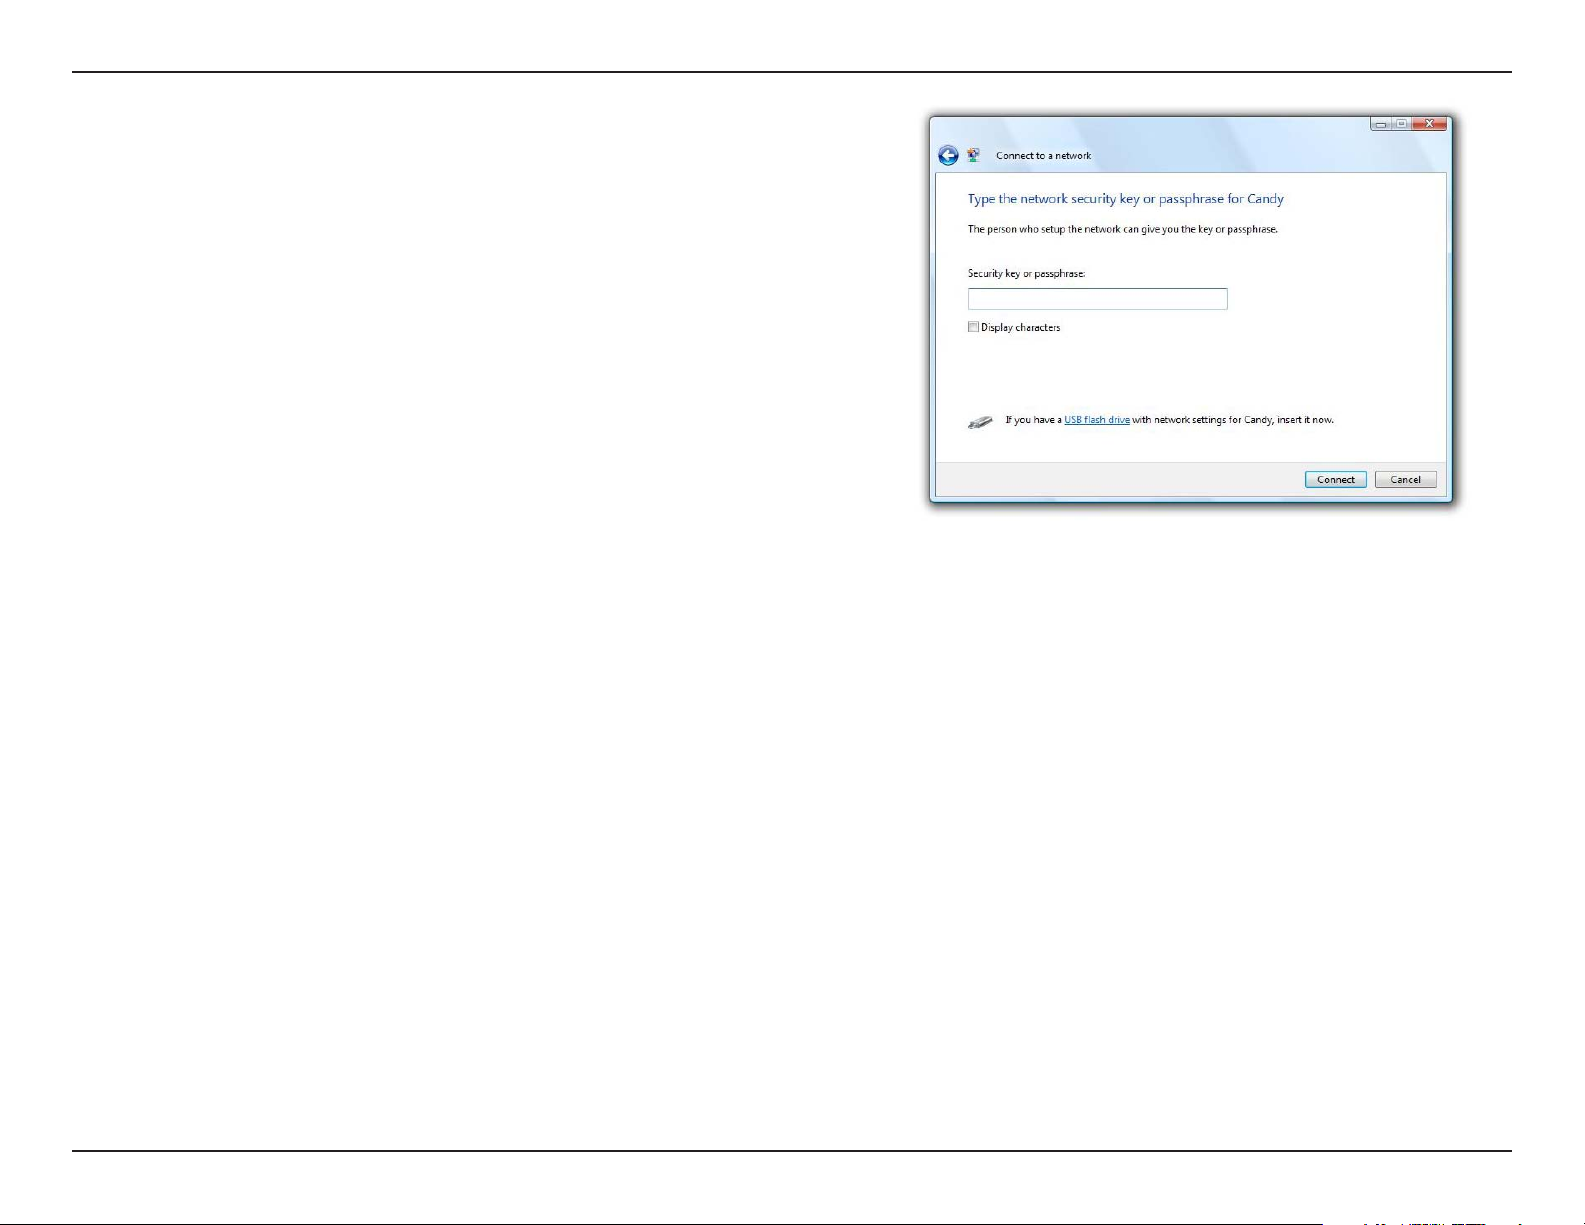
Section 5 - Connecting to a Wireless Network
3. Enter the same security key or passphrase that is on your router and click
Connect.
It may take 20-30 seconds to connect to the wireless network. If the connection
fails, please verify that the security settings are correct. The key or passphrase
must be exactly the same as on the wireless router.
96D-Link DIR-601 User Manual
 Loading...