

Page 1

2.4GHz USB
Wireless Adapter
DD
DD
D
WL-120+WL-120+
WL-120+WL-120+
WL-120+
©2003 D-Link Systems, Inc. All rights reserved. Trademarks or registered trademarks are the property of their respective holders. Software and
specifications subject to change without notice. 1G-BDWL-120+ 04082003
If any of the above items are missing, please contact your reseller.
CD-ROM (containing Drivers, Manual and Warranty)
This product works with the following operating
system software:
Windows XP, Windows
2000, Windows Me, Windows 98se
Before You Begin
You must have at least the following:
• You will need a computer with an available USB port to connect the
DWL-120+ Wireless USB adapter.
• At least a 300 MHz processor and 32 MB of memory
• An 802.1 1b Access Point (for Infrastructure Mode) or another 802.11b
wireless adapter (for Ad-Hoc; Peer-to-Peer networking mode.)
• Properly Installed and Working USB Controller .
DWL-120+ Wireless USB Adapter
Check Your Package Contents
These are the items included with your DWL-120+ purchase:
Mini-USB Cable
Page 2

The Install Screen will appear .
If the CD Autorun function
does not automatically Go to
Start > Run on your computer , then type
“D:\Setup.exe.” If it does
start, proceed to the next
screen.
The letter “D”
represents the
letter of the CD-ROM
drive. Y our CD-ROM
drive may be a different
drive letter.
T urn on the computer and
Insert the D- Link Air DWL-120+ Driver
CD in the CD-ROM drive.
The step-by-step instructions that follow are shown
in Windows XP. The steps and screens are similar
for the other Windows operating systems
Insert the D-Link CD-ROM Into Your
Computer
Do NOT install
the DWL-120+
USB Adapter into your
computer before
installing the driver
software on the D-Link
CD!
Type “D:\Setup.exe.”
Click OK
Click Next
Click Install Driver/PC Utility
Page 3

Click Next
Click Finish
Click No, I will restart
my computer later
Antenna
Used to wirelessly
connect to 802.1 1b
networks.
Shut down Your Computer
Link/Power LED
Link - Indicates that the DWL-120+
is properly installed in the computer .
Power - Indicates that the DWL-
120+ is properly installed in the
computer .
Mini-USB Port
Used to connect the
DWL-120+ to your
computer.
Page 4

Installing the DWL-120+ Wireless USB
Adapter to Your Computer
A. Make sure to turn off your computer.
Restart Your Computer
When you restart your computer
this Found New Hardware
Wizard (Windows XP) screen
will appear:
C. Firmly insert the other end of
the USB cable (smaller plug)
into the DWL-120+.
Select Install the software
automatically (Recommended)
Click Next
B. Firmly insert one end of the
USB cable (larger plug) into
your computer’s USB Port.
Page 5
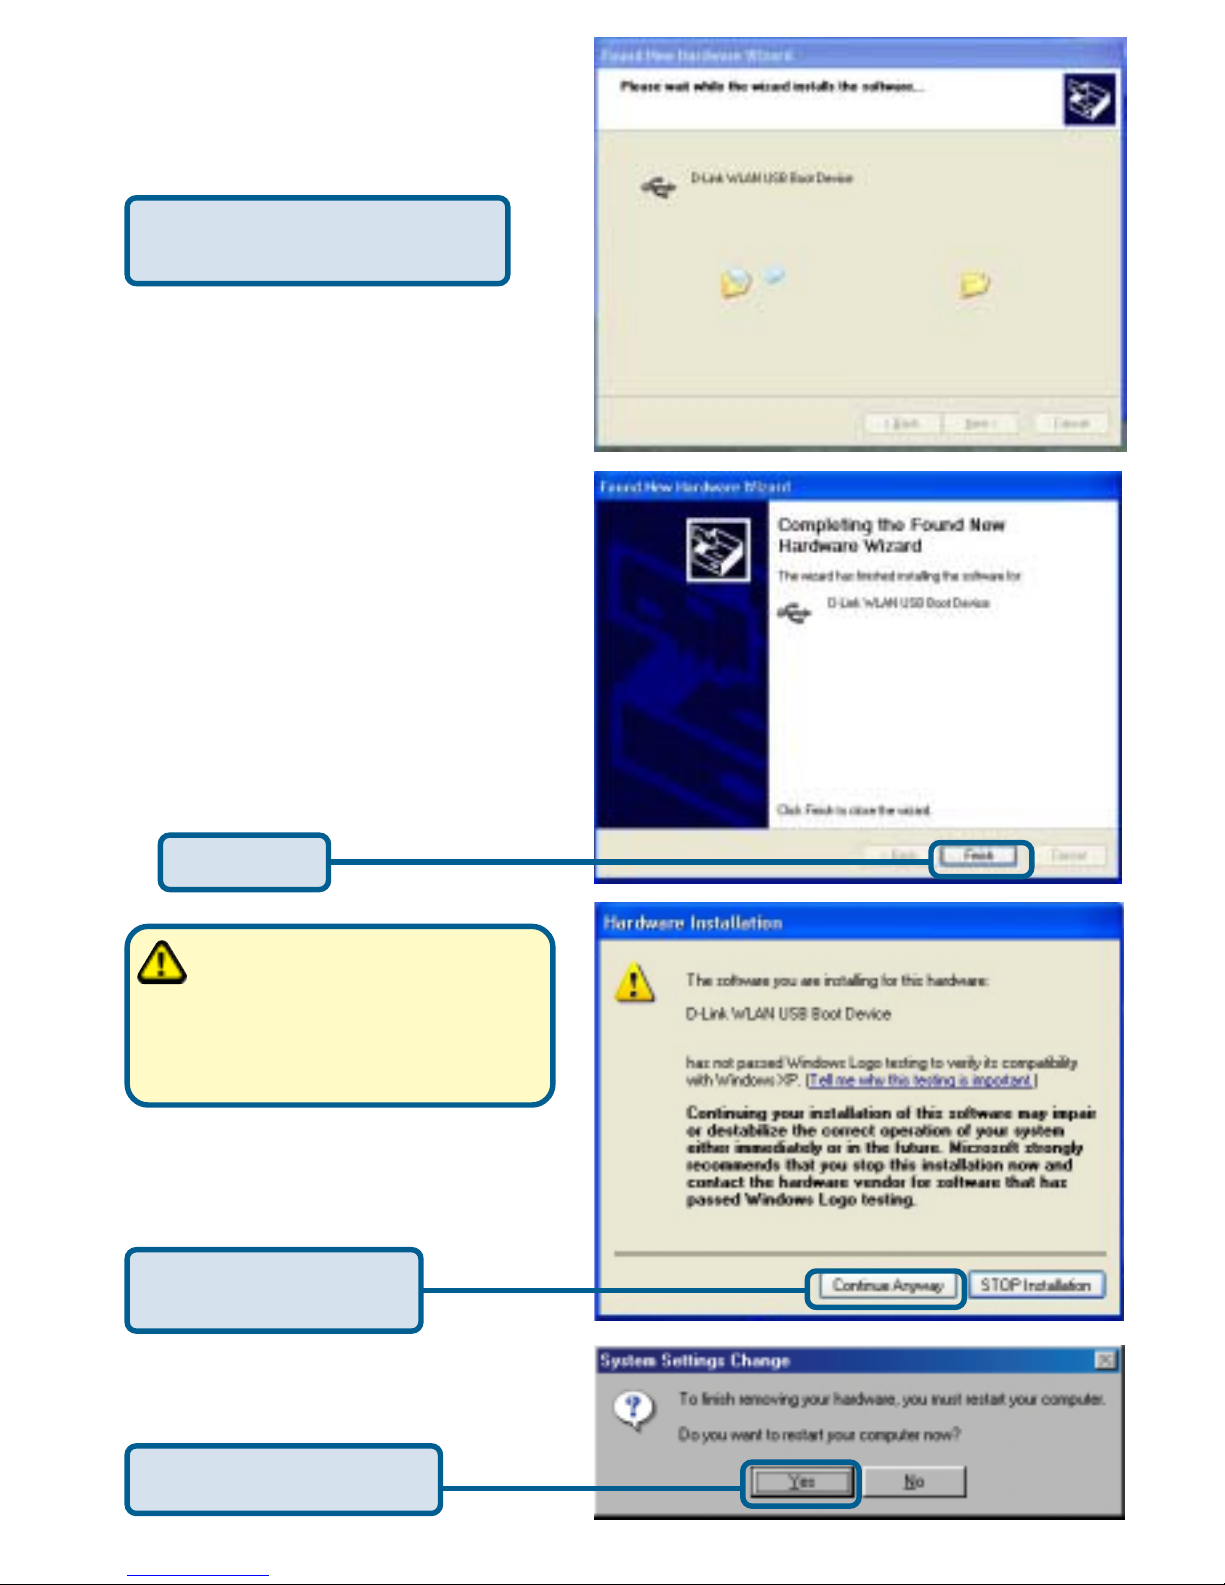
For Windows XP/2000, a
screen similar to this Digital
Signature Not Found screen
may appear during the installation.
Click Yes to continue
the installation
Windows XP will automatically
load the driver files.
Click Yes to finalize the
installation
For Windows Me and 98SE, this
screen may appear.
Click Finish
Page 6
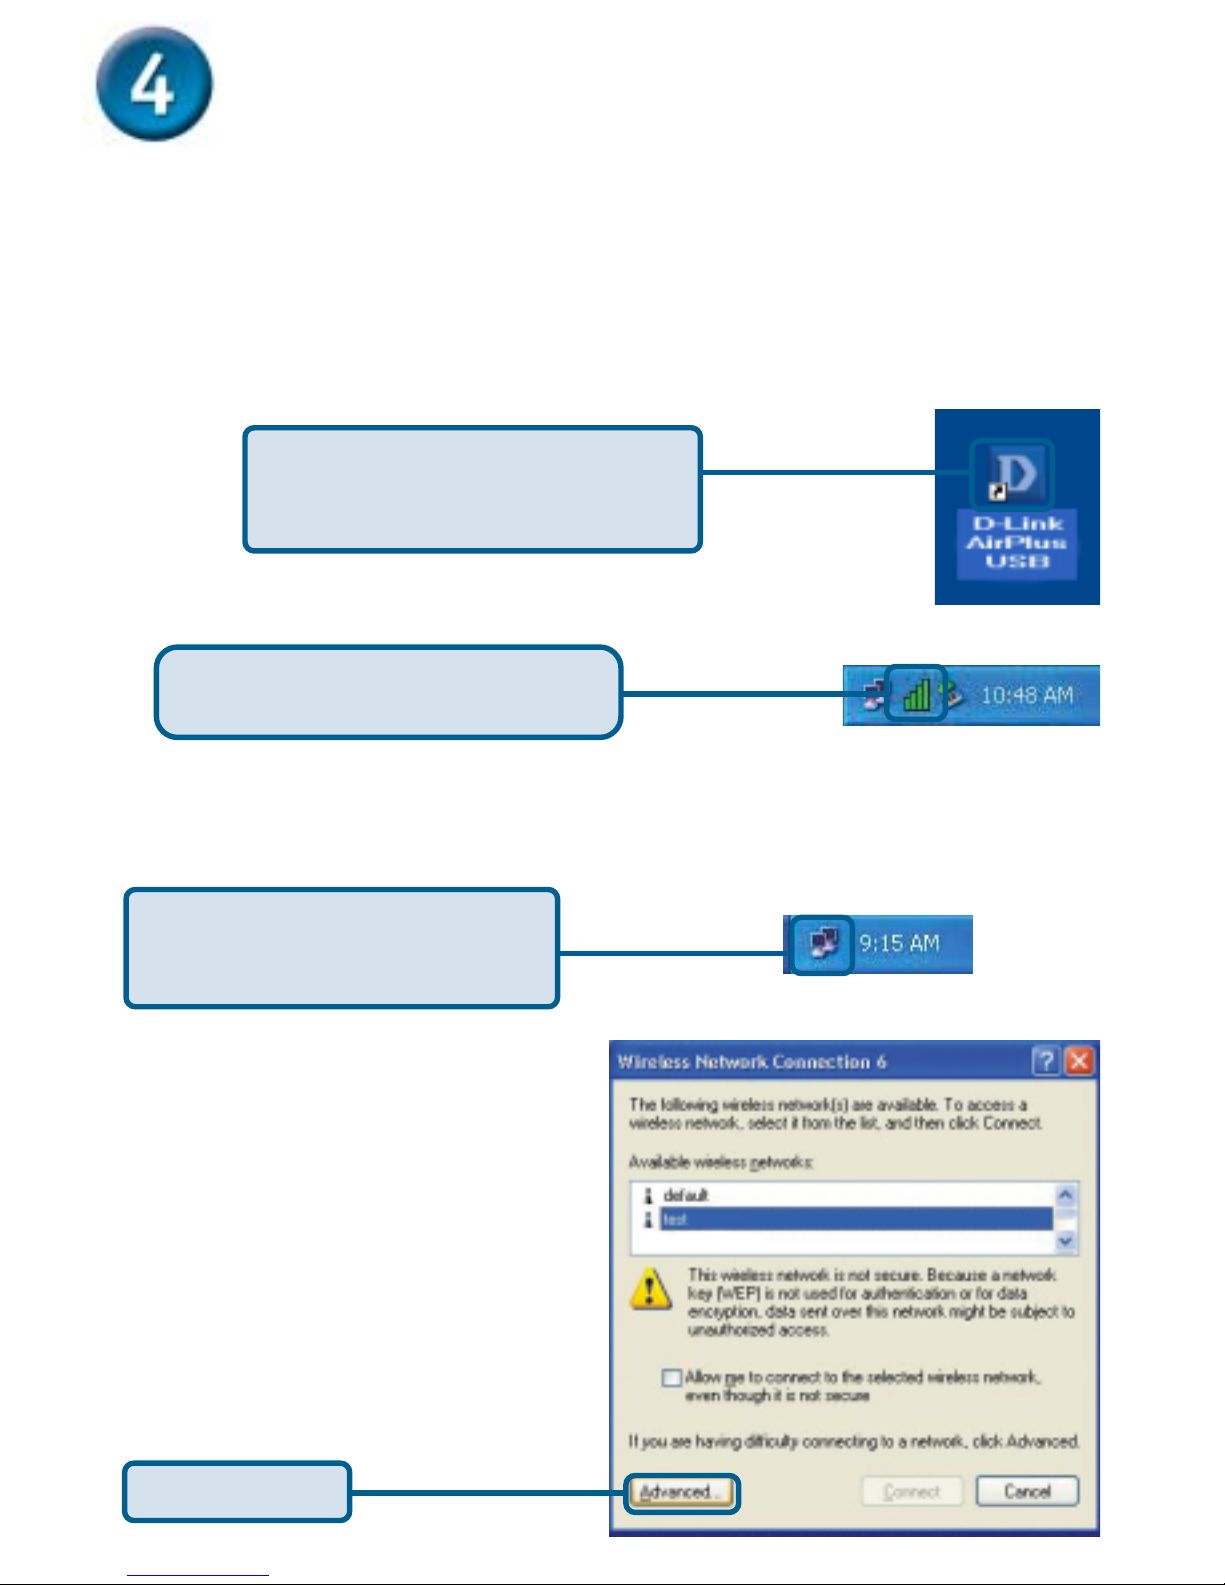
Your Installation is Complete!
After you’ve continued in Windows XP (or after the computer
restarts in the other Windows operating systems), the D-Link Air
DWL-120+ Configuration Utility will automatically start and the
utility icon will appear in the bottom right hand corner of the desktop
screen (systray). If this icon appears GREEN, then you have
successfully installed the DWL-120+, are connected to a
wireless network and are ready to communicate!
Double-click the utility icon to use
the configuration utility .
If the utility icon does not appear,
double-click the shortcut icon that
has appeared on your desktop.
Click the XP Networking icon
to use the Zero Configuration
Wireless Settings.
Click Advanced
For Windows XP, if you wish to use the AirXpert Utility, please do the
following steps.
Page 7
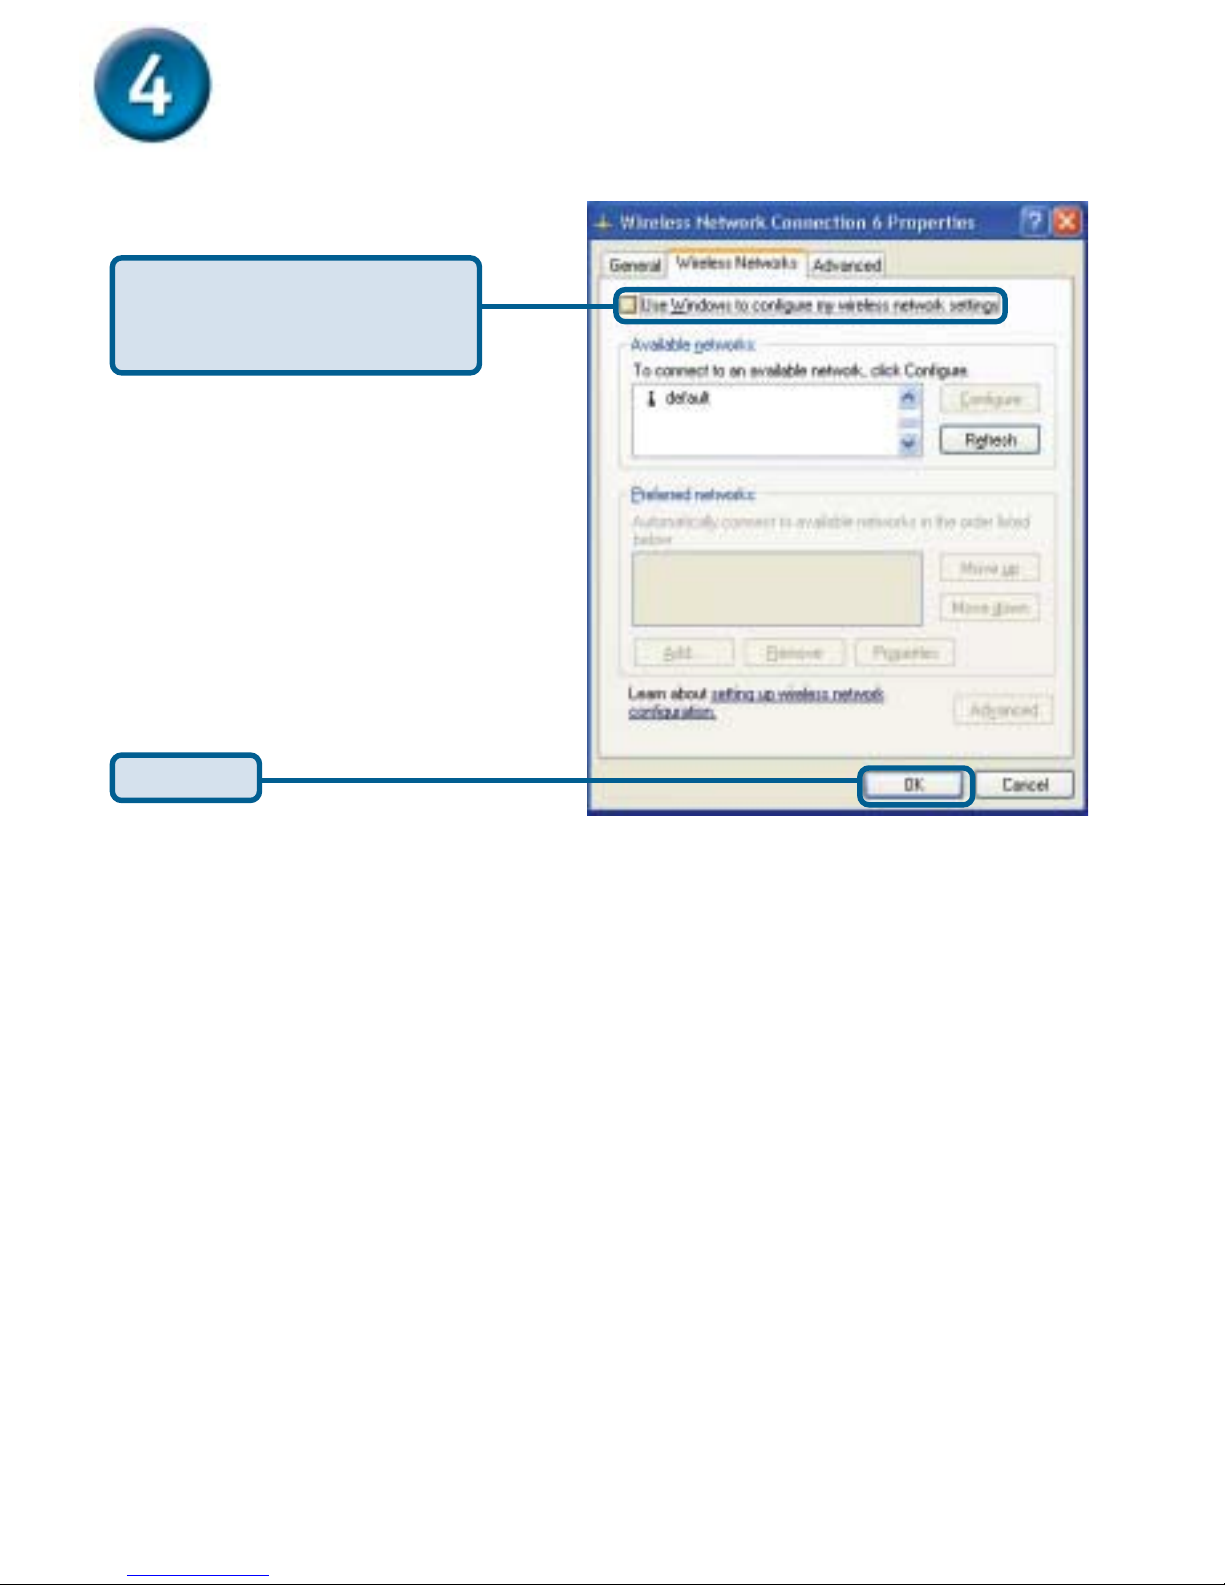
Uncheck “Use Windows to
configure my wireless network settings.”
Click OK
Your Installation is Complete!(cont.)
Page 8
Appendix
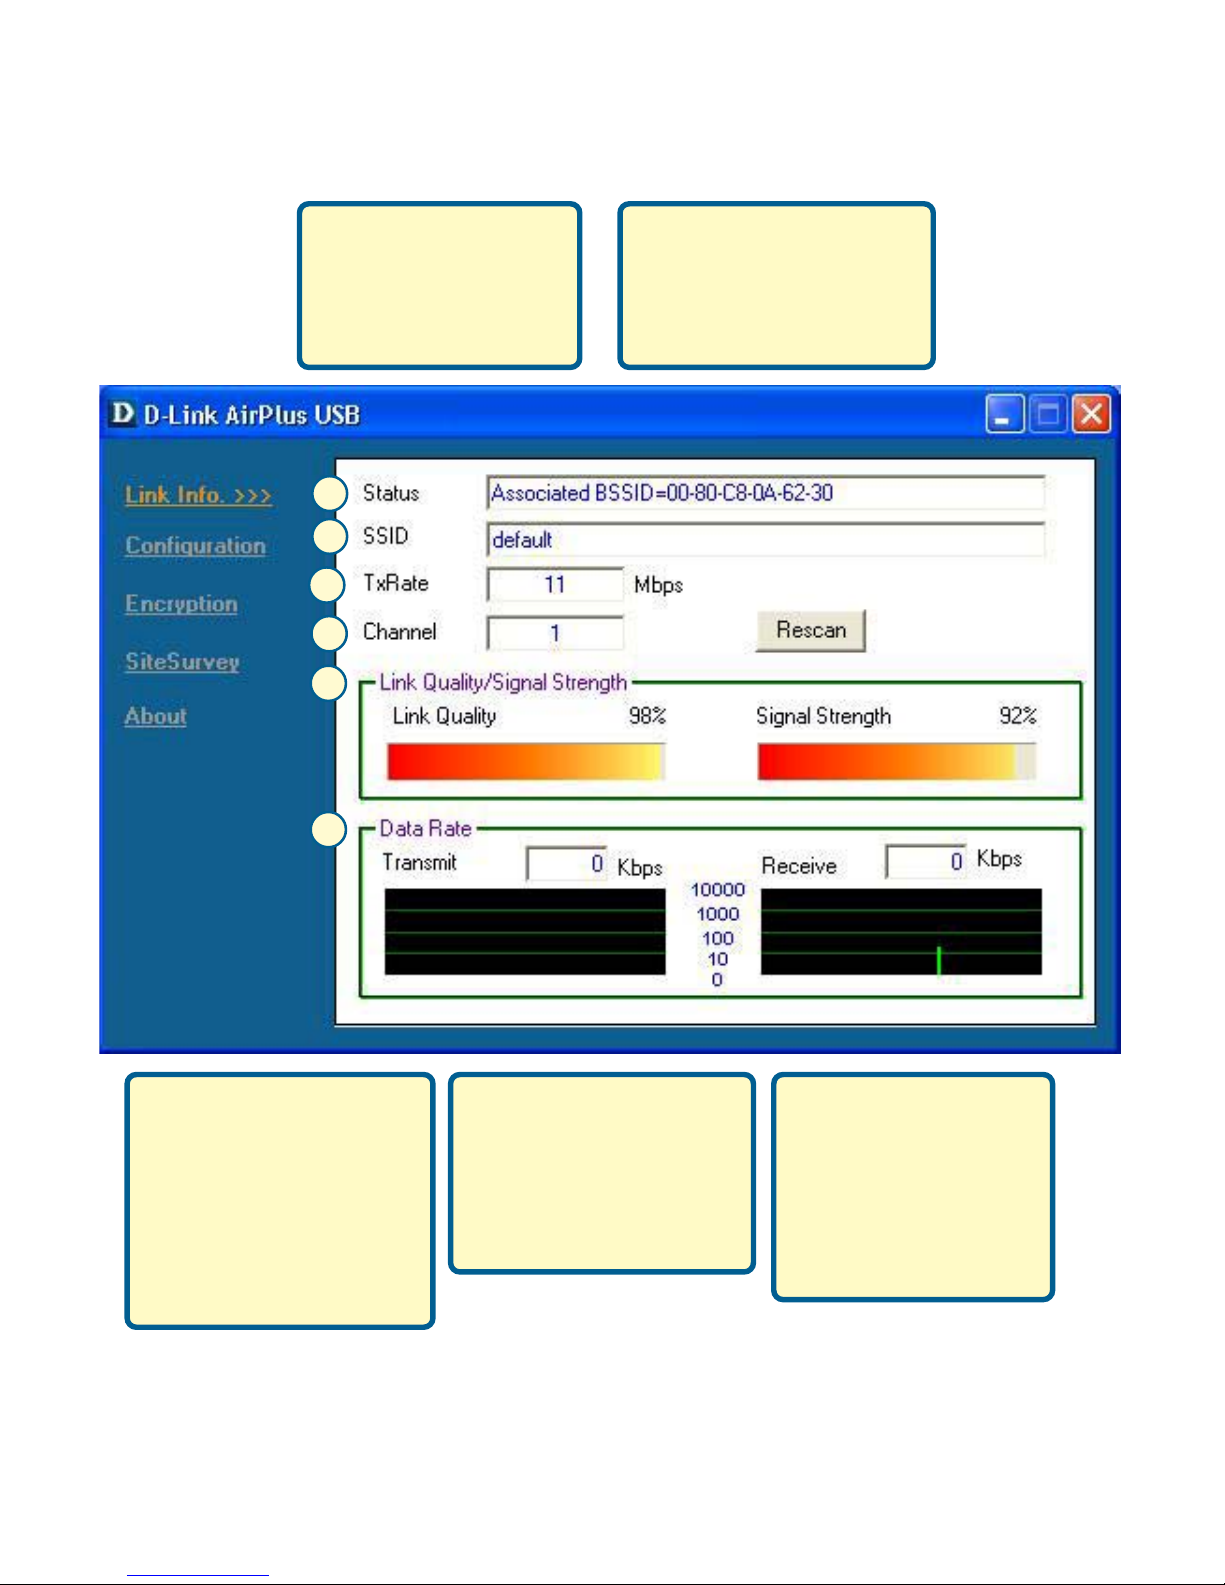
Using the Configuration Utility
B. SSID: The Service Set
Identifier is the name
assigned to the wireless
network. The factory SSID
setting is set to default
A. Status: Displays the
MAC Address of the
Access Point that is
associated with the
DWL-120+.
A
B
C
D
F
E
E. Link Quality /
Signal Strength:
Displays the wireless
signal strength for the
DWL-120+ wireless
connection to the
access point.
C. TxRate: The default
setting is 11Mbps;
however, TxRate settings
are automatically
determined by the DWL120+ depending on the
distance from the access
point.
D. Channel: Displays the
channel information. By
default, the channel is set
to 6 and selection is
automatically determined
by the Access Point.
Page 9
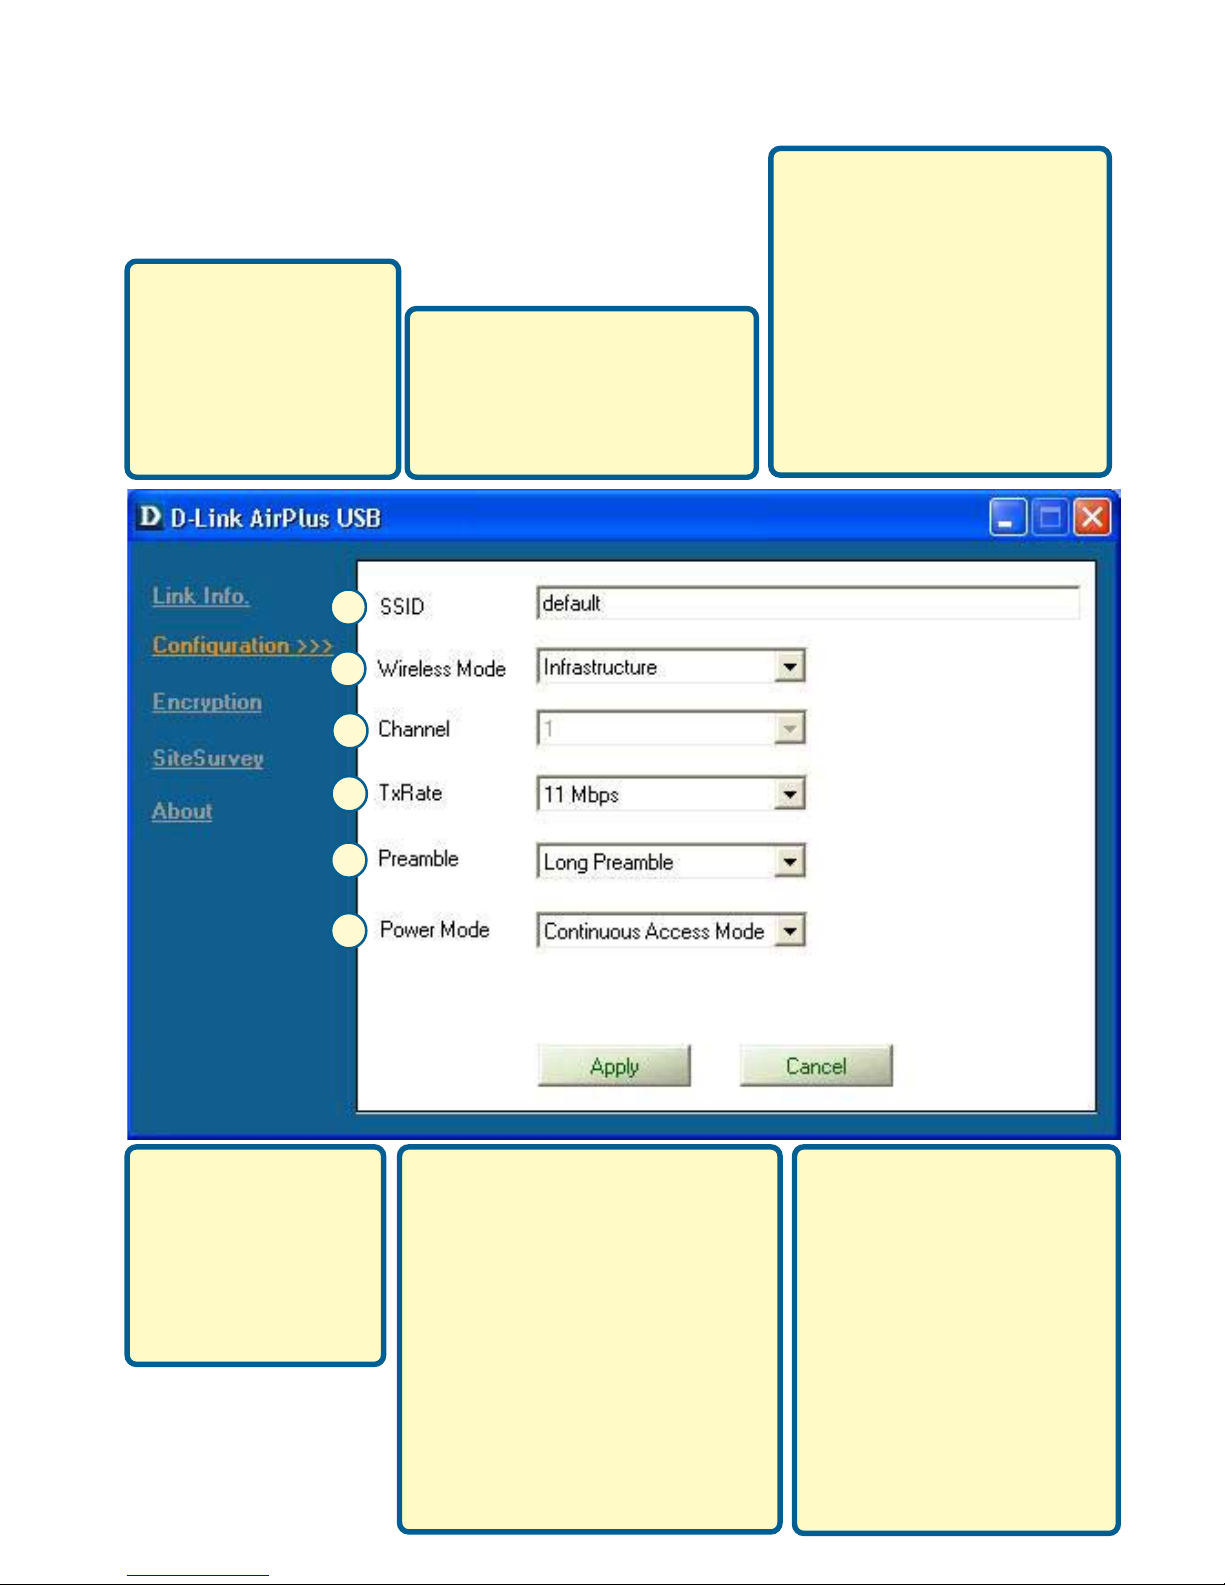
J. TxRate: You can
adjust the transmission rate to get the
best signal possible
depending on your
usage and environment.
L. Power Mode: By
default, Power Mode is
set to Continuous
Access Mode. Continu-
ous Access Mode - this
default setting consumes the most power.
Maximum Power Save this setting consumes
the lease power. Power
Save - this setting
consumes a moderate
amount of power.
K. Preamble: By default, D-Link
AirPlus Products are set to Long
Preamble. The Preamble
defines the length of the CRC
block (Cyclic Redundancy
Check is a common technique
for detecting data transmission
errors) for communication
between the Access Point and
wireless network adapters.
High network traffic areas shout
use the Shorter Preamble type.
G
L
K
J
I
H
H. Wireless Mode: The factory
setting is set to Infrastructure Mode. Ad-Hoc mode is
used for peer-to-peer networking.
Appendix (cont.)
I. Channel: By Default, the
channel is set to 6. Channel
selection is automatically
determined by the DWL120+ depending on the
channel setting of the
access point selected for
association. To change the
channel settings, the
Wireless Mode must be set
to Ad-Hoc.
B. SSID: The Service
Set Identifier is the
name assigned to
the wireless network.
The factory SSID
setting is set to
default.
Page 10
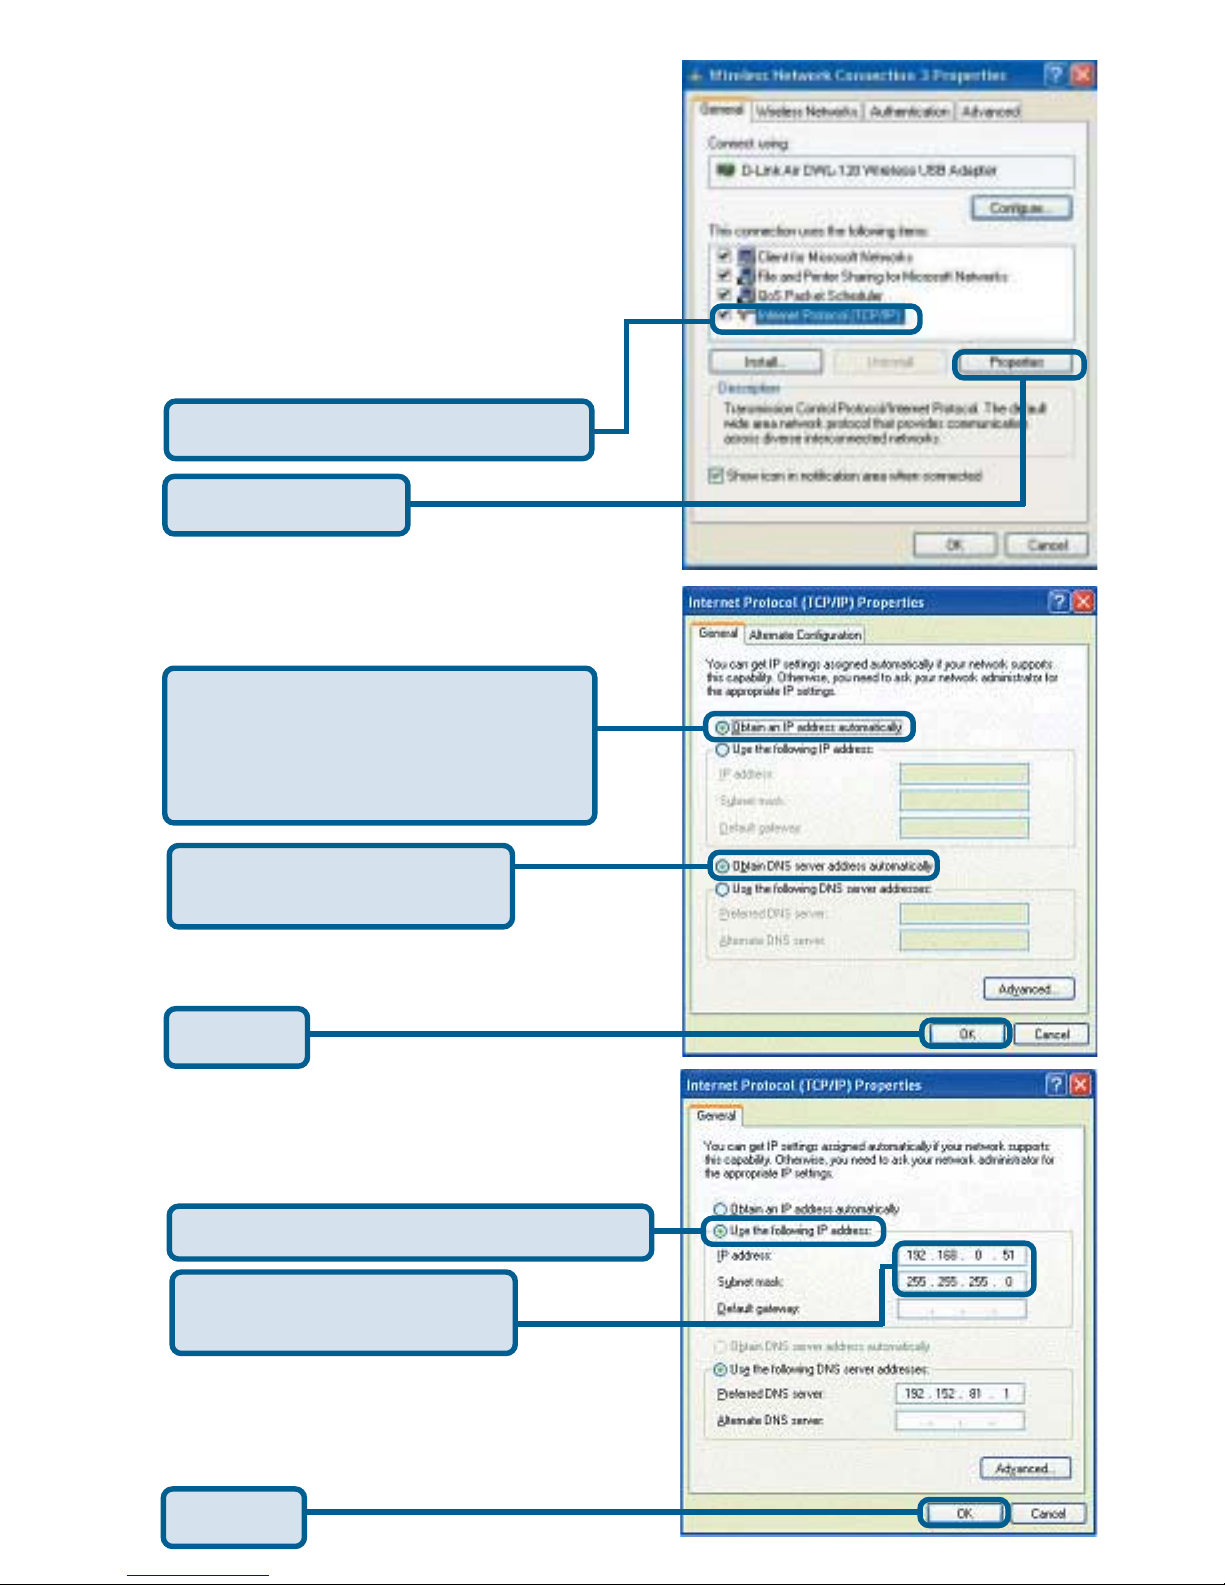
IP Address Configuration
To connect to a network, make sure
the proper network settings are
configured for DWL-120+.
For Microsoft Windows XP:
Go to Start > right click on
My Network Places >
select Properties > Double-click on
the Network Connection associated
with the DWL-120+.
Input a static IP address in the same
range as the Wireless Router or
Access Point.
Static IP address setup
Click OK
IP address: 192.168.0.51
Subnet mask: 255.255.255.0
Click OK
Click Internet Protocol (TCP/IP)
Click Properties
Select Obtain an IP address
automatically (if the Wireless
Router or Access Point has DHCP
server enabled)
Select Obtain DNS server
address automatically
Dynamic IP address setup
Used when a DHCP server is available on
the local network. (i.e. Router)
Used when a DHCP server is not available
on the local network.
Select Use the following IP address
Page 11
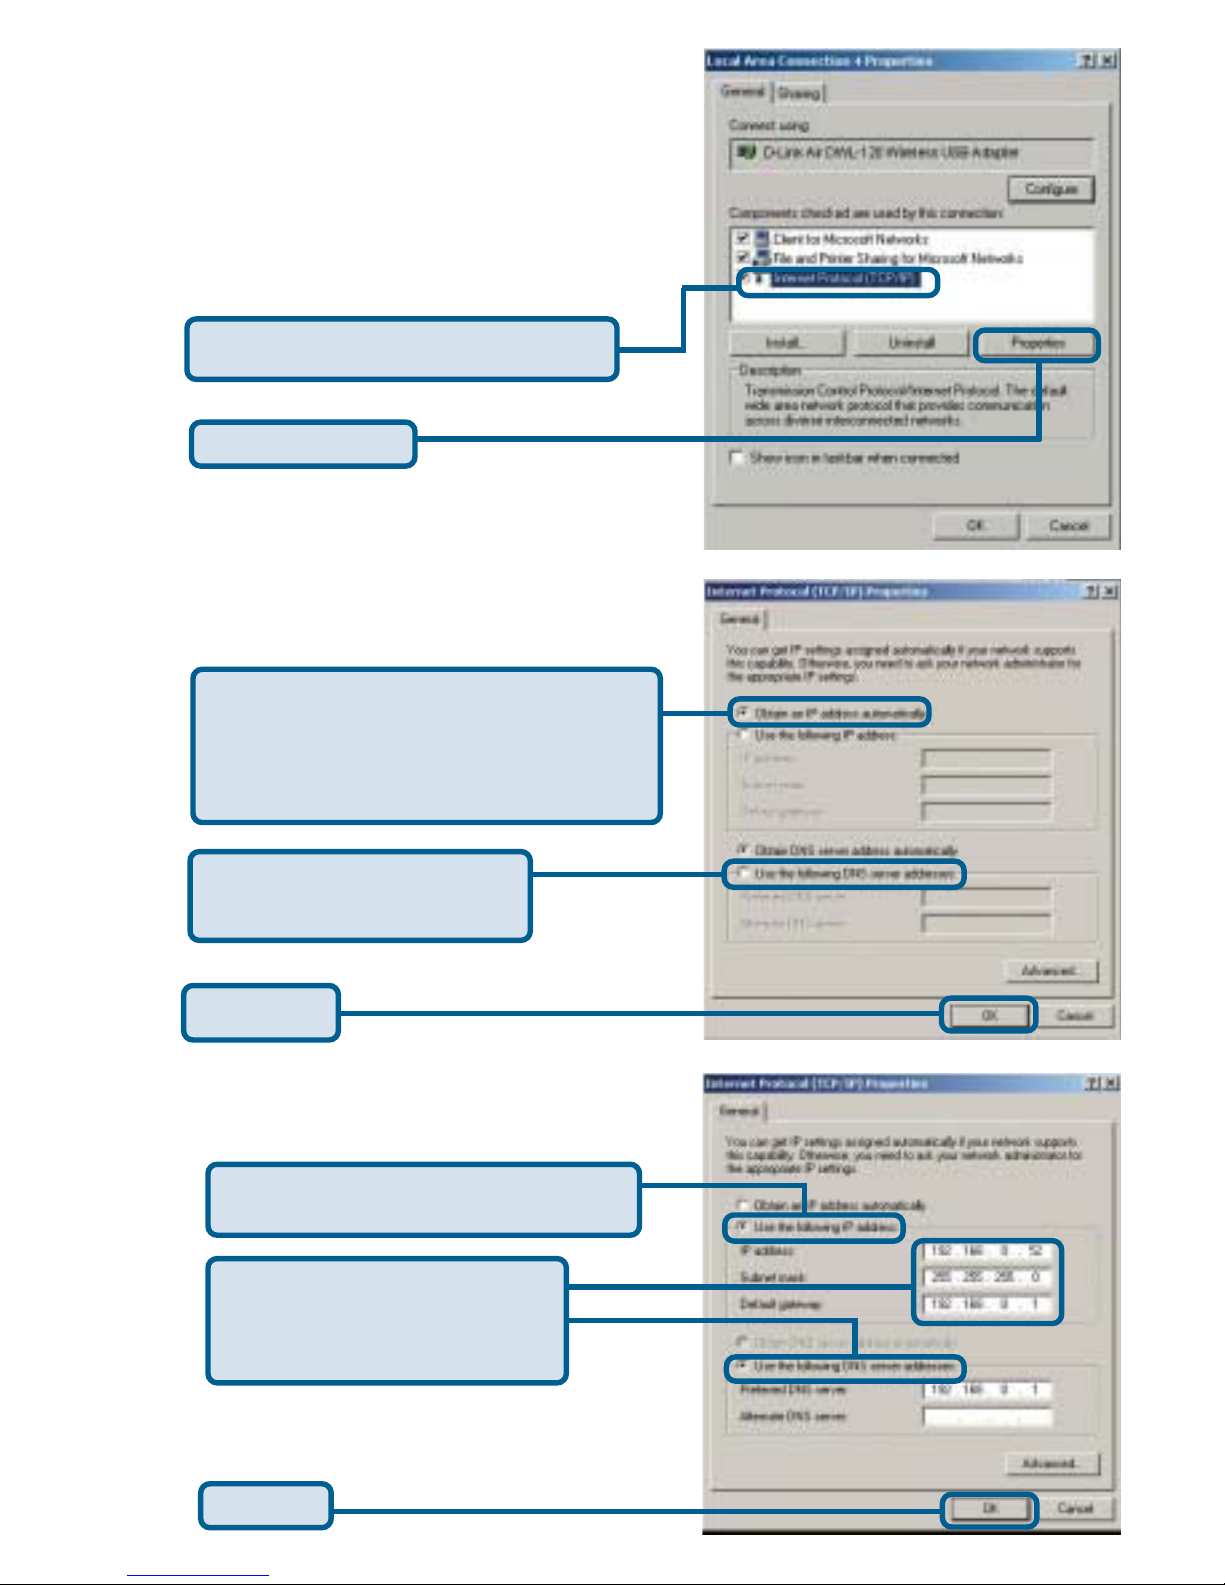
For Windows 2000 users:
Go to Start > Settings > Network and
Dial-up Connections > Double-click on
the Local Area Connection associated
with the DWL-120+ > select Properties
Used when a DHCP server is available on
the local network. (i.e. Router)
Static IP address setup
Input a static IP address in the same
range as the Wireless Router or
Access Point.
Click Properties
Click OK
Click OK
Click Internet Protocol (TCP/IP)
Select Obtain an IP address
automatically (if the Wireless Router
or Access Point has DHCP server
enabled)
Select Obtain DNS server
address automatically
Select Use the following IP
address
Dynamic IP address setup
Used when a DHCP server is not available
on the local network.
IP address: 192.168.0.52
Subnet mask: 255.255.255.0
Default Gateway: 192.168.0.1
DNS Address: 192.168.0.1
Page 12
Technical Support
Y ou can find software updates and user document ation on the D-Link website.
D-Link provides free technical support for customers within the United S tates and
within Canada for the duration of the warranty period on this product.
U.S. and Canadian customers can contact D-Link technical support through our
website, or by phone.
Tech Support for customers within the United States:
D-Link Technical Support over the Telephone:
(877) 453-5465
24 hours a day , seven days a week.
D-Link Technical Support over the Internet:
http://support.dlink.com
email:[email protected]
Tech Support for customers within Canada:
D-Link Technical Support over the Telephone:
(800) 361-5265
Monday to Friday 8:30am to 9:00pm EST
D-Link Technical Support over the Internet:
http://support.dlink.ca
email:[email protected]
 Loading...