

Page 1

CCoonntteennttss
Package Contents------------------------------------------ 1
Introduction ----------------------------------------------------------1
Getting To Know Your USB 2.0 MPEG 1/2/4 Video Converter ------2
Features and Benefits ------------------------------------------------2
Recording Video to a Recordable Disc -------------------- 3
Reference Table-------------------------------------------------------3
Tutorial I (Quality-Oriented) ------------------------------ 3
Step 1: Record Videos -----------------------------------------------3
Step 2: Convert Recorded Files--------------------------------------5
Step 3: Make a DVD/SVCD/VCD/DATA VCD ------------------------8
Tutorial II (Time-Savings Solution) ----------------------- 12
Step 1: Record and Convert Videos ---------------------------------12
Step 2: Make a VCD--------------------------------------------------14
Page 2
PPaacckkaaggee CCoonntteennttss
Contents of Package
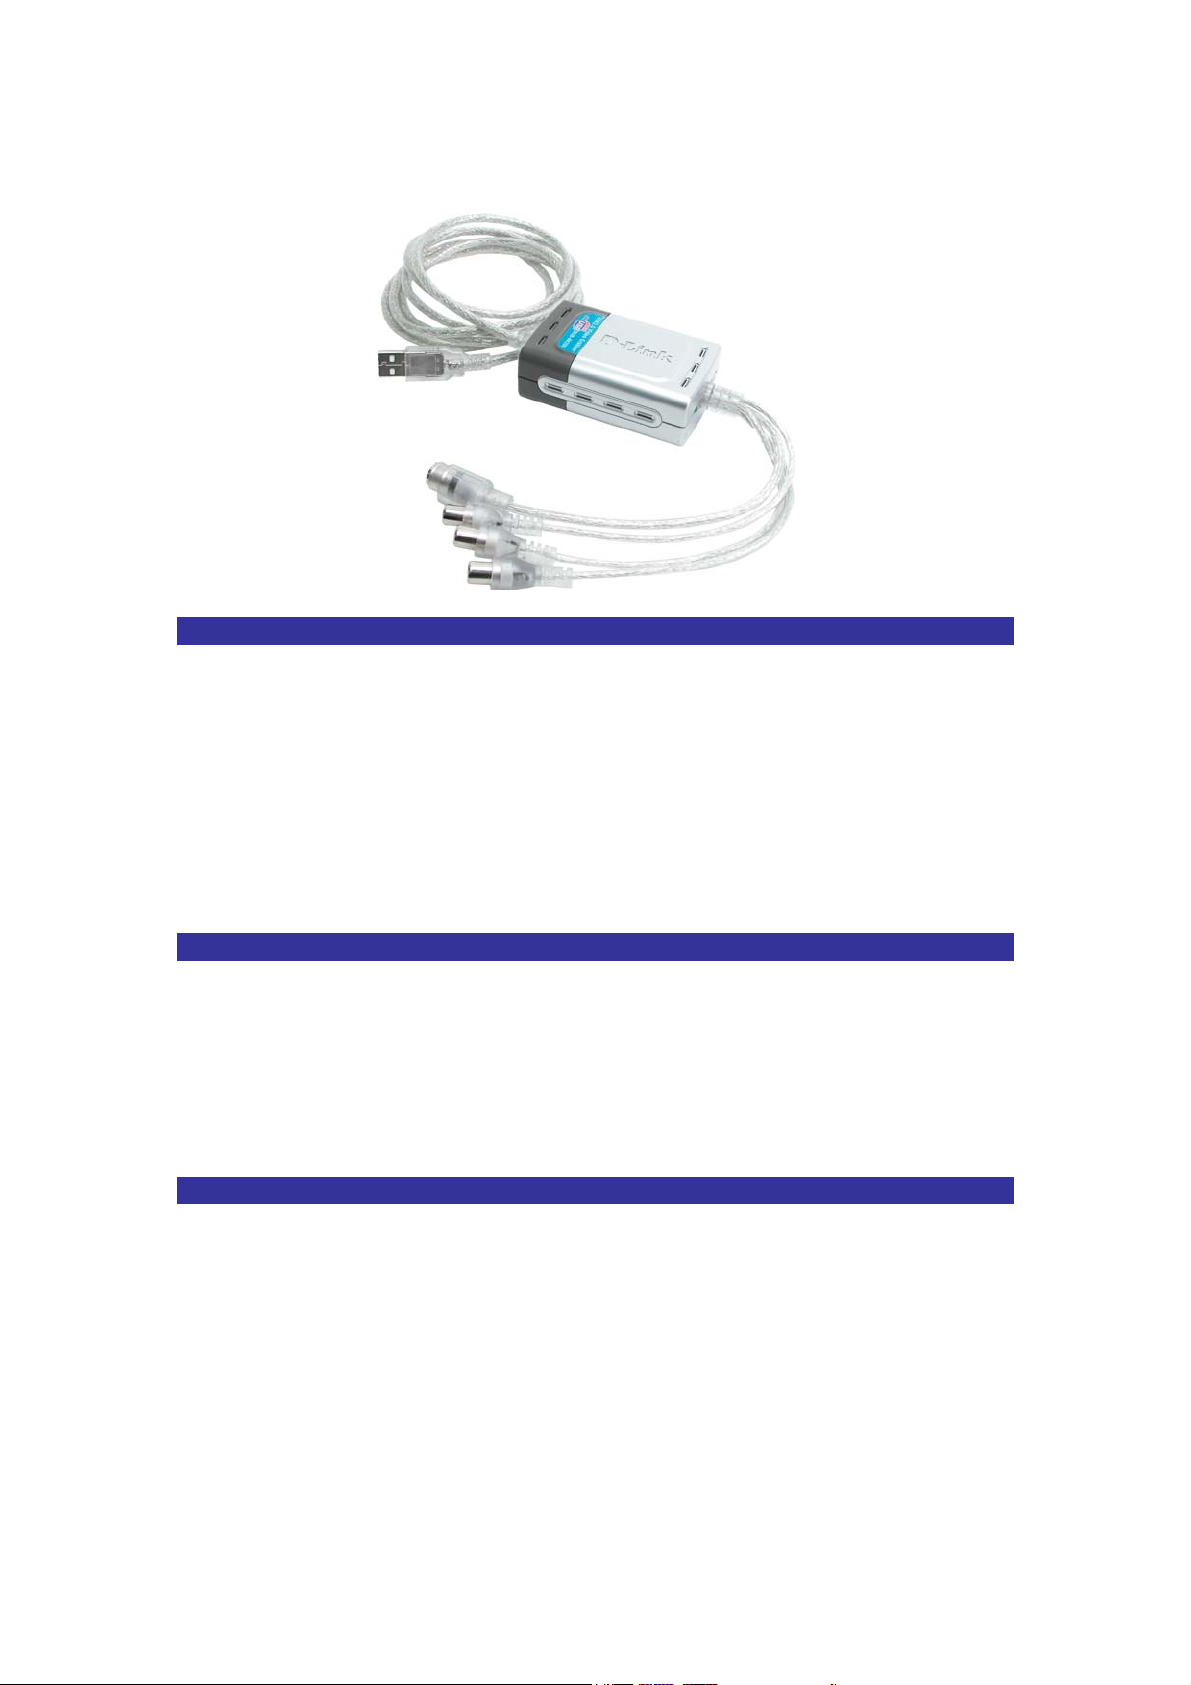
D-Link DUB-AV200 USB 2.0 MPEG 1/2/4 Video Converter
Power Adapter
Driver/Video Editing Software on CD
Quick Installation Guide
If any of the above items are missing, please contact your reseller.
System Requirements
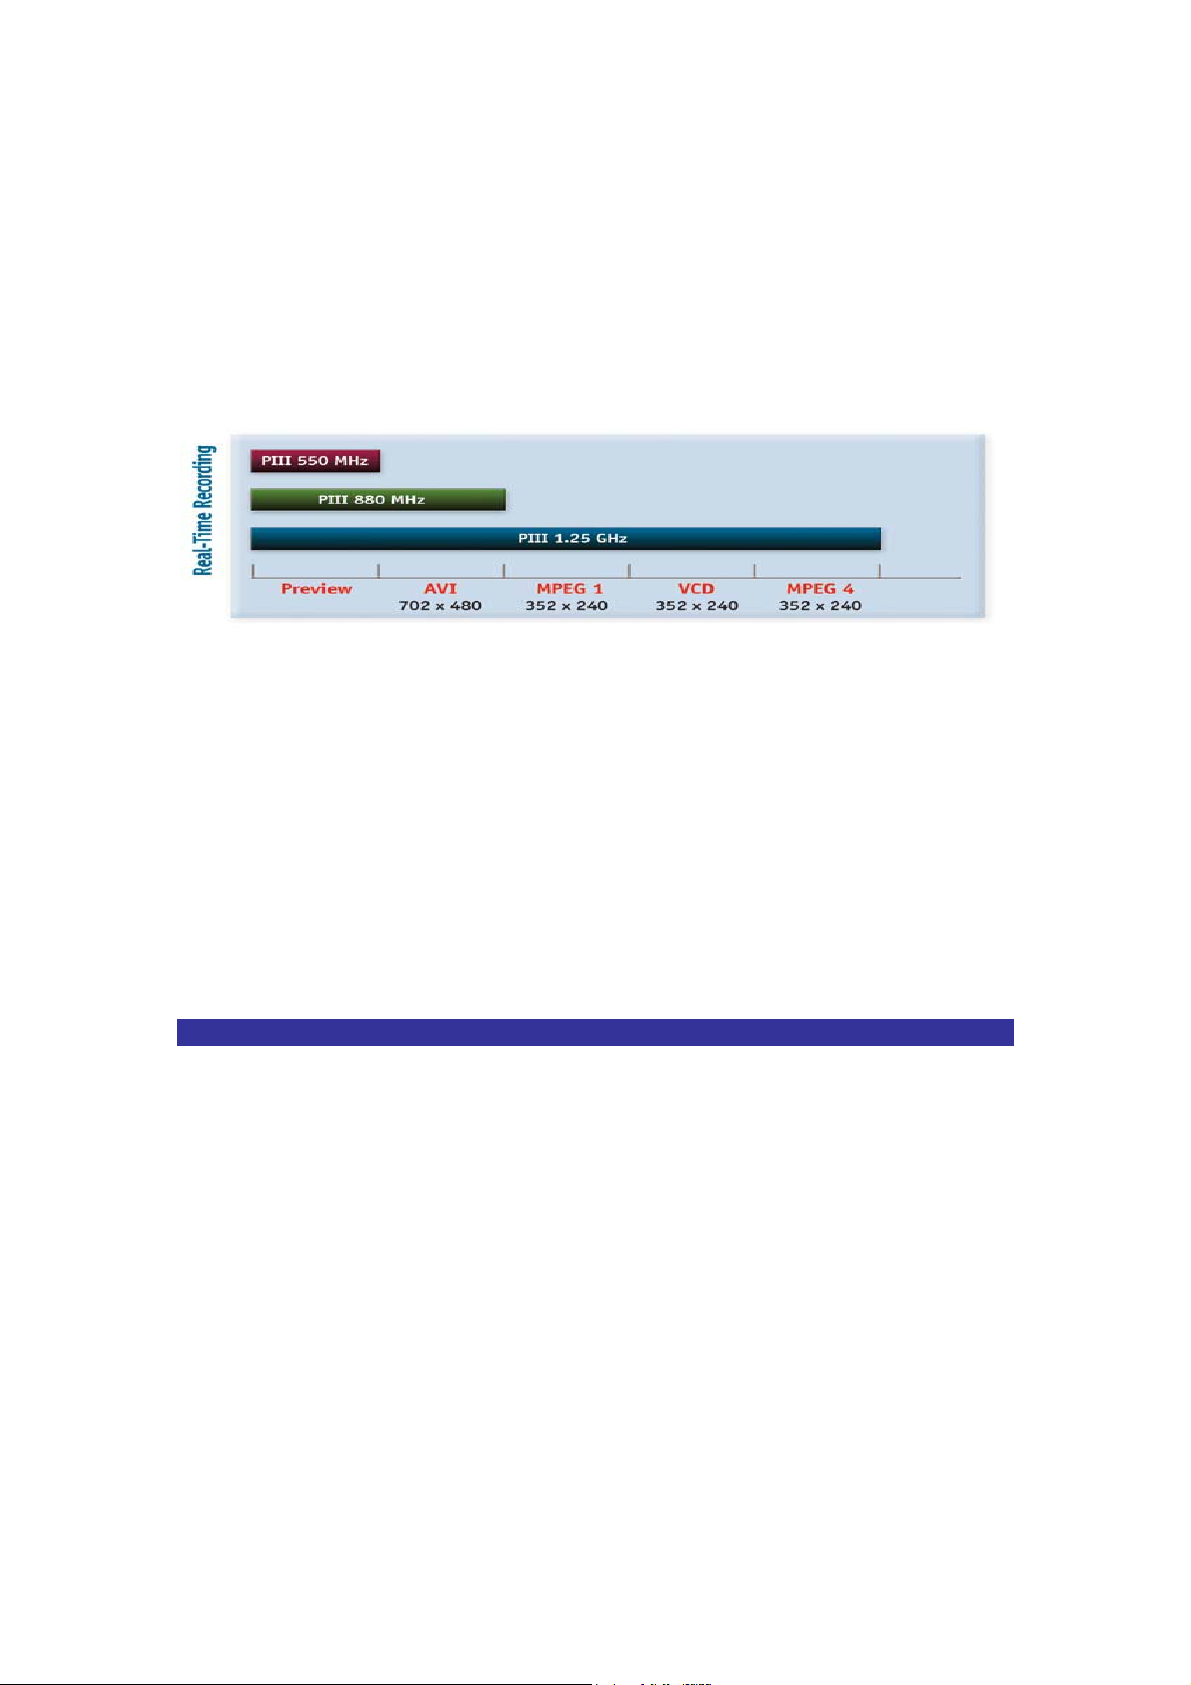
Pentium III 550MHz or Above
Microsoft Windows XP, 2000, Me, 98SE
One Available USB Port (USB 2.0 Recommended)
VGA Card with 8MB RAM
Introduction
The D-Link DUB-AV200 is an advanced video-capture and display device which provides
you with a “high quality PC Theater” solution. The D-Link DUB-AV200 allows you to
capture 30 frames per second (fps) while giving you up to 704x480 resolution for a high
quality video image on a PC or notebook using USB2.0. The DUB-AV200 captures CD
quality stereo audio with a 16 bit, 48KHz sampling rate and provides audio/video
synchronization. The “snapshot” function lets you catch 704x480 still images from your video
source.
With the user-friendly program, DVD Plus, you can easily transfer the captured audio/video
1
Page 3
bit stream into other standard formats such as AVI, MPEG4,VCD and DVD.
Please read the information below which is aimed to assist you in using the DVD Plus
software with your DUB-AV200 Video Converter.
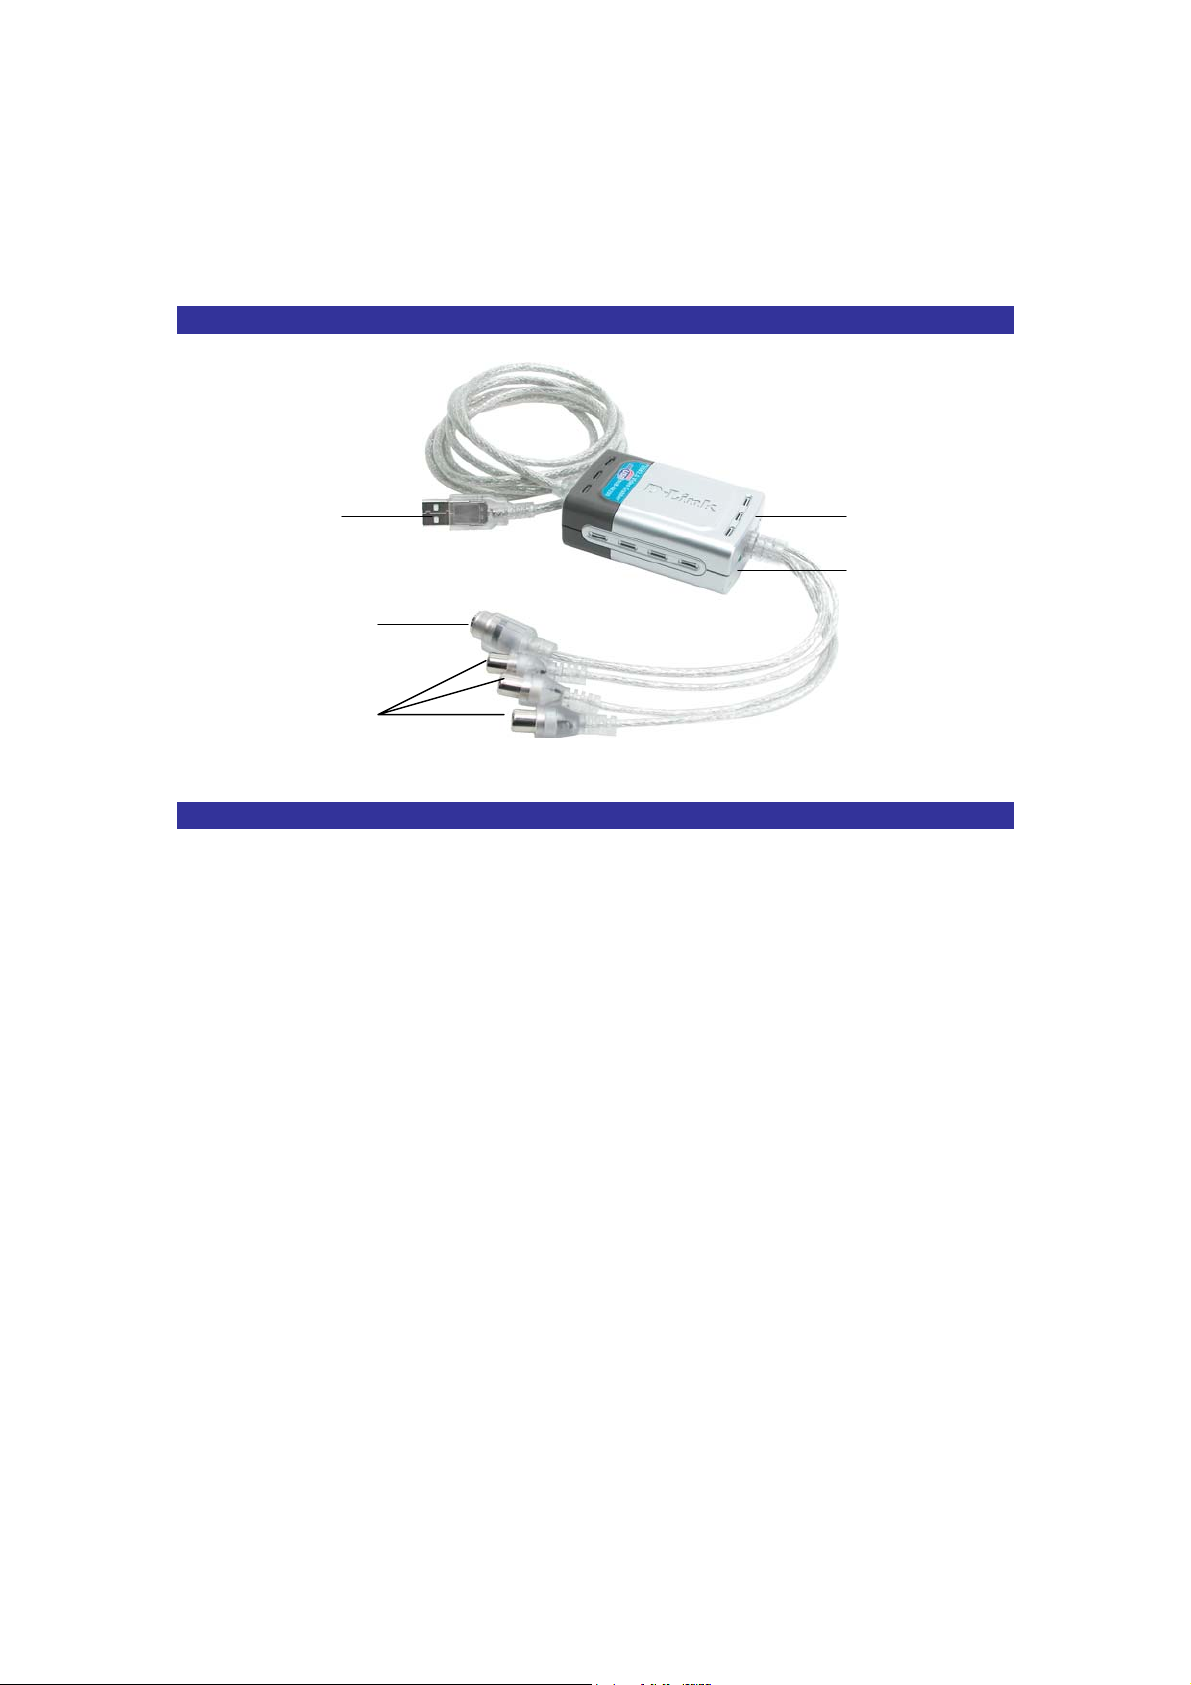
Getting To Know Your USB 2.0 MPEG 1/2/4 Video Converter
USB
Connector
S-Video
Jack
Composite
Video Jacks
Features and Benefits
Professional Snap-Shot Still Image Capture
Analog to Digital Video Convert
704 x 480 (NTSC) @ 30fps High Quality Resolution
704 x 576 (PAL) @ 25fps High Quality Video
Audio Capture & A/V Synchronization Function
Saturation/Contrast/Hue/Brightness Adjustment
Reset
Button
Indicator
Light
Create MPEG Movies
Direct Burn-to-Disc of Recorded MPEG1 /2 with CD/DVD Burner
Video Editing Software Include
2
Page 4
RReeccoorrddiinngg VViiddeeoo ttoo aa RReeccoorrddaabbllee DDiisscc
In the following two tutorials, you will be guided through the procedure of transferring
captured video files to a recordable compact disc. TUTORIAL I illustrates the 3-step process
to capture video. TUTORIAL II presents a 2-step operation to make a Video CD (VCD).
Please read this manual to learn more about recording video to a recordable disc using your
versatile DUB-AV200.
TTuuttoorriiaall II ((QQuuaalliittyy--OOrriieenntteedd))
This tutorial condenses the previously complex task of making a video CD or DVD of your
own into the following three-step processvia using DVD Plus.
1. Recording video clips via DVR
2. Converting recorded files via MPEG Encoder
3. Making a CD via DVD Maker
Follow the sequence of the three applications above (found on the application bar on the DVD
Plus software) to easily create your own video CD or DVD.
Step 1: Record Videos
The process of capturing video from the input video source is:
a) Launch DVR.
b) Choose Property Settings to adjust the advanced configuration for recording (if
needed.)
c) Select an input source.
d) Click the REC button to start recording and click it again to stop recording.
e) The captured video clips have been recorded to your computer’s hard drive..
3
Page 5
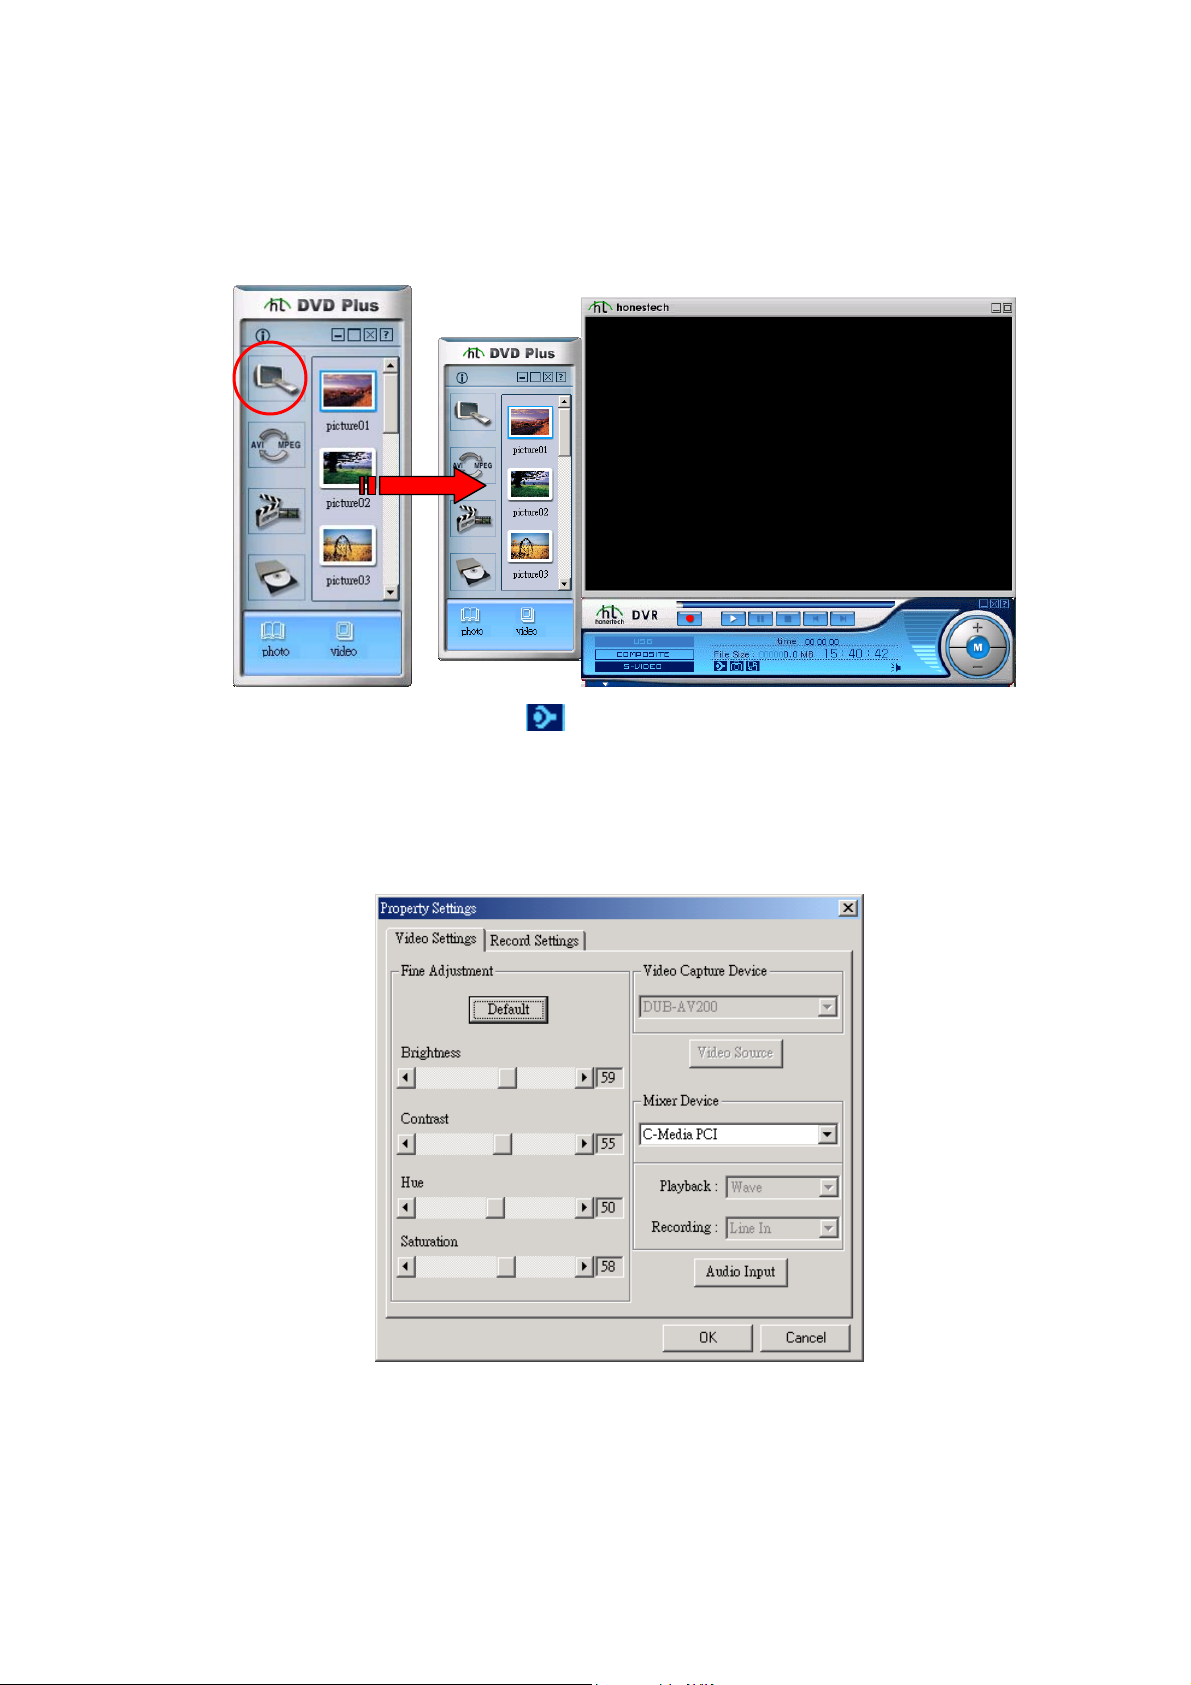
Step by step instructions to start recording:
1. Double-click DVR on the application bar of your DVD Plus interface to launch
DVR.
Preview Window
2. Choose Property Settings
Settings dialog box, where you adjust the recording settings.
3. On the Video Settings tab, drag the Brightness, Contrast, Hue, and Saturation
sliders in the Fine Adjustment field to make adjustments of the video image. You
can choose Default to accept the default video settings.
from the navigation panel to open the Property
4. Click the Record Settings tab to adjust the following configuration settings:
i. Specify the Recording type as Video + Audio.
ii. Define the video format as D-Link (704x480), MPEG1 (352x240), MPEG4
(352x240), or VCD (352x240) for the recorded video clips according to your
4
Page 6
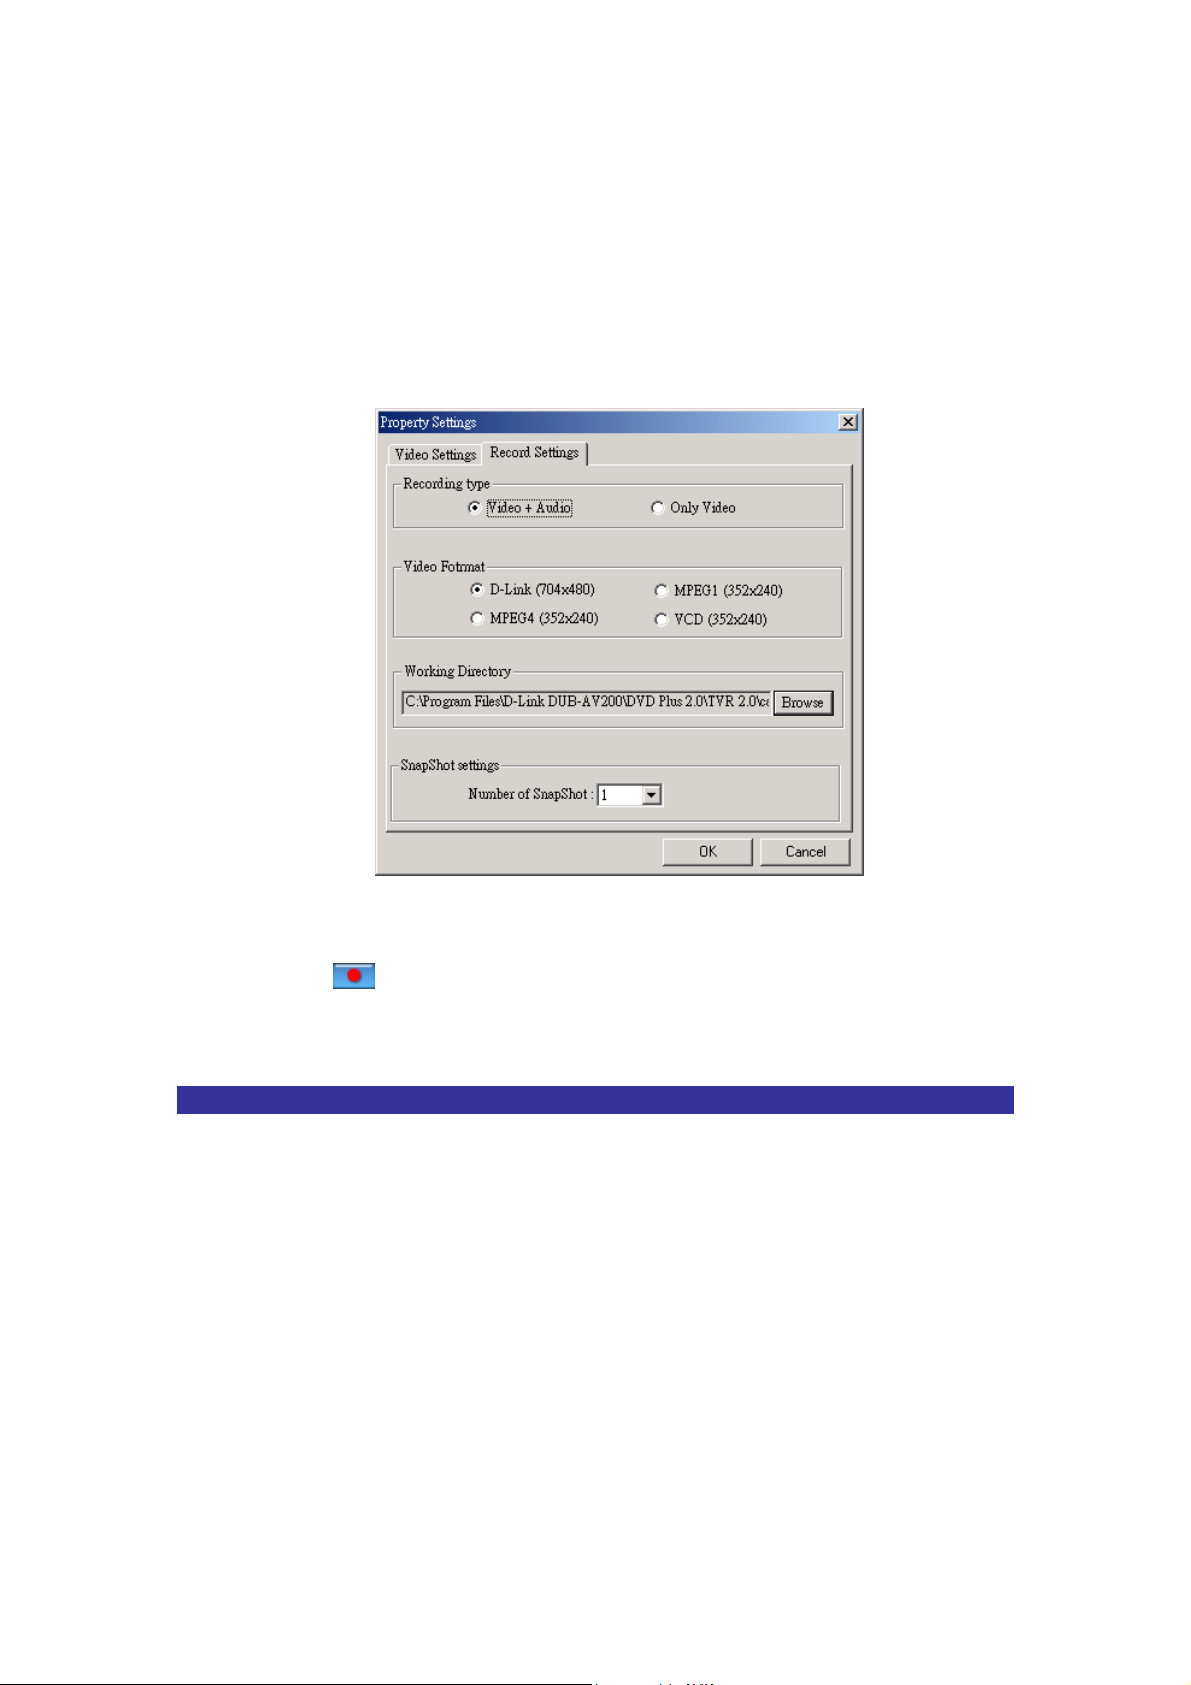
needs. You can convert a recorded file into another file format layer by using
the MPEG Encoder afterwards.
iii. Enter the location where the recorded video clips will be saved by clicking
Browse in the Working Directory field. In the opened Change Folder
dialog box, specify the intended directory and then click OK to save the file.
iv. Then click OK to activate all the settings and close the Property Settings
dialog box.
5. Select input source as Composite or S-Video on the left side of the navigation
panel.
6. Press
file has been added to the system and can be accessed from the Video Folder
window after stopping the recording.
to start recording and press it again to stop recording. The recorded
Step 2: Convert Recorded Files
The recorded video clip needs to be converted into video formats to be played, and MPEG
Encoder performs the conversion of video files into MPEG-1 or MPEG-2 files. With a few
mouse clicks, video files created in AVI, DV-AVI, MPEG-1, MPEG-2, ASF, WMV, or DIVX
formats can be transferred to MPEG 1 or 2 format.
The process of converting video files is:
a) Launch MPEG Encoder.
b) Input the video files you intend to encode.
c) Specify the desired file format.
d) Convert the input files.
5
Page 7
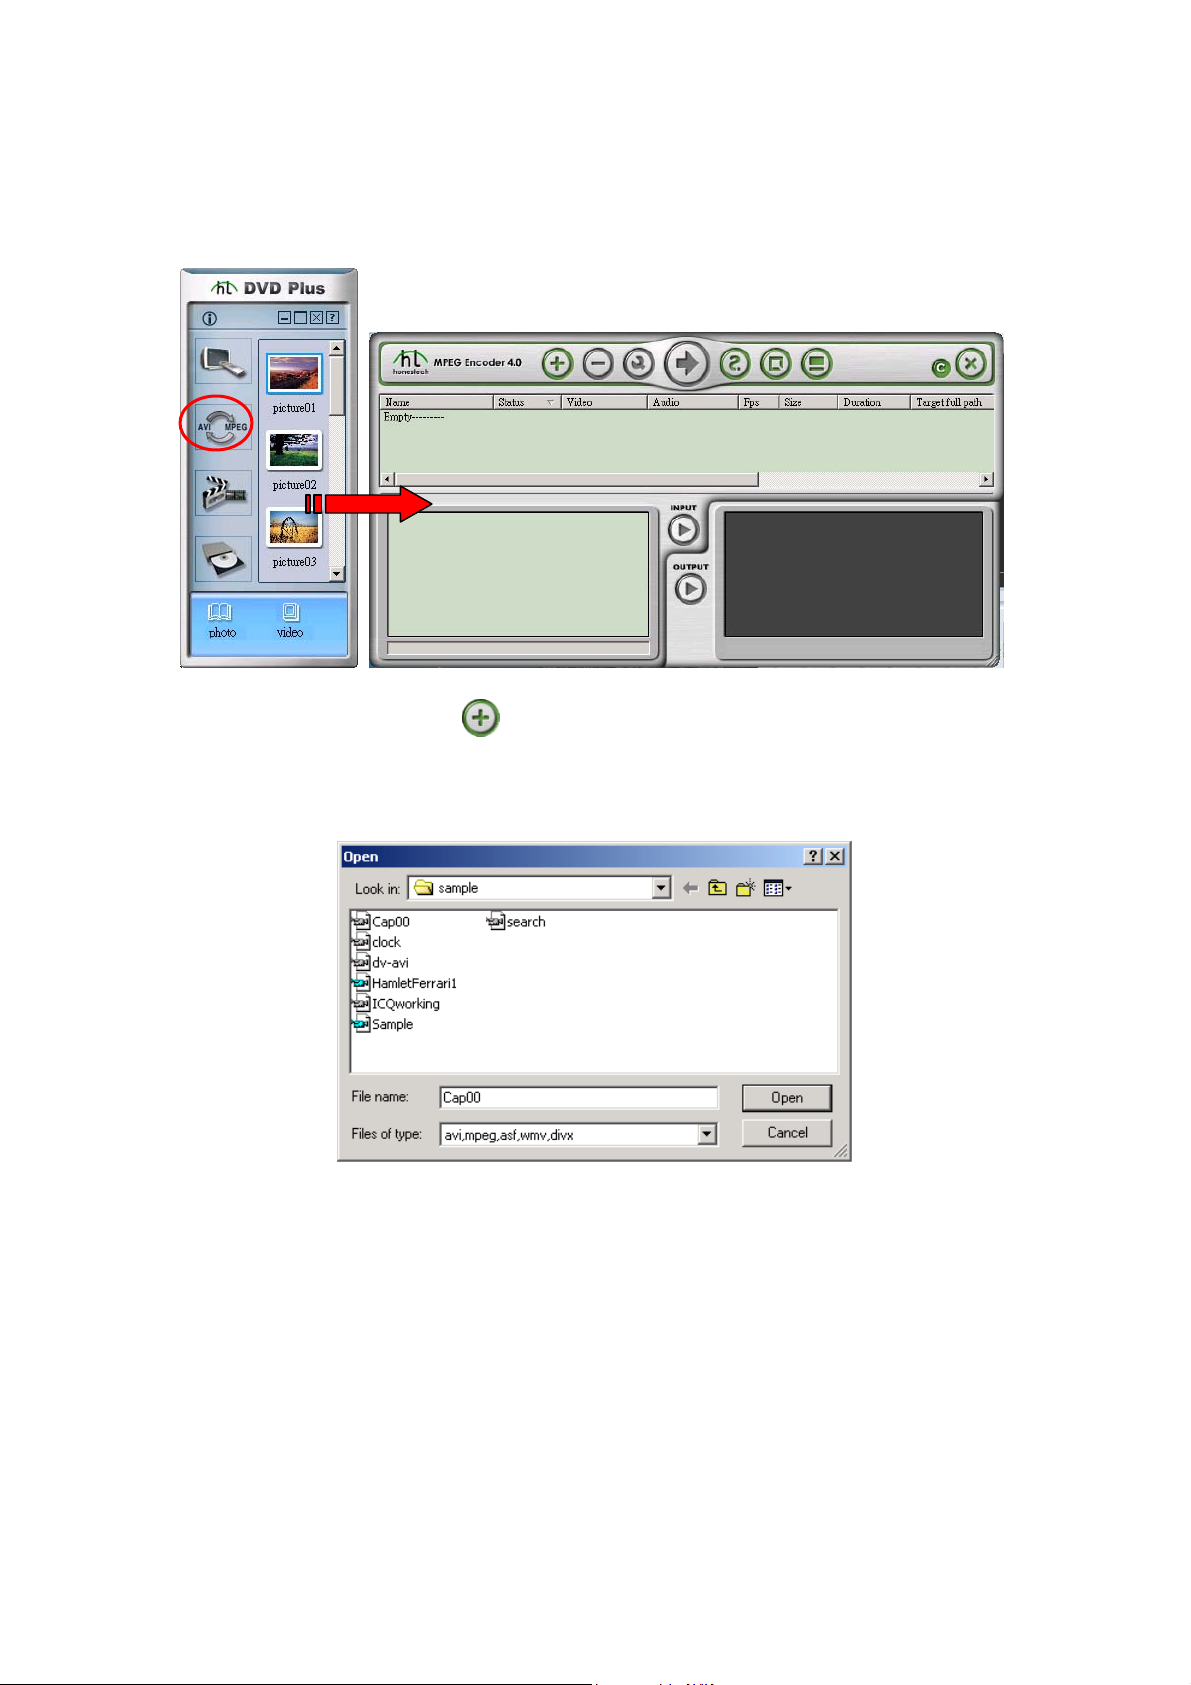
Converting Video Files Using MPEG Encoder:
1. Double-click MPEG Encoder on the application bar of your DVD Plus interface to
launch MPEG Encoder.
2. Choose the Add button
on the MPEG Encoder interface to open the Open
window, from which you can indicate the directory and video files you want to open for
encoding. Click Open when you are done.
3. After choosing the Open button in the Open window, the Option dialog box will be
displayed as shown in the screen below:
6
Page 8
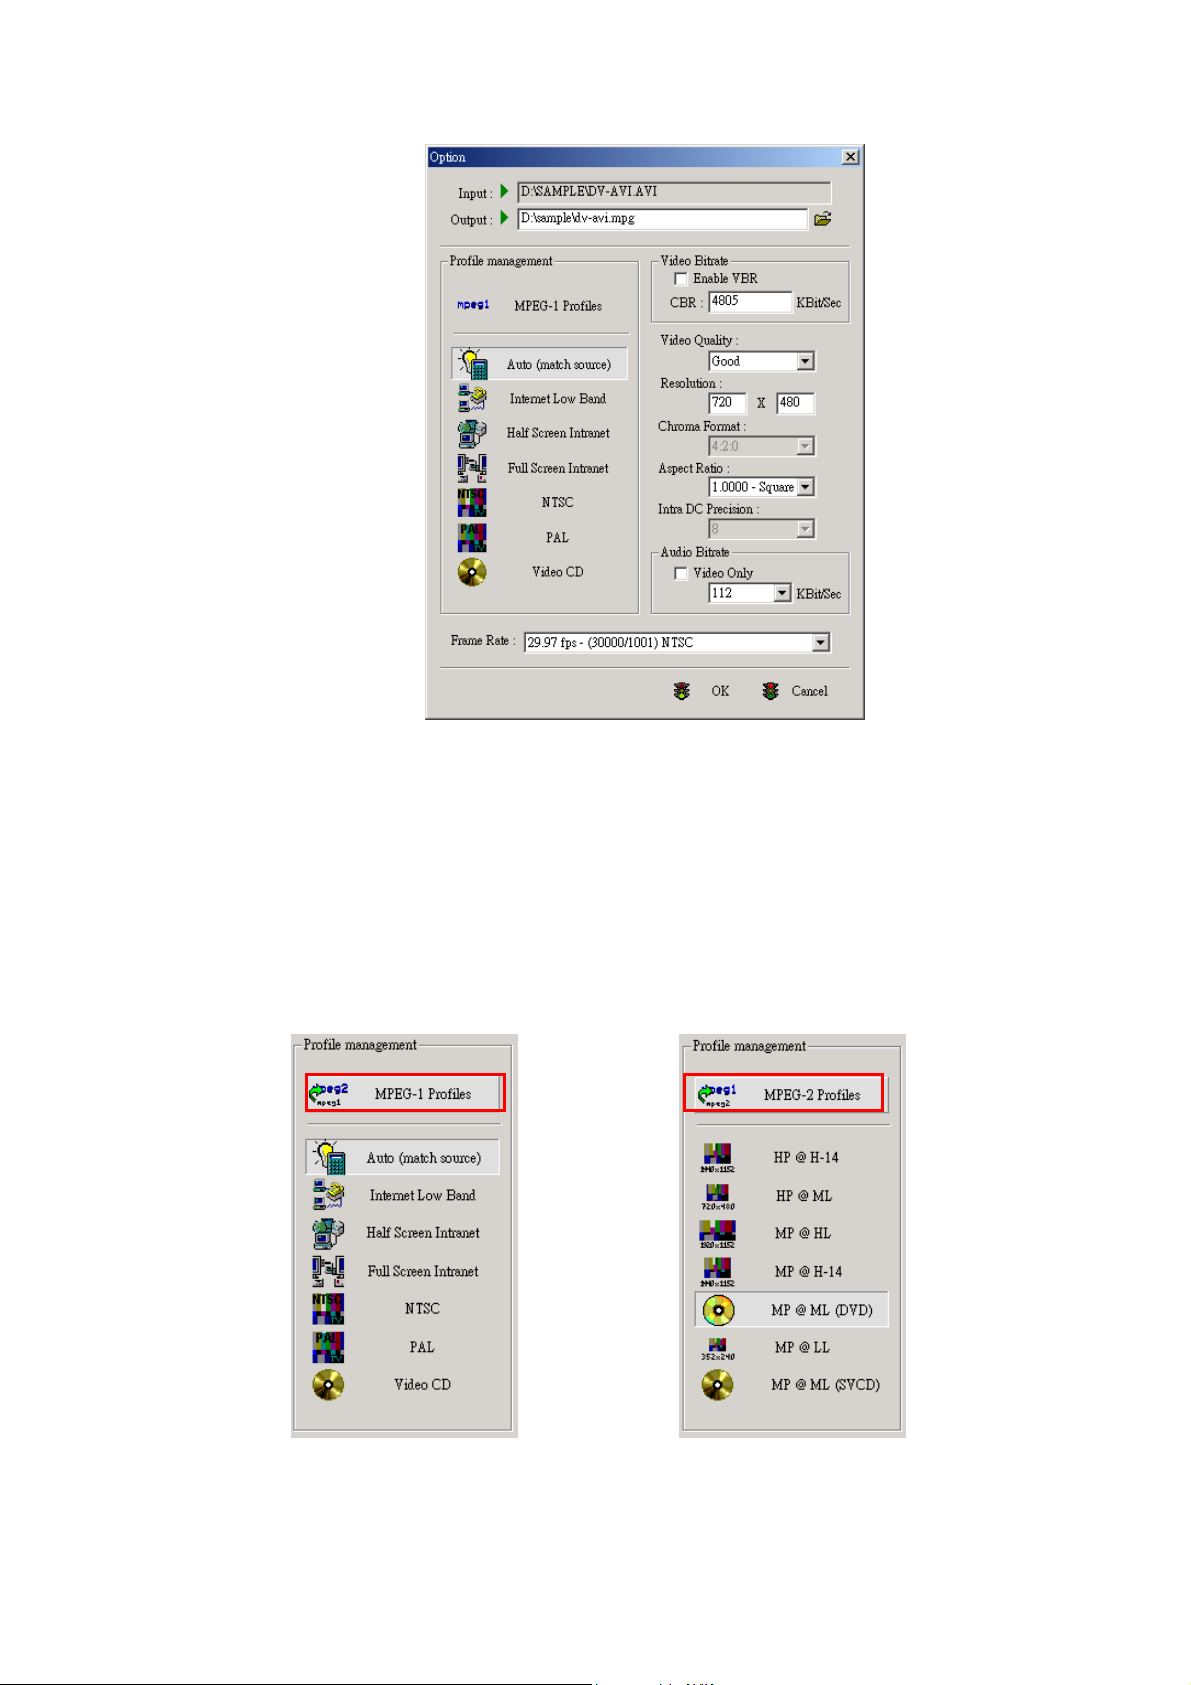
Enter the video file name in the Input field. Click the folder icon on the right of the
Output field to set a location where the converted file will be stored later. To change the
file name for the encoded file, you can directly edit a new name in the Output box, or
keep the default location and file name.
4. In the Profile management pane, define the target file format as MPEG-1 Profiles or
MPEG-2 Profiles for the chosen video file. Next, click one option from the submenu of
the preferred profile item. The screens below illustrate the differences between the
submenus of both profiles.
7
Page 9

The list below provides you general information on corresponding relationships between
a specified profile and a type of disc:
VCD
(Video Compact Disc)
DVD
(Digital Versatile Disc)
SVCD
(Super Video Compact Disc)
For MPEG-1 video of good quality that you can play on your
VCD or DVD player.
For MPEG-2 video of high quality that you can play on your
DVD player.
For MPEG-2 video of high quality that you can play on your
VCD or DVD player.
5. Please note that the settings of the Video Quality on the right pane of the Option dialog
box will vary according to the settings you chose in the Profile management pane.
However, you still can define these features according to your specific needs.
6. Before clicking OK to activate these settings, make sure the state of Frame Rate is
29.97fps –(30000/1001) NTSC.
7. The chosen file will be displayed in the upper pane of the MPEG Encoder’s interface.
Click the file name you want to encode and then choose the Encoding button
to
start converting the file into desired file format. The Encoding button becomes the Stop
button
. During the process of encoding, you may choose the Stop button if to
terminate the conversion.
8. When the Status column in the upper pane displays Done, the process of encoding is
complete.
Step 3: Make a DVD/SVCD/VCD/DATA CD
The last step to create a video CD or DVD is to transfer (or “burn”) your encoded material to
a recordable disc. Before starting the disc-burning process, if you wish to have your prepared
video clips edited, launch MPEG Editor from the application bar.
Here is a quick look at a typical disc burning session:
a) Launch DVD Maker.
b) Define a disc format.
c) Add video files.
d) Design a menu if you are making a DVD.
e) Burn the videos to the disc.
Burning Your Video File to a Disc:
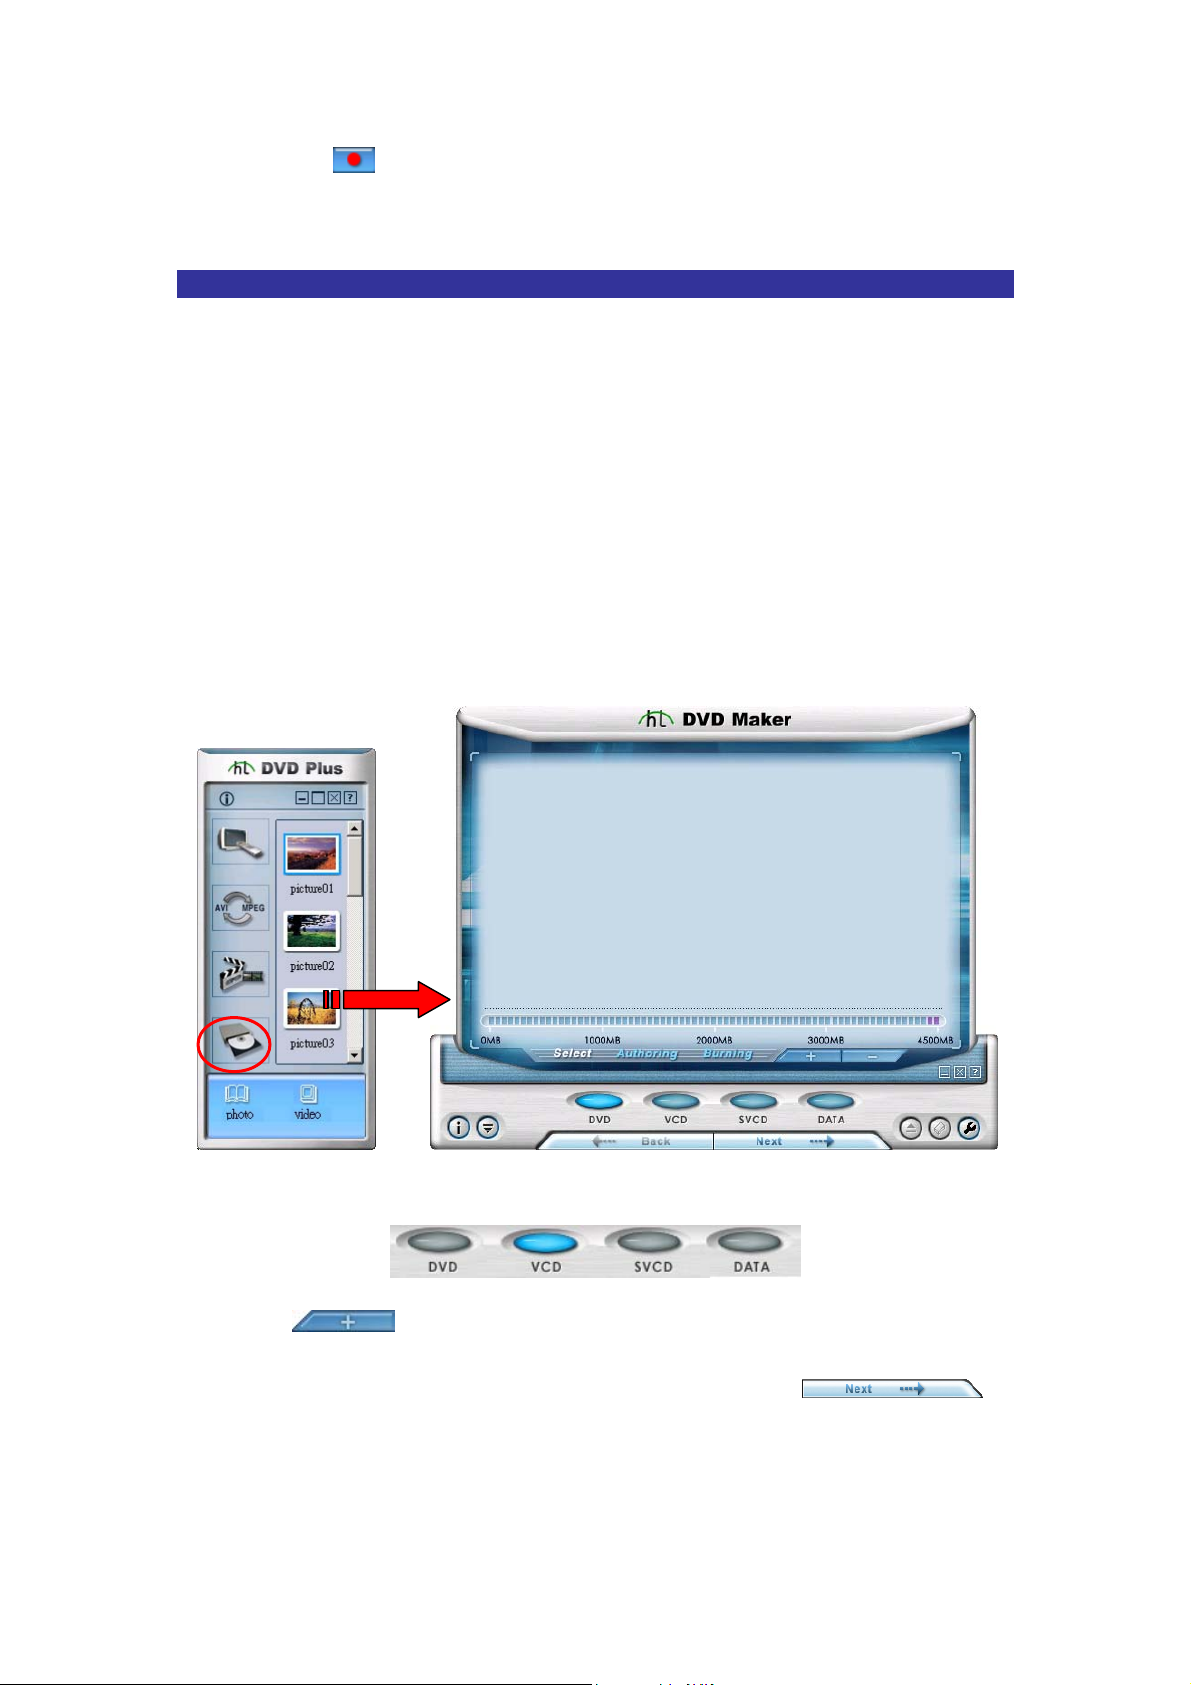
1. Double-click DVD Maker on the application bar of your DVD Plus’s interface to
launch DVD maker.
8
Page 10
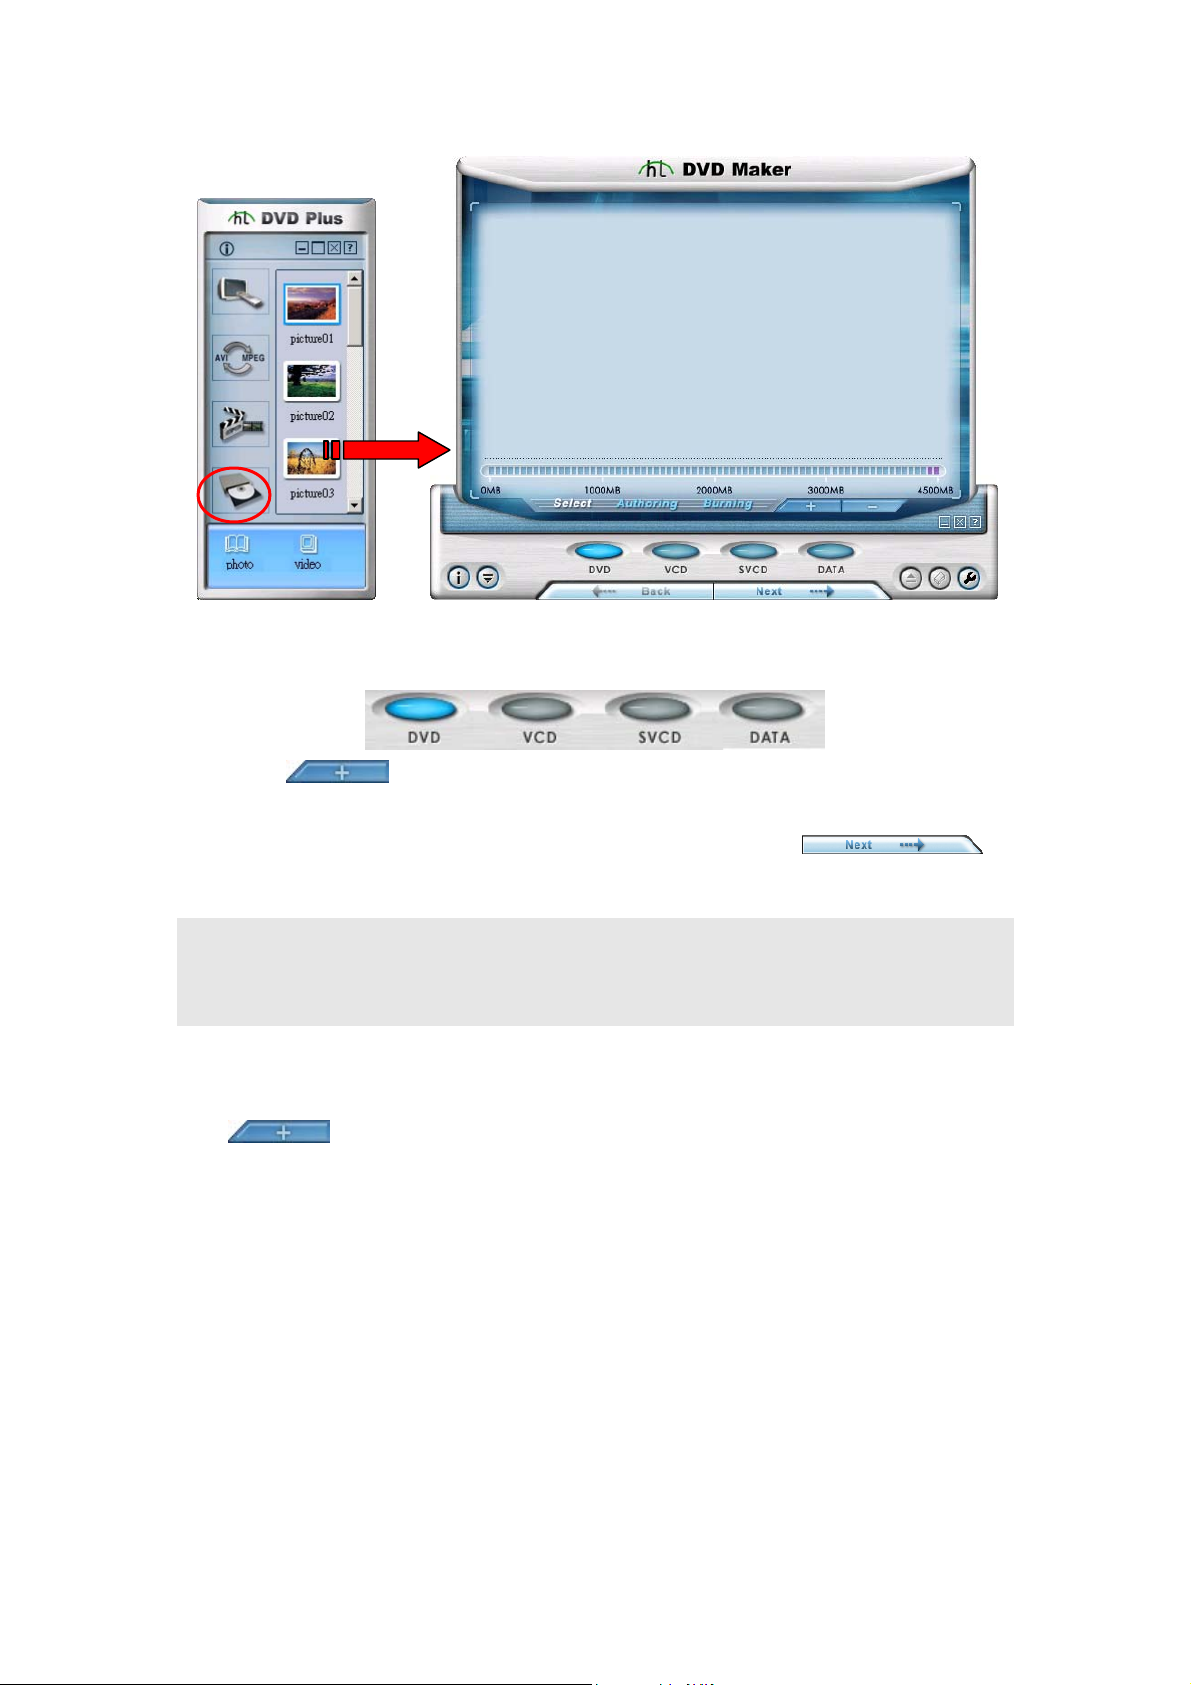
2. Specify a disc type by clicking the DVD, VCD, SVCD, or DATA icon below the
thumbnail window.
3. Click
to open the Open window. From the window, choose the desired
video files and then click Open to add them to the thumbnail window.
4. When you have gathered all the intended video items, select
to
proceed.
Note: If you chose to make a DVD at step 2, you will be led to the step of Authoring a menu template, which will
be shown as the startup page while playing your DVD on a DVD player. Check Step 5 to proceed. Otherwise,
please skip to Step 6 to start burning a CD.
5. Select a menu template that you want to change on the Page pane, and choose a
template from the images displayed below the thumbnail window. You can click the
button to add any existing image on your hard disk to the menu template.
9
Page 11
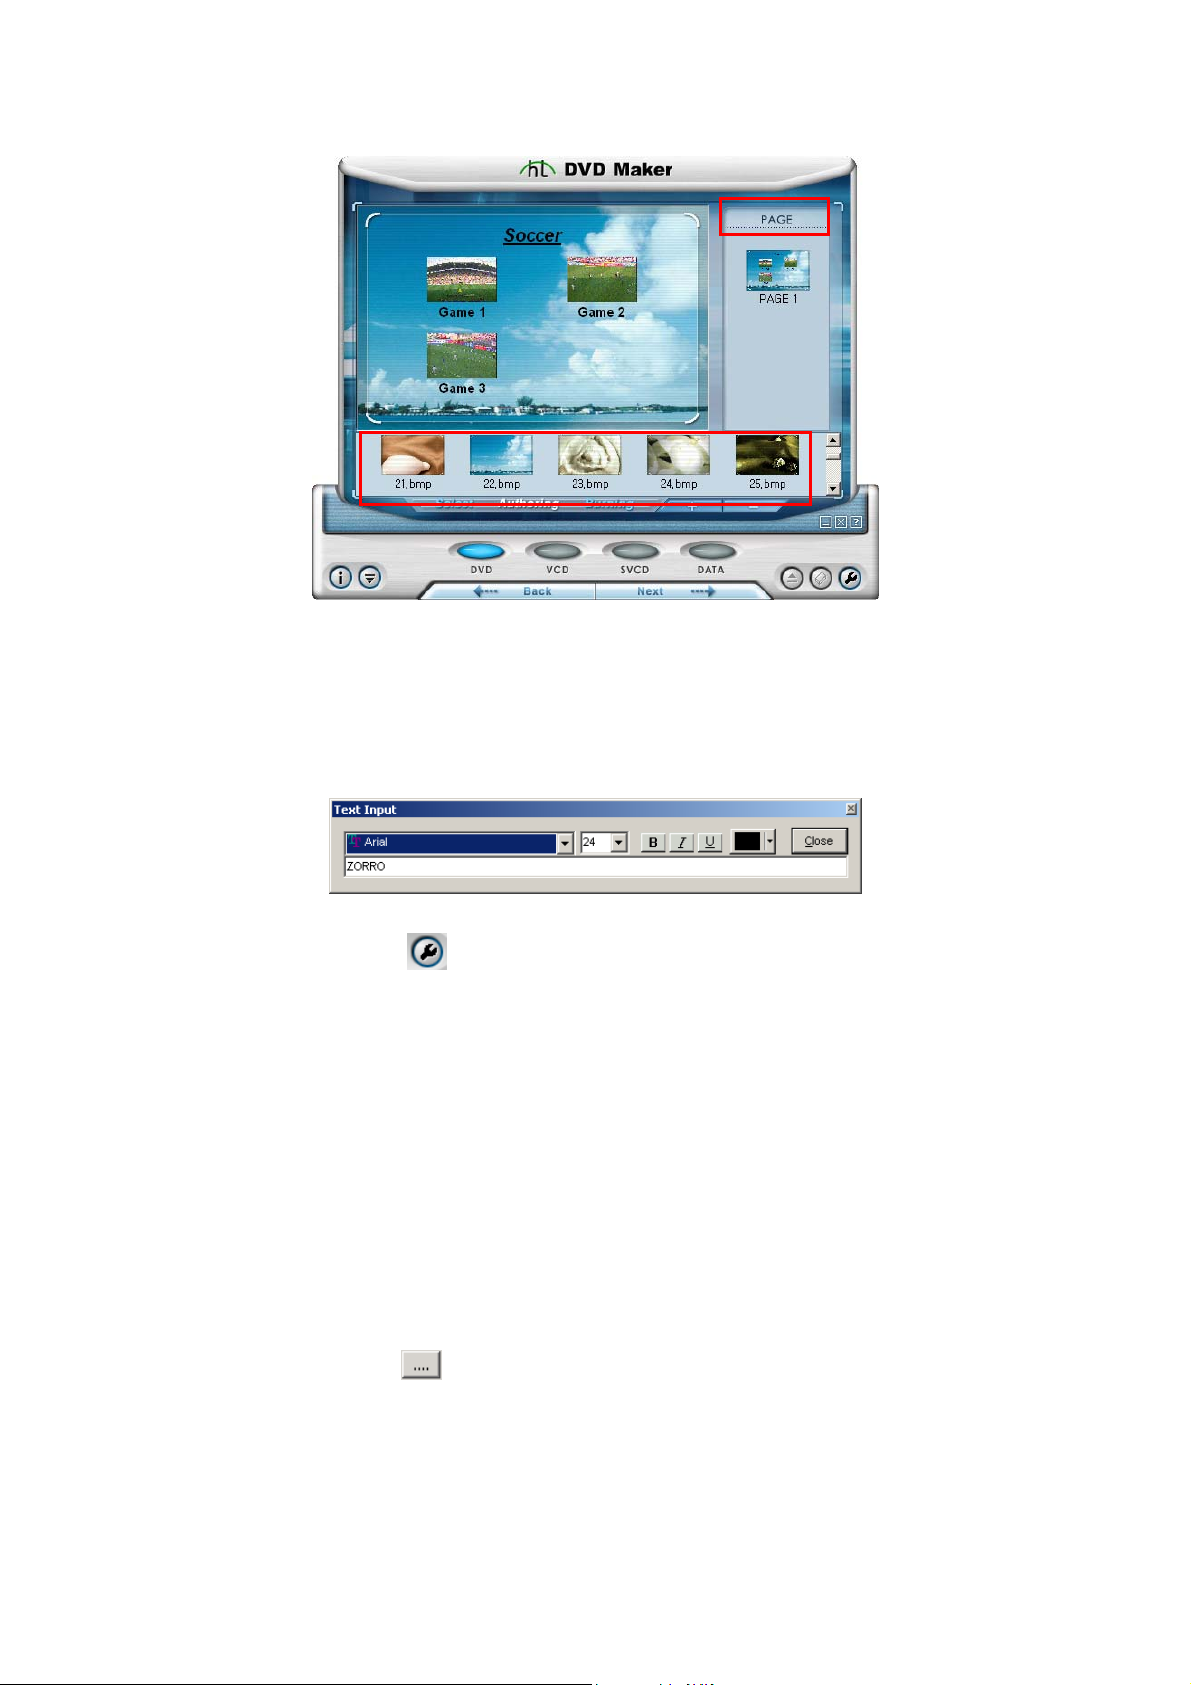
6. To edit the menu title or the video title, double-click the text in the thumbnail window to
open the Text Input window. Type a name in the blank field as the title. You may
change the text style according to your needs. Click Close to exit the Text Input
window when you are done.
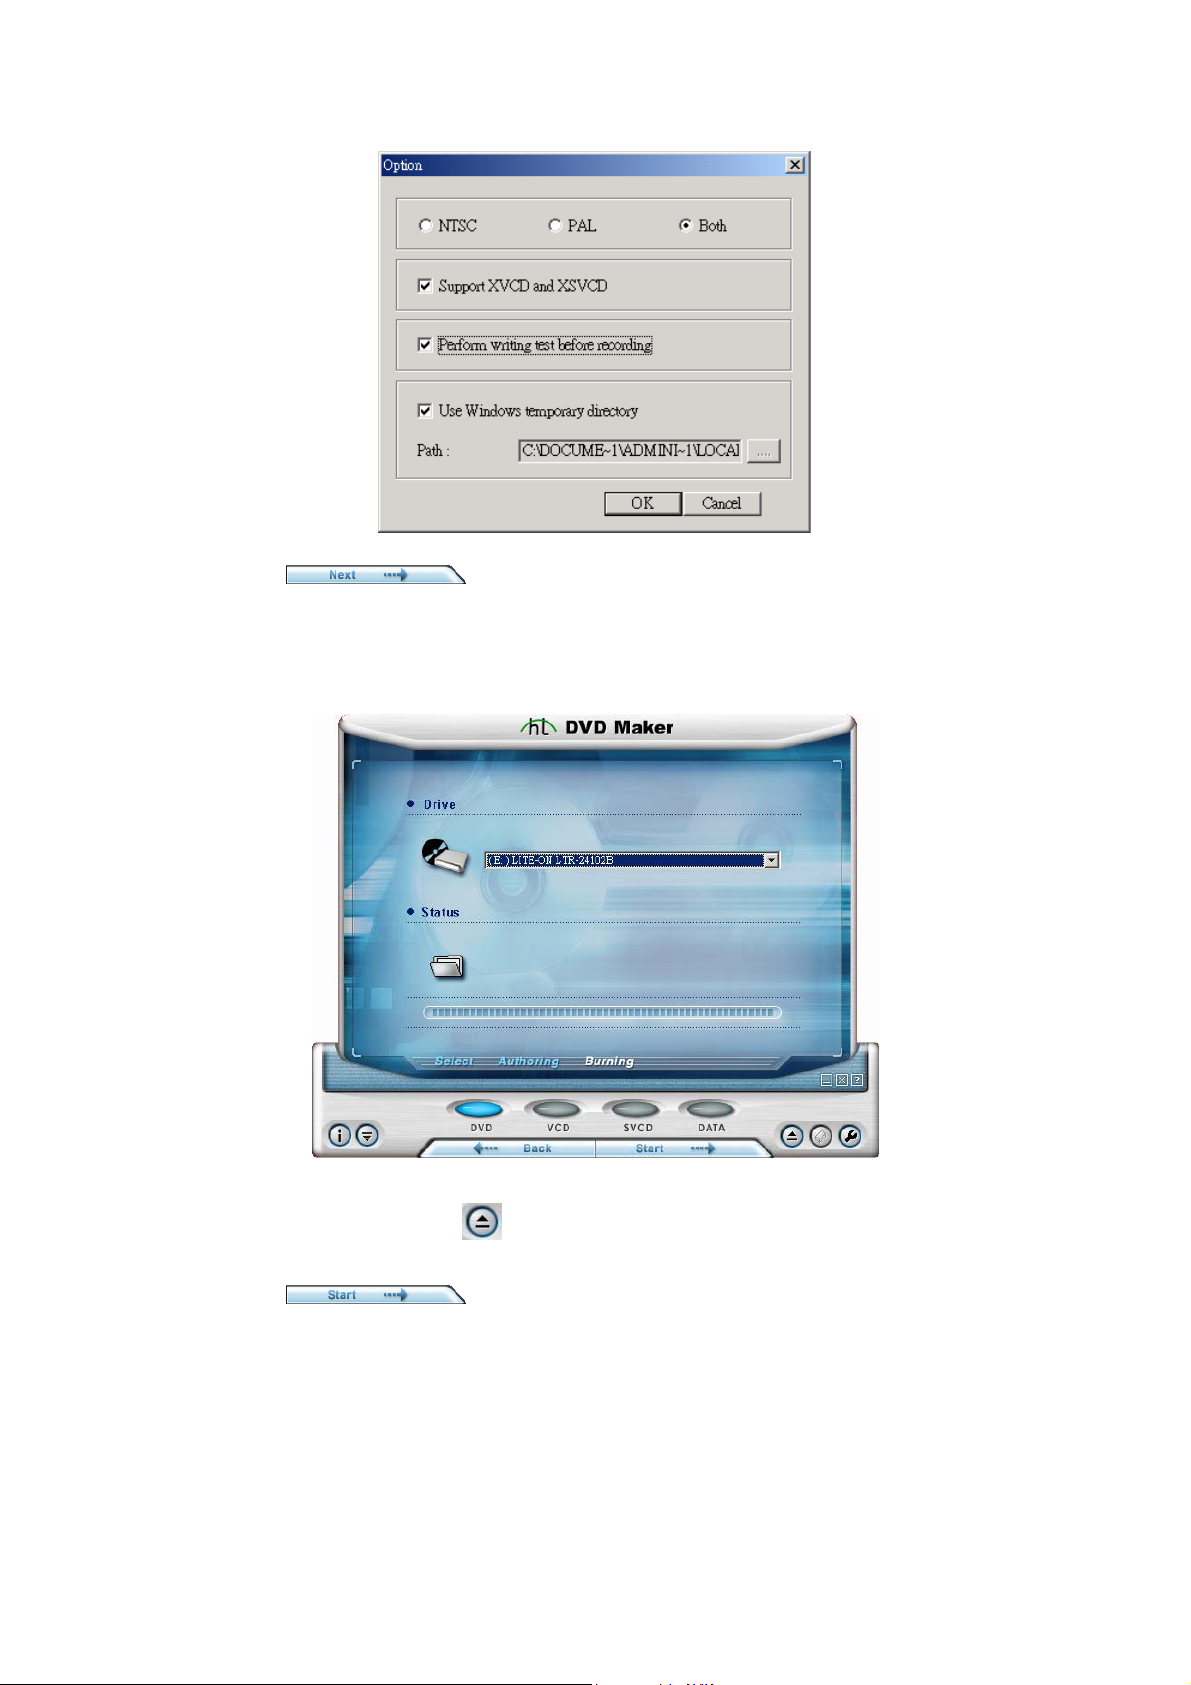
7. If necessary, select
advanced settings for the burning session.
i. Determine the video type as NTSC, PAL, or Both.
ii. Select Support XVCD and XSVCD if needed. Note that both formats are
non-standard deviations of VCD and SVCD. A standard DVD player is not capable
of playing these formats.
iii. The Perform writing test before recording command will check if the data is
to open the Option dialog box, in which you may make more
acceptable before actually burning the file to disc.
iv. You may
specify a location for having the source files saved on the hard disk
by clicking ; otherwise, check Use Windows temporary directory to
store the files in the defaulted location.
When done, click OK to continue.
v.
10
Page 12
8. Click
to continue when you are satisfied with the menu template
and the titles.
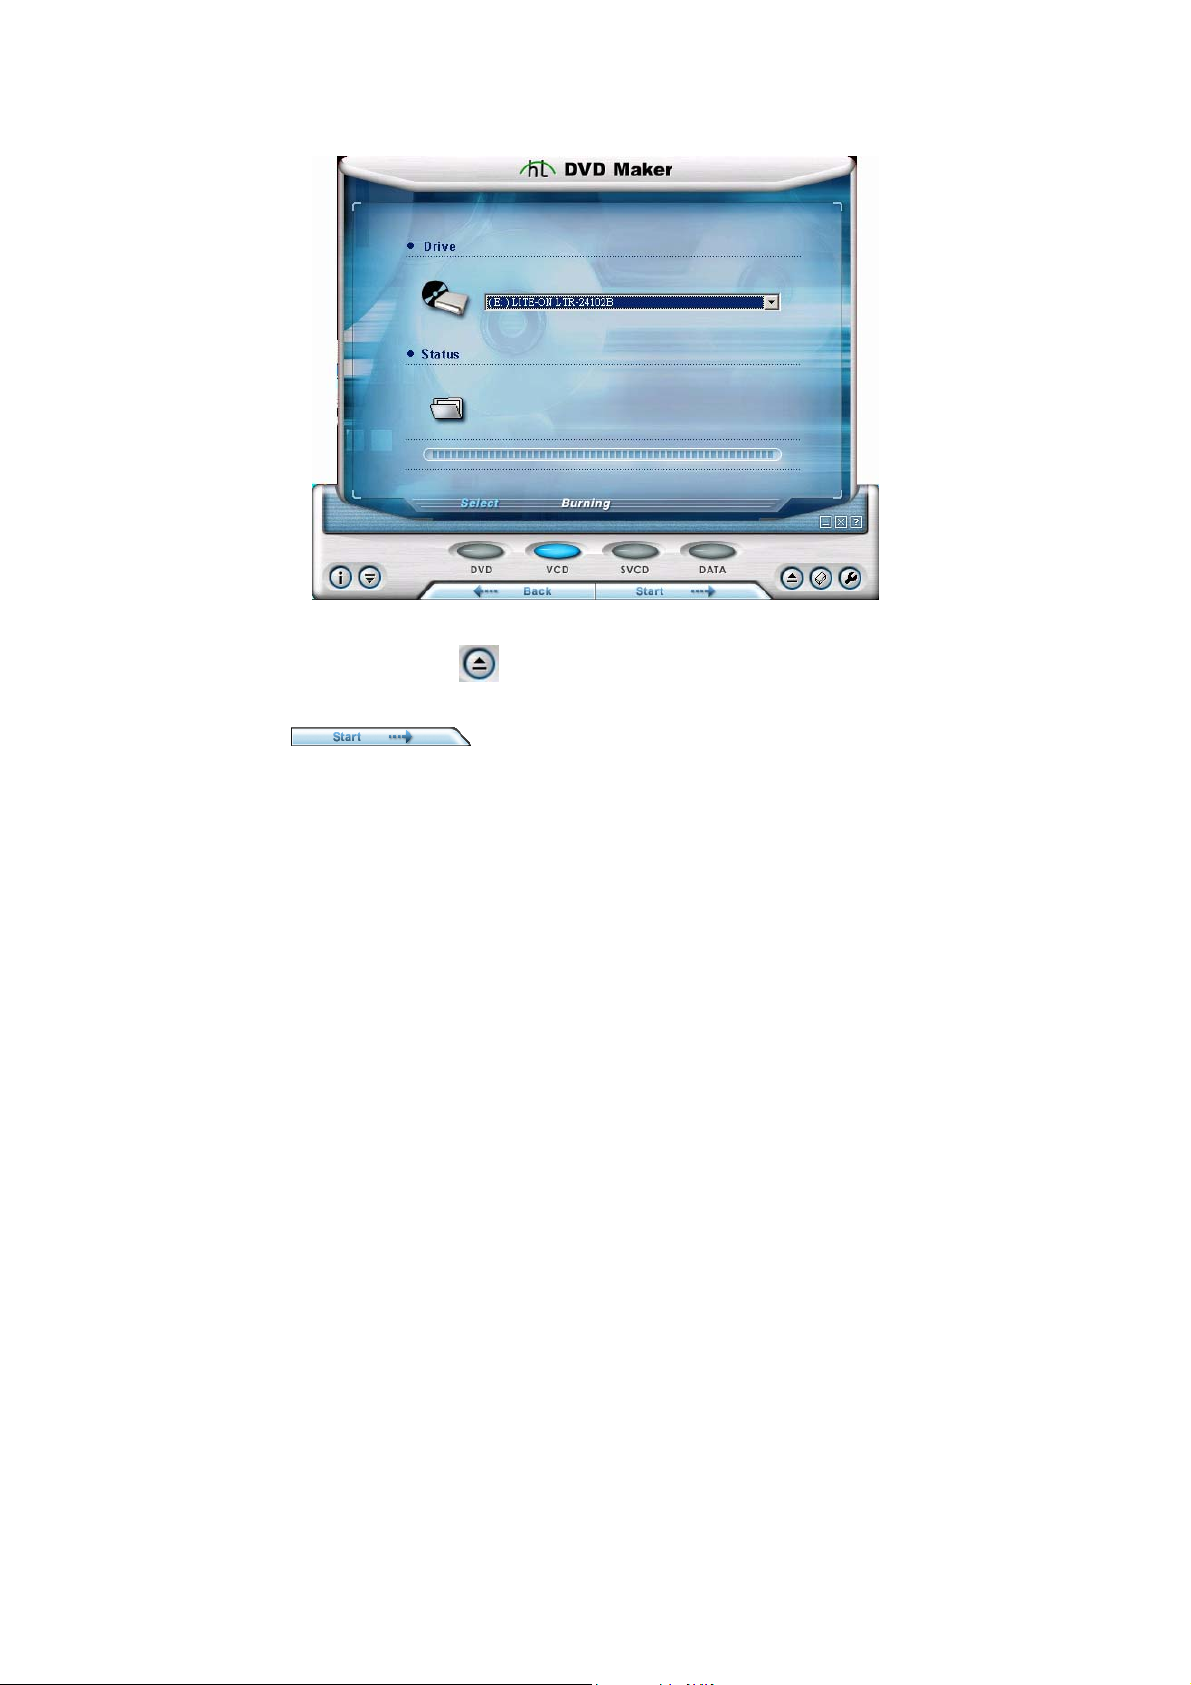
9. Select your burner/recorder from the Device list box.
10. Click on the Eject button
11. Click
to insert a blank recordable disc into the recorder.
to begin burning your CD. When the process of burning is
complete, the recorded disc will be ejected from the drive.
11
Page 13
TTuuttoorriiaall IIII ((TTiimmee--SSaavviinnggss SSoolluuttiioonn))
Tutorial II will guide you through a 2-step process of making a VCD of your own. You will
find creating a VCD becomes easier and faster than ever. Without converting the recorded
video files via MPEG Encoder, you may directly convert the video clips while recording
them. This two-step process is listed below:
1. Recording and converting video clips via DVR
2. Making a VCD via DVD Maker
Please read the following instructions to become thoroughly familiar with creating a VCD.
Step 1: Record and Convert Videos
The process of capturing and converting video from the input video source is:
a) Launch DVR.
b) Choose Property Settings to adjust settings for recording and converting.
c) Select an input source.
d) Click the REC button to start recording and click it again to stop.
e) The captured video clips have been recorded to your system.
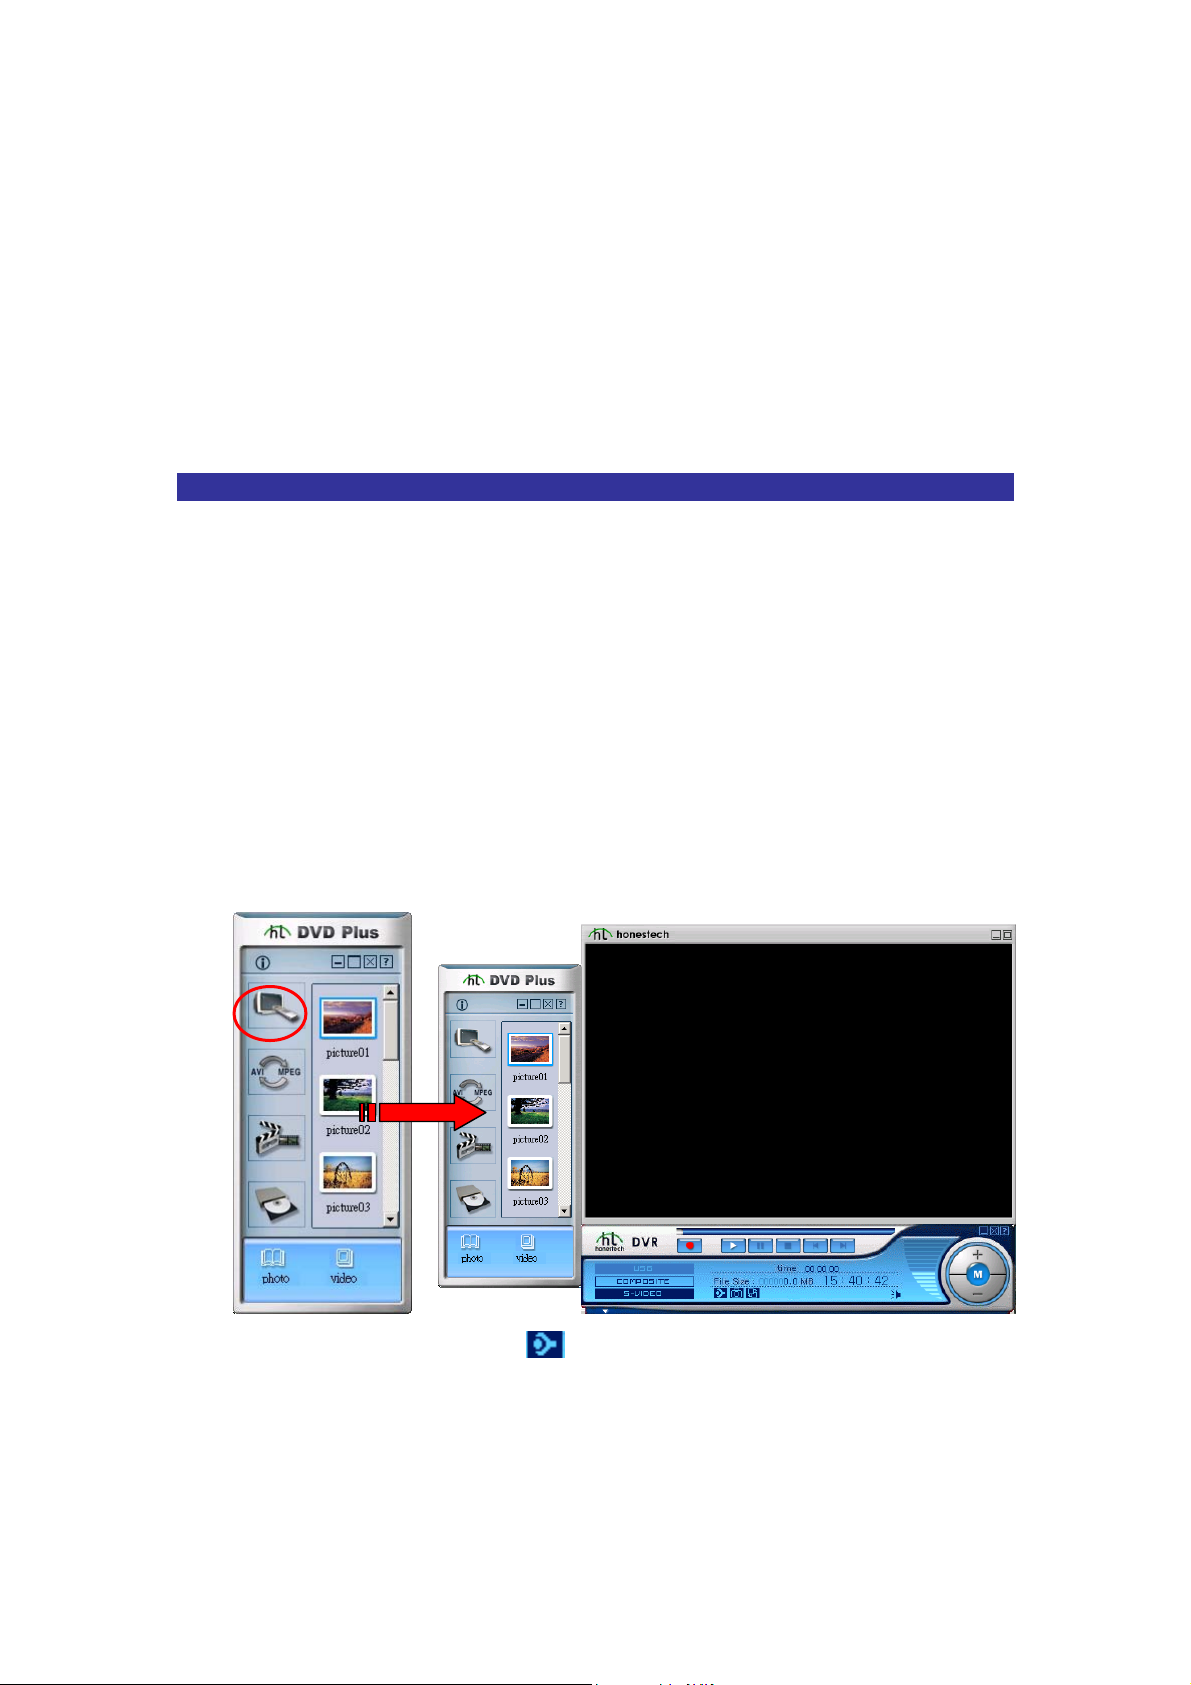
Step-by-step instructions to start recording:
1. Double-click DVR on the application bar of your DVD Plus’s interface to launch
DVR.
Preview Window
2. Choose Property Settings
Settings dialog box.
3. On the Video Settings tab of the Property Settings dialog box, manually drag the
Brightness, Contrast, Hue, and Saturation sliders in the Fine Adjustment field
to make adjustments to the video image, or you may choose Default.
from the navigation panel to open the Property
12
Page 14
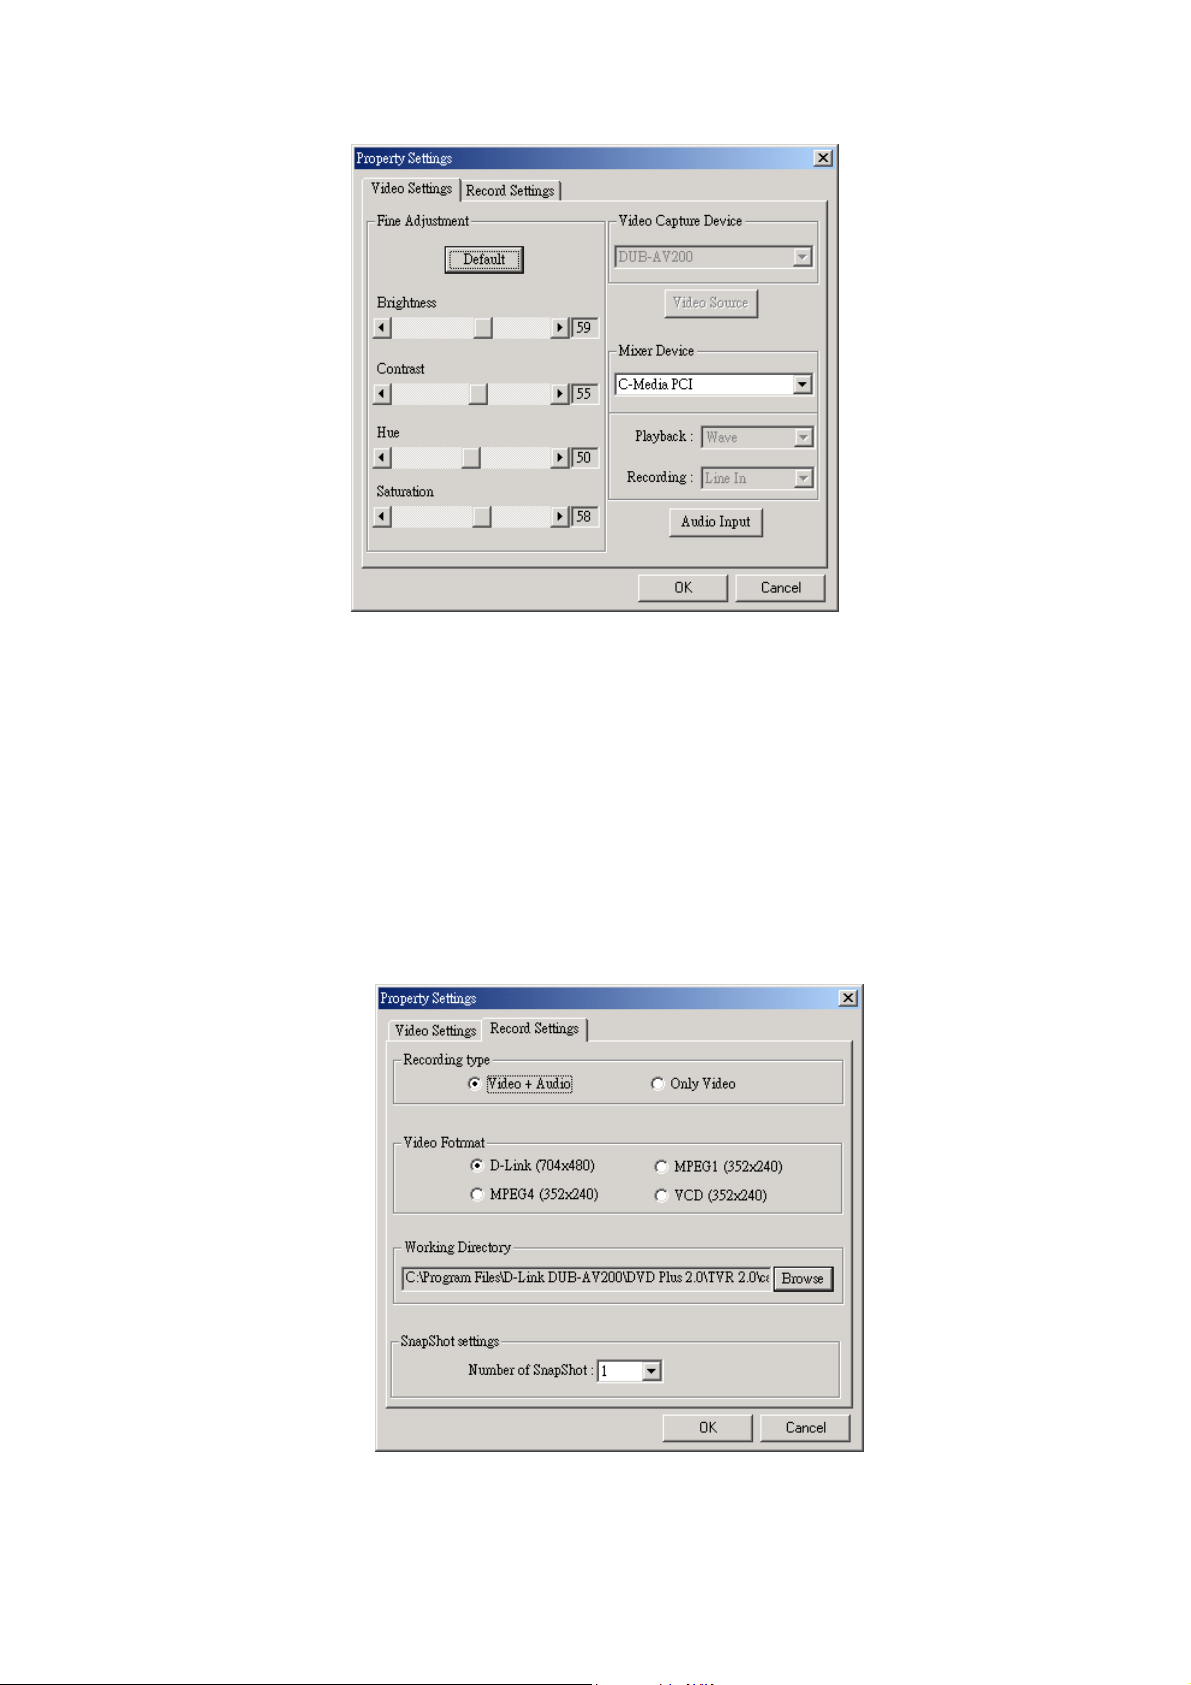
f) Click the Record Settings tab to adjust the following configuration settings:
i. Specify the Recording type as Video + Audio.
ii. In the Video Format field, indicate the target video format of the recorded
video clips as VCD (352x240). The recorded video files will then be saved in
the VCD format.
iii. Click Browse in the Working Directory field to specify a location to save
the recorded video clips. In the opened Change Folder dialog box, select the
intended directory and click OK.
iv. Click OK to activate the new settings and to exit the Property Settings
dialog box.
2. Select input source as Composite or S-Video on the left side of the navigation
panel.
13
Page 15
3. Press to start recording and press it again to stop recording. Within a few
seconds after the recording stops, the recorded file is displayed in the Video
Folder window.
Step 2: Make a VCD
Now you can burn the recorded video clips in VCD format to a disc via DVD Maker.
The VCD burning session is outlined as below:
a) Launch DVD Maker.
b) Define disc format as VCD.
c) Add video files.
d) Burn the videos to the disc.
Step by step instructions to Make a VCD:
1. Double-click DVD Maker on the application bar of the DVD Plus interface to launch
DVD Maker.
2. Specify the disc type as VCD.
3. Click to open the Open window. From the window, choose the desired
video files and then click Open to add them to the thumbnail window.
4. When you have gathered all the intended video items, select to
proceed.
5. Select your burner/recorder from the Device list box.
14
Page 16
6. Choose the Eject button
7. Click
finished, the disc will be ejected.
to insert a CD-R disc into the recorder.
to begin burning your VCD. When the process of burning is
15
Page 17

LIMITED WARRANTY
D-Link provides this limited warranty for its product only to the person or entity who originally purchased the product from D-Link or its
authorized reseller or distributor.
Limited Hardware Warranty: D-Link warrants that the hardware portion of the D-Link products described below (“Hardware”) will be free from
material defects in workmanship and materials from the date of original retail purchase of the Hardware, for the pe ri od set forth below applicable to
the product type (“Warranty Period”) if the Hardware is used and serviced in accordance with applicable documentat ion; provid ed that a completed
Registration Card is returned to an Authorized D-Link Service Office within ninety (90) days after the date of original retail purchase of the
Hardware. If a comple ted Registration Card is not received by an authorized D-Link Service Office within such ninety (9 0) period, then the
Warranty Period shall be ninety (90) days from the date of purchase.
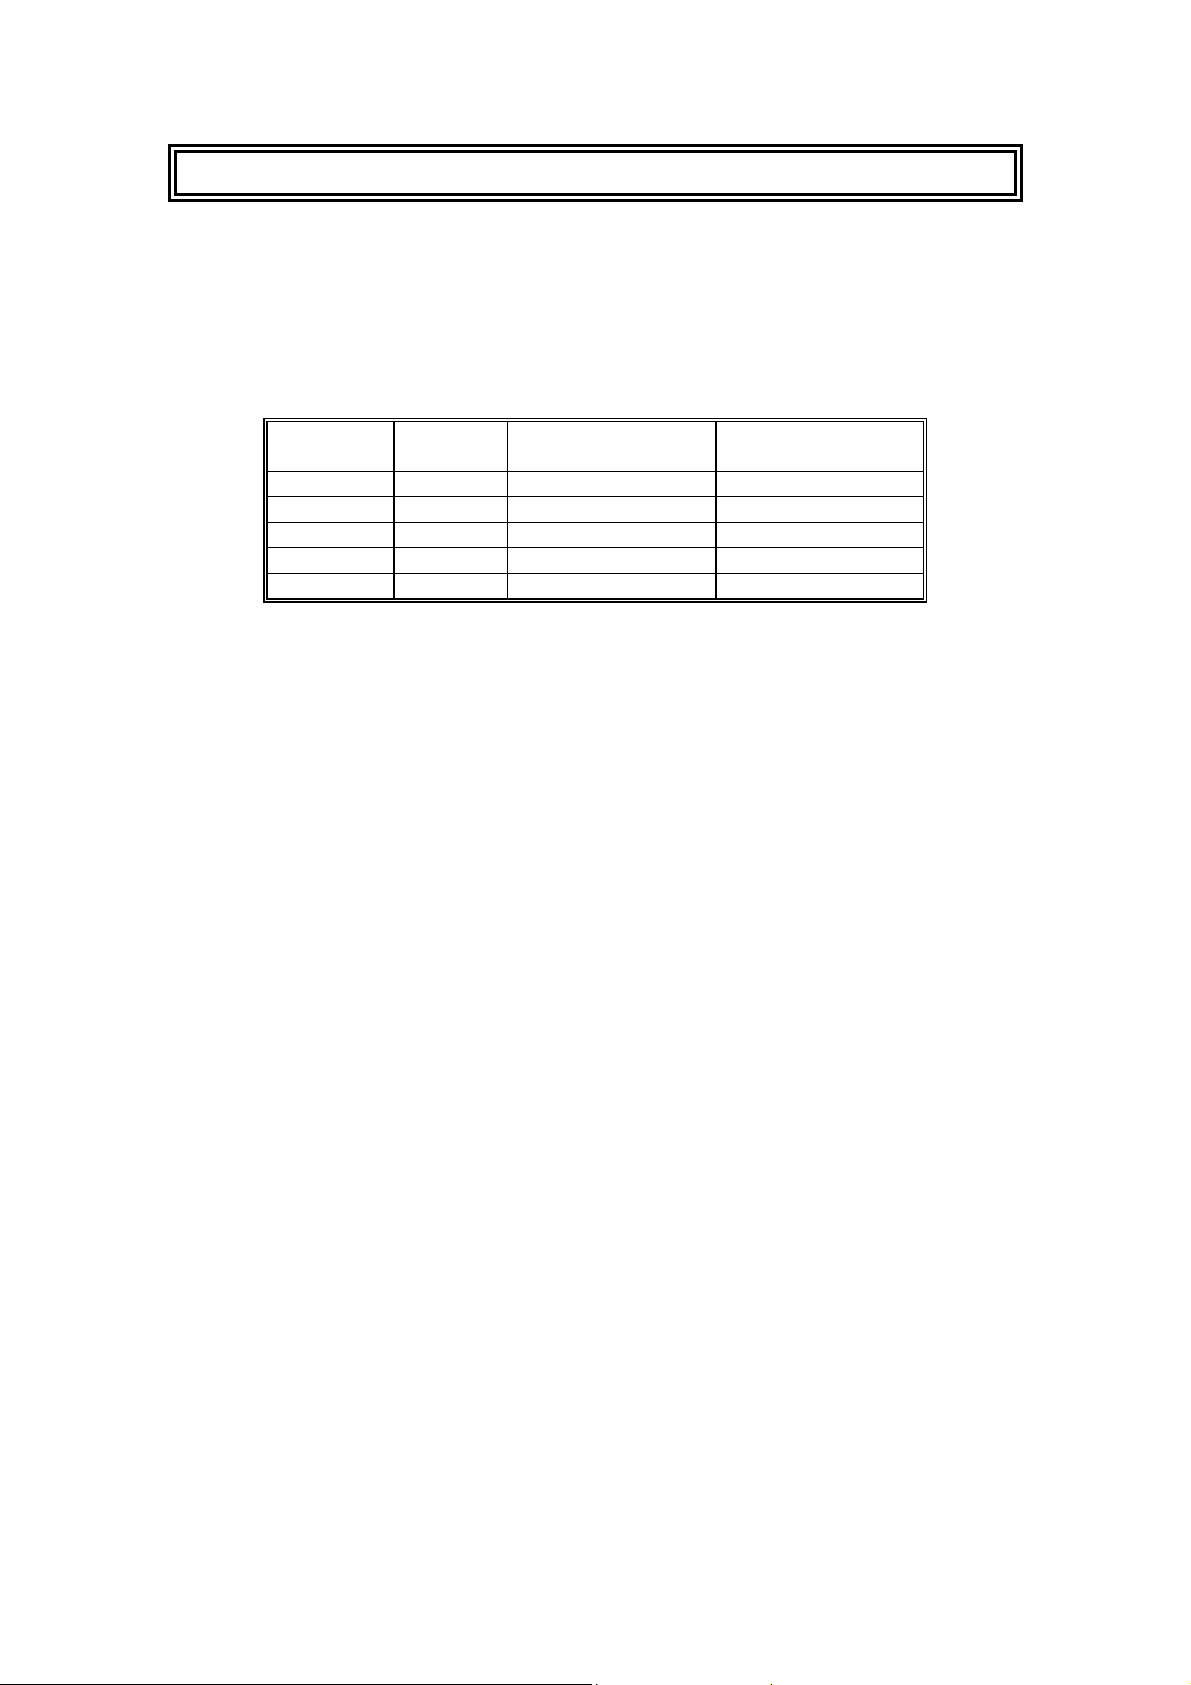
Product Type Warranty Period
Product (excluding power supplies and fans) One (1) Year
Power Supplies and Fans One (1) Year
Spare parts and spare kits Ninety (90) days
D-Link’s sole obligation shall be to repair or replace the defective Hardware at no charge to the original owner. Such repair or replacement will be
rendered by D-Link at an Authorized D-Link Service Office. The replacement Hardware need not be new or of an identical make, model or part;
D-Link may in its discretion may replace the defective Hardware (or any part thereof) with any reconditioned product that D-Link reasonably
determines is substantially equivalent (or superior) in all material respects to the defective Hardware. The Warranty Period shall extend for an
additional ninety (90) days after any repaired or replaced Hardware is delivered. If a material defect is incapable of correction, or if D-Link
determines in its sole discretion that it is not practical to repair or replace the defective Hardware, the price paid by the original purchaser for the
defective Hardware will be refunded by D-Link upon return to D-Link of the defective Hardware. All Hardware (or part thereof) that is replaced
by D-Link, or for which the purchase price is refunded, shall become the property of D-Link upon replacement or refund.
Limited Software Warranty: D-Link warrants that the software portion of the product (“Software”) will substantially conform to D-Link’s then
current functional specifications for the Software, as set forth in the applicable documentation, from the date of original delivery of the Software for
a period of ninety (90) days (“Warranty Period”), if the Software is properly installed on approved hardware and operated as contemplated in its
documentation. D-Link further warrants that, during the Warranty Period, the magnetic media on which D-Link delivers the Software will be free
of physical defects. D-Link’s sole obligation shall be to replace the non-conforming Software (or defective media) with software that substantially
conforms to D-Link’s functional specifications for the Software. Except as otherwise agreed by D-Link in writing, the replacement Software is
provided only to the original licensee, and is subject to the terms and conditions of the license granted by D-Link for the Software. The Warranty
Period shall extend for an additional ninety (90) days after any replacement Software is delivered. If a material non-conformance is incapable of
correction, or if D-Link determines in its sole discretion that it is not practical to replace the non-conforming Software, the price paid by the original
licensee for the non-conforming Software will be refunded by D-Link; provided that the non-conforming Software (and all copies thereof) is first
returned to D-Link. The license granted respecting any Software for which a refund is given autom a tically terminates.
What You Must Do For Warranty Service:
Registration Card
Office for each D-Link product within ninety (90) days after the product is purchased and/or licensed. The addresses/telephone/fax list of the
nearest Authorized D-Link Service Office is provided in the back of this manual. FAILURE TO PROPERLY COMPLETE AND TIMELY
RETURN THE REGISTRATION CARD MAY AFFECT THE WARRANTY FOR THIS PRODUCT.
Submitting A Claim
D-Link Service Office. The claim must include a written description of the Hardware defect or Software nonconformance in sufficient detail to
allow D-Link to confirm the same. The original product owner must obtain a Return Material Authorization (RMA) number from the Authorized
D-Link Service Office and, if requested, provide written proof of purchase of the product (such as a copy of the dated purchase invoice for the
product) before the warranty service is provided. After an RMA number is issued, the defective product must be packaged securely in the original
or other suitable shipping package to ensure that it will not be damaged in transit, and the RMA number m ust be prominently marked on the outside
of the package. The packaged product shall be insured and shipped to D-Link, 53 Discovery Drive, Irvine CA 92618, with all shipping costs
prepaid. D-Link may reject or return any product that is not packaged and shipped in strict compliance with the foregoing requirements, or for
which an RMA number is not visible from the outside of the package. The product owner agrees to pay D-Link’s reasonable handling and return
shipping charges for any product that is not packaged and shipped in accordance with the foregoing requirements, or that is determined by D-Link
not to be defective or non-conforming.
What Is Not Covered:
This limited warranty provided by D-Link does not cover
Products that have been subjected to abuse, accident, alteration, modification, tampering, negligence, misuse, faulty installation, lack of reasonable
care, repair or service in any way that is not contemplated in the documentation for the product, or if the model or serial number has been altered,
tampered with, defaced or removed;
Initial installation, installation and removal of the product for repair, and shipping costs;
Operational adjustments covered in the operating manual for the product, and normal maintenance;
Damage that occurs in shipment, due to act of God, failures due to power surge, and cosmetic damage; and
Any hardware, software, firmware or other products or services provided by anyone other than D-Link.
Disclaimer of Other Warranties: EXCEPT FOR THE LIMITED WARRANTY SPECIFIED HEREIN, THE PRODUCT IS PROVIDED “AS-IS”
WITHOUT ANY WARRANTY OF ANY KIND INCLUDING, WITHOUT LIMITATION, ANY WARRANTY OF MERCHANTABILITY ,
FITNESS FOR A PARTICULAR PURPOSE AND NON-INFRINGEMENT. IF ANY IMPLIED WARRANTY CANNOT BE DISCLAIMED IN
ANY TERRITORY WHERE A PRODUCT IS SOLD, THE DURATION OF SUCH IMPLIED WARRANTY SHALL BE LIMITED TO NINETY
(90) DAYS. EXCEPT AS EXPRESSLY COVERED UNDER THE LIMITED WARRANTY PROVIDED HEREIN, THE ENTIRE RISK AS TO
THE QUALITY, SELECTION AND PERFORMANCE OF THE PRODUCT IS WITH THE PURCHASER OF THE PRODUCT.
Limitation of Liability: TO THE MAXIMUM EXTENT PERMITTED BY LAW, D-LINK IS NOT LIABLE UNDER ANY CONTRACT,
NEGLIGENCE, STRICT LIABILITY OR OTHER LEGAL OR EQUITABLE THEORY FOR ANY LOSS OF USE OF THE PRODUCT,
INCONVENIENCE OR DAMAGES OF ANY CHARACTER, WHETHER DIRECT, SPECIAL, INCIDENTAL OR CONSEQUENTIAL
(INCLUDING, BUT NOT LIMITED TO, DAMAGES FOR LOSS OF GOODWILL, WORK STOPPAGE, COMPUTER FAILURE OR
MALFUNCTION, LOSS OF INFORMATION OR DATA CONTAINED IN, STORED ON, OR INTEGRATED WITH ANY PRODUCT
RETURNED TO D-LINK FOR WARRANTY SERVICE) RESULTING FROM THE USE OF THE PRODUCT, RELATING TO WARRANTY
. The Registration Card provided at the back of this manual must be completed and returned to an Authorized D-Link Service
. Any claim under this limited warranty must be submitted in writing before the end of the Warranty Period to an Authorized
:
Page 18

SERVICE, OR ARISING OUT OF ANY BREACH OF THIS LIMITED WARRANTY, EVEN IF D-LINK HAS BEEN ADVISED OF THE
POSSIBILITY OF SUCH DAMAGES. THE SOLE REMEDY FOR A BREACH OF THE FOREGOING LIMITED WARRANTY IS REPAIR,
REPLACEMENT OR REFUND OF THE DEFECTIVE OR NON-CONFORMING PRODUCT.
GOVERNING LAW: This Limited Warranty shall be governed by the laws of the state of California.
Some states do not allow exclusion or limitation of incidental or consequential damages, or lim itations on how long an im plied w arranty lasts, so the
foregoing limitations and exclusions may not apply. This limited warranty provides specific legal rights and the product owner may also have other rights
which vary from state to state.
Wichtige Sicherheitshinweise
1. Bitte lesen Sie sich diese Hinweise sorgfältig durch.
2. Heben Sie diese Anleitung für den spätern Gebrauch auf.
3. Vor jedem Reinigen ist das Gerät vom Stromnetz zu trennen. Vervenden Sie keine Flüssig- oder Aerosolreiniger. Am besten dient ein
angefeuchtetes Tuch zur Reinigung.
4. Um eine Beschädigung des Gerätes zu vermeiden sollten Sie nur Zubehörteile verwenden, die vom Hersteller zugelassen sind.
5. Das Gerät is vor Feuchtigkeit zu schützen.
6. Bei der Aufstellung des Gerätes ist auf sichern Stand zu achten. Ein Kippen oder Fallen könnte Verletzungen hervorrufen. Verwenden Sie nur
sichere Standorte und beachten Sie die Aufstellhinweise des Herstellers.
7. Die Belüftungsöffnungen dienen zur Luftzirkulation die das Gerät vor Überhitzung schützt. Sorgen Sie dafür, daß diese Öffnungen nicht
abgedeckt werden.
8. Beachten Sie beim Anschluß an das Stromnetz die Anschlußwerte.
9. Die Netzanschlußsteckdose muß aus Gründen der elektrischen Sicherheit einen Schutzleiterkontakt haben.
10. Verlegen Sie die Netzanschlußleitung so, daß niemand darüber fallen kann. Es sollete auch nichts auf der Leitung abgestellt werden.
11. Alle Hinweise und Warnungen die sich am Geräten befinden sind zu beachten.
12. Wird das Gerät über einen längeren Zeitraum nicht benutzt, sollten Sie es vom Stromnetz trennen. Somit wird im Falle einer Überspannung
eine Beschädigung vermieden.
13. Durch die Lüftungsöffnungen dürfen niemals Gegenstände oder Flüssigkeiten in das Gerät gelangen. Dies könnte einen Brand bzw.
Elektrischen Schlag auslösen.
14. Öffnen Sie niemals das Gerät. Das Gerät darf aus Gründen der elektrischen Sicherheit nur von authorisiertem Servicepersonal geöffnet
werden.
15. We nn folgende Situationen auftreten ist das Gerät vom Stromnetz zu trennen und von einer qualifizierten Servicestelle zu überprüfen:
a – Netzkabel oder Netzstecker sint beschädigt.
b – Flüssigkeit ist in das Gerät eingedrungen.
c – Das Gerät war Feuchtigkeit ausgesetzt.
d – Wenn das Gerät nicht der Bedienungsanle itung ensprechend funktioniert oder Sie mit Hilfe dieser Anleitung keine Verbesserung erzielen.
e – Das Gerät ist gefallen und/oder das Gehäuse ist beschädigt.
f – Wenn das Gerät deutliche Anzeichen eines Defektes aufweist.
16. Bei Reparaturen dürfen nur Orginalersatzteile bzw. den Orginalteilen entsprechende Teile verwendet werden. Der Einsatz von ungeeigneten
Ersatzteilen kann eine weitere Beschädigung hervorrufen.
17. Wenden Sie sich mit allen Fragen die Service und Repartur betreffen an Ihren Servicepartner. Somit stellen Sie die Betriebssicherheit des
Gerätes sicher.
18. Zum Netzanschluß dieses Gerätes ist eine geprüfte Leitung zu verwenden, Für einen Nennstrom bis 6A und einem Gerätegewicht gr ßer 3kg
ist eine Leitung nicht leichter als H05VV-F, 3G, 0.75mm2 einzusetzen.
Trademarks
Copyright 1999 D-Link Corporation. Contents subject to change without prior notice. D-Link is a registered trademark of D-Link
Corporation/D-Link Systems, Inc. All other trademarks belong to their respective proprietors.
Copyright Statement
No part of this publication may be reproduced in any form or by any means or used to make any derivative such as translation, transformation, or
adaptation without permission from D-Link Corporation/D-Link Sy stems Inc., as stipulated by the United States Copyright Act of 1976.
Page 19

CE Mark Warning
TThhiiss iiss aa CCllaassss BB pprroodduucctt.. IInn aa ddoommeessttiicc eennvviirroonnmmeenntt,, tthhiiss pprroodduucctt mmaayy ccaauussee rraaddiioo iinntteerrffeerreennccee,,
iinn wwhhiicchh ccaassee tthhee uusseerr mmaayy bbee rreeqquuiirreedd ttoo ttaakkee aaddeeqquuaattee mmeeaassuurreess
Warnung!
Dies ist in Produkt der Klasse B. Im Wohnbereich kann dieses Produkt Funkstoerungen verursachen. In
diesem Fall kann vom Benutzer verlangt werden, angemessene Massnahmen zu ergreifen.
Advertencia de Marca de la CE
Este es un producto de Clase B. En un entorno doméstico, puede causar interferencias de radio, en cuyo
case, puede requerirse al usuario para que adopte las medidas adecuadas.
Attention!
Ceci est un produit de classe B. Dans un environnement domestique, ce produit pourrait causer des
interférences radio, auquel cas l`utilisateur devrait prendre les mesures adéquates.
Attenzione!
Il presente prodotto appartiene alla classe B. Se utilizzato in ambiente domestico il prodotto può
causare interferenze radio, nel cui caso è possibile che l`utente debba assumere provvedimenti
adeguati.
FFCCCC WWaarrnniinngg
This equipment has been tested and found to comply with the limits for a Class B digital device,
pursuant to part 15 of the FCC Rules. These limits are designed to provide reasonable protection
against harmful interference in a residential installation. This equipment generates, uses and can radiate
radio frequency energy and, if not installed and used in accordance with the instructions, may cause
harmful interference to radio communications. However, there is no guarantee that interference will not
occur in a particular installation. If this equipment does cause harmful interference to radio or
television reception, which can be determined by turning the equipment off and on, the user is
encouraged to try to correct the interference by one or more of the following measures:
-Reorient or relocate the receiving antenna.
-Increase the separation between the equipment and receiver.
-Connect the equipment into an outlet on a circuit different from that to which the receiver is
connected.
-Consult the dealer or an experienced radio/ TV technician for help.
Page 20
Offices
AUSTRALIA D-LINK AUSTRALIA
1 Giffnock Ave,North Ryde, NSW 2113, Australia
TEL: 61-2-8899-1800 FAX: 61-2-8899-1868
TOLL FREE: 1800-177-100 (Australia), 0800-900900 (New Zealand)
E-MAIL: [email protected], [email protected]
BENELUX D-LINK BENELUX
CANADA D-LINK CANADA
#2180 Winston Park Drive, Oakville, Ontario, L6H 5W1 Canada
TEL: 1-905-829-5033 FAX: 1-905-829-5095 FREE CALL: 1-800-354-6522
E-MAIL: [email protected] URL: www.dlink.ca FTP: ftp.dlinknet.com
CHILE D-LINK SOUTH AMERICA
Isidora Goyeechea 2934 of 702, Las Condes, Santiago – Chile S.A.
TEL:56-2-232-3185 FAX: 56-2-232-0923
E-MAIL: [email protected], [email protected] URL: www.dlink.cl
CHINA D-LINK CHINA
2F., Sigma Building, 49 Zhichun Road, Haidian District, 100080 Beijing, China
TEL: 86-10-85182533 FAX: 86-10-85182250
DENMARK D-LINK DENMARK
Naverland 2, DK-2600 Glostrup, Copenhagen, Denmark
TEL:45-43-969040 FAX:45-43-424347
E-MAIL: [email protected]
EGYPT D-LINK MIDDLE EAST
7 Assem Ebn Sabet Street, Heliopolis Cairo, Egypt
TEL: 202-2456176 FAX: 202-2456192
E-MAIL: [email protected]
FINLAND D-Link FINLAND
FRANCE D-LINK FRANCE
Le Florilege #2, Allee de la Fresnerie, 78330 Fontenay le Fleury France
TEL: 33-1-302-38688 FAX: 33-1-3023-8689
E-MAIL: [email protected] URL: www.dlink-france.fr
GERMANY D-LINK Central Europe/D-Link Deutschland GmbH
Schwalbacher Strasse 74, D-65760 Eschborn, Germany
TEL: 49-6196-77990 FAX: 49-6196-7799300
INFO LINE: 00800-7250-0000 (toll free) HELP LINE: 00800-7250-4000 (toll free)
REPAIR LINE: 00800-7250-8000
E-MAIL: [email protected]
IBERIA D-LINK IBERIA
INDIA D-LINK INDIA
Plot No.5, Kurla-Bandra Complex Road, Off Cst Road, Santacruz (E), Bombay - 400 098 India
TEL: 91-22-652-6696 FAX: 91-22-652-8914
E-MAIL: [email protected]
ITALY D-LINK ITALIA
Via Nino Bonnet No. 6/b, 20154 Milano, Italy
TEL: 39-02-2900-0676 FAX: 39-02-2900-1723
E-MAIL: [email protected] URL: www.dlink.it
JAPAN D-LINK JAPAN
10F, 8-8-15 Nishi-Gotanda, Shinagawa-ku, Tokyo 141, Japan
TEL: 81-3-5434-9678 FAX: 81-3-5434-9868
E-MAIL: [email protected]
NORWAY D-LINK NORWAY
RUSSIA D-LINK RUSSIA
Michurinski Prospekt 49, 117607 Moscow, Russia
TEL: 7-095-737-3389, 7-095-737-3492 FAX: 7-095-737-3390
E-MAIL: [email protected]
SINGAPORE D-LINK INTERNATIONAL
1 International Business Park, #03-12 The Synergy, Singapore 609917
TEL: 65-774-6233 FAX: 65-774-6322
E-MAIL: [email protected]
S. AFRICA D-LINK SOUTH AFRICA
102-106 Witchhazel Avenue, Einetein Park 2, Block B, Highveld Technopark Centurion, South Africa
TEL: 27(0)126652165 FAX: 27(0)126652186
E-MAIL: [email protected]
SWEDEN D-LINK SWEDEN
P.O. Box 15036, S-167 15 Bromma Sweden
TEL: 46-(0)8564-61900 FAX: 46-(0)8564-61901
E-MAIL: [email protected]
TAIWAN D-LINK TAIWAN
2F, No. 119 Pao-Chung Road, Hsin-Tien, Taipei, Taiwan,
TEL: 886-2-2910-2626 FAX: 886-2-2910-1515
E-MAIL: [email protected]
U.K. D-LINK EUROPE
4
TEL: 44-20-8731-5555 FAX: 44-20-8731-5511
E-MAIL: [email protected]
U.S.A. D-LINK U.S.A.
53 Discovery Drive, Irvine, CA 92618 USA
TEL: 1-949-788-0805 FAX: 1-949-753-7033 INFO LINE: 1-877-453-5465
BBS: 1-949-455-1779, 1-949-455-9616
E-MAIL: [email protected], [email protected] URL: www.dlink.com
Fellenoord 130, 5611 ZB Eindhoven, The Netherlands
TEL: 31-40-2668713 FAX: 31-40-2668666
E-MAIL:[email protected], [email protected]
URL: www.dlink.dk
URL: www.dlink-me.com
Thlli-ja Pakkahuone Katajanokanlaituri 5, FIN-00160 Helsinki, Finland
TEL: 358-9-622-91660 FAX: 358-9-622-91661
E-MAIL: [email protected]
Gran Via de Carlos III, 84, 3° Edificio Trade, 08028 BARCELONA
TEL. 34 93 4090770 FAX 34 93 4910795
E-MAIL: [email protected]
Waldemar Thranesgt. 77, 0175 Oslo, Norway
TEL: 47-22-991890 FAX: 47-22-207039
th
Floor, Merit House, Edgware Road, Colindale, London, NW9 5AB, U.K.
URL: www.dlink-fi.com
URL: www.dlink.de
URL: www.dlinkiberia.es
URL: www.dlink-india.com
URL: www.d-link.co.jp
URL: www.dlink.ru
URL: www.dlink-intl.com
URL: www.d-link.co.za
URL: www.dlink.se
URL: www.dlinktw.com.tw
URL: www.dlink.co.uk
URL: www.dlink.com.au
URL: www.dlink-benelux.nl/, www.dlink-benelux.be/
Page 21
Registration Card
Print, type or use block letters.
Your name: Mr./Ms_____________________________________________________________________________
Organization: ________________________________________________Dept. ____________________________
Your title at organization:________________________________________________________________________
Telephone:_______________________________________ Fax:________________________________________
Organization's full address:______________________________________________________________________
____________________________________________________________________________________________
Country:_____________________________________________________________________________________
Date of purchase (Month/Day/Year):_______________________________________________________________
Product Model Product Serial
No.
(* Applies to adapters only)
Product was purchased from:
Reseller's name:______________________________________________________________________________
Telephone:_______________________________________ Fax:________________________________________
Reseller's full address:_________________________________________________________________________
_________________________________________________________________________
_________________________________________________________________________
Answers to the following questions help us to support your product:
1. Where and how will the product primarily be used?
Home Office Travel Company Business Home Business Personal Use
2. How many employees work at installation site?
1 employee 2-9 10-49 50-99 100-499 500-999 1000 or more
3. What network protocol(s) does your organization use ?
XNS/IPX TCP/IP DECnet Others_____________________________
4. What network operating system(s) does your organization use ?
D-Link LANsmart Novell NetWare NetWare Lite SCO Unix/Xenix PC NFS 3Com 3+Open
Banyan Vines DECnet Pathwork Windows NT Windows NTAS Windows '95
Others__________________________________________
5. What network management program does your organization use ?
D-View HP OpenView/Windows HP OpenView/Unix SunNet Manager Novell NMS
NetView 6000 Others________________________________________
6. What network medium/media does your organization use ?
Fiber-optics Thick coax Ethernet Thin coax Ethernet 10BASE-T UTP/STP
100BASE-TX 100BASE-T4 100VGAnyLAN Others_________________
7. What applications are used on your network?
Desktop publishing Spreadsheet Word processing CAD/CAM
Database management Accounting Others_____________________
8. What category best describes your company?
Aerospace Engineering Education Finance Hospital Legal Insurance/Real Estate Manufacturing
Retail/Chainstore/Wholesale Government Transportation/Utilities/Communication VAR
System house/company Other________________________________
9. Would you recommend your D-Link product to a friend?
Yes No Don't know yet
10.Your comments on this product?
__________________________________________________________________________________________
__________________________________________________________________________________________
* Product installed in type of
computer (e.g., Compaq 486)
* Product installed in
computer serial No.
Page 22
 Loading...