

Page 1
This product can be used with theThis product can be used with the
This product can be used with the
This product can be used with theThis product can be used with the
following operating systems:following operating systems:
following operating systems:
following operating systems:following operating systems:
Windows XP, Me, 2000, 98SEWindows XP, Me, 2000, 98SE
Windows XP, Me, 2000, 98SE
Windows XP, Me, 2000, 98SEWindows XP, Me, 2000, 98SE
DUB-A2DUB-A2
DUB-A2
DUB-A2DUB-A2
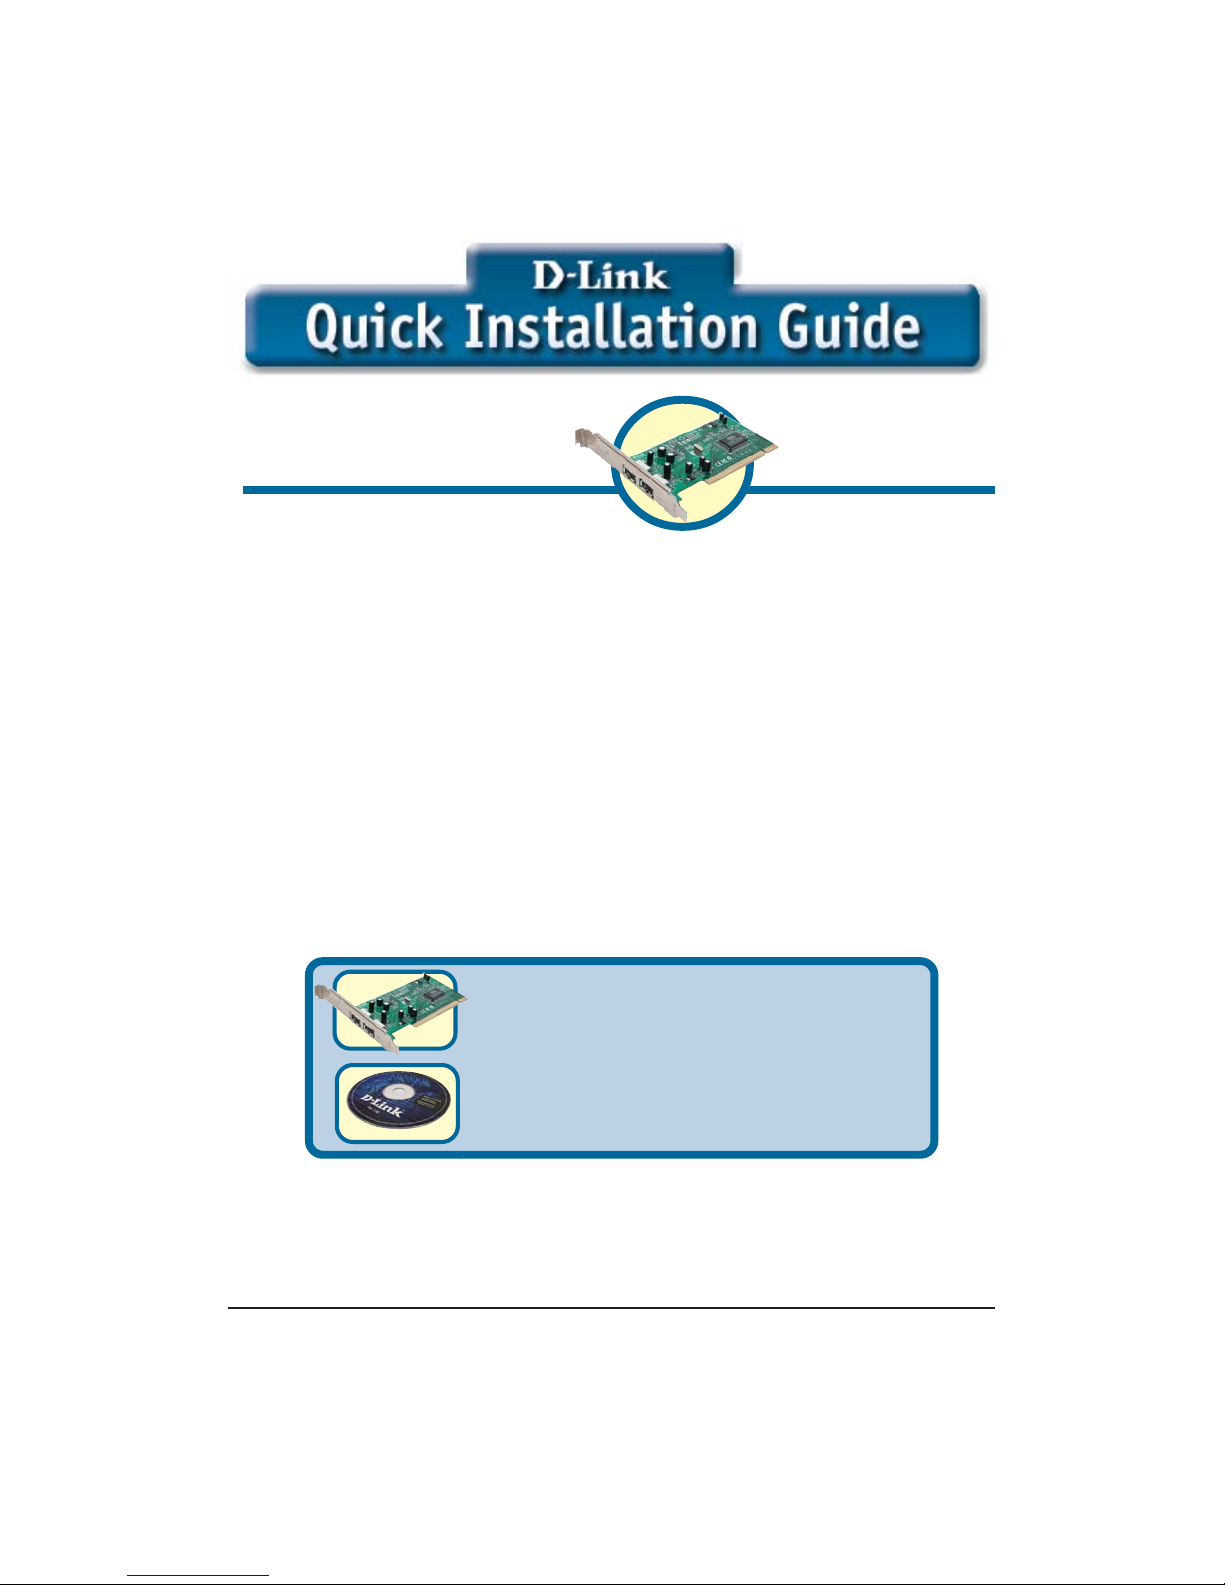
2-Port Hi-Speed
USB 2.0 PCI Adapter
Before You Begin
You must have at least the following:
• Windows XP/Me/2000/98SE
• Pentium Class CPU or Higher
• One Available PCI Slot
• CD-ROM Drive
Check Your Package Contents
These are the items included with your purchase:
If any of the below items are missing, please contact your reseller.
©2003 D-Link Systems, Inc. All rights reserved. Trademarks or registered trademarks are the property of
their respective holders. Software and specifications subject to change without notice. DUB-A2.04182003
• DUB-A2 Hi-Speed USB 2.0 PCI Adapter
• CD-ROM (containing Drivers,
Installation Guide and Warranty)
Page 2
Installing The DUB-A2 Hi-Speed USB
2.0 PCI Adapter Into Your Computer
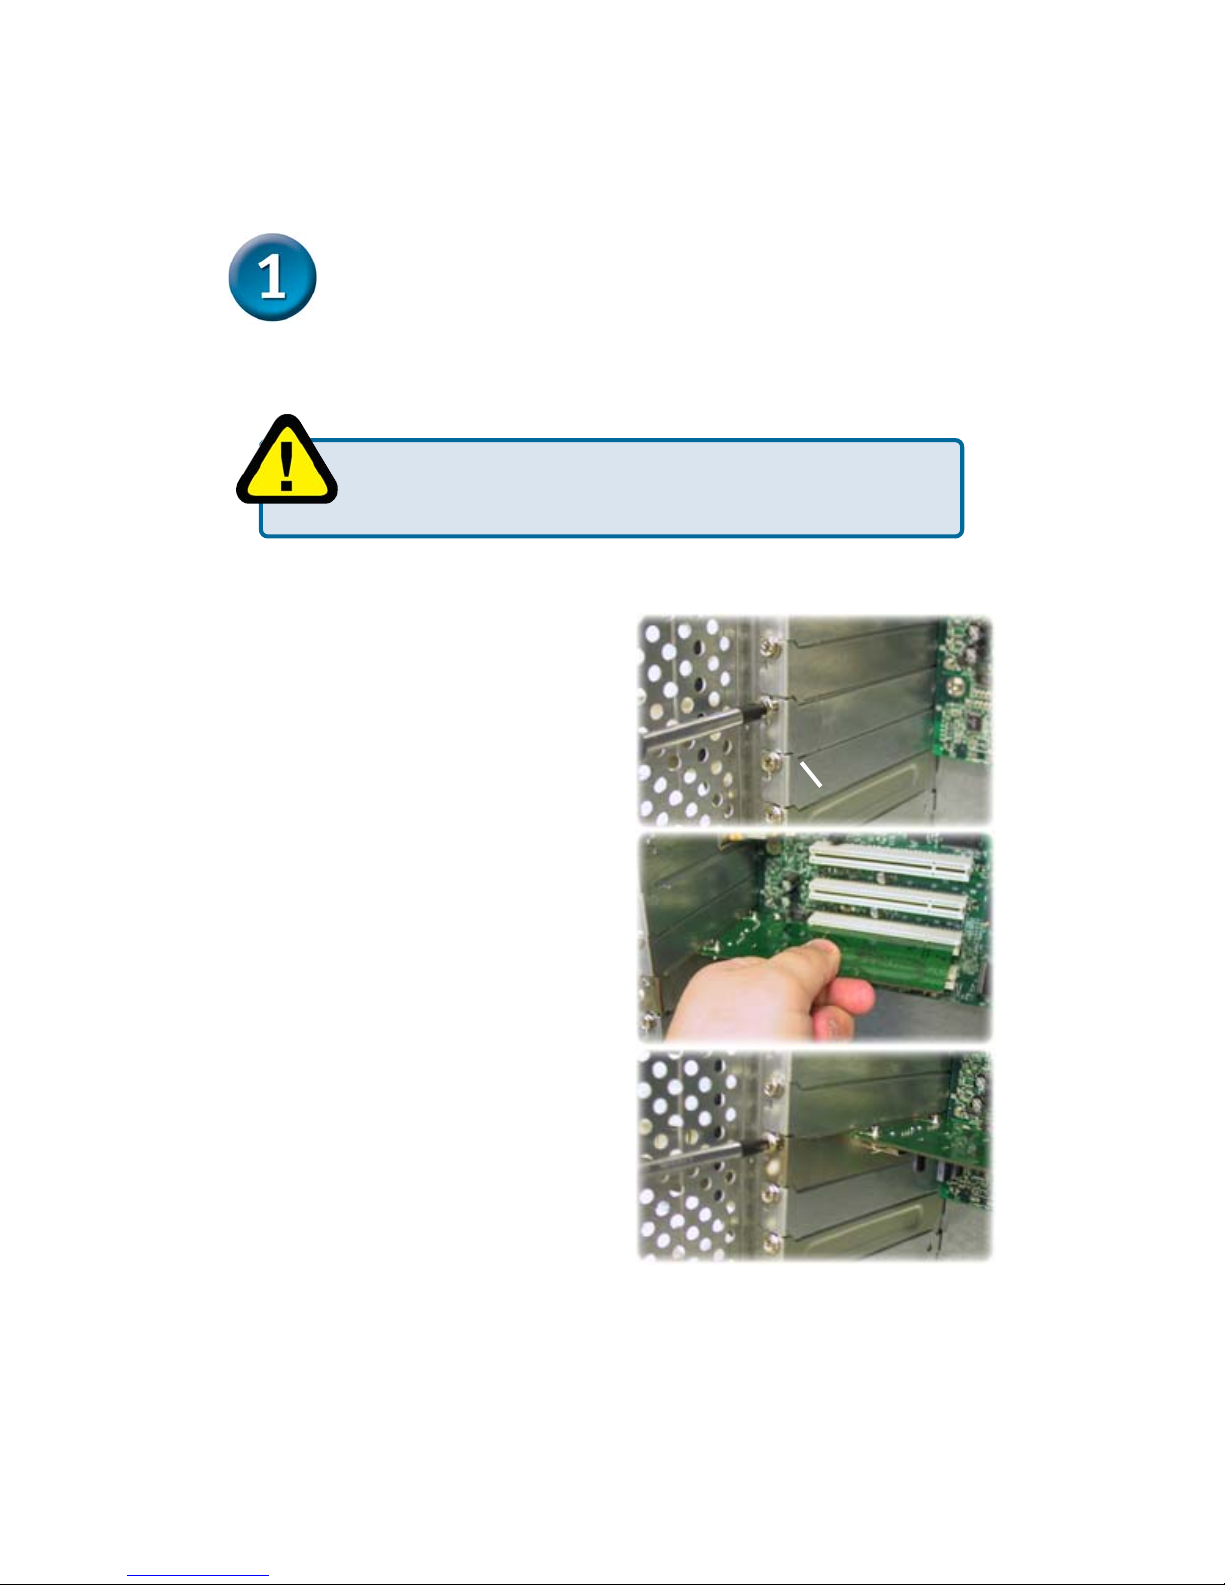
Make sure that your computer is turned OFF
before installing the DUB-A2.
Remove the outer cover of your computer.
Refer to your computer manual as needed.
Remove the backplate. (The small piece
of metal that covers the opening for the
PCI card).
Locate an available PCI slot and
insert the DUB-A2 carefully into the
PCI slot.
PCI Slot
Secure the DUB-A2 with the screw from
the backplate. Replace your computer's
cover and plug in the power cord.
2
Page 3
Installing the DUB-A2 Drivers
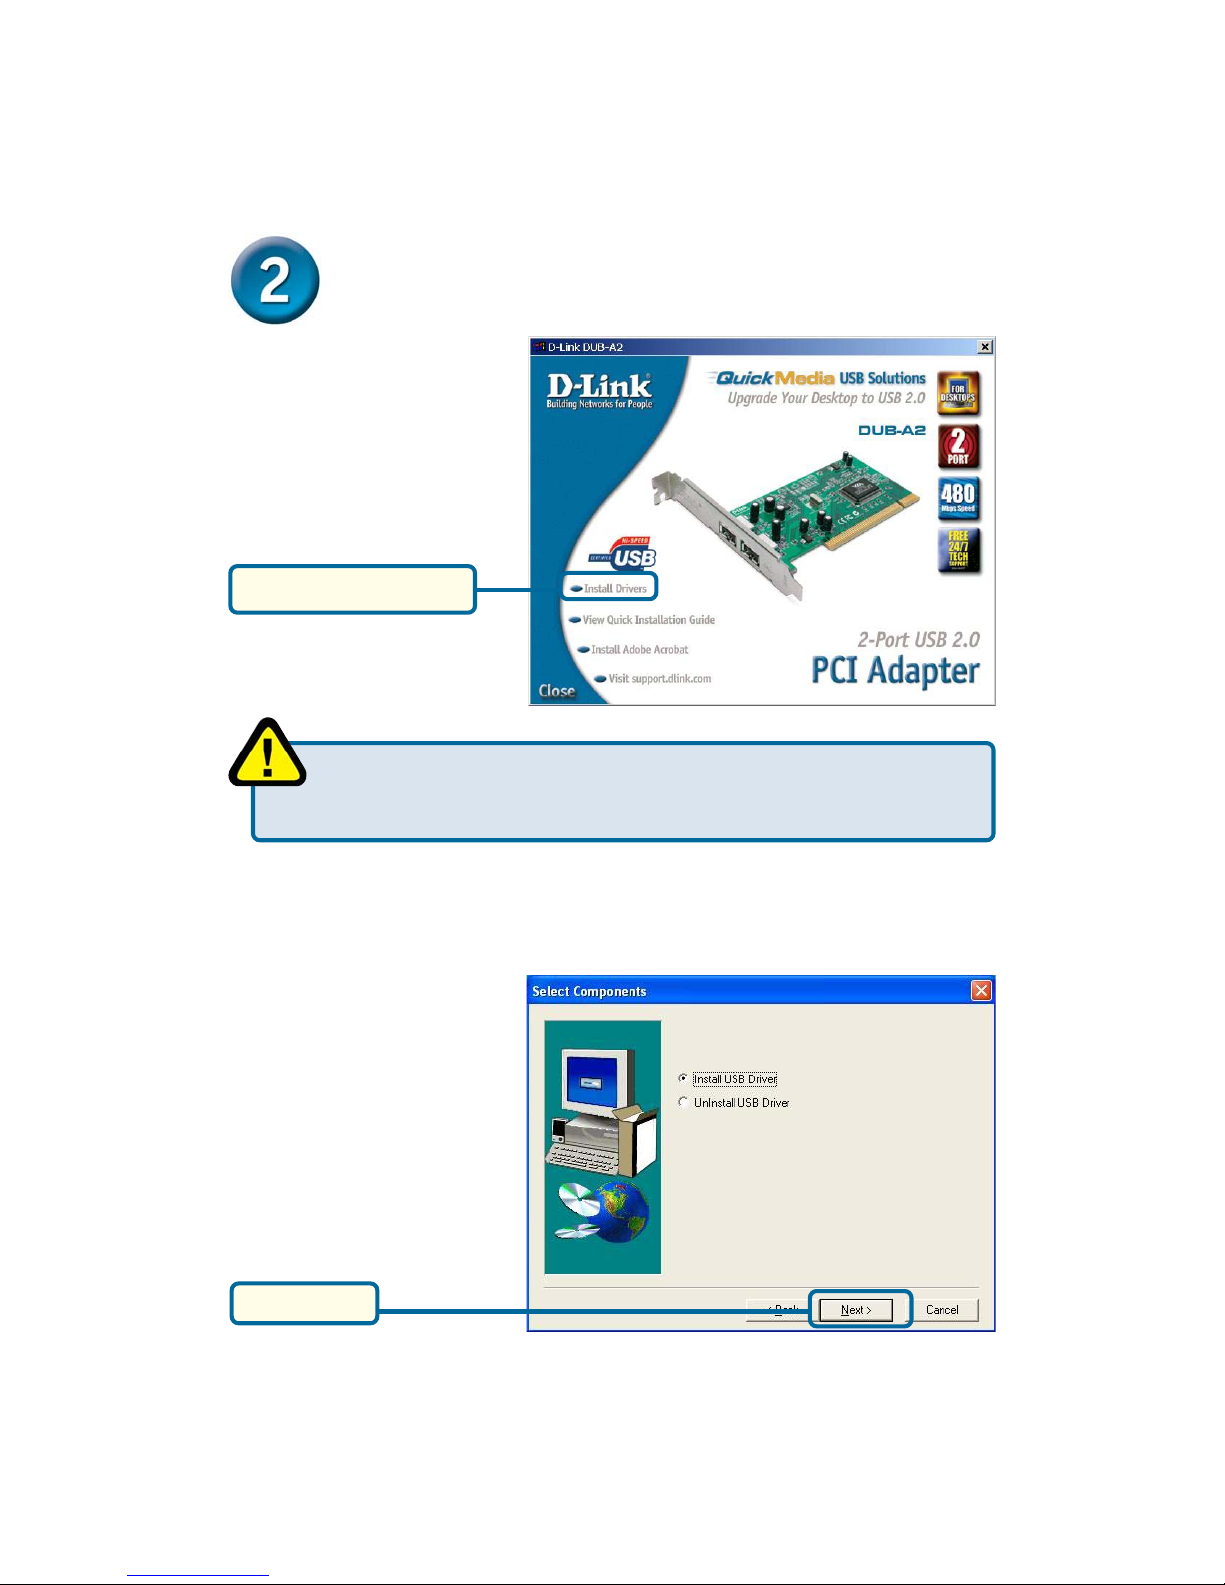
Turn on your computer and
insert the D-Link DUB-A2
Driver CD in the CD-ROM
drive.
Click Install Drivers
If the Autorun screen does not automatically start, click on Start > Run,
enter “D:\Autorun.exe” and click OK. “D” represents the letter of your
CD-ROM drive. Replace it if your CD-ROM drive is a different letter.
Windows XP Users
It is recommended to have the latest Windows XP updates and service packs loaded on
your computer prior to installing the DUB-A2 for optimal performance.
Click Next
3
Page 4
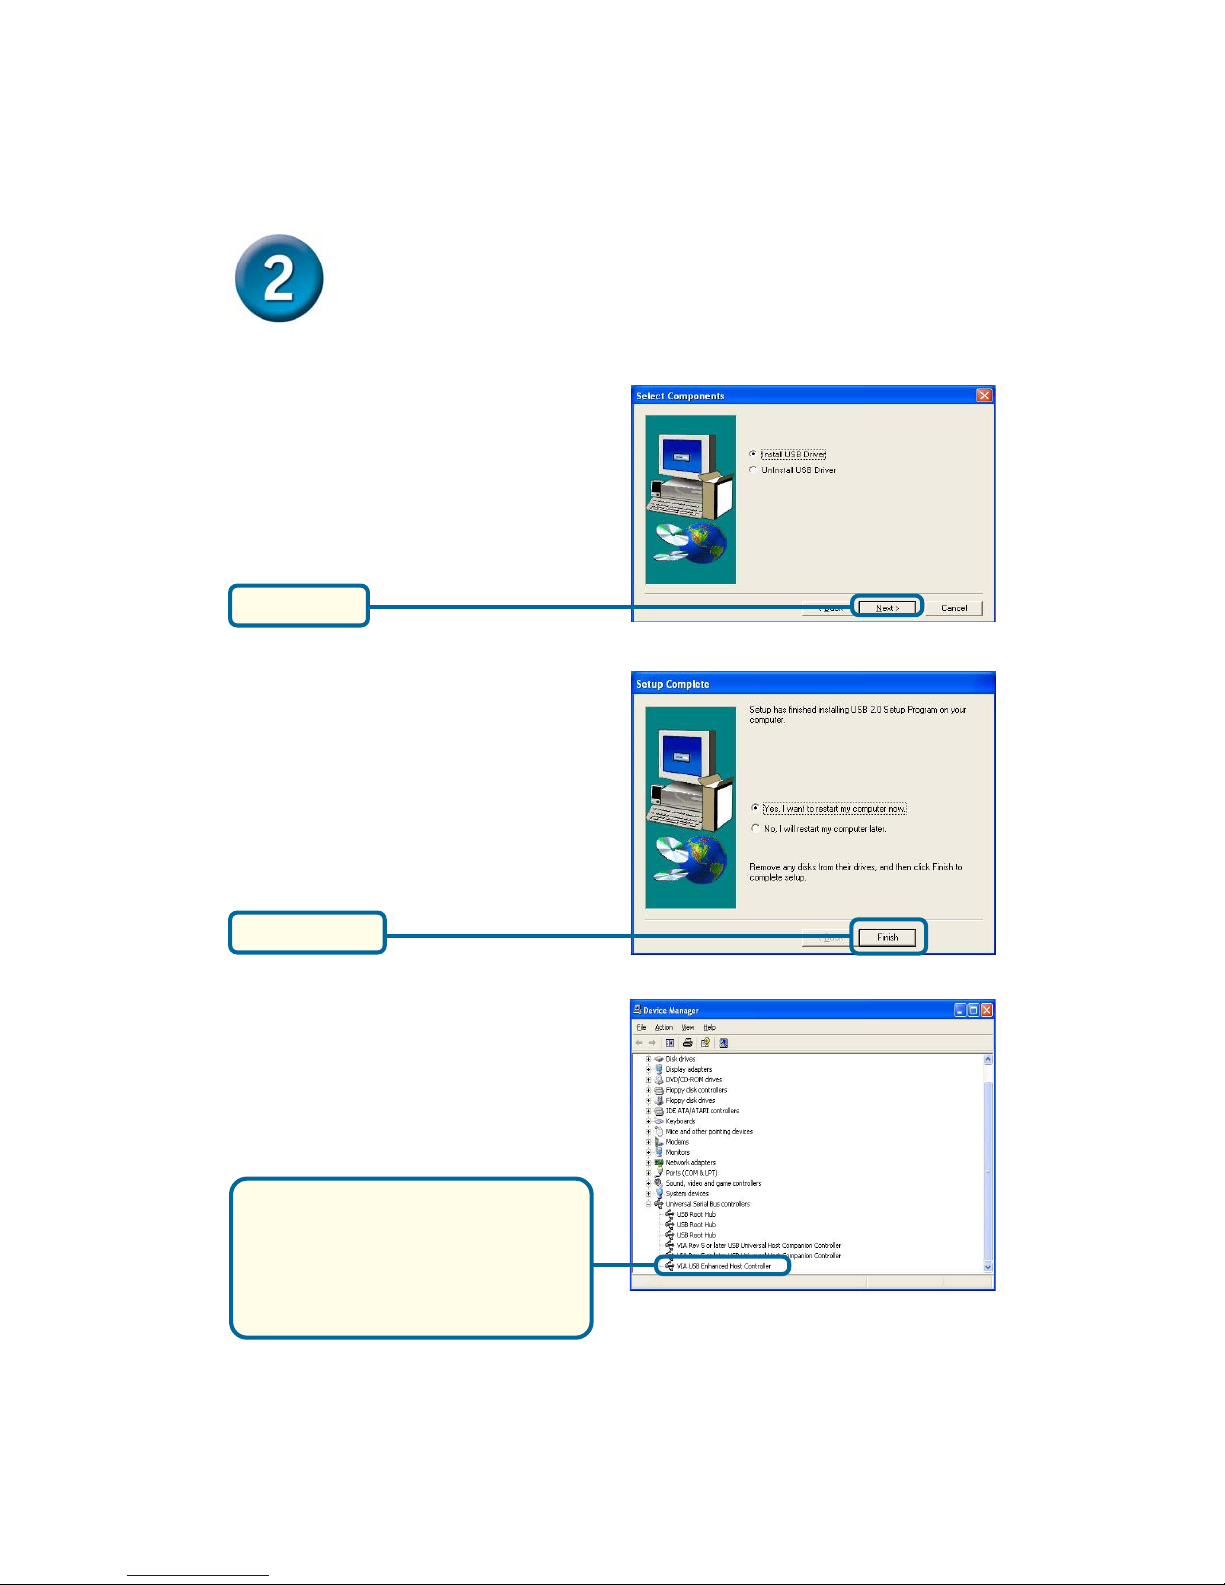
Click Next
Installing the DUB-A2 Drivers
(continued)
Click Finish
To verify your driver installation, right-click
on My Computer>Properties>Hardware>
Device Manager
Click on the + sign next to
Universal Serial Bus controllers and
USB Enhanced Host Controller
should be displayed to verify that
the DUB-A2 is installed.
4
Page 5
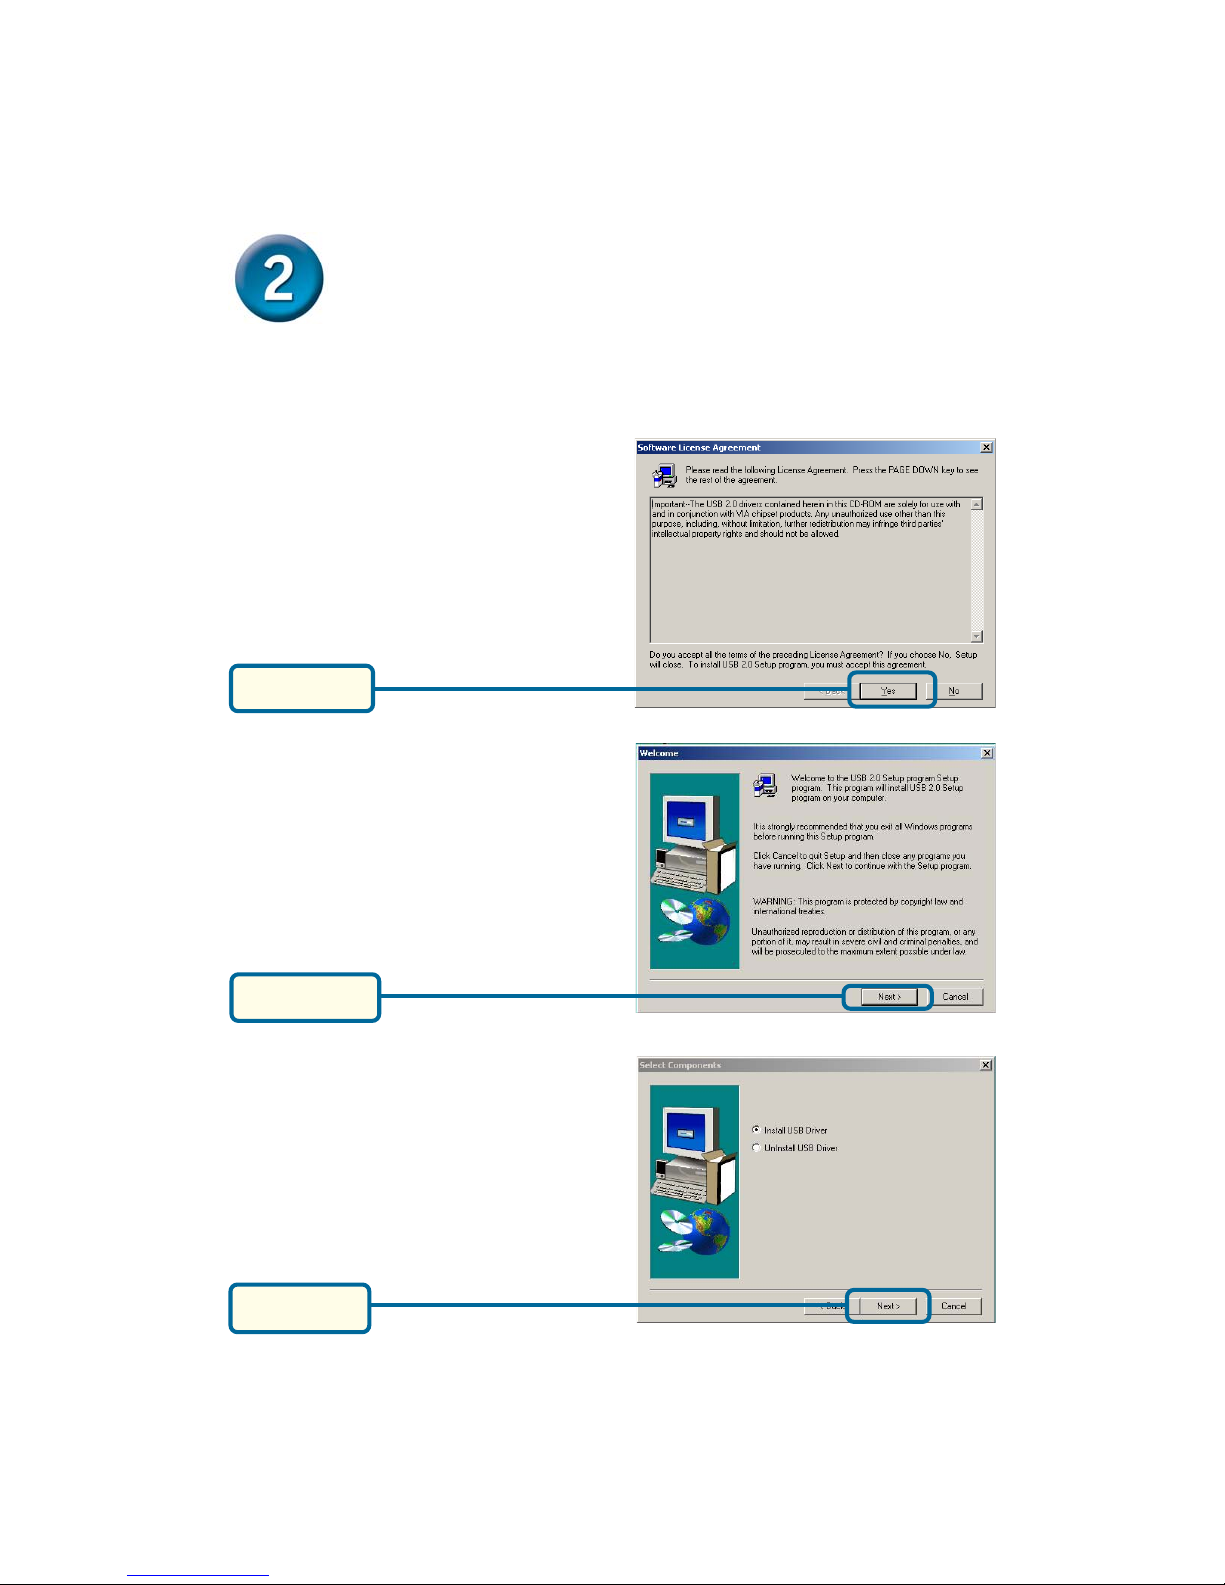
Installing the DUB-A2 Drivers
(continued)
Windows 2000 Users
Click Yes
Click Next
Click Next
5
Page 6
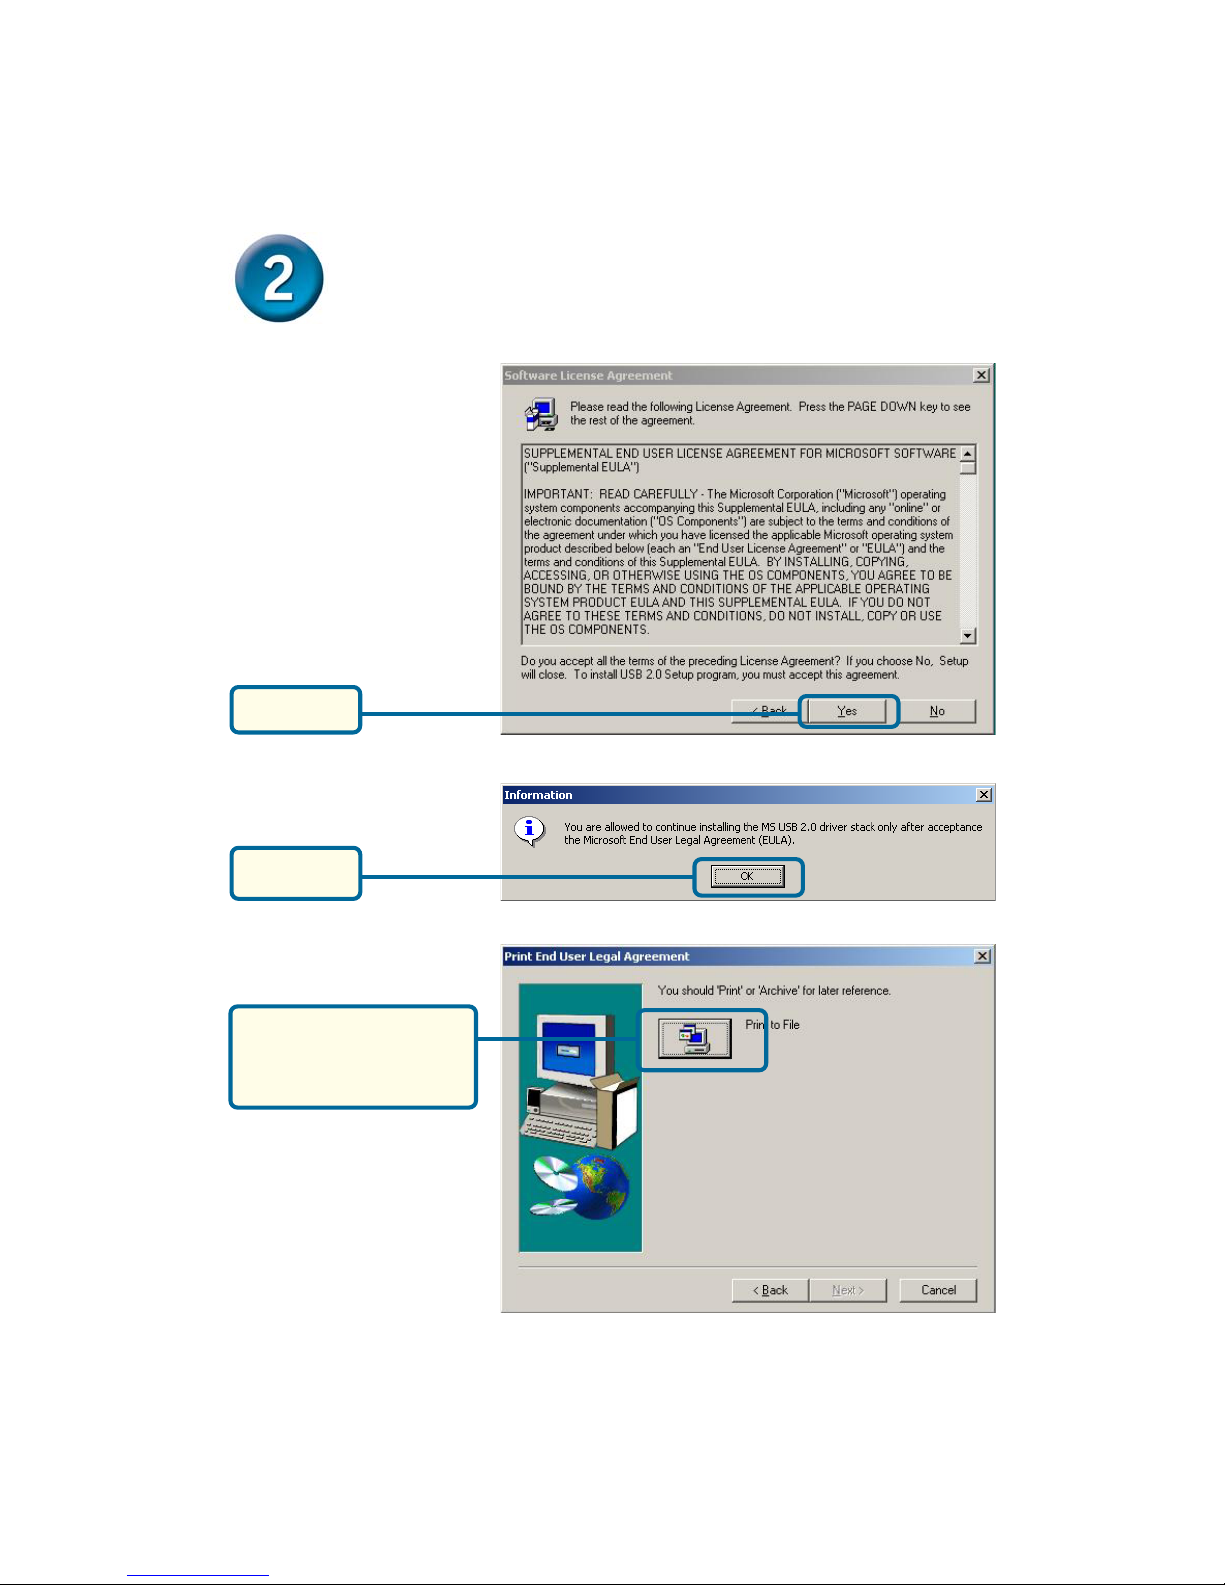
Click Yes
Installing the DUB-A2 Drivers
(continued)
Click OK
Click Print To File to
continue with the
installation
6
Page 7
Installing the DUB-A2 Drivers
(continued)
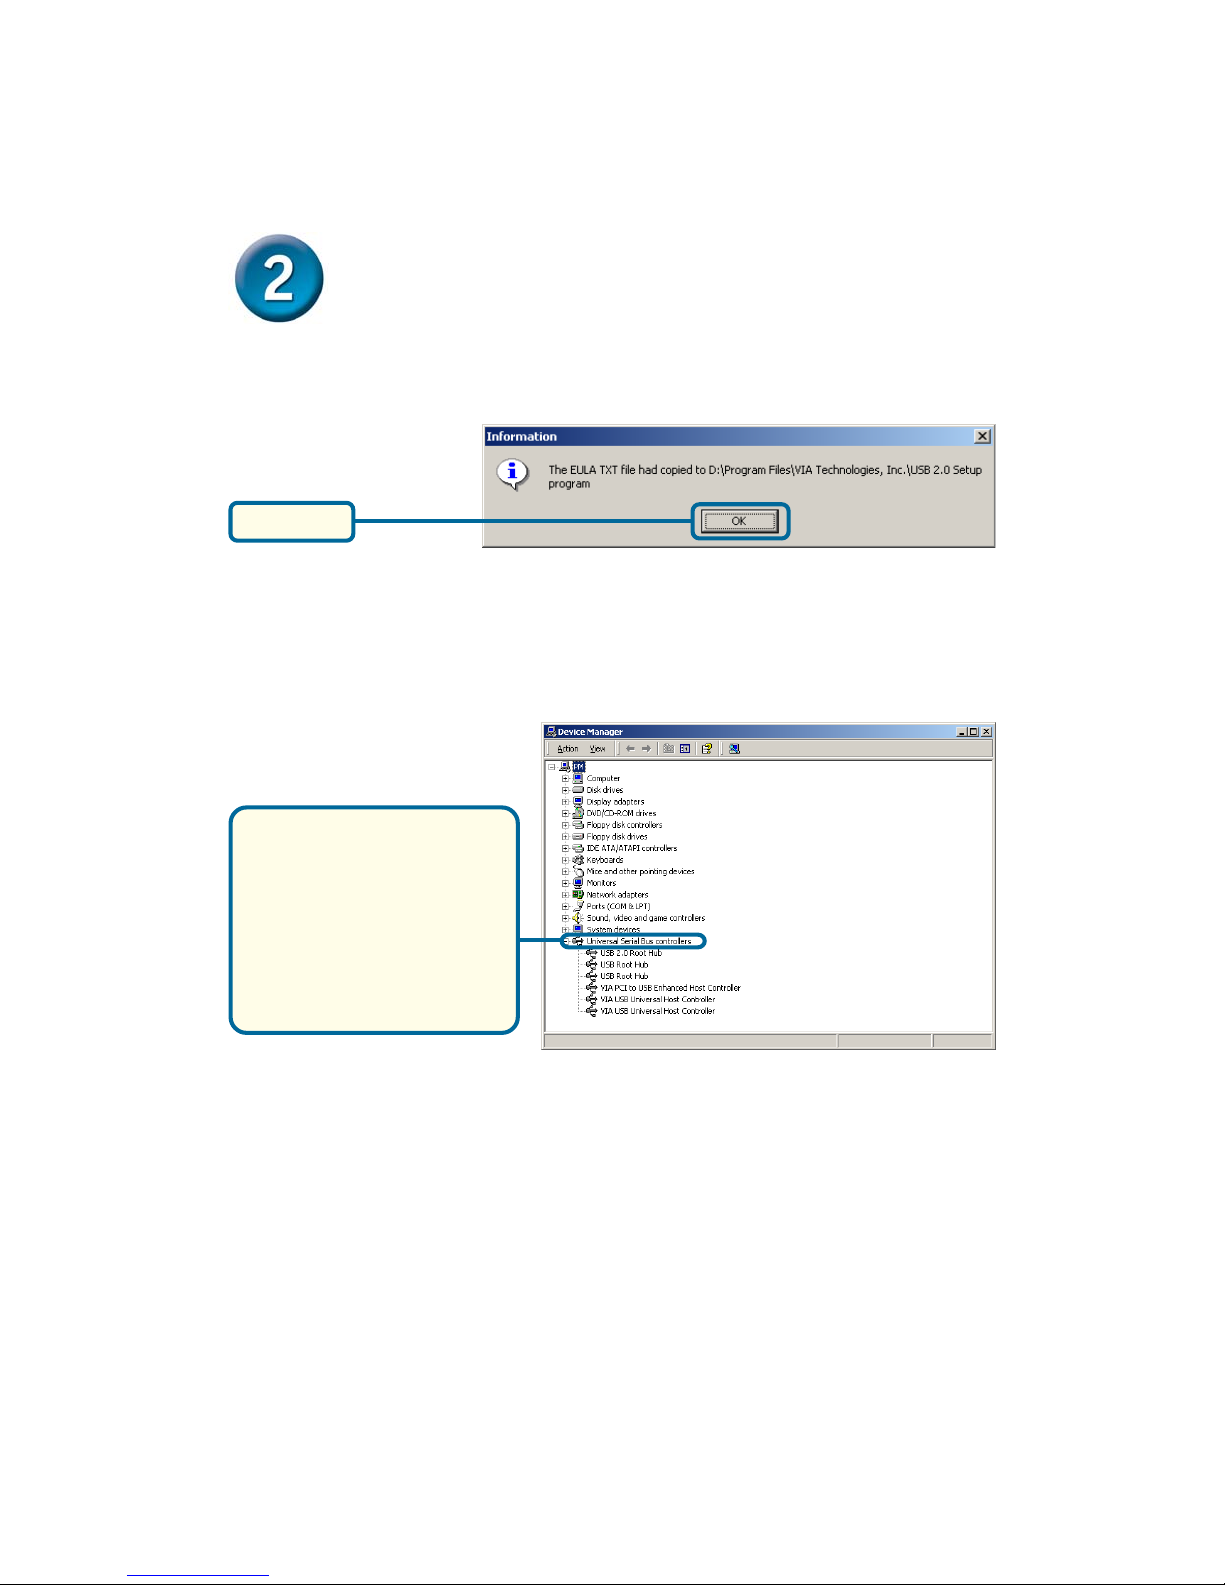
Click OK
Click on the + sign next
to Universal Serial Bus
controllers and USB
Enhanced Host
Controller should be
displayed to verify that
the DUB-A2 is installed.
7
Page 8
Installing the DUB-A2 Drivers
(continued)
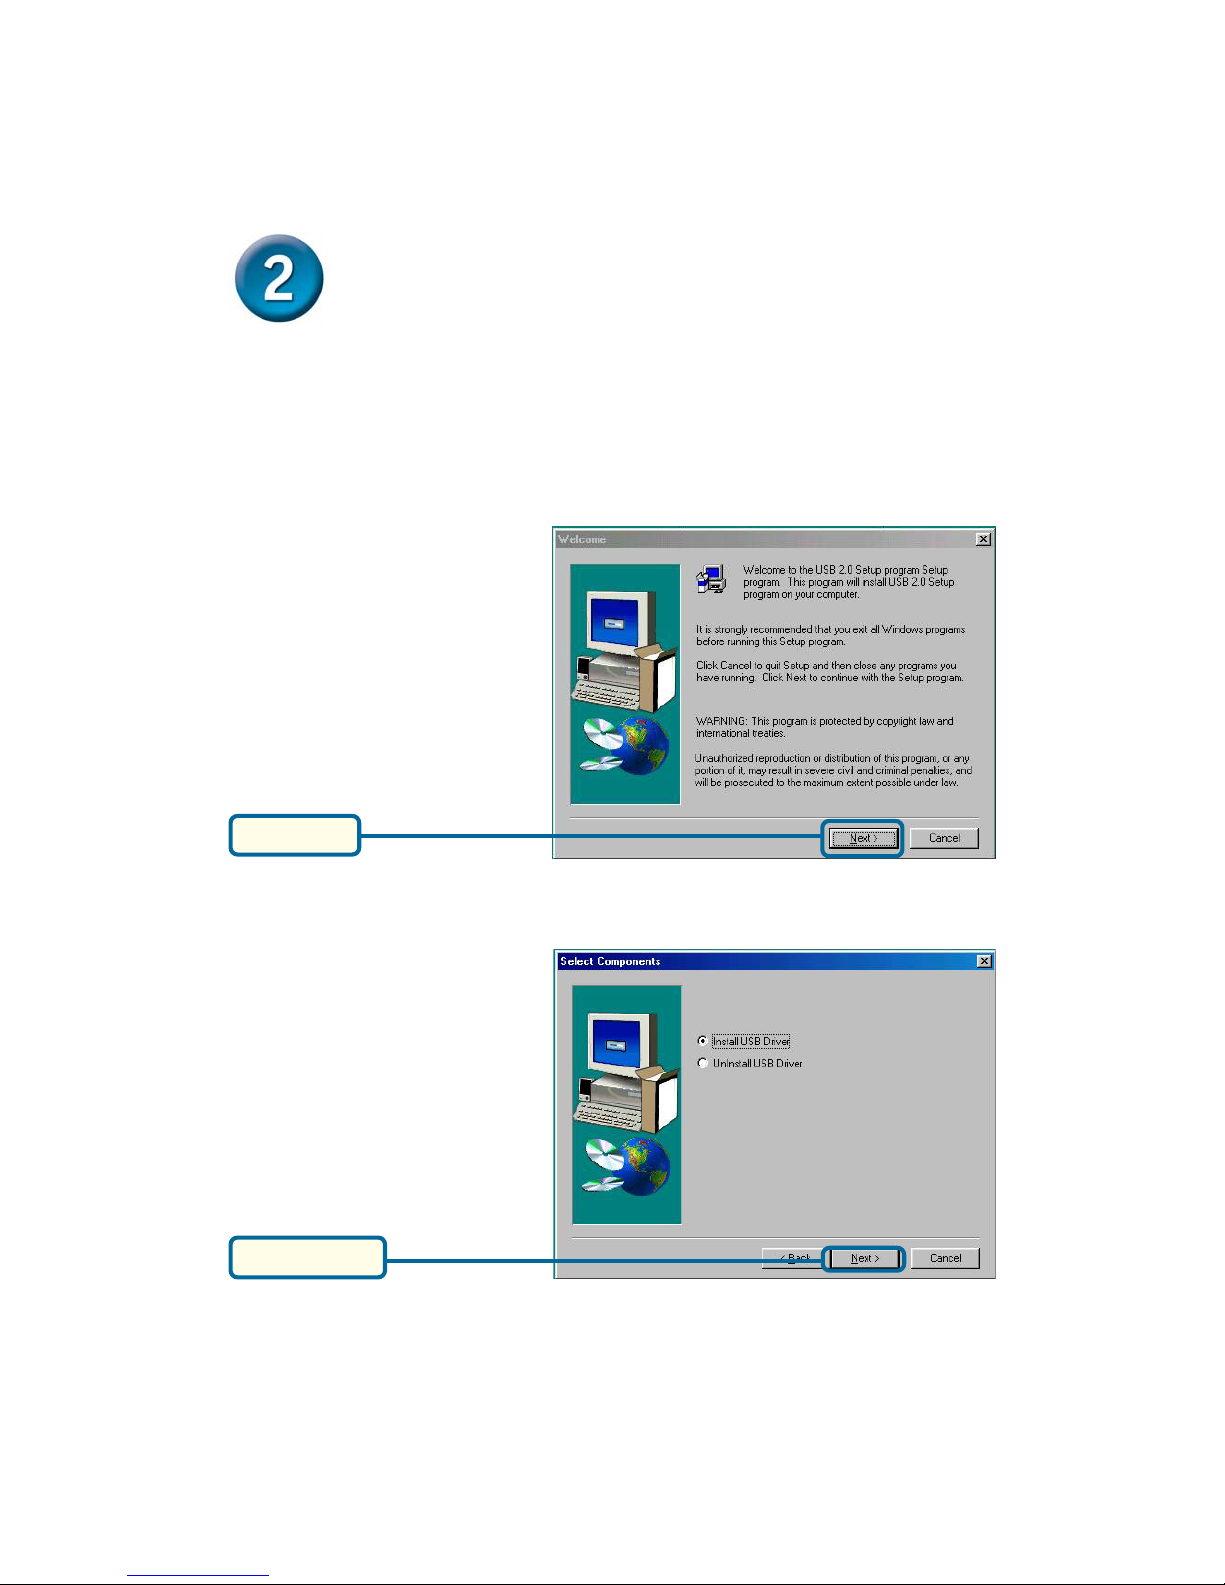
Windows ME/98SE Users
On booting up, Windows may detect new hardware, please cancel out of all
screens and run Install Drivers.
Click Next
Click Next
8
Page 9
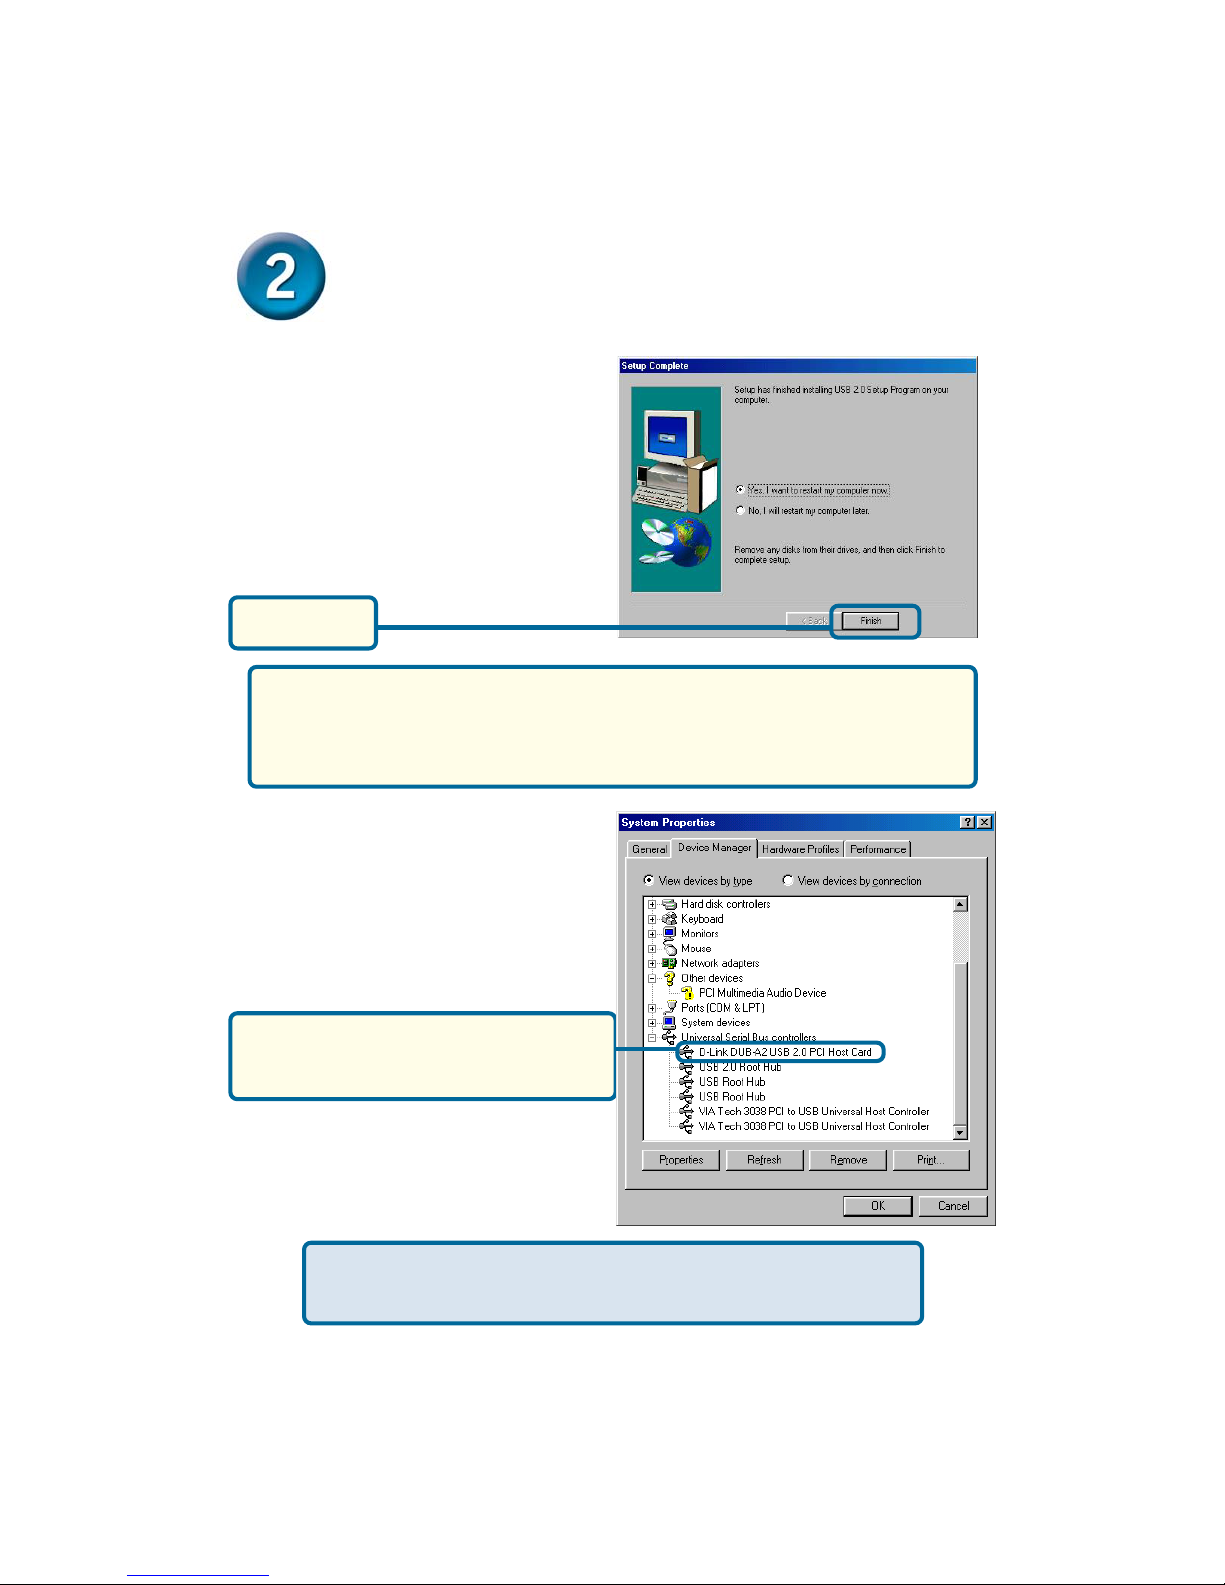
Installing the DUB-A2 Drivers
(continued)
Click Finish
Windows 98 may prompt you for the Windows 98 CD
Rom. If prompted, insert the Windows 98 CD Rom and
select OK.
To verify your DUB-A2 installation right-click
on My Computer>Properties>Device Man-
ager
A D-Link DUB-A2 USB 2.0 PCI Host
Card should be displayed.
Your installation is now complete!
9
Page 10

Introduction to USB 2.0 and Helpful Tips
Introduction
USB stands for Universal Serial Bus. It is a standard for connecting external devices to
your computer quickly and easily. One of the nice things about USB is that power can be
provided to the USB device through the USB cable. However, some devices such as
printers need more power than the USB ports can provide, so those devices will have to
use an external power source. USB also allows the device to be connected and removed
from the PC without the need to shut -down the computer.
USB 2.0 is the second generation standard that improves on USB 1.1 to provide faster
and more reliable data transfers. USB 1.1's speed of 12Mbps is extended to 480Mbps
with USB 2.0. The improved speed and bandwidth opens up the possibility for new
solutions such as external backup or data storage solutions, as well as digital audio and
video solutions.
One important feature of the USB 2.0 standard is that it is backward compliant with USB
1.0 and USB 1.1. This means that all of your current USB products will work with USB 2.0
adapters.
Many USB products are widely available on the market and more are being developed for
future release. Because of the high speed of the USB interface, a USB hub can be used
to connect more than one USB device to one USB port at one time. The USB standard
specifies that up to 127 devices can be connected to your computer.
Helpful Tips
• Remember that when connecting USB 1.0 or USB 1.1 products into a USB 2.0
adapter, the USB 1.x product will not work faster.
• To ensure optimal performance when using USB 2.0 devices, use a USB 2.0 certified
cable such as the DUB-C5AB.
10
Page 11

Notes
11
Page 12

Technical SupportTechnical Support
Technical Support
Technical SupportTechnical Support
You can find software updates and user documentation on the D-Link website.
D-Link provides free technical support for customers within the United States and
within Canada for the duration of the warranty period on this product.
U.S. and Canadian customers can contact D-Link technical support through our
website, or by phone.
Tech Support for customers within the United States:
D-Link Technical Support over the Telephone:
(877) 453-5465
24 hours a day, seven days a week.
D-Link Technical Support over the Internet:
http://support.dlink.com
email:[email protected]
Tech Support for customers within Canada:
D-Link Technical Support over the Telephone:
(800) 361-5265
Monday to Friday 8:30am to 9:00pm EST
D-Link Technical Support over the Internet:
http://support.dlink.ca
email:[email protected]
12
 Loading...