

Page 1
Page 2
D-Link reserves the right to revise this publication and to make changes in the content hereof without obligation to notify any
person or organization of such revisions or changes. Information in this document may become obsolete as our services
and websites develop and change. Please refer to the www.mydlink.com website for the most current information.
Manual Revisions
Revision Date Description
1.0 June 2, 2009 • DSM-350 Revision A1 with rmware version 1.00
Trademarks
D-Link and the D-Link logo are trademarks or registered trademarks of D-Link Corporation or its subsidiaries in the United
States or other countries. All other company or product names mentioned herein are trademarks or registered trademarks
of their respective companies.
Copyright © 2009 by D-Link Corporation.
All rights reserved. This publication may not be reproduced, in whole or in part, without prior expressed written permission
from D-Link Corporation.
Page 3

FCC Statement
This equipment has been tested and found to comply with the limits for a Class B digital device, pursuant to Part 15 of the FCC
Rules. These limits are designed to provide reasonable protection against harmful interference in a residential installation.
This equipment generates, uses and can radiate radio frequency energy and, if not installed and used in accordance with
the instructions, may cause harmful interference to radio communications. However, there is no guarantee that interference
will not occur in a Particular installation. If this equipment does cause harmful interference to radio or television reception,
which can be determined by turning the equipment off and on, the user is encouraged to try to correct the interference by
one or more of the following measures:
- Reorient or relocate the receiving antenna.
- Increase the separation between the equipment and receiver.
- Connect the equipment into an outlet on a circuit different from that to which the receiver is connected.
- Consult the dealer or an experienced radio/TV technician for help.
FCC Caution:
Any changes or modifcations not expressly approved by the party responsible for compliance could void the user’s authority
to operate this equipment.
This device complies with Part 15 of the FCC Rules. Operation is subject to the following two conditions:
(1) This device may not cause harmful interference, and (2) this device must accept any interference received, including
interference that may cause undesired operation.
This Class B digital apparatus complies with Canadian ICES-003.
Cet appareil numérique de la classe B est conforme à la norme NMB-003 du Canada.
Page 4

Table of Contents
Table of Contents
Product Overview ........................................................1
Package Contents ...................................................1
System Requirements ............................................. 2
Introduction ..............................................................3
Features ..................................................................4
Hardware Overview ................................................. 5
Front View .......................................................... 5
Rear Panel (Connections) .................................6
Remote Control .................................................. 7
Installation ....................................................................9
Starting the Setup Wizard ........................................ 9
Installing a Hard Drive ........................................... 10
Connecting the DSM-350 ...................................... 12
HDMI Connection ............................................12
Composite Audio Video Connection ................ 12
S/PDIF Connection .......................................... 13
Network Connection ........................................13
Managing Your MyChannel Media Player ............... 18
The TV Interface ....................................................19
Main Menu ....................................................... 20
Downloads ....................................................... 21
Network Media .................................................22
TV (MyChannel Mode) ..................................... 23
Channels on the MyChannel Media Player .....24
Music ...............................................................26
Videos ..............................................................28
Photos ..............................................................29
Settings ............................................................31
The Web Interface ................................................. 38
Using The Web Interface ................................. 40
My Downloads .................................................41
Channel Management .....................................44
File Management ............................................. 47
Settings ............................................................49
mydlink Portal ............................................................ 14
Device Status ........................................................15
Device Settings ...................................................... 16
Device Info ............................................................. 17
Troubleshooting ........................................................53
Appendix A: Technical Specications .................... 54
iD-Link DSM-350 User Manual
Page 5
Section 1 - Product Overview
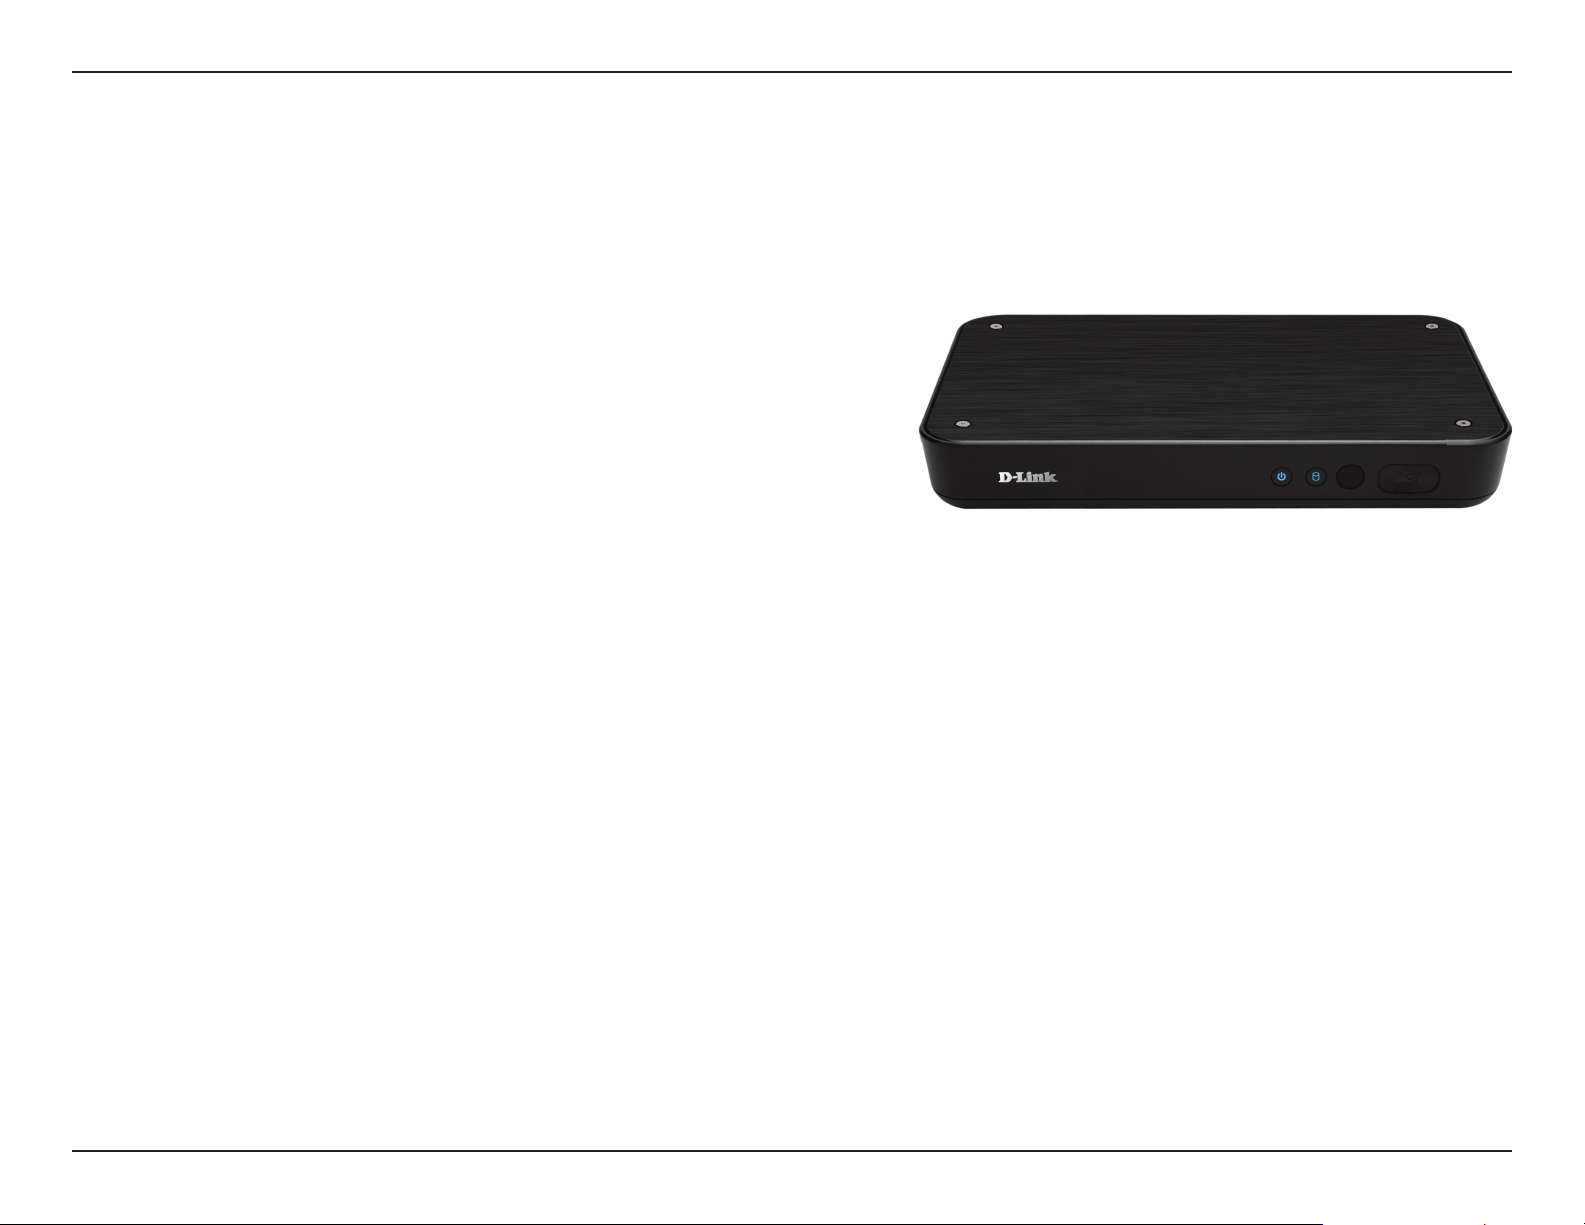
D-Link DSM-350 MyChannel Media Player y
External Power Adapter (12V/2A) y
Remote Control (with batteries) y
CAT5 Ethernet Cable y
Composite AV Cable y
HDD Mounting Kit y
Quick Installation Guide y
CD-ROM with Setup Wizard and User Manual y
Product Overview
Package Contents
Warning: Using a power supply other than the one included with the DSM-350 may cause damage and will void the warranty for
this product.
If any of the above items are missing, please contact your reseller.
1D-Link DSM-350 User Manual
Page 6

Section 1 - Product Overview
System Requirements
Standard or HD television with HDMI or composite video input y
TV, Stereo, or AV receiver with optical digital or composite audio input y
Wired Ethernet Network (100Mbps Ethernet is Recommended for Optimal Video Streaming) y
For managing the DSM-350 with a PC, ensure the PC meets the following specication:
1.3GHz processor
y
128MB memory y
100MB of available hard disk space y
Windows Vista or Windows XP (SP2) y
Internet Explorer 6 or higher with Javascript and ActiveX® support enabled y
2D-Link DSM-350 User Manual
Page 7

Section 1 - Product Overview
Introduction
D-Link introduces the latest addition to its multimedia family of products: the D-Link DSM-350 MyChannel Media Player.
Using your home entertainment center from the comfort of the living room, the DSM-350 includes everything you need
to instantly access and play music, videos, and photos. Use the DSM-350’s 10/100Mbps Ethernet connection to connect
to your wired network and play media les from your PC and network storage devices. USB Direct playback gives you
access to media stored on a USB storage drive.
The DSM-350 is simple to set up, and its sleek design makes it a natural addition to any home entertainment center. The
AV connectors on the back panel of the DSM-350 allow for direct connection to your television or home theater system.
Use the included remote control to listen to your music, watch videos, and display photos, all on your television!
The DSM-350 supports the majority of audio, video, and image le formats. You can play back WMA, MP3, FLAC,
RealAudio, and other audio formats and enjoy them on your home stereo system. Watch stored videos in WMV9,
MPEG1/2/4, RMVB, and many other formats on your television. Enjoy slideshows of your favorite photos in a variety
of formats. Better yet, it’s easy to access your les through an intuitive on-screen interface you can control with the
remote control included with the DSM-350.
The DSM-350 is capable of playing back High-Denition video les with support for resolutions up to 720p and can
connect your television using HDMI and for the highest quality digital video signal. An S/PDIF digital optical audio
output lets you connect the device to a stereo system for accurate, high-quality audio playback.
Getting your les on the DSM-350 is easy; a built-in downloader allows you to download les directly to the device from
HTTP sources or from torrents. You can also access the installed hard drive over a local network as a shared drive,
or you can use a USB cable to connect it to a PC as a USB storage drive.
3D-Link DSM-350 User Manual
Page 8

Section 1 - Product Overview
Stream media content from a PC or D-Link Network Attached Storage to your entertainment center. y
Supports MPEG 1/2/4 video les, as well as RMVB, H.264, XVID, AVI, and more. y
High-Denition (HD) video playback with support for up to 720p resolution. y
Listen to music les on your stereo system, including FLAC audio les. y
Download les directly to an installed hard drive. y
View digital photos, slideshows, and videos on your TV. y
Convenient access to media stored on a USB storage drive. y
Connect to your wired network at up to 100Mbps. y
Support for most popular digital media formats. y
Remote-controlled TV interface for quick access to your media content. y
Sleek design complements your existing audio/video equipment. y
HDMI and Composite video outputs. y
Digital optical and RCA audio outputs. y
Supports DHCP for easy connection to your home network. y
Dynamic on-screen menus and a built-in screensaver. y
Features
4D-Link DSM-350 User Manual
Page 9
Section 1 - Product Overview
Hardware Overview
Front View
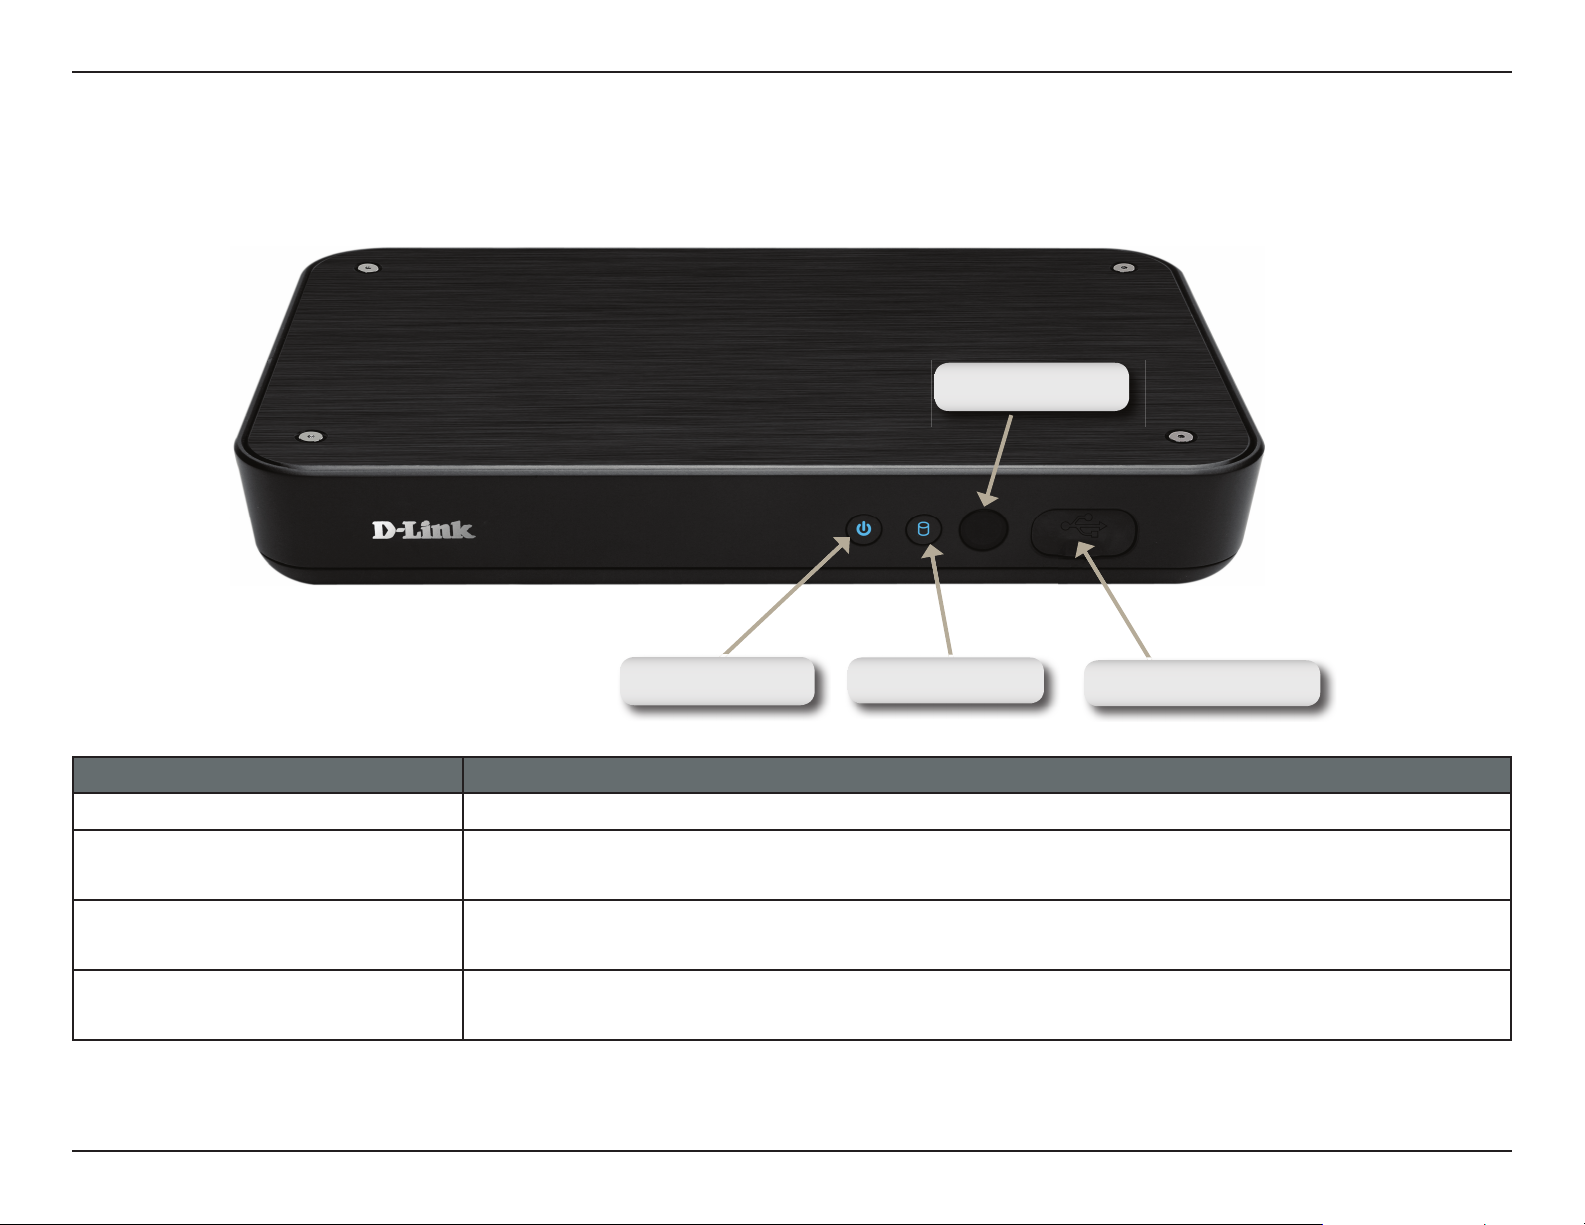
Infrared Sensor
Power LED
COMPONENT DESCRIPTION
Power Button Use this button to power the device On or Off.
Hard Drive LED The LED lights Blue if the Internal Hard Drive is working properly. The LED lights
Red if the Internal Hard Drive is full or has malfunctioned.
Infrared Receiver Receives signals from the included remote control. When using the remote control,
make sure you point it at the infrared receiver.
Type A USB Port Open the rubber cover to access a USB port, which you can use to connect external
USB storage drives to the MyChannel Media Player.
Hard Drive LED
Type A USB Port
5D-Link DSM-350 User Manual
Page 10
Section 1 - Product Overview
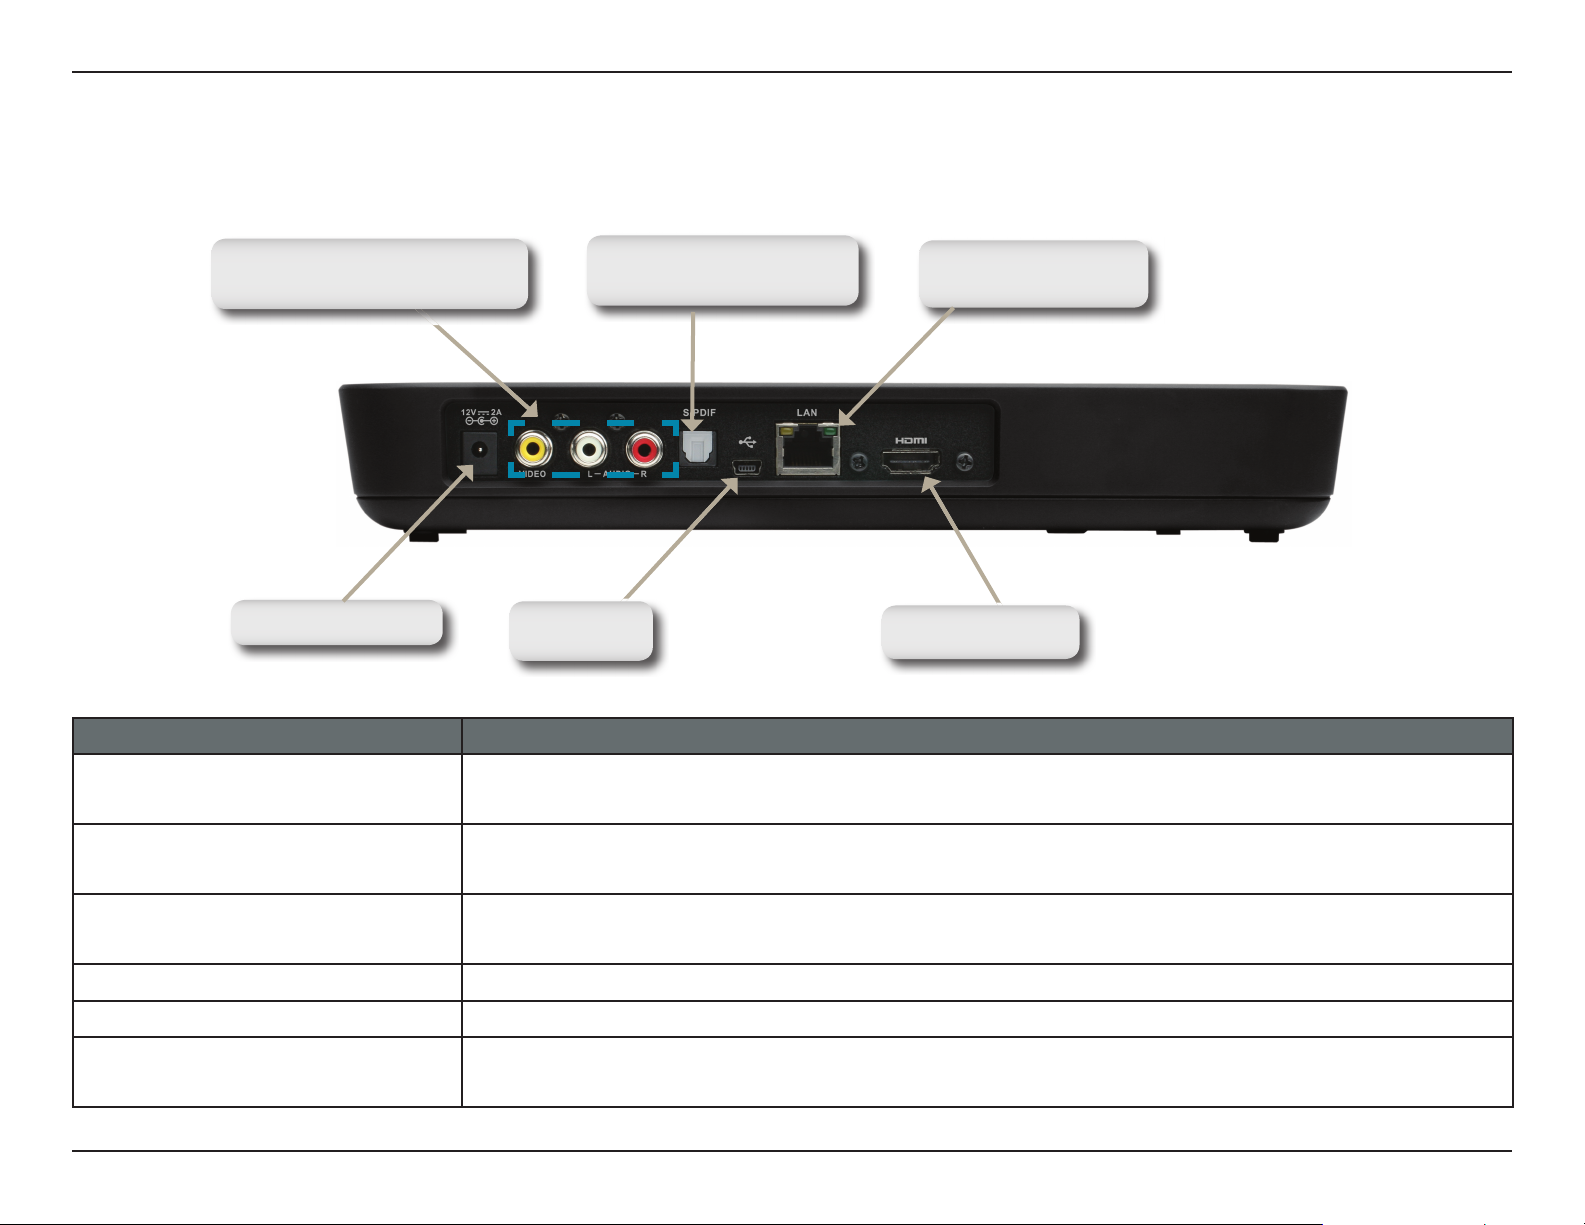
Rear Panel (Connections)
Composite (Video Out) and
Audio L/R Out Connectors
Power Connector
Mini-B USB
Connector
S/PDIF Digital Optical
Audio Out Connector
COMPONENT DESCRIPTION
Composite (Video Out)
and Audio L/R Output
These ports allow you to connect the MyChannel Media Player to a TV with composite
video and RCA audio connectors.
10/100Mbps Fast
Ethernet Port
HDMI Connector
S/PDIF Digital Optical Audio
Use an S/PDIF Digital Optical Audio cable to connect the DSM-350 to a stereo.
Out Connector
10/100Mbps Fast
Ethernet Port
Use the 10/100Mbps Fast Ethernet Port to connect the DSM-350 to the local
network.
Power Connector Connects the 12V DC/2A power adapter.
Mini-B USB Connector 1x USB 2.0 (Mini-B) connector for connection to a PC.
HDMI Connector (Video Out) This port allows you to connect the MyChannel Media Player to a TV that supports
HDMI connections.
6D-Link DSM-350 User Manual
Page 11
Section 1 - Product Overview
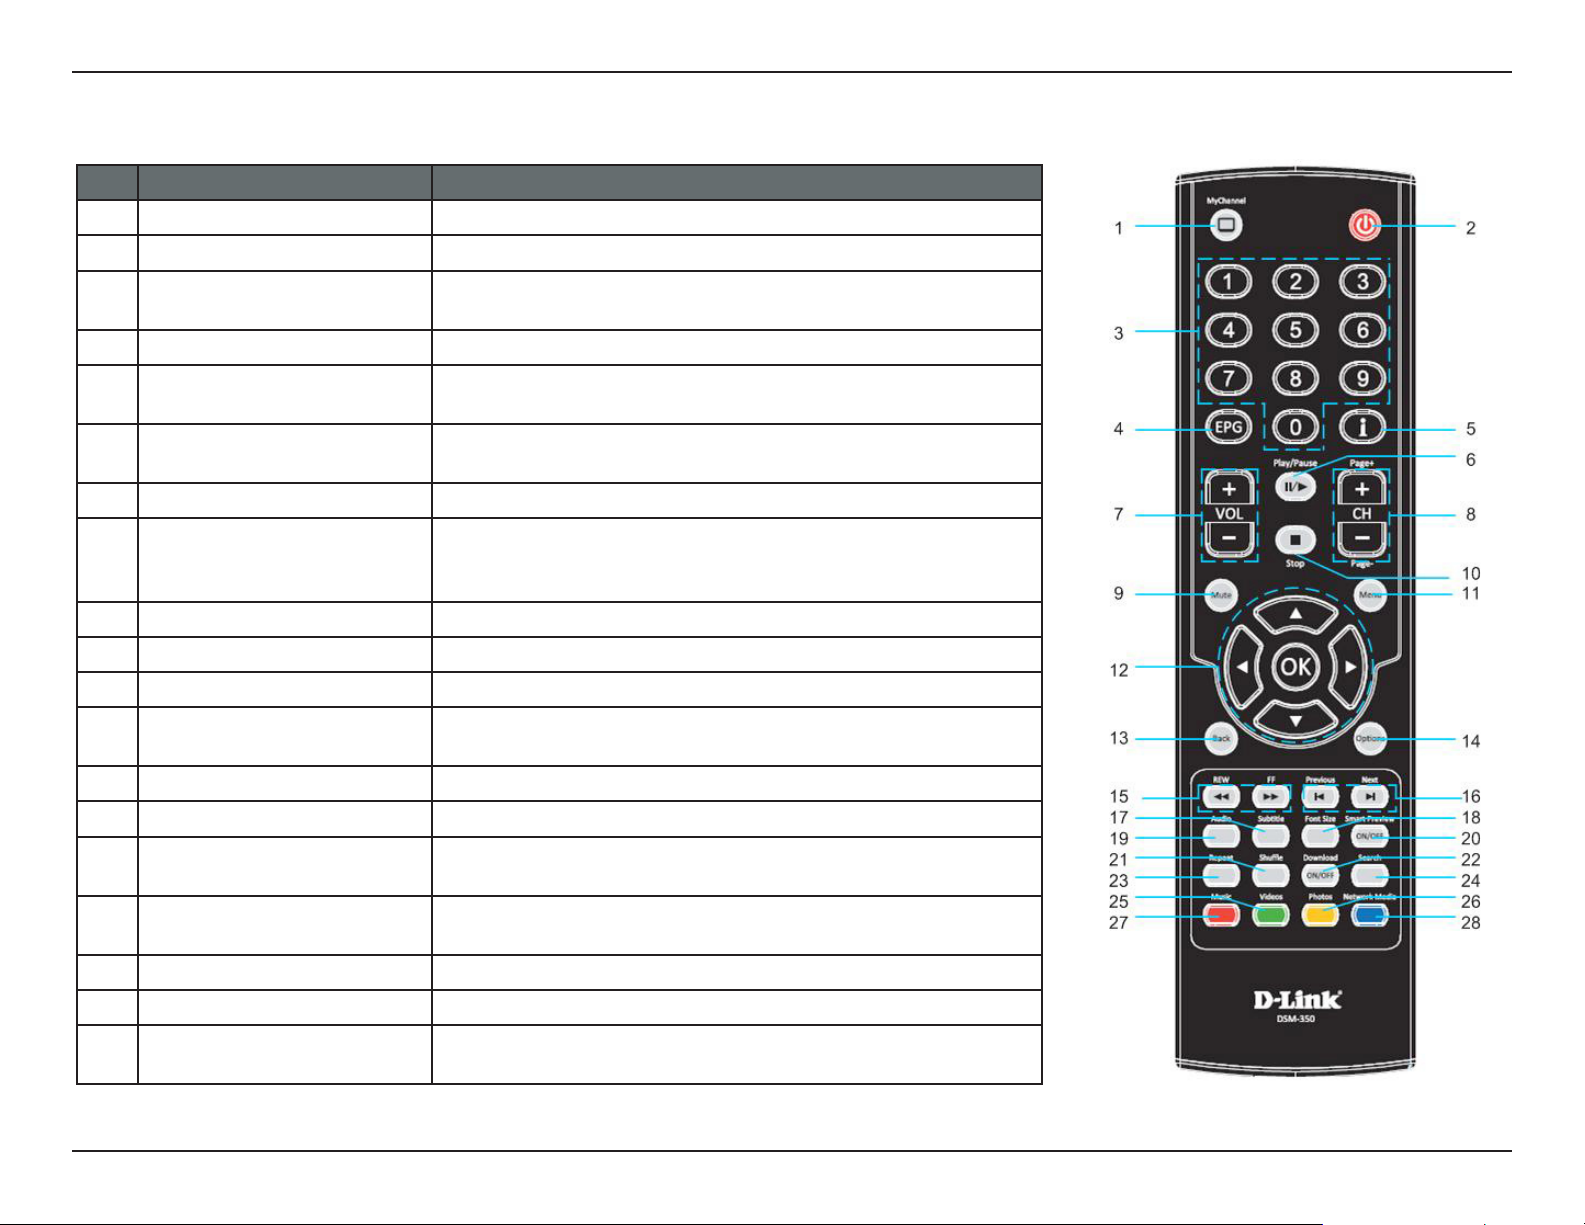
Remote Control
No. Button Description
1. MyChannel Use this button to switch to MyChannel mode.
2. Standby Use this button to toggle standby mode.
3. Number Pad Use these buttons to change channels or to input numbers
when setting up the device.
4. EPG Use this button to enter EPG Mode.
5. Information Use this button to show/hide information about the program
playing.
6. Play/Pause Use this button to play/pause playback of the current file or
slideshow.
7. Volume Control Use these buttons to increase/decrease the volume.
8. Channel Up/Down
(Page Up/Down)
9. Mute Press this button to turn the audio on/off.
10. Stop Use this button to stop the video/audio file.
11. Menu Use this button to open the Main Menu.
12. Left/Right/Up/Down/OK Use these buttons to move left/right/up/down. Press the OK
13. Back Use this button to return to the previous screen.
14. Options Use this button to view the Options menu.
15. Rewind/Fast Forward Use these buttons to Rewind or Fast Forward the video. The
16. Previous/Next Use these buttons to go to the previous/next segment of the
17. Subtitle Use this button to turn subtitles on/off.
18. Font Size Use this button to change the subtitle font size.
19. Audio Use this button select the audio mode.
Press these buttons to jump to the next/previous channel.
For file screens, these buttons will move to the next/previous
page.
button to execute the enter command.
available speeds are 1x/2x/4x/8x.
video, or to go to the previous/next audio track.
7D-Link DSM-350 User Manual
Page 12
Section 1 - Product Overview
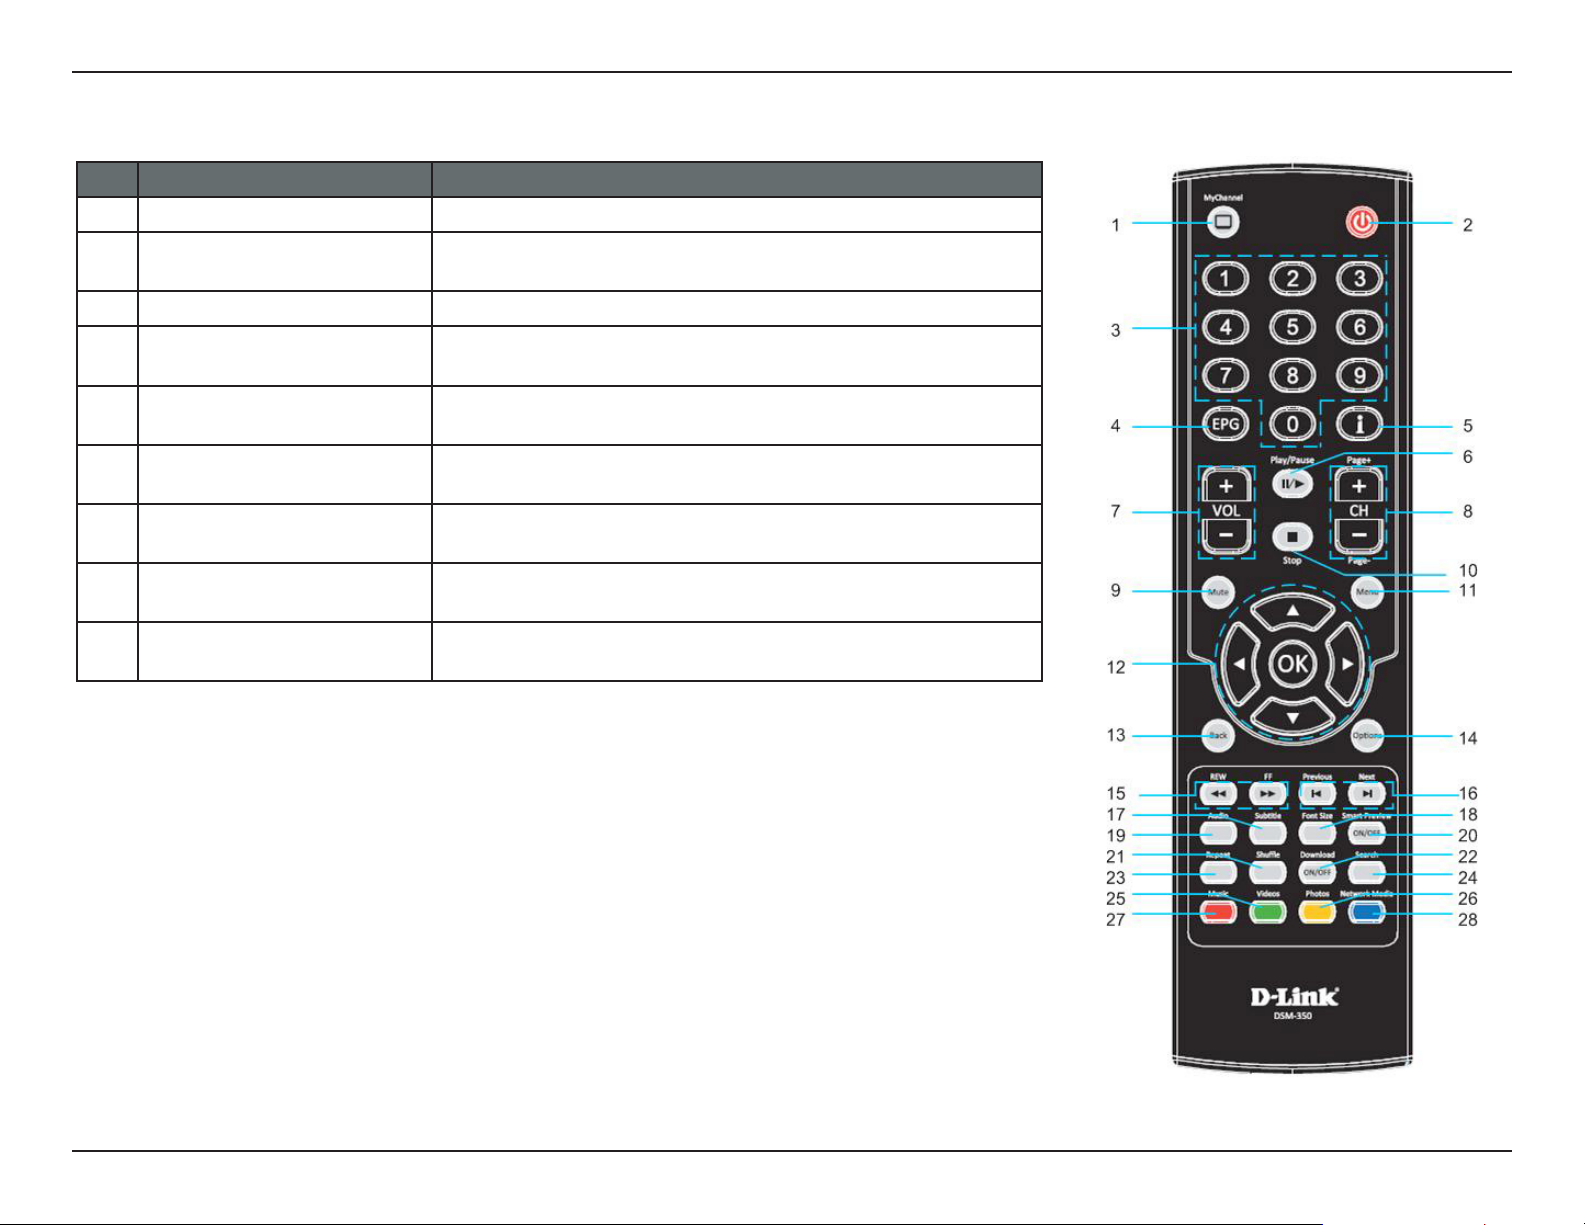
Remote Control (continued)
No. Button Description
20. Smart Preview This button is reserved for future use.
21. Shuffle If listening to music, use this button to turn shuffle mode on/
off.
22. Download Use this button to turn downloading on/off.
23. Repeat When listening to music, use this button to cycle through the
different repeat modes.
24. Search Use this button to search for media stored on the MyChannel
Media Player.
25. Videos Use this button to go directly to the Video section of the Main
Menu.
26. Photos Use this button to go directly to the Photo section of the Main
Menu.
27. Music Use this button to go directly to the Music section of the Main
Menu.
28. Network Media Use this button to go directly to the Network Media section of
the Main Menu.
8D-Link DSM-350 User Manual
Page 13
Section 2 - Installation
Installation
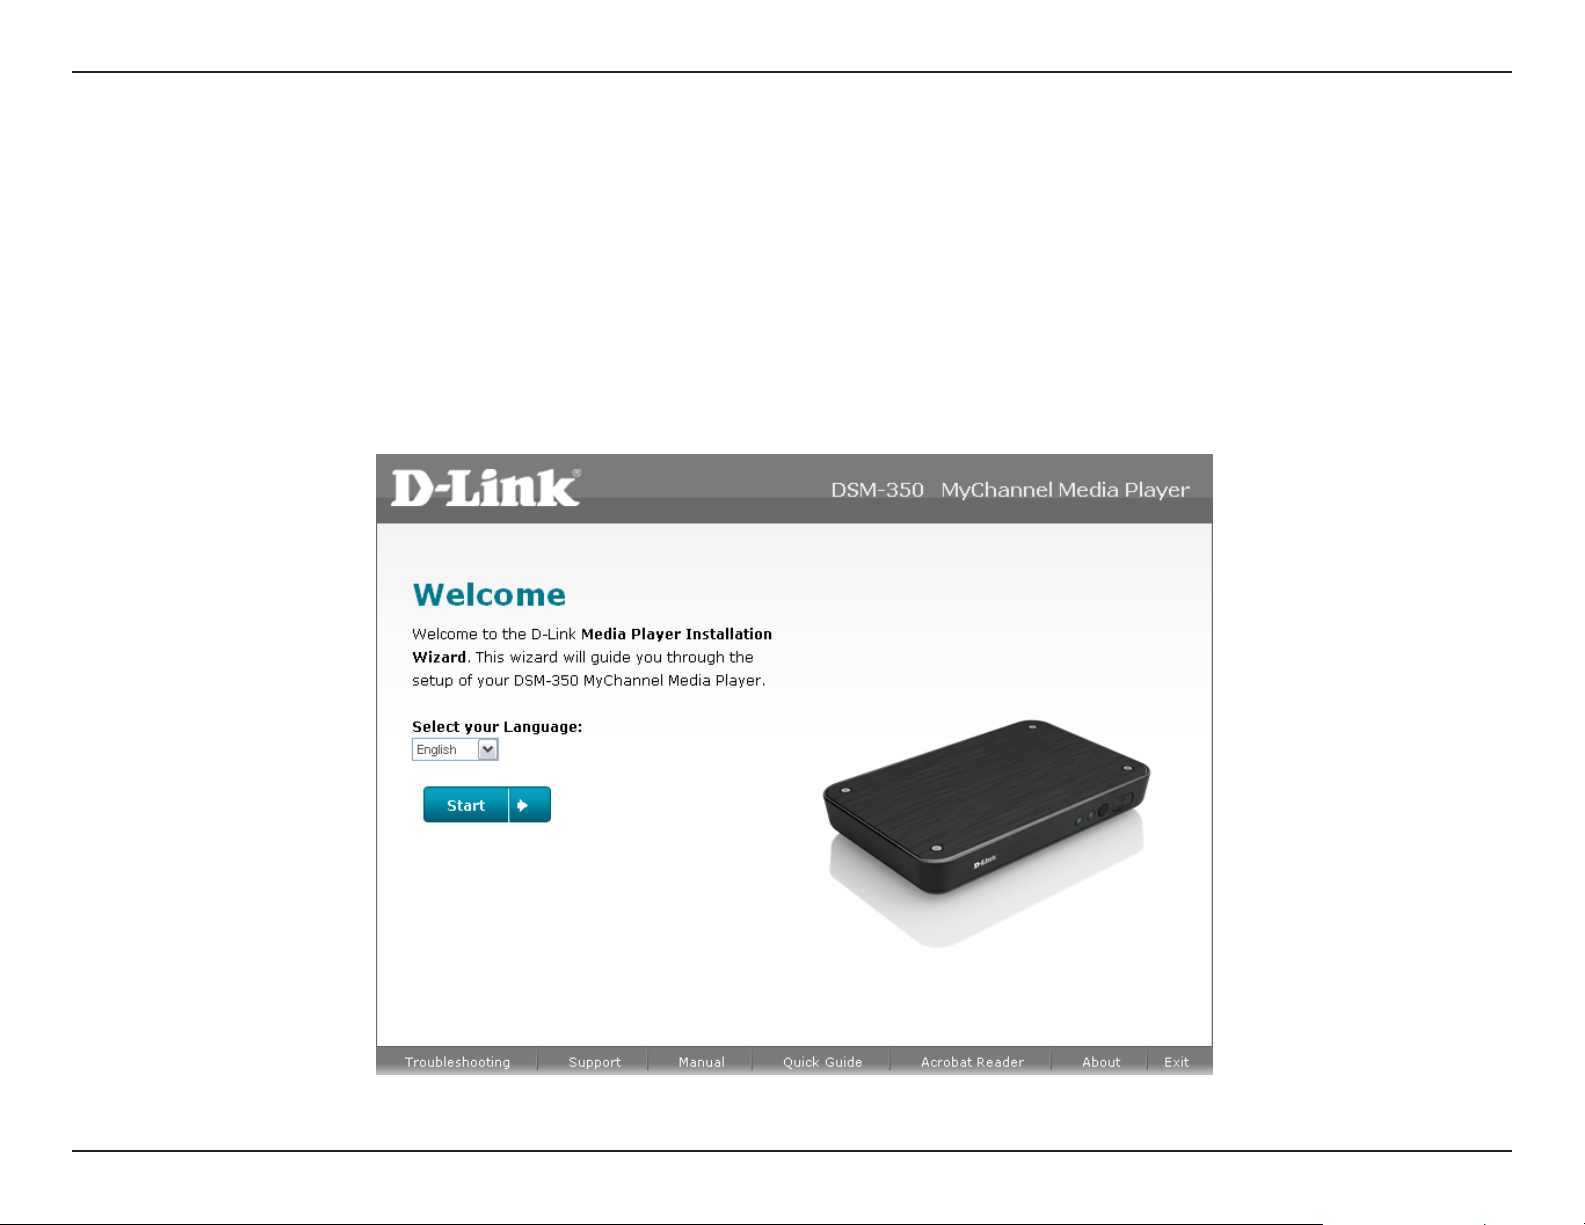
Starting the Setup Wizard
Insert the Installation CD-ROM into your computer’s CD-ROM drive to start the autorun program.
The CD-ROM will open the Setup Wizard. Simply click Start to go through the Setup Wizard, which will help you through
the entire installation process from connecting your hardware to conguring your device.
9D-Link DSM-350 User Manual
Page 14
Section 2 - Installation
Installing a Hard Drive
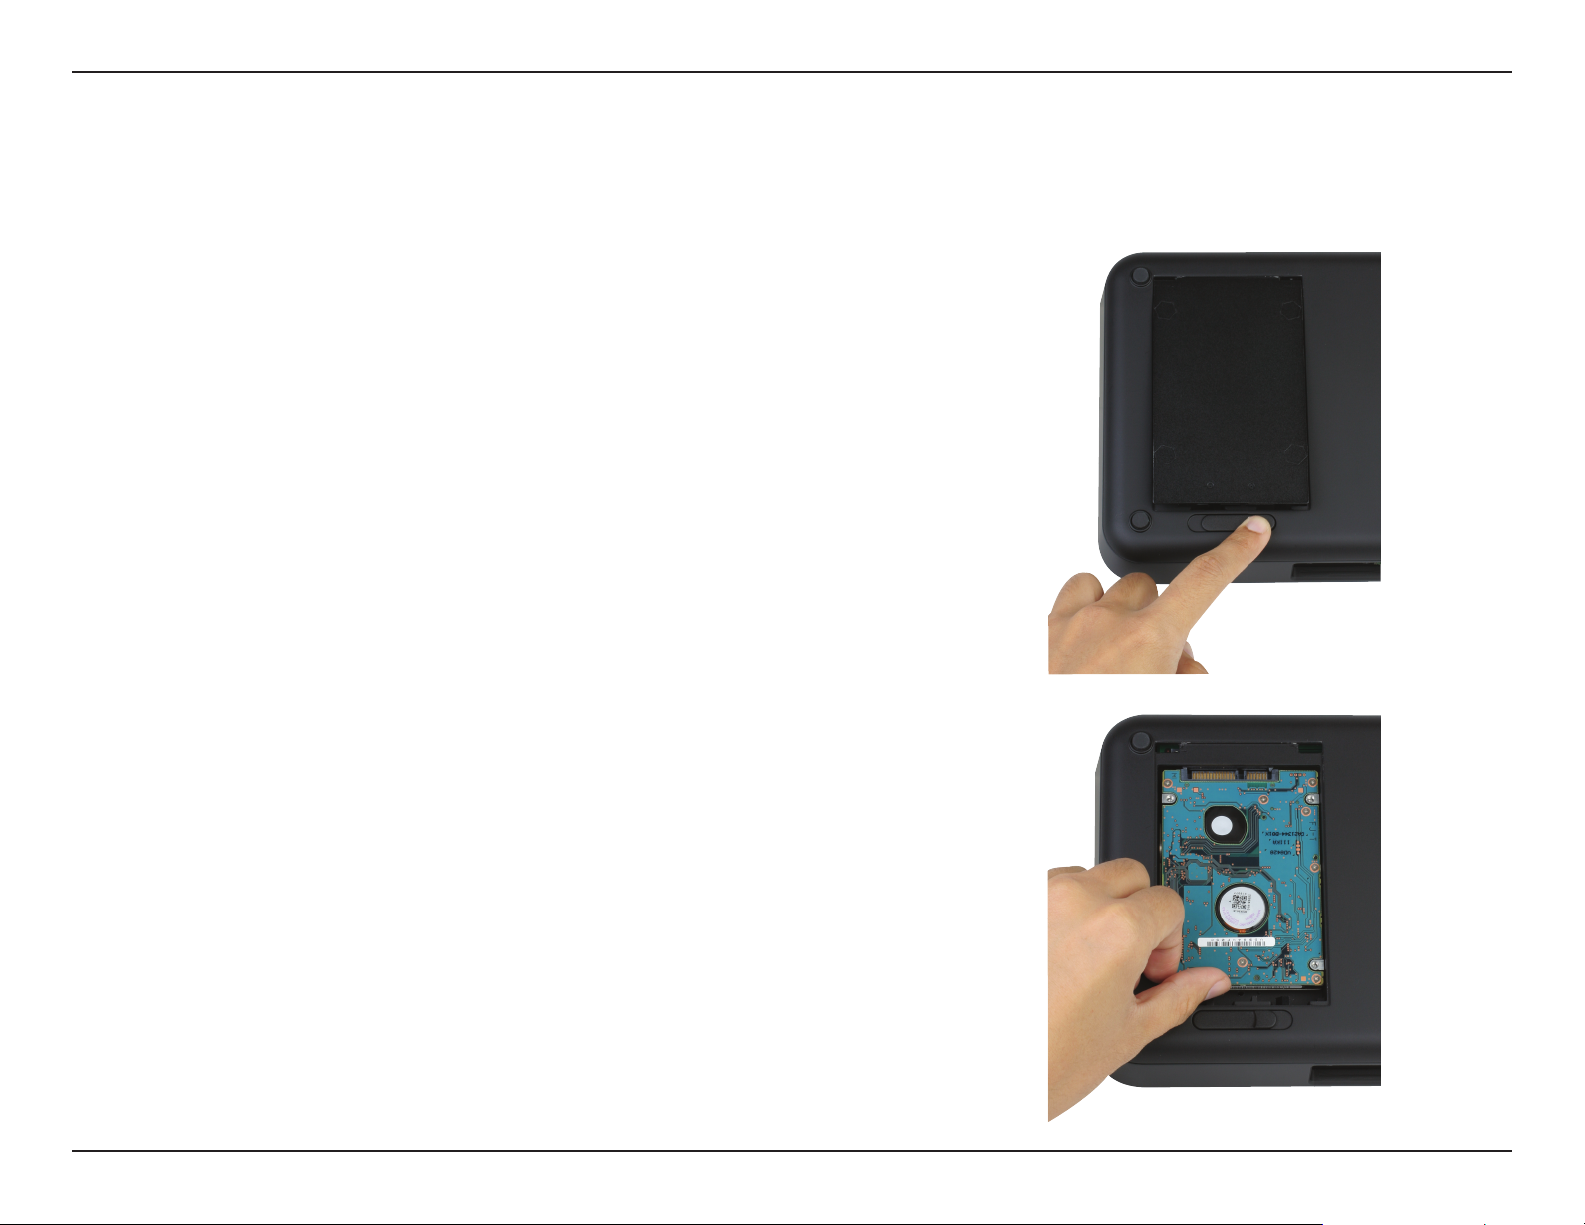
The MyChannel Media Player requires that you install a hard drive in order to access its more advanced functions,
such as downloading and custom channel creation. The MyChannel Media Player accepts 2.5” SATA hard drives.
Turn the DSM-350 over and slide the drive lock to the open
position and remove the hard drive cover.
Insert the hard drive as shown and push it into the drive
connector rmly.
10D-Link DSM-350 User Manual
Page 15
Section 2 - Installation
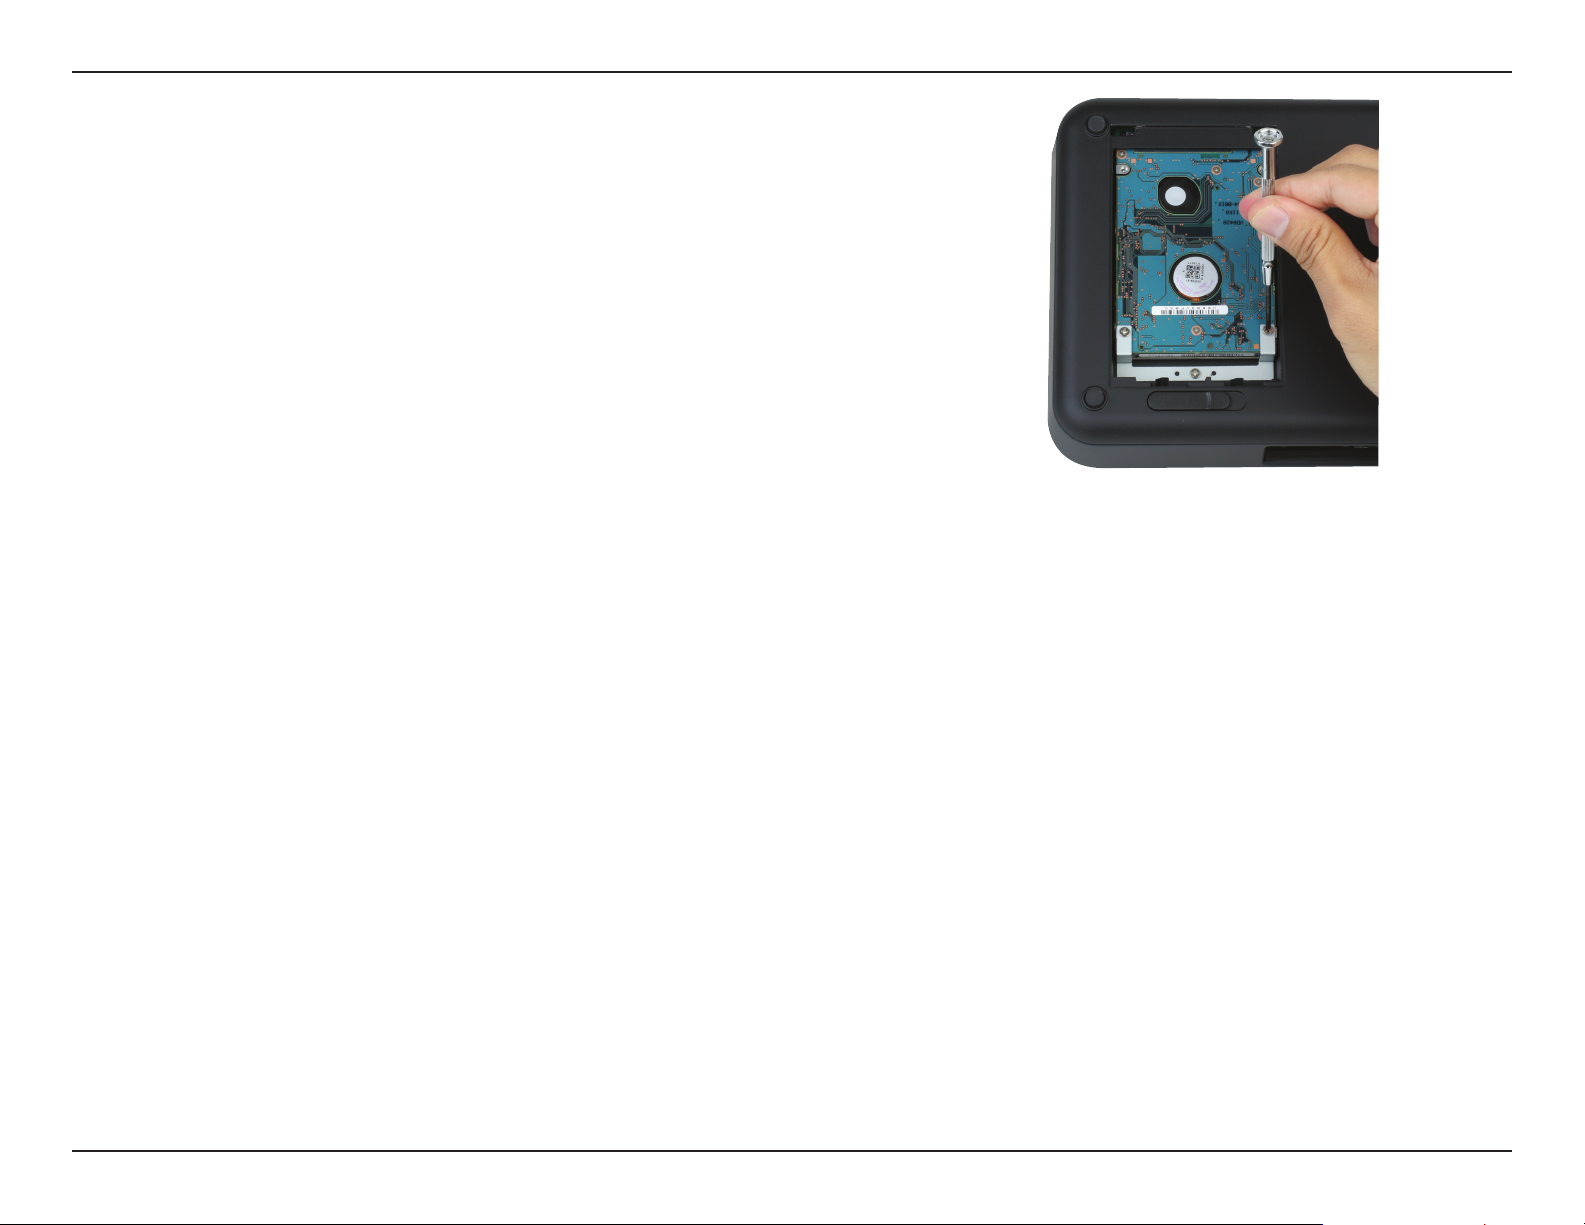
Place the bracket over the hard drive as shown, and
secure the hard drive with the included screws. Replace
the hard drive cover and slide the drive lock to the
locked position.
11D-Link DSM-350 User Manual
Page 16
Section 2 - Installation
Connecting the DSM-350
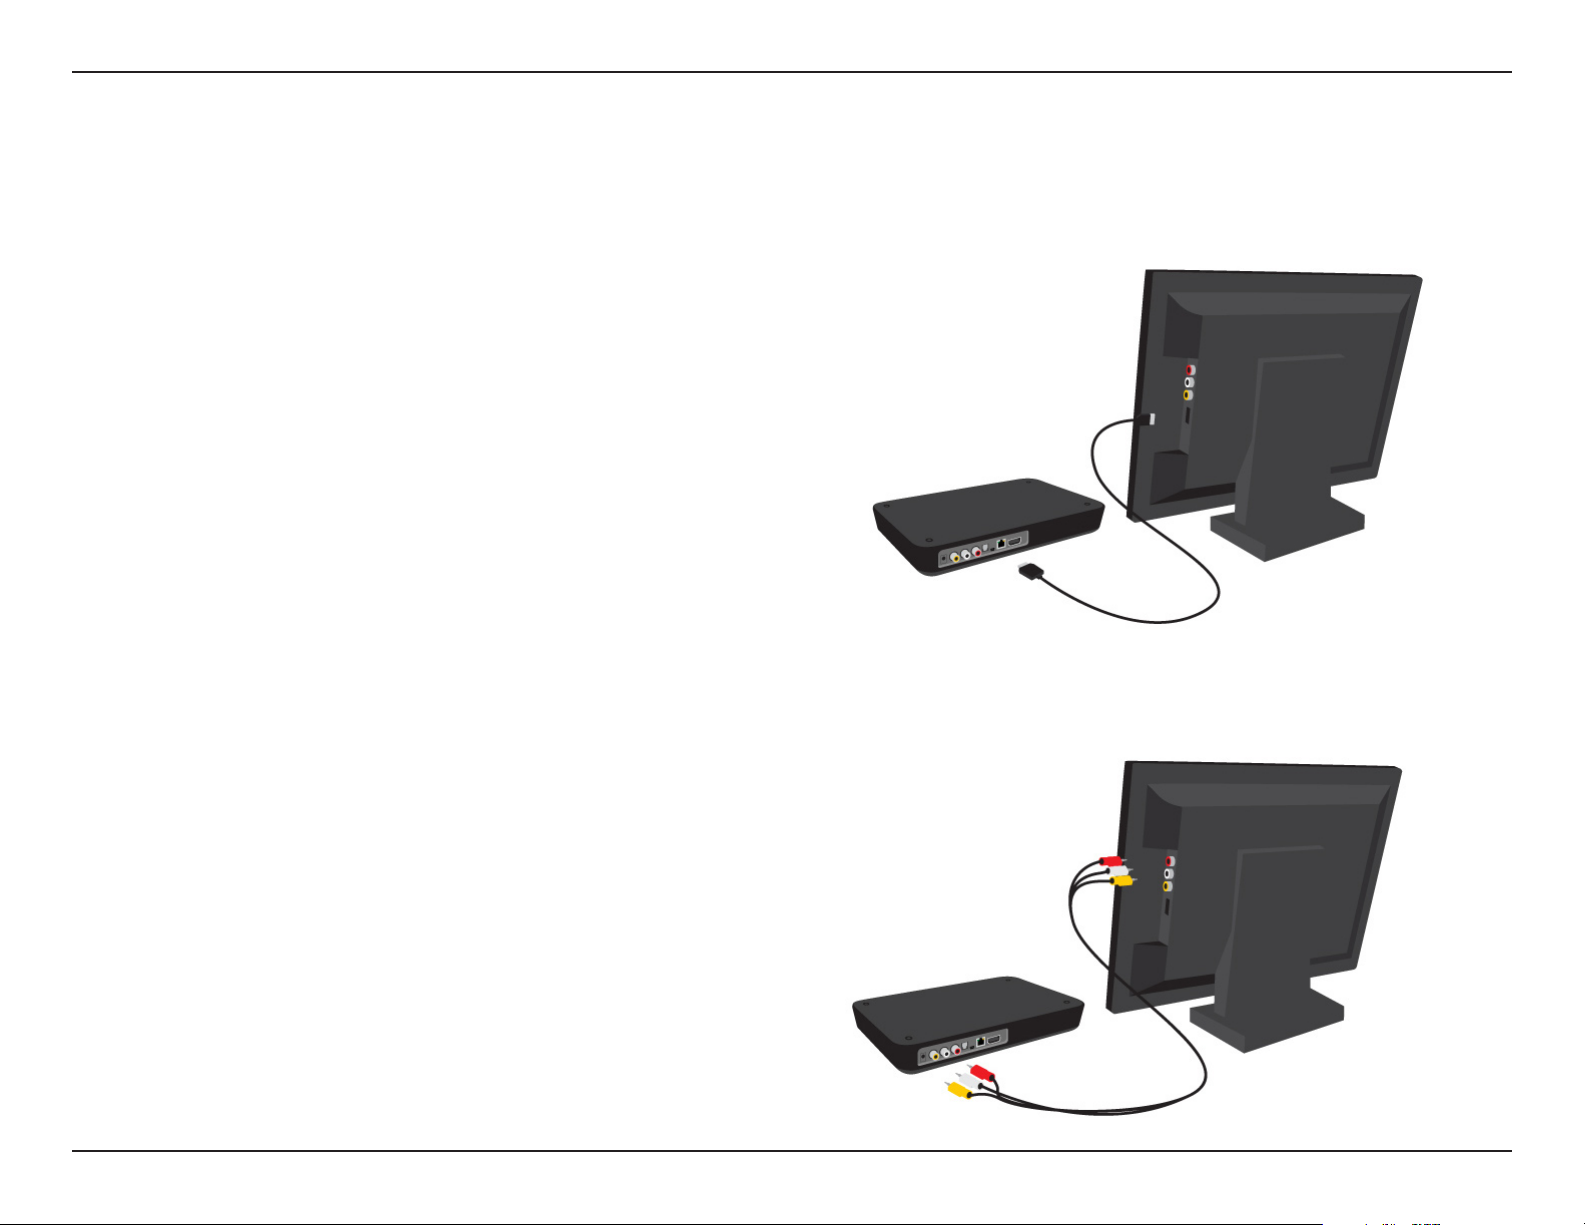
HDMI Connection
HDMI Connector
If your TV uses HDMI, plug an HDMI cable into the HDMI 1.
connector on the back panel of the DSM-350.
Plug the opposite end of the cable to the HDMI connector 2.
on your television or audio/video system.
Note: This cable is not included with the DSM-350.
Composite Audio Video Connection
Composite Connector
If your TV does not have an HDMI port, plug the supplied 1.
yellow video cable into the VIDEO connector on the
DSM-350.
Plug the supplied red and white connectors into the 2. AUDIO
(color-coded matching) connectors on the DSM-350.
Plug the opposite ends to the matching connectors on your 3.
television or audio/video system.
TELEVISION/MONITOR
DSM-350
TELEVISION/MONITOR
DSM-350
12D-Link DSM-350 User Manual
Page 17
Section 2 - Installation
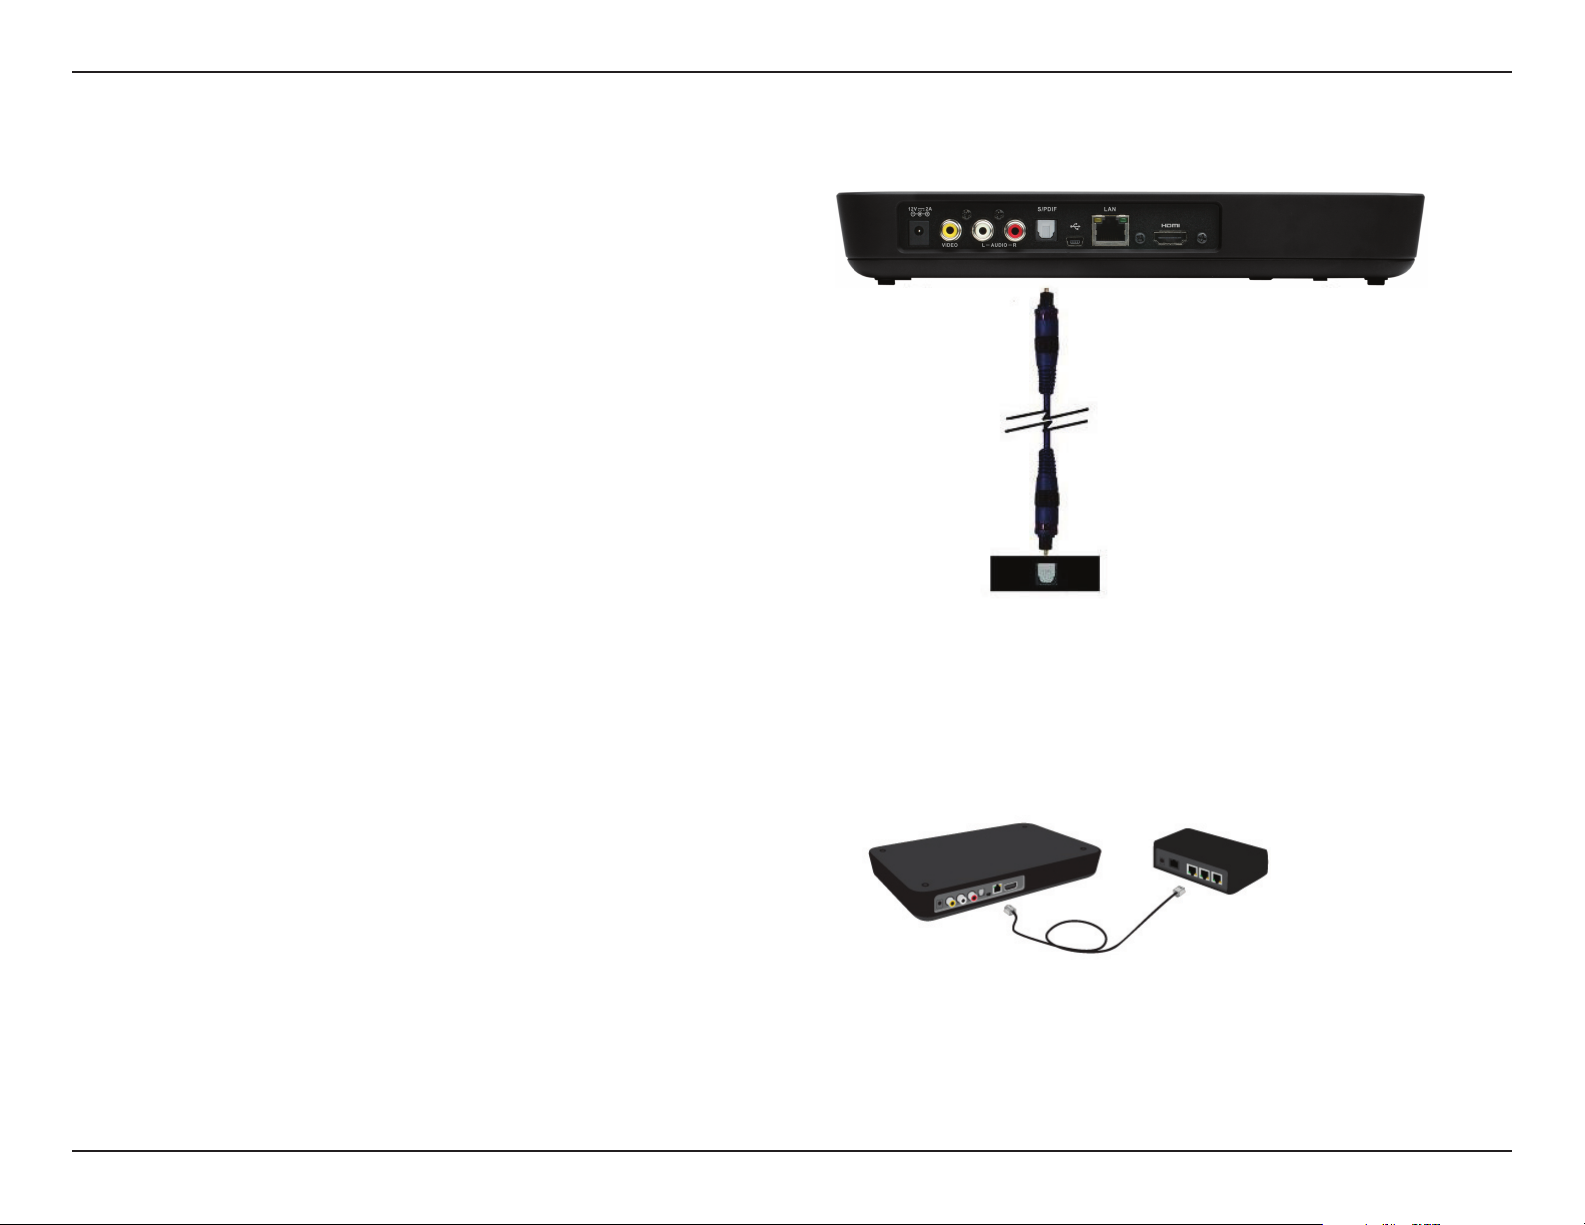
S/PDIF Connection
S/PDIF Connection
If you want to connect the DSM-350 to a stereo system
digitally using an optical cable, connect one end of an
S/PDIF optical audio cable into the S/PDIF connector on
the DSM-350, and connect the other end to the optical audio
input of your audio system.
Note: This cable is not included with the DSM-350.
Network Connection
Connecting to a Switch/Router/Modem
Connect the included Ethernet cable to the network cable
connector, and attach the other end to a switch, router, or
modem on your network.
DSM-350
DSM-350
S/PDIF CONNECTOR ON STEREO
SWITCH/ROUTER/MODEM
13D-Link DSM-350 User Manual
Page 18
Section 3 - mydlink Portal
mydlink Portal
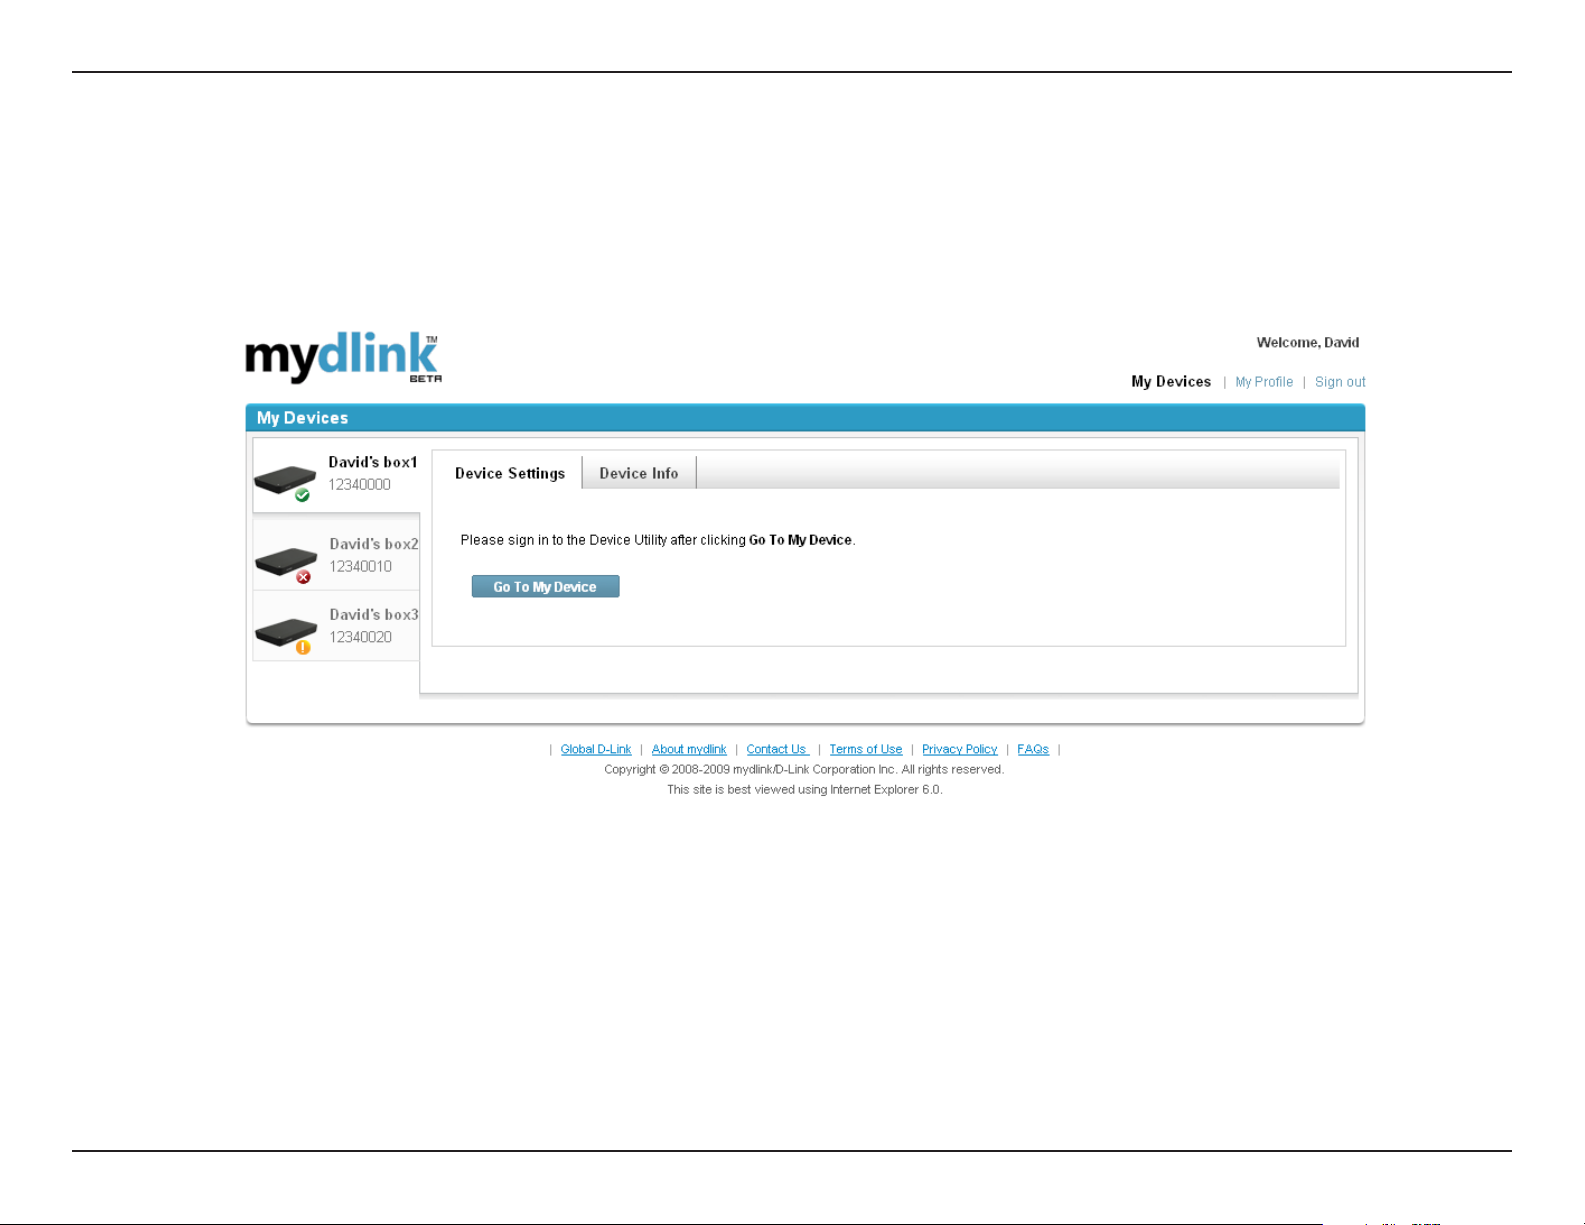
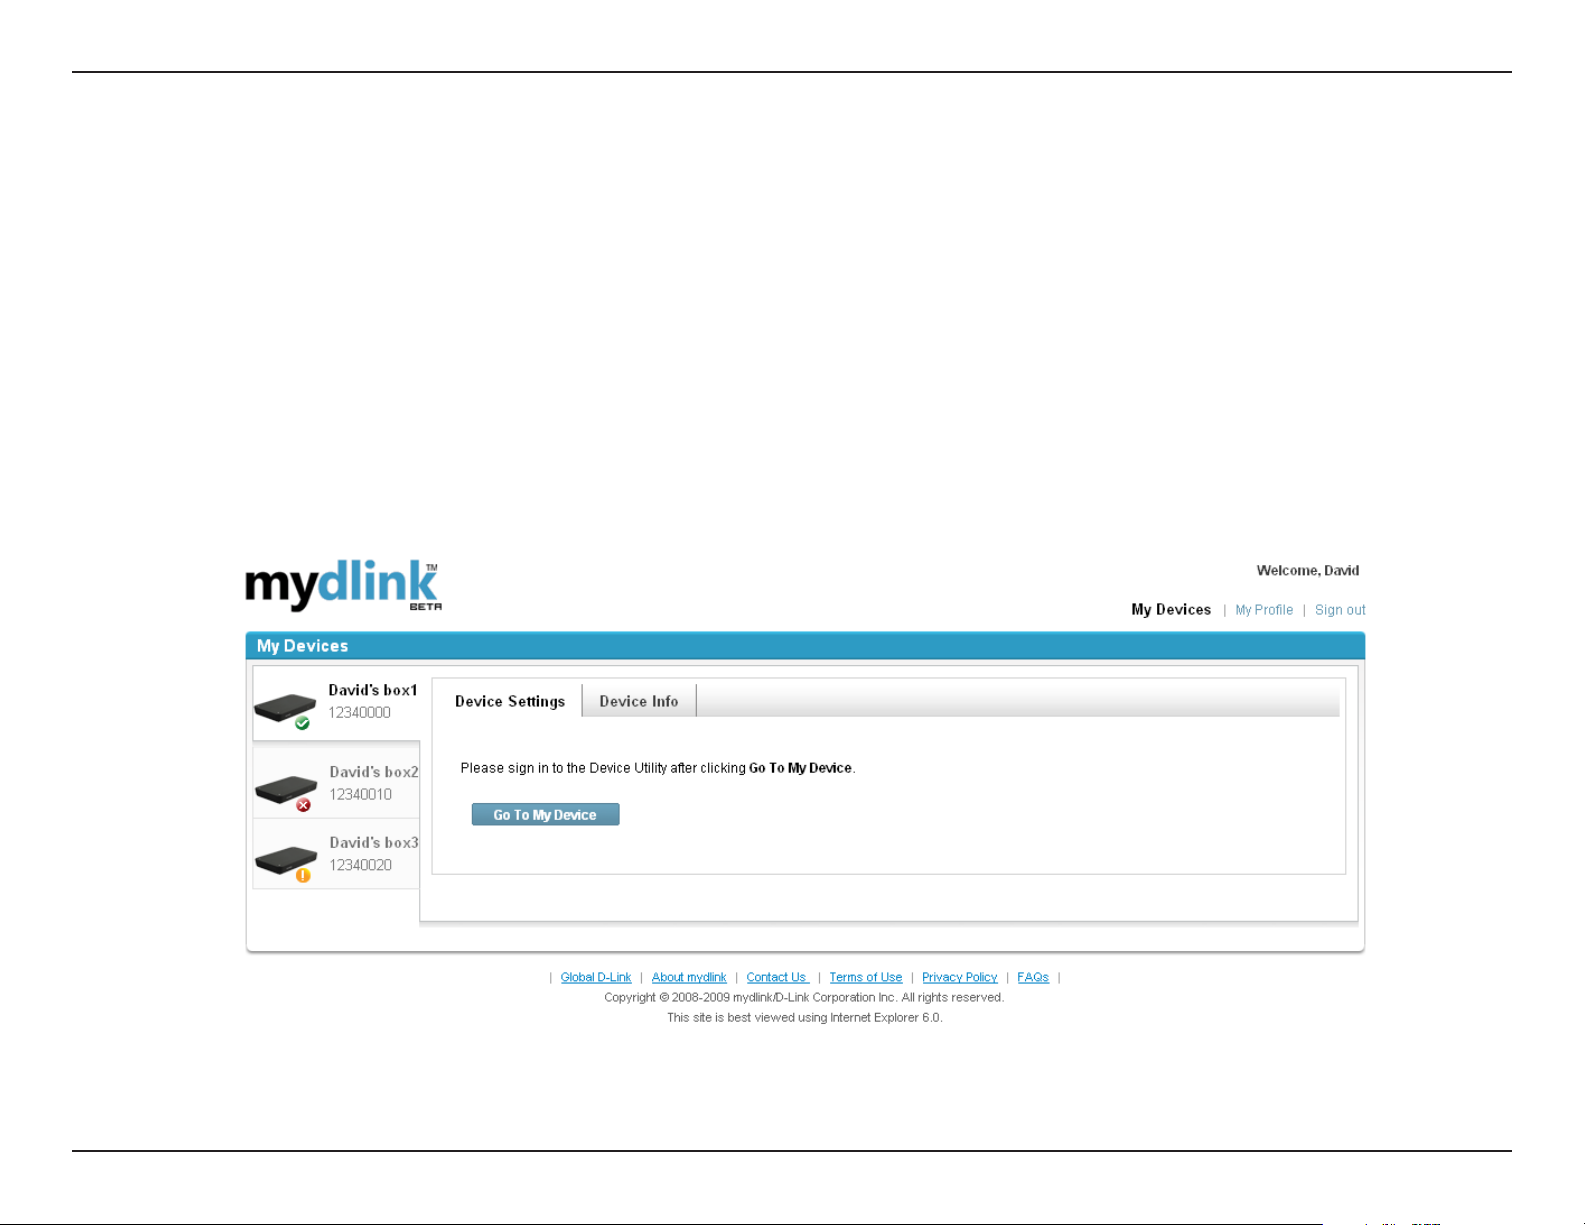
After registering your device with a mydlink account in the Setup Wizard, you will be able to remotely access your
device from the www.mydlink.com website. After signing in to your mydlink account, you will see a screen similar to
the following:
14D-Link DSM-350 User Manual
Page 19
Section 3 - mydlink Portal
Device Status
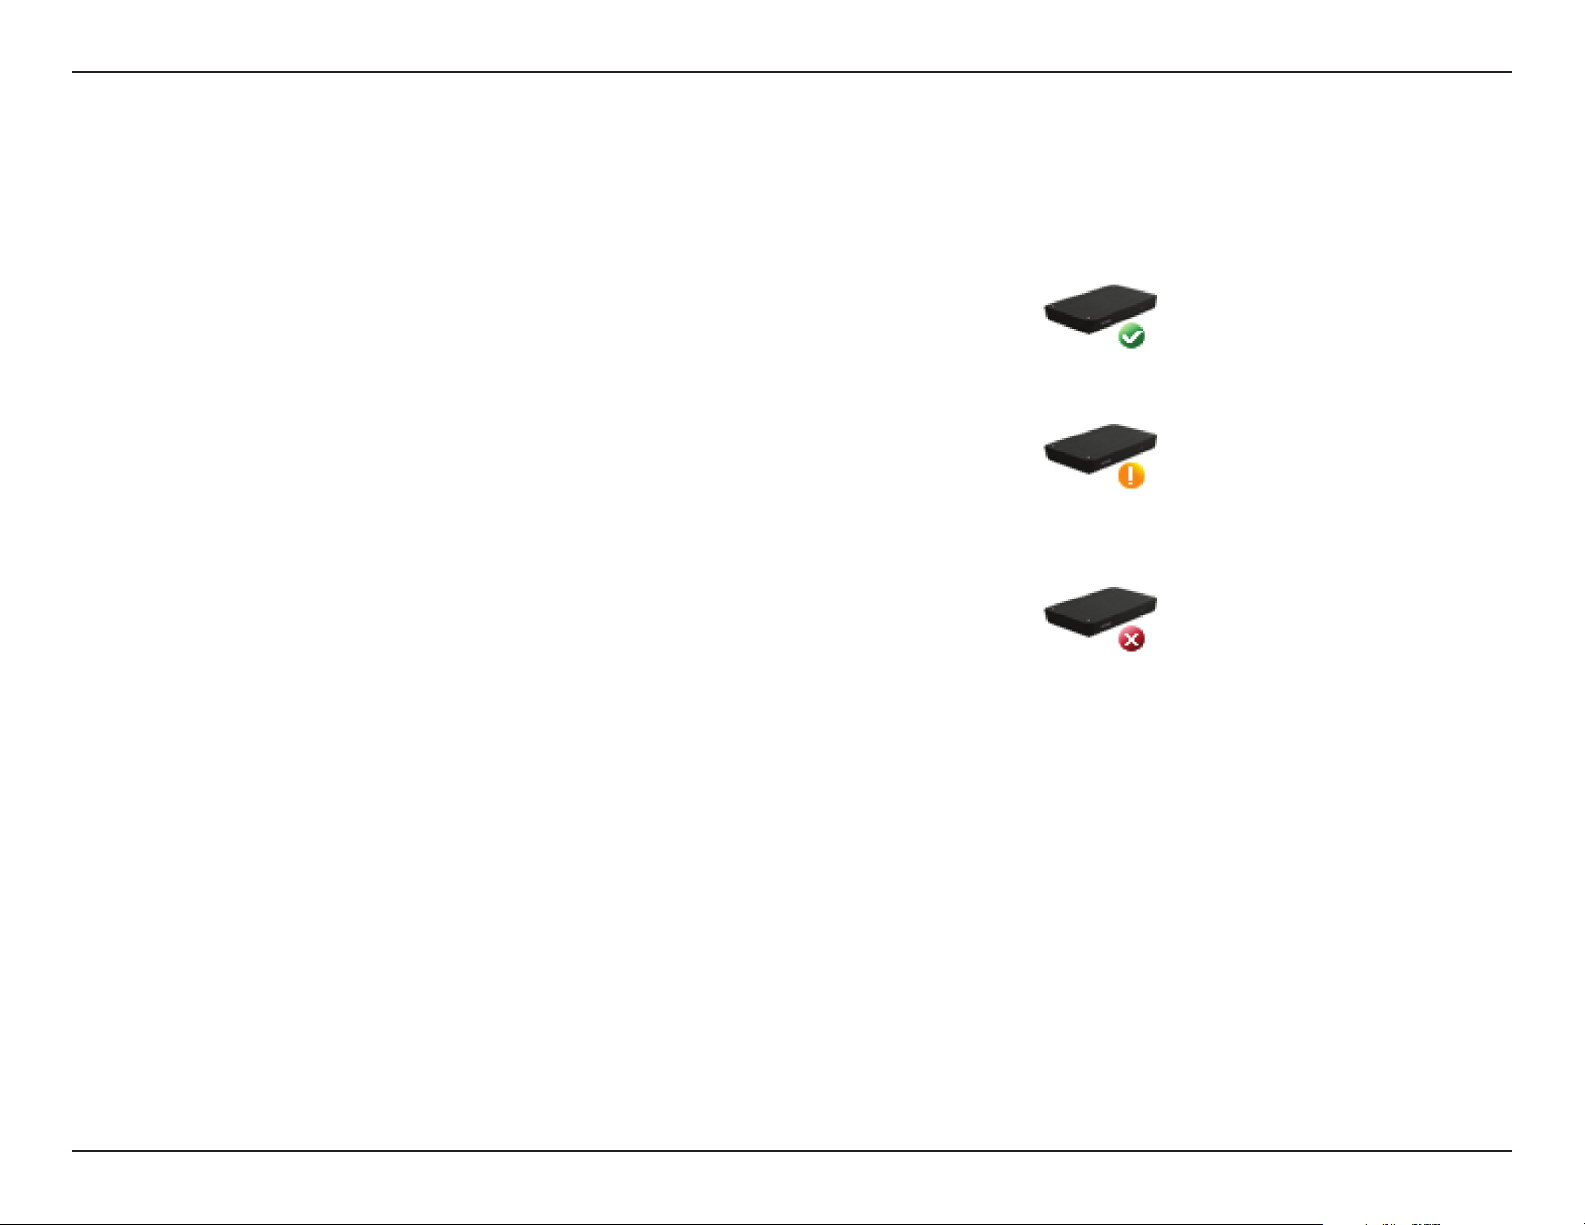
Here, you can see the online status of each of your devices. Your online status may be one of the following:
A green checkmark indicates that your device is online and ready to
use.
A yellow exclamation point indicates that your device is online, but the
device password has changed. You will need to enter your new device
password to access your device again.
A red x indicates that your device is of ine and currently cannot be
accessed remotely.
If your device is of ine, try the following:
• Check to make sure that the Internet connection to your device is
working properly.
• Try restarting your Internet router.
• Check your device’s cable connections and make sure they are
secure.
If you still cannot access your device, reset your device and run the Setup
Wizard again from the Installation CD included in your package.
15D-Link DSM-350 User Manual
Page 20
Section 3 - mydlink Portal
Device Settings
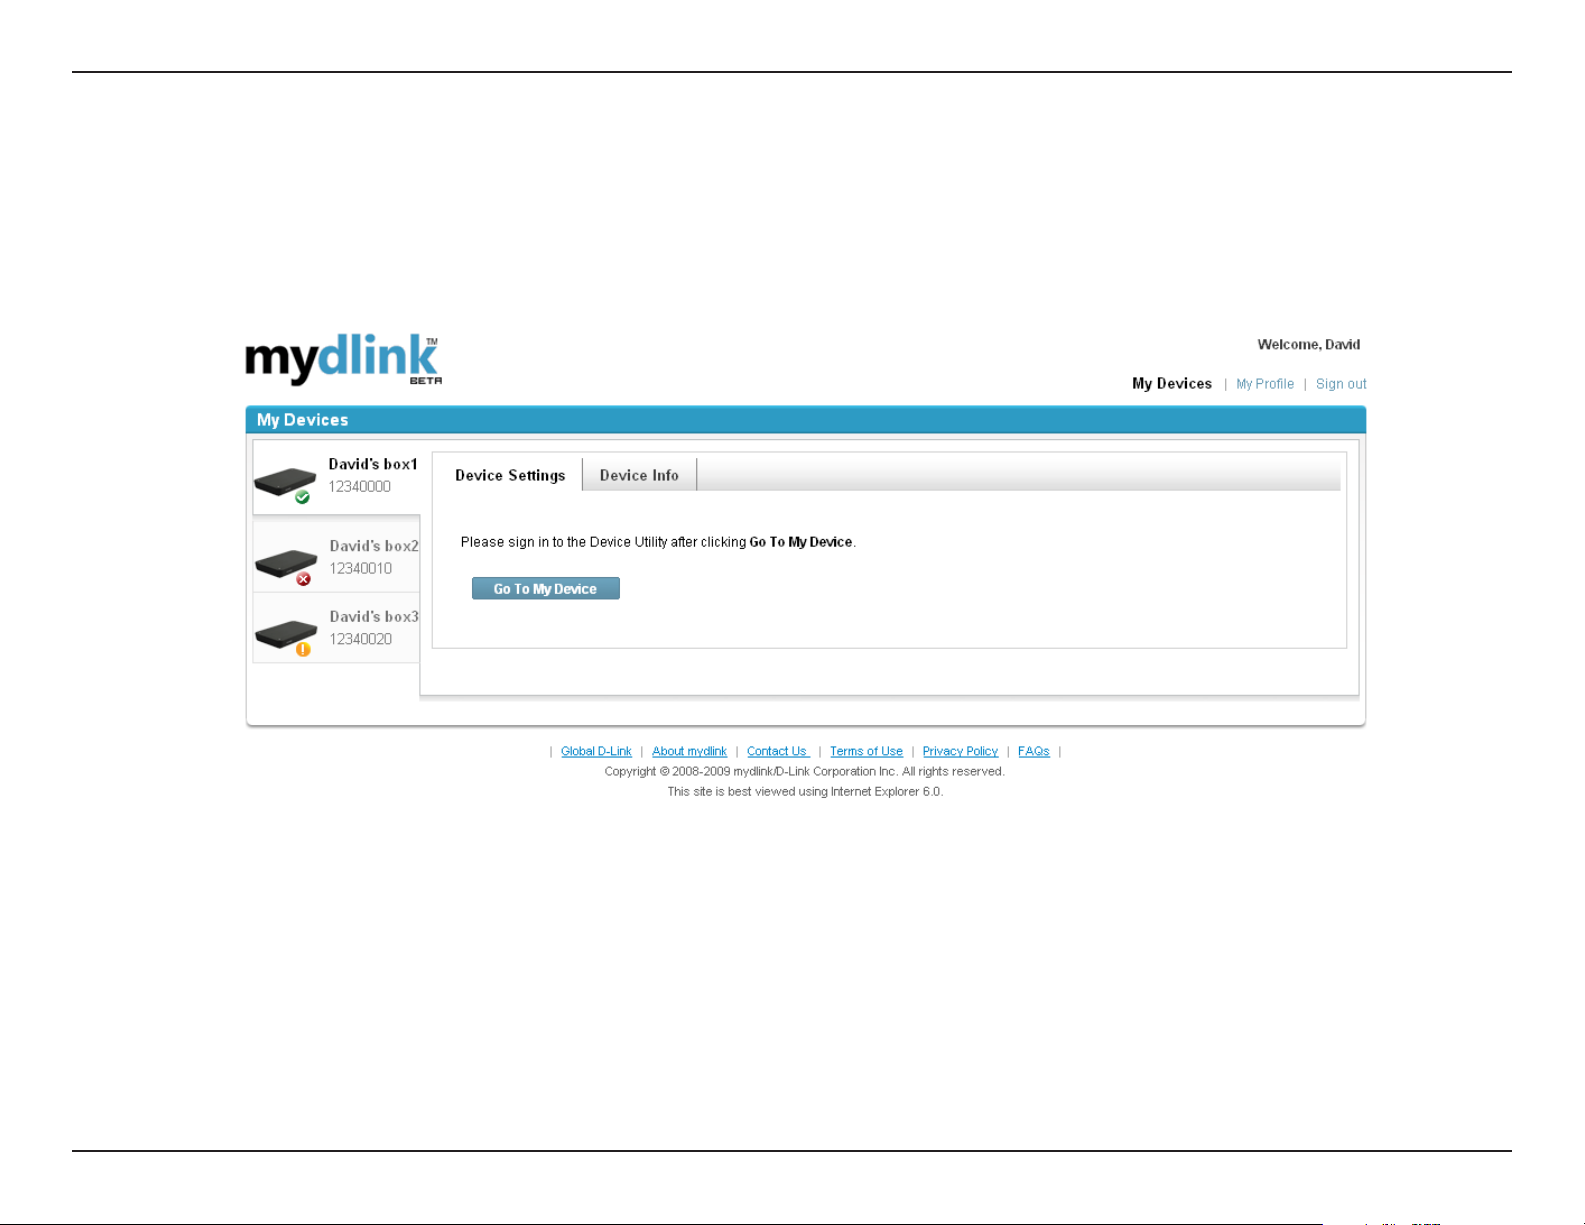
The Device Settings tab allows you to access your device’s conguration interface. To open your device’s conguration
interface, click the Go To My Device button.
16D-Link DSM-350 User Manual
Page 21
Section 3 - mydlink Portal
Device Info
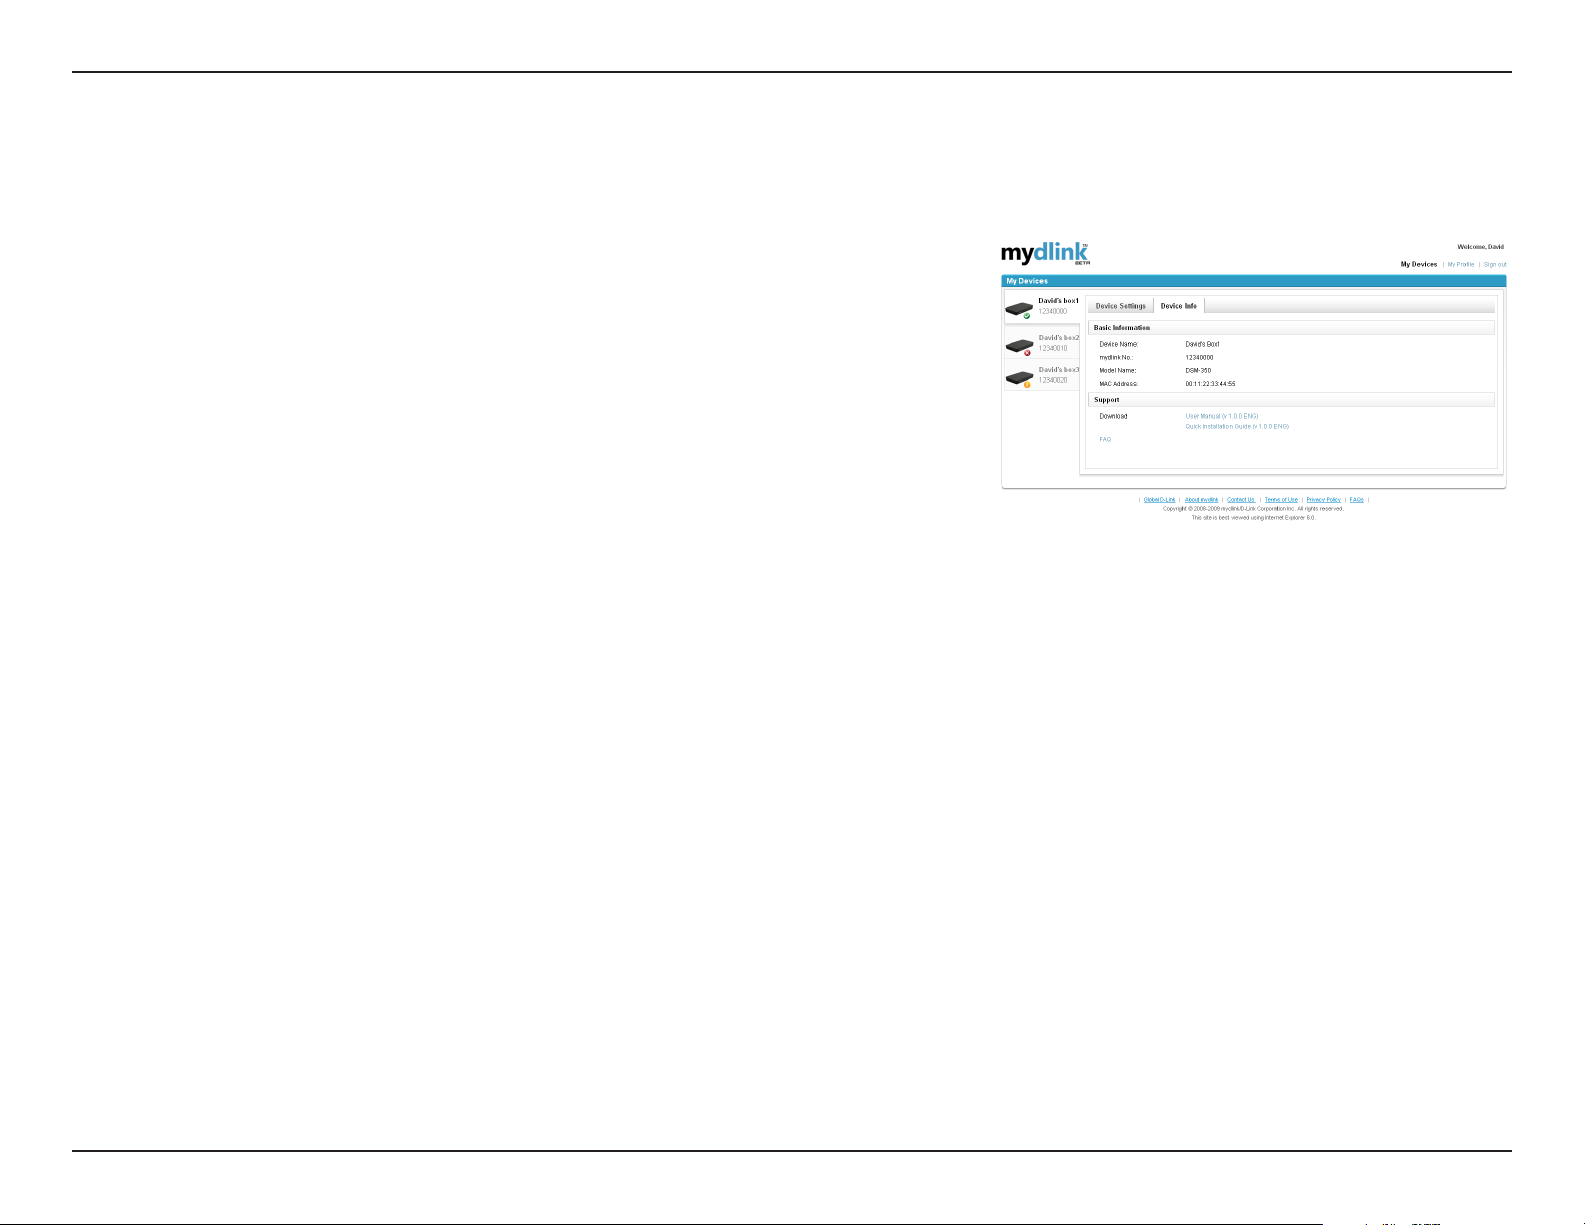
The Device Info tab shows you various information about your device.
Device Name: This shows you the name of your device.
mydlink No.: This shows you the mydlink number of your device.
Model Name: This shows you the model name of your device.
MAC Address: This shows you the MAC address of your device.
Support: This section provides you with links to various support web pages
and downloads related to your product.
17D-Link DSM-350 User Manual
Page 22

Section 4 - Managing Your MyChannel Media Player
Managing Your MyChannel Media Player
There are 2 main interfaces through which you can use your MyChannel Media Player: the TV interface, and the web
interface.
The TV interface of the MyChannel Media Player is the primary interface through which you can play back your digital
media. This is the interface that you will navigate by using the included remote control. You can also manage some of
your download tasks through this mode.
The web interface is the secondary interface that you navigate by using a PC’s web browser. You can access this
interface by going to your www.mydlink.com account, or through a PC connected to the same local network as your
MyChannel Media Player. This is the interface that you will use to add and remove download tasks and to create
custom channels for the MyChannel mode.
18D-Link DSM-350 User Manual
Page 23
Section 4 - Managing Your MyChannel Media Player
The TV Interface
When the MyChannel Media Player is rst connected to a TV and powered on, the Welcome screen will display briey
as the system boots up. After a few seconds, it will enter MyChannel mode. If there are “channels” with video content
ready for playback, by default, the lowest number channel will launch. If this is your rst time using the MyChannel
Media Player or if there are no channels or video les ready on the device, the MyChannel Media Player screen will
go to the Main Menu used for setting up and managing the MyChannel Media Player.
19D-Link DSM-350 User Manual
Page 24
Section 4 - Managing Your MyChannel Media Player
Main Menu
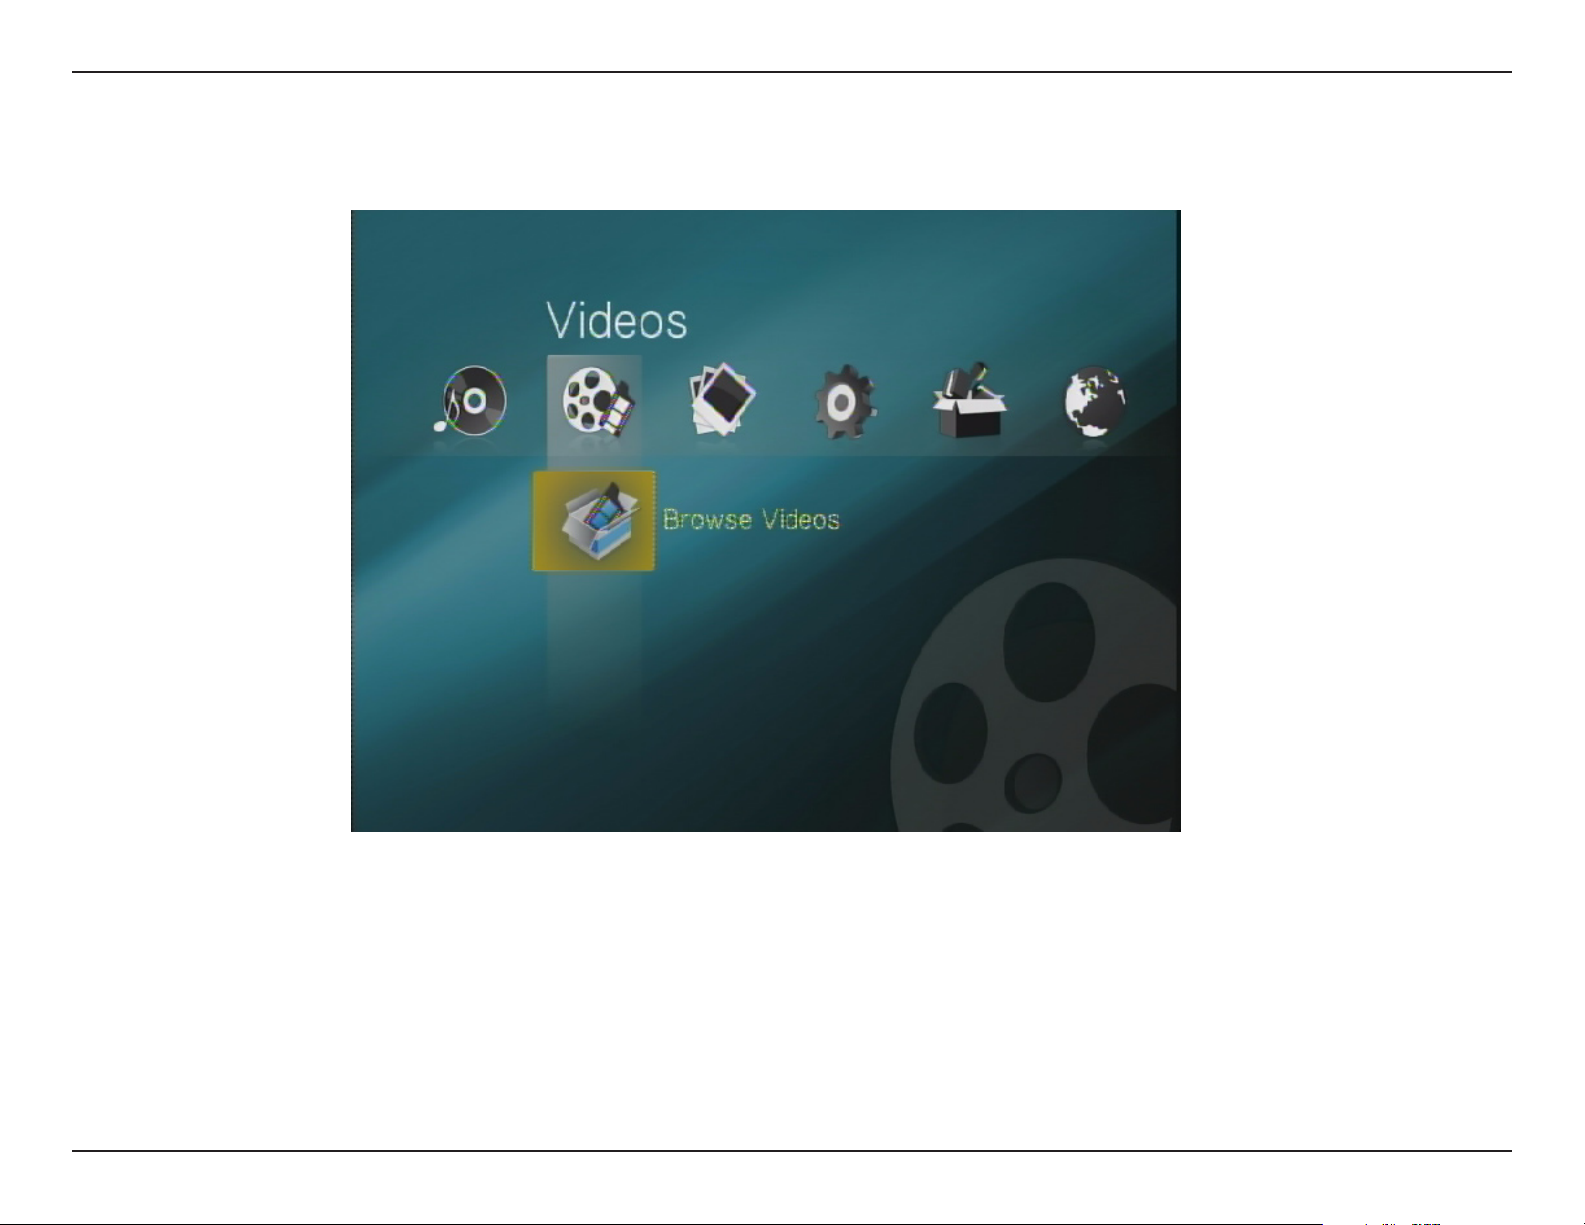
To view the Main Menu, press the Menu button on the remote control.
From the Main Menu, navigate through the different sub-menus, which you can use to select media to play back, or
to congure your DSM-350. Use the Right and Left navigation buttons on the remote control to move to the different
menu directories, and use the Up and Down buttons to scroll through the menus and subdirectories in each category.
Use the OK button to open a menu or le. Press the Back button to return to the previous menu or press the Menu
button to return to the Main Menu.
20D-Link DSM-350 User Manual
Page 25
Section 4 - Managing Your MyChannel Media Player
Downloads
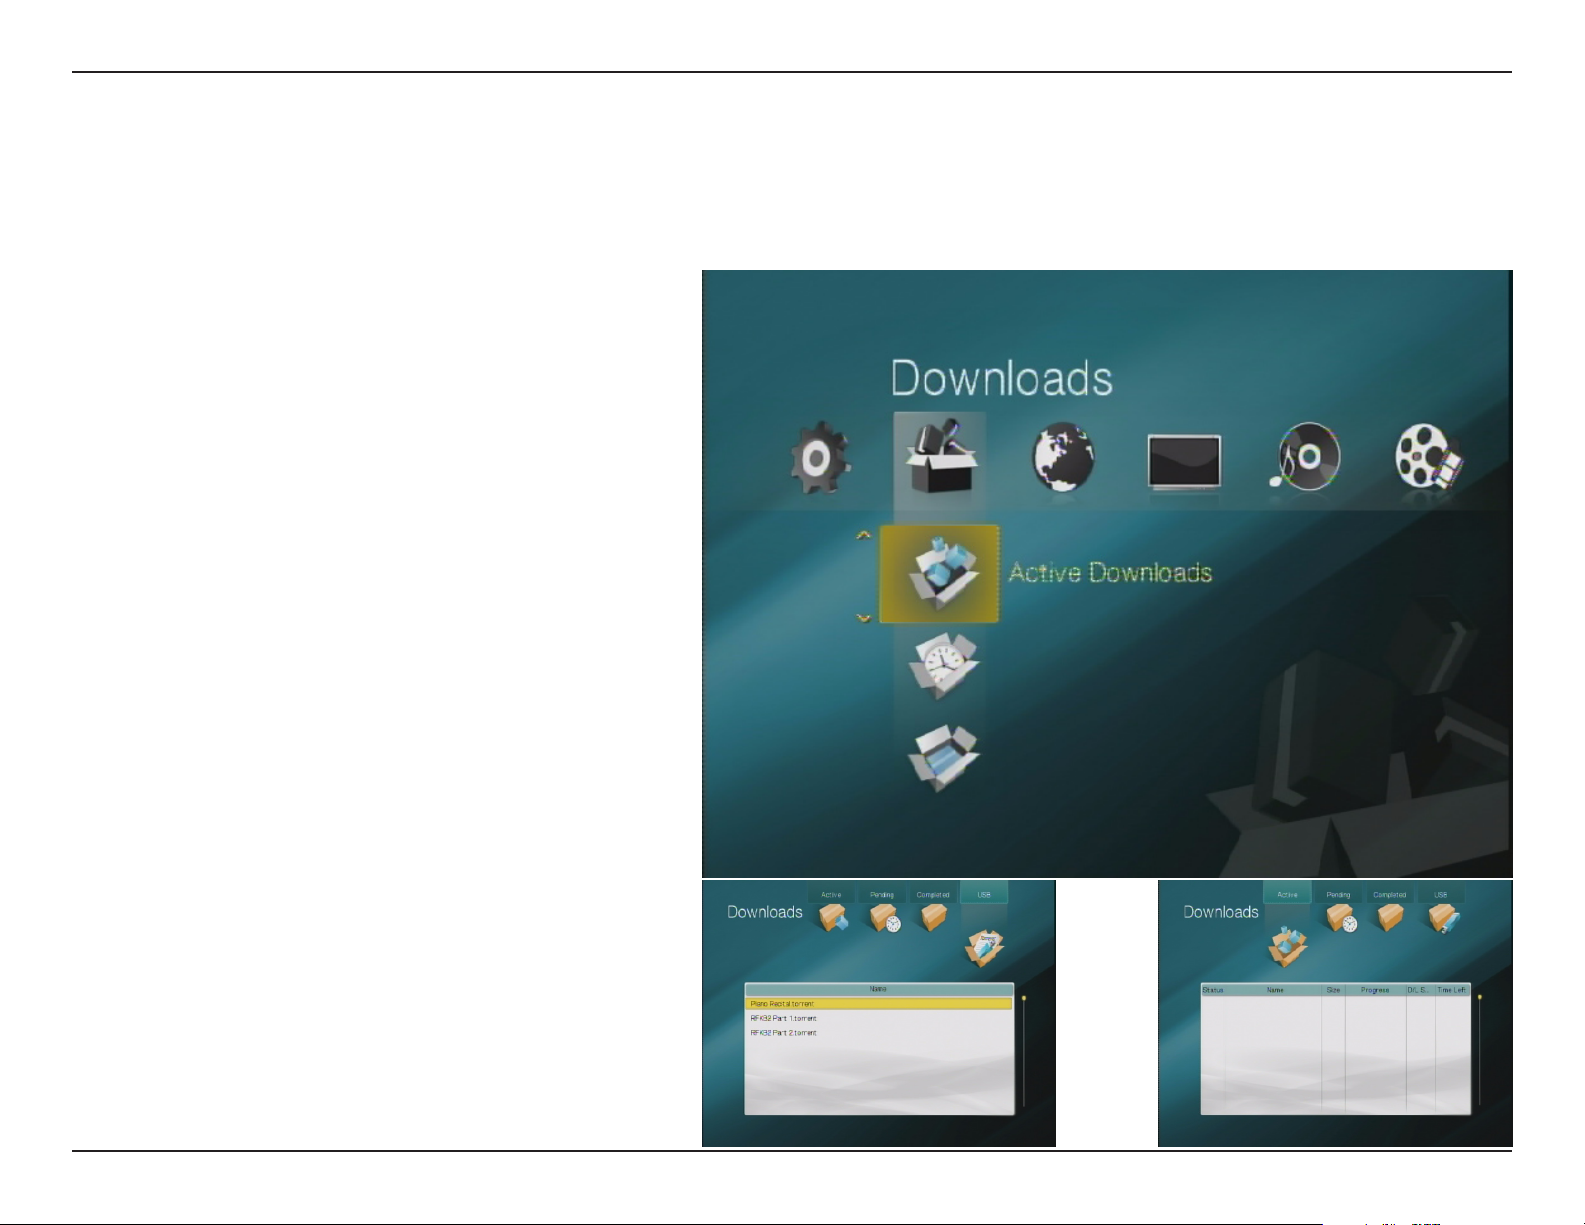
The Downloads menu allows you to view the download list and load torrent les from a USB storage drive.
Active
Downloads
Pending
Downloads
Completed
Downloads
Load from
USB
Select this option to view a list of les
that are currently being downloaded
and their download progress. You can
use the Play/Pause button to start/
pause a download task, or use the Stop
button to stop a download task.
Select this option to view downloads
that are pending.
Select this option to view a list of les
that have been completely download.
Select this option select torrent les to
add to the download list from a USB
storage drive. Torrent les must be
placed in the root directory of the USB
storage drive, and must not placed in
a folder.
21D-Link DSM-350 User Manual
Page 26
Section 4 - Managing Your MyChannel Media Player
Network Media
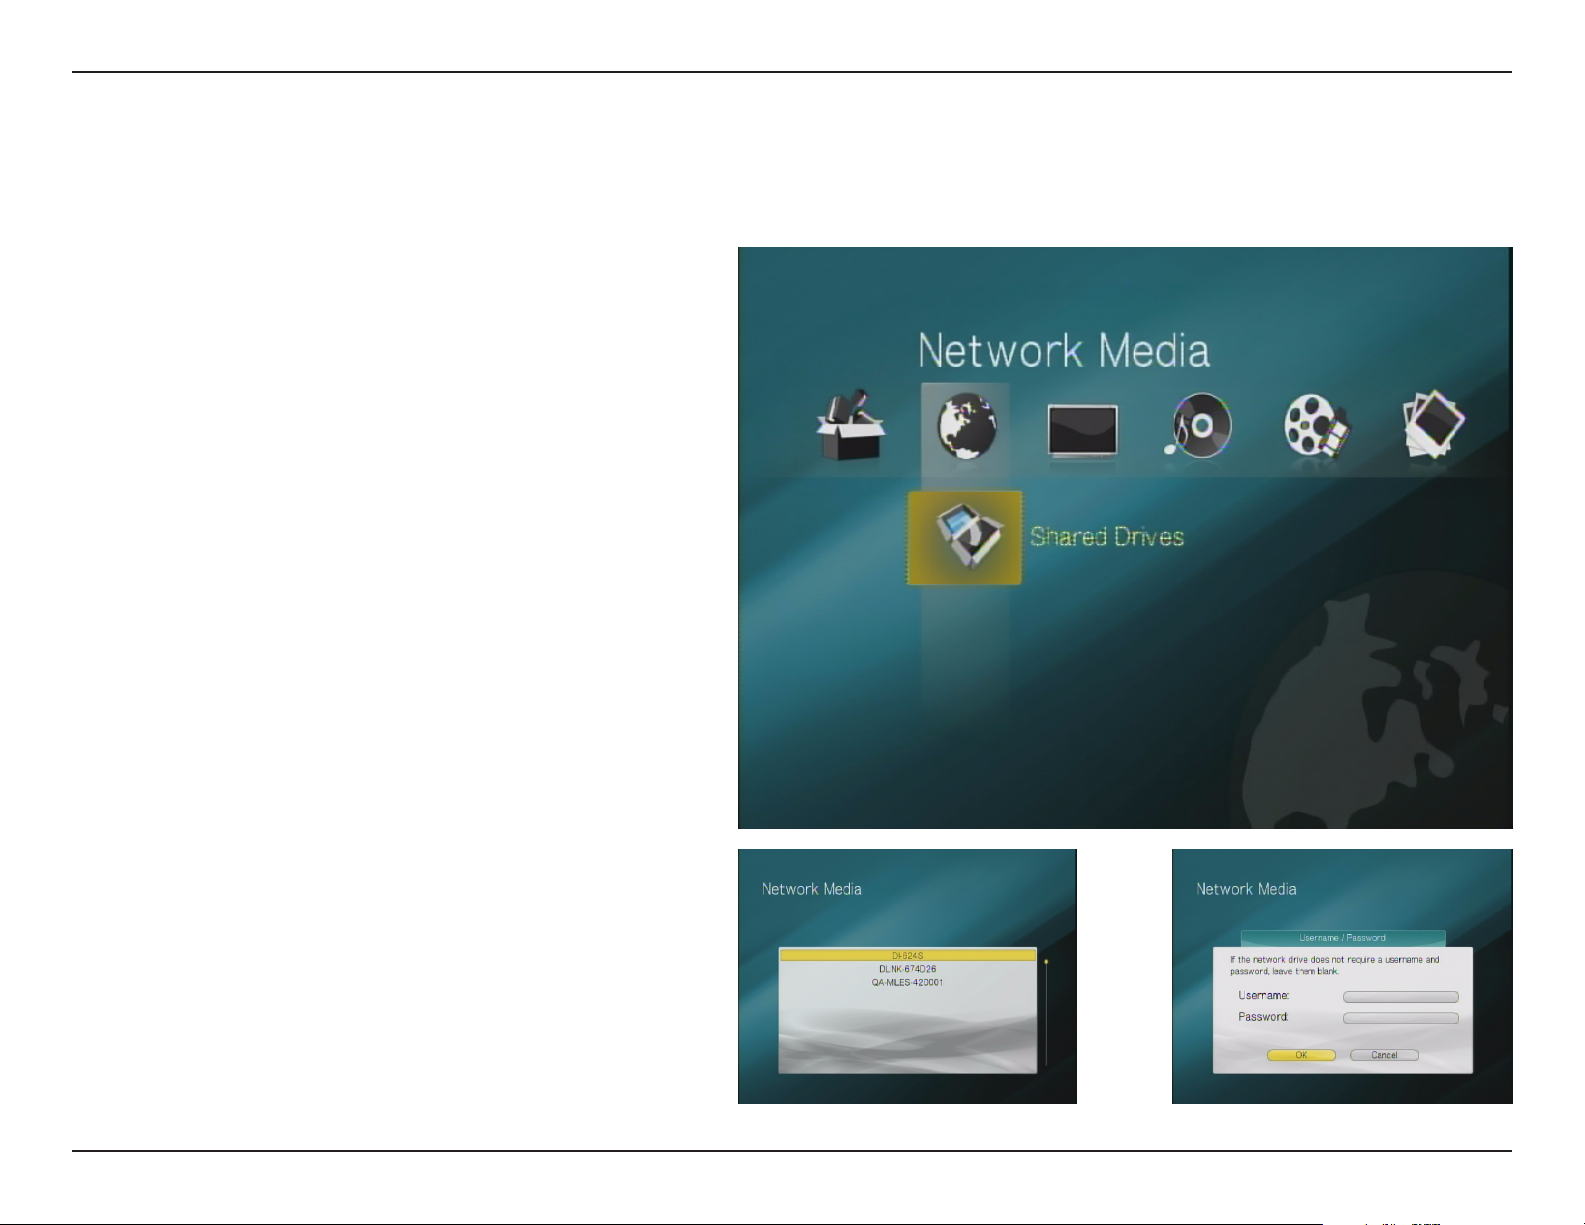
The Network Media menu allows you to view media stored on Samba drives that are connected to your network.
Use the remote control to select a network drive,
then press OK to open it. If it is the rst time
you are accessing the drive, you will need to
enter the login details of the drive (if it is openly
accessible, just select OK to continue). Upon a
successful login, you will be given the option to
save the login details for future use. Network
drives with saved login details will be marked ***
in the Network Media list.
22D-Link DSM-350 User Manual
Page 27
Section 4 - Managing Your MyChannel Media Player
TV (MyChannel Mode)
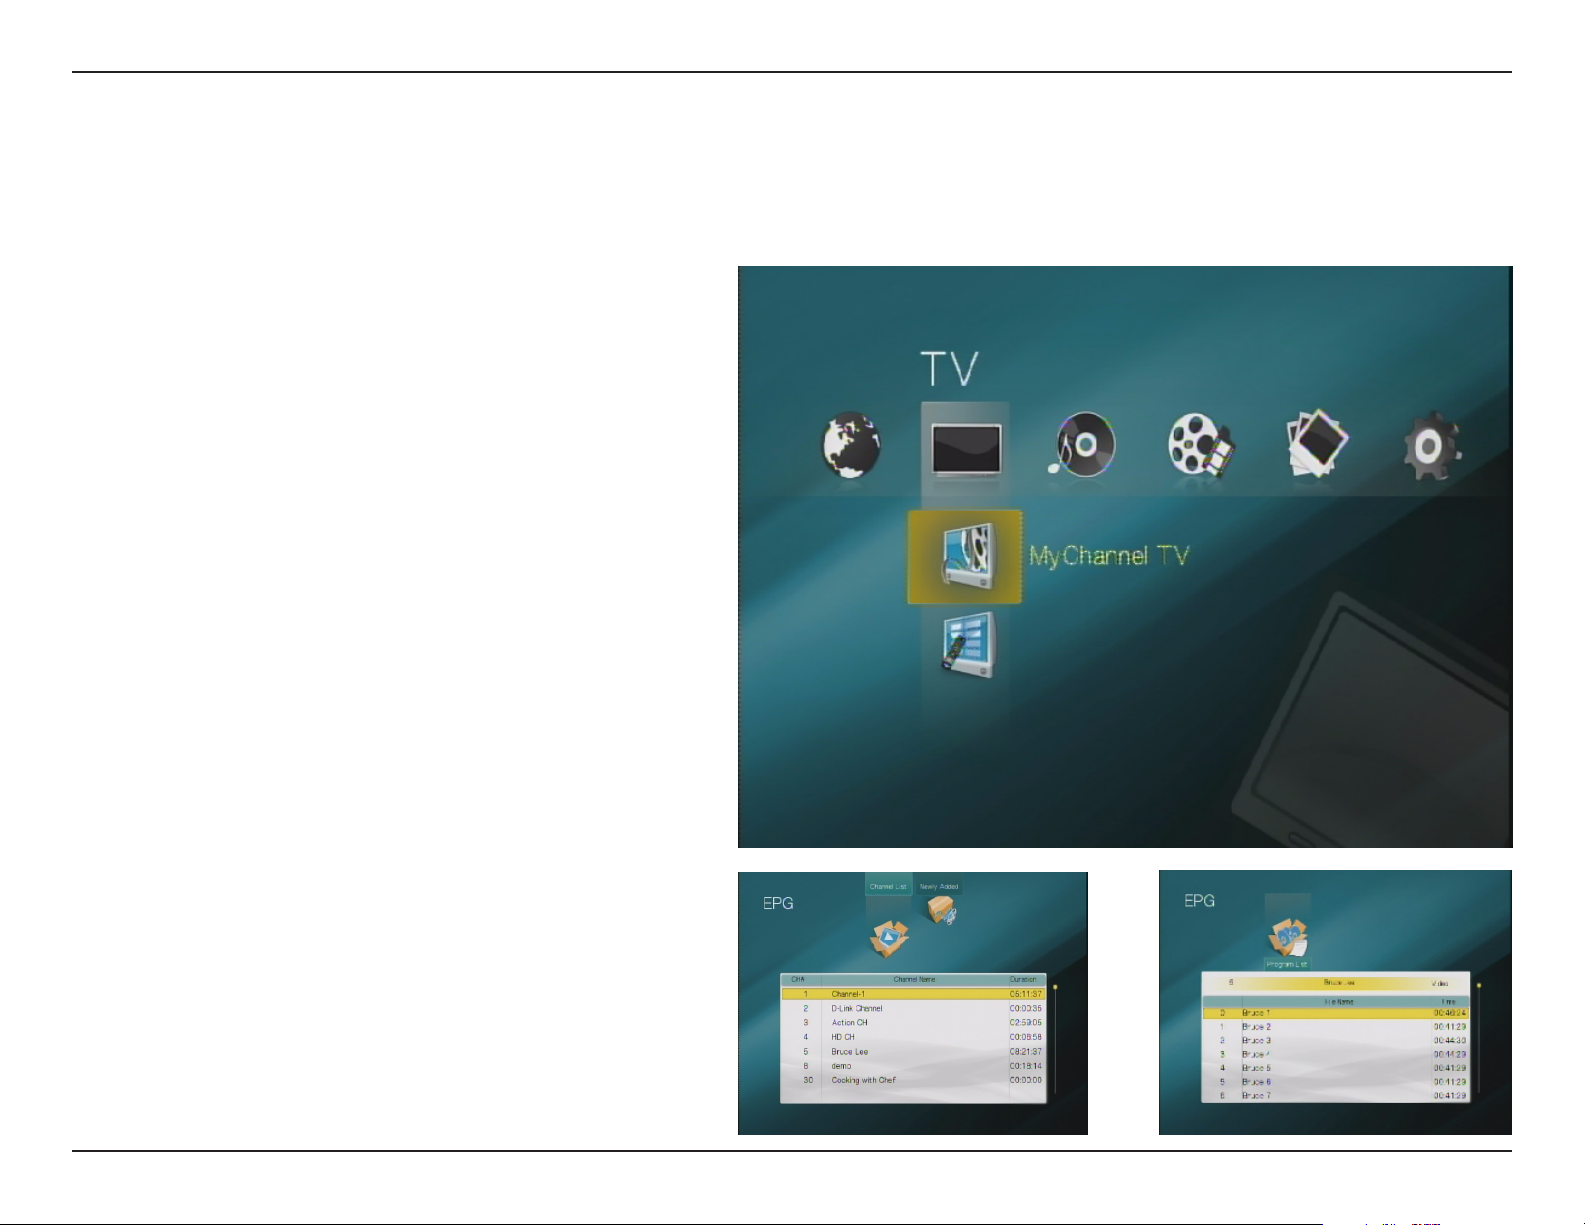
To view enter MyChannel mode, use the Left/Right navigation buttons on the remote control to scroll to the TV menu.
Use the Up/Down navigation buttons and OK button on the remote control to select one of the available options.
MyChannel TV
EPG
Choose this option to enter MyChannel
mode, which allows you to view your videos
using the channels you have created. You
can enter MyChannel mode by pressing the
MyChannel button on the remote control.
Choose this option to view the Electronic
Program Guide (EPG), which shows you a
list of the channels you have created. You
can then select a channel to view a quick
listing of what programs are on the selected
channel.
23D-Link DSM-350 User Manual
Page 28
Section 4 - Managing Your MyChannel Media Player
Channels on the MyChannel Media Player
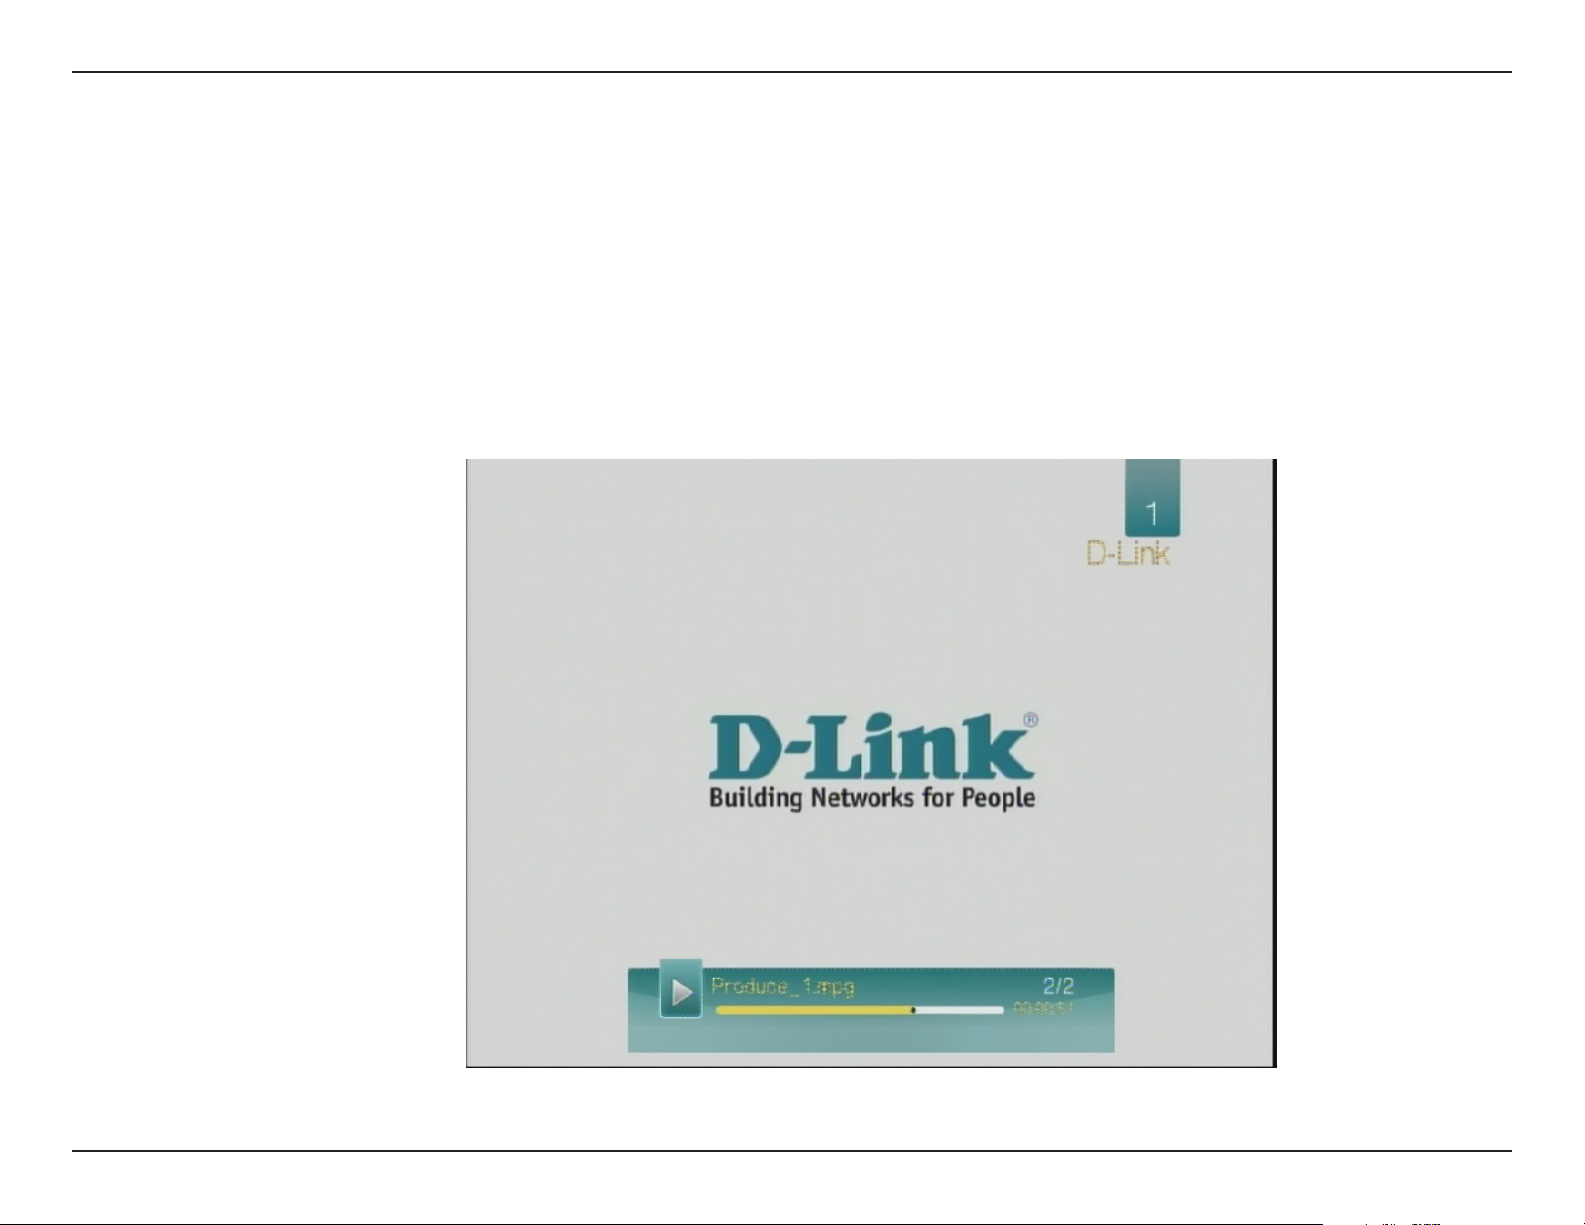
The MyChannel Media Player lets you create your own channels from your video les, making it easy to organize and
watch your video les. For example, you can create a channel called “Comedy” and assign your comedy TV shows
and movies to it, and you can create a “Kids” channel for your children’s programs. You can then ip through your
programs and channels with your remote control.
In MyChannel mode, you will see the current channel number and name in the top-right corner of your screen. Use
the CH + and CH - buttons to switch between channels, and use the Previous and Next buttons to switch between
programs in a channel.
24D-Link DSM-350 User Manual
Page 29
Section 4 - Managing Your MyChannel Media Player
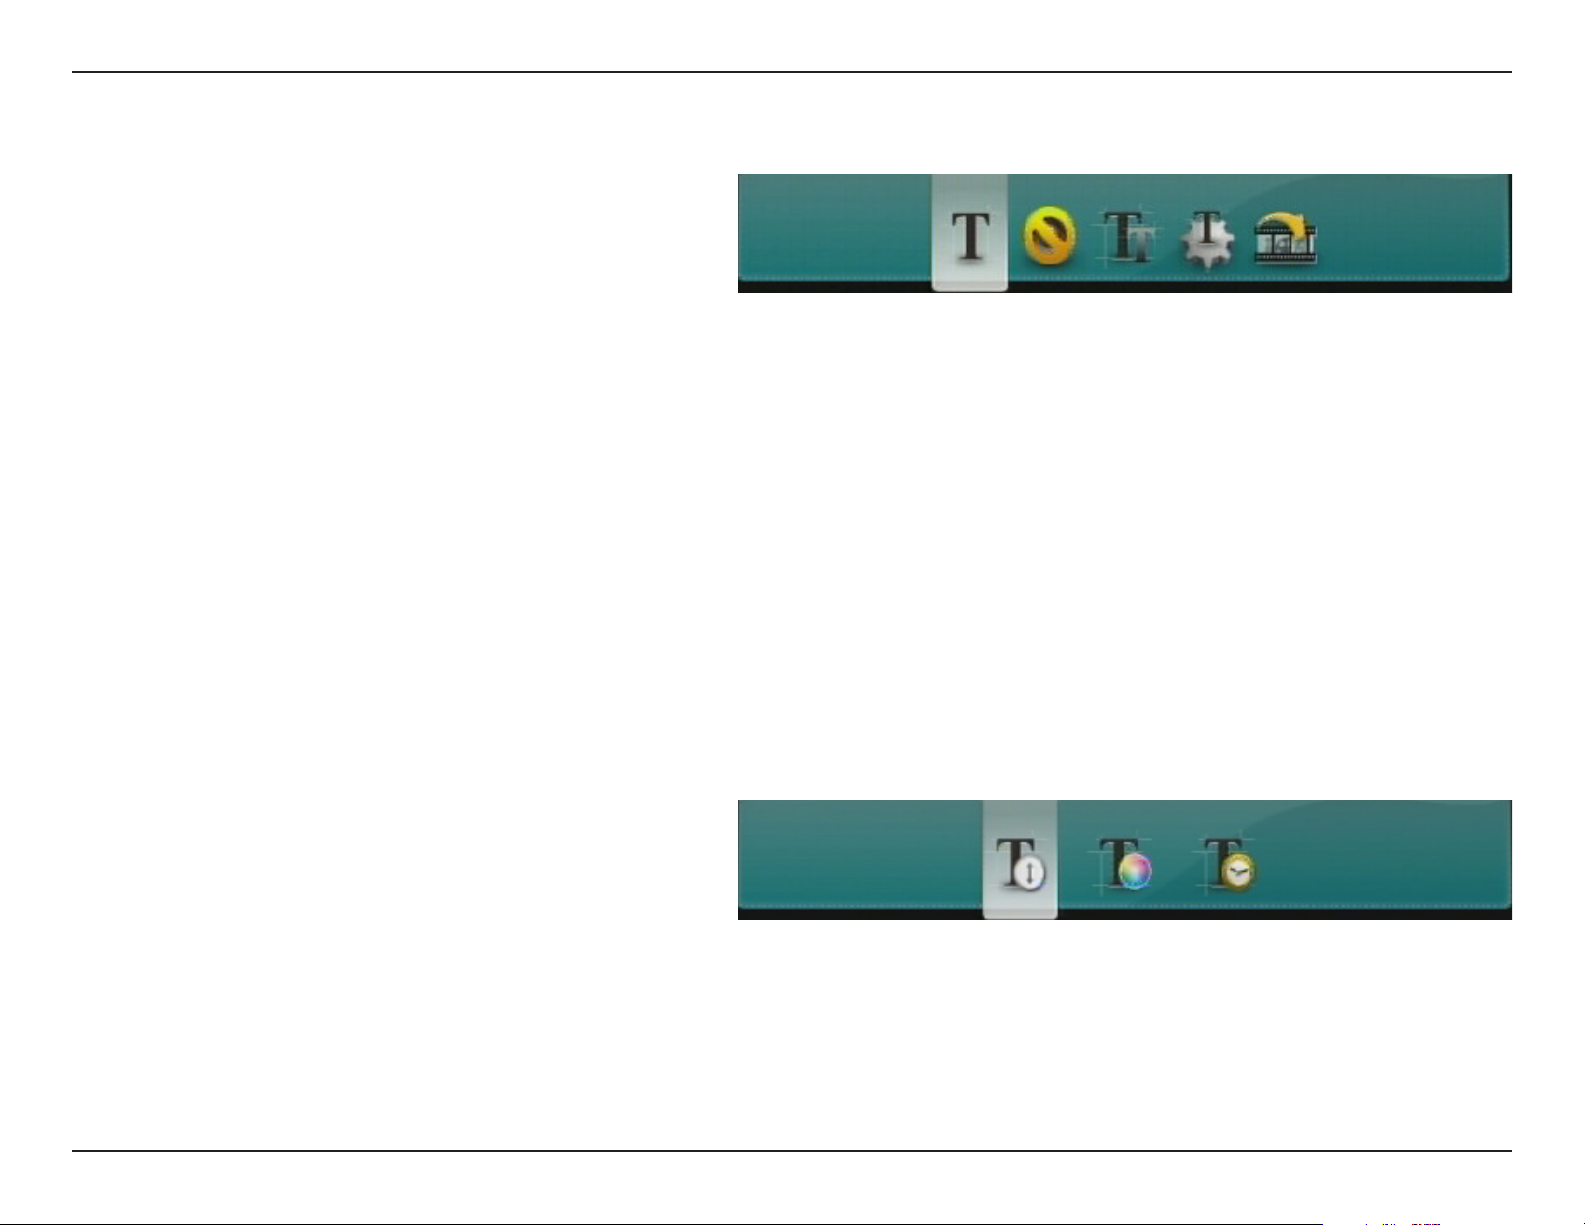
When viewing video les, you can press the Options button to open a option bar at the top of your window. Use the arrow
buttons on the remote to move left and right to move between options, and use the OK button to select an option.
Subtitle Track
Audio Track
Subtitle Size
Subtitle
Options
Jump To
This allows you to select which subtitle
track to display, if more than one track
is available.
This allows you to select which audio
track to play, if more than one track is
available.
This allows you to change the size of
the subtitle font.
This opens a separate option bar for
specic subtitle settings.
This allows you to jump to a specic
time in the video by using the arrow
buttons to select a time, then pressing
the OK button to jump to that time.
If you select the Subtitle Options icon from the Options menu, the following bar will appear:
Subtitle
Position
Subtitle Color
Subtitle
Timing
This allows you to adjust the position
on your screen that subtitles will be
displayed.
This allows you to adjust the color of
the subtitle text.
This allows you to adjust the timing of
the subtitles.
25D-Link DSM-350 User Manual
Page 30
Section 4 - Managing Your MyChannel Media Player
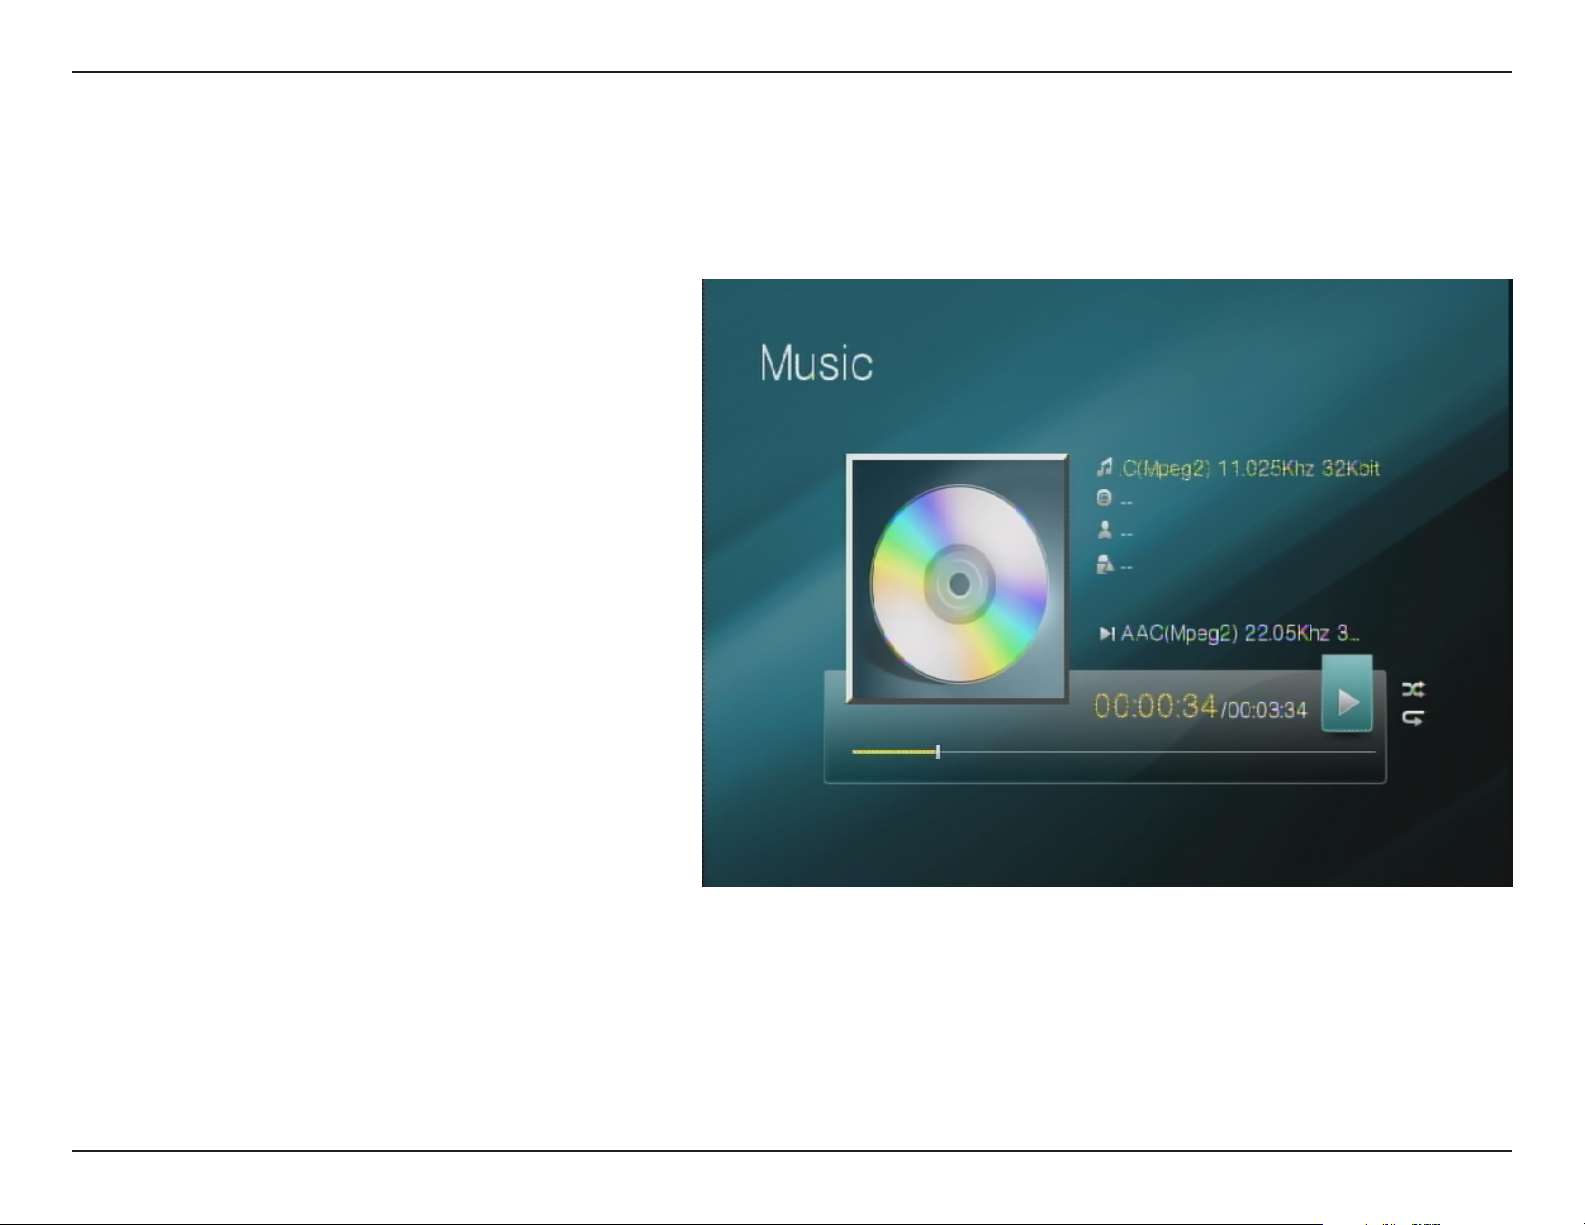
Music
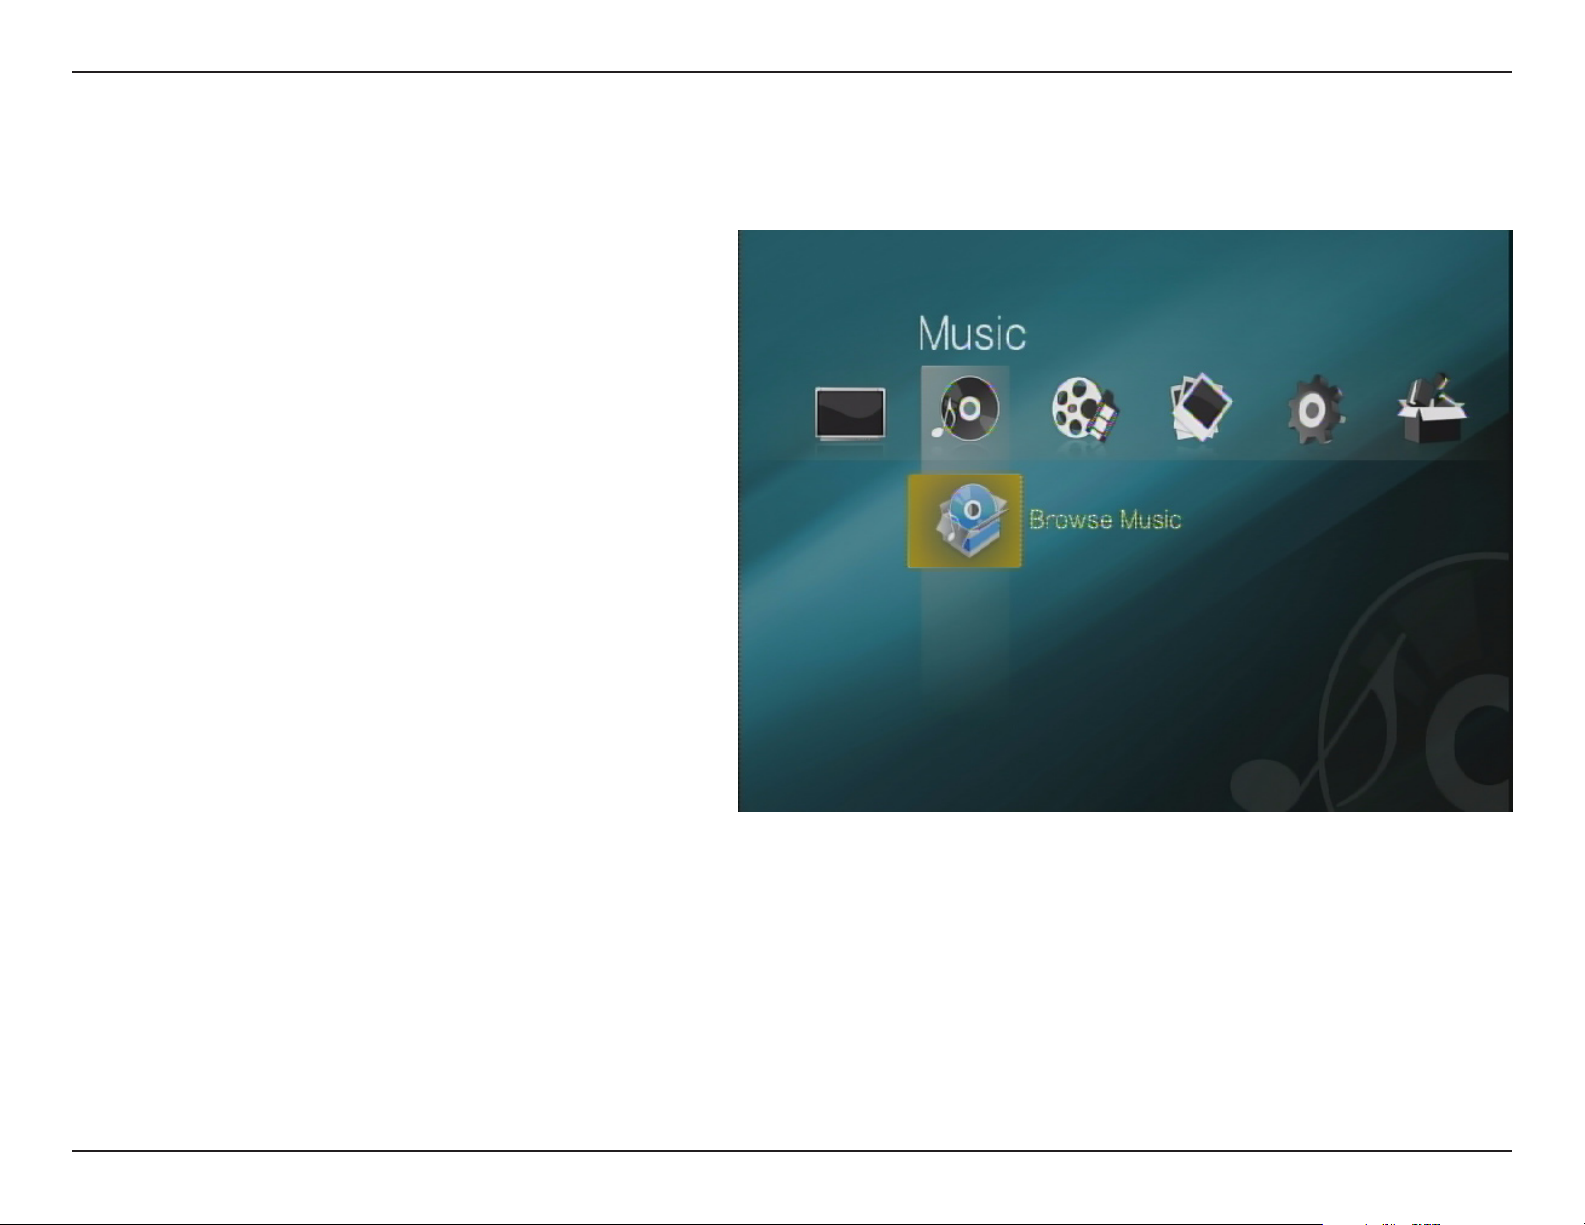
To listen to music stored on the MyChannel Media Player or on an external USB storage drive, do the following:
Use the
1. Left/Right navigation keys on
the remote control to scroll to the Music
menu.
2. Up/Down navigation keys on
Use the
the remote control to scroll to the Browse
Music option. To listen to music stored on
a USB storage drive scroll to the Browse
USB option.
3. OK button in the center of the
Click the
remote control to open the Browse Music
screen.
4. OK button
Use the navigation keys and
to browse to the location your music le is
stored in.
5.
Select the music le with the navigation
keys and press the OK button to start
listening to the music le.
26D-Link DSM-350 User Manual
Page 31
Section 4 - Managing Your MyChannel Media Player
When listening to music, you can use the Play/Pause, Stop, Rewind, Fast Forward, Previous, and Next buttons to
control music playback. You can also press the Shufe button on the remote to shufe playback, and you can press
the Repeat button to cycle to Repeat All or Repeat One mode. You can press Menu to return to the Main Menu while
allowing the music to continue playing in the background.
27D-Link DSM-350 User Manual
Page 32
Section 4 - Managing Your MyChannel Media Player
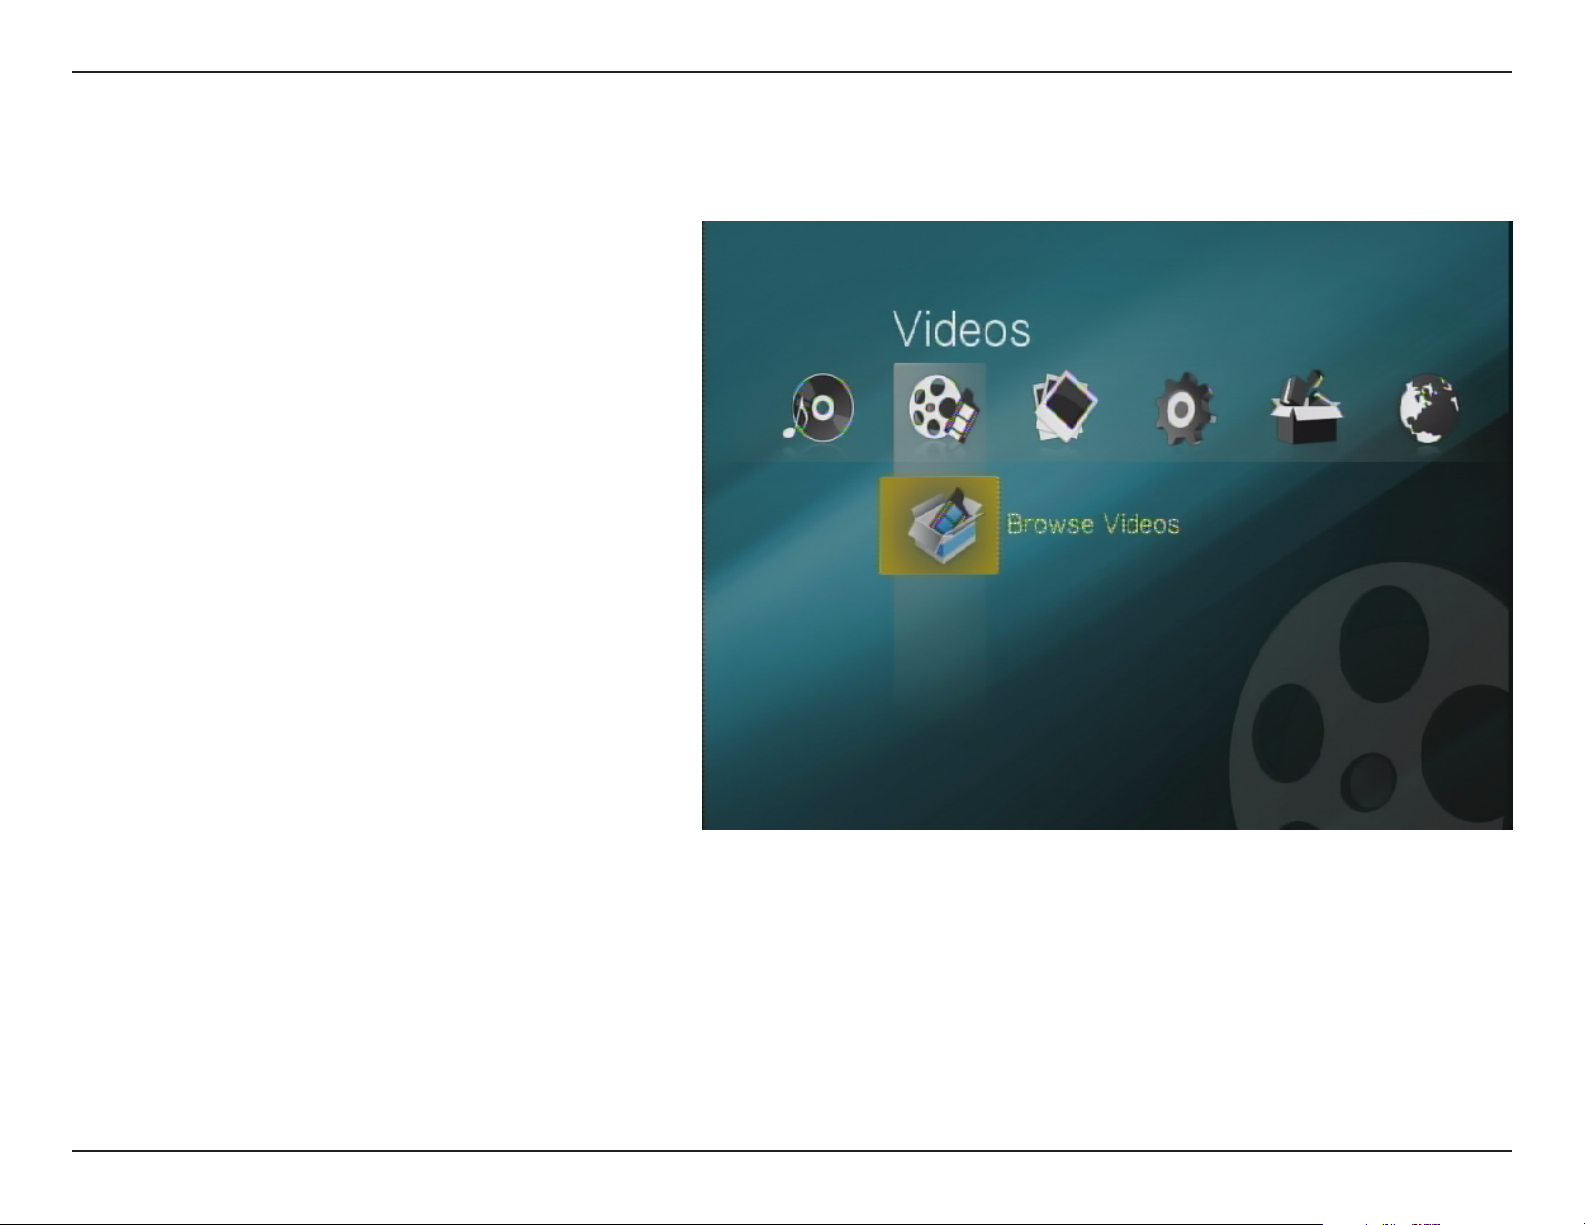
Videos
To view videos stored on the MyChannel Media Player or on an external USB storage drive, do the following:
Use the 1. Left/Right navigation keys on
the remote control to scroll to the Videos
menu.
2. Up/Down navigation keys on
Use the
the remote control to scroll to the Browse
Videos option. To view videos stored on
a USB storage drive scroll to the Browse
USB option.
3. OK button in the center of the
Press the
remote control to open the Browse Video
screen.
4. OK button
Use the navigation keys and
to browse to the location your video is
stored in.
5.
Select the video with the navigation
keys and press the OK button to view the
video.
You can use the same viewing controls in Videos mode as in MyChannel mode, such as playback, volume, and subtitle
controls. However, you will not be able to access your custom channels in this mode.
28D-Link DSM-350 User Manual
Page 33
Section 4 - Managing Your MyChannel Media Player
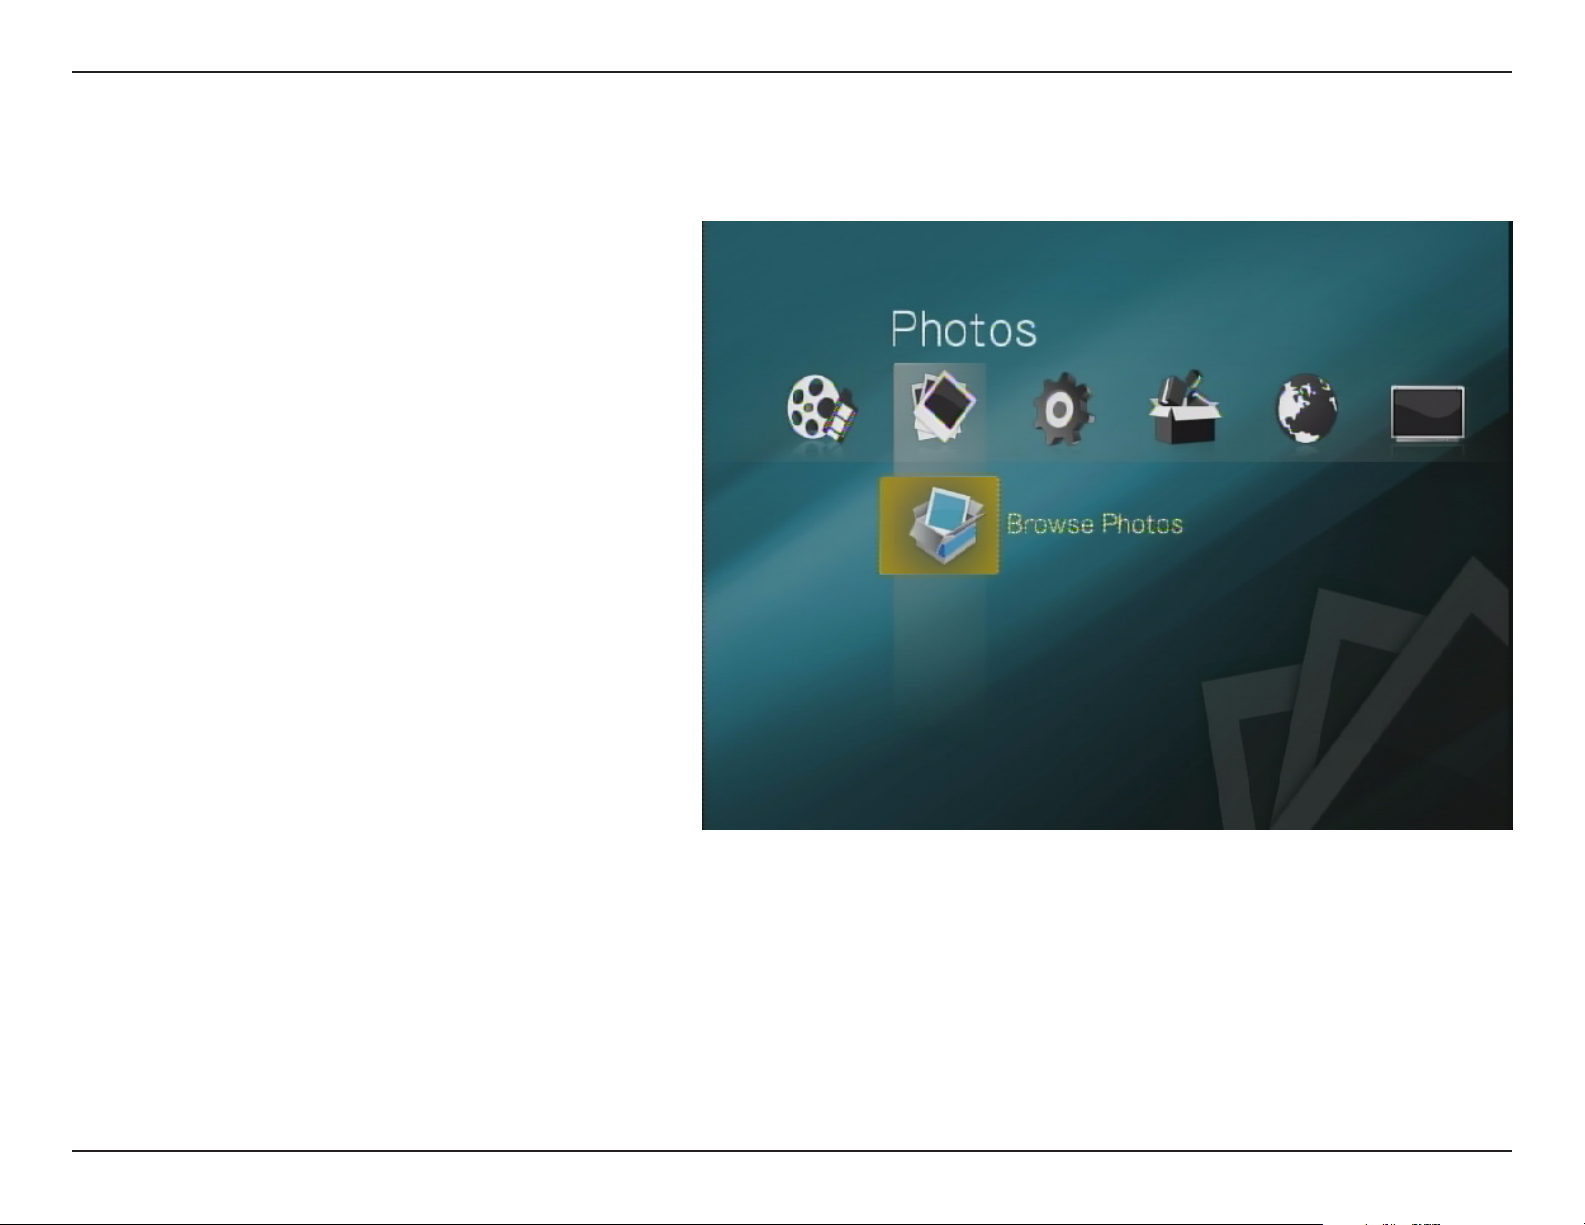
Photos
To view photos stored on the MyChannel Media Player or on an external USB storage drive, do the following:
Use the
1. Left/Right navigation keys on
the remote control to scroll to the Photos
menu.
2. Up/Down navigation keys on
Use the
the remote control to scroll to the Browse
Photos option. To view photos stored on
a USB storage drive scroll to the Browse
USB option.
3. OK button in the center of the
Click the
remote control to open the Browse Photos
screen.
4. OK button
Use the navigation keys and
to browse to the location your photo is
stored in.
5.
Select the photo with the navigation
keys and press the OK button to view the
photo.
29D-Link DSM-350 User Manual
Page 34
Section 4 - Managing Your MyChannel Media Player
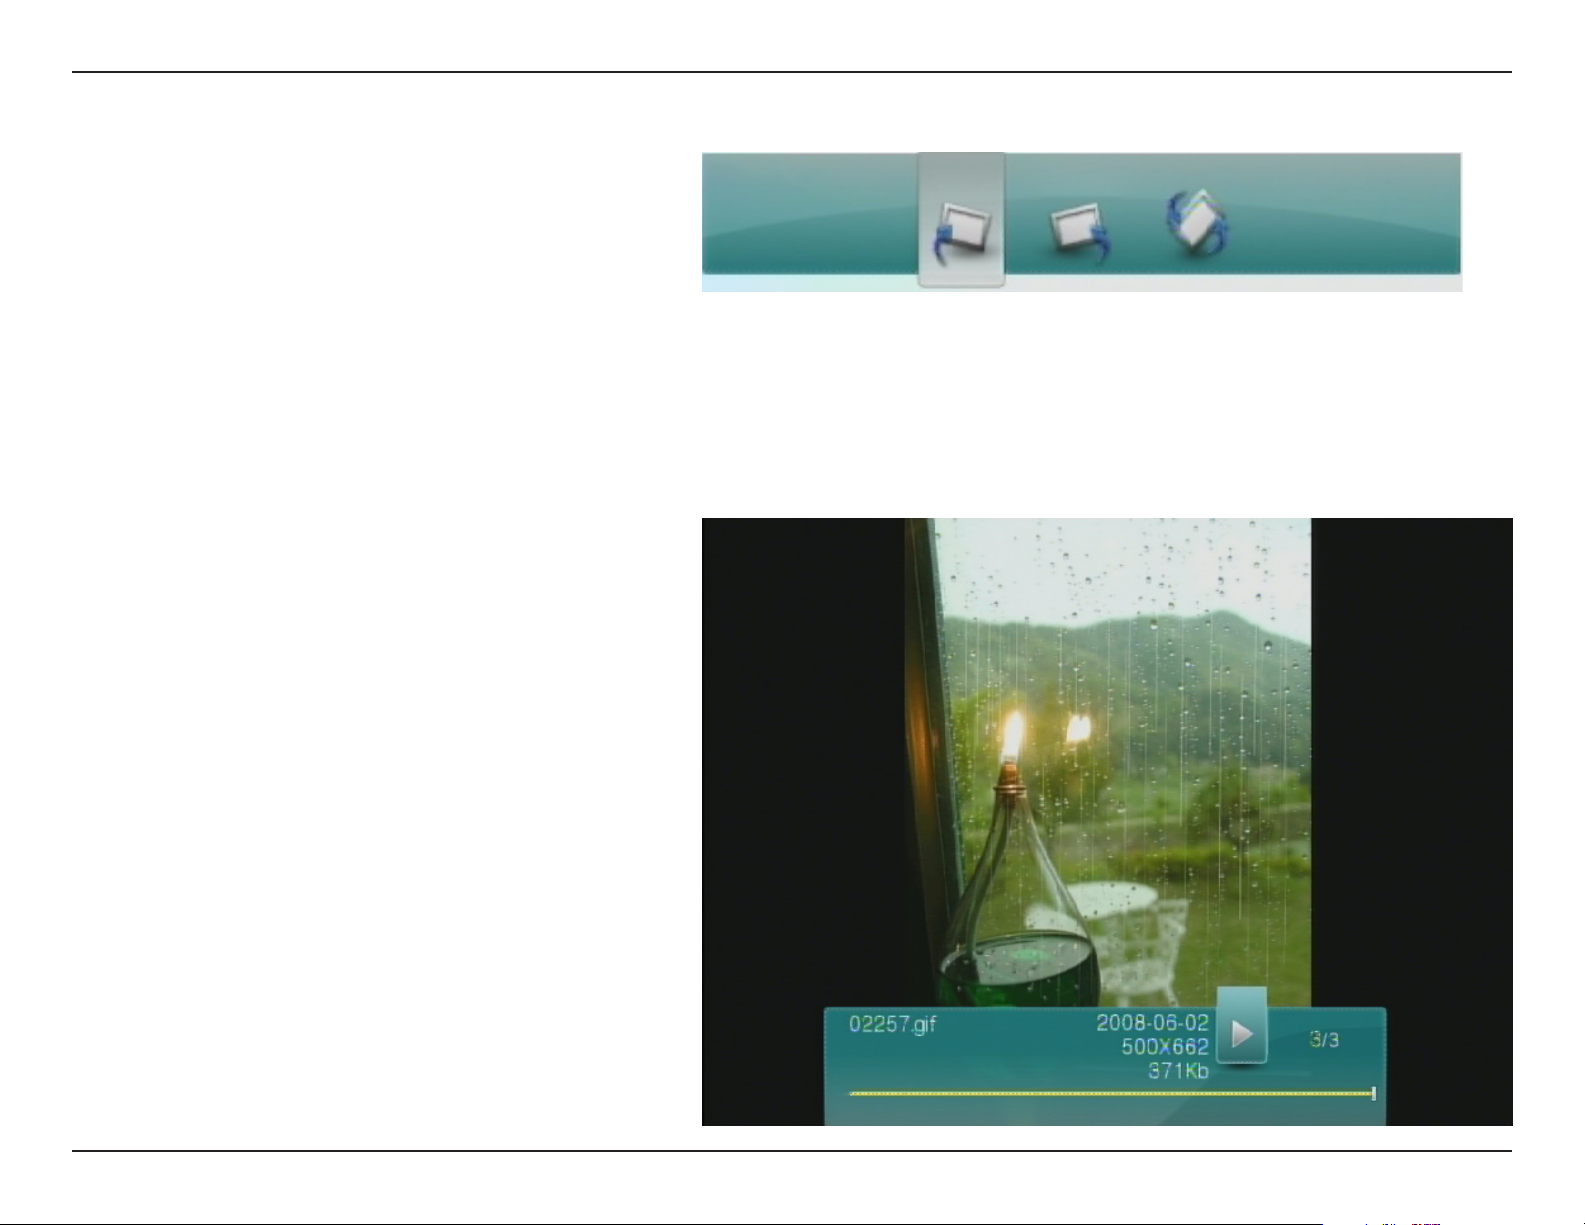
If you press the Options button on the remote while viewing photos, the following bar will appear:
Rotate Right
Rotate Left
Rotate 180°
This will rotate the current photo 90°
clockwise.
This will rotate the current photo 90°
clockwise.
This will rotate the current photo 180°.
When viewing photos, you can press the Play button on the remote to start a slideshow. You can pause the slideshow
by pressing the Play/Pause button again, or you can stop the slideshow by pressing the Stop button. You can adjust
the timing and effects used in the slideshow by going to Main Menu > Settings > Slideshow.
30D-Link DSM-350 User Manual
Page 35
Section 4 - Managing Your MyChannel Media Player
Settings
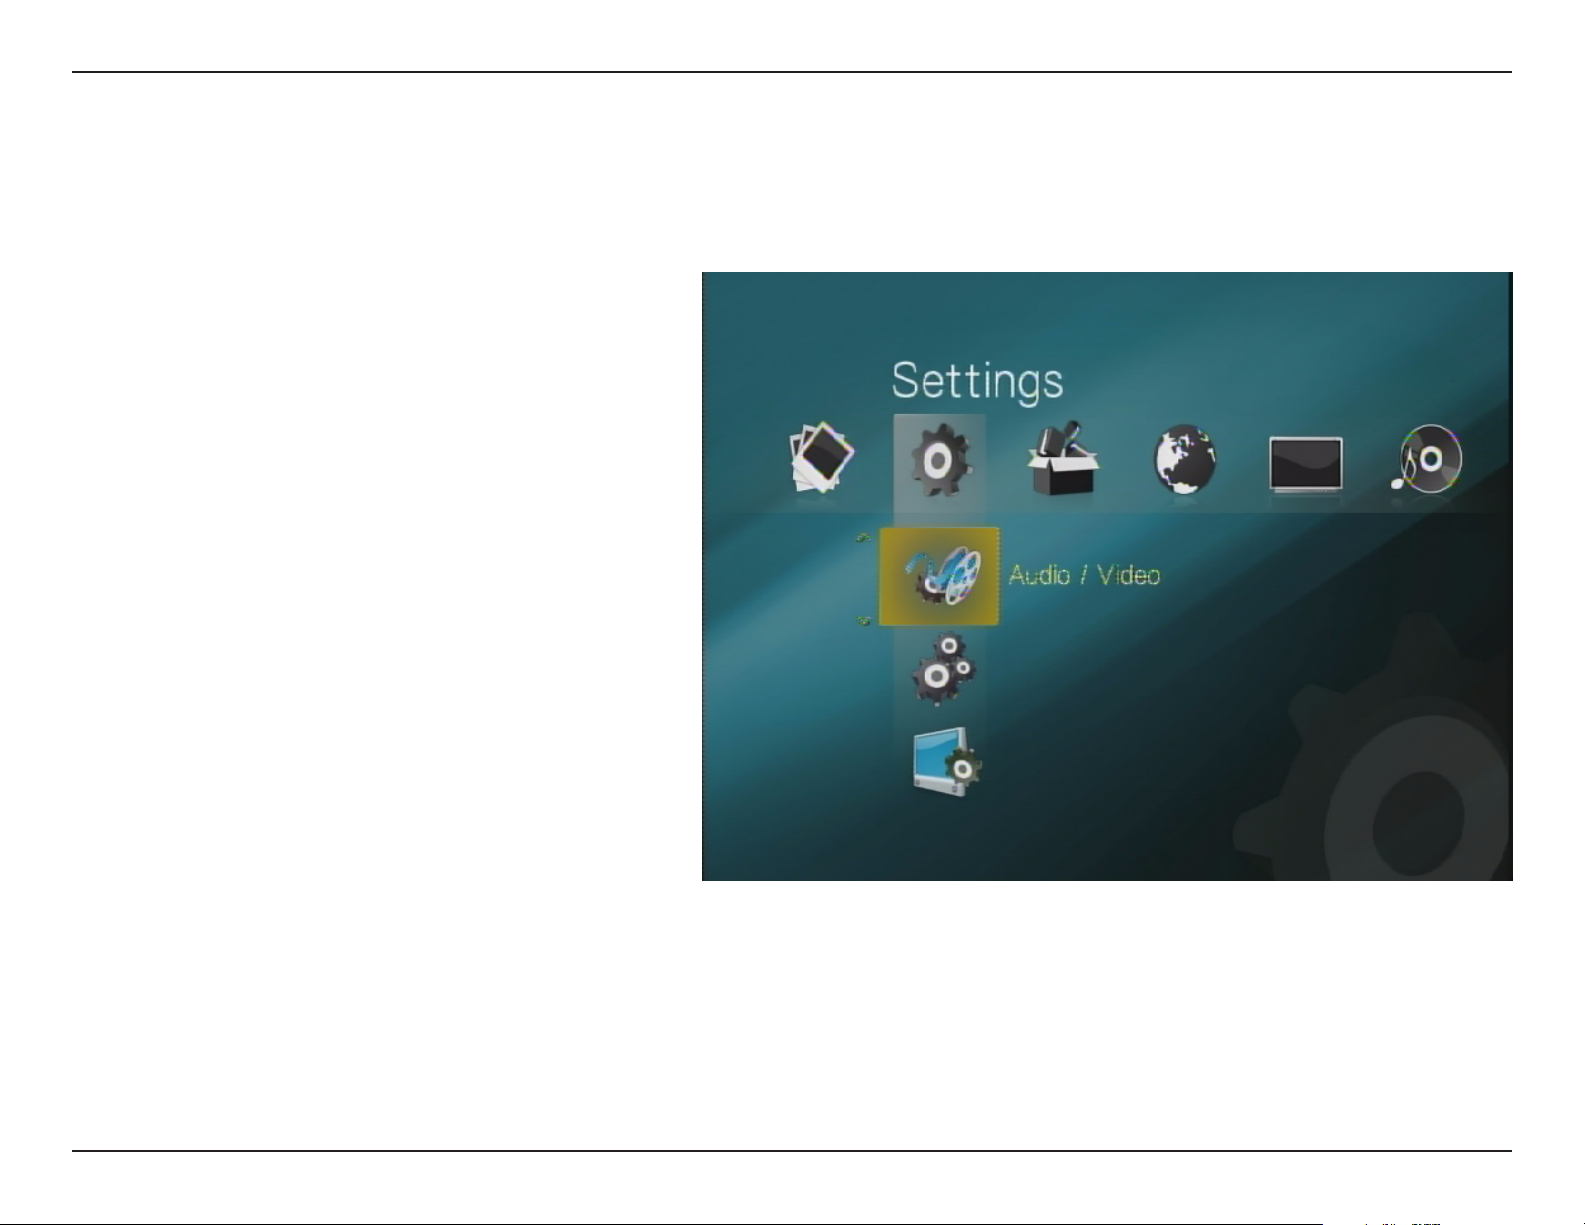
To view the Settings Directory, use the Left/Right navigation buttons on the remote control to scroll to the Settings menu.
Use the Up/Down navigation buttons and OK button on the remote control to select one of the available options.
Playback
Network
Slideshow
Audio/Video
System
Select this option to change video
playback settings.
Select this option to change the
MyChannel Media Player’s network
settings.
Select this option to congure slide
show settings.
Select this option to congure the
Audio/Video settings.
Select this option to configure
various maintenance settings for
your MyChannel Media Player.
31D-Link DSM-350 User Manual
Page 36
Section 4 - Managing Your MyChannel Media Player
Settings
Playback
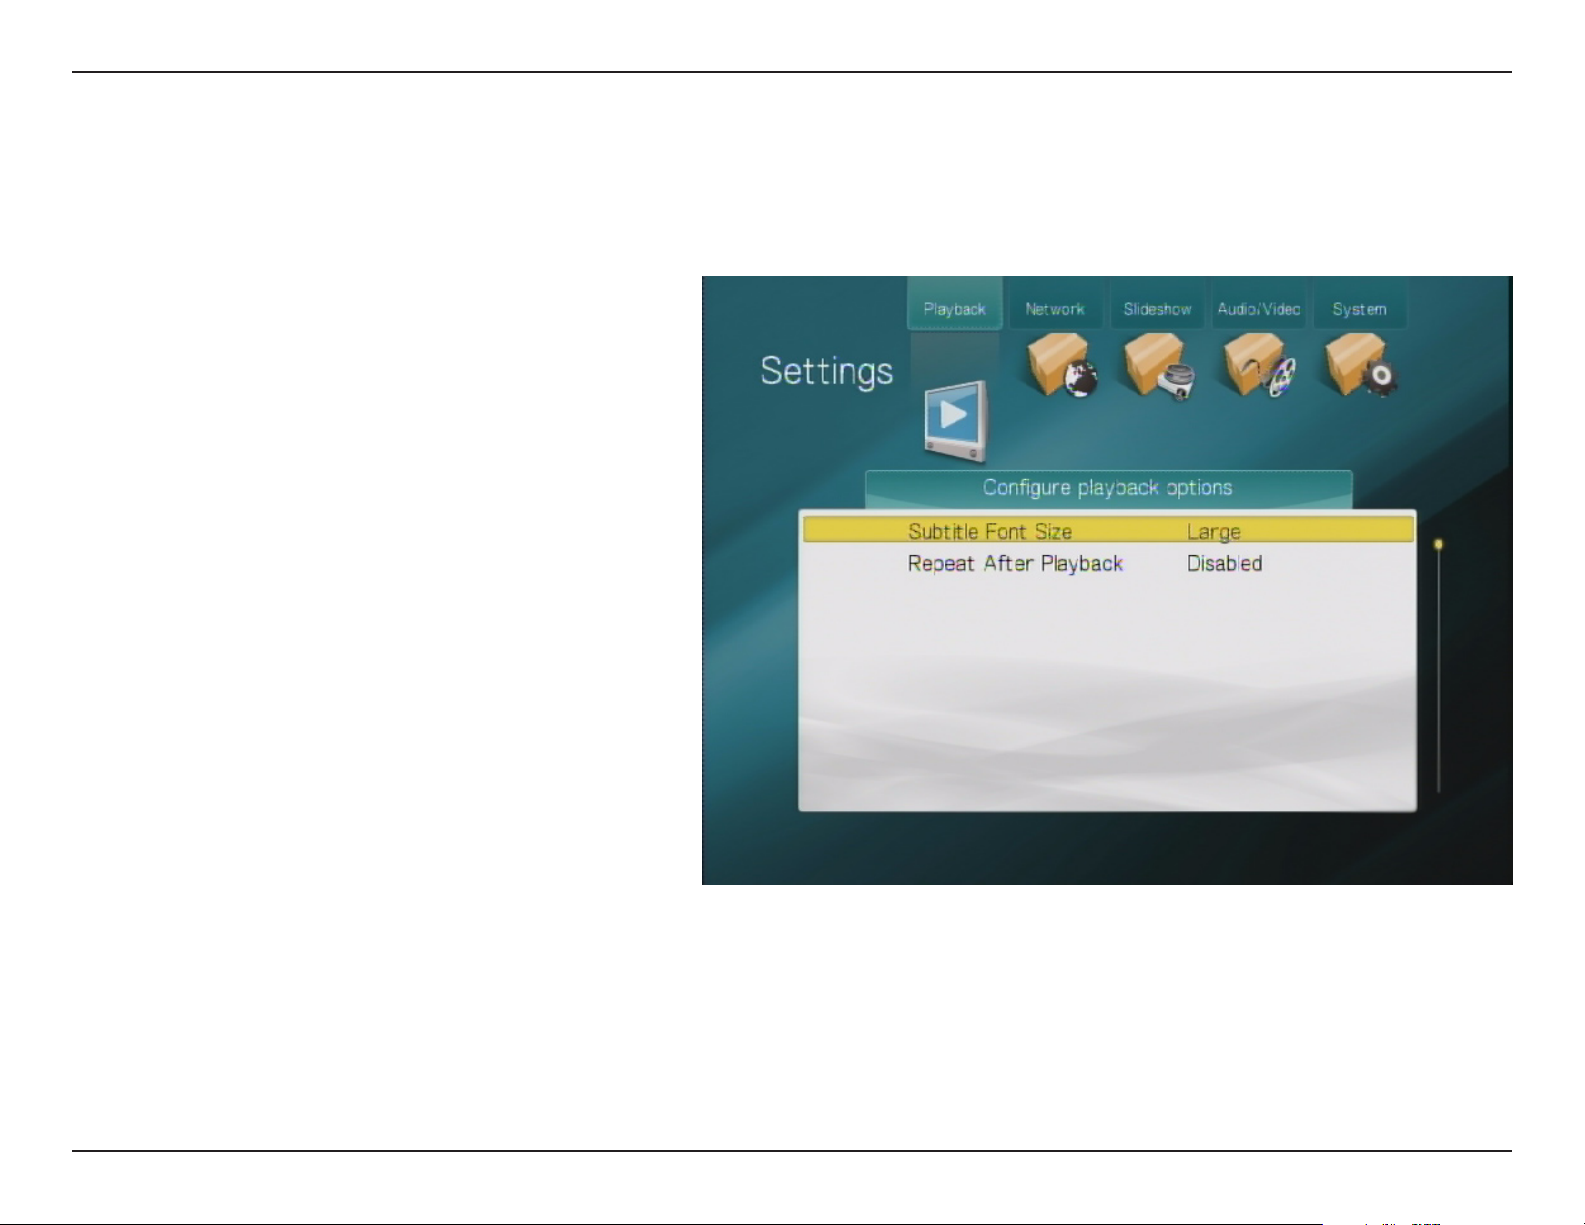
The following options are available in the Playback Settings menu:
Subtitle Font
Size
Repeat After
Playback
Select this option using the remote
control’s navigation and OK keys
if you want to change the Subtitle
Font Size. The available Font Sizes
Large, Medium
are:
Select this option using the remote
control’s navigation and OK keys if
you want to
Repeat After Playback function.
Enable
, and
or
Disable
Small.
the
32D-Link DSM-350 User Manual
Page 37
Section 4 - Managing Your MyChannel Media Player
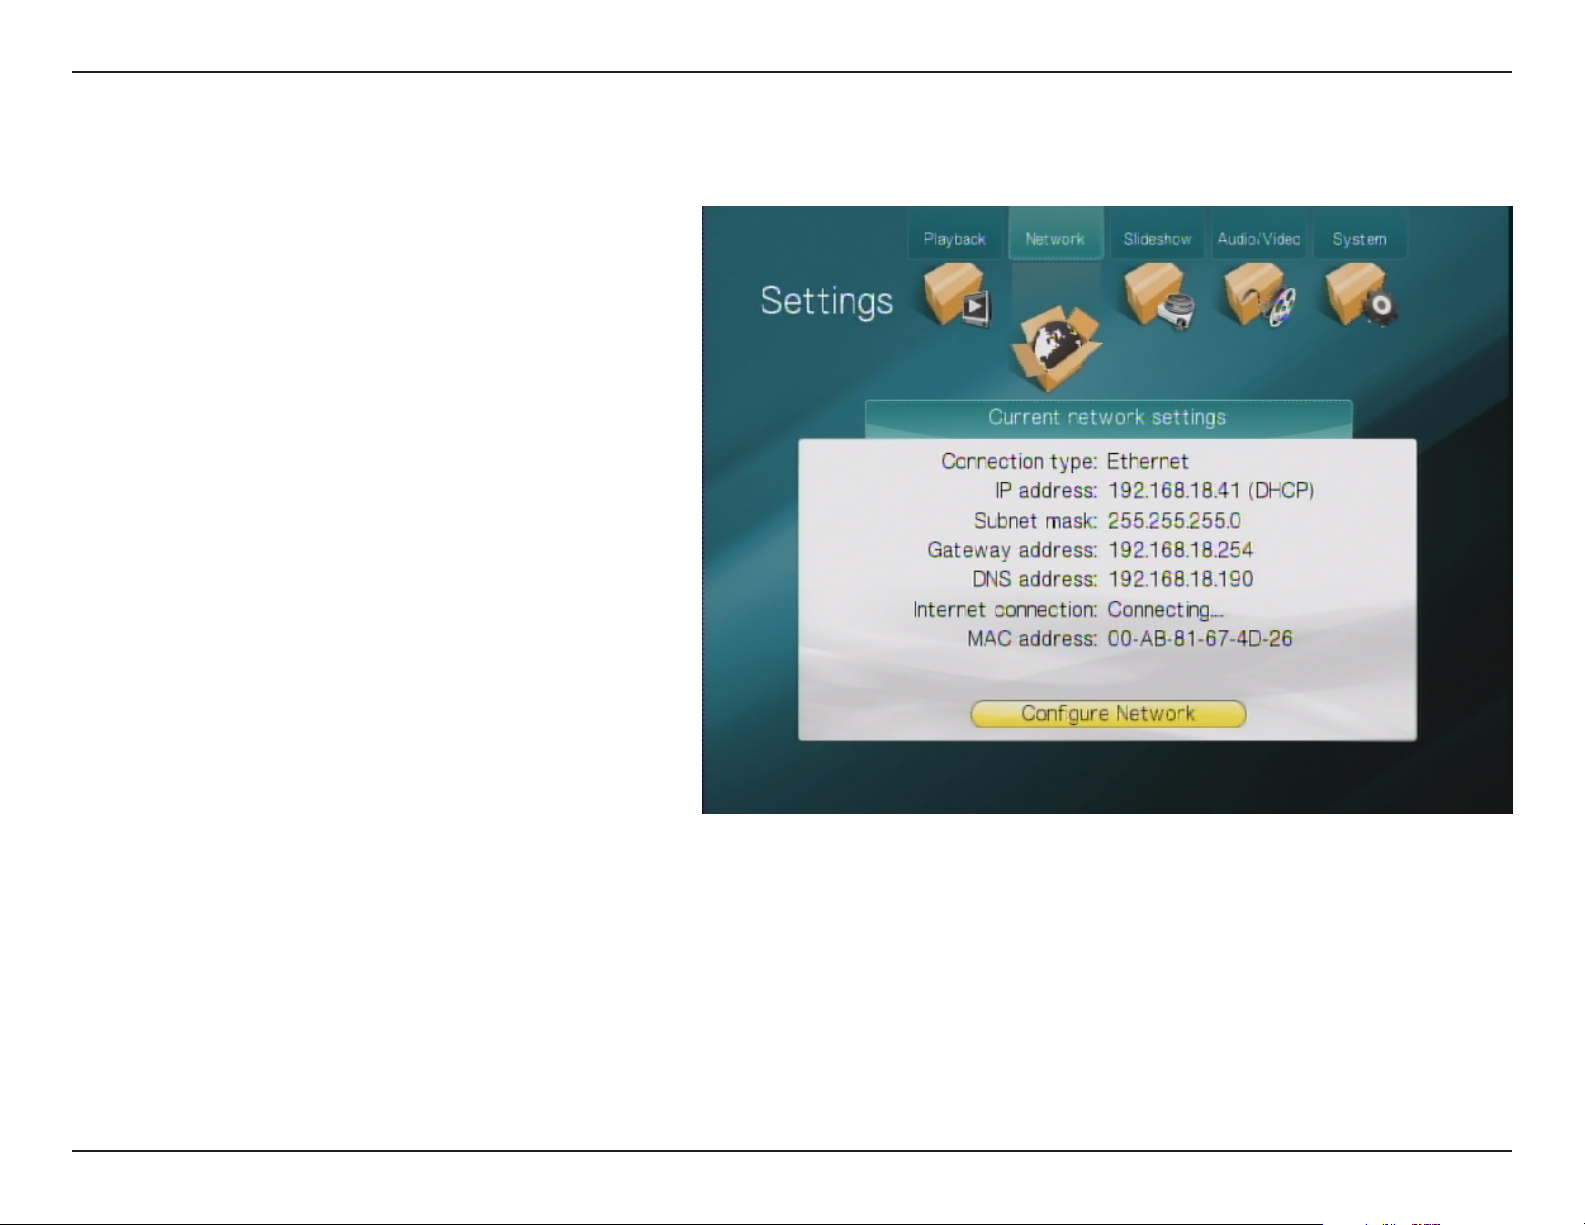
The Network Settings menu displays the current
network settings of the MyChannel Media Player.
To change network settings, press the OK button
in the center of the remote control to start the
Network Wizard, which will guide you through
the steps required to congure the MyChannel
Media Player’s Network Settings.
Settings
Network
33D-Link DSM-350 User Manual
Page 38
Section 4 - Managing Your MyChannel Media Player
Settings
Slideshow
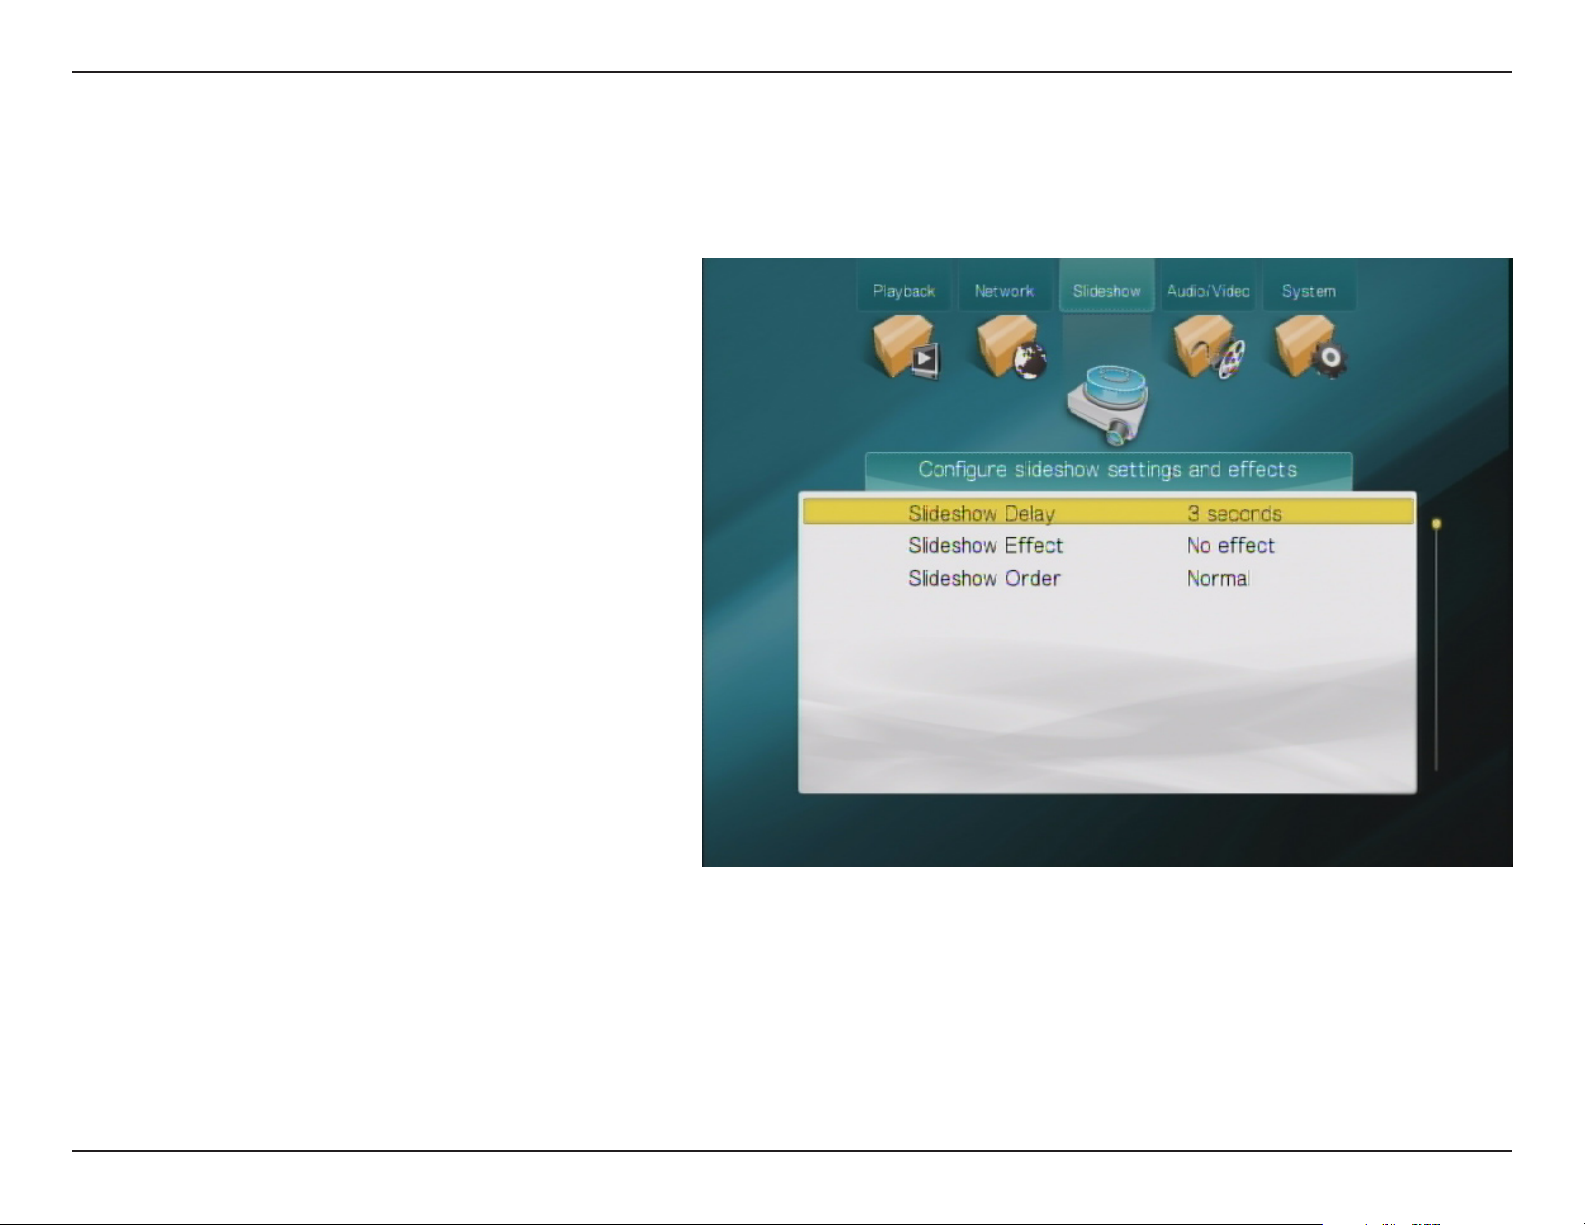
The following options are available in the Slideshow Settings menu:
Slideshow
Delay
Slideshow
Effect
Slideshow
Order
Use this option to change the delay time
between each picture being displayed
during a slide show.
Use this option to change the transition
effect between slides. The available
options are:
In/Fade Out,
Use this option to change the order
slides are displayed during a Slideshow.
The available options are:
Shufe.
No Effect, Random, Fade
and
Wipe In/Wipe Out.
Normal,
and
34D-Link DSM-350 User Manual
Page 39
Section 4 - Managing Your MyChannel Media Player
Settings
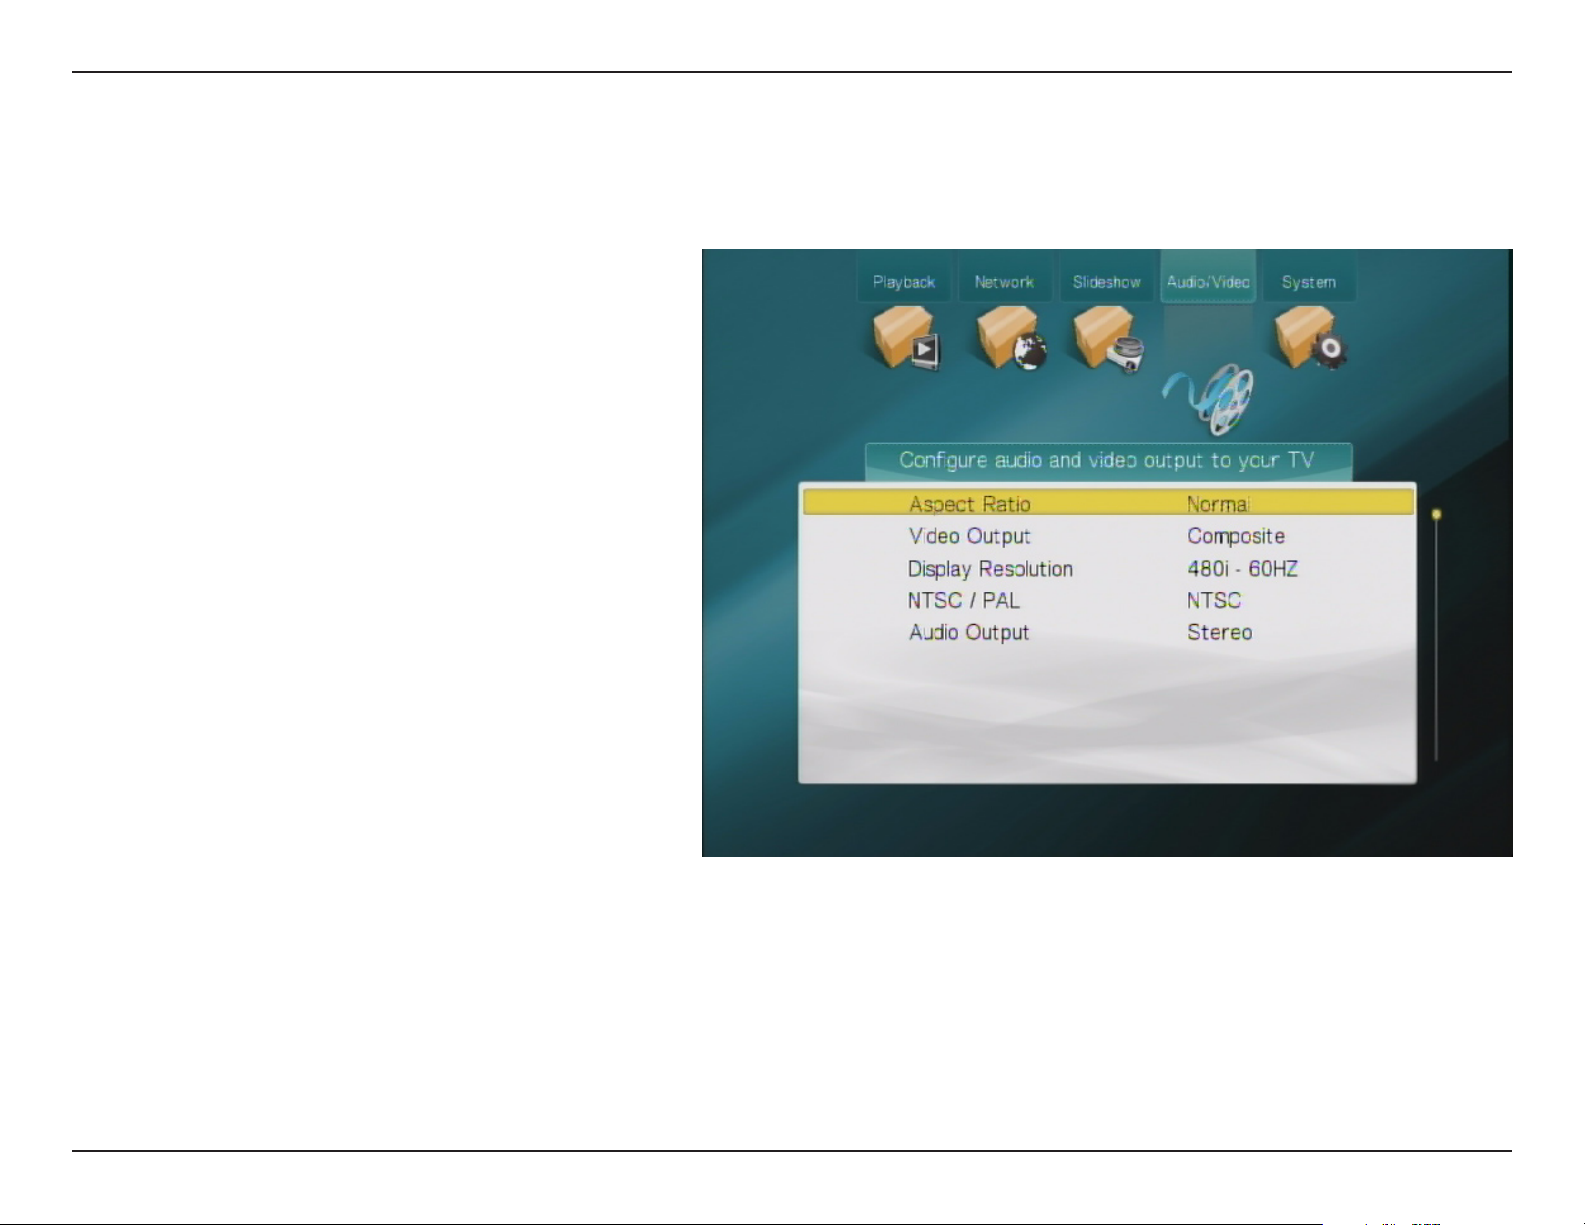
Audio/Video
The following options are available in the Audio/Video Settings menu:
Aspect Ratio
Video Output
Display
Resolution
NTSC / PAL
Use this option to change the Aspect
Rat io when playing vid eos fr om
the MyChannel Media Player. The
available Aspect Ratios are
Widescreen.
Use this option to change the Video
Output method. The available Video
Output methods are:
HDMI.
The MyChannel Media Player supports
a Display Resolution of 480i - 60Hz.
This setting only applies when the
Video Output is set to HDMI.
Use this option to specify if your TV
Standard is
only applies when the Video Output is
set to Composite.
NTSC
or
Normal
Composite
PAL
. This setting
and
and
Audio Output
When using the S/PDIF digital optical
audio output, set this option to
if your stereo system supports digital
sound processing.
Digital
35D-Link DSM-350 User Manual
Page 40
Section 4 - Managing Your MyChannel Media Player
Settings
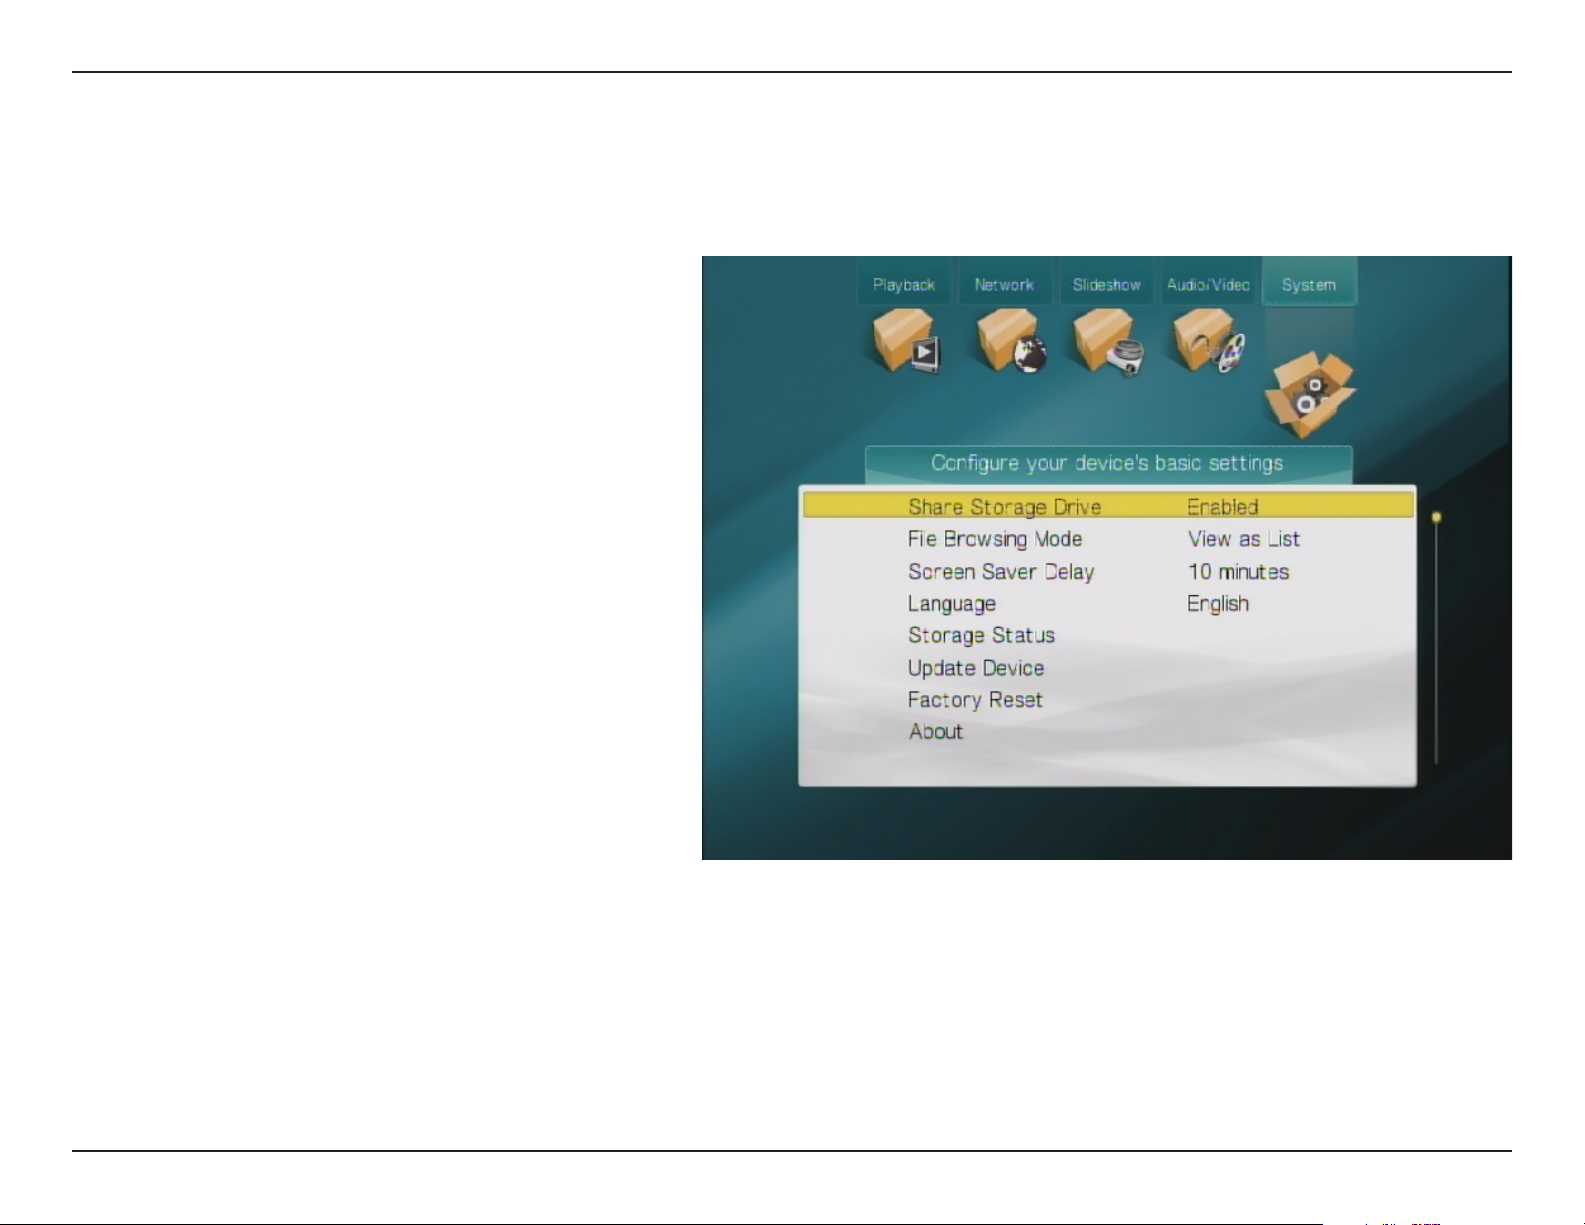
System
The following options are available in the System Settings menu:
Share Internal
Drive
File Browsing
Mode
Screen Saver
Delay
Language
Use th is op tion to specify if th e
MyChannel Media Player’s Internal
Hard Drive should be shared on the
network or not. Select
the Internal Hard Drive to be shared on
the network. Select
this function.
Use this option to change the way les
appear when the MyChannel Media
Player is being browsed from the
network. The available options are
as List
Use this option to specify the amount
of time the MyChannel Media Player
should be idle before the Screen Saver
is activated.
Use this option to change the language
of the TV Interface.
and
View as Thumbnail
Enabled
Disabled
to allow
to disable
View
.
Storage Status
Select this option to view the capacity
and amount of used space on the internal
hard drive. If you have connected a USB
drive to the MyChannel Media Player,
the capacity and amount of used space
will also be displayed here. You can
also format the internal hard drive from
this screen.
36D-Link DSM-350 User Manual
Page 41
Section 4 - Managing Your MyChannel Media Player
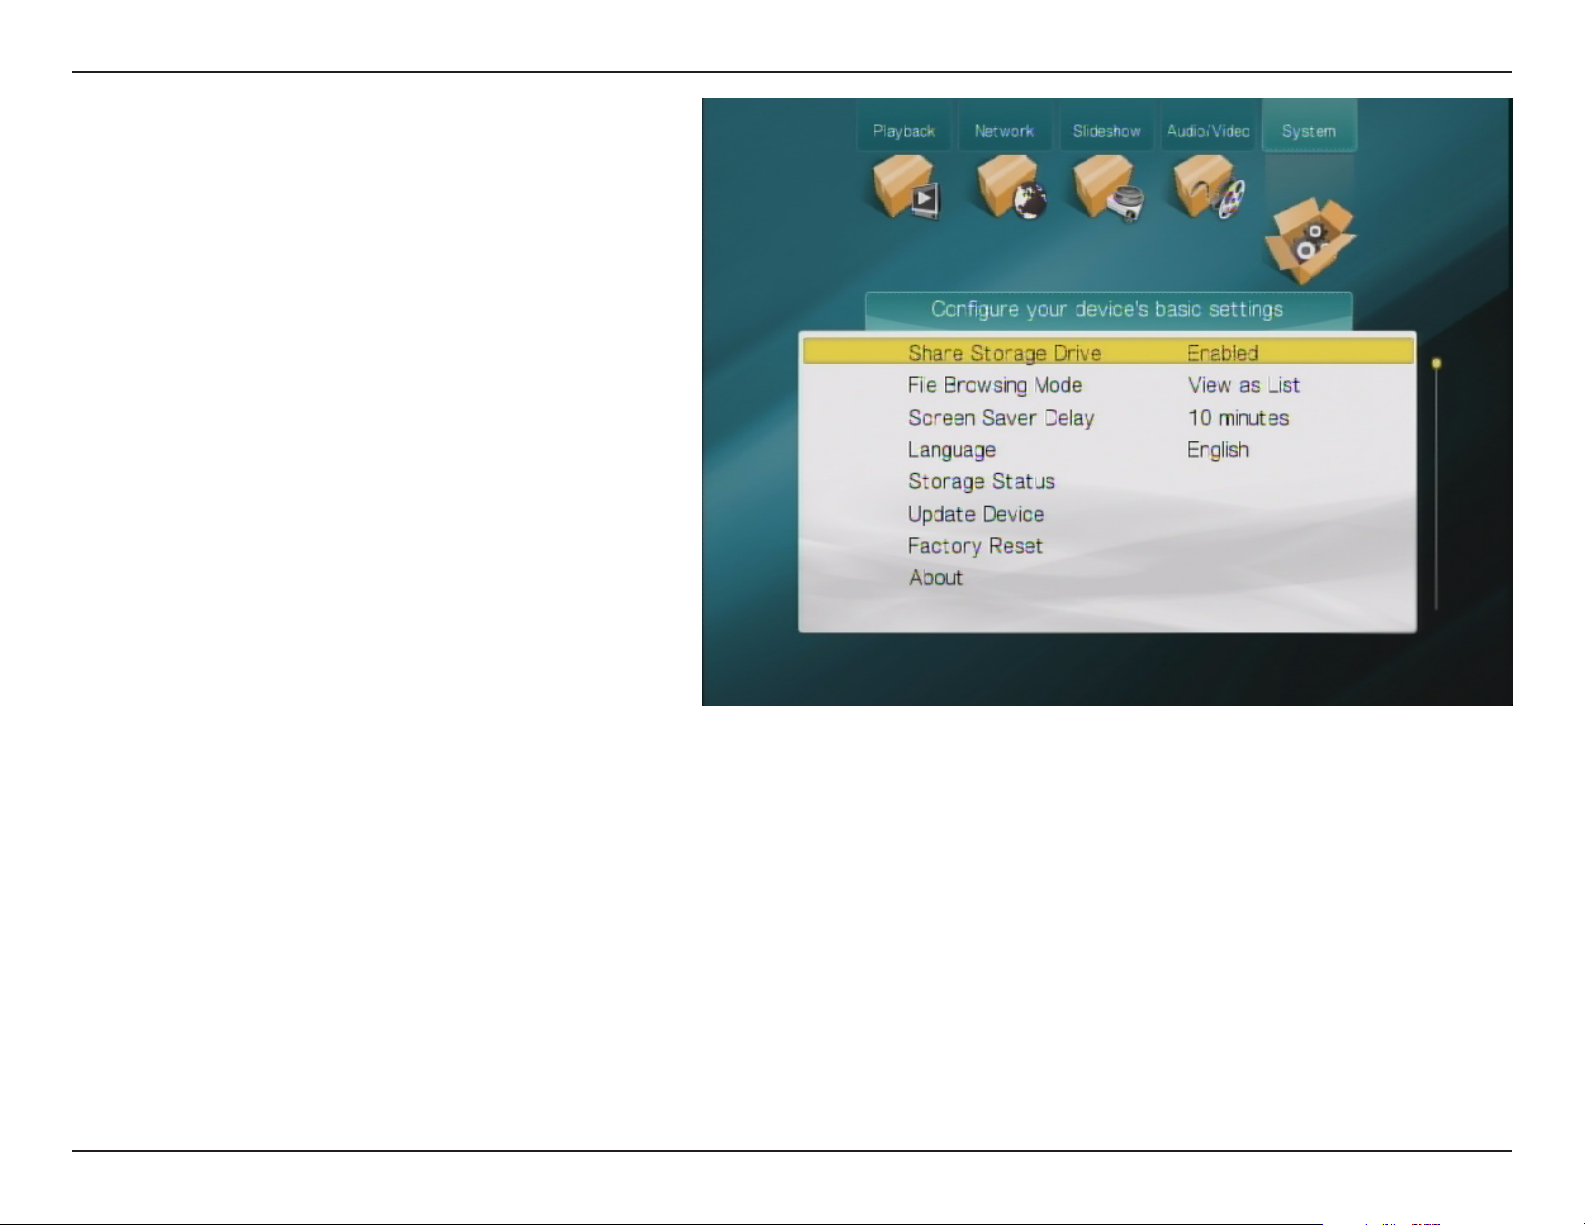
Update Device
Factory Reset
Select this option to view the current
ve rsion of fir mw ar e. Sel ec t th e
Autocheck for updates option to
switch the Automatically check
for rmware updates
Off
. Select the Check for updates
now option to check if there are any
available firmware updates for the
MyChannel Media Player.
You can also update the rmware by
downloading a rmware le to the root
directory of a USB storage drive, then
connecting it to the DSM-350. After
scanning the drive, the DSM-350 will
automatically show Settings > New
Firmware Found. Press the OK button
on the remote, then press it again to
update the rmware.
Sele ct thi s option to rest ore the
MyChannel Media Player back to
factory settings.
option On or
About
Select this option to view the rmware
version of the device and D-Link
Technical Support information.
37D-Link DSM-350 User Manual
Page 42
Section 4 - Managing Your MyChannel Media Player
The Web Interface
The web interface can be accessed by going to your www.mydlink.com account, or through a PC connected to the
same local network as your MyChannel Media Player.
Accessing Your MyChannel Media Player Through mydlink
The easiest way to access your device’s web interface is to sign in to your mydlink account, select your device, then
click on the Go To My Device button.
38D-Link DSM-350 User Manual
Page 43
Section 4 - Managing Your MyChannel Media Player
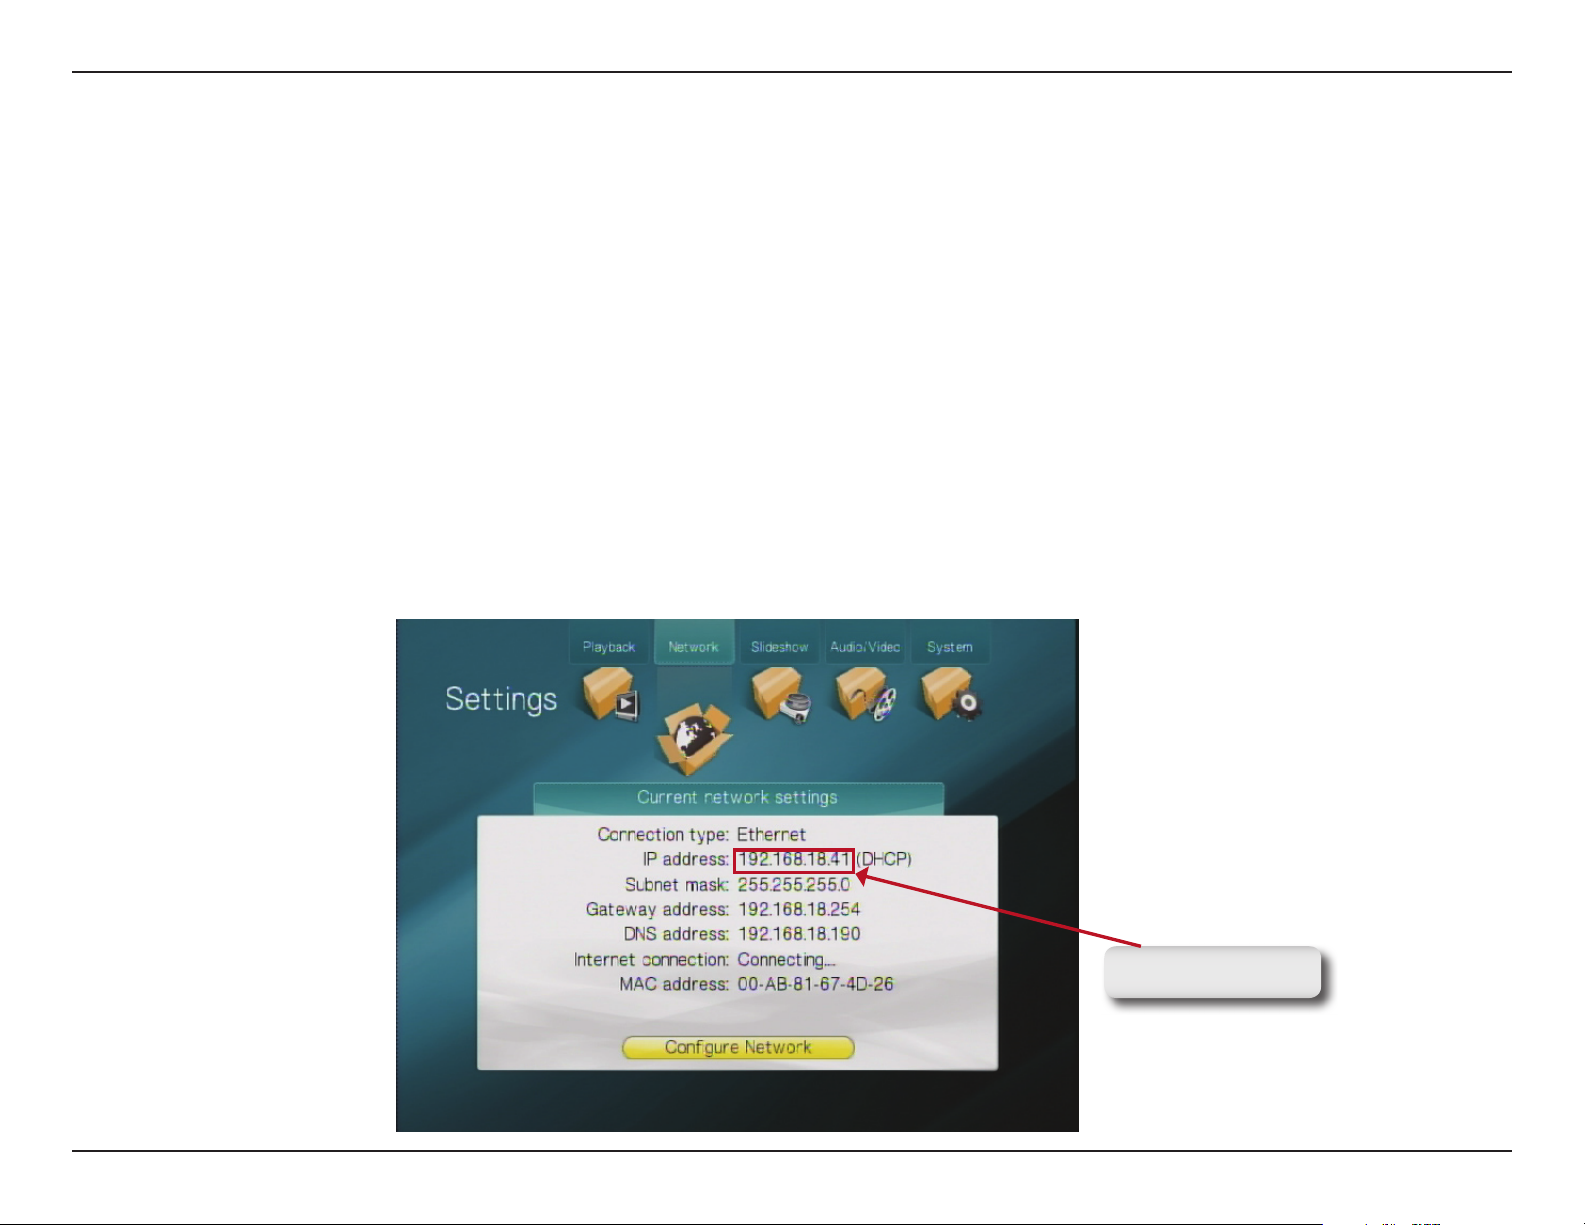
Accessing Your MyChannel Media Player By IP Address
If you do not have a mydlink account, you will need to know the IP address of the device in order to access the web
interface. To nd the IP address of the MyChannel Media Player, press the Menu button on the remote control, use
the Right/Left arrow buttons to nd the Settings menus directory icon, use the Up/Down arrow buttons to scroll to
the Network icon, then press the OK button. The Network menu lists the IP address of the MyChannel Media Player
as well as other network settings. By default, the IP address will be assigned by your router. Type this IP address into
your web browser to access the web interface.
If you are using a PC on the same local network as the MyChannel Media Player, you can go to http://dlink-xxxxxx,
where xxxxxx is the last 6 characters of the device’s MAC address, which you can nd on a label on the bottom of the
device.
Note: Proxy server settings can affect the web browser connection. Try disabling proxy server settings if unable to
connect with a web browser.
DSM-350 IP address
39D-Link DSM-350 User Manual
Page 44
Section 4 - Managing Your MyChannel Media Player
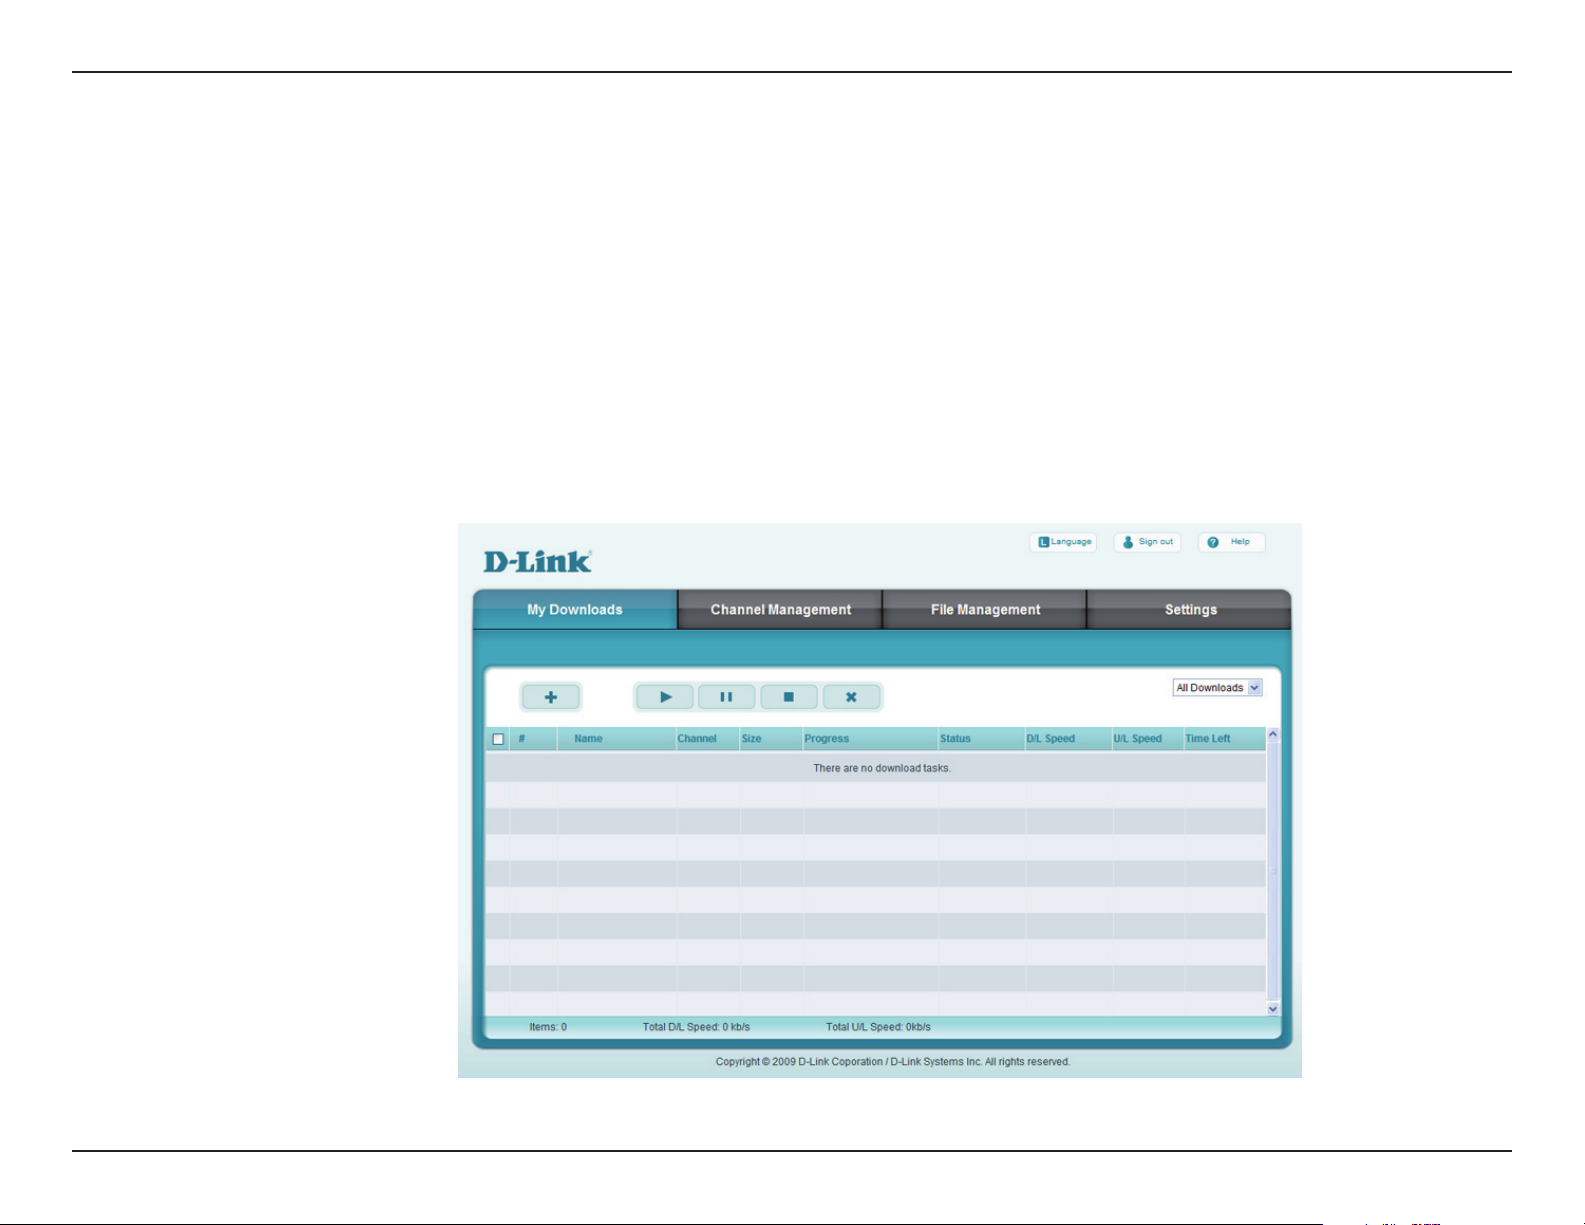
Using The Web Interface
The web interface is organized into 4 tabs:
My Downloads
y - This tab allows you to add and manage download tasks.
y - This tab allows you to set up and manage your custom channels.
Channel Management
y - This tab allows you to manage the les and folders stored on the internal hard drive.
File Management
y - This tab allows you to view and edit device information and settings such as connection settings,
Settings
network settings, and the administrator password.
40D-Link DSM-350 User Manual
Page 45
Section 4 - Managing Your MyChannel Media Player
My Downloads
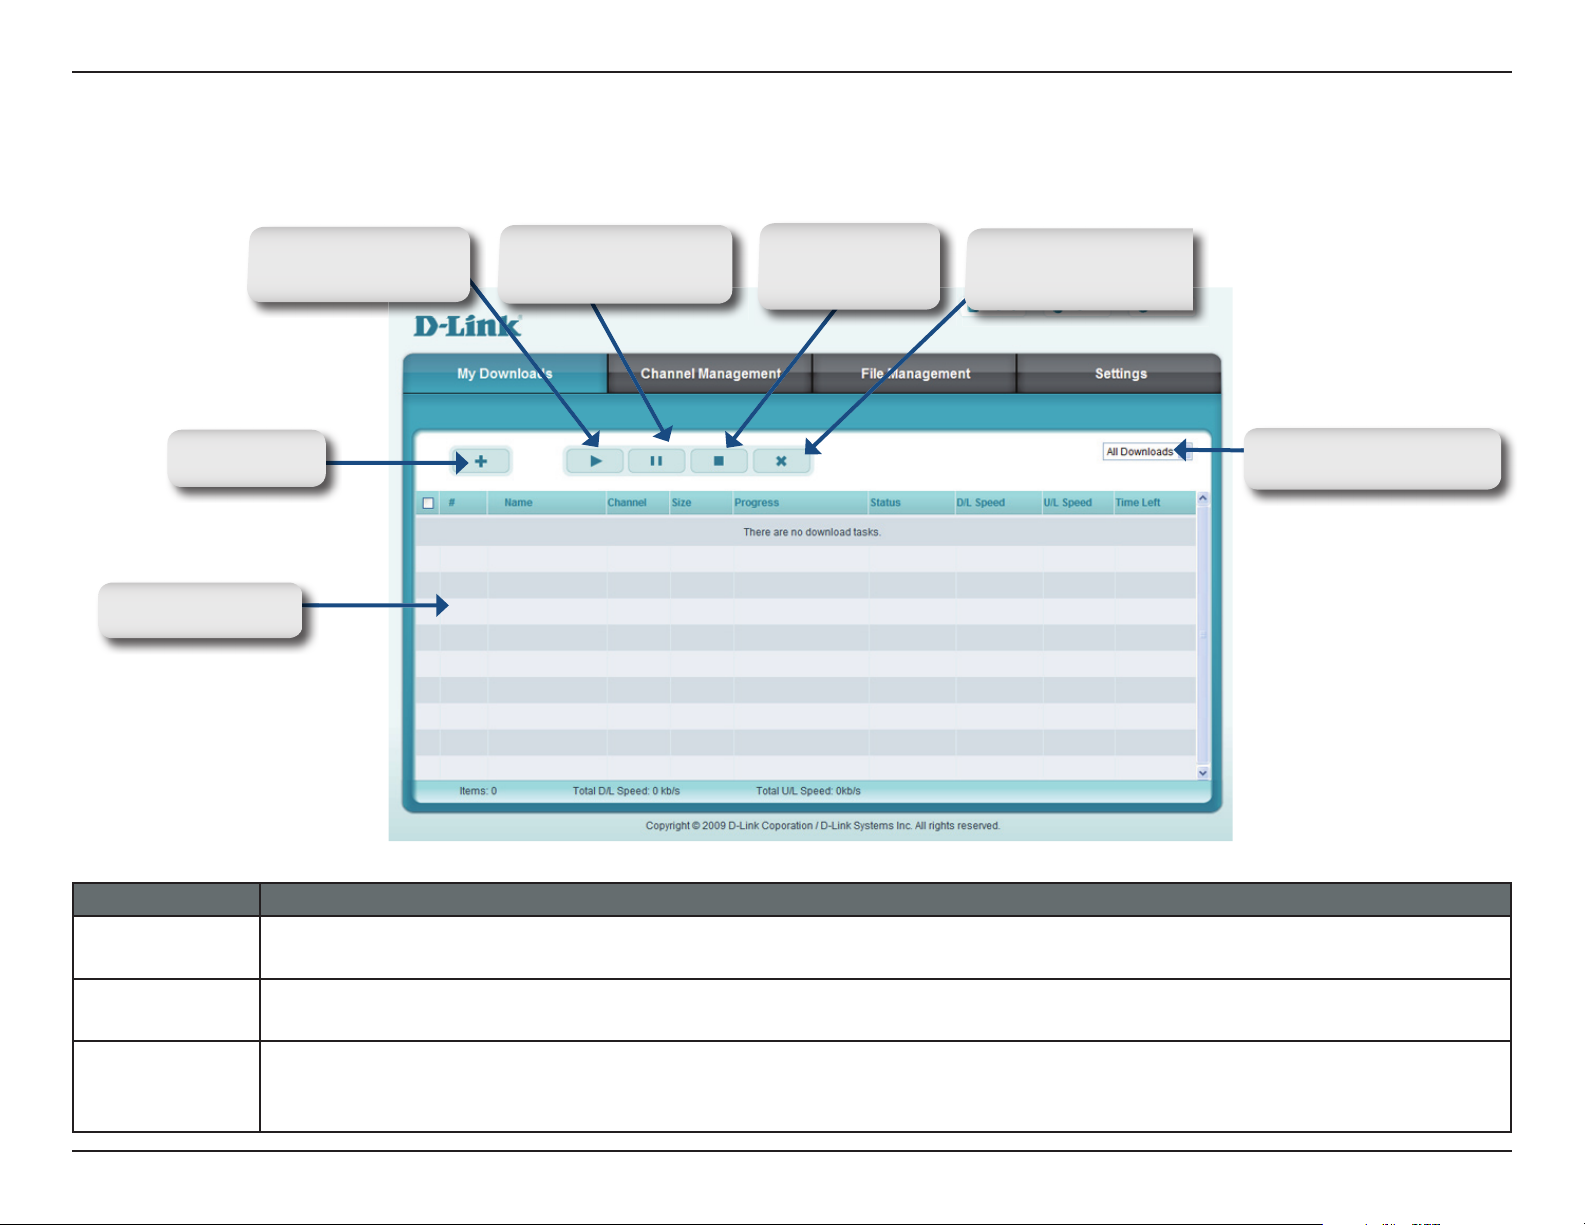
Use the My Downloads page to add and manage your downloads.
Add button
Downloads list
Start Downloads
button
Pause Downloads
button
Stop Downloads
button
Delete Downloads
button
View drop-down menu
FUNCTION DESCRIPTION
Add button Click the Add button to add a new download to the Download list. (See the Add Download section for more
information).
Start Downloads
button
Pause
Downloads
button
To start downloading, tick the download tasks you want to download from the Download List and click the Start
Downloads button.
To pause a torrent, tick the download you want to pause from the Download List and click the Pause Downloads
button.
41D-Link DSM-350 User Manual
Page 46
Section 4 - Managing Your MyChannel Media Player
FUNCTION DESCRIPTION
Stop
Downloads
button
Delete
Downloads
button
Downloads
List
View dropdown menu
To stop a download task, tick the downloads you want to pause from the Download List and click the Stop Downloads
button.
To delete a download task, tick the downloads you want to delete from the Download List and click the Delete Downloads
button.
Displays a list of all the downloads stored on the MyChannel Media Player.
Use the drop-down menu to lter the downloads that appear on the Download List. The available options are:
All Downloads
Downloading
Paused
Queued
Stopped
- Click this option to view all the torrent downloads that are currently paused.
- Click this option to view all the download tasks that are currently queued.
- Click this option to view all the download tasks that are currently stopped.
Completed
Seeding
- Click this options to view all download tasks that have completed, and are currently seeding a torrent.
- Click this option to view all the download tasks in the Download List.
- Click this option to view all the download tasks that are currently downloading.
- Click this option to view all the download tasks that have completed.
42D-Link DSM-350 User Manual
Page 47
Section 4 - Managing Your MyChannel Media Player
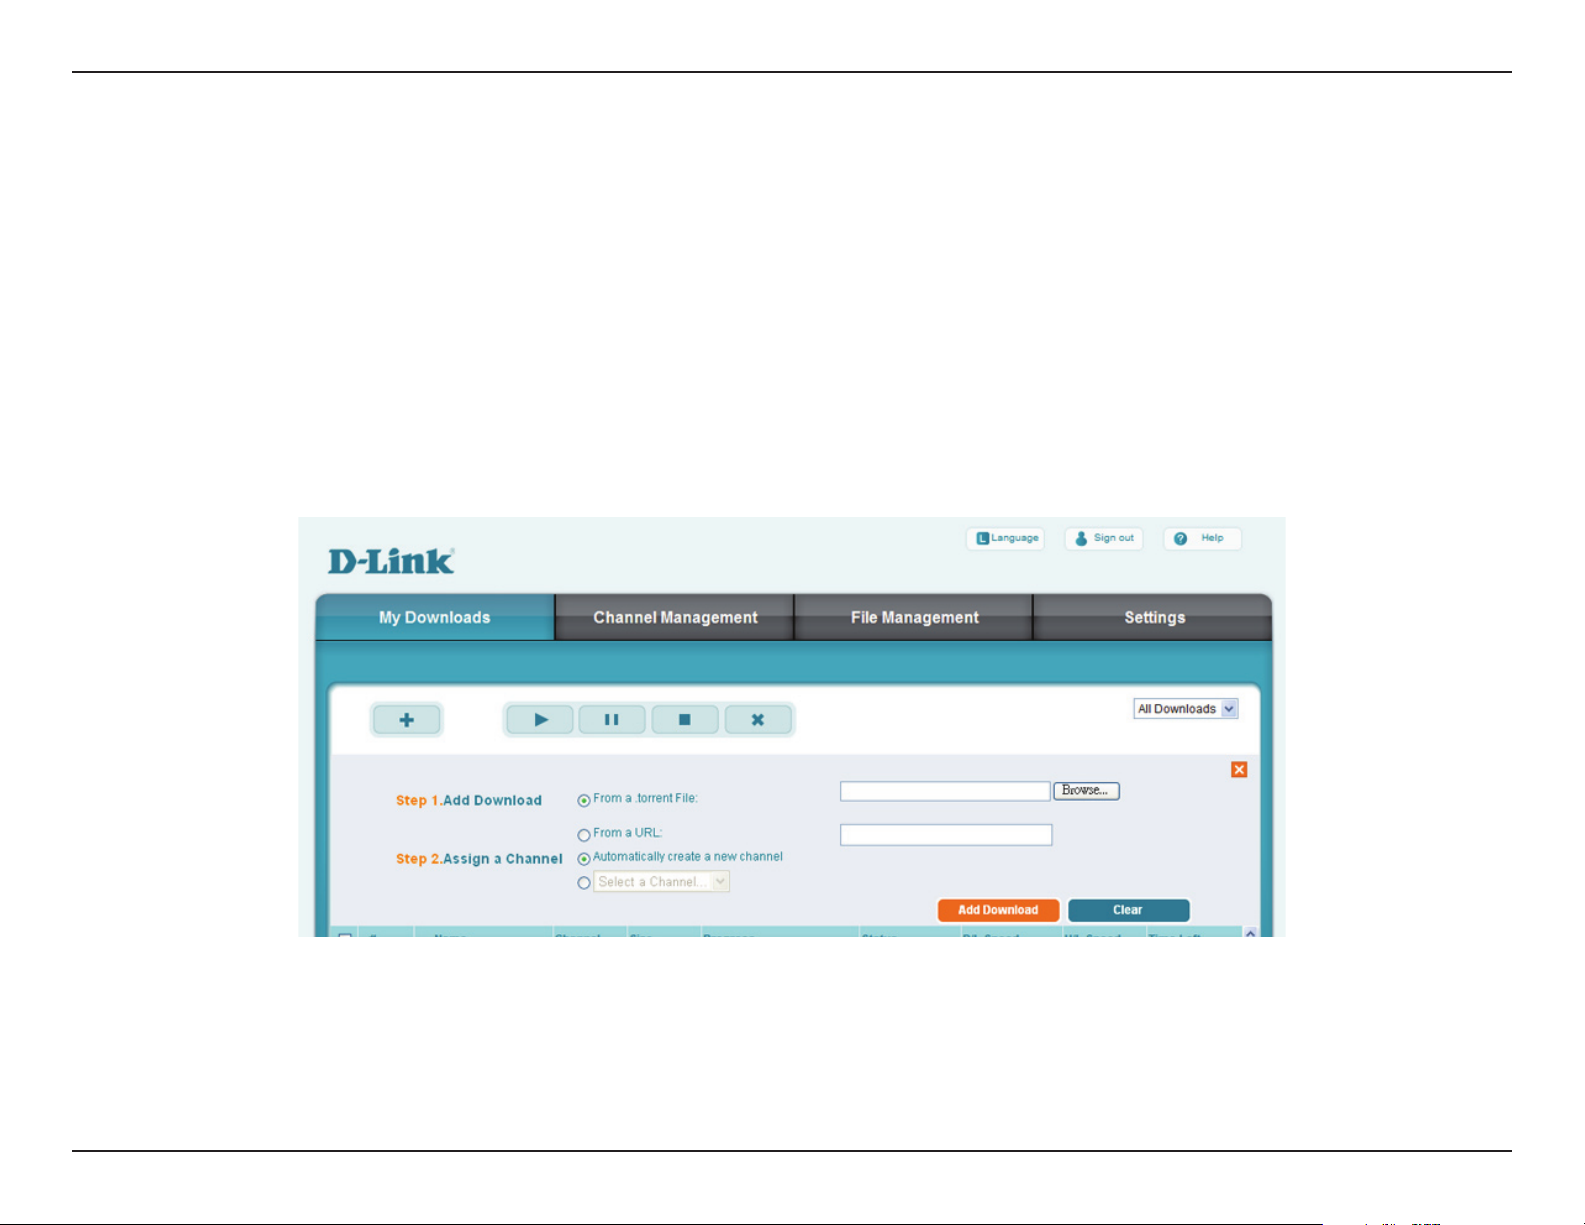
My Downloads - Add Download
There are two steps required to add a new download task:
1. - Select From a torrent File to add a torrent from a .torrent le on your local PC. Type the location
2. - Select the Automatically create a new channel radio button to automatically create a
Add Download
of the torrent le on your PC, or click Browse... to browse to the torrent le. Select From a URL to add a download
task from a URL. Type the URL of the le you wish to download. If the le is a .torrent le, it will be downloaded
and then automatically added as a new download task.
Assign a Channel
new channel and assign the download task to it after the download is completed. To assign the download task to
an existing channel, select Select a Channel and select the channel from the drop-down menu.
After completing the above two steps, click the Add Download button to add the download task to the Downloads List.
43D-Link DSM-350 User Manual
Page 48
Section 4 - Managing Your MyChannel Media Player
Channel Management
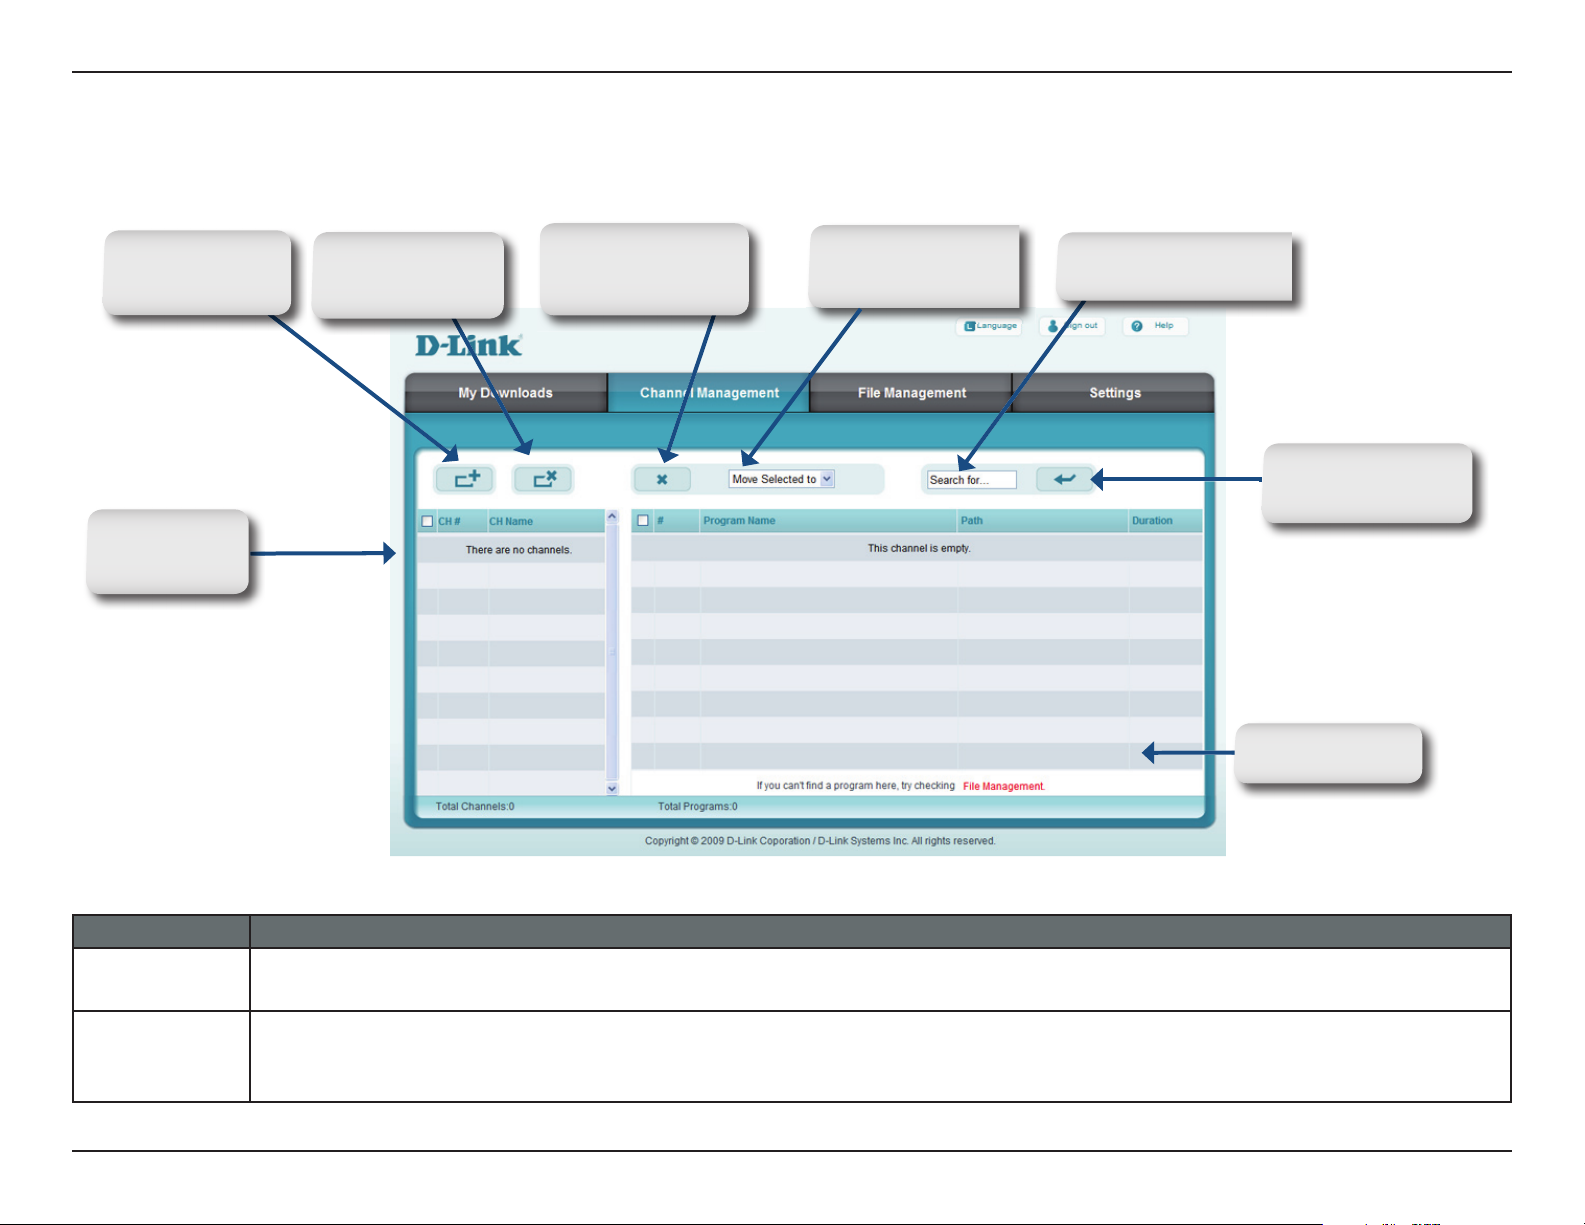
Use the Channel Management page to create new channels, delete channels and con gure existing channels.
New Channel
button
Channel List
Delete
Channel button
Remove Selected
Programs from
Channel button
Move Selecti on
drop-down menu
Search for Program
search box
Clear Search
button
Program List
FUNCTION DESCRIPTION
New Channel
button
Delete
Channel
button
Click the New Channel button to create a new channel. (See the Add New Channel section for more information).
To delete channels, tick the checkboxes next to the channels you want to delete from the Channel List and click the
Delete Channel button.
44D-Link DSM-350 User Manual
Page 49
Section 4 - Managing Your MyChannel Media Player
FUNCTION DESCRIPTION
Remove
Selected
Programs
from Channel
button
Move
Selection dropdown menu
Search for
Program
entry eld
Clear Search
button
Channel List Displays a list of all the channels set up on the MyChannel Media Player.
Program List Displays a list of all the programs set up on the MyChannel Media Player. To search for a program that isn’t in the list,
To remove programs from a channel, tick the checkboxes next to the programs you want to delete from the Program
List and click the Remove Selected Programs from Channel button.
To move programs to another channel, tick the programs you want to move in the Program List and use the drop-down
menu to select the channel you want to move the programs to.
To search for a specic program type the name or part of the le name of the program you want to nd in the channel.
The Program List will be ltered as you type, showing only results that match your search.
Click this button to clear the Search for Program entry eld to show all programs.
click the File Management link at the bottom of the window to search for the le on the internal hard drive.
45D-Link DSM-350 User Manual
Page 50
Section 4 - Managing Your MyChannel Media Player
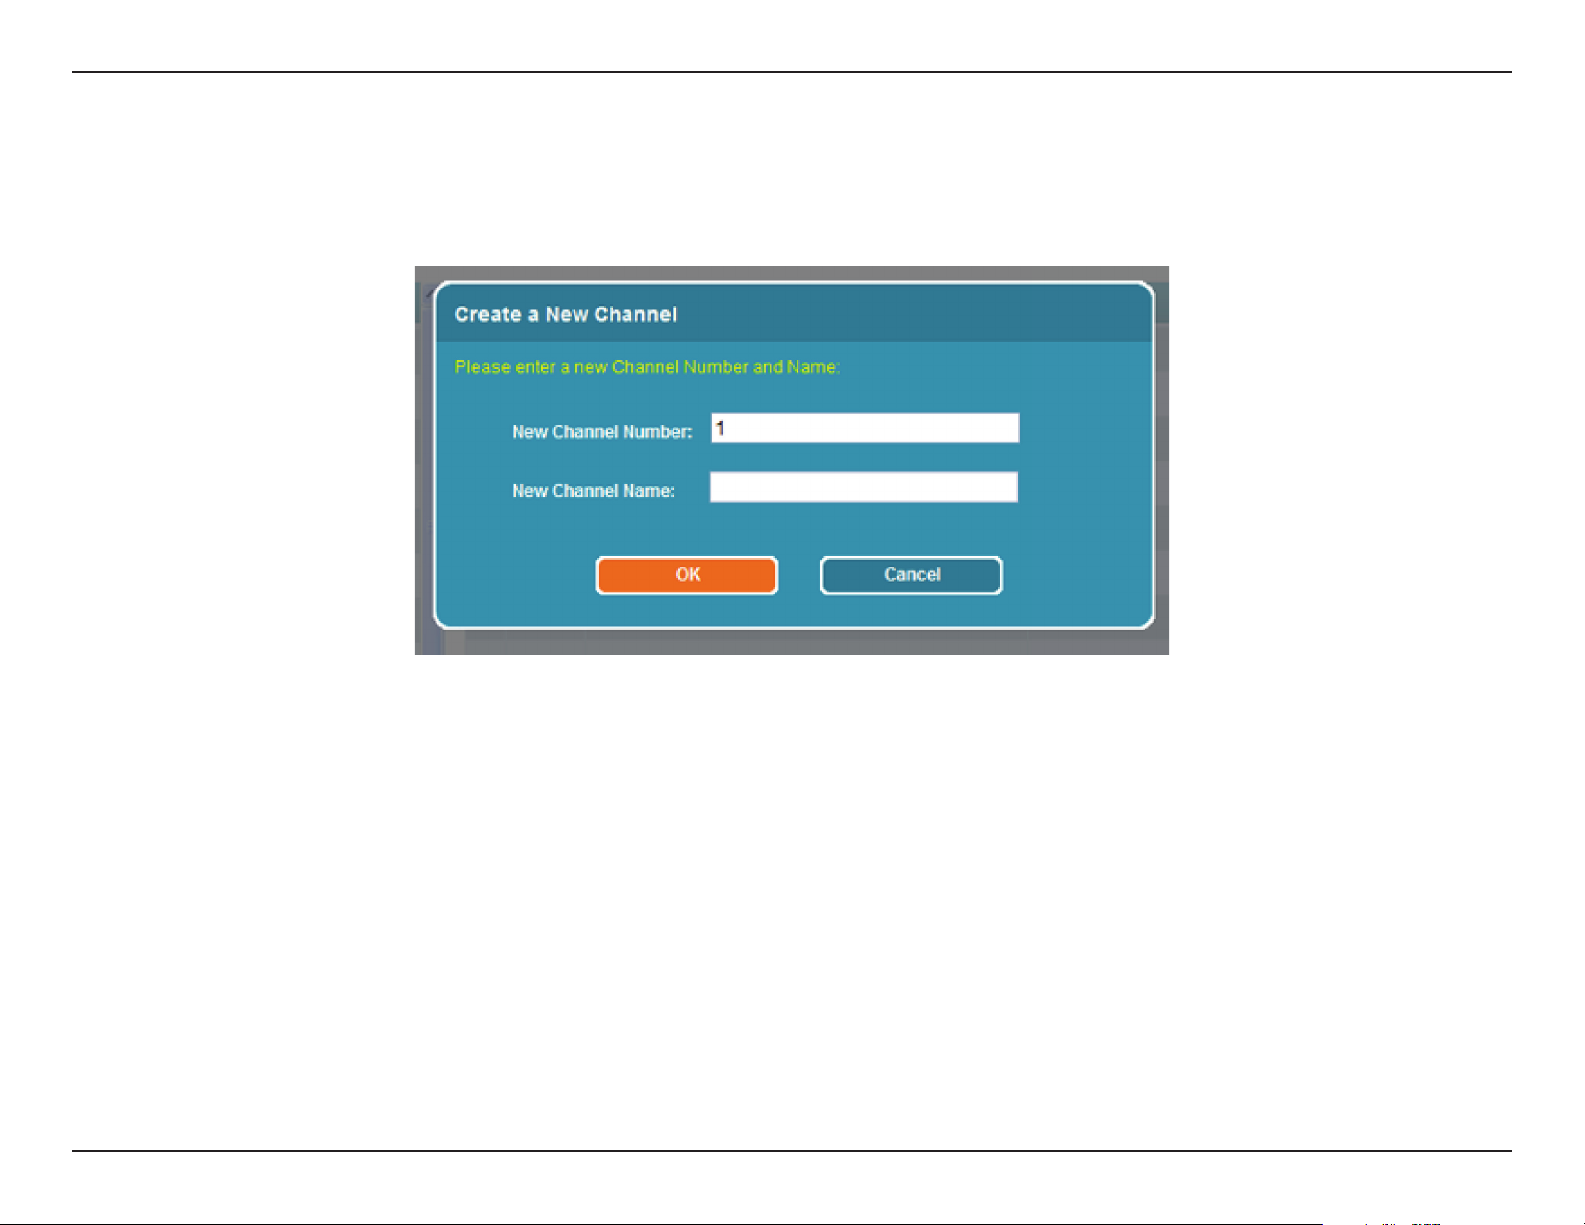
Channel Management - Add New Channel
After you click the Add New Channel button, the following window will appear:
Type the channel number you want for the new channel in the 1. New Channel Number eld.
2. New Channel Name eld.
3. OK button to add the new channel.
Type a name for the new channel in the
Click the
46D-Link DSM-350 User Manual
Page 51
Section 4 - Managing Your MyChannel Media Player
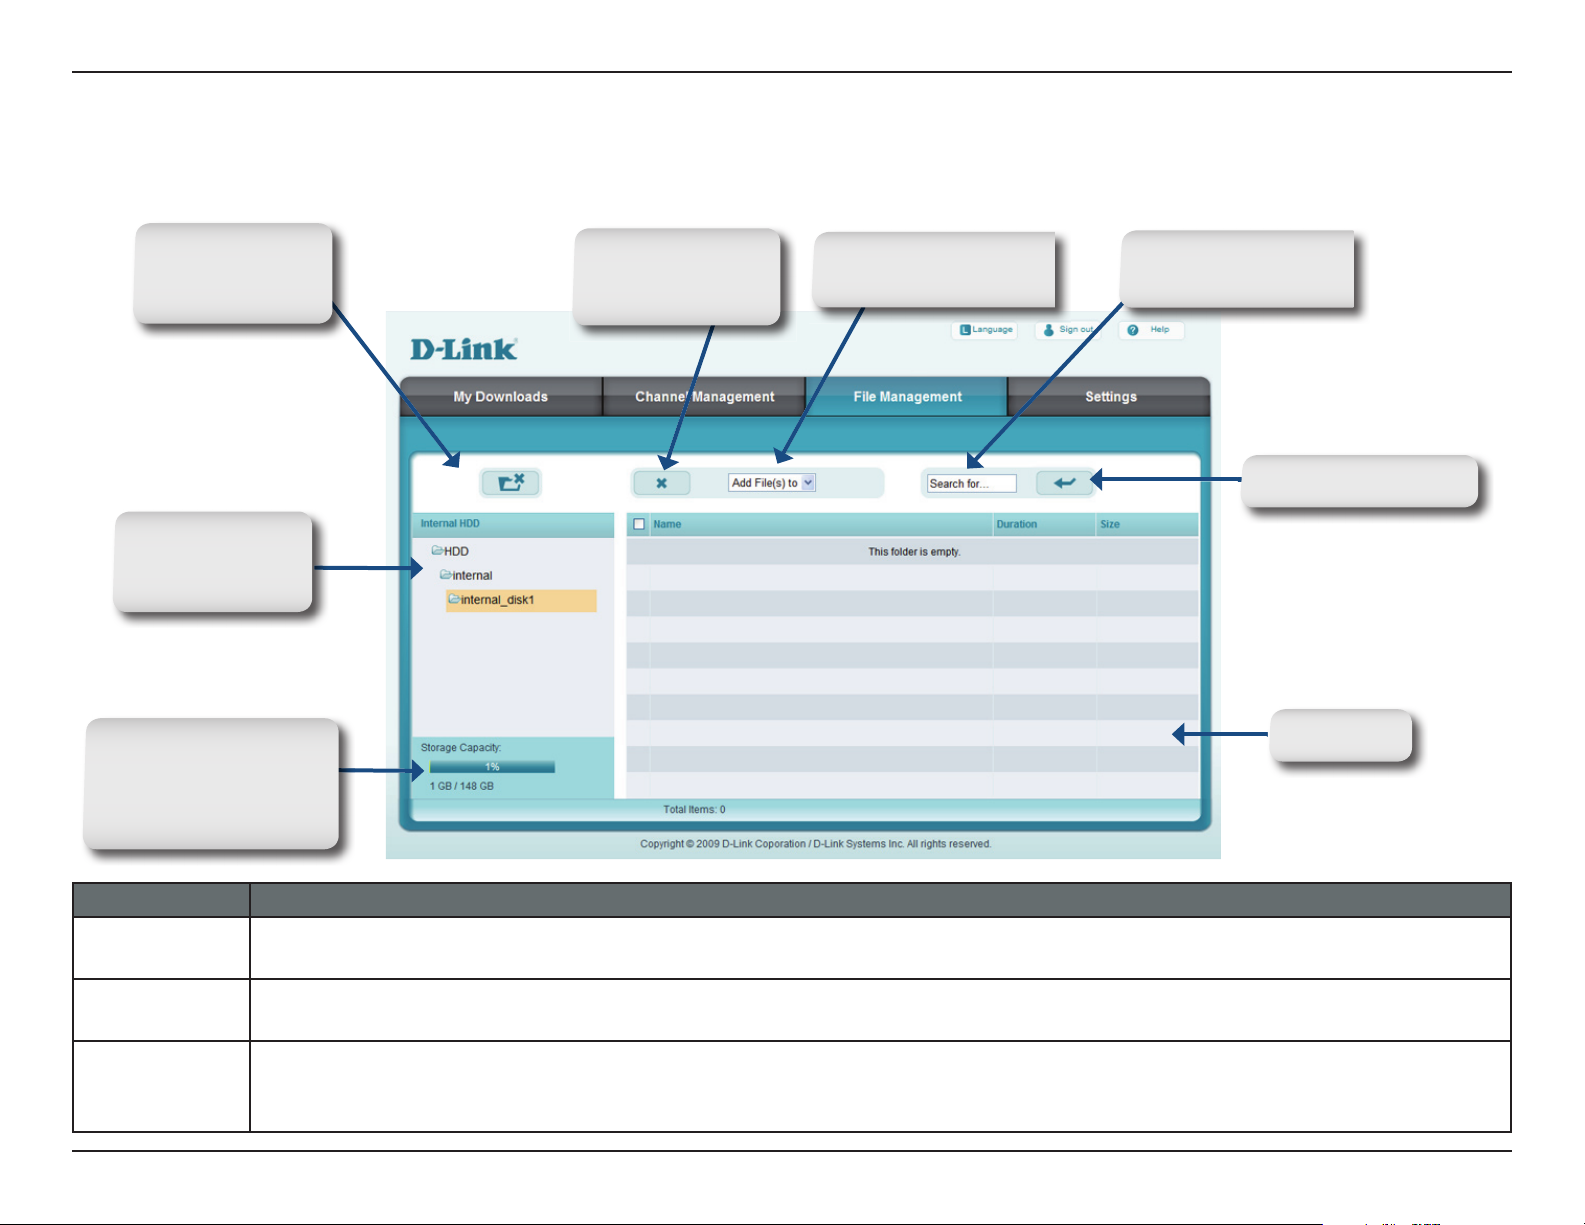
File Management
Use the File Management page to manage the les and folders stored on the DSM-350.
Delete Selected
Folders button
Internal Hard
Disk display.
Displays the storage
capacity of the
hard drive installed
in the DSM-350
Delete Selected
Files button
Add Files to Channel
drop-down menu
Search for File entry
eld
Clear Search button
File List
FUNCTION DESCRIPTION
Delete Selected
Folders button
Delete Selected
Files button
Add Files to
Channel dropdown menu
To delete a folder on the internal hard drive, click the folder that you want to delete in the Internal HDD section and click
the Delete Selected Folders button.
To delete a le , tick the checkbox next to the le that you want to delete from the File List section and click the Delete
Selected Files button.
To add a le to a channel, tick the checkbox next to the le you want to add in the File List and use the drop-down
menu to select the channel you want to add the le to.
47D-Link DSM-350 User Manual
Page 52
Section 4 - Managing Your MyChannel Media Player
FUNCTION DESCRIPTION
Search for File
entry eld
Clear Search
button
File List Displays a list of all the Files stored on the internal hard drive of the MyChannel Media Player.
Internal Hard
Disk display
To search for a specic program type the name or part of the le name of the program you want to nd in the channel.
The File List will be ltered as you type, showing only results that match your search.
Click this button to clear the Search for File entry eld to show all les.
Displays the storage capacity of the MyChannel Media Player’s internal hard drive and how much space has been
used.
48D-Link DSM-350 User Manual
Page 53
Section 4 - Managing Your MyChannel Media Player
Settings
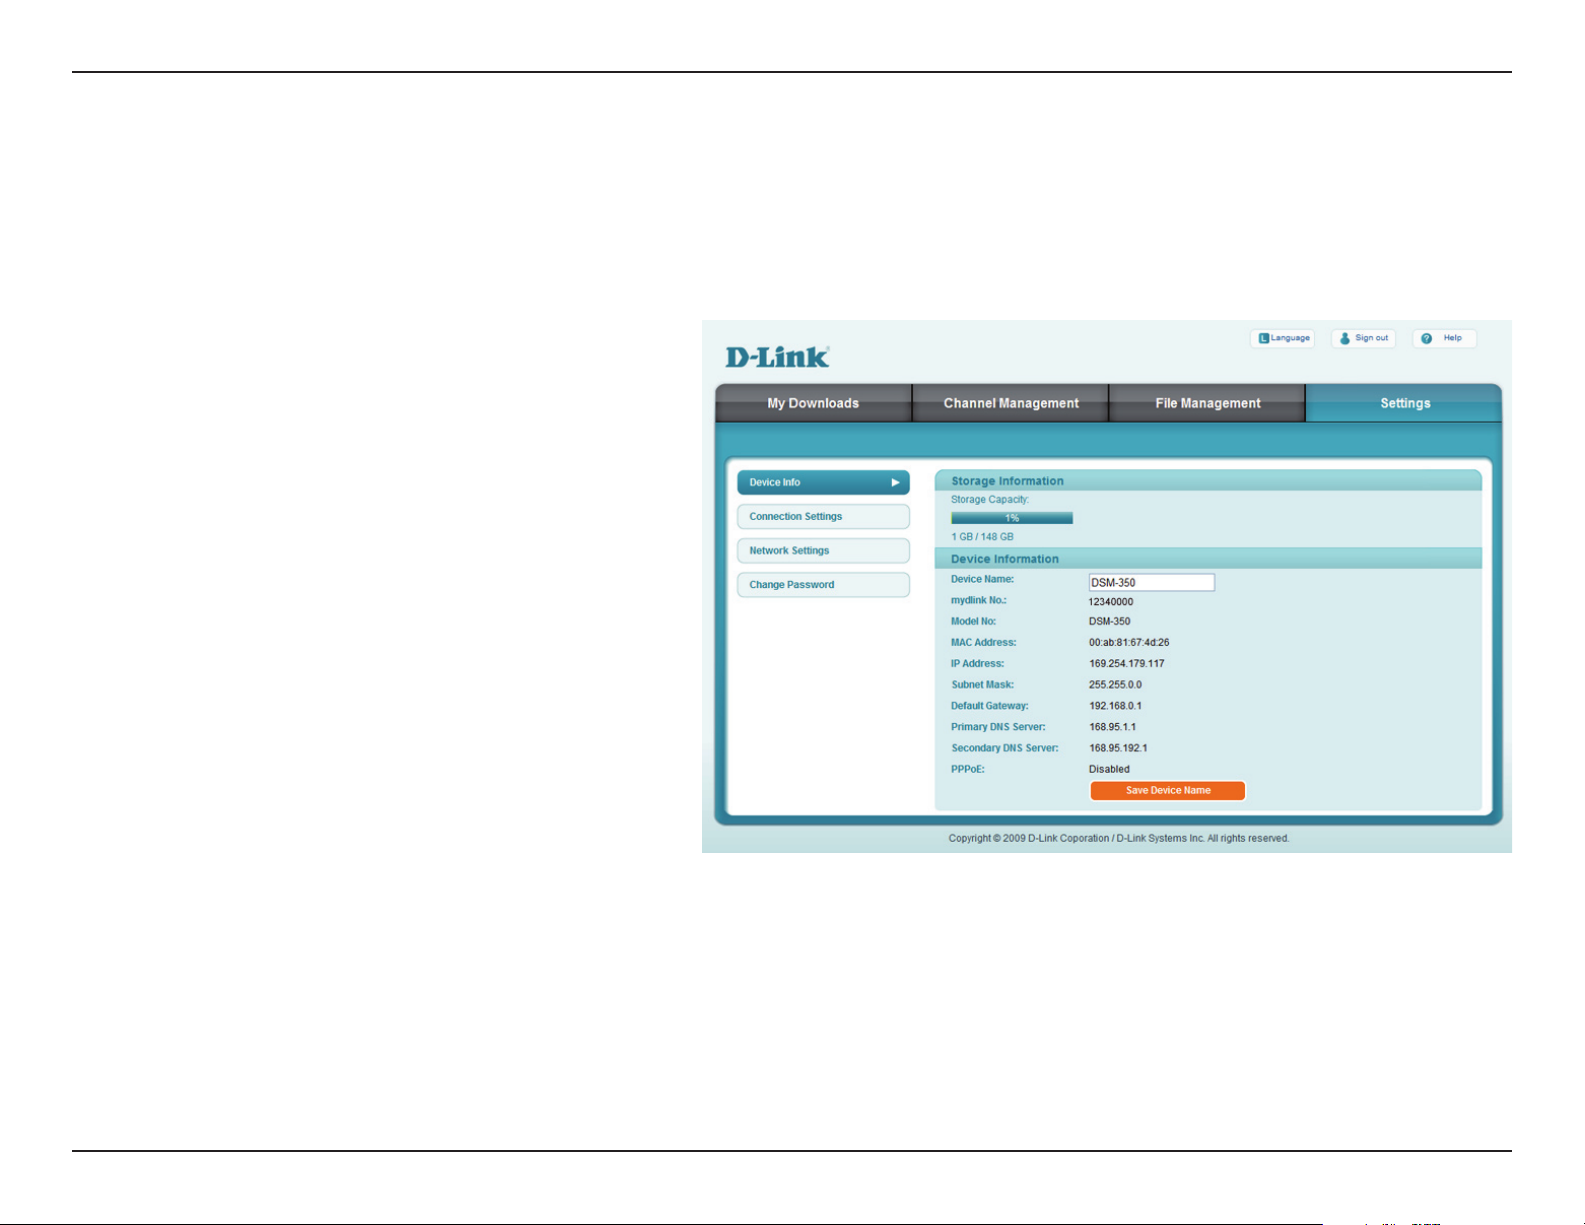
Device Info
The Device Info page displays information about the hard drive installed in the MyChannel Media Player, along with a
summary of the MyChannel Media Player’s network con guration.
Storage
Information
Device
Information
Displays the storage capacity of the
MyChannel Media Player’s internal
hard drive and how much space has
been used.
Displays the Device Name, mydlink
Number, Model Number, MAC Address,
IP address con guration, and PPPoE
status.
To change the Device Name, type
the name you want to identify the
MyChannel Media Player as in the
Device Name eld.
Click the Save Device Name button
when you have finished setting the
Device Name.
49D-Link DSM-350 User Manual
Page 54
Section 4 - Managing Your MyChannel Media Player
Settings
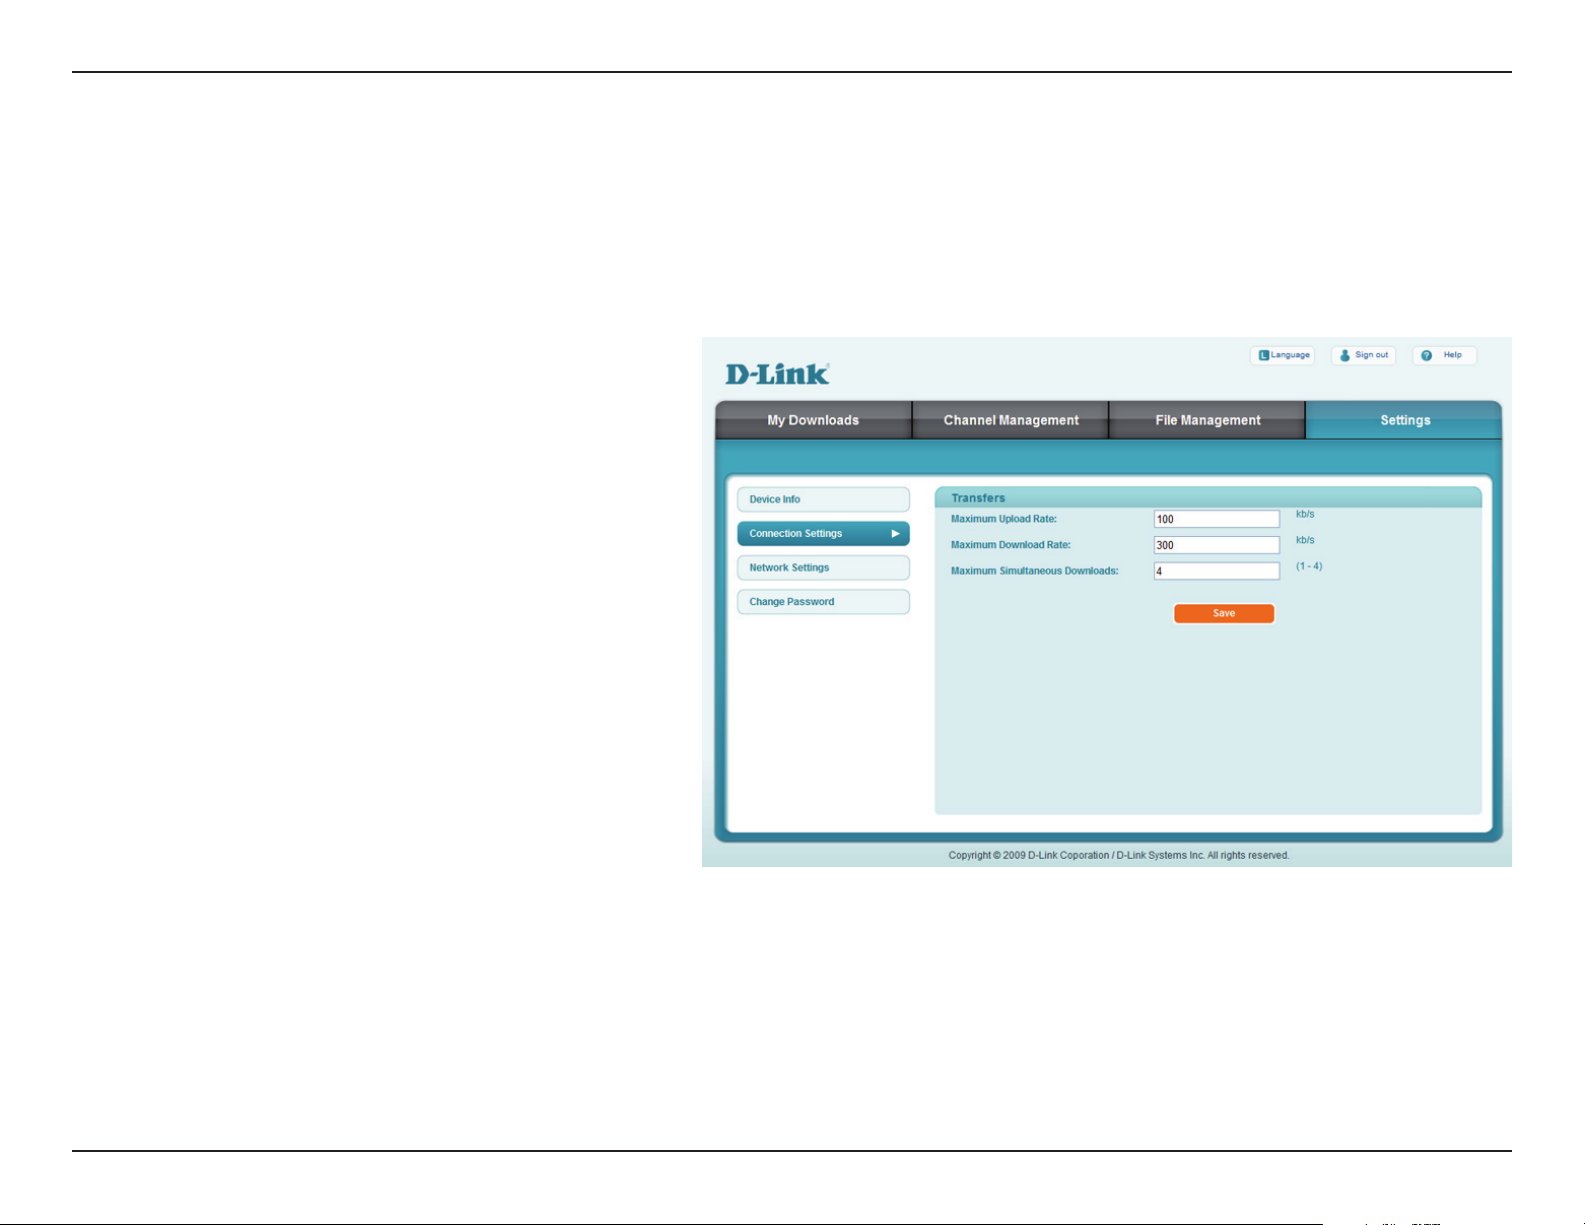
Connection Settings
Use the Connection Settings page to con gure the maximum upload and download rates for the MyChannel Media
Player. The Connection Settings page also allows you to specify to maximum number of simultaneous downloads.
Maximum
Upload Rate
Maximum
Download
Rate
Maximum
Simultaneous
Downloads
Enter the maximum upload rate for the
MyChannel Media Player in kb/s.
Enter the maximum download rate for
the MyChannel Media Player in kb/s.
Use this eld to specify the maximum
number of simultaneous downloads.
You can set this from 1 to 4.
50D-Link DSM-350 User Manual
Page 55
Section 4 - Managing Your MyChannel Media Player
Settings
Network Settings
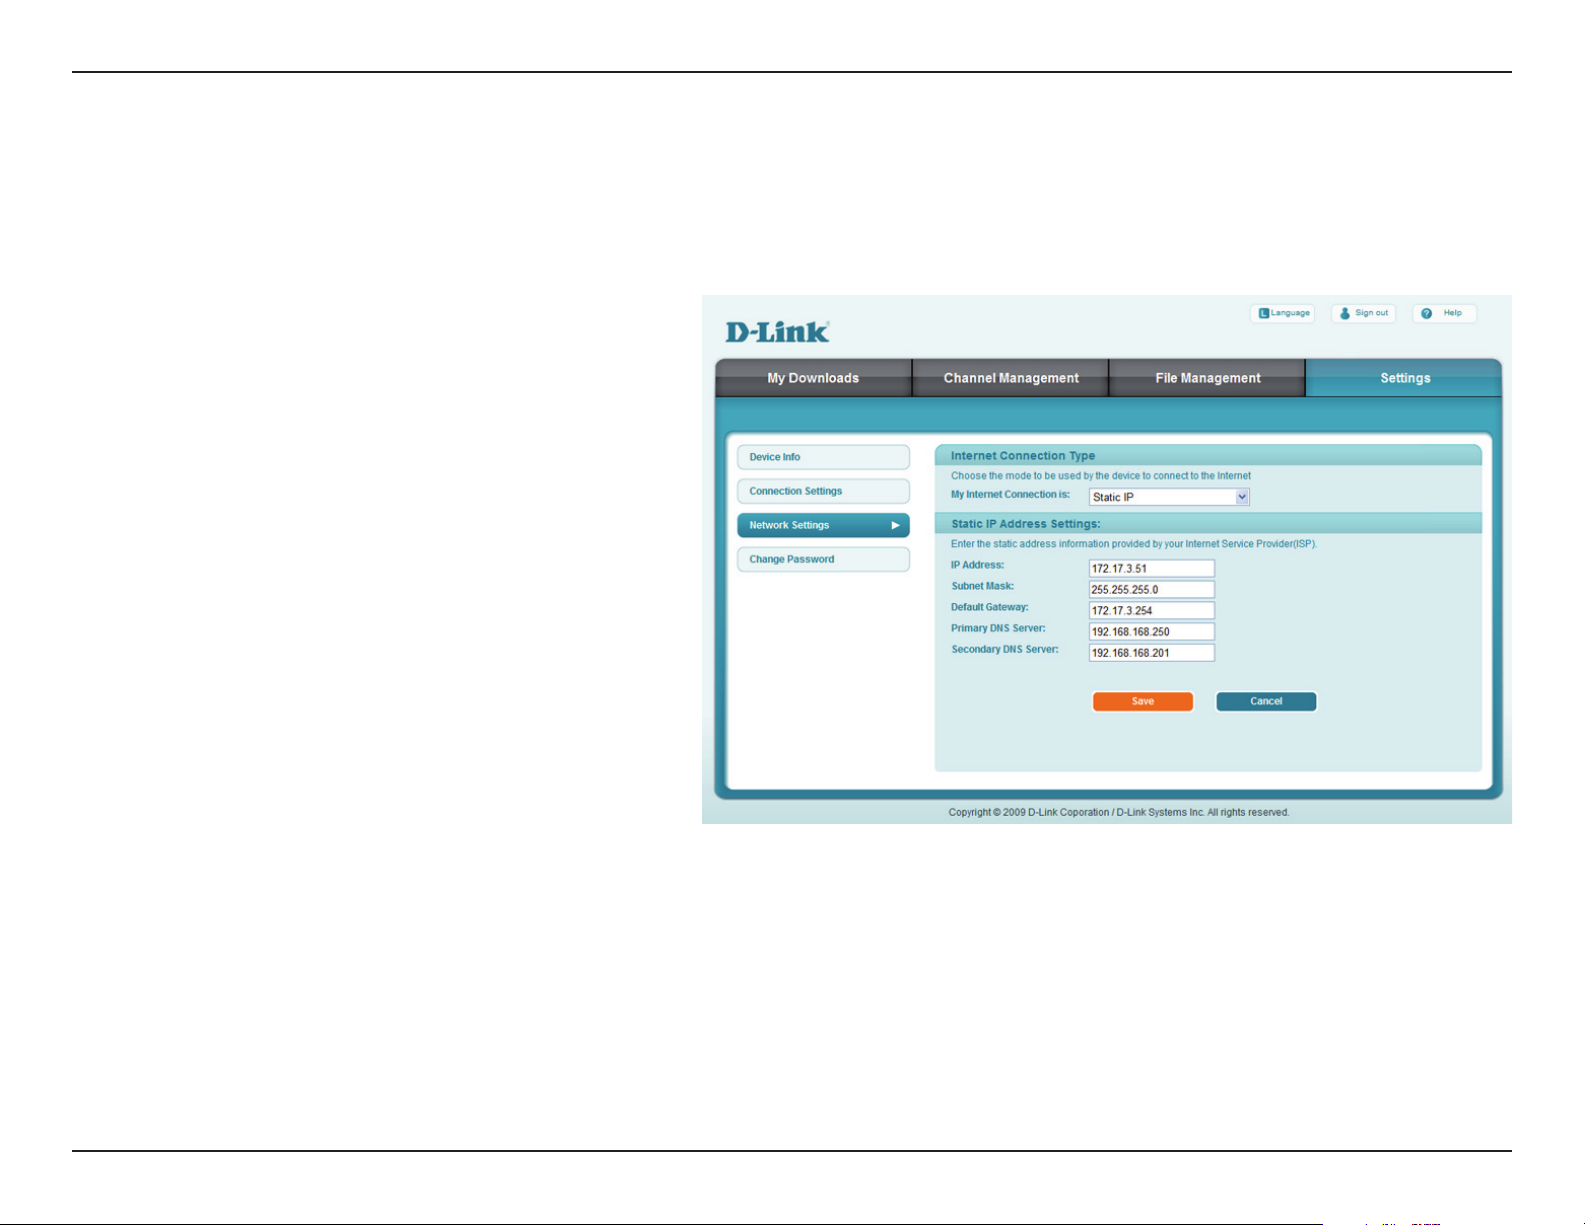
Use the Network Settings page to con gure the Internet Connection settings of your DSM-350.
Internet
Connection
Type:
Use the drop-down menu to choose the
Internet Connection method you use to
connect to your ISP.
The available options are:
Dynamic IP (DHCP): Choose this
option if you use a Dynamic IP address
to connect to your ISP. This is the most
commonly used connection method,
particularly if the DSM-350 is connected
to a router.
PPPoE (Username/Password): Select
this if you use a PPPoE connection
to connect to your ISP. Type in your
PPPoE Username and Password in
their respective elds.
Static IP: If you connect to your ISP
with a Static IP address, type the
IP Address, Subnet Mask, Default
Gateway, Primary DNS Server, and
Secondary DNS Server information in
their respective elds.
Click the Save button when you have nished making any changes.
51D-Link DSM-350 User Manual
Page 56
Section 4 - Managing Your MyChannel Media Player
Settings
Change Password
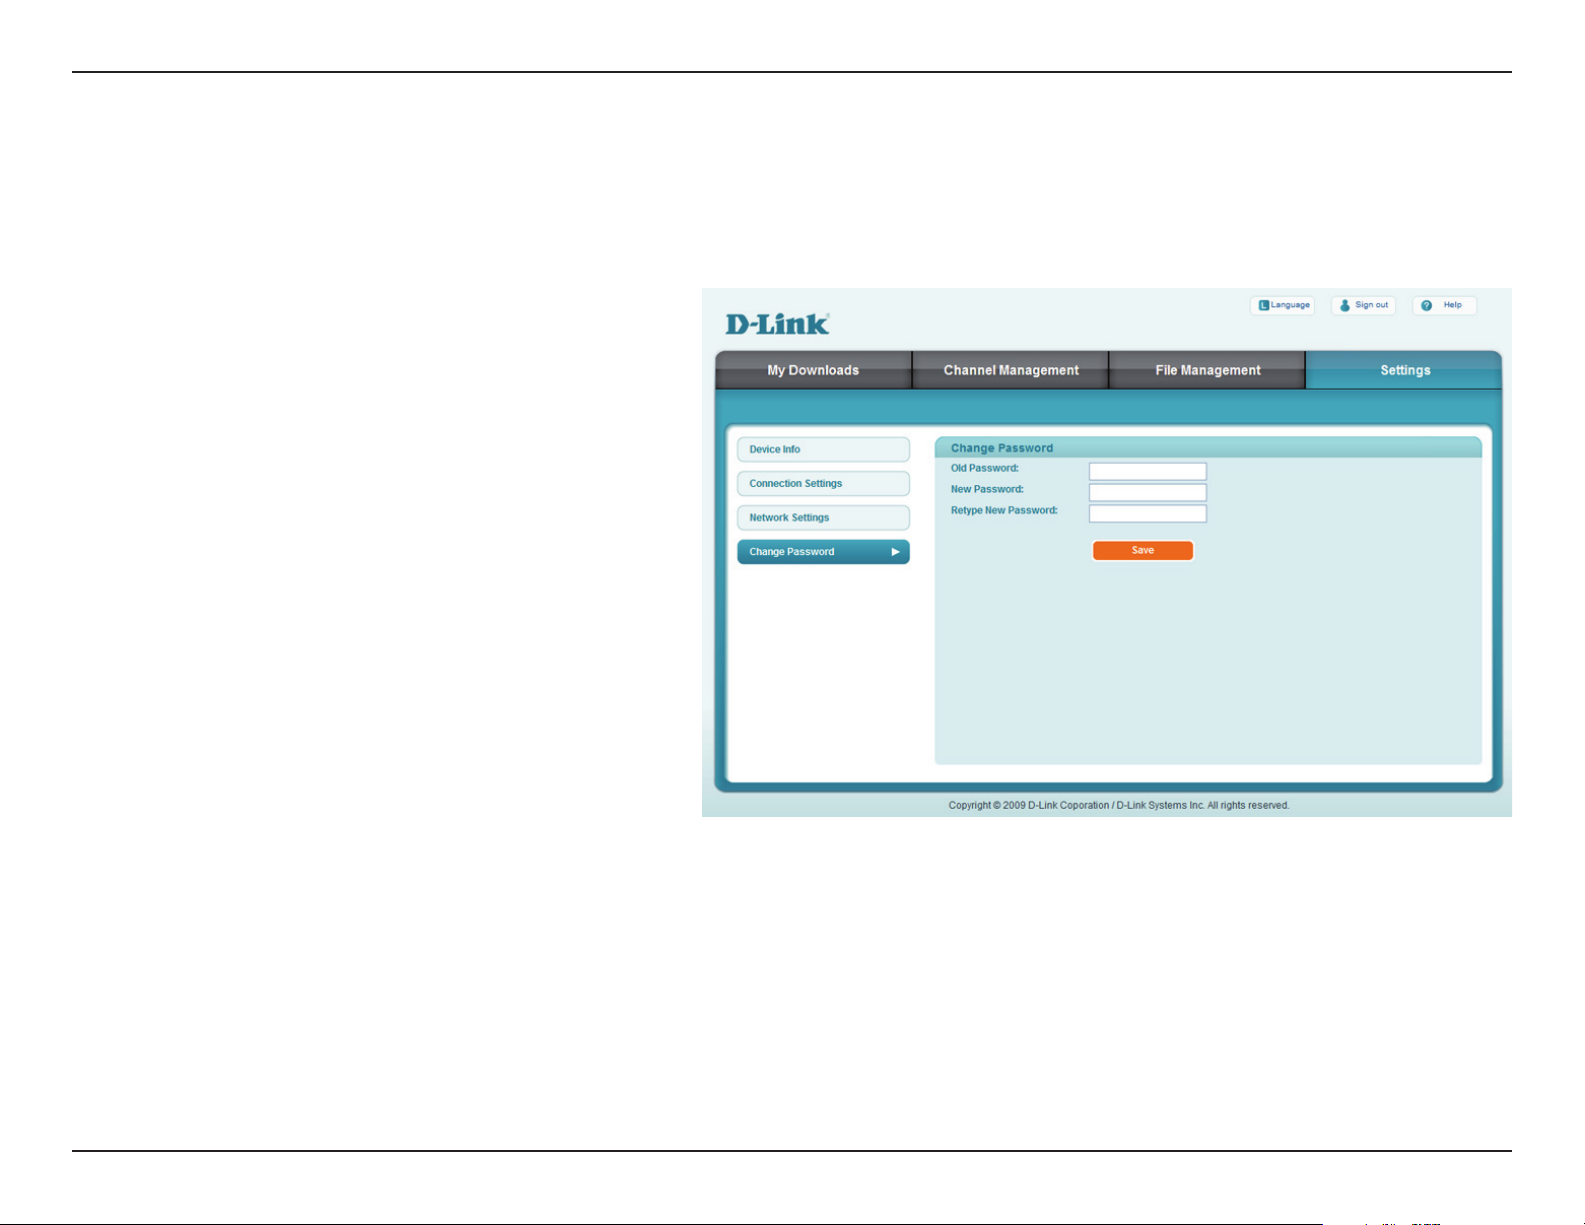
The Change Password page allows you to change the password for the admin account. It is recommended to set an
admin account password when rst con guring the DSM-350.
Old Password
New Password
Confi rm New
Password
Enter the current password for the
Admin account.
Enter a new password for the Admin
account.
Enter the new password for the Admin
account again for con rmation.
Click the Save button when you have nished making any changes.
52D-Link DSM-350 User Manual
Page 57

Section 5 - Troubleshooting
Troubleshooting
1. Why can’t I see any video after connecting the DSM-350 to my TV?
Check to make sure that all cables are connected securely. y
Make sure that the Power LED on the front of the DSM-350 is lit blue. y
Make su re that your TV is set to di splay from th e same input source that yo u connecte d the y
DSM-350 to.
2. Why can’t I hear any audio after connecting the DSM-350 to my stereo?
Check to make sure that all cables are connected securely. y
Make sure that the Power LED on the front of the DSM-350 is lit blue. y
Make sure that your stereo is set to use the same audio inputs that you connected the DSM-350 to. y
3. How do I reset my DSM-350 to factory default settings?
Ensure the DSM-350 is powered on. y
In the on-screen interface, use the remote control to go to Settings > System > Factory Reset. y
Note: Resetting the device to factory default will erase the current conguration settings. To re-congure your
settings, run the Setup Wizard from the Installation CD.
4. How do I add download tasks to my DSM-350?
After nishing the Setup Wizard on the included CD, log in to your mydlink account and go to your DSM-350’s y
settings pages. You can also go to http://dlink-xxxxxx, where xxxxxx is the last 6 digits of your DSM-350’s MAC
address, which you can nd on the bottom of the device.
You can also add .torrent les to the root directory of a USB storage drive (do not put the .torrent les in a folder), y
then use the remote control to go to Downloads > Load from USB.
53D-Link DSM-350 User Manual
Page 58

Appendix A - Technical Specifications
Appendix A: Technical Specifications
Network
• Wired LAN: 10/100BASE-TX Ethernet
• TCP/IP (DHCP / PPPoE / Static IP)
Media Streaming Protocol
• HTTP
Supported Audio Formats:
• MP3 • WAV/PCM/LPCM
• OGG Vorbis • FLAC
• WMA • PLS/M3U/WPS Playlist Support
Supported Video Formats:
• MPEG-1/2/4 • WMV9
• RM/RMVB • MOV (H.264/MPEG-4)
• FLV • AVI (MPEG-4/MJPEG/XVID)
• H.264 • MKV
• SRT Subtitle Support
Supported Image Formats:
• JPEG • BMP
• PNG • GIF
• TIFF
Hard Drive
• 2.5” hard drive bay
• SATA interface
Power Adaptor
• Input: 100-240VAC, 50/60Hz
• Output: 12VDC/2A
Dimensions
• 263mm x 169mm x 38mm
Weight
• 950 g (without a hard drive installed)
Operating Temperature
• 0˚ to 40˚C (32˚ to 104˚F)
Storage Temperature
• -15˚ to 60˚C (5˚ to 140˚F)
Operating Humidity
• 20-80% RH non-condensing
Storage Humidity
• 0-90% RH non-condensing
Certications
• FCC • RoHS
• CE • WEEE
• C-Tick
• BSMI
Outputs
• HDMI (High-Denition Multimedia Interface)
• S/PDIF digital optical port
• Composite (Video Out) and Audio L/R Output
54D-Link DSM-350 User Manual
 Loading...