

Page 1

QUICK
INSTALLATION
GUIDE
INTERNET MEDIA STREAMING PLAYER
DSM-331
GUÍA DE INSTALACIÓN RÁPIDA
GUIA DE INSTALAÇÃO RÁPIDA
Page 2
DSM-331
2
ENGLISH
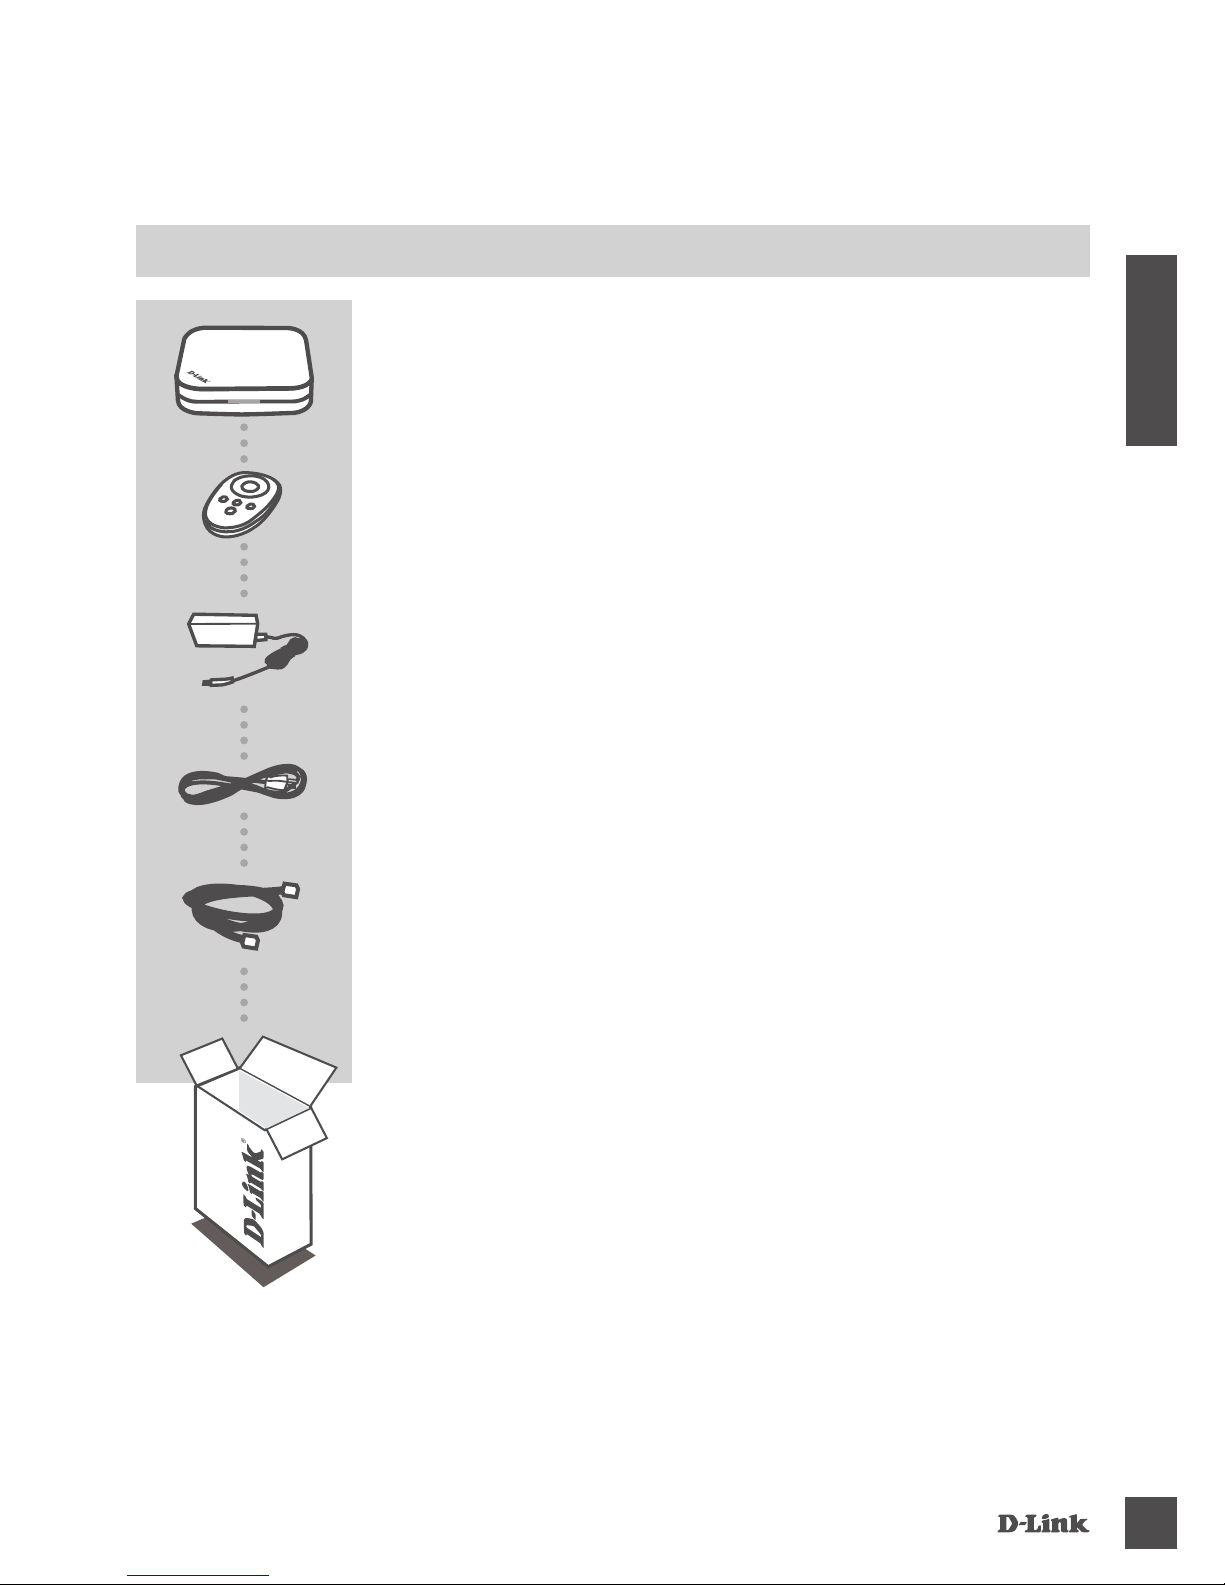
CONTENTS OF
PACKAGING
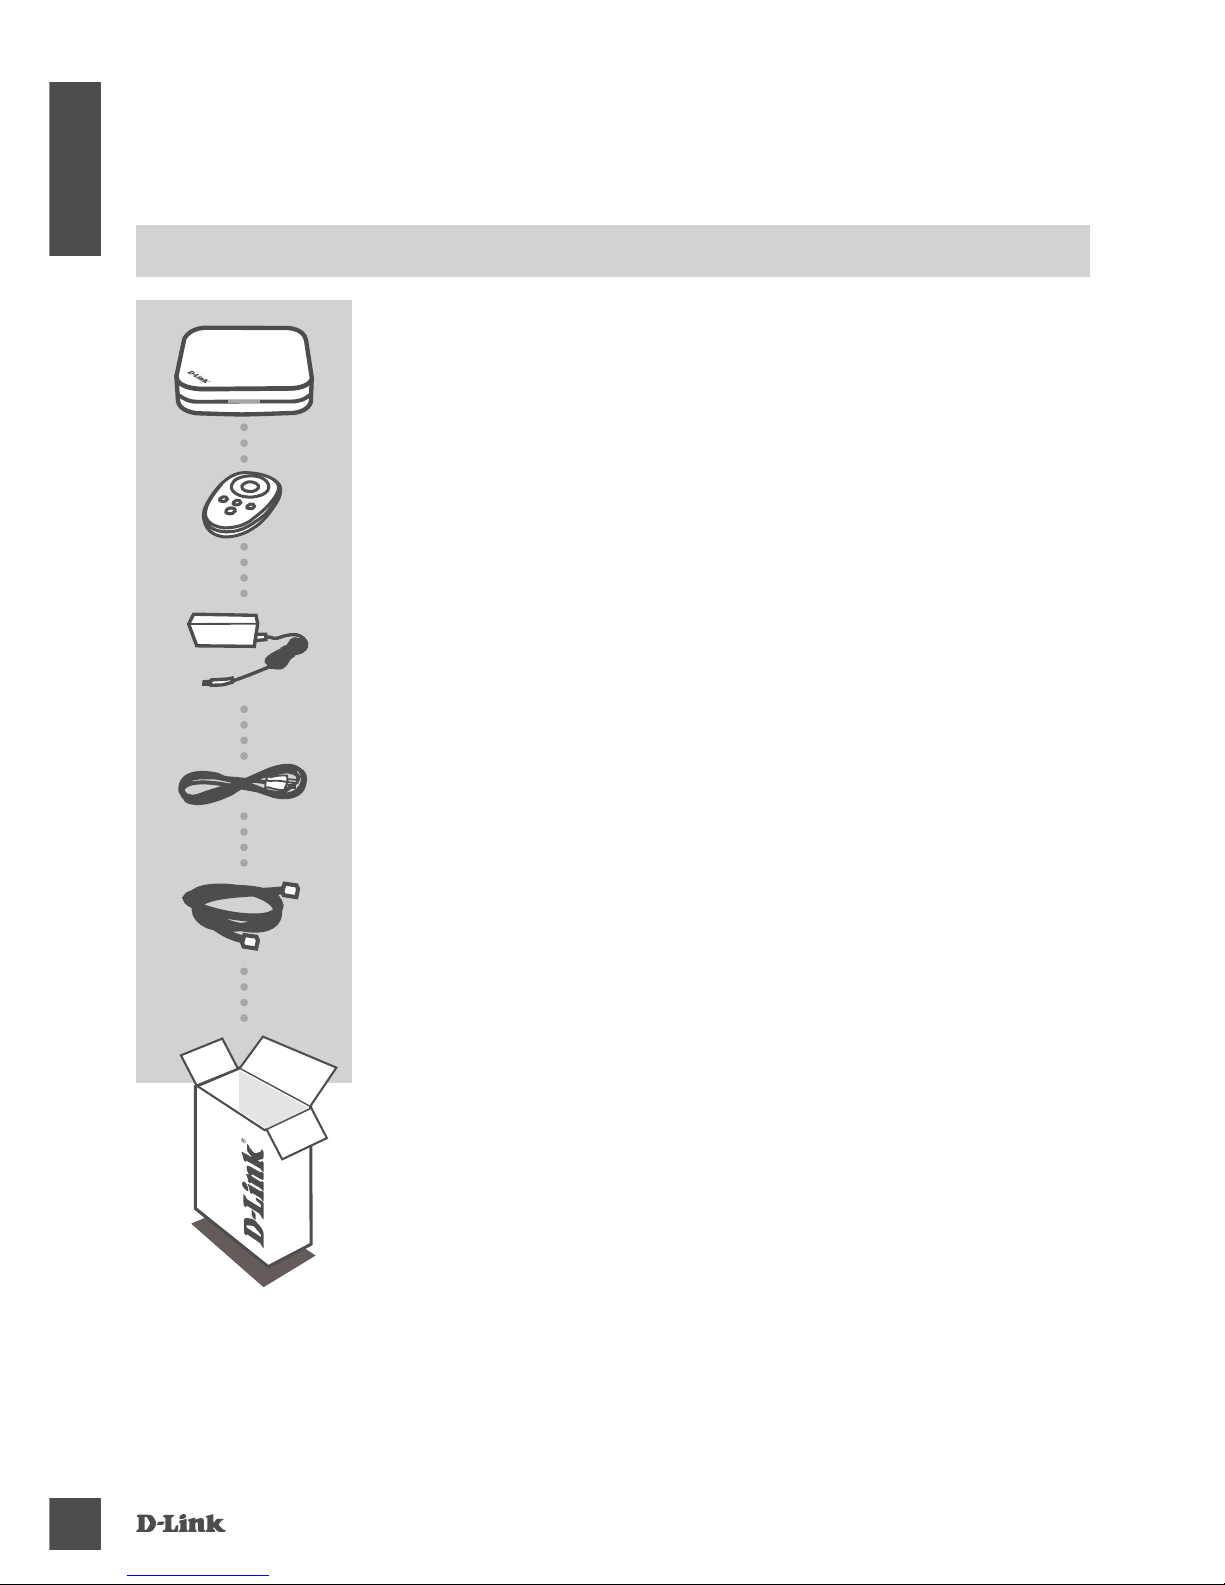
CONTENTS
INTERNET MEDIA STREAMING PLAYER
DSM-331
POWER ADAPTER
12 V / 1A DC
ETHERNET CABLE
CONNECTS THE DEVICE TO YOUR NETWORK
If any of these items are missing from your packaging, please
contact your reseller.
COMPOSITE A/V CABLE
CONNECTS TO A STANDARD TV
REMOTE CONTROL
BATTERIES INCLUDED
Page 3
DSM-331
3
ENGLISH
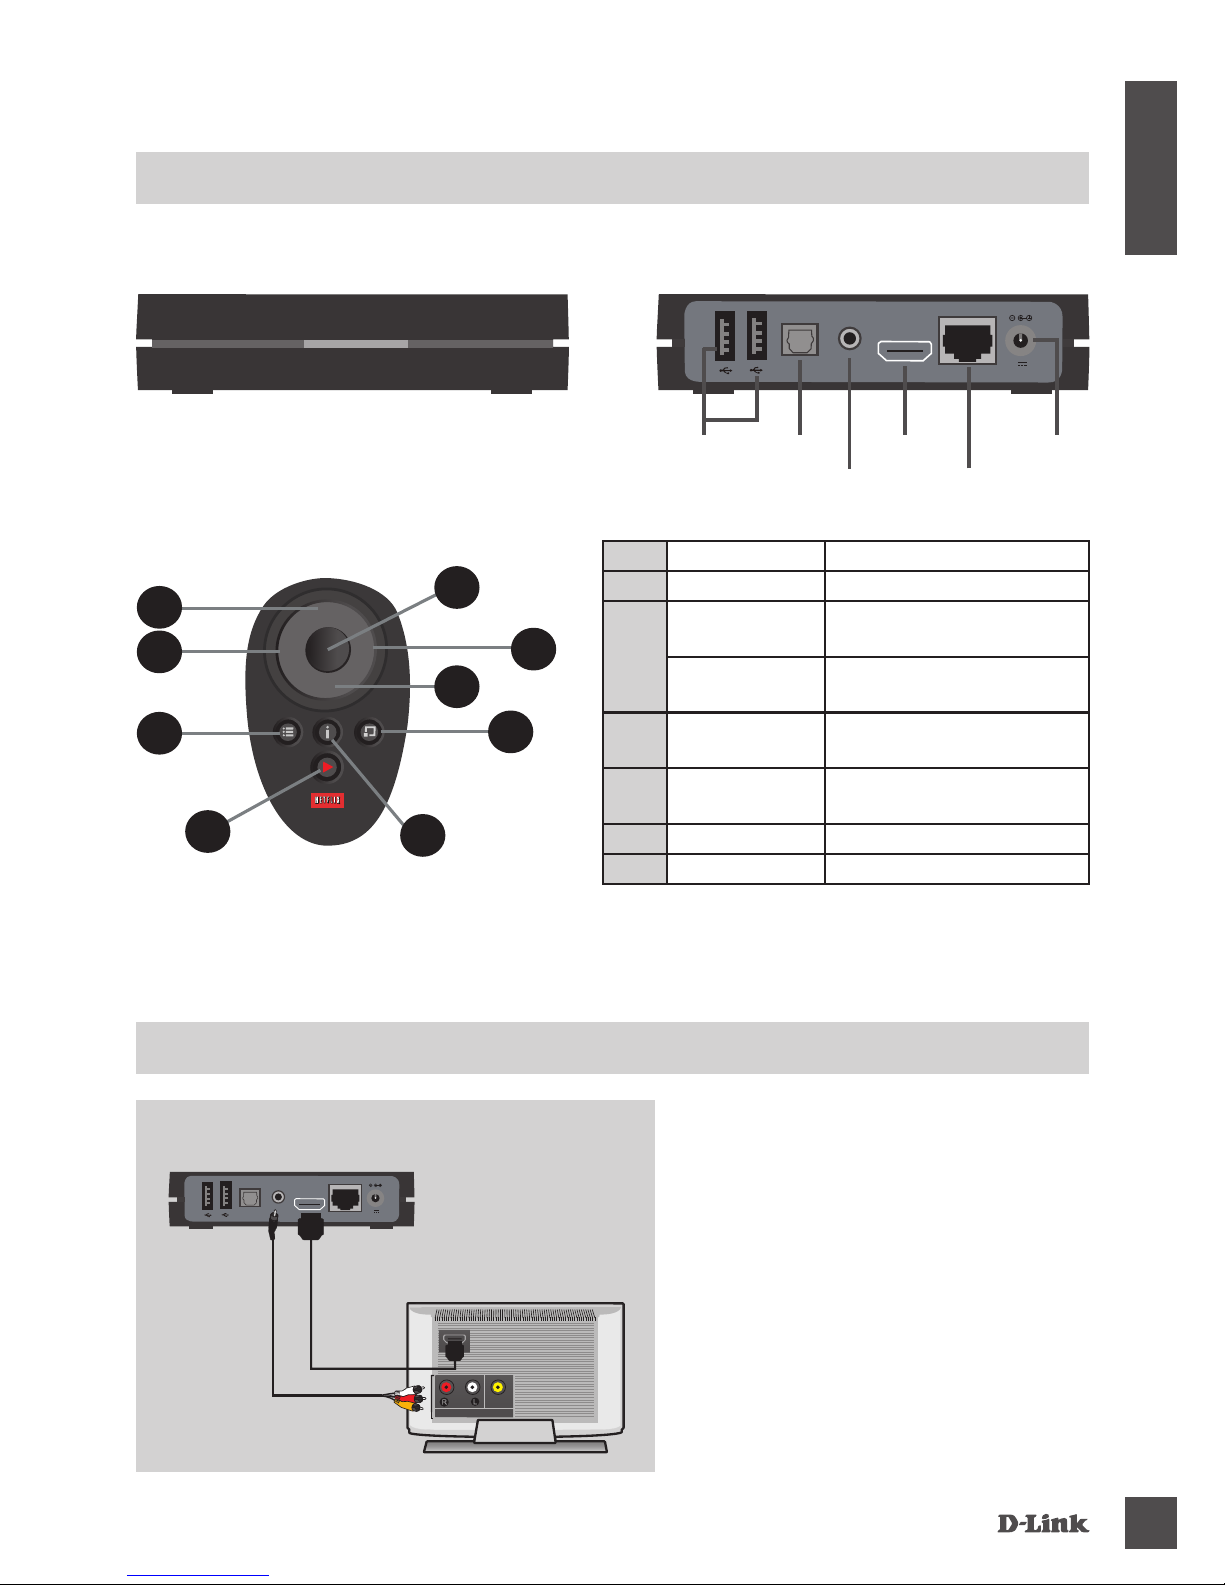
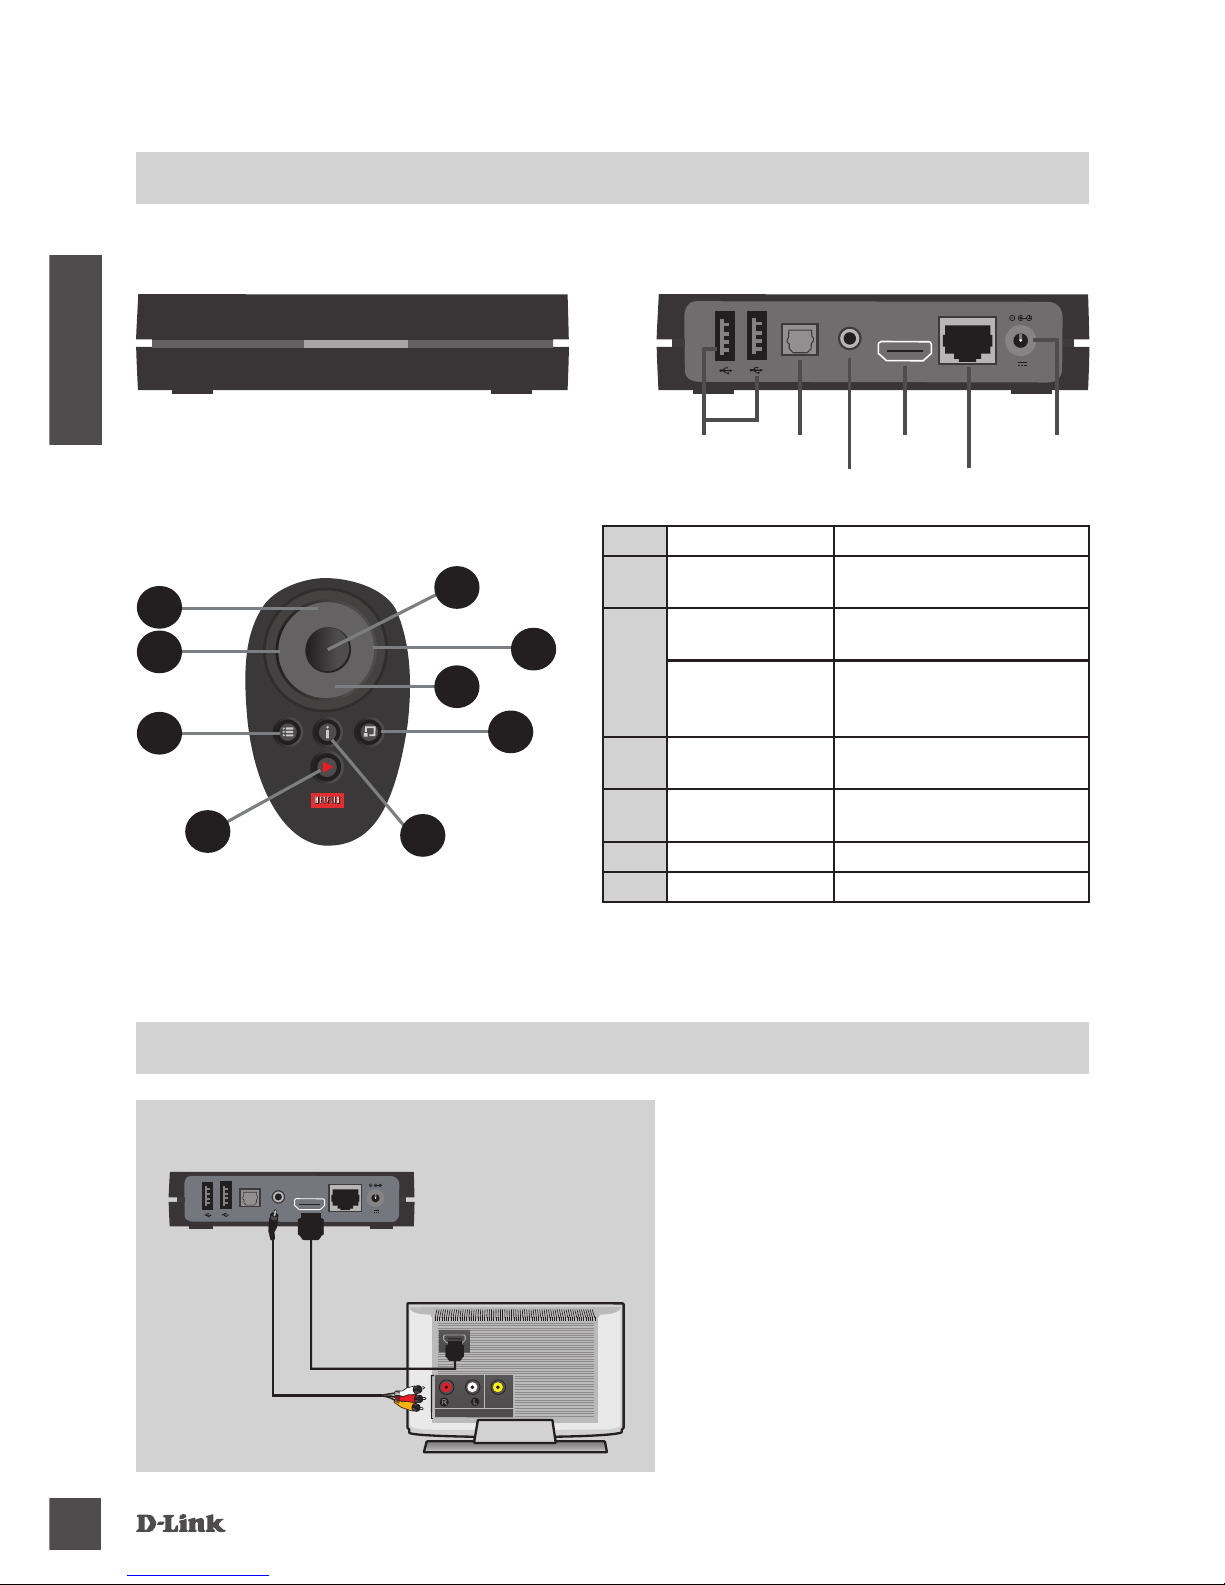
HARDWARE OVERIEW
FRONT AND BACK PANEL
12V 1A
USB PORT OPTICAL
LAN
POWERHDMI
AV
FRONT
BACK
>
>
>
>
1
2
4
2
3
1
6
7
5
12V 1A
PRODUCT SETUP
INSTALLATION STEPS
CONNECT TO THE TV
Using the A /V or an HDMI cable
TV
video
_
audio
_
AV-IN
STEP 1:
TV
DSM-331
OR
1 UP or Down Move up or down
2 Left or Right Move left or right
3
OK
Select an option from a
menu
Power
Turn on/off the device with
long press the OK key
4 Menu
Return to home menu or
back to previous screen
5 Info
Display the detail
information
6 Option Display more options
7 Netix Netix hot key
Page 4
DSM-331
4
ENGLISH
12V 1A
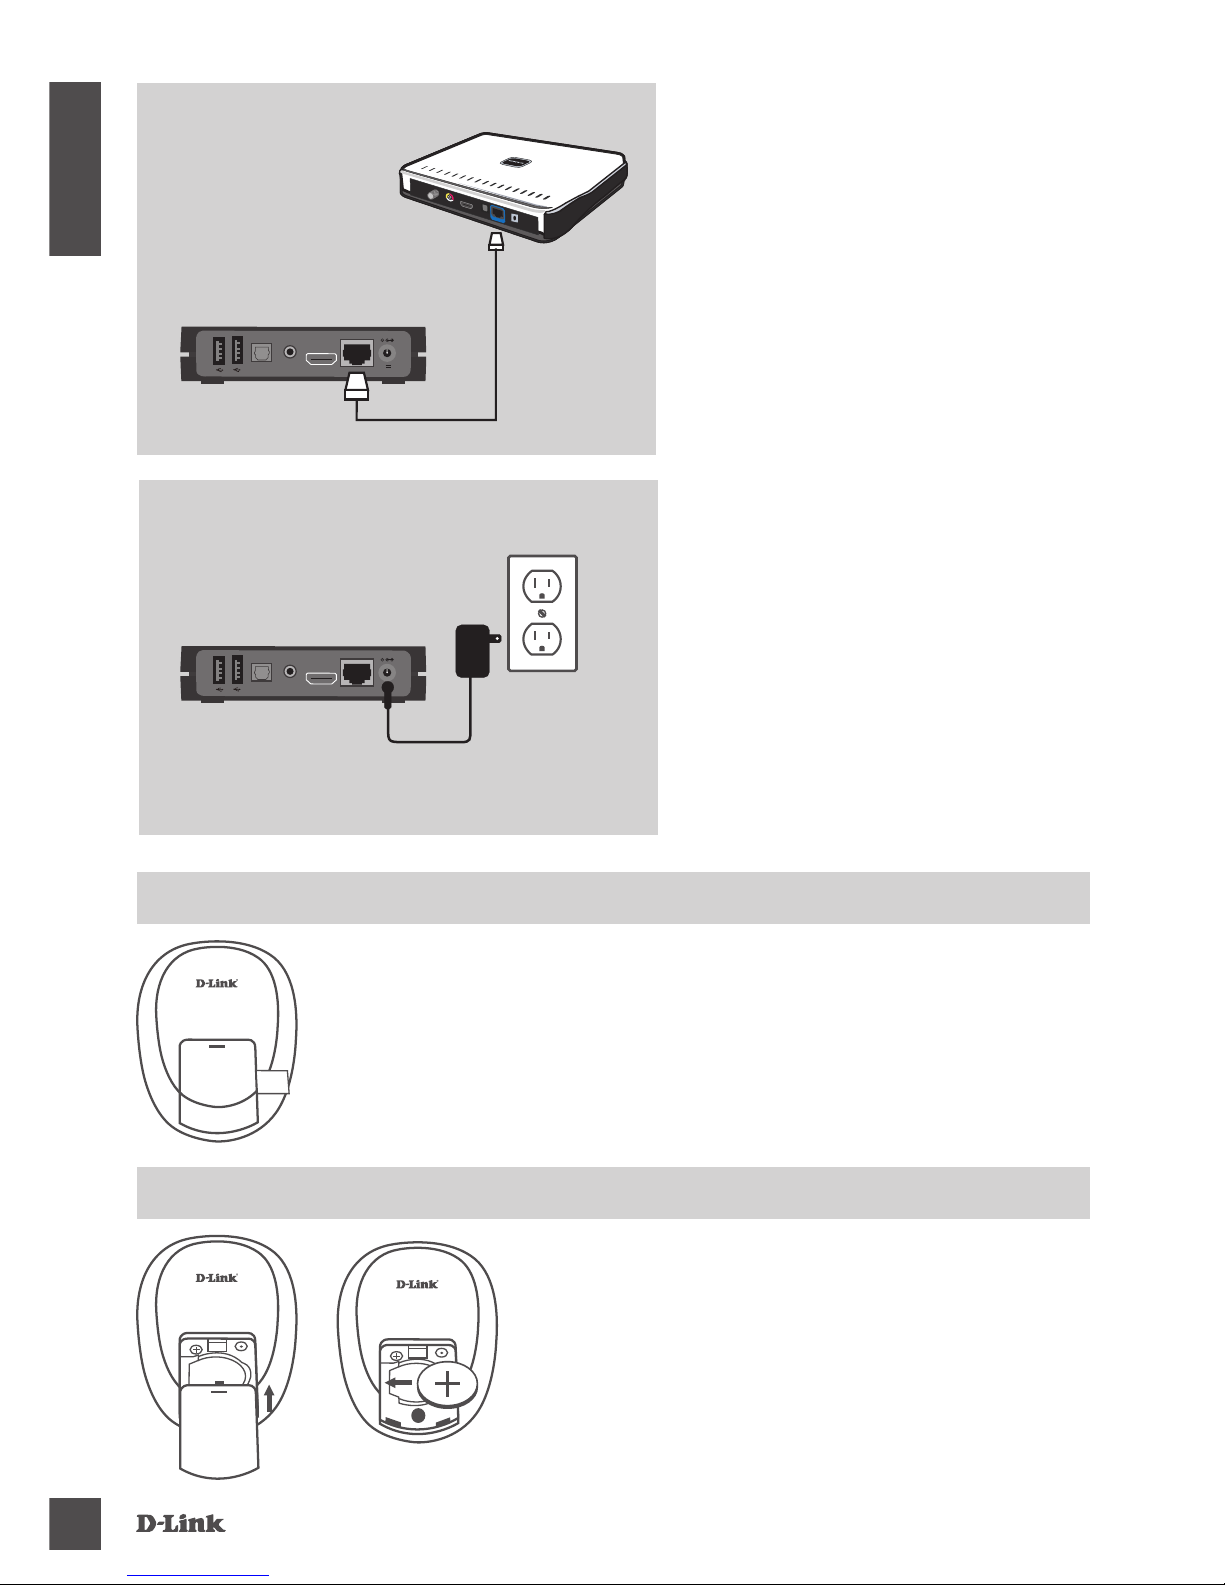
REMOTE BATTERY ACTIVATION
REPLACING REMOTE BATTERY
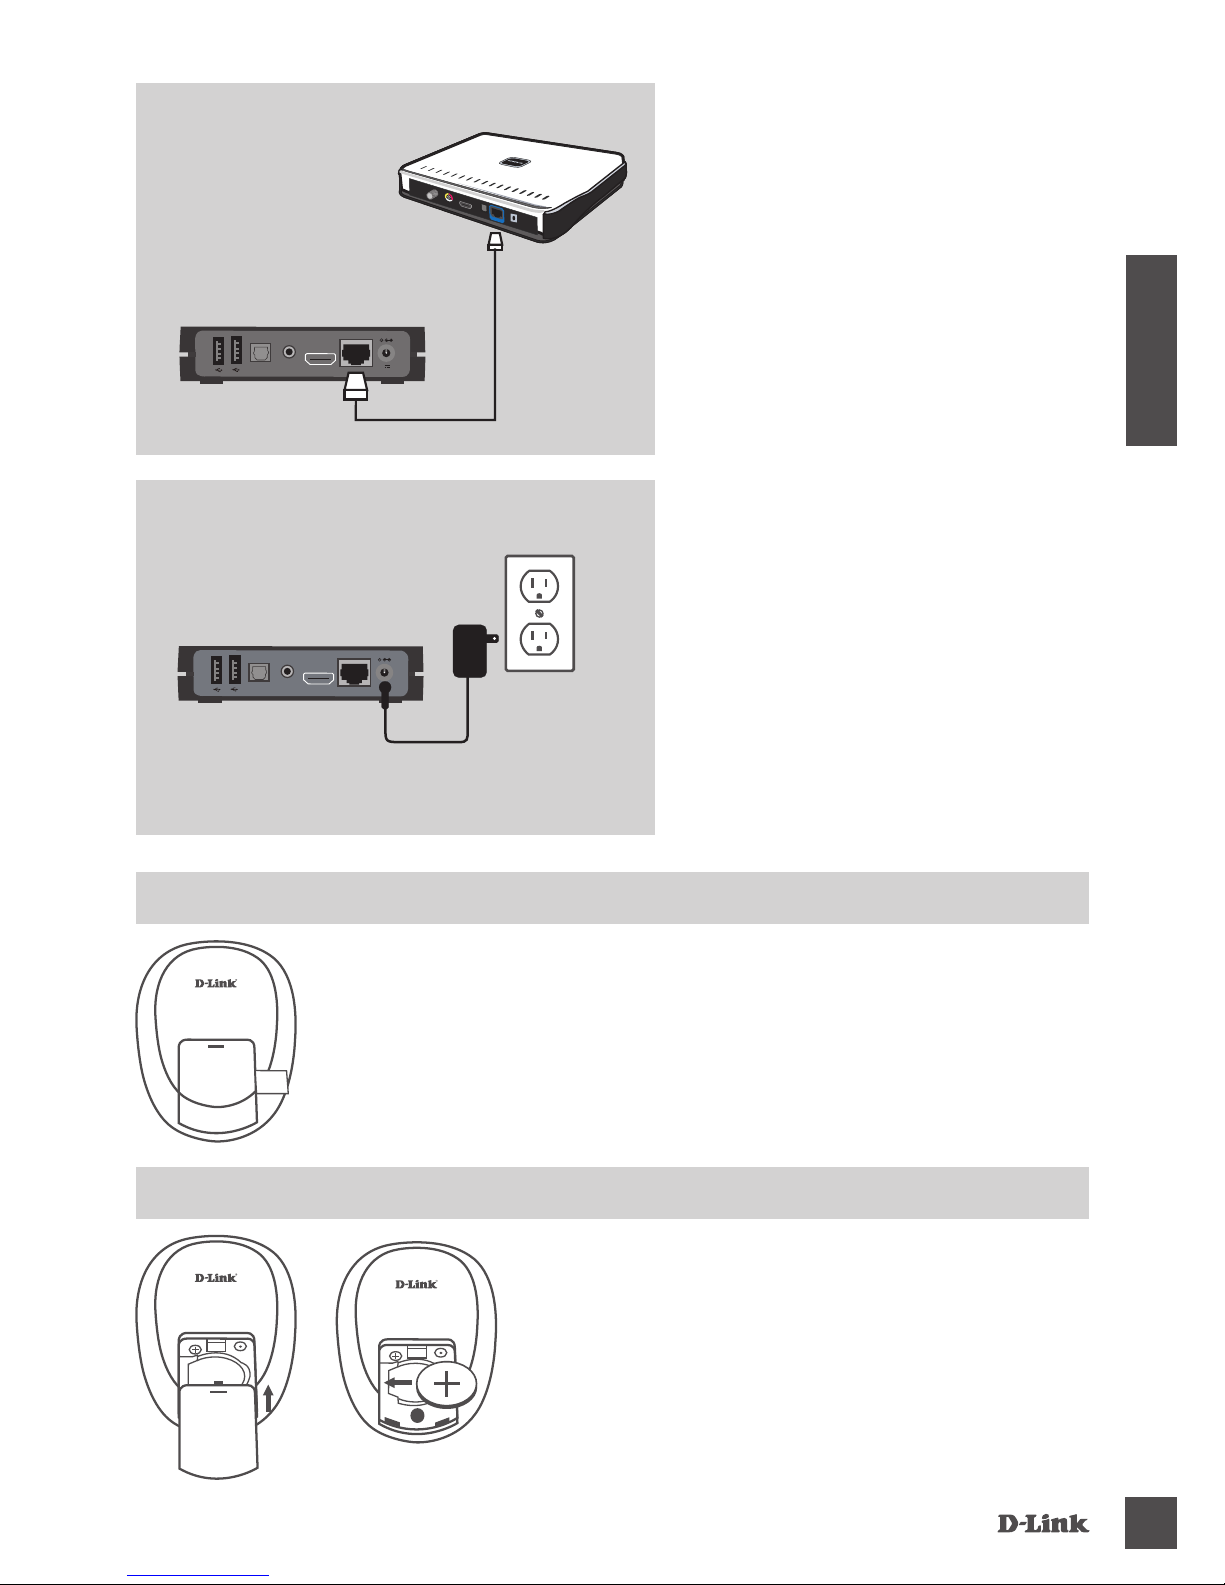
CONNECT THE ROUTER
Using the Ethernet cable
CONNECT THE POWER
Caution: Connect the power only after
connecting the A/V or HDMI cable (not
included) and the Ethernet cable.
Pull out the plastic tab from the remote
- Turn the remote control over and locate the sliding battery
panel on the rear of the unit
- Press the top at the battery panel down and simultaneously
remove the battery panel
- Insert the battery (Coin Cell CR2025) with the + side facing
up in the slot
- Place the battery panel back over the compartment and
slide it up gently until the panel snaps securely into place
STEP 3:
DSM-331
Power
STEP 2:
DSM-331
Router
AV
H
D
M
I
S
/
P
D
I
F
L
A
N
5
V
3
A
AV
H
D
M
I
S
/
P
D
I
F
L
A
N
5
V
3
A
12V 1A
12V 1A
Page 5

DSM-331
5
ENGLISH
TECHNICAL SUPPORT
Australia:
Tel: 1300-766-868
24/7 Technical Support
Web: http://www.dlink.com.au
E-mail: [email protected]
India:
Tel: +91-22-27626600
Toll Free 1800-22-8998
Web: www.dlink.co.in
E-Mail: [email protected]
Singapore, Thailand, Indonesia,
Malaysia, Philippines, Vietnam:
Singapore - www.dlink.com.sg
Thailand - www.dlink.co.th
Indonesia - www.dlink.co.id
Malaysia - www.dlink.com.my
Philippines - www.dlink.com.ph
Vietnam - www.dlink.com.vn
Korea:
Tel : +82-2-2028-1810
Monday to Friday 9:00am to 6:00pm
Web : http://d-link.co.kr
E-mail : [email protected]
New Zealand:
Tel: 0800-900-900
24/7 Technical Support
Web: http://www.dlink.co.nz
E-mail: [email protected]
South Africa and Sub Sahara
Region:
Tel: +27 12 661 2025
08600 DLINK (for South Africa only)
Monday to Friday 8:30am to 9:00pm South
Africa Time
Web: http://www.d-link.co.za
E-mail: [email protected]
Saudi Arabia (KSA):
Tel: +966 01 217 0008
Fax: +966 01 217 0009
Saturday to Wednesday 9.30AM to 6.30PM
Thursdays 9.30AM to 2.00 PM
E-mail: [email protected]
D-Link Middle East - Dubai, U.A.E.
Plot No. S31102,
Jebel Ali Free Zone South,
P.O.Box 18224, Dubai, U.A.E.
Tel: +971-4-8809022
Fax: +971-4-8809066 / 8809069
Technical Support: +971-4-8809033
General Inquiries: [email protected]
Tech Support: [email protected]
Egypt
1, Makram Ebeid Street - City Lights Building
Nasrcity - Cairo, Egypt
Floor 6, ofce C2
Tel.: +2 02 26718375 - +2 02 26717280
Technical Support: +2 02 26738470
General Inquiries: [email protected]
Tech Support: [email protected]
Kingdom of Saudi Arabia
Ofce # 84 ,
Al Khaleej Building ( Mujamathu Al-Khaleej)
Opp. King Fahd Road, Olaya
Riyadh - Saudi Arabia
Tel: +966 1 217 0008
Technical Support:
+966 1 2170009 / +966 2 6522951
General Inquiries: [email protected]
Tech Support: [email protected]
Pakistan
Islamabad Ofce:
61-A, Jinnah Avenue, Blue Area,
Suite # 11, EBC, Saudi Pak Tower,
Islamabad - Pakistan
Tel.: +92-51-2800397, 2800398
Fax: +92-51-2800399
Karachi Ofce:
D-147/1, KDA Scheme # 1,
Opposite Mudassir Park, Karsaz Road,
Karachi – Pakistan
Phone: +92-21-34548158, 34326649
Fax: +92-21-4375727
Technical Support: +92-21-34548310, 34305069
General Inquiries: [email protected]
Tech Support: [email protected]
You can nd software updates and user documentation on the D-Link website.
Tech Support for customers in
Page 6
DSM-331
6
ENGLISH
TECHNICAL SUPPORT
Iran
Unit 5, 5th Floor, No. 20, 17th Alley , Bokharest
St. , Argentine Sq. ,
Tehran IRAN
Postal Code : 1513833817
Tel: +98-21-88880918,19
+98-21-88706653,54
General Inquiries: [email protected]
Tech Support: [email protected]
Morocco
M.I.T.C
Route de Nouaceur angle RS et CT 1029
Bureau N° 312 ET 337
Casablanca , Maroc
Phone : +212 663 72 73 24
Email: [email protected]
Lebanon RMA center
Dbayeh/Lebanon
PO Box:901589
Tel: +961 4 54 49 71 Ext:14
Fax: +961 4 54 49 71 Ext:12
Email: [email protected]
Bahrain
Technical Support: +973 1 3332904
Kuwait:
Technical Support: + 965 22453939 / +965
22453949
Türkiye Merkez İrtibat Ofisi
Ayazağa Maslak yolu
Erdebil Cevahir İş Merkezi No: 5/A Ayazağa /
Maslak İstanbul
Tel: +90 212 2895659
Ücretsiz Müşteri Destek Hattı: 0 800 211 00 65
Web:www.dlink.com.tr
Teknik Destek: [email protected]
Page 7
DSM-331
7
ESPAÑOL
CONTENIDO DEL
EMPAQUE
CONTENIDO
REPRODUCTOR DE INTERNET MEDIA STREAMING
DSM-331
FUENTE DE ALIMENTACIÓN
12V / DC 1A
CABLE ETHERNET
CONECTA EL DISPOSITIVO A LA RED
Si cualquiera de estos elementos no se encuentra en su
empaque, por favor, contáctese con su distribuidor.
CABLE A/V COMPUESTO
SE CONECTA A UN TELEVISOR ESTÁNDAR
CONTROL REMOTO
PILAS INCLUIDAS
Page 8
DSM-331
8
ESPAÑOL
12V 1A
TV
video
_
audio
_
AV-IN
DESCRIPCIÓN DEL HARDWARE
PANEL FRONTAL Y POSTERIOR
12V 1A
PUERTO USB ÓPTICO
LAN
POWERHDMI
AV
FRONTAL
POSTERIOR
>
>
>
>
1
2
4
2
3
1
6
7
5
INSTALACIÓN DEL PRODUCTO
PASOS DE LA INSTALACIÓN
CONECTAR AL TELEVISOR
Utilizando el cable HDMI o A/V
PASO 1:
TV
DSM-331
O
1
Arriba o Abajo Mueve hacia arriba o abajo
2
Derecha o
Izquierda
Mueve hacia derecha o
izquierda
3
OK
Selecciona una opción
desde el menú
Power
Enciende o apaga el
dispositivo manteniendo
presionado el botón OK
4
Menú
Vuelve al menú principal o
vuelve a la pantalla anterior
5
Info
Muestra la información
detallada
6
Option Muestra más opciones
7
Netix Botón Netix
Page 9
DSM-331
9
ESPAÑOL
12V 1A
12V 1A
AV
H
D
M
I
S
/
P
D
I
F
L
A
N
5
V
3
A
AV
H
D
M
I
S
/
P
D
I
F
L
A
N
5
V
3
A
12V 1A
ACTIVACIÓN DE LA BATERÍA DEL CONTROL REMOTO
SUSTITUCIÓN DE LA BATERÍA DEL CONTROL REMOTO
CONECTAR AL ROUTER
Utilizando el cable Ethernet
CONECTAR A LA ENERGIA
Precaución: Conecte la alimentación
sólo después de conectar el cable A/
V o cable HDMI (no incluido) y el cable
Ethernet.
Quite el plástico del control remoto
- Gire el control remoto y localice el panel deslizable de la
batería en la parte posterior de la unidad
- Presione la parte superior del panel de la batería hacia
abajo y al mismo tiempo quite el panel de la batería
- Inserte la batería (tipo botón CR2025) con el lado + hacia
arriba en la ranura
- Vuelva a colocar el panel de batería en el compartimento
y deslícelo hacia arriba con suavidad hasta que el panel
encaje en su lugar
PASO 3:
DSM-331
Power
PASO 2:
DSM-331
Router
Page 10
DSM-331
10
ESPAÑOL
SOPORTE TÉCNICO
Usted puede encontrar actualizaciones de softwares o rmwares y documentación para usuarios a
través de nuestro sitio www.dlinkla.com
SOPORTE TÉCNICO PARA USUARIOS EN LATINO AMERICA
Soporte técnico a través de los siguientes teléfonos de D-Link
PAIS NUMERO
Argentina 0800 - 12235465
Chile 800 - 835465 ó (02) 5941520
Colombia 01800 - 9525465
Costa Rica 0800 - 0521478
Ecuador 1800 - 035465
El Salvador 800 - 6335
Guatemala 1800 - 8350255
México 01800 - 1233201
Panamá 011 008000525465
Perú 0800 - 00968
Venezuela 0800 - 1005767
Soporte Técnico de D-Link a través de Internet
Horario de atención Soporte Técnico en www.dlinkla.com
e-mail: [email protected] & [email protected]
Page 11
DSM-331
11
PORTUGUÊS
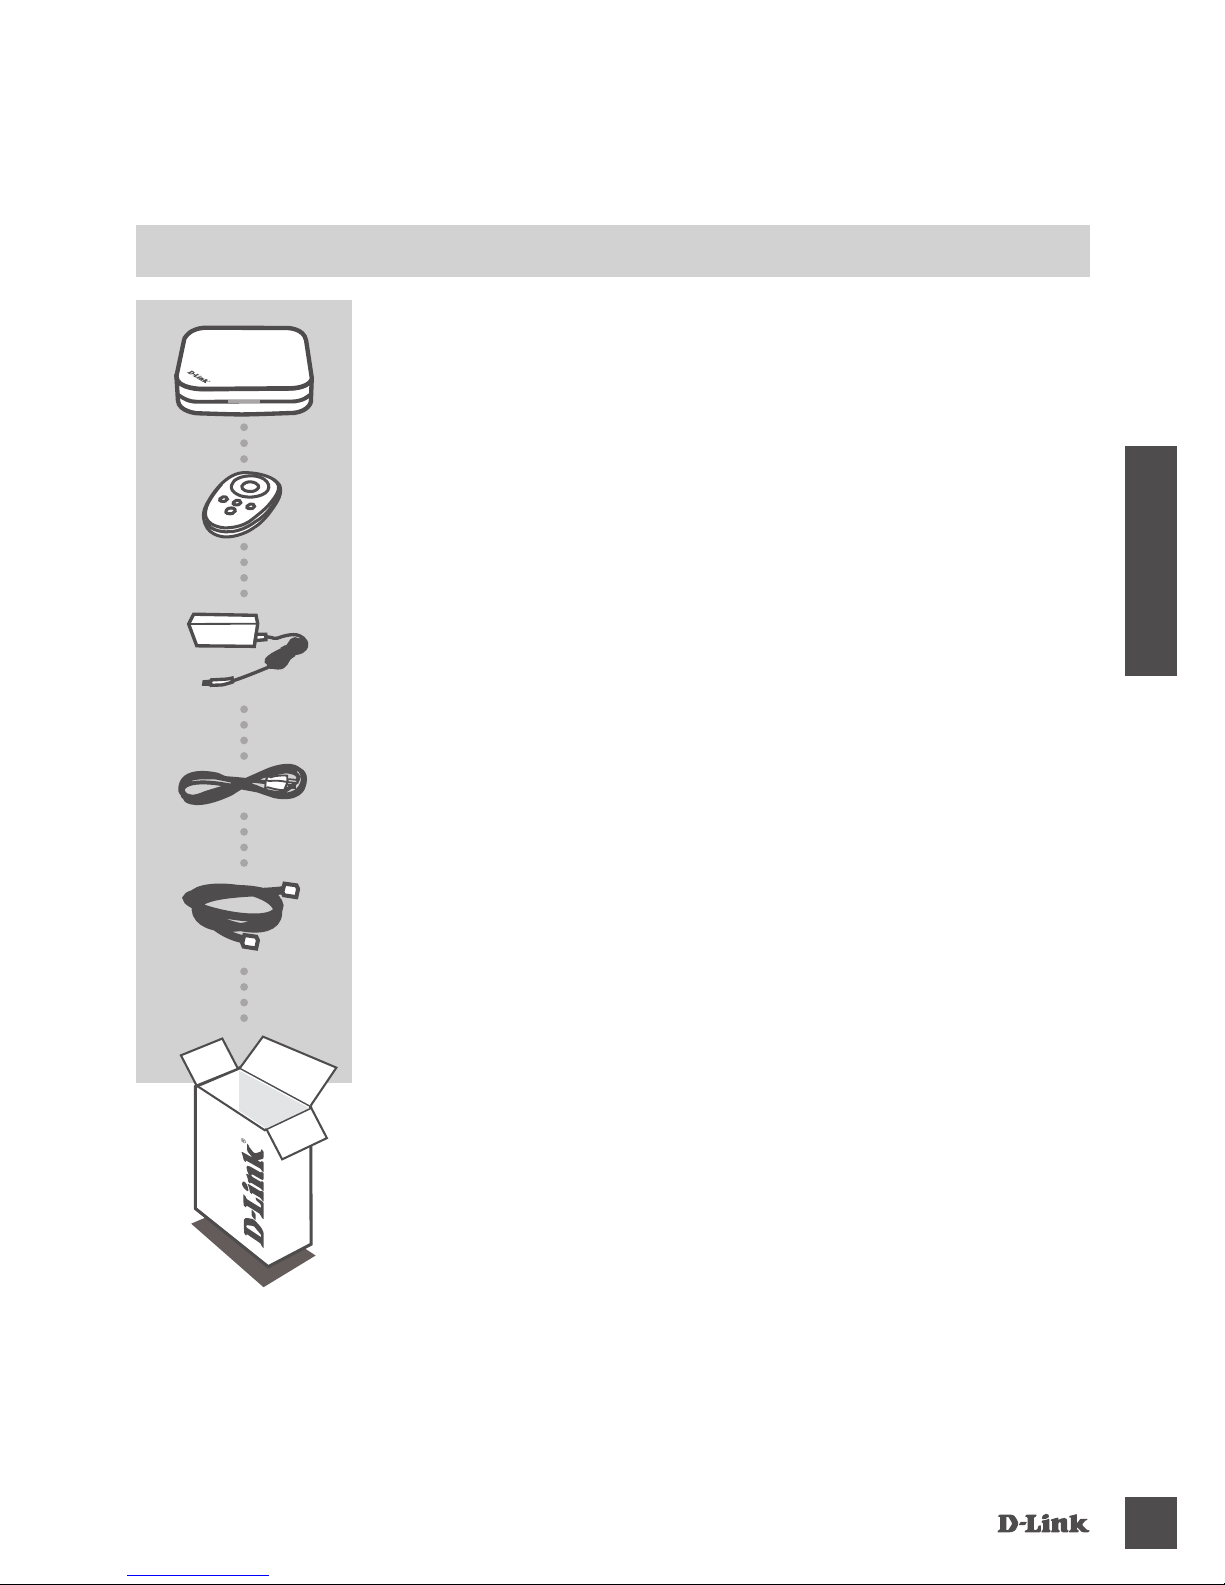
CONTEÚDO DA
EMBALAGEM
CONTEÚDO
INTERNET MEDIA PLAYER
DSM-331
FONTE DE ENERGIA
12 V / 1A DC
CABO DE REDE
CONECTE O DISPOSITIVO A SUA REDE DE INTERNET
Se algum dos itens não constar dentro da embalagem, por
favor, contate seu revendedor.
CABO AV
CONECTE NOS TELEVISORES AV
CONTROLE REMOTO
INCLUSO BATERIA
Page 12
DSM-331
12
PORTUGUÊS
12V 1A
TV
video
_
audio
_
AV-IN
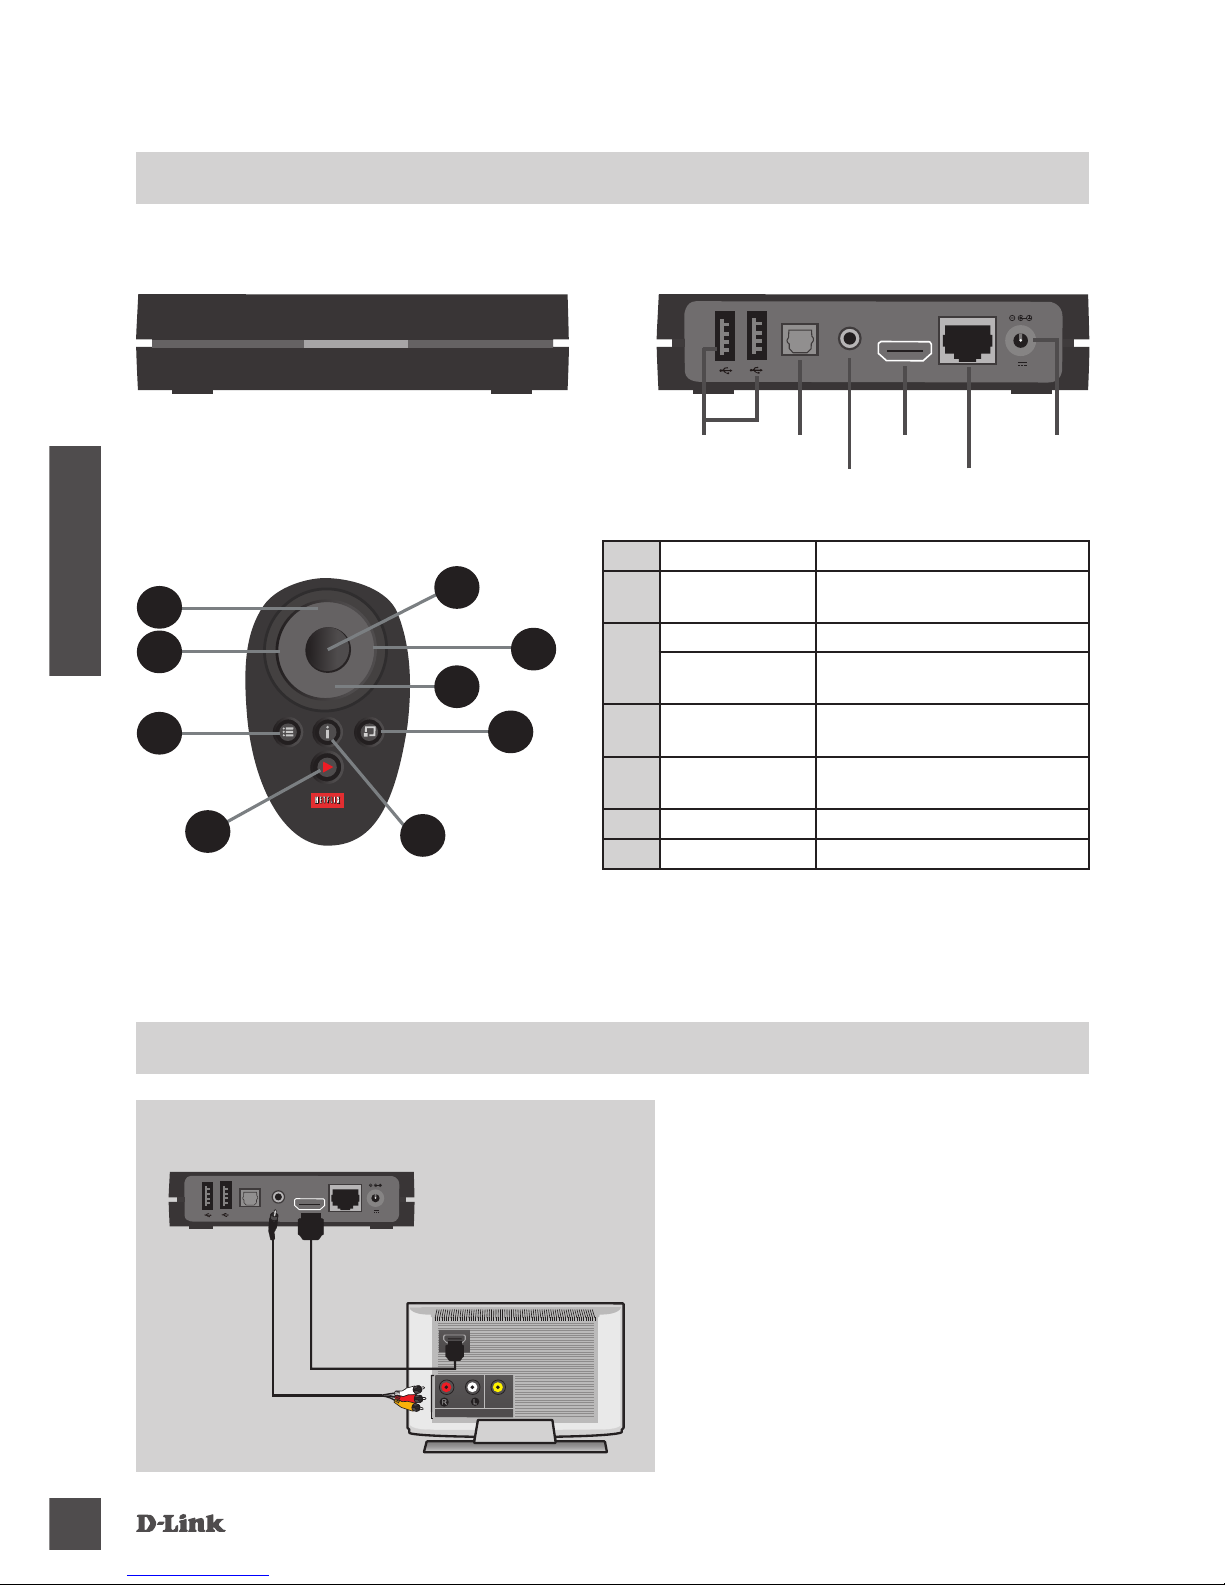
VISÃO GERAL DO HARDWARE
PAINEL DIANTEIRO E PAINEL TRASEIRO
12V 1A
PORTA USB ÓTICA
LAN
ENERGIAHDMI
AV
FRENTE
ATRÁS
CONFIGURAÇÃO DO PRODUTO
ETAPAS DA INSTALAÇÃO
CONECTE A TV
Utilize cabo AV ou HDMI
1O PASSO :
TV
DSM-331
OR
1
Cima ou Baixo Mover para cima ou para baixo
2
Esquerda ou
direita
Mover para esquerda ou
direita
3
OK Selecione uma opção do Menu
Energia
Liga / Desliga pressionado
tecla OK
4
Menu
Retornar a Home ou voltar à
tela anterior
5
Informações
Informações detalhadas no
display
6
Opçöes Mais opções
7
Netix Acesso ao Netix
>
>
>
>
1
2
4
2
3
1
6
7
5
Page 13
DSM-331
13
PORTUGUÊS
12V 1A
12V 1A
AV
H
D
M
I
S
/
P
D
I
F
L
A
N
5
V
3
A
AV
H
D
M
I
S
/
P
D
I
F
L
A
N
5
V
3
A
12V 1A
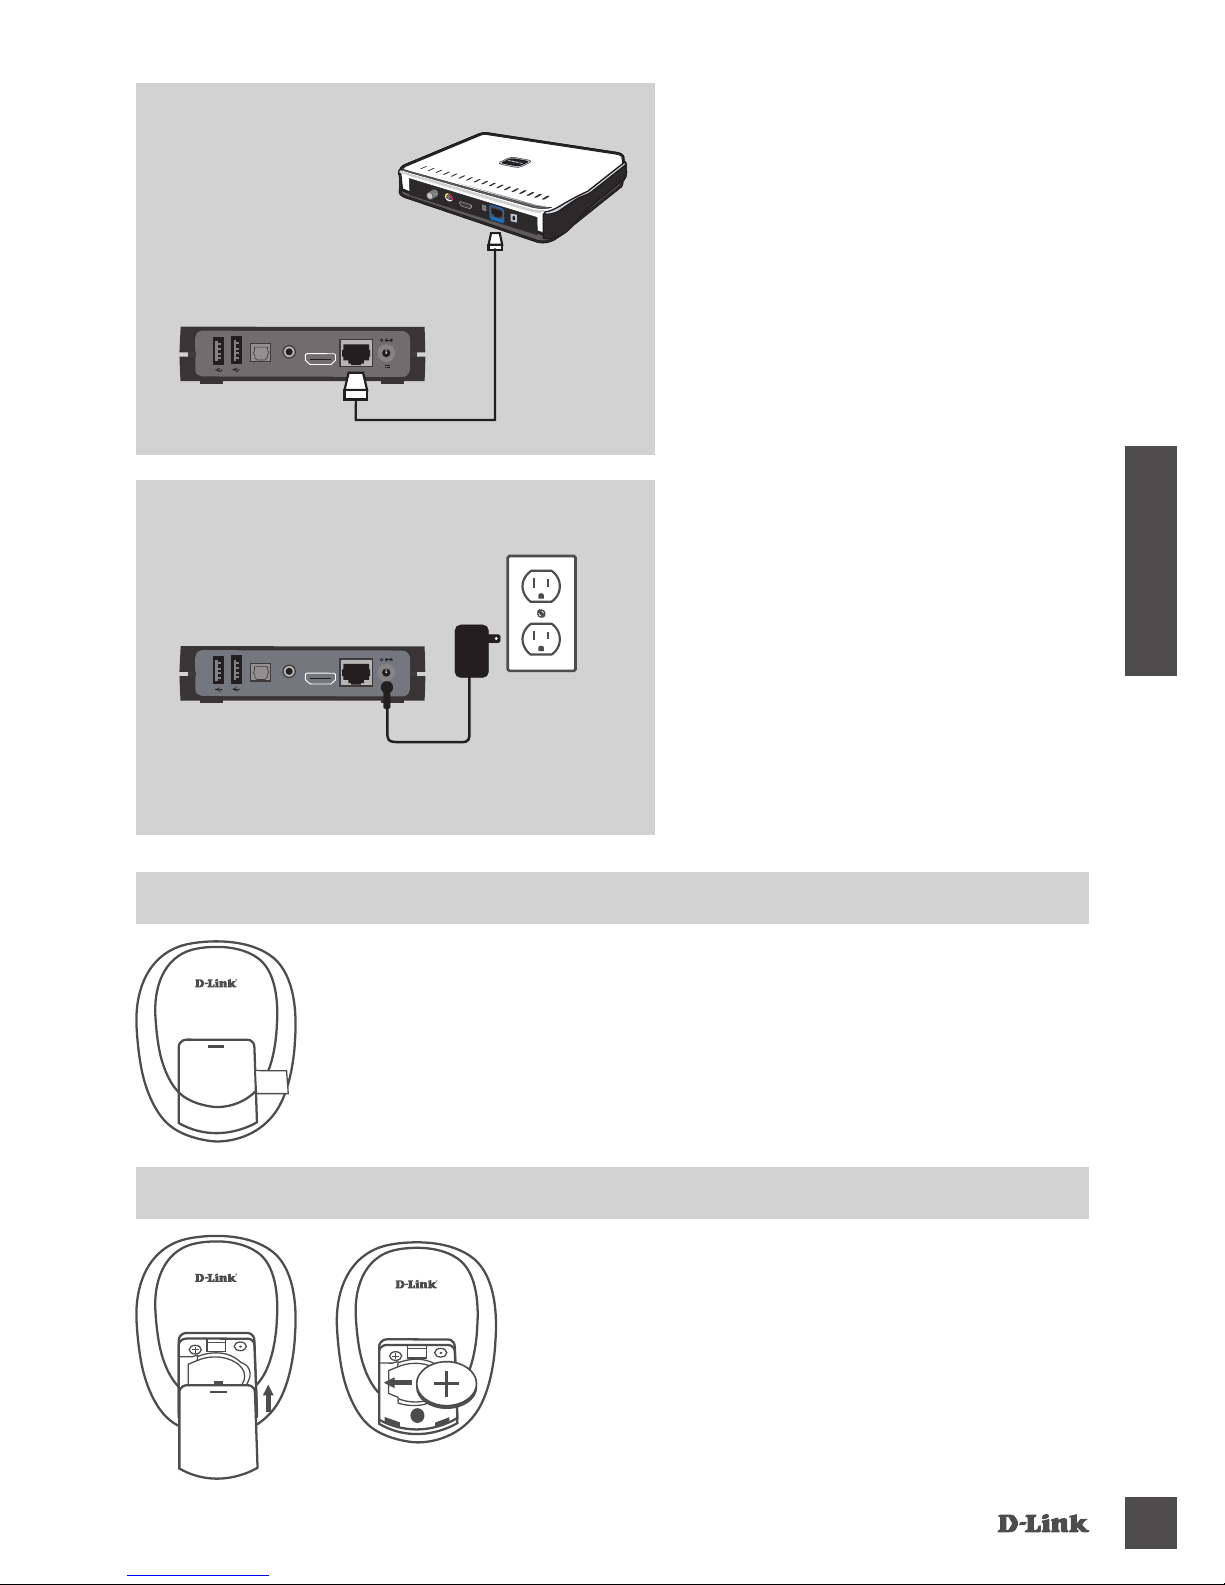
ATIVAÇÃO DA BATERIA
SUBSTITUIÇÃO DA BATERIA
CONECTE AO ROTEADOR
Utilize o cabo de rede
CONECTE A ENERGIA
Atenção: Conecte a energia somente
após conectar o cabo AV ou HDMI (não
incluído) e o cabo de rede.
Retire o plastico do controle remoto
- Ligue o controle remoto, localize o painel da bateria,
pressione o painel e deslize para a parte de trás.
- Pressione a parte superior do painel da bateria para baixo e,
simultaneamente o remova.
- Insira a bateria (célula tipo moeda CR2025) com o lado ( + )
voltado para cima na parte determinada.
- Encaixe o painel da bateria na parte de trás e deslize-o
suavemente até painel que xado.
3O PASSO:
DSM-331
Energia
2O PASSO:
DSM-331
Roteador
Page 14
DSM-331
14
PORTUGUÊS
SUPORTE TÉCNICO
Caso tenha dúvidas na instalação do produto, entre em contato com o
Suporte Técnico D-Link por:
Chat Online
www.dlink.com.br/suporte
E-mail
Back Ofce
backof[email protected] *
*Acionar Garantia para 4 ou mais equipamentos
Telefones
São Paulo: (11) 2755-6950
*GO: 4052-1850 (Ligação local)
*Nordeste: 0800-7024104
*Demais Estados: 4062-1850 (Ligação local)
*Apenas Modems ADSL
Garantia diferenciada vendida pela internet. Agilidade e tranquilidade para suas atividades!
Conheça: http://garantiapremium.dlink.com.br
Atendimento disponível das 9h as 21h de segunda a sexta feira e aos sábados das 9h as 15h
Page 15

DSM-331
15
NOTES
Page 16

Ver. 1.00(DI) 2011/09/01 EG28990030
 Loading...