

Page 1
Page 2
iD-Link DSM-312 User Manual
Preface
D-Link reserves the right to revise this publication and to make changes in the content hereof without obligation to notify any
person or organization of such revisions or changes.
Manual Revisions
Trademarks
D-Link and the D-Link logo are trademarks or registered trademarks of D-Link Corporation or its subsidiaries in the United
States or other countries. All other company or product names mentioned herein are trademarks or registered trademarks of
their respective companies.
Copyright © 2012 by D-Link Systems, Inc.
All rights reserved. This publication may not be reproduced, in whole or in part, without prior expressed written permission
from D-Link Systems, Inc.
Revision Date Description
1.0 June 14, 2012 • Initial Release
Preface
Page 3
iiD-Link DSM-312 User Manual
Preface
This item incorporates copy protection technology that is
protected by U.S. patents and other intellectual property
rights of Rovi Corporation. Reverse Engineering and
disassembly are prohibited.
HDMI, the HDMI logo and High-Denition Multimedia
Interface are trademarks or registered trademarks of
HDMI Licensing LLC.
The Wi-Fi CERTIFIED Logo is a certication mark of the
Wi-Fi Alliance.
Manufactured under license from Dolby Laboratories.
Dolby and the double-D symbol are trademarks of Dolby
Laboratories.
Page 4
iiiD-Link DSM-312 User Manual
Table of Contents
Preface ..........................................................................................i
Manual Revisions ........................................................................... i
Trademarks ...................................................................................... i
Product Overview ......................................................................1
Package Contents .........................................................................1
System Requirements ................................................................. 1
Features ............................................................................................ 2
Hardware Overview ..................................................................... 3
LED ............................................................................................. 3
Connections ...........................................................................4
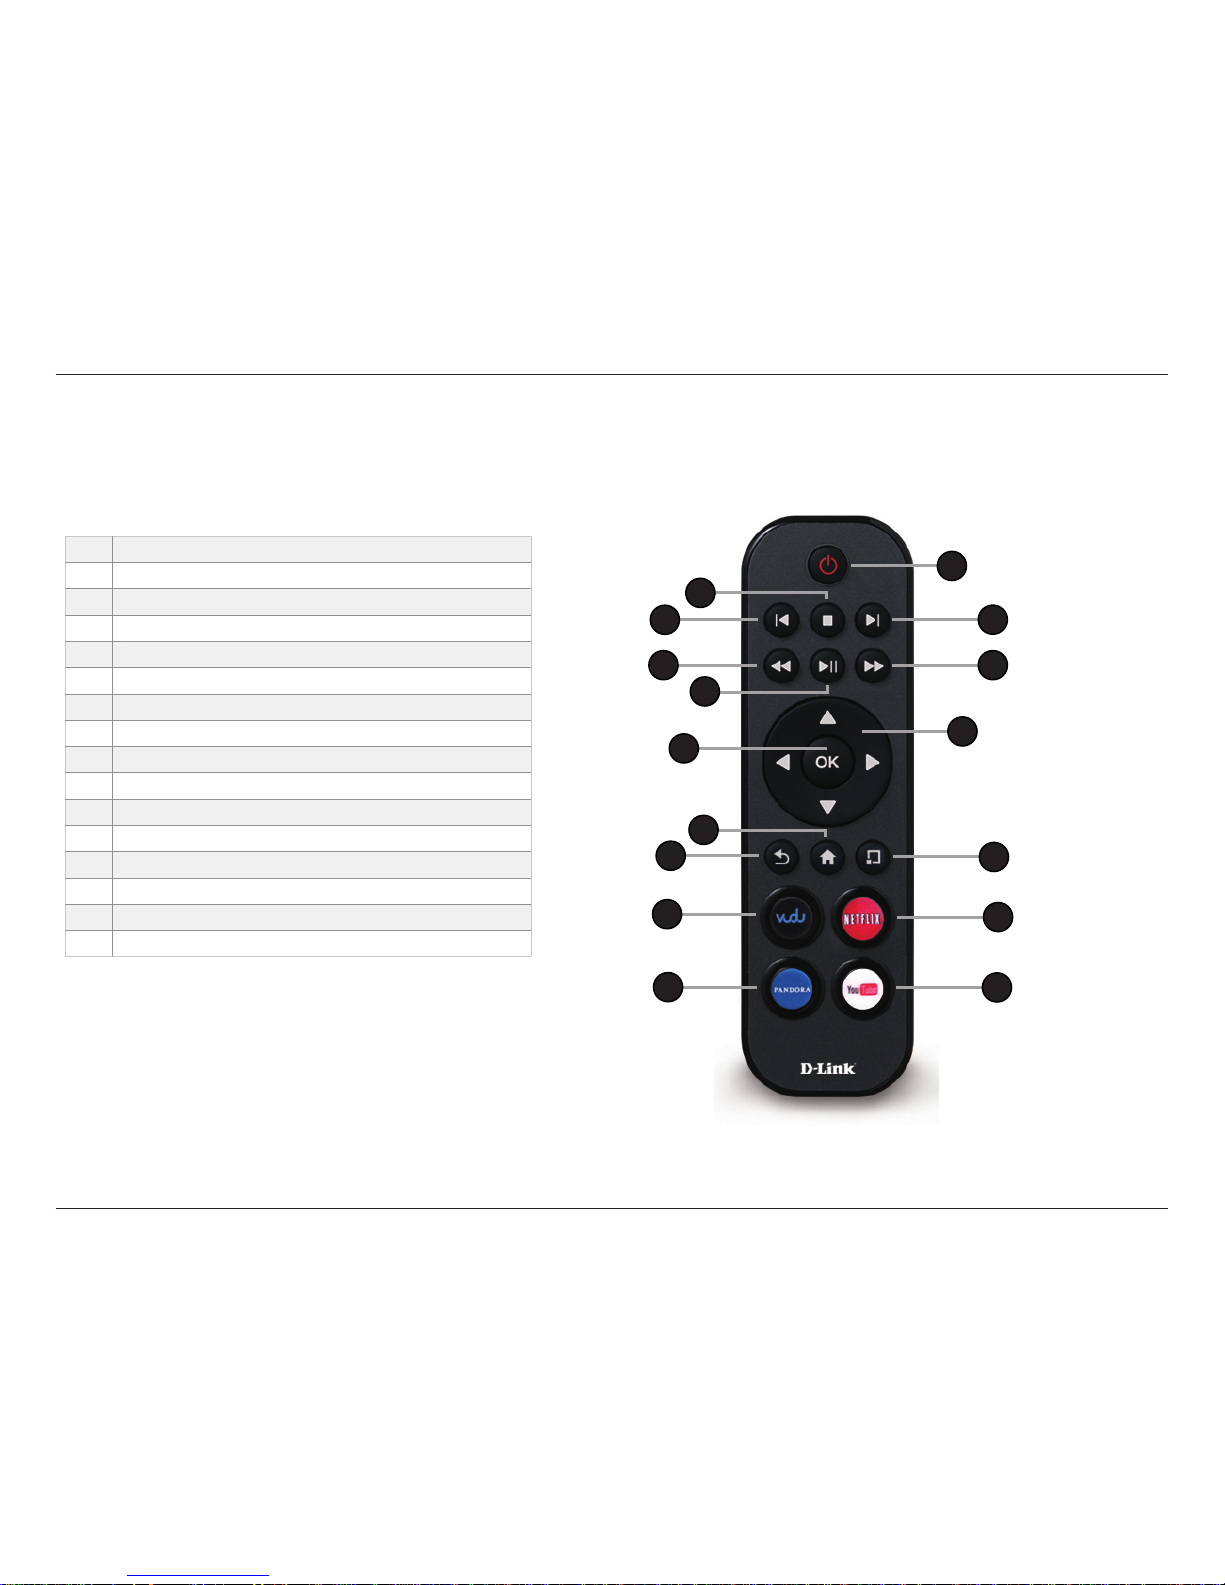
Remote Control Overview ......................................................... 5
Wireless Installation Considerations ...................................... 6
Installation ..................................................................................7
Before You Begin ........................................................................... 7
Connect Directly to a TV ............................................................8
Connect to an A/V Receiver ....................................................10
Apps .......................................................................................... 17
VUDU ...............................................................................................17
Netix ..............................................................................................17
YouTube .........................................................................................18
Pandora ..........................................................................................18
Picasa ..............................................................................................19
AccuWeather ................................................................................19
MovieNite Apps ...........................................................................19
Table of Contents
mydlink ...........................................................................................20
Flingo ..............................................................................................22
Conguration .......................................................................... 23
System ............................................................................................23
Screen Saver .........................................................................24
Maintenance .........................................................................25
Playback .................................................................................27
Video ...............................................................................................28
Resolution .............................................................................28
Audio ...............................................................................................29
HDMI .......................................................................................29
Dolby DRC .............................................................................30
Network .........................................................................................31
Wired (Ethernet) ..................................................................32
Wireless ..................................................................................33
Parental Control ..........................................................................37
D-Link Remote Control App ................................................. 39
Using the Remote Control App .............................................40
Technical Specications ........................................................ 41
Warranty ................................................................................... 42
Registration ............................................................................. 48
Page 5
1D-Link DSM-312 User Manual
Section 1 - Product Overview
• DSM-312 MovieNite™ Plus Streaming Media Player
• Remote Control
• Two AAA Batteries
• Composite Audio/Video Cable
• Power Adapter
• Quick Installation Guide
If any of the above items are missing, please contact your reseller. Note that this product does not include an Ethernet or HDMI cable.
For the best quality video and audio, it is strongly recommended to purchase an HDMI cable.
Package Contents
System Requirements
• HDTV with an HDMI input or a standard TV with a composite (standard A/V) input
• Wired or wireless network connection with Internet connectivity
• Optional: AV receiver with HDMI input or composite (standard A/V) input
Note: For HD quality video (480p/720p/1080i/1080p) you must use an HDMI connection. Composite cables do not support
HD video.
Product Overview
Page 6
2D-Link DSM-312 User Manual
Section 1 - Product Overview
Easy setup will have you watching in minutes, on almost any TV
Built-in wireless functionality, easy on-screen menu system, and HDMI and composite video/audio connections make set up
a breeze. With MovieNite Plus, the only diculty you’ll experience is deciding what to watch.
Over 130 apps and channels
Expand your entertainment options with over 130 channels and apps available to enjoy. Access Netix, VUDU, YouTube,
Rhapsody, Pandora, Picasa, Flickr, mydlink, Facebook, Twitter, AccuWeather, and many more!
Enjoy a home theater experience in stunning 1080p quality
Renting a DVD or Blu-Ray? Save on going out for movies with the endless array of movie selections on Netix or VUDU available
anytime you want. MovieNite Plus is the cheaper, better solution to costly and inconvenient movie tickets and rentals. Achieve
the same quality, in-home theater experience with HD movies in 1080p on your big screen TV.
Free MovieNite™ Plus remote app available for iPhone® and Android®
Control your MovieNite™ Plus by using the remote app available for iPhone® and Android® smartphones.
Features
For the latest rmware version and updated apps, please upgrade the rmware on your MovieNite™ Plus. Once you rst
connect to the Internet, you may be prompted that a new version is available. Follow the on-screen instructions to update
the rmware or refer to page 26 to manually check for an update.
Page 7
3D-Link DSM-312 User Manual
Section 1 - Product Overview
Hardware Overview
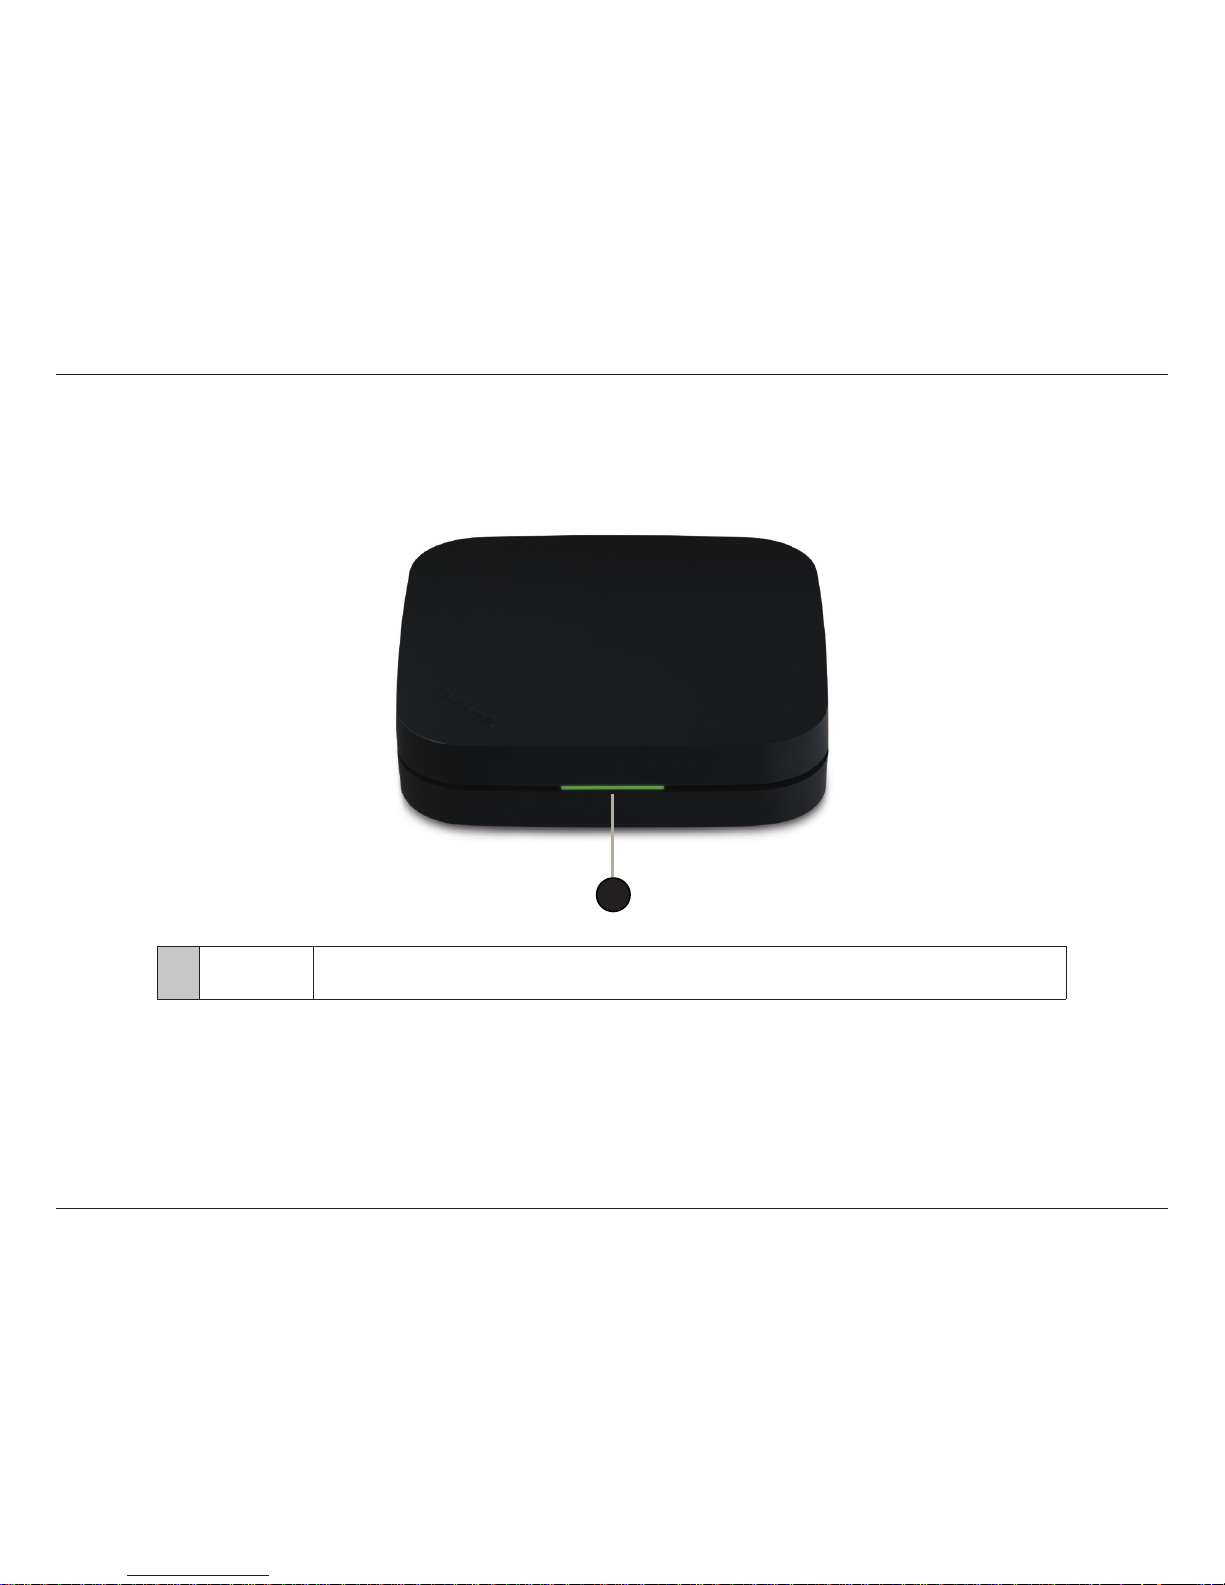
1 LED
Solid green light indicates when the DSM-312 has a good connection to your network.
The light will be amber during boot-up and if there is no connection to your network.
LED
1
Page 8
4D-Link DSM-312 User Manual
Section 1 - Product Overview
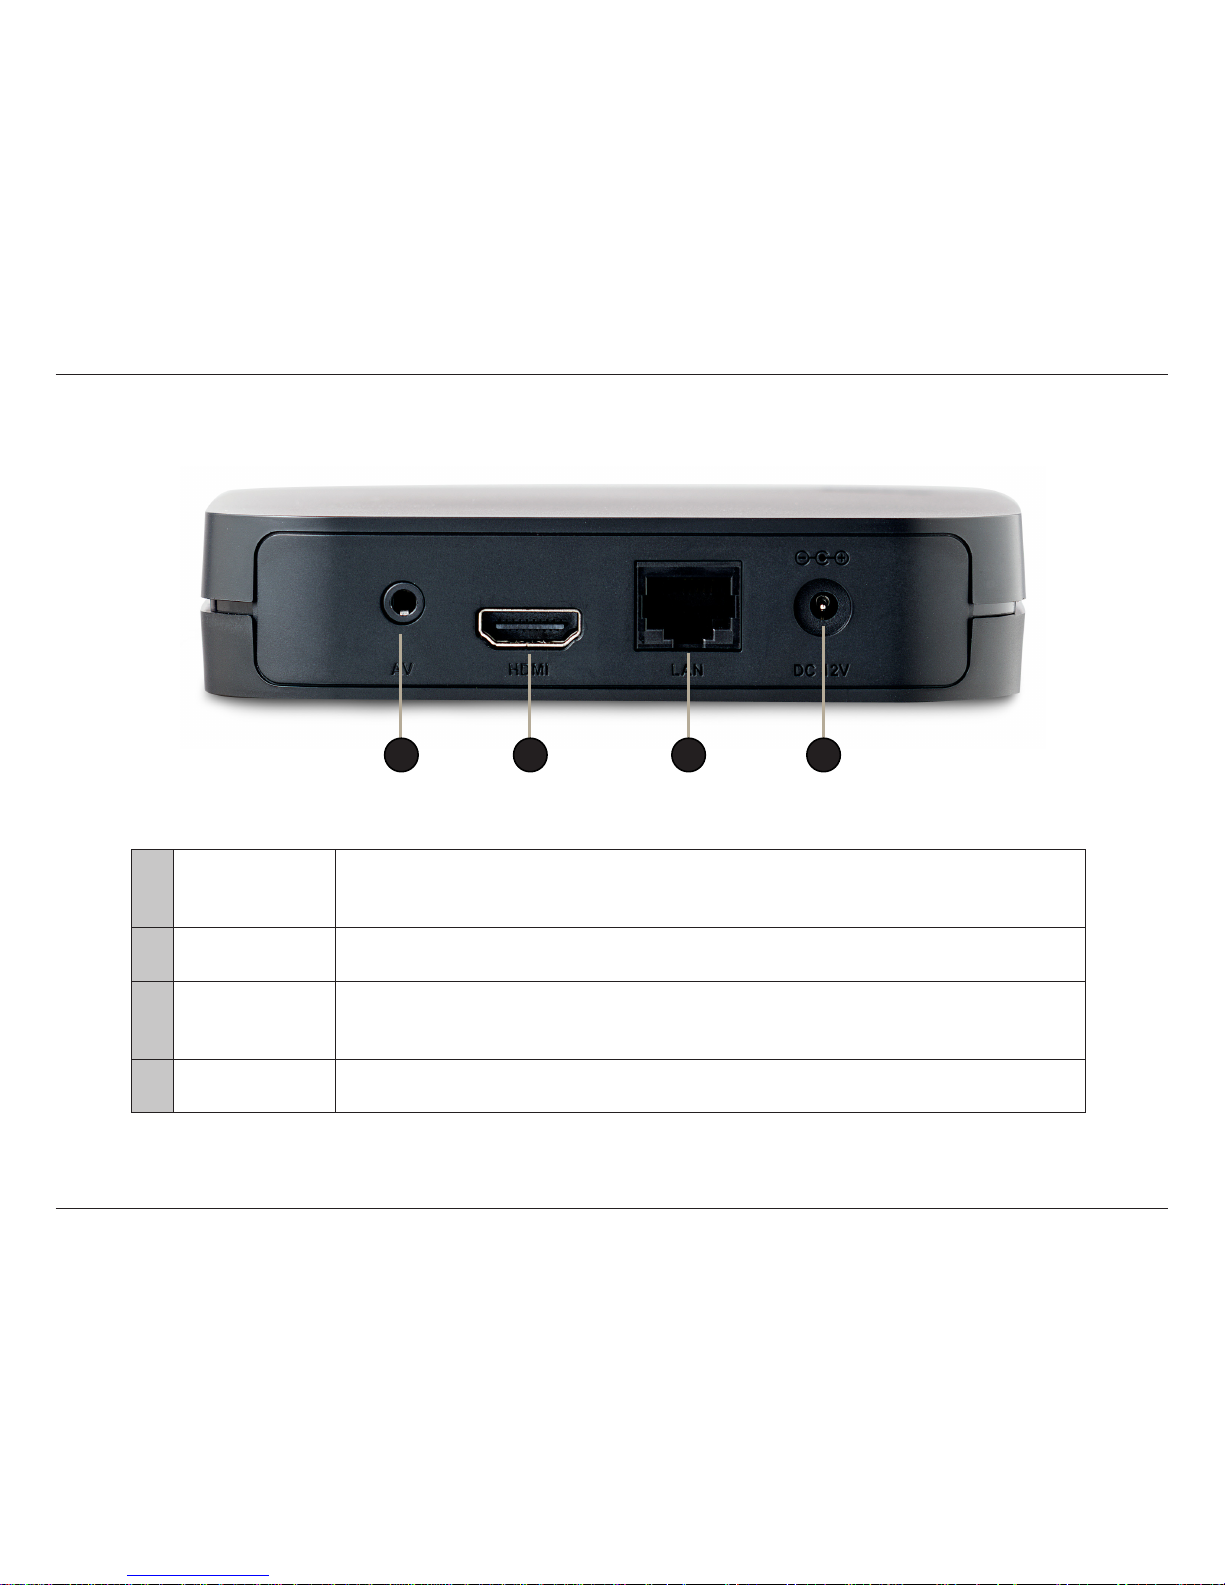
1 AV Port
Connect the supplied composite A/V cable here and the other three plugs into your
TV or A/V receiver. If you are using an HDMI connection, you do not have to connect
this cable.
2 HDMI Port
Connect an HDMI cable (not included) here and the other end into your TV or A/V
receiver.
3 LAN Port
Connect an Ethernet cable (not included) here and the other end to your network
(router, gateway or switch). If you would like to connect using a wireless connection,
do not connect an Ethernet cable.
4 Power Receptor
Connect the supplied power adapter here and the other end into an outlet or surge
protector.
Connections
1 3 42
Page 9
5D-Link DSM-312 User Manual
Section 1 - Product Overview
1 Press to turn the DSM-312 on and o
2 Stop
3 Previous Button (function depends on app)
4 Forward Button (function depends on app)
5 Rewind Button
6 Play/Pause Button
7 Fast Forward Button
8 Directional Pad to navigate menus
9 OK/Enter Button
10 Press to go to the home page
11 Back Button
12 Options Button (function depends on app)
13 Press to launch Vudu
14 Press to launch Netix
15 Press to launch Pandora
16 Press to launch YouTube
1
Remote Control Overview
4
7
8
12
14
16
3
2
5
6
9
15
13
11
10
Page 10
6D-Link DSM-312 User Manual
Section 1 - Product Overview
Wireless Installation Considerations
The DSM-312 allows you access to your network using a wireless connection from virtually anywhere within the operating
range of your wireless router or access point. Keep in mind, however, that the number, thickness and location of walls, ceilings,
or other objects that the wireless signals must pass through, may limit the range. Typical ranges vary depending on the types
of materials and background RF (radio frequency) noise in your home or business. The key to maximizing wireless range is to
follow these basic guidelines:
1. Keep the number of walls and ceilings between the wireless router/AP and other network devices to a minimum
- each wall or ceiling can reduce your adapter’s range from 3-90 feet (1-30 meters.) Position your devices so
that the number of walls or ceilings is minimized.
2. Be aware of the direct line between network devices. A wall that is 1.5 feet thick (.5 meters), at a
45-degree angle appears to be almost 3 feet (1 meter) thick. At a 2-degree angle it looks over 42 feet (14 meters)
thick! Position devices so that the signal will travel straight through a wall or ceiling (instead of at an angle) for
better reception.
3. Building Materials make a dierence. A solid metal door or aluminum studs may have a negative eect on
range. Try to position access points, wireless routers, and computers so that the signal passes through drywall
or open doorways. Materials and objects such as glass, steel, metal, walls with insulation, water (sh tanks),
mirrors, le cabinets, brick, and concrete will degrade your wireless signal.
4. Keep your product away (at least 3-6 feet or 1-2 meters) from electrical devices or appliances that generate RF
noise.
5. If you are using 2.4GHz cordless phones your wireless connection may degrade dramatically or drop completely.
Make sure your 2.4GHz phone base is as far away from your wireless devices as possible. The base transmits a
signal even if the phone in not in use.
Page 11
7D-Link DSM-312 User Manual
Section 2 - Installation
Installation
Before You Begin
• If you’re setting up a wireless connection, make sure you know the wireless network name (SSID), security password (if you
are using encryption) and the security type (WEP or WPA/WPA2)
• Do not place the DSM-312 inside a cabinet if you are using a wireless connection. Your signal will degrade or you may not
connect at all depending on the location of your wireless router or access point. Place in an open area for best results.
• Make sure you have all the required cables. HDMI and Ethernet cables are not included.
• Place the DSM-312 unit away from heat sources such as radiators, heat registers, and avoid setting the unit directly on top of
a receiver, set top box, DVR or other appliances that produce heat.
The quality of the video and audio will depend on several factors:
• The type of audio and video connections you use to connect the DSM-312 and your TV may impact sound and picture
quality. Use HDMI for the best possible video and audio quality. HDMI is required for video resolution 480p and above, and
for surround sound (5.1).
• Your Internet speed/quality will aect streaming quality. Download speeds of 4.0Mbps or faster is recommend for the best
quality video. Sometimes your broadband speed may change based on your ISP’s network conditions. Contact your ISP if you
have problems/questions about your connection speeds and quality. The type/quality of router can also aect your Internet/
network speeds.
• Your home network may also aect speed and quality. Online gaming, large downloads or transfers, streaming from other
sources, etc. while using your DSM-312 may cause your network to slow down.
Page 12
8D-Link DSM-312 User Manual
Section 2 - Installation
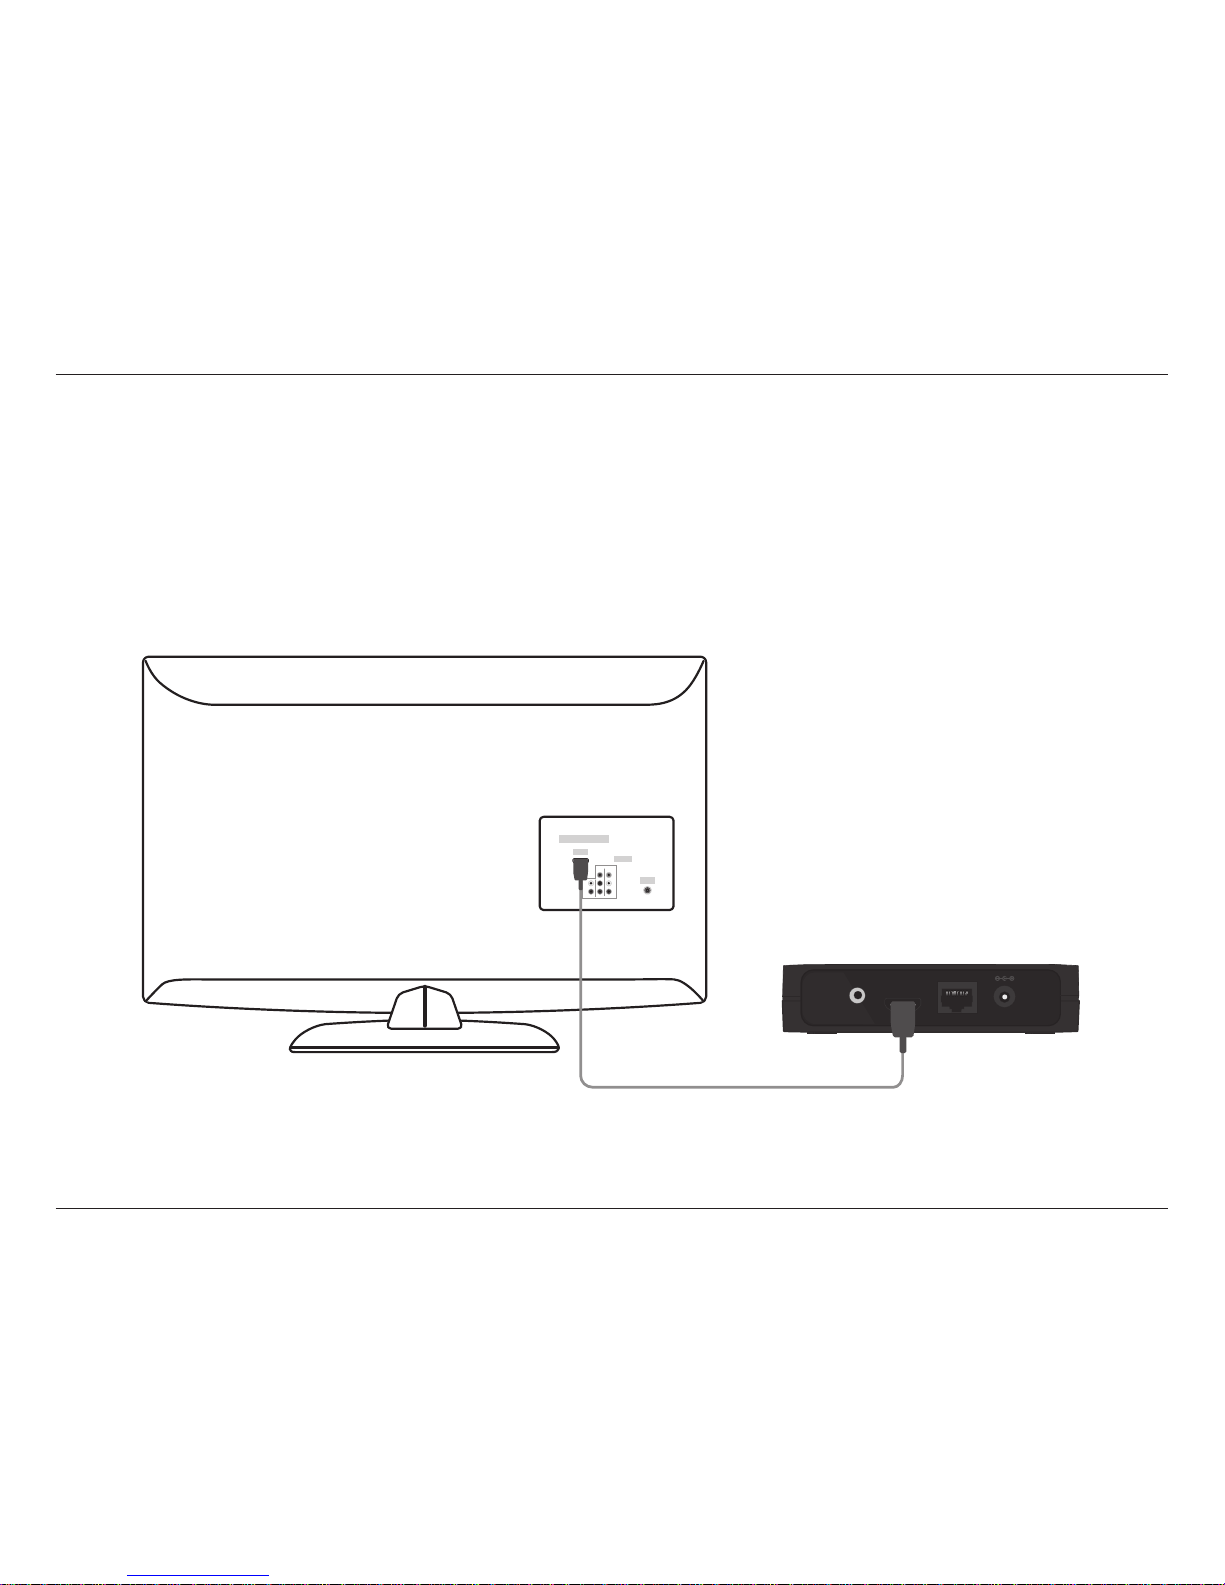
Follow the steps below to connect and install your MovieNite™ Plus Media Player directly to your TV:
Step 1
Connect an HDMI cable (not included) to the HDMI port on the DSM-312 and the other end into an available HDMI input port on
your TV. Note that HDMI is required for HD resolution.
HDMI
LAN DC 12V
AV
HDMI
Connect Directly to a TV
Page 13
9D-Link DSM-312 User Manual
Section 2 - Installation
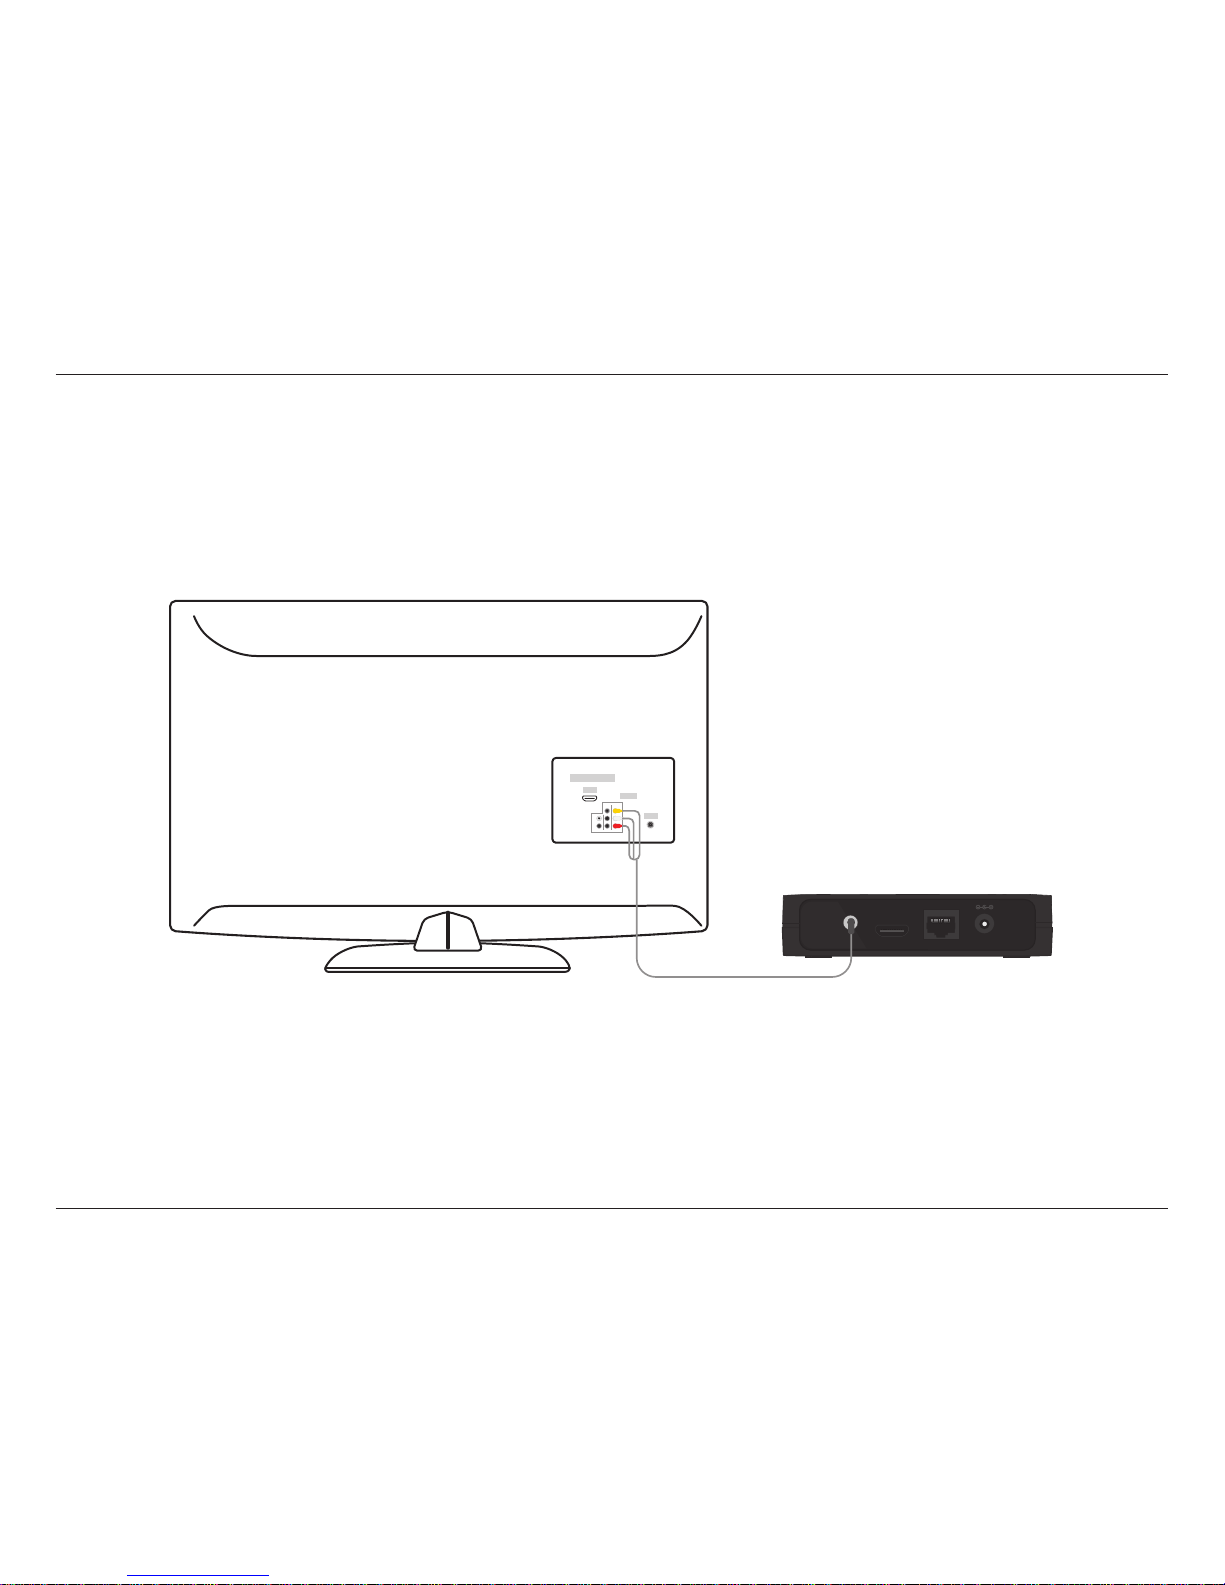
If you do not have an HDMI cable or a TV with an HDMI port, connect the supplied A/V cable into the AV port on the DSM-312
and the other end into the correct matching input ports on your TV (yellow is for video, red and white are for audio).
Note: A composite connection made with the supplied A/V cable will not be capable of HD output to your TV. Also, do not connect the
device through a VCR. Video signals fed through VCRs may be aected by copyright protection systems and the picture will be distorted
on the television.
HDMI
HDMI
LAN DC 12V
AV
Step 2
Power on your TV and select the correct video output. Skip to Step 3 on page 11.
Page 14
10D-Link DSM-312 User Manual
Section 2 - Installation
Follow the steps below to connect and install your MovieNite™ Plus Media Player to an A/V receiver*:
Step 1
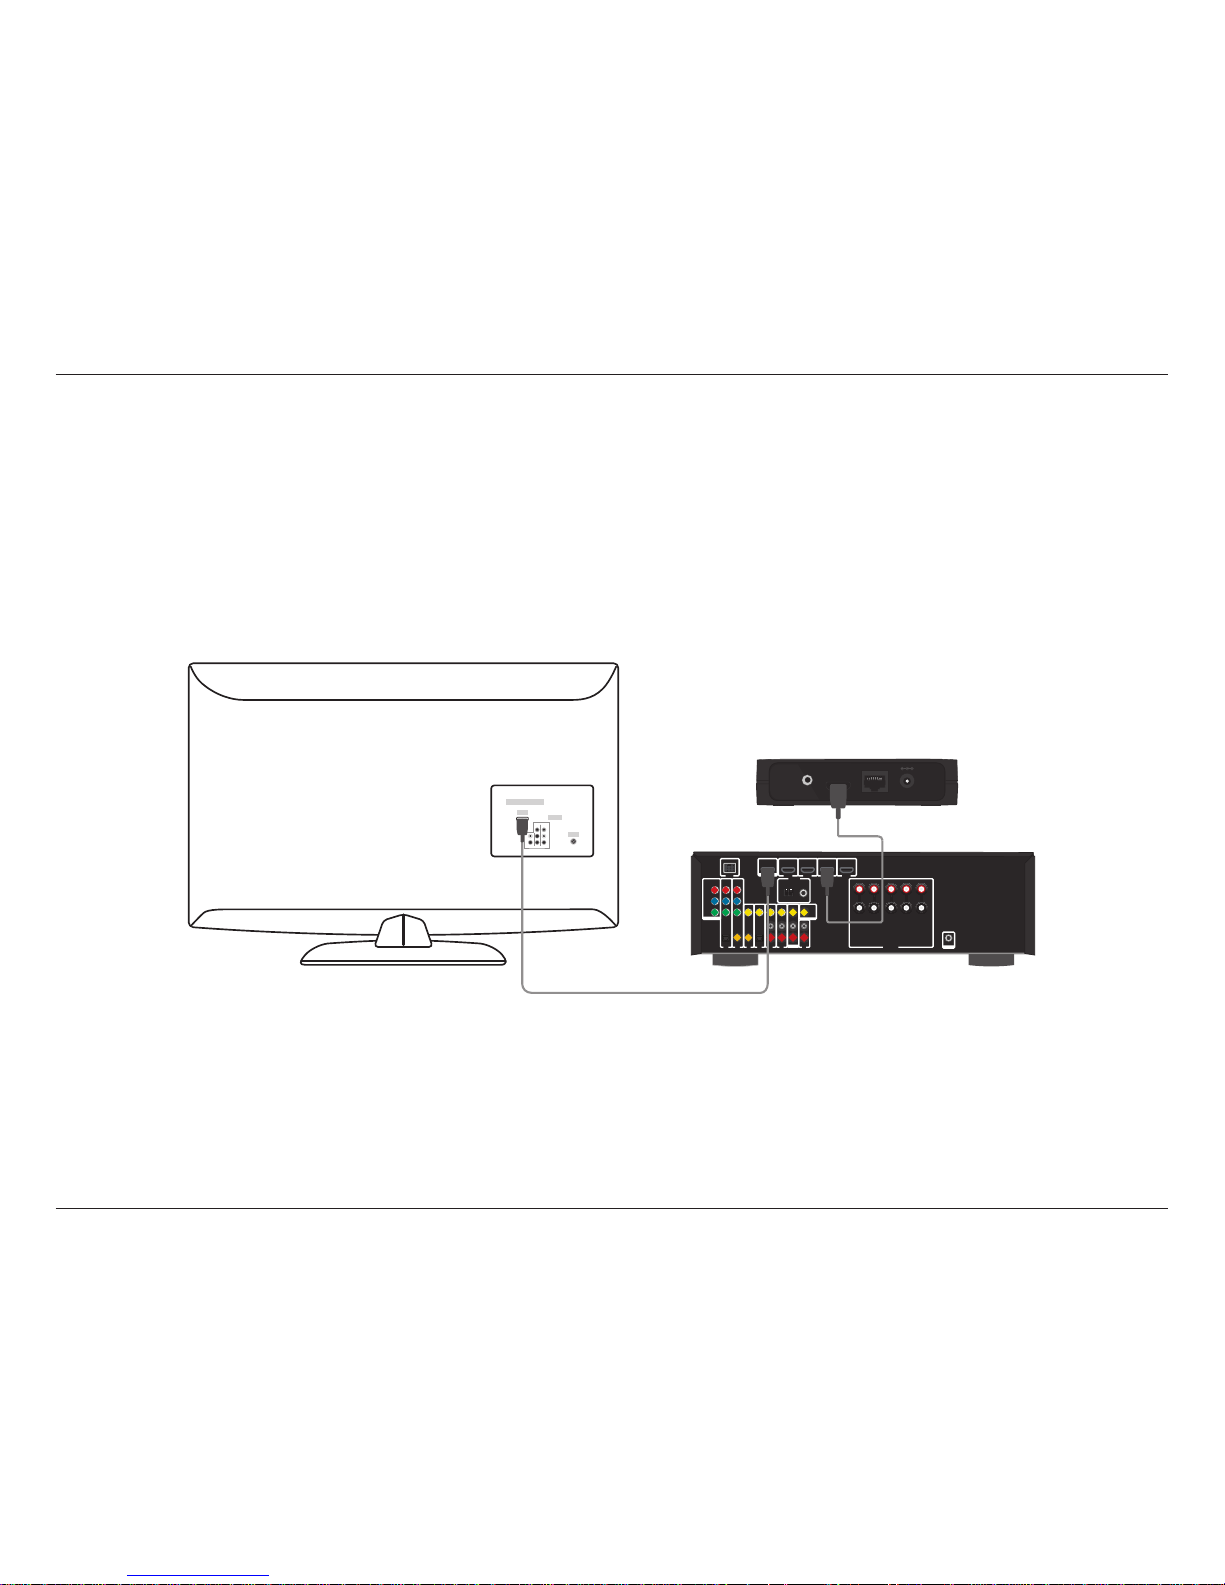
Connect an HDMI cable (not included) to the HDMI port on the DSM-312 and the other end into an available HDMI input port
on your receiver. Note that HDMI is required for HD resolution. If you are unable to connect using an HDMI cable, connect the
supplied A/V cable into the AV port on the DSM-312 and the other end into the correct matching input ports on your receiver
(yellow is for video, red and white are for audio).
HDMI
LAN DC 12V
AV
HDMI
Connect to an A/V Receiver
* Please refer to your A/V receiver’s user manual for more information if you are unsure about how to connect and operate your receiver.
Step 2
Power on your TV and your receiver. Select the correct video output on your TV and correct input/mode on your receiver.
Page 15
11D-Link DSM-312 User Manual
Section 2 - Installation
Step 3
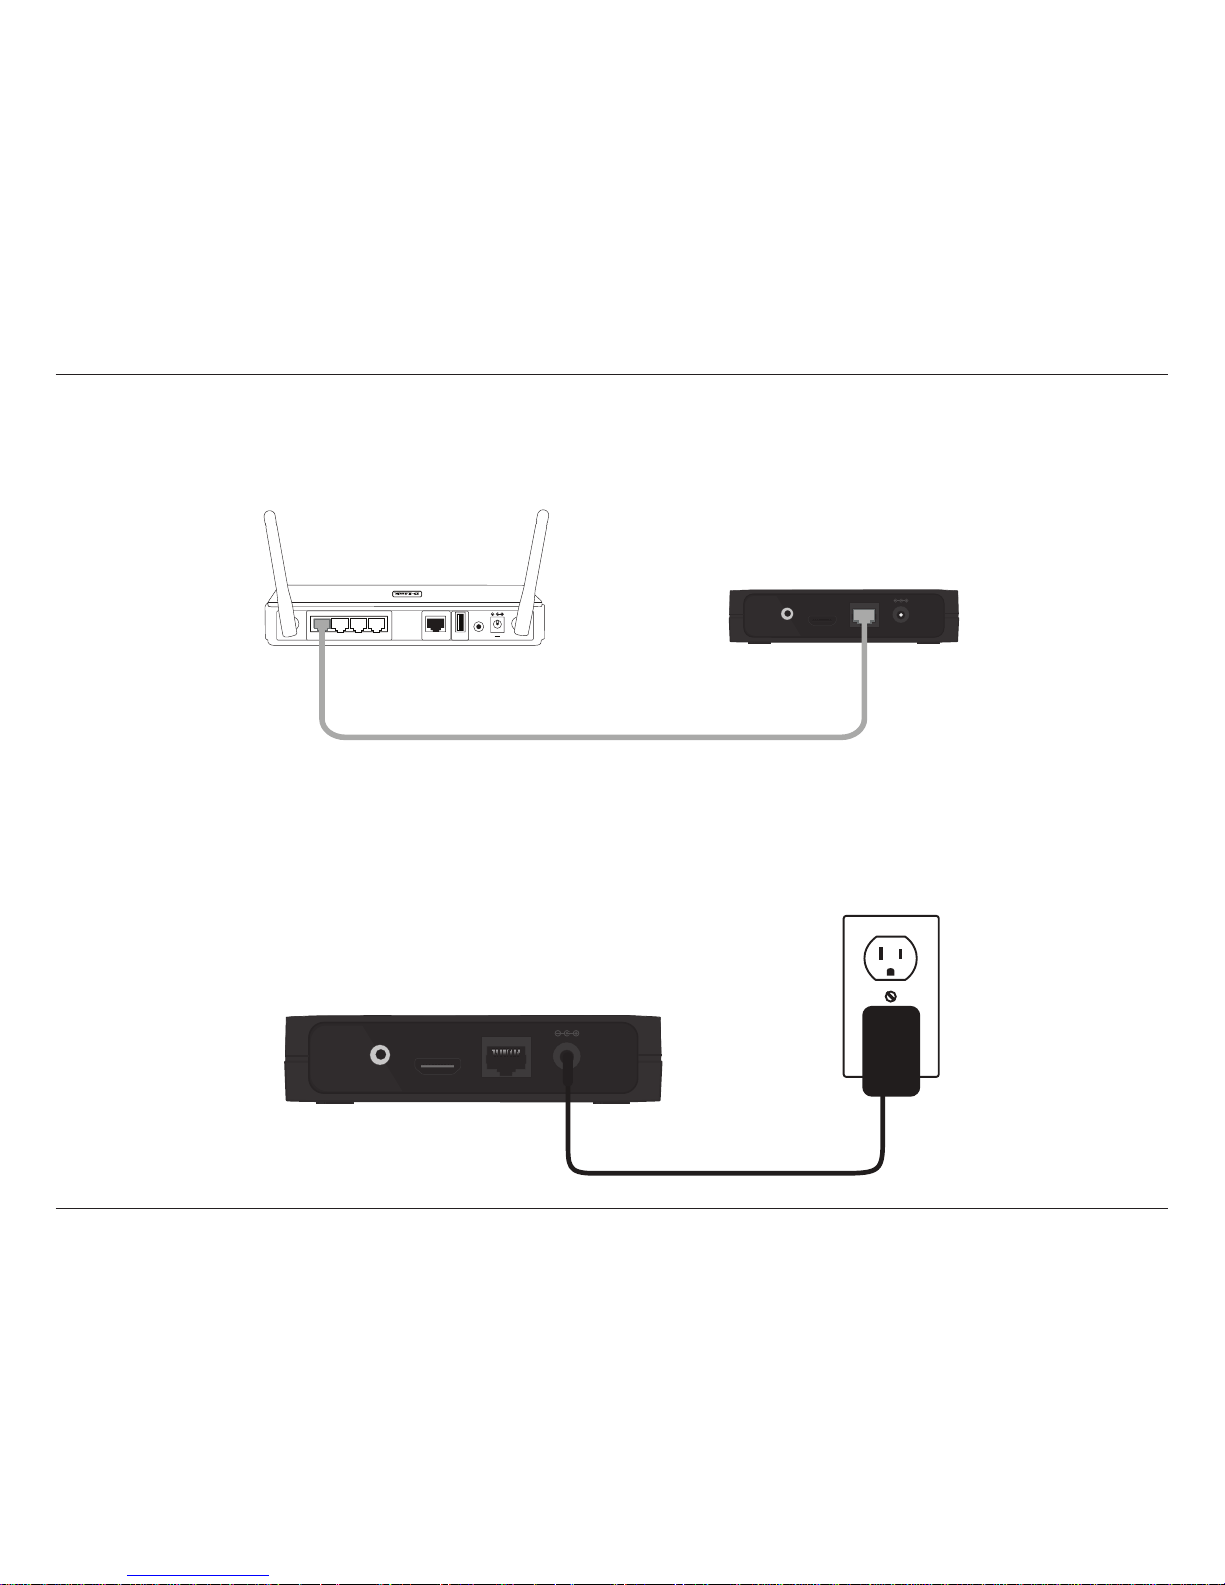
Connect an Ethernet cable (not included) to the LAN port on the DSM-312 and other end into your network (via router, gateway,
or switch). If you want to use the built-in wireless adapter, do not connect the Ethernet cable. The on-screen setup wizard will
allow you congure your wireless settings (refer to Step 6 for wireless setup information).
HDMI
LAN DC 12V
AV
5V
-- -
3A
1 2 LAN 3 4 INTERNET USB
RESET
Step 4
Connect the supplied power adapter to the power receptor on the DSM-312 and plug it into a power outlet or surge protector.
The device will power on.
HDMI
LAN DC 12V
AV
Page 16
12D-Link DSM-312 User Manual
Section 2 - Installation
Step 5
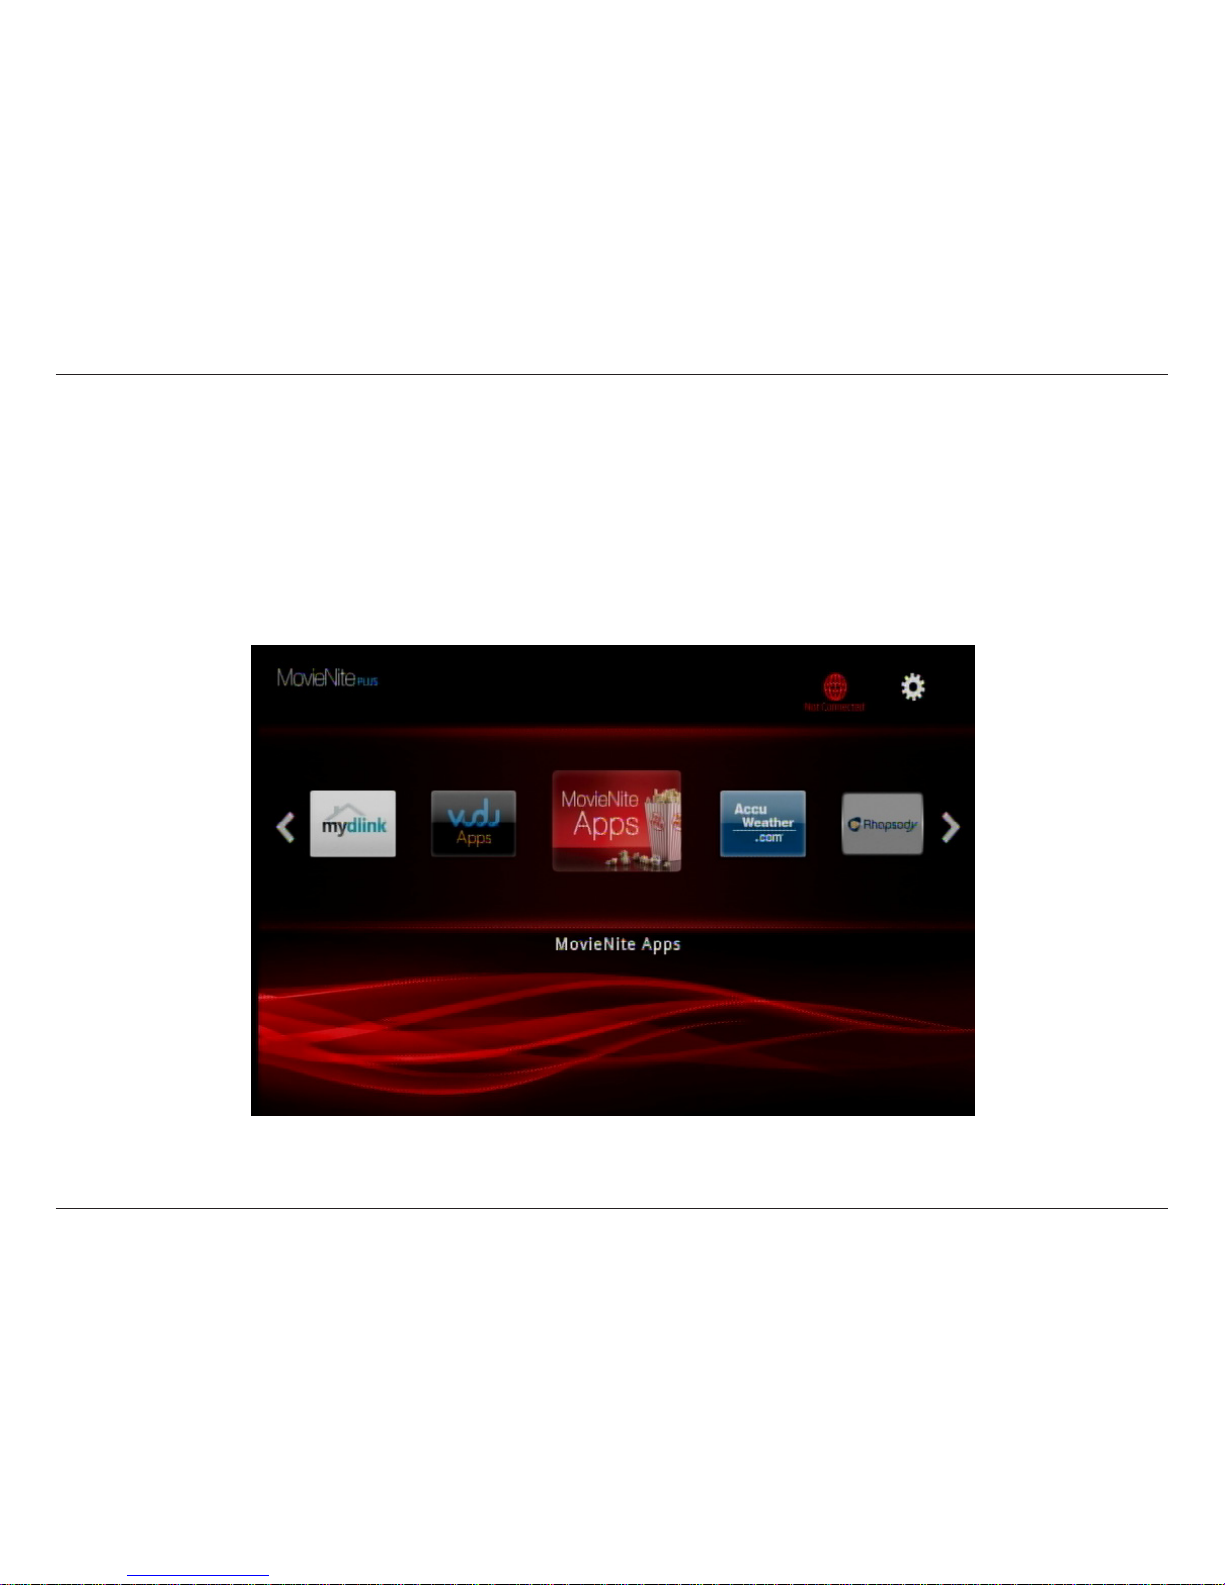
You will see the MovieNite Plus screen appear. Follow the on-screen setup (if any) to congure your DSM-312 media player. You
may manually change your settings by clicking the gear icon from the Home page.
If you connected an Ethernet cable and you cannot connect, please refer to Ethernet Setup on page 16.
Wireless users continue to Step 6 (next page).
Page 17
13D-Link DSM-312 User Manual
Section 2 - Installation
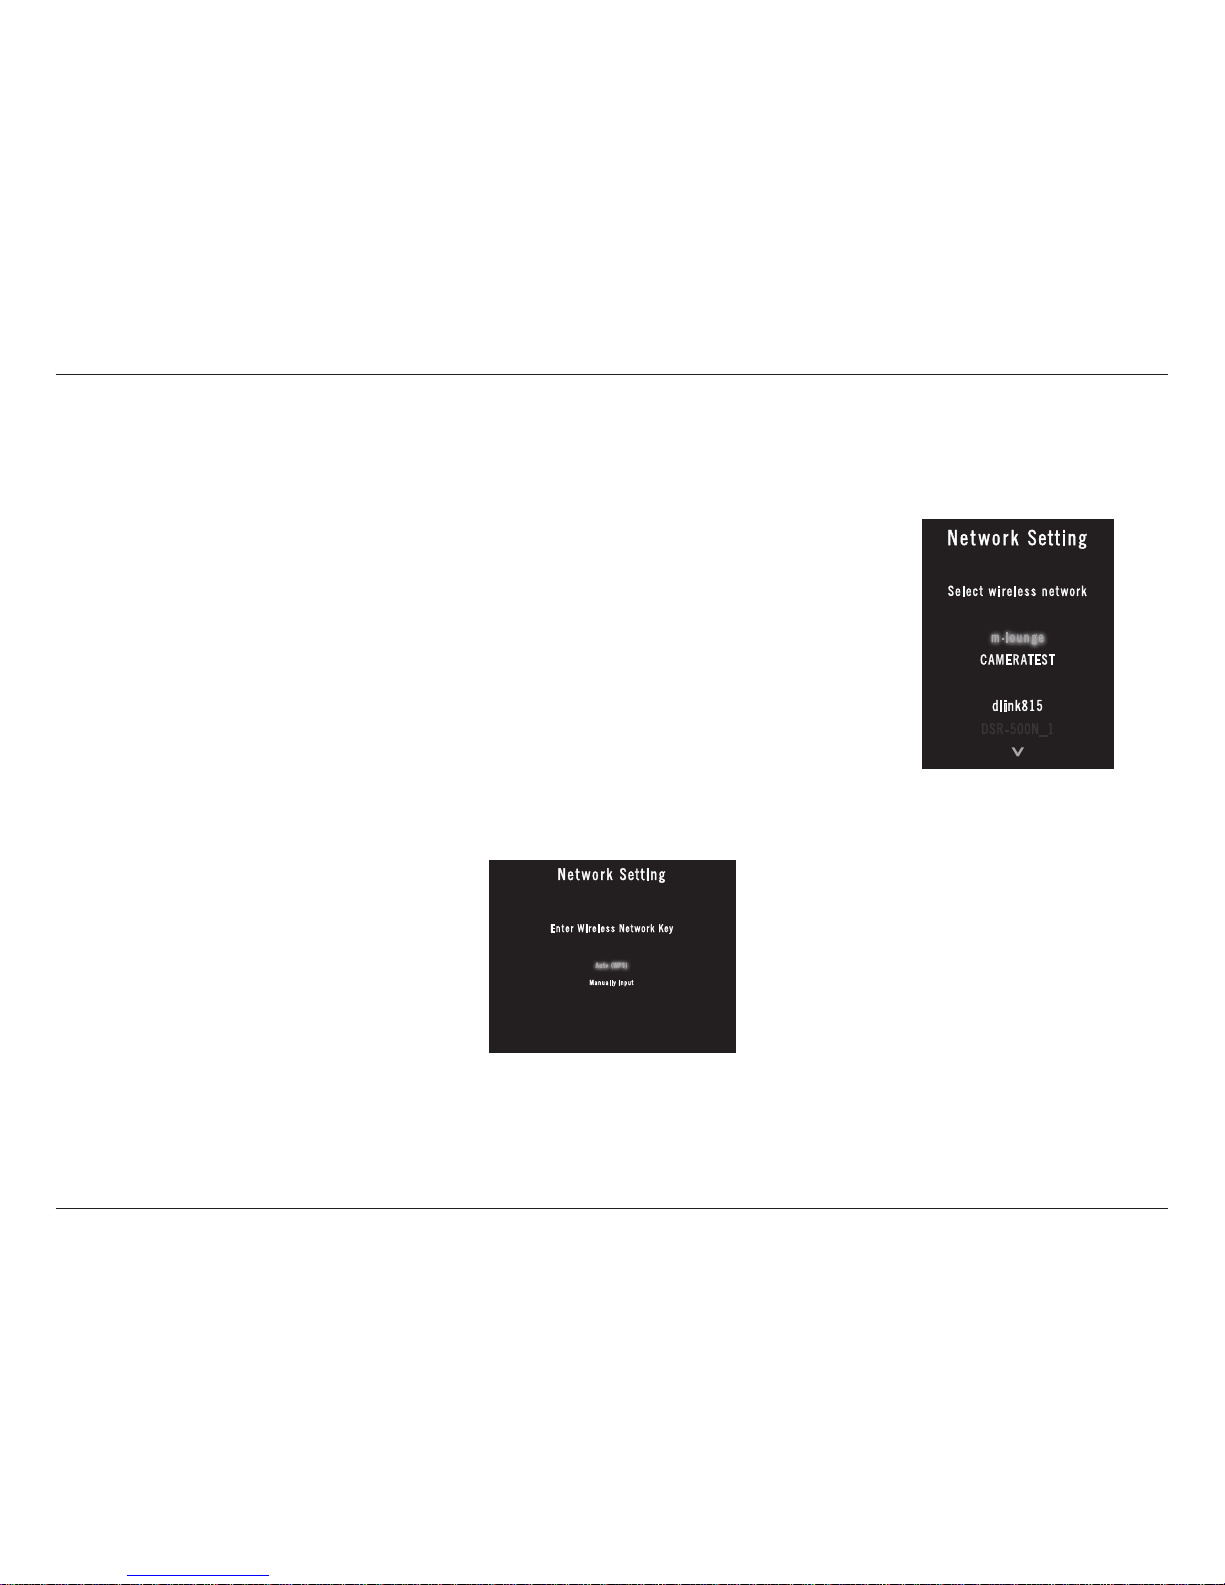
Wireless Setup
Note: You can also use WPS (useful if you do not remember your wireless password). Skip to the WPS Setup section on page 15.
A list of wireless networks in your area will appear. Select the network you want to connect to
and press the OK button on your remote.
If you do not see your network displayed in the list, you can scroll down and select Manually
Connect to manually enter your wireless network name (SSID) and security settings.
Note that your wireless network will not be displayed if your router is out of range or the SSID
broadcast is disabled (or visibility is set to invisible). Remember that the SSID and security
password must match your wireless router or access point exactly (case-sensitive).
Step 6 - If you did not connect an Ethernet cable, the DSM-312 will attempt to connect to a wireless network.
Step 7 - If the network you want to connect to is secure (encrypted), you will be prompted to enter the security password.
Page 18
14D-Link DSM-312 User Manual
Section 2 - Installation
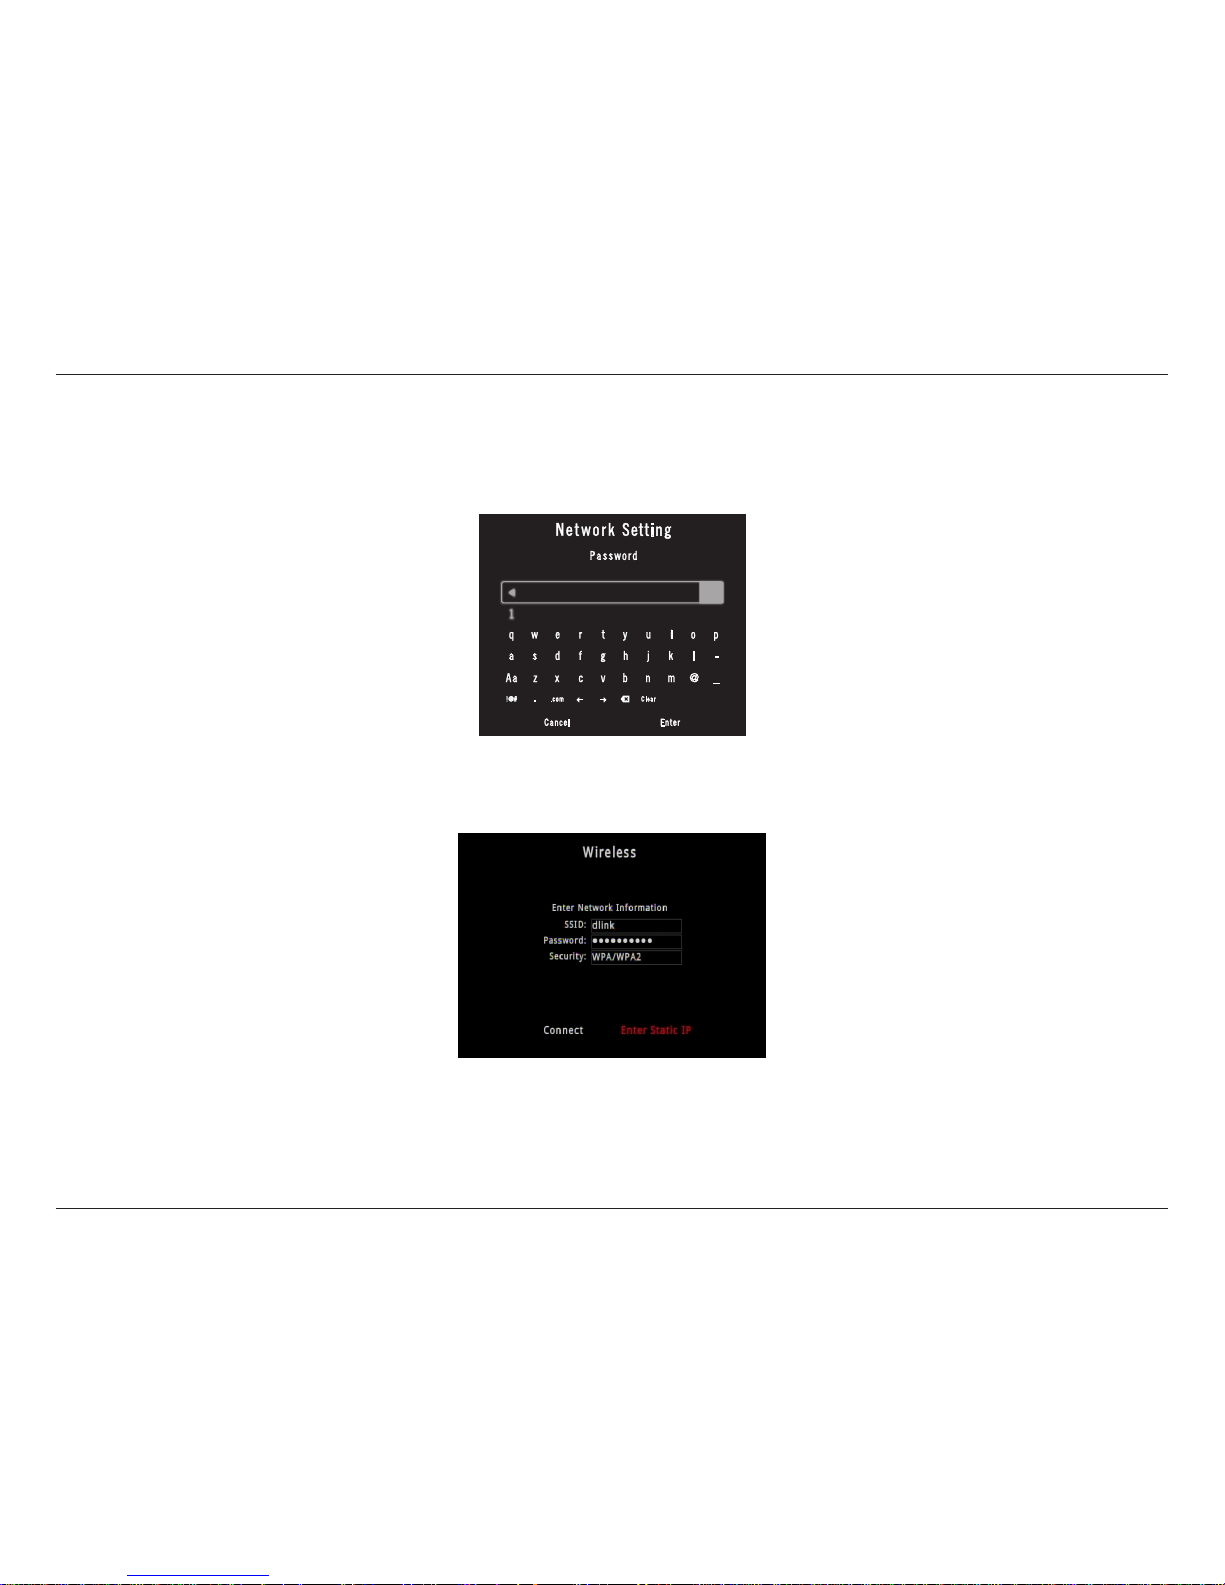
Step 8 - Use the on-screen keyboard to enter the wireless security password. Select Enter and then press the OK button on your
remote.
Note: The password is case-sensitive and must be entered the same as on your router or access point.
If DHCP is disabled on your router, from the Select Connection Mode screen, select Enter Static IP to manually enter the
network settings for your DSM-312 (refer to the If DHCP is disabled on your router section on page 16).
You should now be connected to your wireless network and the Home page will be displayed on your TV.
Note: If for some reason the DSM-312 does not connect to your network, it may be out of range. Move the DSM-312 closer to your router
or access point (in the same room) and repeat the setup steps. Once connected, try moving the DSM-312 back near your TV.
Page 19
15D-Link DSM-312 User Manual
Section 2 - Installation
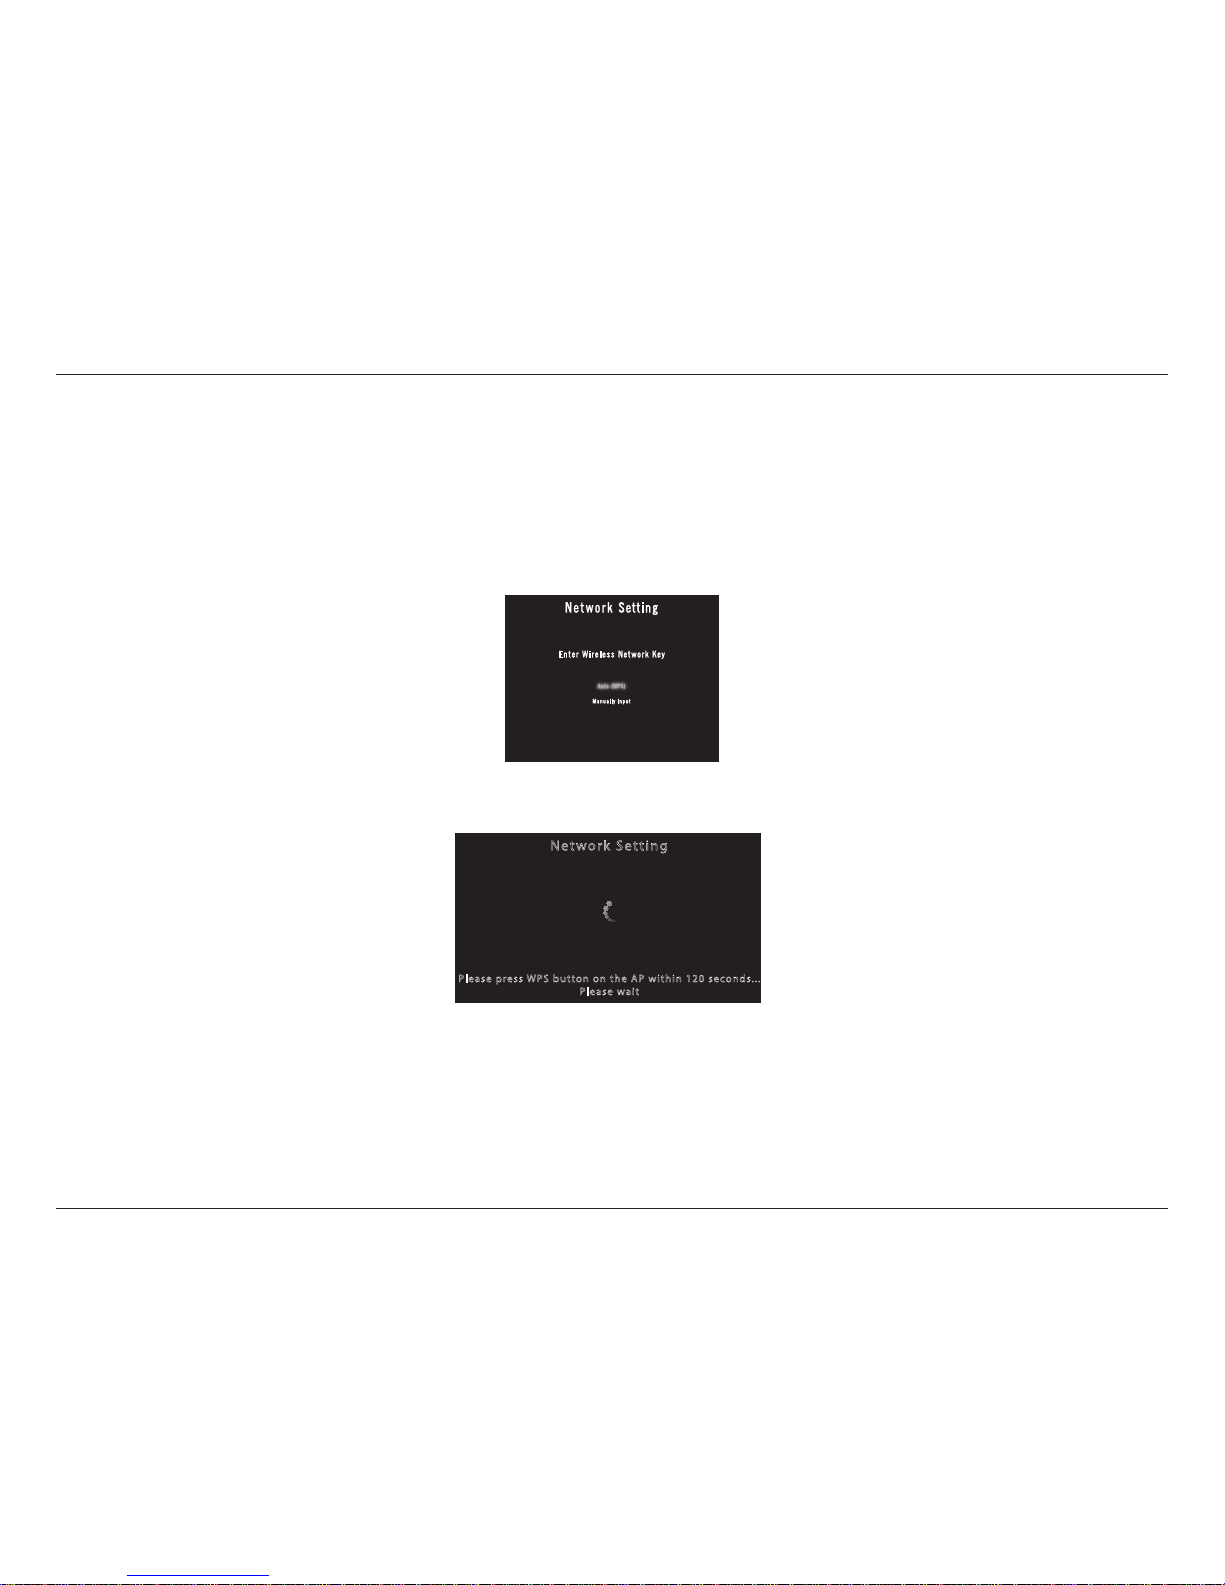
Step 2 - Within 2 minutes, press the WPS button on your router or access point, or launch WPS from its web UI. Please wait about
2 minutes to congure.
Net wo rk S et ti ng
Pl ea se pr ess WP S but to n o n th e A P wit hi n 1 20 s eco nd s.. .
Pl ea se wa it
Step 1 - If you have a WPS-enabled wireless router or access point, you can use the WPS (Wi-Fi Protected Setup) option to
congure your wireless settings automatically. If you do not know how to start WPS on your router or access point, please refer
to its user manual.
After you select your wireless network (from Step 7), select WPS (Auto) and then press the OK button on your remote.
WPS Setup
Step 3 - Your DSM-312 should now be connected to your wireless network.
Note: If for some reason the DSM-312 does not connect to your network, it may be out of range. Move the DSM-312 closer to your router
or access point (in the same room) and repeat the setup steps. Once connected, try moving the DSM-312 back near your TV.
The WPS process will begin.
Page 20
16D-Link DSM-312 User Manual
Section 2 - Installation
Ethernet Setup
If you have connected an Ethernet cable to the DSM-312 and either DHCP is not enabled on your router or the DSM-312 cannot
obtain an IP address, the Network Setting error message will appear.
Verify that your Ethernet connection is good. Check the link light on your router (or switch) is lit in the port that the DSM-312 is
connected to. Select Retry and press the OK button. If you still get an error message, select OK and press the OK button on your
remote.
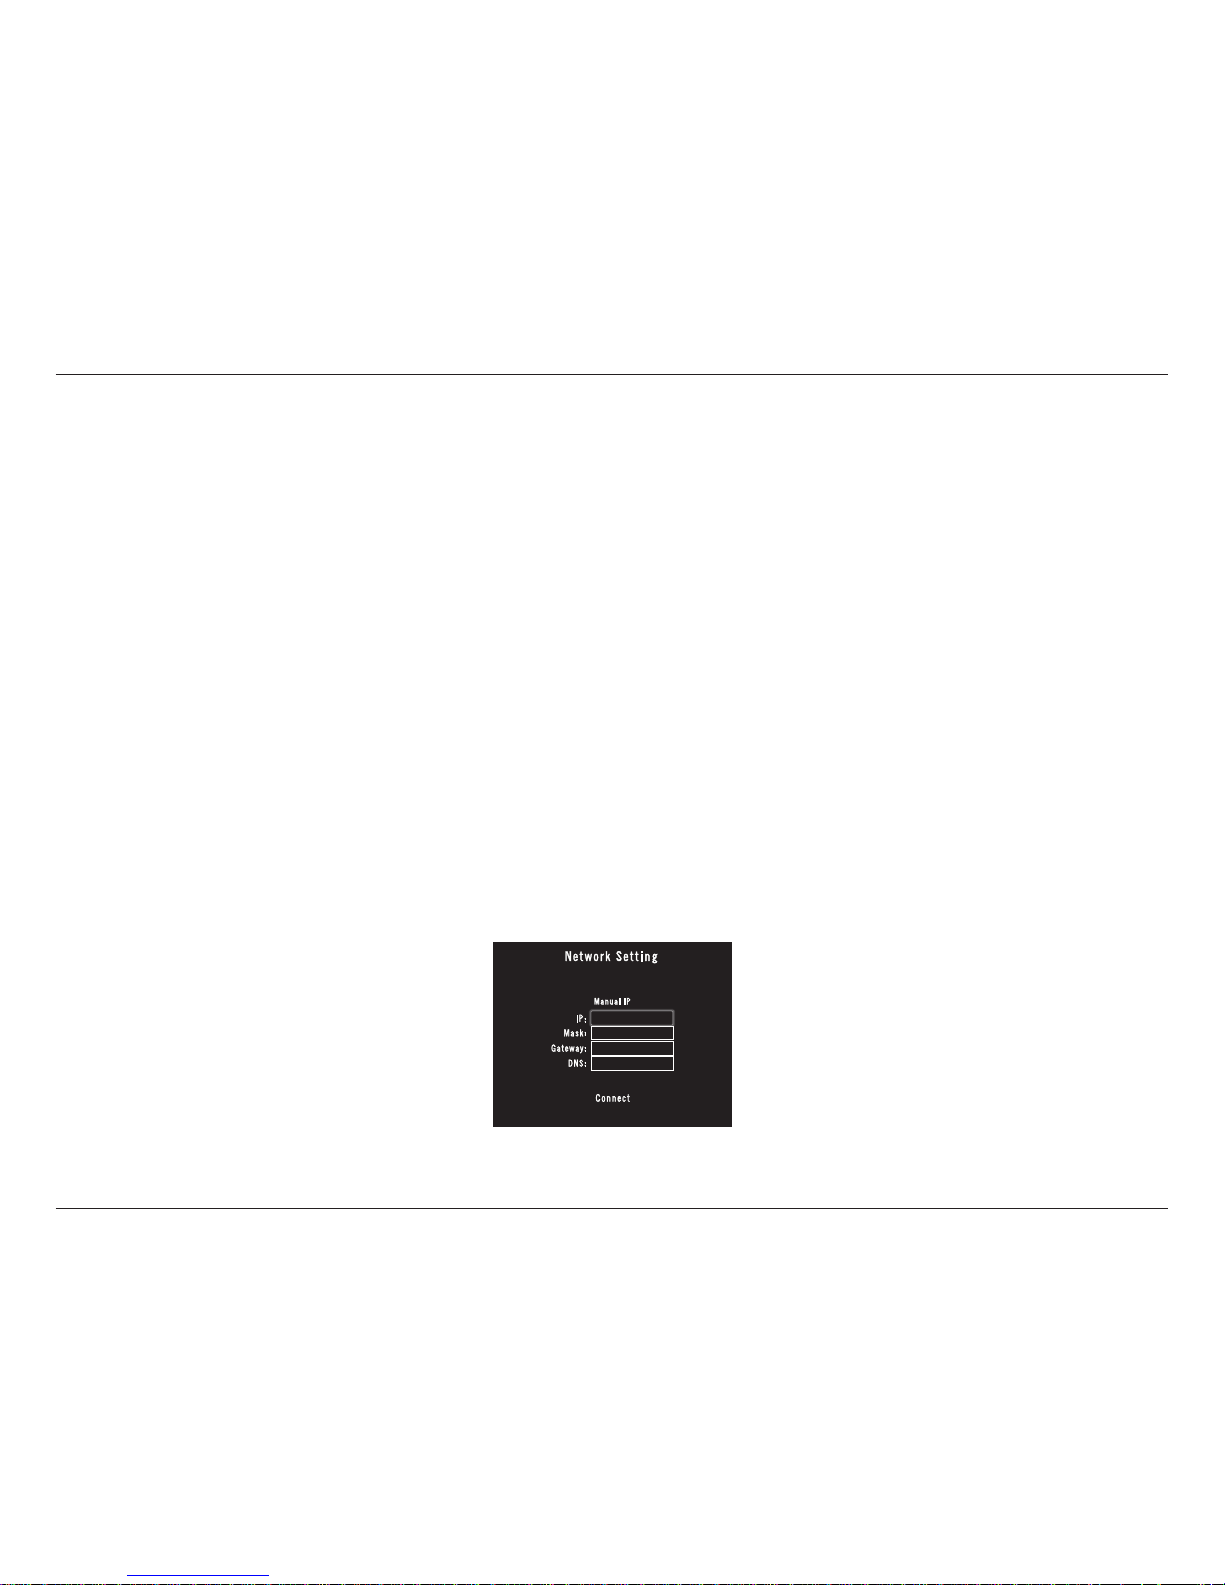
If DHCP is disabled on your router, you will see the Select Connection Mode screen. Select Manual IP and press OK to enter the
IP settings manually (see below).
Step 1 - Select the IP box and press OK on your remote. Use the on-screen keyboard to enter an IP address for the DSM-312.
Select Enter and then press the OK button on your remote.
Step 2 - Repeat step 1 for (subnet) mask, gateway (usually the LAN IP address of your router), and DNS server (usually the LAN
IP address of your router).
Step 3 - Select Connect and press the OK button to save your settings and connect to your network.
If you still cannot connect and your Ethernet or wireless connection is good, check your settings in your router. Possibly MAC
address ltering may be enabled on your router and you will need to add the LAN MAC address of the DSM-312 to the lter list.
If DHCP is disabled on your router
Page 21
17D-Link DSM-312 User Manual
Section 3 - Applications
Apps
VUDU
VUDU provides the largest library of HD movies, and you pay only for what you watch without a subscription or late fees.
You can launch VUDU from the Home page or press the VUDU button on your remote at any time.
• Log in with your existing user account information or create a new user account.
• Use the up, down, left, and right arrow buttons to navigate through your selections and press the OK button to
make a selection.
• Press the back button to back out of the current selection or page.
• During the movie, you can use the forward, previous, stop, pause/play, rewind and fast-forward buttons.
• Press the home button at any time to go to the MovieNite™ Plus Home page.
Netix
Watch unlimited movies and TV shows instantly. Watch as often as you want, anytime you want.
You can launch Netix from the Home page or press the Netix button on your remote at any time.
• Log in with your existing user account information or create a new user account.
• Use the up, down, left, and right arrow buttons to navigate through your selections and press the OK button to
make a selection.
• Press the back button to back out of the current selection or page.
• During the movie, you can use the forward, previous, stop, pause/play, rewind and fast-forward buttons.
• Press the home button at any time to go to the MovieNite™ Plus Home page.
Below are instructions for a few of the more popular apps.
Note: App design/instructions may change without notice.
Page 22
18D-Link DSM-312 User Manual
Section 3 - Applications
YouTube
Discover and watch video clips from the Internet.
You can launch YouTube from the Home page or press the YouTube button on your remote at any time.
• Select one of the options on the left side (Discover Channels, Search, My YouTube, or Featured) and press the OK
button. Select My YouTube to log into your account or pair with your mobile device.
• Use the up, down, left, and right arrow buttons to navigate through your selections and press the OK button to make
a selection.
• Press the back button to back out of the current selection or page.
• During the video, you can use the stop, pause/play, rewind and fast-forward buttons or press the OK button to bring
up on-screen controls. Press the down arrow button to cycle through other options (Info, Related Videos, and Playlist)
• Press the home button at any time to go to the MoveNite™ Plus Home page.
Pandora
Listen to free Internet radio. Personalize your stations and discover new music.
You can launch Pandora from the Home page or press the Pandora button on your remote at any time.
• Log in with your existing user account information or create a new user account.
• Use the up, down, left, and right arrow buttons to navigate through your selections and press the OK button to make
a selection.
• Press the back button to back out of the current selection or page.
• During music playback, you can use the forward, previous, stop, pause/play, rewind and fast-forward buttons.
• Press the home button at any time to go to the MovieNite™ Plus Home page.
Page 23
19D-Link DSM-312 User Manual
Section 3 - Applications
Picasa
View your photos and slide shows on your TV with Picasa.
You can launch Picasa from the Home page.
• Log in with your existing user account information or create a new user account if desired.
• Use the up, down, left, and right arrow buttons to navigate through your selections and press the OK button to make
a selection.
• Press the back button to back out of the current selection or slide show.
• Press the options button to display a menu of more control functions.
• During a slide show, you can use the forward, previous, stop, pause/play buttons.
• Press the home button at any time to go to the MovieNite™ Plus Home page.
AccuWeather
Get your weather forecast, local to international. World class weather radar plus your up to the minute weather report and current
conditions.
You can launch AccuWeather from the Home page.
• Use the up and down arrow buttons to navigate through your selections and press the OK button to make a selection.
• Press the back button to back out of the current selection.
• Press the options button to change toggle between Celsius and Fahrenheit.
• Press the home button at any time to go to the MovieNite™ Plus Home page.
MovieNite Apps
Click to select from a large number of apps. App selection/design may change without notice.
• Use the up and down arrow buttons to navigate through a list of categories and press the OK button to make a selection.
• Use the up, down, left, and right arrow buttons to navigate through your selections and press the OK button to make
a selection.
• Press the back button to back out of the current selection.
• Press the home button at any time to go to the MovieNite™ Plus Home page.
Page 24
20D-Link DSM-312 User Manual
Section 3 - Applications
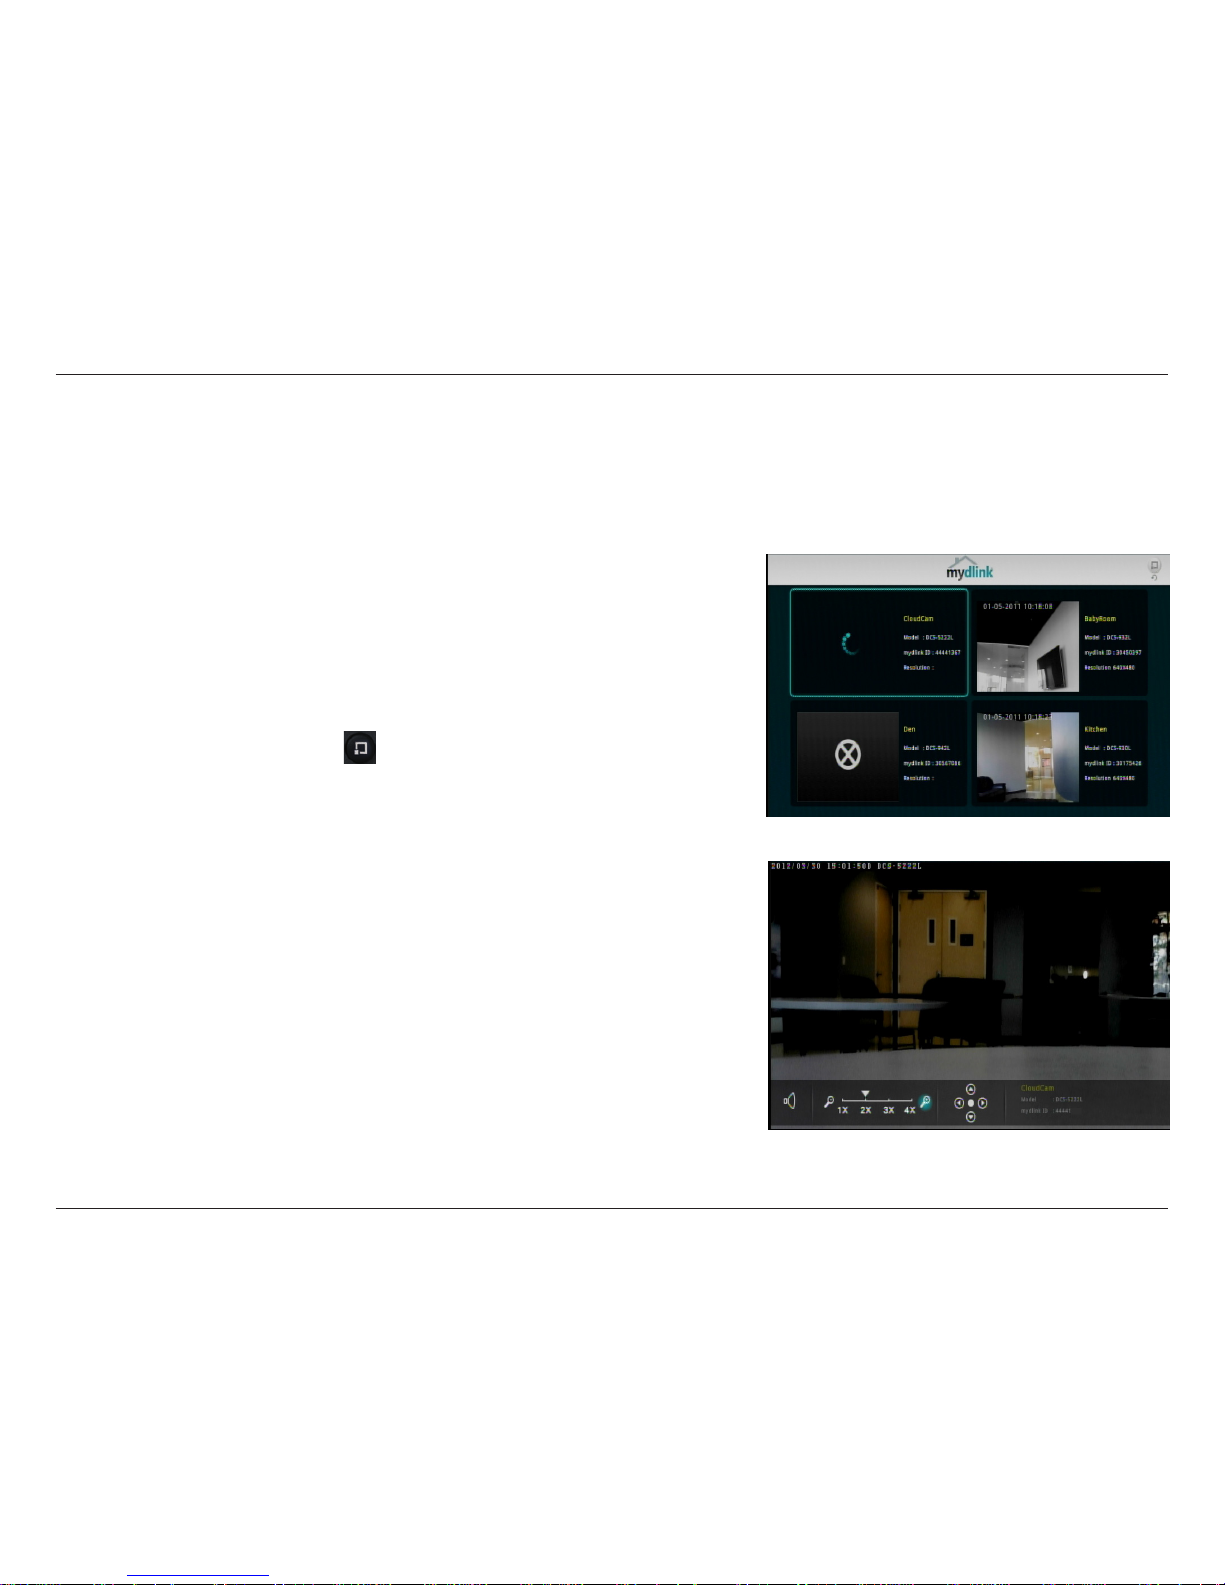
The home page will display all your camera’s live video. In our example we
have 4 cameras, 3 turned on. The icon in the lower-left corner indicates that
there is no connection to that camera (our 4th camera which is turned o).
Use the arrow buttons to select the camera you want to view and press the
OK button.
You can press the options button on the remote to refresh the home page
immediately. This is useful if you add a new camera.
When you select the camera you want to view, its live video feed will display
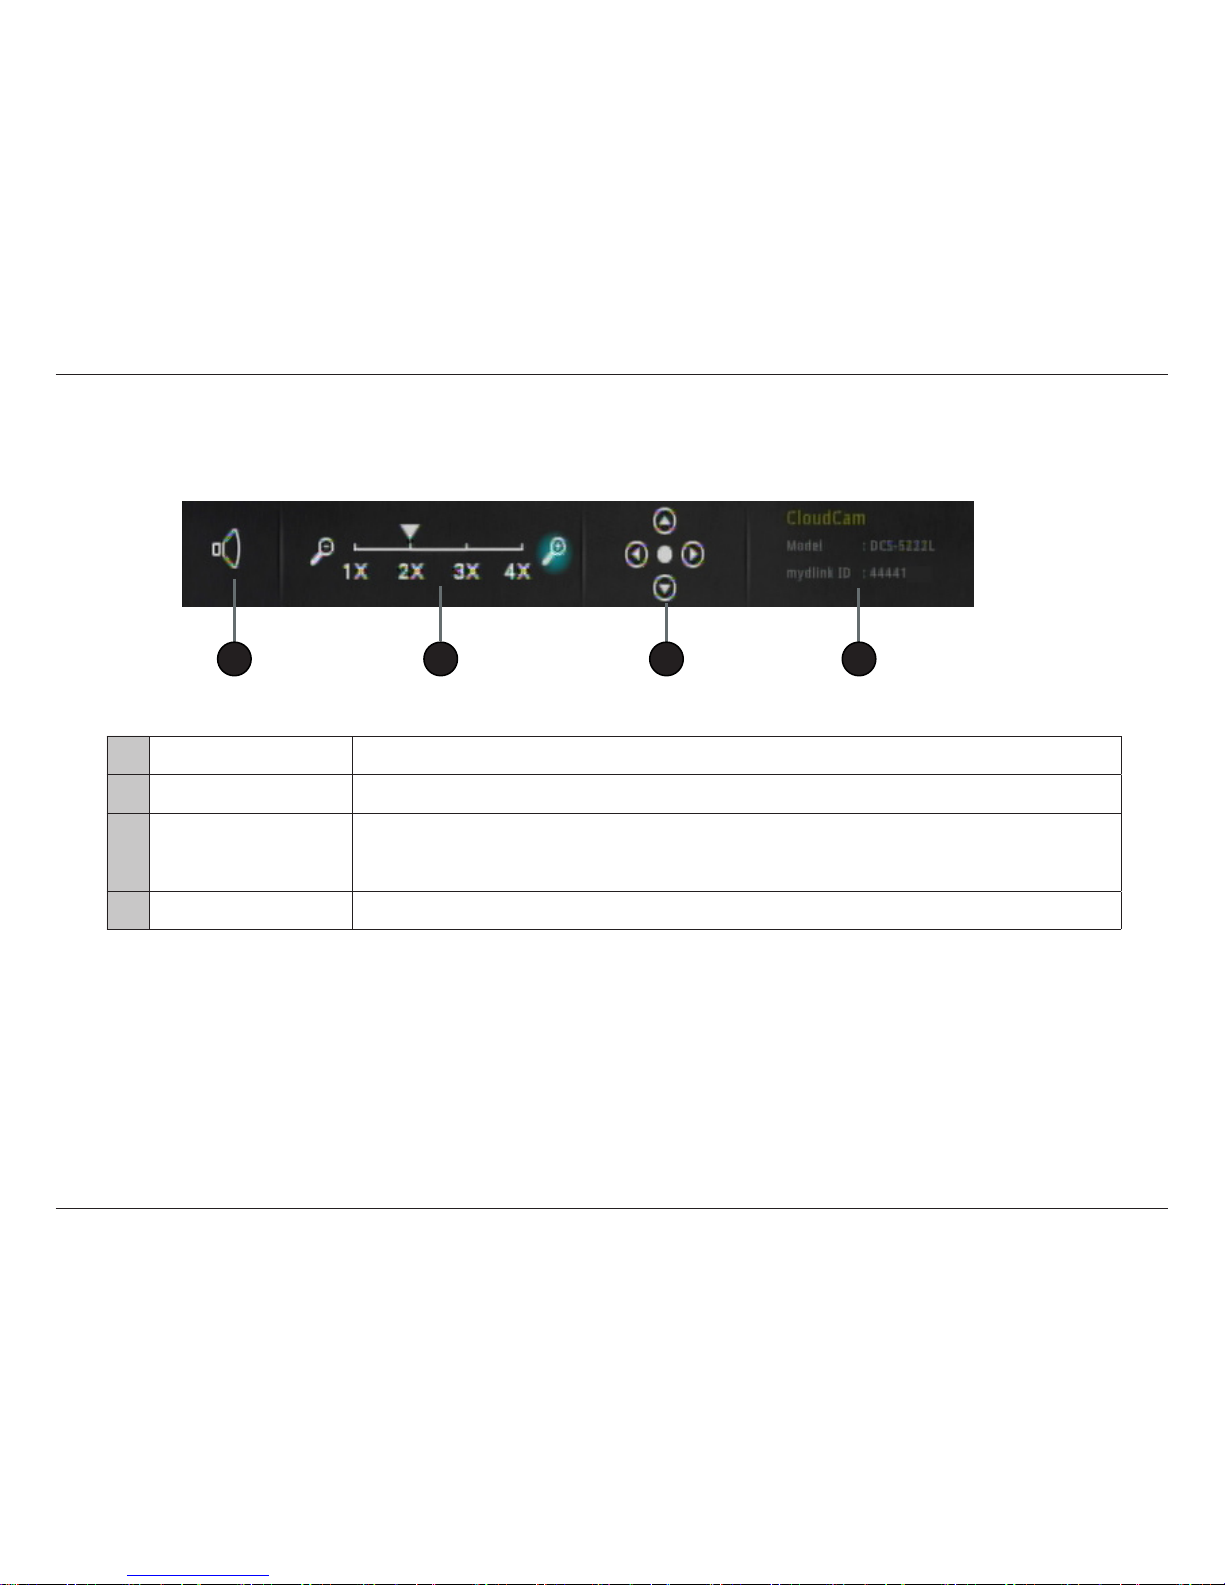
full screen. Depending on your camera, dierent icons will be displayed at
the bottom where you can turn audio on or o, zoom, pan, and tilt. Refer
to the next page for more information. Your camera model and mydlink ID
number will also be displayed.
To go back to the mydlink home page, press the back button on your remote.
mydlink
Conveniently view your live mydlink-enabled network cameras on your TV using the mydlink app on your MovieNite™ Plus.
Monitor what is happening in your home and keep an eye on your kids or pets.
You can launch mydlink from the Home page.
Page 25
21D-Link DSM-312 User Manual
Section 3 - Applications
1 2 3 4
1 Audio Select to turn the audio on or o. Audio must be enabled on your camera.
2 Zoom Select the minus icon (left) to zoom out or select the plus icon (right) to zoom in.
3 Pan/Tilt
Select the arrow icon in the direction you want to pan or tilt your camera. Select the
middle icon for your camera’s “home” position. If your camera does not support pan/
tilt, these icons will not be displayed.
4 Camera Information Your camera name, model number, and its mydlink ID will be displayed here.
Use the arrow buttons on your remote to move the light blue/teal cursor to the icon you want to select then click the OK button.
Page 26
22D-Link DSM-312 User Manual
Section 3 - Applications
Flingo Queue
Flingo will allow you to select content from the Internet to be viewed on your TV through the DSM-312 media player. Follow the
steps below:
1. From a computer that is on the same network as your DSM-312 media player, open your web browser and go to
http://www/ingo.org.
2. Watch the short demo video and then drag the orange Flingo button to the bookmark toolbar on your browser.
3. Now you may visit supported websites such as youtube.com. When you see a video you would like to view on your
TV, select it and then click the Fling button on your web browser.
4. A new page will appear with a list of videos. There will be a check box next to each video. If you want to add the video
to your Flingo Queue, check the box and click Fling ‘em at the top. You can also check the Fling all box to select all
the videos on the page and then click Fling ‘em to add them to the queue. If you select a large number of videos,
allow 1-2 minutes for the videos to be added.
5. Power on your DSM-312 and go to MovieNite Apps. At the top left, select Fling Queue and press the OK button.
The videos you have selected on your computer will now appear in this list. Select a video and press OK to watch it.
6. During playback, press the OK button on your remote. You can skip videos or go back to the Queue. Note that the
rewind and fast forward buttons on the remote currently do not work with this app.
Page 27
23D-Link DSM-312 User Manual
Section 4 - Conguration
Conguration
System
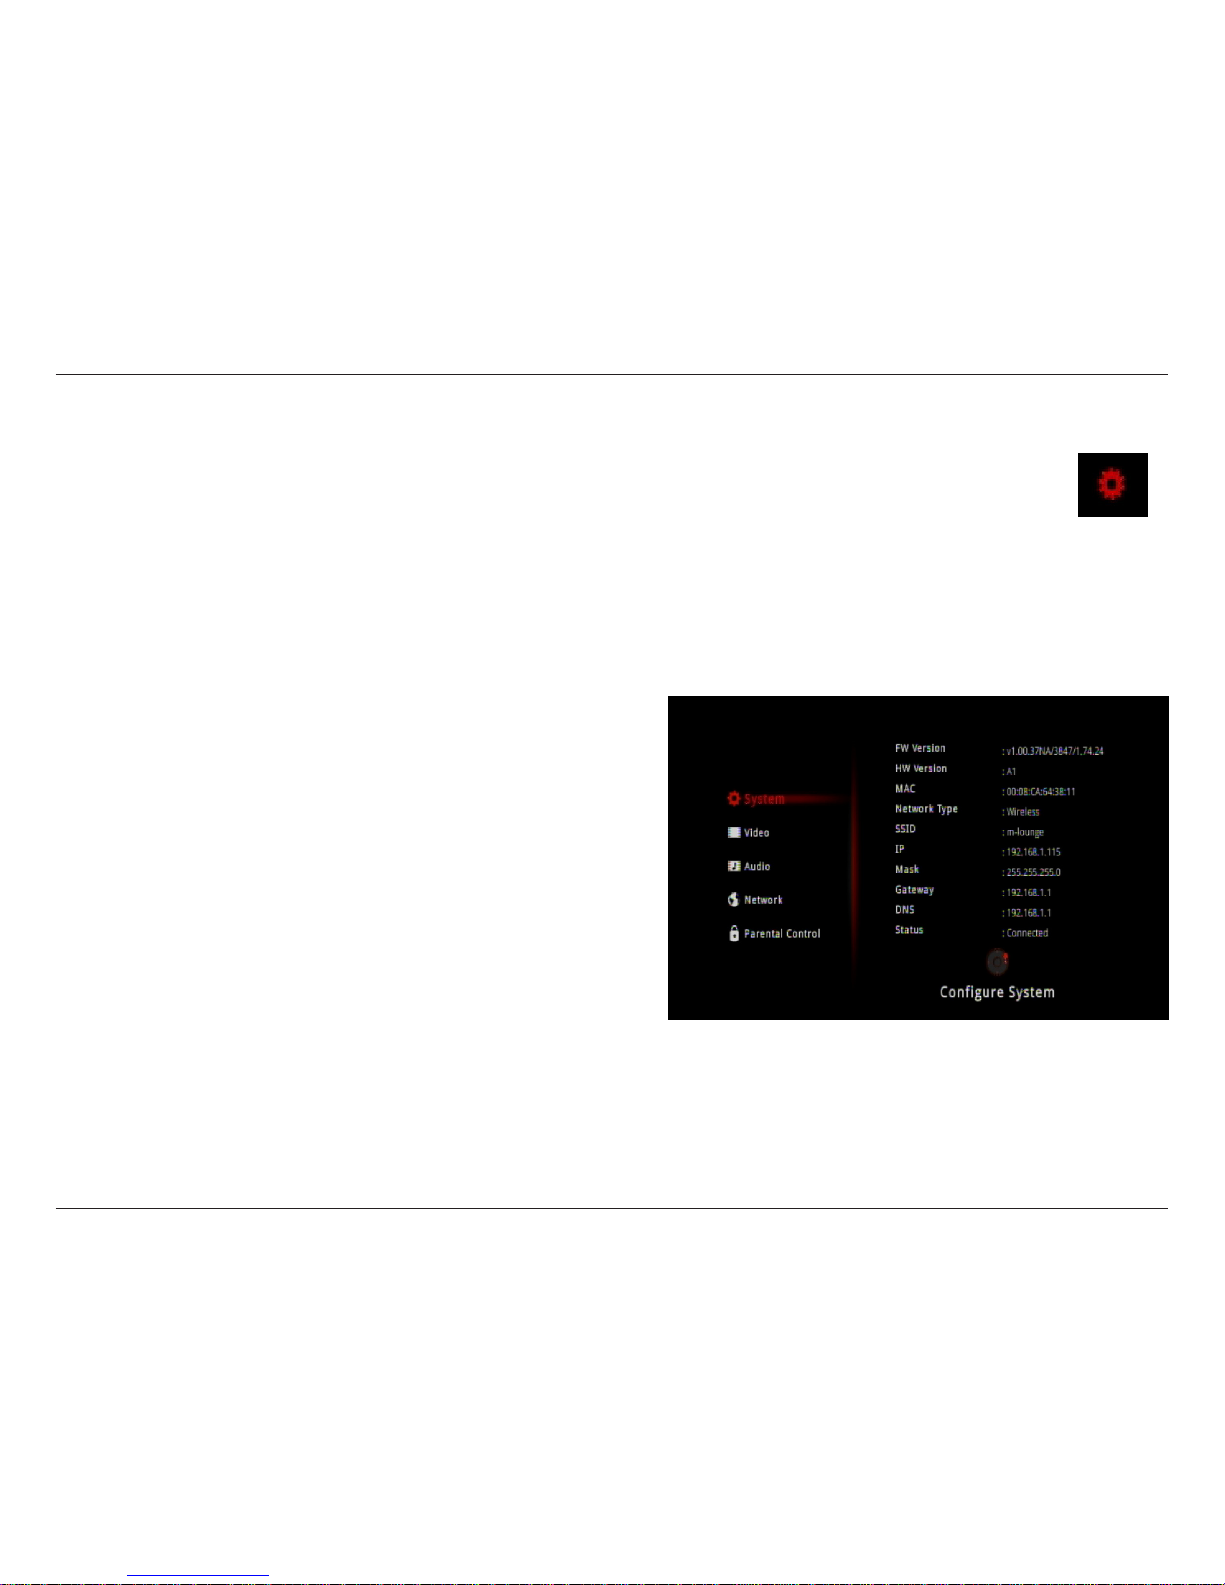
Your DSM-312 will automatically detect your network and TV settings. If you would like to manually congure your
settings, upgrade rmware, and other advanced functions, navigate up to the gear icon on the home page and
press the OK button.
The System screen will display the following device information:
The current rmware version of your DSM-312.
The hardware revision.
The MAC address of the DSM-312.
Displays the current network setting (Wired or Wireless).
Displays the wireless network name (SSID) that the DSM-312 is
currently connected to (if wireless is selected).
The IP address of the DSM-312.
The subnet mask of the network you are connected to.
The default gateway (usually the IP address of your router).
The primary DNS server.
Displays the current status (Connected or Disconnected).
FW Version:
HW Version:
MAC:
Network Type:
SSID:
IP:
Mask:
Gateway:
DNS:
Status:
Press the right arrow to access System options (refer to the next page).
Page 28
24D-Link DSM-312 User Manual
Section 4 - Conguration
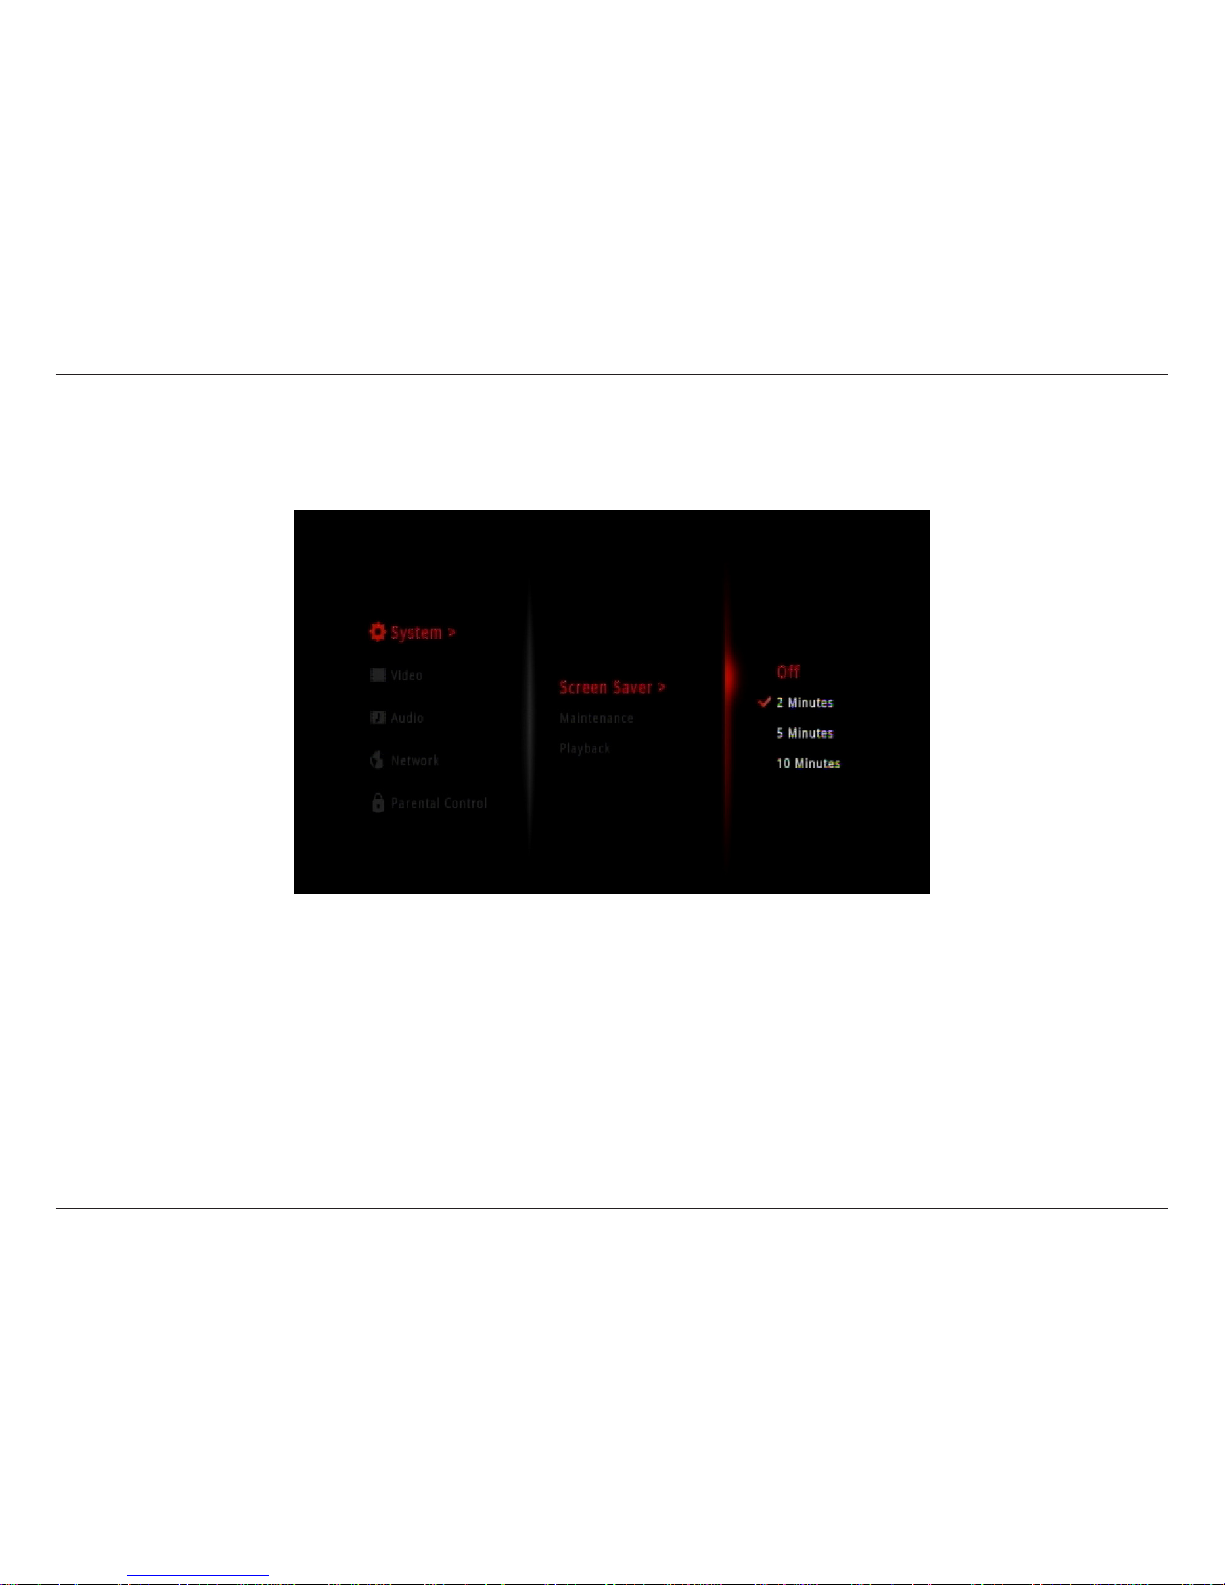
Screen Saver
Select the amount of idle time before the screen saver will start (2, 5, or 10 minutes) or select O to disable the screen saver.
Page 29
25D-Link DSM-312 User Manual
Section 4 - Conguration
Maintenance
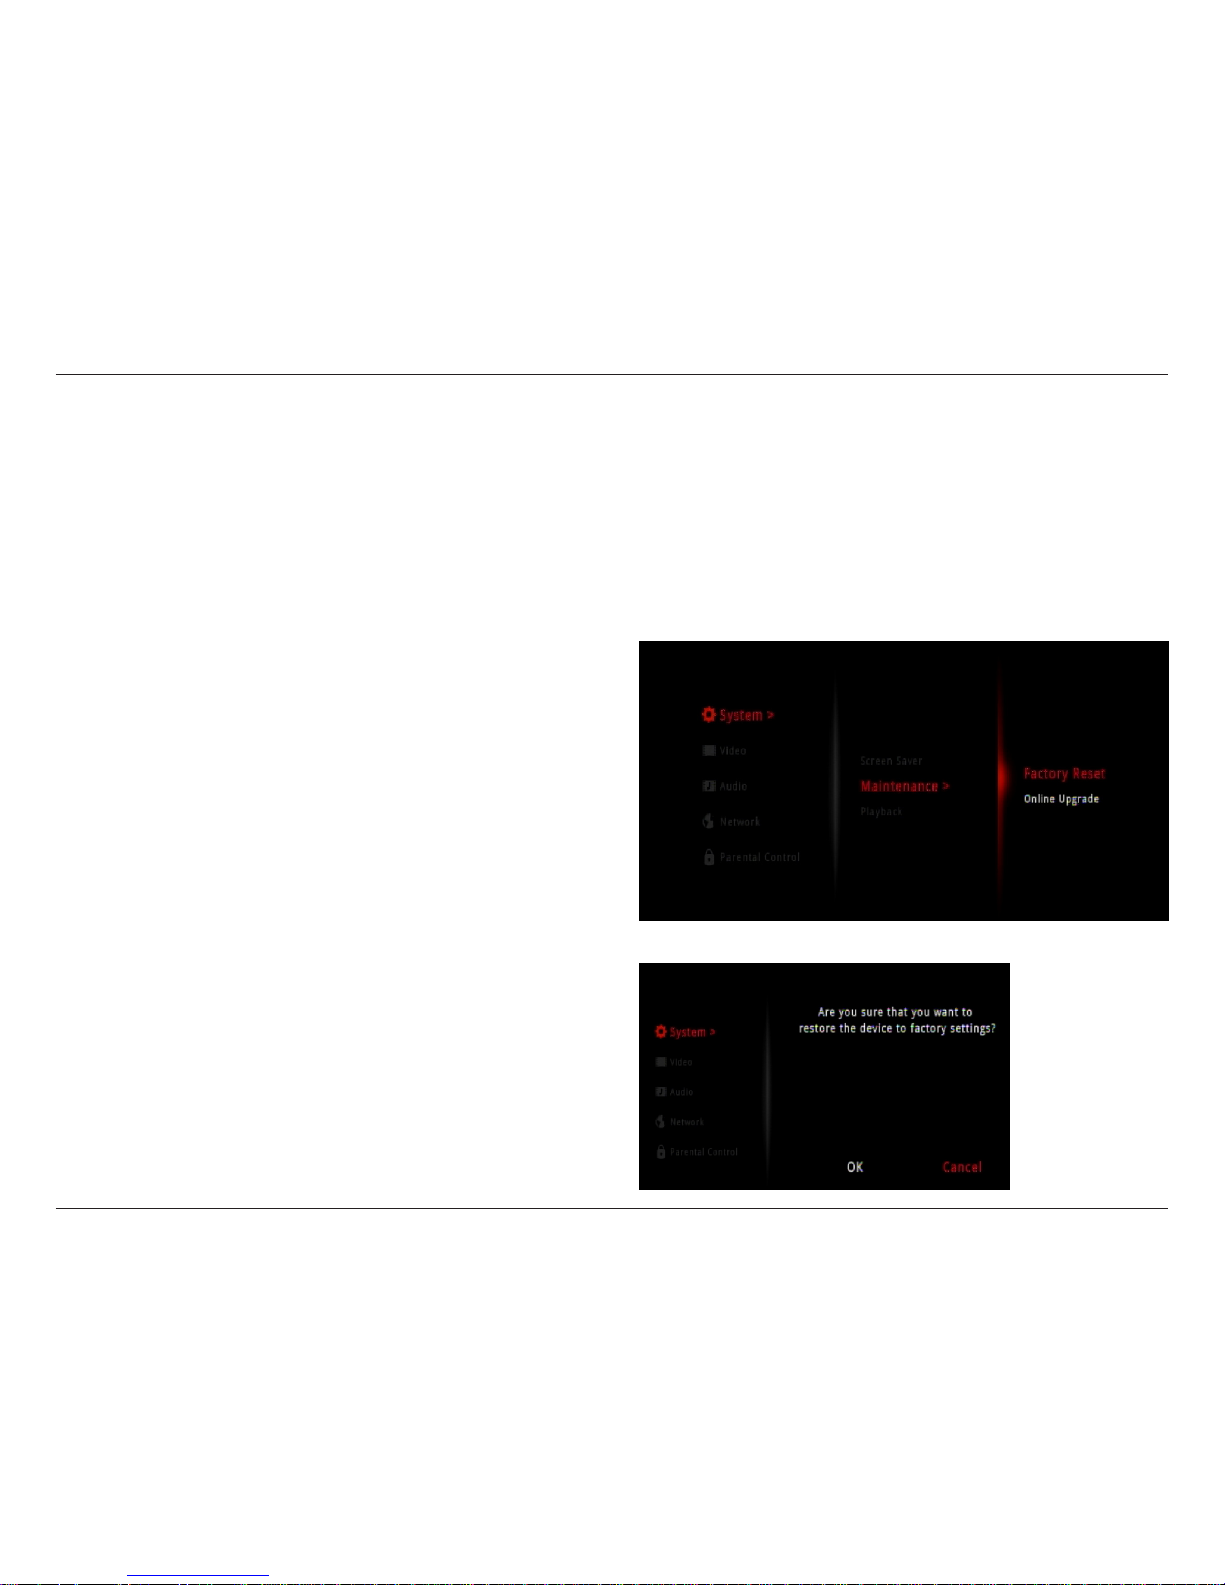
Factory Reset
Select Maintenance to perform a factory reset or to manually upgrade the rmware.
Select Factory Reset to erase all your settings and set the DSM-312 to the default settings.
Step 1 - Select Factory Reset and press the OK button on
your remote.
Step 2 - Select OK and press the OK button on your remote to
start the reset process or select Cancel.
Note: A factory reset will deactivate the account information for
all of the apps. You will need to re-enter your account information
by selecting the app from the Home page.
Page 30
26D-Link DSM-312 User Manual
Section 4 - Conguration
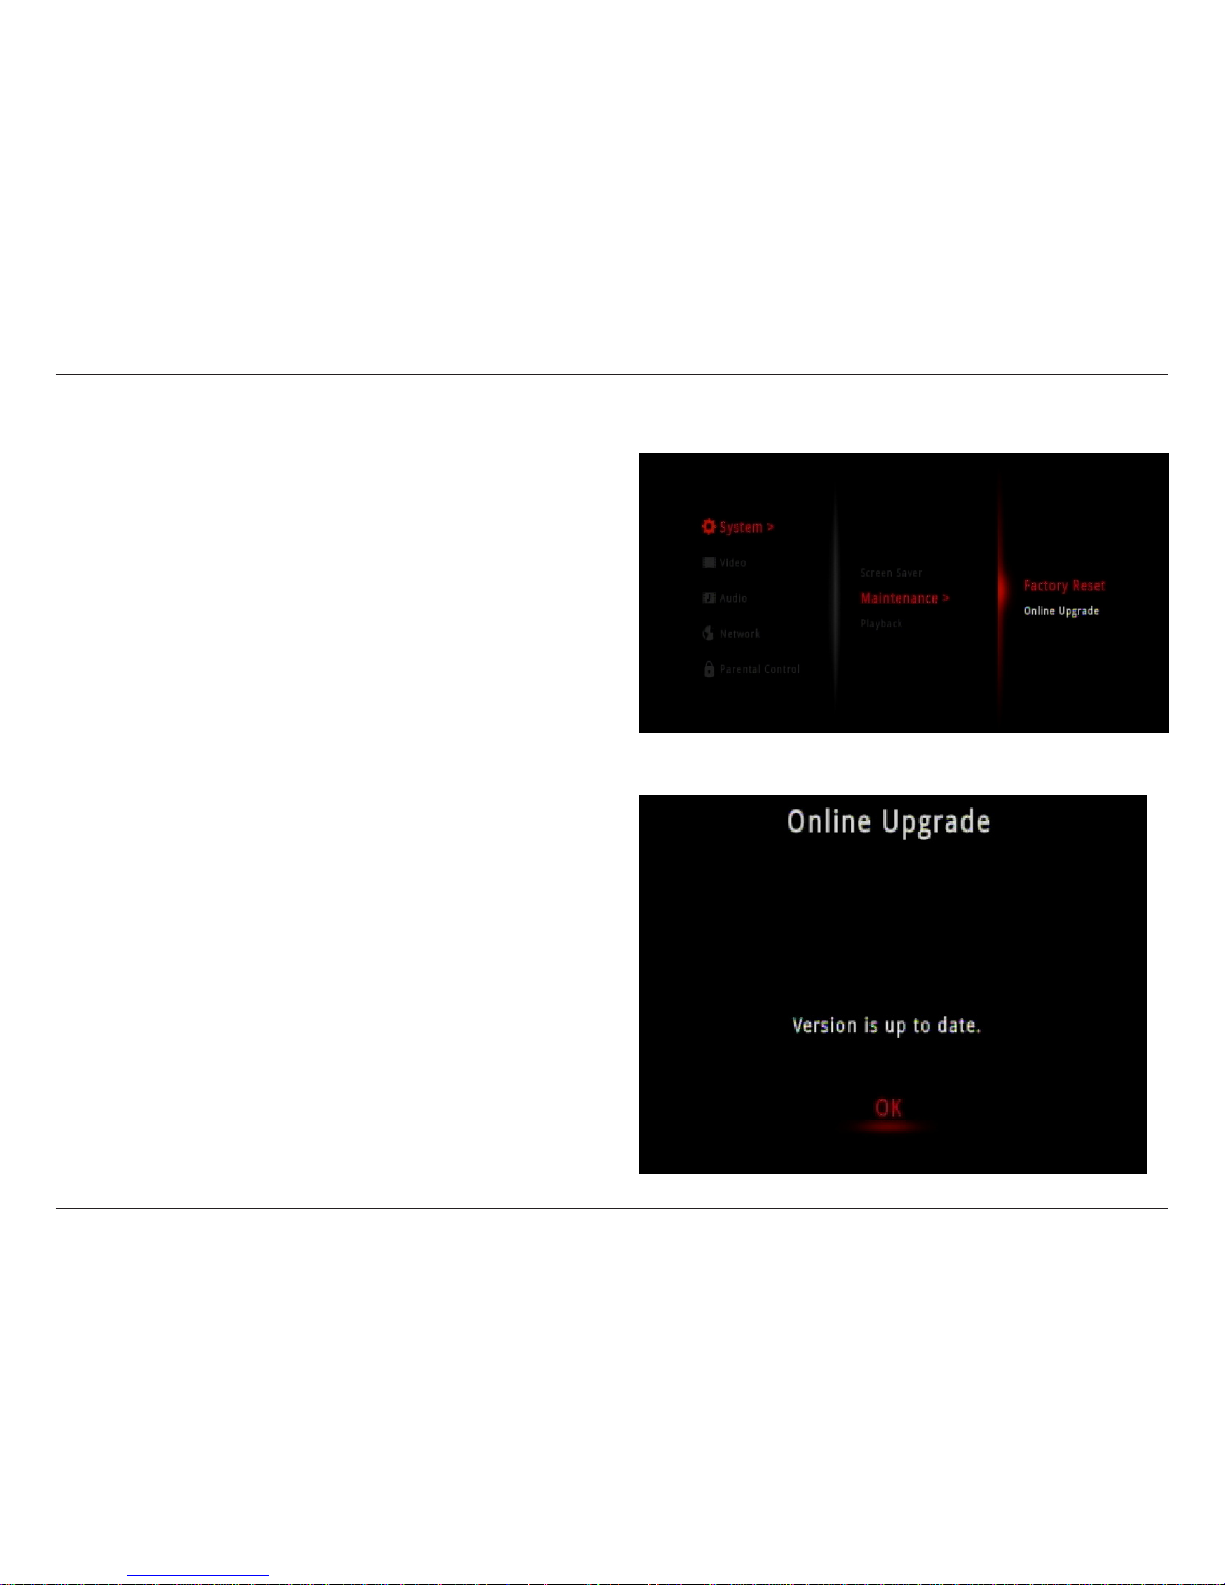
Online (Firmware) Upgrade
Step 1 - Select Online Upgrade and press the OK button on
your remote.
Step 2 - If there is a new rmware available, a message
indicating an update is available will appear. Select OK to start
the upgrade process.
Do NOT turn the DSM-312 o during the upgrade process.
If the rmware is up to date, select OK and press the OK button
on your remote.
Page 31
27D-Link DSM-312 User Manual
Section 4 - Conguration
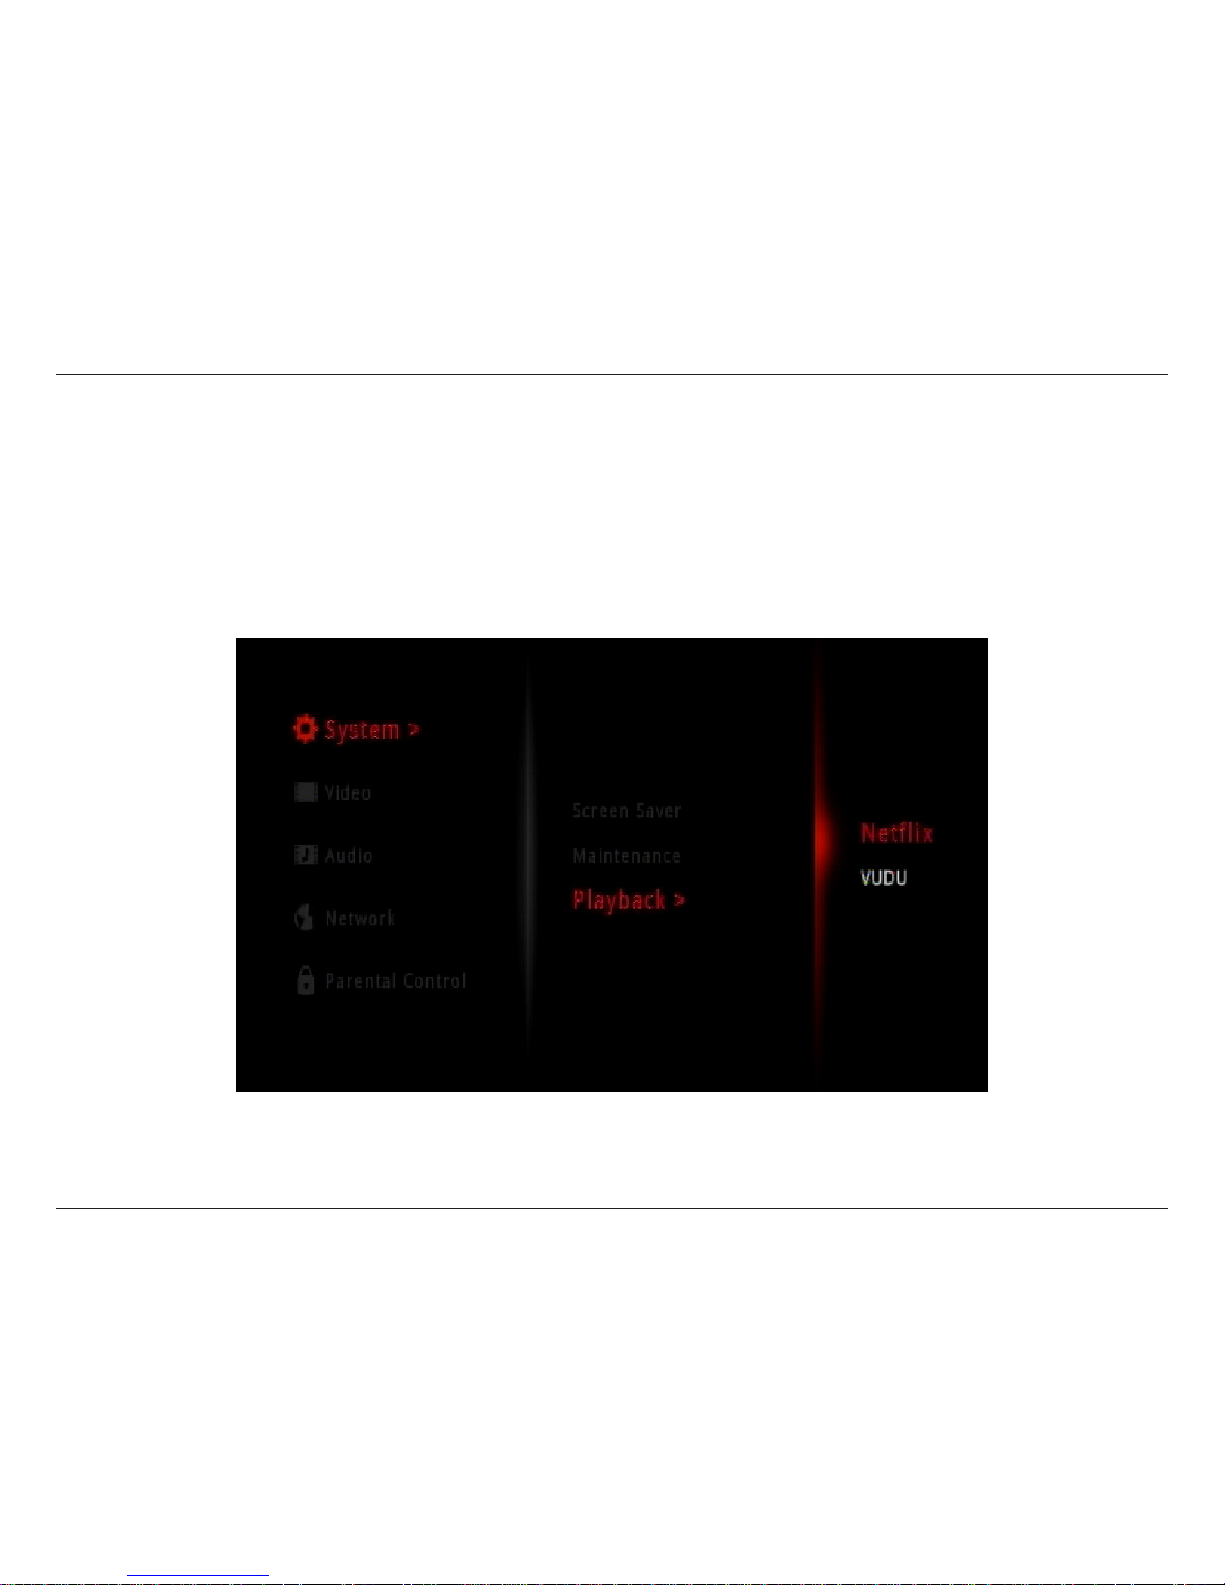
Playback
Select Playback to deactivate your Netix or Vudu accounts. The DSM-312 can only be associated with one Netix and one Vudu
account. If you want to sign in with a dierent account, you will have to perform this deactivation and then go to the Netix or
Vudu app to sign back in.
Note: If you ever sell or give your DSM-312 to another user, remember to deactivate your Netix and Vudu accounts. You can also
perform a factory reset to deactivate all accounts (recommended).
Page 32
28D-Link DSM-312 User Manual
Section 4 - Conguration
Video
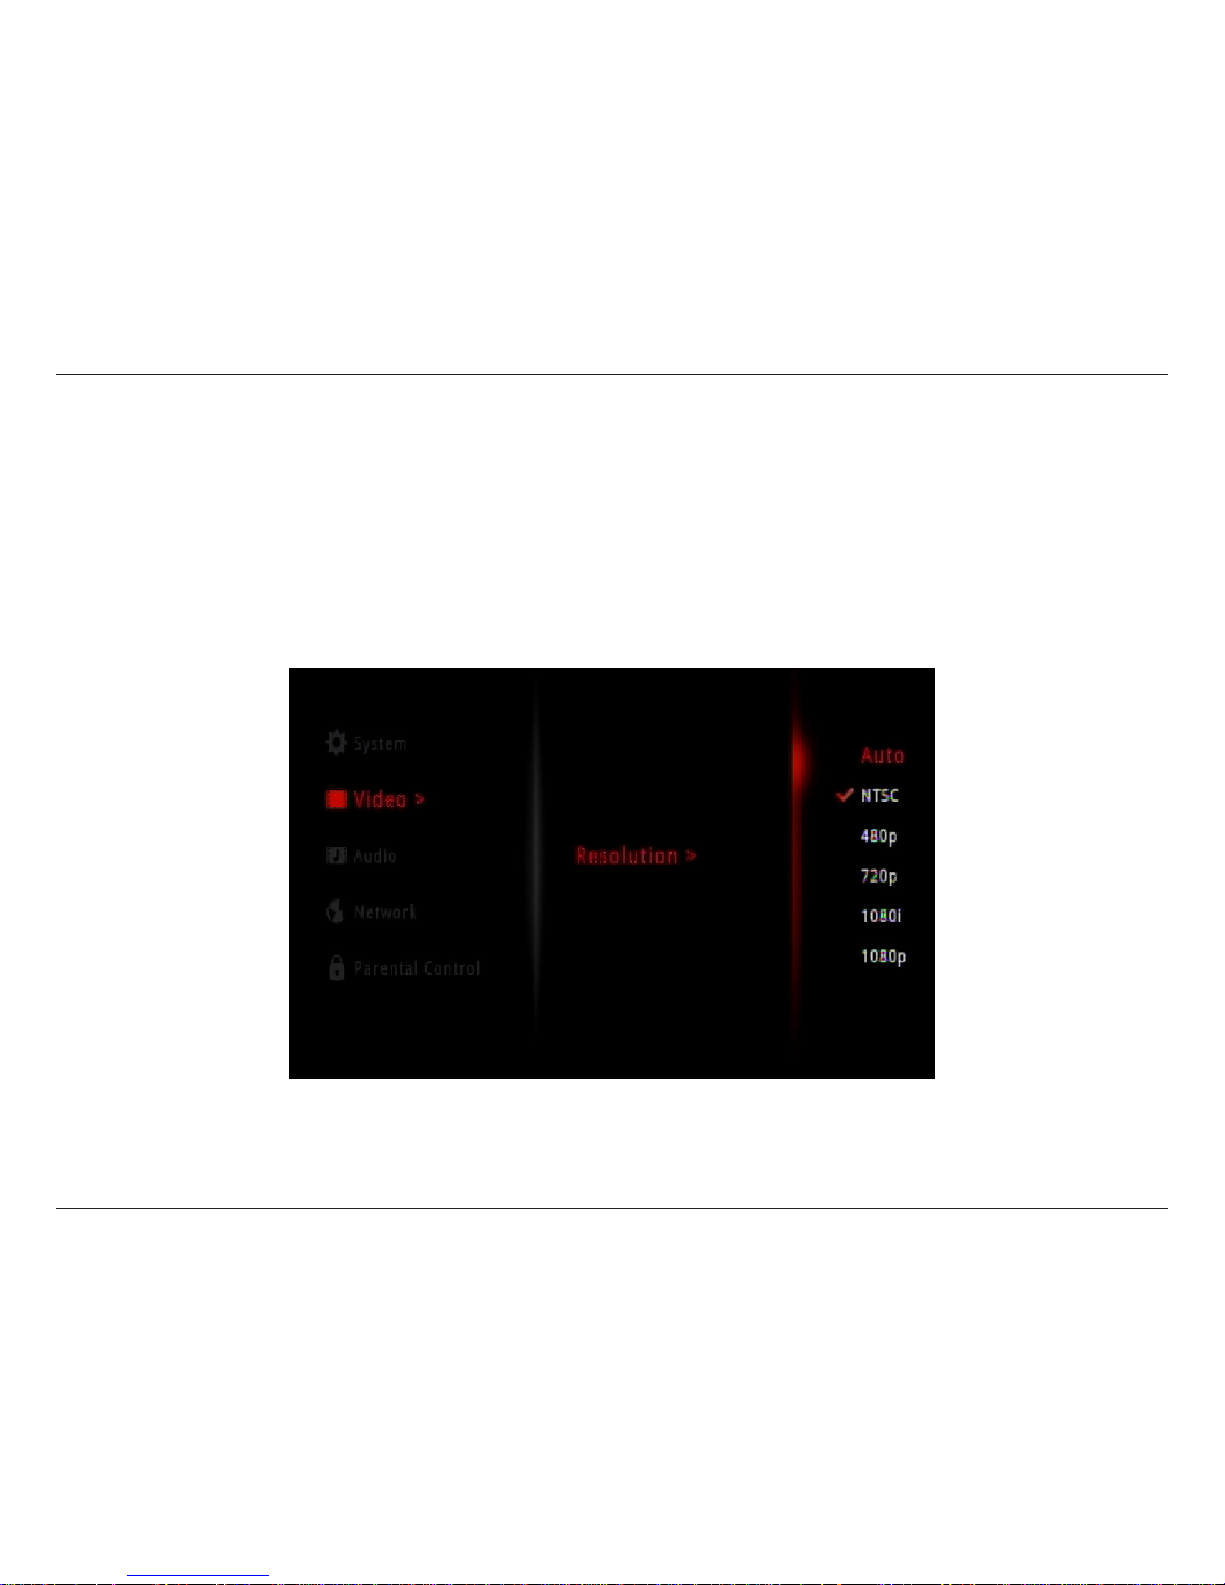
Resolution
Select Resolution to change the screen resolution. Select Auto (recommended), NTSC (480i for older analog TVs), 480p, 720p,
1080i, or 1080p.
Note: You must use an HDMI cable for 480p, 720p, 1080i, and 1080p resolutions.
Page 33
29D-Link DSM-312 User Manual
Section 4 - Conguration
Audio
HDMI
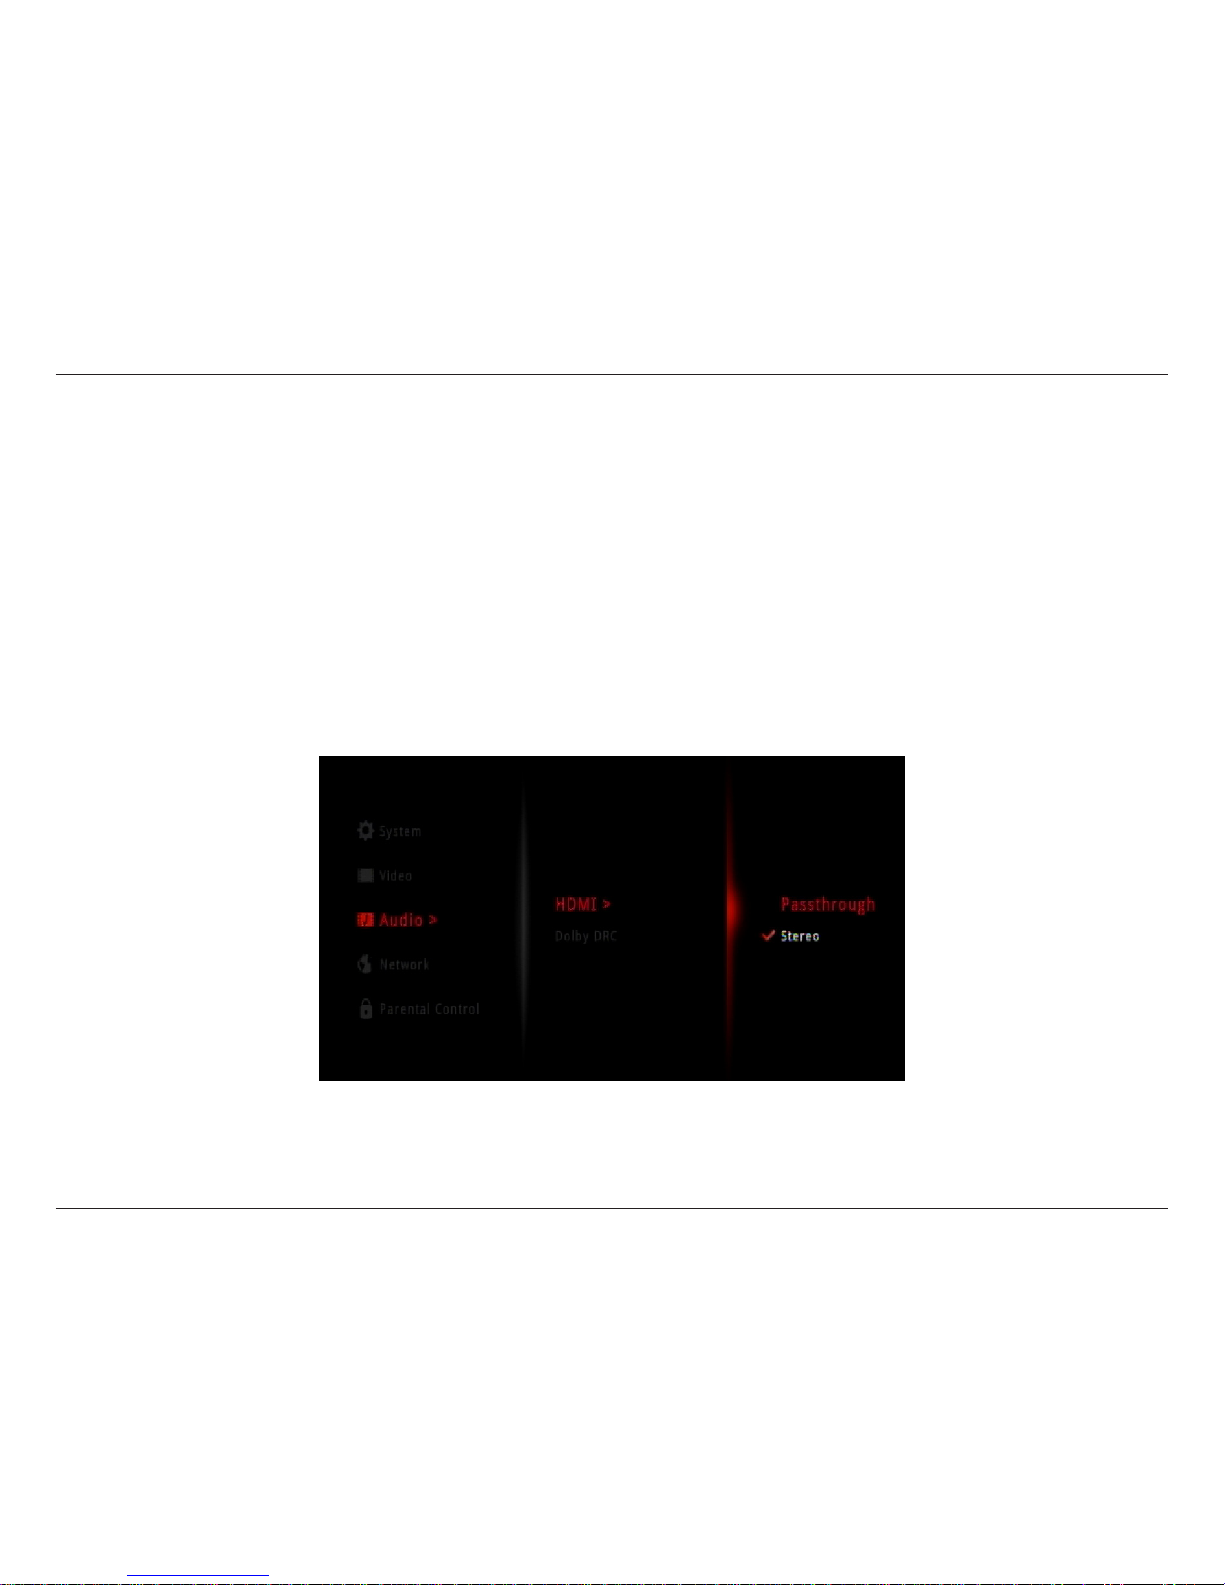
There are 2 options for Audio with an HDMI connection: Passthrough or Stereo.
Passthrough will send the raw undecoded audio from the source. This option is required for 5.1 surround sound (Dolby Digital
Plus).
If your TV does not support Dolby Digital Plus, select Stereo. This will set the audio to 2-channel stereo. Enable if you are having
audio issues with older, incompatible equipment.
Page 34
30D-Link DSM-312 User Manual
Section 4 - Conguration
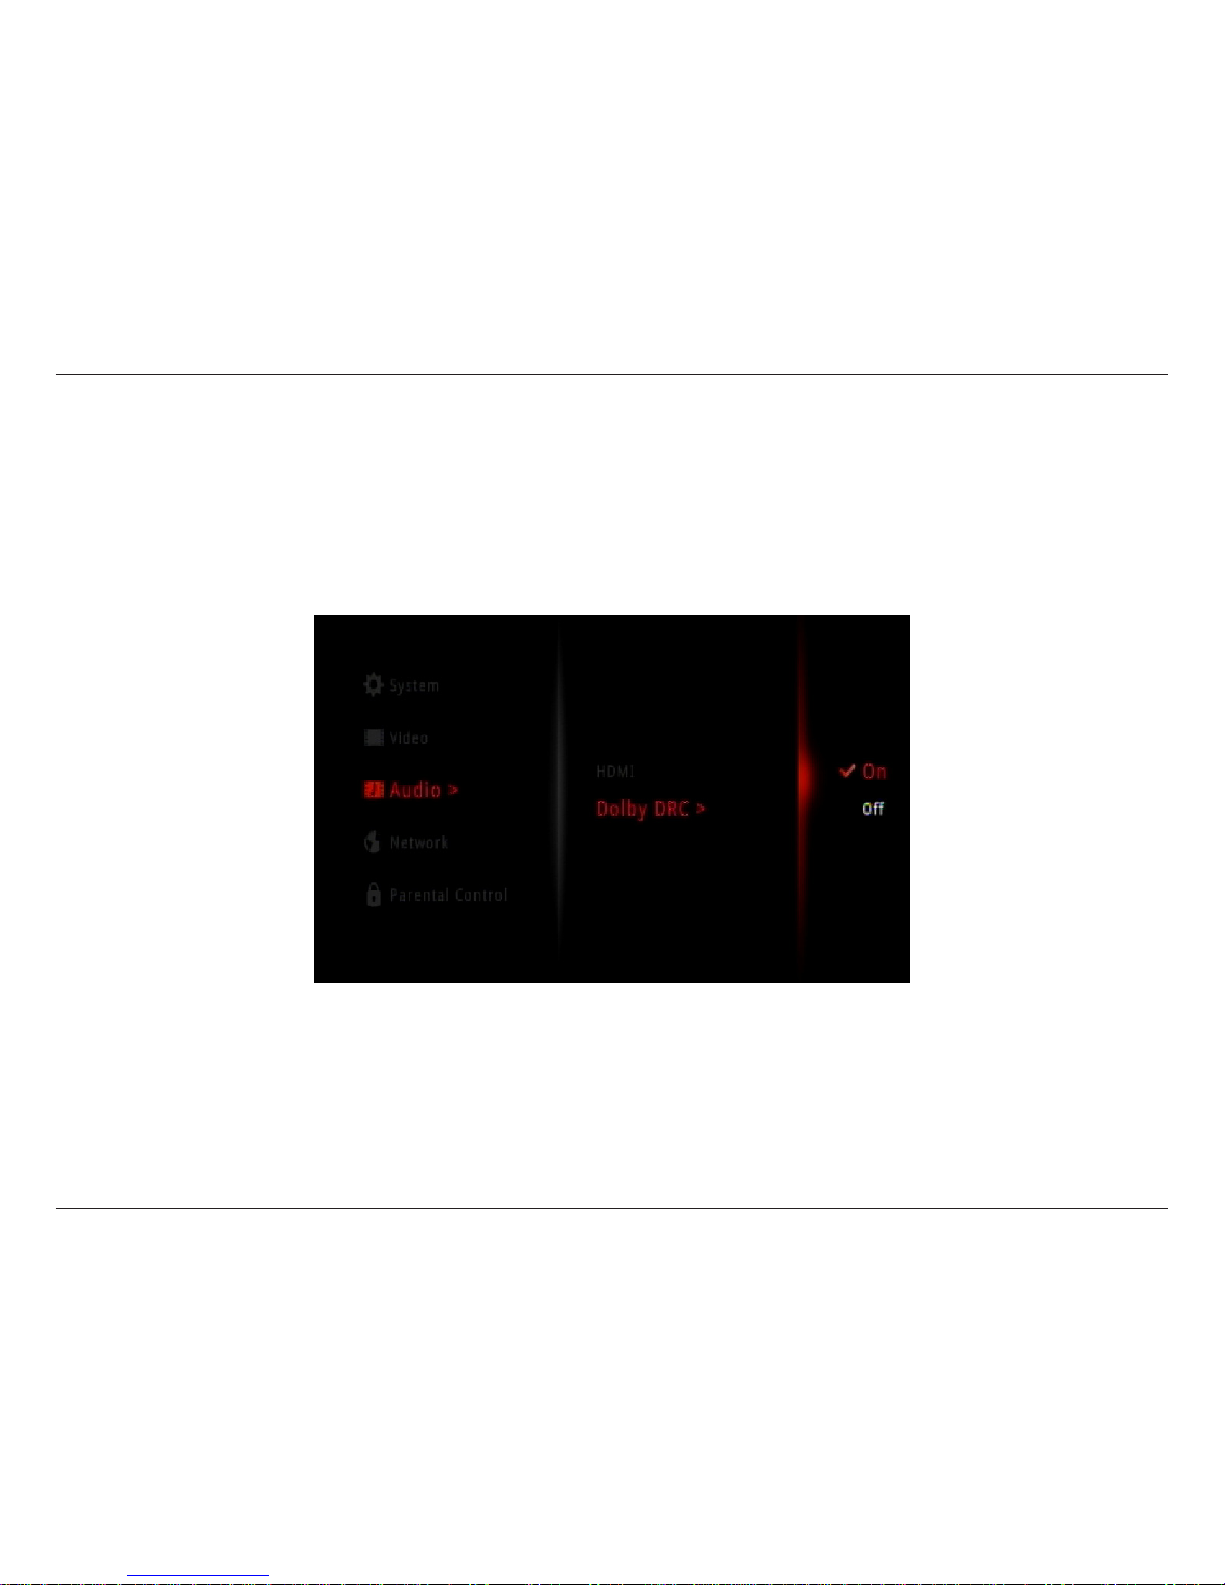
Dolby DRC
Dolby DRC (Dynamic Range Compression), when selected On, will raise the level of quiet sounds and lower the level of loud
sounds. This is useful if you are watching a movie with loud explosions and you don’t want to wake up others sleeping in another
room without turning the volume down too much. By default this option is set to On.
Select O for a better sound experience (recommended).
Page 35
31D-Link DSM-312 User Manual
Section 4 - Conguration
Network
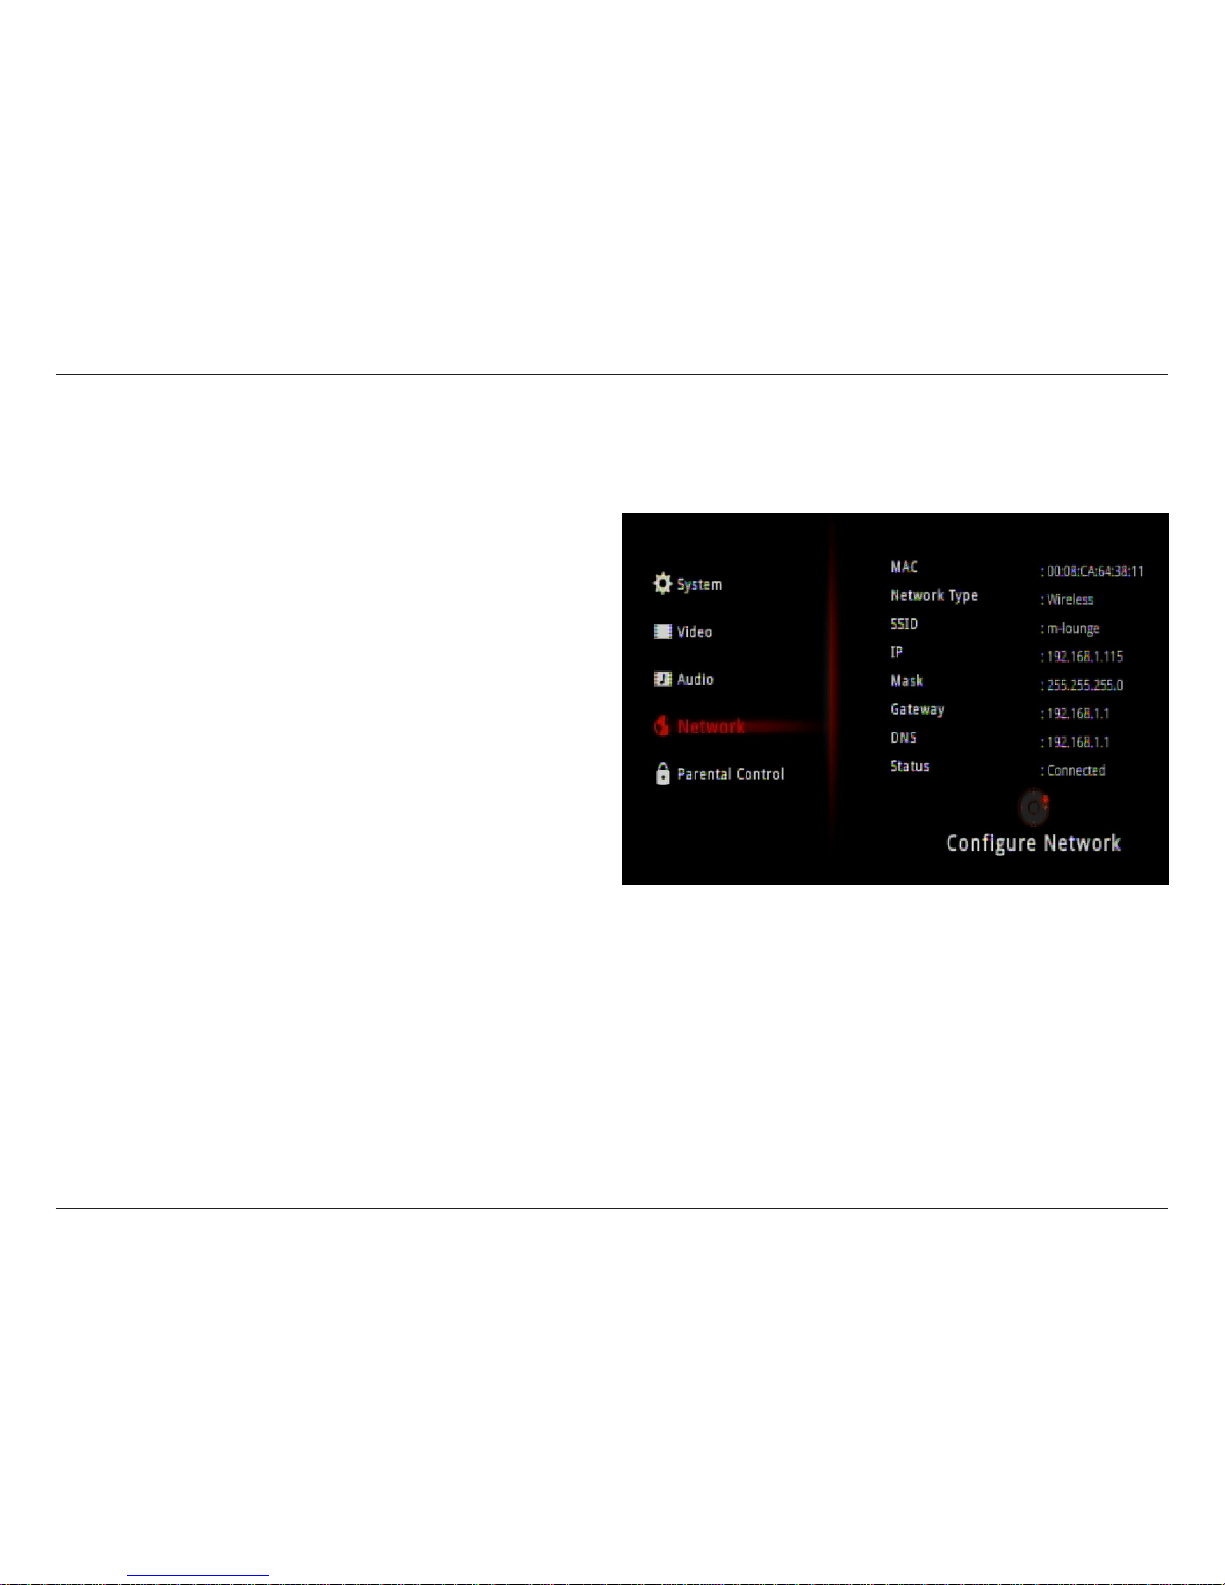
The Network screen will display the following information:
The MAC address of the DSM-312.
Displays the current network setting (Wired or Wireless).
Displays the wireless network name (SSID) that the DSM-312
is currently connected to (if wireless is selected).
The IP address of the DSM-312.
The subnet mask of the network you are connected to.
The default gateway (usually the IP address of your router).
The primary DNS server.
Displays the current status (Connected or Disconnected).
MAC:
Network Type:
SSID:
IP:
Mask:
Gateway:
DNS:
Status:
To edit your network settings, or change from wired to wireless (or vice-versa), press the right arrow button on your remote.
Select Wired or Wireless and press the OK button on your remote. Refer to the next page to set up a wired (Ethernet) connection
or skip to page 33 to connect to a wireless network.
Press the right arrow to access System options (refer to the next page).
Page 36
32D-Link DSM-312 User Manual
Section 4 - Conguration
Wired (Ethernet)
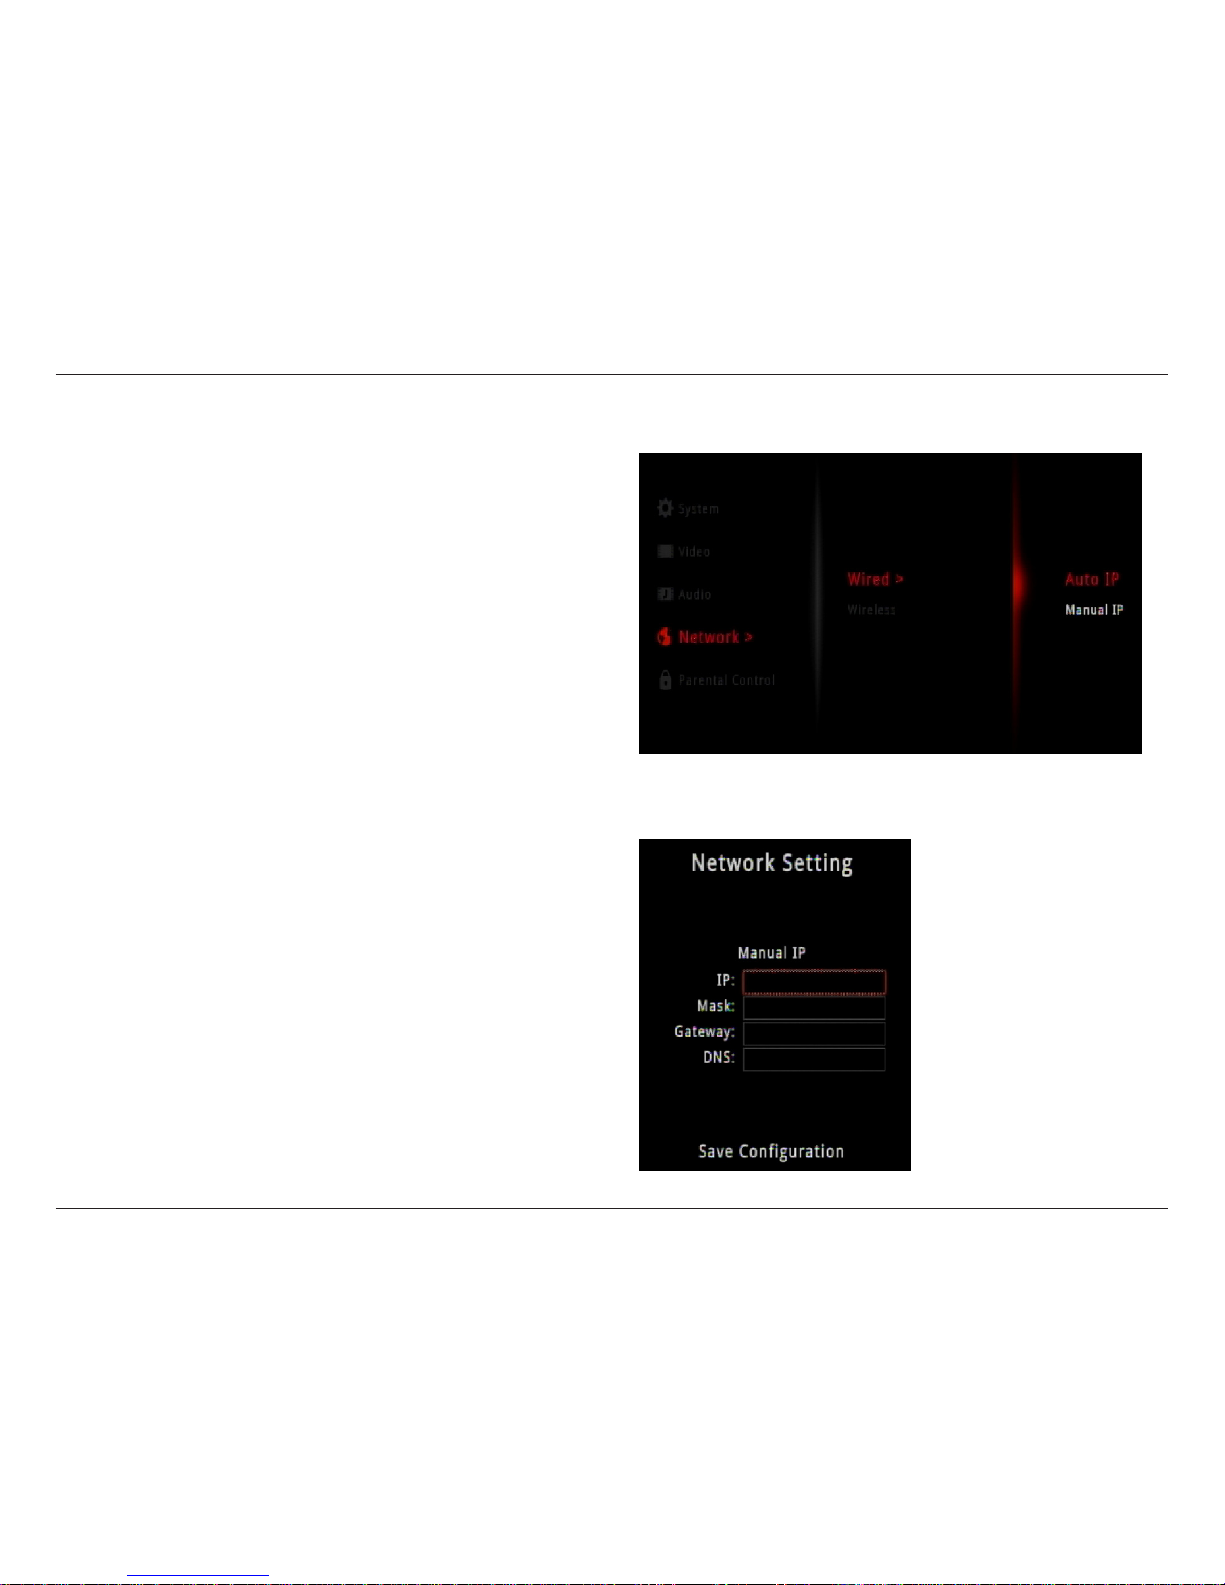
Step 1 - Select Wired to use an Ethernet connection and press
the OK button on your remote.
Step 2 - Select Auto IP to receive your network settings from
a DHCP-enabled router or gateway. If you want to manually
set your network settings, select Manual IP and continue to
Step 3 below.
Step 3 - Enter an IP address for the DSM-312, the subnet mask
of your network, the default gateway IP address (usually the IP
address of your router), and a DNS server.
To enter your settings, select a box using the arrow buttons
and press the OK button to bring up the on-screen keyboard.
Select Save Conguration and press OK on your remote.
Page 37
33D-Link DSM-312 User Manual
Section 4 - Conguration
Wireless
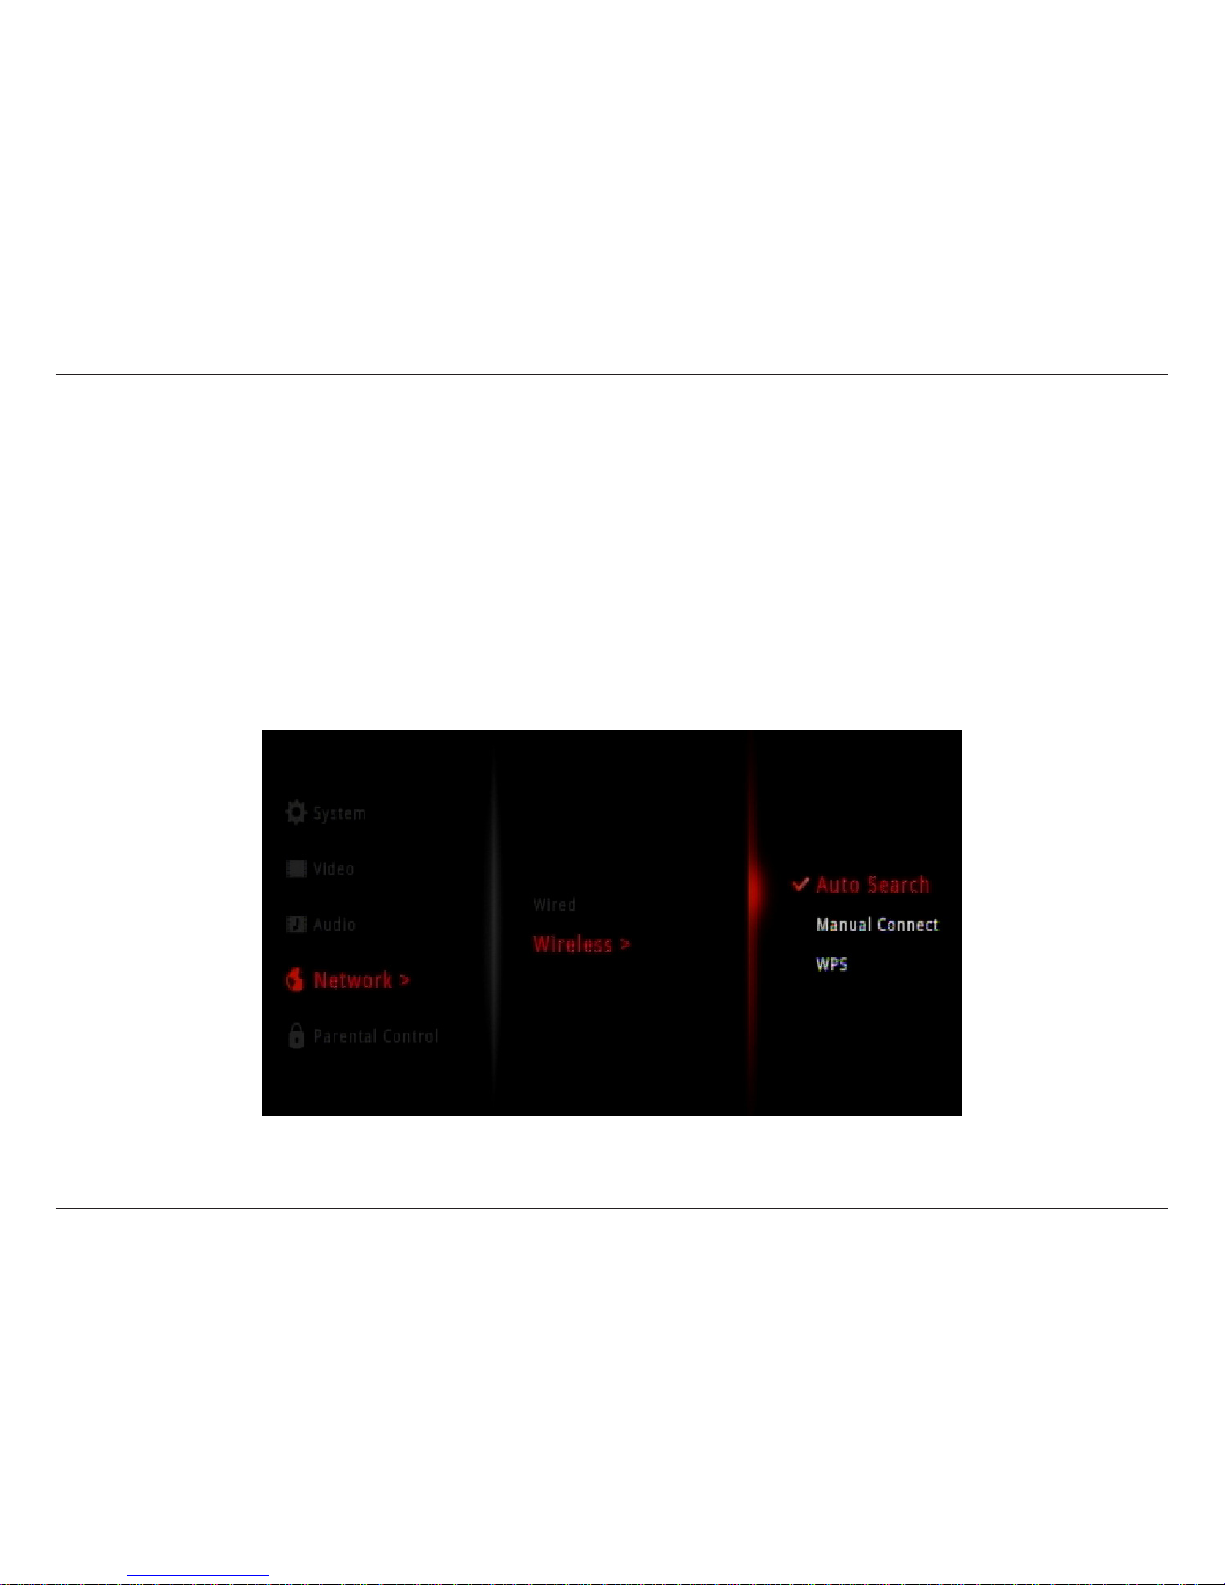
There are 3 ways to connect your DSM-312 to your wireless network: Auto Search, Manual Connect, and WPS.
Auto Search - Select to launch a site survey window and you can select from any available wireless network. Refer to the next page.
Manual Connect - Enter the settings for your wireless network manually. You will need to know the SSID and security passphrase
(if any). Refer to page 35.
WPS - If your router or access point supports WPS, this is the easiest and most secure method. Refer to page 36.
Page 38
34D-Link DSM-312 User Manual
Section 4 - Conguration
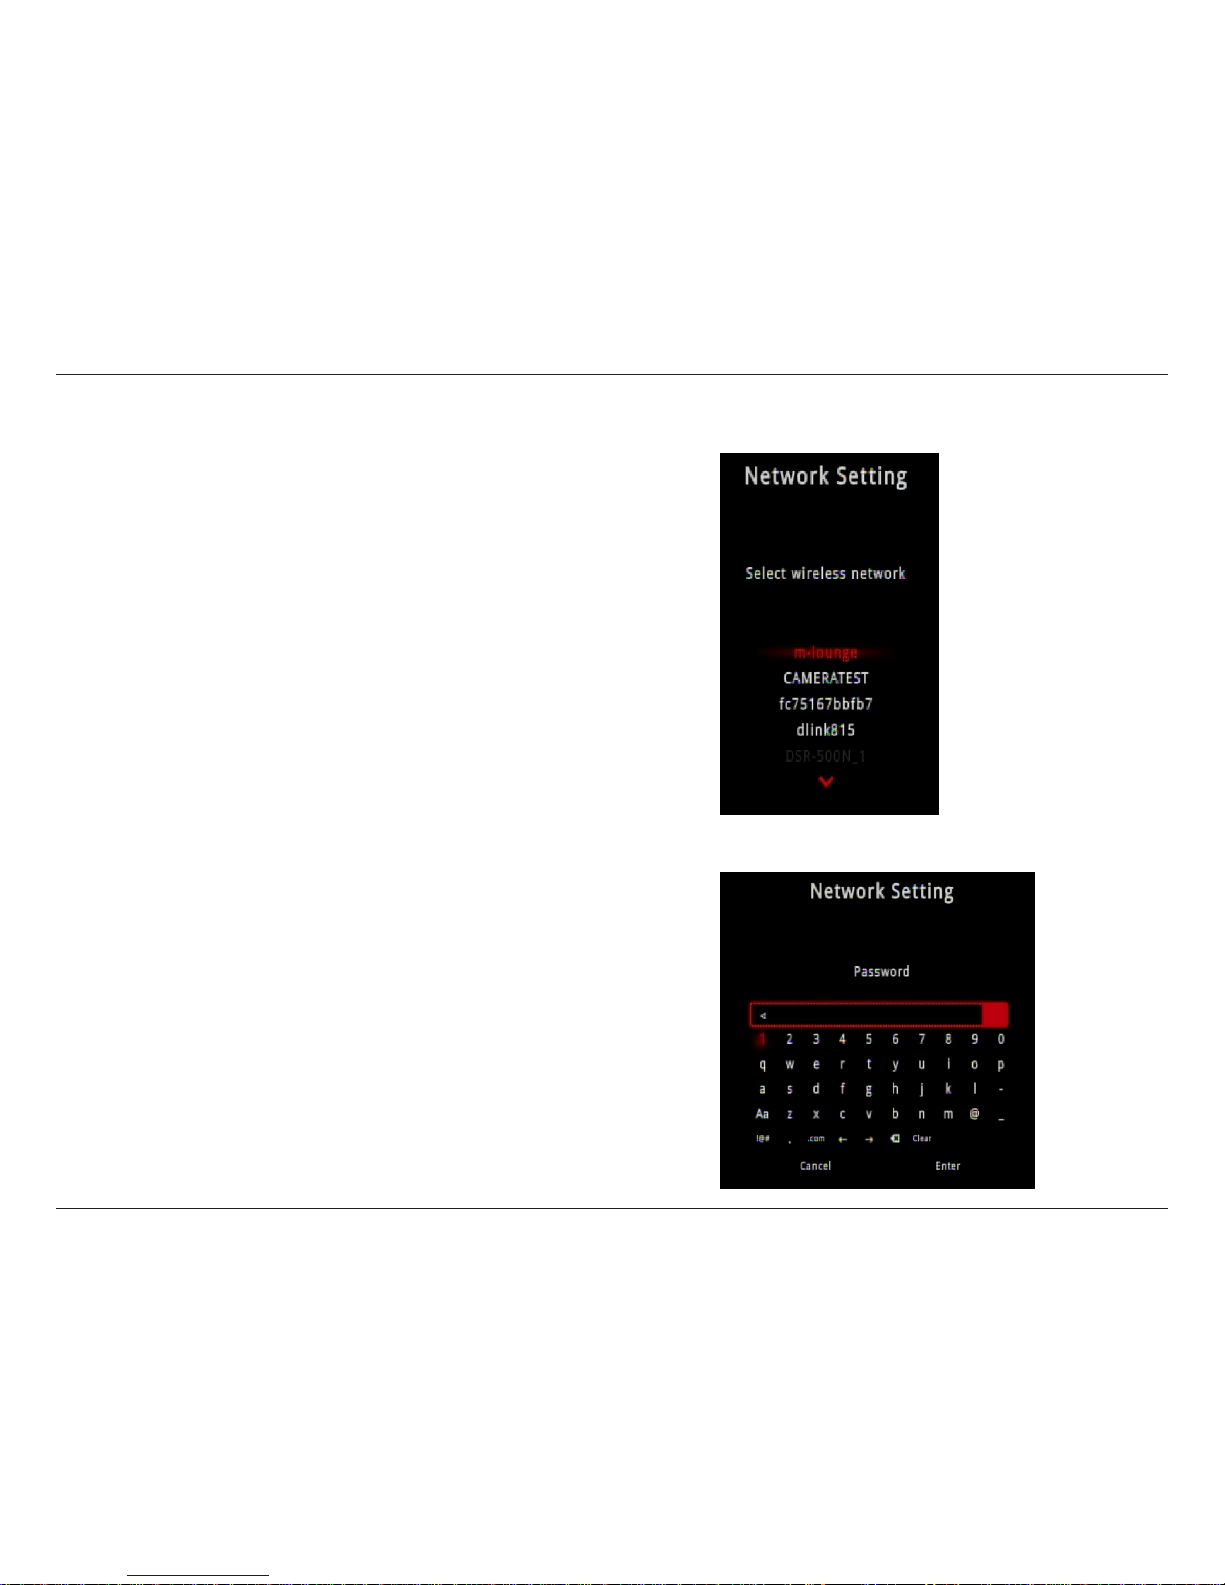
Auto Search (Site Survey)
Step 1 - Select Auto Seach and press the OK button on your remote.
Step 2 - A list of wireless networks in your area will appear. Select
the network you want to connect to and press the OK button on
your remote.
Step 3 - If the network you are connected to is secure, you will
be prompted to enter the security password. Use the on-screen
keyboard and enter the password. Select Enter and then press the
OK button on your remote.
Note: The password is case-sensitive.
Your DSM-312 will now connect to your wireless network.
Page 39
35D-Link DSM-312 User Manual
Section 4 - Conguration
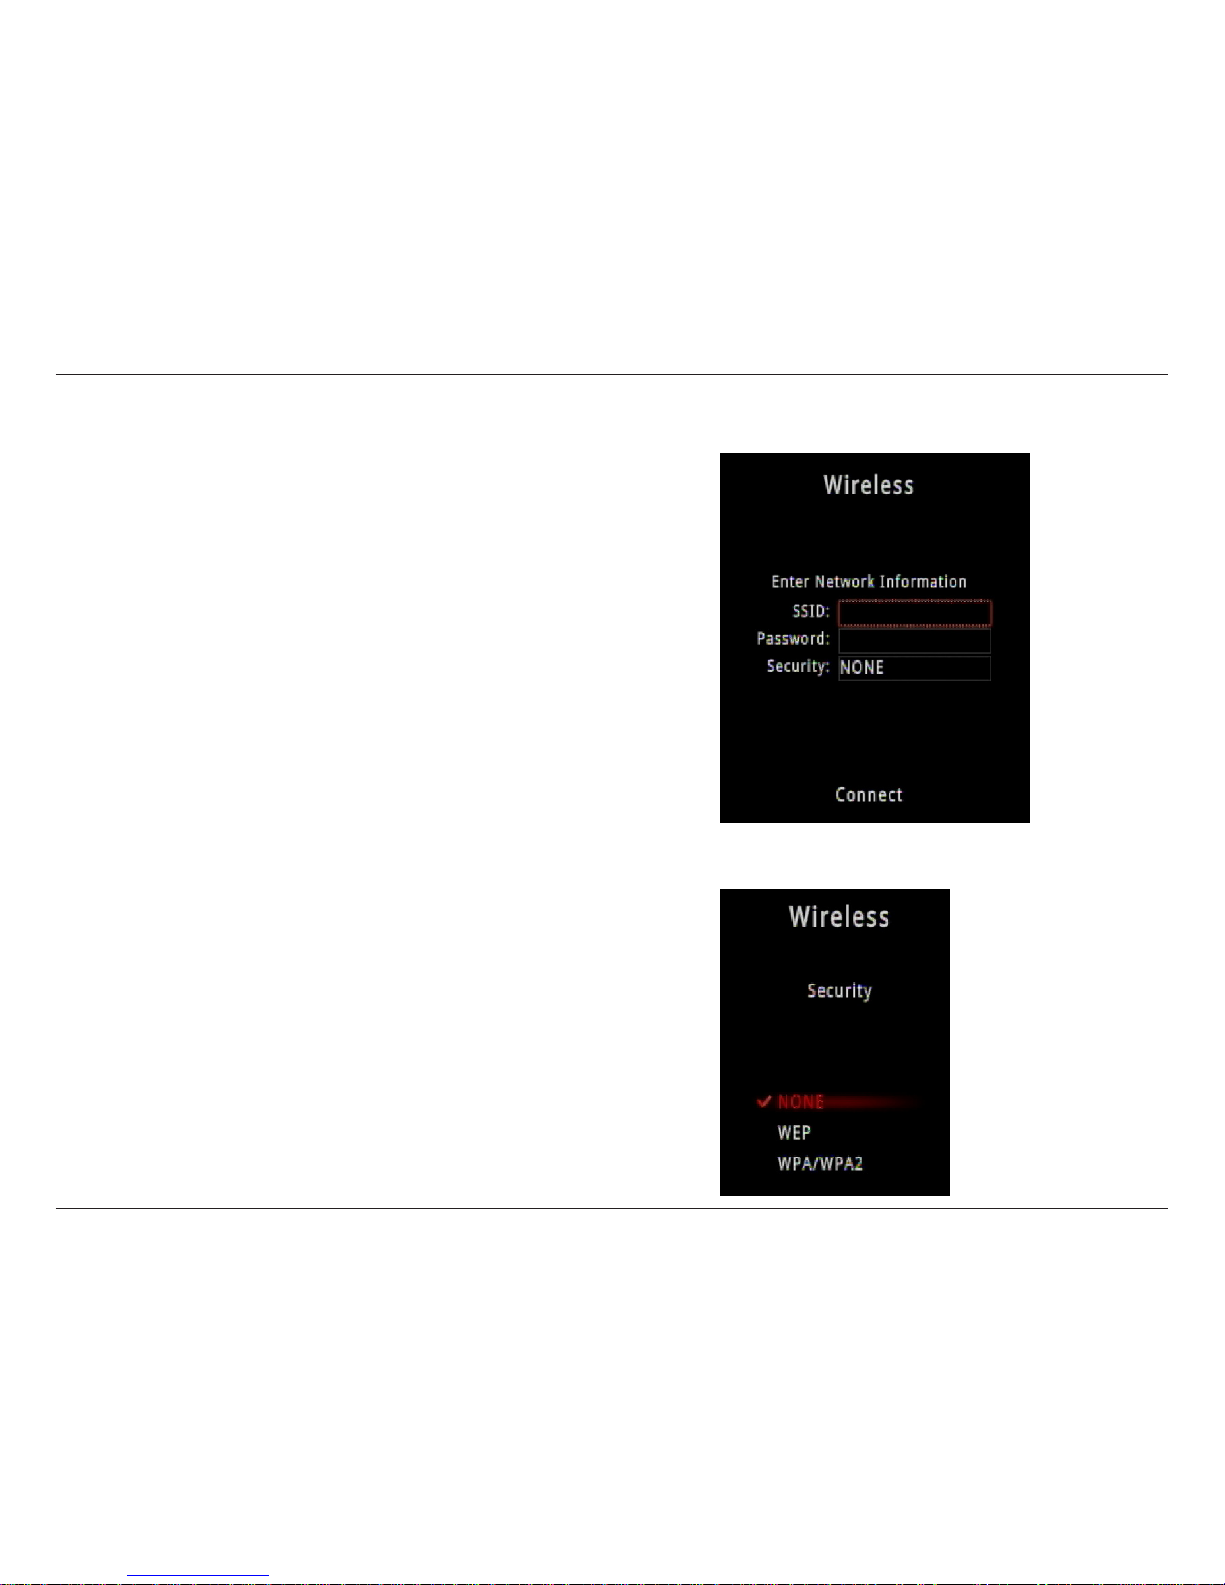
Manual Connect
Step 1 - Select Manual Connect and press the OK button on your
remote.
Step 2 - Select the SSID box and press OK on your remote. Use the
on-screen keyboard to enter the wireless network name (SSID). Select
Enter and then press the OK button on your remote.
Step 3 - Select the Password box and press OK on your remote. Use
the on-screen keyboard to enter the wireless security password. Select
Enter and then press the OK button on your remote. Leave blank if
you are not connecting to a secure network.
Note: The SSID and Password must be exactly the same as on your
wireless router or access point (case-sensitive).
Step 4 - Click the Security box to select the type of encryption being
used on your network (NONE, WEP, or WPA/WPA2).
Step 5 - Select Connect and press the OK button on your remote.
Your DSM-312 will now connect to your wireless network.
Page 40
36D-Link DSM-312 User Manual
Section 4 - Conguration
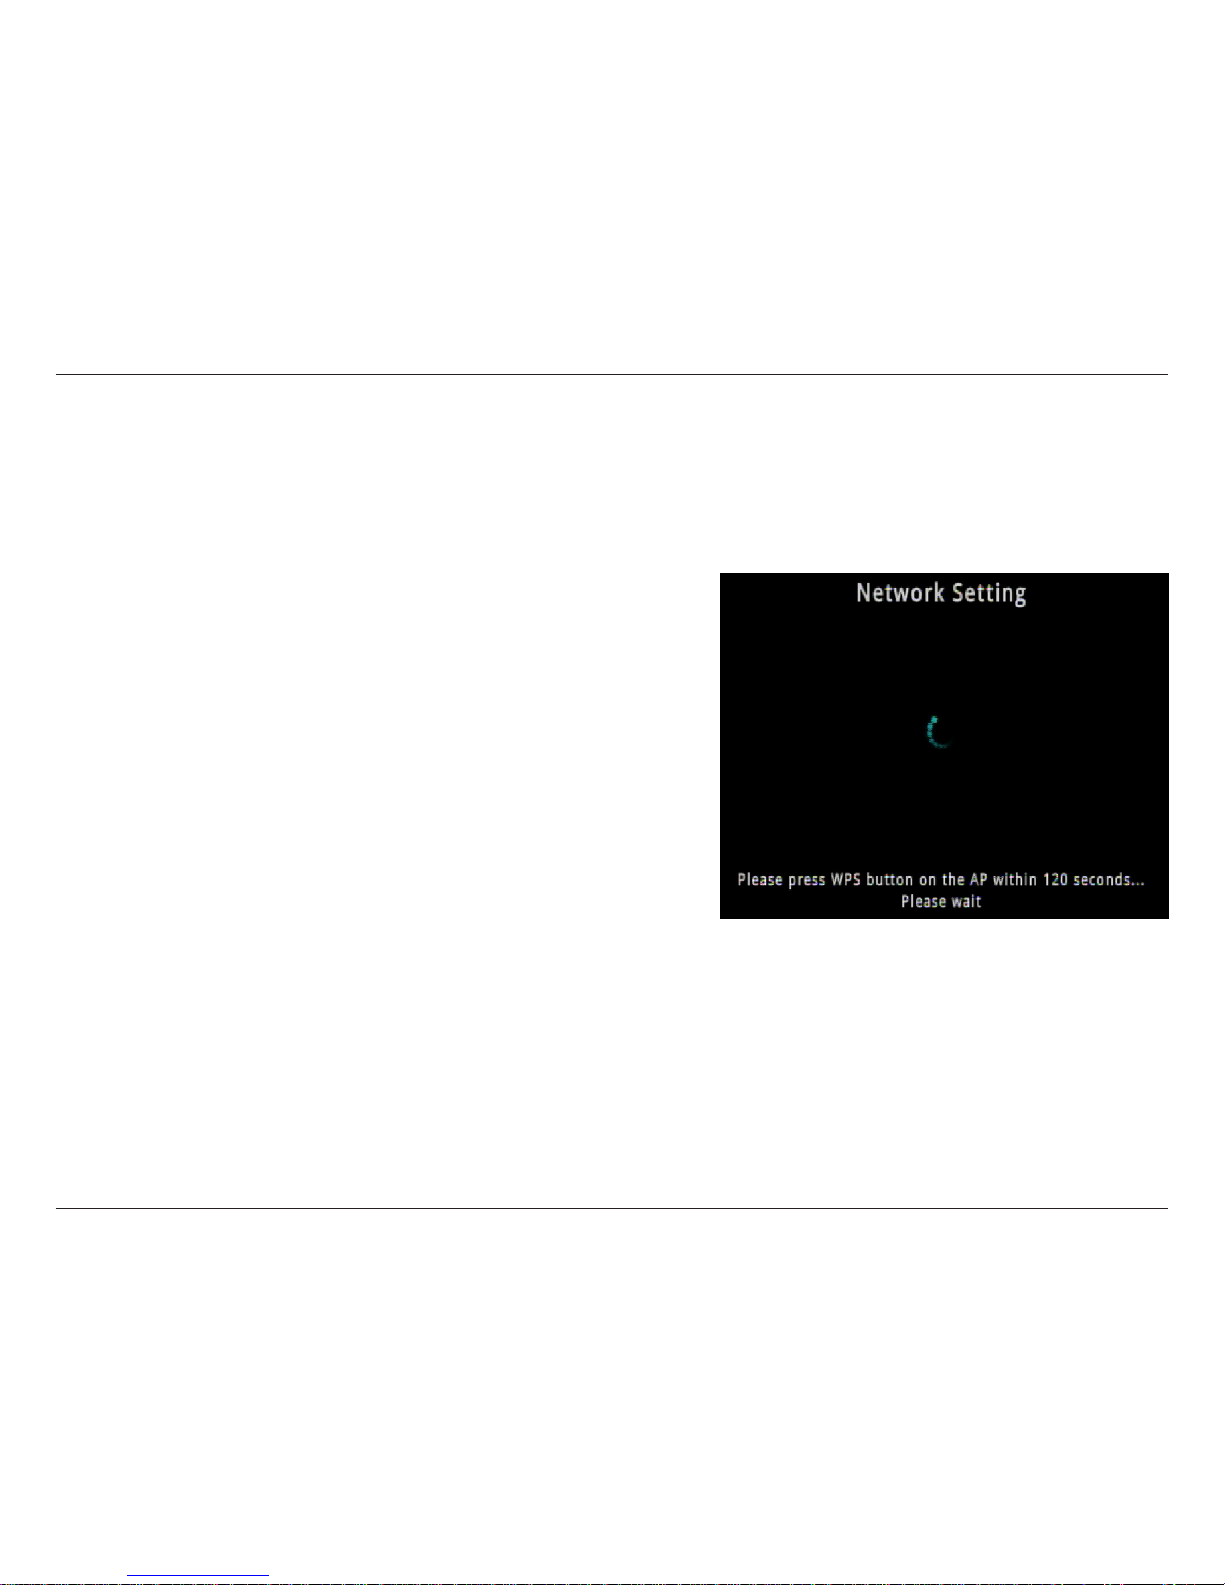
WPS
The easiest and most secure way to connect your DSM-312 to your wireless network is WPS (Wi-Fi Protected Setup). Most wireless
routers and access points will have a WPS button (or a software utility with WPS) that you can press to connect to the DSM-312.
Please refer to your user manual for your wireless router or access point to make sure you understand how to enable WPS.
Step 1 - Select WPS and press the OK button on your remote.
Step 2 - Once this screen appears, press the WPS button on your router
or access point (or launch WPS in its web UI) within 2 minutes.
Step 3 - Allow about a minute for the devices to connect and congure.
Note: If for some reason the DSM-312 does not connect to your network, it
may be out of range. Move the DSM-312 closer to your router or access point
(in the same room) and repeat steps 1-2. Once connected, then try moving
the DSM-312 back near your TV.
Page 41
37D-Link DSM-312 User Manual
Section 4 - Conguration
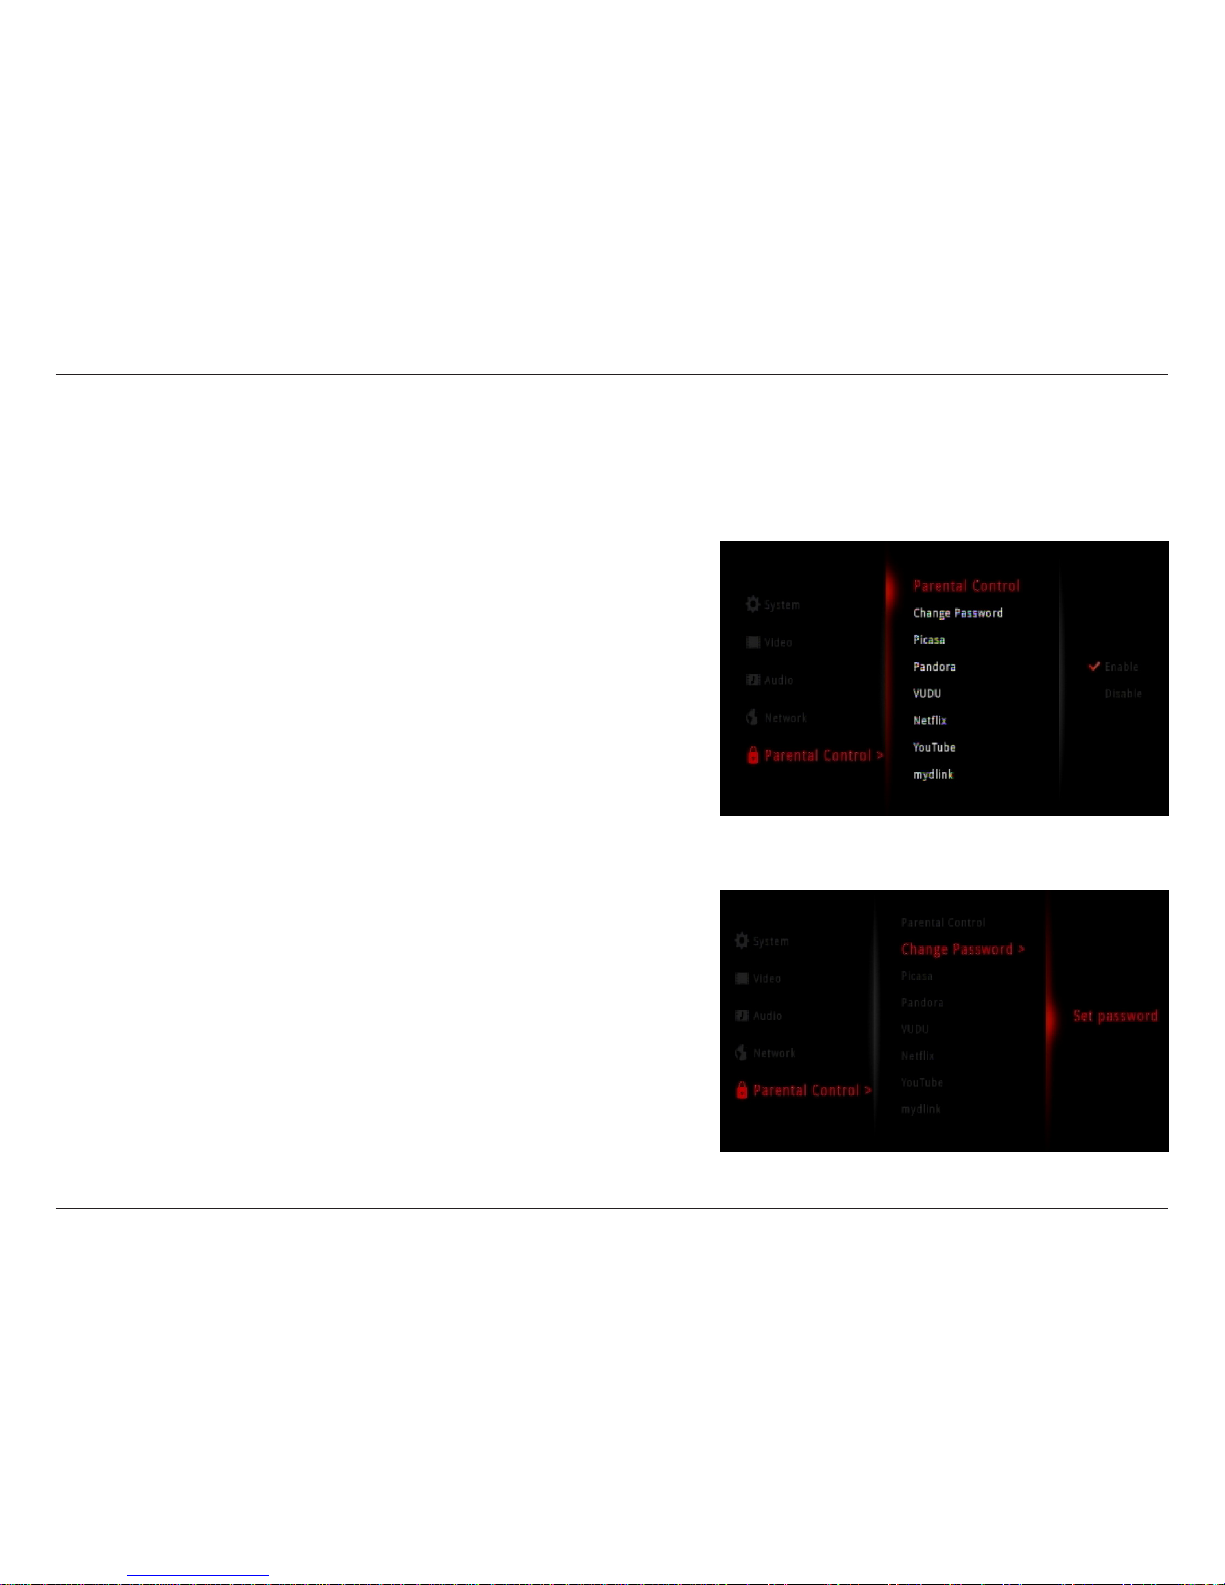
Parental Control
The Parental Control section will allow you to disable and password-protect any of the DSM-312 apps. If enabled, you will have
to enter the 4-digit password when you launch an app.
Step 1 - Select Parental Control, select Enable, and then press the OK
button on your remote.
Step 2 - Select Change Password and press the OK button on your
remote.
Step 3 - Select Set Password and press the OK button on your remote.
Page 42
38D-Link DSM-312 User Manual
Section 4 - Conguration
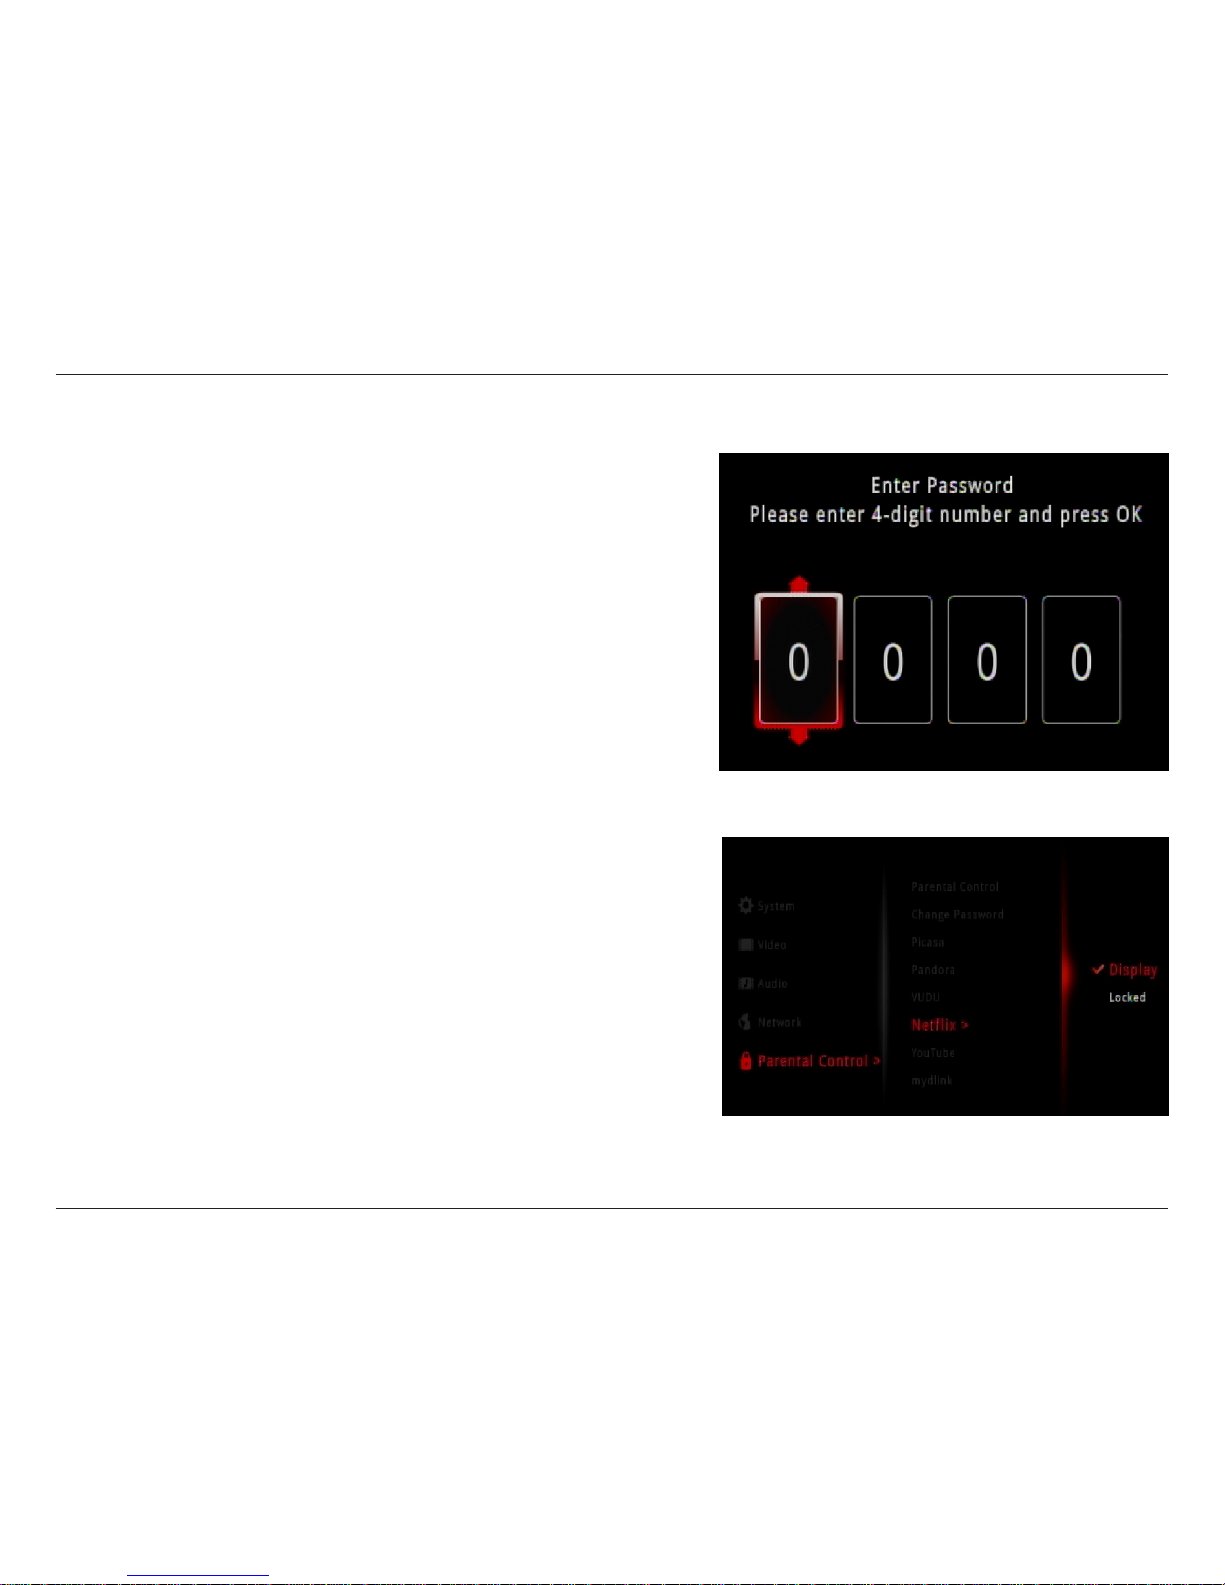
Step 4 - Use the up and down arrow buttons to select a number and
then press the right arrow button to move to the next box. Once you
select the 4-digit password, click the OK button.
Step 5 - By default, all the apps are not password-protected. You can
choose which apps you want to protect. Select the app and then click
the right-arrow button. Select Locked and press the OK button.
Page 43
39D-Link DSM-312 User Manual
Section 5 - D-Link Remote App
D-Link Remote Control App
With the D-Link Remote Control app, you can turn your iPhone, iPod Touch, or Android mobile device into a remote control for
the DSM-312 Media Player.
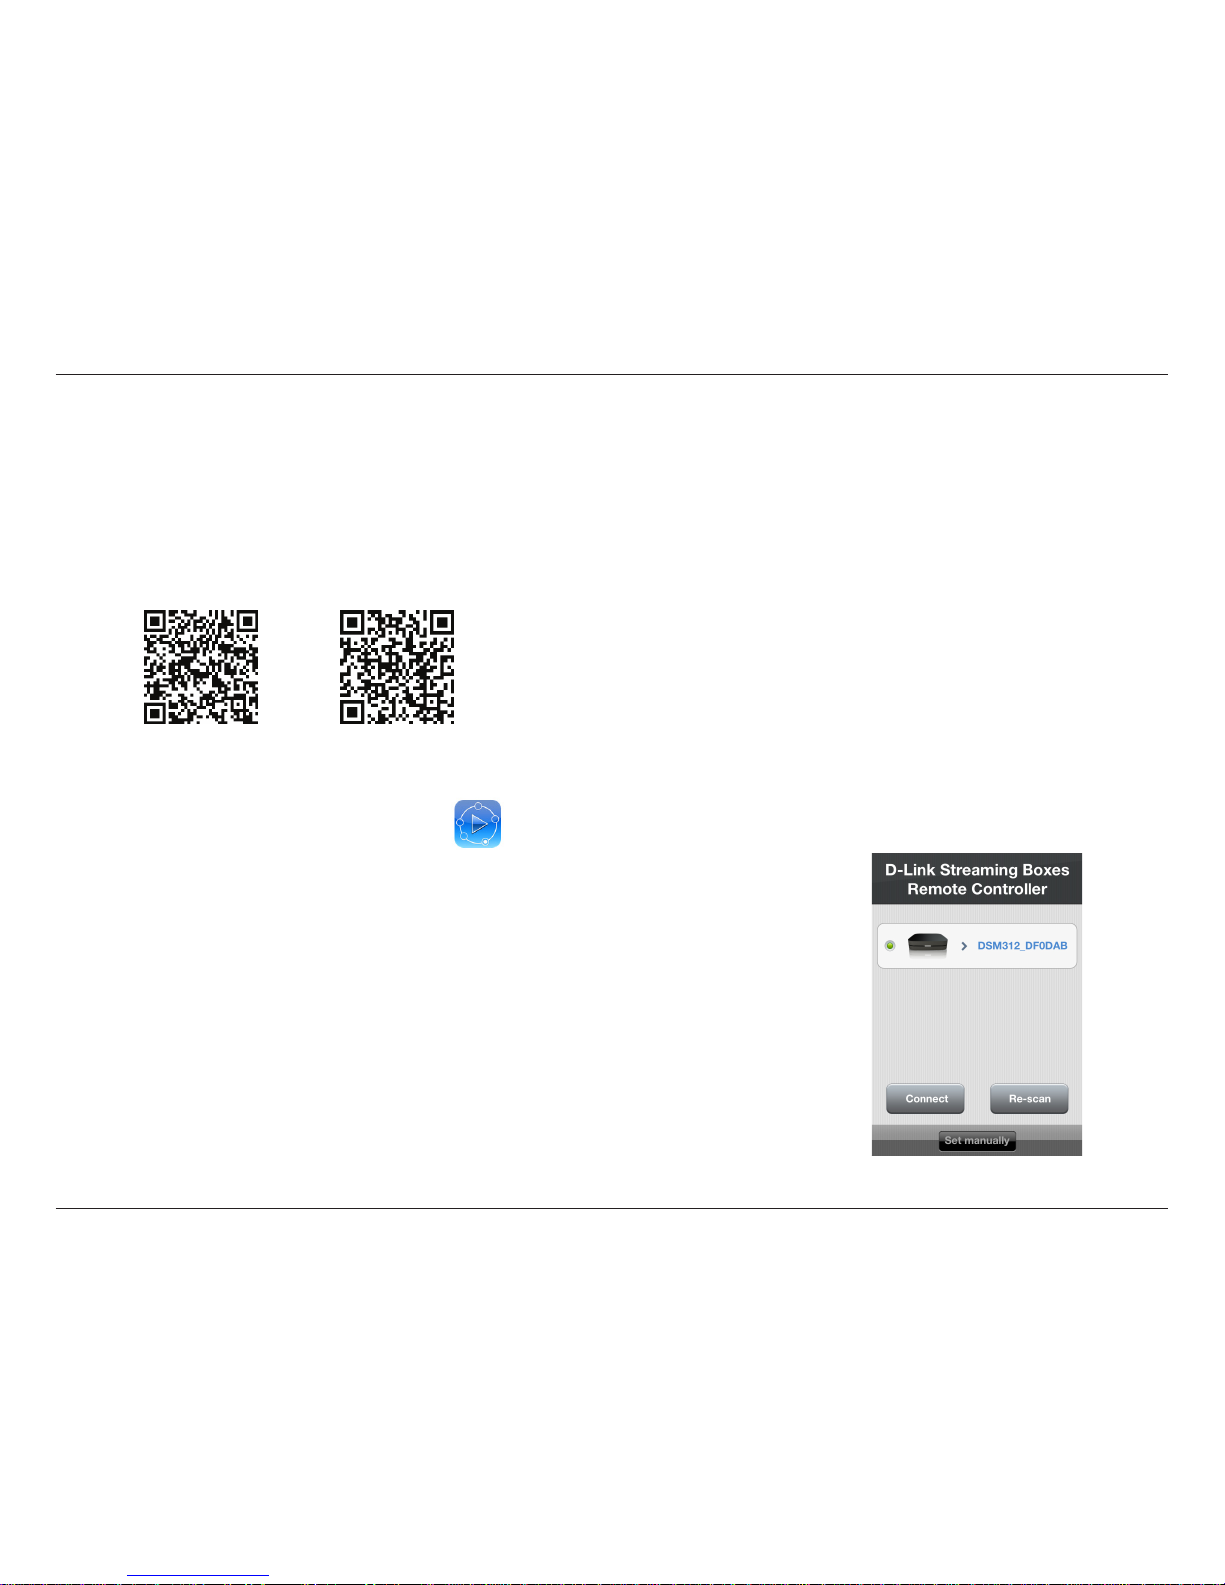
Step 1 - From your smartphone, visit the Apple App Store or Google Play (Android) and search for “D-Link remote”, or scan the
QR codes below:
Step 2 - Download and install the free app.
Step 3 - Connect your smartphone using Wi-Fi to your wireless network. Make sure your
DSM-312 is on the same network and turned on.
Step 4 - Launch the app. The app will automatically search for your DSM-312.
Step 5 - When the app nds your device, select it, and press Connect.
If your DSM-312 is not detected, press Re-scan. If it is still not detected, verify your DSM-312
is turned on and on the same network as your smartphone.
You can also manually enter the IP address of your DSM-312 by pressing Set manually.
Android iOS (Apple)
Page 44
40D-Link DSM-312 User Manual
Section 5 - D-Link Remote App
Using the Remote Control App
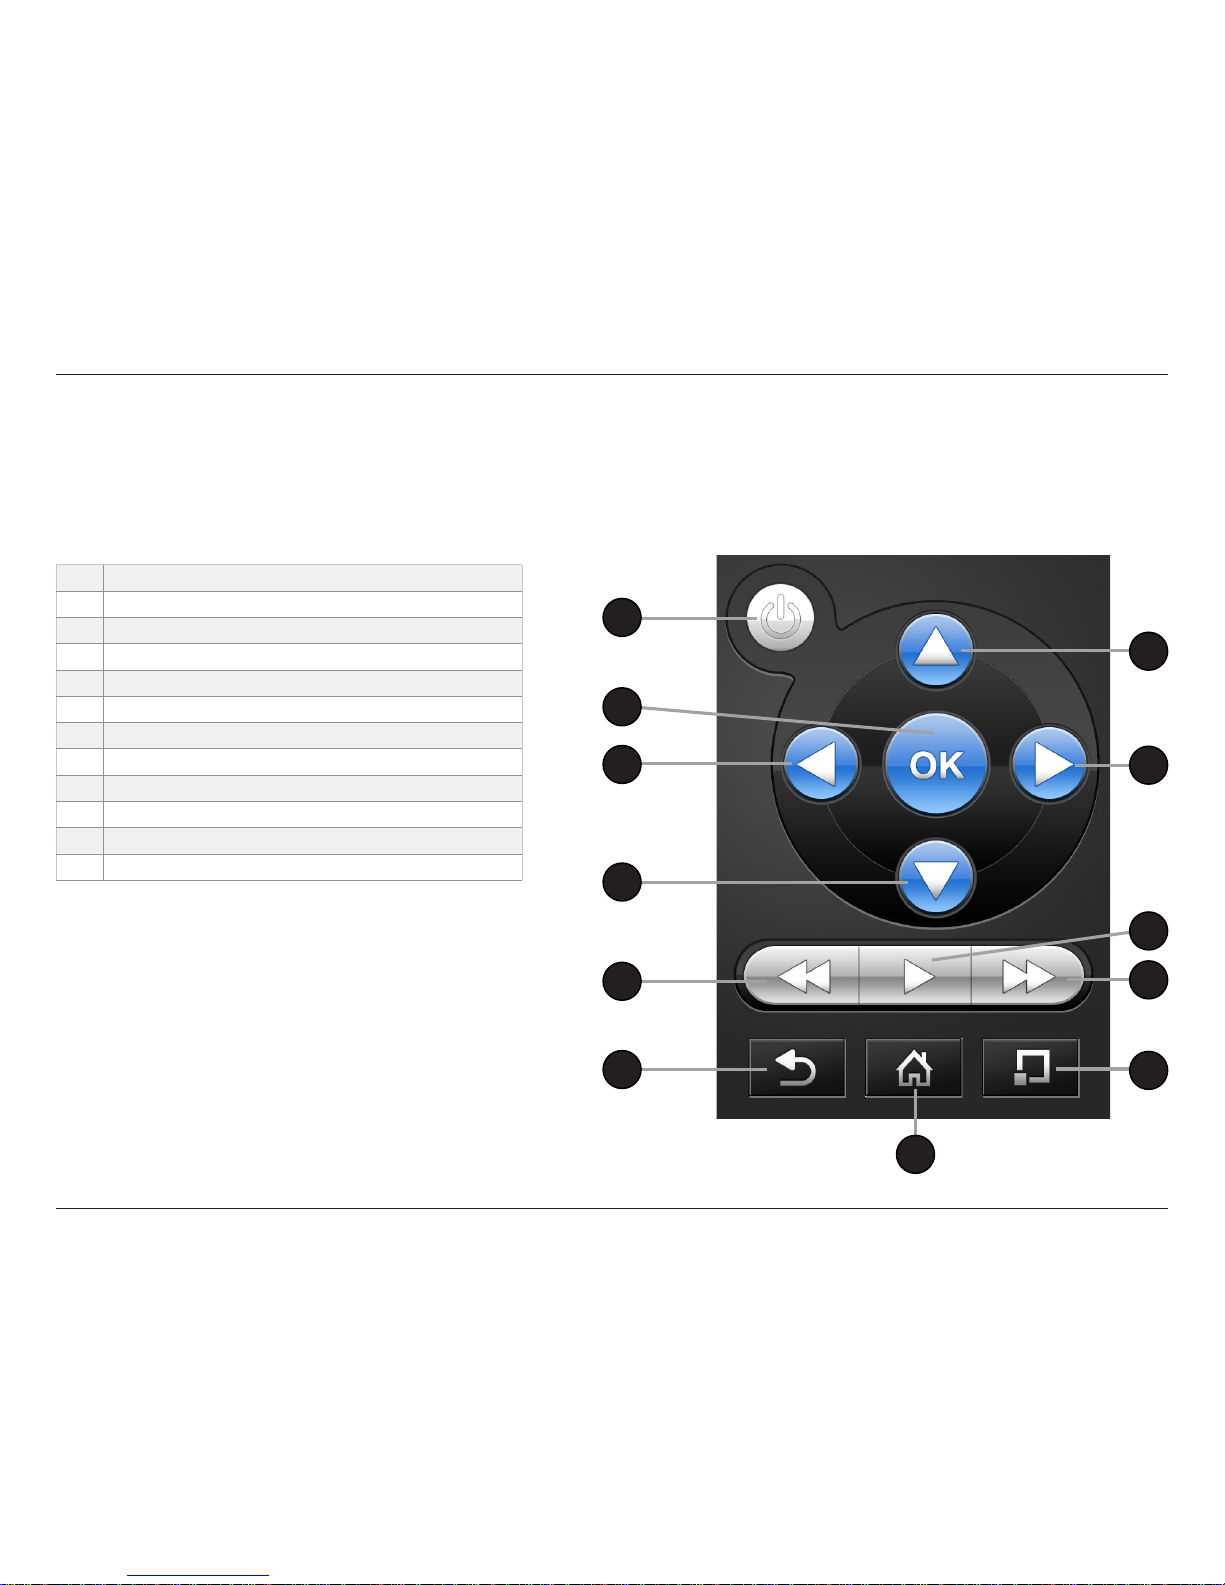
Once your app is installed and connected to your DSM-312, the following interface will be displayed.
1 Press to turn the DSM-312 o
2 The UP navigation button
3 OK/Enter button
4 The LEFT navigation button
5 The RIGHT navigation button
6 The DOWN navigation button
7 Rewind button
8 Play and Pause button
9 Fast Forward button
10 Back button
11 Press to go to the home page
12 Options Button (function depends on app)
1
4
6
2
3
5
7
10
9
8
12
11
Page 45
41D-Link DSM-312 User Manual
Appendix A - Technical Specications
Technical Specications
Video/Audio Playback
• Up to 1080p with an HDMI connection and up to 5.1 channel audio
• 480i on standard A/V (composite) and 2 channel stereo audio
Network
• Built-in 802.11n wireless (2.4GHz) (Wi-Fi)
• Ethernet 10/100 Port
Network Protocols
• IPv4, ARP, UDP, ICMP
• DHCP Client
• DNS Client
• HTTP
Remote Device Support
• MovieNite™ Plus remote app available for iPhone® and Android®
Connectors
• HDMI 1.4 output
• Audio/Video analog
• 10/100 Ethernet
• AC Power
LED
• Amber/green connection status
Power
• 12V / 1A
Dimensions
• 4.8 x 4.6 x 1.1 inches (124 x 117 x 27mm)
Weight
• 6.5oz (180g)
Operating Temperature
• 32o to 104o F (0o to 40o C)
Storage Temperature
• -13o to 158o F (-25o to 70o C)
Operating Humidity
• 10% to 95% RH non-condensing
Certications
• FCC class b
• HDMI
• Dolby Digital Plus
• Wi-Fi
Page 46
42D-Link DSM-312 User Manual
Appendix B - Warranty
Warranty
Subject to the terms and conditions set forth herein, D-Link Systems, Inc. (“D-Link”) provides this Limited Warranty:
• Only to the person or entity that originally purchased the product from D-Link or its authorized reseller or distributor, and
• Only for products purchased and delivered within the fty states of the United States, the District of Columbia, U.S. Possessions
or Protectorates, U.S. Military Installations, or addresses with an APO or FPO.
Limited Warranty:
D-Link warrants that the hardware portion of the D-Link product described below (“Hardware”) will be free from material defects in workmanship
and materials under normal use from the date of original retail purchase of the product, for the period set forth below (“Warranty Period”), except
as otherwise stated herein.
• Hardware (excluding power supplies and fans): One (1) year
The customer’s sole and exclusive remedy and the entire liability of D-Link and its suppliers under this Limited Warranty will be, at
D-Link’s option, to repair or replace the defective Hardware during the Warranty Period at no charge to the original owner or to refund the actual
purchase price paid. Any repair or replacement will be rendered by D-Link at an Authorized D-Link Service Oce. The replacement hardware
need not be new or have an identical make, model or part. D-Link may, at its option, replace the defective Hardware or any part thereof with any
reconditioned product that D-Link reasonably determines is substantially equivalent (or superior) in all material respects to the defective Hardware.
Repaired or replacement hardware will be warranted for the remainder of the original Warranty Period or ninety (90) days, whichever is longer,
and is subject to the same limitations and exclusions. If a material defect is incapable of correction, or if D-Link determines that it is not practical
to repair or replace the defective Hardware, the actual price paid by the original purchaser for the defective Hardware will be refunded by D-Link
upon return to D-Link of the defective Hardware. All Hardware or part thereof that is replaced by D-Link, or for which the purchase price is refunded,
shall become the property of D-Link upon replacement or refund.
Page 47
43D-Link DSM-312 User Manual
Appendix B - Warranty
Limited Software Warranty:
D-Link warrants that the software portion of the product (“Software”) will substantially conform to D-Link’s then current functional specications
for the Software, as set forth in the applicable documentation, from the date of original retail purchase of the Software for a period of ninety (90)
days (“Software Warranty Period”), provided that the Software is properly installed on approved hardware and operated as contemplated in its
documentation. D-Link further warrants that, during the Software Warranty Period, the magnetic media on which D-Link delivers the Software will
be free of physical defects. The customer’s sole and exclusive remedy and the entire liability of D-Link and its suppliers under this Limited Warranty
will be, at D-Link’s option, to replace the non-conforming Software (or defective media) with software that substantially conforms to D-Link’s
functional specications for the Software or to refund the portion of the actual purchase price paid that is attributable to the Software. Except as
otherwise agreed by DLink in writing, the replacement Software is provided only to the original licensee, and is subject to the terms and conditions
of the license granted by D-Link for the Software. Replacement Software will be warranted for the remainder of the original Warranty Period and is
subject to the same limitations and exclusions. If a material non-conformance is incapable of correction, or if D-Link determines in its sole discretion
that it is not practical to replace the non-conforming Software, the price paid by the original licensee for the non-conforming Software will be
refunded by D-Link; provided that the non-conforming Software (and all copies thereof) is rst returned to D-Link. The license granted respecting
any Software for which a refund is given automatically terminates.
Non-Applicability of Warranty:
The Limited Warranty provided hereunder for Hardware and Software portions of D-Link’s products will not be applied to and does not cover any
refurbished product and any product purchased through the inventory clearance or liquidation sale or other sales in which D-Link, the sellers, or
the liquidators expressly disclaim their warranty obligation pertaining to the product and in that case, the product is being sold “As-Is” without any
warranty whatsoever including, without limitation, the Limited Warranty as described herein, notwithstanding anything stated herein to the contrary.
Submitting A Claim:
The customer shall return the product to the original purchase point based on its return policy. In case the return policy period has expired and
the product is within warranty, the customer shall submit a claim to D-Link as outlined below:
• The customer must submit with the product as part of the claim a written description of the Hardware defect or Software
nonconformance in sucient detail to allow D-Link to conrm the same, along with proof of purchase of the product (such as a
copy of the dated purchase invoice for the product) if the product is not registered.
• The customer must obtain a Case ID Number from D-Link Technical Support (USA 1-877-453-5465 or Canada 1-800-361-5265), who
will attempt to assist the customer in resolving any suspected defects with the product. If the product is considered defective, the
customer must obtain a Return Material Authorization (“RMA”) number by completing the RMA form. Enter the assigned Case ID
Number at https://rma.dlink.com/ (USA only) or https://rma.dlink.ca (Canada only).
Page 48
44D-Link DSM-312 User Manual
Appendix B - Warranty
• After an RMA number is issued, the defective product must be packaged securely in the original or other suitable shipping package
o ensure that it will not be damaged in transit, and the RMA number must be prominently marked on the outside of the package.
Do not include any manuals or accessories in the shipping package. D-Link will only replace the defective portion of the product
and will not ship back any accessories.
• The customer is responsible for all in-bound shipping charges to D-Link. No Cash on Delivery (“COD”) is allowed. Products sent COD
will either be rejected by D-Link or become the property of D-Link. Products shall be fully insured by the customer and shipped
to D-Link Systems, Inc.
• USA residents send to 17595 Mt. Herrmann, Fountain Valley, CA 92708. D-Link will not be held responsible for any packages that
are lost in transit to D-Link. The repaired or replaced packages will be shipped to the customer via UPS Ground or any common
carrier selected by D-Link. Return shipping charges shall be prepaid by D-Link if you use an address in the United States, otherwise
we will ship the product to you freight collect. Expedited shipping is available upon request and provided shipping charges are
prepaid by the customer. D-Link may reject or return any product that is not packaged and shipped in strict compliance with the
foregoing requirements, or for which an RMA number is not visible from the outside of the package. The product owner agrees to
pay D-Link’s reasonable handling and return shipping charges for any product that is not packaged and shipped in accordance
with the foregoing requirements, or that is determined by D-Link not to be defective or non-conforming.
• Canadian residents send to D-Link Networks, Inc., 2525 Meadowvale Boulevard Mississauga, Ontario, L5N 5S2 Canada. D-Link will
not be held responsible for any packages that are lost in transit to D-Link. The repaired or replaced packages will be shipped to
the customer via Purolator Canada or any common carrier selected by D-Link. Return shipping charges shall be prepaid by D-Link
if you use an address in Canada, otherwise we will ship the product to you freight collect. Expedited shipping is available upon
request and provided shipping charges are prepaid by the customer. D-Link may reject or return any product that is not packaged
and shipped in strict compliance with the foregoing requirements, or for which an RMA number is not visible from the outside of
the package. The product owner agrees to pay D-Link’s reasonable handling and return shipping charges for any product that is
not packaged and shipped in accordance with the foregoing requirements, or that is determined by D-Link not to be defective or
non-conforming. RMA phone number: 1-800-361-5265 Hours of Operation: Monday-Friday, 9:00AM – 9:00PM EST
What Is Not Covered:
The Limited Warranty provided herein by D-Link does not cover:
Products that, in D-Link’s judgment, have been subjected to abuse, accident, alteration, modication, tampering, negligence, misuse, faulty installation,
lack of reasonable care, repair or service in any way that is not contemplated in the documentation for the product, or if the model or serial number
has been altered, tampered with, defaced or removed; Initial installation, installation and removal of the product for repair, and shipping costs;
Operational adjustments covered in the operating manual for the product, and normal maintenance; Damage that occurs in shipment, due to act
of God, failures due to power surge, and cosmetic damage; Any hardware, software, rmware or other products or services provided by anyone
other than D-Link; and Products that have been purchased from inventory clearance or liquidation sales or other sales in which D-Link, the sellers,
or the liquidators expressly disclaim their warranty obligation pertaining to the product.
Page 49
45D-Link DSM-312 User Manual
Appendix B - Warranty
While necessary maintenance or repairs on your Product can be performed by any company, we recommend that you use only an Authorized D-Link
Service Oce. Improper or incorrectly performed maintenance or repair voids this Limited Warranty.
Disclaimer of Other Warranties:
EXCEPT FOR THE LIMITED WARRANTY SPECIFIED HEREIN, THE PRODUCT IS PROVIDED “AS-IS” WITHOUT ANY WARRANTY OF ANY KIND WHATSOEVER
INCLUDING, WITHOUT LIMITATION, ANY WARRANTY OF MERCHANTABILITY, FITNESS FOR A PARTICULAR PURPOSE AND NONINFRINGEMENT.
IF ANY IMPLIED WARRANTY CANNOT BE DISCLAIMED IN ANY TERRITORY WHERE A PRODUCT IS SOLD, THE DURATION OF SUCH IMPLIED WARRANTY
SHALL BE LIMITED TO THE DURATION OF THE APPLICABLE WARRANTY PERIOD SET FORTH ABOVE. EXCEPT AS EXPRESSLY COVERED UNDER THE
LIMITED WARRANTY PROVIDED HEREIN, THE ENTIRE RISK AS TO THE QUALITY, SELECTION AND PERFORMANCE OF THE PRODUCT IS WITH THE
PURCHASER OF THE PRODUCT.
Limitation of Liability:
TO THE MAXIMUM EXTENT PERMITTED BY LAW, D-LINK IS NOT LIABLE UNDER ANY CONTRACT, NEGLIGENCE, STRICT LIABILITY OR OTHER LEGAL
OR EQUITABLE THEORY FOR ANY LOSS OF USE OF THE PRODUCT, INCONVENIENCE OR DAMAGES OF ANY CHARACTER, WHETHER DIRECT, SPECIAL,
INCIDENTAL OR CONSEQUENTIAL (INCLUDING, BUT NOT LIMITED TO, DAMAGES FOR LOSS OF GOODWILL, LOSS OF REVENUE OR PROFIT, WORK
STOPPAGE, COMPUTER FAILURE OR MALFUNCTION, FAILURE OF OTHER EQUIPMENT OR COMPUTER PROGRAMS TO WHICH D-LINK’S PRODUCT
IS CONNECTED WITH, LOSS OF INFORMATION OR DATA CONTAINED IN, STORED ON, OR INTEGRATED WITH ANY PRODUCT RETURNED TO D-LINK
FOR WARRANTY SERVICE) RESULTING FROM THE USE OF THE PRODUCT, RELATING TO WARRANTY SERVICE, OR ARISING OUT OF ANY BREACH OF
THIS LIMITED WARRANTY, EVEN IF D-LINK HAS BEEN ADVISED OF THE POSSIBILITY OF SUCH DAMAGES. THE SOLE REMEDY FOR A BREACH OF
THE FOREGOING LIMITED WARRANTY IS REPAIR, REPLACEMENT OR REFUND OF THE DEFECTIVE OR NONCONFORMING PRODUCT. THE MAXIMUM
LIABILITY OF D-LINK UNDER THIS WARRANTY IS LIMITED TO THE PURCHASE PRICE OF THE PRODUCT COVERED BY THE WARRANTY. THE FOREGOING
EXPRESS WRITTEN WARRANTIES AND REMEDIES ARE EXCLUSIVE AND ARE IN LIEU OF ANY OTHER WARRANTIES OR REMEDIES, EXPRESS, IMPLIED
OR STATUTORY.
Governing Law:
This Limited Warranty shall be governed by the laws of the State of California. Some states do not allow exclusion or limitation of incidental or
consequential damages, or limitations on how long an implied warranty lasts, so the foregoing limitations and exclusions may not apply. This
Limited Warranty provides specic legal rights and you may also have other rights which vary from state to state.
Trademarks:
D-Link is a registered trademark of D-Link Corporation/D-Link Systems, Inc. Other trademarks or registered trademarks are the property of their
respective owners.
Page 50
46D-Link DSM-312 User Manual
Appendix B - Warranty
Copyright Statement:
No part of this publication or documentation accompanying this product may be reproduced in any form or by any means or used to make any
derivative such as translation, transformation, or adaptation without permission from D-Link Corporation/D-Link Systems, Inc., as stipulated by the
United States Copyright Act of 1976 and any amendments thereto. Contents are subject to change without prior notice.
Copyright ©2012 by D-Link Corporation/D-Link Systems, Inc. All rights reserved.
CE Mark Warning:
This is a Class B product. In a domestic environment, this product may cause radio interference, in which case the user may be required to take
adequate measures.
FCC Statement:
This equipment has been tested and found to comply with the limits for a Class B digital device, pursuant to part 15 of the FCC Rules. These limits are
designed to provide reasonable protection against harmful interference in a residential installation. This equipment generates, uses, and can radiate
radio frequency energy and, if not installed and used in accordance with the instructions, may cause harmful interference to radio communication.
However, there is no guarantee that interference will not occur in a particular installation. If this equipment does cause harmful interference to radio
or television reception, which can be determined by turning the equipment o and on, the user is encouraged to try to correct the interference by
one or more of the following measures:
• Reorient or relocate the receiving antenna.
• Increase the separation between the equipment and receiver.
• Connect the equipment into an outlet on a circuit dierent from that to which the receiver is connected.
• Consult the dealer or an experienced radio/TV technician for help.
FCC Caution:
Any changes or modications not expressly approved by the party responsible for compliance could void the user’s authority to operate this
equipment.
This device complies with Part 15 of the FCC Rules. Operation is subject to the following two conditions:
(1) This device may not cause harmful interference, and
(2) this device must accept any interference received, including interference that may cause undesired operation.
If this device is going to be operated in 5.15 ~ 5.25GHz frequency range, then it is restricted in indoor environment only.
Page 51
47D-Link DSM-312 User Manual
Appendix B - Warranty
IMPORTANT NOTICE:
FCC Radiation Exposure Statement:
This equipment complies with FCC radiation exposure limits set forth for an uncontrolled environment. This equipment should be installed and
operated with minimum distance 20cm between the radiator & your body. This transmitter must not be co-located or operating in conjunction
with any other antenna or transmitter.
The availability of some specic channels and/or operational frequency bands are country dependent and are rmware programmed at the factory
to match the intended destination. The rmware setting is not accessible by the end user.
For detailed warranty information applicable to products purchased outside the United States, please contact the corresponding local D-Link
oce.
Industry Canada Statement:
This device complies with RSS-210 of the Industry Canada Rules. Operation is subject to the following two conditions:
(1) This device may not cause harmful interference, and
(2) this device must accept any interference received, including interference that may cause undesired operation.
IMPORTANT NOTE:
Radiation Exposure Statement:
This equipment complies with Canada radiation exposure limits set forth for an uncontrolled environment. This equipment should be installed and
operated with minimum distance 20cm between the radiator and your body.
This device has been designed to operate with an antenna having a maximum gain of 2 dB. Antenna having a higher gain is strictly prohibited per
regulations of Industry Canada. The required antenna impedance is 50 ohms.
Page 52
48D-Link DSM-312 User Manual
Appendix C - Registration
Version 1.0
June 14, 2012
Product registration is entirely voluntary and failure to complete or return this form will not diminish your warranty rights.
Registration
 Loading...