

Page 1
Page 2
iD-Link DSM-210 User Manual
D-Link reserves the right to revise this publication and to make changes in the content hereof without obligation to
notify any person or organization of such revisions or changes.
Manual Revisions
Trademarks
D-Link and the D-Link logo are trademarks or registered trademarks of D-Link Corporation or its subsidiaries in the
United States or other countries. All other company or product names mentioned herein are trademarks or registered
trademarks of their respective companies.
Copyright © 2008 by D-Link Systems, Inc.
All rights reserved. This publication may not be reproduced, in whole or in part, without prior expressed written permission
from D-Link Systems, Inc.
Revision Date Description
1.0 April 14, 2008 DSM-210 Revision A1 with Firmware version 1.00
Preface
Page 3

iiD-Link DSM-210 User Manual
Use the following safety guidelines to ensure your own personal safety and to help protect your system from potential
damage. Such acts not expressly approved by D-Link will result in the loss of product warranty.
Unless expressly approved by D-Link Systems, you may not:
• Disassemble or reverse engineer the device or attempt to derive source code (underlying ideas, algorithms, or
structure) from the equipment or from any other information provided by D-Link Systems, except to the extent
that this restriction is expressly prohibited by local law.
• Modify or alter the device.
• Remove from the device any product identification or other notices.
To reduce the risk of bodily injury, electrical shock, fire, and damage to the equipment, observe the following
precautions:
Power Sources
• Observe and follow service markings.
• Do not push any objects into the openings of your device. Doing so can cause a fire or an electric shock by
shorting out interior components.
• The powering of this device must adhere to the power specifications indicated for this product.
• Do not overload wall outlets and/or extension cords as this will increase the risk of fire or electric shock.
• Do not rest anything on the power cord or on the device.
Safety Instructions
Page 4

iiiD-Link DSM-210 User Manual
• Position system cables and power cables carefully; route cables so that they cannot be stepped on or tripped
over. Be sure that nothing rests on any cables.
• Operate the device only from the type of external power source indicated on the electrical ratings label.
• Be sure that attached devices are electrically rated to operate with the power available in your location.
• Use only approved power cable(s). If you have not been provided with a power cable for your device or for any
AC-powered option intended for your device, purchase a power cable that is approved for use in your country.
The power cable must be rated for the product and for the voltage and current marked on the product’s electrical
ratings label. The voltage and current rating of the cable should be greater than the ratings marked on the
product.
• To prevent an electric shock, plug the device and peripheral power cables into properly grounded electrical
outlets. These cables are equipped with three-prong plugs to help ensure proper grounding. Do not use adapter
plugs or remove the grounding prong from a cable. If you must use an extension cable, use a 3-wire cable with
properly grounded plugs.
• Observe extension cable and power strip ratings. Make sure that the total ampere rating of all products plugged
into the extension cable or power strip does not exceed 80 percent of the ampere ratings limit for the extension
cable or power strip.
• To protect your device from sudden, transient increases and decreases in electrical power, use a surge suppressor,
line conditioner, or uninterruptible power supply (UPS).
• Do not modify power cables or plugs. Consult a licensed electrician or your power company for site modifications.
Always follow your local/national wiring rules.
Page 5

ivD-Link DSM-210 User Manual
Servicing/Disassembling
• Do not service any product except as explained in your system documentation.
• Opening or removing covers that are marked with the triangular symbol with a lightning bolt may expose you to
an electrical shock. Only a trained service technician should service components inside these compartments.
• To reduce the risk of electric shock, never disassemble this device. None of its internal parts are user-replaceable;
therefore, there is no reason to access the interior.
• Do not spill food or liquids on your system components, and never operate the device in a wet environment. If
the device gets wet, see the appropriate section in your troubleshooting guide or contact your trained service
provider.
• Use the device only with approved equipment.
• Move product with care.
Page 6

vD-Link DSM-210 User Manual
Environment
• Always position the DSM-210 on a stable and level surface. Unstable surfaces can cause the DSM-210 to fall,
resulting in possible damage or injury.
• Do not use this device near water (e.g. near a bathtub, sink, laundry tub, fish tank, in a wet basement or near
a swimming pool).
• Do not use this device in areas with high humidity.
• This device must not be subjected to water or condensation.
• Keep your device away from radiators and heat sources.
Cleaning
• Always unplug the power before cleaning this device.
• Do not use liquid or aerosol cleaners of any kind.
• Use a dry, lint-free cloth for cleaning.
Page 7

1D-Link DSM-210 User Manual
Table of Contents
Preface ...........................................................................i
Manual Revisions .....................................................i
Trademarks ............................................................... i
Safety Instructions ................................................... ii
Product Overview ........................................................2
Package Contents....................................................2
System Requirements .............................................2
Introduction ..............................................................3
Product Overview ....................................................4
Back Panel ......................................................... 4
Front Panel ......................................................... 5
Remote Control........................................................6
Wireless Installation Considerations ........................ 7
Installation ....................................................................8
Attach the Stand ...................................................... 8
Connect Ethernet Cable ..........................................9
Connect Power Supply ............................................9
Configuration .............................................................10
Connect to a Wireless Network .............................10
WPA-PSK ......................................................... 11
WPS ................................................................. 12
Manually Enter SSID........................................13
Connect to a Wired Network .................................. 14
Network Settings ...................................................15
Viewing Pictures ........................................................ 16
Insert External Memory Card ................................16
Select from Storage ...............................................17
Select from Media Server ...................................... 19
Windows® Media Player 11 Setup ......................... 21
FrameChannel .......................................................29
Other Features ...........................................................33
Upgrade Firmware .................................................33
Transition Types .....................................................34
Set Scaling.............................................................35
Reset to Factory Defaults ...................................... 36
Motion Sensor Test ................................................37
About .....................................................................38
D-Link Widget .............................................................39
Product Specifications .............................................. 41
Contacting Technical Support ..................................42
Warranty ..................................................................... 43
Registration ................................................................49
Page 8
2D-Link DSM-210 User Manual
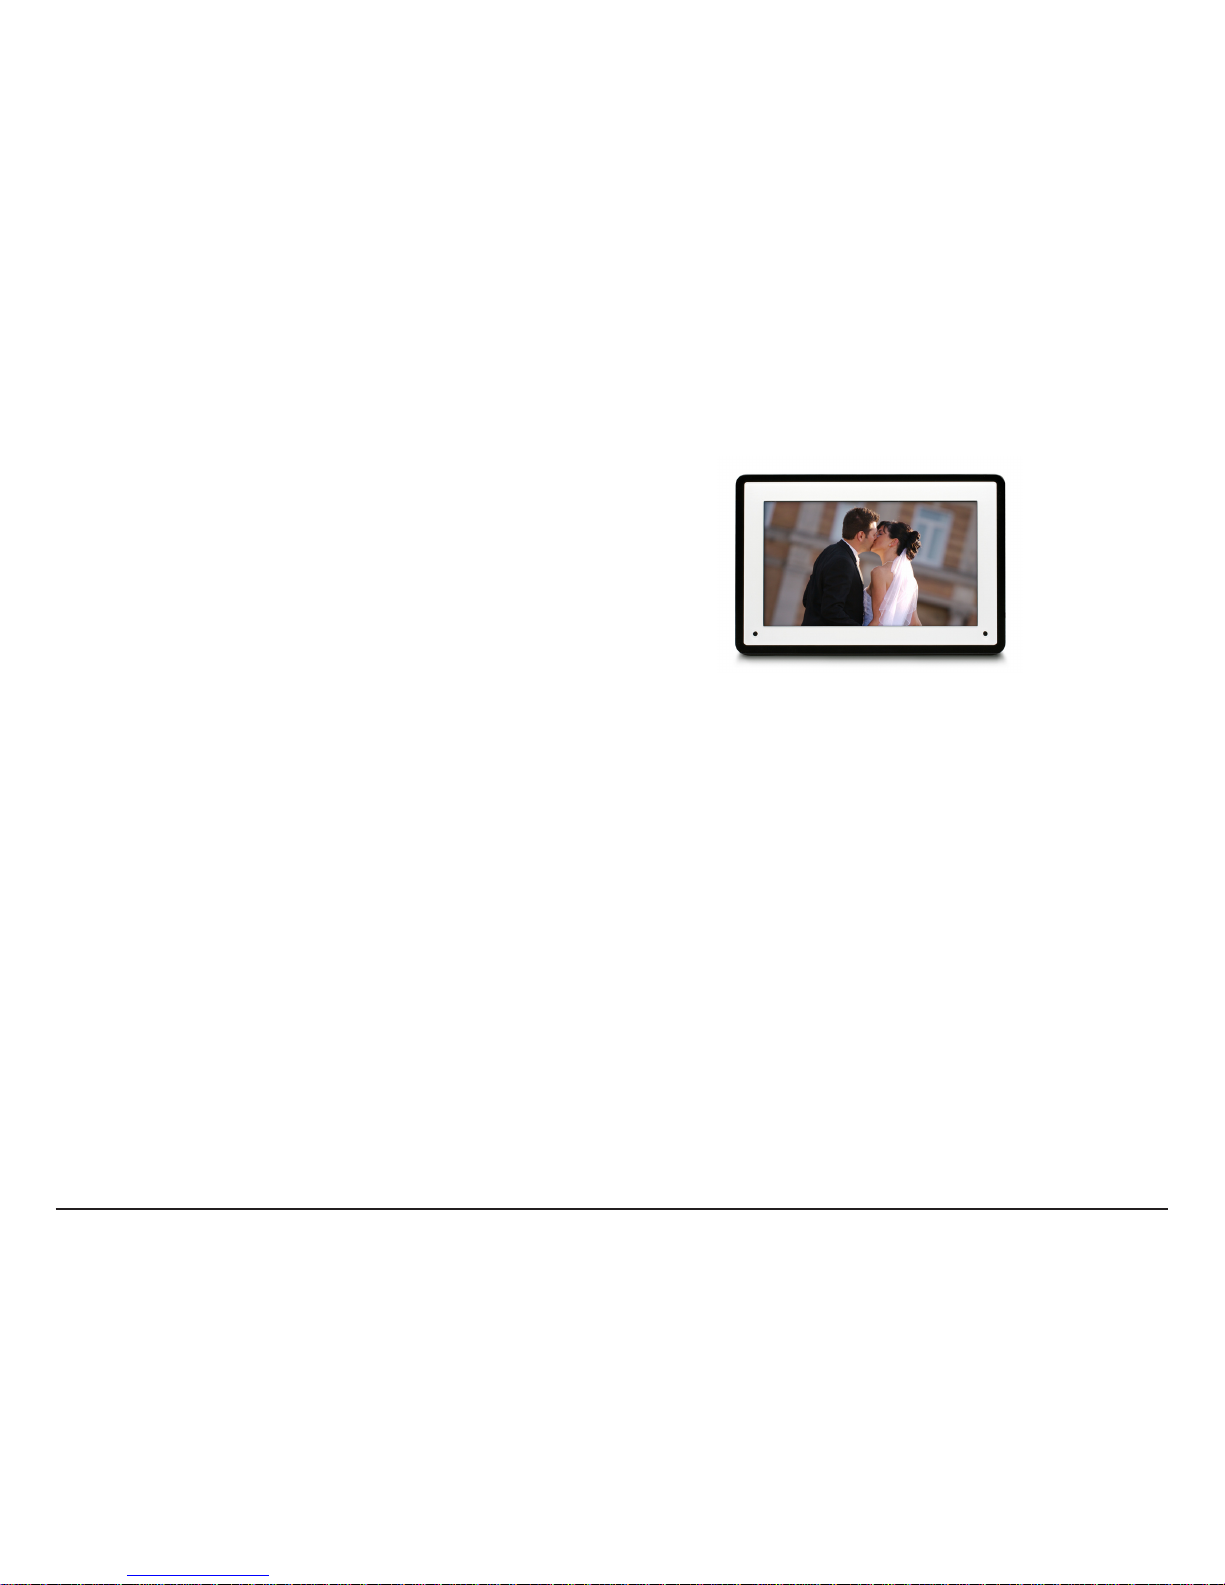
• D-Link DSM-210 Wireless Internet Photo Frame
• Remote Control (batteries included)
• Power Adapter
• Stand
• CAT5 Ethernet Cable
• Faceplates (1 black / 1 white)
• CD-ROM with Widget Software and User Manual
• Quick Setup Guide
System Requirements
Product Overview
Package Contents
For Standalone Use:
• Photos can be viewed directly from a compatible memory card or USB flash drive
• A Computer is Not Required
To View Photos Stored on a PC or Network Attached Storage (NAS):
• A wired (10/100) or wireless (802.11g) network
• Computer with:
• Windows Vista®, Windows XP (SP2), or Windows 2000 (SP4)
• CD-ROM Drive to Install Included Widget Software
• Wired or Wireless Network Adapter
• UPnP™ AV Media Sharing Software (e.g. Windows Media Player 11)
• NAS with Built-in Support for UPnPTM AV (e.g. D-Link DNS-323)
To View Photos and Information from Online Services:
• A wired or wireless network with Internet Access
Page 9

3D-Link DSM-210 User Manual
The D-Link® 10” Wireless Internet Photo Frame (DSM-210) combines the benefit of a digital photo frame with the convenience of the
Internet. Now you can display and share family, vacation, and holiday photos with friends and loved ones around the world. The frame can
also access the Internet to view new photos from multiple photo hosting websites and get RSS feeds of the latest news, weather, sports,
and more.
UNLEASH YOUR PHOTOS
With the Internet Photo Frame you can finally display all of those digital photos you have sitting untouched in your PC. Don’t let all those
wonderful memories collect dust on your hard drive where no one will ever see them again. Display the DSM-210 in your living room and
let guests see photos from your latest vacation, holiday, or other family outing.
THE INTERNET IN A FRAME
Send the DSM-210 as a gift to your family and loved ones. Then share your latest photos with them through popular photo sharing sites
such as Flickr™, Picasa™, Facebook™, FrameChannel, and more. You can also use the Internet Photo Frame to subscribe to your favorite
RSS feeds. Get the latest news, stock updates, sports scores, clock, calendar, weather conditions, and more directly on your frame.
WIRED OR WIRELESS
With the Internet Photo Frame you won’t be tied to simply using a memory card to upload new photos. Use the convenience of your home
network to get new photos using a wired Ethernet connection or the DSM-210’s built-in wireless connection. Wireless setup is made even
easier using WPS (Wi-Fi® Protected Setup). Simply push the WPS button on the frame and then on your compatible router to connect.
MORE THAN MEMORY CARDS
The Internet Photo Frame can also handle many of your standard flash memory formats such as USB thumb drive, SD, MMC, and
Memory Stick. Or you can choose to get pictures from a local UPnP-AV server such as a PC or Network Attached Storage (NAS) device.
Additionally, you can save pictures to the 1GB of internal memory
IN THE HALL OR ON THE WALL
Use the DSM-210 just as you would any standard photo frame. The frame can be wall mounted to hang in your living room or proudly
displayed next to all your other photo frames on a shelf in the hall.
BEING GREEN IS GOOD
Power savings isn’t just for large appliances anymore. The Internet Photo Frame has motion detection so it can automatically turn on when
you enter the room or off if nobody is in the room.
©2008 D-Link Corporation/D-Link Systems, Inc. All rights reserved. D-Link, the D-Link logo, MediaLounge, and the MediaLounge logo are trademarks or registered trademarks of D-Link Corporation or its
subsidiaries in the United States and/or other countries. Other trademarks or registered trademarks are the property of their respective owners.
Introduction
Page 10
4D-Link DSM-210 User Manual
Product Overview
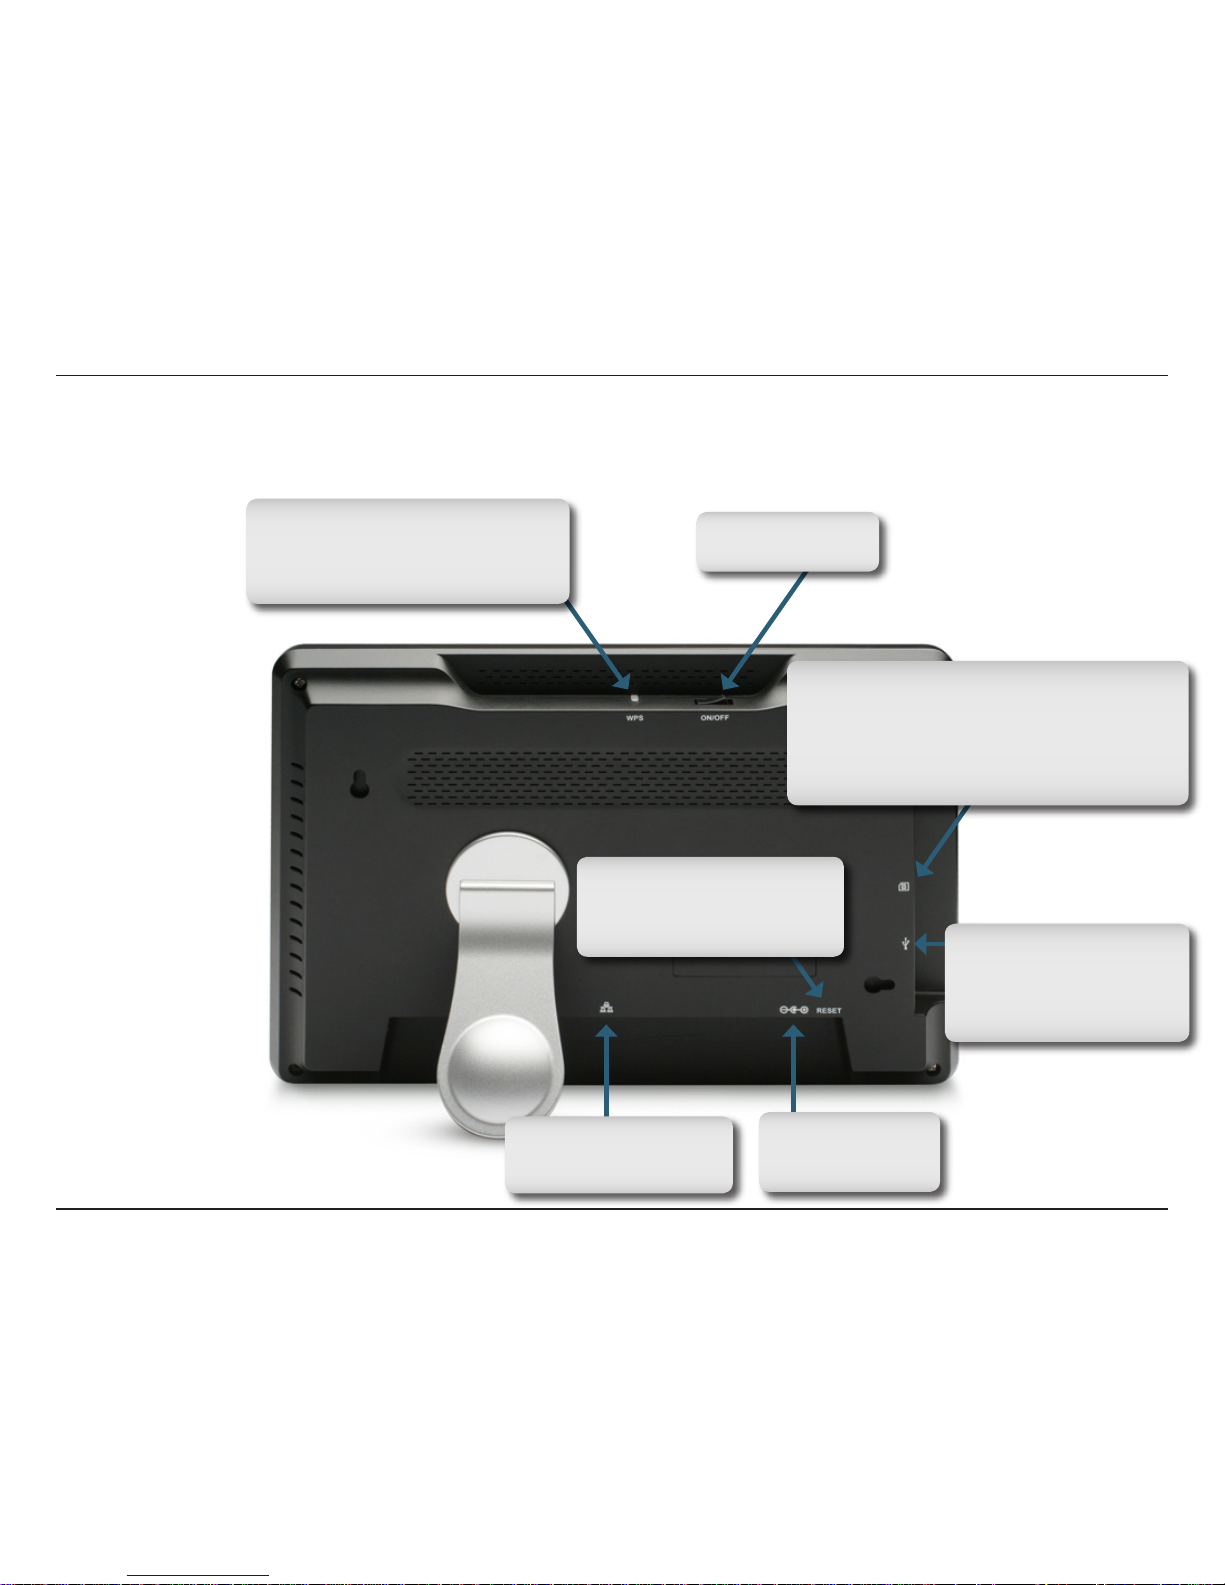
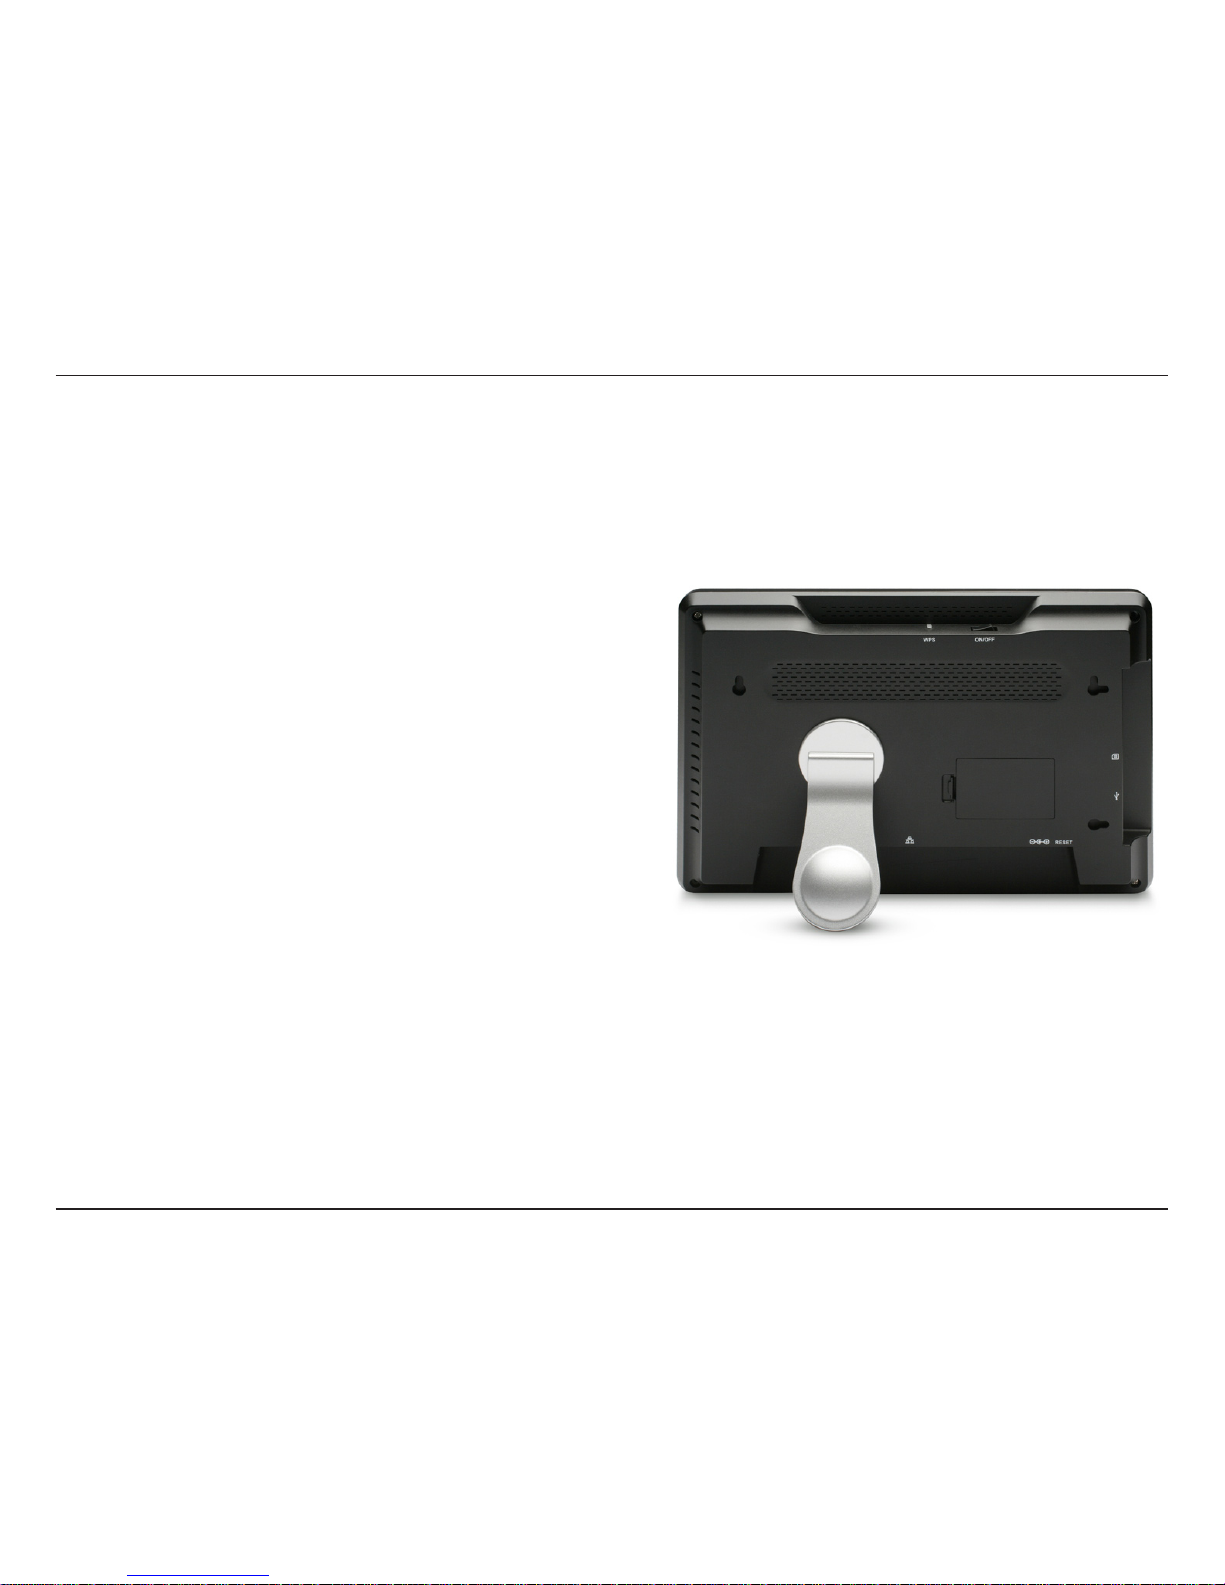
WPS Button
Press to configure the DSM-210
with a WiFi Protected Setup (WPS)
compatible router or access point.
Power Button
Press to turn on/off.
Memory Card Slot
Insert a memory card with stored pictures to
display or copy to the internal memory. The
DSM-210 supports Secure Digital (SD), Secure
Digital High Capacity (SDHC), MultiMedia
Card (MMC), and Memory Stick.
USB Port
Insert an USB thumb
drive with stored pictures
to display or copy to the
internal memory.
Ethernet Port
Connect to your network
using an Ethernet cable.
Power Receptor
Insert the supplied
power adapter.
Reset Button
Press and hold for 10 seconds
to reset the settings to the
factory default values.
Back Panel
Page 11
5D-Link DSM-210 User Manual
Front Panel
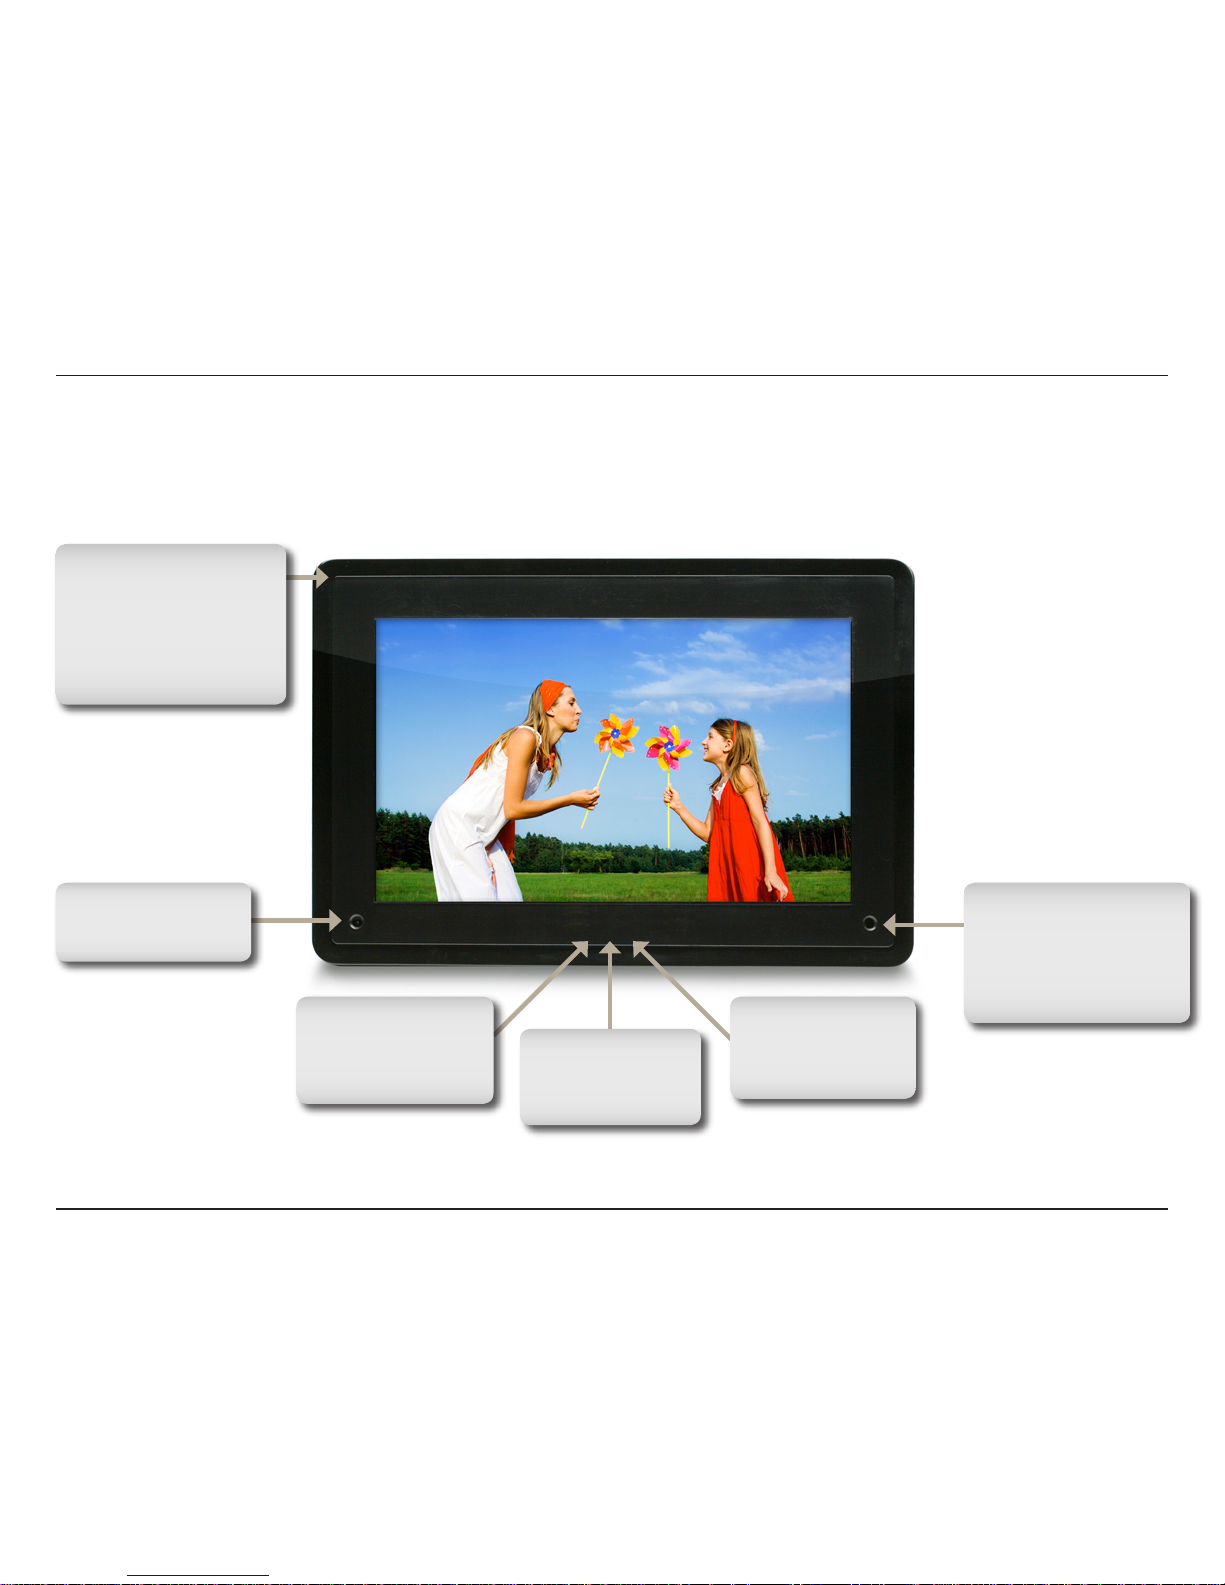
Remote Sensor
Sensor for the remote
control.
Motion Sensor
The frame will turn off
if no one is in the room
and turn on automatically
when someone enters
the room.
Forward
During a slide show,
press to display the
next picture.
Back
During a slide show,
press to display the
previous picture.
Play/Pause
During a slide show,
press to pause or
resume.
Removable Faceplate
To change the faceplate,
use your finger to pull off
the magnetic faceplate
from the corners. Place
the new faceplate onto
the DSM-210.
Page 12
6D-Link DSM-210 User Manual
Remote Control
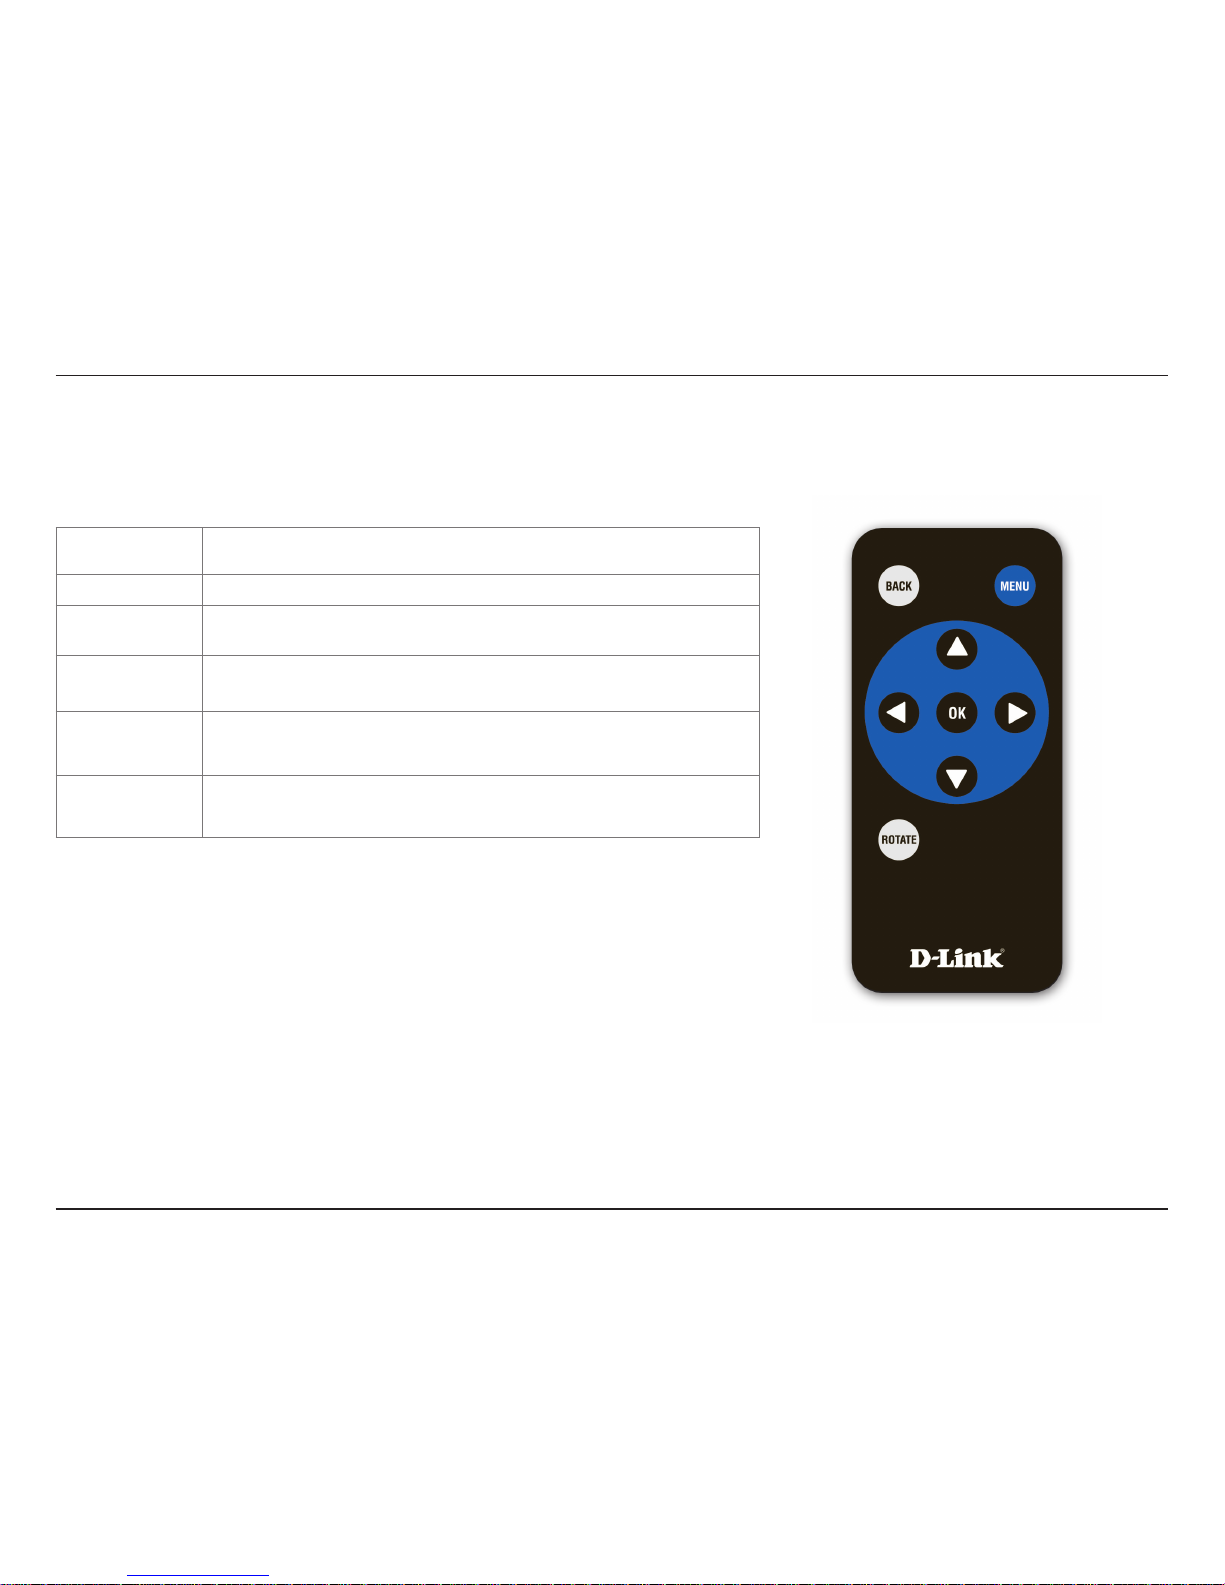
BUTTON FUNCTION
Back
Press to return to previous screen.
Menu
Press to display a list of options.
Arrow Keys
Press to navigate through menu options, slide shows, and
pictures.
Enter
Press to accept the current selection or option, or press to start/
pause in slide show mode.
Rotate
Press to rotate the image clockwise 90o each time button is
pressed.
Page 13

7D-Link DSM-210 User Manual
Wireless Installation Considerations
The D-Link wireless product lets you access your network using a wireless connection from virtually anywhere within
the operating range of your wireless network. Keep in mind, however, that the number, thickness and location of walls,
ceilings, or other objects that the wireless signals must pass through, may limit the range. Typical ranges vary depending
on the types of materials and background RF (radio frequency) noise in your home or business. The key to maximizing
wireless range is to follow these basic guidelines:
1. Minimize the number of walls and ceilings between the access point/wireless router and other network
devices/adapters - each wall or ceiling can reduce your signal from 3-90 feet (1-30 meters.) Position
your devices so that the number of walls or ceilings is minimized.
2. Be aware of the direct line between network devices. A wall that is 1.5 feet thick (.5 meters), at a
45-degree angle appears to be almost 3 feet (1 meter) thick. At a 2-degree angle it looks over 42 feet
(14 meters) thick! Position devices so that the signal will travel straight through a wall or ceiling (instead
of at an angle) for better reception.
3. Building Materials make a difference. A solid metal door or aluminum studs may have a negative effect on
range. Try to position access points, wireless routers, and computers so that the signal passes through
drywall or open doorways. Materials and objects such as glass, steel, metal, walls with insulation, water
(fish tanks), mirrors, file cabinets, brick, and concrete will degrade your wireless signal.
4. Keep your product away (at least 3-6 feet or 1-2 meters) from electrical devices or appliances that
generate RF noise.
5. If you are using 2.4GHz cordless phones or X-10 (wireless products such as ceiling fans, lights, and
home security systems), your wireless connection may degrade dramatically or drop completely. Make
sure your 2.4GHz phone base is as far away from your wireless devices as possible. The base transmits
a signal even if the phone in not in use.
Page 14
8D-Link DSM-210 User Manual
Installation
To place the Internet Photo frame on a shelf or a flat surface,
attach the supplied stand.
Align the arrow on the stand with the arrow on the back of
the frame (approximately at the 2:00 position).
• To use in horizontal position (as shown), turn the stand
counter-clockwise to the H position until the stand locks
into place.
• To use in vertical (portrait mode) position, turn the
stand clockwise to the V position until the stand locks
into place.
Attach the Stand
Page 15
9D-Link DSM-210 User Manual
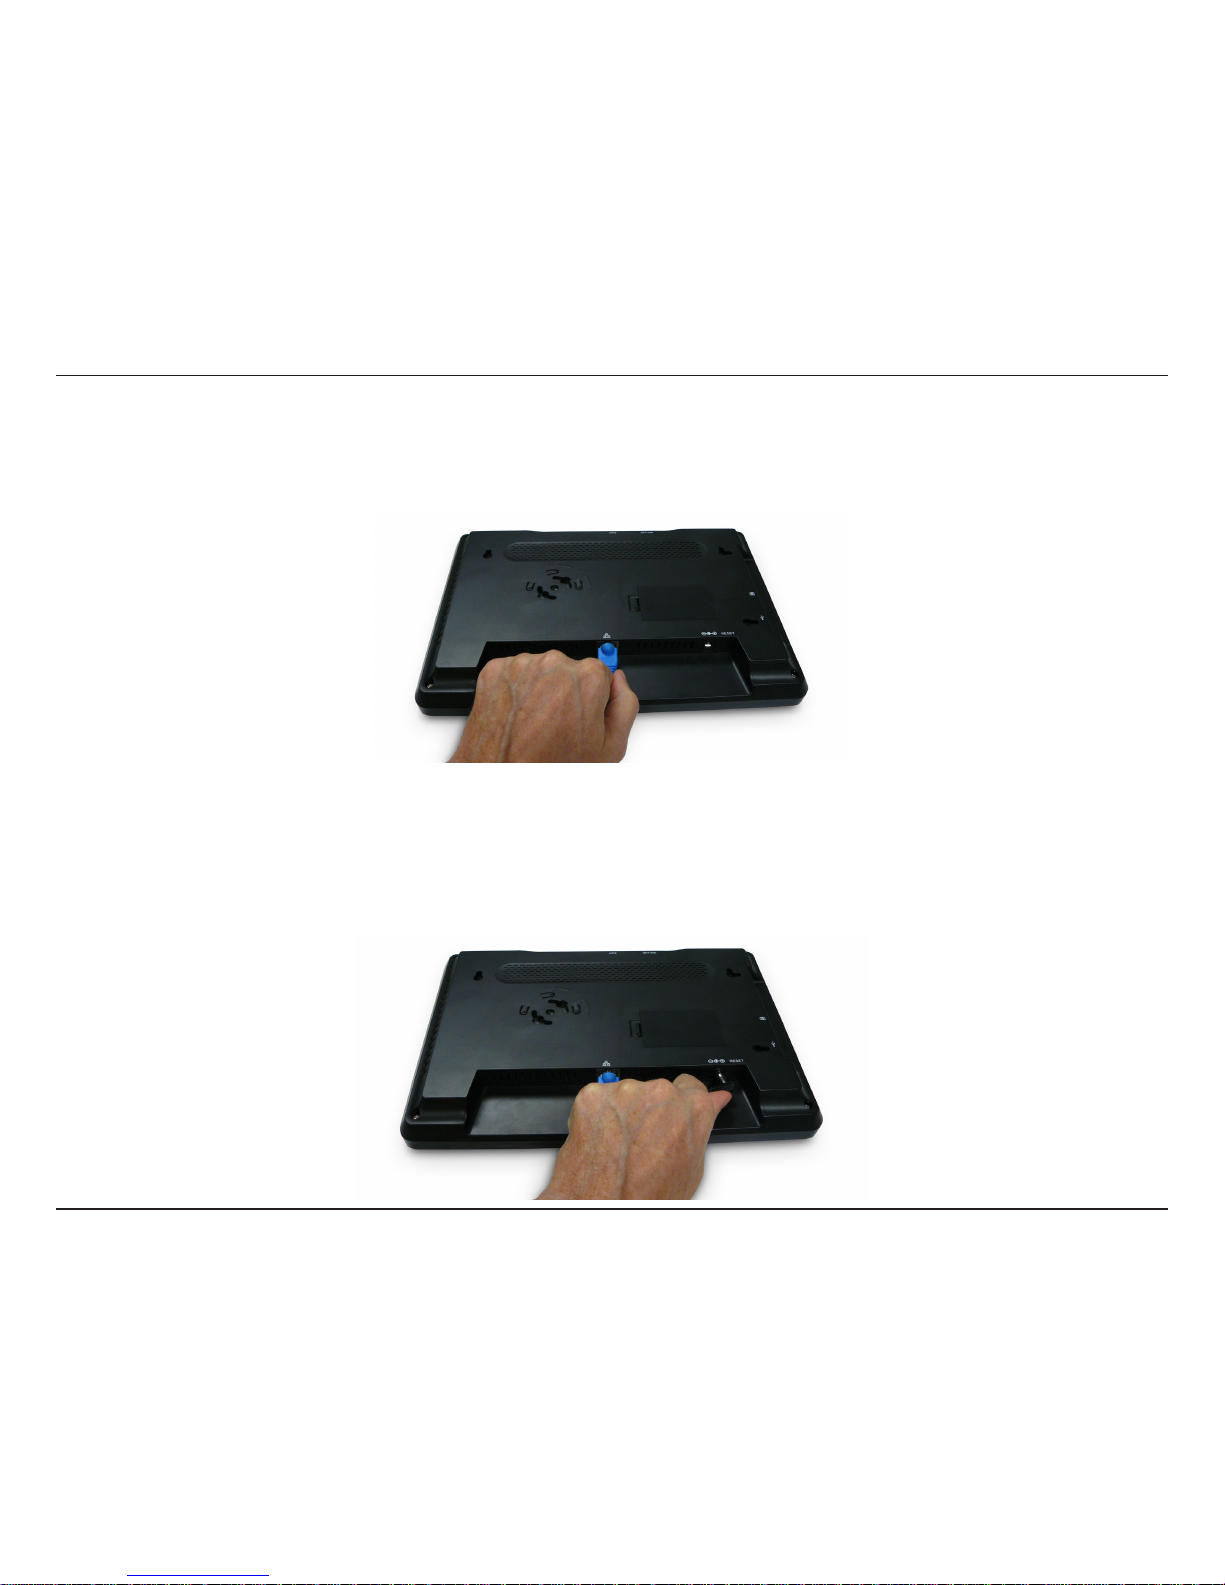
Connect Power Supply
Connect Ethernet Cable
If you are connecting the DSM-210 to a wired network, connect an Ethernet cable to the Ethernet port on the DSM-210
and the other end into your router or switch. If you are connecting to a wireless network, you can skip this step.
Connect the supplied power adapter to the DSM-210 and the other end into an outlet.
Page 16
10D-Link DSM-210 User Manual
Configuration
This section will show you how to configure your new D-Link Wireless Internet Photo Frame. If you are not going to
connect your DSM-210 to a network or to the Internet, and simply want to display pictures from the internal memory,
memory card, and/or from an USB thumb drive, then skip to page 16.
For the quickest and easiest installation, it is highly recommended that both DHCP and SSID Broadcast are enabled on
your home network. If not, then you will need to manually enter the network settings and/or the SSID of your wireless
network (refer to page 15). Most networks have DHCP and SSID broadcast enabled to allow new devices to find the
wireless network and connect automatically.
DHCP (Dynamic Host Configuration Protocol) allows network settings required
by the DSM-210 to be set automatically.
If your router or access point supports Wi-Fi Protected Setup (WPS), skip
to page 12.
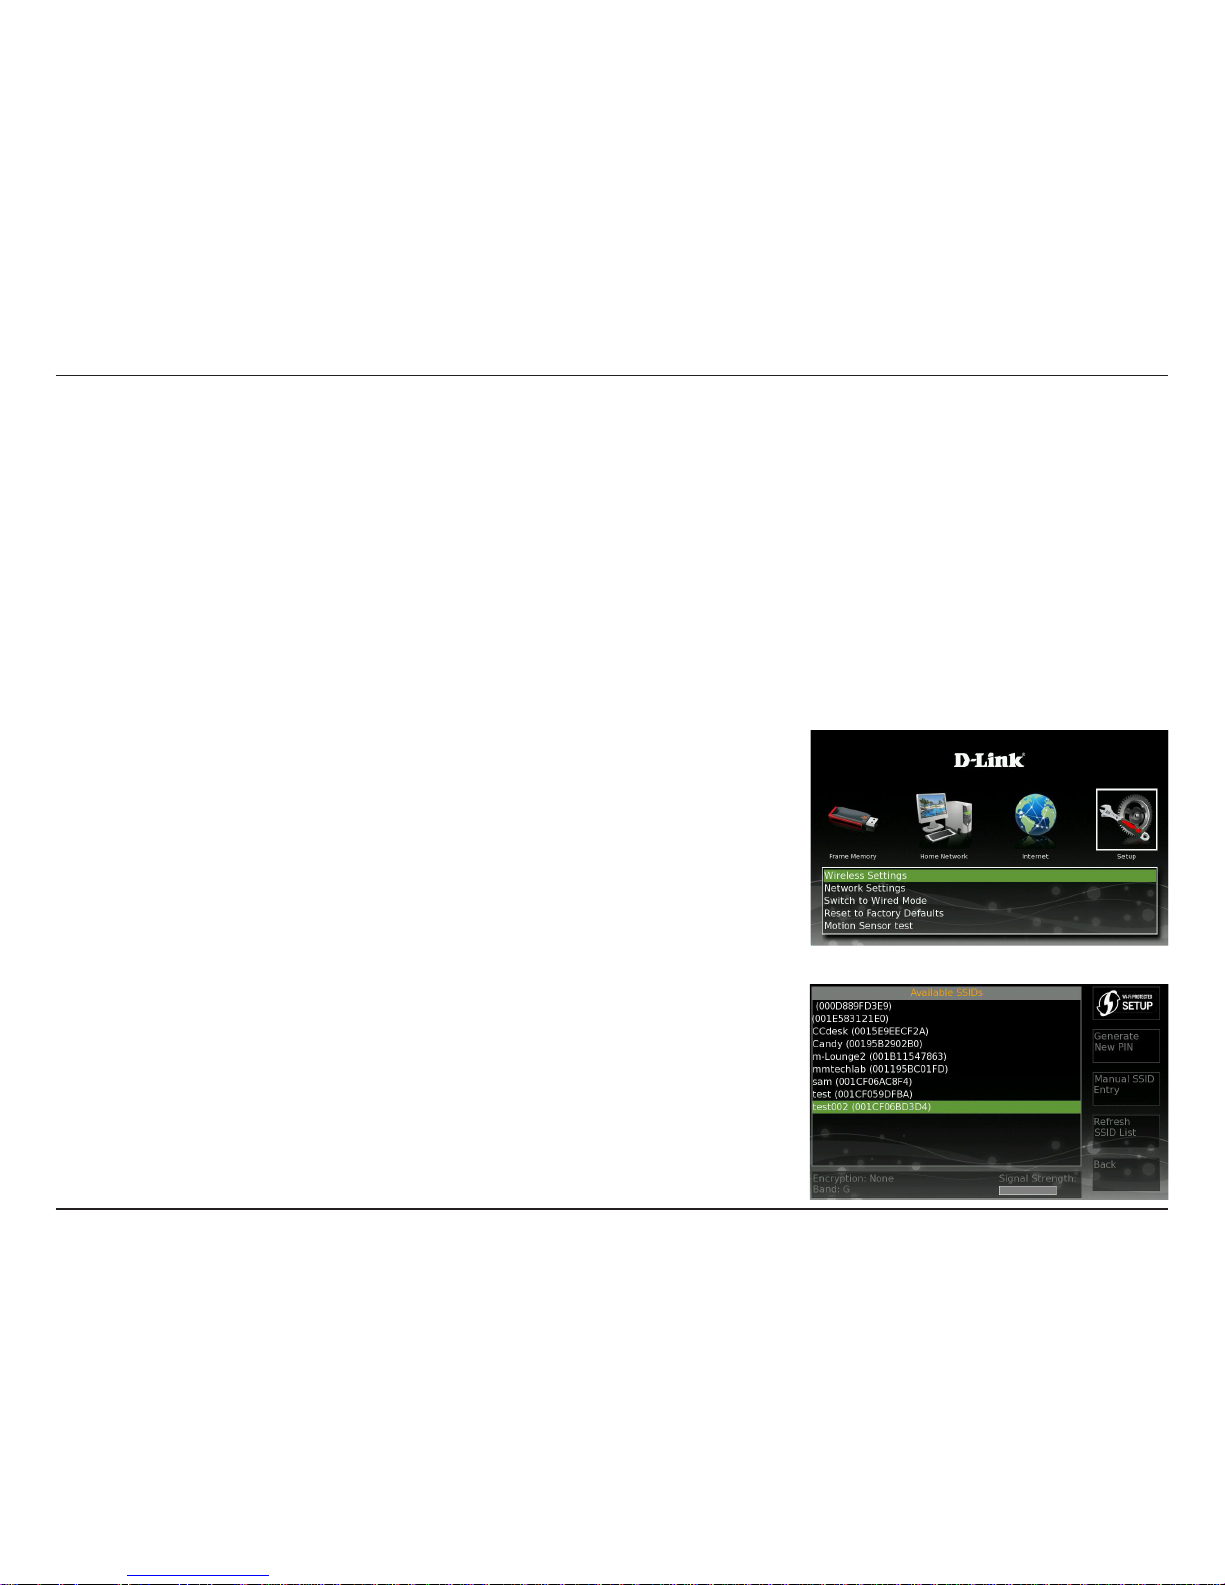
To bring up a list of available wireless networks, use the arrow keys on the
remote control and navigate to the Setup icon. Select Wireless Settings
and press Enter.
A list of available networks will appear in the left pane. Select your wireless
network and press Enter.
Connect to a Wireless Network
Page 17
11D-Link DSM-210 User Manual
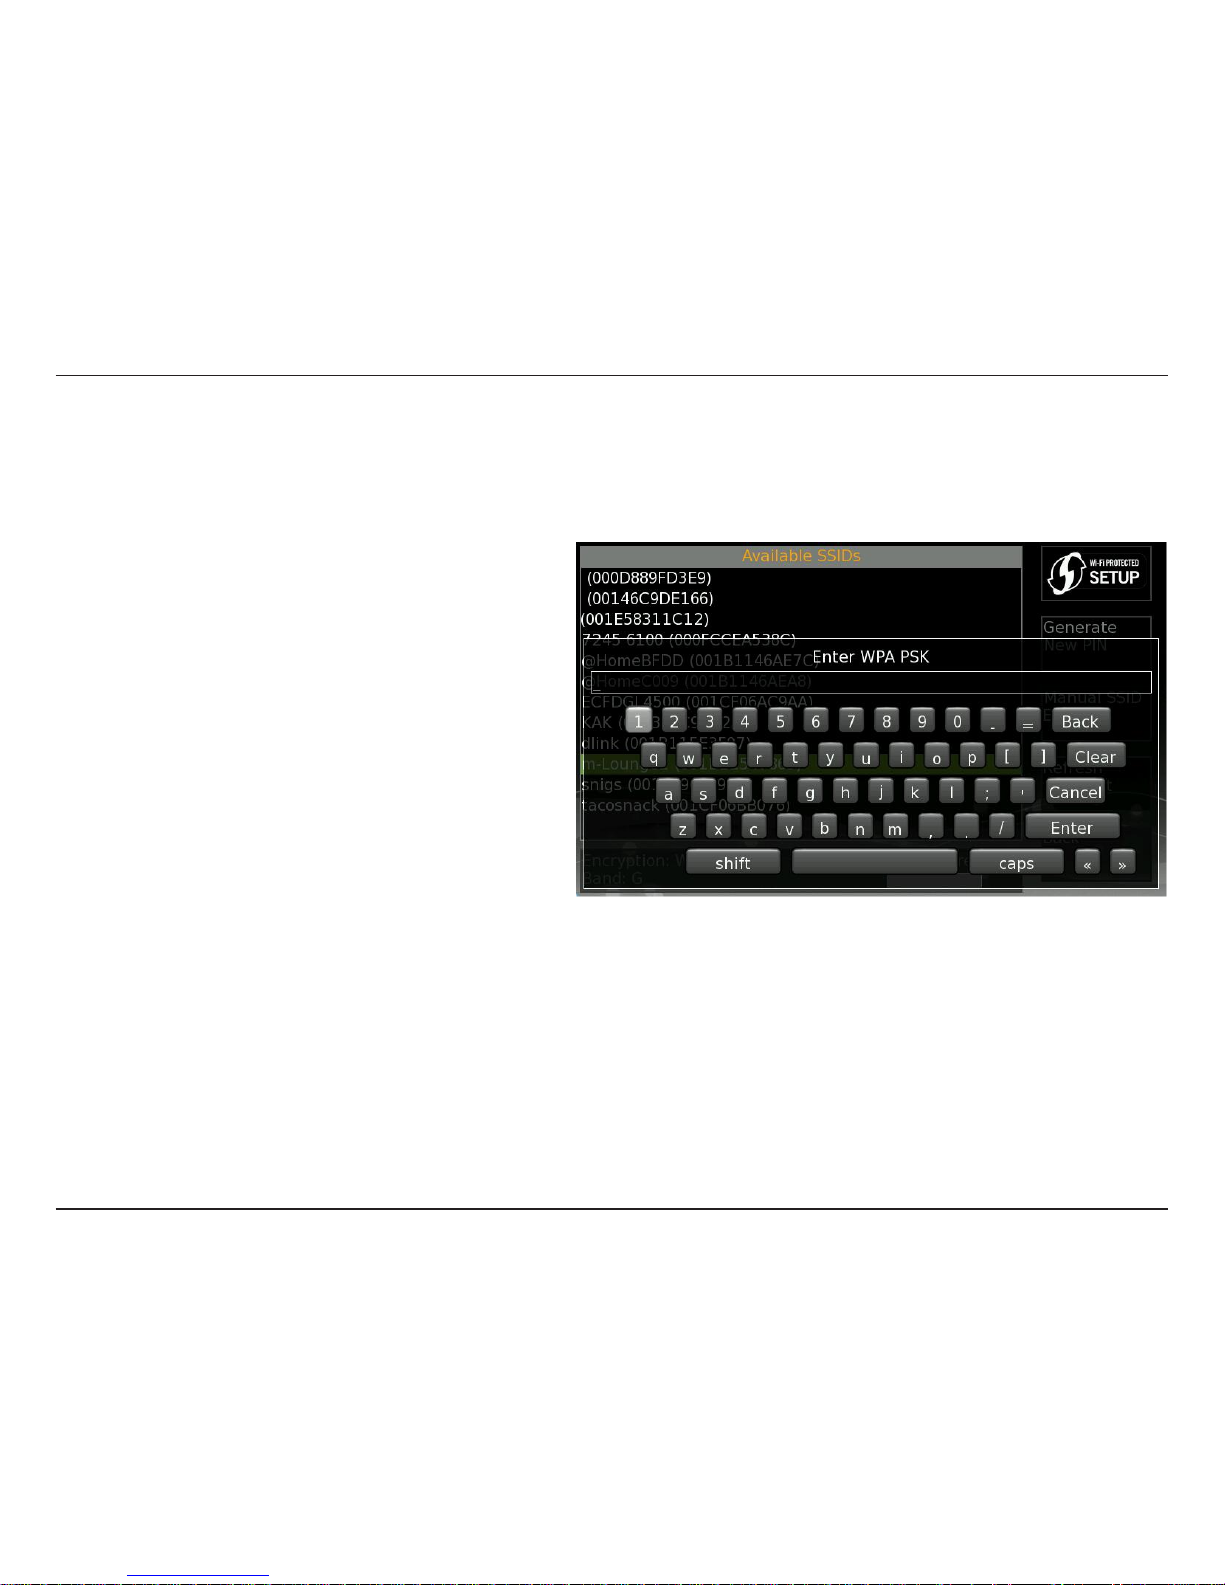
If the wireless network you are connecting to is using wireless security you will be prompted to enter the security
passphrase.
Using the arrow keys on the remote control, select
each letter or number from the on screen keyboard
and press Enter. Once the passphrase is complete,
select Enter from the on screen keyboard.
Note: Allow about a minute for the DSM-210 to
connect to your wireless network.
Once you connect, you may skip to page 15 to
configure/verify your network settings.
WPA-PSK
Page 18
12D-Link DSM-210 User Manual
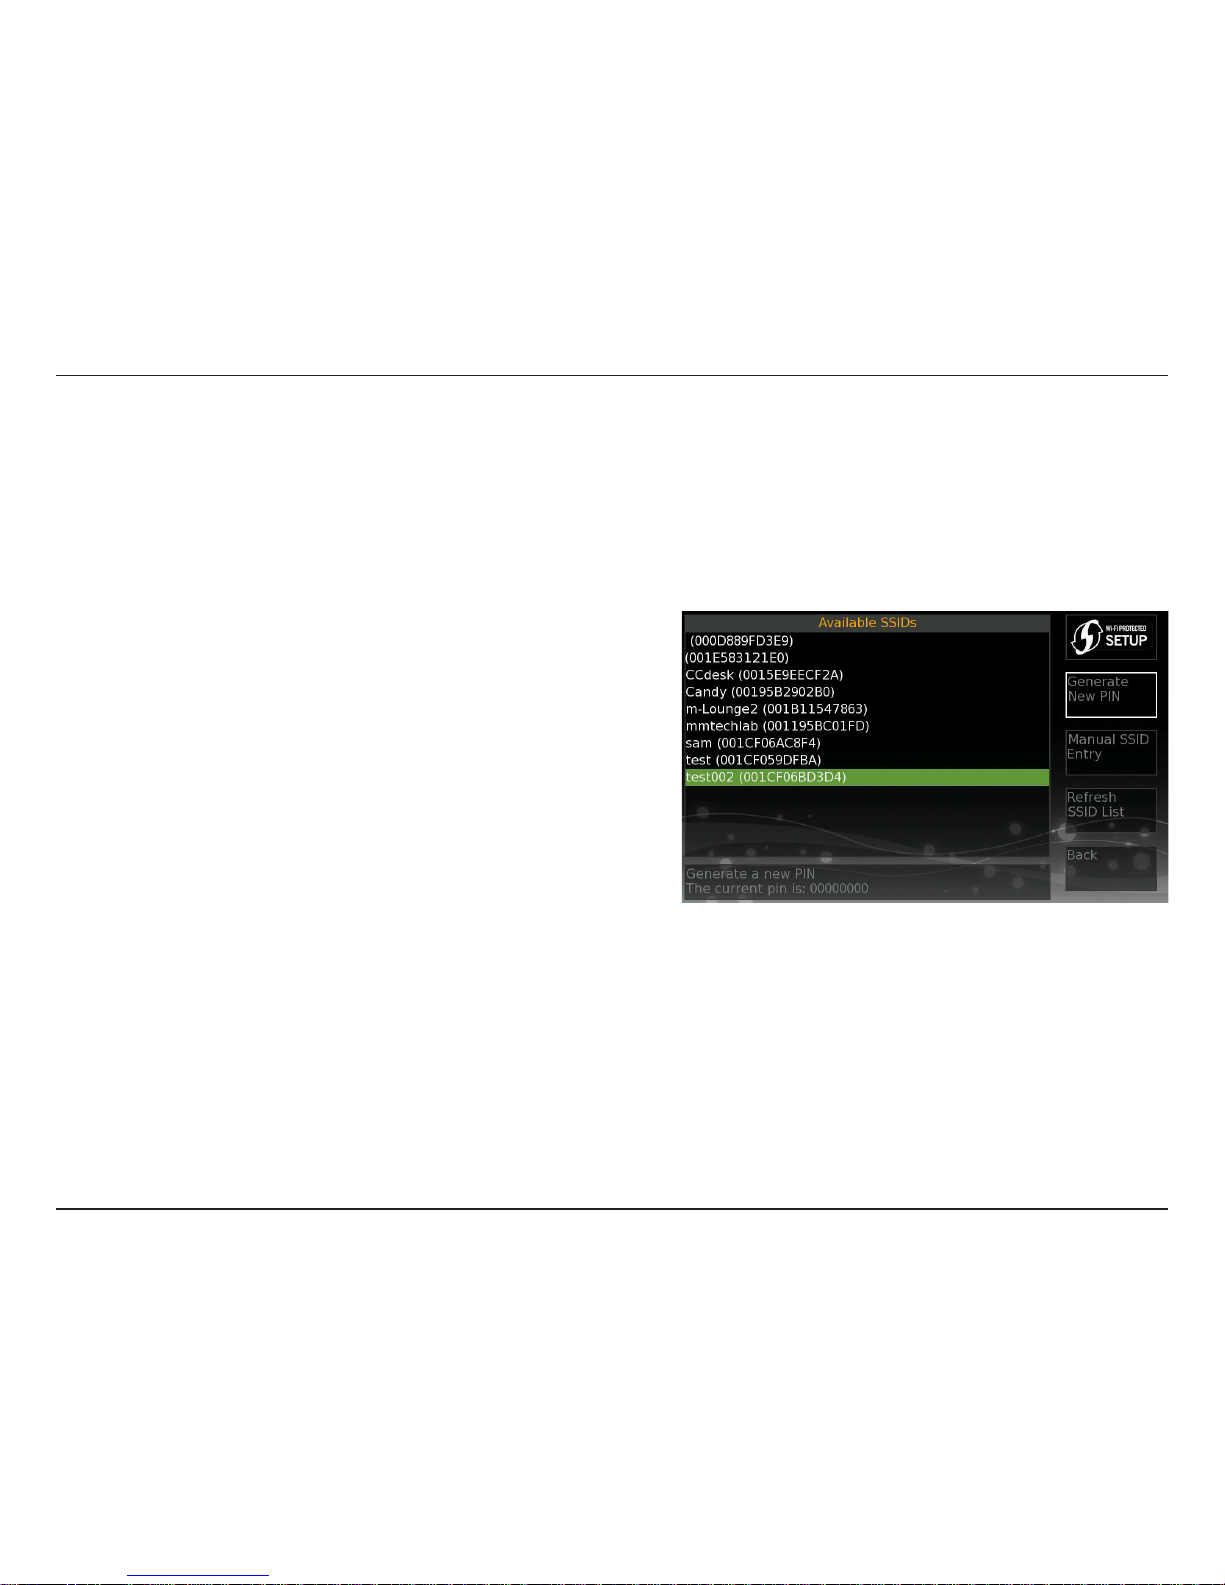
If your wireless router or access point supports WPS, you may
configure the DSM-210 using the push-button or PIN method.
Push-button Method: Press the WPS button on the top of the
frame or select the Wi-Fi Protected Setup on-screen button in
the upper-right corner and press Enter. You will need to press the
WPS button on your wireless router or access point within 120
seconds. Once configured the DSM-210 will reboot.
PIN Method: You can create a PIN by clicking the Generate New
PIN on the right side. Enter this PIN into your wireless router or
access point.
Please refer to your wireless router or access point documentation for more information on how to add a WPS
client to your network.
Once you connect, you may skip to page 15 to configure/verify your network settings.
WPS
Wi-Fi Protected Setup (WPS) is the Wi-Fi Alliance’s standard for wireless security at the touch of a button. With
WPS, the wireless network name (SSID) and encryption keys are automatically generated and broadcast to the client
devices. Users do not have to memorize and input complicated passwords on their wireless devices. This considerably
simplifies the process of setting up security on a wireless network.
Page 19
13D-Link DSM-210 User Manual
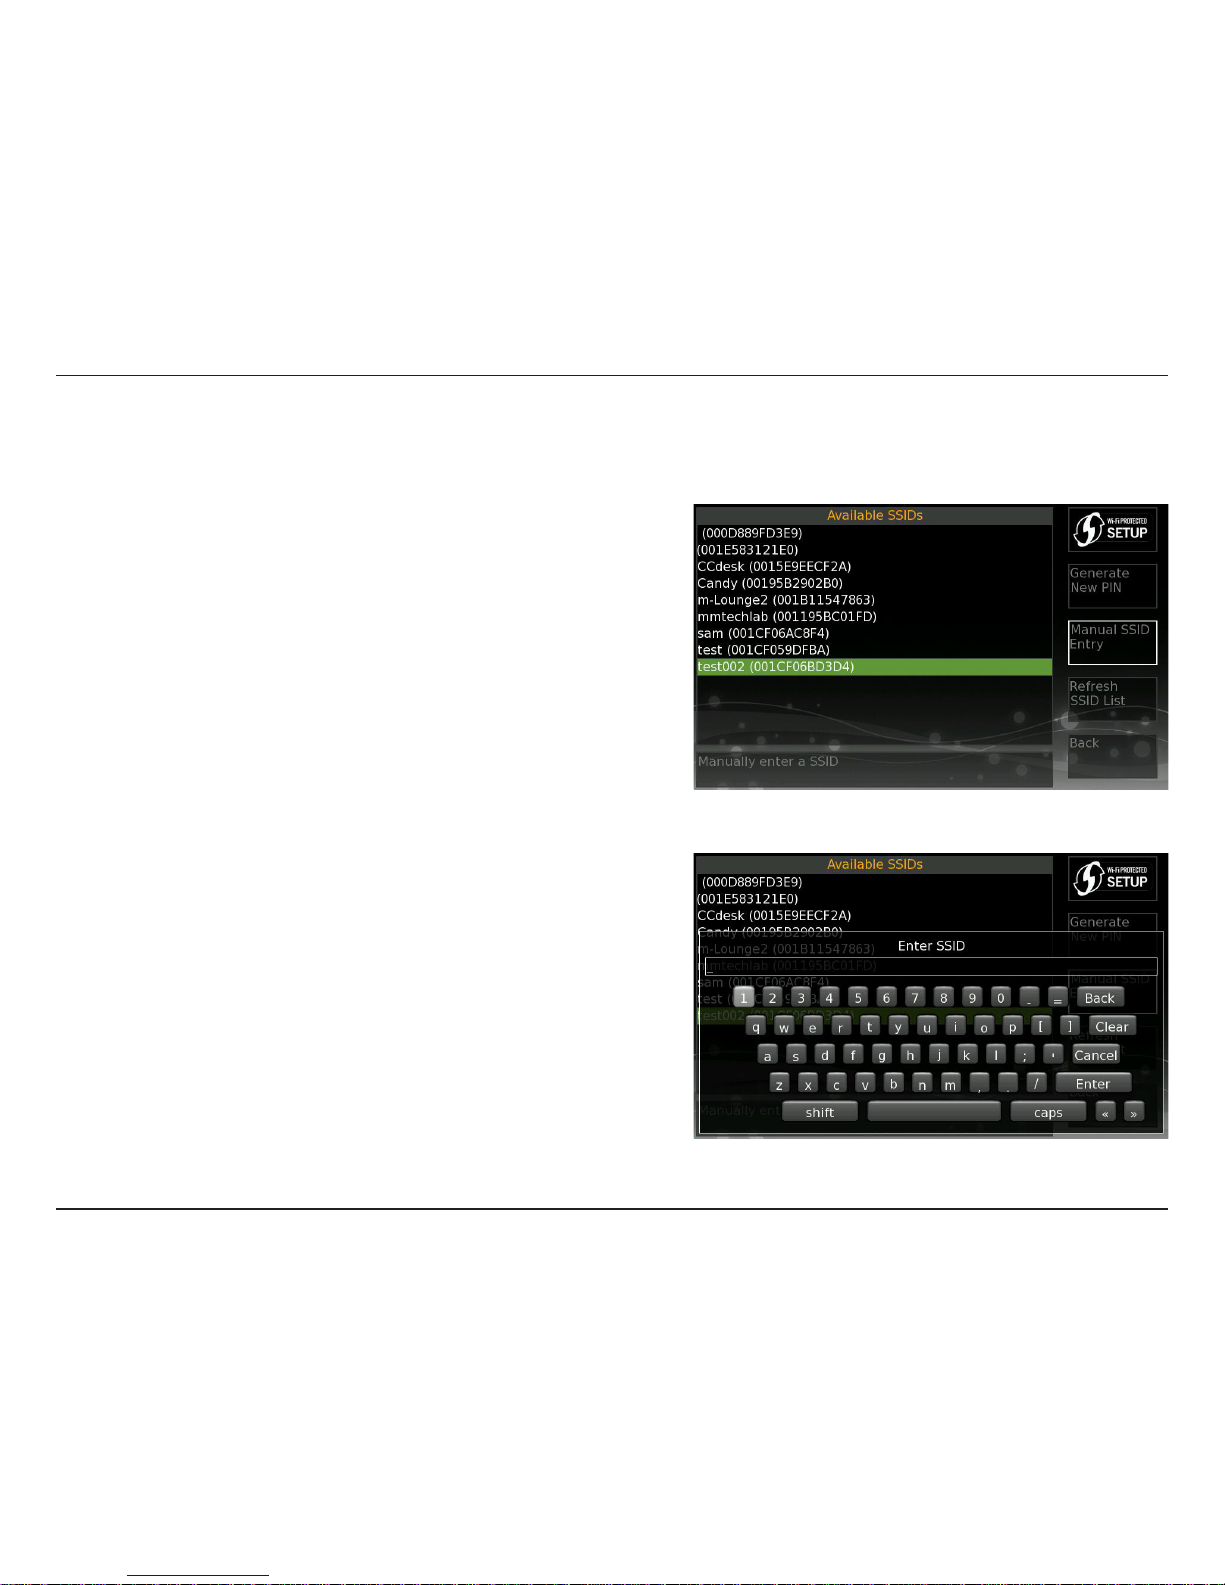
If the SSID Broadcast is not enabled on your wireless router or
access point, it is necessary to enter the SSID or network name
manually. In the right column, select Manual SSID Entry.
Using the remote control, press the arrow keys to select each letter
or number and press Enter. Once the SSID is complete, select
Enter on the onscreen keyboard. The SSID is case-sensitive and
must be entered exactly the same as on your wireless network.
If the wireless network you are connecting to is using wireless
security you will be prompted to enter the security passphrase.
Using the arrow keys on the remote control, select each letter
or number from the on screen keyboard and press Enter. Once
the passphrase is complete, select Enter from the on screen
keyboard (see page 11).
Note: Allow about a minute for the DSM-210 to connect to your
wireless network.
Once you connect, you may skip to page 15 to configure/verify
your network settings.
Manually Enter SSID
Page 20
14D-Link DSM-210 User Manual
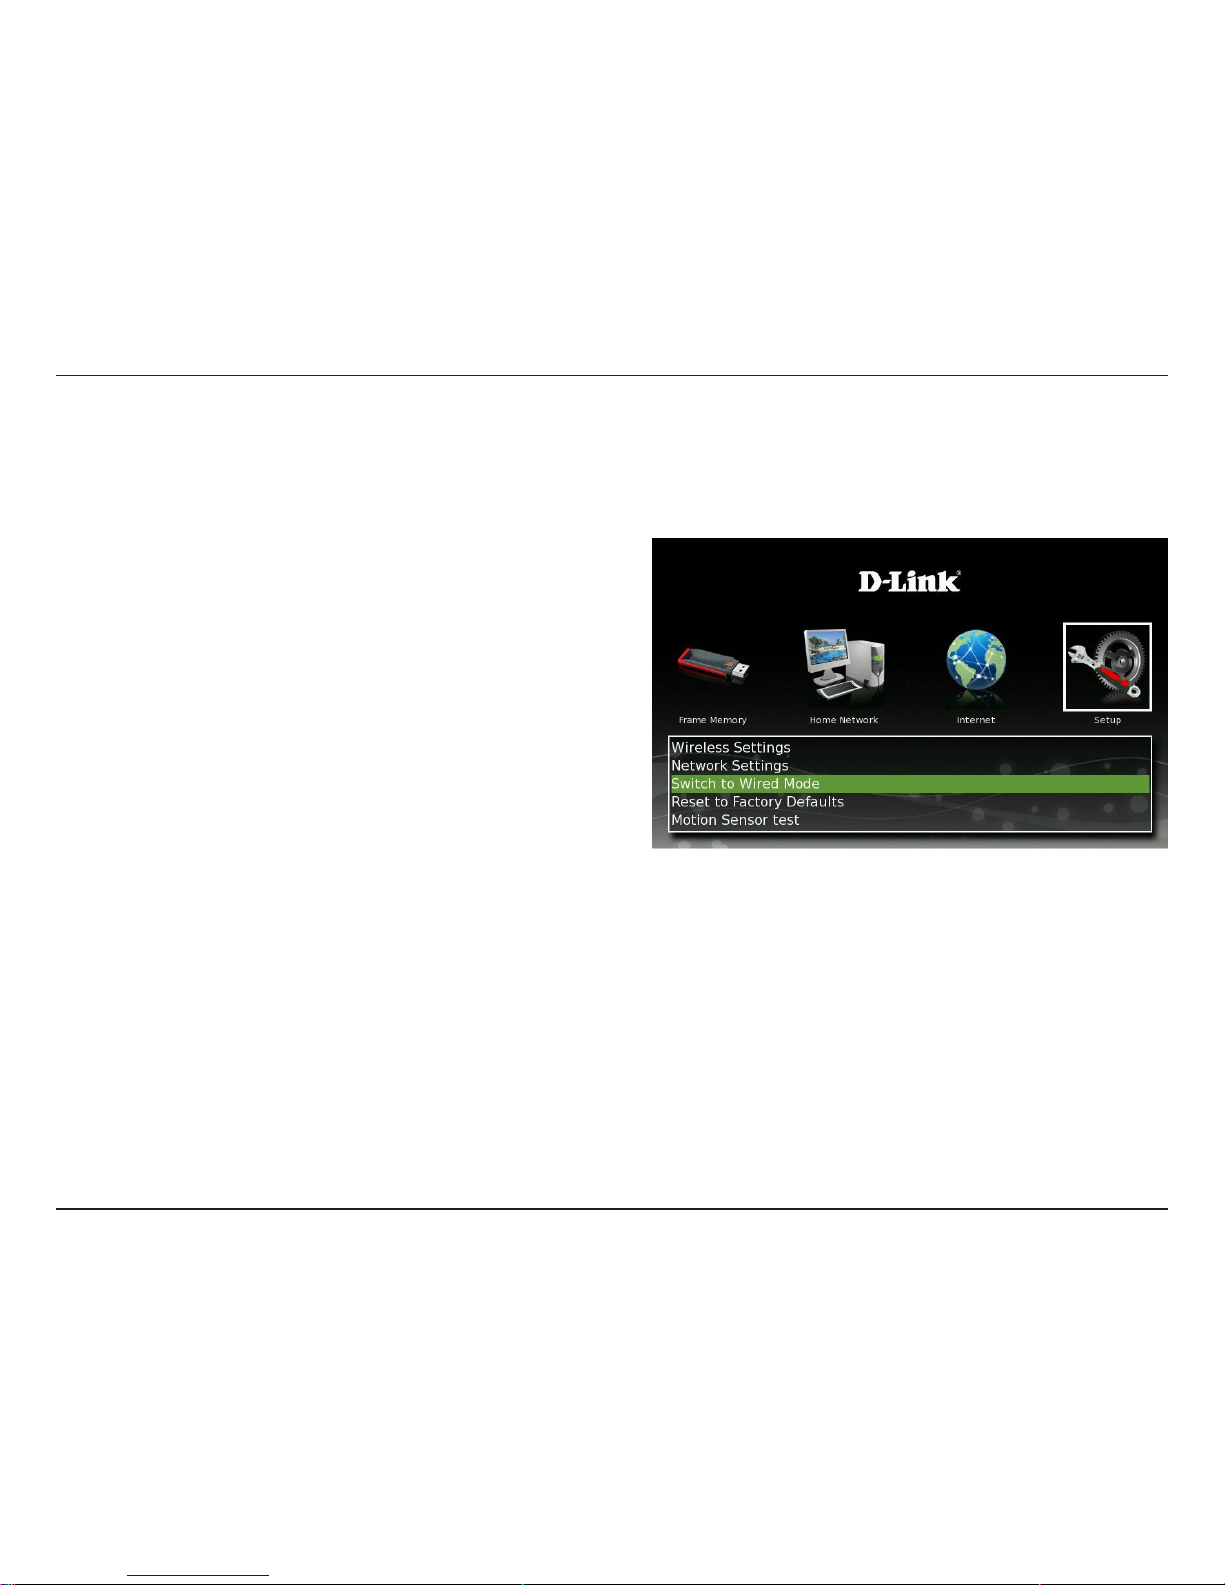
By default, the picture frame is set to wireless mode. To connect to your network using an Ethernet cable, you must set
the picture frame to wired mode.
Once the DSM-210 is powered on, use the remote control
to navigate to the Setup icon.
Select Switch to Wired Mode. The picture frame will
reboot.
Once rebooted, navigate to the Setup icon and select
Network Settings to configure the IP settings (see next
page).
Connect to a Wired Network
Page 21
15D-Link DSM-210 User Manual
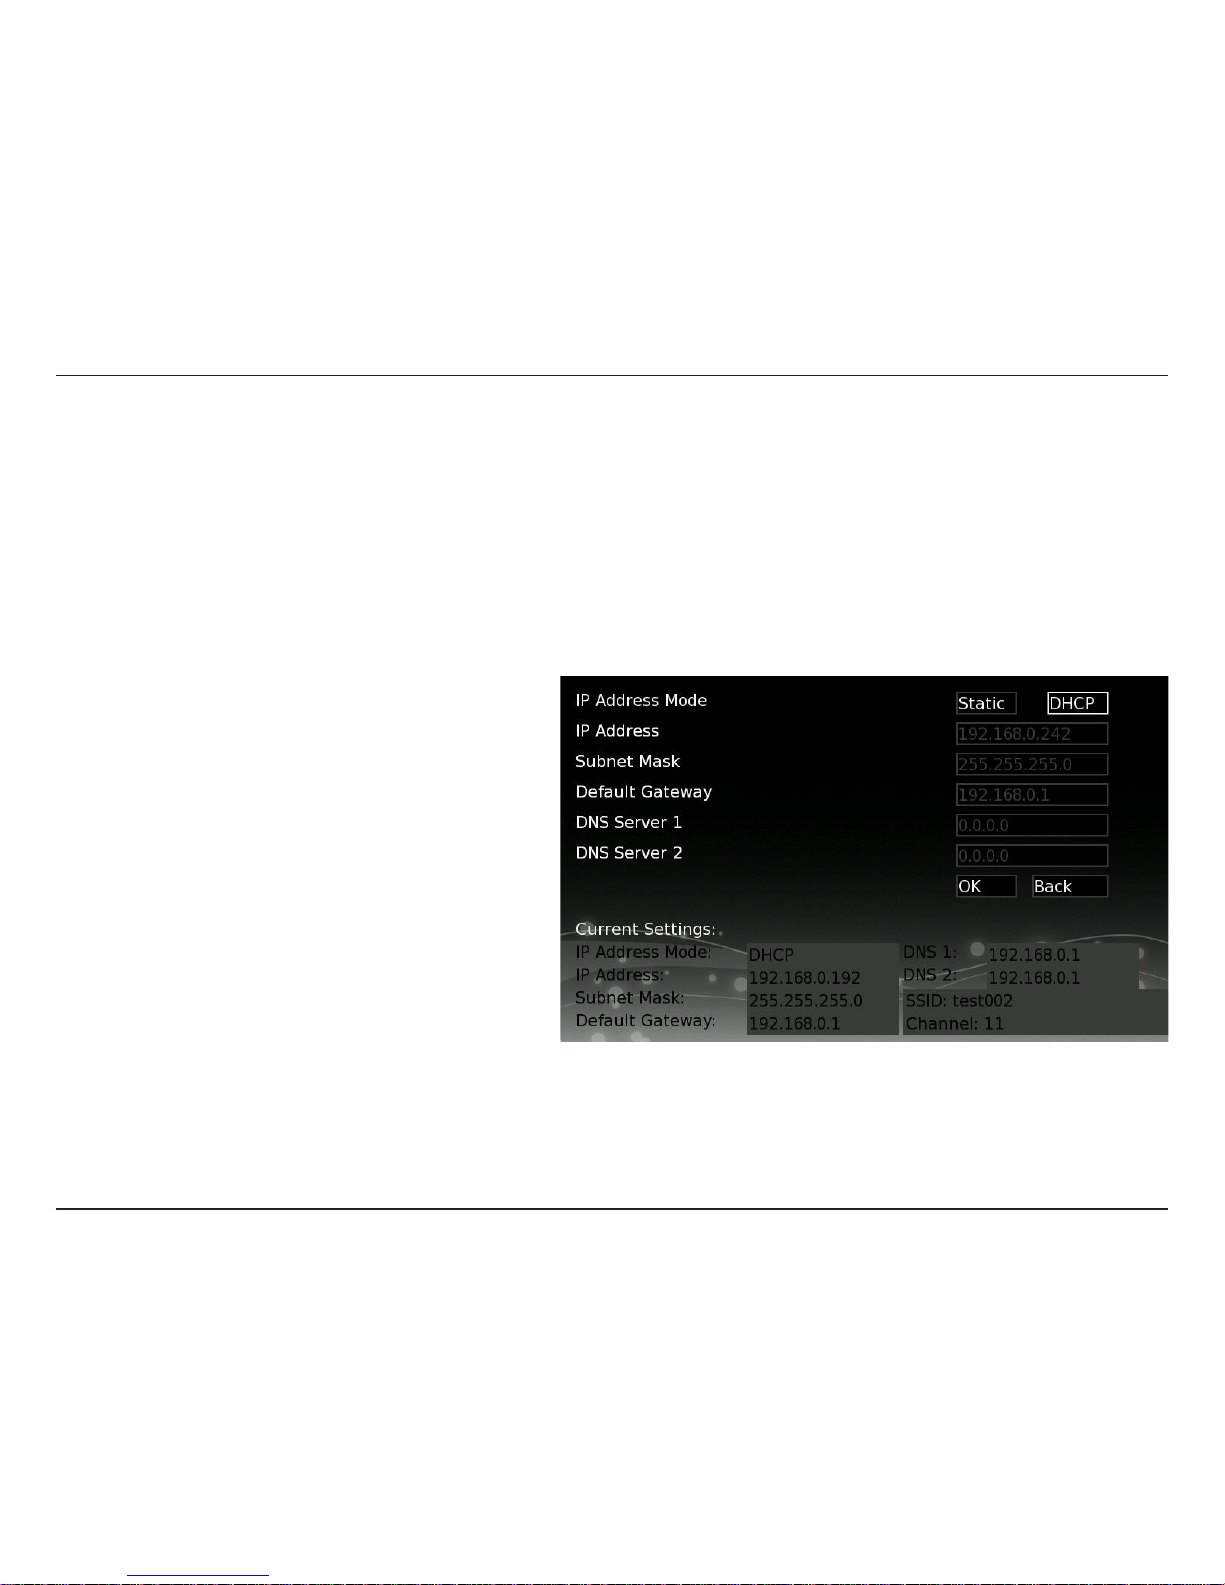
By default the DSM-210 is set to DHCP, allowing your network settings to be automatically configured from your router
or DHCP server. Most networks have DHCP enabled. If you are not sure, please verify your router’s settings.
Network Settings
If you would like to manually enter your network information, select Static and press Enter. Enter the IP settings and
select OK to save. When DHCP is selected, the fields will be blacked out.
Verify your settings listed below Current Settings.
IP Address Mode: Displays Static or DHCP.
IP Address: The current IP Address of your
DSM-210.
Subnet Mask: The current subnet mask.
Default Gateway: The IP Address of your router or
gateway.
DNS1/DNS2: The addresses of your DNS server
(usually the IP address of your router)
SSID: The name of the wireless network you are
connected to (Wireless mode only).
Channel: Displays the wireless channel you are connected to (Wireless mode only).
Page 22
16D-Link DSM-210 User Manual
Insert External Memory Card
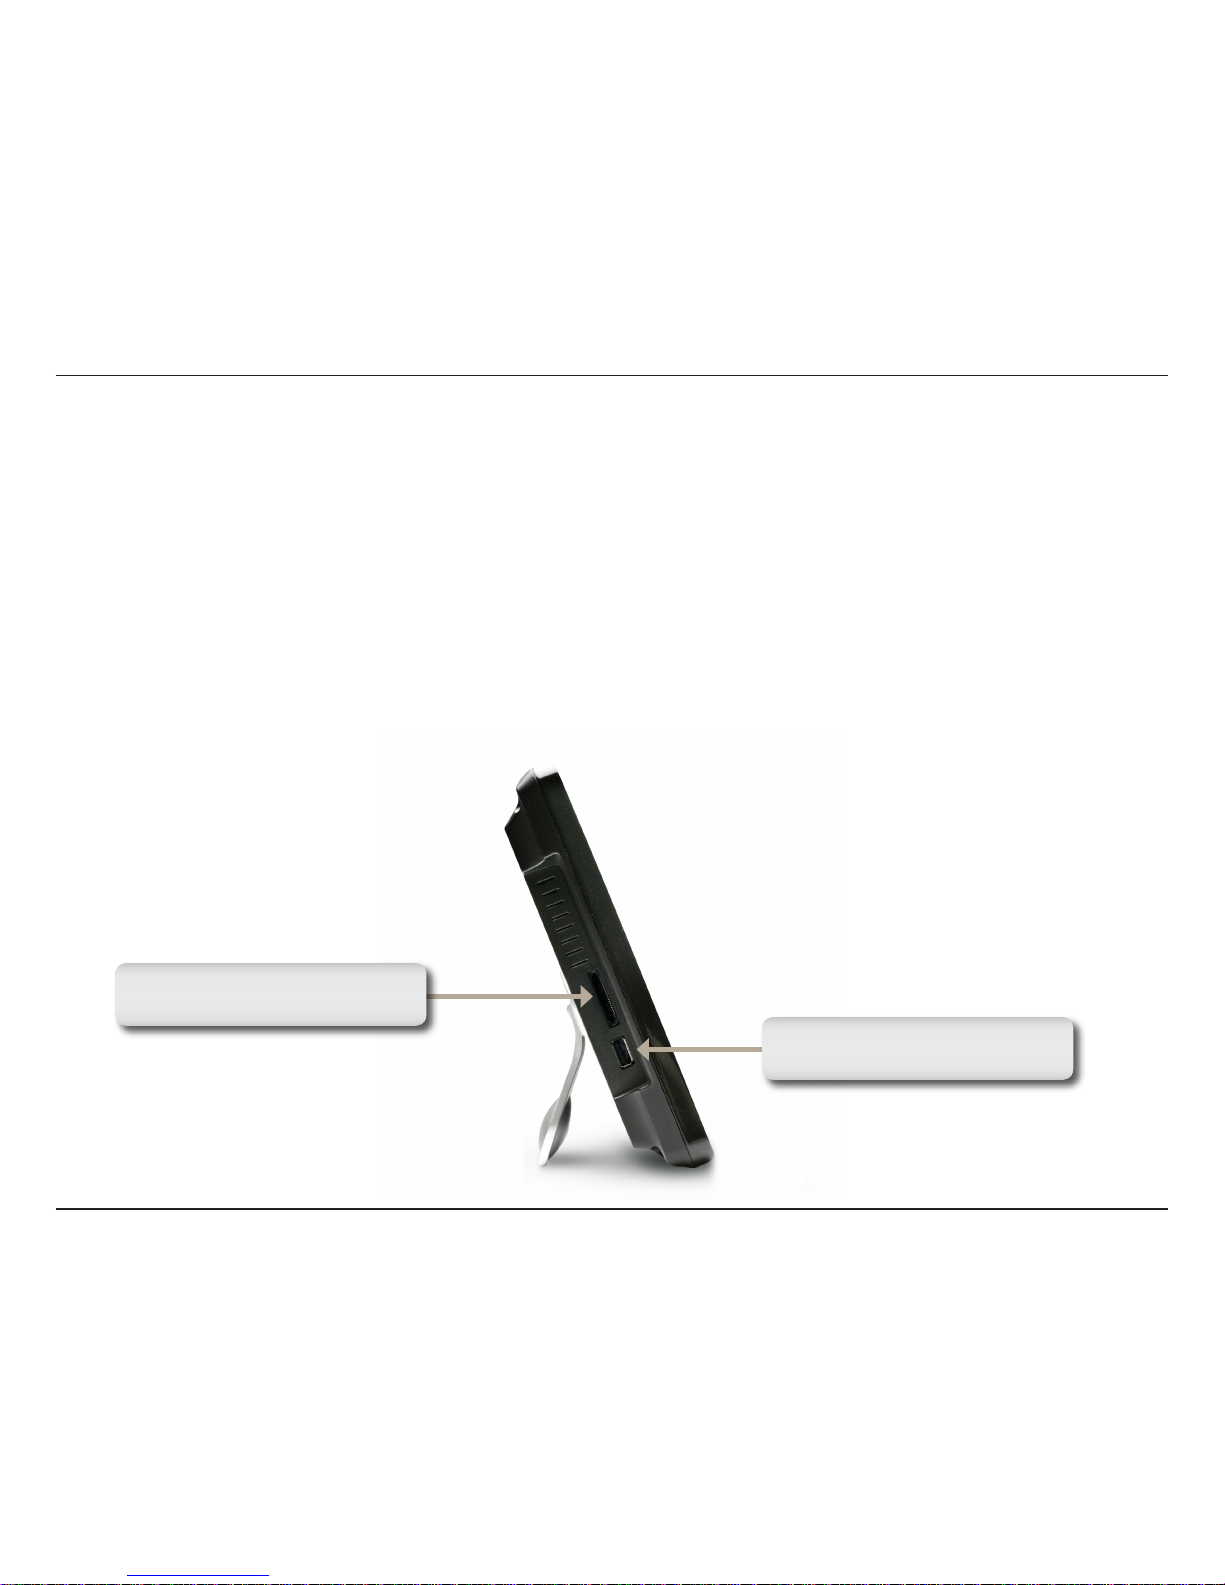
Insert a memory card with stored
pictures to display here.
Insert an USB thumb drive with
stored pictures to display here.
Viewing Pictures
Your DSM-210 can display your pictures from its internal memory and external sources such as USB thumb drives,
memory cards, media servers, and Internet services such as FrameChannel.
To view or copy images to the internal memory from a memory card or USB thumb drive, simply insert your USB
thumb drive into the USB port and/or insert your memory card into the memory card slot located on the left side of the
frame.
The DSM-210 supports Secure Digital (SD), Secure Digital High Capacity (SDHC), MultiMedia Card (MMC), and
Memory Stick.
Page 23
17D-Link DSM-210 User Manual
Select from Storage
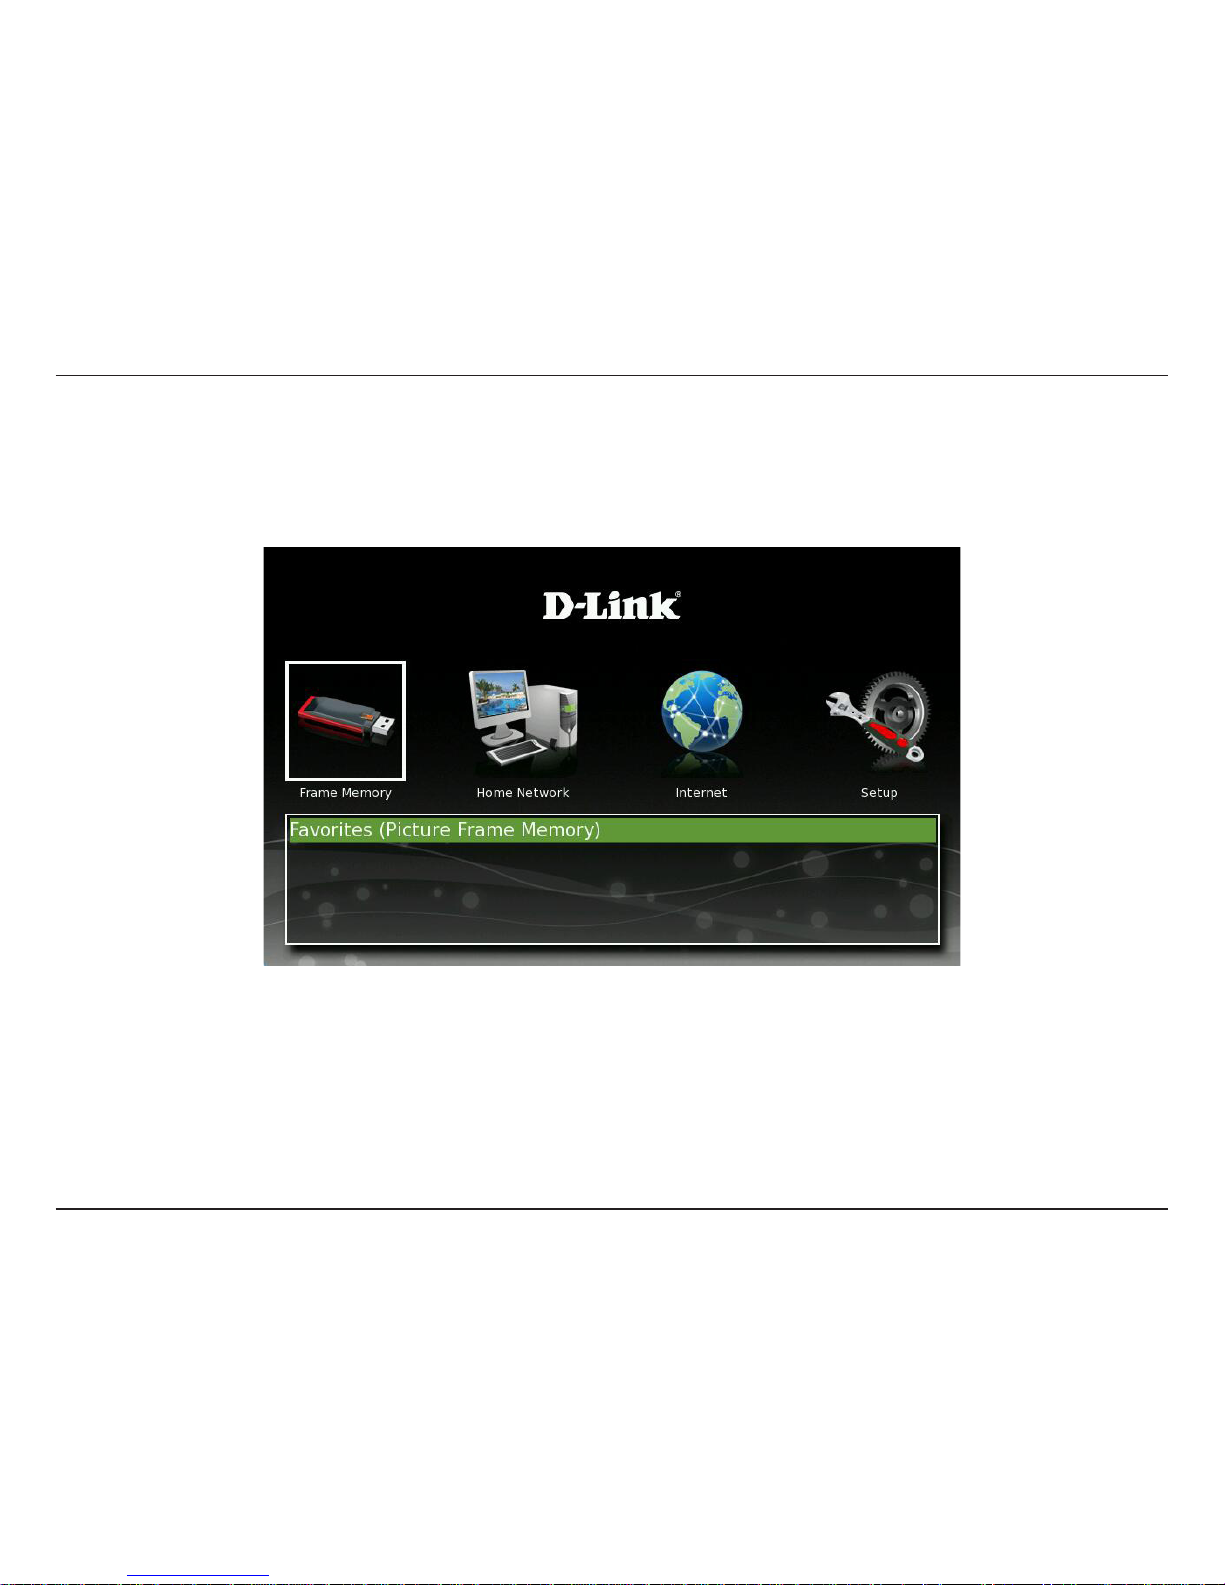
To view images from the internal memory, USB thumb drive, or memory card, highlight the Frame Memory icon. A list
of available sources will be displayed. Select a source and press Enter.
Page 24
18D-Link DSM-210 User Manual
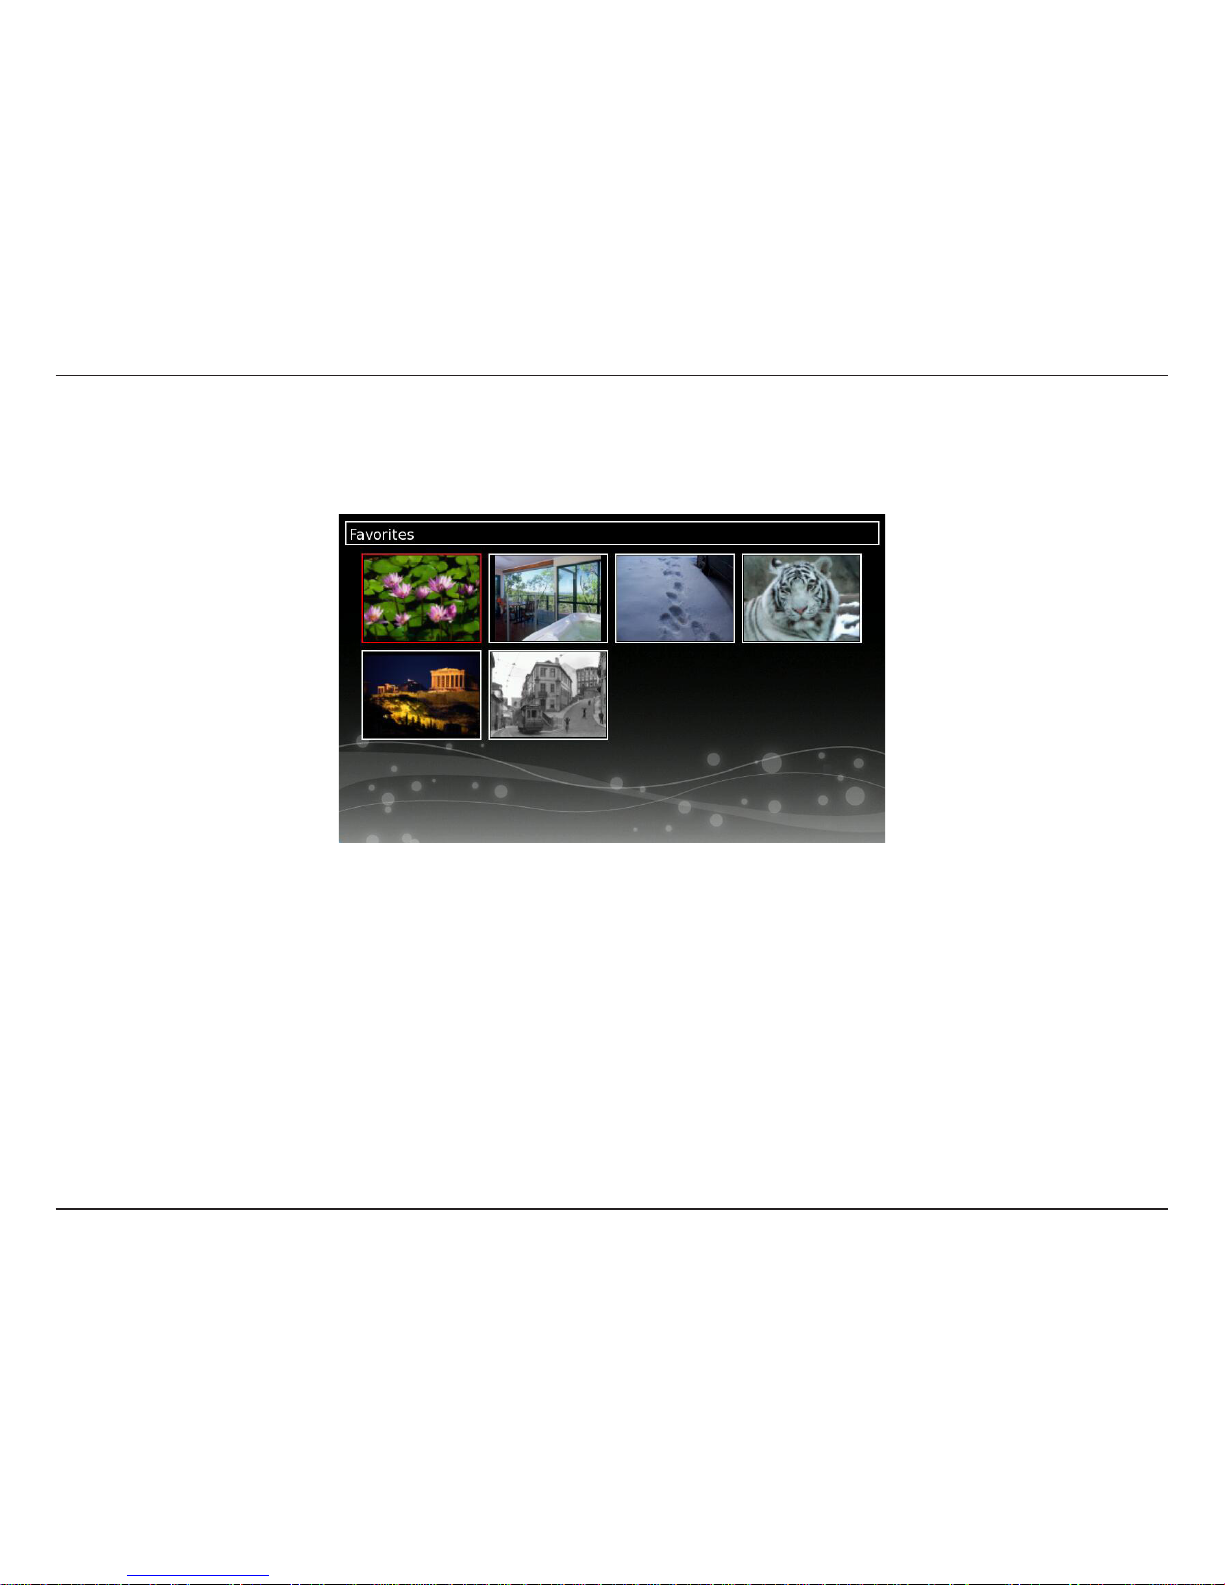
Select the image or folder that contains the images you want to display on your frame and press Enter.
Thumbnails of all the available images will appear. Select an image and press Enter. This will start the slideshow and
will display all images in the selected folder.
During the slideshow, press Menu to set the transition type and scaling type. If you are viewing from a memory card
or USB thumb drive, there will be a Save to Favorites option. This will copy the image to the DSM-210’s internal
memory.
During the slideshow, you can pause and navigate using the touch buttons on the lower-front of the frame.
Page 25
19D-Link DSM-210 User Manual
Select from Media Server
If you have any UPnP-AV servers, such as a PC running Windows Media Player 11* or a Network Attached Storage
(NAS) device on your network, you may select the shared photos to be displayed on your DSM-210.
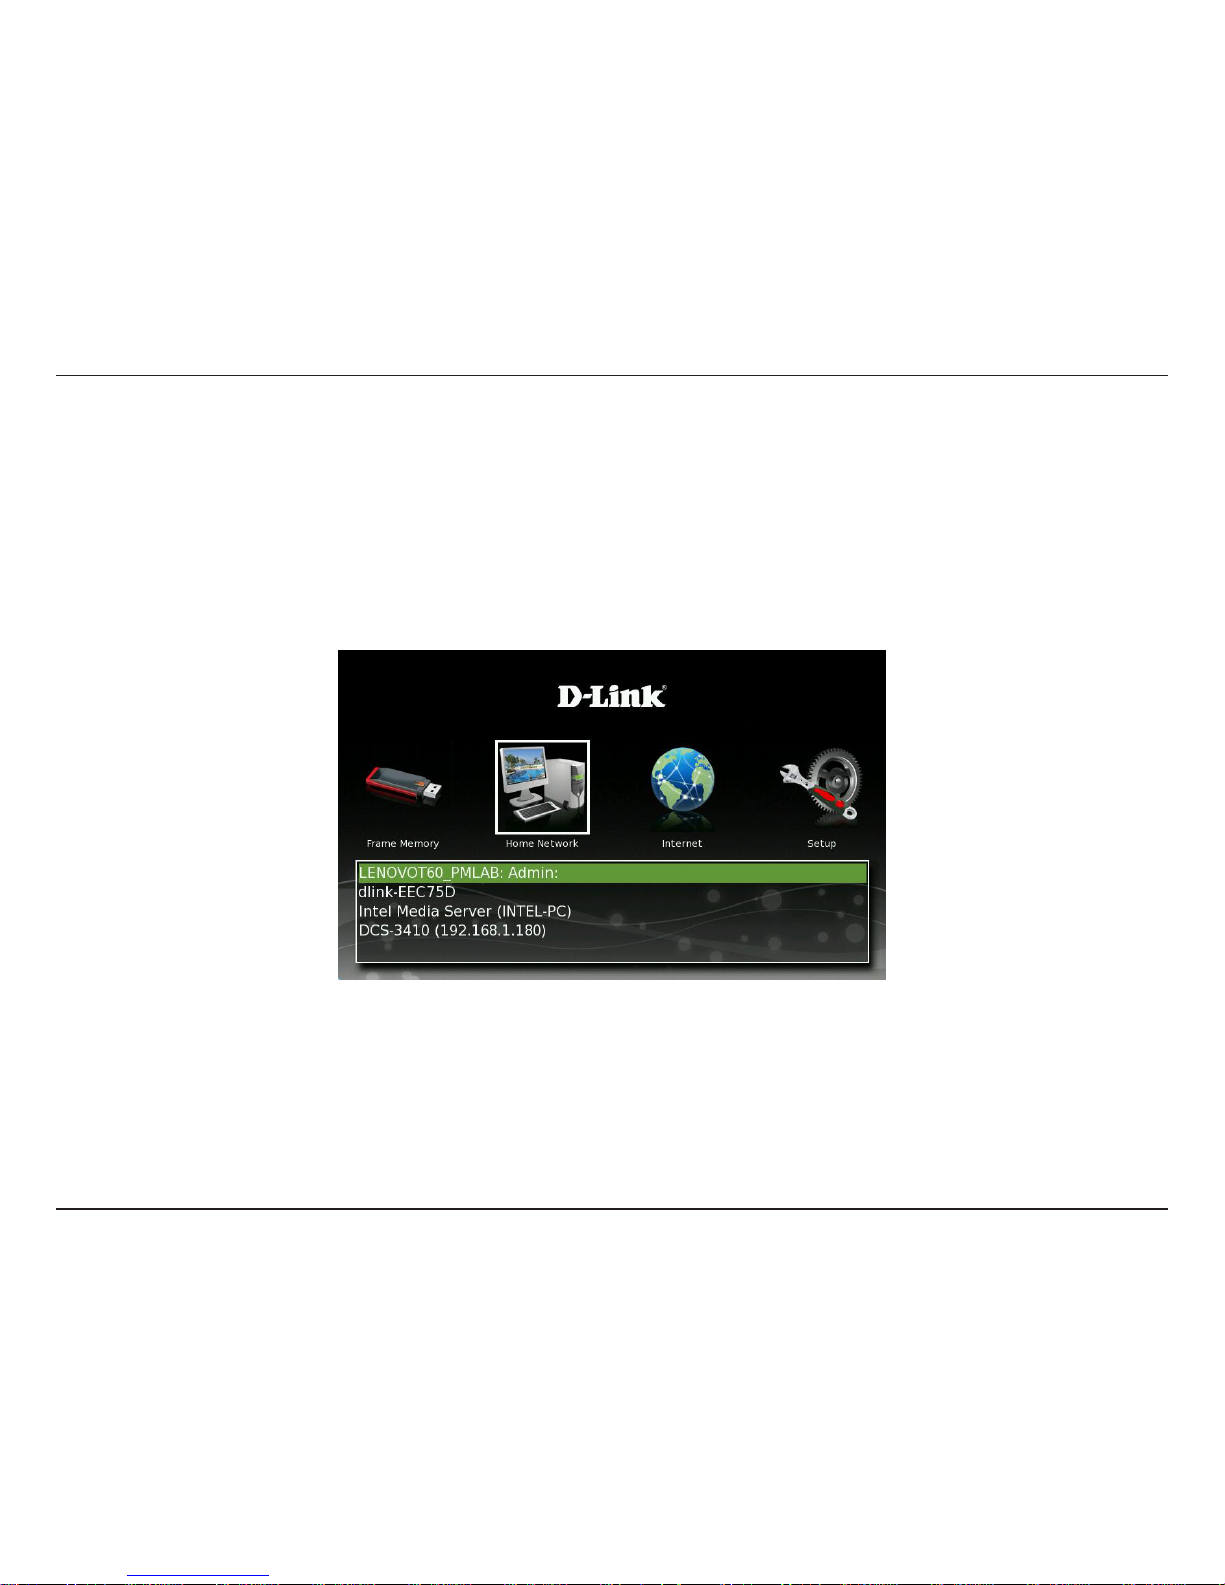
Select the Home Network icon and a list of available Media Servers will be listed. Select the server you want to connect
to and press Enter.
* Windows Media Player 11 is available on Windows Vista™ or for download on Windows® XP (service pack 2) from Windows Update.
Page 26
20D-Link DSM-210 User Manual
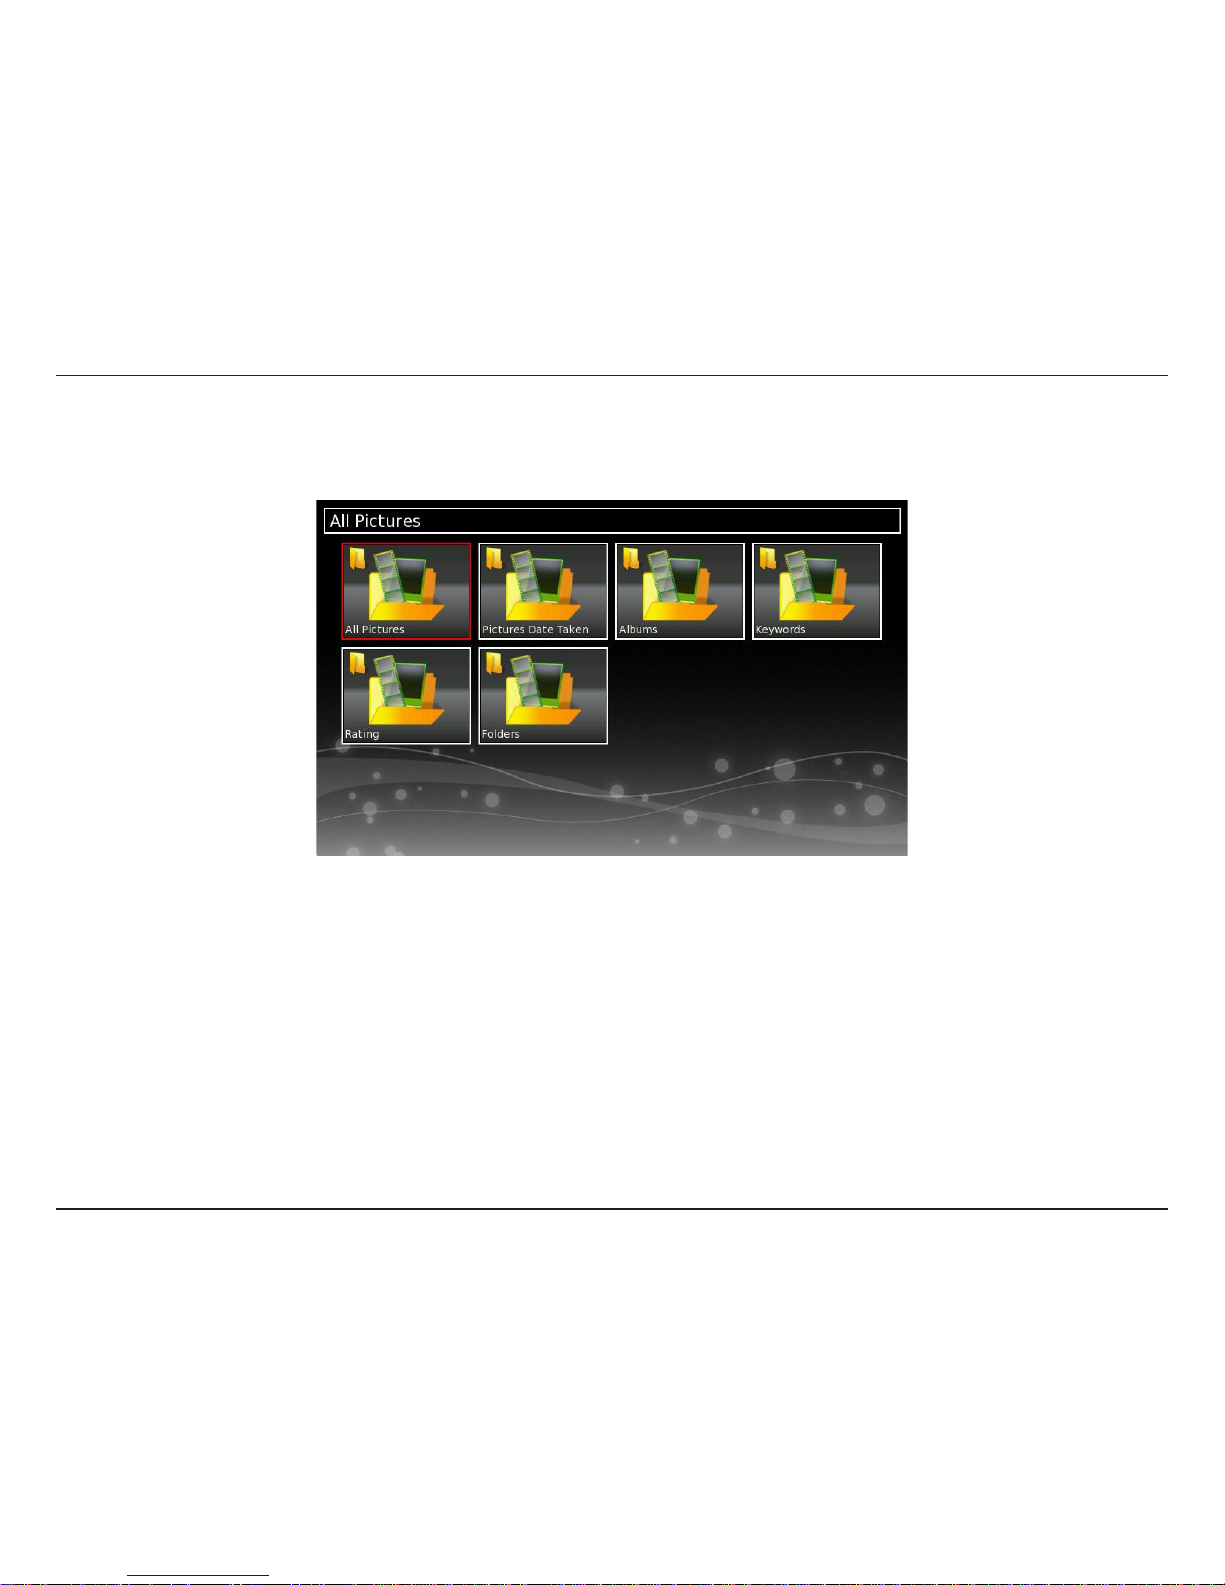
All shared content will appear. Select the pictures you want to display on your DSM-210.
During the slideshow, press Menu to set the transition type and scaling type. There will also be a Save to Favorites
option. This will copy the image to the DSM-210’s internal memory.
During the slideshow, you can pause and navigate using the touch buttons on the lower-front of the frame.
Page 27
21D-Link DSM-210 User Manual
Windows® Media Player 11 Setup
To share photo files from your computer, it is necessary to have Windows® Media Player 11 or another UPnP™
AV media server software on the PC. Windows® Media Player 11 software allows you to share your PC’s photo files
with your DSM-210. Windows® Media Player 11 software then streams the photos to your DSM-210 via your wired/
wireless network connection.
Note: All versions of Windows Vista® include Windows® Media Player 11. Windows® XP offers Windows® Media Player 11
as a free update from Windows® Update, or you can download Windows® Media Player 11 by visiting microsoft.com.
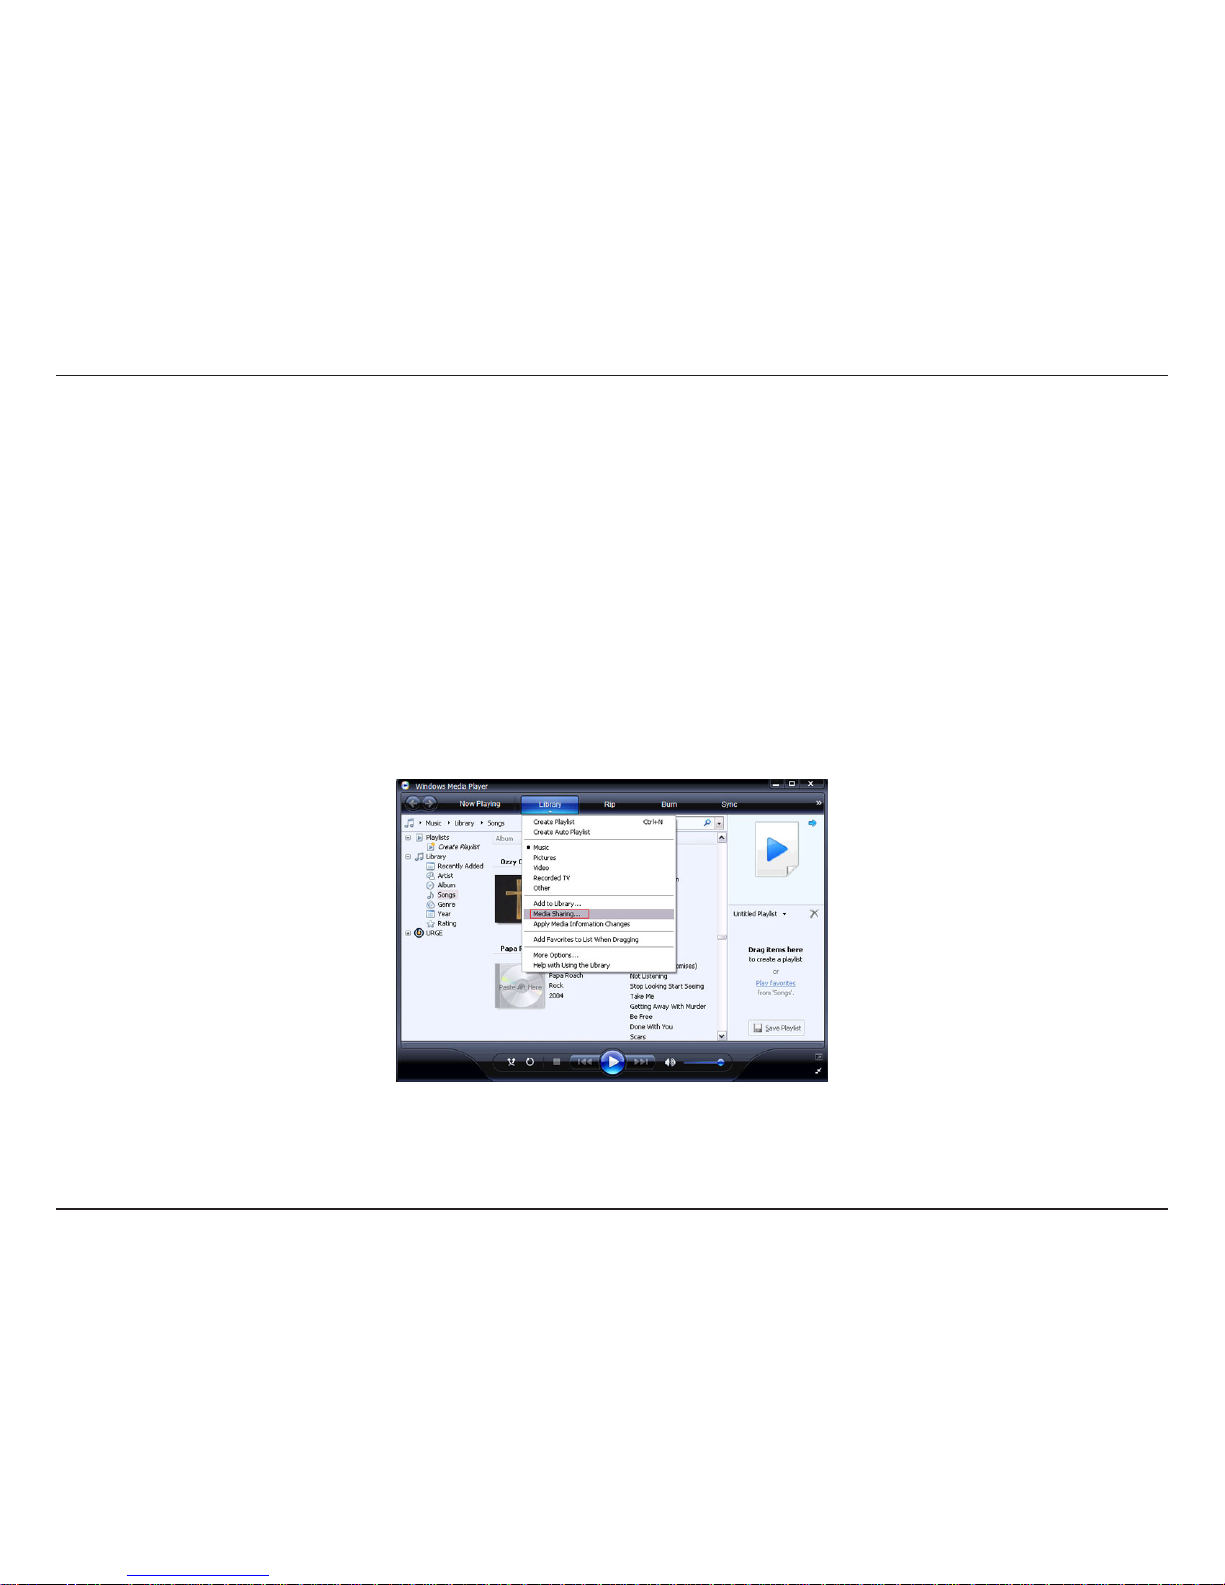
In order to share photos to your DSM-210 using Windows® Media Player 11, you must first allow your
DSM-210 access in the software. Launch Media Player 11 and click the down arrow under Library and select
Media Sharing.
Page 28
22D-Link DSM-210 User Manual
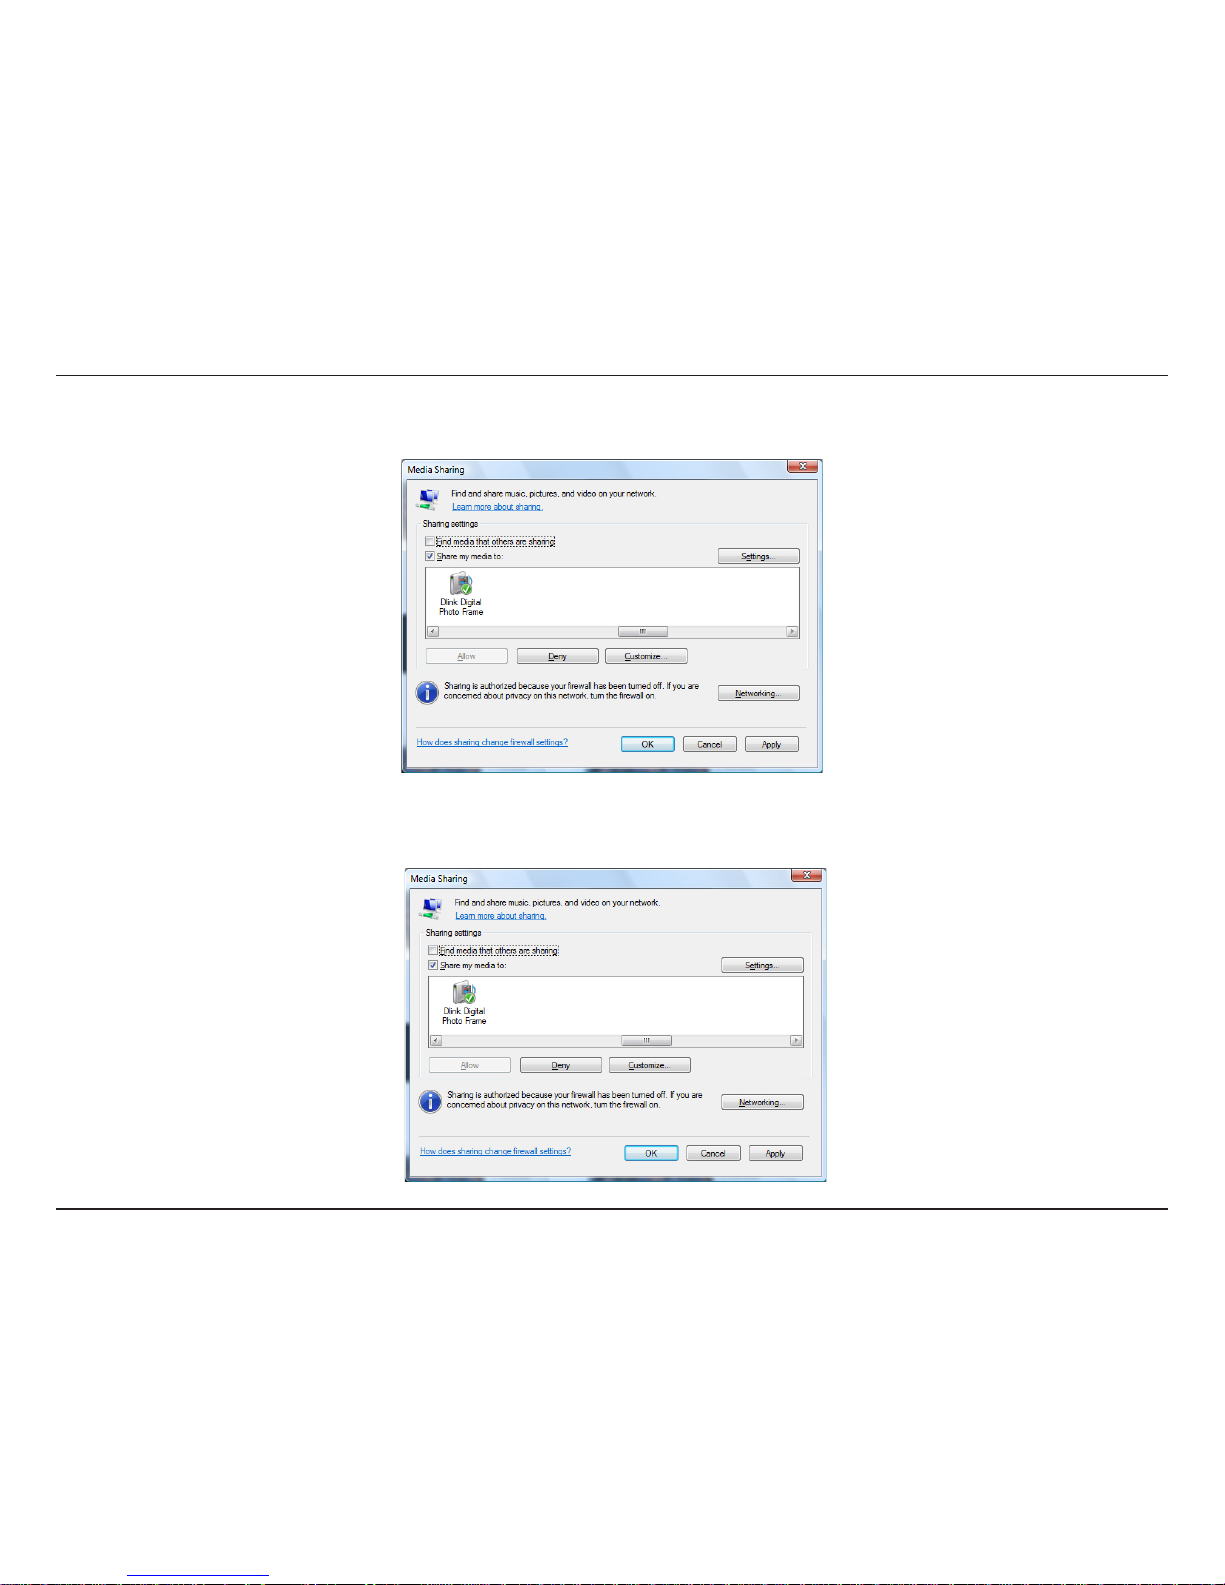
Click the Share my media to: check box. Select your D-Link DSM-210 Digital Photo Frame from the Media
Sharing box and then click the Allow button.
Your device will now have a green check mark. Click Apply and then click OK.
Page 29
23D-Link DSM-210 User Manual
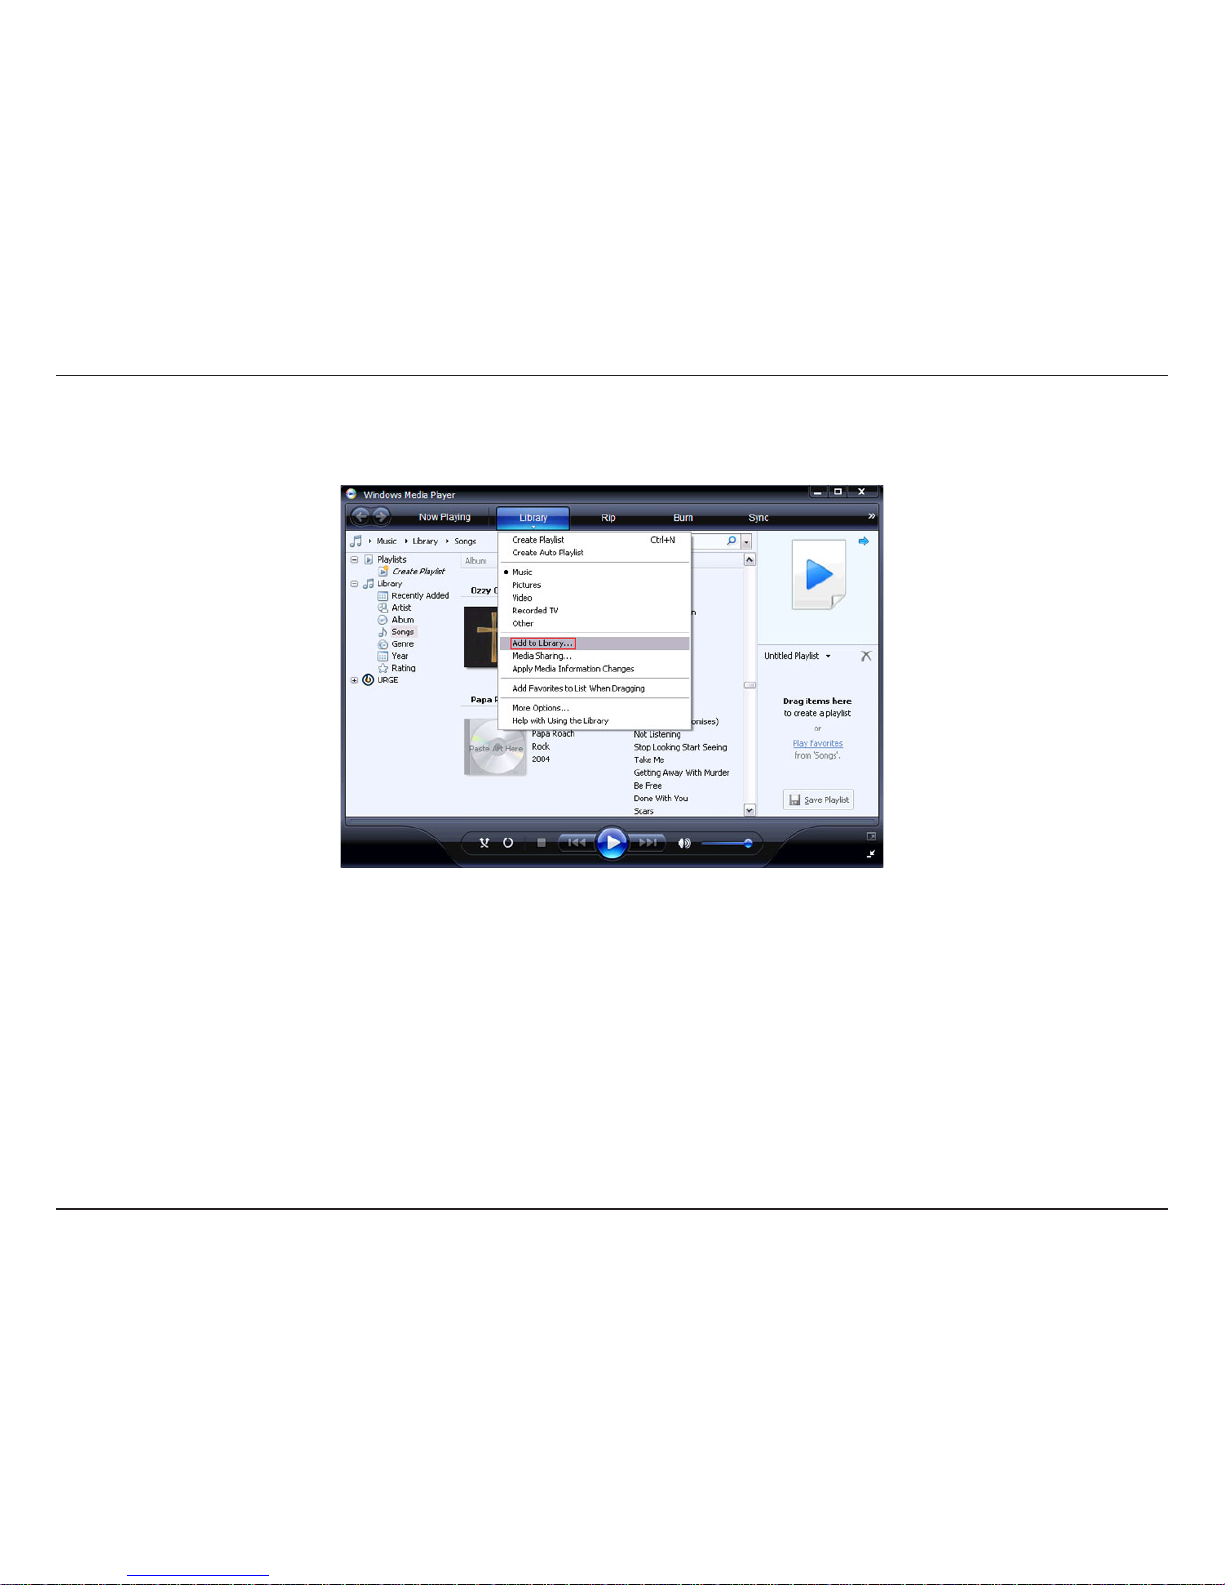
Now you need to add the folders containing photos you want shared with your DSM-210. Click on Library and
then click on Add to Library.
Page 30
24D-Link DSM-210 User Manual
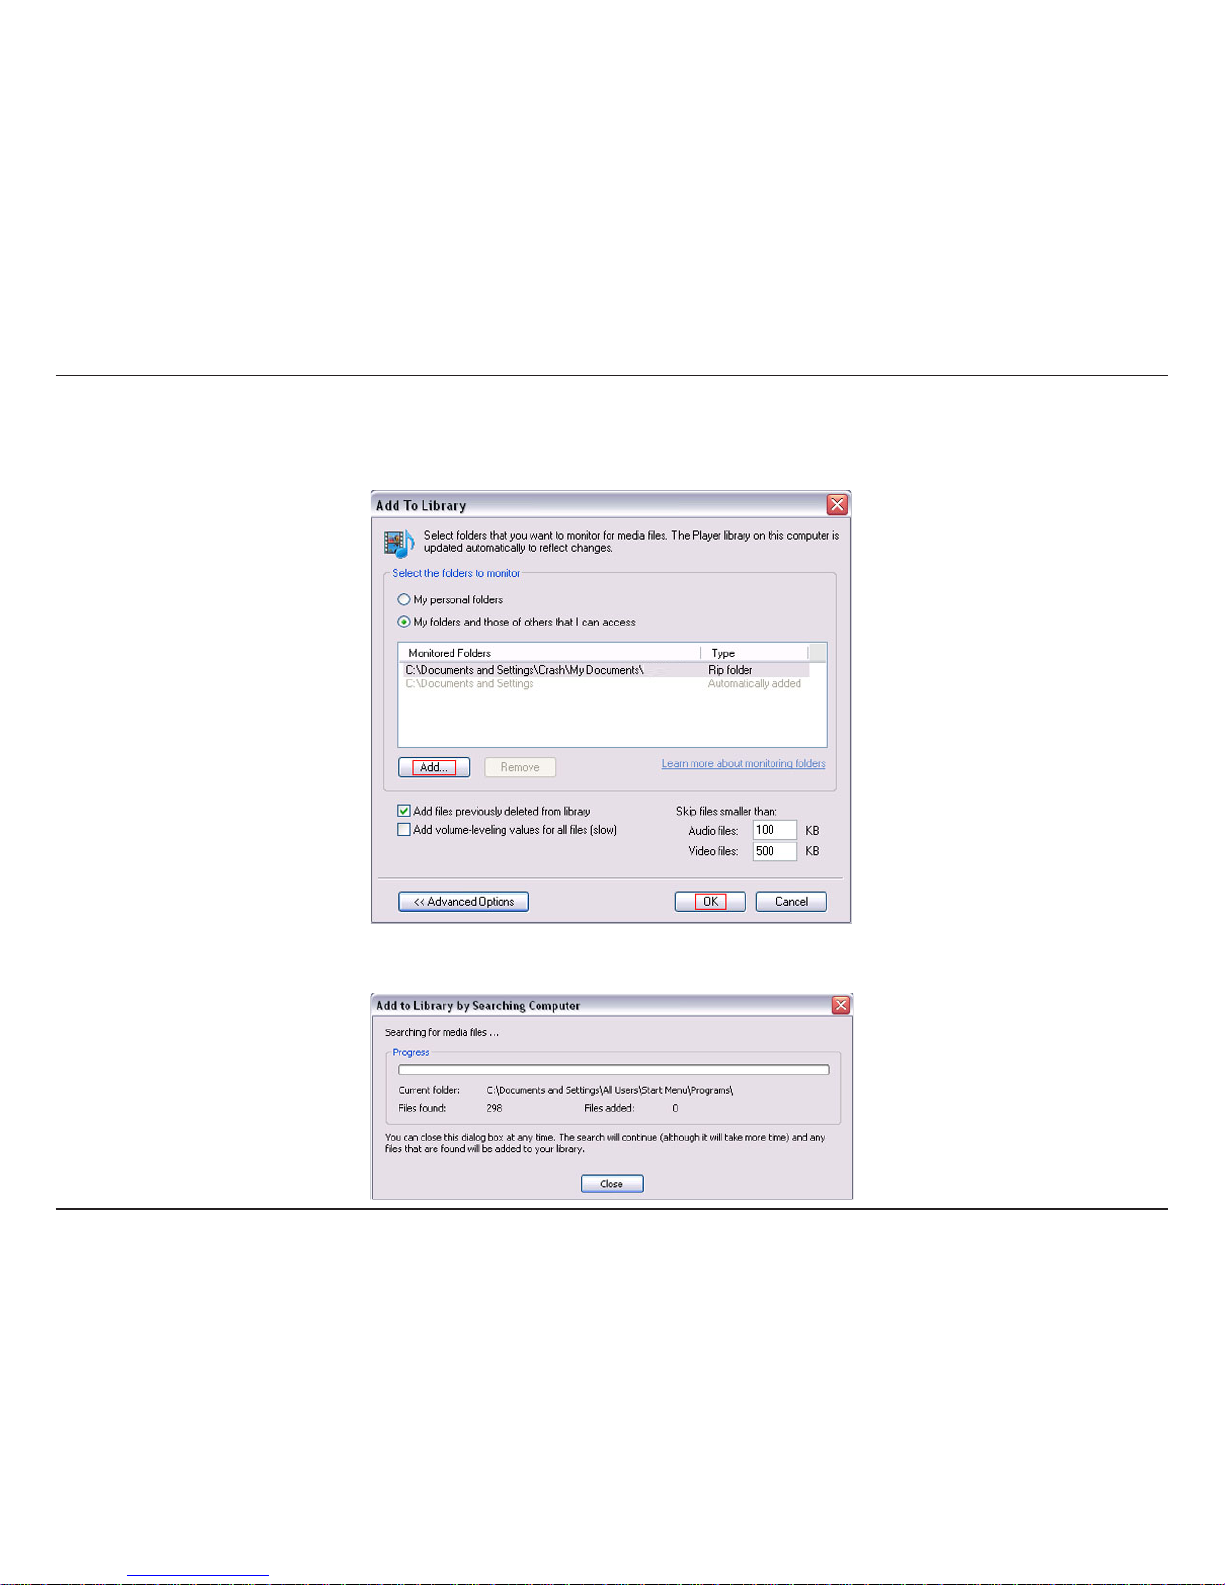
Click the Advanced Options button in the bottom left-hand corner. Click Add and choose the folders with media
you wish to be shared. If you have folders in other areas of your hard drive or on other drives in your PC or network,
you will need to select the Add button and select each folder manually. Once you have added the folder(s) you
want to share click OK.
Windows® Media Player 11 will now search for supported media files in the folders you selected to share.
Page 31
25D-Link DSM-210 User Manual
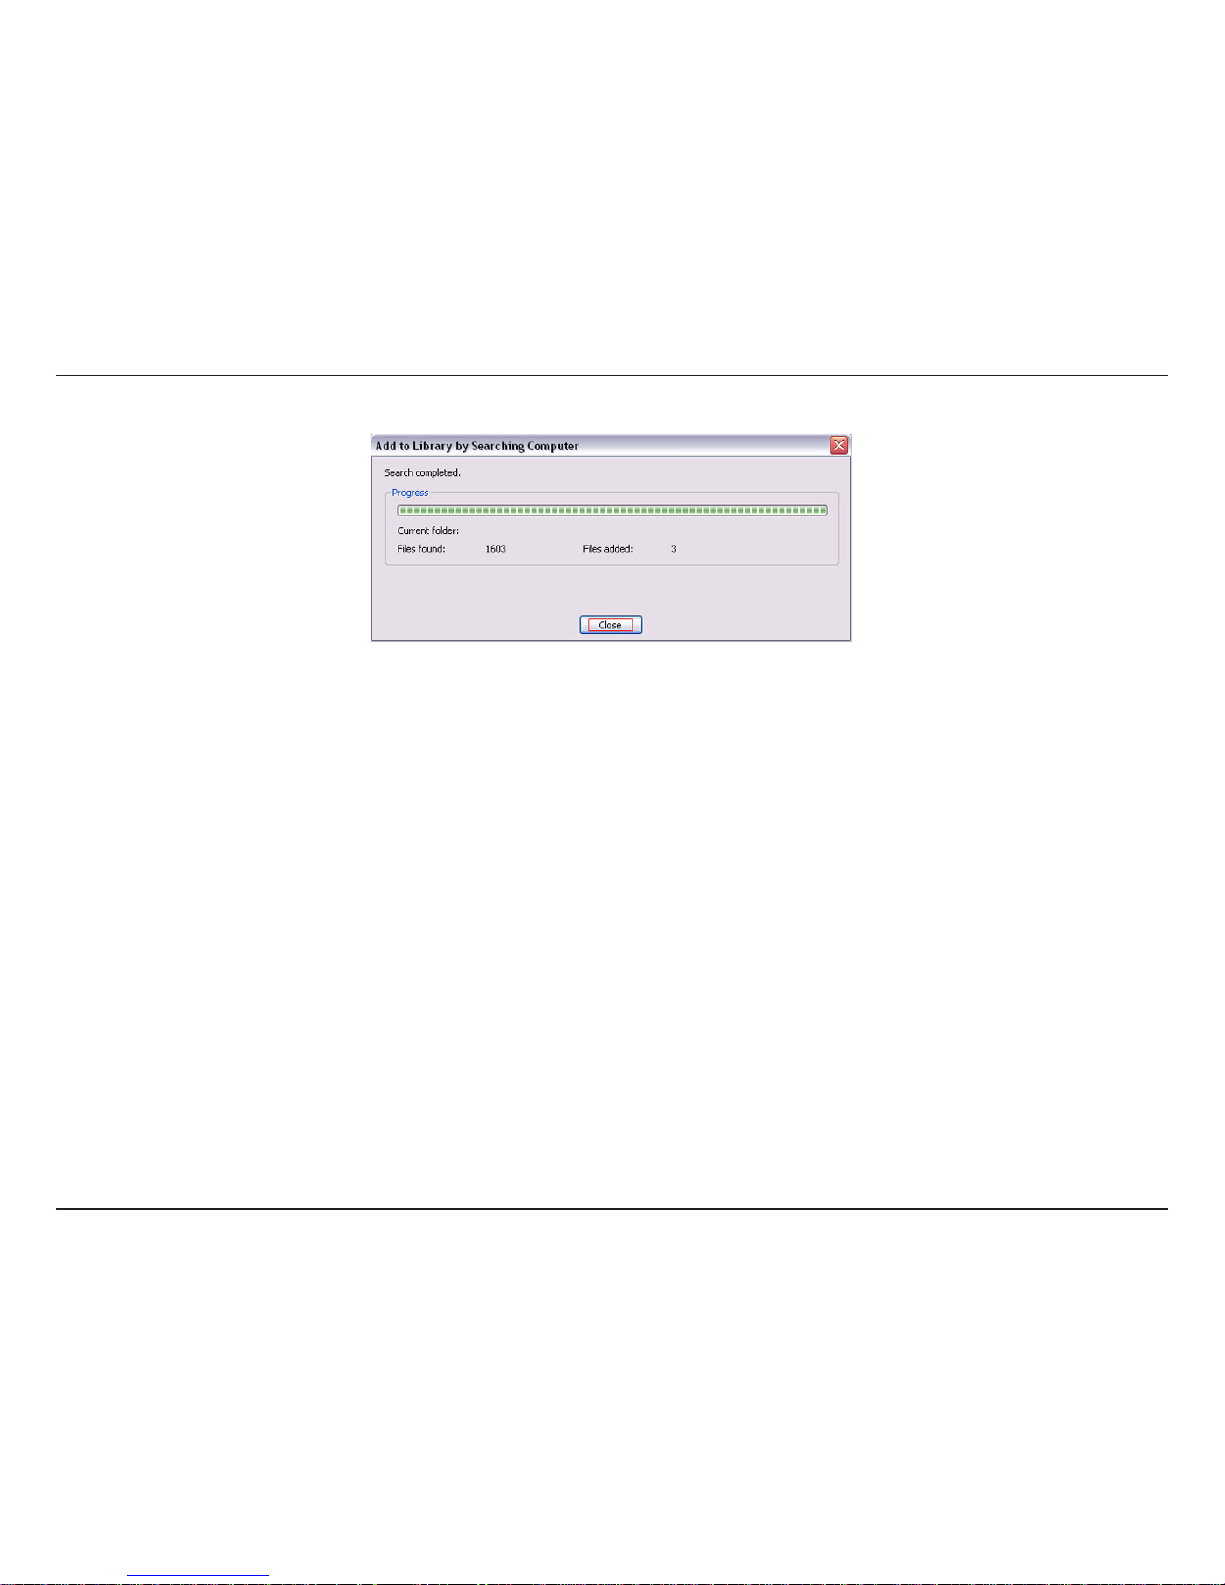
Click Close and you are ready to use Windows® Media Player 11 as your server.
Once you have confirmed that your Windows® Media Player sharing has been enabled and is showing on your
DSM-210 you can select your photos after selecting the Windows Media Player 11 media server from the Home
Network screen.
Page 32
26D-Link DSM-210 User Manual
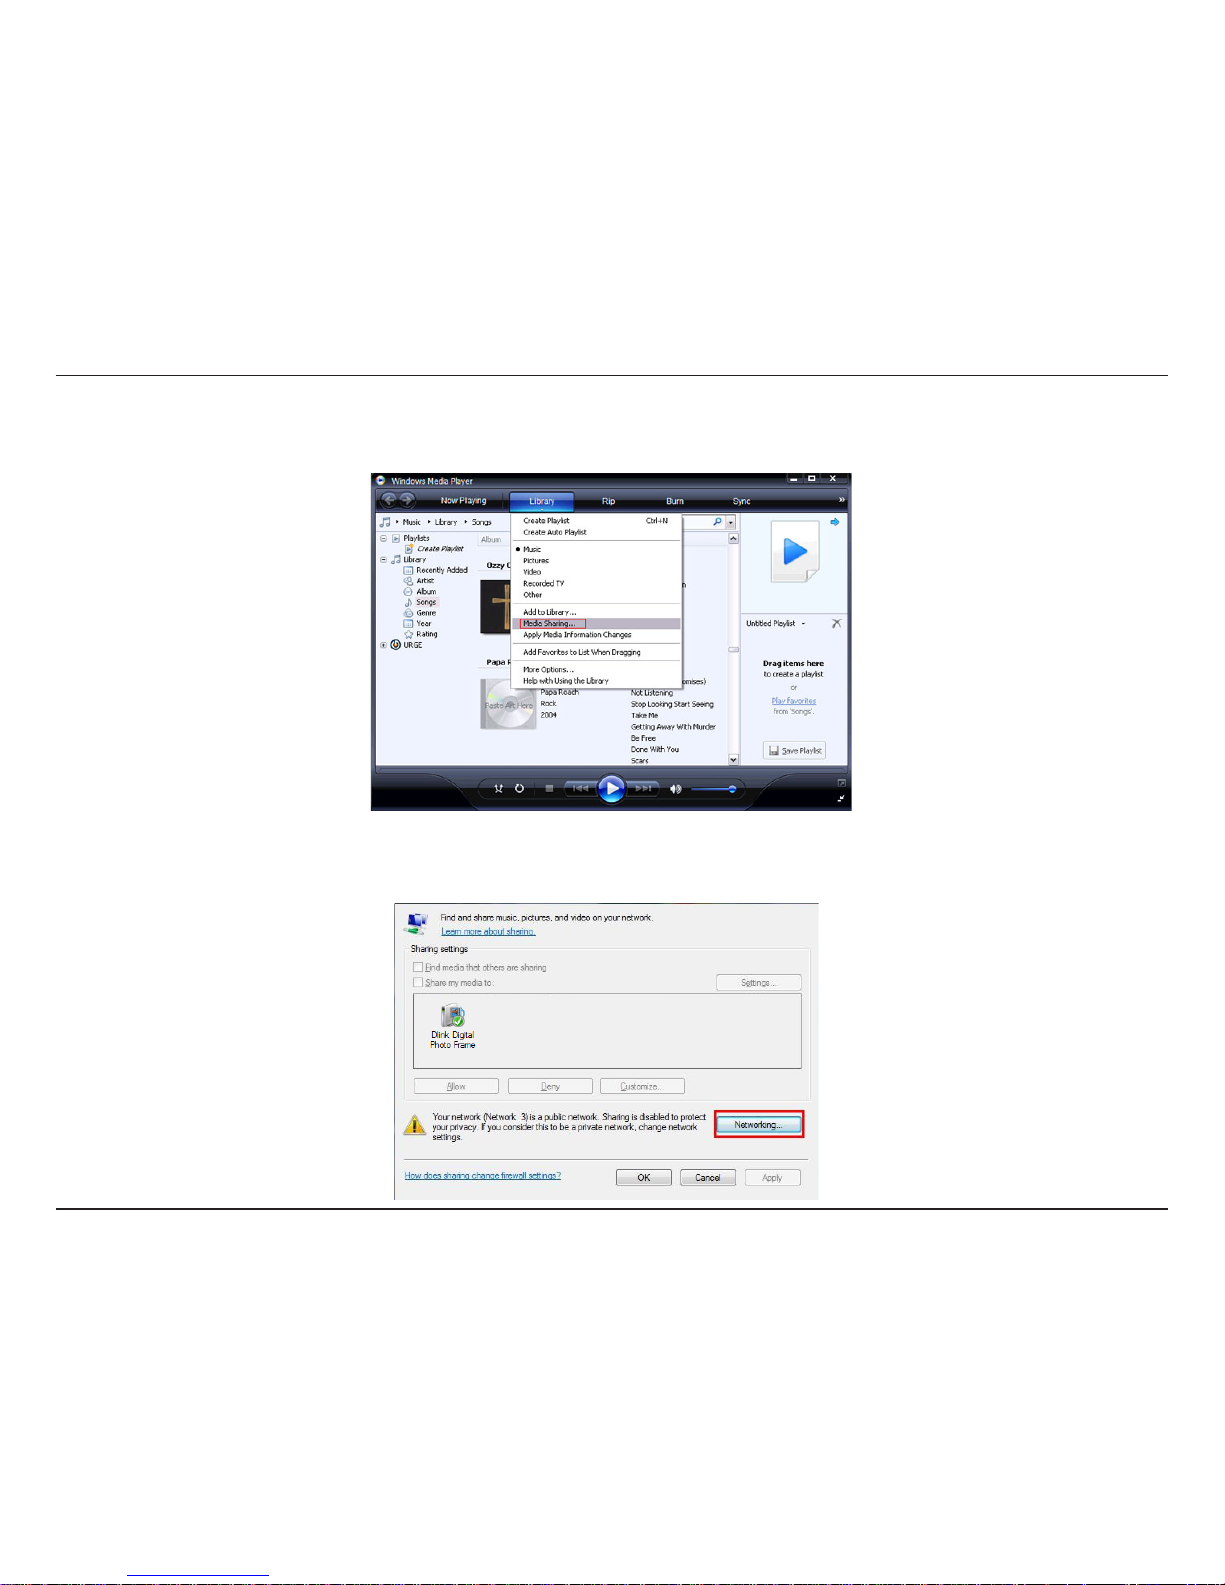
If you are using Windows Vista® and Media Sharing is disabled, follow these steps to enable media sharing:
Open Windows Media Player 11. Click the down arrow under Library and select Media Sharing.
Click the Networking button.
Page 33
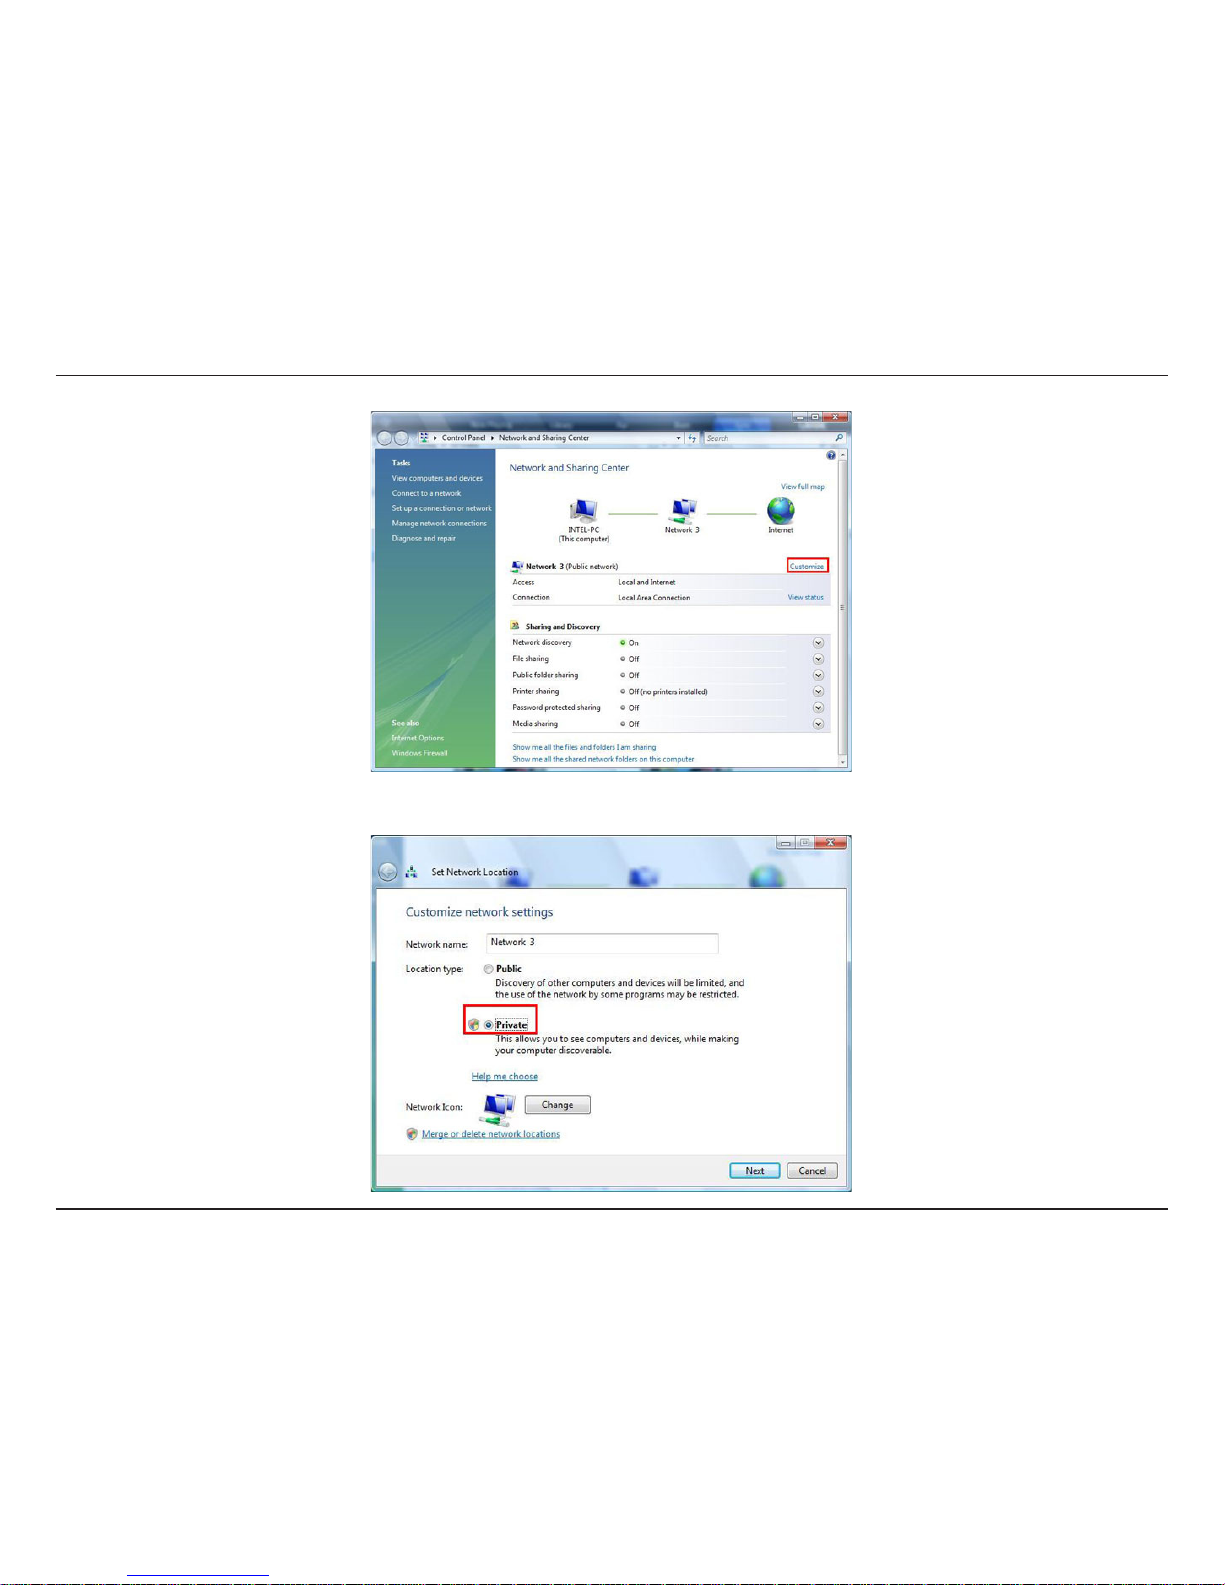
27D-Link DSM-210 User Manual
Click the Customize button.
Select Private under Location Type. Click the Next button.
Page 34
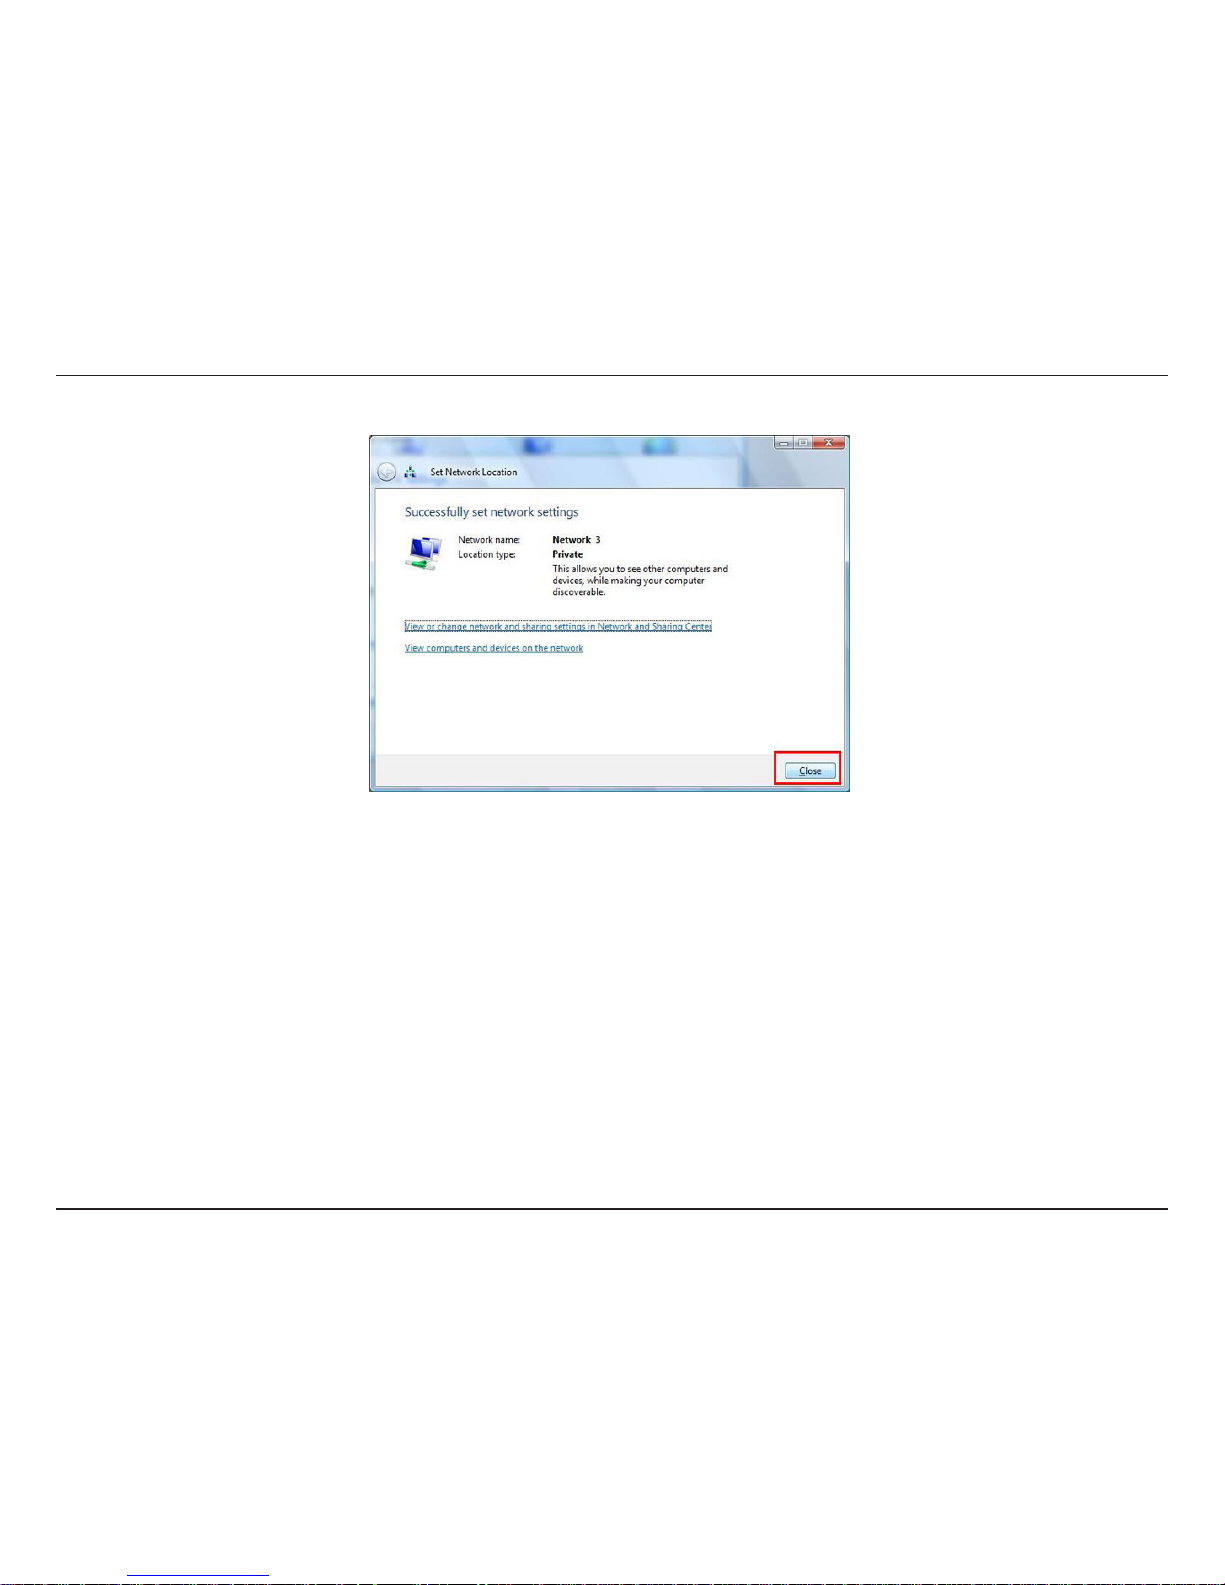
28D-Link DSM-210 User Manual
Click the Close button. Media sharing should now be accessible from your Windows Vista® PC.
Page 35
29D-Link DSM-210 User Manual
FrameChannel
Our featured DSM-210 online site, FrameChannel (http://dlink.framechannel.com), is a free service that allows you to
add, create and manage online channels for your personalized content after you have signed up an account online.
FrameChannel also allows you to set up your frame to incorporate images from popular photo sharing websites, such
as Facebook, Flickr, Picasa, and more. Your frame will automatically update when changes are made to any of your
photo sharing sites.
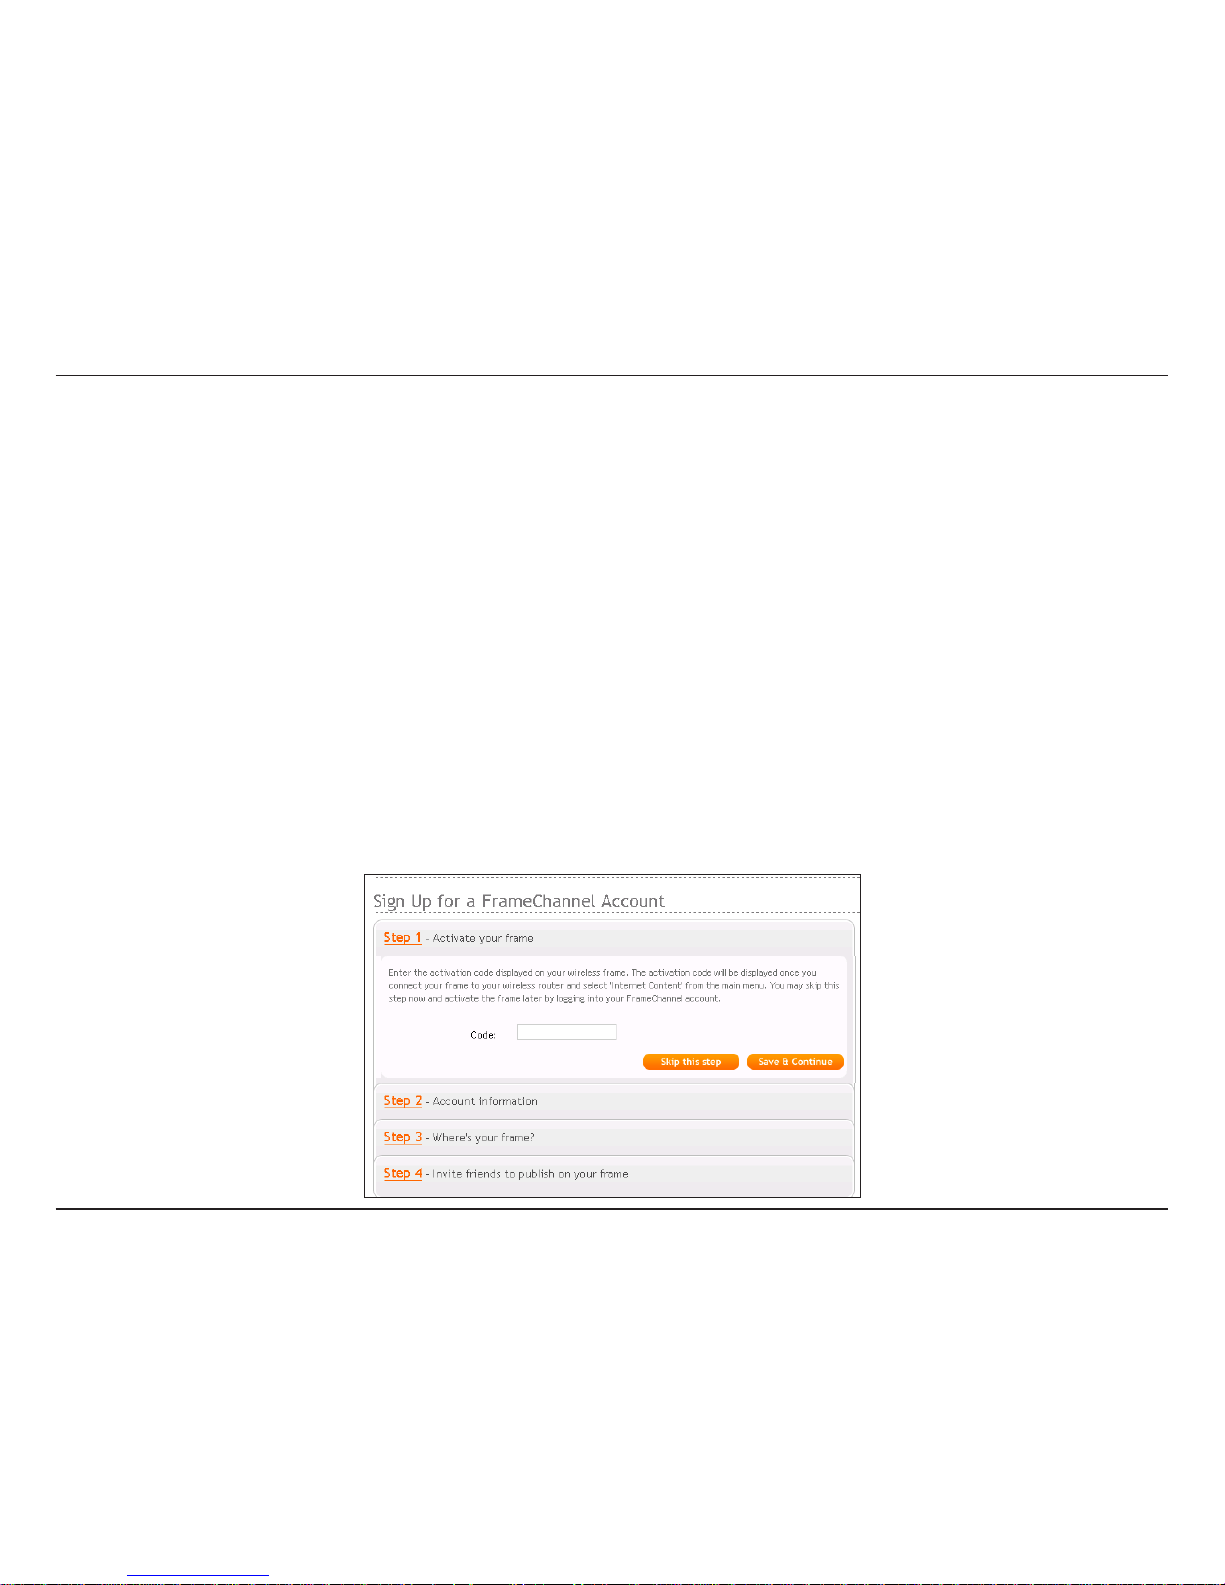
Your DSM-210 can display the instructions to setup a FrameChannel account. On the DSM-210 select Online Content
and then click on Instructions. For more details, follow the steps below:
1. Using the web browser on your PC, enter http://dlink.framechannel.com
2. Click Get Started Now
3. Enter the Activation Code displayed to activate your frame.
Note: Your activation code can be found on your frame, the path is Online Content > Instruction and
click Save & Continue to proceed.
Click Save & Continue to proceed.
Page 36
30D-Link DSM-210 User Manual
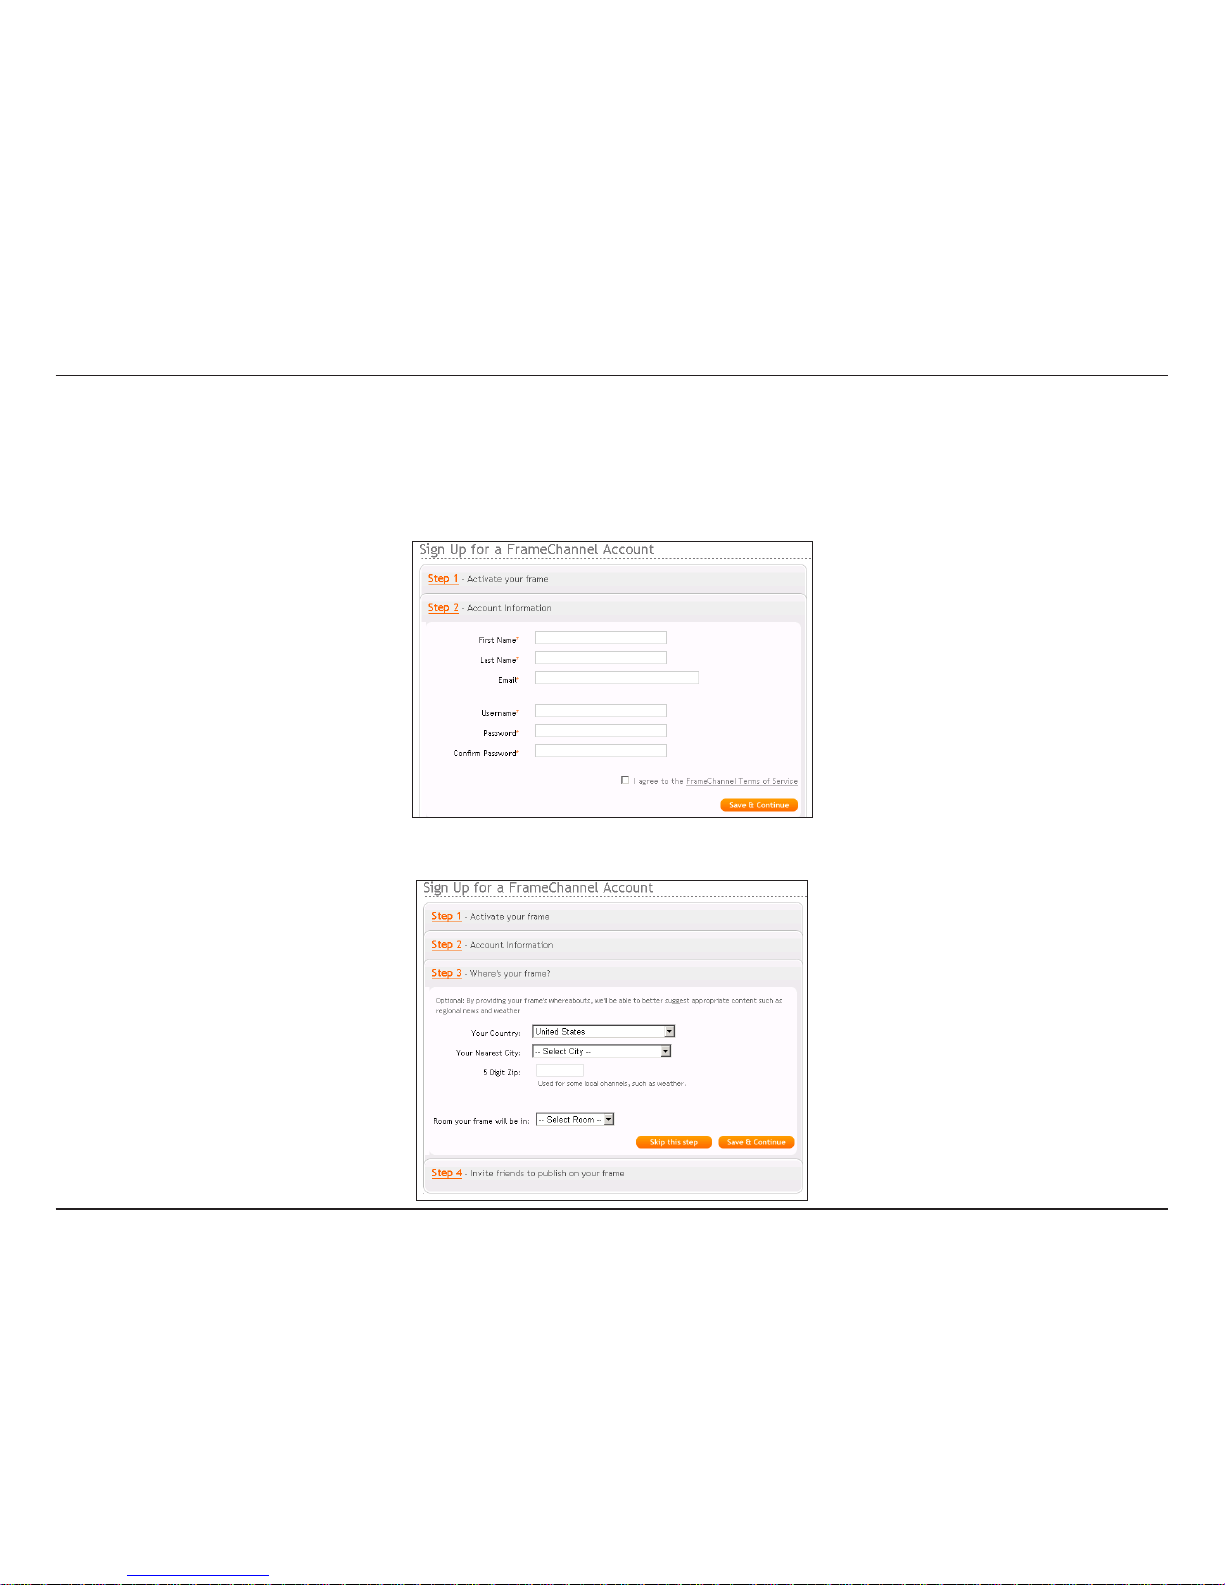
4. Enter your account information. Read and check the checkbox to agree to the FrameChannel’s terms of
service.
Note: It is recommended to note down all your account information for future log-on purposes.
Click Save & Continue to proceed.
5. Enter the remaining information for your account and click Save & Continue to proceed.
Page 37
31D-Link DSM-210 User Manual
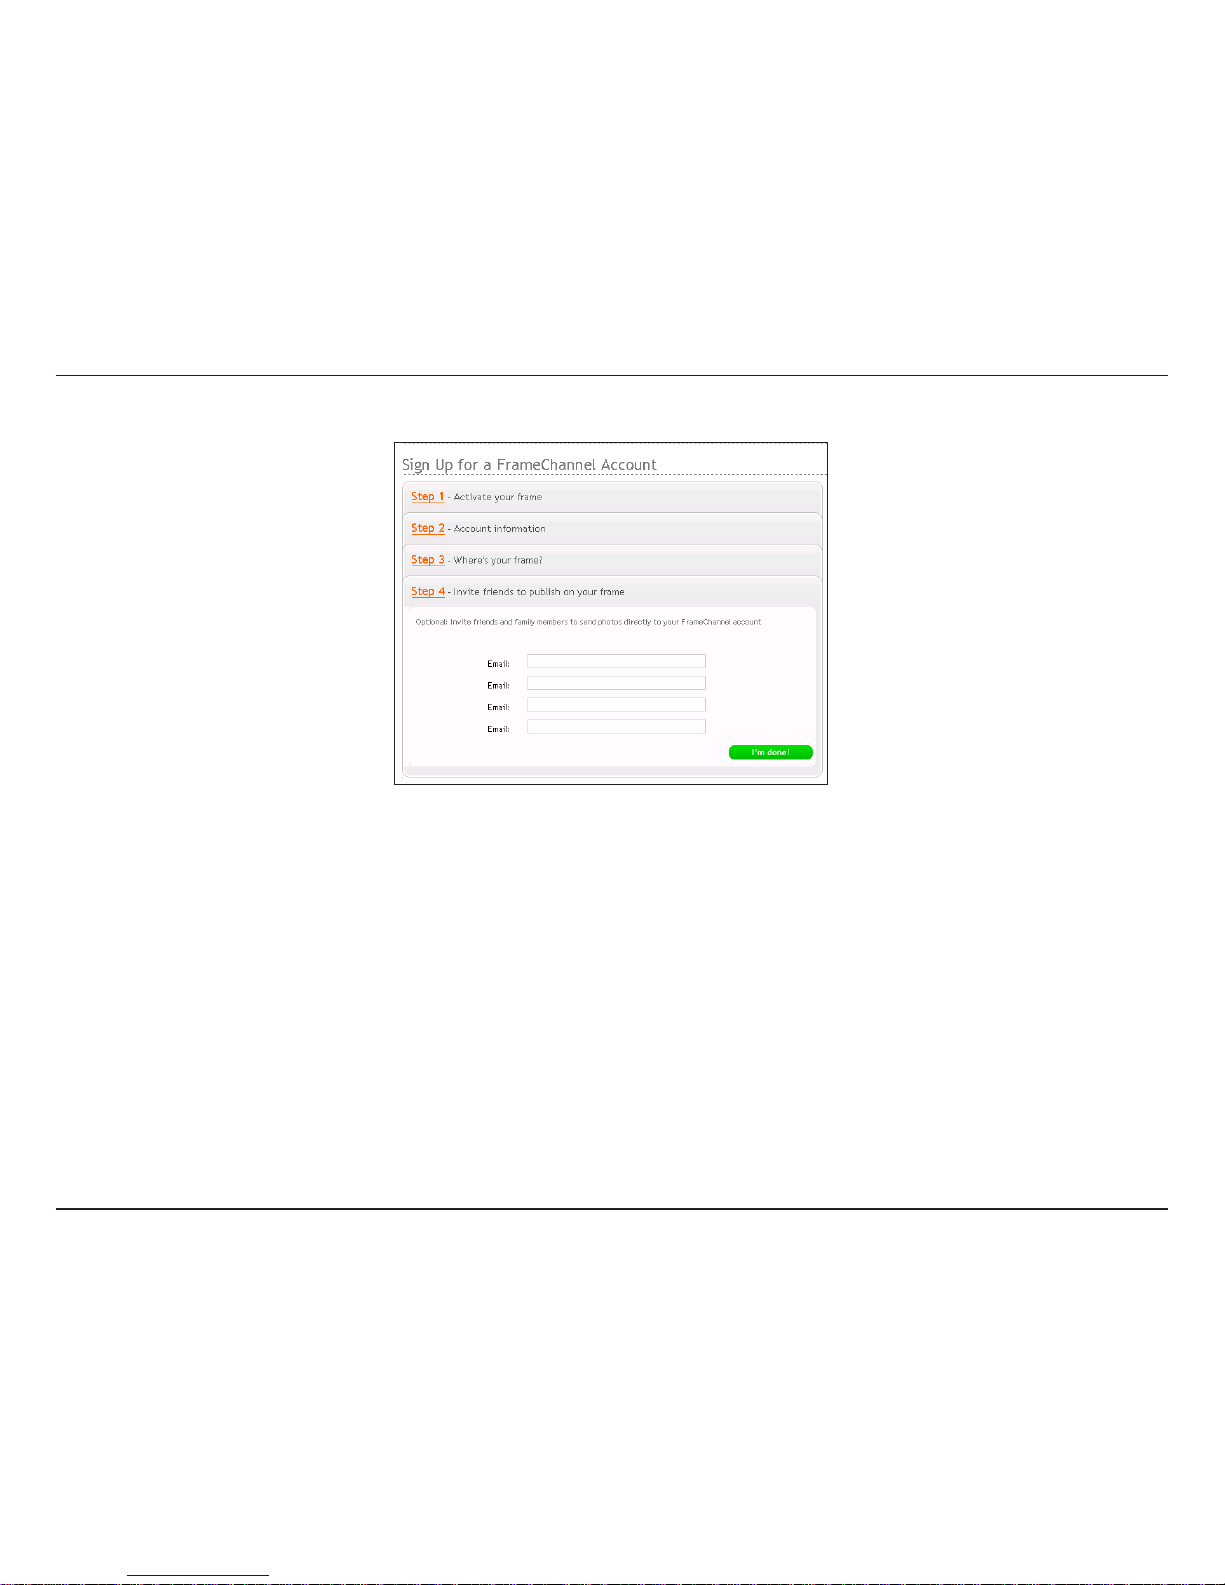
6. You may invite your friends to join or click I’m done! to enjoy your FrameChannel experience.
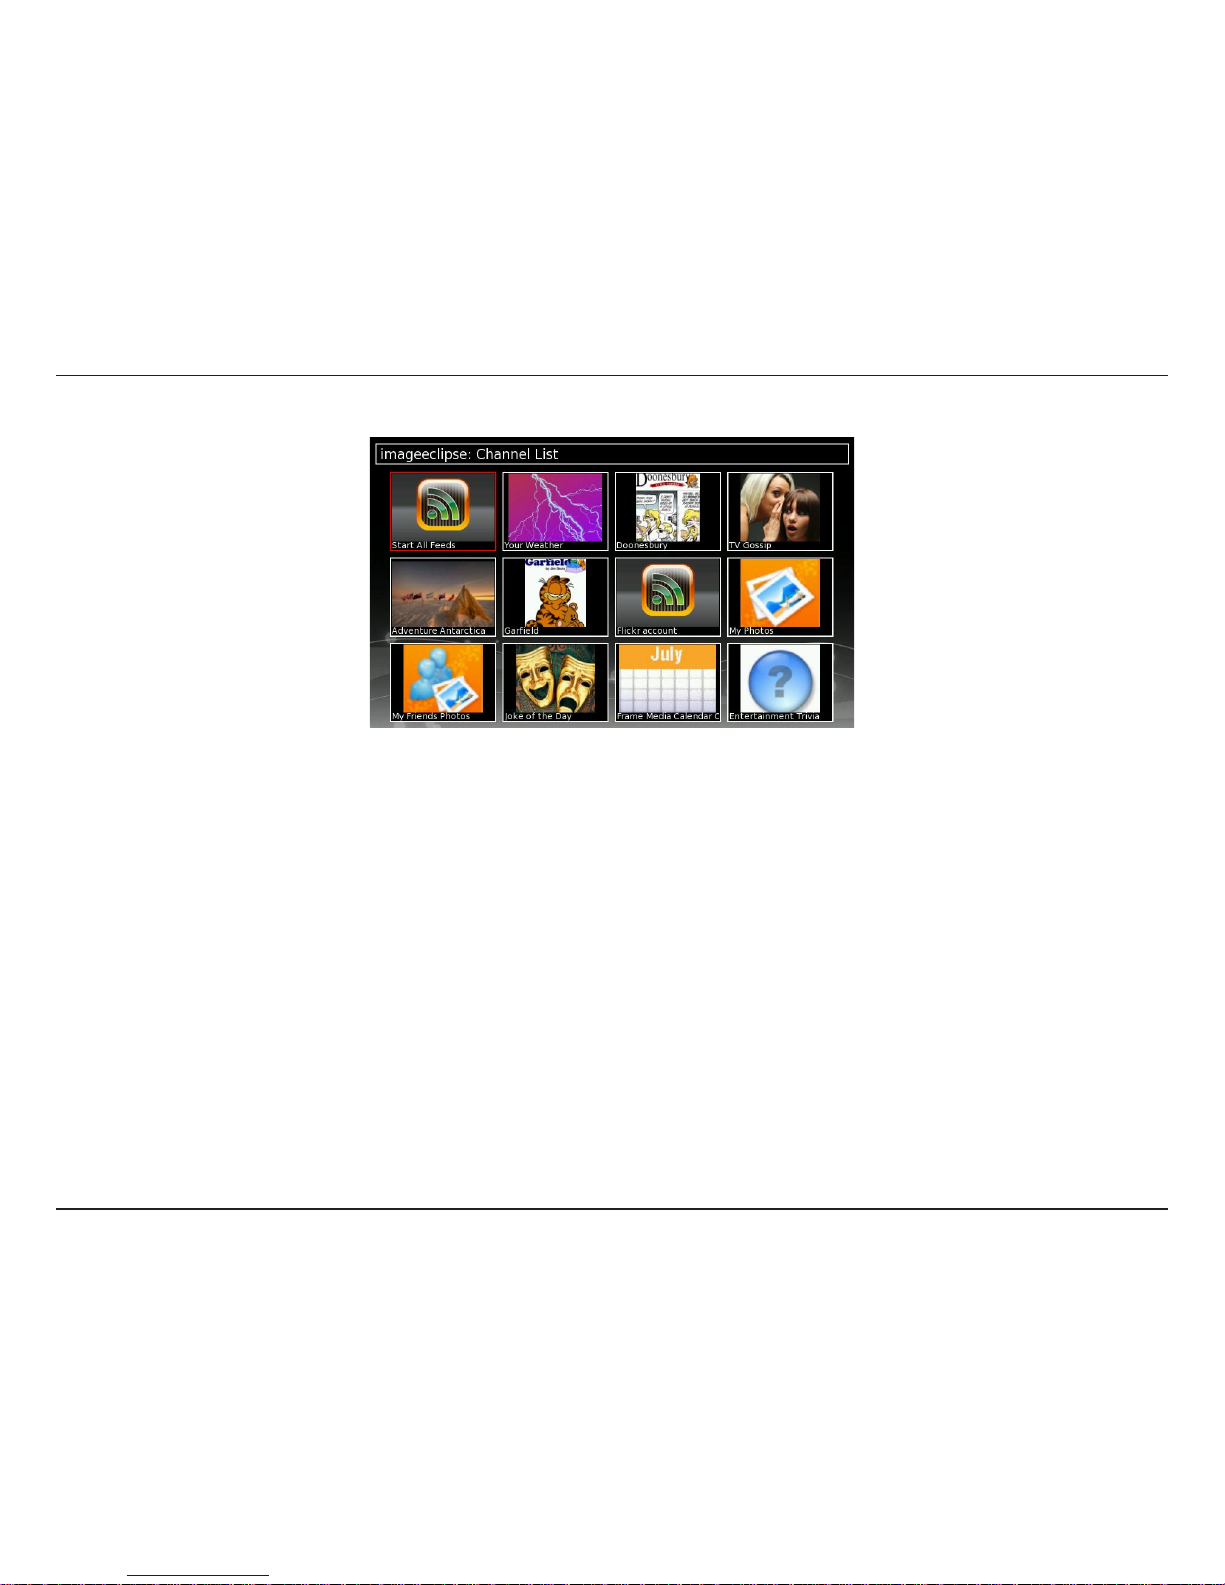
7. From your DSM-210 Digital Photo Frame, refresh the Online Content by clicking BACK on your remote. You
will be able to see all the created channels on your frame.
Page 38
32D-Link DSM-210 User Manual
Once your account is active, you can select what channels you want to display on your frame.
During the slideshow, press Menu to set the transition type and scaling type. There will be a Save to Favorites option.
This will copy the image to the DSM-210’s internal memory.
During the slideshow, you can pause and navigate using the touch buttons on the lower-front of the frame.
Page 39
33D-Link DSM-210 User Manual
Upgrade Firmware
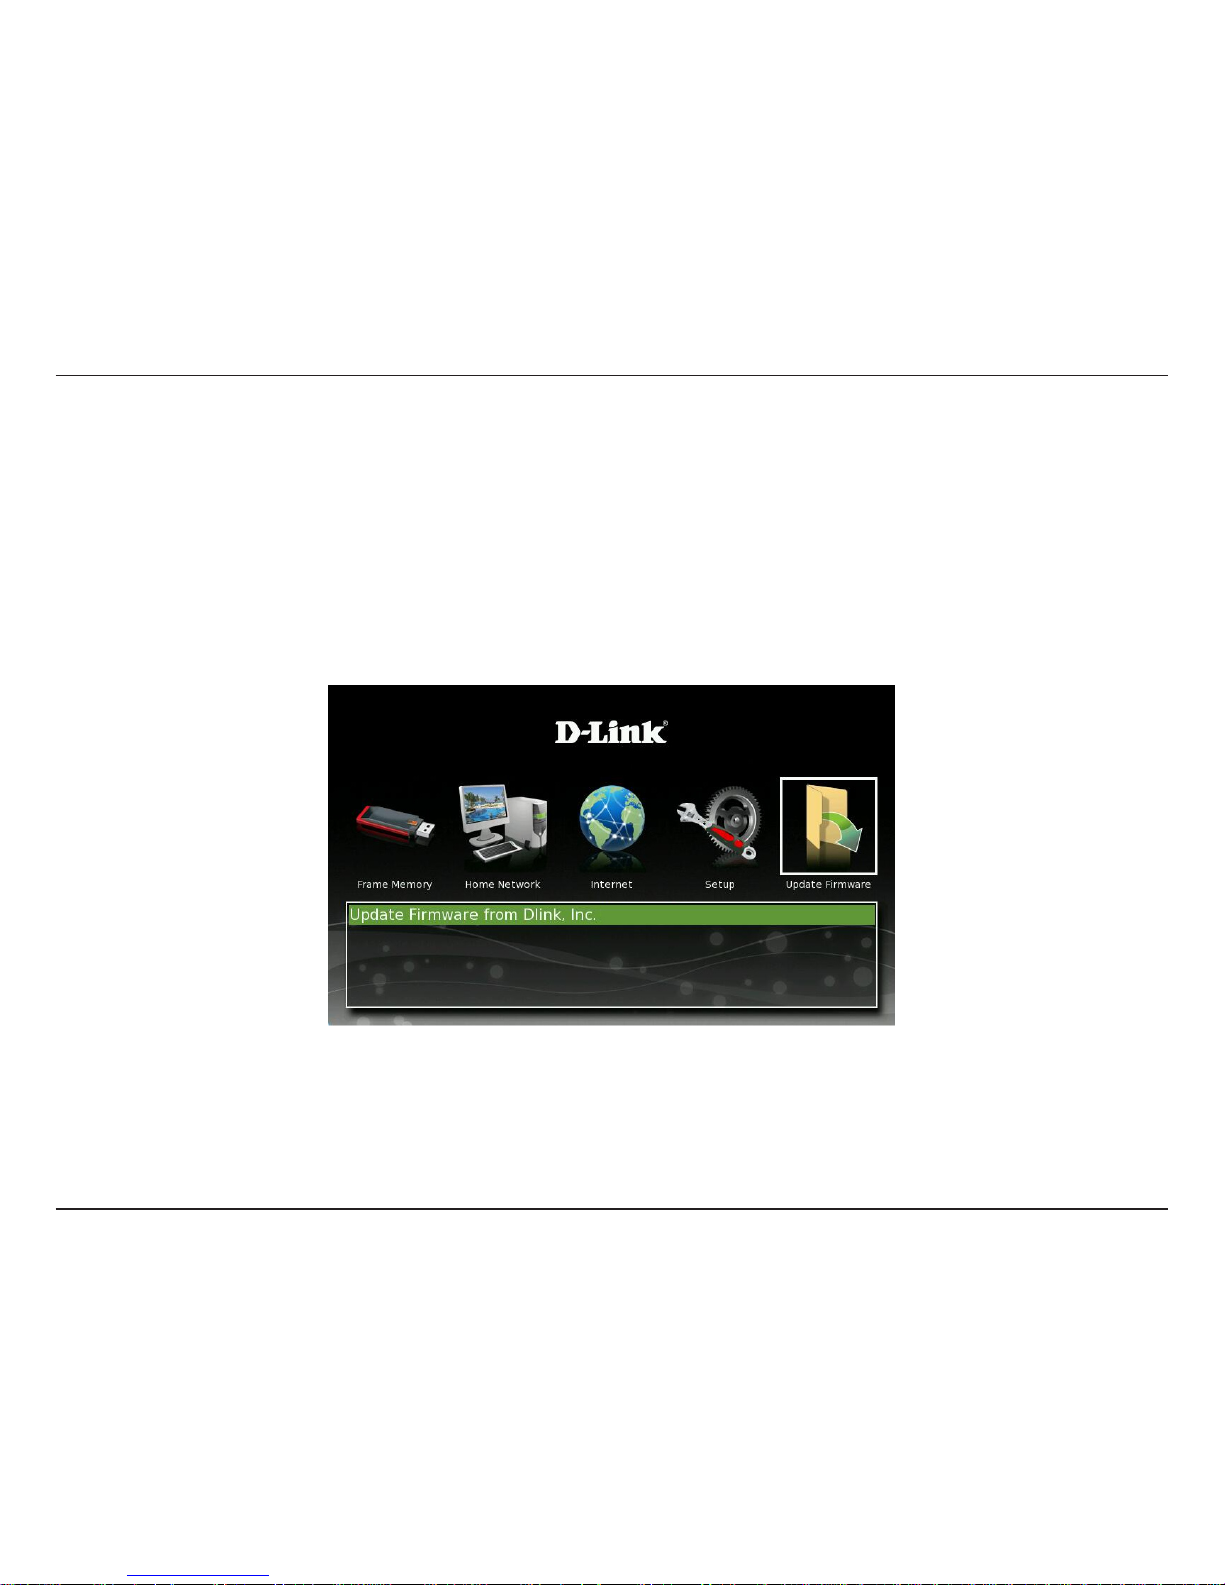
Your frame must be connected to the Internet to perform an upgrade. When connected, the DSM-210 will automatically
notify you if a firmware upgrade is available. If there is an upgrade available, the Upgrade Firmware icon will be
displayed. Select the icon to upgrade the firmware.
Other Features
Page 40
34D-Link DSM-210 User Manual
Transition Types
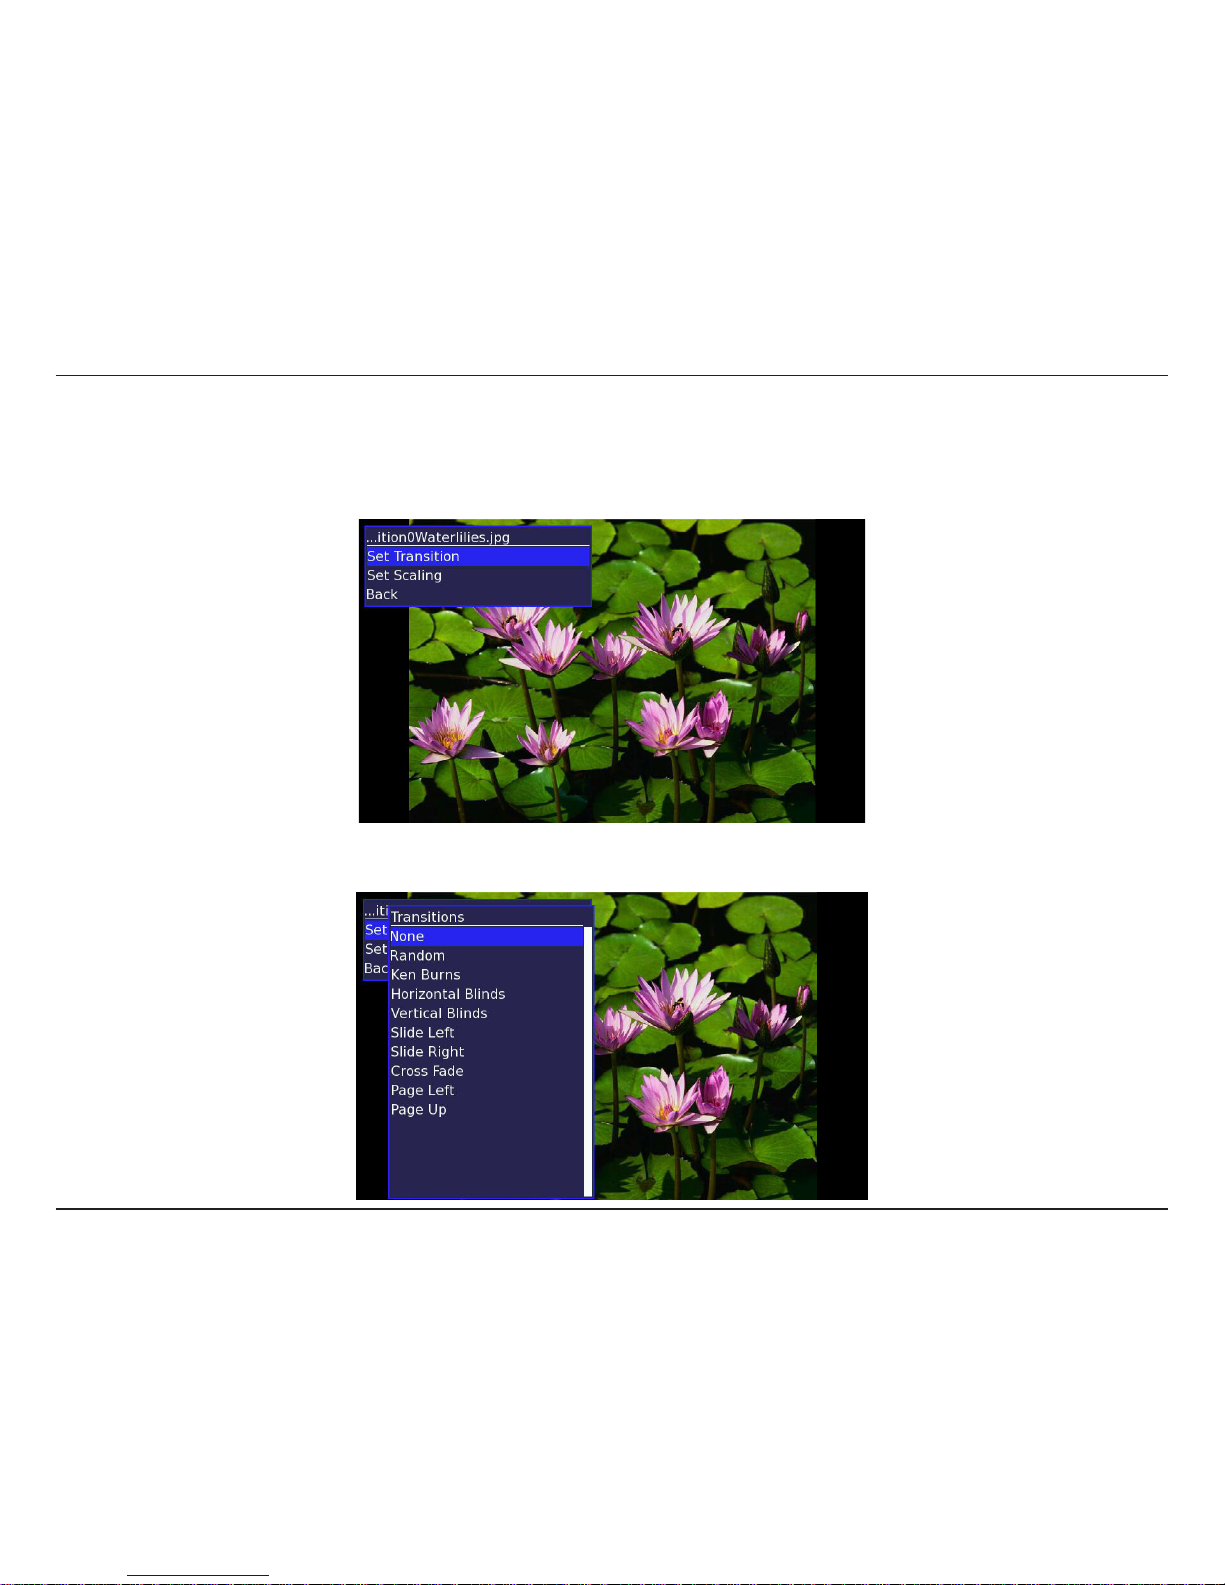
When viewing images you can change the transition type. Transition types are animations that are displayed when
a picture changes to the next picture during a slide show. While in a slide show, press Menu and then select Set
Transition.
A list of transitions will appear. Select a type and press Enter.
Page 41
35D-Link DSM-210 User Manual
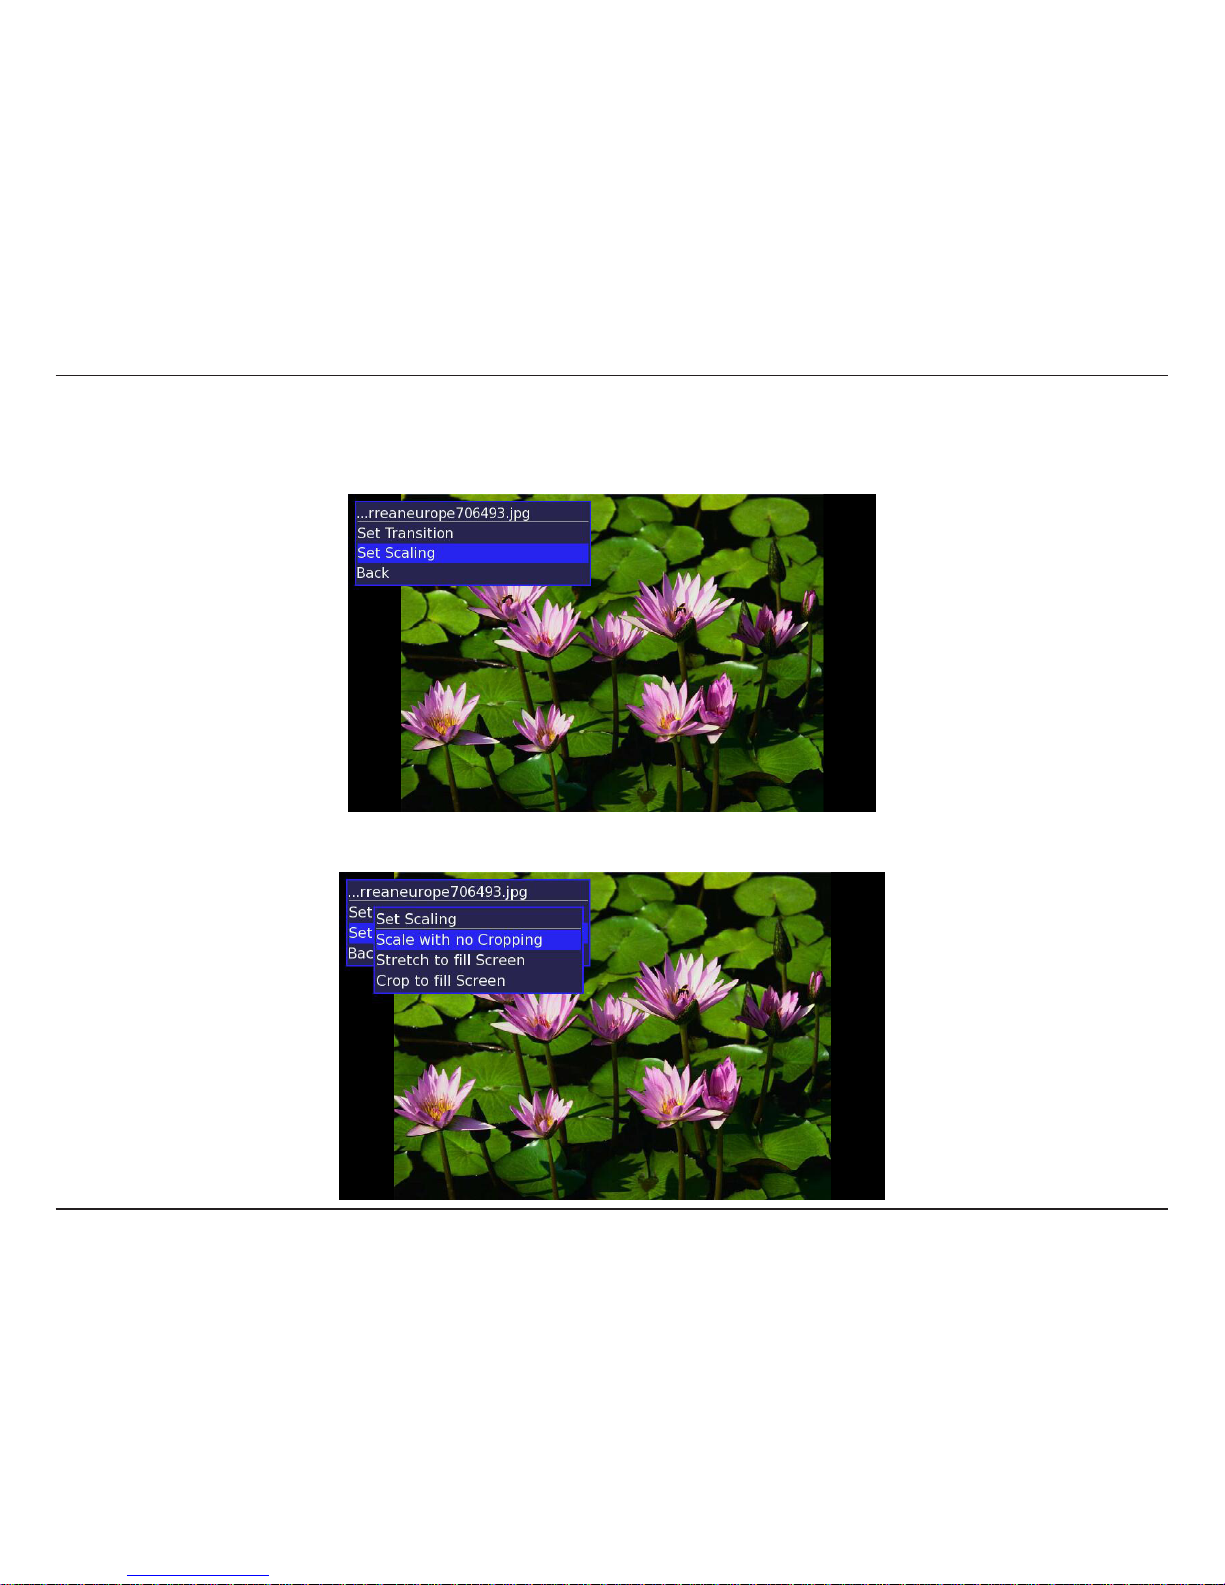
Set Scaling
While in a slide show, press Menu and then select Set Scaling. You can change how the picture fits on your frame.
Select Scale with no Cropping, Stretch to fill Screen, or Crop to fill Screen.
Page 42
36D-Link DSM-210 User Manual
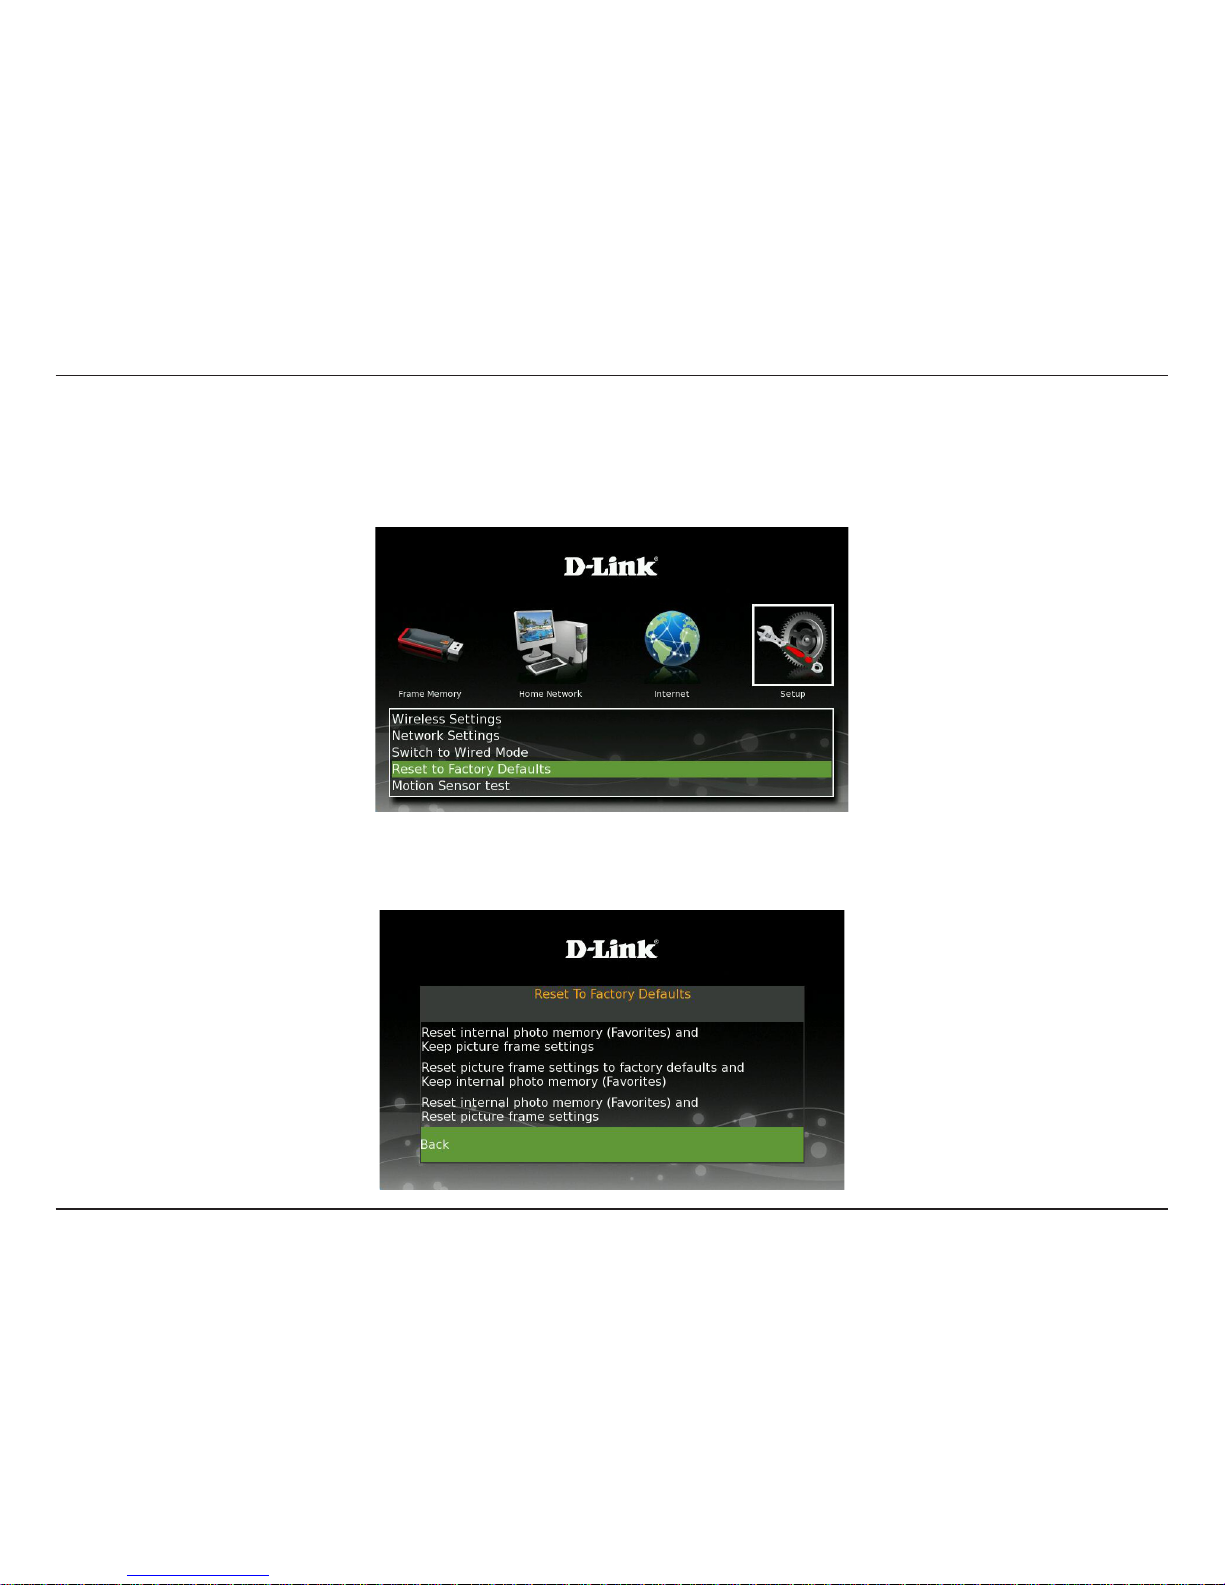
Reset to Factory Defaults
Select the Setup icon and then select Reset to Factory Defualt. This will allow you to reset the frame to the default
settings, erase the internal memory (favorites), or both.
Select which option you want and press Enter.
Page 43
37D-Link DSM-210 User Manual
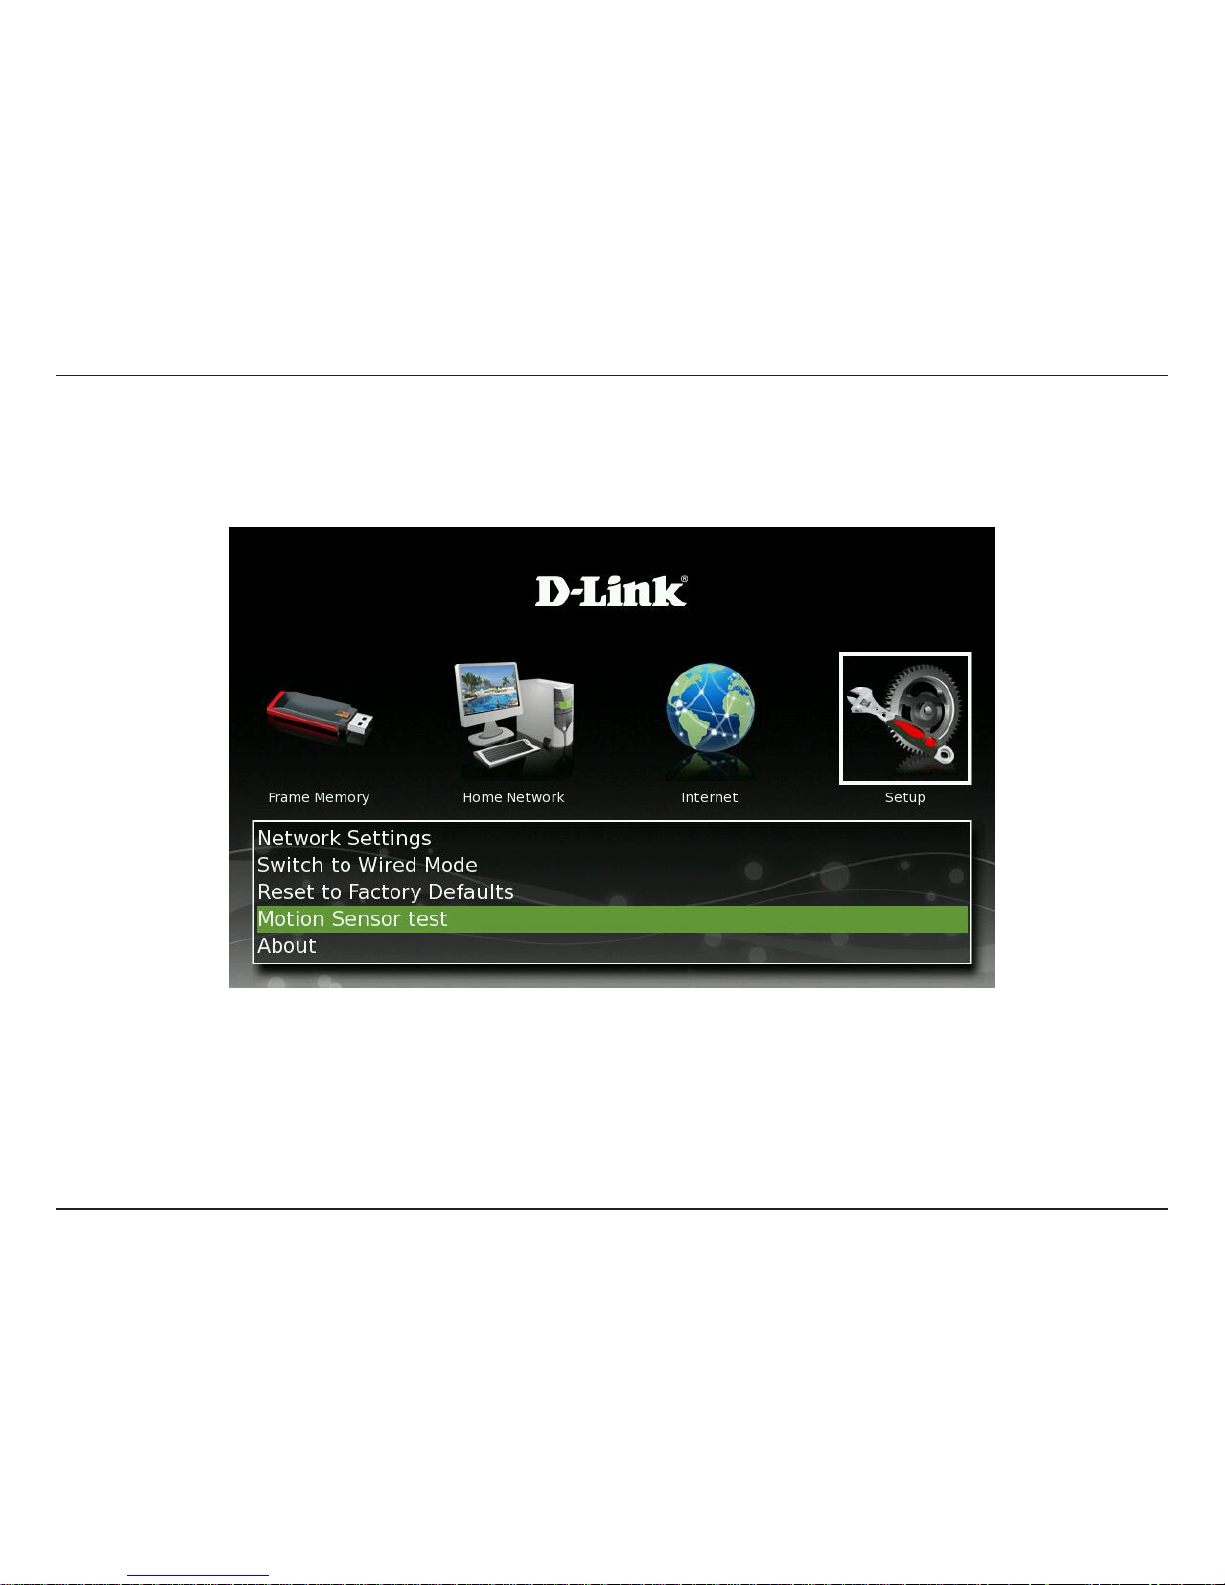
Motion Sensor Test
Select the Setup icon and then select Motion Sensor Test. This will allow you to verify that the motion sensor on your
DSM-210 is working properly.
The test program will do the following:
• Draw green lines if there is no motion.
• Draw red lines if there is motion.
Page 44
38D-Link DSM-210 User Manual
About
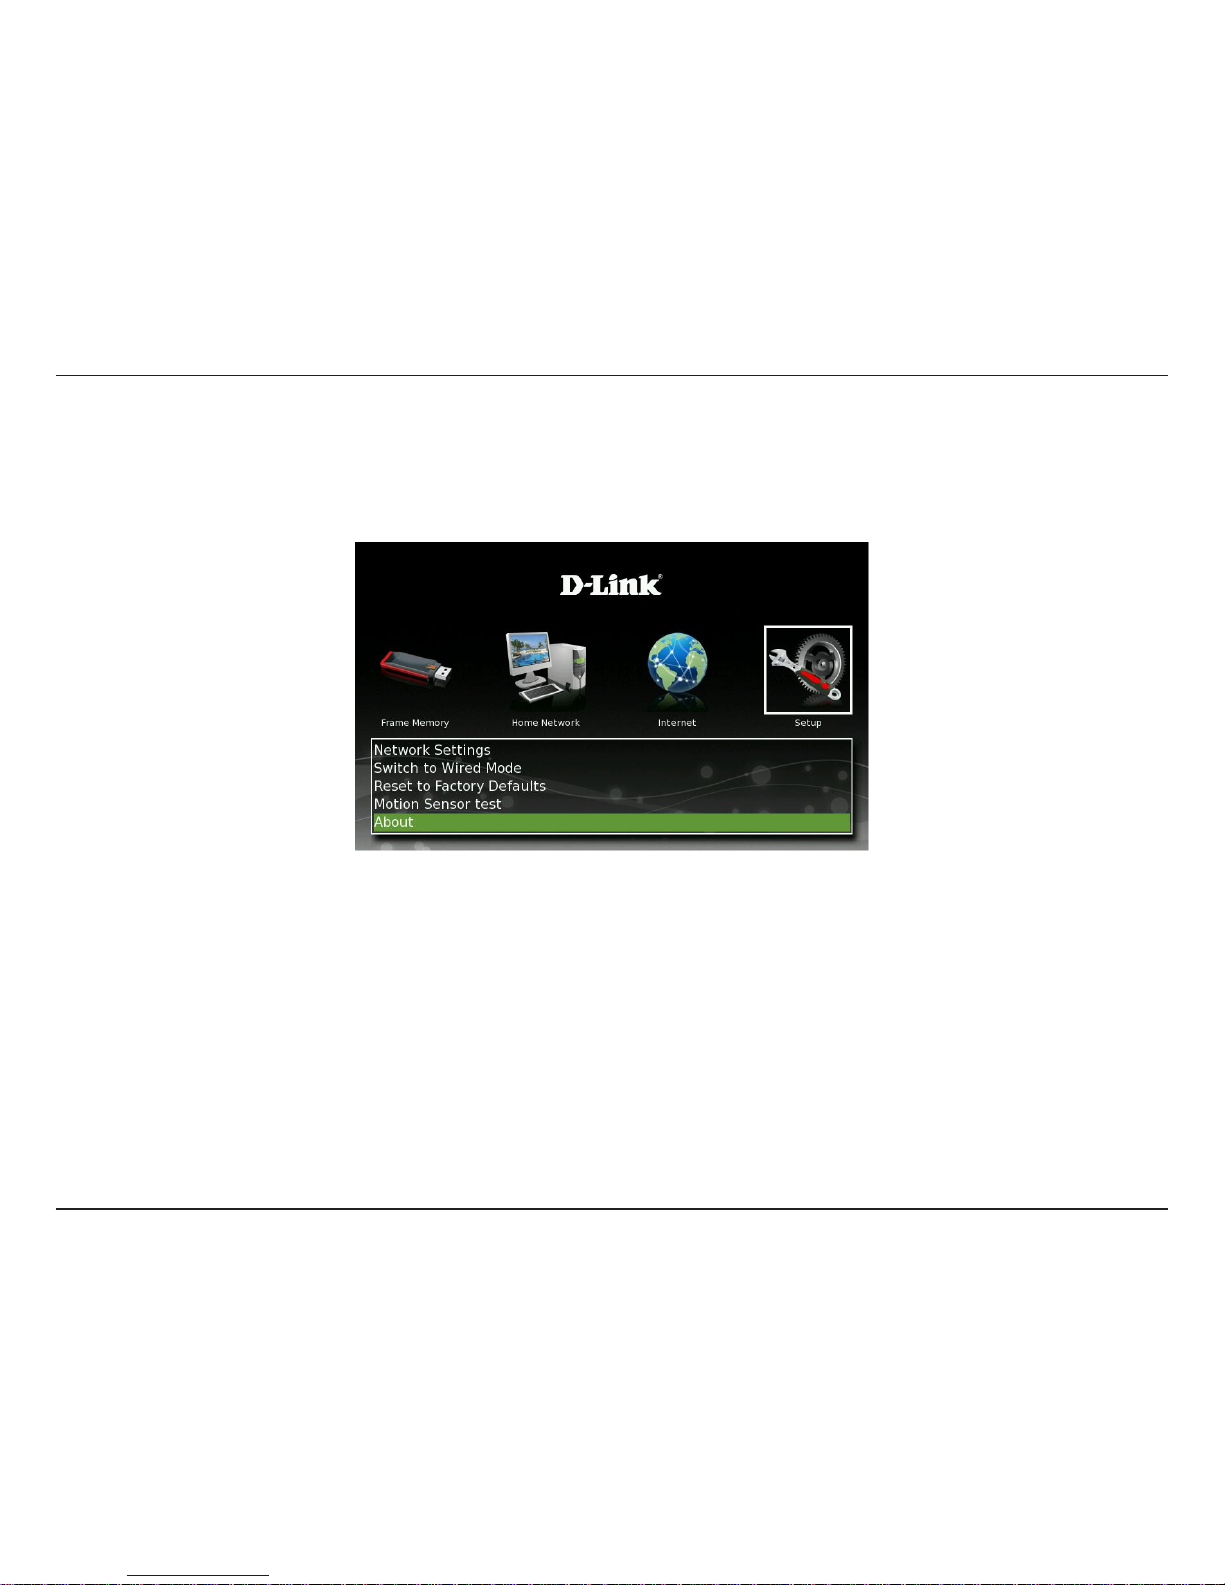
Select the Setup icon and then select About. This will display the information about your frame including the current
version of firmware that is installed.
Page 45
39D-Link DSM-210 User Manual
D-Link Widget
D-Link offers a Widget to use with your DSM-210 frame. The D-Link Widget requires Yahoo Widgets to be installed
in your PC. If you already have Yahoo Widgets installed, just load the D-Link widget from the CD included with your
DSM-210. If you do not have Yahoo Widgets installed, please click the Yahoo link from the D-Link CD.
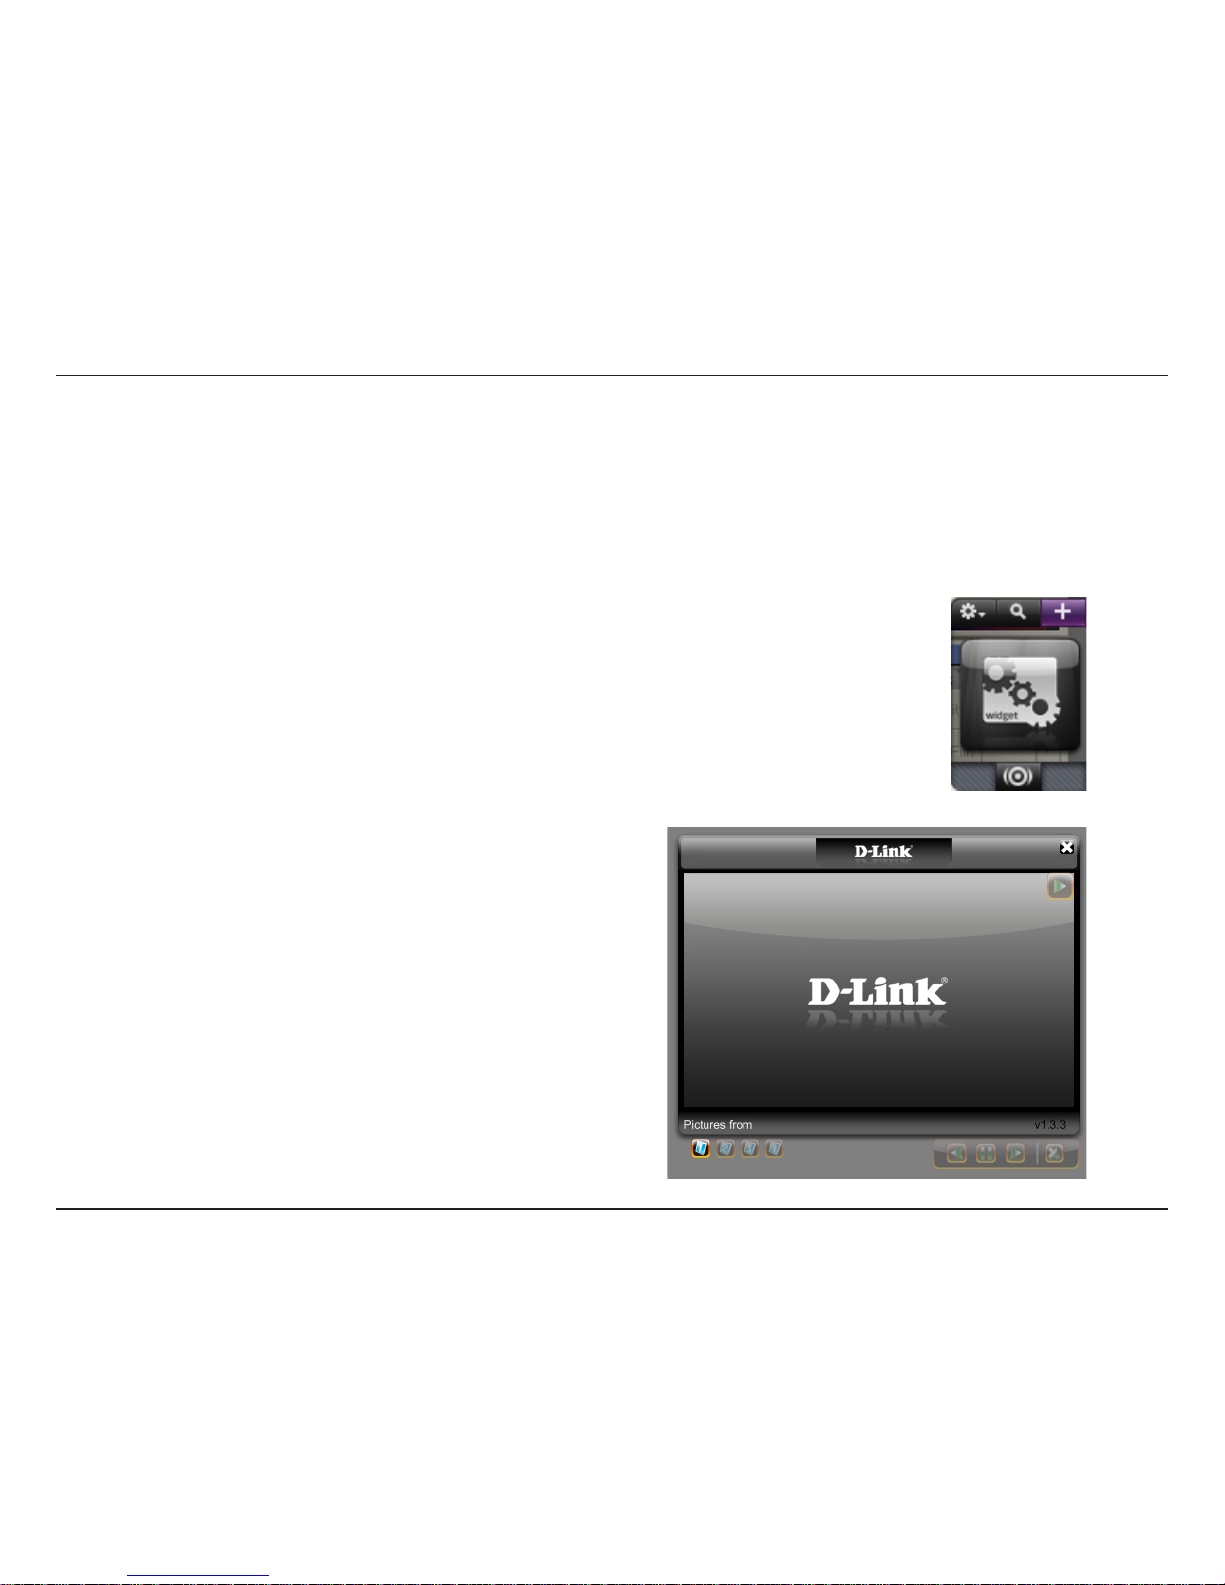
To install the D-Link Widget, insert the DSM-210 CD into your computer. When the
autorun screen appears, select “Install D-Link Widget”. Once installed, the widget
will appear. Click the widget to launch.
The Widget will appear.
Page 46
40D-Link DSM-210 User Manual
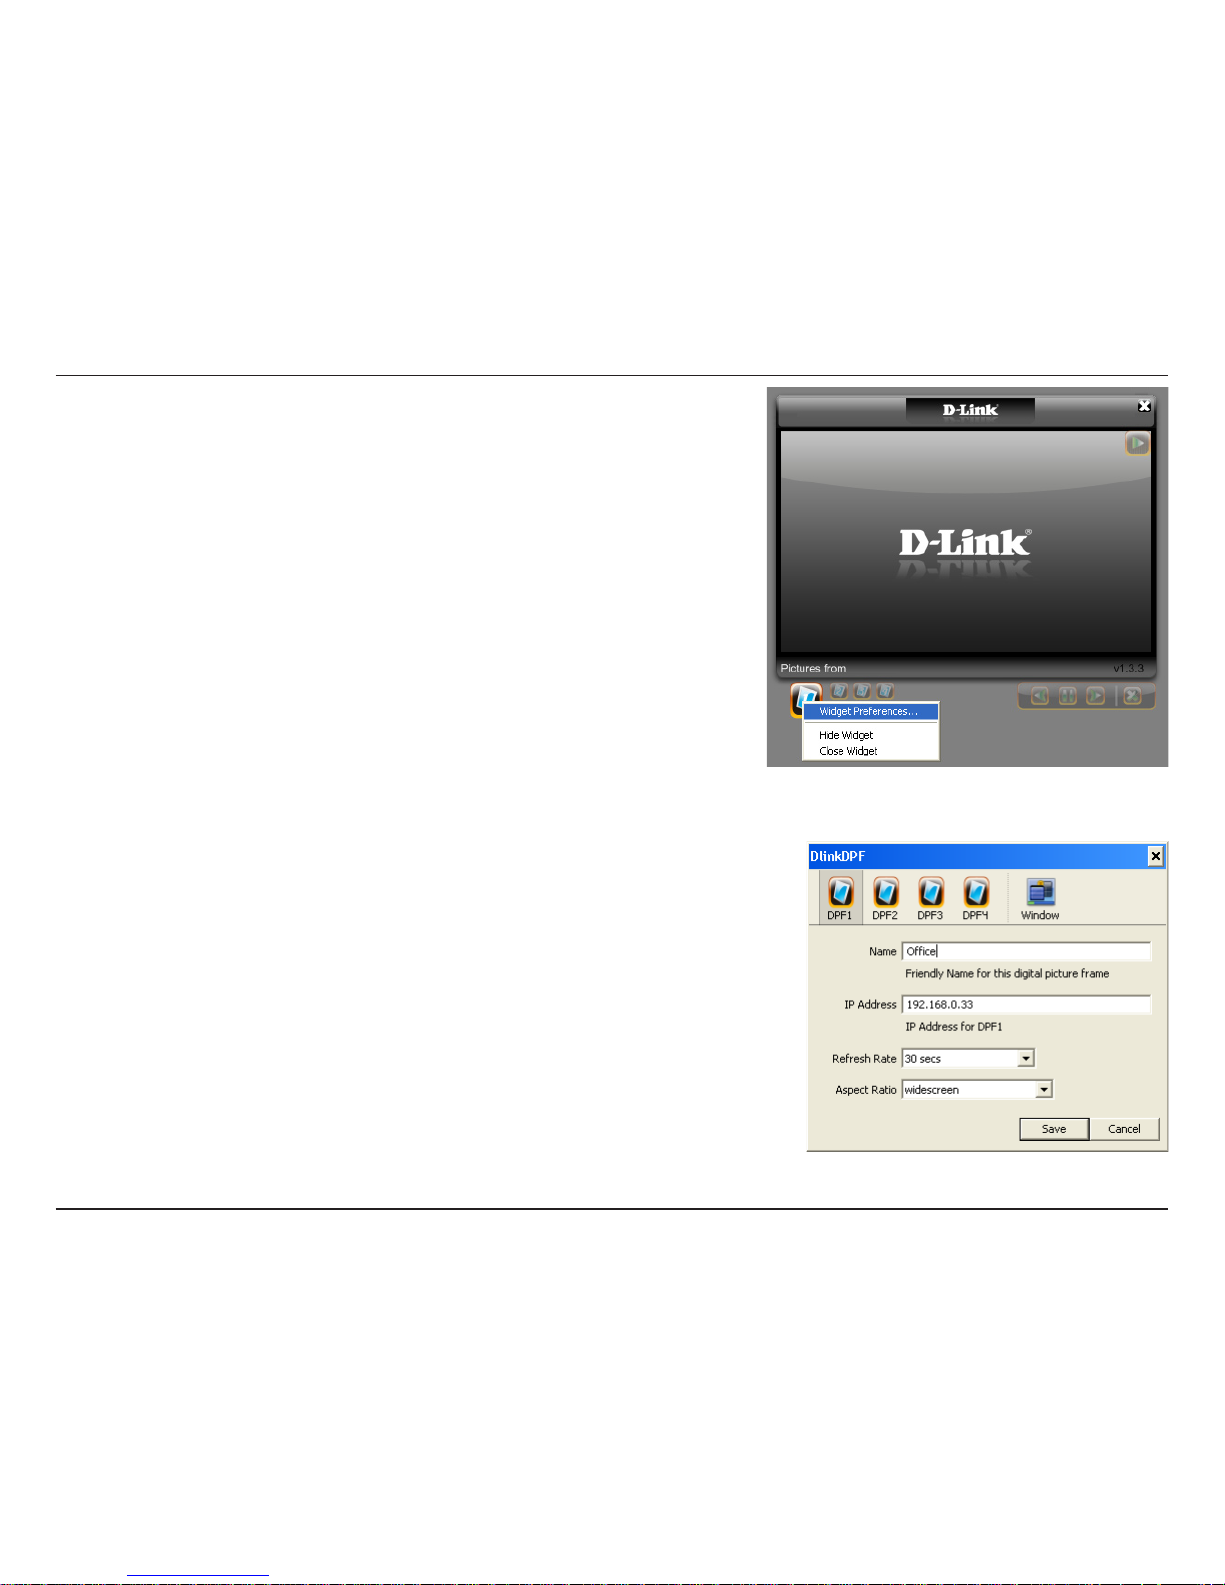
To add your picture frame, right-click one of the four available
frames and select Widget Preferences...
Select one of the available thumbnails (such as DPF1).
1. Enter a name for the frame.
2. Enter the IP Address of the frame (for the IP address of your
frame, refer to page 15 - Network Settings).
3. Select the refresh rate (5, 10, 15, 30 seconds or 1 minute).
4. Select the Aspect Ratio (Widescreen or Standard).
5. Click Save to save your settings.
You may now add photos from your computer to the DSM-210’s internal
memory by dragging and dropping the photos into the widget.
Page 47

41D-Link DSM-210 User Manual
STANDARDS
• 802.11g
• 802.3u
• TCP/IP
• USB 2.0
SCREEN SPECIFICATIONS
• 10” TFT LCD
• 16:9 Format
• 800 x 480 Resolution
• 300 cd/m2 Brightness
DEVICE INTERFACE
• 1 10/100 LAN Port
• 1 USB 2.0 Port
• Flash Memory Card Reader
BUILT-IN MEMORY
• 1GB
SUPPORTED MEMORY FORMATS
• SD (Secure Digital)
• SDHC
• MMC (Multimedia Card)
• Memory Stick
SUPPORTED PHOTO FORMAT
• JPEG
NETWORK
• Wireless: 802.11b/g
• Wired LAN: 10/100Mbps Ethernet
WIRELESS SECURITY
• Wi-Fi® Protected Setup (WPS)
• WPA™ and WPA2
™
TEMPERATURE
• Operating: 32°F to 104°F (0ºC to 40ºC)
• Storage: 32°F to 149°F (0ºC to 65ºC)
DIMENSIONS
• Item (WxDxH): 8” x 12” x 1.3”
WEIGHT
• Item: 1.3lbs
WARRANTY
1-Year Limited
*
* 1-Year Limited Warranty available only in the USA and Canada.
Product Specifications
Page 48
42D-Link DSM-210 User Manual
Contacting Technical Support
U.S. and Canadian customers can contact D-Link technical support through our web site or by phone.
Before you contact technical support, please have the following ready:
• Model number of the product (e.g. DSM-210)
• Hardware Revision (located on the label on the back of the frame (e.g. rev A1))
• Serial Number (s/n number located on the label on the back of the frame).
You can find software updates and user documentation on the D-Link website as well as frequently asked questions
and answers to technical issues.
For customers within the United States:
Phone Support:
(877) 453-5465
Internet Support:
http://support.dlink.com
For customers within Canada:
Phone Support:
(800) 361-5265
Internet Support:
http://support.dlink.com
Page 49

43D-Link DSM-210 User Manual
Warranty
Subject to the terms and conditions set forth herein, D-Link Systems, Inc. (“D-Link”) provides this Limited Warranty:
• Only to the person or entity that originally purchased the product from D-Link or its authorized reseller or distributor, and
• Only for products purchased and delivered within the fifty states of the United States, the District of Columbia, U.S. Possessions
or Protectorates, U.S. Military Installations, or addresses with an APO or FPO.
Limited Warranty:
D-Link warrants that the hardware portion of the D-Link product described below (“Hardware”) will be free from material defects in
workmanship and materials under normal use from the date of original retail purchase of the product, for the period set forth below
(“Warranty Period”), except as otherwise stated herein.
• Hardware: One (1) year
The customer’s sole and exclusive remedy and the entire liability of D-Link and its suppliers under this Limited Warranty will be, at
D-Link’s option, to repair or replace the defective Hardware during the Warranty Period at no charge to the original owner or to refund the
actual purchase price paid. Any repair or replacement will be rendered by D-Link at an Authorized D-Link Service Office. The replacement
hardware need not be new or have an identical make, model or part. D-Link may, at its option, replace the defective Hardware or any part
thereof with any reconditioned product that D-Link reasonably determines is substantially equivalent (or superior) in all material respects
to the defective Hardware. Repaired or replacement hardware will be warranted for the remainder of the original Warranty Period or ninety
(90) days, whichever is longer, and is subject to the same limitations and exclusions. If a material defect is incapable of correction, or if
D-Link determines that it is not practical to repair or replace the defective Hardware, the actual price paid by the original purchaser for the
defective Hardware will be refunded by D-Link upon return to D-Link of the defective Hardware. All Hardware or part thereof that is replaced
by D-Link, or for which the purchase price is refunded, shall become the property of D-Link upon replacement or refund.
Page 50

44D-Link DSM-210 User Manual
Limited Software Warranty:
D-Link warrants that the software portion of the product (“Software”) will substantially conform to D-Link’s then current functional specifications
for the Software, as set forth in the applicable documentation, from the date of original retail purchase of the Software for a period of ninety
(90) days (“Software Warranty Period”), provided that the Software is properly installed on approved hardware and operated as contemplated
in its documentation. D-Link further warrants that, during the Software Warranty Period, the magnetic media on which D-Link delivers the
Software will be free of physical defects. The customer’s sole and exclusive remedy and the entire liability of D-Link and its suppliers under
this Limited Warranty will be, at D-Link’s option, to replace the non-conforming Software (or defective media) with software that substantially
conforms to D-Link’s functional specifications for the Software or to refund the portion of the actual purchase price paid that is attributable
to the Software. Except as otherwise agreed by DLink in writing, the replacement Software is provided only to the original licensee, and
is subject to the terms and conditions of the license granted by D-Link for the Software. Replacement Software will be warranted for the
remainder of the original Warranty Period and is subject to the same limitations and exclusions. If a material non-conformance is incapable
of correction, or if D-Link determines in its sole discretion that it is not practical to replace the non-conforming Software, the price paid by
the original licensee for the non-conforming Software will be refunded by D-Link; provided that the non-conforming Software (and all copies
thereof) is first returned to D-Link. The license granted respecting any Software for which a refund is given automatically terminates.
Non-Applicability of Warranty:
The Limited Warranty provided hereunder for Hardware and Software portions of D-Link’s products will not be applied to and does not cover
any refurbished product and any product purchased through the inventory clearance or liquidation sale or other sales in which D-Link, the
sellers, or the liquidators expressly disclaim their warranty obligation pertaining to the product and in that case, the product is being sold
“As-Is” without any warranty whatsoever including, without limitation, the Limited Warranty as described herein, notwithstanding anything
stated herein to the contrary.
Submitting A Claim:
The customer shall return the product to the original purchase point based on its return policy. In case the return policy period has expired
and the product is within warranty, the customer shall submit a claim to D-Link as outlined below:
• The customer must submit with the product as part of the claim a written description of the Hardware defect or Software
nonconformance in sufficient detail to allow DLink to confirm the same, along with proof of purchase of the product (such
as a copy of the dated purchase invoice for the product) if the product is not registered.
• The customer must obtain a Case ID Number from D-Link Technical Support at 1-877-453-5465, who will attempt to assist
the customer in resolving any suspected defects with the product. If the product is considered defective, the customer must
obtain a Return Material Authorization (“RMA”) number by completing the RMA form and entering the assigned Case ID
Number at https://rma.dlink.com/.
Page 51

45D-Link DSM-210 User Manual
• After an RMA number is issued, the defective product must be packaged securely in the original or other suitable shipping
package to ensure that it will not be damaged in transit, and the RMA number must be prominently marked on the outside
of the package. Do not include any manuals or accessories in the shipping package. DLink will only replace the defective
portion of the product and will not ship back any accessories.
• The customer is responsible for all in-bound shipping charges to D-Link. No Cash on Delivery (“COD”) is allowed. Products
sent COD will either be rejected by D-Link or become the property of D-Link. Products shall be fully insured by the customer
and shipped to D-Link Systems, Inc., 17595 Mt. Herrmann, Fountain Valley, CA 92708. D-Link will not be held responsible
for any packages that are lost in transit to D-Link. The repaired or replaced packages will be shipped to the customer via
UPS Ground or any common carrier selected by D-Link. Return shipping charges shall be prepaid by D-Link if you use an
address in the United States, otherwise we will ship the product to you freight collect. Expedited shipping is available upon
request and provided shipping charges are prepaid by the customer. D-Link may reject or return any product that is not
packaged and shipped in strict compliance with the foregoing requirements, or for which an RMA number is not visible from
the outside of the package. The product owner agrees to pay D-Link’s reasonable handling and return shipping charges
for any product that is not packaged and shipped in accordance with the foregoing requirements, or that is determined by
D-Link not to be defective or non-conforming.
What Is Not Covered:
The Limited Warranty provided herein by D-Link does not cover:
Products that, in D-Link’s judgment, have been subjected to abuse, accident, alteration, modification, tampering, negligence, misuse, faulty
installation, lack of reasonable care, repair or service in any way that is not contemplated in the documentation for the product, or if the
model or serial number has been altered, tampered with, defaced or removed; Initial installation, installation and removal of the product for
repair, and shipping costs; Operational adjustments covered in the operating manual for the product, and normal maintenance; Damage
that occurs in shipment, due to act of God, failures due to power surge, and cosmetic damage; Any hardware, software, firmware or other
products or services provided by anyone other than D-Link; and Products that have been purchased from inventory clearance or liquidation
sales or other sales in which D-Link, the sellers, or the liquidators expressly disclaim their warranty obligation pertaining to the product.
While necessary maintenance or repairs on your Product can be performed by any company, we recommend that you use only an Authorized
D-Link Service Office. Improper or incorrectly performed maintenance or repair voids this Limited Warranty.
Disclaimer of Other Warranties:
EXCEPT FOR THE LIMITED WARRANTY SPECIFIED HEREIN, THE PRODUCT IS PROVIDED “AS-IS” WITHOUT ANY WARRANTY
OF ANY KIND WHATSOEVER INCLUDING, WITHOUT LIMITATION, ANY WARRANTY OF MERCHANTABILITY, FITNESS FOR A
PARTICULAR PURPOSE AND NONINFRINGEMENT.
Page 52

46D-Link DSM-210 User Manual
IF ANY IMPLIED WARRANTY CANNOT BE DISCLAIMED IN ANY TERRITORY WHERE A PRODUCT IS SOLD, THE DURATION OF
SUCH IMPLIED WARRANTY SHALL BE LIMITED TO THE DURATION OF THE APPLICABLE WARRANTY PERIOD SET FORTH ABOVE.
EXCEPT AS EXPRESSLY COVERED UNDER THE LIMITED WARRANTY PROVIDED HEREIN, THE ENTIRE RISK AS TO THE QUALITY,
SELECTION AND PERFORMANCE OF THE PRODUCT IS WITH THE PURCHASER OF THE PRODUCT.
Limitation of Liability:
TO THE MAXIMUM EXTENT PERMITTED BY LAW, D-LINK IS NOT LIABLE UNDER ANY CONTRACT, NEGLIGENCE, STRICT LIABILITY
OR OTHER LEGAL OR EQUITABLE THEORY FOR ANY LOSS OF USE OF THE PRODUCT, INCONVENIENCE OR DAMAGES OF ANY
CHARACTER, WHETHER DIRECT, SPECIAL, INCIDENTAL OR CONSEQUENTIAL (INCLUDING, BUT NOT LIMITED TO, DAMAGES FOR
LOSS OF GOODWILL, LOSS OF REVENUE OR PROFIT, WORK STOPPAGE, COMPUTER FAILURE OR MALFUNCTION, FAILURE OF
OTHER EQUIPMENT OR COMPUTER PROGRAMS TO WHICH D-LINK’S PRODUCT IS CONNECTED WITH, LOSS OF INFORMATION
OR DATA CONTAINED IN, STORED ON, OR INTEGRATED WITH ANY PRODUCT RETURNED TO D-LINK FOR WARRANTY SERVICE)
RESULTING FROM THE USE OF THE PRODUCT, RELATING TO WARRANTY SERVICE, OR ARISING OUT OF ANY BREACH OF
THIS LIMITED WARRANTY, EVEN IF D-LINK HAS BEEN ADVISED OF THE POSSIBILITY OF SUCH DAMAGES. THE SOLE REMEDY
FOR A BREACH OF THE FOREGOING LIMITED WARRANTY IS REPAIR, REPLACEMENT OR REFUND OF THE DEFECTIVE OR
NONCONFORMING PRODUCT. THE MAXIMUM LIABILITY OF D-LINK UNDER THIS WARRANTY IS LIMITED TO THE PURCHASE
PRICE OF THE PRODUCT COVERED BY THE WARRANTY. THE FOREGOING EXPRESS WRITTEN WARRANTIES AND REMEDIES
ARE EXCLUSIVE AND ARE IN LIEU OF ANY OTHER WARRANTIES OR REMEDIES, EXPRESS, IMPLIED OR STATUTORY.
Governing Law:
This Limited Warranty shall be governed by the laws of the State of California. Some states do not allow exclusion or limitation of incidental
or consequential damages, or limitations on how long an implied warranty lasts, so the foregoing limitations and exclusions may not apply.
This Limited Warranty provides specific legal rights and you may also have other rights which vary from state to state.
Trademarks:
D-Link is a registered trademark of D-Link Corporation/D-Link Systems, Inc. Other trademarks or registered trademarks are the property
of their respective owners. Patent Pending.
Copyright Statement:
No part of this publication or documentation accompanying this product may be reproduced in any form or by any means or used to make
any derivative such as translation, transformation, or adaptation without permission from D-Link Corporation/D-Link Systems, Inc., as
stipulated by the United States Copyright Act of 1976 and any amendments thereto. Contents are subject to change without prior notice.
Copyright ©2008 by D-Link Corporation/D-Link Systems, Inc. All rights reserved.
Page 53

47D-Link DSM-210 User Manual
FCC Statement:
This equipment has been tested and found to comply with the limits for a Class B digital device, pursuant to part 15 of the FCC Rules.
These limits are designed to provide reasonable protection against harmful interference in a residential installation. This equipment
generates, uses, and can radiate radio frequency energy and, if not installed and used in accordance with the instructions, may cause
harmful interference to radio communication. However, there is no guarantee that interference will not occur in a particular installation. If
this equipment does cause harmful interference to radio or television reception, which can be determined by turning the equipment off
and on, the user is encouraged to try to correct the interference by one or more of the
following measures:
• Reorient or relocate the receiving antenna.
• Increase the separation between the equipment and receiver.
• Connect the equipment into an outlet on a circuit different from that to which the receiver is connected.
• Consult the dealer or an experienced radio/TV technician for help.
FCC Caution:
Any changes or modifications not expressly approved by the party responsible for compliance could void the user’s authority to operate
this equipment.
This device complies with Part 15 of the FCC Rules. Operation is subject to the following two conditions:
(1) This device may not cause harmful interference, and (2) this device must accept any interference received, including interference that
may cause undesired operation.
IMPORTANT NOTICE:
FCC Radiation Exposure Statement:
This equipment complies with FCC radiation exposure limits set forth for an uncontrolled environment. This equipment should be installed
and operated with minimum distance 20cm between the radiator & your body. This transmitter must not be co-located or operating in
conjunction with any other antenna or transmitter.
The availability of some specific channels and/or operational frequency bands are country dependent and are firmware programmed at
the factory to match the intended destination. The firmware setting is not accessible by the end user.
Page 54

48D-Link DSM-210 User Manual
For detailed warranty information applicable to products purchased outside the United States, please contact the corresponding local
D-Link office.
Industry Canada Notice:
This device complies with RSS-210 of the Industry Canada Rules. Operation is subject to the following two conditions:
(1) This device may not cause harmful interference, and (2) this device must accept any interference received, including interference that
may cause undesired operation.
IMPORTANT NOTE:
Radiation Exposure Statement:
This equipment complies with IC radiation exposure limits set forth for an uncontrolled environment. This equipment should be installed
and operated with minimum distance 20cm between the radiator & your body.
This device has been designed to operate with an antenna having a maximum gain of 2dB. Antenna having a higher gain is strictly prohibited
per regulations of Industry Canada. The required antenna impedance is 50 ohms.
Page 55
49D-Link DSM-210 User Manual
Registration
Version 1.0
April 14, 2008
Product registration is entirely voluntary and failure to complete or return this form will not diminish your warranty
rights.
 Loading...