

Page 1

D-Link NetDefend firewall
Security VPN Firewall
NetDefend secured by Check Point
User Guide
Version 1.0
Revised: 01/17/2006
Page 2

COPYRIGHT & TRADEMARKS
Copyright © 2005 SofaWare, All Rights Reserved. No part of this
document may be reproduced in any form or by any means without
written permission from SofaWare.
Information in this document is subject to change without notice and
does not represent a commitment on part of SofaWare Technologies
Ltd.
SofaWare, Safe@Home and Safe@Office are trademarks, service
marks, or registered trademarks of SofaWare Technologies Ltd.
Check Point, the Check Point logo, FireWall-1, FireWall-1
SecureServer, FireWall-1 SmallOffice, FloodGate-1, INSPECT, IQ
Engine, Meta IP, MultiGate, Open Security Extension, OPSEC,
Provider-1, SecureKnowledge, SecureUpdate, SiteManager-1, SVN,
UAM, User-to-Address Mapping, UserAuthority, Visual Policy
Editor, VPN-1, VPN-1 Accelerator Card, VPN-1 Gateway, VPN-1
SecureClient, VPN-1 SecuRemote, VPN-1 SecureServer, and VPN-1
Edge are trademarks, service marks, or regi ste red tra dem arks of Chec k
Point Software Technologies Ltd. or its affiliates.
All other product names me ntioned herein are trademarks or registered
trademarks of their respective owner s.
The products described i n this document are protected by U.S. Patent
No. 5,606,668 and 5,835,726 and may be protec ted by other U.S.
Patents, foreign patents, or pending applications.
GNU GENERAL PUBLIC LICENSE
Version 2, June 1991
Copyright © 1989, 1991 Free Software Foundation, Inc.
59 Temple Place, Suite 330, Boston, MA 02111-1307 USA
Everyone is permitted to copy and distribute verbatim copies of this
license document, but changing it is no t all ow ed.
PREAMBLE
The licenses for most software are designed to take away your
freedom to share and change it. By contrast, the GNU General Public
License is intended to guarantee your freedom to share and change
free software--to make sure the software is free for all its users. This
General Public License applies to most of the Free Software
Foundation's software and to any other program whose authors
commit to using it. (Some other Free Software Foundation software is
covered by the GNU Library General Public License instead.) You
can apply it to your programs, too.
When we speak of free software, we are referring to freedom, not
price. Our General Public Licenses are designed to make sure that you
have the freedom to distribute copies of free software (and charge for
this service if you wish), that you receive source code or can get it if
you want it, that you can change the software or use pieces of it in new
free programs; and that you know you can do these things.
To protect your rights, w e need to make restrictions that forbid anyone
to deny you these rights or to ask you to surrender the rights. These
restrictions translate to certain responsibilities for you if you distribute
copies of the software, or if you modify it.
For example, if you distribute copies of such a program, whether
gratis or for a fee, you must give the recipients all the rights that you
have. You must make sure t hat they, too, receive or can get the source
code. And you must show them these terms so they know their rights.
We protect your rights with two steps: (1) copyright the software, and
(2) offer you this license which gives you legal permission to copy,
distribute and/or modify the software.
Also, for each author's protection and ours, we want to make certain
that everyone understands that there is no warranty for this free
software. If the software is modified by someone else and passed on,
we want its recipients to know that what they have is not the original,
so that any problems introduced by others will n ot reflect on the
original authors' reputations.
Finally, any free program is threatened constantly by software patents.
We wish to avoid the danger that redistributors of a free pr ogram will
individually obtain patent licenses, in effect making the program
proprietary. To prevent this, we have made it clear that any patent
must be licensed for everyone's free use or not licensed at all.
The precise terms and conditions for copying, distribution and
modification follow.
GNU GENERAL PUBLIC LICENSE TERMS AND CONDITIONS
FOR COPYING, DISTRIBUTION AND MODIFICATION
0. This License applies to any program or other work which
contains a notice placed by the copyright holder saying it may be
distributed under the terms of this General Public License. The
"Program", below, refers to any such program or work, and a "work
based on the Program" means either the Program or any derivative
work under copyright law: that is to say, a work containing the
Program or a portion of it, either verbatim or with modifications
and/or translated into another language. (Hereinafter, translation is
included without limitation in the term "modification".) Each licensee
is addressed as "you".
Activities other than copying, distribution and modification are not
covered by this License; they are outside its scope. The act of running
the Program is not restricted, and the output from the Program is
covered only if its contents constitute a work based on the Program
(independent of having been made by running the Program). Whether
that is true depends on w hat the Program does.
1. You may copy and distribute verbatim copies of the Pr ogram's
source code as you receive it, in any medium, provided th at you
conspicuously and appropriately publish on each c opy an appropriate
copyright notice and disclaimer of warranty; keep intact all the notices
that refer to this License and to the absence of any warranty; and give
any other recipients of the Program a copy of this License along with
the Program.
You may charge a fee for the physical act of transferring a copy, and
you may at your option offer wa rranty protection in exchange for a
fee.
2. You may modify your copy or copies of the Program or any
portion of it, thus forming a work based on the Program, and copy and
distribute such modifications or work under the terms of Section 1
above, provided that you also meet all of these conditions:
a) You must cause the modified files to carry prominent
notices stating that you changed the files and the date of
any change.
b) You must cause any work tha t you distribute or publish,
that in whole or in part contains or is derived from the
Program or any part thereof, to be licensed as a whole at
no charge to all third par ties under the terms of this
License.
c) If the modified program norm a lly reads commands
interactively when run, you must cause it, when started
Page 3

running for such interactive use in the most ordinary way,
to print or display an announcement including an
appropriate copyright notice and a notice that there is no
warranty (or else, saying that you provide a warranty) and
that users may redistribute the program under these
conditions, and telling the user how to view a copy of this
License. (Exception: if the Program itself is interactive but
does not normally print such an announcement, your work
based on the Program is not required to print an
announcement.)
These requirements apply to the modified work as a whole. If
identifiable sections of that work are not derived from the Program,
and can be reasonably considered independent and separate works in
themselves, then this License, and its terms, do not apply to those
sections when you distribute them as separate works. But when you
distribute the same sections as part of a whole which is a work based
on the Program, the distribution of the whole must be on the terms of
this License, whose permissions for other licensees extend to the
entire whole, and thus to each and every part regardless of who wrote
it.
Thus, it is not the intent of this section to claim rights or contest your
rights to work written entirely by you; rather, the intent is to exercise
the right to control the distribution of derivative or collective works
based on the Program.
In addition, mere aggregation of another work not based on the
Program with the Program (or with a work based on the Program) on a
volume of a storage or distribution medium does not bring the other
work under the scope of this License.
3. You may copy and distribute the Program (or a work based on it,
under Section 2) in object code or executable form under the terms of
Sections 1 and 2 above provide d that you also do one of the fo llowing:
a) Accompany it with the complete corresponding
machine-readable source code, which must be distributed
under the terms of Sections 1 a nd 2 above on a medium
customarily used for softw a re interchange; or,
b) Accompany it with a written offer, valid for at least
three years, to give any third party, for a charge no more
than your cost of physically performing source
distribution, a complete machine-readable copy of the
corresponding source code, to be distributed under the
terms of Sections 1 and 2 abo ve on a medium customarily
used for software interchange; or,
c) Accompany it with the information you received as to
the offer to distribute corresponding source code. (This
alternative is allowed only for noncommercial distribution
and only if you received the program in object code or
executable form with such an offer, in accord with
Subsection b above.)
The source code for a work means the preferred form of the work for
making modifications to it. For an executable work, complete source
code means all the source code for all modules it contains, plus any
associated interface definition files, plus the scripts used to control
compilation and installation of the executable. However, as a special
exception, the source code distributed need not include anything that
is normally distributed (in either source or binary form) with the major
components (compiler, kernel, and so on) of the operating system on
which the executable runs, unless that component itself accompanies
the executable.
If distribution of executable or object code is made by offering access
to copy from a designated place, then offering equivalent access to
copy the source code from the same place counts as distribution of the
source code, even though third parties are not compelled to copy the
source along with the object code.
4. You may not copy, m odify, sublicense, or distribute the Program
except as expressly provided under this License. Any attempt
otherwise to copy, modify, sublicense or distribute the Program is
void, and will automatically terminate your rights under this License.
However, parties who have received copies, or rights, from you under
this License will not have their licenses terminated so long as such
parties remain in full compliance.
5. You are not required to accept this License, since you ha ve not
signed it. However, nothing else grants you permission to modify or
distribute the Program or its derivative works. These actions are
prohibited by law if you do not accept this License. Therefore, by
modifying or distributing the Program (or any work based on the
Program), you indicate your acceptance of this License to do so, and
all its terms and conditio ns for copying, distributi ng or modifying the
Program or works based on it.
6. Each time you redistribut e the Program (or any work based on
the Program), the recipient automatically receives a license from the
original licensor to copy, distribute or modify the Program subject to
these terms and conditions. You may not impose any further
restrictions on the recipients' exercise of the rights granted herein. You
are not responsible for enforcing compliance by third parties to this
License.
7. If, as a consequence of a court judgment or allegation of patent
infringement or for any other reason (not limited to patent issues),
conditions are imposed on y ou (whether by court order, agreement or
otherwise) that contradict the conditions of this License, they do not
excuse you from the conditions of this License. If you cannot
distribute so as to satisfy simultaneously your obligations under this
License and any other pertinent obligations, then as a consequence
you may not distribute the Program at all. For example, if a patent
license would not permit royalty-free redistribution of the Program by
all those who receive copies d irectly or indirectly through you, then
the only way you could sat isfy both it and this License would be to
refrain entirely from distribution of the Program.
If any portion of this section is held invalid or unenforceable under
any particular circumstance, the balance of the section is intended to
apply and the section as a whole is intended to apply in other
circumstances.
It is not the purpose of this section to induce you to infringe any
patents or other property right claims or to contes t validity of any such
claims; this section has the sole purpose of protecting the integrity of
the free software distribution system, which is im plemented by public
license practices. Many people have made generous contributions to
the wide range of software distributed through that system in reliance
on consistent application of that system; it is up to the author/donor to
decide if he or she is willing to distribute software through any other
system and a licensee cannot impose that choice.
This section is intended to make thoroughly clear what is believed to
be a consequence of the rest of this License.
8. If the distribution and/or use of the Program is restricted in
certain countries either by patents or by copyrighted interfaces, the
original copyright holder who places the Program under this License
may add an explicit geographical distribution limitation excluding
those countries, so that distribution is permitted only in or among
Page 4

countries not thus excluded. In such case, this License incorporates the
limitation as if writte n in the body of this License.
9. The Free Software Foundation may publish revised and/or new
versions of the General Public License from time to time. Such new
versions will be similar in spirit to the present version, but may differ
in detail to address new problems or concerns.
Each version is given a distinguishing version number. If the Program
specifies a version number of this License which applies to it and "any
later version", you have the option of following the terms and
conditions either of that version or of any later version published by
the Free Software Foundation. If the Program does not specify a
version number of this License, you may choose any version ever
published by the Free Software Foundation.
10. If you wish to incorporate p a rts of the Program into other free
programs whose distribution conditions are different, write to the
author to ask for permission. For software which is copyrighted by the
Free Software Foundation, write to the Free Software Foundation; we
sometimes make exceptions for this. Our decision will be guided by
the two goals of preserving the free status of all derivatives of our free
software and of promoting the sharing and reuse of softw a re generally.
NO WARRANTY
11. BECAUSE THE PROGRAM IS LICENSED FREE OF
CHARGE, THERE IS NO WARRANTY FOR THE PROGRAM, TO
THE EXTENT PERMITTED BY APPLICABLE LAW. EXCEPT
WHEN OTHERWISE STATED IN WRITING THE COPYRIGHT
HOLDERS AND/OR OTHER PARTIES PROVIDE THE
PROGRAM "AS IS" WITHOUT WARRANTY OF ANY KIND,
EITHER EXPRESSED OR IMPLIED, INCLUDING, BUT NOT
LIMITED TO, THE IMPLIED WARRANTIES OF
MERCHANTABILITY AND FITNESS FOR A PARTICULAR
PURPOSE. THE ENTIRE RISK AS TO THE QUALITY AND
PERFORMANCE OF THE PROGRAM IS WITH YOU. SHOULD
THE PROGRAM PROVE DEFECTIVE, YOU ASSUME THE COST
OF ALL NECESSARY SERVICING, REPAIR OR CORRECTION.
12. IN NO EVENT UNLESS REQUIRED BY APPLICABLE
LAW OR AGREED TO IN WRITING WILL ANY COPYRIGHT
HOLDER, OR ANY OTHER PARTY WHO MAY MODIFY
AND/OR REDISTRIBUTE THE PROGRAM AS PERMITTED
ABOVE, BE LIABLE TO YOU FOR DAMAGES, INCLUDING
ANY GENERAL, SPECIAL, INCIDENTAL OR
CONSEQUENTIAL DAMAGES ARISING OUT OF THE USE OR
INABILITY TO USE THE PROGRAM (INCLUDING BUT NOT
LIMITED TO LOSS OF DATA OR DATA BEING RENDERED
INACCURATE OR LOSSES SUSTAINED BY YOU OR THIRD
PARTIES OR A FAILURE OF THE PROGRAM TO OPERATE
WITH ANY OTHER PROGRAMS), EVEN IF SUCH HOLDER OR
OTHER PARTY HAS BEEN ADVISED OF THE POSSIBILITY OF
SUCH DAMAGES.
To receive the SofaWare GPL licensed code, contact
[email protected].
SAFETY PRECAUTIONS
Carefully read the Safety Instructions the Installation and Operating
Procedures provided in this User's Guide b efore at tempting to install
or operate the appliance. Failure to follow these instructions may
result in damage to equipment and/or personal injur ies.
Before cleaning the appliance, unplug the power cord. Use
only a soft cloth dampened with water for cleaning.
When installing the appliance, ensure that the vents are not
blocked.
Do not place this product on an unstable surface or support.
The product may fall, causing serious injury to a child or adult,
as well as serious damage to the product.
Do not use the appliance outdoors.
Do not expose the appliance to liquid or moisture.
Do not expose the appliance to extreme high or low
temperatures.
Do not disassemble or open the appliance. Failure to comply
will void the warranty.
Do not use any accessories other than those approved by
Check Point. Failure to do so may result in loss of
performance, damage to the product, fire, electric shock or
injury, and will void the warranty.
Route power supply cords where they are not likely to be
walked on or pinched by items placed on or against them. Pay
particular attention to cords where they are attached to plugs
and convenience receptacles, and examine the point where
they exit the unit.
Do not connect or disconnect power supply cables and data
transmission lines during thunderstorms.
Do not overload wall outlets or extension cords, as this can
result in a risk of fire or electric shock. Overloaded AC outlets,
extension cords, frayed power cords, damaged or cracke d wire
insulation, and broken plugs are dangerous. They may result in
a shock or fire hazard. Periodically examine the cord, and if its
appearance indicates dama ge or deteriorated insulation, have it
replaced by your service techn ician.
If the unit or any part of it is damaged, disconnect the power
plug and inform the responsible service personnel. Nonobservance may result in damage to the router.
POWER ADAPTER
Operate this product only from the type of power source
indicated on the product’s marking label. If you are not sure of
the type of power supplied t o your home, consult your dealer
or local power company.
Use only the power supply provided with your product. Check
whether the device’s set supply voltage is the same as the local
supply voltage.
To reduce risk of damage to the unit, remove it from the outlet
by holding the power adapter rather than the cord.
SECURITY DISCLAIMER
The appliance provides your office network with the highest level of
security. However, no single security product can provide you with
absolute protection against a determined effort to break into your
system. We recommend using additional security measures to secure
highly valuable or sensitive information.
Page 5

Contents
Contents
About This Guide.................................................................................................................................xi
Introduction...........................................................................................................................................1
About Your D-Link NetDefend firewall.............................................................................................1
NetDefend Secured by Check Point Product Family..........................................................................2
NetDefend Features and Compatibility...............................................................................................2
Connectivity....................................................................................................................................2
Firewall...........................................................................................................................................3
VPN ................................................................................................................................................4
Management....................................................................................................................................4
Optional Security Services..............................................................................................................5
Power Pack Features.......................................................................................................................5
Package Contents............................................................................................................................6
Network Requirements ...................................................................................................................7
Getting to Know Your NetDefend firewall.........................................................................................8
Rear Panel.......................................................................................................................................8
Front Panel....................................................................................................................................10
Getting to Know Your NetDefend firewall.......................................................................................11
Rear Panel.....................................................................................................................................11
Front Panel....................................................................................................................................13
Contacting Technical Support...........................................................................................................14
Installing and Setting up the NetDefend firewall.............................................................................15
Before You Install the NetDefend firewall .......................................................................................15
Windows 2000/XP........................................................................................................................16
Windows 98/Millennium ..............................................................................................................21
Mac OS.........................................................................................................................................26
Mac OS-X.....................................................................................................................................28
Contents i
Page 6

Contents
Wall Mounting the Appliance...........................................................................................................30
Securing the Appliance against Theft...............................................................................................32
Network Installation..........................................................................................................................35
Setting Up the NetDefend firewall....................................................................................................36
Getting Started....................................................................................................................................39
Initial Login to the NetDefend Portal................................................................................................39
Logging on to the NetDefend Portal.................................................................................................42
Accessing the NetDefend Portal Remotely Using HTTPS...............................................................44
Using the NetDefend Portal..............................................................................................................46
Main Menu....................................................................................................................................47
Main Frame...................................................................................................................................48
Status Bar......................................................................................................................................48
Logging off .......................................................................................................................................51
Configuring the Internet Connection................................................................................................53
Overview...........................................................................................................................................53
Using the Internet Wizard.................................................................................................................54
Using a Direct LAN Connection...................................................................................................56
Using a Cable Modem Connection...............................................................................................58
Using a PPTP or PPPoE Dialer Connection..................................................................................59
Using PPPoE.................................................................................................................................60
Using PPTP...................................................................................................................................61
Using Internet Setup..........................................................................................................................63
Using a LAN Connection..............................................................................................................65
Using a Cable Modem Connection...............................................................................................67
Using a PPPoE Connection...........................................................................................................69
Using a PPTP Connection.............................................................................................................71
Using a Telstra (BPA) Connection ...............................................................................................73
ii D-Link NetDefend firewall User Guide
Page 7

Contents
Using a Dialup Connection...........................................................................................................75
Using No Connection....................................................................................................................77
Setting Up a Dialup Modem .............................................................................................................84
Viewing Internet Connection Information........................................................................................87
Enabling/Disabling the Internet Connection.....................................................................................88
Using Quick Internet Connection/Disconnection.............................................................................. 90
Configuring a Backup Internet Connection.......................................................................................90
Setting Up a LAN or Broadband Backup Connection..................................................................91
Setting Up a Dialup Backup Connection ......................................................................................92
Managing Your Network....................................................................................................................93
Configuring Network Settings ..........................................................................................................93
Configuring a DHCP Server.........................................................................................................94
Changing IP Addresses...............................................................................................................105
Enabling/Disabling Hide NAT....................................................................................................107
Configuring a DMZ Network......................................................................................................108
Configuring the OfficeMode Network........................................................................................110
Configuring VLANs ...................................................................................................................111
Configuring High Availability........................................................................................................119
Configuring High Availability on a Gateway.............................................................................122
Sample Implementation on Two Gateways.................................................................................126
Adding and Editing Network Objects.........................................................................................130
Viewing and Deleting Network Objects.....................................................................................138
Using Static Routes.........................................................................................................................139
Adding and Editing Static Routes...............................................................................................139
Viewing and Deleting Static Routes...........................................................................................144
Managing Ports...............................................................................................................................145
Viewing Port Statuses.................................................................................................................146
Contents iii
Page 8

Contents
Modifying Port Assignments......................................................................................................147
Modifying Link Configurations..................................................................................................149
Resetting Ports to Defaults..........................................................................................................150
Using Traffic Shaper.........................................................................................................................151
Overview.........................................................................................................................................151
Setting Up Traffic Shaper...............................................................................................................153
Predefined QoS Classes..................................................................................................................154
Adding and Editing Classes............................................................................................................155
Deleting Classes..............................................................................................................................159
Restoring Traffic Shaper Defaults...................................................................................................160
Configuring a Wireless Network .....................................................................................................161
Overview.........................................................................................................................................161
About the Wireless Hardware in Your NetDefend firewall............................................................162
Wireless Security Protocols ............................................................................................................163
Manually Configuring a WLAN.....................................................................................................165
Using the Wireless Configuration Wizard......................................................................................176
WPA-PSK...................................................................................................................................178
WEP............................................................................................................................................180
No Security .................................................................................................................................181
Preparing the Wireless Stations.......................................................................................................182
Troubleshooting Wireless Connectivity..........................................................................................183
Viewing Reports................................................................................................................................187
Viewing the Event Log...................................................................................................................187
Using the Traffic Monitor...............................................................................................................191
Viewing Traffic Reports .............................................................................................................191
Configuring Traffic Monitor Settings.........................................................................................193
Exporting General Traffic Reports..............................................................................................194
iv D-Link NetDefend firewall User Guide
Page 9

Contents
Viewing Computers ........................................................................................................................194
Viewing Connections......................................................................................................................197
Viewing Wireless Statistics.............................................................................................................198
Setting Your Security Policy............................................................................................................203
Default Security Policy...................................................................................................................203
Setting the Firewall Security Level.................................................................................................204
Configuring Servers........................................................................................................................207
Using Rules.....................................................................................................................................209
Adding and Editing Rules...........................................................................................................213
Enabling/Disabling Rules ...........................................................................................................218
Changing Rules' Priority.............................................................................................................219
Deleting Rules.............................................................................................................................219
Using SmartDefense .......................................................................................................................220
Configuring SmartDefense..........................................................................................................221
SmartDefense Categories............................................................................................................224
Using Secure HotSpot.....................................................................................................................256
Setting Up Secure HotSpot.........................................................................................................257
Enabling/Disabling Secure HotSpot............................................................................................258
Customizing Secure HotSpot......................................................................................................259
Defining an Exposed Host ..............................................................................................................261
Using VStream Antivirus .................................................................................................................263
Overview.........................................................................................................................................263
Enabling/Disabling VStream Antivirus...........................................................................................265
Viewing VStream Signature Database Information........................................................................266
Configuring VStream Antivirus......................................................................................................267
Configuring the VStream Antivirus Policy.................................................................................267
Configuring VStream Advanced Settings...................................................................................275
Contents v
Page 10

Contents
Updating VStream Antivirus...........................................................................................................279
Using Subscription Services.............................................................................................................281
Connecting to a Service Center.......................................................................................................281
Viewing Services Information ........................................................................................................287
Refreshing Your Service Center Connection..................................................................................288
Configuring Your Account .............................................................................................................288
Disconnecting from Your Service Center.......................................................................................289
Web Filtering ..................................................................................................................................290
Enabling/Disabling Web Filtering ..............................................................................................290
Selecting Categories for Blocking ..............................................................................................291
Temporarily Disabling Web Filtering.........................................................................................292
Automatic and Manual Updates......................................................................................................294
Checking for Software Updates when Remotely Managed........................................................294
Checking for Software Updates when Locally Managed ............................................................295
Working With VPNs.........................................................................................................................297
Overview.........................................................................................................................................297
Site-to-Site VPNs........................................................................................................................298
Remote Access VPNs.................................................................................................................301
Internal VPN Server....................................................................................................................302
Setting Up Your NetDefend firewall as a VPN Server...................................................................303
Configuring the Remote Access VPN Server.............................................................................305
Configuring the Internal VPN Server..........................................................................................306
Installing SecuRemote ................................................................................................................307
Adding and Editing VPN Sites .......................................................................................................308
Configuring a Remote Access VPN Site.....................................................................................311
Configuring a Site-to-Site VPN Gateway...................................................................................324
Deleting a VPN Site........................................................................................................................340
vi D-Link NetDefend firewall User Guide
Page 11

Contents
Enabling/Disabling a VPN Site.......................................................................................................340
Logging on to a Remote Access VPN Site......................................................................................341
Logging on through the NetDefend Portal..................................................................................342
Logging on through the my.vpn page.........................................................................................343
Logging off a Remote Access VPN Site.........................................................................................345
Installing a Certificate.....................................................................................................................345
Generating a Self-Signed Certificate...........................................................................................346
Importing a Certificate................................................................................................................350
Uninstalling a Certificate ................................................................................................................352
Viewing VPN Tunnels....................................................................................................................353
Viewing IKE Traces for VPN Connections....................................................................................356
Managing Users.................................................................................................................................359
Changing Your Password................................................................................................................359
Adding and Editing Users...............................................................................................................361
Adding Quick Guest HotSpot Users...............................................................................................365
Viewing and Deleting Users...........................................................................................................367
Setting Up Remote VPN Access for Users.....................................................................................367
Using RADIUS Authentication.......................................................................................................368
Configuring the RADIUS Vendor-Specific Attribute.....................................................................372
Maintenance......................................................................................................................................375
Viewing Firmware Status................................................................................................................375
Updating the Firmware ...................................................................................................................377
Upgrading Your Software Product..................................................................................................379
Registering Your NetDefend firewall.............................................................................................383
Configuring Syslog Logging...........................................................................................................384
Controlling the Appliance via the Command Line..........................................................................386
Using the NetDefend Portal........................................................................................................386
Contents vii
Page 12

Contents
Using the Serial Console.............................................................................................................388
Configuring HTTPS........................................................................................................................390
Configuring SSH.............................................................................................................................392
Configuring SNMP.........................................................................................................................394
Setting the Time on the Appliance..................................................................................................397
Using Diagnostic Tools...................................................................................................................401
Using IP Tools ............................................................................................................................402
Using Packet Sniffer...................................................................................................................404
Filter String Syntax.....................................................................................................................407
Backing Up the NetDefend firewall Configuration.........................................................................415
Exporting the NetDefend firewall Configuration........................................................................415
Importing the NetDefend firewall Configuration........................................................................416
Resetting the NetDefend firewall to Defaults.................................................................................418
Running Diagnostics....................................................................................................................... 421
Rebooting the NetDefend firewall..................................................................................................422
Using Network Printers....................................................................................................................423
Overview.........................................................................................................................................423
Setting Up Network Printers...........................................................................................................424
Configuring Computers to Use Network Printers...........................................................................425
Windows 2000/XP......................................................................................................................425
MAC OS-X.................................................................................................................................431
Viewing Network Printers...............................................................................................................435
Changing Network Printer Ports.....................................................................................................435
Resetting Network Printers.............................................................................................................436
Troubleshooting................................................................................................................................437
Connectivity....................................................................................................................................438
Service Center and Upgrades..........................................................................................................442
viii D-Link NetDefend firewall User Guide
Page 13

Contents
Other Problems ...............................................................................................................................443
Specifications.....................................................................................................................................445
Technical Specifications .................................................................................................................445
CE Declaration of Conformity........................................................................................................449
Federal Communications Commission Radio Frequency Interference Statement..........................451
Glossary of Terms.............................................................................................................................453
Index...................................................................................................................................................461
Contents ix
Page 14

Page 15
About Your D-Link NetDefend firewall
About This Guide
To make finding information in this manual easier, some types of information are
marked with special symbols or formatting.
Boldface type is used for command and button names.
Note: Notes are denoted by indented text and preceded by the Note icon.
Each task is marked with an ic
Warning: Warnings are denoted by indented text and preceded by the Warning icon.
on indicating the NetDefend product required to
perform the task, as follows:
If this icon appears... You can perform the task using these products...
DFL-CP310 or DFL-CPG310, with or without the Power Pack
DFL-CPG310
only, with or without the Power Pack
DFL-CP310 or DFL-CPG310, with the Power Pack
only
Chapter 1: About This Guide xi
Page 16

Page 17

About Your D-Link NetDefend firewall
Chapter 1
This chapter introduces the D-Link NetDefend firewall and this guide.
Introduction
This chapter includes the following topics:
About Your D-Link NetDefend firewall ......................................................1
NetDefend Secured by Check Point Product Family....................................2
NetDefend Features and Compatibility ........................................................2
Getting to Know Your NetDefend firewall..................................................8
Getting to Know Your NetDefend firewall................................................11
Contacting Technical Support....................................................................14
About Your D-Link NetDefend firewall
The D-Link NetDefend firewall is a unified threat management (UTM) appliance
that enables secure high-speed Internet access from the office. Incorporating
software by SofaWare Technologies, an affiliate of Check Point Software
Technologies, the worldwide leader in securing the Internet, the NetDefend
Secured by Check Point Product Family includes both wired and wireless models.
The D-Link firewall, based on the world-leading Check Point Embedded NGX
Stateful Inspection technology, inspects and filters all incoming and outgoing
traffic, blocking all unauthorized traffic.
The NetDefend firewall also allows sharing your Internet connection among
several PCs or other network devices, enabling advanced office networking and
saving the cost of purchasing static IP addresses.
With the NetDefend firewall, you can subscribe to additional security services
available from select service providers, including firewall security and software
updates, Antivirus, Web Filtering, reporting, and VPN management. By supporting
integrated VPN capabilities, the NetDefend firewall allows teleworkers and road
warriors to securely connect to the office network, and enables secure
interconnection of branch offices.
Chapter 1: Introduction 1
Page 18

NetDefend Secured by Check Point Product Family
NetDefend Secured by Check Point Product Family
The NetDefend series includes the following hardware models:
• DFL-CP310 Security VPN Firewall
• DFL-CPG310 Wireless Security VPN Firewall
You can upgrade your NetDefend firewall to include additional features without
replacing the hardware by installing the DFL-CP310 Power Pack, and you can
increase the number of licensed users by installing node upgrades. Contact your
reseller for more details.
NetDefend Features and Compatibility
Connectivity
The NetDefend series includes the following features:
• LAN ports: 4-ports 10/100 Mbps Fast Ethernet switch
• WAN port: 10/100 Mbps Fast Ethernet
• DMZ/WAN2 Port: 10/100 Mbps Fast Ethernet
• Serial (RS232) port for console access and dialup modem connection
• Supported Internet connection methods: Static IP, DHCP Client, Cable
Modem, PPTP Client, PPPoE Client, Telstra BPA login, Dialup
• Concurrent firewall connections: 8,000
• DHCP server, client, and relay
• MAC cloning
2 D-Link NetDefend firewall User Guide
Page 19

NetDefend Features and Compatibility
• Static NAT
• Static routes and source routes
• Ethernet cable type recognition
• Backup Internet connection
• Dead Internet Connection Detection (DCD)
• Traffic Monitoring
• Traffic Shaping
• VLAN Support (requires Power Pack)
• Dynamic Routing (requires Power Pack)
The NetDefend DFL-CPG310 firewall includes the following additional features:
• Wireless LAN interface with dual diversity antennas supporting up to 108
Mbps (Super G) and Extended Range (XR)
• Integrated USB print server
• Wireless QoS (WMM)
Firewall
The NetDefend series includes the following features:
• Check Point Firewall-1 Embedded NGX firewall with Application
Intelligence
• Intrusion Detection and Prevention using Check Point SmartDefense
• Network Address Translation (NAT)
• Three preset security policies
• Anti-spoofing
• Voice over IP (H.323) support
• Instant messenger blocking/monitoring
Chapter 1: Introduction 3
Page 20

NetDefend Features and Compatibility
• P2P file sharing blocking/monitoring
VPN
The NetDefend series includes the following features:
• Remote Access VPN Server with OfficeMode and RADIUS support
• Remote Access VPN Client
• Site to Site VPN Gateway
• IPSEC VPN pass-through
• Algorithms: AES/3DES/DES, SHA1/MD5
• Hardware Based Secure RNG (Random Number Generator)
• IPSec NAT traversal (NAT-T)
• Route-based VPN
• Backup VPN gateways
Management
The NetDefend series includes the following features:
• Management via HTTP, HTTPS, SSH, SNMP, Serial CLI
• Central Management: SMP
• NTP automatic time setting
• TFTP Rapid Deployment
• Local diagnostics tools: Ping, WHOIS, Packet Sniffer, VPN Tunnel
Monitor, Connection Table Monitor, Wireless Monitor, Active Computers
Display, Local Logs
4 D-Link NetDefend firewall User Guide
Page 21

NetDefend Features and Compatibility
Optional Security Services
The following subscription security services are available to NetDefend owners by
connecting to a Service Center:
• Firewall Security and Software Updates
• Web Filtering
• Email Antivirus and Antispam Protection
• VStream Embedded Antivirus Updates
• VPN Management
• Security Reporting
• Vulnerability Scanning Service
Power Pack Features
The table below describes the differences between the standard DFL-CP310 and
DFL-CPG310 with the Power Pack installed.
Feature DFL-CP310/CPG310
DFL-CP310/CPG310 with
Power Pack
High Availability —
Traffic Shaper Basic Advanced
DiffServ Tagging —
Dynamic Routing —
Firewall/VPN Throughput
(Mbps)
100/20 150/30
Secure Hotspot —
Chapter 1: Introduction 5
Page 22

NetDefend Features and Compatibility
Feature DFL-CP310/CPG310
DFL-CP310/CPG310 with
Power Pack
VLAN (Port/Tag-based) —
VPN Throughput 20 Mbps 30 Mbps
Site-to-Site VPN 2 tunnels 15 tunnels
Site-to-Site VPN
(Managed) *
10 tunnels 100 tunnels
Included VPN-1
SecuRemote client
Licenses
5 users 25 users
* When managed by SofaWare Security Management Portal (SMP).
Package Contents
The NetDefend series package includes the following:
• D-Link NetDefend firewall VPN Firewall
• Power adapter
• CAT5 Straight-through Ethernet cable
• Getting Started Guide
• This User Guide
6 D-Link NetDefend firewall User Guide
Page 23

NetDefend Features and Compatibility
The DFL-CPG310 also includes:
• Two antennas
• Wall mounting kit, including two plastic conical anchors and two cross-
head screws
• USB extension cable
Network Requirements
• A broadband Internet connection via cable or DSL modem with Ethernet
interface (RJ-45)
• 10BaseT or 100BaseT Network Interface Card installed on each computer
• TCP/IP network protocol installed on each computer
• Internet Explorer 5.0 or higher, or Netscape Navigator 4.7 and higher
• CAT 5 STP (Category 5 Shielded Twisted Pair) Straight Through Ethernet
cable for each attached device
Note: The NetDefend firewall automatically detects cable types, so you can use
either a straight-through or crossed cable, when cascading an additi onal hub or
switch to the NetDefend firewall.
Note: For optimal results, it is highly recommended to use either Microsoft Internet
Explorer 5.5 or higher, or Mozilla Firefox 1.0 or higher.
• When using the DFL-CPG310, an 802.11b, 802.11g or 802.11 Super G
wireless card installed on each wireless station
Chapter 1: Introduction 7
Page 24
Getting to Know Your NetDefend firewall
Getting to Know Your NetDefend firewall
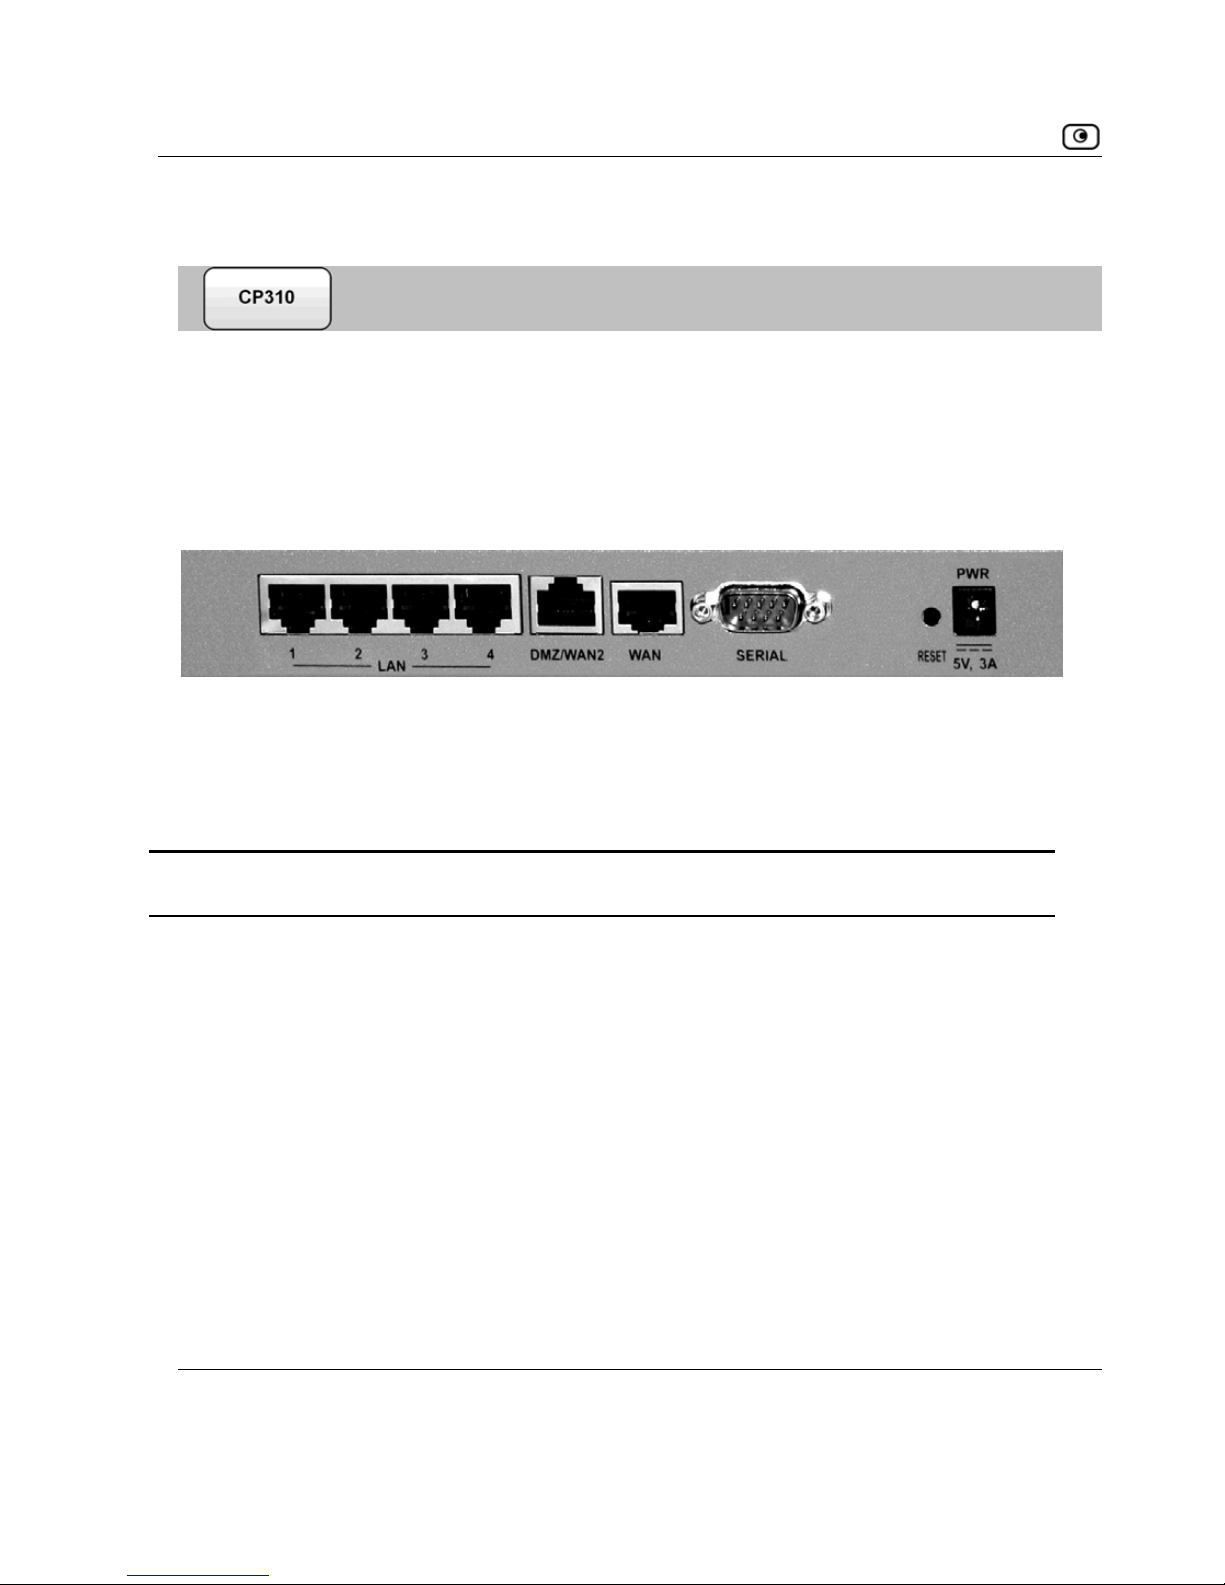
Rear Panel
All physical connections (network and power) to the NetDefend firewall are made
via the rear panel of your NetDefend firewall.
Figure 1: NetDefend firewall Rear Panel Items
Figure 2: NetDefend firewall Rear Panel Items
The following table lists the NetDefend firewall 's rear panel elements.
Table 1: NetDefend firewall Rear Panel Elements
Label Description
PWR A power jack used for supplying power to the unit. Connect the supplied power
adapter to this jack.
8 D-Link NetDefend firewall User Guide
Page 25

Getting to Know Your NetDefend firewall
Label Description
RESET A button used for rebooting the NetDefend firewall or resetting the NetDefend
firewall to its factory defaults. You need to use a pointed object to press this
button.
•
Short press. Reboots the NetDefend firewall
•
Long press (7 seconds). Resets the NetDefend firewall to its factory
defaults, and resets your firmware to the version that shipped with the
NetDefend firewall. This results in the loss of all security services and
passwords and reverting to the factory default firmware. You will have
to re-configure your NetDefend firewall.
Do not reset the unit without consulting your system administrator.
RS-232 /
Serial
A serial port used for connecting computers in order to access the NetDefend CLI
(Command Line Interface), or for connecting an external dialup modem
WAN Wide Area Network: An Ethernet port (RJ-45) used for connecting your cable or
xDSL modem, or for connecting a hub when setting up more than one Internet
connection
DMZ/
WAN2
A dedicated Ethernet port (RJ-45) used to connect a DMZ (Demilitarized Zone)
computer or network. Alternatively, can serve as a secondary WAN port, or as a
VLAN trunk.
LAN 1-4 Local Area Network switch: Four Ethernet ports (RJ-45) used for connecting
computers or other network devices
Chapter 1: Introduction 9
Page 26

Getting to Know Your NetDefend firewall
Front Panel
The NetDefend firewall includes several status LEDs that enable you to monitor
the appliance’s operation.
Figure 3: NetDefend firewall Front Panel
For an explanation of the NetDefend firewall’s status LEDs, see the table below.
Table 2: NetDefend firewall Status LEDs
LED State Explanation
PWR/SEC Off Power off
Flashing quickly (Green) System boot-up
Flashing slowly (Green) Establishing Internet connection
On (Green) Normal operation
Flashing (Red) Hacker attack blocked
On (Red) Error
LAN 1-4/
WAN/
DMZ/WAN2
LINK/ACT Off, 100 Off
Link is down
LINK/ACT On, 100 Off
10 Mbps link established for the
corresponding port
10 D-Link NetDefend firewall User Guide
Page 27
Getting to Know Your NetDefend firewall
LED State Explanation
LINK/ACT On, 100 On
100 Mbps link established for the
corresponding port
LNK/ACT Flashing
Data is being transmitted/received
VPN Flashing (Green) VPN port in use
Serial Flashing (Green) Serial port in use
Getting to Know Your NetDefend firewall
R
to the NetDefend firewall are made
via the rear panel of your NetDefend firewall.
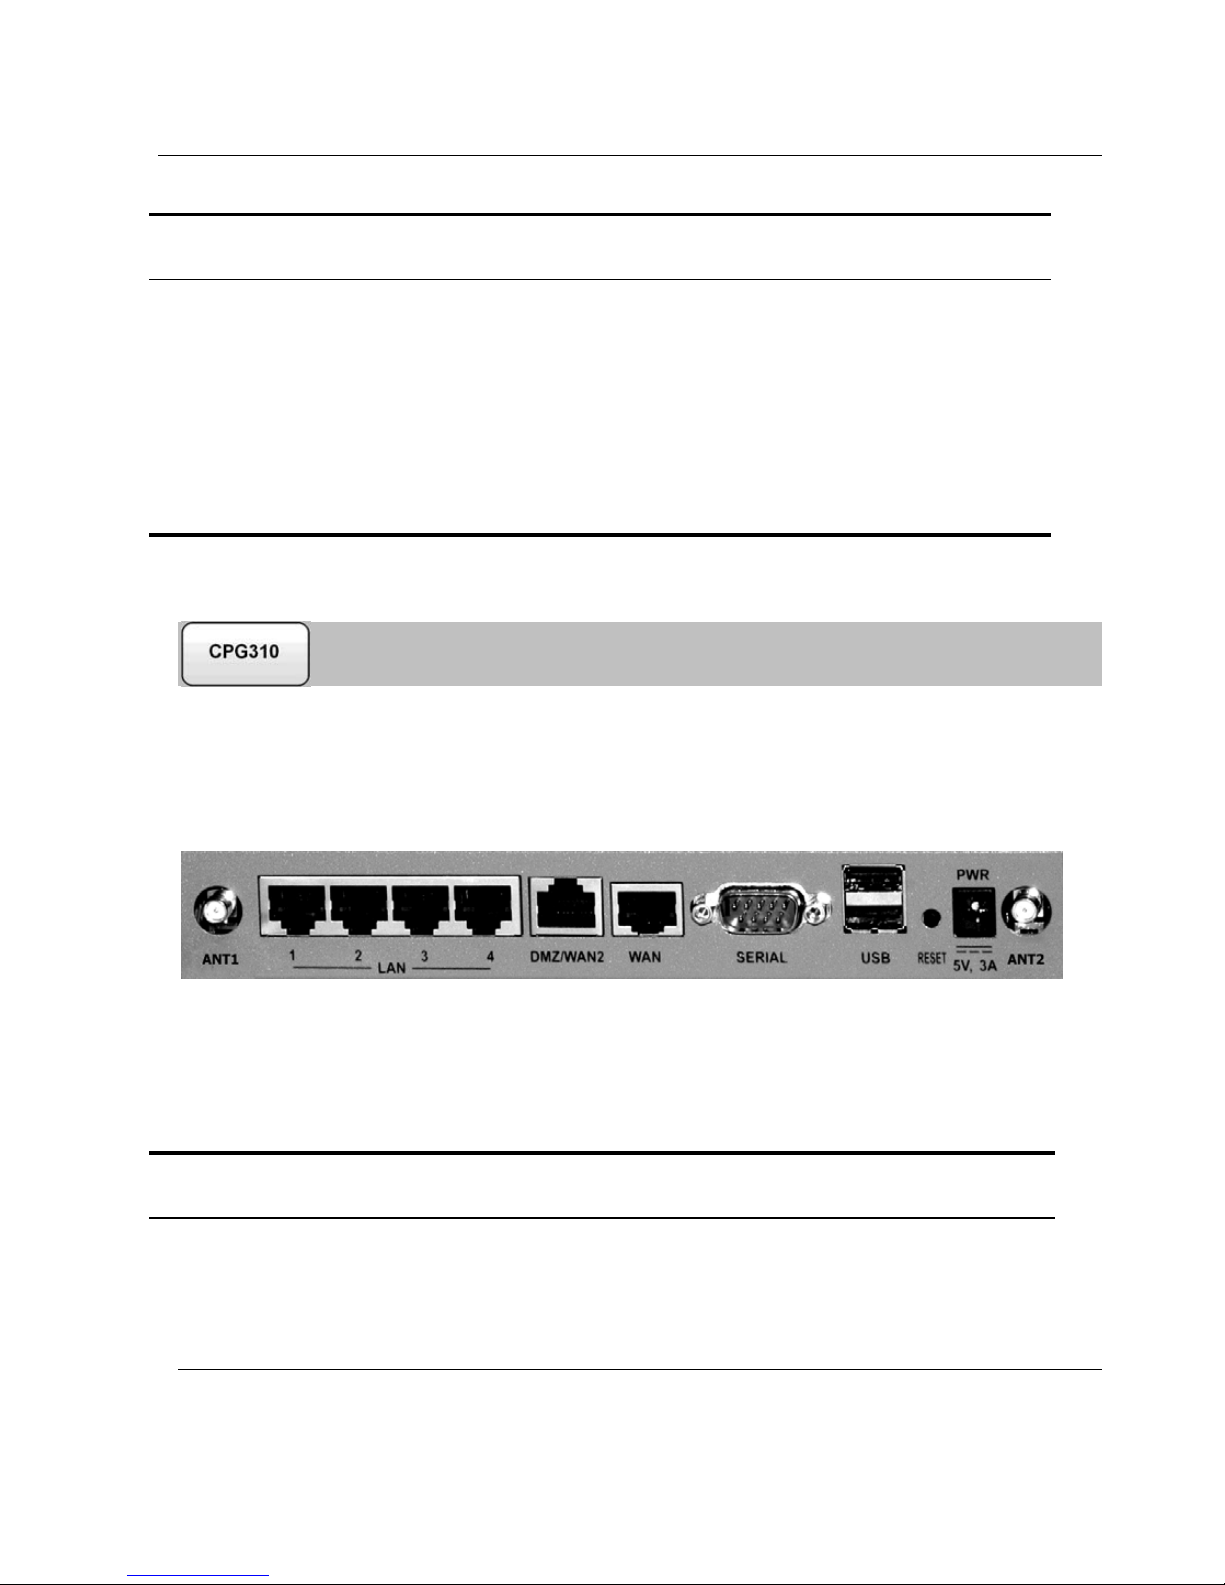
ear Panel
All physical connections (network and power)
Figure 4: NetDefend firewall Rear Panel Items
The following table lists the NetDefend firewall appliance's rear panel elements.
Table 3: NetDefend firewall Rear Panel Elements
Label Description
PWR r supplying power to the unit. Connect the supplied power
adapter to this jack.
A power jack used fo
Chapter 1: Introduction 11
Page 28

Getting to Know Your NetDefend firewall
Label Description
RESET A button used for rebooting the NetDefend firewall or resetting the NetDefend
firewall to its factory defaults. You need to use a pointed object to press this
button.
•
Short press. Reboots the NetDefend firewall
•
Long press (7 seconds). Resets the NetDefend firewall to its factory
default, and resets your firmware to the version that shipped with the
NetDefend firewall. This results in the loss of all security services and
passwords and reverting to the factory default firmware. You will have
to re-configure your NetDefend firewall.
Do not reset the unit without consulting your system administrator.
USB Two USB 2.0 ports used for connecting USB-based printers
RS232 A serial (RS-232) port used for connecting computers in order to access the
NetDefend CLI (Command Line Interface), or for connecting an external dialup
modem
WAN Wide Area Network: An Ethernet port (RJ-45) used for connecting your cable or
xDSL modem, or for connecting a hub when setting up more than one Internet
connection
DMZ/
WAN2
A dedicated Ethernet port (RJ-45) used to connect a DMZ (Demilitarized Zone)
computer or network. Alternatively, can serve as a secondary WAN port , or as a
VLAN trunk.
LAN 1-4 Local Area Network switch: Four Ethernet ports (RJ-45) used for connecting
computers or other network devices
ANT 1/
ANT 2
Antenna connectors, used to connect the supplied wireless antennas
12 D-Link NetDefend firewall User Guide
Page 29
Getting to Know Your NetDefend firewall
Front Panel
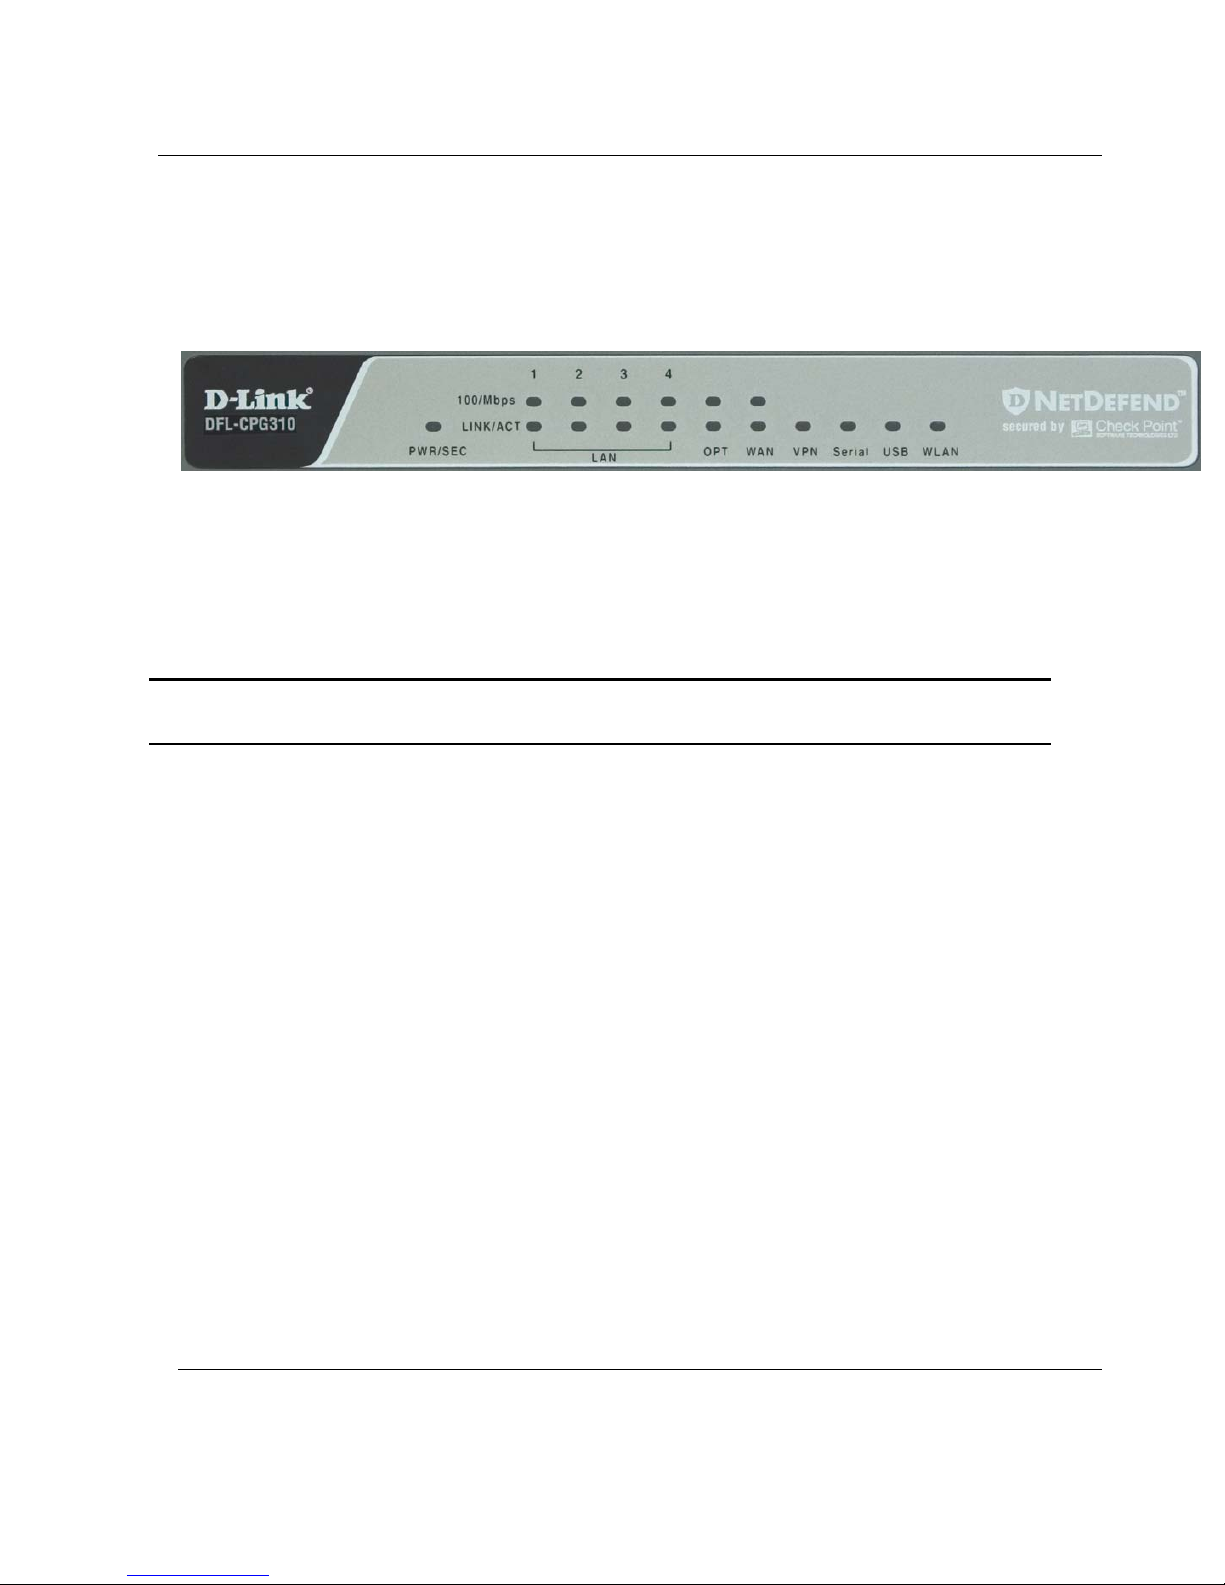
The NetDefend firewall appliance includes several status LEDs that enable you to
monitor the appliance’s operation.
Figure 5: NetDefend firewall Front Panel
For an explanation of the NetDefend firewall appliance’s status LEDs, see the table
below.
Table 4: NetDefend firewall Status LEDs
LED State Explanation
PWR/SEC Off Power off
Flashing quickly (Green) System boot-up
Flashing slowly (Green) Establishing Internet connection
On (Green) Normal operation
Flashing (Red) Hacker attack blocked
On (Red) Error
Flashing (Orange) Software update in progress
LAN 1-4/
WAN/
DMZ/WAN2
LINK/ACT Off, 100 Off
Link is down
LINK/ACT On, 100 Off
10 Mbps link established for the
corresponding port
Chapter 1: Introduction 13
Page 30

Contacting Technical Support
LED State Explanation
LINK/ACT On, 100 On
100 Mbps link established for the
corresponding port
LNK/ACT Flashing
Data is being transmitted/received
VPN Flashing (Green) VPN port in use
Serial Flashing (Green) Serial port in use
USB Flashing (Green) USB port in use
WLAN Flashing (Green) WLAN in use
Contacting Technical Support
If there is a problem with your NetDefend firewall, see http://support.dlink.com/.
You can also download the latest version of this guide from the site.
14 D-Link NetDefend firewall User Guide
Page 31

Before You Install the NetDefend firewall
Chapter 2
This chapter describes how to properly set up and install your NetDefend firewall
in your networking environment.
Installing and Setting up the NetDefend
firewall
This chapter includes the following topics:
Before You Install the NetDefend firewall.................................................15
Wall Mounting the Appliance ....................................................................30
Securing the Appliance against Theft.........................................................32
Network Installation...................................................................................35
Setting Up the NetDefend firewall.............................................................36
Before You Install the NetDefend firewall
Prior to connecting and setting up your NetDefend firewall for operation, you must
do the following:
• Check if TCP/IP Protocol is installed on your computer.
• Check your computer’s TCP/IP settings to make sure it obtains its IP
address automatically.
Refer to the relevant section in this guide in accordance with the operating system
that runs on your computer. The sections below will guide you through the TCP/IP
setup and installation process.
Chapter 2: Installing and Setting up the NetDefend firewall 15
Page 32
Before You Install the NetDefend firewall
Windows 2000/XP
Note: While Windows XP has an "Internet Connection Firewall" option, it is
recommended to disable it if you are using a NetDefend firewall, since the
NetDefend firewall offers better protection.
Checking the TCP/IP Installation
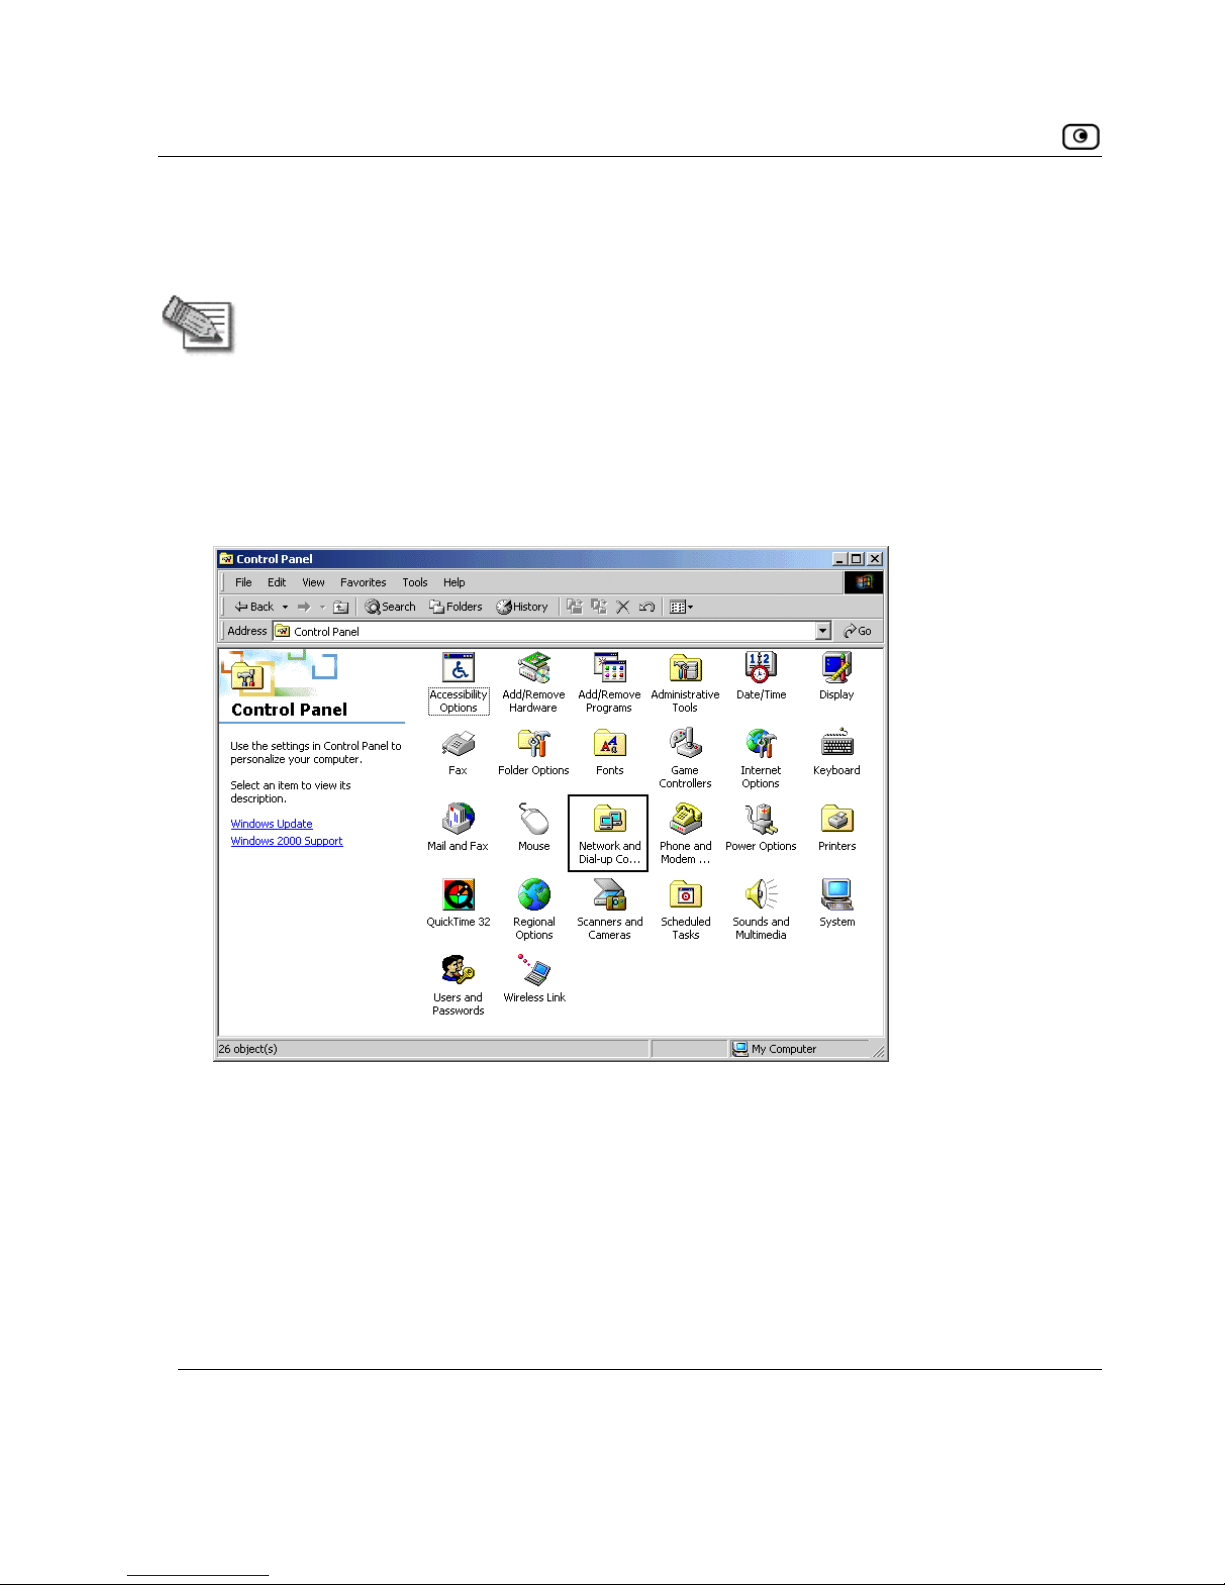
1. Click Start > Settings > Control Panel.
The
Control Panel window appears.
2. Double-click the
Network and Dial-up Connections icon.
16 D-Link NetDefend firewall User Guide
Page 33
Before You Install the NetDefend firewall
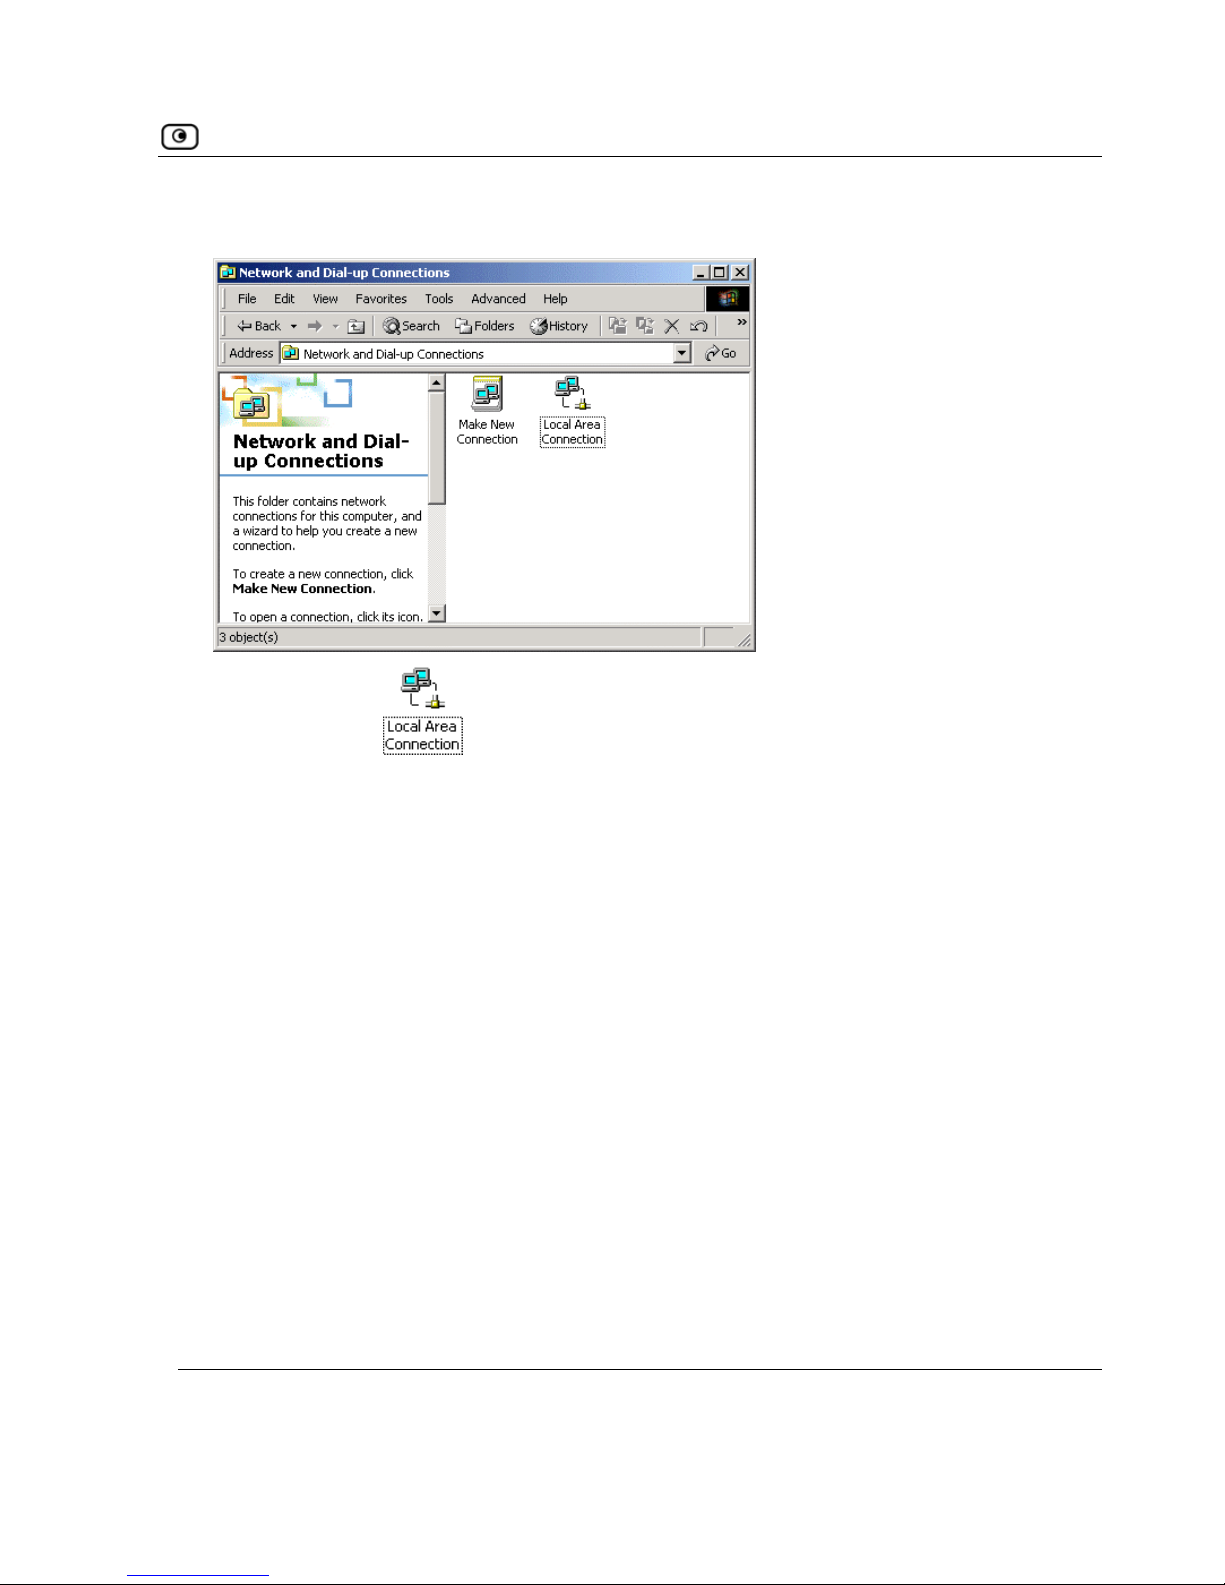
The Network and Dial-up Connections window appears.
3. Right-click the
icon and select Properties from the pop-up menu that
opens.
Chapter 2: Installing and Setting up the NetDefend firewall 17
Page 34
Before You Install the NetDefend firewall
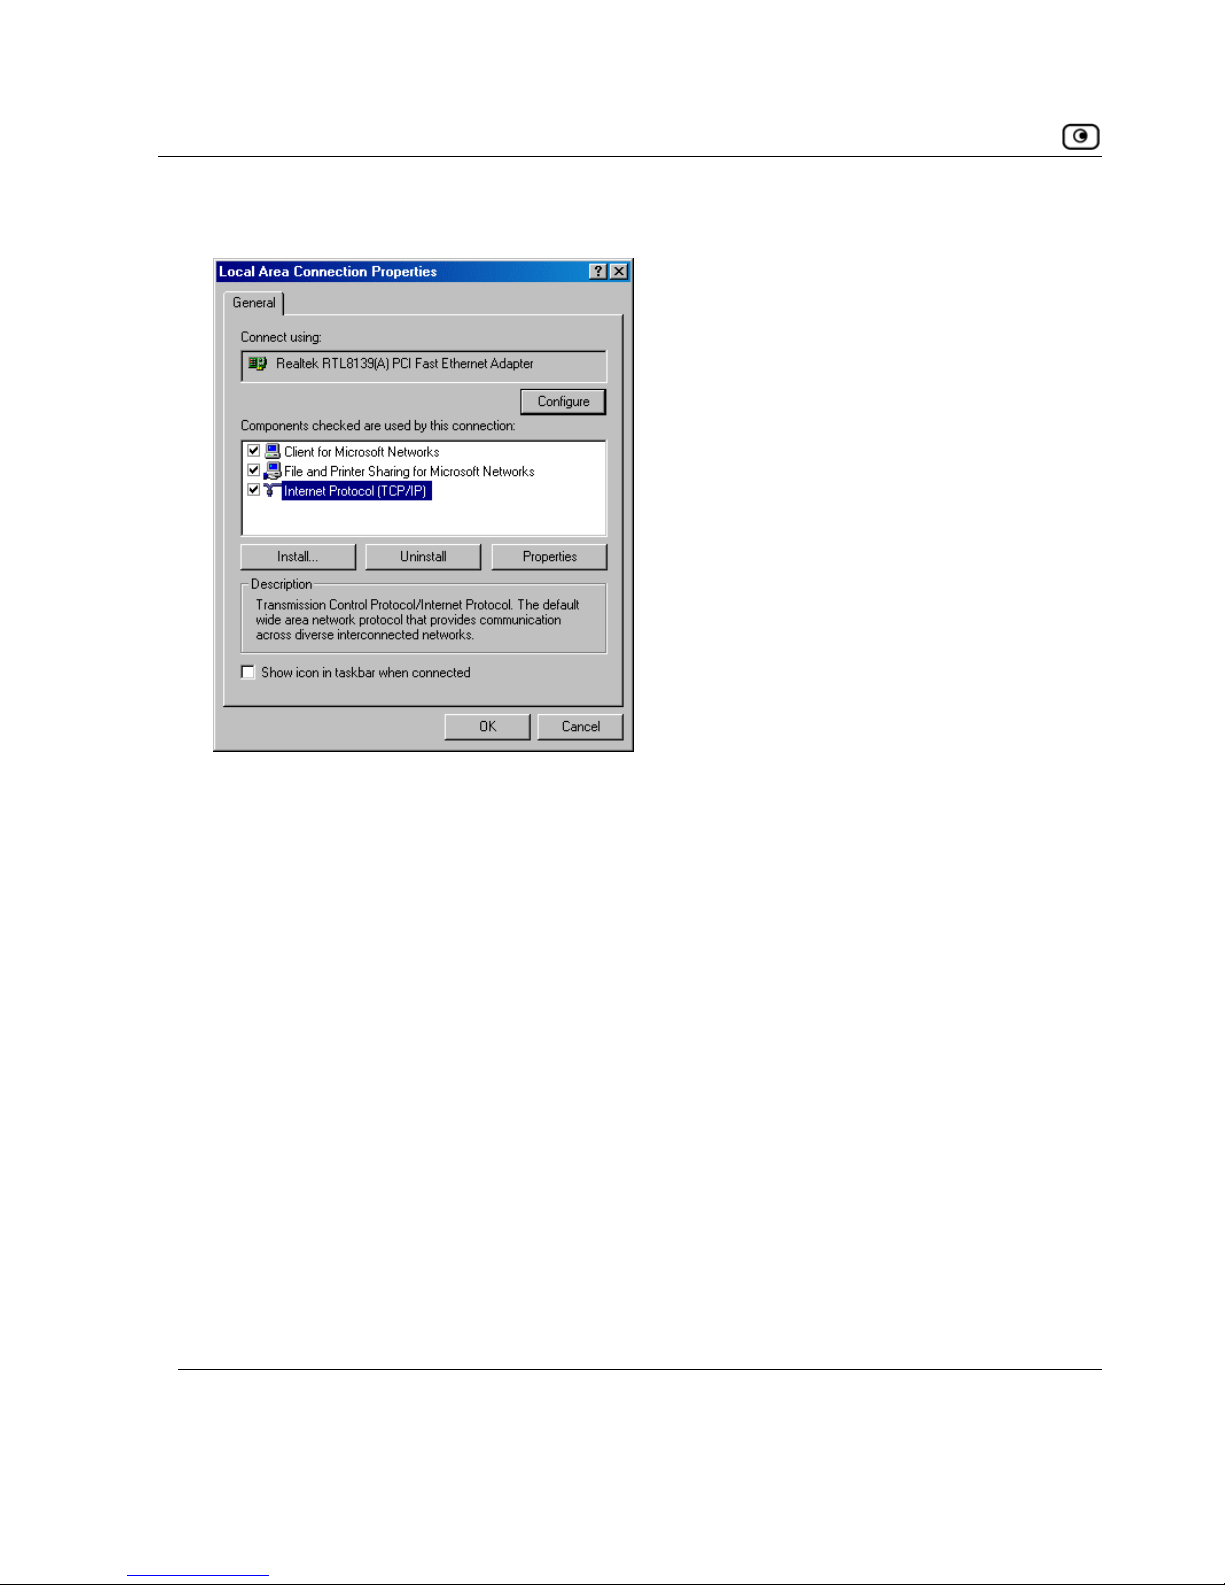
The Local Area Connection Properties window appears.
4.
n the components list and if it is
properly configured with the Ethernet card, installed on your computer. If
ou must install it as described in
In the above window, check if
TCP/IP appears i
TCP/IP does not appear in the Components list, y
the next section.
18 D-Link NetDefend firewall User Guide
Page 35
Before You Install the NetDefend firewall
Installing TCP/IP Protocol
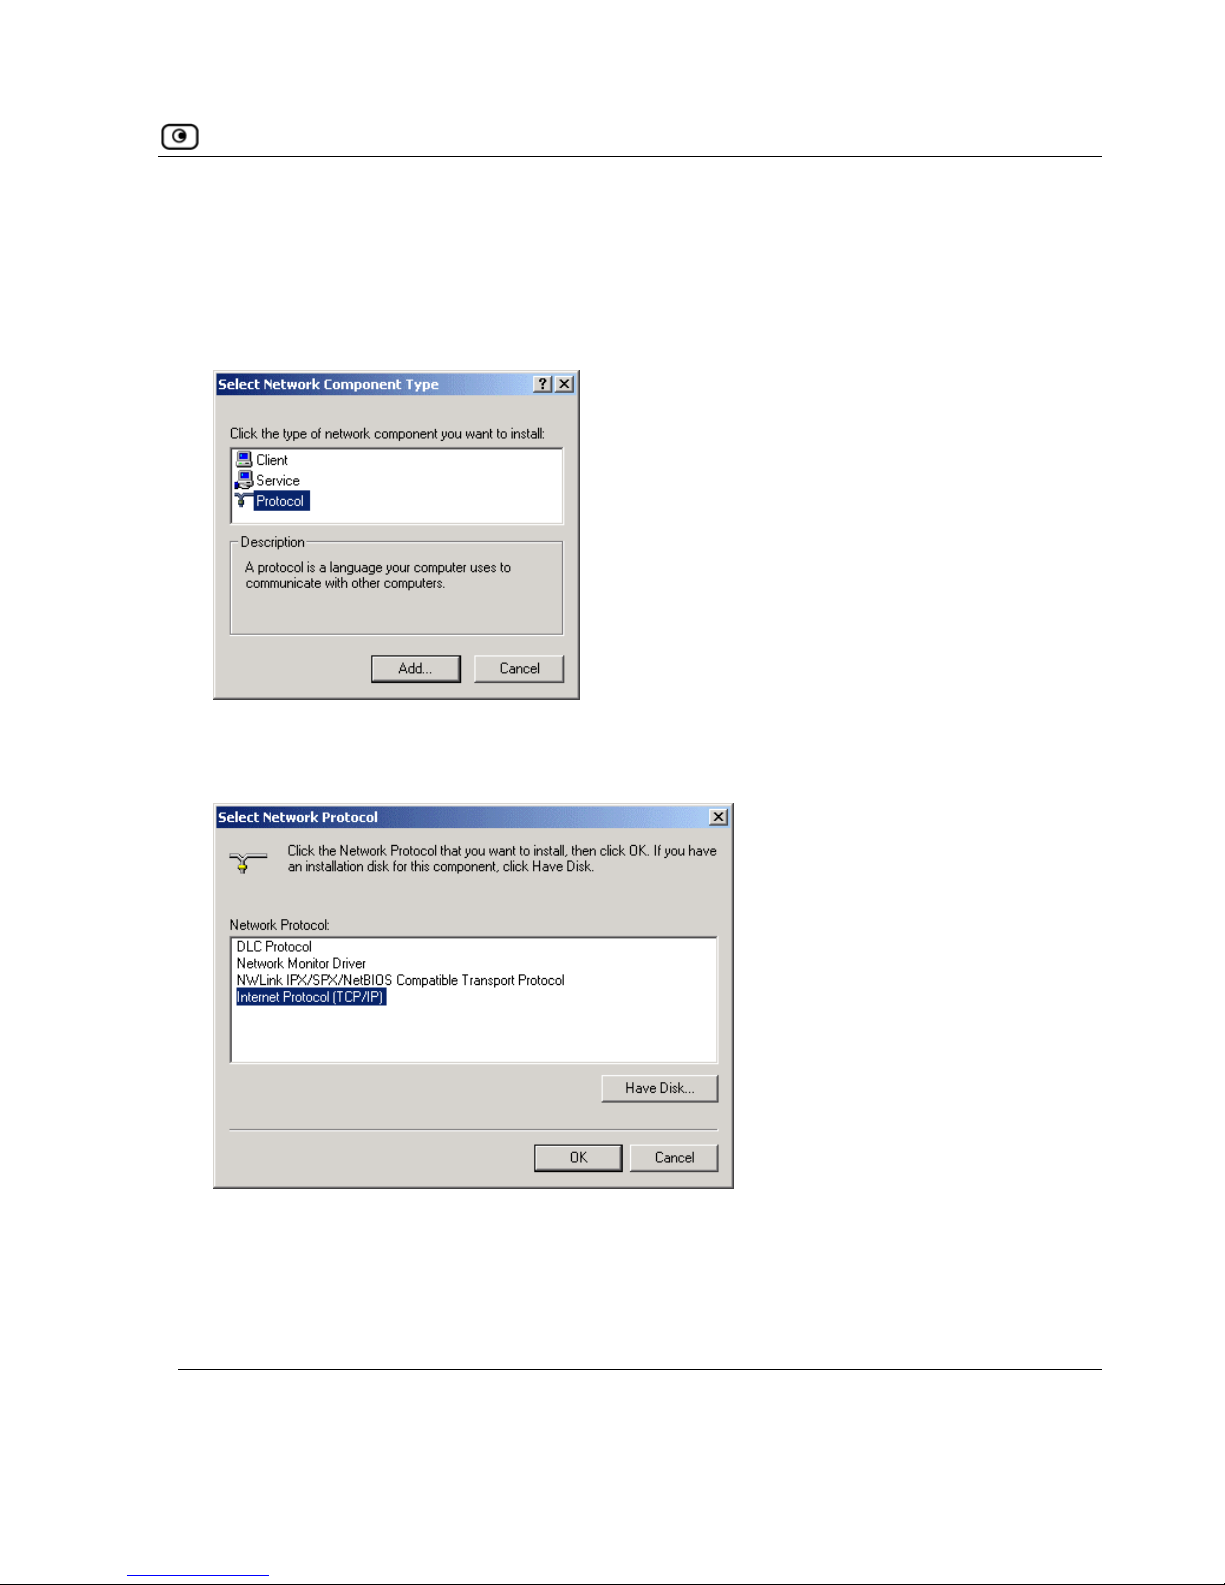
1. In the Local Area Connection Properties window click Install….
The
Select Network Component Type window appears.
2. Choose
Protocol and click Add.
The
Select Network Protocol window appears.
3. Choose
Internet Protocol (TCP/IP) and click OK.
TCP/IP protocol is installed on your computer.
Chapter 2: Installing and Setting up the NetDefend firewall 19
Page 36
Before You Install the NetDefend firewall
TCP/IP Settings
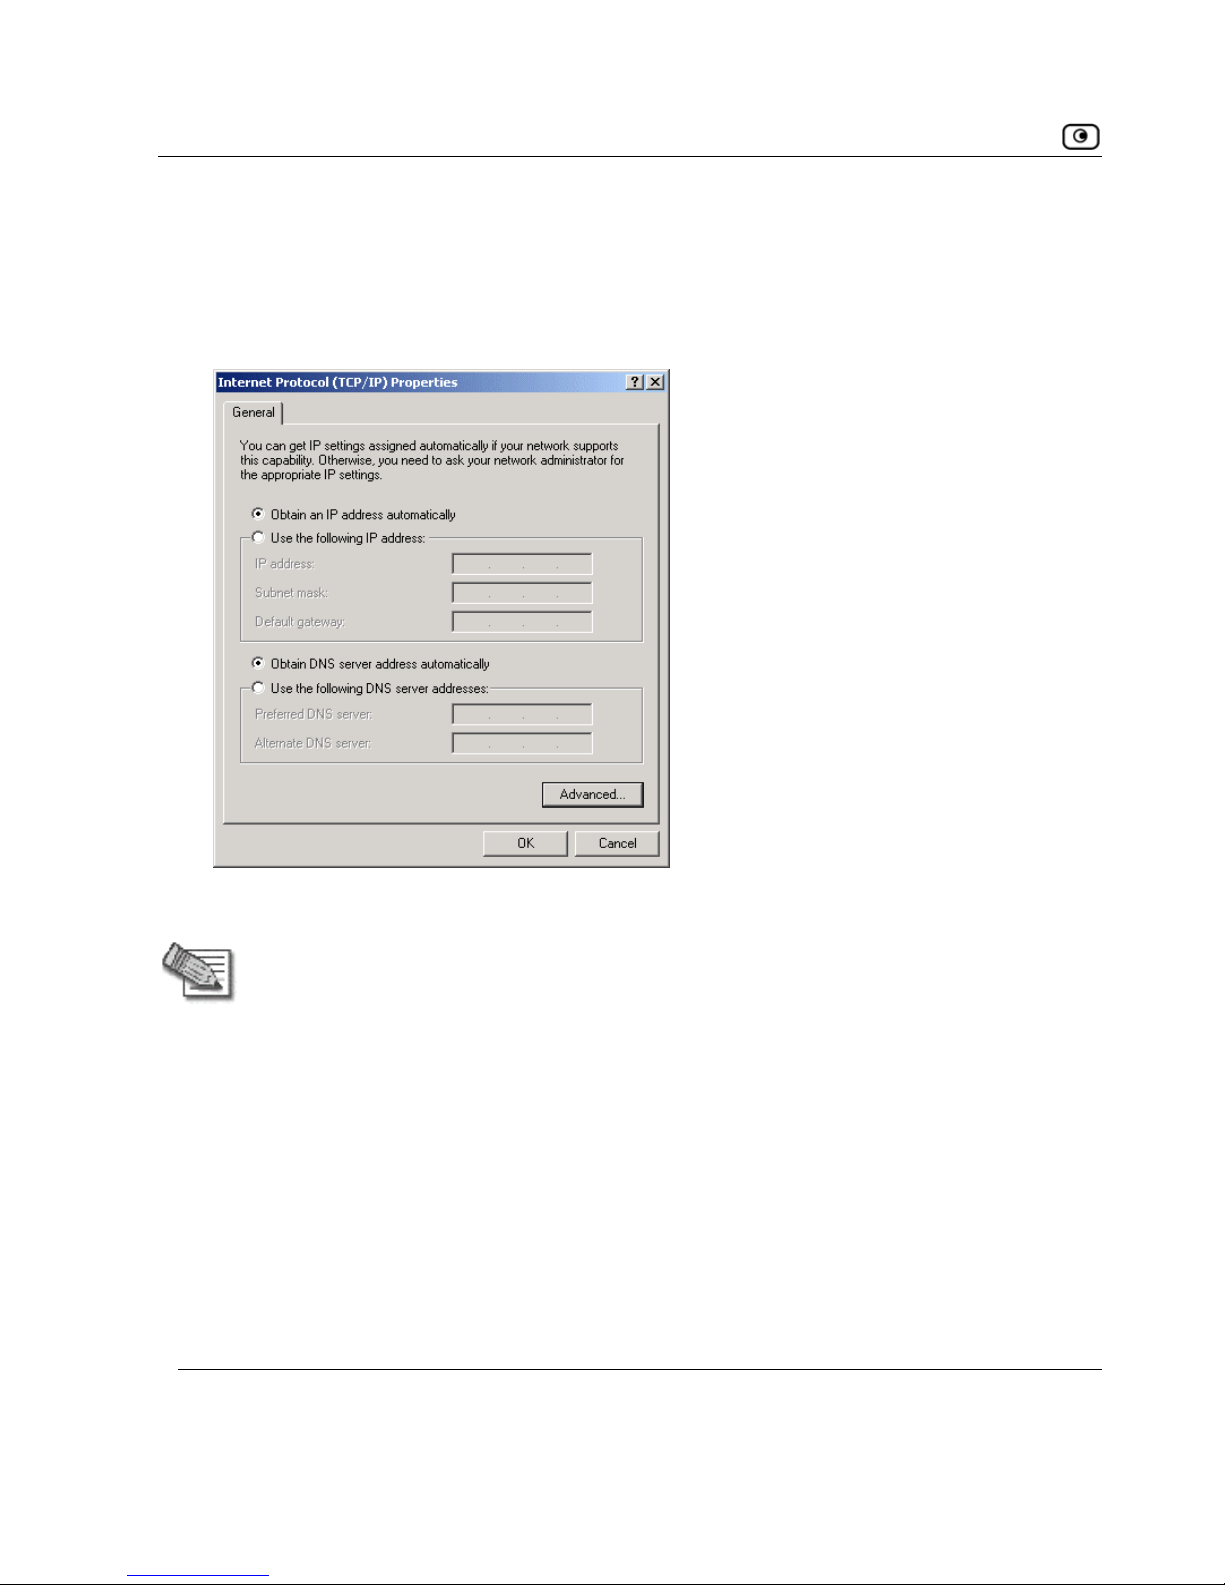
1. In the Local Area Connection Properties window double-click the Internet
ct it and click Properties.
window opens.
Protocol (TCP/IP)
component, or sele
The Internet Protocol (TCP/IP) Properties
2. Click the
Obtain an IP address automatically radio button.
Note: Normally, it is not recommended to assign a static IP address to your PC but
rather to obtain an IP address automatically. If for some reason you need to assign
a static IP address, select
Specify an IP address, type in an IP address in the range of
192.168.10.129-254, enter 255.255.255.0 in the Subnet Mask field, and click OK to
save the new settings.
(Note that 192.168.10 is the default value, and it may vary if you changed it in the
My Network page.)
3. Click the Obtain DNS server address automatically radio button.
4. Click
OK to save the new settings.
Your computer is now ready to access your NetDefend firewall.
20 D-Link NetDefend firewall User Guide
Page 37
Before You Install the NetDefend firewall
Win
Checking the TCP/IP Installation
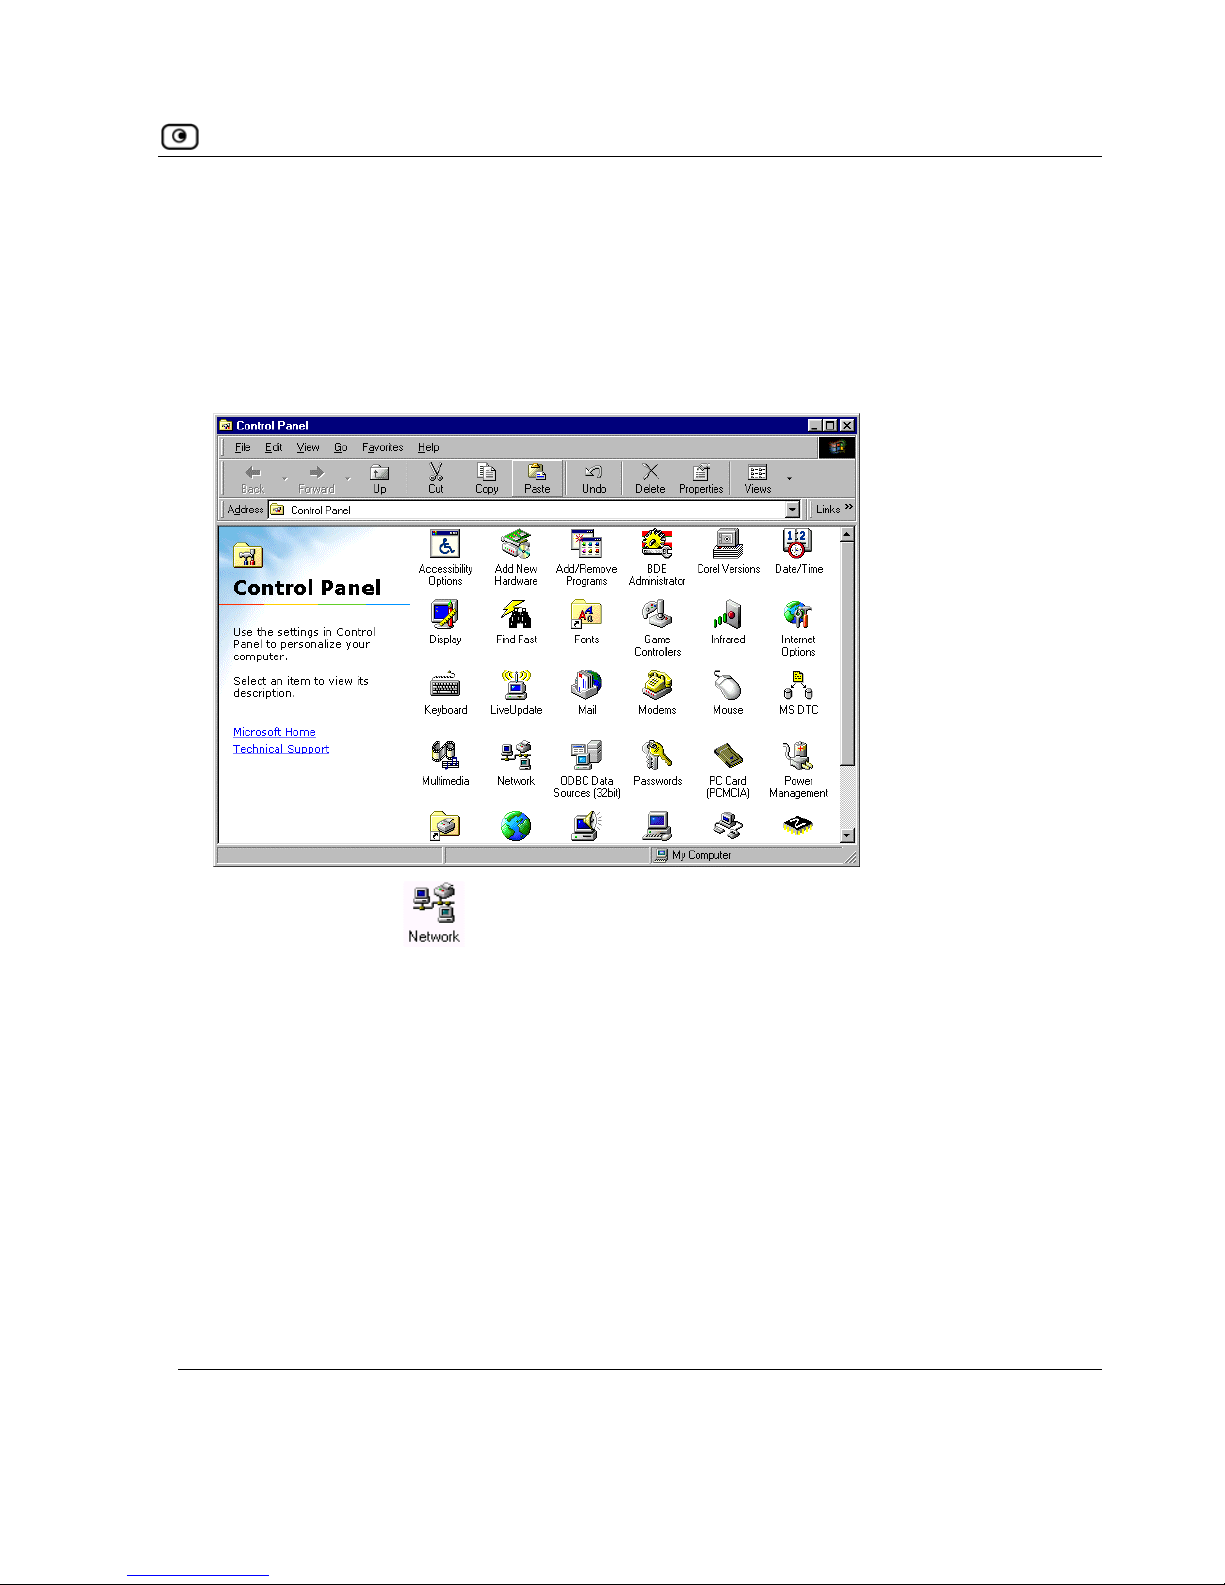
1. Click Start > Settings > Control Panel.
The
Control Panel window appears.
dows 98/Millennium
2. Double-click the
icon.
Chapter 2: Installing and Setting up the NetDefend firewall 21
Page 38
Before You Install the NetDefend firewall
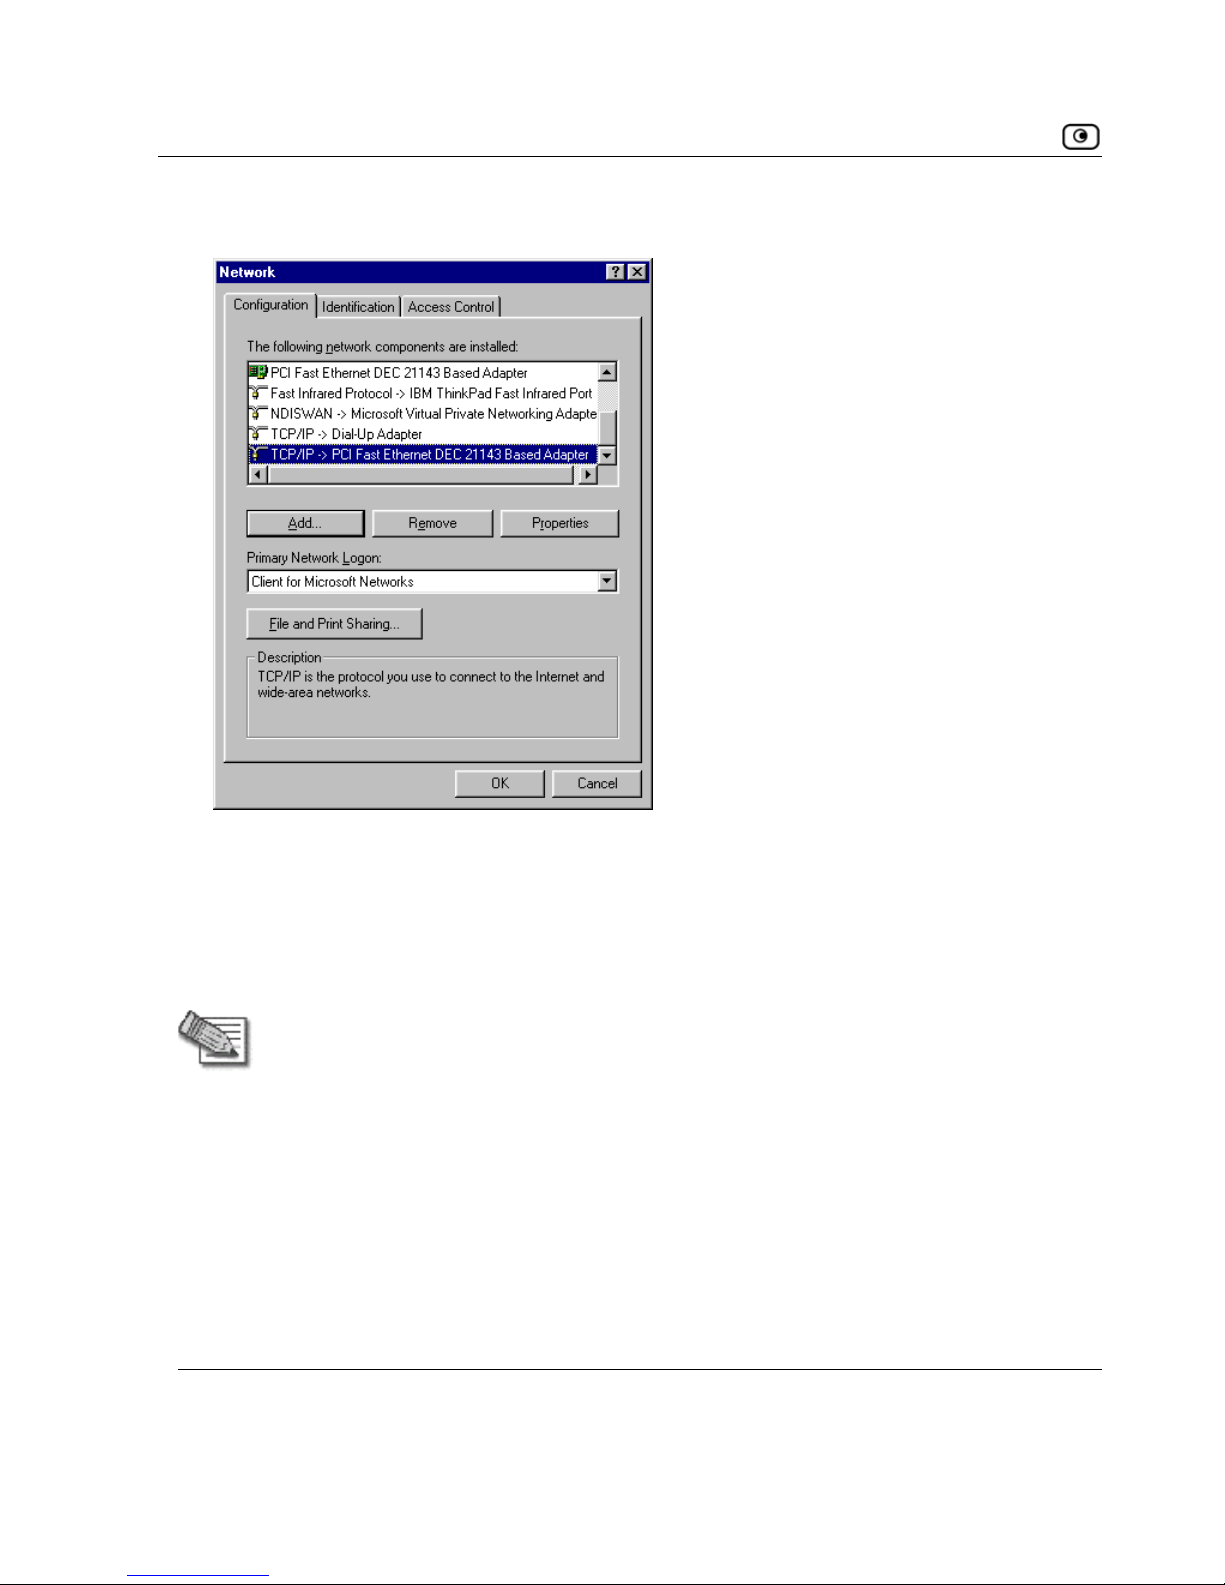
The Network window appears.
3. In the
Network window, check if TCP/IP
and if it is already configured with th
appears in the network components list
e Ethernet card, installed on your
computer.
Installing TCP/IP Protocol
Note: If TCP/IP is already installed and configured on your co
section and mo
mputer skip this
ve directly to TCP/IP Settings.
1. In the Network window, click Add.
22 D-Link NetDefend firewall User Guide
Page 39
Before You Install the NetDefend firewall
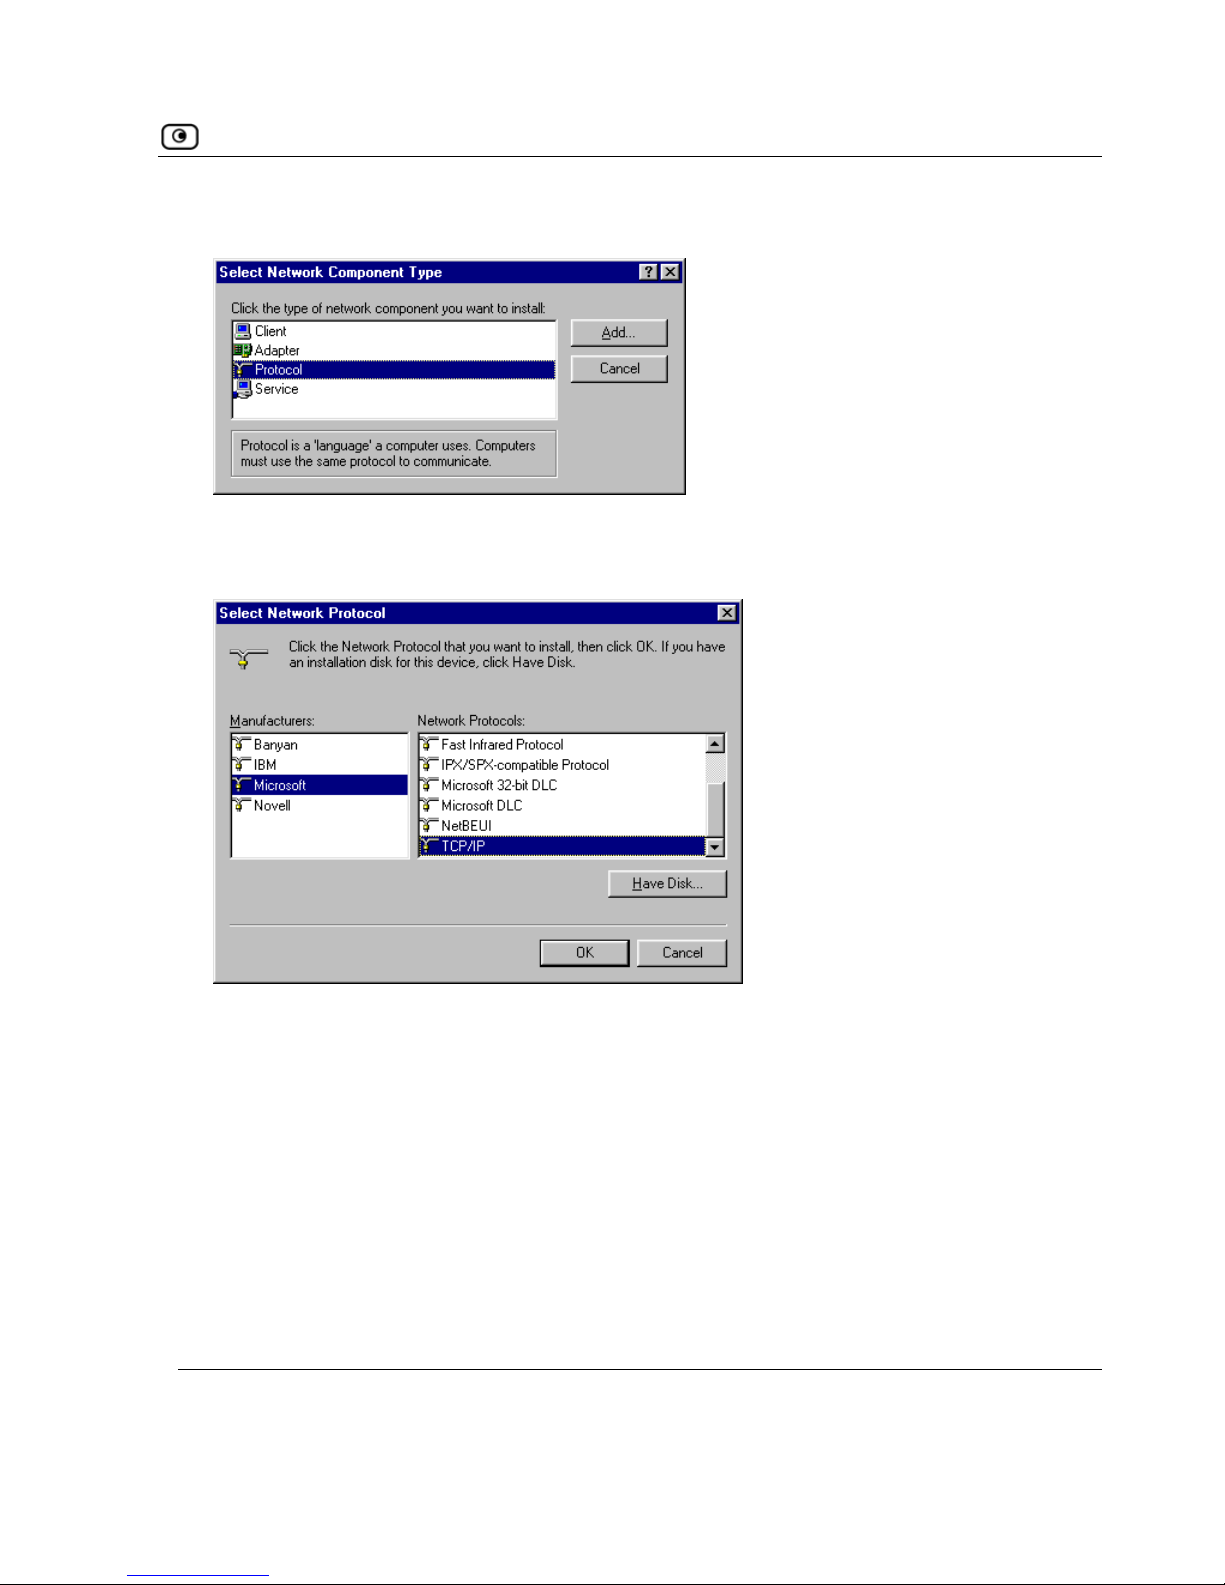
The Select Network Component Type window appears.
2. Choose
Protocol and click Add.
The
Select Network Protocol window appears.
3. In
Manufacturers list choose Microsoft, and in the Network Protocols list
choose TCP/IP.
4. Click
OK.
If Windows asks for original Windows installation files, provide the installation
CD and relevant path when required (e.g. D:\win98)
5. Restart your computer if prompted.
the
Chapter 2: Installing and Setting up the NetDefend firewall 23
Page 40
Before You Install the NetDefend firewall
TCP/IP Settings
Note: If you are connecting your NetDefend firewall to an
existing LAN, consult your network manager for the correct
configurations.
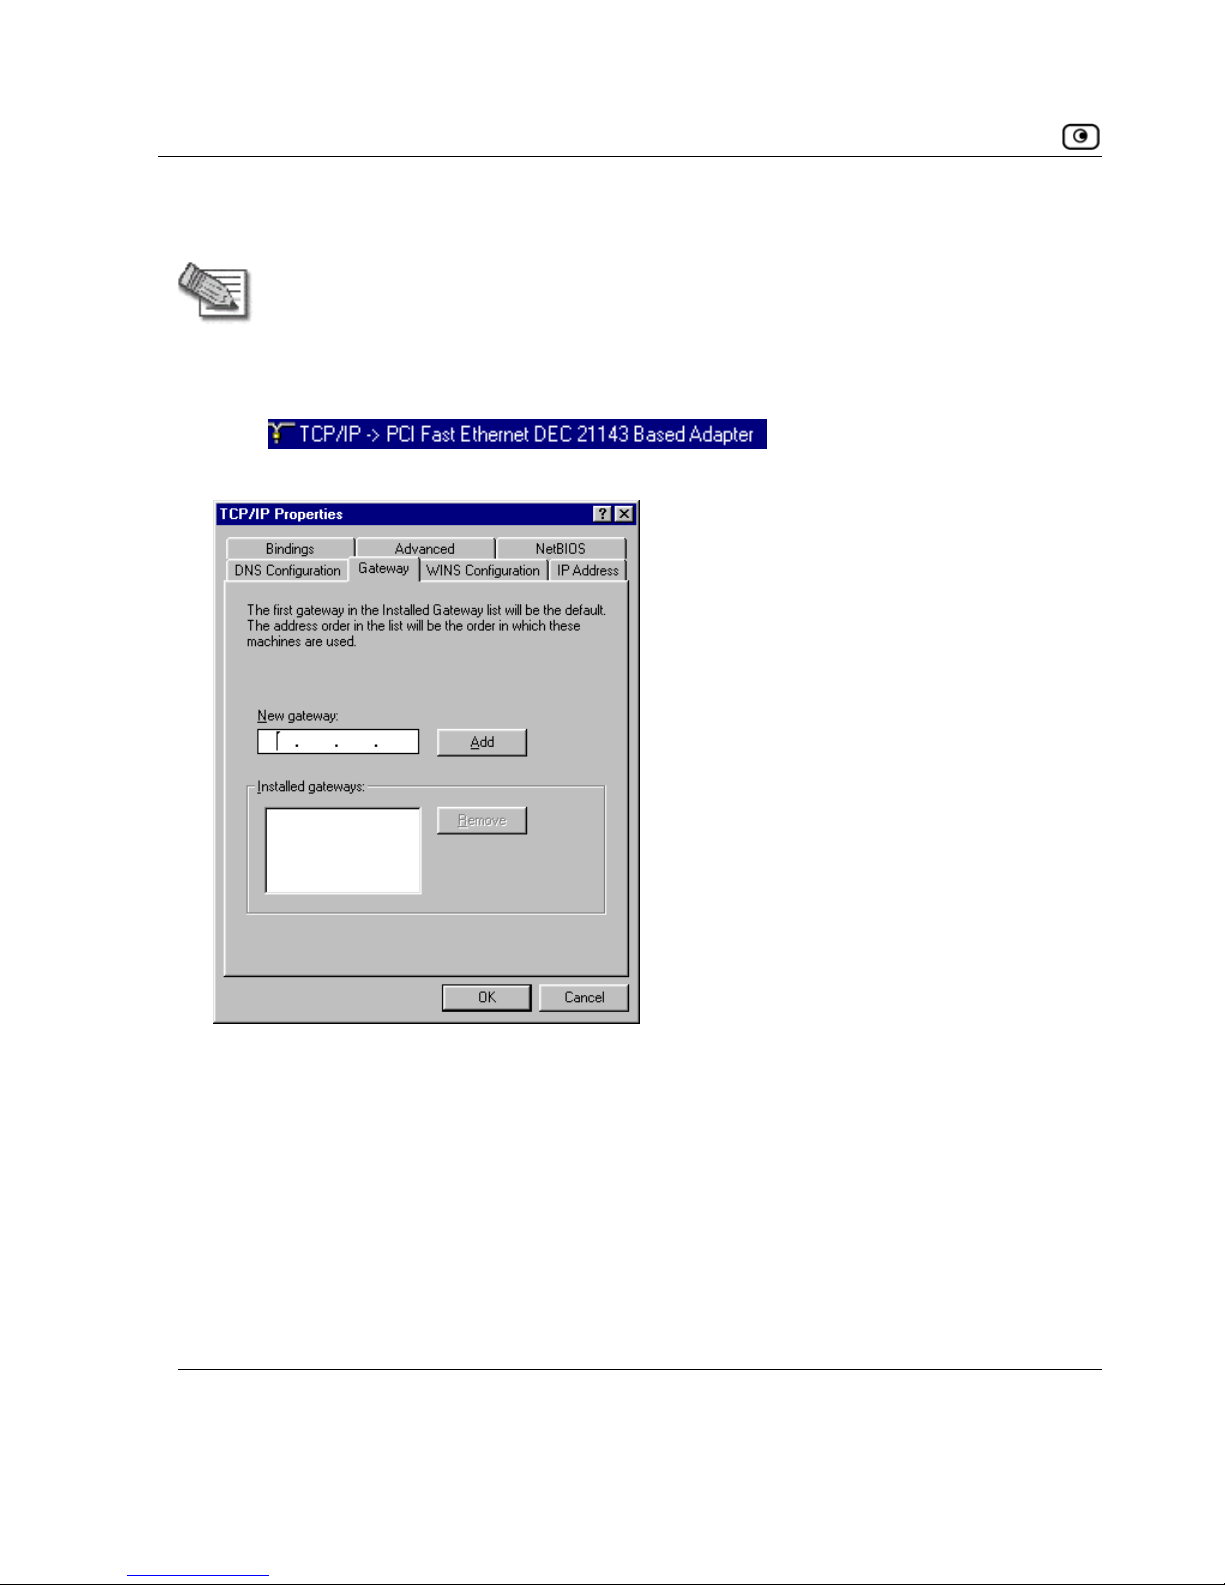
1. In the Network window, double-click the TCP/IP service for the Ethernet card,
which has been installed on your computer
(e.g.
).
The
TCP/IP Properties window opens.
2. Click the
Gateway tab, and remove any installed gateways.
24 D-Link NetDefend firewall User Guide
Page 41
Before You Install the NetDefend firewall
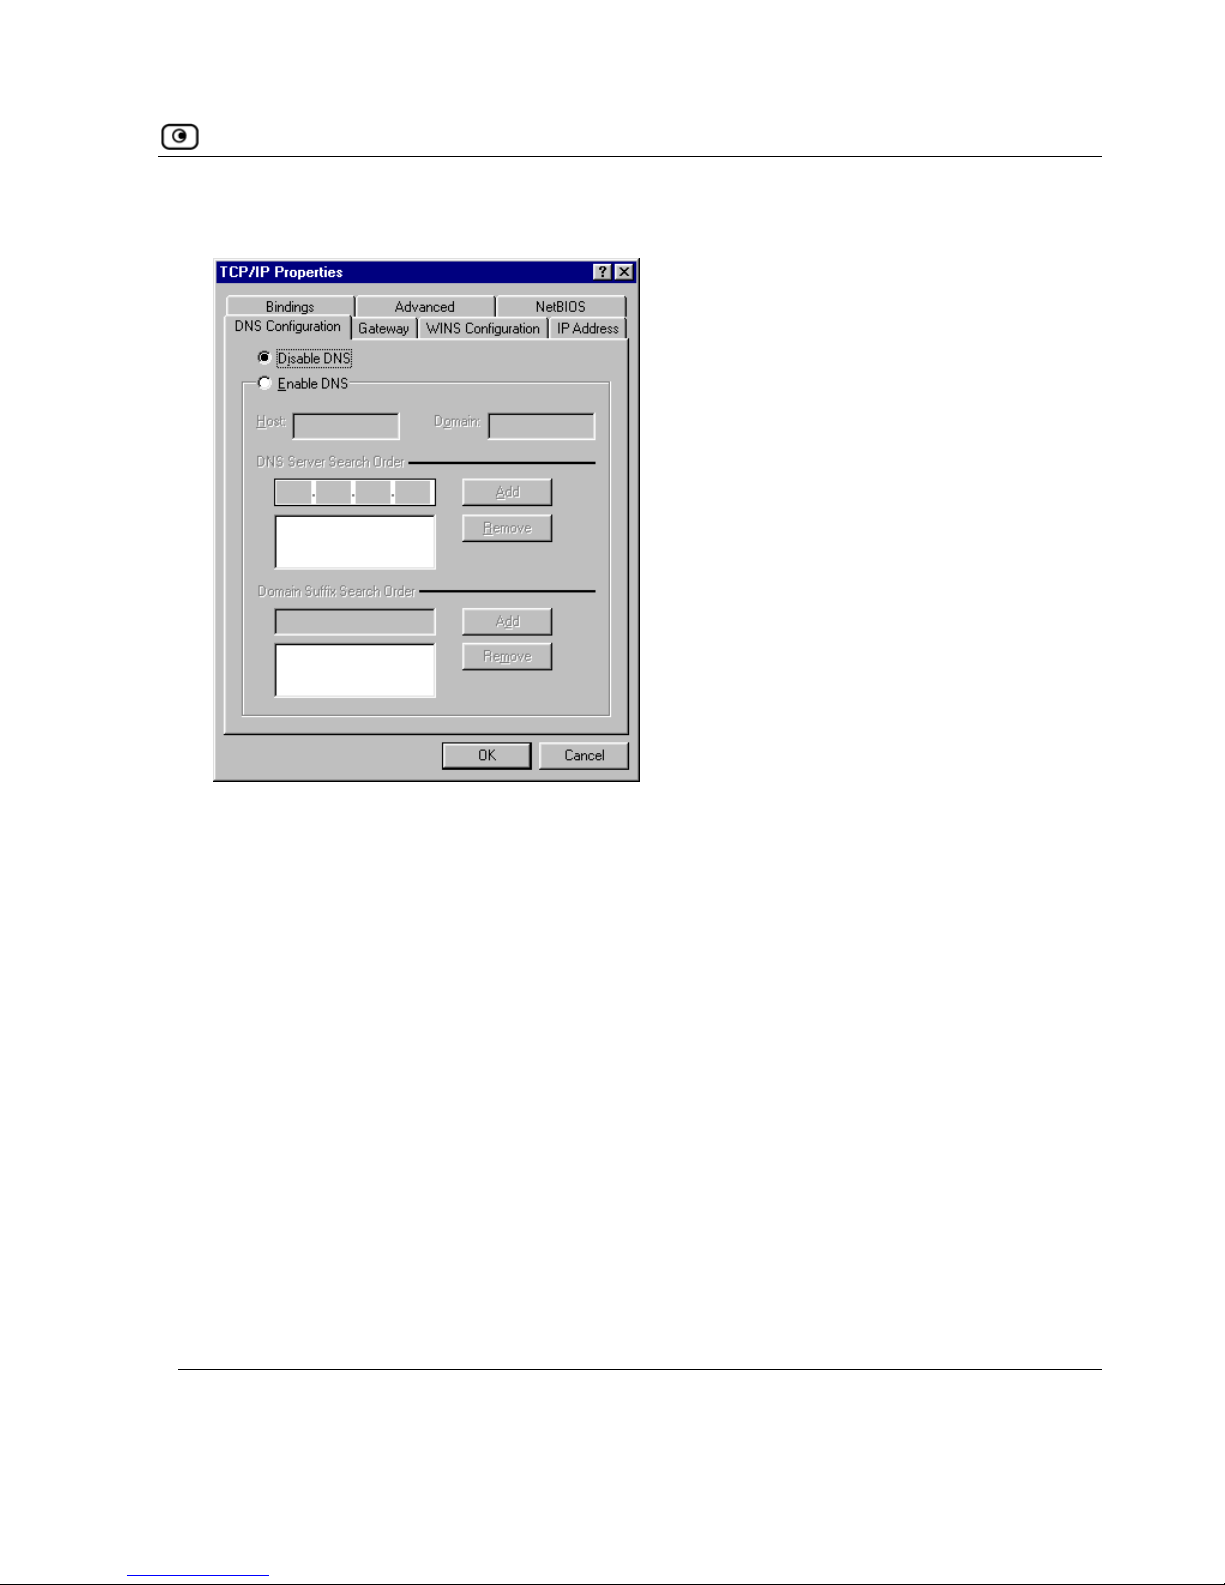
3. Click the DNS Configuration tab, and click the Disable DNS radio button.
Chapter 2: Installing and Setting up the NetDefend firewall 25
Page 42
Before You Install the NetDefend firewall
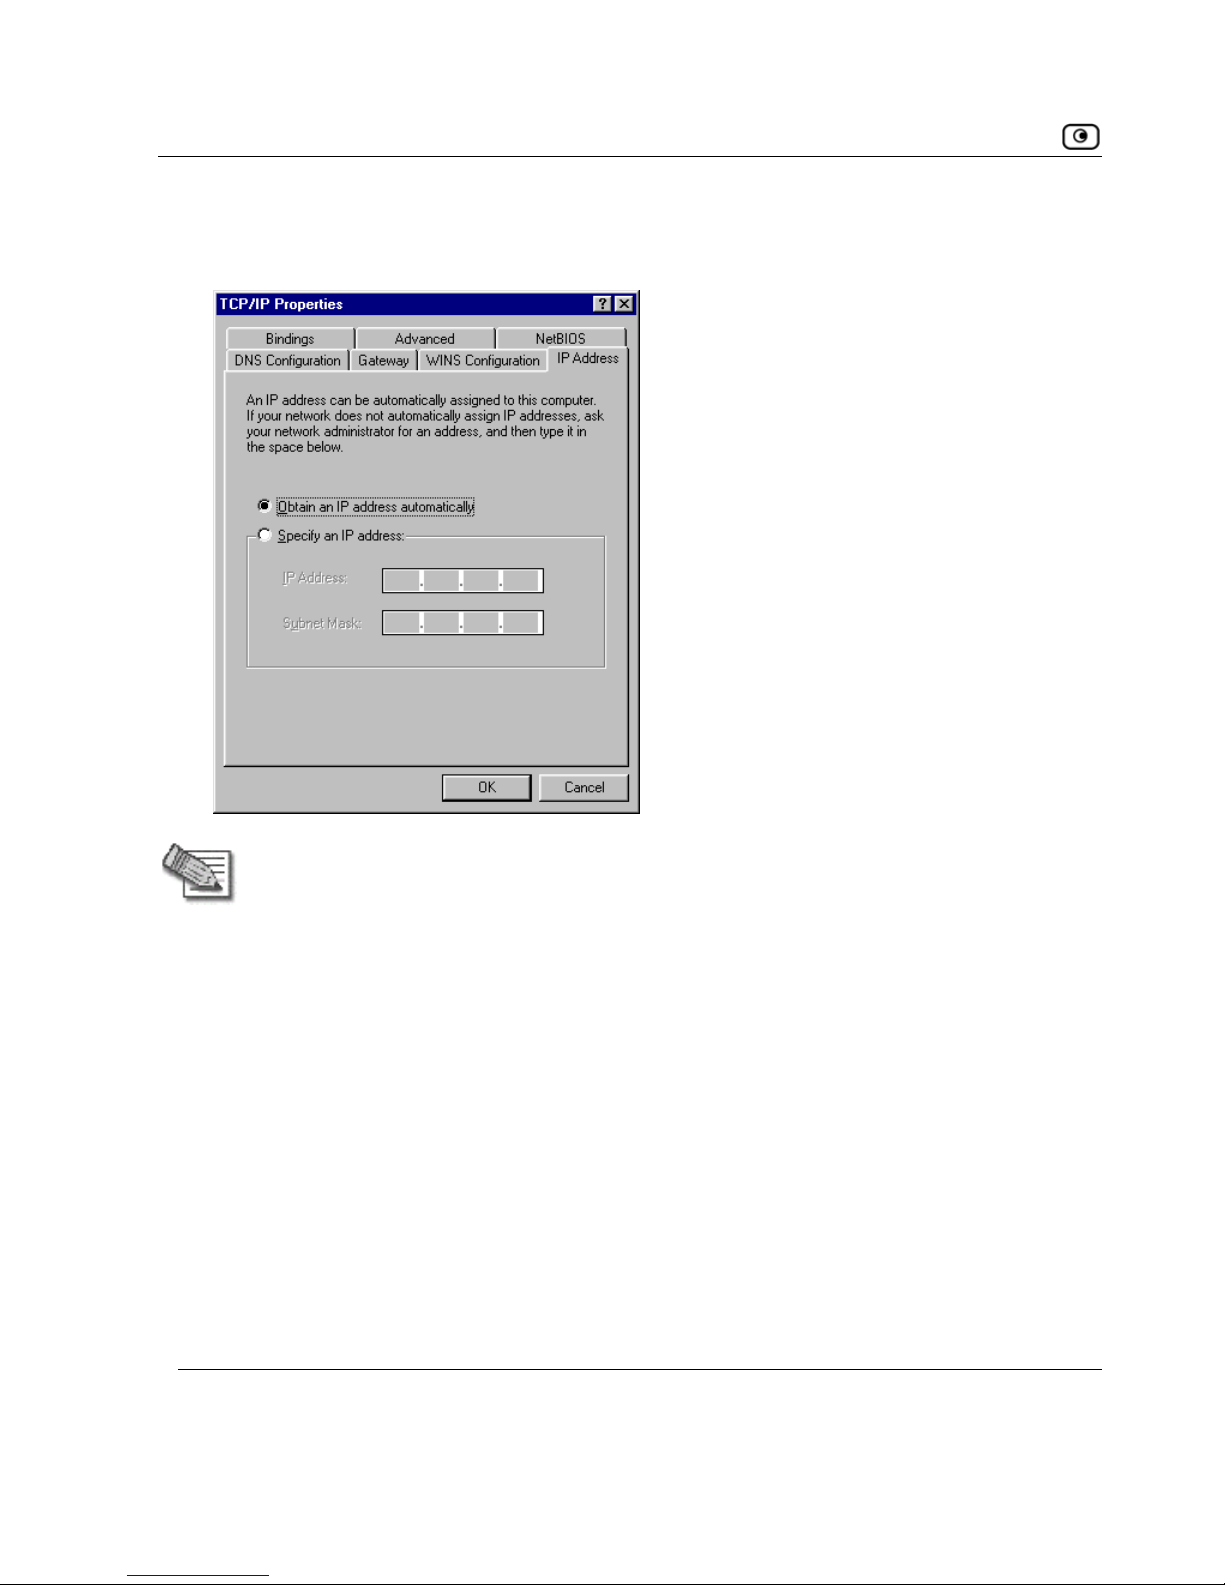
4. Click the IP Address
button.
tab, and click the Obtain an IP address automatically radio
Note: Normally, it is not recommended to assign a static IP
address to your PC but rather to obtain an IP address
automatically. If for some reason you need to assign a static IP
address, select Specify an IP address, type in an IP address in the
range of 192.168.10.129-254, enter 255.255.255.0 in the
Subnet Mask field, and click OK to save the new settings.
(Note that 192.168.10 is the default value, and it may vary if you
changed it in the My Network page.)
rompted for “Do you want to restart your computer?”.
settings to take effect.
Your computer is now ready to access your NetDefend firewall.
M
cedure for setting up the TCP/IP Protocol.
5. Click Yes when p
Your computer restarts, and the new
ac OS
Use the following pro
26 D-Link NetDefend firewall User Guide
Page 43
Before You Install the NetDefend firewall
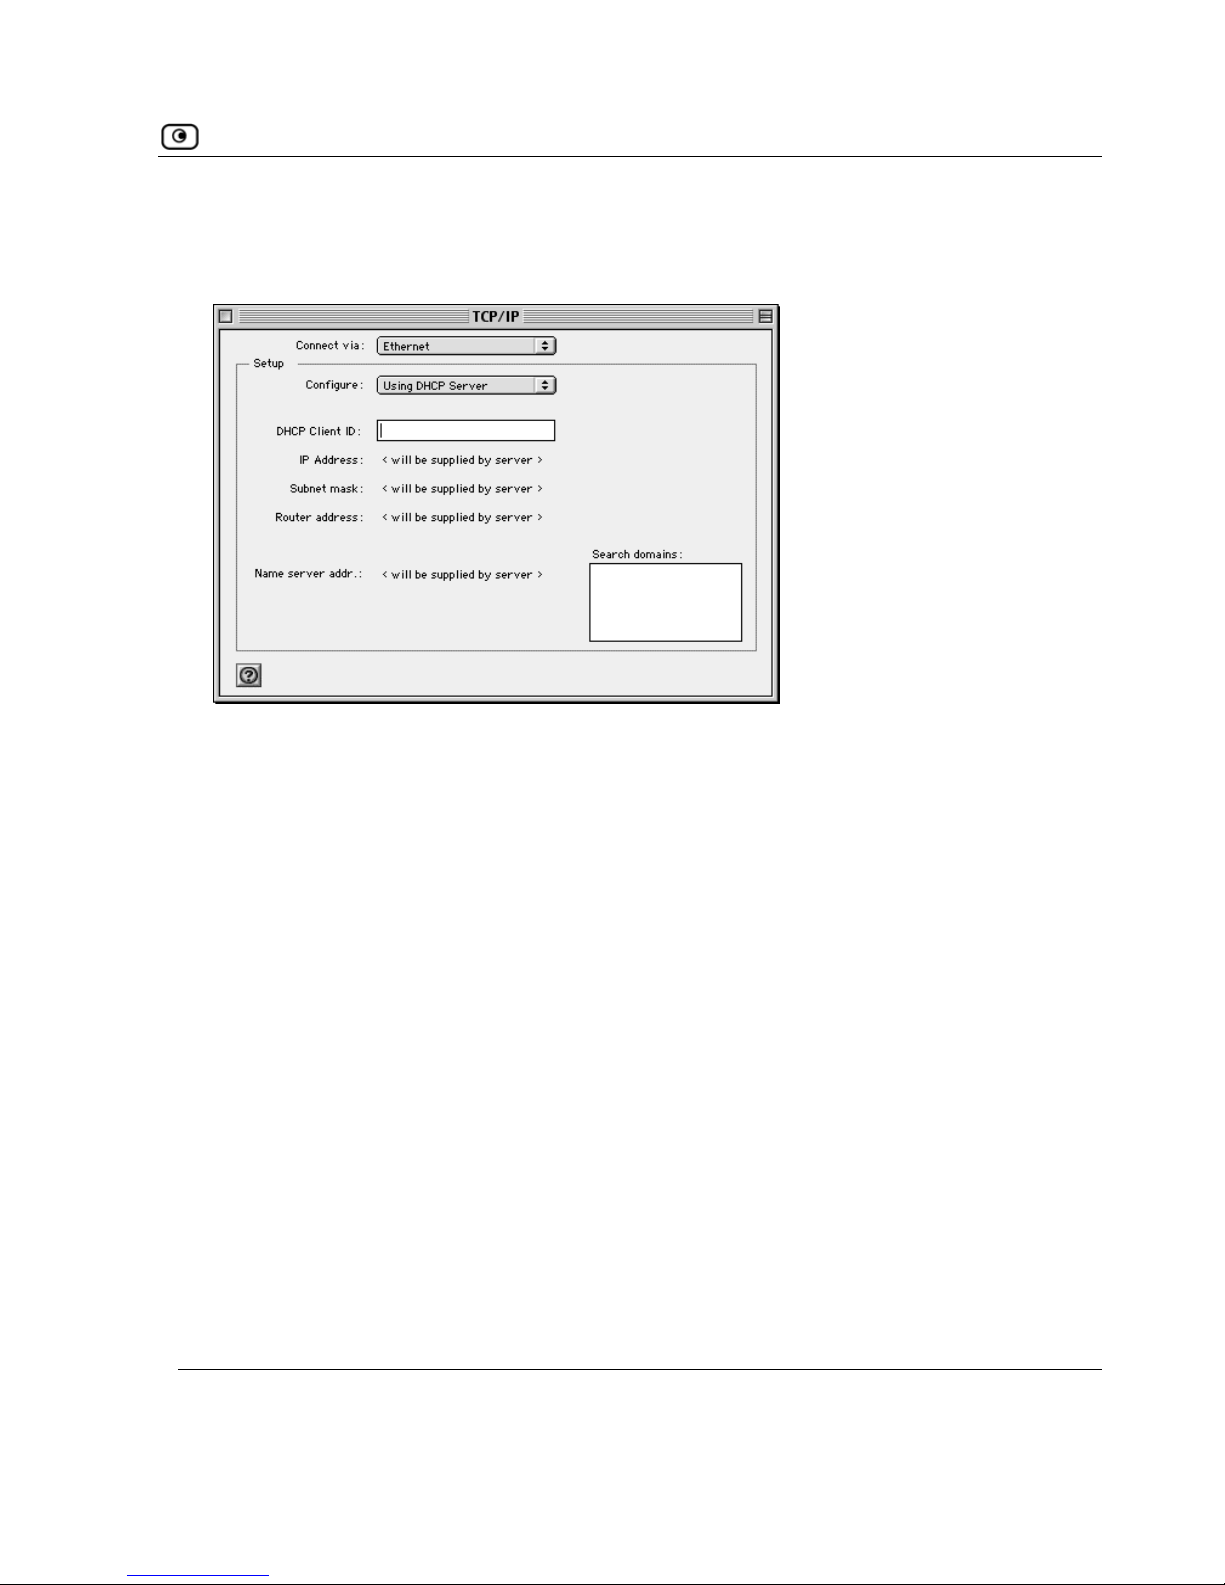
1. Choose Apple Menus -> Control Panels -> TCP/IP.
The
TCP/IP window appears.
2. Click the
Connect via drop-down list, and select Ethernet.
3. Click the
Configure drop-down list, and select Using DHCP Server.
4. Close the window and save the setup.
Chapter 2: Installing and Setting up the NetDefend firewall 27
Page 44
Before You Install the NetDefend firewall
Mac OS-X
Use the following procedure for setting up the TCP/IP Protocol.
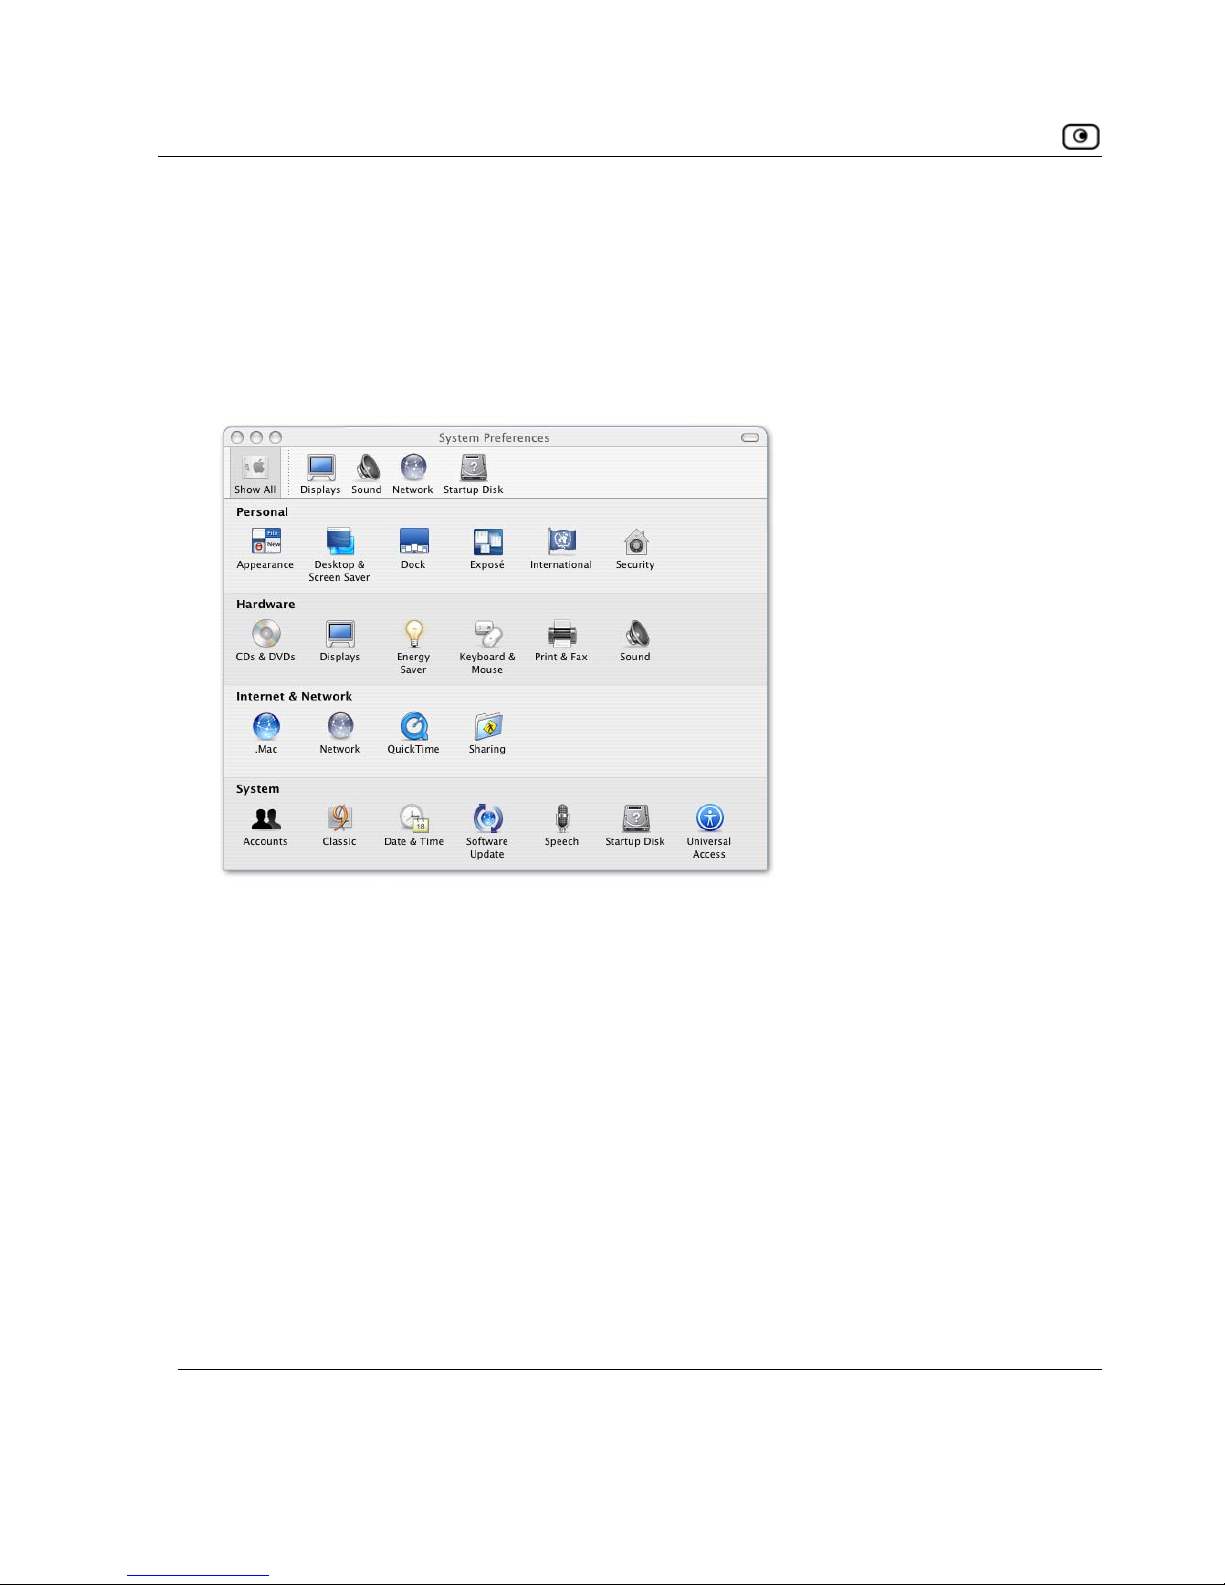
1. Choose
Apple -> System Preferences.
The
System Preferences window appears.
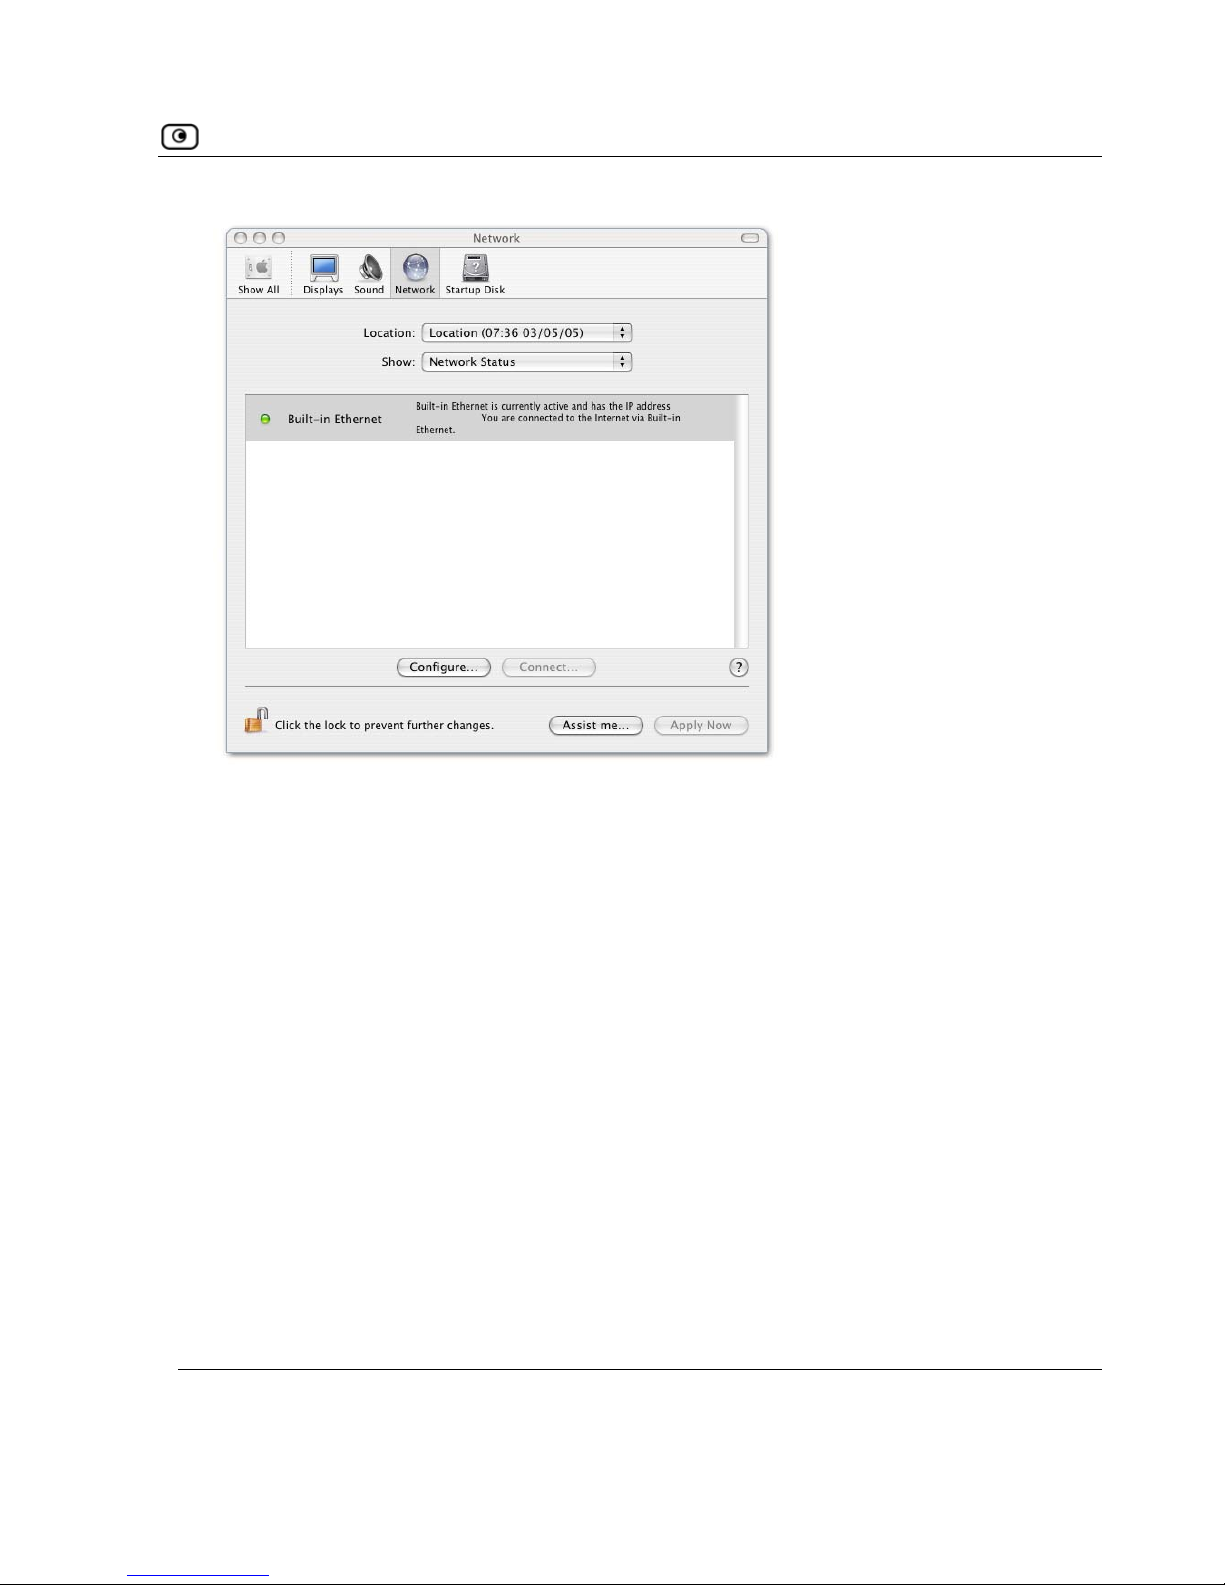
2. Click
Network.
The Network window appears.
28 D-Link NetDefend firewall User Guide
Page 45
Before You Install the NetDefend firewall
3. Click
Configure.
Chapter 2: Installing and Setting up the NetDefend firewall 29
Page 46
Wall Mounting the Appliance
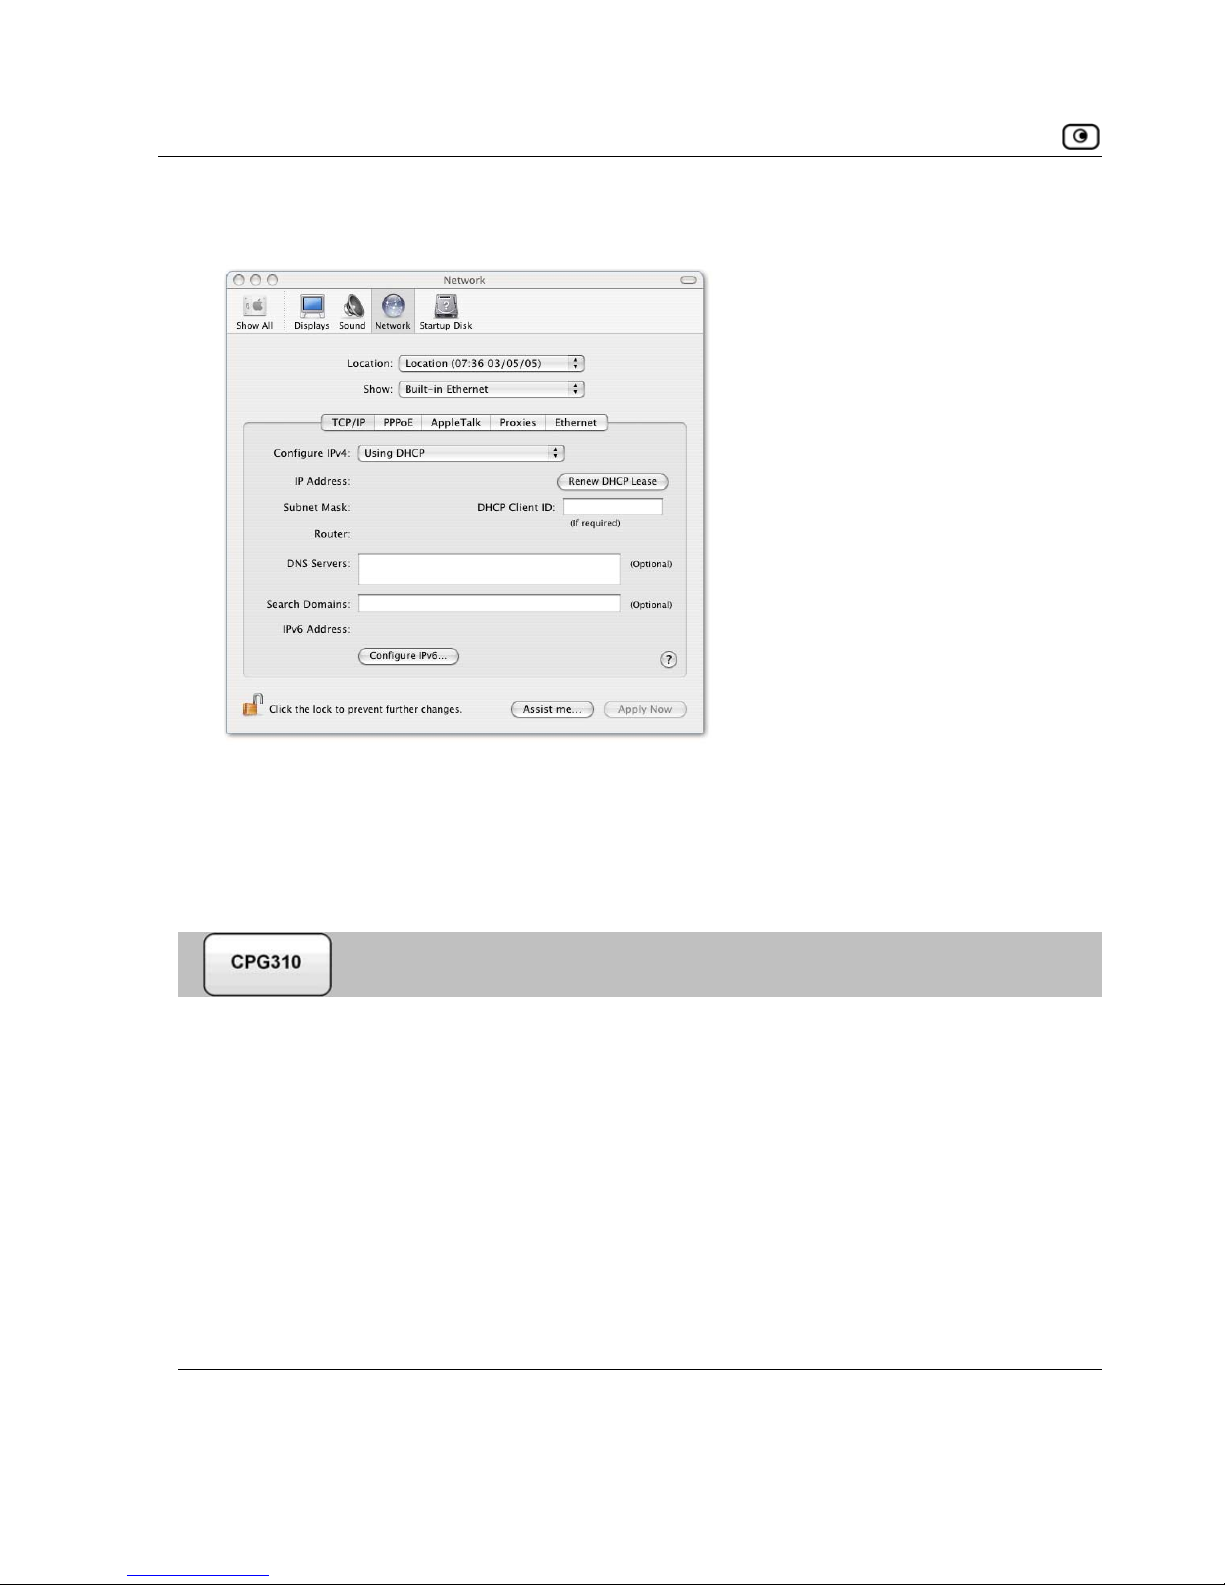
TCP/IP configuration fields appear.
4. Click the
Configure IPv4 drop-down list, and select Using DHCP.
Click 5.
Wall M
Apply Now.
ounting the Appliance
If desired, you can mount your NetDefend firewall on the wall.
To mount the NetDefend firewall on the wall
1. Decide where you want to mount your NetDefend firewall.
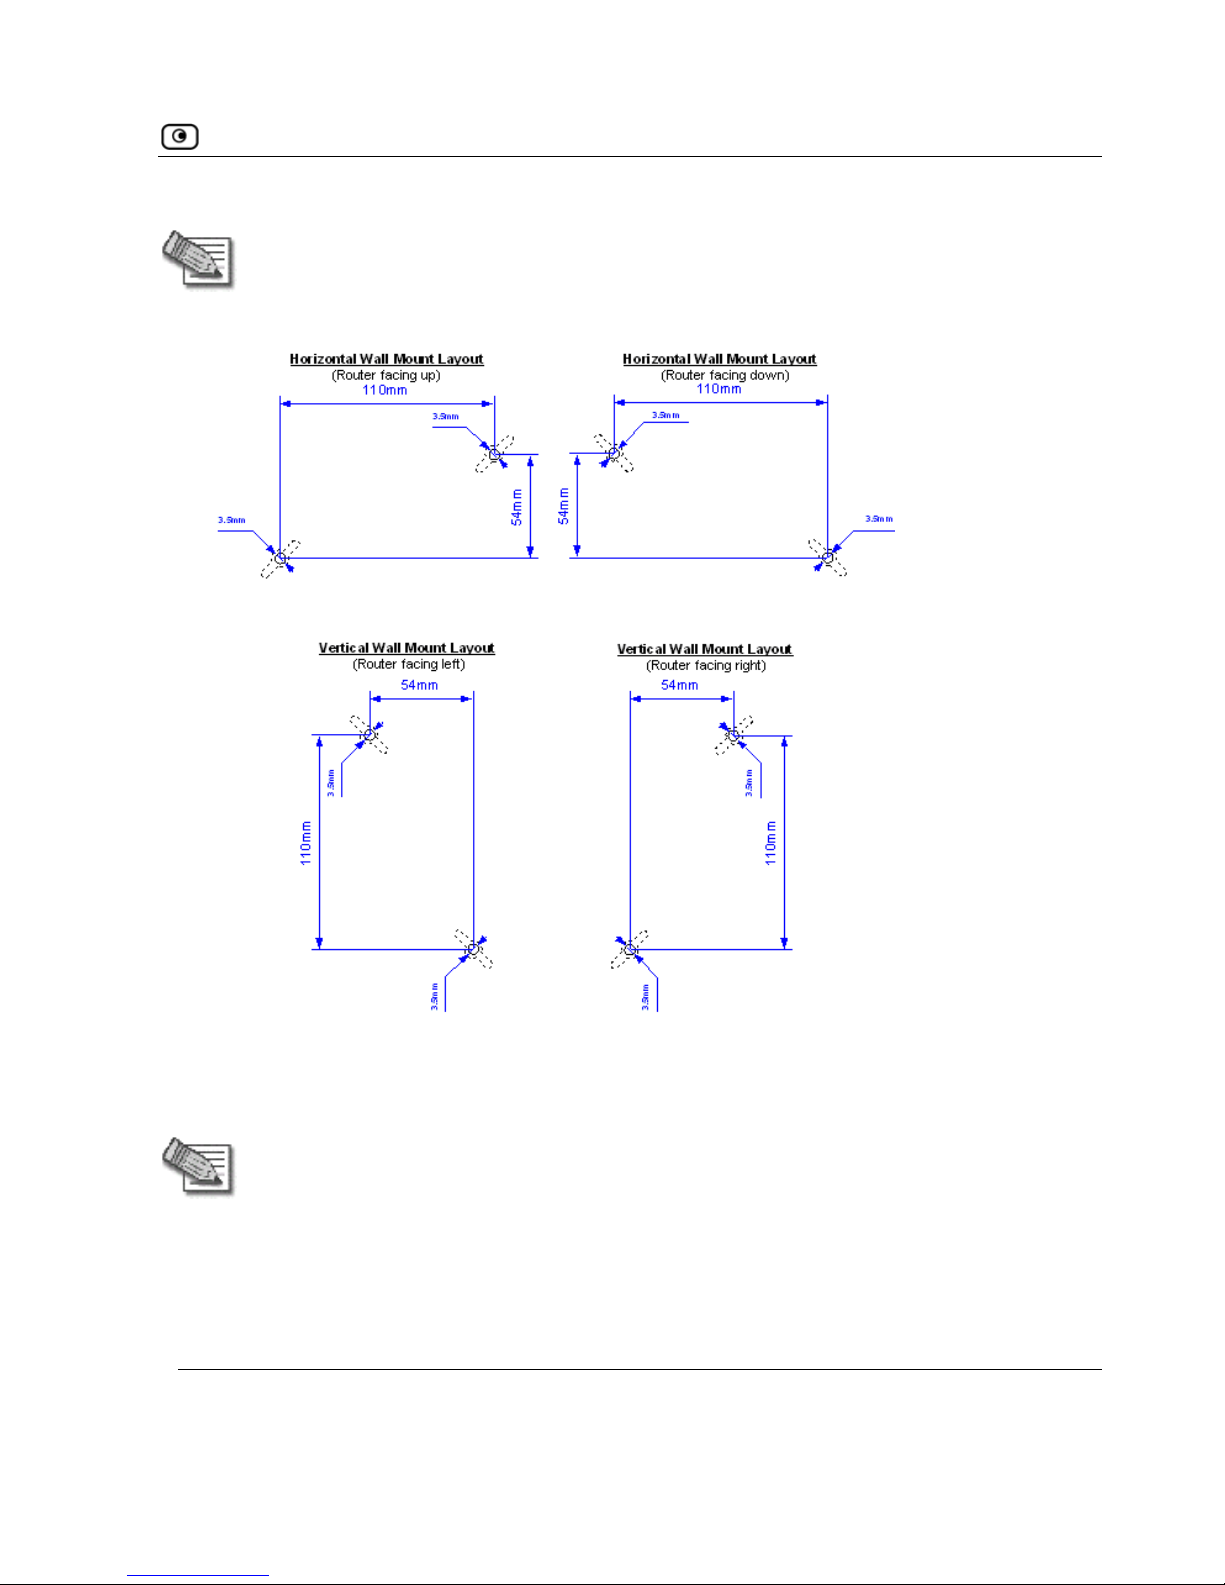
2. Decide on the mounting orientation.
You can mount the appliance on the wall facing up, down, left, or right.
30 D-Link NetDefend firewall User Guide
Page 47
Wall Mounting the Appliance
Note: Mounting the appliance facing downwards is not recommended, as dust might
accumulate in unused ports.
ark two drill holes on the wall, in accordance with the following sk3. M etch:
4. Drill two 3.5 mm diameter holes, approximately 25 mm deep.
5. Insert two plastic conical anchors into the holes.
Note: The conical anchors you received with your NetDefend firewall are suitable for
concrete walls. If you want to mount the appliance on a plaster wall, you must use
anchors that are suitable for plaster walls.
6. Insert the two screws you received with your NetDefend firewall into the plastic
conical anchors, and turn them until they protrude approximately 5 mm from the
wall.
Chapter 2: Installing and Setting up the NetDefend firewall 31
Page 48
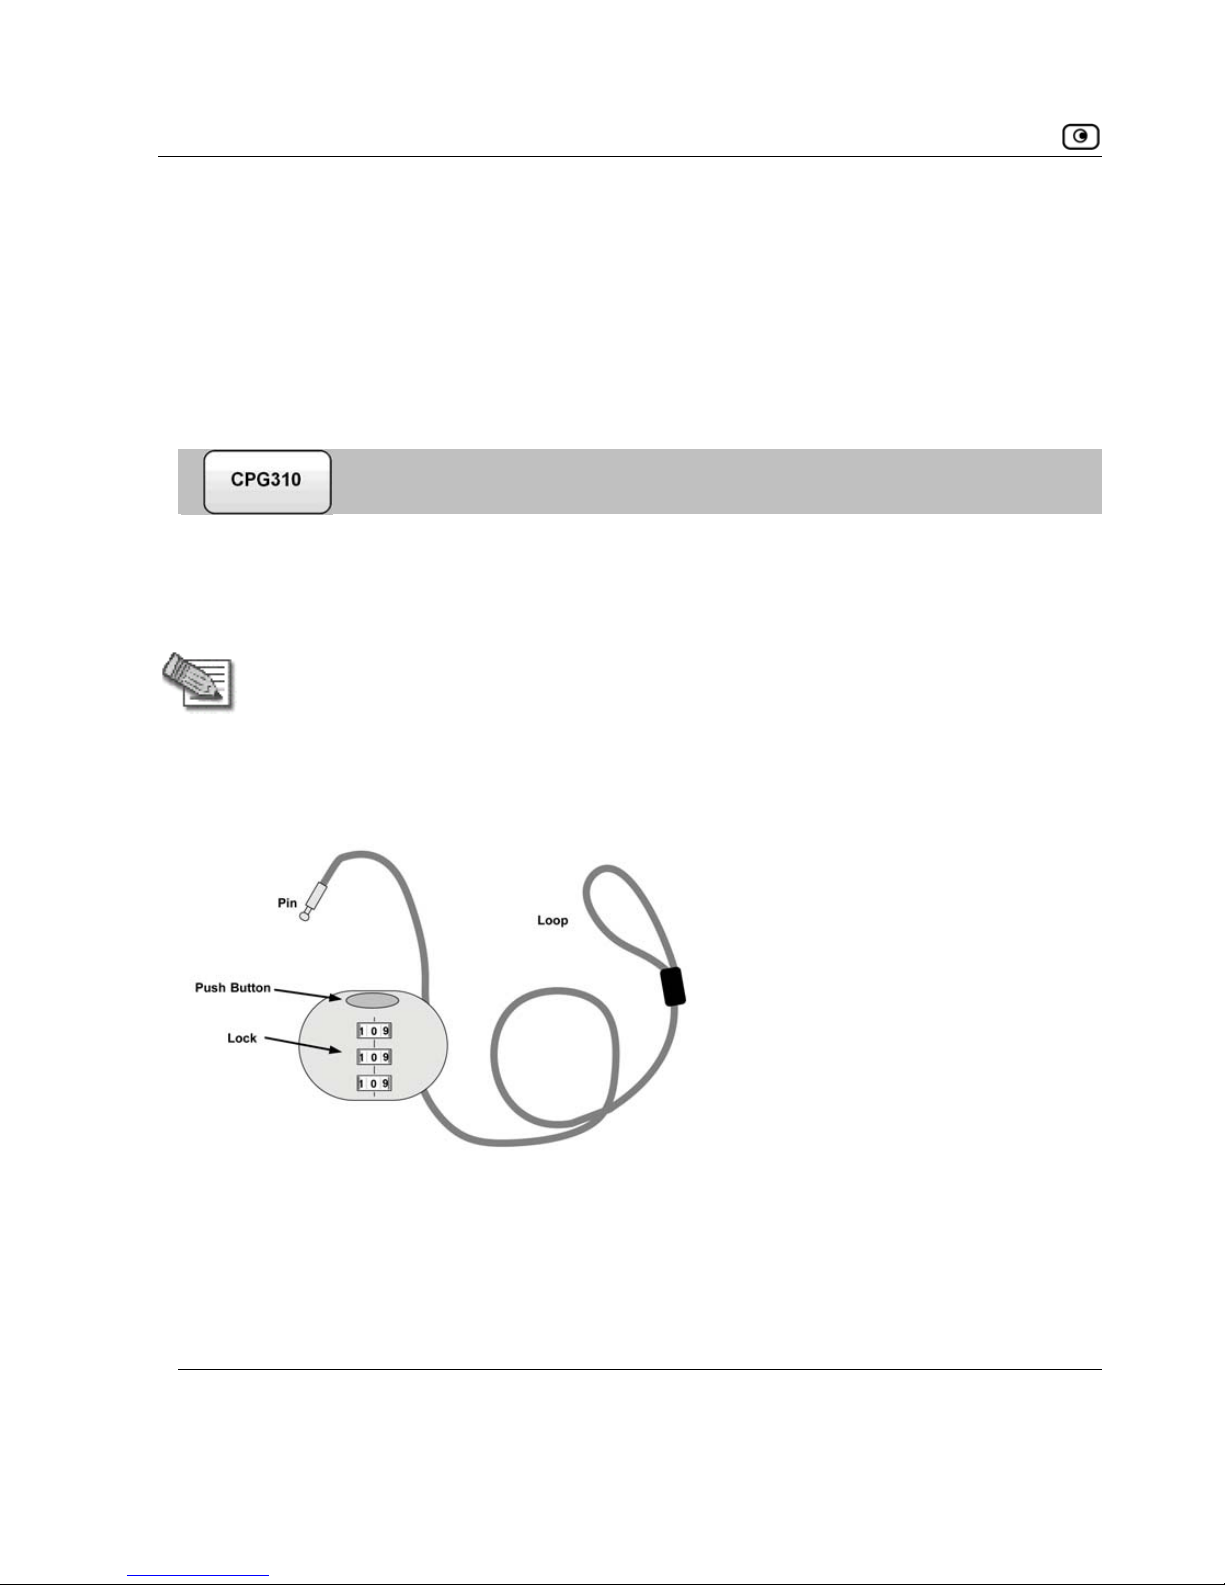
Securing the Appliance against Theft
7. Align the holes on the NetDefend firewall'
wall, then push
Your NetDefend firewall is wall mounted. You can now connect it to your
computer. See
Network Installation on page 35.
Securing the Applia
s underside with the screws on the
the appliance in and down.
nce against Theft
The NetDefend firewall f ht panel, which
enables you to secure your appliance against theft, using an anti-theft security
device.
eatures a security slot to the rear of the rig
Note: Anti-theft security device er hardware stores.
This procedure explains how to install a looped security cable on your appliance. A
looped security cable typically includes the parts shown in the diagram below.
s are available at most comput
Figure 6: Looped Security Cable
32 D-Link NetDefend firewall User Guide
Page 49
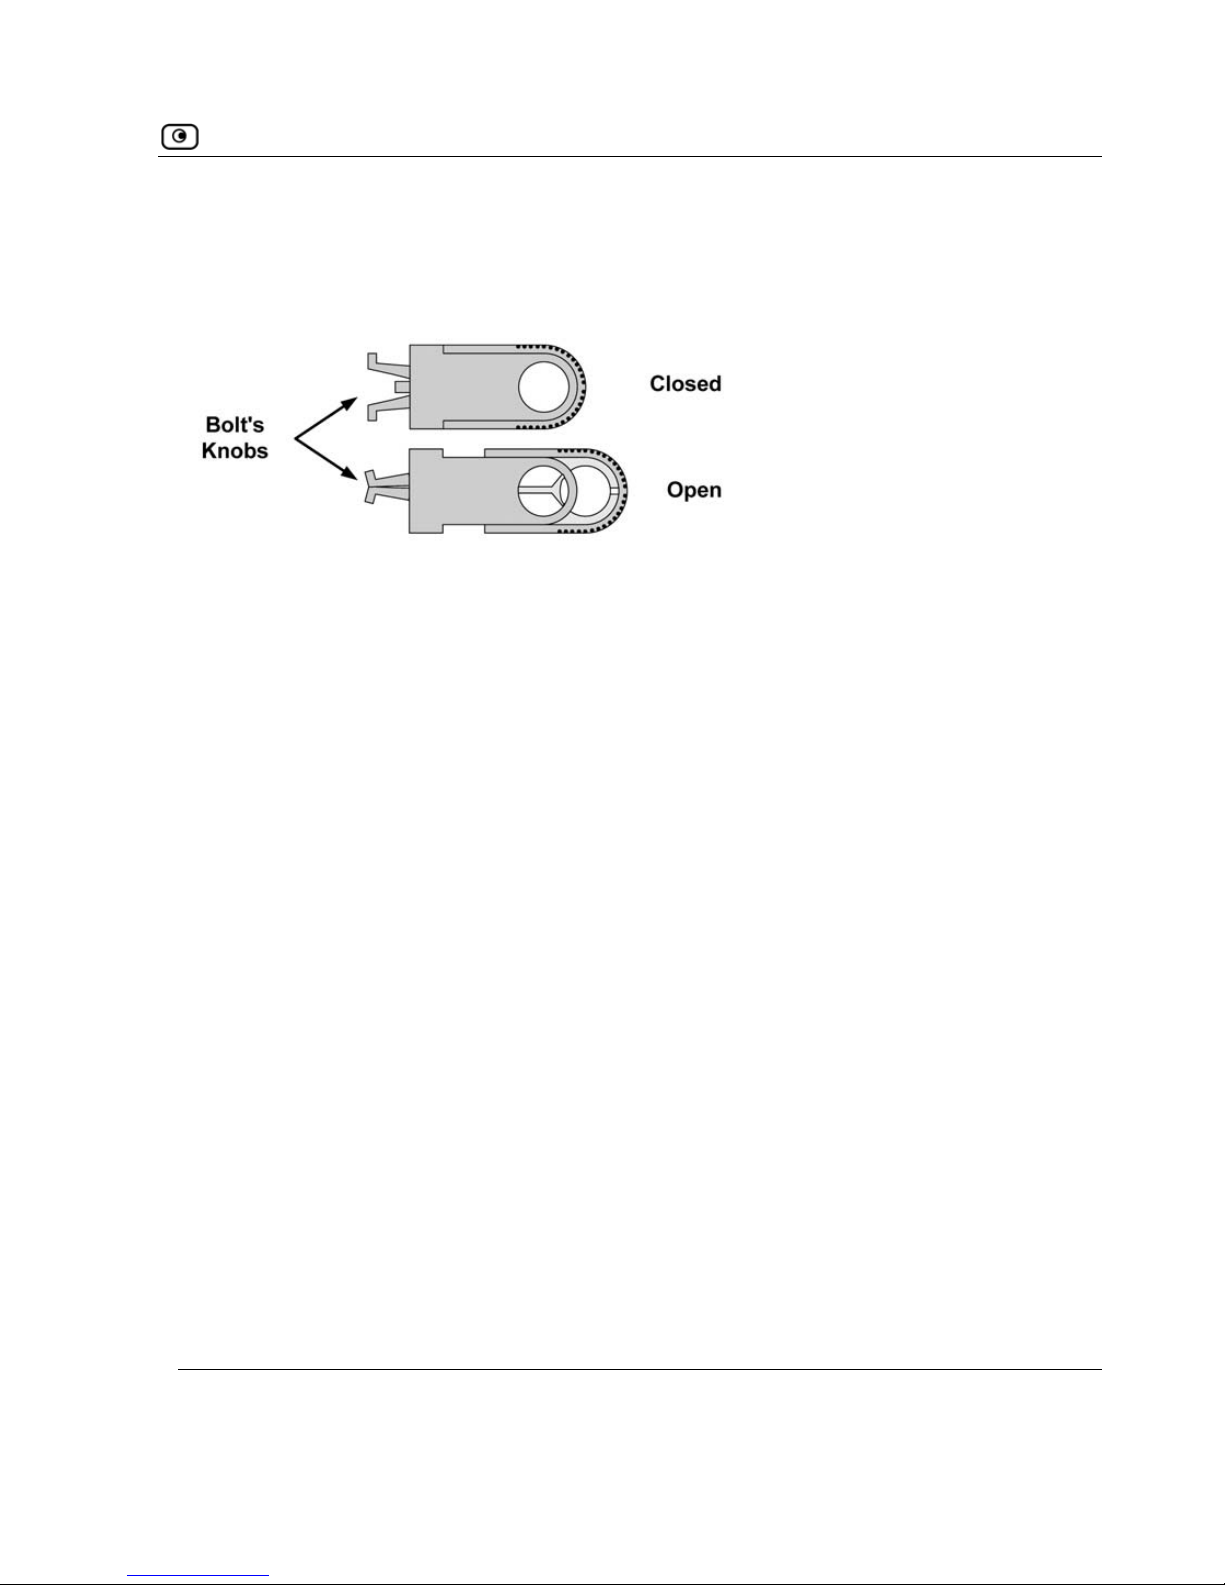
Securing the Appliance against Theft
While these parts may differ between devices, all looped security cables include a
bolt with knobs, as shown in the diagram below:
Figure 7: Looped Security Cable Bolt
The bolt has two states, Open and Closed, and is used to connect the looped
security cable to the appliance's security slot.
To install an anti-theft device on the NetDefend firewall
1. If your anti-theft device has a combination lock, set the desired code, as
that came with your device.
2. escribed
in the documentation that came with your device.
. Slide the anti-theft device's bolt to the
Open position.
described in the documentation
Connect the anti-theft device's loop to any sturdy mounting point, as d
3
Chapter 2: Installing and Setting up the NetDefend firewall 33
Page 50
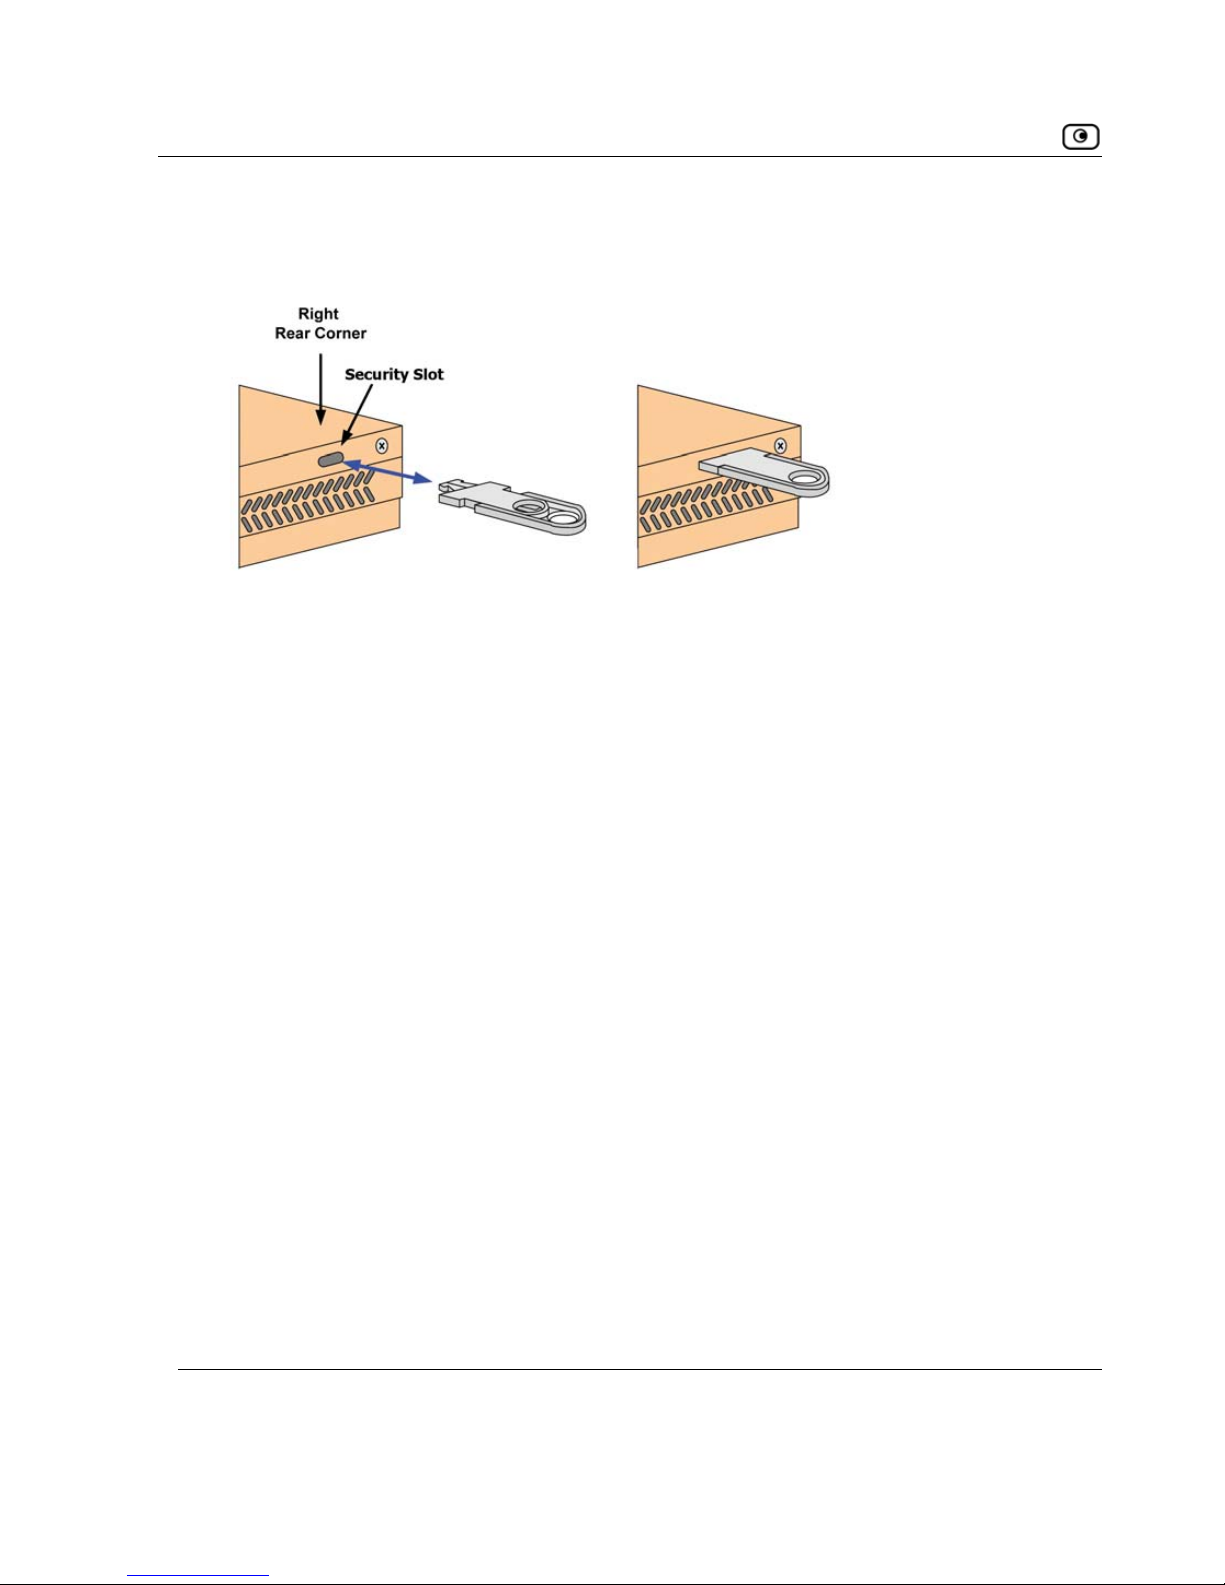
Securing the Appliance against Theft
4. Insert the bolt into the NetDefend firewall's security slot, and then slide the bolt
to the Closed position until the bolt holes are aligned.
5. Thread the anti-theft device's pin through the bolt’s holes, and insert the pin into
the main body of the anti-theft device, as described in the documentation that
came with your device.
34 D-Link NetDefend firewall User Guide
Page 51
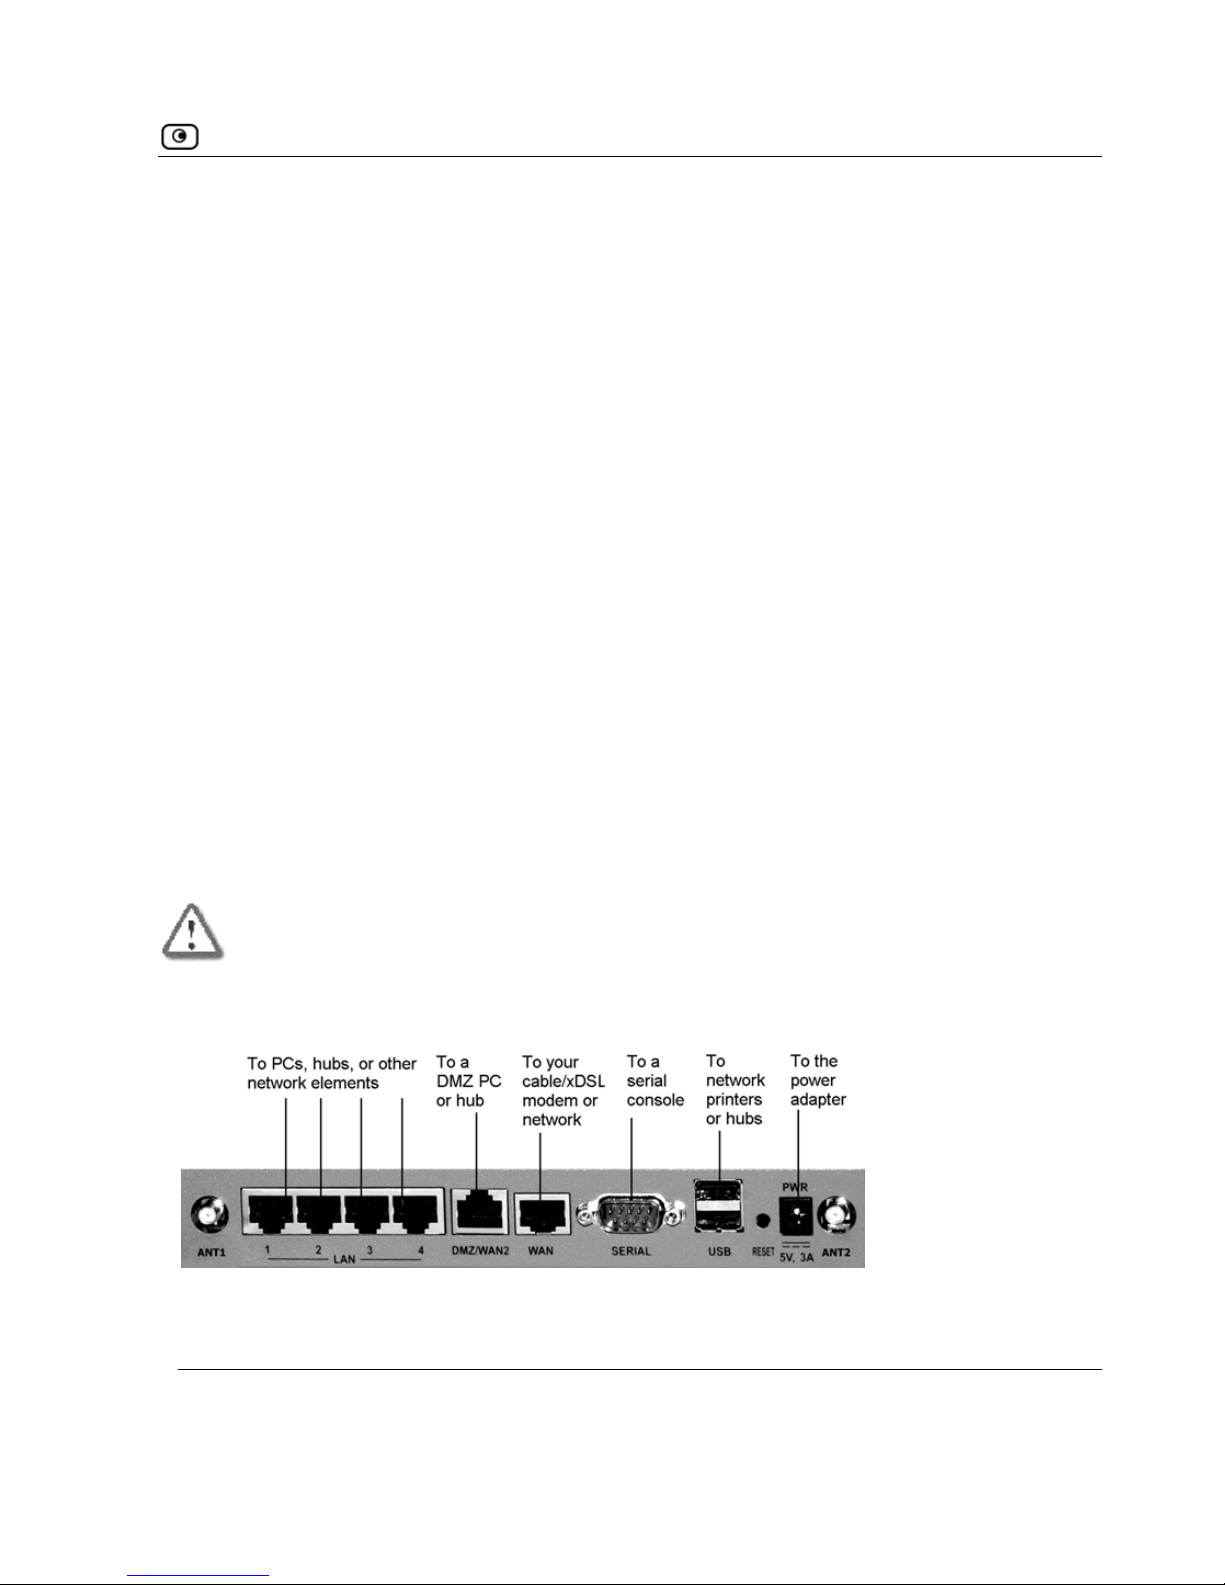
Network Installation
Network Installation
1. Verify that you have the correct cable type.
For information, see Network Requirements.
d of the Ethernet cable to one of the
LAN ports at the back
s.
3
back of the
• Connect the other end of the cable to a Cable Modem, xDSL modem or
PWR, at the back of the
NetDefend firewall.
5. Plug the power adapter into th e wall electrical outlet.
2. Connect the LAN cable:
• Connect one en
of the unit.
• Connect the other end to PCs, hubs, or other network device
. Connect the WAN cable:
• Connect one end of the Ethernet cable to the
WAN port at the
unit.
office network.
4. Connect the power adapter to the power socket, labeled
230 VAC input power. Verify that the wall outlet vo
wer adapter. Failure to observe this
Warning: The NetDefend firewall power adapter is compatible with either 100, 120 or
ltage is compatible with the
warning may result
ment.
voltage specified on your po
in injuries or damage to equip
Figure 8: Typical Connection Diagram
Chapter 2: Installing and Setting up the NetDefend firewall 35
Page 52
Setting Up the NetDefend firewall
6. NetDefend firewall for a wireless connection:
a. Connect the antennas that came with your NetDefend firewall to the
ANT1 and ANT2 antenna connectors in the appliance's rear panel.
b. Bend the antennas at the hinges, so that they point upwards.
7. In models with a print server, you can connect network printers as follows:
a. Connect one end of a USB cable to a
USB port at the back of the unit.
If needed, you can use the provided USB extension cord.
b. Connect the other end to a printer or a USB 2.0 hub.
In wireless models, prepare the
Warning: Verify that the USB devices' power requirement does not exceed the
appliance's USB power supply capabilities. Failure to observe this warning may
cause damage to the appliance and void the warranty.
For information on setting up network printers, see Setting up Network Printers on
S tting
page 424.
e Up the NetDefend firewall
After you have installed the NetDefend firewall, you must set it up using the steps
sh
When setting up your NetDefend firewall for the first time after installation, these
boxes for
configuring your Internet connection. After you have configured your Internet
connection, the Setup Wizard automatically displays the dialog boxes for
regist d
perfo
own below.
steps follow each other automatically. After you have logged on and set up your
password, the Setup Wizard automatically opens and displays the dialog
ering your NetDefend firewall. If desired, you can exit the Setup Wizard an
rm each of these steps separately.
36 D-Link NetDefend firewall User Guide
Page 53
Setting Up the NetDefend firewall
Logging on to the NetDefend Portal and setting up your password
Initial Login to the NetDefend Portal on page 39
Configuring an Internet connection
Using the Internet Wizard on page 54
Setting the Time on your NetDefend firewall
Setting the Time on the Appliance on page 397
Setting up a wireless network
(DFL-CPG310 only)
Configuring a Wireless Network on page 161
Installing the Product Key
Upgrading Your Software Product on page 379
Registering your NetDefend firewall
Registering Your NetDefend firewall on page 383
Setting up subscription services
Connecting to a Service Center on page 281
You can access the Setup Wizard at any time after initial setup, using the procedure
below.
Chapter 2: Installing and Setting up the NetDefend firewall 37
Page 54
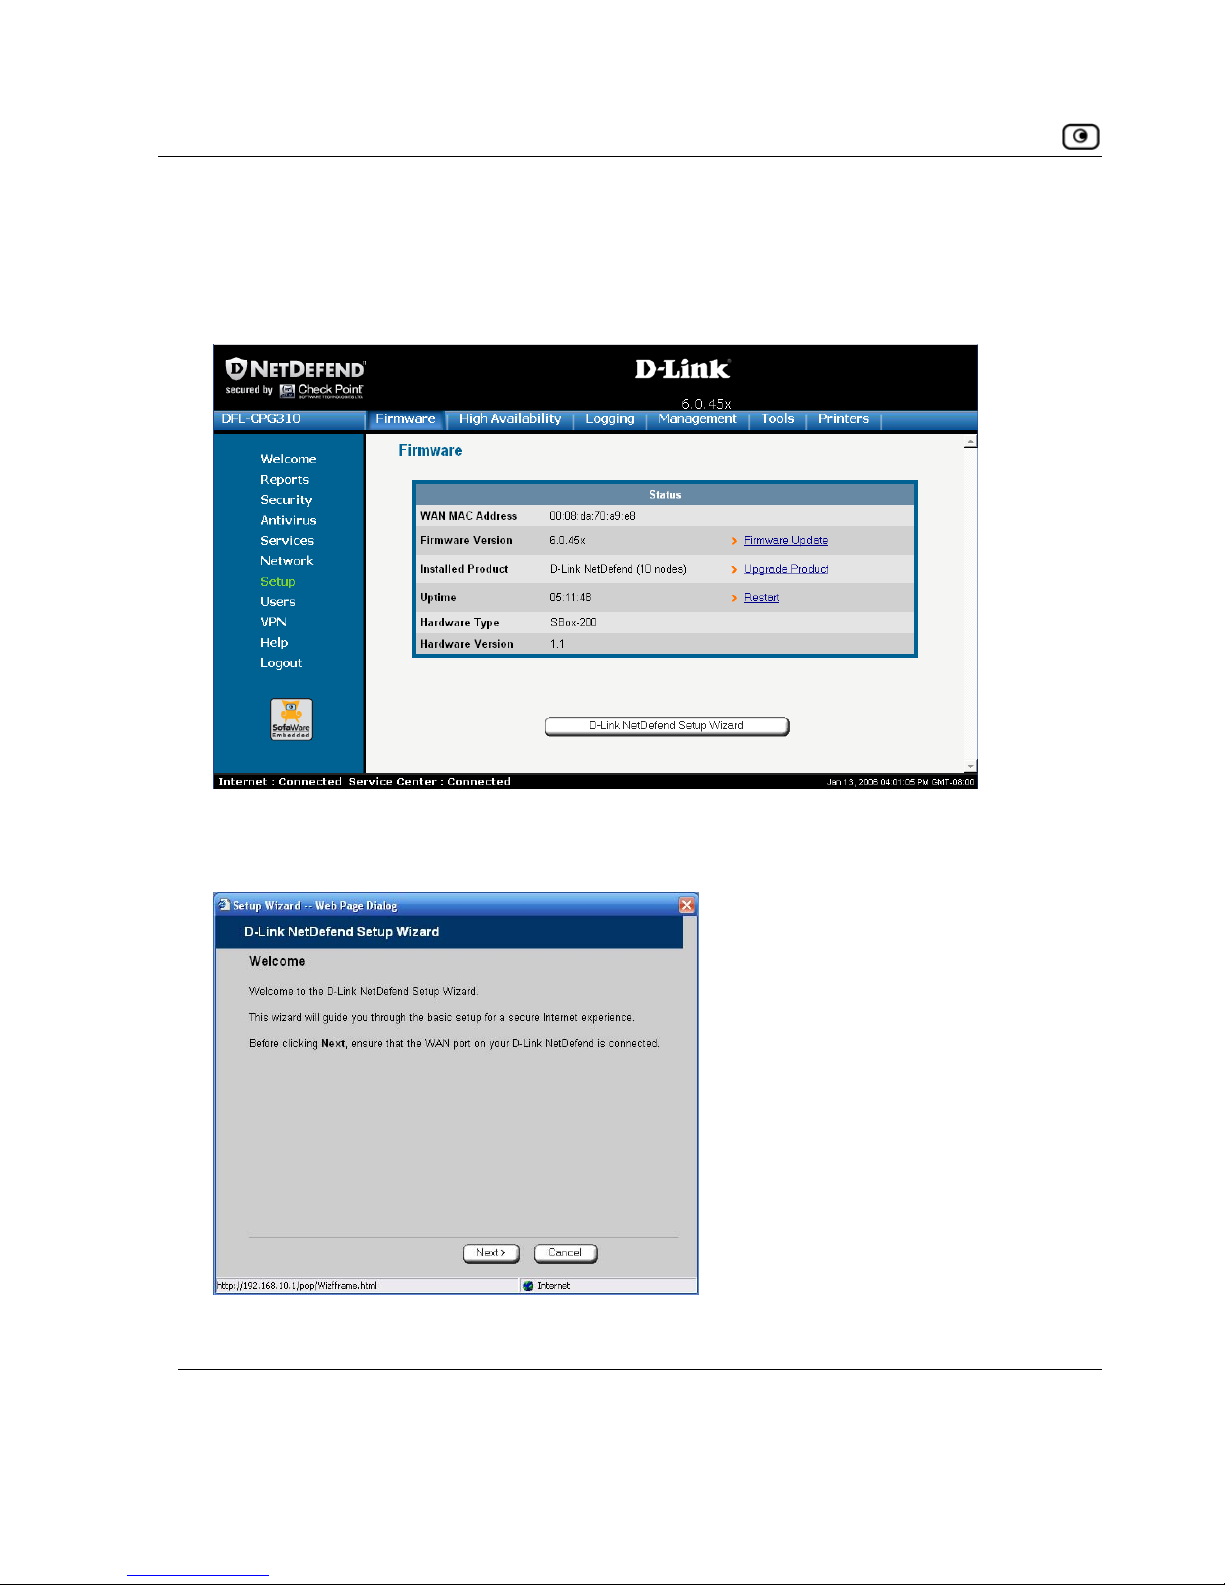
Setting Up the NetDefend firewall
To access the Setup Wizard
ab.
The
Firmware page appears.
1. Click Setup in the main menu, and click the Firmware t
2. Click
end Setup Wizard. NetDef
The
NetDefend Setup Wizard opens with the Welcome page displayed.
38 D-Link NetDefend firewall User Guide
Page 55
Initial Login to the NetDefend Portal
Chapter 3
This chapter contains all the information you need in order to get started using your
NetDefend firewall.
This chapter includes the following topics:
Initial Login to the NetDefend Portal.........................................................39
Logging on to the NetDefend Portal...........................................................42
Accessing the NetDefend Portal Remotely Using HTTPS.........................44
Using the NetDefend Portal........................................................................46
Logging off.................................................................................................51
Initial Login to the NetDefend Portal
The first time you log on to the NetDefend Portal, you must set up your password.
To log on to the NetDefend Portal for the first time
1. Browse to http://my.firewall.
Getting Started
Chapter 3: Getting Started 39
Page 56
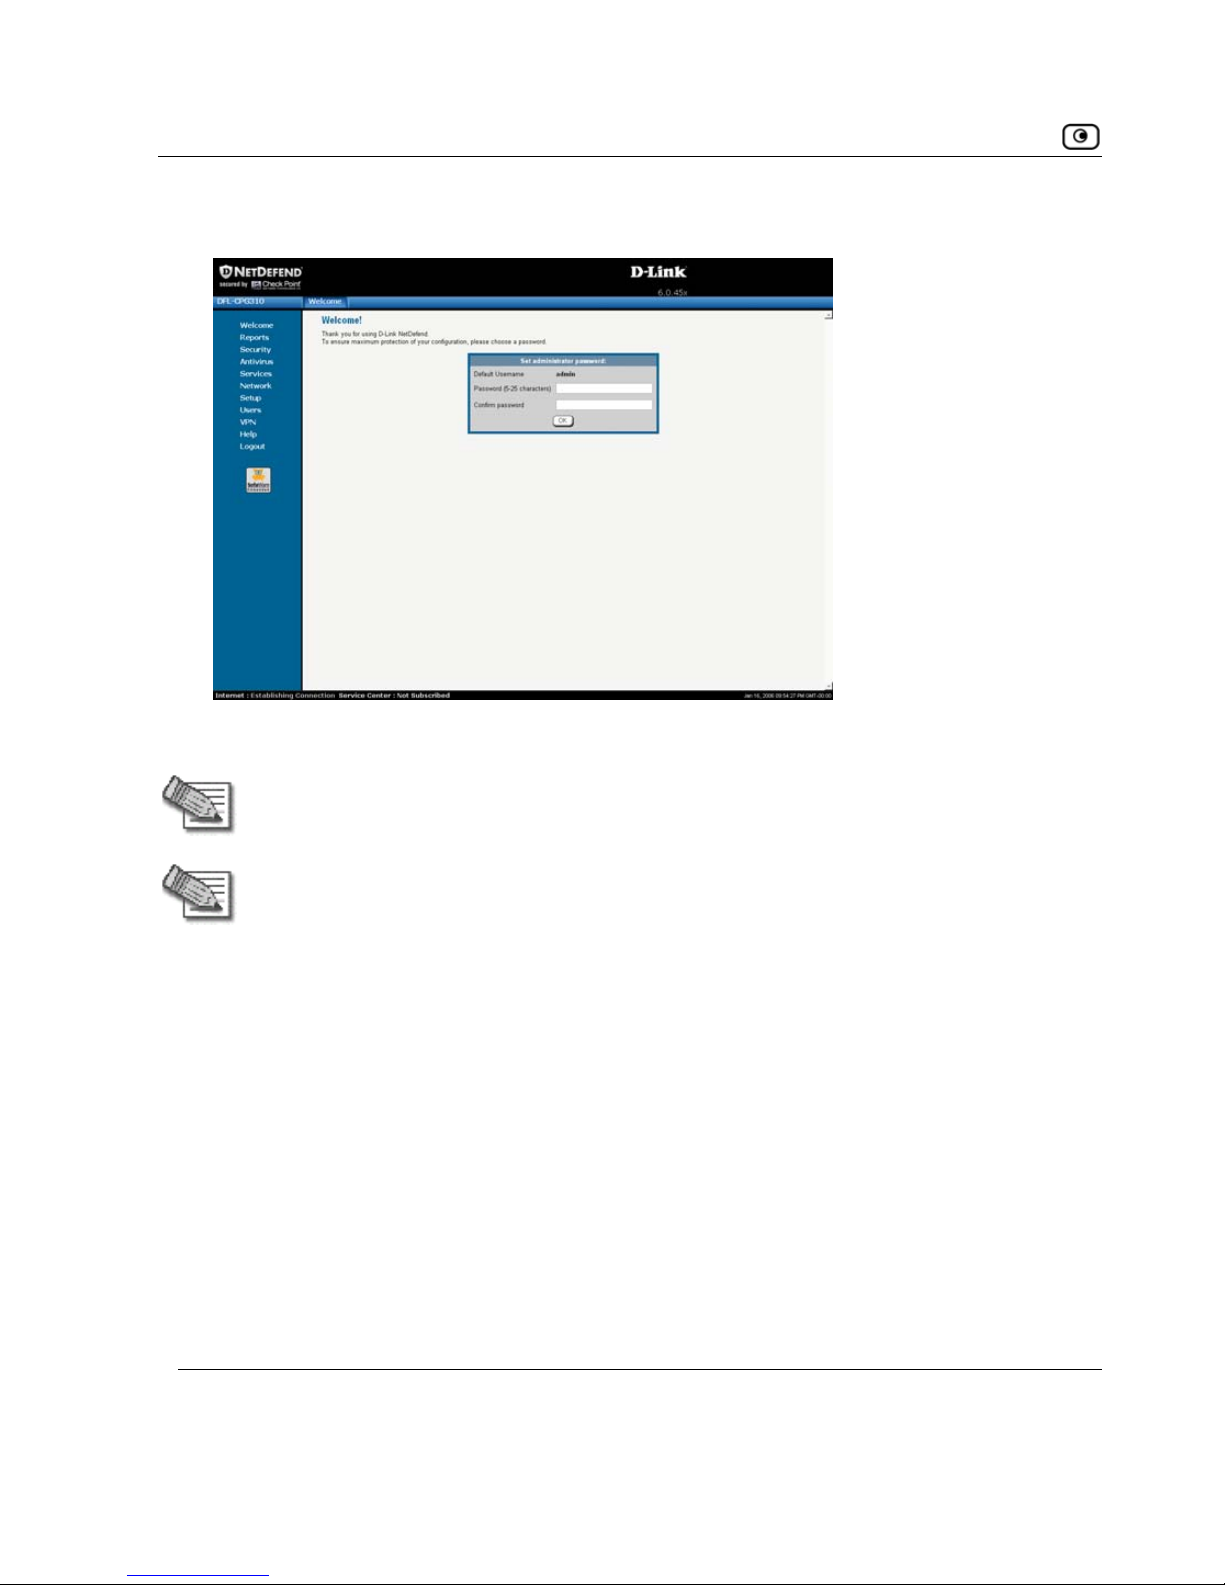
Initial Login to the NetDefend Portal
The initial login page appears.
Type a password both in the
Password and the Confirm Password fields.
2.
Note: The password must be five to 25 characters (letters or numbers).
Note: You can change your password at any time. For further information, see
Changing Your Password.
3. Click OK.
40 D-Link NetDefend firewall User Guide
Page 57
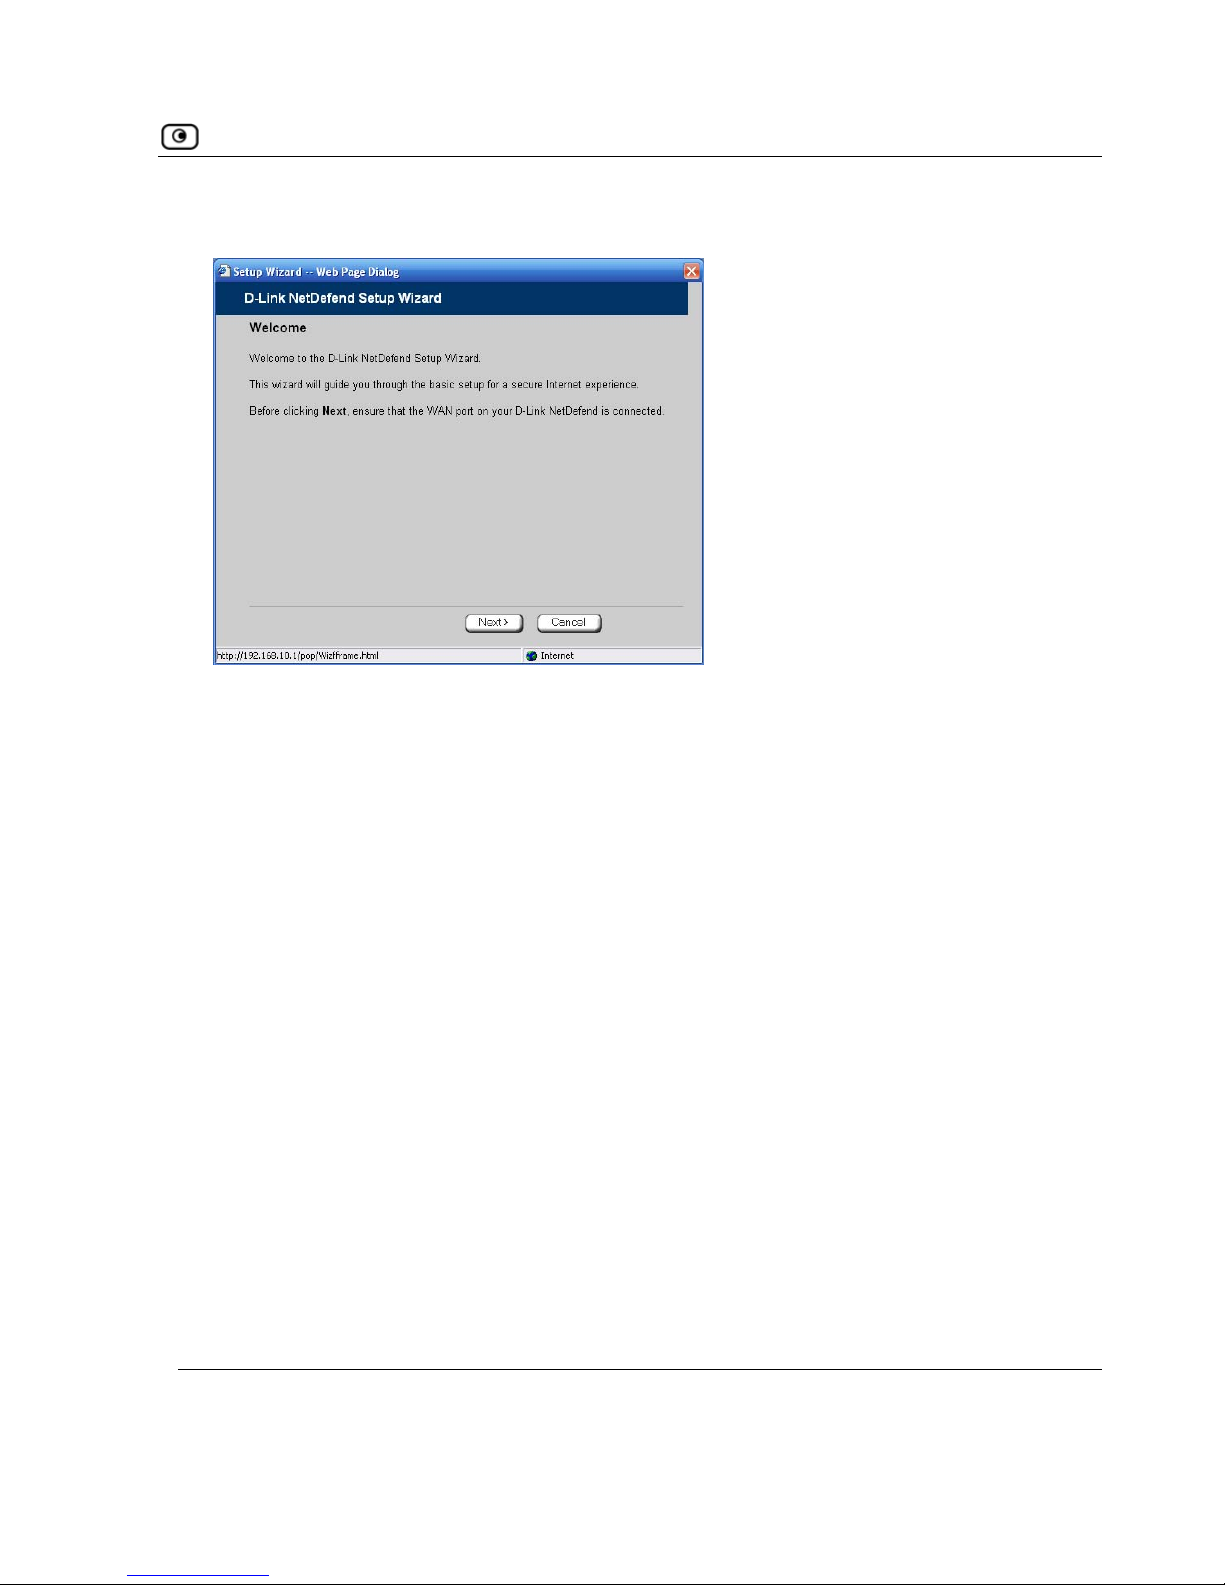
Initial Login to the NetDefend Portal
Th Welcome page displayed. e NetDefend Setup Wizard opens, with the
4. Configure y
• Internet
e Inte ou
through
using the , see Using the Internet Wizard on page 54.
NetDefend firewall.
• Internet Setup
Internet Setup offers advanced setup options, such as configuring two
Internet connections. To use Internet Setup, click
Cancel and refer to Using
Internet Setup
on page 63.
our Internet connection using one of the following ways:
Wizard
Th rnet Wizard is the first part of the Setup Wizard, and it takes y
basic Internet connection setup, step by step. For information on
Internet Wizard
After you have com
guide you th
pleted the Internet Wizard, the Setup Wizard continues to
rough appliance setup. For more information, see Setting Up the
Chapter 3: Getting Started 41
Page 58
Logging on to the NetDefend Portal
Logging on to the NetDefend Portal
Note: By default, HTTP and HTTPS access to the NetDefend Portal is not all owed
from the WLAN, unless you do one of the following:
firewall rule to allow access from the WLAN. See
Using Rules on page 209.
O
• Enable HTTPS access from the Internet. See Configuring HTTPS on
pag
To log on to the NetDefend Portal
1. Do one of the
Browse to
Or
o log on the procedure
Accessing the NetDefend Portal Remotely on page 44.
• Configure a specific
r
e 390.
following:
• http://my.firewall.
• T through HTTPS (locally or remotely), follow
42 D-Link NetDefend firewall User Guide
Page 59
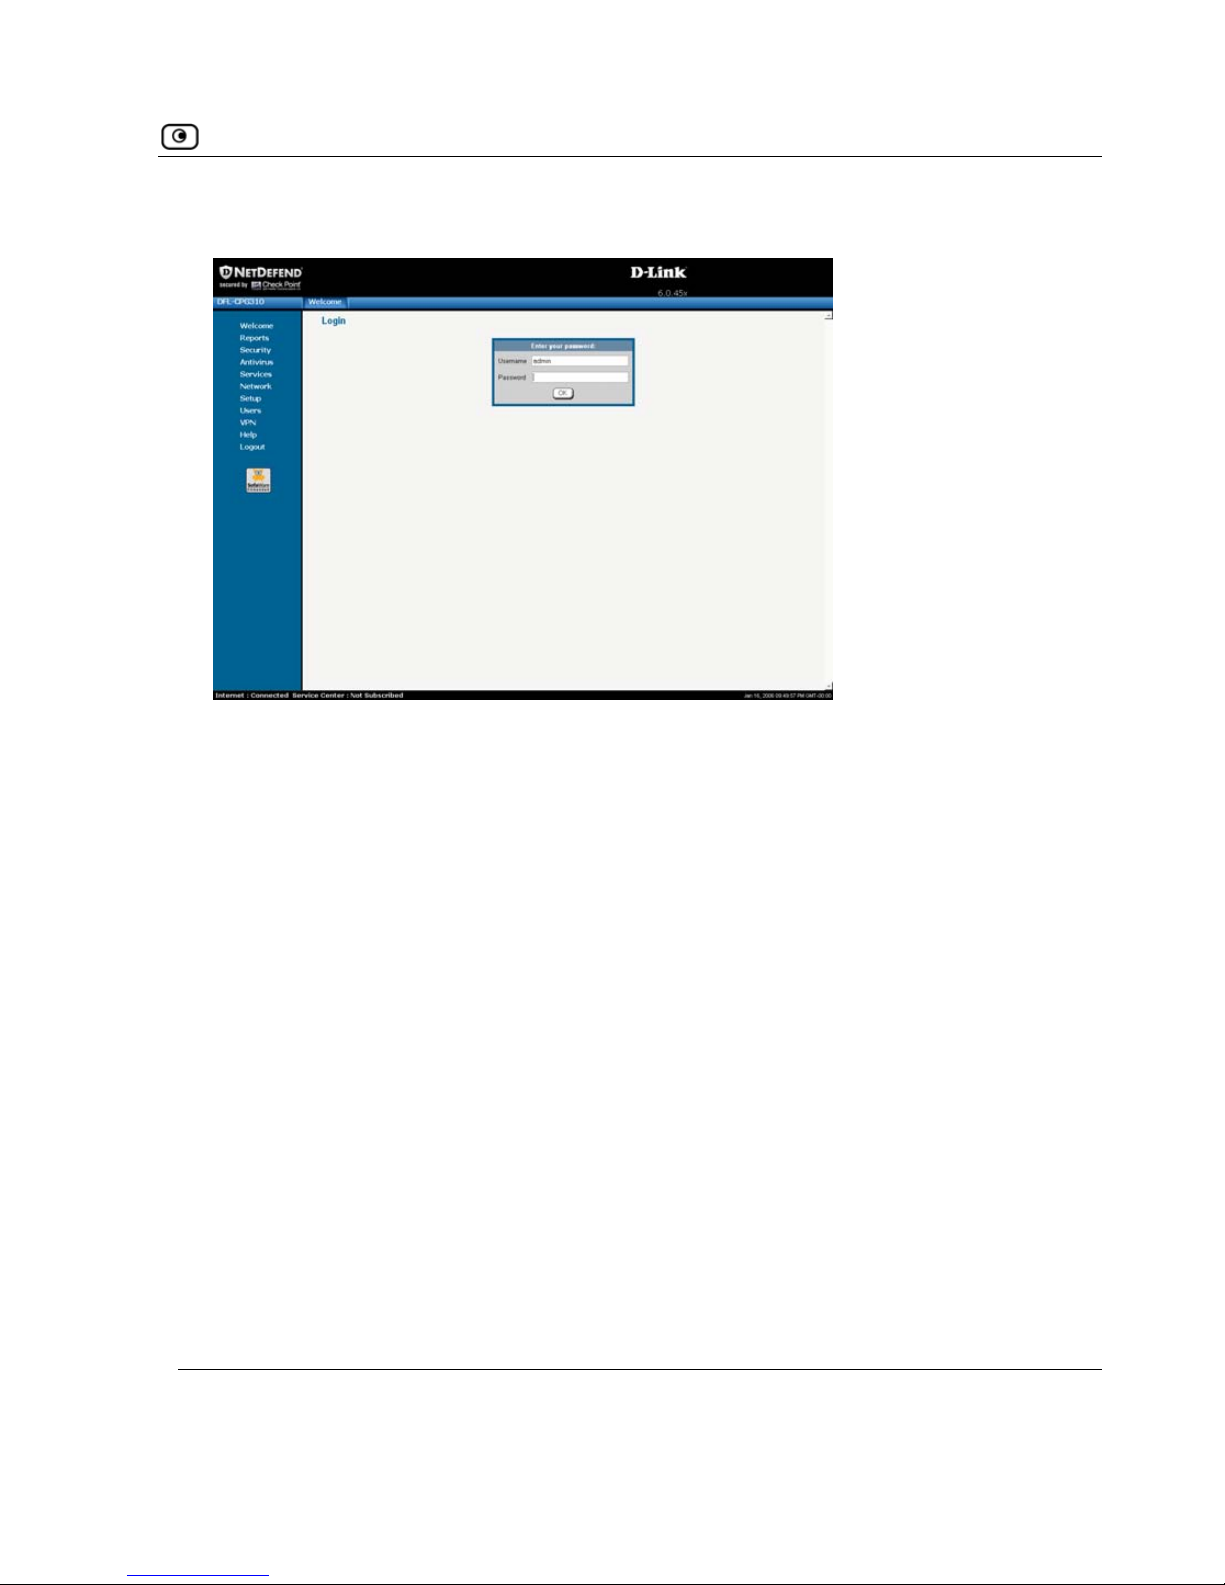
Logging on to the NetDefend Portal
The login page appears.
2. Type your username and password.
3. Click
OK.
Chapter 3: Getting Started 43
Page 60
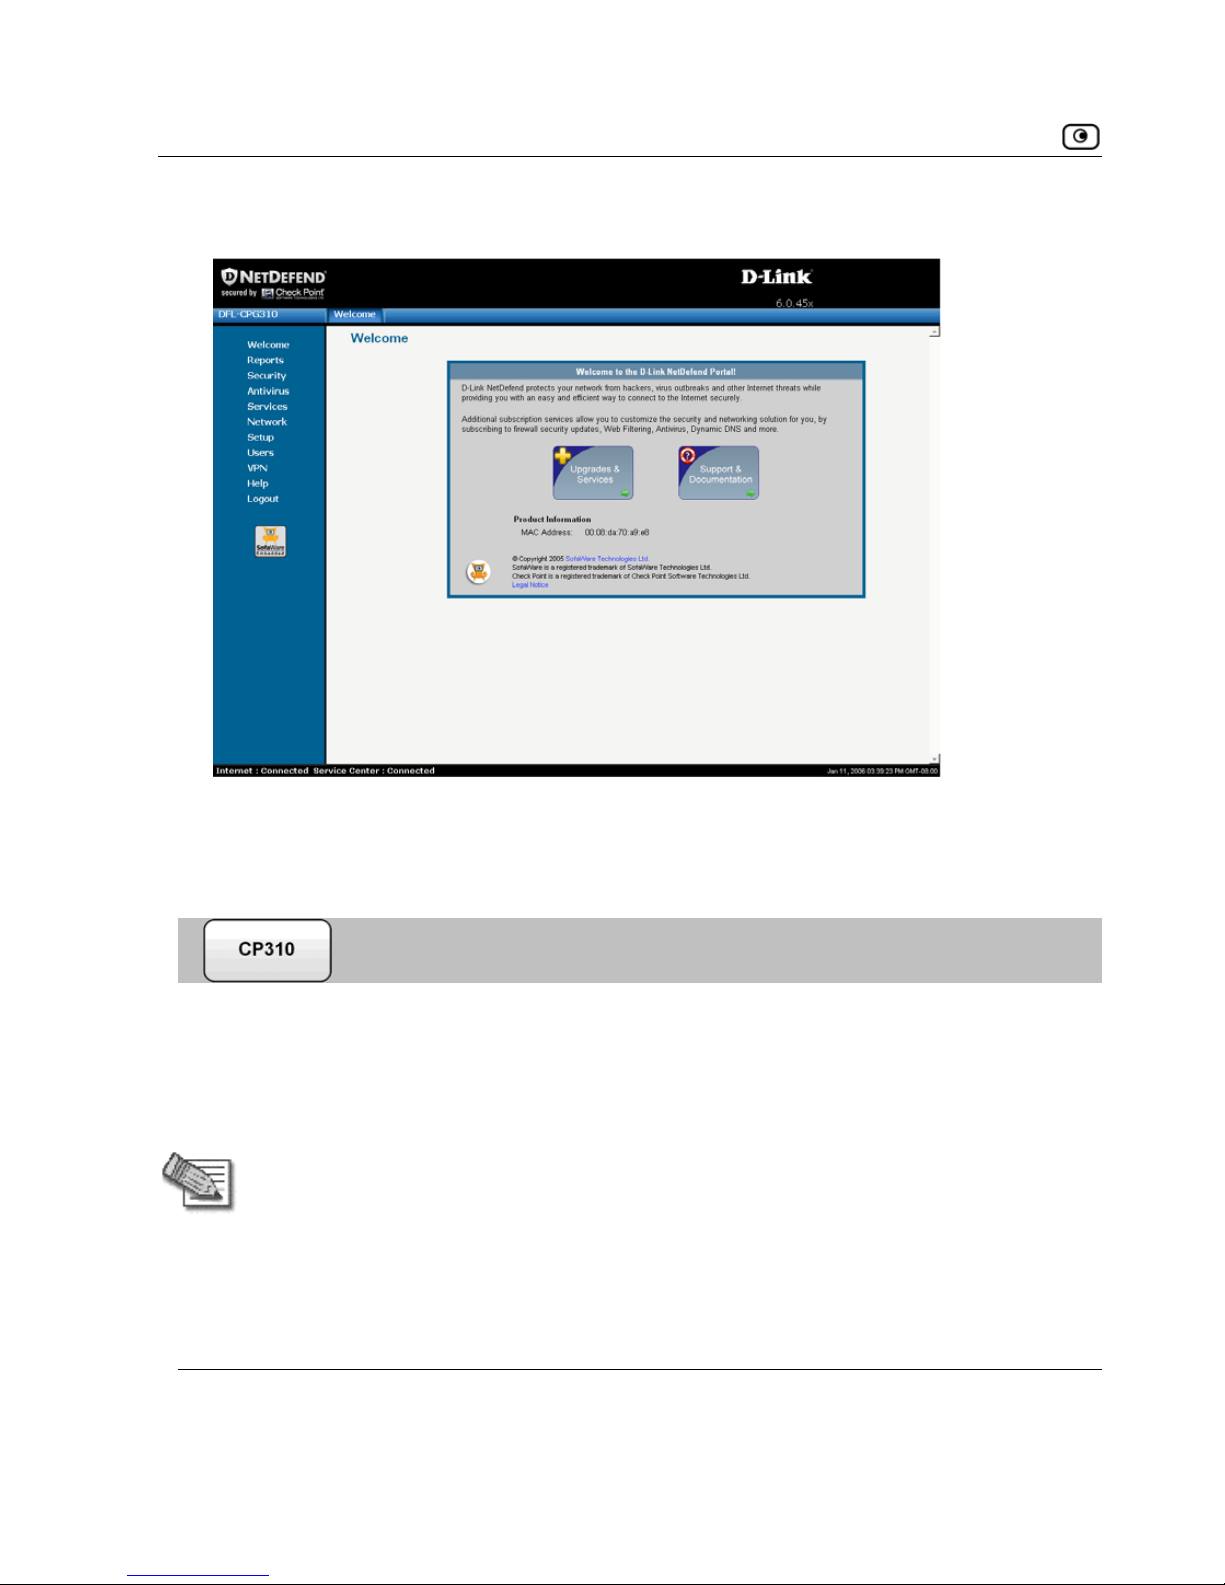
Accessing the TNetDefendT Portal Remotely Using HTTPS
The Welcome page appears.
g the
Accessin
HTTPS
NetDefend Portal Remotely Using
You can access the NetDefend Portal remotely (from the Internet) through HTTPS.
HTTPS is a protocol for accessing a secure Web server. It is used to transfer
confidential user information. If desired, you can also use HTTPS to access the
NetDefend Portal from your internal network.
Note: In order to access the NetDefend Portal remotely using HTTPS, you must first
do both of the following:
• Configure your password, using HTTP. See
Initial Login to the
NetDefend Portal
on page 39.
• Configure HTTPS Remote Access. See
Configuring HTTPS on page
390.
44 D-Link NetDefend firewall User Guide
Page 61

Accessing the TNetDefendT Portal Remotely Using HTTPS
Note: Your browser must support 128-bit cipher strength. To check your browser's
cipher strength, open Internet Explorer and click
Help > About Internet Explorer.
cess the NetDefend Portal from your internal network
• Browse to
(Note that the URL starts with “https”, not “http”.)
The NetD
To access the NetDe
• Browse to ht _IP_address>:981.
(Note that h
The follow n
If this is your first attempt to access the NetDefend Portal through HTTPS, the
certificate in the NetDefend firewall is not yet known to the browser, so the
Security Alert dialog box appears.
To avoid seeing this dialog box again, install the certificate of the destination
NetDefend firewall. If you are using Internet Explorer 5, do the following:
a. Click
View Certificate.
The Certificate dialog box appears, with the General tab displayed.
b. Click Install Certificate.
The
Certificate Import Wizard opens.
c. Click Next.
d. Click
Next.
e. Click
Finish.
f. Click Yes.
g. Click OK.
To ac
https://my.firewall.
efend Portal appears.
fend Po
tps://<firewall
rtal from the Internet
t e URL starts with “https”, not “http”.)
i g things happen in the order below:
Chapter 3: Getting Started 45
Page 62

Using the NetDefend Portal
The Security Alert dialog box reappears.
The NetDefend Portal appears.
U
u to
configure the NetDefend firewall operation and options.
hree major elements.
T ents
Elem
h. Click
Yes.
sing the NetDefend Portal
The NetDefend Portal is a Web-based management interface, which enables yo
manage and
The NetDefend Portal consists of t
able 5: NetDefend Portal Elem
ent Description
Main menu Used for navigating between the various topics (such as Reports, Security,
and Setup).
Main frame Displays information and controls related to the selected topic. The main
frame may also contain tabs that allow you to view different pages related to
the selected topic.
Status bar Shows your Internet connection and managed services status.
46 D-Link NetDefend firewall User Guide
Page 63
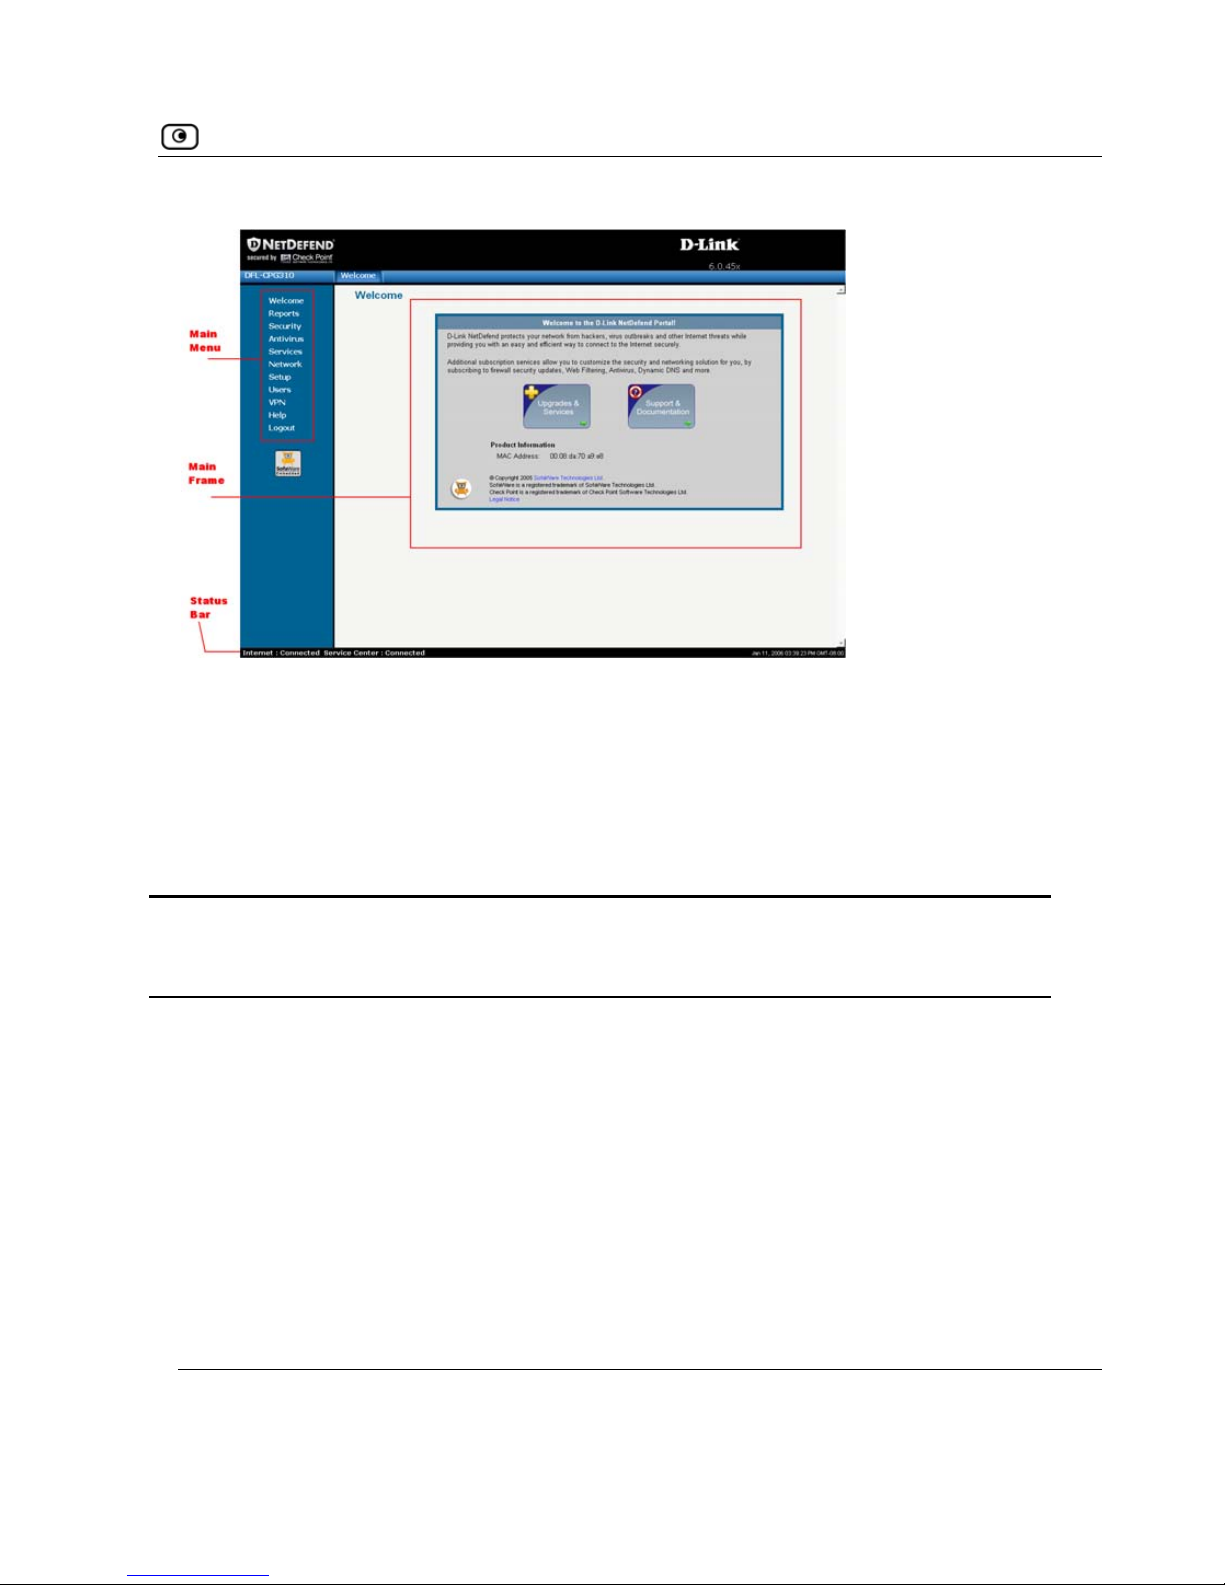
Using the NetDefend Portal
Figure 9: NetDefend Portal
Main Menu
includes the following submenus.
T
This
s
The main menu
able 6: Main Menu Submenus
Does this…
ubmenu…
Welcome Displays general welcome information.
R
, active computers, and established connections.
Securit y computer in
Antivirus
Services
eports Provides reporting capabilities in terms of event logging, traffic
monitoring
y Provides controls and options for setting the security of an
the network.
Allows you to configure VStream Antivirus settings.
Allows you to control your subscription to subscription services.
Chapter 3: Getting Started 47
Page 64

Using the NetDefend Portal
This
subm
Does this…
enu…
Network and Internet
connections.
Allows you to manage and configure your network settings
Setup Provides a set of tools for managing your NetDefend firewall. Allows you
to upgrade your license and firmware and to configure HTTPS access to
your NetDefend firewall.
U
V
Help xt-sensitive help.
Lo lows you to log off of the NetDefend Portal.
sers Allows you to manage NetDefend users.
PN Allows you to manage, configure, and log on to VPN sites.
Provides conte
gout Al
ain Frame
ain and
tab you s are
using. The differences are described throughout this guide.
Status Bar
the fields below, as
we
M
The m frame displays the relevant data and controls pertaining to the menu
elect. These elements sometimes differ depending on what model you
The status bar is located at the bottom of each page. It displays
ll as the date and time.
48 D-Link NetDefend firewall User Guide
Page 65

Using the NetDefend Portal
Tabl
This field… Displays this…
e 7: Status Bar Fields
Internet Your Internet connection status.
The connection status may be one of the following:
•
Connected. The NetDefend firewall is connected to the Internet.
•
Connected – Probing OK. Connection probing is enabled and has
detected that the Internet connectivity is OK.
•
Connected – Probing Failed. Connection probing is enabled and has
detected problems with the Internet connectivity.
•
Not Connected. The Internet connection is down.
• Establishing Connection. The NetDefend firewall is connecting to the
Internet.
Contacting Gateway. The NetDefend firewall is trying to contact the
Internet default gateway.
ally disabled.
Note: You can configure both a primary and a secondary Internet connection.
secondary Internet connection, see
Configuring the Internet Connection on
•
•
Disabled. The Internet connection has been manu
When both connections are configured, the Status bar displays both statuses.
For example “Internet [Primary]: Connected”. For information on configuring a
page 53.
Chapter 3: Getting Started 49
Page 66

Using the NetDefend Portal
This field… Displays this…
Service
Center
Displays your subscription services status.
Your Service Center may offer various subscription services. These include
the firewall service and optional services such as Web Filtering and Email
Antivirus.
Your subscription services status may be one of the following:
•
Not Subscribed. You are not subscribed to sec urity services.
•
Connection Failed. The NetDefend firewall failed to connect to the
Service Center.
•
Connecting. The NetDefend firewall is connecting to the Service
Center.
onnected. You are connected to the Service Center, and security
ervices are active.
• C
s
50 D-Link NetDefend firewall User Guide
Page 67
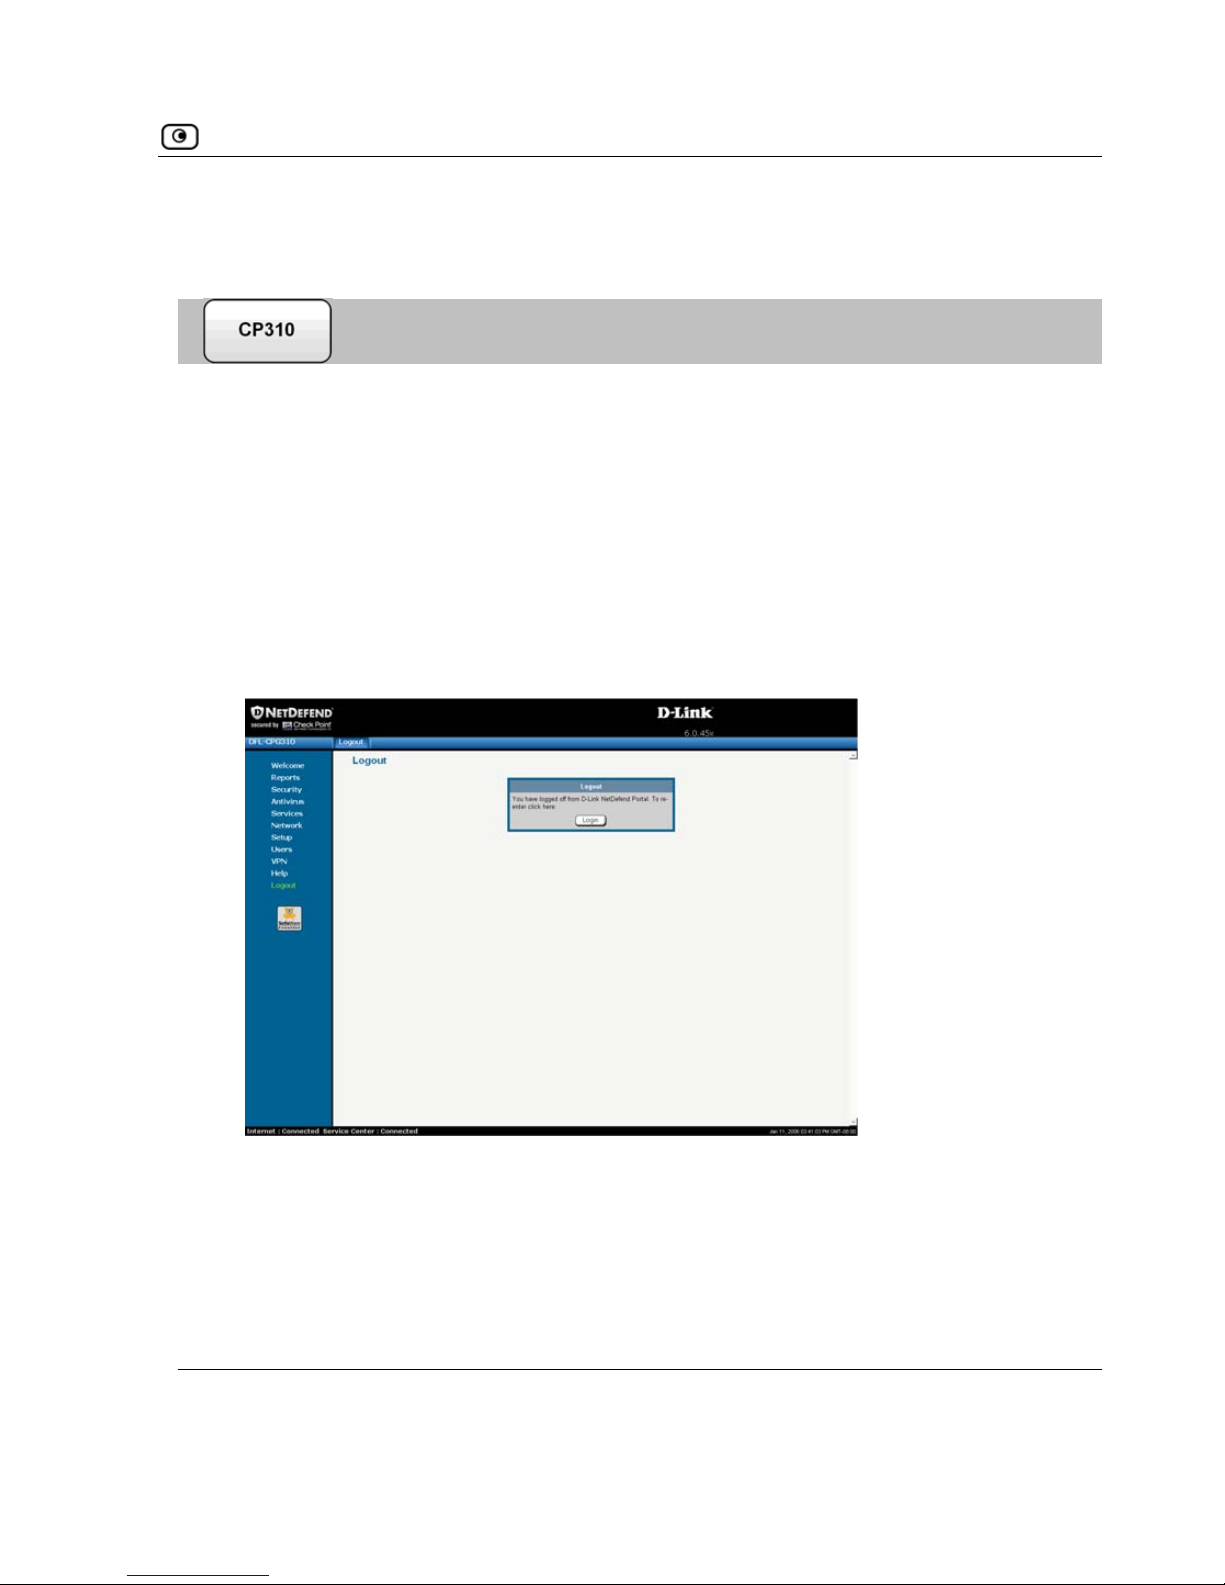
Logging off
Logging off
Logging off terminates your administration session. Any subsequent attempt to
pa
To l
Logout page appears.
connect to the NetDefend Portal will require re-entering of the administration
ssword.
log off of the NetDefend Porta
• Do one of the following:
• If you are connected through HTTP, click
Logout in the main menu.
The
• If you are connected through HTTPS, the
Logout option does not appear
menu. Close the browser window. in the main
Chapter 3: Getting Started 51
Page 68

Page 69

Overview
Chapter 4
This chapter describes how to configure and work with an Internet connection.
This chapter includes the following topics:
Overview....................................................................................................53
Using the Internet Wizard ..........................................................................54
Using Internet Setup...................................................................................63
Setting Up a Dialup Modem.......................................................................84
Viewing Internet Connection Information.................................................. 87
Enabling/Disabling the Internet Connection...............................................88
Using Quick Internet Connect i on/ Di sconnection....................................... 90
Configuring a Backup Internet Connection................................................90
O
Yo nection before you can access the Internet
through the NetDefend firewall. You can configure your Internet connection using
ing setup tools:
•
d is the Internet Wizard. For further
all.
. Guides you through the Internet connection configuration
y step.
• Internet Setup. Offers the following advanced setup options:
• Configure two Internet connections.
For information, see
Configuring a Backup Internet Connection on page 90.
• Enable Traffic Shaper for traffic flowing through the connection.
Configuring the Internet Connection
verview
u must configure your Internet con
any of the follow
Setup Wizard. Guides you through the NetDefend firewall setup step by
step. The first part of the Setup Wizar
information on the Setup Wizard, see Setting Up the NetDefend firew
•
Internet Wizard
process step b
Chapter 4: Configuring the Internet Connection 53
Page 70
Using the Internet Wizard
For information on Traffic Shaper, see Using Traffic Shaper on page 151.
Configure a dialup Internet connection.
config nnection, you must first set up the modem. For
ation, see
on page 84.
the Inte
•
Before uring the co
inform
Setting Up a Dialup Modem
Using rnet Wizard
The Internet Wizard allows
connection quickly er-friendly interface. It lets you to
choose between the following three types of broadband connection methods:
onnection
• PPTP or PPPoE dialer
you to configure your NetDefend firewall for Internet
and easily through its us
• Direct LAN C
• Cable Modem
automatic
the pro
Note: The first time you log on to the NetDefend Portal, the Internet
ally as part of the Setup Wizard. In this case, you should skip to st
Wizard starts
ep 3 in
cedure below.
ernet connection using the Internet Wizard
Internet
2. Click
To set up the Int
1. Click Network in the main menu, and click the tab.
The
Internet page appears.
Internet Wizard.
54 D-Link NetDefend firewall User Guide
Page 71
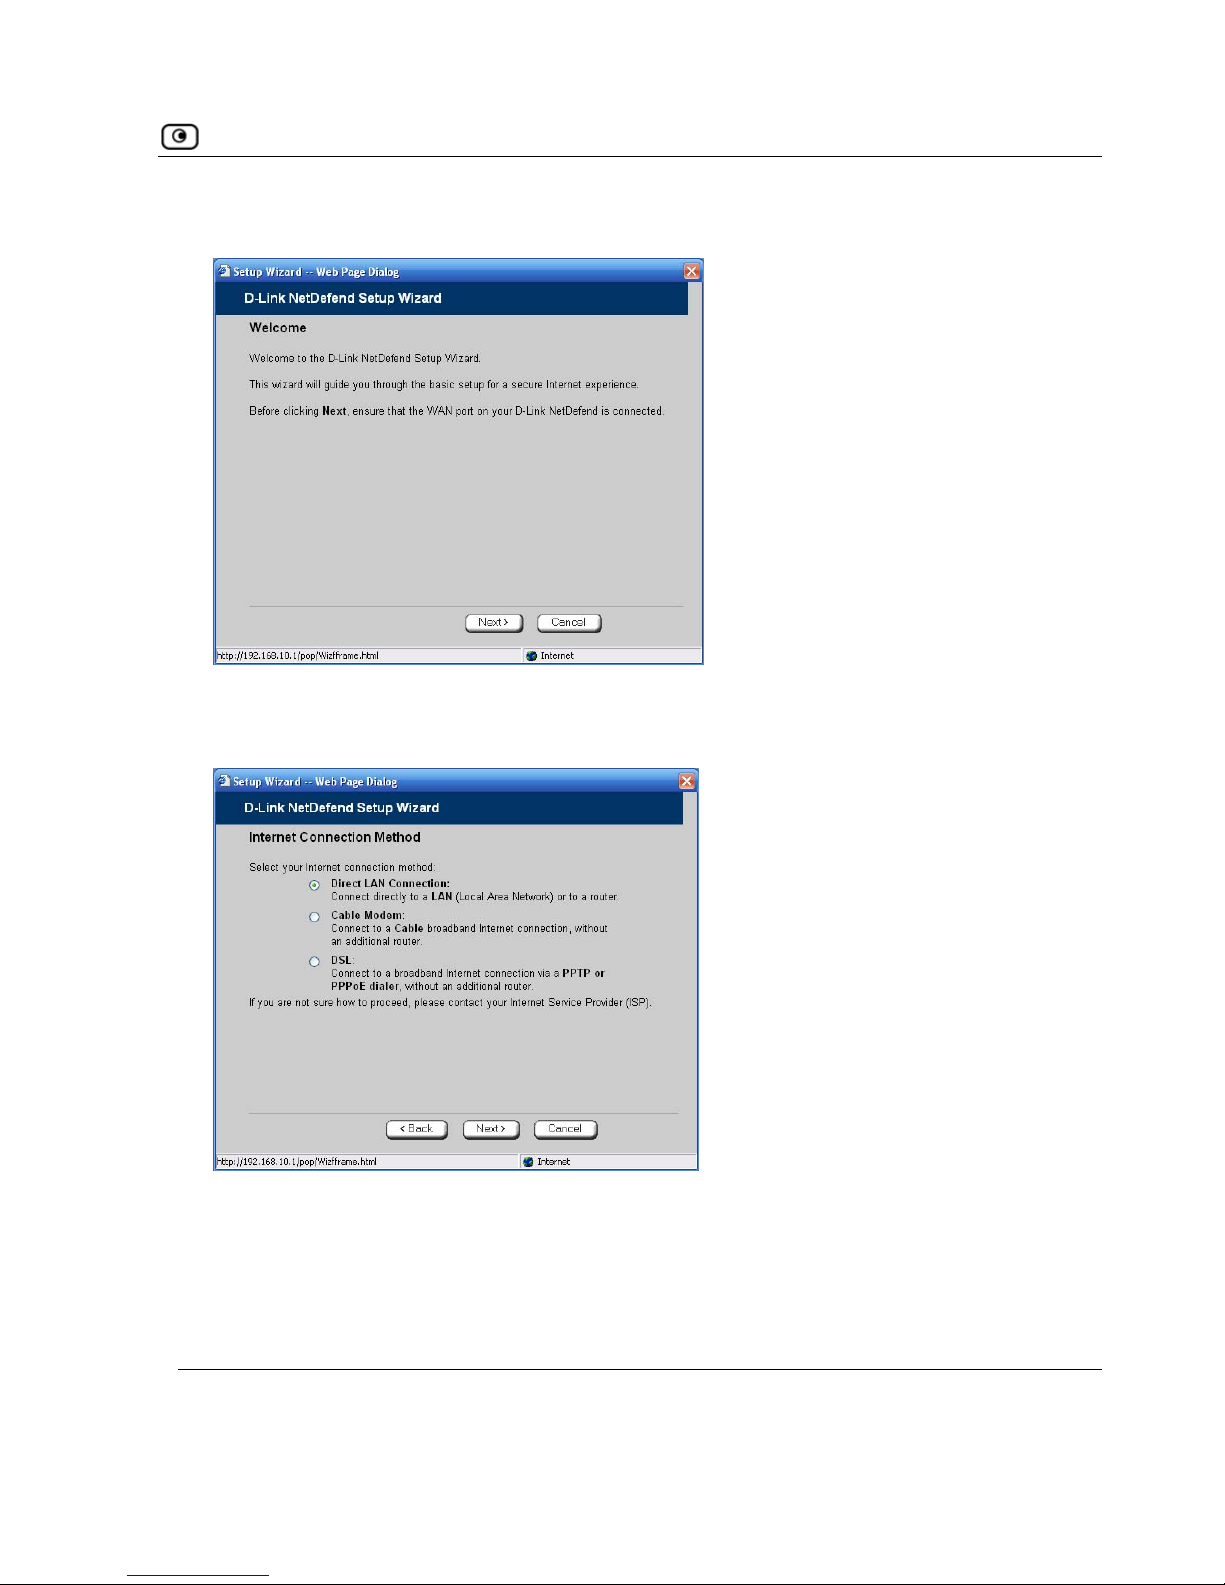
Using the Internet Wizard
The Internet Wizard opens with the Welcome page displayed.
3. Click
Next.
The Internet Connection Method dialog box appears.
4. Select the Internet connection method you want to use for connecting to the
Internet.
Chapter 4: Configuring the Internet Connection 55
Page 72
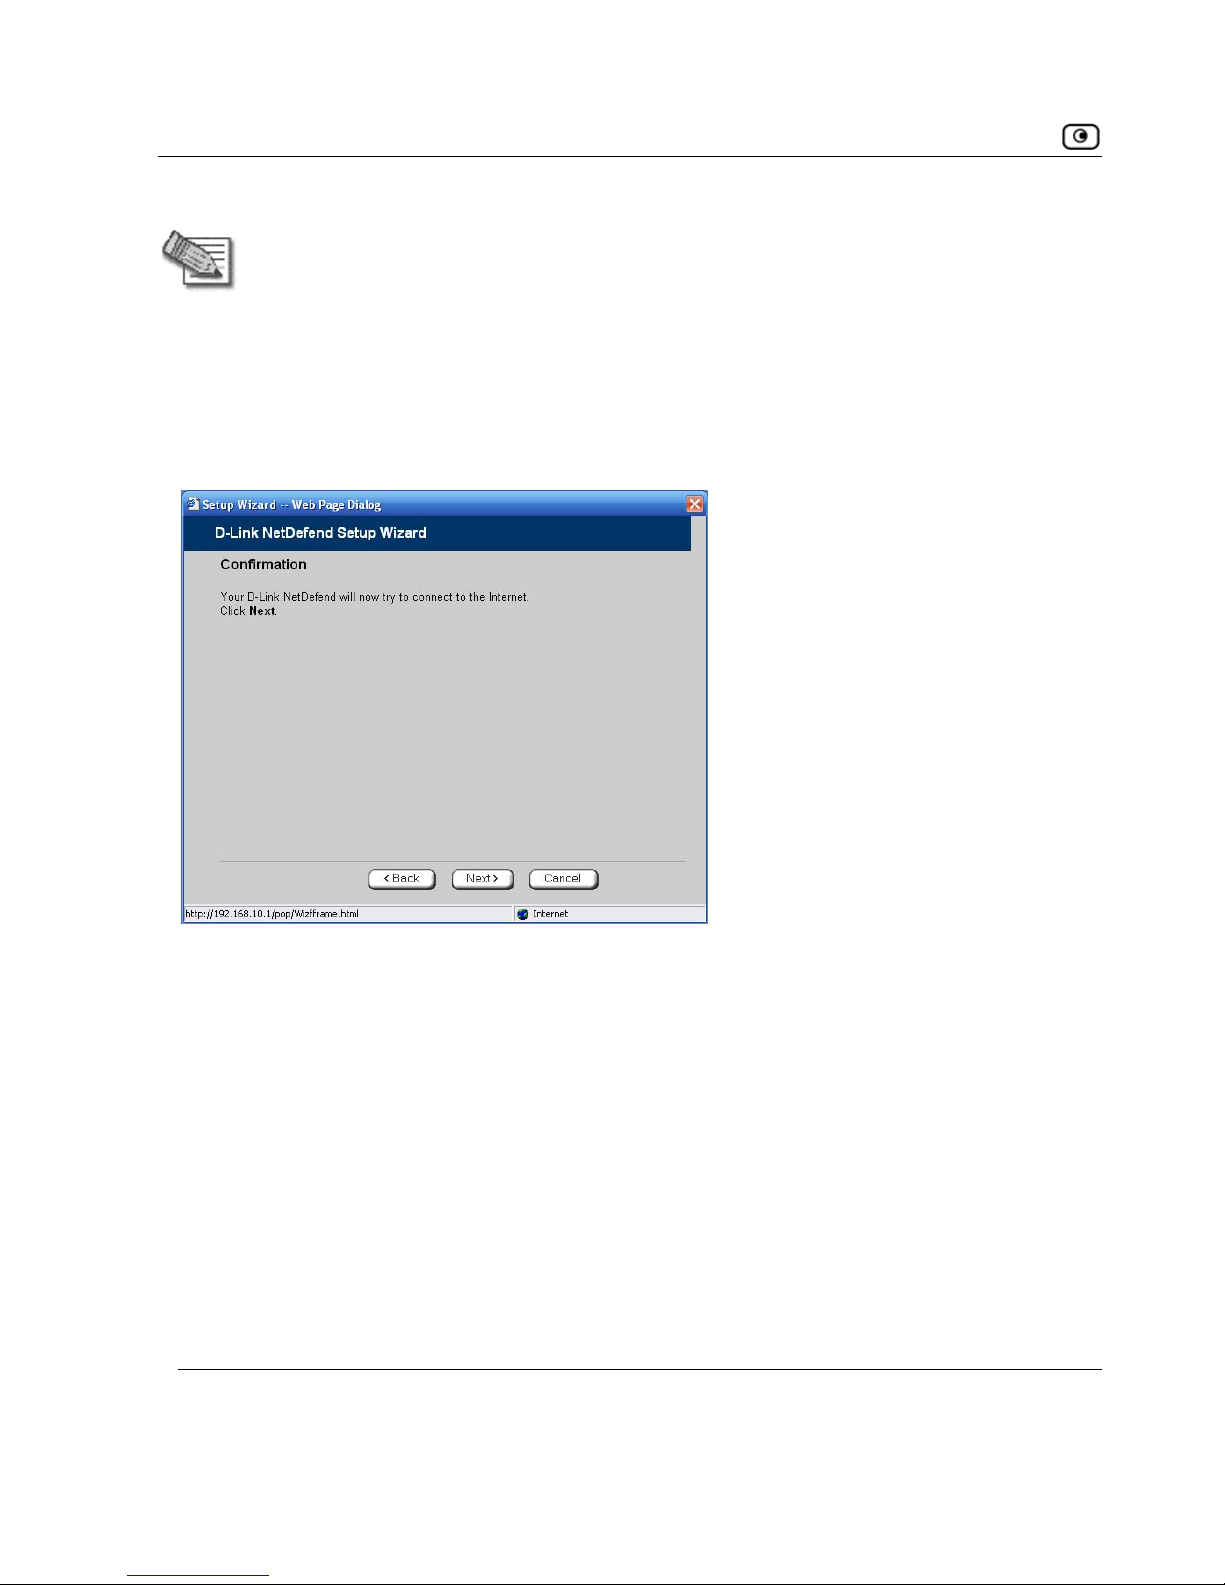
Using the Internet Wizard
Note: If you selected PPTP or
connect to the Internet.
PPPoE dialer, do not use your dial-up software to
5. Click Next.
U
No further settings are required for a direct LAN (Local Area Network) connection.
sing a Direct LAN Connection
The Confirmation screen appears.
1. Click
Next.
he system attempts to connect to the Internet via the selected connection. T
The
Connecting… screen appears.
56 D-Link NetDefend firewall User Guide
Page 73
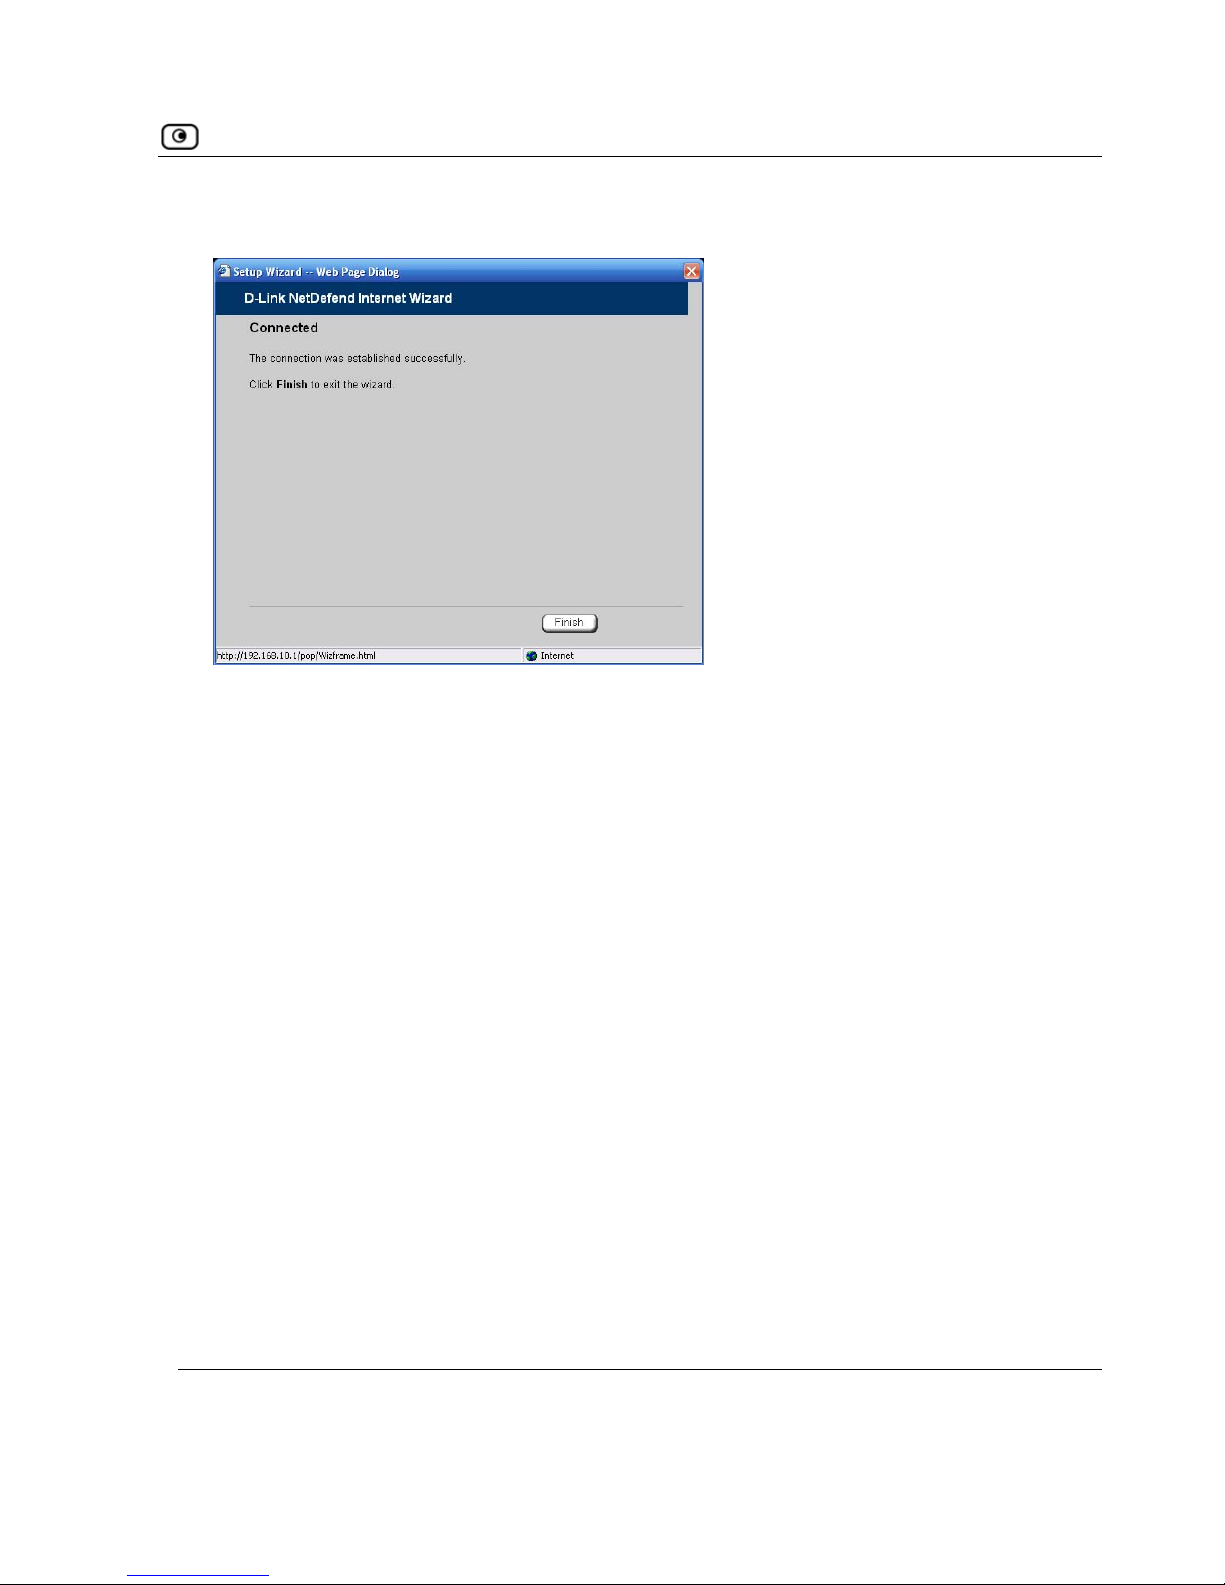
Using the Internet Wizard
At the end of the connection process the Connected screen appears.
2. Click
Finish.
Chapter 4: Configuring the Internet Connection 57
Page 74
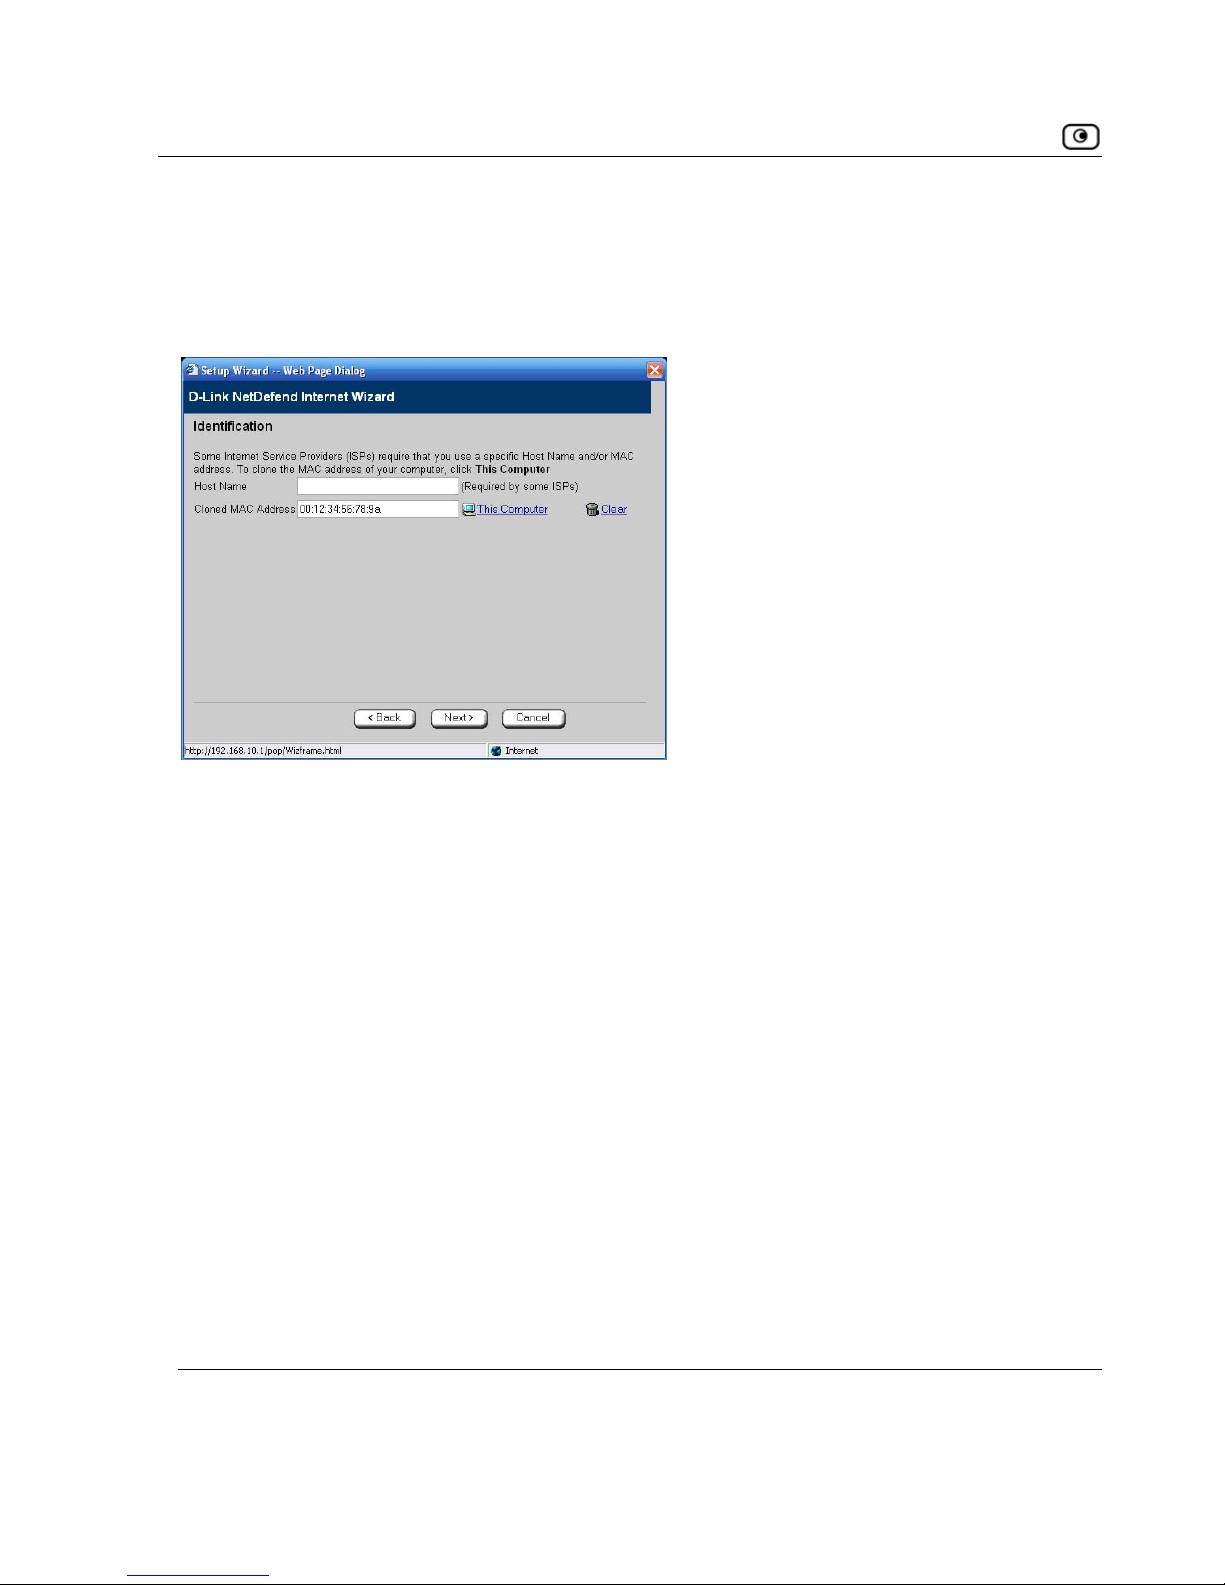
Using the Internet Wizard
Using a Cable Modem Connection
If you selected the Cable Modem connection method, the Identification dialog box
appears.
1.
s do not
fic hostname.
2. A MAC address is a 12-digit identifier assigned to every network device. If your
ISP restricts connections to specific, recognized MAC addresses, they will
instruct you to enter the MAC address. Otherwise, you may leave this field
blank.
If your ISP requires the MAC address, do either of the following:
• Click
This Computer to automatically "clone" the MAC address of your
computer to the NetDefend firewall.
Or
• If the ISP requires authentication using the MAC address of a different
computer, enter the MAC address in the
MAC cloning field.
If your ISP requires a specific hostname for authentication, type it in the
Host
Name
field.
The ISP will supply you with the proper hostname, if required. Most ISP
require a speci
58 D-Link NetDefend firewall User Guide
Page 75
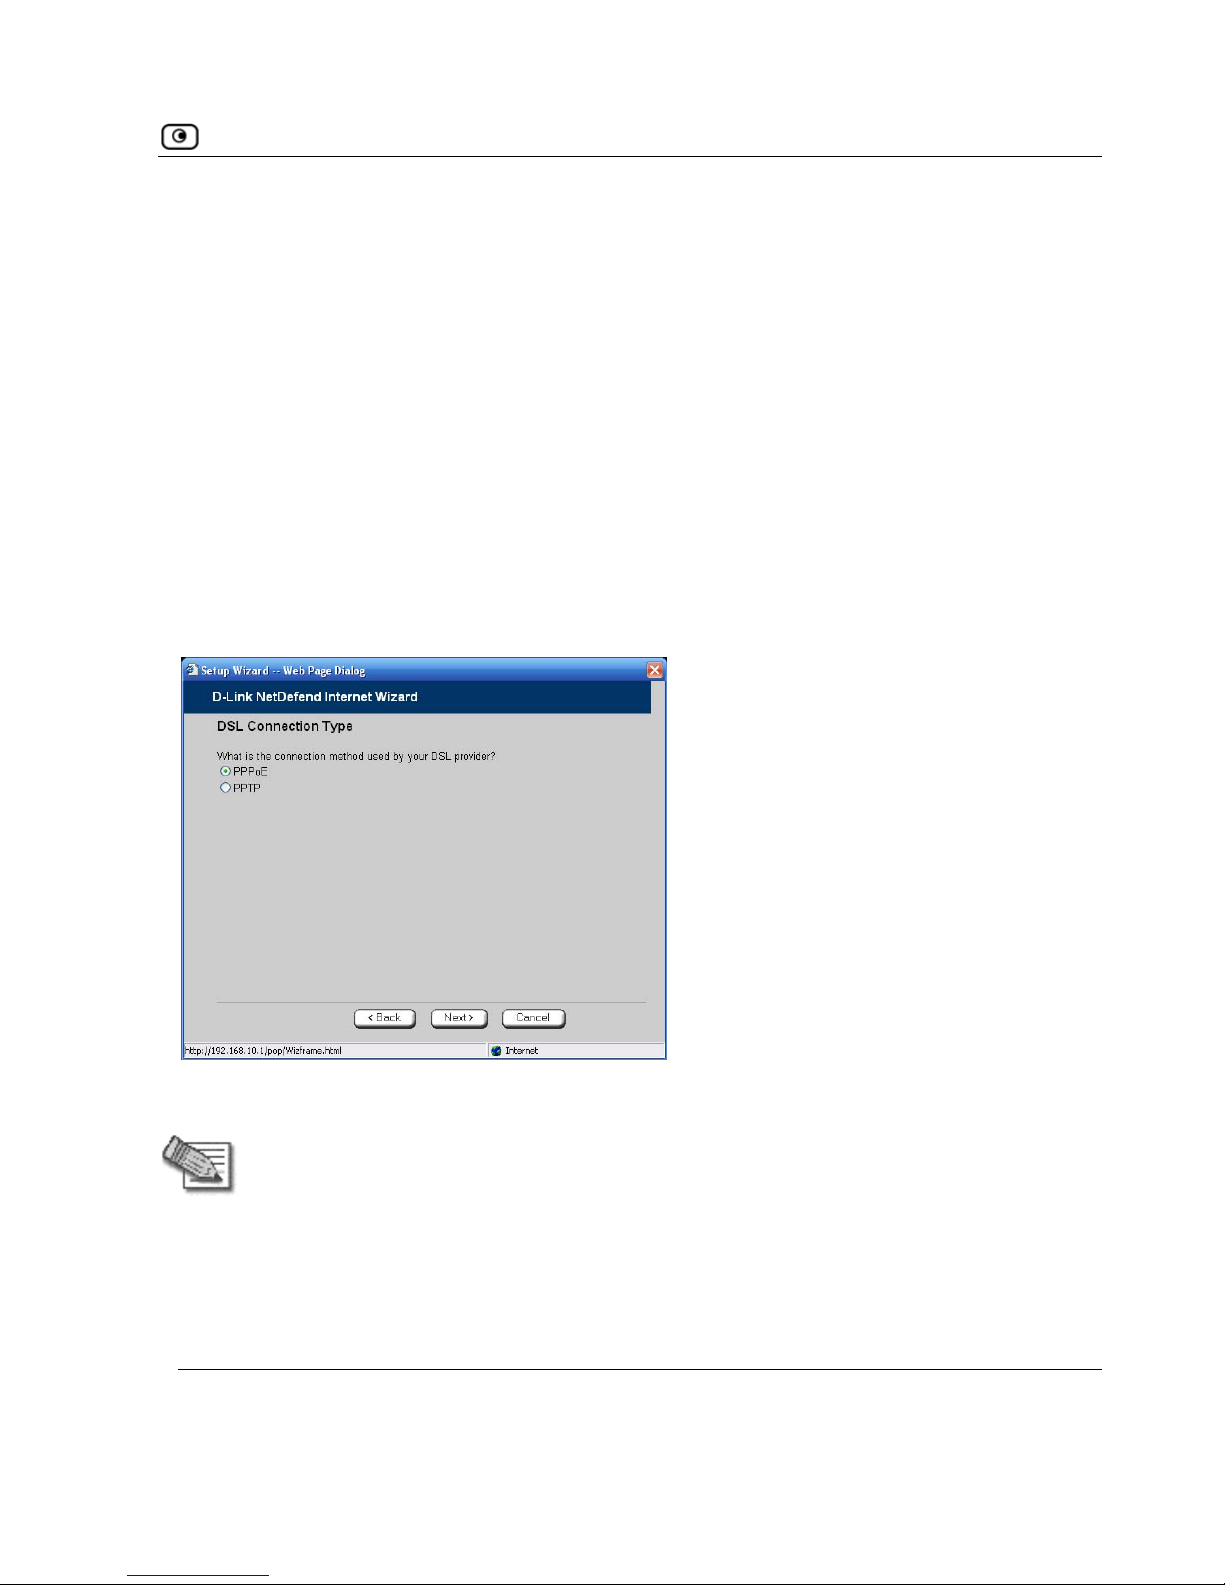
Using the Internet Wizard
3. Click Next.
The
Confirmation screen appears.
4. Click Next.
The system attempts to connect to the Internet.
The
Connecting… screen appears. At the end of the connection process the
Connected screen appears.
5. Click Finish.
Using a PPTP or PPPoE Dialer Connection
If you selected the PPTP or PPPoE dialer connection method, the DSL Connection
Type
dialog box appears.
1. Select the connection method used by your DSL provider.
Note: Most xDSL providers use PPPoE. If you are uncertain regarding which
connection method to use contact your xDSL provider.
2. Click Next.
Chapter 4: Configuring the Internet Connection 59
Page 76
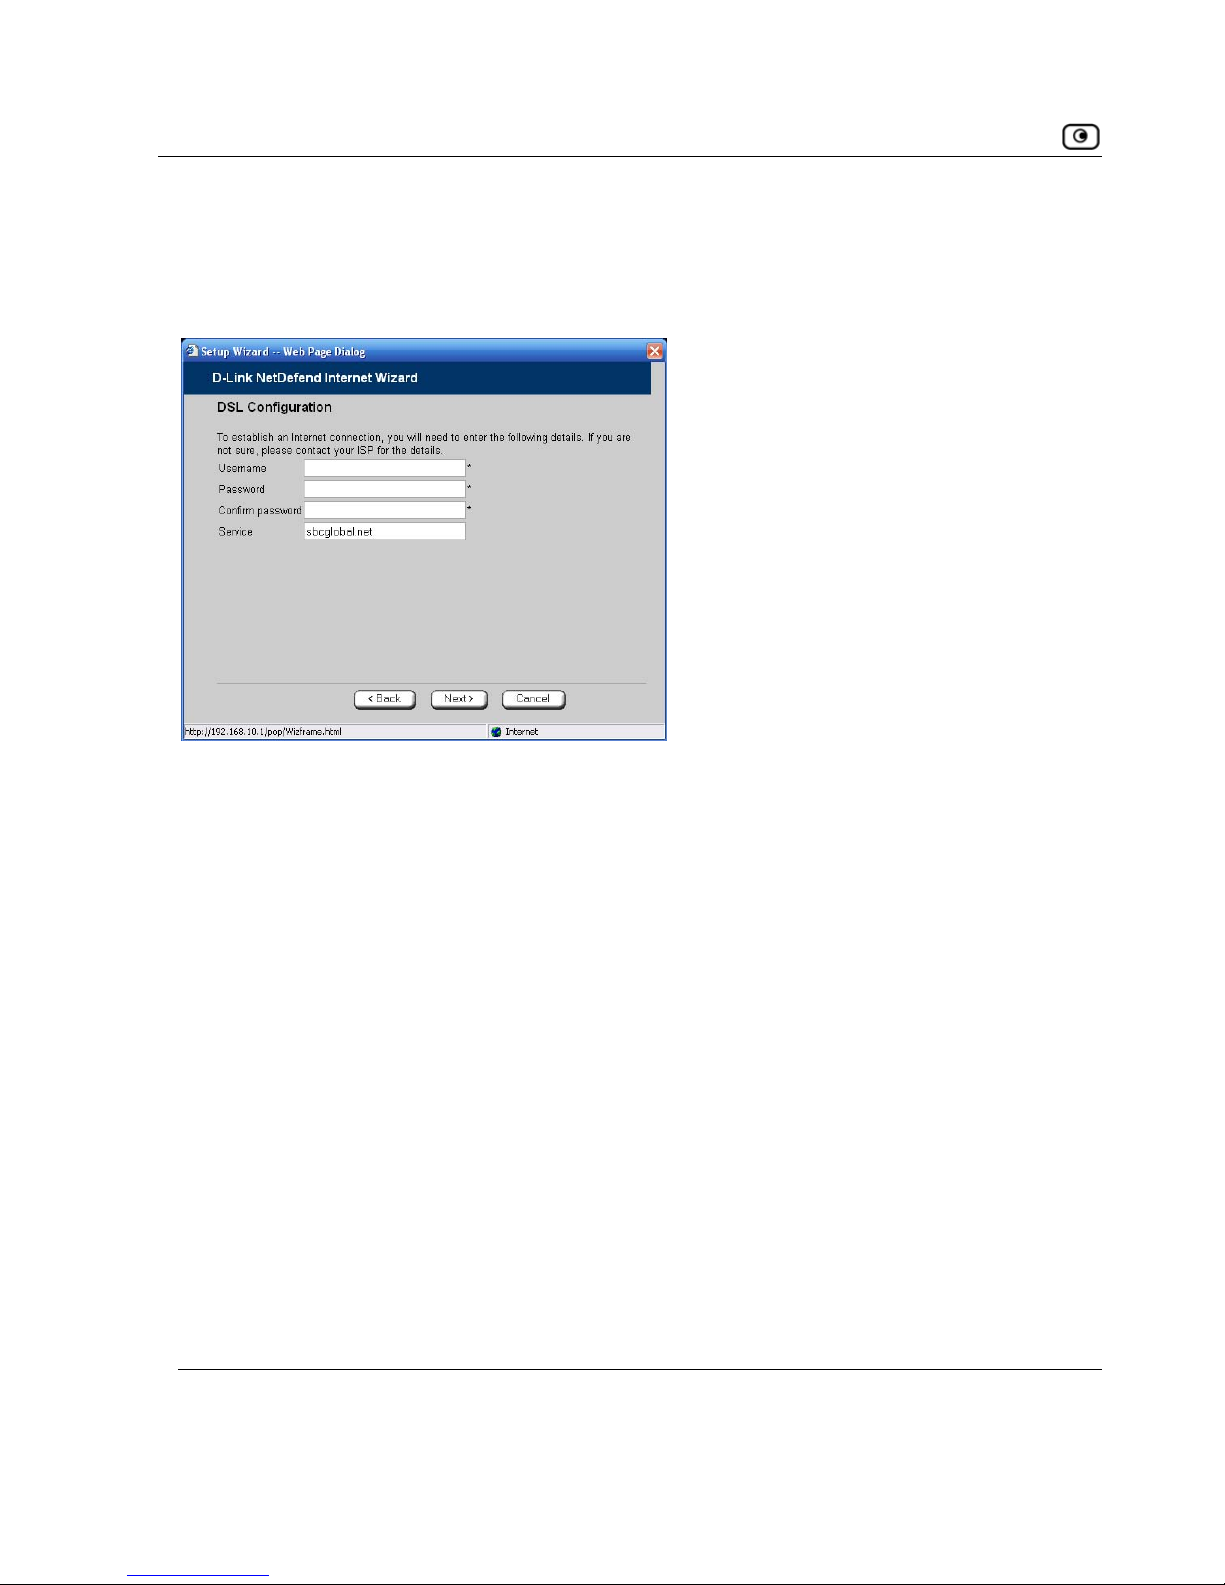
Using the Internet Wizard
Using PPPoE
If you selected the PPPoE connection method, the DSL Configuration dialog box
appears.
Complete1. the fields using the information in the table below.
2.
The Confirmation screen appears.
4. Click
Finish.
Click Next.
3. Click
Next.
The system attempts to connect to the Internet via the DSL connection.
The
Connecting… screen appears.
At the end of the connection process the
Connected screen appears.
60 D-Link NetDefend firewall User Guide
Page 77
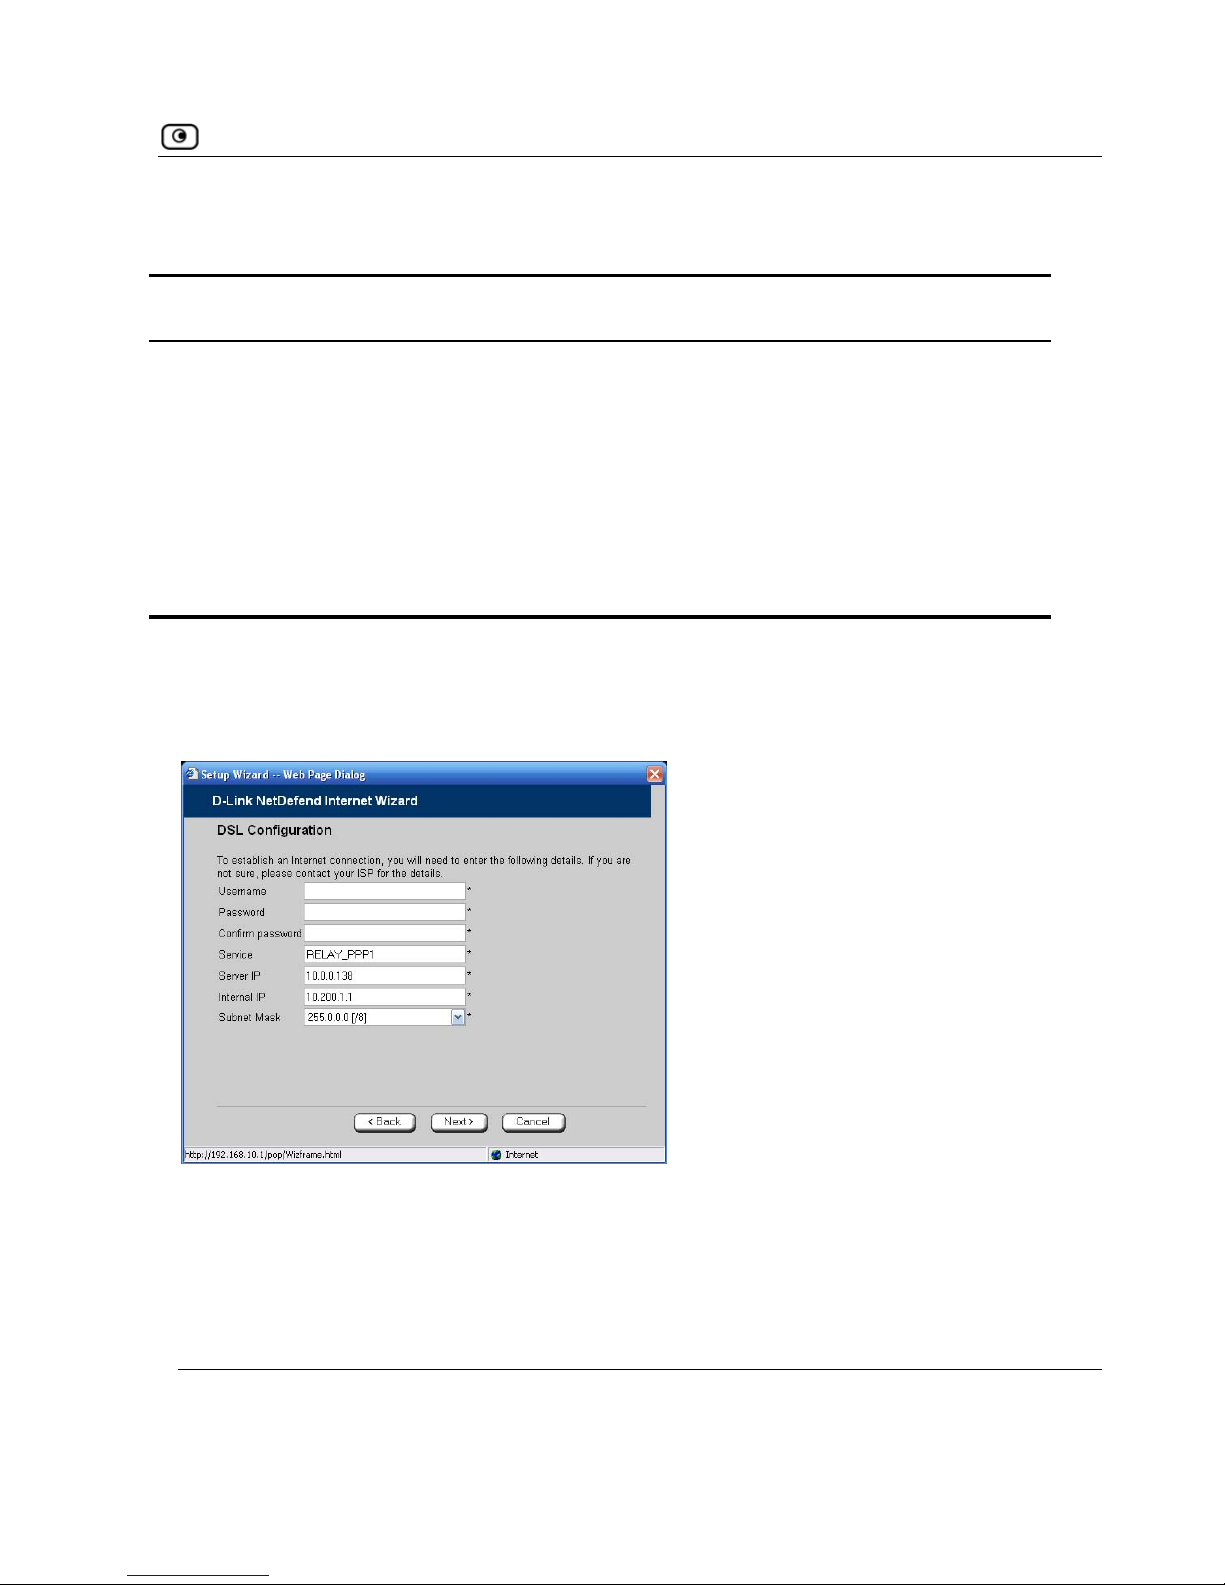
Using the Internet Wizard
Table 8: PPPoE Connection Fields
In this field… Do this…
Username Type your user name.
Password Type your password.
Confirm password Type your password again.
Service Type your service name.
This field can be left blank.
Using PPTP
If you selected the PPTP connection method, the DSL Configuration dialog box
appears.
1. Complete the fields using the information in the table below.
2. Click
Next.
The
Confirmation screen appears.
Chapter 4: Configuring the Internet Connection 61
Page 78

Using the Internet Wizard
3. Click Next.
The system attempts to connect to the Internet via the DSL connection.
The
At the end of the connection process the
Connected screen appears.
4. Click Finish.
Table 9: PPTP Connection Fields
In this field… Do this…
Connecting… screen appears.
Username Type your user name.
Password Type your password.
Confirm password Type your password again.
Service Type your service name.
Serve Type the IP address of the PPTP modem.
Intern P modem.
Subnet Mask Type the subnet mask of the PPTP modem.
r IP
al IP Type the local IP address re quired for accessing the PPT
62 D-Link NetDefend firewall User Guide
Page 79
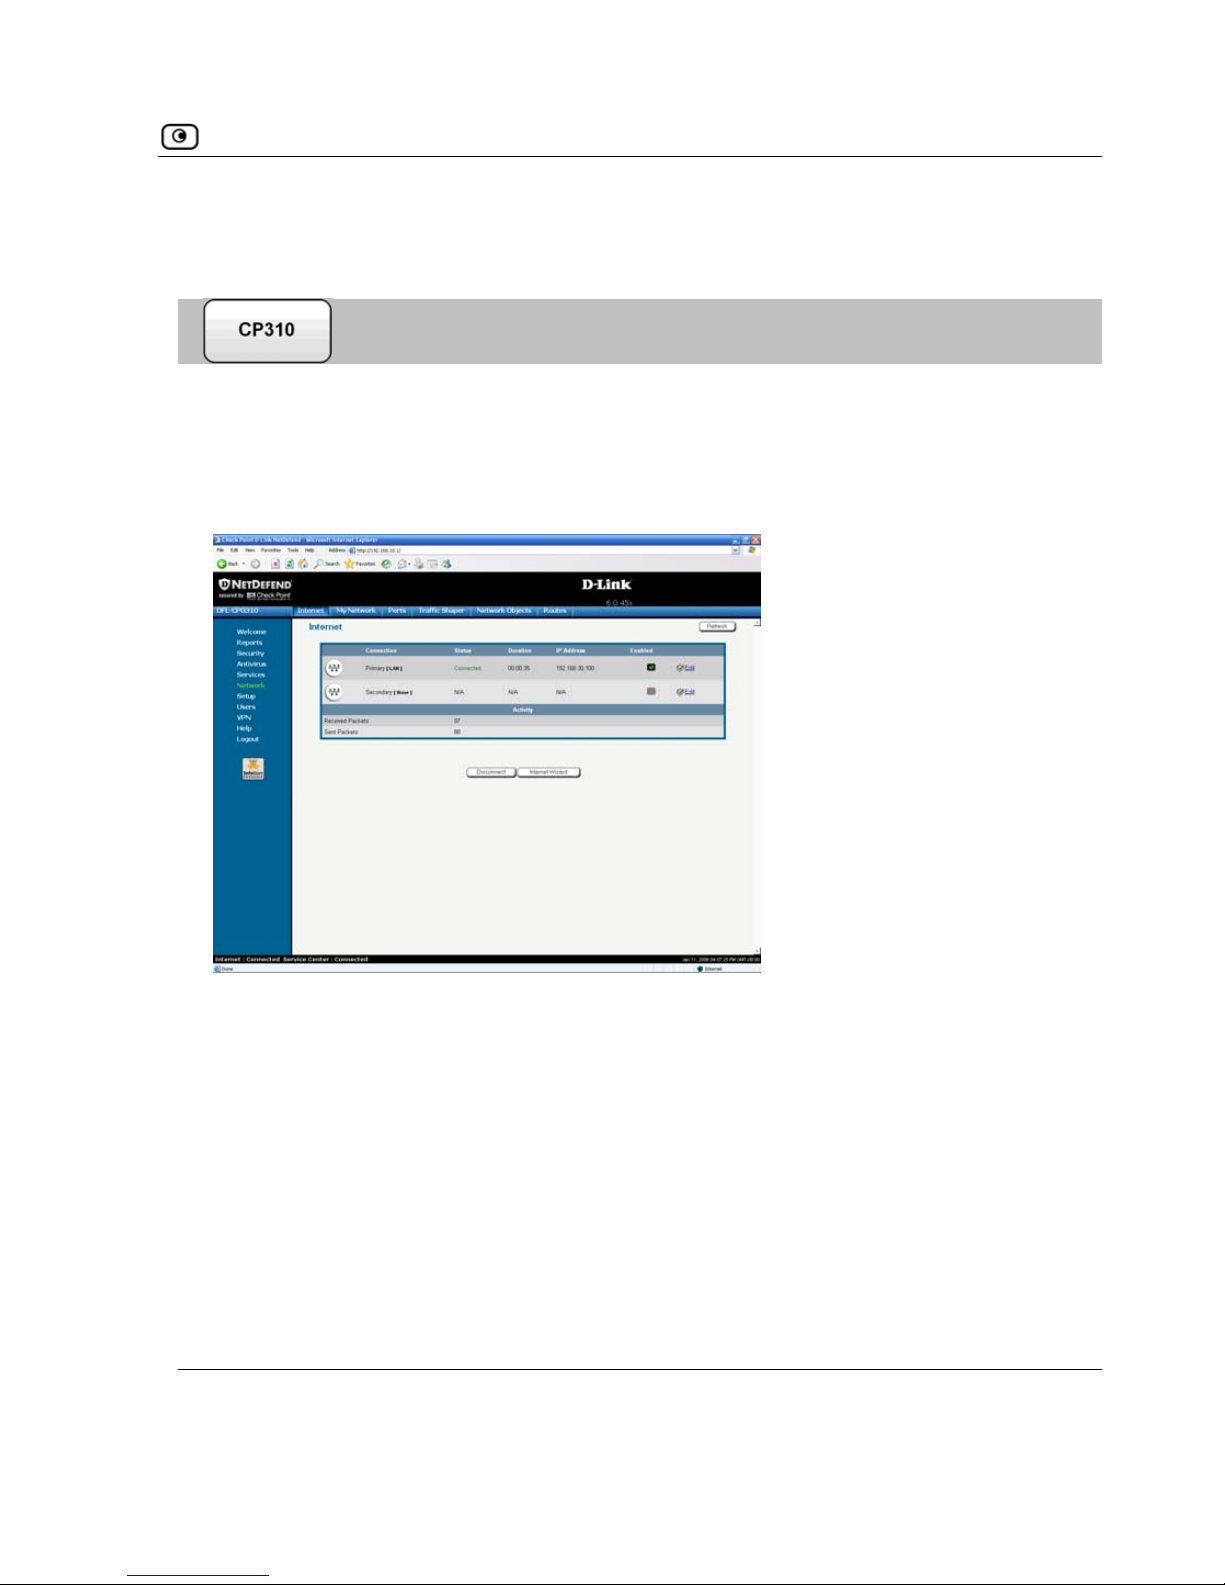
Using Internet Setup
Using Internet Setup
Internet Setup allows you to manually configure your Internet connection.
igure the using Internet Setup
1. Click Network in the main menu, and click the Internet tab.
To conf Internet connection
2. Next to the desired Internet connection, click
Edit.
Chapter 4: Configuring the Internet Connection 63
Page 80
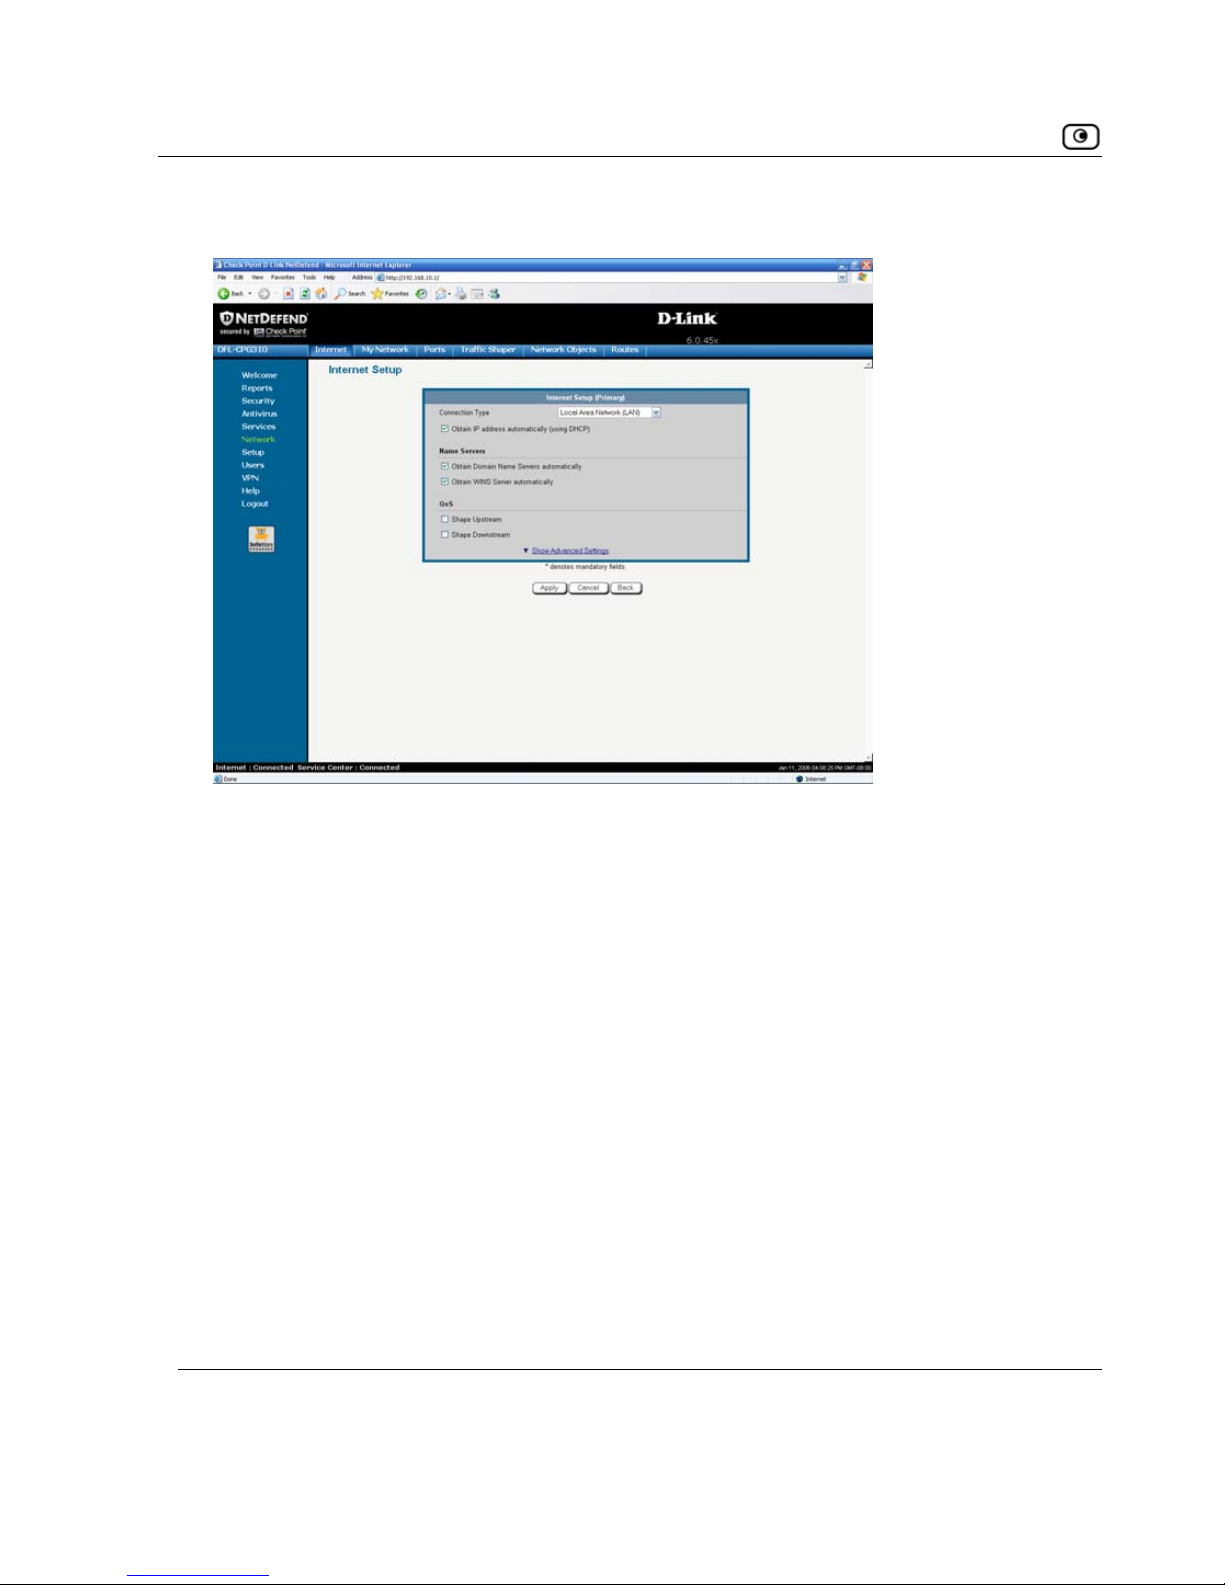
Using Internet Setup
The Internet Setup page appears.
3. From the
Con pe
you are using/intend to use.
c
ing steps should be performed in accordance with the connection type
nection Type drop-down list, select the Internet connection ty
The display
The follow
you have chosen.
hanges according to the connection type you selected.
64 D-Link NetDefend firewall User Guide
Page 81
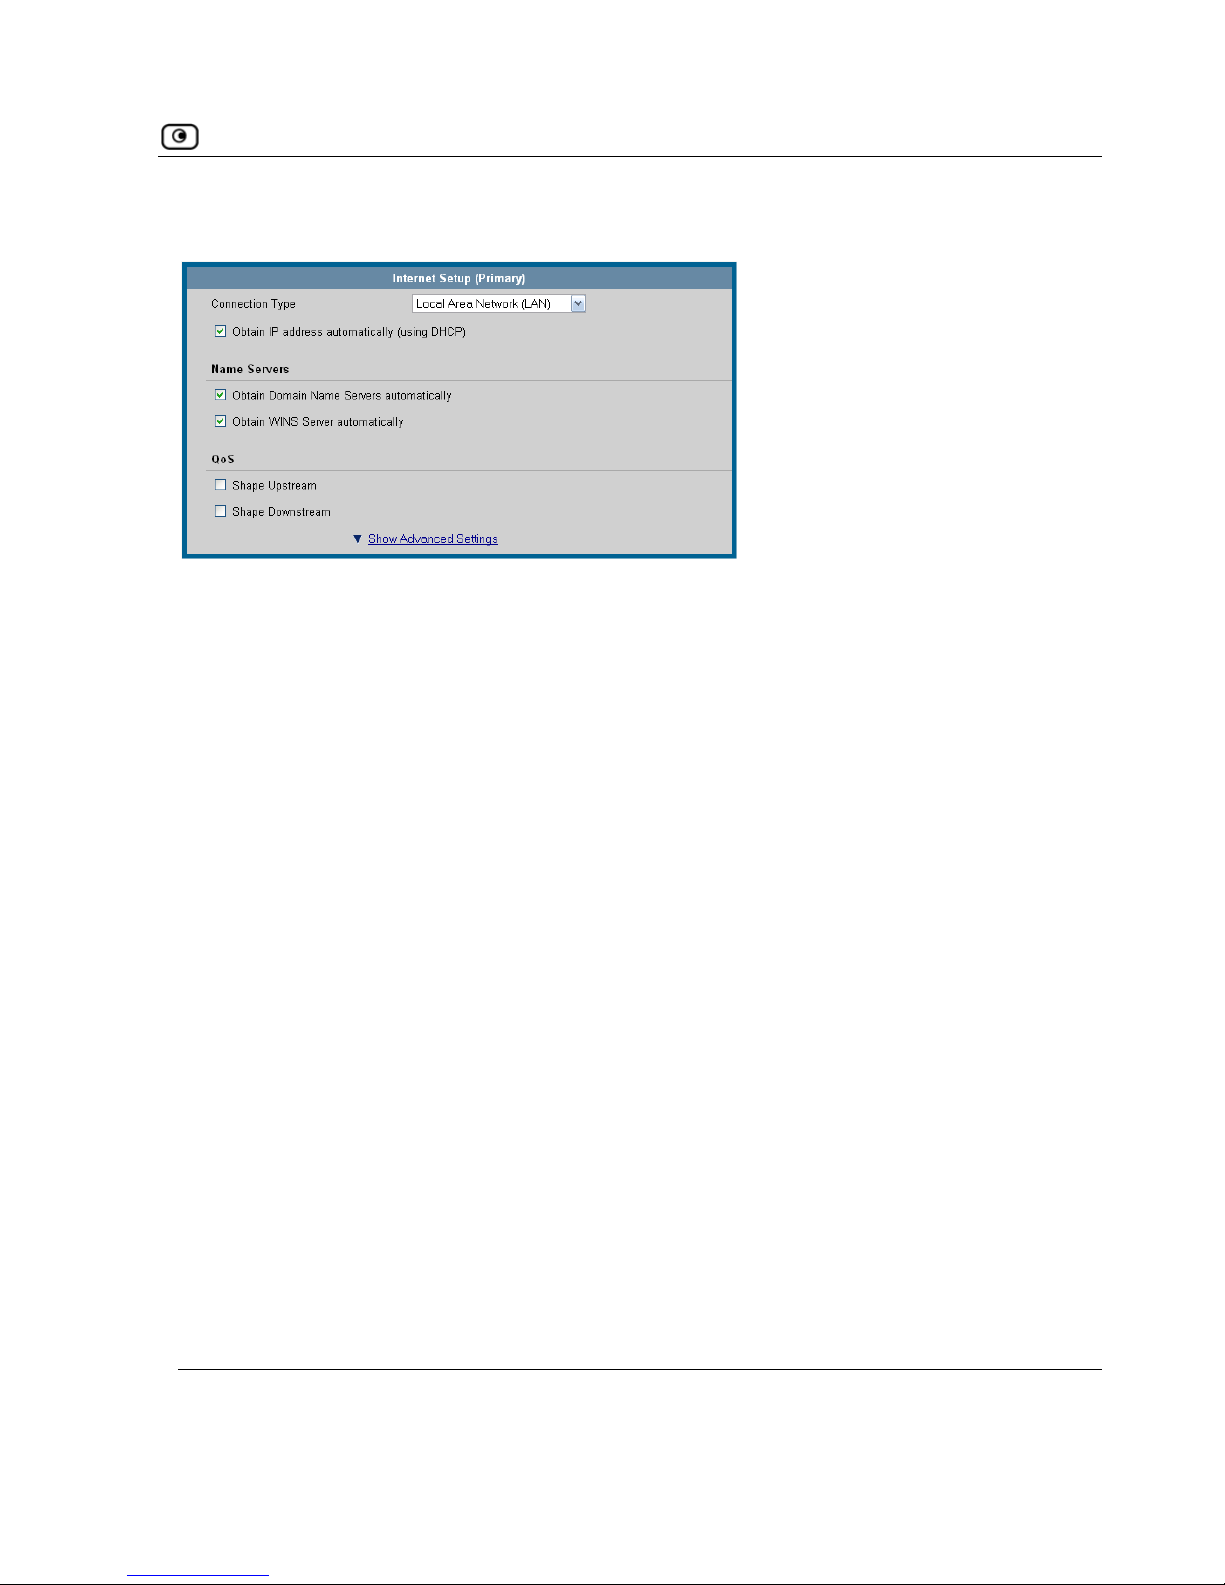
Using Internet Setup
Using a LAN Connection
1. Complete the fields using the relevant information in Internet Setup Fields on
page 77.
Chapter 4: Configuring the Internet Connection 65
Page 82
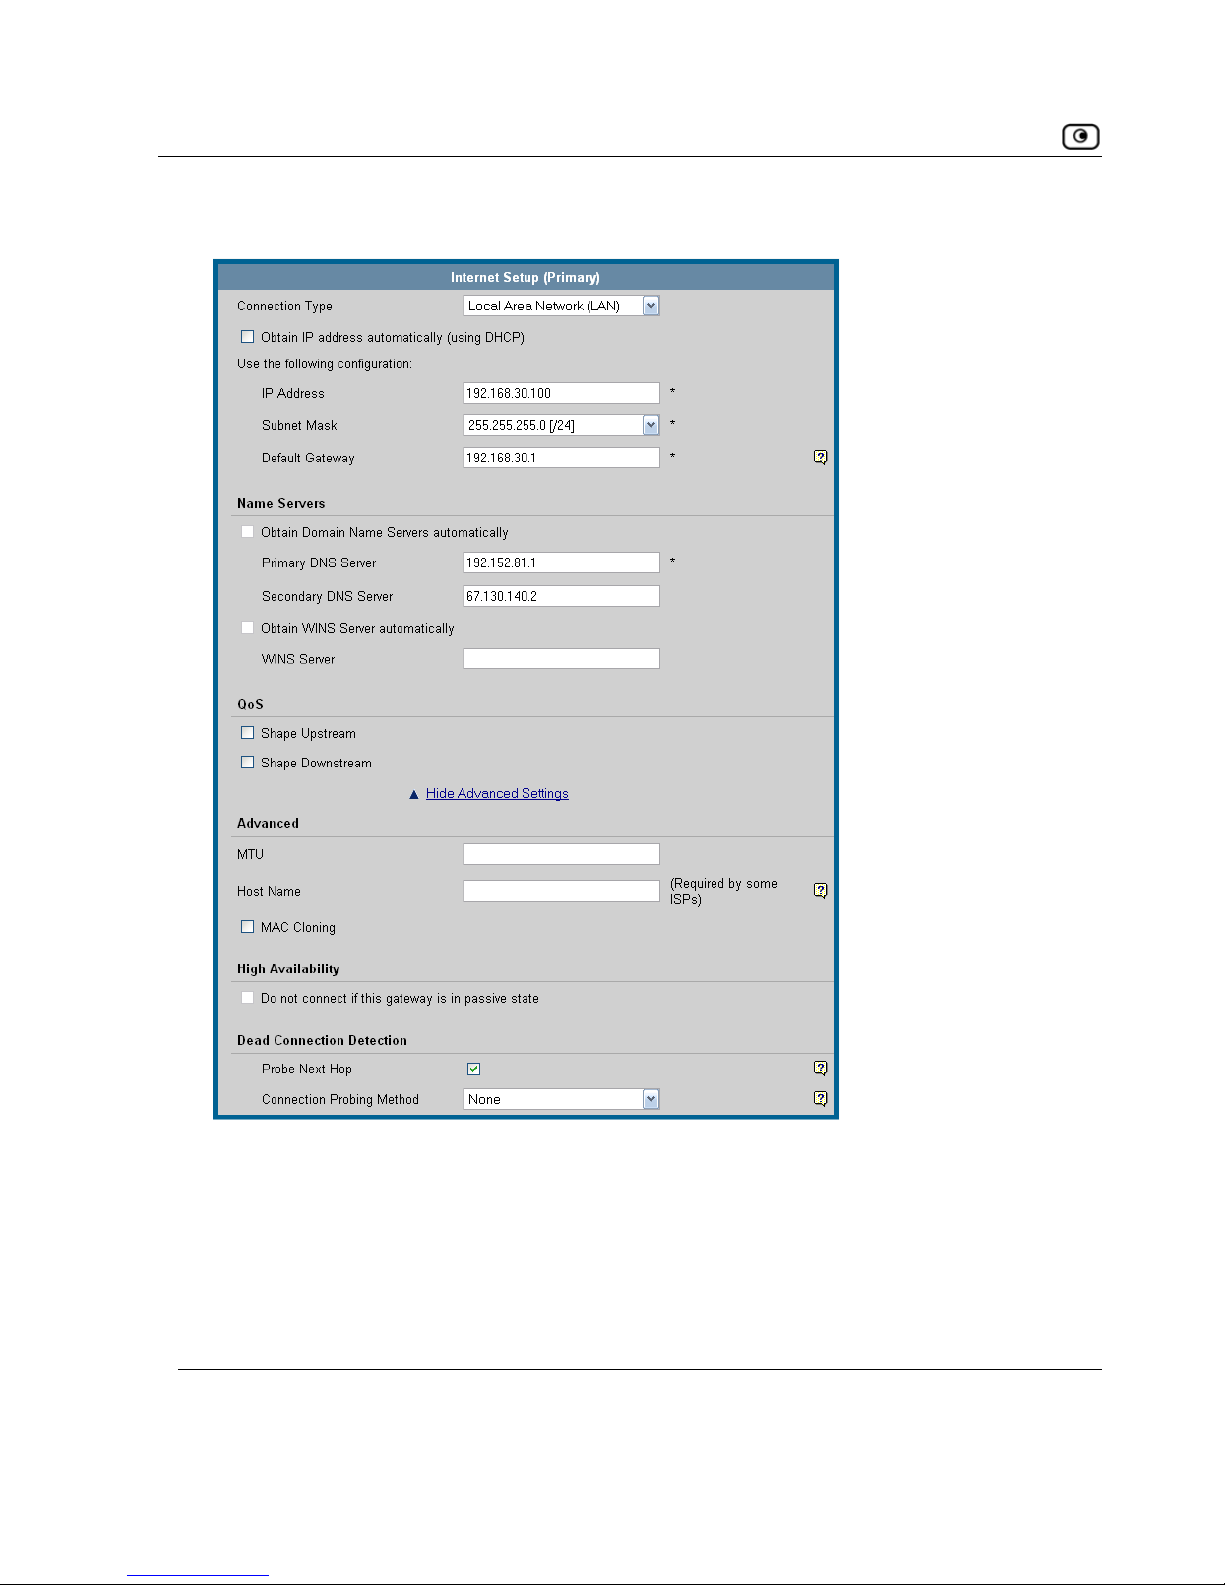
Using Internet Setup
New fields appear, depending on the check boxes you selected.
2. Click
Apply.
The NetDefen ar
displays the Internet status “Connecting”. This may take several seconds.
Once the connection is made, the Status Bar displays the Internet status
“Connected”.
d firewall attempts to connect to the Internet, and the Status B
66 D-Link NetDefend firewall User Guide
Page 83
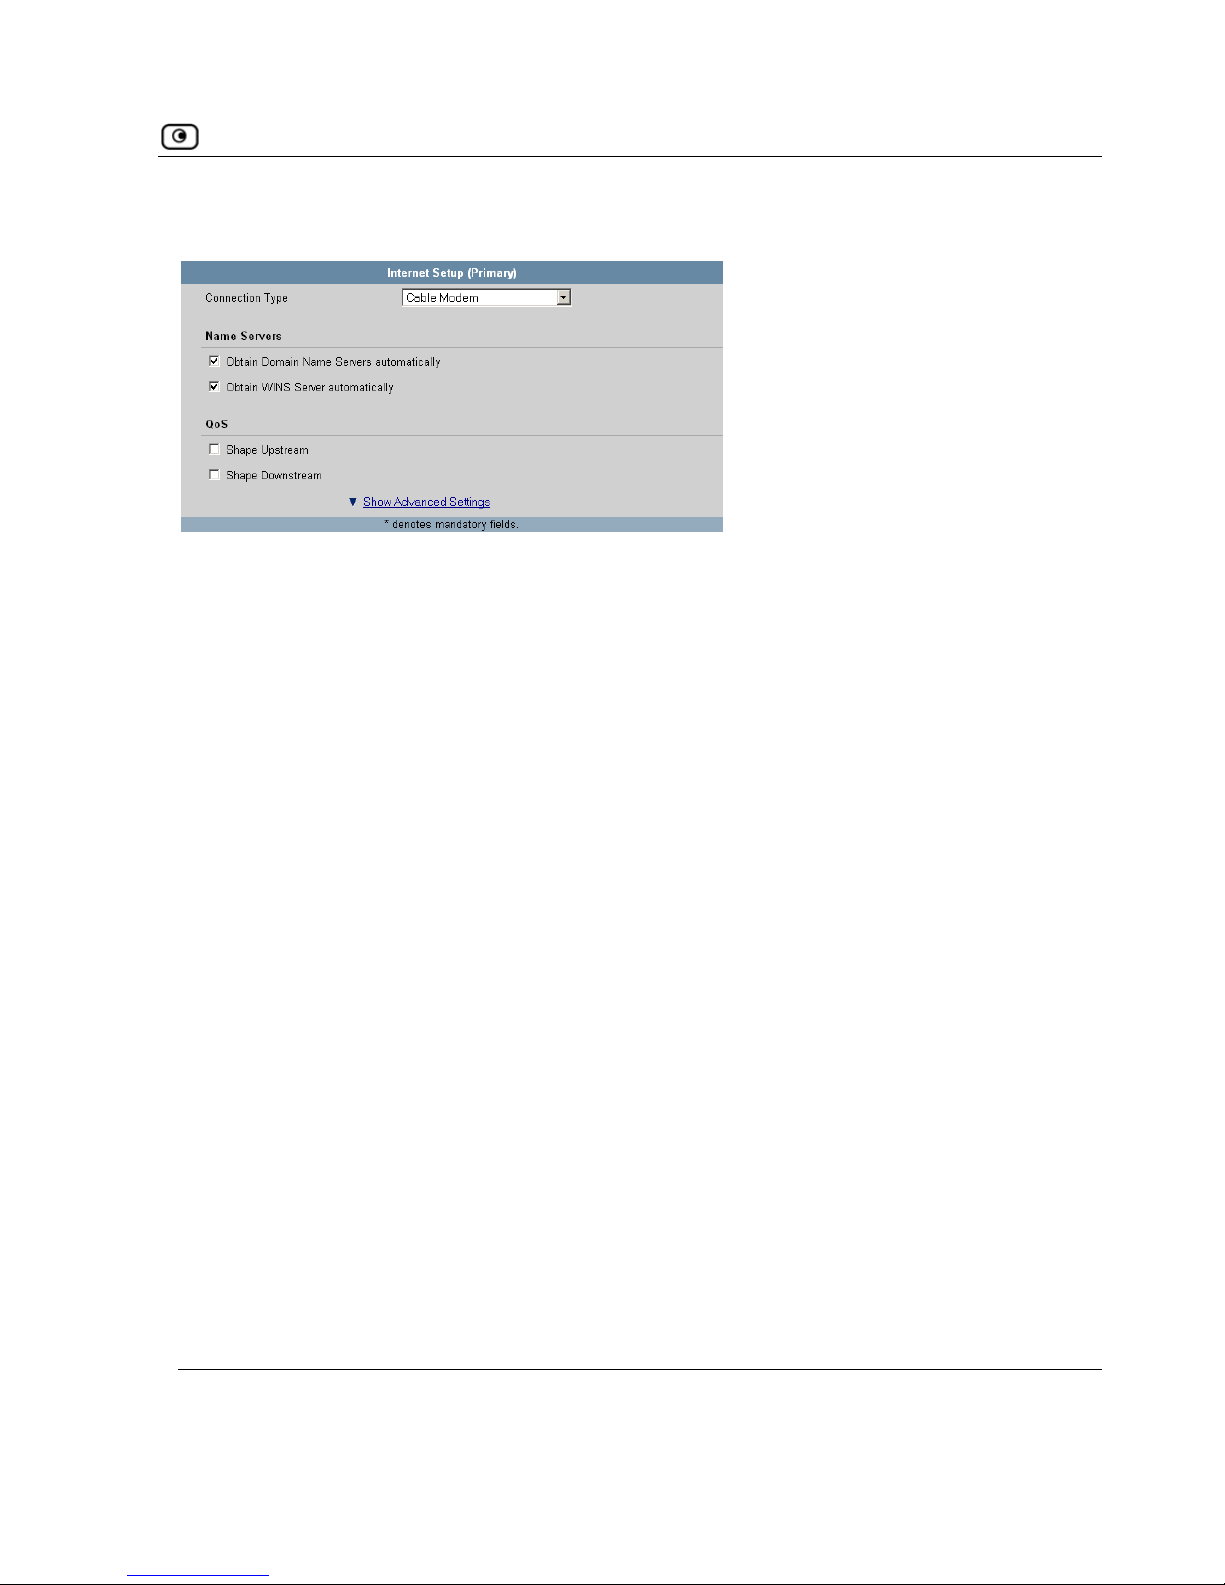
Using Internet Setup
Using a Cable Modem Connection
1. Complete the fields using the relevant information in
Internet Setup Fields on
page 77.
Chapter 4: Configuring the Internet Connection 67
Page 84
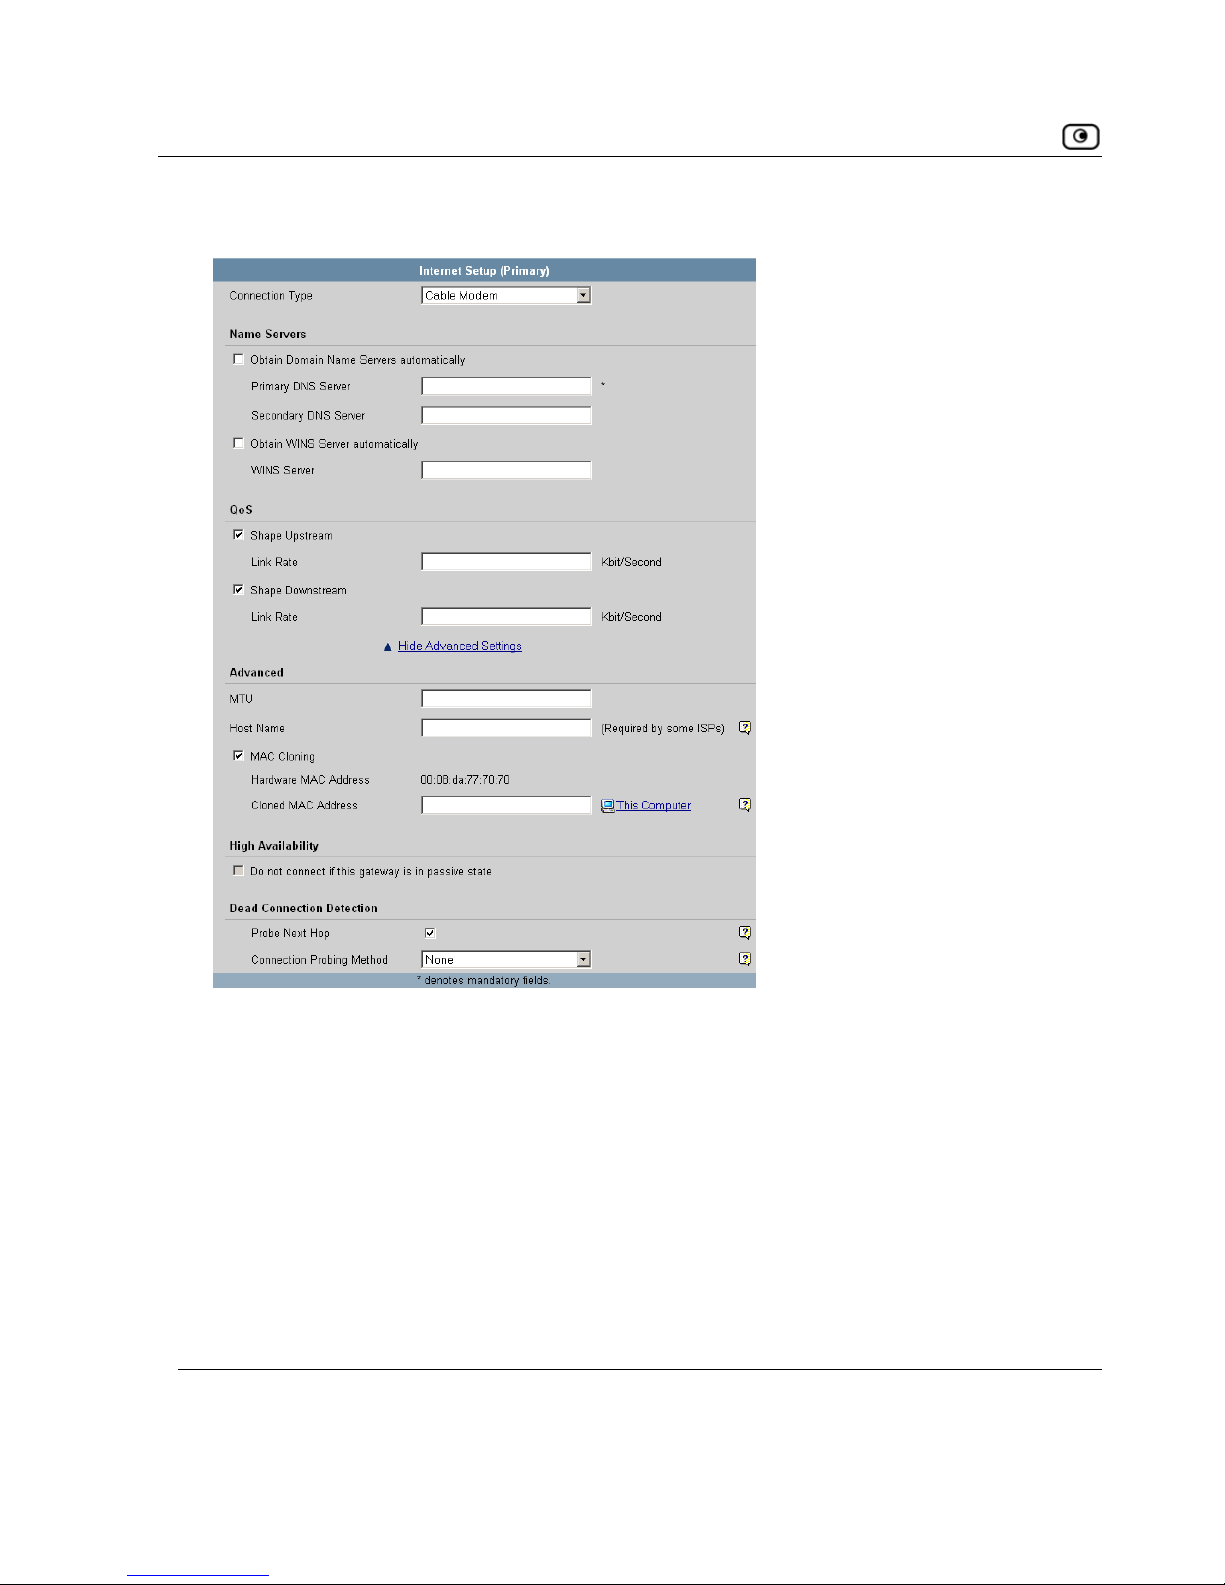
Using Internet Setup
New fields appear, depending on the check boxes you selected.
2. Click
Apply.
The NetDefend firewall attempts to connect to the Internet, and the Status Bar
displays the Internet status “Connecting”. This may take several seconds.
Once the connection is made, the Status Bar displays the Internet status
“Connected”.
68 D-Link NetDefend firewall User Guide
Page 85
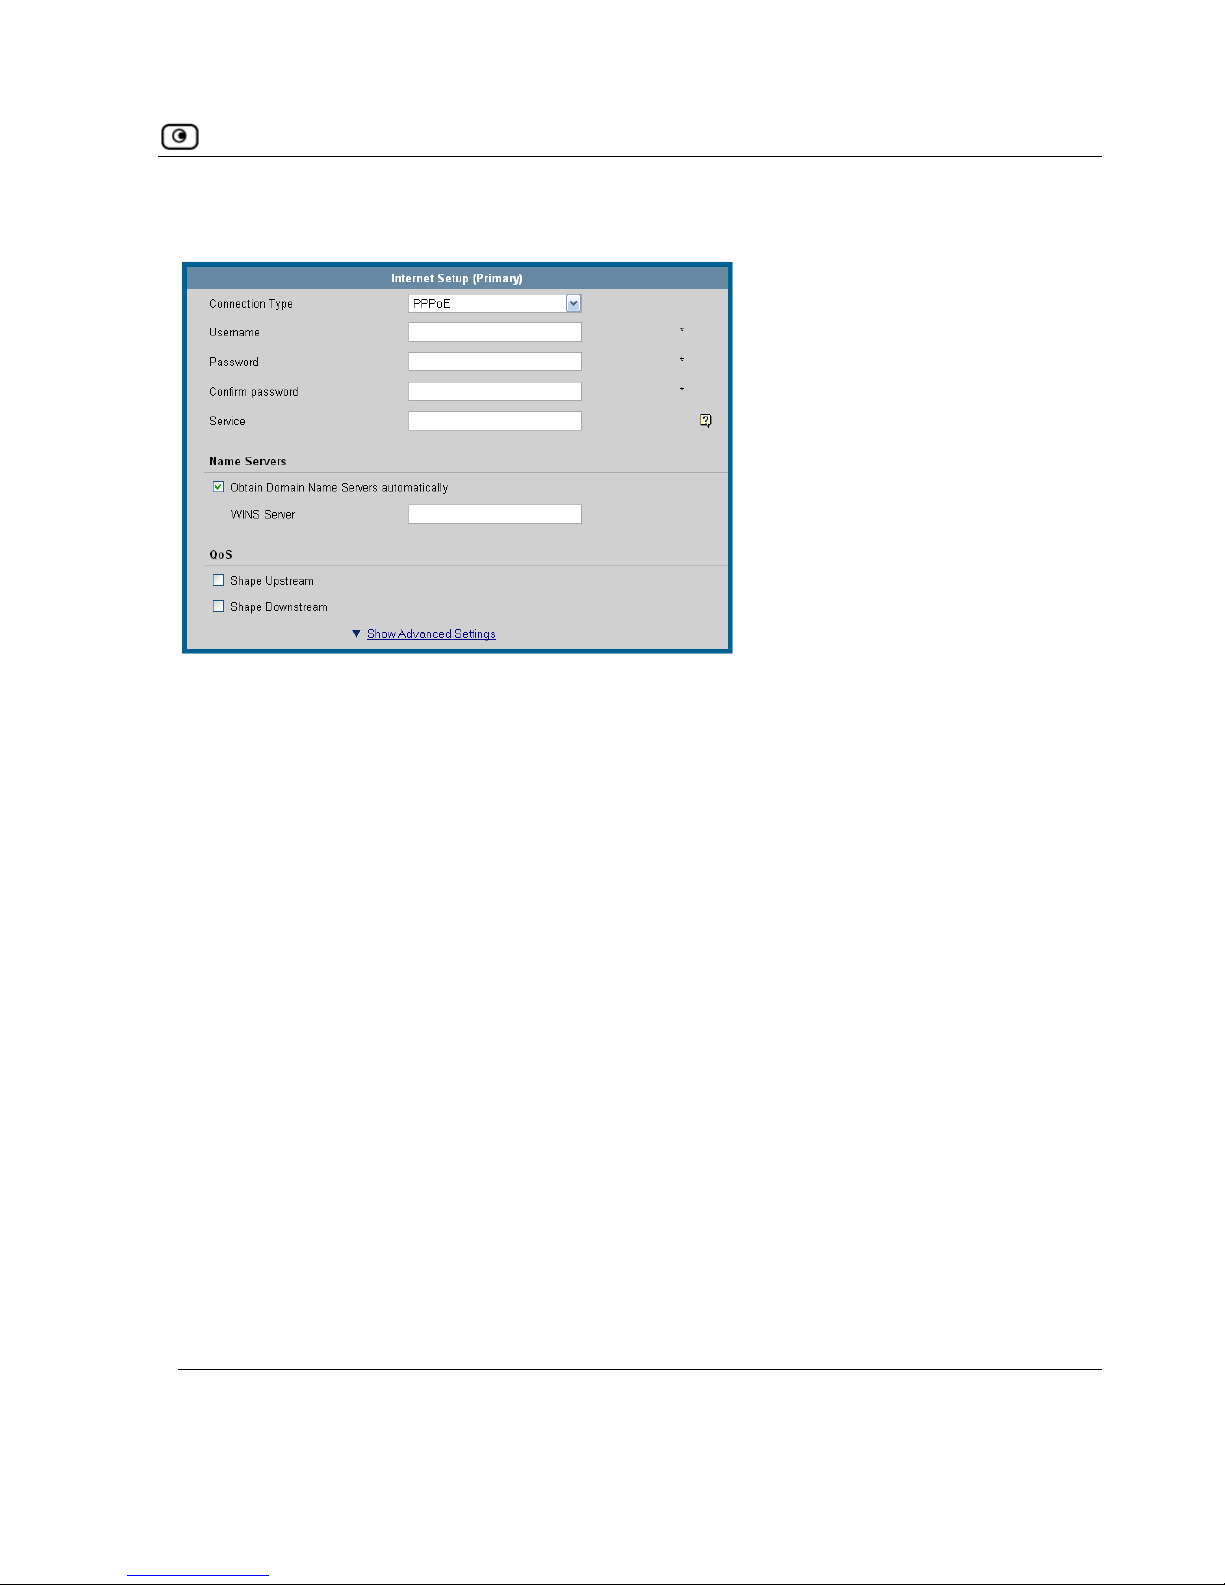
Using Internet Setup
Using a PPPoE Connection
1. Complete the e on
page 77.
fi lds using the relevant information in Internet Setup Fields
Chapter 4: Configuring the Internet Connection 69
Page 86
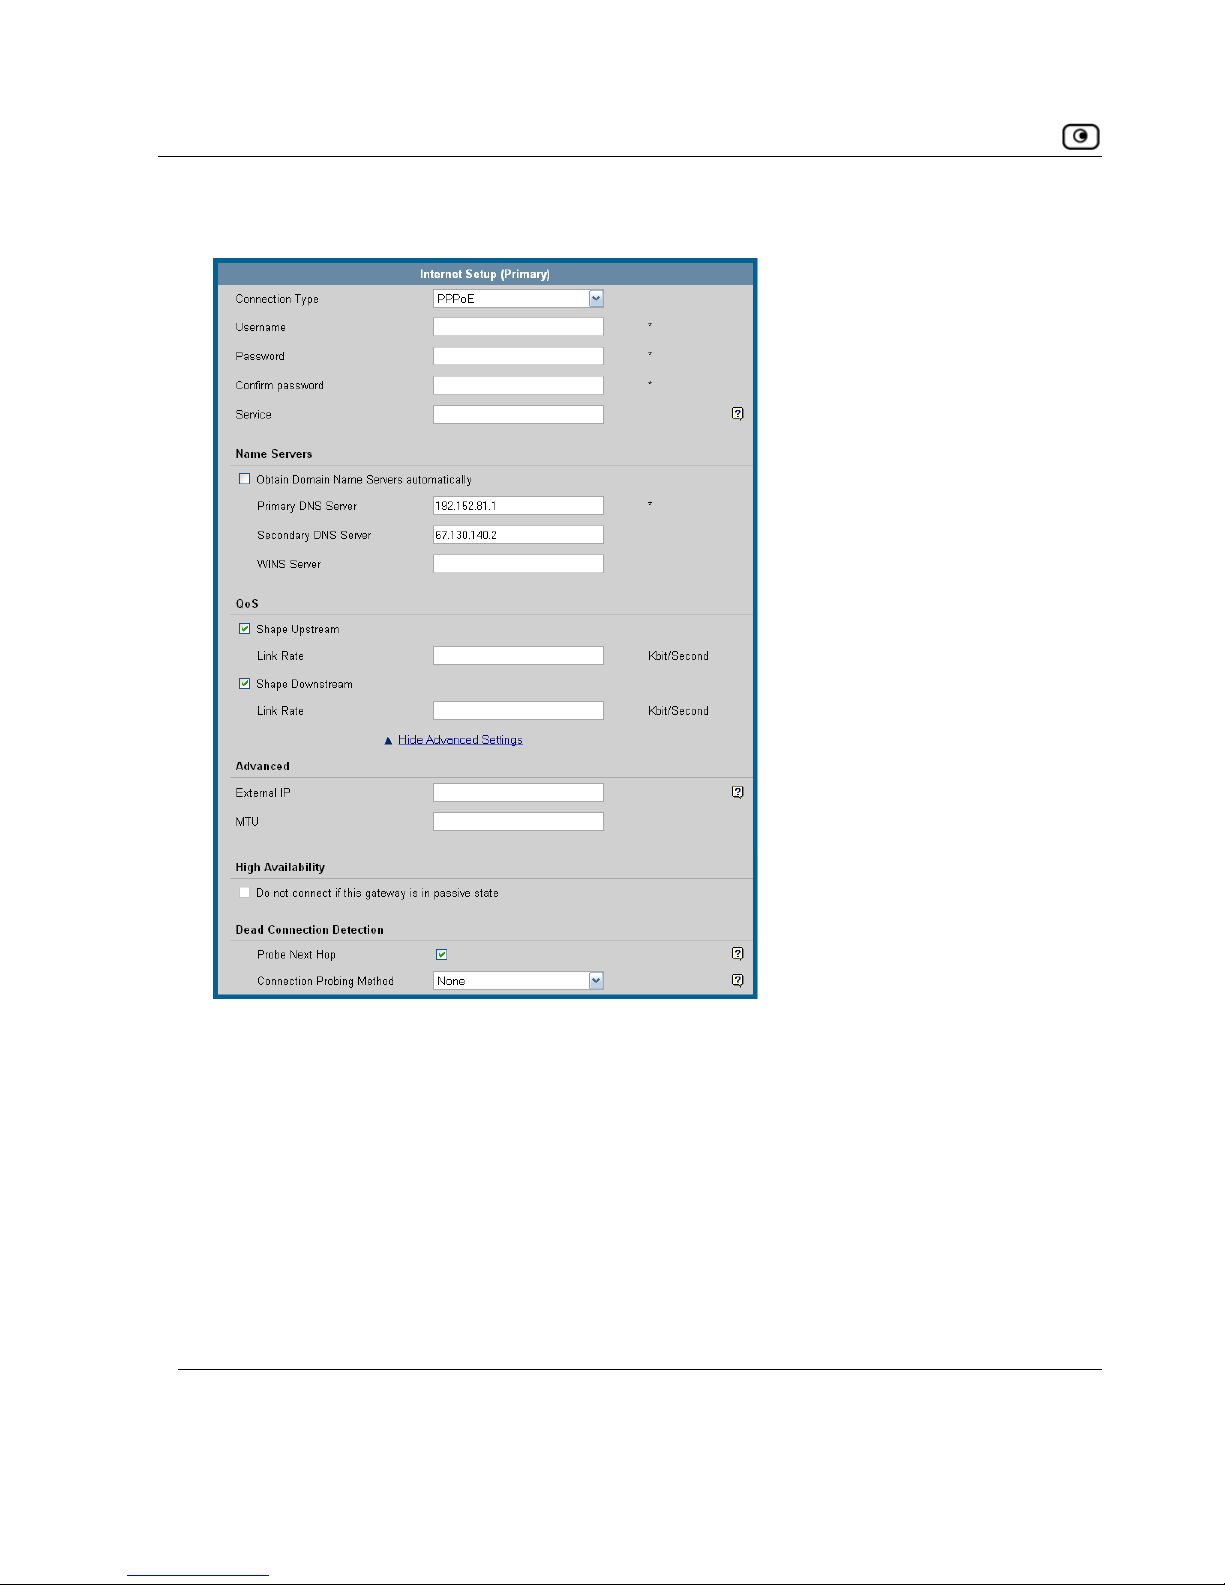
Using Internet Setup
New fields appear, depending on the check boxes you selected.
2.
t, and the Status Bar
s “Connecting”. This may take several seconds.
Once the connection is made, the Status Bar displays the Internet status
“Connected”.
Click
Apply.
The NetDefend firewall attempts to connect to the Interne
displays the Internet statu
70 D-Link NetDefend firewall User Guide
Page 87
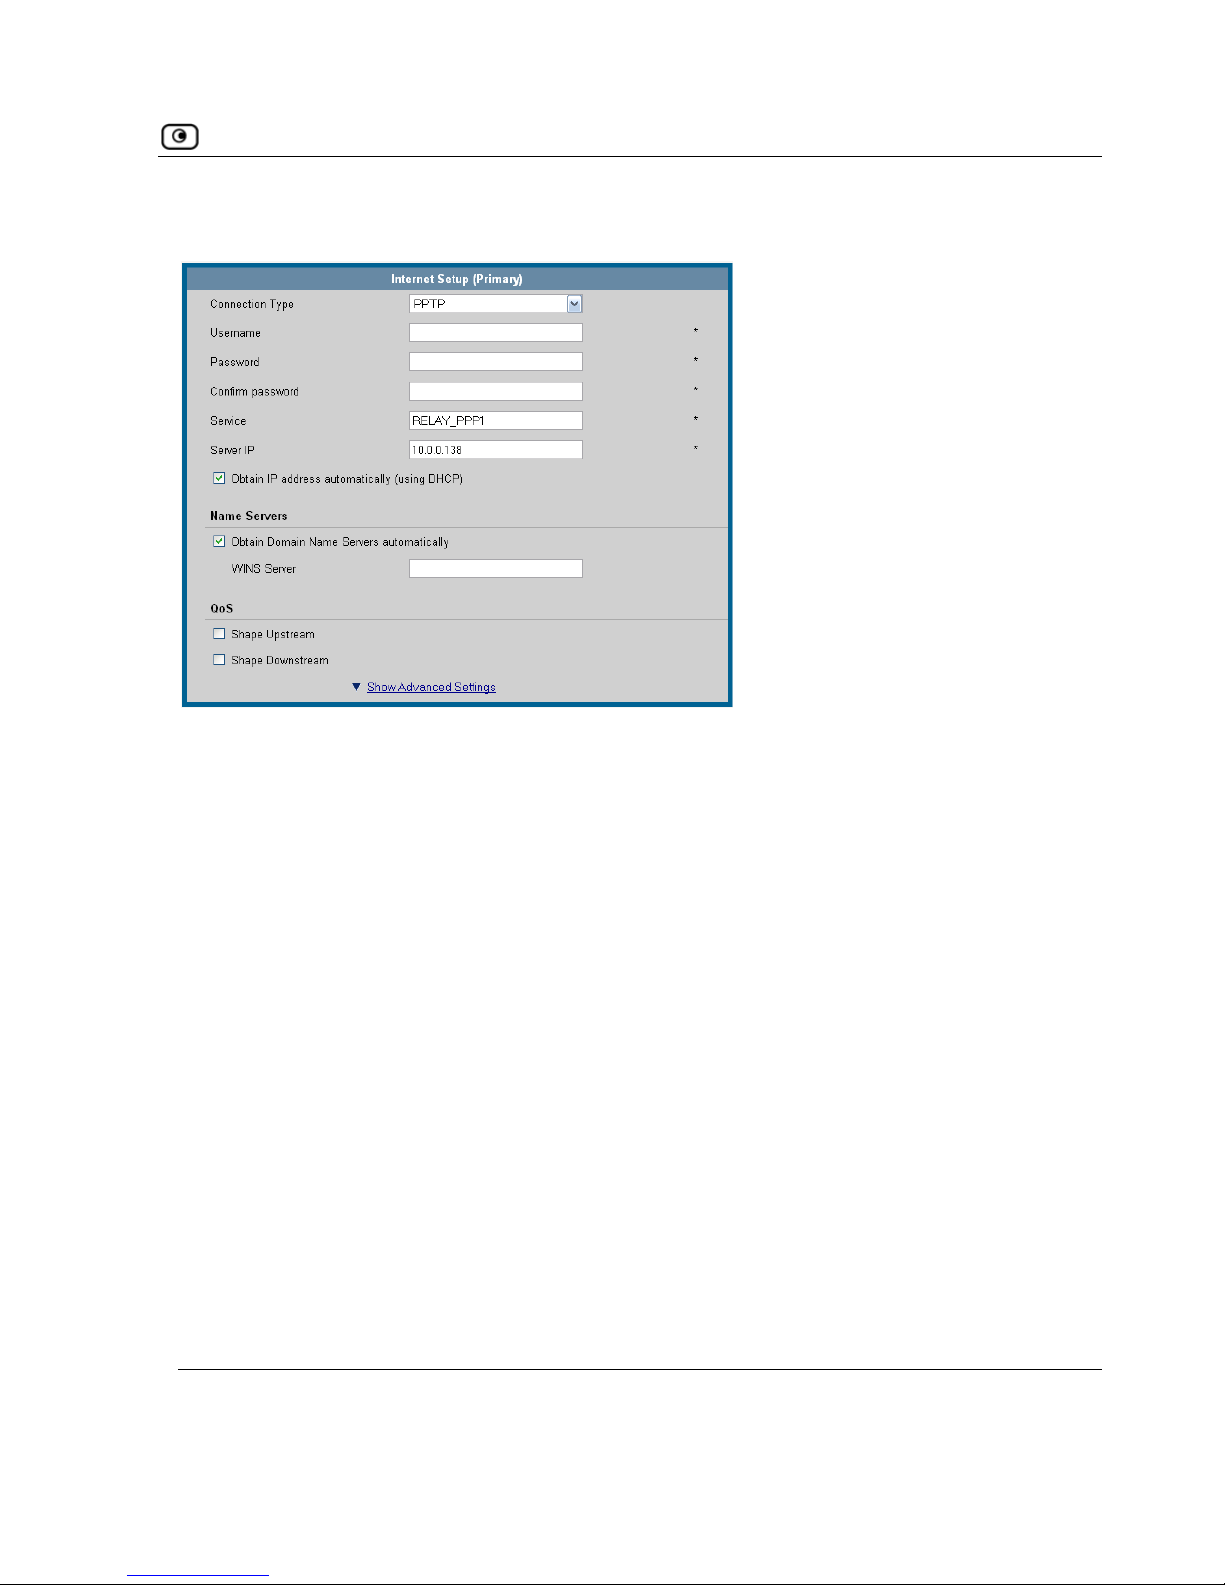
Using Internet Setup
Using a PPTP Connection
1. Comp the relevant information in Internet Setup Fieldslete the fields using
page 77.
on
Chapter 4: Configuring the Internet Connection 71
Page 88
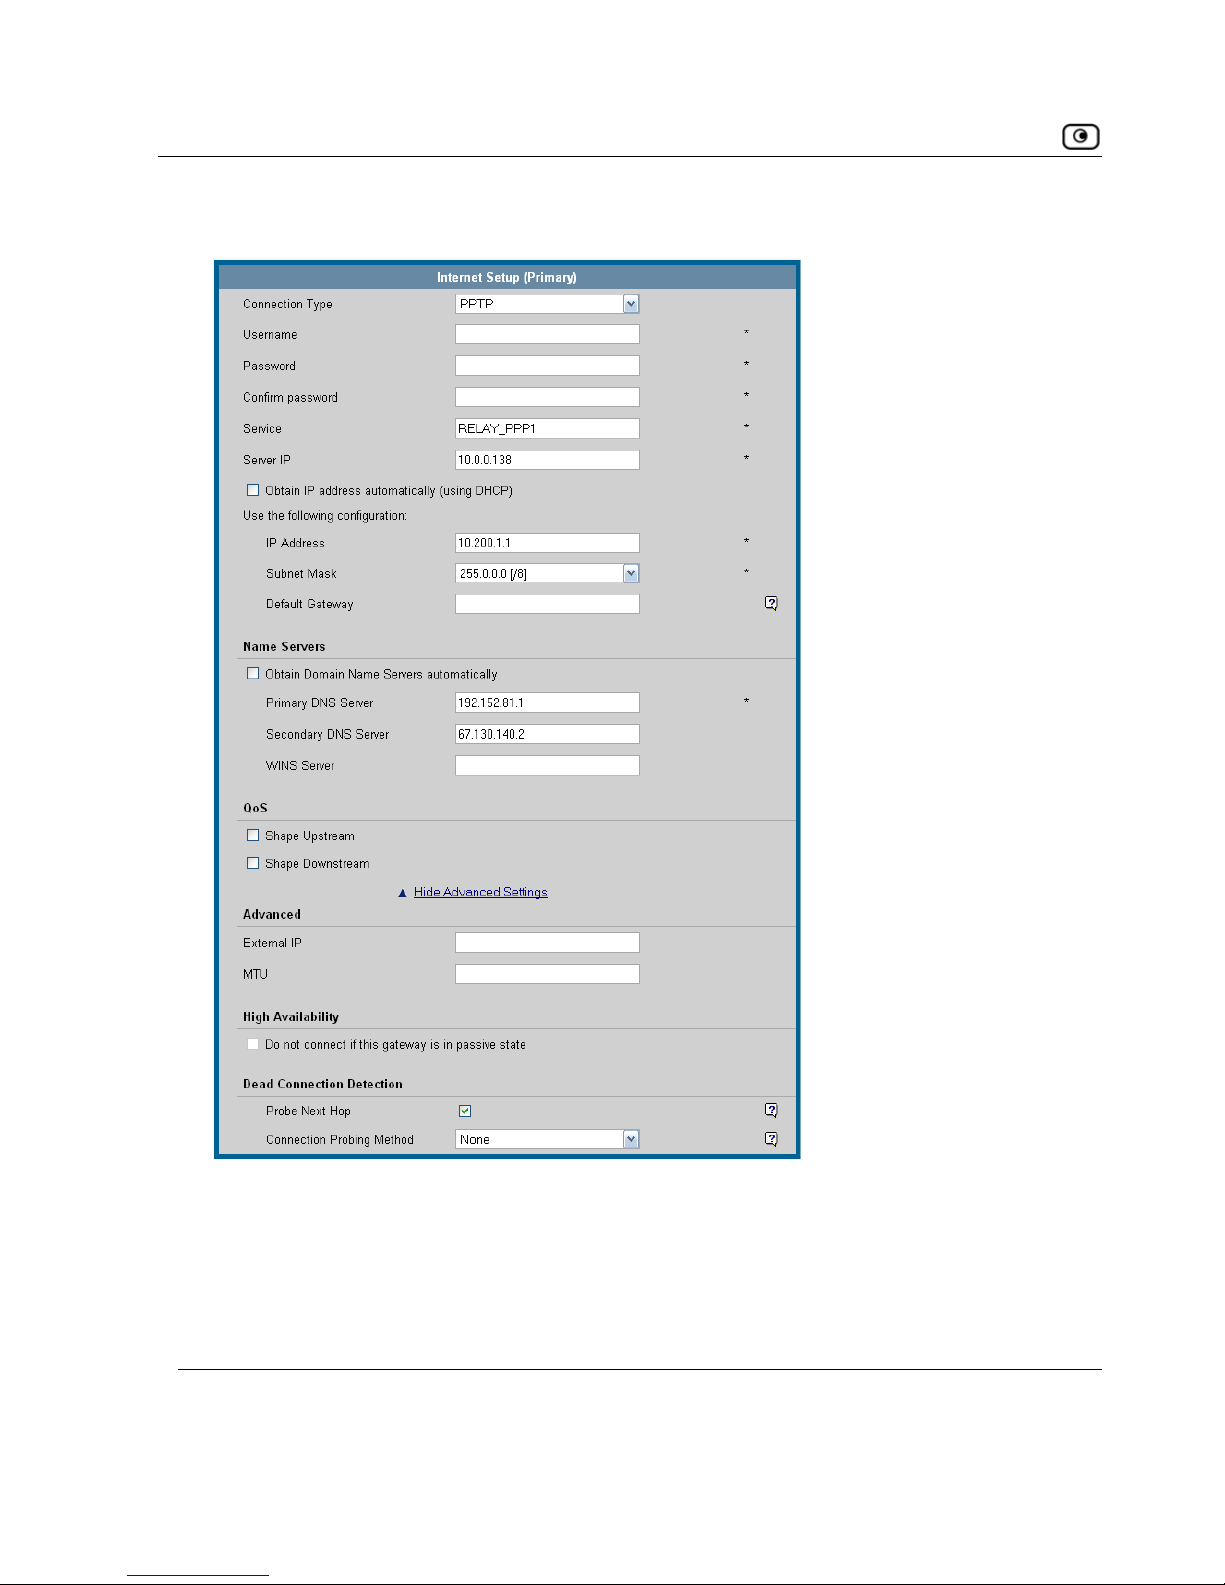
Using Internet Setup
New fields appear, depending on the check boxes you selected.
2. Click
Apply.
The NetDefend firewall attempts to connect to the Internet, and the Status Bar
displays the Internet status “Connecting”. This may take several seconds.
72 D-Link NetDefend firewall User Guide
Page 89
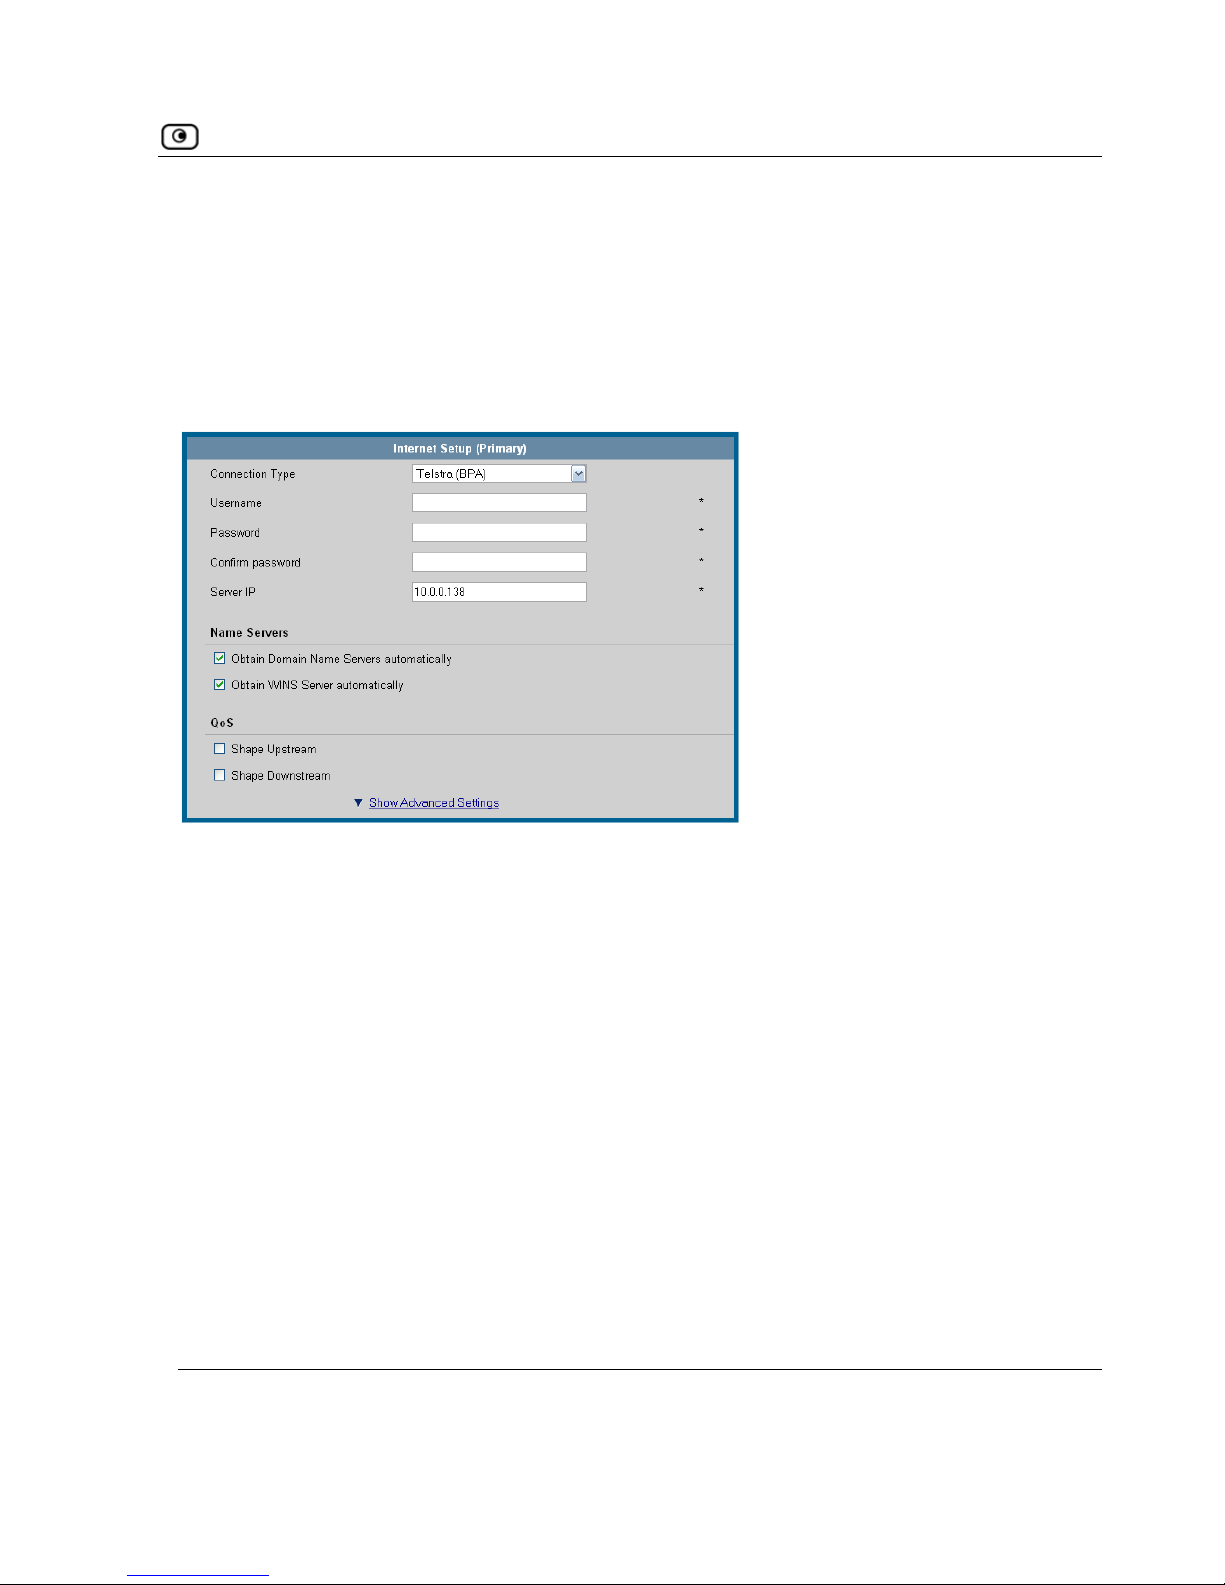
Using Internet Setup
Once the connection is made, the Status Bar displays the Internet status
g a Tels ) Connection
this Internet re subscribed to Telstra® BigPond™
Internet. Telstra BigPond is a trademark of Telstra Corporation Limited.
“Connected”.
Usin tra (BPA
Use connection type only if you a
1. Complete the fields using the relevant information in Internet Setup Fields on
page 77.
Chapter 4: Configuring the Internet Connection 73
Page 90
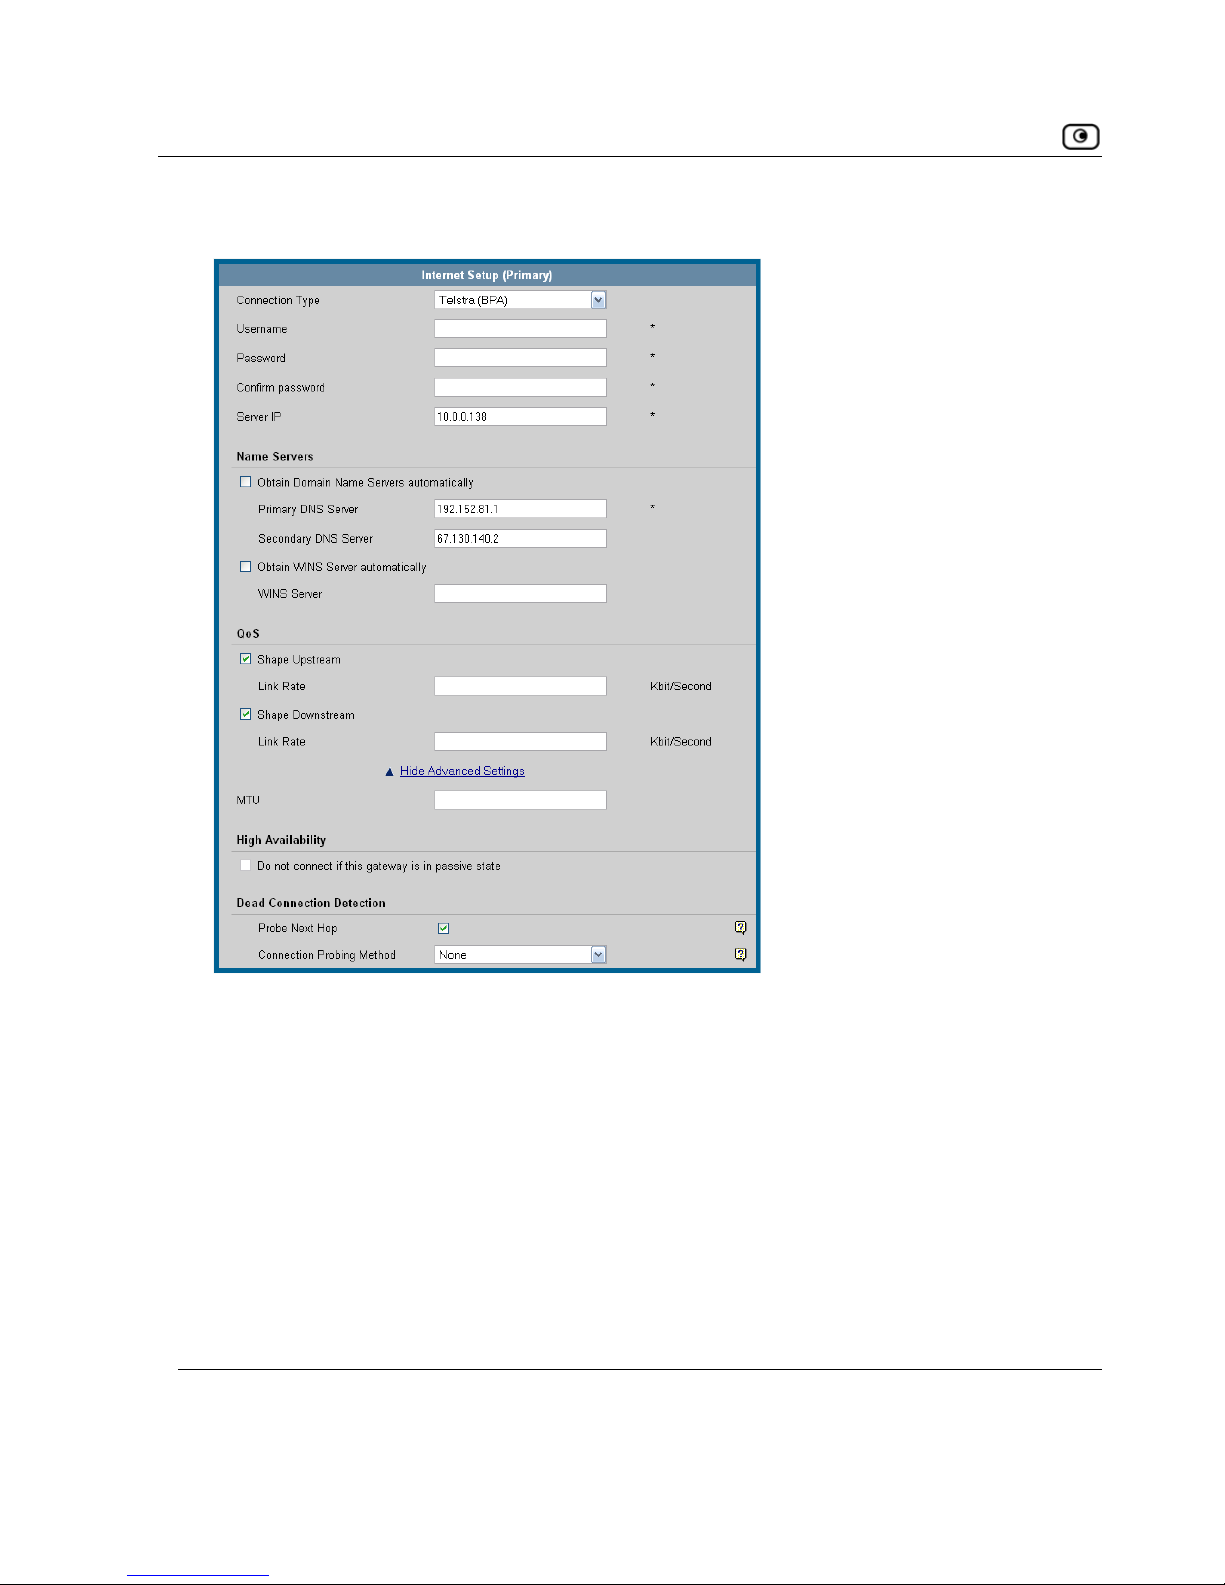
Using Internet Setup
New fields appear, depending on the check boxes you selected.
2. Click
Apply.
The NetDefend firewall attempts to connect to the Internet, and the Status Bar
displays the Internet status “Connecting”. This may take several seconds.
Once the connection is made, the Status Bar displays the Internet status
“Connected”.
74 D-Link NetDefend firewall User Guide
Page 91
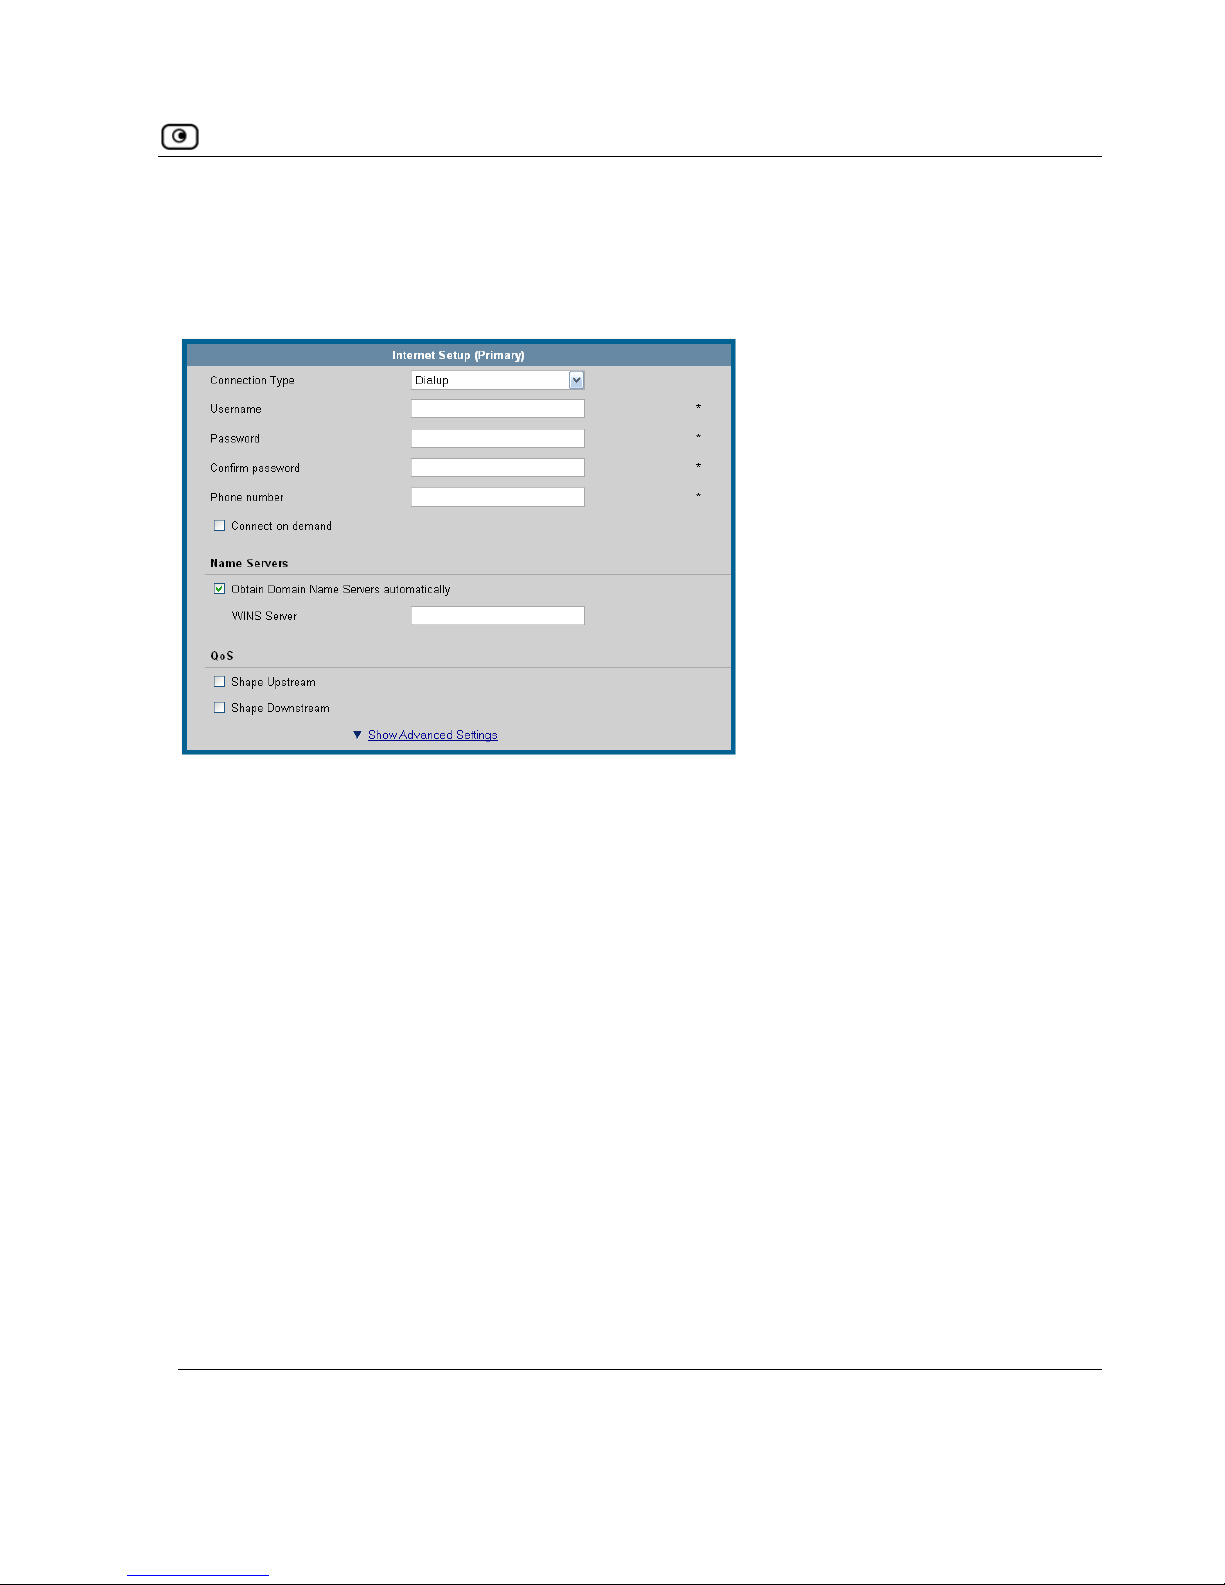
Using Internet Setup
Using a Dialup Connection
information, see
Setting Up a Dialup Modem on page 84.
To use this connection type, you must first set up the dialup modem. For
1. Complete the fields using the relevant information in
Internet Setup Fields on
page 77.
Chapter 4: Configuring the Internet Connection 75
Page 92
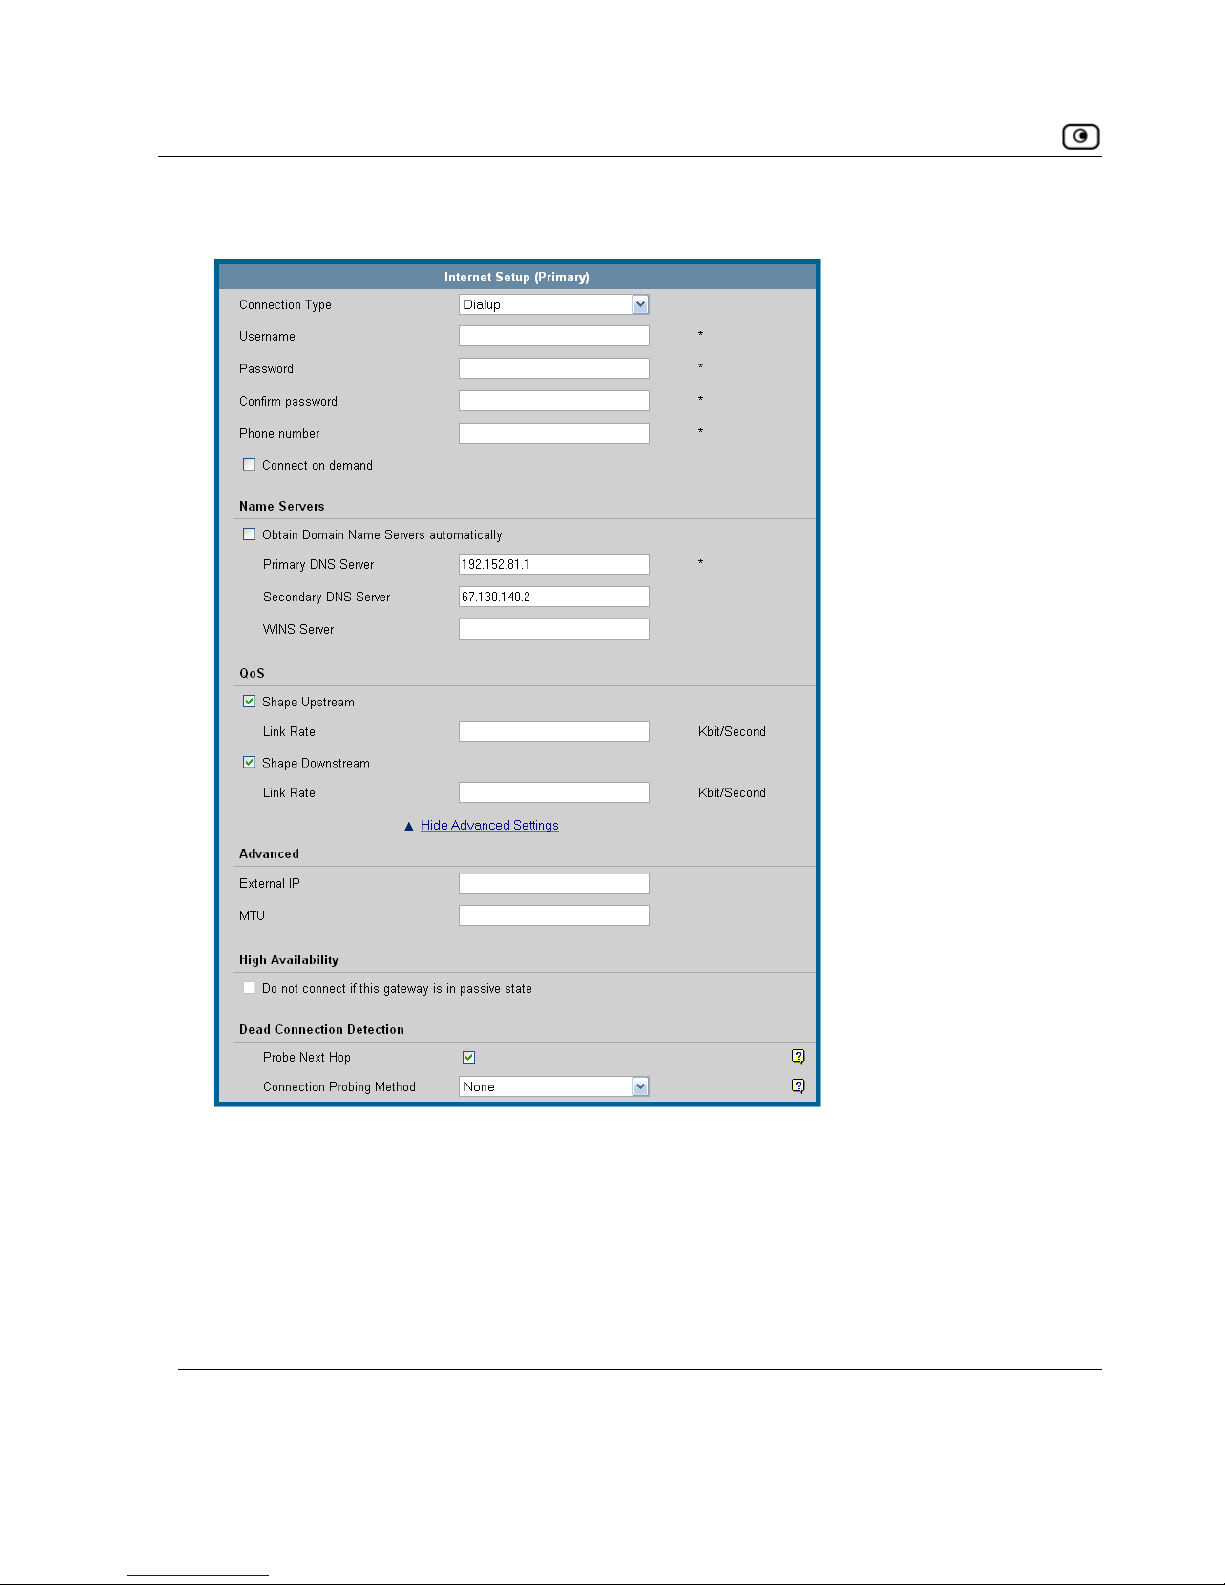
Using Internet Setup
New fields appear, depending on the check boxes you selected.
2. Click
Apply.
The NetDefend firewall attempts to connect to the Internet, and the Status Bar
ay take several seconds.
On ternet status
“Connected”.
displays the Internet status “Connecting”. This m
ce the connection is made, the Status Bar displays the In
76 D-Link NetDefend firewall User Guide
Page 93
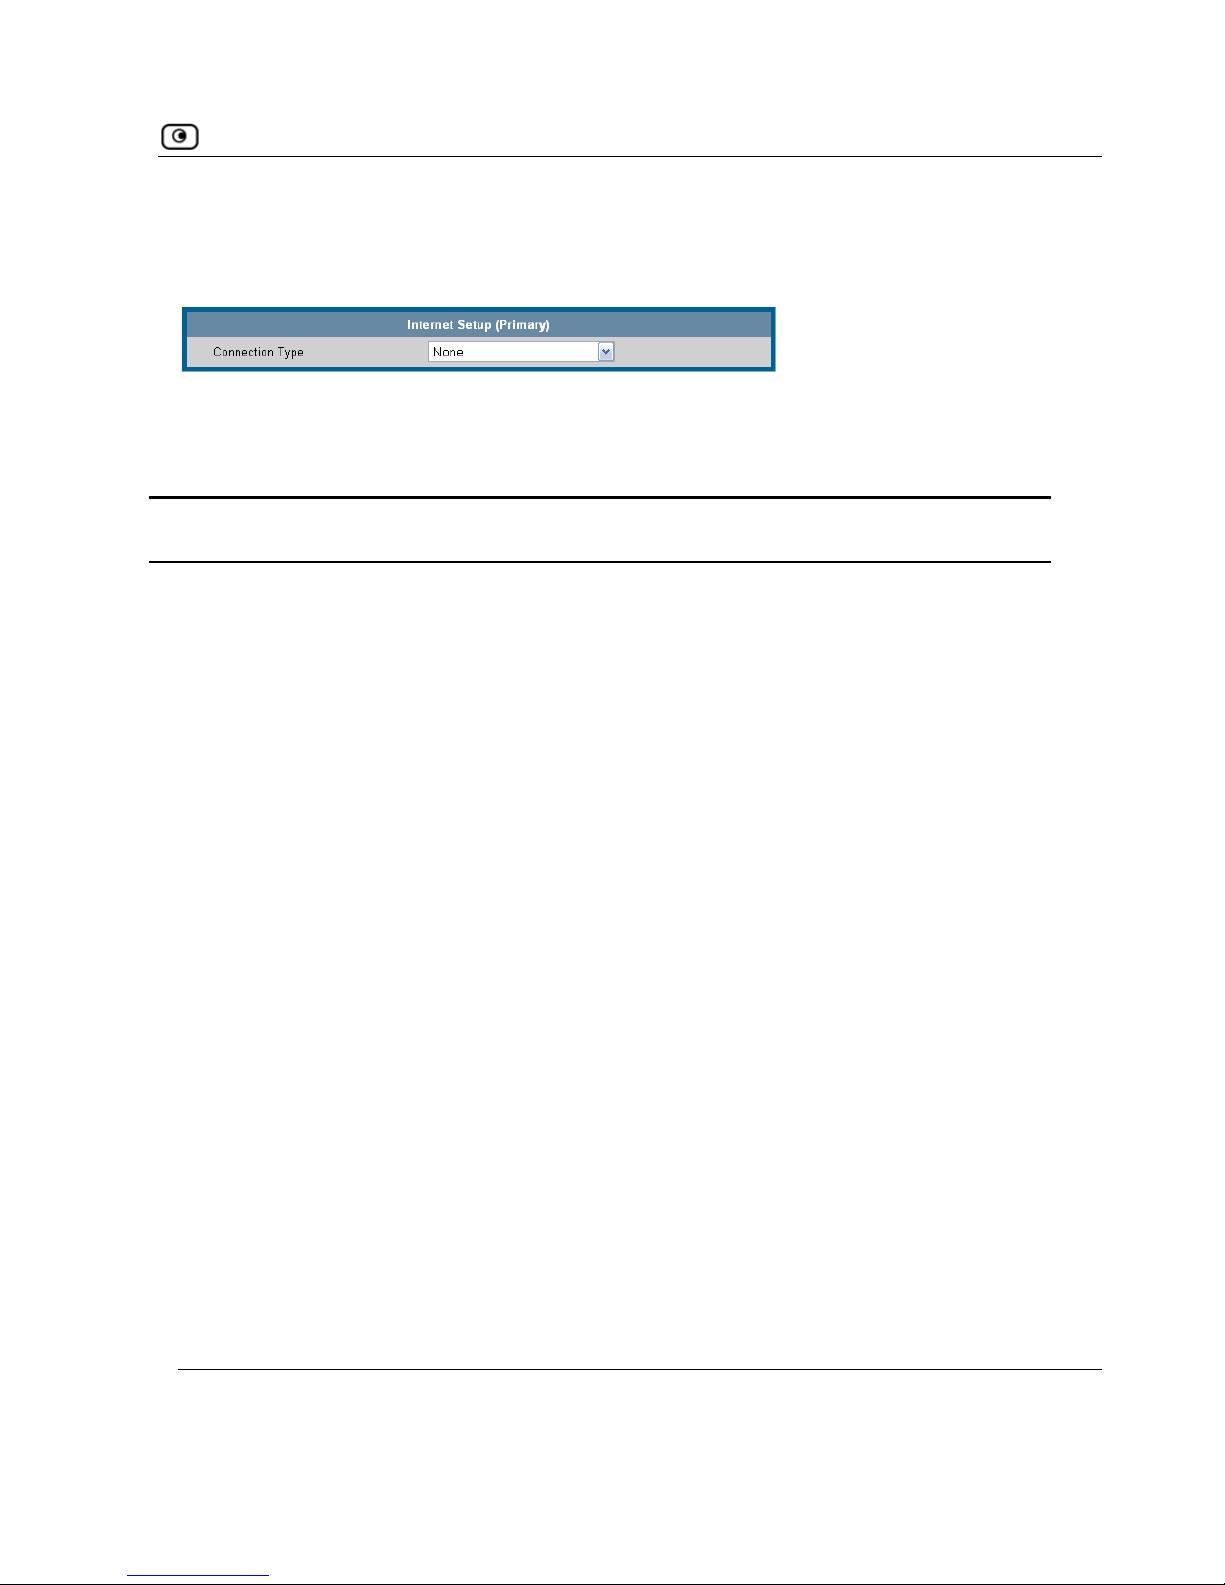
Using Internet Setup
Using No Connection
If you do not have an Internet connection, set the connection type to None.
• Click Apply.
Table 10In: Internet Setup Fields
this field… Do this…
Username Type your user name.
Pass
C
Servi
If your ISP has not provided you with a service name, leave this field
empty.
Server IP If you selected PPTP, type the IP address of the PPTP server as given
by your ISP.
If you selected Telstra (BPA), type the IP address of the Telstra
authentication server as given by Telstra.
Phone Number If you selected Dialup, type the phone number that the modem should
dial, as given by your ISP.
word Type your password.
onfirm password T ype your password.
ce Type your service name.
Chapter 4: Configuring the Internet Connection 77
Page 94

Using Internet Setup
In this field… Do this…
Connect on
demand
Select this option if you do not want the dialup modem to be constantly
connected to the Internet. The modem will dial a connection only under
certain conditions.
This option is useful when configuring a dialup backup con nection. For
information, see
Setting Up a Dialup Backup Connection on page 92.
When no higher
priority connection
is available
Select this option to specify that the dialup modem should only dial a
connection if no other connection exists, and the NetDefend firewall is
not acting as a Backup appliance.
If another connection opens, the dialup modem will disconnect.
For information on configuring the appliance as a Backup or Master, see
Configuring High Availability on page 119.
On outgoing
activity
Select this option to specify that the dialup modem should only dial a
connection if no other connection exists, and there is outgoing activity
(that is, packets need to be transmitted to the Internet).
If another connection opens, or if the connection times out, the dialup
modem will disconnect.
Idle timeout Type the amount of time (in minutes) that the connection can remain idle.
Once this period of time has elapsed, the dialup modem will disconnect.
Obtain IP address
automatically
(using DHCP)
Clear this option if you do not want the NetDefend firewall to obtain an IP
address automatically using DHCP.
IP Address Type the static IP address of your NetDefend firewall.
Subnet Mask Select the subnet mask that applies to the static IP address of your
NetDefend firewall.
78 D-Link NetDefend firewall User Guide
Page 95

Using Internet Setup
In this field… Do this…
Default Gateway Type the IP address of your ISP’s default gateway.
Name Servers
O
N
auto
address automatically using DHCP, but not to automatically configure
Obt
Ser
auto
an IP
configure the
Primary DNS Type the Primary DNS server IP address.
Server
WINS Server Type the WINS server IP address.
QoS
Shape Upstream:
Link Rate
Select this option to enable Traffic Shaper for outgoing traffic. Then type
a rate (in kilobits/second) slightly lower than your Internet connection's
maximum measured upstream speed in the field provided.
It is recommended to try different rates in order to determine which one
provides the best results.
For information on using Traffic Shaper, see
Using Traffic Shaper on
page 151.
btain Domain
ame Servers
Clear this option if you want the NetDefend firewall to obtain an IP
matically
DNS servers.
ain WINS
Clear this option if you want the NetDefend firewall to obtain
ver
address automatically using DHCP, but not to automatically
matically
WINS server.
Server
econdary DNS Type the Secondary DNS server IP address.S
Chapter 4: Configuring the Internet Connection 79
Page 96

Using Internet Setup
In this field… Do this…
Shape
Downs eam: Link
R
Select this option to enable Traffic Shaper for incoming traffic. Then type
a rate (in kilobits/second) slightly lower than your Internet connection's
s the best results.
by
y if
page 151.
tr
ate
maximum measured downstream speed in the field provided.
It is recommended to try different rates in order to determine which one
provide
Note: Traffic Shaper cannot control the number or type of packets it
receives from the Internet; it can only affect the rate of incoming traffic
dropping received packets. This makes the shaping of inbound traffic
less accurate than the shaping of outbound traffic. It is therefore
recommended to enable traffic shaping for incoming traffic onl
necessary.
For information on using Traffic Shaper, see
Using Traffic Shaper on
A
E
ou to do so.
MTU This field allows you to control the maximum transmission unit size.
As a general recommendation you should leave this field empty. If
however you wish to modify the default MTU, it is recommended that you
consult with your ISP first and use MTU values between 1300 and 1500.
dvanced
xternal IP If you selected PPTP, type the IP address of the PPTP client as given by
your ISP.
If you selected PPPoE, this field is optional, and you do not have to fill it
in unless your ISP has instructed y
80 D-Link NetDefend firewall User Guide
Page 97

Using Internet Setup
In this field… Do this…
MAC Cloning A MAC address is a 12-digit identifier assigned to every network device. If
your ISP restricts connections to specific, recognized MAC addresses, you
ection, the DMZ/WAN2 port must be configured as WAN2; otherwise
this field is disabled. For information on configuring ports, see
Managing
must select this option to clone a MAC address.
Note: When configuring MAC cloning for the secondary Internet
conn
Ports
on page 145.
H
Addre
.
Cloned MAC
Address
Do one of the following:
tically "clone" the MAC address of
nd firewall.
tion using the MAC address of a
ess in this field.
Note: In the secondary Internet connection, this field is enabled only if the
DMZ/WAN2 port is set to WAN2.
High Availability
The High Availability area only appears in NetDefend with Power Pack.
Do not connect if
this gateway is in
passive state
If you are using High Availability (HA), select this option to specify that the
gateway should connect to the Internet only if it is the Active Gateway in
the HA cluster.
This field is only enabled if HA is configured.
For information on HA, see
Configuring High Availability on page 119.
Dead Connection
Detection
ardware MAC This field displays the NetDefend firewall's MAC address.
ss
This field is read-only
• Click
This Computer to automa
your computer to the NetDefe
• If the ISP requires authentica
different computer, type the MAC addr
Chapter 4: Configuring the Internet Connection 81
Page 98

Using Internet Setup
In this field… Do this…
P Select this option to automatically detect loss of connectivity to the default
N, this is done by sending ARP requests to the
f you selected PPTP, PPPoE, or Dialup, this is done by
lt gateway does not respond, the Internet
mined that the Internet connection is down, and two Internet
connections are defined, a failover will be performed to the second
Internet connection, ensuring continuous Internet connectivity.
This option is selected by default.
robe Next Hop
gateway. If you selected LA
default gateway. I
sending PPP echo reply (LCP) messages to the PPP peer.
By default, if the defau
connection is considered to be down.
If it is deter
82 D-Link NetDefend firewall User Guide
Page 99

Using Internet Setup
In this field… Do this…
Connection Probing
Method
While the
Probe Next Hop option checks the availability of the next hop
router, which is usually at your ISP, connectivity to the next hop router
are more than one hop away.
, by selecting one
•
None. Do not perform Internet connection probing. Next hop
d, if the Probe Next Hop check box is
dress or DNS name in the 1, 2, and 3 fields. If
ne of the defined servers respond to pinging,
sidered to be down.
ble servers that can be
tor of Internet connectivity, and
ltaneously (that is, they are not at
nd secondary DNS
way responds, the
Internet connection is considered to be down.
Use this method if the availability of your DNS servers is a
good indicator for the availability of Internet connectivity.
•
Probe VPN Gateway (RDP). Send RDP echo requests to up to
three Check Point VPN gateways specified by IP address or
DNS name in the
1, 2, and 3 fields. If for 45 seconds none of
the defined gateways respond, the Internet connection is
considered to be down.
Use this option if you have Check Point VPN gateways, and
you want loss of connectivity to these gateways to trigger ISP
failover to an Internet connection from which these gateways
are reachable.
does not always indicate that the Internet is accessible. For example, if
there is a problem with a different router at the ISP, the next hop will be
reachable, but the Internet might be inaccessible. Connection probing is a
way to detect Internet failures that
Specify what method to use for probing the connection
of the following:
probing will still be use
selected. This is the default value.
•
Ping Addresses. Ping anywhere from one to three servers
specified by IP ad
for 45 seconds no
the Internet connection is con
d if you have reliaUse this metho
pinged, that are a good indica
that are not likely to fail simu
the same location).
•
Probe DNS Servers. Probe the primary a
servers. If for 45 seconds neither gate
Chapter 4: Configuring the Internet Connection 83
Page 100
Setting Up a Dialup Modem
In this field… Do this…
1, 2, 3
If you chose the
Ping Addresses connection probing method, type the IP
addresses or DNS names of the desired servers.
If you chose the
Probe VPN Gateway (RDP) connection probing method, type
the IP addresses or DNS names of the desired VPN gateways.
You can clear a field by clicking
Clear.
Setting Up a Dialup Modem
You can use a dialup modem as a primary or secondary Internet connection
me ess is unavailable.
disconnected when not in use. For information on setting up a dialup backup
Setting Up a Dialup Backup Connection on page 92.
To
egular or ISDN dialup modem to your NetDefend firewall's serial
2.
thod. This is useful in locations where broadband Internet acc
When used as a backup Internet connection, the modem can be automatically
connection, see
set up a dialup modem
1. Connect a r
port.
For information on locating the serial port, see Rear Panel.
Click
Network in the main menu, and click the Ports tab.
84 D-Link NetDefend firewall User Guide
 Loading...