


 Loading...
Covr your whole home in Seamless Wi-Fi
High Performance |
More Coverage |
One Seamless Network |
|
COVR-2202/2200 |
TRI-BAND WHOLE HOME WI-FI SYSTEM |
USER MANUAL |

Preface
D-Link reserves the right to revise this publication and to make changes in the content hereof without obligation to notify any person or organization of such revisions or changes.
Manual Revisions
Revision |
Date |
Description |
1.00 |
July 09, 2018 |
Initial release. |
|
|
|
Trademarks
D-Link and the D-Link logo are trademarks or registered trademarks of D-Link Corporation or its subsidiaries in the United States or other countries. All other company or product names mentioned herein are trademarks or registered trademarks of their respective companies.
Apple®, Apple logo®, Safari®, iPhone®, iPad®, iPod touch® and Macintosh® are trademarks of Apple Inc., registered in the U.S. and other countries. App StoreSM is a service mark of Apple Inc.
Chrome™ browser, Google Play™ and Android™ are trademarks of Google Inc.
Internet Explorer®, Windows® and the Windows logo are trademarks of the Microsoft group of companies. Copyright © 2018 by D-Link Corporation, Inc.
All rights reserved. This publication may not be reproduced, in whole or in part, without prior expressed written permission from D-Link Corporation, Inc.
Power Usage
ErP Power Usage
This device is an Energy Related Product (ErP) that automatically switches to a power-saving Network Standby mode within 1 minute of no packets being transmitted. If it is not needed during certain periods of time, it can be unplugged to save energy.
Network Standby: 3.5 watts
D-Link COVR-2202 User Manual |
i |

Table of Contents
Table of Contents
Product Overview.............................................................. |
1 |
Package Contents......................................................................... |
1 |
System Requirements.................................................................. |
2 |
Introduction.................................................................................... |
3 |
Features............................................................................................ |
3 |
Hardware Overview...................................................................... |
5 |
COVR-2200 LED Indicator................................................... |
5 |
COVR-2200 Rear Panel......................................................... |
6 |
Hardware Setup............................................................................. |
7 |
Using The D-Link Wi-Fi App .............................................. |
7 |
Manual Installation ............................................................ |
10 |
Configuration................................................................... |
12 |
Accessing the Web User Interface......................................... |
12 |
Home............................................................................................... |
13 |
Internet................................................................................... |
14 |
COVR-2200............................................................................. |
15 |
Connected Clients............................................................... |
16 |
Covr Points............................................................................. |
17 |
Settings........................................................................................... |
18 |
Wizard...................................................................................... |
18 |
Internet................................................................................... |
19 |
IPv4...................................................................................... |
19 |
IPv6...................................................................................... |
29 |
Wireless................................................................................... |
40 |
Wi-Fi..................................................................................... |
40 |
Guest Zone....................................................................... |
42 |
Network.................................................................................. |
43 |
Advanced....................................................................................... |
45 |
QoS Engine............................................................................ |
45 |
Firewall.................................................................................... |
47 |
IPv4/IPv6 Rules................................................................ |
49 |
Port Forwarding................................................................... |
50 |
Port Forwarding.............................................................. |
50 |
Virtual Server.................................................................... |
51 |
Website Filter................................................................... |
52 |
Static Routes......................................................................... |
53 |
IPv4...................................................................................... |
53 |
IPv6...................................................................................... |
54 |
Dynamic DNS........................................................................ |
55 |
Management................................................................................ |
57 |
Time & Schedule.................................................................. |
57 |
Time..................................................................................... |
57 |
Schedule............................................................................ |
58 |
System Log............................................................................ |
59 |
System Admin...................................................................... |
61 |
Admin................................................................................. |
61 |
System................................................................................ |
63 |
Upgrade.................................................................................. |
64 |
Statistics.................................................................................. |
65 |
Adding Additional Covr Points........................................ |
66 |
Using the D-Link Wi-Fi App...................................................... |
66 |
D-Link COVR-2202 User Manual |
ii |

Table of Contents |
|
Connect to a Wireless Client............................................ |
69 |
WPS Button................................................................................... |
69 |
Upgrading Firmware........................................................ |
70 |
Using the Web User Interface................................................. |
70 |
Using the D-Link Wi-Fi App...................................................... |
70 |
Resetting Your Device...................................................... |
72 |
Wireless Basics.................................................................. |
73 |
What is Wireless?......................................................................... |
74 |
Tips................................................................................................... |
76 |
Technical Specifications................................................... |
77 |
Regulatory Information................................................... |
79 |
D-Link COVR-2202 User Manual |
iii |

Section 1 - Product Overview
ProductPackageOverviewContents
COVR-2200 Covr Point A Router (x 1)
COVR-2200 Covr Point (x 1)
Power adapter (x 2)
Quick Installation Card
Ethernet Cable
If any of the above items are missing or damaged, please contact your local reseller.
D-Link COVR-2202 User Manual |
1 |

Section 1 - Product Overview
System Requirements
Network Requirements |
• An Ethernet-based cable or DSL modem |
|
• IEEE 802.11ac/n/g/b/a wireless clients |
||
|
• 10/100/1000 Mbps Ethernet |
|
|
|
|
|
Computer with the following: |
|
|
• Windows, Macintosh, or Linux-based operating system |
|
|
• An installed Ethernet adapter or Wi-Fi interface |
|
Web-based Configuration |
Browser requirements: |
|
Utility Requirements |
||
• Internet Explorer 10 or higher |
||
|
||
|
• Firefox 28 or higher |
|
|
• Safari 6 or higher |
|
|
• Chrome 28 or higher |
|
|
|
|
D-Link Wi-Fi App |
• iOS or Android smartphone or tablet. (Please refer to the mobile |
|
Requirements |
app's store page to check whether your device is compatible.) |
|
|
|
D-Link COVR-2202 User Manual |
2 |

Section 1 - Product Overview
Introduction
The COVR-2202 Tri-Band Whole Home Wi-Fi System is an elegant, high-performance home networking solution comprised of three COVR-2200 Covr Points. Each Covr Point features powerful AC1200 Wi-Fi combined with two on-board Gigabit Ethernet ports to bring the uncompromised, full potential of AC1200 Wi-Fi to any area in your home, offering true, seamless whole home coverage. With COVR-2202, D-Link has got you Covr’d.
Features
•AC2200Tri-BandWi-Fi with Smart Backhaul - Covr has a dedicated backhaul band for communication between Covr Points, meaning more Wi-Fi for your connected devices.The Smart Backhaul focuses the signal between Covr Points for the best possible backhaul signal.
•Smart Roaming - The Tri-Band Whole Home Wi-Fi System creates a single, seamless wireless network throughout your entire home using a single wireless network name (SSID).This means that once you connect, your connection is maintained seamlessly as you and your wireless device roam throughout your home, allowing you to experience an uninterrupted connection without buffering, drop-outs, or dead spots.
•Extreme Performance - The six powerful antennas, high-power amplifier, and MU-MIMO technology combined create an ultra-fast, powerful Wi-Fi network capable of handling a large number of connected devices running high-bandwidth applications like 4K streaming and gaming.
•Smart Steering - Behind the scenes, each Covr Point automatically determines whether to connect a device to the 2.4 or 5 GHz band, providing the best speed and range for each device and optimally distributing devices to each network.
1Maximum wireless signal rate derived from IEEE Standard 802.11a, 802.11g, 802.11n and 802.11ac specifications. Actual data throughput will vary. Network conditions and environmental factors, including volume of network traffic, building materials and construction, and network overhead, may lower actual data throughput rate. Environmental conditions will adversely affect wireless signal range.
D-Link COVR-2202 User Manual |
3 |

Section 1 - Product Overview
Features (continued)
•Expandable Network - Covr is a scalable solution; extra Covr Points can be added to increase the reach of your network. Scale up your Wi-Fi by adding another Covr Point to get true whole-home coverage.
•Easy Setup - Using the free D-Link Wi-Fi app or the intuitive web-based user interface, you can quickly set up the COVR-2202 and configure your network with your specific settings in a matter of minutes.
D-Link COVR-2202 User Manual |
4 |

Section 1 - Product Overview
Hardware Overview
COVR-2200 LED Indicator
1
|
|
Solid red |
The COVR-2200 is booting up. |
|
|
|
|
|
|
Blinking orange |
The COVR-2200 is syncing to another COVR-2200 Covr Point. |
|
|
Once set up, a blinking orange LED indicates there is no connection to the device. |
|
|
|
|
|
|
|
|
|
|
COVR Status |
Solid white |
The COVR-2200 is powered on and running. |
1 |
Once set up, a solid white LED indicates a strong connection. |
||
LED |
|
|
|
|
Blinking white |
Once set up, a blinking white LED indicates a weak connection, or that the Covr Point is connecting |
|
|
|
||
|
|
to a wireless client using Wi-Fi Protected Setup (WPS). |
|
|
|
|
|
|
|
|
|
|
|
|
The COVR-2200 is powered off. |
|
|
Off |
If the device is powered on and Status LED is disabled, the device is working as normal. Refer to |
|
|
|
the Admin section on page 61 for more information. |
|
|
|
|
|
|
|
|
D-Link COVR-2202 User Manual |
5 |

Section 1 - Product Overview
COVR-2200 Rear Panel
3
1 2
1 |
Power Connector |
Connect the included power adapter here to power on the device. |
|
|
|
|
|
2 |
Gigabit LAN ports |
Connect Ethernet devices such as computers, switches, storage (NAS) devices, and game consoles. |
|
On Covr Point A, LAN port 1 is designated as the WAN port that connects to your modem. |
|||
|
|
||
|
|
|
|
3 |
WPS |
Press this button to establish an instant connection to a wireless client using Wi-Fi Protected Setup |
|
(WPS). Refer to the Wi-Fi Protected Setup section on page 41 for more information. |
|||
|
|
||
|
|
|
D-Link COVR-2202 User Manual |
6 |
Section 2 - Installation
Hardware Setup
Using The D-Link Wi-Fi App
The free D-Link Wi-Fi app allows you to install and configure your COVR-2202 Tri-Band Whole Home Wi-Fi System from your mobile device or tablet.
This following section will walk you through the installation and configuration steps for the COVR-2202 Tri-Band Whole Home Wi-Fi System using the D-Link Wi-Fi app.
To get the D-Link Wi-Fi app, browse the App Store or Google Play and search for D-Link Wi-Fi. You can also scan the QR code on the right, which will take you to the respective D-Link Wi-Fi app store page directly.
Note: The screenshots may differ depending on your mobile device’s OS version. The following steps show the Android interface of the D-Link Wi-Fi app. If you are using an iOS device, the appearance may differ from that of the screenshots, but the process is the same.
D-Link Wi-Fi
D-Link COVR-2202 User Manual |
7 |

Section 2 - Installation
Using The D-Link Wi-Fi App (Continued)
1. Open the D-Link Wi-Fi app and tap Install New Device at the bottom.
2. Next, select COVR-2202 from the list and tap NEXT.
D-Link COVR-2202 User Manual |
8 |

Section 2 - Installation
Using The D-Link Wi-Fi App (Continued)
3.When asked to create a new network, or add to an existing network, choose Create a new network and tap NEXT.
4.You will now be guided through a step-by-step process for setting up the COVR-2202 hardware. Simply follow the on-screen instructions to complete the installation and Covr Wi-Fi configuration process.
D-Link COVR-2202 User Manual |
9 |
Section 2 - Installation
Manual Installation
If you do not wish to use the D-Link Wi-Fi app, you can manually set up the COVR-2202 and configure your Covr Wi-Fi network using the web-based user interface. Follow the instructions below to set up your COVR-2202 Tri-Band Whole Home Wi-Fi System.
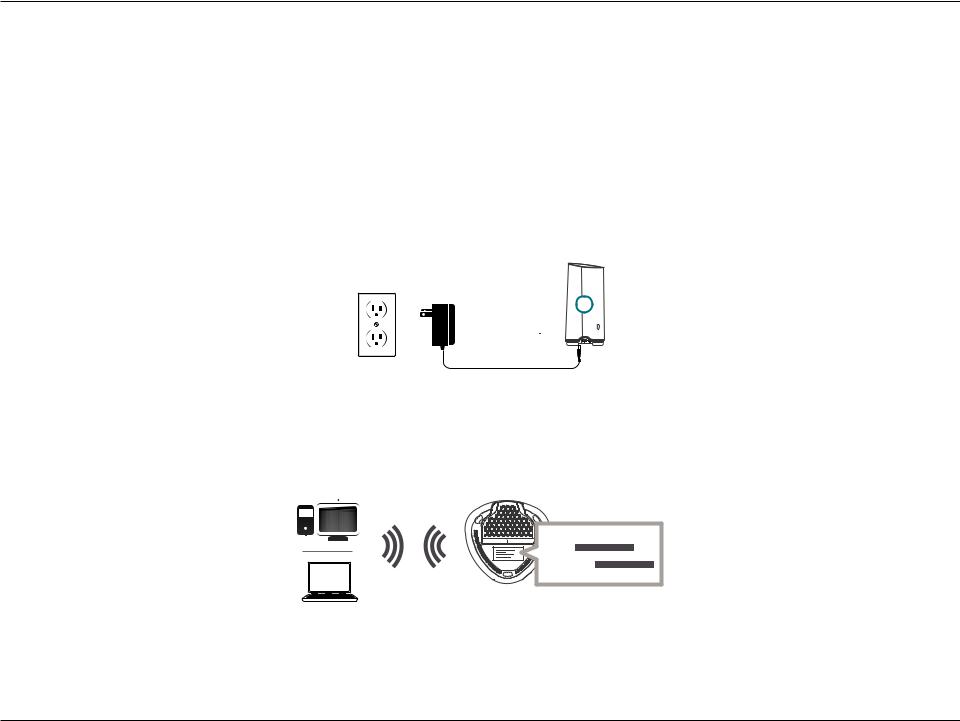
Note: Position the Covr Point labeled A close to your Internet-connected modem.
1. Connect the power adapter and plug the Covr Point into a power outlet. Wait for Covr Point A to boot up.
A
2.When the COVR LED starts blinking orange, wirelessly connect your PC or laptop to the Wi-Fi name (SSID) printed on the back of the device, or on the included Wi-Fi Configuration Card.
Wi-Fi
SSID
Password
Wi-Fi
D-Link COVR-2202 User Manual |
10 |

Section 2 - Installation
Manual Installation (Continued)
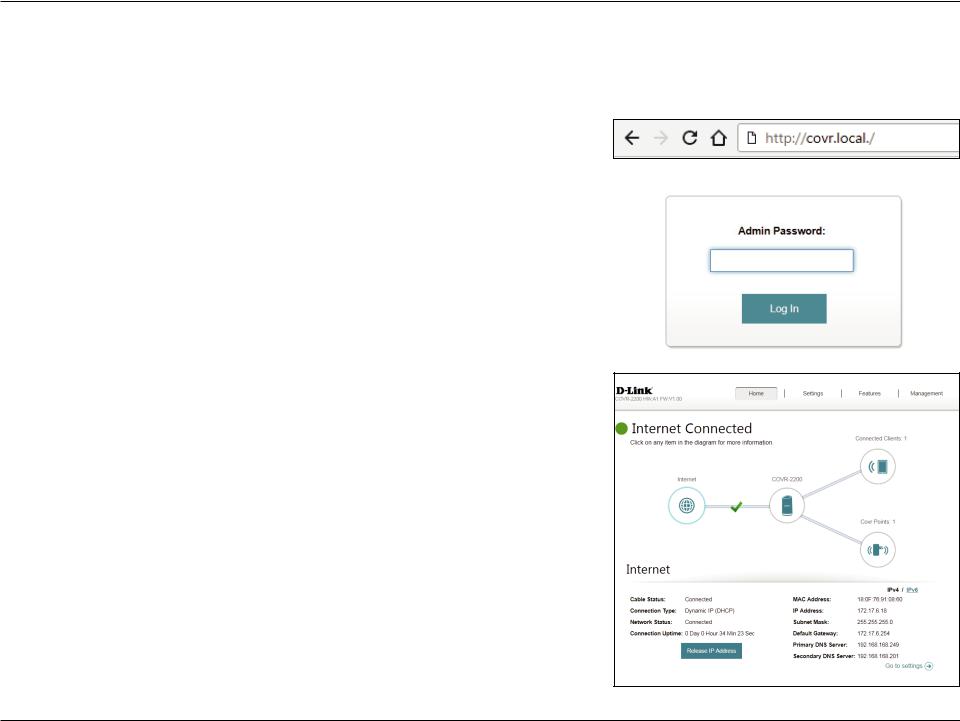
3. Type http://covr.local./ into a web browser and follow the on-screen instructions to complete the setup.
http://covr.local./
Your COVR-2202 Tri-Band Whole Home Wi-Fi System is now set up and ready to use. You can now configure your Covr Wi-Fi settings using the free D-Link Wi-Fi mobile app or the web-based user interface. Refer to the Configuration section on page 12 for more information on configuring your network using the web-based user interface.
D-Link COVR-2202 User Manual |
11 |
Section 3 - Configuration
Configuration
Accessing the Web User Interface
You can access the web-based user interface using one of the following web browsers:
•Internet Explorer 10 or higher
•Firefox 28 or higher
•Safari 6 or higher
•Chrome 28 or higher
1.Open a web browser.
2.Type http://covr.local./ in the address bar.
3.Specify the admin password.
•If this is the first logging in, leave the password blank.
•If you have previously completed the Setup Wizard, specify the password you created during initial setup
Important: If you cannot remember your password, press the reset button on the bottom of the device to restore the default settings. Refer to Resetting your Device on page 72 for more information.
4. Click Log In.
Note: The system will automatically log out after a period of inactivity.
D-Link COVR-2202 User Manual |
12 |
Section 3 - Configuration
Home
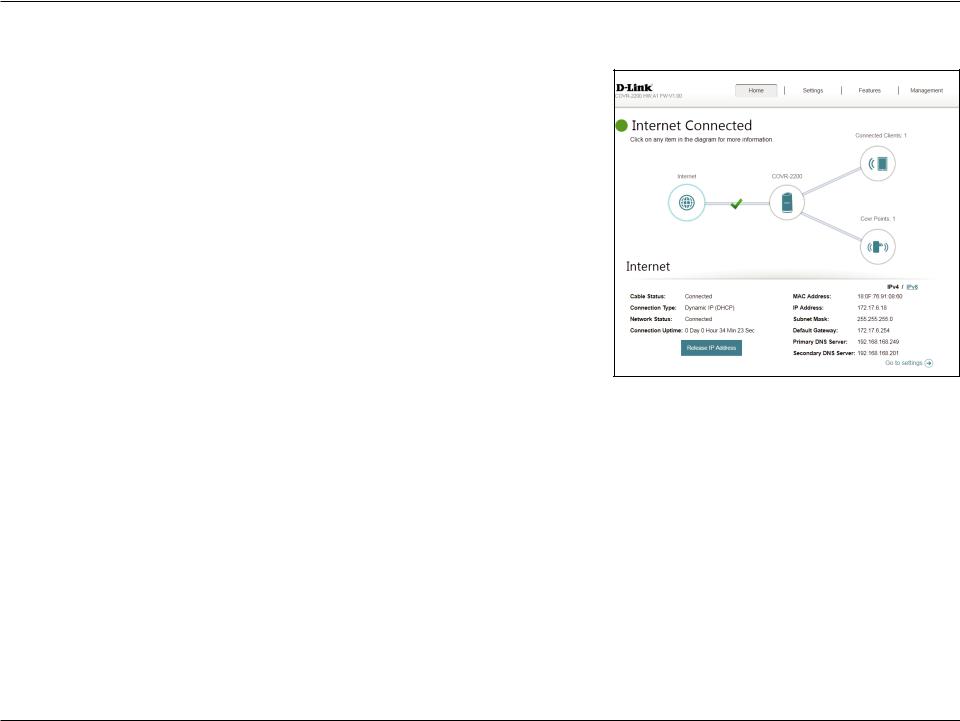
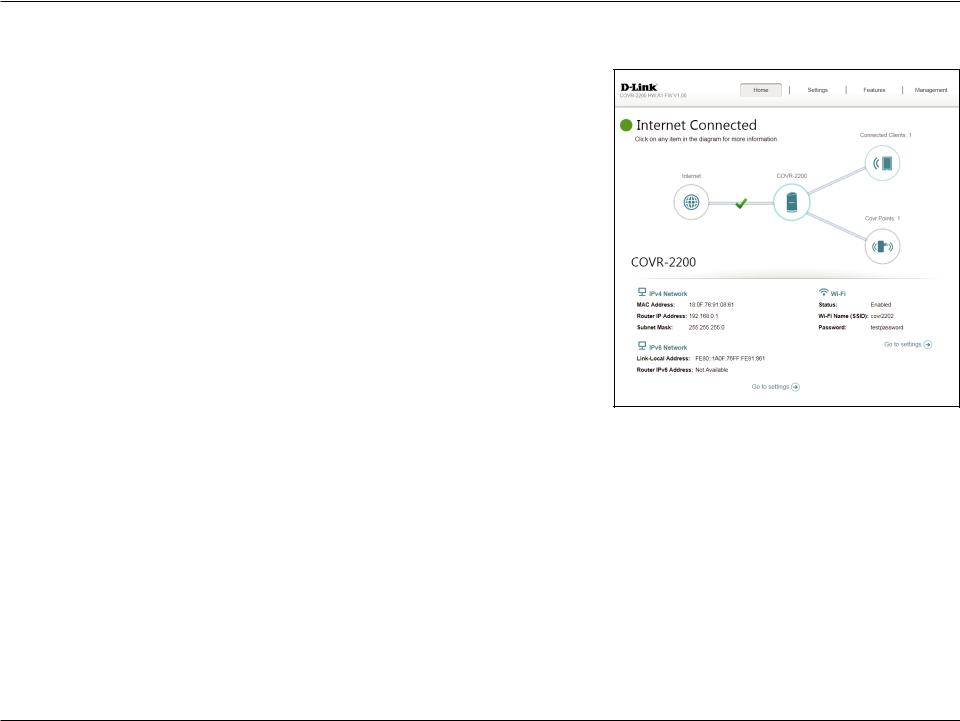
The Home page displays the current status of your Covr Wi-Fi network in the form of an interactive diagram. You can click each icon to display information about each part of the network at the bottom of the screen. The menu bar at the top of the page will allow you to quickly navigate to other pages. Refer to the following pages for a description of each section.
D-Link COVR-2202 User Manual |
13 |
Section 3 - Configuration
Internet
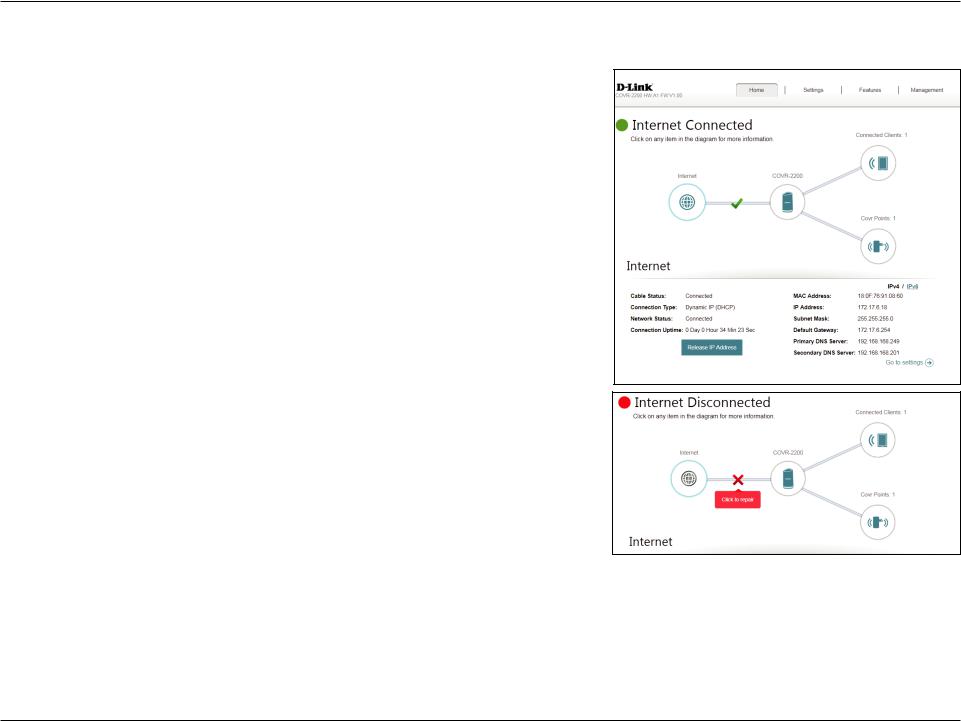
Click on the Internet icon to bring up more details about your Internet connection. Click IPv4 or IPv6 to see details of the IPv4 and IPv6 connection respectively.
The Home page displays whether or not Covr Point A is currently connected to the Internet. If it is disconnected, click Click to repair to bring up the setup wizard, refer to Wizard on page 18 for more information.
Click Release IP Address to release the current IP address and disconnect from the Internet. If you wish to reconnect the Internet, click Renew IP Address.
To reconfigure the Internet settings, click Go to settings at the bottom-right.
Refer to the Internet Settings section starting on page 19 for more information.
D-Link COVR-2202 User Manual |
14 |
Section 3 - Configuration
COVR-2200
Click on the COVR-2200 icon to view details about the Covr Point's wireless and local network settings. This includes IPv4 and IPv6 local networks, and WiFi information.
This overview is only informational. To configure these sections, refer to the corresponding configuration sections in this manual.
D-Link COVR-2202 User Manual |
15 |
Section 3 - Configuration
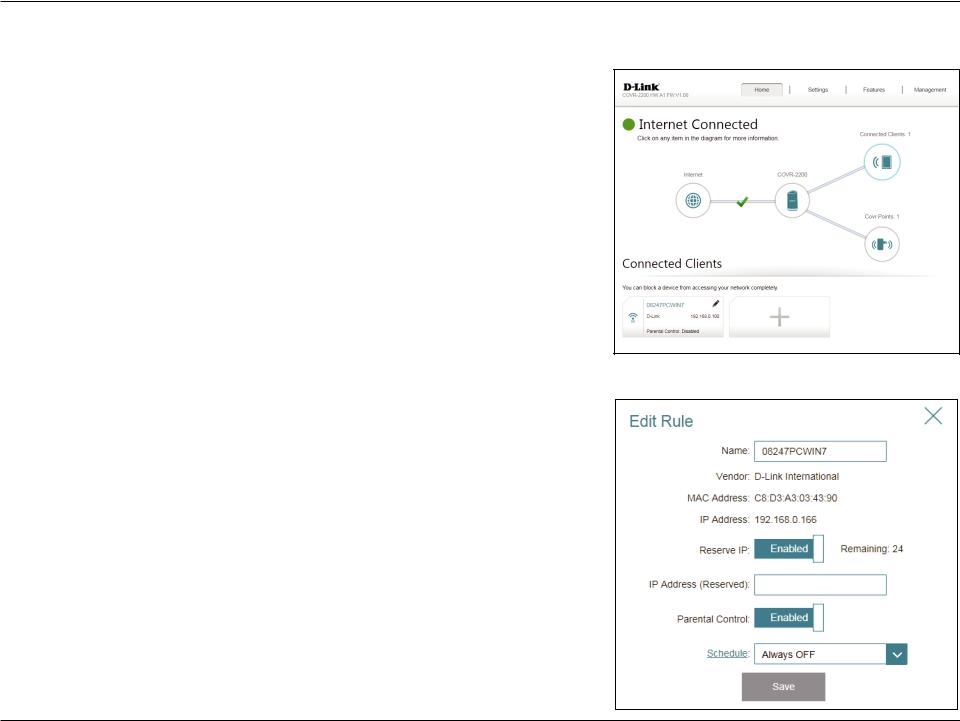
Connected Clients
Click on the Connected Clients icon to view details about the clients currently connected to your Covr Wi-Fi network.
To edit each client’s settings, click the pencil icon on the client you want to edit.
Name: |
Displays the name of this client. You can edit the client's name here. |
Vendor: |
Displays the vendor of the device. |
MAC Address: |
Displays the MAC address of the device. |
IP Address: |
Displays the current IP address of this client. |
Reserve IP: |
Enable to reserve an IP address for this client. |
IP Address |
Specify an IP address for the DHCP server to assign to this client. |
(Reserved): |
|
Parental Control: |
Enable or disable parental control to allow or block access to the |
|
network for this user. |
Schedule: |
If Parental Control is enabled, use the drop-down menu to select |
|
the time schedule that the rule will be enabled for. The schedule |
|
may be set to Always Off, or you can create your own schedules in |
|
the Schedule section. Refer to Schedule on page 58 for more |
|
information. |
|
Click Save when you are done. |
D-Link COVR-2202 User Manual |
16 |
Section 3 - Configuration
Covr Points
Click on the Covr Points icon to view details about all additional Covr Points in your Covr whole home Wi-Fi network.
To edit a Covr Point’s name, click the pencil icon in the top-right of the box of the Covr Point that you want to rename.
To reboot a Covr Point, click the settings icon in the bottom-right of the Covr Point's box and click Reboot.
To remove a Covr Point from your Covr Wi-Fi network, click the settings icon in the bottom-right of the Covr Point's box and click Remove.
Name: Enter a name for the Covr Point.
MAC Address: Displays the MAC address of the Covr Point.
Click Save when you are done.
D-Link COVR-2202 User Manual |
17 |

Section 3 - Configuration
Settings
Wizard
In the Settings menu on the bar on the top of the page, click Wizard to open the setup wizard. This is the same wizard that appears when you set up the device using the web-user interface for the first time.
This Wizard will also launch when clicking the Click to Repair button when no Internet connection is detected.
Refer to Manual Installation on page 10 for more information.
D-Link COVR-2202 User Manual |
18 |
Section 3 - Configuration
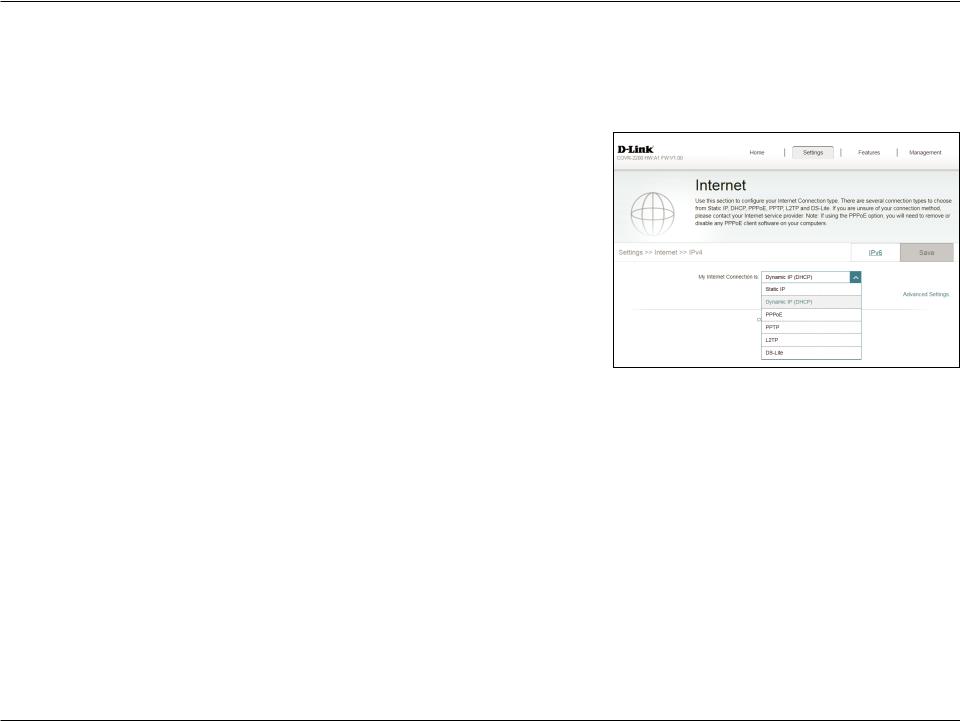
Internet
IPv4
In the Settings menu on the bar on the top of the page, click Internet to see the Internet configuration options.
My Internet Choose your Internet connection type from the drop-down menu.You Connection Is: will be presented with the appropriate options for your connection type. Click Advanced Settings... to expand the list and see all of the
options.
For Dynamic IP (DHCP) refer to page 20.
For Static IP refer to page 21.
For PPPoE refer to page 22.
For PPTP refer to page 24.
For L2TP refer to page 26.
For DS-Lite refer to page 28.
To configure an IPv6 connection, click the IPv6 link. Refer to page 29.
D-Link COVR-2202 User Manual |
19 |
Section 3 - Configuration
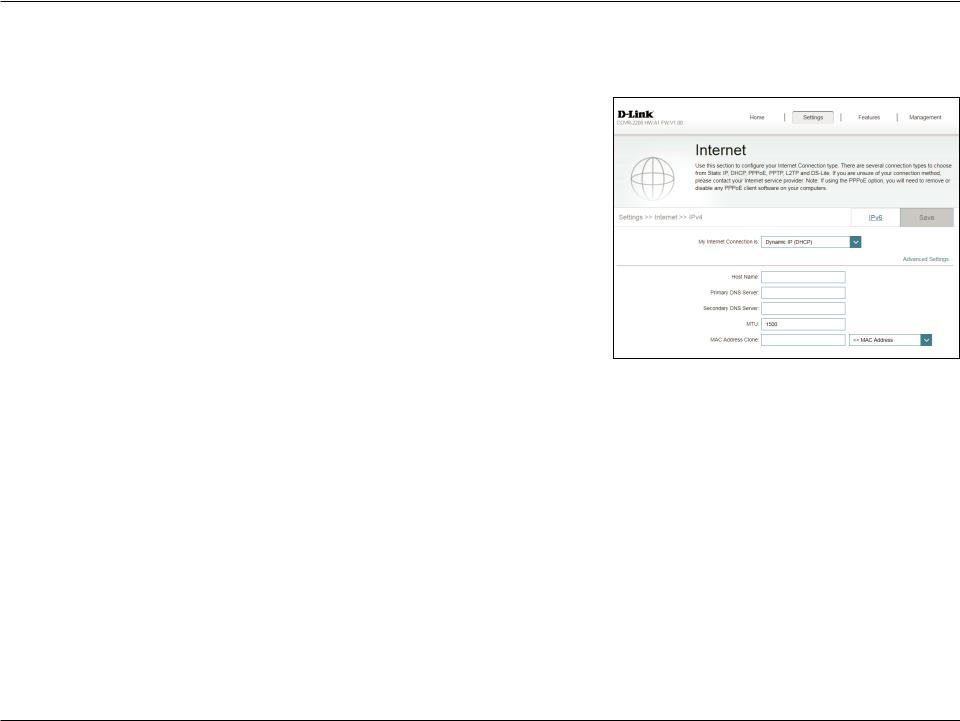
Dynamic IP (DHCP)
Select Dynamic IP (DHCP) to obtain IP address information automatically from your Internet Service Provider (ISP). Select this option if your ISP does not specify an IP address to use.
Advanced Settings
Host Name: The host name is optional but may be required by some ISPs. Leave it blank if you are not sure.
Primary DNS Enter the primary DNS server IP address assigned by your ISP. This Server: address is usually obtained automatically from your ISP.
Secondary DNS Enter the secondary DNS server IP address assigned by your ISP. This Server: address is usually obtained automatically from your ISP.
MTU: Maximum Transmission Unit - you may need to change the MTU for optimal performance with your ISP.
MAC Address The default MAC address is set to the physical interface MAC address Clone: of port 1 on Covr Point A.You can use the drop-down menu to replace the Internet port’s MAC address with the MAC address of a connected
client.
Click Save when you are done.
D-Link COVR-2202 User Manual |
20 |
Section 3 - Configuration
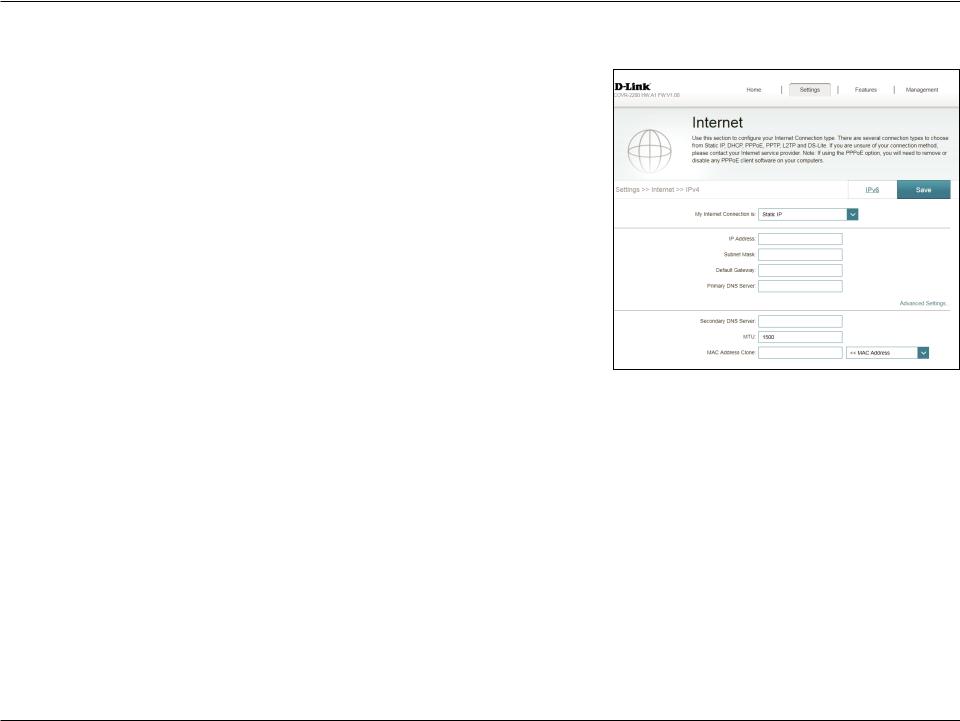
Static IP
Select Static IP if your IP information is provided by your Internet Service Provider (ISP).
IP Address: Enter the IP address provided by your ISP.
Subnet Mask: Enter the subnet mask provided by your ISP.
Default Gateway: Enter the default gateway address provided by your ISP.
Primary DNS Enter the primary DNS server IP address assigned by your ISP.
Server:
Advanced Settings
Secondary DNS Enter the secondary DNS server IP address assigned by your ISP.
Server:
MTU: Maximum Transmission Unit - you may need to change the MTU for optimal performance with your ISP.
MAC Address The default MAC address is set to the physical interface MAC address Clone: of port 1 on Covr Point A.You can use the drop-down menu to replace the Internet port’s MAC address with the MAC address of a connected
client.
Click Save when you are done.
D-Link COVR-2202 User Manual |
21 |
Section 3 - Configuration
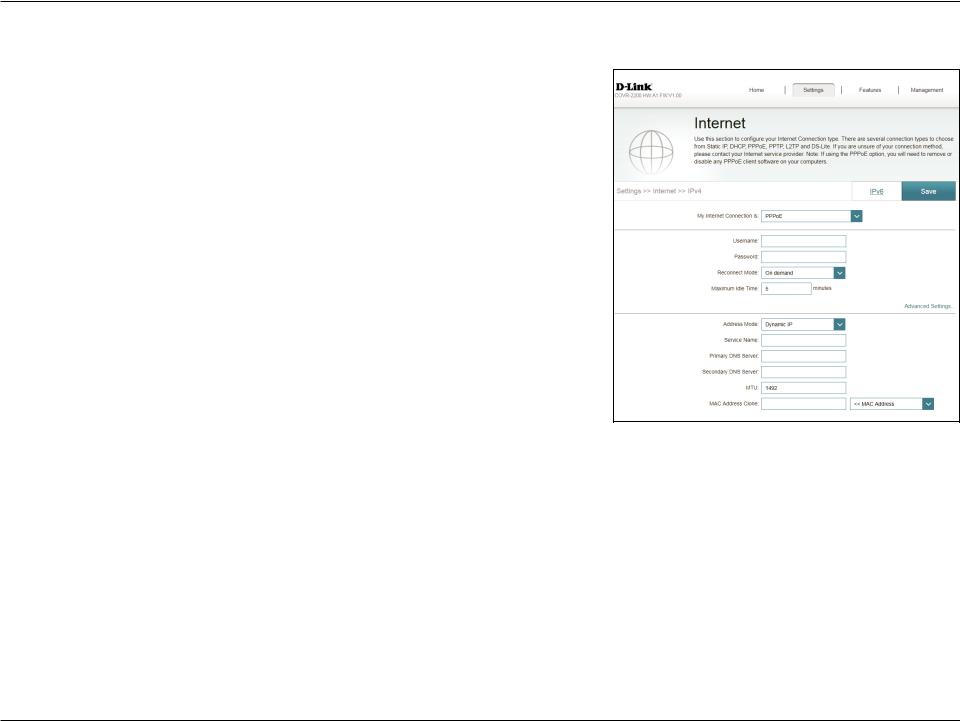
PPPoE
Select PPPoE if your ISP provides and requires you to enter a PPPoE username and password in order to connect to the Internet.
Username: Enter the username provided by your ISP.
Password: Enter the password provided by your ISP.
Reconnect Mode: Select either Always on, On Demand, or Manual.
Maximum Idle Enter a maximum idle time (in minutes) during which the Internet Time: connection is maintained during inactivity. To disable this feature,
select Always on as the reconnect mode.
Advanced Settings
Address Mode: Select Static IP if your ISP assigned you the IP address, subnet mask, gateway, and DNS server addresses. In most cases, select Dynamic IP.
If you selected Dynamic IP as the Address Mode:
Service Name: Enter the ISP service name (optional).
Primary DNS Enter the primary DNS server IP address assigned by your ISP. This Server: address is usually obtained automatically from your ISP.
Secondary DNS Enter the secondary DNS server IP address assigned by your ISP. This Server: address is usually obtained automatically from your ISP.
MTU: Maximum Transmission Unit - you may need to change the MTU for optimal performance with your ISP.
D-Link COVR-2202 User Manual |
22 |

Section 3 - Configuration
PPPoE (continued)
MAC Address The default MAC address is set to the physical interface MAC address Clone: of port 1 on Covr Point A.You can use the drop-down menu to replace the Internet port’s MAC address with the MAC address of a connected
client.
If you selected Static IP as the Address Mode:
IP Address: Enter the IP address provided by your ISP.
Service Name: Enter the ISP service name (optional).
Primary DNS Enter the primary DNS server IP address assigned by your ISP.
Server:
Secondary DNS Enter the secondary DNS server IP address assigned by your ISP.
Server:
MTU: Maximum Transmission Unit - you may need to change the MTU for optimal performance with your ISP.
MAC Address The default MAC address is set to the physical interface MAC address Clone: of port 1 on Covr Point A.You can use the drop-down menu to replace the Internet port’s MAC address with the MAC address of a connected
client.
Click Save when you are done.
D-Link COVR-2202 User Manual |
23 |

Section 3 - Configuration
PPTP
Choose PPTP (Point-to-Point-Tunneling Protocol ) if your Internet Service Provider (ISP) uses a PPTP connection. Your ISP will provide you with a username and password.
PPTP Server: Enter the PPTP server IP address provided by your ISP.
Username: Enter the username provided by your ISP.
Password: Enter the password provided by your ISP.
Reconnect Mode: Select either Always on, On demand, or Manual.
Maximum Idle Enter a maximum idle (in minutes) time during which the Internet Time: connection is maintained during inactivity. To disable this feature,
select Always on as the reconnect mode.
Advanced Settings
Address Mode: Select Static IP if your ISP assigned you the IP address, subnet mask, gateway, and DNS server addresses. In most cases, select Dynamic IP.
If you selected Dynamic IP as the Address Mode:
Primary DNS Enter the primary DNS server IP address assigned by your ISP. This Server: address is usually obtained automatically from your ISP.
Secondary DNS Enter the secondary DNS server IP address assigned by your ISP. This Server: address is usually obtained automatically from your ISP.
MTU: Maximum Transmission Unit - you may need to change the MTU for optimal performance with your ISP.
D-Link COVR-2202 User Manual |
24 |

Section 3 - Configuration
PPTP (continued)
If you selected Static IP as the Address Mode:
PPTP IP Address: Enter the IP address provided by your ISP.
PPTP Subnet Enter the subnet mask provided by your ISP.
Mask:
PPTP Gateway IP Enter the gateway IP address provided by your ISP.
Address:
Primary DNS Enter the primary DNS server IP address assigned by your ISP.
Server:
Secondary DNS Enter the secondary DNS server IP address assigned by your ISP.
Server:
MTU: Maximum Transmission Unit - you may need to change the MTU for optimal performance with your ISP.
Click Save when you are done.
D-Link COVR-2202 User Manual |
25 |

Section 3 - Configuration
L2TP
Choose L2TP (Layer 2 Tunneling Protocol) if your Internet Service Provider (ISP) uses a L2TP connection. Your ISP will provide you with a username and password.
L2TP Server: Enter the L2TP server IP address provided by your ISP.
Username: Enter the username provided by your ISP.
Password: Enter the password provided by your ISP.
Reconnect Mode: Select either Always on, On demand, or Manual.
Maximum Idle Enter a maximum idle (in minutes) time during which the Internet Time: connection is maintained during inactivity. To disable this feature,
select Always on as the reconnect mode.
Advanced Settings
Address Mode: Select Static IP if your ISP assigned you the IP address, subnet mask, gateway, and DNS server addresses. In most cases, select Dynamic IP.
If you selected Dynamic IP as the Address Mode:
Primary DNS Enter the primary DNS server IP address assigned by your ISP. This Server: address is usually obtained automatically from your ISP.
Secondary DNS Enter the secondary DNS server IP address assigned by your ISP. This Server: address is usually obtained automatically from your ISP.
MTU: Maximum Transmission Unit - you may need to change the MTU for optimal performance with your ISP.
D-Link COVR-2202 User Manual |
26 |
Loading...