

Page 1
USER MANUAL
Covr your Whole Home in Seamless Mesh Wi-Fi
High Performance One Seamless Network
COVR-1100 || COVR-1102 || COVR-1103
AC1200 Dual Band Whole Home Mesh Wi-Fi System
More Coverage
Page 2
Preface
D-Link reserves the right to revise this publication and to make changes in the content hereof without obligation to notify any
person or organization of such revisions or changes.
Manual Revisions
Revision Date Description
1.00 September 10, 2019 Initial release
Trademarks
D-Link and the D-Link logo are trademarks or registered trademarks of D-Link Corporation or its subsidiaries in the United States or other countries.
All other company or product names mentioned herein are trademarks or registered trademarks of their respective companies.
Apple®, Apple logo®, Safari®, iPhone®, and Macintosh® are trademarks of Apple Inc., registered in the U.S. and other countries. App Store
mark of Apple Inc.
Chrome™ browser, Google Play™ and Android™ are trademarks of Google Inc.
SM
is a service
Internet Explorer®, Windows® and the Windows logo are trademarks of the Microsoft group of companies.
Copyright © 2019 by D-Link Corporation, Inc.
All rights reserved. This publication may not be reproduced, in whole or in part, without prior expressed written permission from D-Link Corporation, Inc.
Power Usage
ErP Power Usage
This device is an Energy Related Product (ErP) that automatically switches to a power-saving Network Standby mode within 1 minute of no
packets being transmitted. If it is not needed during certain periods of time, it can be unplugged to save energy.
Network Standby: 3.5 watts
iD-Link COVR-1102 User Manual
Page 3

Table of Contents
Table of Contents
Product Overview ..............................................................1
Package Contents .........................................................................1
System Requirements ................................................................. 2
Introduction and Features .........................................................3
Hardware Overview .....................................................................5
COVR-1100 LED Indicator .................................................. 5
COVR-1100 Rear Panel ........................................................ 6
D-Link Wi-Fi App Setup ..............................................................7
Web Based Installation .............................................................. 9
Conguration ................................................................... 10
Home ..............................................................................................11
Internet ...................................................................................12
COVR-1100 ............................................................................13
Connected Clients ..............................................................14
COVR Points ..........................................................................15
Settings ..........................................................................................16
Wizard .....................................................................................16
Internet ...................................................................................17
IPv4 .....................................................................................17
IPv6 .....................................................................................26
VLAN ...................................................................................37
Advanced ..............................................................................44
Firewall ...................................................................................44
IPv4/IPv6 Rules ...............................................................46
Port Forwarding ..................................................................47
Port Forwarding .............................................................47
Virtual Server ................................................................... 48
Website Filter ...................................................................49
Static Routes .........................................................................50
IPv4 .....................................................................................50
IPv6 .....................................................................................51
Dynamic DNS .......................................................................52
Management ................................................................................54
Time & Schedule .................................................................54
Time ....................................................................................54
Schedule ...........................................................................55
System Log ............................................................................56
System Admin ......................................................................58
Admin.................................................................................58
System ...............................................................................60
Upgrade .................................................................................61
Statistics .................................................................................62
Wireless ..................................................................................39
Wi-Fi ....................................................................................39
Guest Zone .......................................................................40
Network ..................................................................................41
D-Link Cloud .........................................................................43
Adding Additional COVR Points .....................................63
Using the D-Link Wi-Fi App .....................................................63
Using an Ethernet Cable ..........................................................65
iiD-Link COVR-1102 User Manual
Page 4

Table of Contents
Third Party Services .........................................................66
Registering a D-Link Cloud Service Account ....................67
Amazon Alexa Setup .........................................................70
Amazon Alexa Voice Commands ..................................74
The Google Assistant Setup ............................................75
The Google Assistant Voice Commands .....................78
Resetting Your Device .....................................................79
Wireless Basics .................................................................80
What is Wireless? .........................................................................81
Tips ...................................................................................................83
Technical Specications .................................................. 84
Regulatory Information ..................................................86
iiiD-Link COVR-1102 User Manual
Page 5
Section 1 - Product Overview
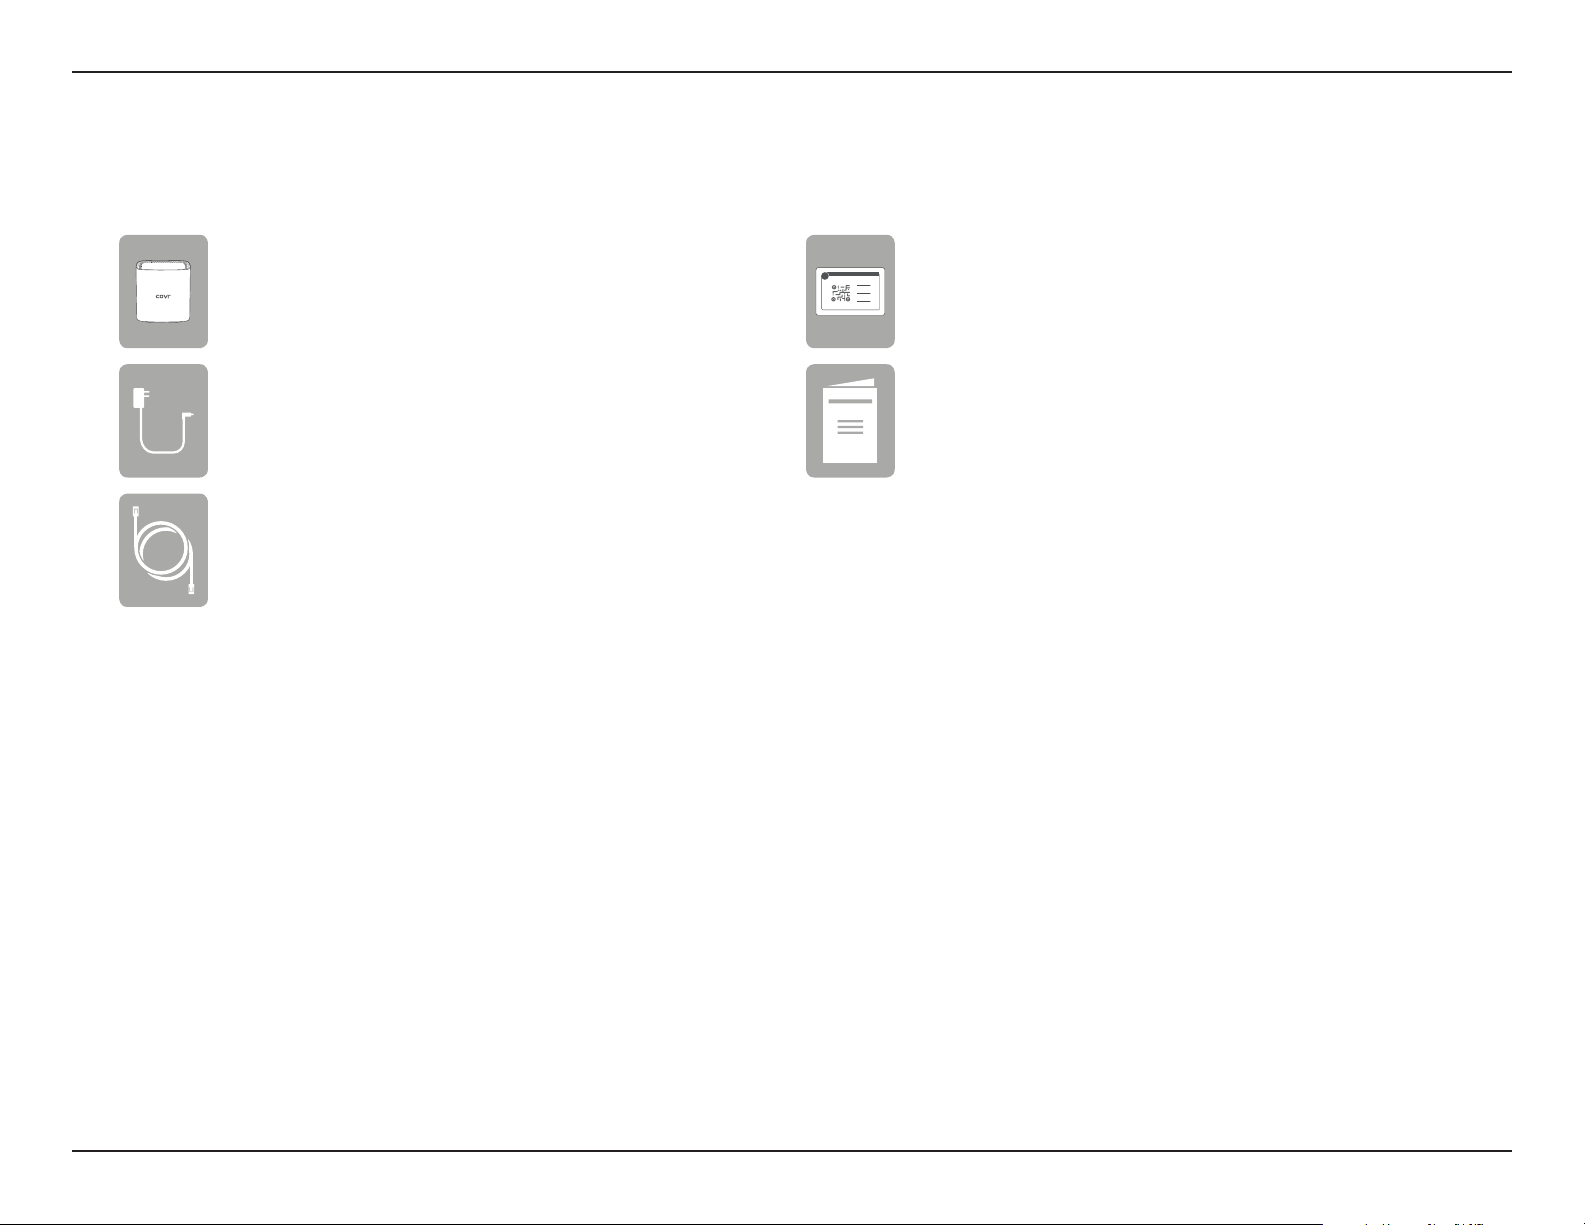
COVR-1100 - COVR Point Router (x 1)
COVR-1102 - COVR Point Router (x 2)
COVR-1103 - COVR Point Router (x 3)
Power adapter (x 1)
Power adapter (x 2)
Power adapter (x 3)
Ethernet Cable
Product Overview
Package Contents
Quick Installation Card
Documentation
If any of the above items are missing or damaged, please contact your local reseller.
1D-Link COVR-1102 User Manual
Page 6

Section 1 - Product Overview
Network Requirements
System Requirements
• An Ethernet-based cable or DSL modem
• IEEE 802.11ac/n/g/b/a wireless clients
• 10/100/1000 Mbps Ethernet
Computer with the following:
• Windows, Macintosh, or Linux-based operating system
• An installed Ethernet adapter or Wi-Fi interface
Web-based Conguration
Utility Requirements
D-Link Wi-Fi App
Requirements
Browser requirements:
• Internet Explorer 10 or higher
• Firefox 28 or higher
• Safari 6 or higher
• Chrome 28 or higher
• iOS® or Android™ device (Please refer to the app's store page to
check whether your device is compatible.)
2D-Link COVR-1102 User Manual
Page 7

Section 1 - Product Overview
Introduction and Features
Introducing the AC1200 Dual Band Whole Home Mesh Wi-Fi System, a seamless Wi-Fi solution that’s the perfect t for your modern
home. It features high-performance COVR Points that blanket every square inch of your home with high-speed AC1200 dual band
Wi-Fi as well as two on-board Gigabit Ethernet ports (per unit) for wired connectivity. With COVR, you enjoy Wi-Fi that’s stable,
consistent, and truly seamless. Featuring integrated voice assistant compatibility for Amazon Alexa and the Google Assistant, you
can control your network with voice commands.
Create or Expand your COVR Network
Gone are the days of only being able to use Wi-Fi in certain areas of your home. The AC1200 Dual Band Whole Home Mesh Wi-Fi
System allows you to easily expand your COVR mesh network just by adding on a COVR-1100 unit wherever you need more Wi-
Fi coverage. Thanks to revolutionary Smart Roaming technology, the COVR unit continuously scans the wireless signal strength
to your devices, automatically connecting them to the strongest signal available. The COVR units handle the transfer seamlessly,
allowing you to walk from room to room without experiencing dropped VoIP calls or frozen video streams. You enjoy seamless
connectivity no matter where you are in the house.
High-Performance, Flexible Mesh Network
Wi-Fi CERTIFIED EasyMesh™ means easy to use, self-adapting Wi-Fi with greater exibility in device choice. Each COVR-1100 unit is
equipped with industry standard Wi-Fi CERTIFIED EasyMesh™ technology. Your COVR points work together to form a self-organizing
and self-optimizing network which collects information and responds to network conditions to maximize performance. From
1-storey apartments to 4-storey houses, and from basements to back decks, COVR’s got you covered.
High-Speed Wired and Wireless Connectivity
With your COVR System you can bring the full potential of Wireless AC speeds of up to 1200 Mbps to any area in your home,
including dead spots. The COVR System creates its own exclusive high-speed Wi-Fi zone for communication with your wireless
devices, allowing you to fully experience demanding multimedia applications from anywhere in your home. The COVR unit is also
equipped with optional Ethernet Backhaul connectivity so that you can optimize the connection between COVR units no matter
what’s between them. In addition, the Gigabit Ethernet ports give you solid, dependable wired performance for devices such as
Network Attached Storage (NAS), media centers, and gaming consoles.
3D-Link COVR-1102 User Manual
Page 8

Section 1 - Product Overview
MU-MIMO and Smart Steering Technology
The COVR AC1200 Dual Band Whole Home Mesh Wi-Fi System features multi-user multiple input, multiple output (MU-MIMO)
Wi-Fi, which transmits multiple separate data streams to each wireless device simultaneously to increase speed and eciency.
Enjoy increased throughput and seamless high-denition streaming media, Internet phone calls, online gaming, and content-rich
web surng throughout your entire home or oce with COVR.
Additionally, the COVR units are equipped with dual-band radios and intelligent Smart Steering. Don’t worry if you don’t know
your 2.4 Ghz from your 5 Ghz, COVR automatically places your device on the optimal wireless band depending on network trac
conditions. With COVR, this happens seamlessly without dropouts, lag, or interruption to your wireless connection, and most
importantly - without you ever lifting a nger.
Always Up-to-Date with the Latest Features
Tired of having to visit the website or manually going to the router’s UI every so often to check for the latest rmware? The COVR
unit will automatically check daily for updates to make sure that the device always has the latest features and the most secure
rmware, and will install the update silently in the background. For an extra peace of mind, in the event of failure during the
rmware update, the router will store a backup system image in the memory before proceeding with the update.
Simple Setup and Conguration
The COVR AC1200 Dual Band Whole Home Mesh Wi-Fi System provides you with a home networking solution that is quick and
easy to set up. The COVR System works straight out of the box, so you just need to plug it in to get started. Congure your network
in no time with the free D-Link Wi-Fi app on your Android or iOS compatible device, or by using the intuitive web-based interface.
4D-Link COVR-1102 User Manual
Page 9
Section 1 - Product Overview
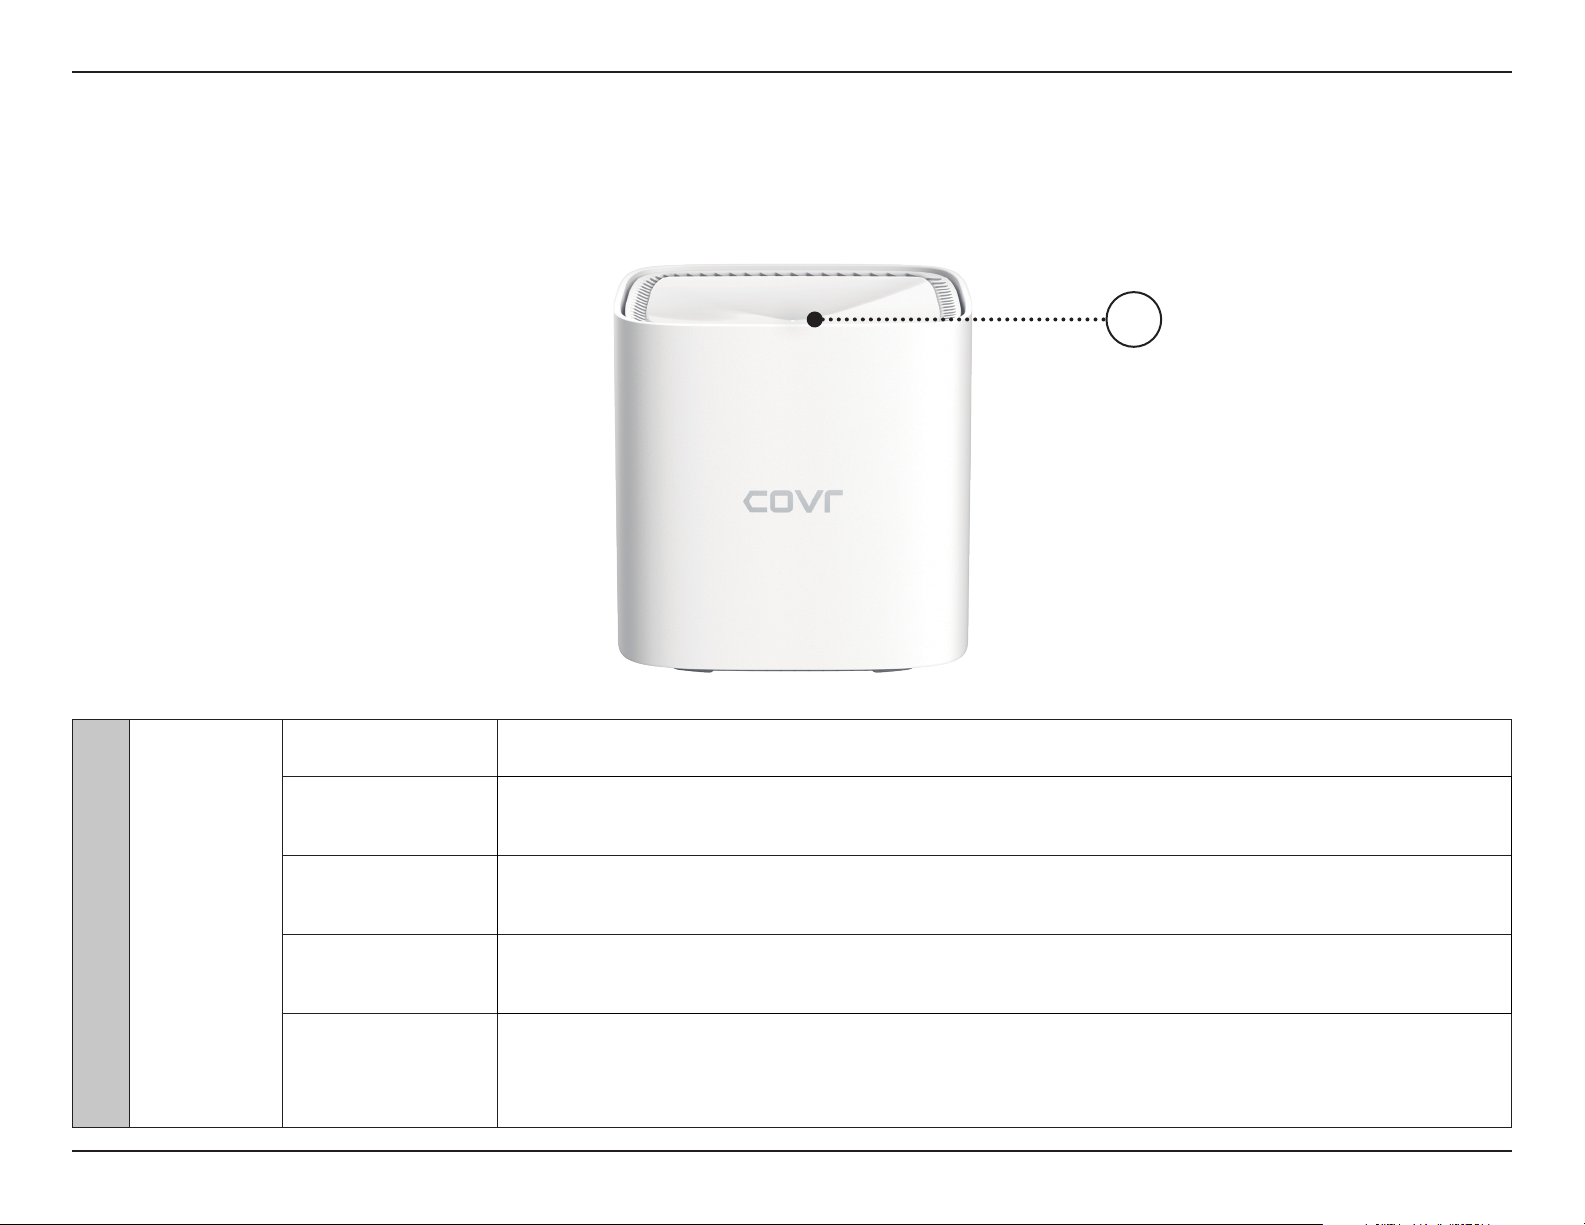
Hardware Overview
COVR-1100 LED Indicator
1
1 Status LED
Solid red The COVR-1100 is booting up.
Blinking orange
Blinking white Once set up, a blinking white LED indicates a weak connection.
Solid white
O
The COVR-1100 is syncing to another COVR-1100 COVR Point.
Once set up, a blinking orange LED indicates there is no connection to the device.
The COVR-1100 is powered on and running.
Once set up, a solid white LED indicates a strong connection.
The COVR-1100 is powered o.
If the device is powered on and Status LED is disabled, the device is working as normal. Refer to
the Admin section on 58 for more information.
5D-Link COVR-1102 User Manual
Page 10

Section 1 - Product Overview
COVR-1100 Rear Panel
1 2 3 4 5
1 Power Button Press the power button to power the device on or o.
2 Internet WAN Port Using an Ethernet cable, connect your broadband modem to this port.
3 Ethernet LAN Port Connect Ethernet devices such as computers, switches, storage (NAS) devices, and game consoles.
4 Power Connector Connect the included power adapter here to power on the device.
5 Reset Button Insert a paperclip in the hole, wait for 5 seconds, then release to reset the router to default settings.
6D-Link COVR-1102 User Manual
Page 11
Section 2 - Installation
D-Link Wi-Fi App Setup
The D-Link Wi-Fi app allows you to install and congure your device from your compatible Android or iOS device.
Note: The screenshots may be dierent depending on your mobile device’s OS version. The following steps show the iOS interface of the D-Link
Wi-Fi app. If you are using an Android device, the appearance may be dierent from that of the screenshots, but the process is the same.
Step 1
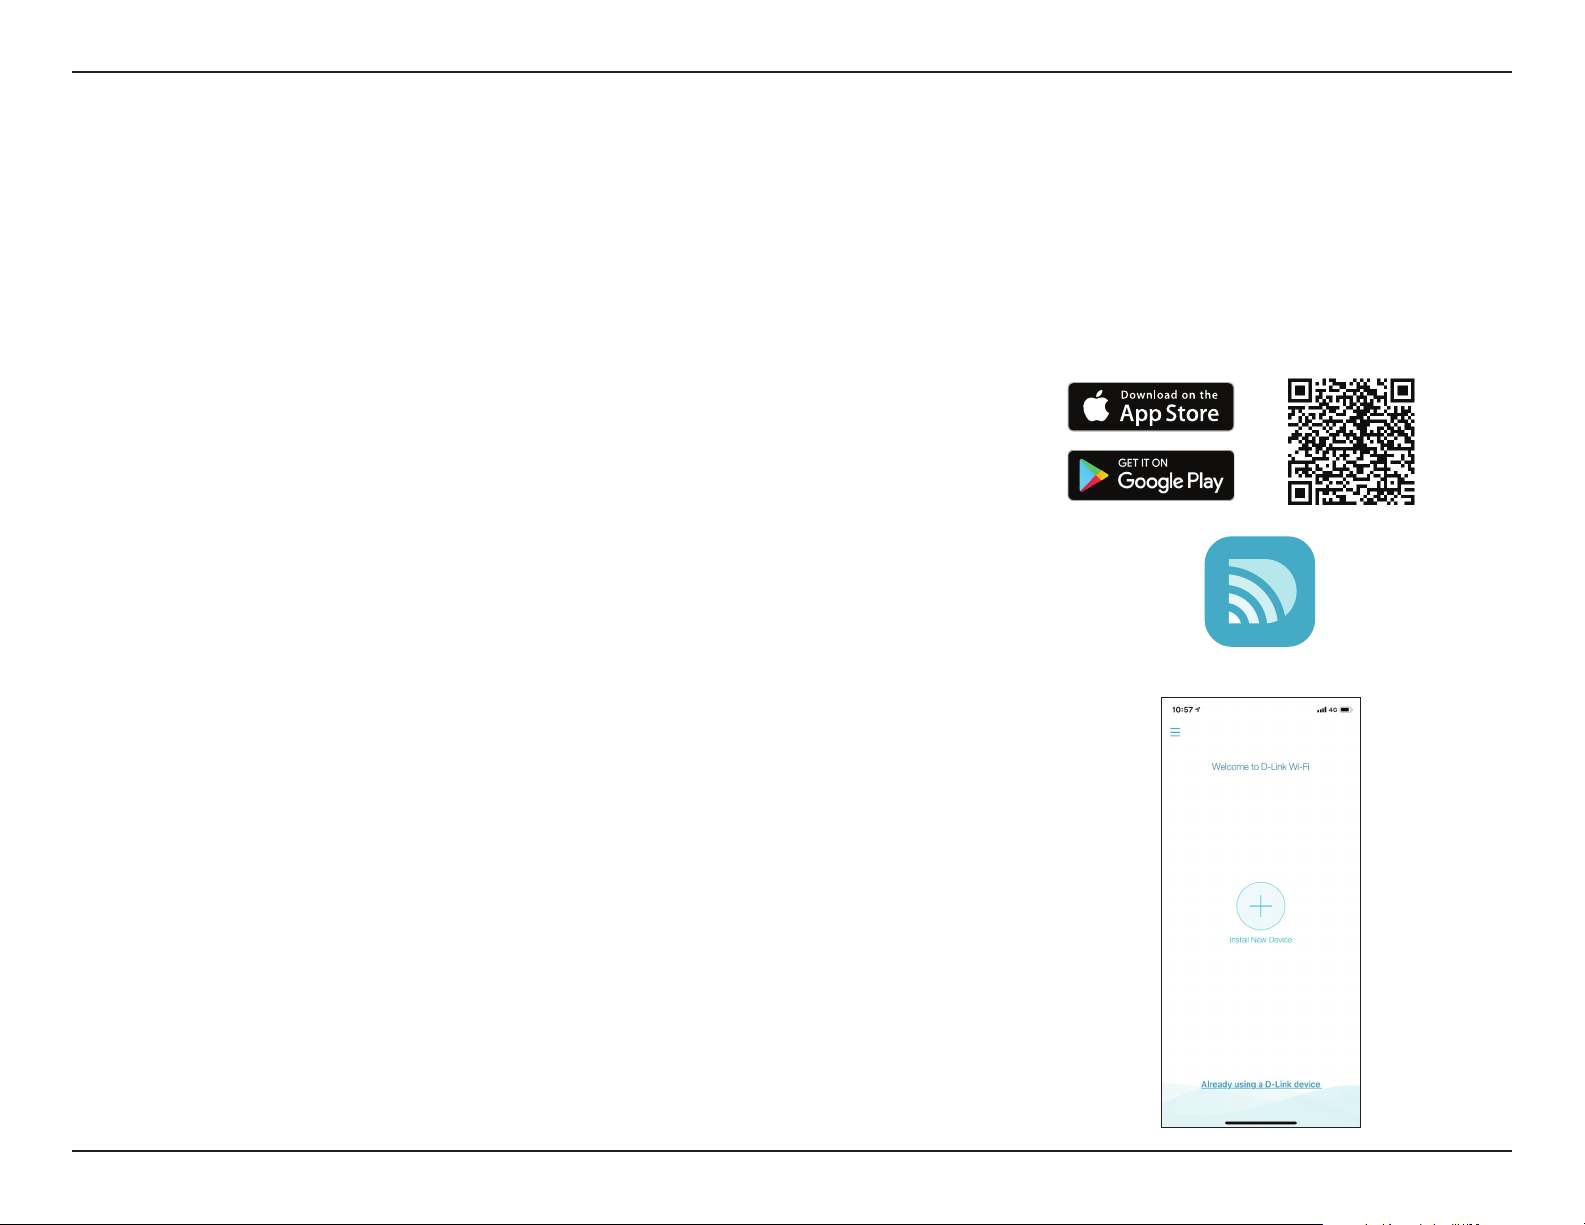
Search and install the free D-Link Wi-Fi app available on the App Store or on
Google Play. You can also scan the QR code on the right, which will take you
to the respective D-Link Wi-Fi app store page.
Step 2
Launch the D-Link Wi-Fi app from the home screen of your device.
Step 3
Tap on the Install New Device button at the middle of the screen.
D-Link Wi-Fi
7D-Link COVR-1102 User Manual
Page 12
Section 2 - Installation
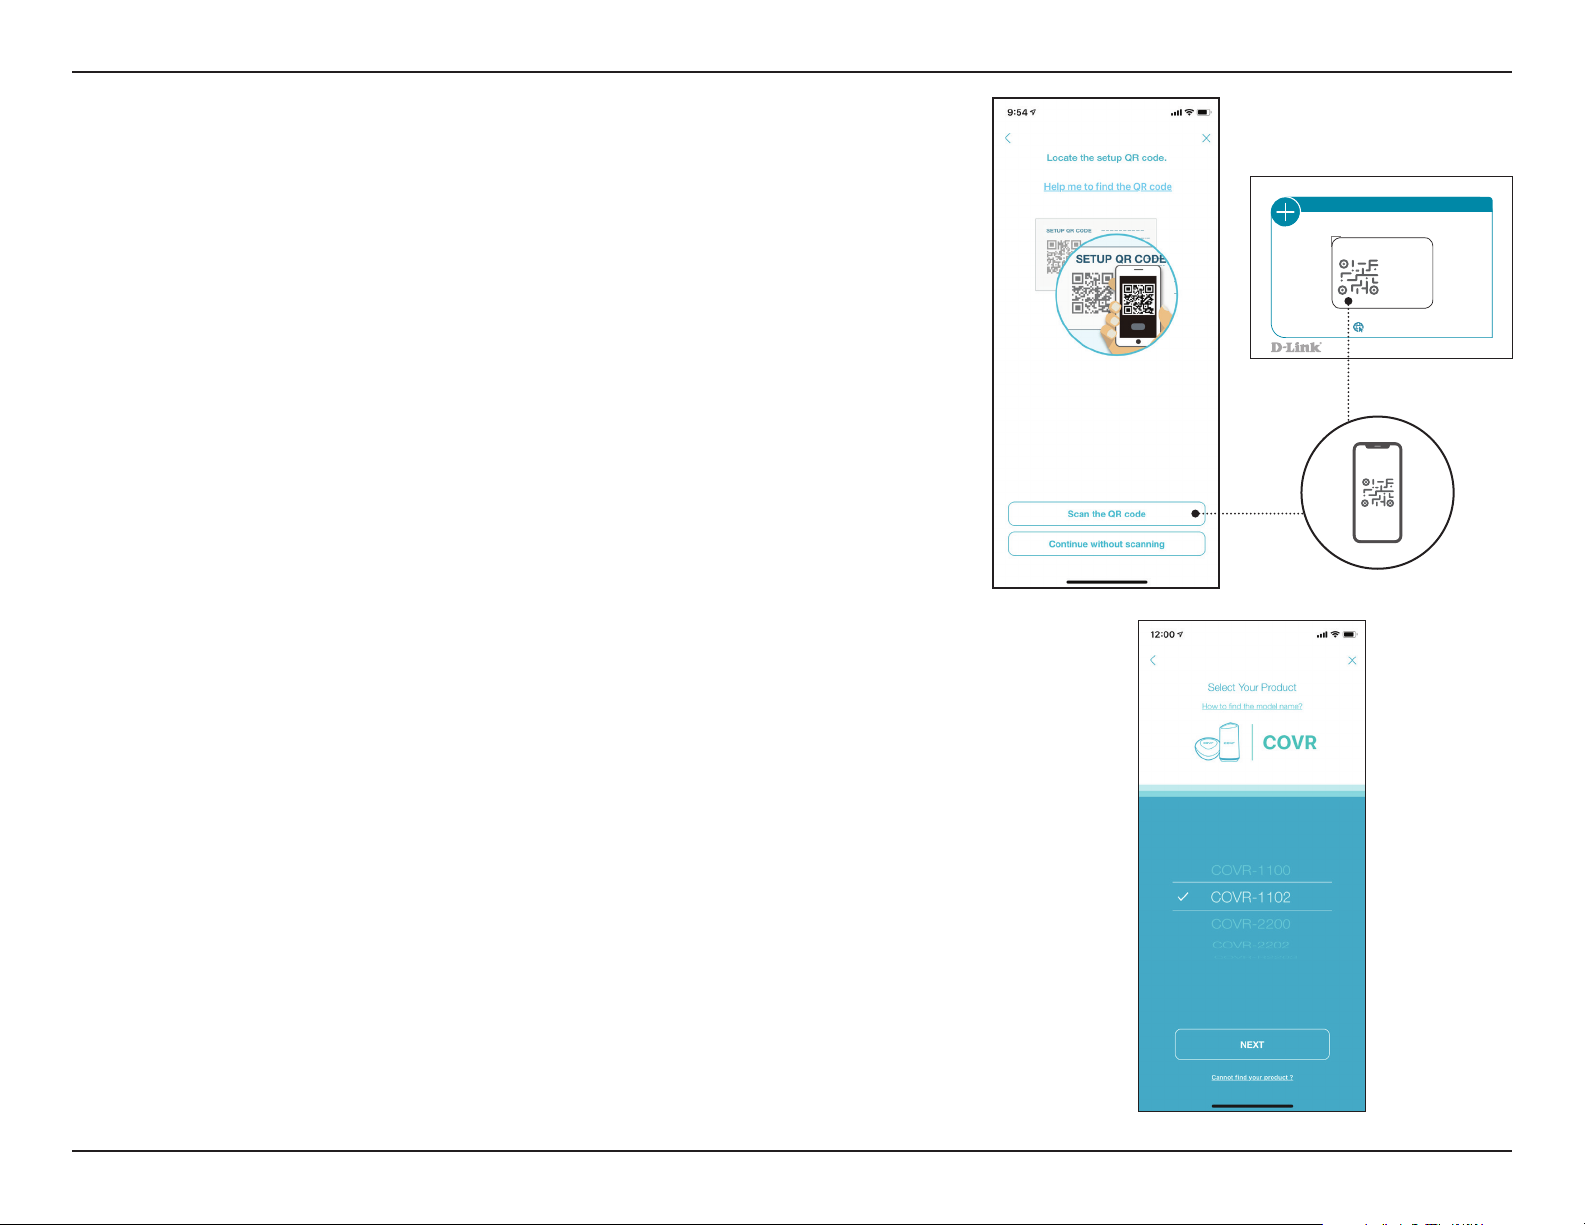
Step 4
Tap Scan the QR code to scan the setup QR code located in the Quick Install
Card and proceed to step 6. Alternatively, you can tap Continue without
scanning to proceed to step 5.
QUICK INSTALLATION CARD
SETUP QR CODE
Model Name:
Wi-Fi Name:
Password:
S/N:
www.dlink.com
Version 1.00 (DI)_90X130 || March 15, 2019
Step 5
Choose COVR from the product options and select COVR-1100, COVR-1102
or COVR-1103 from the list of available devices depending on your COVR
system. Tap Next to continue.
Step 6
You will now be guided through a step-by-step process for setting up your
COVR network. Simply follow the on-screen instructions to complete the
installation and the conguration process.
8D-Link COVR-1102 User Manual
Page 13
Section 2 - Installation
Web Based Installation
If you do not wish to use the D-Link Wi-Fi app, you can manually set up your Covr device and congure your Covr Wi-Fi network
using the web-based user interface.
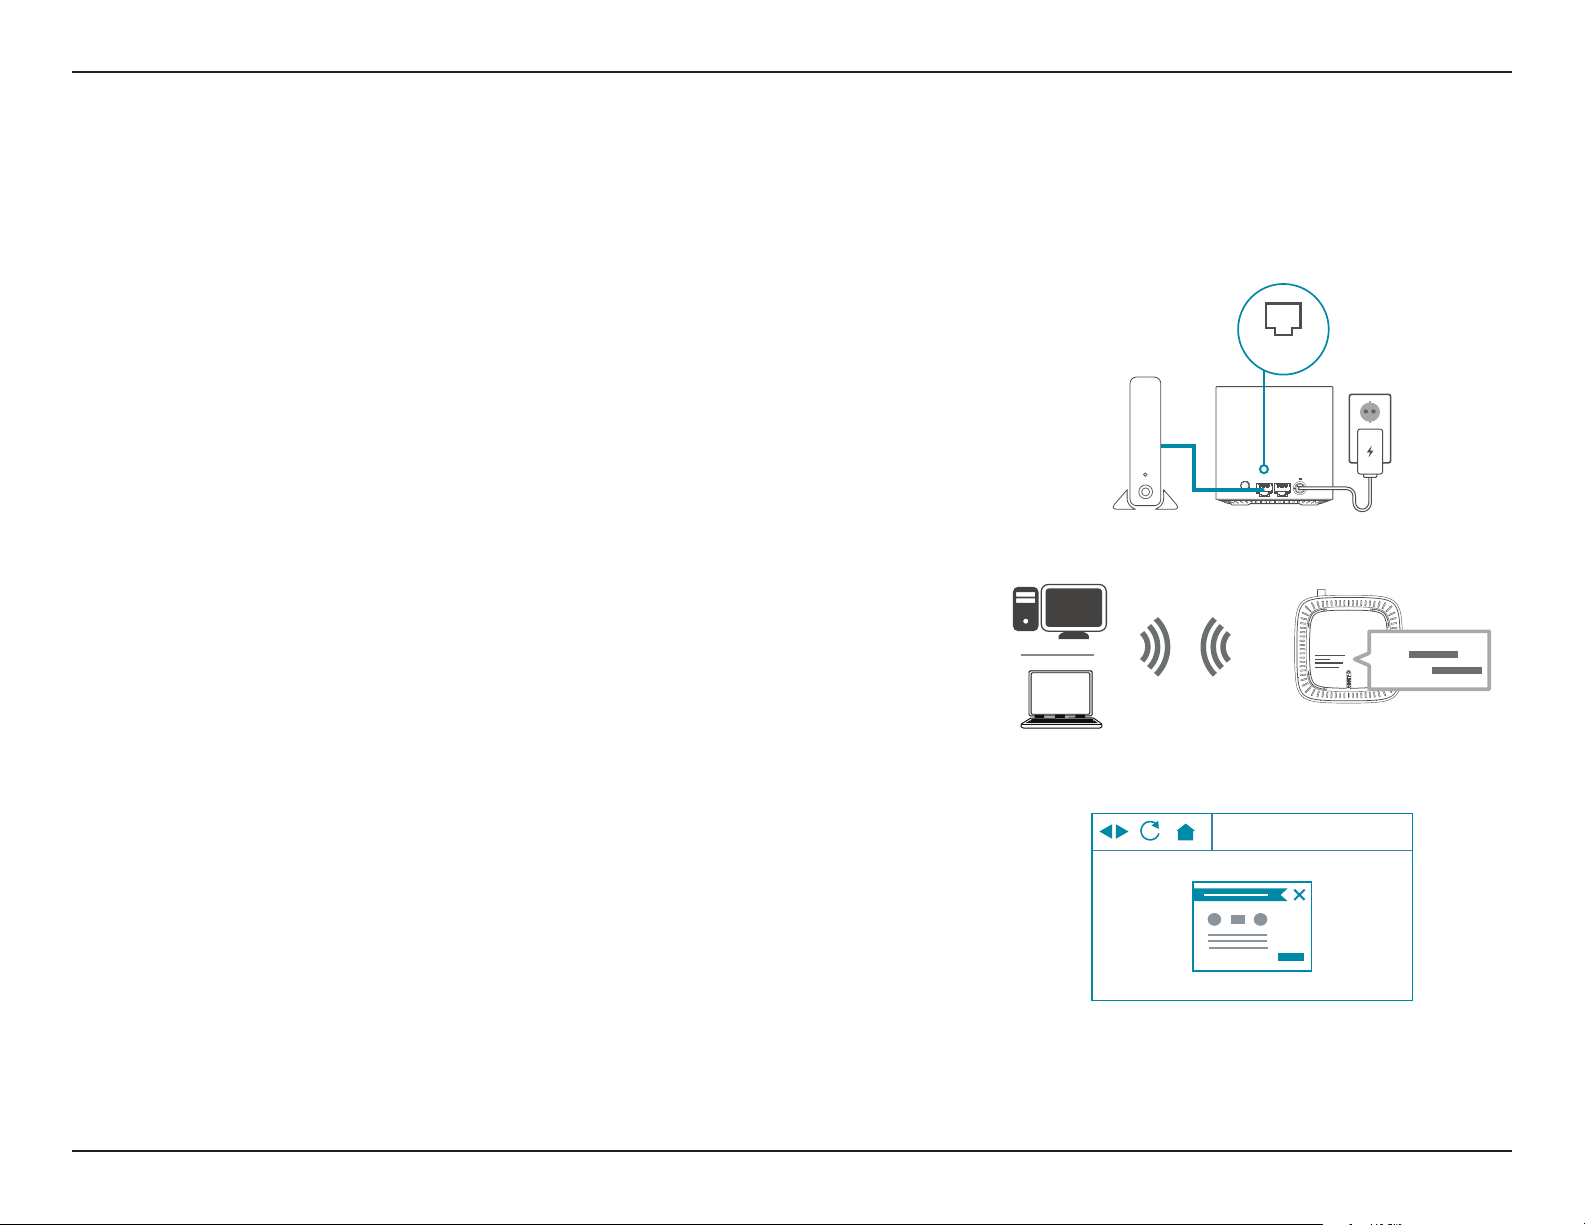
Step 1
Position the Covr Point close to your Internet-connected modem and
connect an Ethernet cable to the modem and to the port labelled as Internet
on the Covr Point. Next, connect the power adapter and plug the Covr Point
into a power outlet.
Internet
Step 2
Wait for the COVR Point to boot up. When the Status LED starts blinking
orange, wirelessly connect your computer to the Wi-Fi name (SSID) printed
on the back of the device, or on the included Quick Install Card.
Step 3
Type http://covr.local./ into a web browser and follow the on-screen
instructions to complete the setup.
Wi-Fi
Wi-Fi
Modem
INTERNET ETHERNETPOWER
1A
12V
http://covr.local./
SSID:
Password:
Your AC1200 Dual Band Whole Home Mesh Wi-Fi System is now set up and ready to use. You can now congure your COVR WiFi settings using the free D-Link Wi-Fi mobile app or the web-based user interface. Refer to the Conguration section on page
10 for more information on conguring your network using the web-based user interface.
9D-Link COVR-1102 User Manual
Page 14
Section 3 - Conguration
Conguration
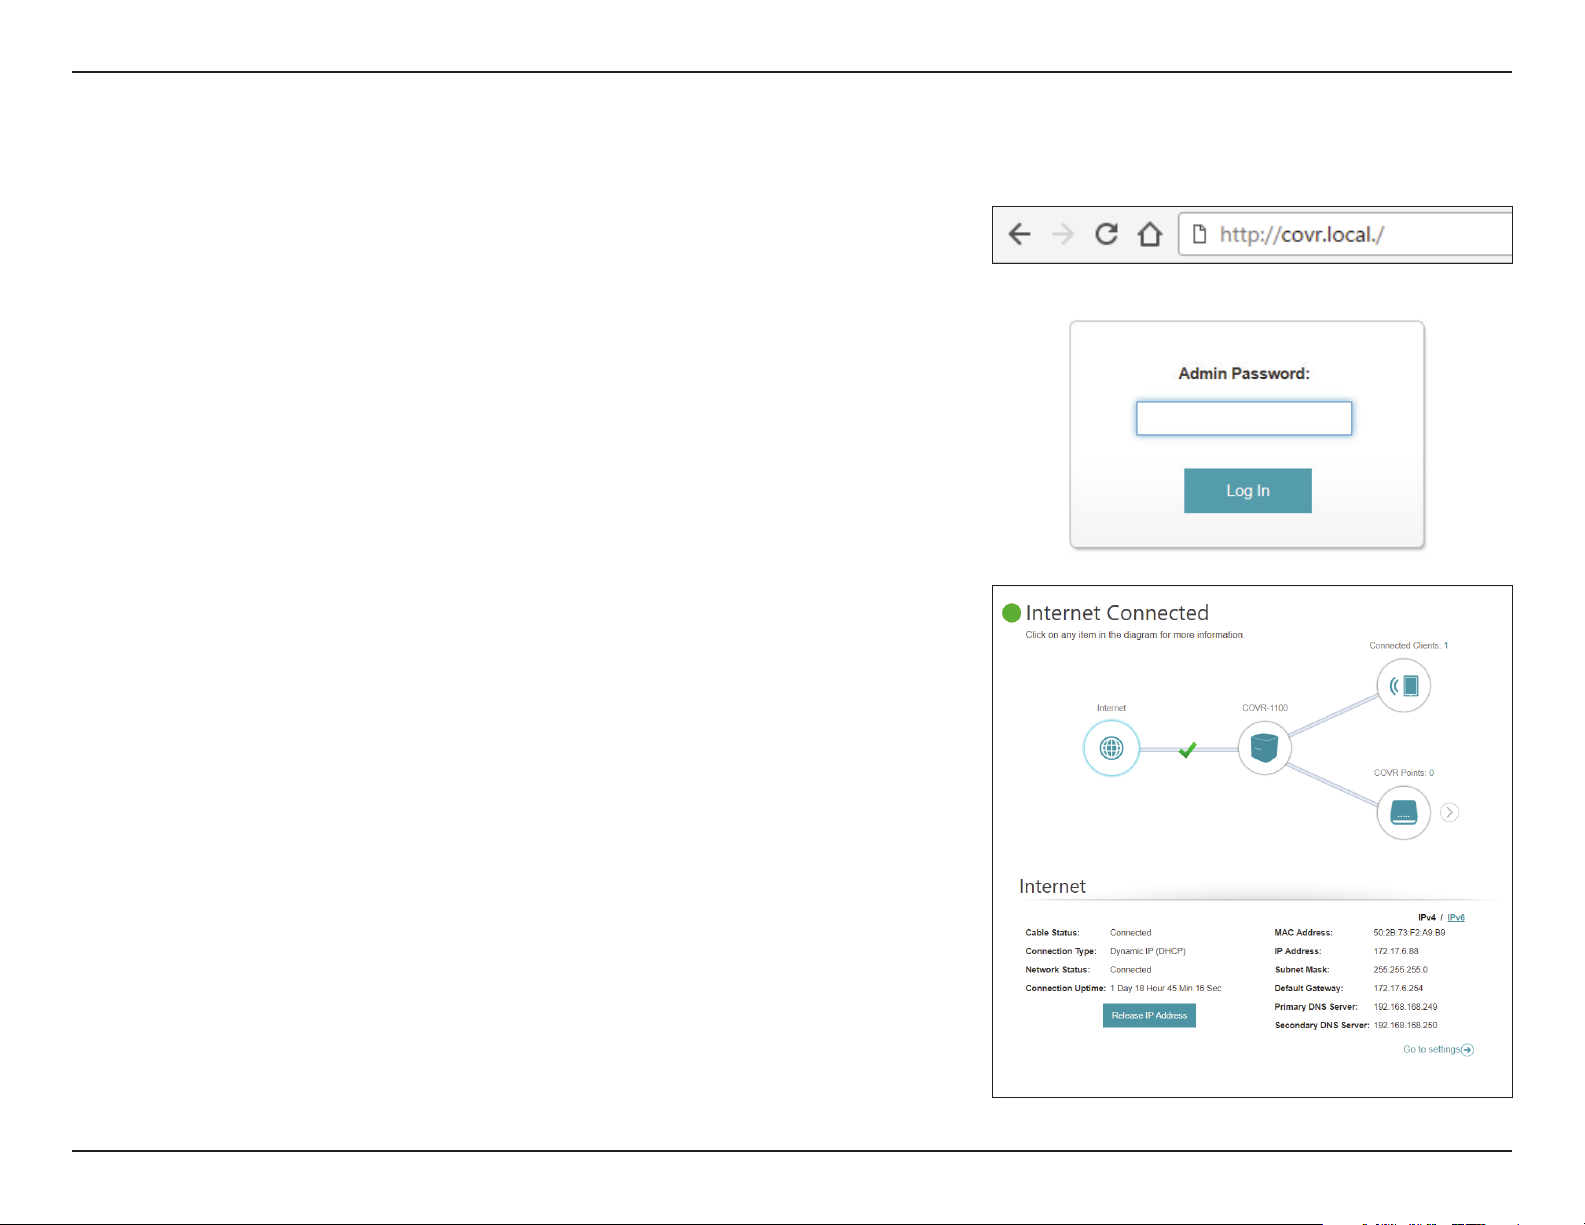
To access the web conguration utility, open a web browser such as Internet
Explorer and enter http://covr.local./ in the address bar.
If you want to access the web interface using a wireless connection, connect
to your COVR Wi-Fi, then open a web browser such as Internet Explorer and
enter http://covr.local./ in the address bar.
Note: If you have previously changed the Management Link in the Network
settings, use this link to access the web user interface instead.
When prompted, enter your password. If you previously followed the setup
wizard, please use the admin password you entered during the wizard.
Otherwise, leave the password blank. Click Log In to proceed.
Note: If you cannot remember your password and cannot log in, press the
Reset button on the bottom of the device with an unfolded paper clip to
restore the device to its default settings. Refer to Resetting your Device on
page 79 for more information.
When you are logged in, the device's home page will open, displaying its
current connection status.
The bar at the top of the page has quick access to Settings , Features, and
Management functions. You may quickly jump back Home at any time.
Note: The system will automatically log out after a period of inactivity.
10D-Link COVR-1102 User Manual
Page 15
Section 3 - Conguration
Home
The Home page displays the current status of your COVR Wi-Fi network in the
form of an interactive diagram. You can click each icon to display information
about each part of the network at the bottom of the screen. The menu bar at
the top of the page will allow you to quickly navigate to other pages. Refer to
the following pages for a description of each section.
11D-Link COVR-1102 User Manual
Page 16
Section 3 - Conguration
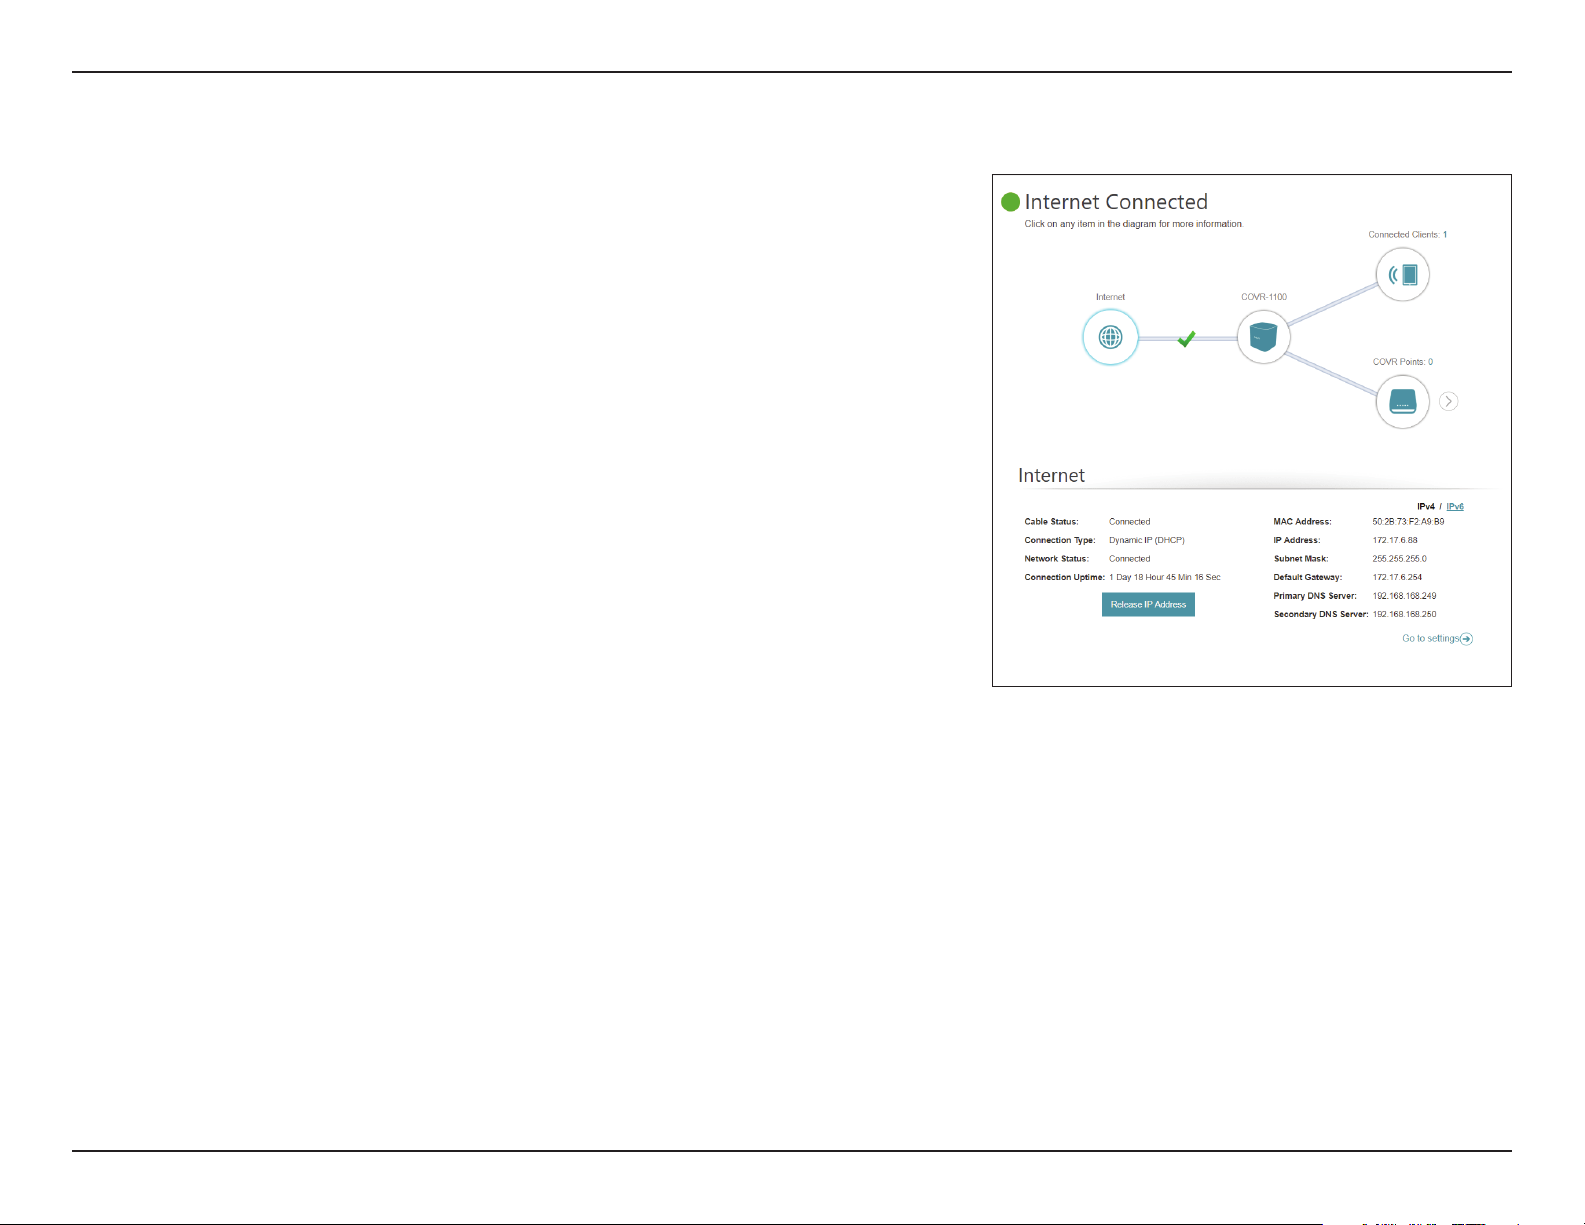
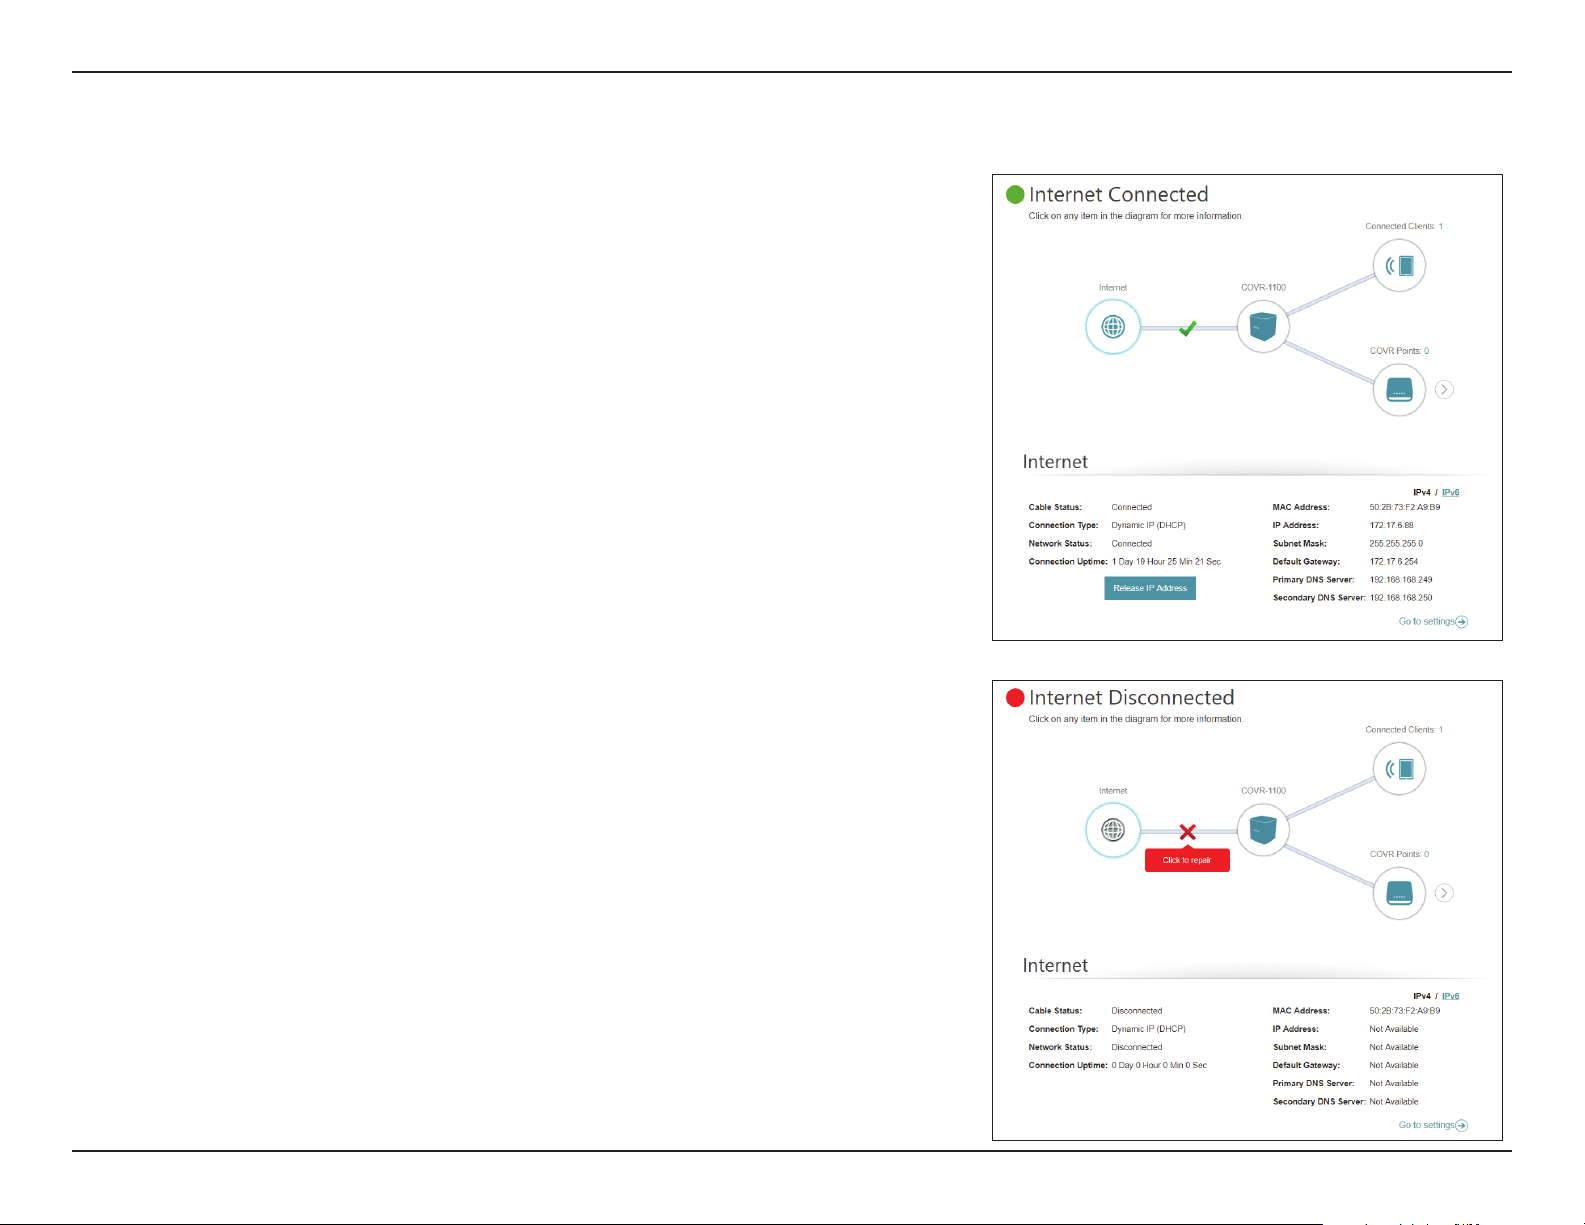
Internet
Click on the Internet icon to bring up more details about your Internet
connection. Click IPv4 or IPv6 to see details of the IPv4 and IPv6 connection
respectively.
The Home page displays whether or not the master COVR Point is currently
connected to the Internet. If it is disconnected, click Click to repair to bring up
the setup wizard, refer to Wizard on page 16 for more information.
Click Release IP Address to release the current IP address and disconnect
from the Internet. If you wish to reconnect the Internet, click Renew IP
Address.
To recongure the Internet settings, click Go to settings at the bottom-right.
12D-Link COVR-1102 User Manual
Page 17
Section 3 - Conguration
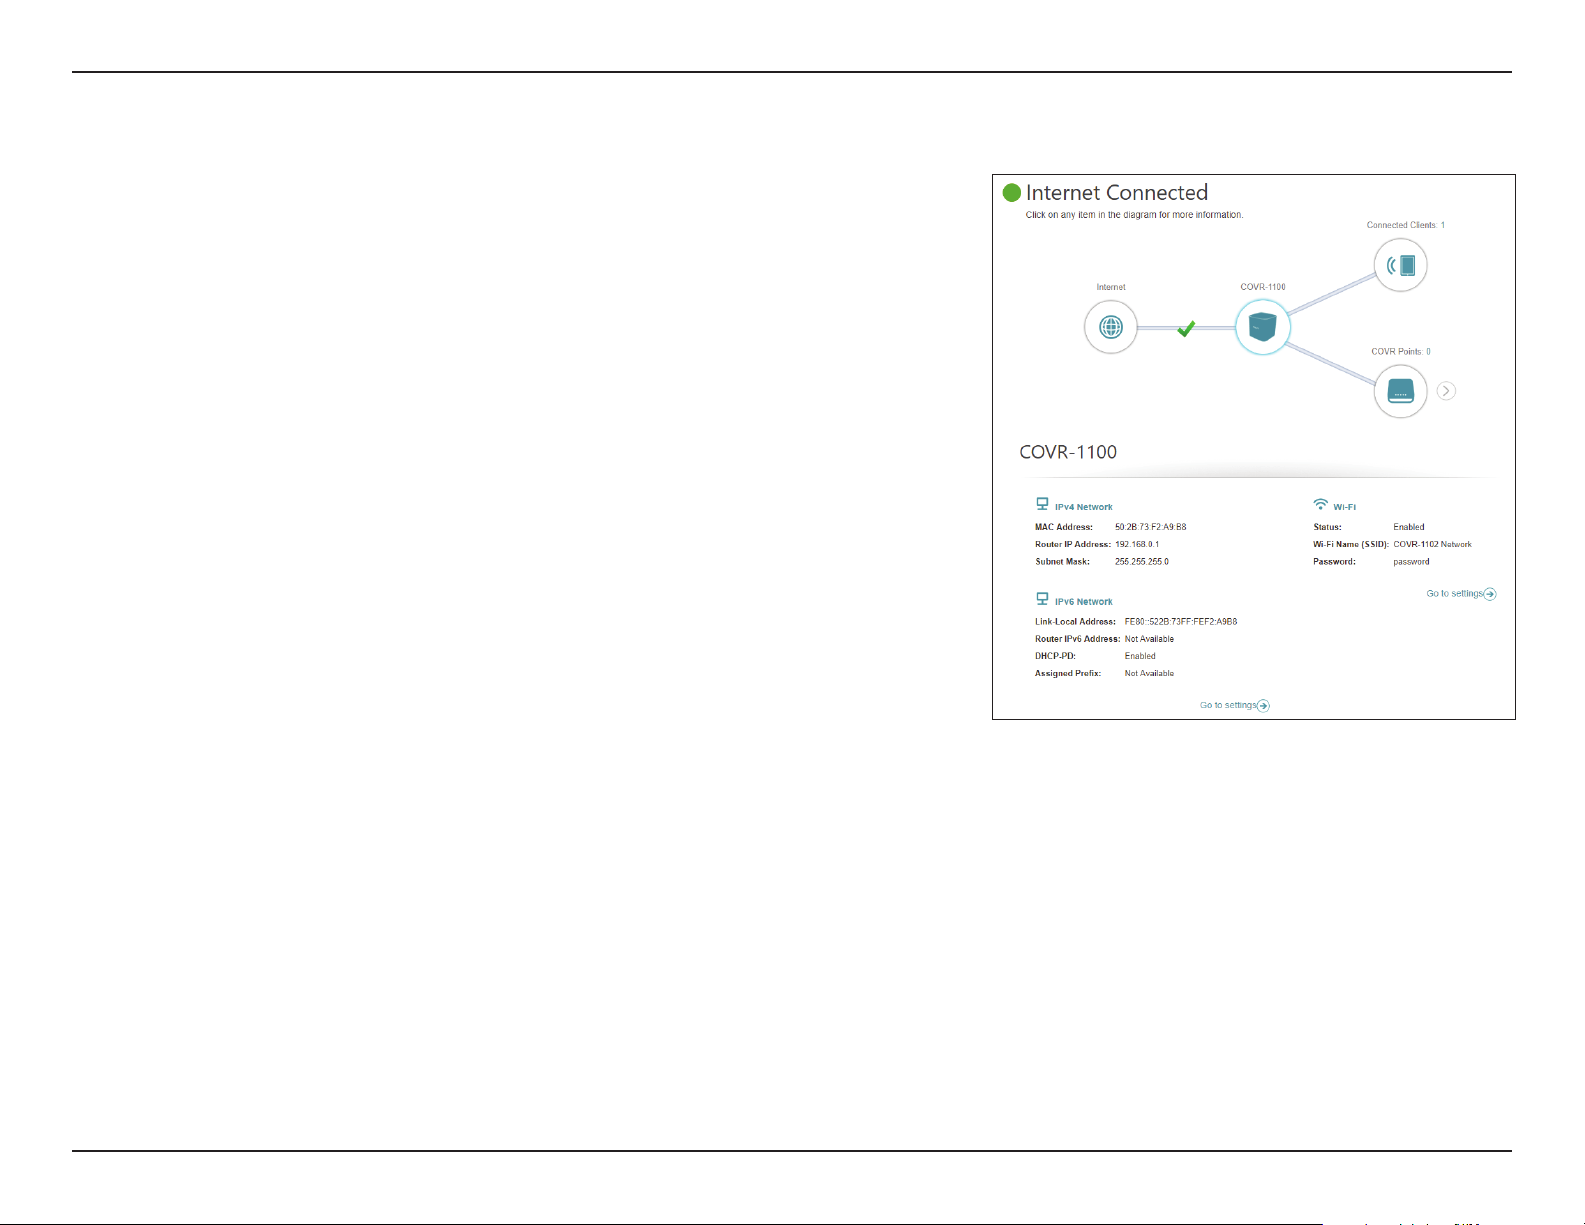
COVR-1100
Click on the COVR-1100 icon to view details about the COVR Point's wireless
and local network settings. This includes IPv4 and IPv6 local network, and Wi-Fi
information.
This overview is only informational. To congure these sections, refer to the
corresponding conguration sections in this manual.
13D-Link COVR-1102 User Manual
Page 18
Section 3 - Conguration
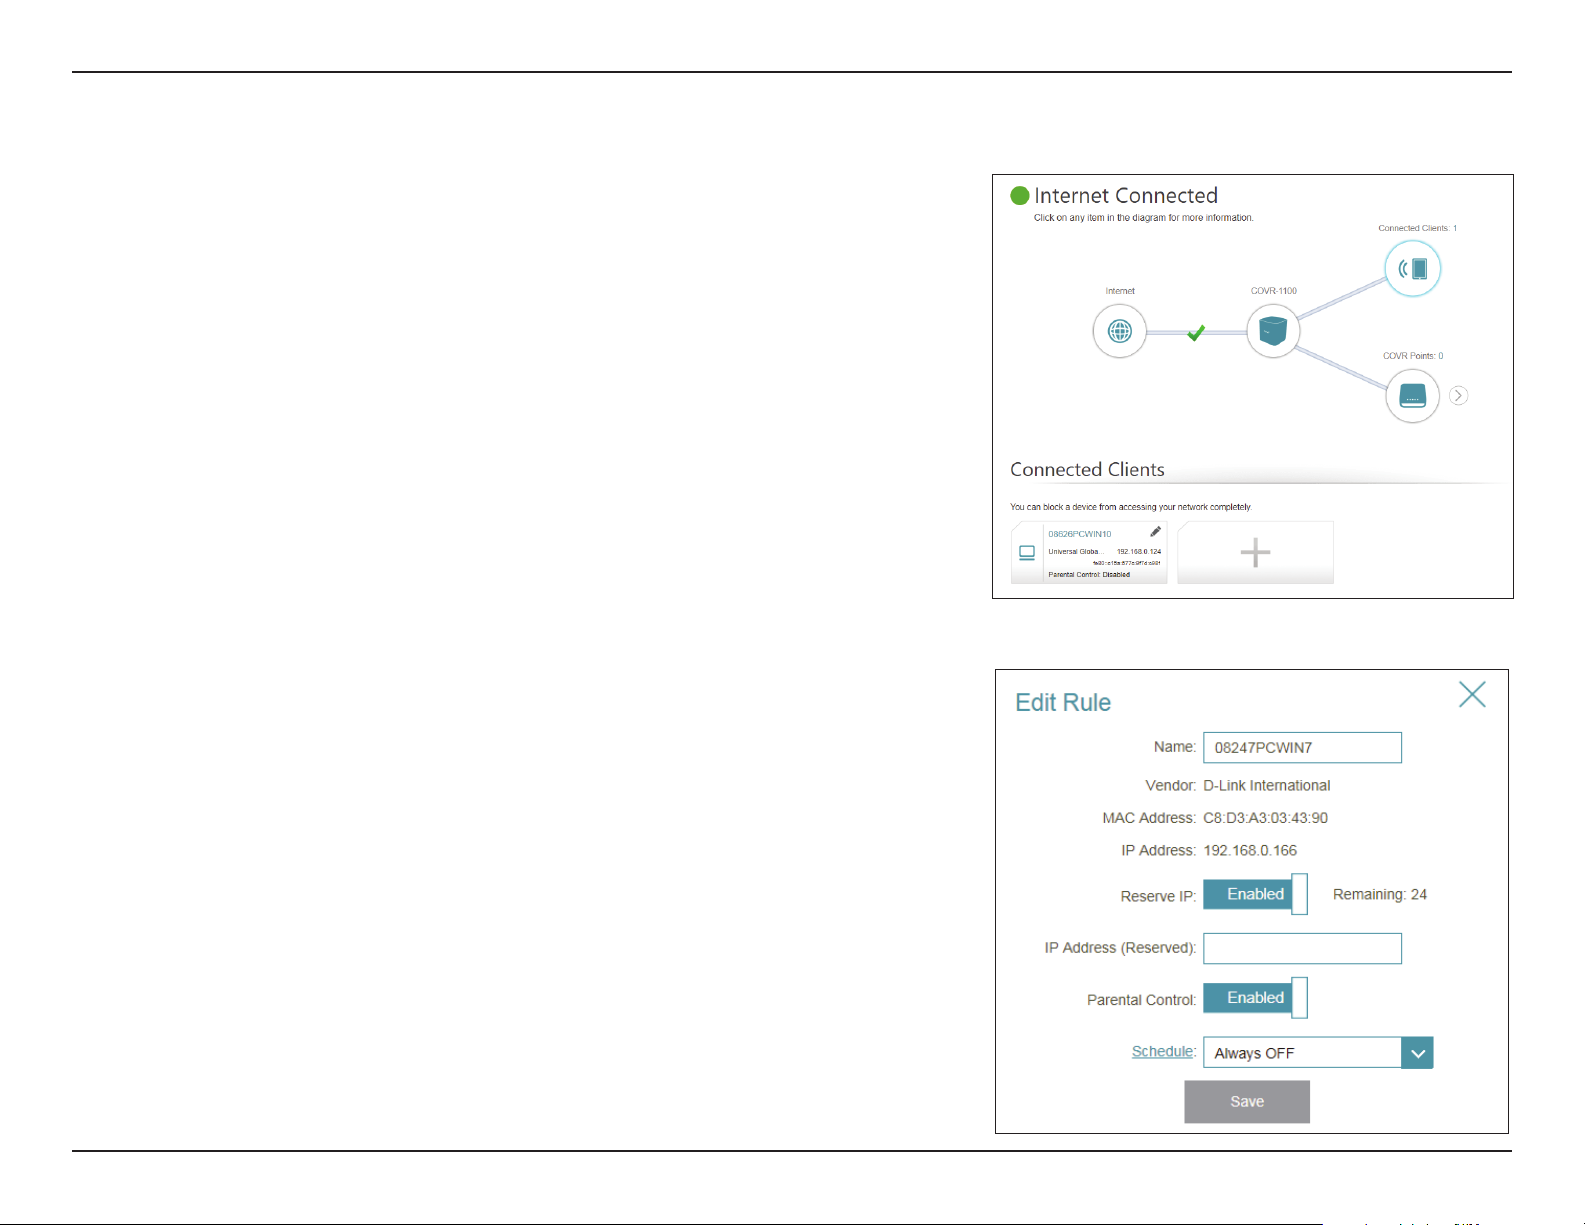
Connected Clients
Click on the Connected Clients icon to view details about the clients currently
connected to your COVR Wi-Fi network.
To edit each client’s settings, click the pencil icon on the client you want to
edit.
Name: Displays the name of this client. You can edit the client's name here.
Vendor: Displays the vendor of the device.
MAC Address: Displays the MAC address of the device.
IP Address: Displays the current IP address of this client.
Reserve IP: Enable to reserve an IP address for this client.
IP Address
(Reserved):
Parental Control: Enable or disable parental control to allow or block access to the
Schedule: If Parental Control is enabled, use the drop-down menu to select
Specify an IP address for the DHCP server to assign to this client.
network for this user.
the time schedule that the rule will be enabled for. The schedule
may be set to Always O, or you can create your own schedules in
the Schedule section. Refer to Schedule on page 55 for more
information.
Click Save when you are done.
14D-Link COVR-1102 User Manual
Page 19
Section 3 - Conguration
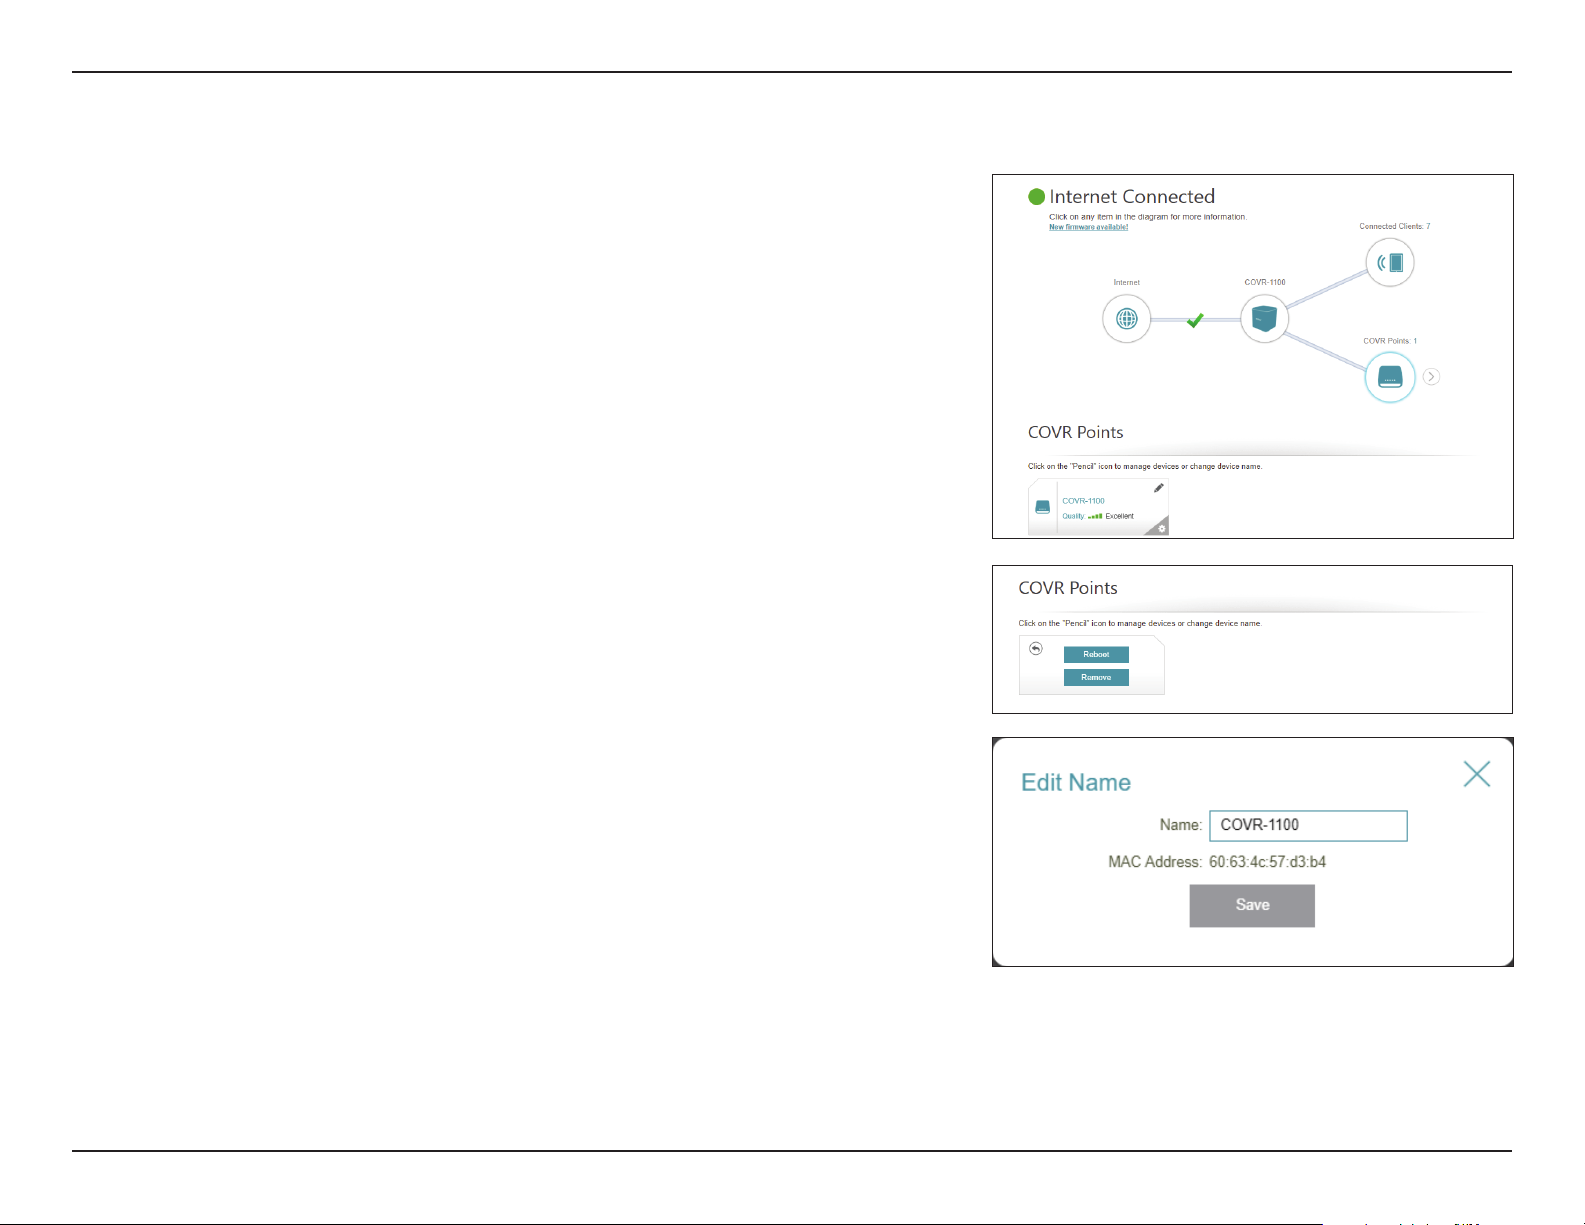
COVR Points
Click on the COVR Points icon to view details about all additional COVR Points
in your COVR whole home Wi-Fi network.
To edit a COVR Point’s name, click the pencil icon in the top-right of the box of
the COVR Point that you want to rename.
To reboot a COVR Point, click the settings icon in the bottom-right of the COVR
Point's box and click Reboot.
To remove a COVR Point from your COVR Wi-Fi network, click the settings icon
in the bottom-right of the COVR Point's box and click Remove.
Name: Enter a name for the COVR Point.
MAC Address: Displays the MAC address of the COVR Point.
Click Save when you are done.
15D-Link COVR-1102 User Manual
Page 20
Section 3 - Conguration
Settings
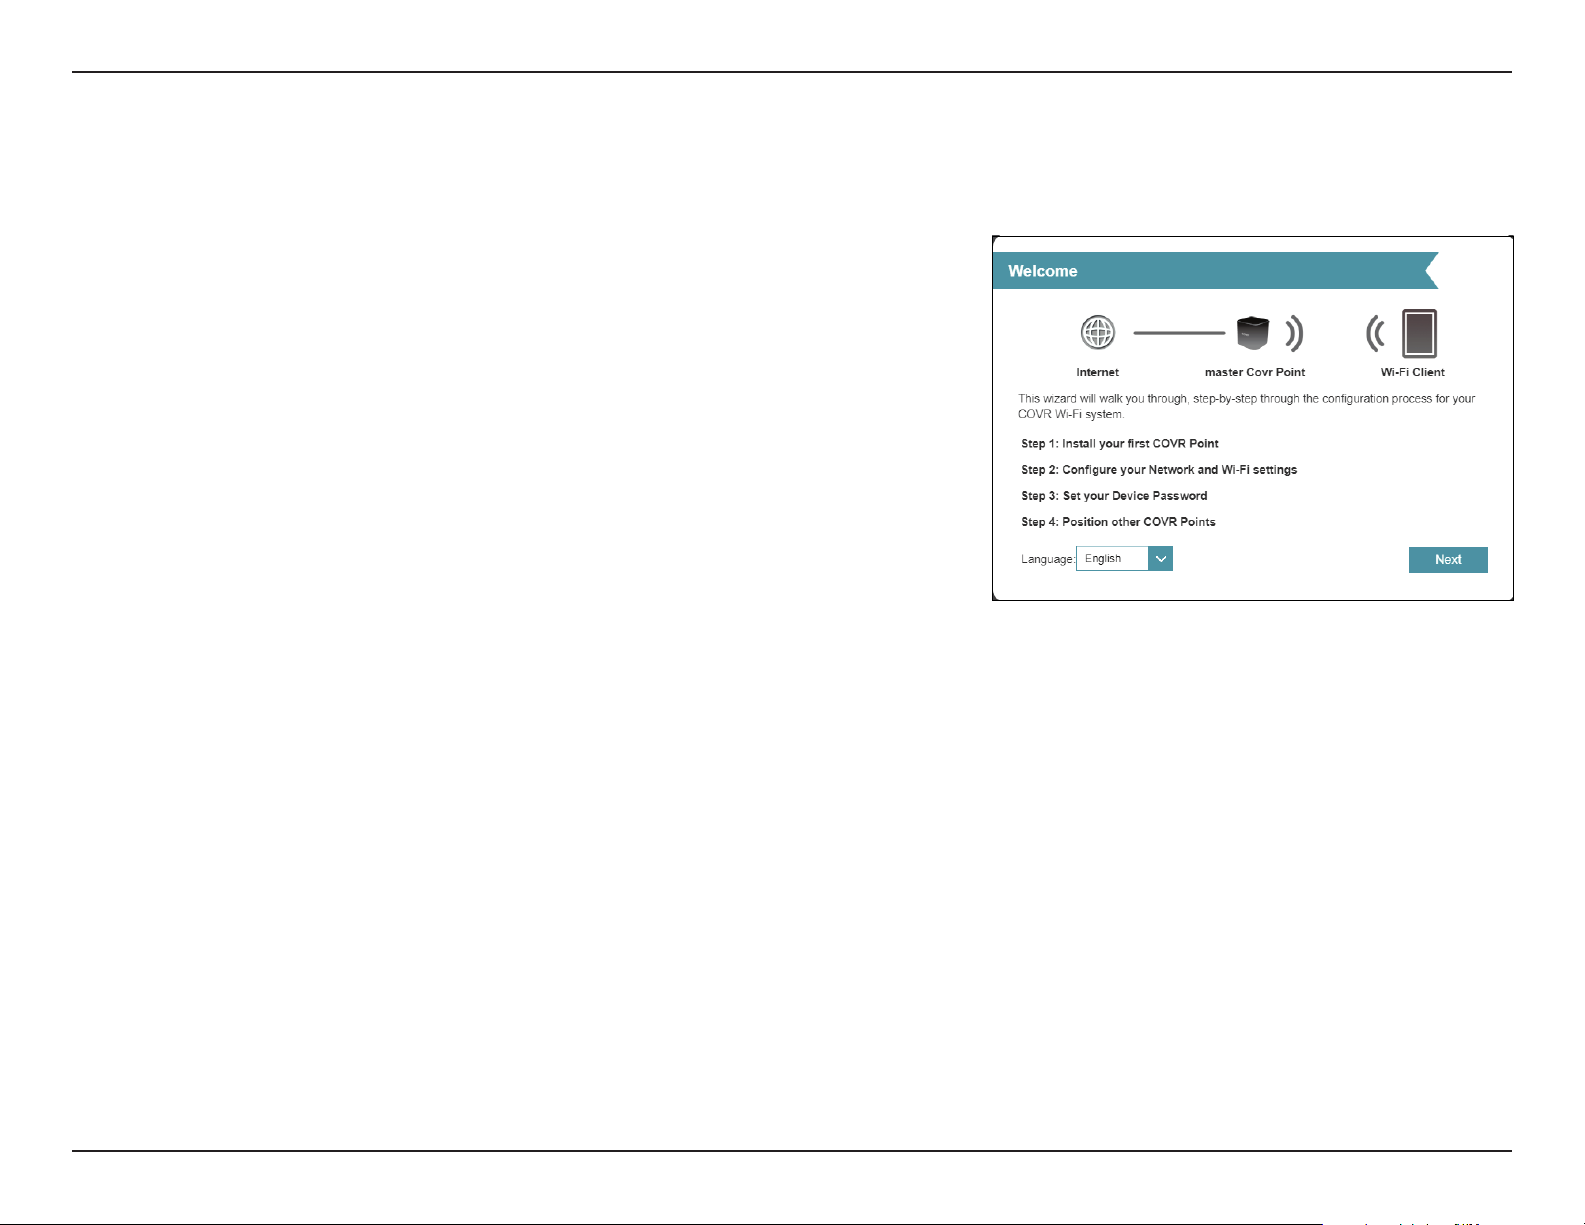
Wizard
In the Settings menu on the bar on the top of the page, click Wizard to open
the setup wizard. This is the same wizard that appears when you set up the
device using the web-user interface for the rst time.
This Wizard will also launch when clicking the Click to Repair button when no
Internet connection is detected.
Refer to Manual Installation on 9 for more information.
16D-Link COVR-1102 User Manual
Page 21
Section 3 - Conguration
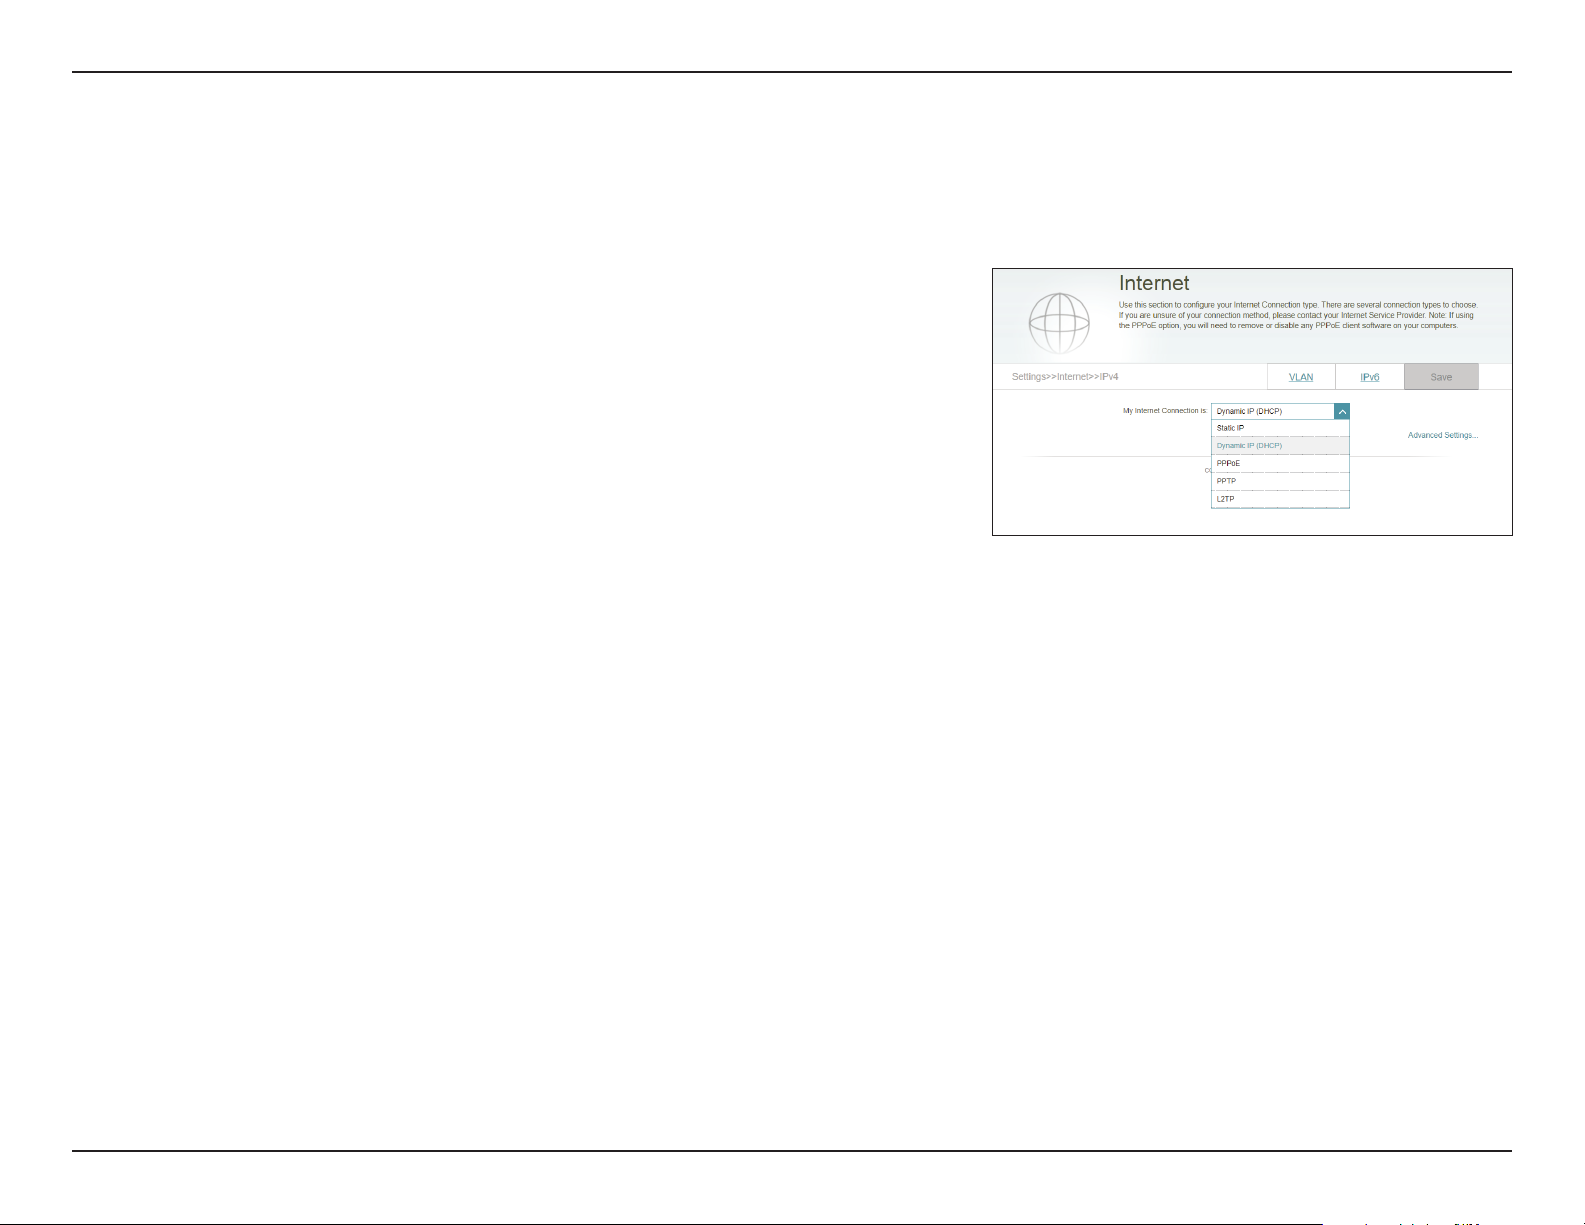
Internet
IPv4
In the Settings menu on the bar on the top of the page, click Internet to see the Internet conguration options.
My Internet
Connection Is:
For Dynamic IP (DHCP) refer to 18.
For Static IP refer to 19.
For PPPoE refer to 20.
For PPTP refer to 22.
For L2TP refer to 24.
To congure an IPv6 connection, click the IPv6 link. Refer to 26.
Choose your Internet connection type from the drop-down menu. You
will be presented with the appropriate options for your connection
type. Click Advanced Settings... to expand the list and see all of the
options.
17D-Link COVR-1102 User Manual
Page 22
Section 3 - Conguration
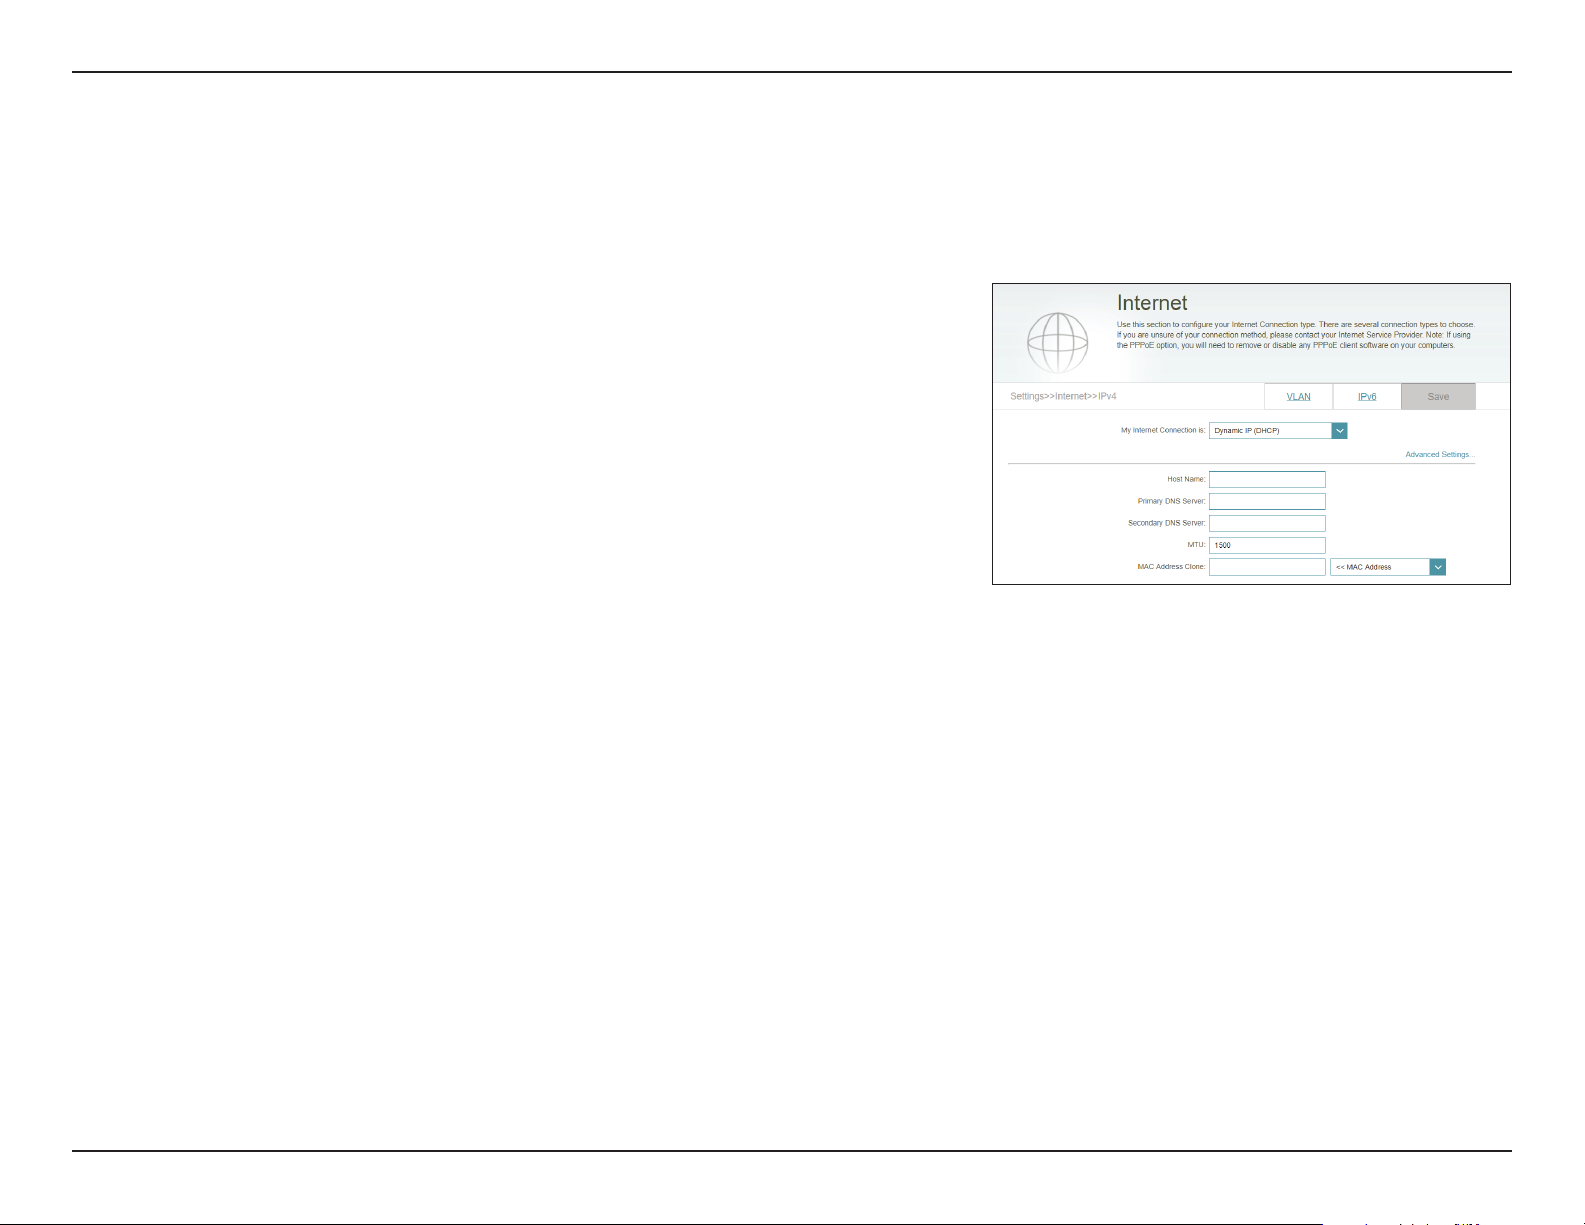
Dynamic IP (DHCP)
Select Dynamic IP (DHCP) to obtain IP address information automatically from your Internet Service Provider (ISP). Select this
option if your ISP does not specify an IP address to use.
Advanced Settings
Host Name: The host name is optional but may be required by some ISPs. Leave
it blank if you are not sure.
Primary DNS
Server:
Secondary DNS
Server:
MTU: Maximum Transmission Unit - you may need to change the MTU for
MAC Address
Clone:
Enter the primary DNS server IP address assigned by your ISP. This
address is usually obtained automatically from your ISP.
Enter the secondary DNS server IP address assigned by your ISP. This
address is usually obtained automatically from your ISP.
optimal performance with your ISP.
The default MAC address is set to the physical interface MAC address
of port 1 on the master COVR Point. You can use the drop-down menu
to replace the Internet port’s MAC address with the MAC address of
a connected client.
Click Save when you are done.
18D-Link COVR-1102 User Manual
Page 23
Section 3 - Conguration
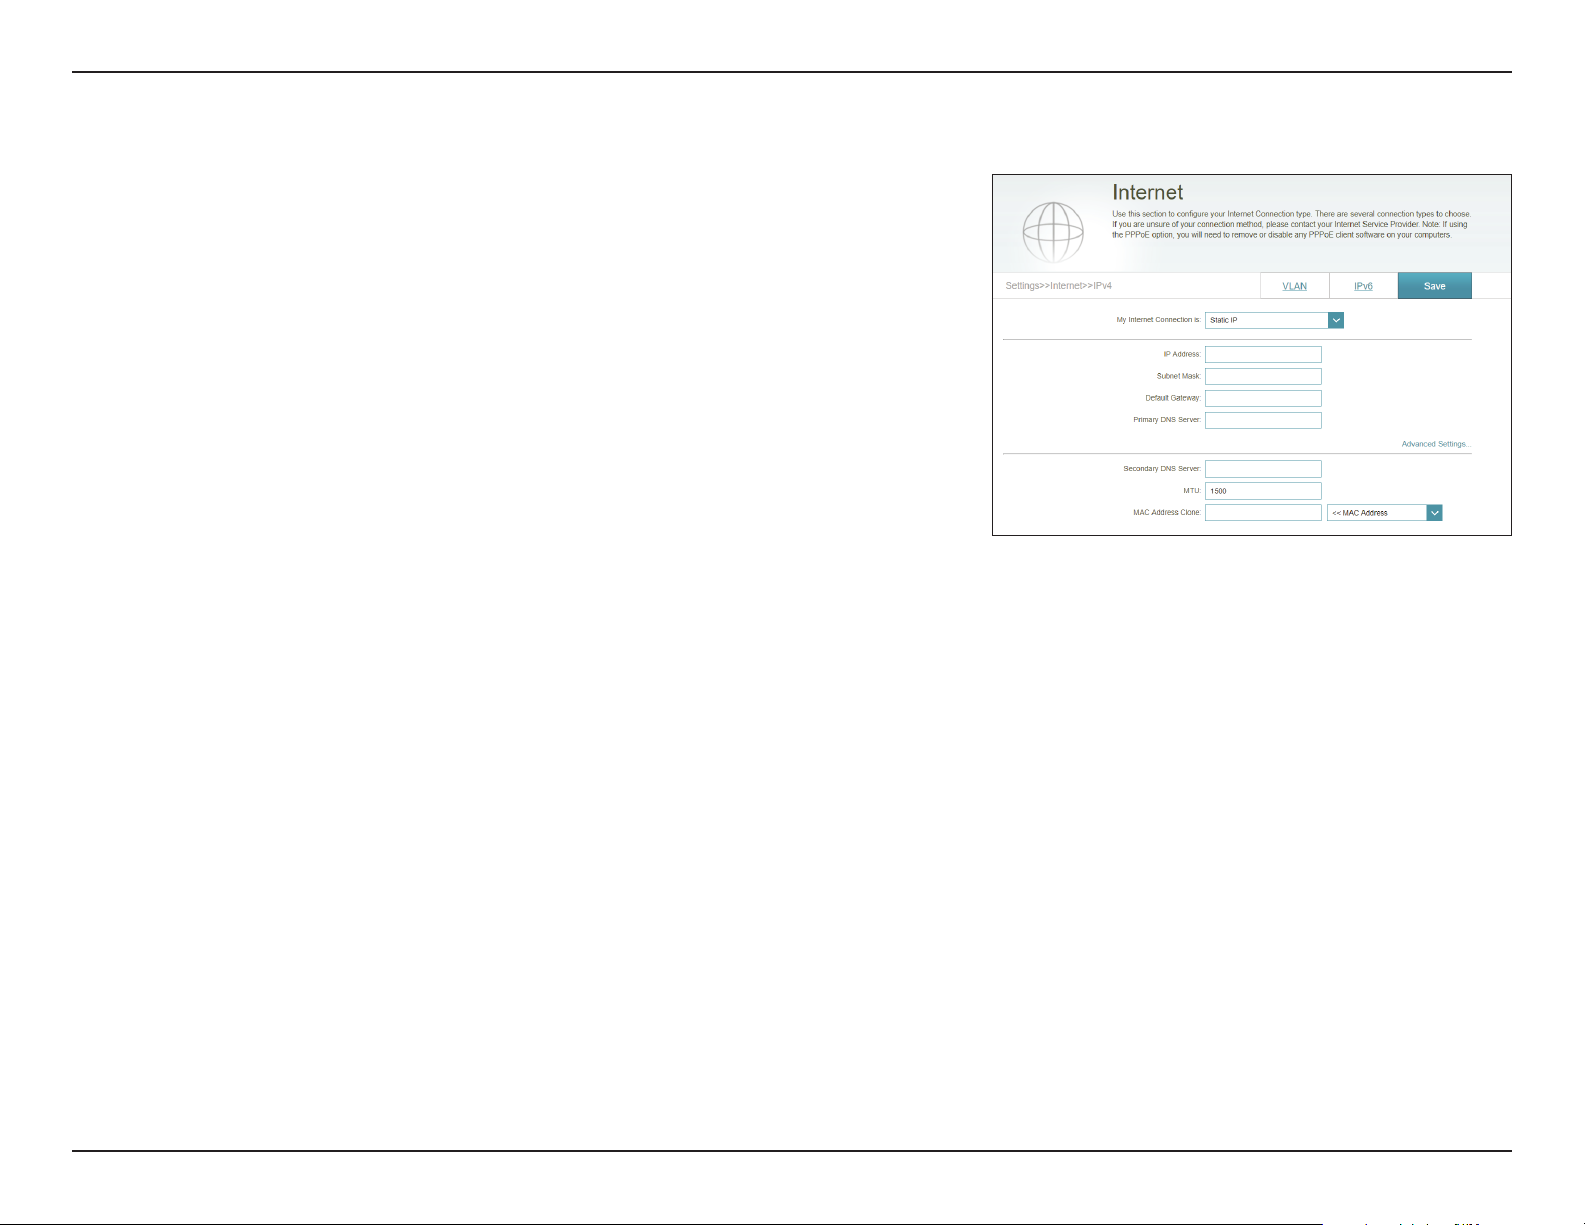
Static IP
Select Static IP if your IP information is provided by your Internet Service
Provider (ISP).
IP Address: Enter the IP address provided by your ISP.
Subnet Mask: Enter the subnet mask provided by your ISP.
Default Gateway: Enter the default gateway address provided by your ISP.
Primary DNS
Server:
Advanced Settings
Secondary DNS
Server:
MTU: Maximum Transmission Unit - you may need to change the MTU for
MAC Address
Clone:
Enter the primary DNS server IP address assigned by your ISP.
Enter the secondary DNS server IP address assigned by your ISP.
optimal performance with your ISP.
The default MAC address is set to the physical interface MAC address
of port 1 on the master COVR Point. You can use the drop-down menu
to replace the Internet port’s MAC address with the MAC address of
a connected client.
Click Save when you are done.
19D-Link COVR-1102 User Manual
Page 24
Section 3 - Conguration
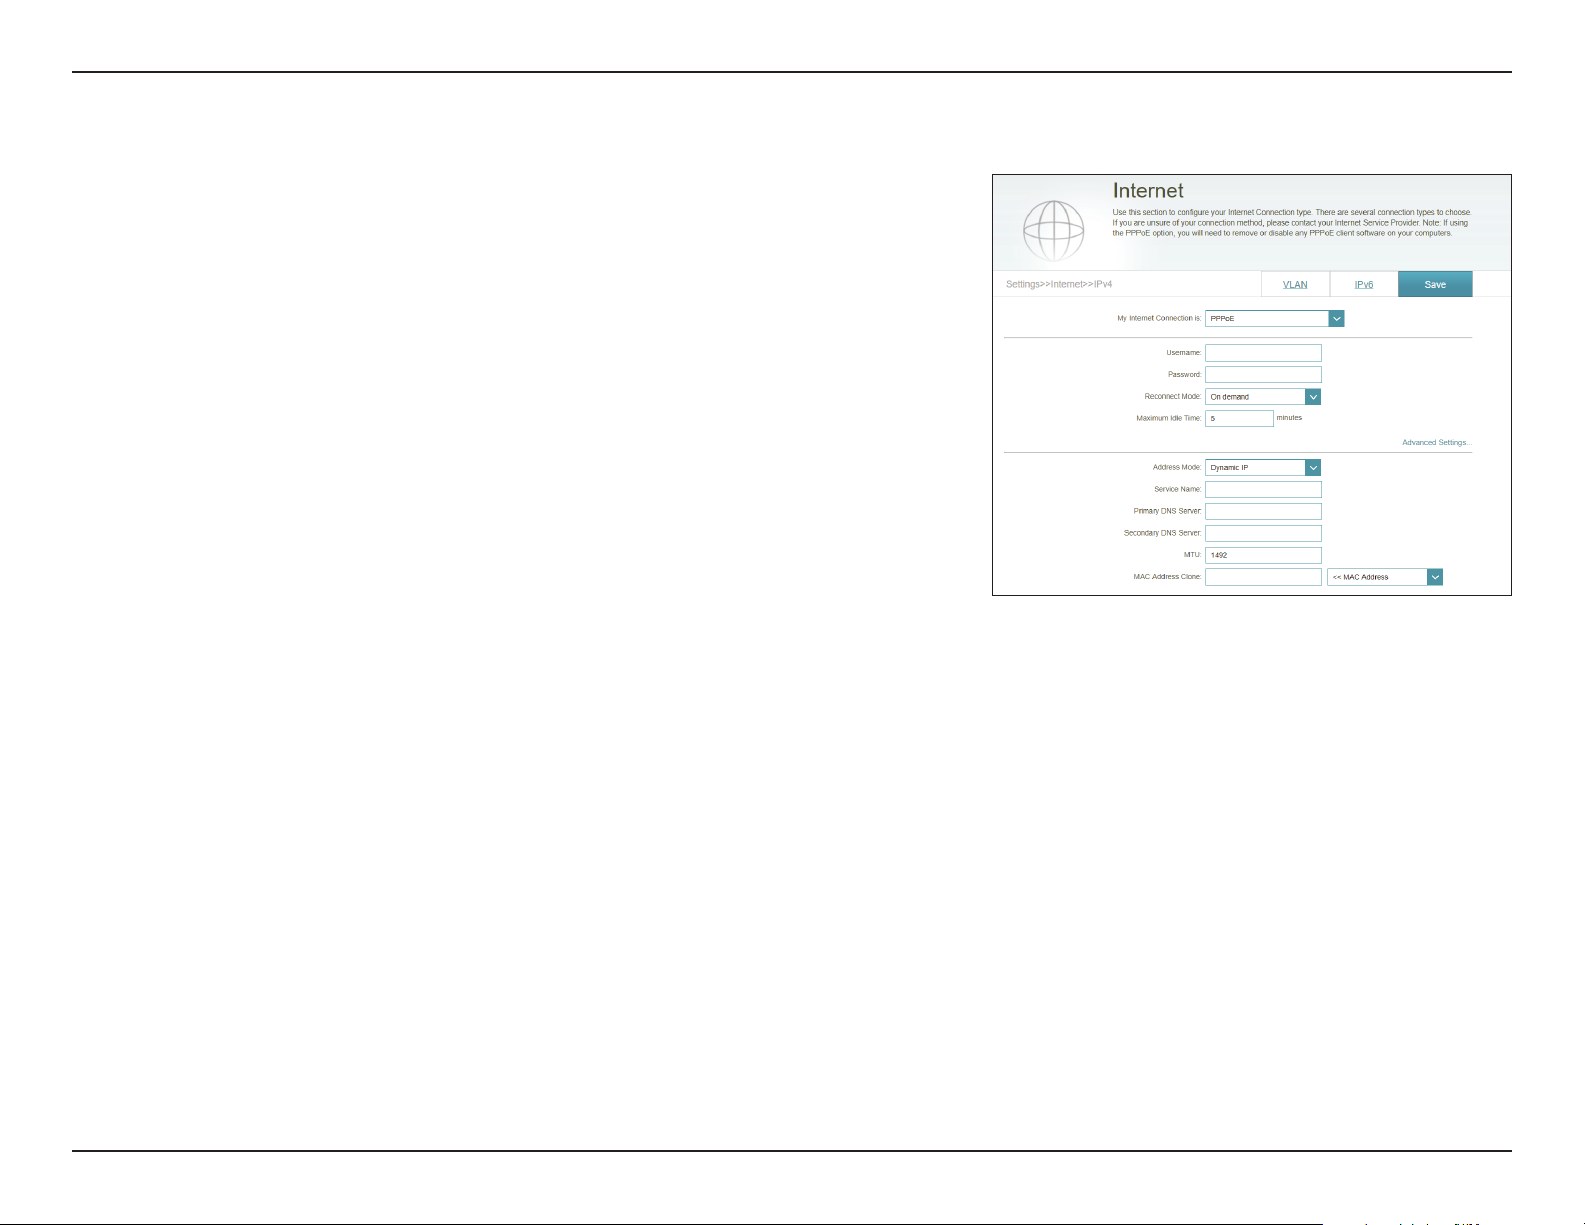
PPPoE
Select PPPoE if your ISP provides and requires you to enter a PPPoE username
and password in order to connect to the Internet.
Username: Enter the username provided by your ISP.
Password: Enter the password provided by your ISP.
Reconnect Mode: Select either Always on, On Demand, or Manual.
Maximum Idle
Time:
Enter a maximum idle time (in minutes) during which the Internet
connection is maintained during inactivity. To disable this feature,
select Always on as the reconnect mode.
Advanced Settings
Address Mode: Select Static IP if your ISP assigned you the IP address, subnet mask,
gateway, and DNS server addresses. In most cases, select Dynamic IP.
If you selected Dynamic IP as the Address Mode:
Service Name: Enter the ISP service name (optional).
Primary DNS
Server:
Secondary DNS
Server:
MTU: Maximum Transmission Unit - you may need to change the MTU for
Enter the primary DNS server IP address assigned by your ISP. This
address is usually obtained automatically from your ISP.
Enter the secondary DNS server IP address assigned by your ISP. This
address is usually obtained automatically from your ISP.
optimal performance with your ISP.
20D-Link COVR-1102 User Manual
Page 25
Section 3 - Conguration
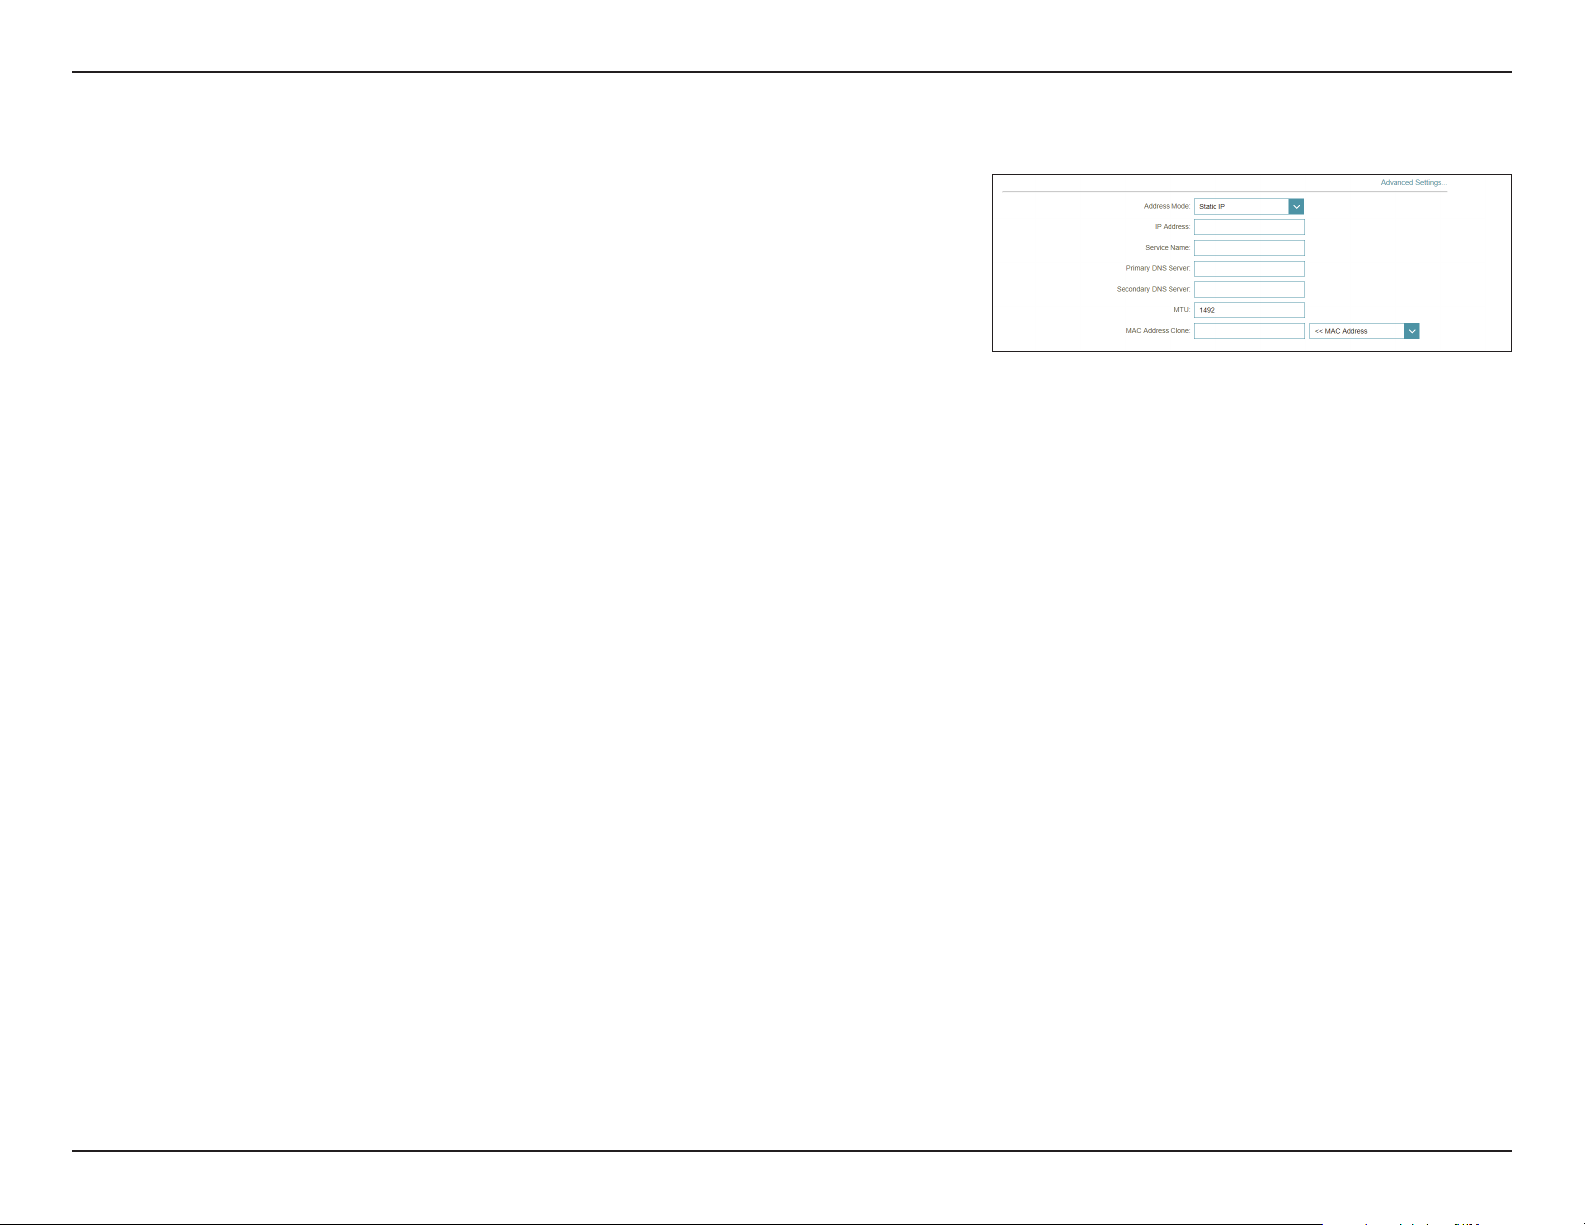
PPPoE (continued)
MAC Address
Clone:
If you selected Static IP as the Address Mode:
IP Address: Enter the IP address provided by your ISP.
Service Name: Enter the ISP service name (optional).
Primary DNS
Server:
Secondary DNS
Server:
MTU: Maximum Transmission Unit - you may need to change the MTU for
MAC Address
Clone:
The default MAC address is set to the physical interface MAC address
of port 1 on the master COVR Point. You can use the drop-down menu
to replace the Internet port’s MAC address with the MAC address of
a connected client.
Enter the primary DNS server IP address assigned by your ISP.
Enter the secondary DNS server IP address assigned by your ISP.
optimal performance with your ISP.
The default MAC address is set to the physical interface MAC address
of port 1 on the master COVR Point. You can use the drop-down menu
to replace the Internet port’s MAC address with the MAC address of
a connected client.
Click Save when you are done.
21D-Link COVR-1102 User Manual
Page 26

Section 3 - Conguration
PPTP
Choose PPTP (Point-to-Point-Tunneling Protocol ) if your Internet Service
Provider (ISP) uses a PPTP connection. Your ISP will provide you with a
username and password.
PPTP Server: Enter the PPTP server IP address provided by your ISP.
Username: Enter the username provided by your ISP.
Password: Enter the password provided by your ISP.
Reconnect Mode: Select either Always on, On demand, or Manual.
Maximum Idle
Time:
Enter a maximum idle (in minutes) time during which the Internet
connection is maintained during inactivity. To disable this feature,
select Always on as the reconnect mode.
Advanced Settings
Address Mode: Select Static IP if your ISP assigned you the IP address, subnet mask,
gateway, and DNS server addresses. In most cases, select Dynamic IP.
If you selected Dynamic IP as the Address Mode:
Primary DNS
Server:
Secondary DNS
Server:
MTU: Maximum Transmission Unit - you may need to change the MTU for
Enter the primary DNS server IP address assigned by your ISP. This
address is usually obtained automatically from your ISP.
Enter the secondary DNS server IP address assigned by your ISP. This
address is usually obtained automatically from your ISP.
optimal performance with your ISP.
22D-Link COVR-1102 User Manual
Page 27
Section 3 - Conguration
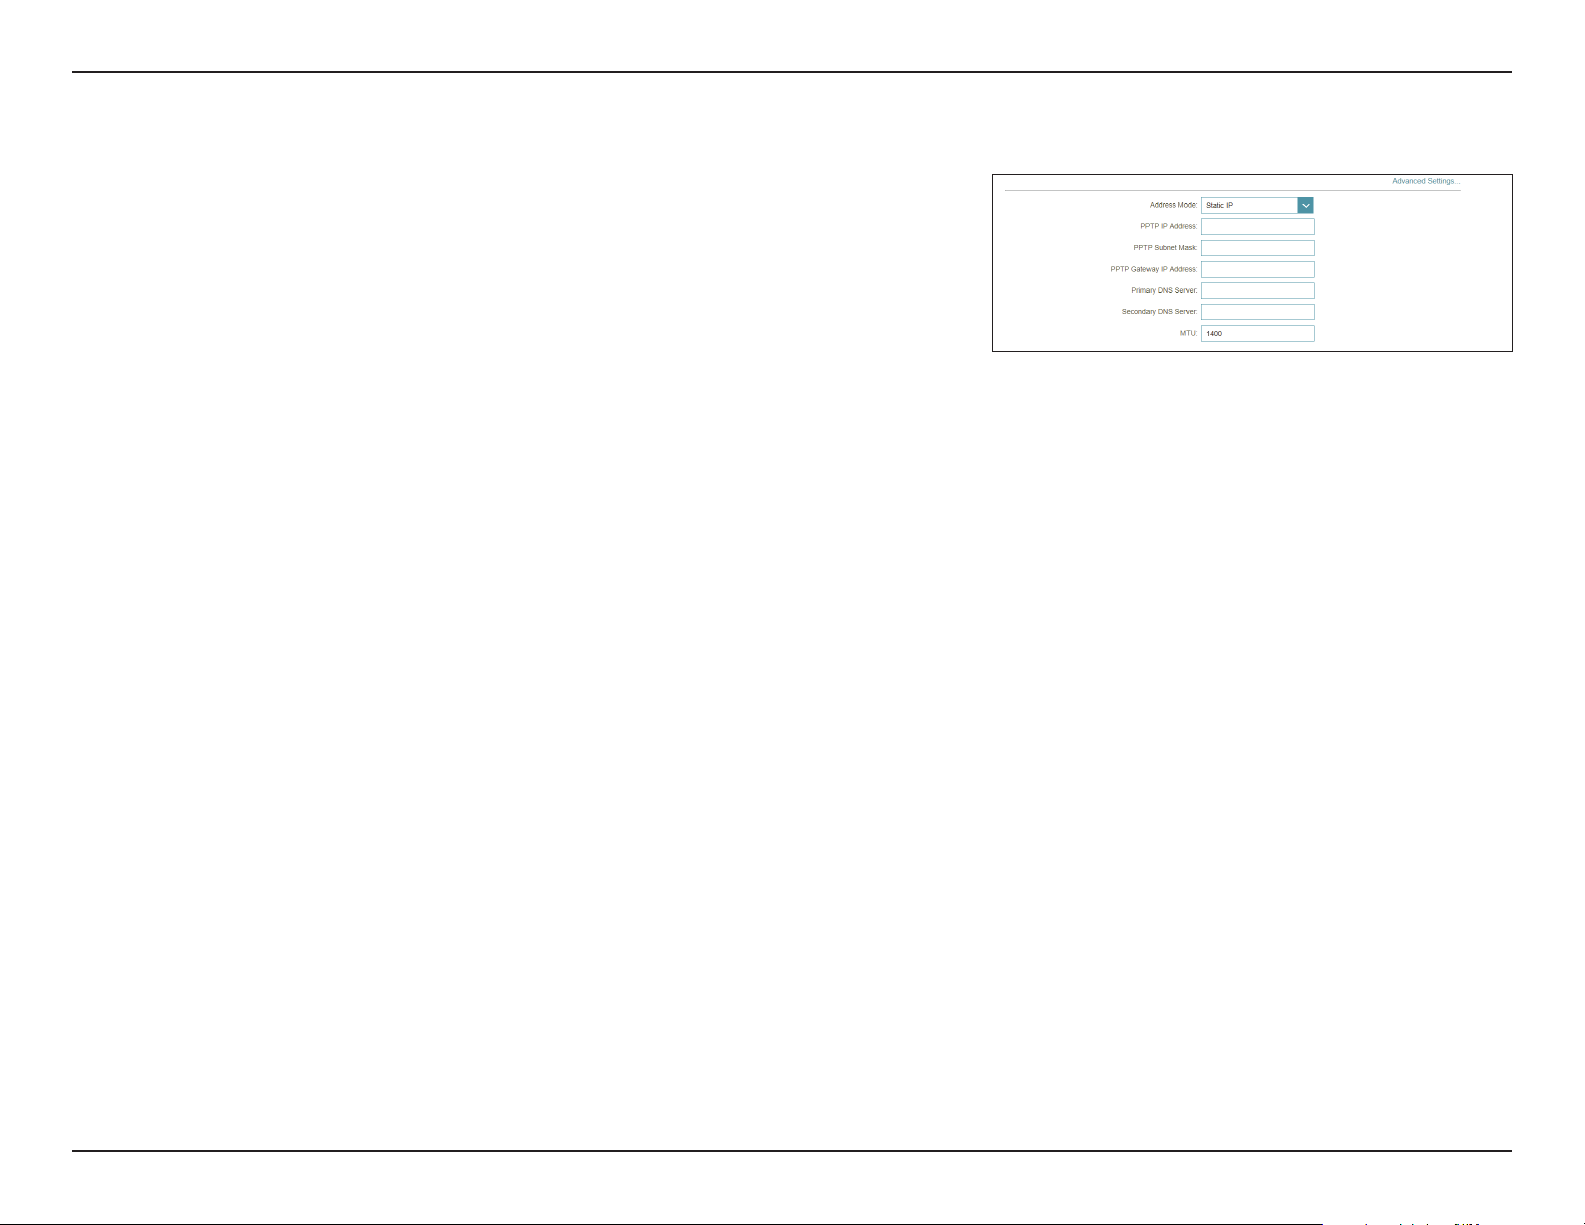
If you selected Static IP as the Address Mode:
PPTP IP Address: Enter the IP address provided by your ISP.
PPTP (continued)
PPTP Subnet
Mask:
PPTP Gateway IP
Address:
Primary DNS
Server:
Secondary DNS
Server:
MTU: Maximum Transmission Unit - you may need to change the MTU for
Enter the subnet mask provided by your ISP.
Enter the gateway IP address provided by your ISP.
Enter the primary DNS server IP address assigned by your ISP.
Enter the secondary DNS server IP address assigned by your ISP.
optimal performance with your ISP.
Click Save when you are done.
23D-Link COVR-1102 User Manual
Page 28
Section 3 - Conguration
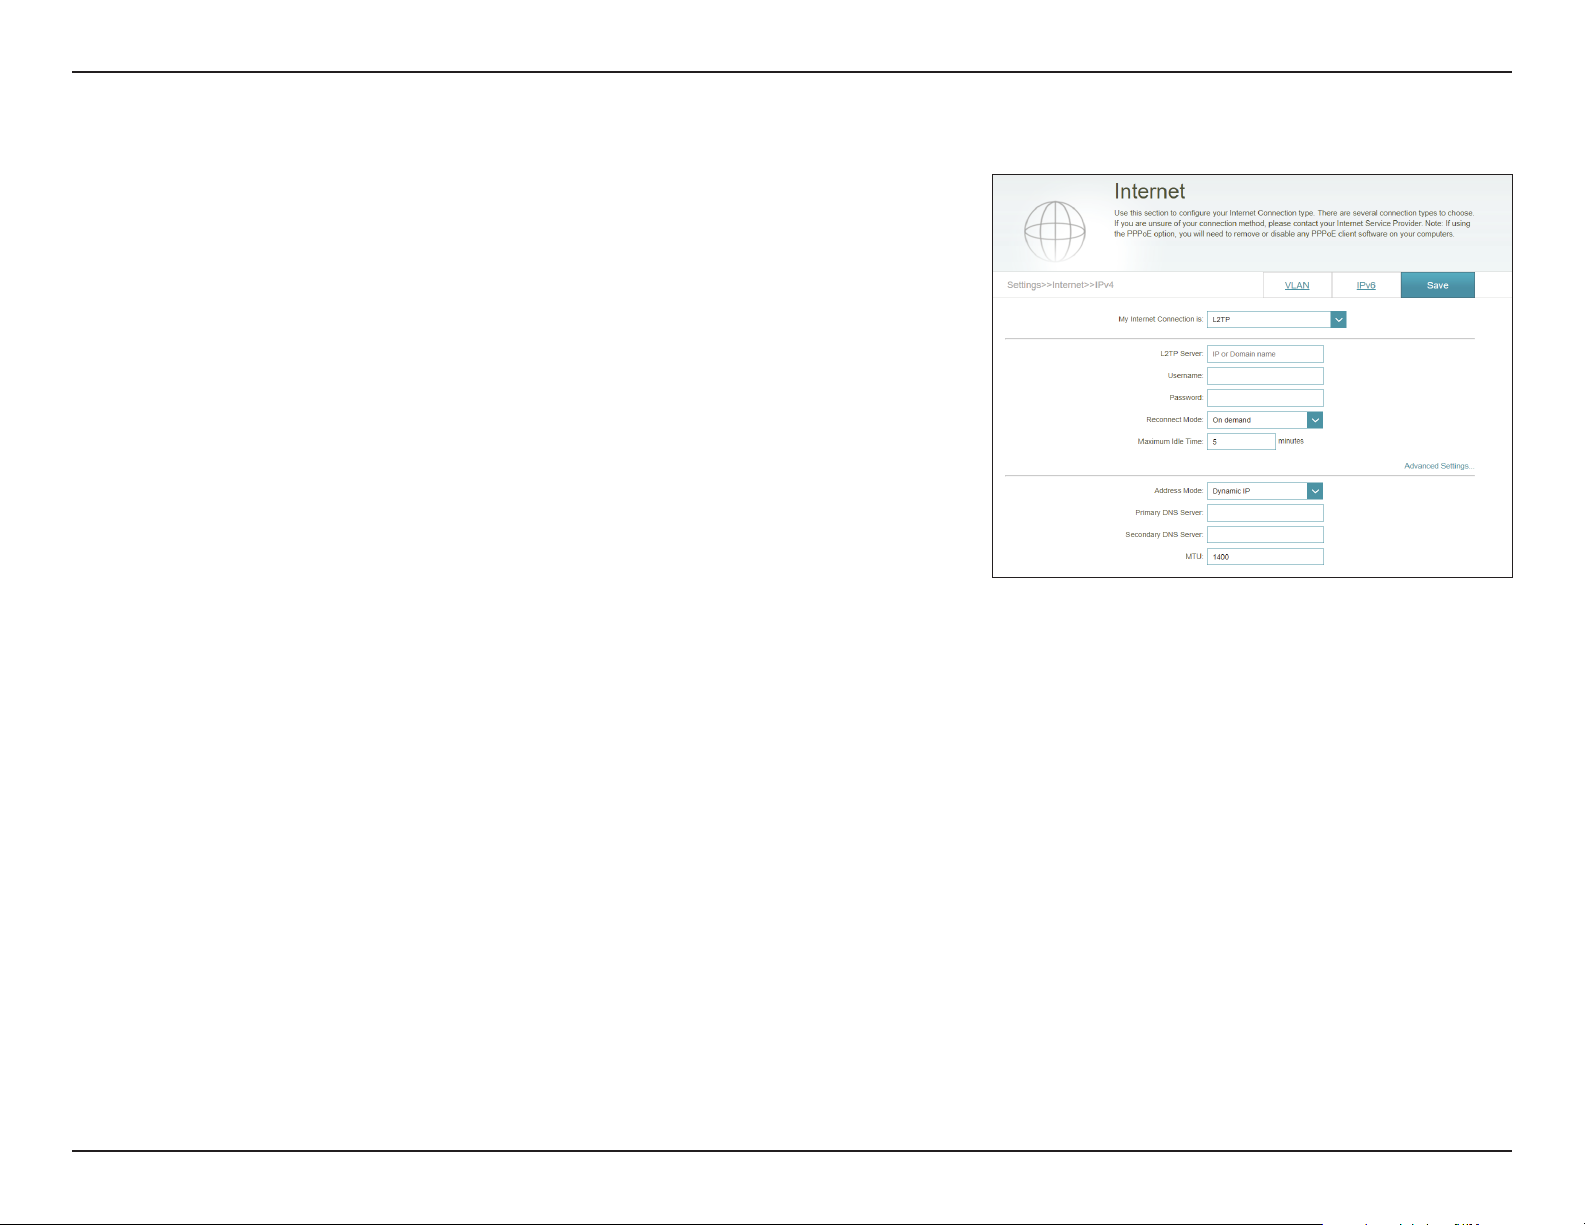
L2TP
Choose L2TP (Layer 2 Tunneling Protocol) if your Internet Service Provider
(ISP) uses a L2TP connection. Your ISP will provide you with a username and
password.
L2TP Server: Enter the L2TP server IP address provided by your ISP.
Username: Enter the username provided by your ISP.
Password: Enter the password provided by your ISP.
Reconnect Mode: Select either Always on, On demand, or Manual.
Maximum Idle
Time:
Enter a maximum idle (in minutes) time during which the Internet
connection is maintained during inactivity. To disable this feature,
select Always on as the reconnect mode.
Advanced Settings
Address Mode: Select Static IP if your ISP assigned you the IP address, subnet mask,
gateway, and DNS server addresses. In most cases, select Dynamic IP.
If you selected Dynamic IP as the Address Mode:
Primary DNS
Server:
Secondary DNS
Server:
MTU: Maximum Transmission Unit - you may need to change the MTU for
Enter the primary DNS server IP address assigned by your ISP. This
address is usually obtained automatically from your ISP.
Enter the secondary DNS server IP address assigned by your ISP. This
address is usually obtained automatically from your ISP.
optimal performance with your ISP.
24D-Link COVR-1102 User Manual
Page 29
Section 3 - Conguration
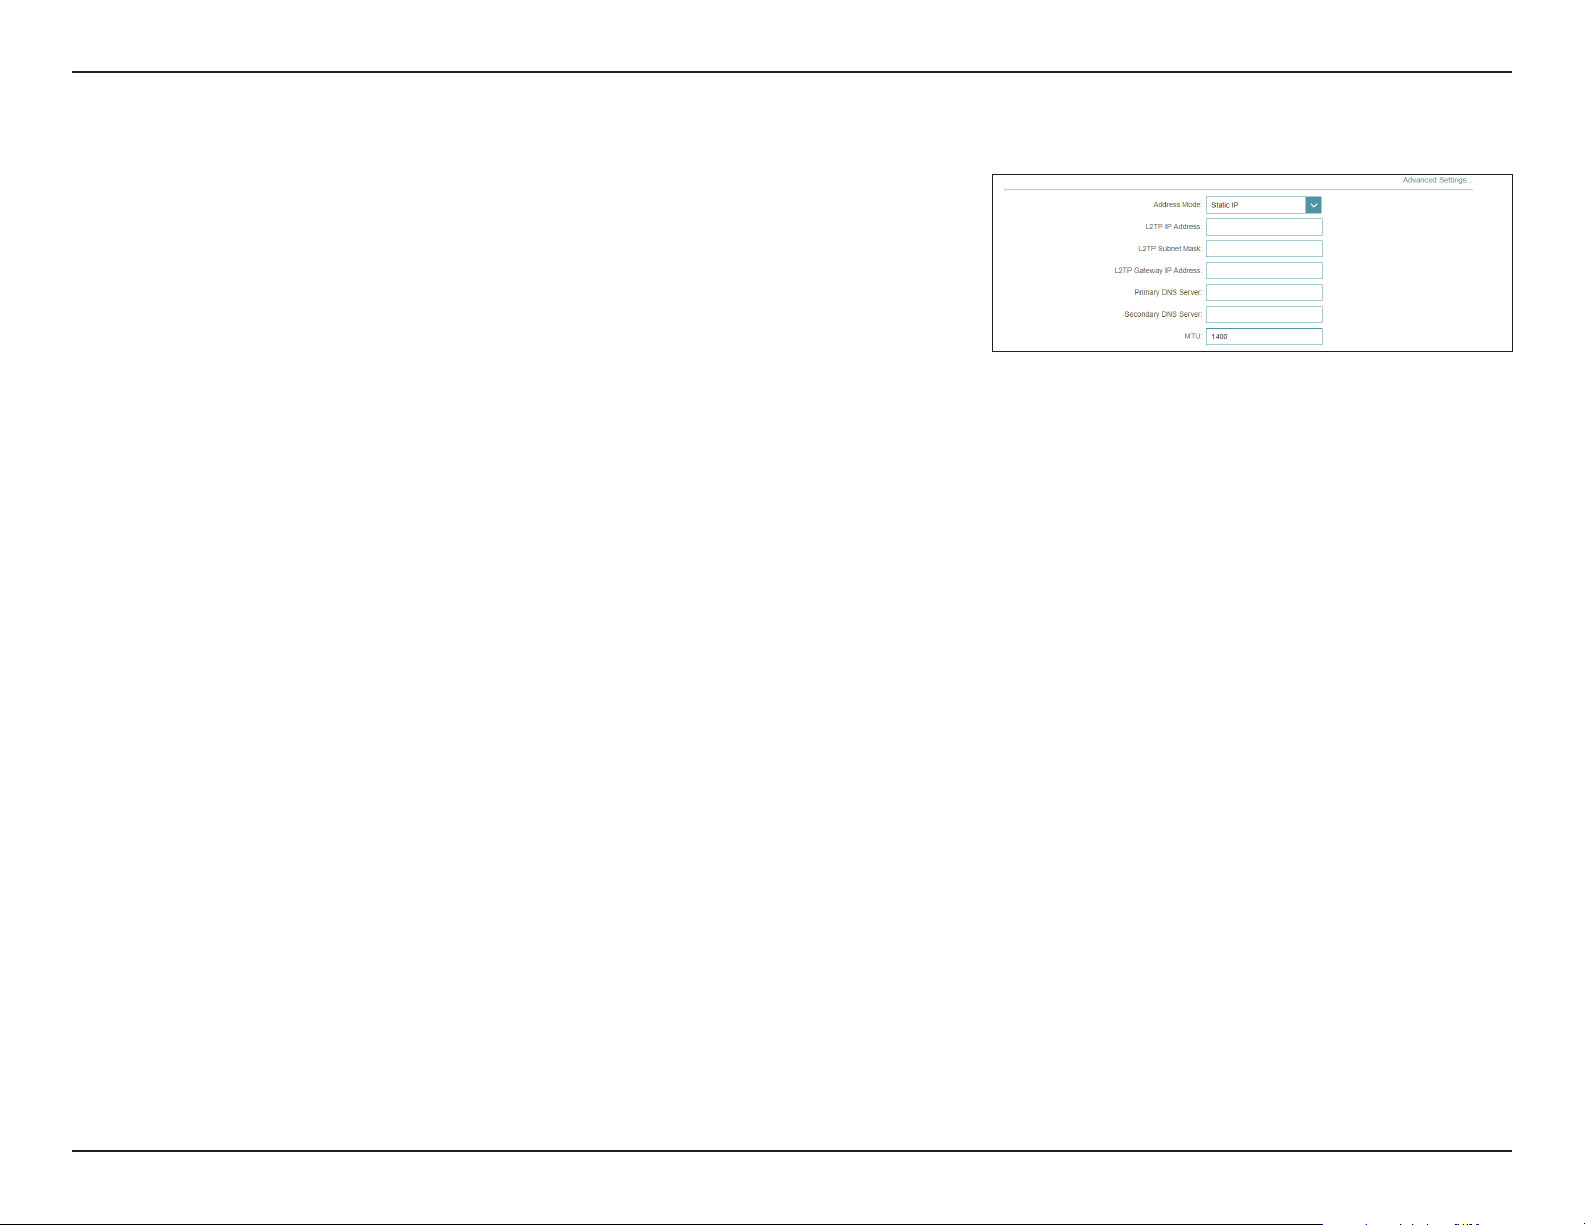
If you selected Static IP as the Address Mode:
L2TP IP Address: Enter the IP address provided by your ISP.
L2TP (continued)
L2TP Subnet
Mask:
L2TP Gateway IP
Address:
Primary DNS
Server:
Secondary DNS
Server:
MTU: Maximum Transmission Unit - you may need to change the MTU for
Enter the subnet mask provided by your ISP.
Enter the gateway IP address provided by your ISP.
Enter the primary DNS server IP address assigned by your ISP.
Enter the secondary DNS server IP address assigned by your ISP.
optimal performance with your ISP.
Click Save when you are done.
25D-Link COVR-1102 User Manual
Page 30
Section 3 - Conguration
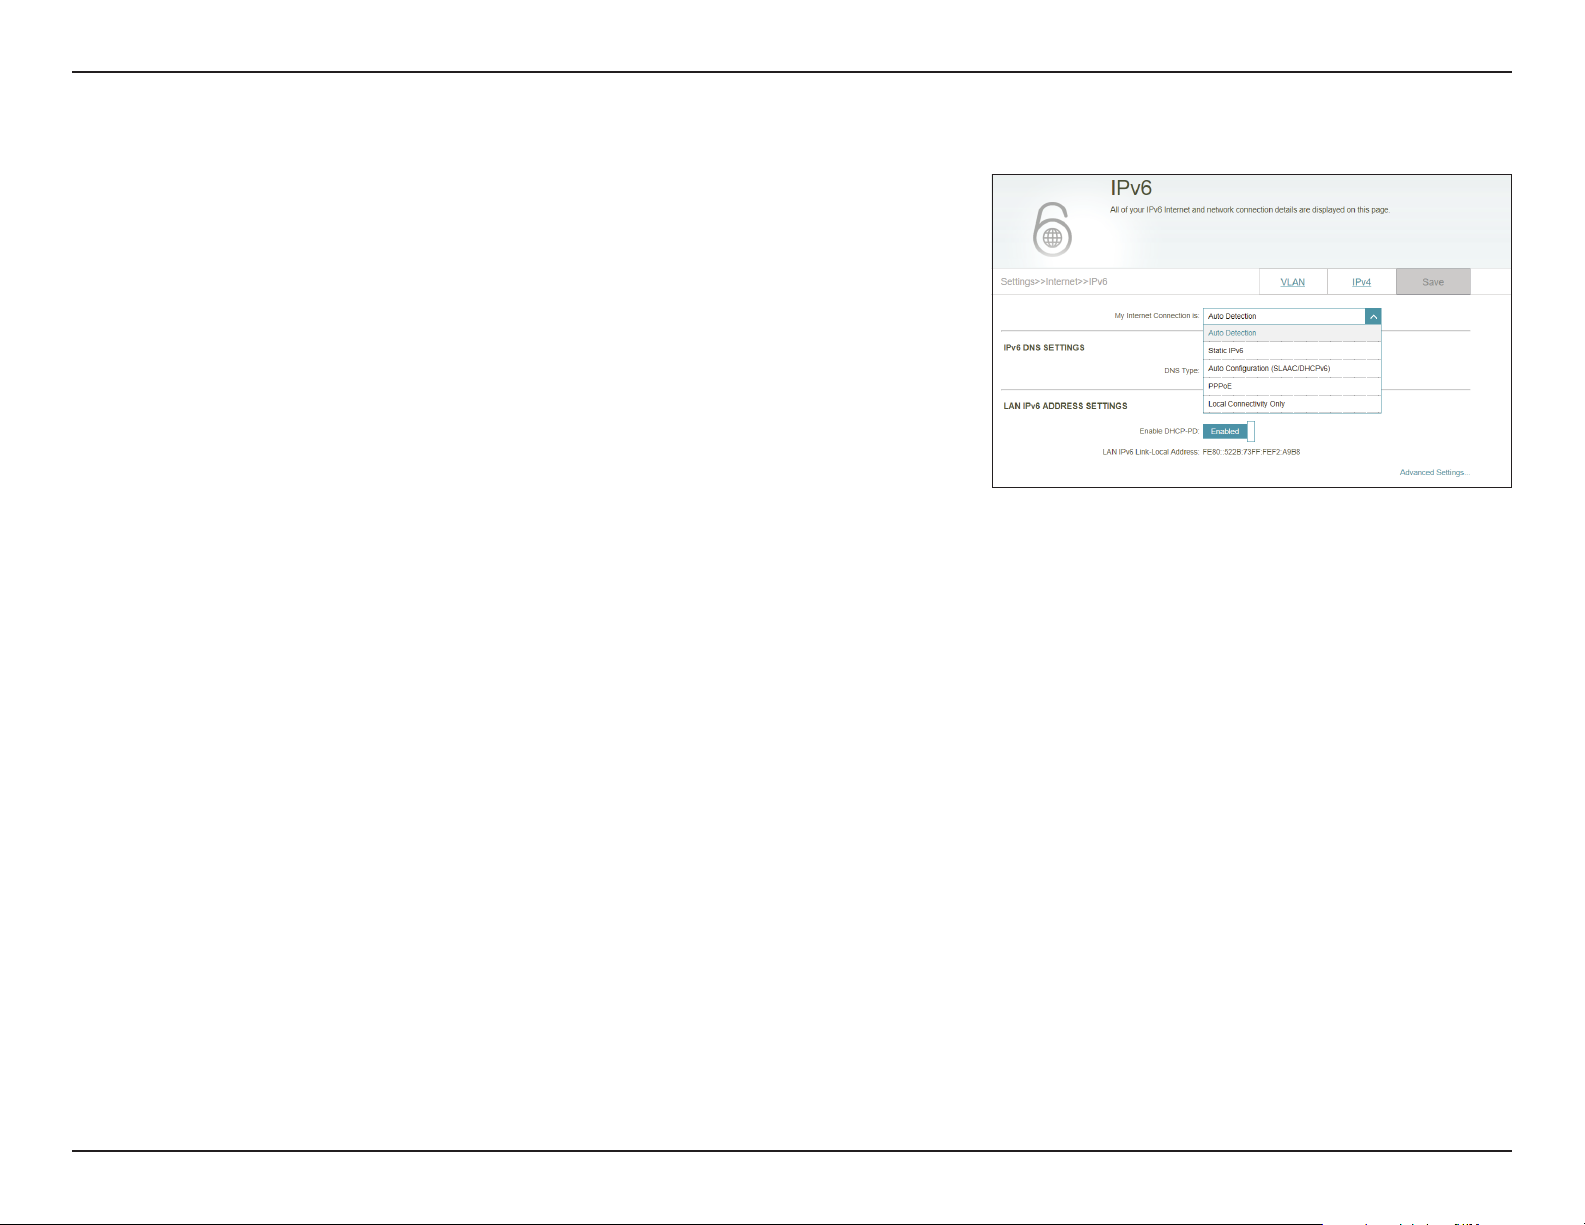
IPv6
To congure an IPv6 connection, click the IPv6 link. To return to the IPv4
settings, click IPv4.
My Internet
Connection Is:
Choose your IPv6 connection type from the drop-down menu. You
will be presented with the appropriate options for your connection
type. Click Advanced Settings... to expand the list and see all of the
options.
For Auto Detection refer to 27.
For Static IPv6 refer to 29.
For Auto Conguration (SLAAC/DHCPv6) refer to 31.
For PPPoE refer to 33.
For Local Connectivity Only refer to 36.
26D-Link COVR-1102 User Manual
Page 31

Section 3 - Conguration
Auto Detection
Select Auto Detection to automatically detect the IPv6 connection method
used by your Internet Service Provider (ISP). If Auto Detection fails, you can
manually select another IPv6 connection type.
IPv6 DNS Settings
DNS Type: Select either Obtain DNS server address automatically or Use the
following DNS address.
If Use the following DNS address is selected:
Primary DNS
Server:
Secondary DNS
Server:
Enter the primary DNS server address.
Enter the secondary DNS server address.
LAN IPv6 Address Settings
Enable DHCP-PD: Enable or disable DHCP Prex Delegation.
LAN IPv6 LinkLocal Address:
If Enable DHCP-PD is disabled, these additional parameters are available for conguration:
LAN IPv6 Address: Enter a valid LAN IPv6 address.
LAN IPv6 LinkLocal Address:
Displays the master COVR Point's LAN link-local address.
Displays the master COVR Point's LAN link-local address.
27D-Link COVR-1102 User Manual
Page 32

Section 3 - Conguration
Auto Detection (Continued)
Advanced Settings - Address Autoconguration Settings
Enable Automatic
IPv6 Address
Assignment:
Enable Automatic
DHCP-PD in LAN:
Autoconguration
Type:
If you selected SLAAC+RDNSS or SLAAC+Stateless DHCP as the Autoconguration Type:
Router
Advertisement
Lifetime:
If you selected Stateful DHCPv6 as the Autoconguration Type:
Enable or disable the Automatic IPv6 Address Assignment feature.
Enabling this feature presents additional conguration options.
Enable or disable DHCP-PD for other IPv6 routers connected to the
LAN interface. This option is only available if Enable DHCP-PD is
enabled.
Note: This feature requires a smaller subnet prex than /64 (i.e. allowing
for a larger address allocation), such as /63. Contact your ISP for more
information.
Select SLAAC+RDNSS, SLAAC+Stateless DHCP, or Stateful DHCPv6.
Enter the router advertisement lifetime (in minutes).
IPv6 Address
Range (Start):
IPv6 Address
Range (End):
IPv6 Address
Lifetime:
Enter the starting IPv6 address for the DHCP server’s IPv6 assignment.
Enter the ending IPv6 address for the DHCP server’s IPv6 assignment.
If Enable DHCP-PD is disabled, enter the IPv6 address lifetime (in
minutes).
Click Save when you are done.
28D-Link COVR-1102 User Manual
Page 33

Section 3 - Conguration
Static IPv6
Select Static IP if your IPv6 information is provided by your Internet Service
Provider (ISP).
Use Link-Local
Address:
IPv6 Address: If Use Link-Local Address is disabled, enter the address supplied
Subnet Prex
Length:
Default Gateway: Enter the default gateway for your IPv6 connection.
Primary DNS
Server:
Secondary DNS
Server:
Enable or disable link-local address use. Enabling this feature will use
your local IPv6 address as the static IP. Disable this feature to manually
enter your static IPv6 address and subnet prex length.
by your ISP.
If Use Link-Local Address is disabled, enter the subnet prex length
supplied by your ISP.
Enter the primary DNS server address.
Enter the secondary DNS server address.
LAN IPv6 Address Settings
LAN IPv6 Address: Enter the LAN (local) IPv6 address for the master COVR Point.
LAN IPv6 LinkLocal Address:
Displays the master COVR Point's LAN link-local address.
29D-Link COVR-1102 User Manual
Page 34

Section 3 - Conguration
Static IPv6 (Continued)
Advanced Settings - Address Autoconguration Settings
Enable Automatic
IPv6 Address
Assignment:
Autoconguration
Type:
If you selected SLAAC+RDNSS or SLAAC+Stateless DHCP as the Autoconguration Type:
Router
Advertisement
Lifetime:
If you selected Stateful DHCPv6 as the Autoconguration Type:
IPv6 Address
Range (Start):
IPv6 Address
Range (End):
IPv6 Address
Lifetime:
Enable or disable the Automatic IPv6 Address Assignment feature.
Select SLAAC+RDNSS, SLAAC+Stateless DHCP, or Stateful DHCPv6.
Enter the router advertisement lifetime (in minutes).
Enter the starting IPv6 address for the DHCP server’s IPv6 assignment.
Enter the ending IPv6 address for the DHCP server’s IPv6 assignment.
Enter the IPv6 address lifetime (in minutes).
Click Save when you are done.
30D-Link COVR-1102 User Manual
Page 35

Section 3 - Conguration
Auto Conguration (SLAAC/DHCPv6)
Select Auto Conguration if your ISP assigns your IPv6 address when your
router requests one from the ISP’s server. Some ISPs require you to adjust
settings on your side before your router can connect to the IPv6 Internet.
IPv6 DNS Settings
DNS Type: Select either Obtain DNS server address automatically or Use the
following DNS address.
If Use the following DNS address is selected:
Primary DNS
Server:
Secondary DNS
Server:
Enter the primary DNS server address.
Enter the secondary DNS server address.
LAN IPv6 Address Settings
Enable DHCP-PD: Enable or disable prex delegation services.
LAN IPv6 LinkLocal Address:
If Enable DHCP-PD is disabled, these additional parameters are available for conguration:
LAN IPv6 Address: Enter a valid LAN IPv6 address.
LAN IPv6 LinkLocal Address:
Displays the master COVR Point's LAN link-local address.
Displays the master COVR Point's LAN link-local address.
31D-Link COVR-1102 User Manual
Page 36

Section 3 - Conguration
Auto Conguration (SLAAC/DHCPv6) (Continued)
Advanced Settings - Address Autoconguration Settings
Enable Automatic
IPv6 Address
Assignment:
Enable Automatic
DHCP-PD in LAN:
Autoconguration
Type:
If you selected SLAAC+RDNSS or SLAAC+Stateless DHCP as the Autoconguration Type:
Router
Advertisement
Lifetime:
If you selected Stateful DHCPv6 as the Autoconguration Type:
Enable or disable the Automatic IPv6 Address Assignment feature.
Enabling this feature presents additional conguration options.
Enable or disable DHCP-PD for other IPv6 routers connected to the
LAN interface. This option is only available if Enable DHCP-PD is
enabled.
Note: This feature requires a smaller subnet prex than /64 (i.e. allowing
for a larger address allocation), such as /63. Contact your ISP for more
information.
Select SLAAC+RDNSS, SLAAC+Stateless DHCP, or Stateful DHCPv6.
Enter the router advertisement lifetime (in minutes).
IPv6 Address
Range (Start):
IPv6 Address
Range (End):
IPv6 Address
Lifetime:
Enter the starting IPv6 address for the DHCP server’s IPv6 assignment.
Enter the ending IPv6 address for the DHCP server’s IPv6 assignment.
If Enable DHCP-PD is disabled, enter the IPv6 address lifetime (in
minutes).
Click Save when you are done.
32D-Link COVR-1102 User Manual
Page 37

Section 3 - Conguration
PPPoE
Select PPPoE if your ISP provides and requires you to enter a PPPoE username
and password in order to connect to the Internet.
PPPoE Session: Select Create a new session to start a new PPPoE session.
Username: Enter the username provided by your ISP.
Password: Enter the password provided by your ISP.
Address Mode: Select Static IP if your ISP assigned you an IP address. In most cases,
select Dynamic IP.
IP Address: If you selected Static IP as the Address Mode, enter the IP address
provided by your ISP.
Service Name: Enter the ISP service name (optional).
Reconnect Mode: Select either Always On or Manual.
MTU: Maximum Transmission Unit - you may need to change the MTU for
optimal performance with your ISP.
33D-Link COVR-1102 User Manual
Page 38

Section 3 - Conguration
IPv6 DNS Settings
DNS Type: Select either Obtain DNS server address automatically or Use the
following DNS address.
If Use the following DNS address is selected:
PPPoE (Continued)
Primary DNS
Server:
Secondary DNS
Server:
Enter the primary DNS server address.
Enter the secondary DNS server address.
LAN IPv6 Address Settings
Enable DHCP-PD: Enable or disable prex delegation services.
LAN IPv6 LinkLocal Address:
If Enable DHCP-PD is disabled, these additional parameters are available for conguration:
LAN IPv6 Address: Enter a valid LAN IPv6 address.
LAN IPv6 LinkLocal Address:
Displays the master COVR Point's LAN link-local address.
Displays the master COVR Point's LAN link-local address.
34D-Link COVR-1102 User Manual
Page 39

Section 3 - Conguration
PPPoE (Continued)
Advanced Settings - Address Autoconguration Settings
Enable Automatic
IPv6 Address
Assignment:
Enable Automatic
DHCP-PD in LAN:
Autoconguration
Type:
If you selected SLAAC+RDNSS or SLAAC+Stateless DHCP as the Autoconguration Type:
Router
Advertisement
Lifetime:
If you selected Stateful DHCPv6 as the Autoconguration Type:
Enable or disable the Automatic IPv6 Address Assignment feature.
Enabling this feature presents additional conguration options.
Enable or disable DHCP-PD for other IPv6 routers connected to the
LAN interface. This option is only available if Enable DHCP-PD is
enabled.
Note: This feature requires a smaller subnet prex than /64 (i.e. allowing
for a larger address allocation), such as /63. Contact your ISP for more
information.
Select SLAAC+RDNSS, SLAAC+Stateless DHCP, or Stateful DHCPv6.
Enter the router advertisement lifetime (in minutes).
IPv6 Address
Range (Start):
IPv6 Address
Range (End):
IPv6 Address
Lifetime:
Enter the starting IPv6 address for the DHCP server’s IPv6 assignment.
Enter the ending IPv6 address for the DHCP server’s IPv6 assignment.
If Enable DHCP-PD is disabled, enter the IPv6 address lifetime (in
minutes).
Click Save when you are done.
35D-Link COVR-1102 User Manual
Page 40

Section 3 - Conguration
Local Connectivity Only
Local Connectivity Only allows you to set up an IPv6 connection that will not
connect to the Internet.
Advanced Settings - IPv6 ULA Settings
Enable ULA: Click here to enable Unique Local IPv6 Unicast Addresses settings.
Use Default ULA
Prex:
If you selected Enable ULA and disabled Default ULA Prex:
ULA Prex: Enter your own ULA prex.
Enable this option to use the default ULA prex.
Current IPv6 ULA Settings
Current ULA
Prex:
LAN IPv6 ULA: Displays the LAN's IPv6 ULA.
Displays the current ULA prex.
Click Save when you are done.
36D-Link COVR-1102 User Manual
Page 41

Section 3 - Conguration
VLAN
A Virtual Local Area Network (VLAN) is sometimes used for services such as
Triple-Play, and divides a network into segments that can only be accessed by
other devices in the same VLAN.
In the Settings menu on the bar on the top of the page, click Internet, then
click the VLAN link.
Triple-Play
Status: Click to enable or disable the Triple-Play VLAN feature.
Priority ID: Enable or disable trac priority ID for the Internet, IPTV, and VOIP
VLANs. Higher priority ID trac takes precedence over trac with a
low priority ID tag.
If Status is enabled:
Internet VLAN ID: Enter the VLAN ID for your Internet connection provided by your ISP.
IPTV VLAN ID: Enter the VLAN ID for your digital cable provided by your ISP. Click
Advanced Settings to select the IPTV Connection type and input in
the details from your ISP.
VOIP VLAN ID: Enter the VLAN ID for your Voice over IP network provided by your
ISP. Click Advanced Settings to select the VOIP Connection type and
input in the details from your ISP.
37D-Link COVR-1102 User Manual
Page 42

Section 3 - Conguration
If Priority ID is enabled:
Priority ID: Select a priority ID from the drop-down menu to assign to the
corresponding VLAN.
Interface Trac Type Setting
LAN Port: From the drop-down menu, select the VLAN for the LAN port.
Click Save when you are done.
VLAN (Continued)
38D-Link COVR-1102 User Manual
Page 43

Section 3 - Conguration
Wireless
Wi-Fi
From this page you can congure your COVR Wi-Fi settings.
Wireless
Wi-Fi Name (SSID): Enter a name for your COVR Wi-Fi network.
Password: Create a password for your COVR Wi-Fi network. Wireless clients will
need to enter this password to successfully connect to the network.
DFS Channel: Dynamic Frequency Selection (DFS) is a Wi-Fi function that enables
WLANs to use 5 GHz frequencies reserved for radars. Enable to allow
the router to monitor the radar signals frequency. If radar signals are
detected on the current channel that the device is on, then the device
will vacate the channel and switch to an alternate channel.
Channel Width: Select Auto 20/40/80 MHz if you are using 802.11ac, 802.11n, and
802.11a devices. Select Auto 20/40 MHz if you are using both 802.11n
and non- 802.11n devices, or 80 MHz/40 MHz/20 MHz if you are not
using any 802.11n devices.
Schedule: Use the drop-down menu to select the time schedule that the rule
will be enabled on. The schedule may be set to Always Enable, or
you can create your own schedules in the Schedule section. Refer to
Schedule on page 55 for more information.
Click Save when you are done.
39D-Link COVR-1102 User Manual
Page 44

Section 3 - Conguration
Guest Zone
The Guest Zone feature will allow you to create a temporary wireless network
that can be used by guests to access the Internet. This zone will be separate
from your main COVR Wi-Fi network.
In the Settings menu on the bar on the top of the page, click Wireless, then
click the Guest Zone link.
COVR Wi-Fi System
Status: Enable or disable the COVR Guest Wi-Fi network.
Wi-Fi Name (SSID): Enter a name for your guest wireless network.
Password: Create a password for your guest Wi-Fi network. Wireless clients will
need to enter this password to successfully connect to the network.
Schedule: Use the drop-down menu to select the time schedule that the rule
will be enabled on. The schedule may be set to Always Enable, or
you can create your own schedules in the Schedule section. Refer to
Schedule on page 55 for more information.
Home Network Access
Internet Access
Only:
Enabling this option will confine connectivity to the Internet,
preventing guests from accessing other local network devices.
Click Save when you are done.
40D-Link COVR-1102 User Manual
Page 45

Section 3 - Conguration
Network
This section will allow you to change the local network settings of the master
COVR Point and congure the DHCP settings. In the Settings menu on the bar
on the top of the page, click Network. Click Advanced Settings... to expand
the list and see all of the options.
Network Settings
LAN IP Address: Enter the IP address of the master COVR Point. The default IP address
is 192.168.0.1.
If you change the IP address, once you click Save, you will need
to enter the new IP address in your browser to get back into the
conguration utility.
Subnet Mask: Enter the subnet mask of the router. The default subnet mask is
255.255.255.0.
Management
Link:
Local Domain
Name:
Enable DNS Relay: Disable to transfer the DNS server information from your ISP to your
The default address to access the web conguration utility is
http://COVR.local/ Here, you can replace "COVR" with a dierent
name. If you change the management link, you will be required to
browse to the new URL in order to access the web UI.
Enter the domain name (optional).
computers. If enabled, your computers will use the master COVR
Point for a DNS server.
41D-Link COVR-1102 User Manual
Page 46

Section 3 - Conguration
DHCP Server
Status: Enable or disable the DHCP server.
Network (Continued)
DHCP IP Address
Range:
DHCP Lease Time: Enter the length of time for the IP address lease (in minutes).
Always Broadcast: Enable this feature to broadcast your network's DHCP server to LAN/
Enter the starting and ending IP addresses for the DHCP server’s IP
assignment.
Note: If you have reserved static IP addresses to client devices, make
sure the IP addresses are outside of this range or you might have an IP
conflict. Refer to Connected Clients section 14 for how reserve IP
addresses for clients.
WLAN clients.
Advanced Settings
WAN Port Speed: You may set the port speed of the Internet port to 10 Mbps, 100
Mbps, 1000 Mbps, or Auto (recommended).
UPnP: Enable or disable Universal Plug and Play (UPnP). UPnP provides
compatibility with networking equipment, software, and peripherals.
IPv4 Multicast
Streams:
Enable to allow IPv4 multicast trac to pass through the master COVR
Point from the Internet.
Click Save when you are done.
42D-Link COVR-1102 User Manual
Page 47

Section 3 - Conguration
D-Link Cloud
In the Settings menu on the bar at the top of the page, click D-Link Cloud to see your D-Link Cloud Service details. This
page lists whether you are registered with D-Link Cloud Service and email address associated with the account. Use the
D-Link Wi-Fi app to nd out more about D-Link Cloud's features.
43D-Link COVR-1102 User Manual
Page 48

Section 3 - Conguration
Advanced
Firewall
Advanced
The integrated rewall helps protect your network from malicious attacks over
the Internet. In the Features menu on the bar on the top of the page, click
Firewall Settings. Click Advanced Settings... to expand the list and see all of
the options.
Enable DMZ: Enable or disable Demilitarized Zone (DMZ). This completely exposes
the client to threats over the Internet, and is not recommended in
ordinary situations.
DMZ IP Address: If you enabled DMZ, enter the IP address of the client you wish to
expose, or use the drop-down menu to quickly select it.
Enable SPI IPv4: Enabling Stateful Packet Inspection (SPI) helps to prevent cyber
attacks by verifying that the trac passing through the session
conforms to known protocols.
Enable Anti-Spoof
Checking:
IPv6 Simple
Security:
IPv6 Ingress
Filtering:
Enable this feature to protect your network from certain kinds of
“spoong” attacks.
Enable or disable IPv6 simple security.
Enable or disable IPv6 ingress ltering.
44D-Link COVR-1102 User Manual
Page 49

Section 3 - Conguration
Advanced (Continued)
Advanced Settings - Application Level Gateway (ALG) Conguration
PPTP: Allows multiple machines on the LAN to connect to their corporate
network using the PPTP protocol.
IPSec (VPN): Allows multiple VPN clients to connect to their corporate network
using IPSec. Some VPN clients support traversal of IPSec through
NAT. This Application Level Gateway (ALG) may interfere with the
operation of such VPN clients. If you are having trouble connecting
with your corporate network, try turning this ALG o. Please check
with the system administrator of your corporate network whether
your VPN client supports NAT traversal.
RTSP: Allows applications that uses Real Time Streaming Protocol (RTSP) to
receive streaming media from the Internet.
SIP: Allows devices and applications using VoIP (Voice over IP) to
communicate across NAT. Some VoIP applications and devices have
the ability to discover NAT devices and work around them. This ALG
may interfere with the operation of such devices. If you are having
trouble making VoIP calls, try turning this ALG o.
Click Save when you are done.
45D-Link COVR-1102 User Manual
Page 50

Section 3 - Conguration
IPv4/IPv6 Rules
The IPv4/IPv6 Rules section is an advanced option that lets you congure what
kind of trac is allowed to pass through the network. To congure the IPv4
rules, from the Firewall Settings page click IPv4 Rules. To congure IPv6 rules,
from the Firewall Settings page click IPv6 Rules. To return to the main Firewall
Settings page, click Advanced.
To begin, use the drop-down menu to select whether you want to ALLOW or
DENY the rules you create. You can also choose to turn ltering OFF.
If you wish to remove a rule, click on its trash can icon in the Delete column. If
you wish to edit a rule, click on its pencil icon in the Edit column. If you wish to
create a new rule, click the Add Rule button. Click Save when you are done. If
you edit or create a rule, the following options will appear:
Name: Enter a name for the rule.
Source IP Address
Range:
Destination IP
Address Range:
Protocol & Port
Range:
Schedule: Use the drop-down menu to select the time schedule that the rule
Enter the source IP address range that the rule will apply to, and using
the drop-down menu, specify whether it is a WAN or LAN IP address.
Enter the destination IP address range that the rule will apply to, and
using the drop-down menu, specify whether it is a WAN or LAN IP
address.
Select the protocol of the trac to allow or deny (Any, TCP, or UDP)
and then enter the range of ports that the rule will apply to.
will be enabled on. The schedule may be set to Always Enable, or
you can create your own schedules in the Schedule section. Refer to
Refer to Schedule on page 55 for more information.
Click Apply when you are done.
46D-Link COVR-1102 User Manual
Page 51

Section 3 - Conguration
Port Forwarding
Port Forwarding
Port forwarding allows you to specify a port or range of ports to forward
to specic devices on the network. This might be necessary for certain
applications to connect through the master COVR Point. In the Features menu
on the bar on the top of the page, click Port Forwarding.
If you wish to remove a rule, click on its trash can icon in the Delete column. If
you wish to edit a rule, click on its pencil icon in the Edit column. If you wish to
create a new rule, click the Add Rule button. Click Save when you are done. If
you edit or create a rule, the following options will appear:
Name: Enter a name for the rule.
Local IP: Enter the IP address of the device on your local network to which
the port will be forwarded. Alternatively, select the device from the
drop-down menu.
TCP Port: Enter the TCP ports that you want to forward. You can enter a single
port or a range of ports. Separate ports with a comma (for example:
24,1009,3000-4000).
UDP Port: Enter the UDP ports that you want to forward. You can enter a single
port or a range of ports. Separate ports with a comma (for example:
24,1009,3000-4000).
Schedule: Use the drop-down menu to select the time schedule that the rule
will be enabled on. The schedule may be set to Always Enable, or
you can create your own schedules in the Schedule section. Refer to
Schedule on page 55 for more information.
Click Apply when you are done.
47D-Link COVR-1102 User Manual
Page 52

Section 3 - Conguration
Virtual Server
The virtual server allows you to specify a single public port on the master
COVR Point for redirection to an internal LAN IP address and Private LAN port.
To congure the virtual server, from the Port Forwarding page click Virtual
Server. To return to the main Port Forwarding page, click Port Forwarding.
If you wish to remove a rule, click on its trash can icon in the Delete column. If
you wish to edit a rule, click on its pencil icon in the Edit column. If you wish to
create a new rule, click the Add Rules button. Click Save when you are done. If
you edit or create a rule, the following options will appear:
Name: Enter a name for the rule. Alternatively, select the protocol/Application
from the drop-down menu.
Local IP: Enter the IP address of the device on your local network to which the
external port will forward. Alternatively, select the device from the
drop-down menu.
Protocol: Select the protocol of the trac that will be forwarded to the selected
IP address (TCP, UDP, Both, or Other).
Protocol Number: If you selected Other as the protocol, enter the protocol number.
External Port: If you selected TCP, UDP, or Both as the protocol, enter the public
port you want to forward.
Internal Port: If you selected TCP, UDP, or Both as the protocol, enter the private
port you want to open.
Schedule: Use the drop-down menu to select the time schedule that the rule
will be enabled on. The schedule may be set to Always Enable, or
you can create your own schedules in the Schedule section. Refer to
Schedule on page 55 for more information.
Click Apply when you are done.
48D-Link COVR-1102 User Manual
Page 53

Section 3 - Conguration
Website Filter
The website lter settings allow you to control access to certain web sites. You
can either create a list of sites to block, or create a list of sites to allow (with all
other sites being blocked).
In the Features menu on the bar on the top of the page, click Website Filter.
If you want to create a list of sites to block, select DENY client access to ONLY
these sites from the drop-down menu. All other sites will be accessible. If you
want to specify a list of sites to allow, select ALLOW clients access to ONLY
these sites from the drop-down menu. All other sites will be blocked.
To add a new site to the list, click Add Rule. Next, under Website URL/Domain
enter the URL or domain. If you wish to remove a rule, click on its trash can
icon in the Delete column. If you wish to edit a rule, simply replace the URL or
domain.
Click Save when you are done.
49D-Link COVR-1102 User Manual
Page 54

Section 3 - Conguration
Static Routes
IPv4
The Static Routes section allows you to dene custom routes to control how
trac moves around your network.
In the Features menu on the bar on the top of the page, click Static Routes.
To congure IPv6 rules, click IPv6 and refer to IPv6 on page 51. To return to
the main IPv4 static routes page, click IPv4.
If you wish to remove a rule, click on its trash can icon in the Delete column. If
you wish to edit a rule, click on its pencil icon in the Edit column. If you wish to
create a new rule, click the Add Route button. Click Save when you are done.
If you edit or create a rule, the following options will appear:
Name: Enter a name for the route.
Destination
Network:
Mask: Enter the subnet mask of the route.
Gateway: Enter your next hop gateway to be taken if this route is used.
Metric: The route metric is a value from 1 to 16 that indicates the cost of using
Interface: Select the interface that the IP packet must use to transit out of the
Enter the destination IP address of this route.
this route. A value of 1 is the lowest cost and 16 is the highest cost.
router when this route is used.
Click Apply when you are done.
50D-Link COVR-1102 User Manual
Page 55

Section 3 - Conguration
IPv6
To congure IPv6 routes, on the Static Routes page click IPv6. To return to the
main IPv4 static routes page, click IPv4.
If you wish to remove a rule, click on its trash can icon in the Delete column. If
you wish to edit a rule, click on its pencil icon in the Edit column. If you wish to
create a new rule, click the Add Rules button. Click Save when you are done. If
you edit or create a rule, the following options will appear:
Name: Enter a name for the route.
DestNetwork: This is the IP address of the router used to reach the specified
destination.
PrexLen: Enter the IPv6 address prex length of the packets that will take this
route.
Gateway: Enter your next hop gateway to be taken if this route is used.
Metric: The route metric is a value from 1 to 16 that indicates the cost of using
this route. A value of 1 is the lowest cost and 16 is the highest cost.
Interface: Select the interface that the IP packet must use to transit out of the
router when this route is used.
Click Apply when you are done.
51D-Link COVR-1102 User Manual
Page 56

Section 3 - Conguration
Dynamic DNS
Most Internet Service Providers (ISPs) assign dynamic (changing) IP addresses.
Using a dynamic DNS service provider, people can enter your domain name in
their web browser to connect to your server no matter what your IP address is.
In the Features menu on the bar on the top of the page, click Dynamic DNS.
Enable Dynamic
DNS:
Status: Displays the current dynamic DNS connection status.
Server Address: Select a Dynamic DNS server from the drop-down menu, or select
Host Name: Enter the host name that you registered with your dynamic DNS
User Name: Enter your dynamic DNS username.
Password: Enter your dynamic DNS password.
Time Out: Enter a timeout time (in hours).
Enable or disable dynamic DNS. Enabling this feature will reveal
further conguration options.
Manual to manually enter a DDNS server address.
service provider.
Click Save when you are done.
At the bottom of the page are the IPv6 host settings. To congure an IPv6
dynamic DNS host, refer to following page.
52D-Link COVR-1102 User Manual
Page 57

Section 3 - Conguration
Dynamic DNS (Continued)
The IPv6 host settings are found at the bottom of the Dynamic DNS page.
If you wish to remove a rule, click on its trash can icon in the Delete column. If
you wish to edit a rule, click on its pencil icon in the Edit column. If you wish to
create a new rule, click the Add Record button. Click Save when you are done.
If you edit or create a rule, the following options will appear:
Host Name: Enter the host name that you registered with your dynamic DNS
service provider.
IPv6 Address: Enter the IPv6 address of the dynamic DNS server. Alternatively, select
the server device in the drop-down menu.
Click Apply when you are done.
53D-Link COVR-1102 User Manual
Page 58

Section 3 - Conguration
Management
Time & Schedule
Time
The Time page allows you to congure, update, and maintain the correct
time on the internal system clock. From here you can set the time zone, the
Network Time Protocol (NTP) server, and enable or disable daylight saving
time.
In the Management menu on the bar on the top of the page, click Time &
Schedule.
Time Conguration
Time Zone: Select your time zone from the drop-down menu.
Time: Displays the current date and time of the extender.
Automatic/Manual Time Conguration
NTP Server: Use the D-Link NTP server to synchronize the time and date. Or select
Manual and input your own NTP Server details.
Click Save when you are done.
54D-Link COVR-1102 User Manual
Page 59

Section 3 - Conguration
Schedule
Some functions can be controlled through a pre-congured schedule. To
create, edit, or delete schedules, from the Time page click Schedule. To return
to the Time page, click Time.
If you wish to remove a rule, click on its trash can icon in the Delete column. If
you wish to edit a rule, click on its pencil icon in the Edit column. If you wish to
create a new rule, click the Add Device button. Click Save when you are done.
If you edit or create a rule, the following screen will appear:
First, enter the name of your schedule in the Name eld.
Each box represents one hour, with the time at the top of each column and the
day of the week to the left of each row. To add a time period to the schedule,
simply click on the starting hour and drag to the ending hour. You can add
multiple days to the schedule, but only one time period per day.
To remove a time period from the schedule, click on the cross icon at the end
of the highlighted section.
Click Apply when you are done.
55D-Link COVR-1102 User Manual
Page 60

Section 3 - Conguration
System Log
The master COVR Point keeps a running log of events. This log can be sent to a
Syslog server, or be sent to your email address.
In the Management menu on the bar on the top of the page, click System
Log.
Log Settings
System Log: Click the Check System Log to download a copy of the system log to
your hard drive.
SysLog Settings
Enable Logging to
Syslog Server:
If Logging to the Syslog Server is Enabled:
Syslog Server IP
Address:
Check this box to send the COVR Point logs to a SysLog Server.
Enter the IP address for the Syslog server. If the Syslog server is
connected to the master COVR Point, select it from the drop-down
menu to automatically populate the eld.
Email Settings
Enable E-mail
Notication:
If E-mail notication is Enabled:
From E-mail
Address:
To E-mail Address: Enter the email address your SysLog messages will be sent to.
Enable this option if you want the logs to be automatically sent to
an email address.
Enter the email address your SysLog messages will be sent from.
56D-Link COVR-1102 User Manual
Page 61

Section 3 - Conguration
System Log (Continued)
SMTP Server
Address:
SMTP Server Port: Enter your SMTP server port.
Enable
Authentication:
Account Name: Enter your SMTP account name.
Password: Enter your SMTP account password.
Enter your SMTP server address.
Enable this option if your SMTP server requires authentication.
E-mail Log When Full or On Schedule
Send When Log
Send on Schedule: If enabled, this option will set the master COVR Point to send the log
Schedule: If you enable Send On Schedule, use the drop-down menu to select
If enabled, this option will set the master COVR Point to automatically
Full:
send the log when it is full.
according to a set schedule.
a schedule to apply. The schedule may be set to Always, or you can
create your own schedules in the Schedule section. Refer to Schedule
on page 55 for more information.
Click Save when you are done.
57D-Link COVR-1102 User Manual
Page 62

Section 3 - Conguration
System Admin
Admin
This page will allow you to change the administrator (Admin) password and
enable the HTTPS server. In the Management menu on the bar on the top of
the page, click System Admin.
Admin Password
Password: Enter a new password for the administrator account. You will need to
enter this password whenever you congure the master COVR Point
using a web browser.
Advanced Settings - Administration
Enable Remote
Management:
Enable Admin
Port:
Remote management allows the master COVR Point to be congured
from the Internet by a web browser. A password is still required to access
the web management interface.
The port number used in the URL to access the master COVR Point.
Example: http://x.x.x.x:8080 where x.x.x.x is the Internet IP address of the
master COVR Point and 8080 is the port used for the web management
interface.
Note: If you enabled Use HTTPS and wish to access the master COVR
Point remotely and securely, you must enter https:// at the beginning
of the address.
58D-Link COVR-1102 User Manual
Page 63

Section 3 - Conguration
Advanced Settings - LED Control
Status LED: Choose to enable or disable the COVR status indicator LED on
the top panel. When disabled, the LED will no longer light up
solid white during normal operation and will instead turn o.
The LED will still light up in the corresponding color and mode in
any of the following circumstances:
-Firmware upgrade
-Device reboot
-Establishing a WPS connection
-Weak uplink signal
-No uplink signal
Once any of the above situations has ended, the LED will briey light
up solid white and then turn o again.
Admin (Continued)
Click Save when you are done.
59D-Link COVR-1102 User Manual
Page 64

Section 3 - Conguration
System
This page will allow you to back up, restore conguration settings, or restore
settings from a previous backup, reset, and set up a reboot schedule for the
device. On the System Admin page click System.
System
Save Settings To
Local Hard Drive:
Load Settings
From Local Hard
Drive:
Restore To Factory
Default Settings:
Click Save to download a backup of your current conguration settings
to your local hard drive. This backup can later be used to restore your
settings.
Click Select File to browse your local hard drive for a conguration le
to restore your conguration settings from. Once selected, click Restore
to apply the settings from the conguration backup.
Click Restore to restore all conguration settings back to the settings
that were in eect at the time the device was shipped from the factory.
Any settings that have not been saved will be lost, including any rules
that you have created.
Auto Reboot Conguration
Reboot the
Device:
Auto Reboot: Use the drop-down menu to select a schedule for the device to
Click the Reboot to reboot the device immediately.
automatically reboot. The schedule may be set to Never, Daily, or
Weekly. Depending on your selection, set a time and date for the
auto reboot schedule.
Click Save when you are done.
60D-Link COVR-1102 User Manual
Page 65

Section 3 - Conguration
Upgrade
This page will allow you to upgrade the extender’s rmware, either
automatically or manually. To manually upgrade the rmware, you must rst
download the newest rmware le from http://support.dlink.com.
In the Management menu on the bar on the top of the page, click Upgrade.
Firmware Information
Current Firmware
Version/Date:
Check for New
Firmware:
Displays the current rmware version and date for the master COVR
Point and any additional COVR Point units.
Click this button to prompt the Covr Points to automatically check
for a new rmware version. If a newer version is found, click Upgrade
Firmware to download and install the new rmware.
Upgrade Manually
Upgrade
Firmware:
If you wish to upgrade manually, rst download the rmware le you
wish to upgrade to. Next, select a device from the drop-down menu to
upgrade rmware for. Then, click the Select File button and browse to
the rmware le you want to install. With the le selected, click Upload
to begin the upgrade process.
Automatic Firmware Upgrade
Automatic
Upgrade:
Choose Upgrade
Time:
If enabled, the router will automatically check for and upgrade to the
newest rmware.
Enable this function to set the router to automatically upgrade its
rmware at a set time.
Upgrade Time:
Congurable if Choose Upgrade Time is enabled. Set the hour and
minute to automatically upgrade by using the drop-down menus.
61D-Link COVR-1102 User Manual
Page 66

Section 3 - Conguration
Statistics
On the Statistics page you can view the amount of packets that pass through
your COVR Wi-Fi network.
In the Management menu on the bar on the top of the page, click Statistics.
You can view the Internet, LAN, Wi-Fi 2.4GHz, and Wi-Fi 5GHz by clicking on
the respective tabs at the top of the graph. The graph will update in real time.
To clear the information on the graph, click Clear.
The trac counter will reset if the device is rebooted.
Click Extender to see the statistics for any additional COVR Points added to
your COVR Network.
62D-Link COVR-1102 User Manual
Page 67

Section 4 - Adding Additional Covr Points
Adding Additional COVR Points
COVR is a scalable solution. You can add additional COVR Points at any time to increase coverage in your home whenever you
need to. Adding more COVR Points is a quick and easy process. You can add up to 3 additional units, for a combined total of 4
COVR Points.
Using the D-Link Wi-Fi App
You can easily add additional units using your mobile device. Refer to the steps below to learn how to add more COVR Points
to your COVR network using the D-Link Wi-Fi app.
Step 1
Open the D-Link Wi-Fi app, then tap the menu icon in the top-left to open the
app menu.
63D-Link COVR-1102 User Manual
Page 68

Section 4 - Adding Additional Covr Points
Step 2
From the app menu, tap Install New Device.
Step 3
Next, select Scan the QR code and scan the QR code located on the Quick
Installation Card of the new COVR Point.
You will now be guided through a step-by-step process for setting up the new
COVR Point. Simply follow the on-screen steps to complete the installation
process. Repeat this process to add additional COVR Points.
QUICK INSTALLATION CARD
SETUP QR CODE
Model Name:
Wi-Fi Name:
Password:
S/N:
www.dlink.com
Version 1.00 (DI)_90X130 || March 15, 2019
64D-Link COVR-1102 User Manual
Page 69

Section 4 - Adding Additional Covr Points
Using an Ethernet Cable
Refer to the steps below to learn how to add more COVR Points to your COVR network using an Ethernet cable.
Step 1
Use the Ethernet cable to connect the new COVR Point to an existing
INTERNET ETHERNETPOWER
1A
COVR Point.
Step 2
Connect the COVR Points to a power source. When the LED on the new
COVR Point changes from blinking orange to solid white, the new COVR
Point is paired and will reboot itself to complete the setup process.
12V
INTERNET ETHERNETPOWER
1A
12V
INTERNET ETHERNETPOWER
1A
12V
INTERNET ETHERNETPOWER
1A
12V
Step 3
Disconnect the Ethernet cable and place the new COVR Point anywhere
in your home to extend your whole home Wi-Fi.
65D-Link COVR-1102 User Manual
Page 70

Section 5- Third Party Services
Third Party Services
Connect to the future of intelligent home network control. The COVR System integrates with your Google Assistant and
Alexa, so you can nally manage and control your network without lifting a nger. Features include enabling and disabling
your Wi-Fi guest zone without having to go into the UI, rebooting the router and checking your router for rmware
upgrades. In order to use third party services to control and manage your device, please register your device with D-Link
Cloud Service.
66D-Link COVR-1102 User Manual
Page 71

Section 5- Third Party Services
Registering a D-Link Cloud Service Account
In order to use third party services to control and manage your device, you will rst need to register your device with the
D-Link Cloud Service. Follow the steps below if you do not have a D-Link Cloud Service account.
Step 1
Launch the D-Link Wi-Fi app.
D-Link Wi-Fi
Step 2
Tap the settings gear icon on the top right corner of the screen.
67D-Link COVR-1102 User Manual
Page 72

Section 5- Third Party Services
Step 3
Tap the Cloud Service icon.
Step 4
Tap the Register button.
68D-Link COVR-1102 User Manual
Page 73

Section 5- Third Party Services
Step 5
In this menu, you can sign up for a D-Link account using Facebook, Google
or an Email address. If you already have a D-Link account, you can tap the
Log In link at the bottom of the screen to be redirected to the login page.
69D-Link COVR-1102 User Manual
Page 74

Section 5- Third Party Services
Amazon Alexa Setup
You will need the Amazon Alexa app, an Amazon account, an Amazon Alexa device and a D-Link Cloud Service account to
use this feature.
Note: The screenshots may be dierent depending on your mobile device’s OS version, your version of the Alexa app, as well as
what personal information may appear onscreen. The following steps show the iOS interface. If you are using an Android device,
the appearance may be dierent from that of the screenshots, but the process is the same.
Step 1
Launch the Amazon Alexa app.
Amazon Alexa
Step 2
Tap the menu icon on the top left-hand corner of the home screen.
70D-Link COVR-1102 User Manual
Page 75

Section 5- Third Party Services
Step 3
Tap on Skills & Games.
Step 4
Search for "D-Link Wi-Fi". Tap on the search result.
71D-Link COVR-1102 User Manual
Page 76

Section 5- Third Party Services
Step 5
Tap ENABLE TO USE to link the skill.
Step 6
Sign in using your D-Link account details.
72D-Link COVR-1102 User Manual
Page 77

Section 5- Third Party Services
Step 7
Congratulations! D-Link Wi-Fi has been successfully linked as a skill for your
Amazon device. Close the window by tapping Done on the top left corner
of the screen. Refer to Amazon Alexa Voice Commands on page 74 for
tasks that you can ask your Amazon Alexa to perform.
73D-Link COVR-1102 User Manual
Page 78

Section 5- Third Party Services
Amazon Alexa Voice Commands
With D-Link Wi-Fi enabled as a skill for Alexa, you can ask Alexa to do any of these tasks:
Task Command
Enable the guest zone. “Alexa, ask D-Link Wi-Fi to enable my guest zone.”
Disable the guest zone. “Alexa, ask D-Link Wi-Fi to disable my guest zone.”
Find out the guest zone credentials. "Alexa, ask D-Link Wi-Fi what are my guest network
credentials.”
Reboot the router "Alexa, ask D-Link Wi-Fi to reboot the router."
Upgrade the router. “Alexa, ask D-Link Wi-Fi to upgrade my router.”
74D-Link COVR-1102 User Manual
Page 79

Section 5- Third Party Services
The Google Assistant Setup
You will need the Google Assistant app, a Google account and a D-Link Cloud Service account to use this feature.
Note: The screenshots may be dierent depending on your mobile device’s OS version, your version of the Google Assistant app, as
well as what personal information may appear onscreen. The following steps show the iOS interface. If you are using an Android
device, the appearance may be dierent from that of the screenshots, but the process is the same.
Step 1
Launch the Google Assistant.
Assistant
Step 2
Tell your Assistant to "Talk to D-Link Wi-Fi."
75D-Link COVR-1102 User Manual
Page 80

Section 5- Third Party Services
Step 3
Tap or say Ye s.
Step 4
Sign in using your D-Link account details.
76D-Link COVR-1102 User Manual
Page 81

Section 5- Third Party Services
Step 5
Tap Allow to continue setup.
Step 6
Congratulations! D-Link Wi-Fi has been successfully linked to your Google
Assistant. Refer to The Google Assistant Voice Commands on page 81
for tasks that you can ask your Google Assistant to perform.
77D-Link COVR-1102 User Manual
Page 82

Section 5- Third Party Services
The Google Assistant Voice Commands
With D-Link Wi-Fi enabled as a skill for the Google Assistant, you can ask your Google Assistant to do any of these tasks:
Task Command
Enable the guest zone. “OK Google, talk to D-Link Wi-Fi to enable my guest zone.”
Disable the guest zone. “OK Google, talk to D-Link Wi-Fi to disable my guest zone.”
Find out the guest zone credentials. "OK Google, talk to D-Link Wi-Fi to tell me my guest network
credentials.”
Reboot the router "OK Google, talk to D-Link Wi-Fi to reboot the router."
Upgrade the router. “OK Google, talk to D-Link Wi-Fi to upgrade my router.”
78D-Link COVR-1102 User Manual
Page 83

Section 6 - Troubleshooting
Resetting Your Device
If you cannot remember your password and cannot log in, or the device is not working properly, you can reset your device to
factory default settings. Note that resetting to factory settings will undo all of your settings.
To reset the device, press and hold down the Reset button on the bottom of the device using an unfolded paper clip for 5
seconds, then release it. The status LED on the top panel will turn solid red.
Once the device has been reset and the LED starts blinking orange, you can set up your device again using the D-Link Wi-Fi app
or the web-based user interface.
Reset Button
79D-Link COVR-1102 User Manual
Page 84

Appendix A - Wireless Basics
Wireless Basics
D-Link wireless products are based on industry standards to provide easy-to-use and compatible high-speed wireless
connectivity within your home, business, or public access wireless networks. Strictly adhering to the IEEE standard, the D-Link
wireless family of products will allow you to securely access the data you want, when, and where you want it. You will be able to
enjoy the freedom that wireless networking delivers.
A wireless local area network (WLAN) is a cellular computer network that transmits and receives data with radio signals
instead of wires. Wireless LANs are used increasingly in both home and oce environments, and public areas such as airports,
coee shops and universities. Innovative ways to utilize WLAN technology are helping people work, and communicate more
eciently. Increased mobility and the absence of cabling and other xed infrastructure have proven to be benecial for many
users.
Wireless users can use the same applications they use on a wired network. Wireless adapter cards used on laptop and desktop
systems support the same protocols as Ethernet adapter cards.
Under many circumstances, it may be desirable for mobile network devices to link to a conventional Ethernet LAN in order to
use servers, printers or an Internet connection supplied through the wired LAN. A wireless router is a device used to provide
this link.
80D-Link COVR-1102 User Manual
Page 85

Appendix A - Wireless Basics
What is Wireless?
Wireless or Wi-Fi technology is another way of connecting your computer to the network without using wires. Wi-Fi uses radio
frequency to connect wirelessly so you have the freedom to connect computers anywhere in your home or oce network.
Why D-Link Wireless?
D-Link is the worldwide leader and award winning designer, developer, and manufacturer of networking products.
D-Link delivers the performance you need at a price you can aord. D-Link has all the products you need to build your
network.
How does wireless work?
Wireless works similarly to how cordless phones work, through radio signals that transmit data from one point A to point B. But
wireless technology has restrictions as to how you can access the network. You must be within the wireless network range area
to be able to connect your computer. There are two dierent types of wireless networks: Wireless Local Area Network (WLAN),
and Wireless Personal Area Network (WPAN).
Wireless Local Area Network (WLAN)
In a wireless local area network, a device called an Access Point (AP) connects computers to the network. The access point
has a small antenna attached to it, which allows it to transmit data back and forth over radio signals. With an indoor access
point the signal can travel up to 300 feet. With an outdoor access point the signal can reach out up to 30 miles to serve places
like manufacturing plants, industrial locations, university and high school campuses, airports, golf courses, and many other
outdoor venues.
81D-Link COVR-1102 User Manual
Page 86

Appendix A - Wireless Basics
Wireless Personal Area Network (WPAN)
Bluetooth is the industry standard wireless technology used for WPAN. Bluetooth devices in WPAN operate in a range up to 30
feet away.
Compared to WLAN the speed and wireless operation range are both less than WLAN, but in return it doesn’t use nearly as
much power. This makes it ideal for personal devices, such as mobile phones, PDAs, headphones, laptops, speakers, and other
devices that operate on batteries.
Who uses wireless?
Wireless technology as become so popular in recent years that almost everyone is using it, whether it’s for home, oce,
business, D-Link has a wireless solution for it.
Home uses/benets
• Gives everyone at home broadband access
• Surf the web, check email, instant message, etc.
• Gets rid of the cables around the house
• Simple and easy to use
Small oce and home oce uses/benets
• Stay on top of everything at home as you would at oce
• Remotely access your oce network from home
• Share Internet connection and printer with multiple computers
• No need to dedicate oce space
82D-Link COVR-1102 User Manual
Page 87

Appendix A - Wireless Basics
Where is wireless used?
Wireless technology is expanding everywhere, not just at home or oce. People like the freedom of mobility and it’s becoming
so popular that more and more public facilities now provide wireless access to attract people. The wireless connection in public
places is usually called “hotspots”.
Using a D-Link USB adapter with your laptop, you can access the hotspot to connect to the Internet from remote locations like:
airports, hotels, coee shops, libraries, restaurants, and convention centers.
Wireless network is easy to setup, but if you’re installing it for the rst time it could be quite a task not knowing where to start.
That’s why we’ve put together a few setup steps and tips to help you through the process of setting up a wireless network.
Tips
Here are a few things to keep in mind, when you install a wireless network.
Centralize your router or access point
Make sure you place the router/access point in a centralized location within your network for the best performance. Try to
place the router/access point as high as possible in the room, so the signal gets dispersed throughout your home. If you have a
two-story home, you may need a repeater to boost the signal to extend the range.
Eliminate Interference
Place home appliances such as cordless telephones, microwaves, and televisions as far away as possible from the router/access
point. This would signicantly reduce any interference that the appliances might cause since they operate on same frequency.
Security
Don’t let your next-door neighbors or intruders connect to your wireless network. Secure your wireless network by turning on
the WPA or WEP security feature on the router. Refer to the product manual for detail information on how to set it up.
83D-Link COVR-1102 User Manual
Page 88

Appendix B - Technical Specications
General
Technical Specications
Device Interfaces (per unit)
LEDs
Antenna Type • 2 x Internal Dual Band Antennas
Data Signal Rate
Standards • IEEE 802.3i
• 1 x Gigabit WAN Port
• 1 x Gigabit LAN Port
• Status LED
• 2.4 GHz
• Up to 300 Mbps
• 5 GHz
• Up to 866 Mbps
• IEEE 802.3u
• IEEE 802.3ab
• Supports auto-negotiation
• Supports auto-MDI/MDIX
1
1
Functionality
Security • WPA2/WPA3 wireless security
Advanced Features • COVR Wi-Fi
• Auto-configuration
• Wireless roaming
• Wireless band steering
• Wireless Air Time Fairness (ATF)
Physical
• IEEE 802.11 a/g/n/ac Wireless WAN
• Ethernet
• 10/100/1000 Mbps (auto-negotiation)
• IEEE 802.11ac Wave 2
• IEEE 802.11n
• IEEE 802.11g
• IEEE 802.11a
• Ethernet Backhaul
• D-Link Wi-Fi app
• MU-MIMO (Wi-Fi)
• Voice Control
Dimensions (L x W x H) • 92 x 92 x 92 mm (3.6 x 3.6 x 3.6 in)
Weight (per unit) • 197 g (0.43 lbs)
Power Input • 100 V to 240 V/AC, 50/60 Hz
Power Consumption • 8.55 W
Temperature • Operating:
Humidity
• Operating: 10% to 90% non-condensing
0 to 40 °C (32 to 104 °F)
• Storage:
• Storage:
-20 to 70 °C (-4 to 158 °F)
5% to 90% non-condensing
84D-Link COVR-1102 User Manual
Page 89

Appendix B - Technical Specications
Certifications • FCC
• IC
• CE
• ErP
• RoHS
• Wi-Fi CERTIFIED EasyMesh™
Order Information
Part Number Description
COVR-1100 / COVR-1102 / COVR-1103 AC1200 Dual Band Whole Home Mesh Wi-Fi System
1
Maximum wireless signal rate derived from the IEEE 802.11ac and 802.11n standards specications. Actual data throughput will vary. Network conditions and environmental factors, including volume of network trac, building materials and construction, and network overhead, may lower
actual data throughput rate. Environmental factors will adversely aect wireless signal range.
85D-Link COVR-1102 User Manual
Page 90

Appendix C - Safety Statements
Regulatory Information
Federal Communication Commission Interference Statement
This equipment has been tested and found to comply with the limits for a Class B digital device, pursuant to Part 15 of the FCC Rules. These limits
are designed to provide reasonable protection against harmful interference in a residential installation. This equipment generates, uses and
can radiate radio frequency energy and, if not installed and used in accordance with the instructions, may cause harmful interference to radio
communications. However, there is no guarantee that interference will not occur in a particular installation. If this equipment does cause harmful
interference to radio or television reception, which can be determined by turning the equipment o and on, the user is encouraged to try to
correct the interference by one of the following measures:
- Reorient or relocate the receiving antenna.
- Increase the separation between the equipment and receiver.
- Connect the equipment into an outlet on a circuit dierent from that to which the receiver is connected.
- Consult the dealer or an experienced radio/TV technician for help.
Non-modications Statement:
Any changes or modications not expressly approved by the party responsible for compliance could void the user’s authority to operate this
equipment.
Caution:
This device complies with Part 15 of the FCC Rules. Operation is subject to the following two conditions:
(1) This device may not cause harmful interference, and (2) this device must accept any interference received, including interference that
may cause undesired operation.
This device and its antenna(s) must not be co-located or operating in conjunction with any other antenna or transmitter except in accordance
with FCC multi-transmitter product procedures. For product available in the USA/Canada market, only channel 1~11 can be operated. Selection
of other channels is not possible.
Note
The country code selection is for non-USA models only and is not available to all USA models. Per FCC regulations, all WiFi product marketed in
the USA must be xed to USA operational channels only.
86D-Link COVR-1102 User Manual
Page 91

Appendix C - Safety Statements
RF Frequency Requirements
This device is for indoor use only when using all channels in the 5.150 GHz to 5.250 GHz frequency range. High power radars are allocated as
primary users of the 5.725 GHz to 5.850 GHz bands. These radar stations can cause interference with and/or damage this device.
It is restricted to indoor environments only.
IMPORTANT NOTICE:
FCC Radiation Exposure Statement
This equipment complies with FCC radiation exposure limits set forth for an uncontrolled environment. This equipment should be installed and
operated with minimum distance 20 cm between the radiator and your body.
Innovation, Science and Economic Development Canada (ISED) Statement:
This device complies with ISED licence-exempt RSS standard(s). Operation is subject to the following two conditions:
(1) this device may not cause interference, and
(2) this device must accept any interference, including interference that may cause undesired operation of the device.
Le présent appareil est conforme aux CNR d'ISED applicables aux appareils radio exempts de licence. L'exploitation est autorisée aux deux
conditions suivantes :
(1) l'appareil ne doit pas produire de brouillage, et
(2) l'utilisateur de l'appareil doit accepter tout brouillage radioélectrique subi, même si le brouillage est susceptible d'en compromettre le
fonctionnement.
(i) the device for operation in the band 5150-5250 MHz is only for indoor use to reduce the potential for harmful interference to co-channel
mobile satellite systems;
(i) les dispositifs fonctionnant dans la bande 5150-5250 MHz sont réservés uniquement pour une utilisation à l’intérieur an de réduire les risques
de brouillage préjudiciable aux systèmes de satellites mobiles utilisant les mêmes canaux;
This device complies with Industry Canada’s licence-exempt RSSs. Operation is subject to the following two conditions:
(1) This device may not cause interference; and
(2) This device must accept any interference, including interference that may cause undesired operation of the device.
87D-Link COVR-1102 User Manual
Page 92

Appendix C - Safety Statements
Le présent appareil est conforme aux CNR d’Industrie Canada applicables aux appareils radio exempts de licence. L’exploitation est autorisée aux
deux conditions suivantes :
(1) l’appareil ne doit pas produire de brouillage;
(2) l’utilisateur de l’appareil doit accepter tout brouillage radioélectrique subi, même si le brouillage est susceptible d’en compromettre le
fonctionnement.
The device meets the exemption from the routine evaluation limits in section 2.5 of RSS 102 and compliance with RSS-102 RF exposure, users
can obtain Canadian information on RF exposure and compliance.
Le dispositif rencontre l'exemption des limites courantes d'évaluation dans la section 2.5 de RSS 102 et la conformité à l'exposition de RSS-102 rf,
utilisateurs peut obtenir l'information canadienne sur l'exposition et la conformité de rf.
This transmitter must not be co-located or operating in conjunction with any other antenna or transmitter. This equipment should be installed
and operated with a minimum distance of 20 centimeters between the radiator and your body.
Cet émetteur ne doit pas être Co-placé ou ne fonctionnant en même temps qu'aucune autre antenne ou émetteur. Cet équipement devrait être
installé et actionné avec une distance minimum de 20 centimètres entre le radiateur et votre corps.
1. the device for operation in the band 5150–5250 MHz is only for indoor use to reduce the potential for harmful interference to co-channel
mobile satellite systems;
2. for devices with detachable antenna(s), the maximum antenna gain permitted for devices in the bands 5250-5350 MHz and 5470-5725 MHz
shall be such that the equipment still complies with the e.i.r.p. limit;
3. for devices with detachable antenna(s), the maximum antenna gain permitted for devices in the band 5725-5850 MHz shall be such that the
equipment still complies with the e.i.r.p. limits specied for point-to-point and non-point-to-point operation as appropriate.
1. les dispositifs fonctionnant dans la bande 5150-5250 MHz sont réservés uniquement pour une utilisation à l’intérieur an de réduire les risques
de brouillage préjudiciable aux systèmes de satellites mobiles utilisant les mêmes canaux;
2. le gain maximal d’antenne permis pour les dispositifs utilisant les bandes 5250-5350 MHz et 5470-5725 MHz doit se conformer à la limite de
p.i.r.e.;
3. le gain maximal d’antenne permis (pour les dispositifs utilisant la bande 5725-5825 MHz) doit se conformer à la limite de p.i.r.e. spéciée pour
l’exploitation point à point et non point à point, selon le cas.
88D-Link COVR-1102 User Manual
Page 93

Appendix C - Safety Statements
(iii) for devices with detachable antenna(s), the maximum antenna gain permitted for devices in the band 5725-5850 MHz shall be such that the
equipment still complies with the e.i.r.p. limits specied for point-to-point and non-point-to-point operation as appropriate;
(iii) pour les dispositifs munis d'antennes amovibles, le gain maximal d'antenne permis (pour les dispositifs utilisant la bande de 5725 à 5850
MHz) doit être conforme à la limite de la p.i.r.e. spéciée pour l'exploitation point à point et l'exploitation non point à point, selon le cas;
Radiation Exposure Statement
This equipment complies with ISED radiation exposure limits set forth for an uncontrolled environment. This equipment should be installed and
operated with minimum distance 20 cm between the radiator and your body.
Déclaration d'exposition aux radiations
Cet équipement est conforme aux limites d'exposition aux rayonnements ISED établies pour un environnement non contrôlé. Cet équipement
doit être installé et utilisé avec un minimum de 20 cm de distance entre la source de rayonnement et votre corps.
NCC
警語:
以下警語適用台灣地區
依據 低功率電波輻射性電機管理辦法
第十二條: 經型式認證合格之低功率射頻電機,非經許可,公司、商號或使用者均不得擅自變更頻率、加大功率或變
更原設計之特性及功能。
第十四條: 低功率射頻電機之使用不得影響飛航安全及干擾合法通信;經發現有干擾現象時,應立即停用,並改善至
無干擾時方得繼續使用。前項合法通信,指依電信法規定作業之無線電通信。低功率射頻電機須忍受合法通信或工
業、科學及醫療用電波輻射性電機設備之干擾。
電磁波曝露量MPE標準值(MPE) 1 mW/cm2,送測產品實值為 0.3693 mW/cm
2
應避免影響附近雷達系統之操作 。
高增益指向性天線只得應用於固定式點對點系統 。
89D-Link COVR-1102 User Manual
Page 94

Appendix C - Safety Statements
Frequency Band(s)
Frequenzband
Fréquence bande(s)
Bandas de Frecuencia
Frequenza/e
Frequentie(s)
Max. Output Power (EIRP)
Max. Output Power
Consommation d’énergie max.
Potencia máxima de Salida
Potenza max. Output
Max. Output Power
5.15 – 5.25 GHz 200 mW
5 G
5.25 – 5.35 GHz 200 mW
5.47 – 5.725 GHz 1 W
2.4 G 2.4 – 2.4835 GHz 100 mW
90D-Link COVR-1102 User Manual
Page 95

Appendix C - Safety Statements
European Community Declaration of Conformity:
Tímto D-Link Corporation prohlašuje, že tento produkt, jeho příslušenství a software jsou v souladu se směrnicí
Česky [Czech]
Dansk [Danish]
Deutsch [German]
Eesti [Estonian]
English
2014/53/EU. Celý text ES prohlášení o shodě vydaného EU a o rmwaru produktu lze stáhnout na stránkách k
produktu www.dlink.com.
D-Link Corporation erklærer herved, at dette produkt, tilbehør og software er i overensstemmelse med direktiv
2014/53/EU. Den fulde tekst i EU-overensstemmelseserklæringen og produktrmware kan wnloades fra
produktsiden hos www.dlink.com.
Hiermit erklärt die D-Link Corporation, dass dieses Produkt, das Zubehör und die Software der Richtlinie 2014/53/
EU entsprechen. Der vollständige Text der Konformitätserklärung der Europäischen Gemeinschaft sowie die
Firmware zum Produkt stehen Ihnen zum Herunterladen von der Produktseite im Internet auf www.dlink.com zur
Verfügung.
Käesolevaga kinnitab D-Link Corporation, et see toode, tarvikud ja tarkvara on kooskõlas direktiiviga 2014/53/EL.
Euroopa Liidu vastavusdeklaratsiooni täistekst ja toote püsivara on allalaadimiseks saadaval tootelehel www.dlink.
com.
Hereby, D-Link Corporation, declares that this product, accessories, and software are in compliance with directive
2014/53/EU. The full text of the EU Declaration of Conformity and product rmware are available for download
from the product page at www.dlink.com
Español [Spanish]
Ελληνική [Greek]
Français [French]
Italiano [Italian]
Por la presente, D-Link Corporation declara que este producto, accesorios y software cumplen con las directivas
2014/53/UE. El texto completo de la declaración de conformidad de la UE y el rmware del producto están
disponibles y se pueden descargar desde la página del producto en www.dlink.com.
Με την παρούσα, η D-Link Corporation δηλώνει ότι αυτό το προϊόν, τα αξεσουάρ και το λογισμικό
συμμορφώνονται με την Οδηγία 2014/53/ΕΕ. Το πλήρες κείμενο της δήλωσης συμμόρφωσης της ΕΕ και το
υλικολογισμικό του προϊόντος είναι διαθέσιμα για λήψη από τη σελίδα του προϊόντος στην τοποθεσία www.dlink.
com.
Par les présentes, D-Link Corporation déclare que ce produit, ces accessoires et ce logiciel sont conformes aux
directives 2014/53/UE.Le texte complet de la déclaration de conformité de l'UE et le icroprogramme du produit
sont disponibles au téléchargement sur la page des produits à www.dlink.com.
Con la presente, D-Link Corporation dichiara che questo prodotto, i relativi accessori e il software sono conformi
alla direttiva 2014/53/UE. Il testo completo della dichiarazione di conformità UE e il rmware del prodotto sono
disponibili per il download dalla pagina del prodotto su www.dlink.com.
91D-Link COVR-1102 User Manual
Page 96

Appendix C - Safety Statements
Ar šo uzņēmums D-Link Corporation apliecina, ka šis produkts, piederumi un programmatūra atbilst direktīvai
Latviski [Latvian]
Lietuvių [Lithuanian]
Nederlands [Dutch]
Malti [Maltese]
Magyar [Hungarian]
Polski [Polish]
2014/53/ES. ES atbilstības deklarācijas pilno tekstu un produkta aparātprogrammatūru var lejupielādēt attiecīgā
produkta lapā vietnē www.dlink.com.
Šiuo dokumentu „D-Link Corporation“ pareiškia, kad šis gaminys, priedai ir programinė įranga atitinka direktyvą
2014/53/ES. Visą ES atitikties deklaracijos tekstą ir gaminio programinę aparatinę įrangą galima atsisiųsti iš gaminio
puslapio adresu www.dlink.com.
Hierbij verklaart D-Link Corporation dat dit product, accessoires en software voldoen aan de richtlijnen 2014/53/
EU. De volledige tekst van de EU conformiteitsverklaring en productrmware is beschikbaar voor download van de
productpagina op www.dlink.com.
Bil-preżenti, D-Link Corporation tiddikjara li dan il-prodott, l-aċċessorji, u s-software huma konformi mad-Direttiva
2014/53/UE. Tista’ tniżżel it-test sħiħ tad-dikjarazzjoni ta’ konformità tal-UE u l-rmware tal-prodott mill-paġna talprodott fuq www.dlink.com.
Ezennel a D-Link Corporation kijelenti, hogy a jelen termék, annak tartozékai és szoftvere megfelelnek a 2014/53/
EU sz. rendeletek rendelkezéseinek. Az EU Megfelelőségi nyilatkozat teljes szövege és a termék rmware a termék
oldaláról tölthető le a www.dlink.com címen.
D-Link Corporation niniejszym oświadcza, że ten produkt, akcesoria oraz oprogramowanie są zgodne z
dyrektywami 2014/53/EU. Pełen tekst deklaracji zgodności UE oraz oprogramowanie sprzętowe do produktu
można pobrać na stronie produktu w witrynie www.dlink.com.
Português [Portuguese]
Slovensko[Slovenian]
Slovensky [Slovak]
Suomi [Finnish]
Svenska[Swedish]
Desta forma, a D-Link Corporation declara que este produto, os acessórios e o software estão em conformidade
com a diretiva 2014/53/UE. O texto completo da declaração de conformidade da UE e do rmware
Podjetje D-Link Corporation s tem izjavlja, da so ta izdelek, dodatna oprema in programnska oprema skladni z
direktivami 2014/53/EU. Celotno besedilo izjave o skladnosti EU in vdelana programska oprema sta na voljo za
prenos na strani izdelka na www.dlink.com.
Spoločnosť D-Link týmto vyhlasuje, že tento produkt, príslušenstvo a softvér sú v súlade so smernicou 214/53/
EÚ. Úplné znenie vyhlásenia EÚ o zhode a rmvéri produktu sú k dispozícii na prevzatie zo stránky produktu www.
dlink.com.
D-Link Corporation täten vakuuttaa, että tämä tuote, lisävarusteet ja ohjelmisto ovat direktiivin 2014/53/EU
vaatimusten mukaisia. Täydellinen EU-vaatimustenmukaisuusvakuutus samoin kuin tuotteen laiteohjelmisto ovat
ladattavissa osoitteesta www.dlink.com.
D-Link Corporation försäkrar härmed att denna produkt, tillbehör och programvara överensstämmer med
direktiv 2014/53/EU. Hela texten med EU-försäkran om överensstämmelse och produkt-rmware kan hämtas från
produktsidan på www.dlink.com.
92D-Link COVR-1102 User Manual
Page 97

Appendix C - Safety Statements
Hér með lýsir D-Link Corporation því yr að þessi vara, fylgihlutir og hugbúnaður eru í samræmi við tilskipun
Íslenska [Icelandic]
Norsk [Norwegian]
2014/53/EB. Sækja má ESB-samræmisyrlýsinguna í heild sinni og fastbúnað vörunnar af vefsíðu vörunnar á www.
dlink.com.
Herved erklærer D-Link Corporation at dette produktet, tilbehøret og programvaren er i samsvar med direktivet
2014/53/EU. Den fullstendige teksten i EU-erklæring om samsvar og produktets fastvare er tilgjengelig for
nedlasting fra produktsiden på www.dlink.com.
Warning Statement:
The power outlet should be near the device and easily accessible.
93D-Link COVR-1102 User Manual
Page 98

Appendix C - Safety Statements
NOTICE OF WIRELESS RADIO LAN USAGE IN THE EUROPEAN COMMUNITY FOR WIRELESS PRODUCT ONLY:
• This device is restricted to indoor use when operated in the European Community using channels in the 5.15-5.35 GHz band to reduce the
potential for interference.
• This device is a 2.4 GHz wideband transmission system (transceiver), intended for use in all EU member states and EFTA countries. This
equipment may be operated in AL, AD, BE, BG, DK, DE, FI, FR, GR, GW, IS, IT, HR, LI, LU, MT, MK, MD, MC, NL, NO, AT, PL, PT, RO, SM, SE, RS, SK, ES,
CI, HU, and CY.
Usage Notes:
• To remain in conformance with European National spectrum usage regulations, frequency and channel limitations will be applied on the
products according to the country where the equipment will be deployed.
• This device is restricted from functioning in Ad-hoc mode while operating in 5 GHz. Ad-hoc mode is direct peer-to-peer communication
between two client devices without an Access Point.
• Access points will support DFS (Dynamic Frequency Selection) and TPC (Transmit Power Control) functionality as required when operating in
5 GHz band within the EU.
• Please refer to the product manual or datasheet to check whether your product uses 2.4 GHz and/or 5 GHz wireless.
HINWEIS ZUR VERWENDUNG VON DRAHTLOS-NETZWERK (WLAN) IN DER EUROPÄISCHEN GEMEINSCHAFT ( NUR FÜR
EIN DRAHTLOSES PRODUKT )
• Der Betrieb dieses Geräts in der Europäischen Gemeinschaft bei Nutzung von Kanälen im 5,15-5,35 GHz Frequenzband ist ausschließlich auf
Innenräume beschränkt, um das Interferenzpotential zu reduzieren.
• Bei diesem Gerät handelt es sich um ein zum Einsatz in allen EU-Mitgliedsstaaten und in EFTA-Ländern - ausgenommen Frankreich. Der
Betrieb dieses Geräts ist in den folgenden Ländern erlaubt: AL, AD, BE, BG, DK, DE, FI, FR, GR, GW, IS, IT, HR, LI, LU, MT, MK, MD, MC, NL, NO, AT,
PL, PT, RO, SM, SE, RS, SK, ES, CI, HU, CY
Gebrauchshinweise:
• Um den in Europa geltenden nationalen Vorschriften zum Nutzen des Funkspektrums weiterhin zu entsprechen, werden Frequenz und
Kanalbeschränkungen, dem jeweiligen Land, in dem das Gerät zum Einsatz kommt, entsprechend, auf die Produkte angewandt.
• Die Funktionalität im Ad-hoc-Modus bei Betrieb auf 5 GHz ist für dieses Gerät eingeschränkt. Bei dem Ad-hoc-Modus handelt es sich um eine
Peer-to-Peer-Kommunikation zwischen zwei Client-Geräten ohneeinen Access Point.
• Access Points unterstützen die Funktionen DFS (Dynamic Frequency Selection) und TPC (Transmit Power Control) wie erforderlich bei Betrieb
auf 5 GHz innerhalb der EU.
• Bitte schlagen Sie im Handbuch oder Datenblatt nach nach, ob Ihr Gerät eine 2,4 GHz und / oder 5 GHz Verbindung nutzt.
94D-Link COVR-1102 User Manual
Page 99

Appendix C - Safety Statements
AVIS CONCERNANT L'UTILISATION DE LA RADIO SANS FIL LAN DANS LA COMMUNAUTÉ EUROPÉENNE (UNIQUEMENT
POUR LES PRODUITS SANS FIL)
• Cet appareil est limité à un usage intérieur lorsqu'il est utilisé dans la Communauté européenne sur les canaux de la bande de 5,15 à 5,35 GHz
an de réduire les risques d'interférences.
• Cet appareil est un système de transmission à large bande (émetteur-récepteur) de 2,4 GHz, destiné à être utilisé dans tous les Étatsmembres de l'UE et les pays de l'AELE. Cet équipement peut être utilisé dans les pays suivants : AL, AD, BE , BG, DK, DE, FI, FR, GR, GW, IS, IT,
HR, LI, LU, MT , MK, MD, MC, NL, NO, AT, PL, PT, RO, SM, SE, RS, SK, ES, CI, HU, CY
Notes d'utilisation:
• Pour rester en conformité avec la réglementation nationale européenne en matière d'utilisation du spectre, des limites de fréquence et de
canal seront appliquées aux produits selon le pays où l'équipement sera déployé.
• Cet appareil ne peut pas utiliser le mode Ad-hoc lorsqu'il fonctionne dans la bande de 5 GHz. Le mode Adhoc fournit une communication
directe pair à pair entre deux périphériques clients sans point d'accès.
• Les points d'accès prendront en charge les fonctionnalités DFS (Dynamic Frequency Selection) et TPC (Transmit Power Control) au besoin lors
du fonctionnement dans la bande de 5 GHz au sein de l'UE.
• Merci de vous référer au guide d'utilisation ou de la che technique an de vérier si votre produit utilise 2.4 GHz et/ou 5 GHz sans l.
AVISO DE USO DE LA LAN DE RADIO INALÁMBRICA EN LA COMUNIDAD EUROPEA (SOLO PARA EL PRODUCTO
INALÁMBRICO)
• El uso de este dispositivo está restringido a interiores cuando funciona en la Comunidad Europea utilizando canales en la banda de 5,15-5,35
GHz, para reducir la posibilidad de interferencias.
• Este dispositivo es un sistema de transmisión (transceptor) de banda ancha de 2,4 GHz, pensado para su uso en todos los estados miembros
de la UE y en los países de la AELC. Este equipo se puede utilizar en AL, AD, BE, BG, DK, DE, FI, FR, GR, GW, IS, IT, HR, LI, LU, MT, MK, MD, MC, NL,
NO, AT, PL, PT, RO, SM, SE, RS, SK, ES, CI, HU, CY
Notas de uso:
• Para seguir cumpliendo las normas europeas de uso del espectro nacional, se aplicarán limitaciones de frecuencia y canal en los productos
en función del país en el que se pondrá en funcionamiento el equipo.
• Este dispositivo tiene restringido el funcionamiento en modo Ad-hoc mientras funcione a 5 Ghz. El modo Ad-hoc es la comunicación directa
de igual a igual entre dos dispositivos cliente sin un punto de acceso.
• Los puntos de acceso admitirán la funcionalidad DFS (Selección de frecuencia dinámica) y TPC (Control de la potencia de transmisión) si es
necesario cuando funcionan a 5 Ghz dentro de la UE.
• Por favor compruebe el manual o la cha de producto para comprobar si el producto utiliza las bandas inalámbricas de 2.4 GHz y/o la de 5
GHz.
95D-Link COVR-1102 User Manual
Page 100

Appendix C - Safety Statements
AVVISO PER L’USO DI LAN RADIO WIRELESS NELLA COMUNITÀ EUROPEA (SOLO PER PRODOTTI WIRELESS)
• Nella Comunità europea, l’uso di questo dispositivo è limitato esclusivamente agli ambienti interni sui canali compresi nella banda da 5,15 a
5,35 GHz al ne di ridurre potenziali interferenze. Questo dispositivo è un sistema di trasmissione a banda larga a 2,4 GHz (ricetrasmittente),
destinato all’uso in tutti gli stati membri dell’Unione europea e nei paesi EFTA.
• Questo dispositivo può essere utilizzato in AL, AD, BE, BG, DK, DE, FI, FR, GR, GW, IS, IT, HR, LI, LU, MT, MK, MD, MC, NL, NO, AT, PL, PT, RO, SM,
SE, RS, SK, ES, CI, HU, CY
Note per l’uso
• Al ne di mantenere la conformità alle normative nazionali europee per l’uso dello spettro di frequenze, saranno applicate limitazioni sulle
frequenze e sui canali per il prodotto in conformità alle normative del paese in cui il dispositivo viene utilizzato.
• Questo dispositivo non può essere attivato in modalità Ad-hoc durante il funzionamento a 5 Ghz. La modalità Ad-hoc è una comunicazione
diretta peer-to-peer fra due dispositivi client senza un punto di accesso.
• I punti di accesso supportano le funzionalità DFS (Dynamic Frequency Selection) e TPC (Transmit Power Control) richieste per operare a 5 Ghz
nell’Unione europea.
• Ti invitiamo a fare riferimento al manuale del prodotto o alla scheda tecnica per vericare se il tuo prodotto utilizza le frequenze 2,4 GHz e/o
5 GHz.
KENNISGEVING VAN DRAADLOOS RADIO LAN-GEBRUIK IN DE EUROPESE GEMEENSCHAP (ALLEEN VOOR
DRAADLOOS PRODUCT)
• Dit toestel is beperkt tot gebruik binnenshuis wanneer het wordt gebruikt in de Europese Gemeenschap gebruik makend van kanalen in de
5.15-5.35 GHz band om de kans op interferentie te beperken.
• Dit toestel is een 2.4 GHz breedband transmissiesysteem (transceiver) dat bedoeld is voor gebruik in alle EU lidstaten en EFTA landen. Deze
uitrusting mag gebruikt worden in AL, AD, BE, BG, DK, DE, FI, FR, GR, GW, IS, IT, HR, LI, LU, MT, MK, MD, MC, NL, NO, AT, PL, PT, RO, SM, SE, RS, SK,
ES, CI, HU, CY
Gebruiksaanwijzingen:
• Om de gebruiksvoorschriften van het Europese Nationale spectrum na te leven, zullen frequentie- en kanaalbeperkingen worden toegepast
op de producten volgens het land waar de uitrusting gebruikt zal worden.
• Dit toestel kan niet functioneren in Ad-hoc mode wanneer het gebruikt wordt in 5 GHz. Ad-hoc mode is directe peer-to-peer communicatie
tussen twee klantenapparaten zonder een toegangspunt.
• Toegangspunten ondersteunen DFS (Dynamic Frequency Selection) en TPC (Transmit Power Control) functionaliteit zoals vereist bij gebruik
in 5 GHz binnen de EU.
• Raadpleeg de handleiding of de datasheet om te controleren of uw product gebruik maakt van 2.4 GHz en/of 5 GHz.
96D-Link COVR-1102 User Manual
 Loading...