

Page 1

Version 1.00 | 01/17/2014
User Manual
Wi-Fi Audio Extender
DCH-M225
Page 2
Preface
D-Link reserves the right to revise this publication and to make changes in the content hereof without obligation to notify any
person or organization of such revisions or changes.
Manual Revisions
Revision Date Description
1.0 December 2, 2013 • Initial release
Trademarks
D-Link and the D-Link logo are trademarks or registered trademarks of D-Link Corporation or its subsidiaries in the United
States or other countries. All other company or product names mentioned herein are trademarks or registered trademarks of
their respective companies.
Copyright © 2013 by D-Link Corporation.
All rights reserved. This publication may not be reproduced, in whole or in part, without prior expressed written permission
from D-Link Systems, Inc.
iD-Link DCH-M225 User Manual
Page 3

Table of Contents
Table of Contents
Preface ................................................................................. i
Manual Revisions ........................................................................... i
Trademarks ...................................................................................... i
Product Overview .............................................................. 1
Package Contents ......................................................................... 1
System Requirements ................................................................. 2
Introduction ...................................................................................3
Features .................................................................................... 3
What is a Wireless Extender? ............................................ 4
Hardware Overview ..................................................................... 5
Front/Top ................................................................................. 5
Side and Bottom ................................................................... 6
Input: 100-240VAC, 50-60Hz, 0.3A ..................................6
FCC ID:KA2CHM225A1 ........................................................ 6
IC: 4216A-CHM225A1 .......................................................... 6
Model: DCH-M225A1 ........................................................... 6
CAN ICES-3 (B)/NMB-3(B) ................................................... 6
P/N: BCHM225LNA...A1 ....................................................... 6
S/N:RZEP1YMXXXXXX .........................................................6
H/W Ver.: A1 F/W Ver.:1.00 ................................................. 6
Wi-Fi Name(SSID):dlink-XXXX ........................................... 6
Wi-Fi Password:XXXXXXXXXX ........................................... 6
DCH-M225 ............................................................................... 6
Wireless Installation Factors ..................................................... 7
FCC ID:KA2CHM225A1 ........................................................ 8
IC: 4216A-CHM225A1 .......................................................... 8
Model: DCH-M225A1 ........................................................... 8
CAN ICES-3 (B)/NMB-3(B) ................................................... 8
P/N: BCHM225LNA...A1 ....................................................... 8
S/N:RZEP1YMXXXXXX .........................................................8
H/W Ver.: A1 F/W Ver.:1.00 ................................................. 8
Wi-Fi Name(SSID):dlink-XXXX ........................................... 8
Wi-Fi Password:XXXXXXXXXX ........................................... 8
DCH-M225 ............................................................................... 8
QRS Mobile App Setup ...............................................................9
Web-based Conguration .......................................................13
Setup Wizard ....................................................................14
Using the WPS Method ....................................................16
Using the Manual Method ..............................................17
Home Screen ........................................................................20
Wi-Fi Settings .......................................................................22
Extended Wi-Fi Settings ...................................................23
Audio Renderer ...................................................................24
Network Settings ................................................................25
Advanced Settings ........................................................25
Maintenance ................................................................................28
Admin .....................................................................................28
System ....................................................................................29
Setting Up Your DCH-M225 ............................................... 8
Input: 100-240VAC, 50-60Hz, 0.3A ..................................8
Upgrade .................................................................................30
Statistics .................................................................................31
iiD-Link DCH-M225 User Manual
Page 4

Table of Contents
Connecting a Wireless Client ..........................................32
WPS Button ...................................................................................32
Connect to a Wireless Network .............................................33
Windows® 8 ...........................................................................33
WPA/WPA2 .......................................................................33
Windows® 7 ...........................................................................35
WPA/WPA2 .......................................................................35
Windows Vista® ....................................................................38
WPA/WPA2 .......................................................................39
Windows® XP ........................................................................41
WPA/WPA2 .......................................................................42
Troubleshooting .............................................................. 44
Wireless Basics .................................................................46
Tips ...................................................................................................47
Technical Specications ..................................................48
Warranty ...........................................................................49
iiiD-Link DCH-M225 User Manual
Page 5

Section 1 - Product Overview
Product Overview
Package Contents
DCH-M225 Wi-Fi Audio Extender
Wi-Fi Conguration Card
If any of the above items are missing from your package, please contact your reseller.
1D-Link DCH-M225 User Manual
Page 6
Section 1 - Product Overview
Network Requirements
Web-based Conguration
Utility Requirements
System Requirements
• A wireless router with an active Internet connection.
• IEEE 802.11n, 802.11g, or 802.11b wireless clients/devices
Computer or Mobile Device with the following:
• A Windows®, Macintosh, Android, or Linux-based operating
system
• Wireless adapter or Wi-Fi functionality
Browser Requirements:
• Internet Explorer 7 or later
• Firefox 12.0 or later
• Safari 4 or later
• Google Chrome 20.0 or later
2D-Link DCH-M225 User Manual
Page 7

Section 1 - Product Overview
Introduction
Features
Easily Extend Your Existing Network and Audio Setup
The DCH-M225 Wi-Fi Audio Extender is a portable plug-in repeater that lets you extend an existing wireless network. It also
has the ability to stream your music library to anywhere within your extended wireless network. Tiny yet powerful, it supports
Wireless N speeds of up to 300 Mbps in a device that ts in the palm of your hand.
Compact, Convenient Design
The DCH-M225 ‘s compact design is ideal for use at home or a small oce, as it does not take up much space and is ready to
use by simply plugging it in. The repeater’s small form means it can easily be plugged into a power outlet without blocking
other outlets while its wall wart design saves you the hassle of dealing with a power cord. Its sleek, unobtrusive appearance
means it blends easily into the background.
Conveniently Stream Audio
Expanding your audio capabilities has never been easier with the help of the DCH-M225. With support for both DLNA and
AirPlay, simply plug in your speakers and you’ll be able to stream audio to anywhere within your wireless network. The Wi-Fi
WMM quality of service protocol ensures that you’ll have no issues with bandwidth when streaming audio and performing other
tasks such as surng the Internet, checking email, or online gaming.
Simple Setup
Through its easy-to-use web-based user interface, you can quickly and easily connect the DCH-M225 to an uplink router,
congure the extender wireless network, and manage the administrative settings. The setup wizard will even guide you through
the setup process, getting your extended wireless network up and running in no time.
* Maximum wireless signal rate derived from IEEE Standard 802.11n and 802.11g specications. Actual data throughput will vary. Network conditions and environmental factors,
including volume of network trac, building materials and construction, and network overhead, lower actual data throughput rate. Environmental conditions will adversely
aect wireless signal range.
3D-Link DCH-M225 User Manual
Page 8

Section 1 - Product Overview
What is a Wireless Extender?
The DCH-M225 acts as a repeater to extend the range of an existing wireless network to provide better signal for parts of
your home or oce that may have poor or no reception. Your existing wireless signal will be re-broadcast by the DCH-M225,
allowing you to reach the farthest corners of your home or oce . The extended network can simply use the same network
credentials as the existing network, or you can specify a dierent network name and password, giving you the exibility to
control network access.
This purpose of this product is to create a constant network connection for your devices. As such, it does not have a standby
mode or use a power management mode. If you wish to power down this product, please simply unplug it from the power
outlet.
4D-Link DCH-M225 User Manual
Page 9

Section 1 - Product Overview
Hardware Overview
Front/Top
1
1 LED Indicator This indicates the current status of the DCH-M225, as detailed in the table below.
LED Indicator Color Status Description
Solid Green The device is powered ON and operating normally
Green
Blinking Green The device is processing WPS
Power/Status
Red
Orange Blinking Orange Cannot connect or provision an IP address from the uplink router
None O Device is not receiving power. Check the power outlet
Solid Red Device is powering ON or system is defective
Blinking Red The device is in recovery mode or the device has malfunctioned
5D-Link DCH-M225 User Manual
Page 10
Section 1 - Product Overview
Hardware Overview
Side and Bottom
2
Input: 100-240VAC, 50-60Hz, 0.3A
FCC ID:KA2CHM225A1
IC: 4216A-CHM225A1
Model: DCH-M225A1
CAN ICES-3 (B)/NMB-3(B)
P/N: BCHM225LNA...A1
S/N:RZEP1YMXXXXXX
H/W Ver.: A1 F/W Ver.:1.00
Wi-Fi Name(SSID):dlink-XXXX
Wi-Fi Password:XXXXXXXXXX
DCH-M225
3
1
1 WPS Button Pressing the WPS button for 1 second allows you to connect with Wi-Fi clients using Wi-Fi Protected Setup
2 Audio Line Out Audio line out jack for connecting an external speaker
3 Reset Button Pressing the reset button will reset the DCH-M225 to the factory default settings
6D-Link DCH-M225 User Manual
Page 11

Section 2 - Conguration
Wireless Installation Factors
The Wi-Fi Audio Extender lets you extend the reach of your existing wireless network, allowing you to work wirelessly from
more places in your home or oce. Keep in mind, however, that the number, thickness, and location of walls, ceilings, or
other objects that the wireless signals must pass through, may limit the range. Typical ranges vary depending on the types
of materials and background RF (radio frequency) noise in your home or business. The key to maximizing wireless range is to
follow these basic guidelines:
1. Keep the number of walls and ceilings between the extender and other network devices to a minimum - each wall or ceiling can
reduce your adapter’s range by up to 98 feet (30 meters). Position your devices so that the number of walls or ceilings is minimized.
2. Be aware of the direct line between network devices. At a 45-degree angle, a wall that is 0.5 meters thick (1.5 feet) appears to be
almost 1 meter (3 feet) thick. At a 2-degree angle it can appear over 14 meters (45 feet) thick! Position devices so that the signal
will travel straight through a wall or ceiling (instead of at an angle) for better reception.
3. Building materials make a dierence. A solid metal door or aluminum studs may have a negative eect on range. Try to position
access points, wireless routers, and computers so that the signal passes through drywall or open doorways. Materials and objects
such as glass, steel, metal, walls with insulation, water (sh tanks), mirrors, le cabinets, brick, and concrete can degrade your
wireless signal.
4. Keep your product away (at least 3-6 feet or 1-2 meters) from electrical devices or appliances that generate RF noise.
5. If you are using 2.4 GHz cordless phones or X-10 (wireless products such as ceiling fans, lights, and home security systems), your
wireless connection may degrade dramatically or drop completely. Make sure your 2.4 GHz phone base is as far away from your
wireless devices as possible. The base transmits a signal even if the phone in not in use.
7D-Link DCH-M225 User Manual
Page 12
Section 2 - Conguration
Ethernet
Setting Up Your DCH-M225
Plug in the DCH-M225 to a power outlet. Verify that the power
LED is blinking orange before continuing.
Locate the Wi-Fi name (SSID) and password for your DCH-M225
device. These details are printed on the specication sticker on the
underside of the device. Using your computer or mobile device’s
Wi-Fi connection utility, connect to the SSID of your DCH-M225
and enter the password. If you are unsure of how to connect to a
wireless network, please refer to “Connect to a Wireless Network”
on page 33, or consult your device’s user manual. Once connected,
you are ready to begin the setup process.
There are two ways to congure your DCH-M225; using the QRS
Mobile app on your smartphone or tablet device, or using the
web GUI on your computer.
Outlet
Input: 100-240VAC, 50-60Hz, 0.3A
FCC ID:KA2CHM225A1
IC: 4216A-CHM225A1
Model: DCH-M225A1
CAN ICES-3 (B)/NMB-3(B)
P/N: BCHM225LNA...A1
S/N:RZEP1YMXXXXXX
H/W Ver.: A1 F/W Ver.:1.00
Wi-Fi Name(SSID):dlink-XXXX
Wi-Fi Password:XXXXXXXXXX
DCH-M225
For detailed information on either of the methods for conguring
your DCH-M225, refer to the following sections of the manual:
• “QRS Mobile App Setup” on page 9
• “Web-based Conguration” on page 13
8D-Link DCH-M225 User Manual
Page 13

Section 2 - Conguration
QRS Mobile App Setup
The DCH-M225 can be set up from your iOS or Android smartphone or tablet device using the QRS Mobile app.
Search for “QRS Mobile” in the App Store or Google Play, or use
your mobile device to scan the QR codes on the right to download
the QRS Mobile app from the App Store (left) for your iOS device,
or from Google Play (right) for your Android device.
For iOS For Android
Connect to the Wi-Fi network that is displayed on the Wi-Fi
Conguration Card included in your package (ex: dlink-a8fa).
Then, enter the Wi-Fi password also printed on the Wi-Fi
Conguration Card (ex: akbdj1936). These details are also printed
on the specication sticker on the underside of the device.
9D-Link DCH-M225 User Manual
Page 14
Section 2 - Conguration
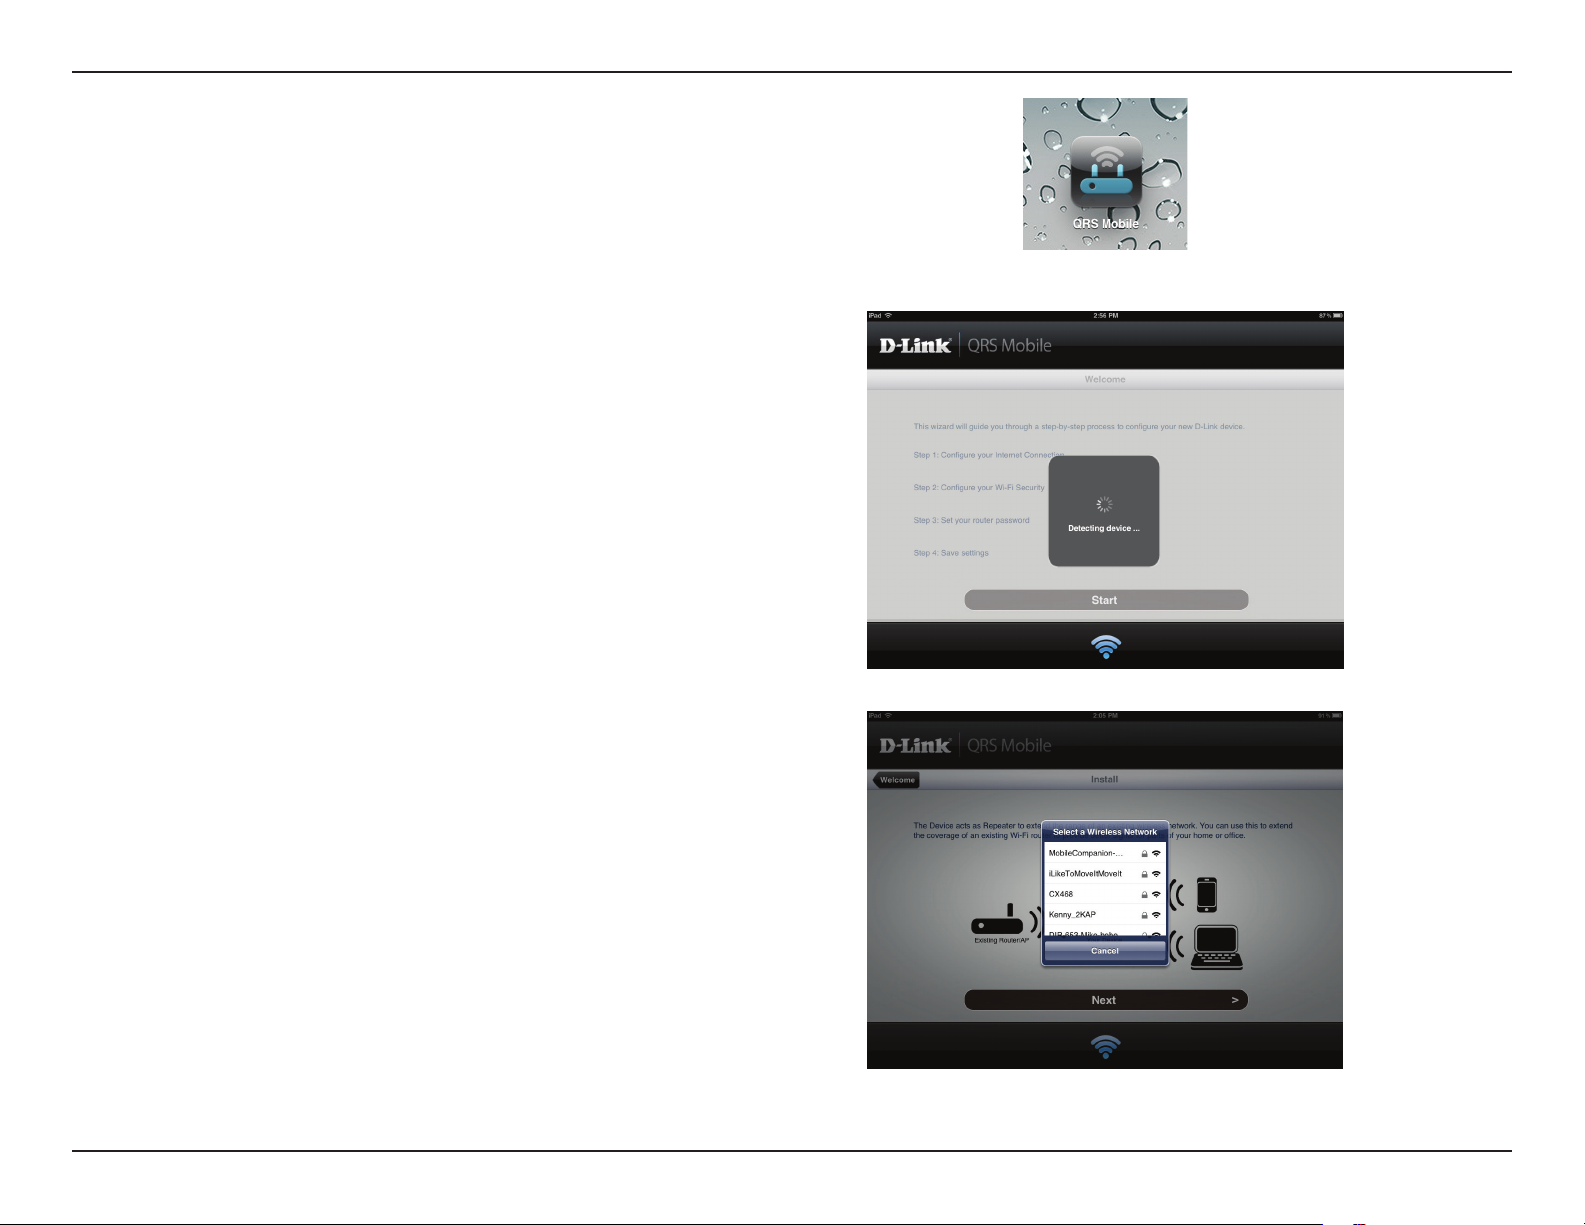
Once your mobile device is connected, tap on the QRS Mobile
icon.
Click Start to continue.
QRS Mobile will first detect your DCH-M225, then scan for
available Wi-Fi networks. Select the network you wish to extend
and enter the password if required.
10D-Link DCH-M225 User Manual
Page 15
Section 2 - Conguration
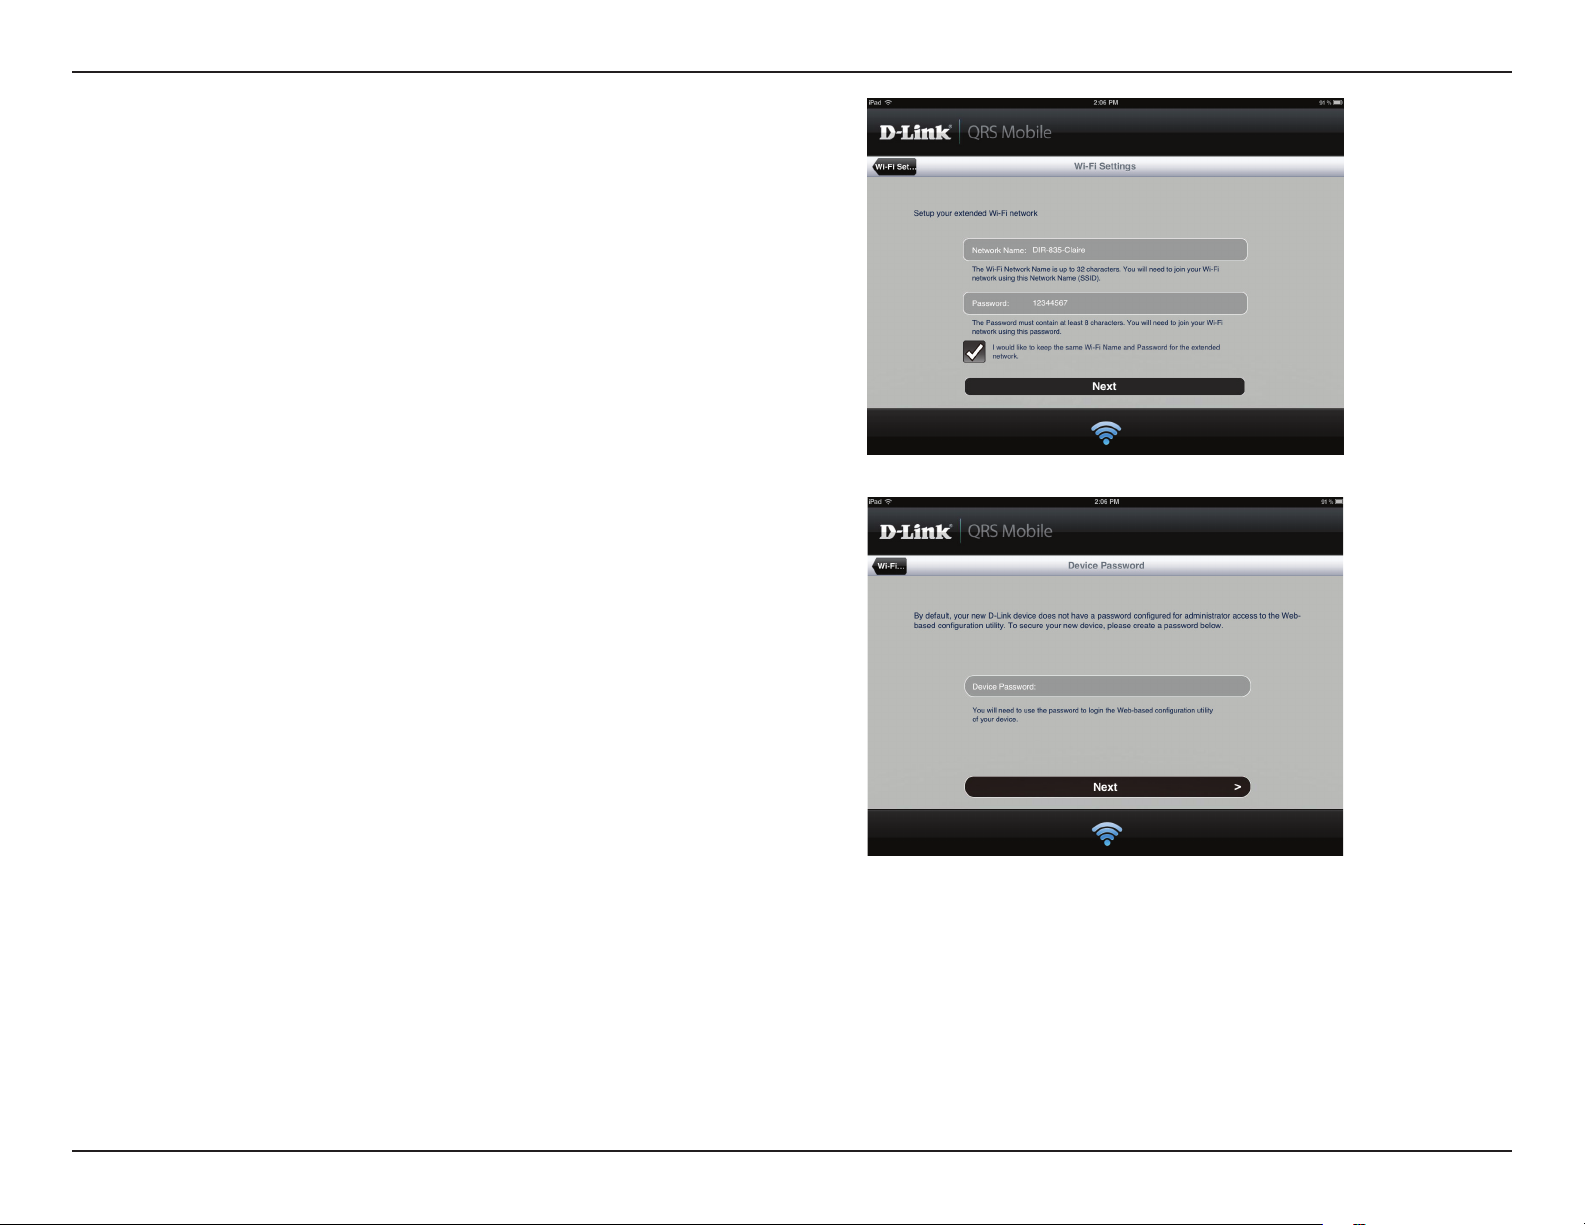
Enter a network name (SSID) and password for the extended
Wi-Fi network. You may keep the existing SSID and password if
you wish. Click Next to continue.
Create an admin password for the DCH-M225’s Web-based
conguration utility. Click Next to continue.
11D-Link DCH-M225 User Manual
Page 16
Section 2 - Conguration
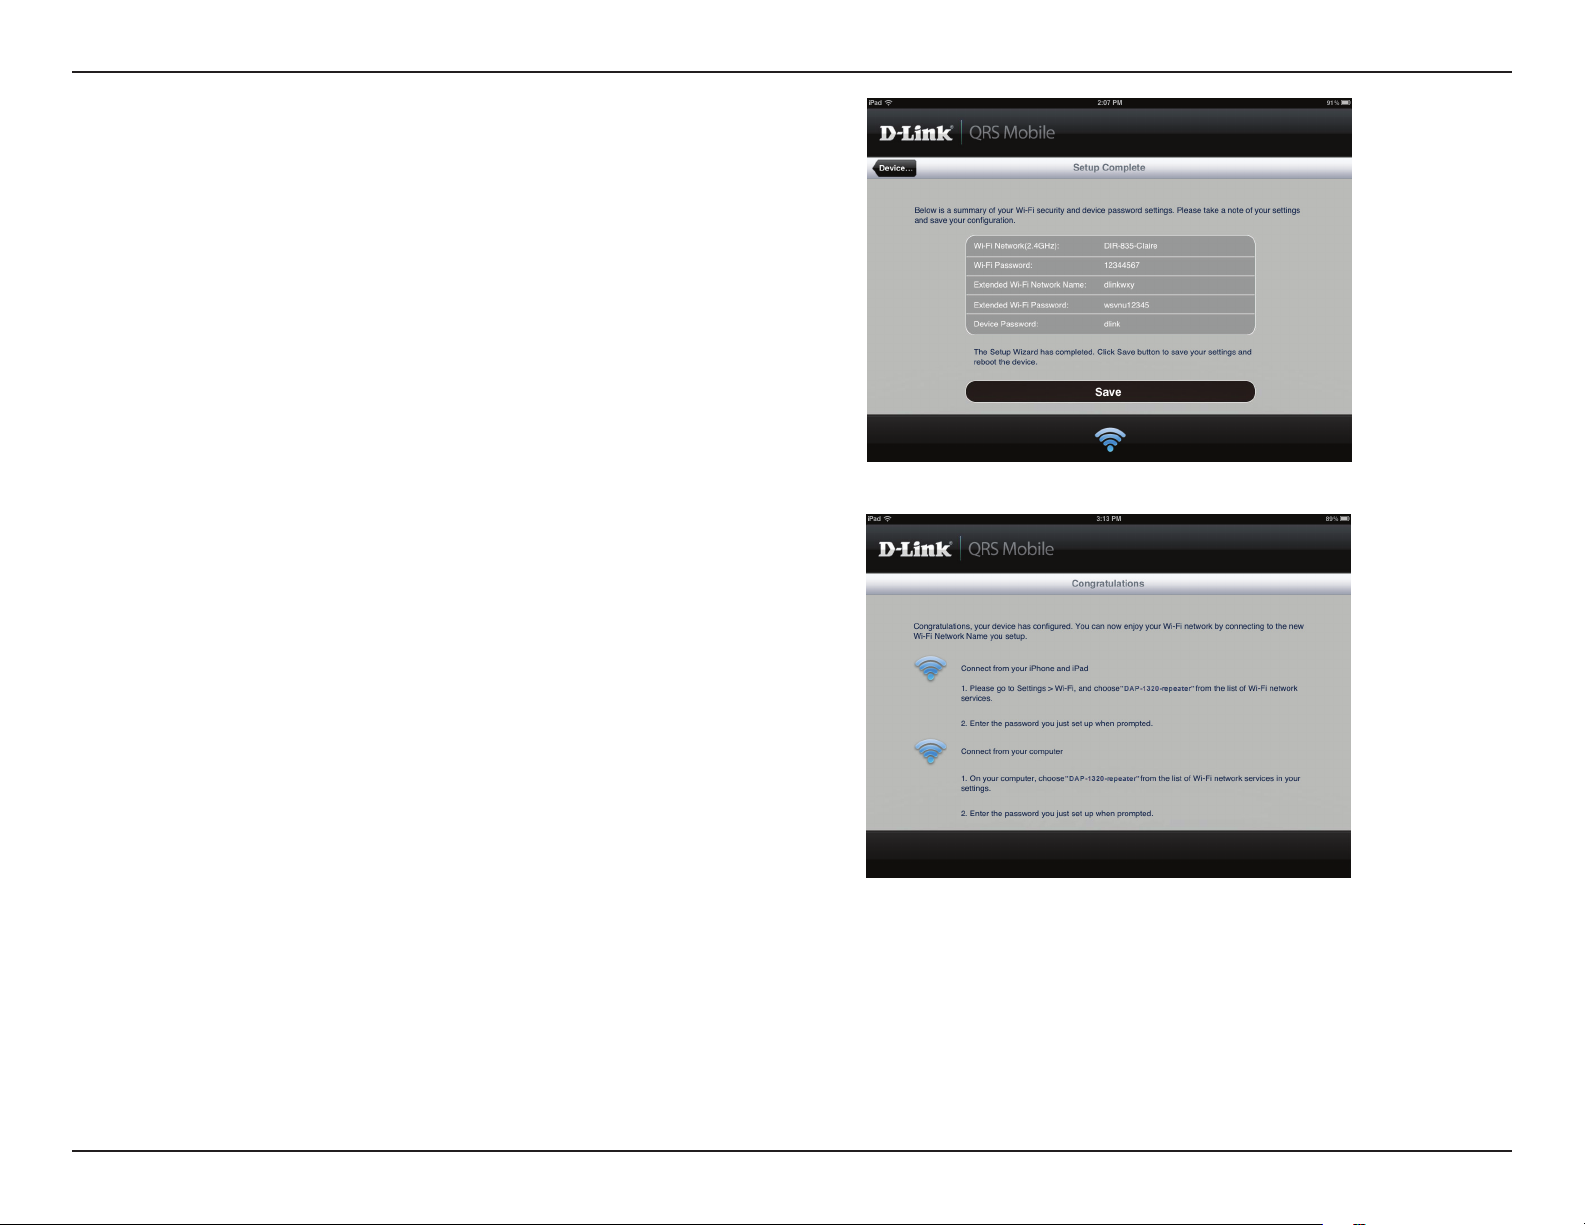
A summary of your settings will be displayed. Click Save to reboot
the device and to complete the setup.
After the setup wizard is complete, the following screen will
appear. You can now change your mobile device and laptop
Wi-Fi settings to the wireless network name and password you
just created.
12D-Link DCH-M225 User Manual
Page 17
Section 2 - Conguration
Web-based Conguration
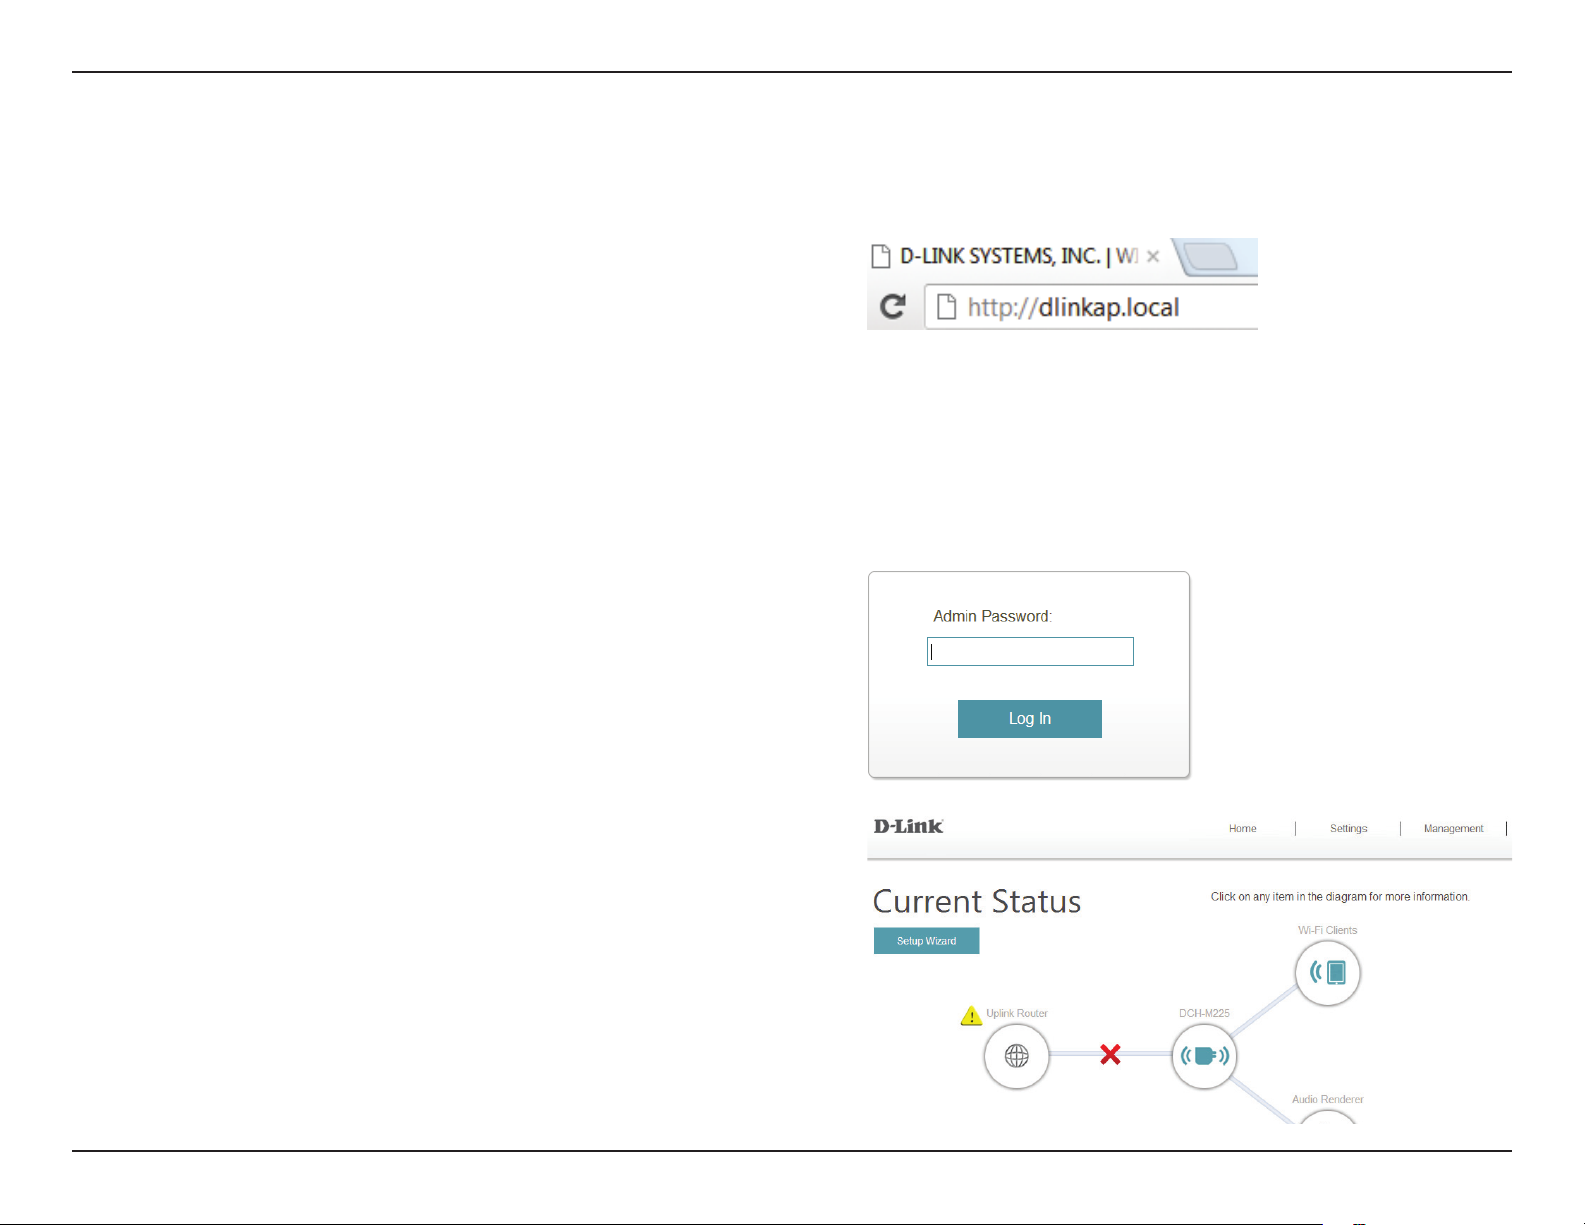
To access the conguration utility for the DCH-M225 on your PC,
rst connect to the DCH-M225 wirelessly using the Wi-Fi name
(SSID) and password located on your Wi-Fi Conguration Card.
Then open a web browser and enter http://dlinkap.local in the
address bar. You can also use the IP address http://192.168.0.50.
Note: If you have multiple DCH-M225 devices on the network,
you can access web-based conguration via http://dlinkapxxxx.
local. as shown in the included Wi-Fi Conguration Card, with
“xxxx” being the last four digits of the DCH-M225’s MAC address.
Enter your password. By default, Admin is selected as the username
and cannot be changed, and by default, the password is blank.
The conguration interface will open, and you can congure the
various settings for the DCH-M225. If you have not yet congured
an uplink network, the home screen will show that there is no
connection between the DCH-M225 and the uplink router.
For detailed information on manually setting up your DCH-M225
to extend an existing wireless network, refer to “Using the Manual
Method” on page 17.
13D-Link DCH-M225 User Manual
Page 18

Section 3 - Web-based Conguration
Setup Wizard
If you wish to congure your extender to connect to the Internet
using the setup wizard, click the Setup Wizard button.
This wizard is designed to guide you through a step-by-step
process to congure your new Wi-Fi Audio Extender to extend
your wireless network and connect to the Internet.
Click Next to continue.
If you already have a Wi-Fi network set up and you want to
congure your Wi-Fi network settings manually, go to Settings
at the top of your browser window and select Wi-Fi from the
drop-down menu (refer to “Wi-Fi Settings” on page 22) to set up the
connection between your DCH-M225 and the uplink router. To
set up the extended Wi-Fi network, select Extended Wi-Fi (refer
to “Extended Wi-Fi Settings” on page 23).
14D-Link DCH-M225 User Manual
Page 19
Section 3 - Web-based Conguration
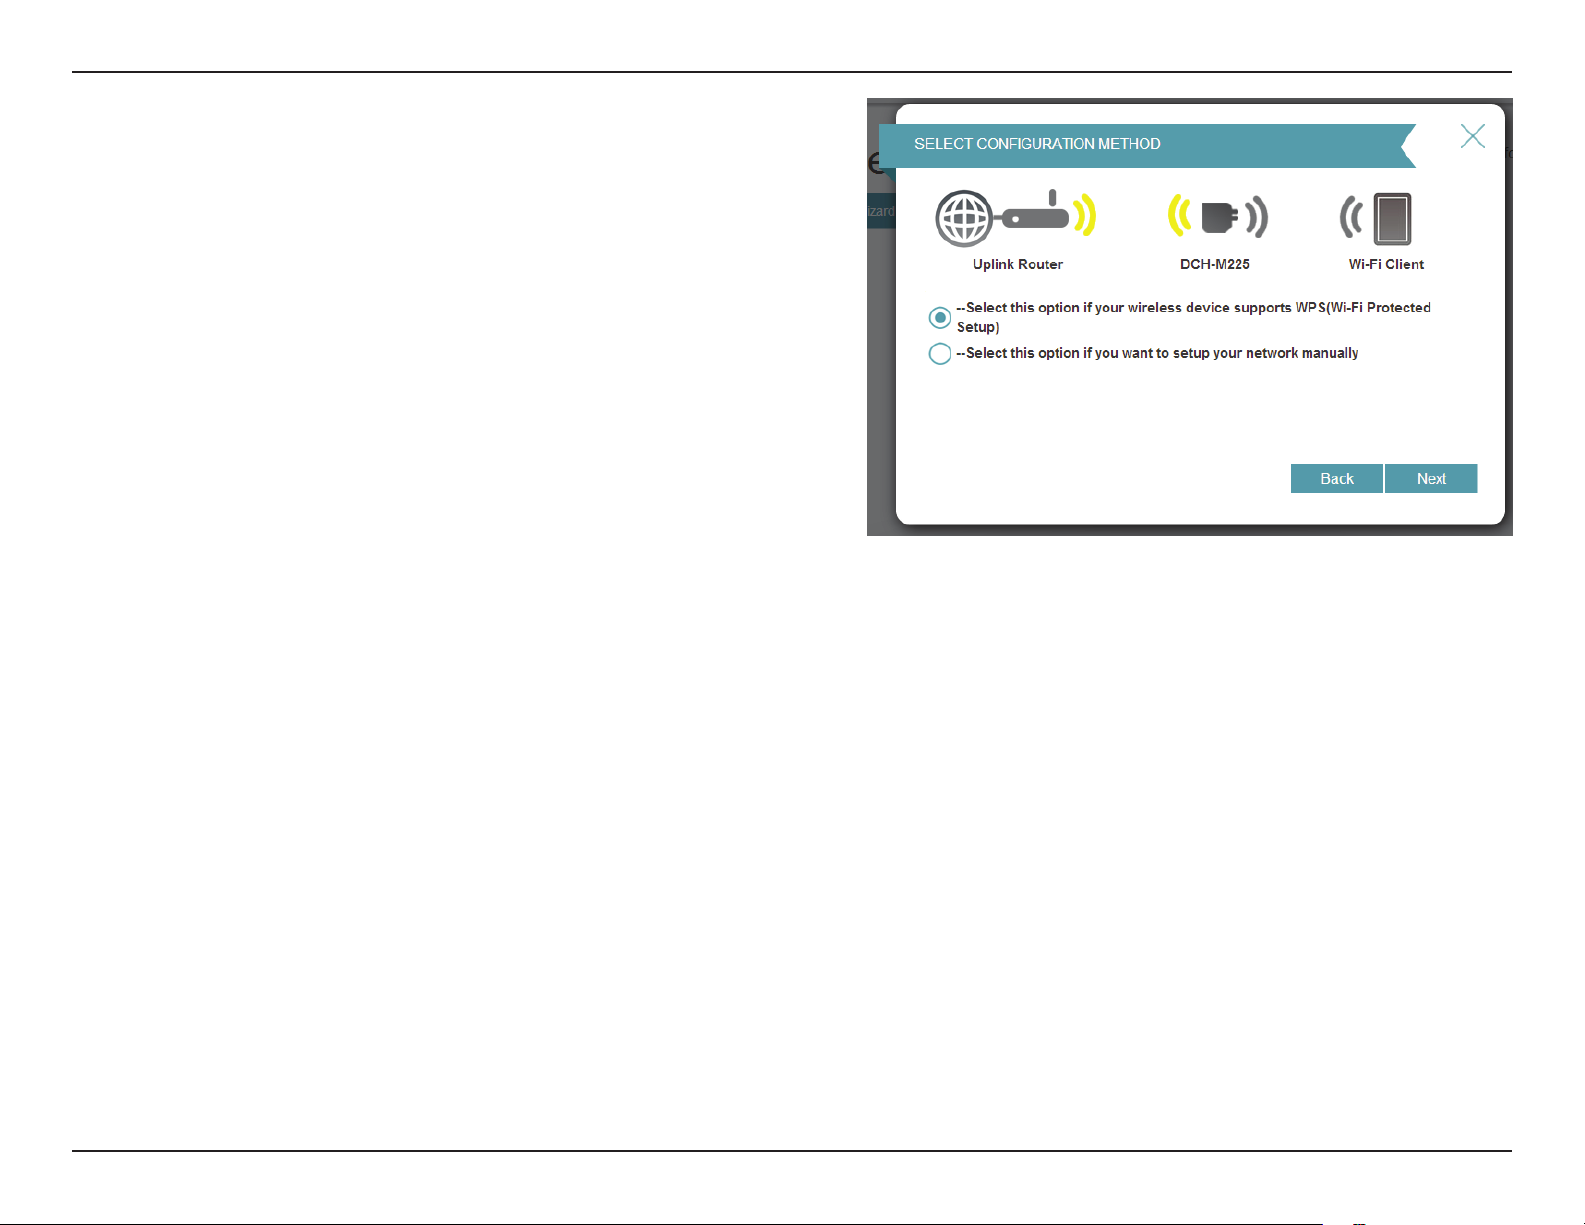
Select whether you want to use the WPS (Wi-Fi Protected Setup)
method or the manual method to set up an extended wireless
network using your DCH-M225 and click Next.
If you wish to use the WPS method, please refer to “Using the WPS
Method” on page 16.
If you wish to use the manual setup method, please refer to “Using
the Manual Method” on page 17.
15D-Link DCH-M225 User Manual
Page 20

Section 3 - Web-based Conguration
Using the WPS Method
To set up using the WPS method, select the rst option from the
setup wizard menu. Click Next to continue.
The DCH-M225 uses the push-button method for WPS. After
selecting WPS, the DCH-M225 will ask you to press the WPS push
button on the access point or router you want to connect the
DCH-M225 to. You have 120 seconds to press the button on your
access point or router. Click Next to continue.
If a connection has been successfully made, you will see a notice
on the screen and the LED on the device will turn solid green.
You can also use the WPS button on the side of the DCH-M225 to
initiate a WPS connection with the uplink router. After pressing
the WPS button on the DCH-M225, you will have 120 seconds to
press the WPS button on your access point or router. The LED on
the DCH-M225 will turn solid green when a connection has been
successfully established with the uplink router.
WPS Button
16D-Link DCH-M225 User Manual
Page 21

Section 3 - Web-based Conguration
Using the Manual Method
To set up your network manually, select the second option from
the setup wizard menu. Click Next to continue.
The DCH-M225 will rst scan for available Wi-Fi networks and
list the networks it has found. If the network you would like to
connect to isn’t listed, click Back and select the manual option
again to perform another scan.
Once you have selected the uplink network you wish to use, click
Select.
17D-Link DCH-M225 User Manual
Page 22
Section 3 - Web-based Conguration
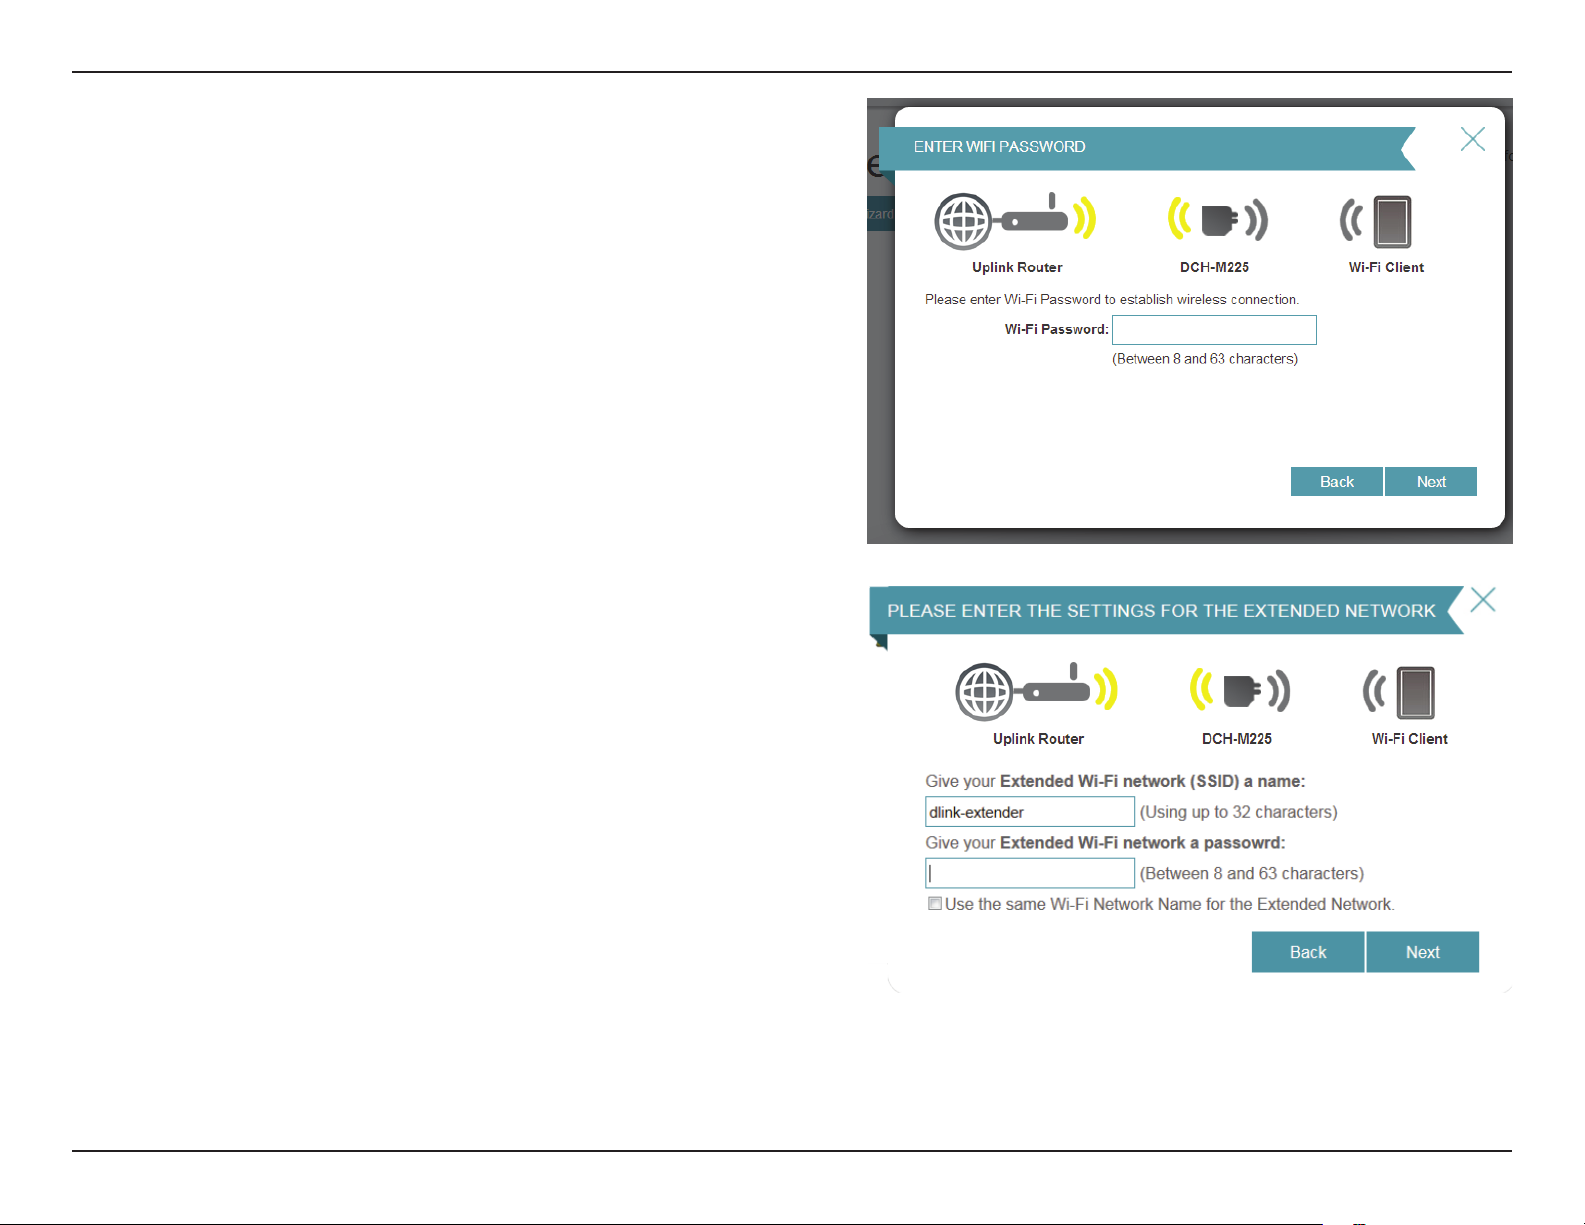
Enter the password for your uplink network.
Click Next to continue, or click Back to return to the previous step.
The DCH-M225 will re-broadcast the Wi-Fi connection from the
uplink router as an extended Wi-Fi network. Enter the SSID and
password that you wish to apply to the extended Wi-Fi network. If
you would like the uplink router Wi-Fi network and the extended
Wi-Fi network to have the same SSID and password, check the
box at the bottom of the screen.
Click Next to continue, or click Back to return to the previous step.
18D-Link DCH-M225 User Manual
Page 23
Section 3 - Web-based Conguration
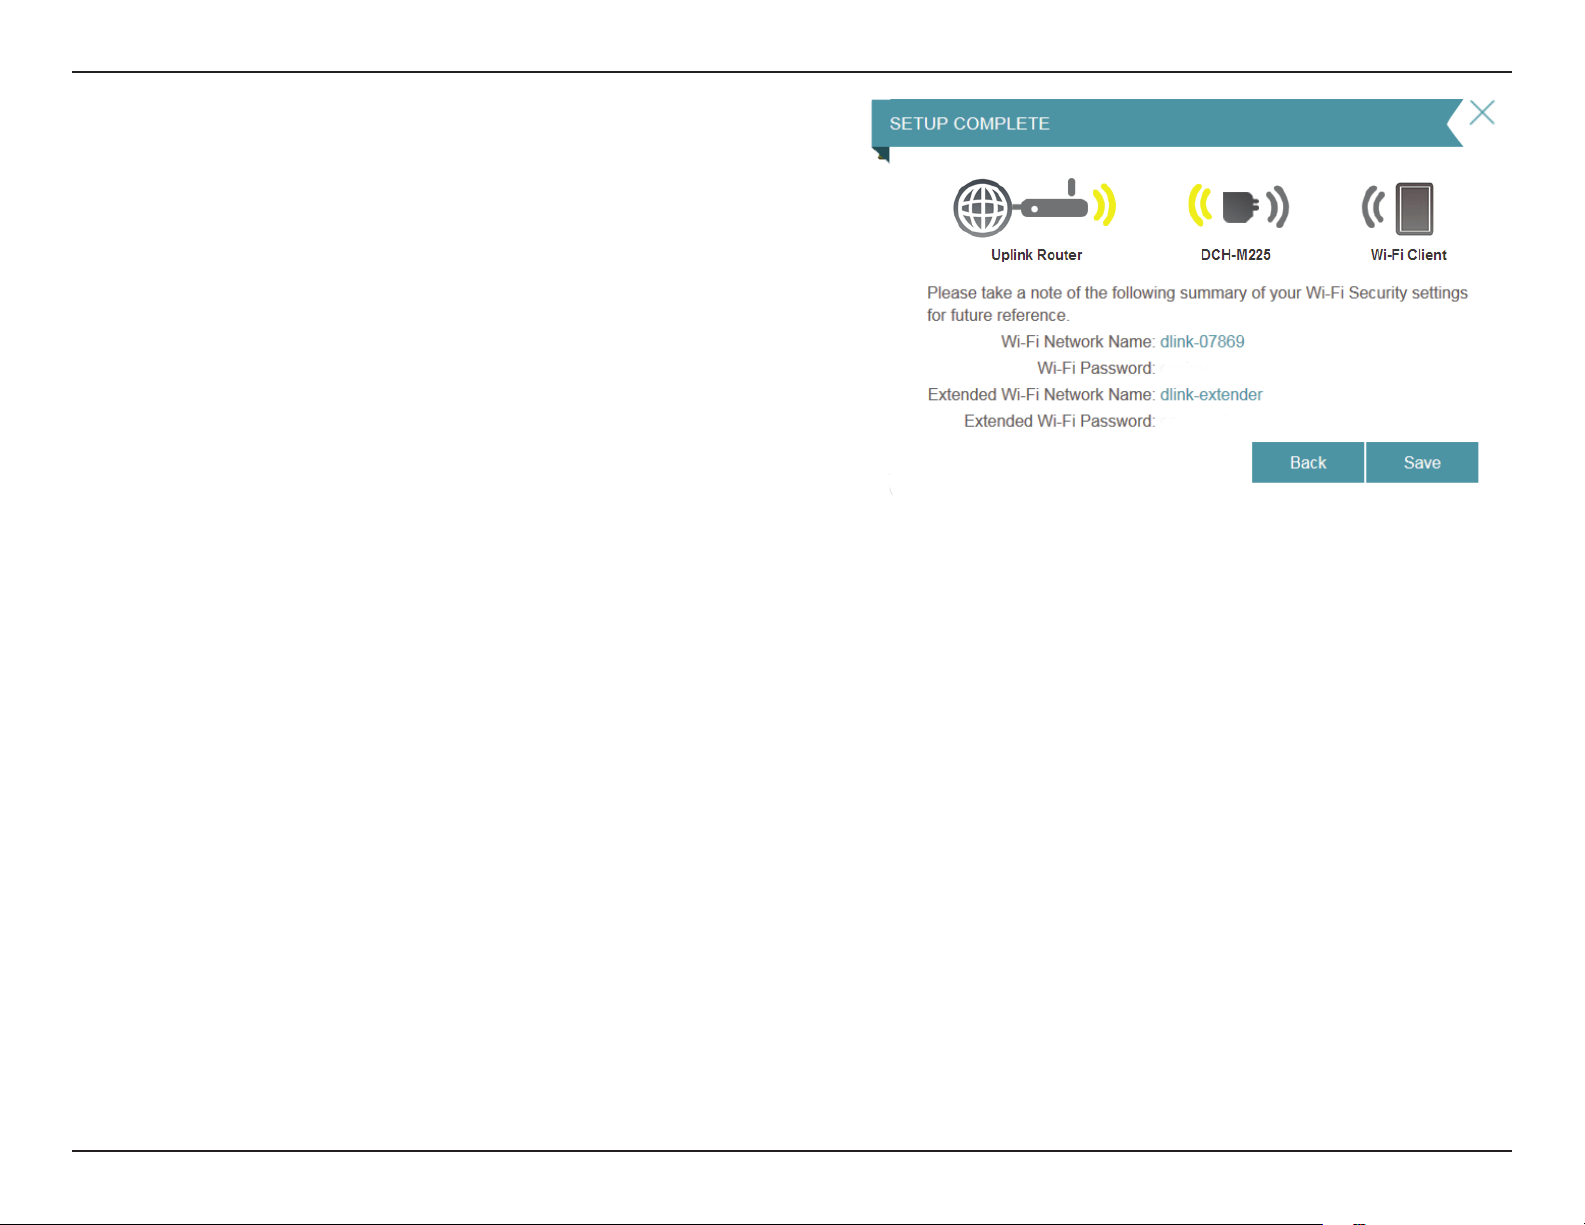
The setup process is now complete. A summary page will appear
showing the settings for both the connection to the uplink router,
and the extended Wi-Fi network. It is recommended that you
make a record of this information for future reference.
Click Save to exit the wizard and return to the home screen.
Or, click Back to return to the previous step.
19D-Link DCH-M225 User Manual
Page 24

Section 3 - Web-based Conguration
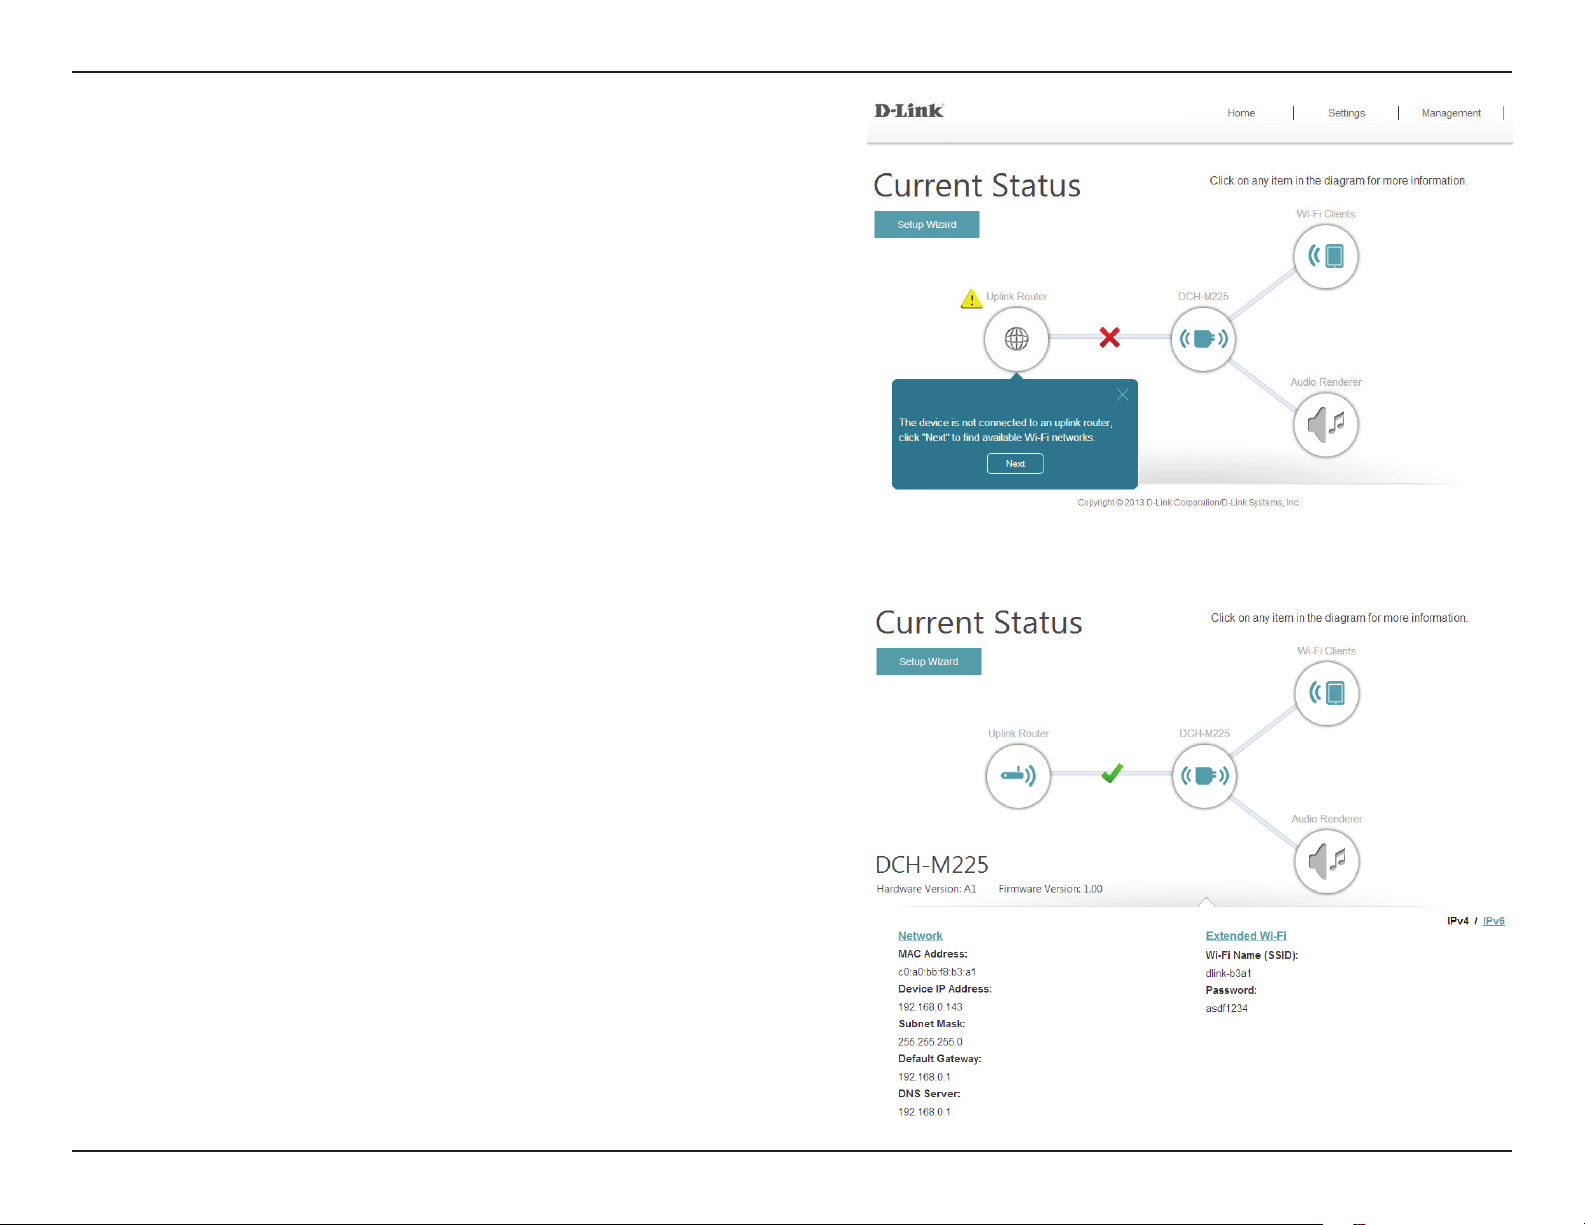
Home Screen
The home screen gives a summary of the current status of devices
connected to the DCH-M225. A green check between devices
indicates that there is an active connection. A red X indicates that
there is no connection present, or there is a connection error.
At any time, you can click on the device images on the home
screen to view the current status of each device.
20D-Link DCH-M225 User Manual
Page 25
Section 3 - Web-based Conguration
If there is no connection between the DCH-M225 and the uplink
router, you can click on the uplink router icon to search for an
available uplink router.
You can view the details of both the uplink router network and
the extended Wi-Fi network by clicking on the DCH-M225 icon.
21D-Link DCH-M225 User Manual
Page 26

Section 3 - Web-based Conguration
Wi-Fi Settings
This page lets you congure the Wi-Fi settings to connect your DCH-M225 to another wireless network. This is the uplink
network which the DCH-M225 will then be able to extend. To access this page, click on the Settings drop-down menu at the
top of the page, and select Wi-Fi.
Wireless
Mode:
Wi-Fi Network
Name (SSID):
Security
Mode:
Password:
This is set to Repeater mode and cannot be changed.
Click Scan to scan for available wireless networks and select
the one you want to use the DCH-M225 to extend.
You can also type in the name (SSID) of the wireless network.
Select the security method that is being used by the wireless
network that you have selected: WEP, WPA-Personal, or
None.
If you selected WEP or WPA-Personal, you will be required
to enter the password or security key for the network you
are attempting to join.
You can also use WPS to connect your wireless devices to
the DCH-M225’s extended network. For further information
on how to do this, please refer to “Connecting a Wireless
Client” on page 32.
Click Save to save the settings and return to the home page.
22D-Link DCH-M225 User Manual
Page 27

Section 3 - Web-based Conguration
Extended Wi-Fi Settings
This page lets you congure the settings for the DCH-M225’s extended wireless network. To access this page, click on the
Settings drop-down menu at the top of the page, and select Extended Wi-Fi.
Wi-Fi Name
(SSID):
Security:
Password:
This is the name of the DCH-M225’s extended network. The
DCH-M225 will rebroadcast the uplink router’s Internet
connection under this SSID. You can also choose to make
the SSID for the extended network the same as the SSID for
the uplink network.
Select the type of wireless security you wish to use for the
extended network. Choose None, WEP, or WPA-Personal.
Enter the password or network key that you wish to use
for the extended network. You can also choose to make
the password for the extended network the same as the
password for the uplink network.
Click Save to save the settings and return to the home page.
23D-Link DCH-M225 User Manual
Page 28

Section 3 - Web-based Conguration
Audio Renderer
This page lets you congure the settings for the DCH-M225’s audio extending feature. To access this page, click on the Settings
drop-down menu at the top of the page, and select Audio Renderer.
DLNA
Renderer
Status:
AirPlay
Status:
Device Name:
Click to enable or disable the DLNA Renderer feature. When
this option is enabled, any DLNA compatible device will be
able to nd the DCH-M225 using the device name that is set
in the Device Name eld below.
Click to enable or disable the AirPlay feature. When this
option is enabled, any AirPlay compatible device will be able
to nd the DCH-M225 using the device name that is set in
the Device Name eld below.
You can enter a name for your device in this eld. Other
devices on your network that can stream audio through
DLNA or AirPlay will be able to identify your DCH-M225 by
this name.
Click Save to save the settings and return to the home page.
24D-Link DCH-M225 User Manual
Page 29

Section 3 - Web-based Conguration
Network Settings
This page lets you congure the network settings for the DCH-M225. To access this page, click on the Settings drop-down
menu at the top of the page, and select Network. Click Save at any time to save the changes you have made on this page.
Device Name: You can change the name of the device by editing the text in
the text box. If you change the name of the device, you will
need to enter “http://xxxx.local.” (where “xxxx” corresponds
to the name of the device) in the address bar of your web
browser in order to access the conguration utility.
Advanced Settings
The Advanced Settings section of the Network Settings page allows you to congure both IPv4 and IPv6 settings which will
be used by the DCH-M225’s extended network.
IPv4 Device Management interface - You can select either a Dynamic or Static IPv4 conguration:
My LAN
Connection is:
IP Address:
Subnet Mask:
Gateway
Address:
Primary DNS
Server:
Secondary
DNS Server:
Here you can select whether you want the IP to have a
Dynamic IP or Static IP address. If you select Dynamic IP,
the options below will not be available.
Enter the Static IP address that you want to assign to the
extended network AP. This address should be outside of the
uplink router’s DHCP address pool.
Enter the subnet mask.
Enter the gateway address. This is usually the IP address of
the uplink router.
Enter the address of the primary DNS server.
Enter the address of the secondary DNS server. This is
optional but will provide backup if the primary server fails.
25D-Link DCH-M225 User Manual
Page 30

Section 3 - Web-based Conguration
IPv6 Device Management Interface - You can select an Autoconguration (dynamic), Static IP, or Link-local IPv6 conguration:
My IPv6
Connection is:
Obtain DNS
Server Address:
Primary DNS
Server:
Secondary DNS
Server:
My IPv6
Connection is:
IPv6 Address:
Select Autoconguration (SLAAC/DHCPv6) to have the
DCH-M225 automatically receive an IPv6 address from the
uplink router.
You can select to obtain IPv6 DNS server information
automatically, or you can select to congure DNS servers
manually.
Enter the primary IPv6 DNS server address.
Enter the secondary IPv6 DNS server address. This is optional
but will provide backup if the primary server fails.
Select Static IPv6 to manually assign an IP address to the
DCH-M225.
Enter the IPv6 address that you want to assign to the
extended network AP. This address should be outside of the
uplink router’s DHCP address pool.
Subnet Prex
Length:
Default Gateway:
Primary DNS
Server:
Secondary DNS
Server:
Enter the length of the IPv6 subnet prex.
Enter the default gateway.
Enter the primary IPv6 DNS server address.
Enter the secondary IPv6 DNS server address. This is optional
but will provide backup if the primary server fails.
26D-Link DCH-M225 User Manual
Page 31

Section 3 - Web-based Conguration
My IPv6
Connection is:
LAN IPv6 LinkLocal Address:
Select Link-local only to only set an IPv6 address for the
local network.
The link-local address of the DCH-M225.
27D-Link DCH-M225 User Manual
Page 32

Section 3 - Web-based Conguration
Maintenance
Admin
This page will allow you to set a new password for the administrator account used to congure the DCH-M225. You can also
enable graphical authentication (CAPTCHA) on this page. To access this page, click on the Management drop down menu at
the top of the page, and select Admin. Click Save at any time to save the changes you have made on this page.
Admin
Password:
Enable
Graphical
Authentication:
Enter the Admin password.
Click on the slider to enable graphical authentication,
or CAPTCHA. This provides an extra layer of security by
requiring you to enter a code that is displayed on-screen. This
can help prevent unauthorized users from gaining access to
your wireless network using automated methods.
28D-Link DCH-M225 User Manual
Page 33
Section 3 - Web-based Conguration
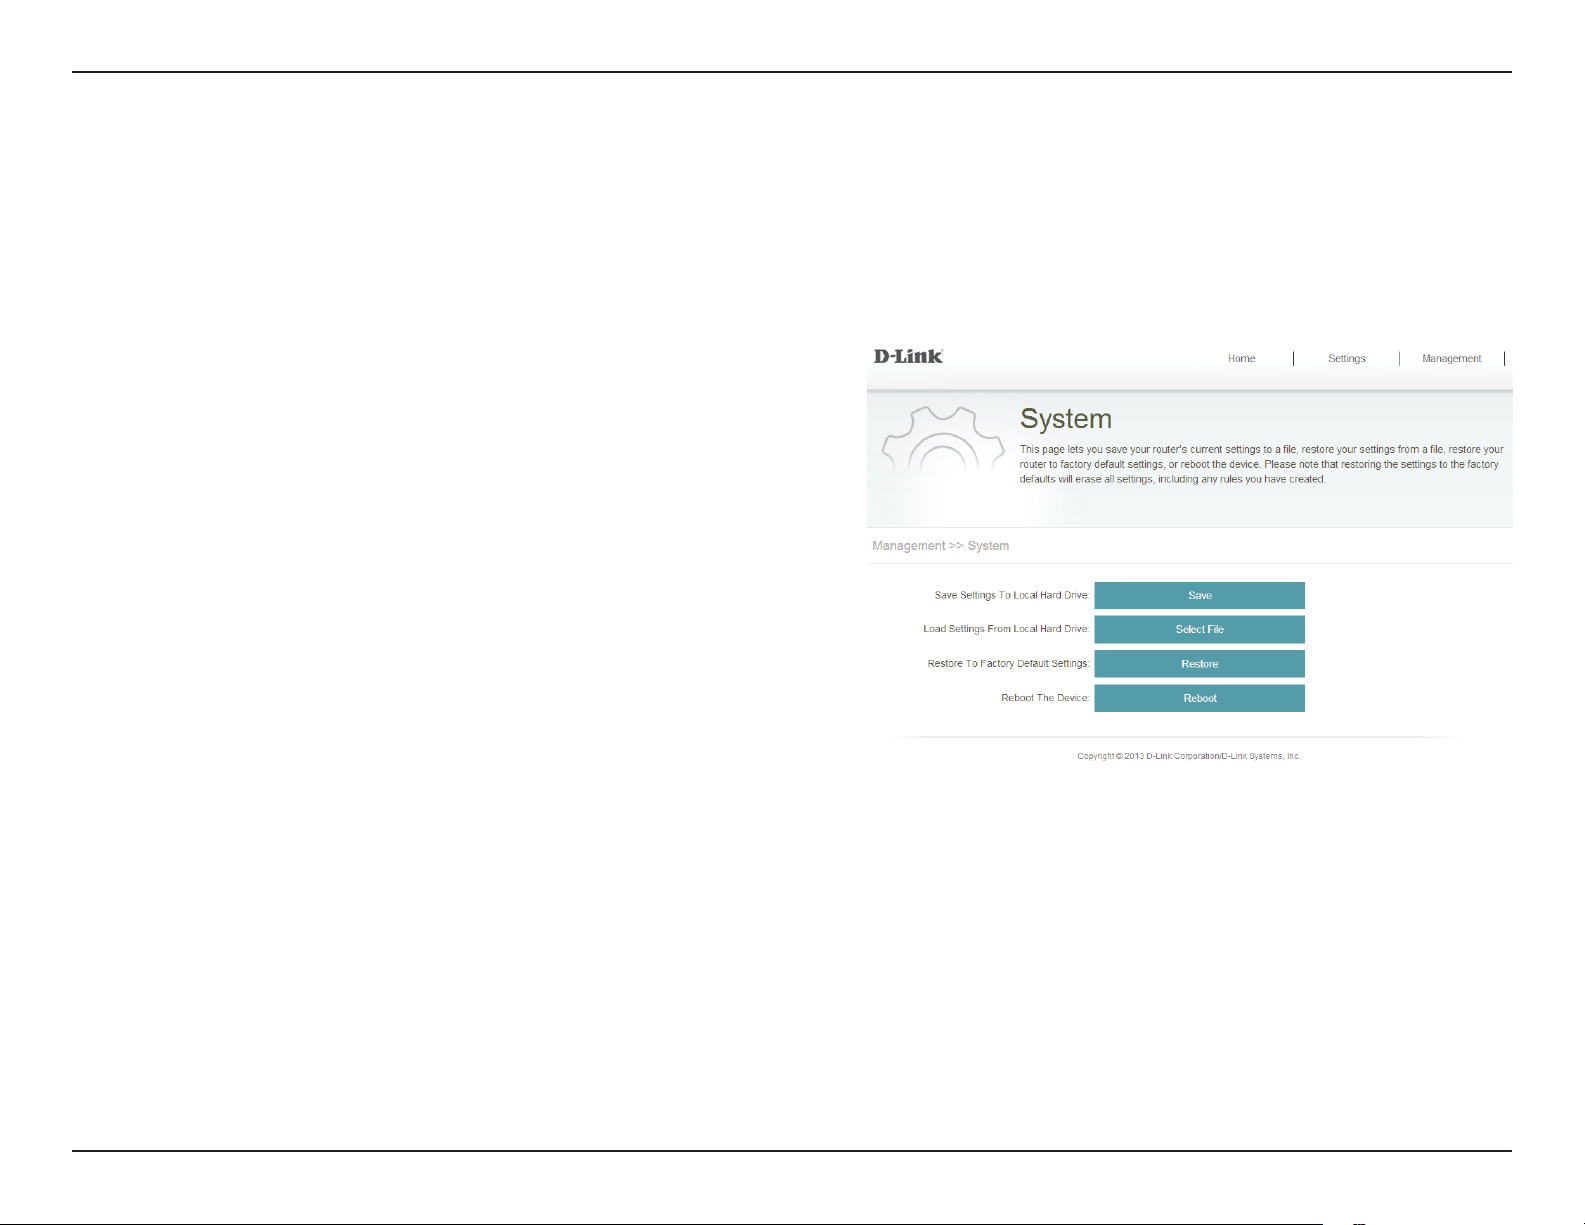
System
This page allows you to save or restore your system conguration, reset or reboot the DCH-M225. To access this page, click
on the Management drop down menu at the top of the page, and select System. Click Save at any time to save the changes
you have made on this page.
Save Settings
To Local Hard
Drive:
Load Settings
From Local
Hard Drive:
Restore
to Factory
Default
Settings:
Reboot the
Device:
Save the system settings into a le to the local hard drive.
You will then see a le dialog where you can select a location
and le name for the settings.
Load the system settings from a le on the local hard drive.
Restore the system settings to factory default settings. This
will erase all currently stored settings.
Click Reboot to reboot the DCH-M225.
29D-Link DCH-M225 User Manual
Page 34
Section 3 - Web-based Conguration
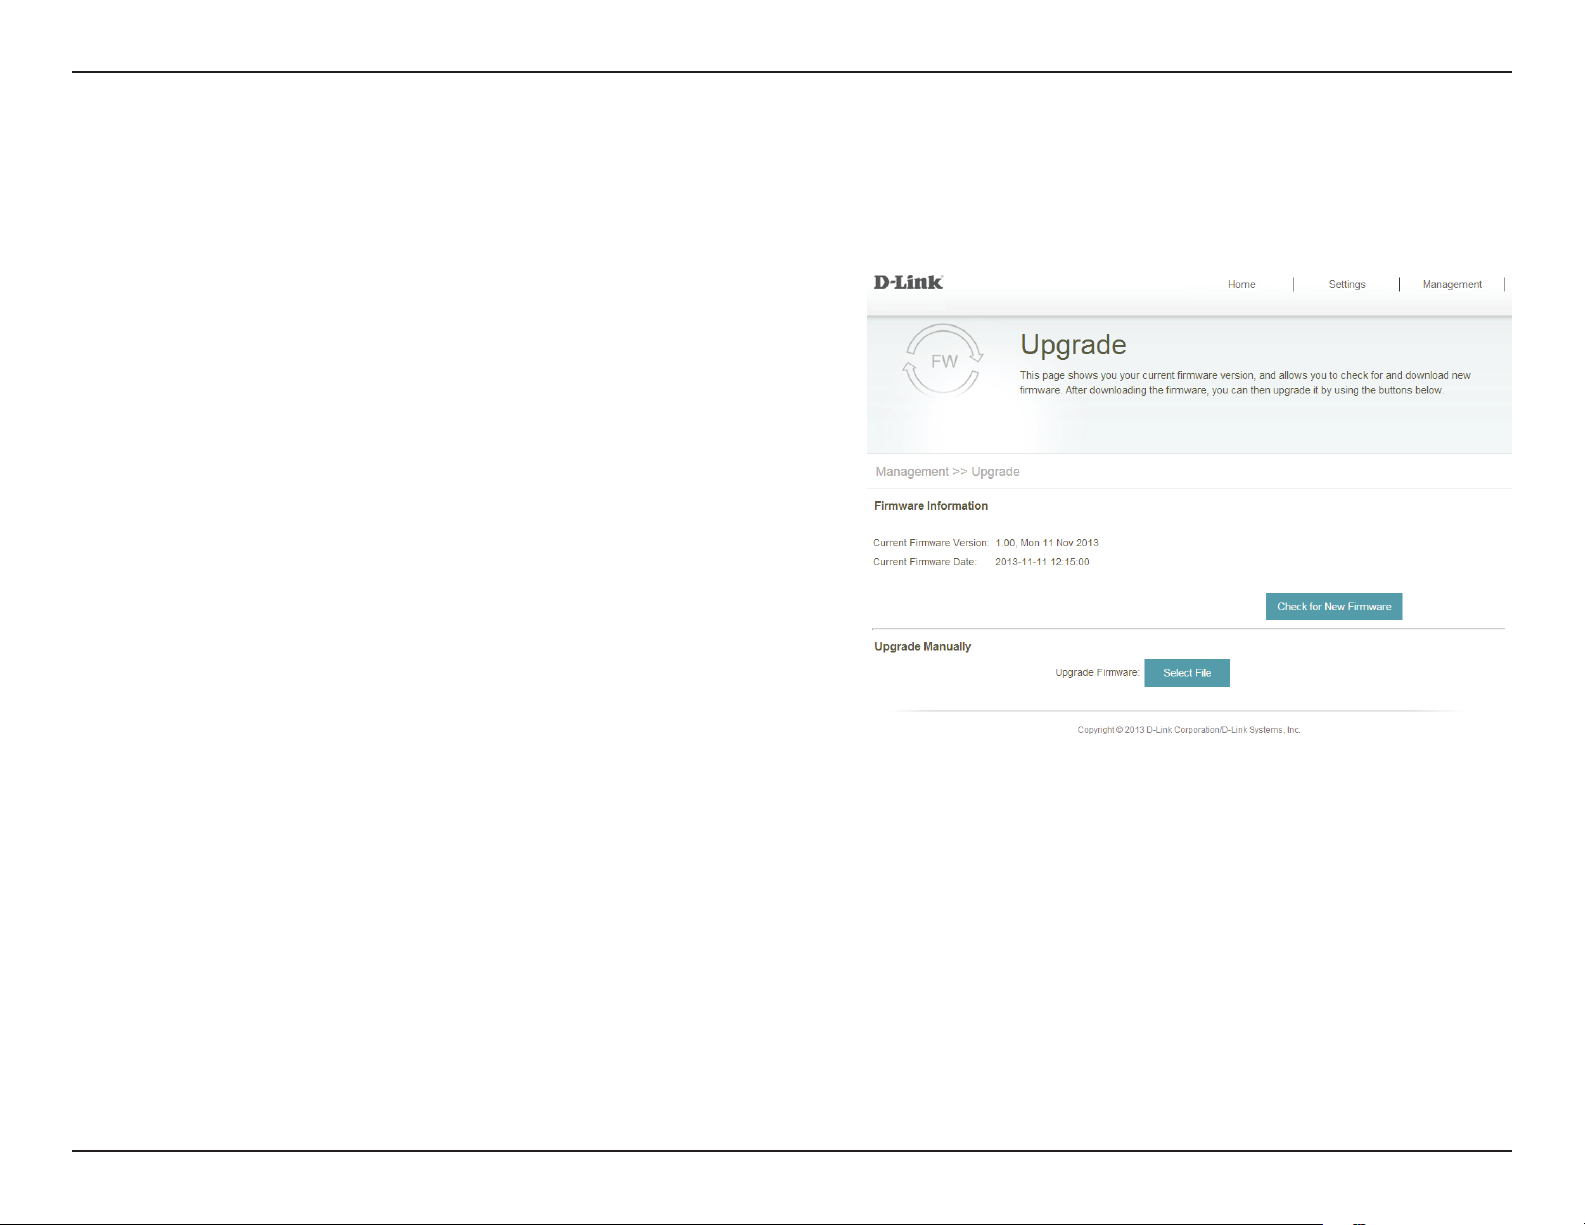
Upgrade
Firmware upgrades may be provided for the DCH-M225 in future. You can check for and upgrade your rmware on this page.
To access this page, click on the Management drop down menu at the top of the page, and select Upgrade.
Firmware
Information:
Check For New
Firmware:
Upgrade
Firmware:
This section displays the currently installed rmware version,
as well as the date on which the current rmware version
was released.
Click Check For New Firmware to nd out if there is new or
updated rmware. If there is, you can download it to your
computer.
Click Select File to locate the rmware le on your local
device and perform a manual rmware upgrade.
30D-Link DCH-M225 User Manual
Page 35

Section 3 - Web-based Conguration
Statistics
This page displays details about your wireless and network connections. To access this page, click on the Management drop
down menu at the top of the page, and select Statistics.
Wi-Fi:
Extended
Wi-Fi:
Clear:
Click on the Wi-Fi tab to display the statistics for the
connection between the DCH-M225 and the uplink router.
Click on the Extended Wi-Fi tab to display the statistics for
the connection between the DCH-M225 and any connected
clients.
Click the Clear button to reset the statistics.
31D-Link DCH-M225 User Manual
Page 36

Section 4 - Connecting a Wireless Client
Connecting a Wireless Client
WPS Button
WPS (Wi-Fi Protected Setup) is a simple and secure way to connect your wireless devices with the DCH-M225. Most wireless
devices such as wireless routers, media players, printers, and cameras will have a WPS button (or a software utility with WPS)
that you can press to connect to the DCH-M225. Please refer to the user manual for the wireless device you want to connect
to make sure you understand how to enable WPS. Once you know, follow the steps below:
Step 1 - Press the WPS button on the DCH-M225 for about 3 seconds. The LED on the device will start to blink. You can also
use the WPS option in the setup wizard section of the web interface.
Step 2 - Within 120 seconds, press the WPS button on your wireless device.
Step 3 - Allow up to 1 minute to congure. Once the LED light stops blinking and turns solid green, you will be connected and
your wireless connection will be secured with WPA2.
32D-Link DCH-M225 User Manual
Page 37
Section 4 - Connecting a Wireless Client
Connect to a Wireless Network
Windows® 8
WPA/WPA2
It is recommended to enable wireless security (WPA/WPA2) on your wireless router or access point before conguring your
wireless adapter. If you are joining an existing network, you will need to know the security key (Wi-Fi password) being used.
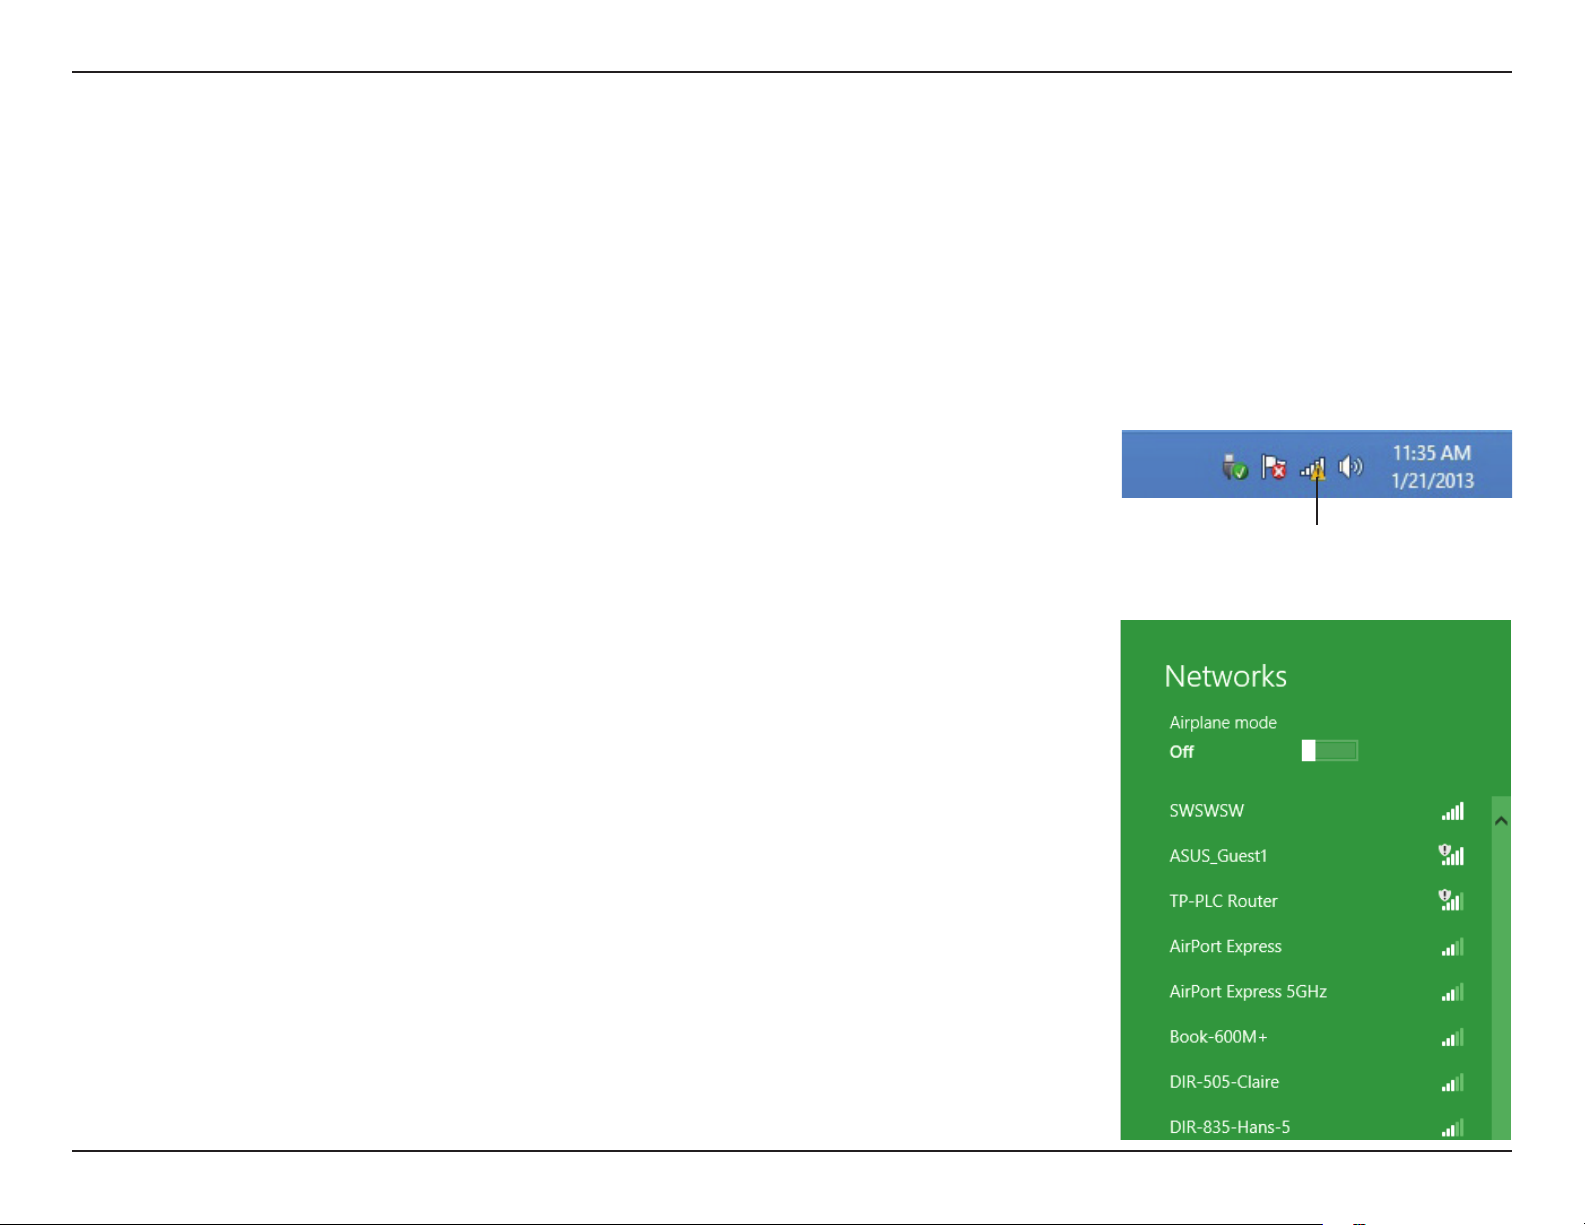
To join an existing network, locate the wireless network icon in the taskbar, next to the
time display.
Wireless Icon
Clicking on this icon will display a list of wireless networks which are within connecting
proximity of your computer. Select the desired network by clicking on the network name.
33D-Link DCH-M225 User Manual
Page 38
Section 4 - Connecting a Wireless Client
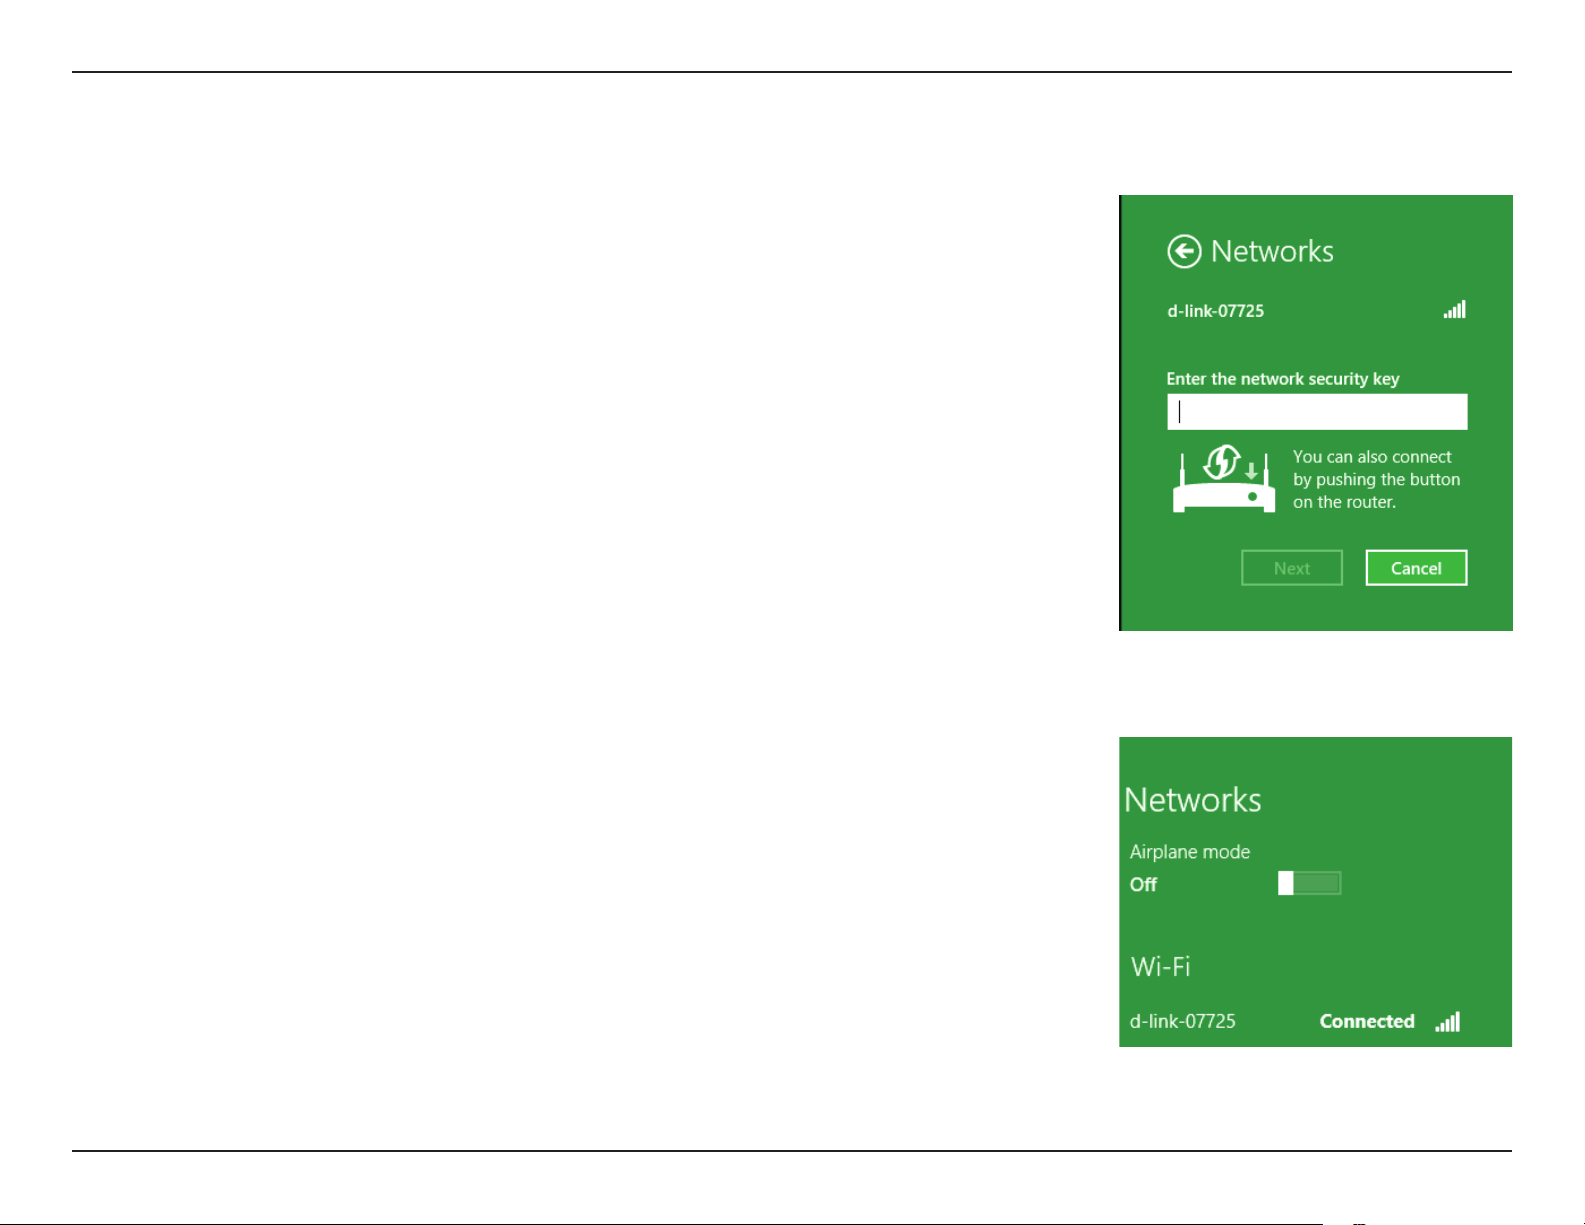
You will then be prompted to enter the network security key (Wi-Fi password) for
the wireless network. Enter the password into the box and click Next.
If you wish to use Wi-Fi Protected Setup (WPS) to connect to the router, you can also
press the WPS button on your router at this point to enable the WPS function.
When you have established a successful connection with a wireless network, the word
Connected will appear next to the name of the network to which you are connected.
34D-Link DCH-M225 User Manual
Page 39

Section 4 - Connecting a Wireless Client
Windows® 7
WPA/WPA2
It is recommended to enable wireless security (WPA/WPA2) on your wireless router or access point before conguring your
wireless adapter. If you are joining an existing network, you will need to know the security key or passphrase being used.
1. Click on the wireless icon in your system tray (lower-right corner).
2. The utility will display any available wireless networks in your area.
Wireless Icon
35D-Link DCH-M225 User Manual
Page 40

Section 4 - Connecting a Wireless Client
3. Highlight the wireless network (SSID) you would like to connect to
and click the Connect button.
If you get a good signal but cannot access the Internet, check your
TCP/IP settings for your wireless adapter. Refer to the Networking
Basics section in this manual for more information.
4. The following window appears while your computer tries to
connect to the router.
36D-Link DCH-M225 User Manual
Page 41

Section 4 - Connecting a Wireless Client
5. Enter the same security key or passphrase that is on your router and
click Connect.
It may take 20-30 seconds to connect to the wireless network. If the
connection fails, please verify that the security settings are correct. The
key or passphrase must be exactly the same as on the wireless router.
37D-Link DCH-M225 User Manual
Page 42

Section 4 - Connecting a Wireless Client
Windows Vista®
Windows Vista® users may use the built-in wireless utility. If you are using another company’s utility or Windows® 2000, please
refer to the user manual of your wireless adapter for help with connecting to a wireless network. Most utilities will have a
“site survey” option similar to the Windows Vista® utility as seen below.
If you receive the “Wireless Networks Are Available” bubble, click on the
center of the bubble to access the utility.
or
Right-click on the wireless computer icon in your system tray (lower-right
corner next to the time). Select Connect to a network.
The utility will display any available wireless networks in your area. Click
on a network (displayed using the SSID) and click Connect.
If you get a good signal but cannot access the Internet, check the TCP/
IP settings for your wireless adapter. Refer to “Troubleshooting” on page
44 for more information.
38D-Link DCH-M225 User Manual
Page 43

Section 4 - Connecting a Wireless Client
WPA/WPA2
It is recommended to enable wireless security (WPA/WPA2) on your wireless router or access point before conguring your
wireless adapter. If you are joining an existing network, you will need to know the security key or passphrase being used.
1. Open the Windows Vista® Wireless Utility by right-clicking on the
wireless computer icon in your system tray (lower right corner of
screen). Select Connect to a network.
2. Highlight the wireless network (SSID) you would like to connect
to and click Connect.
39D-Link DCH-M225 User Manual
Page 44

Section 4 - Connecting a Wireless Client
3. Enter the same security key or passphrase that is on your router and
click Connect.
It may take 20-30 seconds to connect to the wireless network. If the
connection fails, please verify that the security settings are correct. The
key or passphrase must be exactly the same as on the wireless router.
40D-Link DCH-M225 User Manual
Page 45

Section 4 - Connecting a Wireless Client
Windows® XP
Windows® XP users may use the built-in wireless utility (Zero Conguration Utility). The following instructions are for Service
Pack 2 users. If you are using another company’s utility, please refer to the user manual of your wireless adapter for help with
connecting to a wireless network. Most utilities will have a “site survey” option similar to the Windows® XP utility as seen below.
If you receive the Wireless Networks Detected bubble, click on the
center of the bubble to access the utility.
or
Right-click on the wireless computer icon in your system tray (lower-right
corner next to the time). Select View Available Wireless Networks.
The utility will display any available wireless networks in your area. Click
on a network (displayed using the SSID) and click the Connect button.
If you get a good signal but cannot access the Internet, check your TCP/
IP settings for your wireless adapter. Refer to the Networking Basics
section in this manual for more information.
41D-Link DCH-M225 User Manual
Page 46

Section 4 - Connecting a Wireless Client
WPA/WPA2
It is recommended to enable WPA on your wireless router or access point before conguring your wireless adapter. If you are
joining an existing network, you will need to know the WPA key being used.
1. Open the Windows® XP Wireless Utility by right-clicking on the
wireless computer icon in your system tray (lower-right corner
of screen). Select View Available Wireless Networks.
2. Highlight the wireless network (SSID) you would like to
connect to and click Connect.
42D-Link DCH-M225 User Manual
Page 47

Section 4 - Connecting a Wireless Client
3. The Wireless Network Connection box will appear. Enter the WPA-PSK
passphrase and click Connect.
It may take 20-30 seconds to connect to the wireless network. If the
connection fails, please verify that the WPA-PSK settings are correct. The
WPA-PSK passphrase must be exactly the same as on the wireless router.
43D-Link DCH-M225 User Manual
Page 48

Section 5 - Troubleshooting
Troubleshooting
This section provides solutions to problems that can occur during the installation and operation of the DCH-M225. Read the
following descriptions if you are having problems. The examples below are illustrated in Windows® XP. If you have a dierent
operating system, the screenshots on your computer will look similar to the following examples.
1. Why can’t I access the web-based conguration utility?
When entering the IP address of the Wi-Fi Audio Extender (dlinkap.local for example), you are not connecting to a website nor
do you have to be connected to the Internet. The device has the utility built-in to a ROM chip in the device itself. Your computer
must be on the same IP subnet to connect to the web-based utility.
• Make sure you have an updated Java-enabled web browser. We recommend the following:
• Internet Explorer 7 or later
• Firefox 12.0 or later
• Safari 4 or later
• Google Chrome 20.0 or later
• Make sure that you are connected to the same wireless network which is listed on the base of the DCH-M225. If you have an
active wired LAN Ethernet connection, try temporarily unplugging the Ethernet cable from the computer you are using, as
this may eliminate possible conicts from having two simultaneous connections on the same computer.
• Disable any Internet security software running on the computer. Software rewalls such as ZoneAlarm, BlackICE, Sygate,
®
Norton Personal Firewall, and Windows
with your rewall software for more information on disabling or conguring it.
XP rewall may block access to the conguration pages. Check the help les included
44D-Link DCH-M225 User Manual
Page 49

Section 5 - Troubleshooting
• Congure your Internet settings:
• Go to Start > Settings > Control Panel. Double-click the Internet Options Icon. From the Security tab, click the button to restore
the settings to their defaults.
• Click the Connection tab and set the dial-up option to Never Dial a Connection. Click the LAN Settings button. Make sure nothing
is checked. Click OK.
• Go to the Advanced tab and click the button to restore these settings to their defaults. Click OK three times.
• Close your web browser (if open) and open it.
• Access the web management interface. Open your web browser and enter the address of your extender (http://dlinkap.
local) in the address bar. This should open the login page for your web management. If the DCH-M225 is not connected to
an uplink router, you can try accessing the web interface using the default IP address http://192.168.0.50.
• If you still cannot access the conguration, unplug the extender from the power outlet for at least 10 seconds and plug it
back in. Wait about 30 seconds and try accessing the conguration. If you have multiple computers, try connecting using a
dierent computer.
2. What can I do if I forgot my password?
If you forgot your password, you must reset your extender. Unfortunately this process will change all your settings back to the
factory defaults.
To reset the extender, locate the reset button (hole) on the underside panel of the unit. With the extender powered on, use
a paperclip to hold the button down for 10 seconds. Release the button and the extender will go through its reboot process
(indicated by the LED turning red). Wait about 30 seconds to access the extender. The default IP address is http://dlinkap.
local. When logging in, the username is admin and leave the password box empty.
45D-Link DCH-M225 User Manual
Page 50

Appendix A - Wireless Basics
Wireless Basics
D-Link wireless products are based on industry standards to provide easy-to-use and compatible high-speed wireless
connectivity within your home, business or public access wireless networks. Strictly adhering to the IEEE standard, the D-Link
wireless family of products will allow you to securely and conveniently access your network. You will be able to enjoy the
freedom that wireless networking delivers.
A wireless local area network (WLAN) is a cellular computer network that transmits and receives data with radio signals instead of
wires. Wireless LANs are used increasingly in both home and oce environments, and public areas such as airports, coee shops
and universities. Innovative ways to utilize WLAN technology are helping people to work and communicate more eciently.
Increased mobility and the absence of cabling and other xed infrastructure have proven to be benecial for many users.
Wireless users can use the same applications they use on a wired network. Wireless adapters used on laptop and desktop
systems support the same protocols as Ethernet adapter cards.
Under many circumstances, it may be desirable for mobile network devices to link to a conventional Ethernet LAN in order to
use servers, printers or an Internet connection supplied through the wired LAN. A wireless router is a device used to provide
this link.
46D-Link DCH-M225 User Manual
Page 51

Appendix A - Wireless Basics
Tips
Here are a few things to keep in mind when you are installing your Wi-Fi Audio Extender.
Centralize the extender’s location
For best performance, make sure you place the extender in a centralized location within your desired usage area. Try to place
the extender so that there are minimal obstructions between it and the uplink router. If possible, use an elevated power outlet,
so the signal can be dispersed more easily. If you have a large home or usage area, you may need several extenders in order
to achieve optimal coverage.
Eliminate Interference
Place home appliances such as cordless telephones, microwaves, and televisions as far away as possible from the extender.
This can signicantly reduce any interference that the appliances might cause since they operate on same frequency.
Security
Don’t let your neighbors or intruders connect to your wireless network. Secure your wireless network by utilizing the WPA or
WEP security feature on the extender and uplink router. Refer to the relevant sections of this manual for further details.
47D-Link DCH-M225 User Manual
Page 52

Appendix C - Technical Specications
Technical Specications
Standards
• IEEE 802.11n
• IEEE 802.11g
• IEEE 802.11b
Wireless Frequency Range
• 2.4 GHz to 2.4835 GHz
Antenna
• Two Internal Antennas
Security
• Wi-Fi Protected Access (WPA/WPA2)
• WPS™ (PBC)
• Wired Equivalent Privacy (WEP) 64/128-bit
Advanced Features
• QRS Mobile setup app for iOS and Android devices
Device Management
• Web UI
Diagnostic LEDs
• Status/WPS
1
Operating Humidity
• 0% to 90% non-condensing
Power Input
• AC 110-240 V
Maximum Power Consumption
• 5 W
Certications
• FCC
• CE
• IC
• C-Tick
• CSA
• Wi-Fi Certied
Dimensions
• 54 x 42 x 54.5 mm (2.13 x 1.65 x 2.15 inches)
Weight
• 81.2 grams (0.18 lb)
Operating Temperature
• 0 to 40 ˚C (32 to 104 ˚F)
1
Frequency range varies depending on local regulations
48D-Link DCH-M225 User Manual
Page 53

Appendix D - Warranty
Warranty
Industry Canada statement:
This device complies with RSS-210 of the Industry Canada Rules. Operation is subject to the following two conditions: (1) This device may
not cause harmful interference, and (2) this device must accept any interference received, including interference that may cause undesired
operation.
Ce dispositif est conforme à la norme CNR-210 d’Industrie Canada applicable aux appareils radio exempts de licence. Son fonctionnement
est sujet aux deux conditions suivantes: (1) le dispositif ne doit pas produire de brouillage préjudiciable, et (2) ce dispositif doit accepter tout
brouillage reçu, y compris un brouillage susceptible de provoquer un fonctionnement indésirable.
FOR MOBILE DEVICE USAGE (>20cm/low power)
Radiation Exposure Statement:
This equipment complies with IC radiation exposure limits set forth for an uncontrolled environment. This equipment should be installed and operated
with minimum distance 20cm between the radiator & your body.
Déclaration d’exposition aux radiations:
Cet équipement est conforme aux limites d’exposition aux rayonnements IC établies pour un environnement non contrôlé. Cet équipement doit être
installé et utilisé avec un minimum de 20 cm de distance entre la source de rayonnement et votre corps.
49D-Link DCH-M225 User Manual
Page 54

Appendix D - Warranty
Federal Communication Commission Interference Statement
This device complies with Part 15 of the FCC Rules. Operation is subject to the following two conditions: (1) This device may not cause harmful
interference, and (2) this device must accept any interference received, including interference that may cause undesired operation.
This equipment has been tested and found to comply with the limits for a Class B digital device, pursuant to Part 15 of the FCC Rules. These limits are
designed to provide reasonable protection against harmful interference in a residential installation. This equipment generates, uses and can radiate
radio frequency energy and, if not installed and used in accordance with the instructions, may cause harmful interference to radio communications.
However, there is no guarantee that interference will not occur in a particular installation. If this equipment does cause harmful interference to radio
or television reception, which can be determined by turning the equipment o and on, the user is encouraged to try to correct the interference by
one of the following measures:
- Reorient or relocate the receiving antenna.
- Increase the separation between the equipment and receiver.
- Connect the equipment into an outlet on a circuit dierent from that to which the receiver is connected.
- Consult the dealer or an experienced radio/TV technician for help.
FCC Caution: Any changes or modications not expressly approved by the party responsible for compliance could void the user’s authority to
operate this equipment.
This transmitter must not be co-located or operating in conjunction with any other antenna or transmitter.
FOR MOBILE DEVICE USAGE (>20cm/low power)
Radiation Exposure Statement:
This equipment complies with FCC radiation exposure limits set forth for an uncontrolled environment. This equipment should be installed and
operated with minimum distance 20cm between the radiator & your body.
FOR COUNTRY CODE SELECTION USAGE (WLAN DEVICES)
Note: The country code selection is for non-US model only and is not available to all US model. Per FCC regulation, all WiFi product marketed in US
must xed to US operation channels only.
50D-Link DCH-M225 User Manual
 Loading...