

Page 1
ENGLISH
Copyright ©2011 D-Link Corporation/D-Link Systems, Inc. All rights reserved. D-Link and the D-Link logo are registered trademarks of D-Link
Corporation or its subsidiaries in the United States and other countries. Other trademarks are the property of their respective owners. Product
ENGLISH
Quick Install Guide
PowerLine AV 500 4-Port Gigabit Switch Kit
Thank you for purchasing the PowerLine AV 500 4-Port Gigabit Switch Kit. Follow
the easy steps in this guide to properly set up your PowerLine network. Please
verify that all the package contents listed below are available.
Package Contents
One PowerLine AV 500 Adapter (DHP-502AV)
One PowerLine AV 500 4-Port Gigabit Switch (DHP-540)
Recommendations
• For best results, use in a regular wall outlet without any other product plugged
into the same outlet. Connecting this product to a power strip or a surge
protector may adversely aect the performance of this product.
• Avoid using the PowerLine AV 500 adapters and switch in an electrical outlet
that is located near an appliance that uses a lot of power, such as a washer or
dryer, refrigerator, microwave, hair dryer, or air conditioning unit.
• To verify connectivity or if you are having connection problems, plug the
adapter and the switch in the same room to verify whether your home’s
electrical wiring is contributing to the issue. The adapter and switch’s
PowerLine LED indicators will illuminate if the connection is established.
Hardware Installation
Step 1
Plug the PowerLine AV 500 Adapter (DHP-502AV) into an AC wall outlet near
your router. Connect the included Ethernet cable to the network cable connector
located on the bottom of the adapter and attach the other end of the Ethernet
cable to your router.
Note: Power source is conrmed when the green LED Power Indicator on the adapter
is illuminated.
Step 3
To secure the PowerLine Network from unauthorized users, press the Simple
Connect Button on the DHP-502AV adapter for 2 seconds. Then, press the Simple
Connect Button on the DHP-540 switch (located on top) for 2 seconds. This must
be done within two minutes after pressing the Simple Connect Button on the
DHP-502AV adapter. The PowerLine LED on both DHP-502AV and DHP-540
should blink.
Note: Network connectivity is conrmed when the PowerLine and Ethernet LED
indicators on both the DHP-502AV adapter and the DHP-540 switch are illuminated.
Simple Connect Button
DHP-502AV Adapter
DHP-540 Switch
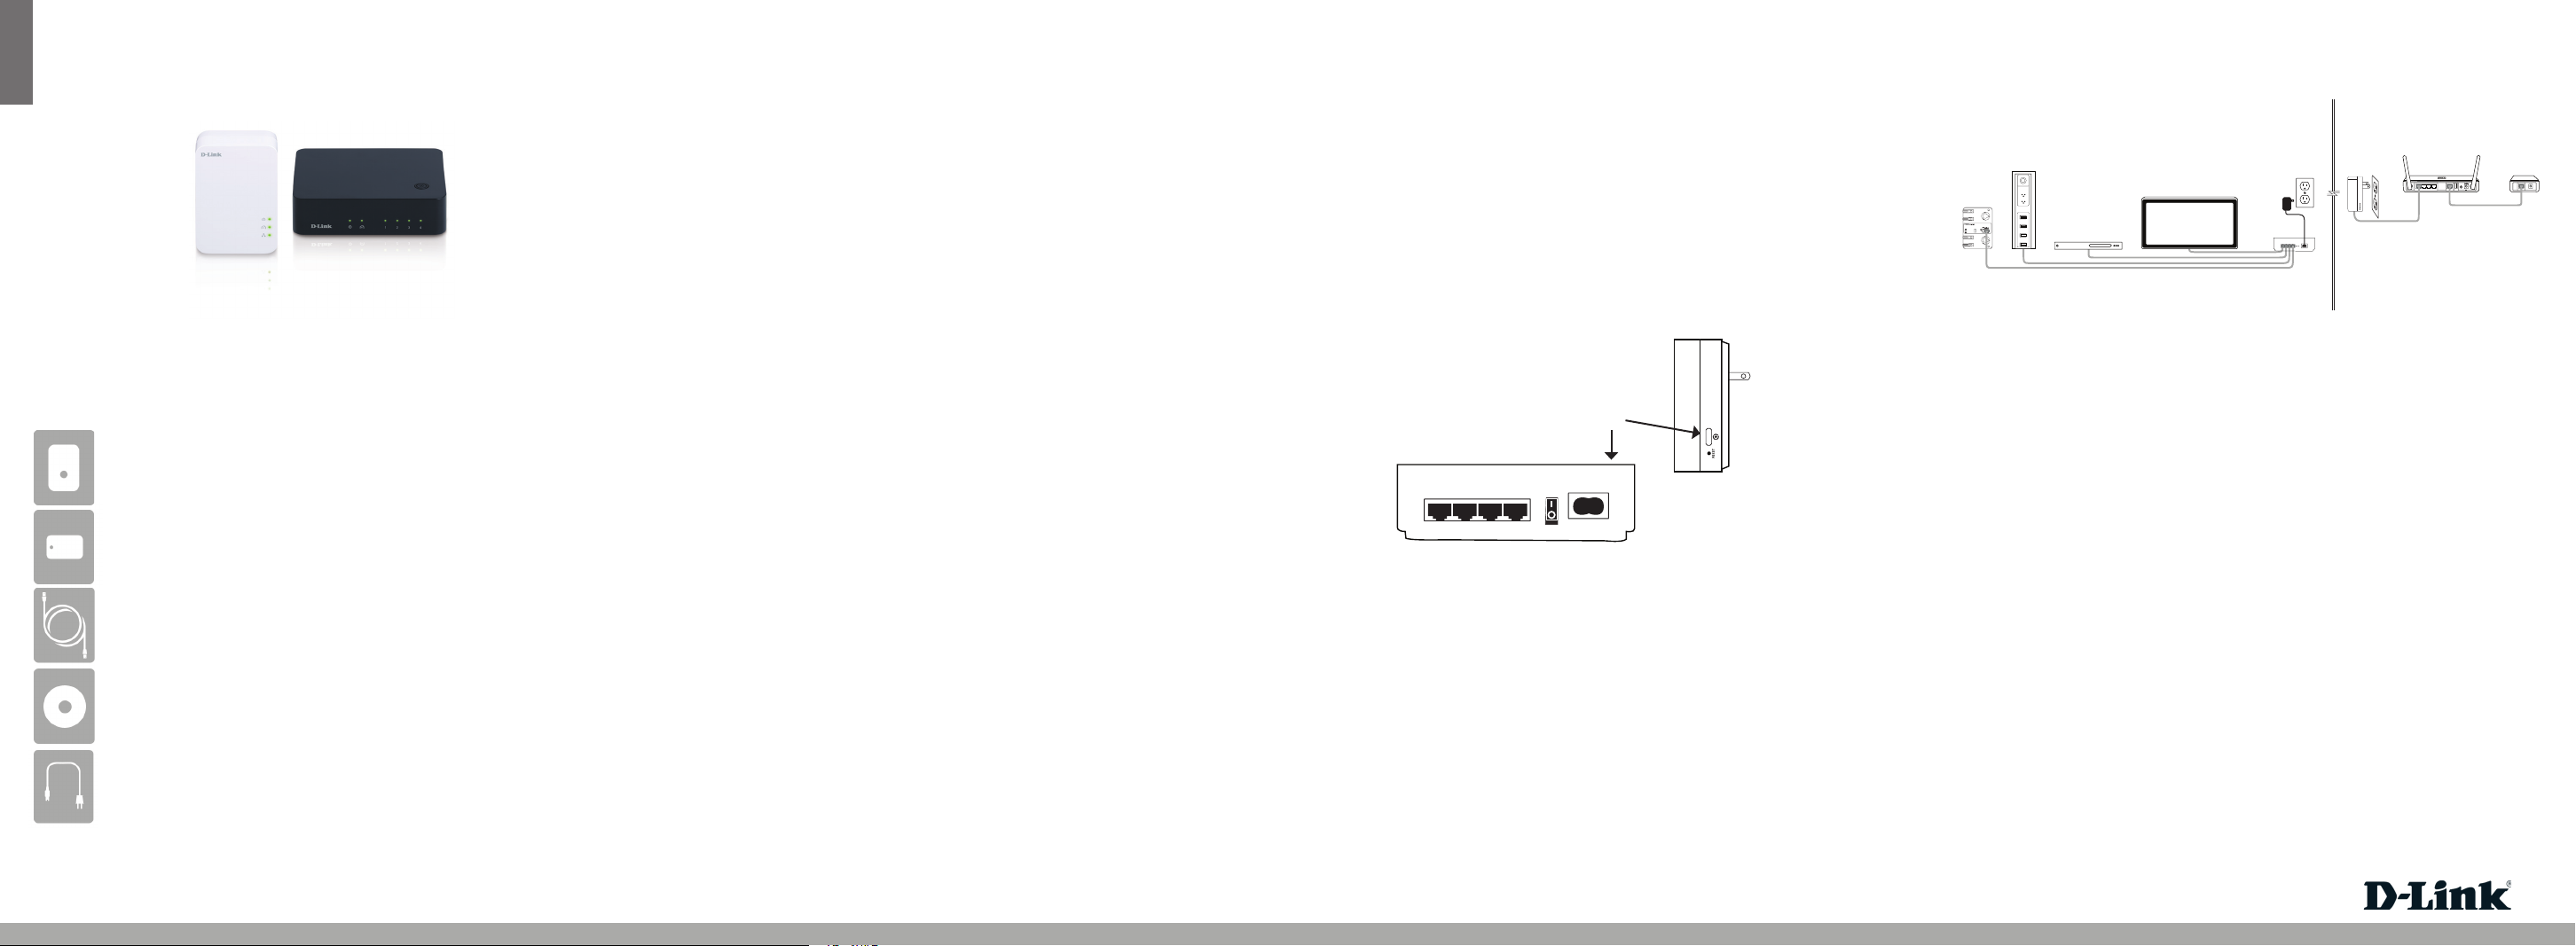
Your Network Setup
Game Console
NAS Storage
Blu-ray DVD Player
TV
DHP-502AV
(included)
DHP-540
(included)
Wireless Router
1 2LAN 3 4 INTERNET USB
Note: A minimum of 2 D-Link PowerLine AV devices are required to create a
PowerLine Network.
Cable/DSL
RESET
5V
3A
---
Modem
INTERNET
Two Ethernet Cables
CD-ROM (Includes User Manual and Software)
Power Cord (for DHP-540 Switch)
If any of the above items are missing, please contact your reseller.
Note: For hardware overview, please refer to the user manual.
DHP-541
Step 2
Connect the supplied power cord into the power receptor located on the back
of the PowerLine AV 500 4-Port Gigabit Switch and connect the other end to
an AC wall outlet (do not plug into a power strip or surge protector) in the
same room as your DHP-502AV in order to verify whether your home’s electrical
wiring is suitable for a PowerLine network. Once congured you may place your
DHP-540 in the location of your choice. Press the power button to the ON
position on the DHP-540 located on the back.
Note: Power source is conrmed when the green LED Power Indicator on the
DHP-540 are illuminated. Network Connectivity is conrmed when the PowerLine
and Ethernet LED indicators on both the DHP-502AV adapter and DHP-540 switch
are illuminated.
Step 4
After the network security setup is completed, your PowerLine network will
be securely congured with the same network encryption key. Place the
DHP-540 switch in a dierent location in your home. The DHP-540 will retain the
security settings even if it is unplugged. Connect the included Ethernet cable
to the network cable connector located on the DHP-540 switch and attach the
other end of the Ethernet cable to a game console, NAS device, media player,
Internet TV or computers.
Technical Support
Having trouble installing your new product? D-Link’s website contains the latest
user documentation and software updates for D-Link products. U.S. and Canadian
customers can contact D-Link Technical Support through our website or by phone.
United States
Internet: http://support.dlink.com
specications, size and shape are subject to change without notice, and actual product appearance may dier from that depicted on the
packaging. Visit www.dlink.com for more details.
Version 1.0 | June 20, 2011
Canada
Internet: http://support.dlink.ca
 Loading...