

Page 1
Two-Way Charging Hub
User Guide
使用说明
使用說明
ユーザーガイド
사용자 가이드
Bedienungsanleitung
Guía del usuario
Guide de l'utilisateur
Guida dell'utente
Gebruiksaanwijzing
Manual do utilizador
Guia do usuário
Руководство пользователя
2020.11v1.0
Page 2

Page 3

Contents
EN
User Guide 3
CHS
CHT
JP
KR
DE
ES
FR
IT
NL
PT
PT-BR
RU
Compliance Information 46
6
使用说明
8
使用說明
ユーザーガイド
사용자 가이드
10
14
Bedienungsanleitung 16
Guía del usuario 20
Guide de l'utilisateur 24
Guida dell'utente 27
Gebruiksaanwijzing 31
Manual do utilizador 34
Guia do usuário 38
Руководство пользователя 41
1
Page 4
Click
Clic
咔
Clic
A.
咔
カチッ
딸깍
Klick
Clic
Klik
Clique
Clique
Щелчок
B.
Click
Clic
C.
2
咔
咔
カチッ
딸깍
Klick
Clic
Clic
Klik
Clique
Clique
Щелчок
Page 5
EN
Disclaimer
Please read this entire document and all safe and lawful practices DJITM provided
carefully before use. Failure to read and follow instructions and warnings may result
in serious injury to yourself or others, damage to your DJI product, or damage to
other objects in the vicinity. By using this product, you hereby signify that you have
read this disclaimer and warning carefully and that you understand and agree to
abide by the terms and conditions herein. You agree that you are solely responsible
for your own conduct while using this product, and for any consequences thereof.
DJI accepts no liability for damage, injury or any legal responsibility incurred directly
or indirectly from the use of this product. This document and all other collateral
documents are subject to change at the sole discretion of DJI.
Warning
1. When using the DJI Mini 2 Two-Way Charging Hub (hereinafter referred to
as “charging hub”) to charge the DJI Mini 2 Intelligent Flight Batteries, it is
recommended to use a DJI 18W USB Charger or an FCC/CE-certied USB
charger that supports Quick Charge or USB Power Delivery protocol.
2. Place the charging hub on a at and stable surface when in use. Ensure the
device is properly insulated to prevent re hazards.
3. DO NOT attempt to touch the metal terminals on the charging hub.
4. Clean the metal terminals with a clean, dry cloth if there is any noticeable buildup.
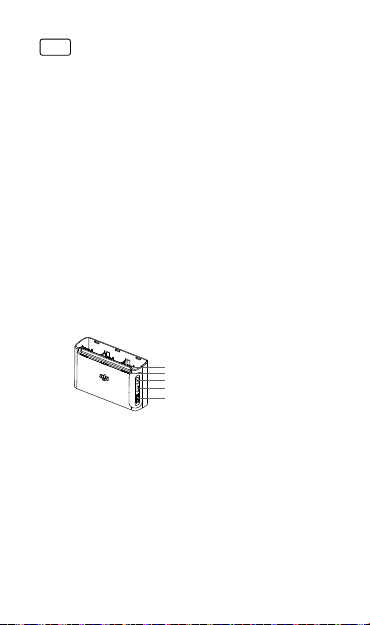
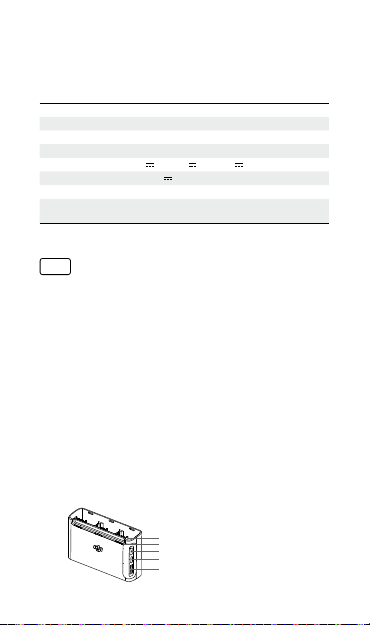
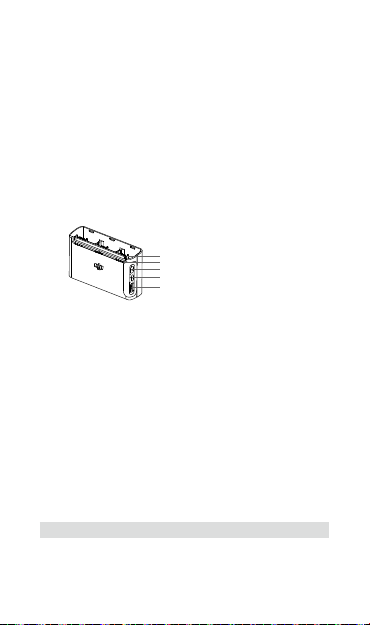
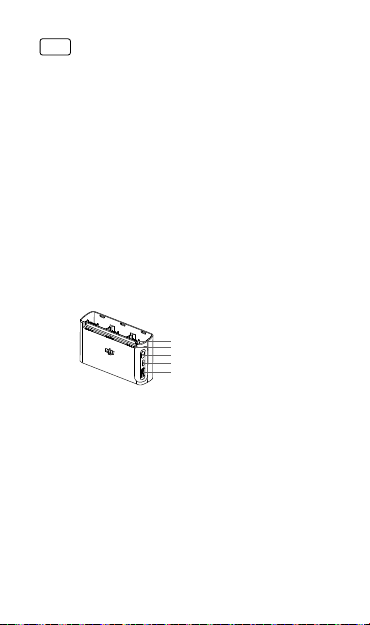
Overview
1. Battery Ports
2. Status LEDs
1
2
3. Function Button
3
4. Power Port (USB-C)
4
5
5. USB Port
Introduction
The DJI Mini 2 Two-Way Charging Hub is designed both to charge Intelligent
Flight Batteries connected to the battery ports and external devices such as a DJI
Mini 2 Remote Controller, smartphones, or tablets connected to the USB port. The
following scenarios explain more about how the charging hub works.
1. When a charger is connected to the charging hub with the Intelligent Flight
Batteries inserted and external devices disconnected from the USB port, the
charging hub will only charge the Intelligent Flight Batteries.
2. When connecting a charger to the charging hub, with the Intelligent Flight Batteries
inserted and external devices connected to the USB port, the Intelligent Flight
Batteries will be prioritized by default. The external devices will be charged when
all the inserted batteries are fully charged. Press and hold the function button on
the charging hub to switch to charging the external devices rst.
3
Page 6
3. When the Intelligent Flight Batteries are inserted into the charging hub, with
external devices connected to the USB port and the charger disconnected
from the charging hub, the batteries can be used as a power bank to charge
the connected external devices.
Usage
Charging Intelligent Flight Batteries
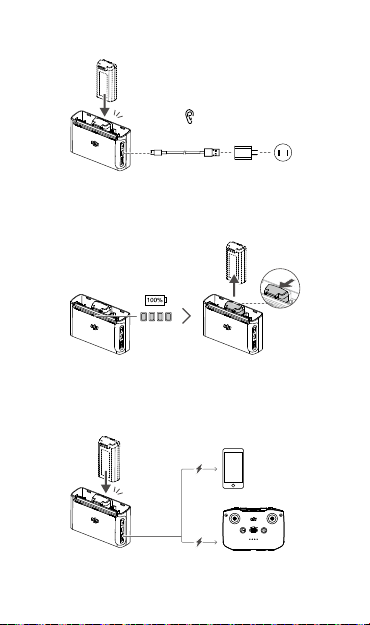
1. As shown in Figure A, insert the battery into the battery port until there is a
click. Connect the charging hub to a power outlet (100-240 V, 50/60 Hz) using
a USB-C cable and a DJI 18W USB Charger.
2. The Intelligent Flight Battery with the highest power level will be charged rst
and the rest will be charged in sequence according to their power levels.
The status LEDs will glow solid white after the corresponding battery is fully
charged. Remove the battery from the charging hub as shown in Figure B.
Using Intelligent Flight Batteries as Power Banks
As shown in Figure C, insert the Intelligent Flight Battery into the charging hub
without connecting it to a charger, then connect any external device to the USB
port in the charging hub. The Intelligent Flight Battery with the lowest power level
will be discharged rst and the rest in sequence according to their power levels.
The status LEDs will display the power level of the battery that supplies power
when the external devices are being charged.
Press the function button on the charging hub once to activate charging
if charging does not begin automatically.
Switching Devices to Charge
When inserting the Intelligent Flight Batteries into the charging hub, if both a
charger and external devices are connected to the charging hub, it will prioritize
the Intelligent Flight Batteries and charge them rst. After all the Intelligent Flight
Batteries have been fully charged, the external devices will be charged.
Press and hold the function button on the charging hub for two seconds to
prioritize charging external devices. Charge for Intelligent Flight Batteries will be
continued after the external devices are fully charged or they have been charged
for 4 hours. When charging external devices, press and hold the function button
for two seconds to switch back to charging Intelligent Flight Batteries.
• When the input of the charging hub is lower than 5V/2A, there is a chance
that the USB port will be unable to charge the external devices.
• When charging an external device such as a smartphone or tablet, if it
has high standby power consumption, the charging hub may not detect
whether the device is fully charged. In this case, charging will not
switch to Intelligent Flight Batteries automatically until after charging the
external devices for 4 hours. Users can manually switch the charging
priority by pressing and holding the function button.
4
Page 7
Checking Battery Levels
The status LEDs will display battery levels for three seconds after the batteries are
inserted into the charging hub. Users can also check the battery levels by pressing
the function button once. Refer to the section below for the battery level description.
Status LEDs Descriptions
Charging Status
Each battery port has its corresponding status LED array.
Status LEDs in an array blink
successively (quickly)
Status LEDs in an array blink
successively (slowly)
Status LEDs in an array blink
successively (slowly for approx. 30 s,
then blink very slowly with a gap of 2 s)
Status LEDs in an array are solid
All status LEDs blink in sequence No battery is inserted.
Battery Level
Each battery port has its corresponding status LED array, from LED1 to LED4 (from
left to right). The battery level description is the same as the one for the battery level
LEDs on the aircraft. Refer to the DJI Mini 2 User Manual for more information.
Abnormal Status
The abnormal status display of each battery status LED array is the same as the
one for the battery level LEDs on the aircraft when inserting the battery into the
aircraft. Refer to the DJI Mini 2 User Manual for more information.
The battery in the corresponding battery
port is being charged using a Quick
Charge charger.
The battery in the corresponding battery port
is being charged using a normal charger.
The battery in the corresponding battery
port is being charged. In this case,
charging will be extremely slow. It is
recommended to use another USB-C
cable for charging.
The battery in the corresponding battery
port is fully charged.
Specifications
Model CHX161
Compatible DJI Charger DJI 18W USB Charger
Compatible DJI Battery BWX161-2250-7.7 Intelligent Flight Battery
Operating Temperature 5° to 40° C (41° to 104° F)
Input 5 V
USB Port Output Max: 5 V
Weight Approx. 72 g
Charging Time*
* Charging time was tested using a DJI 18W USB Charger in a lab environment and
should be used as reference only.
3 A / 9 V 3 A / 12 V 3 A
2 A
For three BWX161-2250-7.7 batteries:
Approx. 4 hours
5
Page 8

CHS
免责声明
使用本产品之前,请仔细阅读并遵循本文及大疆TM创新(DJITM)提供的所有安全
指引,否则可能会给您和周围的人带来伤害,损坏本产品或其它周围的物品。一旦
使用本产品,即视为您已经仔细阅读本文档,理解、认可和接受本文档全部条款和
内容。您承诺对使用本产品以及可能带来的后果负全部责任。大疆创新(DJI)对
于直接或间接使用本产品而造成的损坏、伤害以及任何法律责任不予负责。
本文档及本产品所有相关的文档最终解释权归大疆创新(DJI)所有。如有更新,
恕不另行通知。请访问 www.dji.com 官方网站以获取最新的产品信息。
注意事项
1. 使用 DJI Mini 2 双向充电管家(简称“充电管家”)为智能飞行电池充电时,
推荐配合 DJI 18W USB 充电器或其他符合 FCC/CE 规格且支持 QC 或 USB PD
快充协议的 USB 充电器。
2. 使用时请将充电管家平稳放置,并注意绝缘及防火。
3. 请勿用手或其他物体触碰金属端子。
4. 若金属端子附着异物,请用干布擦拭干净。
部件名称
1. 电池接口
2. 状态指示灯
1
2
3. 功能按键
3
4. 电源接口(USB-C)
4
5. USB 接口
5
简 介
DJI Mini 2双向充电管家既可通过电池接口为 DJI Mini 2 智能飞行电池充电,又可
通过 USB 接口为 DJI Mini 2 遥控器或智能手机、平板电脑等外接设备充电。具体
分为以下几种使用场景。
1. 当插入智能飞行电池,连接充电器,且 USB 接口未连接外接设备时,仅为智能
飞行电池充电。
2. 当插入智能飞行电池,连接充电器,且 USB 接口已连接外接设备时,默认优先
为智能飞行电池充电,所有插入的电池充电完成后再为外接设备充电。长按功
能按键可切换至优先为外接设备充电。
3. 当插入智能飞行电池,不连接充电器时,可将智能飞行电池转换为移动电源为
连接至 USB 接口的外接设备充电。
使 用
为智能飞行电池充电
1. 如图 A,插入电池并按压到底,直至听到“咔”的一声,然后使用 USB-C 线和
DJI 18W USB 充电器连接至交流电源(100-240 V,50/60 Hz)。
6
Page 9
2. 电池将按照电量从高至低的顺序依次进行充电。电池充电完成后对应的状态指
示灯变为白灯常亮,请按照图 B 将电池从充电管家取出。
将智能飞行电池转换为移动电源
无需连接充电器至充电管家,按照图 C 插入电池,并连接外接设备至 USB 接口即
可为外接设备充电。电池将按照电量由低至高的顺序依次放电,充电管家的状态指
示灯将显示当前正在放电的电池电量。
若充电未自动开始,可短按功能按键启动充电。
切换充电设备
智能飞行电池插入充电管家后,若同时连接了充电器和外接设备,将默认优先为智
能飞行电池充电,电池充满后将为外接设备充电。
长按功能按键 2秒可切换至优先为外接设备充电,外接设备充满电或充电4 小时后,
将继续为智能飞行电池充电。为外接设备充电过程中,再次长按功能按键 2 秒可切
换至优先为智能飞行电池充电。
• 若充电管家的电源输入小于 5V/2A,则可能无法通过 USB 接口为外接设
备充电。
• 优先为外接设备充电时,若外接设备待机功耗较高(例如智能手机、平板
电脑),充电管家可能无法检测是否充满,则需等待至充电 4 小时后方可
自动切换至为智能飞行电池充电。用户亦可长按功能按键手动切换。
查看电池电量
电池插入充电管家后,状态指示灯会自动显示电池电量 3 秒,用户亦可短按功能按
键查看电量。电量的指示灯描述见后文。
状态指示灯描述
充电状态
每个电池接口对应一组状态指示灯。
一组灯循环闪烁(快闪) 对应接口的电池正在充电(使用快充充电器)
一组灯循环闪烁(慢闪) 对应接口的电池正在充电(使用普通充电器)
一组灯循环闪烁(慢闪约 30 秒
后转为超慢闪,闪灯间隔 2 秒)
一组灯常亮 对应接口的电池充电完成
所有灯轮流闪烁 所有接口均未插入电池
电池电量
对于每个电池接口对应的一组状态指示灯,从左至右依次为 LED1 至 LED4。电量
指示与飞行器的电池电量指示灯相同,详见《DJI Mini 2 用户手册》。
对应接口的电池正在充电(充电速度极慢,建
议更换 USB-C 线)
7
Page 10
异常状态
每组指示灯的异常状态显示与插入电池至飞行器时其上的电池电量指示灯相同,详
见《DJI Mini 2 用户手册》。
规格参数
产品型号 CHX161
适用的 DJI 充电器 DJI 18W USB 充电器
适用的 DJI 电池 BWX161-2250-7.7 智能飞行电池
工作环境温度 5℃至 40℃
输入 5 V
USB 接口输出 最大 5 V
重量 约 72 g
充电时间 * 三块 BWX161-2250-7.7 智能飞行电池:
* 充电时间为使用 DJI 18W USB 充电器在实验环境下测得,仅供参考。
3 A / 9 V 3 A / 12 V 3 A
2 A
约 4 小时
CHT
免責聲明
使用本産品之前,請仔細閱讀並遵循本文及大疆TM創新(DJITM)提供的所有安全
指南,否則可能會給您和周圍的人帶來傷害,損壞本産品或其它周圍的物品。一旦
使用本產品,即視為您已經仔細閱讀本文件,理解、認可和接受本文件全部條款和
內容。您承諾對使用本產品以及可能帶來的後果負全部責任。大疆創新(DJI)對
於直接或間接使用本產品而造成的損壞、傷害及任何法律責任概不負責。
本文件及本產品所有相關文件的最終解釋權歸大疆創新(DJI)所有。如有更新,
恕不另行通知。請前往 www.dji.com 官方網站以取得最新的產品資訊。
注意事項
1. 使用 DJI Mini 2 雙向充電管家(簡稱「充電管家」)為智能飛行電池充電時,推
薦配合 DJI 18W USB 充電器或其他符合 FCC/CE 規格且支援 QC 或 USB PD 快
充協議的 USB 充電器。
2. 使用時,請將充電管家平穩放置,並注意絕緣及防火。
3. 請勿用手或其他物體觸碰金屬端點。
4. 若金屬端點上附著異物,請用乾布擦拭乾淨。
零組件名稱
1. 電池連接埠
2. 狀態指示燈
1
3. 功能按鍵
2
3
4. 充電連接埠(USB-C)
4
5. USB 連接埠
8
5
Page 11
簡 介
DJI Mini 2 雙向充電管家既可透過電池連接埠為 DJI Mini 2 智能飛行電池充電,又
可透過 USB 連接埠為 DJI Mini 2 遙控器或智慧型手機、平板電腦等外接設備充電。
具體分為以下幾種使用場景。
1. 當插入智能飛行電池,連接充電器,且 USB 連接埠未連接外接設備時,僅為智
能飛行電池充電。
2. 當插入智能飛行電池,連接充電器,且 USB 連接埠已連接外接設備時,預設優
先為智能飛行電池充電,所有插入的電池充電完成後再為外接設備充電。長按
功能按鍵可切換至優先為外接設備充電。
3. 當插入智能飛行電池,不連接充電器時,可將智能飛行電池轉換為移動電源為
連接至 USB 連接埠的外接設備充電。
使 用
為智能飛行電池充電
1. 如圖 A,插入電池並按壓到底,直至聽到「咔」一聲,然後使用 USB-C 線和
DJI 18W USB 充電器連接至交流電源(100-240 V,50/60 Hz)。
2. 電池將按照電量從高至低的順序依次進行充電。電池充電完成後對應的狀態指
示燈變為白燈恆亮,請按照圖 B 將電池從充電管家取出。
將智能飛行電池轉換為行動電源
無需連接充電器至充電管家,按照圖 C 插入電池,並連接外接設備至 USB 連接埠
即可為外接設備充電。電池將按照電量由低至高的順序依次放電,充電管家的狀態
指示燈將顯示當前正在放電的電池電量。
若充電未自動開始,可短按功能按鍵啓動充電。
切換充電設備
智能飛行電池插入充電管家後,若同時連接充電器和外接設備,將預設優先為智能
飛行電池充電,電池充滿後將為外接設備充電。
長按功能按鍵 2 秒可切換至優先為外接設備充電,外接設備充滿電或充電 4 小時
後,將繼續為智能飛行電池充電。為外接設備充電過程中,再次長按功能按鍵 2 秒
可切換至優先為智能飛行電池充電。
• 若充電管家的電源輸入小於 5V/2A,則可能無法透過 USB 連接埠為外接
設備充電。
• 優先為外接設備充電時,若外接設備待機功耗較高(例如智慧手機、平板
電腦),充電管家可能無法檢測是否充滿,則需等待至充電 4 小時後方可
自動切換至為智能飛行電池充電。使用者亦可長按功能按鍵手動切換。
查看電池電量
電池插入充電管家後,狀態指示燈會自動顯示電池電量 3 秒,使用者亦可短按功能
按鍵查看電量。電量的指示燈描述見後文。
9
Page 12
狀態指示燈說明
充電狀態
每個電池連接埠對應一組狀態指示燈。
一組燈循環閃爍(快閃) 對應連接埠的電池正在充電(使用快充充電器)
一組燈循環閃爍(慢閃) 對應連接埠的電池正在充電(使用普通充電器)
一組燈循環閃爍(慢閃約 30 秒
後轉為超慢閃,閃燈間隔 2 秒)
一組燈恆亮 對應連接埠的電池充電完成
所有燈輪流閃爍 所有連接埠均未插入電池
電池電量
對於每個電池連接埠對應的一組狀態指示燈,從左至右依次為 LED1 至 LED4。電
量指示與飛行器的電池電量指示燈相同,詳見《DJI Mini 2 使用者手冊》。
異常狀態
每組指示燈的異常狀態顯示與插入電池至飛行器時其上的電池電量指示燈相同,詳
見《DJI Mini 2 使用者手冊》。
對應連接埠的電池正在充電(充電速度極慢,
建議更換 USB-C 線)
規格參數
產品型號 CHX161
適用的 DJI 充電器 DJI 18W USB 充電器
適用的 DJI 電池 BWX161-2250-7.7 智能飛行電池
運作環境溫度 5℃ 至 40℃
輸入 5 V
USB 連接埠輸出 最大 5 V
重量 约 72 g
充電時間 * 三顆 BWX161-2250-7.7 智能飛行電池:
* 充電時間為使用 DJI 18W USB 充電器在實驗環境下測得,僅供參考。
3 A / 9 V 3 A / 12 V 3 A
2 A
约 4 小時
JP
免責条項
ご使用前に、この文書全体に目を通し、DJITMが提供する安全で合法的慣行につい
ての説明を注意深くお読みください。指示と警告に従わなかった場合、ご自身や
他の人に重傷を負わせたり、またはお客様のDJI製品および周辺の他の物の破損に
つながる恐れがあります。本製品を使用することにより、本書の免責事項および
警告をよく読み、記載されている利用規約を理解し、順守することに同意したと
みなされます。本製品の使用中の行動とこれに伴う結果には、ユーザーが全面的
に責任を負うことに同意するものとします。本製品の使用により直接または間接
的に発生する損害、傷害、およびその他法的責任に対して、DJIは一切責任を負い
10
Page 13
ません。本書およびその他すべての付属書は、DJI独自の裁量で変更されることが
あります。
警告
1. DJI Mini 2 2WAY 充電ハブ(以下「充電ハブ」と呼びます)で DJI Mini 2 イン
テリジェント フライトバッテリーを充電する場合、DJI 18W USB充電器、あ
るいはFCC/CE認定のUSB充電器(Quick ChargeプロトコルまたはUSB Power
Deliveryプロトコル対応)の使用を推奨します。
2. 本充電ハブを使用する際は、平らで安定した面に置いてください。火災の危険
を防ぐために、この機器が適切に絶縁されていることを確認してください。
3. 充電ハブの金属端子に触れないでください。
4. 金属端子の汚れが目立つ場合は、きれいな乾いた布で拭いてください。
5. 本書のイラストは実際の商品と多少異なる場合があります。実物を参照して
ください。
概要
1. バッテリーポート
2. ステータスLED
1
2
3. ファンクション ボタン
3
4. 電源ポート(USB-C)
4
5
5. USBポート
はじめに
DJI Mini 2 2WAY充電ハブは、バッテリーポートに接続されたインテリジェント
フライトバッテリーやUSBポートに接続されたDJI Mini 2送信機/スマートフォ
ン/タブレットなどの外部デバイスの両方を充電するように設計されています。
以下では、充電ハブの仕組みについて詳しく説明します。
1. インテリジェント フライトバッテリーが挿入され、USBポートから外部デバ
イスの接続が切断された状態で充電器が充電ハブに接続されている場合、充
電ハブはインテリジェント フライトバッテリーのみを充電します。
2. インテリジェント フライトバッテリーが挿入され、外部デバイスがUSBポートに
接続された状態で充電器を充電ハブに接続すると、デフォルトの設定ではインテ
リジェント フライトバッテリーが優先されます。挿入されたすべてのバッテリー
が完全に充電されると、外部デバイスが充電されます。最初に外部デバイスの充
電に切り替えるには、充電ハブのファンクションボタンを長押しします。
3. インテリジェント フライトバッテリーを充電ハブに挿入し、外部デバイスを
USBポートに接続し、充電器の接続を充電ハブから切断すると、バッテリー
をパワーバンクとして使用して、接続された外部デバイスを充電できます。
使用方法
インテリジェント フライトバッテリーの充電
1. 図 Aに示すように、カチッという音がするまでバッテリーをバッテリーポート
に挿入します。USB-CケーブルとDJI 18W USB充電器を使用して、充電ハブ
を電源コンセント(100〜240V、50/60Hz)に接続します。
11
Page 14
2. バッテリー残量の一番多いインテリジェント フライトバッテリーが最初に完
全充電され、他のバッテリーも残量が多いものから少ないものへの順で充電
されます。それらのバッテリーが完全に充電されると、ステータスLEDは白く
点灯します。図Bに示すように、充電ハブからバッテリーを取り外します。
インテリジェントフ ライトバッテリーを パワーバ ンクとして使 用する
図Cに示すように、インテリジェント フライトバッテリーを充電器に接続せずに
充電ハブに挿入し、それから外部デバイスを充電ハブの
す。バッテリー残量の一番少ないインテリジェント フライトバッテリーが最初
に放電され、他のバッテリーも残量が少ないものから多いものへの順で放電され
ます。ステータス
バッテリーのバッテリー残量を表示します。
充電するデバイスの切り替え
インテリジェント フライトバッテリーを充電ハブに挿入するときに、充電器と
外部デバイスの両方が充電ハブに接続されている場合、インテリジェント フラ
イトバッテリーが優先され、最初に充電されます。すべてのインテリジェント
フライトバッテリーが完全に充電されると、外部デバイスが充電されます。
充電ハブの機能ボタンを2秒間長押しすると、外部デバイスの充電が優先されま
す。インテリジェント フライトバッテリーの充電は、外部デバイスが完全に充
電されるか、4時間充電された後に行われます。外部デバイスを充電している時
にファンクションボタンを2秒間長押しすると、インテリジェント フライトバッ
テリーの充電に切り替わります。
バッテリー残量の確認
ステータス
量を表示します。または、ファンクションボタンを1回押して、バッテリー残量
を確認することができます。バッテリー残量の説明については、以下のセクショ
ンを参照してください。
12
LED
は、外部デバイスが充電されているときに電力を供給する
充電が自動的に開始されない場合は、充電ハブのファンクションボタン
を1回押して充電を有効にします。
•
充電ハブの入力が
電できない可能性があります。
•
スマートフォンやタブレットなどの外部デバイスを充電する際、スタンバ
イ消費電力が大きい場合、充電ハブはデバイスの充電が完了したかどうか
を検出しないことがあります。この場合、外部デバイスの充電時間が4時
間に達するまで、インテリジェント フライトバッテリーへの自動的な充
電の切り替えは行われません。ユーザーは、ファンクションボタンを長押
しすることで、充電の優先度を手動で切り替えることができます。
5V/2A
より低い場合、
LED
は、バッテリーが充電ハブに挿入された後、3秒間バッテリー残
USB
ポートに接続しま
USB
ポートが外部デバイスを充
Page 15
LED
ステータス
充電ステータス
各バッテリーポートには、一列に並んだステータス
ステータス
(すばやく)点滅
ステータス
(ゆっくり)点滅
ステータス
て点滅(約30秒間ゆっくりと点滅
し、その後2秒間の間隔で非常に
ゆっくり点滅する)
ステータス
すべてのステータス
に点滅
バッテリー残量
各バッテリーポートには、
タス
明と同じです。詳細は、
異常ステータス
各バッテリーのステータス
機体に挿入している時の機体のバッテリー残量
DJI Mini 2
の説明
LED
(一列)が連続して
LED
(一列)が連続して
LED
(一列)が連続し
LED
(一列)が点灯
LED
LED
があります。バッテリー残量の説明は、機体のバッテリー残量
のユーザーマニュアルを参照してください。
該当のバッテリーポートのバッテリー
Quick Charge
は、
されています。
該当のバッテリーポートのバッテリー
は、通常の充電器を使用して充電されて
います。
該当のバッテリーポートのバッテリーが充
電されています。この場合、充電は非常に
遅くなります。別の
用して充電することをお勧めします。
該当のバッテリーポートのバッテリーの
充電が完了しました。
が順番
バッテリーが挿入されていません。
LED1からLED4
(左から右) の一列に並んだステー
DJI Mini 2
のユーザーマニュアルを参照してください。
LED
(一列)の異常ステータス表示は、バッテリーを
LED
仕様
モデル
DJI
対応
充電器
DJI
対応
バッテリー
動作環境温度
入力
USB
ポート出力 最大:
重量 約
充電時間*
*
充電時間はラボ環境下で
です。
CHX161
DJI 18W USB
充電器
BWX161-1065-7.6
バッテリー
5℃ ~ 40℃
3 A / 9 V 3 A / 12 V 3 A
5 V
2 A
5 V
72 g
BWX161-1065-7.6
2.5
約
時間
DJI 18W USB
充電器を使用してテストされており参考値
LED
があります。
充電器を使用して充電
USB-C
ケーブルを使
LED
の表示と同じです。詳細は、
インテリジェント フライト
バッテリー3個の場合:
の説
13
Page 16
KR
고지 사항
DJITM에서 제공해드리는 본 문서 전문과 안전하고 적법한 사용 방법 관련된 모든 내용을 사용 전
에 주의 깊게 읽어 주십시오. 지침 및 경고 사항을 읽고 따르지 않을 경우 사용자 또는 다른 사람
이 심각하게 다치거나 DJI 제품 또는 근처에 있는 다른 물체가 손상될 수 있습니다. 제품을 사용
하는 것은 본 고지 사항 및 경고를 주의 깊게 읽었으며 명시된 약관을 이해하고 준수하기로 동의
한 것으로 간주합니다. 본 제품 사용 시 사용자의 행위와 그에 따른 결과에 대한 책임은 전적으로
본인에게 있다는 것에 동의합니다. DJI는 본 제품의 사용으로 인해 직접 또는 간접적으로 발생한
피해, 부상 또는 모든 법적 책임에 대해 어떠한 책임도 지지 않습니다. 이 문서 및 기타 모든 부수
적인 문서는 DJI의 단독 재량에 따라 변경될 수 있습니다.
경고
1. DJI Mini 2 양방향 충전 허브( 이하 “충전 허브”)를 사용해 DJI Mini 2 인텔리전트 플
라이트 배터리를 충전할 때, DJI 18W USB 충전기 또는 고속 충전이나 USB Power
Delivery(USB 파워 딜리버리, USB PD) 프로토콜을 지원하는 FCC/CE 인증 USB 충전
기를 사용하길 권장합니다.
2. 충전 허브를 사용할 때는 평평하고 흔들리지 않는 바닥에 놓으십시오. 화재가 발생하지 않
도록 기기가 올바르게 절연 처리되어 있는지 확인하십시오.
3. 충전 허브의 금속 단자를 만지려고 시도하지 마십시오.
4. 눈에 띄는 축적물이 있으면 깨끗하고 마른 천으로 금속 단자를 닦으십시오.
개요
1. 배터리 포트
2. 상태 LED
1
2
3. 기능 버튼
3
4. 전원 포트 (USB-C)
4
5. USB 포트
5
소개
DJI Mini 2 양방향 충전 허브는 배터리 포트에 연결해 인텔리전트 플라이트 배터리를 충전하
고, USB 포트에 연결된 외부 장치(USB 포트에 연결된 DJI Mini 2 조종기, 스마트폰 또는 태
블릿)를 충전하도록 설계되었습니다. 다음 시나리오는 충전 허브의 작동 방식에 대해 자세히
설명합니다.
1. 인텔리전트 플라이트 배터리가 삽입되고 USB 포트에서 외부 장치가 분리된 충전 허브에
충전기가 연결되면, 충전 허브는 인텔리전트 플라이트 배터리만 충전합니다.
2. 인텔리전트 플라이트 배터리가 삽입되고 USB 포트에 외부 장치가 연결된 충전 허브에 충
전기를 연결할 경우, 기본적으로 인텔리전트 플라이트 배터리에 우선순위가 지정됩니다.
삽입된 모든 배터리가 완전히 충전되면 외부 장치가 충전됩니다. 외부 장치를 먼저 충전하
도록 전환하려면 충전 허브의 기능 버튼을 길게 누릅니다.
3. 충전기가 충전 허브에서 분리된 상태에서 인텔리전트 플라이트 배터리가 충전 허브에 삽입
되어 있고, 외부 장치가 USB 포트에 연결된 경우, 배터리를 보조 배터리로 사용해 외부 장
치를 충전할 수 있습니다.
14
Page 17
사용법
인텔리전트 플라이트 배터리 충전
1. 그림 A에 표시된 대로 딸깍 소리가 날 때까지 배터리 포트에 배터리를 삽입합니다. USB-C
케이블과 DJI 18W USB 충전기를 사용하여 전원 콘센트(100~240 V, 50/60 Hz)에 충전 허
브를 연결합니다.
2. 배터리 잔량이 가장 높은 인텔리전트 플라이트 배터리부터 먼저 충전되고 잔량 정도에 따
라 나머지도 순서대로 충전됩니다. 해당 배터리가 완전히 충전된 후 상태 LED가 흰색으로
계속 켜져 있습니다. 그림 B와 같이 충전 허브에서 배터리를 제거합니다.
인텔리전트 플라이트 배터리를 보조 배터리로 사용하기
그림 C에 표시된 것처럼, 충전기가 연결되지 않은 충전 허브에 인텔리전트 플라이트 배터리를
삽입한 후, 충전 허브의 USB 포트에 외부 장치를 연결합니다. 배터리 잔량이 가장 낮은 인텔
리전트 플라이트 배터리부터 방전된 후 잔량 정도에 따라 나머지도 순서대로 방전됩니다. 상
태 LED는 외부 장치가 충전될 때 전력을 공급하는 배터리의 전력 수준을 표시합니다.
충전이 자동으로 시작되지 않으면 충전 허브의 기능 버튼을 한 번 눌러 충전을 활성화
합니다.
장치 간 충전 순서 전환하기
인텔리전트 플라이트 배터리를 충전 허브에 삽입할 때 충전기 및 외부 장치가 충전 허브에 연
결되어 있으면, 인텔리전트 플라이트 배터리를 우선순위로 지정하고 먼저 충전합니다. 모든
인텔리전트 플라이트 배터리가 완전히 충전되면 외부 장치가 충전됩니다.
충전 허브의 기능 버튼을 2초 동안 눌러 외부 기기를 충전 우선순위로 지정합니다. 외부 기기
가 완전히 충전되거나 4시간 동안 충전된 후 인텔리전트 플라이트 배터리 충전을 계속합니다.
외부 장치를 충전할 때 기능 버튼을 2초 동안 누르고 있으면 인텔리전트 플라이트 배터리 우
선 충전 상태로 돌아갑니다.
• 충전 허브의 입력이 5V/2A보다 낮은 경우, USB 포트로 외부 장치를 충전하지 못
할 수 있습니다.
• 스마트폰 또는 태블릿과 같은 외부 기기를 충전할 때 대기 전력 소모가 높은 경우,
충전 허브에서 기기가 완전히 충전되었는지 여부를 감지하지 못할 수 있습니다. 이
런 경우, 외부 기기를 4시간 동안 충전할 때까지 충전이 인텔리전트 플라이트 배터
리로 자동 전환되지 않습니다. 사용자가 기능 버튼을 길게 눌러 충전 우선순위를 수
동으로 전환할 수 있습니다.
배터리 잔량 확인
상태 LED는 배터리를 충전 허브에 삽입한 후 3초 동안 배터리 잔량을 표시합니다. 사용자가
기능 버튼을 한 번 눌러 배터리 잔량을 확인할 수도 있습니다. 배터리 잔량에 대한 설명은 아
래 섹션을 참조하십시오.
상태 LED 설명
충전 상태
각 배터리 포트에는 해당 상태 LED 어레이가 있습니다.
15
Page 18

어레이의 상태 LED가 연속적으로 깜박임
(빠르게)
어레이의 상태 LED가 연속적으로 깜박임
(천천히)
어레이의 상태 LED가 연속적으로 깜박임
(약 30초 동안 천천히 깜박이고, 2초 간격
으로 매우 천천히 깜박임)
어레이의 상태 LED가 계속 켜져 있음
모든 상태 LED가 순서대로 깜박임 배터리가 삽입되지 않았습니다.
배터리 잔량
각 배터리 포트에는 LED1에서 LED4(왼쪽에서 오른쪽으로)까지 해당하는 상태 LED 어레이
가 있습니다. 배터리 잔량에 대한 설명은 기체의 배터리 잔량 LED에 대한 설명과 동일합니다.
자세한 정보는 DJI Mini 2 사용자 매뉴얼을 참조하십시오.
비정상 상태
각 배터리 상태 LED 어레이의 비정상 상태 표시는 배터리를 기체에 삽입할 때 기체의 배터리 잔
량 LED에 대한 표시와 동일합니다. 자세한 정보는 DJI Mini 2 사용자 매뉴얼을 참조하십시오.
해당 배터리 포트의 배터리가 고속 충전기를 사
용하여 충전됩니다.
해당 배터리 포트의 배터리가 일반 충전기를 사
용하여 충전됩니다.
해당 배터리 포트의 배터리가 충전되고 있습니
다. 이런 경우 충전 속도가 매우 느립니다. 다른
USB-C 케이블을 충전용으로 사용하는 것이 좋
습니다.
해당 배터리 포트의 배터리가 완전히 충전되었
습니다.
사양
모델 CHX161
호환 가능한 DJI 충전기 DJI 18W USB 충전기
호환 가능한 DJI 배터리 BWX161-2250-7.7 인텔리전트 플라이트 배터리
작동 온도 5~40 °C
입력 5 V
USB 포트 출력 최대: 5 V
무게 약 72 g
충전 시간*
* 충전 시간은 실험실 환경에서 DJI 18W USB 충전기를 사용하여 테스트되었으며 참고용으
로만 이용해야 합니다.
3 A, 9 V 3 A, 12 V 3 A
2 A
BWX161-2250-7.7 배터리 3개의 경우:
약 4 시간
DE
Haftungsausschluss
Bitte lesen Sie vor der Verwendung dieses gesamte Dokument und alle von
DJITM zur Verfügung gestellten sicheren und rechtmäßigen Praktiken sorgfältig
durch. Die Nichtbeachtung der Anweisungen und Warnungen kann zu schweren
Verletzungen für Sie oder andere Personen bzw. zu Schäden an Ihrem DJI-Produkt
oder anderen Objekten in der näheren Umgebung führen. Mit dem Gebrauch des
Produkts bestätigen Sie, dass Sie diesen Haftungsausschluss inkl. Warnungen
aufmerksam gelesen und den Inhalt verstanden haben und mit den allgemeinen
16
Page 19

Geschäftsbedingungen einverstanden sind. Sie stimmen zu, dass Sie beim
Gebrauch des Produkts die alleinige Verantwortung für Ihre Handlungen und alle
daraus entstehenden Folgen tragen. DJI übernimmt keine Haftung für Sachschäden
oder Personenschäden sowie keine juristische Verantwortung für Schäden, die direkt
oder indirekt mit dem Gebrauch des Produkts in Zusammenhang stehen. Dieses
Dokument und alle zugehörigen Dokumente können nach eigenem Ermessen von
DJI jederzeit geändert werden.
Warnung
1. Bei Verwendung der Zweiwege-Akkuladestation für DJI Mini 2 (im Folgenden:
„Akkuladestation“) zum Laden der DJI Mini 2 Intelligent Flight Batteries wird
die Verwendung eines DJI USB-Ladegeräts mit 18 Watt oder ein FCC-/CE-
zertiziertes USB-Ladegerät empfohlen, welches das Schnellladeprotokoll
(Quick Charge Protocol) oder das USB-Leistungsversorgungsprotokoll (USB
Power Delivery Protocol) unterstützt.
2. Verwenden Sie die Akkuladestation nur auf einer ebenen und stabilen Fläche.
Achten Sie außerdem darauf, dass das Gerät entsprechend thermisch isoliert
wird, um Brandrisiken zu vermeiden.
3. Berühren Sie NICHT die Metallklemmen an der Akkuladestation.
4. Reinigen Sie erkennbare Verschmutzungen mit einem sauberen und trockenen
Lappen.
Übersicht
1. Akkuschacht
2. Status-LEDs
1
2
3. Funktionstaste
3
4. Ladeanschluss (USB-C)
4
5. USB-Anschluss
5
Einführung
Die DJI Mini 2 Zweiweg-Akkuladestation dient sowohl zum Laden der Intelligent
Flight Batteries, die im Akkuschacht eingeschoben wurden, als auch zum Laden
externer Geräte wie einer DJI Mini 2-Fernsteuerung, Smartphones oder Tablets,
die an den USB-Anschluss angeschlossen sind. In den folgenden Szenarien
wird die Funktionsweise der Akkuladestation näher erläutert.
1. Wenn ein Ladegerät an die Akkuladestation angeschlossen ist, die Intelligent
Flight Batteries eingelegt sind und externe Geräte vom USB-Anschluss
getrennt sind, lädt die Akkuladestation nur die Intelligent Flight Batteries.
2. Wenn ein Ladegerät an die Akkuladestation angeschlossen ist, die Intelligent
Flight Batteries eingelegt sind und externe Geräte an den USB-Anschluss
angeschlossen sind, lädt die Akkuladestation standardmäßig die Intelligent
Flight Batteries zuerst. Die externen Geräte werden aufgeladen, wenn alle
eingelegten Akkus voll aufgeladen sind. Halten Sie die Funktionstaste an der
Akkuladestation gedrückt, um zuerst die externen Geräte aufzuladen.
17
Page 20

3. Wenn die Intelligent Flight Batteries in die Akkuladestation eingesetzt sind,
externe Geräte an den USB-Anschluss angeschlossen sind und das Ladegerät
von der Akkuladestation getrennt sind, können die Akkus als Powerbank zum
Laden der angeschlossenen externen Geräte verwendet werden.
Verwendung
Auaden der Intelligent Flight Batteries
1. Setzen Sie den Akku wie in Abbildung A gezeigt in den Akkuschacht ein, bis er
hörbar einrastet. Schließen Sie die Akkuladestation mit einem USB-C-Kabel und
einem DJI 18-W-USB-Ladegerät an eine Steckdose (100–240 V, 50/60 Hz) an.
2. Die Intelligent Flight Battery mit dem höchsten Ladezustand wird zuerst
geladen, die anderen werden anschließend in der Reihenfolge ihres jeweiligen
Ladezustands geladen. Die Status-LEDs leuchten dauerhaft weiß, nachdem
der entsprechende Akku vollständig aufgeladen ist. Nehmen Sie den Akku
wie in Abbildung B gezeigt aus der Akkuladestation heraus.
Intelligent Flight Batteries als Powerbanken einsetzen
Setzen Sie, wie in Abbildung C gezeigt, die Intelligent Flight Battery in die
Akkuladestation ein, ohne sie an ein Ladegerät anzuschließen, und schließen
Sie dann ein externes Gerät an den USB-Anschluss der Akkuladestation an.
Die Intelligent Flight Battery mit dem niedrigsten Ladezustand wird zuerst
entladen, die anderen werden anschließend in der Reihenfolge ihres jeweiligen
Ladezustands geladen. Die Status-LEDs zeigen den Ladezustand des Akkus an,
der Strom liefert, wenn externe Geräte geladen werden.
Drücken Sie die Funktionstaste an der Akkuladestation einmal, um den
Ladevorgang zu aktivieren, wenn der Ladevorgang nicht automatisch beginnt.
Auswahl des aufzuladenden Geräts
Wenn beim Einsetzen der Intelligent Flight Batteries in die Akkuladestation
sowohl ein Ladegerät als auch externe Geräte an die Akkuladestation
angeschlossen sind, werden die Intelligent Flight Batteries zuerst geladen.
Nachdem alle Intelligent Flight Batteries vollständig aufgeladen wurden, werden
die externen Geräte aufgeladen.
Halt die Funktionstaste an der Akkuladestation zwei Sekunden lang gedrückt,
um die externen Geräte zuerst aufzuladen. Der Ladevorgang für die Intelligent
Flight Battery wird fortgesetzt, nachdem die externen Geräte vollständig oder
vier Stunden lang aufgeladen wurden. Halten Sie beim Laden externer Geräte
die Funktionstaste zwei Sekunden lang gedrückt, um zum Laden der Intelligent
Flight Batteries zurückzukehren.
• Wenn der Eingang der Akkuladestation niedriger als 5 V / 2 A ist, besteht
die Möglichkeit, dass der USB-Anschluss die externen Geräte nicht
laden kann.
18
Page 21

• Wenn du ein externes Gerät wie z. B. ein Smartphone oder Tablet
auädst und dessen Standby-Leistungsaufnahme hoch ist, dann erkennt
die Akkuladestation möglicherweise nicht, ob das Gerät voll aufgeladen
ist. In diesem Fall wird der Ladevorgang erst dann automatisch auf
Intelligent Flight Battery umgeschaltet, wenn die externen Geräte vier
Stunden lang aufgeladen wurden. Benutzer können die Ladepriorität
manuell umschalten, indem sie die Funktionstaste gedrückt halten.
Überprüfen des Akkuladestands
Die Status-LEDs zeigen den Akkustand drei Sekunden lang an, nachdem
die Akkus in die Akkuladestation eingelegt wurden. Benutzer können den
Akkuladezustand auch durch einmaliges Drücken der Funktionstaste überprüfen.
Lesen Sie sich den Abschnitt unten für die Beschreibung des Akkuladezustands
durch.
Beschreibung der Status-LEDs
Ladestatus
Jeder Akkuschacht verfügt über ein entsprechendes Status-LED-Array.
Status-LEDs in einem Array blinken
nacheinander (schnell)
Status-LEDs in einem Array blinken
nacheinander (langsam)
Status-LEDs in einem Array blinken
nacheinander (ca. 30 s langsam,
dann sehr langsam mit einer Pause
von 2 s)
Status-LEDs in einem Array
leuchten durchgehend
Alle Status-LEDs blinken
nacheinander
Akkuladezustand
Jeder Akkuschacht verfügt über ein entsprechendes Status-LED-Array von LED1
bis LED4 (von links nach rechts). Die Beschreibung des Akkuladezustands
entspricht der Beschreibung der Akkuladezustands-LEDs im Fluggerät. Weitere
Informationen nden Sie in der Bedienungsanleitung des DJI Mini 2.
Anormaler Zustand
Die Anzeige des abnormalen Zustands jedes Akkustatus-LED-Arrays entspricht
der Anzeige der Akkustatus-LEDs im Fluggerät beim Einsetzen des Akkus in das
Fluggerät. Weitere Informationen nden Sie in der Bedienungsanleitung des DJI Mini 2.
Der Akku im entsprechenden
Akkuschacht wird mit einem
Schnellladegerät aufgeladen.
Der Akku im entsprechenden
Akkuschacht wird mit einem normalen
Ladegerät aufgeladen.
Der Akku im entsprechenden
Akkuschacht wird geladen. In diesem Fall
ist der Ladevorgang extrem langsam. Es
wird empfohlen, zum Laden ein anderes
USB-C-Kabel zu verwenden.
Der Akku im entsprechenden
Akkuschacht ist voll aufgeladen.
Es ist kein Akku eingelegt.
19
Page 22

Technische Daten
Modell CHX161
Kompatibles DJI-Ladegerät DJI 18-W-USB-Ladegerät
Kompatibler DJI-Akku Intelligent Flight Battery BWX161-2250-7.7
Betriebstemperatur 5 °C bis 40 °C
Eingang 5 V
USB-Anschluss-Leistung Max.: 5 V
Gewicht Ca. 72 g
Ladezeit*
* Die Ladezeit wurde mit einem DJI 18-W-USB-Ladegerät unter Laborbedingungen
getestet und dient nur als Richtwert.
3 A / 9 V 3 A / 12 V 3 A
2 A
Für drei BWX161-2250-7.7-Akkus:
Ca. 4 Stunden
ES
Renuncia de responsabilidad
Lea detenidamente este documento al completo y todas las prácticas de seguridad
y legales que DJITM ha facilitado antes de su uso. Si no lee ni sigue correctamente
las instrucciones y advertencias, podría sufrir lesiones importantes o provocarlas a
otras personas. Asimismo, podría causar daños en su producto DJI u otros objetos
en las proximidades. Al usar este producto, por la presente manifiesta que ha
leído detenidamente esta renuncia de responsabilidad y advertencia, así como
que entiende y acepta cumplir los términos y condiciones establecidos en este
documento. Acepta que usted es el único responsable de su propia conducta
durante el uso de este producto y de cualquier consecuencia derivada de dicho
uso. DJI no acepta responsabilidad alguna por daños o lesiones, ni ningún tipo de
responsabilidad legal derivada directa o indirectamente del uso de este producto.
Este documento y el resto de documentos colaterales están sujetos a cambios a
entera discreción de DJI.
Advertencia
1. Si utiliza el Centro de carga bidireccional DJI Mini 2 (en adelante, denominado
“centro de carga”) para cargar Baterías de Vuelo Inteligente del DJI Mini 2,
se recomienda que utilice un Cargador USB de 18 W de DJI o un cargador
USB con certicación FCC/CE que admita el protocolo de carga rápida o de
suministro de energía por USB.
2. Coloque el centro de carga sobre una supercie lisa y estable cuando esté
en uso. Asegúrese de que el dispositivo está debidamente aislado para evitar
el riesgo de incendio.
3. NO intente tocar los terminales metálicos del centro de carga.
4. Limpie los terminales metálicos con un paño limpio y seco si presentan
acumulación de residuos.
20
Page 23

Descripción
1. Puertos para las baterías
2. Ledes de estado
1
3. Botón de función
2
4. Puerto de alimentación
3
(USB-C)
4
5
5. Puerto USB
Introducción
El Centro de carga bidireccional DJI Mini 2 está diseñado tanto para cargar
Baterías de Vuelo Inteligente conectadas a los puertos de la batería como
dispositivos externos conectados al puerto USB, como el control remoto de la
DJI Mini 2, teléfonos inteligentes o tabletas. En los siguientes escenarios se
proporciona más información sobre cómo funciona el centro de carga.
1. Cuando se conecta un cargador al centro de carga con las Baterías de Vuelo
Inteligente insertadas y los dispositivos externos desconectados del puerto
USB, el centro de carga solo cargará las Baterías de Vuelo Inteligentes.
2. Cuando conecte un cargador al centro de carga con las Baterías de Vuelo
Inteligente introducidas y dispositivos externos conectados al puerto USB,
se dará prioridad a las Baterías de Vuelo Inteligentes por defecto. Los
dispositivos externos se cargarán cuando todas las baterías introducidas
estén completamente cargadas. Si quiere que se carguen primero los
dispositivos externos, deberá mantener presionado el botón de función del
centro de carga para indicarlo.
3. Cuando las Baterías de Vuelo Inteligente se introducen en el centro de
carga, con dispositivos externos conectados al puerto USB y el cargador
desconectado del centro de carga, las baterías se pueden usar como batería
externa para cargar dichos dispositivos externos conectados.
Uso
Carga de Baterías de Vuelo Inteligente
1. Como se muestra en la Figura A, introduzca la batería en el puerto de la batería
hasta que oiga un clic. Conecte el centro de carga a una toma de corriente
(100-240 V, 50/60 Hz) con un cable USB-C y un cargador USB de 18 W de DJI.
2. La Batería de Vuelo Inteligente con el mayor nivel de carga se cargará
primero, y las demás se cargarán secuencialmente de acuerdo con sus
niveles de carga. Los ledes de estado se iluminarán en blanco jo después
de que la batería correspondiente esté completamente cargada. Retire la
batería del centro de carga como se muestra en la Figura B.
21
Page 24

Uso de Baterías de Vuelo Inteligente como baterías externas
Como se muestra en la Figura C, introduzca la Batería de Vuelo Inteligente en
el centro de carga sin conectarla con un cargador y conecte después cualquier
dispositivo externo al puerto USB del centro de carga. La Batería de Vuelo
Inteligente con el menor nivel de carga se descargará primero, y las demás se
descargarán secuencialmente de acuerdo con sus niveles de carga. Cuando se
estén cargando dispositivos externos, los ledes de estado mostrarán el nivel de
carga de la batería que suministra energía.
Si la carga no comienza automáticamente, presione el botón de función
del centro de carga una vez para activarla.
Cambiar los dispositivos a cargar
Al introducir las Baterías de Vuelo Inteligente en el centro de carga, si están
conectados tanto un cargador como dispositivos externos al centro de carga,
este dará prioridad a las Baterías de Vuelo Inteligente y las cargará primero.
Después de que todas las Baterías de Vuelo Inteligente se hayan cargado
completamente, se empezarán a cargar los dispositivos externos.
Mantenga presionado el botón de función del centro de carga durante dos
segundos para indicar que se dé prioridad a los dispositivos externos. La carga
de las Baterías de Vuelo Inteligente continuará después de que los dispositivos
externos se hayan cargado completamente o se hayan cargado durante 4
horas. Al cargar dispositivos externos, mantenga presionado el botón de función
durante dos segundos para volver a cargar las Baterías de Vuelo Inteligente.
• Cuando la entrada del centro de carga sea inferior a 5 V/2 A, existe la
posibilidad de que el puerto USB no pueda cargar los dispositivos externos.
• Al cargar un dispositivo externo como un teléfono inteligente o una
tableta, si este tiene un alto consumo eléctrico cuando está en
espera, puede que el centro de carga no detecte si el dispositivo
está completamente cargado. En este caso, la carga no cambiará
automáticamente a las Baterías de Vuelo Inteligente hasta que los
dispositivos externos no se hayan estado cargando durante 4 horas.
Los usuarios pueden cambiar manualmente la prioridad de carga
manteniendo presionado el botón de función.
Comprobación de los niveles de batería
Al introducir las baterías en el centro de carga, los ledes de estado mostrarán
los niveles de la batería durante tres segundos. Los niveles de la batería
también se pueden vericar presionando una vez el botón de función. Consulte
la sección siguiente para ver la descripción del nivel de batería.
Descripciones de los ledes de estado
Estado de carga
Cada puerto de la batería tiene su correspondiente conjunto de ledes de estado.
22
Page 25

Los ledes de estado de un
conjunto parpadean sucesivamente
(rápidamente)
Los ledes de estado de un
conjunto parpadean sucesivamente
(lentamente)
Los ledes de estado de
un conjunto parpadean
sucesivamente (lentamente durante
aproximadamente 30 s, y luego muy
lentamente con un intervalo de 2 s)
Los ledes de estado de un conjunto
están jos
Todos los ledes de estado
parpadean en secuencia
Nivel de la batería
Cada puerto de batería tiene su propio conjunto de ledes de estado
correspondiente, de LED1 a LED4 (de izquierda a derecha). La descripción del nivel
de la batería es la misma que la de los ledes de nivel de la batería de la aeronave.
Consulte el manual de usuario del DJI Mini 2 para obtener más información.
Estado anómalo
La indicación de estado anómalo de cada conjunto de ledes de estado de la
batería es la misma que la de los ledes de nivel de batería de la aeronave al
insertar la batería en esta. Consulte el manual de usuario del DJI Mini 2 para
obtener más información.
La batería en el puerto de batería
correspondiente se está cargando con
un cargador de carga rápida.
La batería en el puerto de batería
correspondiente se está cargando con
un cargador normal.
La batería en el puerto de batería
correspondiente se está cargando. En
este caso, la carga será extremadamente
lenta. Se recomienda usar otro cable
USB-C para cargar.
La batería en el puerto correspondiente
está completamente cargada.
No se ha introducido ninguna batería.
Especificaciones
Modelo CHX161
Cargador DJI compatible Cargador USB de 18 W de DJI
Batería DJI compatible Batería de Vuelo Inteligente BWX161-2250-7.7
Temperatura de
funcionamiento
Entrada 5 V
Salida del puerto USB Máx.: 5 V
Peso Aprox. 72 g
Tiempo de carga*
* El tiempo de carga se probó con un cargador USB de 18W de DJI en laboratorio
y debe tomarse solo a título de referencia.
De 5 a 40 °C (de 41 a 104 °F)
3 A / 9 V 3 A / 12 V 3 A
2 A
Para tres baterías BWX161-2250-7.7:
Aprox. 4 h
23
Page 26

FR
Clause d’exclusion de responsabilité
Veuillez lire attentivement ce document dans son intégralité, ainsi que toutes les
pratiques sécuritaires et légales fournies par DJITM avant l’utilisation du produit DJI
associé. Si vous ne lisez pas et ne respectez pas les instructions et les mises en
garde, vous exposez les autres et vous-même à des blessures graves et risquez
d’endommager votre produit DJI ou d’autres objets placés à proximité. En utilisant
ce produit, vous conrmez que vous avez lu attentivement la clause d’exclusion de
responsabilité et la mise en garde, que vous comprenez les conditions générales
qui y sont énoncées, et que vous acceptez de les respecter. Vous déclarez
assumer l’entière responsabilité de votre utilisation du produit ainsi que toutes les
conséquences qui en découlent. DJI décline toute responsabilité quant aux dégâts,
aux blessures ou aux problèmes découlant directement ou indirectement de
l’utilisation de ce produit. DJI se réserve le droit de modier, à sa seule discrétion, le
présent document et tous les autres documents connexes.
Avertissement
1. En utilisant la station de recharge bidirectionnelle DJI Mini 2 (ci-après
dénommée « station de recharge ») pour recharger les Batteries de Vol
Intelligentes DJI Mini 2, nous vous recommandons le chargeur USB 18 W de
DJI ou un chargeur USB certié FCC/CE qui supporte les protocoles Quick
Charge ou USB Power Delivery.
2. Placez la station de recharge sur une surface plane et stable pour l'utiliser.
Vériez que l'appareil est correctement isolé pour prévenir tout risque d'incendie.
3. N'ESSAYEZ PAS de toucher les bornes métalliques de la station de recharge.
4. Nettoyez les bornes métalliques à l'aide d'un chiffon sec et propre si vous
voyez apparaître des dépôts.
Vue d’ensemble
1. Ports de la batterie
2. Voyants LED d’état
3. Bouton fonction
1
2
4. Port d'alimentation
3
(USB-C)
4
5. Port USB
5
Introduction
La station de recharge bidirectionnelle DJI Mini 2 est conçue pour charger des
Batteries de Vol Intelligentes connectées aux ports de batterie et des appareils
externes tels qu'une radiocommande DJI Mini 2, des smartphones ou des
tablettes connectés au port USB. Les scénarios suivants expliquent plus en
détail le fonctionnement de la station de recharge.
1. Lorsqu'un chargeur est connecté à la station de recharge avec les Batteries de
Vol Intelligentes insérées et que les appareils externes sont déconnectés du port
USB, la station de recharge ne charge que les Batteries de Vol Intelligentes.
24
Page 27

2. Lorsqu'un chargeur est connecté à la station de recharge avec les Batteries
de Vol Intelligentes insérées et que les appareils externes sont connectés
au port USB, la station de recharge ne charge que les Batteries de Vol
Intelligentes. Les appareils externes seront chargés lorsque toutes les
batteries insérées seront complètement chargées. Appuyez sur le bouton
fonction de la station de recharge et maintenez-le enfoncé pour passer d’abord
au chargement des appareils externes.
3. Lorsque les Batteries de Vol Intelligentes sont insérées dans la station de
recharge, avec des appareils externes connectés au port USB et que le chargeur
est déconnecté de la station de recharge, les batteries peuvent être utilisées
comme batteries externes pour charger les appareils externes connectés.
Utilisation
Chargement des batteries de vol intelligentes
1. Comme le montre la Figure A, insérez la batterie dans son port jusqu’à ce que
vous entendiez un clic. Connectez la station de recharge à une prise courant (100
- 240 V, 50/60 Hz) à l’aide d’un câble USB-C et d’un chargeur USB DJI 18 W.
2. Les Batteries de Vol Intelligentes sont chargées par ordre décroissant de
niveau de puissance, en commençant par les plus chargées. Les voyants
LED d'état restent allumés en blanc lorsque la batterie correspondante est
complètement chargée. Retirez la batterie de la station de recharge, comme
illustré par la Figure B.
Batteries de Vol Intelligentes comme batteries externes
Comme illustré dans la Figure C, insérez la Batterie de Vol Intelligente dans la
station de recharge sans la connecter à un chargeur, puis connectez tout appareil
externe au port USB de la station de recharge. Les Batteries de Vol Intelligentes
sont déchargées par ordre croissant de niveau de puissance, en commençant par
les moins chargées. Les voyants LED d'état afchent le niveau de charge de la
batterie qui alimente les appareils externes en cours de chargement.
Appuyez une fois sur le bouton fonction de la station de recharge pour
activer le chargement si celui-ci ne démarre pas automatiquement.
Pour changer d’appareil pendant le chargement
Lors de l'insertion des Batteries de Vol Intelligentes dans la station de recharge,
si un chargeur et des appareils externes sont connectés à la station de recharge,
la priorité du chargement est donnée aux Batteries de Vol Intelligentes. Une fois
que toutes les Batteries de Vol Intelligentes auront été complètement chargées,
les appareils externes seront chargés.
Appuyez sur le bouton fonction de la station de recharge et maintenez-le enfoncé
pendant deux secondes pour donner la priorité au chargement des appareils
externes. La charge des Batteries de Vol Intelligentes reprend une fois les appareils
externes complètement chargés ou après quatre heures de chargement. Lorsque
vous chargez des appareils externes, maintenez le bouton fonction enfoncé pendant
deux secondes pour repasser la charge aux Batteries de Vol Intelligentes.
25
Page 28

• Lorsque l'entrée de la station de recharge est inférieure à 5 V/2 A, il est
possible que le port USB ne puisse pas charger les appareils externes.
• Lors de la charge d'un appareil externe tel qu'un smartphone ou une
tablette, si la consommation d'énergie en veille est élevée, la station de
recharge risque de ne pas détecter si l’appareil est complètement chargé.
Dans ce cas, la charge ne passera automatiquement aux Batteries de
Vol Intelligentes qu'après le chargement des appareils externes pendant
quatre heures. Les utilisateurs peuvent modier manuellement la priorité
de charge en appuyant sur le bouton fonction et en le maintenant enfoncé.
Vérication du niveau de batterie
Les voyants LED d'état afchent les niveaux de batterie pendant trois secondes
après l'insertion des batteries dans la station de recharge. Les utilisateurs
peuvent également vérier le niveau de batterie en appuyant une fois sur le
bouton fonction. Reportez-vous à la section ci-dessous pour la description du
niveau de batterie.
Descriptions des voyants LED d’état
État de charge
Chaque port de batterie est associé à une série de voyants LED d'état
correspondante.
Les voyants LED d'état d'une
série clignotent successivement
(rapidement)
Les voyants LED d'état d'une
série clignotent successivement
(lentement)
Les voyants LED d'état d’une
série clignotent successivement
(lentement pendant environ 30 s,
puis clignotent très lentement avec
un intervalle de 2 s)
Les voyants LED d'état d’une série
sont allumés
Tous les voyants LED d'état
clignotent en séquence
Niveau de batterie
Chaque port de batterie est associé à sa série de voyants LED d'état
correspondante, de LED1 à LED4 (de gauche à droite). La description du niveau de
26
La batterie du port de batterie
correspondant est en cours de
chargement à l’aide d’un chargeur
à charge rapide.
La batterie du port de batterie
correspondant est en cours de
chargement à l’aide d’un chargeur
standard.
La batterie du port de batterie
correspondant est en cours de
chargement. Dans ce cas, la charge sera
extrêmement lente. Il est recommandé
d’utiliser un autre câble USB-C pour le
chargement.
La batterie du port de batterie
correspondant est complètement
chargée.
Aucune batterie n'est insérée.
Page 29

batterie est la même que celle des voyants LED de niveau de batterie de l’appareil.
Pour plus d’informations, reportez-vous au guide d'utilisateur du DJI Mini 2.
État anormal
L'afchage d'état anormal de chaque série de voyants LED d'état de batterie
est identique à celui des voyants LED de niveau de batterie de l’appareil lors de
l'insertion de la batterie dans l'appareil. Pour plus d’informations, reportez-vous
au guide d'utilisateur du DJI Mini 2.
Caractéristiques techniques
Modèle CHX161
Chargeurs DJI compatibles Chargeur USB DJI de 18 W
Batteries DJI compatibles Batterie de Vol Intelligente BWX161-2250-7.7
Température de
fonctionnement
Entrée 5 V
Sortie du port USB Max : 5 V
Poids Env. 72 g
Temps de charge*
* Les temps de charge sont le résultat de tests réalisés en laboratoire en utilisant un
chargeur USB DJI 18 W ; ils sont donnés à titre de référence uniquement.
5 à 40 °C
3 A / 9 V 3 A / 12 V 3 A
2 A
Pour trois batteries BWX161-2250-7.7 :
env. 4 heures
IT
Limitazioni di responsabilità
Si prega di leggere con attenzione l’intero documento e tutte le pratiche sicure e
legali DJITM fornite prima dell’uso. La mancata lettura e l’inosservanza delle istruzioni
e delle avvertenze ivi riportate potrebbero determinare lesioni gravi all’utente o
ad altre persone, nonché danni al prodotto DJI o ad altri oggetti che si trovano
nelle vicinanze. Utilizzando il prodotto, l’utente dichiara di aver letto e compreso le
limitazioni di responsabilità e le avvertenze e di accettare i termini e le condizioni ivi
specicati. L’utente riconosce di essere l’unico responsabile della propria condotta
durante l’utilizzo del prodotto e di eventuali relative conseguenze. DJI declina
ogni responsabilità per danni, lesioni o altre responsabilità legali direttamente o
indirettamente imputabili all’utilizzo del presente prodotto. Il presente documento e tutti
i documenti complementari sono soggetti a modiche a esclusiva discrezione di DJI.
Avviso
1. Nell’utilizzare la stazione di ricarica doppio uso per DJI Mini 2 (di seguito
denominata “stazione di ricarica”) per ricaricare le batterie di volo intelligenti
di DJI Mini 2, si raccomanda di servirsi del caricabatterie USB 18W DJI o,
in alternativa, di un caricabatterie USB certificato FCC/CE che supporti il
protocollo Quick Charge o USB Power Delivery.
27
Page 30

2. Durante l’uso, posizionare la stazione di ricarica su una superficie piana
e stabile. Assicurarsi che il dispositivo sia correttamente isolato per prevenire
i rischi di incendio.
3. NON toccare i terminali in metallo presenti sulla stazione di ricarica.
4. Se si notano accumuli di sporcizia, pulire i terminali con un panno asciutto
e pulito.
Panoramica generale
1. Vani batterie
2. LED di stato
3. Tasto funzione
1
2
4. Porta di alimentazione
3
(USB-C)
4
5. Porta USB
5
Presentazione del prodotto
La stazione di ricarica doppio uso per DJI Mini 2 è progettata per ricaricare sia
le batterie di volo intelligenti inserite negli appositi vani, sia dispositivi esterni
come il radiocomando per DJI Mini 2, uno smartphone o un tablet collegati alla
porta USB. Di seguito viene illustrato il funzionamento della stazione di ricarica.
1. Quando un caricabatterie è collegato alla stazione di ricarica con le batterie di
volo intelligenti inserite e nessun dispositivo esterno collegato alla porta USB,
la stazione di ricarica effettua solo la ricarica delle batterie di volo intelligenti.
2. Quando si collega un caricabatterie alla stazione di ricarica, con le batterie
di volo intelligenti inserite e dei dispositivi esterni collegati alla porta USB, le
batterie di volo intelligenti avranno la priorità sull’altro dispositivo collegato.
I dispositivi esterni saranno caricati solo al termine della ricarica di tutte le
batterie inserite. Per dare priorità alla ricarica dei dispositivi esterni, premere
e tenere premuto il tasto funzione sulla stazione di ricarica.
3. Quando nella stazione di ricarica vengono inserite le batterie di volo intelligenti
mentre alla porta USB sono collegati dei dispositivi esterni e il caricabatterie
è scollegato dalla stazione di ricarica, le batterie possono essere utilizzate
come power bank per ricaricare i dispositivi esterni collegati.
Modalità di utilizzo
Ricarica delle batterie di volo intelligenti
1. Come mostrato nella Figura A, inserire la batteria nell’apposito vano no allo
scatto. Collegare la stazione di ricarica a una presa di alimentazione (100-240 V,
50/60 Hz) utilizzando un cavo USB-C e un caricabatterie USB DJI 18W.
2. La batteria di volo intelligente con il livello di carica maggiore verrà ricaricata
per prima, successivamente, saranno caricate in sequenza le batterie con
livelli di carica a decrescere. Quando una batteria è completamente carica,
i LED di stato corrispondenti si accendono di bianco. Rimuovere la batteria
dalla stazione di ricarica come mostrato nella Figura B.
28
Page 31

Utilizzo delle batterie di volo intelligenti come power bank
Come mostrato nella Figura C, inserire la batteria di volo intelligente nella
stazione di ricarica senza collegare quest’ultima a un caricabatterie, quindi
collegare un dispositivo esterno alla porta USB della stazione di ricarica. La
batteria di volo intelligente con il livello di carica maggiore verrà scaricata per
prima, quindi saranno scaricate in sequenza le batterie con livelli di carica a
decrescere. Durante la ricarica dei dispositivi esterni, i LED di stato visualizzano
il livello di carica della batteria che fornisce energia.
Se la ricarica non si avvia automaticamente, attivarla premendo una volta
il tasto funzione sulla stazione di ricarica.
Cambio dei dispositivi in carica
Quando nella stazione di ricarica vengono inserite le batterie di volo intelligenti
mentre a questa sono collegati sia un caricabatterie sia dei dispositivi esterni,
il dispositivo darà la priorità alle batterie di volo intelligenti, che verranno quindi
ricaricate per prime. I dispositivi esterni saranno ricaricati solo al termine della
ricarica di tutte le batterie di volo intelligenti.
Per stabilire la priorità di ricarica dei dispositivi esterni, premere e tenere premuto
per due secondi il tasto funzione sulla stazione di ricarica. La ricarica delle
batterie di volo intelligenti proseguirà una volta che i dispositivi esterni saranno
completamente carichi, oppure dopo che questi saranno stati in carica per 4
ore. Durante la ricarica di dispositivi esterni, tenere premuto il tasto funzione per
due secondi per tornare alla ricarica delle batterie di volo intelligenti.
• La porta USB può ricaricare i dispositivi esterni laddove l’alimentazione
in ingresso della stazione di ricarica sia inferiore a 5 V/2 A.
• Durante la ricarica di un dispositivo esterno come uno smartphone o
un tablet, qualora questo presenti un elevato consumo energetico in
standby, la stazione di ricarica non potrà rilevare il completamento
della carica. In questo caso, la ricarica passerà automaticamente alle
batterie di volo intelligenti solo dopo aver caricato il dispositivo esterno
per 4 ore. Gli utenti possono cambiare manualmente la priorità di
ricarica premendo e tenendo premuto il tasto funzione.
Controllo del livello delle batterie
Dopo l'inserimento delle batterie nella stazione di ricarica, i LED di stato ne
visualizzano i livelli di carica per tre secondi. Gli utenti possono controllare i
livelli di carica delle batterie anche premendo una volta il tasto funzione. Per una
descrizione del livello della batteria, fare riferimento alla sezione che segue.
Descrizione dei LED di stato
Stato della ricarica
Ogni porta della batteria dispone di una stringa di LED di stato corrispondente.
29
Page 32

I LED di stato di una stringa
lampeggiano in successione
(rapidamente)
I LED di stato di una stringa
lampeggiano in successione
(lentamente)
I LED di stato di una stringa
lampeggiano in successione
(lentamente per circa 30 secondi,
quindi molto lentamente con un
intervallo di 2 secondi)
I LED di stato in una stringa sono
accesi
Tutti i LED di stato lampeggiano in
sequenza
Livello della batteria
Ogni porta delle batterie dispone di una stringa di LED di stato corrispondente,
da LED1 a LED4 (da sinistra a destra). La descrizione del livello della batteria
è uguale a quella dei LED del livello della batteria sull’aeromobile. Per ulteriori
informazioni, consultare il manuale d’uso di DJI Mini 2.
Stato anomalo
La visualizzazione dello stato anomalo di ciascuna stringa di LED di stato della
batteria è uguale a quella dei LED di livello della batteria sull’aeromobile quando
viene inserita la batteria. Per ulteriori informazioni, consultare il manuale d’uso di
DJI Mini 2.
La batteria nella porta corrispondente
viene ricaricata utilizzando un
caricabatterie Quick Charge.
La batteria nella porta corrispondente
è in fase di ricarica utilizzando un
caricabatterie normale.
La batteria nella porta corrispondente è in
fase di ricarica. In questo caso, la ricarica
sarà estremamente lenta. Si consiglia
di utilizzare un altro cavo USB-C per la
ricarica.
La batteria nella porta della batteria
corrispondente è completamente carica.
Nessuna batteria inserita.
Caratteristiche tecniche
Modello CHX161
Caricabatterie DJI compatibile Caricabatterie USB DJI 18W
Batteria DJI compatibile Batteria di volo intelligente BWX161-2250-7.7
Temperatura operativa 5 – 40 °C
Ingresso 5 V
Uscita porta USB Max: 5 V
Peso Circa 72 g
Tempo di ricarica*
* La durata della ricarica è stata calcolata in ambiente di laboratorio, utilizzando
un caricabatterie USB DJI 18W, e ha esclusivo valore di riferimento.
30
3 A / 9 V 3 A / 12 V 3 A
2 A
Per tre batterie BWX161-2250-7.7:
Circa 4 ore
Page 33

NL
Disclaimer
Lees vóór gebruik dit hele document, evenals alle veilige en wettelijke praktijken
die DJITM heeft verstrekt. Het niet lezen en opvolgen van de instructies en
waarschuwingen kan leiden tot ernstig letsel bij uzelf of anderen, schade aan het
DJI-product of schade aan andere voorwerpen in de omgeving. Door het gebruik
van dit product geeft u te kennen dat u deze disclaimer en waarschuwing zorgvuldig
hebt gelezen en dat u begrijpt en ermee akkoord gaat dat u zich dient te houden
aan de hierin gestelde algemene voorwaarden. U gaat ermee akkoord dat u tijdens
het gebruik van dit product verantwoordelijk bent voor uw eigen gedrag, en voor de
mogelijke gevolgen daarvan. DJI aanvaardt geen aansprakelijkheid voor schade,
letsel of enige wettelijke verantwoordelijkheid die direct of indirect voortvloeit uit het
gebruik van dit product. Dit document en alle overige documentatie kunnen naar
eigen inzicht van DJI gewijzigd worden.
Waarschuwing
1. Bij gebruik van de DJI Mini 2 Two-Way Charging Hub (hierna ‘oplaadhub’
genoemd) om de DJI Mini 2 Intelligent Flight-batterijen op te laden, wordt het
aangeraden om een DJI 18 W USB-oplader of een FCC-/CE-gecerticeerde
USB-lader te gebruiken die het Quick Charge of USB Power Delivery-protocol
ondersteunt.
2. Plaats de oplaadhub voor gebruik op een vlakke en stabiele ondergrond. Zorg
ervoor dat het apparaat goed geïsoleerd is om brandgevaar te voorkomen.
3. Raak de metalen klemmen van de oplaadhub NIET aan.
4. Reinig de metalen klemmen met een schone, droge doek als vuil zichtbaar is.
Overzicht
1. Accupoorten
1
2. Ledlampjes voor status
2
3. Functieknop
3
4. Voedingspoort (USB-C)
4
5
5. USB-poort
Inleiding
De DJI Mini 2 Two-Way Charging Hub is ontworpen voor het opladen van
Intelligent Flight-batterijen die op de batterijpoorten en externe apparaten
aangesloten zijn, zoals een DJI Mini 2-afstandsbediening, smartphones of tablets
die zijn aangesloten op de USB-poort. De volgende scenario's leggen meer uit
over hoe de oplaadhub werkt.
1. Wanneer een lader is aangesloten op de oplaadhub met de Intelligent Flightbatterijen geplaatst en externe apparaten zijn losgekoppeld van de USBpoort, laadt de oplaadhub alleen de Intelligent Flight-batterijen op.
31
Page 34

2. Wanneer een lader is aangesloten op de oplaadhub met de Intelligent Flightbatterijen geplaatst en externe apparaten zijn aangesloten op de USB-poort,
zullen de Intelligent Flight-batterijen standaard als eerste worden opgeladen.
De externe apparaten worden opgeladen als alle geplaatste batterijen
volledig zijn opgeladen. Houd de functieknop op de oplaadhub ingedrukt om
over te schakelen naar het als eerste opladen van de externe apparaten.
3. Wanneer de Intelligent Flight-batterijen in de oplaadhub worden geplaatst,
met externe apparaten aangesloten op de USB-poort en de lader
losgekoppeld van de oplaadhub, kunnen de batterijen worden gebruikt als
een powerbank om de aangesloten externe apparaten op te laden.
Gebruik
Opladen van de Intelligent Flight-batterijen
1. Zoals weergegeven in Afbeelding A, plaatst u de batterij in de batterijpoort tot u
een klik hoort. Sluit de oplaadhub aan op een stopcontact (100-240 V, 50/60 Hz)
met behulp van een USB-C-kabel en een DJI 18 W USB-oplader.
2. De Intelligent Flight-batterij met het hoogste vermogen wordt als eerste
opgeladen, daarna worden ze opgeladen op volgorde van vermogen. De
statuslampjes branden constant wit nadat de bijbehorende batterij volledig
is opgeladen. Verwijder de batterij uit de oplaadhub zoals weergegeven in
Afbeelding B.
Intelligent Flight-batterijen als powerbank gebruiken
Zoals weergegeven in Afbeelding C, plaatst u de Intelligent Flight-batterij in de
oplaadhub zonder deze op een oplader aan te sluiten en sluit u vervolgens een
extern apparaat aan op de USB-poort in de oplaadhub. De Intelligent Flightbatterij met het laagste vermogen wordt als eerste benut, daarna worden ze benut
op volgorde van vermogen. De statuslampjes geven het vermogen weer van de
batterij die stroom levert wanneer de externe apparaten worden opgeladen.
Druk eenmaal op de functieknop op de oplaadhub om het opladen te
activeren als het opladen niet automatisch begint.
Van apparaat veranderen dat moet worden opgeladen
Als bij het plaatsen van de Intelligent Flight-batterijen in de oplaadhub zowel
een oplader als externe apparaten op de oplaadhub zijn aangesloten, zal
de oplaadhub als eerste de Intelligent Flight-batterijen opladen. Nadat alle
Intelligent Flight-batterijen volledig zijn opgeladen, worden de externe apparaten
opgeladen.
Houd de functieknop op de oplaadhub twee seconden ingedrukt om als eerste
externe apparaten op te laden. Het opladen van Intelligent Flight-batterijen wordt
voortgezet nadat de externe apparaten volledig zijn opgeladen of 4 uur lang
zijn opgeladen. Houd tijdens het opladen van externe apparaten de functieknop
twee seconden ingedrukt om terug te schakelen naar het opladen van Intelligent
Flight-batterijen.
32
Page 35

• Wanneer het ingangsvermogen van de oplaadhub minder is dan
5 V/2 A, bestaat de kans dat de USB-poort de externe apparaten niet
kan opladen.
• Wanneer een extern apparaat, zoals een smartphone of tablet, wordt
opgeladen en het in stand-by veel stroom verbruikt, detecteert de
oplaadhub mogelijk niet of het apparaat volledig is opgeladen. In dit
geval schakelt het opladen niet automatisch over naar Intelligent Flightbatterijen tot na het 4 uur lang opladen van de externe apparaten.
Gebruikers kunnen de prioriteit van het opladen handmatig schakelen
door de functieknop ingedrukt te houden.
Batterijniveaus controleren
De statuslampjes geven gedurende drie seconden batterijniveaus weer nadat de
batterijen in de oplaadhub zijn geplaatst. Gebruikers kunnen het batterijniveau
ook controleren door eenmaal op de functieknop te drukken. Raadpleeg het
onderstaande gedeelte voor een beschrijving van het batterijniveau.
Beschrijving van statuslampjes
Oplaadstatus
Elke batterijpoort heeft bijbehorende ledlampjes.
Ledlampjes in een reeks knipperen
achtereenvolgens (snel)
Ledlampjes in een reeks knipperen
achtereenvolgens (langzaam)
Ledlampjes in een reeks knipperen
achtereenvolgens (langzaam
gedurende ca. 30 sec, knipperen
vervolgens heel langzaam met een
tussenpauze van 2 sec)
Ledlampjes in een reeks branden
constant
Alle ledlampjes knipperen na elkaar Er is geen batterij geplaatst.
Batterijniveau
Bij elke batterijpoort hoort een reeks ledlampjes, van LED1 t/m LED4 (van links
naar rechts). De beschrijving van het batterijniveau is gelijk aan die voor de
ledlampjes voor batterijniveau op het vliegtuig. Raadpleeg voor meer informatie
de gebruikershandleiding van de DJI Mini 2.
De batterij in de bijbehorende
batterijpoort wordt opgeladen met een
snellader.
De batterij in de bijbehorende
batterijpoort wordt opgeladen met een
normale lader.
De batterij in de bijbehorende
batterijpoort wordt opgeladen. In dit
geval zal het opladen extreem langzaam
zijn. Het wordt aanbevolen om voor het
opladen een andere USB-C-kabel te
gebruiken.
De batterij in de bijbehorende
batterijpoort is volledig opgeladen.
33
Page 36

Abnormale status
De abnormale statusweergave van elke reeks ledlampjes is gelijk aan die
voor de ledlampjes voor het batterijniveau op het vliegtuig wanneer de
batterij in het vliegtuig wordt geplaatst. Raadpleeg voor meer informatie de
gebruikershandleiding van de DJI Mini 2.
Technische gegevens
Model CHX161
Compatibele DJI-oplader DJI 18 W USB-lader
Compatibele DJI-batterij BWX161-2250-7.7 Intelligent Flight-batterij
Bedrijfstemperatuur 5° t/m 40°C (41° t/m 104°F)
Ingangsvermogen 5 V
Uitgangsvermogen USB-poort Max: 5 V
Gewicht Ongeveer 72 g
Oplaadtijd*
* De oplaadtijd is getest met behulp van een DJI 18 W USB-lader in een
laboratoriumomgeving bij kamertemperatuur en geldt alleen ter referentie.
3 A/9 V 3 A/12 V 3 A
2 A
Voor drie BWX161-2250-7.7-batterijen:
Ongeveer 4 uur
PT
Exoneração de responsabilidade
Leia cuidadosamente este documento na íntegra e todas as práticas de segurança
e legais DJITM fornecidas antes da utilização. A não leitura e o incumprimento das
instruções e avisos podem resultar em ferimentos graves para si ou terceiros, em
danos ao seu produto da DJI ou em danos noutros objetos que se encontrem
nas proximidades. A utilização deste produto significa que o utilizador leu
cuidadosamente esta declaração de exoneração de responsabilidade e o aviso
e que compreende e aceita cumprir os termos e condições aqui expostos.
O utilizador concorda que é o único responsável pela sua conduta durante a
utilização deste produto e pelas possíveis consequências daí resultantes. A DJI
não assume qualquer responsabilidade pelos danos ou ferimentos ou quaisquer
responsabilidades legais decorrentes direta ou indiretamente da utilização deste
produto. Este e todos os outros documentos de garantia estão sujeitos a alteração
ao critério exclusivo da DJI.
Aviso
1. Ao utilizar o Terminal de carregamento bidirecional DJI Mini 2 (doravante
referido como “terminal de carregamento”) para carregar baterias de voo
inteligentes DJI Mini 2, recomenda-se a utilização de um carregador USB de
18 W da DJI ou um carregador USB certicado pela FCC/CE que suporte o
protocolo de carregamento rápido ou protocolo de fornecimento de energia
USB.
34
Page 37

2. Coloque o terminal de carregamento sobre uma superfície plana e estável
quando estiver a ser utilizado. Certifique-se de que o dispositivo está
devidamente isolado, para evitar riscos de incêndio.
3. NÃO tente tocar nos terminais de metal do terminal de carregamento.
4. Se existir qualquer acumulação visível de sujidade, limpe os terminais de
metal com um pano limpo e seco.
Visão geral
1. Portas da bateria
2. LEDs de estado
1
3. Botão de função
2
4. Porta de alimentação
3
(USB-C)
4
5
5. Porta USB
Introdução
O terminal de carregamento de duas vias DJI Mini 2 foi concebido para carregar
baterias de voo inteligentes ligadas às portas da bateria e a dispositivos
externos, tais como um controlador remoto DJI Mini 2, smartphones ou tablets
ligados à porta USB. Os cenários seguintes explicam mais sobre como funciona
o terminal de carregamento.
1. Quando um carregador está ligado ao terminal de carregamento com as baterias
de voo inteligentes inseridas e dispositivos externos desligados da porta USB, o
terminal de carregamento só carrega as baterias de voo inteligentes.
2. Quando um carregador está ligado ao terminal de carregamento com as
baterias de voo inteligentes inseridas e dispositivos externos desligados da
porta USB, as baterias de voo inteligentes serão priorizadas por predenição.
Os dispositivos externos serão carregados quando todas as baterias
introduzidas estiverem totalmente carregadas. Prima e mantenha premido
o botão de função no terminal de carregamento para mudar para carregar
primeiro os dispositivos externos.
3. Quando as baterias de voo inteligentes são inseridas no terminal de
carregamento, com dispositivos externos ligados à porta USB e o carregador
desligado do terminal de carregamento, as baterias podem ser utilizadas
como baterias externas para carregar os dispositivos externos ligados.
Utilização
Carregar baterias de voo inteligentes
1. Conforme ilustrado na Figura A, insira a bateria na porta da bateria até ouvir
um clique. Ligue o terminal de carregamento a uma tomada eléctrica (100240 V, 50/60 Hz) utilizando um cabo USB-C e um carregador USB DJI 18 W.
2. A bateria de voo inteligente com o nível de potência mais elevado será
carregada primeiro e as restantes serão carregadas em sequência de acordo
com os respetivos níveis de carga. Os LEDs de estado acenderão a branco
sólido após a bateria correspondente estar totalmente carregada. Retire a
bateria do terminal de carregamento, conforme se mostra na gura B.
35
Page 38

Utilizar baterias de voo inteligentes como baterias externas
Como mostrado na Figura C, insira a bateria de voo inteligente no terminal
de carregamento sem o ligar a um carregador e, de seguida, ligue qualquer
dispositivo externo à porta USB do terminal de carregamento. A bateria de voo
inteligente com o nível de potência mais reduzido será descarregada primeiro e
as restantes serão descarregadas em sequência, de acordo com os respetivos
níveis de carga. Os LEDs de estado apresentam o nível de potência da bateria
que fornece energia quando os dispositivos externos estão a ser carregados.
Prima o botão de função no terminal de carregamento uma vez para ativar
o carregamento se o carregamento não for iniciado automaticamente.
Mudar os dispositivos a carregar
Ao inserir as baterias de voo inteligentes no terminal de carregamento, se
estiverem ligados tanto um carregador como dispositivos externos ao terminal
de carregamento, este irá priorizar as baterias de voo inteligentes e carregá-las
primeiro. Depois de todas as baterias de voo inteligentes terem sido totalmente
carregadas, os dispositivos externos serão carregados.
Prima e mantenha premido o botão de função no terminal de carregamento
durante dois segundos, para priorizar os dispositivos externos. O carregamento
das baterias de voo inteligentes será continuado após os dispositivos externos
estarem totalmente carregados ou terem sido carregados durante quatro horas.
Ao carregar dispositivos externos, prima e mantenha premido o botão de função
durante dois segundos, para voltar a carregar baterias de voo inteligentes.
• Quando a entrada do terminal de carregamento for inferior a 5 V/2 A,
existe a possibilidade de a porta USB não conseguir carregar os
dispositivos externos.
• Ao carregar um dispositivo externo como um smartphone ou tablet,
se tiver um elevado consumo de energia no modo de espera, o
terminal de carregamento pode não detetar se o dispositivo está
totalmente carregado. Neste caso, o carregamento não irá mudar
automaticamente para baterias de voo inteligentes, até que os
dispositivos externos carreguem durante quatro horas. Os utilizadores
podem mudar manualmente a prioridade de carregamento premindo e
mantendo premido o botão de função.
Vericar os níveis da bateria
Os LEDs de estado apresentam os níveis da bateria durante três segundos depois
de as baterias serem inseridas no terminal de carregamento. Os utilizadores
também podem verificar os níveis da bateria premindo uma vez o botão de
função. Consulte a secção abaixo para ver a descrição do nível da bateria.
36
Page 39

Descrições dos LEDs de estado
Estado do carregamento
Cada porta da bateria tem a sua matriz LED de estado correspondente.
Os LEDs de estado numa
matriz piscam sucessivamente
(rapidamente)
Os LEDs de estado numa
matriz piscam sucessivamente
(lentamente)
Os LEDs de estado numa
matriz piscam sucessivamente
(lentamente durante aprox. 30 s
e em seguida, piscam muito
lentamente com um intervalo
de 2 s)
Os LEDs de estado de uma
matriz são sólidos
Todos os LEDs de estado
piscam sequencialmente
Nível da bateria
Cada porta da bateria tem a sua matriz LED de estado correspondente, de
LED1 a LED4 (da esquerda para a direita). A descrição do nível da bateria é
igual à do LED do nível da bateria no avião. Para mais informações, consulte o
manual do utilizador do DJI Mini 2.
Estado anormal
A visualização de estado anormal de cada conjunto de LED de estado da
bateria é igual à do LED do nível da bateria no avião ao inserir a bateria no
avião. Para mais informações, consulte o manual do utilizador do DJI Mini 2.
A bateria na porta da bateria correspondente
está a ser carregada utilizando um carregador
de carregamento rápido.
A bateria na porta da bateria correspondente
está a ser carregada utilizando um carregador
normal.
A bateria na porta da bateria correspondente
está a ser carregada. Neste caso, o
carregamento será extremamente lento.
Recomenda-se a utilização de outro cabo
USB-C para carregamento.
A bateria na porta da bateria correspondente
está totalmente carregada.
Não está inserida nenhuma bateria.
Especificações
Modelo CHX161
Carregador DJI compatível Carregador USB de 18 W da DJI
Bateria DJI compatível Bateria de voo inteligente BWX161-2250-7.7
Temperatura de funcionamento 5 °C a 40 °C (41 °F a 104 °F)
Entrada 5 V
Saída da porta USB Máx: 5 V
Peso Aprox. 72 g
Tempo de carregamento*
* O tempo de carregamento foi testado utilizando um carregador USB DJI 18 W
num ambiente laboratorial e deve ser utilizado apenas como referência.
3 A / 9 V 3 A / 12 V 3 A
2 A
Para três baterias BWX161-2250-7.7:
Aprox. 4 horas
37
Page 40

PT-BR
Isenção de responsabilidade
Leia este documento por inteiro e todas as práticas legais e seguras que a DJITM
forneceu cuidadosamente antes de usar seu dispositivo. Não ler e não seguir as
instruções e advertências deste documento pode resultar em lesões graves para
si mesmo ou para terceiros, danos ao seu produto DJI ou a outros objetos nas
proximidades. Ao utilizar este produto, o usuário conrma que leu cuidadosamente
esta Isenção de Responsabilidade e Advertência e que compreende e aceita
cumprir com os termos e condições aqui expostos. O usuário concorda que é
o único responsável por sua conduta ao utilizar este produto e pelas possíveis
consequências dele resultantes. A DJI não assume qualquer responsabilidade
pelos danos, lesões ou quaisquer responsabilidades legais decorrentes direta
ou indiretamente da utilização deste produto. Este e todos os outros documentos
correlacionados estão sujeitos a alterações, a critério exclusivo da DJI.
Advertência
1. Ao usar o carregador com múltiplas entradas bidirecionais DJI Mini 2 (de
agora em diante chamado de “hub de carregamento”) para carregar as
baterias de voo inteligente DJI Mini 2, recomenda-se usar um carregador
USB DJI 18W ou um carregador USB com certicação FCC/CE e suporte a
carregamento rápido ou protocolo de fornecimento de energia USB.
2. Coloque o hub de carregamento em uma superfície plana e estável quando
em uso. Assegure-se de que o dispositivo esteja devidamente isolado para
evitar riscos de incêndio.
3. NÃO toque nos terminais metálicos do hub de carregamento.
4. Se houver acúmulo de sujeira nos terminais metálicos, limpe-os com um pano
limpo e seco.
Visão geral
1. Entradas para bateria
2. LEDs de status
3. Botão de função
1
2
4. Porta de alimentação
3
(USB-C)
4
5. Entrada USB
5
Introdução
O hub de carregamento bidirecional DJI Mini 2 foi criado para carregar baterias de
voo inteligentes conectadas às portas da bateria e a dispositivos externos, como
um controle remoto DJI Mini 2, smartphones ou tablets conectados à porta USB. Os
casos a seguir explicam mais sobre como o hub de carregamento funciona.
1. Ao conectar um carregador ao hub de carregamento, com as baterias de voo
inteligentes inseridas e os dispositivos externos desconectados da porta USB,
o hub de carregamento carregará apenas as baterias de voo inteligentes.
38
Page 41

2. Ao conectar um carregador ao hub de carregamento, com as baterias de
voo inteligentes inseridas e os dispositivos externos conectados à porta
USB, as baterias de voo inteligentes serão priorizadas por padrão. Os
dispositivos externos serão carregados quando todas as baterias inseridas
estiverem totalmente carregadas. Pressione o botão de função, no hub de
carregamento, sem soltar, para carregar dispositivos externos primeiro.
3. Quando as baterias de voo inteligentes são inseridas no hub de carregamento,
com dispositivos externos conectados à porta USB e o carregador
desconectado do hub de carregamento, as baterias podem ser usadas como
um banco de energia para carregar os dispositivos externos conectados.
Uso
Carregamento de baterias de voo inteligentes
1. Como mostra a Figura A, insira a bateria na porta até ouvir um clique.
Conecte o hub de carregamento a uma tomada (100-240 V, 50/60 Hz) usando
um cabo USB-C e um carregador USB DJI 18W.
2. A bateria de voo inteligente com o maior nível de energia será carregada
primeiro, as outras serão carregadas em sequência, de acordo com seus
níveis de energia. Os LEDs de status carão brancos depois que a bateria
correspondente estiver totalmente carregada. Remova a bateria do hub de
carregamento, como mostra a Figura B.
Usando baterias de voo inteligentes como bancos de energia
Conforme mostrado na Figura C, insira a bateria de voo inteligente no hub de
carregamento sem conectá-la ao carregador e, em seguida, conecte qualquer
dispositivo externo à porta USB no hub de carregamento. A bateria de voo
inteligente com o menor nível de energia será descarregada primeiro, e as
outras em sequência, de acordo com seus níveis de energia. Os LEDs de
status exibirão o nível de energia da bateria que fornece energia quando os
dispositivos externos estão sendo carregados.
Pressione o botão de função, no hub de carregamento, uma vez para
ativar o carregamento, se o carregamento não começar automaticamente.
Alternando dispositivos para carregar
Ao inserir as baterias de voo inteligentes no hub de carregamento, se
um carregador e dispositivos externos estiverem conectados ao hub de
carregamento, as baterias de voo inteligentes serão priorizadas. Depois que
todas as baterias de voo inteligentes estiverem totalmente carregadas, os
dispositivos externos serão carregados.
Mantenha pressionado o botão função no carregador com múltiplas entradas
por dois segundos para priorizar o carregamento de dispositivos externos. O
carregamento de baterias de voo inteligente continuará depois que os dispositivos
externos estiverem totalmente carregados, ou após 4 horas de carregamento. Ao
carregar dispositivos externos, pressione o botão de função sem soltar por dois
segundos para voltar a carregar as baterias de voo inteligentes.
39
Page 42

• Quando a entrada do hub de carregamento for inferior a 5V / 2A, existe
a possibilidade de a porta USB não conseguir carregar os dispositivos
externos.
• Ao carregar um dispositivo externo, como um smartphone ou tablet,
caso tenha um alto consumo de energia em espera, o carregador com
múltiplas entradas poderá não detectar se o dispositivo está totalmente
carregado. Nesse caso, o carregamento não mudará automaticamente
para as baterias de voo inteligente até que os dispositivos externos
sejam carregados por 4 horas. Os usuários podem alterar manualmente
a prioridade de carregamento ao manter o botão de função pressionado.
Vericando os níveis da bateria
Os LEDs de status exibirão os níveis da bateria por três segundos após a
inserção das baterias no hub de carregamento. Os usuários também podem
vericar os níveis da bateria pressionando o botão de função uma vez. Consulte
a seção abaixo para a descrição do nível da bateria.
Descrições do LED de status
Status de carregamento
Cada porta da bateria possui seu conjunto de LEDs de status correspondente.
Os LEDs de status em uma
matriz piscam sucessivamente
(lentamente)
Os LEDs de status em uma
matriz piscam sucessivamente
(lentamente)
Os LEDs de status em uma
matriz piscam sucessivamente
(lentamente, por aproximadamente
30 seg., e depois piscam muito
lentamente com um intervalo de 2
seg.)
Os LEDs de status em uma matriz
não piscam
Todos os LEDs de status piscam
em sequência
Nível da bateria
Cada porta da bateria possui seu conjunto de LEDs de status correspondente,
do LED1 ao LED4 (da esquerda para a direita). A descrição do nível da bateria
é igual à dos LEDs de nível da bateria na aeronave. Consulte o Manual do
Usuário do DJI Mini 2 para mais informações.
40
A bateria na porta correspondente está
sendo carregada com carregador Quick
Charge.
A bateria na porta correspondente
está sendo carregada com carregador
normal.
A bateria na porta correspondente está
totalmente carregada. Nesse caso, o
carregamento será extremamente lento.
É recomendável usar outro cabo USB-C
para carregamento.
A bateria na porta correspondente está
totalmente carregada.
Não há bateria inserida.
Page 43

Status anormal
A exibição de status anormal de cada conjunto de LEDs de status da bateria
é igual à dos LEDs do nível de bateria da aeronave, ao inserir a bateria na
aeronave. Consulte o Manual do Usuário do DJI Mini 2 para mais informações.
Especificações
Modelo CHX161
Carregador DJI compatível Carregador DJI USB 18 W
Bateria DJI compatível Bateria de voo inteligente BWX161-2250-7.7
Temperatura de
funcionamento
Entrada 5 V
Saída da porta USB Máx: 5 V
Peso Aprox. 72 g
Tempo de carregamento*
* O tempo de carregamento foi testado usando um carregador DJI USB 18W em
um ambiente de laboratório e deve ser usado apenas como referência.
5° a 40 °C
3 A / 9 V 3 A / 12 V 3 A
2 A
Para três baterias BWX161-2250-7.7:
Aprox. 4 horas
RU
Отказ от ответственности
Внимательно ознакомьтесь с данным документом и правилами техники
безопасности DJITM перед использованием продукта. Пренебрежение
содержимым данного документа и несоблюдение мер безопасности может
привести к серьезным травмам, повреждению устройства DJI или другого
имущества, находящегося поблизости. Используя данный продукт, вы
подтверждаете, что внимательно ознакомились с заявлением об отказе от
ответственности и предупреждением и соглашаетесь выполнять содержащееся
в данном документе пользовательское соглашение. Вы несете полную
ответственность за эксплуатацию данного продукта и все возможные
последствия его использования. DJI не несет ответственность за повреждения,
травмы или любую юридическую ответственность, прямо или косвенно
вызванную использованием данного продукта. Компания DJI вправе единолично
вносить изменения в содержание данного и всех сопутствующих документов.
Предупреждение
1. Для зарядки аккумуляторов Intelligent Flight Battery DJI Mini 2 с помощью
многофункционального зарядного концентратора DJI Mini 2 (именуемого
в дальнейшем «зарядный концентратор») рекомендуется использовать
зарядное устройство USB мощностью 18 Вт от DJI или зарядное
устройство USB, соответствующее стандарту FCC/CE и поддерживающее
быструю зарядку или протокол передачи питания USB.
41
Page 44

2. Зарядный концентратор должен находиться на ровной и устойчивой
поверхности во время использования. Убедитесь, что устройство
изолировано во избежание опасности возгорания.
3. НЕ касайтесь металлических контактов на зарядном концентраторе.
4. При наличии налета очистите металлические контакты чистой сухой
тканью.
Обзор
1. Порты для аккумуляторов
2. Светодиодные индикаторы
1
состояния
2
3. Кнопка функций
3
4. Порт питания (USB-C)
4
5. Порт USB
5
Введение
Многофункциональный зарядный концентратор DJI Mini 2 предназначен
для зарядки аккумуляторов Intelligent Flight Battery, подключаемых к портам
аккумуляторов и внешним устройствам, таким как пульт управления DJI Mini 2,
смартфоны или планшеты, подключенные к порту USB. Следующие сценарии
объясняют принцип работы зарядного концентратора.
1. Если к зарядному концентратору подключено зарядное устройство
с установленными аккумуляторами Intelligent Flight Battery и внешними
устройствами, отсоединенными от порта USB, зарядный концентратор
будет заряжать только аккумуляторы Intelligent Flight Battery.
2. При подключении зарядного устройства к зарядному концентратору
с установленными аккумуляторами Intelligent Flight Battery и внешними
устройствами, подсоединенными к порту USB, аккумуляторы Intelligent Flight
Battery будут иметь приоритет по умолчанию. Внешние устройства будут
заряжаться после полной зарядки всех установленных аккумуляторов.
Нажмите и удерживайте кнопку функций на зарядном концентраторе,
чтобы внешние устройства заряжались первыми.
3. Когда аккумуляторы Intelligent Flight Battery установлены в зарядный
концентратор, а внешние устройства подключены к USB-порту, и зарядное
устройство отсоединено от зарядного концентратора, аккумуляторы
можно использовать в качестве внешнего аккумулятора для зарядки
подключенных внешних устройств.
Использование
Зарядка аккумуляторов Intelligent Flight Battery
1. Вставьте аккумулятор в соответствующий порт до щелчка, как показано на
рисунке A. Подключите зарядный концентратор к розетке (100–240 В, 50/60 Гц)
с помощью кабеля USB-C и зарядного устройства USB DJI мощностью 18 Вт.
42
Page 45

2. Максимальная мощность зарядки будет применяться к аккумулятору
Intelligent Flight Battery. Он будет заряжен первым, затем следуют
остальные аккумуляторы по порядку в соответствии с уровнем их заряда.
Светодиодные индикаторы состояния будут непрерывно гореть белым
после полной зарядки соответствующего аккумулятора. Извлеките
аккумулятор из зарядного концентратора, как показано на рисунке Б.
Использование аккумуляторов Intelligent Flight Battery
в качестве внешних аккумуляторов
Установите аккумулятор Intelligent Flight Battery в зарядный концентратор,
как показано на рисунке В, не подключая его к зарядному устройству.
Затем подключите любое внешнее устройство к порту USB зарядного
концентратора. Первым будет разряжен аккумулятор Intelligent Flight Battery
с минимальным уровнем заряда, затем разрядятся остальные аккумуляторы
по порядку в соответствии с уровнем их заряда. Светодиодные индикаторы
состояния будут отображать уровень заряда аккумулятора, который подает
питание во время зарядки внешних устройств.
Нажмите кнопку функций на зарядном концентраторе один раз, чтобы
активировать зарядку, если она не начинается автоматически.
Переключение устройств на зарядку
При установке аккумуляторов Intelligent Flight Battery в зарядный концентратор,
если к зарядному концентратору подключено зарядное устройство и внешние
устройства, аккумуляторы Intelligent Flight Battery будут заряжаться первыми.
После полной зарядки всех аккумуляторов Intelligent Flight Battery начнется
зарядка внешних устройств.
Нажмите и удерживайте кнопку функций на зарядном концентраторе в
течение двух секунд, чтобы установить приоритет зарядки внешних устройств.
Зарядка аккумуляторов Intelligent Flight Battery продолжится после того, как
внешние устройства будут полностью заряжены, или по истечении 4 часов с
момента их зарядки. При зарядке внешних устройств нажмите и удерживайте
кнопку функций в течение двух секунд, чтобы вернуться к зарядке
аккумуляторов Intelligent Flight Battery.
• Если мощность на входе зарядного концентратора меньше 5 В/2 А, есть
вероятность, что USB-порт не сможет заряжать внешние устройства.
• При зарядке внешнего устройства, такого как смартфон или планшет,
если его энергопотребление высоко в режиме ожидания, зарядный
концентратор может не определить состояние полного заряда
устройства. В этом случае зарядка автоматически переключится на
аккумуляторы Intelligent Flight Battery лишь по истечении 4 часов с
момента зарядки внешних устройств. Пользователи могут вручную
переключить приоритет зарядки, нажав и удерживая кнопку функций.
43
Page 46

Проверка уровня заряда аккумулятора
Светодиодные индикаторы состояния отобразят уровень заряда аккумулятора
в течение трёх секунд после установки аккумуляторов в зарядный
концентратор. Пользователи также могут проверить уровень заряда
аккумулятора, нажав кнопку функций один раз. См. описание уровней заряда
аккумулятора в разделе ниже.
Описание характера мигания светодиодов
Состояние зарядки
Каждый порт аккумулятора соотносится с определенными сигналами
светодиодов.
Светодиоды мигают
последовательно (быстро)
Светодиоды мигают
последовательно (медленно)
Светодиоды мигают
последовательно (медленно
около 30 с, затем очень
медленно с интервалом в 2 с)
Светодиоды горят непрерывно
Все светодиоды мигают
последовательно
Уровень заряда аккумулятора
Каждый порт аккумулятора оснащен соответствующими светодиодами, от
светодиода 1 до светодиода 4 (слева направо). Описание уровней заряда
аккумулятора такое же, как и для светодиодов уровня заряда аккумулятора
на летательном аппарате. Подробная информация приведена в руководстве
пользователя DJI Mini 2.
Аномальное состояние
Отображение аномального состояния каждой группы светодиодов уровня
заряда аккумулятора такое же, как и для светодиодов уровня заряда
аккумулятора на летательном аппарате при установке аккумуляторов в
летательный аппарат. Подробная информация приведена в руководстве
пользователя DJI Mini 2.
44
Аккумулятор, подключенный
к соответствующему порту, заряжается
с помощью зарядного устройства
быстрой зарядки.
Аккумулятор, подключенный
к соответствующему порту, заряжается
с помощью обычного зарядного
устройства.
Аккумулятор, подключенный
к соответствующему порту, заряжается
В этом случае зарядка будет очень
медленной. Для зарядки рекомендуется
использовать другой кабель USB-C.
Аккумулятор, подключенный
к соответствующему порту, полностью
заряжен.
Аккумулятор не установлен.
Page 47

Технические характеристики
Модель CHX161
Совместимое зарядное
устройство DJI
Совместимый аккумулятор
DJI
Диапазон рабочих
температур
Вход 5 В
Выход USB-порта Макс.: 5 В
Масса Около 72 г
Время зарядки*
* Время зарядки измерено с использованием зарядного устройства USB DJI
мощностью 18 Вт в лабораторных условиях и приведено исключительно в
справочных целях.
Зарядное устройство USB мощностью
18 Вт DJI
Аккумулятор Intelligent Flight Battery
(BWX161-2250-7.7)
+5°...+40°C
3 A / 9 В 3 A / 12 В 3 A
2 A
Для трех аккумуляторов BWX161-2250-7.7:
около 4 часов
45
Page 48

Compliance Information
FCC Compliance Statement: Supplier's Declaration of Conformity
Product Name: DJI Mini 2 Two-Way Charging Hub
Model Number: CHX161
Responsible Party: DJI Technology, Inc.
Responsible Party Address: 201 S. Victory Blvd., Burbank, CA 91502
Website: www.dji.com
We, DJI Technology, Inc., being the responsible party, declares that the above
mentioned model was tested to demonstrate complying with all applicable FCC
rules and regulations.
This device complies with part 15 of the FCC Rules. Operation is subject to the
following two conditions: (1) This device may not cause harmful interference, and (2)
this device must accept any interference received, including interference that may
cause undesired operation.
Any changes or modications not expressly approved by the party responsible for
compliance could void the user’s authority to operate the equipment.
ISED Compliance
CAN ICES-3 (B)/NMB-3(B)
EU Compliance Statement: SZ DJI TECHNOLOGY CO., LTD. hereby declares
that this device is in compliance with the essential requirements and other relevant
provisions of th014e Directive 2014/30/EU.
A copy of the EU Declaration of Conformity is available online at www.dji.com/eurocompliance
EU contact address: DJI GmbH, Industriestrasse 12, 97618, Niederlauer, Germany
Declaración de cumplimiento UE: SZ DJI TECHNOLOGY CO., LTD. por la
presente declara que este dispositivo cumple los requisitos básicos y el resto de
provisiones relevantes de la Directive 2014/30/EU.
Hay disponible online una copia de la Declaración de conformidad UE en www.dji.
com/euro-compliance
Dirección de contacto de la UE: DJI GmbH, Industriestrasse 12, 97618, Niederlauer,
Germany
EU-verklaring van overeenstemming: SZ DJI TECHNOLOGY CO., LTD. verklaart
hierbij dat dit apparaat voldoet aan de essentiële vereisten en andere relevante
bepalingen van Richtlijn 2014/30/EU.
De EU-verklaring van overeenstemming is online beschikbaar op www.dji.com/eurocompliance
Contactadres EU: DJI GmbH, Industriestrasse 12, 97618, Niederlauer, Germany
Declaração de conformidade da UE: A SZ DJI TECHNOLOGY CO., LTD. declara,
através deste documento, que este dispositivo está em conformidade com os
requisitos essenciais e outras disposições relevantes da Diretiva 2014/30/EU.
Existe uma cópia da Declaração de conformidade da UE disponível online em www.
dji.com/euro-compliance
46
Page 49

Endereço de contacto na UE: DJI GmbH, Industriestrasse 12, 97618, Niederlauer,
Germany
Dichiarazione di conformità UE: SZ DJI TECHNOLOGY CO., LTD. dichiara che il
presente dispositivo è conforme ai requisiti essenziali e alle altre disposizioni rilevanti
della direttiva 2014/30/EU.
Una copia della dichiarazione di conformità UE è disponibile online all'indirizzo Web
www.dji.com/euro-compliance
Indirizzo di contatto UE: DJI GmbH, Industriestrasse 12, 97618, Niederlauer,
Germany
Déclaration de conformité UE: Par la présente, SZ DJI TECHNOLOGY CO., LTD.
déclare que cet appareil est conforme aux principales exigences et autres clauses
pertinentes de la directive européenne 2014/30/EU.
Une copie de la déclaration de conformité UE est disponible sur le site www.dji.
com/euro-compliance
Adresse de contact pour l'UE : DJI GmbH, Industriestrasse 12, 97618, Niederlauer,
Germany
EU-Compliance: Hiermit erklärt SZ DJI TECHNOLOGY CO., LTD., dass dieses
Gerät den wesentlichen Anforderungen und anderen einschlägigen Bestimmungen
der EU-Richtlinie 2014/30/EU entspricht.
Eine Kopie der EU-Konformitätserklärung nden Sie online auf www.dji.com/eurocompliance
Kontaktadresse innerhalb der EU: DJI GmbH, Industriestrasse 12, 97618, Niederlauer,
Germany
Декларация за съответствие на ЕС: SZ DJI TECHNOLOGY CO., LTD. декларира,
че това устройство отговаря на основните изисквания и другите приложими
разпоредби на Директива 2014/30/ЕС.
Копие от Декларацията за съответствие на ЕС ще намерите онлайн на адрес
www.dji.com/euro-compliance
Адрес за контакт за ЕС: DJI GmbH, Industriestrasse 12, 97618, Niederlauer, Германия
Prohlášení o shodě pro EU: Společnost SZ DJI TECHNOLOGY CO., LTD. tímto
prohlašuje, že tohle zařízení vyhovuje základním požadavkům a dalším příslušným
ustanovením směrnice 2014/30/EU.
Kopie prohlášení o shodě pro EU je k dispozici on-line na webu www.dji.com/eurocompliance
Kontaktní adresa v EU: DJI GmbH, Industriestrasse 12, 97618, Niederlauer, Německo
EU-overensstemmelseserklæring: SZ DJI TECHNOLOGY CO., LTD. erklærer
hermed, at denne enhed er i overensstemmelse med de væsentlige krav og andre
relevante bestemmelser i direktiv 2014/30/EU.
Der er en kopi af EU-overensstemmelseserklæringen tilgængelig online på www.dji.
com/euro-compliance
EU-kontaktadresse: DJI GmbH, Industriestrasse 12, 97618, Niederlauer, Tyskland
Δήλωση Συμμόρφωσης ΕΕ: Η SZ DJI TECHNOLOGY CO., LTD. δια του παρόντος
δηλώνει ότι η συσκευή αυτή συμμορφώνεται με τις βασικές απαιτήσεις και άλλες
σχετικές διατάξεις της Οδηγίας 2014/30/EΕ.
47
Page 50

Αντίγραφο της Δήλωσης Συμμόρφωσης ΕΕ διατίθεται ηλεκτρονικά στη διεύθυνση
www.dji.com/euro-compliance
Διεύθυνση επικοινωνίας στην ΕΕ: DJI GmbH, Industriestrasse 12, 97618, Niederlauer,
Γερμανία
ELi vastavuskinnitus Käesolevaga teatab SZ DJI TECHNOLOGY CO., LTD., et
see seade on kooskõlas direktiivi 2014/30/EL oluliste nõuete ja muude asjakohaste
sätetega.
ELi vastavusdeklaratsiooni koopia on kättesaadav veebis aadressil www.dji.com/
euro-compliance
Kontaktaadress ELis: DJI GmbH, Industriestrasse 12, 97618, Niederlauer, Saksamaa
Pranešimas dėl atitikties ES reikalavimams Bendrovė „SZ DJI TECHNOLOGY
CO., LTD.“ tvirtina, kad šis prietaisas atitinka pagrindinius 2014/30/ES direktyvos
reikalavimus ir kitas susijusias nuostatas.
ES atitikties deklaracijos kopiją galite rasti adresu www.dji.com/euro-compliance
ES kontaktinis adresas: „DJI GmbH“, Industriestrasse 12, 97618, Niederlauer,
Germany (Vokietija)
ES atbilstības paziņojums: SZ DJI TECHNOLOGY CO., LTD. ar šo apliecina, ka šī
ierīce atbilst direktīvas 2014/30/ES pamatprasībām un pārējiem būtiskiem nosacījumiem.
ES atbilstības deklarācijas kopija pieejama tiešsaistē vietnē www.dji.com/eurocompliance
ES kontaktadrese: DJI GmbH, Industriestrasse 12, 97618, Niederlauer, Vācija
EU:n vaatimustenmukaisuusvakuutus: SZ DJI TECHNOLOGY CO., LTD. ilmoittaa
täten, että tämä laite on direktiivin 2014/30/EU olennaisten vaatimusten ja sen
muiden asiaankuuluvien ehtojen mukainen.
Kopio EU:n vaatimustenmukaisuusvakuutuksesta on saatavana verkossa osoitteessa
www.dji.com/euro-compliance
Yhteystiedot EU:ssa: DJI GmbH, Industriestrasse 12, 97618, Niederlauer, Germany
RÁITEAS Comhlíonta an AE: Dearbhaíonn SZ DJI TECHNOLOGY CO., LTD. leis
seo go bhfuil an gléas seo de réir na gceanglas riachtanach agus na bhforálacha
ábhartha eile sa Treoir 2014/30/AE.
Tá coip de Dhearbhú Comhréireachta an AE ar fáil ar líne ag www.dji.com/eurocompliance
Seoladh teagmhála san AE: DJI GmbH, Industriestrasse 12, 97618, Niederlauer,
Germany
Dikjarazzjoni ta’ Konformità tal-UE: SZ DJI TECHNOLOGY CO., LTD. hawnhekk
tiddikjara li dan l-apparat huwa konformi mar-rekwiżiti essenzjali u ma’ dispożizzjonijiet
relevanti oħra tad-Direttiva 2014/30/UE.
Kopja tad-Dikjarazzjoni ta’ Konformità tal-UE hija disponibbli onlajn s-sit www.dji.
com/euro-compliance
Indirizz ta’ kuntatt tal-UE: DJI GmbH, Industriestrasse 12, 97618, Niederlauer, ilĠermanja
Declarația UE de conformitate: Prin prezenta, SZ DJI TECHNOLOGY CO., LTD.
declară faptul că acest dispozitiv este conform cu cerințele esențiale și celelalte
prevederi relevante ale Directivei 2014/30/UE.
48
Page 51

Un exemplar al Declarației UE de conformitate este disponibil online, la adresa www.
dji.com/euro-compliance
Adresa de contact pentru UE: DJI GmbH, Industriestrasse 12, 97618, Niederlauer,
Germania
Izjava EU o skladnosti: Družba SZ DJI TECHNOLOGY CO., LTD. izjavlja, da
ta naprava ustreza osnovnim zahtevam in drugim ustreznim določbam Direktive
2014/30/EU.
Kopija izjave EU o skladnosti je na voljo na spletu na www.dji.com/euro-compliance
Kontaktni naslov EU: DJI GmbH, Industriestrasse 12, 97618, Niederlauer, Nemčija
EU Izjava o sukladnosti: Tvrtka SZ DJI TECHNOLOGY CO., LTD. izjavljuje da je
ovaj uređaj izrađen u skladu s osnovnim zahtjevima i ostalim relevantnim odredbama
Direktive 2014/30/EU.
Kopija EU Izjave o sukladnosti dostupna je na mrežnoj stranici www.dji.com/eurocompliance
Adresa EU kontakta: DJI GmbH, Industriestrasse 12 97618, Niederlauer, Njemačka
Vyhlásenie o zhode EÚ: SZ DJI TECHNOLOGY CO., LTD. týmto vyhlasuje, že
toto zariadenie je v zhode so základnými požiadavkami a ďalšími relevantnými
ustanoveniami smernice 2014/30/EÚ.
Kópia tohto Vyhlásenia o zhode EÚ je k dispozícii online na www.dji.com/eurocompliance
Kontaktná adresa v EÚ: DJI GmbH, Industriestrasse 12, 97618, Niederlauer, Nemecko
Deklaracja zgodności UE: Firma SZ DJI TECHNOLOGY CO., LTD. niniejszym
oświadcza, że przedmiotowe urządzenie jest zgodne z zasadniczymi wymogami i
innymi stosownymi postanowieniami dyrektywy 2014/30/UE.
Kopię deklaracji zgodności UE można znaleźć w Internecie na stronie www.dji.com/
euro-compliance
Adres do kontaktu w UE: DJI GmbH, Industriestrasse 12, 97618, Niederlauer, Niemcy
EU megfelelőségi nyilatkozat: A SZ DJI TECHNOLOGY CO., LTD. ezúton megerősíti,
hogy ez az eszköz megfelel a 2014/30/EU Irányelv alapvető követelményeinek és más
vonatkozó rendelkezéseinek.
Az EU megfelelőségi nyilatkozat másolata elérhető a www.dji.com/euro-compliance
oldalon
EU kapcsolati cím: DJI GmbH, Industriestrasse 12, 97618, Niederlauer, Németország
EU-försäkran om efterlevnad: SZ DJI TECHNOLOGY CO., LTD. härmed förklarar
att denna enhet uppfyller de väsentliga kraven och andra relevanta bestämmelser i
direktivet 2014/30/EU
En kopia av EU-försäkran om efterlevnad nns att tillgå online på adressen www.dji.
com/euro-compliance
Kontaktadress EU: DJI GmbH, Industriestrasse 12, 97618, Niederlauer, Tyskland
Yrlýsing um fylgni við reglur ESB: SZ DJI TECHNOLOGY CO., LTD. lýsir hér með
yr að þetta tæki hlíti mikilvægum kröfum og öðrum viðeigandi ákvæðum tilskipunar
2014/30/ESB.
Nálgast má eintak af ESB-samræmisyrlýsingunni á netinu á www.dji.com/eurocompliance
49
Page 52

Heimilisfang ESB-tengiliðar: DJI GmbH, Industriestrasse 12, 97618, Niederlauer,
Germany
AB Uygunluk Beyanı: SZ DJI TECHNOLOGY CO., LTD. bu belge ile bu cihazın
temel gerekliliklere ve 2014/30/EU sayılı Direktifin diğer ilgili hükümlerine uygun
olduğunu beyan eder.
AB Uygunluk Beyanının bir kopyasına www.dji.com/euro-compliance. adresinden
çevrim içi olarak ulaşılabilir
AB için iletişim adresi: DJI GmbH, Industriestrasse 12, 97618, Niederlauer, Almanya
Environmentally friendly disposal
Old electrical appliances must not be disposed of together with the residual waste,
but have to be disposed of separately. The disposal at the communal collecting
point via private persons is for free. The owner of old appliances is responsible to
bring the appliances to these collecting points or to similar collection points. With
this little personal eort, you contribute to recycle valuable raw materials and the
treatment of toxic substances.
Umweltfreundliche Entsorgung
Elektro-Altgeräte dürfen nicht mit gewöhnlichem Abfall entsorgt werden und müssen
separatentsorgt werden. Die Entsorgung an kommunalen Sammelstellen ist für
Privatpersonen kostenlos. Die Eigentümer der Altgeräte sind für den Transport zu
den Sammelstellen verantwortlich. Durch diesen geringen Aufwand können Sie zur
Wiederverwertung von wertvollen Rohmaterialien beitragen und dafür sorgen, dass
umweltschädliche und giftige Substanzen ordnungsgemäß unschädlich gemacht werden.
Tratamiento de residuos responsable con el medio ambiente
Los aparatos eléctricos viejos no pueden desecharse junto con los residuos
orgánicos, sino que deben ser desechados por separado. Existen puntos limpios
donde los ciudadanos pueden dejar estos aparatos gratis. El propietario de los
aparatos viejos es responsable de llevarlos a estos puntos limpios o similares puntos
de recogida. Con este pequeño esfuerzo estás contribuyendo a reciclar valiosas
materias primas y al tratamiento de residuos tóxicos.
Mise au rebut écologique
Les appareils électriques usagés ne doivent pas être éliminés avec les déchets
résiduels. Ils doivent être éliminés séparément. La mise au rebut au point de collecte
municipal par l'intermédiaire de particuliers est gratuite. Il incombe au propriétaire
des appareils usagés de les apporter à ces points de collecte ou à des points de
collecte similaires. Avec ce petit eort personnel, vous contribuez au recyclage de
matières premières précieuses et au traitement des substances toxiques.
Smaltimento ecologico
I vecchi dispositivi elettrici non devono essere smaltiti insieme ai riuti residui, ma
devono essere smaltiti separatamente. Lo smaltimento da parte di soggetti privati
presso i punti di raccolta pubblici è gratis. È responsabilità del proprietario dei vecchi
dispositivi portarli presso tali punti di raccolta o punti di raccolta analoghi. Grazie a
50
Page 53

questo piccolo impegno personale contribuirete al riciclo di materie prime preziose e
al corretto trattamento di sostanze tossiche.
Milieuvriendelijk afvoeren
Oude elektrische apparaten mogen niet worden weggegooid samen met het
restafval, maar moeten afzonderlijk worden afgevoerd. Afvoeren via het gemeentelijke
inzamelpunt is gratis voor particulieren. De eigenaar van oude toestellen is
verantwoordelijk voor het inleveren van de apparaten op deze of vergelijkbare
inzamelpunten. Met deze kleine persoonlijke inspanning lever je een bijdrage aan de
recycling van waardevolle grondstoen en de verwerking van giftige stoen.
Eliminação ecológica
Os aparelhos elétricos antigos não podem ser eliminados juntamente com os
materiais residuais. Têm de ser eliminados separadamente. A eliminação no
ponto de recolha público através de entidades particulares é gratuita. É da
responsabilidade do proprietário de aparelhos antigos levá-los a estes pontos de
recolha ou a pontos de recolha semelhantes. Com este pequeno esforço pessoal,
contribui para a reciclagem de matérias-primas úteis e para o tratamento de
substâncias tóxicas.
Изхвърляне с оглед опазване на околната среда
Старите електрически уреди не трябва да се изхвърлят заедно с битовите
отпадъци, а отделно. Изхвърлянето в общинския пункт за събиране на
отпадъци от частни лица е безплатно. Собственикът на старите уреди е
отговорен за пренасянето на уредите до тези или до подобни събирателни
пунктове. С това малко собствено усилие допринасяте за рециклирането на
ценни суровини и за обработката на токсични вещества.
Ekologicky šetrná likvidace
Stará elektrická zařízení nesmějí být likvidována spolu se zbytkovým odpadem,
ale musí být likvidována samostatně. Likvidace na komunálních sběrných místech
prostřednictvím soukromých osob je bezplatná. Vlastník starých zařízení odpovídá
za to, že je donese do těchto sběrných míst nebo na obdobná sběrná místa. Tímto
můžete přispět k recyklaci hodnotných surovin a zpracování toxických látek.
Miljøvenlig bortskaelse
Gamle elektriske apparater må ikke bortskaffes sammen med restaffald, men
skal bortskaes separat. Bortskaelse på et fælles indsamlingssted er gratis for
privatpersoner. Ejere af gamle apparater er ansvarlige for at bringe apparater
hen til disse indsamlingssteder eller til lignende indsamlingssteder. Med denne
lille personlige indsats bidrager du til genanvendelse af værdifulde råvarer og
behandlingen af giftige stoer.
Απόρριψη φιλική προς το περιβάλλον
Οι παλιές ηλεκτρικές συσκευές δεν πρέπει να απορρίπτονται μαζί με τα
υπολειμματικά απόβλητα, αλλά ξεχωριστά. Η απόρριψη στο δημοτικό σημείο
συλλογής μέσω ιδιωτών γίνεται χωρίς χρέωση. Ο κάτοχος παλιών συσκευών είναι
υπεύθυνος για τη μεταφορά των συσκευών σε αυτά ή παρόμοια σημεία συλλογής.
Μέσω της ατομικής σας προσπάθειας, συμβάλλετε στην ανακύκλωση πολύτιμων
πρώτων υλών και την επεξεργασία των τοξικών ουσιών.
51
Page 54

Keskkonnasäästlik kasutuselt kõrvaldamine
Vanu elektriseadmeid ei tohi ära visata koos olmejäätmetega, vaid tuleb koguda
ja kasutuselt kõrvaldada eraldi. Kohaliku omavalitsuse elektroonikaromude
kogumispunktis on äraandmine eraisikutele tasuta. Vanade seadmete sellistesse või
sarnastesse kogumispunktidesse toimetamise eest vastutavad seadmete omanikud.
Selle väikese isikliku panusega aitate kaasa väärtusliku toorme ringlussevõtule ja
mürgiste ainete töötlemisele.
Utilizavimas nekenkiant aplinkai
Senų elektrinių prietaisų negalima išmesti kartu su buitinėmis atliekomis; juos būtina
utilizuoti atskirai. Tokių prietaisų utilizavimas per komunalinius atliekų surinkimo
punktus yra nemokamas. Elektrinių prietaisų savininkai utilizuojamus prietaisus
privalo priduoti į atitinkamus arba analogiškus atliekų surinkimo punktus. Tokiu būdu,
įdėdami nedaug pastangų, prisidėsite prie vertingų medžiagų perdirbimo ir aplinkos
apsaugojimo nuo toksinių medžiagų.
Videi draudzīga atkritumu likvidēšana
Vecas elektriskās ierīces nedrīkst likvidēt kopā ar pārējiem atkritumiem, bet tās
jālikvidē atsevišķi. Privātpersonām atkritumu likvidēšana komunālajā savākšanas
punktā ir bez maksas. Veco ierīču īpašnieks ir atbildīgs par ierīču nogādāšanu šajos
savākšanas punktos vai līdzīgos savākšanas punktos. Ar šīm nelielām personiskajām
pūlēm jūs veicināt vērtīgu izejmateriālu pārstrādi un toksisko vielu apstrādi.
Hävittäminen ympäristöystävällisesti
Vanhoja sähkölaitteita ei saa hävittää kaatopaikkajätteen mukana, vaan ne on
hävitettävä erikseen. Kunnalliseen keräyspisteeseen vieminen on yksityishenkilölle
ilmaista. Vanhojen laitteiden omistaja vastaa laitteiden toimittamisesta kyseisiin
keräyspisteisiin tai vastaaviin. Tällä vähäisellä henkilökohtaisella vaivalla edistät omalta
osaltasi arvokkaiden raaka-aineiden kierrätystä ja myrkyllisten aineiden käsittelyä.
Diúscairt neamhdhíobhálach don chomhshaol
Níor cheart seanghléasanna leictreacha a dhiúscairt leis an dramhaíl iarmharach, ach
caithfear iad a chur de láimh astu féin. Tá an diúscairt ag an ionad bailiúcháin pobail
ag daoine príobháideacha saor in aisce. Tá freagracht ar úinéir seanghléasanna na
gléasanna a thabhairt chuig na hionaid bhailiúcháin sin nó chuig ionaid bhailiúcháin
den chineál céanna. Le hiarracht bheag phearsanta mar sin, cuidíonn tú le
hamhábhair luachmhara a athchúrsáil agus le substaintí tocsaineacha a chóireáil
Rimi li jirrispetta l-ambjent
L-apparat elettriku qadim ma għandux jintrema imkien ma’ skart residwu, iżda għandu
jintrema b’mod separat. Ir-rimi l-post tal-ġbir komunali minn persuni privati huwa b’xejn.
Is-sit ta’ apparat qadim huwa responsabbli biex iġib l-apparat f’dawn il-postijiet talġbir jew f ’postijiet tal-ġbir simili. B’dan l-isforz personali żgħir, inti tikkontribwixxi għarriċiklaġġ ta’ materja prima prezzjuża u għat-trattament ta’ sustanzi tossiċi.
Eliminarea ecologică
Aparatele electrice vechi nu trebuie aruncate odată cu deșeurile reziduale, ci trebuie
eliminate separat. Eliminarea în cadrul punctului de colectare local de către persoane
zice este gratuită. Proprietarii de aparate vechi sunt responsabili pentru transportul
acestora la respectivele puncte de colectare sau la alte puncte de colectare similare.
Prin acest efort personal nesemnicativ, puteți contribui la reciclarea materiilor prime
valoroase și la tratarea substanțelor toxice.
52
Page 55

Okolju prijazno odlaganje
Starih električnih aparatov ne smete odvreči skupaj z ostanki odpadkov, temveč
ločeno. Odlaganje na komunalnem zbirnem mestu je za zične osebe brezplačno.
Lastnik starih naprav je odgovoren, da jih pripelje do teh ali podobnih zbirnih mest.
S tako malo osebnega truda prispevate k recikliranju dragocenih surovin in obdelavi
strupenih snovi.
Ekološko odlaganje
Stari električni uređaji ne smiju se odlagati zajedno s kućnim otpadom, već ih
treba odlagati odvojeno. Odlaganje na komunalnom sabirnom mjestu od strane
privatnih osoba je besplatno. Vlasnik starih uređaja dužan je donijeti uređaje do tih
sabirnih mjesta ili sličnih sabirnih mjesta. Ovim malim osobnim naporom doprinosite
recikliranju vrijednih sirovina i pravilnoj obradi otrovnih tvari.
Ekologická likvidácia
Staré elektrospotrebiče sa nesmú likvidovať spolu so zvyškovým odpadom, ale
musia sa zlikvidovať samostatne. Likvidácia v komunálnom zbernom mieste
prostredníctvom súkromných osôb je bezplatná. Majiteľ starých spotrebičov je
zodpovedný za prinesenie spotrebičov na tieto zberné miesta alebo na podobné
zberné miesta. Týmto malým osobným úsilím prispievate k recyklovaniu cenných
surovín a spracovaniu toxických látok
Utylizacja przyjazna dla środowiska
Nie można usuwać starych urządzeń elektrycznych wraz z pozostałymi odpadami.
Wymagają one oddzielnej utylizacji. Utylizacja przez osoby prywatne w punkcie
zbiórki odpadów komunalnych jest darmowa. Właściciel starych urządzeń jest
odpowiedzialny za dostarczenie ich do takich lub podobnych punktów zbiórki.
Zadając sobie tak niewielki trud, przyczyniasz się do recyklingu cennych surowców i
odpowiedniego postępowania z substancjami toksycznymi.
Környezetbarát hulladékkezelés
A régi elektromos készülékeket nem szabad a nem szelektíven gyűjtött hulladékkal
együtt kidobni, hanem a hulladékkezelésüket elkülönítve kell végezni A közösségi
gyűjtőpontokon a magánszemélyek ingyenesen leadhatják ezeket. A régi készülékek
tulajdonosai felelnek azért, hogy e készülékeket ezekre a gyűjtőpontokra, vagy más
gyűjtőpontokra elhozzák. Ezzel a kis személyes erőfeszítéssel Ön is hozzájárul az
értékes nyersanyagok újrahasznosításához és a mérgező anyagok kezeléséhez.
Miljövänlig hantering av avfall
Gamla elektriska apparater får inte kasseras tillsammans med restavfallet utan måste
kasseras separat. Kassering på den lokala insamlingsplatsen för privatpersoner
är gratis. Ägaren av gamla apparater ansvarar för att ta apparaterna till dessa
insamlingsplatser eller till liknande insamlingsplatser. Med denna lilla personliga
insats bidrar du till återvinning av värdefulla råvaror och hantering av giftiga ämnen.
Umhversvæn förgun
Ekki má farga gömlum raftækjum með úrgangsleifum, heldur þarf að farga þeim
sérstaklega. Förgun á almennum söfnunarstöðum er ókeypis fyrir einstaklinga.
Eigandi gamalla tækja ber ábyrgð á að koma með tækin á þessa söfnunarstaði
eða á svipaða söfnunarstaði. Með þessu litla persónulega átaki stuðlar þú að
endurvinnslu verðmætra hráefna og meðferð eitrurefna.
53
Page 56

Çevre dostu bertaraf
Eski elektrikli cihazlar, diğer atıklarla birlikte bertaraf edilmemeli, ayrıca atılmalıdır.
Özel kişiler aracılığıyla genel toplama noktasına bertaraf işlemi ücretsiz olarak
yapılmaktadır. Eski cihazların sahibi, cihazları bu toplama noktalarına veya benzer
toplama noktalarına getirmekten sorumludur. Bu az miktardaki kişisel çabayla, değerli
ham maddelerin geri dönüştürülmesine ve toksik maddelerin işleme alınmasına
katkıda bulunmuş olursunuz.
部件名称
铅
(Pb)汞(Hg)镉(Cd)
线路板 × ○ ○ ○ ○ ○
外壳 × ○ ○ ○ ○ ○
金属部件
× ○ ○ ○ ○ ○
(铜合金)
内部线材 × ○ ○ ○ ○ ○
其他配件 × ○ ○ ○ ○ ○
本表格依据 SJ/T 11364 的规定编制。
○:表示该有害物质在该部件所有均质材料中的含量均在 GB/T 26572 规定的限量
要求以下。
×:表示该有害物质至少在该部件的某一均质材料中的含量超出 GB/T 26572 规定
的限量要求。(产品符合欧盟 ROHS 指令环保要求)
有害物质
六价铬
(Cr
多溴联苯
(PBB)
多溴二苯醚
(PBDE)
+6
)
This content is subject to change.
Download the latest version from
http://www.dji.com/mini-2
DJI is a trademark of DJI.
Copyright © 2020 All Rights Reserved.
3Q4DM2CB02DY
 Loading...