

Page 1
MAVIC PRO
Quick Start Guide
Kurzanleitung
Guía de inicio rápido
Guide de démarrage rapide
Guida di avvio rapido
Snelstartgids
Guia de Início Rápido
Краткое руководство пользователя
V1.2
Page 2

Page 3
Contents
EN
Quick Start Guide 2
Kurzanleitung 12
DE
ES
Guía de inicio rápido 22
FR
Guide de démarrage rapide 32
IT
Guida di avvio rapido 42
NL
Snelstartgids 52
Guia de Início Rápido 62
PT
RU
Краткое руководство пользователя 72
Page 4
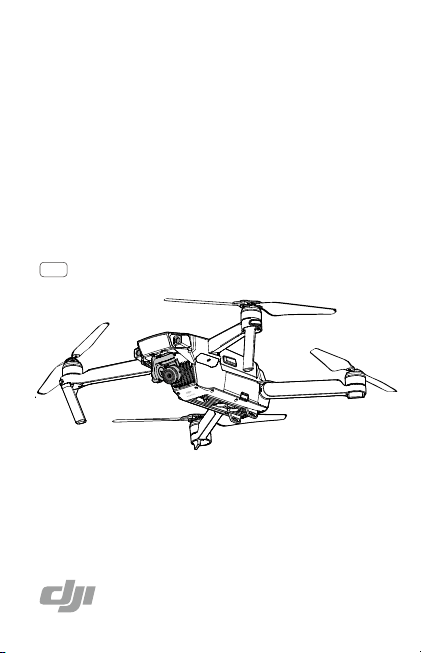
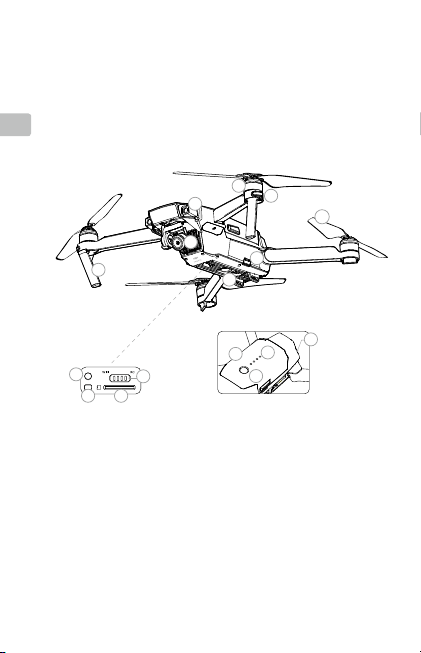
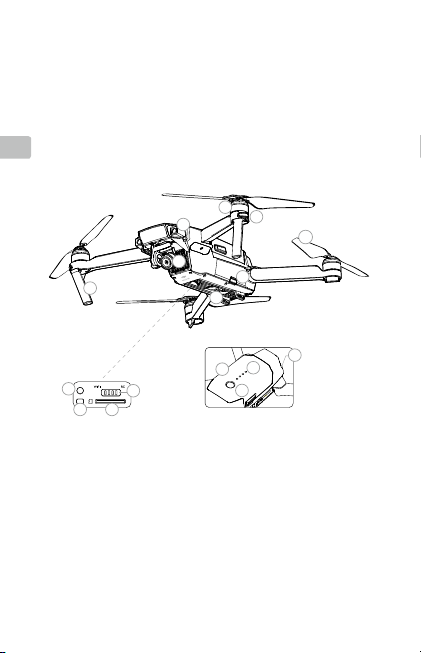
Aircraft
The DJITM MAVICTM Pro is DJI's smallest ying camera, featuring a fully stabilized
camera, Intelligent Flight Modes and Obstacle Avoidance inside a revolutionary
EN
folding design. It captures 4K videos and 12 megapixel photos, and is capable
of both ActiveTrackTM and TapFlyTM making complex shots effortless.
Mavic Pro boasts a maximum ight speed of 40 mph (65 kph) and a maximum
ight time of 27 minutes*.
5
3
1
8
9
1. Gimbal and Camera
2. Downward Vision System
3. Forward Vision System**
4. Micro USB Port
5. Motors
6. Front LEDs
7. Propellers
8. Antennas
* Maximum ight time was tested in 0 wind at a consistent 15.5 mph (25 kph). This value should be
taken for reference only.
** The Forward Vision System is affected by surrounding conditions. Read the Disclaimer and Safety
Guidelines and watch the tutorial in the DJI GOTM 4 app or on the Ofcial DJI website to learn more.
http://www.dji.com/mavic
2
12
11
10
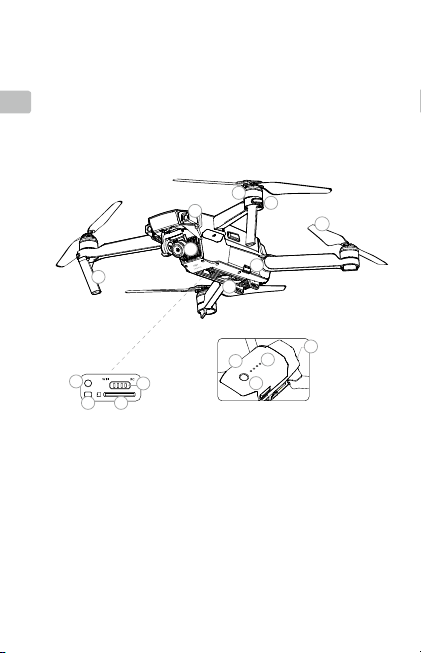
9. Link Button
10. Linking Status Indicator
11. Camera Micro SD Card Slot
12. Control Mode Switch
13. Intelligent Flight Battery
14. Battery Level LEDs
15. Power Button
16. Aircraft Status Indicator
6
7
4
2
16
14
13
15
Page 5
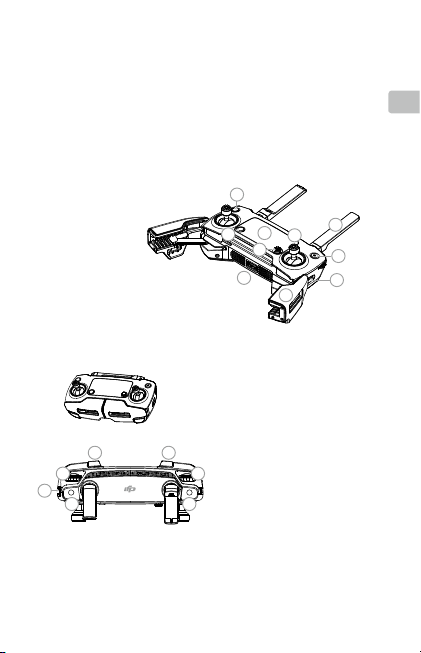
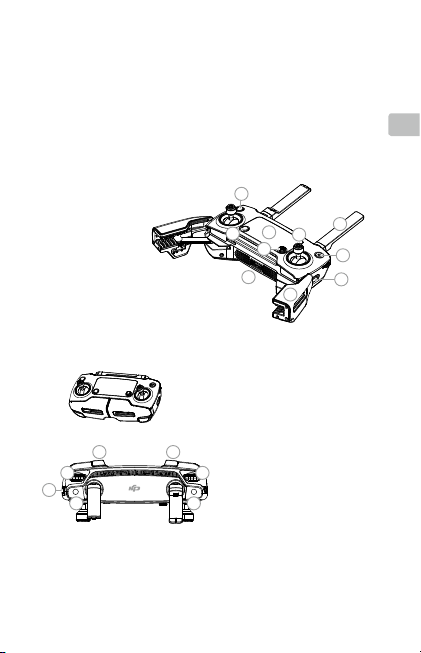
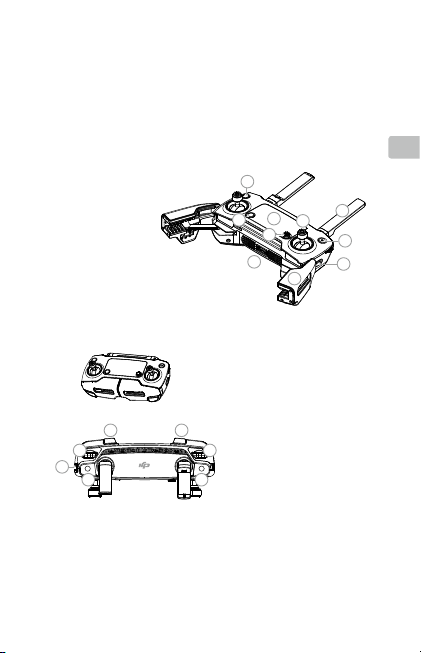
Remote Controller
Built into the Remote Controller is DJI's latest long-range transmission technology
OCUSYNCTM, offering a maximum transmission range of 4.3 mi (7 km). An onboard LCD screen keeps you updated on aircraft data, and video from the
aircraft to the DJI GO 4 app on your mobile device at up to 1080p at close range,
and 720p at longer ranges. The Mavic Pro can also be own by phone only.
Maximum run-time: 2.5 hours*
EN
1. LCD Screen
2. 5D Button
3. Control Sticks
4. Antennas
5. Power Button
6. Flight Mode Switch
7. Mobile Device Clamp
8. USB Port
9. Flight Pause Button
10. RTH Button
Folded
16 17
11
15
13 14
* The remote controller is able to reach its maximum transmission distance (FCC) in a wide open
area with no Electro-Magnetic Interference, and at an altitude of about 400 feet (120 meters).
The maximum run-time is tested under laboratory environment, only for your reference.
10
9
8
12
1
2
11. Gimbal Dial
12. Camera Settings Dial
13. Record Button
14. Shutter Button
15. Power Port (Micro USB)
16. C1 Button (customizable)
17. C2 Button (customizable)
4
3
5
6
7
3
Page 6
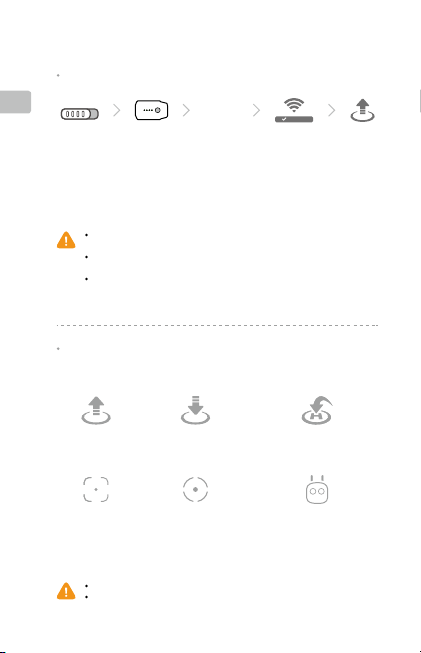
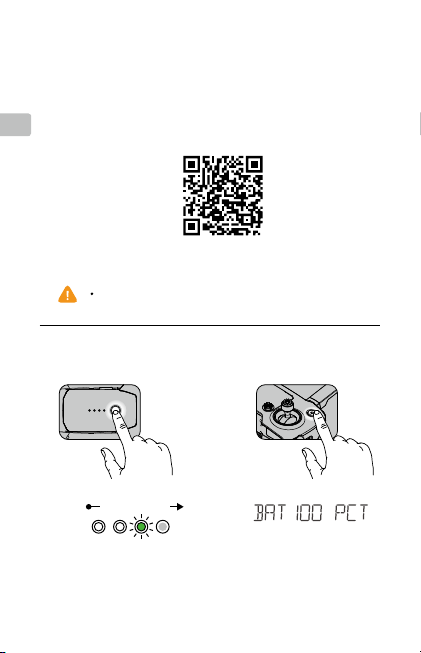
1. Download the DJI GO 4 App and Watch
the Tutorial Videos
EN
Search for ‘DJI GO 4' on the App Store or Google Play, or scan the QR
code to download the app on your mobile device. Watch the tutorial videos
at www.dji.com or in the DJI GO 4 App.
DJI GO 4 app and more information
DJI GO 4 supports iOS 9.0 (or later) or Android 4.4 (or later).
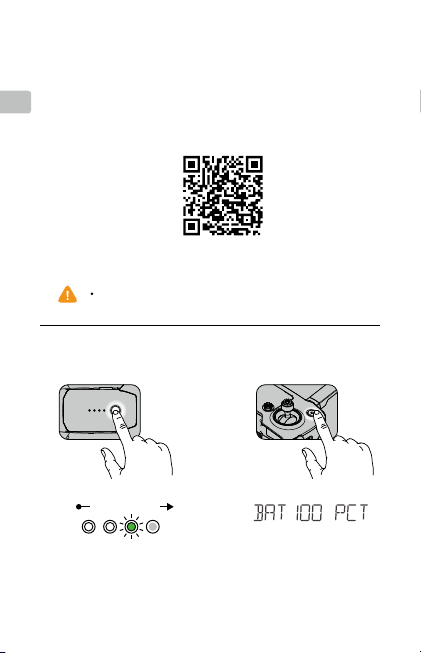
2. Check the Battery Levels
Low
Battery Level High
Battery Level: 100%
Press once to check the battery
level. Press once, then again
and hold to turn on/off.
4
Press once to check the battery level
on LCD screen. Press once, then
again and hold to turn on/off the
remote controller.
Page 7
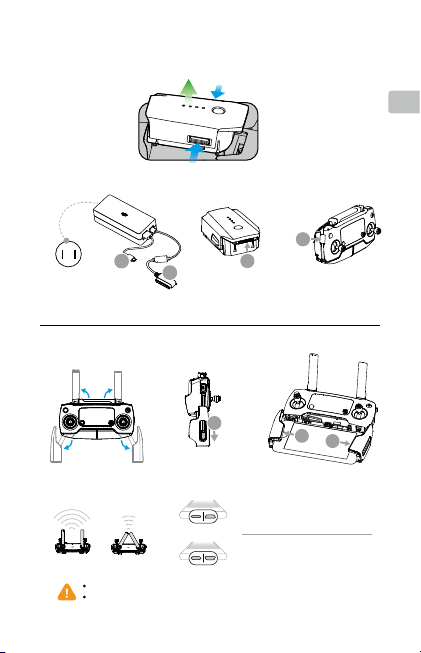
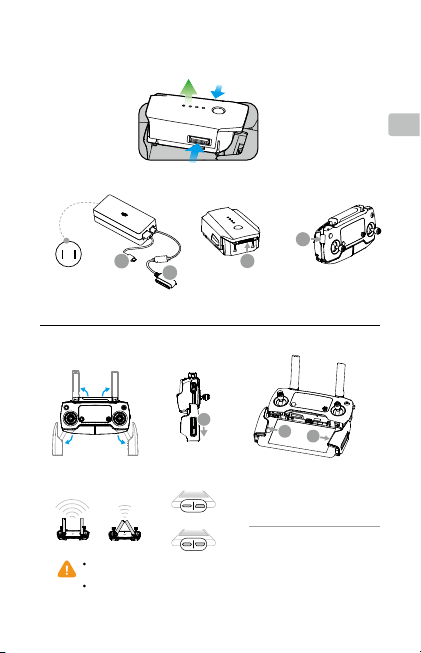
3. Charge the Batteries
Remove Intelligent Flight Battery
A
Charge Time:
~1 hour 20 minutes
Power Outlet
100 - 240V
B
A
4. Prepare the Remote Controller
B
Charge Time:
~2 hours
EN
1
Place one end of the RC
Unfold the antennas and
the mobile device clamp.
Strong Weak
Choose an appropriate RC cable. Do not twist the RC cable.
The RC cable slider must be replaced if using a USB Type-C RC cable. Refer to
the User Manual for RC Cable connection.
cable to the end of the slot .
Lightning connector cable (Connected)
and Standard Micro USB connector
cable included. Use as appropriate.
USB Type-C connector cable is
included. Optional Reverse Micro USB
connector cable is available.
2
3
5
Page 8
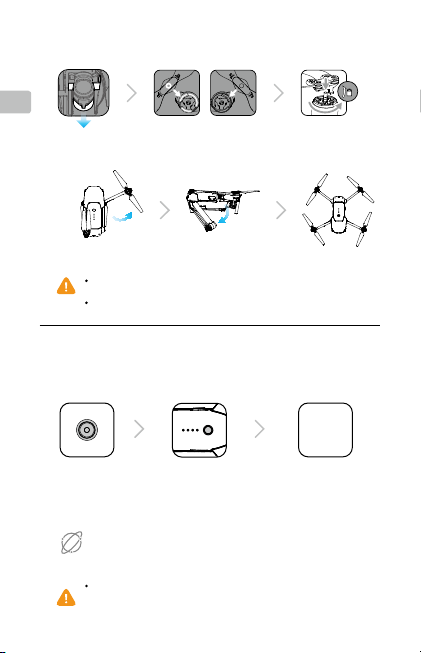
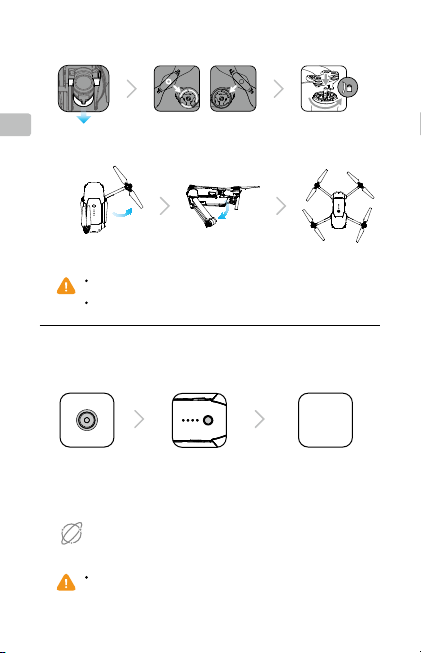
5. Prepare the Aircraft
EN
Remove the gimbal
clamp from the
camera
Match propellers to motors Press the propeller
Marked
Unmarked
down rmly and rotate
in the lock direction
Unfold the front arms
and the propellers
Unfold the front arms and the propellers before the rear ones. All arms and
propellers must be unfolded before takeoff.
The gimbal cover is used to protect the gimbal. Remove it when necessary.
Unfold the rear arms
and the propellers Unfolded
6. Prepare for Takeoff
Power on the
remote controller
Use your DJI account to activate the aircraft. Activation requires an internet
connection.
Internet
The Mavic Pro can be controlled using the Remote Controller or Virtual Joysticks.
Select control modes by toggling the Control Mode Switch. Only toggle this switch
when the aircraft is powered off.
6
Power on the aircraft Launch the DJI GO 4 app
DJI GO 4
App
Page 9
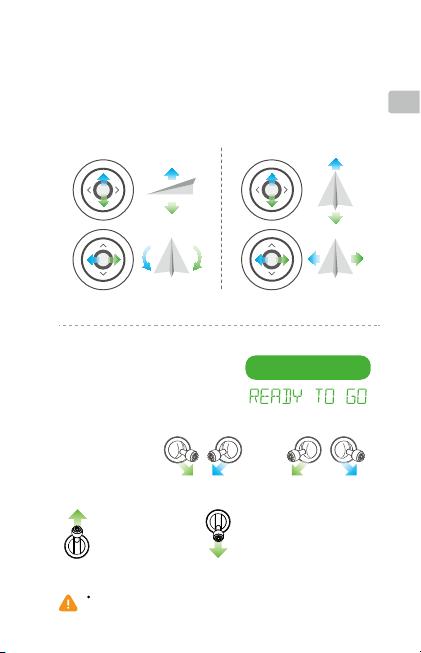
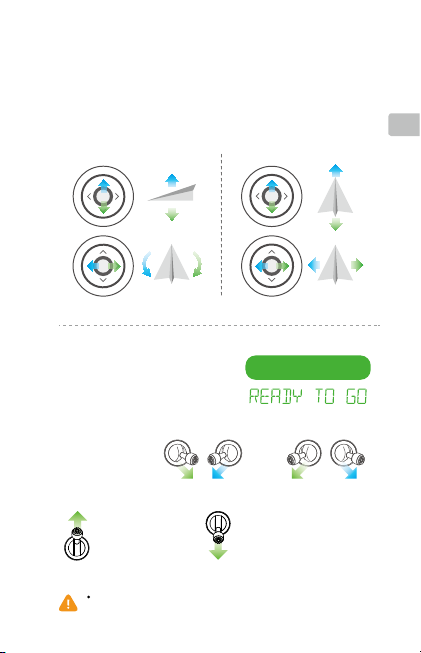
7. Flight
The default ight control is known as Mode 2. The left stick controls the
aircraft's altitude and heading, while the right stick controls its forward,
backward, left and right movements. The gimbal dial controls the
camera's tilt.
t
f
e
L
n
r
u
T
Left Stick
P
U
D
o
w
n
T
u
r
n
R
i
g
h
t
Right Stick
o
F
B
a
c
t
f
e
L
a
w
r
r
d
d
r
k
a
w
R
i
g
h
t
EN
Before taking off, make sure the Aircraft
Status Bar in the DJI GO 4 app or on
the Remote Controller LCD screen
displays 'Ready to Go'.
Combination stick
command to start/stop
the motors.
Left stick up (slowly)
to take off
The motors can only be stopped mid-ight when the ight controller detects critical
error.
Ready to Go (GPS)
OR
Left stick down (slowly) until
you touch the ground
Hold a few seconds to stop
the motors
7
Page 10
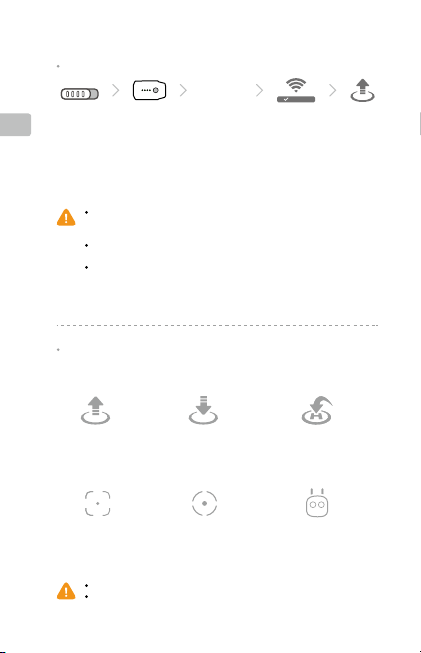
TapFly
Normal
ActiveTrack
Controlling ight with Virtual Joysticks on your mobile device via Wi-Fi
EN
WIFI RC
1. Toggle the Control Mode Switch to turn on Wi-Fi
2. Power on the aircraft
3. Launch the DJI GO 4 app and tap the icon on the top right of your screen,
then scan the Wi-Fi QR Code on the front arm to start connection
4. Tap Auto Takeoff
5. Fly the aircraft with touch control
Turn on your mobile device's Wi-Fi and enter the Wi-Fi password shown on the front
arm to connect to the Mavic network if for any reason you cannot scan the QR code.
When using Wi-Fi in a wide open area with no Electro-Magnetic Interference,
transmission distance is approximately 262 ft (80 m) at an altitude of 164 ft (50 m).
The Wi-Fi frequency of your mobile device can be set to 2.4 Ghz or 5 Ghz. Set
your Wi-Fi to 5 Ghz for less interference. Once connected to the Mavic Pro, you
can change your Wi-Fi password or reset your Wi-Fi connection. (Refer to the User
Manual for more information)
In the DJI GO 4 App
DJI GO 4
App
Mavic_XXX
Auto Landing
Auto Takeoff
Watch the tutorial in the DJI GO 4 app or on the Ofcial DJI website to learn more.
Always set an appropriate RTH altitude before takeoff. When the aircraft is returning
to the Home Point, you should guide it with the control sticks.
8
Return-to-Home (RTH)
Page 11
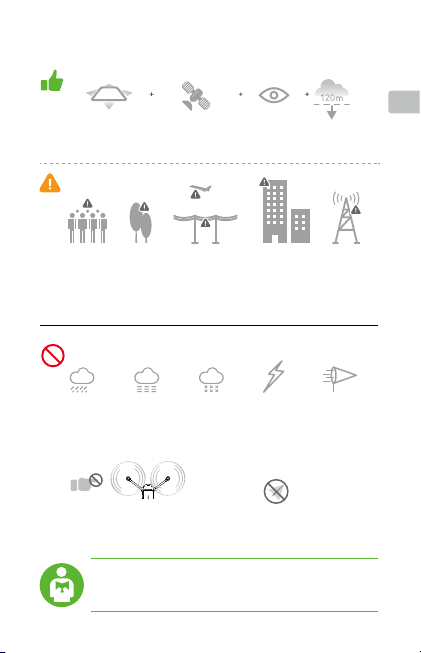
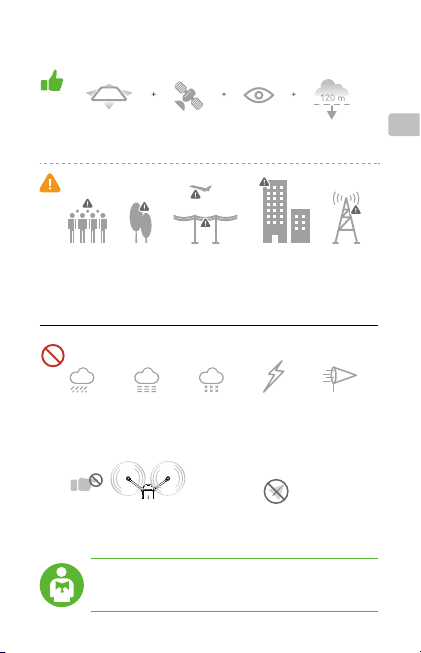
8. Fly Safe
EN
Fly in Open Areas
Avoid ying over or near obstacles, crowds, high voltage power lines,
trees or bodies of water.
DO NOT y near strong electromagnetic sources such as power lines
and base stations as it may affect the onboard compass.
DO NOT use the aircraft in adverse weather conditions such as rain,
snow, fog and wind speeds exceeding 10 m/s or 22 mph.
Stay away from the rotating propellers
and motors.
It’s important to understand basic ight guidelines, for the safety of
both you and those around you. Don't forget to read the
and Safety Guidelines
Strong GPS Signal Maintain Line
of Sight
Learn more at:
http://ysafe.dji.com/no-y
.
Fly Below
400 feet (120 m)
No Fly Zone
≥10m/s
Disclaimer
9
Page 12
Specications
Aircraft
Weight 1.62 lbs (734 g)
EN
Weight (including gimbal cover) 1.64 lbs (743 g)
Max Ascent Speed 16.4 ft/s (5 m/s) in Sport Mode
Max Descent Speed 9.8 ft/s (3 m/s)
Max Speed 40 mph (65 kph) in Sport Mode without wind
Max Service Ceiling Above Sea Level 16404 feet (5000 m)
Max Flight Time 27 minutes (0 wind at a consistent 15.5 mph (25 kph))
Max Hovering Time 24 minutes (0 wind)
Max Flight Distance 8 mi (13 km, 0 wind)
Operating Temperature 32° to 104° F (0° to 40° C)
Satellite Positioning Systems GPS/GLONASS
Gimbal
Controllable Range
Forward Vision System
Sensing Range
Operating Environment Surfaces with clear patterns and adequate lighting
Downward Vision System
Velocity Range ≤ 22.4 mph (36 kph) at 6.6 ft (2 m) above ground
Altitude Range 1 - 43 feet (0.3 - 13 m)
Operating Range 1 - 43 feet (0.3 - 13 m)
Operating Environment Surfaces with a clear patterns and adequate
Camera
Sensor 1/2.3” CMOS, Effective pixels:12.35 Megapixels
Lens 78.8° FOV, 28mm (35mm format equivalent) f/2.2
ISO Range 100 - 3200 (video)
Electronic Shutter Speed 8 s to 1/8000 s
Max Image Size 4000×3000
Still Photography Modes Single shot
10
Pitch: -90° to +30°,
Roll: 0°or 90° (Horizontally and vertically)
Precision measurement range:
2 ft (0.7 m) to 49 ft (15 m)
Detectable range: 49 ft (15 m) to 98 ft (30 m)
(lux > 15)
lighting (lux > 15)
(Total pixels: 12.71 M)
Distortion <1.5%, Focus from 0.5m to ∞
Burst shooting: 3/5/7 frames
Auto Exposure Bracketing (AEB):
3/5 bracketed frames at 0.7EV Bias
,
100 - 1600 (photo)
Page 13
Interval
Video Recording Modes C4K: 4096×2160 24p, 4K: 3840×2160 24/25/30p
Video Storage Bitrate 60 Mbps
Supported File Systems FAT32 (≤ 32 GB), exFAT (> 32 GB)
Photo JPEG, DNG
Video MP4, MOV (MPEG-4 AVC/H.264)
Supported SD Cards microSDTM. Max capacity: 64 GB
Remote Controller
Operating Frequency 2.4 GHz to 2.4835 GHz
Max Transmission Distance FCC Compliant: 4.3 mi (7 km); CE Compliant:
Operating Temperature 32° to 104° F (0° to 40° C)
Battery 2970 mAh
Transmitter Power (avg. EIRP) FCC: ≤ 26 dBm; CE: ≤ 20 dBm
Operating Voltage 950 mA @ 3.7 V
Supported Mobile Device Size Thickness supported: 6.5 - 8.5 mm,
Charger
Voltage 13.05 V
Rated Power 50 W
Intelligent Flight Battery
Capacity 3830 mAh
Voltage 11.4 V
Battery Type LiPo 3S
Energy 43.6 Wh
Net Weight Approx. 0.5 lbs (240 g)
Charging Temperature Range 41° to 104° F (5° to 40° C)
Max Charging Power 100 W
For more information, read the User Manual:
http://www.dji.com/mavic
※
This content is subject to change without prior notice.
MAVICTM and OCUSYNCTM are trademarks of DJI.
Copyright © 2016 DJI All Rights Reserved.
HDR
2.7K: 2720×1530 24/25/30p
FHD: 1920×1080 24/25/30/48/50/60/96p
HD: 1280×720 24/25/30/48/50/60/120p
Class 10 or UHS-1 rating required
2.5 mi (4 km) Unobstructed and free of interference
Max length: 160 mm, Supported USB port types:
Micro USB (Type-B), USB Type-C
TM
Designed by DJI.
Printed in China.
EN
11
Page 14
Fluggerät
Der DJITM MAVICTM Pro ist ein tragbares Fluggerät mit einer revolutionären
Klappkonstruktion. Dank seiner intuitiven, durch intelligente Geräte gesteuerten
Bedienung und der durch einen Gimbal stabilisierten Kamera ist das Aufnehmen von
4K-Video oder 12-Megapixel Teilen und Genießen so einfach wie nie zuvor. Mit TapFlyTM
DE
und ActiveTrackTM können Sie zu einem beliebigen auf Ihrem Gerät sichtbaren Punkt
iegen oder mühelos ein sich bewegendes Objekt xieren.
Der Mavic Pro besticht durch eine maximale Fluggeschwindigkeit von 65 km/h und eine
maximale Flugzeit von 27 Minuten*.
5
3
1
8
9
1. Gimbal und Kamera
2. Untere Ansicht
3. Vorwärts-Ansicht**
4. Micro-USB-Anschluss
5. Motoren
6. Vordere LEDs
7. Propeller
8. Antennen
9. Koppeltaste
* Maximale Flugzeit wurde ohne Wind und bei einer konstanten Geschwindigkeit von 25 km/h getestet.
** Die Leistung der Vorwärts-Ansicht ist von den äußeren Bedingungen abhängig. Näheres erfahren Sie
im Haftungsausschluss und den Sicherheitsvorschriften und in den Tutorials in der „DJI GOTM 4“-App
oder auf der ofziellen DJI-Website.
http://www.dji.com/mavic
12
12
11
10
10. Verknüpfungsstatusanzeige
11. Schlitz für die Micro-SD-Karte
12. Steuerungsmodusschalter
13. Intelligent Flight Battery
14. Akkuladezustands-LED
15. Ein/Aus-Taste
16. Statusanzeige des Fluggeräts
6
7
4
2
16
14
13
15
Page 15
Fernbedienung
In die Fernbedienung integriert ist die aktuelle Weitbereichsübertragungstechnologie
OCUSYNCTM von DJI, die ein Steuern des Fluggeräts bis in eine Entfernung von 7 km
bei gleichzeitiger Live-HD-Übertragung von der Mavic-Kamera über die „DJI GO 4“App ermöglicht. Auf dem LCD-Bildschirm werden während des Fluges fortlaufend
Aktualisierungen angezeigt, und die Mobilgeräteklammer hält das Mobilgerät bei der
Verwendung sicher und fest.
Maximale Betriebszeit: 2,5 Stunden*
1. LCD-Bildschirm
2. 5D-Taste
3. Steuerhebel
4. Antennen
5. Ein/Aus-Taste
6. Flugmodusschalter
7. Mobilgeräteklammer
8. USB-Anschluss
9. „Flight-Pause“-Taste
10. Rückkehrtaste
Zusammengeklappt
10
1
9
2
8
4
3
5
6
7
DE
16 17
11
15
13 14
* Die Fernbedienung erreicht Ihre maximale Übertragungsreichweite (FCC) auf oenem Gelände ohne
elektromagnetische Störquellen und bei einer Flughöhe von ca. 120 Metern.
Die maximale Betriebszeit wurde unter Laborbedingungen getestet und dient nur zur Referenz.
11. Gimbal-Rädchen
12. Kamerarädchen
12
13. Videotaste
14. Fototaste
15. Netzanschluss (Micro-USB)
16. C1-Taste (benutzerdenierbar)
17. C2-Taste (benutzerdenierbar)
13
Page 16
1. „DJI GO 4“-App herunterladen und
Video-Tutorials ansehen
Suchen Sie im App Store oder auf Google Play nach „DJI GO 4“, oder
scannen Sie den QR-Code, um die App auf Ihr Mobilgerät herunterzuladen.
DE
Die Video-Tutorials nden Sie auf www.dji.com oder in der „DJI GO 4“-App.
„DJI GO 4“-App und weitere Informationen
DJI GO 4 wird auf iOS 9.0 (oder höher) sowie Android 4.4 (oder höher) unterstützt.
2. Den Akkuladezustand prüfen
Niedrig
Akkuladezustand
Drücken Sie die Taste einmal, um den AkkuLadezustand zu überprüfen. Drücken Sie die
Taste noch einmal, und halten Sie sie gedrückt,
um das Gerät ein-/auszuschalten.
14
Hoch
Akkuladezustand: 100%
Drücken Sie die Taste einmal, um den
Akkuladezustand auf dem LCD-Bildschirm
zu überprüfen. Drücken Sie die Taste noch
einmal, und halten Sie sie gedrückt, um die
Fernbedienung ein-/auszuschalten.
Page 17
3. Akkus auaden
Entnehmen der Intelligent Flight Battery
A
Ladezeit:
ca. 1 Std. 20 Minuten
Steckdose
100 – 240 V
B
A
4. Fernbedienung vorbereiten
B
Ladezeit:
~ 2 Stunden
DE
1
Stecken Sie ein Ende
des RC-Kabels in das
Klappen Sie die Antennen und die
Mobilgeräteklammer aus.
stark schwach
Wählen Sie ein geeignetes RC-Kabel. Achten Sie darauf, dass das RC-Kabel nicht
verdreht wird!
Der RC Kabel-Schieber muss bei der Nutzung des USB Typ-C Kabels ersetzt werden.
Genauere Informationen hierzu nden Sie in der Bedienungsanleitung im Abschnitt „RCKabel“.
Ende des Schlitzes an der
Fernbedienung ein.
Lightning-Kabel (angeschlossen) und
Standard-Micro-USB-Kabel sind im
Lieferumfang enthalten. Je nach Bedarf
verwenden.
USB Typ-C Kabel inklusive. Optionales
reversibles Micro-USB-Kabel verfügbar.
2
3
15
Page 18
5. Fluggerät vorbereiten
DE
Entfernen Sie die
Gimbal-Klemme von
der Kamera
Klappen Sie die vorderen
Arme und die Propeller aus
Klappen Sie die vorderen Arme und die Propeller aus, bevor Sie die hinteren
ausklappen. Vor dem Losiegen müssen alle Arme und Propeller ausgeklappt sein.
Der Gimbal-Deckel dient zum Schutz des Gimbals. Entfernen Sie ihn gegebenenfalls.
Markiert
Propeller den Motoren
zuordnen
Klappen Sie die vorderen
Arme und die Propeller aus Ausgeklappt
6. Auf den Start vorbereiten
Einschalten der
Fernbedienung
Verwenden Sie Ihr DJI-Konto, um das Fluggerät zu aktivieren. Für die Aktivierung
wird eine Internetverbindung benötigt.
Internet
Der Mavic Pro kann mit der Fernbedienung oder mit virtuellen Joysticks gesteuert werden.
Durch Umschalten des Steuerungsmodusschalters können Sie den Steuerungsmodus
entsprechend auswählen. Schalten Sie diesen Schalter nur um, wenn das Fluggerät
ausgeschaltet ist.
16
Einschalten des
Fluggeräts
Nicht markiert
Drücken Sie den
Propeller herunter, und
drehen Sie ihn in die
Verriegelungsrichtung
DJI GO 4
App
Starten der „DJI GO 4“-App
Page 19
7. Flug
Die Standard-Flugsteuerung wird als Modus 2 bezeichnet. Mit dem linken
Steuerhebel steuern Sie die Höhe und Flugrichtung des Fluggeräts, und mit
dem rechten Steuerhebel steuern Sie ihre Vorwärts-, Rückwärts-, Links- oder
Rechtsbewegung. Mit dem Gimbal-Rädchen wird die Neigung der Kamera
verstellt.
Linker Hebel
f
g
l
i
u
e
t
S
S
i
n
l
f
k
g
n
u
h
e
r
d
s
k
n
i
L
g
g
u
R
e
c
h
t
s
d
r
e
h
u
n
g
Rechter Hebel
ä
w
r
r
t
o
V
R
ü
c
ä
k
w
s
k
n
i
L
s
s
t
r
R
e
c
h
t
s
DE
Stellen Sie vor dem Losiegen sicher, dass
die Fluggerät Statusanzeige in der „DJI GO
4“-App oder auf dem LCD-Bildschirm der
Fernbedienung den Status „Ready to Go“
anzeigt.
Hebelkombination zum
Ein-/Ausschalten der
Motoren
Linken Hebel langsam
nach oben bewegen,
um zu starten
Die Motoren können während des Fluges nur gestoppt werden, wenn der Flugcontroller
einen kritischen Fehler erkennt.
Ready to Go (GPS)
ODER
Drücken Sie den linken Hebel
nach unten (langsam), bis das
Fluggerät den Boden berührt.
Einige Sekunden halten, um die
Motoren auszuschalten
17
Page 20
Steuern des Fluges mit virtuellen Joysticks auf Ihrem Mobilgerät über WLAN
Rückkehrfunktion
WIFI RC
1. Schalten Sie die Steuerungsmodusschalter um, um WLAN einzuschalten
DE
2. Einschalten des Fluggeräts
3. Starten Sie die „DJI GO 4“-App und berühren Sie das Symbol oben rechts
auf Ihrem Bildschirm. Scannen Sie dann den WLAN-QR-Code auf dem
vorderen Träger, um die Verbindung herzustellen.
4. Tippen Sie auf „Auto Takeo“
5. Fliegen des Fluggeräts mit Tippsteuerung
Wenn Sie den QR-Code nicht scannen können, schalten Sie das WLAN Ihres
Mobilgeräts ein, und geben Sie das auf dem vorderen Träger abgebildete WLANPasswort ein, um die Verbindung zum Mavic-Netzwerk herzustellen.
Bei Verwendung von WLAN in oenem Gelände ohne elektromagnetische Störungen
ist die Übertragungsreichweite etwa 80 m bei einer Flughöhe von 50 m.
Die WLAN-Frequenz Ihres Mobilgeräts kann auf 2,4 GHz oder 5 GHz eingestellt werden.
Stellen Sie Ihr WLAN auf 5 GHz ein, um Interferenzen gering zu halten. Sobald eine
Verbindung zum Mavic Pro hergestellt ist, können Sie Ihr WLAN-Passwort ändern,
oder Ihre WLAN-Verbindung zurücksetzen. (Eine ausführliche Beschreibung nden
Sie in der Mavic Pro-Bedienungsanleitung)
„DJI GO 4“-
App
In der „DJI GO 4“-App
Mavic_XXX
Automatisches
Starten
ActiveTrack
Näheres erfahren Sie im Tutorial in der „DJI GO 4“-App oder auf der oziellen DJI-Website.
Stellen Sie immer eine großzügige Höhe für die Rückkehrfunktion ein. Wenn das Fluggerät
zum Startpunkt zurückkehrt, sollten Sie es mit den Steuerhebeln korrigieren, falls nötig.
18
Automatisches
Landen
TapFly
(RTH)
Normal
Page 21
8. Sicher iegen
Nur in offenen
Bereichen fliegen
Über- und umiegen Sie Hindernisse, Menschenmengen, Hochspannungsleitungen,
Bäume und Gewässer stets mit ausreichendem Sicherheitsabstand.
Fliegen Sie NICHT nicht in die Nähe elektromagnetischer Quellen (z. B.
Hochspannungsleitungen, Basisstationen), da die Funktion des Bordkompasses
dadurch gestört werden kann.
Fliegen Sie nicht bei widrigem Wetter (z. B. Regen, Schnee, Nebel oder
Windgeschwindigkeiten über 10 m/s).
Halten Sie ausreichend Abstand zu den
drehenden Propellern und Motoren.
Um Ihre eigene Sicherheit und die Sicherheit der Menschen in Ihrer Umgebung zu
gewährleisten, ist es wichtig, dass Sie die nötigen Grundregeln kennen. Lesen Sie
sich den
Starkes
GPS-Signal
Haftungsausschluss und die Sicherheitsvorschriften
Sichtkontakt
behalten
Mehr Informationen:
http://ysafe.dji.com/no-y
Flugverbotszone
Unter
120 m bleiben
≥10 m/s
durch.
19
DE
Page 22
Technische Daten
Fluggerät
Gewicht 734 g
Gewicht
(einschließlich Gimbal-Deckel)
DE
Max. Steiggeschwindigkeit 5 m/s im Sport-Modus
Max. Sinkgeschwindigkeit 3 m/s
Max. Fluggeschwindigkeit 65 km/h im Sport-Modus ohne Wind
Dienstgipfelhöhe über N.N. 5.000 m
Max. Flugzeit 27 Minuten (Ohne Wind bei konstant 25 km/h)
Max. Flugzeit 24 Minuten (bei Windstille)
Max. Reichweite 13 km (bei Windstille)
Betriebstemperatur 0 bis 40°C (32 bis 104°F)
Satellitengestützte
Positionsbestimmungssystem
Gimbal
Kontrollierter Bereich Nickachse: -90° bis +30°
Vorwärts-Ansicht
Hinderniserfassungsbereich Präzisionsmessentfernung: 0,7 m bis 15 m
Betriebsumgebung Oberächen mit deutlichen Konturen und ausreichender
Untere Ansicht
Positionsbestimmungssystem
Geschwindigkeitsbereich ≤ 36 km/h bei 2 m über dem Boden
Höhenbereich 0,3 bis 13 m
Betriebsbereich 0,3 bis 13 m
Betriebsumgebung Oberächen mit deutlichen Konturen und ausreichender
Kamera
Sensor 1/2,3” CMOS, Pixel eektiv:12,35 Megapixel
Objektiv Sichtfeld 78,8°, 28 mm (entspricht 35-mm-Format), f/2.2
ISO-Bereich 100 - 3200 (Video), 100 - 1600 (Foto)
Belichtungszeit 8 s bis 1/8000 s
Max. Bildgröße 4000×3000
Fotomodi Einzelaufnahme
20
743 g
GPS/GLONASS
Wanken: 0°oder 90° (horizontal und vertikal)
Erfassungsreichweite: 15 m bis 30 m
Beleuchtung (Lux > 15)
Beleuchtung (Lux > 15)
(Pixel gesamt: 12,71 MP)
Verzerrung < 1,5 %, Fokus von 0,5 m bis ∞
Serienbildaufnahme: 3/5/7 Bilder
Belichtungsreihe:
3/5 fokussierte Frames bei Blendenönung 0,7
Page 23
Intervall
Videoaufnahmemodi C4K: 4096×2160 24p, 4K: 3840×2160 24/25/30p
Bitrate des Videospeichers 60 Mb/s
Unterstützte Dateisysteme FAT32 (≤ 32 GB), exFAT (> 32 GB)
Foto JPEG, DNG
Video MP4, MOV (MPEG-4 AVC/H.264)
Unterstützte SD-Speicherkarten microSDTM. Max. Speicherkapazität: 64 GB
Fernbedienung
Betriebsfrequenz 2,4 GHz bis 2,4835 GHz
Sendereichweite FCC-konform: 7 km; CE-konform:
Betriebstemperatur 0 bis 40°C (32 bis 104°F)
Akku 2970 mAh
Strahlungsleistung (avg. EIRP) FCC: ≤26 dBm; CE: ≤20 dBm
Betriebsspannung 950 mA bei 3,7 V
Unterstützte Mobilgerätegröße Unterstützte Dicke 6,5 - 8,5 mm,
Ladegerät
Spannung 13,05 V
Nennleistung 50 W
Intelligent Flight Battery
Kapazität 3830 mAh
Spannung 11,4 V
Akkutyp LiPo 3S
Energie 43,6 Wh
Nettogewicht Etwa 240 g
Ladetemperatur 5 ° bis 40 °C
Max. Ladeleistung 100 W
Nähere Informationen nden Sie in der Bedienungsanleitung:
http://www.dji.com/mavic
※
Der Inhalt kann jederzeit unangekündigt geändert werden.
MAVICTM ist eine Marke von DJI.
Copyright © 2016 DJI Alle Rechte vorbehalten
HDR
2.7K: 2720×1530 24/25/30p
FHD: 1920×1080 24/25/30/48/50/60/96p
HD: 1280×720 24/25/30/48/50/60/120p
Klasse 10 oder UHS-1
4 km ohne Hindernisse und störungsfrei
Max. Länge: 160 mm
Unterstützte USB-Porttypen Lightning,
Micro-USB (Typ B), USB Typ C
Gedruckt in China.
DE
Konzept: DJI.
21
Page 24
Aeronave
El DJITM MAVICTM Pro es una aeronave portátil con un diseño plegable
revolucionario. Su cámara con estabilizador e intuitivos controles mediante
dispositivo inteligente permiten captar vídeos en 4K o fotos de 12 megapíxeles
de asombrosa calidad que se pueden compartir fácilmente. Utilice TapFlyTM y
ActiveTrackTM para volar a cualquier lugar visible en el dispositivo, o seguir sin
ES
esfuerzo un objetivo móvil.
El Mavic Pro alcanza una velocidad de vuelo máxima de 65 km/h (40 mph) y
un tiempo máximo de vuelo de 27 minutos*.
5
3
1
8
9
1. Estabilizador y cámara
2. Sistema de visión inferior
3. Sistema de visión frontal**
4. Puerto MicroUSB
5. Motores
6. Indicadores LED delanteros
7. Hélices
8. Antenas
* El tiempo máximo de vuelo se determinó en ausencia de viento a una velocidad sostenida de
25 km/h (15,5 mph).
** El sistema de visión frontal se ve afectado por las condiciones del entorno. Lea la Renuncia de
responsabilidad y las Directrices de seguridad, y vea el tutorial en la aplicación DJI GOTM 4 o en el
sitio web ocial de DJI para obtener más información.
22
12
11
10
6
7
4
2
16
14
13
15
9. Botón de vinculación
10. Indicador de estado de vinculación
11. Ranura para tarjeta MicroSD de la cámara
12. Interruptor de modo de control
13. Batería de vuelo inteligente
14. Indicadores LED de nivel de batería
15. Botón de encendido
16. Indicador de estado de la aeronave
http://www.dji.com/mavic
Page 25
Control remoto
El control remoto integra la última tecnología de transmisión de largo alcance
OCUSYNCTM de DJI, que permite controlar la aeronave a una distancia de
hasta 7 km (4,3 mi) proporcionando una vista en directo en HD directamente
desde la cámara de Mavic a través de la aplicación DJI GO 4. La pantalla
LCD muestra información durante el vuelo y la abrazadera para dispositivo
móvil sujeta con seguridad su dispositivo móvil mientras lo utiliza.
Tiempo de funcionamiento máximo: 2,5 horas*
1. Pantalla LCD
2. Botón 5D
3. Palancas de control
4. Antenas
5. Botón de encendido
6. Conmutador de modo de vuelo
7. Abrazadera para dispositivo móvil
8. Puerto USB
9. Botón de pausa durante vuelo
10. Botón RTH
Plegado
10
1
9
2
8
4
3
5
6
7
ES
16 17
11
15
13 14
* El control remoto es capaz de alcanzar su distancia máxima de transmisión (FCC) en una amplia zona abierta
sin interferencias electromagnéticas, y a una altitud de unos 120 metros (400 pies).
El tiempo de funcionamiento máximo se ha obtenido en entorno de laboratorio y se incluye como mera
referencia para el usuario.
11. Dial del estabilizador
12. Selector de conguración de la
cámara
12
13. Botón de grabación
14. Botón del obturador
15. Puerto de alimentación
(Micro-USB)
16. Botón C1 (personalizable)
17. Botón C2 (personalizable)
23
Page 26

1. Descargue la aplicación DJI GO 4 y vea
los videotutoriales
Busque "DJI GO 4" en el App Store o en Google Play, o escanee el
código QR para descargar la aplicación en su dispositivo móvil. Vea los
videotutoriales en www.dji.com o en la aplicación DJI GO 4.
ES
Aplicación DJI GO 4 y más información
DJI GO 4 es compatible con iOS 9.0 (o posterior) o Android 4.4 (o posterior).
2. Compruebe el nivel de batería
Bajo
Nivel de batería Alto
Nivel de batería: 100%
Pulse una vez para comprobar
el nivel de batería. Pulse una
vez, después otra y mantenga
pulsado para encender o
apagar.
24
Pulse una vez para comprobar el nivel
de batería en la pantalla LCD. Pulse
una vez, después otra y mantenga
pulsado para encender o apagar el
control remoto.
Page 27

3. Cargue las baterías
Extraiga la batería de vuelo inteligente
B
A
Toma de alimentación
100 - 240 V
Tiempo de carga:
~1 hora y 20 minutos
4. Prepare el control remoto
A
B
Tiempo de carga:
~2 horas
ES
1
Coloque un extremo del cable
Débil
de RC en el extremo de la
ranura del control remoto.
Despliegue las antenas
y la abrazadera para
dispositivo móvil.
Intensa
Elija un cable RC apropiado. No tuerza el cable RC.
Se debe reemplazar el deslizador del cable si se utiliza un cableRC USB C. Consulte
en el manual del usuario los detalles de la conexión del cable del control remoto.
2
Se incluye cable con conector Lightning
(conectado) y cable con conector
Micro USB estándar. Utilizar según
corresponda.
Cable conector USB C incluido. Cable
conector Micro USB inverso opcional
disponible.
3
25
Page 28

5. Prepare la aeronave
ES
Retire de la cámara
la abrazadera del
estabilizador.
Empareje las hélices con
los motores
Marcado
Sin marcar
Presione la hélice hacia
abajo rmemente y
gírela en la dirección de
bloqueo.
Despliegue los brazos
y hélices frontales
Despliegue los brazos y hélices frontales antes que los posteriores. Todos los
brazos y hélices deben estar desplegados antes del despegue.
La cubierta del estabilizador se usa para protegerlo. Retírela cuando sea preciso.
Despliegue los brazos
y hélices posteriores Desplegado
6. Prepárese para el despegue
Encienda el
controlador remoto
Utilice su cuenta DJI para activar la aeronave. La activación requiere una
conexión a Internet.
Internet
El Mavic Pro se puede controlar con el control remoto o los joysticks virtuales.
Seleccione los modos de control conmutando el interruptor de modo de control.
Accione este interruptor solamente cuando la aeronave esté apagada.
26
Encienda la
aeronave
DJI GO 4
App
Abra la aplicación
DJI GO 4
Page 29

7. Vuelo
El control de vuelo predeterminado se conoce como Modo 2. La palanca
izquierda controla la altitud y la dirección de la aeronave, mientras que
la derecha controla los movimientos hacia delante, atrás, izquierda y
derecha. El selector del estabilizador controla la inclinación de la cámara.
Palanca izquierda
b
i
r
a
r
A
Palanca derecha
a
n
l
e
t
e
d
A
ES
A
o
j
b
a
G
a
i
r
d
a
r
r
e
i
d
u
e
q
r
z
e
i
c
r
h
a
r
a
i
G
Antes de despegar ,asegúrese de que
la barra de estado de la aeronave en la
aplicación DJI GO 4 o la pantalla LCD
del control remoto muestra el mensaje
"Ready to Go".
Comando de
combinación de
palancas para arrancar/
detener los motores.
Palanca izquierda arriba
(despacio)
para despegar
Los motores solo se pueden detener en pleno vuelo cuando el controlador de vuelo
detecta un error crítico.
A
s
t
r
á
a
d
r
e
i
u
q
z
I
Ready to Go (GPS)
O bien
Palanca izquierda abajo
(despacio) hasta tocar suelo
Mantenga unos segundos
para detener los motores
D
e
r
e
c
h
a
27
Page 30

Control de vuelo con joysticks virtuales en su dispositivo móvil
mediante Wi-Fi
WIFI RC
1. Accione el interruptor de modo de control para activar el Wi-Fi
ES
2. Encienda la aeronave
3. Abra la aplicación DJI GO 4, toque el icono de la parte superior
derecha de la pantalla, y escanee el código QR del brazo delantero
para iniciar la conexión Wi-Fi.
4. Toque Auto Takeoff
5. Vuele la aeronave usando el control táctil
Encienda el Wi-Fi de su dispositivo móvil e introduzca la contraseña de Wi-Fi
mostrada en el brazo delantero para conectarse a la red Mavic si por algún motivo
no puede escanear el código QR.
Cuando utilice Wi-Fi en una zona al aire libre sin interferencia magnética, la distancia de
transmisión será de aproximadamente 80 m (262 pies) a una altitud de 50 m (164 pies).
La frecuencia de Wi-Fi de su dispositivo móvil se puede establecer en 2,4 Ghz o
5 Ghz. Congure el Wi-Fi a 5 Ghz para reducir las interferencias. Una vez conectado
Mavic Pro
al
, puede cambiar la contraseña de Wi-Fi o reiniciar su conexión Wi-Fi
(consulte el manual del usuario del
Aplicación
DJI GO 4
Mavic Pro
para obtener más información).
En la aplicación DJI GO 4
Mavic_XXX
Despegue
automático
ActiveTrack
Vea el tutorial en la aplicación DJI GO 4 o en el sitio web ocial de DJI para
obtener más información.
Establezca siempre una altitud de RTH adecuada antes del despegue. Cuando la
aeronave esté volviendo punto de origen, debe guiarla con las palancas de control.
28
Aterrizaje
automático
TapFly
Regreso al punto de
origen (RTH)
Normal
Page 31

8. Vuele seguro
Vuele en espacios
abiertos
Evite volar por encima o cerca de obstáculos, multitudes, líneas de alta
tensión, árboles o masas de agua.
NO vuele cerca de fuentes electromagnéticas, como tendidos eléctricos
y estaciones base, ya que esto puede afectar a la brújula de a bordo.
NO utilice la aeronave en condiciones climáticas adversas como lluvia,
nieve, niebla ni con una velocidad del viento superior a
35 km/h o 10 m/s.
Manténgase alejado de las hélices y
los motores en rotación.
Es importante conocer las directrices básicas de vuelo para su
propia seguridad y la de quienes le rodean. No olvide leer la
Renuncia de responsabilidad y las directrices de seguridad
Señal fuerte
de GPS
Mantenga una
línea de visión
directa
Obtenga más información en:
http://ysafe.dji.com/no-y
Vuele por debajo de
120 m (400 pies)
≥10 m/s
Zona de exclusión aérea
.
ES
29
Page 32

Especicaciones
Aeronave
Peso 734 g (1,62 lbs)
Peso (incluida la cubierta del
estabilizador)
Velocidad de ascenso máx. 5 m/s (16,4 pies/s) en modo Sport
Velocidad de descenso máx. 3 m/s (9,8 pies/s)
ES
Velocidad máxima 65 km/h (40 mph) en modo Sport sin viento
Altitud de vuelo máx. por encima
del nivel del mar
Tiempo de vuelo máx. 27 minutos
Tiempo de vuelo máximo 24 minutos (sin viento)
Distancia de vuelo máxima 13 km (sin viento)
Temperatura de funcionamiento De 32 a 40 °C (de 0 a 104 °F)
Sistemas de posicionamiento por
satélite
Estabilizador
Intervalo controlable
Sistema de visión frontal
Rango de detección de obstáculos
Entorno de funcionamiento Supercies con patrones claros e iluminación
Sistema de visión inferior
Intervalo de velocidad ≤ 36 km/h (22,4 mph) a 2 m (6,6 pies) sobre el
Intervalo de altitud 0,3 a 13 m (1 a 43 pies)
Intervalo de funcionamiento 0,3 a 13 m (1 a 43 pies)
Entorno de funcionamiento
Cámara
Sensor 1/2,3” CMOS, Píxeles efectivos:12,35 megapíxeles
Objetivo 78,8° FOV, 28mm (equivalente a formato de
Intervalo de ISO 100 - 3200 (vídeo)
Velocidad obturador electrónico 8 s a 1/8000 s
Tamaño de imagen máximo 4000×3000
Modos de fotografía ja Un disparo
30
743 g (1,64 lbs)
5000 m (16404 pies)
(Viento 0 km/h a 25 km/h (15,5mph) sostenidos)
GPS/GLONASS
Inclinación: -90° a +30°,
Alabeo: 0°o 90° (en horizontal y vertical)
Rango de precisión de la medición: 0,7 m a 15 m
(2 pies a 49 pies), Rango detectable: 15 m a 30 m
(49 pies a 98 pies)
adecuada (lux > 15)
suelo
Supercies con patrones claros e iluminación
adecuada (lux > 15)
(Píxeles totales: 12,71 M)
35mm) f/2.2 Distorsión <1,5 %
enfoque de 0,5 m a ∞
Disparo en ráfagas: 3/5/7 fotogramas
Horquilla de exposición automática (AEB):
3/5 fotogramas en horquilla de exposición a 0.7EV
Bias
Intervalo
HDR
,
100 - 1600 (foto)
Page 33

Modos de grabación de vídeo C4K: 4096×2160 24p, 4K: 3840×2160 24/25/30p
Tasa de bits de almacenamiento de
vídeo
Sistemas de archivo admitidos FAT32 (≤ 32 GB), exFAT (> 32 GB)
Fotografía JPEG, DNG
Vídeo
Tarjetas SD admitidas microSDTM. Capacidad máxima: 64GB
Control remoto
Frecuencia de funcionamiento de 2.4 GHz a 2.4835 GHz
Distancia de transmisión máx. Conformidad con FCC: 7 km (4,3 mi); conforme
Temperatura de funcionamiento De 32 a 40 °C (de 0 a 104 °F)
Batería 2970 mAh
Potencia de transmisión (avg. EIRP) FCC: ≤26 dBm; CE: ≤20 dBm
Tensión de funcionamiento 950 mA a 3,7 V
Tamaño admitido de dispositivo
móvil
Cargador
Voltaje 13,05 V
Potencia nominal 50 W
Batería de vuelo inteligente
Capacidad 3830 mAh
Voltaje 11,4 V
Tipo de batería LiPo 3S
Energía 43,6 Wh
Peso neto Aprox. 240 g (0,5 lbs)
Intervalo de temperatura de carga De 5 a 40 °C (de 41 a 104 °F)
Potencia de carga máx. 100 W
Para obtener más información, lea el manual del usuario:
http://www.dji.com/mavic
※
Este contenido puede modicarse sin noticación previa.
MAVICTM es una marca comercial de DJI.
Copyright © 2016 DJI Todos los derechos reservados.
2.7K: 2720×1530 24/25/30p
FHD: 1920×1080 24/25/30/48/50/60/96p
HD: 1280×720 24/25/30/48/50/60/120p
60 Mbps
MP4, MOV (MPEG-4 AVC/H.264)
Se necesita clasicación clase 10 o UHS-1
con CE: 4 km (2,5 mi) sin obstáculos y libre de
interferencia
Espesor admitido: 6,5 - 8,5 mm
Longitud máxima: 160 mm
Tipos de puerto USB compatibles: Lightning,
Micro USB (Type B), USB Type-C
TM
Diseñado por DJI.
Impreso en China.
ES
31
Page 34

Appareil
Le DJITM MAVICTM Pro est un appareil portatif doté d'un design pliable
révolutionnaire. Grâce à ses commandes intelligentes, intuitives et contrôlées par
votre appareil mobile, la caméra stabilisée par la nacelle permet d'enregistrer
des vidéos 4K et de prendre des photos de 12 mégapixels, que vous pourrez
partager facilement pour éblouir tout le monde. Utilisez les fonctionnalités
TapFlyTM et ActiveTrackTM pour voler dans toutes les zones visibles sur votre
appareil mobile ou pour suivre un objet en mouvement sans le moindre effort.
FR
Le Mavic Pro peut se targuer d'une vitesse de vol maximale de 65 km/h (40 mph)
et d'un temps de vol maximum de 27 minutes*.
5
3
1
8
9
1. Nacelle et caméra
2. Système de vision descendante
3. Système de vision avant**
4. Port Micro USB
5. Moteurs
6. Voyants avant
7. Hélices
8. Antennes
* Le temps de vol maximum a été testé en l’absence de vent, à une vitesse constante de 25 km/h
(15,5 mph).
** Le système de vision avant est inuencé par les conditions environnantes. Pour en savoir plus, lisez
la clause d'exclusion de responsabilité et les consignes de sécurité et visionnez le didacticiel dans
l'application DJI GOTM 4 ou sur le site Web ofciel de DJI.
32
12
11
10
6
7
4
2
16
14
13
15
9. Bouton d’appairage
10. Voyant d'état de l'appairage
11. Logement de carte Micro-SD
12. Commutateur de mode de contrôle
13. Batterie de vol Intelligente
14. Indicateur de niveau de batterie
15. Bouton d'alimentation
16. Voyant d'état de l'appareil
http://www.dji.com/mavic
Page 35

Radiocommande
4
3
1
5
6
10
7
8
2
9
La radiocommande intégrée utilise OCUSYNCTM, la technologie de transmission
à longue portée de DJI la plus récente, qui permet de contrôler votre appareil
jusqu'à 7 km (4,3 miles) et de vous donner un ux vidéo en direct via la caméra
de Mavic dans l'application DJI GO 4. L'écran LCD afche les mises à jour
pendant le vol et la bride permet de maintenir votre appareil mobile pendant
que vous l'utilisez.
Temps de fonctionnement maximal : 2,5 heures*
1. Écran LCD
2. Bouton 5D
3. Manche de contrôle
4. Antennes
5. Bouton d'alimentation
6. Commutateur de mode de vol
7. Bride pour appareil mobile
8. Port USB
9. Bouton Pause de la fonction Vol
10. Bouton RTH
Plié
16 17
11
15
13 14
* La radiocommande peut atteindre une distance de transmission maximale (FCC) dans
une zone dégagée sans interférences électromagnétiques et à une altitude d'environ
120 mètres (400 pieds).
Le temps de fonctionnement maximal est testé en laboratoire, uniquement à titre indicatif.
10
1
9
2
8
7
11. Molette de la nacelle
12. Molette de réglage de la caméra
12
13. Bouton d'enregistrement
14. Obturateur
15. Port d'alimentation (Micro-USB)
16. Bouton C1 (personnalisable)
17. Bouton C2 (personnalisable)
4
3
5
6
FR
33
Page 36

1. Téléchargement de l'application DJI GO 4
et visionnage des didacticiels vidéo
Recherchez « DJI GO 4 » sur l'App Store ou sur Google Play, ou scannez le
code QR pour télécharger l'application sur votre appareil mobile. Visionnez
les didacticiels vidéo à l'adresse www.dji.com ou dans l'application DJI GO 4.
FR
Application DJI GO 4 et
informations supplémentaires
DJI GO 4 est compatible avec iOS 9.0 (ou version ultérieure) ou Android 4.4
(ou version ultérieure).
2. Vérication des niveaux de batterie
Niveau de la
Faible
batterie
Appuyez une fois pour vérier le
niveau de la batterie. Appuyez
à nouveau, puis encore une
fois et maintenez enfoncé pour
allumer/éteindre.
34
Élevé
Niveau de batterie : 100 %
Appuyez une fois pour vérier le
niveau de batterie sur l'écran LCD.
Appuyez à nouveau, puis encore
une fois et maintenez enfoncé pour
allumer/éteindre la radiocommande.
Page 37

3. Chargement des batteries
Retirez la Batterie de vol Intelligente
A
Temps de charge :
environ 1 heure et
20 minutes
Temps de charge :
environ 2 heures
Prise de courant
de 100 à 240 V
B
A
4. Préparation de la radiocommande
1
Placez une extrémité du
Faible
câble RC dans le port de la
radiocommande.
Dépliez les antennes et
la bride pour appareil
mobile.
Fort
Choisissez un câble RC approprié. Ne tordez pas le câble RC.
La glissière du câble RC doitêtre changée si vous utilisez un câble RC USB Type-C.
Consultez le Manuel de l'utilisateur pour en savoir plus sur la connexion des câbles RC.
2
Câbles de connexion Lightning
(connecté) et Micro-USB standard inclus.
À utiliser de manière appropriée.
Câble USB Type-C inclus. Câble Micro
USB inversé facultatif disponible.
FR
B
3
35
Page 38

5. Préparation de l'appareil
Retirez la bride de la
nacelle de la caméra
FR
Marqué
Associer les hélices aux
moteurs correspondants
Non marqué
Montez solidement
l'hélice, puis tournez
dans la direction de
verrouillage.
Dépliez les bras avant
et les hélices
Dépliez les bras avant et les hélices avant ceux situés à l'arrière. Tous les bras et les
hélices doivent être dépliés avant le décollage.
Le cache de la nacelle s'utilise pour protéger la nacelle. Retirez-le si nécessaire.
Dépliez les bras
arrière et les hélices
6. Préparation au décollage
Mettez la
radiocommande
sous tension
Utilisez votre compte DJI pour activer l'appareil. L'activation nécessite une
connexion Internet.
Internet
Le Mavic Pro peut être contrôlé par la radiocommande ou les manettes virtuelles.
Sélectionnez les modes de contrôle en actionnant le commutateur de mode de
contrôle. Actionnez ce commutateur uniquement lorsque l'appareil est hors tension.
36
Mettez l'appareil
sous tension
Déplié
DJI GO 4
App
Lancez l'application
DJI GO 4
Page 39

7. Vol
Le contrôle de vol par défaut est connu sous le nom de Mode 2. Le
manche gauche agit sur l'altitude et l'orientation de l'appareil, tandis que
le manche droit contrôle ses mouvements vers l'avant, l'arrière, la gauche
et la droite. La molette de la nacelle contrôle l'inclinaison de la caméra.
Manche gauche
u
a
t
H
B
a
s
e
h
c
u
a
g
à
r
e
n
r
u
o
T
T
o
u
r
n
e
r
à
d
r
o
i
t
e
Manche droit
a
n
v
A
A
r
r
r
i
è
e
h
c
u
a
G
t
e
D
r
o
i
t
e
FR
Avant de décoller, vériez que la barre
d'état de l'appareil, dans l'application
DJI GO 4 ou sur l'écran LCD de la
radiocommande, afche « Ready to Go ».
Commande de
manche combinée
pour démarrer/couper
les moteurs
Relevez lentement le
manche gauche pour
décoller
Les moteurs peuvent être coupés en plein vol uniquement lorsque le contrôleur de vol
détecte une erreur critique.
Ready to Go (GPS)
OU
Abaissez lentement le
manche gauche jusqu'à ce
que l'appareil touche le sol
Maintenez la position pendant
quelques secondes pour
couper les moteurs
37
Page 40

Contrôler le vol avec les manettes virtuelles sur votre appareil mobile
Mavic_XXX
via Wi-Fi
WIFI RC
1. Actionnez le commutateur de mode de contrôle pour activer le Wi-Fi
2. Mettez l'appareil sous tension
3. Lancez l'application DJI GO 4 et appuyez sur l'icône située dans le coin
FR
supérieur droit de votre écran, puis numérisez le code QR du Wi-Fi sur
le bras avant pour établir une connexion
4. Appuyez sur Auto Takeoff (Décollage automatique)
5. Faites voler l'appareil avec les commandes tactiles
Si, pour quelque raison que ce soit, vous ne parvenez pas à numérisez le code QR,
activez le Wi-Fi sur votre appareil mobile, puis saisissez le mot de passe du Wi-Fi qui
s'afche sur le bras avant pour établir une connexion au réseau Mavic.
Lorsque vous utilisez le Wi-Fi dans une zone dégagée sans interférences
électromagnétiques, la distance de transmission est environ de 80 m (262 pieds) à
une altitude de 50 m (164 pieds).
La fréquence Wi-Fi de votre appareil mobile peut être réglée sur 2,4 GHz ou 5 GHz.
Réglez votre Wi-Fi sur 5 GHz pour diminuer les interférences. Une fois connecté
au Mavic Pro, vous pouvez modier votre mot de passe Wi-Fi ou réinitialiser votre
connexion Wi-Fi. (Consultez le manuel de l'utilisateur du Mavic Pro pour en savoir plus)
Application
DJI GO 4
Dans l'application DJI GO 4
Décollage
automatique
ActiveTrack
Pour en savoir plus, visionnez le didacticiel dans l'application DJI GO 4 ou sur le site
Web ofciel de DJI.
Dénissez toujours une altitude RTH appropriée avant le décollage. Lorsque
l'appareil retourne au point de départ, guidez-le avec les manches de contrôle.
38
Atterrissage
automatique
TapFly
Retour au point de
départ (RTH)
Normal
Page 41

espaces ouverts
en vue
(120 m)
8. Voler en toute sécurité
120 m
Faire voler
l'appareil dans des
Évitez de faire voler l'appareil au-dessus ou à proximité d'obstacles, de
rassemblements de personnes, de lignes électriques à haute tension,
d'arbres ou d'étendues d'eau.
Ne faites PAS voler l'appareil à proximité de sources électromagnétiques
puissantes, telles que des lignes électriques ou des antennes relais.
Celles-ci risquent en effet d'affecter le compas intégré.
N'utilisez PAS l'appareil dans de mauvaises conditions météorologiques
(pluie, neige, brouillard, rafales dont la vitesse dépasse 10 m/s ou
22 mph [35 km/h], etc.).
Tenez-vous à distance des hélices et
des moteurs en rotation.
Il est important que vous compreniez les consignes de vol
fondamentales an d'assurer votre sécurité et celle de votre
entourage. N'oubliez pas de lire la
responsabilité et les consignes de sécurité
Signal GPS fort
Garder
Faire voler l'appareil à
l'appareil
moins de 400 pieds
Pour en savoir plus, rendezvous sur le site :
http://ysafe.dji.com/no-y
Clause d'exclusion de
.
≥10 m/s
Zone d'exclusion
aérienne
FR
39
Page 42

Caractéristiques techniques
Appareil
Poids 734 g (1,62 lb)
Poids (avec le cache de la nacelle) 743 g (1,64 lb)
Vitesse ascensionnelle max. 5 m/s (16,4 pieds/s) en mode Sport
Vitesse de descente max. 3 m/s (9,8 pieds/s)
Vitesse max. 65 km/h (40 mph) en mode Sport sans vent
Plafond pratique max. au-dessus du
FR
niveau de la mer
Temps de vol max 27 minutes (Sans vent, à une vitesse constante de
Temps de vol stationnaire max 24 minutes (sans vent)
Distance de vol max 13 km (sans vent)
Température de fonctionnement De 0 à 40°C (32 à 104°F)
Système de localisation satellite GPS/GLONASS
Nacelle
Plage réglable
Système de vision avant
Plage de détection d'obstacles Distance de mesure de précision : 0,7 m (2 pieds) à
Conditions d'utilisation
Système de vision descendante
Plage de vitesse ≤ 36 km/h (22,4 mph) à 2 m (6,6 pieds) au-dessus
Plage d'altitude de 0,3 à 13 m (de 1 à 43 pieds)
Portée de 0,3 à 13 m (de 1 à 43 pieds)
Conditions d'utilisation
Caméra
Capteur 2/5,8 cm (1/2.3”) Pixels effectifs : 12,35 mégapixels
Lentille Champ de vision 78,8°,
Plage ISO 100-3 200 (vidéo), 100-1 600 (photo)
Vitesse d'obturation électronique 8 s à 1/8 000 s
Taille max. de l'image 4 000 × 3 000
Modes d'images xes Prise de vue unique
40
5 000 m (16 404 pieds)
25 km/h (15,5 mph))
Inclinaison verticale : de -90° à +30°
roulis : 0°ou 90° (horizontalement et verticalement)
15 m (49 pieds), Distance de détection :
15 m (49 pieds) à 30 m (98 pieds)
urfaces régulières et bien éclairées (> 15 lux)
S
du sol
Surfaces régulières et bien éclairées (> 15 lux)
(nombre total de pixels : 12,71 M)
28 mm (équivalent 35 mm) f/2,2
Distorsion <1,5 % Mise au point de 0,5 m à ∞
Prise de vue en rafale : 3/5/7 clichés
Bracketing d'exposition (AEB) :
3/5 clichés en bracketing à 0,7 EV
Intervalle
HDR
Page 43

Modes d'enregistrement vidéo C4K: 4 096 × 2 160 24p, 3 840 × 2 160 24/25/30p
Bitrates de stockage vidéo 60 Mbit/s
Formats de chiers pris en charge FAT32 (≤ 32 Go), exFAT (> 32 Go)
Photo JPEG, DNG
Vidéo
Cartes SD prises en charge microSDTM Capacité max. : 64 Go
Radiocommande
Fréquence de fonctionnement De 2,4 GHz à 2,4835 GHz
Distance de transmission maximale
Température de fonctionnement De 0 à 40°C (32 à 104°F)
Batterie 2970 mAh
Puissance de l'émetteur (avg. EIRP) FCC : ≤26 dBm ; CE : ≤20 dBm
Voltage de fonctionnement 950 mA à 3,7 V
Taille des appareils mobiles pris en
charge
Chargeur
Voltage 13,05 V
Puissance nominale 50 W
Intelligent Flight Battery
Capacité 3830 mAh
Voltage 11,4 V
Type de batterie LiPo 3S
Énergie 43,6 W/h
Poids net Environ 240 g (0,5 lb)
Plage de température de chargement De 5 à 40°C (41 à 104°F)
Puissance de charge max. 100 W
Pour en savoir plus, consultez le manuel de l'utilisateur :
http://www.dji.com/mavic
※
Ce contenu peut être modié sans préavis.
MAVICTM est une marque commerciale de DJI.
Copyright © 2016 DJI Tous droits réservés.
2.7K: 2 720 × 1 530 24/25/30p
FHD: 1 920 × 1 080 24/25/30/48/50/60/96p
HD: 1 280 × 720 24/25/30/48/50/60/120p
MP4, MOV (MPEG-4 AVC/H.264)
Classe 10 ou type UHS-1 minimum
Conformité FCC : 7 km (4,3 miles) ; conformité CE :
4 km (2,5 miles) sans obstacle gênant ni interférence
Épaisseur prise en charge : 6,5-8,5 mm,
Longueur maximale : 160 mm (6,7 pouces)
Types de port USB pris en charge : Lightning,
Micro-USB (Type B), USB Type-C
TM
Une création de DJI.
Imprimé en Chine.
FR
41
Page 44

Velivolo
Il DJITM MAVICTM Pro è un velivolo portatile con un rivoluzionario design
pieghevole. Gli intuitivi comandi motorizzati intelligenti e la telecamera
stabilizzata tramite gimbal consentono di realizzare riprese 4K o fotograe
12 MB, facili da condividere e sempre stupefacenti. Utilizzare TapFlyTM e
ActiveTrackTM per volare in qualsiasi punto visibile sul dispositivo oppure
tracciare facilmente un oggetto in movimento.
Mavic Pro vanta una velocità massima di volo di 40 mph (65 km/h) e un tempo
massimo di volo di 27 minuti*.
IT
5
3
1
8
9
1. Gimbal e videocamera
2. Sistema di visione verso il basso
3. Sistema di visione anteriore**
4. Porta micro-USB
5. Motori
6. LED anteriori
7. Eliche
8. Antenne
* Il tempo di volo massimo è stato testato in assenza di vento a velocità costante di 25 km/h
(15,5 mph).
** Il sistema di visione anteriore è inuenzato dalle condizioni ambientali circostanti.
Per saperne di più, leggere le limitazioni di responsabilità e le direttive sulla sicurezza e visionare
il tutorial sull'applicazione DJI GOTM 4 o sul sito ufciale DJI.
42
12
11
10
6
7
4
2
16
14
13
15
9. Pulsante di collegamento
10. Indicatore dello stato di collegamento
11. Slot per micro-scheda SD per telecamera
12. Commutatore modalità di controllo
13. Batteria di volo intelligente
14. LED di livello di carica batteria
15. Pulsante di accensione
16. Indicatore di stato del velivolo
http://www.dji.com/mavic
Page 45

Dispositivo di controllo remoto
Integrata nel dispositivo di controllo remoto, l'evoluta tecnologia di trasmissione
a lungo raggio OCUSYNCTM di DJI permette di pilotare il velivolo ad una
distanza massima di 7 km (4,3 miglia), ottenendo una vista HD in diretta dalla
telecamera Mavic, grazie all'app DJI GO 4. Lo schermo LCD visualizza gli
aggiornamenti in volo e il dispositivo mobile è bloccato dall'apposita staffa
durante l'utilizzo.
Durata massima di funzionamento: 2,5 ore*
1. Schermo LCD
2. Pulsante 5D
3. Levette di comando
4. Antenne
5. Pulsante di accensione
6. Commutatore modalità di volo
7. Supporto per dispositivo mobile
8. Porta USB
9. Pulsante di pausa del volo
10. Pulsante RTH
Piegato
10
1
9
2
8
4
3
5
6
7
IT
16 17
11
15
13 14
* Il dispositivo di controllo remoto è in grado di raggiungere la distanza massima di trasmissione (FCC) in
una vasta area all'aperto senza interferenze magnetiche e ad un'altitudine di circa 120 metri (400 piedi).
La durata massima i funzionamento è stata testata in laboratorio ed è indicata a semplice scopo di riferimento.
11. Selettore del gimbal
12. Selettore delle impostazioni
della videocamera
12
13. Pulsante di registrazione
14. Pulsante dell'otturatore
15. Porta di alimentazione
(Micro USB)
16. Pulsante C1 (personalizzabile)
17. Pulsante C2 (personalizzabile)
43
Page 46

1. Scaricare l'app DJI GO 4 e visionare i
tutorial
Cercare “DJI GO 4” nell’App Store o in Google Play, oppure effettuare
la scansione del codice QR per scaricare l’applicazione sul proprio
dispositivo mobile. Visionare i tutorial su www.dji.com o nell'app DJI GO 4.
IT
App DJI GO 4 e ulteriori informazioni
DJI GO 4 supporta iOS 9.0 (o versioni successive) o Android 4.4 (o versioni successive).
2. Controllare i livelli di carica della batteria
Livello di carica
Basso
della batteria
Premere una volta per vericare
il livello di carica della batteria.
Premere due volte e tenere premuto
per accendere/spegnere.
44
Alto
Livello di carica della batteria: 100%
Premere una volta per vericare il livello
di carica della batteria sullo schermo
LCD. Premere due volte e tenere premuto
per accendere/spegnere il dispositivo di
controllo remoto.
Page 47

3. Caricare le batterie
Rimuovere la batteria di volo intelligente
B
B
Presa di alimentazione
100 - 240V
A
A
Tempo di ricarica:
circa 1 ora e 20 minuti
Tempo di ricarica:
circa 2 ore
4. Preparare il dispositivo di controllo remoto
1
Inserire una delle estremità
Dispiegare le antenne e
la staffa del dispositivo
mobile.
Forte Debole
Scegliere un cavo RC adeguato. Non attorcigliare il cavo RC.
Il cavo di scorrimento del controllo remoto deve essere sostituito quando viene
usato un cavo per controllo remoto USB di Tipo-C. Per il collegamento del cavo RC,
consultare il manuale utente.
del cavo RC all'estremità
della fessura sul dispositivo
di controllo remoto.
2
3
Il cavo connettore parafulmine (collegato) e
il cavo connettore micro USB standard sono
inclusi. Utilizzare nel modo appropriato.
Cavo connettore USB Tipo-C incluso. È
disponibile un cavo connettore Micro USB
Reverse.
IT
45
Page 48

5. Preparare il velivolo
Contrassegnato
Far corrispondere le eliche
ai motori
IT
Rimuovere la staffa
del gimbal dalla
telecamera
Non contrassegnato
Premere con decisione
l'elica verso il basso e
ruotarla nella direzione
di blocco.
Dispiegare i bracci e le
eliche anteriori
Dispiegare i bracci e le eliche anteriori prima di quelli posteriori. Tutti i bracci e le
eliche devono essere dispiegati prima del decollo.
Il coperchio del gimbal è utilizzato per proteggere la sospensione cardanica.
Rimuoverlo quando necessario.
Dispiegare i bracci e
le eliche posteriori Dispiegato
6. Prepararsi al decollo
Accendere il
dispositivo di
controllo remoto.
Utilizzare il proprio account DJI per attivare il velivolo. L'attivazione richiede una
connessione Internet.
Internet
Il Mavic Pro può essere comandato utilizzando il dispositivo di controllo remoto
o i joystick virtuali. Selezionare le modalità di controllo agendo sull'apposito
commutatore. Azionare questo commutatore solo a velivolo spento.
46
Avviare il velivolo. Lanciare l'app DJI GO 4.
DJI GO 4
App
Page 49

7. Volo
La modalità predenita di controllo di volo è "Mode 2". La levetta sinistra
controlla l'altitudine e la direzione del velivolo, mentre la levetta destra ne
controlla i movimenti in avanti, all'indietro, a sinistra e a destra. Il quadrante
del gimbal controlla l'inclinazione della telecamera.
Levetta sinistra
l
'
o
a
s
l
r
t
o
e
V
V
e
r
s
s
s
o
a
i
l
b
a
r
t
s
i
n
i
s
a
a
t
l
o
v
S
o
S
v
o
l
t
a
a
d
e
s
t
r
a
Levetta destra
n
a
t
v
i
A
I
n
o
r
d
t
i
e
a
r
t
s
i
n
i
S
D
e
s
t
r
a
IT
Prima di decollare, assicurarsi che la
barra di stato del velivolo nell'app DJI GO
4 o sullo schermo LCD del dispositivo
di controllo remoto indichi 'Pronto per la
partenza'.
Combinazione di
comandi da levette
per avviare/arrestare i
motori.
Levetta sinistra verso
l'alto (lentamente)
per il decollo
I motori possono essere spenti solo a metà volo, quando il sistema di controllo di
volo rileva un errore critico.
Pronto per la partenza (GPS)
OPPURE
Levetta sinistra (lentamente)
verso il basso nché non si
tocca il suolo
Tenere premuto alcuni
secondi per arrestare i motori
47
Page 50

Controllo di volo con i joystick virtuali sul dispositivo mobile tramite Wi-Fi
WIFI RC
1. Agire sul commutatore modalità di controllo per attivare il Wi-Fi
2. Avviare il velivolo
3. Avviare l'app DJI GO 4 e toccare l'icona in alto a destra dello schermo,
quindi eseguire la scansione del codice QR del Wi-Fi riportato sul
braccio anteriore per avviare la connessione.
IT
4. Premere Decollo automatico
5. Pilotare l'aereo con touch control
Attivare il Wi-Fi del dispositivo mobile e inserire la password del Wi-Fi riportata sul
braccio anteriore per avviare la connessione alla rete Mavic nel caso non sia possibile
effettuare la scansione del codice QR.
Quando si utilizza il Wi-Fi in un vasto spazio aperto senza interferenze elettromagnetiche,
la distanza di trasmissione è di circa 262 ft (80 m) ad un'altitudine di 164 ft (50 m).
La frequenza Wi-Fi del dispositivo mobile può essere impostata su 2,4 Ghz o su 5 Ghz.
Per avere meno interferenze, impostare il Wi-Fi su 5 Ghz. Una volta stabilita la connessione
al Mavic Pro, è possibile cambiare la password del Wi-Fi o ripristi nare la conn essione
Wi-Fi. (Fare riferimento al Manuale utente del Mavic Pro per ulteriori informazioni)
App
DJI GO 4
Nell'app DJI GO 4
Mavic_XXX
Decollo
automatico
ActiveTrack
Visionare il tutorial sull'app DJI GO 4 o sul sito ufciale DJI per saperne di più.
Impostare sempre un'altitudine RTH adeguata prima del decollo. Quando il velivolo
sta tornando al punto iniziale, è consigliabile guidarlo con le levette di comando.
48
Atterraggio
automatico
TapFly
Ritorno alla posizione
iniziale (RTH)
Normale
Page 51

8. Fly Safe
Volare in
zone aperte
Evitare di volare al di sopra o in prossimità di ostacoli, folle, linee elettriche
ad alta tensione, alberi e specchi d'acqua.
NON volare in prossimità di forti sorgenti elettromagnetiche quali linee
elettriche e stazioni di base, in quanto tali sorgenti possono inuenzare la
bussola di bordo.
NON utilizzare il velivolo in condizioni meteorologiche avverse, come
pioggia, neve, nebbia e venti con una velocità superiore a 10 m/s (22 mi/h).
Mantenere la distanza dalle eliche
rotanti e dai motori.
Per la sicurezza propria e delle altre persone presenti nelle vicinanze,
è importante comprendere le linee guida di base del volo. Si prega di
leggere
Segnale
GPS forte
le limitazioni di responsabilità e le direttive sulla sicurezza
Mantenere la
linea di visione
Per saperne di più:
http://ysafe.dji.com/no-y
Volare al di sotto di
120 m (400 piedi)
≥10m/s
Zona vietata al volo
.
IT
49
Page 52

Caratteristiche tecniche
Velivolo
Peso 1,62 libbre (734 g)
Peso (incluso il coperchio gimbal) 1,64 libbre (743 g)
Massima velocità di risalita 16,4 ft/s (5 m/s) in modalità Sport
Massima velocità di discesa 3 m/s (9,8 ft/s)
Velocità massima 40 mph (65 km/h) in modalità Sport e in assenza di vento
Quota massima di funzionamento
sopra il livello del mare
Durata massima di volo 27 minuti (Assenza di vento a velocità costante di 25 km/h
IT
Tempo massimo in sospensione
Distanza massima di volo
Temperatura di esercizio Da 32 a 104°F (da 0 a 40°C)
Sistemi di posizionamento satellitare GPS/GLONASS
Gimbal
Intervallo controllabile
Sistema di visione anteriore
Intervallo di rilevamento degli
ostacoli
Ambiente operativo Superci con motivi chiari e illuminazione adeguata
Downward Vision System
Intervallo di velocità ≤ 22,4 mph (36 km/h) a 6,6 ft (2 m) dal livello del suolo
Intervallo di altitudine 1 - 43 piedi (0,3 - 13 m)
Intervallo di funzionamento 1 - 43 piedi (0,3 - 13 m)
Ambiente operativo Superci con motivi chiari e illuminazione adeguata
Videocamera
Sensore 1/2,3" CMOS, Pixel effettivi: 12,35 Megapixel
Obiettivo 78,8° FOV, 28mm (equivalente al formato 35mm) f/2,2
Intervallo ISO 100 - 3.200 (video); 100 - 1.600 (foto)
Velocità dell'otturatore elettronico da 8s a 1/8000s
Massima dimensione immagine 4000×3000
Modalità fotograa Scatto singolo
50
5000 m (16404 feet)
(15,5 mph))
24 minuti (in assenza di vento)
8 mi (13 km, in assenza di vento)
Beccheggio: da -90° a +30°;
Rullio: 0°o 90° (orizzontale e verticale)
Precisione intervallo di misurazione: Da 0,7 m (2 piedi) a
15 m (49 piedi) , Intervallo rilevabile: Da 15 m (49 piedi) a
30 m (98 piedi)
(lux > 15)
(lux > 15)
(Pixel totali: 12,71 M)
Distorsione <1,5%, Messa a fuoco da 0,5 m a ∞
Scatti a rafca: 3/5/7 fotogrammi
Auto Exposure Bracketing (AEB):
3/5 fotogrammi nell'intervallo con 0,7 EV di deviazione
Interval
HDR
Page 53

Modalità di registrazione video C4K: 4096×2160 24p, 4K: 3840×2160 24/25/30p
Velocità di trasmissione per
memorizzazione video
File system supportati FAT32 (≤ 32 GB), exFAT (> 32 GB)
Fotograe JPEG, DNG
Video MP4/MOV (MPEG-4 AVC/H.264)
Schede SD supportate microSDTM Capacità massima: 64 GB
Dispositivo di controllo remoto
Frequenza operativa Da 2,4 GHz a 2,4835 GHz
Distanza massima di trasmissione Conforme allo standard FCC: 4,3 miglia (7 km)
Temperatura di esercizio Da 32 a 104°F (da 0 a 40°C)
Batteria 2970 mAh
Potenza del trasmettitore (avg. EIRP) FCC: ≤26 dBm; CE: ≤20 dBm
Tensione di funzionamento 950 mA a 3,7 V
Dimensioni del dispositivo mobile
supportato
Caricabatterie
Tensione 13,05 V
Potenza nominale 50 W
Batteria di volo intelligente
Capacità 3830 mAh
Tensione 11,4 V
Tipo di batteria LiPo 3S
Energia 43,6 Wh
Peso netto Circa 0,5 libbre (240 g)
Intervallo temperatura di carica da 5 °C a 40 °C (da 41 °F a 104 °F)
Massima potenza di carica 100 W
Per ulteriori informazioni, consultare il Manuale utente:
http://www.dji.com/mavic
※
Questi contenuti sono soggetti a modiche senza preavviso.
MAVICTM è un marchio registrato di DJI.
Copyright © 2016 DJI Tutti i diritti riservati.
2.7K: 2720×1530 24/25/30p
FHD: 1920×1080 24/25/30/48/50/60/96p
HD: 1280×720 24/25/30/48/50/60/120p
60 Mbps
Classe 10 o UHS-1 nominale richiesta
Conforme alla normativa CE:
2,5 miglia (4 km) Senza impedimenti e priva di interferenze
Spessore supportato: 6,5 - 8,5 mm
Lunghezza massima: 160 mm
Tipi di porte USB compatibili: Illuminazione
Micro USB (Tipo B), Tipo C
Progettato da DJI.
Stampato in Cina.
IT
51
Page 54

Luchtvaartuig
De DJITM MAVICTM Pro is een draagbaar luchtvaartuig met een revolutionair
inklapbaar ontwerp. De intuïtieve bedieningselementen die worden aangestuurd
door een smart apparaat en de door een gimbal gestabiliseerde camera maken het
heel gemakkelijk om verbazingwekkende video's van 4K of foto's van 12 mega te
maken en te delen. Gebruik TapFlyTM en ActiveTrackTM om zichtbaar op je apparaat
overal te vliegen, of moeiteloos een bewegend object te volgen.
De Mavic Pro kan bogen op een maximale vliegsnelheid van 65 kph (40 mph) en
een maximale vliegtijd van 27 minuten*.
NL
5
3
6
7
1
8
9
1. Gimbal en camera
2. Systeem zicht naar beneden
3. Systeem zicht naar voren**
4. Micro-USB-poort
5. Motoren
6. Voorste leds
7. Propellers
8. Antennes
9. Koppeltoets
* De maximale vliegduur is getest bij een windsnelheid van 0 km/h bij een constante snelheid
van 25 km/h (15,5 mph).
** Het Systeem zicht naar voren wordt beïnvloed door omgevingsomstandigheden. Lees de
disclaimer en veiligheidsrichtlijnen en bekijk de uitleg in de DJI GOTM 4 -app of op de ofciële
DJI-website voor meer informatie.
52
12
11
10
http://www.dji.com/mavic
4
2
16
14
13
15
10. Indicator koppelingsstatus
11. Camera MicroSD-kaartsleuf
12. Schakelaar besturingsmodus
13. Intelligent Flight Battery
14. Accuniveau-leds
15. Aan-/uitknop
16. Indicator status luchtvaartuig
Page 55

Afstandsbediening
In de afstandsbediening is de nieuwste DJI-transmissietechnologie OCUSYNCTM
met lang bereik ingebouwd, waarmee het mogelijk is om het luchtvaartuig tot op een
afstand van 7 km (4,3 mi) te besturen terwijl rechtstreeks vanaf de Mavic's camera
via de DJI GO 4-app een live HD-beeld wordt gepresenteerd. Het LCD-scherm
toont updates terwijl je vliegt en de klem van het mobiele apparaat houdt je mobiele
apparaat stevig bevestigd terwijl je het gebruikt.
Maximale bedrijfstijd: 2,5 uur*
1. LCD -scherm
2. 5D-knop
3. Joysticks
4. Antennes
5. Aan-/uitknop
6. Vluchtmodus-schakelaar
7. Klem mobiel apparaat
8. USB-poort
9. Vluchtpauzeknop
10. RTH-knop
Ingeklapt
10
1
9
2
8
4
3
5
6
7
NL
16 17
11
15
13 14
11. Gimbal dial
12. Camera-instellingen
12
13. Opnameknop
14. Sluiterknop
15. Voedingspoort (Micro USB)
16. C1-knop (aanpasbaar)
17. C2-knop (aanpasbaar)
* De afstandsbediening kan een maximale overdrachtsafstand (FCC) bereiken in een grote open ruimte
zonder elektromagnetische interferentie, en op een hoogte van circa 120 meter (400 feet).
De maximale bedrijfstijd is getest in een laboratoriumomgeving, alleen ter indicatie.
53
Page 56

1. Download de DJI GO 4-app en bekijk de
lmpjes met uitleg
Zoek op 'DJI GO 4' in de App Store of Google Play, of scan de QR-code om
de app te downloaden op uw mobiele apparaat. Bekijk de lmpjes met uitleg
op www.dji.com of in de DJI GO 4-app.
NL
DJI GO 4-app en meer informatie
DJI GO 4 ondersteunt iOS 9.0 (of later) of Android 4.4 (of later).
2. Controleer het accuniveau
Laag
Accuniveau Hoog
Accuniveau: 100%
Druk eenmaal op de knop om het
accuniveau te controleren. Druk
eenmaal en druk vervolgens opnieuw
en houd vast om aan/uit te zetten.
54
Druk eenmaal om het accuniveau op het
LCD-scherm te controleren. Druk eenmaal
en druk vervolgens opnieuw en houd vast
om de afstandsbediening aan/uit te zetten.
Page 57

3. Laad de accu’s op
Verwijder de Intelligent Flight Battery
B
A
Oplaadtijd:
~1 uur en 20 minuten
Oplaadtijd:
~2 uur
Stopcontact
100 - 240 V
B
A
4. Voorbereiden van de afstandsbediening
NL
1
Plaats één uiteinde van de
Klap de antennes en de klem
van het mobiele apparaat uit.
Sterk Zwak
Kies een geschikte RC-kabel. Verdraai de RC-kabel niet.
De RC kabel schuif moet worden vervangen bij gebruik van de USB Type-C RC kabel.
Raadpleeg de gebruikershandleiding voor RC-kabelverbinding.
RC-kabel op het sleufeinde van de
afstandsbediening.
Incl. Lightning-connectorkabel
(aangesloten) en standaard Micro-USBconnectorkabel. Alleen gebruiken voor
gepaste doeleinden.
USB type-C connectie kabel
meegeleverd. Optioneel is de Reverse
Micro USB connectie kabel beschikbaar.
2
3
55
Page 58

5. Het luchtvaartuig voorbereiden
Ongemarkeerd
Gemarkeerd
Propellers afstemmen op
motoren
NL
Verwijder de
gimbalklem van de
camera
Druk de propeller
stevig naar beneden
en draai hem in de
vergrendelde stand.
Klap de voorarmen en
propellers uit
Klap de voorarmen en de propellers uit vóór de achterste. Alle armen en propellers
moeten uitgeklapt zijn voordat mag worden opgestegen.
De gimbalafdekking wordt gebruikt om de gimbal te beschermen. Verwijder deze indien
nodig.
Klap de achterarmen
en propellers uit
6. Voorbereiding voor opstijgen
Schakel de
afstandsbediening in
Gebruik je DJI-account om het luchtvaartuig te activeren. Activering vereist een
internetverbinding.
Internet
De Mavic Pro kan worden bestuurd met de afstandsbediening of virtuele joysticks.
Selecteer de besturingsmodi met de schakelaar van de besturingsmodus. Kies op deze
schakelaar alleen een andere positie als het luchtvaartuig uitgeschakeld is.
56
Schakel het
luchtvaartuig in
Uitgeklapt
DJI GO 4
App
Activeer de DJI GO 4-app
Page 59

7. Vlucht
De standaard vluchtregeling staat bekend als modus 2. Met de linkerjoystick
regel je de hoogte en koers, terwijl je met de rechterjoystick vooruit, achteruit,
naar links en rechts kunt bewegen. Met de gimbal regel je de kanteling van de
camera.
Linkerjoystick
h
o
o
m
O
g
Rechterjoystick
r
u
o
i
o
t
V
O
g
m
a
l
a
R
e
f
c
a
h
s
t
k
s
n
a
i
f
L
Controleer vóór het opstijgen of op de Aircraft
Status Bar in de DJI GO 4-app of op het
LCD-scherm van de afstandsbediening de
melding 'Ready to Go’ wordt weergegeven.
Combination Stick
Command voor het
starten/stoppen van de
motoren.
Linkerstick omhoog
(langzaam)
om op te stijgen
De motoren kunnen gedurende de vlucht alleen worden stopgezet wanneer de
vluchtcontroller een kritieke fout detecteert.
A
c
h
t
r
e
s
k
n
i
L
Ready to Go (GPS)
OF
Linkerjoystick omlaag (langzaam)
totdat u de grond raakt
Wacht enkele seconden om de
motoren uit te schakelen
t
i
u
R
e
c
h
t
s
NL
57
Page 60

De vlucht besturen met virtuele joysticks op uw mobiele apparaat via Wi-Fi
Mavic_XXX
WIFI RC
1. Schakel Wi-Fi in met de schakelaar van de besturingsmodus
2. Schakel het luchtvaartuig in
3. Start de DJI GO 4-app op en druk op het pictogram rechtsboven in je
scherm. Scan vervolgens de wi-QR-code op de voorste arm om de
verbinding tot stand te brengen.
4. Tik op Auto Takeo (Automatisch opstijgen)
NL
5. Bestuur het luchtvaartuig met behulp van aanraakbediening
Mocht je de QR-code niet kunnen scannen, schakel dan wi in op je mobiele apparaat
en voer het wi-wachtwoord in dat op de voorste arm is weergegeven. Maak vervolgens
verbinding met het Mavic-netwerk.
Bij gebruik van Wi-Fi in een grote open ruimte zonder elektromagnetische interferentie is
de overdrachtsafstand circa 80 meter (262 ft) op een hoogte van 50 m (164 ft).
De wi-frequentie van je mobiele apparaat kan worden ingesteld op 2,4 GHz of 5 GHz.
Stel je wi in op 5 GHz voor minder interferentie. Zodra de verbinding met de Mavic Pro
tot stand is gebracht, kun je je wi-wachtwoord wijzigen of je wi-verbinding resetten.
(Raadpleeg de gebruikershandleiding van de Mavic Pro voor meer informatie)
DJI GO 4-
app
In de DJI GO 4 App
Automatisch
opstijgen
ActiveTrack
Bekijk de uitleg in de DJI GO 4-app of op de ociële DJI-website voor meer informatie.
Stel altijd een passende RTH-hoogte in vóór het opstijgen. Als het luchtvaartuig
terugkeert naar de basis, dien je het te begeleiden met de joysticks.
58
Automatisch
landen
TapFly
Return-to-Home (RTH)
Normaal
Page 61

8. Vlieg veilig
Vlieg in open
gebieden
Vermijd vliegen boven of nabij obstakels, drukte, hoogspanningsleidingen,
bomen of water.
Vlieg NIET in de buurt van sterke elektromagnetische bronnen zoals
elektriciteitsleidingen en basisstations, daardoor kan het ingebouwde
kompas ongunstig worden beïnvloed.
Gebruik het vliegtuig NIET bij ongunstige weersomstandigheden zoals regen,
sneeuw, mist en bij windsnelheden van meer dan 10 m/s of 22 mph.
Blijf uit de buurt van de roterende
propellers en motoren.
Het is belangrijk de basisvluchtrichtlijnen te begrijpen voor uw
veiligheid en die van uw medemens. Vergeet niet de
veiligheidsrichtlijnen te lezen
Krachtig
GPS-signaal
Houd uw
luchtvaartuig in
het zicht
.
Vlieg onder
120 meter (400 ft)
≥10m/s
No-y zone
Meer informatie vindt u op:
http://ysafe.dji.com/no-y
disclaimer en
NL
59
Page 62

Specicaties
Luchtvaartuig
Gewicht 734 g (1,62 lbs)
Gewicht (met inbegrip van
gimbalafdekking)
Max. stijgsnelheid 5 m/s (16,4 ft/s) in sportmodus
Max. daalsnelheid 3 m/s (9,8 ft/s)
Max. snelheid 65 kph (40 mph) in sportmodus zonder wind
Max. servicehoogte boven zeeniveau 5000 m (16404 feet)
Max. vluchttijd 27 minuten (Windsnelheid van 0 km/h bij een constante
NL
Max. zweefduur 24 minuten (windsnelheid 0 km/h)
Max. Vliegafstand: 13 km ((windsnelheid 0 km/h)
Bedrijfstemperatuur 0 tot 40°C (32 tot 104°F)
Satellite Positioning Systems GPS/GLONASS
Gimbal
Regelbaar bereik Helling: -90° tot +30°,
Systeem zicht naar voren
Bereik obstakeldetectie Nauwkeurigheid meetbereik: 0,7 m tot 15 m
Werkingsomgeving Oppervlakken met een duidelijke structuur en voldoende
Systeem zicht naar beneden
Snelheidsbereik
Hoogtebereik 0,3 - 13 meter (1 - 43 feet)
Werkingsbereik 0,3 - 13 meter (1 - 43 feet)
Werkingsomgeving Oppervlakken met een duidelijke structuur en voldoende
Camera
Sensor 1/2,3" CMOS, Eectief aantal pixels: 12,35 Megapixels
Lens 78,8° FOV, 28 mm (equivalent 35 mm) f/2.2
ISO-bereik 100 - 3200 (video), 100 - 1600 (foto)
Elektronische sluitertijd 8s tot 1/8000s
Maximale beeldgrootte 4000×3000
Fotografeermodi stille beelden Enkele opname
60
743 g (1,64 lbs)
snelheid van 25 km/h)
Roll: 0°of 90° (Horizontaal en verticaal)
Detecteerbaar bereik: 15 m tot 30 m
verlichting (>15 lux)
≤36 kph (22,4 mph) bij 2 meter (6,6 ft) boven de grond
verlichting (>15 lux)
(Totale pixels: 12,71 M)
Vervorming <1,5%, Scherpstelling van 0,5m tot ∞
Serie-opnamen: 3/5/7 frames
Auto Exposure Bracketing (AEB):
3/5 bracketed frames bij 0,7EV Bias
Interval
Page 63

Video-opnamemodi C4K: 4096×2160 24p, 4K: 3840×2160 24/25/30p
Bitrate video-opslag 60 Mbps
Ondersteunde bestandssystemen FAT32 (≤ 32 GB), exFAT (> 32 GB)
Foto JPEG, DNG
Video
Ondersteunde SD-kaarten microSDTM. Max. capaciteit: 64 GB
Afstandsbediening
Bedrijfsfrequentie 2,4 GHz tot 2,4835GHz
Max. transmissieafstand
Bedrijfstemperatuur 0 tot 40°C (32 tot 104°F)
Accu 2970 mAh
Zendervermogen (avg. EIRP) FCC: ≤26 dBm; CE: ≤20 dBm
Bedrijfsspanning 950 mA @ 3,7 V
Ondersteunde grootte mobiel apparaat Ondersteunde dikte: 6,5 - 8,5 mm,
Oplader
Spanning 13,05 V
Nominaal vermogen 50 W
Intelligent Flight Battery
Capaciteit 3830 mAh
Spanning 11,4 V
Accutype LiPo 3S
Vermogen 43,6 Wh
Netto gewicht Circa 240 g (0,5 lbs)
Bereik oplaadtemperatuur 5 °C tot 40 °C (41 °F tot 104 °F)
Max. oplaadvermogen 100 W
Lees de gebruikershandleiding voor meer informatie:
http://www.dji.com/mavic
※
Deze inhoud is onderhevig aan wijzigingen zonder voorafgaande kennisgeving.
MAVICTM is een handelsmerk van DJI.
Copyright © 2016 DJI Alle rechten voorbehouden.
HDR
2.7K: 2720×1530 24/25/30p
FHD: 1920×1080 24/25/30/48/50/60/96p
HD: 1280×720 24/25/30/48/50/60/120p
MP4, MOV (MPEG-4 AVC/H.264)
Klasse 10- of UHS-1-rating vereist
FCC-conformiteit: 7 km (4,3 mi); CE-conformiteit:
4 km (2,5 mi) Onbelemmerd en vrij van interferentie
Max. lengte: 160 mm
Ondersteunde USB-poorttypen: Lightning,
Micro USB (Type-B), USB Type-C
TM
Ontworpen door DJI.
Gedrukt in China.
NL
61
Page 64

Quadricóptero
O DJITM MAVICTM Pro é um quadricóptero portátil com um design dobrável
revolucionário. Seus controles intuitivos por meio de dispositivos móveis, bem
como sua câmera estabilizada por gimbal, tornam a captura e o compartilhamento
de vídeos 4k e fotos de 12 megabytes incrivelmente fácil. Use o TapFlyTM e o
ActiveTrackTM para voar para qualquer lugar que seja visível no seu dispositivo, ou
para rastrear um objeto em movimento sem esforço.
O Mavic Pro alcança uma velocidade máxima de voo de 65 km/h (40 mph) e um
tempo de voo máximo de 27 minutos*.
5
PT
3
1
8
9
1. Gimbal e câmera
2. Sistema de Visão para Baixo
3. Sistema de Visão à Frente**
4. Porta Micro USB
5. Motores
6. LEDs dianteiros
7. Hélices
8. Antenas
*
O tempo de voo máximo foi testado em condição de vento zero à velocidade constante de
15,5 mph (25 km/h)
**
O Sistema de Visão à Frente é afetado pelas condições do entorno. Leia a isenção e as Diretrizes
de segurança e assista ao tutorial no aplicativo DJI GOTM 4 ou no site ocial da DJI para saber
mais.
Http://www.dji.com/mavic
62
12
11
10
.
6
7
4
2
16
14
13
15
9. Botão Link
10. Indicador do status de vinculação
11. Slot de cartão Micro SD da câmera
12. Interruptor de modo de controle
13. Intelligent Flight Battery
14. LEDs de nível de bateria
15. Botão Power
16. Indicador de status do quadricóptero
Page 65

Controle remoto
Dentro do controle remoto, o DJI apresenta a tecnologia de transmissão de
longo alcance de última geração OCUSYNCTM, que possibilita o controle do seu
quadricóptero a até 7 km (4,3 mi) de distância e, ao mesmo tempo, oferece uma
vista HD ao vivo diretamente da câmera do Mavic por meio do aplicativo DJI GO
4. A tela de LCD exibe atualizações enquanto você voa e o suporte de dispositivos
móveis segura o seu dispositivo móvel rmemente enquanto você o utiliza.
Tempo máximo de execução: 2,5 horas*
1. Tela LCD
2. Botão 5D
3. Joysticks
4. Antenas
5. Botão Power
6. Interruptor de Flight Mode
7. Suporte de dispositivo móvel
8. Entrada USB
9. Botão de pausa do voo
10. Botão RTH
Dobrado
16 17
11
15
13 14
* O controle remoto é capaz de atingir sua distância máxima de transmissão em uma área aberta sem
interferência eletromagnética e a uma altitude de aproximadamente 120 metros (400 pés).
O tempo máximo de funcionamento é testado em ambiente de laboratório, apenas para sua referência.
10
1
9
2
8
7
11. Botão Gimbal
12. Botão giratório de congurações
da câmera
12
13. Botão de gravação
14. Botão Obturador
15. Porta de alimentação (Micro USB)
16. Botão C1 (Personalizável)
17. Botão C2 (Personalizável)
4
3
5
6
PT
63
Page 66

1. Faça download do aplicativo DJI GO 4 e
assista aos vídeos de tutorial
Pesquise "DJI GO 4" na App Store ou Google Play, ou digitalize o código
QR para fazer download do aplicativo no seu dispositivo móvel. Assista aos
vídeos tutoriais em www.dji.com ou no aplicativo DJI GO 4.
PT
DJI GO 4 App and more information
O DJI GO 4 é compatível com iOS 9.0 (ou posterior) ou Android 4.4 (ou posterior).
2. Vericar níveis das baterias
Baixo
Nível de bateria Alto
Nível de bateria: 100%
Pressione uma vez para vericar o
nível da bateria. Pressione uma vez;
em seguida, novamente e segure
para ligar/desligar.
64
Pressione uma vez para vericar o nível da
bateria na tela LCD. Pressione uma vez e,
em seguida, novamente e segure para ligar/
desligar o controle remoto.
Page 67

3. Carga das baterias
Remova a Intelligent Flight Battery
B
Tomada elétrica
100 - 240V
4. Preparo do controle remoto
4. Preparo do controle remoto
Desdobre as antenas e o
suporte de dispositivo móvel
A
Conecte uma das pontas do
cabo RC ao nal do slot no
controle remoto.
Forte Fraco
Selecione um cabo RC adequado. Não torça o cabo RC.
O controle deslizante do Cabo RC deve ser substituído se estiver usando um
Cabo USB tipo C RC. Consulte o Manual do Usuário da conexão para o cabo RC.
A
Tempo de carga:
~1 hora e 20 minutos
1
Cabo do conector lightning
(conectado) e cabo do conector
Micro USB padrão inclusos. Use
conforme apropriado.
Cabo USB Tipo-C incluído. Cabo
Micro-USB reverso opcional
disponível.
B
Tempo de carga:
~2 horas
2
3
PT
65
Page 68

5. Prepare o quadricóptero
Marcado
Remova o grampo
do gimbal da câmera.
Corresponder hélices aos
motores
Desmarcado
PT
Desdobre os braços e
as hélices frontais.
Desdobre os braços e as hélices frontais antes dos traseiros. Todos os braços e hélices
devem ser desdobrados antes da decolagem.
A tampa do gimbal é usada para protegê-lo. Remova-a quando necessário.
Desdobre os braços e
as hélices traseiros. Desdobrados
6. Preparação para a decolagem
Pressione a hélice
rmemente para baixo
e gire-a na direção de
travamento.
DJI GO 4
App
Ligue o controle
remoto.
Use sua conta DJI para ativar o quadricóptero. A ativação requer uma conexão
com a internet.
Internet
O Mavic Pro pode ser controlado usando o controle remoto ou joysticks virtuais.
Selecione os modos de controle alternando o Interruptor de modo de controle. Alterne
este interruptor apenas quando o quadricóptero estiver desligado.
66
Ligue o
quadricóptero.
Inicie o aplicativo DJI GO 4
Page 69

7. Voo
O padrão de controle de voo é conhecido como Modo 2. O joystick esquerdo
controla a altitude e a direção do quadricóptero, enquanto o joystick direito
controla os movimentos para frente, para trás, para a esquerda e para a direita.
O botão giratório do gimbal controla a inclinação da câmera.
Joystick esquerdo
M
I
A
C
B
o
x
a
i
a
d
r
e
u
q
s
e
à
r
a
r
i
V
V
i
r
a
r
à
d
i
r
e
i
t
a
Joystick direito
e
r
f
n
t
a
e
r
a
P
P
s
a
á
r
r
a
t
a
d
r
e
u
q
s
E
D
i
r
e
i
t
a
PT
Antes da decolagem, certique-se de
que a barra de status do quadricóptero
no aplicativo DJI GO 4 ou na tela LCD do
controle remoto exiba “Ready to Go”.
Combination stick
command para ligar/
desligar os motores.
Joystick esquerdo para
cima (lentamente)
para decolar
Os motores podem ser parados em pleno voo apenas quando o controlador de voo
detectar um erro crítico.
Ready to Go (GPS)
OU
Mova (lentamente) o joystick
para baixo até tocar o chão
Segure por alguns segundos
para parar os motores
67
Page 70

Controlar o voo com joysticks virtuais no seu dispositivo móvel via Wi-Fi
WIFI RC
1. Alterne o Interruptor de modo de controle para ligar o Wi-Fi
2. Ligue o quadricóptero.
3. Execute o aplicativo DJI GO 4 e toque no ícone no canto superior direito da tela;
em seguida, digitalize o código QR Wi-Fi no braço frontal para iniciar a conexão.
4. Toque em Auto Takeo
5. Pilote o quadricóptero com controle de toque
PT
Ligue o dispositivo móvel Wi-Fi e digite a senha Wi-Fi mostrada no braço frontal para
conectar-se à rede Mavic se, por algum motivo, você não conseguir digitalizar o código QR.
Ao utilizar o Wi-Fi em uma área aberta ampla sem qualquer interferência
eletromagnética, o alcance da transmissão é de aproximadamente 262 pés (80 m) a
uma altitude de 164 pés (50 m).
A frequência Wi-Fi do seu dispositivo móvel pode ser denida para 2,4 GHz ou 5 GHz.
Dena o Wi-Fi para 5 GHz para ter menos interferências. Depois de ter estabelecido
ligação ao Mavic Pro, pode alterar a sua palavra-passe de Wi-Fi ou repor a sua ligação
de Wi-Fi. (Consulte o Manual do utilizador do Mavic Pro para obter mais informações)
Aplicativo
DJI GO 4
Mavic_XXX
No aplicativo DJI GO 4
Decolagem
automática
ActiveTrack
Assista ao tutorial no aplicativo DJI GO 4 ou no site ocial da DJI para saber mais.
Congure sempre uma altitude RTH adequada antes de decolar. Quando o
quadricóptero estiver retornando ao Home Point, você deverá orientá-lo com os joysticks.
68
Pouso
automático
TapFly
Return-to-Home (RTH)
Normal
Page 71

8. Voe com segurança
Voe em espaços
abertos
Evite voar acima de ou próximo de obstáculos, multidões, linhas de alta
tensão, árvores e corpos d'água.
NÃO voe próximo a fontes eletromagnéticas fortes, como linhas de energia
e estações rádio base, pois isso pode afetar a bússola embarcada.
Não use o quadricóptero em condições climáticas adversas como chuva,
neve, neblina e velocidades do vento acima de 10 m/s ou 22 mph.
Fique longe das hélices giratórias
e dos motores.
Sinal de GPS forte Mantenha o
É importante que você compreenda as diretrizes básicas de voo, tanto para
a sua proteção como para a segurança das pessoas à sua volta. Não se
esqueça de ler a
isenção e as Diretrizes de segurança
campo de visão
Voe abaixo de
400 pés (120 m)
Zona de exclusão aérea
Saiba mais em:
http://ysafe.dji.com/no-y
.
≥10m/s
PT
69
Page 72

Especicações
Quadricóptero
Peso 734 g (1,62 lbs)
Peso (incluindo a tampa do gimbal) 743 g (1,64 lbs)
Velocidade máx. de ascensão 5 m/s (16,4 pés/s) no modo esportivo
Velocidade máx. de descida 3 m (9,8 pés)
Velocidade máx. 65 km/h (40 mph) no modo esportivo, sem vento
Teto máximo de serviço acima do nível
do mar
Tempo de voo máx. 27 minutos (Vento 0 a 15,5 mph (25 km/h) constantes)
Tempo máximo de planagem 24 minutos (Vento zero)
Distância máxima de voo 13 km (Vento zero)
Temperatura Operacional 0° a 40°C (32° a 104°F)
PT
Sistemas de posicionamento por
satélite
Gimbal
Faixa controlável Inclinação: -90° a +30°
Sistema de Visão à Frente
Alcance de detecção de obstáculos Intervalo de medição de precisão: 2 pés (0,7 m) a 49 pés
Ambiente operacional Superfícies com padrões nítidos e iluminação adequada
Sistema de Visão para Baixo
Faixa de velocidade ≤ 36 km/h (22,4 mph) a 2 m (6,6 pés) acima do solo
Faixa de altitude 0,3 a 10 m (1 a 43 pés)
Faixa operacional 0,3 a 10 m (1 a 43 pés)
Ambiente operacional Superfícies com padrões nítidos e iluminação adequada
Câmera
Sensor 1/2,3” CMOS, Pixels efetivos:12,35 M
Lente FOV 78,8° 28 mm (equivalente ao formato 35 mm) f/2.2
Faixa de ISO 100 - 3200(vídeo), 100 - 1600 (foto)
Velocidade do obturador eletrônico 8s a 1/8000s
Tamanho máximo da imagem 4000x3000
Modos de fotograa Disparo único
70
5000 m (16.404 pés)
GPS/GLONASS
Rotação: 0° ou 90° (horizontalmente e verticalmente)
(15 m), Intervalo detectável: 49 pés (15 m) a 98 pés (30 m)
(lux > 15)
(lux > 15)
(Pixels totais: 12,71 M)
Distorção < 1,5%, do foco de 0,5m a ∞
Disparo sequencial: 3/5/7 quadros
Auto Exposure Bracketing (AEB):
3/5 quadros com bracketing em variação de 0,7 EV
Page 73

Intervalo
Modos de gravação de vídeo C4K: 4096×2160 24p, 4K: 3840×2160 24/25/30p
Taxa de bits para armazenamento de
vídeo
Sistemas de arquivo compatíveis FAT32 (≤ 32 GB), exFAT (> 32 GB)
Foto JPEG, DNG
Vídeo MP4, MOV (MPEG-4 AVC/H.264)
Cartões SD compatíveis microSDTM Capacidade máxima: 64 GB
Controle remoto
Frequência operacional 2,4 GHz a 2,4835 GHz
Distância de transmissão máx. Conformidade com a FCC: 7 km (4,3 mi);
Temperatura Operacional 0° a 40°C (32° a 104°F)
Bateria 2970 mAh
Potência do transmissor (avg. EIRP) FCC: ≤26 dBm; CE: ≤20 dBm
Tensão de operação 950 mA a 3,7 V
Tamanhos de dispositivos móveis
suportados
Carregador
Tensão 13,05 V
Potência nominal 50 W
Intelligent Flight Battery
Capacidade 3830 mAh
Tensão 11,4 V
Tipo de bateria LiPo 3S
Energia 43,6 Wh
Peso líquido Aprox. 240 g (0,5 lbs)
Faixa de temperatura de carregamento 5° a 40° C (41° a 104° F)
Potência máx. de carga 100 W
Para mais informações, leia o Manual do Usuário:
Http://www.dji.com/mavic
※
Este conteúdo está sujeito a alterações sem prévio aviso.
MAVICTM é uma marca comercial da DJI.
Copyright © 2016 DJI Todos os direitos reservados.
HDR
2.7K: 2720×1530 24/25/30p
FHD: 1920×1080 24/25/30/48/50/60/96p
HD: 1280×720 24/25/30/48/50/60/120p
60 Mbps
Necessário classicação classe 10 ou UHS-1
Conformidade com a CE:
4 km (2,5 mi) desobstruídos e livre de interferências
Espessura suportada: 6,5 - 8,5 mm,
Comprimento máximo: 160 mm
Tipos de portas USB suportadas: Lightning,
Micro USB (Type-B), USB Type-C
TM
Design pela DJI.
Impresso na China.
PT
71
Page 74

Дрон
DJITM MAVICTM Pro представляет собой портативный дрон с революционной
складной конструкцией. Его простой в использовании пульт управления
и стабилизированная камера позволяют легко снимать видео 4К и
фотографии с разрешением 12 мегапикселей. Благодаря функциям
TapFlyTM и ActiveTrackTM дрон автоматически полетит в выделенную на экане
область и с легкостью последует за движущимся объектом.
Максимальная скорость полета Mavic Pro составляет полета 65 км/ч
(40 мили/ч) и максимальное время полета-27 минут*.
5
3
RU
1
8
9
1. Стабилизатор и камера
2. Система нижнего обзора
3. Система переднего обзора**
4. Порт Micro USB
5. Электродвигатели
6. Передние сигнальные огни
7. Пропеллеры
8. Антенны
9. Кнопка подключения
10. Индикатор статуса подключения
* Максимальное время полета подтверждено испытаниями при отсутствии ветра и постоянной
скорости 25 км/ч.
** Работа Система переднего обзора зависит от окружающей среды. Для получения
дополнительной информации ознакомьтесь с отказом от ответственности и руководством
по технике безопасности и просмотрите видеоролики в приложении DJI GOTM 4 или на
официальном веб-сайте DJI.
72
12
11
10
http://www.dji.com/mavic
6
7
4
2
16
14
13
15
11. Слот для карты памяти Micro SD в камере
12. Переключатель режимов управления
13. Аккумулятор Intelligent Flight Battery
14. Светодиодные индикаторы уровня заряда
аккумулятора
15. Кнопка включения/выключения
16. Индикатор состояния дрона
Page 75

Пульт дистанционного управления
Новейшая технология DJI OCUSYNCTM для передачи данных на большие
расстояния встроена в пульт дистанционного управления. Она позволяет
управлять дроном на расстоянии до 7 км (4,3 мили), при этом обеспечивая
передачу изображения высокой четкости непосредственно с камеры Mavic
через приложение DJI GO 4. ЖК-экран отображает обновляемую информацию
в процессе полета, а крепление мобильного устройства обеспечивает его
стабильное положение во время использования.
Максимальное время работы: 2,5 часа*
10
1. ЖК-экран
2. Кнопка 5D
3. Джойстики
4. Антенны
5. Кнопка включения/выключения
6. Переключатель режимов полета
7. Крепление мобильного устройства
8. Порт USB
9. Кнопка остановки полета
10. Кнопка возвращения в точку взлета
1
9
2
8
В сложенном состоянии
11. Колесико наклона камеры
16 17
11
15
13 14
*
Максимальное расстояние передачи сигнала (FCC) может быть достигнуто на открытом пространстве
без электромагнитных помех при высоте полета около 120 м (400 футов).
Максимальное время работы было измерено в лабораторных условиях и приводится исключительно в
справочных целях.
12. Регулятор яркости изображения
13. Кнопка записи видео
12
14. Кнопка спуска затвора
15. Порт питания (Micro USB)
16. Кнопка C1 (настраиваемая)
17. Кнопка C2 (настраиваемая)
4
3
5
6
7
RU
73
Page 76

1. Загрузите приложение DJI GO 4 и
посмотрите обучающие видеоролики
Найдите «DJI GO 4» в App Store или Google Play или отсканируйте
штрих-код, чтобы загрузить приложение на свое мобильное устройство.
Обучающие видеоролики доступны на веб-сайте www.dji.com или в
приложении DJI GO 4.
RU
DJI GO поддерживает iOS 9.0 (или более позднюю версию) и Android 4.4
(или более позднюю версию).
2.
Проверьте уровень заряда аккумулятора
Индикатор
уровня заряда
Низкий
аккумулятора
Нажмите один раз для проверки
уровня заряда аккумулятора.
Нажмите один раз, затем нажмите
и удерживайте для включения/
выключения.
74
Приложение DJI GO 4 и
дополнительная информация
Высокий
Индикатор уровня заряда
аккумулятора: 100%
Нажмите один раз для проверки
уровня заряда аккумулятора на ЖКэкране. Нажмите один раз, затем
нажмите и удерживайте для включения/
выключения пульта дистанционного
управления.
Page 77

3. Зарядите аккумуляторы
2
3
1
2
3
1
Аккумулятор Intelligent Flight Battery
B
B
A
Розетка
100–240 В
4. Подготовьте пульт дистанционного
управления к работе
Подсоедините один
конец кабеля пульта
дистанционного управления
к разъему на пульте.
Разверните антенны и
разложите крепление
мобильного устройства.
Сильный Слабый
Выберите подходящий кабель пульта дистанционного управления. Не перекручивайте
кабель.
При использовании кабеля для пульта USB Type-C необходимо заменить слайдер для
кабеля на пульте управления. Подробная информация о подключении кабеля пульта
дистанционного управления приведена в руководстве пользователя.
A
Время зарядки:
~1 час 20 минут
1
Соединительный кабель Lightning (подключен)
и соединительный кабель для стандартного
разъема Micro USB входят в комплект поставки.
Используйте только по назначению.
В комплект входит кабель для разъема USB
Type-C. Дополнительно можно приобрести
кабель для реверсивного разъема Micro USB.
Время зарядки:
~2 часа
2
3
RU
75
Page 78

5. Подготовьте дрон
Снимите зажим
стабилизатора с
камеры.
RU
Разложите передние
лучи и пропеллеры
Всегда сначала раскладывайте передние лучи и пропеллеры, затем - задние.
С маркировкой
Соблюдайте цветовую
кодировку пропеллеров и
электродвигателей.
Разложите задние
лучи и пропеллеры
Все лучи и пропеллеры должны находиться в разложенном состоянии перед
взлетом.
Чехол стабилизатора предназначен для защиты стабилизатора и камеры.
Снимите при необходимости.
6. Подготовьтесь к взлету
Без маркировки
Надавите на пропеллер
и поворачивайте
в направлении
блокировки.
Разложенное
состояние
DJI GO 4
App
Включите пульт
дистанционного
управления
Для активации дрона используйте вашу учетную запись DJI. Для этого
потребуется соединение с интернетом.
Интернет
Для управления Mavic Pro используется пульт дистанционного управления или
виртуальные джойстики. Выбор режимов управления осуществляется с помощью
специального переключателя. Выбрать режим полета при помощи данного
переключателя возможно только перед включением дрона.
76
Включите дрон Запустите приложение
DJI GO 4
Page 79

7. Полет
Режим 2 является режимом управления по умолчанию. Левый джойстик
используется для управления высотой и поворотом дрона, правый —
для управления движением вперед, назад, влево и вправо. Колесико
стабилизатора управляет наклоном камеры.
Левый джойстик
Е
Р
В
Х
В
Правый джойстик
р
е
е
п
д
В
В
з
н
и
П
о
о
в
в
е
о
л
р
а
о
н
т
т
н
о
а
р
п
о
р
в
а
о
в
П
о
Перед взлетом убедитесь, что индикатор
состояния дрона в приложении
DJI GO 4 или на ЖК-экране пульта
дистанционного управления показывает
Ready to Go (Готов к полету).
Положение джойстиков
для включения/
выключения
электродвигателей.
Плавно сдвиньте левый
джойстик вверх
для взлета
Двигатели можно останавливать во время полета, только если система
автоматического управления обнаруживает критическую ошибку.
Н
а
з
о
в
е
л
В
Ready to Go (GPS)
ИЛИ
Смещайте левый джойстик вниз
(плавно), пока дрон не коснется
поверхности
Для выключения двигателей
удерживайте джойстик в течение
нескольких секунд
д
а
В
п
р
а
в
о
RU
77
Page 80

Управление полетом с помощью виртуальных джойстиков на вашем
мобильном устройстве через Wi-Fi
WIFI RC
1. Переместите переключатель режимов управления для включения Wi-Fi
2.
Включите дрон
3. Запустите приложение DJI GO 4 и нажмите на значок в правой верхней части
экрана. Затем отсканируйте штрих-код Wi-Fi на передней стойке, чтобы
установить соединение.
4. Нажмите Auto Takeo (Автоматический взлет)
5. Контролируйте дрон с помощью сенсорного управления
Включите Wi-Fi на своем мобильном устройстве и введите пароль Wi-Fi, указанный
на передней стойке, чтобы подключиться к сети Mavic, если по каким-либо
RU
причинам отсканировать штрих-код не удается.
При использовании Wi-Fi на открытом пространстве без электромагнитных помех
расстояние передачи сигнала на высоте 50 м (164 фута) составляет приблизительно
80 м (262 фута).
На вашем мобильном устройстве может быть установлена частота Wi-Fi 2,4 ГГц или
5 ГГц. Чтобы уменьшить помехи, установите частоту Wi-Fi 5 ГГц. После подключения
к Mavic Pro вы можете поменять пароль Wi-Fi или сбросить подключение Wi-Fi.
(Подробная информация приведена в руководстве пользователя Mavic Pro)
Приложение
DJI GO 4
В приложении DJI GO 4
Mavic_XXX
Взлет в
автоматическом
режиме
Функция ActiveTrack
Для получения дополнительной информации ознакомьтесь с руководством в
приложении DJI GO 4 или на официальном веб-сайте DJI.
Перед взлетом всегда устанавливайте подходящую высоту для возврата домой.
При возврате в исходную точку дрон необходимо направлять с помощью
джойстиков.
78
Автоматическая
посадка
Функция TapFly
Возврат домой
(RTH)
Нормальное состояние
Page 81

8. Соблюдайте правила безопасности полетовв
120 мм
Выполняйте полеты
на открытых
участках
При
сильном
сигналеGPS
Выполняйте
полет только в
пределах прямой
видимости
Полет должен
происходить на
высоте менее
120 м (400 футов)
Следует избегать полетов над или в непосредственной близости
от препятствий, скоплений людей, высоковольтных линий
электропередачи, деревьев и водоемов.
ЗАПРЕЩАЕТСЯ выполнять полеты близко от таких источников
сильного электромагнитного поля, как линии электропередачи и
базовые станции, т. к. они могут влиять на работу встроенного компаса.
≥10 м/с
ЗАПРЕЩАЕТСЯ использовать дрон в неблагоприятных погодных
условиях, таких как дождь, снег, туман и при скорости ветра более
10 м/с или 22 мили/ч.
Зоны, запрещенные
для полетов
Не приближайтесь к вращающимся
пропеллерам и электродвигателям.
Для обеспечения своей безопасности и безопасности
окружающих важно понимать основные принципы полета.
Обязательно ознакомьтесь с
ответственности и руководством по технике безопасности
Более подробная информация
приведена на веб-сайте:
http://ysafe.dji.com/no-y
заявлением об отказе от
.
RU
79
Page 82

Технические характеристики
Летательный аппарат
Масса 734 г (1,62 фунта)
Масса (сзащитным боксом) 743 г (1,64 фунта)
Максимальная скорость набора
высоты
Максимальная скорость снижения 3 м/с (9,8 фута/с)
Максимальная скорость 65 км/ч (40 мили/ч) в спортивном режиме в
Максимальная высота над
уровнем моря
Максимальное время полета 27 минут (Отсутствие ветра при постоянной
Максимальное время полета
(в режиме зависания)
Макс. дальность полета
Диапазон рабочих температур 0...+40 °C (32-104 °F)
RU
Спутниковые системы
позиционирования
Стабилизатор
Рабочий диапазон углов вращения Относительно поперечной оси: -90... +30°,
Система переднего обзора
Диапазон обнаружения
препятствий
Условия функционирования Поверхность с видимой текстурой, уровень
Система нижнего обзора
Макс. скорость ≤ 36 км/ч (22,4 мили/ч) при высоте 2 м (6,6 фута)
Диапазон высот 0,3 - 13 м (1 - 43 фута)
Рабочий диапазон 0,3 - 13 м (1 - 43 фута)
Условия функционирования
Камера
Матрица
Объектив Угол обзора 78,8°, фокусное расстояние 20 мм
Диапазон ISO 100 - 3200 (видео); 100 - 1600 (фото)
Диапазон выдержки 8-1/8000 с
Максимальный размер
изображения
80
5 м/с (16,4 фута/с) в спортивном режиме
безветренную погоду
5000 м (16 404 футов)
скорости 25 км/ч)
24 минуты (при отсутствии ветра)
13 км (при отсутствии ветра)
GPS/ГЛОНАСС
относительно продольной оси: 0...+ 90°
(по горизонтали и вертикали)
Расстояние для точного измерения: 0,7–15 м,
Расстояние, на котором возможно измерение:
15–30 м
освещенности >15 лк
над землей
Поверхности с видимой текстурой, уровень
освещенности >15 лк
1/2,3” CMOS, количество эффективных пикселей:
12,35 Mп
(Общее количество пикселей: 12,71 Мп)
(эквивалент формата 35 мм), диафрагма f/2.2
Искажение изображения <1,5%; фокус от 0,5 м до
бесконечности
4000×3000
Page 83

Режимы фотосъемки Единичный снимок
Режимы видеосъемки
Битрейт видео 60 Мбайт/с
Поддерживаемые файловые
системы
Фото JPEG, DNG
Видео
Поддерживаемые карты памяти microSDTM. Максимальный объем: 64 Гбайт
Пульт дистанционного управления
Рабочая частота 2,4-2,4835 ГГц
Макс. расстояние передачи
сигнала
Диапазон рабочих температур 0...+40 °C (32-104 °F)
Аккумулятор 2970 мАч
Мощность передатчика (avg. EIRP) FCC: ≤26 дБм, CE: ≤20 дБм
Рабочее напряжение 950 мА при 3,7 В
Размер совместимого мобильного
устройства
Зарядное устройство
Напряжение 13,05 В
Номинальная мощность 50 Вт
Аккумулятор Intelligent Flight Battery
Емкость 3830 мАч
Напряжение 11,4 В
Тип аккумулятора Литий-полимерный 3S
Энергия 43,6 Вт*ч
Масса нетто Приблиз. 240 г (0,5 фунта)
Диапазон температуры зарядки +5...+40 °C (41-104 °F)
Максимальная мощность зарядки 100 Вт
Дополнительную информацию можно найти в руководстве пользователя:
http://www.dji.com/mavic
※
Этот символ означает, что
содержание может быть изменено без
предварительного уведомления.
YC.BZ.S01021.04
Серийная съемка: 3/5/7 кадров
Автоматическая экспокоррекция (AEB ): 0.7EV с
шагом 3/5 ступени
Автоспуск
HDR
C4K: 4096×2160 24
4K: 3840×2160 24/25/30
2.7K: 2720×1530 24/25/30
FHD: 1920×1080 24/25/30/48/50/60/96 кадров/с
HD: 1280×720 24/25/30/48/50/60/120 кадров/с
кадров/с
кадров/с
кадров/с
FAT32 (≤ 32 Гбайт) ; exFAT (> 32 Гбайт)
MP4, MOV (MPEG-4 AVC/H.264)
Требуемый класс скорости: 10 или UHS-1
FCC: 7 км (4,3 мили); CE: 4 км (2,5 мили) при
отсутствии препятствий и помех
Толщина: 6,5–8,5 мм
Макс. длина: 160 мм
Поддерживаемые типы портов USB Lightning,
Micro USB (Type-B), USB Type-C
MAVICTM является товарным знаком компании DJI.
Copyright © 2016 DJI Все права защищены.
Разработано DJI.
Напечатано в Китае.
RU
81
Page 84

MAVIC PRO
www.dji.com
 Loading...