

Page 1
D-RTK 2
High Precision GNSS Mobile Station
User Guide
使用说明
2020.05v2.0
Page 2

Contents
Disclaimer
EN
Warnings
Introduction
In the Box
Overview
Preparation
How to Use the D-RTK 2 Mobile Station
Appendix
免责声明
CHS
注意事项
简 介
物品清单
部件说明
准 备
使 用
附 录
Compliance Information
2
2
2
3
4
5
6
11
14
14
14
15
16
17
19
23
26
1
Page 3

Disclaimer
Thank you for purchasing D-RTKTM 2 High Precision GNSS Mobile Station (hereinafter referred to as
the “Product”). Read this disclaimer carefully before using this Product. By using this Product, you
hereby agree to this disclaimer and signify that you have read it fully. Please use this Product in strict
EN
accordance with the manual and be sure to pay attention to the Warnings. SZ DJI TECHNOLOGY
CO., LTD., and its afliated companies assume no liability for damage(s) or injuries incurred directly or
indirectly from using, installing or retting this Product improperly, including but not limited to using non-
designated accessories.
TM
is a trademark of SZ DJI TECHNOLOGY CO., LTD. (abbreviated as “DJI”) and its affiliated
DJI
companies. Names of products, brands, etc., appearing in this manual are trademarks or registered
trademarks of their respective owner companies. This Product and manual are copyrighted by DJI with
all rights reserved. No part of this Product or manual shall be reproduced in any form without the prior
written consent or authorization of DJI.
This disclaimer is produced in various languages. In the event of divergence among different versions,
the Chinese version shall prevail when the Product in question is purchased in China, and the English
version shall prevail when the Product in question is purchased in any other region.
Warnings
1. To maximize the lifespan of the battery, remove the Intelligent Battery from the D-RTK 2 Mobile
Station when not in use.
2. Only use the D-RTK 2 in the corresponding frequency band and in accordance with local laws and
regulations.
3. DO NOT bend or fold the cables excessively.
4. Ensure that the D-RTK 2 Mobile Station is perfectly level when mounted and placed.
5. Only operate in an open environment free from radio interference. Turn off nearby devices using the
same frequencies as the D-RTK 2 Mobile Station (e.g. radio transceivers).
6. Ensure that the antennas of all the devices used are unobstructed when in use.
7. Only use genuine DJI parts or parts certified by DJI. Unauthorized parts or parts from non-DJI-
certied manufacturers may cause the system to malfunction and compromise safety.
8. Ensure that the D-RTK 2 Mobile Station and its components are free from contamination (e.g. water,
oil, soil and sand).
9. DO NOT attempt to disassemble any part of the D-RTK 2 Mobile Station that has already been
mounted prior to shipping.
10. Handle the sharp ends of the extension rod and tripod with caution.
11. Take necessary measures to protect the D-RTK 2 Mobile Station and batteries from water in rain,
snow, and/or thunderstorms. Operate with caution in severe weather conditions.
Introduction
The D-RTK 2 High Precision GNSS Mobile Station is a high-precision satellite signal receiver that supports
four global satellite navigation systems: GPS, BEIDOU, GLONASS, and Galileo with 11-band satellite
signal* reception. Its built-in OCUSYNCTM, LAN, and 4G data transmission links ensure uninterrupted,
stable data transmission under a variety of application scenarios. The D-RTK 2 Mobile Station can be used
as an RTK mobile base station to achieve centimeter-level positioning accuracy of an aircraft equipped
with a DJI RTK positioning system (such as Agras T20, T16, MG-1P RTK, Phantom 4 RTK, P4 Multispectral,
MATRICETM 300 RTK, or Matrice 210 RTK V2). Its functions are uncompromised even in environments with
strong magnetic interference, for example, near high-voltage power lines or metal structures. The D-RTK
2 Mobile Station can also be used as a handheld mapping device to achieve enhanced precision in point
positioning during surveying and mapping, or lofting and other engineering applications. In addition,
the D-RTK 2 Mobile Station can be used as a stationary RTK base station to quickly build network RTK
services**.
* Refer to the Specications for details.
** Supported later. DJI only provides technical services, users must comply with the local laws, regulations and
requirements for building network RTK services.
2
Page 4
In the Box
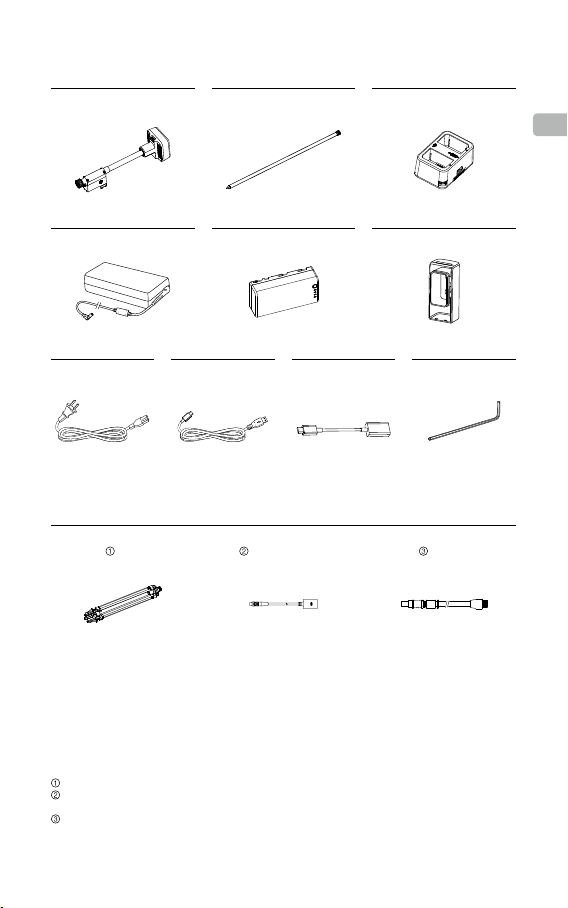
D-RTK 2 Body Extension Rod Charging Hub×1 ×1 ×1
Intelligent Battery (WB37) Battery Cover AC Power Adapter ×1 ×2 ×1
AC Power Cable USB-C Cable USB-C OTG Cable Hex Key
×1 ×1 ×1 ×1
Optional Items
LAN Cable Tripod Power Adapter Cable
EN
When using the D-RTK 2 Mobile Station as a mobile base station, use the Tripod to support the D-RTK 2 body.
When using the D-RTK 2 Mobile Station as a stationary base station, use the Power Adapter Cable and AC Power Adapter to
connect to the AC power for long-term power supply.
When using the D-RTK 2 Mobile Station as a stationary base station, use the LAN Cable to access the cloud server.
3
Page 5
Overview
EN
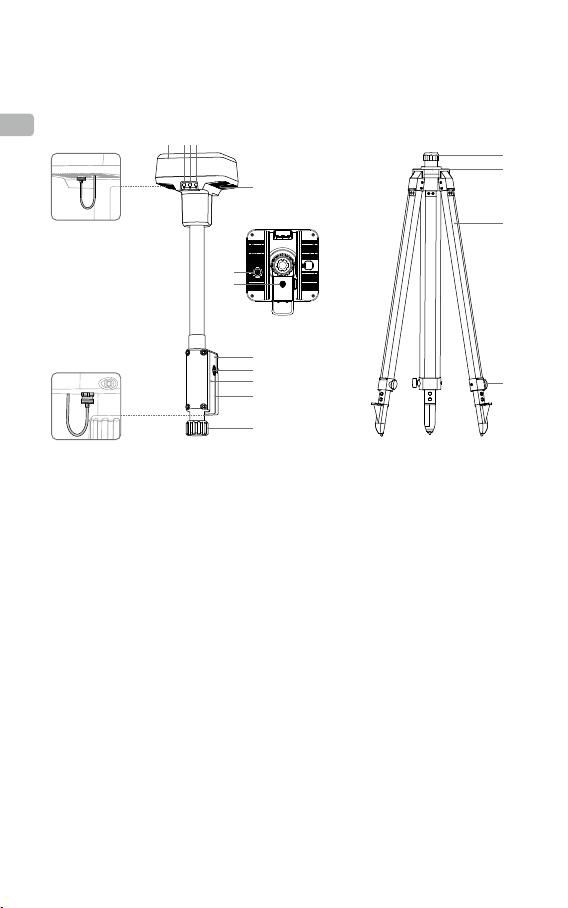
D-RTK 2 Body Tripod
1 2
34
5
11
12
Bottom View
6
7
8
9
10
1. Antenna
2. Link Button and Indicator
3. Power Button and Indicator
4. Operating Mode Button and Indicator
5. USB-C Port
6. Dongle Compartment
7. Rosette Mount
8. Battery Compartment
9. Battery Cover
10. Lock Nut
11. LAN Port*
12. External Power Port*
1. Sleeve
2. Mount Base
3. Retractable Legs
4. Knobs
1
2
3
4
* Equipped with a protective cover that can be stored when the unit is in use.
When not in use, cover the ports to protect the unit from moisture and dust.
The illustrations in this document may be slightly different from the actual
product. Please refer to the actual one.
4
Page 6
Preparation
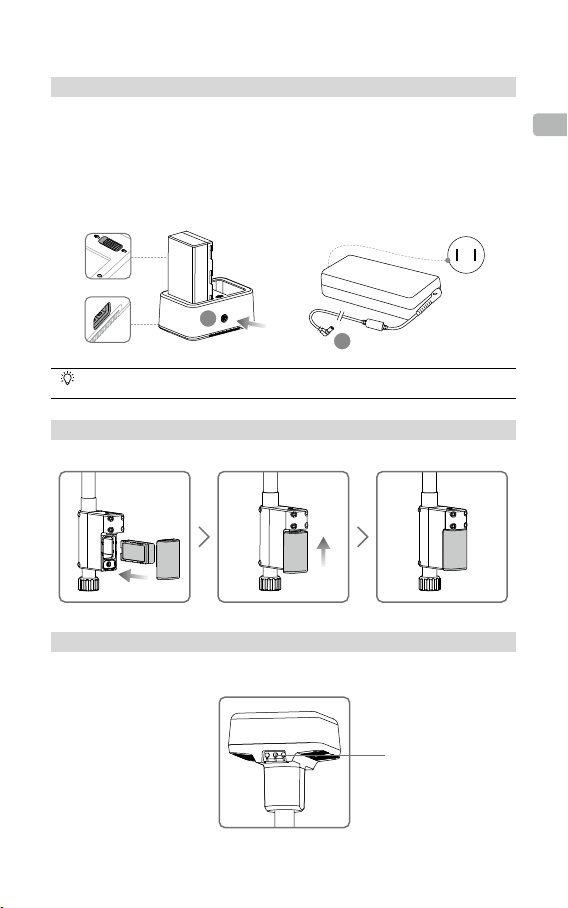
Charging the Battery
Press the battery level button once to check the battery level. Fully charge the batteries before rst-
time use.
1. Place the battery into the charging hub, connect the AC power adapter to the Charging Hub, and
then connect the AC power adapter to a power outlet (100–240V, 50/60Hz).
2. The charging hub will intelligently charge batteries in sequence according to battery power levels
from high to low.
3. The Status LED blinks green when charging and turns solid green when fully charged. The buzzer
will begin beeping when charging is complete. Remove the battery or turn off the buzzer to stop it.
A
A
Refer to the WCH2 Charging Hub User Guide and the WB37 Intelligent Battery Safety
Guidelines for more details.
Mounting the Battery
EN
Powering the D-RTK 2 Mobile Station On/Off
Press and hold the power button to power on/off the D-RTK 2 Mobile Station.
Power Button
5
Page 7
Power Indicator Descriptions
Solid Red System initializing/error notication
Quick Red Blink Battery level is less than 20%
Slow Red Blink Signals from ≤ 5 Satellite received
EN
Solid Yellow Signals from 6-9 Satellite received
Solid Green Signals from ≥10 Satellite received
Operating Modes
The D-RTK 2 Mobile Station provides ve operating modes to use with different products. Follow the
instructions below to switch between modes.
1. Press and hold the Operating Mode button for two seconds. The indicator will turn from green to
yellow to indicate that the device has entered mode switch status.
2. Press the Operating Mode button once to switch modes. Wait two seconds for the device to enter the
corresponding mode. The indicator will turn from yellow to green. Operating modes are indicated by
the blinking pattern of the indicator. Refer to the table below.
3. The device will remain in the original mode if there is no further operation within two seconds of
entering the mode switch status.
Modes Name and Compatible Products Blinking Pattern
Operating Mode 1
Operating Mode 2 Stationary Base Station* Twice
Operating Mode 3
Operating Mode 4 Mobile Base Station (M210 RTK V2) Four Times
Operating Mode 5 Mobile Base Station (Broadcast Mode, M300 RTK) Five Times
* Supported later.
Mobile Base Station
(T20/T16/MG-1P RTK/Phantom 4 RTK/P4 Multispectral)
Handheld Mapping Device
(T20/T16/MG-1P RTK/Phantom 4 RTK)
How to Use the D-RTK 2 Mobile Station
The operations are similar when using the D-RTK 2 Mobile Station with different products. Unless
otherwise specified, the descriptions below are compatible with all the products working in the
corresponding mode.
Connecting to the Remote Controller or Aircraft
Connection Method
The connection method vary depending on the operating mode. See the instructions below.
Operating Mode 1
Using with Agras or Phantom 4 RTK Aircraft
The D-RTK 2 Mobile Station must be linked to the remote controller in the app. The following
descriptions use the DJI Agras app as an example.
1. Power on the D-RTK 2 Mobile Station, wait until system initialization is completed, and enter
Operating Mode 1.
2. Power on the remote controller and make sure that the app is launched.
3. In the app, go to Operation View >
source to D-RTK 2 Mobile Station. Then, tap Linking at the bottom. The remote controller status
indicator will blink blue and a beeping sound from the remote controller will indicate that the remote
controller is being linked.
> RTK to enable aircraft RTK function. Select the RTK signal
Once
Three Times
6
Page 8
4. Press the Link button on the D-RTK 2 Mobile Station and the link indicator will blink red and green
alternately, indicating that the D-RTK 2 Mobile Station is being linked.
5. The linking is successful when the indicator light on the remote controller becomes solid green. The
D-RTK 2 link indicator shows the current working status. Refer to the table below for the details.
6. The remote controller and aircraft must be relinked after the remote controller is linked with the D-RTK
2 Mobile Station. There are three ways that this can be done:
•
After linking the remote controller with the D-RTK 2 Mobile Station, tap Link with Aircraft in the pop-
up window to link it with the aircraft. Then press the Link button on the aircraft to nish linking.
•
On the RTK Settings page, tap the button next to the prompt indicating the aircraft has been
disconnected, and then tap Link with Aircraft in the pop-up window to link it with the aircraft.
•
Link the remote controller with the aircraft on the RC Settings page. When nished, go to the RTK
Settings page and tap Try to Reconnect next to the D-RTK 2 Status to reconnect to D-RTK 2. The
D-RTK 2 status must indicate Connection Success for the RTK functions to work.
Using with P4 Multispectral Aircraft
1. Power on the D-RTK 2 Mobile Station, wait until system initialization is completed, and enter
Operating Mode 1.
2. Power on the remote controller and make sure that the DJI GS Pro app is launched.
3. Go to Mission Page in DJI GS Pro, tap the
settings menu, and then select D-RTK 2 as the RTK signal source. Enable the aircraft RTK at the
bottom of the menu to ensure the aircraft has access to RTK data.
4. Tap Link. The remote controller will start beeping. Then press the link button on the mobile station.
5. The linking is successful when the indicator light on the remote controller becomes solid green. The
D-RTK 2 link indicator shows the current working status. Refer to the table below for details.
•
When the D-RTK 2 Mobile Station has been connected to the remote controller and the
aircraft is being controlled by the remote controller, the D-RTK 2 Mobile Station cannot
be linked with other remote controllers. If required, link after the aircraft lands and the
motors stop.
•
One D-RTK 2 Mobile Station can link with up to ve remote controllers.
Operating Mode 3
The D-RTK 2 Mobile Station must be linked to the remote controller.
1. Power on the D-RTK 2 Mobile Station, wait until system initialization is completed, and enter
Operating Mode 3.
2. Power on the remote controller. Go to Remote Controller Settings in the app, and tap Linking. The
status LED blinks blue and the remote controller will beep twice repeatedly, indicating that the
remote controller is ready to link.
3. Press the Link button on the D-RTK 2 Mobile Station and the link indicator will blink red and green
alternately, indicating that the D-RTK 2 Mobile Station is being linked.
4. The linking is successful when the indicator light on the remote controller becomes solid green. The
D-RTK 2 link indicator shows the current working status. Refer to the table below for details.
Operating Mode 4
The D-RTK 2 Mobile Station must be linked to the M210 RTK V2 aircraft.
1. Power on the M210 RTK V2 aircraft and make sure that it is linked to the remote controller.
2. Press the Link button on the D-RTK 2 Mobile Station and the link indicator will blink red and green
alternately, indicating that the D-RTK 2 Mobile Station is being linked.
3. Press the Link button on the aircraft.
4. Wait for a few seconds. The linking is successful when the indicator lights on both the aircraft and
mobile station become solid green.
icon or RTK on top of the screen to go to the RTK
EN
7
Page 9
Operating Mode 5
When using with the M300 RTK, the remote controller must join the broadcast network of the D-RTK 2
Mobile Station.
1. Power on the D-RTK 2 Mobile Station, wait until system initialization is completed, and enter
Operating Mode 5.
EN
2. Power on the remote controller. Go to RTK Settings in the DJI Pilot app, and set the RTK signal
source to D-RTK 2 Mobile Station.
on the right of the D-RTK 2 Mobile Station status display and a search will start automatically.
3. Tap
Select the desired RTK base station in the search results and wait for a successful connection.
Link Indicator Descriptions
When the linking process starts, the indicator blinks red and green alternately.
When the linking process is nished, the indicator blinking patterns are as shown below.
Operating Mode 1/3/4 Status
Solid Green OcuSync signal quality >70%
Quick Green Blink OcuSync signal quality 35%-70%
Slow Green Blink OcuSync signal quality ≤ 35%
Solid Red OcuSync signal quality = 0
Operating Mode 2 Status
Solid Green Network connected
Solid Red Network disconnected
Operating Mode 5 Status
Solid Green Working normally
Activation
Make sure to activate the D-RTK 2 Mobile Station before rst-time use. Activation can be done in the
app or in the DJI ASSISTANTTM 2 software. The following descriptions use the app for example.
Using with Agras or Phantom 4 RTK Aircraft
1. Power on the D-RTK 2 Mobile Station.
2. Power on the remote controller and make sure that the app is launched.
3. In the app, go to RTK Settings to enable the aircraft RTK function. Select the RTK signal source to
D-RTK 2 Mobile Station. When connecting for the rst-time, a prompt for activation will appear. Follow
the on-screen steps for activation.
Using with M300 RTK or M210 RTK V2 Aircraft
Power on the mobile station, and make sure that it is linked to the aircraft or remote controller. Launch
the DJI Pilot app and follow the on-screen steps for activation.
8
Page 10
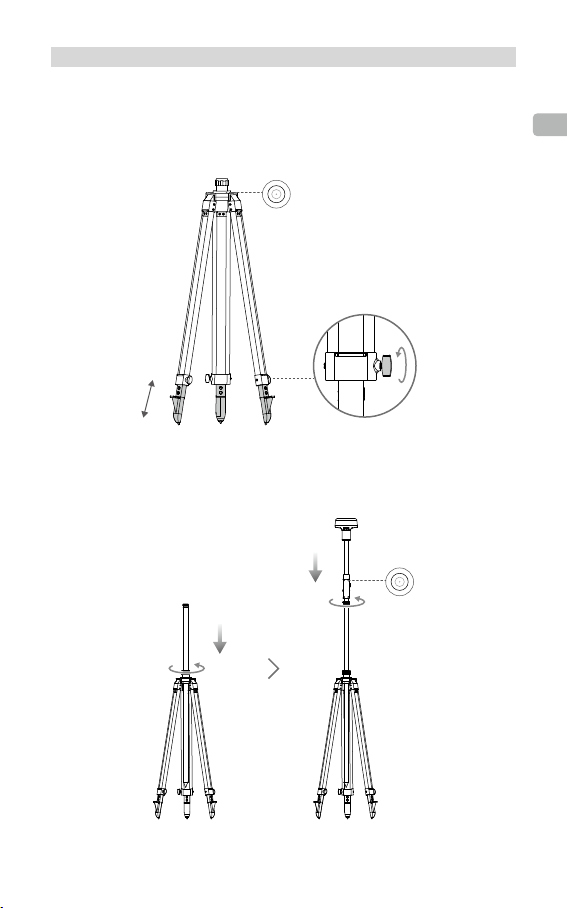
Setup
When used as a mobile base station, choose an open area to set up the D-RTK 2 Mobile Station. Mark
the location and align the center of the tripod with the mark to ensure that the D-RTK 2 Mobile Station
can be replaced at the same location.
1. Unfold the tripod, stretch the three retractable legs to the desired length, and then tighten each of the
three knobs. Ensure that the bubble of the bubble level on the mount base is located within the black
circle (viewed from the top of the bubble level vertically) while keeping the tripod secure.
2. Insert the extension rod into the tripod and tighten the sleeve on the tripod. Then attach the D-RTK 2
body onto the extension rod and tighten the lock nut on the D-RTK 2 body. Ensure that the bubble of
the bubble level on the D-RTK 2 is located within the black circle (viewed from the top of the bubble
level vertically).
EN
9
Page 11

•
DO NOT change the position or angle of the tripod or the D-RTK 2 Mobile Station after the
tripod has been leveled, or else it should be readjusted.
•
The setup environment requires a wild eld of vision. Ensure that there are no obstructions
EN
(trees, buildings) within the zone more than a 15° angel above the horizontal plane of the
D-RTK 2 antenna to prevent the GNSS signals from being absorbed or blocked.
•
The setup location should be at least 200 m away from high-power radio emission sources
(such as television stations, microwave stations, etc.) and at least 50 m away from highvoltage transmission lines to avoid electromagnetic interference to GNSS signals.
•
The setup location should be away from large-area waters or objects that strongly interfere
with satellite signal reception to reduce multipath effects.
Usage
The available operating modes vary depending on the products used with the D-RTK 2 Mobile Station.
Select the corresponding operating mode according to the product in use and follow the instructions
below.
Instructions
Operating Mode 1/4
1. Lift the extension rod in the tripod to adjust the D-RTK 2 Mobile Station to the desired height and
tighten the sleeve.
2. Power on the D-RTK 2 Mobile Station, wait until system initialization is completed, and enter
Operating Mode 1 or 4.
3. Power on the remote controller and aircraft and make sure that the app is launched.
4. In the app, go to RTK Settings to enable aircraft RTK function. Set the RTK signal source to D-RTK 2
Mobile Station and view the Status display to check the connection. When using a P4 Multispectral
aircraft, tap Connect to establish a connection with the base station.
5. Wait for the system to start searching for satellites. Start the motors when the RTK icon displays FIX or
the status of both the aircraft’s orientation and positioning in the status table in RTK settings show FIX.
During ight, if the D-RTK 2 Mobile Station is moved or it is powered off, the aircraft RTK will
switch to GNSS mode and will not enter the RTK FIX status again. Restart the D-RTK 2 Mobile
Station after ight and wait for it to enter the RTK FIX status.
Operating Mode 3
1. Power on the D-RTK 2 Mobile Station, wait until system initialization is completed, and enter
Operating Mode 3.
2. Power on the remote controller and make sure that the app is launched. Check the home screen to
make sure the handheld mapping device is connected.
3. In RTK Settings, select the RTK signal source for the handheld mapping device. Make sure that the
D-RTK 2 Mobile Station used as a handheld mapping device is connected to another D-RTK 2 Mobile
Station used as a base station or a Network RTK server.
4. Set the planning method to handheld RTK for operation planning.
Operating Mode 5
1. Power on the D-RTK 2 Mobile Station, wait until system initialization is completed, and enter
Operating Mode 5.
2. Make sure that the remote controller is connected to the broadcast network of the D-RTK 2 Mobile
Station.
3. Wait for the system to start searching for satellites. Start the motors when the status of both the
aircraft’s orientation and positioning in the status table in RTK settings show FIX.
10
Page 12
Advanced Settings
Operating Mode 1/3/4
1. Go to the bottom of RTK Settings and tap Advanced Settings.
2. The settings vary depending on the product used with the D-RTK 2 Mobile Station. Settings include
managing the list of linked remote controllers and viewing and editing the device name.
3. Input measured coordinates and altitude* to set them to the D-RTK 2 Mobile Station when using as a
base station.
Operating Mode 5
1. Go to the bottom of RTK Settings and tap Advanced Settings. Input the administrator password to
enter conguration.
2. Edit the name of the mobile station and change the password.
3. Input measured coordinates and altitude* to set them to the D-RTK 2 Mobile Station when using as a
base station.
4. The password can be reset by following the instructions below. Press and hold the Link button on the
mobile station for three seconds, and then press the Operating Mode button once. The Operating
Mode Indicator turns from red to green, indicating that the password has been reset successfully.
* If coordinates input into the app are more than 50 m (for Operating Mode 1) or 15 m (for Operating Mode 4 or 5)
away from the actual coordinates of the D-RTK 2 Mobile Station, they will not be imported.
If the D-RTK 2 Mobile Station is restarted after input coordinates are successfully set, these coordinates will be
used only if the difference between the actual coordinates and the set coordinates is less than 5 m. Otherwise, the
actual positioning coordinates will be used.
Appendix
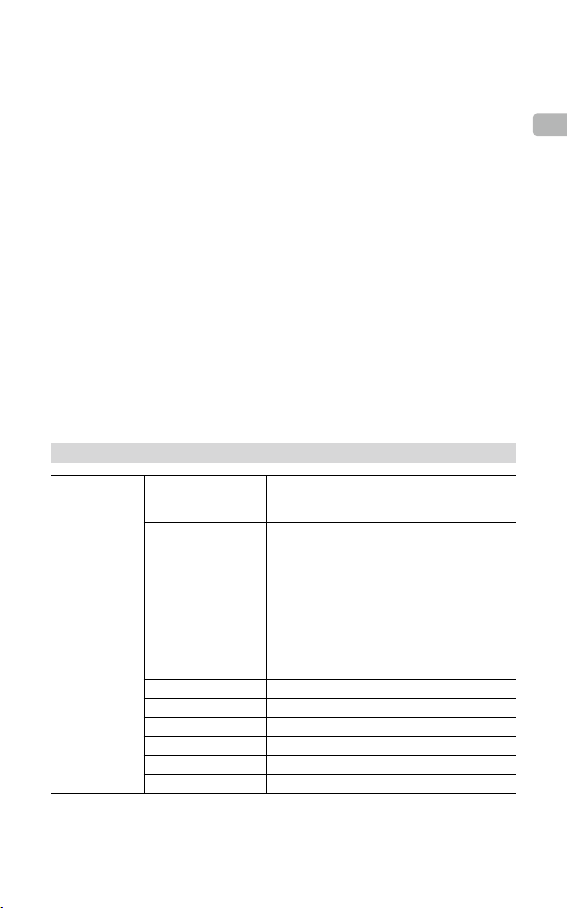
Specications
GNSS Frequency
Positioning Accuracy
GNSS Receiver
Positioning Update Rate 1 Hz, 2 Hz, 5 Hz, 10 Hz and 20 Hz
Cold Start < 45 s
Hot Start < 10 s
Recapture Time < 1 s
Initialization Reliability > 99.9%
Differential Data Format RTCM 2.x/3.x
Simultaneously receive:
GPS: L1, L2, L5; BeiDou: B1, B2, B3
GLONASS: F1, F2; Galileo: E1, E5A, E5B
Single Point
Horizontal: 1.5 m (RMS)
Vertical: 3.0 m (RMS)
RTK
Horizontal: 1 cm + 1 ppm (RMS)
Vertical: 2 cm + 1 ppm (RMS)
1 ppm: For every 1 km increase in distance, the
accuracy will be 1 mm less. For example, the
horizontal accuracy is 1.1 cm when the receiving end
is 1 km away from the base station.
EN
11
Page 13
EN
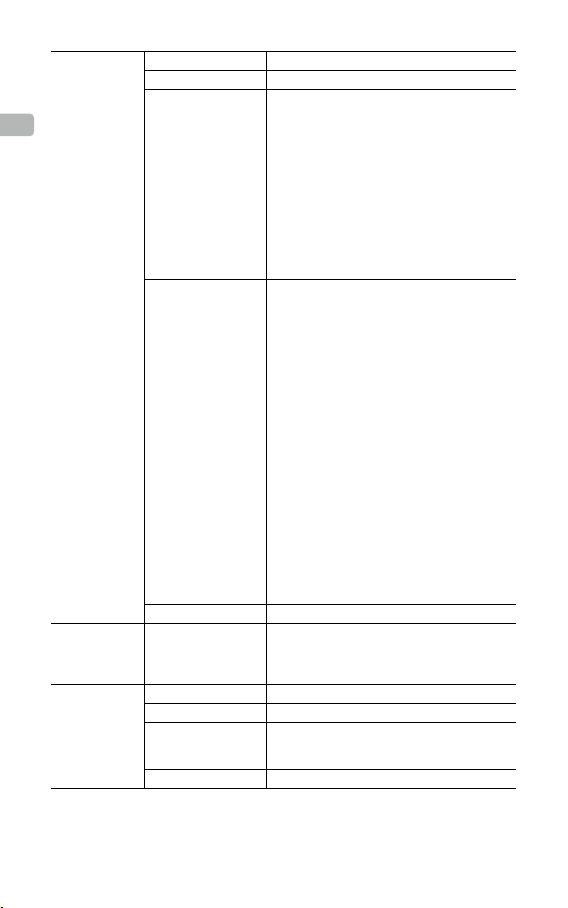
Communication
and Data Storage
IMU Features
Electrical
Characteristics
Data Link OcuSync, LAN, 4G, Wi-Fi
Operating Frequency 2.4000-2.4835 GHz, 5.725-5.850 GHz
EIRP
OcuSync Communication
Distance
Memory Capacity 16 GB
Power Consumption 12 W
Power Supply 16.5 to 58.8VDC
Battery
Run Time WB37 battery: > 2 h
OcuSync
2.4 GHz
SRRC/CE/MIC/KCC: < 20 dBm
FCC/NCC: < 26 dBm
5.8 GHz
SRRC/NCC/FCC: < 26 dBm; CE: < 14 dBm
Wi-Fi
2.4 GHz
SRRC/CE/MIC/KCC: < 20 dBm
FCC/NCC: < 22 dBm
5.8 GHz
SRRC/NCC/FCC: < 22 dBm
Operating Mode 1/3
SRRC/NCC/FCC/MIC/KCC/CE: 2 km
(Unobstructed and free of interference, when the
D-RTK 2 Mobile Station is used as a base station and
the distance from the D-RTK 2 antenna to the bottom
of the tripod is 1.8 m, when the difference in height
between the remote controller and D-RTK 2 is less
than 2 m, and when the remote controller is 1.2 m from
ground level)
Operating Mode 4
Between the aircraft and mobile station:
NCC/FCC: 7 km; SRRC/MIC/KCC/CE: 5 km
Between the remote controller and mobile station: 200 m
(Unobstructed and free of interference at a ying altitude
of about 120 m, when the distance from the D-RTK 2
antenna to the bottom of the tripod is 1.8 m, and when
the remote controller is 1.2 m from ground level)
Operating Mode 5
NCC/FCC: 12 km; SRRC/MIC/KCC/CE: 6 km
(Unobstructed and free of interference, when the
distance from the D-RTK 2 antenna to the bottom of
the tripod is 1.8 m)
Built-in high-precision 6-axis accelerometer
D-RTK 2 movement monitoring
Sloping measurements
Electronic bubble level
Type: Lithium-ion battery
Capacity: 4920 mAh
Energy: 37.3 WH
12
Page 14
Physical
Characteristics
Operating
Temperature
Dimensions (D-RTK 2
body with extension rod)
IP Rating IP65
-4° to 131° F (-20° to 55° C)
168 mm × 168 mm × 1708 mm
Updating the Firmware
Update the D-RTK 2 rmware in the DJI Assistant 2 software or the app*. The following instructions use
the DJI Assistant 2 software for example.
1. Turn on the D-RTK 2 Mobile Station.
2. Connect the D-RTK 2 Mobile Station to the computer via the USB-C cable.
3. Launch DJI Assistant 2 and login with a DJI account.
4. Click D-RTK 2 and then click the rmware update tag.
5. Select the desired rmware version.
6. DJI Assistant 2 will download and update the rmware automatically.
* An app version that supports rmware update is required.
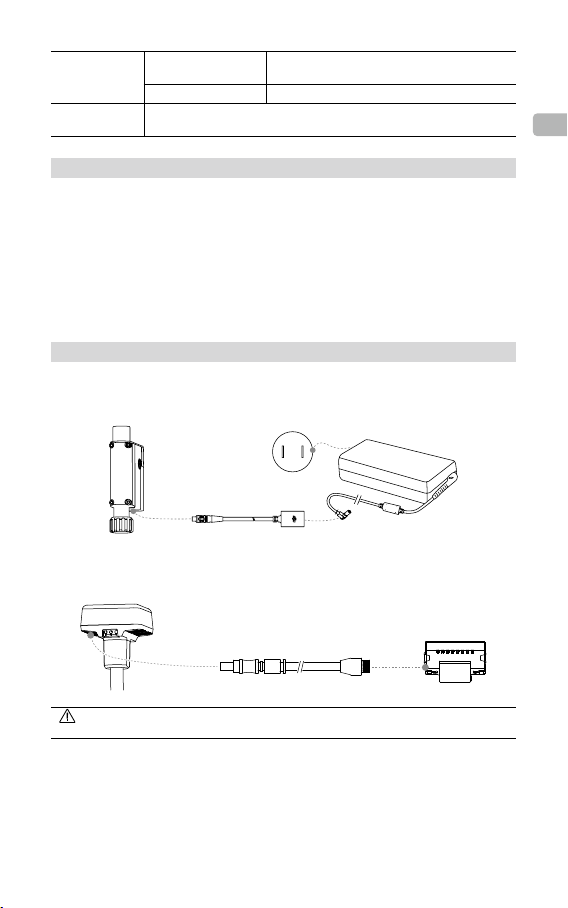
Accessories Usage
Power Adapter Cable
Connect the Power Adapter Cable to the external power port, then connect the Power Adapter to a
power outlet (100-240V, 50/60Hz) with the AC power cable.
LAN Cable
Use the LAN cable to access the public network.
EN
Be sure to comply with local laws and regulations when transmitting satellite positioning
information on a public network.
This content is subject to change.
Download the latest version from
http://www.dji.com/d-rtk-2
13
Page 15

免责声明
感谢您购买 D-RTKTM 2 高精度GNSS 移动站(简称 D-RTK 2 移动站)。在使用之前,请仔细阅
读本声明,一旦使用,即被视为对本声明全部内容的认可和接受。请严格遵守本文安装和使用该
产品,并务必重视注意事项。因用户不当使用、安装、改装(包含但不限于使用非 DJI 指定的零
CHS
配件)造成的任何损失,深圳市大疆
TM
是深圳市大疆创新科技有限公司及其关联公司的商标。本文出现的产品名称、品牌等,均
DJI
为其所属公司的商标或注册商标。本产品及文档为深圳市大疆创新科技有限公司版权所有。未经
许可,不得以任何形式复制翻印。
关于不同语言版本的免责声明可能存在的语义差异,中国以中文版为准,其他地区以英文版为准。
TM
创新科技有限公司及其关联公司将不承担任何责任。
注意事项
1. 为提高电池使用寿命,关闭 D-RTK 2 移动站后,请及时取出其中的智能电池。
2. 根据当地无线电规定,使用对应频段的 D-RTK 2 移动站,并遵守当地无线电法律法规。
3. 安装时切勿过度弯曲和折叠线材。
4. 安装和摆放时,务必确保 D-RTK 2 移动站与水平面相对水平。
5. 在开阔、不受无线电干扰的环境中使用 D-RTK 2移动站。务必在关闭其他同频段的无线设备(如
对讲机等)后再使用。
6. 使用过程中请确保所有设备的天线均不受遮挡。
7. 使用原厂配件或经过 DJI 认证的配件。使用非原厂配件有可能对系统的安全使用造成危险。
8. 确保部件内部没有进入任何异物(如:水、油等液体,沙土等)。
9. 切勿自行拆下出厂时已安装的任何部件。
10. 延长杆底部及三脚架底部较为尖锐,使用时务必小心。
11. 雨雪天气时使用,请对 D-RTK 2 移动站和电池采取必要的防水措施。雷电天气请谨慎使用,
注意防雷。
简 介
D-RTK 2 高精度GNSS 移动站是一款高精度卫星信号接收机,支持GPS、BEIDOU、 GLONASS
和 Galileo 4 系统11 频 * 的卫星信号接收,同时内置OCUSYNC
方便用户在不同应用场景使用。D-RTK 2 移动站可作为 RTK 移动基站,将装备有 DJI RTK 定位
系统的飞行器(如大疆农业植保无人飞机T20、T16、MG-1P RTK,PHANTOM
Multispectral,MATRICE
而且提供强大的抗磁干扰能力,在高压线、金属建筑等强磁干扰的环境下保障可靠的作业飞行。
D-RTK 2 移动站作为手持测绘杆,用于手持测绘、工程放样等其他用途,可实现更加精准的定点
测量。另外,D-RTK 2 移动站还可以作为固定基站,用来快速建立网络 RTK 服务 **。
* 详见规格参数。
** 后续支持;网络 RTK 服务的建设必须符合当地法律法规和资质要求,DJI 仅提供技术服务。
TM
300 RTK、Matrice 210 RTK V2 等)定位精度由米级提升至厘米级,
TM
、LAN、4G 等数据传输链路,
TM
4 RTK,P4
14
Page 16

物品清单
D-RTK 2 主体 延长杆×1 ×1 充电管家 ×1
智能电池(WB37) 电池盖×2 ×1电源适配器 ×1
内六角扳手AC 电源线 ×1 ×1×1USB-C 线 USB-C OTG 线×1
可选配件
LAN 线 三脚架 4G 无线上网卡 电源适配器转接线
CHS
作为移动基站使用时,用于固定 D-RTK 2 主体。
作为固定基站使用时,用于向网络 RTK 服务器传输卫星观测数据。
作为固定基站使用时,连接至交流电源提供长时间供电。
作为固定基站使用时,连接 LAN 线通过有线网络接入到云端服务器。
15
Page 17

CHS
部件说明
D-RTK 2 主体 三脚架
1 2
34
5
11
12
底视图
6
7
8
9
10
1
2
3
4
1. 天线
2. 对频按键及指示灯
3. 电源按键及指示灯
4. 模式按键及指示灯
1. 套筒
2. 基座
3. 伸缩杆
4. 旋钮
5. USB-C 接口
6. 无线上网卡仓
7. 盘齿
8. 电池仓
9. 电池盖
10. 锁定螺母
11. LAN 口 *
12. 外部电源接口 *
* 配备保护盖,接口使用时取下保护盖并保存好;接口未使用时请盖好保护盖以防水防尘。
文中图示可能与实物存在细微差别,请以实物为准。
16
Page 18

准 备
安装无线上网卡
•
务必使用 DJI 认证的无线上网卡(详情咨询 DJI 授权代理商)。否则可能无法安装到
设备上,无法上网或者干扰 OcuSync 通信。
•
用户需自备 SIM 卡,并根据实际使用情况选择合适的流量服务。无线上网卡支持多种
网络制式,根据当地运营商网络的实际情况选择合适的 SIM 卡,以获得最佳体验。
•
按照无线上网卡及 SIM 卡本身的使用说明进行操作。
1. 使用内六角扳手移除无线上网卡仓盖。
2. 无线上网卡中装入 SIM 卡,然后安装到仓内。测试确保工作正常 *。
3. 重新安装无线上网卡仓盖。
* 测试方法:长按电源按键开启 D-RTK 2移动站,按照后文的“连接方法”连接至遥控器或飞行器后,进
入 App 的 RTK 设置页面,在移动站状态显示的右侧,网络信号状态 为三格及以上表示4G 传输信号
良好。
充 电
短按一次电池的电量按键,可查看电池电量。首次使用时,务必将电池充满。
1. 安装电池到充电管家中,再将电源适配器接头插入充电管家的电源接口,最后连接充电器到
交流电源(100-240V,50/60Hz)。
2. 充电过程中,充电管家会优先选择电量较高的电池进行充电。
3. 充电管家绿灯闪烁表示正在充电,绿灯常亮表示充电完毕。电池充满时会有声音提示,拔下
电池或关闭蜂鸣器开关可停止声音提示。
CHS
A
A
参考《 WCH2充电管家使用说明》和《WB37 智能电池安全使用指引》,了解更多内容。
17
Page 19

安装电池
CHS
开启 / 关闭 D-RTK 2 移动站
长按电源按键以开启 / 关闭 D-RTK 2 移动站。
电源按键
电源指示灯说明
红灯常亮 正在初始化 / 错误报警
红灯快闪 电量 <20%
红灯慢闪 接收卫星数量 ≤5 颗
黄灯常亮 接收卫星数量 6-9 颗
绿灯常亮 接收卫星数量 ≥10 颗
选择工作模式
D-RTK 2 移动站共有 5 种工作模式,可配合不同产品使用。按照以下说明进行模式切换。
1. 长按模式按键 2 秒,模式状态指示灯由绿色变为黄色,进入模式修改状态。
2. 短按模式按键切换工作模式,修改后等待 2 秒进入该模式,指示灯由黄色变为绿色。指示灯
周期内循环闪烁的次数表示不同的工作模式,详见下表。
3. 若进入模式修改状态后无操作,则 2 秒后自动退出并维持原模式。
模式 名称及适配产品 闪灯
工作模式 1 移动基站(T20 / T16 / MG-1P RTK / Phantom 4 RTK / P4 Multispectral) 1 次
工作模式 2 固定基站 * 2 次
工作模式 3 手持测绘杆(T20 / T16 / MG-1P RTK / Phantom 4 RTK) 3 次
工作模式 4 移动基站(M210 RTK V2) 4 次
工作模式 5 移动基站(广播模式,M300 RTK) 5 次
* 后续支持。
18
Page 20

使 用
D-RTK 2 移动站配合不同产品使用时,操作方法类似。如无特殊说明,以下内容适用于对应工作模式的所
有适配产品。
连接遥控器或飞行器
连接方法
不同工作模式下的连接方法有所不同,具体操作如下。
工作模式 1
配合大疆农业植保无人飞机及 Phantom 4 RTK 使用
D-RTK 2 移动站需要在 App 中与遥控器对频,下面以大疆农业 App 为例进行说明。
1. 开启 D-RTK 2 移动站电源,等待系统完成初始化,切换到工作模式 1。
2. 打开遥控器,确保显示设备已运行大疆农业 App。
3. 点击“执行作业”进入作业界面,点击
号源为“D-RTK 2 移动站”,然后点击“对频”。遥控器状态指示灯蓝色闪烁,并且发出“滴
滴”提示音,表示进入对频状态。
4. 短按一次 D-RTK 2 移动站上的对频按键,对频状态指示灯红绿交替闪烁表示进入对频状态。
5. 对频成功,遥控器指示灯绿灯常亮,D-RTK 2 移动站指示灯显示当前工作模式下的状态,详
见下表。
6. 遥控器与 D-RTK 2 移动站对频成功后,需要重新与飞行器对频。有以下三种方式:
•
与 D-RTK 2 移动站对频完成后,在弹出的窗口中点击“与飞行器对频”,进入与飞行器对
频的状态,按下飞行器对频按键以完成对频。
•
在“RTK 设置”页面,点击飞行器未连接提示旁边的 按钮,在弹出的窗口中点击“与
飞行器对频”,进入与飞行器对频的状态。
•
在“遥控器设置”页面进行与飞行器的对频。完成对频后,需在“RTK 设置”页面 D-RTK
2 移动站状态处点击“尝试重连”重新连接 D-RTK 2,并确保状态为“连接成功”,否则
将无法使用 RTK 功能。
配合 P4 Multispectral 使用
1. 开启 D-RTK 2 移动站电源,等待系统完成初始化,切换到工作模式 1。
2. 开启遥控器,确保已运行 DJI GS Pro App。
3. 进入 DJI GS Pro 任务界面,点击上方的
作为 RTK 信号源,然后开启菜单底部的飞行器 RTK 开关,否则飞行器将无法使用 RTK 数据。
4. 点击“对频”,遥控器发出“嘀嘀”提示音后按下基站的对频按键。
5. 对频成功,遥控器指示灯绿灯常亮,D-RTK 2 移动站指示灯显示当前工作模式下的状态,详
见下表。
•
当 D-RTK 2 移动站已经连接遥控器且遥控器正在控制飞行器作业时,D-RTK 2 移动站
无法与其他遥控器进行对频,请等待飞行器降落并关闭电机后再进行对频。
•
一个 D-RTK 2 移动站最多可与 5 个遥控器对频。
工作模式 3
D-RTK 2 移动站需要与遥控器对频后,方可使用。
1. 开启 D-RTK 2 移动站电源,等待系统完成初始化,切换到工作模式 3。
2. 开启遥控器,进入App 的“遥控器设置”页面,点击“对频”。遥控器状态指示灯蓝灯闪烁,
并且发出“嘀嘀”提示音,表示进入对频状态。
> RTK,打开“飞行器 RTK 定位”。选择 RTK 信
或 RTK 图标进入 RTK 设置菜单,选择 D-RTK 2
CHS
19
Page 21

3. 短按一次 D-RTK 2 移动站的对频按键,对频状态指示灯红绿交替闪烁表示进入对频状态。
4. 对频成功,遥控器指示灯绿灯常亮,D-RTK 2 移动站指示灯显示当前工作模式下的状态,详
见下表。
工作模式 4
CHS
D-RTK 2 移动站需要与 M210 RTK V2 飞行器对频后,方可使用。
1. 开启 M210 RTK V2 飞行器,并确保已与遥控器对频。
2. 短按一次 D-RTK 2 移动站的对频按键,对频状态指示灯红绿交替闪烁表示进入对频状态。
3. 短按一次飞行器上的对频按键。
4. 等待数秒后,飞行器及移动站的对频状态指示灯均为绿灯常亮,表示对频成功。
工作模式 5
配合 M300 RTK 使用时,需要遥控器加入 D-RTK 2 移动站的广播网络中,方可使用。
1. 开启 D-RTK 2 移动站电源,等待系统完成初始化,切换到工作模式 5。
2. 开启遥控器,进入 DJI Pilot App 的 RTK 设置页面,选择 RTK 信号源为“D-RTK 2 移动站”。
3. 点击 D-RTK 2 移动站状态右侧的
RTK 基站,等待连接成功。
,系统将自动进行搜索,在搜索结果列表中选择所需的
对频状态指示灯说明
进入对频状态时,对频状态指示灯将红绿交替闪烁。
退出对频状态时,对频状态指示灯显示如下:
工作模式 1 / 3 / 4 状态
绿灯常亮 OcuSync 信号质量 >70%
绿灯快闪 OcuSync 信号质量 35%-70%
绿灯慢闪 OcuSync 信号质量 ≤ 35%
红灯常亮 OcuSync 信号质量 =0
工作模式 2 状态
绿灯常亮 网络已连接
红灯常亮 网络未连接
工作模式 5 状态
绿灯常亮 正常工作
激 活
首次使用,需激活 D-RTK 2 移动站。用户可通过 App 或 DJI ASSISTANTTM 2 调参软件完成激活,
下面以 App 为例进行说明。
配合大疆农业植保无人飞机及 Phantom 4 RTK 使用
1. 开启 D-RTK 2 移动站电源。
2. 打开遥控器,确保显示设备已运行 App。
3. 进入 RTK 设置页面,打开“飞行器 RTK 定位”。选择 RTK 信号源为“D-RTK 2 移动站”,
首次连接将会提示激活,请根据弹出的引导进行激活操作。
配合 M300 RTK 及 M210 RTK V2 使用
开启 D-RTK 2 移动站电源,并确保已连接至飞行器或遥控器。运行 DJI Pilot App,按照 App 提
示进行激活操作。
20
Page 22

架设 D-RTK 2 移动站
作为移动基站使用时,选择视野开阔的地点架设 D-RTK 2 移动站并作标记(使三脚架的中心对准
标记点中心),以便 D-RTK 2 移动站被移动后可以准确复位。
1. 撑开三脚架,将三根伸缩杆拉伸至合适长度,然后拧紧旋钮。确保基座上水平仪中的气泡保
持在黑色圆圈内(从水平仪垂直正上方观察),同时确保三脚架稳固。
2. 安装延长杆至三脚架,拧紧三脚架上的套筒。安装D-RTK 2 主体至延长杆,拧紧主体上的
锁定螺母。确保 D-RTK 2 移动站上水平仪中的气泡保持在黑色圆圈内(从水平仪垂直正上
方观察)。
CHS
21
Page 23

•
三脚架调至水平后,请勿改变三脚架或 D-RTK 2 移动站的位置及角度,否则需要重新
调平。
•
移动站的架设环境要求视野开阔,确保 D-RTK 2 移动站天线周围 15°以上没有障碍
物(树木、建筑物),以避免 GNSS 信号被吸收或遮挡。
CHS
•
移动站的架设环境应远离大功率无线电发射源(如电视台、微波站等)至少 200 m,
远离高压输电线至少 50 m,以避免电磁场对 GNSS 信号的干扰。
•
移动站的架设环境附近不应有大面积水域或强烈干扰卫星信号接收的物体,以减弱多
路径效应的影响。
使用 D-RTK 2 移动站
D-RTK 2 移动站配合不同产品使用时,可选择的工作模式有所不同,请根据配合的产品选择工作
模式,按以下说明进行使用。
使用方法
工作模式 1 / 工作模式 4
1. 升起延长杆调整 D-RTK 2 移动站至合适的高度,然后拧紧套筒。
2. 开启 D-RTK 2 移动站电源,等待系统完成初始化,切换到工作模式 1 或工作模式 4。
3. 开启遥控器和飞行器电源,确保已运行 App。
4. 进入“ RTK 设置”页面,打开“飞行器 RTK 定 位 ”,选 取“ D-RTK 2 移动站”作为 RTK 信号源。
查看“状态”项是否为连接成功。若使用 P4 Multispectral 飞行器,点击“连接”,与基站建
立连接。
5. 等待搜星,App 界面上方的RTK 图标显示 FIX 或 RTK 设置页面的状态显示列表中飞行器 RTK
的定向及定位状态均为 FIX,可启动电机起飞。
飞行器飞行过程中,如果移动 D-RTK 2 移动站或关闭电源,则飞行器 RTK 会切换到
GNSS 模式,并且不会再次进入 RTK FIX 状态。需要等待飞行结束后重启电源,才能进
入 RTK FIX 状态。
工作模式 3
1. 开启 D-RTK 2 移动站电源,等待系统完成初始化,切换到工作模式 3。
2. 开启遥控器,确保已运行 App,主界面显示已连接手持 RTK。
3. 在“RTK 设置”页面,选择手持测绘杆所需的 RTK 信号源,确保作为手持测绘杆的 D-RTK 2
移动站与网络 RTK 或另一台作为基站的 D-RTK 2 移动站已建立连接。
4. 选择规划方式为手持 RTK 进行作业规划。
工作模式 5
1. 开启 D-RTK 2 移动站电源,等待系统完成初始化,切换到工作模式 5。
2. 确保遥控器已连接至 D-RTK 2 移动站的广播网络。
3. 等待搜星,在 RTK 设置页面的状态显示列表中,飞行器 RTK 的定向及定位状态均为 FIX,可
启动电机起飞。
22
Page 24

高级设置
工作模式 1 / 3 / 4
1. 在 RTK 设置页面,点击“高级设置”,进入高级设置。
2. 配合不同产品使用时,设置项有所不同,包括管理与移动站对频的遥控器 ID 列表、查看及修
改设备名称等。
3. 当移动站做基站时,可以输入已有坐标,从而使基站的坐标定位为已知的坐标和海拔 *。
工作模式 5
1. 在 RTK 设置页面,点击“高级设置”,输入管理员密码,进入高级设置。
2. 修改移动站名称及管理员密码。
3. 当移动站做基站时,可以输入已有坐标,从而使基站的坐标定位为已知的坐标和海拔 *。
4. 用户还可通过以下操作重置密码:长按移动站的对频按键 3 秒以上,再短按模式按键,模式
状态指示灯由绿灯闪烁变为红灯闪烁,表示密码重置成功。
* 在 App 中输入坐标时,若 D-RTK 2 移动站实际定位坐标与输入坐标距离超过 50 m(工作模式 1)或
15 m(工作模式 4 / 5),则无法写入坐标。
若在成功写入坐标后重启 D-RTK 2 移动站,当实际定位坐标与输入坐标距离在 5 m 内,则使用之前通过
App 写入的坐标。否则,将使用当前定位的坐标。
附 录
规格参数
同时接收:
GPS:L1,L2,L5
卫星接收频点
定位精度
GNSS
接收机
定位更新率 1 Hz,2 Hz,5 Hz,10 Hz 和 20 Hz
冷启动 < 45 s
热启动 < 10 s
重捕获 < 1 s
初始化可靠性 > 99.9%
差分数据传输格式 RTCM 2.X/3.X
BeiDou:B1,B2,B3
GLONASS:F1,F2
Galileo:E1,E5A,E5B
单点
水平:1.5 m(RMS)
垂直:3.0 m(RMS)
RTK
水平:1 cm+1 ppm(RMS)
垂直:2 cm+1 ppm(RMS)
1 ppm:每增加 1 km,精度变差 1 mm。
例如距离基站 1 km,则精度为 1.1 cm。
CHS
23
Page 25

CHS
数据链路 OcuSync, LAN, 4G, Wi-Fi
工作频率 2.4000-2.4835 GHz;5.725-5.850 GHz
OcuSync
2.4 GHz
SRRC/CE/MIC/KCC:< 20 dBm;
FCC/NCC:< 26 dBm
5.8 GHz
等效全向辐射功率
(EIRP)
通信和
数据存储
OcuSync 通信距离
内存容量 16G
惯性测量
功能特性
单元
功耗 12 W
电源 16.5 至 58.8VDC
电气特性
电池
工作时间 WB37 电池:> 2 h
SRRC/NCC/FCC:< 26 dBm;CE:< 14 dBm
Wi-Fi
2.4 GHz
SRRC/CE/MIC/KCC:< 20 dBm;
FCC/NCC:< 22 dBm
5.8 GHz
SRRC/NCC/FCC:< 22 dBm
工作模式 1 / 工作模式 3
SRRC/NCC/FCC/MIC/KCC/CE:2 km
(无干扰、无遮挡;作为移动基站时,D-RTK 2 移动站架设
高度即天线至三脚架末端的高度为 1.8 m,与遥控器的高度
差在 2 m 内,遥控器距地面高度为 1.2 m)
工作模式 4
飞行器与移动站:
NCC/FCC:7 km;SRRC/MIC/KCC/CE:5 km
遥控器与移动站:200 m
(无干扰、无遮挡,飞行高度约 120 m,移动站架设高度即天
线至三脚架末端的高度为 1.8 m,遥控器距地面高度为 1.2 m)
工作模式 5
NCC/FCC:12 km,SRRC/MIC/KCC/CE:6 km
(无干扰、无遮挡,D-RTK 2 移动站架设高度即天线至三脚
架末端的高度为 1.8 m)
内置高精度 6 轴加速度计
D-RTK 2 移动监测
倾斜测量
电子气泡
类型:锂离子电池
容量:4920 mAh
能量:37.3 WH
24
Page 26

物理特性
工作环境
温度
尺寸(D-RTK 2 主
体 + 延长杆)
防尘防水 IP65
-20℃至 55℃
168 mm×168 mm×1708 mm
固件升级
D-RTK 2 移动站可以使用调参软件或 App* 进行固件升级。以下使用 DJI Assistant 2 调参软件对
D-RTK 2 移动站进行升级。
1. 开启 D-RTK 2 移动站电源。
2. 使用 USB-C 线连接 D-RTK 2 移动站的 USB-C 接口至电脑。
3. 启动 DJI Assistant 2 调参软件,使用 DJI 账号登陆并进入主界面。
4. 点击 D-RTK 2,然后点击左边的固件升级选项。
5. 选择并确认需要升级的固件版本。
6. DJI Assistant 2 调参软件将自行下载并升级固件。
* 需配合支持固件升级的 App 版本。
部分配件使用方法
使用电源适配器转接线
将电源适配器转接线一端连接至 D-RTK 2 移动站的外部电源接口,另一端连接至电源适配器,再
使用 AC 电源线连接到交流电源(100-240V,50/60Hz)。
使用 LAN 线
当需要通过网线接入公网时,请使用 LAN 线连接。
CHS
卫星定位信息接入公网时,务必符合当地法律法规要求。
内容如有更新,恕不另行通知。
您可以在 DJI 官方网站查询最新版本
http://www.dji.com/d-rtk-2
25
Page 27

Compliance Information
FCC Compliance Notice
This device complies with Part 15 of the FCC Rules. Operation is subject to the following two conditions: (1) This
device may not cause harmful interference, and (2) This device must accept any interference received, including
interference that may cause undesired operation.
Any changes or modications not expressly approved by the party responsible for compliance could void the user’s
authority to operate the equipment.
This equipment has been tested and found to comply with the limits for a Class B digital device, pursuant to part
15 of the FCC Rules. These limits are designed to provide reasonable protection against harmful interference in a
residential installation. This equipment generates, uses and can radiate radio frequency energy and, if not installed
and used in accordance with the instructions, may cause harmful interference to radio communications. However,
there is no guarantee that interference will not occur in a particular installation. If this equipment does cause harmful
interference to radio or television reception, which can be determined by turning the equipment off and on, the user
is encouraged to try to correct the interference by one or more of the following measures:
— Reorient or relocate the receiving antenna.
— Increase the separation between the equipment and receiver.
— Connect the equipment into an outlet on a circuit different from that to which the receiver is connected.
— Consult the dealer or an experienced radio/TV technician for help.
RF Exposure Information
This equipment complies with FCC radiation exposure limits set forth for an uncontrolled environment. In order to
avoid the possibility of exceeding the FCC radio frequency exposure limits, human proximity to the antenna shall
not be less than 20cm during normal operation.
ISED Warning
This device contains licence-exempt transmitter(s)/receiver(s) that comply with Innovation, Science and Economic
Development Canada’s licence-exempt RSS(s). Operation is subject to the following two conditions: (1)This device
may not cause interference.(2)This device must accept any interference, including interference that may cause
undesired operation of the device.
L’émetteur/récepteur exempt de licence contenu dans le présent appareil est conforme aux CNR d’Innovation,
Sciences et Développement économique Canada applicables aux appareils radio exempts de licence. L’exploitation
est autorisée aux deux conditions suivantes :(1)L’appareil ne doit pas produire de brouillage; (2)L’appareil
doit accepter tout brouillage radioélectrique subi, même si le brouillage est susceptible d’en compromettre le
fonctionnement.
This equipment complies with RSS‐102 radiation exposure limits set forth for an uncontrolled environment. This
equipment should be installed and operated with minimum distance 20cm between the radiator and your body.
This transmitter must not be co-located or operating in conjunction with any other antenna or transmitter.
Cet équipement est conforme aux limites d'exposition aux radiations CNR‐102 établies pour un environnement
non contrôlé. Cet équipement doit être installé et utilisé avec une distance minimale de 20 cm entre le radiateur
et votre corps.
KCC Warning Message
“해당무선설비는 운용 중 전파혼신 가능성이 있으므로 인명안전과 관련된 서비스는 할 수 없습니다 .”
“해당 무선설비는 운용 중 전파혼신 가능성이 있음”
NCC Warning Message
低功率電波輻射性電機管理辦法
第十二條 經型式認證合格之低功率射頻電機,非經許可,公司、商號或使用者均不得擅自變更頻率、加大功率或變更
原設計之特性及功能。
第十四條 低功率射頻電機之使用不得影響飛航安全及干擾合法通信;經發現有干擾現象時,應改善至無干擾時方得繼
續使用。前項合法通信,指依電信法規定作業之無線電通信。低功率射頻電機須忍受合法通信或工業、科學及醫療用
電波輻射性電機設備之干擾。
EU Compliance Statement:
the essential requirements and other relevant provisions of the Directive 2014/53/EU.
A copy of the EU Declaration of Conformity is available online at www.dji.com/euro-compliance
EU contact address: DJI GmbH, Industriestrasse 12, 97618, Niederlauer, Germany
Declaración de cumplimiento UE:
cumple los requisitos básicos y el resto de provisiones relevantes de la Directiva 2014/53/EU.
Hay disponible online una copia de la Declaración de conformidad UE en www.dji.com/euro-compliance
Dirección de contacto de la UE: DJI GmbH, Industriestrasse 12, 97618, Niederlauer, Germany
26
SZ DJI TECHNOLOGY CO., LTD. hereby declares that this device is in compliance with
SZ DJI TECHNOLOGY CO., LTD. por la presente declara que este dispositivo
Page 28

EU-verklaring van overeenstemming:
de essentiële vereisten en andere relevante bepalingen van Richtlijn 2014/53/EU.
De EU-verklaring van overeenstemming is online beschikbaar op www.dji.com/euro-compliance
Contactadres EU: DJI GmbH, Industriestrasse 12, 97618, Niederlauer, Germany
Declaração de conformidade da UE:
este dispositivo está em conformidade com os requisitos essenciais e outras disposições relevantes da Diretiva
2014/53/EU.
Existe uma cópia da Declaração de conformidade da UE disponível online em www.dji.com/euro-compliance
Endereço de contacto na UE: DJI GmbH, Industriestrasse 12, 97618, Niederlauer, Germany
Dichiarazione di conformità UE:
requisiti essenziali e alle altre disposizioni rilevanti della direttiva 2014/53/EU.
Una copia della dichiarazione di conformità UE è disponibile online all'indirizzo Web www.dji.com/euro-compliance
Indirizzo di contatto UE: DJI GmbH, Industriestrasse 12, 97618, Niederlauer, Germany
Déclaration de conformité UE:
conforme aux principales exigences et autres clauses pertinentes de la directive européenne 2014/53/EU.
Une copie de la déclaration de conformité UE est disponible sur le site www.dji.com/euro-compliance
Adresse de contact pour l'UE : DJI GmbH, Industriestrasse 12, 97618, Niederlauer, Germany
EU-Compliance:
und anderen einschlägigen Bestimmungen der EU-Richtlinie 2014/53/EU entspricht.
Eine Kopie der EU-Konformitätserklärung nden Sie online auf www.dji.com/euro-compliance.
Kontaktadresse innerhalb der EU: DJI GmbH, Industriestrasse 12, 97618, Niederlauer, Germany
Декларация за съответствие на ЕС:
основните изисквания и другите приложими разпоредби на Директива 2014/53/ЕС.
Копие от Декларацията за съответствие на ЕС ще намерите онлайн на адрес www.dji.com/euro-compliance
Адрес за контакт за ЕС: DJI GmbH, Industriestrasse 12, 97618, Niederlauer, Германия
Prohlášení o shodě pro EU:
základním požadavkům a dalším příslušným ustanovením směrnice 2014/53/EU.
Kopie prohlášení o shodě pro EU je k dispozici on-line na webu www.dji.com/euro-compliance
Kontaktní adresa v EU: DJI GmbH, Industriestrasse 12, 97618, Niederlauer, Německo
EU-overensstemmelseserklæring:
overensstemmelse med de væsentlige krav og andre relevante bestemmelser i direktiv 2014/53/EU.
Der er en kopi af EU-overensstemmelseserklæringen tilgængelig online på www.dji.com/euro-compliance
EU-kontaktadresse: DJI GmbH, Industriestrasse 12, 97618, Niederlauer, Tyskland
Δήλωση Συμμόρφωσης ΕΕ:
συμμορφώνεται με τις βασικές απαιτήσεις και άλλες σχετικές διατάξεις της Οδηγίας 2014/53/EΕ.
Αντίγραφο της Δήλωσης Συμμόρφωσης ΕΕ διατίθεται ηλεκτρονικά στη διεύθυνση www.dji.com/euro-compliance
Διεύθυνση επικοινωνίας στην ΕΕ: DJI GmbH, Industriestrasse 12, 97618, Niederlauer, Γερμανία
ELi vastavuskinnitus
EL oluliste nõuete ja muude asjakohaste sätetega.
ELi vastavusdeklaratsiooni koopia on kättesaadav veebis aadressil www.dji.com/euro-compliance
Kontaktaadress ELis: DJI GmbH, Industriestrasse 12, 97618, Niederlauer, Saksamaa
Pranešimas dėl atitikties ES reikalavimams
pagrindinius 2014/53/ES direktyvos reikalavimus ir kitas susijusias nuostatas.
ES atitikties deklaracijos kopiją galite rasti adresu www.dji.com/euro-compliance
ES kontaktinis adresas: „DJI GmbH“, Industriestrasse 12, 97618, Niederlauer, Germany (Vokietija)
ES atbilstības paziņojums:
pamatprasībām un pārējiem būtiskiem nosacījumiem.
ES atbilstības deklarācijas kopija pieejama tiešsaistē vietnē www.dji.com/euro-compliance
ES kontaktadrese: DJI GmbH, Industriestrasse 12, 97618, Niederlauer, Vācija
EU:n vaatimustenmukaisuusvakuutus:
2014/53/EU olennaisten vaatimusten ja sen muiden asiaankuuluvien ehtojen mukainen.
Kopio EU:n vaatimustenmukaisuusvakuutuksesta on saatavana verkossa osoitteessa www.dji.com/euro-compliance
Yhteystiedot EU:ssa: DJI GmbH, Industriestrasse 12, 97618, Niederlauer, Germany
RÁITEAS Comhlíonta an AE:
gceanglas riachtanach agus na bhforálacha ábhartha eile sa Treoir 2014/53/AE.
Tá coip de Dhearbhú Comhréireachta an AE ar fáil ar líne ag www.dji.com/euro-compliance
Seoladh teagmhála san AE: DJI GmbH, Industriestrasse 12, 97618, Niederlauer, Germany
Hiermit erklärt SZ DJI TECHNOLOGY CO., LTD., dass dieses Gerät den wesentlichen Anforderungen
Käesolevaga teatab SZ DJI Technology Co., Ltd., et see seade on kooskõlas direktiivi 2014/53/
SZ DJI TECHNOLOGY CO., LTD. verklaart hierbij dat dit apparaat voldoet aan
A SZ DJI TECHNOLOGY CO., LTD. declara, através deste documento, que
SZ DJI TECHNOLOGY CO., LTD. dichiara che il presente dispositivo è conforme ai
Par la présente, SZ DJI TECHNOLOGY CO., LTD déclare que cet appareil est
SZ DJI Technology Co., Ltd. декларира, че това устройство отговаря на
Společnost SZ DJI Technology Co., Ltd. tímto prohlašuje, že tohle zařízení vyhovuje
SZ DJI Technology Co., Ltd. erklærer hermed, at denne enhed er i
Η SZ DJI Technology Co., Ltd. δια του παρόντος δηλώνει ότι η συσκευή αυτή
Bendrovė „SZ DJI Technology Co., Ltd.“ tvirtina, kad šis prietaisas atitinka
SZ DJI Technology Co., Ltd ar šo apliecina, ka šī ierīce atbilst direktīvas 2014/53/ES
SZ DJI Technology Co., Ltd. ilmoittaa täten, että tämä laite on direktiivin
Dearbhaíonn SZ DJI Technology Co., Ltd. leis seo go bhfuil an gléas seo de réir na
27
Page 29

Dikjarazzjoni ta’ Konformità tal-UE:
mar-rekwiżiti essenzjali u ma’ dispożizzjonijiet relevanti oħra tad-Direttiva 2014/53/UE.
Kopja tad-Dikjarazzjoni ta’ Konformità tal-UE hija disponibbli onlajn s-sit www.dji.com/euro-compliance
Indirizz ta’ kuntatt tal-UE: DJI GmbH, Industriestrasse 12, 97618, Niederlauer, il-Ġermanja
Declarația UE de conformitate:
conform cu cerințele esențiale și celelalte prevederi relevante ale Directivei 2014/53/UE.
Un exemplar al Declarației UE de conformitate este disponibil online, la adresa www.dji.com/euro-compliance
Adresa de contact pentru UE: DJI GmbH, Industriestrasse 12, 97618, Niederlauer, Germania
Izjava EU o skladnosti:
drugim ustreznim določbam Direktive 2014/53/EU.
Kopija izjave EU o skladnosti je na voljo na spletu nawww.dji.com/euro-compliance
Kontaktni naslov EU: DJI GmbH, Industriestrasse 12, 97618, Niederlauer, Nemčija
EU Izjava o sukladnosti:
zahtjevima i ostalim relevantnim odredbama Direktive 2014/53/EU.
Kopija EU Izjave o sukladnosti dostupna je na mrežnoj stranici www.dji.com/euro-compliance
Adresa EU kontakta: DJI GmbH, Industriestrasse 12 97618, Niederlauer, Njemačka
Vyhlásenie o zhode EÚ:
požiadavkami a ďalšími relevantnými ustanoveniami smernice 2014/53/EÚ.
Kópia tohto Vyhlásenia o zhode EÚ je k dispozícii online na www.dji.com/euro-compliance
Kontaktná adresa v EÚ: DJI GmbH, Industriestrasse 12, 97618, Niederlauer, Nemecko
Deklaracja zgodności UE:
zgodne z zasadniczymi wymogami i innymi stosownymi postanowieniami dyrektywy 2014/53/UE.
Kopię deklaracji zgodności UE można znaleźć w Internecie na stronie www.dji.com/euro-compliance
Adres do kontaktu w UE: DJI GmbH, Industriestrasse 12, 97618, Niederlauer, Niemcy
EU megfelelőségi nyilatkozat:
EU Irányelv alapvető követelményeinek és más vonatkozó rendelkezéseinek.
Az EU megfelelőségi nyilatkozat másolata elérhető a www.dji.com/euro-compliance oldalon
EU kapcsolati cím: DJI GmbH, Industriestrasse 12, 97618, Niederlauer, Németország
EU-försäkran om efterlevnad:
kraven och andra relevanta bestämmelser i direktivet 2014/53/EU.
En kopia av EU-försäkran om efterlevnad nns att tillgå online på adressen www.dji.com/euro-compliance
Kontaktadress EU: DJI GmbH, Industriestrasse 12, 97618, Niederlauer, Tyskland
Yrlýsing um fylgni við reglur ESB:
kröfum og öðrum viðeigandi ákvæðum tilskipunar 2014/53/ESB.
Nálgast má eintak af ESB-samræmisyrlýsingunni á netinu á www.dji.com/euro-compliance
Heimilisfang ESB-tengiliðar: DJI GmbH, Industriestrasse 12, 97618, Niederlauer, Germany
AB Uygunluk Beyanı:
Direktin diğer ilgili hükümlerine uygun olduğunu beyan eder.
AB Uygunluk Beyanının bir kopyasına www.dji.com/euro-compliance adresinden çevrim içi olarak ulaşılabilir
AB için iletişim adresi: DJI GmbH, Industriestrasse 12, 97618, Niederlauer, Almanya
SZ DJI Technology Co., Ltd. hawnhekk tiddikjara li dan l-apparat huwa konformi
Prin prezenta, SZ DJI Technology Co., Ltd. declară faptul că acest dispozitiv este
Družba SZ DJI Technology Co., Ltd. izjavlja, da ta naprava ustreza osnovnim zahtevam in
Tvrtka SZ DJI Technology Co. Ltd. izjavljuje da je ovaj uređaj izrađen u skladu s osnovnim
SZ DJI Technology Co., Ltd. týmto vyhlasuje, že toto zariadenie je v zhode so základnými
Firma SZ DJI Technology Co., Ltd. niniejszym oświadcza, że przedmiotowe urządzenie jest
A DJI Technology Co., Ltd. ezúton megerősíti, hogy ez az eszköz megfelel a 2014/53/
SZ DJI Technology Co., Ltd. härmed förklarar att denna enhet uppfyller de väsentliga
SZ DJI Technology Co., Ltd. lýsir hér með yr að þetta tæki hlíti mikilvægum
SZ DJI Technology Co., Ltd. bu belge ile bu cihazın temel gerekliliklere ve 2014/53/EU sayılı
CAUTION: RISK OF EXPLOSION IF BATTERY IS REPLACED BY AN INCORRECT TYPE. DISPOSE OF USED
BATTERIES ACCORDING TO THE INSTRUCTIONS
Environmentally friendly disposal
Old electrical appliances must not be disposed of together with the residual waste, but have to be disposed of
separately. The disposal at the communal collecting point via private persons is for free. The owner of old appliances
is responsible to bring the appliances to these collecting points or to similar collection points. With this little personal
effort, you contribute to recycle valuable raw materials and the treatment of toxic substances.
Umweltfreundliche Entsorgung
Elektro-Altgeräte dürfen nicht mit gewöhnlichem Abfall entsorgt werden und müssen separat entsorgt werden. Die
Entsorgung an kommunalen Sammelstellen ist für Privatpersonen kostenlos. Die Eigentümer der Altgeräte sind für den
Transport zu den Sammelstellen verantwortlich. Durch diesen geringen Aufwand können Sie zur Wiederverwertung
von wertvollen Rohmaterialien beitragen und dafür sorgen, dass umweltschädliche und giftige Substanzen
ordnungsgemäß unschädlich gemacht werden.
28
Page 30

Tratamiento de residuos responsable con el medio ambiente
Los aparatos eléctricos viejos no pueden desecharse junto con los residuos orgánicos, sino que deben ser
desechados por separado. Existen puntos limpios donde los ciudadanos pueden dejar estos aparatos gratis. El
propietario de los aparatos viejos es responsable de llevarlos a estos puntos limpios o similares puntos de recogida.
Con este pequeño esfuerzo estás contribuyendo a reciclar valiosas materias primas y al tratamiento de residuos
tóxicos.
Mise au rebut écologique
Les appareils électriques usagés ne doivent pas être éliminés avec les déchets résiduels. Ils doivent être éliminés
séparément. La mise au rebut au point de collecte municipal par l'intermédiaire de particuliers est gratuite. Il incombe
au propriétaire des appareils usagés de les apporter à ces points de collecte ou à des points de collecte similaires.
Avec ce petit effort personnel, vous contribuez au recyclage de matières premières précieuses et au traitement des
substances toxiques.
Smaltimento ecologico
I vecchi dispositivi elettrici non devono essere smaltiti insieme ai rifiuti residui, ma devono essere smaltiti
separatamente. Lo smaltimento da parte di soggetti privati presso i punti di raccolta pubblici è gratis. È responsabilità
del proprietario dei vecchi dispositivi portarli presso tali punti di raccolta o punti di raccolta analoghi. Grazie a questo
piccolo impegno personale contribuirete al riciclo di materie prime preziose e al corretto trattamento di sostanze
tossiche.
Milieuvriendelijk afvoeren
Oude elektrische apparaten mogen niet worden weggegooid samen met het restafval, maar moeten afzonderlijk
worden afgevoerd. Afvoeren via het gemeentelijke inzamelpunt is gratis voor particulieren. De eigenaar van oude
toestellen is verantwoordelijk voor het inleveren van de apparaten op deze of vergelijkbare inzamelpunten. Met deze
kleine persoonlijke inspanning lever je een bijdrage aan de recycling van waardevolle grondstoffen en de verwerking
van giftige stoffen.
Eliminação ecológica
Os aparelhos elétricos antigos não podem ser eliminados juntamente com os materiais residuais. Têm de ser
eliminados separadamente. A eliminação no ponto de recolha público através de entidades particulares é gratuita. É
da responsabilidade do proprietário de aparelhos antigos levá-los a estes pontos de recolha ou a pontos de recolha
semelhantes. Com este pequeno esforço pessoal, contribui para a reciclagem de matérias-primas úteis e para o
tratamento de substâncias tóxicas.
Изхвърляне с оглед опазване на околната среда
Старите електрически уреди не трябва да се изхвърлят заедно с битовите отпадъци, а отделно. Изхвърлянето
в общинския пункт за събиране на отпадъци от частни лица е безплатно. Собственикът на старите уреди е
отговорен за пренасянето на уредите до тези или до подобни събирателни пунктове. С това малко собствено
усилие допринасяте за рециклирането на ценни суровини и за обработката на токсични вещества.
Ekologicky šetrná likvidace
Stará elektrická zařízení nesmějí být likvidována spolu se zbytkovým odpadem, ale musí být likvidována samostatně.
Likvidace na komunálních sběrných místech prostřednictvím soukromých osob je bezplatná. Vlastník starých zařízení
odpovídá za to, že je donese do těchto sběrných míst nebo na obdobná sběrná místa. Tímto můžete přispět k
recyklaci hodnotných surovin a zpracování toxických látek.
Miljøvenlig bortskaelse
Gamle elektriske apparater må ikke bortskaffes sammen med restaffald, men skal bortskaffes separat. Bortskaffelse
på et fælles indsamlingssted er gratis for privatpersoner. Ejere af gamle apparater er ansvarlige for at bringe
apparater hen til disse indsamlingssteder eller til lignende indsamlingssteder. Med denne lille personlige indsats
bidrager du til genanvendelse af værdifulde råvarer og behandlingen af giftige stoffer.
Απόρριψη φιλική προς το περιβάλλον
Οι παλιές ηλεκτρικές συσκευές δεν πρέπει να απορρίπτονται μαζί με τα υπολειμματικά απόβλητα, αλλά ξεχωριστά.
Η απόρριψη στο δημοτικό σημείο συλλογής μέσω ιδιωτών γίνεται χωρίς χρέωση. Ο κάτοχος παλιών συσκευών είναι
υπεύθυνος για τη μεταφορά των συσκευών σε αυτά ή παρόμοια σημεία συλλογής. Μέσω της ατομικής σας προσπάθειας,
συμβάλλετε στην ανακύκλωση πολύτιμων πρώτων υλών και την επεξεργασία των τοξικών ουσιών.
Keskkonnasäästlik kasutuselt kõrvaldamine
Vanu elektriseadmeid ei tohi ära visata koos olmejäätmetega, vaid tuleb koguda ja kasutuselt kõrvaldada eraldi.
Kohaliku omavalitsuse elektroonikaromude kogumispunktis on äraandmine eraisikutele tasuta. Vanade seadmete
sellistesse või sarnastesse kogumispunktidesse toimetamise eest vastutavad seadmete omanikud. Selle väikese
isikliku panusega aitate kaasa väärtusliku toorme ringlussevõtule ja mürgiste ainete töötlemisele.
Utilizavimas nekenkiant aplinkai
Senų elektrinių prietaisų negalima išmesti kartu su buitinėmis atliekomis; juos būtina utilizuoti atskirai. Tokių prietaisų
utilizavimas per komunalinius atliekų surinkimo punktus yra nemokamas. Elektrinių prietaisų savininkai utilizuojamus
prietaisus privalo priduoti į atitinkamus arba analogiškus atliekų surinkimo punktus. Tokiu būdu, įdėdami nedaug
pastangų, prisidėsite prie vertingų medžiagų perdirbimo ir aplinkos apsaugojimo nuo toksinių medžiagų.
Page 31

Videi draudzīga atkritumu likvidēšana
Vecas elektriskās ierīces nedrīkst likvidēt kopā ar pārējiem atkritumiem, bet tās jālikvidē atsevišķi. Privātpersonām
atkritumu likvidēšana komunālajā savākšanas punktā ir bez maksas. Veco ierīču īpašnieks ir atbildīgs par ierīču
nogādāšanu šajos savākšanas punktos vai līdzīgos savākšanas punktos. Ar šīm nelielām personiskajām pūlēm jūs
veicināt vērtīgu izejmateriālu pārstrādi un toksisko vielu apstrādi.
Hävittäminen ympäristöystävällisesti
Vanhoja sähkölaitteita ei saa hävittää kaatopaikkajätteen mukana, vaan ne on hävitettävä erikseen. Kunnalliseen
keräyspisteeseen vieminen on yksityishenkilölle ilmaista. Vanhojen laitteiden omistaja vastaa laitteiden toimittamisesta
kyseisiin keräyspisteisiin tai vastaaviin. Tällä vähäisellä henkilökohtaisella vaivalla edistät omalta osaltasi arvokkaiden
raaka-aineiden kierrätystä ja myrkyllisten aineiden käsittelyä.
Diúscairt neamhdhíobhálach don chomhshaol
Níor cheart seanghléasanna leictreacha a dhiúscairt leis an dramhaíl iarmharach, ach caithfear iad a chur de láimh
astu féin. Tá an diúscairt ag an ionad bailiúcháin pobail ag daoine príobháideacha saor in aisce. Tá freagracht ar
úinéir seanghléasanna na gléasanna a thabhairt chuig na hionaid bhailiúcháin sin nó chuig ionaid bhailiúcháin den
chineál céanna. Le hiarracht bheag phearsanta mar sin, cuidíonn tú le hamhábhair luachmhara a athchúrsáil agus le
substaintí tocsaineacha a chóireáil
Rimi li jirrispetta l-ambjent
L-apparat elettriku qadim ma għandux jintrema imkien ma’ skart residwu, iżda għandu jintrema b’mod separat. Irrimi l-post tal-ġbir komunali minn persuni privati huwa b’xejn. Is-sit ta’ apparat qadim huwa responsabbli biex iġib
l-apparat f’dawn il-postijiet tal-ġbir jew f’postijiet tal-ġbir simili. B’dan l-isforz personali żgħir, inti tikkontribwixxi għarriċiklaġġ ta’ materja prima prezzjuża u għat-trattament ta’ sustanzi tossiċi.
Eliminarea ecologică
Aparatele electrice vechi nu trebuie aruncate odată cu deșeurile reziduale, ci trebuie eliminate separat. Eliminarea
în cadrul punctului de colectare local de către persoane fizice este gratuită. Proprietarii de aparate vechi sunt
responsabili pentru transportul acestora la respectivele puncte de colectare sau la alte puncte de colectare similare.
Prin acest efort personal nesemnificativ, puteți contribui la reciclarea materiilor prime valoroase și la tratarea
substanțelor toxice.
Okolju prijazno odlaganje
Starih električnih aparatov ne smete odvreči skupaj z ostanki odpadkov, temveč ločeno. Odlaganje na komunalnem
zbirnem mestu je za zične osebe brezplačno. Lastnik starih naprav je odgovoren, da jih pripelje do teh ali podobnih
zbirnih mest. S tako malo osebnega truda prispevate k recikliranju dragocenih surovin in obdelavi strupenih snovi.
Ekološko odlaganje
Stari električni uređaji ne smiju se odlagati zajedno s kućnim otpadom, već ih treba odlagati odvojeno. Odlaganje na
komunalnom sabirnom mjestu od strane privatnih osoba je besplatno. Vlasnik starih uređaja dužan je donijeti uređaje
do tih sabirnih mjesta ili sličnih sabirnih mjesta. Ovim malim osobnim naporom doprinosite recikliranju vrijednih
sirovina i pravilnoj obradi otrovnih tvari.
Ekologická likvidácia
Staré elektrospotrebiče sa nesmú likvidovať spolu so zvyškovým odpadom, ale musia sa zlikvidovať samostatne.
Likvidácia v komunálnom zbernom mieste prostredníctvom súkromných osôb je bezplatná. Majiteľ starých spotrebičov
je zodpovedný za prinesenie spotrebičov na tieto zberné miesta alebo na podobné zberné miesta. Týmto malým
osobným úsilím prispievate k recyklovaniu cenných surovín a spracovaniu toxických látok.
Utylizacja przyjazna dla środowiska
Nie można usuwać starych urządzeń elektrycznych wraz z pozostałymi odpadami. Wymagają one oddzielnej
utylizacji. Utylizacja przez osoby prywatne w punkcie zbiórki odpadów komunalnych jest darmowa. Właściciel starych
urządzeń jest odpowiedzialny za dostarczenie ich do takich lub podobnych punktów zbiórki. Zadając sobie tak
niewielki trud, przyczyniasz się do recyklingu cennych surowców i odpowiedniego postępowania z substancjami
toksycznymi.
Környezetbarát hulladékkezelés
A régi elektromos készülékeket nem szabad a nem szelektíven gyűjtött hulladékkal együtt kidobni, hanem
a hulladékkezelésüket elkülönítve kell végezni A közösségi gyűjtőpontokon a magánszemélyek ingyenesen
leadhatják ezeket. A régi készülékek tulajdonosai felelnek azért, hogy e készülékeket ezekre a gyűjtőpontokra,
vagy más gyűjtőpontokra elhozzák. Ezzel a kis személyes erőfeszítéssel Ön is hozzájárul az értékes nyersanyagok
újrahasznosításához és a mérgező anyagok kezeléséhez.
Miljövänlig hantering av avfall
Gamla elektriska apparater får inte kasseras tillsammans med restavfallet utan måste kasseras separat. Kassering på
den lokala insamlingsplatsen för privatpersoner är gratis. Ägaren av gamla apparater ansvarar för att ta apparaterna
till dessa insamlingsplatser eller till liknande insamlingsplatser. Med denna lilla personliga insats bidrar du till
återvinning av värdefulla råvaror och hantering av giftiga ämnen.
30
Page 32

Umhversvæn förgun
Ekki má farga gömlum raftækjum með úrgangsleifum, heldur þarf að farga þeim sérstaklega. Förgun á almennum
söfnunarstöðum er ókeypis fyrir einstaklinga. Eigandi gamalla tækja ber ábyrgð á að koma með tækin á þessa
söfnunarstaði eða á svipaða söfnunarstaði. Með þessu litla persónulega átaki stuðlar þú að endurvinnslu verðmætra
hráefna og meðferð eitrurefna.
Çevre dostu bertaraf
Eski elektrikli cihazlar, diğer atıklarla birlikte bertaraf edilmemeli, ayrıca atılmalıdır. Özel kişiler aracılığıyla genel
toplama noktasına bertaraf işlemi ücretsiz olarak yapılmaktadır. Eski cihazların sahibi, cihazları bu toplama noktalarına
veya benzer toplama noktalarına getirmekten sorumludur. Bu az miktardaki kişisel çabayla, değerli ham maddelerin
geri dönüştürülmesine ve toksik maddelerin işleme alınmasına katkıda bulunmuş olursunuz.
Thailand Warning message
เครื่องโทรคมนาคมและอุปกรณ์นี้ มีความสอดคล้องตามข้อกำาหนดของ กทช.
Mexico Warning message
“La operación de este equipo está sujeta a las siguientes dos condiciones: (1) es posible que este equipo o dispositivo
no cause interferencia perjudicial y (2) este equipo o dispositivo debe aceptar cualquier interferencia, incluyendo la que
pueda causar su operación no deseada.”
Brazil Warning message
Este equipamento opera em caráter secundário, isto é, não tem direito a proteção contra interferência prejudicial,
mesmo de estações do mesmo tipo, e não pode causar interferência a sistemas operando em caráter primário.
部件名称
铅
(Pb)汞(Hg)镉(Cd)
线路板 × ○ ○ ○ ○ ○
外壳 × ○ ○ ○ ○ ○
金属部件
( 铜合金 )
× ○ ○ ○ ○ ○
内部线材 × ○ ○ ○ ○ ○
其他配件 × ○ ○ ○ ○ ○
本表格依据 SJ/T 11364 的规定编制。
○:表示该有害物质在该部件所有均质材料中的含量均在 GB/T 26572 规定的限量要求以下。
×:表示该有害物质至少在该部件的某一均质材料中的含量超出 GB/T 26572 规定的限量要求。
(产品符合欧盟 ROHS 指令环保要求)
有害物质
六价铬
+6
(Cr
多溴联苯
)
(PBB)
多溴二苯醚 (PBDE)
31
Page 33

DJI Support
DJI
技术支持
http://www.dji.com/support
D-RTK is a trademark of DJI.
Copyright © 2020 DJI All Rights Reserved.
D-RTK 是大疆创新的商标。
Copyright © 2020 大疆创新 版权所有
If you have any questions about this document, please contact
DJI by sending a message to
如果您对说明书有任何疑问或建议,请通过以下电子邮箱联系我们:
DocSupport@dji.com
Printed in China.
DocSupport@dji.com
。
.
3GMDTGSM01
 Loading...