

Page 1

CRYSTALSKY
CS785/CS785U/CS550
User Guide
使用说明
使用說明
ユーザーガイド
사용자 가이드
Bedienungsanleitung
Guía de usuario
Guide de l'utilisateur
Guida dell'utente
Gebruiksaanwijzing
Manual do utilizador
Руководство пользователя
2021.04V1.8
Page 2

Contents
EN
User Guide 2
使用说明
CHS
使用說明
CHT
ユーザーガイド
JP
사용자 가이드
KR
Bedienungsanleitung
DE
Guía de usuario
ES
Guide de l’utilisateur
FR
IT
Guida dell’utente
NL
Gebruikershandleiding
PT
Manual do utilizador
RU
Руководство пользователя
Compliance Information 74
32
38
44
50
56
62
68
8
14
20
26
Page 3

Disclaimer
Congratulations on purchasing your new DJITM product. The information in this
document affects your safety and your legal rights and responsibilities. Read this
entire document carefully to ensure proper conguration before use. Failure to read
and follow instructions and warnings in this document may result in serious injury to
yourself or others, damage to your DJI product, or damage to other objects in the
EN
vicinity. This document and all other collateral documents are subject to change at
the sole discretion of DJI. For up-to-date product information, visit http://www.dji.
com and click on the product page for this product.
By using this product, you hereby signify that you have read this disclaimer and
warning carefully and that you understand and agree to abide by the terms and
conditions herein. You agree that you are solely responsible for your own conduct
while using this product, and for any consequences thereof. You agree to use this
product only for purposes that are proper and in accordance with all applicable
laws, rules, and regulations, and all terms, precautions, practices, policies and
guidelines DJI has made and may make available. DJI accepts no liability for
damage, injury or any legal responsibility incurred directly or indirectly from the
use of this product. The user shall observe safe and lawful practices including, but
not limited to, those set forth in this document.
DJI is a trademark of SZ DJI TECHNOLOGY CO., LTD. (abbreviated as “DJI”) and its
afliated companies. Names of products, brands, etc., appearing in this document
are trademarks or registered trademarks of their respective owner companies.
Warning
1. The Charging Hub is only compatible with the DJI specied Charger. DO NOT
attempt to use the Charging Hub with any other battery charger.
2. The Charging Hub is only compatible with the DJI specied Intelligent Battery.
DO NOT attempt to use the Charging Hub with any other battery.
3. Ensure to press the Battery Release Button before remove the battery.
4. DO NOT attempt to touch the metal terminals on the Power Adapter.
5. Clean the metal terminals with a dry, clean cloth if there is any noticeable
buildup of dirt.
Introduction
CrystalSkyTM is designed specifically for aerial photography and can display a
clear image under different lighting conditions with built-in light-sensitive sensor.
Support DJI MAVICTM, OSMOTM series (Osmo Mobile excluded), INSPIRETM series,
PHANTOMTM 4 series, Phantom 3 series (Phantom 3 Professional, Phantom 3
Advanced) and MATRICETM series.* Use the built-in DJI GOTM/DJI GO 4 app to control
the gimbal, camera and other features of your ight system. The app also comes
with a map, a store, and a user center for conguring your aircraft and sharing your
content.
* Support for DJI devices will be added as testing and development continues. Visit the DJI
CrystalSky product page on dji.com for a complete list.
2
Page 4

In the Box
CrystalSky Monitor ×1
Intelligent Battery ×2 (CS785/CS785U) or ×1 (CS550)
Intelligent Battery Charging Hub (WCH2) ×1
CrystalSky User Guide ×1
Intelligent Battery Safety Guidelines ×1
Mounting Bracket (Optional) ×1
Hood (Optional) ×1
* Optional parts can be purchased separately at the ofcial DJI Online Store.
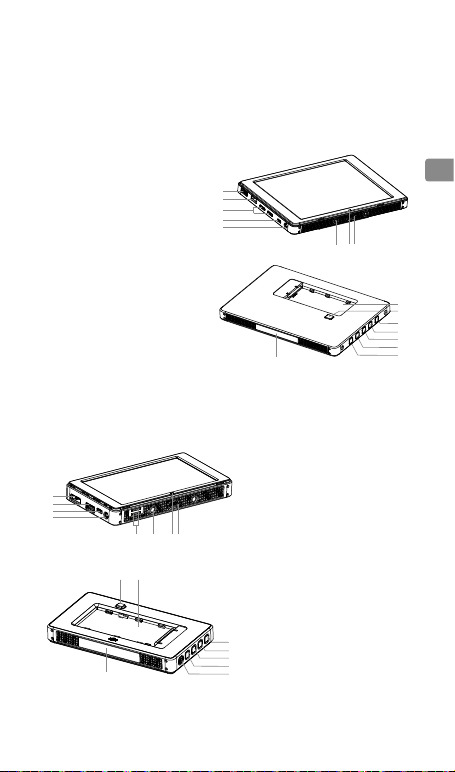
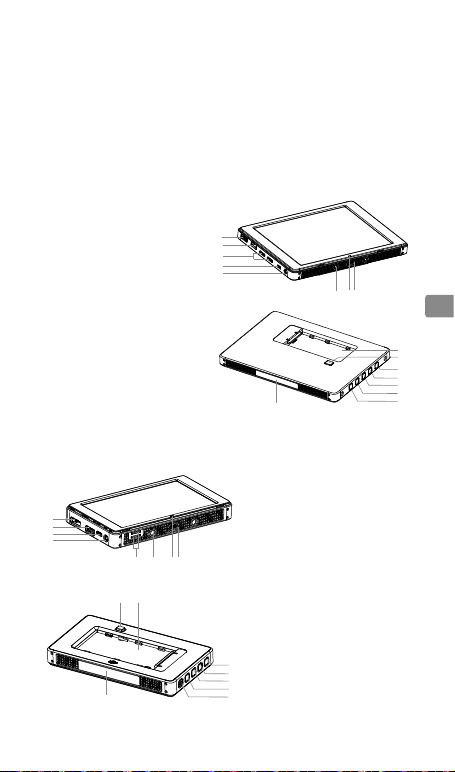
Overview
CrystalSky Monitor
1. HDMI Port
Output HDMI video signal.
2. USB Port
Supported extended device,
e.g. U disk.
3. Micro SD Card Slot
Provides extra storage
space for the display device,
maximum card size is 128 GB.
4. Micro USB Port
Use a Micro USB cable
to connect to the remote
controller when in use, or to the
PC to congure parameters via
DJI ASSISTANT
aircraft rmware, please use
the USB OTG cable.
1
2
5
15
9
TM
2. To update
347 8
6
16
CS550
1
2
3
4
5
9
CS785 (Highlight version) /
CS785U (Ultra-bright version)
5. Headphone Jack
6. Mounting Screw Hole
7. Light-sensitive Port
Built-in light-sensitive sensor.
8. Type-C USB2.0 HS Port
9. Built-in GNSS
10. Power Button
11. Custom Button
12. Setting Button
14
13. Custom Button
13
12
14. Back Button
11
10
15. Battery Release Button
16. Battery Slot
8
6
7
EN
16
15
14
13
12
11
10
3
Page 5

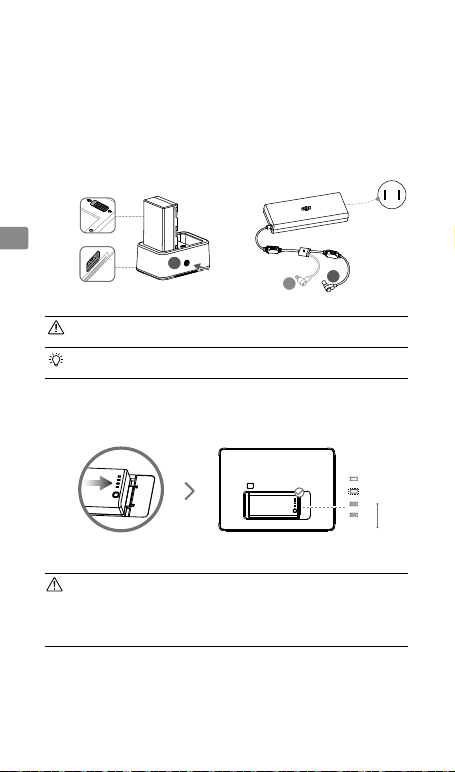
Usage
Charging the Battery
Use the Inspire 2 charger for illustration.*
Place the battery into the standard charging hub, and connect connector B of the
battery charger to the charging hub, then connect the battery charger to a power
outlet (100-240V, 50/60Hz). The Charging Hub will intelligently charge batteries in
EN
sequence according to battery power levels from high to low. The buzzer will begin
beeping when charging is complete. Remove the battery or turn off the Buzzer
Switch to stop it.
The Status LED blinks green when charging and turns solid green when fully
charged.
B
DO NOT charge the Intelligent Flight battery together with the Intelligent
Battery when using the Inspire 2, Phantom 4 charger or Inspire 2 Car
Charger .
•
USB power supply port can be used to charge a mobile device of 5V/2A.
•
Refer to the Charging Hub (WCH2) User Guide for more details.
Mounting the Battery
Put the battery into the Battery Slot, then slide it to the end until you hear a click.
Press the Battery Level Button once to check the battery level.
• Press the Battery Release Button before removing the battery.
• The Intelligent Battery can charge the built-in battery after mounting, which
may reduce the operation time of the Intelligent Battery. The built-in battery
can keep the monitor standby for a short period without the Intelligent Battery,
so you can start the monitor fast once get the Intelligent Battery mounted.
*Use the CrystalSky CS785 for installation illustration.
4
B
A
Low
High
Page 6

Mounting the Monitor
A
B
Ensure that Part B is
unlocked. Install Part
B into Part A.
A
M5
Mount Part A of the
Mounting Bracket’s
to the Monitor.
Lock the
Mounting Bracket.
B
M6
M4
Mount Part B to
the Remote Controller.
Use a coin to adjust the
tightness of the pitch axis.
DO NOT obstruct the built-in GNSS during use.
Connect the Monitor
When using the Mounting Bracket, plug the
connector on the Mounting Bracket to the remote
controller USB port.
When using without the Mounting Bracket, connect the Monitor to the remote
controller via a Micro USB cable.
EN
DO NOT use the Type-C USB 2.0 HS port and Micro USB ports as the Micro
USB port will not work.
5
Page 7

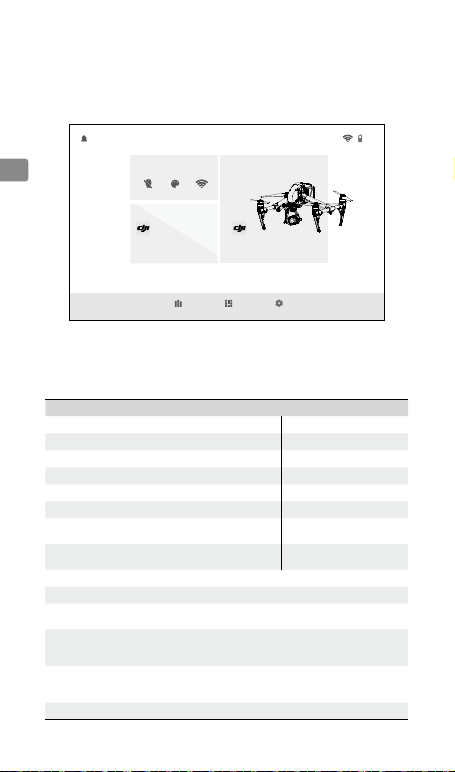
DJI GO/GO 4 App
Press the Power Button until the Monitor powers on, then enter the DJI GO/GO 4 app.
Use the built-in DJI GO/DJI GO 4 app to control the gimbal, camera and other
features of your ight system. The app also comes with a map, a store, and a user
center, for conguring your aircraft and sharing your content.
EN
Quick setting
HDMI
11:30
WED, 8 NOV
SRE Wi-Fi
DJI GO
Connect your DJI device
4.0
DJI GO 4.0
Go Create
ApplicationsExplorer Settings
50%
* This image is for reference only. Please refer to the actual user interface.
Specications
Monitor
Model CS785/ CS785U CS550
Weight Approx. 425 g Approx. 228 g
Dimensions
(without battery)
Dimensions
(with battery)
Touch Screen
Resolution 2048×1536 1920×1080
Brightness
Storage
Built-in App DJI GO, DJI GO 4
Operating System Android 5.1
Ports
Network
EIRP (dBm)
GNSS GPS/GLONASS
Built-in Modules Gyroscope, Compass, Speaker, Light-sensitive Sensor, Microphone
6
208.6×147.8×17 mm 153.76×84.94×19 mm
208.6×147.8×34.75 mm 153.76×84.94×39.6 mm
7.85‘, IPS screen,
supporting multi-point touch
CS785: 1000 cd/m2
CS785U: 2000 cd/m2
CS785: ROM 64GB
CS785U: ROM 128GB
HDMI (Supported 3840×2160 output), Dual SD card slots, USB,
Micro USB, Type-C USB2.0 HS
WIFI frequency band: 2400-2483.5MHz; 5150-5250MHz*;
5725-5850MHz*
Protocol: 802.11b, 802.11g, 802.11n (HT20), 802.11a
Supports 4G dongle
2400-2483.5MHz: CE< 20dBm, FCC<30dBm, SRRC<20dBm;
5150-5250MHz: CE<23dBm, FCC<30dBm;
5725-5850MHz: CE< 14dBm,FCC<30dB, SRRC<30dBm
5.5‘, IPS screen,
supporting multi-point touch
1000 cd/m2
ROM 32GB
Page 8

Built-in Battery 980 mAh, 3.7 V
4K Decoding Capability H.264: 4K30p, H.265: 4K60p
Operating Temperature
Range
Compatible DJI
Products**
Intelligent Battery
Model WB37-4920mAh-7.6V
Capacity 4920 mAh
Voltage 7.6 V
Battery Type LiPo battery
Energy 37.39 Wh
Max Charging Power 55 W
Operating Temperature
Range
Storage Temperature
Charging Temperature 41°to 104° F ( 5° to 40°C)
Net Weight Approx. 170 g
Dimensions 90×45×26 mm
Charging Hub
Model WCH2
Input Voltage 17.3 - 26.2 V
Output Voltage and
Current
Compatible
Battery Charger
Weight 138 g
Operating Temperature 41°to 104° F ( 5° to 40°C)
Charging Time 71 min (Single)
* To comply with local regulations, the operation frequencies of both 5150-5250MHz and
5725-5850MHz are not available in some countries.
** All Mavic and Osmo series products require a Mounting Bracket (purchased separately
from the ofcial DJI Online Store) to be compatible with CrystalSky. Note that only CS550
is compatible with Mavic and Osmo series products..
*** The 57 W battery charger does not supply enough power to charge batteries and other
devices connected to the USB port simultaneously. DO NOT use the USB port to charge
another device when charging batteries.
-4° to 104° F (-20° to 40°C)
Mavic, Osmo series (Osmo Mobile excluded), Inspire, Matrice,
Phantom 3 (Phantom 3 Professional, Phantom 3 Advanced)
and Phantom 4 series
-4° to 104° F (-20° to 40°C)
Less than 3 months: -18.4° to 104° F (-28°C to 45°C)
More than 3 months: 71.6° to 86° F (22°C to 30°C)
8.7 V, 6 A; 5 V, 2 A
Inspire 2 Battery Charger (IN2C180)
Inspire 2 Battery Charger (ADE018)
Inspire 2 Car Charger (C6S90-2)
Inspire 1 Battery Charger (A14-100P1A)
Inspire 1 Battery Charger (ADE018)
Inspire 1 Car Charger (C6S90)
Phantom 4 Series Battery Charger (PH4C100)
Phantom 4 Car Charger (C6S90)
Phantom 3 Professional Battery Charger (ADE019)
Phantom 3 Car Charger (C4S90)
Phantom 3 57W Battery Charger (A14-057N1A) ***
Osmo 57W Battery Charger (A14-057N1A) ***
EN
7
Page 9

免责声明和警告
感谢您购买 DJITM产品。本文所提及的内容关系到您的安全以及合法权益与
责任。使用本产品之前,请仔细阅读本文以确保已对产品进行正确的设置。
不遵循和不按照本文的说明与警告来操作可能会给您和周围的人带来伤害,
损坏本产品或其它周围的物品。本文档及本产品所有相关的文档最终解释
TM
创新(DJI)所有。如有更新,恕不另行通知。请访问 www.dji.
权归大疆
com 官方网站以获取最新的产品信息。
CHS
一旦使用本产品,即视为您已经仔细阅读本免责声明与警告,理解、认可和
接受本声明全部条款和内容。您承诺对使用本产品以及可能带来的后果负全
部责任。您承诺仅出于正当目的使用本产品,并且同意本条款以及大疆创新
(DJI)制定的任何相关条例、政策和指引。大疆创新(DJI)对于直接或间
接使用本产品而造成的损坏、伤害以及任何法律责任不予负责。用户应遵循
包括但不限于本文提及的所有安全指引。
即使存在上述规定,消费者权益依然受当地法律法规所保障,并不受本免责
声明影响。
DJI 是深圳市大疆创新科技有限公司及其关联公司的商标。本文出现的产品
名称、品牌等,均为其所属公司的商标或注册商标。本产品及手册为大疆创
新版权所有。未经许可,不得以任何形式复制翻印。
注意事项
1. 充电管家作为充电接口扩展器,用于对智能电池进行充电。请使用符合
要求的充电器为充电管家供电。
2. 充电管家仅适用于 DJI 指定型号的智能电池充电。请勿使用充电管家为
非指定型号电池充电。
3. 先按下电池移除按键,才能移出电池。
4. 请勿用手或其他物体触碰金属端子。
5. 若金属端子附着异物,请用干布擦拭干净。
简 介
CrystalSkyTM显示屏为航拍设计,在不同光照的环境下能显示清晰的影像。
可支持 DJI MAVIC
PHANTOM
3 Advanced)和 MATRICE
提供飞行与拍摄控制、监控、剪辑和回放等功能,通过触摸显示屏即可轻松
操控。
* 适用的 DJI 设备会持续更新,请访问 DJI CrystalSky 产品页面查看详细列表。
TM
,OSMOTM系列(不含Osmo Mobile),INSPIRETM 系列,
TM
4 系列,Phantom 3 系列(Phantom 3 Professional, Phantom
TM
系列。* 内置 DJI GOTM App / DJI GO 4 App
盒内物品
CrystalSky 显示屏 ×1
智能电池 ×2(CS785/CS785U)或 ×1(CS550)
智能电池充电管家(WCH2)×1
CrystalSky 使用说明 ×1
智能电池安全使用指引 ×1
8
Page 10
普通版安装支架(选配) ×1
遮光罩(选配) ×1
* 本手册所示例的选配件需另行购买,请从 DJI 商城了解更多详细信息。
部件说明
显示屏
1. HDMI 接口
输出 HDMI 视频信号。
2. USB 接口
支持 U 盘等外接设备。
3. Micro SD 卡槽
为 CrystalSky 提供额外的储
存拓展,最大支持 128 GB
Micro SD 卡。
4. Micro USB 接口
可通过 Micro USB 线连接遥
控器使用,或连接PC 通过
DJI Assistant
配置。还可通过USB OTG
线对飞行器进行升级。
TM
2 进行参数
5. 耳机插孔
1
2
3
4
5
9
高亮版 CS785/ 超亮版 CS785U
6
CHS
8
7
16
15
14
13
12
11
10
1
2
5
347 8
6
16
15
6. 螺丝安装孔位
7. 感光口
内置光敏传感器。
8. Type-C USB2.0 HS 接口
9. 内置 GNSS 模块
10. 电源按键
11. 自定义按键
12. 设置按键
13. 自定义按键
14
14. 返回按键
13
12
15. 电池移除按键
11
9
10
16. 电池插槽
CS550
9
Page 11

使 用
充 电
以 Inspire 2 充电器为例进行充电示例 *。
安装电池到充电管家中,再将充电器接头 B 插入充电管家的电源接口,最
后连接充电器到交流电源(100-240V,50/60Hz)。充电过程中,充电管家
会优先选择电量较高的电池进行充电。电池充满时会有声音提示,拔下电池
CHS
或关闭蜂鸣器开关可停止声音提示。
充电管家绿灯闪烁表示正在充电,绿灯常亮表示充电完毕。
B
使用 Inspire 2,Phantom 4 充电器或 Inspire 2 车载充电器时,切勿与
智能飞行电池同时充电。
•
可以使用充电管家的 USB 供电接口为充电要求为 5V/2A 的移动设备
充电。
•
参考充电管家使用说明,了解更多充电管家内容。
B
A
安装电池
安装电池到电池插槽,向右推电池直到听到“咔”一声。
短按一次电量按键,可查看电池电量。
•
先按下电池移除按键,才能移出电池。
•
安装智能电池之后,智能电池可为内置电池充电,这可能会减少智能
电池使用的总时长。在未安装智能电池时,内置电池可为显示屏短
时待机供电,以便在及时安装外部智能电池之后能够快速启动屏幕。
* 安装连线均以 CrystalSky CS785 为例。
10
低
高
Page 12

安装显示屏
B
A
M5
安装支架 A 部件到
显示屏
锁好扣子 使用硬币调节
安装部件 B 到遥控器
俯仰角度松紧度
M6
M4
A
B
打开 B 部件的锁扣,
并安装到 A 中
使用时,切勿阻挡内置 GNSS 模块。
连接显示屏
使用安装支架时,将支架上的连接线接到遥控器的 USB 接口。
如果没有安装支架,则使用遥控器 Micro USB 连接线,连接显示屏的 Micro
USB 接口至遥控器的 USB 接口。
CHS
请勿同时使用Type-C USB2.0 HS 接口和 Micro USB 接口,一旦
Type-C USB2.0 HS 接口正在使用,Micro USB 口将不起作用。
11
Page 13
DJI GO/GO 4 App
长按侧边电源按键,开启设备,进入 DJI GO/GO 4 App 界面。
点击 DJI GO/GO 4 App 来操作飞行器上的云台和相机,控制拍照、录影以
及设置飞行参数,直接分享所拍摄的照片与视频。
CHS
11:30
11月8日 星期三
快捷设置
HDMI
SRE Wi-Fi
DJI GO
Connect your DJI device
4.0
DJI GO 4.0
Go Create
应用程序资源管理器 设置
* 该图仅用于示例,请以实际显示为准。
产品规格
显示屏
型号 CS785/CS785U CS550
重量 约 425 g 约 228 g
尺寸(不含电池) 208.6×147.8×17 mm 153.76×84.94×19 mm
尺寸(含电池) 208.6×147.8×34.75 mm 153.76×84.94×39.6 mm
触摸屏 7.85',IPS 屏幕,支持多点触控 5.5',IPS 屏幕,支持多点触控
分辨率 2048×1536 1920×1080
亮度
存储空间
内置 App DJI GO,DJI GO 4
操作系统 Android 5.1
接口
网络
EIRP(dBm)
GNSS GPS/GLONASS
12
CS785:1000 cd/m2
CS785U:2000 cd/m2
CS785:ROM 64GB
CS785U:ROM 128GB
HDMI(支持 3840×2160 输出),双 SD 卡槽,USB,
Micro USB,Type-C USB2.0 HS
WIFI 频段:2400-2483.5MHz;5150-5250MHz*;5725-5850MHz*
协议:802.11b、802.11g、802.11n (HT20)、802.11a
支持 4G 网卡
2400-2483.5MHz:CE< 20dBm,FCC<30dBm,SRRC<20dBm;
5150-5250MHz:CE<23dBm,FCC<30dBm;
5725-5850MHz:CE< 14dBm,FCC<30dB,SRRC<30dBm
1000 cd/m2
ROM 32GB
50%
Page 14

内置模块 陀螺仪,指南针,扬声器,光敏传感器,麦克风
内置电池 980 mAh,3.7 V
4K 解码能力 H.264:4K30p;H.265:4K60p
工作环境温度 -20℃至 40℃
适用 DJI 产品 **
智能电池
型号 WB37-4920mAh-7.6V
容量 4920 mAh
电压 7.6 V
电池类型 锂离子电池
能量 37.39 Wh
最大充电功率 55 W
工作环境温度 -20℃至 40℃
存放环境温度
充电环境温度 5℃ 至 40℃
电池整体重量 约 170 g
尺寸 90×45×26 mm
充电管家
型号 WCH2
输入电压 17.3 - 26.2 V
输出电压电流 8.7 V,6 A;5 V,2 A
适用充电器型号
重量 138 g
工作环境温度 5℃ 至 40℃
充电时间 71 分钟(单个)
* 部分国家不支持 5150-5250MHz 和 5725-5850MHz 频段,以遵从当地法规。
** Mavic 和 Osmo 仅支持 CS550,并且需要另行购买安装支架,请从 DJI 商城了解更多详
细信息。
*** 57W 充电器充电功率有限,因此,对电池充电时,切勿同时使用 USB 输出口对其它设备
进行充电。
Mavic,Osmo 系列(不含 Osmo Mobile),Inspire,Matrice,
Phantom 3 (Phantom 3 Professional, Phantom 3 Advanced) 和
Phantom 4 系列
存放时间小于 3 个月:28℃至 45℃
存放时间大于 3 个月:22℃至 30℃
Inspire 2 标配充电器 (IN2C180)
Inspire 2 充电器 (ADE018)
Inspire 2 车载充电器 (C6S90-2)
Inspire 1 标配充电器 (A14-100P1A)
Inspire 1 充电器 (ADE018)
Inspire 1 车载充电器 (C6S90)
Phantom 4 标配充电器 (PH4C100)
Phantom 4 车载充电器 (C4S90-4)
Phantom 3 Professional 标配充电器 (ADE019)
Phantom 3 车载充电器 (C4S90)
Phantom 3 57W 充电器 (A14-057N1A)***
Osmo 57W 充电器 (A14-057N1A)***
CHS
13
Page 15

免責聲明和警告
感謝您購買 DJITM 產品。本文所提及的內容關係到您的安全及合法權益與責
任。使用本產品之前,請仔細閱讀本文以確保已對產品進行正確的設定。若
未遵循及未按照本文的說明與警告來操作,可能會對您和周圍的人造成傷害,
損壞本產品或其它鄰近的物品。本文件及本產品所有相關文件的最終解釋權
TM
歸大疆
創新 (DJI) 所有。如有更新,恕不另行通知。請前往 www.dji.com
官方網站以獲取最新的產品資訊。
一旦使用本產品,即視為您已經仔細閱讀本免責聲明與警告,理解、認可和
接受本聲明全部條款和內容。您承諾對使用本產品及可能帶來的後果負全部
CHT
責任。您承諾僅出於正當目的使用本產品,並且同意本條款以及大疆創新
(DJI) 制定的任何相關條例、政策和指南。大疆創新 (DJI) 對於直接或間接
使用本產品而造成的損壞、傷害及任何法律責任概不負責。使用者應遵循包
括但不限於本文提及的所有安全指南。
即使存在上述規定,消費者權益依然受當地法律法規所保障,並不受本免責
聲明影響。
DJI 是深圳市大疆創新科技有限公司及其附屬公司的商標。本文出現的產品
名稱、品牌等,均為其所屬公司的商標或註冊商標。本產品及手冊之版權為
大疆創新所有。未經許可,不得以任何形式複製翻印。
注意事項
1. 充電管家是充電連接埠擴充器,可對智能電池進行充電。請使用符合要
求的充電器為充電管家供電。
2. 充電管家僅適用於為 DJI 指定型號的智能電池充電。請勿使用充電管家
為非指定型號的電池充電。
3. 先按下電池移除按鈕,才能取出電池。
4. 請勿用手或其他物體觸碰金屬端點。
5. 若金屬端點上有異物,請用乾布擦拭乾淨。
簡介
CrystalSkyTM 顯示幕是專為航拍所設計,在不同光照環境下仍能顯示清晰
的影像。可支援 DJI MAVIC
TM
系 列、PHANTOMTM 4 系 列、Phantom 3 系 列(Phantom 3
INSPIRE
Professional、Phantom 3 Advanced)和 MATRICE
TM
應用程式 / DJI GO 4 應用程式,提供飛行與拍攝控制、監控、剪輯和
GO
播放等功能,透過觸摸顯示幕即可輕鬆操控。
* 適用的 DJI 裝置會持續更新,請造訪 DJI CrystalSky 產品頁面查看詳細列表。
TM
,OSMOTM系列(不含Osmo Mobile)、
TM
系 列。* 內建 DJI
包裝內容物
CrystalSky 顯示幕 × 1
智能電池 × 2 (CS785/CS785U) 或 × 1 (CS550)
智能電池充電管家 (WCH2) × 1
CrystalSky 使用說明 × 1
智能電池安全使用指南 × 1
14
Page 16

普通版安裝支架 ( 選配 ) × 1
遮光罩 ( 選配 ) × 1
* 本手冊所列舉的選購配件需另行購買,請從 DJI 商店瞭解更多詳細資料。
零組件說明
顯示幕
1. HDMI 連接埠
輸出 HDMI 影片訊號。
2. USB 連接埠
支援 USB 隨身碟等外接裝置。
3. Micro SD 卡插槽
為 CrystalSky 提供額外的儲存
空間擴充,最高支援 128 GB
Micro SD 卡。
4. Micro USB 連接埠
可透過 Micro USB 線連接遙控
器使用,或連接 PC 通過 DJI
TM
2 進行參數設定。
Assistant
還可透過 USB OTG 線對航拍
機進行升級。
5. 耳機插孔
1
2
3
4
5
高亮度版本 CS785/
超高亮度版本 CS785U
8
6
7
9
CHT
16
15
14
13
12
11
10
1
2
5
347 8
6
16
15
6. 螺絲安裝孔位
7. 感光口
內建光敏感測器。
8. Type-C USB2.0 HS 連接埠
9. 內建 GNSS 模組
10. 電源按鈕
11. 自訂按鈕
12. 設定按鈕
13. 自訂按鈕
14
14. 返回按鈕
13
12
15. 電池移除按鈕
11
10
9
16. 電池插槽
CS550
15
Page 17

使用
充電
以 Inspire 2 充電器為例進行充電示範 *。
安裝電池到充電管家中,再將充電器接頭 B 插入充電管家的電源連接埠,
最後連接充電器到交流電源 (100-240V,50/60Hz)。充電過程中,充電管家
會優先選擇電量較高的電池進行充電。電池充飽時會有聲音提示,拔下電池
或關閉蜂鳴器開關可停止聲音提示。
充電管家綠燈閃爍表示正在充電,綠燈常亮表示充電完畢。
CHT
B
使用 Inspire 2、Phantom 4 充電器或 Inspire 2 車用充電器時,切勿
與智能飛行電池同時充電。
•
可以使用充電管家的 USB 供電連接埠為充電要求為 5V/2A 的行動裝
置充電。
•
參考充電管家使用說明,瞭解更多充電管家內容。
B
A
安裝電池
安裝電池到電池插槽,向右推電池直到聽到「卡嗒」一聲。
短按一次電量按鈕,可查看電池電量。
•
先按下電池移除按鈕,才能取出電池。
•
安裝智能電池之後,智能電池可為內置電池充電,這可能會減少智能
電池使用的總時長。在未安裝智能電池時,內置電池可為顯示器短
時待機供電,以便在及時安裝外部智能電池之後能夠快速啟動畫面。
* 安裝連線均以 CrystalSky CS785 為例。
16
低
高
Page 18

安裝顯示幕
B
M6
A
M5
將支架 A 零組件
安裝到顯示幕
鎖好鎖扣 使用硬幣調整俯仰軸鬆緊度
M4
安裝部件 B 到遙控器
A
B
打開 B 零組件的鎖
扣,並安裝到 A 中
使用時,切勿阻擋內建 GNSS 模組。
連接顯示幕
使用安裝支架時,將支架上的連接線接到遙控器的 USB 連接埠。
如果沒有安裝支架,則使用遙控器 Micro USB 傳輸線,將顯示幕的 Micro
USB 連接埠連接至遙控器的 USB 連接埠。
CHT
請勿同時使用 Type-C USB2.0 HS 連接埠和 Micro USB 連接埠,一旦
Type-C USB2.0 HS 連接埠正在使用,Micro USB 連接埠將無法作用。
17
Page 19

DJI GO/GO 4 應用程式
長按側邊電源按鈕,開啟裝置,進入 DJI GO/GO 4 應用程式介面。
點擊 DJI GO/GO 4 應用程式,來操作航拍機上的雲台和相機,控制拍照、
錄影以及設定飛行參數,直接分享所拍攝的照片與影片。
11:30
WED, 8 NOV
Quick setting
HDMI
SRE Wi-Fi
DJI GO
Connect your DJI device
4.0
DJI GO 4.0
Go Create
ApplicationsExplorer Settings
CHT
* 該圖僅作為範例,請以實際顯示為準。
產品規格
顯示幕
型號 CS785/CS785U CS550
重量 約 425 g 約 228 g
尺寸 (不含電池) 208.6×147.8×17 mm 153.76×84.94×19 mm
尺寸 (含電池) 208.6×147.8×34.75 mm 153.76×84.94×39.6 mm
觸控螢幕 7.85'、IPS 螢幕、支援多點觸控 5.5'、IPS 螢幕、支援多點觸控
解析度 2048×1536 1920×1080
亮度
儲存空間
內建應用程式 DJI GO、DJI GO 4
作業系統 Android 5.1
連接埠
網路
EIRP(dBm)
GNSS GPS/GLONASS
18
CS785:1000 cd/m2
CS785U:2000 cd/m2
CS785:ROM 64GB
CS785U:ROM 128GB
HDMI (支援 3840×2160 輸出)、雙 SD 卡槽、USB、
Micro USB、Type-C USB2.0 HS
WIFI 頻段:2400-2483.5MHz;5150-5250MHz*;5725-5850MHz*
協議:802.11b、802.11g、802.11n (HT20)、802.11a
支援 4G 網卡
2400-2483.5MHz:CE< 20dBm,FCC<30dBm,SRRC<20dBm;
5150-5250MHz:CE<23dBm,FCC<30dBm;
5725-5850MHz:CE< 14dBm,FCC<30dB,SRRC<30dBm
1000 cd/m2
ROM 32GB
50%
Page 20

內建模組 陀螺儀、指南針、揚聲器、光敏感測器、麥克風
內建電池 980 mAh,3.7 V
4K 解碼能力 H.264:4K30p;H.265:4K60p
操作溫度 -20℃ 至 40℃
適用DJI產品**
智能電池
型號 WB37-4920mAh-7.6V
容量 4920 mAh
電壓 7.6 V
電池類型 鋰離子電池
能量 37.39 Wh
最大充電功率 55 W
操作溫度 -20℃ 至 40℃
存放環境溫度
充電環境溫度 5℃ 至 40℃
電池整體重量 約 170 g
尺寸 90×45×26 mm
充電管家
型號 WCH2
輸入電壓 17.3 - 26.2 V
輸出電壓電流 8.7 V,6 A、5 V,2 A
適用充電器型號
重量 138 g
操作溫度 5℃ 至 40℃
充電時間 71 分鐘 (單個)
* 為遵循當地法規,5150-5250MHz 及 5725-5850MHz 兩通信頻率在部分國家無法使用。
** Mavic 和 Osmo 僅支援 CS550,並且需要另行購買安裝支架,請從 DJI 商城瞭解更多詳
細資料。
*** 57W 充電器充電功率有限,因此,對電池充電時,請勿同時使用 USB 輸出連接埠對其它
設備進行充電。
Mavic,Osmo系列(不含Osmo Mobile除外)、Inspire、Matrice、
Phantom 3(Phantom 3 Professional、Phantom 3 Advanced)和
Phantom 4 系列
存放時間小於 3 個月:28℃ 至 45℃
存放時間大於 3 個月:22℃ 至 30℃
Inspire 2 標配充電器 (IN2C180)
Inspire 2 充電器 (ADE018)
Inspire 2 車用充電器 (C6S90-2)
Inspire 1 標配充電器 (A14-100P1A)
Inspire 1 充電器 (ADE018)
Inspire 1 車用充電器 (C6S90)
Phantom 4 標配充電器 (PH4C100)
Phantom 4 車用充電器 (C4S90-4)
Phantom 3 Professional 標配充電器 (ADE019)
Phantom 3 車用充電器 (C4S90)
Phantom 3 57W充電器(A14-057N1A)***
Osmo 57W充電器(A14-057N1A)***
CHT
19
Page 21

免責事項
DJITM の新製品をご購入いただきましてありがとうございます。本書では、ユーザ
ーの安全と法的権利と責任に関する情報を取り扱っています。ご使用の前に、こ
の文書のすべての内容をよくお読み頂き、確実に適切な設定ができるようにして
ください。本書に記載されている指示と警告に従っていただかなかった場合、ご
自身や他の人の重大なけが、または DJI 製品および周辺の他の物の破損につなが
る恐れがあります。この文書およびその他すべての付属書は、DJI 独自の裁量で
変更されることがあります。最新の製品情報については、http://www.dji.com にア
クセスして、本製品に対応する製品ページをクリックしてご覧ください。
本製品を使用することにより、本書の免責事項および警告をよく読み、記載され
JP
ている条件を理解し、順守することに同意したとみなされます。本製品の使用中
の行動とこれに伴う結果には、ユーザーが全面的に責任を負うことに同意するも
のとします。適用されるすべての法、規則および規制を順守して本製品を使用す
るとともに、DJI がこれまでに提供し、今後提供する資料の全条件、安全上の注意、
使用方法、方針およびガイドラインに従うことに同意するものとします。本製品
の使用により直接または間接的に発生する損害、傷害に対して、DJI は一切責任
を負いません。ユーザーは、この文書の規定をはじめとする(ただしこれに限定
しない)、安全で合法的な使用方法を順守するものとします。
DJI は、SZ DJI TECHNOLOGY CO., LTD.(略して「DJI」)およびその関連会社
の商標です。本書に記載されている製品、ブランドなどの名称は、その所有者で
ある各社の商標または登録商標です。
警告
1. 充電ハブは DJI 指定の充電器専用です。この充電ハブを他のバッテリー充電器
に使用しないでください。
2. 充電ハブは DJI 指定のインテリジェントバッテリー専用です。この充電ハブを
他のバッテリーに使用しないでください。
3. 必ずバッテリー解除ボタンを押してから、バッテリーを取り外してください。
4. 電源アダプターの金属端子に触れないでください。
5. 金属端子の汚れが目立つ場合は、乾いたきれいな布で拭いてください。
はじめに
CrystalSkyTMは空撮専用に設計されており、内蔵の光感応センサーにより、照明条
件が異なってもクリアな画像を表示することができます。DJI MAVICTM、OSMO
シリーズ (Osmo Mobile を除く )、INSPIRETMシリーズ、PHANTOMTM 4 シリーズ、
Phantom 3 シリーズ (Phantom 3 Professional, Phantom 3 Advanced)、MATRICE
シリーズに対応しています。* 内蔵の DJI GOTM/ DJI GO 4 アプリを使用して、
フライトシステムのジンバル、カメラ、その他の機能を制御します。このアプリ
には地図、ストア、ユーザーセンターも備わっており、機体を設定したりコンテ
ンツを共有したりできます。
* DJI 機器のサポートサービスは、テストおよび開発の進行中に開始予定です。完全なリス
トは、dji.com の DJI CrystalSky 製品ページでご覧いただけます。
TM
TM
20
Page 22

同梱物
CrystalSky モニター 1 個
インテリジェントバッテリー 2 個(CS785 / CS785U)または 1 個(CS550)
インテリジェントバッテリー充電ハブ(WCH2)1 個
CrystalSky ユーザーガイド 1 冊
インテリジェントバッテリーに関する安全ガイドライン 1 冊
取り付けブラケット(オプション)1 個
フード(オプション)1 個
* オプション部品は、別途 DJI の公式オンラインストアで購入できます。
概観
CrystalSky モニター
1. HDMI ポート
HDMI ビデオ信号を出力します。
2. USB ポート
USB メモリ等の外付けデバイス
に対応しています。
3. Micro SD カードのスロット
ディスプレイ機器用に追加の保存
スペースを用意できます。
最大カードサイズは 128GB。
4. Micro USB ポート
DJI ASSISTANTTM 2 経由でパラメ
ータを設定するには、Micro USB
ケーブルを使用して送信機(使用
している場合)か PC に接続しま
す。機体のファームウェアを更新
するには、USB OTG ケーブルを
使用します。
1
2
3
4
5
9
CS785(ハイライトバージョン)/
CS785U(高輝度バージョン)
8
6
7
JP
16
15
14
13
12
11
10
1
2
5
347 8
6
16
15
9
CS550
5. ヘッドホンジャック
6. 取り付けネジ穴
7. 光感応ポート
内蔵の光感応センサー。
8. Type-C USB2.0 HS ポート
9. 内蔵 GNSS
10. 電源ボタン
11. カスタムボタン
12. 設定ボタン
13. カスタムボタン
14
13
14. 戻るボタン
12
15. バッテリー解除ボタン
11
10
16. バッテリースロット
21
Page 23

使用方法
バッテリーの充電
図では Inspire 2 充電器を使用しています。*
標準充電ハブにバッテリーを置き、バッテリー充電器のコネクター B を充電ハブ
に接続してから、バッテリー充電器を電源コンセント(100-240V、50/60Hz)に
接続します。充電ハブは、バッテリー残量の多いバッテリーから順にインテリジ
ェントに充電します。充電が完了すると、ブザーが鳴り始めます。バッテリーを
取り外すかブザースイッチをオフにしてブザー音を止めます。
充電中はステータス LED が緑色に点滅し、充電が完了すると緑色の点灯に変わり
ます。
JP
B
Inspire 2 充電器、Phantom 4 充電器、Inspire 2 カーチャージャーを使用す
る際、インテリジェント・フライト・バッテリーとインテリジェントバッ
テリーを一緒に充電しないでください。
•
USB 電源ポートを使用して、5V/2A のモバイルデバイスを充電すること
ができます。
•
詳細は、『充電ハブ(WCH2)ユーザーガイド』を参照してください。
バッテリーの取り付け
バッテリースロットにバッテリーを置き、カチッと音がするまで奥にスライドさ
せます。
バッテリーレベルボタンを 1 回押して、バッテリー残量を確認します。
•
バッテリー解除ボタンを押してから、バッテリーを取り外してください。
•
取り付け後、インテリジェントバッテリーは内蔵バッテリーを充電できま
す。しかし、インテリジェントバッテリーの稼働時間は短くなります。イ
ンテリジェントバッテリーを取り付けていない状態でも、内蔵バッテリー
がモニターの待ち受け画面をしばらくの間表示します。そのため、インテ
リジェントバッテリーを取り付ければ、モニターは素早く起動します。
* 取り付け図では CrystalSky CS785 を使用しています。
22
B
A
少
多
Page 24

モニターの搭載
A
B
パーツ B のロックが 解除されて
いることを確認し、パーツ B を
パーツ A に取り付けます
A
M5
取り付けブラケット
のパーツ A を モニタ
ーに取り付けます
取り付けブラケットを ロ
ックします
B
M6
M4
パート B を送信機に取り
付けます
硬貨などを使ってピッチ軸の
締め付け具合を調整します
使用中、内蔵 GNSS を塞がないでください。
モニターの接続
取り付けブラケットを使用する際は、取り付けブラ
ケットのコネクターを送信機の USB ポートに接続し
ます。
取り付けブラケットなしで使用する際は、Micro USB ケーブルでモニターを送信
機に接続します。
JP
Type-C USB 2.0 HS ポートと Micro USB ポートを同時に使用しないでくだ
さい。その場合 Micro USB ポートが機能しません。
23
Page 25

DJI GO / GO 4 アプリ
モニターの電源がオンになるまで電源ボタンを押し、DJI GO /GO 4 アプリに進
みます。
内蔵の DJI GO / DJI GO 4 アプリを使用して、フライトシステムのジンバル、カ
メラ、その他の機能を制御します。このアプリには地図、ストア、ユーザーセン
ターも備わっており、機体を設定したりコンテンツを共有したりできます。
Quick setting
HDMI
JP
11:30
WED, 8 NOV
SRE Wi-Fi
DJI GO
Connect your DJI device
4.0
DJI GO 4.0
Go Create
ApplicationsExplorer Settings
* 画像は参考用のものです。実際のユーザーインターフェースをご確認ください。
仕様
モニター
モデル CS785 / CS785U CS550
重量 約 425g 約 228g
寸法(バッテリーを含
まない)
寸法(バッテリーを含
む)
タッチスクリーン
解像度 2,048 × 1,536 1,920× 1,080
輝度
保管
内蔵アプリ DJI GO、DJI GO 4
オペレーティング
システム
ポート
ネットワーク
EIRP(dBm)
GNSS GPS / GLONASS
24
208.6 × 147.8 × 17mm 153.76 × 84.94 × 19mm
208.6 × 147.8 × 34.75mm 153.76 × 84.94 × 39.6mm
7.85 インチ、IPS スクリーン、
マルチポイントタッチに対応
CS785:1,000cd/m2
CS785U:2,000cd/m2
CS785:ROM 64GB
CS785U:ROM 128GB
5.5 インチ、IPS スクリーン、
マルチポイントタッチに対応
1,000cd/m2
ROM 32GB
Android 5.1
HDMI(3,840× 2,160出力対応)、デュアル SD カードスロット、
USB、Micro USB、Type-C USB2.0 HS
WiFi 周波数帯:2400-2483.5MHz、5150-5250MHz*、
プロトコル:802.11b、802.11g、802.11n (HT20)、802.11a
4G モジュール対応
2400-2483.5MHz: CE< 20dBm, FCC<30dBm, SRRC<20dBm
5150-5250MHz: CE<23dBm, FCC<30dBm
5725-5850MHz: CE< 14dBm, FCC<30dB, SRRC<30dBm
5725-5850MHz*
50%
Page 26

内蔵モジュール
内蔵バッテリー 98mAh、3.7V
4K 復号性能 H.264:4K30p、H.265:4K60p
動作環境温度 -20 〜 40℃
互換性のある
DJI 製品 **
インテリジェントバッテリー
モデル WB37-4,920mAh-7.6V
容量 4,920mAh
電圧 7.6V
バッテリータイプ LiPo バッテリー
電力量 37.39Wh
最大充電電力 55W
動作環境温度 -20℃〜 40℃
保管環境温度
充電温度 41º F 〜 104º F(5℃〜 40℃)
正味重量 約 170g
寸法 90 × 45 × 26mm
充電ハブ
モデル WCH2
入力電圧 17.3 - 26.2V
出力電圧と電流 8.7V, 6A、5V, 2A
互換性のある
バッテリー充電器
重量 138g
動作環境温度 41º F 〜 104º F(5℃〜 40℃)
充電時間 71 分(シングル)
* 現地の法律や規制に準拠するため、5150-5250MHz および 5725-5850MHz の動作周波数
は国によってはご利用できません。
** CrystalSky を、Mavic および Osmo シリーズのすべての製品で使用するには、取り付け
ブラケット(DJI 公式オンラインストアで別売)が必要です。また、Mavicおよび Osmo
シリーズの製品に対応しているのは、CS550 のみです。ご注意ください。
*** USB ポートにバッテリーやその他のデバイスを同時に接続していると、57W バッテリ
ー充電器から充電のための十分な電力が供給されません。バッテリーを充電するときは、
USB ポートで他のデバイスを充電しないでください。
ジャイロスコープ、コンパス、スピーカー、光感応センサー、マ
イク
Mavic、Osmo シリーズ (Osmo Mobile を除く )、Inspire、
Matrice、Phantom 3 (Phantom 3 Professional、Phantom 3
Advanced)、Phantom 4 シリーズ
3 ヵ月以内:-28℃〜 45℃
3 ヵ月超:22℃〜 30℃
Inspire 2 充電器(IN2C180)
Inspire 2 充電器(ADE018)
Inspire 2 車載充電器(C6S90-2)
Inspire 1 充電器(A14-100P1A)
Inspire 1 充電器(ADE018)
Inspire 1 車載充電器(C6S90)
Phantom 4 シリーズ充電器(PH4C100)
Phantom 4 車載充電器(C4S90-4)
Phantom 3 Professional 充電器(ADE019)
Phantom 3 車載充電器(C4S90)
Phantom 3 57W 充電器 (A14-057N1A)***
Osmo 57W 充電器 (A14-057N1A)***
JP
25
Page 27

고지 사항
DJITM 신제품을 구매해주셔서 감사합니다. 본 문서의 정보는 사용자의 안전은 물론 법적 권리 및
책임에 영향을 미칩니다. 제품을 사용하기 전에 전체 문서를 주의 깊게 읽고 구성이 올바른지 확
인하십시오. 본 문서의 지침 및 경고 사항을 읽고 따르지 않으면 자신 또는 다른 사람이 심각한
부상을 입거나 DJI 제품 또는 근처에 있는 다른 물체가 손상될 수 있습니다. 이 문서 및 기타 모든
부수 문서는 DJI의 단독 재량에 따라 변경될 수 있습니다. 최신 제품 정보를 확인하려면 http://
www.dji.com 을 방문하여 본 제품에 대한 제품 페이지를 클릭하십시오.
제품을 사용하는 것은 본 문서의 고지 사항 및 경고를 주의 깊게 읽었으며 명시된 이용 약관을
이해하고 준수하는 것에 동의한 것으로 간주됩니다. 본 제품 사용 시 귀하의 행위와 그에 따른 결
과에 대한 책임은 전적으로 본인에게 있다는 것에 동의합니다. 또한 적용 가능한 모든 법규, 규칙
은 물론 DJI에서 제정하고 제공하는 모든 이용 약관, 예방책, 사례, 정책 및 지침에 따라 적절한
목적으로 본 제품을 사용하는 것에 동의합니다. DJI는 본 제품 사용으로 인해 직접 또는 간접적
KR
으로 발생한 피해, 부상 또는 모든 법적 책임에 대해 어떠한 책임도 지지 않습니다. 사용자는 이
문서에 명시된 내용을 포함하여(단, 이에 국한되지 않음) 안전하고 적법한 사례를 준수해야 합니
다.
DJI는 SZ DJI TECHNOLOGY CO., LTD. (약어로 “DJI”)와 해당 자회사의 상표입니다. 이 문서에
표시된 제품 이름, 브랜드 이름 등은 해당 소유자의 상표 또는 등록 상표입니다.
경고
1. 충전 허브는 DJI 지정 충전기와만 호환됩니다. 다른 배터리 충전기와 충전 허브를 사용하지
마십시오.
2. 충전 허브는 DJI 지정 인텔리전트 배터리와만 호환됩니다. 다른 배터리에는 본 충전 허브를
사용하지 마십시오.
3. 배터리를 제거하기 전에 배터리 분리 버튼을 누르십시오.
4. 전원 어댑터의 금속 단자에 접촉하지 마십시오.
5. 눈에 띄는 먼지 축적물이 있으면 깨끗하고 마른 천으로 금속 단자를 닦으십시오.
소개
CrystalSkyTM는 항공 사진 촬영을 위해 특별히 설계되었으며 내장된 광감지 센서를 통해 다른
조명 조건에서도 선명한 이미지를 표시할 수 있습니다. DJI MAVICTM, OSMOTM 시리즈 (Osmo
Mobile 제외), INSPIRETM 시리즈, PHANTOMTM 4 시리즈. Phantom 3 시리즈 (Phantom 3
Professional, Phantom 3 Advanced) 및 MATRICETM 시리즈를 지원합니다.* 내장된 DJI GOTM/
DJI GO 4 앱을 사용하여 짐벌, 카메라 및 기타 비행 시스템 기능을 제어할 수 있습니다. 또한 앱에
포함된 지도, 스토어, 사용자 센터를 통해 자신의 기체를 구성하고 콘텐츠를 공유할 수 있습니다.
* DJI 기기에 대한 지원은 테스트 및 개발 진행 상황에 따라 추가될 것입니다. 전체 목록을 확인하려면 dji.
com의 DJI CrystalSky 제품 페이지를 방문하십시오.
구성품 설명서
CrystalSky 모니터 ×1
인텔리전트 배터리 ×2(CS785/CS785U) 또는 ×1(CS550)
인텔리전트 배터리 충전 허브(WCH2) ×1
CrystalSky 사용자 가이드 ×1
인텔리전트 배터리 안전 가이드 ×1
마운팅 브라켓(선택 사항) ×1
26
Page 28

후드(선택 사항) ×1
* 선택 사항으로 제공되는 부품은 공식 DJI Online Store에서 별도로 구매할 수 있습니다.
개요
CrystalSky 모니터
1. HDMI 포트
HDMI 동영상 신호를 출력합니다 .
2. USB 포트
확장 장치 지원 ( 예 : U 디스크 )
3. Micro SD 카드 슬롯
디스플레이 장치를 위해 추가 저장
공간을 제공하며 최대 카드 크기는
128GB 입니다 .
4. Micro USB 포트
Micro USB 케이블을 사용하여 사용
중인 조종기에 연결하거나 , 또는 PC
에 연결하여 DJI ASSISTANT
통해 매개 변수를 구성합니다 . 기체
펌웨어를 업데이트하려면 USB OTG
케이블을 사용하십시오 .
5. 헤드폰 잭
1
2
3
4
5
8
6
7
TM
2 를
9
CS785( 하이라이트 버전 )/
CS785U( 초고휘도 버전 )
KR
16
15
14
13
12
11
10
1
2
5
347 8
6
16
15
9
6. 장착 나사 구멍
7. 광감지 포트
내장형 광감지 센서입니다 .
8. Type-C USB2.0 HS 포트
9. 내장 GNSS
10. 전원 버튼
11. 사용자 정의 버튼
12. 설정 버튼
13. 사용자 정의 버튼
14. 뒤로 버튼
14
15. 배터리 분리 버튼
13
16. 배터리 슬롯
12
11
10
CS550
27
Page 29
사용
배터리 충전
그림은 Inspire 2 충전기를 기준으로 합니다 .*
배터리를 표준 충전 허브에 장착하고 , 배터리 충전기의 커넥터 B 를 충전 허브에 연결한 후 배터
리 충전기를 전원 콘센트 (100~240V, 50/60Hz) 에 연결합니다. 충전 허브는 전력 수준이 높은
배터리부터 낮은 배터리 순으로 지능적으로 배터리를 충전합니다 . 충전이 완료되면 버저에서
신호음을 내기 시작합니다 . 배터리를 꺼내거나 버저 스위치를 꺼서 중단시킵니다 .
충전 중에는 상태 LED 가 녹색으로 깜박이며 완전히 충전되면 녹색으로 일정하게 켜집니다 .
KR
B
Inspire 2, Phantom 4 충전기 또는 Inspire 2 차량용 충전기를 사용할 경우에는 인텔리
전트 플라이트 배터리를 인텔리전트 배터리와 함께 충전하지 마십시오 .
•
5V/2A 의 모바일 장치를 충전하는 데 USB 전원 공급 포트를 사용할 수 있습니다 .
•
자세한 내용은 충전 허브 (WCH2) 사용자 가이드를 참조하십시오 .
배터리 장착
배터리를 배터리 슬롯에 놓고 딸깍 소리가 날 때까지 끝까지 밀어 넣습니다 .
배터리 수준 버튼을 한 번 눌러 배터리 수준을 확인합니다 .
•
배터리를 제거하기 전에 배터리 분리 버튼을 누르십시오 .
•
장착된 인텔리전트 배터리는 내장 배터리를 충전할 수 있습니다 . 이 경우 , 인텔리전
트 배터리의 사용 시간이 줄어들 수 있습니다 . 인텔리전트 배터리 없이도 내장 배터리
를 사용해 모니터를 잠시 대기시키는 것이 가능합니다 . 덕분에 인텔리전트 배터리를
새로 교체할 경우 , 더욱 신속하게 모니터를 사용할 수 있습니다 .
* 설치 그림은 CrystalSky CS785 를 기준으로 합니다 .
28
B
A
낮음
높음
Page 30

모니터 장착
A
B
B 부분이 잠금 해제되어
있는지 확인하고 B 부분을 A 부분
에 설치합니다 .
A
M5
마운팅 브라켓의
A 부분을 모니터에
장착합니다 .
마운팅 브라켓을
잠급니다 .
B
M6
M4
조종기에 파트 B 를 장착합니다 .
동전을 사용해 피치 축을
고정합니다 .
사용 중에는 내장 GNSS 를 가리지 마십시오 .
모니터 연결
마운팅 브라켓을 사용할 경우에는 마운팅 브라켓의 커넥터를
조종기 USB 포트에 연결합니다 .
마운팅 브라켓 없이 사용할 경우에는 모니터를 Micro USB 케이블을 통해 조종기에 연결합니다 .
KR
Type-C USB 2.0 HS 포트 및 Micro USB 포트를 동시에 사용하지 마십시오 . 동시에 사
용할 경우 Micro USB 포트에서는 작동하지 않습니다 .
29
Page 31

DJI GO/GO 4 앱
모니터가 켜질 때까지 전원 버튼을 누르고 DJI GO/GO 4 앱을 실행합니다 .
내장된 DJI GO/DJI GO 4 앱을 사용하여 짐벌 , 카메라 및 기타 비행 시스템 기능을 제어할 수 있
습니다 . 또한 앱에 포함된 지도 , 스토어 , 사용자 센터를 통해 자신의 기체를 구성하고 콘텐츠를
공유할 수 있습니다 .
Quick setting
HDMI
11:30
KR
WED, 8 NOV
SRE Wi-Fi
DJI GO
Connect your DJI device
4.0
DJI GO 4.0
Go Create
ApplicationsExplorer Settings
*이 이미지는 참조용으로만 사용해야 합니다. 실제 사용자 인터페이스를 참조하십시오.
사양
모니터
모델 CS785/CS785U CS550
무게 약 425g 약 228g
크기 ( 배터리 제외 ) 208.6 × 147.8 × 17mm 153.76 × 84.94× 19mm
크기 ( 배터리 포함 ) 208.6 × 147.8 × 34.75mm 153.76 × 84.94 × 39.6mm
터치 스크린
해상도 2048 × 1536 1920 × 1080
밝기
저장 장치
내장 앱 DJI GO, DJI GO 4
운영 체제 Android 5.1
포트
네트워크
EIRP (dBm)
30
7.85‘, IPS 스크린 ,
다중 지점 터치 지원
CS785: 1000cd/m2
CS785U: 2000cd/m2
CS785: ROM 64GB
CS785U: ROM 128GB
HDMI(3840 × 2160 출력 지원 ), 듀얼 SD 카드 슬롯, USB, Micro USB,
Type-C USB2.0 HS
WIFI 주파수 대역 : 2400-2483.5MHz, 5150-5250MHz*, 5725-5850MHz*
프로토콜 : 802.11b, 802.11g, 802.11n(HT20), 802.11a
4G 모듈 지원
2400-2483.5MHz: CE< 20dBm, FCC<30dBm, SRRC<20dBm
5150-5250MHz: CE<23dBm, FCC<30dBm
5725-5850MHz: CE< 14dBm, FCC<30dB, SRRC<30dBm
5.5‘, IPS 스크린 ,
다중 지점 터치 지원
1000cd/m2
ROM 32GB
50%
Page 32

GNSS GPS/GLONASS
내장 모듈 자이로스코프 , 콤파스 , 스피커 , 광감지 센서 , 마이크
내장 배터리 980mAh, 3.7V
4K 디코딩 기능 H.264: 4K 30p, H.265: 4K 60p
작동 온도 범위 -20° ~40° C(-4° ~104° F)
호환 DJI 제품 **
인텔리전트 배터리
모델 WB37-4920mAh-7.6V
용량 4920mAh
전압 7.6V
배터리 유형 LiPo 배터리
에너지 37.39Wh
최대 충전 전력 55W
작동 온도 범위 -20° ~40° C(-4° ~104° F)
보관 온도
충전 온도 5° ~40° C(41° ~104° F)
순중량 약 170g
크기 90 × 45 × 26mm
충전 허브
모델 WCH2
입력 전압 17.3~26.2V
출력 전압 및 전류 6A 에서 8.7V, 2A 에서 5V
호환 가능 배터리 충전기
무게 138g
작동 온도 5° ~40° C(41° ~104° F)
충전 시간 71분(1회)
* 현지 규정에 따라 , 일부 국가에서는 5150-5250MHz 와 5725-5850MHz 작동 주파수를 지원하지 않을
수 있습니다 .
** Mavic 과 Osmo 시리즈의 모든 제품은 마운팅 브래킷 (DJI 공식 온라인 매장에서 별도 구매 ) 이 있어야
CrystalSky 모니터를 장착할 수 있습니다. CS550 모니터만 Mavic 및 Osmo 시리즈 제품과 호환됩니다.
*** 57W 배터리 충전기가 공급하는 전원으로 USB 포트에 함께 연결된 배터리 및 기타 기기를 동시에 충전
할 수 없습니다 . 배터리 충전 중에 USB 포트로 다른 기기를 충전하지 마십시오.
Mavic, Osmo 시리즈 (Osmo Mobile 제외 ), Inspire, Matrice, Phantom 3
(Phantom 3 Professional, Phantom 3 Advanced) 및 Phantom 4 시리즈
3 개월 미만 : -28° C~45° C(-18.4° ~104° F)
3 개월 이상 : 22° C~30° C(71.6° ~86° F)
Inspire 2 배터리 충전기 (IN2C180)
Inspire 2 배터리 충전기 (ADE018)
Inspire 2 차량용 충전기 (C6S90-2)
Inspire 1 배터리 충전기 (A14-100P1A)
Inspire 1 배터리 충전기 (ADE018)
Inspire 1 차량용 충전기 (C6S90)
Phantom 4 시리즈 배터리 충전기 (PH4C100)
Phantom 4 차량용 충전기 (C4S90-4)
Phantom 3 Professional 배터리 충전기 (ADE019)
Phantom 3 차량용 충전기 (C4S90)
Phantom 3 57W 배터리 충전기 (A14-057N1A)***
Osmo 57W 배터리 충전기 (A14-057N1A)***
KR
31
Page 33

Haftungsausschluss
Vielen Dank, dass Sie sich für ein Produkt von DJITM entschieden haben. Die
hier enthaltenen Informationen betreffen Ihre persönliche Sicherheit sowie Ihre
gesetzlichen Rechte und Verpichtungen. Bitte lesen Sie das gesamte Dokument
aufmerksam durch, um das Produkt für den Betrieb ordnungsgemäß einrichten zu
können. Die Nichtbeachtung der in diesem Dokument enthaltenen Anweisungen
und Warnungen kann zu schweren Verletzungen der eigenen Person oder
anderer oder zu Schäden an Ihrem DJI-Produkt oder anderen Objekten in der
näheren Umgebung führen. Dieses Dokument und alle zugehörigen Dokumente
können nach eigenem Ermessen von DJI jederzeit geändert werden. Die aktuellen
Informationen zu unseren Produkten finden Sie auf http://www.dji.com unter
„Produkte“.
Mit dem Gebrauch des Produkts bestätigen Sie, dass Sie diesen
Haftungsausschluss inkl. Warnungen aufmerksam gelesen und den Inhalt
verstanden haben, und erklären Ihr Einverständnis mit den Bedingungen. Sie
stimmen zu, dass Sie beim Gebrauch des Produkts die alleinige Verantwortung
für Ihre Handlungen und alle daraus entstehenden Folgen tragen. Sie erklären
DE
sich damit einverstanden, dass Sie das Produkt ausschließlich für sachgerechte
Zwecke nutzen, die allen geltenden Gesetzen, Regelungen und Vorschriften
sowie allen aktuellen wie künftigen Bedingungen, Schutzmaßnahmen, Praktiken,
Richtlinien und Empfehlungen von DJI entsprechen. DJI übernimmt keine
Haftung für Sachschäden oder Personenschäden sowie keine juristische
Verantwortung für Schäden, die direkt oder indirekt mit dem Gebrauch des
Produkts in Zusammenhang stehen. Der Anwender richtet sich nach der sicheren,
rechtskonformen Praxis, die zum Teil in dem vorliegenden Dokument festgelegt ist.
DJI ist eine Marke der SZ DJI TECHNOLOGY CO., LTD. (kurz DJI) und seiner
verbundenen Unternehmen. Namen von Produkten, Marken, usw., die in diesem
Dokument enthalten sind, sind Warenzeichen oder eingetragene Warenzeichen
der jeweiligen Besitzer.
Warnung
1. Die Akkuladestation ist nur mit dem angegebenen DJI Akkuladegerät
kompatibel. Versuchen Sie NICHT, die Akkuladestation mit einem anderen
Akkuladegerät zu verwenden.
2. Die Akkuladestation ist nur mit der DJI Intelligent Flight Battery kompatibel.
Versuchen Sie NICHT, die Akkuladestation für andere Akkus zu verwenden.
3. Betätigen Sie die Akkufreigabetaste, bevor Sie den Akku entnehmen.
4. Berühren Sie NICHT die Metallklemmen am Adapter.
5. Reinigen Sie erkennbare Verschmutzungen mit einem sauberen und trockenen
Lappen.
Einleitung
Der CrystalSkyTM ist speziell für die Darstellung von Luftaufnahmen ausgelegt
und liefert dank seines integrierten Lichtsensors auch bei wechselnden
Lichtverhältnissen ein glasklares Bild. Unterstützt die Serien DJI MAVICTM, OSMOTM
(ausgenommen Osmo Mobile), INSPIRETM, PHANTOMTM 4, Phantom 3 (Phantom
3 Professional, Phantom 3 Advanced) und MATRICETM.* Mit der integrierten DJI
GOTM/DJI GO 4 App können Sie den Gimbal, die Kamera und andere Funktionen
des Flugsystems steuern. Zusätzlich enthält die App eine Landkarte, einen Shop
und ein Anwender-Center, in dem Sie Ihr Fluggerät kongurieren und Inhalte mit
Bekannten teilen können.
* Die Prüfung und Entwicklung schreitet ständig voran, und mit der Zeit werden weitere DJI
Geräte unterstützt werden. Eine vollständige Liste der unterstützten DJI Geräte nden Sie
auf der DJI CrystalSky Produktseite auf dji.com.
32
Page 34

Lieferumfang
CrystalSky-Monitor × 1
Intelligent Battery × 2 (CS785/CS785U) oder × 1 (CS550)
Intelligent Battery Akkuladestation (WCH2) × 1
CrystalSky Bedienungsanleitung × 1
Sicherheitsrichtlinien zur Intelligent Battery × 1
Befestigungsklammer (optional) × 1
Schutz (optional) × 1
* Optionales Zubehör kann separat im offiziellen DJI Online-Store erworben
werden.
Übersicht
CrystalSky-Monitor
1. HDMI-Anschluss
HDMI-Videoausgang
2. USB-Anschluss
Unterstütztes Erweiterungsgerät
(z. B. U disk)
3. Micro-SD-Karteneingang
Zusätzlicher Speicherplatz für
das Display (maximaler Speicher
pro Karte 128 GB)
4. Micro-USB-Anschluss
Über ein Micro-USB-Kabel
können Sie das Gerät mit der
Fernbedienung oder einem PC
(zu Kongurierung über DJI
TM
ASSISTANT
2) verbinden. Zur
Aktualisierung der Firmware
verwenden Sie bitte das USBOTG-Kabel.
5. Kopfhörerbuchse
1
2
5
347 8
6
16
15
9
1
2
3
4
5
9
CS785 (helle Version)/
CS785U (ultrahelle Version)
6. Loch für Montageschraube
7. Lichtempndlichkeitsanschluss
Integrierter Lichtsensor
8. Type-C-USB2.0-HS-Anschluss
9. Integriertes GNSS
10. Ein/Aus-Taste
11. Frei belegbare Taste
12. Einstellungstaste
14
13. Frei belegbare Taste
13
14. Zurück Taste
12
15. Akkufreigabetaste
11
10
16. Akkusockel
8
6
7
CS550
DE
16
15
14
13
12
11
10
33
Page 35

Verwendung
Akku laden
Das Inspire 2 Ladegerät wird zur Veranschaulichung abgebildet.*
Setzen Sie den Akku in die Standard-Akkuladestation, und stecken Sie Stecker
B des Akkuladegeräts in die Akkuladestation. Schließen Sie das Ladegerät dann
an eine Steckdose (100 – 240 V, 50/60 Hz) an. Die Akkuladestation lädt die Akkus
der Reihe nach automatisch nach Ladestand (Akku mit dem höchsten Ladestand
zuerst, Akku mit dem niedrigsten Ladestand zuletzt). Der Buzzer gibt einen Piepton
ab, wenn der Ladevorgang abgeschlossen ist. Entfernen Sie den Akku, oder
betätigen Sie den Buzzer-Schalter, um den Ton abzuschalten.
Die Status-LED blinkt während des Ladevorgangs grün. Wenn Sie durchgehend
grün leuchtet, ist der Ladevorgang abgeschlossen.
DE
B
Laden Sie AUF KEINEN FALL eine Intelligent Flight Battery gemeinsam mit
einer Intelligent Battery, wenn Sie ein Inspire 2 oder Phantom 4 Ladegerät
oder ein Inspire 2 Autoladegerät verwenden.
•
Über den USB-Spannungsversorgungsanschluss kann das mobile Gerät
bis 5 V /2 A geladen werden.
•
Nähere Informationen finden Sie in der Bedienungsanleitung der
Akkuladestation (WCH2).
Montieren des Akkus
Setzen Sie den Akku in den Akkusockel, und schieben Sie ihn nach hinten, bis Sie
ein Klicken hören.
Drücken Sie die Akkuladestandstaste einmal, um den Ladestand zu prüfen.
•
Betätigen Sie die Akkufreigabetaste, bevor Sie den Akku entnehmen.
•
Die Intelligent Battery ist in der Lage die integrierte Batterie aufzuladen,
nachdem diese eingelegt wurde. Dies reduziert jedoch die Betriebsdauer
der Intelligent Battery. Die integrierte Batterie ist in der Lage den Monitor
für eine gewisse Zeit im Standby mit Strom zu versorgen, bis eine neue
geladene Intelligent Battery eingelegt wird.
B
A
Niedrig
Hoch
*Der CrystalSky CS785 wird zur Veranschaulichung abgebildet.
34
Page 36

Montage des Monitors
A
B
Stellen Sie sicher, dass Teil B nicht
gesichert ist, und montieren
Teil B and Teil A.
A
M5
Montieren Sie Teil A der
Montageklammer am Monitor.
Sichern Sie die
Montageklammer.
B
M6
M4
Befestigen Sie Komponente B
an der Fernsteuerung.
Nutzen Sie eine Münze oder einen
Schraubendreher um die Steifheit
des Nickwinkels zu kontrollieren.
Verdecken Sie bei der Verwendung NICHT den eingebauten GNSS-Sensor.
Anschließen des Monitors
Wenn Sie die Montageklammer verwenden, verbinden
Sie den Steckverbinder der Montageklammer mit dem
USB-Anschluss der Fernbedienung.
Wenn Sie die Montageklammer nicht verwenden, verbinden Sie den Monitor über
das Micro-USB-Kabel mit der Fernbedienung.
DE
Verwenden Sie den Type-C-USB-2.0-HS-Anschluss und den Micro-USBAnschluss NICHT gleichzeitig, da der Micro-USB-Anschluss in diesem Fall
nicht funktioniert.
35
Page 37

DJI GO/GO 4 App
Drücken Sie die Einschalttaste, bis der Monitor aktiviert wird, und starten Sie dann
die DJI GO/GO 4 App.
Mit der integrierten DJI GO/DJI GO 4 App können Sie den Gimbal, die Kamera
und andere Funktionen des Flugsystems steuern. Zusätzlich enthält die App
eine Landkarte, einen Shop und ein Anwender-Center, in dem Sie Ihr Fluggerät
kongurieren und Inhalte mit Bekannten teilen können.
50%
Quick setting
HDMI
11:30
WED, 8 NOV
DE
* Diese Abbildung dient nur als Referenz. Halten Sie sich an die tatsächliche
Benutzeroberäche.
SRE Wi-Fi
DJI GO
Connect your DJI device
4.0
DJI GO 4.0
Go Create
ApplicationsExplorer Settings
Technische Daten
Monitor
Modell CS785/CS785U CS550
Gewicht ca. 425 g ca. 228 g
Abmessungen
(ohne Akku)
Abmessungen (mit Akku) 208,6 × 147,8 × 34,75 mm 153,76 × 84,94 × 39,6 mm
Touchscreen
Auösung 2048 × 1536 1920 × 1080
Helligkeit
Speicher
Integrierte App DJI GO, DJI GO 4
Betriebssystem Android 5.1
Anschlüsse
Netzwerk
EIRP(dBm)
GNSS GPS/GLONASS
36
208,6 × 147,8 × 17 mm 153,76 × 84,94 × 19 mm
7,85", LCD-Bildschirm,
mit Multi-Point-Touch
CS785: 1000 cd/m2
CS785U: 2000 cd/m2
CS785: ROM 64 GB
CS785U: ROM 128 GB
HDMI (3840 × 2160 Ausgang unterstützt), zwei SDKartensteckplätze, USB, Micro-USB, Type-C-USB2.0-HS
WIFI-Frequenz: 2400-2483.5MHz,
Protokoll: 802.11b, 802.11g, 802.11n (HT20), 802.11a
4G-Module werden unterstützt
2400-2483.5MHz: CE< 20dBm, FCC<30dBm, SRRC<20dBm
5150-5250MHz: CE<23dBm, FCC<30dBm
5725-5850MHz: CE< 14dBm, FCC<30dB, SRRC<30dBm
5150-5250MHz* und 5725-5850MHz*
5,5", IPS-Bildschirm,
mit Multi-Point-Touch
1000 cd/m2
ROM 32 GB
Page 38

Integrierte Module Gyroskop, Kompass, Lautsprecher, Lichtsensor, Mikrofon
Integrierter Akku 980 mAh; 3,7 V
Mit 4K-Dekodierung H.264: 4K30p, H.265: 4K60p
Betriebstemperatur -20 bis 40 °C
Kompatible DJI
Produkte**
DJI Intelligent Battery
Modell WB37-4920mAh-7.6V
Kapazität 4920 mAh
Spannung 7,6 V
Akkutyp LiPo-Akku
Energie 37,39 Wh
Max. Ladeleistung 55 W
Betriebstemperatur -20 bis 40 °C
Lagertemperatur
Ladetemperatur 5 bis 40 °C
Nettogewicht ca. 170 g
Abmessungen 90 × 45 × 26 mm
Akkuladestation
Modell WCH2
Eingangsspannung 17,3 – 26,2 V
Ausgangsspannung
und Strom
Kompatible
Akkuladegeräte
Gewicht 138 g
Betriebstemperatur 5 bis 40 °C
Ladezeit 71 min (einzeln)
* Durch lokale Reglementierungen ist die 5150-5250 und 5725-5850MHz Betriebsfrequenz
nicht in allen Ländern verfügbar.
** Alle Produkte der Serien Mavic und Osmo benötigen eine Montagehalterung (separat im
ofziellen DJI Online Store erhältlich), damit sie mit dem CrystalSky kompatibel sind. Nur
das Modell CS550 ist mit den Produkten der Serien Mavic und Osmo kompatibel.
*** Das 57-W-Akkuladegerät bietet nicht genügend Leistung, um Akkus und andere an den
USB-Anschluss angeschlossene Geräte gleichzeitig zu laden. Verwenden Sie USB-
Anschluss NICHT, um ein anderes Gerät zu laden, wenn Sie gerade Akkus laden.
Mavic, Osmo-Serie (ausgenommen Osmo Mobile), Inspire,
Matrice, Phantom 3 (Phantom 3 Professional, Phantom 3
Advanced) und Phantom 4
Maximal 3 Monate: -28 bis 45 °C
Länger als 3 Monate: 22 bis 30 °C
8,7 V bei 6 A, 5 V bei 2 A
Inspire 2 Akkuladegerät (IN2C180)
Inspire 2 Akkuladegerät (ADE018)
Inspire 2 Autoladegerät (C6S90-2)
Inspire 1 Akkuladegerät (A14-100P1A)
Inspire 1 Akkuladegerät (ADE018)
Inspire 1 Autoladegerät (C6S90)
Phantom 4 Akkuladegerät (PH4C100)
Phantom 4 Autoladegerät (C4S90-4)
Phantom 3 Professional Akkuladegerät (ADE019)
Phantom 3 Autoladegerät (C4S90)
Phantom 3 57W Akkuladegerät (A14-057N1A)***
Osmo 57W Akkuladegerät (A14-057N1A)***
DE
37
Page 39

Renuncia de responsabilidad
Enhorabuena por la compra de su nuevo producto DJITM. La información incluida
en este documento afecta a su seguridad, y a sus derechos y responsabilidades
legales. Lea este documento en su totalidad para garantizar una conguración
adecuada antes de su uso. Si no lee ni sigue correctamente las instrucciones y
advertencias de este documento, podría sufrir lesiones importantes o causárselas
a otras personas; igualmente, podría causar daños en su producto DJI u otros
objetos en las proximidades. Este documento y el resto de documentos colaterales
están sujetos a cambios a entera discreción de DJI. Para obtener información
actualizada sobre el producto, visite http://www.dji.com y haga clic en la página
de producto de este producto.
Al usar este producto, por la presente maniesta que ha leído detenidamente esta
renuncia de responsabilidad y advertencia y que entiende y acepta cumplir con
los términos y condiciones establecidos en este documento. Acepta que usted es
el único responsable de su propia conducta durante el uso de este producto, así
como de cualquier consecuencia derivada del mismo. Acepta usar este producto
sólo con nes apropiados y de acuerdo con todas las leyes, reglas y normativas
aplicables, así como todos los términos, precauciones, prácticas, políticas y
ES
directrices que haya facilitado y pueda facilitar DJI. DJI no acepta responsabilidad
alguna por daños o lesiones, ni ningún tipo de responsabilidad legal derivada
directa o indirectamente del uso de este producto. El usuario deberá respetar
las prácticas seguras y legales incluidas, entre otras, las establecidas en este
documento.
DJI es una marca comercial de SZ DJI TECHNOLOGY CO., LTD. (abreviada
como “DJI”) y sus empresas aliadas. Los nombres de productos, marcas, etc.,
que aparecen en este documento son marcas comerciales o marcas comerciales
registradas de sus respectivas empresas propietarias.
Advertencia
1. El Puerto de carga sólo es compatible con el cargador de batería especicada
de DJI. NO intente usar el Puerto de carga con ningún otro cargador de
baterías.
2. El Puerto de carga sólo es compatible con la Batería Inteligente especicada de
DJI. NO intente usar el Puerto de carga con ninguna otra batería.
3. Asegúrese de pulsar el botón de extracción de batería antes de retirar la
batería.
4. NO toque los terminales metálicos del adaptador de alimentación.
5. Limpie los terminales metálicos con un paño limpio y seco si están visiblemente
sucios.
Introducción
CrystalSkyTM está diseñado especícamente para fotografía aérea y es capaz de
mostrar una imagen nítida en condiciones de iluminación variables gracias a su
sensor fotosensible integrado. Es compatible con las series DJI MAVICTM, OSMOTM
(Osmo Mobile Excluido), INSPIRETM, PHANTOMTM 4, Phantom 3 (Phantom 3
Professional, Phantom 3 Advanced) y MATRICETM.* Use la aplicación integrada DJI
GOTM/DJI GO 4 para controlar el estabilizador, la cámara y el resto de funciones
del sistema de vuelo. La aplicación también incluye un mapa, una tienda y un
centro de usuarios para congurar la aeronave y compartir contenidos con otros
usuarios.
* La compatibilidad con dispositivos DJI se irá añadiendo a medida que continúen las
pruebas y el desarrollo Visite la página de producto de DJI CrystalSky en dji.com para ver
una lista completa.
38
Page 40

Contenido del embalaje
Monitor CrystalSky ×1
Batería Inteligente ×2(CS785/CS785U) o ×1(CS550)
Puerto de carga de Batería Inteligente (WCH2) ×1
Guía de usuario de CrystalSky ×1
Directrices de seguridad de la Batería Inteligente ×1
Soporte de montaje (opcional) ×1
Cubierta (opcional) ×1
* Las piezas opcionales se pueden adquirir por separado en la tienda en línea
ocial de DJI.
Descripción general
Monitor CrystalSky
1. Puerto HDMI
Señal de salida de vídeo HDMI.
2. Puerto USB
Dispositivo ampliado compatible;
por ejemplo, disco U.
3. Ranura para tarjeta MicroSD
Proporciona almacenamiento
adicional para el dispositivo de
visualización, con una capacidad
máxima de tarjeta de 128 GB.
4. Puerto Micro USB
Utilice un cable Micro USB
para conectar al control remoto
durante el uso, o al PC para
congurar parámetros mediante
DJI ASSISTANT
actualizar el rmware de la
aeronave, utilice el cable USB
OTG.
1
2
5
9
TM
15
CS550
2. Para
347 8
6
16
1
2
3
4
5
8
6
7
9
CS785 (Versión con color de contraste) /
CS785U (Versión ultrabrillante)
5. Toma para auriculares
6. Oricio roscado de montaje
7. Puerto sensible a la luz
Sensor fotosensible integrado.
8. Puerto USB2.0 HS Type-C
9. GNSS integrado
10. Botón de encendido
11. Botón personalizado
12. Botón de ajuste
13. Botón personalizado
14
13
14. Botón de atrás
12
15. Botón de liberación de la batería
11
10
16. Ranura para la batería
ES
16
15
14
13
12
11
10
39
Page 41

Uso
Carga de la batería
En las ilustraciones se utiliza el cargador del Inspire 2 como ejemplo.*
Coloque la batería en el Puerto de carga estándar y conecte el conector B del
cargador al Puerto de carga; a continuación, conecte el cargador de baterías
a una toma de alimentación (100-240 V, 50/60 Hz). El Puerto de carga cargará
de manera inteligente las baterías secuencialmente de acuerdo con su nivel de
carga, del más alto al más bajo. El zumbador comenzará a emitir pitidos una vez
nalizada la carga. Retire la batería o apague el interruptor del zumbador para
silenciarlo.
El LED de estado parpadea en verde durante la carga y pasa a verde fijo al
nalizar esta.
ES
NO cargue la Batería de Vuelo Inteligente junto con la Batería Inteligente
cuando use los cargadores Inspire 2 o Phantom 4, o el cargador para coche
Inspire 2.
•
El puerto de alimentación USB se puede utilizar para cargar un
dispositivo móvil de 5 V /2 A.
•
Consulte la guía del usuario del Puerto de carga (WCH2) para obtener
más información.
Montaje de la batería
Introduzca la batería en la ranura y deslícela del todo hasta que escuche un clic.
Pulse el botón de nivel de batería una vez para comprobar el nivel de la batería.
•
Pulse el botón de extracción de batería antes de retirar la batería.
•
La Batería Inteligente puede cargar la batería interna una vez acoplada,
lo que puede reducir la duración de la Batería Inteligente. La batería
interna puede mantener el monitor en modo espera durante un pequeño
periodo de tiempo sin la Batería Inteligente, para que pueda iniciar el
monitor con rapidez una vez haya acoplado la Batería Inteligente.
*Para ilustrar la instalación se utiliza el CrystalSky CS785.
40
B
A
B
Bajo
Alto
Page 42

Montaje del monitor
A
B
Compruebe que la pieza B esté
desbloqueada, e instale la pieza
B en la pieza A.
A
M5
Monte la pieza A del
soporte de montaje
en el monitor.
Bloquee el
soporte de montaje
B
M6
M4
Instale la Parte B en el
control remoto.
Ajuste con una moneda la
rigidez del eje de inclinación.
NO obstruya el GNSS incorporado durante el uso.
Conecte el monitor
Cuando use el soporte de montaje, conecte el
conector del soporte de montaje al puerto USB del
control remoto.
Cuando lo utilice sin el soporte de montaje, conecte el monitor al control remoto
mediante un cable Micro USB.
ES
NO utilice los puertos USB2.0 HS Type-C y Micro USB simultáneamente, ya
que en esta situación el puerto Micro USB estará desactivado.
41
Page 43

Aplicación DJI GO/GO 4
Pulse el botón de encendido hasta que el monitor se encienda; seguidamente,
abra la aplicación DJI GO/GO 4.
Use la aplicación integrada DJI GO/DJI GO 4 para controlar el estabilizador, la
cámara y el resto de funciones del sistema de vuelo. La aplicación también incluye
un mapa, una tienda y un centro de usuarios que permite congurar la aeronave y
compartir contenidos con otros usuarios.
50%
Quick setting
HDMI
11:30
WED, 8 NOV
SRE Wi-Fi
DJI GO
Connect your DJI device
4.0
DJI GO 4.0
Go Create
ES
ApplicationsExplorer Settings
* Esta imagen se suministra sólo como referencia. Consulte la interfaz de usuario real.
Especicaciones
Monitor
Modelo CS785/ CS785U CS550
Peso Aprox. 425 g Aprox. 228 g
Dimensiones
(sin batería)
Dimensiones(con batería) 208,6×147,8×34,75 mm 153,76×84,94×39,6 mm
Pantalla táctil
Resolución 2048×1536 1920×1080
Brillo
Almacenamiento
Aplicación integrada DJI GO, DJI GO 4
Sistema operativo Android 5.1
Puertos
Red
EIRP(dBm)
GNSS GPS/GLONASS
Módulos integrados Giroscopio, brújula, altavoz, sensor fotosensible, micrófono
Batería integrada 980 mAh, 3,7 V
42
208,6×147,8×17 mm 153,76×84,94×19 mm
7,85", panel IPS,
multitáctil
CS785: 1000 cd/m2
CS785U: 2000 cd/m2
CS785: 64 GB de ROM
CS785U: 128 GB de ROM
HDMI (admite salida a 3840×2160), dos ranuras de tarjeta SD,
USB, Micro USB, USB2.0 HS Type-C
Banda de frecuencia WIFI: 2400-2483.5MHz, 5150-5250MHz* y
5725-5850MHz*
Protocolo: 802.11b, 802.11g, 802.11n (HT20), 802.11a
Compatible con módulos 4G
2400-2483.5MHz: CE< 20dBm, FCC<30dBm, SRRC<20dBm
5150-5250MHz: CE<23dBm, FCC<30dBm
5725-5850MHz: CE< 14dBm, FCC<30dB, SRRC<30dBm
5,5", panel IPS,
multitáctil
1000 cd/m2
32 GB de ROM
Page 44

Capacidad de
decodicación en 4K
Intervalo de
temperaturas de
funcionamiento
Productos DJI
compatibles**
Batería Inteligente
Modelo WB37-4920mAh-7.6V
Capacidad 4920 mAh
Voltaje 7,6 V
Tipo de batería Batería LiPo
Energía 37,39 Wh
Potencia de carga máx. 55 W
Intervalo de
temperaturas de
funcionamiento
Temperatura de
almacenamiento
Temperatura de carga 41 a 104 °F (5 a 40 °C)
Peso neto Aprox. 170 g
Dimensiones 90×45×26 mm
Centro de carga
Modelo WCH2
Tensión de entrada 17,3 - 26,2 V
Tensión y corriente de
salida
Compatible
Cargador de la batería
Peso 138 g
Temperatura de
funcionamiento
Tiempo de carga 71 min. (simple)
* Para cumplir las regulaciones locales, las frecuencias de operación de 5150-5250MHz y
5725-5850MHz no están disponibles en algunos países o regiones.
** Todos los productos de las series Mavic y Osmo requieren un soporte (se adquiere
por separado en la tienda en línea ocial de DJI) para ser compatibles con CrystalSky.
Tenga en cuenta que sólo el modelo CS550 es compatible con los productos de las
series Mavic y Osmo.
*** El cargador de batería de 57 W no suministra la suciente potencia para cargar la batería
y otros dispositivos conectados al puerto USB simultáneamente. NO use el puerto USB
para cargar otro dispositivo al cargar las baterías.
H.264: 4K30p, H.265: 4K60p
-20 a 40 °C (-4 a 104 °F)
Series Mavic, Osmo (Osmo Mobile Excluido), Inspire, Matrice,
Phantom 3 (Phantom 3 Professional, Phantom 3 Advanced) y
Phantom 4
-20 a 40 °C (-4 a 104 °F)
Menos de 3 meses: -28 a 45 °C (-18,4 a 104 °F)
Más de 3 meses: 22 a 30 °C (71,6 a 86 °F)
8,7 V, 6 A; 5 V, 2 A
Cargador de batería Inspire 2 (IN2C180)
Cargador de batería Inspire 2 (ADE018)
Cargador para coche Inspire 2 (C6S90-2)
Cargador de batería Inspire 1 (A14-100P1A)
Cargador de batería Inspire 1 (ADE018)
Cargador para coche Inspire 1 (C6S90)
Cargador de batería de la serie Phantom 4 (PH4C100)
Cargador para coche Phantom 4 (C4S90-4)
Cargador de batería Phantom 3 Professional (ADE019)
Cargador para coche Phantom 3 (C4S90)
Cargador de batería 57W Phantom 3 (A14-057N1A)***
Cargador de batería 57W Osmo (A14-057N1A)***
41 a 104 °F (5 a 40 °C)
ES
43
Page 45

Clause d'exclusion de responsabilité
Vous venez d'acquérir un nouveau produit DJITM. Félicitations ! Les informations
contenues dans ce document affectent votre sécurité, vos droits et vos obligations.
Lisez-le attentivement pour bien congurer votre appareil avant de l'utiliser. Si vous
ne lisez pas les instructions et les avertissements ci-après, vous exposez les autres
et vous-même à des blessures graves et risquez d'endommager votre produit DJI
ou d'autres objets placés à proximité. DJI est susceptible de modier à tout moment
le présent document et les autres documents connexes. Pour connaître les dernières
informations sur le produit, rendez-vous sur le site http://www.dji.com et cliquez sur
la page produit correspondante.
En utilisant ce produit, vous confirmez avoir lu attentivement la présente clause
d'exclusion de responsabilité et l'avertissement gurant dans les présentes, compris
les conditions d'utilisation exposées ici et accepté de vous y conformer. Vous
déclarez assumer l'entière responsabilité de votre utilisation du produit ainsi que
toutes les conséquences qui en découlent. Vous vous engagez à utiliser le produit
dans un cadre légal et adapté, conformément aux lois et réglementations en vigueur,
dans le respect des conditions, précautions, pratiques, politiques et consignes
publiées par DJI, aujourd'hui et à l'avenir. DJI décline toute responsabilité quant aux
dégâts, aux blessures ou aux problèmes découlant directement ou indirectement de
l'utilisation de ce produit. L'utilisateur s'engage à respecter la réglementation et les
FR
pratiques décrites dans le présent document (sans s'y limiter).
DJI est une marque commerciale de SZ DJI TECHNOLOGY CO., LTD. (abrégée
en « DJI ») et de ses sociétés afliées. Les noms de produits, de marques, etc.,
apparaissant dans le présent document sont des marques commerciales ou des
marques déposées de leurs détenteurs respectifs.
Avertissement
1. La station de charge est uniquement compatible avec le chargeur désigné par DJI.
N’essayez PAS d’utiliser la station de charge avec un autre chargeur de batterie.
2. La station de charge est uniquement compatible avec la Batterie Intelligente désignée
par DJI. N’essayez PAS d’utiliser la station de charge avec une autre batterie.
3. Pensez à appuyer sur le bouton de déverrouillage de la batterie avant de la retirer.
4. N’essayez PAS de toucher les bornes métalliques de l’adaptateur d'alimentation.
5. Nettoyez les bornes métalliques à l'aide d'un chiffon sec et propre si vous voyez
apparaître des dépôts de poussière.
Introduction
CrystalSkyTM est spéciquement conçu pour la photographie aérienne et afche
une image nette dans différentes conditions d'éclairage grâce au capteur
photosensible intégré. Compatible avec les modèles DJI MAVICTM, OSMOTM (Osmo
Mobile exclu), INSPIRETM, PHANTOMTM 4, Phantom 3 (Phantom 3 Professional,
Phantom 3 Advanced) et MATRICETM.* Contrôlez la nacelle, la caméra et les autres
fonctions de votre système de vol à l'aide de l'application DJI GOTM/DJI GO 4
intégrée. L'application inclut également les fonctions Map, Store et User Center
pour congurer votre appareil et partager vos contenus.
* De nouveaux appareils DJI seront pris en charge au l des tests et du développement.
Consultez la page du produit DJI CrystalSky sur dji.com pour obtenir la liste complète.
Contenu de l'emballage
Écran CrystalSky ×1
44
Page 46
Batterie Intelligente ×2 (CS785/CS785U) ou ×1 (CS550)
Station de charge de la Batterie Intelligente (WCH2) ×1
Guide de l'utilisateur CrystalSky ×1
Consignes de sécurité relatives à la Batterie Intelligente ×1
Support de xation (en option) ×1
Pare-soleil (en option) ×1
* Les accessoires peuvent être achetés séparément sur la boutique en ligne
ofcielle DJI.
Vue d'ensemble
Écran CrystalSky
1. Port HDMI
Signal de sortie vidéo HDMI.
2. Port USB
Permet d'ajouter un périphérique
d'extension (ex. disque externe).
3. Logement de la carte Micro-SD
Fournit un espace de stockage
supplémentaire pour le
périphérique d'afchage. La
capacité maximale de la carte est
de 128 Go.
4. Port Micro USB
Utilisez un câble Micro USB
pour vous connecter à la
radiocommande pendant
l'utilisation, ou à l'ordinateur pour
congurer les paramètres avec
DJI ASSISTANT
à jour le rmware de l'appareil,
utilisez le câble USB OTG.
5. Prise casque
1
2
5
TM
15
9
2. Pour mettre
347 8
6
16
1
2
3
4
5
6
9
CS785 (version haute luminosité) /
CS785U (version ultra-lumineuse)
6. Trou de vis de xation
7. Port photosensible
Capteur photosensible intégré.
8. Port USB 2.0 Type-C haut débit
9. GNSS intégré
10. Bouton d'alimentation
11. Bouton personnalisé
12. Bouton des paramètres
13. Bouton personnalisé
14. Bouton de retour
15. Bouton de déverrouillage
de la batterie
14
16. Logement de batterie
13
12
11
10
8
7
CS550
FR
16
15
14
13
12
11
10
45
Page 47

Utilisation
Recharge de la batterie
Utilisez le chargeur Inspire 2 indiqué dans l'illustration.*
Insérez la batterie dans la station de charge standard, raccordez le connecteur B du
chargeur de batterie à la station de charge, puis branchez le chargeur à une prise
secteur (100-240 V, 50/60 Hz). La station de charge recharge intelligemment
les batteries selon leur niveau de charge, du plus élevé au plus faible. Le signal
sonore se déclenchera une fois la charge terminée. Retirez la batterie ou appuyez
sur le bouton sonore pour l'arrêter.
La LED d'état clignote en vert pendant la charge et s'allume en vert lorsque la
batterie est entièrement chargée.
FR
Ne chargez PAS la Batterie de Vol Intelligente et la Batterie Intelligente
simultanément à l'aide du chargeur Inspire 2, Phantom 4 ou du chargeur
allume-cigare Inspire 2.
•
Le port d'alimentation USB peut être utilisé pour charger un appareil
mobile de 5 V / 2 A.
•
Pour en savoir plus, consultez le guide de l'utilisateur de la station de
charge (WCH2).
Montage de la batterie
Insérez la batterie dans le logement de batterie, puis faites-la glisser jusqu'à
entendre un clic.
Appuyez une fois sur le bouton Niveau de la batterie pour vérier le niveau de
charge de la batterie.
•
Appuyez sur le bouton de déverrouillage de la batterie avant de retirer la
batterie.
•
La Batterie Intelligente peut charger la batterie intégrée après avoir été
installée. La durée de vie de la Batterie Intelligente s'en trouve réduite. La
batterie intégrée peut conserver le moniteur en veille pendant une certaine
période sans avoir recours à la Batterie Intelligente. Cela permet d'allumer
le moniteur rapidement une fois que vous changez de Batterie Intelligente.
*Utilisez l'écran CrystalSky CS785 indiqué dans l'illustration d'installation.
46
B
B
A
Faible
Élevé
Page 48

Montage de l'écran
A
B
Vériez que la pièce B est
déverrouillée, puis insérez
la pièce B dans la pièce A.
A
M5
Vissez la pièce A du
support de xation
à l'écran.
Verrouillez le
support de xation.
B
M6
M4
Installez la Partie B sur la
radiocommande.
Ajustez l'angle vertical de
l'écran à l'aide d'une pièce de
monnaie.
N'obstruez PAS le GNSS intégré pendant l'utilisation.
Connexion de l'écran
Si vous utilisez le support de fixation, branchez
le connecteur de ce dernier au port USB de la
radiocommande.
Si vous n'utilisez pas le support de xation, connectez l'écran à la radiocommande
à l'aide d'un câble Micro USB.
FR
N'utilisez PAS les ports USB 2.0 Type-C haut débit et Micro USB
simultanément, car le port Micro USB ne fonctionnera pas dans ce cas.
47
Page 49

Application DJI GO/GO 4
Appuyez sur le bouton d'alimentation jusqu'à allumer l'écran, puis accédez à
l'application DJI GO/GO 4.
Contrôlez la nacelle, la caméra et les autres fonctions de votre système de vol à l'aide
de l'application DJI GO/DJI GO 4 intégrée. L'application inclut également les fonctions
Map, Store et User Center pour congurer votre appareil et partager vos contenus.
50%
Quick setting
HDMI
11:30
WED, 8 NOV
SRE Wi-Fi
DJI GO
Connect your DJI device
4.0
DJI GO 4.0
Go Create
FR
ApplicationsExplorer Settings
*L’image est fournie à titre indicatif uniquement. Référez-vous à l’interface utilisateur réelle.
Caractéristiques techniques
Écran
Modèle CS785 / CS785U CS550
Poids Env. 425 g Env. 228 g
Dimensions
(sans batterie)
Dimensions
(avec batterie)
Écran tactile
Résolution 2 048 × 1 536 1 920 × 1 080
Luminosité
Stockage
Application intégrée DJI GO, DJI GO 4
Système d'exploitation Android 5.1
Ports
Réseau
EIRP (dBm)
GNSS GPS/GLONASS
Modules intégrés
48
208,6 × 147,8 × 17 mm 153,76 × 84,94 × 19 mm
208,6 × 147,8 × 34,75 mm 153,76 × 84,94 × 39,6 mm
Écran IPS de 7,85 po
avec interface tactile multipoint
CS785 : 1 000 cd/m2
CS785U : 2 000 cd/m2
CS785 : 64 Go de mémoire ROM
CS785U : 128 Go de mémoire
ROM
HDMI (sortie 3 840 × 2 160 prise en charge), deux logements
pour carte SD, USB, Micro USB, USB 2.0 Type-C haut débit
Bande de fréquence Wi-Fi : 2400-2483.5MHz, 5150-5250MHz*,
5725-5850MHz*
Protocole : 802.11b, 802.11g, 802.11n (HT20), 802.11a
Modules 4G pris en charge
2400-2483.5MHz: CE< 20dBm, FCC<30dBm, SRRC<20dBm
5150-5250MHz: CE<23dBm, FCC<30dBm
5725-5850MHz: CE< 14dBm, FCC<30dB, SRRC<30dBm
Gyroscope, boussole, haut-parleur, capteur photosensible,
microphone
Écran IPS de 5,5 po
avec interface tactile multipoint
1 000 cd/m2
32 Go de mémoire ROM
Page 50

Batterie intégrée 980 mAh, 3,7 V
Fonction de décodage 4K H.264 : 4K30p, H.265 : 4K60p
Plage de température de
fonctionnement
Produits DJI
compatibles**
Batterie Intelligente
Modèle WB37 - 4 920 mAh - 7,6 V
Capacité 4 920 mAh
Tension 7,6 V
Type de batterie Batterie LiPo
Énergie 37,39 W/h
Puissance de
charge max.
Plage de température de
fonctionnement
Température de
stockage
Température de charge Entre 5 et 40°C (41 et 104°F)
Poids net Env. 170 g
Dimensions 90 × 45 × 26 mm
Station de charge
Modèle WCH2
Tension d'entrée 17,3 à 26,2 V
Tension et courant
de sortie
Chargeur de
batterie compatible
Poids 138 g
Température de
fonctionnement
Temps de charge 71 min (une unité)
* An de se conformer aux réglementations locales, les fréquences de fonctionnement
5150-5250MHz et 5725-5850MHz ne sont pas disponibles dans certains pays.
** Tous les produits des gammes Mavic et Osmo nécessitent un support de fixation
(acheté séparément sur la boutique en ligne ofcielle de DJI) pour être compatibles
avec CrystalSky. Notez que seul le CS550 est compatible avec les produits des gammes
Mavic et Osmo.
*** Le chargeur de batterie 57 W ne fournit pas assez de courant pour charger
simultanément les batteries et d'autres périphériques connectés au port USB. N'UTILISEZ
PAS le port USB pour charger un autre appareil lors de la charge des batteries.
-20 à 40 °C (-4 à 104 °F)
Mavic, Osmo (Osmo Mobile exclu), Inspire, Matrice, Phantom 3
(Phantom 3 Professional, Phantom 3 Advanced) et Phantom 4
55 W
-20 à 40 °C (-4 à 104 °F)
Moins de 3 mois : -28 à 45°C (-18,4 à 104°F)
Plus de 3 mois : 22 à 30°C (71,6 à 86°F)
8,7 V, 6 A; 5 V, 2 A
Chargeur de batterie Inspire 2 (IN2C180)
Chargeur de batterie Inspire 2 (ADE018)
Chargeur allume-cigare Inspire 2 (C6S90-2)
Chargeur de batterie Inspire 1 (A14-100P1A)
Chargeur de batterie Inspire 1 (ADE018)
Chargeur allume-cigare Inspire 1 (C6S90)
Chargeur de batterie série Phantom 4 (PH4C100)
Chargeur allume-cigare Phantom 4 (C4S90-4)
Chargeur de batterie Phantom 3 Professional (ADE019)
Chargeur allume-cigare Phantom 3 (C4S90)
Chargeur de batterie 57W Phantom 3 (A14-057N1A)***
Chargeur de batterie 57W Osmo (A14-057N1A)***
Entre 5 et 40°C (41 et 104°F)
FR
49
Page 51

Limitazioni di responsabilità
Congratulazioni per aver acquistato il nuovo prodotto DJITM. Le informazioni
contenute nel presente documento riguardano la sicurezza, i diritti e le
responsabilità legali degli utenti. Leggere con attenzione l'intero documento per
garantire la corretta congurazione dell'apparecchio prima dell'uso. La mancata
lettura del presente documento e l'inosservanza delle istruzioni e delle avvertenze
in esso contenute possono causare lesioni gravi a sé stessi o ad altri, danneggiare
il prodotto DJI o causare danni a oggetti che si trovano in prossimità. Il presente
documento e tutti i documenti complementari sono soggetti a modifiche a
esclusiva discrezione di DJI. Per informazioni aggiornate su questo prodotto,
visitare http://www.dji.com e fare clic sulla pagina relativa al prodotto.
Utilizzando il prodotto, l'utente dichiara di aver letto e compreso le limitazioni
di responsabilità e gli avvertimenti e di accettare i termini e le condizioni ivi
specicati. L'utente riconosce di essere l'unico responsabile della propria condotta
durante l'utilizzo del prodotto e delle relative conseguenze. L'utente accetta di
utilizzare il presente prodotto esclusivamente per scopi leciti e conformi a tutte
le leggi, le normative e i regolamenti applicabili e nel rispetto di tutti i termini,
le precauzioni, le pratiche, le politiche e le direttive che DJI ha reso o renderà
disponibili. DJI declina ogni responsabilità per danni, lesioni o altre responsabilità
legali direttamente o indirettamente imputabili all'utilizzo del presente prodotto.
L'utente è tenuto a osservare pratiche di condotta sicure e legittime, ivi comprese,
ma non limitatamente a, quelle esposte nel presente documento.
IT
DJI è un marchio di SZ DJI TECHNOLOGY CO., LTD. (abbreviato come "DJI") e
sue società afliate. I nomi di prodotti, marchi, ecc. che compaiono nel presente
documento sono marchi o marchi registrati delle rispettive società proprietarie.
Avvertimento
1. L'hub di carica è compatibile esclusivamente con il caricabatterie dedicato DJI.
NON tentare di utilizzare l'hub di carica con qualsiasi altro caricabatterie.
2. L'hub di carica è compatibile esclusivamente con la batteria intelligente
dedicata DJI. NON utilizzare l'hub di carica con un'altra batteria.
3. Assicurarsi di premere il tasto di rilascio della batteria prima di rimuoverla.
4. NON toccare i morsetti in metallo presenti sull'adattatore di alimentazione.
5. Se si notano accumuli di sporcizia, pulire i morsetti in metallo con un panno
asciutto e pulito.
Introduzione
CrystalSkyTM è progettato specicatamente per la fotograa aerea ed è in grado di
riprodurre immagini nitide in diverse condizioni di luce grazie al sensore integrato
sensibile alla luce. Supporta le serie DJI MAVICTM, OSMOTM (Osmo Mobile
esclusa), INSPIRETM, PHANTOMTM 4, Phantom 3 (Phantom 3 Professional, Phantom
3 Advanced) e MATRICETM.* È possibile utilizzare l'app integrata DJI GOTM/DJI GO
4 per controllare il gimbal, la telecamera e altre funzioni del sistema di volo. L'app
è inoltre dotata di una mappa, uno store e un centro utente a disposizione per la
congurazione del proprio velivolo e la condivisione del contenuto.
* Il supporto per i dispositivi DJI verrà aggiunto come proseguimento dei collaudi e dello
sviluppo. Visitare la pagina del prodotto DJI CrystalSky su dji.com per un elenco completo.
Contenuto della confezione
Un monitor CrystalSky
50
Page 52

2 batterie intelligenti (CS785/CS785U) o 1 batteria intelligente (CS550)
Un hub di carica per la batteria intelligente (WCH2)
Una Guida dell'utente CrystalSky
Linee guida sulla sicurezza della batteria intelligente
Una staffa di montaggio (opzionale)
Un coperchio (opzionale)
* I componenti disponibili in opzione possono essere acquistati separatamente
presso lo store on-line ufciale DJI.
Quadro d'insieme
Monitor CrystalSky
1. Porta HDMI
Segnale video dell'uscita HDMI.
2. Porta USB
Supporto dei dispositivi esteso, ad
esempio U-disk.
3. Slot per scheda micro-SD
Fornisce uno spazio di
memorizzazione aggiuntivo per
il dispositivo di visualizzazione
con una capacità massima della
scheda pari a 128 GB.
4. Porta micro-USB
Utilizzare un cavo micro-USB per
la connessione al dispositivo di
controllo remoto quando in uso
o per la connessione al PC per
congurare i parametri tramite DJI
TM
ASSISTANT
2. Per aggiornare il
rmware del velivolo, utilizzare il
cavo USB OTG.
5. Jack per cufe
1
2
5
347 8
6
16
15
9
1
2
3
4
5
9
CS785 (versione Highlight) /
CS785U (versione Ultra-bright)
6. Foro per vite di ssaggio
7. Porta sensibile alla luce
Sensore integrato sensibile alla
luce.
8. Porta USB2.0 HS di tipo-C
9. GNSS integrato
10. Tasto di accensione
11. Tasto di personalizzazione
12. Tasto per le impostazioni
13. Tasto di personalizzazione
14. Tasto di indietro
15. Tasto di rilascio della batteria
14
16. Alloggiamento della batteria
13
12
11
10
8
6
7
CS550
IT
16
15
14
13
12
11
10
51
Page 53

Uso
Carica della batteria
Utilizzare il caricabatterie Inspire 2 a scopo dimostrativo.*
Posizionare la batteria nell'hub di carica standard e collegare il connettore B del
caricabatterie all'hub di carica, quindi collegare il caricabatterie a una presa di
alimentazione (100-240 V, 50/60 Hz). L'hub di carica ricarica le batterie in modo
intelligente in sequenza secondo i livelli di carica delle stesse, partendo da quelle
più cariche per arrivare a quelle meno cariche. Il cicalino inizia a emettere un
segnale acustico quando la carica è completa. Rimuovere la batteria o disattivare
l'interruttore del cicalino per interrompere il cicalino.
Il LED di stato lampeggia in verde quando la batteria è in carica e diventa sso di
colore verde quando è completamente carica.
B
IT
NON caricare la batteria di volo intelligente insieme alla batteria intelligente
quando si utilizza il caricabatterie per Inspire 2, Phantom 4 o il caricabatterie
per auto Inspire 2
•
La porta di alimentazione USB può essere utilizzata per caricare il
dispositivo mobile a 5 V / 2 A.
•
Fare riferimento alla Guida dell'utente dell'hub di carica (WCH2) per
ulteriori informazioni.
Montaggio della batteria
Posizionare la batteria nello slot della batteria, quindi farla scorrere verso l'estremità
no a quando non si avverte uno scatto (clic).
Premere una volta il tasto per controllare il livello di carica.
•
Premere il pulsante di rilascio della batteria prima di rimuovere la batteria.
•
La batteria intelligente può caricare la batteria integrata dopo il montaggio;
questa operazione può ridurre il tempo di funzionamento della batteria
intelligente. La batteria integrata può mantenere il monitor nella modalità di
stand-by per un breve periodo senza la batteria intelligente, consentendo così
di avviare il monitor velocemente una volta montata la batteria intelligente.
*Utilizzare CrystalSky CS785 per spiegare l'installazione.
52
B
A
Basso
Alto
Page 54

Montaggio del monitor
A
B
Assicurarsi che la parte B
sia sbloccata, installare la
parte B nella parte A.
A
M5
Montare il ssaggio
parte A della staffa
sul monitor.
Bloccare la staffa di
montaggio.
B
M6
M4
Montare la parte B sul
dispositivo di controllo
remoto.
Utilizzare una moneta per
regolare il serraggio dell'asse di
beccheggio.
NON ostruire il GNSS integrato durante l'uso.
Collegare il monitor
Se si utilizza la staffa di montaggio, inserire il
connettore sulla staffa di montaggio sulla porta USB
del dispositivo di controllo remoto.
Se non si utilizza la staffa di montaggio, collegare il monitor al dispositivo di
controllo remoto utilizzando un cavo micro-USB.
IT
NON utilizzare contemporaneamente la porta USB 2.0 HS di tipo-C e la
porta micro-USB, la porta micro-USB non funzionerà in quel momento.
53
Page 55

App DJI GO/GO 4
Premere il tasto di accensione no a quando il monitor non si accende, quindi
avviare l'app DJI GO/GO 4.
È possibile utilizzare l'app integrata DJI GO/DJI GO 4 per controllare il gimbal, la
telecamera e altre funzioni del sistema di volo. L'app è inoltre dotata di una mappa,
un negozio e un centro utente a disposizione per la congurazione del proprio
velivolo e la condivisione del contenuto.
50%
Quick setting
HDMI
11:30
WED, 8 NOV
SRE Wi-Fi
DJI GO
Connect your DJI device
4.0
DJI GO 4.0
Go Create
IT
* Questa immagine è fornita solo a scopo di consultazione. Fare riferimento all'interfaccia
utente effettiva.
ApplicationsExplorer Settings
Caratteristiche tecniche
Monitor
Modello CS785/CS785U CS550
Peso Circa 425 g Circa 228 g
Dimensioni
(senza batteria)
Dimensioni (con batteria) 208,6×147,8×34,75 mm 153,76×84,94×39,6 mm
Schermo a soramento
Risoluzione 2048×1536 1920×1080
Luminosità
Intervallo di temperatura
App integrata DJI GO, DJI GO 4
Sistema operativo Android 5.1
Porte
Rete
EIRP (dBm)
GNSS GPS/GLONASS
54
208,6×147,8×17 mm 153,76×84,94×19 mm
Schermo IPS da 7,85"
con supporto per funzione
multitocco
CS785: 1000 cd/m2
CS785U: 2000 cd/m2
CS785: ROM 64 GB
CS785U: ROM 128 GB
HDMI (uscita supportata 3840×2160), slot per scheda dual SD,
USB, micro-USB, USB2.0 HS di tipo-C
Banda di frequenza Wi-Fi 2400-2483.5MHz, 5150-5250MHz* e
5725-5850MHz*
Protocollo: 802.11b, 802.11g, 802.11n (HT20), 802.11a
Supporta i moduli 4G
2400-2483.5MHz: CE< 20dBm, FCC<30dBm, SRRC<20dBm
5150-5250MHz: CE<23dBm, FCC<30dBm
5725-5850MHz: CE< 14dBm, FCC<30dB, SRRC<30dBm
Schermo IPS da 5,5"
con supporto per funzione
multitocco
1000 cd/m2
ROM 32 GB
Page 56

Moduli integrati
Batteria incorporata 980 mAh, 3,7 V
Capacità di decodica 4K H.264: 4K30p, H.265: 4K60p
Intervallo di temperature
di esercizio
Prodotti compatibili DJI**
Batteria intelligente
Modello WB37-4920 mAh-7,6 V
Capacità 4920 mAh
Tensione 7,6 V
Tipo di batteria Batteria LiPo
Energia 37,39 Wh
Massima potenza
di carica
Intervallo di temperature
di esercizio
Temperatura di
stoccaggio
Temperatura di carica Da 5 °C a 40 °C (da 41 °F a 104 °F)
Peso netto Circa 170 g
Dimensioni 90×45×26 mm
Hub di carica
Modello WCH2
Tensione di ingresso 17,3 - 26,2 V
Tensione di uscita e
corrente
Compatibile
Caricabatterie
Peso 138 g
Temperatura di
funzionamento
Tempo di carica 71 min (singola)
* Per conformarsi alle normative locali, le frequenze di funzionamento di 5150-5250MHz e
5725-5850MHz non sono disponibili in alcuni paesi.
** Tutti i prodotti serie Mavic e Osmo richiedono una staffa di montaggio compatibile con
CrystalSky (da acquistare separatamente dal negozio online DJI). Tenere presente che
solo CS550 è compatibile con i prodotti serie Mavic e Osmo.
*** Il caricabatterie da 57 W non eroga una potenza sufciente per caricare le batterie e altri
dispositivi collegati simultaneamente alla porta USB. NON utilizzare la porta USB per
caricare un altro dispositivo durante la ricarica delle batterie.
Giroscopio, bussola, altoparlante, sensore sensibile alla luce,
microfono
Da -20 °C a 40 °C (da -4 °F a 104 °F)
Serie Mavic, Osmo (Osmo Mobile esclusa), Inspire, Matrice,
Phantom 3 (Phantom 3 Professional, Phantom 3 Advanced) e
Phantom 4
55 W
Da -20 °C a 40 °C (da -4 °F a 104 °F)
Meno di 3 mesi: da -28 °C a 45 °C (da -18,4 °F a 104 °F)
Più di 3 mesi: da 22 °C a 30 °C (da 71,6 °F a 86 °F)
8,7 V, 6 A; 5 V, 2 A
Caricabatterie Inspire 2 (IN2C180)
Caricabatterie Inspire 2 (ADE018)
Caricabatterie per auto Inspire 2 (C6S90-2)
Caricabatterie Inspire 1 (A14-100P1A)
Caricabatterie Inspire 1 (ADE018)
Caricabatterie per auto Inspire 1 (C6S90)
Caricabatterie serie Phantom 4 (PH4C100)
Caricabatterie per auto Phantom 4 (C4S90-4)
Caricabatterie Phantom 3 Professional (ADE019)
Caricabatterie per auto Phantom 3 (C4S90)
Caricabatterie 57W Phantom 3 (A14-057N1A)***
Caricabatterie 57W Osmo (A14-057N1A)***
Da 5 °C a 40 °C (da 41 °F a 104 °F)
IT
55
Page 57

Disclaimer
Gefeliciteerd met de aankoop van je nieuwe DJITM-product. De informatie in dit
document betreft je veiligheid en je wettelijke rechten en plichten. Lees dit hele
document zorgvuldig door om ervoor te zorgen dat je de juiste conguratie toepast
vóór het gebruik. Het niet lezen en opvolgen van de instructies en waarschuwingen
in dit document kan leiden tot ernstig letsel bij jezelf of anderen, tot schade aan je
DJI-product of schade aan andere objecten in de omgeving. Dit document en alle
overige documentatie zijn onderhevig aan veranderingen naar goeddunken van
DJI. Surf voor up-to-date productinformatie naar http://www.dji.com en klik op de
productpagina van dit product.
Door dit product te gebruiken geef je aan dat je deze disclaimer en waarschuwing
zorgvuldig hebt gelezen en dat je begrijpt en ermee akkoord gaat dat je je moet
houden aan de hierin gestelde voorwaarden en bepalingen. Je gaat ermee
akkoord dat je verantwoordelijk bent voor je eigen gedrag tijdens het gebruik van
dit product, en voor de mogelijke gevolgen daarvan. Je gaat ermee akkoord om dit
product uitsluitend voor gepaste doeleinden te gebruiken en in overeenstemming
met alle toepasselijke wetten, regels en voorschriften, en alle voorwaarden,
voorzorgsmaatregelen, gewoonten, beleidsregels en richtlijnen die DJI heeft
opgesteld en beschikbaar heeft gesteld. DJI aanvaardt geen aansprakelijkheid
voor schade, letsel of enige wettelijke verantwoordelijkheid die direct of indirect
voortkomt uit het gebruik van dit product. De gebruiker neemt veilig en legaal
gebruik in acht, inclusief, maar niet beperkt tot wat in dit document uiteen is gezet.
DJI is een handelsmerk van SZ DJI TECHNOLOGY CO., LTD. (Afgekort als
NL
“DJI”) en haar dochterondernemingen. Namen van producten, merken, enz.
in dit document zijn handelsmerken of gedeponeerde handelsmerken van hun
respectieve eigenaren.
Waarschuwing
1. De Charging Hub is alleen compatibel met de bijbehorende lader. Probeer de
Charging Hub NIET met een andere acculader te gebruiken.
2. De Charging Hub is alleen compatibel met de Inspire 2 Battery Charger.
Probeer de Charging Hub NIET met een andere acculader te gebruiken.
3. Zorg dat je vóór het verwijderen van de accu op de ontgrendelknop van de
accu drukt.
4. Probeer NIET de metalen klemmen van de Power Adapter aan te raken.
5. Reinig de metalen klemmen met een schone, droge doek als er een zichtbare
ophoping van vuil is.
Inleiding
CrystalSkyTM is ontworpen voor luchtfotografie dat onder verschillende
lichtomstandigheden scherpe beelden levert, dankzij de ingebouwde
lichtgevoelige sensor. Ondersteuning voor DJI MAVICTM, OSMOTM -serie,
(exclusief Osmo Mobile), INSPIRETM-serie, PHANTOMTM 4-serie, Phantom 3-serie
(Phantom 3 Professional, Phantom 3 Advanced) en MATRICETM-serie.* Gebruik de
geïntegreerde DJI GOTM-/DJI GO 4-app om de gimbal, camera en andere functies
van jouw ight system te bedienen. De app omvat ook een kaart, een online store
en een gebruikerscentrum om je drone te congureren en je content te delen.
* Naarmate de testprocedures en ontwikkeling vorderen, wordt ondersteuning voor DJI
apparaten toegevoegd. Ga voor een volledige lijst naar de productpagina van DJI
CrystalSky op dji.com.
56
Page 58

In de doos
CrystalSky Monitor ×1
Intelligent Battery ×2 (CS785/CS785U) of ×1 (CS550)
Intelligent Battery Charging Hub (WCH2) ×1
Gebruikershandleiding CrystalSky x1
Veiligheidsrichtlijnen Intelligent Battery x1
Montagesteun (optie) ×1
Dop (optie) ×1
* Optionele onderdelen kunnen afzonderlijk worden aangeschaft in de ofciële DJI
Online Store.
Overzicht
CrystalSky Monitor
1. HDMI-poort
HDMI-video-uitgangssignaal.
2. USB-poort
Ondersteund uitbreidings-
apparaat, bijv. een U-disk.
3. MicroSD-kaartsleuf
Deze sleuf biedt extra
opslagruimte voor het
weergaveapparaat, ondersteunt
maximaal 128 GB.
4. Micro-USB-poort
Gebruik een micro-USB-kabel
om de afstandsbediening aan te
sluiten als deze wordt gebruikt,
of de pc om parameters te
congureren via DJI ASSISTANT
2. Gebruik de USB-OTG-kabel
om de rmware van de drone
updaten.
5. Hoofdtelefoonaansluiting
1
2
5
347 8
6
16
15
9
CS550
1
2
3
4
5
TM
CS785 (Highlight-versie) /
CS785U (Ultra-bright-versie)
14
13
12
11
10
8
6
7
9
6. Schroefopening voor montage
7. Poort lichtgevoelig
Ingebouwde lichtgevoelige
sensor.
8. Type-C USB 2.0 HS-poort
9. Ingebouwde GNSS
10. Aan-/uitknop
11. Aanpasbare knop
12. Instelknop
13. Aanpasbare knop
14. Terug knop
15. Accu-ontgrendelknop
16. Accuvak
NL
16
15
14
13
12
11
10
57
Page 59

Gebruik
Accu opladen
Gebruik de Inspire 2-lader zoals afgebeeld.*
Plaats de accu in de standaard Charging Hub en sluit connect B van de lader
aan op de Charging HUB. Sluit vervolgens de lader aan op een stroombron
(100-240 V, 50/60 Hz). De Charging Hub laadt de accu's op in volgorde van hun
vermogensniveau, van hoog naar laag. De zoemer geeft een signaal wanneer het
opladen is voltooid. Verwijder de accu of schakel de zoemerschakelaar uit om de
zoemer te stoppen.
De Status-LED knippert groen tijdens het laden en brandt onafgebroken groen als
de accu volledig is opgeladen.
B
A
Laad de Intelligent Flight Battery NIET tegelijk op met de Intelligent Battery
wanneer u de Inspire 2, Phantom 4 Charger of Inspire 2 Car Charger
NL
gebruikt.
•
De USB-voedingspoort kan worden gebruikt om een mobiel apparaat van
5 V / 2 A op te laden.
•
Raadpleeg de gebruikershandleiding van de Charging Hub (WCH2) voor
meer informatie.
Accu monteren
Plaatst de accu in het accuvak en schuif hem naar voren tot je een klik hoort.
Druk eenmaal op de accuniveauknop om het laadniveau te controleren.
•
Druk vóór het verwijderen van de accu op de ontgrendelknop van de accu.
•
Nadat de Intelligent Battery is geplaatst, kan deze de ingebouwde accu
opladen, wat mogelijk leidt tot een kortere accuduur van de Intelligent
Battery. De ingebouwde accu kan de monitor zonder hulp van de Intelligent
Battery gedurende een korte tijd in de stand-by-modus houden, zodat u de
monitor snel kunt starten zodra de Intelligent Battery is geplaatst.
* Gebruik de CrystalSky CS785 zoals afgebeeld.
58
B
Laag
Hoog
Page 60

De monitor monteren
A
B
Zorg dat deel B
is ontgrendeld en monteer
deel B op deel A.
A
M5
Monteer deel A van de
montage-
steun op de monitor.
Vergrendel de
montagesteun.
B
M6
M4
Monteer onderdeel B op
de afstandsbediening.
Gebruik een munt om de
hellingsas vaster/losser te draaien.
Zorg dat je de ingebouwde GNSS NIET blokkeert.
Sluit de monitor aan
Als je de montagesteun gebruikt, sluit de connector
van de montagesteun dan aan op de USB-poort van
de afstandsbediening.
Als je de montagesteun niet gebruikt, sluit dan de monitor aan op de
afstandsbediening met een micro-USB-kabel.
NL
Gebruik de Type-C USB 2.0 HS-poort en micro-USB-poort NIET tegelijkertijd.
De micro-USB-poort werkt op dat moment niet.
59
Page 61

DJI GO-/GO 4-app
Druk op de aan/uit-knop totdat de monitor inschakelt, start vervolgens de DJI GO-/
GO 4-app.
Gebruik de geïntegreerde DJI GO-/DJI GO 4-app om de gimbal, camera en
andere functies van jouw ight system te bedienen. De app omvat ook een kaart,
een online store en een gebruikerscentrum om je drone te configureren en je
content te delen.
50%
Quick setting
HDMI
11:30
WED, 8 NOV
SRE Wi-Fi
DJI GO
Connect your DJI device
4.0
DJI GO 4.0
Go Create
ApplicationsExplorer Settings
*Deze afbeelding dient alleen ter referentie. Raadpleeg de gebruikersinterface.
NL
Specicaties
Monitor
Model CS785 / CS785U CS550
Gewicht Ongeveer 425 g Ongeveer 228 g
Afmetingen
(zonder accu)
Afmetingen (met accu) 208,6 × 147,8 × 34,75 mm 153,76 × 84,94 × 39,6 mm
Touchscreen
Resolutie 2048×1536 1920×1080
Helderheid
Opslag
Ingebouwde app DJI GO, DJI GO 4
Besturingssysteem Android 5.1
Poorten
Netwerk
EIRP (dBm)
GNSS GPS/GLONASS
208,6 × 147,8 × 17 mm 153,76 × 84,94 × 19 mm
7,85" IPS-scherm,
ondersteunt multitouch
CS785: 1000 cd/m2
CS785U: 2000 cd/m2
CS785: ROM 64GB
CS785U: ROM 128 GB
HDMI (ondersteunt 3840×2160-output), twee SD-kaart-sleuven,
USB, micro-USB, Type-C USB 2.0 HS
WiFi-frequentieband: 2400-2483.5MHz, 5150-5250MHz*,
Protocol: 802.11b, 802.11g, 802.11n (HT20), 802.11a
Ondersteunt 4G-modules
2400-2483.5MHz: CE< 20dBm, FCC<30dBm, SRRC<20dBm
5150-5250MHz: CE<23dBm, FCC<30dBm
5725-5850MHz: CE< 14dBm, FCC<30dB, SRRC<30dBm
5,5" IPS-scherm,
ondersteunt multitouch
1000 cd/m2
ROM 32 GB
5725-5850MHz*
Ingebouwde modules Gyroscoop, kompas, luidspreker, lichtgevoelige sensor, microfoon
60
Page 62

Ingebouwde accu 980 mAh, 3,7 V
4K-decodering H.264: 4K30p, H.265: 4K60p
Bedrijfstempera-
tuurbereik
Compatibele DJI-
producten**
Intelligent Battery
Model WB37-4920mAh-7.6V
Capaciteit 4920 mAh
Spanning 7,6 V
Accutype LiPo-accu
Vermogen 37,39 Wh
Max. oplaadvermogen 55 W
Bedrijfstempera-
tuurbereik
Opbergtemperatuur
Oplaadtemperatuur 41 °F tot 104 °F (5 °C tot 40 °C)
Netto gewicht Ongeveer 170 g
Afmetingen 90 × 45 × 26 mm
Charging Hub
Model WCH2
Ingangsspanning 17,3 - 26,2 V
Uitgangsspanning en
stroom
Compatibel
Acculader
Gewicht 138 g
Bedrijfstemperatuur 41 °F tot 104 °F (5 °C tot 40 °C)
Oplaadtijd 71 min. (enkel)
* Om aan lokale wetgeving te voldoen, is het gebruik van zowel de 5150-5250MHz als de
5725-5850MHz frequentie in een aantal landen niet beschikbaar.
** Alle producten van de Mavic- en Osmo-serie vereisen een Mounting Bracket (afzonderlijk
verkrijgbaar bij de officiële webwinkel van DJI) to voor gebruik in combinatie met
CrystalSky. Let op: alleen CS550 kan worden gebruikt in combinatie met producten van
de Mavic- en Osmo-serie.
*** De 57 W-acculader levert niet genoeg vermogen om de accu's en overige apparaten die
zijn aangesloten op de USB-poort tegelijkertijd op te laden. Gebruik de USB-poort tijdens
het opladen van de accu's niet om een ander apparaat op te laden.
-20 °C tot 40 °C
Mavic, Osmo (exclusief Osmo Mobile), Inspire, Matrice, Phantom
3 (Phantom 3 Professional, Phantom 3 Advanced) en Phantom
4-serie
-20 °C tot 40 °C
Minder dan 3 maanden: -28 tot 45 °C (-18,4° tot 104 °F)
Meer dan 3 maanden: 22 tot 30 °C (71,6° tot 86 °F)
8,7 V, 6 A; 5 V, 2 A
Inspire 2 Battery Charger (IN2C180)
Inspire 2 Battery Charger (ADE018)
Inspire 2 Car Charger (C6S90-2)
Inspire 1 Battery Charger (A14-100P1A)
Inspire 1 Battery Charger (ADE018)
Inspire 1 Car Charger (C6S90)
Phantom 4 Series Battery Charger (PH4C100)
Phantom 4 Car Charger (C6S90)
Phantom 3 Professional Battery Charger (ADE019)
Phantom 3 Car Charger (C4S90)
Phantom 3 57W Battery Charger (A14-057N1A)***
Osmo 57W Battery Charger (A14-057N1A)***
NL
61
Page 63

Isenção de Responsabilidade
Parabéns por ter adquirido o seu novo produto da DJITM. As informações
contidas neste documento afetam a sua segurança e os seus direitos legais
e responsabilidades. Leia este documento cuidadosamente para assegurar
uma conguração correta antes da utilização. A não leitura e o incumprimento
das instruções e avisos contidos neste documento podem resultar em lesões
graves para si ou terceiros, em danos no produto da DJI ou em danos noutros
objetos que se encontrem nas proximidades. Este e todos os outros documentos
de garantia estão sujeitos à alteração a critério exclusivo da DJI. Para obter
informações atualizadas sobre o produto, visite http://www.dji.com e clique na
página de produto relativa a este produto.
A utilização deste produto significa que o utilizador leu cuidadosamente esta
declaração de exoneração de responsabilidade e o aviso e que compreende e
aceita cumprir os termos e condições aqui expostos. O utilizador concorda que é
o único responsável pela sua conduta durante a utilização deste produto e pelas
possíveis consequências daí resultantes. O utilizador compromete-se a utilizar
este produto apenas para ns que sejam aceitáveis e estejam em conformidade
com todas as leis, regras e regulamentações aplicáveis e ainda todos os
termos, precauções, práticas, políticas e diretrizes que a DJI disponibilize e
possa vir a disponibilizar. A DJI não assume qualquer responsabilidade pelos
danos, ferimentos ou quaisquer responsabilidades legais decorrentes direta ou
indiretamente da utilização deste produto. O utilizador deve observar as práticas
seguras e legais, incluindo, entre outras, as apresentadas no presente documento.
DJI é uma marca comercial da SZ DJI TECHNOLOGY CO., LTD. (abreviada
como "DJI") e suas empresas aliadas. Nomes de produtos, marcas, etc., que
aparecem neste documento são marcas comerciais ou marcas registradas de
PT
suas respectivas companhias proprietários.
Advertência
1. O Ponto de Carregamento é compatível apenas com o carregador de bateria
DJI especicado. NÃO tente utilizar o Ponto de Carregamento com qualquer
outro carregador de bateria.
2. O Ponto de Carregamento é compatível apenas com a Intelligent Battery DJI
especicada. NÃO tente utilizar o Ponto de Carregamento com qualquer outra
bateria.
3. Pressione o botão de remoção da bateria antes de removê-la.
4. NÃO tente tocar nos terminais metálicos sobre o Adaptador de Energia.
5. Se houver acúmulo de sujeira nos terminais metálicos, limpe-os com um pano
de limpeza limpo e seco.
Introdução
O CrystalSkyTM foi projetado especicamente para fotograa aérea, sendo capaz
de exibir imagens nítidas sob diferentes condições de iluminação através de um
sensor de luz incorporado. Compatível com DJI MAVICTM, séries OSMOTM (sem
Osmo Mobile), INSPIRETM, PHANTOMTM 4, Phantom 3 (Phantom 3 Professional,
Phantom 3 Advanced) e MATRICETM.* Use o aplicativo integrado DJI GOTM/DJI GO
4 para controlar o estabilizador, a câmera e outros recursos do seu dispositivo de
voo. O aplicativo também inclui um mapa, uma loja e uma central de usuário para
você congurar seu quadricóptero e compartilhar conteúdo.
* O suporte para dispositivos DJI será adicionado à medida que o teste e desenvolvimento
continue. Acesse a página de produto do DJI CrystalSky em dji.com para obter uma lista
completa.
62
Page 64

Incluído na embalagem
Monitor CrystalSky ×1
Intelligent Battery ×2 (CS785/CS785U) ou ×1 (CS550)
Ponto de Carregamento da Intelligent Battery (WCH2) ×1
Guia do usuário do CrystalSky ×1
Diretrizes de segurança da Intelligent Battery ×1
Suporte de montagem (opcional) ×1
Tampa (opcional) ×1
* As peças opcionais podem ser adquiridas separadamente na loja on-line ocial DJI.
Visão geral
Monitor CrystalSky
1. Entrada HDMI
Saída de sinal de vídeo HDMI.
2. Entrada USB
Dispositivo estendido de
suporte, por exemplo, um
U-disc.
3. Slot do cartão Micro SD
Fornece espaço de
armazenamento extra para
o dispositivo de exibição, o
máximo suportado é de 128
GB.
4. Porta Micro USB
Use um cabo Micro USB para
conectar ao controle remoto
quando em uso, ou ao PC para
congurar parâmetros via DJI
TM
ASSISTANT
2. Para atualizar
o rmware do quadricóptero,
use o cabo USB OTG.
5. Conector de fone de ouvido
1
2
5
347 8
6
16
15
9
CS550
1
2
3
4
5
9
CS785 (versão Highlight) /
CS785U (versão Ultra-bright)
6. Orifício do parafuso de
montagem
7. Porta sensível à luz
Sensor incorporado sensível
à luz.
8. Porta USB 2.0 HS Tipo-C
9. GNSS integrado
10. Botão liga/desliga
11. Botão personalizado
12. Botão de conguração
13. Botão personalizado
14
14. Botão Volta
13
15. Botão de remoção da bateria
12
11
16. Slot da bateria
10
8
6
7
PT
16
15
14
13
12
11
10
63
Page 65

Uso
Carga da bateria
O carregador do Inspire 2 é usado para ns ilustrativos.*
Coloque a bateria no ponto de carregamento padrão e conecte o conector B
do carregador da bateria no ponto de carregamento. Em seguida, conecte
o carregador da bateria a uma tomada (100-240V, 50/60Hz). O Ponto de
Carregamento vai carregar as baterias de maneira inteligente em sequência, de
acordo com os níveis de potência da bateria, do alto para o baixo. O sinal sonoro
começará a tocar quando a carga estiver completa. Remova a bateria ou desligue
o interruptor do sinal sonoro para pará-lo.
O LED de status pisca em verde durante o carregamento e ca aceso em verde
quando a carga estiver plena.
B
A
NÃO carregue a Intelligent Flight Battery com a Intelligent Battery quando
usar o carregador do Inspire 2, do Phantom 4 ou o carregador automotivo
do Inspire 2.
PT
•
A porta de alimentação USB pode ser usada para carregar o dispositivo
móvel de 5V/2A.
•
Consulte o Guia do Usuário do Ponto de Carregamento (WCH2) para
obter mais detalhes.
Montagem da bateria
Coloque a bateria no slot da bateria e deslize-a até o m até ouvir-se um clique.
Pressione o botão do nível da bateria uma vez para vericar o nível da bateria.
•
Pressione o botão de remoção da bateria antes de removê-la.
•
A Intelligent Battery pode carregar a bateria integrada após a montagem,
podendo assim reduzir o tempo de operação da Intelligent Battery. A
bateria integrada pode manter o modo em espera do monitor por um
curto período sem a Intelligent Battery, para que você possa iniciar o
monitor rapidamente tão logo a Intelligent Battery seja montada.
*O CrystalSky CS785 é usado para ns ilustrativos.
64
B
Baixo
Alto
Page 66

Montagem do monitor
A
B
Parte B deve estar
desbloqueado, instale
Parte B no Parte A.
A
M5
Monte o suporte de
montagem Parte A no
Monitor.
Trave o Suporte de
Montagem.
B
M6
M4
Monte Parte B no Controle
Remoto.
Use uma moeda para ajustar o
aperto do eixo de inclinação.
NÃO obstrua o GNSS integrado durante o uso.
Conexão do monitor
Ao usar o Suporte de Montagem, plugue o conector
no Suporte de Montagem à porta USB do controle
remoto.
Quando utilizar sem o Suporte de Montagem, conecte o monitor ao controle
remoto através de um cabo Micro USB.
PT
NÃO use a porta USB 2.0 HS Tipo-C e as portas Micro USB
simultaneamente, pois a porta Micro USB não funcionará nesse momento.
65
Page 67

Aplicativo DJI GO/GO 4
Pressione o botão liga/desliga até o Monitor ligar; depois, ligue o aplicativo DJI
GO/GO 4.
Use o aplicativo integrado DJI GO/DJI GO 4 para controlar o estabilizador, a
câmera e outros recursos do seu dispositivo de voo. O aplicativo também inclui um
mapa, uma loja e uma central de usuário para você congurar seu quadricóptero
e compartilhar conteúdo.
Quick setting
HDMI
11:30
WED, 8 NOV
SRE Wi-Fi
DJI GO
Connect your DJI device
4.0
DJI GO 4.0
Go Create
ApplicationsExplorer Settings
*Imagem meramente para referência. Consulte a interface de usuário real.
PT
Especicações
Monitor
Modelo CS785/ CS785U CS550
Peso Aprox. 425 g Aprox. 228 g
Dimensões
(sem bateria)
Dimensões
(com bateria)
Tela de toque
Resolução 2048×1536 1920×1080
Brilho
Armazenamento
Aplicativo integrado DJI GO, DJI GO 4
Sistema operacional Android 5.1
Portas
Rede
EIRP(dBm)
GNSS GPS/GLONASS
66
208,6×147,8×17 mm 153,76×84,94×19 mm
208,6×147,8×34,75 mm 153,76×84,94×39,6 mm
7,85‘, tela IPS,
com suporte multitoque
CS785: 1000 cd/m2
CS785U: 2000 cd/m2
CS785: ROM 64 GB
CS785U: ROM 128 GB
HDMI (compatível com 3840×2160), slot duplo para cartões SD,
USB, Micro USB, Tipo-C USB 2.0 HS
Banda de frequência WIFI: 2400-2483.5MHz, 5150-5250MHz* e
5725-5850MHz*
Protocolo: 802.11b, 802.11g, 802.11n (HT20), 802.11a
Suporta módulos 4G
2400-2483.5MHz: CE< 20dBm, FCC<30dBm, SRRC<20dBm
5150-5250MHz: CE<23dBm, FCC<30dBm
5725-5850MHz: CE< 14dBm, FCC<30dB, SRRC<30dBm
5,5‘, tela IPS,
com suporte multitoque
1000 cd/m2
ROM 32 GB
50%
Page 68

Módulos incorporados Giroscópio, Bússola, Alto-falante, Sensor sensível à luz, Microfone
Bateria integrada 980 mAh, 3,7 V
Capacidade de
decodicação de 4K
Faixa de temperatura
operacional
Produtos DJI
compatíveis**
Intelligent Battery
Modelo WB37-4920mAh-7,6V
Capacidade 4920 mAh
Tensão 7,6 V
Tipo de bateria Bateria LiPo
Energia 37,39 Wh
Potência máx. de carga 55 W
Faixa de temperatura
operacional
Temperatura de
armazenamento
Detecção de
temperatura
Peso líquido Aprox. 170 g
Dimensões 90×45×26 mm
Ponto de Carregamento
Modelo WCH2
Tensão de entrada 17,3 - 26,2 V
Tensão de saída e
corrente
Compatível
Carregador da bateria
Peso 138 g
Temperatura
operacional
Tempo de carregamento 71 min (único)
* Para cumprir com as regulamentações locais, as frequências de operação de 5150-
5250MHz e 5725-5850MHz não estão disponíveis em alguns países.
** Todos os produtos das séries Mavic e Osmo requerem um Suporte de Montagem (adquirido
separadamente na Loja On-line ocial da DJI) para serem compatíveis com o CrystalSky.
Observe que apenas o CS550 é compatível com os produtos das séries Mavic e Osmo.
*** O carregador de bateria de 57 W não suporta energia suciente para carregar baterias
e outros dispositivos conectados simultaneamente à porta USB. NÃO use a porta USB
para carregar outro dispositivo enquanto estiver carregando baterias.
H.264: 4K30p, H.265: 4K60p
-4° a 104° F (-20° a 40°C)
Séries Mavic, Osmo (sem Osmo Mobile), Inspire, Matrice,
Phantom 3 (Phantom 3 Professional, Phantom 3 Advanced) e
Phantom 4
-4° a 104° F (-20° a 40°C)
Menos de 3 meses: -18,4° a 104° F (-28°C a 45°C)
Mais de 3 meses: 71,6° a 86° F (22°C a 30°C)
41° a 104°F (5° a 40°C)
8,7 V, 6 A; 5 V, 2 A
Carregador de Bateria Inspire 2 (IN2C180)
Carregador de Bateria Inspire 2 (ADE018)
Carregador Automotivo Inspire 2 (C6S90-2)
Carregador de Bateria Inspire 1 (A14-100P1A)
Carregador de Bateria Inspire 1 (ADE018)
Carregador Automotivo Inspire 1 (C6S90)
Carregador de Bateria Série Phantom 4 (PH4C100)
Carregador Automotivo Phantom 4 (C4S90-4)
Carregador de Bateria Phantom 3 Professional (ADE019)
Carregador Automotivo Phantom 3 (C4S90)
Carregador de Bateria 57W Phantom 3 (A14-057N1A)***
Carregador de Bateria 57W Osmo (A14-057N1A)***
41° a 104°F (5° a 40°C)
PT
67
Page 69

Отказ от ответственности
Поздравляем с приобретением нового продукта DJITM. Информация,
содержащаяся в этом документе, затрагивает вашу безопасность, законные
права и обязанности. Внимательно ознакомьтесь с данным документом перед
использованием продукта. Пренебрежение содержимым данного документа
и несоблюдение мер безопасности может привести к серьезным травмам,
повреждению продукта DJI и другого имущества. Компания DJI вправе вносить
изменения в содержание данного и сопутствующих документов. Для получения
обновленной информации по продукту посетите веб-сайт http://www.dji.com и
выберите страницу, соответствующую данному продукту.
Используя данный продукт, вы подтверждаете, что внимательно ознакомились
с заявлением об отказе от ответственности и предупреждением и соглашаетесь
выполнять правила и условия настоящего документа. Вы несете полную
ответственность за эксплуатацию данного продукта и за все возможные
последствия от его использования. Вы соглашаетесь использовать данный
продукт только в правомерных целях, способом, который не противоречит
действующему законодательству, правилам и предписаниям, включая
международные и государственные правила полетов, и всем условиям,
мерам предосторожности, установкам, курсам и руководствам, которые были
предоставлены и могут быть предоставлены в будущем компанией DJI. DJI
не несет ответственность за повреждения, травмы или любую юридическую
ответственность, прямо или косвенно вызванную использованием данного
продукта. На пользователя возлагается обязанность соблюдать правила
техники безопасности и законы, включая, но не ограничиваясь изложенными в
настоящем документе.
DJI является товарным знаком компании SZ DJI TECHNOLOGY CO., LTD.
(сокращенно "DJI") и ее дочерних компаний. Названия продуктов, торговых
марок и т. д., содержащиеся в данном документе, являются товарными знаками
или зарегистрированными товарными знаками соответствующих компаний.
RU
Предупреждение
1. Зарядный концентратор совместим только с указанным зарядным
устройством DJI. НЕ пытайтесь использовать зарядный концентратор с
любым другим зарядным устройством для аккумуляторной батареи.
2. Зарядный концентратор совместим только с указанным аккумулятором DJI
Intelligent Battery. НЕ пытайтесь использовать зарядный концентратор с
любым другим аккумулятором.
3. Обязательно нажмите кнопку разблокировки аккумулятора перед его
выниманием.
4. НЕ касайтесь металлических контактов на адаптере питания.
5. Очистите металлические клеммы чистой сухой тканью, если они загрязнены.
Введение
Дисплей CrystalSkyTM предназначен для аэросъемки и обеспечивает четкое
изображение в различных условиях освещения благодаря встроенному
светочувствительному датчику. Совместим с дронами DJI MAVICTM, OSMOTM
(за исключением Osmo Mobile), INSPIRETM, PHANTOMTM 4, Phantom 3 (Phantom
3 Professional, Phantom 3 Advanced) и MATRICETM.* Встроенное приложение
DJI GOTM/DJI GO 4 позволяет управлять стабилизатором, камерой и другими
функциями дрона. В приложении также есть разделы «Карта», «Интернетмагазин» и «Пользовательский центр», которые дают возможность проводить
конфигурацию дрона и обмениваться снятыми материалами с другими
пользователями.
* После завершения разработки и тестирования будет добавлена поддержка устройств
DJI. Посетите страницу, посвященную продукции DJI CrystalSky, на сайте dji.com, чтобы
ознакомиться с полным списком поддерживаемых устройств.
68
Page 70

Комплект поставки
Монитор CrystalSky ×1
Аккумулятор Intelligent Battery ×2(CS785/CS785U) или ×1(CS550)
Зарядный концентратор аккумулятора Intelligent Battery (WCH2) ×1
Руководство пользователя CrystalSky ×1
Инструкции по технике безопасности для аккумулятора Intelligent Battery ×1
Кронштейн (дополнительно) ×1
Бленда объектива (дополнительно) ×1
* Дополнительные компоненты можно приобрести отдельно в официальном
интернет-магазине DJI.
Обзор
Монитор CrystalSky
1. Порт HDMI
Передача видеосигнала HDMI
2. Порт USB
Совместимое устройство для
увеличения объема памяти,
например U-диск.
3. Слот для карты памяти Micro SD
Обеспечивает дополнительную
память для устройства
отображения, макс. 128 Гбайт
4. Порт Micro USB
С помощью кабеля Micro USB
подключите монитор к пульту
управления для использования
или к ПК для настройки
параметров через
DJI ASSISTANTTM 2.
Для обновления прошивки
дрона используйте кабель USB
OTG.
5. Разъем для наушников
1
2
5
9
15
приложение
347 8
6
16
1
2
3
4
5
9
CS785 (вариант Highlight) /
CS785U (вариант Ultra-bright)
6. Отверстие для крепежного винта
7. Встроенный светочувствительный
датчик
8. Порт, тип-C USB2.0 HS
9. Встроенный модуль GNSS
10. Кнопка питания
11. Настраиваемая кнопка
12. Кнопка настройки
13. Настраиваемая кнопка
14. Кнопка назад
14
15. Кнопка освобождения
13
12
аккумулятора
11
16. Углубление для аккумулятора
10
8
6
7
CS550
16
15
RU
14
13
12
11
10
69
Page 71

Использование
Зарядка аккумулятора
На изображении показано зарядное устройство для Inspire 2.*
Поместите аккумулятор в стандартный зарядный концентратор и подсоедините
разъем B зарядного устройства аккумулятора к зарядному концентратору, затем
подключите зарядное устройство аккумулятора к разъему питания (100-240 В,
50/60 Гц). Зарядный концентратор будет заряжать аккумуляторы по порядку в
соответствии с уровнем их заряда от самого высокого к самому низкому. Зуммер
начнет издавать звуковой сигнал, когда зарядка будет окончена. Снимите
аккумулятор или переместите переключатель зуммера для его отключения.
Светодиодный индикатор состояния мигает зеленым во время зарядки и
начинает гореть непрерывно, когда аккумулятор полностью заряжен.
B
ЗАПРЕЩАЕТСЯ заряжать аккумулятор Intelligent Flight Battery вместе
с аккумулятором Intelligent Battery при использовании зарядного
устройства Inspire 2, Phantom 4 или автомобильного зарядного
устройства Inspire 2.
•
USB-разъем питания можно использовать для зарядки мобильного
RU
устройства 5 B / 2 A.
•
Подробную информацию см. в руководстве по эксплуатации зарядного
концентратора (WCH2).
Установка аккумулятора
Поместите аккумулятор в специальное углубление, затем переместите его до
щелчка.
Нажмите кнопку на аккумуляторе один раз, чтобы проверить уровень его заряда.
•
Обязательно нажмите кнопку разблокировки аккумулятора перед его
выниманием.
•
После установки аккумулятор Intelligent Battery будет заряжать
встроенную батарею, что может сократить время работы Intelligent
Battery. Встроенная батарея способна поддерживать работу монитора
в режиме ожидания в течение короткого времени без аккумулятора
Intelligent Battery, что позволит быстро приступить к работе сразу
после подключения Intelligent Battery.
*На иллюстрации процесса установки показан монитор CrystalSky CS785.
70
B
A
Низкий
Высокий
Page 72

Установка монитора
B
M6
A
M5
Установите кронштейн А
в монитор.
Зафиксируйте
кронштейн.
Во время эксплуатации встроенный модуль GNSS НЕ должен быть
перекрыт.
Подключение монитора
При использовании кронштейна соедините разъем
на кронштейне с портом USB пульта управления.
При использовании без кронштейна подключите монитор к пульту управления с
помощью кабеля Micro USB.
M4
Прикрепите деталь B на
пульт управления.
Для изменения угла наклона
монитора используйте
монетку.
A
B
Убедитесь, что компонент B
разблокирован, установите
компонент B в компонент A.
RU
НЕ используйте порты тип-C USB 2.0 HS и Micro USB одновременно, т. к.
в таком случае порт Micro USB не будет работать.
71
Page 73

Приложение DJI GO/GO 4
Нажмите кнопку питания для включения монитора, затем войдите в приложение
DJI GO/GO 4.
Встроенное приложение DJI GO/DJI GO 4 позволяет управлять стабилизатором,
камерой и другими функциями дрона. В приложении также есть разделы
«Карта», «Интернет-магазин» и «Пользовательский центр», которые дают
возможность проводить конфигурацию дрона и обмениваться снятыми
материалами с другими пользователями.
Quick setting
HDMI
11:30
WED, 8 NOV
*Данное изображение приведено исключительно в справочных целях. Пожалуйста, см.
интерфейс пользователя.
Технические характеристики
RU
Монитор
Модель CS785/ CS785U CS550
Масса Около 425 г Около 228 г
Размеры
(без аккумулятора)
Размеры
(с аккумулятором)
Сенсорный экран
Разрешение 2048×1536 1920×1080
Яркость
Память
Встроенное приложение DJI GO, DJI GO 4
Операционная система Android 5.1
Порты
Сеть
EIRP(dBm) 2400-2483.5MHz: < 20dBm
GNSS GPS/ГЛОНАСС
Встроенные модули Гироскоп, компас, динамик, светочувствительный датчик, микрофон
72
SRE Wi-Fi
DJI GO
Connect your DJI device
208,6×147,8×17 мм 153,76×84,94×19 мм
208,6×147,8×34,75 мм 153,76×84,94×39,6 мм
7,85-дюймовый экран с планарной
коммутацией
и поддержкой множественных
касаний (Multitouch)
CS785: 1000 кд/м2
CS785U: 2000 кд/м2
CS785: ПЗУ 64 Гбайт
CS785U: ПЗУ 128 Гбайт
HDMI (поддержка разрешения 3840×2160), два слота для карт памяти
SD, USB, Micro USB, тип-C USB2.0 HS
Диапазон частот WIFI: 2400-2483.5MHz
Протокол: 802.11b, 802.11g, 802.11n (HT20), 802.11a
Поддержка модулей 4G
4.0
DJI GO 4.0
Go Create
ApplicationsExplorer Settings
5,5-дюймовый экран с планарной
коммутацией
и поддержкой множественных
касаний (Multitouch)
1000 кд/м2
ПЗУ 32 Гбайт
50%
Page 74

Встроенный аккумулятор 980 мАч, 3,7 В
Декодирование сигнала 4K H.264: 4K30p, H.265: 4K60p
Рабочий диапазон
температур
Совместимые продукты
DJI**
Аккумулятор Intelligent Battery
Модель WB37 4230 мАч, 7,6 В
Емкость 4920 мАч
Напряжение 7,6 В
Тип аккумулятора Литий-полимерный
Емкость 37,39 Вт·ч
Максимальная мощность
зарядки
Рабочий диапазон
температур
Диапазон температур
хранения
Диапазон температур
зарядки
Масса Прибл. 170 г
Размеры 90×45×26 мм
Зарядный концентратор
Модель WCH2
Входное напряжение 17,3 – 26,2 В
Выходное напряжение и
ток
Совместимые зарядные
устройства
Масса 138 г
Диапазон рабочих
температур
Время зарядки 71 мин (один аккумулятор)
** Для использования монитора CrystalSky на продуктах серии Mavic и Osmo требуется
крепежный кронштейн (приобретается отдельно). Обратите внимание, что только
модель CS550 совместима с продуктами серий Mavic и Osmo.
*** Зарядное устройство аккумулятора 57 Вт не обеспечивает достаточной мощности
для зарядки аккумуляторов и других устройств, одновременно подключенных к порту
USB. ЗАПРЕЩАЕТСЯ использовать порт USB для зарядки других устройств во время
зарядки аккумуляторов.
от -20 до +40 °C (от -4 до 104 °F).
Дроны серий Mavic, Osmo (за исключением Osmo Mobile), Inspire,
Matrice, Phantom 3 (Phantom 3 Professional, Phantom 3 Advanced) и
Phantom 4
55 Вт
от -20 до +40 °C (от -4 до 104 °F).
Менее 3 месяцев: от -28 до +45 °C (от -18,4 до 104 °F).
Более 3 месяцев: от 22 до 30 °C (от 71,6 до 86 °F).
от 5 до 40 °C (от 41 до 104 °F)
8,7 В при 6 A, 5 В при 2 A
Зарядное устройство для аккумулятора Inspire 2 (IN2C180)
Зарядное устройство для аккумулятора Inspire 2 (ADE018)
Автомобильное зарядное устройство для Inspire 2 (C6S90-2)
Зарядное устройство для аккумулятора Inspire 1 (A14-100P1A)
Зарядное устройство для аккумулятора Inspire 1 (ADE018)
Автомобильное зарядное устройство для Inspire 1 (C6S90)
Зарядное устройство для аккумулятора Phantom 4 (PH4C100)
Автомобильное зарядное устройство для Phantom 4 (C4S90-4)
Зарядное устройство для аккумулятора Phantom 3 Professional
(ADE019)
Автомобильное зарядное устройство для Phantom 3 (C4S90)
Зарядное устройство для аккумулятора 57W Phantom 3 (A14-
057N1A)***
Зарядное устройство для аккумулятора 57W Osmo (A14-057N1A)***
от 5 до 40 °C (от 41 до 104 °F)
RU
73
Page 75

Compliance Information
FCC Compliance Notice
Supplier’s Declaration of Conformity
Product name: CrystalSky (7.85 inch)/(Ultra 7.85 inch)/(5.5 inch)
Model Number: CS785/CS785U/CS550
Responsible Party: DJI Technology, Inc.
Responsible Party Address: 201 S. Victory Blvd., Burbank, CA 91502
Website: www.dji.com
We, DJI Technology, Inc., being the responsible party, declares that the above mentioned model was
tested to demonstrate complying with all applicable FCC rules and regulations.
This device complies with Part 15 of the FCC Rules. Operation is subject to the following two conditions:
(1) This device may not cause harmful interference, and (2) This device must accept any interference
received, including interference that may cause undesired operation.
Any changes or modications not expressly approved by the party responsible for compliance could
void the user’s authority to operate the equipment.
This equipment has been tested and found to comply with the limits for a Class B digital device,
pursuant to part 15 of the FCC Rules. These limits are designed to provide reasonable protection
against harmful interference in a residential installation. This equipment generates, uses and can radiate
radio frequency energy and, if not installed and used in accordance with the instructions, may cause
harmful interference to radio communications. However, there is no guarantee that interference will not
occur in a particular installation. If this equipment does cause harmful interference to radio or television
reception, which can be determined by turning the equipment off and on, the user is encouraged to try
to correct the interference by one or more of the following measures:
— Reorient or relocate the receiving antenna.
— Increase the separation between the equipment and receiver.
— Connect the equipment into an outlet on a circuit different from that to which the receiver is connected.
— Consult the dealer or an experienced radio/TV technician for help.
RF Exposure Information
This equipment complies with FCC radiation exposure limits set forth for an uncontrolled environment.
End user must follow the specic operating instructions for satisfying RF exposure compliance. This
transmitter must not be co-located or operating in conjunction with any other antenna or transmitter.
ISED Compliance Notice
This device contains licence-exempt transmitter(s)/receiver(s) that comply with Innovation, Science
and Economic Development Canada’s licence-exempt RSS(s). Operation is subject to the following
two conditions: (1)This device may not cause interference.(2)This device must accept any interference,
including interference that may cause undesired operation of the device.
L’émetteur/récepteur exempt de licence contenu dans le présent appareil est conforme aux CNR
d’Innovation, Sciences et Développement économique Canada applicables aux appareils radio
exempts de licence. L’exploitation est autorisée aux deux conditions suivantes :(1)L’appareil ne doit
pas produire de brouillage; (2)L’appareil doit accepter tout brouillage radioélectrique subi, même si le
brouillage est susceptible d’en compromettre le fonctionnement.
This equipment complies with ISED radiation exposure limits set forth for an uncontrolled environment. End
user must follow the specic operating instructions for satisfying RF exposure compliance. This transmitter
must not be co-located or operating in conjunction with any other antenna or transmitter.The portable
device is designed to meet the requirements for exposure to radio waves established by the ISED.
Cet équipement est conforme aux limites d’exposition aux rayonnements ISED établies pour un
environnement non contrôlé. L’utilisateur nal doit suivre les instructions spéciques pour satisfaire
les normes. Cet émetteur ne doit pas être co-implanté ou fonctionner en conjonction avec toute autre
antenne ou transmetteur. Le dispositif portatif est conçu pour répondre aux exigences d’exposition aux
ondes radio établie par le développement énergétique DURABLE.
部件名称
线路板 × ○ ○ ○ ○ ○
金属部件(铜合金) × ○ ○ ○ ○ ○
内部线材 × ○ ○ ○ ○ ○
其他配件 × ○ ○ ○ ○ ○
本表格依据 SJ/T 11364 的规定编制。
○:表示该有害物质在该部件所有均质材料中的含量均在 GB/T 26572 规定的限量要求以下。
×:表示该有害物质至少在该部件的某一均质材料中的含量超出 GB/T 26572 规定的限量要求。
(产品符合欧盟 ROHS 指令环保要求)
74
铅
(Pb)汞(Hg)镉(Cd)
外壳 × ○ ○ ○ ○ ○
有害物质
六价铬
(Cr
+6
)
多溴联苯 (PBB)
多溴二苯醚
(PBDE)
Page 76

KCC Compliance Notice
“해당무선설비는 운용 중 전파혼신 가능성이 있으므로 인명안전과 관련된 서비스는 할 수 없습니다.”
“해당 무선설비는 운용 중 전파혼신 가능성이 있음”
NCC Compliance Notice
取得審驗證明之低功率射頻器材,非經核准,公司、商號或使用者均不得擅自變更頻率、加大功率或變
更原設計之特性及功能。低功率射頻器材之使用不得影響飛航安全及干擾合法通信;經發現有干擾現象時,
應立即停用,並改善至無干擾時方得繼續使用。前述合法通信,指依電信管理法規定作業之無線電通信。
低功率射頻器材須忍受合法通信或工業、科學及醫療用電波輻射性電機設備之干擾。
應避免影響附近雷達系統之操作。
高增益指向性天線只得應用於固定式點對點系統。
EU Compliance Statement: SZ DJI TECHNOLOGY CO., LTD. hereby declares that this device is in
compliance with the essential requirements and other relevant provisions of the Directive 2014/53/EU.
A copy of the EU Declaration of Conformity is available online at www.dji.com/euro-compliance
EU contact address: DJI GmbH, Industriestrasse 12, 97618, Niederlauer, Germany
GB Compliance Statement: SZ DJI TECHNOLOGY CO., LTD. hereby declares that this device is in
compliance with the essential requirements and other relevant provisions of Radio Equipment Regulations
2017.
A copy of the GB Declaration of Conformity is available online at www.dji.com/euro-compliance
Declaración de cumplimiento UE: SZ DJI TECHNOLOGY CO., LTD. por la presente declara que este
dispositivo cumple los requisitos básicos y el resto de provisiones relevantes de la Directiva 2014/53/EU.
Hay disponible online una copia de la Declaración de conformidad UE en www.dji.com/euro-compliance
Dirección de contacto de la UE: DJI GmbH, Industriestrasse 12, 97618, Niederlauer, Germany
EU-verklaring van overeenstemming: SZ DJI TECHNOLOGY CO., LTD. verklaart hierbij dat dit apparaat
voldoet aan de essentiële vereisten en andere relevante bepalingen van Richtlijn 2014/53/EU.
De EU-verklaring van overeenstemming is online beschikbaar op www.dji.com/euro-compliance
Contactadres EU: DJI GmbH, Industriestrasse 12, 97618, Niederlauer, Germany
Declaração de conformidade da UE: A SZ DJI TECHNOLOGY CO., LTD. declara, através deste documento,
que este dispositivo está em conformidade com os requisitos essenciais e outras disposições relevantes da
Diretiva 2014/53/EU.
Existe uma cópia da Declaração de conformidade da UE disponível online em www.dji.com/euro-compliance
Endereço de contacto na UE: DJI GmbH, Industriestrasse 12, 97618, Niederlauer, Germany
Dichiarazione di conformità UE: SZ DJI TECHNOLOGY CO., LTD. dichiara che il presente dispositivo è
conforme ai requisiti essenziali e alle altre disposizioni rilevanti della direttiva 2014/53/EU.
Una copia della dichiarazione di conformità UE è disponibile online all'indirizzo Web www.dji.com/euro-
compliance
Indirizzo di contatto UE: DJI GmbH, Industriestrasse 12, 97618, Niederlauer, Germany
Déclaration de conformité UE : Par la présente, SZ DJI TECHNOLOGY CO., LTD déclare que cet
appareil est conforme aux principales exigences et autres clauses pertinentes de la directive
européenne 2014/53/EU.
Une copie de la déclaration de conformité UE est disponible sur le site www.dji.com/euro-compliance
Adresse de contact pour l'UE : DJI GmbH, Industriestrasse 12, 97618, Niederlauer, Germany
PRÉCAUTIONS D'USAGE DE L'APPAREIL
N’utilisez pas l’appareil dans un hôpital, un avion ou un équipement automobile en raison des
radiofréquences qui peuvent produire des interférences
• Maintenez une distance minimale de 15 cm entre votre appareil et un stimulateur cardiaque pour éviter
toute interférence
Eloigner les équipements radioélectriques du ventre des femmes enceintes.
Eloigner les équipements radioélectriques du bas-ventre des adolescents.
Le débit d'absorption spécifique (DAS) local quantifie l'exposition de l'utilisateur aux ondes
électromagnétiques de l'équipement concerné. Le DAS maximal autorisé est de 2 W/ kg pour la tête et
le tronc et de 4 W/ kg pour les membres.
La ou les valeurs du débit d'absorption spécique des CS785/CS785U/CS550:
DAS tronc: 0.304 W/ kg
DAS membres: 0.304 W/ kg
75
Page 77

EU-Compliance: Hiermit erklärt SZ DJI TECHNOLOGY CO., LTD., dass dieses Gerät den wesentlichen
Anforderungen und anderen einschlägigen Bestimmungen der EU-Richtlinie 2014/53/EU entspricht.
Eine Kopie der EU-Konformitätserklärung nden Sie online auf www.dji.com/euro-compliance
Kontaktadresse innerhalb der EU: DJI GmbH, Industriestrasse 12, 97618, Niederlauer, Germany
Декларация за съответствие на ЕС: SZ DJI TECHNOLOGY CO., LTD. декларира, че това устройство
отговаря на основните изисквания и другите приложими разпоредби на Директива 2014/53/ЕС.
Копие от Декларацията за съответствие на ЕС ще намерите онлайн на адрес www.dji.com/euro-compliance
Адрес за контакт за ЕС: DJI GmbH, Industriestrasse 12, 97618, Niederlauer, Германия
Prohlášení o shodě pro EU: Společnost SZ DJI TECHNOLOGY CO., LTD. tímto prohlašuje, že tohle
zařízení vyhovuje základním požadavkům a dalším příslušným ustanovením směrnice 2014/53/EU.
Kopie prohlášení o shodě pro EU je k dispozici on-line na webu www.dji.com/euro-compliance
Kontaktní adresa v EU: DJI GmbH, Industriestrasse 12, 97618, Niederlauer, Německo
EU-overensstemmelseserklæring: SZ DJI TECHNOLOGY CO., LTD. erklærer hermed, at denne enhed
er i overensstemmelse med de væsentlige krav og andre relevante bestemmelser i direktiv 2014/53/EU.
Der er en kopi af EU-overensstemmelseserklæringen tilgængelig online på www.dji.com/euro-compliance
EU-kontaktadresse: DJI GmbH, Industriestrasse 12, 97618, Niederlauer, Tyskland
Δήλωση Συμμόρφωσης ΕΕ: Η SZ DJI TECHNOLOGY CO., LTD. δια του παρόντος δηλώνει ότι η συσκευή
αυτή συμμορφώνεται με τις βασικές απαιτήσεις και άλλες σχετικές διατάξεις της Οδηγίας 2014/53/EΕ.
Αντίγραφο της Δήλωσης Συμμόρφωσης ΕΕ διατίθεται ηλεκτρονικά στη διεύθυνση www.dji.com/euro-compliance
Διεύθυνση επικοινωνίας στην ΕΕ: DJI GmbH, Industriestrasse 12, 97618, Niederlauer, Γερμανία
ELi vastavuskinnitus Käesolevaga teatab SZ DJI TECHNOLOGY CO., LTD., et see seade on kooskõlas
direktiivi 2014/53/EL oluliste nõuete ja muude asjakohaste sätetega.
ELi vastavusdeklaratsiooni koopia on kättesaadav veebis aadressil www.dji.com/euro-compliance
Kontaktaadress ELis: DJI GmbH, Industriestrasse 12, 97618, Niederlauer, Saksamaa
Pranešimas dėl atitikties ES reikalavimams Bendrovė „SZ DJI TECHNOLOGY CO., LTD.“ tvirtina, kad
šis prietaisas atitinka pagrindinius 2014/53/ES direktyvos reikalavimus ir kitas susijusias nuostatas.
ES atitikties deklaracijos kopiją galite rasti adresu www.dji.com/euro-compliance
ES kontaktinis adresas: „DJI GmbH“, Industriestrasse 12, 97618, Niederlauer, Germany (Vokietija)
ES atbilstības paziņojums: SZ DJI TECHNOLOGY CO., LTD. ar šo apliecina, ka šī ierīce atbilst
direktīvas 2014/53/ES pamatprasībām un pārējiem būtiskiem nosacījumiem.
ES atbilstības deklarācijas kopija pieejama tiešsaistē vietnē www.dji.com/euro-compliance
ES kontaktadrese: DJI GmbH, Industriestrasse 12, 97618, Niederlauer, Vācija
EU:n vaatimustenmukaisuusvakuutus: SZ DJI TECHNOLOGY CO., LTD. ilmoittaa täten, että tämä laite
on direktiivin 2014/53/EU olennaisten vaatimusten ja sen muiden asiaankuuluvien ehtojen mukainen.
Kopio EU:n vaatimustenmukaisuusvakuutuksesta on saatavana verkossa osoitteessa www.dji.com/euro-
compliance
Yhteystiedot EU:ssa: DJI GmbH, Industriestrasse 12, 97618, Niederlauer, Germany
RÁITEAS Comhlíonta an AE: Dearbhaíonn SZ DJI TECHNOLOGY CO., LTD. leis seo go bhfuil an gléas
seo de réir na gceanglas riachtanach agus na bhforálacha ábhartha eile sa Treoir 2014/53/AE.
Tá coip de Dhearbhú Comhréireachta an AE ar fáil ar líne ag www.dji.com/euro-compliance
Seoladh teagmhála san AE: DJI GmbH, Industriestrasse 12, 97618, Niederlauer, Germany
Dikjarazzjoni ta’ Konformità tal-UE: SZ DJI TECHNOLOGY CO., LTD. hawnhekk tiddikjara li dan l-apparat
huwa konformi mar-rekwiżiti essenzjali u ma’ dispożizzjonijiet relevanti oħra tad-Direttiva 2014/53/UE.
Kopja tad-Dikjarazzjoni ta’ Konformità tal-UE hija disponibbli onlajn s-sit www.dji.com/euro-compliance
Indirizz ta’ kuntatt tal-UE: DJI GmbH, Industriestrasse 12, 97618, Niederlauer, il-Ġermanja
Declarația UE de conformitate: Prin prezenta, SZ DJI TECHNOLOGY CO., LTD. declară faptul că acest
dispozitiv este conform cu cerințele esențiale și celelalte prevederi relevante ale Directivei 2014/53/UE.
Un exemplar al Declarației UE de conformitate este disponibil online, la adresa www.dji.com/euro-compliance
Adresa de contact pentru UE: DJI GmbH, Industriestrasse 12, 97618, Niederlauer, Germania
Izjava EU o skladnosti: Družba SZ DJI TECHNOLOGY CO., LTD. izjavlja, da ta naprava ustreza
osnovnim zahtevam in drugim ustreznim določbam Direktive 2014/53/EU.
Kopija izjave EU o skladnosti je na voljo na spletu na www.dji.com/euro-compliance
Kontaktni naslov EU: DJI GmbH, Industriestrasse 12, 97618, Niederlauer, Nemčija
EU Izjava o sukladnosti: Tvrtka SZ DJI TECHNOLOGY CO., LTD. izjavljuje da je ovaj uređaj izrađen u
skladu s osnovnim zahtjevima i ostalim relevantnim odredbama Direktive 2014/53/EU.
Kopija EU Izjave o sukladnosti dostupna je na mrežnoj stranici www.dji.com/euro-compliance
Adresa EU kontakta: DJI GmbH, Industriestrasse 12 97618, Niederlauer, Njemačka
Vyhlásenie o zhode EÚ: SZ DJI TECHNOLOGY CO., LTD. týmto vyhlasuje, že toto zariadenie je v zhode
so základnými požiadavkami a ďalšími relevantnými ustanoveniami smernice 2014/53/EÚ.
Kópia tohto Vyhlásenia o zhode EÚ je k dispozícii online na www.dji.com/euro-compliance
Kontaktná adresa v EÚ: DJI GmbH, Industriestrasse 12, 97618, Niederlauer, Nemecko
Deklaracja zgodności UE: Firma SZ DJI TECHNOLOGY CO., LTD. niniejszym oświadcza, że
przedmiotowe urządzenie jest zgodne z zasadniczymi wymogami i innymi stosownymi postanowieniami
dyrektywy 2014/53/UE.
76
Page 78

Kopię deklaracji zgodności UE można znaleźć w Internecie na stronie www.dji.com/euro-compliance
Adres do kontaktu w UE: DJI GmbH, Industriestrasse 12, 97618, Niederlauer, Niemcy
EU megfelelőségi nyilatkozat: A SZ DJI TECHNOLOGY CO., LTD. ezúton megerősíti, hogy ez az eszköz
megfelel a 2014/53/EU Irányelv alapvető követelményeinek és más vonatkozó rendelkezéseinek.
Az EU megfelelőségi nyilatkozat másolata elérhető a www.dji.com/euro-compliance oldalon
EU kapcsolati cím: DJI GmbH, Industriestrasse 12, 97618, Niederlauer, Németország
EU-försäkran om efterlevnad: SZ DJI TECHNOLOGY CO., LTD. härmed förklarar att denna enhet
uppfyller de väsentliga kraven och andra relevanta bestämmelser i direktivet 2014/53/EU.
En kopia av EU-försäkran om efterlevnad nns att tillgå online på adressen www.dji.com/euro-compliance
Kontaktadress EU: DJI GmbH, Industriestrasse 12, 97618, Niederlauer, Tyskland
Yrlýsing um fylgni við reglur ESB: SZ DJI TECHNOLOGY CO., LTD. lýsir hér með yr að þetta tæki hlíti
mikilvægum kröfum og öðrum viðeigandi ákvæðum tilskipunar 2014/53/ESB.
Nálgast má eintak af ESB-samræmisyrlýsingunni á netinu á www.dji.com/euro-compliance
Heimilisfang ESB-tengiliðar: DJI GmbH, Industriestrasse 12, 97618, Niederlauer, Germany
AB Uygunluk Beyanı: SZ DJI TECHNOLOGY CO., LTD. bu belge ile bu cihazın temel gerekliliklere ve
2014/53/EU sayılı Direktin diğer ilgili hükümlerine uygun olduğunu beyan eder.
AB Uygunluk Beyanının bir kopyasına www.dji.com/euro-compliance adresinden çevrim içi olarak ulaşılabilir
AB için iletişim adresi: DJI GmbH, Industriestrasse 12, 97618, Niederlauer, Almanya
CAUTION: RISK OF EXPLOSION IF BATTERY IS REPLACED BY AN INCORRECT TYPE. DISPOSE
OF USED BATTERIES ACCORDING TO THE INSTRUCTIONS
Environmentally friendly disposal
Old electrical appliances must not be disposed of together with the residual waste, but have to be
disposed of separately. The disposal at the communal collecting point via private persons is for free.
The owner of old appliances is responsible to bring the appliances to these collecting points or to similar
collection points. With this little personal effort, you contribute to recycle valuable raw materials and the
treatment of toxic substances.
Umweltfreundliche Entsorgung
Elektro-Altgeräte dürfen nicht mit gewöhnlichem Abfall entsorgt werden und müssen separat entsorgt
werden. Die Entsorgung an kommunalen Sammelstellen ist für Privatpersonen kostenlos. Die Eigentümer
der Altgeräte sind für den Transport zu den Sammelstellen verantwortlich. Durch diesen geringen
Aufwand können Sie zur Wiederverwertung von wertvollen Rohmaterialien beitragen und dafür sorgen,
dass umweltschädliche und giftige Substanzen ordnungsgemäß unschädlich gemacht werden.
Tratamiento de residuos responsable con el medio ambiente
Los aparatos eléctricos viejos no pueden desecharse junto con los residuos orgánicos, sino que deben
ser desechados por separado. Existen puntos limpios donde los ciudadanos pueden dejar estos
aparatos gratis. El propietario de los aparatos viejos es responsable de llevarlos a estos puntos limpios
o similares puntos de recogida. Con este pequeño esfuerzo estás contribuyendo a reciclar valiosas
materias primas y al tratamiento de residuos tóxicos.
Mise au rebut écologique
Les appareils électriques usagés ne doivent pas être éliminés avec les déchets résiduels. Ils doivent être
éliminés séparément. La mise au rebut au point de collecte municipal par l'intermédiaire de particuliers
est gratuite. Il incombe au propriétaire des appareils usagés de les apporter à ces points de collecte ou à
des points de collecte similaires. Avec ce petit effort personnel, vous contribuez au recyclage de matières
premières précieuses et au traitement des substances toxiques.
Smaltimento ecologico
I vecchi dispositivi elettrici non devono essere smaltiti insieme ai riuti residui, ma devono essere smaltiti
separatamente. Lo smaltimento da parte di soggetti privati presso i punti di raccolta pubblici è gratis. È
responsabilità del proprietario dei vecchi dispositivi portarli presso tali punti di raccolta o punti di raccolta
analoghi. Grazie a questo piccolo impegno personale contribuirete al riciclo di materie prime preziose e al
corretto trattamento di sostanze tossiche.
Milieuvriendelijk afvoeren
Oude elektrische apparaten mogen niet worden weggegooid samen met het restafval, maar moeten
afzonderlijk worden afgevoerd. Afvoeren via het gemeentelijke inzamelpunt is gratis voor particulieren.
De eigenaar van oude toestellen is verantwoordelijk voor het inleveren van de apparaten op deze of
vergelijkbare inzamelpunten. Met deze kleine persoonlijke inspanning lever je een bijdrage aan de
recycling van waardevolle grondstoffen en de verwerking van giftige stoffen.
Eliminação ecológica
Os aparelhos elétricos antigos não podem ser eliminados juntamente com os materiais residuais. Têm
de ser eliminados separadamente. A eliminação no ponto de recolha público através de entidades
77
Page 79

particulares é gratuita. É da responsabilidade do proprietário de aparelhos antigos levá-los a estes
pontos de recolha ou a pontos de recolha semelhantes. Com este pequeno esforço pessoal, contribui
para a reciclagem de matérias-primas úteis e para o tratamento de substâncias tóxicas.
Изхвърляне с оглед опазване на околната среда
Старите електрически уреди не трябва да се изхвърлят заедно с битовите отпадъци, а отделно.
Изхвърлянето в общинския пункт за събиране на отпадъци от частни лица е безплатно. Собственикът
на старите уреди е отговорен за пренасянето на уредите до тези или до подобни събирателни
пунктове. С това малко собствено усилие допринасяте за рециклирането на ценни суровини и за
обработката на токсични вещества.
Ekologicky šetrná likvidace
Stará elektrická zařízení nesmějí být likvidována spolu se zbytkovým odpadem, ale musí být likvidována
samostatně. Likvidace na komunálních sběrných místech prostřednictvím soukromých osob je bezplatná.
Vlastník starých zařízení odpovídá za to, že je donese do těchto sběrných míst nebo na obdobná sběrná
místa. Tímto můžete přispět k recyklaci hodnotných surovin a zpracování toxických látek.
Miljøvenlig bortskaffelse
Gamle elektriske apparater må ikke bortskaffes sammen med restaffald, men skal bortskaffes separat.
Bortskaffelse på et fælles indsamlingssted er gratis for privatpersoner. Ejere af gamle apparater er
ansvarlige for at bringe apparater hen til disse indsamlingssteder eller til lignende indsamlingssteder. Med
denne lille personlige indsats bidrager du til genanvendelse af værdifulde råvarer og behandlingen af
giftige stoffer.
Απόρριψη φιλική προς το περιβάλλον
Οι παλιές ηλεκτρικές συσκευές δεν πρέπει να απορρίπτονται μαζί με τα υπολειμματικά απόβλητα, αλλά
ξεχωριστά. Η απόρριψη στο δημοτικό σημείο συλλογής μέσω ιδιωτών γίνεται χωρίς χρέωση. Ο κάτοχος
παλιών συσκευών είναι υπεύθυνος για τη μεταφορά των συσκευών σε αυτά ή παρόμοια σημεία συλλογής.
Μέσω της ατομικής σας προσπάθειας, συμβάλλετε στην ανακύκλωση πολύτιμων πρώτων υλών και την
επεξεργασία των τοξικών ουσιών.
Keskkonnasäästlik kasutuselt kõrvaldamine
Vanu elektriseadmeid ei tohi ära visata koos olmejäätmetega, vaid tuleb koguda ja kasutuselt kõrvaldada
eraldi. Kohaliku omavalitsuse elektroonikaromude kogumispunktis on äraandmine eraisikutele tasuta.
Vanade seadmete sellistesse või sarnastesse kogumispunktidesse toimetamise eest vastutavad
seadmete omanikud. Selle väikese isikliku panusega aitate kaasa väärtusliku toorme ringlussevõtule ja
mürgiste ainete töötlemisele.
Utilizavimas nekenkiant aplinkai
Senų elektrinių prietaisų negalima išmesti kartu su buitinėmis atliekomis; juos būtina utilizuoti atskirai. Tokių
prietaisų utilizavimas per komunalinius atliekų surinkimo punktus yra nemokamas. Elektrinių prietaisų
savininkai utilizuojamus prietaisus privalo priduoti į atitinkamus arba analogiškus atliekų surinkimo
punktus. Tokiu būdu, įdėdami nedaug pastangų, prisidėsite prie vertingų medžiagų perdirbimo ir aplinkos
apsaugojimo nuo toksinių medžiagų.
Videi draudzīga atkritumu likvidēšana
Vecas elektriskās ierīces nedrīkst likvidēt kopā ar pārējiem atkritumiem, bet tās jālikvidē atsevišķi.
Privātpersonām atkritumu likvidēšana komunālajā savākšanas punktā ir bez maksas. Veco ierīču īpašnieks
ir atbildīgs par ierīču nogādāšanu šajos savākšanas punktos vai līdzīgos savākšanas punktos. Ar šīm
nelielām personiskajām pūlēm jūs veicināt vērtīgu izejmateriālu pārstrādi un toksisko vielu apstrādi.
Hävittäminen ympäristöystävällisesti
Vanhoja sähkölaitteita ei saa hävittää kaatopaikkajätteen mukana, vaan ne on hävitettävä erikseen.
Kunnalliseen keräyspisteeseen vieminen on yksityishenkilölle ilmaista. Vanhojen laitteiden omistaja vastaa
laitteiden toimittamisesta kyseisiin keräyspisteisiin tai vastaaviin. Tällä vähäisellä henkilökohtaisella vaivalla
edistät omalta osaltasi arvokkaiden raaka-aineiden kierrätystä ja myrkyllisten aineiden käsittelyä.
Diúscairt neamhdhíobhálach don chomhshaol
Níor cheart seanghléasanna leictreacha a dhiúscairt leis an dramhaíl iarmharach, ach caithfear iad a
chur de láimh astu féin. Tá an diúscairt ag an ionad bailiúcháin pobail ag daoine príobháideacha saor in
aisce. Tá freagracht ar úinéir seanghléasanna na gléasanna a thabhairt chuig na hionaid bhailiúcháin sin
nó chuig ionaid bhailiúcháin den chineál céanna. Le hiarracht bheag phearsanta mar sin, cuidíonn tú le
hamhábhair luachmhara a athchúrsáil agus le substaintí tocsaineacha a chóireáil
Rimi li jirrispetta l-ambjent
L-apparat elettriku qadim ma għandux jintrema imkien ma’ skart residwu, iżda għandu jintrema b’mod
separat. Ir-rimi l-post tal-ġbir komunali minn persuni privati huwa b’xejn. Is-sit ta’ apparat qadim huwa
responsabbli biex iġib l-apparat f’dawn il-postijiet tal-ġbir jew f’postijiet tal-ġbir simili. B’dan l-isforz personali
żgħir, inti tikkontribwixxi għar-riċiklaġġ ta’ materja prima prezzjuża u għat-trattament ta’ sustanzi tossiċi.
Eliminarea ecologică
Aparatele electrice vechi nu trebuie aruncate odată cu deșeurile reziduale, ci trebuie eliminate separat.
Eliminarea în cadrul punctului de colectare local de către persoane zice este gratuită. Proprietarii de
aparate vechi sunt responsabili pentru transportul acestora la respectivele puncte de colectare sau la
alte puncte de colectare similare. Prin acest efort personal nesemnicativ, puteți contribui la reciclarea
materiilor prime valoroase și la tratarea substanțelor toxice.
78
Page 80

Okolju prijazno odlaganje
Starih električnih aparatov ne smete odvreči skupaj z ostanki odpadkov, temveč ločeno. Odlaganje na
komunalnem zbirnem mestu je za zične osebe brezplačno. Lastnik starih naprav je odgovoren, da jih
pripelje do teh ali podobnih zbirnih mest. S tako malo osebnega truda prispevate k recikliranju dragocenih
surovin in obdelavi strupenih snovi.
Ekološko odlaganje
Stari električni uređaji ne smiju se odlagati zajedno s kućnim otpadom, već ih treba odlagati odvojeno.
Odlaganje na komunalnom sabirnom mjestu od strane privatnih osoba je besplatno. Vlasnik starih uređaja
dužan je donijeti uređaje do tih sabirnih mjesta ili sličnih sabirnih mjesta. Ovim malim osobnim naporom
doprinosite recikliranju vrijednih sirovina i pravilnoj obradi otrovnih tvari.
Ekologická likvidácia
Staré elektrospotrebiče sa nesmú likvidovať spolu so zvyškovým odpadom, ale musia sa zlikvidovať
samostatne. Likvidácia v komunálnom zbernom mieste prostredníctvom súkromných osôb je bezplatná.
Majiteľ starých spotrebičov je zodpovedný za prinesenie spotrebičov na tieto zberné miesta alebo na
podobné zberné miesta. Týmto malým osobným úsilím prispievate k recyklovaniu cenných surovín a
spracovaniu toxických látok
Utylizacja przyjazna dla środowiska
Nie można usuwać starych urządzeń elektrycznych wraz z pozostałymi odpadami. Wymagają one
oddzielnej utylizacji. Utylizacja przez osoby prywatne w punkcie zbiórki odpadów komunalnych jest
darmowa. Właściciel starych urządzeń jest odpowiedzialny za dostarczenie ich do takich lub podobnych
punktów zbiórki. Zadając sobie tak niewielki trud, przyczyniasz się do recyklingu cennych surowców i
odpowiedniego postępowania z substancjami toksycznymi.
Környezetbarát hulladékkezelés
A régi elektromos készülékeket nem szabad a nem szelektíven gyűjtött hulladékkal együtt kidobni,
hanem a hulladékkezelésüket elkülönítve kell végezni A közösségi gyűjtőpontokon a magánszemélyek
ingyenesen leadhatják ezeket. A régi készülékek tulajdonosai felelnek azért, hogy e készülékeket ezekre a
gyűjtőpontokra, vagy más gyűjtőpontokra elhozzák. Ezzel a kis személyes erőfeszítéssel Ön is hozzájárul
az értékes nyersanyagok újrahasznosításához és a mérgező anyagok kezeléséhez.
Miljövänlig hantering av avfall
Gamla elektriska apparater får inte kasseras tillsammans med restavfallet utan måste kasseras separat.
Kassering på den lokala insamlingsplatsen för privatpersoner är gratis. Ägaren av gamla apparater
ansvarar för att ta apparaterna till dessa insamlingsplatser eller till liknande insamlingsplatser. Med denna
lilla personliga insats bidrar du till återvinning av värdefulla råvaror och hantering av giftiga ämnen.
Umhversvæn förgun
Ekki má farga gömlum raftækjum með úrgangsleifum, heldur þarf að farga þeim sérstaklega. Förgun á
almennum söfnunarstöðum er ókeypis fyrir einstaklinga. Eigandi gamalla tækja ber ábyrgð á að koma með
tækin á þessa söfnunarstaði eða á svipaða söfnunarstaði. Með þessu litla persónulega átaki stuðlar þú að
endurvinnslu verðmætra hráefna og meðferð eitrurefna.
Çevre dostu bertaraf
Eski elektrikli cihazlar, diğer atıklarla birlikte bertaraf edilmemeli, ayrıca atılmalıdır. Özel kişiler aracılığıyla
genel toplama noktasına bertaraf işlemi ücretsiz olarak yapılmaktadır. Eski cihazların sahibi, cihazları bu
toplama noktalarına veya benzer toplama noktalarına getirmekten sorumludur. Bu az miktardaki kişisel
çabayla, değerli ham maddelerin geri dönüştürülmesine ve toksik maddelerin işleme alınmasına katkıda
bulunmuş olursunuz.
This device is restricted to indoor use when operating in the 5150-5250MHz frequency range in all EU/
EFTA member states and Turkey.
Im Frequenzbereich 5150 – 5250 MHz darf dieses Gerät in allen EU/EFTA-Mitgliedsstaaten und der
Türkei nur innerhalb von Gebäuden verwendet werden.
Este dispositivo está limitado a su uso en interiores cuando esté funcionando en el rango de frecuenciade
5150-5250 MHz en todos los estados miembros de la UE/AELC y Turquía.
Cet appareil est réservé à un usage en intérieur dans une plage de fréquence de 5 150 à 5 250 MHz
dans tous les pays membres de l'Union Européenne et de l'Association européenne de libre-
échange,ainsi qu'en Turquie.
Il presente dispositivo è limitato all'uso in ambienti interni se utilizzato nell'intervallo di frequenze
difunzionamento 5150-5250 MHz in tutti gli stati dell'UE/AELS e in Turchia.
Dit apparaat mag in landen van de EU/EFTA en Turkije alleen in binnenruimtes worden gebruikt
wanneer het frequentiebereik 5150-5250 MHz is ingesteld.
Este dispositivo está restrito para uso em áreas internas ao operar na faixa de frequência de 51505250MHz em todos os estados-membros da UE/EFTA e Turquia.
Использование данного устройства в частотном диапазоне 5150-5250 МГц разрешается только
впомещениях во всех странах, входящих в ЕС/ЕАСТ, а также в Турции.
79
Page 81

BE BG CZ DK DE EE
IE EL ES FR HR IT
CY LV LT LU HU MT
NL AT PL PT RO SI
SK FI SE UK TR NO
CH IS LI
Thailand Warning message
.
Mexico Warning message
“La operación de este equipo está sujeta a las siguientes dos condiciones: (1) es posible que este equipo
o dispositivo no cause interferencia perjudicial y (2) este equipo o dispositivo debe aceptar cualquier
interferencia, incluyendo la que pueda causar su operación no deseada.”
The Adopted Trademarks HDMI, HDMI High-Denition Multimedia Interface, and the HDMI Logo are
trademarks or registered trademarks of HDMI Licensing Administrator, Inc. in the United States and
other countries.
To prevent possible hearing damage, do not listen at high volume levels for long periods.
为防止可能出现的听力损伤,请勿长时间用高音量听音乐。
為防止可能出現的聽力損傷,請勿長時間用高音量聽音樂。
聴覚障害を起こさないよう、長時間大音量で使用しないでください。
오랫동안 높은 음량으로 청취하면 청각이 손상될 수 있으니 항상 주의하시기 바랍니다.
Um mögliche Hörschäden zu vermeiden, vermeiden Sie hohe Lautstärken über längere Zeiträume.
Para evitar posibles daños en el oído, no utilice los auriculares a un volumen alto durante un tiempo
prolongado.
Pour empêcher de possibles douleurs ou lésions, ne réglez pas le volume à haut niveau sur de
longues périodes.
Per evitare possibili danni all'udito, non ascoltare a volumi elevati per lunghi periodi.
Luister geen langere periodes naar een hoog volume om gehoorschade te voorkomen.
Para evitar possíveis danos auditivos, não ouça com volume elevado por períodos longos.
Во избежание возможного повреждения слуха не слушайте громкую музыку и другие звуки
в течение продолжительного периода времени.
Page 82

diphenyl ethers (PBDE)
多溴二苯醚 Polybrominated
(PBB)
biphenyls
多溴聯苯 Polybrominated
(Cr+6)
chromium
六價鉻 Hexavalent
限用物質及其化學符號
(Cd)
鎘 Cadmium
設備名稱:顯示幕 , 型號(型式): CS550, CS785, CS785U
(Hg)
汞 Mercury
(Pb)
鉛 Lead
外殼 ○ ○ ○ ○ ○ ○
線路板 ○ ○ ○ ○ ○ ○
單元U nit
面板 ○ ○ ○ ○ ○ ○
金屬部件 ○ ○ ○ ○ ○ ○
內部線材 ○ ○ ○ ○ ○ ○
其他 ( 含風扇 . 振動馬達) ○ ○ ○ ○ ○ ○
備考 1.〝超出 0.1 wt %〞及〝超出 0.01 wt %〞係指限用物質之百分比含量超出百分比含量基準值。
備考 2.〝○〞係指該項限用物質之百分比含量未超出百分比含量基準值。
備考 3.〝-〞係指該項限用物質為排除項目。
台灣進口商
西華科技開發股份有限公司
高雄市三民區漢口街 200 號
注意:
- 若更換電池不當 , 可能會有爆炸的危險
- 請與本公司服務專線聯絡或就近經銷商洽談 , 進行更換相同的電池
- 電池棄置時應交至電池回收中心處理
使用過度恐傷害視力
(1) 使用 30 分鐘請休息 10 分鐘
(2) 未滿 2 歲幼兒不看螢幕,2 歲以上每天看螢幕不要超過 1 小時
Page 83

DJI Support
DJI
技术支持
DJI
技術支援
サポート
DJI
고객지원
DJI
DJI Support
Servicio de asistencia de DJI
Service client DJI
Assistenza DJI
DJI-ondersteuning
Suporte DJI
Техническая поддержка DJI
http://www.dji.com/support
If you have any questions about this document, please
contact DJI by sending a message to
CrystalSky and DJI are trademarks of DJI.
Copyright © 2021 DJI All Rights Reserved.
DocSupport@dji.com
.
Printed in China.
 Loading...