

Page 1
DJI FOCUS Handwheel 2
User Guide
使用说明
使用說明
ユーザーガイド
사용자 가이드
Bedienungsanleitung
Guía del usuario
Guide de l'utilisateur
Guida dell'utente
Gebruiksaanwijzing
Manual do utilizador
Руководство пользователя
V1.0
2017.03
Page 2

Contents
EN
User Guide
CHS
CHT
JP
KR
DE
ES
FR
IT
NL
PT
RU
使用说明
使用說明
ユーザーガイド
사용자 가이드
Bedienungsanleitung
Guía del usuario
Guide de l'utilisateur
Guida dell'utente
Gebruiksaanwijzing
Manual do utilizador
Руководство пользователя
4
10
16
22
28
34
40
46
52
58
64
70
Compliance Information
76
3
Page 3
EN
Disclaimer and Warning
Congratulations on purchasing your new DJITM product. The information in this document
affects your safety and your legal rights and responsibilities. Read this entire document
carefully to ensure proper conguration before use. Failure to read and follow instructions
and warnings in this document may result in serious injury to yourself or others, or damage
to your DJI product or damage to other objects in the vicinity. This document and all other
collateral documents are subject to change at the sole discretion of DJI. For up-to-date
product information, visit http://www.dji.com and click on the product page for this product.
By using this product, you hereby signify that you have read this disclaimer and warning
carefully and that you understand and agree to abide by the terms and conditions herein. You
agree that you are solely responsible for your own conduct while using this product, and for
any consequences thereof. You agree to use this product only for purposes that are proper
and in accordance with all applicable laws, rules, and regulations, and all terms, precautions,
practices, policies and guidelines DJI has made and may make available.
DJI accepts no liability for damage, injury or any legal responsibility incurred directly or
indirectly from the use of this product. The user shall observe safe and lawful practices
including, but not limited to, those set forth in this document.
DJI is a trademark of SZ DJI TECHNOLOGY CO., LTD. (abbreviated as “DJI”) and its afliated
companies. Names of products, brands, etc., appearing in this document are trademarks or
registered trademarks of their respective owner companies.
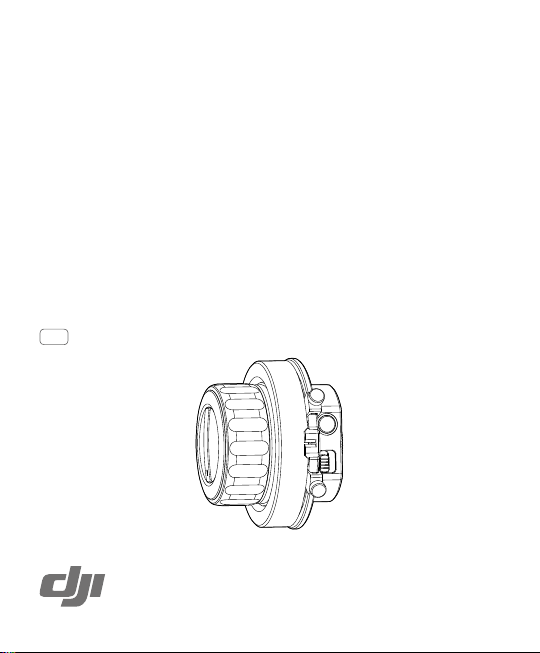
Introduction
The DJI Focus Handwheel 2 enables users to control aperture, focus or zoom on the
TM
2 and OSMOTM Pro/RAW cameras precisely and conveniently.
INSPIRE
[1]
[2]
[3]
4
[4]
[7]
[6]
[5]
[4]
[8]
[9]
[10 ]
Page 4

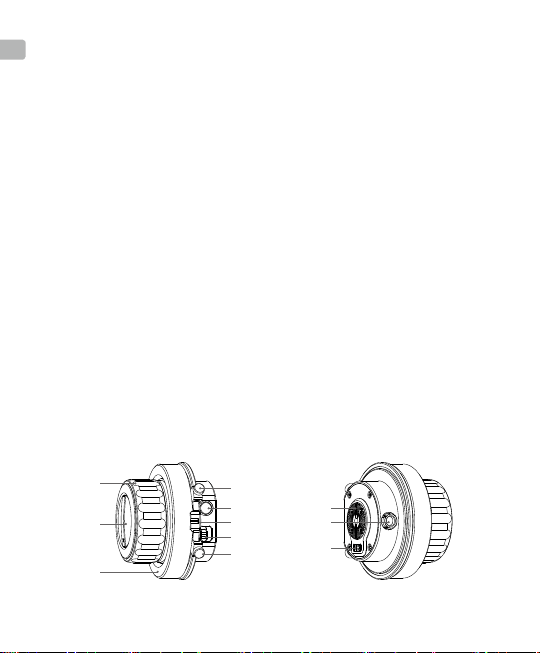
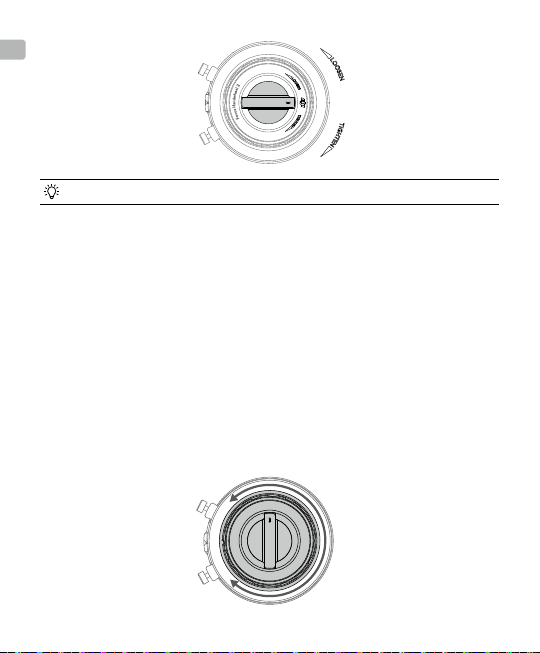
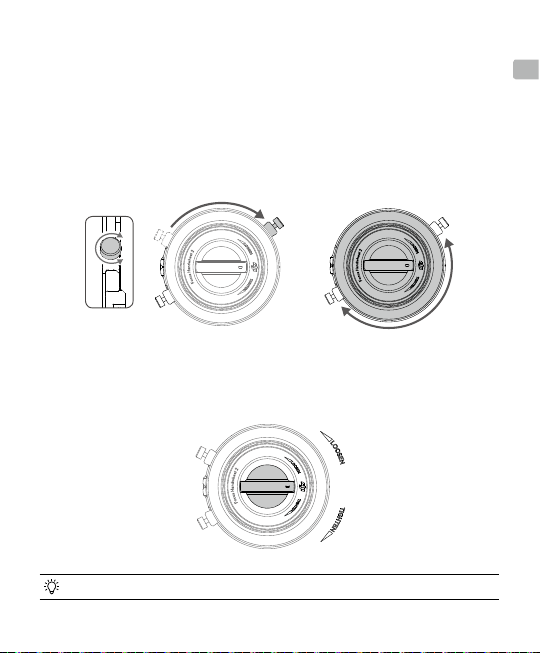
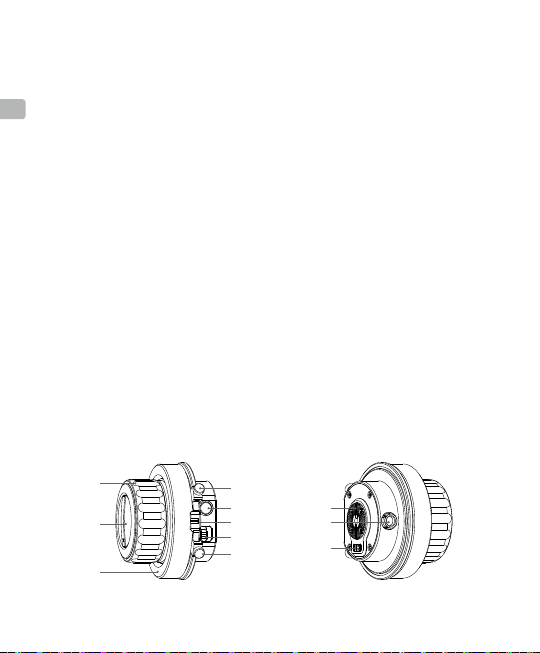
[1] Focus Wheel
Controls the camera lens.
[2] Stiffness Control
Adjusts focus wheel stiffness.
[3] Marking Ring
Provides a marking scale.
[4] Hard Stop Screws
Adjustable hard stops limit the focus wheel travel range.
[5] Power Switch
Toggle the power switch to power on/off the Focus Handwheel 2.
[6] Status LED/Backlight
Indicates the communication status and illuminates the marking ring from behind.
[7] LENS Button
Opens lens travel settings and switching between focus, aperture or zoom control,
subject to lens compatibility.
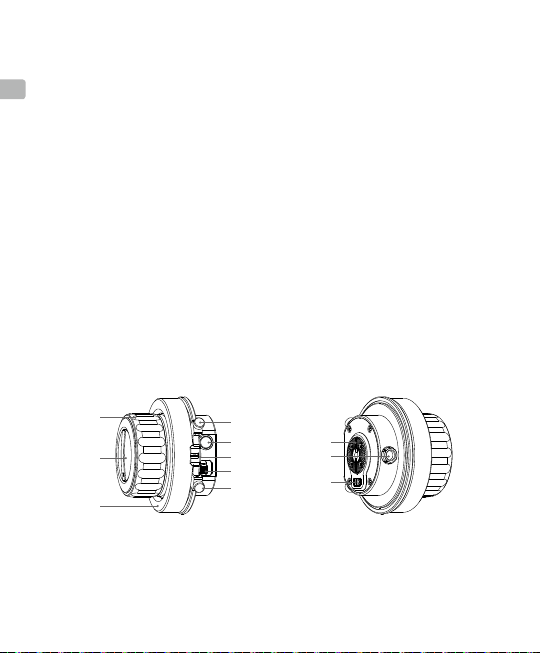
[8] DJI Rosette Mount
Used when mounting and securing the Focus Handwheel 2.
[9] Communication Port
Connects to the Osmo Pro/RAW.
[10] Pogo Pin
Connects to the Inspire 2 DJI Focus Handwheel 2 Remote Controller Stand for power
supply and communication. Ensure the Pogo Pin is clean and in good condition. Do not
cause the Pogo Pin to short-circuit.
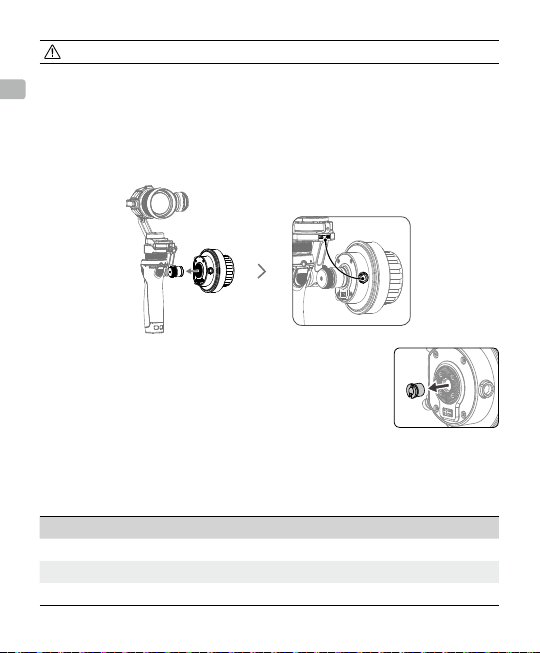
Installation
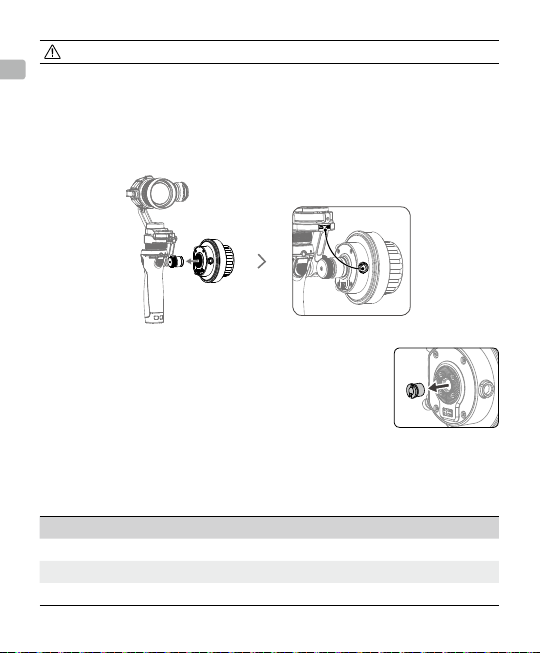
Mounting on Inspire 2 Remote Controller
1. Attach the Focus Handwheel 2 to the Remote Controller Stand mounted on Inspire 2
remote controller (visit the ofcial DJI online store for more information on the DJI Focus
Handwheel 2-Remote Controller Stand).
2. Connect the cable on the Stand to the Inspire 2 Remote controller to power the Focus
Handwheel 2.
EN
5
Page 5
EN
The DJI Focus Handwheel 2 is compatible with the Inspire 2 only. The Inspire 1 series
is not supported.
Mounting on Osmo Pro/RAW
1. Attach the Focus Handwheel 2 to the Osmo Pro/RAW as shown then tighten the screw.
2. Connect the Communication Port on the Focus Handwheel 2 to the Osmo Pro/RAW for
power supply and communication using the dedicated Focus Handwheel 2-Osmo Pro/
RAW communication cable (not included, visit the official DJI online store for more
information). Ensure the cable's orientation is correct before plugging into the ports.
Mounting on other Devices
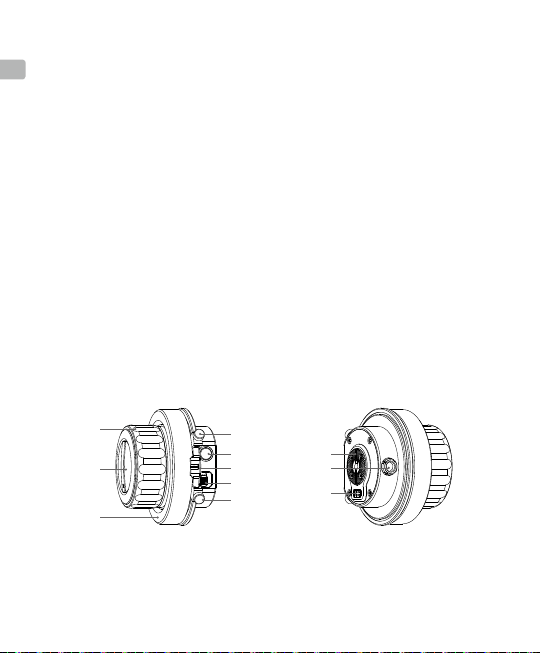
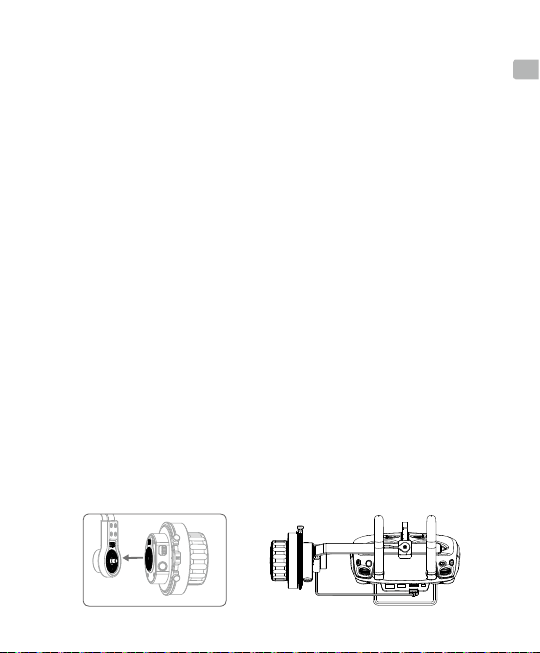
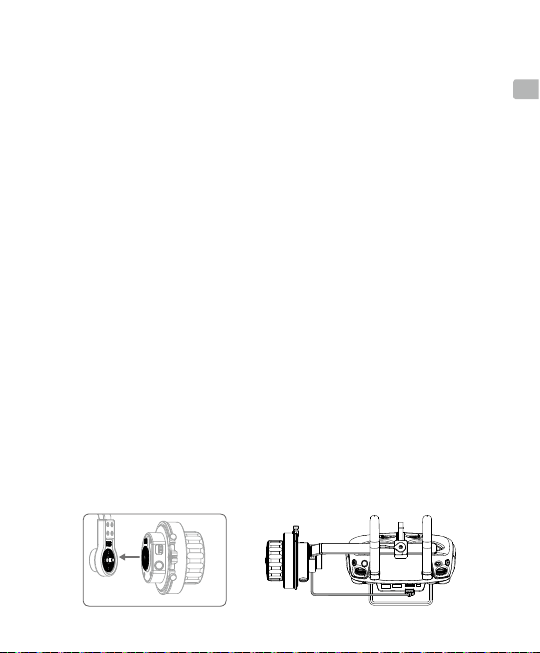
The Rosette Mount on the DJI Handwheel 2 provides
two mounting dimensions: 1/4” and 3/8”. If mounting the
Handwheel 2 on other devices with 3/8” port, remove the
screw in the Rosette Mount as shown.
6
Page 6
Status LED Description
The status LED indicates the communication status after the Focus Handwheel 2 is powered
on. Refer to the table below for more information about the blinking patterns.
Blinking Patterns Description
Blinks quickly Upgrade failed.
Blinks slowly No device detected.
Solid on Working properly.
Settings
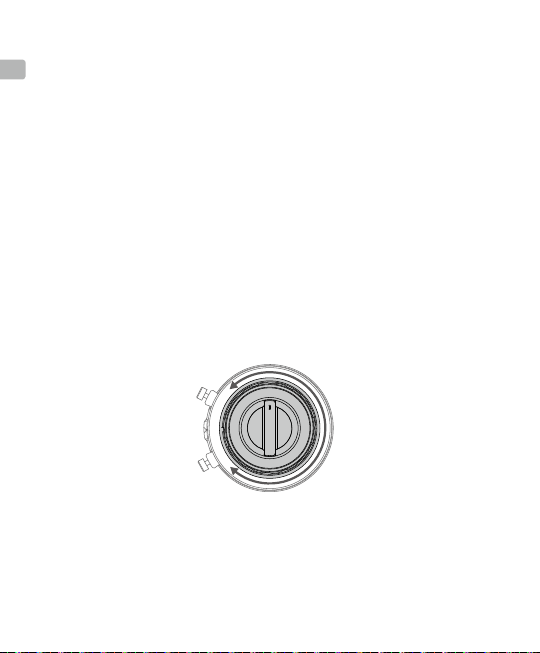
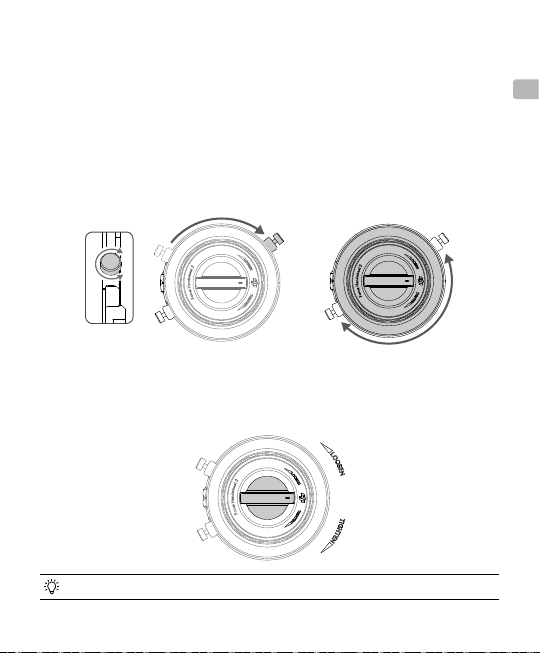
Setting Mechanical Limits
The two adjustable hard stop screws around the focus wheel can be used to limit the travel
range physically.
1. Loosen the hard stop screws, slide them to the desired positions and tighten.
2. The travel range of the focus wheel is now limited to the distance between the two hard
stop screws.
Adjusting the Stiffness
Turn the control knob at the center while holding the focus wheel to adjust the stiffness of the
wheel. Adjust the focus wheel until it reaches a stiffness or looseness that feels comfortable.
EN
7
Page 7
EN
The rotation direction of the Focus wheel can be reversed in the DJI GOTM/DJI GO 4 app.
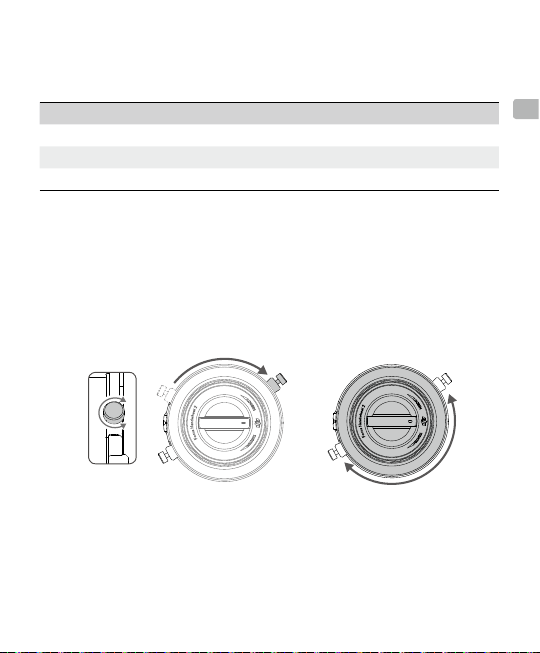
Travel Range Settings
Travel range settings are only available in the focus control mode.
1. Turn the focus wheel to the desired upper travel limit and press the lens button once.
2. Turn the focus wheel to the desired lower travel limit and press the lens button once.
Turning the focus wheel a full cycle will now rotate the lens between the two travel limits.
3. Press the lens button again to reset.
Switch Control Mode
1. Press and hold the lens button to switch between focus, aperture and zoom control.
2. Focus, aperture or zoom control can be switched in the DJI GO/DJI GO 4 app.
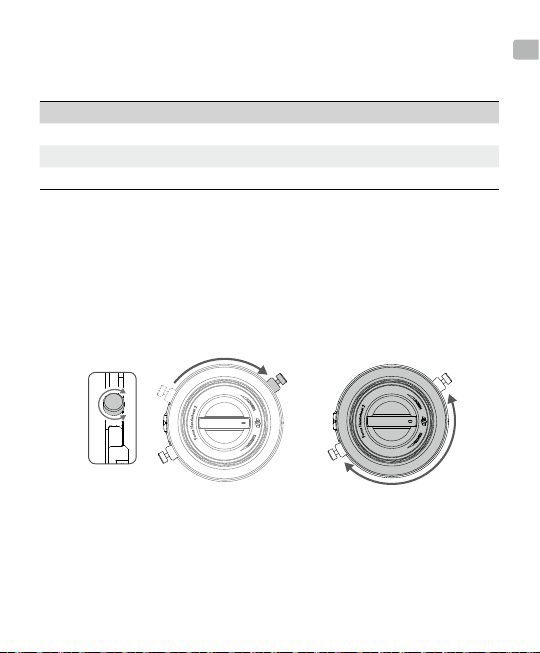
Calibration
Only calibrate the Focus Handwheel when you feel lens control is not optimal.
How to Calibrate: Within the rst ve seconds after powering on, rotate the Focus wheel back
and forth across its full travel range four times.
8
Page 8

Update Firmware
The Focus Handwheel 2 can be upgraded through the Inspire 2 remote controller and Osmo
Pro/RAW. Refer to the Inspire 2 user manual or the Osmo Pro/RAW upgrade guide for details.
Specications
Model FH02
Weight 340g
Dimensions 86 (diameter)×68 (height) mm
Operating Temperature -4°to 131°F (-20℃ to 55℃)
Operating Voltage 5V-12V
Operating Current 0.03A-0.072A
Power 0.36W
This content is subject to change.
Download the latest version from
http://www.dji.com/focus
EN
9
Page 9
免责声明与警告
CHS
感谢您购买大疆TM创新(DJITM)产品。本文所提及的内容关系到您的安全以及合法权
益与责任。使用本产品之前,请仔细阅读本文以确保已进行正确的设置。不遵循和按照
本文的说明与警告来操作可能会给您和周围的人带来伤害,或者损坏本产品或其它周围
的物品。本文档及所有相关的文档最终解释权归大疆创新(DJI)所有。如有更新,恕
不另行通知。请访问 www.dji.com 官方网站以获取最新的产品信息。
一旦使用本产品,即视为您已经仔细阅读免责声明和警告,理解、认可和接受本声明全
部条款和内容。您承诺对使用本产品以及其可能带来的后果负全部责任。您承诺仅出于
正当目的使用本产品,并且同意本条款以及大疆创新(DJI)制定的任何相关条例、政
策和指引。
大疆创新(DJI)对于直接或间接使用本产品而造成的损坏、伤害以及任何法律责任不
予负责。用户应遵循包括但不限于本文提及的所有安全指引。
DJI 是深圳市大疆创新科技有限公司及其关联公司的商标。本文出现的产品名称、品牌
等,均为其所属公司的商标或注册商标。
简 介
DJI Focus 手持跟焦器 2 可安装于 INSPIRETM 2 遥控器或 OSMOTM Pro/RAW,方便、精
准控制相机镜头对焦点、光圈或变焦(需要镜头支持)。
[1]
[2]
[3]
[1] 电机控制旋钮
通过转动旋钮来调节镜头对焦点、光圈或变焦。
[2] 阻尼调节旋钮
调节电机控制旋钮的阻尼大小。
10
[4]
[7]
[6]
[5]
[4]
[8]
[9]
[10 ]
Page 10
[3] 标记环
用于记录镜头位置。
[4] 机械限位装置螺丝
机械限位装置用于设置电机控制旋钮的转动范围。
[5] 电源开关
拨动开关至 ON/OFF 以开启 / 关闭手持跟焦器 2。
[6] 状态指示灯 / 标记环 LED 灯
指示手持跟焦器 2 与相机的通信状态,同时可为标记环照明。
[7] LENS 按键
用于映射镜头控制行程,以及切换对焦、光圈、变焦控制。
[8] 盘齿
通过盘齿接口安装固定手持跟焦器 2。
[9] 通信接口
通过通信接口连接 Osmo Pro/RAW 实现通信。
[10] 触点
通过触点跟Inspire 2 遥控器支架连接,使遥控器为手持跟焦器2 供电以及实现通信。
请保持触点清洁、完整无破损。请勿使触点之间短路。
安装
配合 Inspire 2 遥控器使用
1. 将手持跟焦器 2 安装至Inspire 2- 手持跟焦器 2 遥控器支架(需另行购买,请访问
DJI 官方商城了解详情)。
2. 通过连接遥控器支架线材与 Inspire 2 遥控器实现供电及通信。
CHS
11
Page 11
手持跟焦器 2 仅适配于 Inspire 2 遥控器,不适用于 Inspire 1 系列遥控器。
CHS
配合 Osmo Pro/RAW 使用
1. 将手持跟焦器 2 安装至 Osmo Pro/RAW 的盘齿接口。
2. 使用手持跟焦器 2-Osmo Pro/RAW 数据线(需另行购买,请访问 DJI 官方商城了解
详情)连接手持跟焦器 2 的通信接口与 Osmo Pro/RAW的通信接口,实现供电及通信。
安装至其它设备使用
手持跟焦器 2 盘齿接口为1/4”以及 3/8”两种规格,若需
安装至接口为 3/8”的设备,将盘齿接口处的螺丝取下即可。
系统状态指示灯信息
拨动开关以开启手持跟焦器 2,正常连接后,手持跟焦器 2 指示灯指示当前状态。请参
照下表了解状态指示灯信息。
状态指示灯 状态描述
快闪 升级失败
慢闪 无设备接入
常亮 正常工作
12
Page 12
设置
设置机械限位
控制旋钮的机械限位可以改变,您可以只使用旋钮的部分行程来控制镜头相应的部分行
程。
1. 拧松机械限位装置上的螺丝,将机械限位装置起点移动到某个位置并拧紧螺丝。
2. 将机械限位装置终点移动到某一位置并拧紧螺丝。控制旋钮只可在机械限位装置之
间转动,以控制镜头的部分行程。
调节阻尼
电机控制旋钮的阻尼可以调节。一只手握住电机控制旋钮,另一只手根据阻尼调节旋钮
的提示,增大或调小阻尼。
可在 DJI GOTM/DJI GO 4 App 设置电机控制旋钮的旋转方向。
CHS
13
Page 13
映射镜头行程
CHS
在对焦模式下,可设置映射镜头行程,以使用控制旋钮的全部行程来控制所映射的镜头
起、终点之间的行程。
1. 选择镜头行程起点,短按一次 LENS 按键,LED 灯快闪,记录当前位置为行程起点。
2. 旋转控制旋钮,选择镜头行程终点,再次短按 LENS 按键,LED 灯常亮,记录当前
位置为行程终点。镜头行程映射完成。
3. 第三次短按 LENS 按键,取消映射。
切换镜头控制
1. 长按 LENS 按键可以切换对焦、光圈或变焦控制。
2. 在 DJI GO/DJI GO 4 App 中可设置切换对焦、光圈或变焦控制。
校准
在手持跟焦器 2 无法精准控制对焦时,可通过校准来获得精准控制。
校准方式:在手持跟焦器 2 开机后的 5 秒内,使电机控制旋钮走满四次行程(电机控制
旋钮分别碰撞到机械限位起、终点两次)以完成校准。
固件升级
手持跟焦器 2 可通过Inspire 2 遥控器或 Osmo Pro/RAW 升级固件。详情请参考
《Inspire 2 用户手册》或《Osmo Pro/RAW 固件升级方法》。
14
Page 14

规格参数
型号 FH02
重量 340 g
尺寸 86(直径)×68(高) mm
工作温度 -20℃至 55℃
工作电压 5V-12V
工作电流 0.03A-0.072A
功率 0.36W
内容如有更新,恕不另行通知。
您可以在 DJI 官方网站查询最新版本《使用说明》
http://www.dji.com/focus
CHS
15
Page 15
免責聲明與警告
感謝您購買大疆TM創新 (DJITM) 產品。本文所提及的內容關係到您的安全及合法權益與
CHT
責任。使用本產品之前,請仔細閱讀本文以確保已進行正確設定。未確實遵循並按照本
文之說明與警告進行操作,可能會對您和周圍人員帶來傷害,或導致本產品或周圍其他
物品損壞。本文件及所有相關文件的最終解釋權歸大疆創新 (DJI) 所有。如有更新,恕
不另行通知。請前往 www.dji.com 官方網站以獲取最新的產品資訊。
一旦使用本產品,即視為您已經仔細閱讀免責聲明與警告,理解、認可並接受本聲明全
部條款和內容。您承諾對使用本產品及可能帶來的後果負全部責任。您承諾僅出於正當
目的使用本產品,並且同意本條款以及大疆創新 (DJI) 制定的任何相關條例、政策和指南。
大疆創新 (DJI) 對於直接或間接使用本產品而造成的損壞、傷害及任何法律責任概不負
責。使用者應遵循包括但不限於本文提及的所有安全指南。
DJI 是深圳市大疆創新科技有限公司及其附屬公司的商標。本文出現的產品名稱、品牌
等,均為其所屬公司的商標或註冊商標。
簡介
DJI Focus 手持跟焦器 2 可安裝於 INSPIRETM 2 遙控器或 OSMOTM Pro/RAW,可輕鬆地
精準控制相機鏡頭對焦點、光圈或變焦 ( 需使用支援此功能的鏡頭 )。
[1]
[2]
[3]
[1] 馬達控制旋鈕
透過轉動旋鈕可調整鏡頭對焦點、光圈或變焦。
[2] 阻尼調節旋鈕
調節馬達控制旋鈕的阻尼大小。
16
[4]
[7]
[6]
[5]
[4]
[8]
[9]
[10 ]
Page 16
[3] 標記環
用於記錄鏡頭位置。
[4] 機械邊界點裝置螺絲
機械邊界點裝置用於設定馬達控制旋鈕的轉動範圍。
[5] 電源開關
撥動開關至 ON/OFF 以開啟 / 關閉手持跟焦器 2。
[6] 狀態指示燈 / 標記環LED燈
指示手持跟焦器 2 與相機的通訊狀態,同時可為標記環照明。
[7] LENS按鈕
用於制定鏡頭控制行程,以及切換對焦、光圈、變焦控制。
[8] 轉盤
透過轉盤連接埠安裝固定手持跟焦器 2。
[9] 通訊連接埠
透過通訊連接埠連接 OSMO Pro/RAW 進行通訊。
[10] 接點
透過接點與 Inspire 2 遙控器支架相連接,使遙控器為手持跟焦器 2 供電並進行通
訊。請保持接點清潔且完整無破損。請勿使接點之間短路。
安裝
配合Inspire2遙控器使用
1. 將手持跟焦器 2 安裝至 Inspire 2 手持跟焦器 2 遙控器支架 ( 需另購,請前往 DJI 官
方商城瞭解詳情 )。
2. 透過連接遙控器支架線材與 Inspire 2 遙控器,進行供電及通訊。
CHT
17
Page 17
手持跟焦器 2 僅適用於 Inspire 2 遙控器,不適用 Inspire 1 系列遙控器。
CHT
配合OsmoPro/RAW使用
1. 將手持跟焦器 2 安裝至 Osmo Pro/RAW 的轉盤連接埠。
2. 使用手持跟焦器 2 Osmo Pro/RAW 數據傳輸線 ( 需另購,請前往 DJI 官方商城瞭解
詳情 ),將手持跟焦器 2 的通訊連接埠,和 Osmo Pro/RAW 的通訊連接埠相連接,
進行供電及通訊。
安裝至其它設備使用
手持跟焦器 2 轉盤連接埠有 1/4” 以及 3/8” 兩種規格,若需
安裝至連接埠為 3/8” 的設備,請將轉盤連接埠處的螺絲取
下即可。
系統狀態指示燈說明
撥動開關以開啟手持跟焦器 2,正常連接後,手持跟焦器 2 指示燈會指示當前狀態。請
參閱下表瞭解狀態指示燈的說明。
狀態指示燈 狀態說明
快速閃爍 升級失敗
緩慢閃爍 無設備接入
恆亮 正常運作
18
Page 18
設定
設定機械邊界點
控制旋鈕的機械邊界點可以變更,您可以只使用旋鈕的部分行程來控制鏡頭相應的部分
行程。
1. 將機械邊界點裝置上的螺絲轉鬆,然後將機械邊界點裝置的起點移至某個位置並轉
緊螺絲。
2. 將機械邊界點裝置的終點移至某個位置並轉緊螺絲。控制旋鈕只可在機械邊界點裝
置之間轉動,以控制鏡頭的部分行程。
調節阻尼
馬達控制旋鈕的阻尼可以調節。一隻手握住馬達控制旋鈕,另一隻手根據阻尼調節旋鈕
的提示,將阻尼調大或調小。
可在 DJI GOTM/DJI GO 4 應用程式中設定馬達控制旋鈕的旋轉方向。
CHT
19
Page 19

制定鏡頭行程
在對焦模式下,可制定鏡頭行程,以使用控制旋鈕的全部行程來控制所制定鏡頭起點與
CHT
終點之間的行程。
1. 選擇鏡頭行程起點,短按一次 LENS 按鈕,LED 燈會快閃,將當前位置記錄為行程
起點。
2. 旋轉控制旋鈕,選擇鏡頭行程終點,再次短按 LENS 按鈕,LED 燈恆亮,將當前位
置記錄為行程終點。鏡頭行程制定完成。
3. 第三次短按 LENS 按鈕可取消制定。
切換鏡頭控制
1. 長按 LENS 按鈕可切換對焦、光圈或變焦控制。
2. 在 DJI GO/DJI GO 4 應用程式中可設定切換對焦、光圈或變焦控制。
校準
在手持跟焦器 2 無法精準控制對焦時,可藉由校準達到精準控制。
校準方式:在手持跟焦器 2 開機後 5 秒內,使馬達控制旋鈕完成四次行程 ( 馬達控制旋
鈕分別碰撞到機械邊界點的起點、終點兩次 ) 以完成校準。
韌體升級
手持跟焦器 2 可透過 Inspire 2 遙控器或 Osmo Pro/RAW 升級韌體。詳情請參閱
《Inspire 2 使用者手冊》或《Osmo Pro/RAW 韌體升級方法》。
20
Page 20

規格
型號 FH02
重量 340 g
尺寸 86 ( 直徑 ) × 68 ( 高 ) mm
操作溫度 -20℃ 至 55℃
運作電壓 5V-12V
運作電流 0.03A-0.072A
功率 0.36 W
內容如有更新,恕不另行通知。
您可以在DJI官方網站查詢最新版本的《使用說明》
http://www.dji.com/focus
CHT
21
Page 21
免責事項および警告
DJITM の新製品をご購入いただきましてありがとうございます。本書では、ユーザーの安全と法的
権利と責任に関する情報を取り扱っています。ご使用の前に、この文書のすべての内容をよくお読
JP
み頂き、確実に適切な設定ができるようにしてください。本書を読んでその指示や警告に従ってい
ただかない場合、ご自身や他人が重傷を負ったり、DJI 製品が損傷したり、付近にある他のものを
損傷する恐れがあります。この文書およびその他すべての付属書は、DJI 独自の裁 量で変更される
ことがあります。最新の製品情報については、http://www.dji.com にアクセスして、本製品に対応す
る製品ページをクリックしてご覧ください。
本製品を使用することにより、本書の免責事項および警告をよく読み、記載されている条件を理解し、
順守することに同意したとみなされます。本製品の使用中の行動とこれに伴う結果には、ユーザー
が全面的に責任を負うことに同意するものとします。適用されるすべての法、規則および規制を順
守して本製品を使用するとともに、DJI がこれまでに提供し、今後提供する資料の全条件、安全上
の注意、使用方法、方針およびガイドラインに従うことに同意するものとします。
本製品の使用により直接または間接的に発生する損害、傷害に対して、DJI は一切責任を負いませ
ん。ユーザーは、この文書の規定をはじめとする(ただしこれに限定しない)、安全で合法的な使用
方法を順守するものとします。
DJI は、SZ DJI TECHNOLOGY CO., LTD.( 略 し て「 DJI」)およびその関連会社の商標です。本書に
記載されている製品、ブランドなどの名称は、その所有者である各社の商標または登録商標です。
はじめ に
DJI Focus Handwheel 2 を INSPIRETM 2 や OSMOTM Pro/RAW のカメラに 装 着 することで、絞り
やフォーカス、ズームを正確かつ便利に調整できます。
[1]
[2]
[3]
22
[4]
[7]
[6]
[5]
[4]
[8]
[9]
[10 ]
Page 22

[1] フォーカスハンドホイール
カメラレンズの調整をします。
[2] 固 さ調 整 ノブ
フォーカスハンドホイールの固さを調整します。
[3] マ ー カ ーリン グ
目盛りを 表 示しま す。
[4] ハードストップネジ
ハードストップネジを調整してフォーカスハンドホイールの移動範囲を制限します。
[5] 電 源スイッチ
電源 ス イッチを 切り替えることで、Focus Handwheel 2 の電源をオン/オフします。
[6] ス テー タス LED / バ ック ラ イト
通信ステータスを示し、マーカーリングを後方から照らします。
[7] LENS ボタン
レンズの互換性に応じて、レンズの稼動範囲を設定したり、フォーカス調整、絞り調整、ズーム
調整の切り替えをするために使用します。
[8] DJI ロ ゼ ット マ ウ ン ト
Focus Handwheel 2 の取り付けおよび固定に使用します。
[9] 通信ポート
Osmo Pro/RAW との通信ポート。
[10] ポゴ ピン
電源および通信を確保するため、Inspire 2 DJI Focus Handwheel 2 の送信機スタンドを接
続します。ポゴピンは必ず、きれいで良好な状態で使用してください。また、ポゴピンを短絡さ
せないでください。
取り付け
Inspire 2 送信機への取り付け
1. Inspire 2 送信機に付けられた送信機スタンドに、Focus Handwheel 2 を取り付け ます(DJI
Focus Handwheel 2- 送信機スタンドの詳細については、DJI 公式オンラインストアをご覧くだ
さ い )。
2. Focus Handwheel 2 の電源を確保するため、スタンドのケーブルを Inspire 2 送信機に接続し
ます。
JP
23
Page 23

JP
DJI Focus Handwheel 2 は Inspire 2 とのみ互換性があります。Inspire 1 シリーズはサポ
ートして おりま せ ん 。
Osmo Pro/RAW への取り付け
1. 図 のよう に Osmo Pro/RAW に Focus Handwheel 2 を取り付け、ネジで締め付けます。
2. 電源および通信を確保するため、Focus Handwheel 2 の通信ポートをOsmo Pro/RAW
に接続します。接続には、専用 Focus Handwheel 2-Osmo Pro/RAW 通信ケーブル(付属
していません。詳細については公式 DJI オンラインストアをご覧ください )を 使用しま す。ポ
ートに接続する前に、ケーブルの向きが正しいことを確認します。
他のデバイスへの接続
DJI Handwheel 2 のロゼットマ ウントは、1/4”と3/8” での取り
付けが可能です。Handwheel 2 をその他のデバイスに取り付け
るのに、3/8” ポートを使用する場合、図のようにロゼットマウン
トの 中 のネ ジ を取り外します。
24
Page 24
ステ ー タス LED の解説
ステ ータス LED は、Focus Handwheel 2 の電源がオンになった後の通信ステータスを表示します。
点滅パターンの詳細については次の表を参照してください。
点滅パ ターン 説明
すばやく点滅 アップグレ ード に 失 敗しまし た
ゆ っ くり 点 滅 デバイスが検 出されませんでした
点灯 正常に動 作しています
設定
稼動範囲の設定
フォーカスハンドホイールの周囲にある 2 つの調整可能なハードストップネジを使用して、稼動範
囲を物理的に制限できます。
1. ハードストップネジを緩め、適切な位置にスライドして締め付けます。
2. これでフォーカスハンドホイールの稼動範囲は 2 つのハードストップネジ間の範囲に制限され
ます。
固さの調整
フォーカスハンドホイールを押さえながら、中央にある固さ調整ノブを回してハンドルの固さを調
整します。ちょうどよい固さ、緩さになるまでフォーカスハンドホイールを調整します。
25
JP
Page 25

JP
フォーカスハンドホイールの回転方向は、DJI GOTM/DJI GO 4 アプリで 逆に することができ
ます。
稼動範囲の設定
稼動範囲の設定は、フォーカス調整モードでのみ行えます。
1. フォーカスハンドホイールを希望の上限稼動位置まで回し、レンズボタンを 1 度 押しま す。
2. フォーカスハンドホイールを希望の下限稼動位置まで回し、レンズボタンを 1 度 押 し ま す 。フ ォ
ーカスハンドホイールをフルに回してみてください。2 つの稼動限度位置の間でのみレンズが
回ることが 分かりま す。
3. 再度レンズボタンを押すと解除されます。
調整切替モード
1. レンズ ボ タンを 長 押しして、フォーカス調 整 、絞り調整 、ズーム調 整 を 切り替えま す。
2. フォーカス調整、絞り調整、ズーム調整は、DJI GO/DJI GO 4 アプリで 切り替えられま す。
キャリブ レ ー ション
レンズの制御が最適でないと感じるときのみ、フォーカスハンドホイールをキャリブレーションし
ます。
キャリブレーション方法:電源投入直後の 5 秒以内に、フォーカスハンドホイールを稼動範囲いっ
ぱいに左右に 4 回回 転させます。
26
Page 26

ファームウェアのアップデ ート
Focus Handwheel 2 は、Inspire 2 送信機とOsmo Pro/RAW を使 用して アップグレ ードすることが
できます。詳細については、Inspire 2 のユーザーマニュアルまたは Osmo Pro/RAW アップグレ ー
ドガイドを参照してください。
仕様
モデル FH02
重量 340g
寸法 86(直径)× 68(高さ)mm
動作環境温度 -20 〜 55℃
動作電圧 5 〜 12V
動作電流 0.03 〜 0.072A
電源 0.36W
本内容は変更されることがあります。
最新 版は 下記よりダウンロードしてください。
http://www.dji.com/focus
JP
27
Page 27

고지 사항 및 경고
DJITM 신제품을 구매해주셔서 감사합니다. 본 문서의 정보는 사용자의 안전은 물론 법적 권리 및 책임에 영향
을 미칩니다. 제품을 사용하기 전에 전체 문서를 주의 깊게 읽고 구성이 올바른지 확인하십시오. 본 문서의 지
침 및 경고 사항을 읽고 따르지 않으면 자신 또는 다른 사람이 심각한 부상을 입거나 DJI 제품 또는 근처에 있
는 다른 물체가 손상될 수 있습니다. 이 문서 및 기타 모든 부수 문서는 DJI의 단독 재량에 따라 변경될 수 있
KR
습니다. 최신 제품 정보를 확인하려면 http://www.dji.com
십시오.
제품을 사용하는 것은 본 문서의 고지 사항 및 경고를 주의 깊게 읽었으며 명시된 이용 약관을 이해하고 준수
하는 것에 동의한 것으로 간주됩니다. 본 제품 사용 시 귀하의 행위와 그에 따른 결과에 대한 책임은 전적으로
본인에게 있다는 것에 동의합니다. 또한 적용 가능한 모든 법규, 규칙은 물론 DJI에서 제정하고 제공하는 모든
이용 약관, 예방책, 사례, 정책 및 지침에 따라 적절한 목적으로 본 제품을 사용하는 것에 동의합니다.
DJI는 본 제품 사용으로 인해 직접 또는 간접적으로 발생한 피해, 부상 또는 모든 법적 책임에 대해 어떠한 책
임도 지지 않습니다. 사용자는 이 문서에 명시된 내용을 포함하여(단, 이에 국한되지 않음) 안전하고 적법한
사례를 준수해야 합니다.
DJI는 SZ DJI TECHNOLOGY CO., LTD. (약어로 “DJI”)와 해당 자회사의 상표입니다. 이 문서에 표시된 제품
이름, 브랜드 이름 등은 해당 소유자의 상표 또는 등록 상표입니다.
을 방문하여 본 제품에 대한 제품 페이지를 클릭하
소개
DJI Focus Handwheel 2를 사용하면 INSPIRETM 2 및 OSMOTM Pro/RAW 카메라의 조리개, 초점 또는 줌을
정밀하고 편리하게 제어할 수 있습니다.
[1]
[2]
[3]
28
[4]
[7]
[6]
[5]
[4]
[8]
[9]
[10 ]
Page 28

[1] 포커스 휠
카메라 렌즈를 제어합니다.
[2] 강성 제어
포커스 휠의 강성을 제어합니다.
[3] 마킹 링
마킹 배율을 제공합니다.
[4] 하드 정지 나사
조절식 하드 정지 나사가 포커스 휠의 조정 범위를 제한합니다.
[5] 전원 스위치
전원 스위치를 전환하여 Focus Handwheel 2의 전원을 켜고 끕니다.
[6] 상태 LED/백라이트
통신 상태를 표시하며 뒤에서 마킹 링을 비춥니다.
[7] 렌즈 버튼
렌즈 이동 설정을 열고 초점, 조리개 또는 줌 제어 사이를 전환합니다(렌즈 호환성에 따라 다름).
[8] DJI Rosette 마운트
Focus Handwheel 2를 장착하여 고정시킬 때 사용합니다.
[9] 통신 포트
Osmo Pro/RAW에 연결합니다.
[10] 포고 핀
전원 공급과 통신을 위해 Inspire 2 DJI Focus Handwheel 2 조종기 스탠드에 연결합니다. 포고 핀은
청결하고 양호한 상태를 유지해야 합니다. 포고 핀에서 단락이 발생하지 않도록 하십시오.
설치
Inspire 2 조종기 장착
1. Focus Handwheel 2를 Inspire 2 조종기에 장착된 조종기 스탠드에 부착합니다(DJI Focus Handwheel
2 조종기 스탠드에 대한 자세한 내용은 공식 DJI Online Store에서 확인).
2. 스탠드에 있는 케이블을 Inspire 2 조종기에 연결하여 Focus Handwheel 2의 전원을 켭니다.
KR
29
Page 29

KR
DJI Focus Handwheel 2는 Inspire 2에만 호환됩니다. Inspire 1 시리즈는 지원되지 않습니다.
Osmo Pro/RAW에 장착
1. 그림과 같이 Osmo Pro/RAW에 Focus Handwheel 2를 연결하고 나사를 조입니다.
2. 전원 공급과 통신을 위해 전용 Focus Handwheel 2-Osmo Pro/RAW 통신 케이블(포함되지 않음, 자세
한 내용은 공식 DJI Online Store에서 확인)을 사용하여 Focus Handwheel 2의 통신 포트를 Osmo Pro/
RAW에 연결합니다. 케이블을 포트에 연결하기 전에 케이블 방향이 정확한지 확인하십시오.
기타 장치 장착
DJI Handwheel 2의 Rosette 마운트의 장착 크기에는 두 가지가 있는
데 1/4” 및 3/8”입니다. Handwheel 2를 3/8” 포트가 있는 다른 장치에
장착하는 경우 그림과 같이 Rosette 마운트에 있는 나사를 제거합니다.
30
Page 30

상태 LED 설명
상태 LED는 Focus Handwheel 2의 전원이 켜진 후 통신 상태를 나타냅니다. 깜박임 패턴에 대한 자세한 내
용은 아래 표를 참조하십시오.
깜박임 패턴 설명
빠르게 깜박임 업데이트 실패
느리게 깜박임 검색된 장치가 없습니다 .
켜진 상태 유지 정상 작동 중입니다 .
설정
기계적 제한 설정
포커스 휠 주위 두 개의 조절식 하드 정지 나사를 사용하여 물리적 이동 범위를 제한할 수 있습니다.
1. 하드 정지 나사를 풀고 원하는 위치로 밀어 넣고 조입니다.
2. 포커스 휠의 이동 범위는 이제 두 개의 하드 정지 나사 사이의 거리로 제한됩니다.
강성 조정
휠의 강성 조정을 위해 포커스 휠을 잡은 상태에서 중앙의 조절 손잡이를 돌립니다. 강성 또는 느슨한 느낌이
편안해질 때까지 포커스 휠을 조정합니다.
KR
31
Page 31

KR
포커스 휠의 회전 방향은 DJI GOTM/DJI GO 4 앱에서 반대로 되돌릴 수 있습니다.
이동 범위 설정
이동 범위 설정은 초점 제어 모드에서만 사용할 수 있습니다.
1. 포커스 휠을 원하는 이동 상한까지 돌린 후 렌즈 버튼을 한 번 누릅니다.
2. 포커스 휠을 원하는 이동 하한까지 돌린 후 렌즈 버튼을 한 번 누릅니다. 포커스 휠을 완전히 한 바퀴 돌리
면 렌즈가 두 이동 제한 사이에서 회전합니다.
3. 재설정하려면 렌즈 버튼을 다시 누릅니다.
제어 모드 전환
1. 초점, 조리개 및 줌 제어 사이를 전환하려면 렌즈 버튼을 길게 누릅니다.
2. 초점, 조리개 또는 줌 제어는 DJI GO/DJI GO 4 앱에서 전환할 수 있습니다.
캘리브레이션
렌즈 제어가 최적이 아니라고 느낄 때만 포커스 핸드휠을 캘리브레이션하십시오.
캘리브레이션 방법:
32
전원을 켜고 5초 이내에, 포커스 휠을 한 바퀴씩 앞뒤로 4번 돌립니다.
Page 32

펌웨어 업데이트
Focus Handwheel 2는 Inspire 2 조종기 및 Osmo Pro/RAW를 통해 업데이트할 수 있습니다. 자세한 내용은
Inspire 2 사용자 매뉴얼 또는 Osmo Pro/RAW 업데이트 가이드를 참조하십시오.
사양
모델 FH02
무게 340g
크기 86( 직경 ) × 68( 높이 )mm
작동 온도 -20℃ ~55℃ (-4° ~131° F)
작동 전압 5V~12V
작동 전류 0.03A~0.072A
전력 0.36W
이 문서의 내용은 언제든지 변경될 수 있습니다.
최신 버전은 다음 웹사이트에서 다운로드하십시오.
http://www.dji.com/focus
KR
33
Page 33

Haftungsausschluss und Warnhinweis
Vielen Dank, dass Sie sich für ein Produkt von DJITM entschieden haben. Die hier enthaltenen Informationen
betreffen Ihre persönliche Sicherheit sowie Ihre gesetzlichen Rechte und Verpichtungen. Bitte lesen Sie
das gesamte Dokument aufmerksam durch, um das Produkt für den Betrieb ordnungsgemäß einrichten
zu können. Die Nichtbeachtung der in diesem Dokument enthaltenen Anweisungen und Warnungen kann
zu schweren Verletzungen der eigenen Person oder anderer oder zu Schäden an Ihrem DJI-Produkt oder
anderen Objekten in der näheren Umgebung führen. Dieses Dokument und alle zugehörigen Dokumente
DE
können nach eigenem Ermessen von DJI jederzeit geändert werden. Die aktuellen Informationen zu unseren
Produkten nden Sie auf http://www.dji.com unter „Produkte“.
Mit dem Gebrauch des Produkts bestätigen Sie, dass Sie diesen Haftungsausschluss inkl. Warnungen
aufmerksam gelesen und den Inhalt verstanden haben, und erklären Ihr Einverständnis mit den
Bedingungen. Sie stimmen zu, dass Sie beim Gebrauch des Produkts die alleinige Verantwortung für Ihre
Handlungen und alle daraus entstehenden Folgen tragen. Sie erklären sich damit einverstanden, dass Sie
das Produkt ausschließlich für sachgerechte Zwecke nutzen, die allen geltenden Gesetzen, Regelungen
und Vorschriften sowie allen aktuellen wie künftigen Bedingungen, Schutzmaßnahmen, Praktiken, Richtlinien
und Empfehlungen von DJI entsprechen.
DJI übernimmt keine Haftung für Sachschäden oder Personenschäden sowie keine juristische
Verantwortung für Schäden, die direkt oder indirekt mit dem Gebrauch des Produkts in Zusammenhang
stehen. Der Anwender richtet sich nach der sicheren, rechtskonformen Praxis, die zum Teil in dem
vorliegenden Dokument festgelegt ist.
DJI ist eine Marke der SZ DJI TECHNOLOGY CO., LTD. (kurz DJI) und seiner verbundenen Unternehmen.
Namen von Produkten, Marken, usw., die in diesem Dokument enthalten sind, sind Warenzeichen oder
eingetragene Warenzeichen der jeweiligen Besitzer.
Einleitung
Mit dem DJI Focus Handrad 2 können Benutzer Blende, Fokus und Zoom bei den Kameras des
INSPIRETM 2 und OSMOTM Pro/RAW präzise und bequem steuern.
[1]
[2]
[3]
34
[4]
[7]
[6]
[5]
[4]
[8]
[9]
[10 ]
Page 34

[1] Schärfeziehrädchen
Zum Steuern des Objektivs.
[2] Widerstandsregler
Zur Einstellung des Widerstands des Schärfeziehrädchens.
[3] Markierungsring
Zum Einzeichnen von Markierungen (mit Skala).
[4] Anschlagschrauben
Zum Festlegen eines bestimmten Bereichs, in dem das Schärfeziehrädchen gedreht werden kann.
[5] Ein-/Ausschalter
Zum Bedienen des Netzschalters zum Ein- und Ausschalten des Focus Handrad 2.
[6] Status-LED/Hintergrundbeleuchtung
Zum Anzeigen des Kommunikationsstatus und gleichzeitigen Beleuchten des Markierungsrings
von hinten.
[7] Objektivtaste
Zum Öffnen der Objektivwegeinstellungen und zum Umschalten zwischen Fokus-, Blenden- und
Zoomsteuerung, abhängig von der Kompatibilität des Objektivs.
[8] DJI Rosettenhalterung
Zum Montieren und Sichern des Focus Handrad 2.
[9] Kommunikationsanschluss
Zur Verbindung mit dem Osmo Pro/RAW über ein Daten-/Stromkabel.
[10] Federkontakt
Zum Anschließen der Fernbedienungshalterung für das Inspire 2 DJI Focus Handrad 2 – für
Stromversorgung und Kommunikation. Sorgen Sie dafür, dass der Federkontakt sauber und in
gutem Zustand ist. Achten Sie darauf, dass am Federkontakt kein Kurzschluss auftritt.
Montage
Montage an der Fernbedienung für Inspire 2
1. Befestigen Sie das Focus Handrad 2 an der Fernbedienungshalterung, die an der Fernbedienung
für Inspire 2 montiert (Besuchen Sie den ofziellen DJI Online-Store, um weitere Informationen zur
Fernbedienungshalterung für das DJI Focus Handrad 2 zu erhalten).
2. Schließen Sie das Kabel an der Halterung an die Fernbedienung für Inspire 2 an, um das Focus
Handwheel 2 mit Strom zu versorgen.
DE
35
Page 35

DE
Das DJI Focus Handrad 2 ist nur mit dem Inspire 2 kompatibel. Der Inspire 1 wird nicht
unterstützt.
Montage am Osmo Pro/RAW
1. Bringen Sie das DJI Focus Handrad 2 wie abgebildet am Osmo Pro/RAW an, und ziehen Sie die
Schraube fest.
2. Verbinden Sie zur Stromversorgung und zum Datenaustausch den Kommunikationsanschluss am
Focus Handrad 2 über das spezielle Focus Handrad 2-Osmo Pro/RAW-Kommunikationskabel mit
dem Osmo Pro/RAW (das Kabel ist nicht im Lieferumfang enthalten, weitere Informationen erhalten
Sie im ofziellen DJI Online-Store). Vergewissern Sie sich vor dem Einstecken, dass das Kabel
korrekt ausgerichtet ist.
Montage an anderen Geräten
Die Rosettenhalterung am DJI Handrad 2 bietet zwei
Montageabmessungen: 1/4" und 3/8". Entfernen Sie bei der
Montage des Handrad 2 an anderen Geräten mit einem
3/8"-Anschluss die Schraube in der Rosettenhalterung, wie gezeigt.
36
Page 36

Beschreibung der Status-LED
Die Status-LED zeigt den Kommunikationsstatus nach dem Einschalten des Focus Handrad 2 an. Die
folgende Tabelle enthält weitere Informationen zu den Leuchtabfolgen der Status-LED.
Blinkfolge Beschreibung
Blinkt schnell Upgrade fehlgeschlagen
Blinkt langsam Kein Gerät erkannt
Leuchtet durchgehend Einwandfreier Betrieb
Einstellungen
Mechanische Anschläge festlegen
Die beiden Anschlagschrauben dienen als Endpunkte eines festgelegten Bereichs. Das Rädchen kann
nur bis zu diesen Endpunkten gedreht werden und nicht weiter.
1. Lockern Sie die Anschlagschrauben, schieben Sie sie an die gewünschte Position, und ziehen Sie
sie wieder fest.
2. Das Schärfeziehrädchen kann nun nur in dem begrenzten Bereich zwischen den beiden
Anschlägen gedreht werden.
Den Widerstand regeln
Drehen Sie den Regler in der Mitte, und halten Sie das Schärfeziehrädchen dabei fest, um festzulegen,
wie schwer oder leicht sich das Rädchen drehen lässt. Passen Sie den Widerstand so an, dass sich
das Drehen für Sie natürlich und bequem anfühlt.
DE
37
Page 37

DE
Die Drehrichtung des Schärfeziehrädchens kann über die App „DJI GOTM/DJI GO 4“ umgekehrt
werden.
Drehbereichseinstellungen
Drehbereichseinstellungen sind nur im Fokuseinstellmodus verfügbar.
1. Drehen Sie das Schärfeziehrädchen bis zur gewünschten oberen Drehbereichsgrenze, und
drücken Sie die Objektivtaste einmal.
2. Drehen Sie das Schärfeziehrädchen bis zur gewünschten unteren Drehbereichsgrenze, und
drücken Sie die Objektivtaste einmal. Wenn Sie jetzt das Schärfeziehrädchen einen vollständigen
Zyklus drehen, bewegt sich das Objektiv zwischen den beiden Drehbereichsgrenzen.
3. Drücken Sie die Objektivtaste erneut, um das Objektiv zurückzusetzen.
Umschalten des Steuerungsmodus
1. Drücken Sie länger die Objektivtaste, um zwischen Fokus-, Blenden- und Zoomsteuerung umzuschalten.
2. Fokus-, Blenden- und Zoomsteuerung können über die App „DJI GO/DJI GO 4“ umgeschaltet werden.
Kalibrierung
Kalibrieren Sie das DJI Focus Handrad, wenn Sie das Gefühl haben, dass die Steuerung des Objektivs
nicht optimal ist.
Einleiten der Kalibrierung: Drehen Sie innerhalb der ersten fünf Sekunden nach dem Einschalten das
Schärfeziehrädchen um 360° und wieder zurück, und wiederholen Sie dies viermal.
38
Page 38

Aktualisieren der Firmware
Das Focus Handrad 2 kann über die Fernbedienung für Inspire 2 und Osmo Pro/RAW aktualisiert
werden. Weitere Informationen finden Sie in der Bedienungsanleitung für Inspire 2 oder in der
Aktualisierungsanleitung für den Osmo Pro/RAW.
Technische Daten
Modell FH02
Gewicht 340 g
Abmessungen 86 (Durchmesser)×68 (Höhe) mm
Betriebstemperatur -20 ℃ bis 55 ℃
Betriebsspannung 5 V-12 V
Betriebsstromstärke 0,03 A-0,072 A
Leistung 0,36 W
Änderungen vorbehalten.
Die aktuelle Fassung nden Sie unter
http://www.dji.com/focus
DE
39
Page 39

Renuncia de responsabilidad y advertencia
Enhorabuena por la compra de su nuevo producto DJITM. La información incluida en este documento
afecta a su seguridad, y a sus derechos y responsabilidades legales. Lea este documento en su
totalidad para garantizar una conguración adecuada antes de su uso. Si no lee y sigue correctamente
las instrucciones y advertencias de este documento podría sufrir lesiones importantes o causárselas
a otras personas; igualmente, podría causar daños en su producto DJI u otros objetos en las
proximidades. Este documento y el resto de documentos colaterales están sujetos a cambios a entera
discreción de DJI. Para obtener información actualizada sobre el producto, visite http://www.dji.com y
ES
haga clic en la página de producto de este producto.
Al usar este producto, por la presente manifiesta que ha leído detenidamente esta renuncia de
responsabilidad y advertencia y que entiende y acepta cumplir con los términos y condiciones
establecidos en este documento. Acepta que usted es el único responsable de su propia conducta
durante el uso de este producto, así como de cualquier consecuencia derivada del mismo. Acepta
usar este producto sólo con nes apropiados y de acuerdo con todas las leyes, reglas y normativas
aplicables, así como todos los términos, precauciones, prácticas, políticas y directrices que haya
facilitado y pueda facilitar DJI.
DJI no acepta responsabilidad alguna por daños o lesiones, ni ningún tipo de responsabilidad legal
derivada directa o indirectamente del uso de este producto. El usuario deberá respetar las prácticas
seguras y legales incluidas, entre otras, las establecidas en este documento.
DJI es una marca comercial de SZ DJI TECHNOLOGY CO., LTD. (abreviada como “DJI”) y sus
empresas aliadas. Los nombres de productos, marcas, etc., que aparecen en este documento son
marcas comerciales o marcas comerciales registradas de sus respectivas empresas propietarias.
Introducción
La rueda manual de enfoque DJI Focus 2 permite a los usuarios controlar de manera cómoda y
precisa la apertura, el enfoque o el zoom de las cámaras INSPIRETM 2 y OSMOTM Pro/RAW.
[1]
[2]
[3]
40
[4]
[7]
[6]
[5]
[4]
[8]
[9]
[10 ]
Page 40

[1] Rueda de enfoque
Controla el objetivo de la cámara.
[2] Control de dureza
Ajusta la dureza de la rueda de enfoque.
[3] Anillo graduado
Proporciona una escala graduada.
[4] Tornillos de tope
Los topes ajustables limitan el rango de desplazamiento de la rueda de enfoque.
[5] Interruptor de encendido
Conmuta el interruptor de encendido para encender o apagar la Rueda DJI FOCUS 2.
[6] LED de estado/Retroiluminación
Indica el estado de la comunicación y retroilumina el anillo graduado.
[7] Botón del objetivo (LENS)
Abre los ajustes de desplazamiento del objetivo y conmuta entre control de enfoque, apertura o
zoom, según la compatibilidad del objetivo.
[8] Soporte de roseta DJI
Se utiliza para montar y jar la Rueda DJI FOCUS 2.
[9] Puerto de comunicación
Se conecta al Osmo Pro/RAW.
[10] Conector Pogo
Se conecta a la base del control remoto de la Rueda DJI FOCUS 2 para suministro de
alimentación y comunicación. Asegúrese de que el conector Pogo esté limpio y en buen estado.
Evite la posibilidad de cortocircuitos en el conector Pogo.
Instalación
Montaje en el control remoto del Inspire 2
1. Acople la Rueda DJI FOCUS 2 al soporte del control remoto montado en el control remoto del
Inspire 2 (visite la tienda en línea ocial de DJI para obtener más información acerca del control
remoto de la Rueda DJI FOCUS 2).
2. Conecte el cable del soporte al control remoto del Inspire 2 para alimentar la Rueda DJI FOCUS 2.
ES
41
Page 41

ES
La rueda manual de enfoque DJI FOCUS 2 sólo es compatible con el Inspire 2. No es
compatible con la serie Inspire 1.
Montaje en el Osmo Pro/RAW.
1. Fije la Rueda DJI FOCUS 2 al Osmo Pro/RAW como se muestra, y apriete el tornillo.
2. Conecte el puerto de comunicación de la Rueda DJI FOCUS 2 al Osmo Pro/RAW para el suministro
de alimentación y transmisión de datos utilizando el cable de comunicación Rueda DJI FOCUS
2-Osmo Pro/RAW (no incluido; visite la tienda en línea ocial de DJI para obtener más información).
Asegúrese de que la orientación del cable es correcta antes de conectarlo en los puertos.
Montaje en otros dispositivos
El Soporte de Roseta de la Rueda DJI FOCUS 2 proporciona
dos dimensiones de montaje: 1/4” y 3/8”. Si monta la Rueda DJI
FOCUS 2 en otros dispositivos con puerto de 3/8”, retire el tornillo
del Soporte de Roseta como se muestra.
42
Page 42

Descripción del LED de estado
El LED de estado indica el estado de la comunicación tras encender la Rueda DJI FOCUS 2. Consulte
la tabla siguiente para obtener más información sobre los patrones de parpadeo.
Patrones de parpadeo Descripción
Parpadeo rápido La actualización ha fallado.
Parpadeo lento Dispositivo no detectado.
Luz ja Funcionamiento correcto.
Ajustes
Establecimiento de límites mecánicos
Los dos topes de tornillo ajustables alrededor de la rueda de enfoque se pueden utilizar para limitar
físicamente el rango de desplazamiento.
1. Aoje los dos topes de tornillo, deslícelos a las posiciones deseadas, y apriete.
2. El rango de desplazamiento de la rueda de enfoque está ahora limitado a la distancia entre ambos
topes de tornillo.
Ajuste de la dureza
Gire el dial de control del centro mientras sujeta la rueda de enfoque para ajustar la dureza de la
rueda. Ajuste la rueda de enfoque hasta que el grado de dureza o suavidad de giro le resulte cómodo.
ES
43
Page 43

ES
El sentido de giro de la rueda de enfoque se puede invertir en la aplicación DJI GOTM/DJI GO 4.
Ajustes de intervalo de desplazamiento
Los ajustes de intervalo de desplazamiento sólo están disponibles en el modo de control de enfoque.
1. Gire la rueda de enfoque al límite superior de desplazamiento deseado y pulse una vez el botón
de objetivo.
2. Gire la rueda de enfoque al límite inferior de desplazamiento deseado y pulse una vez el botón de
objetivo. Al girar la rueda de enfoque una vuelta completa, el objetivo girará ahora entre los dos
topes de desplazamiento establecidos.
3. Pulse de nuevo el botón de objetivo para eliminar el ajuste.
Conmutación del modo de control
1. Mantenga pulsado el botón de objetivo para conmutar entre control de enfoque, apertura y zoom.
2. El control de enfoque, apertura o zoom se puede conmutar en la aplicación DJI GO/DJI GO 4.
Calibración
Solamente calibre la rueda manual de enfoque si le parece que el control del objetivo no es óptimo.
Para calibrar: Antes de transcurridos cinco segundos después de encender, gire la rueda de enfoque
a tope a un lado y a otro cuatro veces.
44
Page 44

Actualización del rmware
La Rueda DJI FOCUS 2 se puede actualizar mediante el control remoto del Inspire 2 y del Osmo Pro/
RAW. Consulte el manual del usuario del Inspire 2 o la guía de actualización del Osmo Pro/RAW para
obtener más información.
Especicaciones
Modelo FH02
Peso 340 g
Dimensiones 86 mm (diámetro) × 68 mm (altura)
Temperatura de funcionamiento -20 a 55 ℃ (-4 a 131 °F)
Voltaje de funcionamiento 5V-12V
Corriente de funcionamiento 0,03 A-0,072 A
Potencia 0,36 W
Contenido sujeto a cambios.
Descargue la última versión en
http://www.dji.com/focus
ES
45
Page 45

Clause d'exclusion de responsabilité et mise en garde
Vous venez d'acquérir un nouveau produit DJITM. Félicitations ! Les informations contenues dans
ce document affectent votre sécurité, vos droits et vos obligations. Lisez-le attentivement pour bien
congurer votre appareil avant de l'utiliser. Si vous ne lisez pas les instructions et les mises en garde
ci-après, vous exposez les autres et vous-même à des blessures graves et risquez d'endommager
votre produit DJI ou d'autres objets placés à proximité. DJI est susceptible de modier à tout moment
le présent document et les autres documents connexes. Pour connaître les dernières informations sur
le produit, rendez-vous sur le site http://www.dji.com et cliquez sur la page produit correspondante.
En utilisant ce produit, vous confirmez avoir lu attentivement la présente clause d'exclusion de
FR
responsabilité et la mise en garde gurant dans les présentes, compris les conditions d'utilisation
exposées ici et accepté de vous y conformer. Vous déclarez assumer l'entière responsabilité de votre
utilisation du produit ainsi que toutes les conséquences qui en découlent. Vous vous engagez à utiliser
le produit dans un cadre légal et adapté, conformément aux lois et réglementations en vigueur, dans
le respect des conditions, précautions, pratiques, politiques et consignes publiées par DJI, aujourd'hui
et à l'avenir.
DJI décline toute responsabilité quant aux dégâts, aux blessures ou aux problèmes découlant
directement ou indirectement de l'utilisation de ce produit. L'utilisateur s'engage à respecter la
réglementation et les pratiques décrites dans le présent document (sans s'y limiter).
DJI est une marque commerciale de SZ DJI TECHNOLOGY CO., LTD. (abrégée en « DJI ») et de ses
sociétés afliées. Les noms de produits, de marques, etc., apparaissant dans le présent document
sont des marques commerciales ou des marques déposées de leurs détenteurs respectifs.
Introduction
La bague de mise au point DJI Focus Handwheel 2 permet aux utilisateurs de contrôler l'ouverture,
la mise au point ou le zoom des caméras INSPIRETM 2 et OSMOTM Pro/RAW, de manière précise et en
toute simplicité.
[1]
[2]
[3]
46
[4]
[7]
[6]
[5]
[4]
[8]
[9]
[10 ]
Page 46

[1] Bague de mise au point
Contrôle la lentille de la caméra.
[2] Contrôle de la rigidité
Ajuste la rigidité de la bague de mise au point.
[3] Anneau de repérage
Fournit une plage de repérage.
[4] Vis de blocage
Ces vis de blocage réglables limitent la plage de déplacement de la bague de mise au point.
[5] Bouton d'alimentation
Permet de mettre la bague de mise au point Focus Handwheel 2 sous/hors tension.
[6] Voyant d'état/Rétroéclairage
Indique l'état de la communication et éclaire l'anneau de repérage par derrière.
[7] Bouton LENS (lentille)
Ouvre les paramètres de déplacement de la lentille et permet de basculer entre le contrôle de la
mise au point, de l'ouverture ou du zoom (si la lentille est compatible).
[8] Support Rosette DJI
Utilisé pour le montage et la xation de la bague de mise au point Focus Handwheel 2.
[9] Port de communication
Se connecte à l'Osmo Pro/RAW.
[10] Broche Pogo
Se connecte au support DJI Focus Handwheel 2 pour radiocommande de l'Inspire 2 pour
l'alimentation et la communication. Assurez-vous que la broche Pogo est propre et en bon état.
Évitez tout court-circuit.
Installation
Montage sur la radiocommande de l'Inspire 2
1. Fixez la bague de mise au point Focus Handwheel 2 au support pour radiocommande de l'Inspire
2 (visitez la boutique en ligne DJI officielle pour plus d'informations sur le support DJI Focus
Handwheel 2 pour radiocommande).
2. Connectez le câble du support à la radiocommande de l'Inspire 2 pour mettre la bague de mise au
point Focus Handwheel 2 sous tension.
FR
47
Page 47

La bague de mise au point DJI Focus Handwheel 2 est uniquement compatible avec l'Inspire 2.
FR
La gamme Inspire 1 n'est pas prises en charge.
Montage sur l'Osmo Pro/RAW
1. Fixez la bague de mise au point Focus Handwheel 2 sur l'Osmo Pro/RAW comme illustré, puis
serrez la vis.
2. Connectez le port de communication de la bague de mise au point Focus Handwheel 2 à l'Osmo
Pro/RAW pour l'alimentation et la communication, à l'aide du câble de communication dédié reliant
la bague de mise au point Focus Handwheel 2 à l'Osmo Pro/RAW (câble non fourni, visitez la
boutique en ligne DJI ofcielle pour plus d'informations). Vériez que le câble est bien orienté avant
de le brancher dans les ports.
Montage sur d'autres appareils
Le support Rosette de la bague de mise au point DJI Handwheel 2
offre deux possibilités de montage à différentes dimensions :
6,3 mm (1/4") et 9,5 mm (3/8"). Si vous montez la bague de mise au
point Handwheel 2 sur d'autres appareils à l'aide du port de 9,5 mm
(3/8"), retirez la vis du support Rosette comme illustré.
48
Page 48

Description du voyant d'état
Le voyant d'état indique l'état de la communication, une fois la bague de mise au point Focus
Handwheel 2 mise sous tension. Reportez-vous au tableau ci-dessous pour en savoir plus sur les
différents clignotements.
Clignotements Description
Clignote rapidement Échec de la mise à niveau
Clignote lentement Aucun appareil détecté
Reste allumé Fonctionne correctement
Réglages
Réglage des limites mécaniques
Les deux vis de blocage réglables de la bague de mise au point peuvent être utilisées pour limiter
physiquement la plage de déplacement.
1. Desserrez les vis de blocage, faites-les glisser dans les positions souhaitées, puis serrez-les.
2. La plage de déplacement de la bague de mise au point est désormais limitée à la distance entre
les deux vis de blocage.
Réglage de la rigidité
Tournez la molette de contrôle au centre en maintenant la bague de mise au point pour régler la
rigidité de la bague. Ajustez la bague de mise au point jusqu'à ce qu'elle adopte une rigidité ou une
mobilité qui vous convient.
FR
49
Page 49

FR
La direction de la rotation de la bague de mise au point Focus peut être inversée dans
l'application DJI GOTM/DJI GO 4.
Paramètres de plage de déplacement
Les paramètres de plage de déplacement sont uniquement disponibles en mode de contrôle de la
mise au point.
1. Tournez la bague de mise au point jusqu'à la limite de déplacement maximale souhaitée et
appuyez une fois sur le bouton LENS.
2. Tournez la bague de mise au point jusqu'à la limite de déplacement minimale souhaitée et appuyez
une fois sur le bouton LENS. Un tour complet de la bague de mise au point fera désormais tourner
la lentille entre ces deux limites de déplacement.
3. Appuyez à nouveau sur le bouton de la lentille pour réinitialiser ce réglage.
Changement du mode de contrôle
1. Maintenez le bouton LENS enfoncé pour basculer entre le contrôle de la mise au point, de l'ouverture
ou du zoom.
2. Il est possible de basculer entre le contrôle de la mise au point, de l'ouverture ou du zoom à partir
de l'application DJI GO/DJI GO 4.
Étalonnage
Étalonnez uniquement la bague de mise au point si vous sentez que le contrôle de la lentille n'est pas optimal.
Comment effectuer l'étalonnage : dans un délai de 5 secondes après la mise sous tension, faites tourner
4 fois la bague de mise au point dans les deux sens et dans sa plage de déplacement complète.
50
Page 50

Mise à jour du rmware
La bague de mise au point Focus Handwheel 2 peut être mise à niveau par le biais de la
radiocommande de l'Inspire 2 et de l'Osmo Pro/RAW. Reportez-vous au guide de l'utilisateur de
l'Inspire 2 ou au guide de mise à niveau de l'Osmo Pro/RAW pour plus d'informations.
Caractéristiques techniques
Modèle FH02
Poids 340 g
Dimensions 86 mm (diamètre) × 68 mm (hauteur)
Température de fonctionnement -20 à 55 ° (-4 à 131 °F)
Tension de fonctionnement 5 V à 12 V
Courant de fonctionnement 0,03 A à 0,072 A
Puissance 0,36 W
Contenu sujet à modications.
Téléchargez la dernière version à l'adresse
http://www.dji.com/focus
FR
51
Page 51

Limitazioni di responsabilità e avvertimenti
Congratulazioni per aver acquistato il nuovo prodotto DJITM. Le informazioni contenute nel presente
documento riguardano la sicurezza, i diritti e le responsabilità legali degli utenti. Leggere con
attenzione l'intero documento per garantire la corretta congurazione dell'apparecchio prima dell'uso.
La mancata lettura del presente documento e l'inosservanza delle istruzioni e delle avvertenze in esso
contenute possono causare lesioni gravi a se stessi o ad altri, danneggiare il prodotto DJI o causare
danni a oggetti in prossimità. Il presente documento e tutti i documenti complementari sono soggetti
a modiche a esclusiva discrezione di DJI. Per informazioni aggiornate su questo prodotto, visitare
http://www.dji.com e fare clic sulla pagina relativa al prodotto.
Utilizzando il prodotto, l'utente dichiara di aver letto e compreso le limitazioni di responsabilità e gli
IT
avvertimenti e di accettare i termini e le condizioni ivi specicati. L'utente riconosce di essere l'unico
responsabile della propria condotta durante l'utilizzo del prodotto e delle relative conseguenze. L'utente
accetta di utilizzare il presente prodotto esclusivamente per scopi leciti e conformi a tutte le leggi,
le normative e i regolamenti applicabili e nel rispetto di tutti i termini, le precauzioni, le pratiche, le
politiche e le direttive che DJI ha reso o renderà disponibili.
DJI declina ogni responsabilità per danni, lesioni o altre responsabilità legali direttamente o
indirettamente imputabili all'utilizzo del presente prodotto. L'utente è tenuto a osservare pratiche
di condotta sicure e legittime, ivi comprese, ma non limitatamente a, quelle esposte nel presente
documento.
DJI è un marchio di SZ DJI TECHNOLOGY CO., LTD. (abbreviato come "DJI") e sue società afliate. I
nomi di prodotti, marchi, ecc. che compaiono nel presente documento sono marchi o marchi registrati
delle rispettive società proprietarie.
Introduzione
La ghiera di messa a fuoco Focus Handwheel 2 DJI permette agli utenti di controllare in modo
semplice e preciso l'apertura, la messa a fuoco e lo zoom sulle telecamere INSPIRETM 2 e OSMOTM
Pro/RAW.
[1]
[2]
[3]
52
[4]
[7]
[6]
[5]
[4]
[8]
[9]
[10 ]
Page 52

[1] Ghiera di messa a fuoco
Controlla l'obiettivo della telecamera.
[2] Controllo rigidità
Consente di regolare la rigidità della ghiera di messa a fuoco.
[3] Anello di indicazione
Fornisce una scala di indicazione.
[4] Viti di arresto
Le viti di arresto regolabili limitano il campo di spostamento della ghiera di messa a fuoco.
[5] Interruttore di accensione
Agire sull'interruttore di accensione per accendere/spegnere Focus Handwheel 2.
[6] LED di stato/Retroilluminazione
Indica lo stato di comunicazione e retroillumina l'anello di indicazione.
[7] Pulsante LENS
Consente di impostare il campo di spostamento dell'obiettivo e di passare tra le diverse modalità
di controllo di messa a fuoco, apertura o zoom, in base alla compatibilità dell'obiettivo.
[8] Supporto a rosetta DJI
Utilizzato per il montaggio e il ssaggio di Focus Handwheel 2.
[9] Porta di comunicazione
Consente il collegamento alla telecamera Osmo Pro/RAW.
[10] Pogo Pin
Consente il collegamento del supporto per il dispositivo di controllo remoto Inspire 2 per Focus
Handwheel 2 DJI per l'alimentazione e la comunicazione. Assicurarsi che il Pogo Pin sia pulito e
in buone condizioni. Non causare il cortocircuito del Pogo Pin.
Installazione
Montaggio sul dispositivo di controllo remoto Inspire 2
1. Collegare Focus Handweel 2 al supporto per il dispositivo di controllo remoto montato sul
dispositivo di controllo remoto Inspire 2 (per ulteriori informazioni sul supporto per il dispositivo di
controllo remoto per Focus Handwheel 2 DJI, visitare il negozio on-line ufciale DJI).
2. Collegare il cavo sul supporto al dispositivo di controllo remoto Inspire 2 per l'alimentazione di
Focus Handwheel 2.
IT
53
Page 53

Focus Handwheel 2 DJI è compatibile solo con Inspire 2. La serie Inspire 1 non è supportata.
IT
Montaggio sulla telecamera Osmo Pro/RAW
1. Fissare la ghiera Focus Handwheel 2 alla telecamera Osmo Pro/RAW come illustrato, quindi serrare
la vite.
2. Collegare la porta di comunicazione su Focus Handwheel 2 alla telecamera Osmo Pro/RAW per
l'alimentazione e la comunicazione tramite l'apposito cavo di comunicazione tra Focus Handwheel
2 e Osmo Pro/RAW (non incluso, per ulteriori informazioni visitare il negozio on-line ufciale DJI).
Vericare che l'orientamento del cavo sia corretto prima di inserirlo nelle porte.
Montaggio su altri dispositivi
Il supporto a rosetta su Focus Handwheel 2 DJI prevede due
dimensioni di montaggio: 1/4" e 3/8". In caso di montaggio di Focus
Handwheel 2 su altri dispositivi con porta da 3/8", rimuovere la vite
dal supporto a rosetta, come illustrato.
54
Page 54

Descrizione del LED di stato
Il LED di stato indica lo stato di comunicazione dopo l'accensione di Focus Handwheel 2. Consultare
la tabella riportata di seguito per ulteriori informazioni sugli schemi di lampeggiamento.
Schemi di lampeggiamento Descrizione
Se lampeggia velocemente Aggiornamento non riuscito.
Se lampeggia lentamente Nessun dispositivo rilevato.
Se acceso e sso Funzionamento corretto.
Impostazioni
Impostazione dei limiti meccanici
Le due viti di arresto sulla ghiera di messa a fuoco possono essere utilizzate per limitare sicamente il
campo di spostamento.
1. Allentare le viti di arresto, farle scorrere no alla posizione desiderata e serrarle.
2. Il campo di spostamento della ghiera di messa a fuoco è ora limitato alla distanza compresa tra le
due viti di arresto.
Regolazione della rigidità
Ruotare la manopola no al centro mantenendo la ghiera di messa a fuoco per regolare la rigidità della
ghiera. Regolare la ghiera di messa a fuoco no a raggiungere la rigidità o l'allentamento desiderato.
IT
55
Page 55

La direzione di rotazione della ghiera di messa a fuoco può essere invertita nell'app DJI GOTM/
IT
DJI GO 4.
Impostazioni del campo di spostamento
Le impostazioni del campo di spostamento sono disponibili solo nella modalità di controllo della messa
a fuoco.
1. Ruotare la ghiera di messa a fuoco no al limite di spostamento superiore desiderato e premere
una volta il pulsante dell'obiettivo.
2. Ruotare la ghiera di messa a fuoco no al limite di spostamento inferiore desiderato e premere una
volta il pulsante dell'obiettivo. Eseguendo un ciclo di rotazione completo della ghiera di messa a
fuoco, l'obiettivo viene quindi ruotato tra i due limiti di spostamento.
3. Premere nuovamente il pulsante dell'obiettivo per la reimpostazione.
Modalità di controllo del commutatore
1. Tenere premuto il pulsante dell'obiettivo per passare tra le modalità di controllo di messa a fuoco,
apertura e zoom.
2. È possibile passare tra le modalità di controllo di messa a fuoco, apertura e zoom nell'app DJI GO/
DJI GO 4.
Taratura
Tarare la ghiera di messa a fuoco soltanto se si percepisce che il controllo dell'obiettivo non è ottimale.
Come eseguire la taratura: entro i primi cinque secondi dopo l'accensione, ruotare quattro volte avanti
e indietro la ghiera di messa a fuoco no al necorsa del campo di spostamento.
56
Page 56

Aggiornamento del rmware
È possibile aggiornare Focus Handwheel 2 tramite il dispositivo di controllo remoto Inspire 2 e la
telecamera Osmo Pro/RAW. Per ulteriori dettagli, fare riferimento al manuale utente di Inspire 2 o alla
guida di aggiornamento della telecamera Osmo Pro/RAW.
Caratteristiche tecniche
Modello FH02
Peso 340 g
Dimensioni 86 (diametro) x 68 (altezza) mm
Temperatura di funzionamento Da -20 ℃ a 55 ℃ (da -4 °F a 131 °F)
Tensione di funzionamento Da 5 V a 12 V
Corrente di esercizio Da 0,03 A a 0,072 A
Alimentazione 0,36 W
Il presente contenuto è soggetto a modiche.
Scaricare l'ultima versione da
http://www.dji.com/focus
IT
57
Page 57

Disclaimer en waarschuwing
Gefeliciteerd met de aankoop van je nieuwe DJITM-product. De informatie in dit document betreft je
veiligheid en je wettelijke rechten en plichten. Lees dit hele document zorgvuldig door om ervoor
te zorgen dat je de juiste conguratie toepast vóór het gebruik. Het niet lezen en opvolgen van de
instructies en waarschuwingen in dit document kan leiden tot ernstig letsel bij jezelf of anderen, tot
schade aan het DJI-product of schade aan andere objecten in de omgeving. Dit document en alle
overige documentatie zijn onderhevig aan veranderingen naar goeddunken van DJI. Surf voor up-to-
date productinformatie naar http://www.dji.com en klik op de productpagina van dit product.
Door dit product te gebruiken geef je aan dat je deze disclaimer en waarschuwing zorgvuldig hebt
gelezen en dat je begrijpt en ermee akkoord gaat dat je je moet houden aan de hierin gestelde
voorwaarden en bepalingen. Je gaat ermee akkoord dat je verantwoordelijk bent voor je eigen gedrag
tijdens het gebruik van dit product, en voor de mogelijke gevolgen daarvan. Je gaat ermee akkoord
NL
om dit product uitsluitend voor gepaste doeleinden te gebruiken en in overeenstemming met alle
toepasselijke wetten, regels en voorschriften, en alle voorwaarden, voorzorgsmaatregelen, gewoonten,
beleidsregels en richtlijnen die DJI heeft opgesteld en beschikbaar heeft gesteld.
DJI aanvaardt geen aansprakelijkheid voor schade, letsel of enige wettelijke verantwoordelijkheid die
direct of indirect voortkomt uit het gebruik van dit product. De gebruiker neemt veilig en legaal gebruik
in acht, inclusief, maar niet beperkt tot wat in dit document uiteen is gezet.
DJI is een handelsmerk van SZ DJI TECHNOLOGY CO., LTD. (Afgekort als “DJI”) en haar
dochterondernemingen. Namen van producten, merken, enz. in dit document zijn handelsmerken of
gedeponeerde handelsmerken van hun respectieve eigenaren.
Inleiding
Met het DJI Focus handwiel 2 kunnen gebruikers het diafragma, de zoomfunctie en scherpstelling op
de INSPIRETM 2 en de OSMOTM Pro/RAW-camera's nauwkeurig en eenvoudig instellen.
[1]
[2]
[3]
58
[4]
[7]
[6]
[5]
[4]
[8]
[9]
[10 ]
Page 58

[1] Scherpstelwiel
Bedient de cameralens.
[2] Stijfheidsregeling
Stelt de stijfheid van het scherpstelwiel af.
[3] Markeerring
Voorziet in een markeerschaal.
[4] Begrenzingsschroeven
Begrenzingsschroeven begrenzen het draaibereik van het scherpstelwiel.
[5] Aan/uit-schakelaar
Bedien de aan/uit-schakelaar om het Focus handwiel 2 in of uit te schakelen.
[6] Status-LED/backlight
Geeft de communicatiestatus weer en zorgt ervoor dat de markeringsring van achteren wordt
verlicht.
[7] LENS-knop
Opent instellingen voor lensbeweging en omschakelen tussen scherpstelling, het diafragma en de
zoomfunctie, afhankelijk van de compatibiliteit van de lens.
[8] DJI rozetbevestiging
Wordt gebruikt voor het monteren en vastzetten van het Focus handwiel 2.
[9] Communicatiepoort
Maakt verbinding met de Osmo Pro/RAW.
[10] Pogo-pen
Voor aansluiting op de houder voor de afstandsbediening op het Focus handwiel 2 op de
Inspire 2 voor voeding en communicatie. Zorg dat de Pogo-pen schoon is en in een goede staat
verkeert. Zorg dat de Pogo-pen geen kortsluiting maakt.
Installatie
Montage op de afstandsbediening van de Inspire 2
1. Bevestig het Focus handwiel 2 op de houder voor de afstandsbediening die op de
afstandsbediening van de Inspire 2 is gemonteerd (ga naar de ofciële DJI Online Store voor meer
informatie over de houder voor de afstandsbediening van het DJI Focus handwiel 2).
2. Sluit de kabel op de houder aan op de afstandsbediening van de Inspire 2 om het Focus handwiel
2 van voeding te voorzien.
NL
59
Page 59

Het DJI Focus handwiel 2 is alleen compatibel met de Inspire 2. De Inspire 1-serie wordt niet
ondersteund.
NL
Montage op de Osmo Pro/RAW
1. Bevestig het Focus handwiel 2 zoals afgebeeld op de Osmo Pro/RAW en haal de schroef aan.
2. Gebruik de speciale communicatiekabel Focus handwiel 2 - Osmo Pro/RAW (niet meegeleverd, ga
naar de ofciële DJI Online Store voor meer informatie) om de communicatiepoort van het Focus
handwiel 2 aan te sluiten op de Osmo Pro/RAW. Zorg dat de kabel juist is georiënteerd voordat je
de kabeluiteinden in de poorten plaatst.
Montage op andere apparaten
De rozetmontage op het DJI handwiel 2 is er in twee
montageafmetingen: 1/4” en 3/8”. Als je het handwiel 2 op andere
apparaten met een 3/8”-poort monteert, verwijder dan de bout in
de rozetmontage zoals afgebeeld.
60
Page 60

Beschrijvingen van status-LED
De status-LED geeft de communicatiestatus aan nadat het Focus handwiel 2 is ingeschakeld.
Raadpleeg de onderstaande tabel voor meer informatie over de knipperpatronen.
Knipperpatronen Beschrijving
Knippert snel Upgrade mislukt.
Knippert langzaam Geen apparaat gevonden.
Brandt continu Werkt naar behoren.
Instellingen
Mechanische begrenzingen instellen
De twee afstelbare begrenzingsschroeven rondom het scherpstelwiel kunnen worden gebruikt om het
draaibereik fysiek te begrenzen.
1. Draai de begrenzingsschroeven los, schuif ze in de gewenste stand en draai ze vast.
2. Het draaibereik van het scherpstelwiel is nu beperkt tot de afstand tussen de twee begrenzingsschroeven.
De stijfheid aanpassen
Draai aan de regelknop in het midden terwijl je het scherpstelwiel vasthoudt om de stijfheid van het
wiel aan te passen. Stel het handwiel voor scherpstelling af totdat het stijfheids- of losheidsniveau naar
wens is.
NL
61
Page 61

De draairichting van het Focus handwiel kan met de DJI GOTM/DJI GO 4-app worden
omgekeerd.
NL
Instellingen draaibereik
De instellingen voor het draaibereik zijn alleen beschikbaar in de besturingsmodus scherpstelling.
1. Draai het scherpstelwiel naar het gewenste bovenste begrenzingspunt en druk eenmaal op de
LENS-knop.
2. Draai het scherpstelwiel naar het gewenste onderste begrenzingspunt en druk eenmaal op de
LENS-knop. Als het scherpstelwiel nu helemaal rond wordt gedraaid, draait de lens tussen de twee
begrenzingspunten.
3. Druk nogmaals op de LENS-knop om te resetten.
Besturingsmodus wisselen
1. Houd de LENS-knop ingedrukt om te wisselen tussen scherpstelling, het diafragma en de zoomfunctie.
2. Besturing van de scherpstelling, het diafragma of de zoomfunctie kan worden geschakeld in de
DJI GO/DJI GO 4-app.
Kalibratie
Kalibreer het handwiel voor scherpstelling alleen als je voelt dat de lensregeling niet optimaal is.
Kalibreren: Draai het Focus handwiel binnen de eerste vijf seconden na inschakeling viermaal
helemaal links- en rechtsom binnen het volledige draaibereik.
62
Page 62

Firmware updaten
Het Focus handwiel 2 kan worden geüpgraded met behulp van de afstandsbediening Inspire 2 en de
Osmo Pro/RAW. Raadpleeg de gebruikershandleiding van de Inspire 2 of de upgradehandleiding van
de Osmo Pro/RAW voor meer informatie.
Specicaties
Model FH02
Gewicht 340 g
Afmetingen 86 (diameter)×68 (hoogte) mm
Bedrijfstemperatuur -20 ℃ tot 55 ℃ (-4 °F tot 131 °F)
Bedrijfsspanning 5V-12V
Bedrijfsstroom 0,03 A - 0,072 A
Voeding 0,36 W
Deze inhoud is aan verandering onderhevig.
Download de nieuwste versie op
http://www.dji.com/focus
NL
63
Page 63

Isenção de responsabilidade e aviso
Parabéns por ter adquirido o seu novo produto da DJITM. As informações contidas neste documento
afetam a sua segurança e os seus direitos legais e responsabilidades. Leia este documento
cuidadosamente para assegurar uma conguração correta antes da utilização. A não observância
das instruções e avisos deste documento pode resultar em lesões graves para si mesmo ou terceiros,
ou danos ao seu produto DJI ou danos a outros objetos nas proximidades. Este e todos os outros
documentos de garantia estão sujeitos à alteração a critério exclusivo da DJI. Para obter informações
atualizadas sobre o produto, visite http://www.dji.com e clique na página de produto relativa a este
produto.
A utilização deste produto significa que o utilizador leu cuidadosamente esta declaração de
exoneração de responsabilidade e o aviso e que compreende e aceita cumprir os termos e condições
aqui expostos. O utilizador concorda que é o único responsável pela sua conduta durante a utilização
deste produto e pelas possíveis consequências daí resultantes. O utilizador compromete-se a utilizar
PT
este produto apenas para ns que sejam aceitáveis e estejam em conformidade com todas as leis,
regras e regulamentações aplicáveis e ainda todos os termos, precauções, práticas, políticas e
diretrizes que a DJI disponibilize e possa vir a disponibilizar.
A DJI não assume qualquer responsabilidade pelos danos, ferimentos ou quaisquer responsabilidades
legais decorrentes direta ou indiretamente da utilização deste produto. O utilizador deve observar as
práticas seguras e legais, incluindo, entre outras, as apresentadas no presente documento.
DJI é uma marca comercial da SZ DJI TECHNOLOGY CO., LTD. (abreviada como "DJI") e suas
empresas aliadas. Nomes de produtos, marcas, etc., que aparecem neste documento são marcas
comerciais ou marcas registradas de suas respectivas companhias proprietários.
Introdução
O DJI Focus Handwheel 2 permite aos usuários controlar abertura, foco ou zoom das câmeras Pro/
RAW INSPIRETM 2 e OSMOTM de uma forma precisa e conveniente.
[1]
[2]
[3]
64
[4]
[7]
[6]
[5]
[4]
[8]
[9]
[10 ]
Page 64

[1] Botão Focus
Controla a lente da câmera.
[2] Controle de rigidez
Ajusta a rigidez do botão Focus.
[3] Anel de marcação
Fornece uma escala de marcação.
[4] Parafusos de batente
Ajustáveis, limitam o curso do botão Focus.
[5] Botão Liga/Desliga
Usado para ligar/desligar o Focus Handwheel 2.
[6] LED de status/luz de fundo
Indica o status da comunicação e ilumina o anel de marcação por detrás.
[7] Botão LENS
Abre as congurações de curso da lente e alterna entre foco, controle de abertura ou zoom,
sujeito a compatibilidade de lentes.
[8] Suporte em roseta DJI
Usado para montar e prender o Focus Handwheel 2.
[9] Porta de comunicação
Conecta-se ào Osmo Pro/RAW.
[10] Pino terminal
Conecta-se ao suporte do controle remoto do DJI Focus Handwheel 2 do Inspire 2 para
alimentação elétrica e comunicação. O pino terminal deve estar limpo e em bom estado. Tome
cuidado para evitar um curto-circuito no pino terminal.
Instalação
Montagem no Controle Remoto Inspire 2
1. Prenda o Focus Handwheel 2 ao Suporte do Controle Remoto instalado no controle remoto do
Inspire 2 (acesse a loja on-line ocial da DJI para obter mais informações sobre o Suporte do
Controle Remoto do DJI Focus Handwheel 2).
2. Conecte o cabo no Suporte do controle remoto do Inspire 2 para ligar o Focus Handwheel 2.
PT
65
Page 65

O DJI Focus Handwheel 2 é compatível apenas com o Inspire 2. A série Inspire 1 não é
compatível.
Montagem no Osmo Pro/RAW
1. Prenda o Focus Handwheel 2 no Osmo Pro/RAW conforme mostrado. Em seguida, aperte o
PT
parafuso.
2. Conecte a porta de comunicação no Focus Handwheel 2 ào Osmo Pro/RAW para ligar a
alimentação elétrica e a comunicação, usando o cabo de comunicação dedicado entre o Focus
Handwheel 2 e o Osmo Pro/RAW (não incluído, acesse a loja on-line oficial da DJI para mais
informações). Certique-se de que o cabo esteja orientado corretamente antes de conectar nas
portas.
Fixação em outros dispositivos
O Suporte em Roseta no DJI Handwheel 2 permite duas
dimensões de montagem: 1/4” e 3/8”. Se estiver montando o
Handwheel 2 em outros dispositivos com porta 3/8”, remova o
parafuso no Suporte em Roseta conforme mostrado.
66
Page 66

Descrição dos LEDs de status
O LED de estado indica o estado de comunicação após ligar o Focus Handwheel 2. Consulte a tabela
abaixo para mais informações sobre os padrões de luzes piscando.
Padrão de luzes piscando Descrição
Pisca rapidamente Falha na atualização.
Pisca lentamente Nenhum dispositivo detectado.
Sólido em Funcionando corretamente.
Congurações
Denir limites mecânicos
Os dois parafusos de batente ao redor do botão Focus podem ser usados para limitar sicamente o
curso de deslocamento.
1. Solte os parafusos de batente, deslize-os até as posições pretendidas e aperte-os.
2. O curso de deslocamento do botão Focus agora está limitado à distância entre os dois parafusos
de batente.
Ajustando a rigidez
Gire o botão de controle no centro, segurando o botão focus para ajustar a rigidez do botão rotativo.
Ajuste o botão focus até ele alcançar um nível de rigidez ou afrouxamento confortável para você.
PT
67
Page 67

A direção de rotação no botão Focus pode ser revertida no aplicativo DJI GOTM/DJI GO 4.
Congurações de curso de deslocamento
PT
As congurações de curso de deslocamento estão disponíveis somente no modo de controle do foco.
1. Gire o botão Focus até o limite superior do curso desejado e pressione o botão Lens uma vez.
2. Gire o botão Focus até o limite inferior do curso desejado e pressione o botão Lens uma vez. Ao
girar o botão Focus por um ciclo inteiro, a lente girará entre os dois limites do curso.
3. Pressione novamente o botão Lens para redenir.
Alterar modo de controle
1. Pressione e segure o botão Lens para alternar entre foco, abertura e controle de zoom.
2. Foco, abertura ou controle de zoom podem ser acionados no aplicativo DJI GO/DJI GO 4.
Calibração
Só calibre o Focus Handwheel se perceber que o controle da lente não está ideal.
Como calibrar: Durante os primeiros cinco segundos após ligar, gire o botão Focus para trás e para
frente por todo o curso de deslocamento, quatro vezes.
68
Page 68

Atualizar o rmware
O Focus Handwheel 2 pode ser atualizado através do controle remoto do Inspire 2 e do Osmo Pro/
RAW. Consulte o manual do usuário do 2 Inspire ou o guia de atualização do Osmo Pro/Raw para
detalhes.
Especicações
Modelo FH02
Peso 340 g
Dimensões 86 (diâmetro) x 68 (altura) mm
Temperatura operacional -4° a 131°F (-20° a 55℃)
Tensão de operação 5V-12V
Corrente de funcionamento 0,03 A - 0,072 A
Alimentação 0,36 W
Este conteúdo está sujeito a alterações.
Baixe a versão mais recente disponível em
http://www.dji.com/focus
PT
69
Page 69

Заявление об отказе от ответственности и
предупреждение
Поздравляем с приобретением нового продукта DJITM. Информация, содержащаяся в этом документе,
затрагивает вашу безопасность, законные права и обязанности. Внимательно ознакомьтесь с данным
документом перед использованием продукта. Пренебрежение содержимым данного документа и
несоблюдение мер безопасности может привести к серьезным травмам, повреждению продукта DJI и
другого имущества. Компания DJI вправе вносить изменения в содержание данного и сопутствующих
документов. Для получения обновленной информации по продукту посетите веб-сайт http://www.dji.com
и выберите страницу, соответствующую данному продукту.
Используя данный продукт, вы подтверждаете, что внимательно ознакомились с заявлением об
отказе от ответственности и предупреждением и соглашаетесь выполнять правила и условия
настоящего документа. Вы несете полную ответственность за эксплуатацию данного продукта
и за все возможные последствия его использования. Вы соглашаетесь использовать данный
продукт только в правомерных целях, способом, который не противоречит действующему
законодательству, правилам и предписаниям, включая международные и государственные правила
полетов, и всем условиям, мерам предосторожности, установкам, курсам и руководствам, которые
RU
были предоставлены и могут быть предоставлены в будущем компанией DJI.
DJI не несет ответственность за повреждения, травмы или любую юридическую ответственность,
прямо или косвенно вызванную использованием данного продукта. На пользователя возлагается
обязанность соблюдать правила техники безопасности и законы, включая, но не ограничиваясь
изложенными в настоящем документе.
DJI является товарным знаком компании SZ DJI TECHNOLOGY CO., LTD. (сокращенно "DJI")
и ее дочерних компаний. Названия продуктов, торговых марок и т. д., содержащиеся в данном
документе, являются товарными знаками или зарегистрированными товарными знаками
соответствующих компаний.
Введение
Ручной регулятор фокуса DJI Focus Handwheel 2 обеспечивает удобное и точное управление
диафрагмой, фокусом и зумом камер на INSPIRETM 2 и OSMOTM Pro/RAW.
[1]
[2]
[3]
70
[4]
[7]
[6]
[5]
[4]
[8]
[9]
[10 ]
Page 70

[1] Рукоятка управления фокусом
Управляет объективом камеры.
[2] Регулировка свободы вращения
Служит для регулировки свободы вращения рукоятки.
[3] Маркировочное кольцо
Кольцо с маркировочной шкалой.
[4] Ограничительные винты
Регулируемые винты для ограничения диапазона вращения рукоятки.
[5] Выключатель питания
Включение/выключение питания регулятора Focus Handwheel 2.
[6] Светодиодный индикатор состояния/задняя подсветка
Показывает состояние связи и подсвечивает маркировочную шкалу сзади.
[7] Кнопка LENS (Объектив)
Открывает настройки вращения объектива и позволяет переключаться между режимами
управления фокусом, диафрагмой и зумом (при условии совместимости с объективом).
[8] Крепление DJI Rosette
Используется для установки и крепления рукоятки Focus Handwheel 2.
[9] Порт связи
Обеспечивает связь с Osmo Pro/RAW.
[10] Пружинный контакт
Обеспечивает подключение регулятора DJI Focus Handwheel 2 к держателю пульта
дистанционного управления Inspire 2 для подачи питания и связи. Убедитесь, что пружинный
контакт очищен и находится в хорошем состоянии. Обеспечьте защиту пружинного контакта
от короткого замыкания.
Сборка
Установка на пульт дистанционного управления Inspire 2
1. Подсоедините регулятор Focus Handwheel 2 к держателю пульта управления Inspire 2 (посетите
сайт официального онлайн-магазина DJI для получения более подробной информации о
держателе).
2. Подключите кабель держателя к пульту управления Inspire 2 для подачи питания на регулятор
Focus Handwheel 2.
RU
71
Page 71

Ручной регулятор фокуса DJI Focus Handwheel 2 совместим только с Inspire 2. Серия
Inspire 1 не поддерживается.
Крепление на Osmo Pro/RAW.
1. Закрепите регулятор Focus Handwheel 2 на Osmo Pro/RAW, как показано на рисунке, и затяните
винт.
2. Подсоедините порт связи на регуляторе Focus Handwheel 2 к Osmo Pro/RAW для подачи
питания и связи с помощью специального кабеля (не включен в комплект поставки, посетите
официальный онлайн-магазин DJI для получения подробной информации). Прежде чем
вставить кабель в соответствующий порт, убедитесь, что он обращен к нему правильной
стороной.
RU
Установка на другие устройства
Крепление Rosette на регуляторе DJI Handwheel 2 обеспечивает
два монтажных размера: 1/4 и 3/8 дюйма. При установке
Handwheel 2 на другие устройства с портом 3/8 дюйма снимите
винт крепления Rosette, как показано на рисунке.
Расшифровка значений цвета светодиодного
индикатора
Светодиодный индикатор состояния показывает состояние связи после включения регулятора
Focus Handwheel 2. В таблице ниже приведены пояснения к сигналам светодиодного индикатора
состояния.
72
Page 72

Характер мигания Описание
Мигает быстро Обновление не выполнено.
Мигает медленно Устройство не обнаружено.
Горит непрерывно Работает нормально.
Настройки
Настройка механических ограничений
Два регулируемых ограничительных винта, расположенных по бокам рукоятки, можно
использовать для ограничения диапазона вращения рукоятки.
1. Ослабьте ограничительные винты, переместите их в нужное место и снова затяните.
2. Теперь диапазон вращения рукоятки ограничен расстоянием между этими двумя
ограничительными винтами.
Регулировка свободы вращения
Поверните рукоятку управления в центре, удерживая регулятор фокуса в неподвижном состоянии,
чтобы отрегулировать степень свободы его вращения. Установите удобную для вас степень
свободы вращения.
RU
73
Page 73

Направление вращения регулятора фокуса можно изменить с помощью приложения DJI GOTM/
DJI GO 4.
Настройки диапазона вращения
Настройки диапазона вращения доступны только в режиме управления фокусом.
1. Поверните регулятор фокуса в желаемое верхнее предельное положение и нажмите кнопку
объектива один раз.
2. Поверните регулятор фокуса в желаемое нижнее предельное положение и нажмите кнопку
объектива один раз. Теперь полный поворот регулятора фокуса приведет к повороту объектива
из одного предельного положения в другое.
3. Нажмите кнопку объектива еще раз для сброса настроек.
Переключение режима управления
1. Нажмите и удерживайте кнопку объектива для переключения между режимами управления
фокусом, диафрагмой и зумом.
2. Переключаться между режимами управления фокусом, диафрагмой и зумом можно с помощью
приложения DJI GO/DJI GO 4.
RU
Калибровка
Выполняйте калибровку ручного регулятора фокуса только в случае недостаточно точного
управления объективом.
Порядок калибровки: в течение пяти секунд после включения поверните регулятор фокуса вперед/
назад до упора четыре раза.
Обновление прошивки
Регулятор Focus Handwheel 2 можно обновить через пульт управления Inspire 2 и Osmo Pro/RAW.
Подробная информация приведена в руководстве пользователя Inspire 2 или руководстве по
обновлению Osmo Pro/RAW.
74
Page 74

Технические характеристики
Модель FH02
Масса 340 г
Размеры 86 (диаметр)×68 (высота) мм
Диапазон рабочих температур от -20 до +55 ℃ (от -4 до 131 °F)
Рабочее напряжение 5-12 В
Рабочий ток 0,03–0,072 A
Мощность 0,36 Вт
Компания вправе вносить изменения в содержание данного документа.
Актуальную редакцию документа можно загрузить с веб-сайта:
http://www.dji.com/focus
RU
75
Page 75

Compliance Informatron
FCC Compliance
This device complies with Part 15 of the FCC Rules. Operation is subject to the following
two conditions: (1) This device may not cause harmful interference, and (2) This device
must accept any interference received, including interference that may cause undesired
operation.
Any changes or modifications not expressly approved by the party responsible for
compliance could void the user’s authority to operate the equipment.
EU Compliance Statement
SZ DJI TECHNOLOGY CO., LTD. hereby declares that this device is in compliance with
the essential requirements and other relevant provisions of the EMC Directive.
A copy of the EU Declaration of Conformity is available online at www.dji.com/euro-
compliance
EU-Compliance
Hiermit erklärt SZ DJI TECHNOLOGY CO., LTD., dass dieses Gerät den wesentlichen
Anforderungen und anderen einschlägigen Bestimmungen der EU-Richtlinie EMC
entspricht.
Eine Kopie der EU-Konformitätserklärung finden Sie online auf www.dji.com/euro-
compliance.
Declaración de cumplimiento UE
SZ DJI TECHNOLOGY CO., LTD. por la presente declara que este dispositivo cumple los
requisitos básicos y el resto de provisiones relevantes de la Directiva EMC.
Hay disponible online una copia de la Declaración de conformidad UE en www.dji.com/
euro-compliance
Déclaration de conformité UE
Par la présente, SZ DJI TECHNOLOGY CO., LTD déclare que cet appareil est conforme
aux principales exigences et autres clauses pertinentes de la directive européenne EMC.
Une copie de la déclaration de conformité UE est disponible sur le site www.dji.com/
euro-compliance
Dichiarazione di conformità UE
SZ DJI TECHNOLOGY CO., LTD. dichiara che il presente dispositivo è conforme ai
requisiti essenziali e alle altre disposizioni rilevanti della direttiva EMC.
Una copia della dichiarazione di conformità UE è disponibile online all'indirizzo Web
www.dji.com/euro-compliance
76
Page 76

EU-verklaring van overeenstemming
SZ DJI TECHNOLOGY CO., LTD. verklaart hierbij dat dit apparaat voldoet aan de
essentiële vereisten en andere relevante bepalingen van Richtlijn EMC.
De EU-verklaring van overeenstemming is online beschikbaar op www.dji.com/euro-
compliance
Declaração de conformidade da UE
A SZ DJI TECHNOLOGY CO., LTD. declara, através deste documento, que este
dispositivo está em conformidade com os requisitos essenciais e outras disposições
relevantes da Diretiva EMC.
Existe uma cópia da Declaração de conformidade da UE disponível online em www.dji.
com/euro-compliance
Заявление о соответствии требованиям ЕС
SZ DJI TECHNOLOGY CO., LTD. настоящим подтверждает, что данное устройство
выполнено в строгом соответствии с основополагающими требованиями и другими
актуальными предписаниями Директивы EMC.
С полным текстом официальной декларации о соответствии требованиям ЕС можно
ознакомиться на веб-сайте компании DJI по адресу www.dji.com/euro-compliance
EU contact address: DJI GmbH, Industrie Strasse. 12, 97618, Niederlauer, Germany
77
Page 77

DJI Support
DJI
技术支持
DJI
技術支援
DJI
サポート
지원
DJI
DJI Support
Servicio de asistencia de DJI
Service client DJI
Assistenza DJI
DJI-ondersteuning
Suporte DJI
Техническая поддержка DJI
http://www.dji.com/support
78
Page 78

If you have any questions about this document, please contact
DJI by sending a message to
OSMO and INSPIRE are trademarks of DJI.
Copyright © 2017 DJI All Rights Reserved.
如果您对说明书有任何疑问或建议,请通过以下电子邮箱联系我们:
DocSupport@dji.com
OSMO 和 INSPIRE 是大疆创新的商标
Copyright ©
2017 大疆创新 版权所有
DocSupport@dji.com
。
.
Printed in China.
中国印制
 Loading...