

Page 1
OSMO MOBILE
Quick Start Guide
快速入门指南
快速入門指南
クイックスタートガイド
퀵 스타트 가이드
Kurzanleitung
Guía de inicio rápido
Guide de démarrage rapide
Guida di avvio rapido
Snelstartgids
Guia de início rápido
Краткое руководство пользователя
V1.0
Page 2

Contents
EN
Quick Start Guide 4
CHS
快速入门指南 10
CHT
快速入門指南 16
JP
クイックスタートガイド 22
KR
퀵 스타트 가이드 28
DE
Kurzanleitung 34
ES
Guía de inicio rápido 40
FR
Guide de démarrage rapide 46
IT
Guida di avvio rapido 52
NL
Snelstartgids 58
PT
Guia de início rápido 64
RU
Краткое руководство пользователя 70
Compliance Information 76
3
Page 3
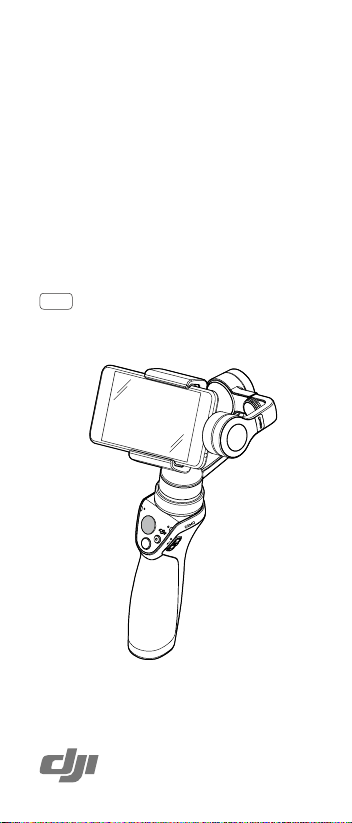
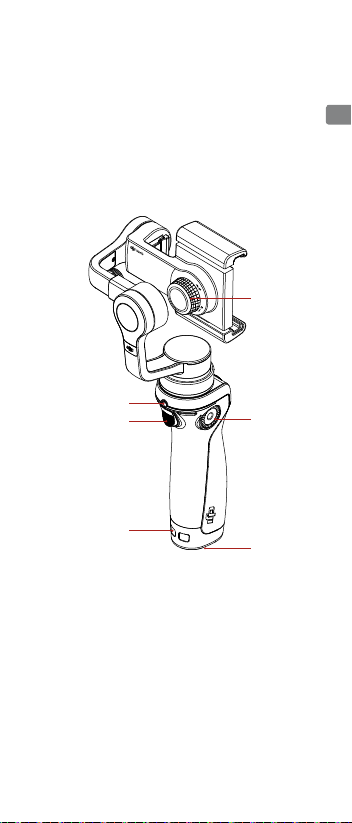
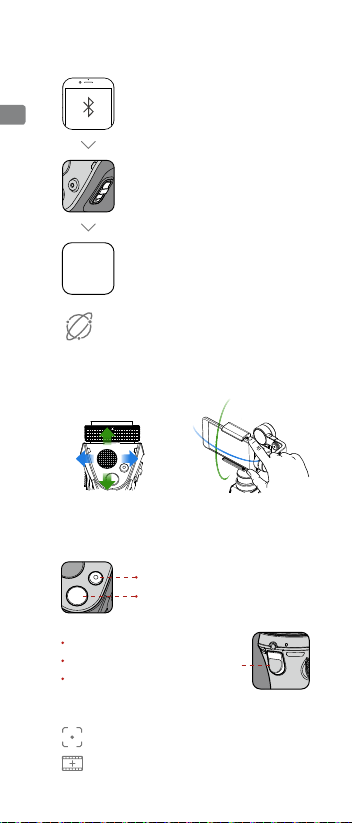
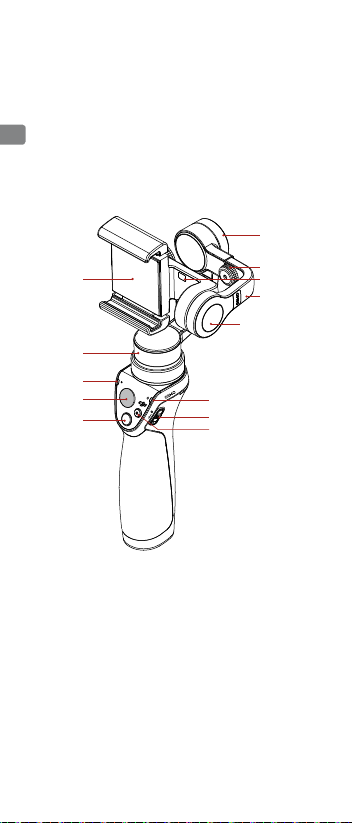
Osmo Mobile
EN
The OSMOTM Mobile is an advanced gimbal that turns
your mobile phone into a smart motion camera by
stabilizing it while in motion. It is easy to use, and powerful
features such as ActiveTrack and Motion Timelapse are
available through the DJI GO app.
1
9
2
3
4
5
8
7
6
13
12
11
10
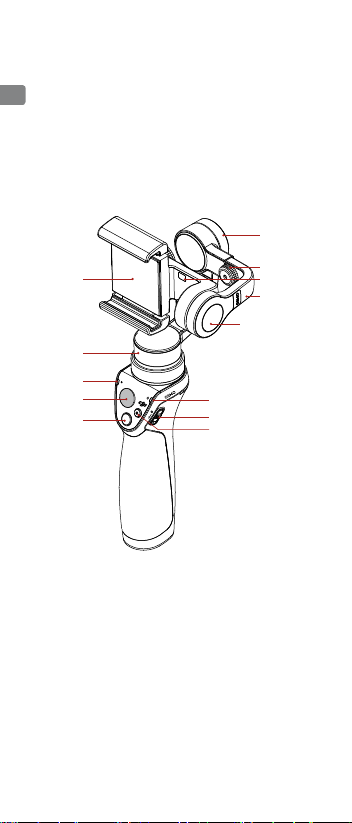
1 Mobile Phone Holder
2 Pan Motor
3 Camera Status LED
4 Joystick
5 Shutter Button
6 Record Button
7 Power Switch
8 System Status LED
4
9 Tilt Motor
10 Adjustable Arm
11 Mobile Phone
Detection Sensor
12 Balance
Adjustment Knob
13 Roll Motor
Page 4
EN
14
15
16
18
17
19
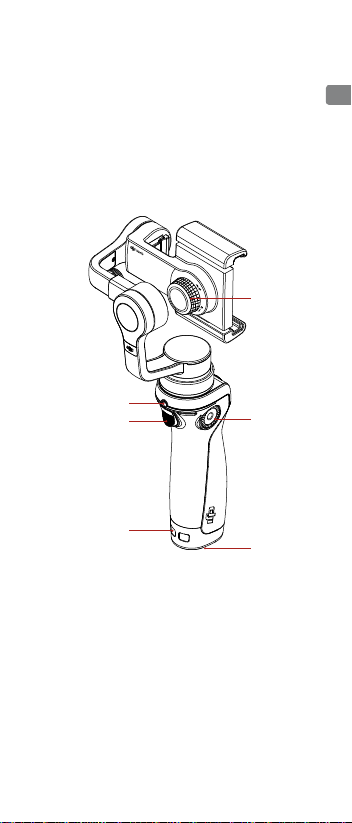
14 Holder Lock Knob
15 Charging/Upgrade Port
16 Trigger
17 DJI Rosette Mount
18 Lanyard Hole
19 Battery Cover
※ Mobile Phone is not included.
5
Page 5
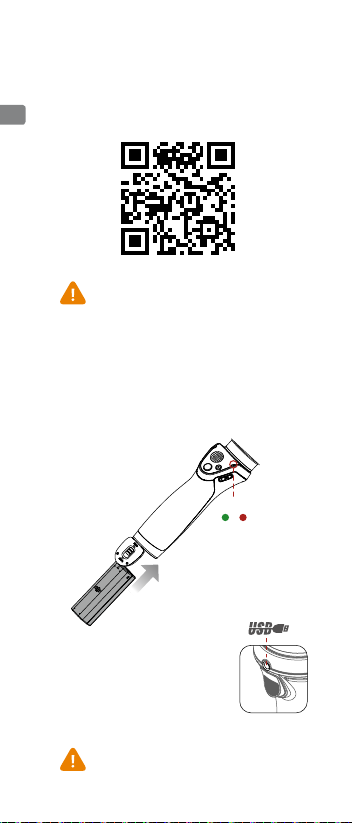
1. Install the DJI GO App
Search for ‘DJI GO’ on the App Store or Google Play,
EN
and install the app on your mobile phone.
DJI GO supports iOS 8.0 (or later) and Android 4.4
(or later).
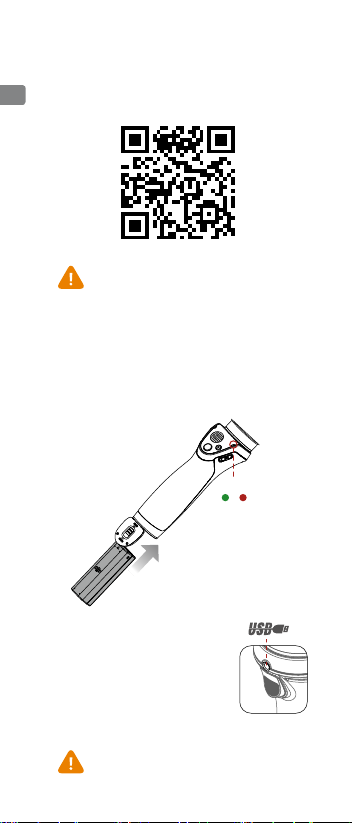
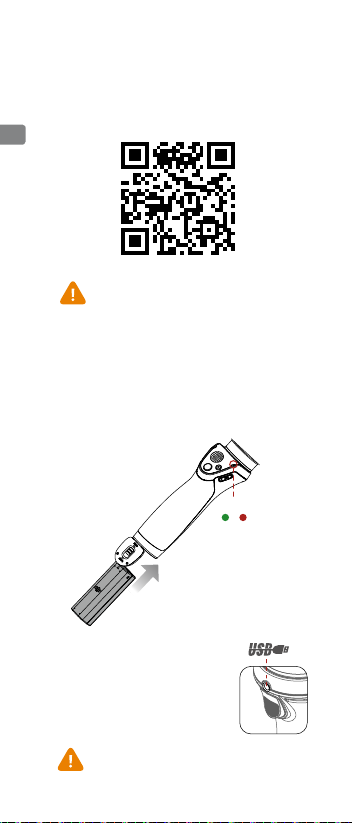
2. Prepare the Battery
Fully charge the battery before using it for the rst
time to activate it, otherwise the gimbal will not work.
Insert the battery as shown.
To charge the Osmo Mobile, connect the
USB adapter (not included) to the charging
port using the provided power cable.
The battery is fully charged when the
system status LED become solid green.
USB Adapter Charging time : 3 hours
( when charging at 1 A)
Maximum Supported USB Charging
Current: 2.1 A
Max Run-time: 4.5 hours
Only use the Power Cable with the Osmo Mobile.
Damage may occur if the Power Cable is attached to
any other device's 3.5 mm port.
6
Battery Level
High Low
Page 6
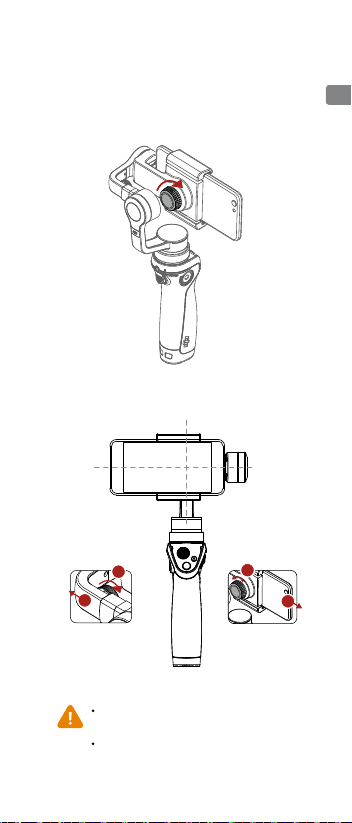
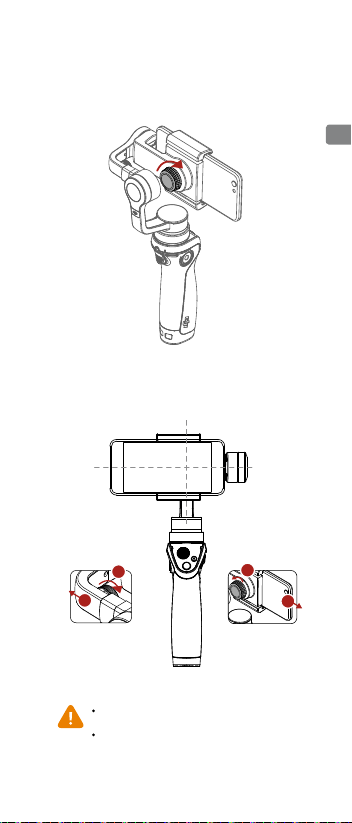
3. Mount and Balance the
Mobile Phone
With the Osmo Mobile powered off, loosen the
Holder Lock Knob, place the mobile phone in the
mobile phone holder and tighten the knob to secure
its position.
The system is balanced if the mobile phone remains
level when released, balanced only by the gimbal.
Left Right
EN
1
2
If the roll axis tilts to
the left, pull out the
arm until the roll axis
remains level.
Do not power on the Osmo Mobile without a mobile
phone. The Osmo Mobile will not work if no device is
detected by the Mobile Phone Detection Sensor.
It is important to balance the mobile phone in order to
achieve optimal performance. The Osmo Mobile should
only be balanced when powered off.
If the roll axis tilts to
the right, adjust the
mobile phone to the
left until the roll axis
levels out.
1
2
7
Page 7
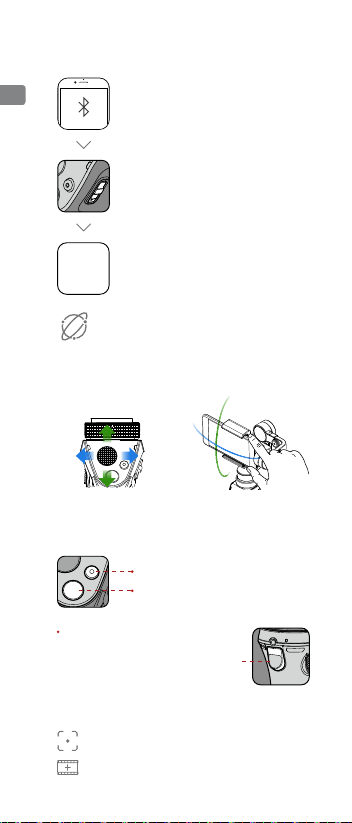
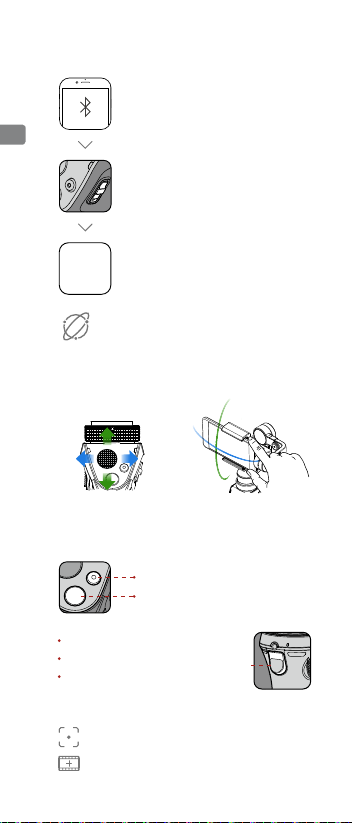
4. Connect to the DJI GO App
Internet
EN
Enable Bluetooth on your mobile phone
To Power On: Pull down and hold for 1.5 s
Pull down again > Sleep
Pull down and hold for 1.5 s > Power Off
Launch the DJI GO app and then follow
DJI GO
the instructions to connect to the Osmo
App
Mobile.
Activate the Osmo Mobile when using it for the rst
time. This requires an internet connection.
5. Controls
Use the joystick to pan or
tilt the mobile phone.
SmoothTrack Mode is enabled automatically to smooth out jerky
movements.
Record Button: Press once to start
recording, and again to stop recording.
Shutter Button: Press once to take a photo.
Press and hold for burst capture.
Trigger
Hold down to enable Lock Mode.
Tap twice to center the mobile phone.
Tap three times to switch between the
mobile phone’s front and rear cameras.
Position the mobile phone
directly by hand.
DJI GO advanced features:
8
ActiveTrack: Mark an object on your screen to track it as it moves.
Motion Timelapse: To capture a moving timelapse video from
different camera positions.
Page 8

Specications
Handle
Dimensions 2.4×1.9×6.4 inch
(61.8×48.2×161.5 mm)
Weight (battery included) 201 g
Gimbal
Name Zenmuse M1
Model ZM01
Dimensions 4.92×4.29×3.57 inch (Folded)
(125.06×109.15×90.98 mm)
Weight 300 g
Consumption 2.5 W
Angular Vibration Range ±0.03°
Controllable Range Pan: ±150°
Roll: ±25°
Tilt: -125° to +35°
Mechanical Range Pan: ±165°
Roll: -50° to +90°
Tilt: -140° to +50°
Max Controllable Speed 120°/s
Mobile Phone Width Range 2.31-3.34 inch (58.6-84.8 mm)
Wireless
Model Bluetooth Low Energy 4.0
Intelligent Battery
Model HB01-522365
Type LiPo
Capacity 980 mAh
Energy 10.8 Wh
Voltage 11.1 V
Charging Temperature 5° to 40° C (41° to 104° F)
Operating Temperature 0° to 40° C (32° to 104° F)
EN
DJI provides various optional accessories for the Osmo Mobile. Visit
the DJI Online Store for more information:
For more information, read the User Manual:
www.dji.com/product/osmo-mobile
※ This content is subject to change without prior notice.
TM
is a trademark of DJI.
OSMO
Copyright © 2016 DJI All Rights Reserved.
Printed in China.
http://store.dji.com
9
Page 9

认识 Osmo Mobile
OSMOTM Mobile 配备适配手机的高精度三轴云台,
CHS
通过手柄和 DJI GO App 控制云台及手机相机,可
拍摄专业级别稳定流畅的画面,并可实现智能跟拍、
移动延时摄影等高级功能。
1
9
2
3
4
5
8
7
6
13
12
11
10
1 手机支架
2 平移轴电机
3 相机状态指示灯
4 摇杆
5 拍照按键
6 录影按键
7 电源开关
10
8 系统状态指示灯
9 俯仰轴电机
10 伸缩臂
11 手机检测传感器
12 平衡调节旋钮
13 横滚轴电机
Page 10
CHS
14
15
16
18
17
19
14 支架锁紧旋钮
15 充电 / 升级接口
16 模式切换按键
17 盘齿
18 挂绳孔
19 电池仓盖
※本产品不包含手机。
11
Page 11
1. 下载安装 DJI GO App
请在手机软件商店搜索“DJI GO”并安装或使
用手机扫描下方二维码安装。
CHS
DJI GO App 要求使用 iOS 8.0及以上系统或 Android
4.4 及以上系统。
2. 准备电池
首次使用前,请务必给电池充电以激活电池,否
则 Osmo Mobile 将不工作。如图将电池装入,
然后锁住电池仓盖。
电量
高 低
使用充电线连接 USB 充电器充电。充电
时,系统状态指示灯变为绿灯常亮代表电
已充满。
完全充满约需 3 小时。
(充电电流为 1A 时)
USB 充电器最大充电电流为 2.1A。
最长工作时间约为 4.5 小时。
Osmo Mobile 充电线仅适用于 Osmo Mobile。请勿将
充电线连接其它任何设备的 3.5 mm 接口,否则可能损
坏该设备。
12
Page 12

3. 安装手机
在 Osmo Mobile 电源关闭的情况下,调节支架
锁紧旋钮,使手机稳定置于支架内后拧紧旋钮。
调节平衡,使手机保持水平。
左侧 右侧
CHS
1
2
若向左倾斜,适
度拉伸伸缩臂。
未安装手机时请勿开启 Osmo Mobile,若手机检测传
感器未检测到设备,Osmo Mobile 将不工作。
安装手机后,务必在 Osmo Mobile 电源关闭、保持
手柄平稳的情况下调节云台平衡,否则将会影响其工
作性能。
1
2
若向右倾斜,将
手机向左移动。
13
Page 13
4. 连接 DJI GO App
Internet
CHS
5. 操 作
平滑控制云台的转动 用手快速调整角度
系统自动启用 SmoothTrack 跟随模式,使手机始终平滑跟随
手柄转动。
DJI GO App 高级拍摄功能:
14
开启手机蓝牙功能
开机:下拉并保持 1.5 秒
休眠:开机状态时下拉然后松开
关机:下拉并保持 1.5 秒
运行 DJI GO App,按提示连接
DJI GO
App
Osmo Mobile。
全新的 Osmo Mobile 通过 DJI GO App 激活才能
使用。激活时手机需连接互联网。
短按开始 / 停止录影
短按拍照,长按连拍
按住:锁定云台朝向不变
双击:云台自动回到中间位置
三击:切换手机前置或后置相机
智能跟拍:手机自动跟随选定目标拍摄。
移动延时摄影:拍摄具有移动轨迹的延时影像。
Page 14
规格参数
手 柄
尺 寸 61.8×48.2×161.5 mm
重 量(含电池) 201 g
云 台
名 称 Zenmuse M1
型 号 ZM01
尺 寸 125.06×109.15×90.98 mm(收缩状态)
重 量 300 g
功 耗 2.5 W
角度抖动量 ±0.03°
可控转动范围 平移:±150° 横滚:±25°
俯仰:-125°至 +35°
结构设计范围 平移:±165° 横滚:-50°至 +90°
俯仰:-140°至 +50°
最大控制转速 120°/s
适用手机宽度 58.6-84.8 mm
无 线
型 号 低功耗蓝牙 4.0
电 池
型 号 HB01-522365
类 型 LiPo
容 量 980 mAh
能 量 10.8 Wh
电 压 11.1 V
充电环境温度 5℃至 40℃
使用环境温度 0℃至 40℃
CHS
DJI 提供丰富的 Osmo Mobile 可选配件,请访问 DJI官网商城了解详
细的可选配件信息:http://store.dji.com/cn
了解产品全部信息,请下载 Osmo Mobile 用户手册
www.dji.com/cn/product/osmo-mobile
※ 内容如有更新,恕不另行通知。
TM
是大疆创新的商标
OSMO
Copyright © 2016 大疆创新 版权所有
中国印制
微信扫一扫关注 DJI公众号
15
Page 15
認識 Osmo Mobile
OSMOTM Mobile 配備適用手機的高精度三軸雲台,
透過把手和 DJI GO 應用程式控制雲台及手機相機,
CHT
可拍攝專業級穩定流暢的畫面,並可實現智能跟拍、
移動縮時攝影等高階功能。
1
9
2
3
4
5
8
7
6
13
12
11
10
1 手機支架
2 平移軸馬達
3 相機狀態指示燈
4 搖桿
5 拍照按鈕
6 錄影按鈕
7 電源開關
16
8 系統狀態指示燈
9 俯仰軸馬達
10 伸縮臂
11 手機偵測感測器
12 平衡調節旋鈕
13 橫滾軸馬達
Page 16

CHT
14
15
16
18
17
19
14 支架鎖緊旋鈕
15 充電 / 升級連接埠
16 模式切換按鈕
17 轉盤
18 掛繩孔
19 電池盒蓋
※ 本產品不包含手機。
17
Page 17
1. 下載安裝 DJI GO 應用程式
請在手機應用程式商店搜尋「DJI GO」,或使
用手機掃描下方 QR 碼以進行安裝。
CHT
DJI GO 應用程式需要使用 iOS 8.0 及更高版本,或
Android 4.4 及更高版本。
2. 準備電池
首次使用前,請務必為電池充電以啟動電池,否
則 Osmo Mobile 將無法運作。將電池裝入 ( 如
圖所示 ),然後鎖住電池盒蓋。
電量
高 低
使用充電線連接 USB 充電器以進行充電。
充電時,系統狀態指示燈若變為恆亮綠燈,
即代表電池已充飽電。最長運作時間約為
4.5 小時。
完全充飽電約需 3 小時。
( 充電電流為 1 A 時 )
USB 充電器最大充電電流為 2.1 A。
Osmo Mobile 充電線僅適用於 Osmo Mobile。請勿將
充電線連接其它任何設備的 3.5 mm 連接埠,否則可能
損壞該設備。
18
Page 18
3. 安裝手機
在 Osmo Mobile 電源關閉的情況下調節支架鎖
緊旋鈕,使手機穩定置於支架內後鎖緊旋鈕。
手動調節平衡,使手機保持水平。
左側 右側
CHT
1
2
若向左傾斜,拉
伸調節伸縮臂。
未安裝手機時,請勿開啟 Osmo Mobile,若手機偵測
感測器未偵測到裝置,Osmo Mobile 將不會運作。
安裝手機後,務必在 Osmo Mobile 電源關閉、保持手
柄平穩的情況下調節雲台整體平衡,否則將會影響其
運作性能。
若向右傾斜,將
手機向左移動。
1
2
19
Page 19
4. 連接 DJI GO 應用程式
Internet
CHT
開機:下拉並保持 1.5 秒
開啟手機藍牙功能
關機:下拉並保持 1.5 秒直至關機
休眠:於開機狀態時下拉,然後鬆開
啟動 DJI GO 應用程式,按提示連
DJI GO
App
接 Osmo Mobile。
全新的 Osmo Mobile 必須透過 DJI GO 應用程式啟
動才能使用。啟動時,手機需連線至網際網路。
5. 操作
平穩控制雲台的轉動 用手快速調整角度
系統自動啟用 SmoothTrack 跟隨模式,使手機始終平穩跟隨把
手轉動。
短按可開始 / 停止錄影
短按可拍照,長按可連拍
按住:鎖定雲台維持當前方向
按兩下:雲台自動回到中間位置
按三下:切換手機前置或後置相機
DJI GO 應用程式高階拍攝功能:
20
智能跟拍:手機自動跟隨目標拍攝。
移動縮時攝影:拍攝具有移動軌跡的縮時影像。
Page 20
規格
把手
尺寸 61.8×48.2×161.5 mm
重量 ( 含電池 ) 201 g
雲台
名稱 Zenmuse M1
型號 ZM01
尺寸 125.06×109.15×90.98 mm
(收合狀態 )
重量 300 g
功率消耗 2.5 W
角度抖動量 ±0.03°
可操控轉動範圍 平移:±150° 橫滾:±25°
俯仰:-125° 至 +35°
機械設計範圍 平移:±165° 橫滾:-50° 至 +90°
俯仰:-140° 至 +50°
最大操控轉速 120°/s
適用手機寬度 58.6 至 84.8 mm
無線
型號 低功耗藍牙 4.0
電池
型號 HB01-522365
類型 LiPo
容量 980 mAh
能量 10.8 Wh
電壓 11.1 V
充電環境溫度 5℃ 至 40℃
操作環境溫度 0℃ 至 40℃
CHT
DJI 提供豐富的 Osmo Mobile 選購配件,請造訪 DJI 官網商店瞭解
詳細的選購配件資訊:http://store.dji.com/cn
如需更多產品資訊,請下載 Osmo Mobile 使用者手冊
www.dji.com/cn/product/osmo-mobile
※ 內容如有更新,恕不另行通知。
TM
是大疆創新的商標
OSMO
Copyright © 2016 大疆創新 版權所有
於中國大陆印製
WeChat 掃描關注 DJI 公眾號
21
Page 21

Osmo Mobile
OSMOTMMobileを使うと、あなたのモバイルデバイスはス
マート・モ ーション・カメラに変 身します。本 製 品を 使うと、
動きながら撮影しても手ブレを防止します。簡単操作なの
にとてもパワフルに手ぶれを防止します。
JP
1
9
2
3
4
5
8
7
6
13
12
11
10
1モバイルデバイス・ホル
ダー
2パ ン軸モ ーター
3カメラステータスLED
4 ジョイス ティック
5 シャッター ボ タン
6録画ボタン
7電源スイッチ
22
8システムステータスLED
9チルト軸モーター
10 ア ジャスタブル アーム
11モバイルデバイス検出
センサー
12バランス調整ノブ
13ロール軸モーター
Page 22
JP
14
15
16
18
14ホルダーロックノブ
15充電/アップグレードポート
16トリガー
17DJIロゼットマウント
18ストラップホール
19バッテリーカバー
※
モバイルデバイスは含まれません。
17
19
23
Page 23

1. DJI GO アプリのインストール
AppStoreまたはGooglePlayで「DJIGO」を検索して、
お手持ちのモバイルデバイスにアプリをインストール
し ま す 。
JP
DJIGOはiOS8.0以降とAndroid4.4以降に対応して
います。
2. バッテリーの準備
初回使用時には、バッテリーを完全に充電してくださ
い。完全に充電しないと、ジンバルが動作しません。
バッテリー を図 のように 挿 入します。
バッテリーレ ベル
高い 低い
OsmoMobile を充電するには、付属の電源
ケーブルでUSBアダプター(別売)を充電ポ
ートに 接 続しま す。
システムステータスLEDが緑色に点灯したら、
バッテリーは完全に充電されています。
USBアダプター充電時間:3時間
(充電電流1A時)
サポートされるUSB充電最大電流:2.1A
最長充電時間:4時間30分
OsmoMobile に付属している電源ケーブルだけを使って
ください。付属の電源ケーブルを別のデバイスの 3.5mm
のコネクターにつなげると破損する恐れがあります。
24
Page 24

3.
モバイル デバイスの 取り付けとバランス
電源を切った状態で、ホルダーロックノブを緩め、ホル
ダーにモバイルデバイスを入れて、ノブを締め付けてく
ださい。
手を放してもモバイルデバイスが水平な状態を保てる
ようにバランスを調節してください 。
左 右
JP
1
2
ロール軸が左に傾いて
いる場合、ロール軸が
水平 になるまでアー ム
を引き出します。
モバイルデバイスを取り付けない状態で、OsmoMobile
の電源をオンにしないでください。モバイルデバイス検
出センサーによって機器が検出されない場合、Osmo
Mobile は機能しません。
性能を十分 に発揮させるために、モバイルデバイスが
水平な状態を保てるようにに調節してください。バラン
スを取 るときは、電源を 切った状 態で 行ってください 。
ロール軸が右に傾い
ている場合、ロール軸
が水平になるまでモ
バイルデバイスを左
に動 かします。
1
2
25
Page 25

4.DJI GO アプリへの接続
Internet
モバイルデバイスのBluetoothを有効
化します
JP
電源の付け方:スイッチを下 げて、そ のま
ま約 1.5 秒間長押しします。
もう一度下げる>スリープ
下方向に1.5秒間長押し>電源オフ
DJIGOアプリを開けて、アプリの指示に
DJI GO
App
従ってOsmoMobile に接続してください。
初回使用時は、OsmoMobile をアクティベートしてくだ
さい。この操作にはインターネット接続が必要です。
5 . コント ロー ル
ジョイスティックを使用して、
モバイルデバイスをパンま
た は チ ル ト し ま す 。
[スムーズトラック]モードが自動的に有効になり、ぎくしゃくした動きを滑ら
かにしま す。
録画ボタン:1回押すと録画を開始し、もう
一度押すと録画を停止します。
シャッター ボ タン:1回押すと写真撮影します。
長押しすると、連続撮影します。
トリガ ー
押し下げると[LockMode]が有効になります。
モバイルデバイスの中央を2回タップします。
モバイルデバイスの前面カメラと背面カメラ
を切り替 えるには 、3 回 タップします。
DJIGOの高度な機能:
アクティブトラック:画面上で対象物をマークし、その移動を追跡で
きます。
モーションタイムプラス:カメラのポジションを移動させながらタイ
ムラプス映像を撮影できます。
26
手でモバイルデバイスを
直接動かすこともできます。
Page 26

仕様
ハンド ル
寸法 61.8×48.2×161.5mm
重量(バッテリーを含む) 201g
ジンバル
名称 ZenmuseM1
モデル ZM01
寸法 125.06×109.15×90.98mm
(折り畳み状態)
重量 300g
消費電力 2.5W
角度ぶれ範囲 +/-0.03°
操作可動範囲 パン:± 150°
ロ ー ル:± 2 5 °
チルト:-125°~ +35°
機械的な可動範囲 パン:± 165°
ロール:-50°~+90°
チルト:-140°~ +50°
最大動作速度 120°/ 秒
装着可能なモバイルデバイスの幅
ワイヤレス
モデル BluetoothLowEnergy4.0
インテリジェントバッテリー
モデル HB01-522365
タイプ LiPo
容量 980mAh
電力量 10.8Wh
電圧 11.1V
充電温度 5 ~ 40℃
動作温度 0 ~ 40℃
58.6 ~ 84.8mm(2.31 ~ 3.34インチ)
JP
DJIでは、OsmoMobile用の各種アクセサリーをオプションで提供してい
ます。詳細については、DJIのオンラインストアをご覧ください。
http://store.dji.com
詳細については、以下にあるユーザーマニュアルを参照してください。
www.dji.com/product/osmo-mobile
※このクイックスタートガイドは予告なく変更される場合があります。
TM
はDJIの商標です。
OSMO
Copyright©2016DJIAllRightsReserved.
PrintedinChina.
27
Page 27

Osmo Mobile
OSMOTM Mobile은 휴대폰을 움직임에도 흔들리지 않는
스마트 모션 카메라로 만들어주는 고급 짐벌입니다. 사용
이 간편하며 DJI GO 앱을 통해 ActiveTrack 및 모션 타임
랩스 등의 강력한 기능을 사용할 수 있습니다.
KR
1
9
2
3
4
5
8
7
6
13
12
11
10
1 휴대폰 홀더
2 좌우 회전 모터
3 카메라 상태 LED
4 조이스틱
5 셔터 버튼
6 녹화 버튼
7 전원 스위치
8 시스템 상태 LED
28
9 상하 회전 모터
10 조절식 암
11 휴대폰 감지 센서
12 균형
조정 손잡이
13 롤 회전 모터
Page 28

KR
14
15
16
18
17
19
14 홀더 고정 손잡이
15 충전/업데이트 포트
16 트리거
17 DJI Rosette 마운트
18 연결끈 구멍
19 배터리 덮개
※
휴대폰은 포함되어 있지 않습니다.
29
Page 29

1. DJI GO 앱
App Store 또는 Google Play에서 'DJI GO'를 검색하여
앱을 휴대폰에 설치합니다.
KR
배터리 준비
2.
처음으로 가동하여 사용하기 전에 완전히 충전하십시
오. 그렇지 않으면 짐벌이 작동하지 않을 수 있습니다.
설치
DJI GO는 iOS 8.0 이상 또는 Android 4.4 이상을 지원
합니다.
그림과 같이 배터리를 삽입합니다.
배터리 수준
높음 낮음
Osmo Mobile을 충전하려면 제공된 전원 케
이블로 USB 어댑터(별매)를 충전 포트에 연
결합니다.
시스템 상태 LED가 녹색으로 유지되면 배터
리가 완전히 충전된 것입니다.
USB 어댑터 충전 시간: 3시간
(1A에서 충전 시)
지원되는 최대 USB 충전 전류: 2.1A
최대 실행 시간: 4.5시간
전원 케이블을 Osmo 모바일 이외의 장치와 사용하지
마십시오. 전원 케이블을 Osmo 모바일이 아닌 다른
장치에 연결 시 손상이 일어날 수 있습니다.
30
Page 30

휴대폰 장착 및 균형 조정
3.
Osmo 모바일의 전원이 꺼진 상태에서 홀더 고정 손잡
이를 풀고 휴대폰을 휴대폰 홀더에 배치한 다음 손잡
이를 조여 제 위치에 고정시킵니다.
휴대폰을 손에서 놓고 짐벌만으로 균형을 잡을 때 휴
대폰이 수평을 유지하면 시스템의 균형이 맞춰진 것입
니다.
왼쪽 오른쪽
KR
1
2
롤 축이 왼쪽으로 기울
어 있으면 롤 축이 수평
이 될 때까지 암을 당깁
니다.
휴대폰 없이 Osmo Mobile의 전원을 켜지 마십시오.
휴대폰 감지 센서에서 장치를 감지하지 않으면 Osmo
Mobile이 작동하지 않습니다.
최적의 성능을 얻으려면 휴대폰의 균형을 맞추는 것이
중요합니다. Osmo Mobile은 전원을 끈 상태에서 균형
을 맞춰야 합니다.
롤 축이 오른쪽으로
기울어 있으면 롤 축
이 수평이 될 때까지
휴대폰을 왼쪽으로 조
정합니다.
1
2
31
Page 31

4. DJI GO 앱에
Internet
연결
휴대폰의 Bluetooth 활성화
KR
제어
5.
조이스틱을 사용하여 휴대폰을
좌우 또는 상하로 회전시킵니다.
부드러운 이동을 위해 SmoothTrack 모드가 자동으로 활성화됩니다.
DJIGO고급기능:
전원을켜려면
에서 1.5초 동안 유지합니다.
다시 아래로 당기면 대기 모드로 진입합니다.
아래로 당긴 상태에서 1.5초 동안 유지하면 전원
이 꺼집니다.
DJI GO
DJI GO 앱을 실행 한 후 다음 지침에 따
App
라 Osmo Mobile을 연결합니다.
모바일을처음사용하는경우인증이필요합니다.인증
Osmo
하려면인터넷에연결해야합니다
녹화버튼
시 누르면 녹화가 정지됩니다.
셔터버튼
길게 누르면 연속 촬영합니다.
트리거
길게 누르면 잠금 모드로 전환됩니다.
두 번 누르면 휴대폰이 가운데로 정렬됩니
다.
세 번 누르면 휴대폰의 전면/후면 카메라
사이를 전환합니다.
화면에서 물체를 선택하여 이동 경로를 추적합니다.
ActiveTrack:
모션타임랩스
선택한 여러 카메라 위치에서 타임랩스 동영상을
:
촬영합니다.
32
스위치를 아래로 당긴 상태
:
.
손으로 직접 휴대폰 위치
를 조정합니다.
한 번 누르면 녹화가 시작되고 다
:
한 번 누르면 사진이 촬영됩니다.
:
Page 32

사양
핸들
크기 2.4×1.9×6.4인치
(61.8×48.2×161.5mm)
무게(배터리 포함) 201g
짐벌
이름 Zenmuse M1
모델 ZM01
치수 4.92 ×4.29×3.57인치 (접었을 때)
125.06×109.15×90.98 mm
중량 300g
전력 소비 2.5W
비틀림 진동 범위 ±0.03°
제어 가능 범위 좌우: ±150°
롤 회전: ±25°
상하: -125° ~ +35°
기계적 범위 좌우: ±165°
롤 회전: -50° ~ +90°
상하: -140° ~ +50°
최대 제어 가능 속도 120°/초
휴대폰 폭 범위 58.6~84.8mm (2.31~3.34인치)
무선
모델 Bluetooth Low Energy 4.0
인텔리전트 배터리
모델 HB01-522365
유형 LiPo
용량 980mAh
에너지 10.8Wh
전압 11.1V
충전 온도 5°~40°C (41°~104°F)
작동 온도 0°~40°C (32°~104°F)
KR
DJI는 Osmo에 사용할 수 있는 여러 가지 액세서리 옵션을 제공합니다.
자세한 정보는 DJI Online Store를 방문하십시오.
자세한내용은사용설명서를확인하십시오
www.dji.com/product/osmo-mobile
※ 본 퀵 스타트 가이드는 사전 고지 없이 변경될 수 있습니다.
TM
는 DJI의 상표입니다.
OSMO
Copyright © 2016 DJI All Rights Reserved.
Printed in China.
http://store.dji.com
.
33
Page 33

Osmo Mobile
Der OSMOTM Mobile ist ein hochmoderner Gimbal, der Dein
Telefon in eine Smart Motion Camera verwandelt, während Sie
in Bewegung sind. Er ist extrem einfach zu handhaben, und
dank der „DJI GO“-App bietet er spannende Funktionen wie
ActiveTrack oder Bewegungszeitraffer.
DE
1
9
2
3
4
5
8
7
6
13
12
11
10
1 Mobilgerätehalter
2 Schwenkmotor
3 Kamerastatus-LED
4 Joystick
5 Fototaste
6 Videotaste
7 Ein-/Ausschalter
34
8 Systemstatus-LED
9 Neigemotor
10 Justierbügel
11 Mobiltelefon-
Erkennungssensor
12 Balance- Regler
13 Rollmotor
Page 34

DE
14
15
16
17
18
19
14 Halterungsxierknopf
15 Lade-/Updateanschluss
16 Auslöser
17 DJI Schutzdeckelhalterung
18 Loch für Schlüsselringe
19 Akku-Deckel
※ Mobiltelefon ist nicht im Lieferumfang enthalten.
35
Page 35

1. „DJI GO“-App installieren
Suchen Sie im App Store oder auf Google Play nach
„DJI GO“, und installieren Sie die App auf Ihrem
Mobiltelefon.
DE
DJI GO wird auf iOS 8.0 (oder höher) sowie Android
4.4 (oder höher) unterstützt.
2. Akku vorbereiten
Laden Sie den Akku vor der ersten Verwendung vollständig
auf, um ihn zu aktivieren, andernfalls funktioniert der
Gimbal nicht.
Setzen Sie den Akku wie hier gezeigt ein.
Akkuladezustand
Hoch Niedrig
Um den Osmo Mobile zu laden, verbinden
Sie den USB-Adapter (nicht enthalten) mit
dem Ladeanschluss. Verwenden Sie hierfür
das mitgelieferte Stromkabel.
Der Akku ist vollständig geladen, wenn
die Systemstatus-LED durchgehend grün
leuchtet.
Auadezeit bei Verwendung des USB-
Adapters: 3 Stunden
(Auaden bei 1 A)
Max. Ladestrom über USB: 2,1 A
Max. Betriebszeit: 4,5 Stunden
Benutze das Stromkabel nur mit dem Osmo Mobile. Es
können Schäden auftreten, wenn das Kabel mit einem
anderen 3,5 mm Geräte-Anschluss verbunden wird.
36
Page 36

3. Das Mobiltelefon anbringen
und ausbalancieren
Wenn der Osmo Mobile ausgeschaltet ist, lockern Sie den
Halterungsxierknopf, platzieren Sie das Mobiltelefon in der
Halterung, und drehen Sie den Knopf fest, bis das Telefon
sicher xiert ist.
Das System in ausbalanciert, wenn das Mobiltelefon
gerade ausgerichtet bleibt und dabei nur vom Gimbal
unterstützt wird.
Links Rechts
DE
1
2
Wenn die Rollachse nach
links zieht, ziehen Sie den
Arm nach außen, bis die
Rollachse korrekt justiert
ist.
Schalten Sie den Osmo Mobile nicht ohne Mobiltelefon
ein. Der Osmo Mobile funktioniert nicht, wenn der
Mobiltelefon-Erkennungssensor kein Gerät erkennt.
Um ein optimales Ergebnis zu erzielen, ist es wichtig,
das Telefon auszubalancieren. Die Ausbalancierung
des Osmo Mobile sollte nur erfolgen, wenn das Gerät
ausgeschaltet ist.
Wenn die Rollachse
nach rechts zieht,
schieben Sie das
Mobiltelefon nach links,
bis die Rollachse korrekt
justiert ist.
1
2
37
Page 37

4. Verbindung zur „DJI GO“-App
Internet
herstellen
Aktivieren Sie Bluetooth auf Ihrem
Mobiltelefon.
Einschalten: Schalter nach unten ziehen
DE
und für 1,5 Sekunden halten
Erneut nach unten ziehen > Ruhezustand
Ziehen und 1,5 s halten > ausschalten
Starten Sie die DJI GO App und folgen Sie
DJI GO
den Anleitungen um den Osmo Mobile zu
App
verbinden.
Schalten Sie zunächst den Osmo Mobile ein, wenn
Sie ihn zum ersten Mal verwenden. Hierfür wird eine
Internetverbindung benötigt.
5. Bedienelemente
Mit dem Joystick schwenken oder
neigen Sie das Mobiltelefon.
Der SmoothTrack-Modus ist automatisch aktiviert und gleicht ruckartige
Bewegungen aus.
Auslöser
Gedrückt halten, um die Arretierung zu
aktivieren.
Zweimal drücken, um Mobiltelefon zu
zentrieren.
Dreimal drücken, um zwischen der
vorderen und der hinteren Kamera des
Mobiltelefons hin und her zu schalten.
Erweiterte Funktionen von DJI GO:
Videotaste: Einmal drücken, um die
Videoaufnahme zu starten. Zum Stoppen
erneut drücken.
Fototaste: Dient als Auslöser für
Fotoaufnahmen. Für Serienaufnahme
gedrückt halten.
ActiveTrack: Markieren Sie ein Objekt auf dem Bildschirm, und
die Kamera bleibt darauf xiert.
Bewegte Zeitrafferaufnahmen: Nehmen Sie Zeitrafferaufnahmen
aus verschiedenen Kamerapositionen auf.
38
Fixieren Sie das Mobiltelefon
direkt per Hand.
Page 38

Technische Daten
Griff
Abmessungen 2,4×1,9×6,4"
(61,8×48,2×161,5 mm)
Gewicht (mit Akku) 201 g
Gimbal
Name Zenmuse M1
Modell ZM01
Abmessungen 4,92×4,29×3,57" (eingeklappt)
125,06×109,15×90,98 mm
Gewicht 300 g
Verbrauch 2,5 W
Kontrollierte Winkelgenauigkeit ±0,03°
Kontrollierter Bereich Schwenken: ±150°
Rollen: ±25°
Neigen: -125° bis +35°
Mechanischer Bereich Schwenken: ±165°
Rollen: -50° bis +90°
Neigen: -140° bis +50°
Max. steuerbare Geschwindigkeit 120 °/s
Breite des Mobiltelefons 2,31 – 3,34" (58,6 – 84,8 mm)
Funkübertragung
Modell Bluetooth Low Energy 4.0
Intelligent Battery
Modell HB01-522365
Typ LiPo
Kapazität 980 mAh
Energie 10,8 Wh
Spannung 11,1 V
Ladetemperatur 5 bis 40 °C
Betriebstemperatur 0 bis 40 °C
DE
DJI bietet verschiedenes Zubehör für den Osmo Mobile an. Weitere
Informationen erhalten Sie im DJI-Onlineshop:
Nähere Informationen nden Sie in der Bedienungsanleitung:
www.dji.com/product/osmo-mobile
※ Diese Kurzanleitung kann jederzeit unangekündigt geändert werden.
TM
ist eine Marke von DJI.
OSMO
Copyright © 2016 DJI Alle Rechte vorbehalten
Gedruckt in China.
http://store.dji.com
39
Page 39

Osmo Mobile
El OSMOTM Mobile es un avanzado estabilizador de
teléfono móvil que estabiliza el teléfono móvil cuando está
en movimiento. Es fácil de usar, y permite utilizar potentes
funciones como ActiveTrack y Motion Timelapse mediante la
aplicación DJI GO.
ES
1
2
3
4
5
8
7
6
13
12
11
10
9
1 Soporte para teléfono móvil
2 Motor de giro
3 LED de estado de la cámara
4 Joystick
5 Botón del obturador
6 Botón de grabación
7 Interruptor de encendido
8 LED de estado del sistema
40
9 Motor de inclinación
10 Brazo ajustable
11 Sensor de detección de
teléfono móvil
12 Rueda de ajuste de
equilibrio
13 Motor de alabeo
Page 40

ES
14
15
16
18
14 Rueda de bloqueo de soporte
15 Puerto de carga/actualización
16 Gatillo
17 Soporte de roseta DJI
18 Oricio para la correa
19 Tapa de la batería
※ Teléfono móvil no incluido.
17
19
41
Page 41

1. Instale la aplicación DJI GO
Busque "DJI GO" en el App Store o en Google Play e
instale la aplicación en su teléfono móvil.
ES
DJI GO es compatible con iOS 8.0 (o posterior) y
Android 4.4 (o posterior).
2. Prepare la batería
Cargue totalmente la batería antes de usarla por primera
vez para activarla, o el estabilizador no funcionará.
Introduzca la batería tal y como se muestra.
Para cargar el Osmo Mobile, conecte el
adaptador USB (no incluido) al puerto de
carga usando el cable de alimentación
suministrado.
La batería está completamente cargada
cuando el LED de estado del sistema se
queda iluminado en verde.
Tiempo de carga con el adaptador USB:
3 horas (al cargar a 1 A)
Corriente de carga máxima admitida por
USB: 2,1 A
Tiempo de funcionamiento máximo: 4,5 horas.
Utiliza el cable de alimentación sólo con el Osmo Mobile.
Podrían ocurrir daños si conecta el cable de alimentación
a cualquier otro dispositivo con un puerto de 3.5 mm.
42
Nivel de batería
Alto Bajo
Page 42

3. Monte y equilibre el teléfono móvil
Con el Osmo Mobile apagado, aoje la rueda de bloqueo
del soporte, coloque el móvil en el soporte de teléfono
móvil y apriete la rueda para jarlo en su sitio con
seguridad.
El sistema está equilibrado si el teléfono móvil se mantiene
nivelado al soltarlo, equilibrado solo por el estabilizador.
Left Right
ES
1
2
Si el eje de alabeo se
inclina a la izquierda,
tire del brazo para
estirarlo hasta que el
eje de alabeo quede
nivelado.
No encienda el Osmo Mobile sin un teléfono móvil. El
Osmo Mobile no funcionará si el sensor de detección
de teléfono móvil no detecta ningún dispositivo.
Es importante equilibrar el teléfono móvil para
conseguir un rendimiento óptimo. El Osmo Mobile
debe equilibrarse solamente cuando está apagado.
Si el eje de alabeo se
inclina a la derecha,
ajuste el teléfono móvil
a la izquierda hasta que
el eje de alabeo quede
nivelado.
1
2
43
Page 43

4. Conéctese con la aplicación DJI GO
Internet
Active el Bluetooth en su teléfono móvil
Para encender: Apriete y mantenga pulsado
durante 1,5 s
Apriete de nuevo > Suspensión
ES
Apriete y mantenga pulsado durante 1,5 s >
Apagado
Inicie la aplicación DJI GO y siga las
DJI GO
instrucciones para conectarse al Osmo
App
Mobile.
Active el Osmo Mobile cuando lo utilice por primera
vez. Esto requiere una conexión a Internet.
5. Controles
Utilice el joystick para girar o
inclinar el teléfono móvil.
El modo SmoothTrack se activa automáticamente para suavizar los
movimientos erráticos.
Botón de grabación: Púlselo una vez para
iniciar la grabación y vuelva a pulsarlo
para detenerla.
Botón del obturador: Pulse una vez para
tomar una foto. Manténgalo pulsado para
fotograar en ráfaga.
Gatillo
Mantenga pulsado para activar el modo de
bloqueo.
Toque dos veces para centrar el teléfono
móvil.
Toque tres veces para cambiar entre la
cámara frontal y la posterior del teléfono.
Funciones avanzadas de DJI GO:
ActiveTrack: Marque un objeto en la pantalla para seguirlo
mientras se mueve.
Motion Timelapse: Capture un vídeo time-lapse en movimiento
desde diferentes posiciones de cámara.
44
Sitúe el teléfono móvil
manualmente.
Page 44

Especicaciones
Mango
Dimensiones 61,8×48,2×161,5 mm
(2,4×1,9×6,4 pulgadas)
Peso (batería incluida) 201 g
Estabilizador
Nombre Zenmuse M1
Modelo ZM01
Dimensiones
Peso 300 g
Consumo 2,5 W
Intervalo de vibración angular ±0,03°
Rango controlable Giro: ±150°
Alabeo: ±25°
Inclinación: de -125° a +35°
Rango mecánico Giro: ±165°
Alabeo: de -50° a +90°
Inclinación: de -140° a +50°
Velocidad máx. controlable 120°/s
Rango de anchura de teléfono móvil
Inalámbrico
Modelo Bluetooth Low Energy 4.0
Batería Inteligente
Modelo HB01-522365
Tipo LiPo
Capacidad 980 mAh
Energía 10,8 Wh
Voltaje 11,1 V
Temperatura de carga de 5 a 40 °C (de 41 a 104 °F)
Temperatura de funcionamiento de 0 a 40 °C (de 32 a 104 °F)
125,06×109,15×90,98 mm (plegado)
4,92×4,29×3,57 pulg.
58,6-84,8 mm (2,31-3,34 pulg)
ES
DJI dispone de varios accesorios opcionales para el Osmo Mobile.
Para obtener más información visite la tienda en línea de DJI:
http://store.dji.com
Para obtener más información, lea el manual del usuario:
www.dji.com/product/osmo-mobile
※ Esta Guía de inicio rápido está sujeta a cambios sin aviso previo.
TM
es una marca comercial de DJI.
OSMO
Copyright © 2016 DJI Todos los Derechos Reservados.
Impreso en China
45
Page 45

Osmo Mobile
L'OSMOTM Mobile est une nacelle pour téléphone mobile de
pointe qui permet de stabiliser votre téléphone en mouvement.
Il est simple d'utilisation et des fonctionnalités avancées
comme ActiveTrack et Motion Timelapse sont proposées dans
l'application DJI GO.
FR
1
2
3
4
5
1 Support pour téléphone mobile
2 Moteur Pan
3 Voyant d'état de la caméra
4 Joystick
5 Obturateur
6 Bouton d'enregistrement
7 Bouton d'alimentation
8 Voyant d'état du système
46
13
12
11
10
9
8
7
6
9 Moteur d'inclinaison
10 Bras réglable
11 Capteur de détection
de téléphone mobile
12 Bouton de réglage
d'équilibrage
13 Moteur rotatif
Page 46

FR
14
15
16
18
14 Poignée de verrouillage du support
15 Port de charge/mise à niveau
16 Gâchette
17 Support Rosette DJI
18 Point d'attache du cordon
19 Couvercle de la batterie
※ Le téléphone mobile n'est pas inclus.
17
19
47
Page 47

1. Installez l'application DJI GO
Recherchez « DJI GO » sur l'App Store ou sur Google Play
et installez l'application sur votre téléphone mobile.
FR
DJI GO est compatible avec iOS 8.0 (ou version
ultérieure) et Android 4.4 (ou version ultérieure).
2. Préparez la batterie
Chargez complètement la batterie avant de l'utiliser pour la
première fois, ou la nacelle ne fonctionnera pas.
Insérez la batterie comme indiqué.
Élevé Faible
Pour charger l'Osmo Mobile, connectez
l'adaptateur USB (non fourni) au port de
charge avec le câble d'alimentation fourni.
La batterie est chargée complètement quand
le voyant d'état du système devient vert xe.
Temps de chargement de l'adaptateur USB :
3 heures
(avec un chargement à 1 A)
Courant de charge USB maximal pris en
charge : 2,1 A
Temps de fonctionnement maximal :
4,5 heures
N'utilisez que le câble d'alimentation de l'Osmo
Mobile. Connecter ce câble à tout autre port 3,5mm
d'appareils différents peut provoquer des dégâts.
48
Niveau de
la batterie
Page 48

3. Montez et équilibrez le
téléphone mobile
Éteignez l'Osmo Mobile, desserez la poignée de
verrouillage du support, placez le téléphone mobile dans
le support pour téléphone mobile, puis serrez bien la
poignée.
Le système est équilibré si le téléphone mobile reste à
niveau. Dans le cas contraire, il est équilibré uniquement
par la nacelle.
Gauche Droite
FR
1
2
Si l'axe de roulis
s'incline vers la
gauche, sortez le bras
jusqu'à ce que l'axe de
roulis soit à niveau.
Ne mettez pas l'Osmo Mobile sous tension sans
téléphone mobile. L'Osmo Mobile ne fonctionnera
pas si aucun appareil n'est détecté par le capteur de
détection de téléphone mobile.
Il est essentiel que le téléphone mobile soit équilibré
pour obtenir des performances optimales. L'Osmo
Mobile doit être équilibré uniquement quand il est hors
tension.
Si l'axe de roulis
s'incline vers la droite,
réglez le téléphone
mobile vers la gauche
jusqu'à ce que l'axe de
roulis soit à niveau.
1
2
49
Page 49

4. Connectez-vous à l'application
Internet
DJI GO
Activez le Bluetooth sur votre téléphone
mobile
Mise sous tension : abaissez l'interrupteur et
abaissez-le à nouveau pendant 1,5s
Abaissez à nouveau l'interrupteur > Veille
Maintenez l'interrupteur abaissé pendant 1,5 s >
FR
Mise hors tension
Lancez l'application DJI GO, puis suivez les
DJI GO
instructions pour vous connecter à l'Osmo
App
Mobile.
Si vous utilisez l'Osmo Mobile pour la première fois,
activez-le. Cette opération nécessite une connexion
Internet.
5. Commandes
Utilisez le joystick pour déplacer
horizontalement ou verticalement le
téléphone mobile.
Le mode SmoothTrack est activé automatiquement pour lisser les
mouvements saccadés.
Gâchette
Maintenez-la enfoncée pour activer le mode
de verrouillage.
Appuyez deux fois pour centrer le téléphone
mobile.
Appuyez trois fois pour passer de la caméra
avant à la caméra arrière du téléphone
mobile.
Fonctionnalités avancées de DJI GO :
Bouton d'enregistrement : appuyez une
fois pour démarrer l'enregistrement et une
autre fois pour l'arrêter.
Obturateur : appuyez une fois pour
prendre une photo. Maintenez enfoncé
pour prendre des photos en rafale.
ActiveTrack : marquez un objet sur votre écran pour le suivre
dans ses mouvements.
Motion Timelapse : permet de prendre des vidéos en timelapse
depuis différentes positions sélectionnées.
50
Positionnez le téléphone
mobile manuellement.
Page 50

Caractéristiques techniques
Poignée
Dimensions 61,8 × 48,2 × 161,5 mm
(2,4 × 1,9 × 6,4 pouces)
Poids (batterie incluse) 201 g
Nacelle
Nom Zenmuse M1
Modèle ZM01
Dimensions 125,06 × 109,15 × 90,98 mm (pliée)
(4,92 × 4,29 × 3,57 pouces)
Poids 300 g
Consommation 2,5 W
Plage angulaire de vibration ±0,03°
Portée Contrôlable Pan : ±150°
Roulis : ±25°
Inclinaison : -125° à +35°
Portée Mécanique Pan : ±165°
Roulis : -50° à +90°
Inclinaison : -140° à +50°
Vitesse contrôlable max. 120°/s
Largeur du téléphone mobile 58,6-84,8 mm (2,31-3,34 pouces)
Modèle sans l
Bluetooth Low Energy 4.0
Batterie intelligente
Modèle HB01-522365
Type LiPo
Capacité 980 mAh
Énergie 10,8 Wh
Voltage 11,1 V
Température de chargement 5 à 40 °C (41 à 104 °F)
Température de Fonctionnement 0 à 40 °C (32 à 104 °F)
FR
DJI propose différents accessoires en option pour l'Osmo Mobile. Visitez
la boutique en ligne de DJI pour en savoir plus :
Pour en savoir plus, consultez le manuel de l'utilisateur :
www.dji.com/product/osmo-mobile
※ Ce guide de démarrage rapide peut être modié sans préavis.
TM
est une marque commerciale de DJI.
OSMO
Copyright © 2016 DJI Tous droits réservés.
Imprimé en Chine.
http://store.dji.com
51
Page 51

Dispositivo mobile OSMO
Il dispositivo mobile OSMOTM è un gimbal per telefono cellulare
avanzato che trasforma il proprio telefono in una telecamera
intelligente stabilizzandolo mentre si è in movimento. È facile
da usare e offre potenti funzioni quali ActiveTrack e Motion
Timelapse attraverso l'app DJI GO.
IT
1
2
3
4
5
1 Supporto per dispositivo
mobile
2 Motore di rotazione
orizzontale (pan)
3 LED di stato della
videocamera
4 Joystick
5 Pulsante dell'otturatore
6 Pulsante di registrazione
7 Interruttore di alimentazione
52
13
12
11
10
9
8
7
6
8 LED di stato del sistema
9 Motore di inclinazione
10 Braccio regolabile
11 Sensore di rilevamento
del telefono cellulare
12 Manopola di
regolazione del
bilanciamento
13 Motore di rollio
Page 52

IT
14
15
16
18
14 Manopola di bloccaggio del supporto
15 Porta di ricarica/aggiornamento
16 Grilletto
17 Supporto a rosetta DJI
18 Foro per cordino
19 Coperchio della batteria
※ Il telefono cellulare non è incluso.
17
19
53
Page 53

1. Installare l'app DJI GO
Cercare "DJI GO" nell'App Store o in Google Play e
installare l'applicazione sul proprio telefono cellulare.
IT
DJI GO supporta iOS 8.0 (o versioni successive) e
Android 4.4 (o versioni successive).
2. Preparare la batteria
Caricare completamente la batteria prima di usarla per la
prima volta per attivarla, altrimenti il gimbal non funzionerà.
Inserire la batteria come mostrato nella gura.
Per caricare il dispositivo mobile Osmo,
collegare l'adattatore USB (non incluso)
alla porta di ricarica utilizzando il cavo di
alimentazione fornito.
La batteria è completamente carica quando
il LED di stato del sistema diventa verde.
Tempo di carica dell'adattatore USB: 3 ore
(quando si ricarica a 1 A)
Corrente di ricarica USB massima
supportata: 2,1 A
Tempo di esecuzione massimo: 4,5 ore
Utilizzare il cavo di alimentazione solo con Osmo Mobile.
Potrebbero vericarsi dei danni qualora il cavo di
alimentazione venisse collegato a una porta di 3,5 mm di
qualsiasi altro dispositivo.
54
Livello di carica
della batteria
Alto Basso
Page 54

3. Montare e bilanciare il
telefono cellulare
A dispositivo Osmo Mobile spento, allentare la manopola
di bloccaggio del supporto, posizionare il telefono cellulare
sul relativo supporto e serrare la manopola per ssarne la
posizione.
Il sistema è bilanciato se il telefono cellulare resta a livello
quando viene rilasciato, bilanciato solo dal gimbal.
Sinistra Destra
IT
1
2
Se l'asse di rollio si
inclina verso sinistra,
estrarre il braccio no a
quando tale asse non
resta a livello.
Non accendere il dispositivo mobile Osmo senza un
telefono cellulare collegato. Il dispositivo mobile Osmo
non funziona se non viene rilevato alcun dispositivo
dal sensore di rilevamento telefoni cellulari.
È importante bilanciare il telefono cellulare al ne di
ottenere prestazioni ottimali. Il dispositivo mobile Osmo
deve essere bilanciato solo quando è spento.
Se l'asse di rollio si
inclina verso destra,
regolare il telefono
cellulare verso sinistra
no al livellamento
dell'asse.
1
2
55
Page 55

4. Collegarsi all'app DJI GO
Internet
Attivare il Bluetooth sul telefono cellulare
Per procedere all'accensione:
e tenerlo premuto per 1,5 secondi
Portare nuovamente l'interruttore verso il basso
> Sleep
Portare l'interruttore verso il basso e tenerlo
premuto per circa 1,5 s > Power Off
IT
Avviare l'app DJI GO e seguire le istruzioni
DJI GO
per il collegamento al dispositivo mobile
App
Osmo.
Attivare il dispositivo mobile Osmo se lo si utilizza
per la prima volta. Per farlo occorre una connessione
Internet.
5. Controlli
Utilizzare il joystick per
ruotare o inclinare il
telefono cellulare.
La modalità SmoothTrack è attiva automaticamente per rendere più uidi i
movimenti della mano dell'utente.
Pulsante di registrazione: premere
una volta per avviare la registrazione,
premere nuovamente per interrompere la
registrazione.
Pulsante dell'otturatore: premere una volta
per scattare una foto. Tenere premuto per
lo scatto a rafca.
ActiveTrack: contrassegnare un oggetto sullo schermo per
seguirne gli spostamenti.
Motion Timelapse: per scattare fotograe in timelapse da
diverse posizioni della fotocamera.
Funzioni avanzate DJI GO:
56
Grilletto
Tenerlo premuto per attivare la modalità di
blocco.
Toccarlo due volte per centrare il telefono
cellulare.
Toccarlo tre volte per passare dalla
fotocamera anteriore del telefono cellulare a
quella posteriore e viceversa.
Posizionare il telefono
cellulare manualmente.
Page 56

Caratteristiche tecniche
Impugnatura
Dimensioni 61,8 × 48,2 × 161,5 mm
(2,4 × 1,9 × 6,4 pollici)
Peso (batteria inclusa) 201 g
Gimbal
Nome Zenmuse M1
Modello ZM01
Dimensioni 125,06 × 109,15 × 90,98 mm
(piegato)
(4,92 × 4,29 × 3,57 pollici)
Peso 300 g
Consumo 2,5 W
Intervallo di vibrazioni angolari ±0,03°
Intervallo controllabile Rotazione: ±150°
Rollio: ±25°
Inclinazione (tilt): da -125° a +35°
Intervallo meccanico Rotazione: ±165°
Rollio: da -50° a +90°
Inclinazione (tilt): da -140° a +50°
Velocità massima controllabile 120°/s
Intervallo di larghezza del telefono cellulare
Wireless
Modello Bluetooth a basso consumo
energetico 4.0
Batteria intelligente
Modello HB01-522365
Tipo LiPo
Capacità 980 mAh
Energia 10,8 Wh
Tensione 11,1 V
Temperatura di ricarica
Temperatura di esercizio
58,6-84,8 mm (2,31-3,34 pollici)
Da 5 °C a 40 °C (da 41 °F a 104 °F)
Da 0 °C a 40 °C (da 32 °F a 104°F)
IT
DJI fornisce vari accessori opzionali per il dispositivo Osmo Mobile.
Per ulteriori informazioni, è possibile visitare il negozio online di DJI:
http://store.dji.com
Per ulteriori informazioni, consultare il Manuale utente:
www.dji.com/product/osmo-mobile
※ Questa Guida di avvio rapido è soggetta a modiche senza preavviso.
TM
è un marchio di DJI.
OSMO
Copyright © 2016 DJI Tutti i diritti riservati.
Stampato in Cina.
57
Page 57

Osmo Mobile
De OSMOTM Mobile is een geavanceerde gimbal die je mobiele
telefoon omtovert in een Smart Motion-camera door je telefoon
te stabiliseren wanneer deze in beweging is. Hij is eenvoudig in
het gebruik en krachtige functies zoals ActiveTrack en Motion
Timelapse zijn beschikbaar via de DJI GO app.
NL
1
9
2
3
4
5
8
7
6
13
12
11
10
1 Houder mobiele telefoon
2 Panmotor
3 Camerastatus-LED
4 Joystick
5 Sluiterknop
6 Opnameknop
7 Aan/uit-schakelaar
8 Systeemstatus-LED
58
9 Tiltmotor
10 Verstelbare arm
11 Detectiesensor mobiele
telefoon
12 Balans
Instelknop
13 Rolmotor
Page 58

NL
14
15
16
18
14 Vergrendelknophouder
15 Oplaad-/upgradepoort
16 Trigger
17 DJI Rozetbevestiging
18 Koordbevestigingsopening
19 Accu-afdekking
※ mobiele telefoon niet erbij inbegrepen.
17
19
59
Page 59

1. DJI GO-app installeren
Zoek 'DJI GO' in de App Store of Google Play en installeer
de app op je mobiele telefoon.
NL
DJI GO ondersteunt iOS 8.0 (of hoger) en Android 4.4
(of hoger).
2. Accu voorbereiden
Laad de accu vóór het eerste gebruik volledig op om deze
te activeren, anders zal de gimbal niet werken.
Plaats de accu zoals aangegeven.
Hoog Laag
Om de Osmo Mobile op te laden, sluit je
de USB-adapter (niet meegeleverd) aan
op de oplaadpoort met gebruik van de
meegeleverde voedingskabel.
De accu is volledig opgeladen, wanneer de
systeemstatus-LED onafgebroken groen is.
Oplaadtijd USB-adapter: 3 uur
(bij opladen op 1 A)
Maximum USB-ondersteunde
oplaadstroom: 2,1A
Maximale looptijd: 4,5 uur
Gebruik de Power Cable alleen met de Osmo. Als de Power
Cable aangesloten wordt op een 3.5mm poort van een
ander apparaat kan er schade ontstaan.
60
Accuniveau
Page 60

3. Bevestig en balanceer de
mobiele telefoon
Maak, wanneer de Osmo Mobile is uitgeschakeld, de
vergrendelknophouder los, plaats de mobiele telefoon in
de mobiele-telefoonhouder en draai de knop vast om het
geheel vast te zetten.
Het systeem is in balans als de mobiele telefoon waterpas
blijft wanneer deze wordt losgelaten en alleen in evenwicht
wordt gehouden door de gimbal.
Links Rechts
NL
1
2
Indien de rolas naar
links kantelt, trek je de
arm uit totdat de rolas
waterpas blijft.
Schakel de Osmo Mobile niet in zonder een mobiele
telefoon. De Osmo Mobile functioneert niet als de
mobiele telefoon-detectiesensor geen apparaat
detecteert.
Het is belangrijk de mobiele telefoon te balanceren
voor het bereiken van optimale prestaties. De Osmo
Mobile mag alleen worden gebalanceerd wanneer
deze is uitgeschakeld.
Indien de rolas naar
rechts kantelt, stel je
de mobiele telefoon
naar links bij totdat de
rolas waterpas is.
1
2
61
Page 61

4. Verbinden met de DJI GO app
Internet
Schakel Bluetooth in op je mobiele telefoon
Om in te schakelen: Druk in en ingedrukt
houden gedurende 1,5 s
Druk opnieuw in > Sleep (slaapstand)
Druk in en ingedrukt houden gedurende
1,5 s > Power Off (uitschakelen)
DJI GO
Open de DJI GO-app en volg de instructies
App
NL
voor de verbinding met de Osmo Mobile.
Activeer de Osmo Mobile wanneer je deze voor de
eerste keer gebruikt. Hier is een internetverbinding
nodig.
5. Bedieningselementen
Gebruik de joystick om
de mobiele telefoon te
pannen of te kantelen.
SmoothTrack Mode wordt automatisch ingeschakeld om schokkerige
bewegingen af te vlakken.
Trigger
Houd ingedrukt om de vergrendelingsmodus
in te schakelen.
Tik twee keer om de mobiele telefoon te
centreren.
Tik drie keer om te schakelen tussen de
camera's vóór en achter van de mobiele
telefoon.
DJI GO geavanceerde functies:
62
Opnameknop: Druk eenmaal om de
opname te starten en nogmaals op de
opname te stoppen.
Sluiterknop: Druk eenmaal op de knop
om een foto te nemen. Druk op de
knop en houd deze ingedrukt voor een
opnamereeks.
ActiveTrack: Markeer een voorwerp op het scherm om het te
volgen terwijl het beweegt.
Motion Timelapse: Voor het vastleggen van een bewegende
timelapse-video vanuit verschillende cameraposities.
Positioneer de mobiele
telefoon meteen handmatig.
Page 62

Specicaties
Handgreep
Afmetingen 2.4×1.9×6.4 inch
(61,8×48,2×161,5 mm)
Gewicht (inclusief accu) 201 g
Gimbal
Naam Zenmuse M1
Model ZM01
Afmetingen 4.92×4.29×3.57 inch (gevouwen)
125,06×109,15×90,98 mm
Gewicht 300 g
Verbruik 2.5 W
Bereik torsietrillingen ±0,03°
Controleerbaar bereik Pan: ± 150°
Rol: ± 25°
Kanteling: -125° tot +35°
Mechanisch bereik Pan: ± 165°
Rol: -50° tot +90°
Kanteling: -140° tot +50°
Maximum controleerbare snelheid 120°/s
Reikwijdte mobiele telefoon 2,31-3,34 inch (58,6-84,8 mm)
draadloos
Model Bluetooth Low Energy 4.0
Intelligent Battery
Model HB01-522365
Type LiPo
Capaciteit 980 mAh
Energie 10,8 Wh
Spanning 11,1 V
Oplaadtemperatuur 5 ° tot 40 °C (41 ° tot 104 °F)
Oplaadtemperatuur 0 ° tot 40 °C (32 ° tot 104 °F)
NL
DJI levert diverse optionele accessoires voor de Osmo Mobile. Ga
voor meer informatie naar de DJI Online Store:
Lees de gebruikershandleiding voor meer informatie:
www.dji.com/product/osmo-mobile
※ Deze Snelstartgids is onderhevig aan wijzigingen zonder voorafgaande
kennisgeving.
TM
is een handelsmerk van DJI.
OSMO
Copyright © 2016 DJI Alle rechten voorbehouden.
Gedrukt in China.
http://store.dji.com
63
Page 63

Osmo Mobile
O OSMOTM Mobile é um balanceiro avançado que transforma
o seu telemóvel numa câmara de movimento inteligente,
estabilizando-a enquanto em movimento. É fácil de usar e
dispõe de características poderosas, tais como a ActiveTrack
e a Motion Timelapse, que estão disponíveis através da
aplicação DJI GO.
1
PT
9
2
3
4
5
8
7
6
13
12
11
10
1 Suporte para telemóvel
2 Motor de varrimento horizontal
3 LED de estado da câmara
4 Joystick
5 Botão do obturador
6 Botão de gravação
7 Interruptor de ligar/desligar
8 LED de estado do sistema
64
9 Motor de inclinação
10 Braço ajustável
11 Sensor de deteção
do telemóvel
12 Equilíbrio Manípulo
de ajuste
13 Motor de rotação
Page 64

14
PT
15
16
18
14 Manípulo de bloqueio do suporte
15 Porta de carga/Atualização
16 Acionador
17 Suporte em roseta DJI
18 Orifício de segurança
19 Tampa da bateria
※ Telemóvel não incluído.
17
19
65
Page 65

1. Instale a aplicação DJI GO
Pesquise "DJI GO" na App Store ou no Google Play e
instale a aplicação no seu telemóvel.
A DJI GO é compatível com o iOS 8.0 (ou posterior) e
PT
Android 4.4 (ou posterior).
2. Prepare a bateria
Carregue totalmente a bateria antes de a utilizar pela primeira
vez para a ativar; caso contrário, o balanceiro não funcionará.
Insira a bateria conforme indicado.
Para carregar o Osmo Mobile, ligue o
adaptador USB (não incluído) à porta de
carga utilizando o cabo de alimentação
fornecido.
O LED de estado do sistema mostra uma
luz verde continuamente acesa quando a
bateria está completamente carregada.
Tempo de carga do adaptador USB:
3 horas (quando carrega a 1 A)
Corrente de carga máxima suportada do
USB: 2,1 A
Tempo máximo de funcionamento: 4,5 horas
Somente utilize o cabo de alimentação com o Osmo.
Poderá ocorrer danos se conectá-lo com outro
dispositivo de portas de 3,5mm.
66
Nível da bateria
Alto Baixo
Page 66

3. Monte e equilibre o telemóvel
Com o Osmo Mobile desligado, desaperte o manípulo
de bloqueio do suporte, coloque o telemóvel no suporte
para telemóvel e aperte o manípulo para xar a respetiva
posição.
O sistema está equilibrado se o telemóvel permanecer
nivelado; quando for libertado, equilibrado apenas pelo
balanceiro.
Esquerda Direita
PT
1
2
Se o eixo de rotação
se inclinar para a
esquerda, puxe o
braço até que o eixo
de rotação permaneça
nivelado.
Não ligue o Osmo Mobile sem um telemóvel. O Osmo
Mobile não funcionará se o sensor de deteção de
telemóvel não detetar um telemóvel.
É importante equilibrar o telemóvel para alcançar um
desempenho perfeito. O Osmo Mobile apenas deve
ser equilibrado quando estiver desligado.
Se o eixo de rotação se
inclinar para a direita,
ajuste o telemóvel para
a esquerda até que o
eixo de rotação que
nivelado.
1
2
67
Page 67

4. Ligue a aplicação DJI GO
Internet
Ative o Bluetooth no seu telemóvel
Para ligar: Puxe para baixo e mantenha
premido durante 1,5 s
Volte a puxar para baixo > Sleep
Puxe para baixo e mantenha premido durante
1,5 s > Desligar
Inicie a aplicação DJI GO e, de
DJI GO
seguida, siga as instruções para ligar o
App
PT
Osmo Mobile.
Ative o Osmo Mobile quando o utilizar pela primeira
vez. A ativação requer uma ligação à Internet.
5. Controlos
Utilize o joystick para deslocar ou
inclinar o telemóvel.
O SmoothTrack Mode é acionado automaticamente para suavizar
movimentos bruscos.
Botão de gravação: Prima uma vez para
iniciar a gravação e prima novamente
para a interromper.
Botão do obturador: Prima uma vez para
tirar uma fotograa. Prima e mantenha
premido para captura contínua.
Acionador
Mantenha premido para ativar o modo de
bloqueio.
Toque duas vezes para centrar o telemóvel.
Toque três vezes para alternar entre as
câmaras frontal e traseira do telemóvel.
Funções avançadas da aplicação DJI GO
ActiveTrack: Marque um objeto no ecrã para acompanhar o
respetivo movimento.
Motion Timelapse: Para captar um vídeo com intervalo de tempo
em movimento a partir de diferentes posições da câmara.
68
Posicione o telemóvel
diretamente à mão.
Page 68

Especicações
Pega
Dimensões 2,4 × 1,9 × 6,4 polegadas
(61,8 × 48,2 × 161,5 mm)
Peso (bateria incluída) 201 g
Balanceiro
Nome Zenmuse M1
Modelo ZM01
Dimensões 4,92 × 4,29 × 3,57 polegadas
(dobrado)
125,06 × 109,15 × 90,98 mm
Peso 300 g
Consumo 2,5 W
Amplitude de vibração angular ±0,03°
Amplitude controlável Varrimento: ±150°
Rotação: ±25°
Inclinação: -125° a +35°
Amplitude mecânica Varrimento: ±165°
Rotação: -50° a +90°
Inclinação: -140° a +50°
Velocidade controlável máx. 120°/s
Amplitude da largura do telemóvel 2,31 - 3,34 polegadas (58,6 - 84,8 mm)
Sem os
Modelo Bluetooth Low Energy 4.0
Intelligent Battery
Modelo HB01-522365
Tipo LiPo
Capacidade 980 mAh
Energia 10,8 Wh
Tensão 11,1 V
Temperatura de carga 5 °C a 40 °C (41 °F a 104 °F)
Temperatura de funcionamento 0 °C a 40 °C (32 °F a 104 °F)
PT
A DJI dispõe de vários acessórios opcionais para o Osmo Mobile. Visite
a loja online da DJI para obter mais informações:
Para mais informações, consulte o manual do utilizador:
www.dji.com/product/osmo-mobile
※ Este guia de início rápido está sujeito a alterações sem aviso prévio.
TM
é uma marca comercial da DJI.
OSMO
Copyright © 2016 DJI Todos os direitos reservados.
Impresso na China.
http://store.dji.com
69
Page 69

Osmo Mobile
OSMOTM Mobile представляет собой
усовершенствованный стабилизатор мобильного
телефона, уравновешивающий устройство во время
движения и превращающий его в подвижную камеру.
Он прост в использовании и обладает мощными
функциями ActiveTrack и Motion Timelapse, доступными
в приложении DJI GO.
1
RU
2
3
4
5
1 Держатель мобильного устройства
2 Электродвигатель поворота
3 Светодиодный индикатор состояния камеры
4 Джойстик
5 Кнопка спуска затвора
6 Кнопка записи
7 Выключатель питания
8 Светодиодный индикатор состояния системы
9 Электродвигатель наклона
10 Регулируемый рычажок
9
8
7
6
13
12
11
10
70
Page 70

14
RU
15
16
18
17
19
11 Датчик обнаружения мобильного телефона
12 Регулятор балансировки
13 Электродвигатель крена
14 Регулятор ширины держателя
15 Порт зарядки/обновления
16 Кнопка блокировки
17 Крепление DJI Rosette
18 Проушина для ремня
19 Крышка аккумулятора
※
Мобильный телефон не входит в комплект поставки.
71
Page 71

1. Установите приложение DJI GO
Найдите приложение DJI GO в App Store или
Google Play и установите его на мобильный
телефон.
DJI GO поддерживает iOS 8.0 (или более позднюю
версию) или Android 4.4 (или более позднюю версию).
RU
2. Подготовьте аккумулятор
Полностью зарядите аккумулятор перед первым
использованием, чтобы активировать его, в
противном случае стабилизатор не будет работать.
Установите аккумулятор, как показано на рисунке.
Индикатор уровня
заряда аккумулятора
Высокий Низкий
Для зарядки Osmo Mobile подключите
адаптер USB (не входит в комплект)
к разъему для зарядки с помощью
предоставляемого кабеля питания.
Аккумулятор полностью заряжен, когда
индикатор состояния системы непрерывно
светится зеленым.
Время зарядки адаптера USB: 3 часа
( во время зарядки при силе тока 1 A)
Максимальный поддерживаемый ток
зарядки USB: 2,1 A
Макс. время работы: 4,5 часа
Кабель питания следует использовать только с Osmo
Mobile. Использование кабеля питания с другими
устройствами может привести к повреждению
устройства.
72
Page 72

3. Установите и сбалансируйте
мобильный телефон
Перед включением Osmo Mobile oслабьте запорный
рычаг держателя, поместите мобильный телефон в
держатель и затяните регулятор ширины держателя
для надежной фиксации.
Система сбалансирована, если мобильный телефон
сохраняет горизонтальное положение после того,
как его отпустили, а балансировку обеспечивает
только стабилизатор.
Влево Вправо
RU
1
2
Если ось вращения
наклоняется влево,
тяните рычажок на
себя, пока она не
выровняется.
Не включайте питание на Osmo Mobile без
мобильного телефона. Osmo Mobile не будет
работать, если датчик обнаружения мобильного
телефона не обнаружит мобильное устройство.
Для оптимальной работы важно сбалансировать
мобильный телефон. Osmo Mobile можно
балансировать только при отключенном питании.
1
2
Если ось вращения
наклоняется вправо,
смещайте мобильный
телефон влево, пока
она не выровняется.
73
Page 73

4. Подключитесь к приложению
Internet
DJI GO
Включите Bluetooth на вашем
мобильном телефоне
Для включения: и удерживайте в
течение 1,5 с.
Сдвиньте еще раз > Переход в режим ожидания
Сдвиньте и удерживайте в течение 1,5 с >
Выключение питания
Запустите приложение DJI GO
DJI GO
и следуйте инструкциям по
App
RU
подключению Osmo Mobile.
Если вы используете Osmo Mobile впервые,
выполните процедуру активации. Для этого
потребуется соединение с Интернет.
5. Органы управления
Используйте джойстик
для поворота или наклона
мобильного телефона.
Режим SmoothTrack включается автоматически для сглаживания
резких движений.
Кнопка записи: нажмите один раз, чтобы
начать запись, и еще раз, чтобы остановить ее.
Кнопка затвора: нажмите один раз,
чтобы сделать фотографию. Нажмите и
Кнопка блокировки
Удерживайте для активации режима
блокировки.
Нажмите дважды для центровки
мобильного телефона.
Нажмите три раза для переключения
между передней и задней камерами
мобильного телефона.
Расширенные функции DJI GO:
удерживайте для серийной съемки.
Функция ActiveTrack: отметьте объект на экране для
отслеживания его перемещения.
Функция Motion Timelapse: для интервальной съемки в
движении из разных положений камеры.
74
Вручную разместите
мобильный телефон.
Page 74

Технические характеристики
Рукоятка
Размеры 61,8×48,2×161,5 мм
(2,4×1,9×6,4 дюйма)
Масса (с аккумулятором) 201 г
Стабилизатор
Наименование Zenmuse M1
Модель ZM01
Размеры в сложенном состоянии 125,06×109,15×90,98 мм
4,92×4,29×3,57 дюйма
Масса 300 г
Энергопотребление 2,5 Вт
Диапазон угловой вибрации ±0,03°
Рабочий диапазон углов вращения Поворот: ±150°
Крен: ±25°
Наклон: от -125° до +35°
Механический диапазон углов Поворот: ±165°
вращения Крен: от -50° до +90°
Наклон: от -140° до +50°
Максимальная контролируемая скорость
Допустимая ширина мобильного телефона
Беспроводная связь
Модель Bluetooth Low Energy 4.0
Аккумулятор Intelligent Battery
Модель HB01-522365
Тип Литий-полимерный
Емкость 980 мАч
Энергия 10,8 Втч
Напряжение 11,1 В
Диапазон температур зарядки от 5 до 40 °С (от 41 до 104 °F)
Диапазон рабочих температур от 0 до 40 °С (от 32 до 104 °F)
120°/с
58,6-84,8 мм (2,31-3,34 дюйма)
RU
DJI предоставляет различные комплектующие для Osmo Mobile.
Для получения дополнительной информации посетите онлайнмагазин DJI
http://store.dji.com
Дополнительную информацию можно найти в руководстве
пользователя:
※ Это Краткое руководство пользователя может быть изменено без
OSMO
Copyright © 2016 DJI Все права защищены.
Напечатано в Китае.
www.dji.com/product/osmo-mobile
предварительного уведомления.
TM
является товарным знаком компании DJI.
75
Page 75

Compliance Information
FCC Compliance Notice
This device complies with Part 15 of the FCC Rules.
Operation is subject to the following two conditions: (1)
This device may not cause harmful interference, and
(2) This device must accept any interference received,
including interference that may cause undesired
operation.
changes or modications not expressly approved by
the party responsible for compliance could void the
user’s authority to operate the equipment.
This equipment has been tested and found to comply
with the limits for a Class B digital device, pursuant to
Part 15 of the FCC Rules. These limits are designed
to provide reasonable protection against harmful
interference in a residential installation. This equipment
generates, uses and can radiate radio frequency
energy and, if not installed and used in accordance
with the instructions, may cause harmful interference
to radio communications. However, there is no
guarantee that interference will not occur in a particular
installation.
If this equipment does cause harmful interference to
radio or television reception, which can be determined
by turning the equipment off and on, the user is
encouraged to try to correct the interference by one or
more of the following measures:
Reorient or relocate the receiving antenna.
Increase the separation between the equipment and
receiver.
Connect the equipment into an outlet on a circuit
different from that to which the receiver is connected.
Consult the dealer or an experienced radio/TV
technician for help.
RF Exposure Information
This equipment complies with FCC radiation exposure
limits set forth for an uncontrolled environment .
This transmitter must not be co-located or operating in
conjunction with any other antenna or transmitter.
IC RSS Warning
This device complies with Industry Canada licenseexempt RSS standard(s). Operation is subject to the
following two conditions: (1) this device may not cause
interference, and (2) this device must accept any
interference, including interference that may cause
undesired operation of the device.
Le présent appareil est conforme aux CNR d'Industrie
Canada applicables aux appareils radio
exempts de licence. L'exploitation est autorisée aux
deux conditions suivantes : (1) l'appareil ne
doit pas produire de brouillage, et (2) l'utilisateur de
l'appareil doit accepter tout brouillage
76
Page 76

radioélectrique subi, même si le brouillage est
susceptible d'en compromettre le fonctionnement.
RF Exposure Information:
This equipment complies with IC radiation exposure
limits set forth for an uncontrolled environment .
This transmitter must not be co-located or operating in
conjunction with any other antenna or transmitter.
CAN ICES-3 (B)/NMB-3(B)
(1) 이 기기는 가정용으로 전자파적합등록을 한 기기로서 주거지
역에서는 물론 모든 지역에서 사용할 수 있습니다 .
(2) 당해 무선설비는 전파혼신 가능성이 있으므로 인명안전과
관련된 서비스는 할 수 없음。
根據 NCC 低功率電波輻射性電機管理辦法規定 :
(1)第十二條經型式認證合格之低功率射頻電機,非經許
可,公司、商號或使用者均不得擅自變更頻率、加大
功率或變更原設計之特性及功能。
(2)第十四條低功率射頻電機之使用不得影響飛航安全及
干擾合法通信;經發現有干擾現象時,應立即停用,
並改善至無干擾時方得繼續使用。
前項合法通信,指依電信法規定作業之無線電通信。
低功率射頻電機須忍受合法通信或工業、科學及醫療
用電波輻射性電機設備之干擾。
EU Compliance Statement: SZ DJI TECHNOLOGY CO.,
LTD. hereby declares that this device is in compliance
with the essential requirements and other relevant
provisions of the R&TTE Directive.
A copy of the EU Declaration of Conformity is available
online at www.dji.com/euro-compliance
EU contact address: DJI GmbH, Industrie Strasse. 12,
97618, Niederlauer, Germany
เครื่องโทรคมนาคมและ อุปกรณ์นี้ มีความสอดคล้องตามข้อกำาหนดของ กทช.
La operación de este equipo está sujeta a las
siguientes dos condiciones: (1) es posible que este
equipo o dispositivo no cause interferencia perjudicial
y (2) este equipo o dispositivo debe aceptar cualquier
interferencia, incluyendo la que pueda causar su
operación no deseada.”
Este equipamento opera em caráter secundário, isto
é, não tem direito a proteção contra interferência
prejudicial, mesmo de estações do mesmo tipo, e não
pode causar interferência a sistemas operando em
caráter primário
77
Page 77

DJI Support
DJI 技术支持
DJI 技術支援
DJIサポート
DJI 지원
DJI Support
Asistencia técnica de DJI
Assistance DJI
Assistenza DJI
DJI-ondersteuning
Suporte DJI
Техническая поддержка DJI
http://www.dji.com/support
If you have any questions about this document, please
contact DJI by sending a message to
如果您对说明书有任何疑问或建议,请通过以下电子邮箱联系我们:
DocSupport@dji.com
78
。
DocSupport@dji.com
.
Page 78

OSMO MOBILE
www.dji.com
 Loading...