

Page 1
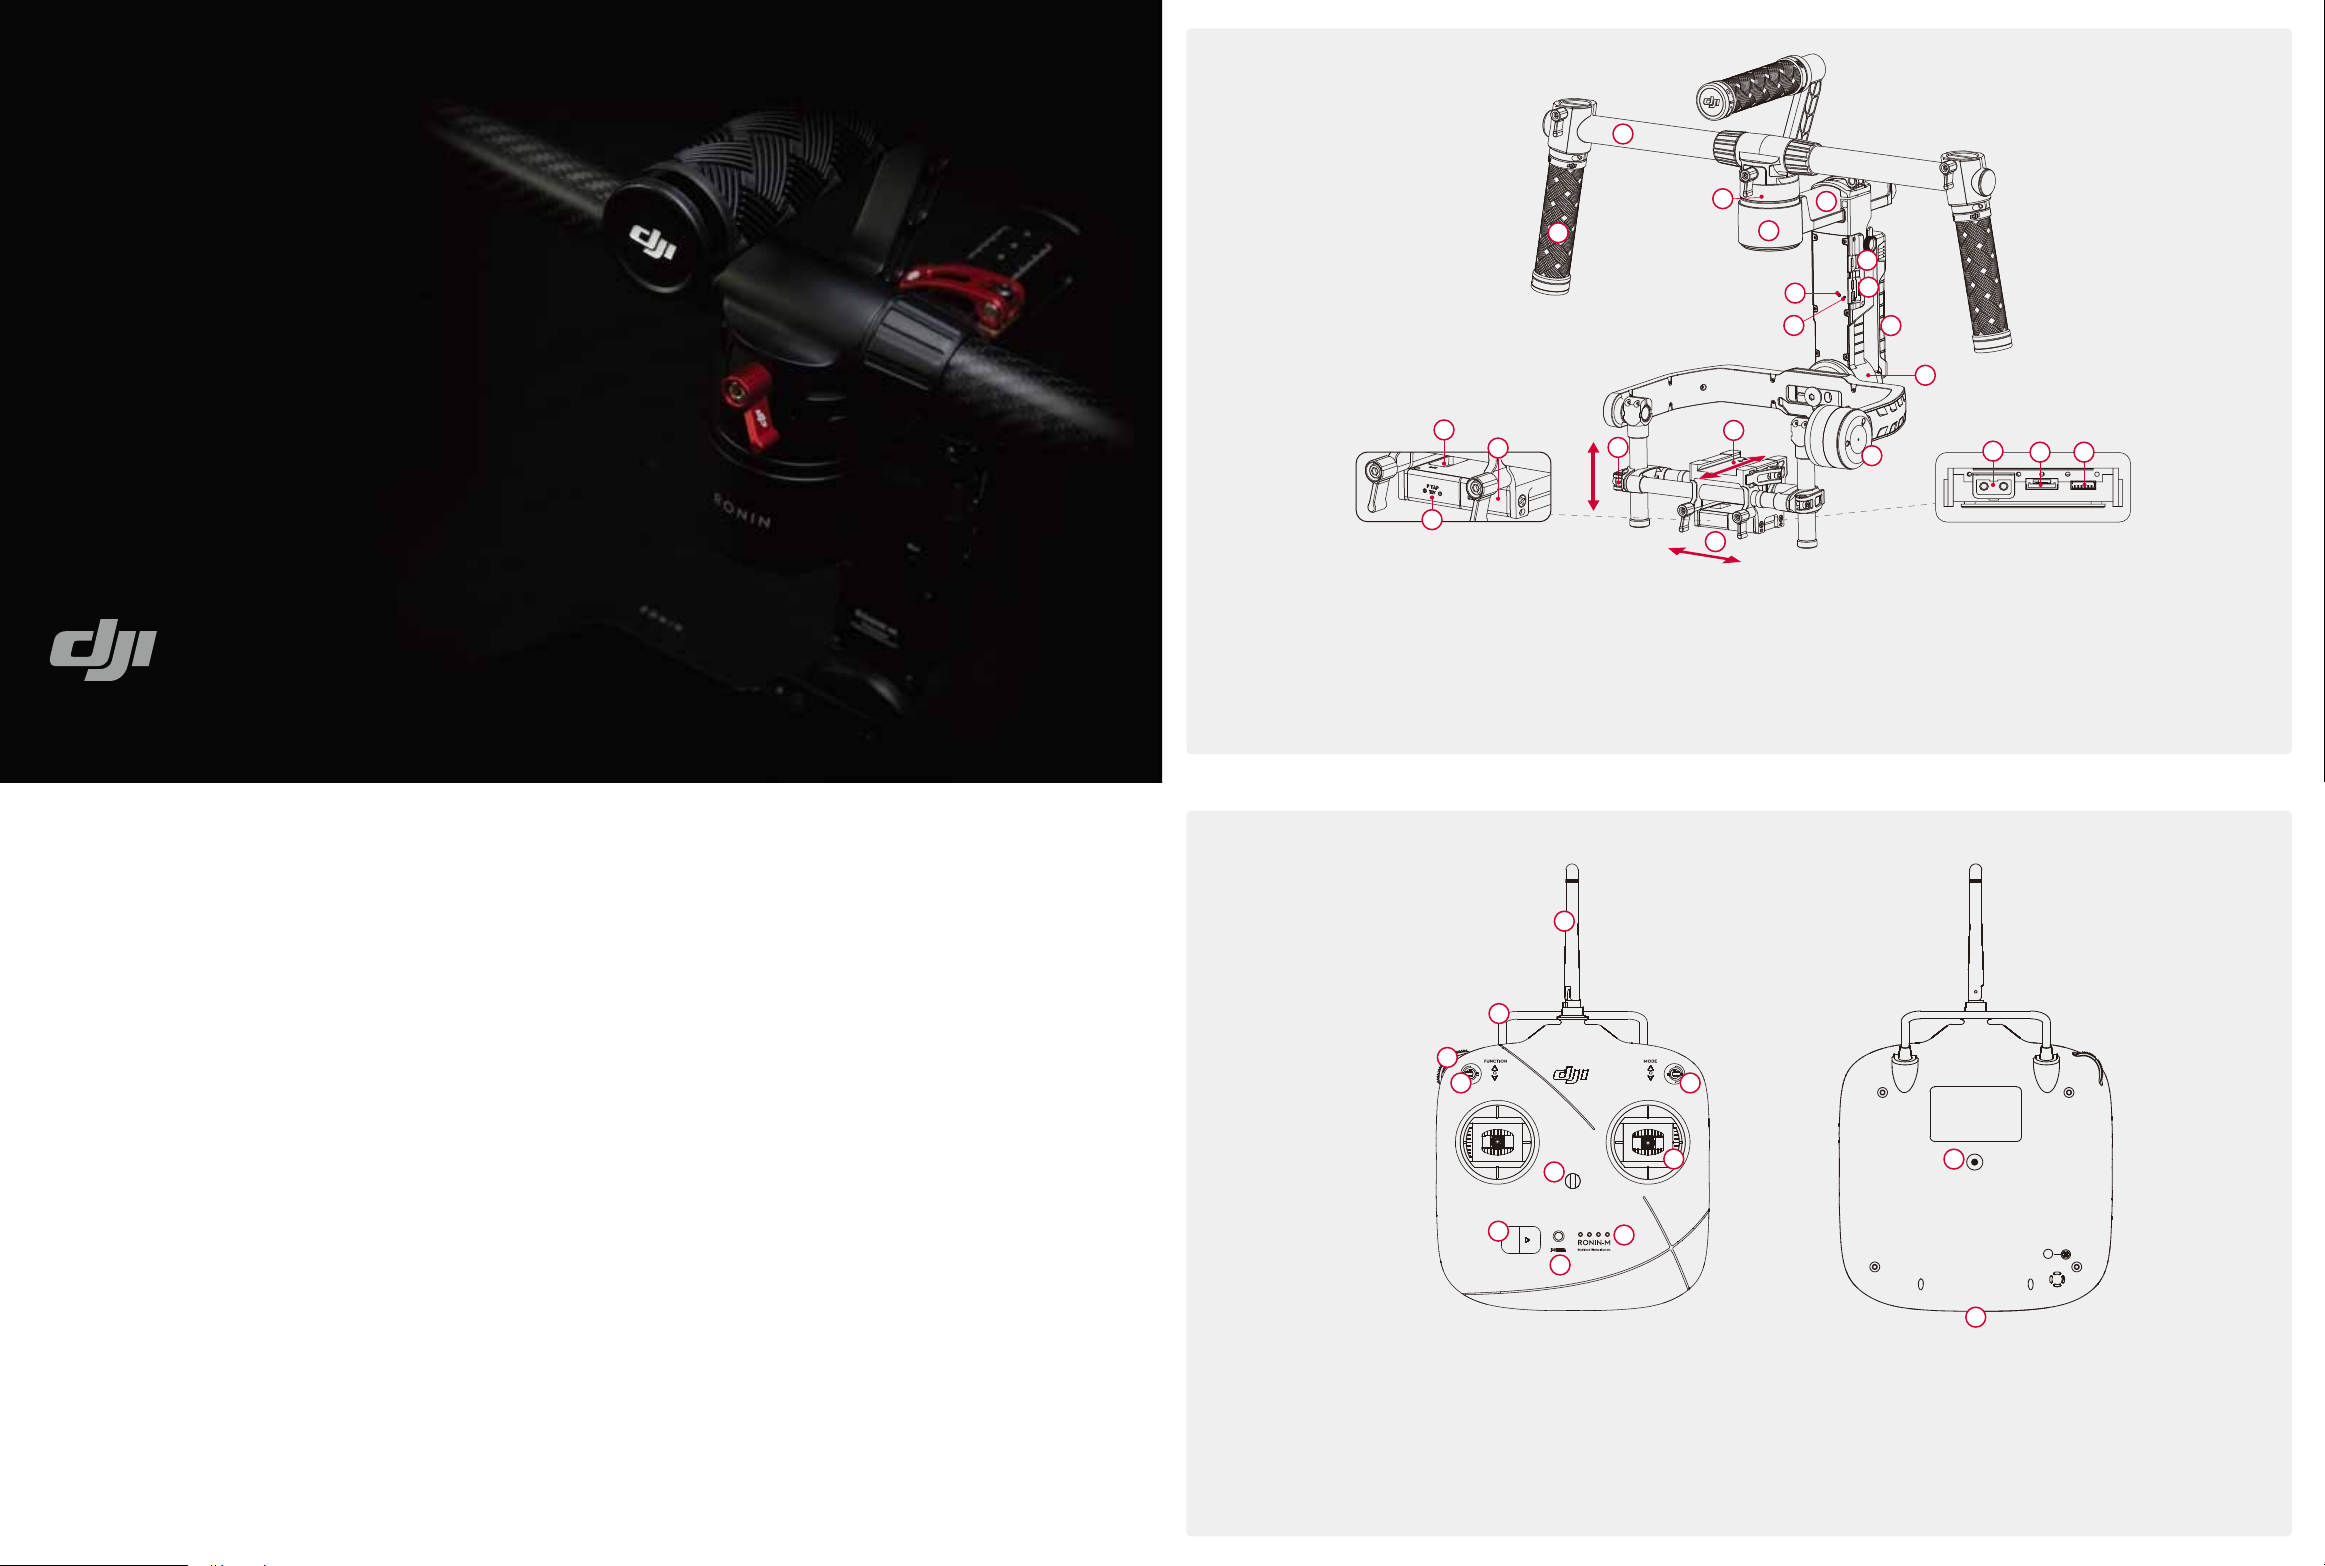
Ronin-M Diagram
RONIN-M
Quick Start Guide
V1.6
1. Top Handle Bar
2. Side Handle
3. Quick Release Mount
4. Pan Motor
5. Pan Adjustment Slider
6. D-Bus Receiver Port
7. USB Port & CAN Port
1
3
2
16
18
17
14
8. Bind Button
9. Gimbal LED Indicator
10. DJI Intelligent Battery
11. Roll Motor
12. Tilt Motor
13. Fore and Aft Adjustment
14. Tilt Vertical Adjustment
13
15
5
4
6
8
9
7
10
11
19
20
12
15. Roll Adjustment
16. IMU Port
17. P-TAP Accessory Power Port
18. USB Accessory Power Port
19. P-TAP Accessory Power Port (rear side)
20. DJI Lightbridge Port (rear side)
21. GCU Port (rear side)
21
RONIN-M
www.dji.com
©2015 DJI. All Rights Reserved.
Printed in China
Remote Control
1
2
3
45
7
8
9
1. Antenna
2. Carrying Handle
3. Left Dial (reserved)
4. 3-Position Switch MODE
5. 3-Position Switch FUNCTION
6. Joysticks
10
6
7. Neck Strap Attachment
8. Power Switch
9. Power Indicator
10. Battery Level Indicators
11. Battery Charging & RC Assistant Port (Micro-USB port)
12. Reserved Port
12
11
Page 2

RONIN-M
Auto Tune Stability
Quick Start Guide
Start
A. Download and install the DJI Assistant app.
Search “DJI Assistant” on the App Store and then follow the instructions
for iOS installation. Search "DJI Ronin" on the Google Play and then
follow the instructions for Android installation.
B. Before you start using your Ronin-M, be sure to charge the DJI Intelligent
Battery first.
Pressing the Intelligent Battery power button once will display the current
battery level. Press and hold for 1 second to turn on/off.
C. Slide the power switch to the right to power on the remote control. The
battery level indicators display the current battery status. If the low
voltage alert sounds, recharge the battery via the micro USB port.
●
Refer to the User Manual for more DJI Intelligent Battery information.
●
Use a mobile device that runs iOS 7.0 or above or Android 4.3 or above.
Assembling the Ronin-M
A. Deploy the tuning stand as shown.
Remove the lower legs from their vertical position
and install them into the bottom base of the
stand. Remove the upper legs from their vertical
position and install them into the upper base of
the stand. Be sure the locator slots are lined up.
1
2
C. Attach the Ronin-M to the handle.
Slide the handle bar horizontally into the
gimbal and tighten the lock-knob.
2
B. Assembling the handle bar.
Attach the handle bars to both sides of the
top handle and tighten the grip screws.
Attach the grips to the handle bar and
lock them in the preferred position.
Place the handle assembly on the tuning
stand.
1
2
D. To mount the DJI Intelligent Battery into
the Ronin-M, loosen the thumb screws
on either side of the battery and slide it
directly into the gimbal and then slide
down. Tighten the thumb screws. Ensure
the battery is seated all the way down.
Low
DJI Assistant
Battery Level
High
Mounting the Camera on the Ronin-M
Insert the camera until the safety lock engages. Make sure the camera first achieves a rough balance
by sliding the camera platform forward and back. The camera should not tilt forward (lens heavy) or
tilt backward. When you have arrived at a rough balance, tighten the side clamp.
●
The camera needs to be fully setup with all accessories prior to installing and balancing on the gimbal.
Balancing
A. Balancing the Vertical Tilt
Rotate the tilt axis so that the camera
lens is pointing upward and loosen the
two vertical adjustment tabs. Gently
slide the camera mount crossbar forwards
or backwards until the camera points
upwards when released. Latch the tabs
back into their closed position to tighten.
3
1
2
C. Balancing Depth for the Tilt Axis
Loosen the side clamp to slide the camera
forwards or backwards until the tilt axis
remains level and then tighten the side
clamp.
B. Balancing the Roll Axis
Loosen the two lock-knobs to slide the
camera left or right until the roll axis remains
level, and then tighten the two lock-knobs.
3
1
2
D. Balancing the Pan Axis
Open the clamp on the pan axis and turn
the knob to slide the assembly. Tighten
the clamp after balancing is completed.
1
2
3
DJI Ronin-M Assistant App Settings
A. With the Ronin-M on the tuning stand and a properly balanced camera, tap the Auto Tune Stability
button.
B. Switch on/off the Briefcase Mode as needed.
C. Switch on/off the SmoothTrack
Mode as needed. In the
SmoothTrack options menu,
the settings for the pan axis,
tilt axis and the roll axis can
be independently adjusted.
D. Adjust the control speed.
E. If the Ronin-M starts to vibrate,
go into the “Motor” page and
reduce stiffness settings.
●
For more information, please refer to the User Manual.
Mode:N/A
Motor
Gimbal
Auto Tune Stability
Configuration
Stiffness
0 0
Pan Axis
Tilt Axis
Roll Axis
Live Data
Power Angle
Pan
0
Tilt
0
Roll
0
Gimbal Control Viewer More
Trim
0000
0
0
0
?
Briefcase Mode
Motor Kill
Roll Control
Internal Receiver
Silent Mode
Calibrate Center
Calibrate System
Restore default settings
Accounts
Gimbal Control Viewer More
N/A
Mode:
More
***@***.com
Gimbal
?
SmoothTrack Mode
Pan SmoothTrack
Tilt SmoothTrack
Roll SmoothTrack
SmoothTrack Adjustments
Pan Axis
Tilt Axis
Roll Axis
Test
Gimbal Control Viewer More
SmoothTrack
Deadband Accel
Speed
0
0 0
0
Test Pan Speed
Test Tilt Speed
0 0
0
?
Control
Control Speed Adjustment
Thumb
Controller
Remote
Operator
0
0
Gimbal Control Viewer More
Maximum Speed
Pan
401515
?
Tilt
15
Pairing with PC/MAC Assistant (Alternate Work Flow)
A. Connect the Ronin-M to your computer via USB cable and
be sure the Ronin-M is powered on.
B. Download the PC/MAC Assistant from DJI.com (ensure you
have also installed the DJI Windows Driver first if you are
installing it on a Windows Operation System), and then
launch the Assistant.
C. Click the Auto Tune Stability button.
D. Reduce motor stiffness settings if the Ronin-M shakes.
E. Switch on/off the Briefcase Mode and SmoothTrack Mode as
needed. Adjust the maximum control speed.
●
The tuning abilities of the DJI Assistant app and DJI PC/MAC Assistant are the same. There is no need
to repeat your settings in both Assistants.
●
The DJI Ronin-M Assistant app and the PC/MAC Assistant program cannot be simultaneously launched
and connected at the same time. If running the Assistant app on your mobile device, be sure to
disconnect the micro USB cable.
Connecting the Remote Control to Ronin-M
A. Turn on the Ronin-M.
B. Press the recessed Bind Button (shown below) of the Ronin-M once with something sharp such
as a paperclip.
C. Slide the power switch to the right to power on the remote control. If the LED of gimbal turns solid
green light, the remote control and the Ronin-M have been successfully bound.
2
1
1
●
Make sure the battery is powered off during the installation process.
Mounting the Camera on the Mounting Plate
A. Attach the camera to the mounting plate and tighten the screws.
B. Attach the lens support to the mounting plate.
C. Apply upward pressure to the lens support and tighten the screw.
1
3
1
2
3
2
Pairing with the DJI Ronin-M Assistant App
A. Power on the Ronin-M. Switch on Bluetooth on your mobile device and launch the DJI Assistant app.
B. Connect your mobile device to the Ronin-M within the DJI Assistant app.
C. When using the app for the first time, you will be prompted to register using a valid e-mail address.
D. Check balance in the Viewer page. If a particular motor axis indicates a power greater than 10,
please rebalance the camera.
Viewer
?
Angle
Power
。
Pan Axis
1.89
2
。
Tilt Axis
-0.45
-2
。
Roll Axis
-0.01
0
Power
Temperature
Gimbal
Angle
Voltage
14.50V
。
35.40
0:01:59
Time
Control Viewer More
Device Selection
Ronin-M: 000036
D. Test the remote control to see if it is paired.
Remote Control Operation
A. MODE:
The MODE switch is used for toggling
SmoothTrack.
Position 1
Position 2
Position 3
-Free, SmoothTrack Off
-Free, SmoothTrack On
-Reset to Center, SmoothTrack On
C. Left Stick: Horizontal movements on the left stick
control the roll axis.
D. Right Stick: Horizontal movements on the right stick
control the pan axis. Vertical movements on the right
stick control the tilt axis.
B. FUNCTION:
i. The FUNCTION switch is used to select the
SmoothTrack speed.
ii. Activating Motor Kill Switch by quickly
Bind Button
Position 1
Position 2 Position 3
-Fast -Normal -Slow
flipping the FUNCTION switch up and down
3 times. This will enable/disable Motor Kill.
 Loading...