

Page 1
Ronin
2015.7
V1.8
User Manual
Page 2

Disclaimers and Warnings
Congratulations on purchasing your new DJI product. Please read this manual and disclaimer carefully
before using this product. By using this product, you hereby agree to this disclaimer and signify that
you have read it in full. You agree that you are responsible for your own conduct and any content
created while using this product, and for any consequence thereof. You agree to use this product
only for purposes that are proper and in accordance with local regulations, terms and any applicable
polices and guidelines.
By reading this disclaimer, you also agree:
1. Any part of this disclaimer is subject to change without prior notice. Refer to www.dij.com for the
latest version.
2. DJI reserves the right of nal interpretation of this disclaimer.
Do not modify or adjust the Ronin.
The Ronin has been calibrated before it leaves the factory. No modication or amending to the Ronin
is allowed. Make sure to use the original battery, otherwise performance may be hindered, and
internal malfunctions and damage to the gimbal may be caused. Please download the corresponding
Assistant software.
As DJI has no control over use, setup, final assembly, modification or misuse, no liability shall be
assumed nor accepted for any resulting damage or injury. By the act of use, setup or assembly, the
user accepts all resulting liability. DJI assumes no liability for damage(s) or injuries incurred directly or
indirectly from the use of this product.
DJI and Ronin are registered trademarks of DJI as names of product, brand, etc., appearing in this manual
are trademarks or registered trademarks of their respective owner companies. This product and manual
are copyrighted by DJI with all rights reserved. No part of this product or manual shall be reproduced in any
form without the prior written consent or authorization of DJI.
Using Lithium Polymer (LiPo) Batteries
LiPo smart batteries can be extremely hazardous and require special attention when handled. Always
follow these instructions when using LiPo batteries:
1. DJI smart batteries must be charged with a DJI charger.
2. DJI smart batteries are designed to stop charging when full. However, it is good practice to monitor
the charging progress and disconnect the battery from the charger once fully charged.
3. Do not charge a smart battery near ammable materials or on ammable surfaces such as carpet or wood.
4. Never charge a swollen, leaky or damaged battery.
5. Examine charger regularly for damage to the cord, plug, enclosure or other parts. Never use a
damaged charger.
6. Disconnect the charger when not in use.
7. Do not clean the charger with denatured alcohol or other ammable solvents.
Usage and Storage
Keep batteries out of the reach of children and pets.
Never discharge batteries below 3V per cell.
Do not heat the battery.
Do not insert or remove batteries if the plastic cover has been torn or compromised in any way.
Do not drop or strike batteries.
Never use a swollen, leaky or damaged battery.
Clean battery terminals with a clean, dry cloth.
2014 DJI. All Rights Reserved.
2
©
Page 3
User Manual
Ronin
Do not expose batteries to extreme temperatures, including excessive heat. Do not leave the batteries
inside vehicles on hot days.
Do not allow batteries to come into contact with any kind of liquid. Do not leave batteries out in the rain
or near a source of moisture.
Do not leave batteries in a microwave oven or in a pressurized container.
Do not attempt to dismantle, pierce or cut a battery. Do not attempt to repair batteries yourself.
Do not place loose battery cells on any conductive surface, such as metal-toppled tables.
Do not put the loose cells in a pocket, bag or drawer where they may short-circuit against other items
or where battery terminals could be pressed against each other.
Do not place or use batteries on strong electrostatic or electromagnetic surfaces or surrounding areas.
This may result in battery damage.
Do not place heavy objects on the batteries or charger. Avoid dropping batteries.
Avoid direct contact with the electrolyte contained within the batteries. The electrolyte and electrolysis
vapors are harmful to your health.
Do not mix battery brands inside the controller.
Do not attach the battery to wall or car charger sockets directly. Always use a DJI approved adapter.
Battery Disposal
Discarding batteries in general household waste is bad for the environment. Please dispose of
batteries properly.
Do not dispose of batteries in re.
Damaged or unusable batteries must be disposed of in a container specially reserved for this
purpose. When disposing of batteries, follow appropriate local guidelines and regulations. For further
information, contact your local solid waste authority or a battery store.
Only use the DJI smart battery.
Always use the DJI smart battery charger.
FCC Compliance
Ronin complies with part 15 of the FCC rules. Operation is subject to the following two conditions: (1)
Ronin may not cause harmful interference, and (2) Ronin accepts any interference received, including
interference that may cause undesired operation.
Using this Manual
Legend
Important Hints and Tips References or Denitions
Download DJI Ronin Assistant App
Download and install the DJI Ronin Assistant App.
Search "DJI Assistant" on the App Store and then follow the instructions for iOS installation.
Search "DJI Ronin" on Google Play and then follow the instructions for Android installation.
iOS7.0 or above
Android4.3 or above http://m.dji.net/dji-ronin
2014 DJI. All Rights Reserved.
©
3
Page 4

Contents
Disclaimers and Warnings
Using Lithium Polymer (LiPo) Batteries 2
Usage and Storage 2
Battery Disposal 3
FCC Compliance 3
Using this Manual
Legend 3
Download DJI Ronin Assistant App 3
Introduction
Package & Instruction Sheet
In the Box
Gimbal Description
Getting Started
Smart Battery 8
Tuning Stand 10
Installing the Handle Bar onto the Gimbal 11
Smart Battery Installation 12
Mounting the Camera 12
Handle Bar Adjustment 14
Balancing
Step 1: Balancing the Tilt Axis 15
Step 2: Balancing the Roll Axis 15
Step 3: Balancing the Vertical Tilt 15
Step 4: Balancing the Pan Axis 16
Advanced Roll Adjustment 16
DJI Ronin Assistant App Tuning
Download and Install 17
Basic Settings 17
Advanced Settings 18
DJI PC / MAC Assistant Tuning
Install DJI PC / MAC Assistant 23
Settings 24
Remote Control
Connecting the Remote Control to Ronin 30
Remote Control Power LED Indicator Status 30
Remote Control Battery Level Indicator Status 31
Remote Control Features 31
Adding 3rd Party Transmitter/Receiver 32
Operation Modes
Underslung Mode 32
Upright Mode 33
Briefcase Mode 33
Maintenance
Troubleshooting
Specication
2014 DJI. All Rights Reserved.
4
©
2
3
5
5
6
8
8
14
17
23
29
32
33
34
35
Page 5
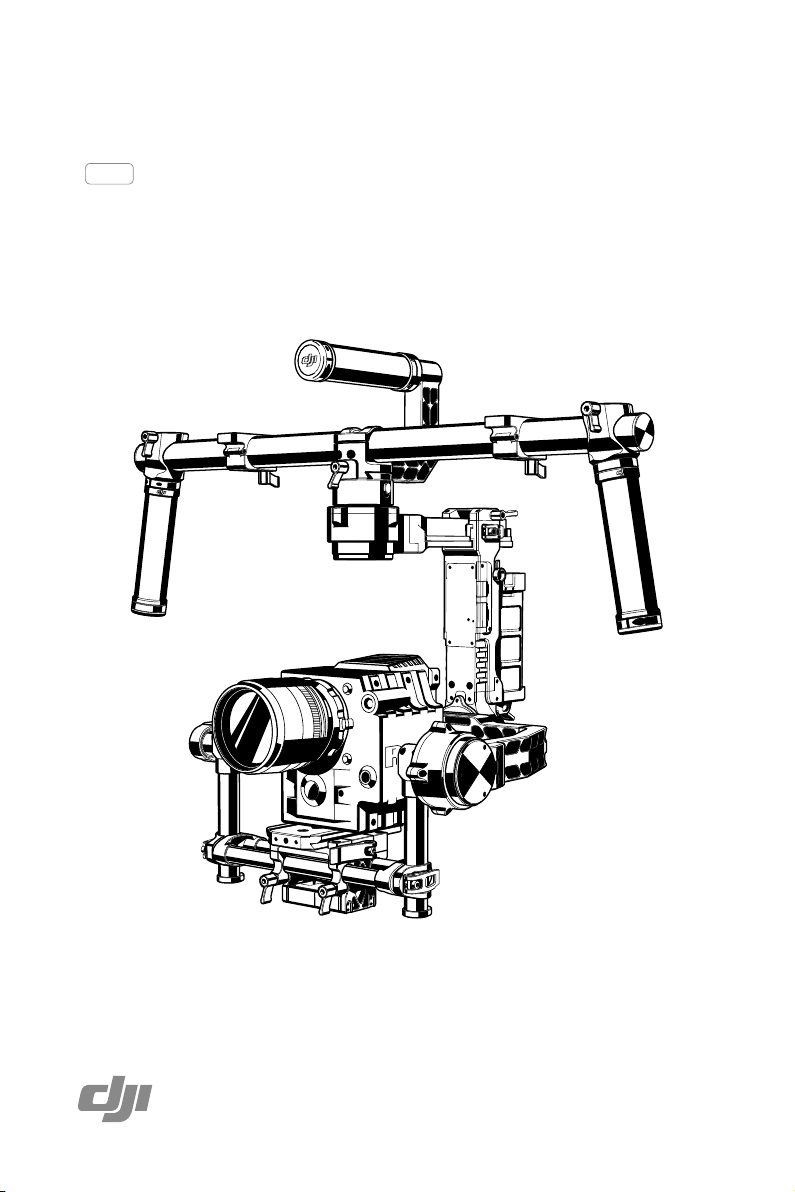
Introduction
The DJI Ronin is the culmination of years of stabilization experience built into our most advanced
camera stabilization platform to date. The technology built into the DJI Ronin allows a broad spectrum
of cameras varying in size and weight to be mounted for class leading stabilization. We’ve put years of
passion and excitement into the Ronin, bringing world-class movement translation and stability to the
professional cinematographer’s market.
A brushless gimbal stabilization system is not simply three brushless motors moving on three axes.
The motors work with position feedback and the IMU (Inertial Measurement Unit) to communicate with
our custom 32-bit processor, which processes movement calculations in milliseconds. This equates
to control and stability accuracy down to 0.02 degrees of translated movement, meaning your images
are going to be perfectly still in all three axes of movement. There are three operation modes in the
Ronin: underslung mode, upright mode and briefcase mode.
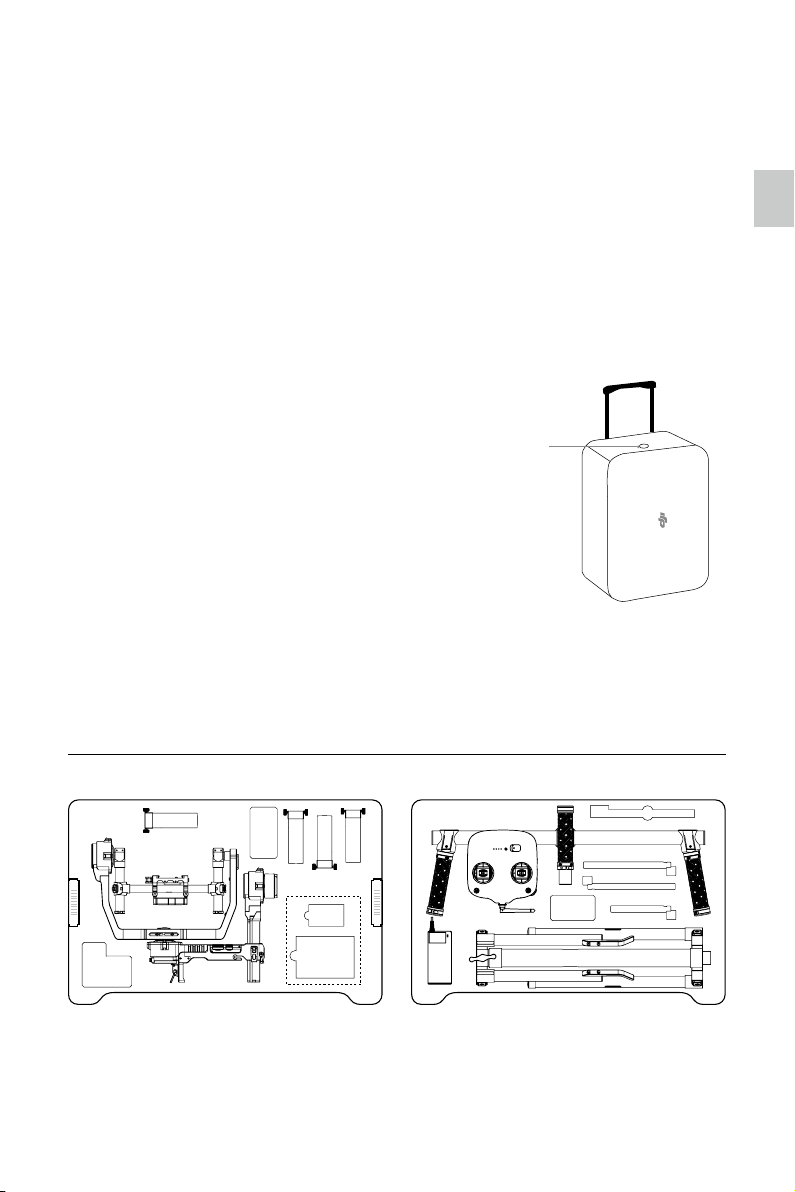
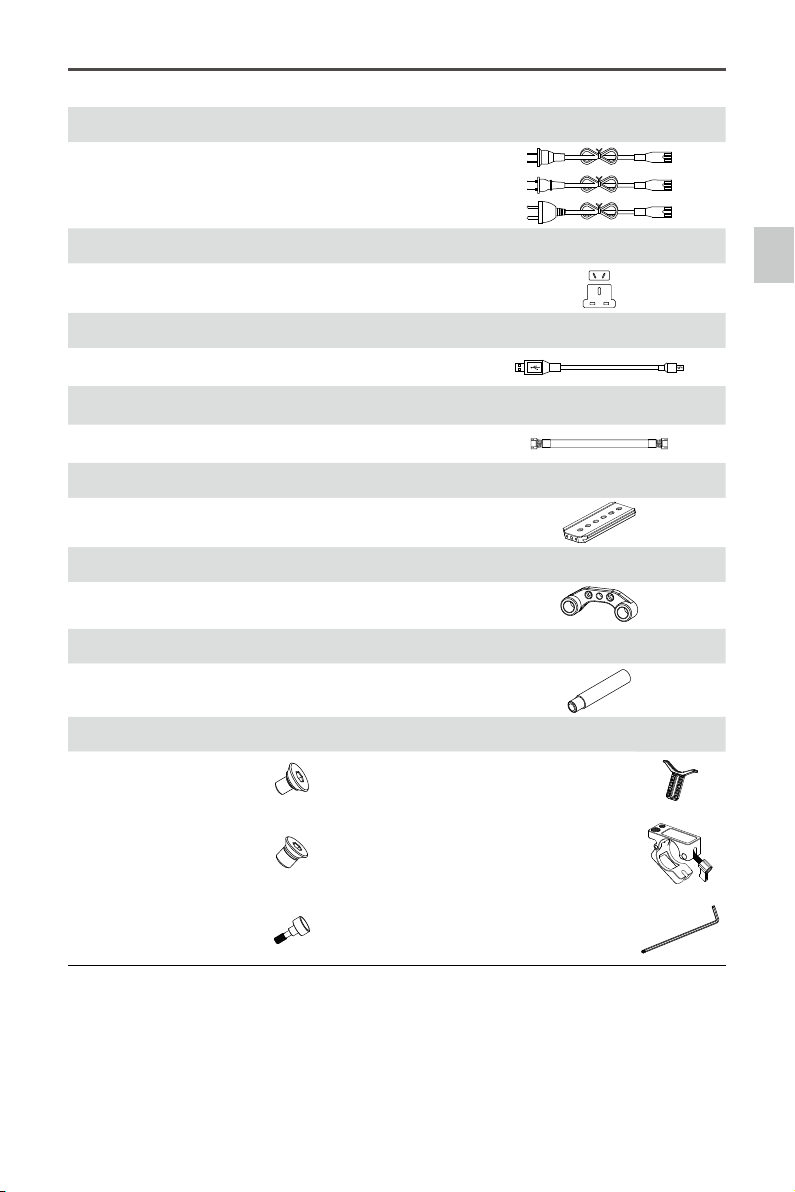
Package & Instruction Sheet
Air pressure may be built up during air transportation or
during extreme barometric pressure changes. Loosen
the pressure valve knob on the side of the case prior
to transportation in these circumstances to prevent
pressure build up.
Below is the layout of the items inside the case. Not every item in this sheet is provided by DJI. There
are pre-cut slots for some additional accessories. For more information regarding what's included,
please refer to the "In the box" section of this manual.
Pressure Valve
Introduction / Package & Instruction Sheet
INSTRUCTION SHEET
UPPER LAYER
3
1 Gimbal
2 Smart Battery
3 Accessories
4 LCD Screen
2
1
5 DJI Lightbridge Air System (under the LCD Screen)
6 DJI Lightbridge Ground System (under the LCD Screen)
7 Remote Control -2.4 GHz
8 Adjustable Length Extension Rod
3
2
2
5
6
Battery
LOWER LAYER
Smart
2
4
12
7
3
9 Top Handle Bar
10 Camera Mounting Plate
11 Tuning Stand
12 Charger
2014 DJI. All Rights Reserved.
©
8
9
10
10
10
11
5
Page 6
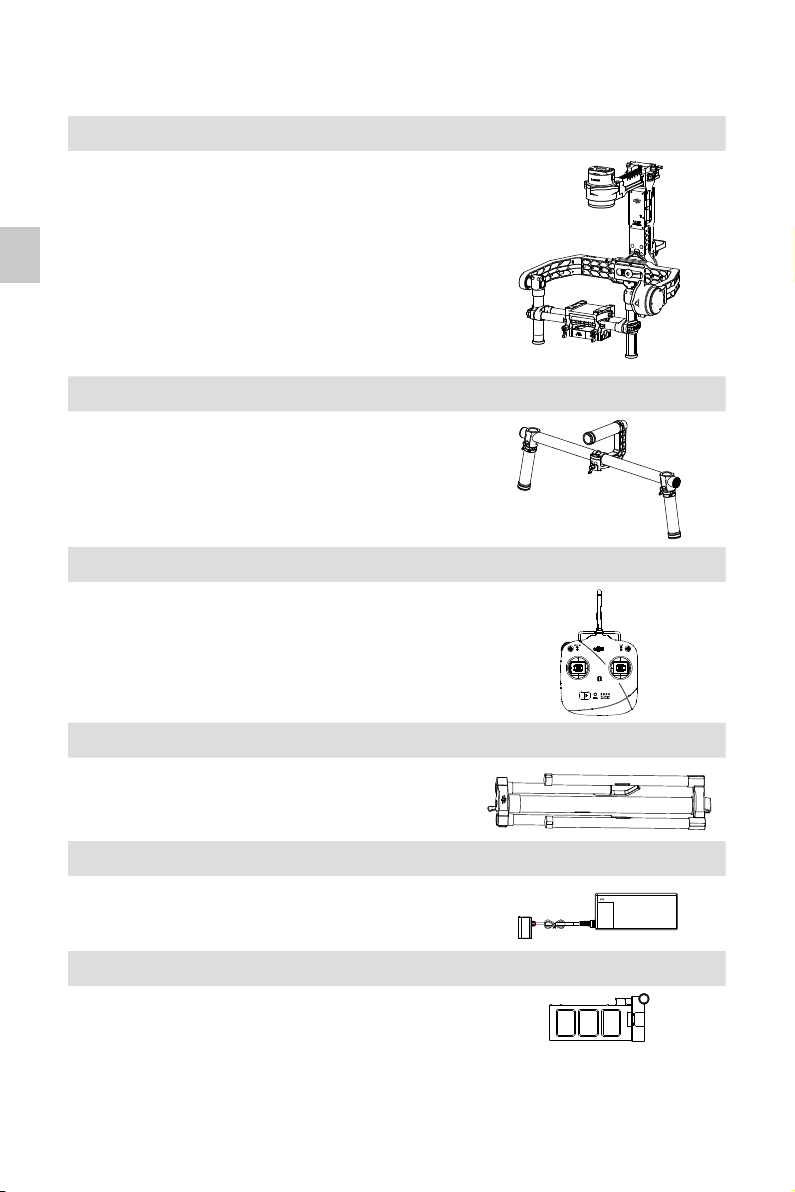
In the Box
Gimbal × 1
The gimbal includes built-in DJI motor drive modules, an
independent IMU module, a 32-bit DSP processor, power
supply module, Bluetooth, transmitter/receiver module,
In the Box
camera shelf, and power breakout box.
Handle Bar × 1
Customizable handle platform for the gimbal.
Remote Control -2.4 GHz × 1
Controls the movements of the gimbal, switches the work
modes, and selects gimbal speed.
Tuning Stand × 1
For suspending or storing the gimbal.
Charger × 1
110-240V automatic switching charger.
Smart Battery × 1
Power source for the gimbal. Also supplies power for other
external devices.
2014 DJI. All Rights Reserved.
6
©
Page 7
Cables × 3
ANSI & JIS & CE cables.
Plug Adaptors × 2
Ronin
User Manual
SAA & BS adaptors.
Micro-USB Cable × 1
For rmware upgrades.
7-Pin Cable × 1
For connecting the gimbal and Lightbridge.
Camera Mounting Plate × 1
For mounting your camera onto the gimbal.
Extension Rod Holder × 1
For installing extension accessories with the extension rods.
Adjustable Length Extension Rod × 4
For installing extension accessories with the extension rod
holder.
Accessories Package
Camera Screw A (1/4”) ×2 Lens Support ×1
Camera Screw B (3/8”) ×2
Top Bar Quick Release
Accessories Mount x 2
In the Box
Lens Support Screw ×1
Allen Wrench ×3
(3mm, 4mm, & 3/16”)
©
2014 DJI. All Rights Reserved.
7
Page 8
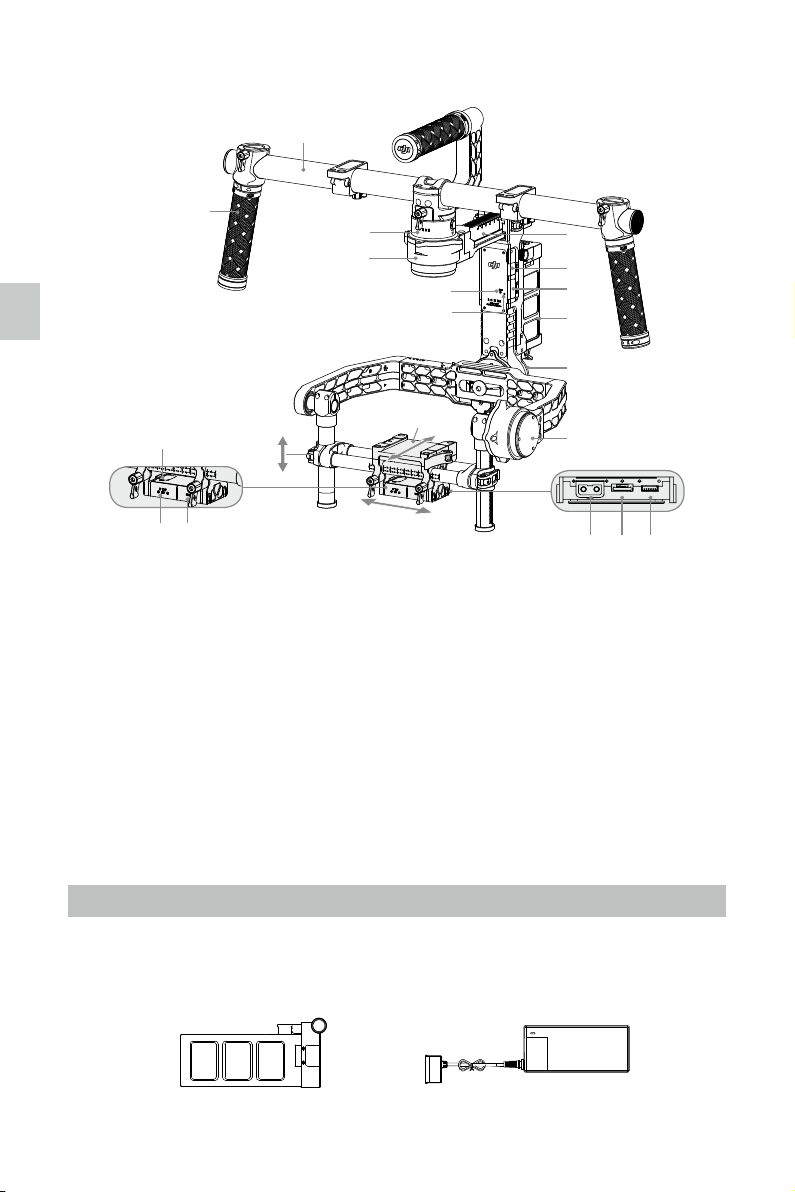
Gimbal Description
[2]
Gimbal Description / Getting Started
[1]
[3]
[4]
[8]
[9]
[5]
[6]
[7]
[10]
[11]
[16]
[18]
[17]
[1] Top Handle Bar
[2] Side Handle
[3] Quick Release Mount
[4] Pan Motor
[5] Pan Adjustment Slider
[6] D-BUS Receiver Port
[7] USB Port & CAN Bus Port
[8] Bind Button
[9] Gimbal LED Indicator Light
[10] Smart Battery
[11] Roll Motor
[14]
[13]
[15]
[12] Tilt Motor
[13] Fore and Aft Adjustment
[14] Tilt Vertical Adjustment
[15] Roll Adjustment
[16] IMU Port
[17] P-TAP Accessory Power Port
[18] USB Accessory Power Port
[19] P-TAP Port (rear side)
[20] DJI Lightbridge Port (rear side)
[21] GCU Port (rear side)
[12]
[19] [20]
[21]
Getting Started
Smart Battery
Before you start using your Ronin, be sure to charge the battery rst. The smart battery is specially
designed for the Ronin. It has a battery capacity of 3400mAh, voltage of 14.8V, and power
management functionality. Charge the smart battery only with DJI approved chargers. When the
battery is fully charged, it has a maximum run time of 4 hours.
2014 DJI. All Rights Reserved.
8
©
Smart Battery Charger
Page 9
User Manual
Ronin
DJI Smart Battery Functions
Balance Charging Automatically balances the voltage of each battery cell during charging.
Capacity Display Displays current battery levels.
Overcharge Protection Charging stops automatically when the battery voltage reaches
16.8V to prevent overcharge damage.
Over Discharge Protection Discharging stops automatically when battery voltage reaches
12V to prevent over discharge damage.
Short Circuit Protection Automatically cuts power supply when a short circuit is detected.
Sleep Protection Sleep mode is activated after 10 minutes of inactivity to save power.
Charging Temperature Detection The battery will charge only when the temperature is between 0℃
and 55℃.
BatterySpecications
Type LiPo
Capacity 14.8V, 3400mAh
Charging Environment Temperature 0°C ~ 45°C
Operating Environment Temperature -15°C ~ 50°C
Charging/Discharging Environment Relative Humidity <80%
Getting Started
Read the user manual, disclaimer, and battery warnings before use. Users take full
responsibility for all operations and usage.
Always use DJI approved chargers. DJI takes no responsibility for any use of non-DJI
approved chargers.
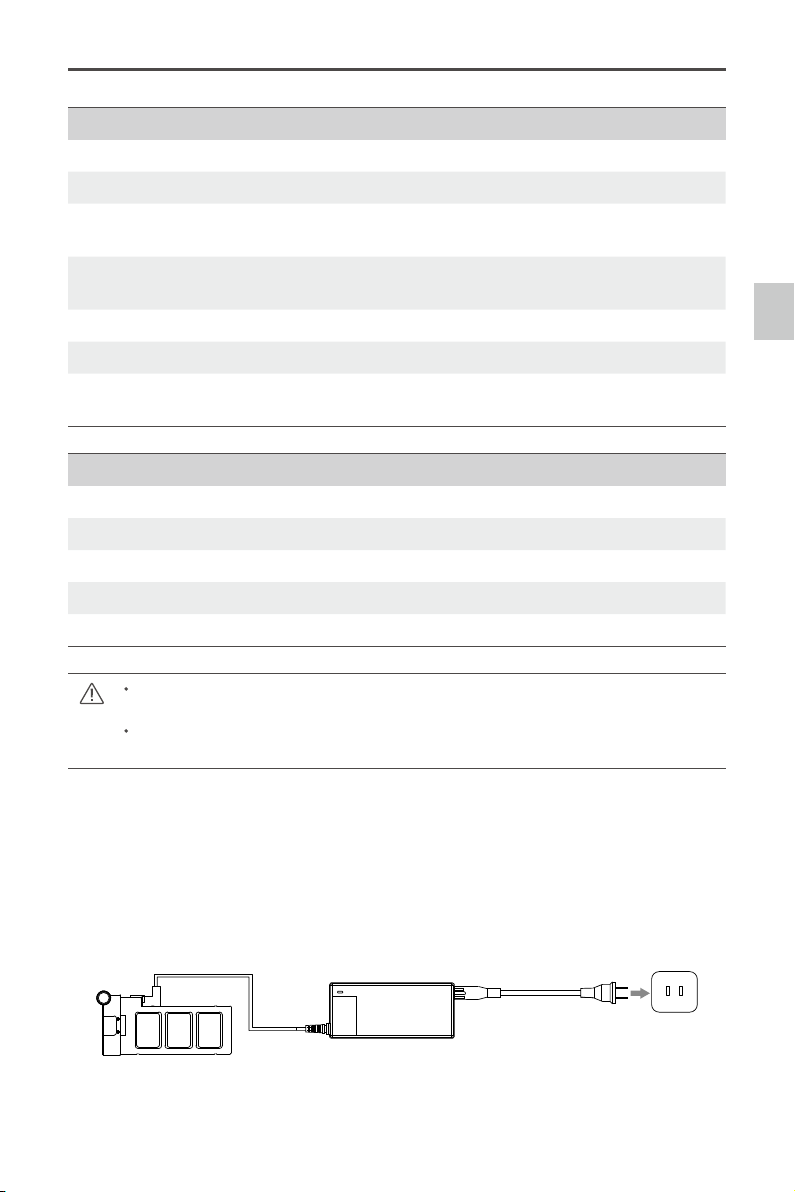
Charging the Smart Battery
1. Connect the charger to a wall socket (100-240V, 50/60Hz), using the plug set if necessary.
2. Connect the battery to the charger.
3. The battery level indicator lights display current capacity level as the battery charges.
4. The battery is fully charged when the battery level indicator lights shut off and the indicator light on
the charger turns green. Disconnect the battery from the charger when charging is completed.
Socket
2014 DJI. All Rights Reserved.
©
9
Page 10

User Manual
Ronin
Using the Smart Battery
[1] [2] [3] [4] LED indicator lights
[6]
[1]
[2]
[3]
[4]
[5]
Getting Started
Checking the battery level: When the battery is powered off, pressing the battery power button once
[5] Power Button
(with one LED battery power indicator.)
[6] Thumb Screws
will display the current battery level.
Powering on: When the battery is powered off, press and hold for 1 second to turn on the smart battery.
Powering off: When the battery is powered on, press and hold for 1 second to turn off the smart battery.
Description of the Smart Battery Level Indicators
The battery level indicators show the current battery level during both the charging and discharging
process. The following is a description of the indicators.
: The LED is in a solid state on :The LED is blinking : The LED is off
Discharging process
LED1 LED2 LED3 LED4 Current battery level
87.5%~100%
75%~87.5%
62.5%~75%
50%~62.5%
37.5%~50%
25%~37.5%
12.5%~25%
0%~12.5%
<0%
Tuning Stand
You can use the tuning stand during setup or for storage of the gimbal. The following steps show
how to use the tuning stand.
1. Put the stand in the upright position as shown in the picture below.
2. Press button [1] and pull the lower legs outward away from the stand, and then pull downward.
Then press button [2] and pull the upper arms outward and upward.
3. The upper half of this tuning stand can be removed by loosening the knob [3]. You can use it with
any C-stand style stud that ts the hole [4]. When mounting on to a C-stand, be sure to check the
balance of the stand so as to not have the Ronin with a camera tilt over. When setting on a table,
make sure the table is a at and even surface.
2014 DJI. All Rights Reserved.
10
©
Page 11
User Manual
Ronin
[2]
[3]
[4]
[1]
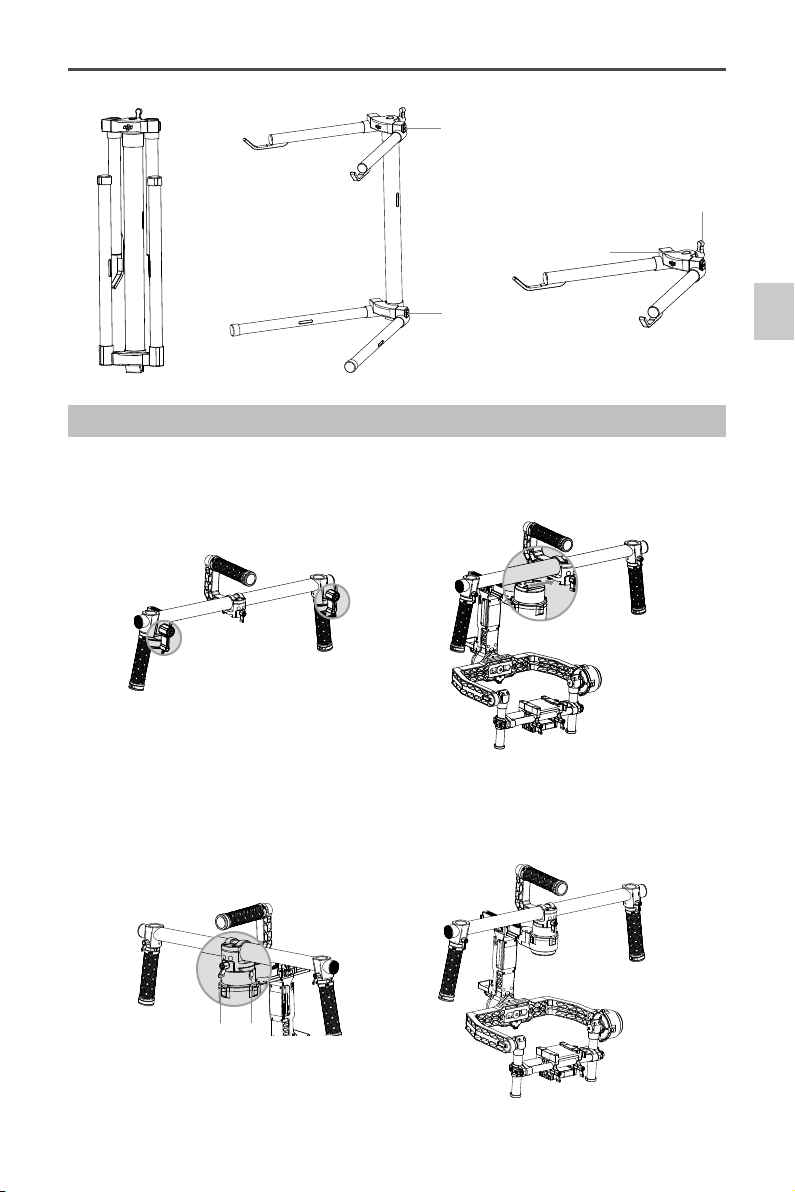
Installing the Handle Bar onto the Gimbal
1. The turn knobs on the handles are loose by default. Adjust the grips to the desired position and
tighten the screws to secure their position.
2. Place the handle bar in the position as shown below.
Getting Started
3. Push the lock [1]downward on the pan motor, and slide the handle bar into the gimbal. Then tighten
the lock-knob [2].
4. With your hands on the handles, be sure the gimbal is not obstructed during a 360 degree pan.
Installation is complete.
[2] [1]
2014 DJI. All Rights Reserved.
©
11
Page 12

User Manual
Ronin
Smart Battery Installation
1. Loosen the thumb screws on either side of the battery. Slide the battery directly into the gimbal and
then slide down. Be sure the battery’s thumb screws go down into their locating slots making full
contact with the gimbal’s electrical leads.
2. Tighten the thumb screws on the battery to lock it in place.
Getting Started
Make sure the battery is powered off during the installation.
An incorrectly installed battery may lead to (1) Poor battery connection, or (2) Unavailable
battery information.
Mounting the Camera
The Ronin uses an adjustable camera mounting plate to allow you to easily balance, install and
remove your camera. The Ronin has been tested with the following types of cameras. Other cameras
similar in size and weight may also work.
Black Magic Cinema Camera Canon 6D Nikon D800
Black Magic Pocket Cinema Camera Canon 7D Panasonic GH3
Canon 1Dc Canon C100 Panasonic GH4
Canon 5DMKII Canon C300 RED Epic/Scarlet
Canon 5DMKIII Canon C500 Sony NEX7
Camera Size Requirements: the maximum depth
from the center of gravity on the camera base
plate is 140mm; the maximum height measured
from the top of the camera base plate is
225mm; and the maximum width is 195mm.As
shown in the picture on the right.
To avoid obstructing camera movement, the use
of soft connection cables is recommended.
225mm
195mm
140mm
140mm
1. Attach the camera mounting plate to your camera using the provided screws. Choose the correct
1/4" or 3/8" screws. Some cameras have two tripod mounting holes. It’s best to secure the camera
as tightly as possible. If two mounting holes are available on your camera, then use both mounting
holes. Choose the right screw holes according to your camera’s conguration.
2. Install the extension rod holder and lens support. Gently push up to apply a little pressure to the
lens, then tighten the thumbscrew.
2014 DJI. All Rights Reserved.
12
©
Page 13

User Manual
Ronin
Why do you need to use a lens support?
Certain cameras have a very tight lens securing system, and some cameras like the Canon
5D MKII and MKIII have very loose lens securing systems. The Ronin balances the camera as
one solid unit. If the mounted camera has a loose camera securing system, the lens support
must be used. This is because if a loose connection between the lens and the camera body
is apparent, vibrations could travel through to the camera but not directly to the lens, resulting
in the two masses shaking at different frequencies. The resulting oscillation will translate to the
IMU, causing the whole gimbal to shake. If the lens support ts, it's best to use it at all times.
The lens support can be installed either facing outward or inward to accommodate different
lens types.
Ensure alignment of the camera plate and then tighten the screw prior to tightening the lens
support.
3. If using follow focus or other accessories, insert the extension rod into the extension rod holder and
tighten. Congure the length of the rods needs to accommodate for the length of the lens used.
Getting Started
4. With the gimbal on the tuning stand facing outward, insert the camera until the safety lock is
engaged. Make sure the gimbal is not turned on when balancing the camera.
5. Tighten the camera base side clamp. You can adjust the tightness of the side clamp with the M3
allen wrench.
2014 DJI. All Rights Reserved.
©
13
Page 14

User Manual
Ronin
Handle Bar Adjustment
The customizable handle bar of the Ronin can be removed by following the steps below, if required.
1. Loosen screw on either grip.
Balancing
2. Remove the grip from the handle bar. Loosen the two screws and then the top bar can be removed.
3. The resulting setup is shown below.
Balancing
To achieve the best performance from the Ronin, proper balancing is necessary and a must. Accurate
balance is critical in shots where the Ronin will be subjected to extreme movements or accelerations
(running, horseback riding, biking, car mounts, helicopters, etc.) Proper balance will also offer a longer
battery runtime. There are 3 axes that need to be accurately balanced prior to powering the Ronin on
and setting up the software.
The camera needs to be fully setup with all accessories prior to installing and balancing the
camera on the gimbal. If you are balancing the camera with a lens cap on, be sure to remove
the lens cap prior to balancing. Be sure whenever balancing the camera that the Ronin’s
power is turned off.
2014 DJI. All Rights Reserved.
14
©
Page 15

User Manual
Ronin
Step 1: Balancing the Tilt Axis
First, we need to balance the camera fore and aft on the Tilt Axis. When the proper fore and aft tilt
balance is achieved, the camera will stay level when you remove your hands.
1. Loosen the camera base's side clamp to allow the camera and mounting plate to slide forwards
and backwards.
2. Slide the camera forwards or backwards until the Tilt Axis remains level. It takes very small
adjustments to get the balance right.
3. Tighten the side clamp to lock the camera and mounting plate in position. If properly balanced, the
camera should be able to remain steady in any given tilt angle.
Step 2: Balancing the Roll Axis
Balancing the camera left-to-right on the Roll Axis is also required. When the proper left/right roll
balance is achieved, the camera will stay level.
1. Loosen the 2 lock-knobs to allow the camera and mounting plate to slide left and right.
2. Slide the camera left or right until the Roll Axis remains level.
3. Tighten the 2 lock-knobs to lock the camera mounting plate in position.
Balancing
When adjusting the roll balancing position of the camera, only loosen the 2 lock-knobs a few
turns to allow the camera base to slide. Do not loosen the lock-knobs excessively.
Step 3: Balancing the Vertical Tilt
To adjust the vertical balance, you will need to change the camera’s vertical position. When proper balance
is achieved, you can rotate the camera to any tilt angle, and it will stay in that position.
Adjust the height of the crossbar to achieve vertical tilt balance.
1. Rotate the Tilt Axis so that the camera lens is pointing skyward as much as your lens setup will allow
and loosen the two vertical adjustment tabs.
2. Gently slide the camera mount crossbar forward or backward until the camera remains pointing
skyward when released.
2014 DJI. All Rights Reserved.
©
15
Page 16

User Manual
Ronin
3. Tighten the tabs and be sure the measurement marks match up on either side of the vertical bars.
If they do not match up, the assembly could possibly be skewed higher or lower on one side,
which would cause the tilt motor to bind. Once the tab is tightened, manually rotate the assembly
simulating tilt to ensure there is no binding in the tilt motor. Sometimes you may need to go back
and balance the fore and aft tilt axis balance if the vertical balance required a signicant change.
Step 4: Balancing the Pan Axis
The entire mass below the pan motor must be balanced on the central axis line of the pan motor. To
achieve this balance, you must slide the pan axis slider.
1. Loosen the two tabs on the pan axis knuckle and turn the knobs to slide the assembly.
2. Identify if the Ronin is front heavy or rear heavy. Turn the knobs and reposition them by pulling
outwards to slide the pan slider forwards or backwards.
3. While the Ronin is resting on the tuning stand, try rotating the Ronin along the pan axis by lifting one
side of the handle bar. If the camera does not swing, the pan axis is properly balanced. Ensure you
tighten the two tabs after balancing is completed.
Advanced Roll Adjustment
If additional roll adjustment is needed in cases where the camera itself is too light in comparison to the
tilt motor assembly, advanced roll adjustment can be achieved by loosening the indicated screws and
pushing the assembly to the right or left.
2014 DJI. All Rights Reserved.
16
©
Page 17

DJI Ronin Assistant App Tuning
N/A
?
Gimbal
Mode:
Wizard
Pan SmoothTrack
Tilt SmoothTrack
Roll SmoothTrack
Speed
Pan Axis
Tilt Axis
Deadband Accel
SmoothTrack Adjustments
0
0 0
0
0
0
Roll Axis
0 0
0
Test Pan Speed
SmoothTrack Test
Test Tilt Speed
Gimbal Control Viewer More
N/A
?
Gimbal
Mode:
Wizard
Auto Tune Stability
Briefcase Mode
Pan SmoothTrack
Live Data
Calibrate
Briefcase Mode
SmoothTrack Mode
0
0
0
0
0
0
Power
Pan
Tilt
Roll
Angle
Tilt SmoothTrack
Roll SmoothTrack
Gimbal Control Viewer More
Gimbal Control Viewer More
Pan
Thumb
Controller
Remote
Operator
Tilt
Control Speed Adjustment
15
1515
40
Speed
Pan Axis
Tilt Axis
Deadband Accel
0
0 0
0
0
0
Roll Axis
0 0
0
Test Pan Speed
SmoothTrack Test
Test Tilt Speed
Test Roll Speed
?
Gimbal
Wizard
After nishing the balancing portion, you can adjust software parameters through the DJI Assistant App.
Download and Install
1. Download the DJI Assistant App: Search “DJI Assistant” on the App Store then follow instructions for
the iOS version.Search “DJI Ronin” on the Google Play then follow instructions for the Android version.
2. Be sure Bluetooth is switched to the on position on your mobile device. Position the camera in the
standard operating position. Power on your Ronin and then open the app to connect to the Ronin
via Bluetooth.
3. Register your e-mail address when using the app for the very rst time.
4. Connect to your Ronin according to the tips in the app. After connecting to the main controller of the
gimbal, you will see the Wizard menu. When the green light at the top in the App is steady and the
blue light is blinking, the connection is complete. The green LED light on the Ronin will light up.
After switching on Bluetooth on your mobile device, go back to the Ronin Assistant App to
connect to the Ronin. The Ronin will not show up in the settings menu of your mobile device.
It can only be connected to via the App.
There are two device types, choose "Ronin" to enter the gimbal assistant page. Choosing
"A2" will enter the DJI ight controller assistant page.
Basic Settings
The functionality in the Wizard are the most basic functions you may want to adjust upon receiving
your Ronin. These options are also the most used functions during standard operation of the Ronin.
You can complete all these settings in the Wizard menu.
DJI Ronin Assistant App Tuning
1. Calibrate
Auto Tune Stability provides an easy one-touch button for automatic configuration of each axis.
Trajectory, speed, power and stiffness of motors are automatically tuned for the camera conguration
that’s mounted. Auto Tune Stability should be tapped whenever there is a new camera conguration
mounted such as a lens change or accessories change. This will offer the best stability and the most
optimal settings.
2014 DJI. All Rights Reserved.
©
17
Page 18

User Manual
Wizard
Gimbal
Motor
Mode:N/A
SmoothTrack
Gimbal Control Viewer More
Gimbal Control Viewer More
?
0
0
0
0
0
0 0
0
00
0
0
Mode:N/A
Motor
Gimbal
Pan Axis
Stiffness
Power Angle
Trim
Tilt Axis
Roll Axis
Pan
Tilt
Roll
Auto Tune Stability
Live Data
Configuration
?
Gimbal
Test Pan Speed
Test Tilt Speed
SmoothTrack
SmoothTrack Adjustments
Test
Speed
Deadband Accel
Pan Axis
Tilt Axis
0
0 0
0 0
0
Roll Axis
0
0
0
Gimbal Control Viewer More
Pan SmoothTrack
SmoothTrack Mode
Tilt SmoothTrack
Roll SmoothTrack
Ronin
2. Live Data
This monitors the feedback from each motor axis. If a particular motor axis indicates a power greater than
10, this often means the mechanical balancing of the camera hasn’t been properly adjusted. A properly
balanced camera rig will have each axis indicating close to 0 power. Don’t worry if these settings are not
always 0. The Angle indicates the current angle at which each axis is in relation to center.
3. Briefcase Mode
When Briefcase Mode is switched on, the Ronin will be able to seamlessly transform into this operation
mode. With Briefcase Mode turned off, the Ronin will allow the Roll axis to follow if the Ronin is tilted
past the standard roll axis travel.
4. SmoothTrack Mode
When SmoothTrack Mode is enabled, the Ronin will can be "steered," on the selected axis, by the
camera’s operator. The steering/translation speed can be adjusted for each axis independently. When
the Ronin's top bar is rotated left or right, the camera will move, smoothly following the user’s input, and
stop at the appropriate angle. In the SmoothTrack options menu, the settings for the pan axis, roll axis
and the tilt axis can be independently adjusted.
The pan axis speed will determine how fast the camera will travel while translating a pan movement. Pan
DJI Ronin Assistant App Tuning
deadband will determine how much movement the gimbal will tolerate prior to translating the camera’s pan.
The roll axis speed will determine how fast the camera will travel while translating a roll movement. Roll
deadband will determine how much movement the gimbal will tolerate prior to translating the camera’s roll.
The tilt axis speed will determine how fast the camera will travel while translating a tilt movement. Tilt
deadband will determine how much movement the gimbal will tolerate prior to translating the camera’s tilt.
The SmoothTrack pan, roll, and tilt speed can be tested. Ensure there is no obstruction of the camera
before tapping the test button.
5. Control Speed Adjustment
Remote control speed can be adjusted here. The adjustment represents the maximum speed of
gimbal control in the Pan and Tilt axis when the control sticks are pushed to their endpoints.
Advanced Settings
There are more advanced functions you can adjust through the Assistant to meet your requirement.
Gimbal Menu
18
©
2014 DJI. All Rights Reserved.
Page 19

User Manual
Gimbal Control Viewer More
Gimbal Control Viewer More
?
Gimbal Control Viewer More
Control Speed Adjustment
Thumb
Controller
Remote
Operator
Pan
Tilt
Control
Maximum Speed
40
15
15
15
Ronin
1. Gimbal Motor Adjustment
The Auto Tune Stability button allows for automatic adjustment of each motor’s stiffness settings (as relayed
from the sensors and how the Ronin sees each axis’s interaction) to accomplish an optimized setting.
Besides tuning stiffness, there are other electronic settings being tuned. It is highly recommended that the
Auto Tune Stability button be tapped whenever there is a new camera conguration mounted, including a
lens change or accessories change. This will offer the best stability and the most optimal settings.
Each axis has its own stiffness and trim adjustment. The motor stiffness adjustment allows ne tuning of the
amount of power applied to the motors as they react to the balancing of weight on each axis. The higher
you can adjust the stiffness settings without having any vibrations or oscillations from the gimbal, the better.
A majority of the time, the Auto Tuned settings will be suitable. The Trim adjustment controls the preset
amount of trim applied to each axis off center. The default setting of 0 degrees represents center.
2. Gimbal SmoothTrack Mode
Refer to the Basic Settings section for details relating to SmoothTrack Mode (P18).
Control Menu
1. Controller Deadband
Thumb Controller and the remote operator controller can have independent pan and tilt deadbands of
movement. The larger the deadband, the more deadband there is in the stick movement prior to the
input being translated to actual movement of the gimbal.
2. Controller Maximum Speed
Maximum Speed is a function that allows the controlled stick response from being a linear response
to what is known as an increasing response curve. This means the amount of gimbal travel in the Pan
or Tilt is not directly proportional to control stick travel. Control response can be adjusted to be milder
below the initial rst half of control stick travel and be increased to a higher speed towards the last
half of control stick travel. This preset exponential curve is selected based off the input of maximum
speed. The thumb controller and the remote operator control sticks can have maximum speeds set
independently from each other.
N/A
Wizard
Mode:
Control
Deadband Maximum Speed
Smoothing Endpoint
Channels Settings
Deadband Adjustment
Control
Thumb
Controller
Remote
Operator
Deadband
Pan
6
6
?
Tilt
6
6
DJI Ronin Assistant App Tuning
2014 DJI. All Rights Reserved.
©
19
Page 20

Ronin
Gimbal Control Viewer More
User Manual
Control
Smoothing Adjustment
Thumb
Controller
Remote
Operator
Smoothing
Pan
15
15
?
Tilt
15
15
Control
Endpoint Adjustments
Pan Axis
Tilt Axis
Test
Test Pan Endpoints
Test Tilt Endpoints
Left Right
0 0
Up Down
0 0
?
N/A
Mode:
Endpoint
DJI Ronin Assistant App Tuning
Gimbal Control Viewer More
3. Controller Smoothing
When the control stick input is released, the smoothing of the translated movement will come to a
smooth slow down if the smoothing is increased. If the smoothing is 0, the slowdown will appear as an
abrupt stop. The thumb controller and remote operator control sticks can be set independently. Pan
and tilt smoothing can also be set independently.
4. Controller Endpoints Adjustment
Pan Axis endpoints can be adjusted independently for left and right movement when used with a
remote control or the thumb controller. Pan Axis endpoints setting means during controller input, the
maximum point in which the gimbal will rotate left or right.
If the requirement to rotate 360 degrees on the Pan axis is needed, simply adjust the endpoints for pan to 0.
If endpoints are set to 0 for 360 degree Pan ability, then "Test Pan Endpoint" will not move the pan axis.
Tilt Axis endpoints can be adjusted independently for up and down movement when used with a
remote control or the thumb controller. Tilt Axis endpoints setting means during controller input, the
maximum point in which the gimbal will rotate up or down.
The Pan and Tilt endpoints can be tested. Ensure there is no obstruction of the camera when tapping
the Test buttons.
5. Channels
This is a channel indicator to provide feedback during remote operator conguration. Pan, Tilt, and
Roll can be re-assigned to either of the remote control sticks. The controlled axis can also be reversed.
6. Controller Settings
Controller Priority: If both input devices send control signals to the gimbal, the selected controller
priority will be the only device to send a signal at that given time.
Pan/Tilt remote speed adjustments can be pre-congured to be selectable on the 2nd operator remote
control. The control speed settings for pan and tilt can be set independently from each other.
Setting Speed Toggle Presets, you are setting the Function switch (left switch) on the Ronin remote
control. These presets will allow you to change the SmoothTrack speed remotely. If the remote control
2014 DJI. All Rights Reserved.
20
©
Page 21

User Manual
N/A
Mode
Gimbal Control Viewer More
Control Viewer More
Gimbal
Gimbal Control Viewer More
N/A
Mode
Ronin
is turned on, the Speed Toggle Presets for SmoothTrack will take precedence over the App settings.
Once the remote control is turned off, the SmoothTrack settings in the App will take over.
Viewer Menu
Control
Channels
CH 0
CH 1
CH 2
CH 3
CH 4
CH 5
CH 6
CH 7
Channels
Normal
Normal
Normal
REV
REV
REV
Normal
Normal
Combined
:
Settings
Thumb Controller
Independent
Pan
?
Pan
Tilt
Roll
Control
Controller Priority
Remote Operator
Pan/Tilt Remote Speed Adjustment
Speed Toggle Presets
Fast
Normal
Slow
Gimbal Control Viewer More
?
RollTilt
The viewer provides all the essential live data for monitoring the gimbals electronics as well as
feedback from the motors. Power is indicated for each axis. The current angle of each axis is also
indicated. The voltage of the battery, temperature of the main electronics, and also current uptime can
also be monitored via this menu.
:
More
Briefcase Mode
Motor Kill
Roll Control
Silent Mode
Calibrate Center
Calibrate System
Restore default settings
***@
Accounts
***
?
.com
Viewer
Power
Pan Axis
Roll Axis
Tilt Axis
Temperature
Power
Voltage
Time
2
-2
0
14.50V
35.40
0:01:59
Angle
。
Angle
1.89
-0.45
-0.01
?
。
。
。
DJI Ronin Assistant App Tuning
2014 DJI. All Rights Reserved.
©
21
Page 22

User Manual
Ronin
More Menu
Briefcase Mode
When Briefcase Mode is switched on, the Ronin will be able to seamlessly transform into this
operational mode. With Briefcase Mode turned off, the Ronin will continue to allow the Roll axis to
follow.
Motor Kill
When activated, the Ronin is still powered on, but the motors will be powered off. This will allow an
adjustment to the gimbal or camera without having to turn off the gimbal. Prior to turning off the kill
switch, make sure the gimbal is positioned in the standard operating position. The motor kill switch can
also be used in case the gimbal operator runs into an issue, or you need to make a quick mechanical
adjustment to the gimbal or camera setup.
Roll Control
When the Roll Remote Control is off, the roll axis movement cannot be controlled by a remote control
or the thumb controller.
Silent Mode
Enable Silent Mode to reduce the level of noise that is created by the motors in environments such as a
quiet room. By enabling silent mode, larger and sudden gimbal movements may not be as accurately
stabilized during use in situations such as running when silent mode wouldn’t really be needed. Use
silent mode in quiet conditions where light motor noise may be an issue during audio recording.
Otherwise, it is recommended to leave silent mode off.
Calibrate Center
If the Ronin’s Pan axis is off center, you can recalibrate the true center of the Ronin using this switch.
Using a remote control, position the pan axis at dead center, then tap the Calibrate Center. Tap “Center”
again in the pop-up to conrm. Power cycle after calibrating center.
Calibrate System
Calibrate System is only used if you notice any kind of drift in any of the axes. To calibrate the system,
place the Ronin on the tuning stand and make sure it is completely steady. Then tap the Calibrate
System button and let the process nish before picking up the Ronin.
Restore Default Settings
This will restore all the factory settings that are congurable through the app.
Device List
To force the App to nd the Ronin, select "Device List" to force the App to search for Bluetooth devices
it recognizes.
2014 DJI. All Rights Reserved.
22
©
Page 23

DJI PC / MAC Assistant Tuning
You may also tune the Ronin and upgrade the rmware through the DJI PC / MAC Assistant.
The tuning settings of the DJI Assistant App and DJI PC / MAC Assistant are the same. There
is no need to repeat your settings in both Assistants.
The DJI Ronin Assistant App and the PC / MAC Assistant program cannot be simultaneously
launched and connected at the same time. If running the Assistant App on your mobile
device, be sure to disconnect the micro USB cable.
Install DJI PC / MAC Assistant
Installing and Running on Windows
1. Download the DJI WIN DRIVER INSTALLER from the Ronin product page on DJI.com. Connect the
Ronin to your PC via USB cable and be sure the Ronin is powered on prior to installing the DJI WIN
Driver.
2. Download the appropriate Assistant installer from DJI.com.
3. Double click the Assistant installer and follow the steps to nish the installation.
4. Run Assistant.
5. Upgrade the rmware or congure parameters using Assistant as needed.
The Assistant installer can be used on Windows XP, Win7, and Win8 (32 or 64 bit)
Installing and Running on Mac OS X
1. Download the Assistant installer (.DMG) format from the Ronin download page.
2. Run the installer and follow the prompts to nish installation.
DJI PC / MAC Assistant Tuning
2014 DJI. All Rights Reserved.
©
23
Page 24

User Manual
Ronin
3.
When launching for the rst time, if using Launchpad to run the Ronin Assistant, Launchpad
will not allow access because Assistant has not been reviewed by the Mac App Store.
4. Locate the Gimbal icon in Finder, press Control then click the icon (or right-click the icon
using a mouse). Choose Open from the shortcut menu, then click Open in the prompt dialog
box to launch.
5. After the first successful launch, double click the Gimbal icon as normal to launch using
Finder or Launchpad.
DJI PC / MAC Assistant Tuning
DMG installer supports Mac OS X 10.9 or above.
Ronin Assistant on Mac OS X and Windows are the same. Assistant pages shown in this
manual are from the Windows version.
Settings
Adjust the following basic functions before using the Ronin: Auto Tune Stability, Briefcase Mode,
SmoothTrack and Maximum Speed Adjustment.
The denition and function of every button in the DJI Assistant App and DJI PC Assistant are the same,
refer to the DJI Assistant App for more details.
2014 DJI. All Rights Reserved.
24
©
Page 25

User Manual
Ronin
Basic
1. Gimbal
Motor: The Auto Tune Stability button allows for automatic adjustment of each motor’s stiffness settings
(as relayed from the sensors and how the Ronin sees each axis’s interaction) to accomplish an
optimized setting. Each axis has its own stiffness and trim adjustment.
Live Data: This monitors the feedback from the motors on each axis.
Briefcase Mode: Select the checkbox to enable Briefcase Mode.
Enable Silent Mode: Enable Silent Mode to reduce the level of noise that is created by the motors in
environments such as a quiet room. By enabling silent mode, larger and sudden gimbal movements
may not be as accurately stabilized during use in situations such as running when silent mode wouldn’t
really be needed. Use silent mode in quiet conditions where light motor noise may be an issue during
audio recording. Otherwise, it is recommended to leave silent mode off.
DJI PC / MAC Assistant Tuning
Roll Remote Control Off: Select this checkbox to prevent the roll axis movement from being controlled
by the included remote controller or the optional thumb controller.
Motor Kill Switch: Select the checkbox to enable the Motor Kill Switch.
SmoothTrack: Select this checkbox to enable SmoothTrack. Note that the pan axis, tilt axis and the roll
axis can be adjusted independently.
The pan, tilt and roll SmoothTrack speed can be tested. Ensure that there is nothing obstructing the
camera when running the test procedures.
Reset Password: If you forgot your Bluetooth connection password, click here to reset your password.
Calibrate Center: If the Ronin’s Pan axis is off center, you can recalibrate the true center of the Ronin using
this switch. Using a remote control, position the pan axis at dead center, then click the Calibrate Center. Click
“Center” again in the pop-up to conrm. Once calibrated, power cycle for the new center to take effect.
Viewer Menu: The Viewer provides essential live data for monitoring the Ronin’s electronics and feedback
from the motors. Power is indicated for each axis. The current angle of each axis is also indicated.
2014 DJI. All Rights Reserved.
©
25
Page 26

User Manual
Ronin
Calibrate System: Calibrate System is only used if you notice any kind of drift in any of the axes. To
calibrate the system, place the Ronin on the tuning stand and make sure it is completely steady. Then
click the Calibrate System button and let the process nish before picking up the Ronin.
Auto Tune Stability: The Auto Tune Stability button allows for automatic adjustment of each motor’s
stiffness settings (as relayed from the sensors and how the Ronin sees each axis’s interaction) to
accomplish an optimized setting.
Default: Click here to restore all of the factory settings.
It is normal for your Ronin to shake momentarily when the Auto Tune Stability function is
conguring the stiffness settings.
The motors will exhibit more stiffness for the same stiffness values after the rmware update.
Adjust the stiffness values if necessary. It is recommended that you increase the tilt axis
stiffness value if the Auto Tune Stability function congures a value below 30.
To achieve the best performance, set the SmoothTrack deadband value of each axis to 5 or
above.
It is highly recommended that you adjust the stiffness settings by hand if you are in Silent
Mode.
DJI PC / MAC Assistant Tuning
2. Control
The thumb controller and the remote operator control sticks have a Deadband, Maximum Speed, and
Smoothing, all of which can be set independently.
Endpoint: Pan Axis endpoints can be adjusted independently for left and right movement when used with a
remote control or the thumb controller. Tilt Axis endpoints can be adjusted independently for up and down
movement when used with a remote control or the thumb controller.
If the requirement to rotate 360 degrees on the Pan axis is needed, simply adjust the endpoints for pan to 0. If
endpoints are set to 0 for 360 degree Pan ability, then "Test Pan Endpoint" will not move the pan axis.
The Pan and Tilt endpoints can be tested. Ensure the camera is unobstructed when clicking the Test buttons.
Controller Priority: If both input devices send control signals to the gimbal, the selected controller priority will be
2014 DJI. All Rights Reserved.
26
©
Page 27

User Manual
Ronin
the only device to send a signal at that given time.
Pan/Tilt Remote Speed Adjustment: Click to choose combined or independent settings.
Speed Toggle Presets: These presets will allow you to change the SmoothTrack speed remotely. If the remote
control is turned on, the Speed Toggle Presets for SmoothTrack will take precedence over the Assistant
settings. Once the remote control is turned off, the SmoothTrack settings in the Assistant will take over.
3. Channels
DJI PC / MAC Assistant Tuning
This is a channel indicator to provide feedback during remote operator conguration. Pan, Tilt, and
Roll can be re-assigned to either of the remote control sticks. The controlled axis can also be reversed.
4. Battery
*This page
provides all of
the essential
information
regarding the
Ronin’s battery.
2014 DJI. All Rights Reserved.
©
27
Page 28

User Manual
Ronin
Upgrade
You can view the latest rmware version information on this page. Upgrade the rmware by following
the steps below:
1. Connect the Ronin to your computer via the Micro-USB cable and wait until the blue indicator LED
in the PC Assistant blinks.
2. Click “Upgrade”.
3. Wait for the download to nish.
4. Click “Upgrade” again and then click “Conrm”.
5. Power the Ronin off and on after the upgrade is complete.
Ensure your computer is connected to the internet.
Close any antivirus programs and network rewalls during the upgrade.
Ensure the Ronin is powered on during the upgrade.
Do not disconnect the USB cable during the upgrade.
Do not power off the Ronin until the upgrade is completed.
Info
You can check the Assistant version via Info.
S/N is a 32 digit authorization code for future function activations. The authorization code for your unit
is lled in after its been manufactured. In the future, you may be asked to ll in a new S/N if you require
function upgrades. Fill in the S/N and then click the Write button. If you ll in an invalid S/N more than
30 times, your GCU will be locked and you will have to contact our customer support.
2014 DJI. All Rights Reserved.
28
©
Page 29

Ronin
User Manual
Remote Control
[1]
[2]
[3]
J3
J4
[5]
[7]
[8]
[9]
[10]
[1] Antenna
[2] Carrying Handle
[3] Left Dial(reserved)
[4] 3-Position Switch MODE
[5] 3-Position Switch FUNCTION
[6] Joystick 1(J1;J2)
[7] Joystick 2(J3;J4)
[4]
[6]
[11]
Remote Control
J2
J1
[13]
[12]
[8] Neck Strap Attachment
[9] Power Switch
[10] Power Indicator
[11] Battery Level Indicator
[12] RC Assistant/ Charging Port
(Micro-USB Port)
[13] Reserved Port
2014 DJI. All Rights Reserved.
©
29
Page 30

User Manual
Ronin
Connecting the Remote Control to Ronin
1. Turn on the Ronin.
2. Slide the power switch to the right to power on the remote control. If the power LED indicator is
solid, the remote control is functioning normally. To the right, the battery level indicators display the
current battery status. The LED indicator on the Ronin gimbal will blink red at this time.
3. Press and hold the Bind Button (shown below) for a few seconds until the LED blinks green
three times. If the LED changes to a solid, red light, the remote control and the Ronin have been
successfully bound. The binding process only needs to be done once unless the bind button is
pressed or if the Ronin needs to be bound to another remote control.
Bind Button
Remote Control
Please make sure the battery level of remote control is enough before use. If the low voltage
warning alert sounds (refer to <Remote Control Power LED Indicator Status>), please
recharge the battery as soon as possible.
Charge the remote control battery by using the included micro-USB cable. Using the
incorrect type of charging cable may cause damage.
Turn off the remote control before charging. The power LED indicator will display solid
green when the battery is fully charged.
Remote Control Power LED Indicator Status
Power LED Indicator Sound Remote Control Status
— Solid Green None Functioning normally.
— Solid Red None Charging( remote control is powered off)
— Solid Yellow None
— Solid Red
Quick Red ashing
Slow Green ashing
The remote control will power off automatically when battery voltage drops below 3.45V.
Charge the battery as soon as possible when the low voltage alert occurs.
2014 DJI. All Rights Reserved.
30
©
BB---BB---BB
......
B-B-B
B--B--B
Remote control joysticks calibration error. Needs to be
re-calibrated.
Low voltage (from 3.5V-3.53V). Recharge the remote control.
Critical low voltage (from 3.45V-3.5V). Recharge the
remote control immediately.
Alert will sound after 15 minutes of inactivity. It will stop
......
once you start using the remote control.
Page 31

User Manual
Ronin
Remote Control Battery Level Indicator Status
The battery level indicator displays the current battery level. The following is a description of the
indicators.
The LED is in a solid state on : The LED is blinking : The LED is off
:
LED1 LED2 LED3 LED4 Current Battery Level
75%~100%
50%~75%
25%~50%
12.5%~25%
0%~12.5%
<0%
Remote Control Features
MODE: The MODE switch is used for toggling SmoothTrack.
1. In Position 1, SmoothTrack is off. Remote control will freely position
pan axis stops and holds the last input position of the pan axis control
stick.
2. In Position 2, SmoothTrack is on. Remote control will freely position
pan axis stops and holds the last input position of the pan axis control
stick.
3. In Position 3, SmoothTrack is on. The gimbal will always point and
reset pan to the forward facing direction once the pan axis control
stick is let go.
Remote Control
Position 1 -Free, SmoothTrack Off
Position 2 -Free, SmoothTrack On
Position 3
FUNCTION: 1. The FUNCTION switch is used to select the SmoothTrack speed.
-Reset to Center, SmoothTrack On
There are 3 possible selections: Fast, Normal and Slow. The value
of each speed can be preset in the App or PC Assistant.
Position 1 -Fast Position 2 -Normal Position 3 -Slow
2. Activating Motor Kill Switch.
Quickly ip the FUNCTION switch between Position 1 and Position
3 consecutively for 3 times and you will activate the motor kill
switch. Do the same again to turn off the motor kill switch. Prior to
re-activating the gimbal motors, be sure to position the camera in
the standard operating position. The motor kill switch is useful in
case the gimbal operator runs into an issue or you need to make a
quick mechanical adjustment to the gimbal or camera setup.
2014 DJI. All Rights Reserved.
©
31
Page 32

Ronin
User Manual
Left Stick: Horizontal movements on the left stick control the Roll axis. Vertical
movements have no denition.
Right Stick: Horizontal
movements on the right stick
control the Pan axis.
Reset the password of the Bluetooth connection: turn on the remote controller and
the Ronin, then quickly move both control sticks inwards towards the inner bottom
corners within the rst 8 seconds of powering on the Ronin.
These stick settings can be customized in the DJI Ronin Assistant App or PC Assistant.
Right Stick: Vertical movements
on the right stick control the Tilt
axis.
Adding 3rd Party Transmitter/Receiver
Ronin supports 3rd party transmitters/receivers, such as D-Bus. Connect the transmitter through the
port (refer to Page 8 for the location of D-Bus port ).
Operation Modes
Operation Modes
There are three operation modes in the Ronin: underslung mode, upright mode and briefcase mode.
Underslung Mode
Underslung mode is the standard, default mode. It can be used without any user input.
2014 DJI. All Rights Reserved.
32
©
Page 33

User Manual
Ronin
Upright Mode
Flip the gimbal forward 180 degrees and it will automatically change to upright mode. Alternatively,
you can set the gimbal into upright mode before turning it on. Upright mode is ideal for car mounts
or other high camera positions, as it allows you to shoot higher and/or at eye level. Upright mode can
be used without any user input. Do not ip the gimbal over sideways going left or right to convert to
upright mode.
Briefcase Mode
Briefcase mode allows you to hold the Ronin in a slim profile close to your body. To enter briefcase
mode, rotate the handle bar 90 degrees so that it is perpendicular to the ground. You may turn briefcase
mode off in the gimbal app, in which case the Ronin will never automatically transform into briefcase
mode. In briefcase mode, the remote control does not have pan or roll control of the Ronin.
Maintenance
Upright Mode Briefcase Mode
Maintenance
The figure to the right shows the proper way to
transport the Ronin with the stand. Using the hookand-loop straps, lock the Ronin gimbal in place as
shown. Be sure to undo the straps prior to turning
the Ronin on!
The Ronin is a precise machine and it is not water
resistant. Keep it away from sand and dust during
usage. After use, it is recommended to wipe the
Ronin down with a soft dry cloth. Never spray any
cleaning liquids onto the Ronin.
2014 DJI. All Rights Reserved.
©
33
Page 34

Troubleshooting
NO. The Problem What to Do
1 Motors appear to be weak After camera balancing, launch the Assistant App or the PC
2 If after tapping the Auto
Tune Stability button and
the gimbal is still vibrating
3 Pan axis seems off center Go into the Assistant App or PC Assistant, tap/click the
4 Ronin seems to be drifting Place the Ronin on the tuning stand and in the Assistant App
5 SmoothTrack doesn’t work (1) Turn on the Remote control and be sure the MODE switch
Troubleshooting
6 Motors seem to shutoff
automatically
7 Gimbal shuts off and
doesn’t come back on
8 Forgot the Bluetooth
password
9 Footage appears to
wobble side to side or up
and down
Assistant and start the Auto Tune Stability. Wait for the process
to complete and the stiffness settings will be populated on the
screen.
(1) Check to make sure all knobs are very tight. Including the
pan motor knob.
(2) Check to make sure the camera securing screw is tight.
Push on the camera plate to make sure it is not loose and
sliding in the camera mount.
(3) Try decreasing the stiffness of the each axis. You should
be able to tell if there is one particular axis being affected
by looking at the "power" of the axes.
Calibrate Center and follow the on-screen instructions.
or the PC Assistant, tap/click the Calibrate System button. Let
the process complete before picking up the Ronin.
is not at Position 1 (the uppermost position).
(2) SmoothTrack is turned off in the Assistant App or the PC
Assistant software.
(3) The SmoothTrack Deadband is turned up too high.
Reduce the Deadband size in the SmoothTrack Menu.
Check your camera balance. If the power indicated in the
Gimbal Motors Menu indicates 10 or more on any of the 3
axes, please rebalance your camera.
Power cycle the gimbal. This is a motor protection algorithm
that’s built into the Ronin to save its own electronic
components. If any particular motor goes into a self protection
mode (motor shuts off) 6 times within a 1 minute period, the
Ronin will shut off power to the motors and will not come back
to life unless power cycled.
Connect Ronin to the PC Assistant and click the "Reset
Password" button to reset your password.
SmoothTrack speed is too high or SmoothTrack deadband
is too low. Decrease the SmoothTrack speed or increase the
deadband.
2014 DJI. All Rights Reserved.
34
©
Page 35

Specication
General
Built-In Functions Three Operation Modes
Underslung Mode
Upright Mode
Briefcase Mode
Built-in independent IMU module
DJI Specialized Gimbal Drive
Motors with Encoders
Peripheral
Camera Tray Dimensions Maximum depth at center of mass on camera base plate: 140mm
Maximum height measured from top of camera base plate:
225mm
Maximum width: 195mm
Accessory Power Connections 12V regulated P-Tap x 2, USB 500mW x 1, DJI Lightbridge x 1
GCU Input Power 4S Ronin Battery
Connections 2.4GHz Remote Control, Bluetooth, USB
PC/MAC Assistant Software
Requirements
Mobile Assistant Software
Requirements
Windows XP SP3; Windows 7; Windows 8 (32 or 64 bit);
Mac OS X 10.9 or above
iOS version 7.0 or above(Mobile devices: iPhone 4s, iPhone 5,
iPhone 5s, iPod touch 5 , iPad 3, iPad 4, iPad mini);Android 4.3 or above
Mechanical & Electrical Characteristics
Working Current Static current: 300mA (@16V)
Dynamic current: 600mA (@16V)
Locked motor current: Max 10A (@16V)
Operating Temperature -15°C ~ 50°C (-5°F ~ 120°F)
Weight 4.20kg (9.26lbs) fully loaded with handlebar
Gimbal Dimensions 620mm(W) x 280-380mm (D) x 500mm(H)
Working Performance
Load Weight Capacity
(Reference Value)
Control Angle Accuracy 0.02°
Maximum Control Rotation
Speed
Control Rotation Range Pan axis control: 360°
7.25kg (16lbs)
Pan axis: 90°/sec
Tilt axis: 100°/sec
Roll axis: 30°/sec
Tilt axis control: Up 45° to Down 120°
Roll axis control: ± 25°
Bluetooth Module
USB Connection
2.4GHz Receiver
Temperature Sensor
DJI Advanced 32-Bit DSP Processor
D-Bus Receiver Supported
Specication
2014 DJI. All Rights Reserved.
©
35
Page 36

The content is subject to change.
Download the latest version from
http://www.dji.com/product/ronin/download
If you have any questions about this document, please contact DJI
by sending a message to DocSupport@dji.com.
2014 DJI. All Rights Reserved.
©
 Loading...