

Page 1
DJI DROPSAFE
User Manual
2014.12
V1.0
Page 2

Contents
Disclaimer
Using this manual
Legend 3
Watch the Tutorial Videos 3
Prole
In the Box
System Introduction
System Base 5
Installing DJI Dropsafe System
Detach System Base 6
Attachment Pad 6
Congure Remote Controller Switches 6
System Base Connection 6
Setting Up the System Base for Deployment 7
3
3
3
3
5
6
Setting Up the CO
Folding the Parachute 10
Connecting DJI Dropsafe to Your Multirotor 10
Install Backup Battery 12
DJI Dropsafe System Activation
Appendix
Specications 13
System LED table 13
2014 DJI. All Rights Reserved.
2
©
Canister 9
2
12
13
Page 3
Disclaimer
90±2 mm
10±1 mm
The DJI Dropsafe is designed to reduce the drop speed of your ight platform. There is no guarantee that it
will protect your equipment, prevent injury, or prevent property damage.
CO2 canisters are required and not included with the DJI Dropsafe. DJI assumes no liability for or damages
or injuries incurred directly or indirectly from using CO2 canisters improperly or using CO2 canisters that don’t
meet safety requirements or standards.
Using this manual
Legend
Important Hints and Tips
Watch the Tutorial Videos
Please watch the tutorial videos below to learn how to use DJI Dropsafe correctly and safely.
www.dji.com/product/dropsafe/video
DJI Dropsafe ofcial tutorial videos
Prole
The DJI Dropsafe is designed to reduce the drop speed of your ight platform. It is mounted to your ight
platform and can be remotely activated when properly setup. In the event of an emergency, it deploys in less
than half a second, and is effective at a minimum altitude of 6 meters. The DJI Dropsafe is compatible with
DJI S1000+, S1000, S900 systems and DJI A2 ight control system.
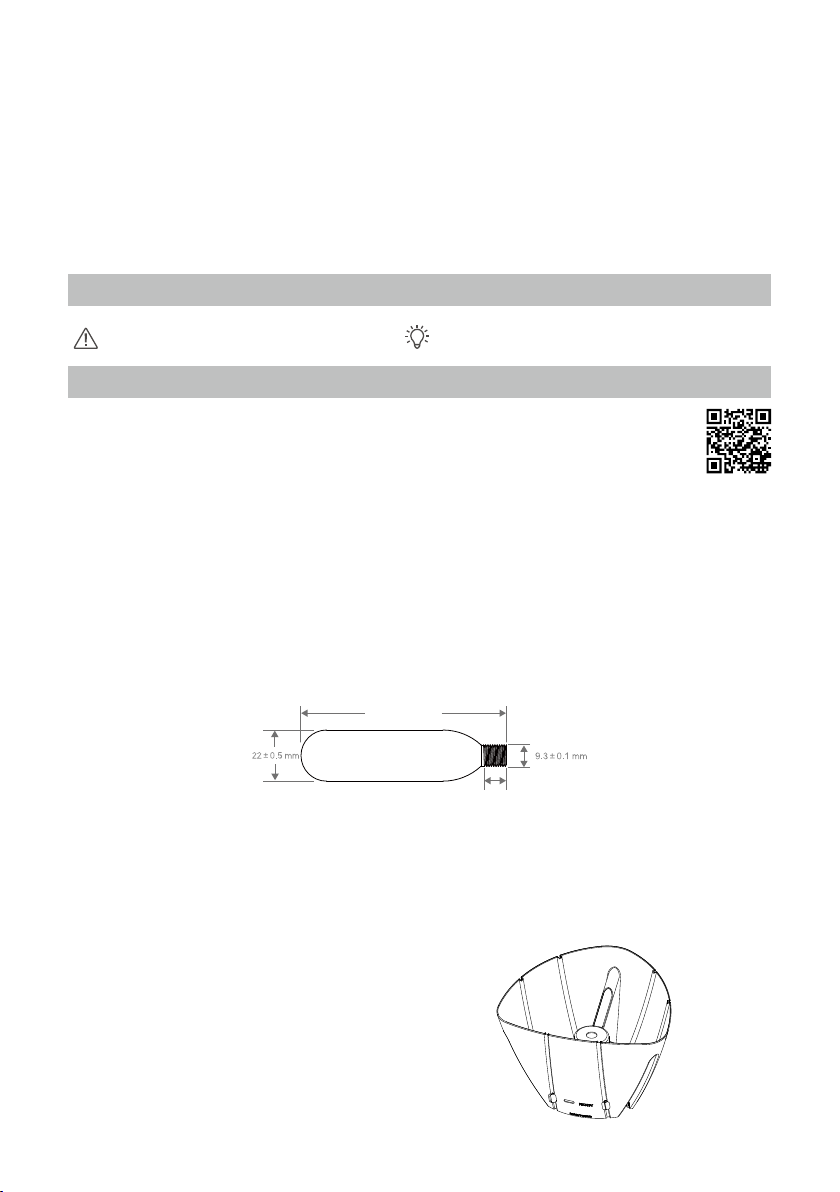
CO2 canisters are required and not included with the DJI Dropsafe. Only use ISI 16g CO2 canisters or other
16g CO2 canisters with specications as shown in the gure. Improper use of the 16g CO2 canisters, or using
other CO2 canisters, may cause system error or damage.
Screw size: 3/8 24 UNF-1A
In the Box
The complete DJI Dropsafe package includes the following items. If any items are missing, contact DJI or
your local DJI authorized dealer for assistance.
Parachute Housing x1
2014 DJI. All Rights Reserved.
©
3
Page 4
DJI DROPSAFE
User Manual
Winglet x3
Side Strip x3
System Base x1
(Including: spring and triggering pin)
Manifold x1
Packing Tool x1
Connection Cable x4
Safety Pin x1
Trigger Compression Tool x1
Hex Screwdriver x1
Attachment Pad x2
Parachute Pack x1
Screw x1
Backup Battery x1
2014 DJI. All Rights Reserved.
4
©
Page 5
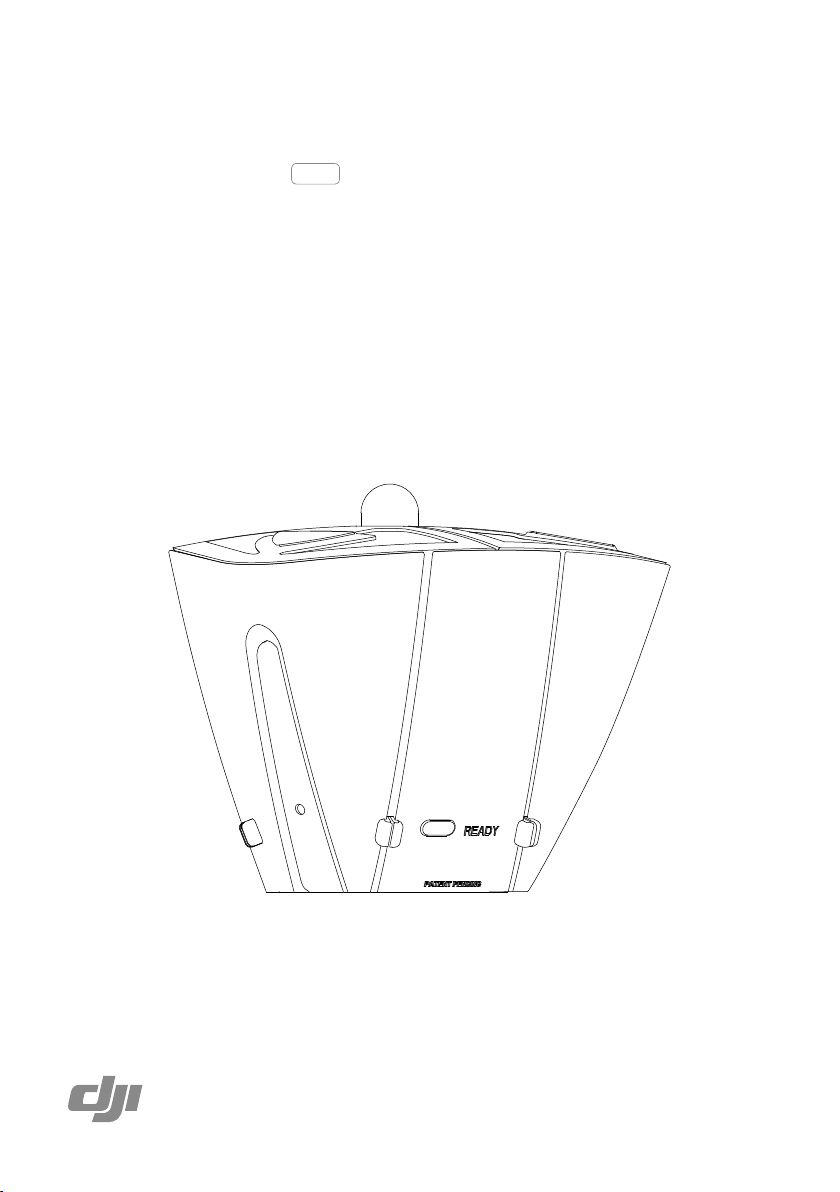
System Introduction
System base serves as the major component for the DJI Dropsafe system. Features such as self-check,
stopping motors, triggering CO2 canister are implemented by the system base and ight controller. Triggering
safety pin is in place to prevent users from accidently triggering the system. Parachute can be deployed in
less than 0.5 second.
System Base
Top View
[1]
[1] Connection Ports
[2] Triggering Housing Unit
[2]
[3]
[4]
[3] Initialization Button
[4] System LEDs
Connection Ports
Used to connect the DJI Dropsafe to a DJI ight controller and remote controller receiver.
Triggering Housing Unit
Houses the spring and triggering pin.
Initialization Button
Press the initialization button to put the system into the ready state.
System Introduction
System LEDs
The system LEDs indicate the system status. Refer to the table in the Appendix for LED denitions (P13).
2014 DJI. All Rights Reserved.
©
5
Page 6

Installing DJI Dropsafe System
Detach System Base
System base is attached to parachute housing by default. To set up the system
base, you need to detach the system base from the parachute housing. Follow
the steps below to detach the system base from the parachute housing:
1. Remove the cover, then take off the winglets and side strips.
2. Remove the screw and take off parachute housing.
3. Unscrew the manifold.
Attachment Pad
Installing System Base
Stick one of the attachment pads onto the bottom of the DJI Dropsafe system base, and the other pad to the
center of your aircraft’s upper plate. Then secure the system base to your aircraft by pressing the attachment
pad on the system base against the attachment pad on the aircraft.
Caution: The system base must be placed in the center of the aircraft’s upper plate to achieve
optimal performance.
CongureRemoteControllerSwitches
Two remote controller switches must be congured for proper use of the DJI Dropsafe: one is a “safety switch”,
and the other is an “activation switch” used to activate and deploy the system. Follow the instructions below. For the
details on how to congure the channel assignment of the switches, refer to your remote controller’s user manual.
1. Recommend to select a trainer switch to act as the “safety switch”.
2. Select a 2-position switch to act as the “activation switch”.
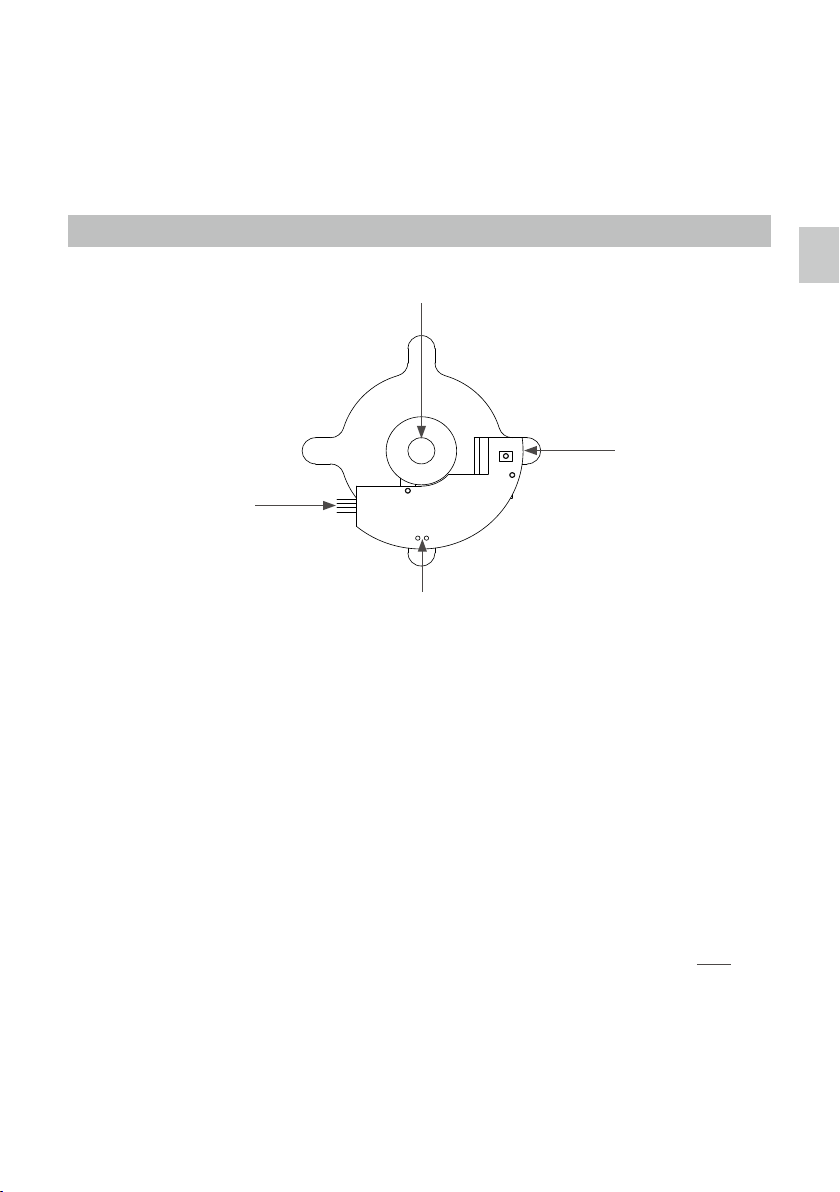
System Base Connection
Remote Controller and Flight Controller Connection
The DJI Dropsafe system base must be connected to your flight controller and RC receiver to function
properly. Refer to the diagram below to complete the connections:
For A2 ight control system, connect the ECO and WK ports on the system base to the X3 and F4 ports on
your ight controller. Then, connect the RC2 port on the system base to the port on the RC receiver that will
be used as an “activation switch” to activate and deploy the DJI Dropsafe. Lastly, connect the RC1 port on the
system base to the port on the RC receiver that will be used as a “safety switch”.
ECO
WK
DJI Dropsafe
Connection Ports
RC2
RC1
The DJI Dropsafe system can be deployed by A2 ight control system automatically. Upgrade the
A2 controller unit rmware to 2.4 version or above and enable the parachute function in A2 Assistant
to use the DJI Dropsafe system with A2 ight control system.
2014 DJI. All Rights Reserved.
6
©
X3
A2 Flight Controller
F4
Channel for
activation switch
Channel for
safety switch
Remote
Controller
Reciever
Page 7

DJI DROPSAFE
User Manual
Setting Up the System Base for Deployment
Ensure the "activation switch" and "safety switch" on your remote controller are turned off. Ensure the
spring and triggering pin are within the triggering housing unit. Follow the instructions below to set up the
system base:
1. Place the trigger compression tool into the triggering housing unit. Use the supplied hex
screwdriver to rotate the trigger compression tool clockwise for ve times and then power on the onboard battery. The LED indicators on system base will blink red and green for three times to indicate
the system is functional.
×5
2. Press the initialization button to initialize the system. The system LED will blink solid red when the
initialization is completed. If the system LED blinks red, it indicates the signal from remote controller
or ight controller is abnormal. Ensure both the "activation switch" and "safety switch" on the remote
controller are in the OFF position and that the parachute function of your ight controller is enabled.
3. Rotate the screwdriver to tighten the trigger compression tool until the system LED blinks solid
green. Meanwhile, the other system LED will blink red for 9 seconds and then goes off.
Installing System Base
Green system LED blinks solid.
Red system LED blinks for 9 secs.
2014 DJI. All Rights Reserved.
©
7
Page 8

DJI DROPSAFE
4. It is recommended to test the system before each deployment. Follow the steps below to complete the
test:
(1) Ensure triggering pin is locked in place and system is connected with ight controller. Unscrew the
trigger compression tool for one round (do not unscrew for more than one round, otherwise triggering
pin might be damaged when it is released). Make sure that system LED blinks solid green.
(2) Toggle and hold the "safety switch" on the remote controller to the ON position. Then toggle the
"activation switch" to activate and deploy the system. If the system is deployed successfully, the system
LED blinks solid green and red, otherwise it indicates there is connection error, examine the connection
to re-run the test until the issue is solved.
(3) Power off the ight controller to complete the test. Repeat step 1 to step 3 described in "Setting Up the
System Base for Deployment" to reset the system base.
Installing System Base
5. Now the triggering pin is in the ready position. Rotate the hex screwdriver counter-clockwise to remove the
trigger compression tool from the triggering housing unit.
User Manual
6. Screw the manifold into the system base (as shown in the gure A below).
7. Ensure the manifold is aligned with the marker on the system base (as shown in the gure B below).
A B
2014 DJI. All Rights Reserved.
8
©
Page 9

Setting Up the CO2 Canister
90±2 mm
10±1 mm
CO2 canisters are required and not included
with the DJI Dropsafe. Only use ISI 16g CO2
canisters or other 16g CO2 canisters with
specications as shown in the gure. Improper
use of the 16g CO2 canisters, or using other CO2
canisters, may cause system error or damage.
base, and gently slide the housing into place over
the three arms of the manifold. Ensure that the
LED window is aligned with the system LEDs.
System LED
Window
DJI DROPSAFE
Screw size: 3/8 24 UNF-1A
2. Attach the three side strips onto the housing. 1. Position the parachute housing over the system
User Manual
Installing System Base
System
LEDs
3. Slide the safety pin into the hole on the side strip,
and thread it through the hole on the system base.
Be aware that the safety pin should always be
placed through the strip that is located behind the
system LED window.
Safety Pin Hole
System LED
Window
4. Screw your 16g CO2 canister into the mounting
hole on the manifold.
Mounting
Hole
2014 DJI. All Rights Reserved.
©
9
Page 10

DJI DROPSAFE
User Manual
Folding the Parachute
Folding the parachute properly is crucial for effective deployment. Carefully follow the instructions below to
fold the parachute.
Watch the video tutorial on how to fold the parachute at www.dji.com/product/
dropsafe/video before you fold the parachute for the rst time. Failure to follow the
folding instructions exactly may result in unsuccessful parachute deployment.
Installing System Base
Short String
Connection String
1. Remove the parachute from the package. Open the parachute above the system base, and allow the tip of
the CO2 canister to run through the opening of the parachute. Ensure each short string is aligned with each
of the three arms of the manifold.
2. Start folding the parachute and put the packing tool in place. The packing tool should cover each of the
three arms of the manifold.
3. Watch the video tutorial on www.dji.com/product/dropsafe/video and carefully follow the instructions in the
video to fold the parachute.
4. Attach the short strings to the winglets by tightening the loop around the groove.
5. Remove the packing tool from the manifold. Then attach each winglet to one of the manifold arms.
Remove the packing tool from the manifold before you attach the winglets. Failure to do so may
result in unsuccessful parachute deployment.
Connecting DJI Dropsafe to Your Multirotor
1. Attach the connection strings as shown in the video tutorial on www.dji.com/product/dropsafe/video.
2014 DJI. All Rights Reserved.
10
©
Page 11

DJI DROPSAFE
M3
M6
M1M2
M3
M6
M8
M5
2. For example, S900 users should connect and secure each connection string to its specied position, as
circled below:
M1M2
User Manual
M4 M5
3. For example, S1000 users should connect and secure each connection string to its specied position, as
circled below. S1000+ users can secure each connection string in the same locations.
Installing System Base
M4
Lower Center Board
over the Landing
Gear Connection
2014 大疆创新 版权所有
©
M7
11
Page 12

DJI DROPSAFE
4. Pull the connection strings tight and place the strings into the string holders on the parachute housing as
shown in the gure below. Adjust the length of the connection strings on both ends of the string holders.
Ensure the strings are not loose on either end and will not affect the rotation of the propellers.
User Manual
Install Backup Battery
You may wish to activate the backup battery on your RC receiver to provide power in the event that the onboard battery fails. Follow the steps below to install the backup battery:
1. Turn on the battery. Backup battery LED will ash blue.
DJI Dropsafe System Activation
2. Plug backup battery into the remote controller receiver.
3. Remove safety pin to put the DJI Dropsafe system in “Ready” state.
Ensure the backup battery is turned on before plugging in the receiver. Otherwise, the backup
battery won’t work.
Recharge your backup battery when the battery is low. Connect the micro-USB port on the backup
battery with a power source to recharge the backup battery. The backup battery LED will display red
when the battery is charging. The backup battery LED will display green when it is fully charged.
DJI Dropsafe System Activation
To activate the system and deploy the DJI Dropsafe, rst toggle and hold the "safety switch" on the remote
controller to the ON position. Then toggle the "activation switch" to activate and deploy the system.
In order to prevent accidental deployment before takeoff, a nine second safety countdown is imposed.
When the system is initialized, the LEDs will display solid green and blink red for nine seconds. During
this period, the DJI Dropsafe will not respond to any commands from the remote controller. The system
will only respond to commands after nine seconds. The nine second countdown will restart if either the
"activation switch" or "safety switch" is toggled during the countdown.
DO NOT activate the DJI Dropsafe system before ight.
The DJI Dropsafe has a minimum deployment altitude of 6 meters, as tested at sea level. Users should
be aware that the minimum deployment altitude is subject to altitude, air pressure, and other factors.
The table below shows the descending speed of aircraft relative to the payload when the DJI
Dropsafe is deployed.
Pay Load Descending Speed*
3kg 4.4m/s
6kg 5.6 m/s
9kg 6.8m/s
12kg 8.6m/s
15kg 11.7m/s
* The data above is obtained at sea level, in a no wind environment. For the test, the connection strings
were attached to the aircraft 17cm away from the center of gravity and were uniform in their circular
distribution. The actual speed of descent may vary depending on the external environment or the
aerodynamic shape of your equipment.
2014 DJI. All Rights Reserved.
12
©
Page 13

Appendix
Specications
Hardware Requirement
Supported Flight Control System A2
Supported Multi-rotor S1000+, S1000, S900
Mechanical and Electrical Features
Input Voltage 5 V
System Weight 550 g
Deployment Time 0.5 s
Minimal Deployment Altitude 6 m
System LED table
System LED Remark
—
—
/
—
—
×3
Solid green System is ready.
Solid red The trigger is not compressed.
Blinking red
Blinking green
Solid green and red Successful deployment.
Green and red blink
simultaneously
Green and red blink
simultaneously for 3 times
Alternating green and red
Solid green and blinking red
LEDs OFF
The trigger is not compressed, and the remote controller
or ight controller safety function is active.
The trigger is compressed, and the remote controller or
ight controller safety function is active.
Signal not detected from the remote controller, and
abnormal ight controller signal.
System powering on, and initialization test complete.
Signal not detected from the remote controller or flight
controller.
The remote controller has been used within the nine
second safety countdown.
Powered off, or reset required.
Appendix
2014 DJI. All Rights Reserved.
©
13
Page 14

User manual is subject to change without prior notice.
You may visit DJI ofcal website to obtain the latest version of user manual.
http://www.dji.com/product/dropsafe
2014 DJI. All Rights Reserved.
©
 Loading...