

Page 1
DJI Smart Controller
User Manual
2019.04
v1.2
Page 2

Searching for Keywords
Search for keywords such as “battery” and “install” to find a topic. If you are using Adobe
Acrobat Reader to read this document, press Ctrl+F on Windows or Command+F on Mac to
begin a search.
Navigating to a Topic
View a complete list of topics in the table of contents. Click on a topic to navigate to that section.
Printing this Document
This document supports high resolution printing.
Page 3
Using this Manual
Legends
Warning Important Hints and Tips Explanation
Video Tutorials
Please watch the tutorial videos in the link below, which demonstrate how to use this product safely:
https://www.dji.com/smart-controller?site=brandsite&from=nav
Download DJITM ASSISTANTTM 2
Download DJI Assistant 2 at http://www.dji.com/dji-smart-controller
2019 DJI All Rights Reserved.
©
1
Page 4

Contents
Using this Manual
Legends 1
Video Tutorials 1
Download DJITM ASSISTANTTM 2 1
Contents 2
Product Prole
Introduction 3
Overview 4
Preparing the Smart Controller
Charging the Battery 6
Attaching the Control Sticks 6
Smart Controller Operations
Turning the Smart Controller On and Off 7
Activating the Smart Controller 7
Linking the Smart Controller 8
Controlling the Aircraft 8
Operating the Camera 12
Dual Remote Controller Mode 13
Display Interface
Homepage 14
Quick Settings 15
DJI GO 4 App / DJI Pilot 16
1
3
6
7
14
Appendix
Specications
2019 DJI All Rights Reserved.
©
2
17
Changing Storage Locations for Images and Videos 17
Control Stick Navigation 17
DJI GO Share (only available when using DJI GO 4) 17
Status LED and Battery Level Indicators Description 18
Smart Controller Warning Sounds 19
System Update 19
Button Combinations 19
Calibrating the Compass 20
Blocking Third-party Notications 21
HDMI 21
After-sales Information 21
22
Page 5
Product Prole
Introduction
The DJI Smart Controller features OCUSYNC™ 2.0 technology and is compatible with aircraft which
support OcuSync 2.0. With a wide range of function buttons, the remote controller can perform a variety
of tasks and control the aircraft within a maximum range of 8 km. Dual transmission frequency support
makes HD video downlink stable and reliable.
Ultra-bright Screen: The built-in 5.5 inch screen boasts a high brightness of 1000 cd/m² and a resolution
of 1920×1080 pixels.
Multiple Connections: The Smart Controller supports Wi-Fi and Bluetooth connections.
Video and Audio Management: The Smart Controller has a built-in microphone and speaker, and is
capable of displaying 4K videos at 60 fps both in H.264 and H.265 formats. In addition, the videos can
be displayed on an external monitor by using the HDMI port.
Extended Storage Capability: The Smart Controller’s storage capability can be increased by using a
microSD card. This allows users to store more images and videos and makes it easier to export them to
a computer.
Reliable in More Environments: The Smart Controller can operate normally within a wide temperature
range from -4° F (20° C) to 104° F (40° C).
Compatible with More DJI Aircrafts: With the Aircraft Management feature of Smart Controller, users can
add and manage more aircraft models. The Mavic 2 Pro, Mavic 2 Zoom, and Mavic 2 Enterprise series
are supported.
DJI GO Share: The brand new DJI GO Share function of the built-in DJI GO 4 App enable users to
transfer images and videos to smart devices after they have been downloaded from playback in DJI
GO™ 4.
Maximum ight time was tested in windless conditions at a consistent speed of 15.5 mph
(25 kph) using the MAVIC
Refer to Specications to check compatible aircrafts models.
To comply with local regulations, the 5.8 GHz frequency is not available in some countries
and regions.
4K/60fps is supported for non HDR 10 bit videos. When selecting HDR 10 bit videos, only
4k/30fps is available.
The main difference between linking the Smart Controller with the Mavic 2 Pro/Zoom and
the Smart Controller with the Mavic 2 Enterprise series, is the built-in app used for ight. The
Mavic 2 Pro/Zoom uses the DJI GO 4 app and the Mavic 2 Enterprise series uses DJI Pilot.
The general descriptions in this manual apply to all aircraft models that link to the Smart
Controller.
TM
2. This value should be taken for reference only.
2019 DJI All Rights Reserved.
©
3
Page 6
DJI Smart Controller User Manual
28
16
17
18
19
20
21
22
23
24
25
26
27
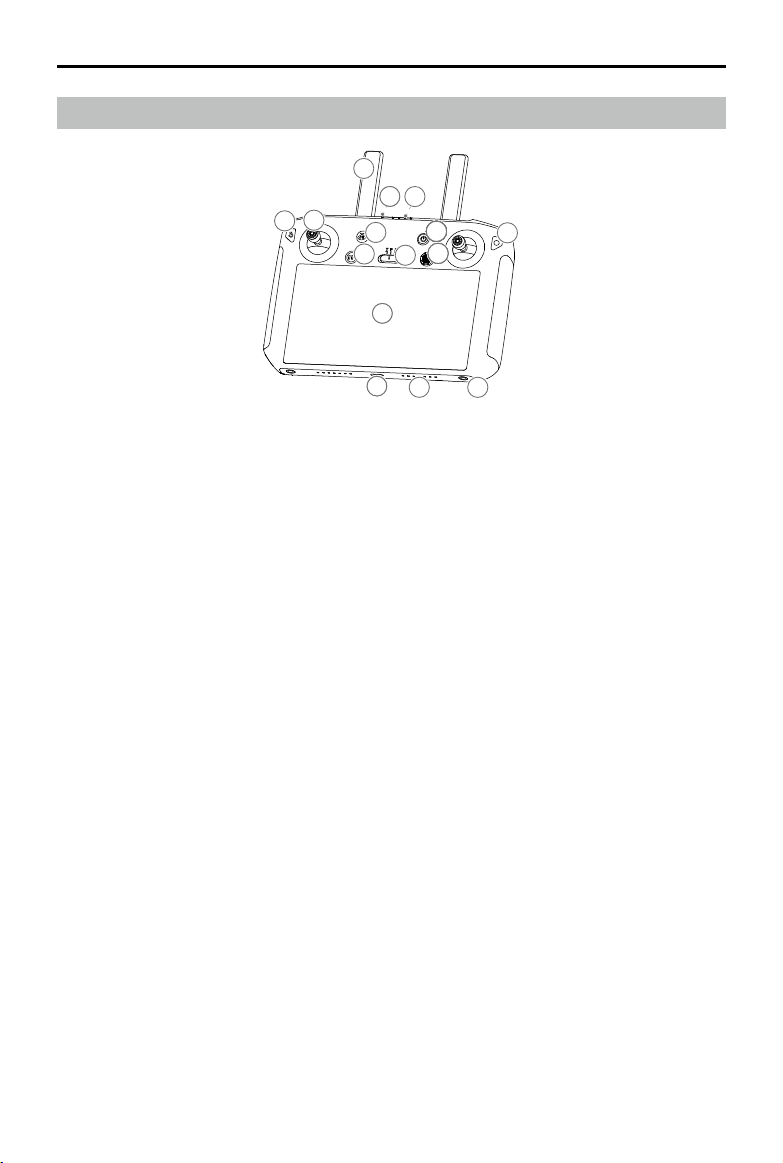
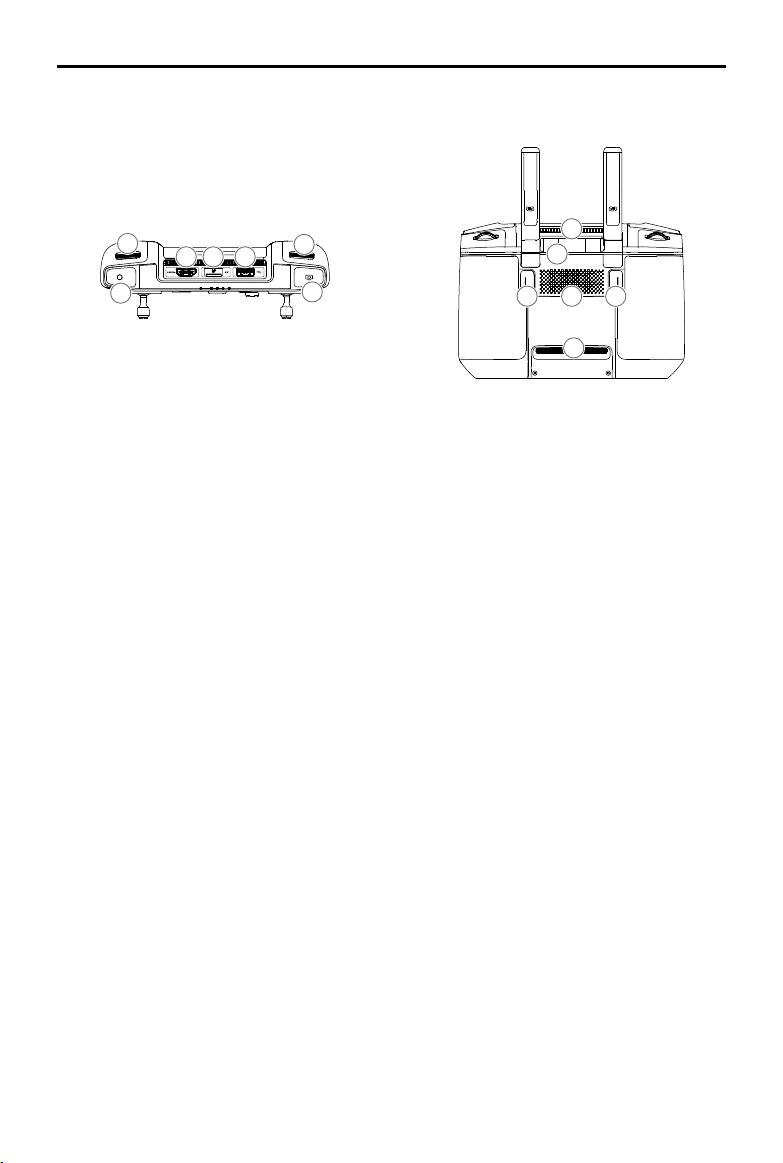
Overview
1
8
77
3
2
5
4
10
13
10
12
1010101010101010101010101010
9999
6
14
11
15
1 Antennas
Relays aircraft control and video signal.
2 Back Button / Function Button
Press once to return to the previous
page and press twice to go back to the
homepage. Hold to view a guide to using
button combinations. Refer to the Button
Combinations section for more information.
3 Control Sticks
Control the orientation and movement of the
aircraft when the remote controller is linked
to an aircraft. Go to Settings > Control Stick
Navigation, to customize the navigation
settings.
4 RTH Button
Press and hold to initiate Return to Home
(RTH). Press again to cancel RTH.
5 Flight Pause Button
Press once to exit TapFly, ActiveTrack, and
other Intelligent Flight Modes.
6 Flight Mode Switch
Switch between T-mode, P-mode, and
S-mode.
7 Status LED
Indicates the linking status and warnings for
the control sticks, low battery level, and high
temperature.
2019 DJI All Rights Reserved.
©
4
8 Battery Level LEDs
Displays the battery level of the remote
controller.
9 5D Button
The default conguration is listed below. The
functions can be set in DJI GO 4 / DJI Pilot.
Up: Recenter gimbal/move gimbal downward
Down: Focus switch/metering
Left: Decrease EV value
Right: Increase EV value
Press: Open DJI GO 4 / DJI Pilot Intelligent
Flight Modes menu (not available for Mavic 2
Enterprise series).
When the remote controller is not linked to an
aircraft, the 5D button can be used to navigate
on the remote controller. Go to Settings >
Control Stick Navigation to enable this function.
10 Power Button
Use to turn the remote controller on and off.
When the remote controller is powered on,
press the button to enter sleep mode or to
wake up the controller.
11 Conrm Button / Customizable Button C3*
When the remote controller is not linked to an
aircraft, press to conrm a selection. When
linked to an aircraft, the button cannot be used
to conrm a selection. However, the function
of the button when linked to an aircraft can be
customized in DJI GO 4 / DJI Pilot.
* This Conrm button can be customized in future rmware.
Page 7
DJI Smart Controller User Manual
28
23
24
25
26
27
16
18
19
17
12 Touchscreen
Tap to select.
13 USB-C Port
Use to charge or update the remote
controller.
14 Microphone
Records audio.
15 Screw Holes
16 Gimbal Dial
Use to control the camera’s tilt.
17 Record Button
Press to start recording video. Press
again to stop recording.
18 HDMI Port
For video output.
19 microSD Card Slot
Use to insert a microSD card.
20 USB-A Port
Use to connect external devices.
21 Focus/Shutter Button
Half press to focus, and then press to
take a photo.
20
22
21
23
24
25
26
27
28
22 Camera Settings Dial
Mavic 2 Pro: Turn the dial to adjust the
exposure compensation (when in Program
mode), aperture (when in Aperture Priority
and Manual mode), or shutter (when in
Shutter Priority mode).
Mavic 2 Zoom/ Mavic 2 Enterprise: Turn
to adjust the zoom of the Mavic 2 Zoom
camera.
Mavic 2 Enterprise Dual: Turn the dial to
adjust the exposure compensation.
23 Air Vent
Used for heat dissipation. DO NOT cover
the air vent during use.
24 Sticks Storage Slot
Use to store a pair of control sticks.
25 Customizable Button C2
The default conguration is playback. The
conguration can be set in DJI GO 4 / DJI
Pilot.
26 Speaker
Outputs sound.
27 Customizable Button C1
The default conguration is center focus.
The conguration can be set in DJI GO 4 /
DJI Pilot.
28 Air Intake
Used for heat dissipation. DO NOT cover
the air intake during use.
2019 DJI All Rights Reserved.
©
5
Page 8

Preparing the Smart Controller
Charging the Battery
There are two pairs built-in 2500 mAh Li-ion batteries in the remote controller. Please charge the
remote controller using the USB-C port.
Charging Time: 2 hours (using a standard USB power adapter)
Power Outlet
100 ~ 240 V
Please use a DJI ofcal USB power adapter to charge the remote controller. If not, a USB
power adapter certied FCC/CE rated 12 V/2 A is recommended.
The battery will deplete when stored for an extended period of time. Please recharge the
battery at least once every three months to prevent over discharging.
USB Power Adapter USB-C Cable
Attaching the Control Sticks
Two pairs of control sticks are included in the packaging for the Smart Controller. One pair is stored
in the sticks storage slot on the back of the remote controller. Follow the steps below to attach the
control sticks stored in the sticks storage slot to the remote controller.
Lift the antennas Remove the control sticks Rotate to attach the
control sticks
2019 DJI All Rights Reserved.
©
6
Page 9

Smart Controller Operations
Turning the Smart Controller On and Off
Follow the steps below to turn the remote controller on and off.
1. Press the power button once to check the current battery level. Charge the remote controller if
the battery level is too low.
2. Hold the power button or press once and then hold the power button to power on the remote
controller.
3. Repeat Step 2 to power off the remote controller.
Activating the Smart Controller
The Smart Controller needs to be activated before using for the rst time. Make sure the
remote controller can connect to the internet during activation. Follow the steps below to
Internet
activate the Smart Controller.
1. Power on the remote controller. Select the language and tap “Next”. Carefully read the terms of
use and privacy policy and tap “Agree”. After conrming, set the country/region.
2. Connect the remote controller to the internet via Wi-Fi. After connecting, tap “Next” to continue
and select the time zone, date, and time.
3. Log in with your DJI account. If you do not have an account, create a DJI account and log in.
4. Tap “Activate” on the activation page.
5. After activating, please select if you would like to join the Smart Controller Improvement Project.
The project helps to improve the user experience by sending diagnostic and usage data
automatically every day. No personal data will be collected by DJI.
6. The remote controller will check for rmware updates. If a rmware update is available, you will
be prompted to download the latest version.
Please check the internet connection if the activation fails. If the internet connection is
normal, please try to activate the remote controller again. Contact DJI if the activation
continues to fail.
2019 DJI All Rights Reserved.
©
7
Page 10

DJI Smart Controller User Manual
Linking the Smart Controller
When the Smart Controller is purchased together with an aircraft, the remote controller has already
been linked to the aircraft, and they can be directly used after activating the remote controller and
aircraft. If the Smart Controller and the aircraft were purchased separately, follow the steps below to
link the remote controller to the aircraft.
Method 1: Using Smart Controller Buttons
1. Power on the remote controller and the aircraft.
2. Press the customizable button C1, C2, and Record button simultaneously. The status LED blinks
blue and the controller beeps twice to indicate the linking has started.
3. Press the linking button on the aircraft. The remote controller’s status LED will be solid green if
the linking is successful.
Method 2: Using DJI GO 4 / DJI Pilot
1. Power on the remote controller and the aircraft. Tap “Go” on the homepage and log in using a
DJI account.
2. Tap “Enter Device”, select “Connect to the aircraft”, and follow the prompts to start linking.
3. Select “Enter the Camera View” and tap
Controller Linking” and tap “OK” to conrm.
4. The status LED blinks blue and the remote controller beeps twice to indicate the linking has
started.
5. Press the linking button on the aircraft. The remote controller's status LED will be solid green if
the linking is successful.
in camera view. Scroll to the bottom, tap “Remote
Method 3: Using Quick Settings
1. Power on the remote controller and the aircraft.
2. Swipe down from the top of the screen to open Quick Settings. Tap
3. The status LED blinks blue and the remote controller beeps twice to indicate the linking has
started.
4. Press the linking button on the aircraft. The remote controller's status LED will be solid green if
the linking is successful.
Make sure the remote controller is within 1.6 ft (0.5 m) of the aircraft during linking.
Make sure the remote controller is connected to the internet when logging in using a DJI
account.
to start linking.
Controlling the Aircraft
The control sticks control the aircraft’s orientation (yaw), forward and backward movement (pitch),
altitude (throttle), and left and right movement (roll). The control stick mode determines the function
of each control stick. Three preprogrammed modes (Mode 1, Mode 2, and Mode 3) are available
and custom modes can be congured in DJI GO 4 / DJI Pilot. The default mode is Mode 2.
2019 DJI All Rights Reserved.
©
8
Page 11

DJI Smart Controller User Manual
In each of the three pre-programmed modes, the aircraft hovers in place at a constant orientation
when both sticks are centered. See the gures below to see the function of each control stick in the
three preprogrammed modes.
Mode 1
Left Stick
Forward
Right Stick
UP
Mode 2
Mode 3
Backward
Turn RightTurn Left
Right StickLeft Stick
UP
Down
Turn RightTurn Left
Left Stick Right Stick
Forward
Backward
Down
RightLeft
Forward
Backward
RightLeft
UP
Down
RightLeft
Turn RightTurn Left
The gure below explains how to use each control stick. Mode 2 has been used as an example.
2019 DJI All Rights Reserved.
©
9
Page 12

DJI Smart Controller User Manual
Center position: Control sticks are centered.
Moving the control stick: Control sticks are pushed away from the center.
Control Stick Mode 2 Aircraft Remarks
Left Stick
Left Stick
Right Stick
Right Stick
UP
Down
Forward
Backward
Moving the left stick up or down changes the
aircraft’s altitude. Push the stick up to ascend and
down to descend. The more the stick is pushed
away from the center position, the faster the aircraft
changes altitude. Push the stick gently to prevent
sudden and unexpected changes in altitude.
Moving the left stick to the left or right controls the
orientation of the aircraft. Push the stick left to rotate
the aircraft counter-clockwise and right to rotate
the aircraft clockwise. The more the stick is pushed
Turn RightTurn Left
away from the center position, the faster the aircraft
rotates.
Moving the right stick up and down changes the
aircraft’s pitch. Push the stick up to y forward and
down to y backward. The more the stick is pushed
away from the center position, the faster the aircraft
moves.
Moving the right stick to the left or right changes the
aircraft’s roll. Push the stick left to y left and right to
y right. The more the stick is pushed away from the
RightLeft
center position, the faster the aircraft moves.
Keep the remote controller away from magnetic materials to avoid it being affected by
magnetic interference.
To avoid damage, it is recommended that the control sticks are removed and stored in
the storage slot on the remote controller during transportation or storage.
Flight Mode Switch
Toggle the switch to select the ight mode. Choose between T-mode, P-mode, and S-mode.
2019 DJI All Rights Reserved.
©
10
Page 13

DJI Smart Controller User Manual
位置T
位置S
位置P
Position Flight Mode
Position T
Position P
Position S
T-mode (Tripod): The aircraft utilizes GPS and vision systems to locate itself, stabilize, and navigate
between obstacles. In this mode, the maximum ight speed is limited to 2.2 mph (3.6 kph). The
responsiveness to stick movements is also reduced for smoother, more controlled movement.
P-mode (Positioning): P-mode works best when the GPS signal is strong. The aircraft utilizes GPS,
Vision Systems, and an Infrared Sensing System to stabilize, avoid obstacles, and track moving
subjects. Advanced features such as TapFly and ActiveTrack are available in this mode.
S-mode (Sport): The handling gain values of the aircraft are adjusted to enhance aircraft
maneuverability. Note that Vision Systems are disabled in this mode.
Regardless of the position the switch is in on the remote controller, the aircraft begins in P-mode
by default. To switch ight modes, rst go to camera view in DJI GO 4 / DJI Pilot, tap
“Multiple Flight Modes”. After enabling multiple ight modes, toggle the switch to P and then to S or
T to switch ight modes.
Refer to the ight modes section in the aircraft’s user manual for more information about
ight mode features for different aircraft types.
T T-mode (Tripod)
P P-mode (Positioning)
S S-mode (Sport)
and enable
RTH Button
Press and hold the RTH button to start Return to Home (RTH) and the aircraft will return to the last
recorded Home Point. Press the button again to cancel RTH and regain control of the aircraft. Refer
to the Return to Home section in the aircraft’s user manual for more information about RTH.
2019 DJI All Rights Reserved.
©
11
Page 14

DJI Smart Controller User Manual
Customizable Buttons
There are three customizable buttons on the controller: C1, C2, and the Conrm button. When the
remote controller is not linked to an aircraft, press the Conrm button to conrm a selection. When
the remote controller is linked to an aircraft, the button cannot be used to confirm a selection.
However, the function of the button when linked to an aircraft can be customized in DJI GO 4 / DJI
Pilot.
The functions of the C1 and C2 buttons are set in DJI GO 4 / DJI Pilot. The default conguration for
the C1 button is center focus and the default conguration for the C2 button is playback.
Optimal Transmission Range
The optimal transmission range of the Smart Controller is shown below:
80°
Make sure the antennas are facing towards the aircraft. When the angle between the antennas and
the back of the Smart Controller is 80° or 180°, the connection between the remote controller and
the aircraft can reach its optimal performance.
Note that the illustrations above do not reect the actual distances between the user and aircraft
and are for reference only.
DJI GO 4 / DJI Pilot will warn the user when the transmission signal is weak. Adjust the
antennas to make sure that the aircraft is within the optimal transmission range.
Operating the Camera
Shoot videos and photos with the Focus/Shutter button and Record button on the remote controller.
1. Focus/Shutter Button
Press to take a photo. If Burst mode is selected, multiple photos will be taken if the button is
continuously pressed.
2. Record Button
Press once to start recording video and press again to stop.
3. Camera Settings Dial
Mavic 2 Pro: Turn the dial to adjust the exposure compensation (when in Program mode),
aperture (when in Aperture Priority and Manual mode), or shutter (when in Shutter Priority mode).
Mavic 2 Zoom/ Mavic 2 Enterprise: Turn to adjust the zoom of the Mavic 2 Zoom camera.
Mavic 2 Enterprise Dual: Turn the dial to adjust the exposure compensation.
2019 DJI All Rights Reserved.
©
12
Page 15

DJI Smart Controller User Manual
Dual Remote Controller Mode
DJI Smart Controller supports Dual Remote Controller Mode when using with the Mavic 2 Pro/Zoom,
which allows two remote controllers to connect to the same aircraft.
Both the Primary remote controller and the Secondary remote controller can control the orientation
of the aircraft and the movement of the gimbal and camera operation.
Please note the different operations of the Primary and Secondary remote controller listed below.
1. Gimbal Dial
Both the Primary remote controller and the Secondary remote controller can control the gimbal
dial, but the Primary remote controller has priority. For example, the Secondary remote controller
is unable to control the gimbal dial when the Primary remote controller is using the gimbal dial.
After the Primary remote controller has stopped controlling the gimbal dial for two seconds or
more, the Secondary remote controller can control the gimbal dial.
2. Control Stick
Both the Primary remote controller and the Secondary remote controller can control the
orientation of the aircraft using control sticks. The Primary remote controller has priority. The
Secondary remote controller is unable to control the aircraft’s orientation when the Primary remote
controller is operating the control sticks. After the control sticks are idle for two seconds or more,
the Secondary remote controller can control the aircraft’s orientation.
If the control sticks on the Primary remote controller are pushed down and inward, the motors of
the aircraft stop. If the same action is performed on the Secondary remote controller, however,
the aircraft does not respond.
The control sticks on the Primary remote controller need to be released so that the Secondary
remote controller can control the aircraft.
3. Flight Mode Switch
The ight mode can only be switched on the Primary remote controller. The Flight Mode Switch is
disabled on the Secondary remote controller.
4. DJI GO 4 Settings
The display and parameter settings for the Primary and Secondary remote controllers in DJI GO
4 are the same. The Secondary remote controller can only congure the ight controller, vision
system, video transmission, and Intelligent Flight Battery. Display and parameter settings for the
Primary and Secondary remote controllers are the same in DJI GO 4.
2019 DJI All Rights Reserved.
©
13
Page 16

Display Interface
11:30
Homepage
The screen displays the homepage when the Smart Controller is powered on.
Example: Mavic 2 Pro
5
1
2
1 Time
Displays local time.
2 DJI GO 4 / DJI Pilot
Tap to enter DJI GO 4 / DJI Pilot. The
button is blue if the remote controller is
linked to the aircraft. Users can tap to
enter camera view after logging in using a
DJI account. If the remote controller is not
linked to the aircraft, tap, and log in using
a DJI account. Select “Enter Device” and
follow the prompts to enter camera view.
GO
100%
3 4
3 Gallery
Tap to check stored images and videos.
4 App Center
Tap to check all applications including DJI
GO 4 / DJI Pilot, Settings, File Manager,
and any third-party apps that users have
downloaded and installed. Refer to the
App Center section for more information.
5 Battery Level
Displays the battery level of the remote
controller.
Navigate on the remote controller by using the 5D button, the control sticks, or touching the
screen. Conrm a selection by pressing the 5D button or touching the screen. Refer to the
Control Stick Navigation section for more information.
2019 DJI All Rights Reserved.
©
14
Page 17

DJI Smart Controller User Manual
Sat, Mar 30
App Center
Tap to enter App Center. Users can nd default system apps and third-party apps that have
been downloaded.
Apps
DJI GO 4.0 DJI Pilot
Settings
Gallery
Camera
The App Center is subject to change in future
Press the icon to enter the app.
To move an app, hold the icon and move the app to where you wish to place it. To delete the
app, hold the icon and drag it to the top of this page to remove it. Note that default system apps
cannot be deleted.
Press Settings to be able to configure settings such as button combinations, control stick
navigation, date & time, languages, Wi-Fi, and Bluetooth.
DJI bears no responsibility for the safe use of or compatibility support for third-party apps. If
a third-party app is affecting the performance of the Smart Controller, try to delete the thirdparty apps or reset the Smart Controller to factory settings. To reset the Smart Controller to
factory settings, go to Factory Data Reset under Settings.
Quick Settings
Swipe down from the top of the screen to open Quick Settings.
4 5
11:30
8:13 PM
1
SRE
Wi-Fi
Capture Record Control Stick
Bluetooth
FN
HDMI
Calibration
2
3
Darkpart
Linking
Go-Share
Recent Settings
100%
100%
100%
99+
GO
2019 DJI All Rights Reserved.
©
15
Page 18

DJI Smart Controller User Manual
1 Tap an icon to enable or disable the corresponding function. Hold the icon to enter the settings of
the function (if available).
: Tap to enable or disable Wi-Fi. Hold to enter settings and connect to or add a Wi-Fi network.
: Tap to enable or disable SRE mode. Hold to enter settings and select an SRE mode.
: Tap to enable or disable Bluetooth. Hold to enter settings and connect with nearby Bluetooth
devices.
: Tap to enable or disable the HDMI connection. Hold to enter settings and adjust HDMI
resolution, rotation, output mode, and screen zoom.
: Tap to start linking the remote controller to an aircraft.
: Tap to activate DJI GO Share. Hold to enter settings and set a GO Share Hotspot. Refer to
the DJI GO Share section for more information.
: Tap to screenshot the screen.
: Tap to start recording the screen. While recording, the screen displays the recording time.
Tap “Stop” to stop recording.
: Tap or hold to check the button combinations.
: Tap to calibrate the sticks and wheels.
: Tap to check recently opened apps.
: Tap or hold to enter settings.
2 Adjusting Brightness
Slide the bar to adjust brightness. The icon
bar, and the icon will turn to
3 Adjusting Volume
Slide the bar to adjust the volume. Tap
4 Homepage
: Tap to go back to the homepage.
5 Notications
: Tap to check system notications.
to switch it to manual brightness mode.
means auto brightness. Tap this icon or slide the
to mute the volume.
SRE (Sunlight Readable Enhancement) allows users to bump up the highlights or
shadows of an image individually or together. This helps users see particular areas of the
screen more clearly when sunlight is strong.
Quick Settings vary depending on the aircraft model linked and the rmware version of
the Smart Controller.
DJI GO 4 App / DJI Pilot
To enter DJI GO 4 / DJI Pilot, tap “Go” on the homepage or tap on the homepage, then tap DJI
GO 4 / DJI Pilot. In DJI GO 4 / DJI Pilot, you can check the ight status and set ight and camera
parameters. Since the Smart Controller is compatible with multiple aircraft models, and the interface
of DJI GO 4 / DJI Pilot may change based on the aircraft model, refer to the DJI GO 4 / DJI Pilot app
section in the aircraft’s user manual for more information.
2019 DJI All Rights Reserved.
©
16
Page 19

Appendix
Changing Storage Locations for Images and Videos
After linking, you can use DJI GO 4 to select to store images and videos on the aircraft. Users can
also use DJI GO 4 to select to store images and videos to the Smart Controller or on the microSD
card in the Smart Controller.
Auto Sync HD Photos:
Power on the remote controller and the aircraft, and make sure they are linked. Run DJI GO 4, and
enter the camera view. Tap
high resolution to the microSD card in the remote controller at the same when the microSD card in
the aircraft stores the images.
Store to Smart Controller:
Power on the remote controller and the aircraft, and make sure they are linked. Run DJI GO 4, and enter
camera view. Tap
To cache images and videos to the remote controller, enable “Cache Locally When Recording”.
To store images and videos to the microSD card in the remote controller, enable “Download
Footage to External SD Card”.
When “Download Footage to External SD Card” is enabled, all the selected images will be
downloaded to the remote controller's microSD card when downloading the images to the remote
controller in playback.
The “Cache Locally When Recording” and “Download Footage to External SD Card” are
disabled by default.
To enable “Download Footage to External SD Card”, make sure a microSD card is
inserted into the remote controller.
> :
> and enable “Auto Sync HD Photos”. All images will be stored in
Control Stick Navigation
Tap Control Stick Navigation in Settings. Users can enable or disable the control sticks and 5D
button to navigate on the remote controller. Control Stick Navigation is not available when the
remote controller is linked to an aircraft, even if it is enabled beforehand.
Control Sticks: Move up, down, right, or left to navigate. It is not possible to conrm a selection with
the control sticks.
5D Button: Push up, down, right, or left to navigate. Press to conrm a selection.
As the control sticks and 5D button may not be compatible with third-party apps, it is
recommended to use the touchscreen to navigate when using third-party apps.
DJI GO Share (only available when using DJI GO 4)
The videos and images downloaded to the Smart Controller from DJI GO 4 can be wirelessly
transferred to other smart devices. Follow the steps below to use DJI GO Share.
1. Power on the remote controller and swipe down from the top of the screen to open Quick
Settings. Tap
and a QR code will appear.
2019 DJI All Rights Reserved.
©
17
Page 20

DJI Smart Controller User Manual
2. Run DJI GO 4 on your smart device and scan the QR code using DJI GO 4.
3. Wait until the remote controller and the smart device are successfully connected. After
connecting, you can check all the images and videos downloaded to the remote controller on
your smart device.
4. Select the images and videos you want to share and tap “Download” to download them to your
smart device.
Only images and videos cached or downloaded to your remote controller in playback in DJI
GO 4 can be shared using DJI GO Share.
Status LED and Battery Level Indicators Description
Status LED Battery Level Indicators
The battery level indicators displays the battery level of the controller. The status LED displays the
linking status and warnings for control stick, low battery level, and high temperature.
Status LED Description
Solid Red The remote controller is not linked to an aircraft.
Solid Green The remote controller is linked to an aircraft.
Blinks Blue The remote controller is linking to an aircraft.
The temperature of the remote controller is too high or the
battery level of the aircraft is low.
75%~100%
50%~75%
25%~50%
0%~25%
2019 DJI All Rights Reserved.
©
18
Blinks Red
Blinks Yellow The battery level of the remote controller is low.
Blinks Cyan The control sticks are not centered.
Battery Level Indicators Battery Level
Page 21

DJI Smart Controller User Manual
Smart Controller Warning Sounds
In certain scenarios that require a user warning, the Smart Controller will do so by vibrating and/or
beeping. When the controller beeps and the status LED is solid green, this error may be related to
the aircraft or ight status, and a warning will appear in DJI GO 4 / DJI Pilot. If this error is related to
the Smart Controller, the controller’s screen will display a warning or alert.
To disable the beeping, power on the remote controller, select “Sound” in Settings, and turn off
“Notication volume”.
System Update
Method 1: Wireless Update
Make sure the remote controller is connected to the internet while updating.
1. Power on the remote controller. Tap
“System Update”.
2. Tap “Check for Updates” to check the rmware. A prompt will appear if a rmware update is
available.
3. Follow the prompts to nish the update.
4. The remote controller automatically restarts after the update is nished.
Method 2: DJI Assistant 2
1. Make sure the remote controller is powered off, and then connect the remote controller to a
computer using a USB 3.0 USB-C cable.
2. Power on the remote controller.
3. Launch DJI Assistant 2, and log in using a DJI account.
4. Click the Smart Controller icon, and then “Firmware Update”.
5. Select and conrm the rmware version you want to update.
6. DJI Assistant 2 will download and update the rmware automatically.
7. The remote controller will restart after update.
and then . Scroll to the bottom of the page and tap
Make sure the remote controller has more than 50% power before updating.
DO NOT disconnect the USB-C cable during the update.
Make sure the remote controller or the computer is connected to the internet during the
update.
The update takes approximately 15 minutes.
Button Combinations
Some frequently-used features can be activated by using button combinations. To use button
combinations, hold the back button and then press the other button.
2019 DJI All Rights Reserved.
©
19
Page 22

DJI Smart Controller User Manual
11:3011:30
Checking the available button combinations
Hold the Back button until the controller vibrates to check button combinations:
Press and then the corresponding button to perform an operation.
50%
100%
Brightness Mode
Screen Recording
Home
Recent Apps
Quick Settings
Button Combinations
Adjust Volume
Screenshot
Using Button Combinations
The functions of the button combinations cannot be changed. The following table displays the
function of each button combination.
Button Combinations Description
Function Button + Right Wheel Adjust the system volume
Function Button + Left Wheel Adjust the screen brightness
Function Button + Record Button Record the screen
Function Button + Focus/Shutter Button Screenshot the screen
Function Button + 5D Button (up) Return to Homepage
Function Button + 5D Button (down) Open Quick Settings
Function Button + 5D Button (left) Check recently opened apps
Function Button + 5D Button (right) Open App Center
Calibrating the Compass
After the remote controller is used in places with electro-magnetic interference, the compass may
need to be calibrated. A warning prompt will appear if the remote controller’s compass requires
calibration. Tap the warning pop-up to start calibrating. In other cases, follow the steps below to
calibrate your remote controller.
1. Enter the App Center, tap
2. Follow the diagram on the screen to calibrate your remote controller.
3. The user will receive a prompt when the calibration is successful.
2019 DJI All Rights Reserved.
©
20
, and scroll down and tap Compass.
Page 23

DJI Smart Controller User Manual
Blocking Third-party Notications
To ensure safe ight, we recommend to disable third-party notications before each ight. Follow
the steps below to disable third-party notications.
1. Enter the App Center, tap
2. Enable “Aerial Photography Do Not Disturb Mode”.
, and scroll down and tap Notications.
HDMI
A monitor can display the remote controller’s interface by connecting the remote controller to a
monitor using a HDMI cable. Follow the steps below to enable the HDMI connection.
1. Swipe down from the top of the screen to open Quick Settings.
2. Follow the diagram on the screen to calibrate your remote controller. Tap HDMI to enable or
disable the HDMI connection. Hold to enter settings and adjust HDMI resolution, rotation, output
mode, and screen zoom.
After-sales Information
Please visit http://www.dji.com/support for more information about after-sales service and warranty
policies.
2019 DJI All Rights Reserved.
©
21
Page 24

Specications
OcuSync 2.0
Operation Frequency Range 2.400-2.4835 GHz; 5.725-5.850 GHz*
2.400-2.4835 GHz:
Max Transmission Distance
(Unobstructed, free of interference)
Transmitter Power (EIRP)
Wi-Fi
Protocol
Operation Frequency Range
Transmitter Power (EIRP)
Bluetooth
Protocol Bluetooth 4.2
Operation Frequency Range 2.400-2.4835 GHz
Transmitter Power (EIRP)
General
Battery 18650 Li-ion (5000 mAh @ 7.2 V)
Charge Type Supports USB power adapters rated 12 V/2 A
Rated Power 15 W
Storage Capacity Rom: 16 GB + scalable (microSD**)
Charge Time 2 hours (Using a USB power adapter rated 12 V/2 A)
Working Time 2.5 hours
Video Output Port HDMI Port
Power Supply Current/ Voltage
(USB-A port)
Operation Temperature Range 4° to 104° F (-20° to 40° C)
Storage Temperature Range
8 km (FCC); 4 km (CE); 4 km (SRRC); 4 km (MIC)
5.725-5.850 GHz:
8 km (FCC) : 2 km (CE) : 5 km (SRRC)
2.400-2.4835 GHz:
25.5 dBm (FCC); 18.5 dBm (CE); 19 dBm (SRRC);
18.5 dBm (MIC)
5.725-5.850 GHz:
25.5 dBm (FCC); 12.5 dBm (CE); 18.5 dBm (SRRC)
Wi-Fi Direct, Wi-Fi Display, 802.11a/g/n/ac
Wi-Fi with 2×2 MIMO is supported
2.400-2.4835 GHz; 5.150-5.250 GHz*;
5.725-5.850 GHz*
2.400-2.4835 GHz:
21.5 dBm (FCC); 18.5 dBm (CE);
18.5 dBm (SRRC); 20.5 dBm (MIC)
5.150-5.250 GHz:
19 dBm (FCC); 19 dBm (CE);
19 dBm (SRRC); 19dBm (MIC)
5.725-5.850 GHz:
21 dBm (FCC); 13 dBm (CE); 21 dBm (SRRC)
4 dBm (FCC); 4 dBm (CE)
4 dBm (SRRC); 4 dBm (MIC)
5 V/ 900 mA
Less than one month: -22° to 140° F (-30° to 60° C)
One month to three months: -22° to 113° F (-30° to 45° C)
Three months to six months: -22° to 95° F (-30° to 35° C)
More than six months: -22° to 77° F (-30° to 25° C)
2019 DJI All Rights Reserved.
©
22
Page 25

DJI Smart Controller User Manual
Charging Temperature Range 5° to 40° C (41° to 104° F)
Supported Aircraft Models***
Recommended microSD Cards
GNSS GPS+GLONASS
Dimensions
Weight Approx. 630 g
* Local regulations in some countries prohibit the use of the 5.8 GHz and 5.2 GHz frequencies
and in some regions the 5.2 GHz frequency is only allowed for indoor use.
** The Smart Controller supports microSD cards with a maximum storage capacity of 128 GB.
*** The Smart Controller will support more DJI aircraft in future. Please visit the ofcial website for
the latest information.
Mavic 2 Pro, Mavic 2 Zoom, Mavic 2 Enterprise,
Mavic 2 Enterprise Dual
Sandisk Extreme 32GB UHS-3 microSDHC
Sandisk Extreme 64GB UHS-3 microSDXC
Panasonic 32GB UHS-3 microSDHC
Panasonic 64GB UHS-3 microSDXC
Samsung PRO 32GB UHS-3 microSDHC
Samsung PRO 64GB UHS-3 microSDXC
Samsung PRO 128GB UHS-3 microSDXC
177.5 × 121.3 × 40 mm
(antennas folded, and the control sticks unmounted)
177.5 × 181 × 60 mm
(antennas unfolded, and the control sticks mounted)
2019 DJI All Rights Reserved.
©
23
Page 26

DJI Support
http://www.dji.com/support
This content is subject to change.
Download the latest version from
http://www.dji.com/dji-smart-controller
If you have any questions about this document, please
contact DJI by sending a message to
© 2019 DJI All Rights Reserved.
DocSupport@dji.com
.
 Loading...