


User Manual
2023.03
v1.2
Searching for Keywords
Search for keywords such as “battery” and “install” to find a topic. If you are using Adobe
Acrobat Reader to read this document, press Ctrl+F on Windows or Command+F on Mac to
begin a search.
Navigating to a Topic
View a complete list of topics in the table of contents. Click on a topic to navigate to that
section.
Printing this Document
This document supports high resolution printing.
Revision Log
Version Date Revisions
v1.2 2023.03
Added new supported devices for the aircraft and feature
descriptions for the goggles.

Using this Manual
Legend
Warning Important Hints and Tips Reference
Read Before the First Flight
Read the following documents before using DJI AVATATM.
1. User Manual
2. Quick Start Guide
3. Safety Guidelines
It is recommended to watch all tutorial videos and read the safety guidelines before using for the rst time. Prepare
for your rst ight by reviewing the quick start guide and refer to this user manual for more information.
Video Tutorials
Visit the link below to watch the tutorial videos, which demonstrate how to use DJI Avata safely:
https://s.dji.com/guide24
Download the DJI Fly App
Scan the QR code above to download DJI Fly.
The Android version of DJI Fly is compatible with Android v6.0 and later. The iOS version of DJI Fly is compatible
with iOS v11.0 and later.
* For increased safety, ight is restricted to a height of 98.4 ft (30 m) and a range of 164 ft (50 m) when not connected
or logged into the app during ight. This applies to DJI Fly and all apps compatible with DJI aircraft.
Download the DJI Virtual Flight App
Scan the QR code on the right to download DJI Virtual Flight.
The iOS version of DJI Virtual Flight is compatible with iOS v11.0 and later.
Download DJI Assistant 2 (Consumer Drones Series)
Download DJI ASSISTANTTM 2 (Consumer Drones Series) at https://www.dji.com/avata/downloads.
The operating temperature of this product is -10° to 40° C. It does not meet the standard operating
temperature for military grade application (-55° to 125° C), which is required to endure greater
environmental variability. Operate the product appropriately and only for applications that meet the
operating temperature range requirements of that grade.
© 2023 DJI All Rights Reserved.
1

Contents
Using this Manual
Legend 1
Read Before the First Flight 1
Video Tutorials 1
Download the DJI Fly App 1
Download the DJI Virtual Flight App 1
Download DJI Assistant 2 (Consumer Drones Series) 1
Product Prole
Introduction 4
Preparing the Aircraft 5
Preparing the Goggles 6
Preparing the Remote Control Devices 9
Diagram 11
Linking 17
Activation 18
Aircraft
Flight Modes 19
Aircraft Status Indicator 20
Return to Home 21
Vision System and Infrared Sensing System 23
Flight Recorder 25
Propellers 26
Intelligent Flight Battery 28
Gimbal and Camera 32
1
4
19
Goggles
DJI Goggles 2 34
DJI FPV Goggles V2 43
Remote Control Devices
DJI Motion Controller 48
DJI FPV Remote Controller 2 52
DJI Fly App
© 2023 DJI All Rights Reserved.
2
34
48
58

DJI Avata
User Manual
Flight
Flight Environment Requirements 59
Flight Restrictions 59
Pre-Flight Checklist 61
Starting/Stopping the Motors 61
Flight Test 63
Maintenance
Aircraft 64
Goggles 74
Appendix
Specications 77
Firmware Update 83
Aftersales Information 83
FAR Remote ID Compliance Information 84
59
64
77
© 2023 DJI All Rights Reserved.
3

Product Prole
Introduction
DJI Avata features a compact and portable aircraft body, which is equipped with a propeller guard. With both a
Vision System and an Infrared Sensing System, it can hover stably and y exibly indoors as well as outdoors, and
automatically initiate Return to Home (RTH). With a gimbal and 1/1.7″ sensor camera, the aircraft stably shoots
4K 60fps ultra-HD video and 4K photos. The aircraft has a maximum hover time of approximately 18 minutes.
DJI Avata uses DJI O3+ technology, when used with compatible goggles and remote control devices, it provides
video transmission with a maximum range of 6 mi (10 km), and a bit rate of up to 50 Mbps, bringing an immersive
ight experience.
The goggles are equipped with a high-performance display. By receiving the video signal from the aircraft, users
can enjoy a rst-person view of their aerial experience in real time. The remote control devices are equipped with
a range of function buttons, which can be used to control the aircraft and operate the camera. DJI Goggles 2
and DJI Motion Controller can easily control the ight of the aircraft by tracking your head or hand movements,
bringing a new and convenient ight control experience.
Aircraft
Goggles
Refer to the appendix for the goggles and remote control devices supported by DJI Avata. This
manual only takes DJI Goggles 2, DJI FPV Goggles V2, DJI Motion Controller, and DJI FPV Remote
Controller 2 as examples. Refer to the user manuals of other supported devices respectively for use.
The remote control devices reach their maximum transmission distance (FCC) in a wide open area
with no electromagnetic interference at an altitude of about 120 m (400 ft). The maximum transmission
distance refers to the maximum distance that the aircraft can still send and receive transmissions. It
does not refer to the maximum distance the aircraft can y in a single ight.
Maximum hover time was tested in an environment with no wind or interference.
Using the goggles does not satisfy the requirement of visual line of sight (VLOS). Some countries or
regions require a visual observer to assist during ight. Make sure to comply with local regulations
when using the goggles.
© 2023 DJI All Rights Reserved.
4
Remote Control Device

DJI Avata
User Manual
Preparing the Aircraft
1. Remove the gimbal protector from the camera.
2. Remove the Intelligent Flight Battery and use a USB charger to charge the battery. It takes approximately 90
minutes to fully charge an Intelligent Flight Battery.
2
2
3
1
≥30 W
USB PD
1
It is recommended to use the DJI 30W USB-C Charger or other USB Power Delivery chargers.
It is recommended to attach a gimbal protector to protect the gimbal when the aircraft is not in use.
Adjust the camera to the horizontal position, then install the gimbal protector and make sure it is
secure.
Make sure to remove the gimbal protector before powering on the aircraft. Otherwise, it may aect the
aircraft self-diagnostics.
© 2023 DJI All Rights Reserved.
5

3
1
2
DJI Avata
User Manual
Preparing the Goggles
DJI Goggles 2
1. Unfold the antennas.
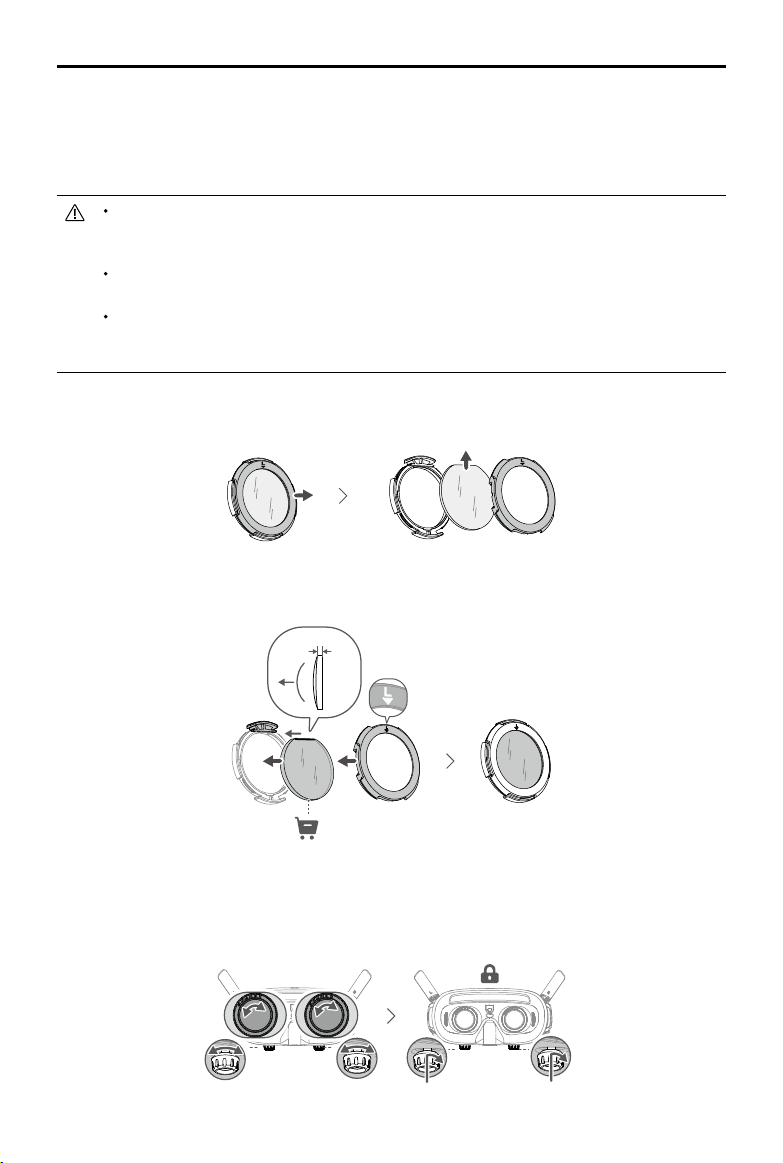
2. Remove the screen protector.
3. Attach the headband to the goggles.
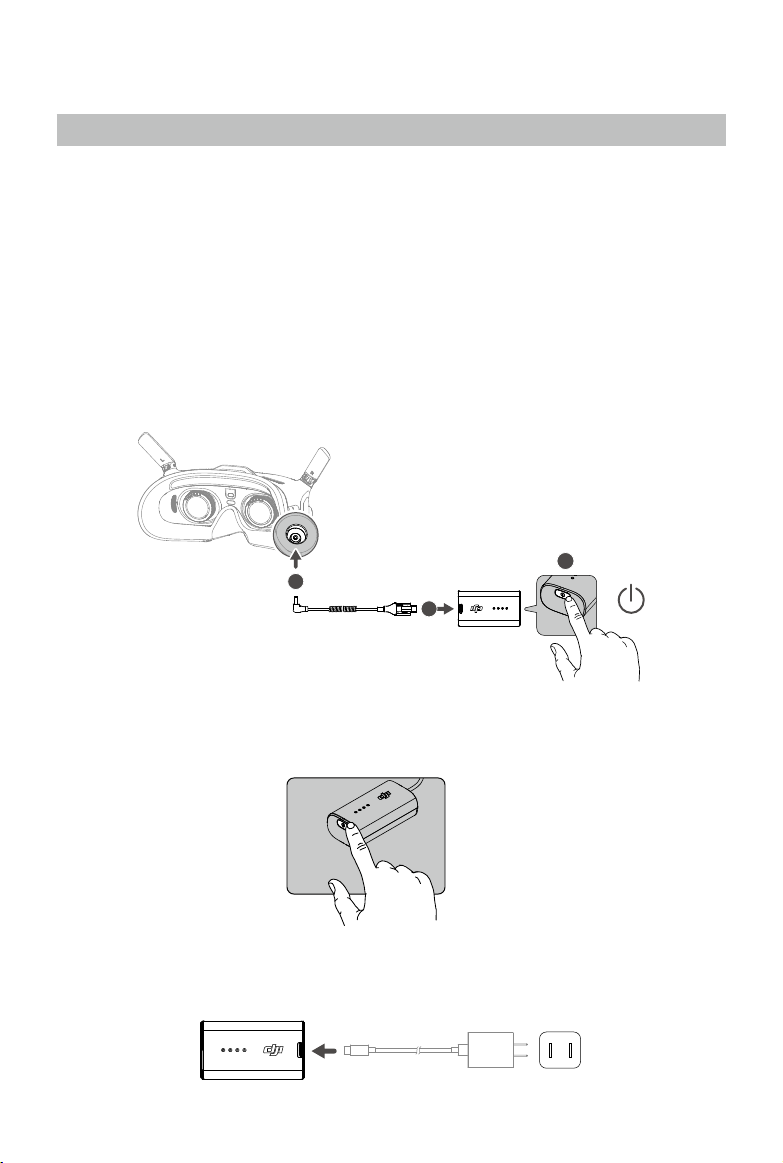
4. Use the power cable (USB-C) provided to connect the power port of the goggles to the goggles battery. Press
the power button once, then press again and hold for two seconds to power the goggles on.
© 2023 DJI All Rights Reserved.
6
3
1
2

56
-
72 mm
56
-
72 mm
56
-
72 mm
-8.0 D
-
+2.0D
DJI Avata
User Manual
5. Wear the goggles and adjust the headband until the goggles t comfortably.
6. Use the IPD (Interpupillary Distance) Slider / Diopter Adjustment Knob (hereinafter referred to as "knob") to
adjust the distances between the lenses and the diopter to get a clear view.
a. Rotate both the knobs in the direction as shown to unlock them. Once unlocked, the knobs will pop out.
b. Toggle the knobs left and right to adjust the distance between the lenses until the images are
properly aligned.
c. Slowly rotate the knobs to adjust the diopter. The supported adjustment range is from -8.0 D to
+2.0 D.
-8.0 D
-
+2.0D
d. After you get a clear view, press the knobs in and rotate them in the direction as shown to lock in
the lenses’ position and the diopter.
© 2023 DJI All Rights Reserved.
7

DJI Avata
User Manual
The diopter lenses do not support astigmatism correction. If you require astigmatism correction or if
the goggles’ diopter is unsuitable, you can purchase additional lenses and use the eyeglass frames
provided to install them on the goggles. Refer to the “Using the Eyeglass Frames” for more information.
When adjusting the diopter for the rst time, you are advised to adjust to a degree that is slightly lower
than the strength of your actual eyeglasses. Give your eyes enough time to adapt, then adjust the
diopter again until you get a clear view. Do not use a diopter higher than your actual eyeglass power to
avoid eyestrain.
Fold the antennas to avoid damage when the goggles are not in use.
Re-attach the screen protector after use to protect the lens and prevent damage caused by direct
sunlight.
Only use the DJI goggles battery provided. DO NOT use non-DJI batteries.
DO NOT use the goggles battery to power other devices.
DJI FPV Goggles V2
1. Install the four antennas to the mounting holes on the front of the goggles. Make sure that the antennas are
installed securely.
2. Attach the strap to the headband attachment on the top and sides of the goggles.
3. Use the included power cable to connect the power port of the goggles to the goggles battery. Press the
power button once, then press again and hold for two seconds to power the goggles on.
3
1
2
© 2023 DJI All Rights Reserved.
8

DJI Avata
4. Align the lenses over your eyes and pull the headband down. Adjust the headband size until the goggles t
5. Turn the IPD slider to adjust the distance between the lenses until the images are properly aligned.
User Manual
securely and comfortably on your face and head.
58-70 mm
The goggles can be worn over glasses.
DO NOT use the goggles battery to power other mobile devices.
Preparing the Remote Control Devices
Press the power button once to check the current battery level. Charge before using if the battery level is too low.
DJI Motion Controller
5V, 1A/2A
USB Power Delivery chargers are not supported.
© 2023 DJI All Rights Reserved.
9

DJI Avata
User Manual
DJI FPV Remote Controller 2
1. Charge the battery.
2. Remove the control sticks from the storage slots and mount them on the remote controller.
3. Unfold the antennas.
2
1
© 2023 DJI All Rights Reserved.
10

DJI Avata
Diagram
Aircraft
User Manual
5
6
4
3
1
2
14
1. Propellers
2. Motors
3. Propeller Guard
4. Gimbal and Camera
5. Aircraft Status Indicator
16 16
7
8
12
13
6. Upper Frame
7. Intelligent Flight Battery
8. Battery Buckles
9. Power Button
10. Battery Level LEDs
15
9 10
11
11. Power Port
12. USB-C Port
13. microSD Card Slot
14. Landing Gears
(Built-in antennas)
15. Infrared Sensing System
16. Downward Vision System
Before ying, make sure the USB-C port and microSD card slot cover is correctly and securely sealed
to avoid interference with the propellers.
© 2023 DJI All Rights Reserved.
11

DJI Avata
User Manual
Goggles
DJI Goggles 2
2
2
3
3
4
4
8
8
9
9
7
7
1. Antennas
1
1
5
5
6
6
13
11
11
10
10
12
12
13
2. Touch Panel
3. Headband Attachment
4. Power Port
5. USB-C Port
6. IPD Slider / Diopter Adjustment Knob
7. microSD Card Slot
8. 3.5 mm Audio Port
9. LED Dot Matrix Display
10. Lenses
11. Proximity Sensor
Detects whether the user is wearing
the goggles and automatically turns
the screen on or o.
12. Link Button
13. Foam Padding
DJI FPV Goggles V2
1. Antennas
2. Front Cover
3. Channel Adjustment Buttons
4. Channel Display
© 2023 DJI All Rights Reserved.
12
1
1
3
3
2
2
8
8
4
4
5
5
6
6
7
7
5. USB-C Port
6. microSD Card Slot
7. Air Intake
8. IPD Slider

DJI Avata
User Manual
12
10
10
9
9
11
11
12
13
13
14
14
15
16
16
1718
17
18
15
9. Headband Attachment
10. Foam Padding
11. Lenses
12. Air Vent
13. Shutter/Record Button
Press once to take photos or start or stop
recording. Press and hold to switch between
photo and video mode.
14. Back Button
Press to return to the previous menu or exit
the current mode.
15. 5D Button
Toggle the button to scroll through the menu.
Press the button to conrm.
On the home screen, toggle left or right to adjust
the screen brightness. Toggle up or down to
adjust the volume. Press the button to enter the
menu.
16. Audio/AV-IN Port
17. Power Port (DC5.5×2.1)
18. Link Button
© 2023 DJI All Rights Reserved.
13

DJI Avata
User Manual
Remote Control Devices
DJI Motion Controller
1
1
2
2
4
4
3
3
5
7
7
5
6
6
9
9
8
8
10
10
1. Battery Level LEDs
Indicates the battery level of the motion
controller.
2. Lock Button
Press twice to start the motors of the aircraft.
Press and hold to make the aircraft automatically
take o, ascend to approx. 1.2 m, and hover.
Press and hold while hovering to make the
aircraft automatically land and the motors stop.
Press once to cancel the Low Battery RTH
countdown when the prompt appears in the
goggles, and the aircraft will not enter the Lower
Battery RTH.
3. Mode Button
Press once to switch between Normal and
Sport mode.
4. Brake Button
Press once to make the aircraft brake and hover
in place (only when GNSS or Vision System is
available). Press again to unlock the attitude.
Press and hold to initiate RTH.
When the aircraft is performing RTH or auto
landing, press the button once to cancel RTH or
landing.
© 2023 DJI All Rights Reserved.
14
5. Gimbal Tilt Slider
Push up and down to adjust the tilt of the
gimbal. Only available before takeo, during
RTH, or landing.
6. Shutter/Record Button
Press once to take photos or start or stop
recording. Press and hold to switch between
photo and video mode.
7. Accelerator
Press to y the aircraft in the direction of the
circle in the goggles. Apply more pressure to
accelerate. Release to stop and hover.
8. Lanyard Hole
9. USB-C Port
For charging and connecting the motion
controller to a computer for rmware updates.
10. Power Button
Press once to check the current battery level.
Press once then again and hold to power the
motion controller on or o.

8 13
10
9
12
14
11
DJI Avata
User Manual
DJI FPV Remote Controller 2
5
5
3
3
4
4
2
2
6
6
7
7
9
1
1
9
8 13
8 13
10
10
14
14
12
12
11
11
1. Power Button
Press once to check the current battery level.
Press, and then press and hold to power the
remote controller on or o.
2. Battery Level LEDs
Displays the current battery level of the
remote controller.
3. Lanyard Attachment
4. C1 Button (Customizable)
The function of this button can be adjusted in
the goggles. By default, press once to enable
or disable ESC Beeping.
5. Control Sticks
Used to control the movements of the
aircraft. The control sticks mode can be set in
the goggles. The control sticks are removable
and easy to store.
6. USB-C Port
For charging and connecting the remote
controller to your computer.
7. Control Sticks Storage Slots
For storing the control sticks.
8. Flight Pause/RTH Button
Press once to make the aircraft brake and
hover in place (only when GNSS or Vision
System is available). Press and hold to initiate
RTH.
When the aircraft is performing RTH or auto
landing, press the button once to cancel RTH
or landing.
9. Gimbal Dial
Controls the tilt of the camera.
10. Flight Mode Switch
Switch between Normal, Sport, and Manual
mode. Manual mode is disabled by default and
must be enabled in the goggles.
11. C2 Switch (Customizable)
The function of this switch can be adjusted in the
goggles. By default, toggle the switch to recenter
the gimbal and adjust up and down.
12. Start/Stop Button
When using Manual mode, press twice to start or
stop the motor.
When using Normal or Sport mode, press once
to cancel Low Battery RTH countdown when the
prompt appears in the goggles, and the aircraft
will not enter the lower battery RTH.
13. Shutter/Record Button
Press once to take photos or start or stop
recording. Press and hold to switch between
photo and video mode.
14. Antennas
Relay aircraft control wireless signals.
© 2023 DJI All Rights Reserved.
15

DJI Avata
User Manual
15
16
16 17 1815
18
17
15. F1 Right Stick Resistance Adjustment Screw (Vertical)
Tighten the screw clockwise to increase the vertical resistance of the corresponding stick. Loosen the screw
to decrease vertical resistance.
16. F2 Right Stick Recentering Adjustment Screw (Vertical)
Tighten the screw clockwise to disable the vertical recentering of the corresponding stick. Loosen the screw
to enable vertical recentering.
17. F1 Left Stick Resistance Adjustment Screw (Vertical)
Tighten the screw clockwise to increase the vertical resistance of the corresponding stick. Loosen the screw
to decrease vertical resistance.
18. F2 Left Stick Recentering Adjustment Screw (Vertical)
Tighten the screw clockwise to disable the vertical recentering of the corresponding stick. Loosen the screw
to enable vertical recentering.
© 2023 DJI All Rights Reserved.
16
DJI Avata
User Manual
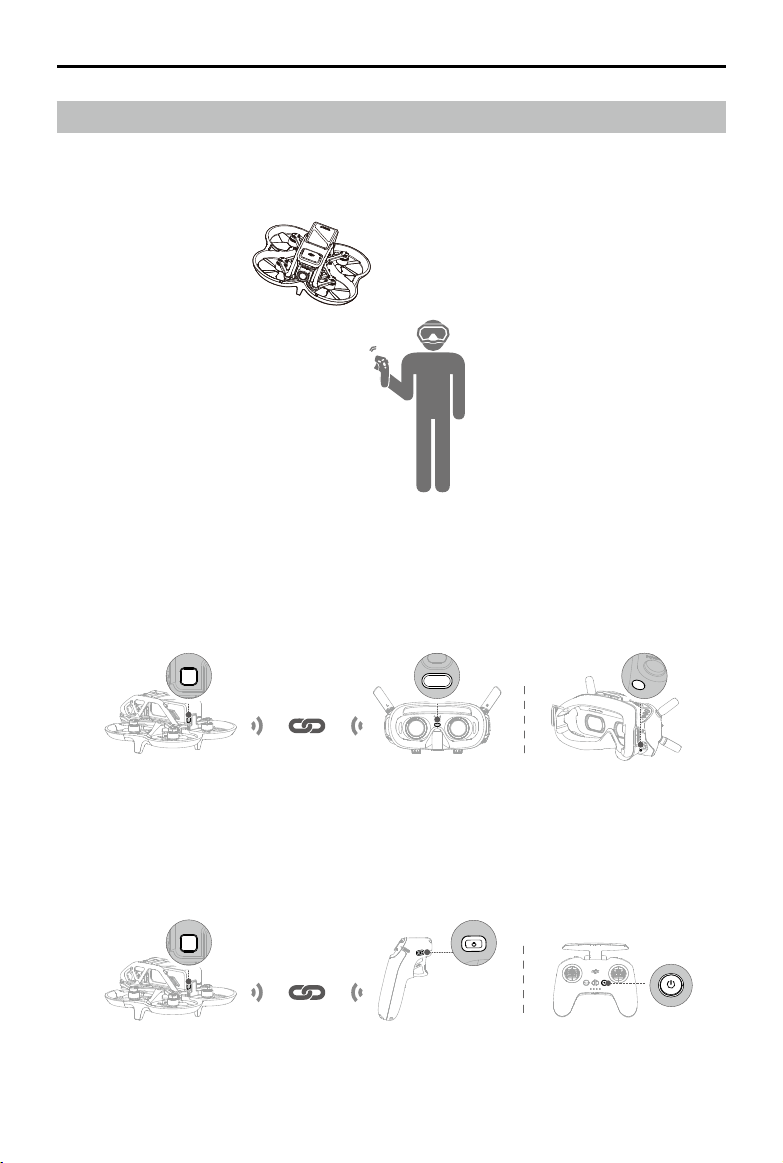
Linking
Follow the steps below to link the aircraft, goggles, and remote control devices. Make sure that the DJI devices
used with the aircraft are activated through the DJI Assistant 2 (Consumer Drones Series) and updated to the
latest rmware before linking.
1. Power on the aircraft, goggles, and remote control devices. Press and then press and hold the power button
to power devices on or o.
2. Press the link button on the goggles. The goggles will start to beep continually.
3. Press and hold the power button on the aircraft until the battery level LEDs start to blink in sequence.
4. Once linking is completed, the battery level LEDs of the aircraft turn solid and display the battery level, the
goggles stop beeping, and image transmission can be displayed normally.
5. Press and hold the power button on the aircraft until the battery level LEDs start to blink in sequence.
6. Press and hold the power button of the remote control device until it starts to beep continually and the battery
level LEDs blinks in sequence.
7. Once linking is successful, the remote control device stops beeping and both the battery level LEDs turn solid
and display the battery level.
© 2023 DJI All Rights Reserved.
17

DJI Avata
User Manual
Make sure the goggles and the remote control device are within 0.5 m of the aircraft during linking.
To switch between the aircraft or air unit, enter the goggles menu and select before linking. For DJI
Goggles 2, enter the Status page to select the aircraft or air unit. For DJI FPV Goggles V2, switch in
Settings and then go to About page.
The aircraft can be controlled with only one remote control device during ight. If your aircraft has been
linked with multiple remote control devices, turn o other remote control devices before ight.
Activation
DJI Avata must be activated before using for the rst time. Make sure all devices are linked after powering on the
aircraft, goggles, and remote control device. Connect the USB-C port of the goggles to the mobile device, run DJI
Fly, and follow the prompts to activate. An internet connection is required for activation.
DJI Fly
App
OTG
USB-C
© 2023 DJI All Rights Reserved.
18

Aircraft
DJI Avata contains a flight controller, gimbal and camera, video downlink system, vision system, propulsion
system, and an Intelligent Flight Battery.
Flight Modes
DJI Avata has three ight modes, which can be switched via the ight mode switch or button on the remote
control devices.
Normal Mode: The aircraft utilizes GNSS, the Downward Vision System, and the Infrared Sensing System to
locate itself and stabilize. When the GNSS signal is strong, the aircraft uses GNSS to locate itself and stabilize.
When the lighting and other environmental conditions are sucient, the aircraft uses the vision system. When the
Downward Vision System is enabled and lighting conditions are sucient, the maximum ight attitude angle is 25°
and the maximum ight speed is 8 m/s.
Sport Mode: The aircraft utilizes the GNSS and Downward Vision System to automatically stabilize itself. In
Sport mode, aircraft responses are optimized for agility and speed making it more responsive to control stick
movements. The maximum ight speed is 14 m/s.
Manual Mode: Classic FPV aircraft control mode with the highest maneuverability, which can be used for racing
and freestyle ying. In Manual mode, all ight assistance functions such as automatic stabilization are disabled and
procient control skills are required.
In Normal or Sport mode, when the Downward Vision System is unavailable or disabled and when the GNSS
signal is weak or the compass experiences interference, the aircraft cannot position itself or brake automatically,
which increases the risk of potential ight hazards. At this time, the aircraft may be more easily aected by its
surroundings. Environmental factors such as wind can result in horizontal shifting, which may present hazards,
especially when ying in conned spaces.
Manual mode is only supported when using the DJI FPV remote controller 2 to operate the aircraft, and
the throttle stick can be adjusted in this mode. DJI motion controller does not support Manual mode.
When using Manual mode, move the remote control sticks to directly control the throttle
and attitude of the aircraft. The aircraft has no flight assistance functions such as automatic
stabilization and can reach any attitude. Only experienced pilots should use Manual mode. Failure
to operate in this mode properly is a safety risk and may even lead to the aircraft crashing.
Manual mode is disabled by default. Make sure that the switch is set to Manual mode in the goggles
before switching to Manual mode. The aircraft will remain in Normal or Sport mode if the switch
is not set to Manual mode in the goggles. Go to Settings > Control > Remote Controller > Button
Customization, and then set the Custom Mode to Manual Mode.
Before using Manual mode, it is recommended to adjust the screw on the rear of the throttle stick so
that the stick does not recenter and to practice ying in the mode using DJI Virtual Flight.
When using Manual mode for the rst time, the maximum attitude of the aircraft will be limited. After
you are familiar with ying in Manual mode, the attitude restriction can be disabled in the goggles. Go
to Settings > Control > Remote Controller > Gain & Expo > M Mode Attitude Limit.
When turning the aircraft at high speed in Manual mode, the attitude may become unstable. Avoid
moving the aircraft laterally to ensure a stable ight.
If using the manual mode when the battery is low, the aircraft power output is limited, please y with caution.
The maximum speed and braking distance of the aircraft significantly increase in Sport mode. A
minimum braking distance of 30 m is required in windless conditions.
The responsiveness of the aircraft signicantly increases in Sport mode, which means a small control
stick movement on the remote controller translates into the aircraft moving a large distance. Make sure
to maintain adequate maneuvering space during ight.
© 2023 DJI All Rights Reserved.
19

DJI Avata
User Manual
Aircraft Status Indicator
DJI Avata has an aircraft status indicator on the top.
Aircraft Status Indicator
The aircraft status indicator shows the status of the ight control system of the aircraft. Refer to the table below for
more information about the aircraft status indicator.
Aircraft Status Indicator Descriptions
Normal States
Warning States
——
Blinks red, yellow, and
green alternately
Blinks green slowly GNSS or vision system enabled for positioning
Blinks yellow slowly GNSS and vision system disabled
Blinks yellow quickly Remote control device signal lost
Blinks red slowly Low battery
Blinks red quickly Critically low battery
Blinks red IMU error
Solid red Critical error
Blinks red and yellow
alternately
Powering on and performing self-diagnostic tests
Compass calibration required
© 2023 DJI All Rights Reserved.
20
DJI Avata
User Manual
Return to Home
The Return to Home (RTH) function brings the aircraft back to the last recorded Home Point and lands when
the GNSS signal is strong. There are three types of RTH: Smart RTH, Low Battery RTH, and Failsafe RTH. If the
aircraft successfully recorded the Home Point and the GNSS signal is strong, the RTH will be triggered when
either Smart RTH is initiated, the aircraft battery level is low, or the signal between the remote control device and
the aircraft is lost. RTH will also be triggered in other abnormal scenarios such as where video transmission is lost.
Description
Home Point
GNSS
The default Home Point is the rst location where the aircraft received a strong or
moderately strong GNSS signal (where the icon shows white). The aircraft status
20
indicator blinks green quickly and a prompt appears in the goggles to conrm the
Home Point has been recorded.
Smart RTH
If the GNSS signal is sucient, Smart RTH can be used to bring the aircraft back to the Home Point. Smart RTH
can be initiated or canceled by the remote control devices. After exiting RTH, users will regain control of the
aircraft.
Low Battery RTH
When the Intelligent Flight Battery level is too low and there is not enough power to return home, land the aircraft
as soon as possible.
In order to avoid unnecessary danger due to insucient power, DJI Avata will intelligently determine whether the
current battery level is sucient to return to the Home Point based on the current location. Low Battery RTH
is triggered when the Intelligent Flight Battery is depleted to the point that the safe return of the aircraft may be
aected.
RTH can be canceled by the remote control devices. If RTH is canceled following a low battery warning, the
Intelligent Flight Battery may not have enough power for the aircraft to land safely, which may lead to the aircraft
being crashed or lost.
The aircraft will land automatically if the current battery level can only support the aircraft long enough to descend
from its current altitude. The remote control devices can be used to alter the direction of the aircraft during the
landing process. Pressing the accelerator when using the motion controller during landing can make the aircraft
stop descending and fly at the current altitude to adjust the horizontal position. The aircraft will continue to
descend after releasing the accelerator.
Failsafe RTH
If the Home Point was successfully recorded and the compass is functioning normally, Failsafe RTH automatically
activates after the remote control signal is lost for more than 3.5 seconds.
The aircraft will y backwards for 50 m on its original ight route and enter Straight Line RTH. The aircraft enters
Straight Line RTH if the remote control signal is restored during Failsafe RTH.
The response of the aircraft when the wireless signal is lost can be changed in the goggles. The aircraft will not
execute Failsafe RTH if land or hover has been selected in the settings.
Other RTH Scenarios
A prompt will appear in the goggles and RTH will be initiated if the video download signal is lost during ight, while
the remote control devices can still be used to control the movements of the aircraft.
© 2023 DJI All Rights Reserved.
21
DJI Avata
User Manual
RTH (Straight Line)
1. The Home Point is recorded automatically.
2. RTH is triggered.
3. If the aircraft is less than 5 m from the Home Point when RTH begins, it lands immediately.
If the aircraft is more than 5 m and less than 50 m from the Home Point when RTH begins, it will return home
at the current altitude with a maximum horizontal speed of 3 m/s.
If the aircraft is further than 50 m from the Home Point when RTH begins, it will ascend to the RTH altitude
and return home at a horizontal speed of 12 m/s. The aircraft ies to the Home Point at the current altitude if
the RTH altitude is lower than the current altitude.
4. After reaching the Home Point, the aircraft lands and the motors stop.
During RTH, obstacles around and above the aircraft cannot be detected or avoided.
The aircraft cannot return to the Home Point if the GNSS signal is weak or unavailable. If the GNSS
signal becomes weak or unavailable after Failsafe RTH is triggered, the aircraft will hover for a while
before landing.
Before each ight, it is important to enter Settings and then Safety on the goggles and set a suitable
RTH altitude.
During RTH, if the aircraft is ying forward and the remote controller signal is normal, the DJI FPV
remote controller 2 can be used to control the speed of the aircraft, but cannot control the orientation
or y left or right. The orientation and horizontal position of the aircraft can be controlled when it is
descending. When the aircraft is ascending or ying forward, push the control stick completely in the
opposite direction to exit RTH.
The aircraft will hover if it ies into a GEO Zone during RTH.
The aircraft may not be able to return to the Home Point when the wind speed is too high. Fly with
caution.
Landing Protection
Landing Protection will activate during Smart RTH. Landing Protection is enabled once the aircraft begins to land.
1. Once Landing Protection determines that the ground is suitable, the aircraft will land gently.
2. If the ground is determined unsuitable for landing, the aircraft will exit landing, then hover and wait for pilot
conrmation.
3. If Landing Protection is not operational, the goggles will display a landing prompt when the aircraft descends
to 0.25 m. Press and hold the lock button on the motion controller, or pull down on the throttle stick of the
remote controller to land.
When flying in strong winds, the aircraft will save power for landing by automatically adjusting the
orientation to be consistent with the wind direction before landing.
The landing protection only works in certain scenarios and cannot replace the control and judgment of
the user. During landing, pay attention to the surrounding environment of the landing point and avoid
obstacles that are not suitable for landing such as trees, branches, and bushes.
© 2023 DJI All Rights Reserved.
22

DJI Avata
User Manual
Vision System and Infrared Sensing System
DJI Avata aircraft is equipped with both an Infrared Sensing System and a Downward Vision System.
The Downward Vision System consists of two cameras. The Infrared Sensing System consists of two 3D infrared
modules. The Downward Vision System and Infrared Sensing System help the aircraft maintain its current position,
hover more precisely, and to y indoors or in other environments where GNSS is unavailable.
Vision System
Infrared Sensing System
Vision System
Detection Range
The Downward Vision System works best when the aircraft is at an altitude of 0.5 to 10 m and its operating range
is 0.5 to 20 m. The FOV to the front and rear is 106° and 90° to the right and left.
90°
106°
90°
0.5-20 m
© 2023 DJI All Rights Reserved.
23

DJI Avata
User Manual
Calibrating Vision System Cameras
Auto Calibration
The Downward Vision System cameras installed on the aircraft are calibrated before shipping. If any abnormality
is detected with a vision system camera, the aircraft will automatically calibrate and a prompt will appear in the
goggles. No further action is required to address the issue.
Advanced Calibration
If the abnormality persists after auto calibration, a prompt appears in the goggles that advanced calibration is
required. Advanced calibration can only be performed using DJI Assistant 2 (Consumer Drones Series). Follow the
steps below to calibrate the vision system cameras.
1
Point the aircraft toward the screen.
2
Align the boxes. Pan and tilt the aircraft.
3
Using the Vision System
The positioning function of the Downward Vision System is applicable when the GNSS signals are unavailable or
weak. It is automatically enabled in Normal or Sport mode.
© 2023 DJI All Rights Reserved.
24

DJI Avata
User Manual
Pay attention to the ight environment. The Downward Vision System and Infrared Sensing System
only work in certain scenarios and cannot replace human control and judgment. During ight, pay
attention to the surrounding environment and to the warnings on the goggles. Be responsible for and
maintain control of the aircraft at all times.
The aircraft has a max hovering altitude of 20 m when using the vision system in an open and at
environment with clear texture. The best positioning altitude range of the vision system is 0.5 to 10 m.
The vision positioning performance may decrease when ying beyond this range. Fly with caution.
The Downward Vision System may not function properly when the aircraft is flying over water.
Therefore, the aircraft may not be able to actively avoid the water below when landing. It is
recommended to maintain flight control at all times, make reasonable judgments based on the
surrounding environment, and avoid over-relying on the Downward Vision System.
Note that the Downward Vision System and Infrared Sensing System may not function properly when
the aircraft is ying too fast.
The vision system cannot work properly over surfaces without clear pattern variations or where the
light is too weak or too strong. The vision system cannot work properly in the following situations:
a) Flying over monochrome surfaces (e.g., pure black, white, red, or green).
b) Flying over highly reective surfaces.
c) Flying over water or transparent surfaces.
d) Flying over moving surfaces or objects.
e) Flying in an area with frequent and drastic lighting changes.
f) Flying over extremely dark (< 10 lux) or bright (> 40,000 lux) surfaces.
g) Flying over surfaces that strongly reect or absorb infrared waves (e.g., mirrors).
h) Flying over surfaces without clear patterns or texture (e.g., power poles).
i) Flying over surfaces with repeating identical patterns or texture (e.g., tiles with the same design).
j) Flying over obstacles with small surface areas (e.g., tree branches).
Keep the sensors clean at all times. DO NOT tamper with the sensors. DO NOT use the aircraft in
environments with signicant dust or humidity. DO NOT obstruct the Infrared Sensing System.
If the aircraft is involved in a collision, it may be necessary to calibrate the vision system. Calibrate the
vision system if the app prompts you to do so.
DO NOT y when it is rainy, smoggy, or the visibility is lower than 100 m.
Check the following every time before takeo:
a) Make sure there are no stickers or any other obstructions over the glass of the Downward Vision
System and Infrared Sensing system.
b) Use soft cloth if there is any dirt, dust, or water on the glass of the Downward Vision System and
Infrared Sensing system. DO NOT use any cleaning product that contains alcohol.
c) Contact DJI Support if there is any damage to the glass of the Downward Vision System or Infrared
Sensing System.
Flight Recorder
Flight data including ight telemetry, aircraft status information, and other parameters are automatically saved
to the internal data recorder of the aircraft. The data can be accessed using DJI Assistant 2 (Consumer Drones
Series).
© 2023 DJI All Rights Reserved.
25

DJI Avata
User Manual
Propellers
There are two types of DJI Avata propellers, which are designed to spin in dierent directions. Make sure to match
the propellers and motors by following the instructions.
Propellers With Marks Without Marks
Illustration
Mounting Position Attach on motors with marks Attach on motors without marks
Attaching the Propellers
Flip the aircraft over so that the bottom is facing up, and mount the marked propellers onto the motors with
marks. Insert the propeller into the motor base, slightly rotate the propeller to align the positioning holes and insert
them, and then use a screwdriver to fasten the two screws. Mount the unmarked propellers to the motors without
marks.
© 2023 DJI All Rights Reserved.
26

DJI Avata
User Manual
Detaching the Propellers
Flip the aircraft so that the bottom is facing up, use a screwdriver to loosen the two screws and detach the
propellers from the motors.
Propeller blades are sharp. Handle with care.
Only use ocial DJI propellers. DO NOT mix propeller types.
Propellers are consumable components. Purchase additional propellers if necessary.
Make sure that the propellers and motors are installed securely before each ight.
Make sure that all propellers are in good condition before each ight. DO NOT use aged, chipped, or
broken propellers.
To avoid injury, stay away from rotating propellers or motors.
Make sure the motors are mounted securely and rotating smoothly. Land the aircraft immediately if a
motor is stuck and unable to rotate freely.
DO NOT attempt to modify the structure of the motors.
DO NOT touch or let hands or body parts come in contact with the motors after ight as they may be
hot.
DO NOT block any of the ventilation holes on the motors or the body of the aircraft.
Make sure the ESCs sound normal when powered on.
© 2023 DJI All Rights Reserved.
27

DJI Avata
User Manual
Intelligent Flight Battery
The Avata Intelligent Flight Battery is a 14.76 V, 2420 mAh battery with smart charging and discharging
functionality.
Battery Features
1. Battery Level Display: The battery level LEDs display the current battery level.
2. Auto-Discharging Function: To prevent swelling, the battery automatically discharges to approximately 96%
of the battery level when it is idle for one day, and approximately 60% when idle for ve days. It is normal to
feel moderate heat from the battery, while it is discharging.
3. Balanced Charging: During charging, the voltages of the battery cells are automatically balanced.
4. Overcharge Protection: The battery stops charging automatically once fully charged.
5. Temperature Detection: To prevent damage, the battery only charges when the temperature is between 5°
and 40° C (41° and 104° F). Charging stops automatically if the temperature of the battery exceeds 50° C
(122° F) during charging.
6. Overcurrent Protection: The battery stops charging if an excess current is detected.
7. Over-Discharge Protection: Discharging stops automatically to prevent excess discharge when the battery is
not in use. Over-discharge protection is not enabled when the battery is in use.
8. Short Circuit Protection: The power supply is automatically cut if a short circuit is detected.
9. Battery Cell Damage Protection: DJI goggles display a warning prompt when a damaged battery cell is
detected.
10. Hibernation Mode: The battery switches o after 20 minutes of inactivity to save power. If the battery level
is less than 10%, the battery enters Hibernation mode to prevent over-discharge after being idle for six
hours. In Hibernation mode, the battery level indicators do not illuminate. Charge the battery to wake it from
hibernation.
11. Communication: Information about the voltage, capacity, and current of the battery is transmitted to the
aircraft.
Refer to the DJI Avata Safety Guidelines and the stickers on the battery before use. Users shall take full
responsibility for all operations and usage.
Using the Battery
Checking the Battery Level
Press the power button once to check the battery level.
© 2023 DJI All Rights Reserved.
28
Power Button
LED1
LED2
LED3
LED4
Battery Level LEDs

DJI Avata
User Manual
The battery level LEDs display the power level of the battery during charging and discharging. The
statuses of the LEDs are dened below:
LED is on. LED is o. LED is blinking.
LED1 LED2 LED3 LED4 Battery Level
89%-100%
76%-88%
64%-75%
51%-63%
39%-50%
26%-38%
14%-25%
1%-13%
Powering On/Off
Press the power button once and then press again and hold for two seconds to power the aircraft on or o. The
battery level LEDs display the battery level when the aircraft is powered on. The battery level LEDs turn o when
the aircraft is powered o.
Low Temperature Notice
1. Battery capacity is signicantly reduced when ying at low temperatures from -10° to 5° C (14° to 41° F). Make
sure to fully charge the battery before takeo.
2. Batteries cannot be used in extremely low-temperature environments lower than -10° C (14° F).
3. When in low-temperature environments, end the ight as soon as the goggles display the low battery voltage
warning.
4. To ensure optimal performance, keep the battery temperature above 20° C (68° F).
5. The reduced battery capacity in low-temperature environments reduces the wind speed resistance
performance of the aircraft. Fly with caution.
6. Fly with extra caution at high altitudes.
In cold environments, insert the battery into the battery compartment and power on the aircraft to
warm up before taking o.
Charging the Battery
Fully charge the battery before each use.
1. Charge with a USB charger and connect it to an AC outlet (100-240V, 50/60 Hz). Use a power adapter if
necessary.
2. Connect the Intelligent Flight Battery to the USB charger using DJI Avata Adapter with the battery powered o.
3. The battery level LEDs display the current battery level during charging.
4. The Intelligent Flight Battery is fully charged when all the battery level LEDs are o. Detach the adapter when
the battery is fully charged.
© 2023 DJI All Rights Reserved.
29

DJI Avata
The table below shows the battery level during charging.
User Manual
≥30 W
USB PD
It is recommended to use the DJI 30W USB-C Charger or other USB Power Delivery chargers.
The charging time is approximately 90 minutes.
For safety purposes, keep the batteries at a low power level in transit. Before transportation, it is
recommended to discharge the batteries to 30% or lower.
DO NOT charge an Intelligent Flight Battery immediately after ight as it may be too hot. Wait for the
battery to cool down to room temperature before charging again.
The charger stops charging the battery if the cell temperature is not within 5° to 40° C (41° to 104° F).
The ideal charging temperature is from 22° to 28° C (71.6° to 82.4° F).
The Battery Charging Hub (not included) can charge up to four batteries. Visit the ocial DJI online
store for more information.
Fully charge the battery at least once every three months to maintain battery health.
DJI does not take any responsibility for damage caused by not using DJI Avata Adapter or DJI Avata
Battery Charging Hub.
LED1 LED2 LED3 LED4 Battery Level
1%-50%
51%-75%
76%-99%
100%
DJI Avata Adapter Status LED Descriptions
LED Indicator Description
Solid yellow No battery attached
Pulses green Charging
Solid green Fully charged
Blinks yellow Temperature of battery too low or too high (no further operation needed)
Solid red Power supply or battery error (unplug and plug the batteries or charger to resume charging)
© 2023 DJI All Rights Reserved.
30

DJI Avata
User Manual
Battery Protection Mechanisms
The battery level LEDs can display battery protection notications triggered by abnormal charging conditions.
Battery Protection Mechanisms
LED1 LED2 LED3 LED4
Blinking Pattern Status
LED2 blinks twice per second Overcurrent detected
LED2 blinks three times per second System abnormal
LED3 blinks twice per second Overcharge detected
LED3 blinks three times per second
LED4 blinks twice per second
LED4 blinks three times per second
Over-voltage charger
detected
Charging temperature
is too low
Charging temperature
is too high
LED4 blinks four times per second Non-DJI adapter
If any of the battery protection mechanisms are activated, unplug the charger, and plug it in again to resume
charging. If the charging temperature is abnormal, wait for it to return to normal and the battery will automatically
resume charging without the need to unplug and plug the charger again.
Installing/Removing the Battery
Install the Intelligent Flight Battery in the aircraft before use. Insert the Intelligent Flight Battery into the battery
compartment of the aircraft. Make sure it is mounted securely and that the battery buckles are clicked into place
before connecting it to the power port.
Click
1
2
Disconnect the power port, press the battery buckles on the sides of the Intelligent Flight Battery, and remove it
from the compartment.
2
DO NOT insert or remove the battery while the aircraft is powered on.
Make sure the battery is mounted securely.
© 2023 DJI All Rights Reserved.
31
1
3

DJI Avata
User Manual
Maintenance
Return to home or land promptly if a prompt appears in the goggles that the Intelligent Flight Battery requires
maintenance.
1. Fully charge the battery.
2. Leave the battery for 24 hours.
3. Insert the battery in the aircraft and hover at an altitude of up to 2 m after takeo. When the battery reaches
20%, land the aircraft and power o, and remove the battery.
4. Leave the battery for 6 hours.
5. Maintenance should now be complete and the battery is ready to use. Repeat the steps above if the
maintenance prompt continues to appear in the goggles.
Gimbal and Camera
Gimbal Prole
The gimbal of DJI Avata stabilizes the camera and supports tilt angle adjustment, allowing you to capture clear
and steady images and videos at high ight speed. The control tilt range is -80° to +65°. Use the remote control
devices to control the tilt of the camera.
65°
0°
-80°
Gimbal Mode
The gimbal mode will automatically switch according to the ight mode.
Normal/Sport mode: the gimbal is in attitude stabilization mode. The tilt angle of the gimbal remains stable relative
to the horizontal plane.
Manual mode: the gimbal is in lock mode. The tilt angle of the gimbal remains stable relative to the aircraft body.
DO NOT tap or knock the gimbal after the aircraft is powered on. Launch the aircraft from open and
at ground to protect the gimbal during takeo.
Precision elements in the gimbal may be damaged in a collision or impact, which may cause the
gimbal to function abnormally.
Avoid getting dust or sand on the gimbal, especially in the gimbal motors.
A gimbal motor error may occur if the aircraft is on uneven ground, the gimbal is obstructed, or the
gimbal experiences a collision or crash.
DO NOT apply external force to the gimbal after the gimbal is powered on. DO NOT add any extra
payload to the gimbal as this may cause the gimbal to function abnormally or even lead to permanent
motor damage.
Make sure to remove the gimbal protector before powering on the aircraft. Make sure to mount the
gimbal protector when the aircraft is not in use.
Flying in heavy fog or clouds may make the gimbal wet, leading to temporary failure. The gimbal will
recover full functionality once it is dry.
© 2023 DJI All Rights Reserved.
32

DJI Avata
User Manual
Camera
DJI Avata uses a 1/1.7" CMOS sensor camera with up to 12 million eective pixels. The aperture of the lens is
F2.8, the focus range is 0.6 m to innity, and the FOV of the lens can reach 155°.
DJI Avata camera can shoot up to 4K 60fps HD video and 4K photos.
Make sure the temperature and humidity are suitable for the camera during use and storage.
Use a lens cleanser to clean the lens to avoid damage or poor image quality.
DO NOT block any ventilation holes on the gimbal and camera as the heat generated may damage the
device and cause harm.
Storing Photos and Videos
DJI Avata has 20 GB of built-in storage and supports the use of a microSD card to store photos and videos. A
UHS-I Speed Grade 3 rating or above microSD card is required due to the fast read and write speeds necessary
for high-resolution video data. Refer to the Specications for more information about recommended microSD
cards.
Photos and videos recorded by the aircraft can be previewed. Insert the microSD card of the aircraft
into the microSD card slot of the goggles.
DO NOT remove the microSD card from the aircraft while it is powered on. Otherwise, the microSD
card may be damaged.
Check camera settings before use to ensure they are congured correctly.
Before shooting important photos or videos, shoot a few images to test whether the camera is
operating correctly.
Make sure to power o the aircraft correctly. Otherwise, the camera parameters will not be saved and
any recorded videos may be aected. DJI is not responsible for any loss caused by an image or video
recorded in a way that is not machine-readable.
© 2023 DJI All Rights Reserved.
33
Goggles
3
1
2
DJI Goggles 2
DJI Goggles 2 are equipped with high-performance dual displays and ultra-low-latency image transmission for
use with DJI aircraft, giving you a real-time aerial FPV (First Person View) experience. The wireless streaming
function enables you to project the live-feed from your mobile phone or computer to the goggles screen, bringing
you an immersive viewing experience. DJI Goggles 2 support the Head Tracking function. With this function, the
aircraft and gimbal can be controlled through head movements. When used with the DJI Motion Controller, you
can control the aircraft and the gimbal camera freely to meet your shooting needs in various scenarios. The touch
panel enables you to easily complete operations using only one hand while watching the screen. To provide a
more comfortable experience for users who are visually impaired, the goggles support diopter adjustment so that
glasses are not required during use.
Power Supply
Use the power cable provided to connect the power port of the goggles to the goggles battery.
3
1
2
Press the power button once to check the current battery level.
Press once, then press again and hold for two seconds to power the goggles on or o.
It is recommended to use a USB Power Delivery charger when the battery of the googles is low.
© 2023 DJI All Rights Reserved.
34
< 2.8 mm
DJI Avata
User Manual
Using the Eyeglass Frames
The goggles support diopter adjustment in the range of -8.0 D to +2.0 D. The goggles do not support astigmatism
correction. If you require astigmatism correction or the goggles’ diopter is unsuitable, you can purchase additional
lenses and use the eyeglass frames to install them on the goggles.
When purchasing lenses, bring the eyeglass frames (a pair) to a professional optical shop to ensure
that the shape, size, astigmatism axis, and edge thickness (< 2.8 mm) of the lenses meet the
installation requirements of the eyeglass frames.
The overall diopter is the sum of the goggles’ diopter and the diopter of the additional lenses. Make
sure to adjust the diopter of the goggles rst and lock the knobs before installing the eyeglass frames.
If the installed lens supports astigmatism correction, do not rotate the knob after the eyeglass frame is
installed. Otherwise, the astigmatism axis will shift resulting in blurred vision. Make sure to adjust the
diopter of the goggles before installing the eyeglass frames.
1. Detach the eyeglass frame and remove the original dummy lens.
2. Install the prepared lens as shown. Make sure to distinguish the left lens and the right one.
< 2.8 mm
3. Adjust the diopter of the goggles according to your needs and lock the knobs.
For example, if you usually wear -6.0 D glasses and the self-prepared lens is -3.0 D, then you will need to
adjust the diopter of the goggles to -3.0 D to ensure that the overall diopter is -6.0 D after the eyeglass frame
is installed on the goggles.
© 2023 DJI All Rights Reserved.
35
15min
10min
1.8km/h
1024.4mD500m
H
20.5km/h
80
20
75%
12'59''
15min
10min
1.8km/h
1024.4mD500m
H
20.5km/h
80
20
75%
12'59''
15min
10min
1.8km/h
1024.4mD500m
H
20.5km/h
80
20
75%
12'59''
Manual
Mode
300
ISO
1/200
Shuttle
5.5
Apeture+3M.M
ManualWB1200K
DJI Avata
User Manual
4. Install the left and right frames onto the goggles. When installing, make sure that the mark on the top of
the frame is facing upwards, and the triangular arrow is aligned with the white dot on the upper edge of the
goggle lens.
L
R
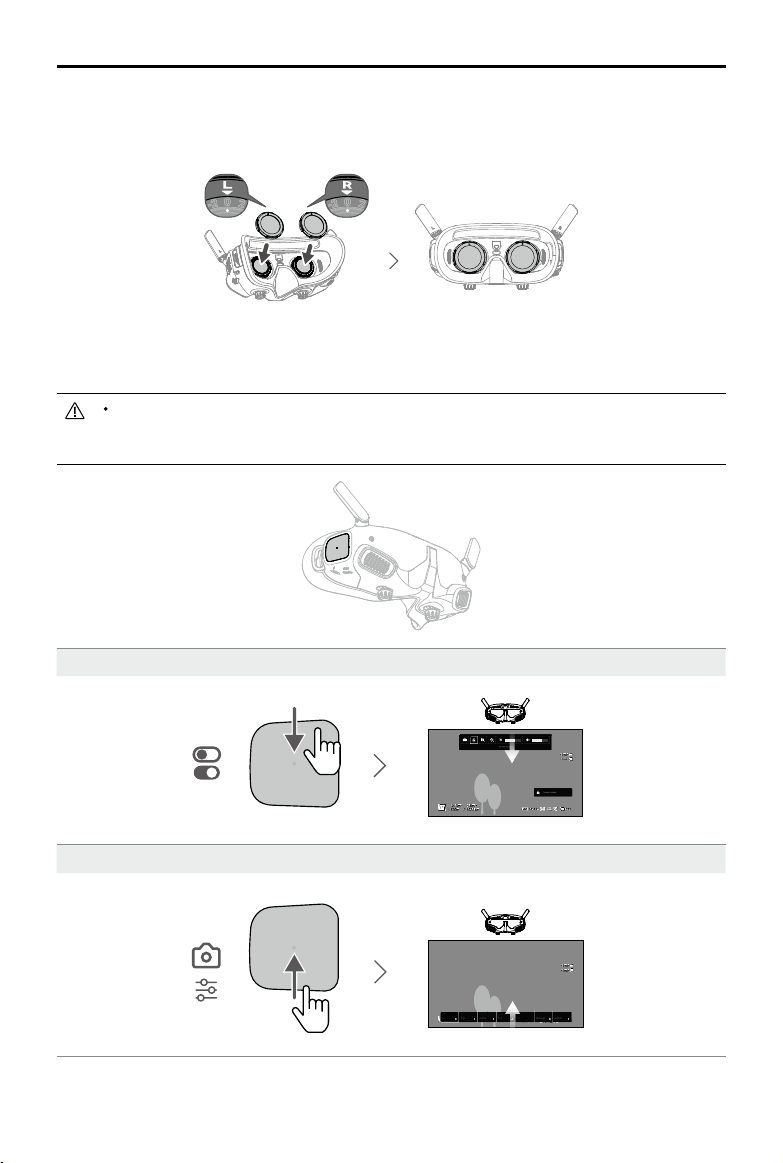
Operation
The touch panel enables you to operate with only one hand.
To ensure ight safety when using the motion controller, press the brake button once to brake and
hover before operating the touch panel of the goggles. Failure to do so is a safety risk and may lead to
the aircraft losing control or injury.
Swipe down from the top: Enter the shortcut menu
Swipe up from the bottom: Enter the camera settings
© 2023 DJI All Rights Reserved.
36

15min
10min
1.8km/h
1024.4mD500m
H
20.5km/h
80
20
75%
12'59''
15min
10min
1.8km/h
1024.4mD500m
H
20.5km/h
80
20
75%
12'59''
Manual
Mode
300
ISO
1/200
Shuttle
5.5
Apeture+3M.M
ManualWB1200K
15min
10min
Status
Album
Transmission
Setting
More
15min
10min
80
20
75%
12'59''
15min
10min
80
20
75%
12'59''
5.5
Apeture+3M.M
ManualWB1200K
15min
10min
15min
10min
80
20
75%
12'59''
15min
10min
80
20
75%
12'59''
5.5
Apeture+3M.M
ManualWB1200K
15min
10min
15min
10min
1.8km/h
1024.4mD500m
H
20.5km/h
80
20
75%
12'59''
15min
10min
1.8km/h
1024.4mD500m
H
20.5km/h
80
20
75%
12'59''
Manual
Mode
300
ISO
1/200
Shuttle
5.5
Apeture+3M.M
ManualWB1200K
15min
10min
Status
Album
Transmission
Setting
More
15min
10min
1.8km/h
1024.4mD500m
H
20.5km/h
80
20
75%
12'59''
15min
10min
1.8km/h
1024.4mD500m
H
20.5km/h
80
20
75%
12'59''
Manual
Mode
300
ISO
1/200
Shuttle
5.5
Apeture+3M.M
ManualWB1200K
Status
Album
Transmission
Setting
More
DJI Avata
User Manual
Swipe right from the left: Enter the menu
Swipe up/down/right/left: Navigate the menu Single tap: Conrm/Select
Tap with two ngers: Back
Press and hold with two ngers on the Home Screen:
Lock/Unlock the screen
When playing video:
Swipe left/right: Control the progress
bar
Swipe up/down: Adjust volume Tap once: Pause/Play
When operating the touch panel, use slow and precise swipes to maximize function accuracy.
You can change the setting to enter the menu by swiping left to right. Go to Settings > Control > Invert
Horizontal Swipe to make the changes.
© 2023 DJI All Rights Reserved.
37

DJI Avata
User Manual
Home Screen
1
2
3
14
4
5678910111213
1. Flight Direction Indicator
When the motion controller is stationary, it indicates the midpoint of the screen. When the motion controller is
moved, it indicates the change of the aircraft orientation or gimbal tilt.
2. Storage Information
Displays the remaining capacity of the aircraft and goggles. A ashing icon will appear when recording.
3. Gimbal Slider
Displays the gimbal tilt angle when the gimbal slider or dial is toggled.
4. Prompts
Displays notications and information such as when a new mode is applied or battery level is low.
5. Goggles Battery Level
Displays the battery level of the goggles.
6. GNSS Status
Displays the current strength of the aircraft GNSS signal.
7. Video Bitrate
Displays the current video bitrate of the live view.
8. Remote Control Device and Video Downlink Signal Strength
Displays the remote control signal strength between the aircraft and remote control device and the video
downlink signal strength between the aircraft and the goggles.
When the remote control or image transmission signals are weak, a visual prompt will display at the bottom of
the screen. The user can keep ying or perform RTH.
Orange: moderately weak signal
Red: weak signal
© 2023 DJI All Rights Reserved.
38

DJI Avata
9. Remaining Flight Time
Displays the remaining ight time of the aircraft after starting the motors.
10. Aircraft Battery Level
11. Distance to the Ground
Displays the current altitude information of the aircraft from the ground when the aircraft is less than 10 m
12. Flight Telemetry
Displays the horizontal distance (D) and speed as well as vertical distance (H) and speed between the aircraft
13. Flight Modes
Displays the current ight mode.
14. Home Point
Indicates the location of the Home Point.
User Manual
above the ground.
and the Home Point.
The goggles will display the screen saver if they are disconnected from the aircraft and not used for an
extended period. Tap the touch panel to exit the screen saver. Reconnect the goggles to the aircraft
and image transmission will be restored.
If the devices are not used for an extended period, it may take longer than usual to search for the
GNSS signal. If the signal is unobstructed, it takes approximately 20 seconds to search for the GNSS
signal when powering on and o within a short period.
If you select to record with both the aircraft and the goggles, the storage information of both the
aircraft and goggles will be displayed on the home screen. If you select to record with only the aircraft
or goggles, only the storage information of the corresponding device will be displayed.
Menu
Shortcut Menu
Swipe down from the top of the touch panel to enter the shortcut menu and perform the following functions:
• Start/stop recording • Lock/unlock the screen
• Enable/disable Enhanced Display • Enable/disable Head Tracking
• Adjust brightness • Adjust volume
© 2023 DJI All Rights Reserved.
39

DJI Avata
User Manual
Camera Settings
Swipe up from the bottom of the touch panel to enter the camera settings to change the camera parameters.
Menu
Swipe right from the left of the touch panel to open the goggles menu.
1
2
3
4
5
1. Status
Displays the in-use aircraft model and detailed information of prompt alerts. To change aircraft, use the switch
function in the upper right corner.
2. Album
Shows the photos or videos stored on the microSD of the goggles. Select the le and conrm to preview.
© 2023 DJI All Rights Reserved.
40

DJI Avata
3. Transmission
The Transmission menu has a Pilot sub-menu and Audience sub-menu.
4. Settings
User Manual
• The video transmission settings for the current device can be set under the Pilot sub-menu, including but
not limited to:
a. Enable or disable the broadcast mode. The device number will be displayed when Broadcast mode is
enabled so that other devices can nd the device and enter the channel to see the camera view.
b. Set the focus mode to on, o, or auto. If Focus mode is turned on, the center of the screen will be
clearer and the edges will be blurred.
c. Set the channel mode to auto or manual. It is recommended to select auto so that the video
transmission will intelligently select the channel with the best signal.
d. Set the frequency band. Only 5.8 GHz frequency band is supported.
e. Set the bandwidth of the video transmission. The number of channels available varies according to the
bandwidth. The channel with the best signal strength can be manually selected.
The larger the bandwidth, the more spectrum resources it occupies, which provides a higher video
transmission rate and clearer image quality. However, there will also be a higher chance of wireless
interference and the amount of equipment that can be accommodated will be more limited. To avoid
interference in a multiplayer scenario, manually select a xed bandwidth and channel.
• If any nearby video transmission device turns on the Broadcast mode, the device and its signal strength can
be viewed in the Audience sub-menu. Select a channel to see the camera view.
• Safety
a. Set the safety congurations such as max ight altitude, max ight distance, and RTH altitude. Users
can also update the Home Point, and view the IMU and compass status and calibrate them if necessary.
b. Find My Drone helps to nd the location of the aircraft on the ground by using the cached video in the
goggles. If the aircraft still has battery, turn on ESC beeping to help nd the aircraft using sound.
c. Advanced Safety Settings include aircraft signal lost action, enabling/disabling AirSense, and emergency
propeller stop. The aircraft can be set to hover, land, or RTH when it loses the signal from the remote
control devices. If the emergency propeller stop is enabled, the motors can be stopped mid-flight
anytime by pressing the lock button twice on the motion controller or performing a combination stick
command (CSC) on the remote controller. If the switch is disabled, the motors can only be stopped midight with the same control action in an emergency situation, such as if a collision occurs, a motor stalls,
the aircraft rolls in the air, or is out of control and is ascending or descending quickly.
Stopping the motors mid-flight will cause the aircraft to crash.
• Control
a. Set stick mode and customize functions of certain remote controller buttons in Remote Controller. The
exponential can be adjusted when using Manual mode. Users can also calibrate the remote controller.
b. Calibrate the motion controller, or view its tutorial video.
c. Calibrate the gimbal or adjust the gimbal tilt speed.
d. Set the unit, or invert horizontal swipe for the touch panel.
e. Use ip function.
f. Watch the goggles tutorial.
• Camera
a. Set video quality, camera FOV, EIS (electronic image stabilization), gridlines, enable or disable the
center point of the screen, and format the microSD card. Note that the data cannot be recovered after
formatting. Operate with caution.
b. In Advanced Camera Settings, users can set the recording device, color, and anti-icker, as well as
enable or disable auto record on takeo, and video subtitles.
c. Select Reset Camera Parameters to restore all camera settings to default.
© 2023 DJI All Rights Reserved.
41

DJI Avata
Adjust screen brightness, zoom, and display or hide the Home Point.
5. More
The wireless streaming function enables you to cast the video playing on the mobile device to the goggles
User Manual
• Display
• About
a. View device information, such as the serial number and the rmware of the goggles and linked devices.
b. Select the system language.
c. Select Reset All to reset the goggles and the linked devices to their default settings.
d. Select Clear All Data to clear all aircraft data, including data in the aircraft internal storage and SD card,
unlocking licenses, aircraft logs, and other user data stored on the aircraft, and the aircraft will be reset
to the default settings.
The cleared data cannot be restored. Perform with caution.
screen (the video player must support the screen casting function).
Using the Head Tracking Function
DJI Avata supports a head tracking function, which can be enabled by clicking in the shortcut menu of the
goggles.
After enabling the head tracking, the horizontal orientation of the aircraft and the gimbal tilt can be controlled
through head movements. The remote control device will only control the ight path of the aircraft. The gimbal will
not be able to be controlled by the remote control device.
Using the Wireless Streaming Function
The wireless streaming function enables you to project the video playing on your mobile phone or computer to the
goggles display. For this to work, the video player must support screen casting.
To use this function, open the goggles menu and select More, then tap Wireless Streaming and follow the onscreen instructions.
© 2023 DJI All Rights Reserved.
42

DJI Avata
User Manual
DJI FPV Goggles V2
The DJI FPV Goggles V2 are equipped with a high-performance display and support 810p 120fps HD display
and real-time audio transmission. By receiving the video signal from the aircraft, users can enjoy a rst-person
view of their aerial experience in real-time. They can also be used to play videos recorded by the goggles and set
transmission, control, and camera parameters.
Power Supply
Use the included goggles power cable (USB-C) to connect the power port of the goggles to the goggles battery.
Press the power button once to check the current battery level.
Press once, then press again and hold for two seconds to power the goggles on or o.
Charge the goggles battery if the battery level is low.
© 2023 DJI All Rights Reserved.
43
5V, 1A

DJI Avata
Operation
User Manual
5D Button
Toggle the button to scroll through the menu. Press the
button to conrm.
On the home screen, press the button to enter
the menu. Toggle left or right to adjust the screen
brightness. Toggle up or down to adjust the volume.
During video playback, press the 5D button to pause or
continue, toggle the 5D button left or right to adjust the
progress bar, and toggle up or down to adjust the volume.
Channel Adjustment
Buttons
Press the up or down button to
switch channels (only available
when in manual channel mode).
Shutter/Record Button
Press once to take photos or start or stop recording.
Press and hold to switch between photo and video mode.
Back Button
Press to return to the previous menu or exit the current
mode.
Home Screen
13
Channel Display
Displays the current channel of
the goggles (will display A when
in auto channel mode).
1
2
3
4
© 2023 DJI All Rights Reserved.
44
56789101112

DJI Avata
1. Flight Direction Indicator
When the motion controller is stationary, it indicates the midpoint of the screen. When the motion controller is
2. Storage Information
Displays the remaining capacity of the aircraft and goggles. A ashing icon will appear when recording.
3. Gimbal Slider
Displays the gimbal tilt angle when the gimbal slider or dial is toggled.
4. Prompts
Displays notications and information such as when a new mode is applied or battery level is low.
5. Goggles Battery Level
Displays the battery level of the goggles. The goggles will beep when the battery level is too low.
6. GNSS Status
Displays the current GNSS signal strength.
7. Remote Control Device and Video Downlink Signal Strength
Displays the remote control signal strength between the aircraft and remote control device and the video
8. Remaining Flight Time
Displays the remaining ight time of the aircraft after starting the motors.
9. Aircraft Battery Level
Displays the current battery level of the Intelligent Flight Battery on the aircraft.
10. Distance to the Ground
Displays the current altitude information of the aircraft from the ground when the aircraft is less than 10 m
11. Flight Telemetry
Displays the horizontal distance (D) and speed as well as vertical distance (H) and speed between the aircraft
12. Flight Modes
Displays the current ight mode.
13. Home Point
Indicates the location of the Home Point.
User Manual
moved, it indicates the change of the aircraft orientation or gimbal tilt.
downlink signal strength between the aircraft and the goggles.
above the ground.
and the Home Point.
The goggles will display the screen saver if they are not used for an extended period or disconnected
from the aircraft. Press any button of the goggles or relink them to the aircraft to restore the video
transmission display.
If the devices are not used for an extended period, it may take longer than usual to search for the
GNSS signal. If the signal is unobstructed, it takes approximately 20 seconds to search for the GNSS
signal when powering on and o within a short period.
If you select to record with both the aircraft and the goggles, the storage information of both the
aircraft and goggles will be displayed on the home screen. If you select to record with only the aircraft
or goggles, only the storage information of the corresponding device will be displayed.
© 2023 DJI All Rights Reserved.
45

DJI Avata
User Manual
Menu
Press the 5D button on the goggles to enter the menu bar.
1
2
3
4
1. Status
Displays detailed information for current status warning prompts.
2. Album
Shows the photos or videos stored on the microSD of the goggles. Select the le and conrm to preview.
3. Transmission
The Transmission menu has a Pilot sub-menu and Audience sub-menu.
• The video transmission mode for the current device can be set under the Pilot sub-menu, including but not
limited to:
a. Enable or disable the broadcast mode. The device number will be displayed when Broadcast mode is
enabled so that other devices can nd the device and enter the channel to see the camera view.
b. Set the focus mode to on, o, or auto. If Focus mode is turned on, the center of the screen will be
clearer and the edges will be blurred.
c. Set the channel mode to auto or manual. It is recommended to select auto so that the video
transmission will intelligently select the channel with the best signal.
d. Set the frequency band. Only 5.8 GHz frequency band is supported.
e. Set the bandwidth of the video transmission. The number of channels available varies according to the
bandwidth. The channel with the best signal strength can be manually selected.
The larger the bandwidth, the more spectrum resources it occupies, which provides a higher video
transmission rate and clearer image quality. However, there will also be a higher chance of wireless
interference and the amount of equipment that can be accommodated will be more limited. To avoid
interference in a multiplayer scenario, manually select a xed bandwidth and channel.
• If any nearby video transmission device turns on the Broadcast mode, the device and its signal strength can
be viewed in the Audience sub-menu. Select a channel to see the camera view.
4. Settings
• Safety
a. Set the safety congurations such as max ight altitude, max ight distance, and RTH altitude. Users
can also update the Home Point, and view the IMU and compass status and calibrate them if necessary.
b. Find My Drone helps to nd the location of the aircraft on the ground by using the cached video in the
goggles.
© 2023 DJI All Rights Reserved.
46

DJI Avata
Set the parameters for the remote controller or the motion controller. Calibrate the gimbal or adjust aircraft
Adjust screen brightness, zoom, and display or hide the Home Point.
User Manual
c. Advanced Safety Settings include aircraft signal lost action, enabling/disabling AirSense, and emergency
propeller stop. The aircraft can be set to hover, land, or RTH when it loses the signal from the remote
controller devices. If the emergency propeller stop is enabled, the motors can be stopped mid-ight
anytime by pressing the lock button twice on the motion controller or performing a combination stick
command (CSC) on the remote controller. If the switch is disabled, the motors can only be stopped midight with the same control action in an emergency situation, such as if a collision occurs, a motor stalls,
the aircraft rolls in the air, or is out of control and is ascending or descending quickly.
Stopping the motors mid-flight will cause the aircraft to crash.
• Control
parameters such as the gimbal tilt speed.
• Camera
a. Camera parameters such as ISO, shutter, EV, and WB can be adjusted. Also, the camera mode can be
set to auto or manual.
b. Set video quality, camera FOV, EIS (electronic image stabilization), gridlines, enable or disable the
center point of the screen, and format the microSD card. Note that the data cannot be recovered after
formatting. Operate with caution.
c. In Advanced Camera Settings, users can set the recording device, color, and anti-icker, as well as
enable or disable auto record on takeo, and video subtitles.
d. Select Reset Camera Parameters settings to restore all camera settings to default.
• Display
• About
a. View device information, such as the serial number and the rmware of the goggles and linked devices.
b. Select the system language.
c. Select Reset All to reset the goggles and the linked devices to their default settings.
d. Switch aircraft model.
© 2023 DJI All Rights Reserved.
47

Remote Control Devices
DJI Motion Controller
When used with the goggles, the DJI Motion Controller provides an immersive and intuitive ying experience that
allows users to easily control the aircraft using hand movements. Built into the DJI Motion Controller is DJI's O3+
transmission technology, oering a maximum transmission range of 6 mi (10 km). The motion controller works at
both 2.4 and 5.8 GHz and is capable of selecting the best transmission channel automatically.
Operation
Powering On/Off
Press the power button once to check the current battery level. Charge before using if the battery level is too low.
Press once then press again and hold for two seconds to power the motion controller on or o.
Charging the Battery
Use a USB-C cable to connect a charger to the USB-C port of the motion controller.
5V, 1A/2A
USB Power Delivery chargers are not supported.
Controlling the Camera
1. Shutter/Record Button: Press once to take a photo or to start or stop recording. Press and hold to switch
between photo and video mode.
2. Gimbal Tilt Slider: Push up or down to adjust the tilt of the gimbal (only available before takeo, during RTH or
landing).
Gimbal Tilt Slider
Shutter/Record Button
© 2023 DJI All Rights Reserved.
48
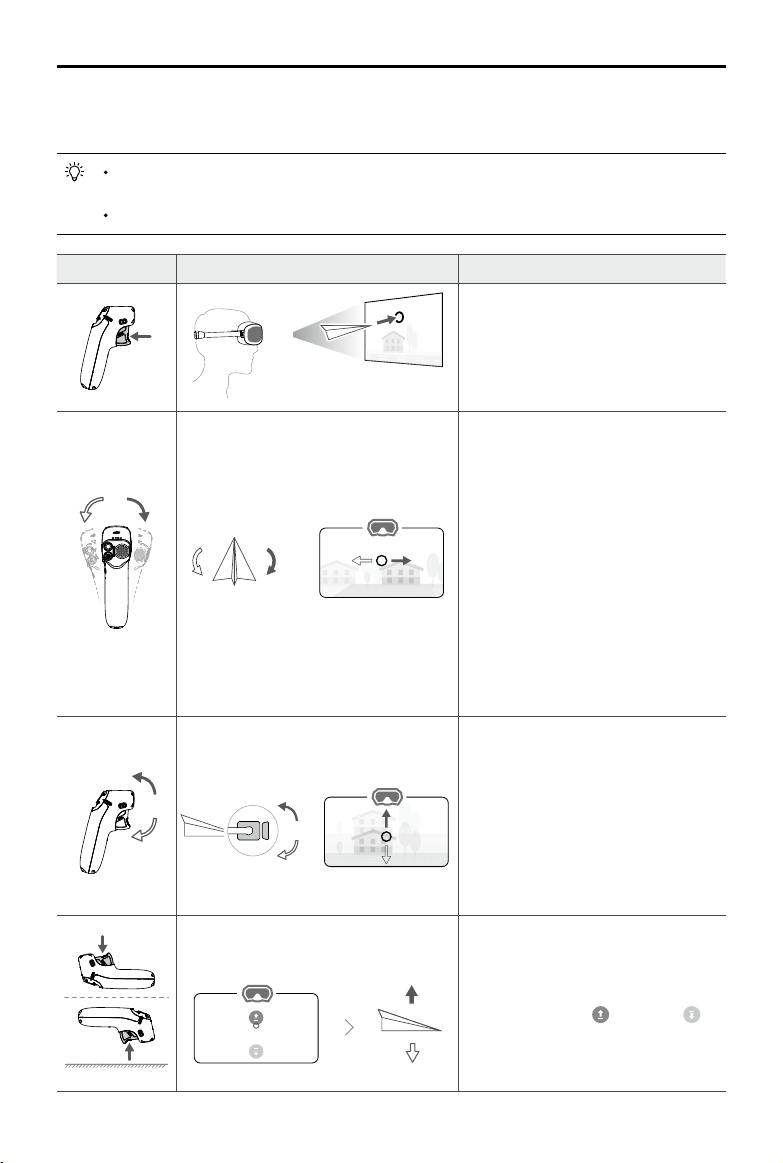
DJI Avata
User Manual
Controlling the Aircraft
The motion controller has two modes: Normal mode and Sport mode. Normal mode is selected by default.
It is recommended to watch the tutorial video in the goggles before using for the rst time. Go to
Settings > Control > Motion Controller > Flight Control > First Flight Tutorial.
Before using for the rst time, practice ying with the motion controller using DJI Virtual Flight.
Motion Controller Aircraft & Goggles Screen Remarks
Press the accelerator to y in the direction
of the circle in the goggles.
Apply more pressure to accelerate. Release
to stop and hover.
The orientation of the aircraft can be
controlled by tilting the motion controller
left and right.
Tilt left to rotate the aircraft
counterclockwise and tilt right to rotate
clockwise. The aircraft hovers in place if the
motion controller is vertically xed.
The tilt angle corresponds to the angular
velocity of the rotation of the aircraft.
The greater the tilt angle of the motion
controller, the faster the aircraft will rotate.
The circle in the goggles will move left
and right and the video transmission will
change accordingly.
Tilt the motion controller up or down to
control the tilt of the gimbal.
The tilt of the gimbal changes with the tilt
of the motion controller accordingly and is
always consistent with the orientation of
the motion controller.
The circle in the goggles will move up
and down and the video transmission will
change accordingly.
© 2023 DJI All Rights Reserved.
49
To control the ascent or descent of the
aircraft, rst tilt the motion controller 90°
up or down. Once the circle in the goggles
goes into the ascend or descend
icon, press the accelerator to make the
aircraft ascend or descend.

DJI Avata
User Manual
Lock Button
Mode Button
Brake Button
Lock Button
Press twice to start the motors of the aircraft.
Press and hold to make the aircraft take o automatically, ascend to approximately 1.2 m, and hover.
Press and hold while the aircraft is hovering to land it automatically and stop the motors.
Press once to cancel the Low Battery RTH countdown when the prompt appears in the goggles, and the aircraft
will not enter the Lower Battery RTH.
Critical Low Battery landing cannot be canceled.
Brake Button
Press once to make the aircraft brake and hover in place. Press again to unlock the attitude.
When the aircraft is performing RTH or auto landing, press the button once to cancel RTH or landing.
Press and hold the brake button until the motion controller beeps to indicate that RTH has started. Press the
button again to cancel RTH and regain control of the aircraft.
Mode Button
Press once to switch between Normal and Sport mode. The current mode is displayed in the goggles.
Motion Controller Alert
The motion controller sounds an alert during RTH. The alert cannot be canceled. The motion controller sounds an
alert when the battery level is 6% to 15%. A low battery level alert can be canceled by pressing the power button.
A critical battery level alert will sound when the battery level is less than 5% and cannot be canceled.
© 2023 DJI All Rights Reserved.
50
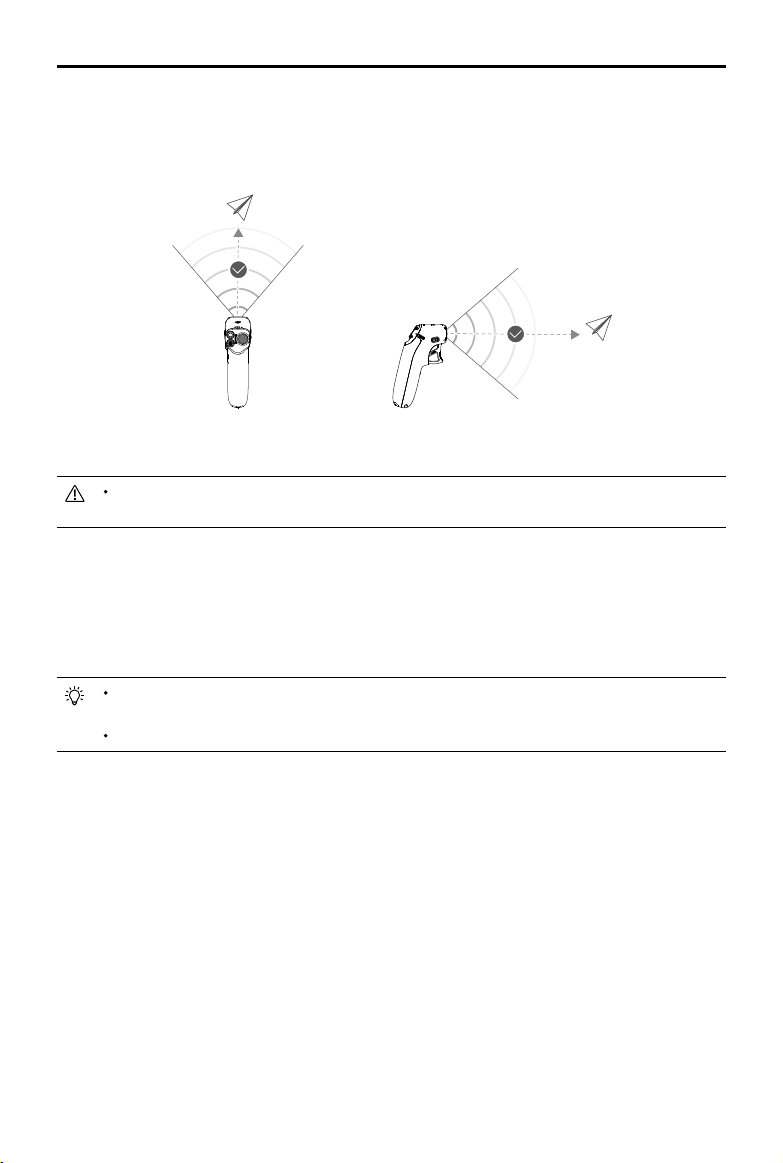
DJI Avata
User Manual
Optimal Transmission Zone
The signal between the aircraft and the motion controller is most reliable when the motion controller is positioned
in relation to the aircraft as shown below.
Optimal Transmission Zone
In order to avoid interference, DO NOT use other wireless devices on the same frequency as the
motion controller.
Motion Controller Calibration
The compass, IMU, and accelerator of the motion controller can be calibrated. Immediately calibrate any of the
modules when prompted to do so.
On the linked goggles, go to Settings > Control > Motion Controller > Motion Controller Calibration. Select the
module and follow the prompts to complete calibration.
DO NOT calibrate your compass in locations with strong magnetic interference, such as near magnets,
parking lots, or construction sites with underground reinforced concrete structures.
DO NOT carry ferromagnetic materials such as mobile phones during calibration.
© 2023 DJI All Rights Reserved.
51
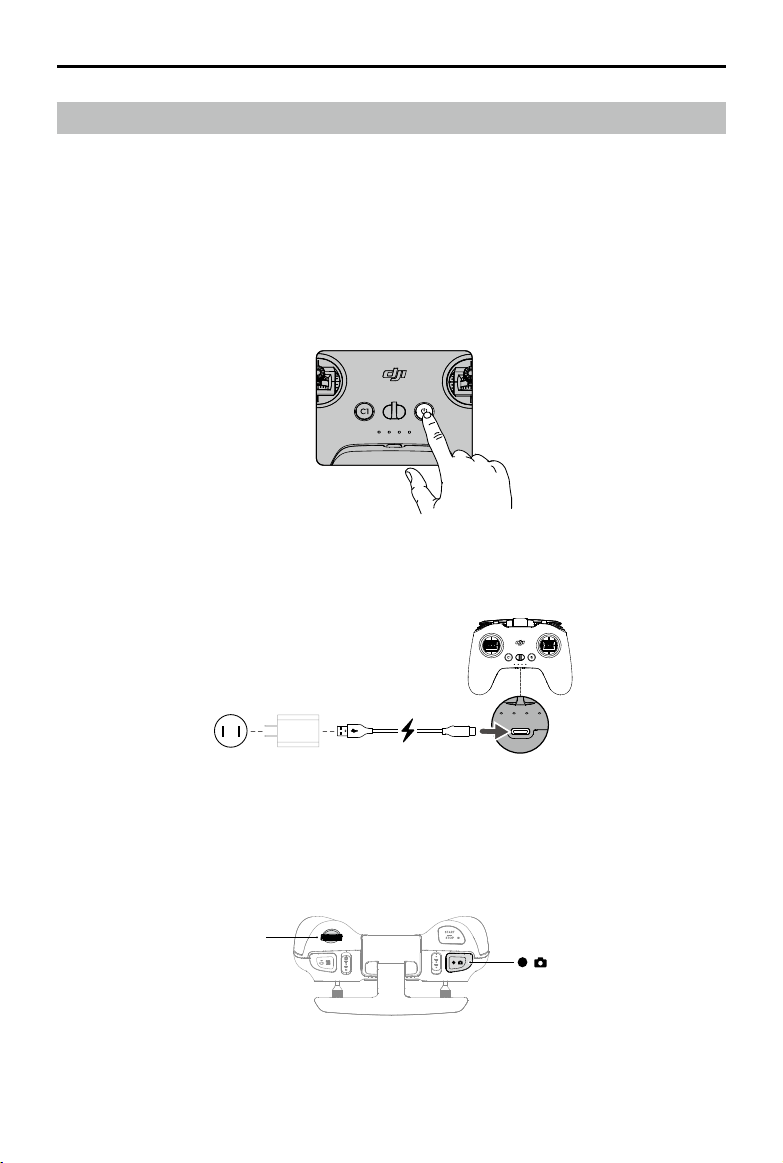
DJI Avata
User Manual
DJI FPV Remote Controller 2
Built-into the DJI FPV Remote Controller 2 is DJI O3+ transmission technology, oering a maximum transmission
range of 6 mi (10 km). The buttons make control of the aircraft and camera eortless while the detachable control
sticks allow for the remote controller to be easily stored.
Operation
Powering On/Off
Press the power button once to check the current battery level. If the battery level is too low, recharge before use.
Press once then press again and hold for two seconds to power the remote controller on or o.
Charging the Battery
Use a USB-C cable to connect a charger to the USB-C port of the remote controller.
Controlling the Camera
1. Shutter/Record Button: Press once to take a photo or to start or stop recording. Press and hold to switch
between photo and video mode.
2. Gimbal Dial: Control the tilt of the gimbal.
Gimbal Dial
Shutter/Record Button
© 2023 DJI All Rights Reserved.
52

DJI Avata
User Manual
Controlling the Aircraft
The control sticks can be operated in Mode 1, Mode 2, or Mode 3, as shown below.
Mode 1
Mode
Mode
Left Stick
Forward
Backward
Turn RightTurn Left
2
UP
Down
Turn RightTurn Left
3
Left Stick Right Stick
Forward
Right Stick
Right StickLeft Stick
UP
Down
RightLeft
Forward
Backward
RightLeft
UP
Backward
RightLeft
Down
Turn RightTurn Left
The default control mode of the remote controller is Mode 2. In this manual, Mode 2 is used as the example to
illustrate how to use the control sticks.
Stick Neutral/Center Point: Control sticks are in the center.
Moving the control stick: Push the control stick away from the center or push the throttle stick away
from the lowest position when using Manual mode.
© 2023 DJI All Rights Reserved.
53

DJI Avata
User Manual
Remote Controller
(Mode 2)
Aircraft
( Indicates nose direction)
Remarks
Throttle Stick: moving the left stick up or down
changes the altitude of the aircraft.
Push the stick up to ascend and down to descend.
Push the stick gently to prevent sudden and
unexpected changes in altitude.
Normal/Sport mode
The aircraft hovers in place if the stick is in the center.
Use the left stick to take o when the motors are
spinning at an idle speed. The further the stick is
pushed away from the center, the faster the aircraft
changes elevation.
Manual mode
The throttle stick has no center. Before ying, adjust
the throttle stick to prevent it from returning to the
center.
Yaw Stick: moving the left stick to the left or right
controls the orientation of the aircraft.
Push the stick left to rotate the aircraft
counterclockwise and right to rotate the aircraft
clockwise. The aircraft hovers in place if the stick is in
the center.
The more the stick is pushed away from the center,
the faster the aircraft rotates.
Pitch Stick: moving the right stick up and down to
change the pitch of the aircraft.
Push the stick up to fly forward and down to fly
backward. The aircraft hovers in place if the stick is in
the center.
The more the stick is pushed away from the center,
the faster the aircraft moves.
Roll Stick: moving the right stick to the left or right
changes the roll of the aircraft.
Push the stick left to y left and right to y right. The
aircraft hovers in place if the stick is in the center.
The more the stick is pushed away from the center,
the faster the aircraft moves.
Flight Mode Switch
Toggle the switch to select the desired ight mode.
Position Flight Mode
M Manual mode
S Sport mode
N Normal mode
© 2023 DJI All Rights Reserved.
54
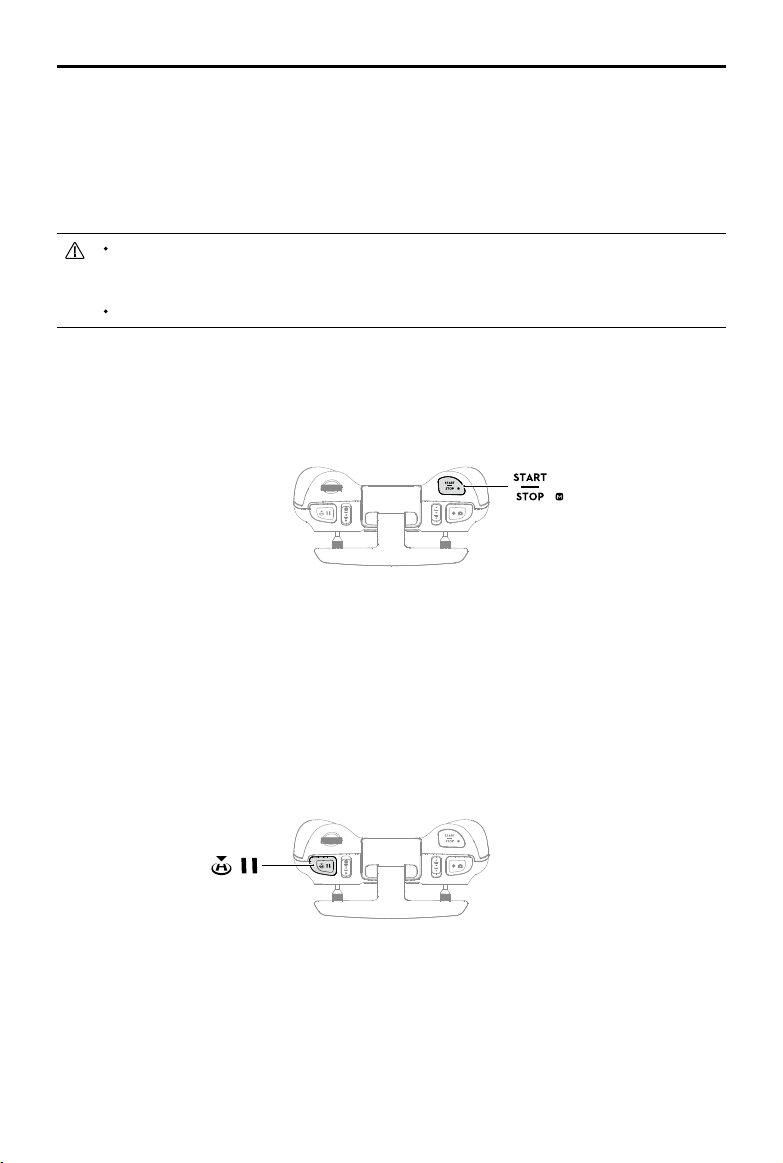
DJI Avata
Manual mode is disabled by default. Make sure that the switch is set to Manual mode in the goggles before
switching to Manual mode. The aircraft will remain in Normal or Sport mode if the switch is not set to Manual
mode in the goggles. Go to Settings > Control > Remote Controller > Button Customization, and then set Custom
Mode to Manual mode.
Before using Manual mode, it is recommended to tighten the F2 screw on the rear of the throttle stick so that the
stick does not return to the center and adjust the F1 screw to make sure the stick resistance is suitable.
User Manual
When using Manual mode, the aircraft has no flight assistance functions such as automatic
stabilization. Before using Manual mode, practice flying in Manual mode using DJI Virtual Flight to
ensure that you can y safely.
Only adjust the throttle stick before the aircraft takes o. DO NOT adjust during ight.
Start/Stop Button
When using Manual mode, press twice to start or stop the motor.
When using Normal or Sport mode, press once to cancel Low Battery RTH countdown when the prompt appears
in the goggles, and the aircraft will not enter the lower battery RTH.
Flight Pause/RTH Button
Press once to make the aircraft brake and hover in place. Make sure that the pitch stick and roll stick return to
the center and push the throttle stick to resume control of the ight. When the aircraft is performing RTH or auto
landing, press the button once to cancel RTH or landing.
When the aircraft is in Manual mode, press the button to make the aircraft brake and hover in place. The aircraft
attitude returns to level and the ight mode automatically switches to Normal mode.
Press and hold the RTH button until the remote controller beeps to indicate that RTH has started. Press the
button again to cancel RTH and regain control of the aircraft. Refer to the Return to Home section for more
information about RTH.
© 2023 DJI All Rights Reserved.
55
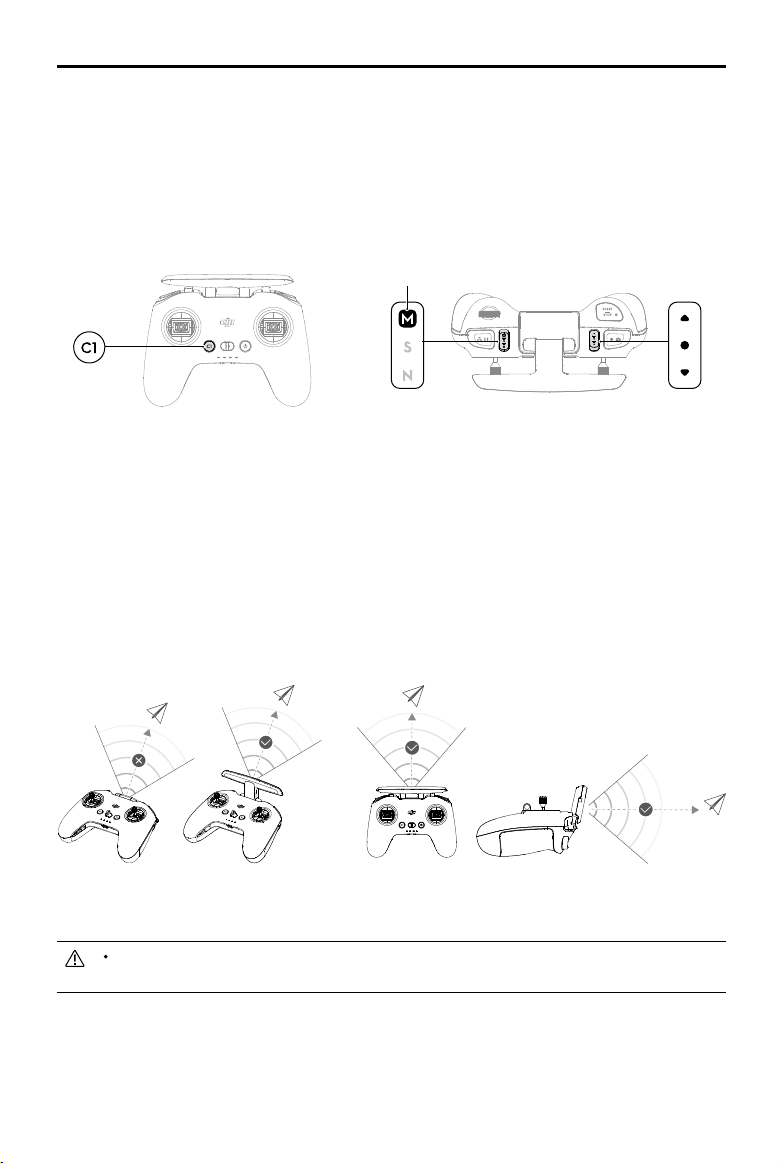
DJI Avata
User Manual
Customizable Buttons
The functions of the customizable buttons can be set on the remote controller settings in the goggles, including
the C1 button, C2 switch, and the custom mode.
The C1 button and C2 switch can be used as shortcuts for functions such as raising, lowering, or recentering the
gimbal, ipping the aircraft, or enabling or disabling ESC beeping.
The custom mode can be set to Manual or Sport mode.
Custom Mode
C1 Button
C2 Switch
Remote Controller Alert
The remote controller sounds an alert during RTH. The alert cannot be canceled. The remote controller sounds an
alert when the battery level is 6% to 15%. A low battery level alert can be canceled by pressing the power button.
A critical battery level alert will sound when the battery level is less than 5% and cannot be canceled.
Optimal Transmission Zone
The signal between the aircraft and the remote controller is most reliable when the antennas are positioned in
relation to the aircraft as shown below.
Weak Strong Optimal Transmission Zone
In order to avoid interference, DO NOT use other wireless devices on the same frequency as the
remote controller.
© 2023 DJI All Rights Reserved.
56

DJI Avata
User Manual
Stick Adjustment
When using Manual mode, adjust the throttle stick based on your stick mode for a better user experience.
1. Turn the remote controller over and lift the rear rubber grip from the inside groove.
Groove
2. The screws under the grip can adjust the corresponding stick on the front of the remote controller. Use an
H1.5 hex key to adjust the resistance of the stick and recenter the stick vertically. The control resistance
increases when the F1 screw is tightened, and the control resistance decreases when the F1 screw is
loosened. The recentering is disabled when the F2 screw is tightened, and the recentering is enabled when
the F2 screw is loosened.
2 3 4
1
1
F1 Right Stick Resistance Adjustment
Screw (Vertical)
2
F2 Right Stick Recentering Adjustment
Screw (Vertical)
3. Reattach the rubber grip once the adjustment is complete.
© 2023 DJI All Rights Reserved.
57
3
F1 Left Stick Resistance Adjustment
Screw (Vertical)
4
F2 Left Stick Recentering Adjustment
Screw (Vertical)

DJI Fly App
Connect the goggles to the mobile device, launch DJI Fly, and enter the home screen. Tap GO FLY to display the
video transmission, which allows you to share the FPV camera view.
Fly Spots
View or share nearby suitable ight and shooting locations, learn more about GEO zones, and preview aerial
photos of dierent locations taken by other users.
Academy
Tap the icon in the top right corner to enter Academy and view product tutorials, ight tips, ight safety notices,
and manual documents.
SkyPixel
Enter SkyPixel to view videos and photos shared by other users.
Prole
View the account information, ight records, DJI forum, online store, Find My Drone, and other settings.
Some countries and regions require real-time reporting of the location of the aircraft while ying. As a
result, it is necessary to connect the goggles to the mobile device and run DJI Fly. Make sure to check
and comply with local regulations.
Fully charge your mobile device before launching DJI Fly.
Mobile cellular data is required when using DJI Fly. Contact your wireless carrier for data charges.
DO NOT accept phone calls or use texting features during ight if you are using a mobile phone as
your display device.
Read all safety prompts, warning messages, and disclaimers carefully. Familiarize yourself with relevant
regulations in your area. You are solely responsible for being aware of all relevant regulations and ying
in a way that is compliant.
Use the in-app tutorial to practice your ight skills if you have never operated the aircraft or if you do
not have sucient experience to operate the aircraft with condence.
The app is designed to assist your operation. Use sound discretion and DO NOT rely on the app to
control the aircraft. The use of the app is subject to DJI Fly Terms of Use and DJI Privacy Policy. Read
them carefully in the app.
© 2023 DJI All Rights Reserved.
58

Flight
After completing the pre-ight preparation, it is recommended to train your ying skills and practice ying safely.
Make sure that all ights are carried out in an open area. The ying height is limited to 500 m. DO NOT exceed this
height. Strictly abide by local laws and regulations when ying. Make sure to read the DJI Avata Safety Guidelines
to understand the safety notices before ying.
Flight Environment Requirements
1. Do not operate the aircraft in severe weather conditions including wind speeds exceeding 10.7 m/s, snow,
rain, and fog.
2. Only fly in open areas. Tall buildings and large metal structures may affect the accuracy of the onboard
compass and GNSS system. It is recommended to keep the aircraft at least 5 m away from structures.
3. Avoid obstacles, crowds, trees, and bodies of water (recommended height is at least 3 m above water).
4. Minimize interference by avoiding areas with high levels of electromagnetism such as locations near power
lines, base stations, electrical substations, and broadcasting towers.
5. The aircraft and battery performance are limited when ying at high altitudes. Be careful when ying 16,404 ft
(5,000 m) or more above sea level.
6. GNSS cannot be used on the aircraft in the polar regions. Use the vision system instead.
7. DO NOT take o from moving objects, such as cars and ships.
8. In strong winds, the vertical speed of the aircraft may be limited. Adjusting the nose of the aircraft to fly
downwind can reduced power loss for a greater vertical speed.
9. When the aircraft turns at high speed or side brakes suddenly in a strong wind environment, the attitude may
become unstable. Please y with caution.
10. DO NOT use the aircraft in an environment at risk of a re or explosion.
Flight Restrictions
GEO (Geospatial Environment Online) System
DJI’s Geospatial Environment Online (GEO) System is a global information system that provides real-time
information on ight safety and restriction updates and prevents UAVs from ying in restricted airspace. Under
exceptional circumstances, restricted areas can be unlocked to allow ights in. Prior to that, the user must submit
an unlocking request based on the current restriction level in the intended ight area. The GEO system may not
fully comply with local laws and regulations. Users shall be responsible for their own ight safety and must consult
with the local authorities on the relevant legal and regulatory requirements before requesting to unlock a ight in a
restricted area. For more information about the GEO system, visit https://www.dji.com/ysafe.
Flight Limits
For safety reasons, ight limits are enabled by default to help users operate this aircraft safely. Users can set ight
limits on height and distance. Altitude limits, distance limits, and GEO zones function concurrently to manage ight
safety when GNSS is available. Only altitude can be limited when GNSS is unavailable.
Flight Altitude and Distance Limits
Maximum ight altitude restricts an aircraft’s ight altitude, while maximum ight distance restricts an aircraft’s ight
radius around the Home Point. These limits can be set using the goggles for improved ight safety.
© 2023 DJI All Rights Reserved.
59

DJI Avata
User Manual
Max Altitude
Home Point
Height of aircraft when powered on
Strong GNSS Signal
Restriction Goggles
Max Altitude
Max Radius
Aircraft's altitude cannot exceed the specied value set in
goggles.
The straight-line distance from the aircraft to the Home Point
cannot exceed the max ight distance set in goggles.
Weak GNSS Signal
Restriction Goggles
Height is restricted to 50 m from the takeo point if lighting is
sucient.
Max Altitude
Max Radius No limits
Height is restricted to 3 m above the ground if lighting is not
sucient and the Infrared Sensing System is operating.
Height is restricted to 50 m from the takeo point if lighting is not
sucient and the Infrared Sensing System is not operating.
Max Radius
Home Point not manually updated during flight
Prompt: Max ight altitude
reached.
Prompt: Max ight
distance reached.
Prompt: Max ight
altitude reached.
There will be no altitude limit if the GNSS signal becomes weak during ight as long as the GNSS
signal display was white or yellow when the aircraft was powered on.
If the aircraft reaches one of the limits, users can still control the aircraft, but cannot y it any further. If
the aircraft ies out of the max radius, it will automatically y back within range when the GNSS signal
is strong.
For safety reasons, do not y close to airports, highways, railway stations, railway lines, city centers, or
other sensitive areas. Only y the aircraft within visual line of sight.
© 2023 DJI All Rights Reserved.
60

DJI Avata
User Manual
GEO Zones
DJI’s GEO system designates safe ight locations, provides risk levels and safety notices for individual ights, and
oers information on restricted airspace. All restricted ight areas are referred to as GEO Zones, which are further
divided into Restricted Zones, Authorization Zones, Warning Zones, Enhanced Warning Zones, and Altitude
Zones. Users can view such information in real-time in DJI Fly. GEO Zones are specic ight areas, including but
not limited to airports, large event venues, locations where public emergencies have occurred (such as forest
res), nuclear power plants, prisons, government properties, and military facilities. By default, the GEO system
limits takeos and ights in zones that may cause safety or security concerns. A GEO Zone map that contains
comprehensive information on GEO Zones around the globe is available on the ocial DJI website: https://www.
dji.com/ysafe/geo-map.
Pre-Flight Checklist
1. Make sure the goggles battery, remote control devices, Intelligent Flight Battery, and mobile device are fully
charged.
2. Make sure the propellers are mounted correctly and securely.
3. Make sure the Intelligent Flight Battery and goggles battery are properly connected and secure.
4. Make sure the USB-C port and microSD card slot cover is correctly and securely sealed.
5. Make sure the gimbal and camera are functioning normally.
6. Make sure that there is nothing obstructing the motors and that they are functioning normally.
7. Make sure that the goggles are functioning normally and display the video transmission.
8. Make sure that the gimbal protector is detached and the camera lens and the sensors are clean.
9. Make sure that the goggles antennas are installed securely and the remote controller antenna is lifted.
10. Only use genuine DJI parts or DJI authorized parts. Unauthorized parts may cause system malfunctions and
compromise ght safety.
Starting/Stopping the Motors
DJI Motion Controller
Lock Button
Press the lock button twice to start the motors of the aircraft.
Press and hold the lock button to make the aircraft take o automatically, ascend to approximately 1.2 m, and hover.
Press and hold the lock button while the aircraft is hovering to land it automatically and stop the motors.
© 2023 DJI All Rights Reserved.
61

DJI Avata
User Manual
DJI FPV Remote Controller 2
Starting the Motors
Normal/Sport mode:
A CSC is used to start the motors. Push both sticks to the inner or outer bottom corners to start the motors.
Once the motors start spinning, release both sticks simultaneously.
OR
Manual mode:
Make sure the throttle stick is in the lowest position and press the start/stop button twice to start the motors.
+
Throttle Stick
Stopping the Motors
Normal/Sport mode:
The motors can be stopped in two ways:
Method 1: When the aircraft has landed, push the throttle stick down and hold. The motors will stop after three
seconds.
Method 2: When the aircraft has landed, push the throttle stick down, and perform the same CSC used to start
the motors. Release both sticks once the motors have stopped.
OR
Method 1
Manual mode:
Press the start/stop button twice to stop the motors once the aircraft has landed.
© 2023 DJI All Rights Reserved.
62
Method 2
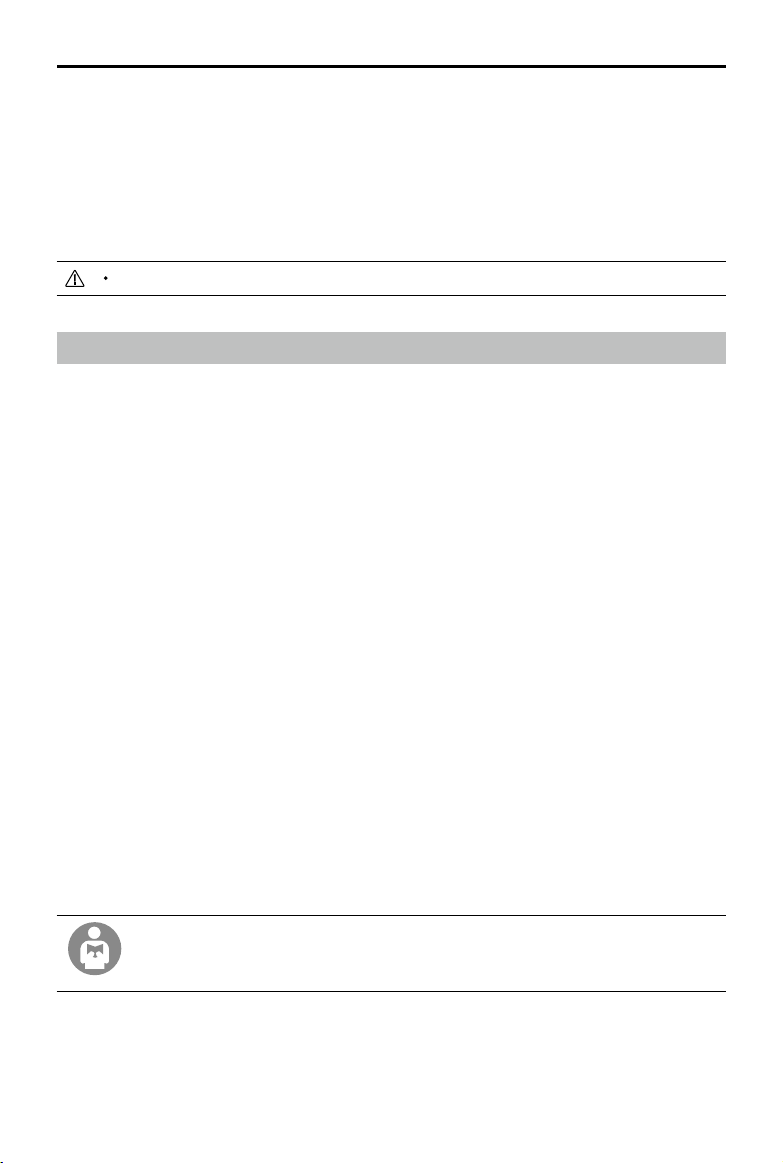
DJI Avata
User Manual
Stopping the Motors Mid-Flight
When using Normal or Sport mode, the motors can only be stopped by pressing the lock button twice on the
motion controller or performing a CSC on the remote controller mid-ight in an emergency situation such as if
the aircraft has a stalled motor, is involved in a collision, is rolling in the air, is out of control, or is ascending or
descending quickly. The default setting can be changed in goggles.
When using the Manual mode, press the start/stop button twice on the remote controller to stop the motors at
any time.
Stopping motors mid-ight will cause the aircraft to crash.
Flight Test
Takeo/Landing Procedures
1. Place the aircraft in an open, at area with the aircraft rear facing towards you.
2. Power on the goggles, remote control device, and the aircraft.
3. Wait until the aircraft status indicator blinks green slowly to indicate that the Home Point has been recorded
and put on the goggles.
4. Start the motors.
5. For DJI motion controller, press and hold the lock button, to make the aircraft take o automatically, ascend to
approximately 1.2 m, and hover.
For DJI FPV remote controller V2, gently push the throttle stick up to take o.
6. For DJI motion controller, press and hold the lock button while the aircraft is hovering to land it automatically
and stop the motors.
For DJI FPV remote controller V2, pull the throttle stick down to land the aircraft. Stop the motors after landing.
7. Power o the aircraft, goggles, and remote control device.
Video Suggestions and Tips
1. The pre-ight checklist is designed to help you y safely and shoot videos during ight. Go through the full preight checklist before each ight.
2. Select the desired gimbal operation mode.
3. It is recommended to use Normal mode to take photos or record videos.
4. DO NOT y in bad weather such as on rainy or windy days.
5. Choose the camera settings that best suit your needs.
6. Perform ight tests to establish ight routes and preview scenes.
7. Push the control sticks gently to ensure smooth and stable movement of the aircraft.
8. When using Manual mode, y in an open, wide, and sparsely populated environment to ensure ight safety.
It is important to understand the basic ight guidelines, both for your protection and for the safety
of those around you.
DO NOT forget to read the safety guidelines.
© 2023 DJI All Rights Reserved.
63

Maintenance
Aircraft
Follow the steps below to replace components of the aircraft such as the propeller guard, or upper frame.
It is recommended to remove the propellers and Intelligent Flight Battery before replacing the propeller
guard and upper frame.
Propeller Guard
Detaching
1. Flip the aircraft over, remove the two screws as shown in the figure below, then gently remove the vision
module and disconnect the FPC connector. DO NOT over-extend the cable to avoid irreversible damage.
1
2
2. Remove the four screws on the landing gears, then remove the antenna covers. Pull the tab to remove the
antenna board, then remove the antenna cables along the cable groove.
© 2023 DJI All Rights Reserved.
64

DJI Avata
3. Remove the four screws on the bottom of the aircraft and the two screws on the top, then gently turn left and
User Manual
right to remove the propeller guard. Be careful not to pull out the propeller guard with force to avoid damaging
the cables.
© 2023 DJI All Rights Reserved.
65

DJI Avata
User Manual
1
2
Attaching
1. Fix the antenna cables in the cable slot on the side of the center module to avoid damaging the cables.
© 2023 DJI All Rights Reserved.
66
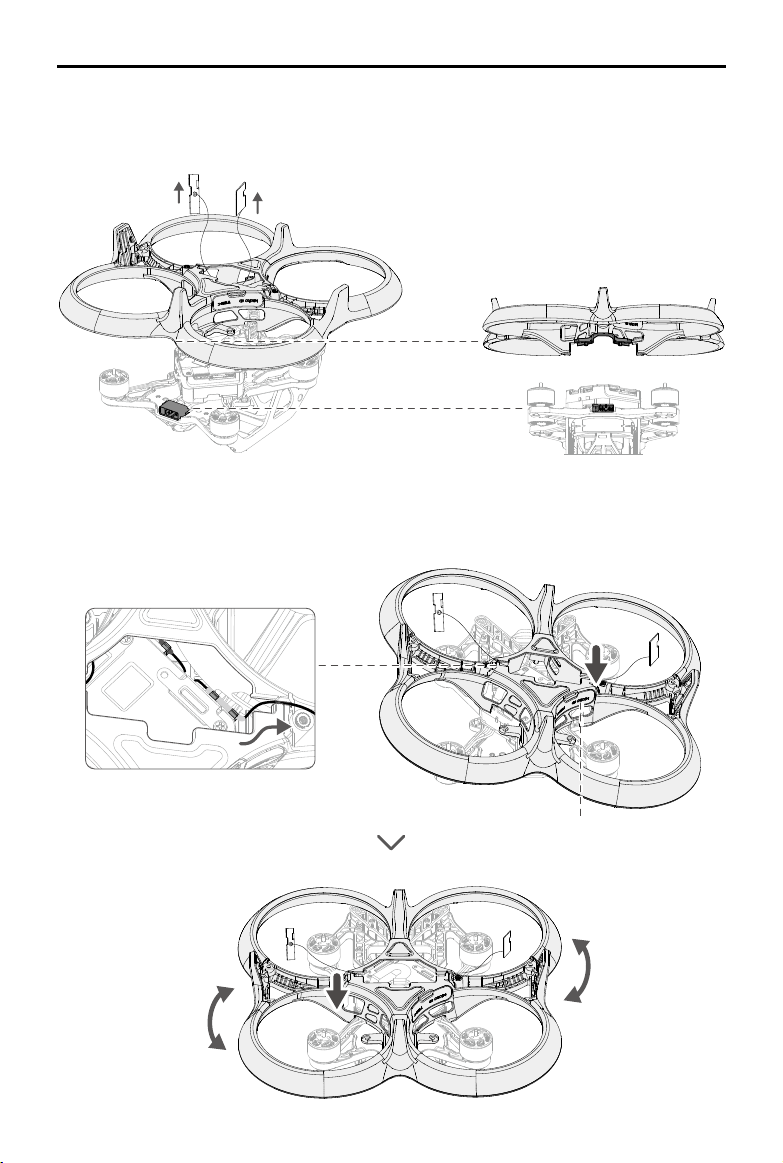
DJI Avata
2. Prepare a new propeller guard and pass the two antenna boards through the hole in the center of the propeller
3. When installing, slowly tilt and press the side with the USB-C port and microSD card slot cover rst, be careful
User Manual
guard. Adjust the propeller guard so that the square groove at the rear aligns with the battery port.
not to catch the antenna cable on this side, then gently turn the propeller guard left and right to secure the
other side.
© 2023 DJI All Rights Reserved.
67
USB-C Port and
microSD Card Slot Cover

DJI Avata
4. Check the L and R marks on the antenna board and the inside of the propeller guard, and install the antenna
User Manual
board on the corresponding landing gear. Tilting the antenna board to make it t tightly into the slot on the
inner side of the landing gear and then arranging the antenna cable to x it in the cable groove.
L
R
© 2023 DJI All Rights Reserved.
68

DJI Avata
5. Tighten the two M2×4.3 screws and the two M1.6×5 screws on the bottom of the aircraft in turn, and then the
User Manual
two M2×4.3 screws on the top. (Note that the two M1.6×5 screws on the rear side of the bottom are relatively
longer).
1
M2×4.3
M1.6×5
2
© 2023 DJI All Rights Reserved.
69
M2×4.3

2
DJI Avata
6. Insert the end of the antenna cover into the landing gear, press the antenna cover to t the propeller guard,
User Manual
and then tighten the four M2×4.3 screws. Make sure that the antennas and antenna covers on both sides are
rmly installed.
1
M2×4.3
2
© 2023 DJI All Rights Reserved.
70
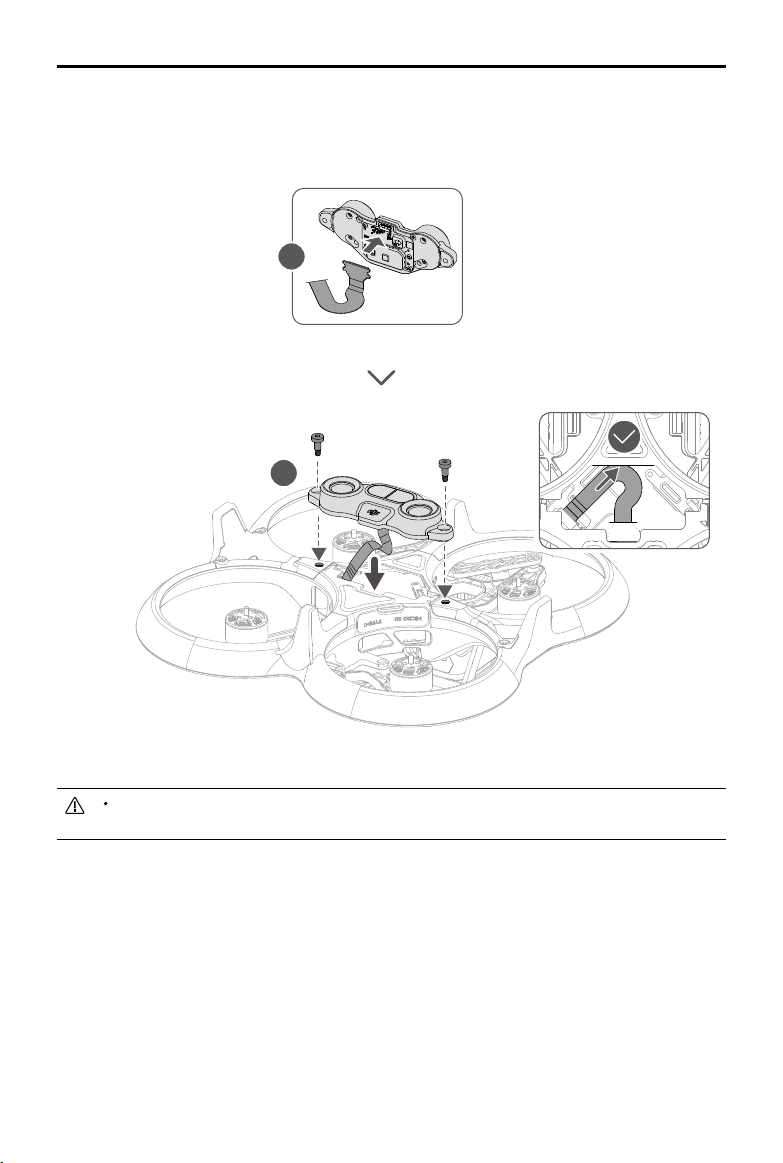
1
2
DJI Avata
7. Check the shape of the vision module and the position of the opening in the center of the propeller guard, and
User Manual
then connect the FPC cable to the vision module correctly. After ensuring that the FPC cable is completely
placed inside the propeller guard, tighten the two M2×6.3 screws to complete the installation.
1
M2×6.3
2
© 2023 DJI All Rights Reserved.
71
Check to make sure the USB-C port and microSD card slot cover is correctly and securely sealed to
avoid contact with the propellers.

DJI Avata
User Manual
Upper Frame
Detaching
1. Remove the two screws on both sides of the upper frame.
2. Flip the aircraft over, remove the six screws as shown in the figure below, then remove the upper frame.
Remove the upper frame gently to avoid damaging the GNSS module above.
Attaching
1. Prepare a new upper frame and install it on the top of the aircraft. Make sure to align the corresponding holes
and that the gimbal and camera cable is in the groove to avoid damage.
© 2023 DJI All Rights Reserved.
72

DJI Avata
2. Adjust the position of the GNSS module so that the screw holes on the module are aligned with the screw
User Manual
holes on both sides of the upper frame, then tighten the two M2×4.3 screws.
M2×4.3
M2×4.3
3. Tighten the six M1.6×5 screws on the bottom to complete the installation.
© 2023 DJI All Rights Reserved.
73
M1.6×5

DJI Avata
User Manual
Goggles
DJI Goggles 2
Replacing the Antennas
If an antenna is damaged, you can contact DJI after-sales to purchase a new one for replacement.
To remove the antenna, hold the bottom of the antenna and pull it upwards.
When installing, distinguish the left and right antennas and make sure the antenna is properly aligned with the
port.
Replacing the Foam Padding
1. Hold the bottom of the foam padding and remove it gently as shown below.
© 2023 DJI All Rights Reserved.
74

DJI Avata
2. Align the positioning columns of the new foam padding with the positioning holes on the goggles, install it and
User Manual
DO NOT pull the sides when removing the foam padding. Otherwise, the padding may be damaged.
press the left and right sides. After hearing a "click", check and make sure that there is no gap between the
foam padding and the goggles.
Cleaning and Maintenance of the Lenses
Use a piece of soft, dry, and clean cloth to wipe in a circular motion from the center to the outer edges of each
lens.
Re-attach the screen protector to protect the lenses when the goggles are not in use.
Make sure to disconnect the goggles from the power outlet before cleaning and make sure that no
cables are connected.
DO NOT clean the lenses with alcohol.
The lenses are delicate. Clean them gently. DO NOT scratch them as this will aect viewing quality.
Store the goggles in a dry place at room temperature to avoid damage to the lenses and other optical
components from high temperatures and humid environments.
Keep the lenses away from direct sunlight to avoid screen damage.
© 2023 DJI All Rights Reserved.
75

DJI Avata
User Manual
DJI FPV Goggles V2
Cleaning
Make sure to disconnect the goggles from the power outlet before cleaning and make sure that there are no
cables connected.
Clean the surface of the goggles with a soft, dry, clean cloth. To clean the foam padding, moisten the cloth with
clean water and wipe the foam padding.
Replacing the Foam Padding
The foam padding is attached to the goggles with Velcro. When replacing the foam padding, peel it gradually
from the left or right side. Align the new foam padding with the goggles and press the foam padding down so it is
securely attached.
Maintenance of Lenses
Use a cleaning cloth to wipe the lenses gently.
1. Moisten the cleaning cloth with alcohol or a lens cleaner.
2. Wipe in a circular motion from the center to the outer edges of the lenses.
DO NOT clean the foam padding with alcohol.
The lenses are delicate. Clean them gently. DO NOT scratch them as this will aect viewing quality.
Store the goggles in a dry room at room temperature to avoid damage to the lenses from high
temperature and humid environments.
© 2023 DJI All Rights Reserved.
76

Appendix
Specications
DJI Avata
Aircraft
Model QF2W4K
Takeo Weight Approx. 410 g
Dimensions (L×W×H) 180×80×80 mm
Diagonal Distance 120 mm
Max Ascent Speed 6 m/s (Normal/Sport mode)
Max Descent Speed 6 m/s (Normal/Sport mode)
Max Horizontal Speed
(near sea level, no wind)
Max Service Ceiling Above
Sea Level
Max Hover Time Approx. 18 mins
Max Flight Distance 11.6 km
Max Wind Speed Resistance 10.7 m/s
Operating Temperature -10° to 40° C (14° to 104° F)
GNSS GPS + Galileo + BeiDou
Hovering accuracy range
Antennas Dual Antennas, 2T2R
Internal Storage 20 GB
Supported DJI Goggles
Supported DJI Remote
Controller Devices
Transmission
Operating Frequency
Transmitter Power (EIRP) 5.8 GHz: <33 dBm (FCC), <14 dBm (CE), <30 dBm (SRRC)
Communication Bandwidth Max 40 MHz
Live View Modes and Latency
Max Video Bitrate 50 Mbps
Max Transmission Range 10 km (FCC), 2 km (CE), 6 km (SRRC)
Audio Transmission No
8 m/s (Normal mode)
14 m/s (Sport mode)
27 m/s (Manual mode)
5000 m
Vertical: ±0.1 m (with Vision Positioning), ±0.5 m (with GNSS Positioning)
Horizontal: ±0.3 m (with Vision Positioning), ±1.5 m (with GNSS Positioning)
DJI Goggles 2
DJI FPV Goggles V2
DJI Goggles Integra
DJI FPV Remote Controller 2
DJI Motion Controller
DJI RC Motion 2
2.400-2.4835 GHz (Rx)
5.725-5.850 GHz (Tx/Rx)
With DJI Goggles 2
1080p/100fps: The lowest transmission latency is 30 ms
1080p/60fps: The lowest transmission latency is 40 ms
With DJI FPV Goggles V2
810p/120fps: The lowest transmission latency is lower 28 ms
810p/60fps: The lowest transmission latency is lower than 40 ms
© 2023 DJI All Rights Reserved.
77
DJI Avata
Gimbal
Mechanical Range Tilt: -95° to +75°
Controllable Rotating Range Tilt: -80° to +65°
Stabilization Single-axis (tilt)
Max Control Speed 60°/s
Angular vibration range ±0.01° (Normal mode)
Electronic Roll Axis Live view correction not supported, supports video correction
Sensing System
Downward Vision System
Operating Environment
Camera
Image Sensor 1/1.7” CMOS, Eective Pixels: 12 MP
Lens
ISO Range
Shutter speed
Still Photography Modes Single shot
Max Photo Size 4000×3000
Photo Format JPEG
Video Resolution
Video format MP4
Max Video Bitrate 150 Mbps
Color Proles Standard, D-Cinelike
RockSteady EIS Supported (O, RockSteady, HorizonSteady)
Distortion Correction Supported (Standard, Wide-Angle, Super Wide Angle)
Supported File System
Intelligent Flight Battery
Capacity 2420 mAh
Standard Voltage 14.76 V
Max Charging Voltage 17 V
Battery Type Li-ion
Chemical System LiNiMnCoO2
Energy 35.71 Wh@0.5C
Discharge Rate 7C (typical)
Weight Approx. 162 g
Charging Temperature 5° to 40° C (41° to 104° F)
User Manual
Infrared Sensor Measurement Range: 10 m
Precision Measurement Range: 0.5-10 m
Eective Measurement Range: 0.5-20 m
Non-reective, discernible surfaces with diuse reectivity of >20%
Adequate lighting of lux >15
FOV: 155°
Equivalent Focal Length: 12.7 mm
Actual Focal Length: 2.34 mm
Aperture: f/2.8
Focus Mode: Fixed focus
Focus Range: 0.6 m to ∞
100-6400 (auto)
100-25600 (manual)
1/8000-1/50 s (photo)
1/8000-1/50 s (video)
4K@30/50/60fps
2.7K@30/50/60/100/120fps
1080p@30/50/60/100/120fps
exFAT (recommend)
FAT32
© 2023 DJI All Rights Reserved.
78

DJI Avata
SD Cards
Supported microSD Cards microSD card, UHS-I Speed Grade 3
Recommended microSD
Cards
User Manual
SanDisk Extreme 32GB U3 V30 A1 microSDXC
SanDisk Extreme Pro 32GB U3 V30 A1 microSDXC
Kingston Canvas Go!Plus 64GB U3 V30 A2 microSDXC
Kingston Canvas React Plus 64GB U3 V90 A1 microSDXC
Kingston Canvas React Plus 128GB U3 V90 A1 microSDXC
Kingston Canvas React Plus 256GB U3 V90 A1 microSDXC
Samsung PRO Plus 256GB V30 U3 V30 A2 microSDXC
DJI Avata dissipates heat by using the airow of the propellers to prevent the aircraft from overheating.
When the aircraft is in standby mode for a long time, the temperature may rise. In this situation, the
built-in temperature control system can detect the current temperature and will power o the aircraft
automatically to prevent overheating. The general standby time periods of the aircraft in the stationary
state are as follows. If these times are exceeded, the aircraft may automatically power o to prevent
overheating (tested in an indoor environment with an ambient temperature of 25℃).
a. When in standby mode on the ground: about 21 minutes;
b. When updating rmware: about 18 minutes (please update within 10 minutes of powering on the
aircraft, otherwise the update may fail due to overheating);
c. When connecting to the computer using the USB-C port, the aircraft will not overheat and can be
used for longer.
These specications have been determined through tests conducted with the latest rmware. Firmware
updates can enhance performance. It is highly recommended to update to the latest rmware.
© 2023 DJI All Rights Reserved.
79
DJI Avata
User Manual
DJI Goggles 2
Goggles
Model RCDS18
Weight Approx. 290 g (with headband)
Dimensions
Screen Size (single screen) 0.49 inch
Resolution (single screen) 1920×1080
Screen Refresh Rate Max. 100 Hz
FOV 51°
IPD Range 56-72 mm
Diopter Range +2.0 D to -8.0 D
Transmission
Operating Frequency 2.400-2.4835 GHz, 5.725-5.850 GHz
Transmitter Power (EIRP)
Wi-Fi
Protocol Wi-Fi 802.11b/a/g/n/ac
Operating Frequency
Transmitter Power (EIRP)
Bluetooth
Protocol Bluetooth 5.2
Operating Frequency 2.400-2.4835 GHz
Transmitter Power (EIRP) <8 dBm
Max Video Bitrate 50 Mbps
Supported Video Recording
Format
Supported Video Playback
Format
Wi-Fi Wireless Streaming DLNA
Operating Temperature -10° to 40° C (14° to 104° F)
Power Input DJI Goggles 2 Battery
Supported microSD Cards microSD Card, max 256 GB
DJI Goggles 2 Battery
Weight Approx. 122 g
Dimension 73.04×40.96×26 mm
Capacity 1800 mAh
Voltage 7-9 V 1.5 A
Battery Type Li-ion
Chemical System LiNiMnCoO2
Energy 18 Wh
Charging Temperature 0° to 45° C (32° to 113° F)
Max Charging Power 12.6 W (5 V 2 A / 9 V 1.4 A)
Operating Time Around 2 hours
© 2023 DJI All Rights Reserved.
80
167.4×103.9×81.31 mm (antenna folded)
196.69×103.9×104.61 mm (antenna unfolded)
2.4 GHz: <30 dBm (FCC), <20 dBm (CE/SRRC/MIC/KC)
5.8 GHz: <30 dBm (FCC), <23 dBm (SRRC), <14 dBm (CE/KC)
2.400-2.4835 GHz
5.150-5.250 GHz (indoor use only)
5.725-5.850 GHz
2.4 GHz: <20 dBm (FCC/CE/SRRC/MIC/KC)
5.1 GHz: <20 dBm (FCC/CE/MIC/KC)
5.8 GHz: <20 dBm (FCC/SRRC/KC), <14 dBm (CE)
MOV
MP4, MOV
(Video format: H.264, H.265; Audio format: ACC, PCM)
DJI Avata
User Manual
DJI FPV Goggles V2
Goggles
Model FGDB28
Weight Approx. 420 g (incl. headband and antennas)
Dimensions
Screen Size 2-inch
Screen Resolution
(Single Screen)
Screen Refresh Rate 144 Hz
FOV 30° to 54°; Image size: 50-100%
IPD Range 58-70 mm
Operating Frequency 2.400-2.4835 GHz, 5.725-5.850 GHz
Transmitter Power (EIRP)
Communication Bandwidth Max 40 MHz
Max Video Bitrate 50 Mbps
Supported Video Recording
Format
Supported Video Playback
Format
Operating Temperature 0° to 40° C (32° to 104° F)
Power Input DJI FPV Goggles Battery
Supported microSD Cards microSD Card, max 256 GB
DJI FPV Goggles Battery
Weight Approx. 119 g
Dimension 73.04×40.96×26 mm
Capacity 1800 mAh
Voltage Max 9 V
Battery Type LiPo 2S
Chemical System LiNiMnCoO2
Energy 18 Wh
Charging Temperature 0° to 45° C (32° to 113° F)
Max Charging Power 10 W
Operating Time Approx. 1 hour and 50 minutes
184×122×110 mm (excl. antennas)
202×126×110 mm (incl. antennas)
1440×810
2.4 GHz: ≤28.5 dBm (FCC), ≤20 dBm (CE/SRRC/MIC)
5.8 GHz: ≤31.5 dBm (FCC), ≤19 dBm (SRRC), ≤14 dBm (CE)
MOV (Video format: H.264)
MP4, MOV, MKV (Video format: H.264; Audio format: AAC-LC, AAC-HE, AC-3,
MP3)
DJI Motion Controller
Model FC7BMC
Weight Approx. 167 g
Operating Frequency 2.400-2.4835 GHz, 5.725-5.850 GHz
Transmitter Power (EIRP)
Operating Temperature -10° to 40° C (14° to 104° F)
Operating Time Approx. 5 hours
© 2023 DJI All Rights Reserved.
81
2.4 GHz: ≤28.5 dBm (FCC), ≤20 dBm (CE/SRRC/MIC)
5.8 GHz: ≤31.5 dBm (FCC), ≤19 dBm (SRRC), ≤14 dBm (CE)

DJI Avata
User Manual
DJI FPV Remote Controller 2
Model FC7BGC
Weight Approx. 346 g
Dimensions 190×140×51 mm
Operating Frequency 2.400-2.4835 GHz, 5.725-5.850 GHz
Transmitter Power (EIRP)
Operating Temperature -10° to 40° C (14° to 104° F)
Charging Time 2 hours and 30 minutes
Operating Time Approx. 9 hours
2.4 GHz: ≤28.5 dBm (FCC), ≤20 dBm (CE/SRRC/MIC)
5.8 GHz: ≤31.5 dBm (FCC), ≤19 dBm (SRRC), ≤14 dBm (CE)
© 2023 DJI All Rights Reserved.
82
DJI Avata
User Manual
Firmware Update
Use one of the following methods to update the rmware:
1. Use the DJI Fly App to update the rmware for the entire set of devices including the aircraft, goggles, and
remote control device.
2. Use DJI Assistant 2 (Consumer Drones Series) to update the rmware for a single device.
Using DJI Fly
Power on the aircraft, goggles, and remote control device. Make sure all the devices are linked. Connect the
USB-C port of the goggles to the mobile device, run DJI Fly, and follow the prompt to update. An internet
connection is required.
Using DJI Assistant 2 (Consumer Drones Series)
1. Power on the device and connect it to a computer with a USB-C cable.
2. Launch DJI Assistant 2 (Consumer Drones Series) and log in with a DJI account.
3. Select the device and click “Firmware Update” on the left side of the screen.
4. Select the rmware version.
5. The rmware will be downloaded and updated automatically.
6. The device will restart automatically after the rmware update is complete.
Make sure to follow all the steps to update the rmware, otherwise the update may fail.
The rmware update will take several minutes. When updating the rmware, it is normal for the gimbal
to go limp, and the aircraft to reboot. Wait until the update is complete.
Make sure the computer is connected to the internet during the update.
Make sure that the device has sucient power before updating the rmware.
Do not unplug the USB-C cable during an update.
If there are any additional batteries that needs to be updated after the update is complete, insert it into
the aircraft and power on the aircraft. A prompt will appear in the goggles to update the battery. Make
sure to update the battery before takeo.
Note that the update may reset various ight parameters such as the RTH altitude and the maximum
flight distance. Before updating, take note of your preferred settings and readjust them after the
update.
Aftersales Information
Visit https://www.dji.com/support to learn more about aftersales service policies, repair services, and support.
© 2023 DJI All Rights Reserved.
83

DJI Avata
User Manual
FAR Remote ID Compliance Information
The aircraft complies with the requirements of 14 CFR Part 89:
The aircraft automatically broadcasts Remote ID messages from takeo to shut down. An external device
such as a cell phone or tablet is required to be connected as a location source to DJI mobile devices without
an integrated GNSS system
always allow the DJI ight control app to obtain its accurate location information. The connected external
device must minimally be one of the following:
1) FCC Certied personal wireless device that uses GPS with SBAS (WAAS) for location services; or
2) FCC Certied personal wireless device with integrated GNSS.
Also, the external device must be operated in a way that does not interfere with the location reported and its
correlation to the operator location.
The aircraft automatically initiates a pre-ight self-test (PFST) of the Remote ID system before takeo and
cannot take o if it does not pass the PFST
viewed in either a DJI ight control app such as DJI Fly or DJI goggles.
The aircraft monitors the Remote ID system functionality from pre-ight to shut down. If the Remote ID system
malfunctions or has a failure, an alarm will be displayed in either a DJI ight control app such as DJI Fly or DJI
goggles.
Footnotes
[1] DJI mobile devices without an integrated GNSS system such as DJI RC-N1, DJI FPV Goggles V2, and DJI
Goggles 2.
[2] The pass criterion for PFST is that the hardware and software of the Remote ID required-data source and
transmitter radio in the Remote ID system are functioning properly.
[1]
, and must run the DJI ight control app such as DJI Fly in the foreground and
[2]
. The results of the PFST of the Remote ID system can be
© 2023 DJI All Rights Reserved.
84
Contact
DJI SUPPORT
https://www.dji.com/support
This content is subject to change.
Download the latest version from
https://www.dji.com/avata
If you have any questions about this document, please contact
DJI by sending a message to DocSupport@dji.com.
DJI and DJI AVATA are trademarks of DJI.
Copyright © 2023 DJI All Rights Reserved.
 Loading...