

Page 1
2.4G Bluetooth Datalink & iPad
The Air
end
The
Ground end
Flight control
system
PC Ground
Station
iPad Ground
Station
CAN-Bus
USB
Bluetooth
Bluetooth
Signals from
Ground Station
Signals from Flight
control system
BTU module
CAN-Bus
Flight control systems that support the 2.4G Bluetooth Datalink
ACE ONE(Firmware V4.02 or above), WKM(Firmware V5.24 or above),
NAZA-M, NAZA-M V2(Firmware V4.00 or above), A2(Firmware V2.0 or above)
Important: To make your Phantom 2 compatible with the 2.4G Bluetooth Datalink, please update the firmware of
Phantom 2 and BTU module to the latest version.
BTU
Module
USB
cable
CAN-Bus
cable
DC power
cable
The Ground end of
2.4G Bluetooth
Datalink
The Air end of
2.4G Bluetooth Datalink
Ground Station User Guide
Thank you for purchasing DJI products. Please strictly follow this user guide to mount and connect the 2.4G
Bluetooth Datalink, install the Assistant Software on your computer, as well as the App on your mobile device.
Note:The map of Mainland China download from Mainland China IP addresses has differences with the actual
geographic environments. If users download the map of Mainland China from foreign IP addresses, which will be
more accurate.
V1.14
2.4G Bluetooth Datalink
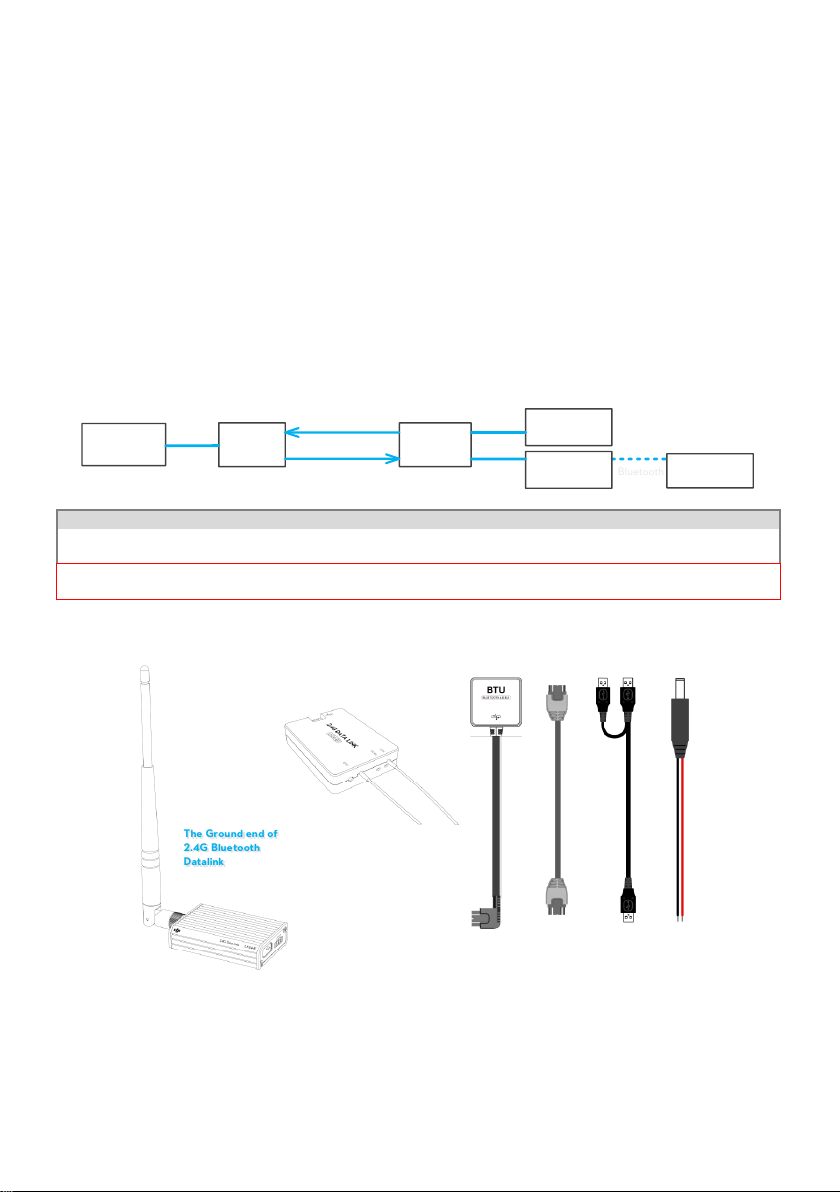
The 2.4G Bluetooth Datalink consists of the Air end and the Ground end, which provides reliable and stable remote
wireless transmissions for Ground Station based applications. The signal flow is as shown below.
1.1 In the box
Important:the firmware of BTU should be upgraded to version 1.0.1.2 or above to use with the 2.4G Bluetooth
Datalink.
1.2 User supplied
To use the 2.4G Bluetooth Datalink and Ground Station, please prepare the Flight control system, the aircraft,
batteries, PC or iPad etc.
©2013-2015 DJI. All Rights Reserved. - 1 -
Page 2
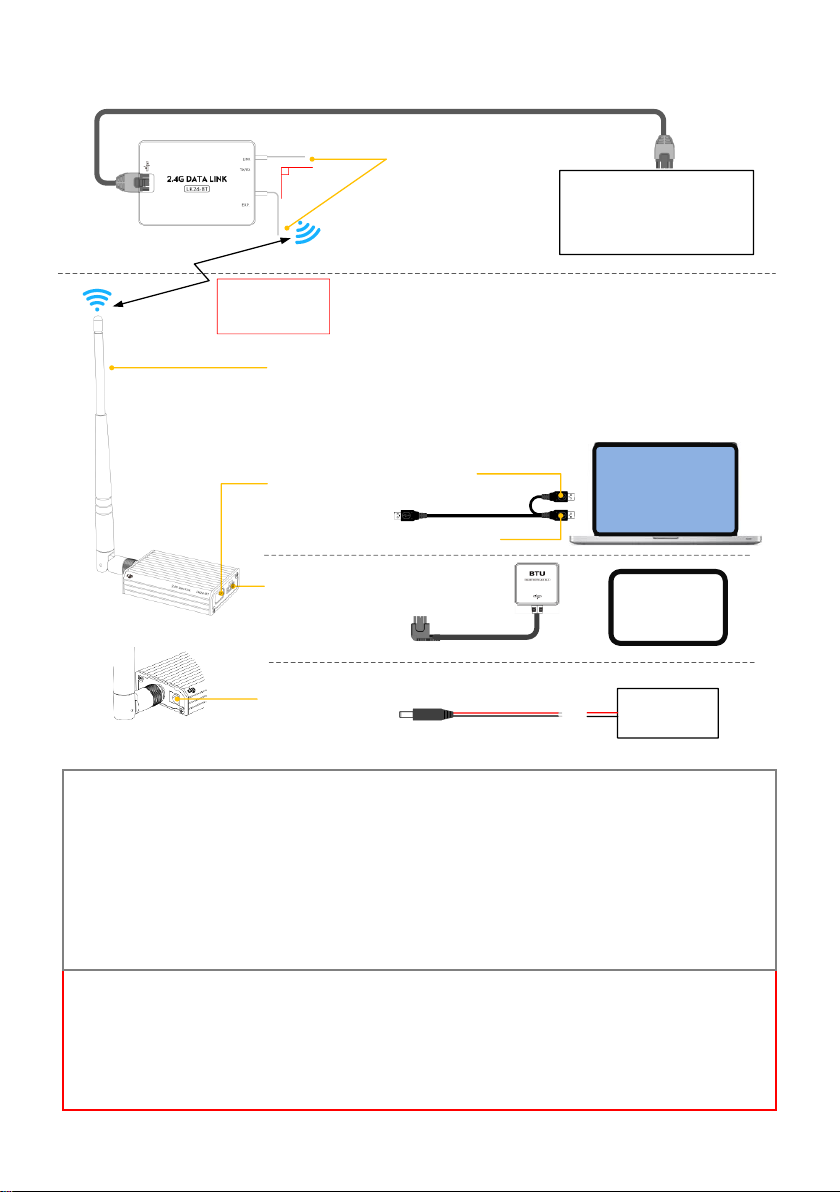
1.3 Connections and use
Antenna
The tail of the Antenna
should be pointed
downward and
unobstructed to ensure the
communication distance.
· PC Ground Station
· 2.4G Bluetooth Datalink
Assistant Software
· As sista nt S oftw are of
Flight control system
USB port
Connect to a PC via a
USB cable to use the
PC Ground Station or
configure the 2.4G
Bluetooth Datalink in
the Assistant Software.
CAN-Bus port
Connect the BTU
module when using the
iPAD Ground Station
DC power port
Connect DC power, you
can choose one of the
USB power supply or DC
power supply to provide
power for the Ground
end.
The Ground end
Distance between the
two ends should be
more than 1.5m
Co mm un ic at io n&
power supply port
Ex tra pow er
supply port
· 3S-6S Battery
· 9.9V~25.2V
DC power
-
+
· iPad Ground
Station
· Assistant of Flight
control system
+
-
90
o
To Flight control system
To any CAN-Bus port on ACE ONE, WKM ,
NAZA-M,NAZA-M V2
Or to the CAN2 port(or the CAN-Bus port
on the devices connected to the CAN2
port) on A2
The Air end
Antenna
The tail of the Antenna
should be pointed
upwards and
unobstructed to ensure
the communication
distance.
Notes:
(1) You can configure the Flight control system using the Assistant software on a PC or iOS mobile Device
wirelessly over the link of the 2.4G Bluetooth Datalink, however you cannot upgrade the firmware of
the Flight control system using this communication route.
(2) When connecting a BTU module or a LED Bluetooth unit to the Flight control system to configure in
the Assistant on mobile devices, as well as connecting a BTU module to the Ground end to use the iPad
Ground station, the two Bluetooth communication links will not interfere with each other.
(3) If the Air end is changed to connect to a new Main controller, you should power cycle the Ground end.
(4) Make sure the LED indicator of BTU module is green after power on, for specific usage details please
refer to the BTU Manual.
(5) For usage of the PC Ground Station please refer to the latest Ground Station User Manual.
Important :
(1) If there are obstacles between the ground and air ends then the radio signal of the 2.4G Bluetooth
Datalink will be weak; please make sure the antennas are always visibly unobstructed during the flight.
Human body, trees, buildings or hills will disconnect the link between the Air end and the Ground end.
(2) Make sure the antenna of the Air end is pointing down, and the antenna of the Ground end is pointing
upwards; it’s better to put the Ground end at a high place to get further transmission distance.
(3) When using the ACE ONE Flight control system with the 2.4G Bluetooth Datalink, the Ground Station
will connect to the Main controller 15s after power on.
(1) Please assemble the antenna of the Ground end first.
(2) For connections and use please refer to the diagram below.
©2013-2015 DJI. All Rights Reserved. - 2 -
Page 3
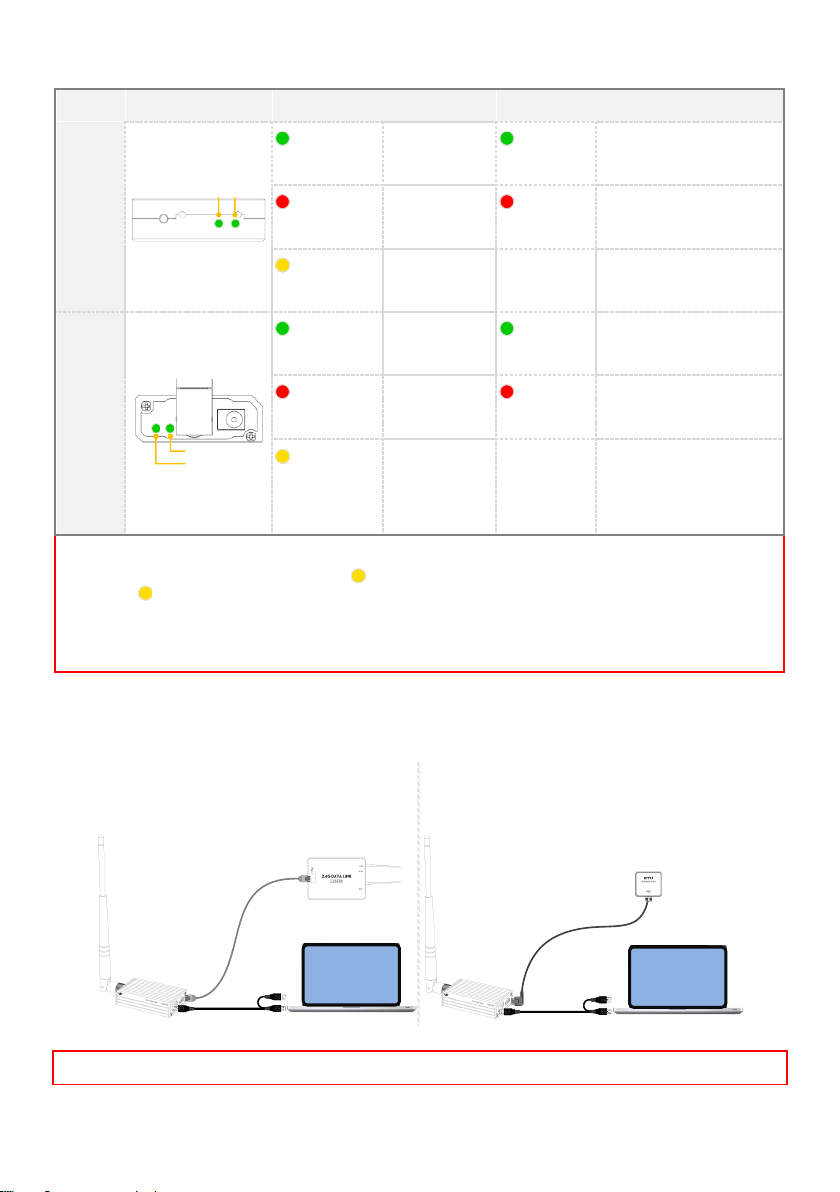
1.4 LED Indicator descriptions
LED
TX/RX
LINK
The Air
end
LINK
TX/RX
Green blinks
Sending
Solid Green
The Air end links with the
Ground end successfully
Red blinks
Receiving
Solid Red
The Air end delinks with the
Ground end
Yellow blinks
Searching the
Main controller
The
Ground
end
TX/RX
LINK
Green blinks
Sending
Solid Green
The Air end links with the
Ground end successfully
Red blinks
Receiving
Solid Red
The Air end delinks with the
Ground end
Yellow blinks
Power voltage of
the Ground end
is less than 9.9V
Notes :
(1) LED Indicators on both ends will blink when powering on, then the TX/RX indicator of the Air end will
blink when searching the Main controller.
(2) The LED Indicators of LINK on both ends should be solid green to indicate that the two ends have linked
successfully.
(3) It’s recommended to check the power voltage of the Ground end regularly when using batteries for
power supply, in order to avoid over-discharging.
· 2.4G Bluetooth
Datalink Assistant
software
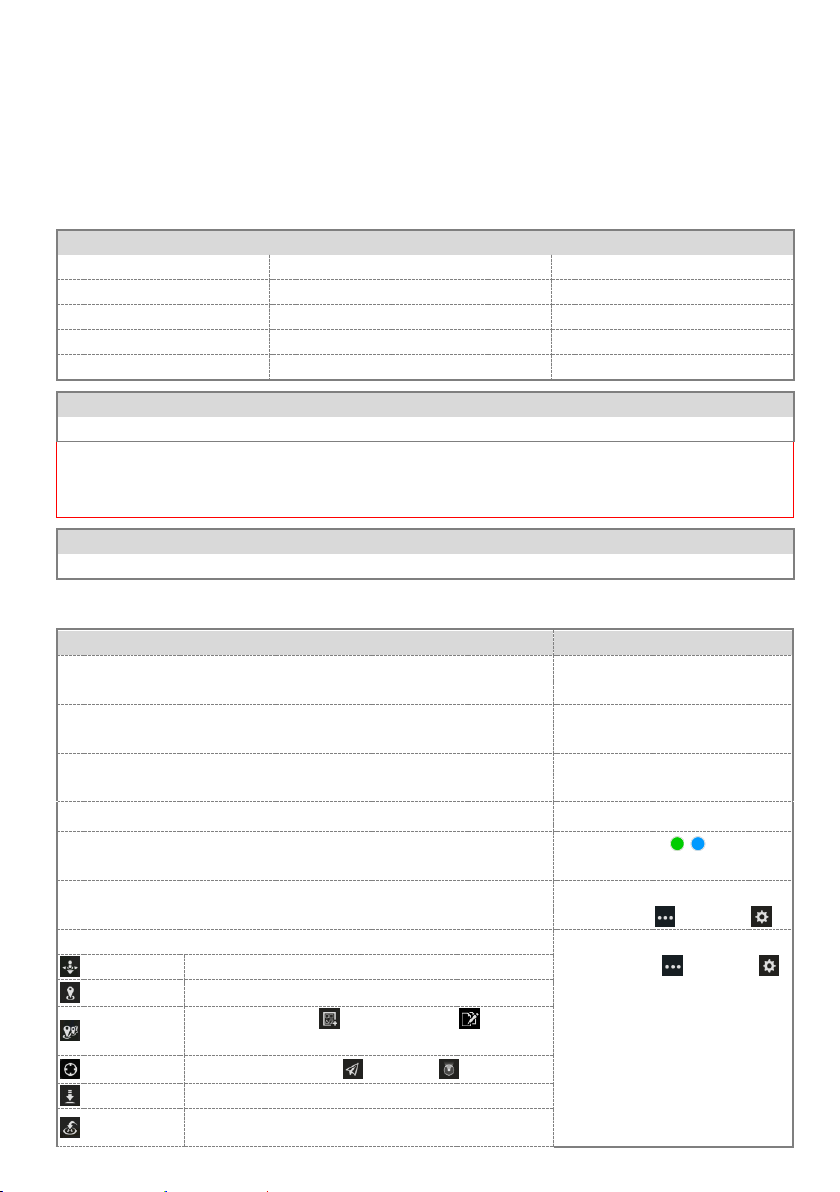
To upgrade the Air end
and the Ground end
To upgrade the Ground
end and BTU module
· 2.4G Bluetooth
Datalink Assistant
software
Important : POWER CYCLE the Flight control system and 2.4G Bluetooth Datalink after upgrade.
The LED Indicators of the 2.4G Bluetooth Datalink will work after power on, the descriptions are shown below.
1.5 Upgrade
Use the 2.4G Bluetooth Datalink Assistant software to upgrade the 2.4G Bluetooth Datalink and BTU module.
Please refer to the diagram below to connect when upgrading.
©2013-2015 DJI. All Rights Reserved. - 3 -
Page 4
iPad Ground Station App
Functions
Map information display
Joystick mode
One key Take off/ Go Home
Flight display in real time
Single waypoint
Auto Landing
Flight simulator
Waypoints
Customized Waypoints
4 kinds of Route Template
Customized Route Template
Low voltage alert
Voice guidance function
GPS SNR Display
Flight control systems that support the iPad Ground Station
WKM(Firmware V5.24 or above), NAZA-M, NAZA-M V2(Firmware V4.00 or above),A2(Firmware V2.0 or above).
Important: Phantom 2 supports iPad Ground Station V1.4.58. To use the iPad Ground Station with the Phantom 2,
please update the main controller firmware to V2.00 or above, update the central board firmware to V1.0.1.24 or
above while the BTU firmware should be updated to V1.0.1.3 or above.
iOS Devices that support the iPad Ground Station
iPad3,iPad4,iPad mini, iPad mini with Retina display,iPad Air(iOS 6.1 or above)
First time use
Tips and Notes
1. Open your iPad and search “DJI” in the App Store to download and install
the Ground Station(GS) App.
2. Open the Bluetooth function of your iPad.
There will have popups if you forget to
enable the Bluetooth
3. Connect the 2.4G Bluetooth Datalink and BTU module to the Flight
control system, power on.
Please refer to the Datalink part to
connect
4. Run the GS App, create an account through the Internet and login.
PC account is available to login.
5. The GS will search your Main controller and named with“NEW”, you will
be asked to set a new name and a password for the Main controller.
LED in GS indicates after the GS is
connected with the Main controller
6. Please read the tips text carefully after login. Open the FisrtUse function
to make use of the help text.
FisrtUse function can be opened and
closed in
“
More
“
“Settings“
7. Enable the Flight Simulator and try out the follow functions:
(1) F
light Simulator can be opened and
closed in
“
More
“
“Settings“
(2) When using the GS the Flight control
system will enter into GPS control mod e and
the aquired satellites shoule be more than 6.
(3) In GPS control mode the GS control
priorto the Transmitter, Users can toggle
the control mode switch to other mode and
back to the GPS mode quickly to get the
Joystick
Use the sticks on the screen to control the aircraft
Single waypoint
Edit a single waypoint and go
Waypoints
Use the templates to set routes, batch the
waypoints and upload the routes, then confirm and go
Location
Use to locate the aircraft or the iPad
Auto Landing
The aircraft will land slowly
One key Go
Default Home point is the one recorded by the aircraft
The iPad Ground Station is designed for remote flight control in applications of surveillance, aerial photography,
etc., it should be used with the 2.4G Bluetooth Datalink to achieve auto flight after the setting of the routes. The
application with easy usable design offers great portability and simple operation, which will provide users with an
extraordinary flight experiences.
2.1 Introduction
2.2 First Time Use
©2013-2015 DJI. All Rights Reserved. - 4 -
Page 5
Home
automatically after recording conditions are satisfied
control by Transmitter.
8. Disable the Flight Simulator and power cycle the Flight control system to
start real flights. Click on Joystick and you can use One key Take off to take
off your aircraft
(1) Please view the map of fight fields via
Internet in the GS before outdoors flights,
then the maps can be used off-line.
(2) Please use the GS for real flights after
you are familiar with its use and functions,
Refer to all help text in the App.
2.3 Using Tips
1. Customized Route Template
In Waypoints mode, users can set a route and click to save it as a template. Users can view all
the customized route templates in the template menu, slip from right to left on a template and you can
choose to detele it.
2. Capturing waypoints
In Waypoints mode, click to capture the aircraft attitude (including longitude, latitude, height and nose
pointing direction) properties to build a new waypoint during flight. This function is always available when the
UAV is hovering or flying.
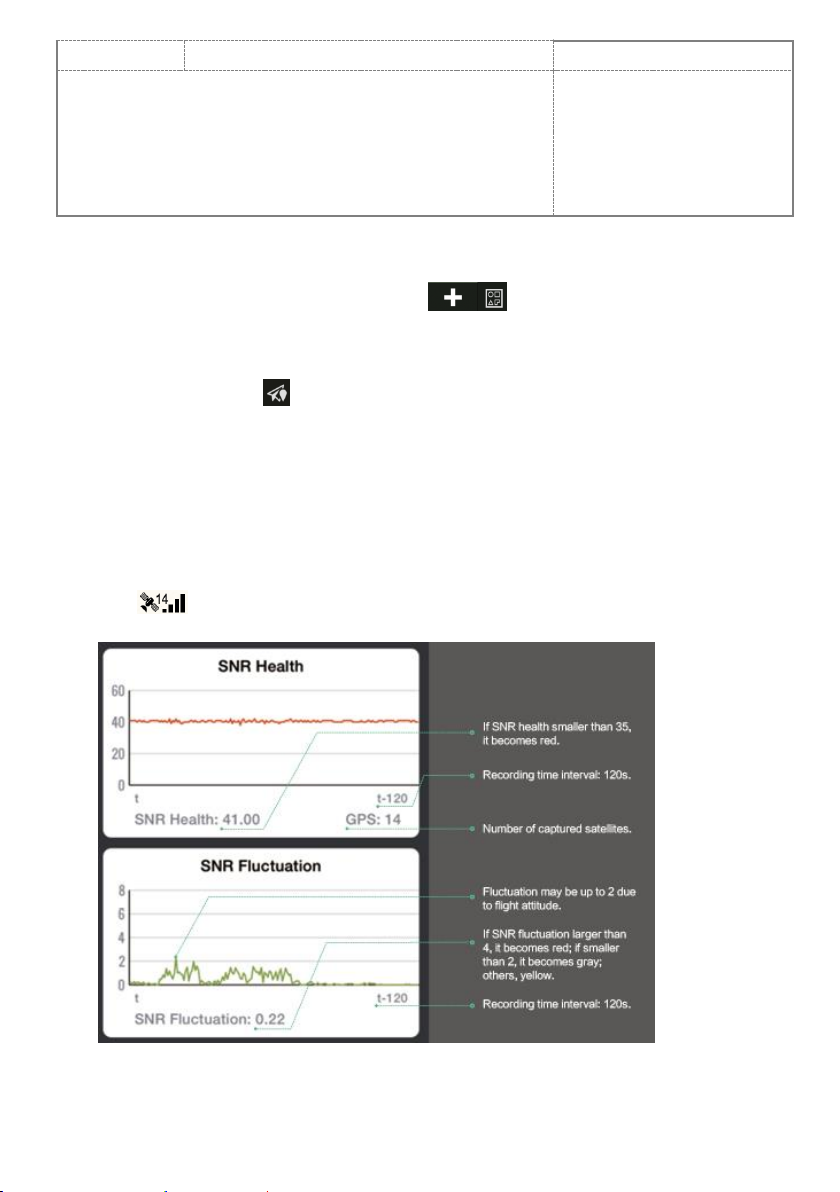
3. GPS SNR Display
iPad Ground Station has added “SNR Health” and “SNR Fluctuation” index monitors for GPS signals. Pilots
will be able to monitor GPS signal quality, ensuring they have strong and stable signals for better flight
performance. By referring to these two values, pilots will be empowered to find the best locations for takeoff
and flight, while also detecting areas that might interfere with GPS signals.
Click . The SNR interface provides you with “SNR Health” and “SNR Fluctuation” index monitors
whose values change according to aircraft maneuvers and environmental interference.
The “SNR Health Index” shows the GPS signal strength captured by the GPS receiver. A larger number
indicates a stronger GPS signal. We highly recommend pilots only take off when the SNR health value is
greater than 36.
©2013-2015 DJI. All Rights Reserved. - 5 -
Page 6

The “SNR Fluctuation Index” shows the overall stability of the craft’s current GPS signal. A smaller number
means that the signals will fluctuate less and provide a more stable GPS signal overall.
2.4 Flight Limit of Special Areas
All UAV operators should abide by all regulations from such organizations at ICAO (International Civil Aviation
Organization) and per country airspace regulations. For safety reasons, key areas have been restricted, such as:
a) Within the radius of 8Km from the airport.
Users will not be able to build waypoints or Home points in designated special areas and the waypoint routines go
through these special areas are invalid, and the UAV will fail to cruise to those areas.
All the special areas have been restricted are specified on the DJI official website and please refer to Special Areas
List (http://www.dji.com/fly-safe/category-gs) to obtain details.
©2013-2015 DJI. All Rights Reserved. - 6 -
Page 7

Appendix
Performance
RF Data Rate
1536 kbps
Indoor/Urban Range
≤ 350 m
Outdoor/RF Line-of-Sight Range
≤ 2 km
Transmit Power
≤ 125 mW
Receiver Sensitivity (1%PER)
-94 dBm
Power Consumption
The Ground end: ≤ 2.3 W The Air end: ≤ 1.8 W
Features
Frequency Band
2.4 G (2400 MHz ~ 2483 MHz)
Serial Data Rate
115200 bps
Antenna Options
SMA
Operating Temperature
-10°C ~ +60°C
Size (No Antenna)
The Ground end: 73 mm x 47.8 mm x 17.1 mm
The Air end: 49.8 mm x 36.4 mm x 11.4 mm
Weight (with Antenna)
The Ground end: 93 g The Air end: 32 g
Power supply
Supply Voltage
The Ground end: 9.9 V - 25.2 V The Air end: 6 V
Current (Transmitting signal)
0.18 A @ 12.5 V
Current (Receiving signal)
0.30 A @ 6 V
Regulatory Approvals
FCC(USA)
Yes
Performance
RF Data Rate
1536 kbps
Indoor/Urban Range
≤ 200 m
Outdoor/RF Line-of-Sight Range
≤ 1.1 km
EIRP (Equivalent Isotropic Radiated Power)
≤ 100 mW
Receiver Sensitivity (1%PER)
-94 dBm
Power Consumption
The Ground end: ≤ 1.3 W The Air end: ≤ 0.9 W
Features
Frequency Band
2.4 G (2400 MHz ~ 2483 MHz)
Serial Data Rate
115200 bps
Antenna Options
SMA
Operating Temperature
-10°C ~ +60°C
Size (No Antenna)
The Ground end: 73 mm x 47.8 mm x 17.1 mm
3.1 2.4G Bluetooth specifications (Deliveries passed FCC)
3.2 2.4G Bluetooth specifications (Deliveries passed CE)
©2013-2015 DJI. All Rights Reserved. - 7 -
Page 8

The Air end: 49.8 mm x 36.4 mm x 11.4 mm
Weight (with Antenna)
The Ground end: 93 g The Air end: 32 g
Power supply
Supply Voltage
The Ground end: 9.9 V - 25.2 V The Air end: 6 V
Current (Transmitting signal)
0.10 A @ 12.5 V
Current (Receiving signal)
0.15 A @ 6 V
Regulatory Approvals
CE(European)
Yes
2.4G Bluetooth Datalink Failure
The Ground Station fails to connect with the Main controller, please check the following items
The distance between the two ends of the 2.4G Bluetooth Datalink should be more than 1.5 m.
Make sure the Ground end is connected correctly and the LED indicator of BTU is green.
If above are ok please power cycle, while this problem continues after powering cycle, there may be hardware
problems such as the Antenna is broken, please contact your authorized dealer.
3.3 FAQ
©2013-2015 DJI. All Rights Reserved. - 8 -
Page 9

2.4G Bluetooth Datalink & iPad Ground Station
Date:
2.4G Bluetooth Datalink firmware version(The Ground end):
2.4G Bluetooth Datalink firmware version(The Air end):
BTU module firmware version:
2.4G Bluetooth Datalink Assistant Software version:
iPad Ground Station App version:
User Guide Version:
May 8, 2015
1.0.1.5
1.0.1.1
1.0.1.3
1.0.0.6
1.4.62
1.14
Release Notes
What is new?
iPad Ground Station App
1. Display GPS SNR Health and SNR Fluctuation status.
Pilots will be able to monitor GPS signal quality, ensuring they have strong and stable
signals for better flight performance. By referring to these two values, pilots will be
empowered to find the best locations for takeoff and flight, while also detecting areas
that might interfere with GPS signals.
©2013 -2015 DJI. All Rights Reserved.
Page 10

2.4G Bluetooth Datalink & iPad Ground Station
Date:
2.4G Bluetooth Datalink firmware version(The Ground end):
2.4G Bluetooth Datalink firmware version(The Air end):
BTU module firmware version:
2.4G Bluetooth Datalink Assistant Software version:
iPad Ground Station App version:
User Guide Version:
November 7, 2014
1.0.1.5
1.0.1.1
1.0.1.3
1.0.0.6
1.4.59
1.12
Release Notes
What is new?
iPad Ground Station App
1. Flight limit tips added in Ground Station GUI for A2 flight control system.
Note
The “Flight Limit of Special Areas” function in Ground Station is still on even through the
“Airport Limits” option in the A2 Assistant software is off.
©2013 -2015 DJI. All Rights Reserved.
Page 11

2.4G Bluetooth Datalink & iPad Ground Station
Date:
2.4G Bluetooth Datalink firmware version(The Ground end):
2.4G Bluetooth Datalink firmware version(The Air end):
BTU module firmware version:
2.4G Bluetooth Datalink Assistant Software version:
iPad Ground Station App version:
User Guide Version:
March 26, 2014
1.0.1.5
1.0.1.1
1.0.1.3
1.0.0.6
1.4.58
1.10
Release Notes
What is new?
iPad Ground Station App
1. Supported of Phantom 2 and main controller firmware upgraded to V2.00 or above,
central board firmware upgraded to V1.0.1.24 or above, the BTU module firmware
upgraded to V1.0.1.3 or above.
2. Added flight limits function of special areas. Users will not be able to build waypoints
or Home points in designated special areas and the waypoint routines go through
these special areas are invalid.
3. Added customized routine template.
4. Added a waypoint setting button to capture the aircraft attitude (including longitude,
latitude, height and nose pointing direction) properties to build a new waypoint during
flight.
5. Added metric and imperial unit switch.
User Guide
1. Added descriptions of using tips and flight limits function.
Note
The latest iPad Ground Station Software V1.0.48 is reviewing by the App Store, Phantom 2
users will be able to download and use the software several days later in this week.
©2013 -2015 DJI. All Rights Reserved.
Page 12

2.4G Bluetooth Datalink & iPad Ground Station
Date:
2.4G Bluetooth Datalink firmware version(The Ground end):
2.4G Bluetooth Datalink firmware version(The Air end)
2.4G Bluetooth Datalink Assistant Software version:
iPad Ground Station App version:
User Guide Version:
November.1 2013
1.0.1.5
1.0.1.1
1.0.0.6
1.3.56
1.08
Release Notes
What is new?
Firmware
1. Added support of A2 flight control system, requiring A2 controller unit firmware V2.0 or
above.
2. Supported iOS devices requiring iOS 6.1 or above.
User Guide
1. Added description of supporting A2 flight control system.
2. Added support of iPad mini with Retina display and iPad Air.
©2013 -2015 DJI. All Rights Reserved.
Page 13

2.4G Bluetooth Datalink & iPad Ground Station
Date:
2.4G Bluetooth Datalink firmware version(The Ground end):
2.4G Bluetooth Datalink firmware version(The Air end)
2.4G Bluetooth Datalink Assistant Software version:
iPad Ground Station App version:
User Guide Version:
2013/09/23
1.0.1.3
1.0.1.1
1.0.0.6
1.2.47
1.02
What is new?
2.4G Bluetooth Datalink Assistant Software
1. Fix the abnormal displays in the software.
Release Notes
©2013 -2015 DJI. All Rights Reserved.
Page 14

2.4G Bluetooth Datalink & iPad Ground Station
Date:
2.4G Bluetooth Datalink firmware version(The Ground end):
2.4G Bluetooth Datalink firmware version(The Air end)
2.4G Bluetooth Datalink Assistant Software version:
iPad Ground Station App version:
User Guide Version:
2013/09/06
1.0.1.3
1.0.1.1
1.0.0.4
1.2.47
1.00
2.4G Bluetooth Datalink Functions
1. Provide communications between the Ground end and the Air end using the DJI
bidirectional data communication modules; the iPad Ground Station communicates
with the Ground end using the BTU module.
2. Use the 2.4G Bluetooth Datalink Assistant Software to upgrade the firmware of the
2.4G Bluetooth Datalink and the BTU module.
3. Provide bidirectional communications with large dataflow within the specified distance
of the remote control.
iPad Ground Station Functions
1. Friendly interface design
2. Joystick control on touch screen
3. Single waypoint function, click desired point and go
4. Waypoints function, edit a routine and go
5. Editable Home point & automatic Go Home supported
6. Auto landing function supported
7. Flight simulator supported
8. Customized joystick mode supported
9. Routes saving and reloading supported
10. Chinese and English UI supported
11. Voice guidance function
12. Use the Bluetooth 4.0 low-power consumption technology
Flight control systems that supported (2.4G Bluetooth Datalink):
ACE ONE, WKM, NAZA-M, NAZA-M V2
Flight control systems that supported (iPad Ground Station):
WKM, NAZA-M, NAZA-M V2
*All the firmware of the flight control systems should be upgraded to the latest version
* The firmware of NAZA-M and NAZA-M V2 should be upgraded to version 4.00, which is
coming soon.
©2013 -2015 DJI. All Rights Reserved.
Release Notes
 Loading...