

Page 1
Maintenance & Operating
Instructions
For
Dixon Bayco
VR4040CS-AL
VAPOR HOSE COUPLER
Canada:
Dixon Group Canada Limited
Innisfil (Barrie), Ontario
Phone: 705-436-1125
Fax: 705-436-6251
Toll Free: 877-963-4966
E-mail: isales@dixongroupcanada.com
USA:
Dixon Bayco USA
Chestertown, Maryland
Phone: 410-778-2000
Fax: 410-778-4702
Toll Free: 800-355-1991
E-mail: dixonbayco@dixonvalve.com
Mexico:
Dixva, S. de R.L. de C.V.
Monterrey, N.L
Phone: 01-800-00-DIXON (34966)
Fax: 01-81-8354-8197
E-mail: contactenos@dixonvalve.com.mx
Europe:
Dixon Group Europe Ltd
Preston, England
Phone: +44 (0)1772 323529
Fax: +44 (0)1772 314664
E-mail: enquiries@dixoneurope.co.uk
Asia Pacific:
Dixon (Asia Pacific) Pty Ltd Wingfield,
South Australia
Phone: +61 8 8202 6000
Fax: +61 8 8202 6099
E-mail: enquiries@dixonvalve.com.au
dixonvalve.com
For Sales and Service Contact
Page 2
VR4040CS-AL Vapor Hose Coupler
2 090121 REV 0 VR4040CS-AL
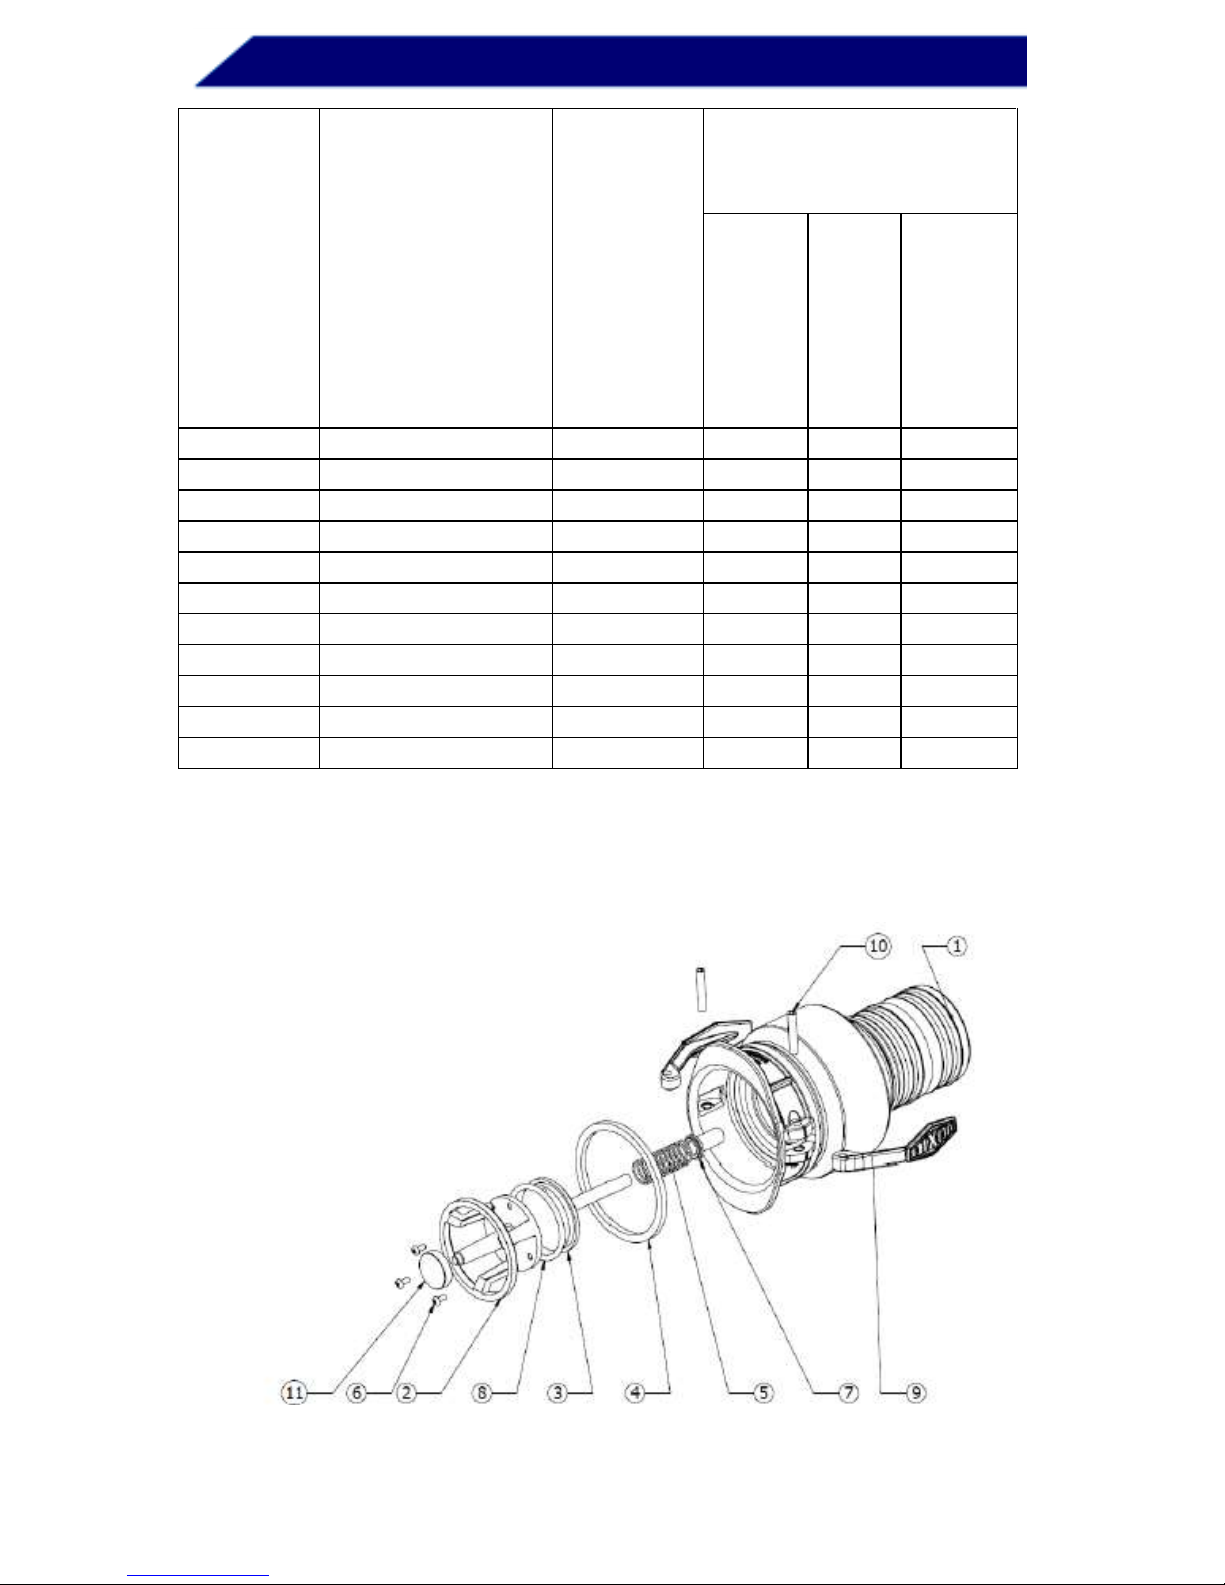
Item
Description
Part No.
Quantity of Components
per Unit
1
Body
341818
1 - -
2
Cage
341819
1 - -
3
Poppet
341820
1 - -
4
Gasket
112262
1 1 -
5
Spring
112263
1 - -
6
Machine Screw
112264
3 3 -
7
Bushing
390146
1 - -
8
O-Ring #334
110691
1 1 -
9
Paddle Arm
40215SS
2 - 2
10
Cam Arm Pin
40218SS
2 - 2
11
Button
391860
1 - -
Use relevant repair kit
Repair Kit VR4040CSRK1: Seal Repair Kit
Repair Kit VR4040CSRK2: Cam Arm Repair Kit
VR4040CS
-AL
VR4040CSRK1 VR4040CSRK2
Page 3

VR4040CS-AL Vapor Hose Coupler
VR4040CS-AL 090121 REV 0 3
These instructions and recommendations are provided to ensure proper
operation and long service life of Dixon Bayco VR4040CS-AL. Parts are
identified by the item number on the assembly drawing and parts list.
SEAL REPLACEMENT FOR DIXON BAYCO VR4040CS-AL VAPOR
HOSE COUPLER
1. Hold the cage (2) and undo the machine screws (6) using a
screwdriver.
2. Remove the cage (2) and visually inspect the cage (2) and the
button (11). If the cage (2) and the button (2) are worn or damaged,
replace with new ones.
**The button (11) is tightened onto the probe of the cage
(2) permanently in the factory. Please order the cage (2)
with the button (11) for replacement.**
3. Push the poppet (3) into the coupler and hold. Remove the O-Ring
(8) from the poppet (3). Remove the poppet (3) and the spring (5).
Page 4

VR4040CS-AL Vapor Hose Coupler
4 090121 REV 0 VR4040CS-AL
THE POPPET (3) IS HELD UNDER CONSIDERABLE SPRING
TENSION. PERSONAL INJURIES MAY RESULT IF THIS
PRECAUTION IS NOT TAKEN. HOLD THE POPPET (3) FIRMLY
WHEN REMOVING THE O-RING (8) AND RELEASE THE POPPET
(3) SLOWLY.
4. Remove the gasket (4). Install the new gasket (4). Make sure that
the gasket (4) sits in the groove properly.
5. Install the spring (5) and the poppet (3). Push the poppet (3) into
the coupler and hold. Install the new O-Ring (8) and make sure that
the O-Ring (8) sits in the poppet (3) groove properly.
6. Install the cage (2) to the poppet (3) using the machine screws (6)
and a screwdriver.
DIXON BAYCO WARRANTY:
For Warranty Information, please refer to the inside back cover of the
latest Dixon Catalog.
 Loading...