

Page 1
Page 2
“PLAYSTATION” is a registered trademark and “PS3” is a trademark of Sony Computer Entertainment Inc. The ratings icon is a trademark of the
Entertainment Software Association. SIXAXIS is a trademark of Sony Computer Entertainment Inc. © 2008 Sony Computer Entertainment Inc.
LIMITED WARRANTY
Publisher warranty required here.
WARNING: PHOTOSENSITIVITY/EPILEPSY/SEIZURES
A very small percentage of individuals may experience epileptic seizures or blackouts when exposed
to certain light patterns or flashing lights. Exposure to certain patterns or backgrounds on a television
screen or when playing video games may trigger epileptic seizures or blackouts in these individuals.
These conditions may trigger previously undetected epileptic symptoms or seizures in persons who
have no history of prior seizures or epilepsy. If you, or anyone in your family, has an epileptic condition
or has had seizures of any kind, consult your physician before playing. IMMEDIATELY DISCONTINUE
use and consult your physician before resuming gameplay if you or your child experience any of the
following health problems or symptoms:
UÊ`ââiÃÃÊ UÊiÞiÊÀÊÕÃViÊÌÜÌViÃÊ UÊ`ÃÀiÌ>ÌÊ UÊ>ÞÊinvoluntary movement
UÊ>ÌiÀi`ÊÛÃÊÊ UÊÃÃÊvÊ>Ü>ÀiiÃÃÊ UÊÃiâÕÀiÃÊ Ê or convulsion.
RESUME GAMEPLAY ONLY ON APPROVAL OF YOUR PHYSICIAN.
_____________________________________________________________________________
Use and handling of video games to reduce the likelihood of a seizure
UÊ1ÃiÊÊ>ÊÜiÌÊ>Ài>Ê>`Êii«Ê>ÃÊv>ÀÊ>Ü>ÞÊ>ÃÊ«ÃÃLiÊvÀÊÌiÊÌiiÛÃÊÃVÀii°
UÊÛ`Ê>À}iÊÃVÀiiÊÌiiÛÃðÊ1ÃiÊÌiÊÃ>iÃÌÊÌiiÛÃÊÃVÀiiÊ>Û>>Li°
UÊÛ`Ê«À}i`ÊÕÃiÊvÊÌiÊ*9-//"
®
ОКГЮГМi°К/>iК>К£xХМiКLАi>К`ХА}Кi>VКХАКvК«>Ю°
UÊÛ`Ê«>Þ}ÊÜiÊÞÕÊ>ÀiÊÌÀi`ÊÀÊii`ÊÃii«°
_____________________________________________________________________________
Stop using the system immediately if you experience any of the following symptoms: lightheadedness,
nausea, or a sensation similar to motion sickness; discomfort or pain in the eyes, ears, hands, arms, or
any other part of the body. If the condition persists, consult a doctor.
NOTICE:
Use caution when using the SIXAXIS™ wireless controller motion sensor function. When using the
SIXAXIS™ wireless controller motion sensor function, be cautious of the following points. If the
controller hits a person or object, this may cause accidental injury or damage. Before using, check
that there is plenty of space around you. When using the controller, grip it firmly to make sure it
cannot slip out of your hand. If using a controller that is connected to the PS3™ system with a USB
cable, make sure there is enough space for the cable so that the cable will not hit a person or object.
Also, take care to avoid pulling the cable out of the PS3™ system while using the controller.
WARNING TO OWNERS OF PROJECTION TELEVISIONS:
Do not connect your PLAYSTATION
®
3 system to a projection TV without first consulting the user manual
for your projection TV, unless it is of the LCD type. Otherwise, it may permanently damage your TV screen.
HANDLING YOUR PLAYSTATION
®
3 FORMAT DISC:
UÊDo not bend it, crush it or submerge it in liquids. UÊDo not leave it in direct sunlight or near a radiator
or other source of heat. UÊBe sure to take an occasional rest break during extended play. UÊ Keep this
disc clean. Always hold the disc by the edges and keep it in its protective case when not in use. Clean
ÌiÊ`ÃVÊ ÜÌÊ>ÊÌvÀii]ÊÃvÌ]Ê`ÀÞÊ VÌ]ÊÜ«}ÊÊ ÃÌÀ>}ÌÊiÃÊ vÀÊViÌiÀÊÌÊ ÕÌiÀÊi`}i°Ê iÛiÀÊÕÃiÊ
solvents or abrasive cleaners.
Contents
Getting Started..............................................................2
Menu Controls...............................................................4
Basic Controls...............................................................5
Game Overview..............................................................6
Gameplay.....................................................................8
The Garage....................................................................9
Riders.........................................................................10
Multiplayer..................................................................10
Customer Support Information........................................12
Limited Warranty .........................................................13
1
Page 3
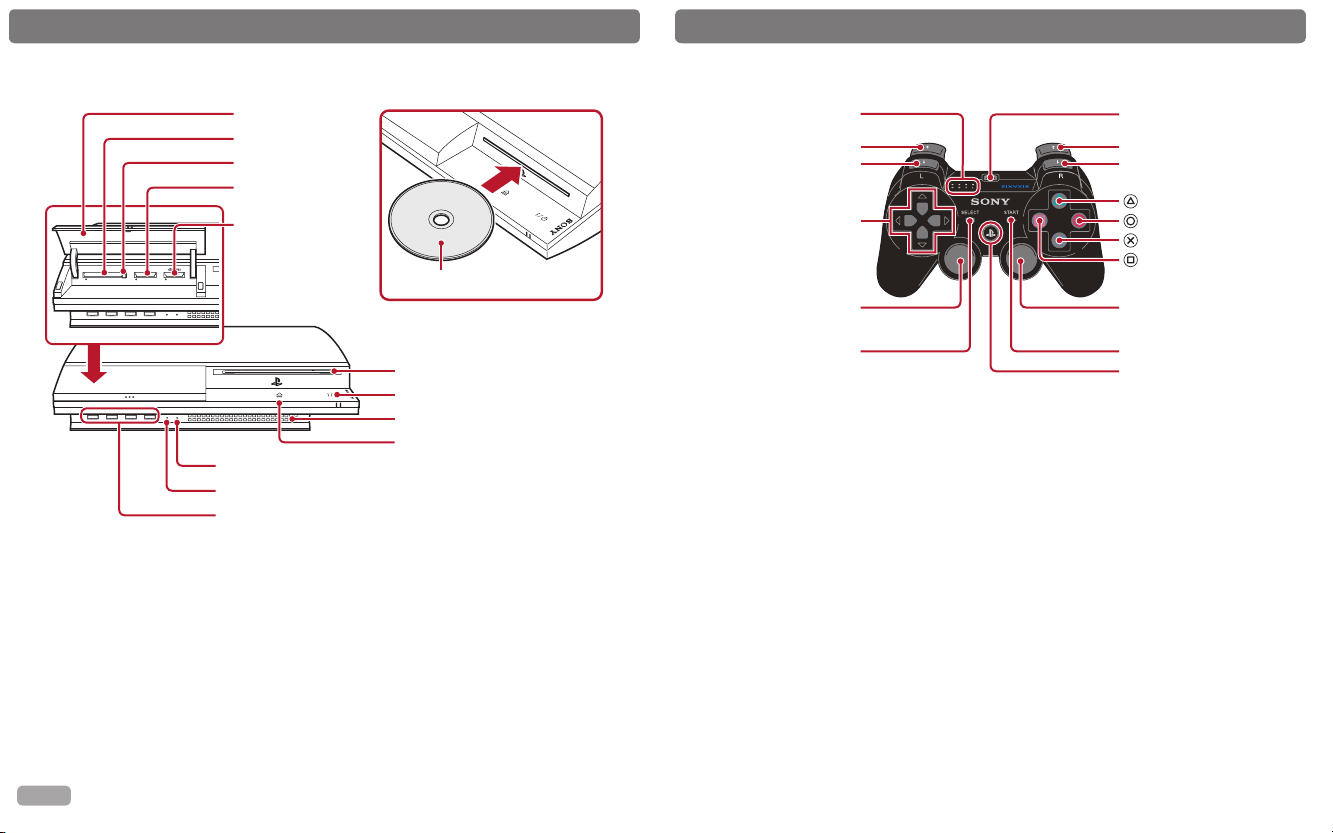
SELECT button
USB connector
L2 button
L1 button
Directional
buttons
Left stick/
L3 button*
START button
R2 button
R1 button
button
button
button
button
Right stick/
R3 button*
PS button
Port indicators
GETTING STARTED
Saved data for PLAYSTATION
®
3 format software
Saved data for PLAYSTATION®3 format software is saved on the system’s hard disk.
The data is displayed under “Saved Game Utility” in the Game menu.
Game Hint: Set Motion Sensor Adjust to “on” to enable the motion sensitive feature of the
wireless controller. Roll the wireless controller from side to side or pitch forwards and
backwards to maneuver your vehicle in the air. When on the ground, pitch the controller up
when leaving a jump to preload. The amount of in-air control or preload you get will depend on
the degree of controller movement applied.
Note: To use the controller, you must first register or “pair” the controller with the
PLAYSTATION
®
3 system and assign a number to the controller. For details, refer to the
instructions supplied with the system.
Using the SIXAXIS™ wireless controller (for PLAYSTATION®3)
* The L3 and R3 buttons function when the sticks are pressed.
PLAYSTATION®3 system front
GETTING STARTED
To remove a disc, touch the eject button after quitting the game.
Hint
Note: Some models of the PLAYSTATION
®
3 system do not include media slots. For specific
features included, refer to the instructions for use of your model of the PLAYSTATION
®
3 system.
Starting a game: Before use, carefully read the instructions supplied with the PLAYSTATION
®
3
computer entertainment system. The documentation contains information on setting up and
using your system as well as important safety information.
Check that the MAIN POWER switch (located on the system rear) is turned on. Insert the PURE
disc with the label facing up into the disc slot. Select the icon for the software title under [Game]
in the PLAYSTATION
®
3 system’s home menu, and then press the button. Refer to this manual
for information on using the software.
Quitting a game: During gameplay, press and hold down the PS button on the wireless
controller for at least 2 seconds. Then select “Quit Game” from the screen that is displayed.
Insert the disc with the
label side facing up.
CF SD/miniSD
Disc slot
CF*
1
slot
*1 CompactFlash
®
*2 Secure Digital
SD*2 Memory
Card slot
Memory
Stick™ slot
Slot cover
Power button
Vent
USB connectors
HDD access indicator
WLAN access indicator
Eject button
Eject button
3
Page 4

Menu Controls
basic Controls
Left stick...........................................................Select item
button.........................................................Conrm item
button ........................................................Ca
START button......................................................Start game / Pause game
Position Lap Counter
Timer
ncel / Return to previous screen
Thrill Bar
R2 button..............................................................Accelerate
L2 button..............................................................Brake / Reverse
R1 button.............................................................Tweak trick in mid-air
L1 button.............................................................Tweak trick in mid-air
button + any direction on the Left thumbstick.......Basic trick
button + any direction on the Left thumbstick.......Advanced trick
button + any direction on the Left thumbstick........Pro trick
button............................................................Boost
Right stick...........................................................Change camera view
Left stick (left + right)...........................................Steer
Left stick (up + down)...........................................Lean / Pre-load
R1 button + L1 button + any direction
on the Left thumbstick............................................Special Trick
R3 button.............................................................Look Back
START button.........................................................Pause game
4 5
Page 5

Game Overview
Throttle up your ATV and check your fear at the starting line as you compete
against fifteen rival riders in unique off-road trick-racing events on 36
different tracks. Leap off snow-capped Italian mountains, jump gaping chasms
in New Mexico and ride the rim of active volcanoes in New Zealand on your way
to victory. Build your ATV from the ground up to create your own unique quad
with handling and performance to suit your riding style. Experience extreme
speed, catch massive air and nail spectacular airborne tricks while you leave
your competition in the dust. Welcome to Off-Road Trick Racing.
Welcome to Pure.
Pre-load
This is how you jump your ATV in Pure. Pull the left stick down and flick it up
immediately before a ramp to pre-load your ATV and catch air. You should preload off of most ramps to get enough air to pull tricks.
Note: You can use the power accumulated in the Thrill Bar to boost by hitting
the
button. However, this will deplete your Thrill Bar meter, so boost wisely!
Thrill Bar
The Thrill Bar indicates what level of tricks
you are able to pull off. There are four
levels, each increasing in complexity and
the amount of boost they give you. They
can be activated by filling the level on the
Thrill Bar meter.
button tricks are the most basic. As you successfully land tricks, the Thrill
Bar begins to fill up. As the bar fills up, more difficult tricks become available,
as indicated by the button icons arranged on the Thrill Bar. When the Thrill Bar
is empty, only button tricks are available.
As you fill it up (by landing tricks without crashing), you will be able to do
button tricks, and eventually button tricks. Watch out though, if you
crash or use boost, your Thrill Bar level will reduce and you can temporarily
lose the ability to do the more advanced tricks until you build it back up again.
Tricks
To pull tricks, you have to get air by pre-load jumping. Once you’re in the air,
you can pull tricks by holding either the , , or buttons while pushing the
left thumbstick in any one of eight directions – UP, DOWN, LEFT, RIGHT or any
of the four diagonals. You can only perform or button tricks if your Thrill
Bar level is high enough at the time. Try pulling trick combos but just make
sure you have enough air!
Note: You can “tweak” tricks by holding L1 or R1 buttons while performing a trick.
Boost
You earn boost by doing tricks and you can use boost to help you win races.
You can use the power accumulated in the Thrill Bar to boost by hitting the
button. However, this will deplete your Thrill Bar meter, so boost wisely!
Saving up boost is always a good idea.
Special Tricks
Each rider has their own signature Special Trick and up to seven further Special
Tricks. Some of these extra Special Tricks are available right away and others
are unlocked by playing through the World Tour.
Once you’ve earned a special trick by completely filling your Thrill Bar, it can
only be taken away by crashing. Unlike the other trick types, you don’t lose
your Special Trick when you boost. This means that you can use your entire bar
of boost if you need to because you can fill the Bar right back up again if you
perform another Special Trick.
6 7
Page 6

Gameplay
pure World Tour
Compete in offroad stages across seven locations; Italy, New Mexico,
Wyoming, Thailand, New Zealand, Glamis Dunes and Ocotillo Wells. Each stage
has races, sprints and freestyle events, so be ready to ride them all. Earn new
ATV parts, garage slots, paint jobs, new special tricks and character outfits on
your way to becoming the Pure World Champion.
Races
Pit yourself against up to 15 other riders in an all-out trick-filled race to the
finish. Tricks give you boost which will help you to win races.
Freestyle
Freestyle races are held on some of the most outrageous outdoor tracks in the
world. Earn the highest point total in a session to earn the top spot but keep
a close eye on your gas gauge – you could run out! These events are all about
trick combos because they yield the biggest scores. A red circle will appear
after you land a trick. Pull another trick before the circle disappears and you’ll
link your scores into a combo.
Sprint
Sprint races are short and intense.With 15 rival riders and very few jumps,
Sprints are crowded and brutally competitive.
Online
PURE features online play for up to 16 players. Race, Freestyle, Sprint and
Freeride event types are available in online play. Freeride allows you to hang
out with your friends online without time pressure or forced objectives.
Your scores and lap times are recorded on extensive online leaderboards
The Garage
Garage
In the Garage, build your ride from the ground up. Customize everything
from seat to tires
and handlebars to
shocks. With the
huge number of
different parts available from real world
manufacturers, you
can generate more
than 65,000 different
ATVs.
You can store only two custom ATVs at the start of the game. Unlock more as
you play through world tour and experiment with different parts and combinations. Design your ATVs for Sprint, Race or Freestyle.You can even design ATVs
for specific tracks. Just watch how vital statistics for your bike change as you
choose each part.You can build your bike part by part or simply ‘quick-build’
your bike by holding the or
tively. Remember to revisit your old ATV designs when you unlock new parts.
Note: You can’t Quick Build sprint quads.
buttons for race or freestyle spec respec-
8 9
Page 7

riders
There are six different riders to choose from, each with different riding styles
and a unique Special Trick.
Multiplayer
You can play online with up to 15 other players through PLAYSTATION®Network.
By installing Pure onto your PLAYSTATION®3 hard disk drive you can improve
loading times. The option is located in the Storage Options menu; please make
sure you have at least 1.3 GB of available free space before you attempt the
installation.
NOTES
10 11
 Loading...